

Page 1
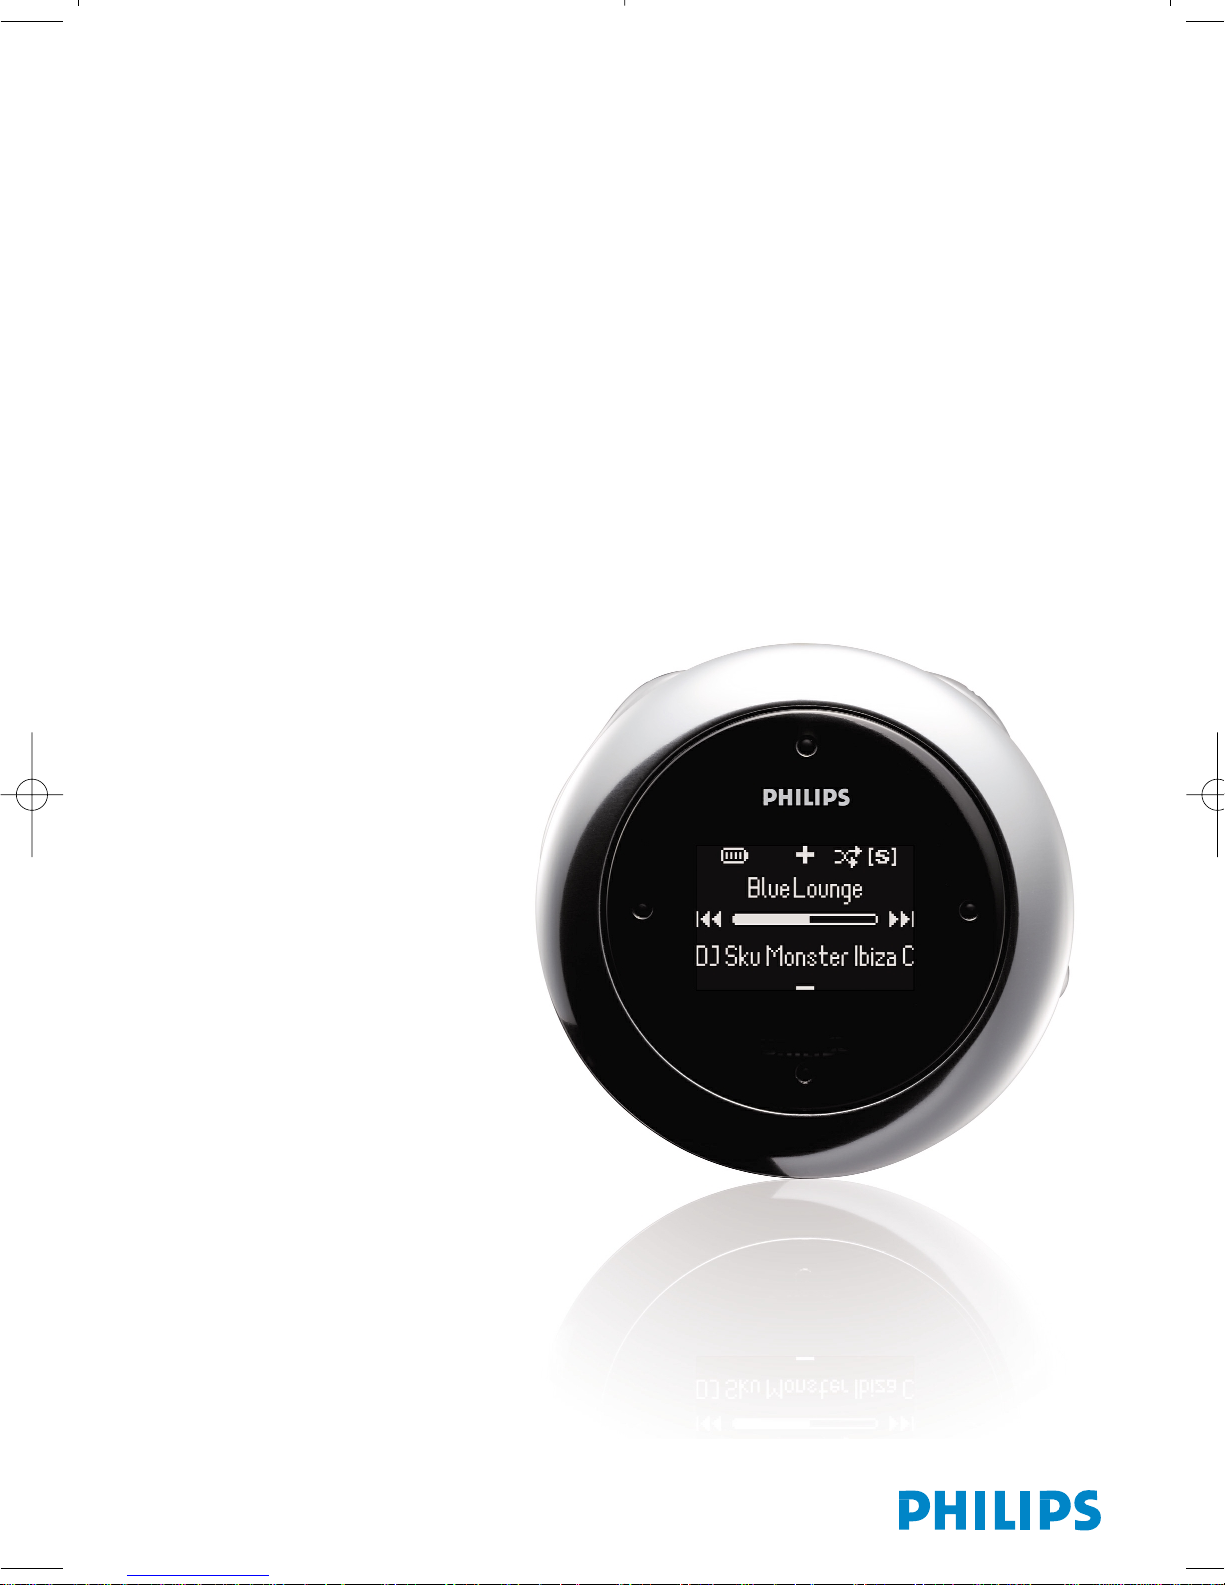
User Manual
manuel d’utilisation | benutzerhandbuch | manual del usuario
gebruikershandleiding | manuale per l'utente | manual do usuário
användar-handbok
Digital Audio Player
Lecteur audio numérique | Digitaler Audio-Player | Reproductor de audio digital
Digitale audiospeler | Lettore audio digitale | Leitor Áudio Digital
Digital ljudspelare
Page 2

I
Contents
Welcome
About your new product ........................................................................................................................................................................................ 1
Accessories ...................................................................................................................................................................................................................... 1
Register your product ................................................................................................................................................................................................ 1
More information .......................................................................................................................................................................................................... 1
Connect and Charge
Charging your device ................................................................................................................................................................................................2-3
Indication of power level............................................................................................................................................................................................ 4
Enjoy
Powering on and off .................................................................................................................................................................................................... 4
Front of device .............................................................................................................................................................................................................. 5
Back of device ....................................................................................................................................................................................................................6
Root menu ........................................................................................................................................................................................................................ 7
Navigation .......................................................................................................................................................................................................................... 7
Music mode ...................................................................................................................................................................................................................... 8
Searching for your desired music.......................................................................................................................................................................... 8
Playback ............................................................................................................................................................................................................................ 9
Customizing playback .................................................................................................................................................................................................. 9
Getting digital music onto your device ............................................................................................................................................................10
Radio mode*** .......................................................................................................................................................................................................... 11
Using the stopwatch ................................................................................................................................................................................................ 12
Tracking your workout progress ..........................................................................................................................................................................12
Using the talking stopwatch ....................................................................................................................................................................................13
Using ShockLock during music playback..........................................................................................................................................................14
Customizing settings .............................................................................................................................................................................................. 15
Wearing player on your arm .......................................................................................................................................................................... 16
Troubleshooting ............................................................................................................................................................................................................17
Safety and Maintenance
General maintenance .......................................................................................................................................................................................... 18
About operating and storage temperatures ...................................................................................................................................... 18
Take care when using headphones ............................................................................................................................................................ 18
Copyright information ............................................................................................................................................................................................ 19
Environmental information .................................................................................................................................................................................. 19
Disposal of your old product .............................................................................................................................................................................. 19
Modifications ................................................................................................................................................................................................................ 19
Notice for the USA .................................................................................................................................................................................................. 20
Notice for the Canada and European Union .................................................................................................................................. 20
Technical data ................................................................................................................................................................................................................ 21
Page 3

II
About Philips Device Manager and Windows Media Player
About Philips Device Manager..............................................................................................................................................................................22
About Windows Media Player ..............................................................................................................................................................................22
Windows Media Player 10
Search and add tracks to the Librar y ........................................................................................................................................................23-24
Transfer tracks to your device........................................................................................................................................................................25-26
Add Tracks to a Playlist on your PC using WMP ......................................................................................................................................27
Delete Tracks and Playlists........................................................................................................................................................................................28
Edit Track Information ................................................................................................................................................................................................29
Search for Tracks ............................................................................................................................................................................................................30
Update and repair with Philips Device Manager
Upgrade ..............................................................................................................................................................................................................................31
Firmware Update ..........................................................................................................................................................................................................31
Device Repair ..................................................................................................................................................................................................................32
Page 4
1
Welcome
About your new product
With your newly purchased product, you can enjoy the following:
- MP3 and WMA playback (see MUSIC MODE section)
- FM radio*** (see RADIO MODE section)
- Workout progress tracking
***FM radio is only available to some regional versions. FM radio is currently not available in Europe.
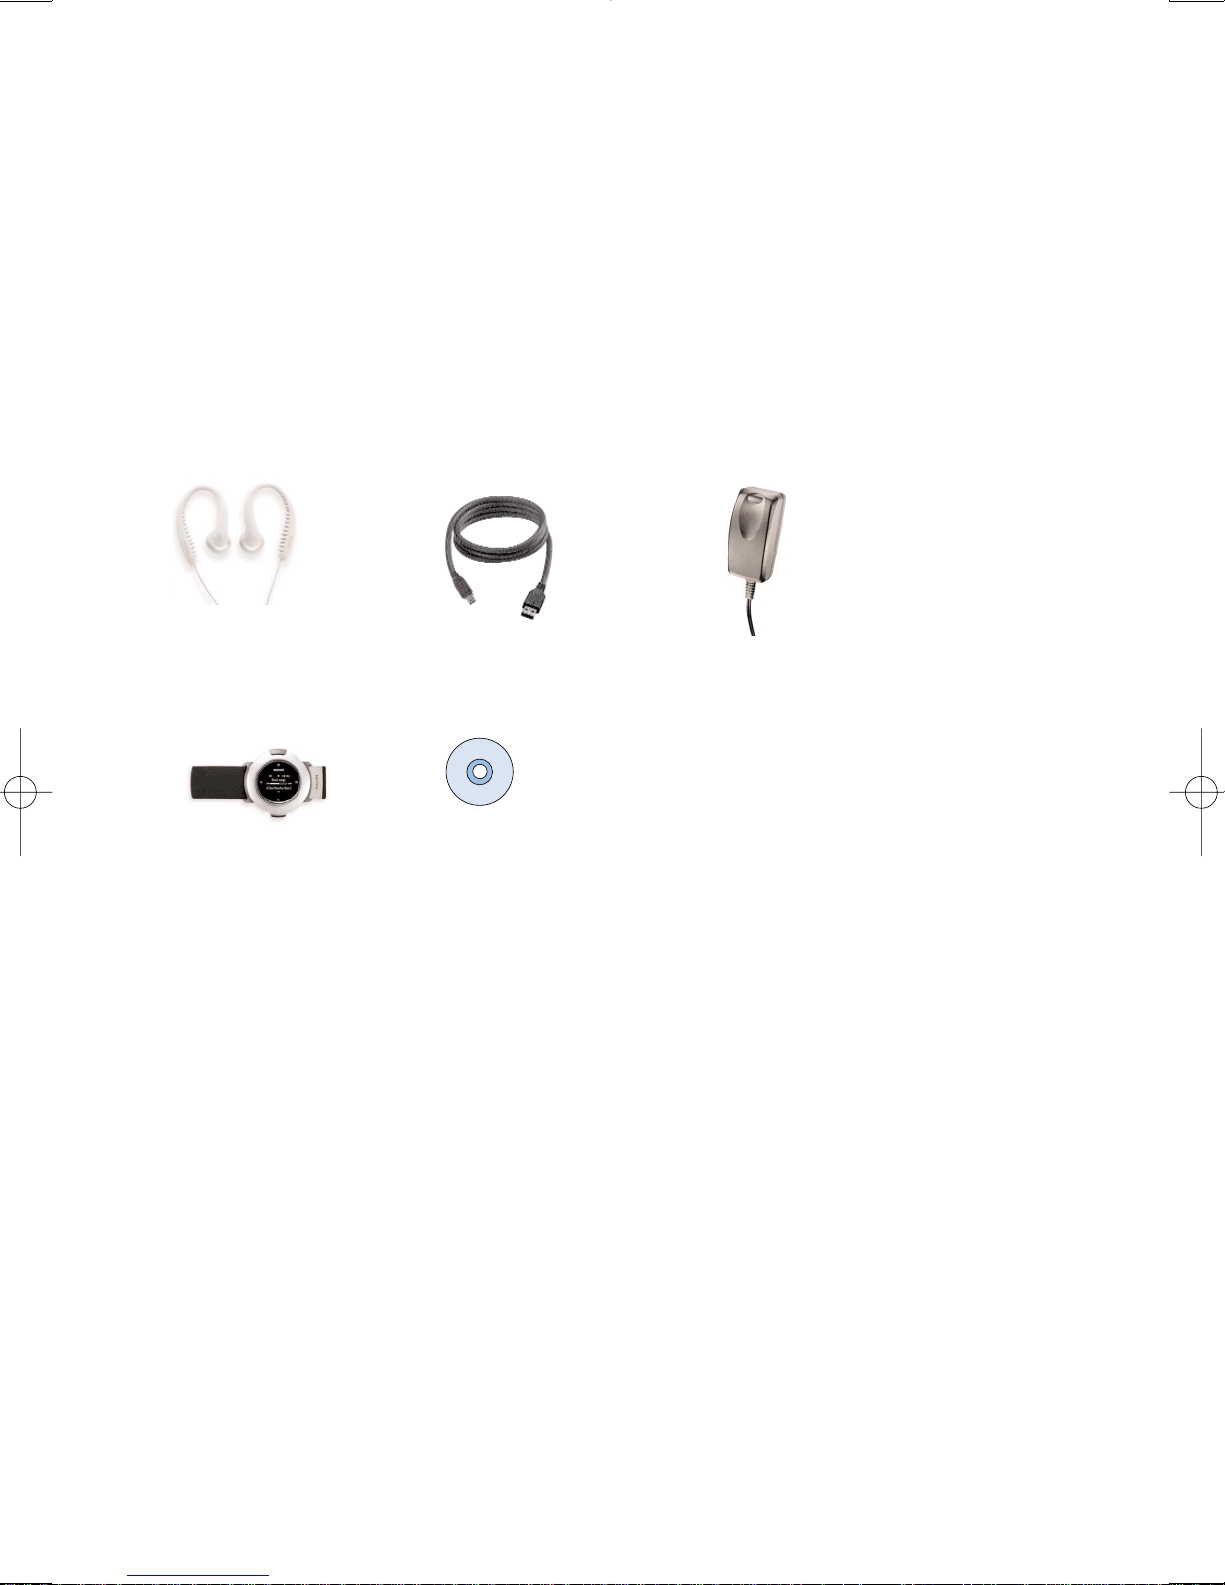
Accessories
Headphones USB cable Multi-voltage adaptor
Armband CDROM with user manual, drivers, FAQ, music management softwares
Register your product
Since it is possible for you to upgrade your product, we recommend that you register your product on
www.philips.com/register so we can inform you as soon as new free upgrades become available.
More information
Please visit www.philips.com/support to view:
- FAQ, Frequently Asked Questions
- Latest user manuals
- Latest PC software downloads
- Firmware upgrade files and Device Manager
The model and production numbers can be found inside the battery compartment.
Page 5
2
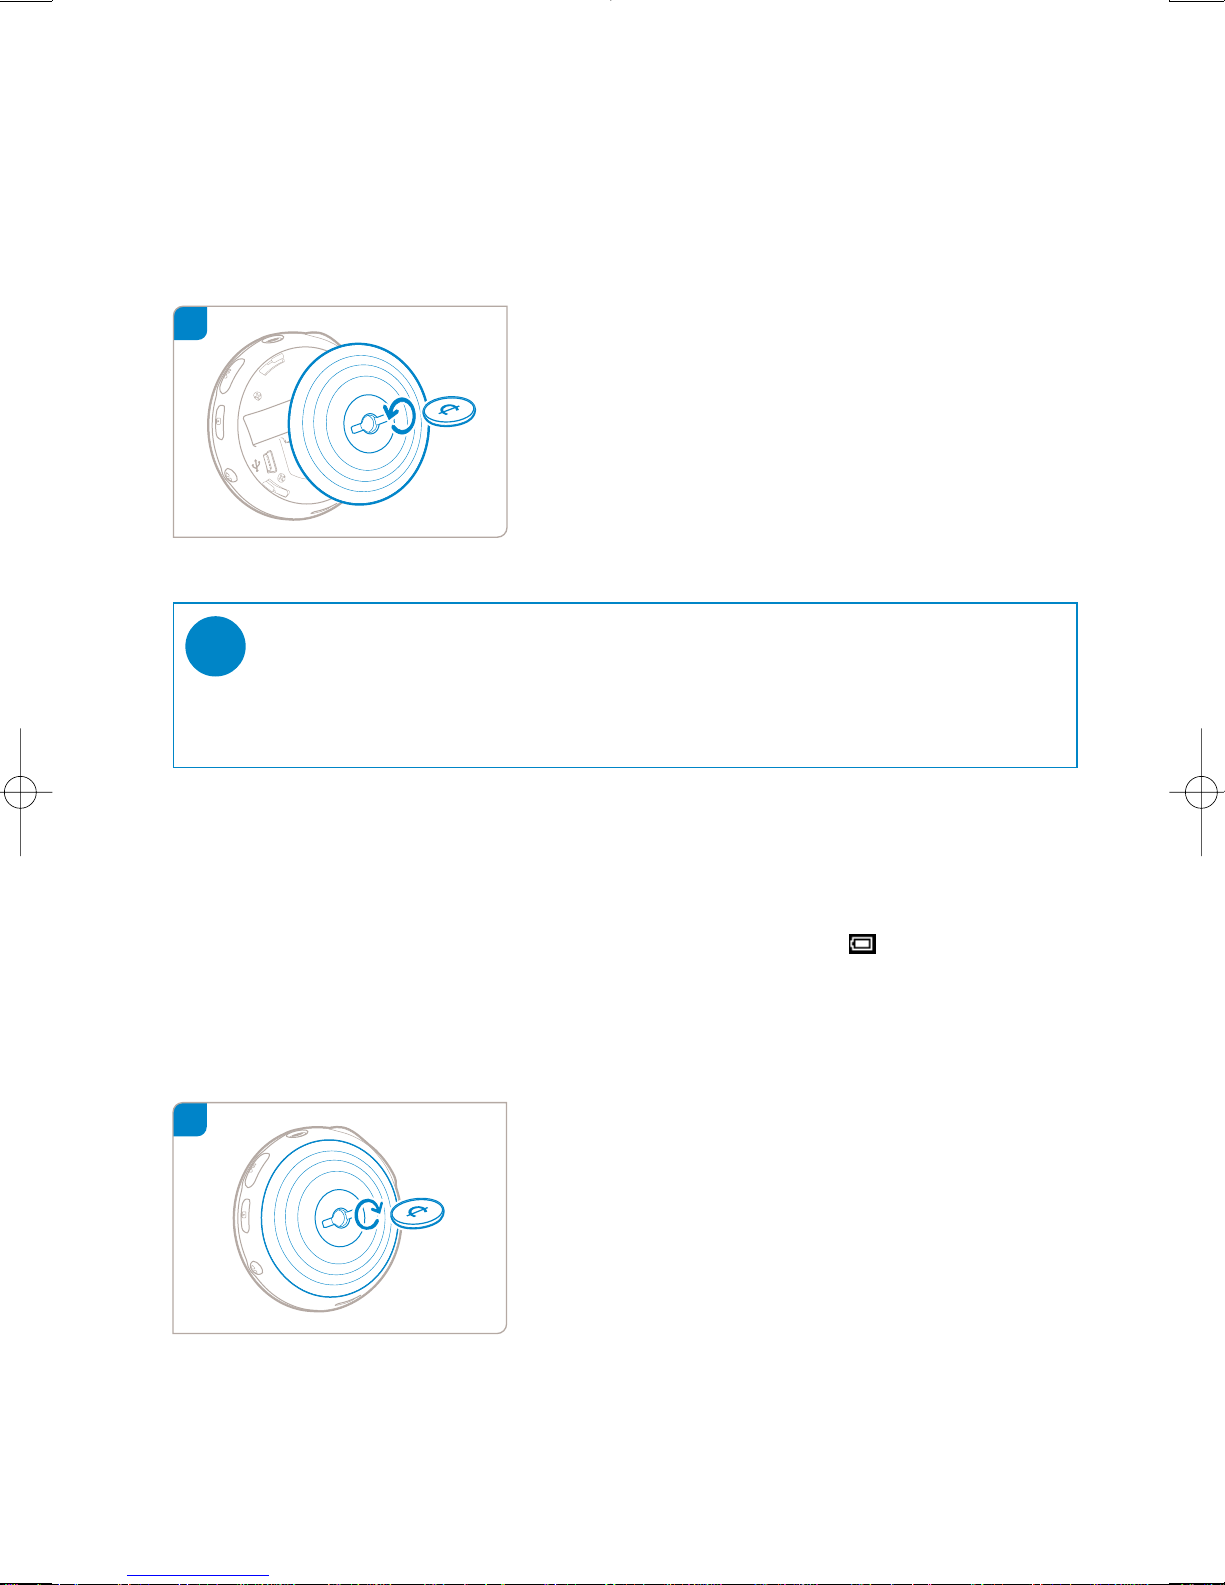
Charging your device
2 Connect the included multi-voltage adaptor / charger into the jack marked 5V DC, and
then plug the multi-voltage adaptor / charger into a standard AC outlet.
Please charge for 4 hours for 100% battery power for first time use. Fast charge: 1 hour.
The device is fully charged when the charging animation stops and the icon shows.
TIP
You can also twist open the cover without using a coin.
Grip on the rubber part of the back cover. Without moving your gripping
point, gently twist anti-clockwise to open.
✔
1
3
Use an appropriately-sized coin to twist
anti-clockwise to unlock the back cover.
Match the latches on the cover with the slots in your
device. Twist clockwise gently to
replace the back cover.
Connect and Charge
Page 6
3
TIP
You can also charge your device during USB connection. Please connect your device to
your computer using the included USB cable.
✔
To charge your device battery via USB, you must:
1 Have a high power USB port (many computers will pop up a warning message if you connect your
device and to a PC with a lower power USB port)
2 Ensure that your device battery is not empty
3 Connect your device to a high-power USB 2.0 port on your computer.
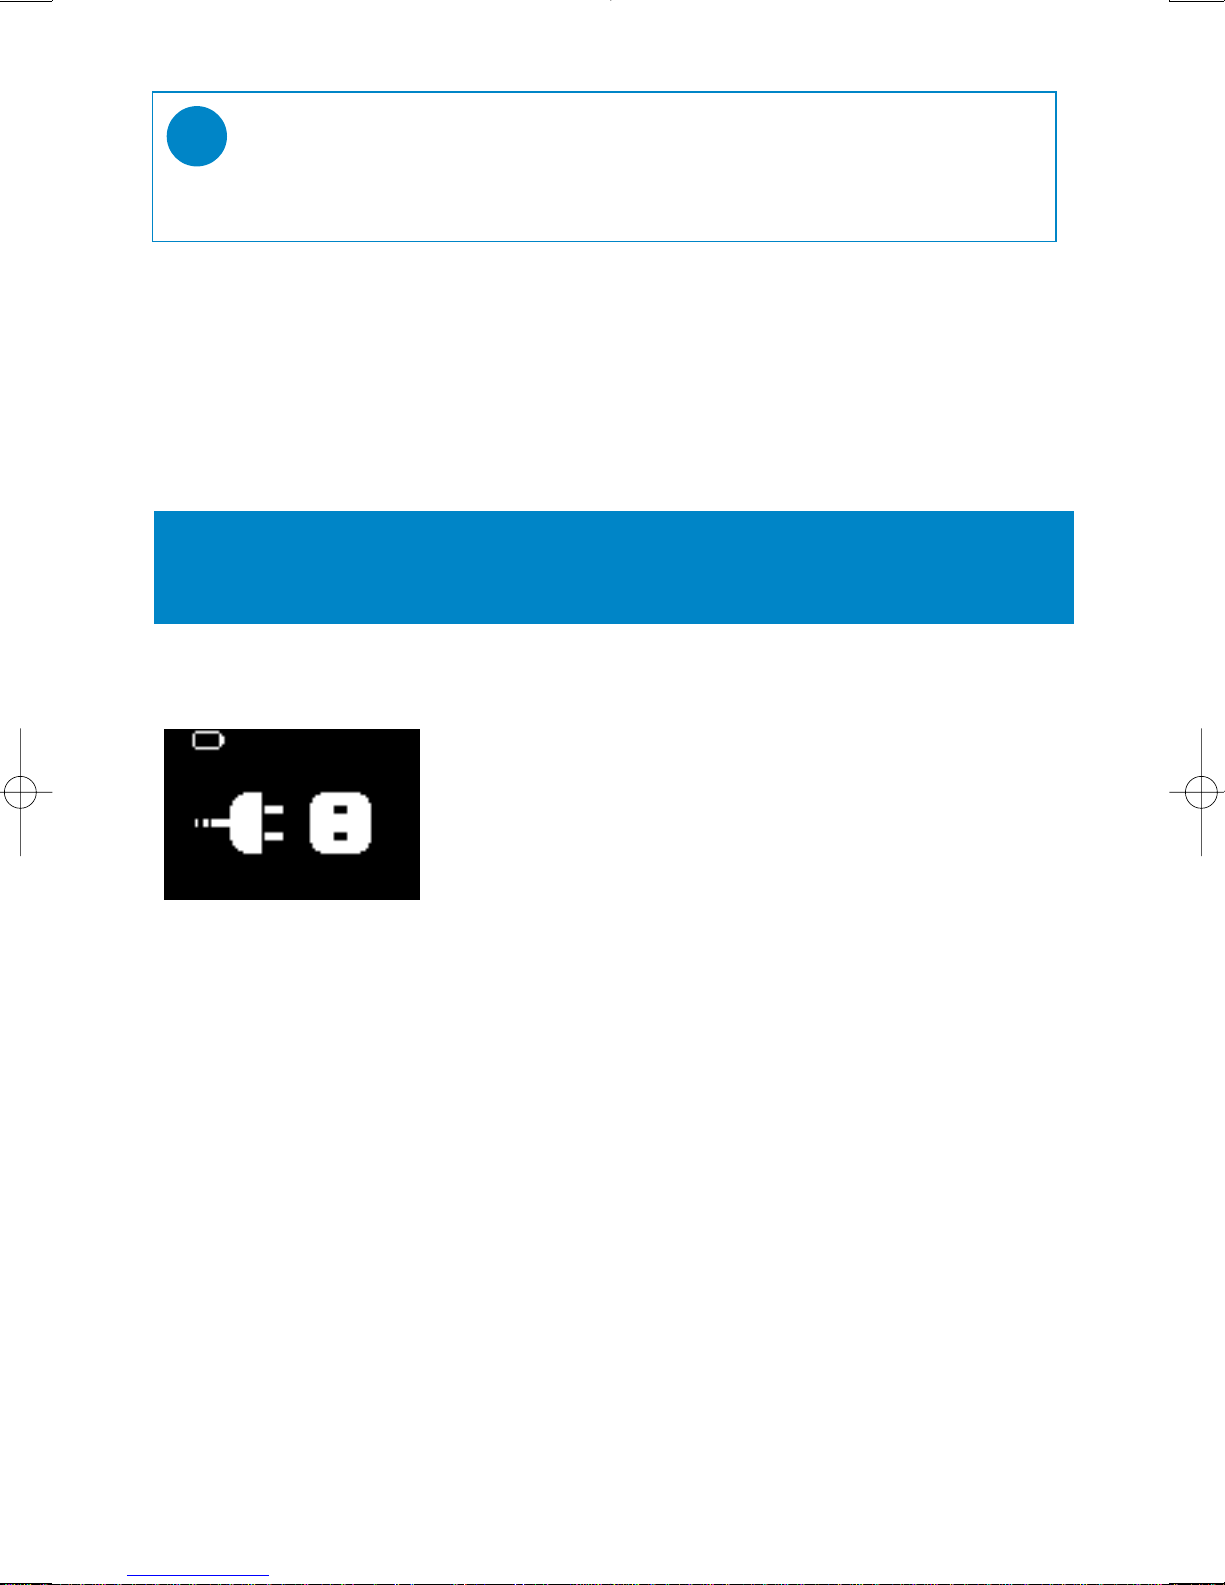
If your device is exceptionally low on power, you will see below warning message on your device.
This means that you must connect your device to a power outlet using
the by-packed power adapter / charger. Charge your device for at least 30
minutes (1 hour is recommended), then connect it to your computer
again to transfer music. Always check the battery status icon on your
device display.
If Songs Transfer More Slowly Over USB 2.0
If you transfer a large amount of songs or data using USB 2.0 and the device battery is low, your device
will go into power-saving mode.Transfer speeds will slow down considerably. This is normal.
If you want to transfer at higher speeds, you can stop the transfer, eject your device, and connect it to a
power outlet using the by-packed power adapter / charger. Charge your device for at least 30 minutes (1
hour is recommended), then connect it to your computer again to transfer music.
IMPORTANT!
Connecting your device to a USB port on your keyboard will not charge the
battery.
Page 7
4
Enjoy
Powering on / off
Power on: Press and hold 2;.
➔ PHILIPS splash screen appears briefly
Power off: Press and hold 2; again.
TIP
Your device automatically powers down if there is no operation and no
music played for 10 minutes. Last playback status / screen will be resumed
at next powering on.
✔
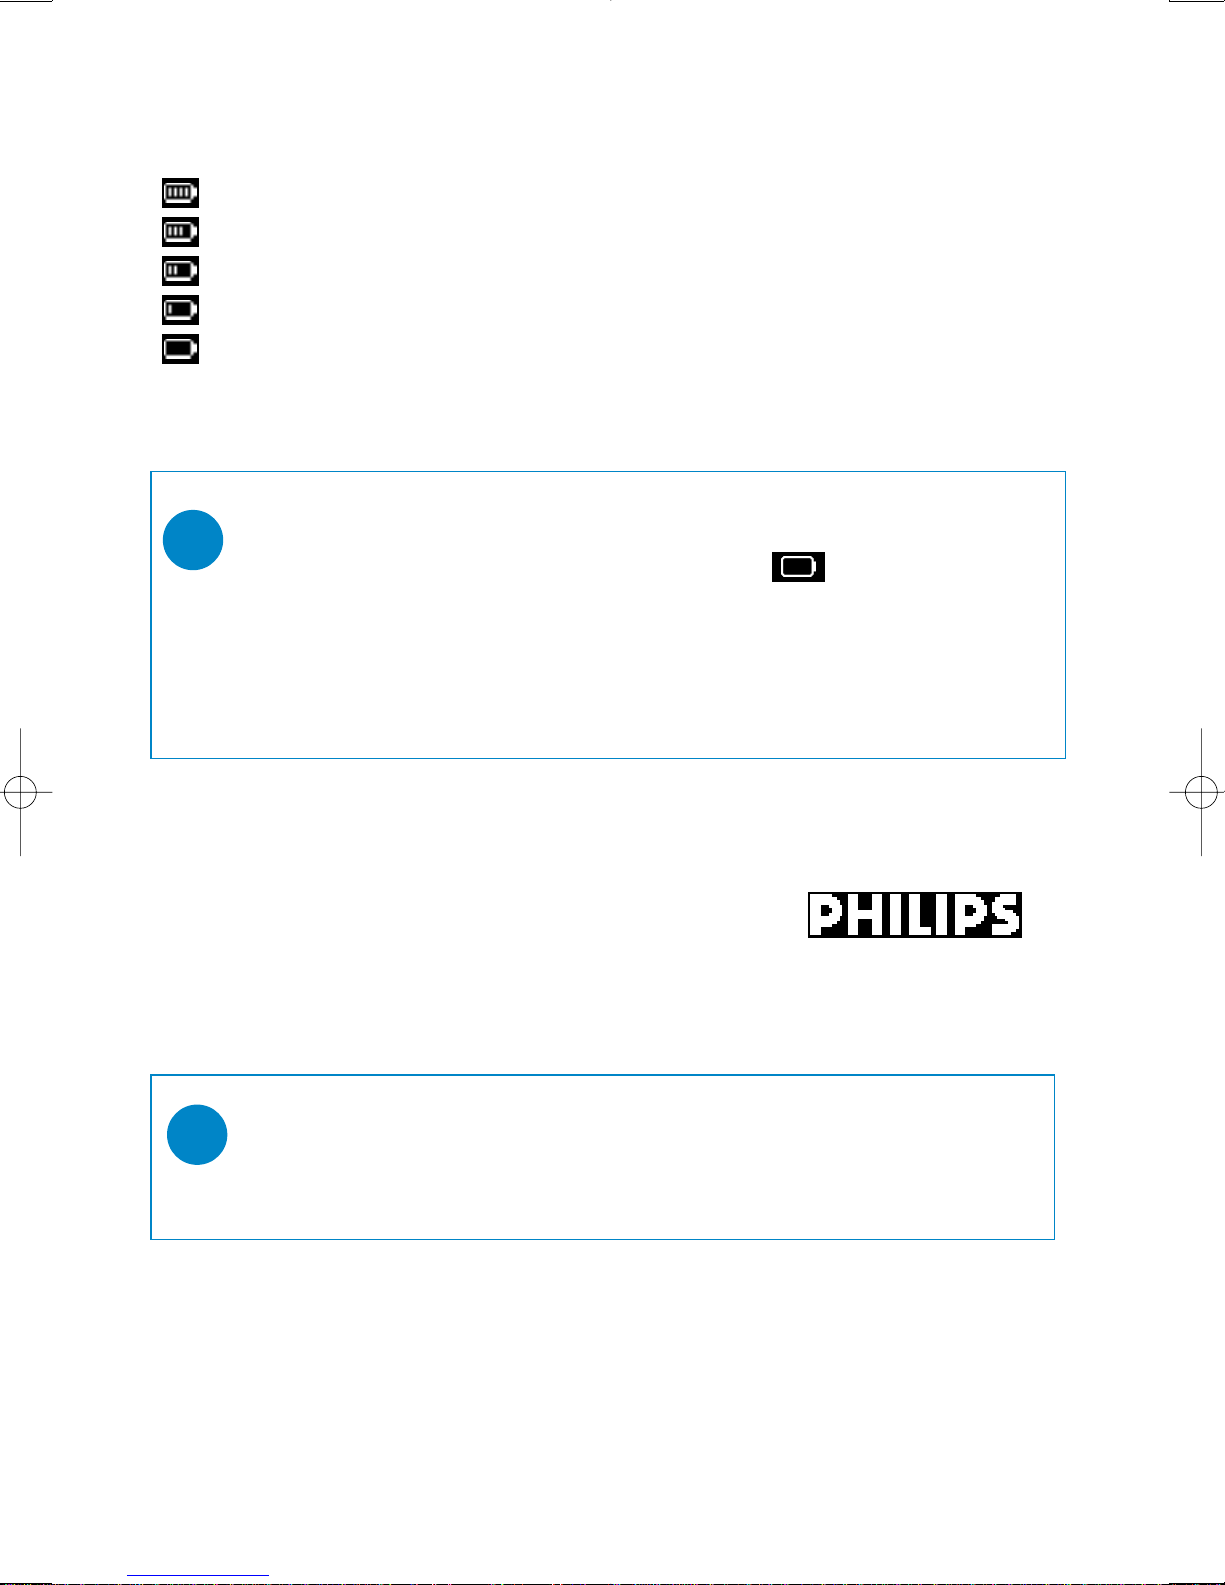
Indication of power level
You can see the approximate power level of your batteries on the display.
Battery full
Battery two-thirds full
Battery half full
Battery low
Battery empty
Note: Rechargeable batteries show lower voltage levels when compared to alkaline ones.
Batteries contain chemical substances, so they should be disposed of properly.
TIP
When the batteries are nearly empty, the battery low screen blinks and
the beep tone sounds once. When you hear a double beep, your device will power down.
Your device will save all settings and un-finished tracking before it powers down.
Rechargeable batteries have a limited number of charge cycles and may eventually need to be
replaced. Battery life and number of charge cycles vary by use and settings.
✔
Page 8
5
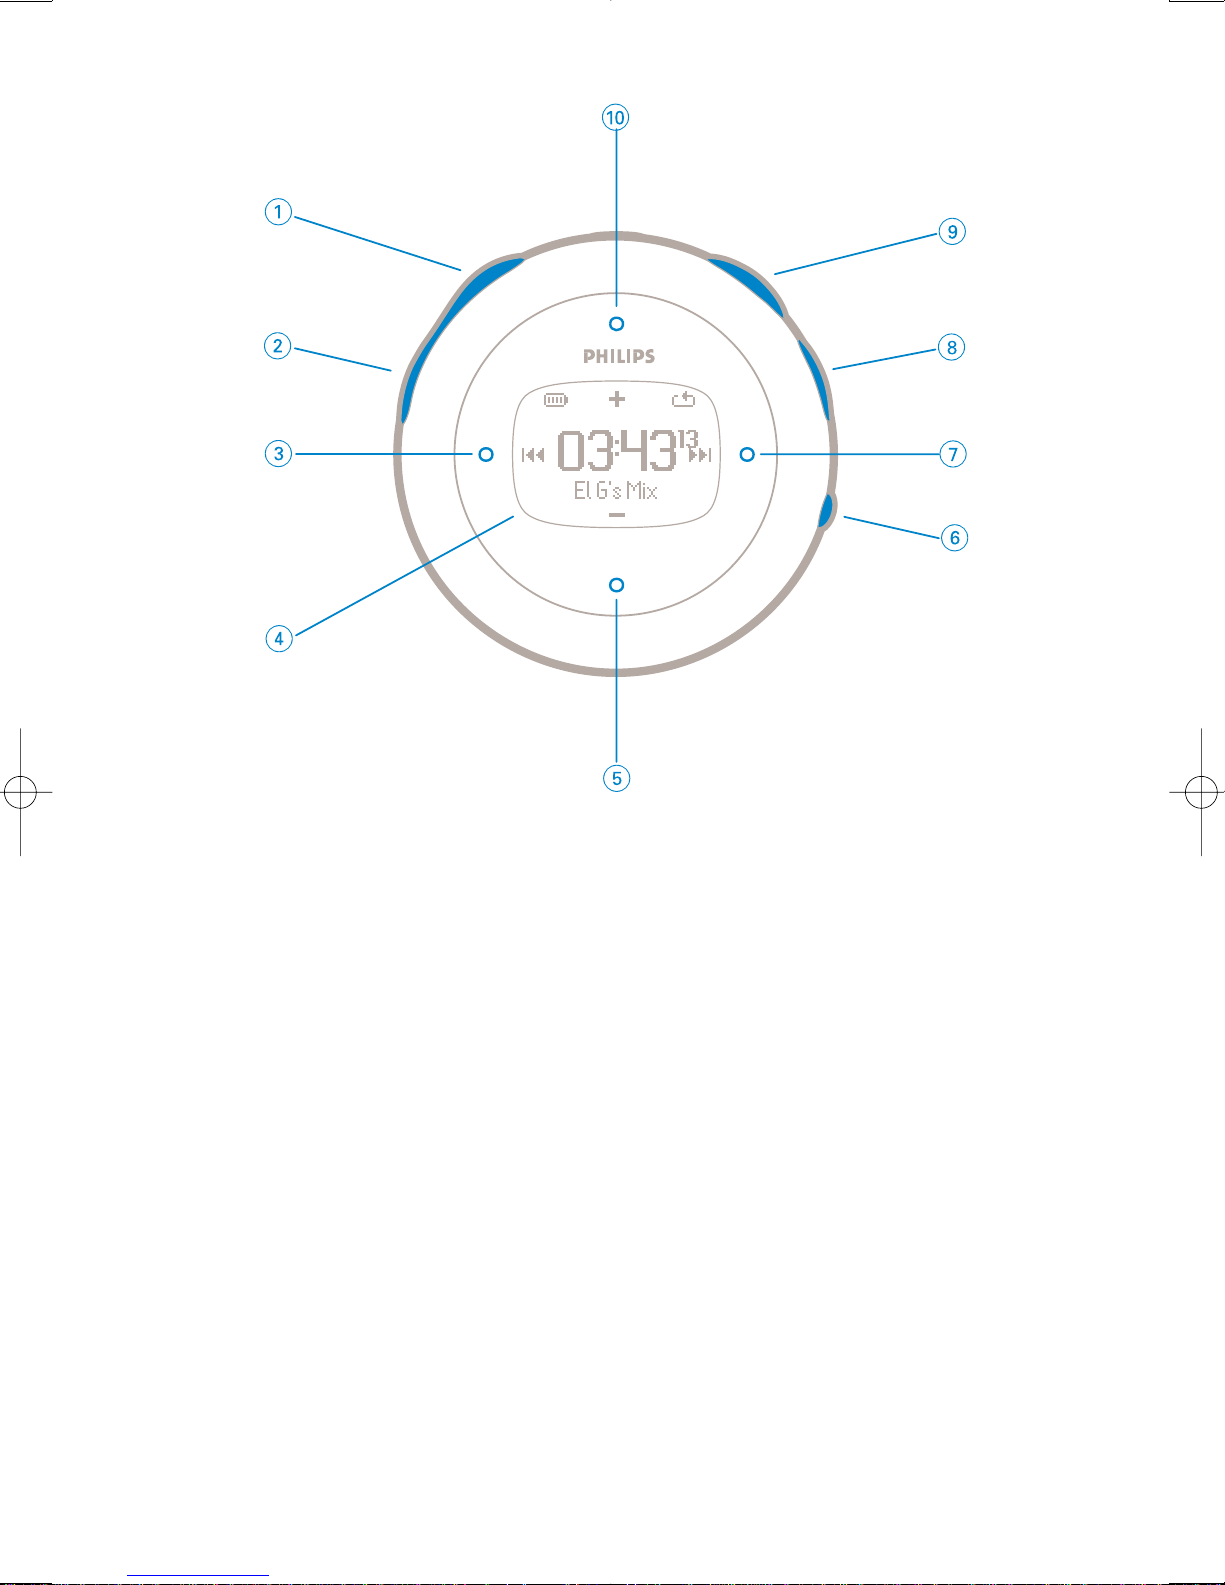
Front of device
1 Talking stopwatch Activates voice feedback telling you "elapsed time"
2 Stopwatch Press to start, pause, or reset
3 Previous Rewinds / Up 1 level / Skip to previous
4 Display Dynamically displays menu, options and track information
5 VOL - / Move down Navigate down / volume down in playscreeen
6 VIEW To switch between root menu, library and now playing screens.
7 Next Fast forward / Down to 1 level / Skip to next
8 Lock key Disables / enables key lock and ShockLock
9 2; Power on / off and Play / Pause
0 VOL + / Move up Navigate up / volume up in playscreeen
10
1
Page 9
6
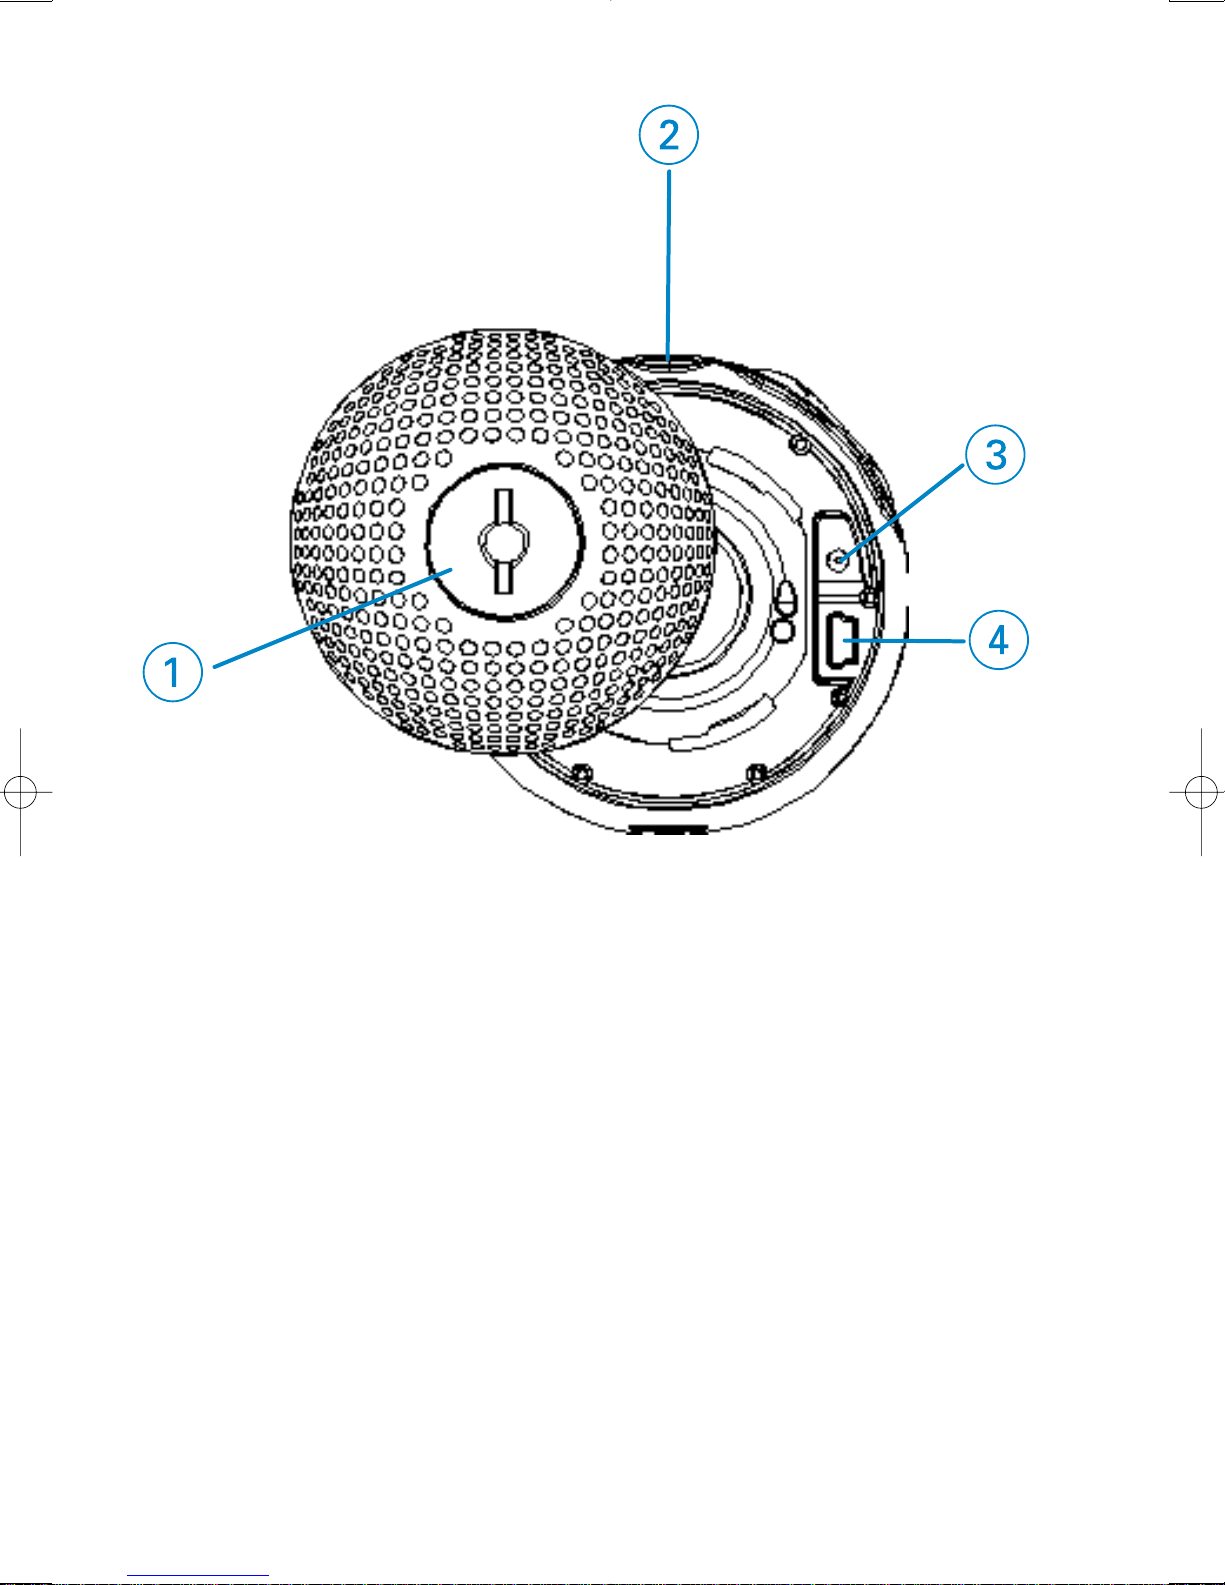
Back of device
1 Back Cover Insert a coin here to twist open / close back cover;
connects to arm band
2 p Headphones jack
3 Charging socket
4 USB cable connector
Page 10
7
Root menu
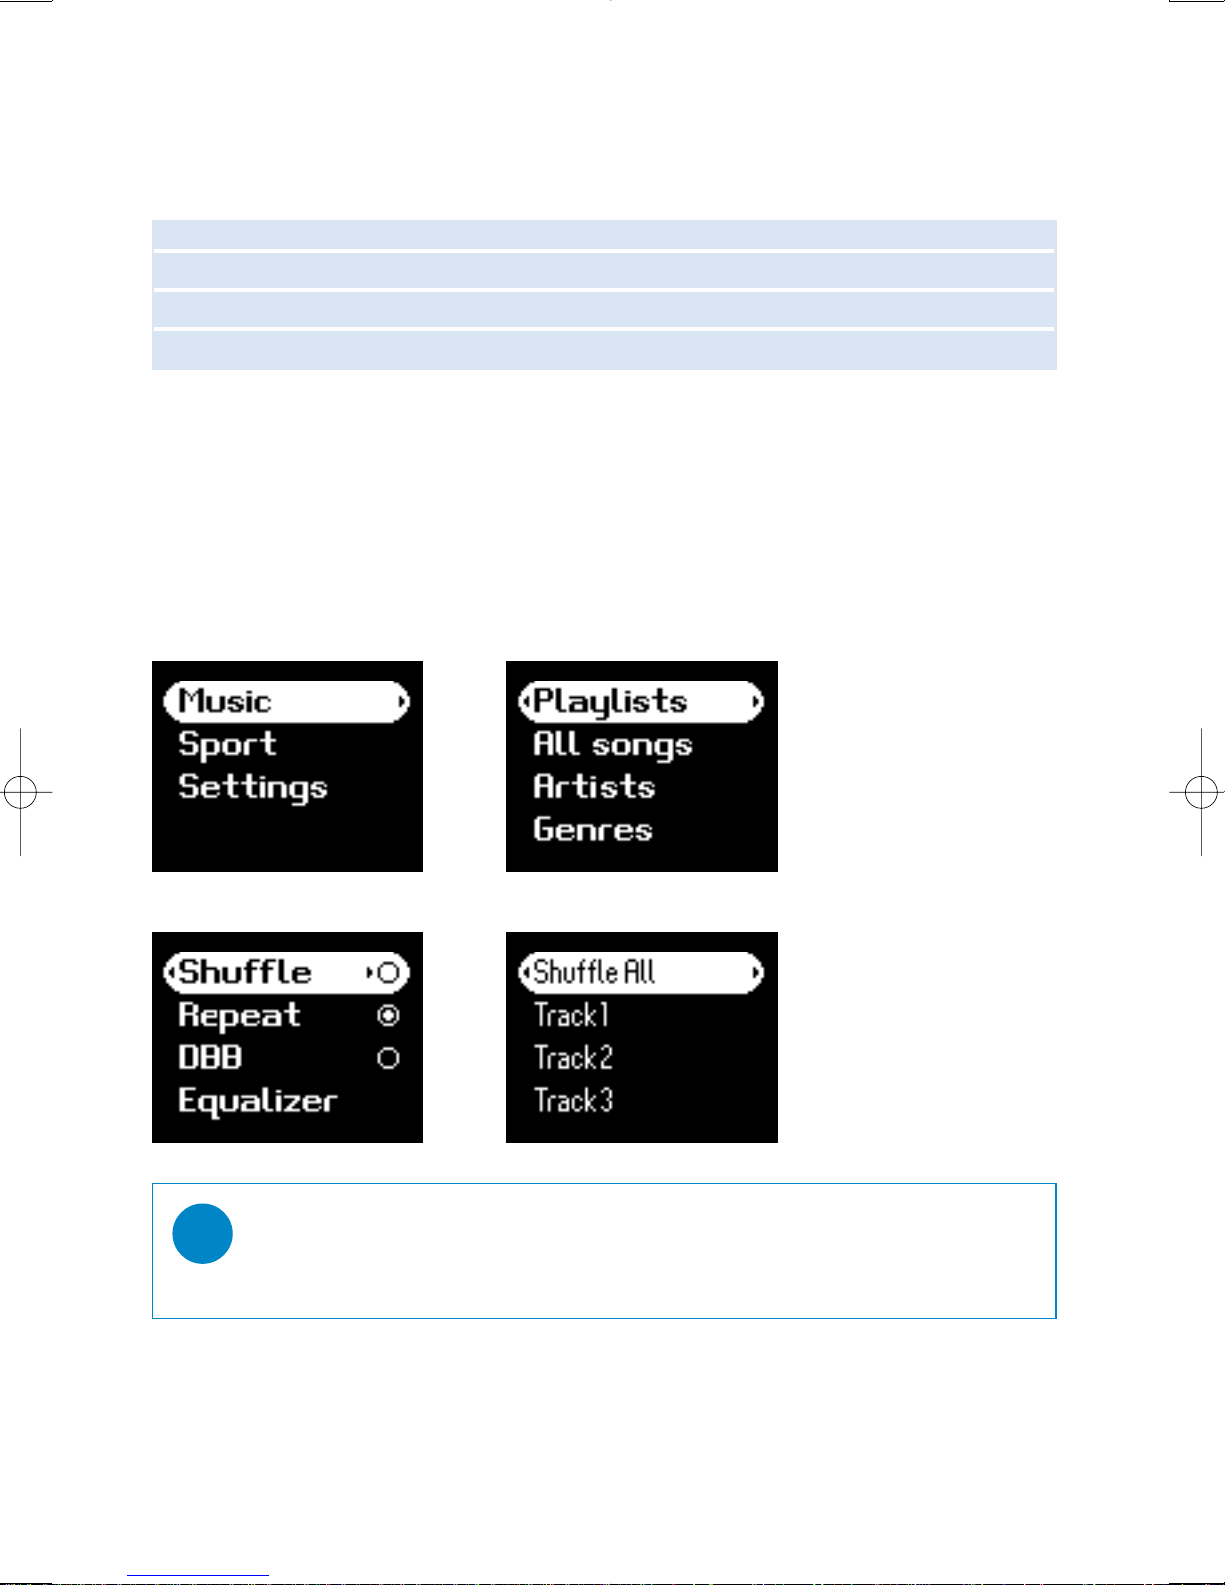
When your device powers up, you will see the ROOT MENU.
***FM radio is only available in some regional versions. FM radio is currently not available in Europe..
Navigation
Your device has an intuitive menu navigation system to guide you through various
settings and operations. Use 3, 4, 1, 2 to browse through menus. Press 2 to
confirm your selection.
Music enter to play your digital music tracks
Radio*** enter to listen to your radio presets
Sport enter to view your workout summary
Settings enter to customize settings for your device
TIP
Select Shuffle All to play all your device music in a random way.
✔
Page 11
8
Music mode
We have put some music tracks on your device so that you can jump star t your music experience.
You can also transfer your digital music collection from your computer to your device through the
included music management software.
(see GETTING DIGITAL MUSIC ON YOUR DEVICE for more information)
IMPORTANT!
We recommend that you use the Sync function in Windows Media Player 10 to
transfer music to your player.
Searching for your desired music
1 From the root menu, select MUSIC to enter the music mode. As you enter the music
mode, you can search from the following display options:
2 Press 3 to scroll up or 4 to scroll down for your option.
Press 2 for next or 1 for previous levels.
3 Press 2; to play your selection.
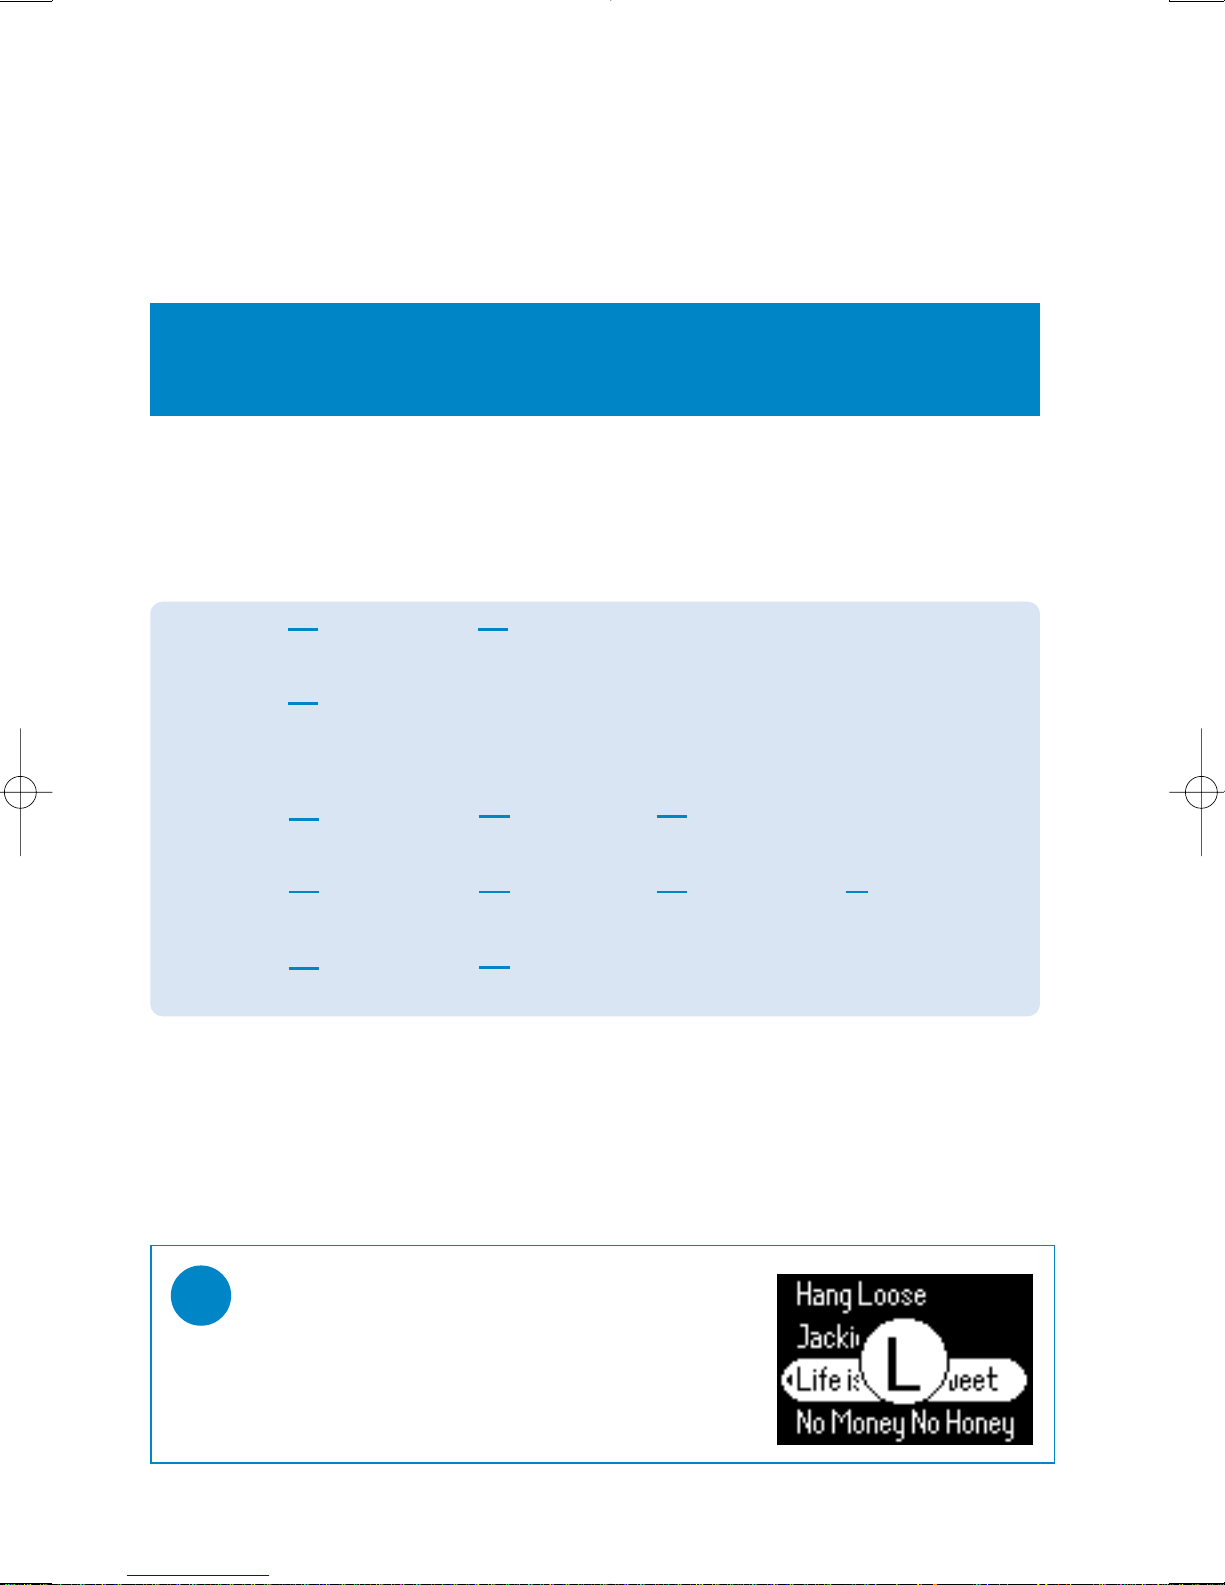
TIP
You can also press and hold 3 or 4 key to SuperScroll.
An enlarged head letter will show as the tracks scroll
quickly.
Stop pressing when you have arrived at your desired
head letter.
✔
Playlists Playlists
collections
Tracks listed in
play order
All songs Shuffle All
Alphabetically
listed tracks
Alphabetically
listed albums
Artists Alphabetically
listed artists
Alphabetically
listed artists
Genres Alphabetically
listed genres
Tracks listed in
album order
Albums Alphabetically
listed albums
Tracks listed in
album order
Alphabetically
listed albums
Tracks listed in
album order
Note: If your music is missing any ID3 tag information, then your may find empty fields or an indication
stating "No artist found" or "No album found" or “No genres found”.
Page 12
9
Playback
The keys: 2; , 0, 5, 3, 7 (see drawing on page 5) are multi-funtional. They work according to
how you press them: press or press and hold. During music playback, you can do the following:
Pause music Press 2; during playback
Go to next track Press 7
Go to previous track Press 3
Forward search Press and hold 7
Backward search Press and hold 3
Volume control 0 / 5
Basic Operation Controls to press
Customizing playback
Changing play modes
1 From the root menu, select Settings.
2 Use scroll controls to select the following options. Press 2; to confirm your selection.
Press 2; to deselect a checked option.
Changing Bass Enhancement
1 From the root menu, select Settings > DBB.
2 Use scroll controls to select On or Off.
Changing equalizers
1 From the root menu, select Settings > EQ.
2 Use scroll controls to select Rock, RnB, Electronica, Hip Hop, Classical, Jazz.
Shuffle On Off
Repeat Off On
Shuffle and repeat On On
Normal Off Off
Play mode Shuffle Repeat
Page 13
10
Getting digital music onto your device
Before you can transfer your MP3 and/or WMA collection to your device using Windows Media
Playe, you need to have both Windows Media Player and Philips Device Manager installed on your PC
as follows:
Install Philips Device Manager and Windows Media Player
1 Insert the supplied CD into your computer's CD-ROM drive.
If the CD does not autorun, please click the .exe from the root directory of the CD.
2 Select your language and follow screen instructions to complete installation of Philips
Philips Device Manager and Windows Media Player.
Connect your device to the computer
1 Connect your device to your computer using the supplied USB
cable. A USB connection animation will be shown as soon as your
device is connected.
2 You can organize files and transfer music to your device during
USB connection.
Organize and transfer your music using Windows Media Player 10
1 Launch Windows Media Player from Windows desktop or Start menu.
2 To transfer files from your computer to your device, click Copy to CD or Device / Sync tab.
3 In the Items to Copy pane, in the drop-down list, click the playlist, category, or other item that
you want to copy.
4 Clear the check boxes next to any files you do not want to copy.
5 In the Items on Device pane, in the drop-down list, click the device that you want to copy files
to. i.e. PHILIPS GoGear / PHILIPS device.
6 Click the Start Sync button.
If your Windows Media Player is open when you connect your device, your device
may not be recognized.
✔
Music files may be transferred using Windows Explorer (by drag and drop) to your device only if
they are saved in the following folder: "media"
Page 14
11
Radio mode***
***FM radio is only available to some regional versions. FM radio is currently not available in Europe..
Select your FM region
1 From the root menu, select Settings > Advanced > Radio settings.
2 Select your region. Press 2 to confirm your selection.
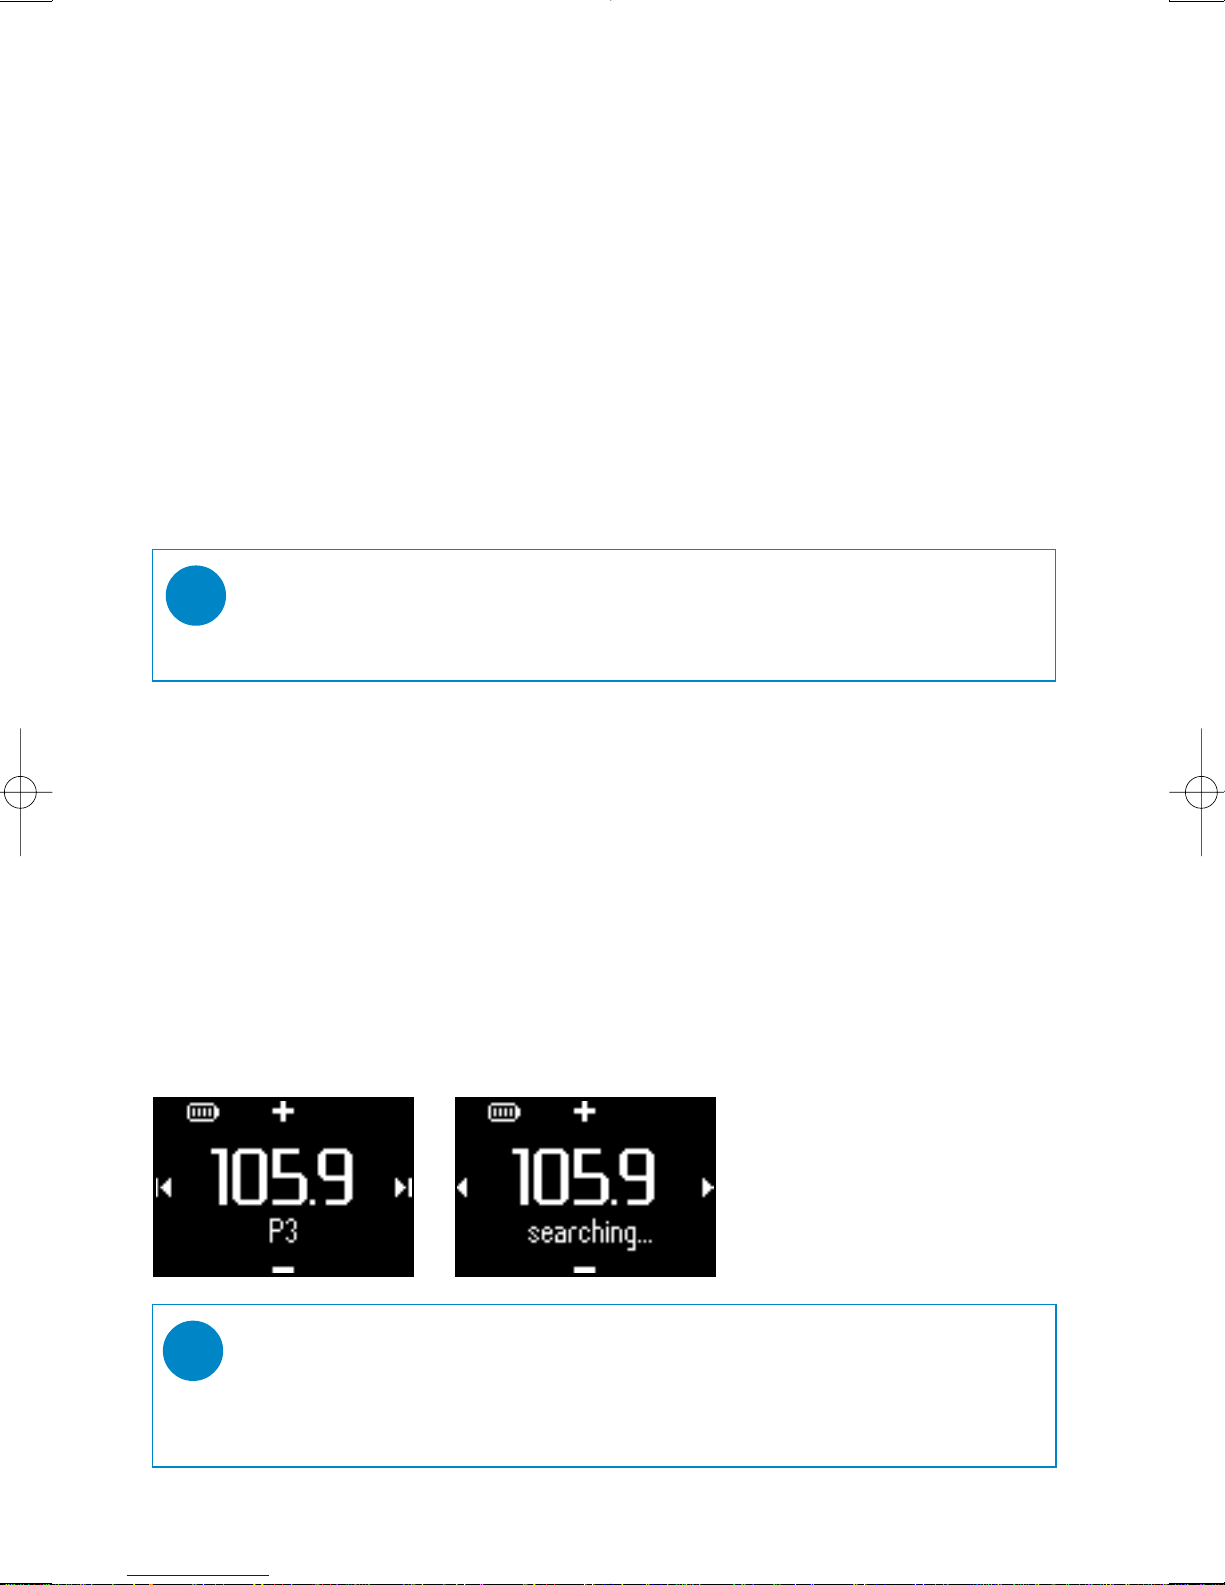
Auto tune
1 From the root menu, select RADIO to enter the radio mode.
2 Press 1 from P1 or 2 from P10 to select Autotune.
Press 2; to confirm.
➔ Your device will automatically select the 10 strongest available
stations. Press any key to abort
Playing a radio station
1 From the root menu, select RADIO to enter the radio mode.
2 Press 1 for the previous or 2 for the next preset.
Manual tune
1 From the radio play screen, press and hold 2 to start manual tune.
2 Press 1 or 2 to tune step by step.
➔ The screen indicates the change in frequency. You will hear a
hissing sound / the tuned station as you manual tune.
3 Press and hold 1 to search for the last available station or press and hold 2 to search for the
next available station.
4 Press 2; to confirm and save your preset.
TIP
If you do not want to store a manual tuned preset, do not press any key.
The manual tuning screen will time out without saving.
The headphone wire is used as an FM antenna. If necessary, move it for
optimum reception.
✔
TIP
Please ensure that you connect the bypacked headphones during auto tuning of your radio
presets since the headphone cable functions as an antenna.
✔
Page 15
12
Using the stopwatch
You can use your device as a stopwatch to track your workout progress.
All stopwatch activities will be recorded and stored on your device.
During use of stopwatch, you may press the talking stopwatch key to hear your elapsed time via the
headphones.
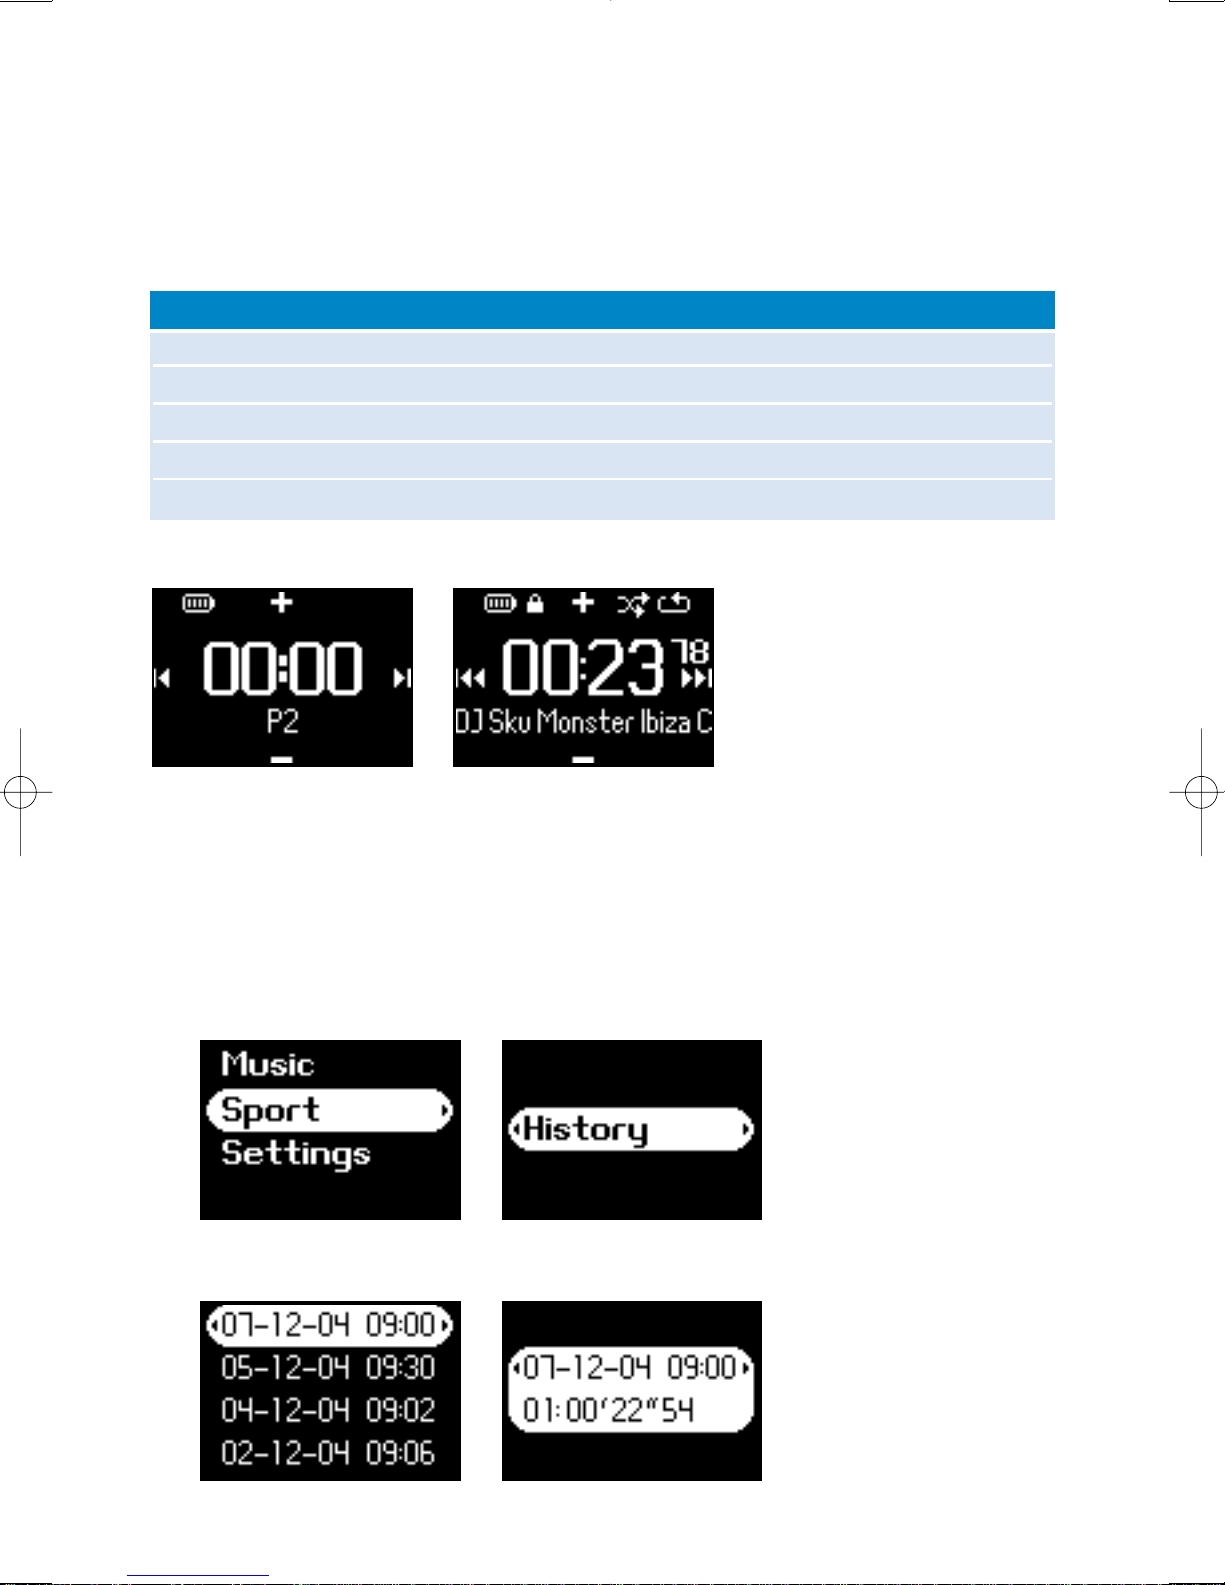
The screen shots below show what you see when you are using stopwatch.
The talking stopwatch voice feedback is available in: English, French, German and Spanish only.These
are linked to the language selection that you make in Settings. All other languages have English voice
feedback.
Go to stopwatch screen Press and hold 2 (see "Front of device section" on p.5)
Start timing Press 2 from stopwatch screen
Pause timing Press 2 when stopwatch is active
Resume timing Press 2 when stopwatch is paused
Reset stopwatch Press and hold 2
Stopwatch operation Controls to press
Tracking your workout progress
You can use your device as a stopwatch to track your workout progress.
1 From root menu, select Sport > History.
2 You can view a list of recorded workout logs. Press 2 to view details. You will see the date of
your workout and the elapsed time of your workout.
Page 16
13
Using the talking stopwatch
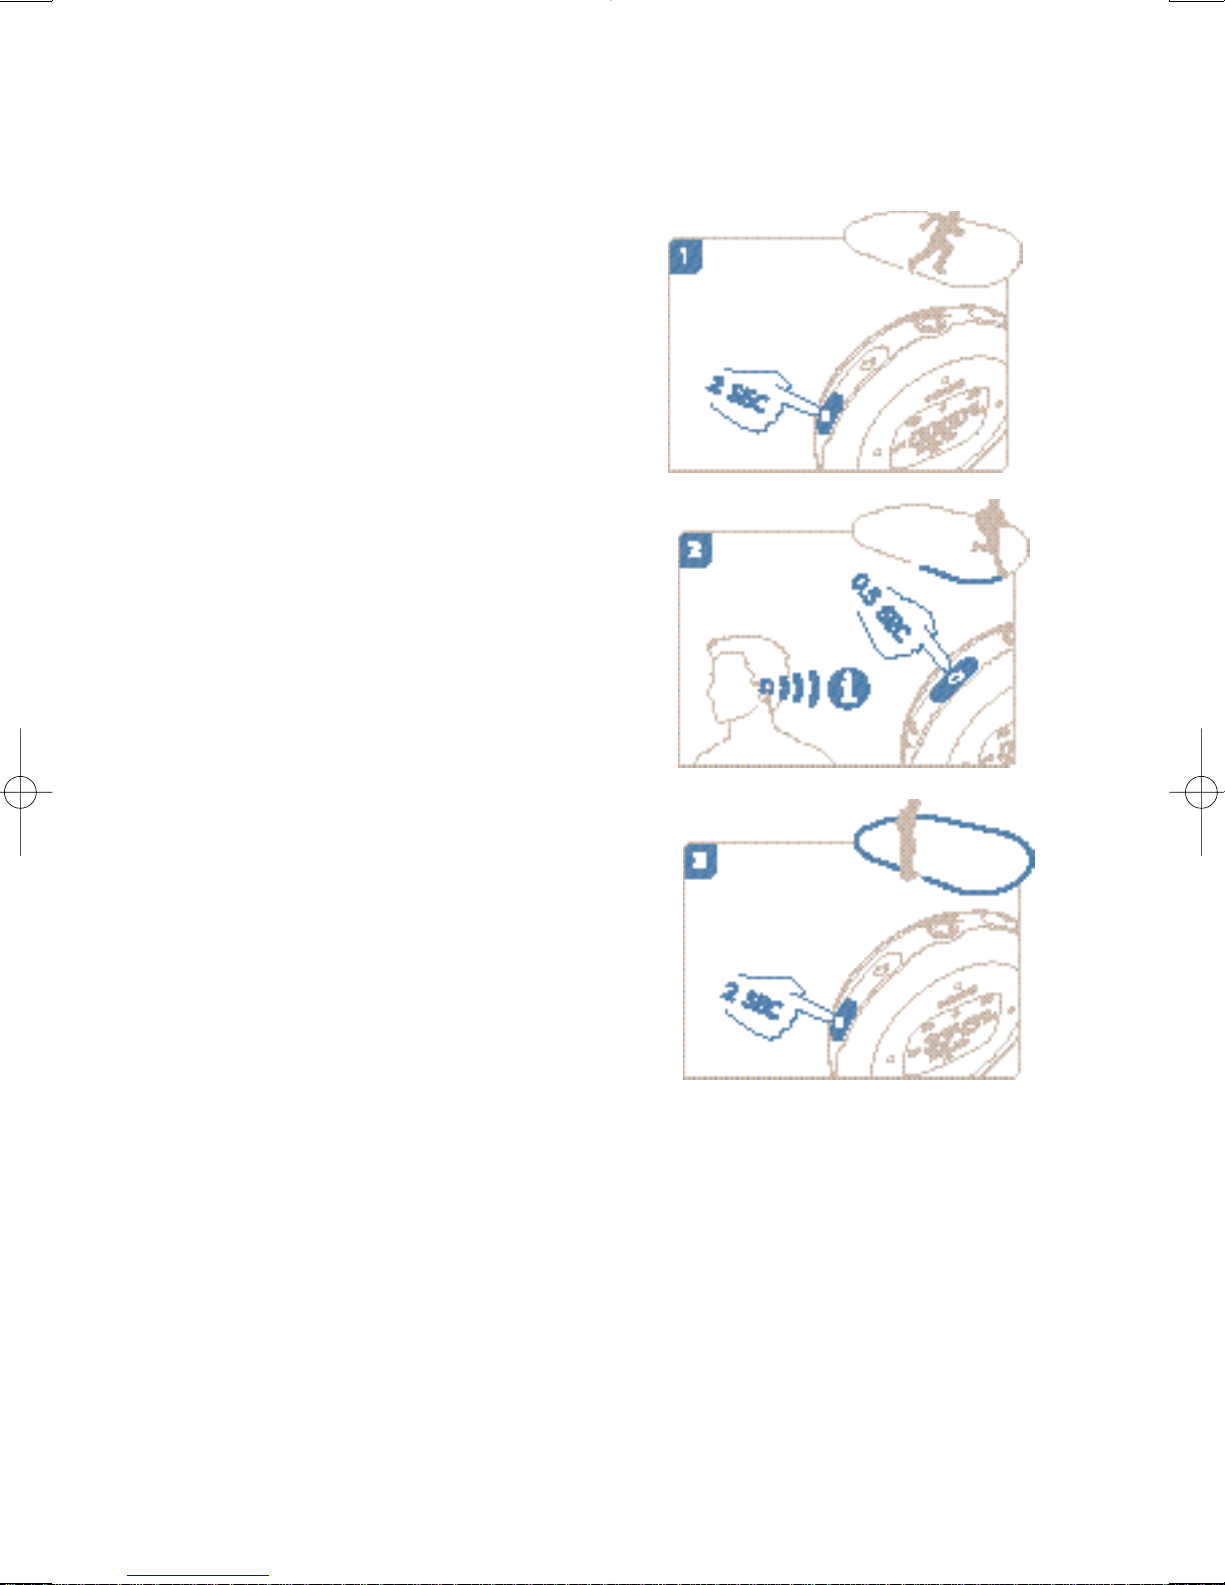
1 Press clock to star t stopwatch.
2 Press for elapsed time.
3 Press clock to stop stopwatch.
The talking stopwatch voice feedback is available in: English, French, German and Spanish only.These are
linked to the language selection that you make in Settings. All other languages have English voice feedback.
Page 17
14
3 During ShockLock mode, you can only listen to songs loading into the buffer. The number of songs that fit
into the buffer varies.You can expect that between 4 and 12 songs will fit.These songs will play
continuously in Repeat mode until you deactivate ShockLock or your battery is depleted.
4 To deactivate ShockLock, press and hold LOCK and deselect ShockLock, or turn off your player. During
ShockLock mode, the default music playback mode is Repeat playback mode.
During ShockLock loading, you may get a message informing you that the feature is only possible to activate for
non-subscription songs. In order not to violate any agreements you may have with your music subscription
services and to protect your subscription count only songs that you actually own can be loaded into ShockLock
mode. Songs acquired through music subscription services can be played in normal playback mode.
Using ShockLock during music playback
All hard disk players may be vulnerable to shock which may affect the quality of your music enjoyment during
vigorous workouts or activities. Philips has come with an innovation to further protect your player during
rigorous exercise called ShockLock.
ShockLock can be activated on any selection of music you own (that is on any music that does
not come from music subscription services) so you can enjoy your favorite music while on the move
without being interrupted by shock.
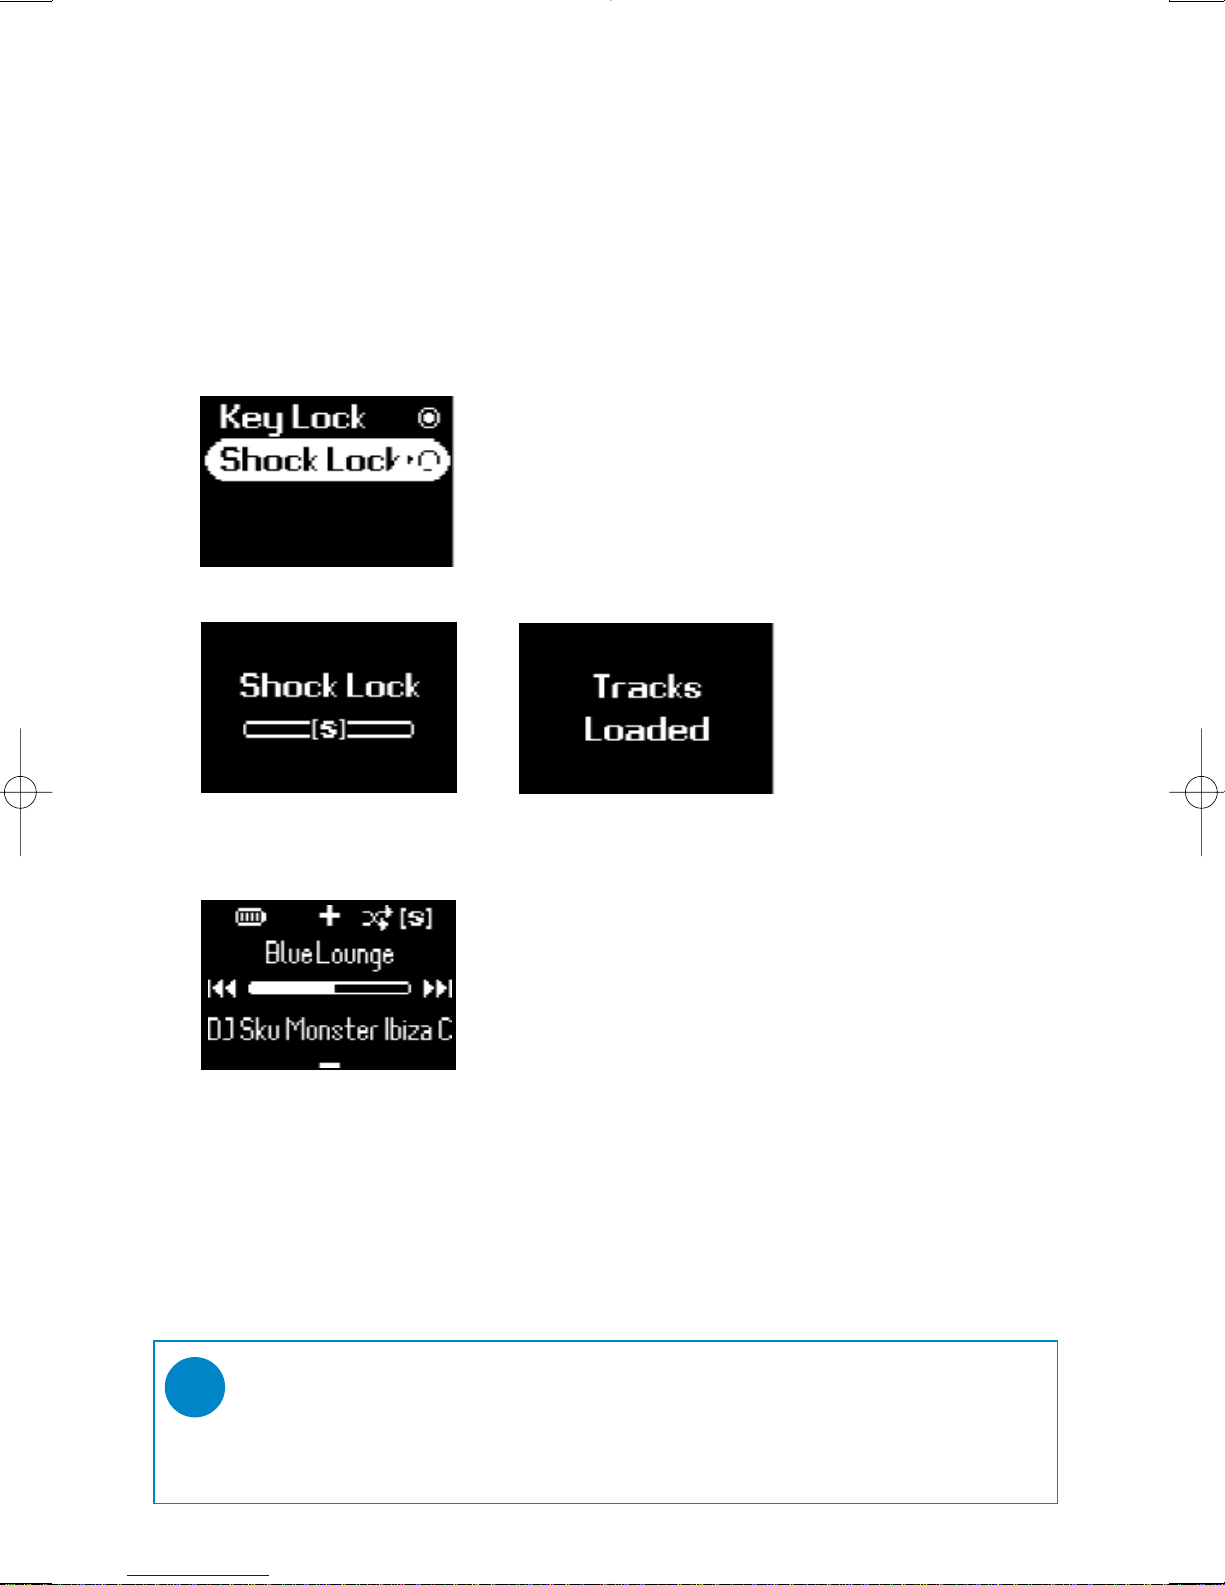
To activate ShockLock during music playback, follow the instructions below.
1 Press LOCK key. Select ShockLock.
2 Device shows loading mode.
TIP
During ShockLock mode, you may not be able to access some functions of your player. If you
wish to perform new functions, please deactivate ShockLock mode first.
✔
Page 18
15
Customizing settings
1 From the root menu, select Settings.
2 Press 3 to scroll up or 4 to scroll down for your option. Press 2 for next or 1 for
previous levels.
3 Press 2 to confirm your selection.
4 Press 1 once or more to exit the menu display.
Shuffle Play tracks in random order
Repeat Play tracks repeatedly
SmartSave
Battery power saving mode
DBB Base enhancement
Equalizer Rock / R&B / Electronica / Hip Hop / Classical / Jazz / Off
Backlight 5 seconds / 10 seconds / 30 seconds / Off
Contrast Levels 1 - 6
Language English, French, German, Spanish, Italian, Por tuguese
(Brazilian), Dutch, Swedish, Chinese (Simplified),
Chinese (Traditional), Japanese, Korean
Factory settings Restore factory settings
Information Free space / About
Advanced
Radio Settings USA / Europe / Japan
Smart Hide Off / 1 / 2 / 3 / 4
Voice Feedback On time / On demand
Setting Function
TIP
Options for each setting are shown on the device display.
✔
TIP
- SmartSave is a battery power saving mode. During this mode, certain features that
consume high power, such as DBB and EQ are deactivated for opimal battery performance.
- Smart Hide is a function to hide some library information..With Smart Hide, you can scroll
faster to the right content by hiding albums and artists which contain songs that are fewer
than a specified number.
Smart Hide 1 will hide all artists and albums that has only 1 track in the library.
Smart Hide 2 will hide all artists and albums that has only 2 or fewer trackc in the librar y.
Smart Hide 3 will hide all artists and albums that has only 3 or fewer tracks in the librar y.
Smart Hide 4 will hide all artists and albums that has only 4 or fewer tracks in the librar y.
✔
Page 19
16
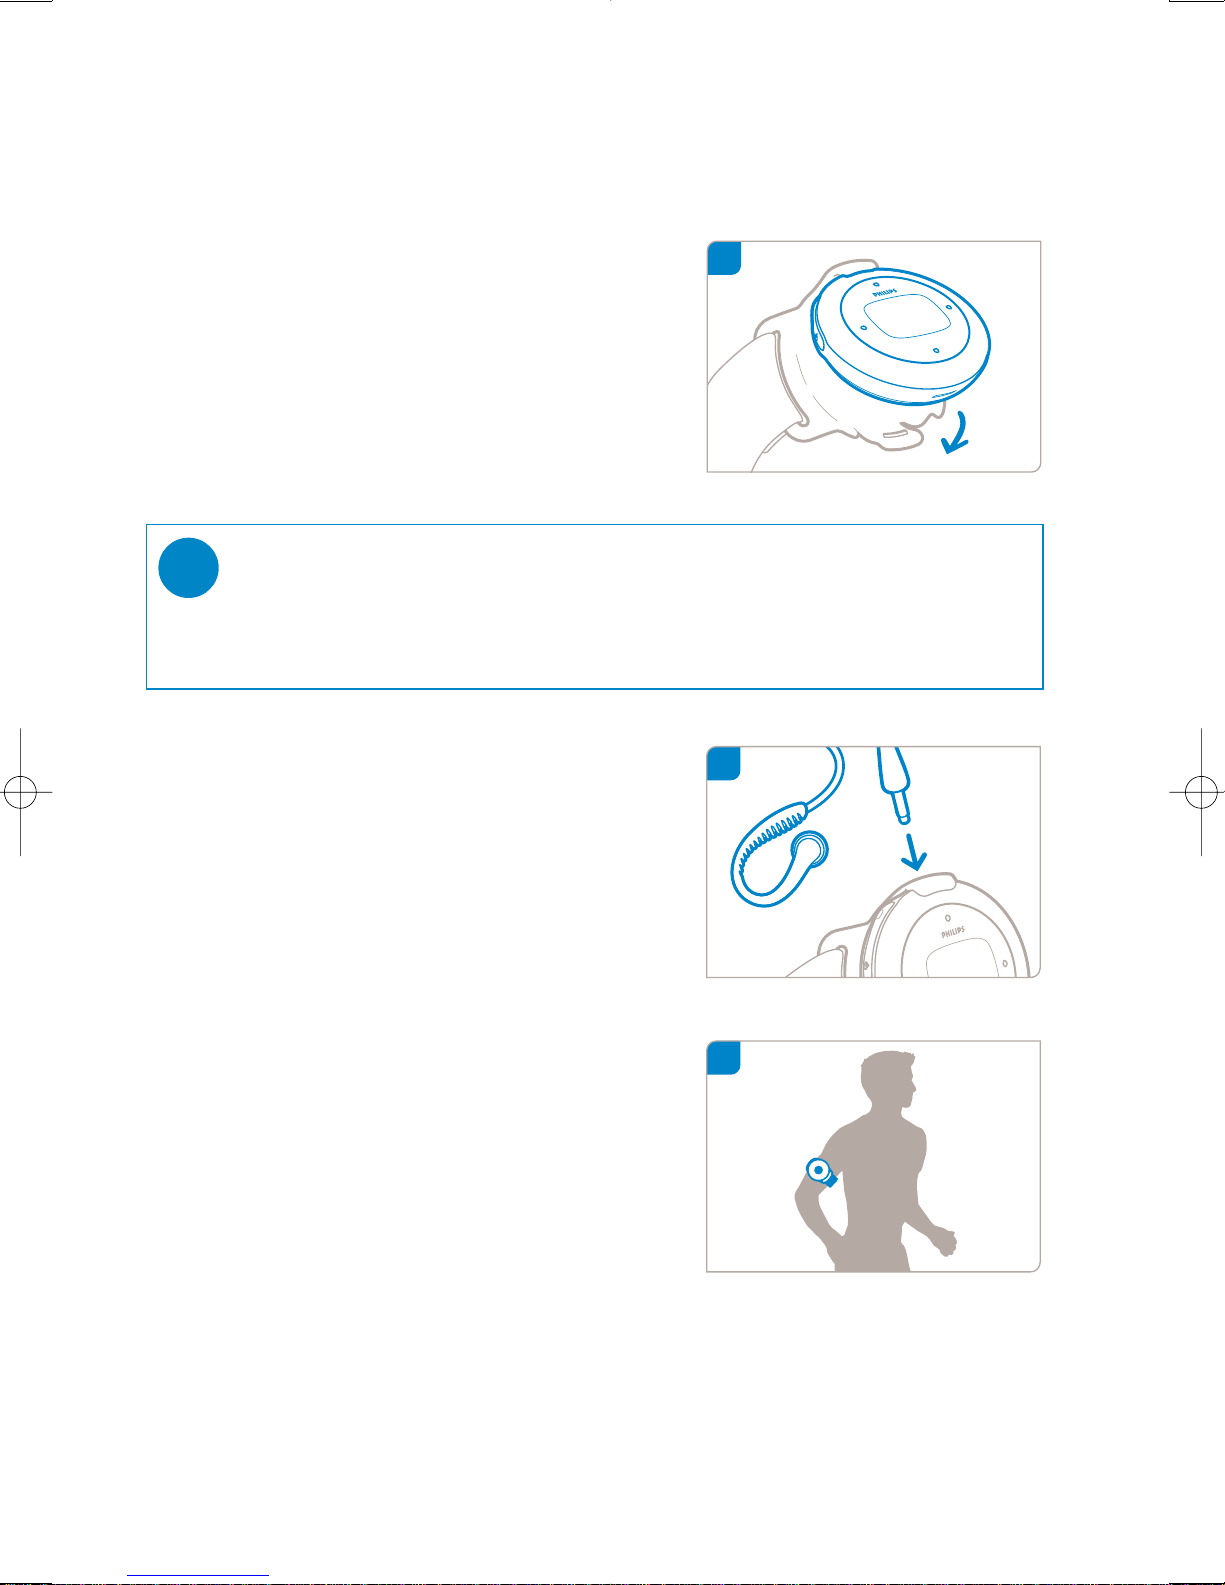
Wearing player on your arm
1 Attach device to armband, matching the
cover latch with the armband cup.
TIP
Ensure that the headphone socket is pointing upward.You will hear a click sound when you
have secured the player.
✔
2 Connect headphones.
3 Adjust fitting and wear on your arm.
1
2
3
Page 20
17
Hang up Press and hold [VOLUME +] and 2; simultaneously.
Your device will reset.
Cannot power up Charge your device.
In case of device error, connect your device to the
computer. Use Device Manager to restore your device.
Device shows "Player problem" Device / memory card error. Connect your device to the
computer. Use Philips Device Manager to repair your device.
Device shows IIIIIIII You have transferred music tracks with Chinese, Japanese,
Korean or other languages to your device. You need the
corresponding fonts to display this information correctly.
Press Settings .Select Language. Select the source language
of the music tracks. Note:Your music still plays even this
information is not shown properly.
No sound when the 2; button is - You may have a weak battery. Charge your device.
pressed on my PSA player - Check if your headphone plug has been inserted into the head
phone jack of the unit completely
- When you press the 2; button, make sure that it is pressed
and held for long enough until the display light up.
- Check if the volume is at an audible level. Increase the volume
using the VOLUME + button.
- If psa is in pause mode, press the 2; button to resume playback.
- Press power/play/pause and Volume + simultaneously for 2 seconds.
Your device will reset.
- If nothing works then try connecting your psa player to the
computer and then start Philips Device Manager and select
"restore" to rebuild the database and firmware image of the
psa player
Cannot transfer from my PSA back This is not an error.Windows Media Player can only transfer tracks
to my computer from your computer back to your PSA but not the other way round,
subject to digital rights management.
Device shows " ! " / "Connect to PC" Connect your device to the computer. Use Philips Device
Manager to repair your device.
Symptom Solution
Troubleshooting
If a fault occurs, first check the points listed in the following pages. For further help and other
troubleshooting tips, please also check out FAQs at www.philips.com/support.
If you are unable to find a solution by following these hints, consult your dealer or service
center.
WARNING:
Under no circumstances should you try to repair the set yourself, as this will invalidate
the warranty.
Page 21

18
Safety and Maintenance
General maintenance
To avoid damage or malfunction:
- Do not expose to excessive heat caused by heating equipment or direct sunlight.
- Do not drop your player or allow objects to fall on your player.
- Do not allow your player to be submersed in water. Do not expose earphone socket or
battery compartment to water as water entering the set may cause major damage.
- Do not use any cleaning agents containing alcohol, ammonia, benzene, or abrasives as
these may harm the set.
- Active mobile phones in the vicinity may cause interference.
- Backup your files. Please ensure that you retain the original files that you have downloaded
to your device. Philips is not responsible for any loss of content if the product becomes
damaged or not readable / legible.
- Manage (transfer, delete, etc.) your files only through included music software to avoid
problems!
About operating and storage temperatures
- Operate in a place where the temperature is always between 0 and 35
o
C (32 to 95oF).
- Store in a place where the temperature is always between -20 and 45
o
C (-4 to 113oF).
- Battery life may shorten in low temperature conditions.
Take care when using headphones
Hearing safety
Listen at a moderate volume. Using headphones at high volume can impair your hearing. We recommend
headphone no. SHJ025 for this product.
Important (for models with bypacked headphones):
Philips guarantees compliance with the maximum sound power of its audio players as determined by
relevant regulatory bodies only with the original model of provided headphones. In case this one
needs replacement, we recommend that you contact your retailer to order a model identical to that of
the original provided by Philips.
Traffic safety
Do not use headphones while driving or cycling as you may cause an accident.
Page 22
19
Copyright information
- All other brand and product names are trademarks of their respective companies
or organizations.
- Unauthorized duplication of any recordings downloaded from the internet or made from
audio CDs is a violation of copyright laws and international treaties.
- The making of unauthorized copies of copy-protected material, including computer programmes, files,
broadcasts and sound recordings, may be an infringement of copyrights and constitute a criminal
offence.This equipment should not be used for such purposes.
Environmental information
We have reduced the packaging to its minimum and made it easy to separate into materials: cardboard,
PS, PE, PET.
Your set consists of material which can be recycled if disassembled by a specialized company
Please observe the local regulations to dispose of packaging, exhausted batteries and old
equipment.
Disposal of your old product
Your product is designed and manufactured with high quality materials and components,
which can be recycled and reused.
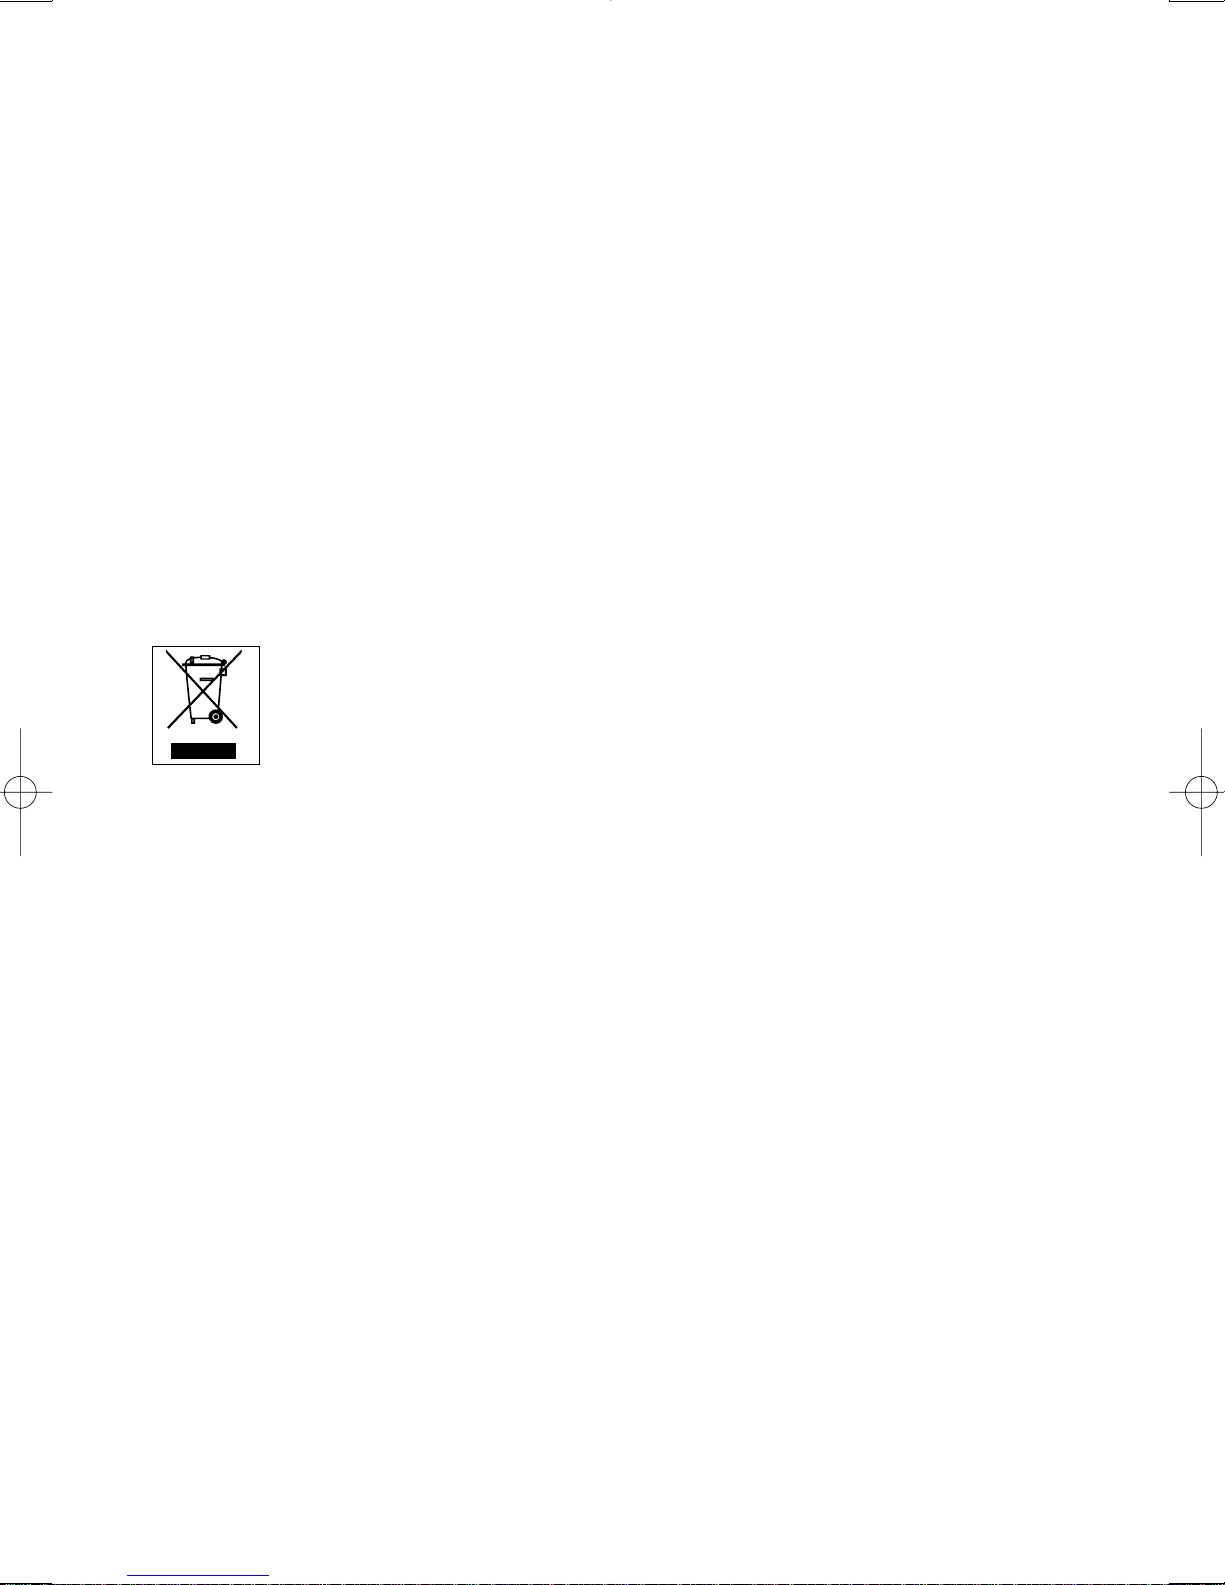
When this crossed-out wheeled bin symbol is attached to a product it means the
product is covered by the European Directive 2002/96/EC.
Please inform yourself about the local separate collection system for electrical and
electronic products.
Please act according to your local rules and do not dispose of your old products with your normal household waste. The correct disposal of your old product will help
prevent potential negative consequences for the environment and human health.
Modifications
Modifications not authorized by the manufacturer may void user authority to operate this device.
Page 23

20
Notice for the USA
Note:
This equipment has been tested and found to comply with the limits for a Class B digital device, pursuant
to part 15 of the FCC Rules.These limits are designed to provide reasonable protection against harmful
interference in a residential installation.This equipment generates, uses, and can radiate radio frequency
energy and, if not installed and used in accordance with the instruction manual, may cause harmful
interference to radio communications.
However, there is no guarantee that interference will not occur in a particular installation.
If this equipment does cause harmful interference to radio or television reception, which can be
determined by turning the equipment off and on, the user is encouraged to try to correct the interference
by one or more of the following measures:
- Relocate the receiving antenna.
- Increase the separation between the equipment and receiver.
- Connect the equipment into an outlet on a circuit different from that to which the receiver
is connected.
- Consult the dealer or an experienced radio/ TV technician for help.
Notice for Canada
This Class B digital apparaatus complies with Canadian ICES-003.
The set complies with the FCC-Rules, Part 15 and with 21 CFR 1040.10.
Operation is subject to the following two conditions:
1. This device may not cause harmful interference, and
2.This device must accept any interference received, including interference that may cause
undesired operation.
Notice for the European Union
This product complies with the radio interference requirements of the European Union.
Philips
PSA610
PSA612
PSA615
Philips
PSA225
PSA235
PSA245
Page 24

Technical Data
Power supply 610 mAh Li-ion internal rechargeable battery
Multi-voltage charger / adaptor: 4 hours full charge; 1 hour fast charge
Rechargeable batteries have a limited number of charge cycles and
may eventually need to be replaced. Battery life and number of charge
cycles vary by use and settings
Picture / Display Blue backlight LCD, 96 x 64 pixels
Sound Bass enhancement Digital Bass boost
Channel separation 50 dB
Equalizer customizable
Equalizer settings Rock / R&B / Electronica / Hip Hop /
Classical / Jazz
Frequency response 30-18 000 Hz
Signal to noise ratio >80 dB
Output Power (RMS) 2 x 4 mW
Audio Playback
Compression format MP3
(8-320 kbps and VBR; Sample rate: 8, 11.025, 16, 22.050, 24, 32, 44.1,
48 kHz)
WMA (5-192 kbps)
DRM WMDRM
ID3-tag support Album title and artist name
Storage Media
Built-in memory capacity PSA610 3 GB* micro hdd
PSA612 4 GB* micro hdd
PSA615 6 GB* micro hdd
Tuner / Reception / Transmission Auto store / Tuner band: FM***
***FM radio is only available to some regional versions. FM radio is
currently not available in Europe.
Connectivity Headphone 3.5 mm, USB
Music transfer via Windows Media Player 10
Data transfer via Windows Explorer (note: Windows XP users only - music
transferred via Windows Explorer to "media" folder will playback)
System Requirements Windows XP(SP1 or above)
Internet connection
Microsoft Internet Explorer 6.0 or later
USB port
This product is protected by certain intellectual property rights of Microsoft Corporation. Use or distribution
of such technology outside this product is prohibited without a license from Microsoft or an authorized
Microsoft subsidiary.
Content providers are using the digital rights management technology for Windows Media contained in this
device ("WM-DRM") to protect the integrity of their content ("Secure Content") so that their intellectual
property, inlcuding copyright, in such content is not misappropriated.This device uses WM-DRM software to
playe Secure Content ("WM-DRM Software"). If the security of the WM-DRM Software in this device has been
compromised, owners of Secure Content ("Secure Content Owners") may request that Microsoft revoke the
WM-DRM Software's right to acquire new licenses to copy, display and/or play Secure Content. Revocation
does not alter the WM-DRM Software's ability to play unprotected content. A list of revoked WM-DRM
Software is sent to your device whenever you download a license for Secure Content from the Internet or
from a PC. Microsoft may, in conjunction with such licences, also download revocations lists onto your device
on behalf of Secure Content Owners.
Philips reserves the right to make design and specification changes for product improvement without prior notice.
*Note that some operating systems display capacity in units of “GB”where 1.0 GB = 2
30
= 1,073,741,834 bytes.
1 GB=1 billion bytes; actual formatted capacity less.
21
Page 25
22
About Windows Media Player
With Windows Media Player you can easily manage your digital music collection and transfer music to
your device.
M
Install Windows Media Player and Device Manager
Insert the supplied CD into your computer's’s CD-ROM drive.
1
Follow screen instructions to begin and complete installation.
2
Install Windows Media Player.
3
Fill in necessary information when prompted to do so.
4
About Philips Device Manager
With Philips Device Manager, you can update and repair your device
with a few simple clicks.
Note:
Music that has not been transferred to your device using Windows Media Player can
not be played on your device.
Page 26
23
Windows Media Player 10
Connect your device to your computer using the supplied USB cable.
The USB connection screen will automatically appear.
1
Launch Windows Media Player.
2
TIP
Please refer to your computer’s manual for the exact position of your USB port.
Look for the USB symbol on the processing unit of your computer.
✔
Page 27
24
*Actual display varies with use.
Search and add tracks to the Library
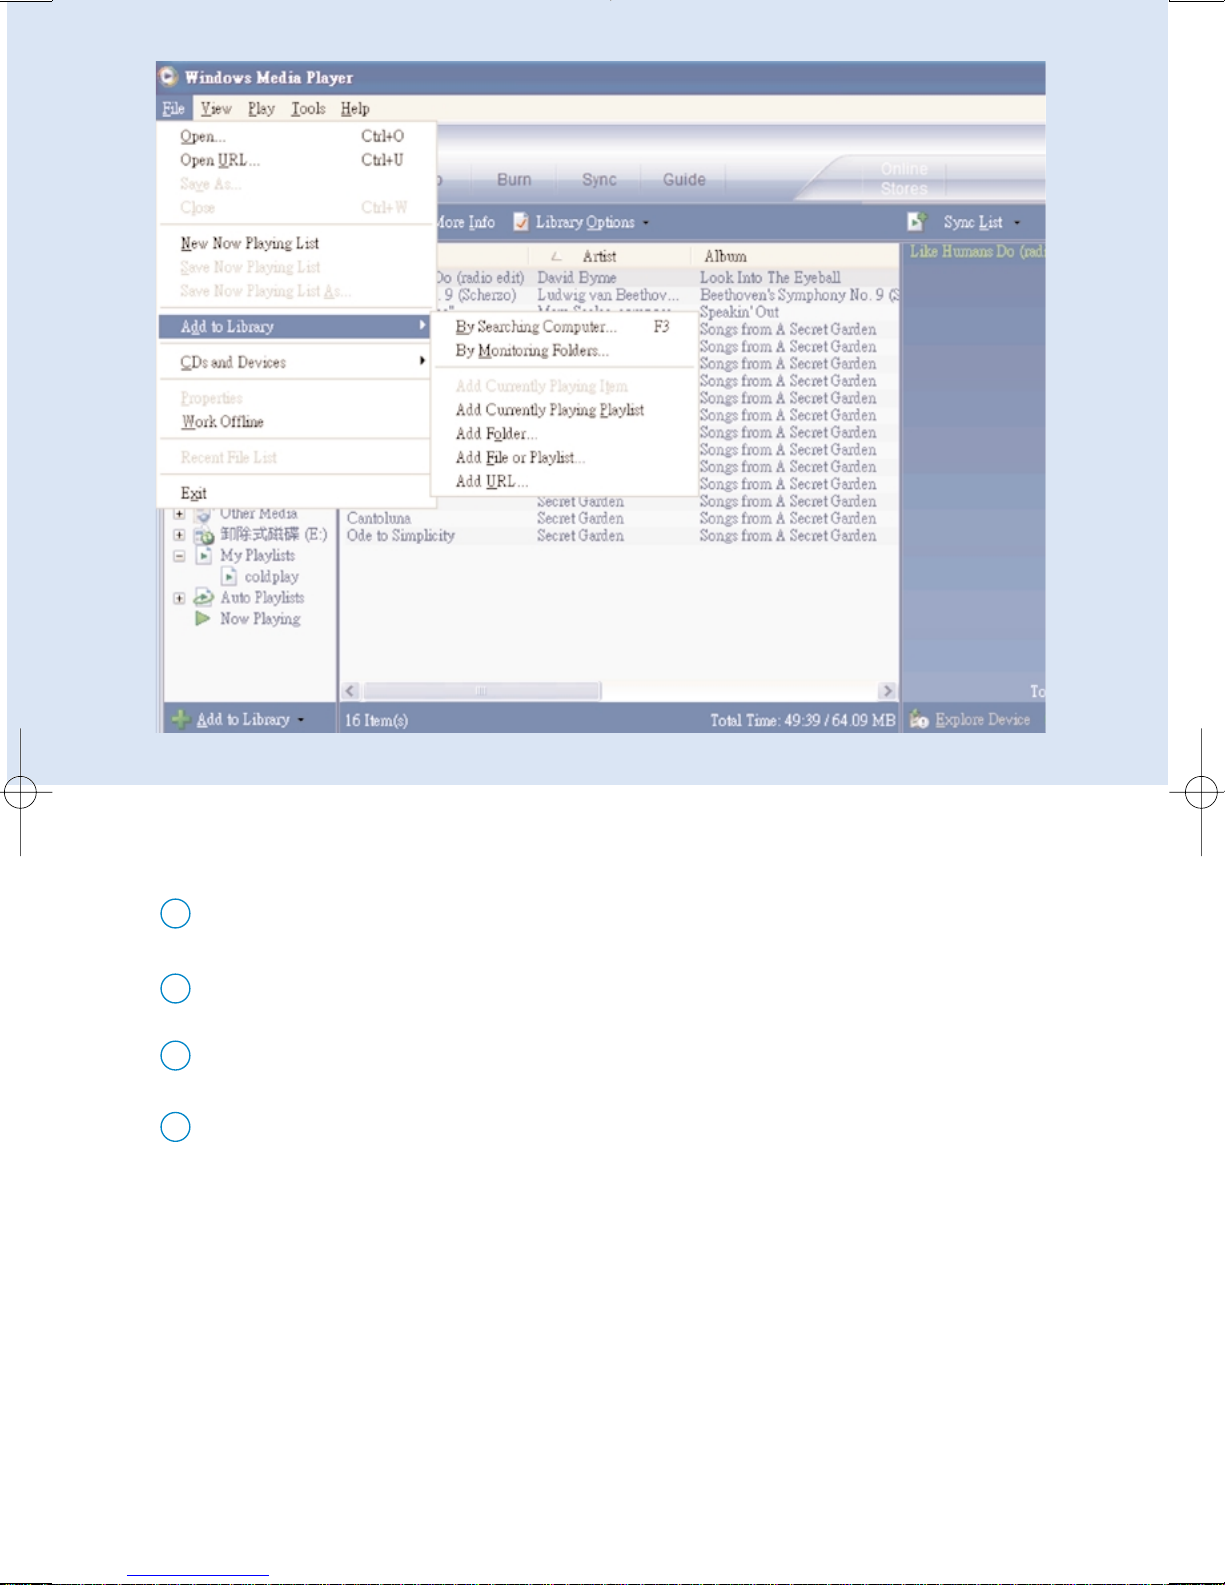
Go to File menu. Click Add to Library > By Searching Computer.
1
Click Browse in the dialog box to point to the folder you want to add to.
2
Complete the information in the dialog box, and then click Search.
3
Files will be added to the Library.
4
Page 28
25
Transfer tracks to your device
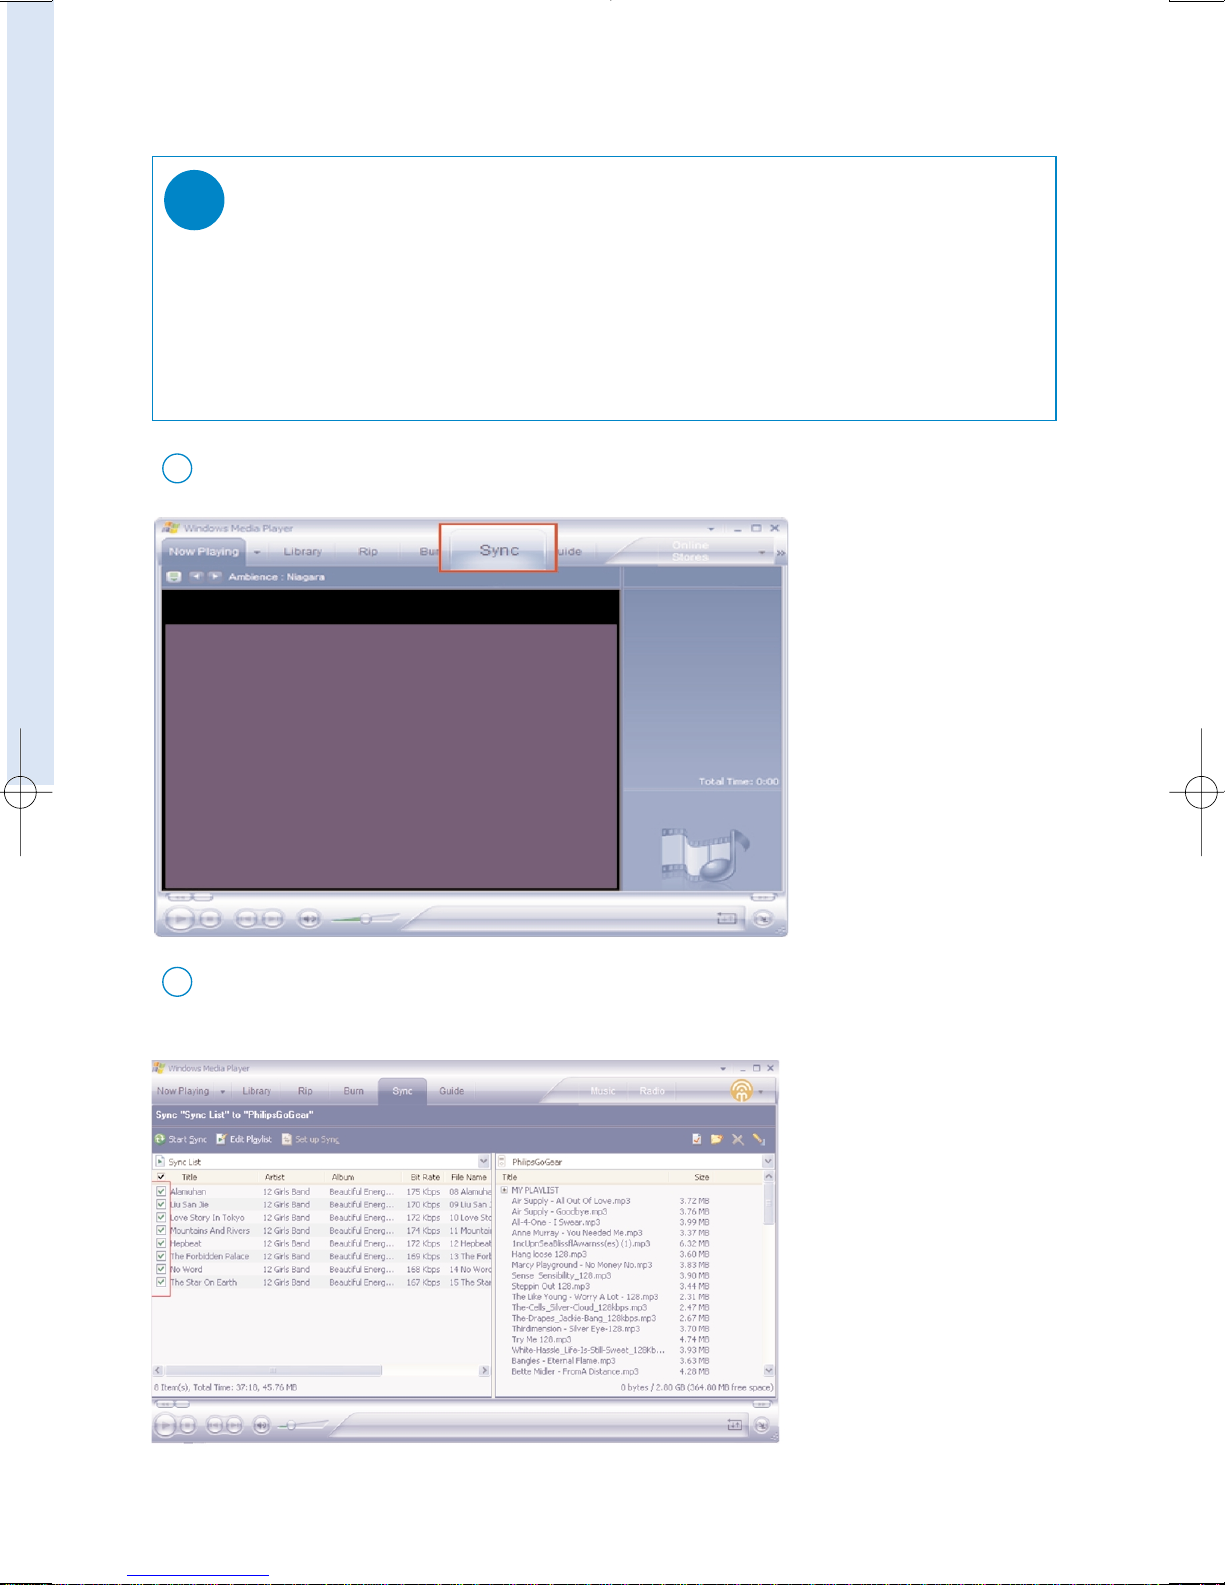
Click on Sync.
1
In the Items to Copy pane, show the playlist, category, or other items that you want to copy that
you want to copy. Clear the check boxes next to any files you do not want to copy.
2
TIP
Simply connect your device to your computer, choose the synchronization
method you want, and you're ready to synchronize your library to your device.
Choose a synchronization method:
Automatic. With this option, the Player synchronizes content to the device when you connect
it to your computer or when you change synchronization settings.The Player synchronizes your
entire library if it can fit, or the Player synchronizes your favorite content first.
Manual. With this option, you pick specific files or playlists you want to synchronize each time
you want to make changes to the content on your device.
✔
Page 29
26
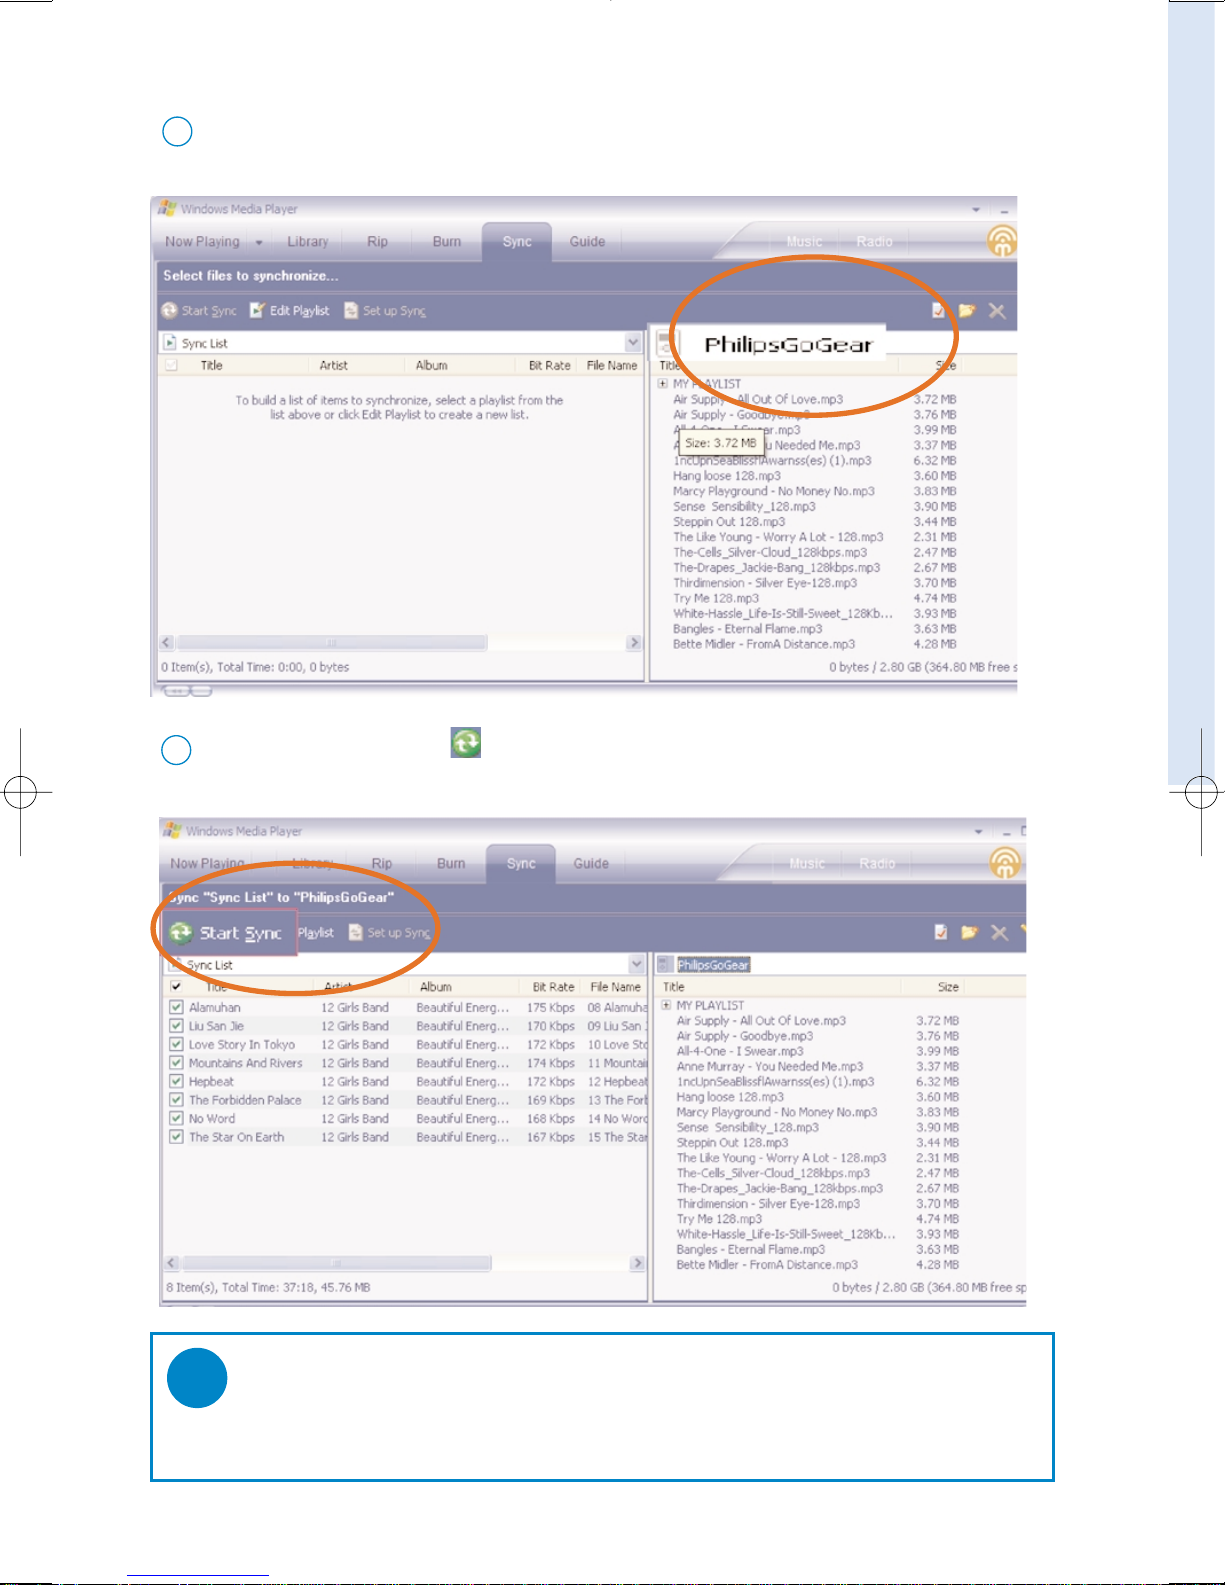
In the Items on Device pane, show the device that you want to copy files to, i.e. GoGear Audio /
Philips GoGear. Clear the check boxes next to any files you do not want to copy.
.
3
Click the Start Sync button
4
TIP
For further details of music transfer on WMP 10, go to the help section of Windows Media
Player and click Help > Synchronizing content to devices.
✔
Page 30
27
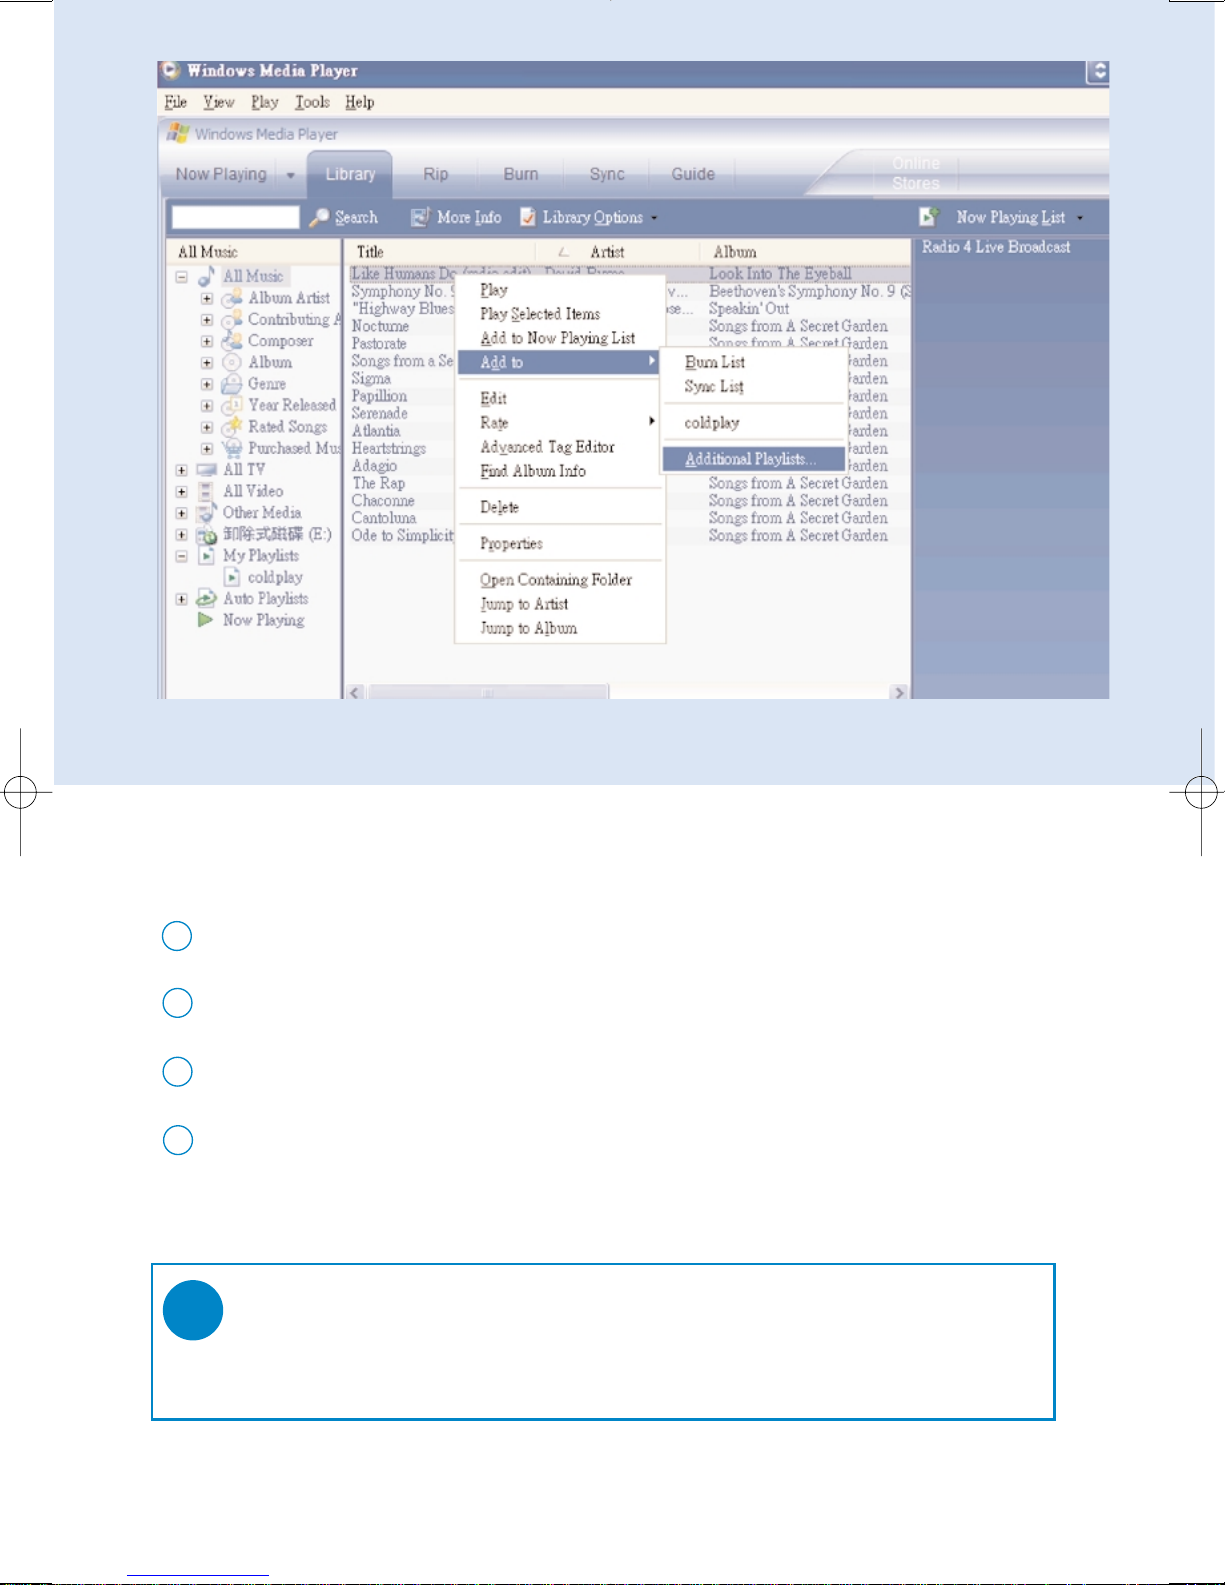
Add Tracks to a Playlist on your PC using WMP
Click to highlight an item.
1
Right click on the item and select Add to > Additional Playlist.
2
From the Add to Playlist pop-up window, select an existing playlist or add new one.
3
TIP
Press and hold <Ctrl> on your keyboard and click to select more than one item.
To select consecutive items, click the first item, press and hold <Shift> on your
keyboard, and then click the last item.
✔
The selection is added to playlist.
4
*Actual display varies with use.
Page 31
28
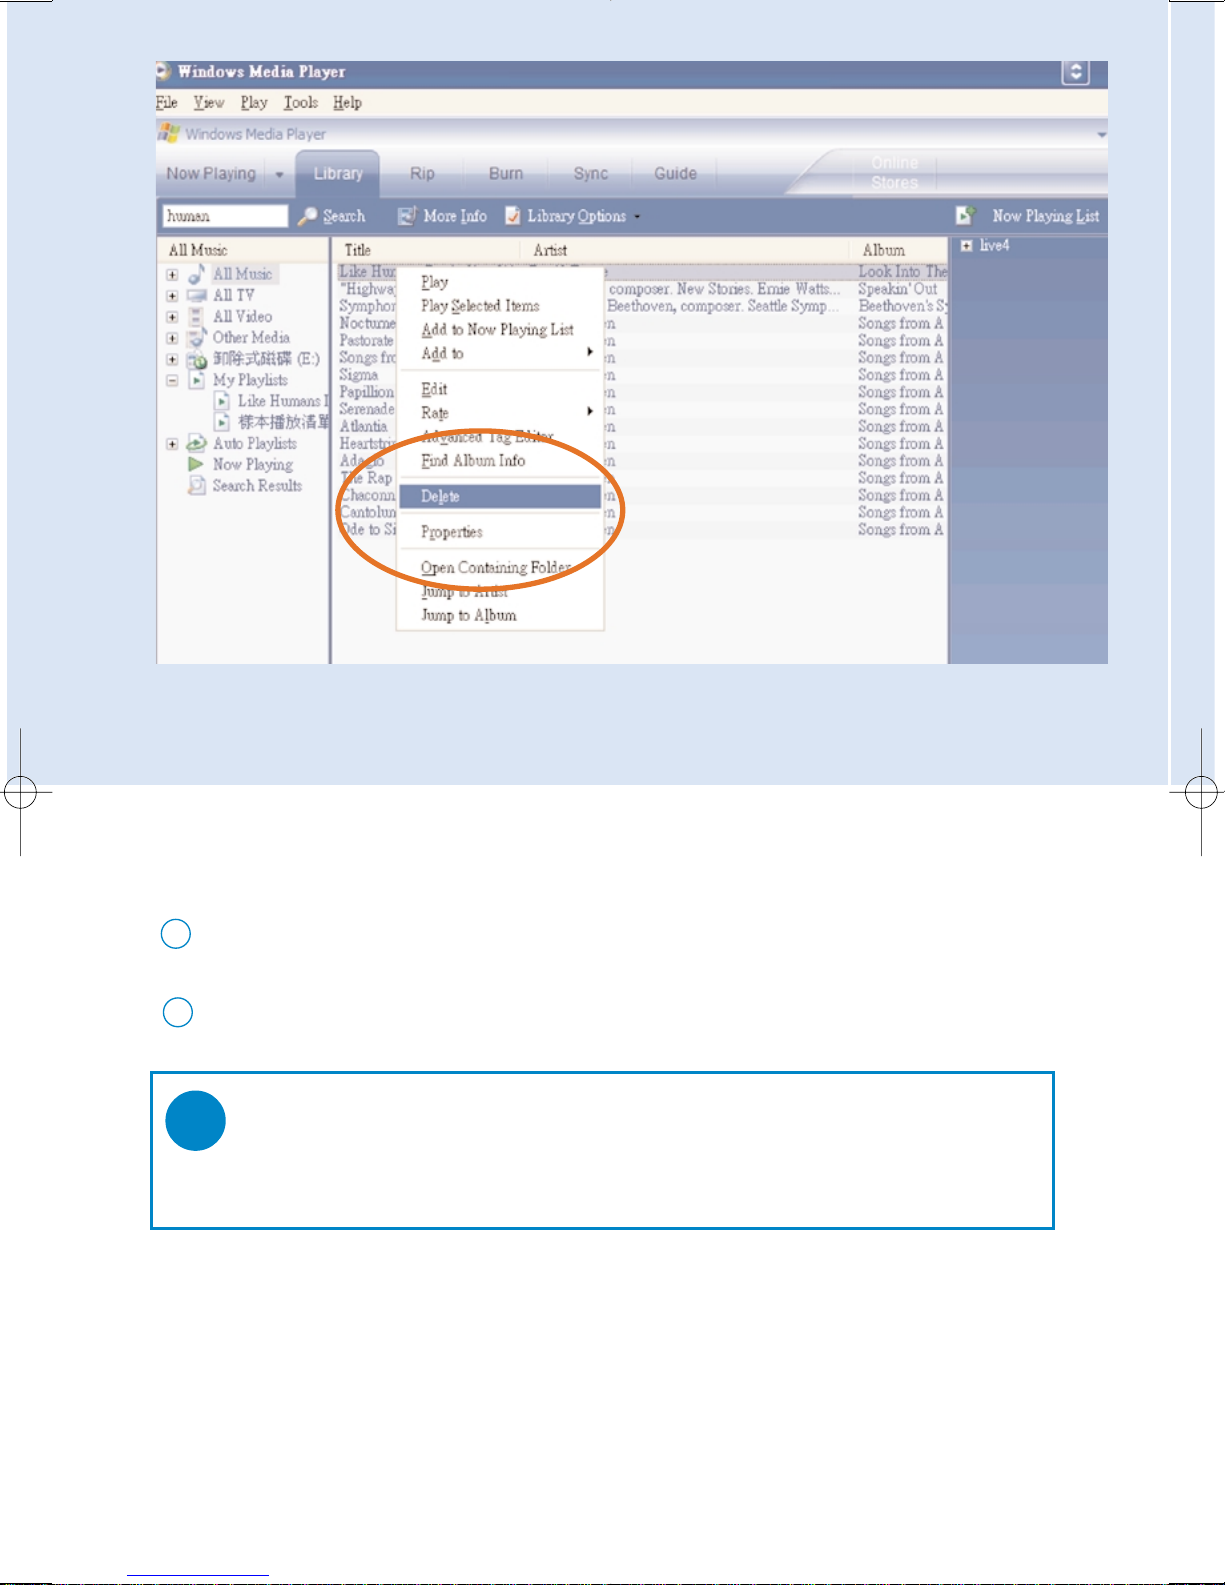
Click to highlight an item.
1
Right click and select Delete to delete.
2
TIP
Press and hold <Ctrl> on your keyboard and click to select more than one item.
To select consecutive items, click the first item, press and hold <Shift> on your
keyboard, and then click the last item.
✔
Delete Tracks and Playlists
*Actual display varies with use.
Page 32
29
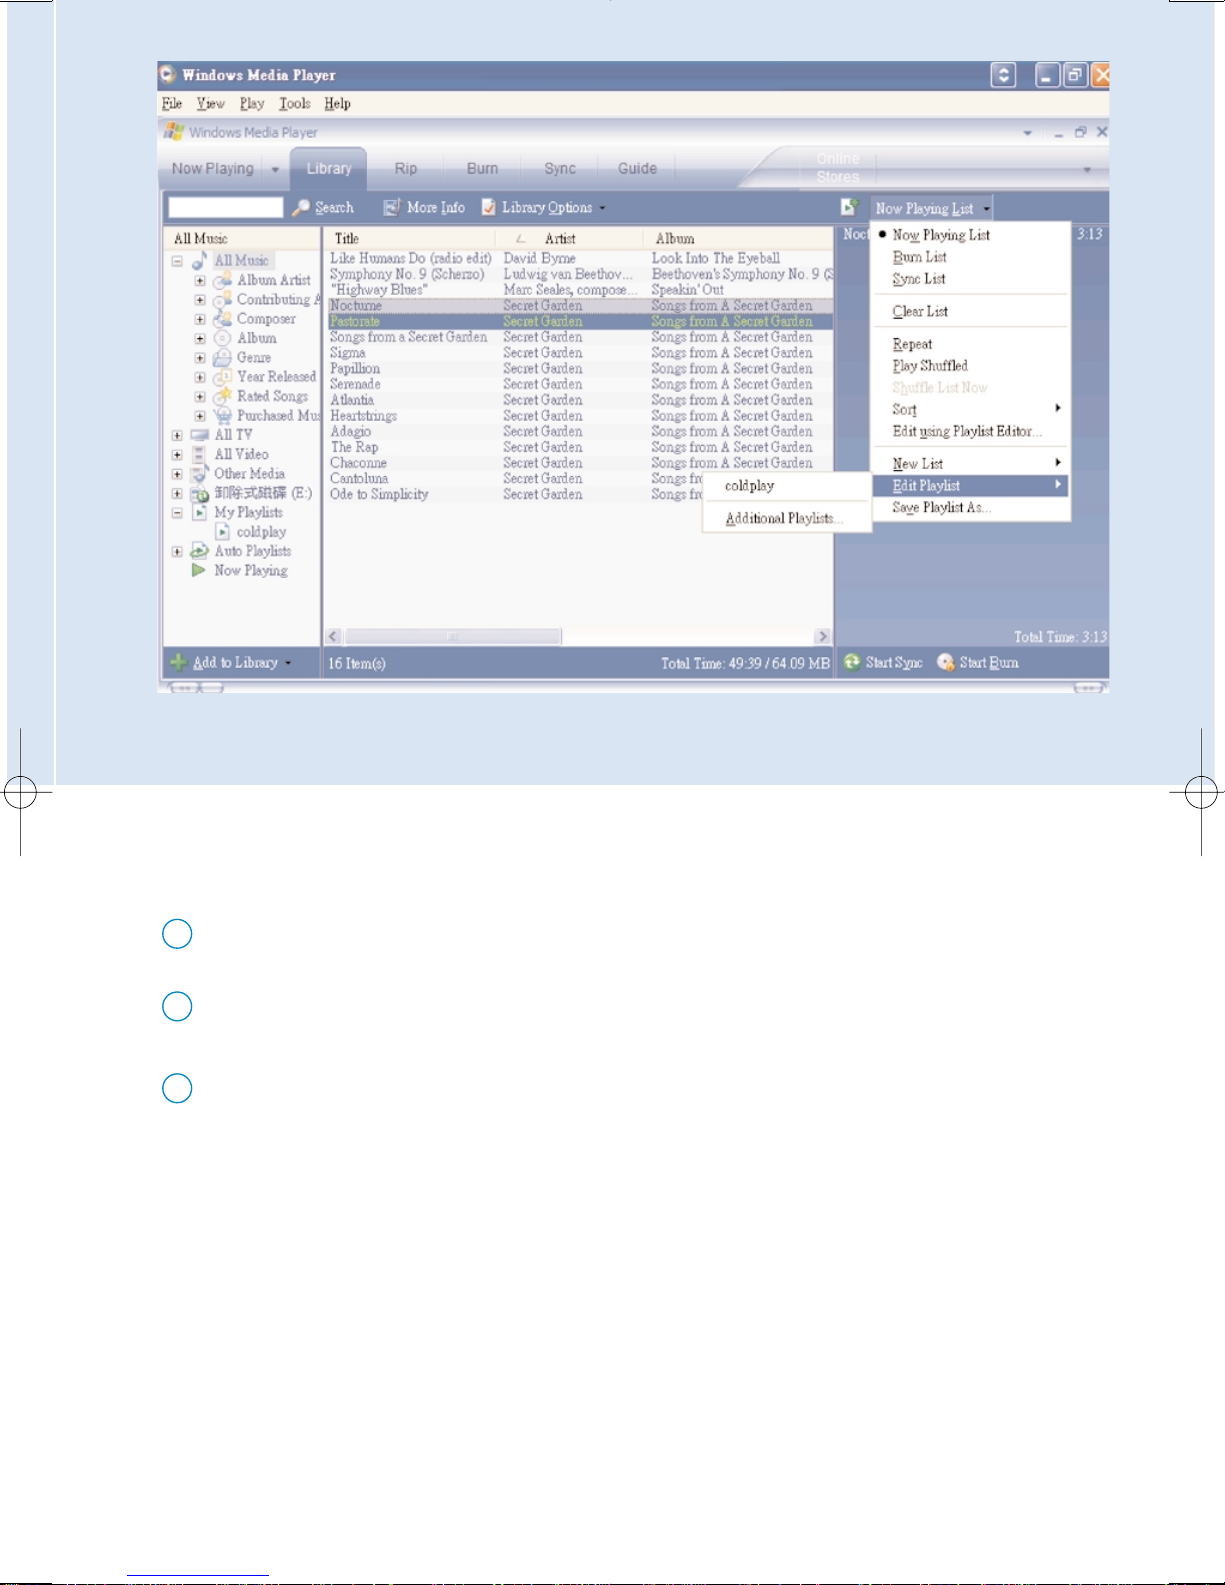
Edit Track Information
Click on a track.
1
Right click and select Edit.
2
Click on the text boxes to edit relevant information.
3
*Actual display varies with use.
Page 33
30
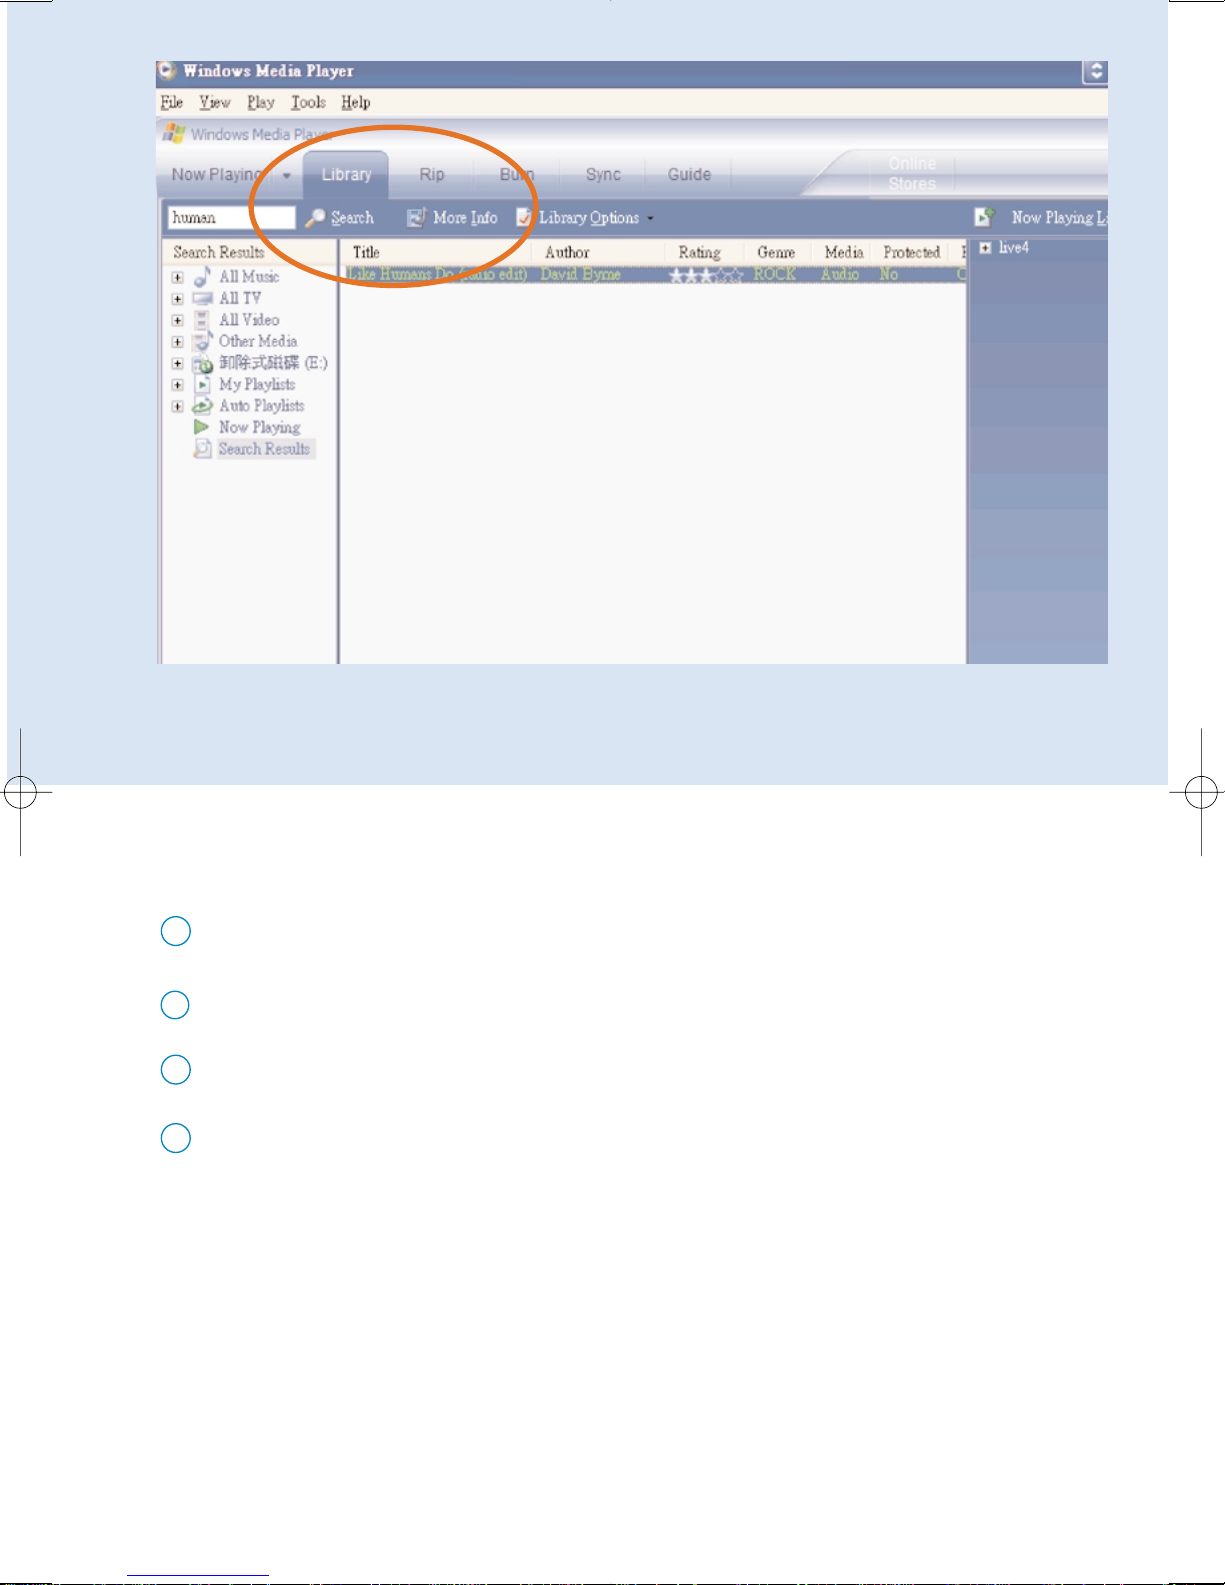
Search for Tracks
Type a search string in the Search field.
1
Click on Search to start searching.
2
You will see tracks that contain the search string.
3
You can play, transfer, delete or add these tracks.
4
*Actual display varies with use.
Page 34
31
Upgrades
We know you will enjoy your product for a long time. For best performance, we recommend that
you regularly check in to www.philips.com for free upgrades of the latest software and firmware for
your product.
Firmware Update
Your device is controlled by an internal program called firmware. You can install the latest firmware from
the bypacked CD and download it from www.philips.com/suppor t to keep your device updated.
Connect your device to your computer (powered by the supplied AC/DC adapter if
applicable).
2
Select your device and click Upgrade, Device Manager will check whether a new firmware is
available and install it on your device.
4
TIP
Please charge your device fully before firmware upgrade. This will ensure steady power
supply for completing the whole process.
✔
In case you have chosen “Cancel”, the firmware present on the PC will be loaded onto the device.
7
Install the latest Philips Device Manager from the bypacked CD. Philips Device Manager will
automatically notify you if any new updates are available.
1
If your:
- internet connection is activated
- your Device Manager has been installed on your PC
- your device is connected and powered on
then your Device manager will pop-up a message if new firmware is available for your device
Launch Device Manager User Interface by right-clicking on this icon in the taskbar
and selecting “Launch Device Manager” or from the Desktop icons or by going to
Start ➔ Programs ➔ Philips Device Manager ➔ or from the desktop.
3
If a new firmware file is available for your device, you will be prompted to download the same.
You can choose “Ye s ” to download the latest firmware or choose “Cancel” to use the existing
firmware file on your PC.
5
The process is complete when the device restarts and displays the power up splash screen.
A success message will be displayed to you.
8
If you have chosen to download the latest firmware, after the download, the Device Manager will
prompt you for permission to load the firmware onto the device. On selecting “Ye s ” the latest
firmware will be loaded into the device.
6
Update and repair with Philips Device Manager
Page 35
32
Device Repair
Your device is controlled by an internal program called firmware. In case your device has a problem,
or you wish to format the device, you may need to repair it.
1 Connect your device to your computer (powered by the supplied AC/DC adapter if
applicable).
2 Launch Device Manager User Interface by right-clicking on this icon in the
taskbar and selecting "Launch Device Manager" or by going to
Start ➔ Programs ➔ Philips Device Manager
3 In the main window, go to the repair tab and click Repair.
4 You will be prompted before repair begins.
TIP
Please charge your device fully before device repair. This will ensure
steady power supply for completing the whole process.
✔
5 Click OK to continue. Click Cancel to stop.
6 The Device Manager will repair your device. Once the repair is complete,
the device can be used again.
Your device will be automatically disconnected as soon as Device Manager finishes interacting
with your device and will get connected back to the PC after the repair is complete.
ATTENTION!
All media contents will be erased!
Page 36
Specifications are subject to change without notice.
Trademarks are the property of Koninklijke Philips Electronics N.V.
or their respective owners
2005 © Koninklijke Philips Electronics N.V. All rights reserved.
www.philips.com
 Loading...