

Philips PSA260/05 User Manual

PPrreeppaarraattiioonnss
IInnssttaallll
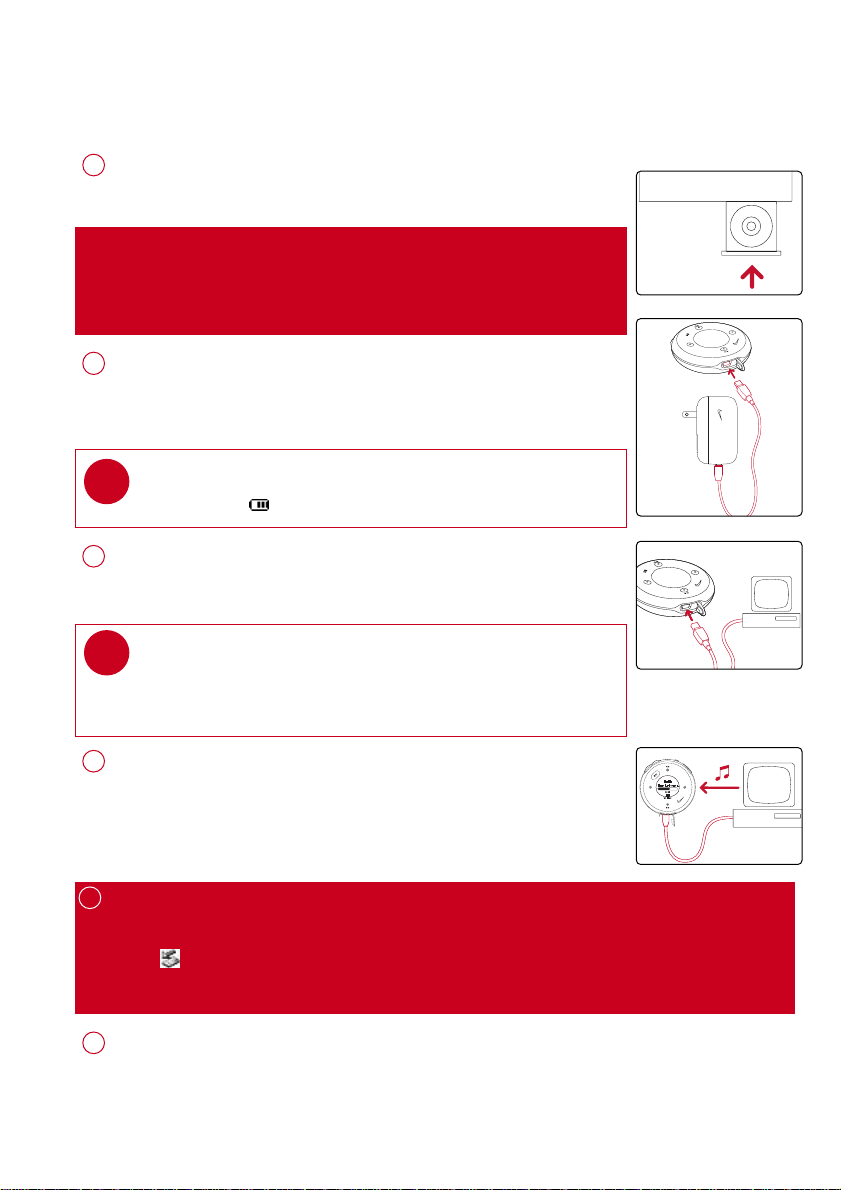
1
Insert the supplied CD into your computer’s CD-ROM drive.
Follow screen instructions to complete installation.
AATTTTEENNTTIIOONN!!
WINDOWS 98SE USERS:
To avoid installation problems,
computer until
CChhaarrggee
2
Open the USB cover. Connect the supplied charger to the USB port
and the main power supply. For extended battery power, please
charge for at least 4 hours for first time use.
TIP
✔
This indicator shows your battery information during charging.
CCoonnnneecctt ppllaayyeerr ttoo ccoommppuutteerr
3
Open the USB cover. Connect your player to your computer using
the supplied USB cable.
TIP
✔
Please refer to your computer’s manual for the exact position of
your USB port. Look for the USB symbol on the processing unit of
your computer.
AAFFTTEERR
DDOO NNOOTT CCOONNNNEECCTT
installation completes.
your player to your
OOrrggaanniizzee aanndd ttrraannssffeerr mmuussiicc vviiaa DDMMMM // MMuussiiccmmaattcchh®®
4
Launch DMM/ Musicmatch® on your PC from Windows desktop
SSttaarrtt
or
menu.
Organize and transfer music files from your computer to your player.
5
UUnnpplluugg ssaaffeellyy
To avoid loss of data, disconnect your player safely.
Exit any active application working with your player.
Click on the task tray.
Remove the USB cable.
PPoowweerr oonn aanndd eennjjooyy!!
6
Press and hold 22;; for 2 seconds to power on if the player does not
power on automatically. Enjoy your new running / music experience!
1
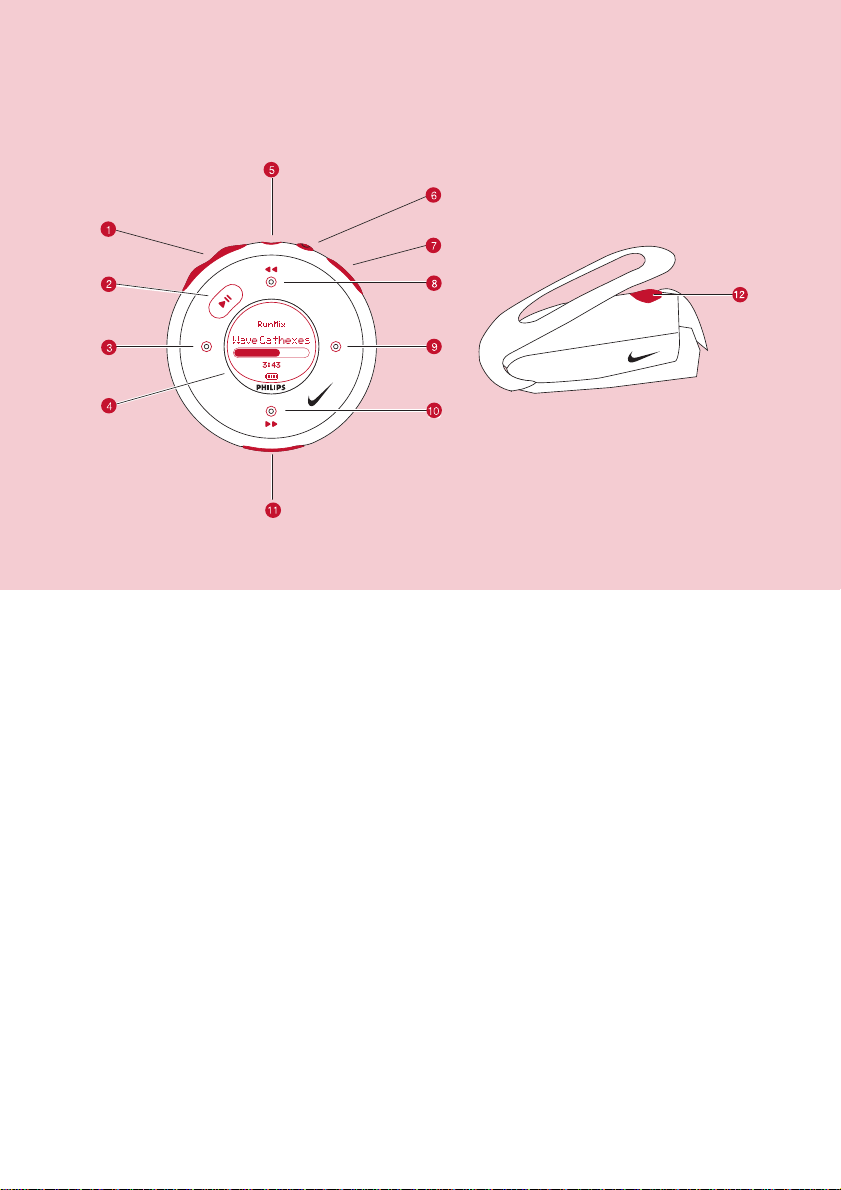
NNaammee ooff PPaarrttss
−− // ++
1
2 22;; Press and hold to power on / off; press briefly to play / pause
3 11 Left
LLCCDD ddiissppllaayy
4
HHeeaaddpphhoonneess jjaacckk
5
RRuunn
6
VVooiiccee ffeeeeddbbaacckk
7
8 33 , 55 Up / Previous / Fast rewind
9 22 Right
0 44 , 66 Down / Next / Fast forward
UUSSBB ppoorrtt //
!
CChhaarrggiinngg ssoocckkeett
SSDDMM
@
Volume control, press −−to decrease; press ++to increase
Dynamically displays menu, options and track information
Connects headphones
Starts / stops recording running activities
Activates running feedback
Open cover to connect to computer / charge your player
Power ON / OFF speed and distance monitor
2

MMeennuu NNaavviiggaattiioonn
1
Press and hold 22;; to power on.
See specific chapters for details of each setting.
2
MMuussiicc
RRuunnnniinngg
RRaaddiioo
SSeettttiinnggss SSttrroobbee lliigghhtt
PPllaayylliissttss
AArrttiissttss
AAllbbuummss
GGeennrreess
AAllll TTrraacckkss
HHiissttoorryy
CCaalliibbrraattiioonn
Preset 1
...
44
Preset 10
Autosearch
SShhuuffffllee && RReeppeeaatt
DDBBBB
EEqquuaalliizzeerr
e.g. Playlist001... PlaylistXXX
e.g. A ... Z
e.g. A ... Z
e.g. A ... Z
e.g. A ... Z
List of Freerun logs by date
MMaannuuaall
AAuuttoommaattiicc
Left
Up
33
11 22
44
Down
Right
BBaacckklliigghhtt
CCoonnttrraasstt
LLaanngguuaaggee
SSyynncchhrroonniizzee
VVooiiccee ffeeeeddbbaacckk
DDiissttaannccee uunniittss
FFaaccttoorryy sseettttiinnggss
3
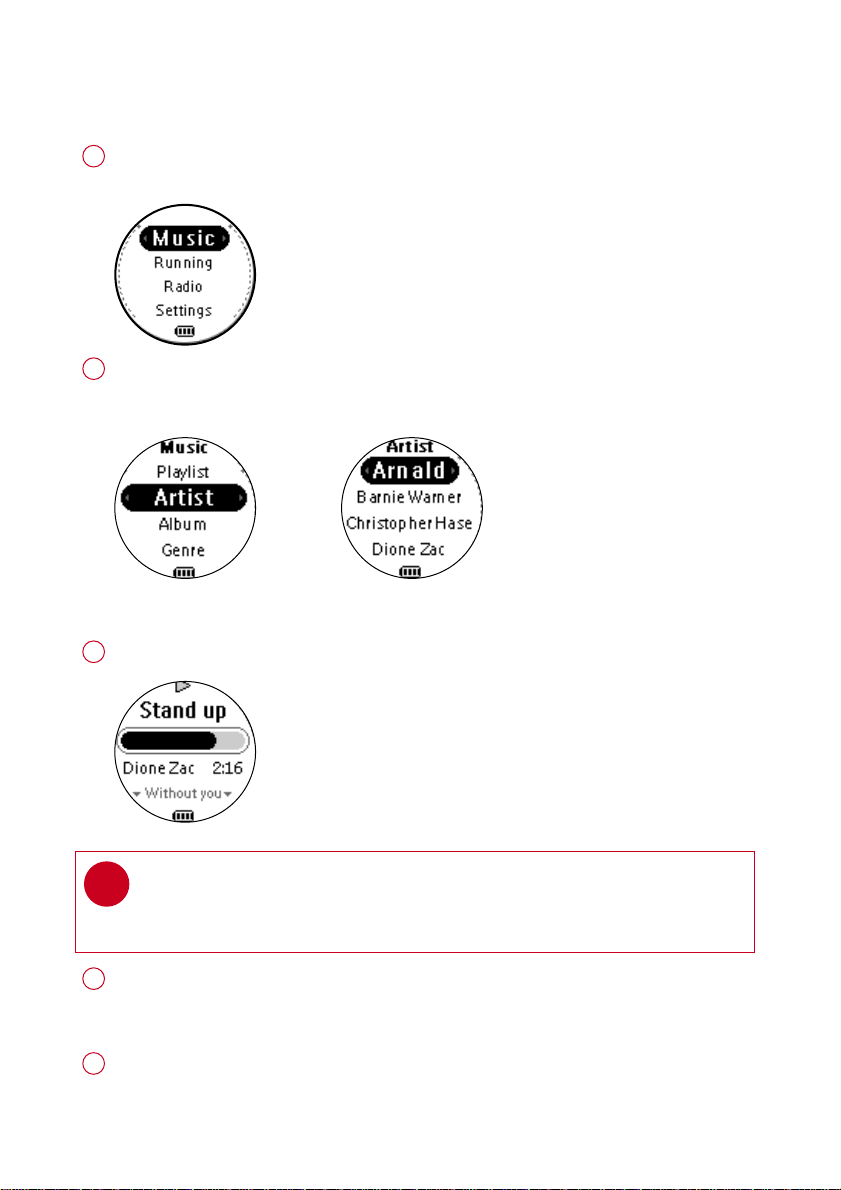
MMuussiicc MMooddee:: BBaassiicc OOppeerraattiioonn
Press and hold 22;; to power on.
1
From the root menu, press 22 to enter the music mode.
Any radio playback will stop as you enter the music mode.
Press 33 to scroll up or 44 to scroll down for your option.
2
Press 22 for next or 11 for previous levels of library.
Press 22;; to play.
Library options Artists list
Press 22;; to pause during playback.
3
Playscreen
TIP
✔
> To display library options during playback, press 11 .
> To display the root menu, press and hold 11 .
Press 33 , 33 for the previous or 44, for the next track.
4
Press 33 to play the same track again.
Press and hold 44 to fast forward or 33 to rewind in a track during playback.
Press and hold 22;; to power off. Your player will save your current
5
music playback status and resume next time you power on.
*Actual display varies with use
4
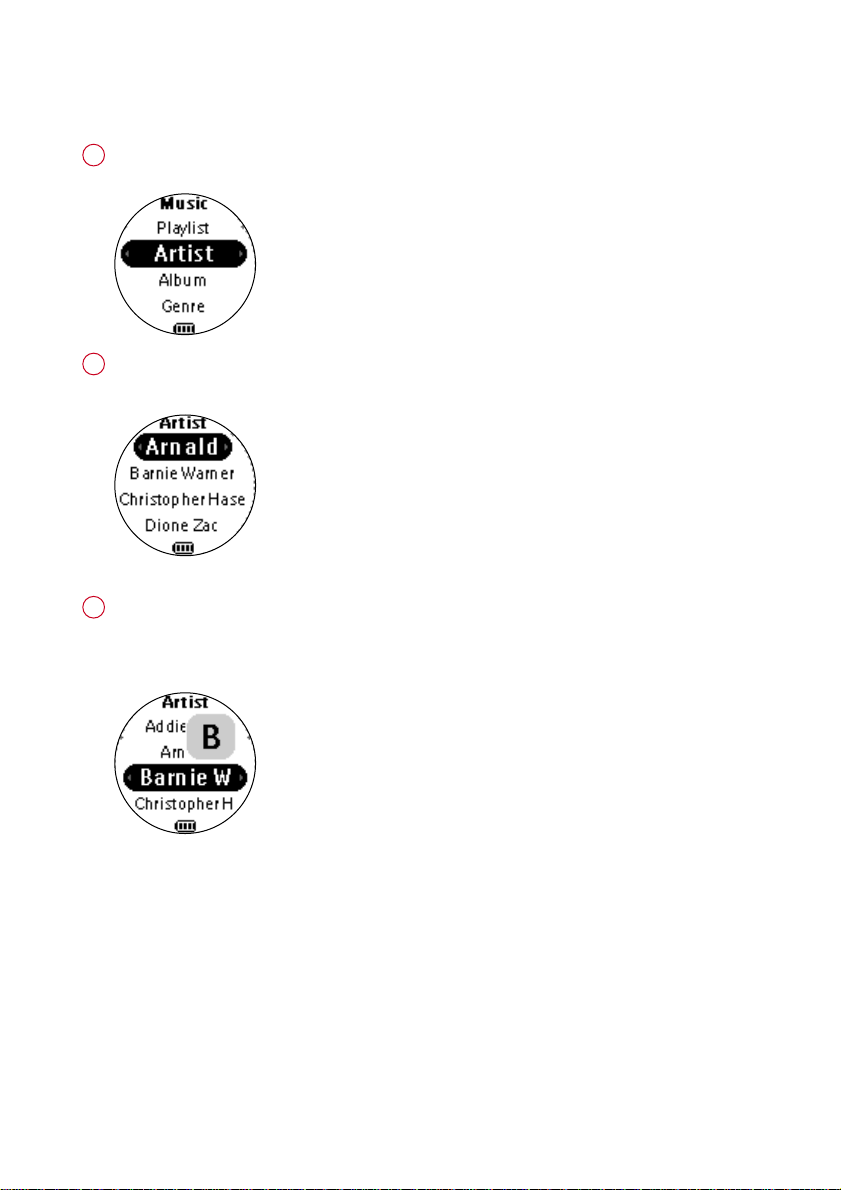
MMuussiicc MMooddee:: LLiibbrraarryy OOppttiioonnss aanndd FFaasstt SSccrroolllliinngg
1
Press 33 to scroll up or 44 to scroll down for your library option.
Press 22 on
Press 22 for the next or 11 for the previous level of library.
2
Artists list in alphabetical order
3
Press and hold 44 for 2 seconds to scroll down quickly.
Press and hold 33 for 2 seconds to scroll up quickly.
Release button to stop scrolling.
Browsing tracks quickly.
AArrttiisstt
to display the artist library
*Actual display varies with use
5
IInnssttaalllliinngg tthhee ssppeeeedd aanndd ddiissttaannccee mmoonniittoorr
TBD
2 SEC
1
✔
2
3
4
Use an appropriately-sized coin to twist
monitor battery door. Insert an AAA alkaline battery (with positive in first).
Replace the battery door, pressing fully in and twist
secure the closing.
TIP
Batteries contain chemical substances, so they should be disposed of
properly.
Incorrect use of batteries can cause the electrolyte leakage and will
corrode the compartment or cuase the batteries to burst.
Remove the batteries if the set is not to be used for a long time.
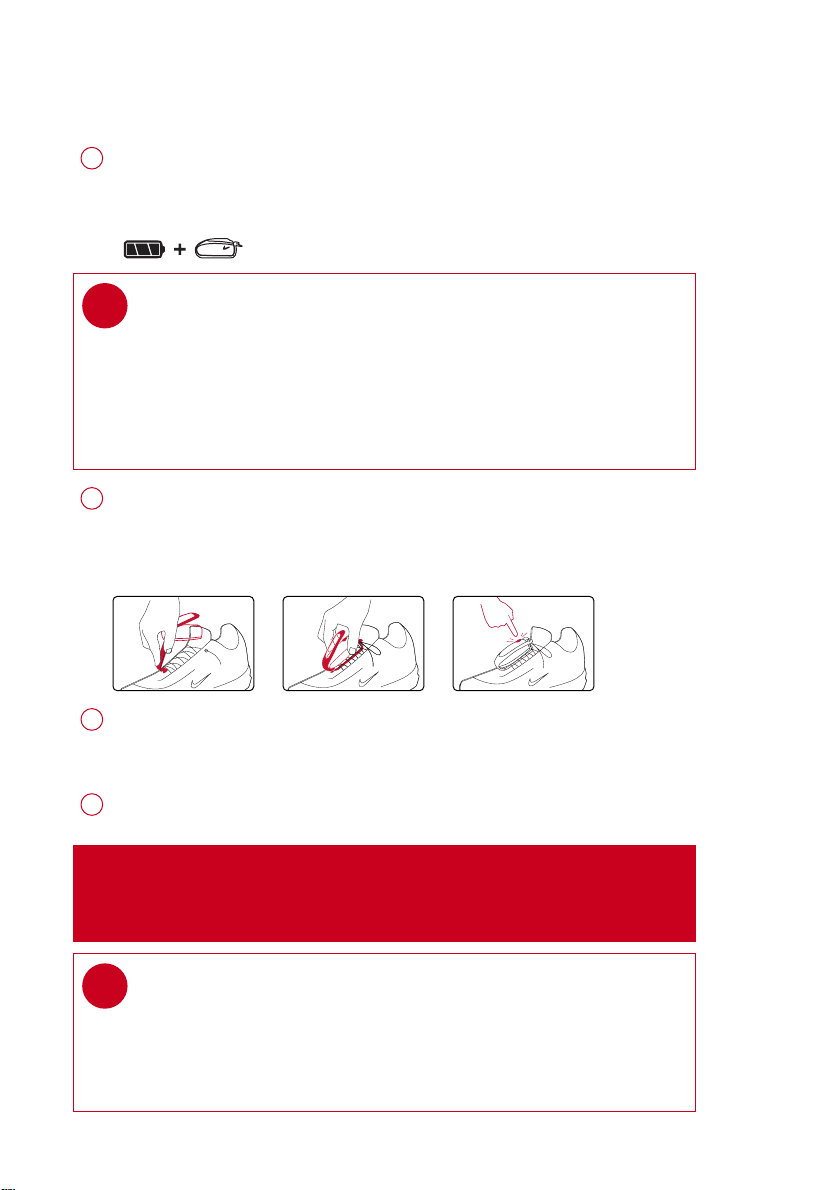
Unhook the rubber strap and detach the clip. Loosen shoelaces and slide
monitor clip under laces. Secure the monitor to your running shoe.
The monitor should rest just below where laces tie and be secure enough to
stay in place during running.
Press and hold 22;; for 2 seconds to power on your player.
SSDDMM
Press
The monitor is now ready to record your running activities.
After running is completed, terminate the logging (see page 11).
Press and hold
for 2 seconds to power on the monitor. Your monitor will blink .
SSDDMM
for 2 seconds to power off your monitor after use.
cclloocckkwwiissee
to open the speed
aannttii--cclloocckkwwiissee
to
AATTTTEENNTTIIOONN
(especially users of pacemakers or other implanted devices) should
consult a physician or health professional before using the
✔
: Anyone beginning an exercise regimen for the first time
MMPP33
RUN.
TIP
> Your SDM automatically shutdown when there is no connection with
your player for 10 minutes or no activity is detected for 30 minutes.
SSDDMM
Press
> Replace the battery when your monitor blinks rapidly (usually after 50 hrs
for a high quality alkaline battery).
for 2 seconds to power on the monitor again.
6
6 SEC
SSyynncchhrroonniizziinngg ppllaayyeerr wwiitthh
ssppeeeedd aanndd ddiissttaannccee mmoonniittoorr
Please synchronize your player with the speed and distance monitor if:
> you have bought a new speed and distance monitor; or
> you cannot establish connection between your player and the speed and distance monitor
even when a new alkaline battery is inserted
Press and hold 22;; for 2 seconds to power on your player.
1
From the root menu, press 44, 44, 44, 22 to enter the settings mode.
2
3
SSYYNNCCHHRROONNIIZZEE
Select
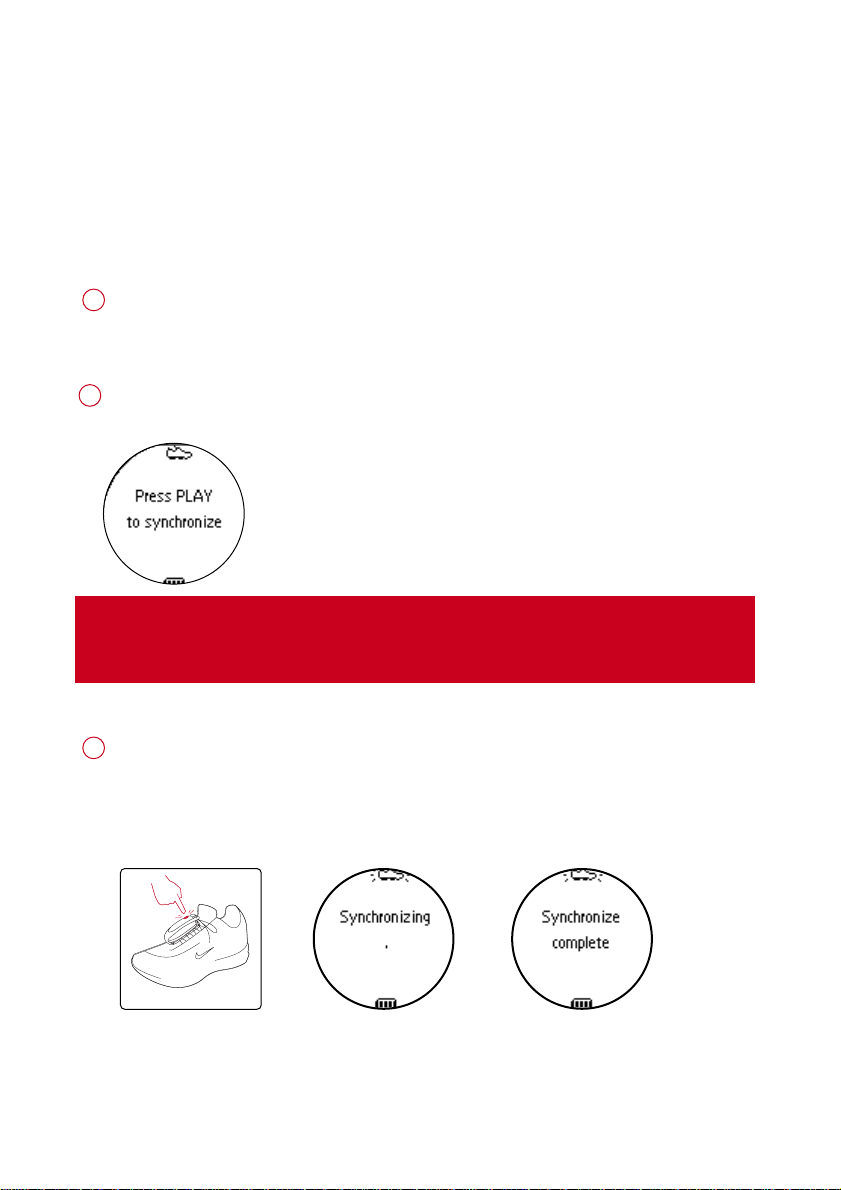
IIMMPPOORRTTAANNTT!!
Your player will link with the first monitor which gives out signals.
Make sure there is no activated sensors within 15 meters.
Press and hold
The speed and distance monitor light will blink rapidly (x3).
Wait for the player screen to display
Your player is now synchronized with your monitor.
and press 22 . Press 22 ;; to start synchronization when prompted.
SSDDMM
on your monitor for 6 seconds.
SSyynncchhrroonniizzee ccoommpplleettee
.
*Actual display varies with use
7
RRuunnnniinngg mmooddee:: AAuuttoommaattiicc ccaalliibbrraattiioonn
Your speed and distance monitor provides unprecedented accuracy right out of the box.
In addition, an optional calibration procedure can be performed to guarantee optimal accuracy
for a specific user, which will correct for individual stride variations such as pronation or supination. Calibration can be performed either automatically or manually.
Press and hold 22;; to power on.
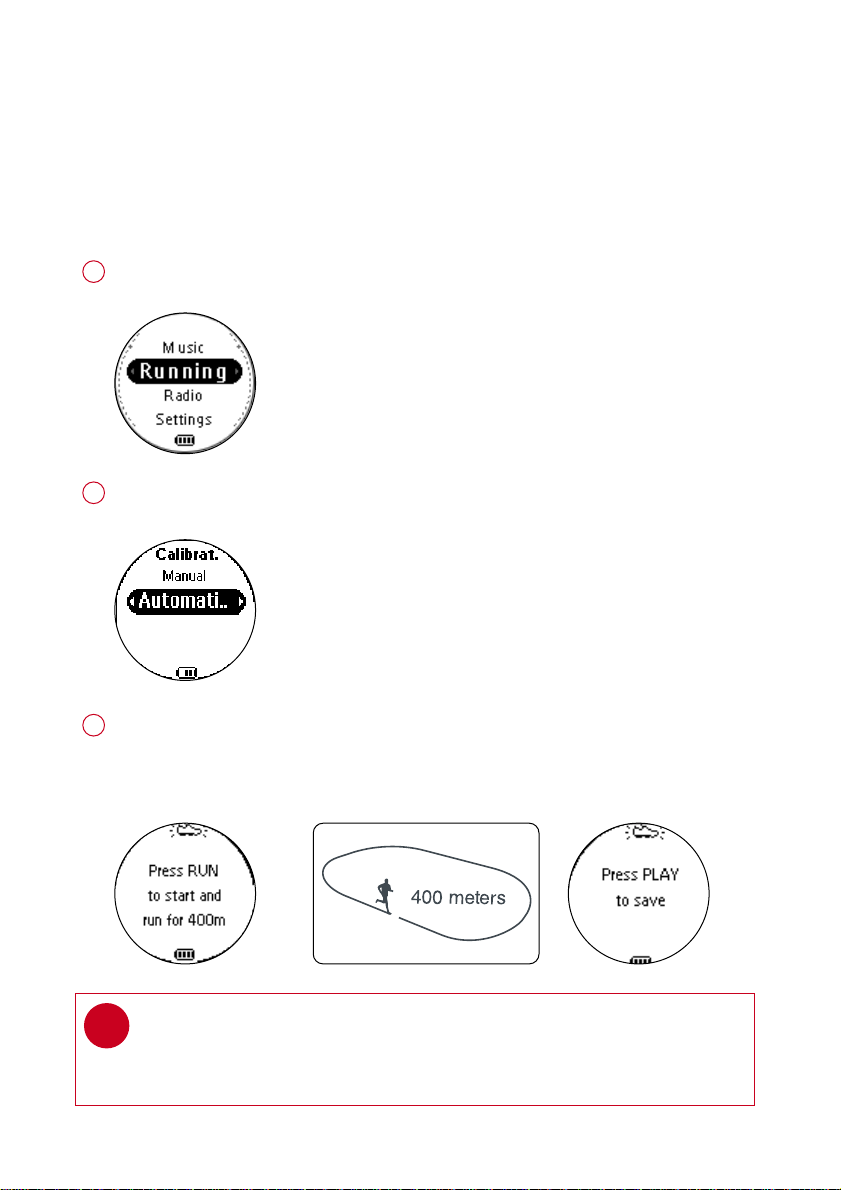
1
From the root menu, press 44 , 22 to enter the running mode.
2
To calibrate the speed and distance monitor, select CALIBRATION > AUTOMATIC.
3
Press RUN and start running 400 metres on the inner lane of a marked track as prompted.
Press RUN again when you have completed your track.
22 ;;
Press
✔
*Actual display varies with use
to save the calibration value.
TIP
If you want to stop the calibration during running, press 11 to
discard the calibration value.
8
RRuunnnniinngg mmooddee:: MMaannuuaall ccaalliibbrraattiioonn
To optimize SDM performance for different running style, you can manually
calibrate the SDM.
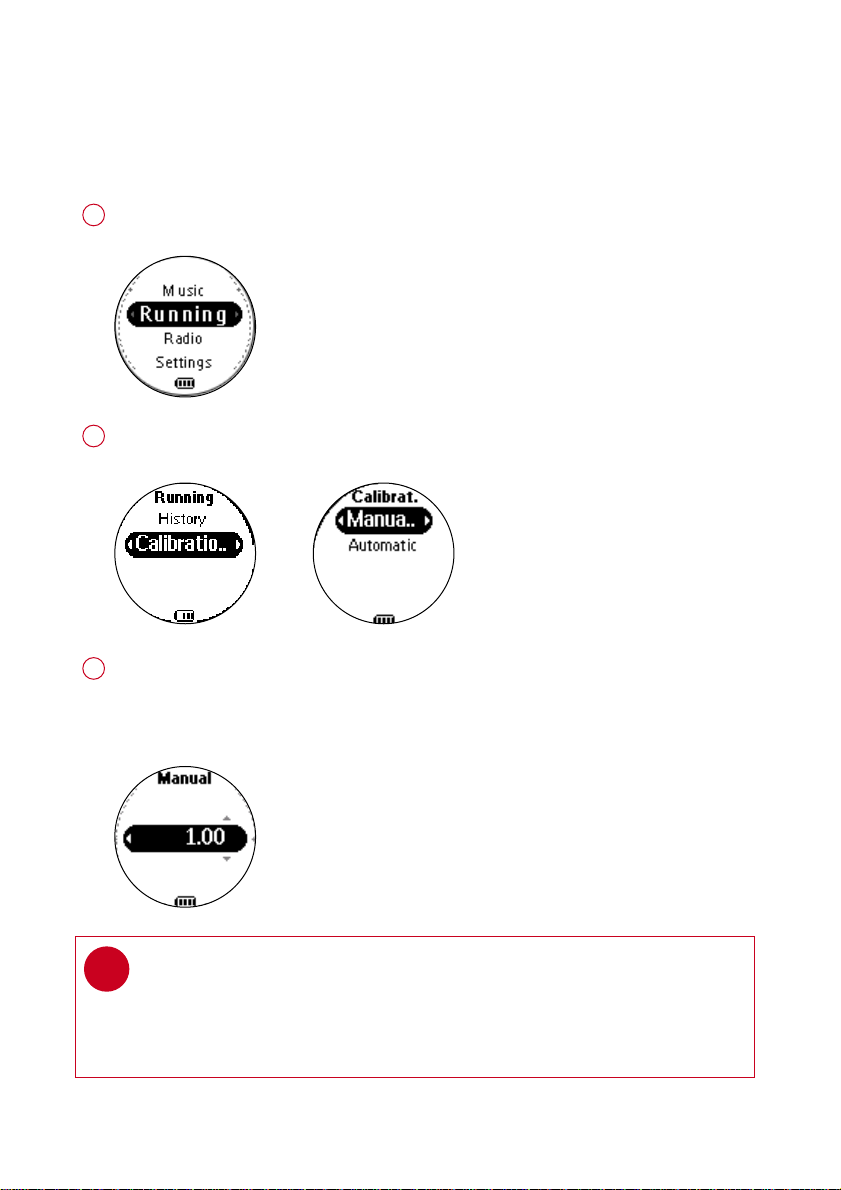
Press and hold 22;; to power on.
1
From the root menu, press 44 , 22 to enter the running mode.
2
To calibrate the speed and distance monitor, select CALIBRATION > MANUAL.
3
Press 33 or 44 to select calibration offset (from 0.50 to 1.50). Change the offset value
to make small adjustments. If the monitor is under-measuring a known distance,
increase the offset value. Different shoe models may affect the monitor’s calibration.
Adjust the offset value accordingly if you notice differences between shoes.
TIP
✔
> If you run 400m and the monitor returns a reading of 380m (5% under), you
should adjust the offset value to 1.05.
> Write down and keep your offset value. It will come in handy if your friends
borrow your MP3RUN and they change your calibration setting.
*Actual display varies with use
9
LLooggggiinngg yyoouurr rruunnnniinngg aaccttiivviittiieess
To keep your workout log synchronized with summer / winter timing, please connect
your player to your computer and start DMM before logging your running activities.
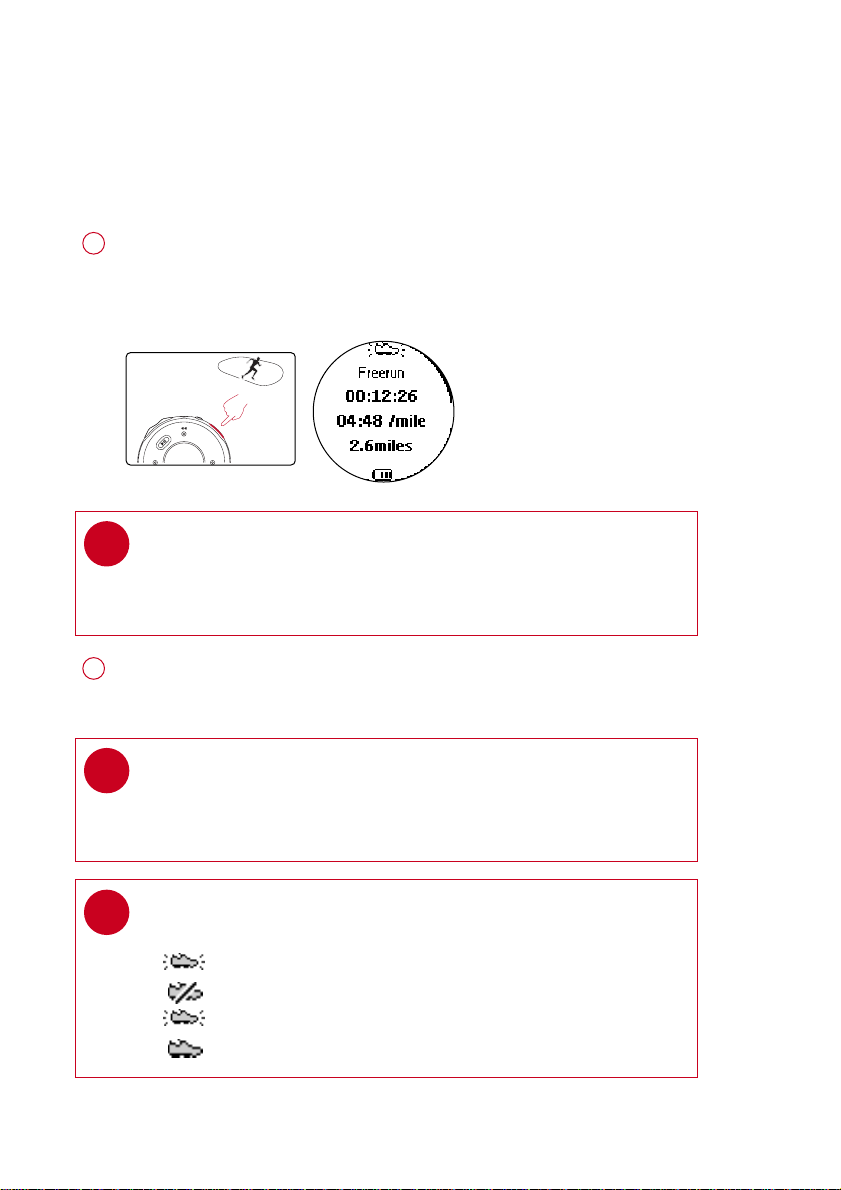
SSDDMM
Press
1
Press
The screen will display an SDM connection status icon.
Start running. Your running activities will now be logged.
✔
for 2 seconds to power on the monitor.
RRUUNN
and wait for a beep.
TIP
Any radio playback will stop as you start logging your running activities.
You can select an item from the music mode to accompany your running.
(See page 4 for more information.)
RRUUNN
Press
2
Press
✔
✔
*Actual display varies with use
briefly to pause logging.
RRUUNN
briefly again to resume logging.
TIP
Use pause to log your running more accurately.
RRUUNN
Press
Press
TIP
Check your SDM connection status from the following icons:
> SDM active
> SDM inactive
> (blinking) SDM trying to establish connection
> SDM not yet sychronized (see page 7)
briefly to pause logging after the beep.
RRUUNN
briefly again to resume logging and start running.
10
0.5 SEC
1 SEC
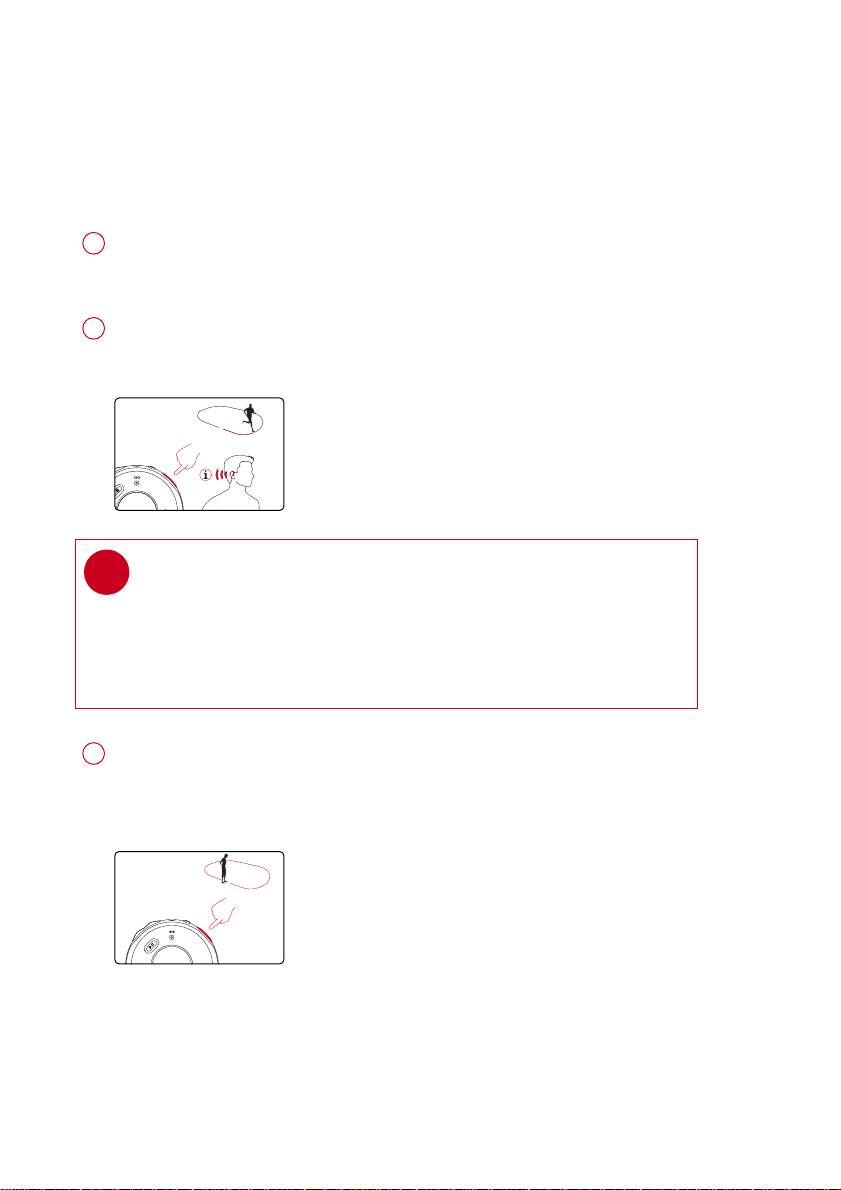
GGeettttiinngg ffeeeeddbbaacckk oonn yyoouurr rruunnnniinngg
Voice feedback will be available 2 minutes after logging started.
Start logging your running activities. (see page 10)
1
FFEEEEDDBBAACCKK
2
✔
Press
TIP
You can also get feedback automatically according to distance
(every km / mile) and time (every 5 minutes).
Select this option from
to get information (in English) about your running progress.
SSEETTTTIINNGGSS➔VVOOIICCEE FFEEEEDDBBAACCKK
.
Press and hold
3
Your running data will be saved and your music playback will continue.
(See page 20 for information on how to manage your running data on
your computer.)
RRUUNN
for 1 second to stop logging.
11
RRaaddiioo MMooddee:: AAuuttoommaattiicc TTuunniinngg
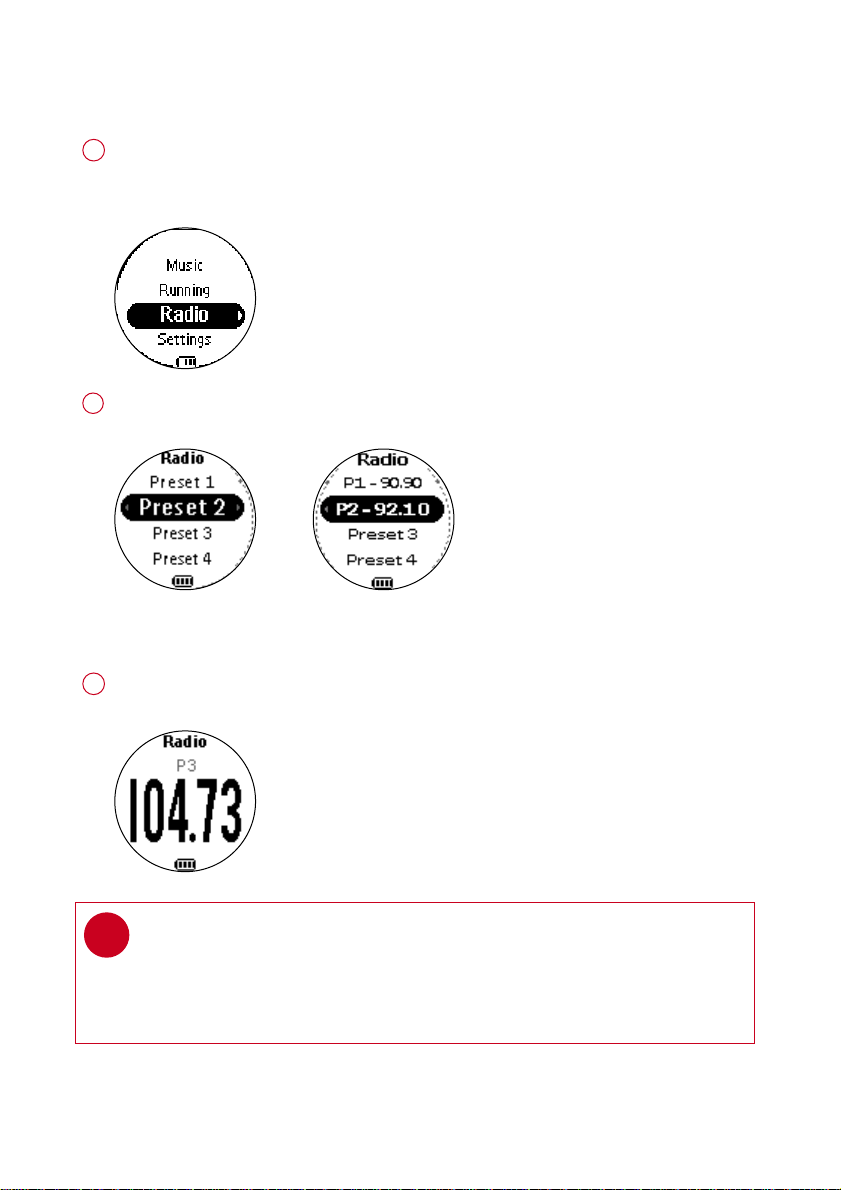
1
From the root menu, press 44, 44, 22 to enter the radio mode (disabled during
running logging).
Any music playback will stop as you enter the radio mode.
Press 44 to scroll down to
2
the 10 strongest radio stations. Press 11 to abort
Radio mode, no station
stored
Press 33 to scroll up or 44 to scroll down for your preset.
3
Press 22;; to play the selected station.
TIP
✔
> Connect your headphones before you start tuning.
> No stations are tuned if you are using your player for the first time.
> Some settings and functions are not available in the radio mode.
AAUUTTOO SSEEAARRCCHH
Stations tuned
. Press 22;; to automatically select
AAUUTTOO SSEEAARRCCHH
.
*Actual display varies with use
12
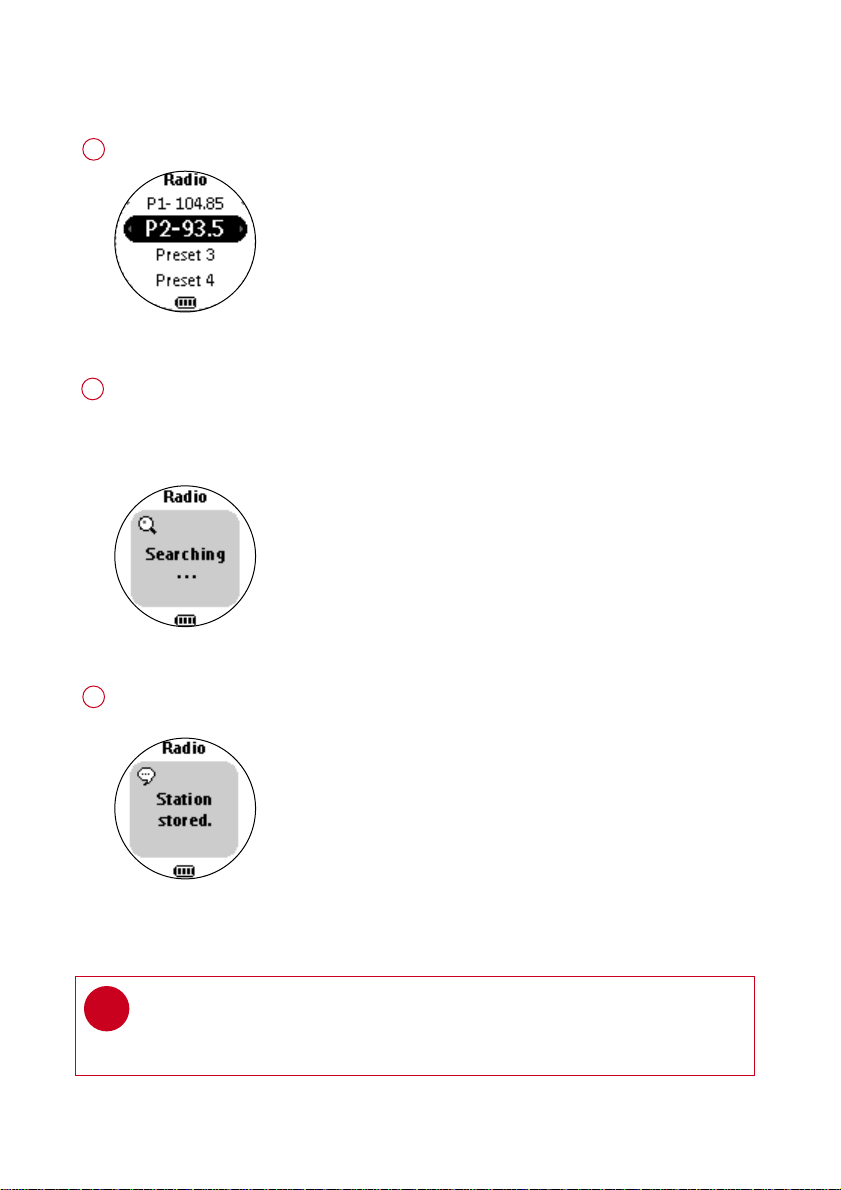
RRaaddiioo MMooddee:: MMaannuuaall TTuunniinngg
Press 33 to scroll up or 44 to scroll down for your preset.
1
Radio preset menu
2
Press 22;; to play the selected station.
Press 44 or 33 to fine tune (tune step by step).
Press and hold 44 to search for the next available station.
Press and hold 33 for the previous available station.
Press 11 to abort searching.
Manual tuning
Press 22;; to save your setting.
3
Station stored
TIP
✔
If you want to discard the newly searched station, press 11 to exit the radio menu.
*Actual display varies with use
13
 Loading...