

Page 1
Always there to help you
Question?
Contact
Philips
Register your product and get support at
www.philips.com/welcome
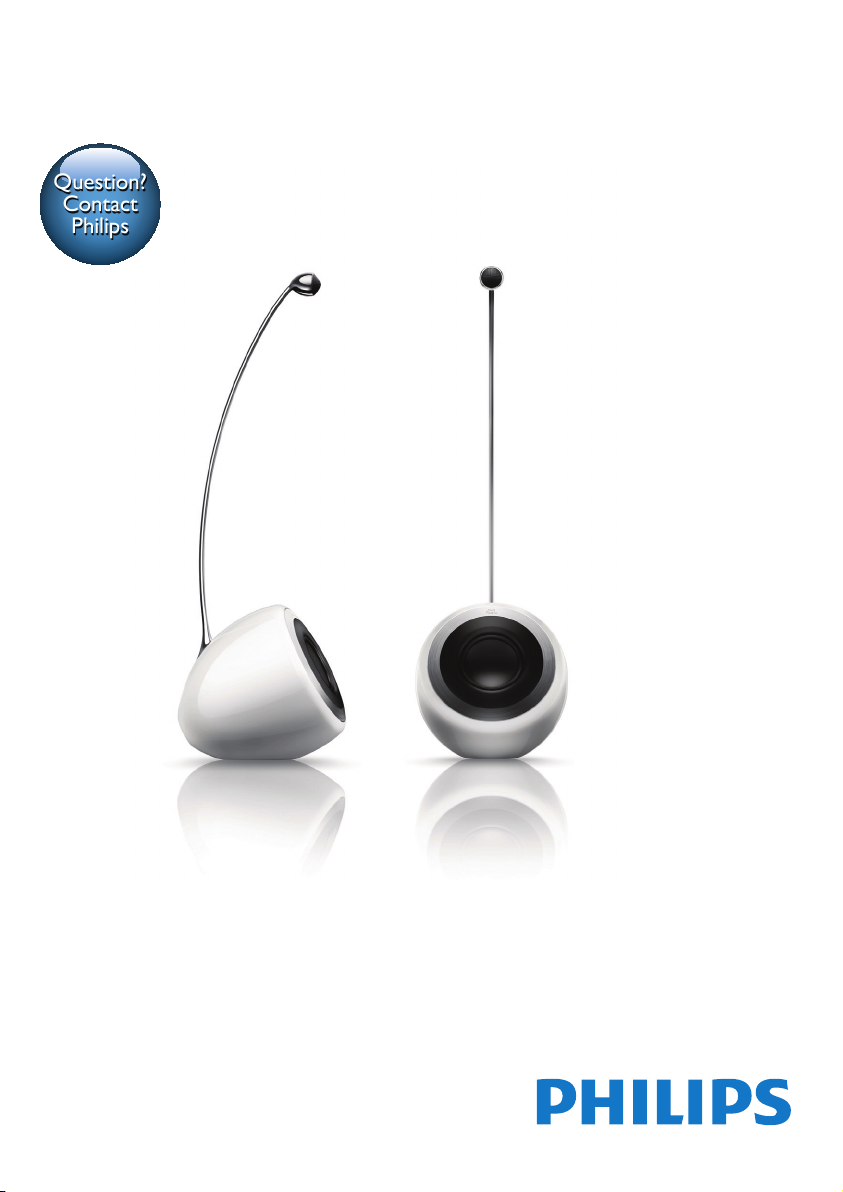
PS1
User manual
Page 2

Page 3

Contents
1 Important 2
Safety 2
Care for your product 3
Care of the environment 3
Help and support 4
2 Your SoundSphere DesignLine
speakers 5
Introduction 5
What's in the box 5
Overview of the main speaker 6
Overview of the remote control 7
3 Get started 8
Unpack and install the SoundSphere
DesignLine speakers 8
Place the SoundSphere DesignLine
speakers 8
Connect 9
Prepare the remote control 12
Turn on 12
4 Use your SoundSphere
DesignLine speakers 13
Play audio from your TV connected
through HDMI ARC 13
Play audio and watch video from a
digital device connected through
HDMI IN 13
Play audio from an external device
connected through analog audio
sockets 14
Play audio from a Bluetooth enabled
device 14
Adjust volume 15
Select a preset sound effect 16
5 Productspecications 17
English
6 Troubleshooting 18
7 Notice 20
Compliance 20
Trademarks 20
EN
1
Page 4

1 Important
Read and understand all instructions
before you use your product. If damage
is caused by failure to follow instructions,
the warranty does not apply.
Safety
This 'bolt of lightning' indicates
uninsulated material within the device
may cause an electrical shock. For the
safety of everyone in your household,
please do not remove the covering.
The 'exclamation mark' calls attention
to features for which you should read
the enclosed literature closely to prevent
operating and maintenance problems.
WARNING: To reduce the risk of re or electric
shock, the device should not be exposed to rain
or moisture and objects lled with liquids, such
as vases, should not be placed on the device.
CAUTION: To prevent electric shock,
fully insert the plug. (For regions with
polarized plugs: To prevent electric shock,
match wide blade to wide slot.)
Important Safety Instructions
Follow all instructions.
• Heed all warnings.
• Do not use this device near water.
• Clean only with dry cloth.
• Do not block any ventilation openings.
Install in accordance with the
manufacturer's instructions.
• Do not install near any heat sources such
as radiators, heat registers, stoves, or other
devices (including ampliers) that produce
heat.
• Protect the power cord from being
walked on or pinched, par ticularly at plugs,
convenience receptacles, and the point
where they exit from the device.
• Only use attachments/accessories specied
by the manufacturer.
• Use only with the cart, stand, tripod,
bracket, or table specied by the
manufacturer or sold with the device.
When a cart is used, use caution when
moving the cart/device combination to
avoid injury from tip-over.
• Unplug this device during lightning storms
or when unused for long periods of time.
• Refer all servicing to qualied service
personnel. Servicing is required when the
device has been damaged in any way, such
as power-supply cord or plug is damaged,
liquid has been spilled or objects have
fallen into the device, the device has been
exposed to rain or moisture, does not
operate normally, or has been dropped.
• Battery usage CAUTION – To prevent
battery leakage which may result in bodily
injury, proper ty damage, or damage to the
unit:
• Install all batteries correctly, + and - as
marked on the unit.
• Do not mix batteries (old and new
or carbon and alkaline, etc.).
• Batteries (packed or installed) shall
not be exposed to excessive heat
such as sunshine, re or the like.
2 EN
Page 5
• Remove batteries when the unit
is not used for a long time.
• Risk of swallowing coin battery!
• The device may contain a coin/button
type battery, which can potentially
be swallowed. Keep the battery out
of reach of children at all times! If
swallowed, the battery can cause
serious injury or death. Severe internal
burns can occur within two hours of
ingestion.
• If you suspect that a battery
has been swallowed or placed
inside any part of the body, seek
immediate medical attention.
• When you change the batteries, always
keep all new and used batteries out of
reach of children. Make sure that the
battery compar tment is completely
secure after you replace the battery.
• If the battery compar tment cannot be
completely secured, discontinue use
of the product. Keep out of reach of
children and contact the manufacturer.
• The device shall not be exposed to
dripping or splashing.
• Do not place any sources of danger on
the device (e.g. liquid lled objects, lighted
candles).
• Where the MAINS plug or an appliance
coupler is used as the disconnect device,
the disconnect device shall remain readily
operable.
Warning
• Never remove the casing of this apparatus.
• Never lubricate any part of this apparatus.
• Never place this apparatus on other electrical
equipment.
• Keep this apparatus away from direct sunlight, naked
ames or heat.
• Ensure that you always have easy access to the power
cord, plug or adaptor to disconnect this apparatus from
the power.
Risk of overheating! Never install this
apparatus in a conned space. Always
leave a space of at least four inches around
this apparatus for ventilation. Ensure
curtains or other objects never cover
the ventilation slots on this apparatus.
Mains fuse
This information applies only to
products with a UK mains plug.
This product is tted with an approved molded
plug. If you replace the fuse, use one with:
• the ratings shown on the plug,
• a BS 1362 approval, and
• the ASTA approval mark.
Contact your dealer if you are not sure
about what type of fuse to use.
Caution: To conform with the EMC
directive (2004/108/EC), do not detach
the plug from the power cord.
Care for your product
Use only microber cloth to clean the product.
Care of the environment
Your product is designed and manufactured
with high quality materials and components,
which can be recycled and reused.
When this crossed-out wheeled bin symbol
is attached to a product it means that
the product is covered by the European
Directive 2002/96/EC. Please inform yourself
English
EN
3
Page 6

about the local separate collection system
for electrical and electronic products.
Please act according to your local rules
and do not dispose of your old products
with your normal household waste.
Correct disposal of your old product helps
to prevent potential negative consequences
for the environment and human health.
Your product contains batteries covered by the
European Directive 2006/66/EC, which cannot
be disposed with normal household waste.
Please inform yourself about the local
rules on separate collection of batteries
because correct disposal helps to
prevent negative consequences for the
environmental and human health.
Help and support
For extensive online support, visit our
website at www.philips.com/support to:
• download the complete user manual
• print the quick start guide
• watch video tutorials (available only for
selected models)
• nd answers to frequently answered
questions (FAQs)
• email us a question
• chat with our support representative.
Follow the instructions on the website
to select your language, and then enter
your product model number.
Alternatively, you can contact our
Consumer Care in your country. Before
you contact us, note down the model
number and serial number of your
product. You can nd this information on
the back or bottom of your product.
4 EN
Page 7

2 Your
What's in the box
SoundSphere
DesignLine
speakers
Congratulations on your purchase, and
welcome to Philips! To fully benet from
the support that Philips offers, register your
product at www.philips.com/welcome.
If you contact our Consumer Care, you will
be asked for the model and serial number
of this apparatus. The model number and
serial number are on the bottom of the
apparatus. Write the numbers here:
Model No. __________________________
Serial No. ___________________________
Introduction
With the SoundSphere DesignLine
speakers, you can:
• enjoy audio from your TV through
HDMI ARC connection.
• enjoy audio from an external
digital device such as your set-top
box, DVD/Blu-ray player, or games
console through HDMI connection.
• enjoy audio from an external analog
device through AUX IN connection.
• enjoy audio from Bluetooth-
enabled devices.
Check and identify the contents
of your package:
Always there to help you
Register your product and get support at
www.philips.com/welcome
Question?
Contact
Philips
Quick start guide
• 2 x SoundSphere DesignLine speakers,
including 2 x tweeter poles
• 1 x Allen wrench and 2 x screws
for tweeter pole installation
• 1 x speaker connection cable
• 1 x HDMI cable
• 1 x AC power cord
• 1 x remote control
• Printed materials
English
EN
5
Page 8
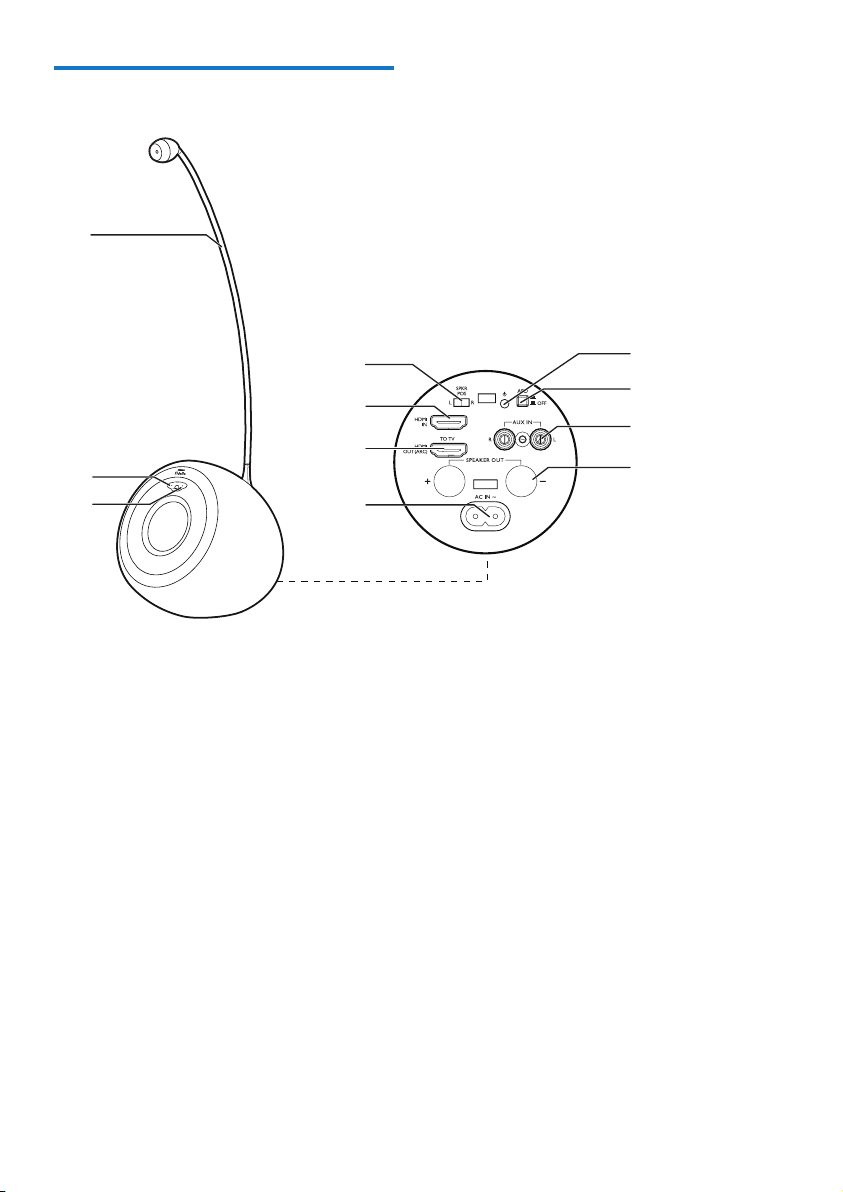
Overview of the main speaker
a
b
c
a Tweeter pole
b Power indicator
• Light up red in sleep mode.
• Blink red during remote control
operation when the SoundSphere
DesignLine speakers are active.
• Turn off in standby mode
or when the SoundSphere
DesignLine speakers are active.
c Source indicator
• Light up blue when the selected audio
source is Bluetooth.
• Light up white when the selected
audio source is HDMI ARC.
• Light up green when the selected
audio source is HDMI IN.
• Light up yellow when the
selected audio source is AUX.
d
e
f
g
k
j
i
h
d SWAP L/R
• Swap to the left or right audio channel,
so that you can place the main speaker
at either side of your TV based on the
AC outlet location.
e HDMI IN
• Connect to the HDMI output on a
digital device.
f HDMI OUT (ARC)
• Connect to the HDMI (ARC) input
socket on a TV.
g AC IN~
• Connect to the power supply.
h SPEAKER OUT +/-
• Connect the two speakers through the
supplied speaker cable.
6 EN
Page 9

i AUX IN L/R
• Connect to the analog audio output
sockets on the TV or an external
device.
j APD (on)/ (off)
• Switch the Auto Power Down feature
on or off.
k
• (Press) switch the speakers on or to
sleep mode.
• (Press and hold for more than 3
seconds) switch to standby mode.
Overview of the remote control
a
b
c
d
e
f
g
h
j
i
b
• Turn on the music sound effect.
c
• Turn on the movie sound effect.
d SURR OFF/ON
• Switch off/on the virtual surround
sound effect.
e (mute)
• Mute or restore volume.
f +/- (volume)
• Increase or decrease volume.
g AUX
• Switch your audio source to the AUX
connection.
h HDMI ARC
• Switch your source to HDMI ARC
connection. HDMI ARC can only
be selected if you connect your
SoundSphere DesignLine speakers to
an HDMI ARC compliant TV through
HDMI ARC.
i HDMI IN
• Switch your source to the HDMI IN
connection.
j Bluetooth
• Switch to Bluetooth mode.
English
a
• (Press) switch the speakers on or to
sleep mode.
• (Press and hold for more than 3
seconds) switch to standby mode.
EN
7
Page 10

3 Get started
Caution
• Use of controls or adjustments or performance of
procedures other than herein may result in hazardous
radiation exposure or other unsafe operation.
Always follow the instructions in
this chapter in sequence.
2
Unpack and install the SoundSphere DesignLine speakers
Caution
• Unpack and install the tweeter poles in an open space.
• Use both your hands and take care when you take the
speakers one by one out from the box.
1 In an open space, take the tweeter poles
out from the box, then take out the
speakers (in bags) with both hands.
2 Install the tweeter poles onto the speakers
with the supplied Allen wrench and screws.
Place the SoundSphere DesignLine speakers
1 Place the speakers on the left and right
of your TV respectively based on the AC
outlet location.
2 If the main speaker is on the left of the TV,
slide SWAP L/R on the back of the main
speaker to the left position.
• If the main speaker is on the right of
the TV, slide SWAP L/R to the right
position.
8 EN
Page 11

Connect
This section helps you connect your
SoundSphere DesignLine speakers
to a TV and other devices.
For information about how to set up
connections of your SoundSphere
DesignLine speakers and accessories, you
can also see the quick start guide.
Note
• For identication and supply ratings, refer to the type
plate at the bottom of the product.
• Before you make or change any connections, make sure
that all devices are disconnected from the power outlet.
1 Unscrew the speaker connectors.
2 Inser t fully the end of a speaker cable with
red mark into the left red (+) connector.
3 Screw the left red (+) connector to secure
the cable.
4 Inser t fully the end of a speaker cable
without red mark into the left black (-)
connector.
5 Screw the left black (-) connector to
secure the cable.
6 Repeat steps 2-5 to inser t the speaker
cable into the right connectors on the
other speaker.
Connect to TV through HDMI (ARC)
English
Connect speaker cables
Note
• For optimal sound, use the supplied speakers only.
Connect your SoundSphere DesignLine
speakers to a TV. You can listen to
audio from TV programs through your
SoundSphere DesignLine speakers. Use the
best quality connection available on your
SoundSphere DesignLine speakers and TV.
Your SoundSphere DesignLine speakers
support HDMI with Audio Return
Channel (ARC). If your TV is HDMI ARC
compliant, you can hear the TV audio
through your SoundSphere DesignLine
speakers with a single HDMI cable.
EN
9
Page 12

HDMI (ARC)
1 Using a High Speed HDMI cable, connect
the HDMI OUT (ARC) socket on your
SoundSphere DesignLine speakers to the
HDMI ARC socket on the TV.
• The HDMI ARC socket on the TV
might be labeled differently. For details,
see the TV user manual.
2 On your TV, turn on HDMI-CEC
operations. For details, see the TV user
manual.
Note
• If your TV is not HDMI ARC compliant, connect
an audio cable to hear the TV audio through your
SoundSphere DesignLine speakers (see 'Connect to
TV or other devices through analog audio cables' on
page 11).
• If your TV has a DVI socket, you can use an HDMI/
DVI adapter to connect to TV. However, some of the
features may not be available.
Connect digital devices through
HDMI
Connect a digital device such as a set-top box,
DVD/Blu-ray player, or games console to your
SoundSphere DesignLine speakers through a
single HDMI connection. When you connect
the devices in this way and play a movie, the
• video is automatically displayed on your
TV, and
• audio is automatically played on your
SoundSphere DesignLine speakers.
10 EN
Page 13

HDMI OUT
• Through analog audio cables, connect the
AUX IN L/R sockets on your SoundSphere
DesignLine speakers to the AUDIO OUT
sockets on the TV or other devices.
Connect power
Caution
• Risk of product damage! Make sure that the power
supply voltage matches the voltage printed on the
bottom of the unit.
• Risk of electric shock! When you unplug the AC cord,
always pull the plug from the socket. Never pull the
cord.
• Before you connect the AC power cord, make sure that
you have completed all the other connections.
English
1 Through a High Speed HDMI cable,
connect the HDMI OUT socket on your
digital device to the HDMI IN socket on
your SoundSphere DesignLine speakers.
2 Connect your SoundSphere DesignLine
speakers to TV through HDMI OUT
(ARC).
• If the TV is not HDMI CEC compliant,
select the correct video input on your
TV.
3 On the connected device, turn on HDMI-
CEC operations. For details, see the user
manual of the device.
Connect to TV or other devices
through analog audio cables
Note
• When your SoundSphere DesignLine speakers and
TV are connected through HDMI ARC, this audio
connection is not required.
HDMI (ARC)
• Connect the AC power cord to
• the AC IN~ socket on the back of the
main speaker.
• the wall power socket.
EN
11
Page 14

Prepare the remote control
Caution
• Risk of explosion! Keep batteries away from heat,
sunshine or re. Never discard batteries in re.
Forrst-timeuse:
• Remove the protective tab to activate the
remote control battery.
Toreplacetheremotecontrolbattery:
1 Open the batter y compartment.
2 Inser t one CR2032 battery with correct
polarity (+/-) as indicated.
3 Close the batter y compartment.
Note
• Before you press any function button on the remote
control, rst select the correct source with the remote
control instead of the main unit.
• If you are not going to use the remote control for a
long time, remove the battery.
• Point the remote control directly at the IR sensor on
the front of the main speaker for better reception.
Turn on
• Press .
» The SoundSphere DesignLine speakers
switch to the last selected source.
» The source indicator lights up in the
corresponding color.
Switch to sleep mode
• Press again to switch the SoundSphere
DesignLine speakers to sleep mode.
» While the source indicator turns off,
the power indicator lights up red.
Tip
• To switch the SoundSphere DesignLine speakers on
from sleep mode again, you can also press the power
key on the remote control of your TV connected
through HDMI ARC.
• In sleep mode, when you turn on the TV connected
through HDMI (ARC), the SoundSphere DesignLine
speakers wake up automatically.
Toswitchtostandbymode:
• Press and hold for more than three
seconds.
» The power indicator turns off.
Toactivatetheautopowerdownfeature:
• Press down the APD switch on the back of
the main speaker ( : on ; : off).
» After staying idle for 30 minutes, the
SoundSphere DesignLine speakers
enter standby mode automatically.
Tip
• To wake up from standby mode, you can press
on the main speaker or the remote control of the
SoundSphere DesignLine speakers.
12 EN
Page 15

4 Use your
SoundSphere
DesignLine
speakers
This section helps you use the
SoundSphere DesignLine speakers to
play audio from connected devices.
Play audio from your TV connected through HDMI ARC
1
Play audio and watch video from a digital device connected through HDMI IN
HDMI OUT
HDMI
AV
TV
HDMI (ARC)
2
1
TV
English
TV
TV
HDMI
HDMI (ARC)
AV
2
1 Make sure that the SoundSphere
DesignLine speakers are connected
to your TV through HDMI ARC (see
'Connect to TV through HDMI (ARC)' on
page 9).
2 Press HDMI ARC on the remote control
of the speakers to select the HDMI output
(ARC) source.
» The source indicator on the main
speaker turns white.
3 Select the correct source on your TV (see
the user manual of your TV for details).
» You can hear audio from the TV
through the SoundSphere DesignLine
speakers.
1 Make sure that both the digital device and
the TV are connected to HDMI IN and
HDMI OUT (ARC) of the SoundSphere
DesignLine speakers respectively (see
'Connect digital devices through HDMI' on
page 10).
2 Press HDMI IN on the remote control
of the speakers to select the HDMI input
source.
» The source indicator on the main
speaker turns green.
3 Select the correct source on your TV (see
the user manual of your TV for details).
» You can hear audio from the digital
device through the SoundSphere
DesignLine speakers. At the same time,
you can watch video from the digital
device on the TV screen.
EN
13
Page 16

Play audio from an external
T
device connected through
analog audio sockets
2
1
TV
AV
V
HDMI
Enable/disable Dolby night mode
The Dolby night mode, also called DRC
(Dynamic Range Control), allows you to select
a quiet sound or full dynamic sound. When
the Dolby night mode is enabled, the volume
of loud sound is decreased while the volume
of soft sound (such as speech) is increased.
ToenableDolbynightmode:
• In AUX source, press , SURR ON and
successively within 3 seconds.
» Both the power and source indicator
ash twice at t he same time.
» You can hear a quiet sound from the
speakers.
TodisableDolbynightmode:
• In AUX source, press , SURR ON and
successively within 3 seconds again.
» Both the power and source indicator
ash three times at the same time.
» You can hear the full dynamic sound
from the speakers.
1 Make sure that the external device (such
as your TV) is connected to the AUX IN
sockets on the SoundSphere DesignLine
speakers (see 'Connect to TV or other
devices through analog audio cables' on
page 11).
2 Press AUX on the remote control of the
speakers to select the AUX source.
» The source indicator on the main
speaker turns yellow.
3 If the external device is a TV, select the
correct source on the TV (see the user
manual of the TV for details).
4 Play audio on the external device (see the
user manual of the external device).
» You can hear audio from the external
device through the SoundSphere
DesignLine speakers.
14 EN
Tip
• After the speakers are powered off and then powered
on again, the Dolby night mode is disabled automatically.
Play audio from a Bluetooth enabled device
Connect the SoundSphere DesignLine
speakers to a Bluetooth enabled device
(such as an iPad, iPhone, iPod touch, Android
phone, or laptop), and then you can listen to
the audio les stored on the device through
your SoundSphere DesignLine speakers.
What you need
• A Bluetooth enabled device which
supports Bluetooth prole A2DP, and with
Bluetooth version as 2.1 + EDR.
Page 17

• The operational range between the
SoundSphere DesignLine speakers and a
Bluetooth enabled device is approximately
10 meters (30 feet).
2
Philips PS1
1 Press Bluetooth on the remote control
to switch the SoundSphere DesignLine
speakers to Bluetooth mode.
» The source indicator on the main
speaker blinks blue.
2 On the Bluetooth device, switch on
Bluetooth, search for and select Philips PS1
to start connection (see the user manual
of the Bluetooth device on how to enable
Bluetooth).
• When prompted for a password, enter
"0000".
3 Wait until the source indicator turns solid
blue and you hear a beep sound from the
SoundSphere DesignLine speakers.
4 Select and play audio les or music on
your Bluetooth device.
Tip
• During play, if there is an incoming call, music play is
paused. Play resumes when the call ends.
• To exit Bluetooth, select another source.
Tip
• When your switch back to Bluetooth mode, Bluetooth
connection remains active.
Note
• The music streaming may be interrupted by obstacles
between the device and SoundSphere DesignLine
speakers, such as wall, metallic casing that covers the
device, or other devices nearby that operate in the
same frequency.
• If you want to connect your SoundSphere DesignLine
speakers with another Bluetooth enabled device, hold
Bluetooth for 3 seconds and then press to reset
the Bluetooth connection.
• Philips does not guarantee 100% compatibility with all
Bluetooth devices.
Adjust volume
• Press +/- (volume) to increase or decrease
volume.
• To mute sound, press (mute).
» The power indicator on the main
speaker blinks red slowly.
• To restore sound, press (mute)
again or press +/- (volume).
English
EN
15
Page 18

Select a preset sound effect
• During play, press or to select the
music or movie sound effect.
To experience an immersive audio experience
withvirtualsurroundsoundoutput:
• Press SURR ON to turn on the surround
sound effect.
• To turn off the virtual surround sound
effect, press SURR OFF.
Toexperiencetheatsoundeffect:
• Press , , SURR ON and SURR OFF
successively within 3 seconds.
• To turn off the at sound effect, press
either or .
16 EN
Page 19

5 Product
specifications
Note
• Specications and design are subject to change without
notice.
Amplier
• Power specication: 2 x 100W @ 0.1%
THD
• Frequency response: 20Hz - 20KHz +0 dB
/ -1dB
• Signal-to-noise ratio: ≥ 90dBA
(A-weighted)
• Input sensitivity:
• AUX: 1000mV ± 200mV 22kohm
Bluetooth
Remote control batteries
• 1 x CR2025
English
• Bluetooth version: V2.1 + EDR
• Frequency band: 2.402-2.480 GHz ISM
Band
• Range: 10m (free space)
Main unit
• Power supply: 220-240 V~, 50/60 Hz
• Power consumption: 52 W
• Standby power consumption: < 0.5 W
• Loudspeaker system impedance: 4 ohm
• Speaker drivers: 6.5 inch woofer + 25mm
VC tweeter
• Dimensions (W x H x D) (each speaker):
345.1 x 381.4 x 1104.3 mm
• Weight: 37 kg with packing
EN
17
Page 20

6 Troubleshooting
Warning
• Risk of electric shock. Never remove the casing of the
product.
To keep the warranty valid, never try
to repair the product yourself.
If you have problems using this product,
check the following points before you
request service. If you still have a problem,
get support at www.philips.com/support.
Main unit
The buttons on the SoundSphere DesignLine
speakers do not work.
• Disconnect the SoundSphere DesignLine
speakers from the power supply for a few
minutes, then reconnect.
Sound
No sound from the SoundSphere DesignLine
speakers.
• Connect the audio cable from your
SoundSphere DesignLine speakers to your
TV or other devices. However, you do not
need a separate audio connection when:
• the SoundSphere DesignLine speakers
and TV are connected through HDMI
ARC connection, or
• a device is connected to the
HDMI IN connector on your
SoundSphere DesignLine speakers.
• On the remote control, select the correct
audio input.
• Make sure that the SoundSphere
DesignLine speakers are not muted.
Distorted sound or echo.
• If you play audio from the TV through the
SoundSphere DesignLine speakers, make
sure that the TV is muted.
HDMI
The source indicator on the main speaker
blinks white continuously.
• You may have connected the SoundSphere
DesignLine speakers to a non-ARC HDMI
socket on the TV. Connect to the correct
HDMI ARC socket (see 'Connect to TV
through HDMI (ARC)' on page 9).
• The HDMI ARC or CEC settings on your
TV may be disabled. Make sure that the
features are enabled (see the TV user
manual for details).
The source indicator on the main speaker
blinks yellow continuously.
• Make sure that you have connected the
HDMI IN socket on the SoundSphere
DesignLine speakers to an HDMI output
socket on the digital device correctly (see
'Connect digital devices through HDMI' on
page 10).
18 EN
Bluetooth
A device cannot connect with the
SoundSphere DesignLine speakers.
• The device does not support the
compatible proles required for the
SoundSphere DesignLine speakers.
• You have not enabled the Bluetooth
function of the device. See the user manual
of the device on how to enable the
function.
• The device is not correctly connected.
Connect the device correctly (see 'Play
audio from a Bluetooth enabled device' on
page 14).
• The SoundSphere DesignLine speakers are
already connected with another Bluetooth
device. Hold Bluetooth for 3 seconds
and then press to reset the Bluetooth
connection, then try again.
Page 21

Quality of audio play from a connected
Bluetooth device is poor.
• The Bluetooth reception is poor. Move
the device closer to the SoundSphere
DesignLine speakers, or remove any
obstacle between the device and the
SoundSphere DesignLine speakers.
The connected Bluetooth device connects and
disconnects constantly.
• The Bluetooth reception is poor. Move
the device closer to the SoundSphere
DesignLine speakers, or remove any
obstacle between the device and the
SoundSphere DesignLine speakers.
• Turn off Wi-Fi function on the Bluetooth
device to avoid interference.
• For some Bluetooth devices, the
Bluetooth connection can be deactivated
automatically to save power. This does
not indicate any malfunction of the
SoundSphere DesignLine speakers.
Is there any visible indication when the
encoding format changes?
• As the input encoding format changes at
the HDMI socket, the source indicator on
the speakers blinks accordingly. The source
indicator remains as it is if the speakers
detect no encoding format change.
• When the speakers detect a DTS
stream, the source indicator blinks
three times.
• When the speakers detect
a Dolby stream, the source
indicator blinks twice.
English
EN
19
Page 22

7 Notice
This section contains the legal
and trademark notices.
& pending. DTS, the Symbol, & DTS and the
Symbol together are registered trademarks
& DTS Digital Surround and the DTS logos
are trademarks of DTS, Inc. Product includes
software. DTS, Inc. All Rights Reserved.
Compliance
This product complies with the
radio interference requirements of
the European Community.
Hereby, Philips Consumer Lifestyle, declares
that this speaker is in compliance with the
essential requirements and other relevant
provisions of Directive 1999/5/EC.
A copy of the EC declaration of Conformity
is available in the Por table Document
Format (PDF) version of the user
manual at www.philips.com/support.
Note
• The type plate is located on the bottom of the device.
Trademarks
Philips and the Philips’ Shield Emblem are
registered trademarks of Koninklijke Philips N.V.
and are used by WOOX Innovations Limited
under license from Koninklijke Philips N.V.”
Manufactured under license from Dolby
Laboratories. Dolby and the double-D symbol
are trademarks of Dolby Laboratories.
The Bluetooth® word mark and logos
are registered trademarks owned by
Bluetooth SIG, Inc. and any use of such
marks by Philips is under license.
© 2013 CSR plc and its group companies.
The aptX® mark and the aptX logo are
trade marks of CSR plc or one of its
group companies and may be registered
in one or more jurisdictions.
The terms HDMI and HDMI High-
Denition Multimedia Interface, and the
HDMI Logo are trademarks or registered
trademarks of HDMI Licensing LLC in
the United States and other countries.
Manufactured under license under U.S.
Patent Nos: 5,956,674; 5,974,380; 6,487,535
& other U.S. and worldwide patents issued
20 EN
Page 23

Page 24

Specicationsaresubjecttochangewithoutnotice.
2013 © WOOX Innovations Limited. All rights reserved.
This product was brought to the market by WOOX
InnovationsLimitedoroneofitsafliates,furtherreferred
tointhisdocumentasWOOXInnovations,andisthe
manufacturer of the product. WOOX Innovations is the
warrantor in relation to the product with which this booklet
was packaged. Philips and the Philips Shield Emblem are
registered trademarks of Koninklijke Philips N.V.
PS1_UM_12_V2.0
 Loading...