

Page 1
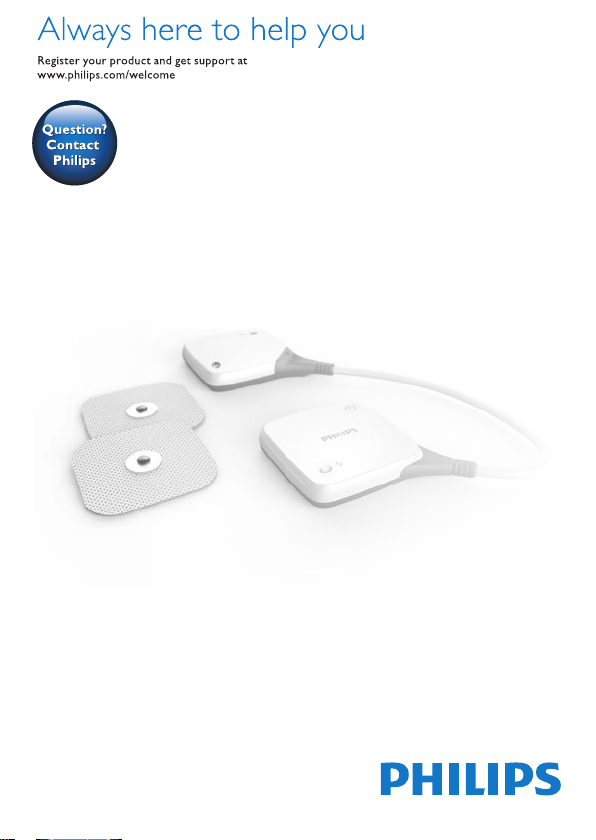
PR3840
Page 2
1
Page 3

ENGLISH 6
繁體中文 52
简体中文 91
PR3840
Page 4

4
ENGLISH
Table of contents
Introduction 4
Contra-indications, reactions and side effects 6
Important safety information 8
Pre-set programs 16
Product overview 22
Preparing for use 22
Using the device 24
After use 32
Troubleshooting 34
Signals on the device 37
Replacement 38
Ordering accessories 38
Guarantee and support 39
Recycling 40
Specications 41
Explanation of symbols 43
Electromagnetic emissions and immunity 49
Electrode placement guide 50
Introduction
Congratulations on your purchase and welcome to
Philips! To benet fully from the support that Philips
offers, register your product at www.philips.com/
pain-relief/register.
Read this user manual carefully before you use the
PulseRelief device. The PulseRelief device is available
without prescription. To achieve optimal treatment
success with your PulseRelief device, we recommend
that you use it according to the treatment
instructions in this user manual. If you need further
information or have questions, please visit
www.philips.com/pain-relief or contact the
Philips Consumer Care Centre in your country.
Read chapter ‘Contra-indications, reactions and side
effects’ and chapter ‘Important safety information’
before you start using the device.
Page 5

ENGLISH 5
Intended use
The PulseRelief is intended to be used by adult
consumers who experience mild to moderate
chronic pain or acute post-surgical pain. The purpose
of this device is to provide pain relief through
transcutaneous electrical nerve stimulation (TENS).
You can also use this device for electrical muscle
stimulation (EMS). The device is suitable for home use.
If you recently had surgery or are in the care of a
doctor, do not use this device without consulting
your doctor rst.
Do not place the electrodes over open wounds
or rashes.
TENS and pain management
Transcutaneous electrical nerve stimulation (TENS)
is a non-invasive pain relief method for which
clinical proof exists that it can help relieve pain.
Physiotherapists and other healthcare professionals
use TENS daily as part of their treatment. TENS
treatment passes electrical pulses across the intact
surface of the skin to activate the underlying nerves.
Clinical evidence suggests that TENS produces
pain relief in a similar way to the nervous system’s
own pain-relief mechanisms, for instance similar to
massaging a painful area.
The device uses a rechargeable battery to generate
pulses. These pulses are applied to the skin through
self-adhesive hydrogel electrodes. You can choose
one of the 15 pre-set TENS programs with different
pulse settings and you can adjust the intensity of the
pulse according to your own preference.
Page 6

ENGLISH6
Electrical muscle stimulation
Electrical muscle stimulation (EMS), also known as
neuromuscular electrical stimulation (NMES) or
electromyostimulation, uses electric pulses to evoke
muscle contraction. A stimulation device generates
pulses and delivers them through electrodes on the
skin close to the muscles you want to stimulate. The
pulses mimic the way the central nervous system
makes the muscles contract. You can choose one of
the 5 pre-set EMS programs.
Pain management
We all want to enjoy doing our daily activities. When
you experience pain, however, the instinctive reaction
is to avoid pain by reducing your activity level. As a
result, you become less t and less able to enjoy doing
the things you like. Staying active, without overdoing
it, is impor tant to avoid being trapped in a persistent
pain cycle. The key to self-managing your pain is
pacing: distributing periods of activity and periods of
rest over the day in a way that feels most comfor table
for you. The key to pacing is spreading out your
activities and ‘taking a break before you need it’.
Important safety information
Contra-indications
Do not use the device if:
- you have a cardiac pacemaker,
implanted debrillator or other
implanted metallic or electronic
device (e.g. a drug delivery system),
as use in these cases could cause
electric shock, burns, electrical
interference, or even death.
Page 7

ENGLISH 7
- you have a heart disease.
- you have epilepsy.
- you are in the rst trimester of your
pregnancy, as the effects of TENS on
the development of the foetus are
as yet unknown. Avoid use over the
uterus during pregnancy to reduce
the risk of inducing labour. If you
are pregnant, always consult your
doctor or midwife before use.
- you have a cognitive impairment.
- you have venous or arterial
thrombosis or thrombophlebitis. If
you use the device for EMS, there is
a risk of mobilising the blood clot.
- you have undiagnosed pain, unless your
doctor recommends use of this device.
Reactions
Stop using the device and consult
your doctor if the pain worsens or
if you experience adverse reactions
from the device.
Possible adverse reactions may
include the following:
- skin irritation beneath the
electrodes, although the gel used
on the electrodes is not known to
cause allergic reactions
Page 8
ENGLISH8
- burns beneath the electrodes
- headaches or other painful sensations
- nausea or feeling faint
Side effects
- After EMS, some muscle soreness may
occur some time after the treatment.
- Some reddening of the skin under
or around the electrodes may
occur during and shortly after EMS
treatment. Skin reddening usually
disappears within two hours after
treatment. If the skin continues to
be red for more than a day, please
consult your doctor.
Warnings
General warnings
- Read this user manual carefully and
always adhere to the treatment
instructions.
- Stop using the device and consult a
doctor if the pain worsens.
- This is a medical device. Keep the
device out of the reach of children.
Children may not be able to use
it according the instructions in this
user manual. This device should not
be used on or by children.
Page 9

ENGLISH 9
- This appliance is not intended for
use by adults with reduced sensory
or mental capabilities. They may not
be able to use it according to the
instructions in this user manual and
they may become agitated by the
treatment.
- Do not use the device on children,
as the device is not designed to use
on children.
- Do not modify the device or
the electrodes. This could cause
improper functioning.
- Only use the adapter supplied to
charge the device. Use of another
adapter may cause a hazardous
situation.
- This device is designed for use by
and on a single adult person.
Do not apply to or treat the
following parts or areas
- Stimulation on the sides of the
neck over the carotid sinus may
have severe adverse effects on your
heart rhythm or blood pressure.
Page 10

ENGLISH10
- Stimulation on the front of the neck
may cause severe muscle spasms
that could close your airway and
result in breathing difculties.
- Do not apply stimulation across
your chest because the introduction
of electrical current into the chest
may cause rhythm disturbances to
your heart, which could be lethal.
- Stimulation across the head or on
opposite sides of the head must be
avoided, as the effects on the brain
are unknown.
- Do not place the electrodes on skin
that is not intact, clean or healthy.
Open, irritated or otherwise damaged
skin may lead to the delivery of too
much current to the area, which may
potentially cause burns.
- If you recently had surgery, do not
place one or both electrodes on the
cut. Place the electrodes at a distance
of 3 to 5 cm from the cut or along
the proximal nerves or near the
spine where the skin is intact.
- Do not place the electrodes
near cancerous lesions, as this may
have a negative impact on the
cancerous lesion.
Page 11

ENGLISH 11
- Do not place the electrodes on
areas of skin that lack normal
sensation. This may cause you to
be unaware of the high intensity
current administered, which may
result in electrical skin burns.
- Do not place the electrodes over
open wounds or rashes. Open
wounds may lead to the delivery
of too much current to the area,
potentially leading to burns.
It might also cause substances in
the electrode to enter the skin.
- Do not place the electrodes over
swollen, red, infected or inamed
areas or skin eruptions (e.g.
phlebitis, thrombophlebitis and
varicose veins). Stimulation must
not be applied to areas with known
thrombosis or thrombophlebitis, as
stimulation may increase circulation,
resulting in a greater risk of emboli.
- Do not place the electrodes inside
body cavities, e.g. the mouth. This
device is not designed for internal
application.
- For EMS, only place the electrodes
on healthy, uninjured muscles.
Page 12

ENGLISH12
Do not use the device in the
following conditions
- Do not use the device if you
recently had surgery or are in the
care of a doctor and have not
consulted your doctor rst.
- Do not use the device if you have a
tendency to bleed internally due to
any impact or injury.
- Do not use EMS stimulation to
contract a muscle if contraction
of the muscle may disrupt healing.
For instance, if the muscle or
tendon is torn, muscle contraction
may exacerbate the tear, just like
a voluntary contraction. This may
also be the case after a recent
surgical procedure or following
acute trauma or fracture. Muscle
contraction in case of tendinitis may
also worsen symptoms.
- Do not use the device while
driving, operating machines or
performing any other activity in
which electrical stimulation can put
you at risk of injury.
Page 13

ENGLISH 13
- Do not use if you are likely to fall
asleep during the treatment, as this
may cause you to sense injuries
too late. If you use the device at
bedtime, set the timer to make it
switch off automatically.
- Do not use while in the bath,
shower or swimming pool. This
increases the risk of electric shocks
and burns to the skin.
- Do not apply stimulation in the
presence of electronic monitoring
equipment (e.g., cardiac monitors,
ECG alarms), which may not
operate properly when the
electrical stimulation device is in use.
- Do not use the device when you are
connected to high-frequency surgical
equipment. This may result in burns
on the skin under the electrodes and
may damage the device.
- Do not use the device within less
than 1 metre from shortwave or
microwave medical equipment.
Close proximity to this equipment
may cause unstable device output.
Page 14

ENGLISH14
- Portable RF communications
equipment (including peripherals
such as antenna cables and external
antennas) should be used no closer
than 30 cm (12 inches) to any part of
the device including cables specied
by the manufacturer. Otherwise,
degradation of the performance of
this equipment could result.
- Use of accessories, transducers and
cables other than those specied
or provided by the manufacturer
of this equipment could result in
increased electromagnetic emissions
or decreased electromagnetic
immunity of this equipment and
result in improper operation.
Precautions
- If you had surgery recently, consult
your doctor before you use the
device. Using the device may disrupt
the healing process.
- Use Burst TENS programs while
resting, as these programs can
result in muscle contraction in the
treatment area.
Page 15

ENGLISH 15
- Make sure that you end the
treatment in the Philips Treatment
App or press the on/off button on
the device before you remove the
device or the electrodes. If you do
not end the treatment, you may
experience an unpleasant sensation
in your ngers when you touch
the magnets. This sensation is not
harmful, but can be unpleasant.
- Only use this device with the
adapter, cord and accessories
recommended by the manufacturer.
- Always check the device and the
electrodes for damage before
use. Do not use the device or an
electrode if it is damaged.
- The device is not waterproof.
Do not use the device in wet
surroundings and prevent it from
getting wet.
- Although you can use the device
indoors and outdoors, it does not
withstand all weather conditions.
- The device does not withstand high
and low temperatures. Please check
the operating conditions in chapter
‘Specications’.
Page 16

ENGLISH16
- The electrodes have a limited
shelf life. Please check the packaging
for the use-by date prior to use.
Do not use electrodes whose
use-by date has expired. For
ordering replacement electrodes,
see chapter ‘Ordering accessories’.
- Do not use plaster or tape to attach
the electrodes to the skin.
- Always use and store the electrodes
according to the instructions in
chapters ‘Using the device’ and
‘After use’.
- If the device does not function as
described here, stop using it and
contact the Consumer Care Centre.
For contact details, see chapter
‘Guarantee and support’.
Compliance with standards
- The device meets the relevant
standards for this type of Class IIa
electrical medical appliance and
appliances using electrical stimulation
for home use.
- This Philips appliance complies
with all applicable standards and
regulations regarding exposure to
electromagnetic elds.
Page 17

ENGLISH 17
Pre-set programs
The device comes standard with 15 pre-set
programs for TENS and 5 pre-set programs for EMS.
Please note that the order of the programs in the
list does not signify a recommendation of specic
programs for specic conditions. As the effect of
a treatment program may strongly differ from
person to person, we advise you to try out different
treatment programs to nd out which one works
best for you.
Program overview
Conventional TENS programs
Conventional TENS is a common TENS program
with high-frequency stimulation. It is based on the
Gate Control Theory that states that this type of
stimulation will block transmission of pain signals in
the nervous system. It is comparable to ‘rubbing the
pain away’. Most people use Conventional TENS
for 30 minutes per session, but you can use it as
often and as long as it feels comfortable. The effect
is usually most perceptible during stimulation and
generally wears off rather quickly after stimulation.
You have to adjust the intensity of the program so
that you clearly feel the stimulation. Stimulations
must not feel unpleasant or painful.
Page 18

ENGLISH18
Name of
Conventional
TENS program
Conventional May give you a continuous tingling
Thorough
stimulus
Pre-activity May give you a more local and soft
Soft stimulus May give you a softer stimulating
Deep stimulus May give you a deeper stimulating
Radiating pulse May give you a more radiating
Program description Suggested
stimulation
May give you a more thorough
stimulating sensation
stimulating sensation
sensation, e.g. for sensitive body parts
sensation
stimulation sensation
Burst TENS programs
Burst TENS offers a high-frequency stimulation that
comes in trains of pulses. This type of stimulation is
known to trigger endorphin release. Endorphins are
painkillers produced by the body. You can use Burst
TENS around 30 minutes multiple times a day, for
example 3 times. We advise you to adjust the intensity
of the Burst program so that you feel the stimulation
strongly. Burst programs generally give a sharper
sensation, which can feel somewhat unpleasant. It is
also advised to adjust the intensity up to a level that
produces visible muscle contractions in the treatment
area. These contractions are not harmful. If you nd
these contractions too uncomfortable, you can
decrease the intensity, choose a different program or
move the electrodes to a different place. Apply Burst
TENS programs while resting, as they can result in
muscle contraction in the treatment area.
treatment
time
No limit
No limit
No limit
No limit
No limit
No limit
Page 19

ENGLISH 19
Name of
Burst TENS
program
Continuous
burst
Slow
kneading
Mild
kneading
Deep
kneading
Diffuse
burst
Program description Suggested
May give you a pulsing burst stimulation to
release endorphins in your body
May give you a slower and massaging burst
stimulation to release endorphins
May give you a milder burst stimulation to
release endorphins in your body
May give you a more local and deeper
burst stimulation to release endorphins in
your body
May give you a more diffuse burst stimulation
to release endorphins in your body
* optionally multiple times a day, can be changed
in the app
Frequency-modulated TENS programs
Frequency-modulated TENS is a program in which
the frequency of the pulse varies from high to low.
This can be more comfortable or effective than
the other programs in some cases. You can use
frequency-modulated TENS for around 30 minutes
multiple times a day, for example 3 times.
treatment
time
30 min.*
30 min.*
30 min.*
30 min.*
30 min.*
Page 20

ENGLISH20
Name of Freq.
Mod. TENS
program
Mixed
frequency
Pulsing
massage
Deep massage May give you a slower and deeper
Gentle
massage
Program description Suggested
May give you a owing stimulation
sensation
May give you a more pulsing
stimulation sensation
owing sensation
May give you a mild owing
stimulation sensation
* optionally multiple times a day, can be changed in
the app
Electrical muscle stimulation (EMS) programs
Electrical muscle stimulation (EMS), also known
as neuromuscular electrical stimulation (NMES)
or electromyostimulation, uses pulses to evoke
muscle contraction. This can for example help to
strengthen muscles.
Use EMS only on healthy, uninjured muscles. Apply EMS
programs while resting (sitting, lying), as they result in
muscle contraction. First-time users can experience
electrical muscle stimulation as an unfamiliar and
unusual sensation. We therefore advise you to start
at a low intensity setting to get used to the sensation
before you choose a higher intensity setting. In general,
stimulation must always feel comfor table. The muscle
contractions must not feel exhausting, strenuous or
tiring. After strenuous exercise or exertion, we advise
you to use a lower setting to avoid muscle fatigue.
treatment
time
30 min.*
30 min.*
30 min.*
30 min.*
Page 21
ENGLISH 21
Name of EMS program Program description Suggested
Muscle stimulation
pulse
Muscle stimulation ow May give you a comfortable
Muscle stimulation
wave
Muscle stimulation ux May give you an energising
Muscle stimulation
bounce
Program name Program type Frequency Pulse
Conventional Conventional 100 Hz 200µs continuous
Thorough
stimulus
Pre-activity Conventional 100 Hz 150µs continuous
Soft stimulus Conventional 80 Hz 60µs continuous
May give you a nice soothing
sensation
tingling sensation
May give you a mild
contracting and relaxing
sensation
muscle sensation
May give you a rhythmically
relaxing sensation
* optionally multiple times a day, can be changed in the app
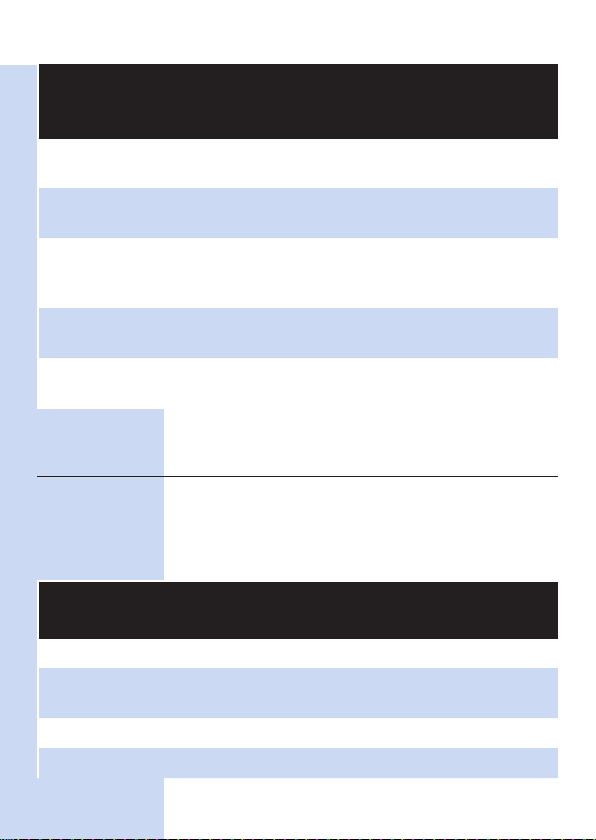
Program specications
The table below gives information on the frequency,
pulse width and pre-set time of each program.
The current pulse in all programs has a symmetrical
bi-phase waveform.
Conventional 40 Hz 200µs continuous
width
treatment
time
30 min.*
20 min.*
30 min.*
25 min.*
20 min.*
Pre-set
time
Page 22
ENGLISH22
Program name Program type Frequency Pulse
Deep stimulus Conventional 80 Hz 150µs continuous
Radiating Pulse Conventional 60 Hz 150µs continuous
Continuous burst Burst 100 Hz, 2 Hz250µs 30 min.
Slow kneading Burst 80 Hz, 1 Hz200µs 30 min.
Mild kneading Burst 80 Hz, 3 Hz200µs 30 min.
Deep kneading Burst 80 Hz, 2 Hz150µs 30 min.
Diffuse burst Burst 80 Hz, 2 Hz180µs 30 min.
Mixed frequency Freq. Mod. 8-100 Hz 250µs 30 min.
Pulsing massage Freq. Mod. 2-8 Hz 250µs 30 min.
Deep massage Freq. Mod. 2-80 Hz 180µs 30 min.
Gentle massage Freq. Mod. 8-80 Hz 150µs 30 min.
Muscle stimulation
pulse
Muscle stimulation
ow
Muscle stimulation
wave
Muscle stimulation
ux
Muscle stimulation
bounce
Ampl. Mod. 40 Hz 200µs 30 min.
Ampl. Mod. 50 HZ 150µs 20 min.
Ampl. Mod. 65 Hz 200µs 30 min.
Ampl. Mod. 40 Hz 350µs 25 min.
Ampl. Mod. 50 Hz 300µs 20 min.
width
Pre-set
time
Page 23
ENGLISH 23
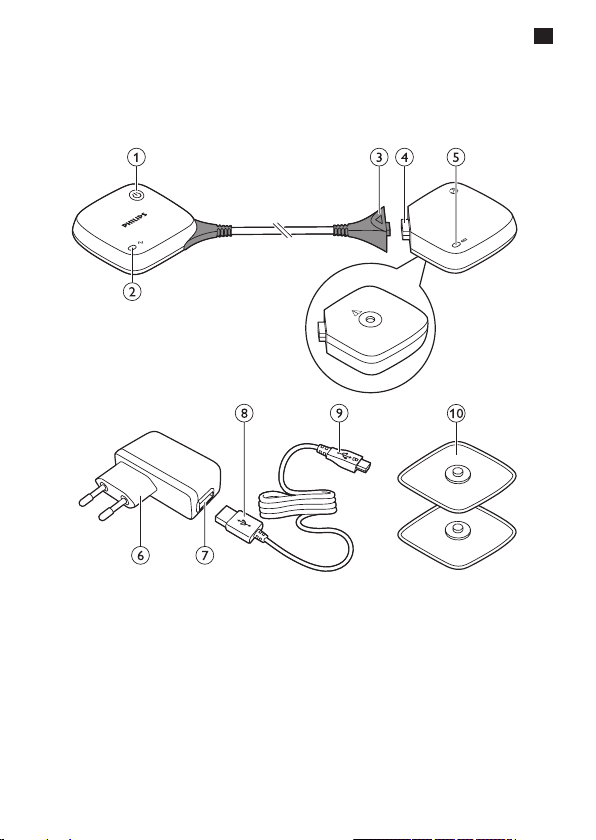
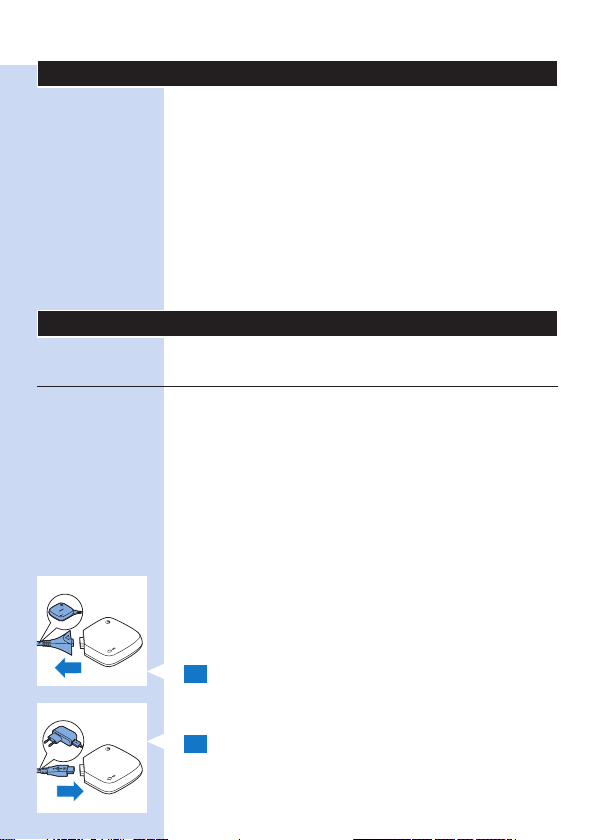
Product overview (Fig. 1)
1 On/off button
2 Status indicator
3 Detachable connector
4 Micro-USB socket of device
5 Battery indicator
6 Adapter
7 Socket for standard USB plug
8 Standard USB plug
9 Micro-USB plug
10 Self-adhesive hydrogel electrodes
Preparing for use
Charging the device
To be able to use the device, you rst have to
charge it. Charging the device takes approx. 5 hours
at room temperature. When the rechargeable
battery is fully charged, it contains sufcient energy
for approx. 8 hours of continuous use under normal
operating conditions.
Note: If the device is not fully charged when you start
a treatment, the battery may run out during the
treatment. We advise you to always fully charge the
device before you start a treatment.
Note: Treatment is not possible when the device is
charging.
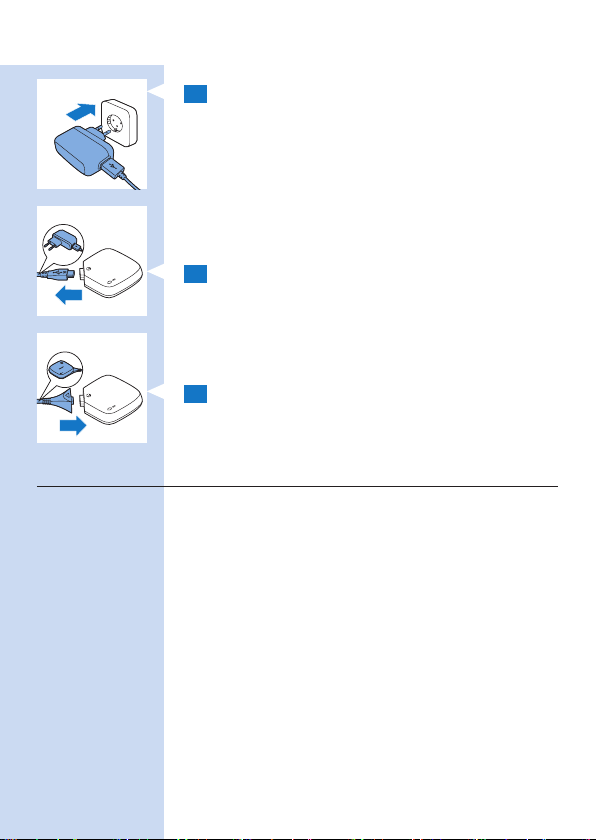
1 Unplug the cable that connects the two units
from the micro-USB socket of the device unit
with the battery indicator.
2 Insert the micro-USB plug of the adapter cable
into the micro-USB socket of the device.
Page 24
ENGLISH24
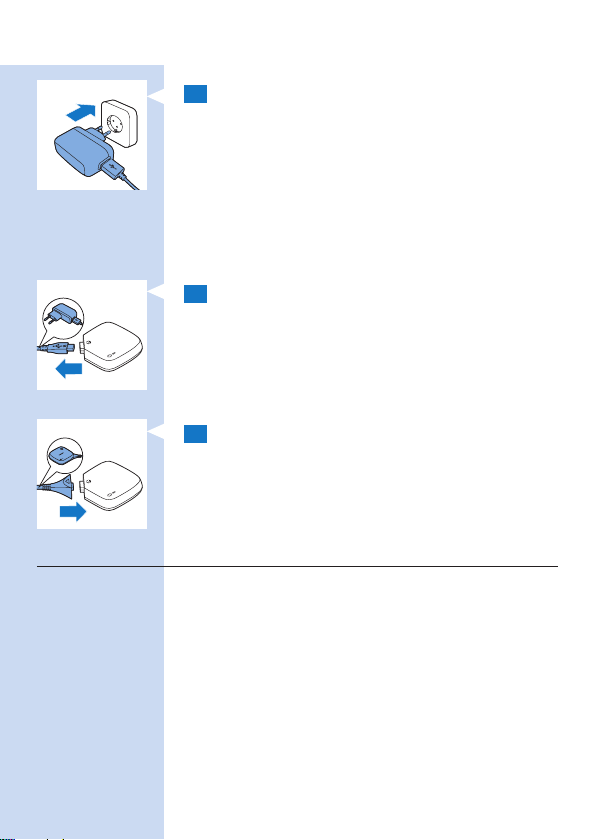
3 Insert the USB plug into the socket of the
adapter and insert the adapter into a wall socket.
Note: Insert the USB plug into a wall socket that
is properly accessible so that the USB plug can be
removed easily. The device is only connected to the
mains during charging.
, The battery indicator is solid orange during
charging. When the battery is fully charged, the
battery indicator turns solid green.
4 Remove the micro-USB plug from the micro-
USB socket of the device.
Note: The USB socket may only be used for charging
with the adapter supplied or for connecting the cable
that connects the two units. Do not use this socket for
any other purpose.
5 Reconnect the cable that connects the two
units by inserting the device connector into
the micro-USB socket of the device.
Installing and setting up the Treatment App
You need the Philips Treatment app to operate the
device. Please go to the Apple App Store or GooglePlay,
search for the ‘Philips Treatment’ app and press install.
Refer to the quick start guide for more details.
Note: The Treatment App is an app that can be used
for PulseRelief (PR3840) and BlueTouch (PR3743,
PR3431). The installation procedure is the same for
both devices.
Page 25
ENGLISH 25
Using the device
Attaching the electrodes and the device
1 Make sure that the skin you want to place the
electrodes on looks healthy and is free from
wounds or rashes.
For TENS:
• Do not place the electrodes over open wounds.
Open wounds may lead to the delivery of too
much current to the area, which may cause burns.
•
If you recently had surgery, do not place electrodes
on the cut. Place the electrodes at a distance of
3 to 5 cm from the cut or along the proximal
nerves or near the spine where the skin is intact.
• Do not place the electrodes near cancerous
lesions, as this may have a negative impact on
the cancerous lesion.
For EMS:
Only place the electrodes on healthy, uninjured
muscles.
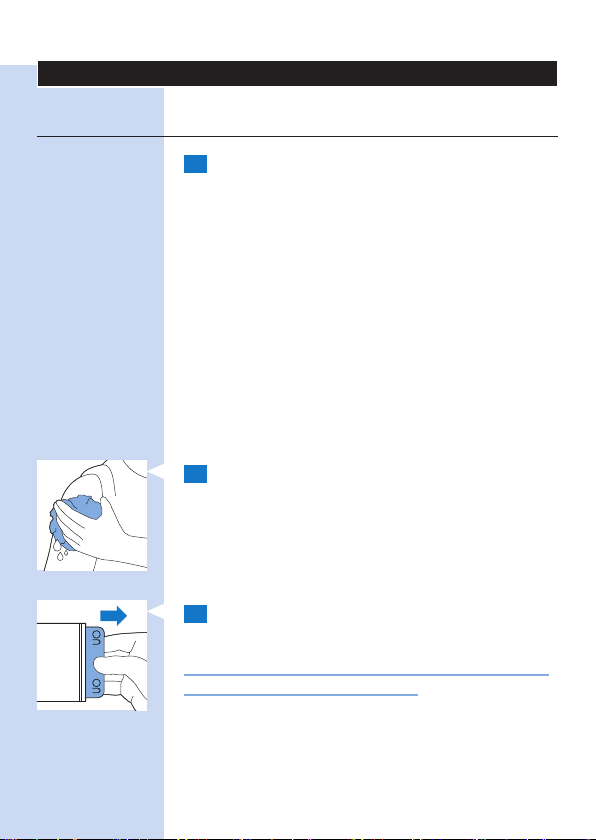
2 Clean the skin with a moist cloth and dry it.
The skin you want to place the electrodes on
must be dry, clean and free from cream or lotion.
Note: Dirt, grease or particles left on the skin may
lodge themselves in the hydrogel of the electrodes. This
has an adverse effect on the adhesive power of the
electrodes.
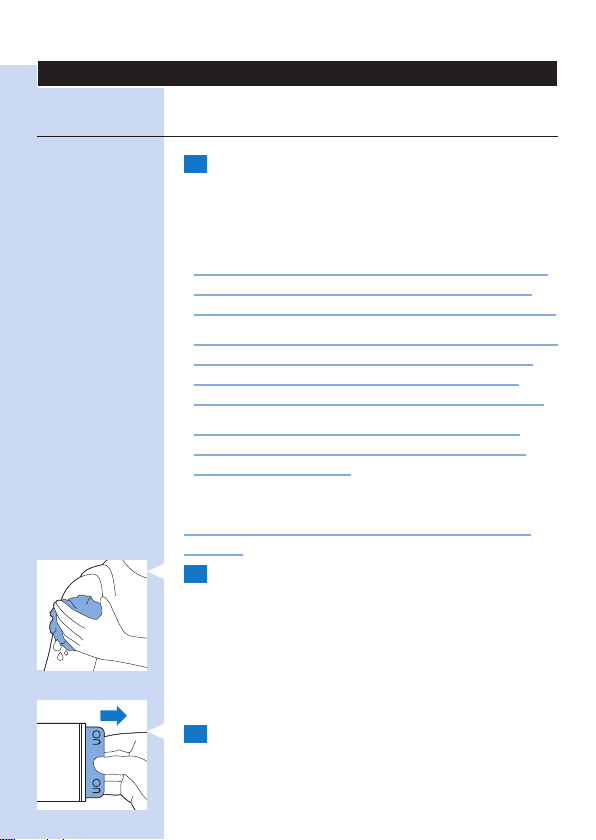
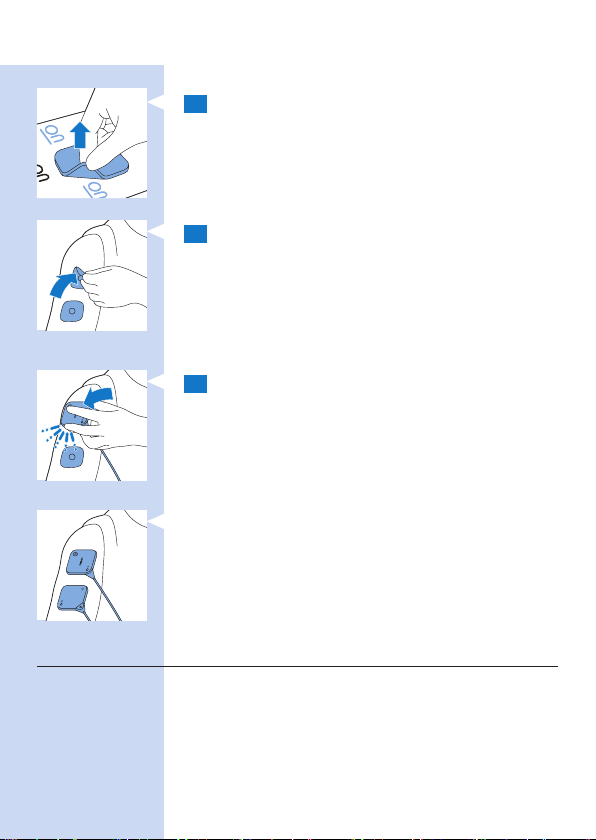
3 Take the electrodes from the plastic bag and
check them for damage and signs of wear.
Page 26
ENGLISH26
Caution: Do not use electrodes whose use-by
date has expired. The use-by date is shown on the
resealable plastic bag.
Note: Replace the electrodes when they are damaged
or dirty, when they have lost their adhesive power or
when stimulation becomes uncomfortable, i.e. when you
experience an unpleasant stinging or biting sensation.
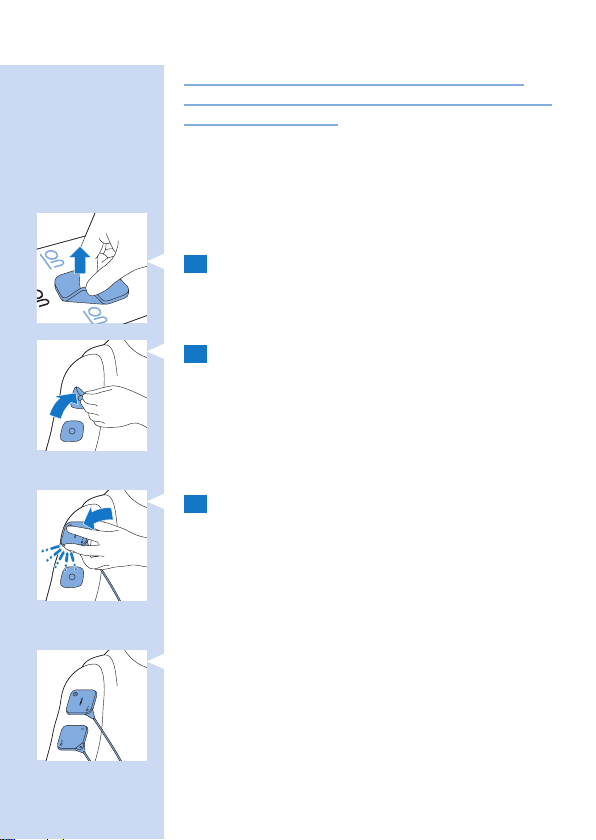
4 Pull the electrode off the liner and place it on
the skin at the place you want to treat. See
section ‘Electrode placement’ below and the
placement guide.
5 Place the second electrode on the body part
you want to treat.
Note: Always place the electrodes on the skin before
you connect the device.
Note: Do not place the electrodes on top of each other
or so close to each other that they touch each other.
6 Attach the device to the electrodes. The device
units have magnets in the centre to ensure
easy connection to the metal connectors of
the electrodes. When the device units lock
onto the electrodes properly, you hear a click.
Note: You can wear the electrodes with the device units
attached to them under your clothes, also during treatment.
Note: Consult the electrode placement guide for the
recommended position for the electrodes during
treatment. This is only a recommendation. You can
perform all activities allowed as intended use and not
warned against in chapter ‘Important’ when you wear
the device on your body. You can also continue to wear
the device on your body in between treatments.
Page 27

ENGLISH 27
Electrode placement
To get maximum results from stimulation, it is
important to place the electrodes correctly. Always
make sure that you have normal skin sensation in
the treatment area before you attach the electrodes.
The optimal place may vary slightly from person to
person, so try moving the electrodes around until
you get the most effective results. In some cases, it
can be helpful to mark the spot for future use. For
suggestions regarding placement of the electrodes,
see the ‘Electrode Placement Guide’. Please note
that you may need assistance to place the electrodes
on certain spots on your body.
As a rule, place the electrodes on or near the
treatment area. Stimulation may result in visible
muscle contraction, especially in burst TENS
programs (programs 7 to 11). This is not harmful,
but if you nd these contractions uncomfortable,
try moving the electrodes to a different place.
Please note that when you use EMS programs
(programs 16 to 20), muscle contraction is a
desired effect. If no muscle contraction occurs in an
EMS program, you have not placed the electrodes
correctly or you have chosen a too low intensity.
• Do not place electrodes over the carotid sinus
on the sides of your neck or on the front of your
neck, across your chest or on your head.
• Do not place the electrodes over open wounds.
Open wounds may lead to the delivery of too
much current to the area, which may cause burns.
• If you recently had surgery, do not place
electrodes on the cut. Place the electrodes at a
distance of 3 to 5 cm from the cut or along the
proximal nerves or near the spine where the skin
is intact.
Page 28
ENGLISH28
• Do not place the electrodes near cancerous
lesions, as this may have a negative impact on the
cancerous lesion. (See chapter ‘Important safety
information’.)
Using the app to start and stop a treatment
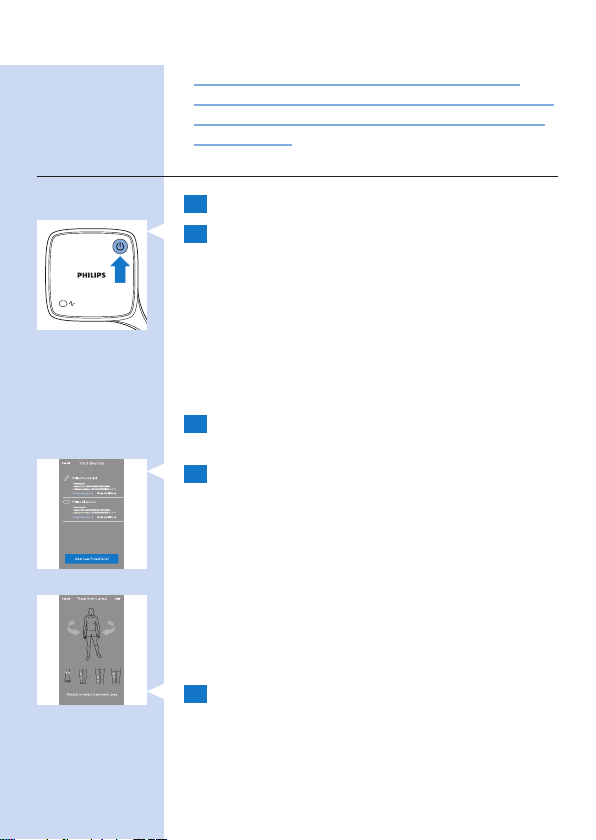
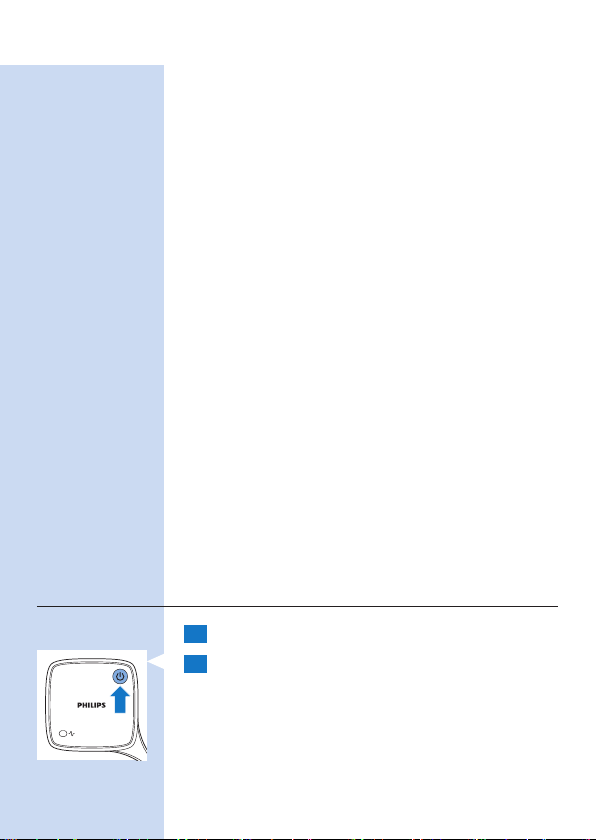
1 Switch on Bluetooth on your mobile device.
2 Use the on/off button to switch the device to
standby.
, The status indicator on the device lights up solid
green to indicate that the device is in standby
mode and ready for treatment.
, If you do not start the treatment within
5 minutes, the device switches off automatically.
If this happens, you rst have to press the on/off
button again to start a treatment.
3 Open the Philips Treatment App.
4 The app automatically selects PulseRelief if only
a PulseRelief device is paired to the app. If both
a PulseRelief and a BlueTouch device are paired
to the app, tap ‘PulseRelief’ to select the device.
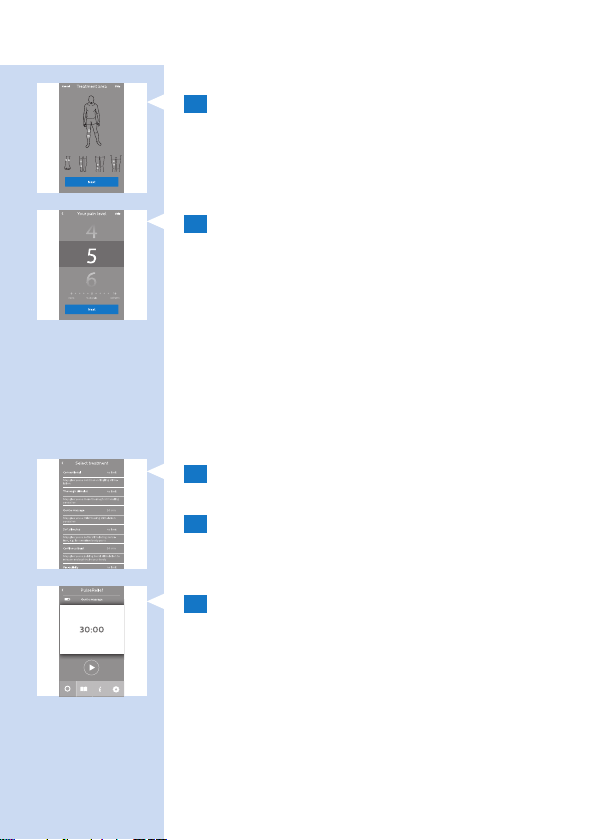
Selecting a treatment area
At rst-time use, you always have to select a
treatment area. If you have used the device before,
you can choose between ‘My previous treatment’
to repeat the previous treatment, or ‘Select new
treatment’ to star t a different treatment.
1 Rotate the body animation on the screen.
Page 29
ENGLISH 29
2 Tap on one of the suggested locations for the
electrodes to select the area you want to treat.
Rating your pain intensity
1 Swipe vertically to rate the intensity of your
pain on a scale from 0 to 10. If you experience
no pain tap 0 and if you experience the worst
pain ever tap 10. If your pain is somewhere
in between, rate it by tapping the appropriate
number.
Note: The pain intensity you indicate is not used by the
app to determine the intensity of the treatment. The
rating is only stored in your treatment diary. You can
switch off this feature in the settings tab of the app.
Selecting your treatment
1 Scroll through the list of programs and tap a
program to select it.
2 The start screen of the treatment appears.
Starting and stopping a treatment
1 Tap the play button on the screen.
, The treatment screen opens and the time starts
to count down.
, The status indicator on the device starts to ash
orange.
Page 30
ENGLISH30
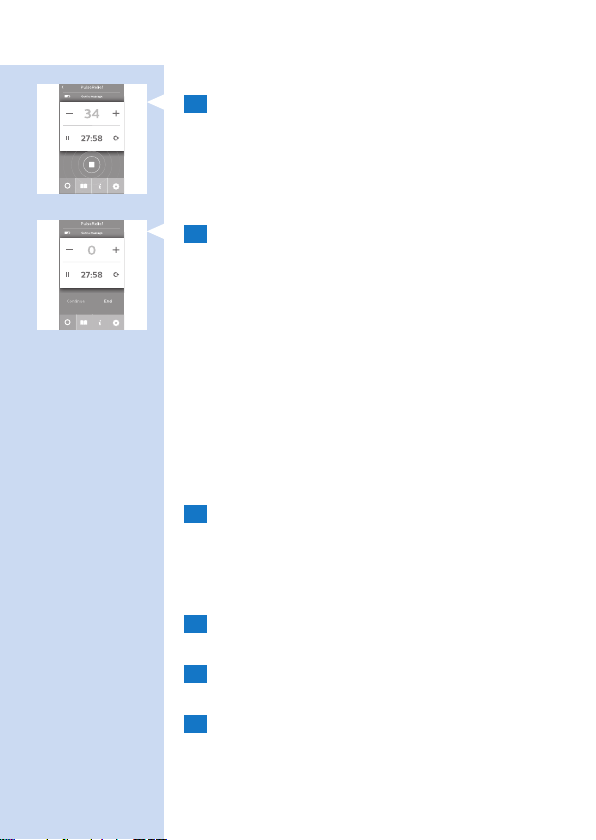
2 On the treatment screen, you can tap the + or
the - to increase or decrease the intensity to a
comfortable level.
3 In programs with a specied maximum
treatment time, treatment continues until the
timer has counted down to 0. In programs that
have no specied maximum treatment time, the
timer counts up from 0. It continues to count
up until you stop the treatment. If you want to
stop or interrupt the treatment, tap the square
in the centre of the pulsing treatment indicator
to stop the program.
- To resume the program, tap ‘Continue’ or the
arrow next to the time.
- To end the program, tap ‘End treatment’.
Switching to another program
1 If you want to switch to another treatment
program while a program is running:
- on a smartphone or iPod, tap the name of the
program in the treatment screen.
- on a tablet, tap ‘Treatment list’
2 The list of programs opens. Tap the treatment
program you want to use.
3 The start screen of the treatment appears.
Tap the play button to start the treatment.
4 Tap the + to increase the intensity to a
comfortable level.
Page 31
ENGLISH 31
Note: When you switch to another program during
treatment, the intensity is automatically reset to 0.
This is a safety measure. The intensity level of the
previous program may be too high for the new program.
Adapting the treatment time
1 Tap the time displayed in the treatment screen.
2 Change the remaining treatment time.
Quick start
From the start screen, you can immediately start the
program you used during your previous treatment.
1 From the start screen, tap the name of the
treatment under ‘My previous treatment’.
2 Swipe vertically to rate the intensity of your
pain on a scale from 0 to 10.
3 Start the treatment.
Other app features
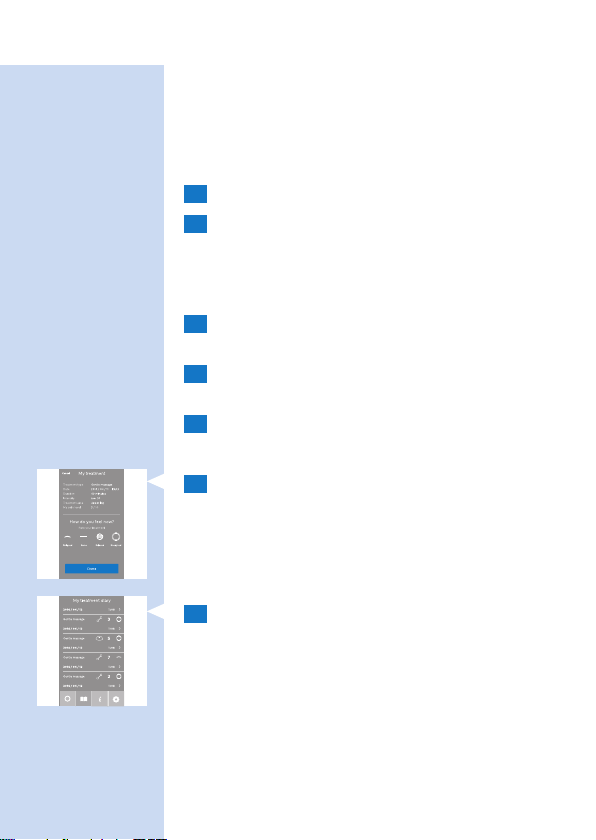
1 After the program nishes, you get to a screen
that asks you to describe how you feel. You can
indicate this by tapping one of the icons.
2 Tap the book symbol to open your diary.
The diary shows when treatments took place,
which program you used and how long the
treatment lasted.
- Tap the arrow to see more details.
Page 32
ENGLISH32
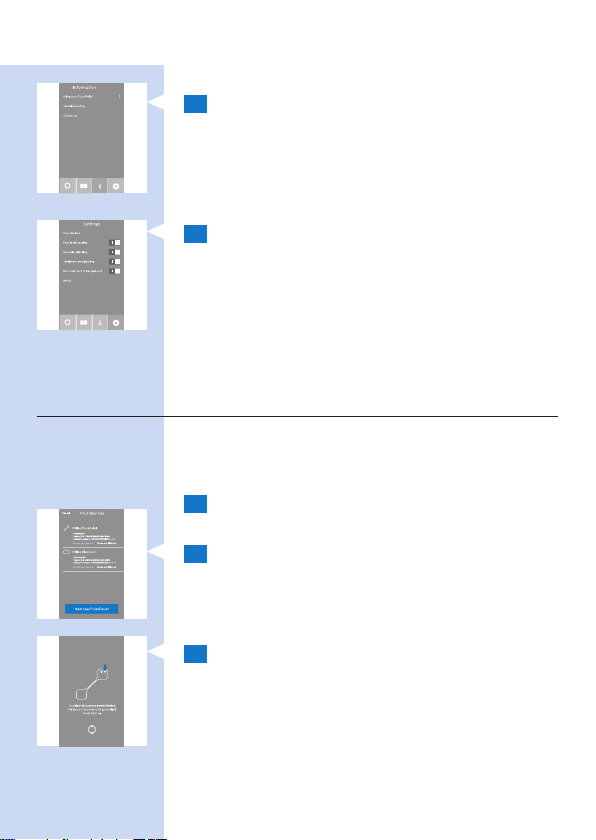
3 Tap the ‘i’ to open the information screen.
This screen contains the following items:
- Using your PulseRelief
- Contact us
4 Tap the settings symbol to open the settings
screen. This screen contains the following items:
- Your devices
- Pain level tracking
- Sensation tracking
- Treatment area tracking
- Run treatment in background
- About
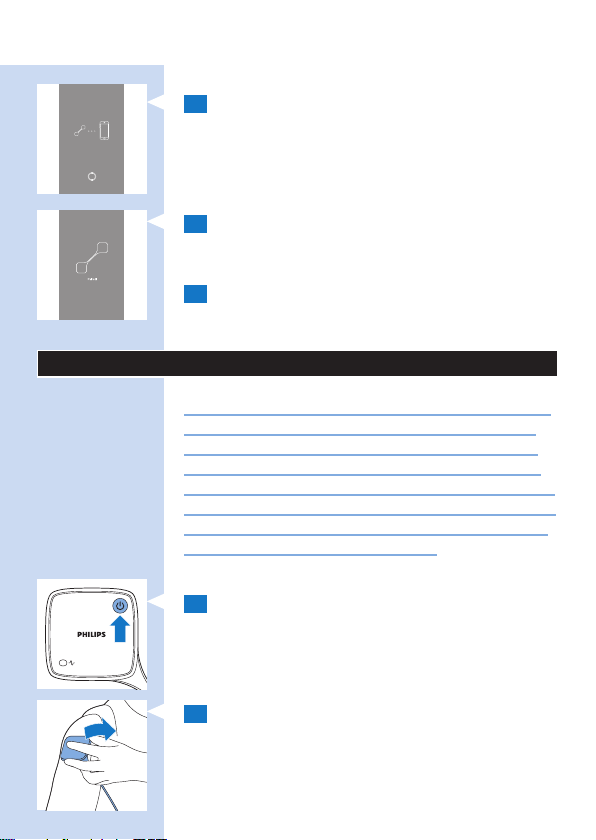
Using a second device
To treat a larger area of the body or to treat
different body areas at the same time, you can pair a
second PulseRelief device to the app.
1 Tap the settings symbol and then tap ‘Your
Devices’.
2 At the bottom of the screen, tap the device
you want to pair: PulseRelief.
3 Switch on the device when the app tells you to.
Page 33
ENGLISH 33
4 The app enters pairing mode.
5 When the device is paired to the app, the
smart phone icon disappears and only the
device is shown.
6 Tap ‘Back’ to go back to the treatment screen.
After use
Caution: Make sure that you end the treatment in
the app or press the on/off button to switch off
the device before you remove the device or the
electrodes. If the treatment has not ended when
you remove the device or the electrodes, you may
experience an unpleasant sensation in your ngers
when you touch the connectors. This sensation is
not harmful, but can be unpleasant.
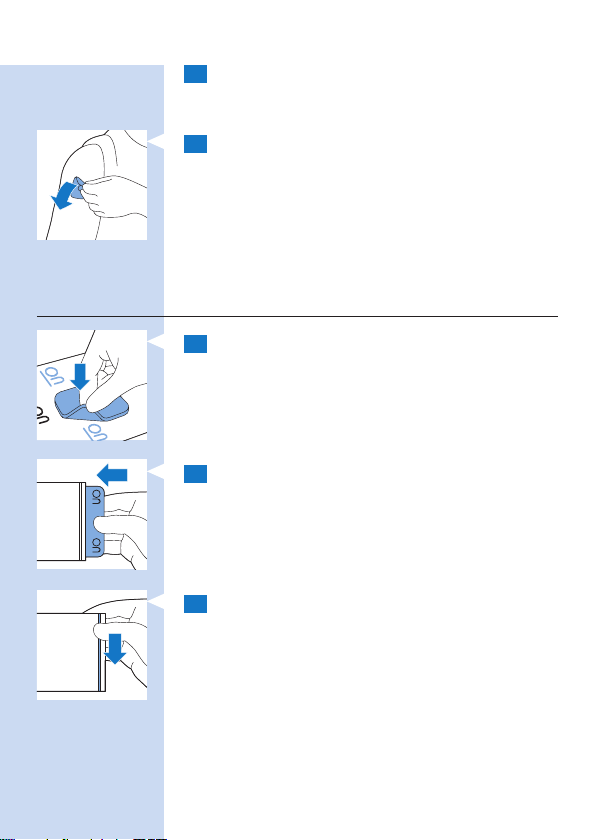
1 Press the on/off button to switch off the device.
2 Detach the device from the electrodes by
pulling it off.
Note: If you forget to switch off the device, it will switch
off automatically 5 minutes after you detach it.
Page 34
ENGLISH34
3 If you have used the device quite frequently
during the day, it is advisable to recharge it
before your next treatment.
4 Peel the electrodes off the skin by pulling at
the edge.
Note: You can leave the electrodes at the same spot as
long as the treatment is effective and no skin irritation
occurs underneath the electrodes. If treatment at a
spot is no longer effective or skin irritation occurs,
move the electrodes to a different spot.
Storage of the electrodes
1 Place the electrodes back on the liner.
2 Slide the liner with the electrodes back into
the bag.
3 Reseal the bag for dust-free storage.
Note: To keep the electrodes in good condition and to
prevent the hydrogel layer from drying out, always store
them in the resealable bag when they are not attached
to your body for treatment. Seal the resealable bag to
guarantee dust-free storage.
Note: If you want to store electrodes for more than a month,
keep them at temperatures between +5°C and 27°C. Do
not store the electrodes in the freezer or the refrigerator.
Avoid high temperatures and exposure to direct sunlight.
Page 35

ENGLISH 35
Cleaning
Do not immerse the device in water or rinse it
under the tap.
Do not immerse the electrodes in water.
1 Clean the device with a damp cloth and a mild
cleaning agent, e.g. dishwashing liquid.
Note: You can also clean the device with 70% isopropyl
alcohol (IPA).
Caution: Do not use any other cleaning agents
than the ones mentioned above, as other cleaning
agents could damage the material, e.g. cause loss
of gloss.
2 If the electrodes are dirty, put a drop of water
on your nger and gently rub the dirt off the
surface.
Note: Do not use soap or alcohol to clean the electrodes.
Troubleshooting
This chapter summarises the most common
problems you could encounter with the PulseRelief.
If you are unable to solve the problem with the
information below, visit www.philips.com/
support for a list of frequently asked questions or
contact the Philips Consumer Care Centre in your
country.
Page 36

ENGLISH36
Problem Possible
The battery
indicator on
the device
was orange
and then
the device
switched off.
The battery
indicator on
the device is
solid orange.
I experienced
an unpleasant
sensation
when I
touched the
connectors
of the device
or the
electrodes.
cause
The battery
is empty.
The battery
is low.
You did not
end the
treatment in
the app or
did not press
the on/off
button on
the device
before you
removed the
device.
Solution
Charge the device (see chapter
‘Preparing for use’).
This means that the battery has 30% of
its capacity left. Recharge the device as
soon as possible (see chapter ‘Preparing
for use’).
Always end the treatment in the app
or press the on/off button on the
device before you remove the device
from your skin. In this way, you avoid
the unpleasant sensation when you
touch the connectors of the device or
touch the electrodes. This sensation is
unpleasant but not harmful.
Page 37

ENGLISH 37
Problem Possible
The
treatment
feels different
or less
pleasant than
usual.
cause
The intensity
is too high or
too low.
The
electrodes
are not in the
right place.
The
electrodes
are not
properly
attached.
The
electrodes
are too dirty.
Solution
On the program settings screen in the
app, tap + or - to increase or decrease
the intensity. You can also choose a
different treatment program.
Switch off the device and detach it
from the electrodes. Remove the
electrodes from the skin and move
them to a slightly different place.
Switch off the device and detach it
from the electrodes. Check if the
electrodes are attached to the skin
properly.
You can try to clean the electrodes
(see chapter ‘Cleaning’). If this does not
help, replace the electrodes.
Page 38
ENGLISH38
Problem Possible
cause
The
electrodes
are worn.
You are using
electrodes
that are past
their use-by
date.
Signals on the device
Indicator signals on the device
Battery indicator
- The battery indicator shows the following signals:
1 The battery indicator is solid orange when the
2 The battery indicator is solid green when the
Status indicator
- The status indicator on the device shows the
following signals:
1 The status indicator is solid green when the
2 The status indicator ashes orange during
3 The status indicator ashes green when the
Solution
Replace the electrodes.
Remove the electrodes and use new
ones that are not past their use-by
date.
rechargeable battery of the device is low and
during charging.
device is connected to the mains and when the
rechargeable battery is fully charged.
device is switched on and in standby mode.
treatment to indicate that the treatment is in
progress.
device is pairing.
Page 39

ENGLISH 39
Replacement
Electrodes
Replace the electrodes if:
- they are damaged or torn.
- they are past the use-by date indicated on the
resealable bag.
- they have lost their adhesive power. Never use
plaster or tape to attach them to your skin.
- stimulation feels less strong.
- when stimulation is uncomfortable, i.e. when
you experience an unpleasant stinging or biting
sensation.
Note: Always replace the electrodes with electrodes
recommended for this device by the manufacturer.
You can order new electrodes at www.philips.com.
Ordering accessories
To buy accessories or spare parts,
visit www.shop.philips.com/service or go
to your Philips dealer. You can also contact the
Philips Consumer Care Centre in your country.
Electrodes
You can order new electrodes on www.philips.com.
Caution: Only use this device with the adapter,
cord and electrodes recommended by the
manufacturer.
Page 40
ENGLISH40
Guarantee and support
Your device has been designed and developed with
the greatest possible care to guarantee an expected
service life of 5 years.
If you need service or information or if you
have a problem, please visit our website at
www.philips.com/support. You can also contact
the Philips Consumer Care Centre in your country.
Its telephone number and contact URL is:
- United Kingdom: 0844 338 04 89 (5p/min. from a
BT landline, other landline and mobile providers
may charge more)
- Hong Kong: 852 2619 9663 (free of charge for
landline calls).
Guarantee restrictions
The terms of the guarantee do not cover the
electrodes, as the electrodes are subject to wear and
have to be replaced regularly.
Manufacturer’s legal address
Philips Consumer Lifestyle B.V.
Tussendiepen 4, 9206 AD Drachten, Netherlands
Recycling
- This symbol means that this product shall not
be disposed of with normal household waste
(2012/19/EU).
- This symbol means that this product contains
a built-in rechargeable battery which shall not
be disposed of with normal household waste
(2006/66/EC). Follow the instructions in section
Page 41
ENGLISH 41
‘Removing the rechargeable battery’ to remove
the battery.
- Follow your country’s rules for the separate
collection of electrical and electronic products
and rechargeable batteries. Correct disposal
helps prevent negative consequences for the
environment and human health.
- All plastic par ts are marked with recycle symbols.
Removing the rechargeable batteries
Note: Always remove the rechargeable batteries
before you hand in the device at an ofcial collection
point. If you have trouble removing the batteries,
you can also take the device to a Philips service centre,
which will remove the battery pack for you and will
dispose of it in an environmentally safe way.
1 Make sure the rechargeable batteries are
empty. Switch on the device as often as is
necessary until you are no longer able to
switch it on because the batteries have run
out completely.
2 Insert the tip of a at-head screwdriver
between upper and lower shell at the
micro-USB socket.
Note: This action destroys the device and must only
be executed if you intend to discard the device.
3 Turn the screwdriver to separate the two shells.
Note: You may have to insert and turn the screwdriver a
few times to break the two shells loose from each other.
4 When the shells have come apart, use the
screwdriver to remove the batteries. Dispose
of the plastic parts and the batteries separately
according to local rules
Page 42

ENGLISH42
Specications
Model PR3840
Rated voltage(V) - adapter 100-240 ~ 150mA
Rated frequency (Hz) - adapter 50-60
Rated output - adapter 5V , 500 mA
Class Medical device Class IIa
Ingress of water - device IP22
Battery type - device Li-Ion
Adapter The adapter is specied as part of
Pulse output parameters
Frequency range 1-100 Hz
Pulse duration 60-350 µs for programs 1 to 20
Maximum current output 60mA at 500-1000 Ohm
Maximum output voltage 60V
Current pulse shape Biphase symmetrical
the medical system.
(net current 0 DC)
Operating conditions
Temperature from +5°C to +40°C
Relative humidity from 15% to 93% (non-condensing)
Atmospheric pressure from 700hPa to 1060hPa
Page 43
ENGLISH 43
Storage and transport conditions
Temperature - electrodes from 0°C to +40°C
Temperature - device from -10°C to +50°C
Relative humidity less than 93% (non-condensing)
Atmospheric pressure from 700hPa to 1060hPa
Note: If you want to store the electrodes for more
than a month, keep them at temperatures between
+5°C and +27°C.
Note: Do not store the electrodes in the freezer or
refrigerator. Do not expose them to high temperatures,
nor immerse them in water, or leave them outside of
the plastic bag.
Explanation of symbols
Symbols on the adapter and the device
- This symbol indicates that the adapter is double
insulated (Class II), according to IEC 60601-1.
- This symbol means: Do not throw away with the
normal household waste. For further instructions,
see chapter ‘Recycling’.
Symbols on the device
- This is the symbol for serial number. This symbol is
followed by the manufacturer’s serial number.
Page 44
ENGLISH44
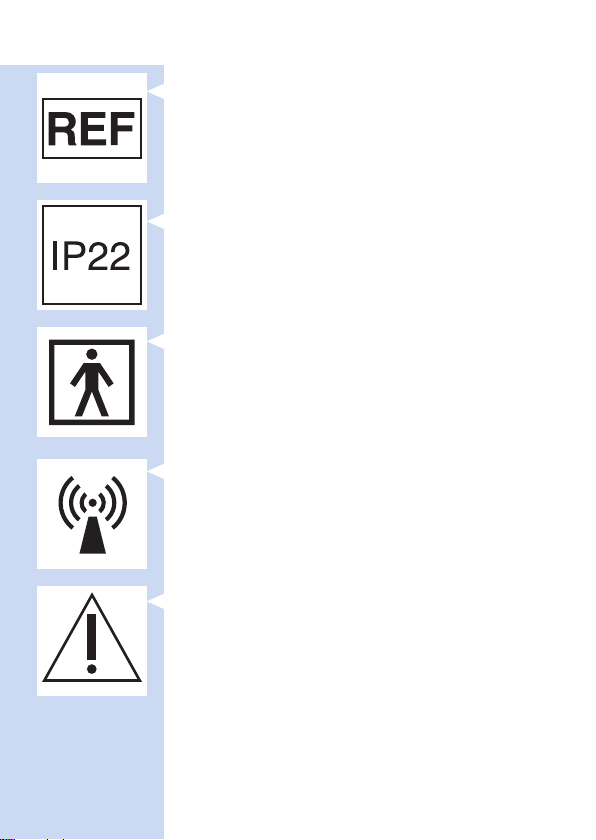
- This is the symbol for reference number. This
symbol is followed by the manufacturer’s
reference number, which is the type number of
the device.
- This symbol on the device means: protected
against access to hazardous parts with a nger and
against vertically falling water drops when tilted up
to 15 degrees.
- This symbol means that the part of the device that
comes into physical contact with the user (also
known as the applied part) is of type BF (Body
Floating) according to IEC 60601-1. The applied
parts are the electrodes.
- This symbol means that this device emits
non-ionising radiation. All devices and systems that
include RF transmitters or that intentionally apply
RF electromagnetic energy must have a label with
this symbol.
- This symbol means: caution TENS output. You nd
this symbol near all electrode connections.
Page 45
ENGLISH 45
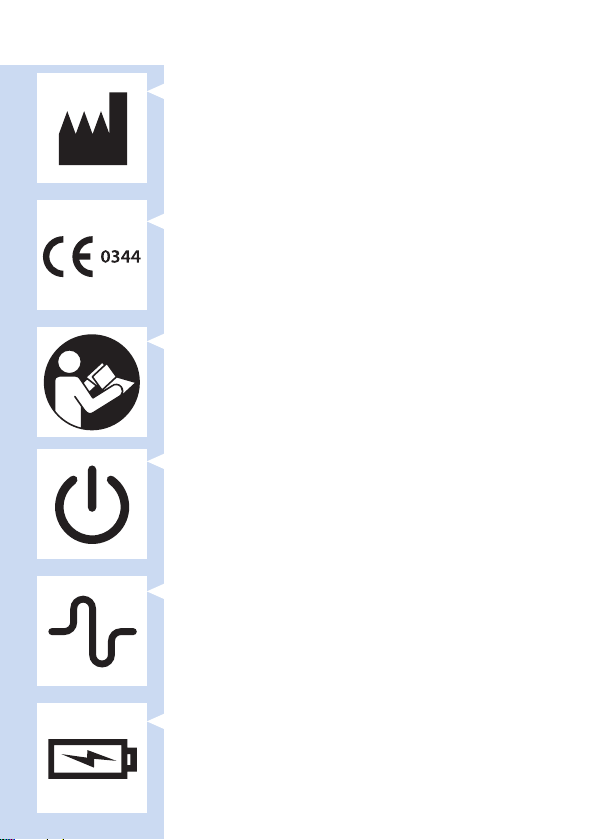
- This symbol means ‘Manufactured by’ and appears
next to the address of the legal manufacturer.
- This symbol means: Conforms to EC Directives.
CE stands for ‘Conformité Européenne’. 0344 is
the number of the notied body.
- This symbol means: read the user manual before
you start using the device.
- This symbol is the mark that identies the
standby button.
- This is the pulse symbol. It appears next to the
status indicator.
- This is the battery symbol. It appears next to the
battery indicator.
Page 46
ENGLISH46
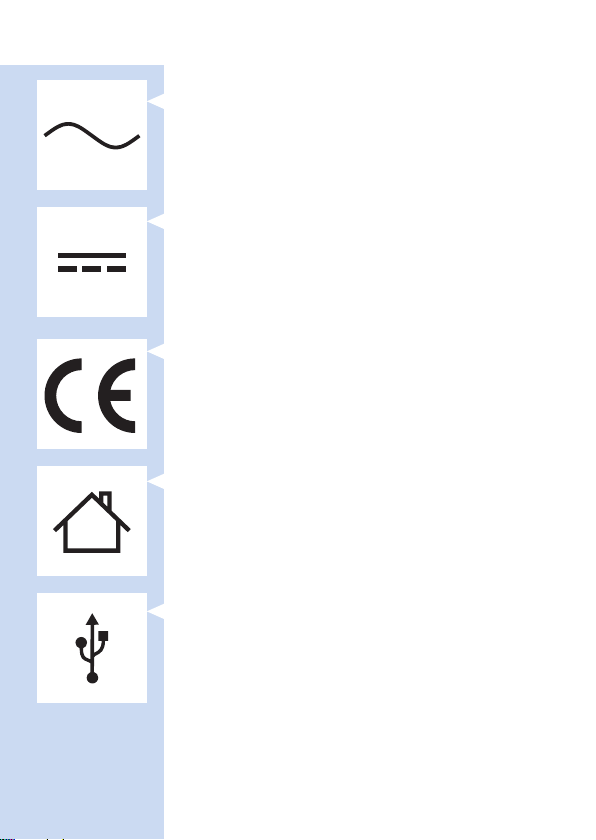
Symbols on the adapter
- This symbol means: alternating current.
- This symbol means: direct current.
- This symbol means: Conforms to EC Directives.
CE stands for ‘Conformité Européenne’.
- This symbol means: may only be used indoors.
- This symbol means: USB connector.
Page 47
ENGLISH 47
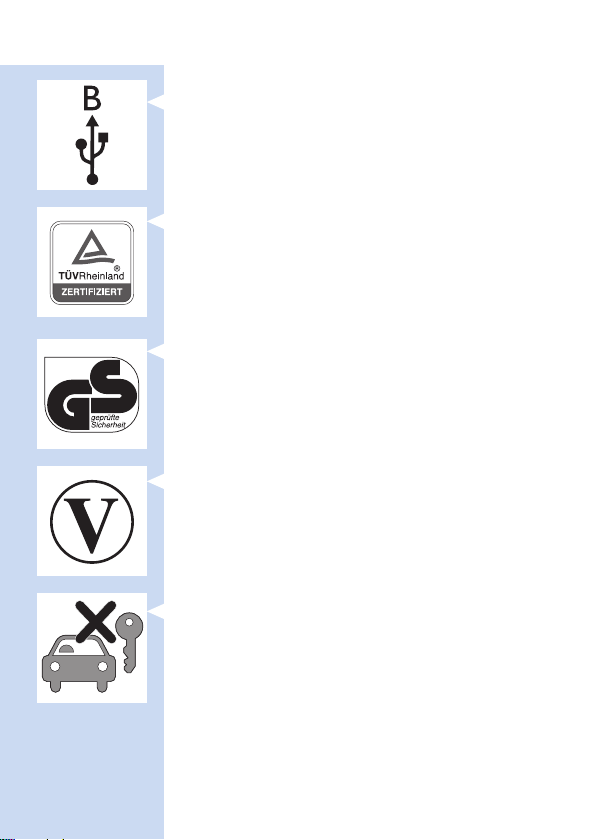
- This symbol means: micro-USB connector.
- This symbol is the certication logo that includes
identication of the accredited compliance test
house.
- This symbol is the certication mark for technical
equipment. The GS mark is based on the German
Equipment and Product Safety Act.
- This symbol shows that the no-load power CEC
(California Energy Commission) Efciency Level is
V (ve) in order to meet EU requirements.
Symbols on electrode bag
- This symbol means: Do not use while driving,
operating machines or performing other activities
that may present a risk of injury.
Page 48
ENGLISH48
- This symbol means: Do not use damaged or worn
electrodes or electrodes that have lost their
adhesive power.
- This symbol means: The electrodes should be used
by one person and not shared with others.
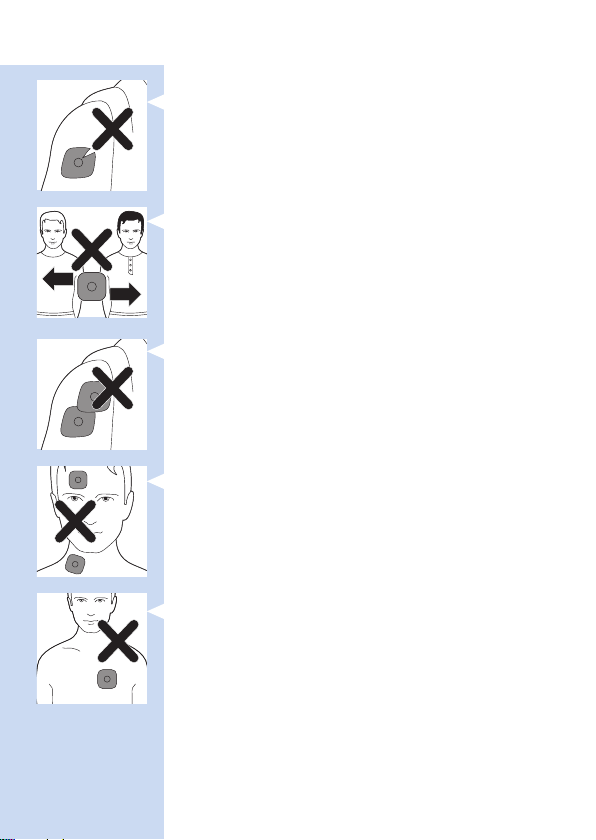
- This symbol means: Do not place the electrodes
on top of each other or so close to each other
that they touch each other.
- This symbol means: Do not place electrodes on
your head or on your neck.
- This symbol means: Do not place the electrodes
on your chest.
Page 49
ENGLISH 49
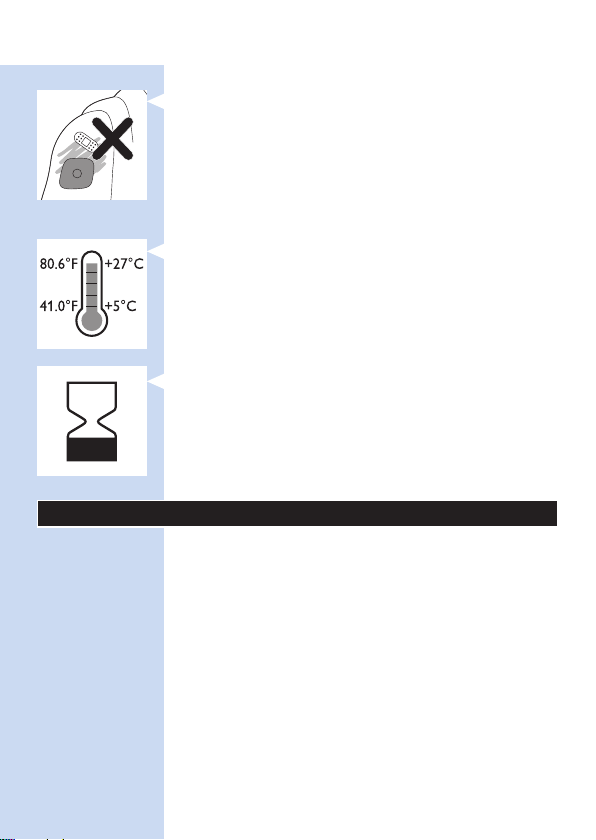
- This symbol means:
- Do not put the electrodes on open wounds,
cancerous lesions, rashes and infected or inamed
skin.
- If you recently had surgery, do not place
electrodes on the cut (Fig. 33).
- This symbol indicates the minimum and maximum
storage temperature for electrodes if they are
stored for more than a month.
- This is the symbol for ‘use by’. It indicates after
which date the electrodes must not be used
anymore.
Electromagnetic emissions and immunity
Electromagnetic Compatibility (EMC)
The PulseRelief device is approved according to
EMC safety standard EN 60601-1-2. It is designed to
be used in typical domestic or clinical environments.
Page 50
ENGLISH50
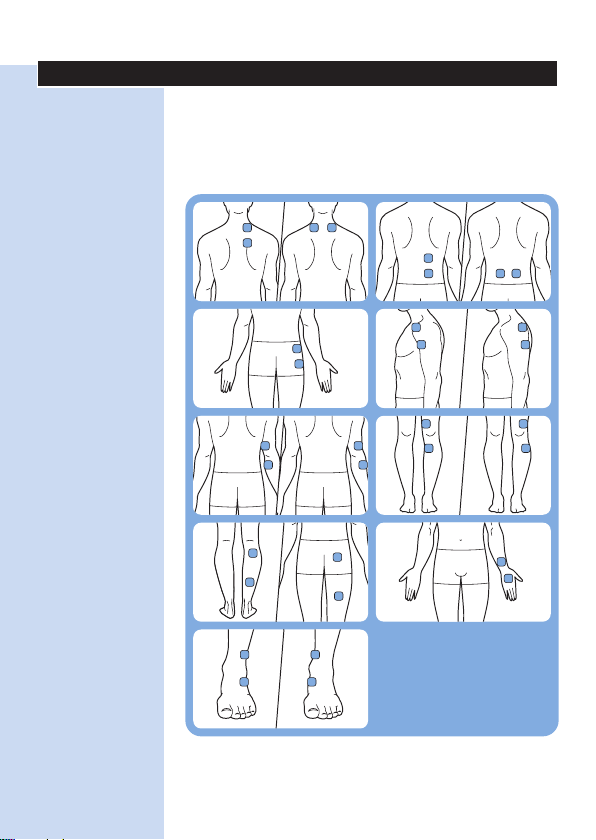
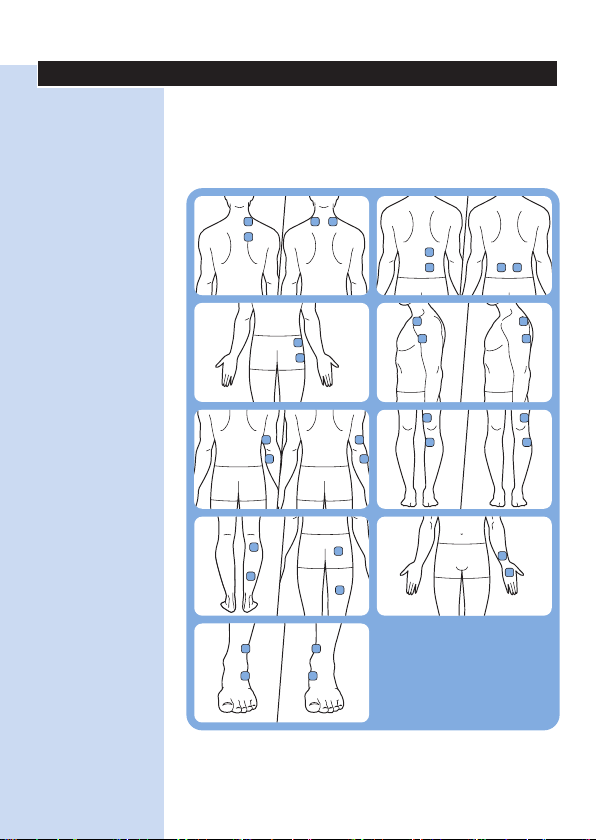
Electrode placement guide
TENS
For a description of the TENS programs
(programs 1 - 15), refer to chapter ‘Pre-set programs’.
Page 51
ENGLISH 51
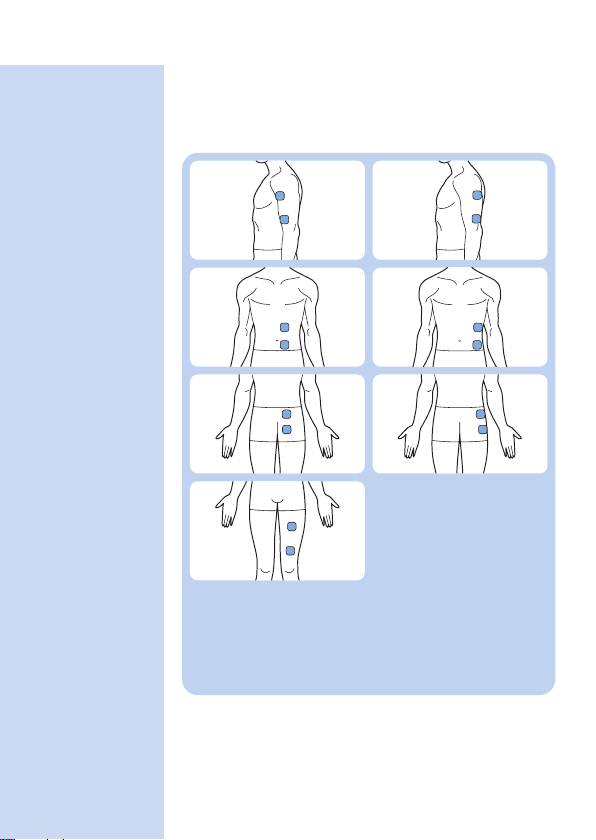
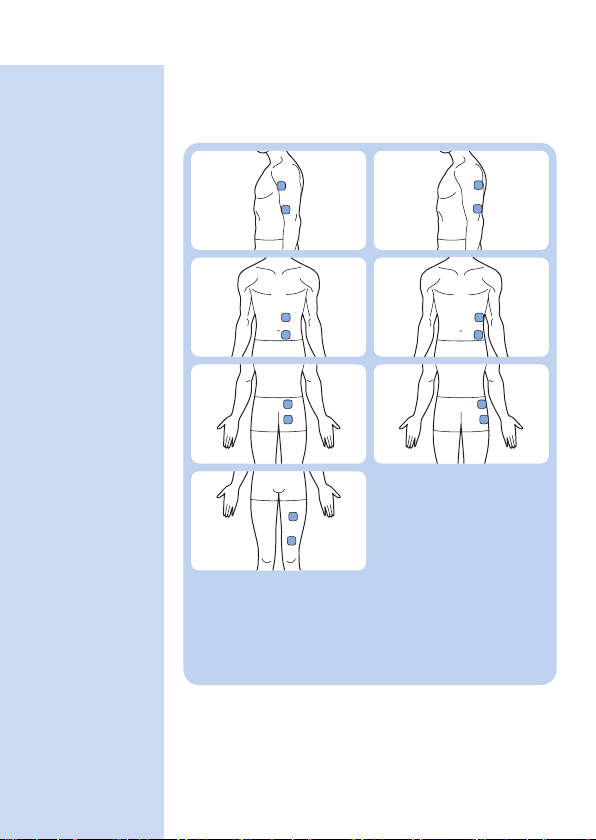
EMS
For a description of the EMS programs
(programs 16 - 20), refer to chapter ‘Pre-set programs’.
Page 52

52 繁體中文
目錄
簡介 52
禁忌症狀、反應和副作用 54
重要安全資訊 55
預設療程 59
產品概要 64
使用前準備 64
使用裝置 66
使用完畢 73
疑難排解 75
裝置上的訊號 77
更換 77
訂購配件 78
保固與支援 78
回收 79
規格 80
符號說明 81
電磁放射與抗擾 88
電極片放置位置指南 89
簡介
恭喜您購買本產品並歡迎加入飛利浦!請於
www.philips.com/pain-relief/register 註冊您的
產品,以善用飛利浦提供的支援服務。
使用 PulseRelief 裝置之前,請先仔細閱讀本使
用手冊。本 PulseRelief 裝置不需醫師處方箋
即可購得。若要讓您的 PulseRelief 裝置發揮最
佳療效,我們建議您根據本使用手冊中的治療
指示來使用產品。如需進一步資訊或有任何問
題,請造訪 www.philips.com/pain-relief,或聯
絡您所在國家/地區的飛利浦客戶服務中心。
根據本使用手冊目前的內容,本裝置已獲得 CE
認證。
Page 53

53繁體中文
適合用途
PulseRelief 專供有輕微到中度慢性疼痛問題,
或是急性術後疼痛問題的成人消費者使用。
本裝置旨在透過經皮神經電刺激 (TENS) 緩解
疼痛,您也可以用本裝置來進行肌肉電刺激
(EMS)。本產品適合在家使用。
如果您最近有接受手術或正在接受醫師的照護,
請務必先諮詢您的醫師,再行使用本裝置。
開始使用裝置前,務請詳讀「禁忌症狀、反應
和副作用」以及「重要安全資訊」單元。
TENS 與疼痛管理
經皮神經電刺激 (TENS) 是一種非侵入性的疼痛
緩解方式,經臨床證明可幫助舒緩疼痛。物理
治療師和其他醫療專業人員可每天使用 TENS
以進行治療。TENS 療程會讓電脈衝通過完好
的皮膚表層,以刺激底下的神經。臨床證明顯
示 TENS 緩解疼痛的方式類似於神經系統本身
的疼痛緩解機制,例如類似於按摩疼痛部位的
效果。
本裝置使用充電式電池產生脈衝。這些脈衝透
過自黏式凝膠電極片應用在皮膚上。您可以從
15 個預設的 TENS 療程中進行選擇,並搭配不
同的脈衝設定,且可視需求調整脈衝強度。
肌肉電刺激
肌肉電刺激 (EMS) 亦稱為神經肌肉電刺激
(NMES) 或電刺激,是使用電脈衝引發肌肉收
縮。刺激裝置能產生脈衝,並透過您要刺激的
肌肉附近皮膚上的電極片傳送脈衝。脈衝以類
似中樞神經系統的方式讓肌肉收縮。您可以從
5 個預設的 EMS 療程中進行選擇。
Page 54

54
繁體中文
疼痛管理
我們都希望能順利進行我們的日常活動。當您
感到疼痛時,當下的直覺反應便是減少活動量
以避免疼痛。但是如此一來,您的體能就會變
得較差,也比較沒辦法盡興地做自己想做的
事。保持活躍 (但不過於勉強) 非常重要,因
為這樣才能避免陷入疼痛始終好不了的循環。
自我管理疼痛的關鍵在於安排適當步調:以您
感到最舒適的方式來分配一天當中的活動時間
與休息時間。安排步調的關鍵在於分散活動時
間,並「在您感到需要休息之前便稍事休息」。
禁忌症狀、反應和副作用
禁忌症狀
如您有下列情況,請勿使用本裝置:
- 體內裝有心律調整器、植入心臟除顫器或其
他金屬或電子裝置 (例如藥物釋放系統),
在此情況下使用本裝置,恐會造成電擊、
灼傷、電氣干擾,甚至是死亡。
- 有心臟疾病。
- 患有癲癇。
- 妊娠第一期的孕婦。由於目前仍不確定 TENS
是否會對胎兒發展有所影響,因此懷孕期間
請避免用於子宮,以減少引發分娩的風險。
若您是孕婦,請務必於使用前諮詢您的醫師
或助產士。
- 有認知障礙。
- 有靜脈或動脈血栓或血栓性靜脈炎。如果您
使用本裝置進行 EMS (肌肉電刺激),可能會
造成血塊移動。
- 若有未確診的疼痛,請勿使用,除非您的醫
師建議使用本裝置。
Page 55
繁體中文
反應
如果疼痛加重,或如果使用裝置時產生不良反
應,請停止使用裝置並諮詢您的醫師。
可能發生的不良反應包括下列項目:
- 黏貼電極片部位出現皮膚過敏,雖然電極片
使用的凝膠並無已知會引起過敏反應的成份
- 黏貼電極片部位出現肌膚灼傷
- 頭痛或其他疼痛感
- 噁心或暈眩
副作用
- EMS 療程結束後的一段時間內,某些肌肉可
能會有痠痛的現象。
- 在進行 EMS 治療期間和剛結束後,電極片下
方或周圍的皮膚可能會有部分紅腫。皮膚紅
腫通常會在治療過後的兩小時內消失。如果
皮膚持續紅腫超過一天,請諮詢您的醫師。
重要安全資訊
警示
一般警示
- 請先仔細閱讀本使用手冊並務必隨時遵照治
療指示。
- 如果疼痛加重,請停止使用裝置並諮詢您的
醫師。
- 此為醫療裝置。請將裝置放在兒童拿不到的
地方。本裝置不應用於兒童,亦不應為兒童
所用。
- 本產品不適用於感官或心智能力退化的成人,
因為他們可能無法根據本使用手冊的指示進
行使用,且治療可能使其感到躁動。
- 本裝置非為兒童設計製造,請勿將本裝置用
於兒童身上。
55
Page 56

56
繁體中文
- 請勿擅自改造本裝置或電極片,否則會導致
運作失常。
- 只能使用產品所附的轉換器為裝置充電。
使用其他轉換器可能會發生危險。
- 本裝置專供單一成人操作及使用所設計。
請勿用於或治療下列身體部位或區域
- 刺激頸部兩側的頸動脈穴,可能會對您的心
律或血壓造成嚴重的不良影響。
- 刺激頸部前側可能會造成嚴重的肌肉痙攣,
並可能因此導致呼吸道閉鎖及呼吸困難。
- 請勿在胸部施加刺激,因為電流進入胸部可
能會造成心律不整,且有致命危險。
- 由於尚未確知刺激腦部的影響,請務必避免
刺激頭部或頭部兩側。
- 請勿在開放性傷口上放置一個或兩個電極片。
用於開放性傷口上可能會導致該區域承受過多
電流,進而造成燒傷。
- 如果您最近有接受手術,請勿在手術傷口上
放置一個或兩個電極片。請將電極片放置在
距離手術傷口 3 至 5 公分處,或放置在完好
皮膚的近端神經或脊椎附近。
- 請勿在癌症病變的部位附近放置電極片,
否則可能對癌症病變部位產生負面影響。
- 請勿將電極片置於缺乏正常知覺的皮膚部位
上,以免因無法察覺施加的高強度電流而造
成皮膚電燒傷。
- 請勿在開放性傷口或過敏部位上放置電極片。
開放性傷口可能使過多電流進入療程部位,
導致潛在燙傷。也可能造成電極片內的物質
進入皮膚。
- 請勿將電極片置於腫脹、發紅、感染或發炎
部位,或皮膚炎部位 (例如靜脈炎、血栓性
靜脈炎和靜脈曲張) 上。切勿在已知罹患血
栓或血栓性靜脈炎的部位施加刺激,因為刺
激可能加速循環,導致發生栓塞的風險大幅
增加。
Page 57

繁體中文
- 請勿將電極片置於體腔內,例如口腔。本裝
置並非針對內用而設計。
請勿在下列情況之下使用本裝置
- 如果您最近有接受手術或正在接受醫師的照護,
且尚未諮詢您的醫師,則請勿使用本裝置。
- 如果您容易因任何衝擊或受傷而有內出血現
象,則請勿使用本裝置。
- 如果肌肉收縮可能會干擾復原,則請勿使用
EMS 刺激使肌肉收縮。舉例而言,如果肌肉
或肌腱有撕裂傷,肌肉收縮可能會像自主收
縮那樣,讓撕裂傷惡化。最近動過手術,或
是遭遇急性創傷或脫臼,可能也會導致上述
情況。肌肉收縮對肌腱炎來說也會使得症狀
惡化。
- 請勿在開車、操作機器,或進行任何其他會因
電刺激而造成受傷風險的活動時使用本裝置。
- 如果您可能會在治療期間睡著,請勿使用本
裝置,否則可能來不及及時察覺傷害。如果
您在睡眠期間使用本裝置,則請設定定時器
以自動關閉裝置。
- 請勿在泡澡、淋浴或在游泳池內使用本裝
置,這會增加觸電及皮膚燙傷的風險。
- 請勿在有電子監控設備 (例如心臟監視
器、ECG 警示) 時施加刺激,因為使用電刺
激裝置時,這類設備可能無法正常運作。
- 當您與高頻外科醫療設備連接時請勿使用本
裝置,否則可能造成電極片下的肌膚灼傷,
並導致裝置損壞。
- 請勿在距離短波或微波醫療設備 1 公尺內的
範圍使用本裝置。靠近這類設備可能會導致
不穩定的裝置輸出。
- 使用可攜式 RF 通訊設備 (包括天線纜線及外
部天線等周邊設備) 時,應與原廠指定的纜線
等裝置所有部分保持 30 公分 (12 英吋) 以上
的距離,否則可能導致設備效能退化。
57
Page 58

58
繁體中文
- 使用非本設備製造商所指定或提供的配件、
轉換器及纜線,可能導致設備的電磁放射增
加或電磁抗擾功能下降,以致造成運作不良。
警告
- 如果您最近動過手術,使用本裝置之前請先
諮詢您的醫師。使用本裝置可能會妨礙復原
過程。
- 請在休息狀態下使用陣發式 TENS 療程,
因為這類療程會在治療部位造成肌肉收縮。
- 請確定您結束飛利浦療程應用程式的療程,
或是按下裝置上的開關按鈕,然後才可取下
裝置或電極片。如果您沒有結束療程,當您
碰觸磁鐵時,手指可能會產生不適感。此不
適感不會造成傷害,但可能會不太舒服。
- 使用本裝置時,請僅搭配製造商建議的轉換
器、電線和配件。
- 使用前,請務必檢查裝置和電極片是否損
壞。若裝置或電極片已受損,則請勿使用。
- 本裝置不防水。請勿在潮濕的環境中使用本
裝置,並應避免其受潮。
- 雖然您可在室內及室外使用本裝置,但裝置
無法承受所有天氣狀況。
- 本裝置無法承受高溫和低溫,請查閱「規
格」單元中的操作環境資訊。
- 電極片的保存時間有限。使用前,請檢查包
裝上的有效期限。請勿使用已到期的電極
片。若要訂購替換的電極片,請參閱「訂購
配件」單元。
- 請勿使用貼布或膠帶將電極片黏貼在皮膚上。
- 請務必依照「使用裝置」和「使用完畢」單
元中的說明來使用並存放電極片。
- 如果裝置無法如此處所述正常作用,則請停
止使用裝置並與客戶服務中心聯絡。如需聯
絡詳細資料,請參閱「保固與支援」單元。
Page 59

繁體中文
符合標準
- 本裝置符合此類 Class IIa 電子醫療器材及家
用電刺激器材的相關標準。
- 本飛利浦產品符合所有電磁場暴露的相關適
用標準和法規。
預設療程
本裝置針對 TENS 提供 15 個預設療程,
針對 EMS 提供 5 個預設療程。請注意,清單中
的療程順序不表示就特定情況建議使用特定療
程。由於療程的效果可能因人而有極大差異,
我們建議您嘗試不同療程,以找出效果最佳的
療程。
療程概要
傳統式 TENS 療程
傳統式 TENS是最常用的 TENS 療程,採用高
頻刺激。其運作乃根據閘門控制理論,意即此
類刺激會阻斷神經系統中的疼痛訊號傳輸。作
用方式相當於「揉散疼痛感」的行為。大多數
人使用傳統式 TENS 的每次治療時間約為 30 分
鐘,但只要您沒有感覺不適,便可視需求頻繁
且長時間使用。刺激期間的療效通常最顯著,
且在刺激結束後,效果也會很快消失。您必須
適當調整療程的強度,以便明確感覺到刺激的
效果。刺激作用切勿令人感到不適或疼痛。
59
傳統式 TENS 療
程名稱
傳統式 帶給您連續麻刺感的刺激 沒有限制
徹底刺激 帶給您更徹底的刺激感覺 沒有限制
預先活化 帶給您更局部且柔和的刺激 沒有限制
療程說明 建議治療時間
Page 60

60
繁體中文
傳統式 TENS 療
程名稱
柔和刺激 帶給您較柔和的刺激感覺,例
深入刺激 帶給您較深入的刺激感覺 沒有限制
放射脈衝 帶給您更放射性的刺激感覺 沒有限制
陣發式 TENS
療程名稱
連續脈衝 帶給您連串脈衝式刺激,釋放體內
慢速推拿 帶給您較慢速、透過按摩的連串脈
溫和推拿 帶給您較溫和的連串脈衝刺激,釋
療程說明 建議治療時間
沒有限制
如針對敏感的身體部位
陣發式 TENS 療程
陣發式 TENS 是以一連串的脈衝給予高頻刺
激。此類型的刺激已知可用來觸發腦內啡的分
泌。腦內啡是身體自行產生的止痛機制。您一
天可使用陣發式 TENS 多次,每次約 30 分鐘,
例如一天可使用 3 次。我們建議您調整陣發
式療程的強度以感受強烈的刺激。陣發式療程
通常會提供更強烈的刺激感,因此可能會引起
不適。同時,我們也建議您將強度調高至可在
治療部位產生明顯肌肉收縮的程度。此類收縮
不會產生危害,不過如果您對收縮現象感到不
適,可以選擇不同療程,或將電極片移到不同
部位以降低強度。陣發式 TENS 會在治療部位
造成肌肉收縮,因此請在靜止狀態下使用。
療程說明 建議治療
時間
30 分鐘*
的腦內啡
30 分鐘*
衝刺激,釋放腦內啡
30 分鐘*
放體內的腦內啡
Page 61

繁體中文
61
陣發式 TENS
療程名稱
深入推拿 帶給您更局部、更深入的連串脈衝
連串脈衝
擴散
調頻式 TENS 療
程名稱
混合頻率 帶給您流竄的刺激感覺 30 分鐘*
脈波按摩 帶給您更脈衝式的刺激感覺 30 分鐘*
深入按摩 帶給您較慢速、較深入的流
輕柔按摩 帶給您溫和流竄的刺激感覺 30 分鐘*
療程說明 建議治療
刺激,釋放體內的腦內啡
帶給您更擴散式的連串脈衝刺激,
釋放體內的腦內啡
*可選擇一天使用數次,可在應用程式中變更
調頻式 TENS 療程
調頻式 TENS 療程的脈衝頻率高低各有不同。
在某些情況下,此療程比其他療程更為舒服或
有效。您一次可使用調頻式 TENS 約 30 分鐘,
一天可使用多次,例如一天可使用 3 次。
療程說明 建議治療時間
竄感覺
*可選擇一天使用數次,可在應用程式中變更
肌肉電刺激 (EMS) 療程
肌肉電刺激 (EMS) 亦稱為神經肌肉電刺激
(NMES) 或電刺激,是使用脈衝引發肌肉收縮。
例如,可用來協助強化肌肉。
EMS 只能用於健康且沒有受傷的肌肉。由於
EMS 療程會造成肌肉收縮,因此請在靜止狀態
下 (坐、臥躺) 使用。首次使用者可能會對肌肉
電刺激感到不熟悉且不尋常。所以我們建議您
時間
30 分鐘*
30 分鐘*
30 分鐘*
Page 62
繁體中文
62
一開始先使用低強度設定,適應這種感覺之後
再選擇較高的強度設定。通常,刺激必須帶來
舒適感。肌肉收縮不應讓人感到精疲力竭、
累人或疲倦。進行強烈的運動或勞動之後,
建議您使用較低的設定,以避免肌肉疲勞。
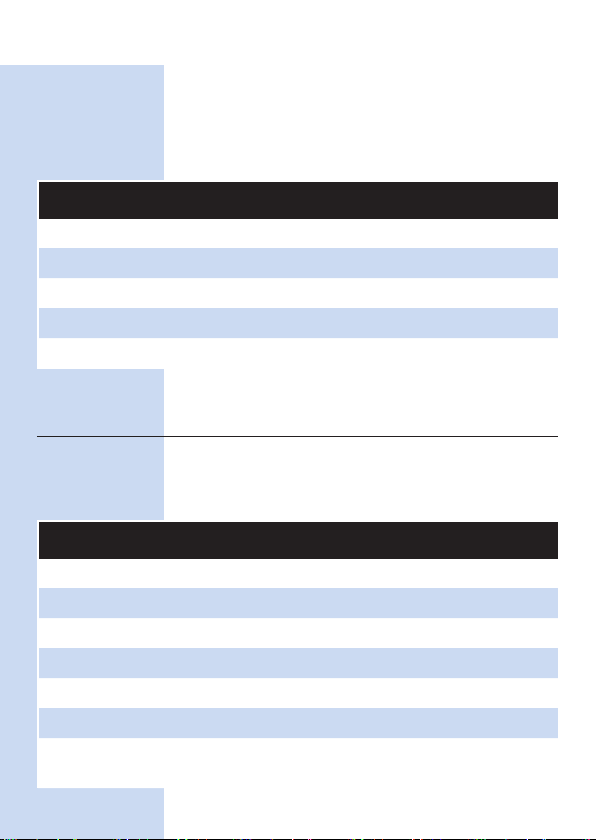
EMS 療程名稱 療程說明 建議治療時間
脈衝式肌肉刺激 帶給您怡然的舒緩感 30 分鐘*
電流式肌肉刺激 帶給您舒適的麻刺感 20 分鐘*
電波式肌肉刺激 帶給您溫和的收縮與放鬆感 30 分鐘*
起伏式肌肉刺激 帶給您肌肉振奮感 25 分鐘*
彈跳式肌肉刺激 帶給您節律性的放鬆感 20 分鐘*
*可選擇一天使用數次,可在應用程式中變更
療程規格
下表可提供您關於各療程的頻率、脈波寬度及
預設時間之相關資訊。所有療程的電流脈衝均
具有對稱式雙相波形。
療程名稱 療程類型 頻率 脈波寬度 預設時間
傳統式 傳統式 100 Hz 200µs 連續
徹底刺激 傳統式 40 Hz 200µs 連續
預先活化 傳統式 100 Hz 150µs 連續
柔和刺激 傳統式 80 Hz 60µs 連續
深入刺激 傳統式 80 Hz 150µs 連續
放射脈衝 傳統式 60 Hz 150µs 連續
連續脈衝 陣發式 100 Hz、2 Hz250µs 30 分鐘
Page 63
繁體中文
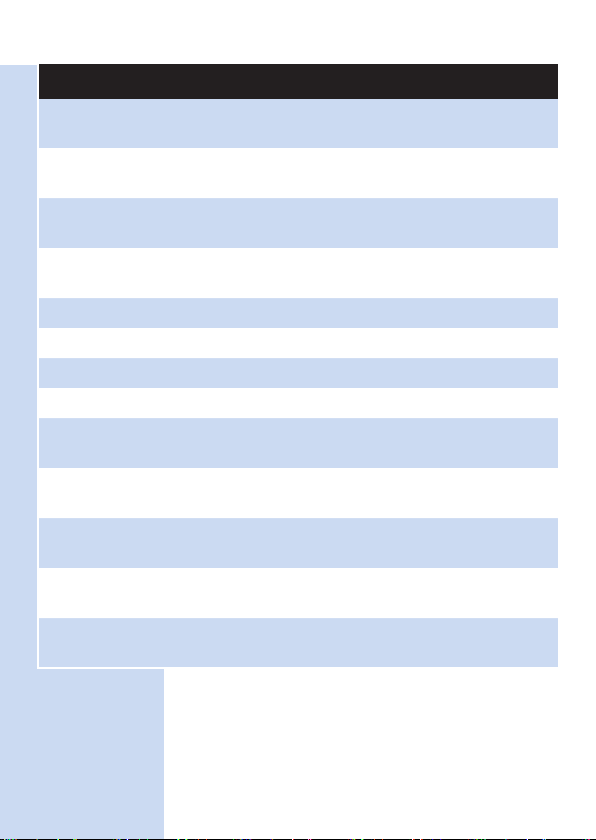
療程名稱 療程類型 頻率 脈波寬度 預設時間
慢速推拿 陣發式 80 Hz、1 Hz200µs 30 分鐘
溫和推拿 陣發式 80 Hz、3 Hz200µs 30 分鐘
深入推拿 陣發式 80 Hz、2 Hz150µs 30 分鐘
63
連串脈衝
擴散
混合頻率 調頻式 8-100 Hz 250µs 30 分鐘
脈波按摩 調頻式 2-8 Hz 250µs 30 分鐘
深入按摩 調頻式 2-80 Hz 180µs 30 分鐘
輕柔按摩 調頻式 8-80 Hz 150µs 30 分鐘
脈衝式肌肉刺激調幅式 40 Hz 200µs 30 分鐘
電流式肌肉刺激調幅式 50 Hz 150µs 20 分鐘
電波式肌肉刺激調幅式 65 Hz 200µs 30 分鐘
起伏式肌肉刺激調幅式 40 Hz 350µs 25 分鐘
彈跳式肌肉刺激調幅式 50 Hz 300µs 20 分鐘
陣發式 80 Hz、2 Hz180µs 30 分鐘
Page 64
64 繁體中文
產品概要 (圖 1)
1 開關按鈕
2 狀態指示燈
3 可拆式接頭
4 裝置的 Micro-USB 插孔
5 電池指示燈
6 轉換器
7 標準 USB 插頭用插座
8 標準 USB 插頭
9 Micro-USB 插頭
10 自黏式凝膠電極片
使用前準備
為裝置充電
若要開始使用本裝置,首先必須為裝置充電。
在室溫環境中為裝置充電的時間約需 5 小時。
充電式電池充飽電後,將具備足夠電力,
可在正常操作環境下連續使用約 8 小時。
注意: 如果開始進行治療時,裝置未充飽電,
則電池電力可能會於治療期間耗盡。我們建議
您在開始進行治療前,務必先將裝置充飽電。
注意: 裝置充電時,無法進行療程。
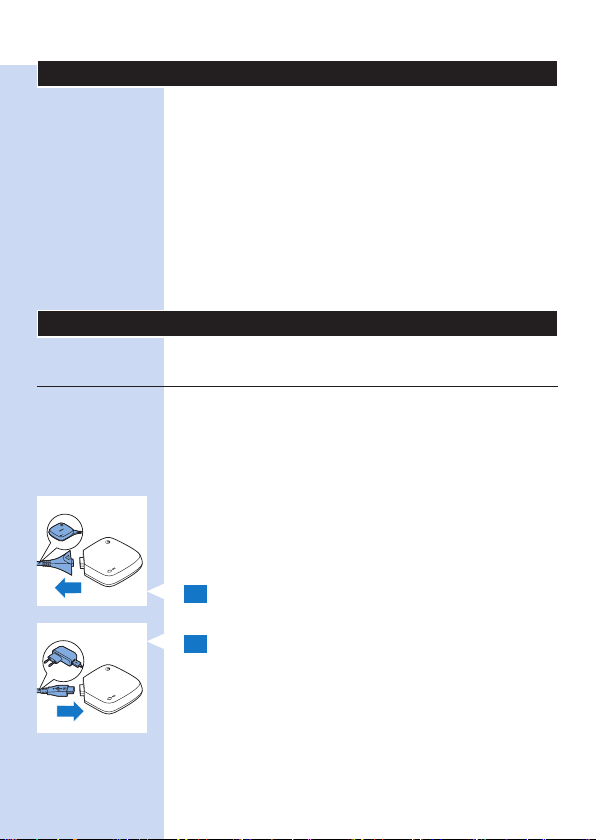
1 從附有電池指示燈裝置的 Micro-USB
插孔,拔除連接兩個裝置的纜線。
2 將轉換器纜線的 Micro-USB 插頭插入裝置
的 Micro-USB 插孔。
Page 65
65繁體中文
3 將 USB 插頭插入轉換器的插孔,然後將轉
換器插入電源插座。
注意: 將 USB 插頭插入周圍可適當觸及的電
源插座,以便隨時能輕易拔下 USB 插頭。
本裝置僅於充電時才連接電源。
, 電池指示燈在充電期間會持續亮橘燈。
當電池充飽電力後,電池指示燈會轉為持續
亮綠燈。
4 從裝置的 Micro-USB 插孔,拔除 Micro-
USB 插頭。
注意: USB 插孔僅限用於充電 (需使用隨附的電
源轉換器) 或用於連接纜線 (以便連接兩個裝置)。
請勿將此插孔用於任何其他用途。
5 將裝置的接頭插入裝置的 Micro-USB
插孔,重新連接連結兩個裝置的纜線。
安裝及設定療程應用程式
您需要飛利浦療程應用程式來操作裝置。請
前往 Apple App Store 或 Google Play 搜尋
「Philips Treatment」(飛利浦療程) 應用程式,
並按安裝。如需更多詳細資料,請參閱快速入
門指南。
注意: 療程應用程式適用於 PulseRelief
(PR3840) 和 BlueTouch (PR3743、PR3741)。
兩者的安裝程序相同。
Page 66
66 繁體中文
使用裝置
連接電極片與裝置
1 請確定您要黏貼電極片的皮膚外觀健康,
沒有傷口或過敏情形。
TENS 警告:
- 請勿開放性傷口上放置電極片。用於開放性
傷口上可能會導致該區域承受過多電流,
進而造成燒傷。
- 如果您最近有接受手術,請勿在手術傷口上
放置電極片。請將電極片放置在距離手術傷
口 3 至 5 公分處,或放置在完好皮膚的近端
神經或脊椎附近。
- 請勿在癌症病變的部位附近放置電極片,
否則可能對癌症病變部位產生負面影響。
EMS 警告:
- 只能將電極片貼在健康且沒有受傷的肌肉上。
2 請用濕布清潔皮膚並將皮膚擦乾。您要貼
上電極片的皮膚部位必須保持乾燥、潔淨,
不能塗抹乳霜或乳液。
注意: 皮膚上的灰塵、油脂或微粒可能會卡在
電極片的凝膠中,這會對電極片的黏性產生不
良影響。
3 從塑膠袋取出電極片,並檢查是否有損壞及
磨損跡象。
警告: 請勿使用已到期的電極片。有效日期標
示在可重複密封的塑膠袋上。
注意: 請在電極片損壞、變髒、失去黏性,
或當您開始對刺激感到不適 (即當您感到不舒服
的刺痛感) 時更換電極片。
Page 67
4 請從墊片上取下電極片,然後將其放在您要
進行治療的皮膚部位。請參閱下文的「電極
片放置位置」一節,以及放置位置指南。
5 將第二片電極片放在您要進行治療的身體部
位上。
注意: 請務必先將電極片置於皮膚上,再連接
裝置。
注意: 請勿將電極片相互疊放,或讓它們過於
靠近以至於相互碰觸。
6 將裝置連接至電極片上。本裝置的中央附
有磁鐵,以確保可輕鬆連接電極片的金屬接
頭。當裝置正確鎖入電極片時,您會聽到喀
噠一聲。
注意: 您可以在衣服底下貼戴連接至裝置的電
極片,治療期間亦如是。
注意: 在治療期間,請查閱電極片放置位置指
南,瞭解建議放置電極片的位置。該資訊僅供
建議參考。當您將裝置戴在身上時,仍然可以
進行裝置目標用途所允許或「重要安全資訊」
單元未列出警告的所有活動。您也可以在每個
療程中間的空檔,繼續將裝置戴在身上。
電極片放置位置
若要從刺激當中得到最佳效果,正確放置電極
片甚為重要。黏貼電極片前,請務必確定治療
的皮膚部位擁有正常的知覺反應。每個人的最
佳位置可能稍微不同,因此請試著四處移動電
極片,直到您得到最有效的效果為止。在某些
情況下,標記位置有助於日後繼續使用該位
67繁體中文
Page 68
68 繁體中文
置。如需電極片放置位置的相關建議,請參閱
「電極片放置位置指南」。請注意,某些身體
部位的電極片放置位置可能需要他人協助。
一般而言,請將電極片置於或靠近治療部位。
刺激作用可能會造成明顯的肌肉收縮現象,
在使用陣發式 TENS 療程時尤其如此 (療程
7 至 11)。這並不會造成傷害,但如果您對此類
收縮感到不舒服,則請嘗試將電極片移至其他
部位。請注意,當您使用 EMS 療程 (療程 16
至 20) 時,肌肉收縮為所需的效果。如果 EMS
療程沒有造成肌肉收縮,就表示您沒有正確放
置電極片,或是您選擇的強度太低。
警示
- 請勿將電極片放置在頸部兩側的的頸動脈穴
或頸部前方,亦不可放置於胸部或頭上。
- 請勿開放性傷口上放置電極片。用於開放性
傷口上可能會導致該區域承受過多電流,進
而造成燒傷。
- 如果您最近有接受手術,請勿在手術傷口上
放置電極片。請將電極片放置在距離手術傷
口 3 至 5 公分處,或放置在完好皮膚的近端
神經或脊椎附近。
- 請勿在癌症病變的部位附近放置電極片,否
則可能對癌症病變部位產生負面影響 (請參閱
「重要安全資訊」單元)。
使用應用程式以開始和停止治療
1 開啟行動裝置上的藍牙。
2 使用開關按鈕,將裝置切換至待機狀態。
, 裝置上的狀態指示燈持續亮起綠燈時,代表
裝置處於待機模式,可供進行治療。
, 如果您沒有在 5 分鐘內開始療程,則裝置會
自動關閉電源。若發生此情況,您必須再次
按下開關按鈕,才能開始療程。
Page 69
69繁體中文
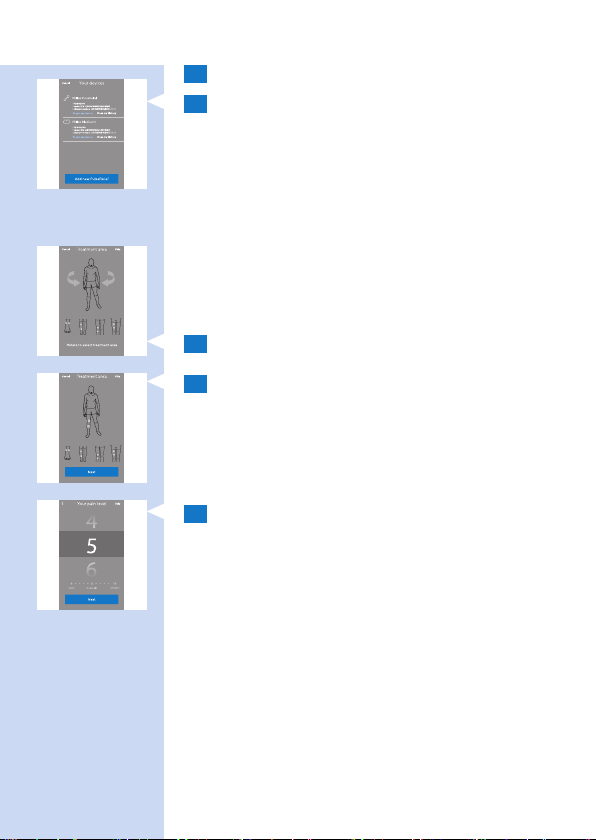
3 開啟飛利浦療程應用程式。
4 如果只有 PulseRelief 裝置與應用程式配
對,應用程式會自動選擇 PulseRelief。如
果 PulseRelief 和 BlueTouch 裝置皆與應用
程式配對,請按一下「PulseRelief」以選擇
裝置。
選擇治療部位
在首次使用時,您必須選擇治療部位。如果您
之前已用過本裝置,則可以選擇「My previous
treatment」(上一次療程) 重複上次療程,
或「Select new treatment」(選擇新療程) 開始
不同的療程。
1 旋轉畫面上的身體動畫。
2 點按其中一個建議的位置,讓電極片選擇您
要治療的部位。
為您的疼痛強度評分
1 垂直撥動,以從 0 至 10 分的範圍內,評定
疼痛的強度。如果您未感覺到疼痛,請點選
0,但如果您感覺極度疼痛,請點選 10。如
果您的疼痛程度介於這兩者之間,請點選適
當數字以進行評分。
注意: 您所指定的疼痛強度並不是此應用程式
用來決定治療強度的依據。此分級只是要作為
記錄以儲存在您的療程日記中。如果不需要此
功能,您可以在應用程式的設定索引標籤中關
閉此功能。
Page 70
70 繁體中文
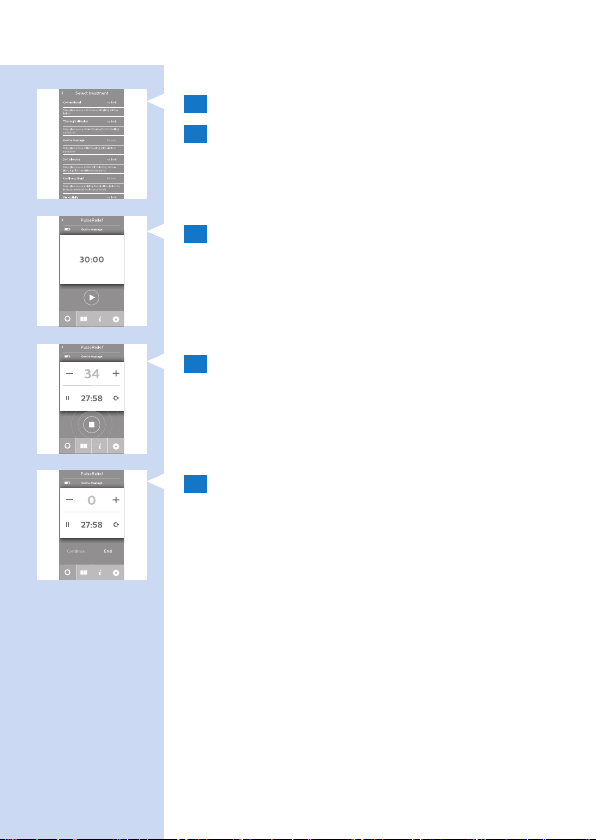
選擇您的療程
1 捲動療程清單,並按一下療程以進行選擇。
2 此時會顯示療程的開始畫面。
開始和停止治療
1 按一下畫面上的開始按鈕。
, 療程畫面會開啟,時間開始倒數。
, 裝置上的狀態指示燈會開始閃橘燈。
2 在療程畫面上,您可以按一下 + 或 -,
將強度提高或降低至舒適的程度。
3 在指定了最長治療時間的療程中,療程會持
續到定時器倒數計時至 0 為止。在未指定最
長治療時間的療程中,定時器會從 0 開始計
算。它會繼續計算,直到您停止療程為止。
如果您要停止或中斷治療,按一下脈衝治療
指示燈中央的四方形以停止療程。
- 如果要恢復療程,請按一下「Continue」
(繼續) 或時間旁邊的箭頭。
- 如果要結束療程,請按一下「End
treatment」(結束療程)。
Page 71
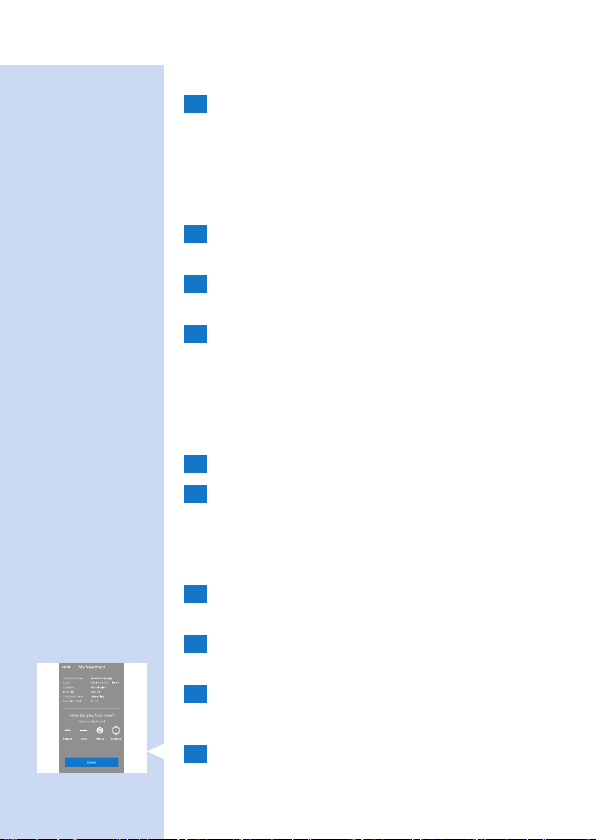
切換至其他療程
1 療程進行中若要切換至其他療程,請執行下
列操作:
- 在智慧型手機或 iPod 上,按一下療程畫面的
療程名稱。
- 在平板電腦上,按一下「Treatment list」
(療程清單)
2 此時療程清單會開啟。按一下您要使用的療
程。
3 此時會顯示療程的開始畫面。按一下開始按
鈕,以開始療程。
4 按一下 + 以將強度提高至舒適的程度。
注意: 當您在治療期間切換至其他療程時,
強度會自動重設為 0。此為安全措施。先前療
程的強度對新的療程來說,可能會太強。
調整療程時間
1 按一下顯示在療程畫面上的時間。
2 變更剩餘的療程時間。
快速開始
從開始畫面,您可以立即開始您在上個療程中
使用的療程。
1 從開始畫面,按一下「My previous
treatment」(上一次療程) 中的療程名稱。
2 垂直撥動,以從 0 至 10 分的範圍內,
評定疼痛的強度。
3 開始療程。
其他應用程式功能
1 在療程結束之後,畫面會要求您說明您的感
受,只要按一下其中一個圖示即可。
71繁體中文
Page 72
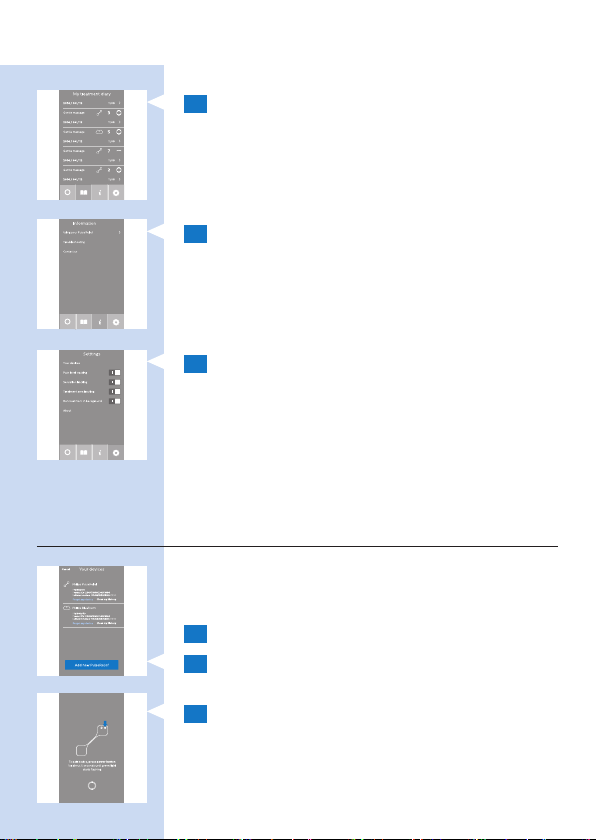
72 繁體中文
2 按一下書籍符號以開啟您的療程日記。
日記會顯示進行療程的時間、您使用哪一個
療程,以及療程持續多久時間。
- 按一下箭頭,以瞭解詳情。
3 按一下「i」以開啟資訊畫面。此畫面包含下
列項目:
- 使用您的 PulseRelief
- 與我們聯絡
4 按一下設定符號以開啟設定畫面。此畫面包
含下列項目:
- 您的裝置
- 疼痛程度追蹤
- 感覺追蹤
- 治療部位追蹤
- 在背景執行療程
- 關於
使用第二個裝置
如果要治療身體較大的部位,或是同時治療不
同部位,您可以將第二個 PulseRelief 裝置與應
用程式配對。
1 按一下設定符號,然後按一下「您的裝置」。
2 在畫面底部按一下您要配對的裝
置:PulseRelief。
3 當應用程式告訴您要開啟裝置時,請照做。
Page 73
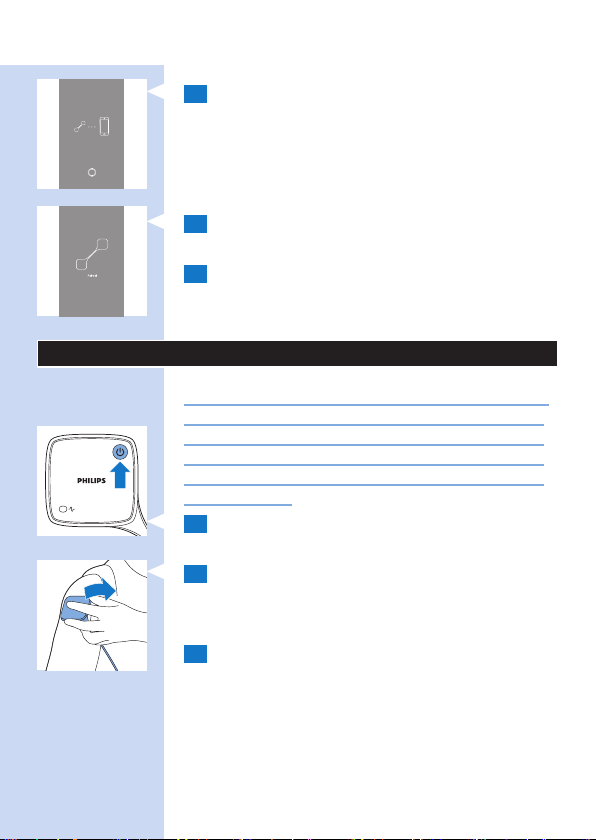
4 應用程式會進入配對模式。
5 在裝置與應用程式配對之後,智慧型手機圖
示會消失並僅顯示該裝置。
6 按一下「上一步」以回到療程畫面。
使用完畢
警告: 請確定您結束應用程式的療程,或是按
下裝置上的開關按鈕以關閉裝置,然後才可取
下裝置或電極片。如果您在療程結束之前取下
裝置或電極片,當您碰觸接頭時,手指可能會
產生不適感。此不適感不會造成傷害,但可能
會不太舒服。
1 按下開關按鈕以關閉裝置。
2 將裝置從電極片拔離拆下。
注意: 如果您忘記關閉裝置,裝置會在您拆下
後的 5 分鐘內自動關閉。
3 如果您一天當中使用裝置的次數相當頻繁,
建議您先為裝置充電,再進行下一次療程。
73繁體中文
Page 74
74 繁體中文
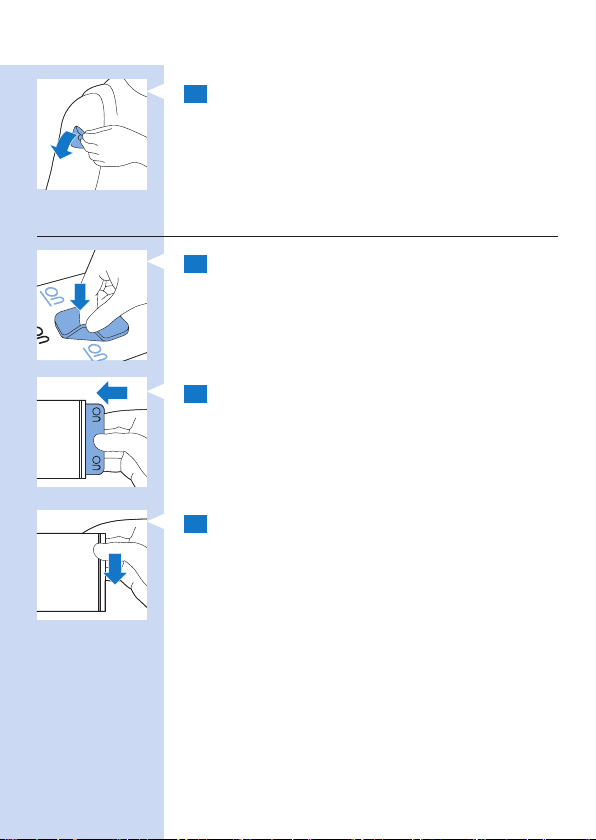
4 從電極片的邊緣將其從皮膚上撕起。
注意: 只要治療有效,且電極片下方並未出現
皮膚過敏,您就可以將電極片留在相同部位。
如果治療的部位不再有效,或是出現皮膚過敏,
請將電極片移動至不同的部位。
收納電極片
1 將電極片貼回墊片上。
2 將黏上電極片的墊片放回袋中。
3 將袋子密封好,以防沾染灰塵。
注意: 為了妥善保存電極片並防止凝膠層乾
掉,當身體不使用電極片以進行治療時,請一
律將其放回密封袋中。請將密封袋完全密封,
以防沾染灰塵。
注意: 如果您要存放電極片的時間超過一個
月,請將其置於溫度 +5°C 到 27°C 之間的
地方。請勿將電極片存放於冷凍庫或冰箱中,
並避免高溫環境或陽光直接照射。
Page 75

繁體中文
清潔
請勿將本裝置浸入水中或置於水龍頭下沖洗。
請勿將電極片浸入水中。
1 請用濕布及溫和的清潔劑來清潔裝置,例如
洗碗精。
注意: 您也可以使用濃度 70% 的異丙醇 (IPA)
來清潔裝置。
警告: 除前述清潔劑外,請勿使用任何其他清
潔劑,因為其他清潔劑可能會破壞材質,例如
導致失去光澤。
2 如果電極片髒汙,請將水滴在手指上並輕輕
將髒污自表面擦除。
注意: 請勿使用肥皂或酒精清潔電極片。
疑難排解
本單元概述您使用 PulseRelief 時最常遇到的問
題。如果您無法利用以下資訊解決您遇到的問
題,請造訪 www.philips.com/support 查看常見
問題清單,或聯絡您所在國家/地區的飛利浦客
戶服務中心。
75
問題 可能原因 解決方法
裝置上的電
池指示燈亮
橘燈,然後
裝置關閉。
裝置上的電
池指示燈持
續亮橘燈。
電池電量完
全耗盡。
電池電力不足。這表示電池剩下 30% 的電量。
為裝置充電 (請參閱「使用前準
備」單元)。
請儘速為裝置充電 (請參閱「使用
前準備」單元)。
Page 76

76
繁體中文
問題 可能原因 解決方法
我在碰觸裝
置接頭或電
極片時感到
不適。
治療感覺與
平常不同,
或沒有那麼
舒服。
在您取下裝
置之前,並
未結束應用
程式中的療
程,或是未
按下裝置上
的開關按
鈕。
強度太高或
太低。
電極片位置
不正確。
電極片未正
確貼上。
電極片太
髒。
電極片磨
損。
您使用已超
過有效日期
的電極片。
請務必結束應用程式中的療程,
或是按下裝置上的開關按鈕,然
後才可從皮膚上取下裝置。如此
一來,您就能避免在碰觸裝置接
頭或電極片時感到不適。此不適
感不會造成傷害。
在應用程式的療程設定畫面中,
按一下 + 或 - 以提高或降低強
度。您也可以選擇不同療程。
關閉裝置電源,然後將其從電極
片拆下。將電極片從皮膚上撕
下,並稍微移至不同的地方。
關閉裝置電源,然後將其從電極
片拆下。檢查電極片是否正確貼
至皮膚。
您可以嘗試清潔電極片 (請參閱「
清潔」單元)。若情況依舊,請更
換電極片。
請更換電極片。
移除電極片,並使用未超過有效
日期的新電極片。
Page 77
裝置上的訊號
裝置上的指示燈號
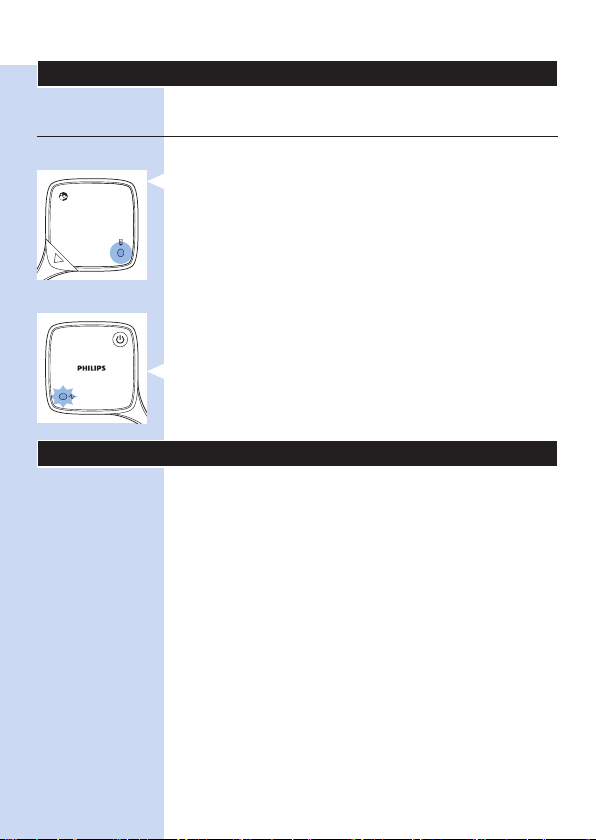
電池指示燈
- 電池指示燈會顯示下列訊號:
1 當裝置的充電式電池電力不足,以及在充電
期間時,電池指示燈會持續亮橘燈。
2 當裝置已連接至主電源,且充電式電池充飽
電力時,電池指示燈會持續亮綠燈。
狀態指示燈
- 裝置上的狀態指示燈會顯示下列訊號:
1 當裝置開啟且處於待機模式時,狀態指示燈
會持續亮綠燈。
2 在治療期間,狀態指示燈會閃橘燈,表示正
在進行治療。
3 當裝置正在配對時,狀態指示燈會閃綠燈。
更換
電極片
如果電極片出現下列情況,請予以更換:
- 損壞或破損。
- 超過密封袋上標示的有效日期。
- 失去黏性。請勿使用繃帶或膠帶將其貼至您
的皮膚。
- 刺激強度減弱。
- 刺激令人感到不適,亦即您感到不舒服的刺
痛感。
注意: 請一律使用製造商建議此裝置使用的電
極片進行更換。您可於 www.philips.com 訂購
新電極片。
77繁體中文
Page 78

78
繁體中文
訂購配件
若要購買配件或備用零件,請造訪
www.shop.philips.com/service,或者洽詢您的
飛利浦經銷商。您也可以聯絡您所在國家/地區
的飛利浦客戶服務中心。
電極片
您可以在 www.philips.com 訂購新電極片。
警告: 使用本裝置時,請僅搭配製造商建議的
轉換器、電線和電極片。
保固與支援
本裝置經過精心設計與開發,以確保 5 年的預
期服務壽命。
如果您需要相關服務或資訊,或是有任何問
題,請瀏覽我們的網站 www.philips.com/
support。您也可以聯絡您所在國家/地區的飛利
浦客戶服務中心。電話號碼及聯絡網址如下:
- 英國:0844 338 04 89 (BT 市話通話每分鐘
5P,其他市話和手機電信業者費用可能更高)
- 香港:852 2619 9663 (區內免費電話)。
保固限制
電極片為耗損品,需定期更換,因此不包含在
保固範圍內。
製造商法定地址
Philips Consumer Lifestyle B.V.
Tussendiepen 4, 9206 AD Drachten,
Netherlands
Page 79
回收
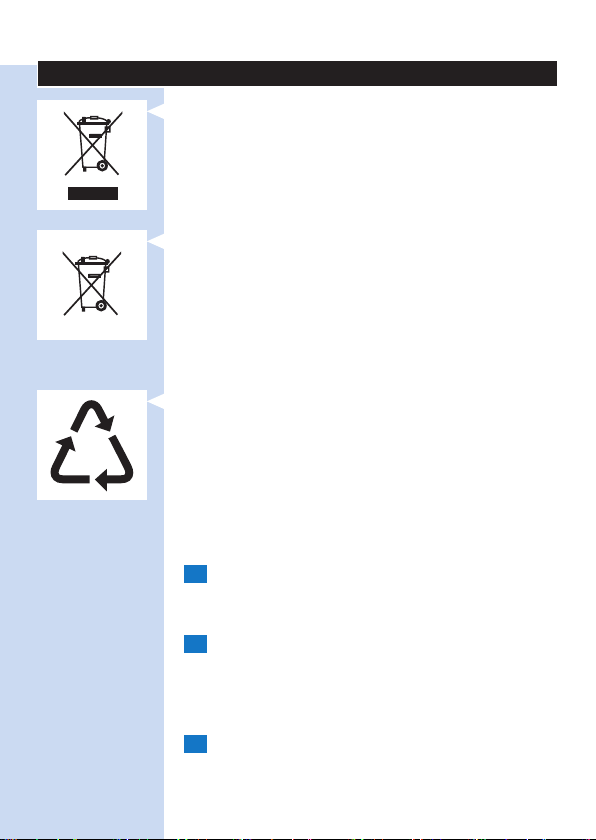
- 此符號表示本產品不得與一般家用廢棄物一
併丟棄 (2012/19/EU)。
- 此符號表示本產品含有內建充電式電池,
不得與一般家用廢棄物一併丟棄 (2006/66/EC)。
請依照「取出充電式電池」一節中的指示取
出電池。
- 請遵循您所在國家/地區對電氣與電子產品及
充電式電池分類收集系統的規定。正確處理
廢棄產品有助於避免對環境和人類健康帶來
負面影響。
- 所有塑膠零件均標有回收符號。
取出充電式電池
注意: 請將充電式電池取出,再將裝置送至
政府指定的回收點。若您在拆卸電池時遇到困
難,可將本裝置拿到飛利浦服務中心。服務中
心會為您拆卸電池組,並以對環境無害的方式
處理電池。
1 請確定充電式電池的電量耗盡。請視需要頻
繁開啟裝置,直到因為電池電量完全耗盡,
而再也無法開啟為止。
2 將一字螺絲起子的尖端插入 Micro-USB
插孔的上方與下方機殼之間。
注意: 此動作會損壞裝置,且僅能在您想要丟
棄裝置時執行。
3 旋轉螺絲起子,以分開兩個機殼。
79繁體中文
Page 80

繁體中文
80
注意: 您可能需要插入並旋轉螺絲起子數次,
才能將兩個機殼旋鬆分開。
4 在機殼分開之後,使用螺絲起子移除電池。
請根據當地法規分別丟棄塑膠零件和電池
規格
型號 PR3840
額定電壓 (V) - 轉換器 100-240 ~ 150mA
額定頻率 (Hz) - 轉換器 50-60
額定輸出 - 轉換器 5V , 500 mA
級別 醫療裝置級別 IIa
防水等級 - 裝置 IP22
電池類型 - 裝置 鋰電池
轉換器 轉換器屬於本醫療系統的一部
脈衝輸出參數
頻率範圍 1-100 Hz
脈衝期 針對療程 1 至 20 使用 60-350
最大電流輸出 於 500-1000 歐姆時為 60mA
最大輸出電壓 60V
電流脈衝波形 對稱式雙相 (淨電流 0 DC)
分。
µs
Page 81
操作環境
溫度 +5°C 至 +40°C
相對濕度 15% 至 93% (無凝結)
氣壓 700hPa 至 1060hPa
存放與攜帶條件
溫度 - 電極片 0°C 至 +40°C
溫度 - 裝置 -10°C 至 +50°C
相對濕度 低於 93% (無凝結)
氣壓 700hPa 至 1060hPa
注意: 如果您要存放電極片的時間超過一個月,
請將其置於溫度 +5°C 到 +27°C 之間的地
方。
注意: 請勿將電極片存放於冷凍庫或冰箱中。
請勿讓電極片暴露於高溫之下、浸入水中或置
於塑膠袋外。
符號說明
轉換器與裝置上的符號
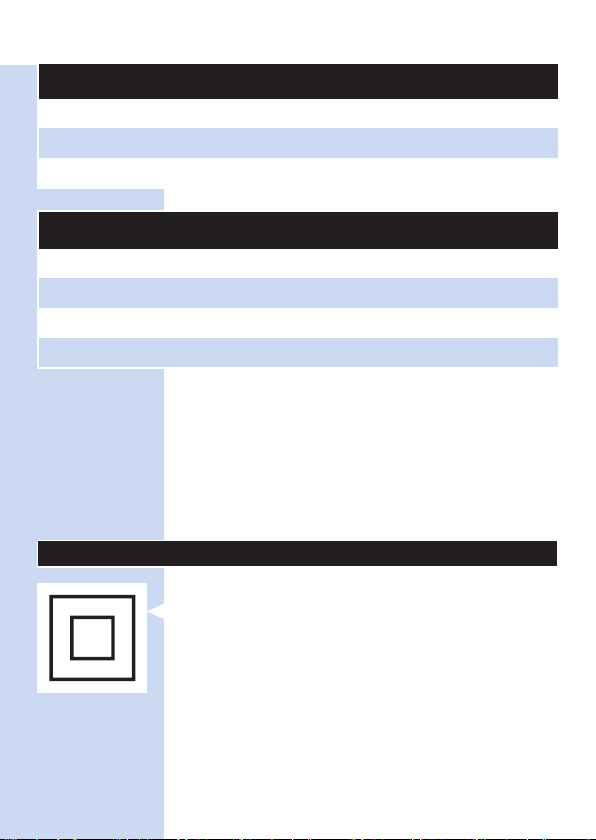
- 此符號表示轉換器根據 IEC 60601-1 標準,
採用雙重絕緣 (Class II)。
81繁體中文
Page 82
82 繁體中文
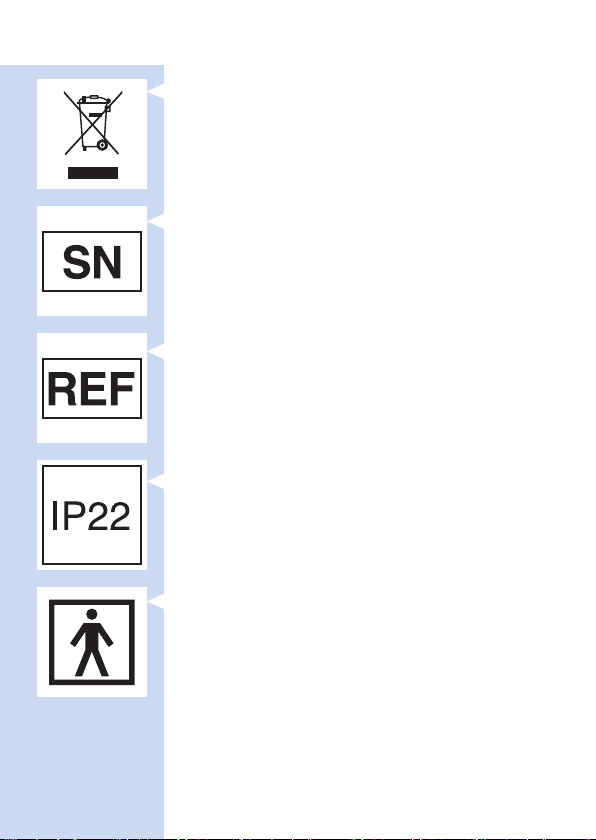
- 此符號表示:請勿與一般家庭廢棄物一併丟棄。
如需更進一步說明,請參閱「回收」單元。
裝置上的符號
- 這是序號符號。此符號後面會接製造商序
號。
- 這是參考編號符號。此符號後面會接製造商的
參考編號,即裝置型號。
- 裝置上有此符號表示:保護手指不會接觸危
險部分,並避免傾斜達 15 度時垂直落下的水
滴造成有害影響。
- 此符號表示與使用者有身體接觸的裝置部分
(也稱為零件) 是符合 IEC 60601-1 標準的 BF
(基體浮動) 型零件。該零件為電極片。
Page 83
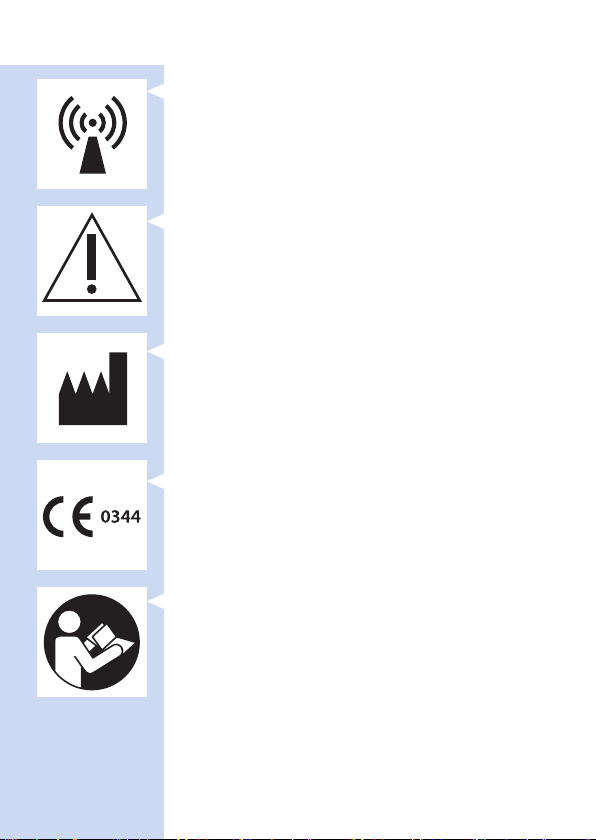
- 此符號表示本裝置會釋放非游離輻射。所有
含有 RF 發射器或刻意採用 RF 電磁能的裝置
和系統都必須標示此符號。
- 此符號表示:注意 TENS 輸出。您會在所有
電極片接點的附近發現此符號。
- 此符號表示「製造商」,並顯示於法定製造
商地址旁邊。
- 此符號表示:符合 EC 指令。CE 是
Conformité Européenne (符合歐盟規定)
的縮寫。0344 是認證機構的編號。
- 此符號表示:開始使用本裝置前,請先閱讀
使用手冊。
83繁體中文
Page 84
84 繁體中文
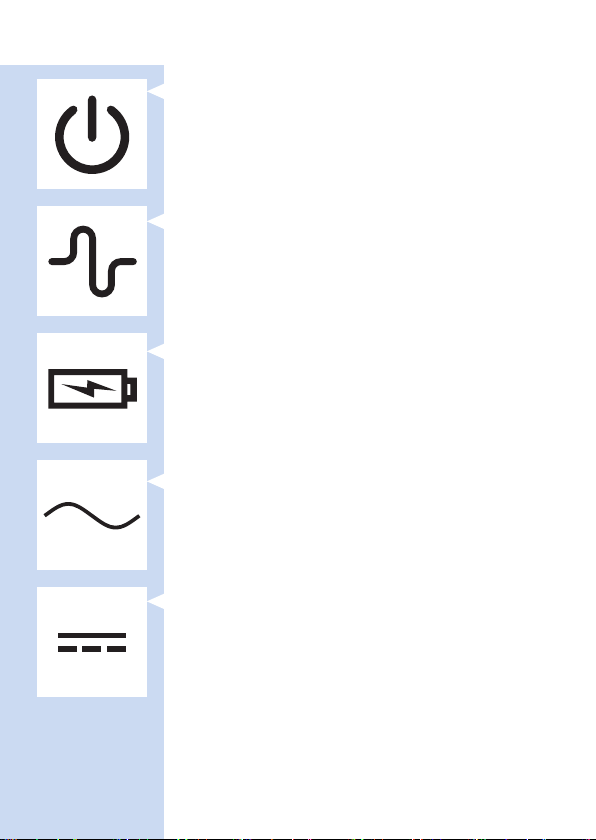
- 此符號是識別待機按鈕的標記。
- 這是脈衝符號,顯示於狀態指示燈旁。
- 這是電池符號,顯示於電池指示燈旁。
轉換器上的符號
- 此符號表示:交流電。
- 此符號表示:直流電。
Page 85
- 此符號表示:符合 EC 指令,CE 是
Conformité Européenne (符合歐盟規定)
的縮寫。
- 此符號表示:僅供室內使用。
- 此符號表示:USB 接頭。
- 此符號表示:Micro-USB 接頭。
- 此符號為認證標誌,其中包括符合法規認證
的測試廠識別。
85繁體中文
Page 86
86 繁體中文
- 此符號為技術設備的認證標記。GS 標記乃根
據「德國設備和產品安全法」。
- 此符號表示無負載功率的 CEC (加州能源委
員會) 功效等級為 V (五),以符合歐盟需求。
電極片收納袋上的符號
- 此符號表示:請勿在駕駛、操作機械或從事
其他具受傷風險之活動時使用。
- 此符號表示:請勿使用損壞、磨損或失去黏
性的電極片。
- 此符號表示:電極片僅供一人使用,不應多
人共用。
Page 87
87繁體中文
- 此符號表示:請勿將電極片相互疊放,
或讓它們過於靠近以至於相互碰觸。
- 此符號表示:請勿將電極片置於頭部或頸部。
- 此符號表示:請勿將電極片置於胸部。
- 此符號表示:
- 請勿開放性傷口上放置電極片。用於開放性
傷口上可能會導致該區域承受過多電流,
進而造成燒傷。
- 如果您最近有接受手術,請勿在手術傷口上
放置電極片。請將電極片放置在距離手術傷
口 3 至 5 公分處,或放置在完好皮膚的近端
神經或脊椎附近。
- 請勿在癌症病變的部位附近放置電極片,
否則可能對癌症病變部位產生負面影響。
- 此符號表示電極片存放時間會超過一個月
時,最低和最高的存放溫度。
Page 88
88 繁體中文
- 此符號表示製造商批號代碼,以利辨識。
- 此符號表示「有效期限」,指出電極片的到
期時間。
電磁放射與抗擾
電磁相容性 (EMC)
PulseRelief 裝置係根據 EMC 安全標準
EN60601-1-2 核可,專為一般家庭或門診環境
使用而設計。
Page 89
繁體中文
電極片放置位置指南
TENS 低週波治療器
如需 TENS 療程的說明 (療程 1 - 15),
請參閱「預設療程」單元。
89
Page 90
90
繁體中文
EMS
如需 EMS 療程的說明 (療程 16 - 20),
請參閱「預設療程」單元。
Page 91

91简体中文
目录
简介 91
禁忌症、反应和副作用 93
重要安全信息 94
预设程序 98
产品概述 103
使用准备 104
使用设备 105
使用后 113
故障种类和处理方法 114
设备上的信号 116
更换 119
订购附件 117
保修和支持 117
回收 118
规格 119
符号说明 120
电磁辐射和抗干扰 127
电极放置指南 128
简介
感谢您的惠顾,欢迎光临飞利浦!为了您能充分
享受飞利浦提供的支持,请在 www.philips.com/
pain-relief/register 上注册您的产品。
使用 PulseRelief 设备之前,请仔细阅读本用户
手册。PulseRelief 无需处方即可使用。为顺利
使用 PulseRelief 设备获得最佳照射效果,建议
您按照本用户手册中的照射说明进行使用。
如需更多信息或有任何疑问,请访问
www.philips.com/pain-relief 或联系您所在国家/
地区的飞利浦客户服务中心。
该设备已基于用户手册的最新内容,通过 CE
认证。
Page 92

92 简体中文
适合用途
PulseRelief 旨在供伴有轻度至中度慢性疼痛或
术后急性疼痛的成人消费者使用。本设备的用
途是通过经皮电神经刺激 (TENS) 缓解疼痛。
您也可以将其用于电动肌肉刺激 (EMS)。
本设备适合家庭使用。
如果您近期做过手术或由医生护理,则在未获
得医生许可的情况下,请勿使用此设备。
在开始使用设备之前,请先阅读“禁忌症、
反应和副作用”和“重要安全信息”章节。
TENS 和疼痛管理
经临床验证,经皮电神经刺激 (TENS) 是一种有
效的无创疼痛缓解方法。物理治疗师和其他医
疗保健专业人士每天都使用 TENS 进行照射。
在 TENS 照射过程中,设备会让电脉冲穿过完
好的皮肤表面,以激活底层神经。临床证据表
明,TENS 缓解疼痛的方式与神经系统自身的止
痛机制类似,例如类似于按摩疼痛区域。
本设备使用充电电池产生脉冲。这些脉冲通过
自粘凝胶电极作用于皮肤。您可以选择具有不
同脉冲档的 15 种 TENS 预设程序之一并可以根
据自己的偏好调节脉冲强度。
电动肌肉刺激
电动肌肉刺激 (EMS),也称为神经电动肌肉刺
激 (NMES) 或肌电刺激,使用电脉冲引起肌肉
收缩。刺激设备产生脉冲并通过皮肤上的电极
传递给要刺激的肌肉。脉冲会模拟中枢系统使
肌肉收缩的方式。您可以选择 5 种 EMS 预设程
序之一。
Page 93

疼痛治疗
我们都希望享受日常活动的乐趣。当您出现疼
痛时,无论如何,本能的反应是通过降低活动
程度来避免疼痛。这样一来,您会变得有些不
适应,很少能够享受到做喜欢的事情的乐趣。
保持运动,但要适可而止,重要的是要避免陷
入持续性疼痛周期。自我治疗疼痛的关键是节
奏:以感觉最舒适的方式分配一天中的活动时
间和休息时间。控制节奏的关键是将运动分散
开来,“休息一下再做事”。
禁忌症、反应和副作用
禁忌症
在以下情况下,切勿使用本设备:
- 您拥有心脏起搏器、植入式除颤器或其他植
入式金属或电子设备(例如药物输送系统),
因为在这些情况下使用可能会导致触电、
烧伤、电气干扰或甚至死亡。
- 患有心脏病。
- 患有癫痫症。
- 您处于孕早期,TENS 对胎儿发育的影响尚未
知。怀孕期间避免在子宫上使用设备,以降
低引产的风险。如果您是孕妇,务必在使用
设备前先咨询医生或助产士。
- 患有认知障碍。
- 患有静脉或动脉血管栓塞或血栓性静脉炎。
如果您使用设备进行 EMS 照射,则可能会存
在血块移动的风险。
- 若有尚未确诊的未知疼痛,除非您的医生建议,
否则不要使用本设备。
93简体中文
Page 94
94
简体中文
反应
如果疼痛剧烈,或者在使用本设备时出现不良
反应,应停止使用本设备并咨询医生。
可能出现的不良反应包括以下情况:
- 电极片部位出现皮肤过敏,虽然电极片使用
的凝胶并无已知会引起过敏反应的成份
- 电极下方的烧伤
- 头痛或其他疼痛感觉
- 恶心或眩晕
副作用
- 使用 EMS 照射后的一段时间后,可能会出现
一些肌肉酸痛。
- 使用 EMS 照射期间或治疗之后,电极片下方
或周围皮肤可能会有一些发红。皮肤发红现
象通常会在照射后 2 小时内消失。如果皮肤
持续发红超过一天,请咨询医生。
重要安全信息
警告
一般警告
- 请仔细阅读本用户手册,并始终遵循治疗操
作说明。
- 如果疼痛剧烈,应停止使用本设备并咨询医生。
- 这是医疗器械。请将该器械置于儿童接触不
到的地方。不得将此器械用于儿童或由儿童
使用。
- 本产品不适合感觉或精神上有障碍的成人使
用。他们可能无法根据本用户手册中的说明进
行使用,并且照射可能会导致他们产生焦虑。
- 请勿在儿童身上使用本设备,因为该产品设
计不适合用于儿童。
- 请勿修改设备或电极,这可能导致无法正常
工作。
Page 95

简体中文
- 只能使用随附的电源适配器为设备充电。
使用其他电源适配器可能会导致危险情况。
- 本设备专为一个成人使用而设计。
请勿应用于或照射以下局部位置或部位
- 刺激颈部两侧的颈动脉穴,可能会对心律和
血压产生严重的不良影响。
- 刺激颈部的正面可能会引起严重的肌肉痉挛,
引起呼吸道闭合,导致呼吸困难。
- 请勿对您的胸部施加电刺激,因为随着电流
到达胸内,可能会导致心率失常,而心率失
常可能致死。
- 由于尚未确认刺激脑部的影响,不得刺激头部
或头部两侧
- 请勿将一个或两个电极放在开放性伤口处。
开放性伤口可能导致过多的电流进入此区域,
从而可能造成烫伤。
- 如果您近期做过手术,请勿将一个或两个电
极放在切口处。请将电极放在距离切口 3 至
5 厘米的位置,或沿着近端神经或靠近皮肤完
好的脊柱进行放置。
- 请勿将电极放在癌症病变附近,因为这可能
对癌症病变产生消极影响。
- 请勿将电极放在缺乏正常知觉的皮肤部位。
这可能使您意识不到高亮度辐射,从而可能
导致皮肤电流烫伤。
- 请勿将电极放在开放性伤口或皮疹处。开放
性伤口可能导致过多的电流进入此区域,
从而可能造成烫伤。它也可能会导致电极物
质进入皮肤。
- 请勿将电极放在肿胀、发红、感染或发炎区
域或皮肤溃烂区域(例如静脉炎、血栓性静
脉炎和静脉曲张)。刺激不能施加至患有常
见血管栓塞或血栓性静脉炎的部位,因为刺
激可能会增加循环,导致更高的栓塞风险。
- 请勿将电极放入体内,例如口腔。此设备并
不适合在体内使用。
95
Page 96

96
简体中文
请勿在以下条件下使用设备
- 如果您近期做过手术或正由医生护理,且未
先咨询医生,请勿使用设备。
- 如果您由于撞击或受伤导致内出血,请勿使
用设备。
- 如果肌肉收缩会干扰愈合,则不要使用 EMS
刺激使肌肉收缩。例如,如果肌肉或肌腱撕
裂,像自主收缩可能会加剧肌肉撕裂。近期
实施过外科手术或急性创伤或骨折后,可能
也会导致以上的情况。肌肉收缩也可能会导
致肌腱炎出现恶化症状。
- 请勿在以下情况使用设备:驾驶汽车、操作
机器,或进行电刺激可能会让您处于受伤的危
险境地的任何活动。
- 如果您可能在照射过程中入睡,则不要使用
设备,因为这会使您在感觉到伤痛时已经太
迟了。如果您在入睡时使用设备,则需设置
计时器,使其可以自动关闭。
- 请勿在沐浴、淋浴或游泳时使用设备,这将
增加触电和灼伤皮肤的风险。
- 请勿在有电子监控设备(例如,心脏监护仪、
心电图报警器)的情况下施加电刺激,使用电
刺激设备可能会导致这些设备无法正常工作。
- 当您连接高频手术设备时,请勿使用本设备。
这可能会导致电极片下的皮肤灼伤和损坏本
设备。
- 请勿在距离短波或微波医疗设备不到 1 米处
使用本设备。靠近这类设备可能导致本设备
输出不稳定。
- 便携式射频通信设备(包括天线电缆和外部
天线等外设)应在距离设备的任何部件
(包括制造商指定的电缆)30 厘米(12 英
寸)以外的地方使用。否则,可能导致此设
备的性能下降。
- 使用未设备制造商指定或提供的附件、传感
器和电缆,可能导致此设备的电磁辐射增强,
或电磁抗干扰力减弱,并造成不当操作。
Page 97

简体中文
注意
- 如果您近期做过手术,请在使用设备前咨询
医生。使用设备可能会影响伤口愈合。
- 休息放松时最好使用阵发式 (Burst) TENS 程
序,因为这类疗程可让照射区域内治疗部位
造成肌肉收缩。
- 确保先在应用程序中终止照射或先按设备上
的开/关按钮,再取下设备或电极片。如果未
终止照射,手指接触磁体时可能会产生令人
不适的感觉。这种感觉是无害的,但会让你
感觉不太舒服。
- 本设备只能使用制造商推荐的适配器、电源
线和附件。
- 使用之前,请务必检查设备及电极片是否损坏。
如果存在损坏,则不要使用设备或电极片。
- 本设备不防水。请勿在潮湿的环境中使用本
设备并防止其受潮。
- 虽然本设备可在室内和室外使用,但设备无
法承受所有天气状况。
- 本设备无法承受高温和低温。请查看
“规格”一章中所述的操作条件。
- 电极片的保存期有限。请在使用前查看包装
上的使用期限。请勿使用已超过使用期限的
电极片。如需订购替换电极片,请参阅
“订购配件”一章。
- 请勿使用石膏或胶带将电极片粘在皮肤上。
- 请始终遵照“使用设备”和“使用后”两章
中的操作说明使用和存储电极片。
- 如果设备无法如所述一样正常工作,请停止
使用设备并联系客户服务中心。有关联系详
情,请参阅“保修和支持”一章。
97
Page 98

98
简体中文
符合标准
- 本设备符合此类 IIa 级 (Class IIa) 电气医疗器
械和使用电刺激的家用电器的相关标准。
- 本飞利浦产品符合所有有关暴露于电磁场的
适用标准和法规。
预设程序
设备标配 15 种 TENS 预设程序和 5 种 EMS
预设程序。请注意,列表中的程序顺序并非表
示针对特定情况推荐的特定程序。由于照射程
序的效果可能会因人而异,而且差异还可能很
大,因此建议您尝试不同的照射程序,以找出
最适合自己的程序。
程序概述
常规型 TENS 程序
常规 TENS 是具有高频刺激的通用 TENS 程
序。其基于疼痛闸门控制理论,该理论指出此
类刺激会阻断疼痛信号在神经系统中的传输。
这相当于“按摩去痛”。大多数人每个疗程使
用常规 TENS 程序 30 分钟,但是感觉舒适便可
以经常使用。照射效果通常在刺激过程中最明
显,在刺激后快速消失。您需要调节程序的强
度,以便清楚地感觉到刺激。刺激时一定不能
感觉不适或疼痛。
常规型 TENS 程
序的名称
常规型 可带给您持续麻刺的刺激 无限制
彻底刺激 可带给您更彻底的刺激感 无限制
活动前 可带给您更局部的柔和刺激感 无限制
程序描述 建议的治疗
时间
Page 99

简体中文
99
常规型 TENS 程
序的名称
柔和刺激 可带给您更柔和的刺激感,例
深层刺激 可带给您更深层的刺激感 无限制
辐射脉冲 可带给您更发散的刺激感 无限制
猝发型 TENS
程序的名称
持续强劲 可带给您脉冲式猝发刺激,以在您
缓慢揉捏 可带给您更缓慢的按摩式猝发刺
温和揉捏 可带给您更温和的猝发刺激,以在
程序描述 建议的治疗
时间
无限制
如针对敏感身体部位
猝发型 TENS 程序
强劲 TENS 提供呈脉冲序列的高频刺激。已知此
类刺激可触发内啡肽的释放。内啡肽是人体生成
的止痛剂。您可在一天当中多次(例如 3 次)
使用强劲 TENS,每次使用约 30 分钟。建议您
调整强劲程序的强度,以便能够感觉到强烈的刺
激。强劲程序通常会带来更强烈清晰的感觉,
这可能会令人感到有些不适。另外,建议将强度
调整至可在照射区域内产生可见肌肉收缩的水
平。这些收缩没有危害。如果认为肌肉收缩的
不适感过强,可以降低强度、选择不同的程序或
将电极移动到其他位置。休息时最好应用强劲
TENS,因为它会导致照射区域内的肌肉收缩。
程序描述 建议的治
疗时间
30 分钟*
体内释放内啡肽
30 分钟*
激,以释放内啡肽
30 分钟*
您体内释放内啡肽
Page 100

100
简体中文
猝发型 TENS
程序的名称
深层揉捏 可带给您更局部更深层的猝发刺
强劲扩散 可带给您更扩散的猝发刺激,以在
调频型 TENS 程
序的名称
混合频率 可带给您平滑的刺激感 30 分钟*
脉冲按摩 可带给您更脉冲式的刺激感 30 分钟*
深层按摩 可带给您更缓慢更深层的平
轻柔按摩 可带给您温和的平滑刺激感 30 分钟*
程序描述 建议的治
疗时间
30 分钟*
激,以在您体内释放内啡肽
30 分钟*
您体内释放内啡肽
* 每天多次任选,可在应用程序中更改
调频型 TENS 程序
在调频型 TENS 程序中,脉冲频率会从高至低
不断变化。在某些情况下,此程序会比其他程
序更舒适或更有效。您可在一天当中多次(例如
3 次)使用调频型 TENS,每次使用约 30 分钟。
程序描述 建议的治疗
时间
30 分钟*
滑刺激感
* 每天多次任选,可在应用程序中更改
 Loading...