

Page 1
POWERCHANNELMENU VOLUMEEARPHONE
TABLE OF CONTENTS
12
1
2
3
4
5
6
7
8
9
10
11
COLOR TELEVISION
AND
REMOTE CONTROL
PR1309B
Owner’s Manual (Use and Setup Guide)
FEATURES
• First Time Setup automatically sets the
TV for local channels and the correct picture signal (antenna or cable).
• Infrared Remote Control operates your
TV and helps you set up on-screen features.
• Standard Broadcast (VHF/UHF) or
Cable TV (CATV) channel capability
• Closed Captioning allows you to read TV
program dialogue as on-screen text.
• Automatic Channel Setup quickly and
easily selects stations available in your area.
• Sleep Timer automatically turns the TV
OFF at preset times.
• Language Selection allows you to choose
English or Spanish on-screen menus. This
does not affect the language of Closed
Captioning.
• Automatic Shut Off turns off the TV after
15 minutes when it is on a channel that is
not receiving a broadcast signal (for example, if a station has gone off the air for the
night).
Getting Started
Warning/Precautions . . . . . . . . . . . . . . . . . . . . . . . . . . .1
Features . . . . . . . . . . . . . . . . . . . . . . . . . . . . . . . . . . . . .1
Registration . . . . . . . . . . . . . . . . . . . . . . . . . . . . . . . . . .1
Hooking Up Your TV (Antenna/Cable Connections) .2-3
VCR Connections . . . . . . . . . . . . . . . . . . . . . . . . . . . . .3
First Time Setup . . . . . . . . . . . . . . . . . . . . . . . . . . . . . . .4
Basic TV and Remote Control Operation . . . . . . . . . . .4
On-screen Features
Automatic Channel Setup . . . . . . . . . . . . . . . . . . . . . . .5
Save/Delete Channels . . . . . . . . . . . . . . . . . . . . . . . . . . .5
Channel Review . . . . . . . . . . . . . . . . . . . . . . . . . . . . . . .5
Language Selection . . . . . . . . . . . . . . . . . . . . . . . . . . . . .5
Channel Reminder . . . . . . . . . . . . . . . . . . . . . . . . . . . . .5
Volume Bar . . . . . . . . . . . . . . . . . . . . . . . . . . . . . . . . . .6
Sleep Timer . . . . . . . . . . . . . . . . . . . . . . . . . . . . . . . . . .6
SmartLock . . . . . . . . . . . . . . . . . . . . . . . . . . . . . . . . . . .6
Picture Adjustments . . . . . . . . . . . . . . . . . . . . . . . . . . . .7
Closed Captioning . . . . . . . . . . . . . . . . . . . . . . . . . . . .7
General Information
Glossary . . . . . . . . . . . . . . . . . . . . . . . . . . . . . . . . . . . . .7
Tips . . . . . . . . . . . . . . . . . . . . . . . . . . . . . . . . . . . . . . . .8
Index . . . . . . . . . . . . . . . . . . . . . . . . . . . . . . . . . . . . . . .8
Warranty . . . . . . . . . . . . . . . . . . . . . . . . . . . . . . . . . . . .8
For Customer Use
Enter below the Serial Number and the Model Number
of this television (located on the back of the TV). Keep
this information for future reference.
Model No. __________________________
Serial No.___________________________
Printed in Malaysia - 1 - IB8121E003 / 0EMN01554 / L9706XG ★★★★★
Federal Communications Commission
Warning: Any unauthorized changes
or modifications to this equipment
void the user’s authority to operate it.
Once your PHILIPS MAGNAVOX purchase is registered, you’re eligible to receive all the privileges of owning a PHILIPS MAGNAVOX product. So complete and return the
Warranty Registration Card enclosed with your purchase at once. And take advantage of these important benefits.
Return your Warranty Registration card today to ensure you receive
all the benefits you’re entitled to.
Congratulations
on your
purchase,
and welcome to the
“family!”
Dear PHILIPS MAGNAVOX product owner:
Thank you for your confidence in PHILIPS MAGNAVOX. You’ve selected one of the best-built, best-backed products
available today. And we’ll do everything in our power to keep you happy with your purchase for many years to come.
As a member of the PHILIPS MAGNAVOX “family,” you’re entitled to protection by one of the most comprehensive warranties and outstanding service networks in the industry.
What’s more, your purchase guarantees you’ll receive all the information and special offers for which you qualify, plus easy access to accessories
from our convenient home shopping network.
And most importantly you can count on our uncompromising commitment to your total satisfaction.
All of this is our way of saying welcome–and thanks for investing in a PHILIPS MAGNAVOX product.
Sincerely,
Robert Minkhorst
President and Chief Executive Officer
Know these
safetysymbols
t This “bolt of lightning” indicates uninsulated material within your unit which may cause an electrical
shock. For the safety of everyone in your household, please do not remove product covering.
s The “exclamation point” calls attention to features for which you should read the enclosed literature
closely to prevent operating and maintenance problems.
WARNING: TO PREVENT FIRE OR SHOCK HAZARD, DO NOT EXPOSE THIS EQUIPMENT TO
RAIN OR MOISTURE.
CAUTION: To prevent electric shock, match wide blade of plug to wide slot and fully insert.
ATTENTION: Pour éviter les choc électriques, introduire la lame la plus large de la fiche dans la borne cor-
respondante de la prise et pousser jusqu’au fond.
CAUTION
RISK OF ELECTRIC SHOCK
DO NOT OPEN
CAUTION: TO REDUCE THE RISK OF ELECTRIC SHOCK, DO NOT
REMOVE COVER (OR BACK). NO USER-SERVICEABLE PARTS
INSIDE. REFER SERVICING TO QUALIFIED SERVICE PERSONNEL.
Warranty
Verification
Registering your product within 10 days confirms your right to maximum protection
under the terms and conditions of your
PHILIPS MAGNAVOX warranty.
Owner
Confirmation
Your completed Warranty
Registration Card serves as
verification of ownership in the
event of product theft or loss.
Model
Registration
Returning your Warranty Registration Card
right away guarantees you’ll receive all
the information and special offers which you
qualify for as the owner of your model.
P.S. Remember, to get the most from your PHILIPS MAGNAVOX product, you must return your
Warranty Registration Card within 10 days. So please mail it to us right now!
R
E
G
I
S
T
R
A
T
I
O
N
N
E
E
D
E
D
W
I
T
H
I
N
1
0
D
A
Y
S
Hurry!
Visit our World Wide Web Site at http://www.philipsmagnavox.com
This manual, your new product, and the packaging
contain materials that can be recycled and reused.
Specialized companies can recycle your product to
increase the amount of reusable materials and to minimize the amount that needs to be disposed properly.
Your product uses batteries that should not be
thrown away when depleted but should be disposed
as small chemical waste.
Please find out about the local regulations on disposal
of your old product, batteries, manual, and packaging
whenever you replace existing equipment.
This owner’s manual is
made of recycled paper.
Page 2
ANT.IN
OR
ANT.IN
OR
UHF
VHF
300
Ω
75-300 Ω ADAPTOR
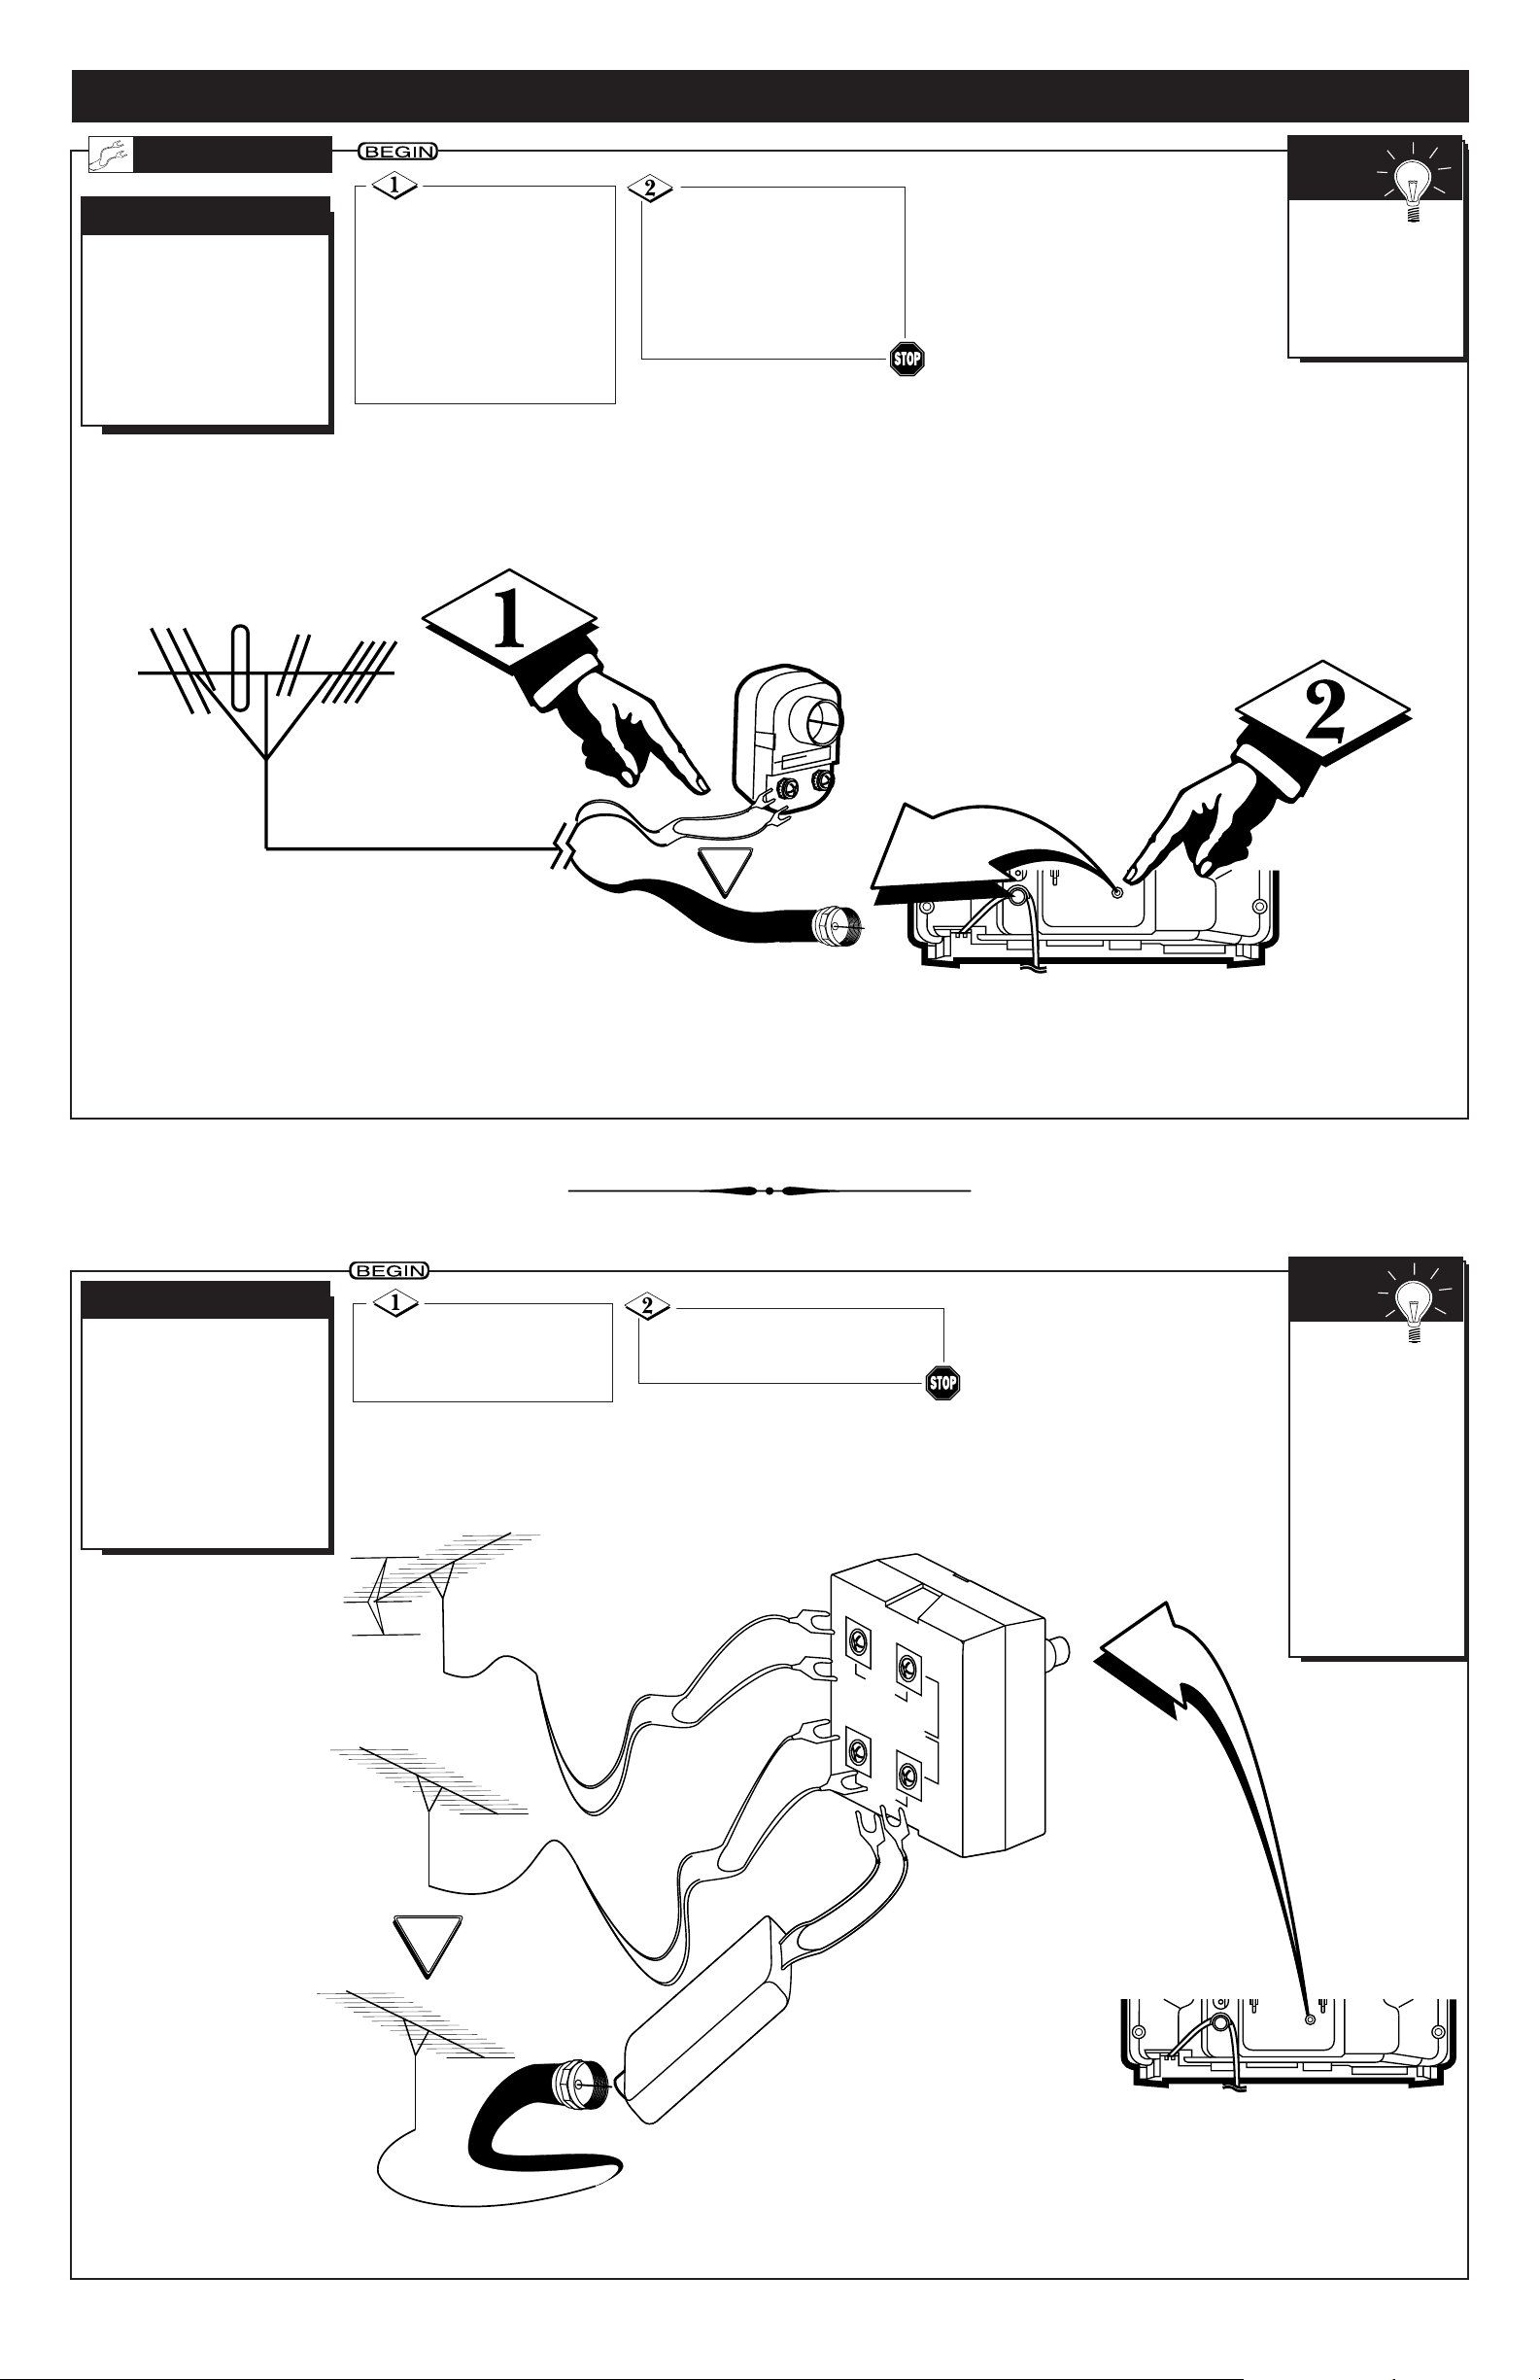
HOOKING UP YOUR TV (ANTENNA/CABLE CONNECTIONS)
A
combination antenna
receives normal broadcast
channels (VHF 2-13 and UHF
14-69). Your connection is easy
since there is only one 75Ω
(ohm) antenna jack on the
back of your TV - and that’s
where the antenna goes.
ANTENNA
COMBINATION UHF/VHF
To set the
TV to select only
the channel numbers in your area,
see First Time Setup
on page 4.
SMART
HELP
If your antenna has
a round connector (75Ω),
then you're ready to connect it
to the TV.
If your antenna has flat
twin-lead wire (300Ω), you
first need to attach the antenna
wires to the screws on a 300
to 75Ω adaptor.
Push the round end of
the adaptor (or cable) onto
the ANT(enna) IN jack on
the back of the TV. If the
round end of the adaptor or
cable is threaded, screw it
down tight.
Y
ou may have two separate
antennas. One antenna is
for VHF channels (2-13) and
the other antenna is for UHF
channels (14-69).
For homes with separate
UHF/VHF antennas, you will
need an optional combiner
before you can connect the
antennas to the TV.
SEPARATE UHF/VHF
300 to 75Ω
Adaptor
Combination
VHF/UHF
Antenna
(Outdoor or
Indoor)
Twin-lead
Wire
Round Cable
75Ω
Back of TV
Back of TV
U/V Combiner
75-300Ω Adaptor
Outdoor UHF Antenna
(Twin-lead 300Ω)
Outdoor VHF
Antenna
(Twin-lead 300Ω)
Twin-lead
Wire
Push the round end of the
combiner onto the ANT(enna)
IN jack on the back of the TV.
Attach the separate
UHF and VHF antennas to
the correct screws on the
combiner.
Round
End
Outdoor VHF
Antenna
(Round cable 75Ω)
- 2 -
To order
any optional
accessory, contact
your dealer or call
1-800-851-8885.
• UHF/VHF
Combiner:
4835 466 97016
• 75-300Ω
Adaptor:
M61009
• 300-75Ω
Adaptor:
4835 218 27003
SMART
HELP
Page 3
ANT.IN
IN
OUT
OR
Y
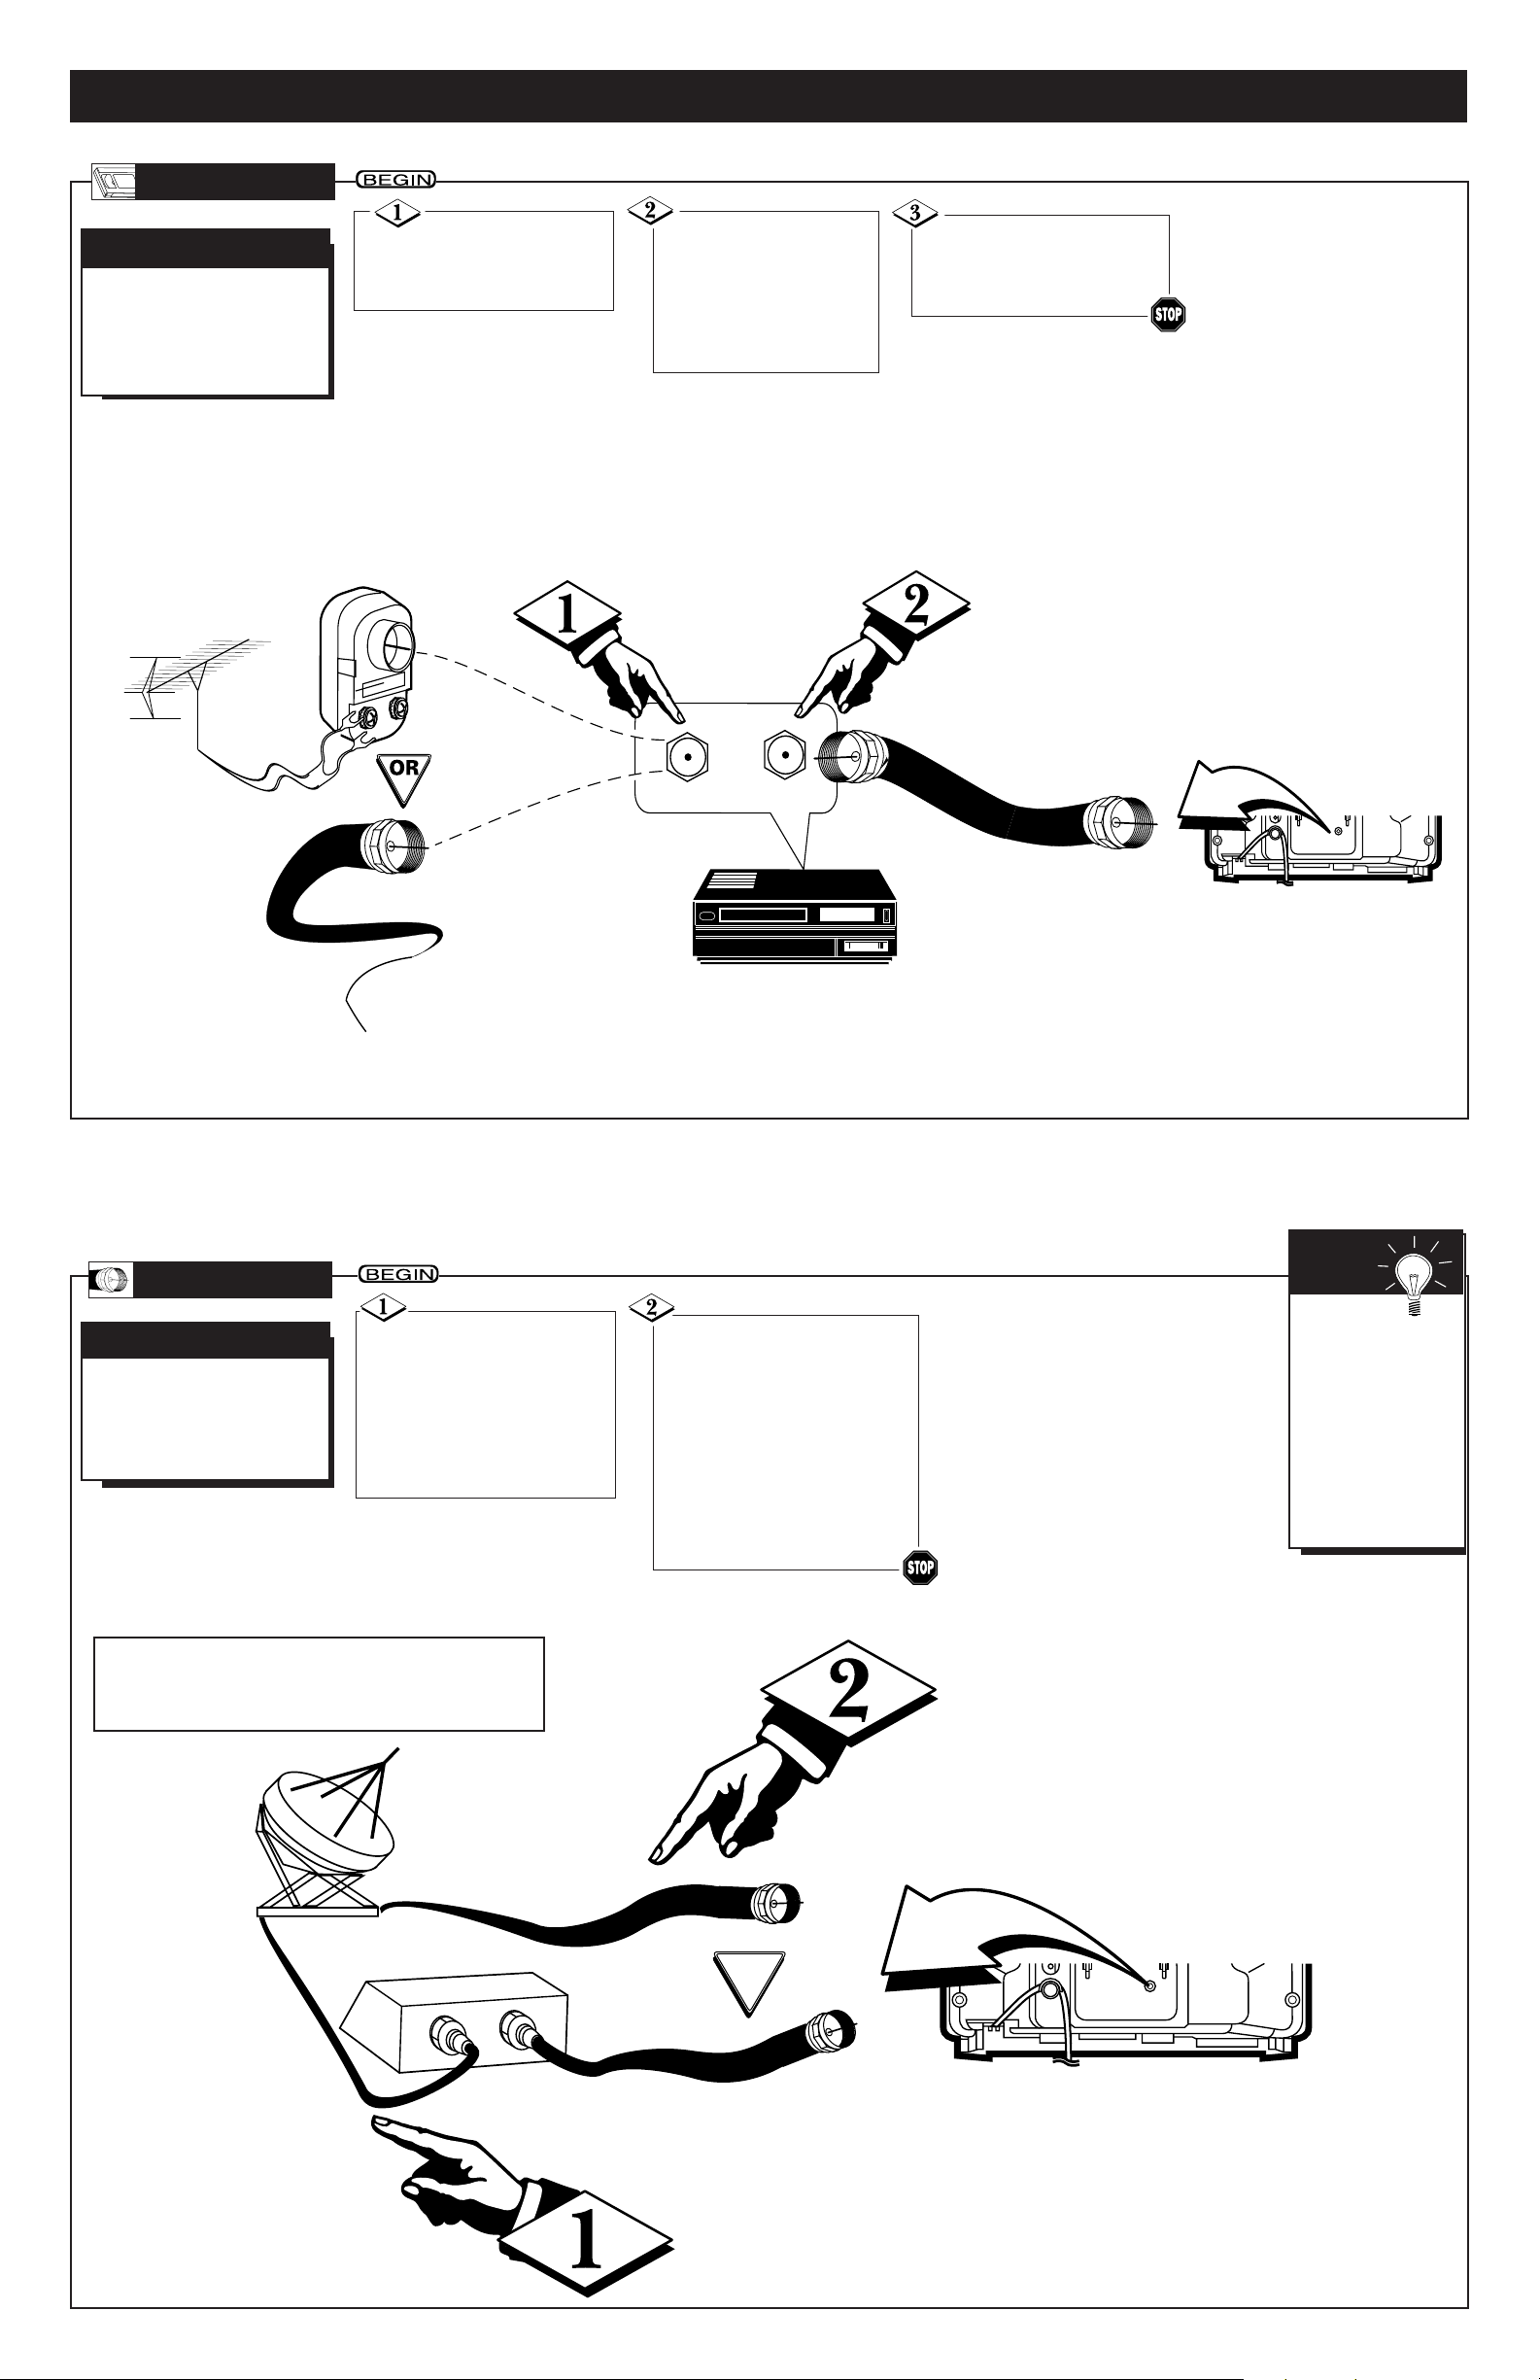
our Cable TV signal may be
a single (75V) cable or a
Cable Box installation. In either
case, the connection to the TV
is very easy.
CABLE TV
CABLE/CABLE BOX
If you do not have a
Cable Box, then you're ready
to connect your Cable TV signal to the TV.
If you have a Cable Box:
Connect the Cable TV signal
to the IN jack on the Cable
Box.
Connect the Cable TV signal to the ANT(enna) IN jack
on the TV.
If you have a Cable Box:
Use a coaxial cable to connect
the OUT jack of the Cable Box
to the ANT(enna) IN jack on
the TV.
NOTE: The coaxial cable
might be supplied by the Cable
TV company.
Back of TV
Coaxial cable
Cable Box
To select
only the channels on
your Cable system,
see First Time Setup
(page 4). If you use a
Cable Box, set the
TV to the same
channel as the CH
3/4 switch on the
back of the Cable
Box.
SMART
HELP
Cable TV Company
Cable TV Signal (75Ω)
Note to the Cable TV System Installer: This reminder is provided to
call the Cable TV system installer’s attention to Article 820-40 of the
National Electrical Code, which provides guidelines for proper grounding - in
particular, specifying that the cable ground shall be connected to the grounding system of the building, as close to the point of cable entry as possible.
HOOKING UP YOUR TV (ANTENNA/CABLE CONNECTIONS) (CONT’D)
ANT.IN
OUT TO TV
IN FROM ANT.
T
he basic Antenna/Cable to
VCR to TV connection is
shown here. If you have a Cable
Box, refer to the VCR owner’s
manual for details.
VCR TO TV
BASIC CONNECTION
Connect your
Antenna or Cable signal to
the IN FROM ANT(enna)
jack on the VCR.
Connect a coaxial
cable to the OUT TO
TV jack on the VCR
and to the ANT(enna)
IN jack on the TV.
The coaxial cable may be
supplied with the VCR.
Coaxial cable
Outdoor VHF/UHF
Antenna
300 to 75Ω Adaptor
Cable TV signal
Back of TV
Refer to the VCR
owner's manual for other
possible connections and for
operating details.
VCR
- 3 -
Page 4
- 4 -
HOW TO SET UP AND USE YOUR TV
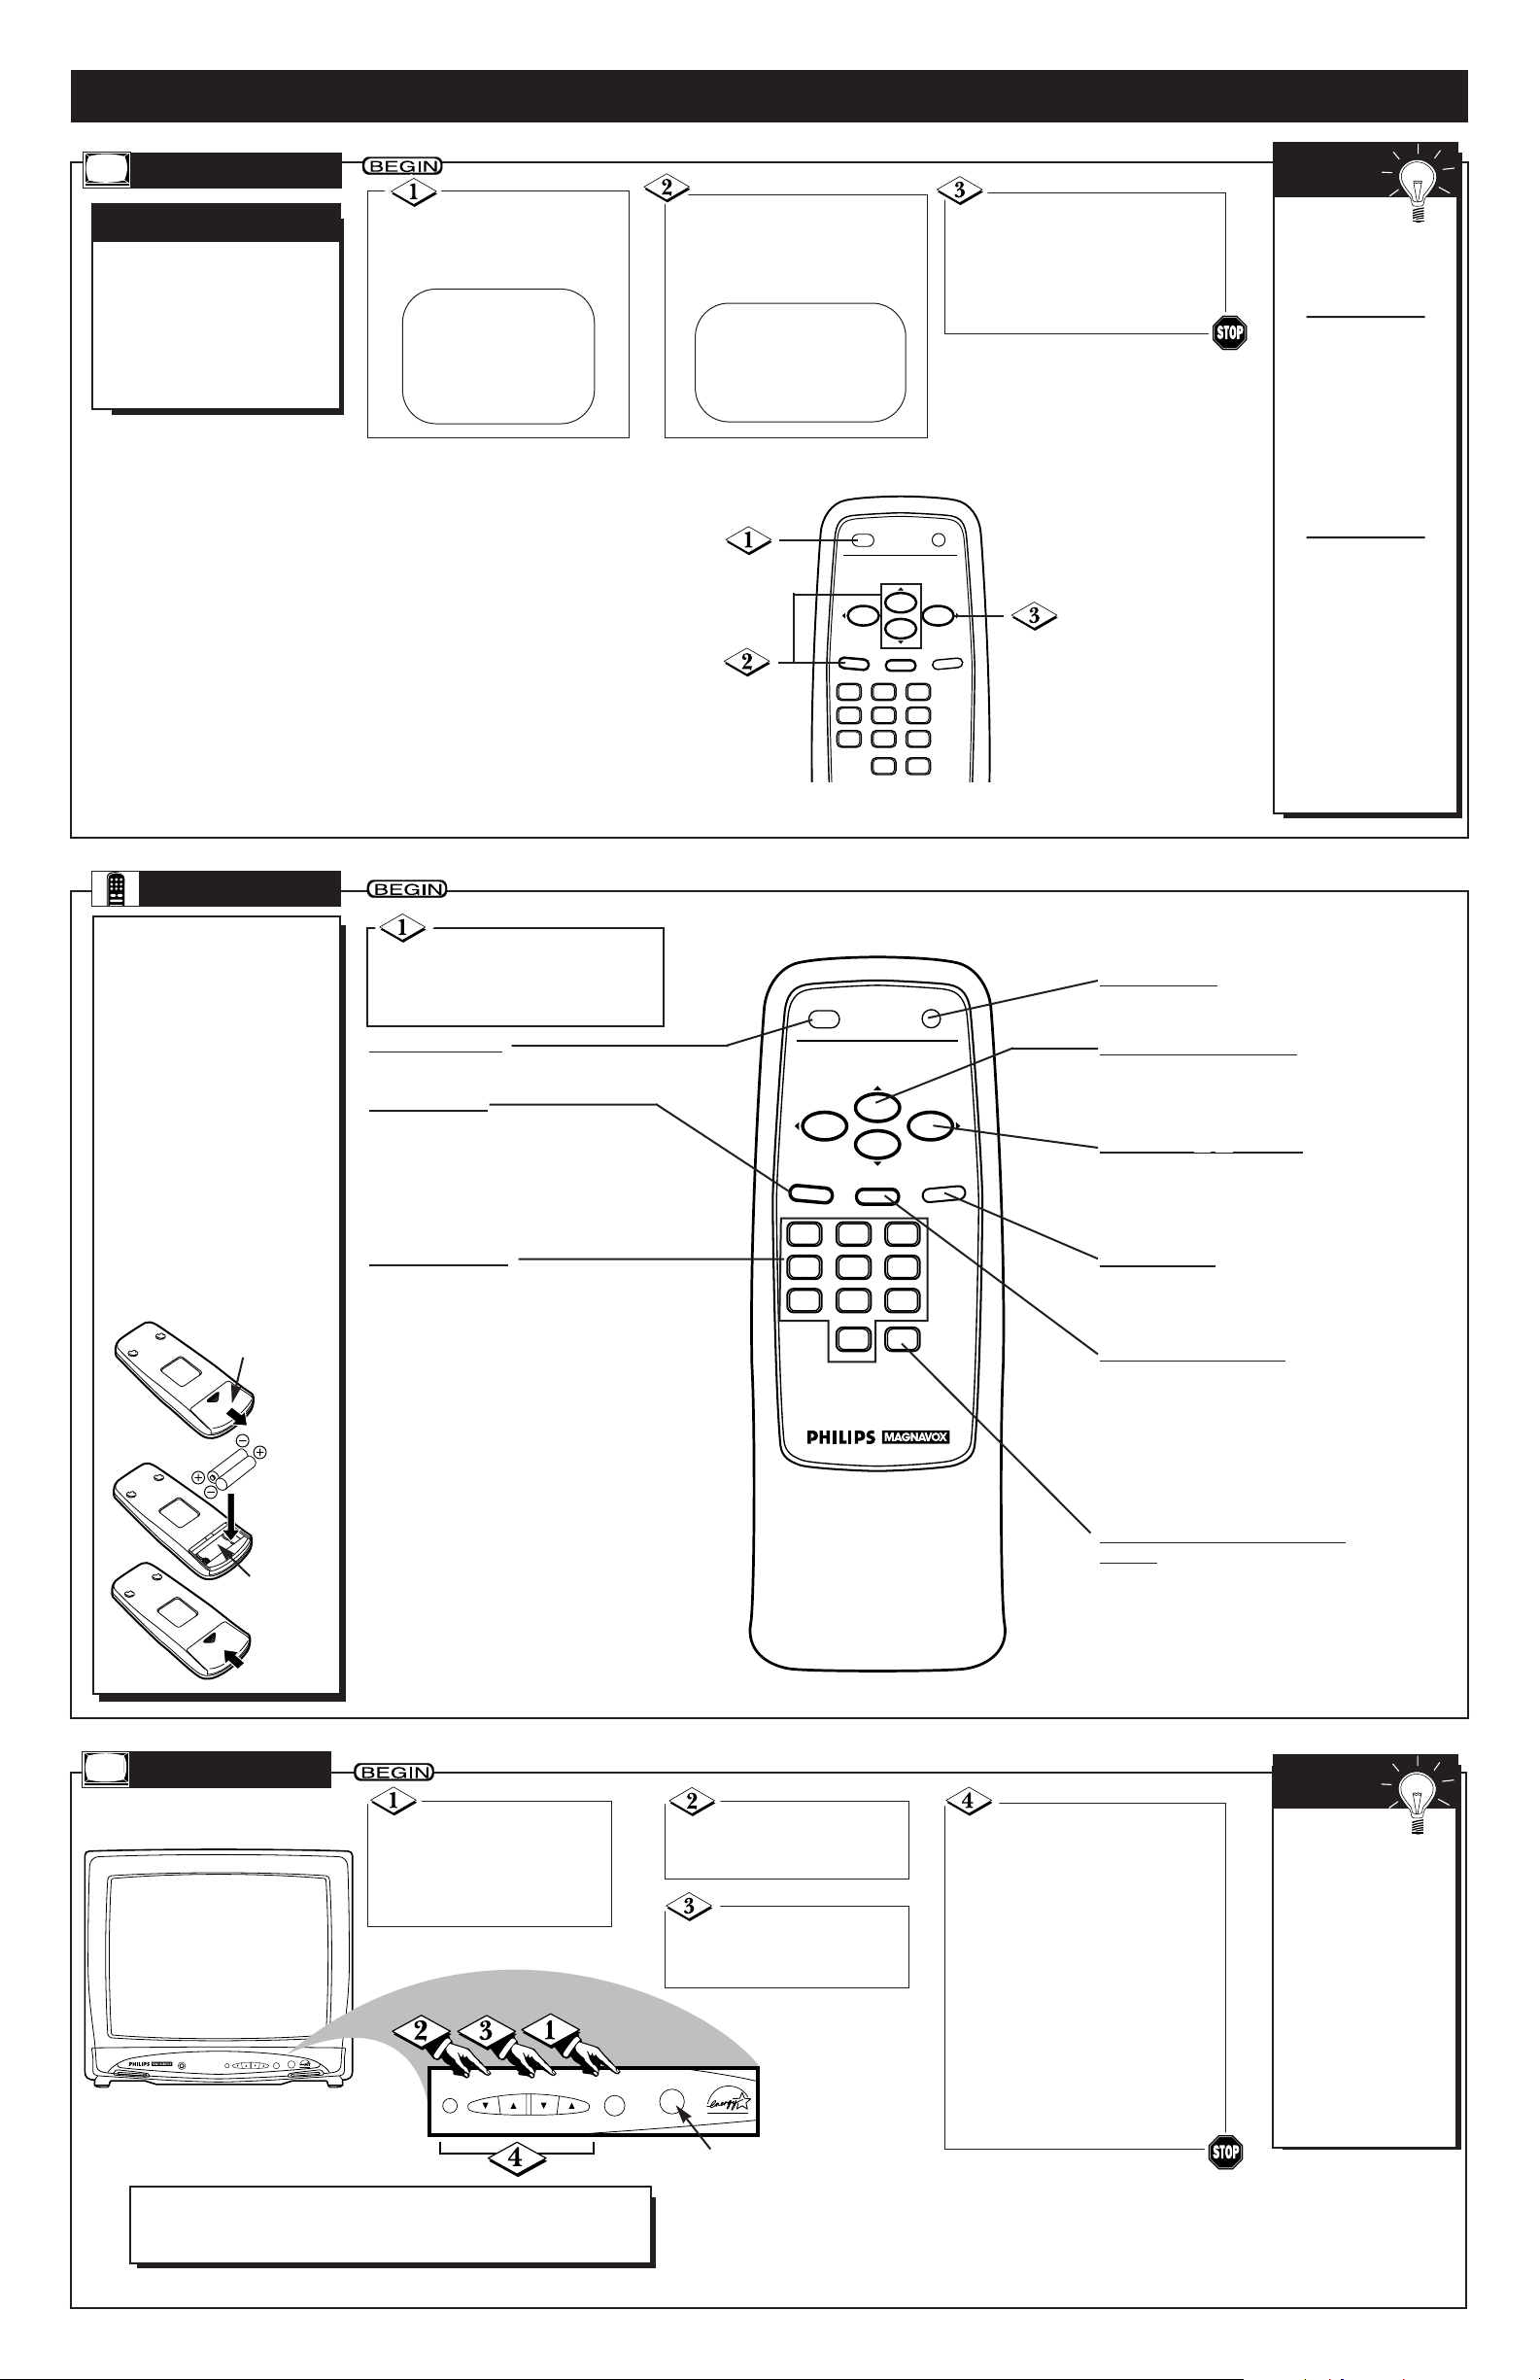
Press the POWER
button to turn ON the TV.
Be sure to connect the TV
power cord to a standard
AC outlet.
Press the VOLUME
▲/▼ buttons to adjust
the sound level.
Press the CHAN-
NEL
▲/▼
buttons to
select TV channels.
TELEVISION
The current
channel number
will appear briefly
when the TV is first
turned ON and with
channel changes. To
display the channel
number for five seconds, press the STATUS/EXIT button.
Or, to remove the
channel number,
press the
STATUS/EXIT button
again.
SMART
HELP
MENU
REMOTE
T
o load the batteries into the
remote:
1.
Slide off the battery
compartment lid on the
remote control.
2.
Insert two AA batteries (supplied) into the
battery compartment
as indicated inside the
compartment. Batteries
installed incorrectly may
damage the remote control.
3.
Replace the lid.
Point the remote control
toward the remote sensor on the TV
when operating the TV with the
remote.
MENU Button
Press to access the on-screen menu.
Press the CH(annel) ▲/▼ buttons to
select an item in the menu. Press the
VOL(ume)
B/{ buttons to adjust an
item in the menu or to advance to the
next menu.
Number Buttons
Press to select channels.
• Cable Users
Enter channel numbers as a two-digit
number for the quickest results. For
example, to select channel 6, press 0,6.
If you only press the Number 6 button,
channel 6 will be selected after a brief
delay. (There also may be a brief delay
when you select channels 10, 11, and
12.) If you want to select channels 100
and above, enter channel numbers as a
three-digit number. For example, to
select channel 117, press 1, 1, 7.
• Antenna Users
Enter channel numbers as a two-digit
number for the quickest results. You
may only select channels 2-69. For
example, to select channel 5, press 0,5.
If you only press the Number 5 button,
channel 5 will be selected after a brief
delay.
MUTE
Button
Press to turn OFF the sound on the TV.
Press again to return the sound to its
previous level.
CH(annel)
▲/▼ Buttons
Press to scan through programmed
channel numbers. Press to select an item
in the on-screen menu.
STATUS/EXIT
Button
Press to see the current channel number
on the TV screen.
Press to remove the on-screen menu.
You also may remove the menu by pressing the CH(annel) ▲/▼ buttons to select
EXIT, then pressing the VOL(ume) B
button.
SLEEP
Button
Press to set the TV to turn itself OFF
automatically.
Details are on page 6.
POWER Button
Press to turn the TV ON and OFF.
ALT. CH (Alternate Channel)
Button
Press to return to the TV channel you
were viewing immediately before switching to your current channel.
Battery
Compartment
Lid
Battery
Compartment
F
irst Time Setup takes care of
some basic TV settings for
you. Follow these steps:
• to set the language of the TV’s
on-screen menu, and
• to quickly add area channels
into the TV’s memory.
FIRST TIME SETUP
Note:
You can connect earphones (not supplied) to the EARPHONE
jack on the front of the TV for private, personal listening.
SMART
HELP
If you do not
want to set up
channels now, press
the STATUS/EXIT
button at step 3.
The menu shown at
step 1 will appear
only the first time you
turn on the TV. If it
does not appear, follow the instructions
on page 5 to select a
language and set up
channels.
If you have not connected the antenna or
cable to the TV, an
on-screen message
will prompt you to do
so. You may need to
follow the steps for
Automatic Channel
Setup on page 5 in
order to finish setting
the channels available
in your area.
Press the CH(annel) ▲/▼
buttons to select English or
Spanish menus. Then, press the
MENU button.
Press the VOL(ume)
B
button to begin automatic channel
setup.
When setup is complete,
“CHANNELS ARE SET” will
appear on the screen.
Press the MENU button
to display the TV’s on-screen
menu.
Press the CHANNEL
▲/▼
buttons to select an item in the
menu.
Press the VOLUME ▲/▼ buttons to adjust an item in the
menu, to advance to the next
menu, or to return to a previous
menu.
Note: To remove the menu,
press the CHANNEL ▲/▼ buttons to select EXIT. Then, press
the VOLUME ▲ button.
Press the POWER
button to turn ON the TV.
The language selection menu
appears on the TV screen.
SELECT LANGUAGE
> ENGLISH ON
ESPAÑOL
SELECT KL OR
PRESS MENU TO CONTINUE
Remote
Sensor
VOL(ume) B/{ Buttons
Press to adjust the TV sound level. Press
to adjust an item in the on-screen menu,
to advance to the next menu, or to
return to a previous menu.
CONNECT ANTENNA OR CABLE
TO TV
THEN PRESS B
TO END PRESS EXIT
POWER
CH.
CH.
MENU
STATUS/EXIT
0
SLEEP
VOL.VOL.
MUTE
321
654
987
ALT. CH
MENU
POWER
CH.
CH.
STATUS/EXIT
0
321
654
987
ALT. CH
SLEEP
VOL.VOL.
MUTE
POWERCHANNELMENU VOLUMEEARPHONE
POWERCHANNELMENU VOLUME
Page 5
- 5 -
ON-SCREEN FEATURES
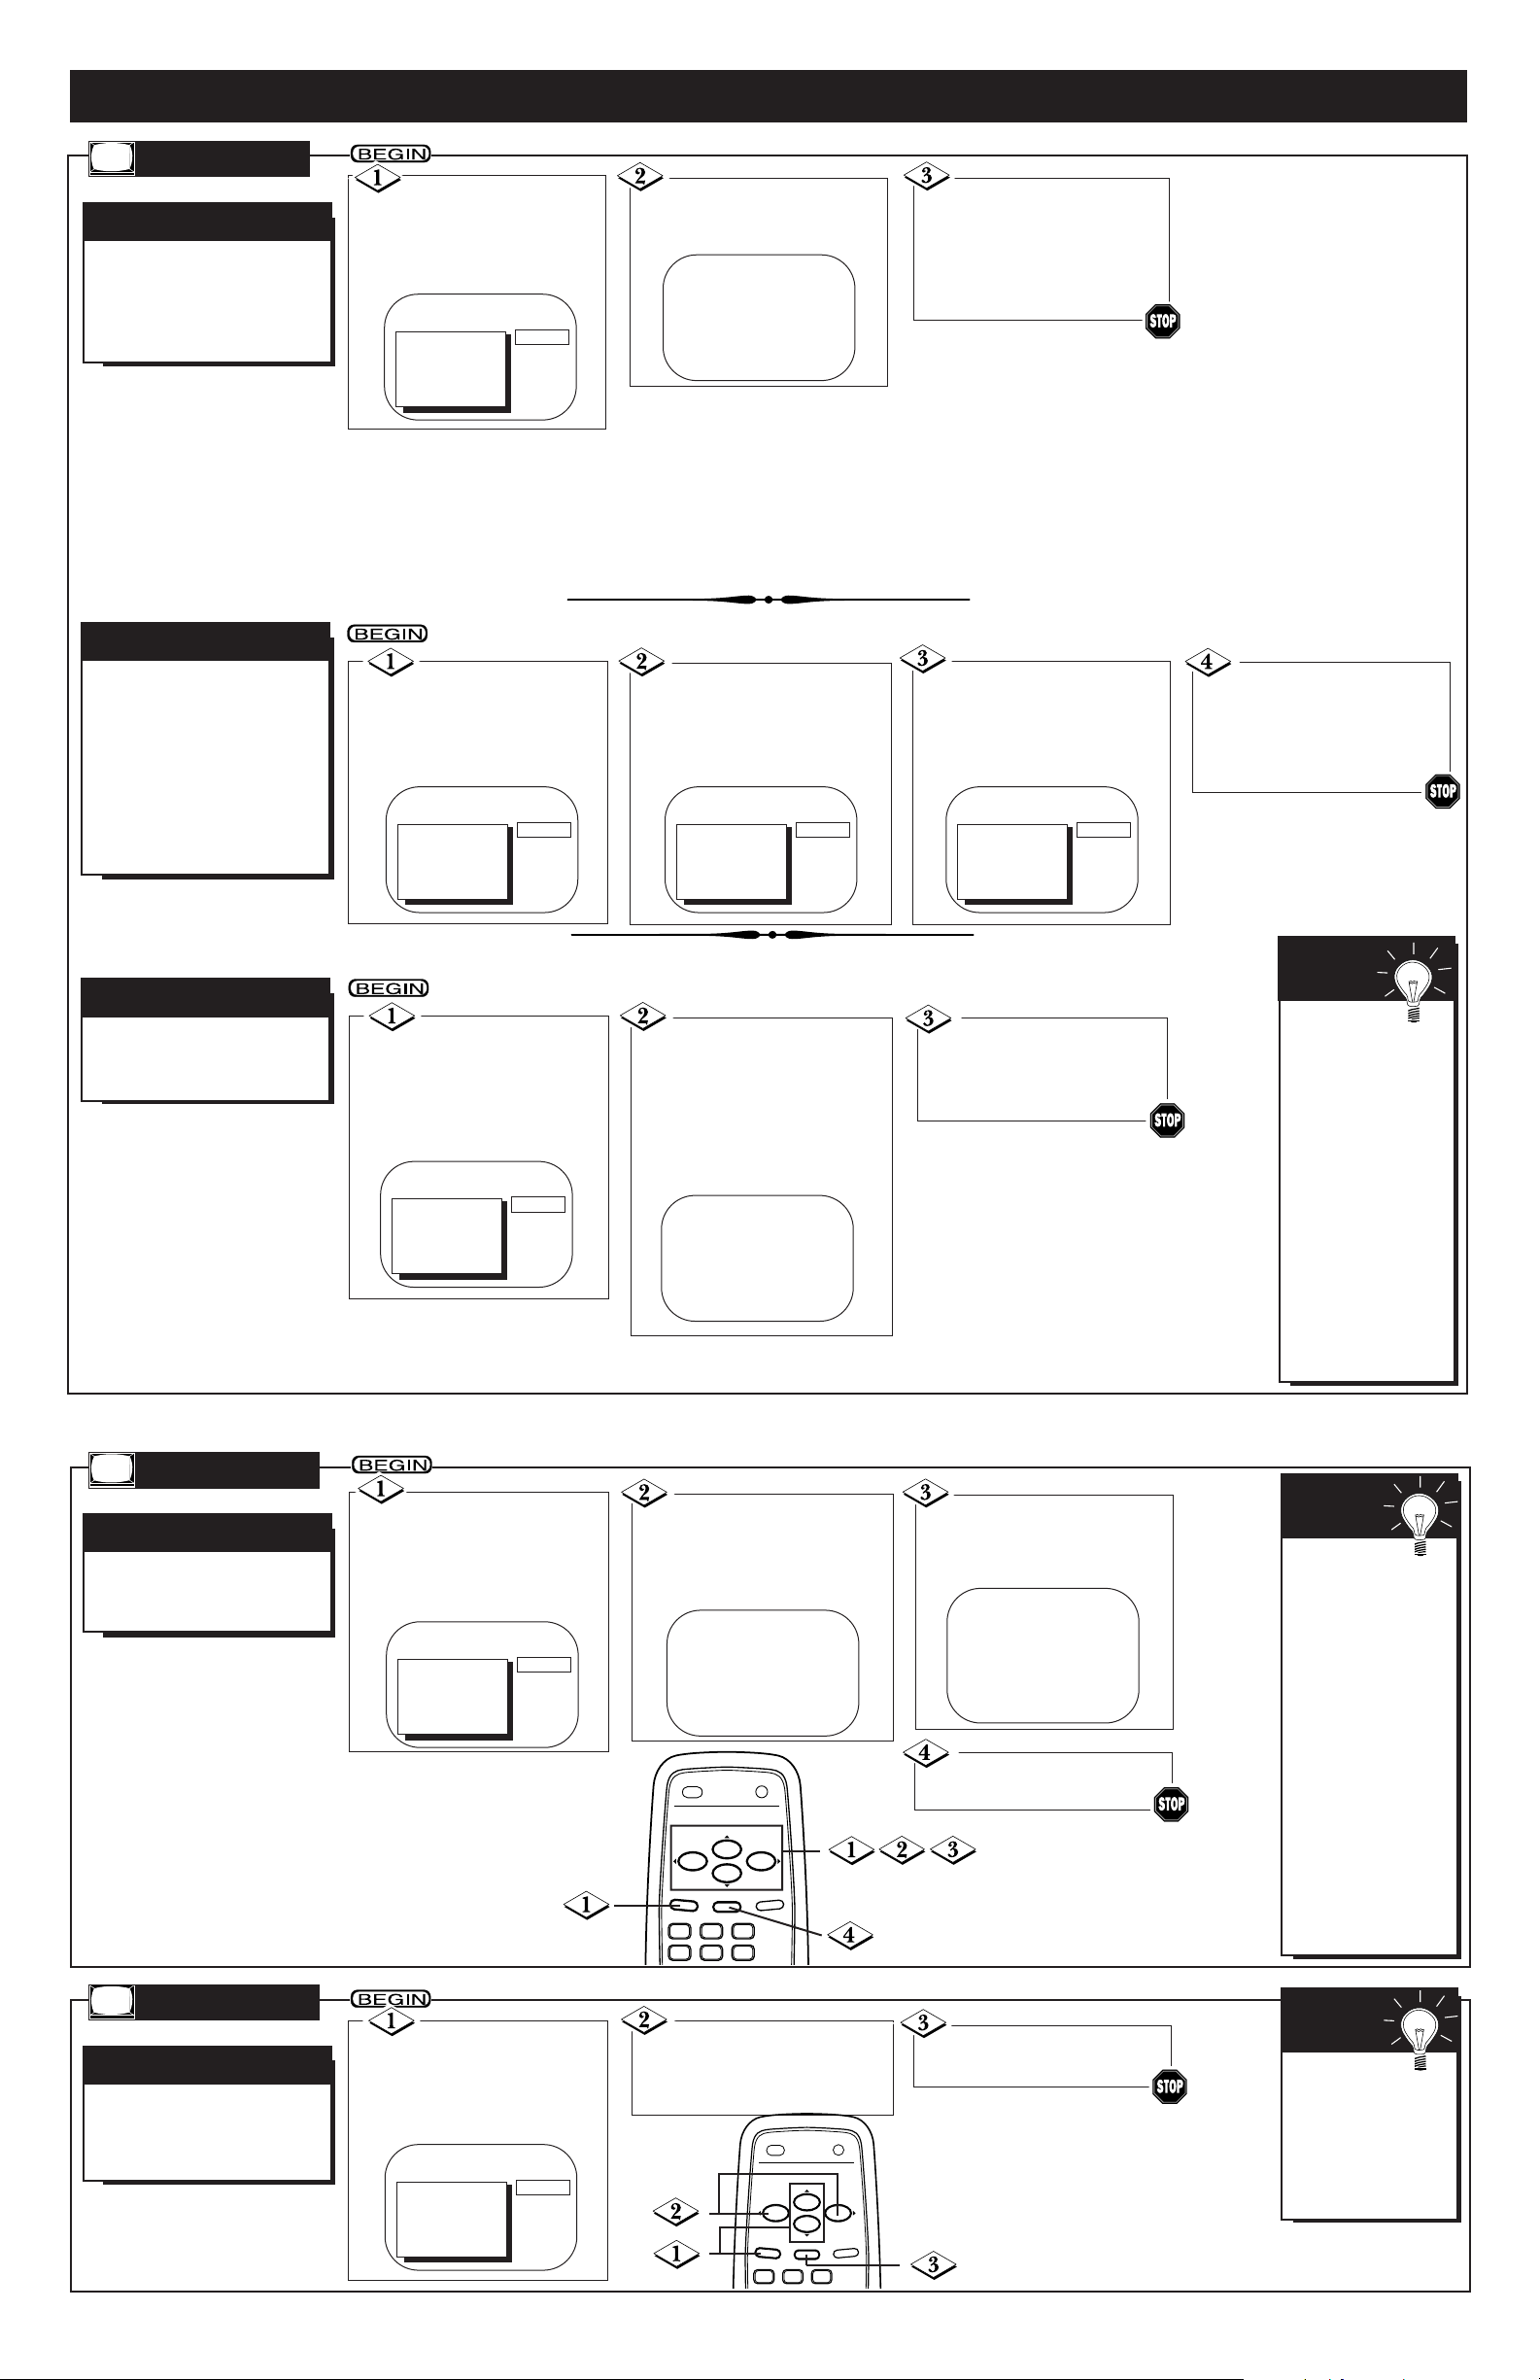
A
utomatic Channel Setup (see
above) adds all the channels
it can find (on your Antenna or
Cable TV system) into the TV's
memory. Save/Delete channels
makes it easy for you to add
other channels or drop unwanted channels from the TV's
memory.
SAVE/DELETE CHANNELS
A
lthough the TV can memo-
rize channels when you first
turn it on, you may want to set
up or reprogram channels by
following these steps.
AUTOMATIC CHANNEL SETUP
Press the CH(annel)
▲/▼ buttons to select
AUTO PROGRAMMING.
CHANNEL
Press the MENU
button, then press the
CH(annel) ▲/▼ buttons to
select SETUP. Then, press
the VOL(ume) B button.
Press the VOL(ume)
B
button to begin automatic channel setup.
When setup is complete,
“CHANNELS ARE SET” will
appear on the screen.
F
ollow these steps to change
the language of the on-
screen menus.
LANGUAGE SELECTION
Press the MENU but-
ton, then press the
CH(annel) ▲/▼ buttons to
select SETUP. Then, press
the VOL(ume) B button.
Press the CH(annel)
▲/▼ buttons to choose
SELECT LANGUAGE.
Then, press the VOL(ume)
B button.
LANGUAGE
Press the CH(annel)
▲/▼ buttons to select
ENGLISH or ESPAÑOL
(Spanish).
Press the MENU
button, then press the
CH(annel) ▲/▼ buttons to
select CHANNEL.
Press the Number buttons to select the channel
you want to SAVE (or
DELETE).
Press the VOL(ume)
B/{ buttons to select
SAVED (to add the channel) or DELETED (to
delete the channel).
Press the
STATUS/EXIT button
when you finish adding (or
deleting) all the channels you
want.
T
o review the channels programmed into the TV’s
memory, follow these steps.
CHANNEL REVIEW
Press the MENU
button, then press the
CH(annel) ▲/▼ buttons to
select SETUP. Then, press
the VOL(ume) B button.
Press the CH(annel)
▲/▼ buttons to select CH
MEMORY REVIEW.
Then, press the VOL(ume)
B button. A list of pro-
grammed channels will appear
on the screen for 10 seconds.
Press the
STATUS/EXIT button
once or twice when you
are finished.
TO ADJUST PRESS { / B
CH123
> CHANNEL
SMARTLOCK
REVIEW
SETUP
EXIT
BRIGHTNESS
SAVED
TO ADJUST PRESS { / B
CH 23
> CHANNEL
SMARTLOCK
REVIEW
SETUP
EXIT
BRIGHTNESS
DELETED
TO ADJUST PRESS { / B
CH 23
> CHANNEL
SMARTLOCK
REVIEW
SETUP
EXIT
BRIGHTNESS
SAVED
> SETUP
EXIT
BRIGHTNESS
PICTURE
COLOR
TINT
PRESS B
SETUP
SELECT LANGUAGE
> AUTO PROGRAMMING
CH MEMORY REVIEW
SELECT KL CHOOSE B
TO END PRESS EXIT
> SETUP
EXIT
BRIGHTNESS
PICTURE
COLOR
TINT
PRESS B
SETUP
SELECT LANGUAGE
AUTO PROGRAMMING
> CH MEMORY REVIEW
SELECT KL CHOOSE B
TO END PRESS EXIT
Press the
STATUS/EXIT button.
> SETUP
EXIT
BRIGHTNESS
PICTURE
COLOR
TINT
PRESS B
SETUP
> SELECT LANGUAGE
AUTO PROGRAMMING
CH MEMORY REVIEW
SELECT KL CHOOSE B
TO END PRESS EXIT
SELECT LANGUAGE
> ENGLISH ON
ESPAÑOL
SELECT KL
TO END PRESS EXIT
If all the programmed channels
don’t fit on the
screen, press the
VOL(ume) B button
to see the remaining
channels.
If you do not press
the VOL(ume) B
button within 10 seconds, the remaining
channels will appear
on the screen automatically. When all
channels have been
displayed, the SETUP
menu will reappear.
SMART
HELP
T
he channel number will
remain on the screen at all
times when you set REMINDER
to ON.
CHANNEL REMINDER
Press the MENU
button, then press the
CH(annel) ▲/▼ buttons to
select REMINDER.
Press the VOL(ume)
B/{ buttons so that ON
or OFF appears to the
right of REMINDER.
REMINDER
Press the
STATUS/EXIT button.
TO ADJUST PRESS { / B
> REMINDER
CHANNEL
SMARTLOCK
REVIEW
SETUP
EXIT
OFF
If you accidentally chose Spanish
and need English:
1) Press the MENU
button. 2) Press the
CH(annel) ▲/▼ buttons to select
PREPARACION, then
press the VOL(ume)
B button. 3) Press
the CH(annel) ▲/▼
buttons to choose
SELECCION
IDIOMA, then press
the VOL(ume) B button. 4) Press the
CH(annel) ▲/▼ buttons to select ENGLISH. 5) Press the
STATUS/EXIT button.
SMART
HELP
The channel
number will not
remain on the screen
if a Closed Captioning
mode is selected.
CAPTION must be
set to OFF. Details
are on page 7.
SMART
HELP
POWER
MENU
CH.
CH.
STATUS/EXIT
SLEEP
VOL.VOL.
MUTE
321
654
POWER
MENU
CH.
CH.
STATUS/EXIT
SLEEP
VOL.VOL.
MUTE
321
Page 6
ON-SCREEN FEATURES (CONT’D)
- 6 -
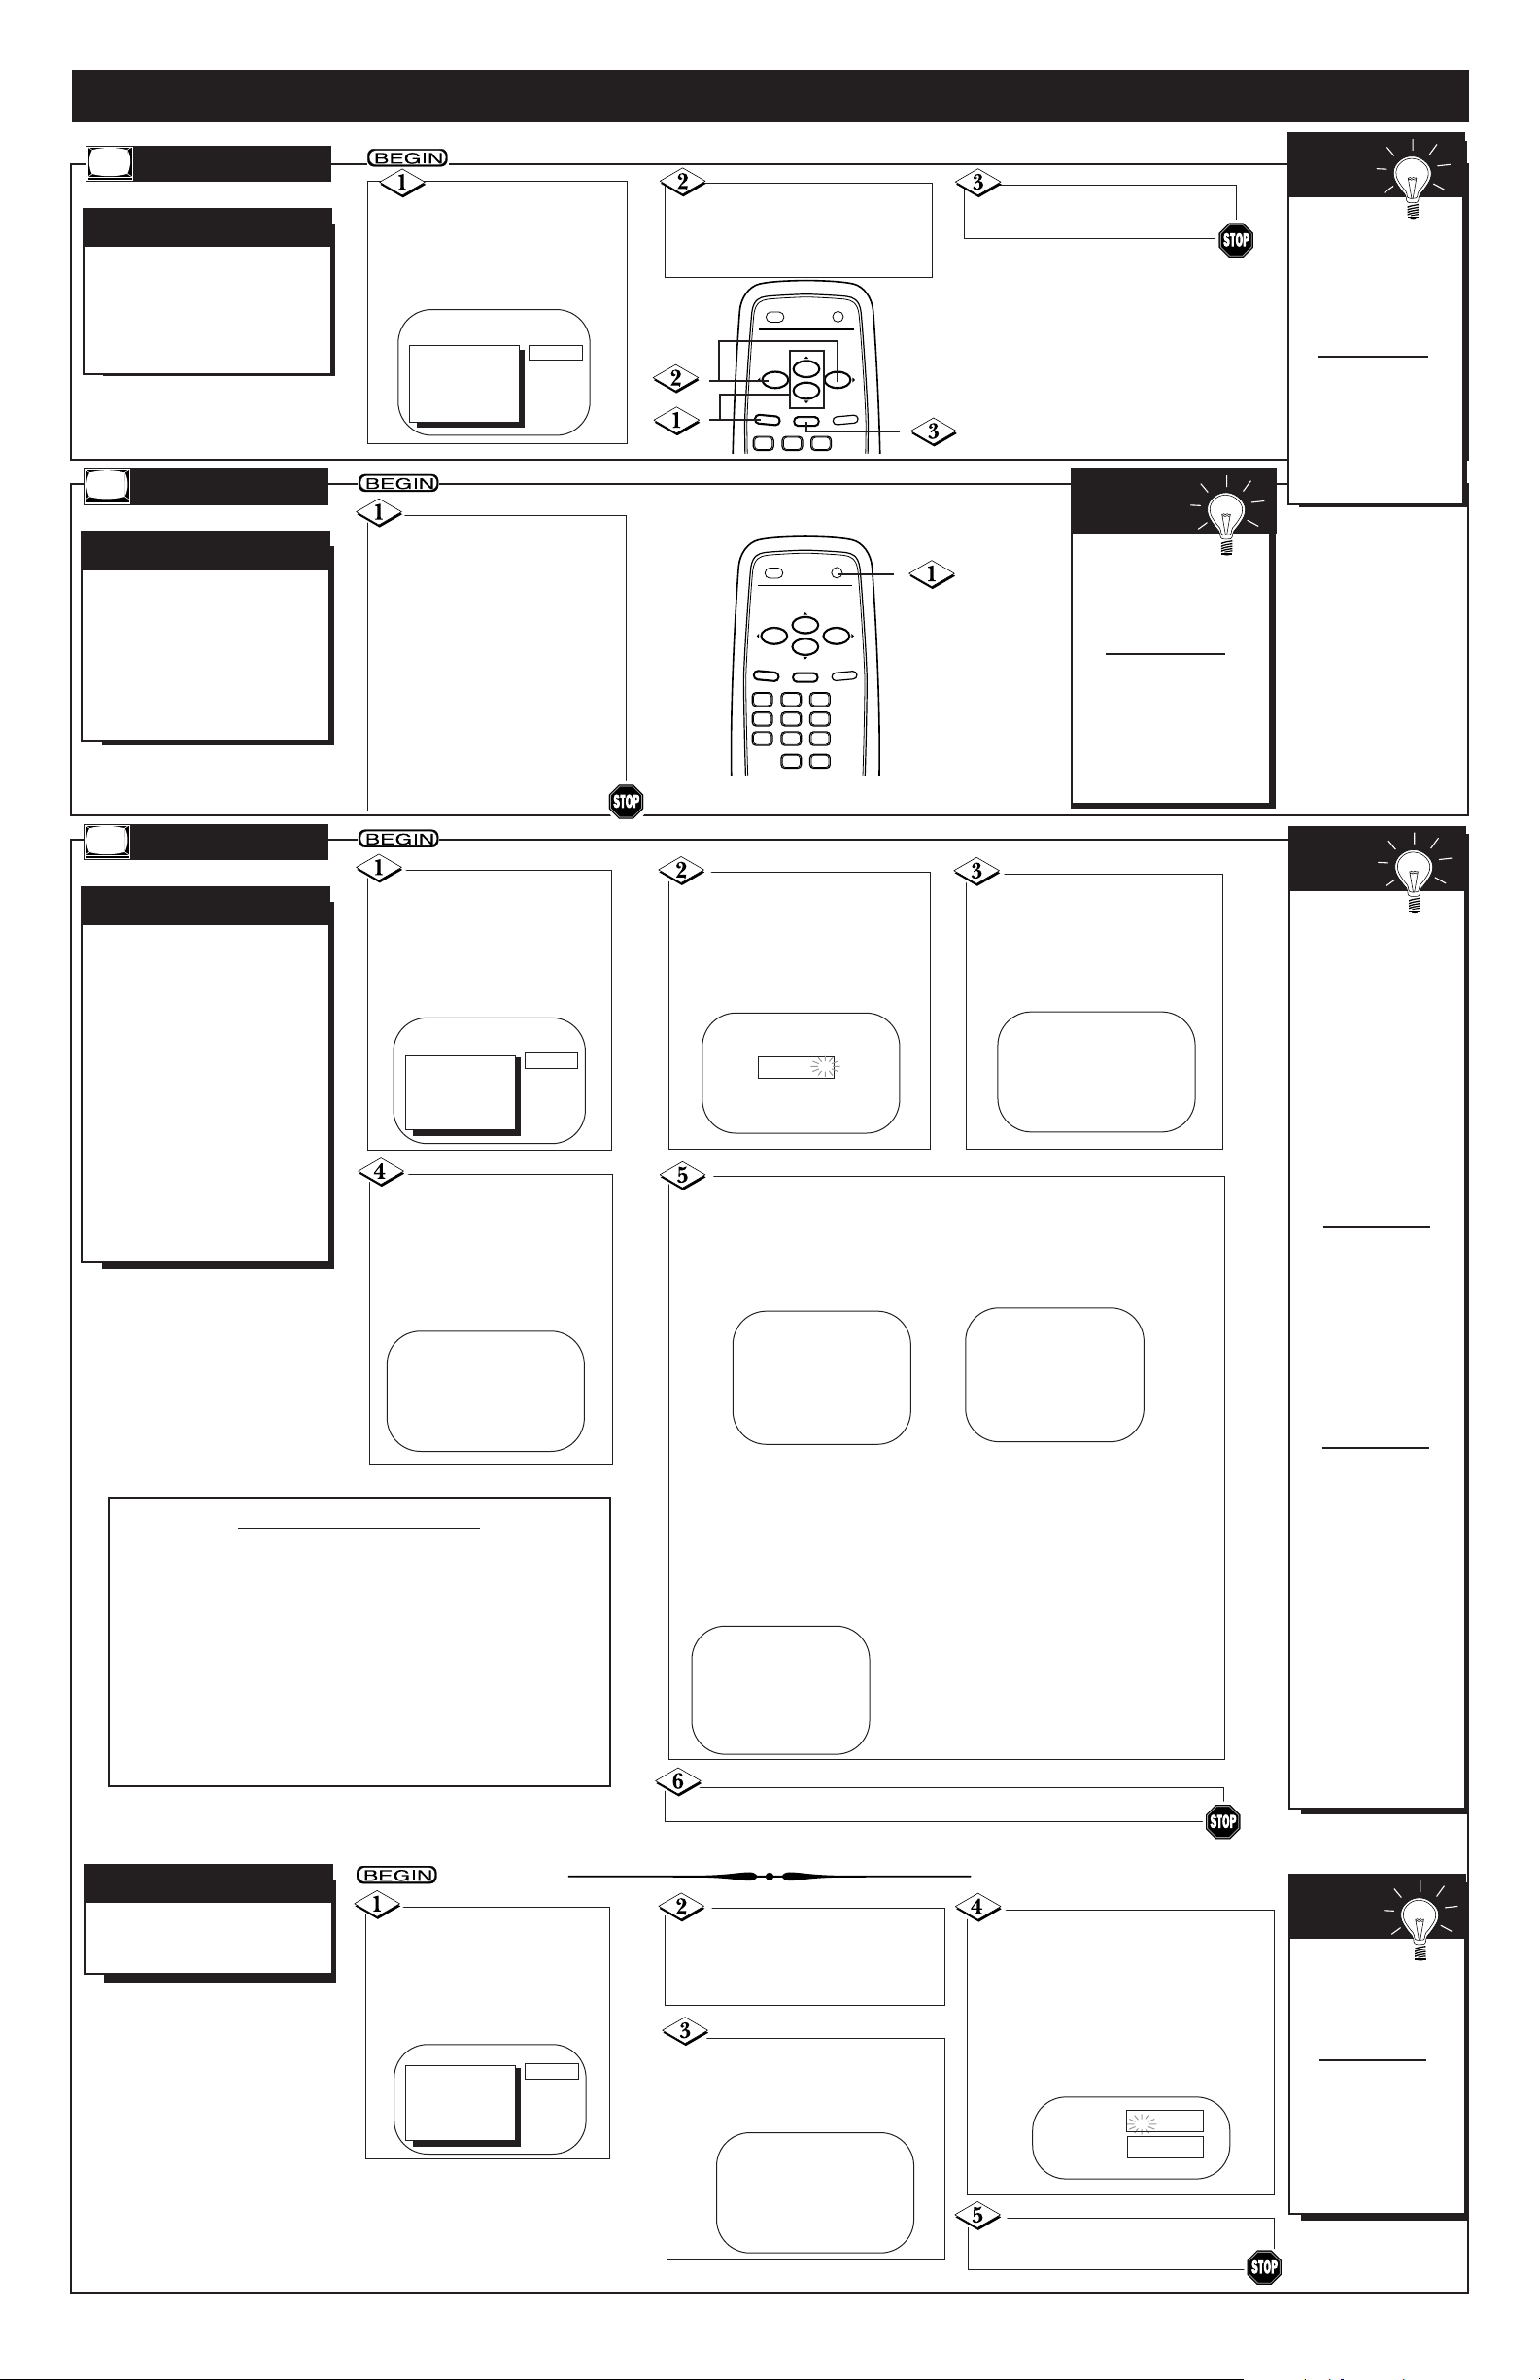
H
ave you ever fallen asleep
in front of the TV, only to
have it wake you up at 2 a.m.
with a test pattern screeching
in your ears? Well, your TV
can save you all that trouble by
automatically turning itself off.
SLEEP TIMER
Press the SLEEP button
repeatedly to pick the
amount of time (30 minutes to
120 minutes) before the TV
turns itself off. The length of
time will appear on the screen
briefly.
One minute before the TV
shuts itself off, the seconds will
count down on the screen.
GOOD NIGHT appears on the
TV screen 10 seconds before
the TV shuts itself off.
To see how
many minutes remain
before the TV shuts
itself off, press the
SLEEP button once.
To cancel a SLEEP
TIMER setting, press
the SLEEP button
repeatedly until SLEEP
0 MIN appears on the
screen.
SMART
HELP
SLEEP TIMER
S
martLock enables parents to
prevent their children from
watching inappropriate material
on TV. SmartLock reads the
ratings for programming (except
for news and sports programs,
unedited movies on premium
cable channels, and Emergency
Broadcast System signals), then
denies access to programming if
the program’s rating meets or
exceeds the limitations you
select. To block specific ratings,
follow these steps.
SMARTLOCK
Press the MENU but-
ton, then press the
CH(annel) ▲/▼ buttons to
select SMARTLOCK.
Then, press the
VOL(ume) Bbutton.
SMARTLOCK
Use the Number but-
tons to enter your access
code. The default code is 0711.
If you have not set up your personal access code, you should
use 0711.
Press the CH(annel)
▲/▼ buttons to select
BLOCK. Then, press the
VOL(ume) B button.
> SMARTLOCK
REVIEW
SETUP
EXIT
BRIGHTNESS
PICTURE
PRESS B
SMARTLOCK
Enter Your Access Code
X X X -
SMARTLOCK
> BLOCK
CHANGE CODE
SELECT KL CHOOSE B
TO END PRESS EXIT
Press the CH(annel)
▲/▼ buttons to select
Movie Ratings or
Parental Guidelines.
Then, press the
VOL(ume) B button.
Press the CH(annel) ▲/▼ buttons to select the rating
you want to block. Then, press the VOL(ume) B button so
that ON appears beside the rating.
For example, if you set PG to ON, you may not view PG programming because the block is on. Programs with a PG or higher rating
will be blocked.
• More specific ratings are available for TV-Y7, TV-PG, TV-14, and
TV-MA. When you press the VOL(ume) B button to turn ON
TV-Y7, TV-PG, TV-14 or TV-MA, additional ratings will appear.
Press the CH(annel) ▲/▼ buttons to select a specific rating. Then, press the VOL(ume) B button so that ON
appears beside the rating. If you select the rating category and
turn it on or off, the specific ratings will turn on or off automatically. But, you can always turn specific ratings on or off by selecting them individually.
BLOCK
> Movie Ratings
Parental Guidelines
SELECT KL CHOOSE B
TO END PRESS EXIT
MOVIE RATINGS
> G [OFF]
PG [OFF]
PG-13 [OFF]
R [OFF]
NC-17 [OFF]
X [OFF]
SELECT KL CHOOSE B
TO END PRESS EXIT
PARENTAL GUIDELINES
> TV-Y [OFF]
TV-Y7 >
- - - - - - - - - - - - - - - TV-G [OFF]
TV-PG >
TV-14 >
TV-MA >
SELECT KL CHOOSE B
TO END PRESS EXIT
Press the MENU but-
ton, then press the
CH(annel) ▲/▼ buttons to
select SMARTLOCK. Then,
press the VOL(ume)
B
button.
Press the Number buttons
to enter your old access code.
If
you have never set up your personal access code, use 0711.
Use the Number buttons to
enter your desired access code in
the New Code space. Then, enter
the same code in the Confirm
Code space.
Your new access code should be
recorded. You will return to the
SMARTLOCK menu.
> SMARTLOCK
REVIEW
SETUP
EXIT
BRIGHTNESS
PICTURE
PRESS B
New Code
Confirm Code
_ _ _ _
_ _ _ _
Press the STATUS/EXIT
button.
To check the
SmartLock settings,
press the MENU button, then press the
CH(annel) ▲/▼ buttons to select REVIEW.
Press the VOL(ume) B
button so that the
SmartLock settings
appear. Ratings that are
blocked will appear on
the screen. An “X” will
appear if a specific rating is blocked, such as
V for Violence in the
TV-14 category.
If the “Incorrect Access
Code...” message
appears after step 2,
enter the correct
access code. In order
to protect the privacy
of the access code, an
X will appear on the
screen instead of the
number you enter.
A “CHANNEL XX
BLOCKED...” message
will appear when someone tries to access the
blocked programming.
If you want to view this
programming, enter
your access code. The
channel will remain
blocked until you enter
the correct code. If you
do not know the code,
you will have to select
another channel. When
you turn off the TV
once, the programming
is blocked again.
SMART
HELP
• V-Violence
• S-Sexual situations
• L-Language
• D-Inappropriate dialogue
• FV-Fantasy Violence may
frighten children under
seven; TV-Y7 category only.
Some cartoons may have
this rating.
• TV-Y - Appropriate for all
children
• TV-Y7 - Appropriate for
children seven and older
• TV-G - General Audience
• TV-PG - Parental Guidance
suggested
• TV-14 - Unsuitable for children under 14
• TV-MA - Mature audience
only
You cannot
use the default code
after you set up
your personal access
code.
To restore 0711 as
your personal access
code, unplug the
TV’s power cord for
10 seconds, then
plug it in again.
SMART
HELP
T
he Volume Bar displays the
TV’s volume level on the TV
screen. When the Volume Bar is
set to ON, it will appear when
you adjust the volume.
VOLUME BAR
Press the MENU
button, then press the
CH(annel) ▲/▼ buttons to
select VOLUME BAR.
Press the VOL(ume)
B//{ buttons so that ON or
OFF appears beside VOLUME BAR.
Try it out.
Press the
VOL(ume) B/{
buttons. The VOLUME BAR should
appear on the
screen.
To avoid delays in
Closed Captioning
when you adjust or
mute the volume,
set the VOLUME
BAR to OFF.
SMART
HELP
VOLUME BAR
Press the STATUS/EXIT
button.
TO ADJUST PRESS { / B
> VOLUME BAR
REMINDER
CHANNEL
SMARTLOCK
REVIEW
SETUP
OFF
T
o change the access code,
follow these steps.
ACCESS CODE
Press the STATUS/EXIT button.
RATING EXPLANATIONS
Press the CH(annel) ▲/▼
buttons to select CHANGE
CODE. Then, press the
VOL(ume) Bbutton.
SMARTLOCK
BLOCK
> CHANGE CODE
SELECT KL CHOOSE B
TO END PRESS EXIT
TV-PG
> TV-PG [OFF]
D [OFF]
L [OFF]
S [OFF]
V [OFF]
SELECT KL CHOOSE B
TO END PRESS EXIT
POWER
MENU
POWER
MENU
CH.
CH.
STATUS/EXIT
CH.
CH.
STATUS/EXIT
0
SLEEP
VOL.VOL.
MUTE
321
SLEEP
VOL.VOL.
MUTE
321
654
987
ALT. CH
Page 7
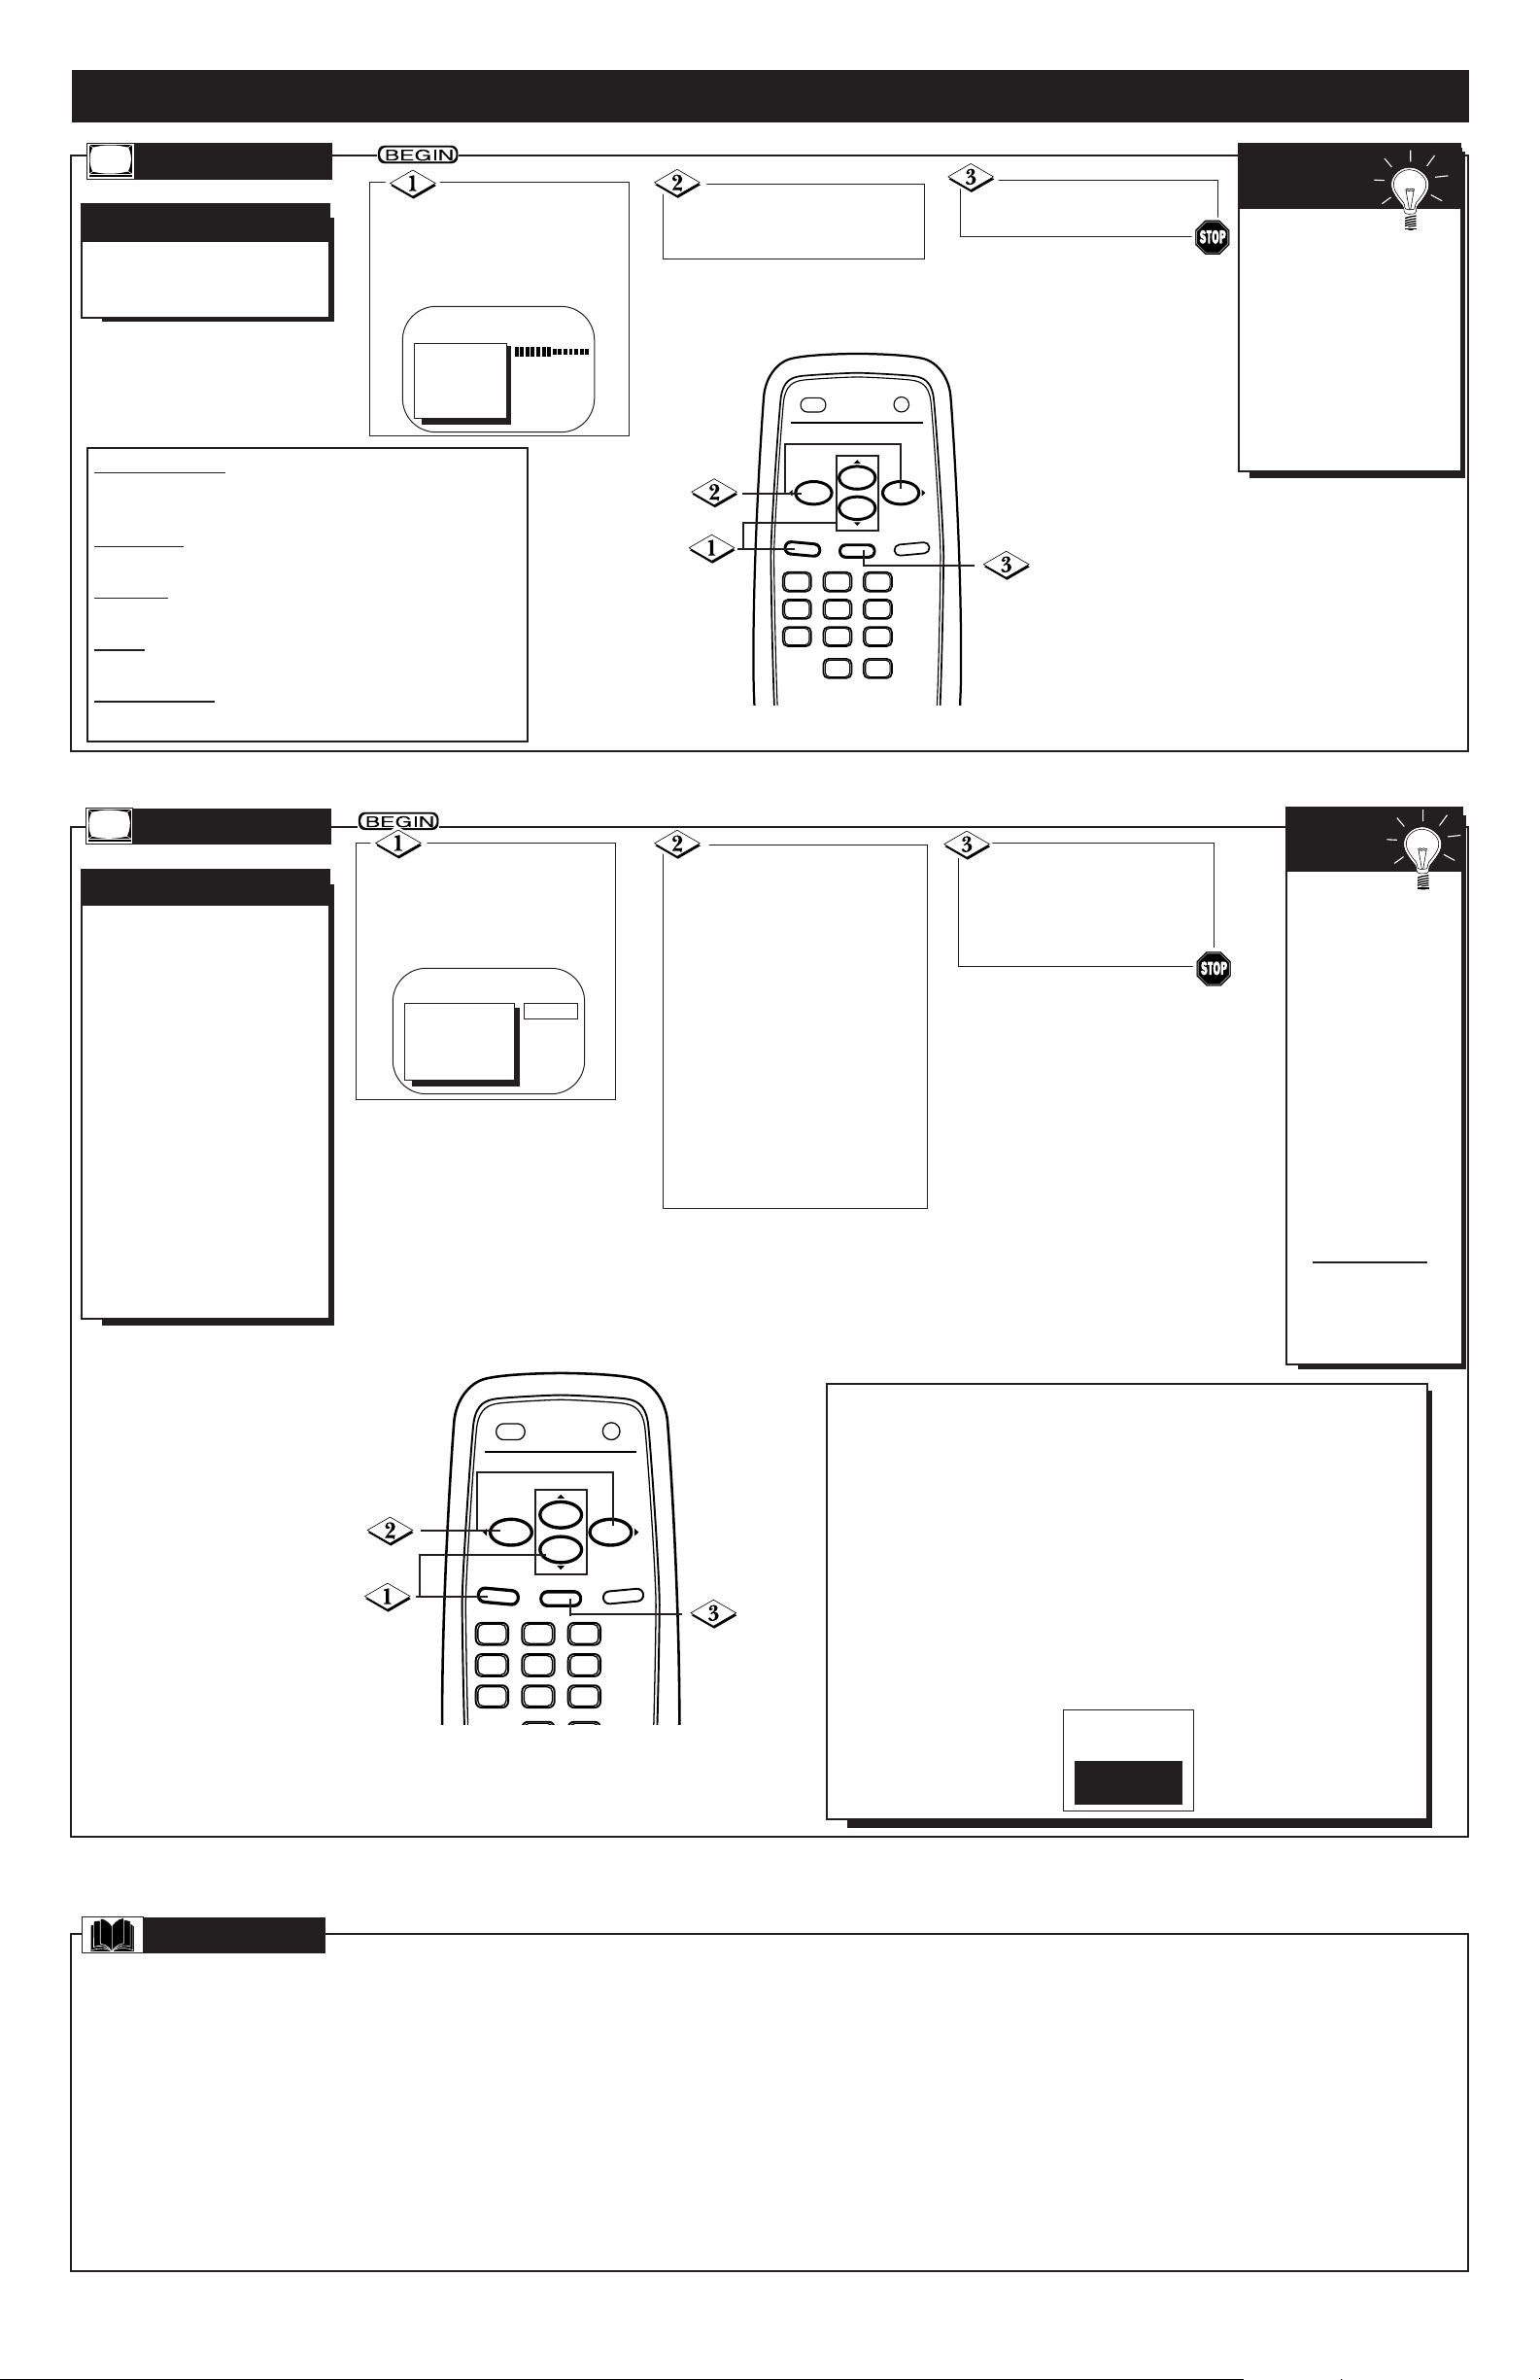
C
losed Captioning allows you
to read the voice content of
television programs on the TV
screen. Designed to help the
hearing impaired, this feature
uses on-screen text boxes to
show dialogue and conversations
while the TV program is in
progress.
Note: Broadcast stations will
often use spelling abbreviations,
symbols, dropouts and other
grammatical shortcuts in order
to keep pace with the on-screen
action. These factors vary with
the source of the captioned text
material and do not indicate a
need for TV service.
CLOSED CAPTIONING
Closed
Captions will be
delayed briefly when
you mute or adjust
the volume, change
channels, or press
the STATUS/EXIT
button to see the
current channel
number. Closed
Captions will not be
delayed when you
mute or adjust the
volume if you set
the VOLUME BAR
to OFF. Details are
on page 6.
To cancel Closed
Captions, set CAPTION to OFF at
step 2.
SMART
HELP
ON-SCREEN FEATURES (CONT’D)
CAPTION
Coaxial Cable - A single cable with a metal connector that screws (or pushes) direct-
ly onto a 75V jack (ANT(enna) In jack) on the Television or VCR.
Display - Allows the user to quickly confirm what channel number is being viewed
currently.
Jack Panel - The area on the back of the TV.
Menu - An on-screen listing of features that are available for adjustments.
On-screen Displays (OSD) - The wording or messages that help you set up features
(color adjustment, channel setup, etc.).
Programming - Adding or deleting channels in the television’s memory. The televi-
sion “remembers’’ only the locally available or desired channel numbers and skips over
any unwanted channel numbers.
Reminder - Continuously displays the current channel number on the TV screen.
Remote Sensor - A window or opening on the front of the TV through which
remote control signals are received.
Twin Lead Wire - The two-strand 300V antenna wire used with many indoor and
outdoor antenna systems. In many cases, this type of antenna wire requires an additional adaptor (or balun) in order to connect to the ANT(enna) In jack on the TV.
Volume Bar - Appears on the TV screen when you adjust the volume.
GLOSSARY
- 7 -
Notes:
• Captions and texts may not match the TV voice broadcast exactly.
• Interference may cause the Closed Captioning system to function
improperly.
• The caption or text characters will not appear if the menu is on the
screen.
• Remember, not all TV programs and commercials are broadcast with
Closed Captioning. Neither are all Closed Caption modes necessarily
being used by a broadcast station during the transmission of a program. Refer to your area's TV program listings for the stations and
times of shows with Closed Captioning.
• If a black box appears on the screen, your TV is set to a TEXT mode.
To remove the black box, select CAPTION 1, CAPTION 2, or OFF at
step 2 above.
Press the MENU
button, then press the
CH(annel) ▲/▼ buttons to
select CAPTION.
Press the VOL(ume)
B/{ buttons to select a
Closed Caption mode, for
example CAPTION 1.
Note: Usually CAPTION 1 is
the preferred mode for viewing
captioned material.
CAPTION 1 or 2 modes: dialogue (and descriptions) for the
action on the captioned TV
program shows on the screen.
TEXT 1 or 2 modes: only a
black box appears on the TV
screen. If the TEXT mode is
active, text or information will
appear.
Press the
STATUS/EXIT button.
Closed Captions will appear if
they are available for the current program.
T
o adjust your TV picture
controls, select a channel
and follow these steps.
PICTURE ADJUSTMENTS
PICTURE
To reset the picture controls to the original factory settings, press
the MENU button, then
press the CH(annel) ▲/▼
buttons to select TV
RESET. Press the
VOL(ume) B button. TV
RESET COMPLETED will
appear briefly on the
screen.
SMART
HELP
Press the MENU
button, then press the
CH(annel) ▲/▼ buttons to
select a control.
Press the VOL(ume)
B//{ buttons to adjust the
selected picture control.
BRIGHTNESS Press the VOL(ume) B/{ buttons
until the darkest parts of the picture are as bright as
you prefer.
PICTURE Press the VOL(ume) B/{ buttons until
the lightest parts of the picture show good detail.
COLOR Press the VOL(ume) B/{ buttons to add
or reduce color.
TINT Press the VOL(ume) B/{ buttons to obtain
natural skin tones.
SHARPNESS Press the VOL(ume) B/{ buttons
to improve detail in the picture.
TO ADJUST PRESS { / B
> BRIGHTNESS
PICTURE
COLOR
TINT
SHARPNESS
TV RESET
Press the
STATUS/EXIT button.
TO ADJUST PRESS { / B
> CAPTION
VOLUME BAR
REMINDER
CHANNEL
SMARTLOCK
REVIEW
OFF
K
K
POWER
MENU
CH.
CH.
STATUS/EXIT
0
SLEEP
VOL.VOL.
MUTE
321
654
987
ALT. CH
MENU
POWER
CH.
CH.
STATUS/EXIT
SLEEP
VOL.VOL.
MUTE
321
654
987
Page 8
P
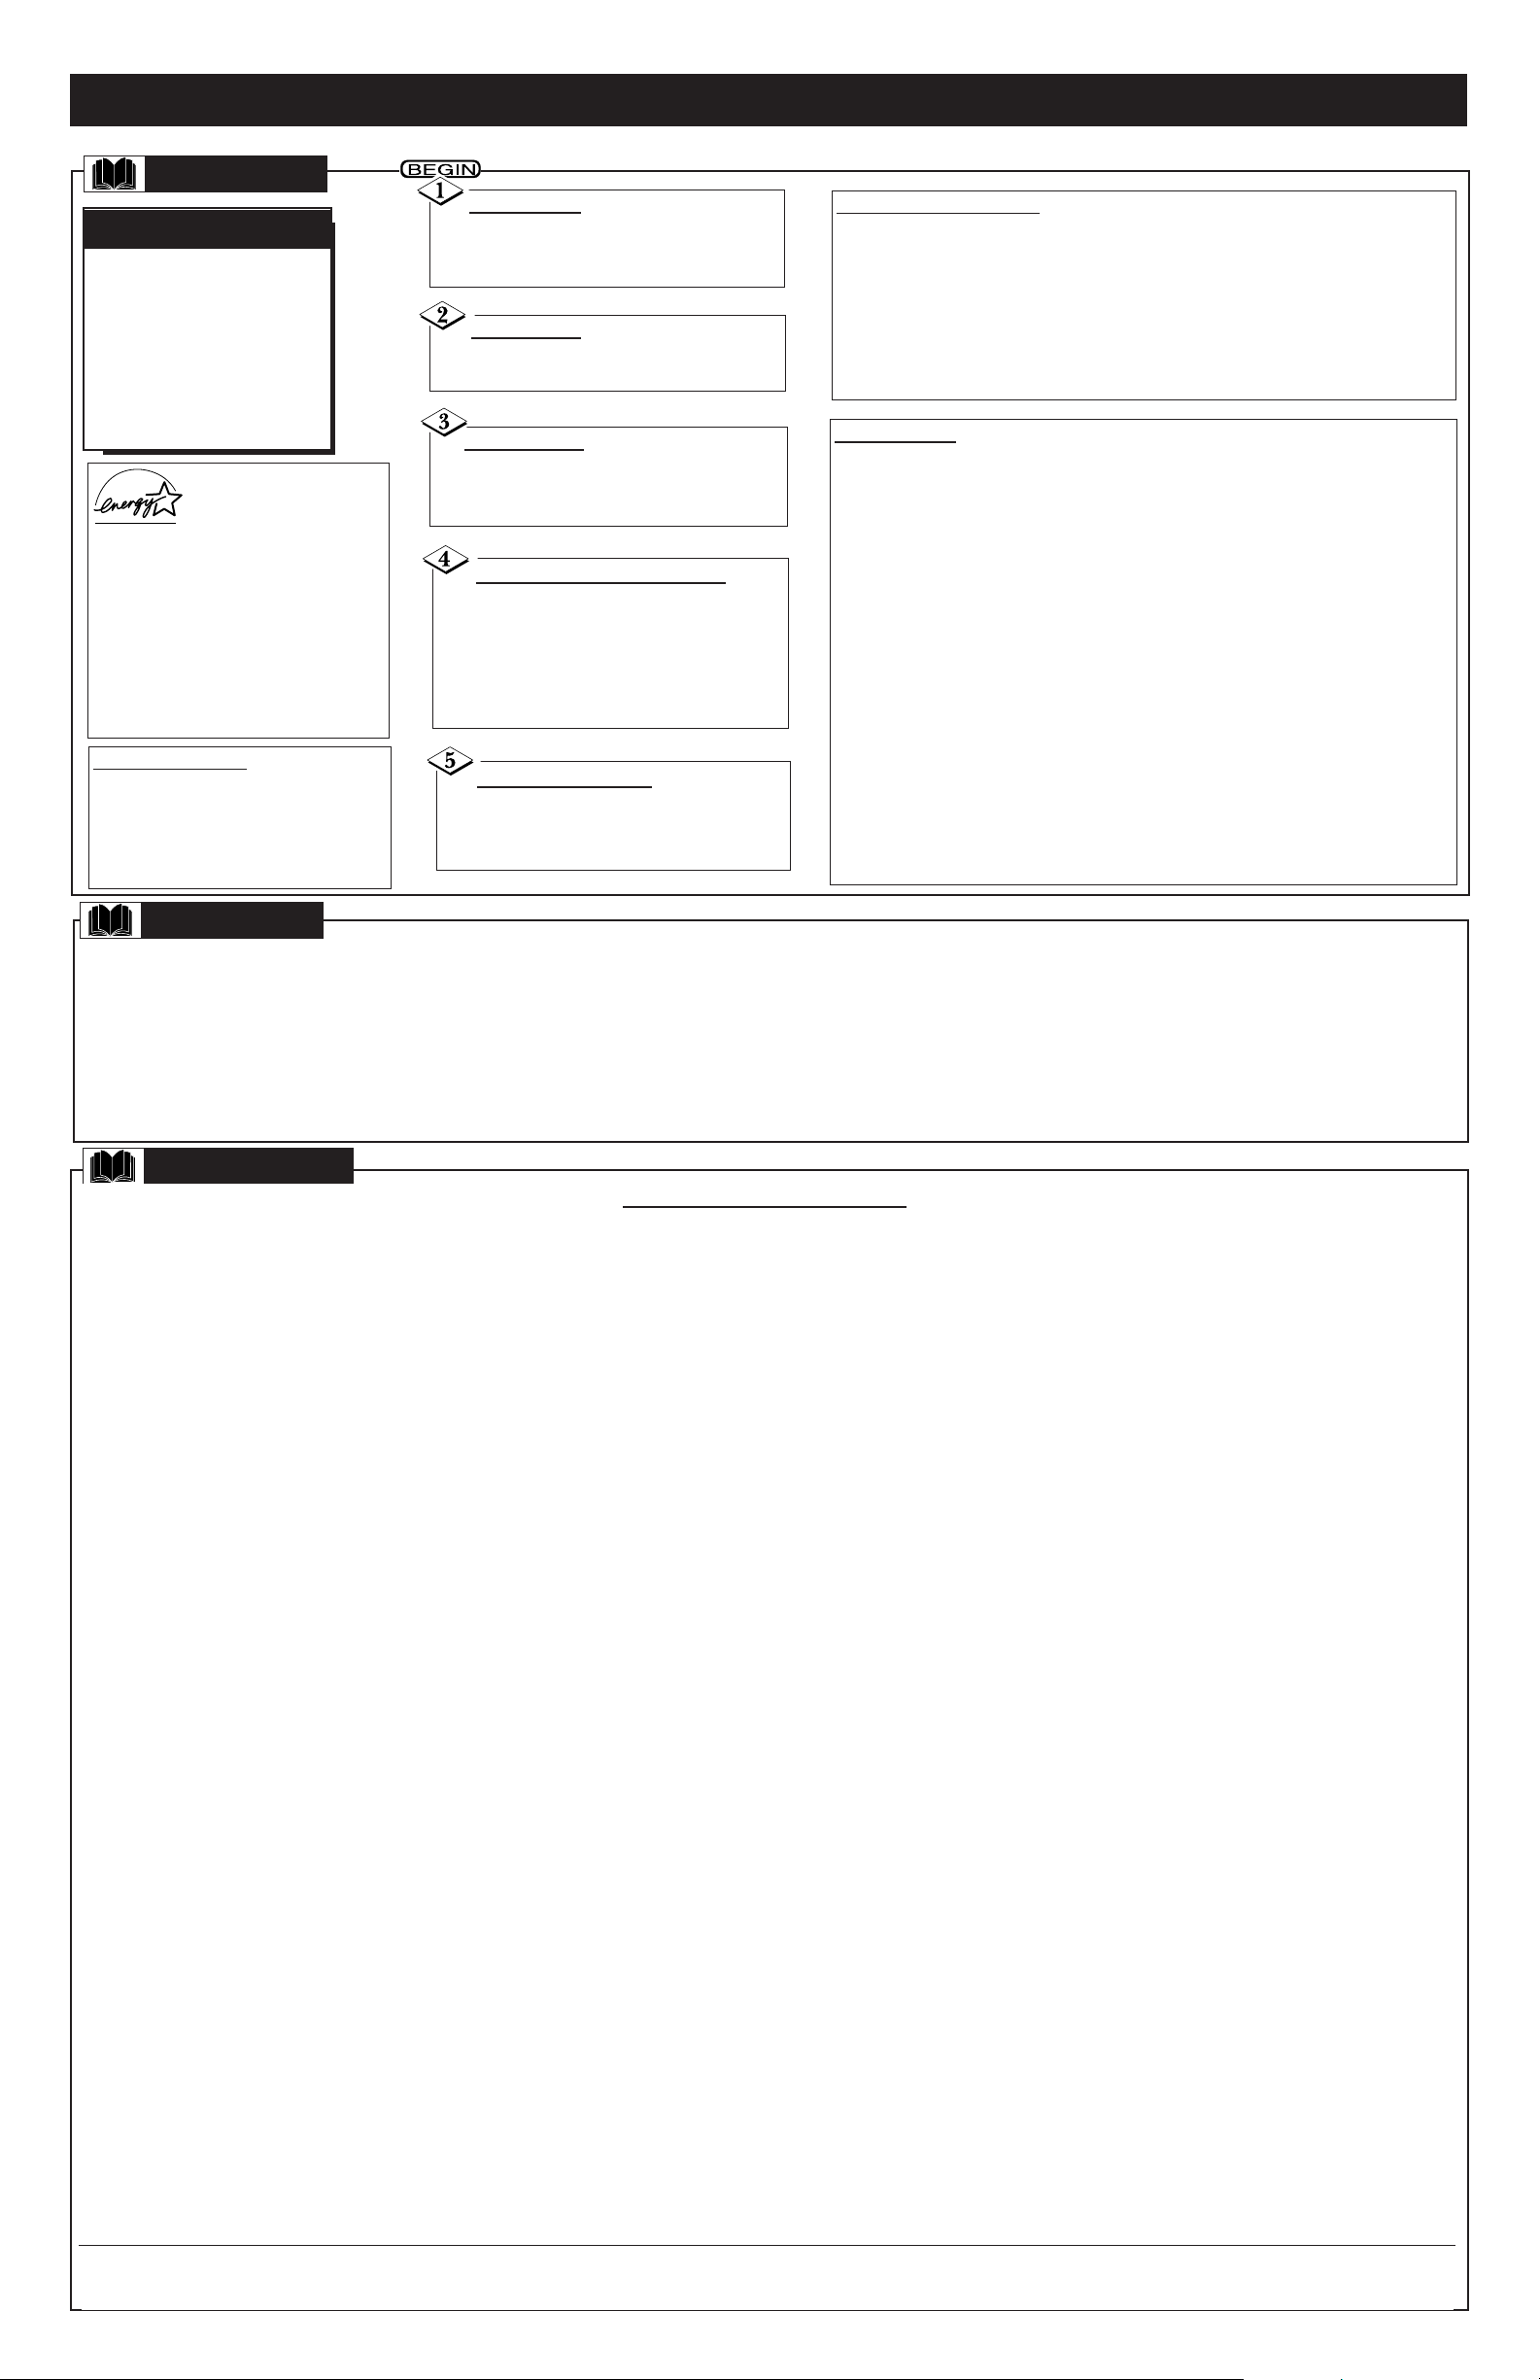
lease make these simple
checks before calling for service. These tips can save you
time and money since charges
for TV installation and adjustment of customer controls are
not covered under your
warranty.
TROUBLESHOOTING
No Power
• Check the TV power cord.
• Make sure the power outlet is not on a
wall switch.
No Picture
• Check antenna/cable connections. Is the
antenna or cable properly secured to the
ANT(enna) IN jack on the TV?
GENERAL INFORMATION
No Sound
• Check the VOL(ume) B/{ buttons.
• Check the MUTE button.
Wrong Channel
• Repeat channel selection.
• Add desired channel numbers into the
TV memory. See page 5 for details.
TIPS
Philips Service Solutions Group, P.O. Box 2976, Longview, Texas 75606
(903) 242-4800
Cleaning and Care
• Unplug the TV before cleaning.
• Avoid using anything abrasive that could scratch the screen.
• Wipe the TV screen with a clean cloth dampened with water.
• Gently wipe cabinet surfaces with a clean cloth or sponge dampened with
cool clear water. Use a clean dry cloth to dry the wiped surfaces.
• Occasionally vacuum the ventilation holes or slots in the cabinet back.
• Never use thinners, insecticide sprays, or other chemicals on or near the
cabinet.
ALT. CH Button . . . . . . . .4
Antenna Connections . . .2-3
Batteries . . . . . . . . . . . . . .4
Cable TV Connections . . . .3
Channel Setup . . . . . . . . .4-5
CH(annel) ▲/▼ Buttons . .4
Closed Captioning . . . . . . .7
Coaxial Cable . . . . . . . . . . .3
Controls/Remote . . . . . . . .4
Controls/TV . . . . . . . . . . . .4
Delete Channels . . . . . . . .5
Features . . . . . . . . . . . . . . .1
First Time Setup . . . . . . . . .4
Glossary . . . . . . . . . . . . . .7
Language Selection . . . . . . .5
MENU Button . . . . . . . . . .4
MUTE Button . . . . . . . . . . .4
Number Buttons . . . . . . . .4
Picture Adjustments . . . . . .7
POWER Button . . . . . . . . .4
Precautions . . . . . . . . . .1, 8
Reminder . . . . . . . . . . . . . .5
Remote Control . . . . . . . .4
Remote Sensor . . . . . . . . .4
Safety Notes . . . . . . . . . . .1
Save Channels . . . . . . . . . .5
Service . . . . . . . . . . . . . . . .8
Setup . . . . . . . . . . . . . . . . .4
SLEEP Button . . . . . . . . .4, 6
Sleep Timer . . . . . . . . . . . .6
SmartLock . . . . . . . . . . . . .6
STATUS/EXIT button . . . .4
Tips . . . . . . . . . . . . . . . . . .8
VCR Connections . . . . . . .3
Volume Bar . . . . . . . . . . . .6
VOL(ume) B/{ Buttons . .4
Warranty . . . . . . . . . . . . . .8
INDEX
WARRANTY
COLOR TELEVISION
90 Days Free Labor
One Year Free Replacement of Parts (Two Years Free Replacement on Color Picture Tube)
This product must be carried in for repair.
WHO IS COVERED?
You must have proof of purchase to receive warranty service. A sales receipt or other document showing that you purchased the product is considered proof of purchase.
WHAT IS COVERED?
Warranty coverage begins the day you buy your product. For 90 days thereafter, all parts will
be repaired or replaced free, and labor is free. From 90 days to one year from the day of
purchase, all parts will be repaired or replaced free, but you pay for all labor charges. From
one to two years from the day of purchase, you pay for the replacement or repair of all parts
except the picture tube, and for all labor charges. After two years from the day of purchase,
you pay for the replacement or repair of all parts, and for all labor charges.
All parts, including repaired and replaced parts, are covered only for the original warranty
period. When the warranty on the product expires, the warranty on all replaced and
repaired parts also expires.
WHAT IS EXCLUDED?
Your warranty does not cover:
• labor charges for installation or setup of the product, adjustment of customer controls on
the product, and installation or repair of antenna systems outside of the product.
• product repair and/or part replacement because of misuse, accident, unauthorized repair,
or other cause not within the control of Philips Consumer Electronics Company.
• reception problems caused by signal conditions or cable or antenna systems outside the
unit.
• a product that requires modification or adaptation to enable it to operate in any country
other than the country for which it was designed, manufactured, approved, and/or authorized, or repair of products damaged by these modifications.
• incidental or consequential damages resulting from the product. (Some states do not
allow the exclusion of incidental or consequential damages, so the above exclusion may
not apply to you. This includes, but is not limited to, prerecorded material, whether
copyrighted or not copyrighted.)
• a product used for commercial or institutional purposes.
WHERE IS SERVICE AVAILABLE?
Warranty service is available in all countries where the product is officially distributed by
Philips Consumer Electronics Company. In countries where Philips Consumer Electronics
Company does not distribute the product, the local Philips service organization will attempt
to provide service (although there may be a delay if the appropriate spare parts and technical
manual(s) are not readily available).
MAKE SURE YOU KEEP...
Please keep your sales receipt or other document showing proof of purchase. Attach it to
this owner’s manual and keep both nearby. Also keep the original box and packing material
in case you need to return your product.
BEFORE REQUESTING SERVICE...
Please check your owner’s manual before requesting service. Adjustments of the controls discussed there may save you a service call.
TO GET WARRANTY SERVICE IN U.S.A.,
PUERTO RICO, OR U.S. VIRGIN ISLANDS...
Contact a Philips factory service center (see enclosed list) or authorized service center to
arrange repair.
(In U.S.A., Puerto Rico, and U.S. Virgin Islands, all implied warranties, including implied warranties of merchantability and fitness for a particular purpose, are limited in duration to the
duration of this express warranty. But, because some states do not allow limitations on how
long an implied warranty may last, this limitation may not apply to you.)
TO GET WARRANTY SERVICE IN CANADA...
Please contact Philips at:
1-800-661-6162 (French Speaking)
1-800-363-7278 (English Speaking)
(In Canada, this warranty is given in lieu of all other warranties. No other warranties are
expressed or implied, including any implied warranties of merchantability or fitness for a particular purpose. Philips is not liable under any circumstances for any direct, indirect, special,
incidental, or consequential damages, howsoever incurred, even if notified of the possibility of
such damages.)
REMEMBER...
Please record below the model and serial numbers found on the product. Also, please fill out
and mail your warranty registration card promptly. It will be easier for us to notify you if
necessary.
MODEL # ________________________________________________
SERIAL # ________________________________________________
- 8 -
Power Failure
• When you disconnect the power
cord from the AC outlet, or if you
have a power failure, the Sleep
Timer will be cancelled. You may
reset the Sleep Timer.
As an ENERGY STAR
®
Partner, Philips
Consumer Electronics
Company has determined that this
product meets the ENERGY STAR
®
guidelines for energy efficiency.
ENERGY STAR®is a U.S. registered
mark.
Using products with the ENERGY
STAR®label can save energy. Saving
energy reduces air pollution and
lowers utility bills.
Remote Doesn't Work
• Check batteries. Replace with AA Heavy
Duty (Zinc Chloride) or Alkaline batteries if necessary.
• Clean the remote and the remote sensor
on the TV.
• Check the TV power cord.
SmartLock
• Programming may be rated by the Motion Picture Association of America
(MPAA) or according to the Television Parental Guidelines. In order to
block any inappropriate programming, set your limits in both places (Movie
Ratings and Parental Guidelines).
• Ratings will remain blocked even after a power failure.
• You cannot access the menu when the “CHANNEL XX BLOCKED...”
message appears.
• If you enter the access code once, you may change channels without seeing the “CHANNEL XX BLOCKED” message again. If you turn off the TV
power, you will be asked for the access code again when you tune to a
blocked channel.
• If a power failure occurs, the default code, 0711, will be the active access
code again.
• If you connect the power cord to an AC outlet that is controlled by a wall
switch, your personal access code will be erased every time you turn off
the power at the wall switch. The default code will be the active code
again.
• To restore 0711 as your personal access code, unplug the TV’s power
cord for 10 seconds, then plug it in again.
 Loading...