

Philips PR0930X4 User Manual
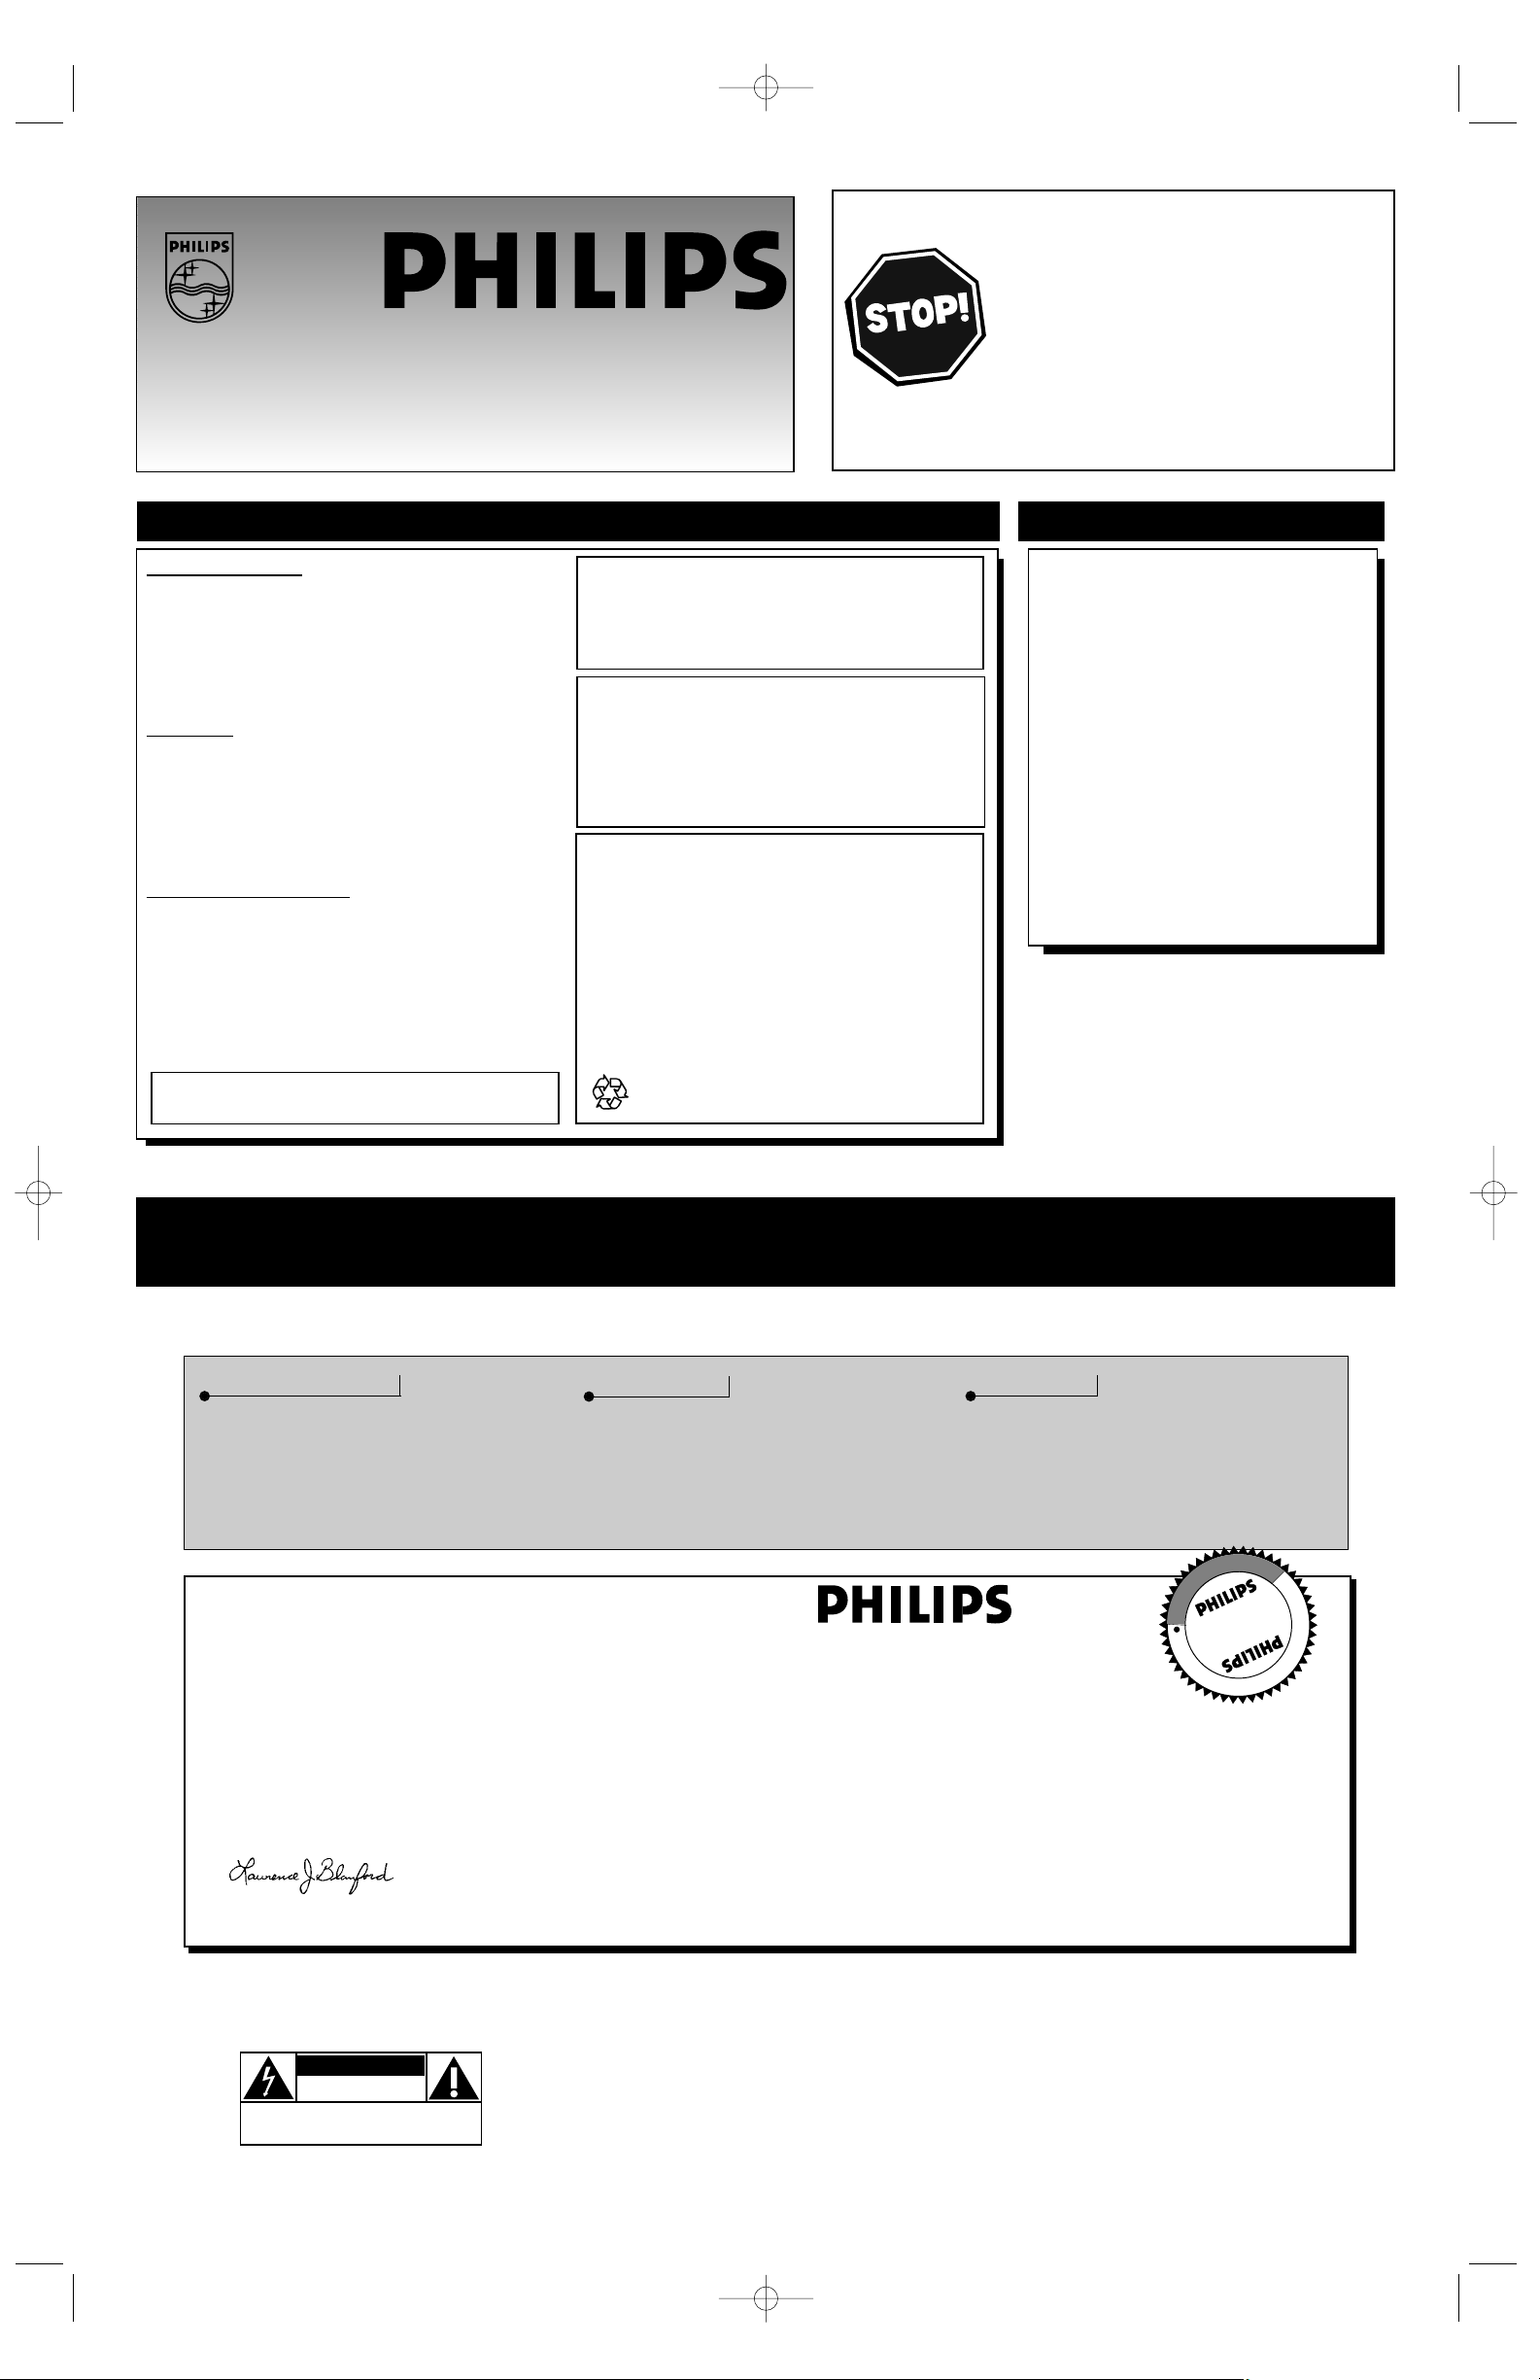
TABLE OF CONTENTS
PR0930X4
Owner’s Manual
FEATURES
• Infrared Remote Control operates your
TV and helps you set up on-screen features.
• Standard Broadcast (VHF/UHF) or
Cable TV (CATV) channel capability
• Auto Install quickly and easily selects sta-
tions available in your area.
• Sleeptimer automatically turns off the TV
within a set amount of time.
• Language Selection allows you to choose
English or Spanish on-screen menus.
• Automatic Shut Off turns off the TV after
15 minutes when it is on a channel that is
not receiving a broadcast signal (for example, if a station has gone off the air for the
night).
• FM Mode allows you to listen to FM radio
stations through the TV.
Getting Started
Warning/Precautions . . . . . . . . . . . . . . . . . . . . . . . . . . .1
Features . . . . . . . . . . . . . . . . . . . . . . . . . . . . . . . . . . . . .1
Registration . . . . . . . . . . . . . . . . . . . . . . . . . . . . . . . . . .1
Hooking Up Your TV . . . . . . . . . . . . . . . . . . . . . . . . .2-4
Auto Install . . . . . . . . . . . . . . . . . . . . . . . . . . . . . . . . . .5
Basic TV and Remote Control Operation . . . . . . . . . . .5
Features
Channel Edit . . . . . . . . . . . . . . . . . . . . . . . . . . . . . . . . .6
Language . . . . . . . . . . . . . . . . . . . . . . . . . . . . . . . . . . . .6
Volume . . . . . . . . . . . . . . . . . . . . . . . . . . . . . . . . . . . . .6
Sleeptimer . . . . . . . . . . . . . . . . . . . . . . . . . . . . . . . . . . .6
Picture Adjustments . . . . . . . . . . . . . . . . . . . . . . . . . . . .7
FM Mode . . . . . . . . . . . . . . . . . . . . . . . . . . . . . . . . . . .7
General Information
Glossary . . . . . . . . . . . . . . . . . . . . . . . . . . . . . . . . . . . . .7
Tips . . . . . . . . . . . . . . . . . . . . . . . . . . . . . . . . . . . . . . . .8
Index . . . . . . . . . . . . . . . . . . . . . . . . . . . . . . . . . . . . . . .8
Warranty . . . . . . . . . . . . . . . . . . . . . . . . . . . . . . . . . . . .8
For Customer Use
Enter below the Serial Number and the Model Number
of your television (located on the back of the TV). Keep
this information for future reference.
Model No. __________________________
Serial No.___________________________
Printed in Malaysia - 1 - IB8352E001/0EMN01934/ L0951UB ★★★★★
Federal Communications Commission
Warning: Any unauthorized changes
or modifications to this equipment
void the user’s authority to operate it.
Once your PHILIPS purchase is registered, you’re eligible to receive all the privileges of owning a PHILIPS product.
So complete and return the Warranty Registration Card enclosed with your purchase at once. And take advantage of these important benefits.
Return your Warranty Registration card today to ensure
you receive all the benefits you’re entitled to.
Congratulations
on your
purchase,
and welcome to the
“family!”
Dear PHILIPS product owner:
Thank you for your confidence in PHILIPS. You’ve selected one of the best-built, best-backed products
available today. And we’ll do everything in our power to keep you happy with your purchase for many years to come.
As a member of the PHILIPS “family,” you’re entitled to protection by one of the most comprehensive warranties and
outstanding service networks in the industry.
What’s more, your purchase guarantees you’ll receive all the information and special offers for which you qualify, plus
easy access to accessories from our convenient home shopping network.
And most importantly you can count on our uncompromising commitment to your total satisfaction.
All of this is our way of saying welcome–and thanks for investing in a PHILIPS product.
Sincerely,
Lawrence J. Blanford
President and Chief Executive Officer
Know these
safetysymbols
t This “bolt of lightning” indicates uninsulated material within your unit which may cause an electrical
shock. For the safety of everyone in your household, please do not remove product covering.
s The “exclamation point” calls attention to features for which you should read the enclosed literature
closely to prevent operating and maintenance problems.
WARNING: TO PREVENT FIRE OR SHOCK HAZARD, DO NOT EXPOSE THIS EQUIPMENT TO
RAIN OR MOISTURE.
CAUTION: To prevent electric shock, match wide blade of plug to wide slot and fully insert.
ATTENTION: Pour éviter les choc électriques, introduire la lame la plus large de la fiche dans la borne cor-
respondante de la prise et pousser jusqu’au fond.
CAUTION
RISK OF ELECTRIC SHOCK
DO NOT OPEN
CAUTION: TO REDUCE THE RISK OF ELECTRIC SHOCK, DO NOT
REMOVE COVER (OR BACK). NO USER-SERVICEABLE PARTS
INSIDE. REFER SERVICING TO QUALIFIED SERVICE PERSONNEL.
Warranty
Verification
Registering your product within 10 days confirms your right to maximum protection
under the terms and conditions of your
PHILIPS warranty.
Owner
Confirmation
Your completed Warranty
Registration Card serves as
verification of ownership in the
event of product theft or loss.
Model
Registration
Returning your Warranty Registration Card
right away guarantees you’ll receive all
the information and special offers which you
qualify for as the owner of your model.
P.S. Remember, to get the most from your PHILIPS product, you must return your
Warranty Registration Card within 10 days. So please mail it to us right now!
R
E
G
I
S
T
R
A
T
I
O
N
N
E
E
D
E
D
W
I
T
H
I
N
1
0
D
A
Y
S
Hurry!
This manual, your new product, and the packaging
contain materials that can be recycled and reused.
Specialized companies can recycle your product to
increase the amount of reusable materials and to minimize the amount that needs to be disposed properly.
Your product uses batteries that should not be
thrown away when depleted but should be disposed
as small chemical waste.
Please find out about the local regulations on disposal
of your old product, batteries, manual, and packaging
whenever you replace existing equipment.
This owner’s manual is
made of recycled paper.
Copyright 2002 by Philips Consumer Electronics. All rights reserved.
Read this manual first!
Congratulations on purchasing this product.
If you have any problems, our Representatives can help
you get the most from your new product by explaining:
• Hookups
• First Time Setup, and
• Feature Operation
Do not attempt to return this product to the store.
For fast help, call us first!
1-800-531-0039
Thank you for making us a part of your home!
PR0930x4 3/1/02 10:21 AM Page 1
12
1
1
1
2
0
1
3
9
4
8
5
7
6
HOOKING UP YOUR TV (ANTENNA/CABLE CONNECTIONS)
A
combination antenna or a
rod antenna (supplied)
receives normal broadcast
channels (VHF 2-13 and UHF
14-69). Your connection is easy
since there is only one 75Ω
(ohm) antenna jack on the
back of your TV - and that’s
where the antenna goes.
ANTENNA
COMBINATION UHF/VHF
To set the
TV to select only
the channel numbers in your area,
see Auto Install on
page 5.
If you install the TV
beneath a kitchen
cabinet, you may
push a rod antenna
into the antenna
hole on the bottom
of the TV cabinet
for the best use. See
page four for details
on how to install
the TV under a
kitchen cabinet.
SMART
HELP
If you install a rod
antenna (supplied), push the
base of the antenna into the
antenna hole on either the left
or the bottom of the TV.
If your antenna has a
round connector (75Ω),
then you're ready to connect it
to the TV. Go to step 2.
If your antenna has flat
twin-lead wire (300Ω), you
first need to attach the antenna
wires to the screws on a 300
to 75Ω adapter (not supplied).
Push the round end of
the adapter (cable or rod
antenna) onto the
ANT(enna) IN jack on the
back of the TV. If the round
end of the adapter or cable is
threaded, screw it down tight.
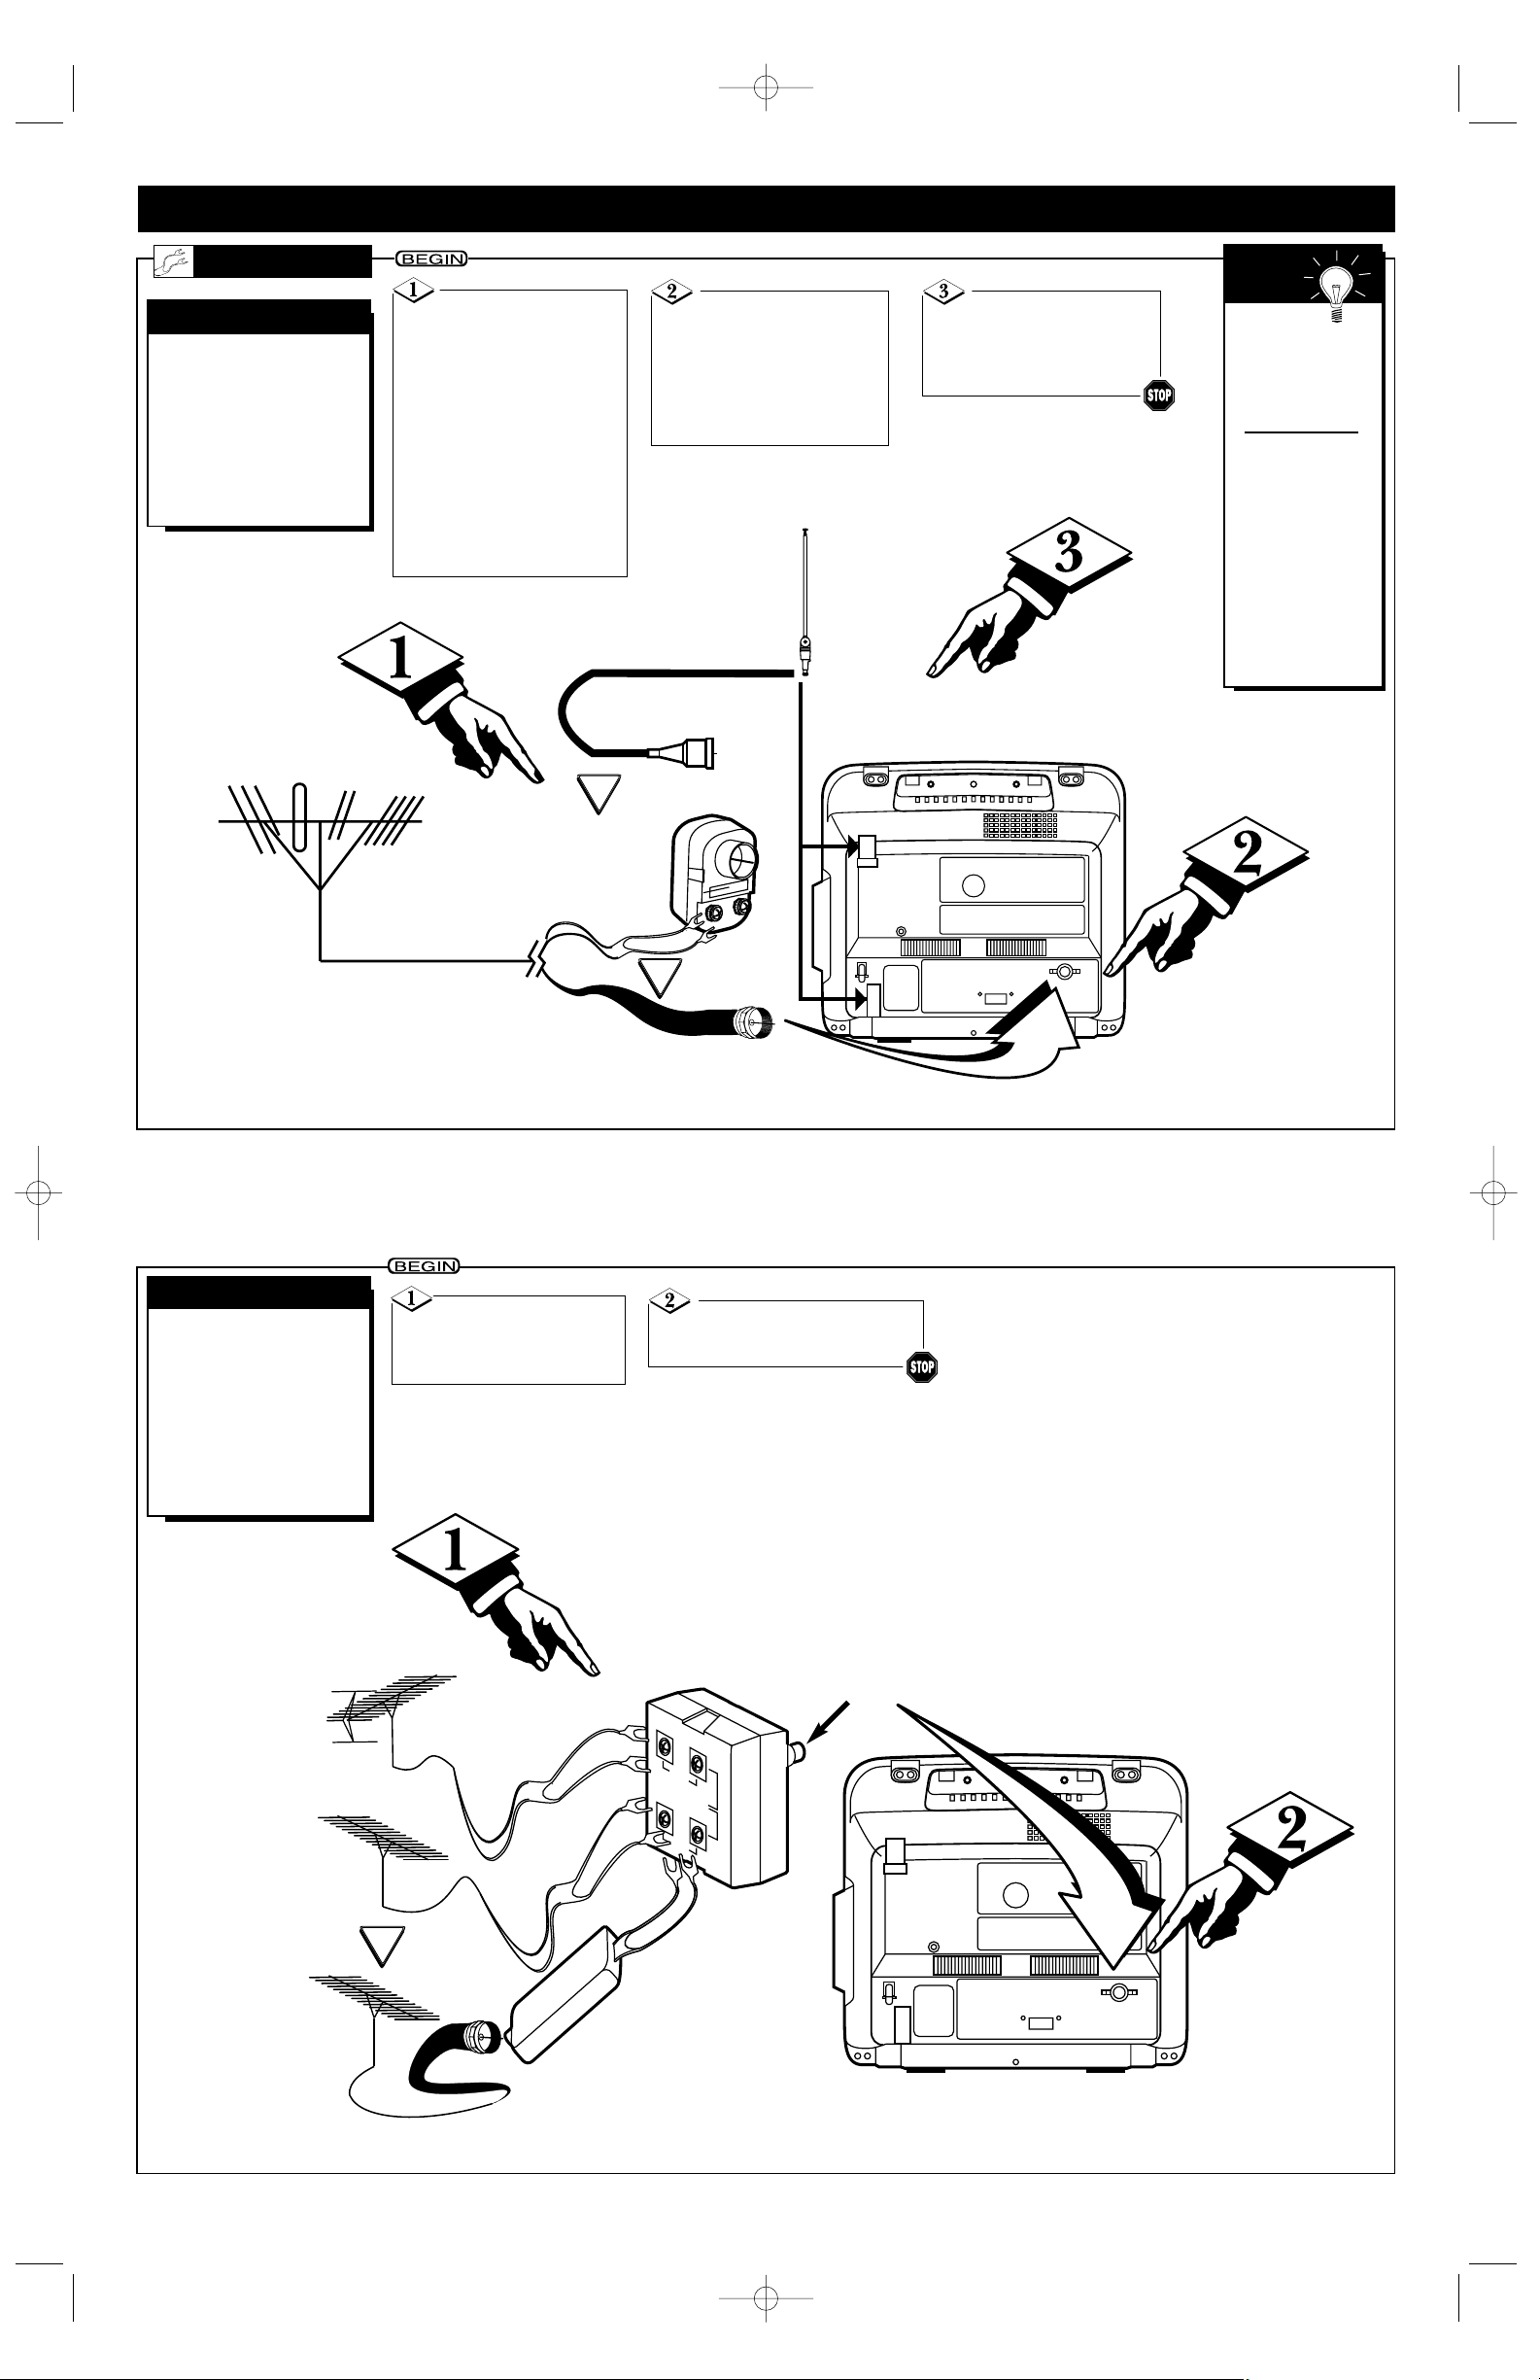
Y
ou may have two separate
antennas. One antenna is
for VHF channels (2-13) and
the other antenna is for UHF
channels (14-69).
For homes with separate
UHF/VHF antennas, you will
need an optional combiner
before you can connect the
antennas to the TV.
SEPARATE UHF/VHF
Back of TV
UHF/VHF Combiner
(not supplied)
75-300Ω Adapter
Outdoor UHF Antenna
(Twin-lead 300Ω)
Outdoor VHF
Antenna
(Twin-lead 300Ω)
Twin-lead
Wire
Push the round end of the
combiner onto the ANT(enna)
IN jack on the back of the TV.
Attach the separate
UHF and VHF antennas to
the correct screws on the
combiner (not supplied).
Round
End
Outdoor VHF
Antenna
(Round cable 75Ω)
- 2 -
If you installed a rod
antenna, extend the antenna
and adjust its length, direction,
and angle for the clearest picture.
PR0930x4 3/1/02 10:21 AM Page 2
Combination
VHF/UHF Antenna
(outdoor or indoor)
Twin-lead wire
Round cable of
Rod Antenna
to ANT. IN
OR
300 to 75Ω adapter
to ANT. IN
Rod Antenna
(supplied)
To either
Antenna Hole
Round Cable
OR
75Ω to ANT. IN
AC 120V
ANT. IN
Back of TV
OR
E
T
P
A
D
A
Ω
-300
75
U
H
F
300
Ω
VHF
R
AC 120V
ANT. IN

Y
our Cable TV signal may be
a single (75Ω) cable or a
Cable Box installation. In either
case, the connection to the TV
is very easy.
C
ABLE TV
CABLE
/CABLE BOX
If you do not have a
Cable Box, then you're ready
to connect your Cable TV signal to the TV. Go to step 2.
If you have a Cable Box:
Connect the Cable TV signal
to the IN jack on the Cable
Box.
If you do not have a
Cable Box, connect the Cable
TV signal directly to the
ANT(enna) IN jack on the TV.
If you have a Cable Box:
Use a coaxial cable (not supplied) to connect the OUT jack
of the Cable Box to the
ANT(enna) IN jack on the TV.
Back of TV
Coaxial cable
Cable Box
To select
only the channels on
your Cable system,
see Auto Install
(page 5).
If you use a Cable
Box, set the TV to
the same channel as
the CH 3/4 switch
on the back of the
Cable Box. Select
channels at the
Cable Box.
SMART
HELP
Cable TV Company
Cable TV Signal (75Ω)
Note to the Cable TV System Installer: This reminder is provided to
call the Cable TV system installer’s attention to Article 820-40 of the
National Electrical Code, which provides guidelines for proper grounding - in
particular, specifying that the cable ground shall be connected to the grounding system of the building, as close to the point of cable entry as possible.
HOOKING UP YOUR TV (ANTENNA/CABLE CONNECTIONS) (CONT’D)
T
he basic Antenna/Cable to
VCR to TV connection is
shown here. If you have a Cable
Box, refer to the VCR owner’s
manual for details.
VCR TO TV
BASIC CONNECTION
Connect your
Antenna or Cable signal to
the ANTENNA IN jack on
the VCR.
Connect a coaxial
cable (not supplied) to
the RF OUT or
ANTENNA OUT jack
on the VCR and to the
ANT(enna) IN jack on
the TV.
Coaxial cable
Outdoor
VHF/UHF
Antenna
300 to 75Ω
Adapter
Cable TV signal
Back of TV
Refer to the VCR
owner's manual for other
possible connections and for
operating details.
Back of VCR
VCR
(example only)
- 3 -
PR0930x4 3/1/02 10:21 AM Page 3
OR
POWER
VCR/TV
RF/ANTENNA OUT
ANTENNA IN
PAUSE
RECORD
PLAY
F.FWD
REW
STOP/EJECT
CHANNEL
MENU STATUS/EXIT
AC 120V
ANT. IN
IN
OUT
OR
AC 120V
ANT. IN
 Loading...