

Page 1
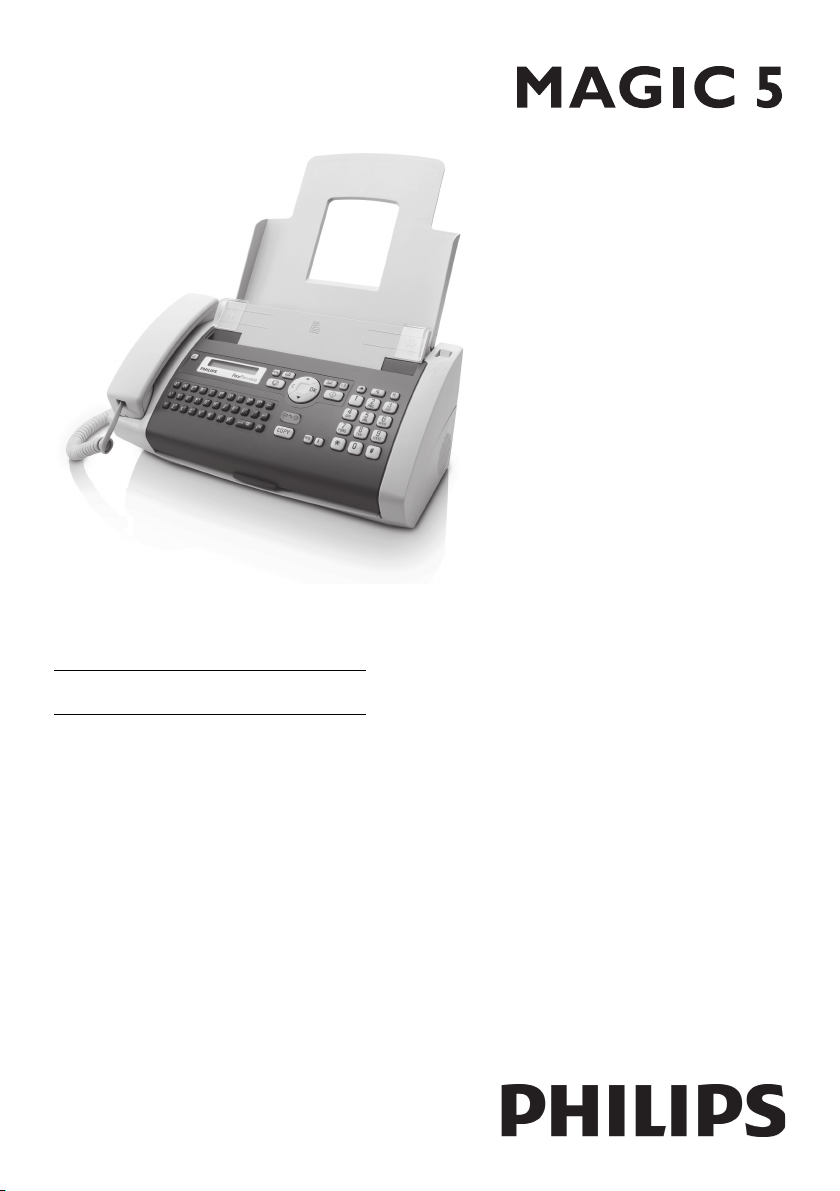
EN User Manual
Register your product and get support at
www.philips.com/welcome
PPF 725
PPF 755
Page 2
Dear Customer
· Dear Customer
Introduction Brand Variable
EN
With the purchase of this device, you have chosen a
quality PHILIPS product brand. Their device fulfils the
most varied requirements for private use or in your office and business everyday.
Your device is delivered with an already inserted free
ink film for a few test pages. For this ink film, you do not
require any Plug’n’Print card (= chip card with information regarding ink film capacity).
Telephone Book
In the telephone book of your device, you can save entries with multiple numbers and collect multiple entries
into groups. You can assign various ring tones to the entries.
Short Dial
You can assign short dial numbers to frequently dialled
telephone numbers. You can load these numbers quickly with the short dial key and the number keys.
The built-in answering machine (model dependent)
stores up to 30 minutes of messages. You can record internal and external voice messages (= memos). Using
remote message retrieval, you can call new messages
from each telephone. With the VIP code, callers can
also reach you even while the answering machine is
switched on.
You can send fax messages in different resolutions to
one or more recipients or a group. You can also poll
faxes and prepare documents for polling.
Fax Templates
Five fax templates, which you can use, are stored in your
device. With these templates you can quickly create, for
example, a short fax note or an invitation.
Select the resolution for text and photo in order to
copy documents with your device. You can also create
multiple copies.
You can send SMS messages from your device if this
service is activated for your telephone line (this function
is not supported in all countries and networks, model
dependent). Received SMS messages can be managed
with the extensive functions of the SMS menu.
Activate notification by SMS to receive an SMS message,
for instance on your mobile phone, when calls, fax
transmissions or other messages arrive in your absence
(this function is not supported in all countries and networks, model dependent).
If you want, your device can print Sudoku puzzles in four
different difficulty levels with solution.
We hope you enjoy your device and its many functions!
About this User Manual
· About this User Manual
With the installation guide on the following pages, you
can start using your device quickly and easily. Detailed
descriptions can be found in the following sections of
this user manual.
Read the entire user manual carefully. Follow all safety
instructions in order to ensure proper operation of
your device. The manufacturer accepts no liability if
these instructions are not followed.
Multiple models of this device series are described in
this user manual. Please note that some functions are
only available with specific models.
Symbols Used
Troubleshooting
Troubleshooting
This symbol designates tips that will help you to
use your device more effectively and easily.
Dangers
DANGER!
DANGER!
Warns about dangers for people, damage to
the device or other objects as well as possible
loss of data. Injuries or damage can result
from improper handling.
2 Philips · PPF 725 · PPF 755
Page 3

Table of Contents
Table of Contents
1 General Safety Information 4
2 Over view 5
Overview of the Menu Functions 5
Device Overview 7
Panel 8
3 Initial Operation 9
Packing Contents 9
Attaching Paper Tray 9
Loading Paper 9
Connecting the Handset 10
Connecting the Telephone Cable 10
Connecting the Mains Cable 10
Initial Installation 10
4 Telephone Functions 12
Placing a Call on the Device 12
Calling Additional Telephone Functions 12
Getting Outside Line 13
Chain Dialling 13
Insert Dialling Pause 13
Hands-Free 13
Recording a Telephone Conversation 13
Telephone Book of the Device 13
Groups 14
Short Dial 15
Calling Line Identification (CLIP) 15
Missed Calls 15
5 Answering Machine 16
Switching On and Off 16
Editing the Outgoing Message 16
Listening to Messages 17
Deleting Messages 17
Setting up Forwarding and Remote Access 17
Using Remote Access 18
Remote Control Functions 18
Recording Internal Memos 19
Modifying the Settings 19
6 Fax 20
Sending a Fax 20
Sending Fax Manually 21
Direct Inward Dialling or Selecting Subaddress
Eavesdropping while Connection is
Established
Sending to Multiple Recipients (=
Broadcasting)
Sending Fax Later 22
Fax Reception 22
Receiving Fax Manually 22
Polling Faxes 22
Using Fax Templates 22
7 Copier 23
Inserting Documents 23
Making a Copy 23
Creating Multiple Copies 23
8 SMS 24
SMS Requirements 24
Sending SMS 24
Notification by SMS 24
Receiving SMS Messages 24
Reading SMS Messages 24
Calling SMS Functions 25
Printing SMS Messages 25
Deleting SMS Messages 25
Modifying the Settings 25
9 Fun and Games 27
Sudoku 27
10 Settings 28
Entering the Date and Time 28
Selecting the Language 28
Selecting the Country 28
Entering Number 28
Entering Name 28
Adjust contrast 28
Reducing Transmission Speed 29
Switching Page Adjustment On and Off 29
Setting the Ring Tones 29
Setting the Fax Switch 29
Printing Lists and Help Pages 30
Starting Initial Installation 30
11 Telephone Lines and Additional
Devices
Configuring Telephone Lines and Services 31
Connecting Additional Devices 31
Using Additional Telephones (Easylink) 32
12 Service 33
Checking the Ink Film Reserve 33
Changing the Ink Film 33
Fixing a Paper Jam 34
21
21
21
Fixing a Document Jam 35
Cleaning 36
Checking the Firmware Version 37
Using Service Codes 37
Power Cycling 37
Troubleshooting 38
13 Appendix 39
Technical Data 39
EN
31
Table of Contents 3
Page 4

1 General Safety Information
EN
General Safety Information
Introduction 3
Your device has been tested in conformity with standards EN 60950-1 and IEC 60950-1 and should only be
operated with telephone systems and power equipment
that meet these standards. The device was built exclusively for use in the indicated sales region.
Introduction 2
Do not make any changes or settings that are not described in this user manual. Physical injury or damage to
the device or loss of data can result from improper handling. Take note of all warning and safety notes indicated.
Setting Up the Device
The device should be placed securely on a stable, flat surface.
The device should be placed securely on a stable, flat
surface. If the device should fall, it can be damaged or
can cause injury to people, especially small children. Position all cables in such a way that no one will stumble
on them, thus avoiding possible injuries to persons or
damage to the device itself. If the device is dropped it
should be inspected by a technical service center.
The distance between th e device and other appliances or objec ts, must be at least 15 centimetres.
The distance between the device and other devices or
objects must be at least 15 centimetres; this also applies
to the use of additional cordless telephones. Do not
place the device in the vicinity of radios or televisions.
Lock the cover of the device comp letely into place
Lock the cover of the device completely into place when
opening the device. You could be injured if the cover
falls while you are working on the device.
Protect the device aga inst direct sunlig ht
Protect the device against direct sunlight, heat, large
temperature fluctuations and moisture. Do not place
the device in the vicinity of heaters or air conditioners.
Observe the information on temperature and humidity
in the technical data.
The device must have sufficient ventilation
The device must have sufficient ventilation and may not
be covered. Do not put your device in closed cabinets
or boxes. Do not place the machine on soft surfaces
such as tablecloths or carpets and do not cover the ventilation slits. Otherwise the device could overheat or
catch fire.
In the event that the device becom es too hot, or if you see smoke c oming from the device
In the event that the device becomes too hot, or if you
see smoke coming from the device, you must immediately pull the power cable out of the power socket.
Have your device examined by trained professionals at
a technical service location. To prevent the spread of
fire, open flames should be kept away from the device.
Do not plug in the device in mo ist rooms.
Do not plug in the device in moist rooms. Never touch
the mains cable, the mains connection or the telephone
socket with wet hands.
Do not allow liquids to enter into the device.
Do not allow liquids to enter into the device. Disconnect the device from the power socket if liquids or foreign objects have entered the device and have your
device examined by trained professionals at a technical
service location.
Do not allow children t o handle the device without supervisio n.
Do not allow children to handle the device without supervision. The packing materials should be kept out of
the hands of children.
Magnetic telephone handset
The telephone handset of the device is magnetic. Caution, small metallic objects (paper clips) may be retained
if placed near or on the telephone handset.
Power Supply
Check whether the mai ns voltage of your device
Check whether the mains voltage of your device (indicated on the type label) matches the mains voltage available at the setup location.
Use only the power and telephones cables supplied.
Use only the power and telephones cables supplied.
The device does not have an on/off key.
Set up your device so that the power socket is easily accessible. The device does not have an on/off key. In an
emergency, disconnect your device from the power
supply by pulling the power plug.
Never touch the power or telephone cable if the insulation is damaged.
Never touch the power or telephone cable if the insulation is damaged. Replace damaged wires immediately.
Use suitable cables only; if necessary please contact our
technical customer service or your retailer.
Disconnect your device from the power and telephone networks during an electrical storm.
Disconnect your device from the mains and telephone
network during an electrical storm in order to avoid
electrical surge damage. If this is not possible, do not
use the device during an electrical storm.
Before cleaning the sur face of your device, disconnect it from the power and telep hone networks.
Before cleaning the surface of your device, disconnect it
from the power and telephone networks. Use a soft,
lint-free cloth. Never use liquid, gaseous or easily flammable cleansers (sprays, abrasives, polishes, alcohol).
Do not allow any moisture to reach the interior of the
device.
Only clean the display w ith a dry, soft cloth.
Only clean the display with a dry, soft cloth. If the display
breaks, a mildly corrosive liquid may escape. Avoid all
contact with your skin and eyes.
In the event of a power f ailure, your devi ce will not function ;
In the event of a power failure, your device will not function; saved data is retained.
Repairs
Display
Should disruptions occur, follow the instructions on the
display and on the error report.
Repairs
Do not make any repairs to the device yourself. Improper maintenance can result in injuries or damage to the
device. Only have your device repaired by an authorised
service centre.
Do not remove the type label from your device; this
would void the warranty.
Consumable Materials
Original Consumable Ma terial
Use only original consumable materials. These are available from a specialised retailer or through our order
service (see back side of this user manual). Other consumable materials could damage the device or shorten
its service life.
Environment
Dispose of old consumable materials according to the
waste regulations of your country.
4 Philips · PPF 725 · PPF 755
Page 5

2 Overview
Overview
Overview of the Menu
Functions
· Overview of the Menu Functions
The following functions are available on your device.
There are two ways in which you can call functions:
Menu Navigation
Navigating in the Menu: Press OK or one of the two
arrow keys [, to open the function menu. Page
through [ menu entries. Use OK to select a menu
function. Press C to return to the previous menu level.
Press j to close the menu and return to the starting
mode.
Direct Loading
Calling Functions Directly: You can call a menu
function directly using the function number. Press OK
and enter the appropriate function number using the
numeric keypad. Confirm with OK. You will find the
function number in the following list.
Help 6 · Function List
Printing the Functions List
Press î and 6 to print a list of all functions
and settings of your device.
EN
Overview · Overview of the Menu Functions 5
Page 6

1 Telephone Book
11 Looking Up an Entry (PPF 6xx · SPFX 4x)
EN
11 Looking up an Entry . . . page 12
12 New Entry (SPFX)
12 New Entry . . . page 13
13 Creating Group
13 Creating Group . . . page 14
14 Short Dial New
14 Short Dial . . . page 15
15 Changing Entries
15 Changing Entries . . . page 14
16 Deleting Entries
16 Deleting Entries . . . page 14
17 Printing Entries
17 Printing Entries . . . page 30
2 Calls
21 Received Calls (PPF 6xx · SPFX 4x)
21 Calls Received . . . page 12
22 Outgoing Calls (PPF 6xx · SPFX 4x )
22 Outgoing Calls . . . page 12
23 Printing Entries
23 Printing Entries . . . page 30
3 Fax
31 Polling
31 Polling . . . page 22
32 Polling Send
32 Polling Send . . . page 22
33 Sending Fax Later
33 Sending Fax Later . . . page 22
34 Broadcasting
34 Sending to Multiple Recipients (=
Broadcasting)
35 Printing Fax Journal
35 Printing Fax Journal . . . page 30
36 Printing Transmission Report
36 Printing Transmission Report . . . page 30
37 Print Reduced in Size
37 Print reduced in size . . . page 29
38 Reducing Transmission Speed
38 Reducing Transmission Speed . . . page 29
4 Miscellaneous
41 Printing Call Log
41 Printing Call Log . . . page 30
42 Switching Notification Tone for Call Waitin g On/Off (Type 2)
42 Switching notification tone for
call waiting on/off (PPF¦755)
43 Using Fax Templates
43 Using Fax Templates . . . page 22
44 Setting the Contrast
44 Adjust contrast . . . page 28
45 Using Service Codes
45 Using Service Codes . . . page 37
46 Checking the Ink Film Reserve
46 Checking the Ink Film Reserve . . . page 33
47 Checking the Firmware Version
47 Checking the Firmware Version . . . page 37
48 Sudoku
48 Sudoku . . . page 27
5 Fax Switch
51 Configuring Day Mode
51 Setting the Day Mode . . . page 29
52 Configuring Night Mode
52 Setting the Night Mode . . . page 29
53 Setting the Timer
53 Setting the Timer . . . page 29
54 Easylink
54 Easylink . . . page 32
55 Setting the Ring Tones
55 Setting the Ring Tones . . . page 29
. . . page 21
. . . page 13
6 SMS
61 Sending SMS (SPFX 43/47)
61 Sending SMS . . . page 24
62 Reading SMS (PPF 675 · 676 · 6xx · SPFX 43 /47)
62 Reading SMS Messages . . . page 24
63 Printing SMS
63 Printing SMS Messages . . . page 25
64 Deleting SMS (PPF 675 · 676 · 6xx · SPFX 4 3/47)
64 Deleting SMS Messages . . . page 25
65 Notification by SMS
65 Notification by SMS . . . page 24
66 SMS Access
66 SMS Access . . . page 25
7 Answering Machine
(Type 2)
(PPF¦755)
71 Switches Answering Machine On/Off (PPF 675 · 676 · 6xx · SPFX 47)
71 Switches answering machine on/
off
72 Listening to Messages (PPF 675 · 676 · 6xx · SPFX 47)
72 Listening to Messages . . . page 17
73 Recording Internal Memos (PPF 675 · 676 · 6xx · SPFX 47)
73 Recording Internal Memos . . . page 19
74 Setting the Recording Duration
74 Setting the Recording Duration . . . page 19
75 Editing the Outgoing Message (PPF 675 · 676 · 6xx · SPFX 47)
75 Editing the Outgoing Message . . . page 16
76 Using Announcement without Recording Message
. . . page 16
76 Using announcement without
recording message (= external memo)
77 Forwarding Messages
77 Forwarding Messages . . . page 17
78 Entering the VIP Code
78 Entering the VIP Code . . . page 19
79 Entering Access Code
. . . page 16
79 Entering Access Code . . . page 17
9 Settings
91 Entering the Date and Time
91 Entering the Date and Time . . . page 28
92 Selecting the Language
92 Selecting the Language . . . page 28
93 Selecting the Country
93 Selecting the Country . . . page 28
94 Entering Number
94 Entering Number . . . page 28
95 Entering Name (SPFX)
95 Entering Name . . . page 28
96 Configuring Telephone Lines and Services
96 Configuring Telephone Lines and
Services
. . . page 31
6 Philips · PPF 725 · PPF 755
Page 7
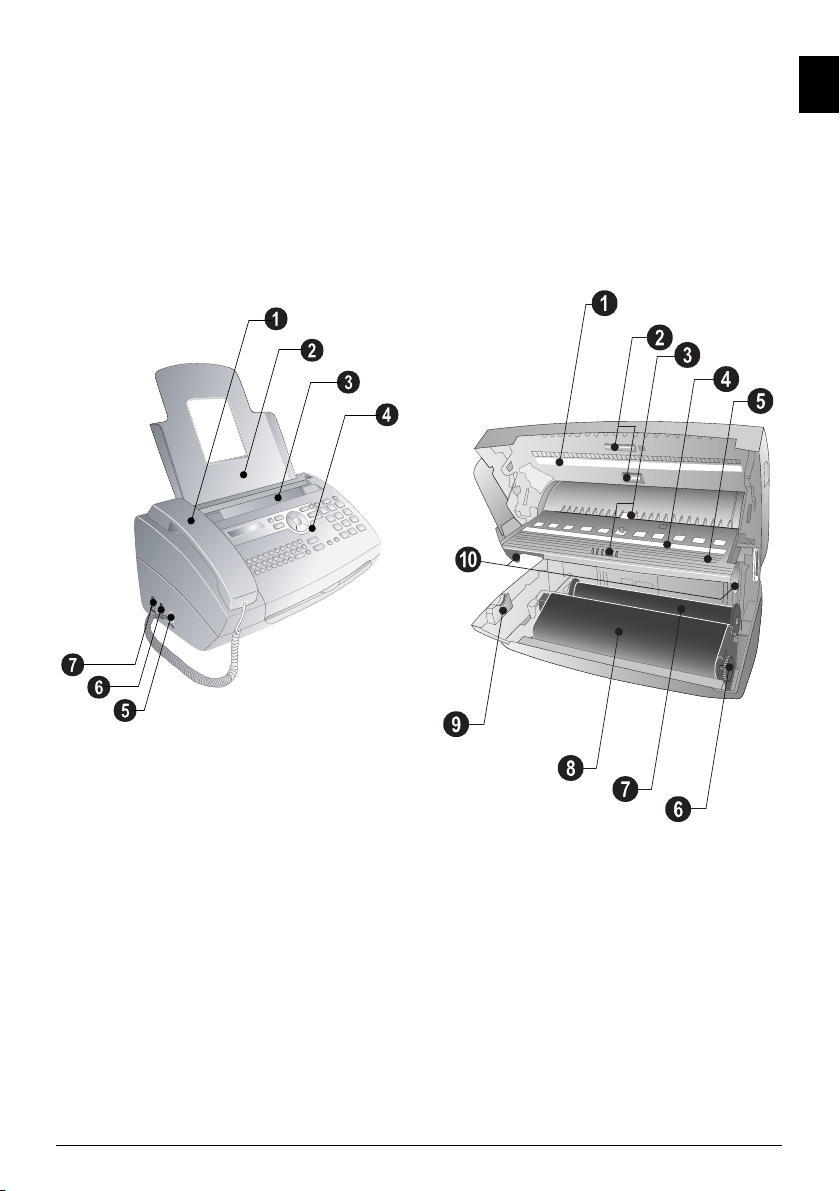
Device Overview
· Device Overview
Primo · Voice overview
‚ Handset
ƒ Paper tray
„ Document feeder (writing facing up)
… Panel with display
† ) socket—Connection socket for the telephone
handset
‡ EXT socket—Connection socket for additional de-
vices
ˆ LINE socket—Connection socket for telephone ca-
ble
SPFX 4x
‚ Scanner glass
ƒ Rollers of the automatic document feeder
„ Rests of the intake rollers
… Document guide / scanner film
† Cover for scanner and automatic document feeder
‡ Toothed wheel for tightening the ink film
ˆ Ink film roll in the rear ink film compartment
‰ Ink film roll in the front ink film compartment
Š Slot for the Plug’n’Print card
‹ Locks for the cover of the scanner and automatic
document feeder
Innenansicht nummeriert
EN
Internal Description
Overview · Device Overview 7
Page 8
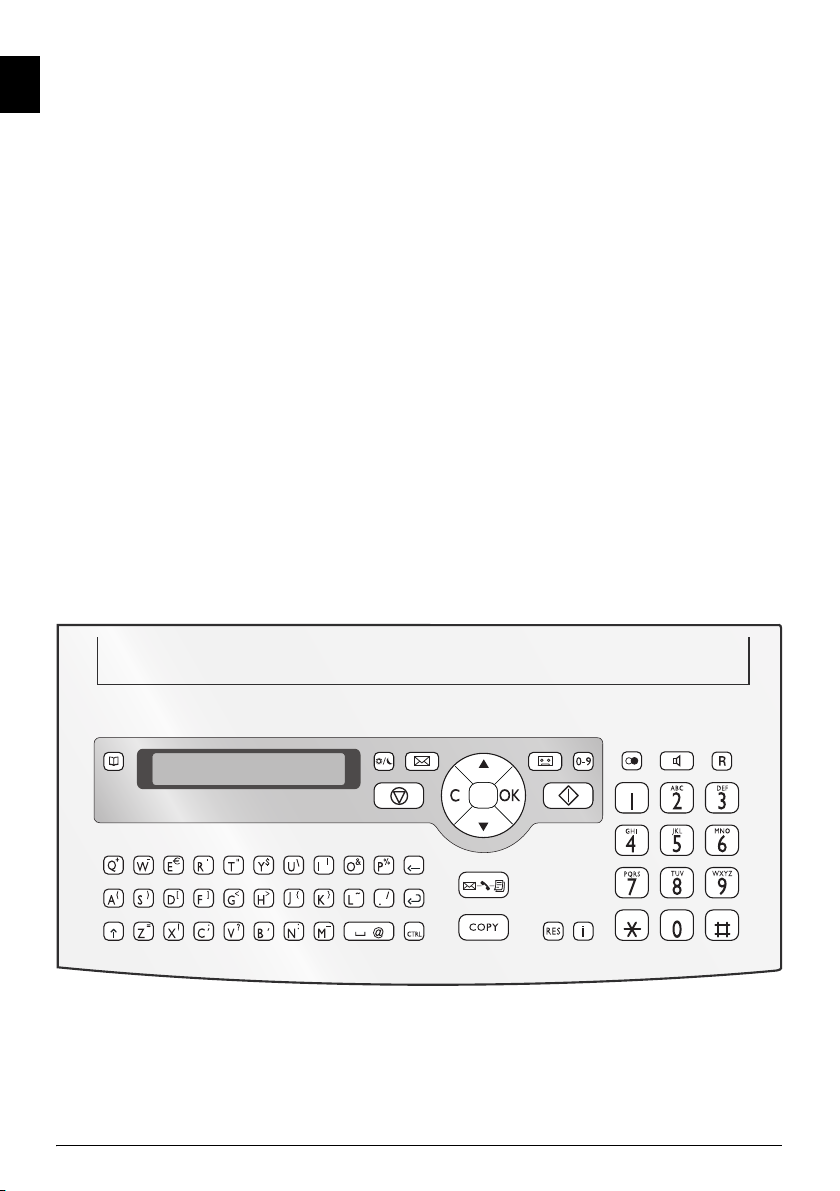
Panel
· Panel
Telephone Book
EN
m—Press briefly: Calling up the telephone book entries. Selecting the entries with the [ / press and hold:
saving new entries
Fax Switch
º/»—Setting the timer and the fax reception modes
(= fax switch). Modes set on the display ™ (day), ˜
(night). Activated timer is indicated with ›
_—Calling the SMS menu (function is not supported
in all countries and networks)
Answering Machine (Type 2)
b (PPF¦755)—Calling answering machine menu
Ý—Press briefly: Load short dial entries. Selecting
the entries with the [ or numeric keys / press and
hold: Assign a new short dial entry
Stop (AM Type 2)
j—Function abort / return to the starting mode / documents eject / (PPF¦755): ending message playback
C (AM Type 2)
C—Return to the previous menu level / press briefly:
deleting individual characters / press and hold: deleting
complete input / (PPF¦755): during a playback: deleting
individual message / in the starting mode: deleting all
messages
Arrow Keys
[—Calling the menu functions / navigation within the
menu / selecting options / moving the cursor / adjusting
the volume level
OK
OK—Calling the menu functions / confirming input
Start
o—Press briefly: Starting transmission of messages /
press and hold: Starting fax polling
Letter keypad—Entering characters. Entering capital
letters by pressing and holding + key. Deleting using \.
Entering a break using |. Entering a space using ½. Entering special characters by pressing and holding CTRL
key.
Quick search/entering initial letters with the letter keypad: Enter the initial letters with the letter keypad to
quickly navigate through the telephone book.
Message
ä—Lights up, if new messages are received / list
of the new messages with submenus / blinks in the case
of device error (for example no ink film)
COPY—Press briefly: creating a copy / press and hold:
creating multiple copies / printing SMS
Resolution
RES—Setting higher resolution for faxes and copying
(RESOL.: STANDARD, RESOL.: FINE, RESOL.:
PHOTO)
Help
î—Press briefly: Printing help pages and setting lists /
press and hold: Starting initial installation process
Redialling
@—Press briefly: Toggling between the list of the last
10 dialled numbers (= redial list) / press and hold: List
of last ten callers (caller list)
Speaker (SPFX 43 · 47 · SP 4840)
l—(PPF¦725): Dialling with the handset replaced /
(PPF¦755): hands-free
R
R—Press briefly: insert short line interruption (Hook
Flash) as office index on PABX or for calling special
functions in the public telephone network (PSTN)/long
press: Inserting dialling pause
Numeric Keys (short dial)
Numeric keypad—Inputting digits, characters and special characters / press and hold: Recalling short dial
numbers
SPFX 47
8 Philips · PPF 725 · PPF 755
Page 9
3 Initial Operation
Initial Operation
EN
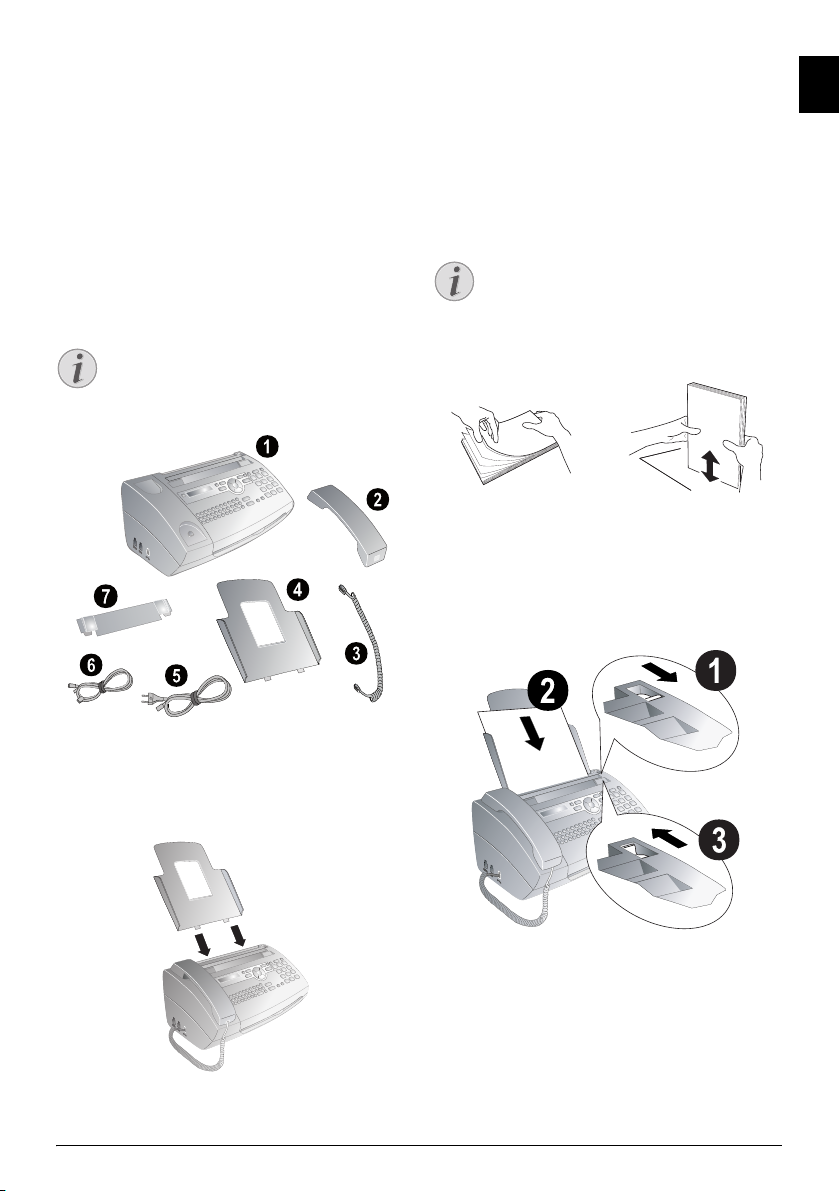
Packing Contents
· Packing Contents
Packing Contents Sagem Primo Voice
‚ Device
ƒ Telephone handset
„ Spiral cable for telephone handset
… Paper tray
† Mains cable with plug (country-specific)
‡ Telephone cable with plug (country-specific)
ˆ Additional document support
User Manual
User manual with installation guide (not depicted)
Missing Package Conten ts
Missing Package Contents
If any of the parts are missing or damaged,
please contact your retailer or our customer
service.
Loading Paper
· Loading Paper
Paper Format
Before you can receive documents or make copies, you
must load paper into the device. Please use only appropriate paper in standard format A4 (210 × 297 millime-
tre · preferably 80 g/m
technical data.
Loading Paper
Loading Paper
Separate the paper sheets by fanning them out,
then align them by tapping edge of the stack
lightly against a flat surface. This will prevent
several sheets of paper from being drawn in all
at once.
Preparing Paper
1. Fold open the lever on the right beside the paper
feed towards front.
2. Insert paper in the paper feeder. In the paper tray
you can insert maximum 50 sheets (A4 · 80 g/
m).
3. Fold open the lever on the right beside the paper
feed backward in order to enclose the paper.
Papier einlegen
2
). Follow the specifications in the
Attaching Paper Tray
· Attaching Paper Tray
Insert the paper tray in the opening provided for it behind the paper feeder.
Initial Operation · Packing Contents 9
Page 10
Connecting the Handset
· Connecting the Handset
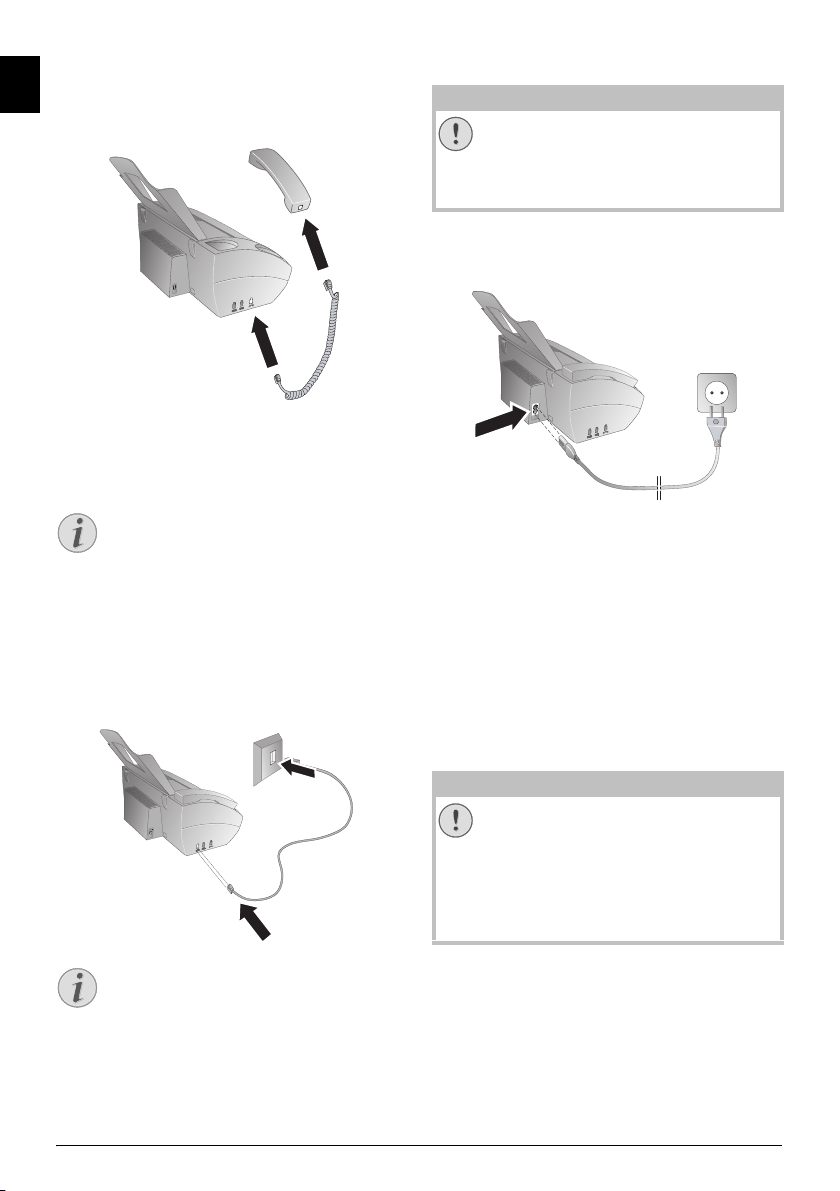
Connecting the Handset
EN
Plug one end of the spiral cable into the socket on the
telephone handset. Insert the other end into the socket
designated with the ) symbol.
Hörer anschließen
Connecting the Telephone
Cable
· Connecting the Telephone Cable
Connecting the Telephone Cable
Analogue Fax Machine
Your device is an analogue fax device (Group 3).
It is not an ISDN device (Group 4), and therefore it cannot be operated directly on an ISDN
connection. In order to do this, you need either
an analogue adapter or a connection for analogue terminals.
Connecting the Telephone Cable
Connect the telephone cable to the device by inserting
it in the socket designated with LINE (RJ-11-Connector). Insert the telephone plug into your PTT line socket.
Telefonkabel anschließen
Connecting the Mains Cable
· Connecting the Mains Cable
Mains Voltage at the Site of Installation
CAUTION!
Mains Voltage at the Site of
Installation!
Check whether the mains voltage of your device (indicated on the type label) matches the
mains voltage available at the setup location.
Connecting the Mains C able
Insert the mains cable into the connection located on
the rear side of the device. Plug the power cable into the
electrical outlet.
Netzkabel anschließen
Initial Installation
· Initial Installation
Starting Initial Installation
After you connect your device to the mains voltage, the
initial installation commences. Press î. Your device
prints a help page.
Selecting the Language
1. Use [ to select the desired display language.
2. Confirm with OK.
Selecting the Country
Setting the Country Correctly
CAUTION!
Setting the Country Correctly!
You must set the country in which you are operating the device. Otherwise your device is
not adapted to the telephone network. If your
country is not included in the list, you must
select a different setting and use the correct
telephone cable for the country. Consult your
retailer.
PABX Systems 1
Connection to Private Automatic
Branch Exchange
If you connect your device as extension to a telephone system, you must set it for working as
an extension (see also chapter Telephone Lines
Setting the Country
1. Use [ to select the country in which you are operating the device.
2. Confirm with OK.
After this input, the device prints another help page and
checks the telephone line.
and Additional Devices, page 31).
10 Philips · PPF 725 · PPF 755
Page 11
Entering Number
Page Header
Your name and number are added together with date,
time and page number at the top edge of each fax transmission (= header).
Entering Number
1. Enter your number. Using # or * you can enter
a plus sign.
2. Confirm with OK.
Entering Name
1. Enter the name using the letter keypad. Enter capital
letters by pressing and holding + key. You can delete
individual characters using \. You can enter space
using ½. Press CTRL and the respective letter key
to enter the special character printed above it.
Navigating in the Editor
You can move the cursor using [. Use C
to delete individual characters.
2. Confirm with OK.
Entering the Date and Time
Entering Time/Date
1. Enter the time, e.g. 1400 for 2 pm.
2. Enter the date (two digits each) e.g.
080607 for 8 June 2007.
3. Confirm with OK.
Help 2 · Initial Installatio n Process
Starting Initial Installation Process
You can restart the initial installation process
any time. Press î and 2.
EN
Initial Operation · Initial Installation 11
Page 12
4 Telephone Functions
EN
Telephone Functions
Help 3 · Telephone Functions
Printing Telephone Book Functions
Press î and 3 to print an overview of the
telephone book functions.
Connecting Additional Telephon es
For information on how to connect additional telephones and which functions are available to you, please
refer the chapter on Telephone Lines and Additional
Devices, (see also chapter Telephone Lines and Additional
Devices, page 31).
Placing a Call on the Device
· Placing a Call on the Device
Dial the desired number. There are several ways to do
this: Then pick up the handset.
Direct Dialling
Direct Dialling
You can also lift up the receiver first, then dial a
number. The dialling process begins immediately.
Manual Dialling: Dial the desired number using the
numeric keypad.
Telephone Book
Telephone Book:
1. Press m.
Access Function
You can also search for an entry in the telephone book by pressing OK, 11 and
OK.
2. Select an entry using [. Enter the starting letters
with the numeric keypad to quickly navigate through
the telephone book.
Multiple Categories for One Entry
You can save an entry multiple times with
the same name but in a different category. In
the telephone book, the first letter of the
category appears after the entry.
Quick search/entering initial letters with the letter keypad: Enter the initial letters with the letter key-
pad to quickly navigate through the telephone book.
Short Dial: Press Ý. Select the desired entry using
[ or with the numeric keys.
Recalling Short Dial Number
Access Function
You can also load short dial entries by holding
the respective number key pressed (for at least
two seconds).
Redial List
Redial List: Press @. Use [ to select an entry from
the list of the dialled numbers.
Outgoing Calls
Access Function
You can also load the redial list by pressing OK,
22 and OK.
Caller List: Press and hold @ (at least two seconds).
Use the [ to select an entry from the list of callers.
Calls Received
Access Function
You can also load the caller list by pressing OK,
21 and OK.
CLIP Prerequisite
Calling Line Identification (CLIP)
For this function to work, the Caller Line Identification (CLIP) must be activated for your telephone line (country and network dependent).
The number and name will not be shown if the
caller suppresses his number.
Calling Additional
Telephone Functions
· Calling Additional Telephone Func tions
Type 2 (großer Core)
(PPF¦755)
Function is not supporte d in all countries an d networks
(Function is not supported in all countries and
networks)
Additional Telephone Functions
You can use additional telephone functions with your
device for example call toggling, three-way call or call
forwarding. Contact your telephone company to inquire
whether or not these functions are available for your
connection. The signal to the switchboard to call these
services is a short line interruption (Hook Flash). How
to call up the functions, depends on your telephone
company and may vary from the description found below.
Making a Second Call
1. During a call, press R.
2. Enter the desired number using the numeric keypad
or select a saved entry.
Switching Between Calls (= Call
Toggling)
Switching Between Calls
Press R, to toggle between the calls.
Receiving a Second Call
Call Waiting
During a call, you can be informed about another call by
a notification tone (= call waiting) if your telephone
company offers this service. The notification tone for
call waiting on the device is switched off in the factory.
Receiving a Second Call
During a call, press R to accept the new call.
CLIP Prerequisite
Calling Line Identification (CLIP)
For this function to work, the Caller Line Identification (CLIP) must be activated for your telephone line (country and network dependent).
The number and name will not be shown if the
caller suppresses his number.
12 Philips · PPF 725 · PPF 755
Page 13
Switching Notification Tone for
Call Waiting On/Off
1. Press OK, 42 and OK.
2. Use [, to select whether you would like to turn
the call waiting on or off.
3. Confirm with OK.
Getting Outside Line
· Getting Outside Line
PABX Systems
Private branch exchanges (PABX) are typical in many offices and some households. You must dial an outside
line access code in order to get a connection to the
public telephone network (PSTN) from a PABX.
Inserting Outside Line Access Code
Enter the outside line access code with which you reach
the public telephone network before you enter the desired number or select a stored entry. The outside line
access code is usually 0.
Incorrect Outside Line A ccess Code
Incorrect Outside Line Access Code
In rare cases, the outside line access code may
be a different number or a two-digit number.
For older telephone systems, the outside line
access code can be R (= Flash). Press R to enter
this outside line access code. If the connection
to the public telephone network is not possible,
contact your telephone system supplier.
Setting Up an Extension
Connection to Private Automatic
Branch Exchange
If you operate your device permanently on an
extension, save the outside line access code 96
(see also chapter Configuring Telephone Lines and
Services, page 31).
Chain Dialling
· Chain Dialling
You can combine and edit manually entered digits and
saved entries, before the dialling process starts. If you
have saved, for example, the telephone number prefix of
an inexpensive telephone service provider (call-by-call)
as a telephone book entry, select this entry and manually
enter the subsequent telephone number or select another saved entry.
Insert Dialling Pause
· Insert Dialling Pause
It may be necessary to insert a dial pause in telephone
number, for example, for a direct-inward dialling
number, a sub-address or in a long distance number.
Hold R pressed (for at least two seconds). – appears on
the display. The second part of the number is dialled
only after a short pause.
Hands-Free
· Hands-Free
Type 2 (großer Core)
(PPF¦755)
1. Press l to dial without lifting up the handset. You
will hear a dial tone from the loudspeaker.
2. Enter the desired number using the numeric keypad
or select a saved entry. The dialling process begins
immediately. At this stage, any numbers that have
been incorrectly entered can no longer be changed.
Handset Near the Device
Hands-Free
Put the handset near the device with the microphone facing up in order to achieve an optimum
communication.
Recording a Telephone
Conversation
· Recording a Telephone Conversation
Type 2 (großer Core)
(PPF¦755)
Recording a Telephone Conversation
You can record a telephone conversation. After recording, the ä key flashes, and you can hear the recording like a message on the answering machine.
Recording a Telephone Conversation
CAUTION!
Recording a Telephone Conversation!
You must inform your caller when recording
a telephone conversation.
Recording a Telephone Conversation
1. During a call, press b. The recording begins.
2. Press b again to end the recording.
Telephone Book of the
Device
· Telephone Book of the Device
Telephone Book
In the telephone book of your device, you can save entries with multiple numbers and collect multiple entries
into groups. You can assign various ring tones to the entries. Follow the specifications in the technical data.
Cursor Navigation 1
Navigating in the Editor
You can move the cursor using [. Use C to
delete individual characters. Press j to close
the menu and return to the starting mode.
Saving Entry
1. Hold m pressed (for at least two seconds).
Access Function
You can also call the function by pressing
OK, 12 and OK.
2. Enter the name using the letter keypad. Enter capital
letters by pressing and holding + key. You can delete
individual characters using \. You can enter space
using ½. Press CTRL and the respective letter key
to enter the special character printed above it.
Navigating in the Editor
You can move the cursor using [. Use C
to delete individual characters.
3. Confirm with OK.
EN
Telephone Functions · Getting Outside Line 13
Page 14

4. Using [, select the category for which you would
EN
like to enter a number: CATEGORY: HOME, CATEGORY: WORK, CATEGORY: MOBILE or CATEGORY: FAX.
5. Confirm with OK.
6. Enter the telephone number.
7. Confirm with OK.
8. You can assign a ring tone to the number. Use the
number keys 0 to 9 to select a ring tone. Using
[, set the volume.
9. Confirm with OK. The entry is saved.
Edit Entry
1. Press OK, 15 and OK.
2. Using [ select the entry which you would like to
edit.
3. Confirm with OK.
4. Edit the name.
5. Confirm with OK.
6. Using [, select the category for which you would
like to enter a number: CATEGORY: HOME, CAT-
EGORY: WORK, CATEGORY: MOBILE or CATEGORY: FAX.
7. Confirm with OK.
8. Enter the telephone number.
9. Confirm with OK.
10. You can assign a ring tone to the number. Use the
number keys 0 to 9 to select a ring tone. Using
[, set the volume.
11. Confirm with OK. The entry is saved.
Deleting an Entry
1. Press OK, 16 and OK.
2. Using [ select the entry which you would like to
delete.
3. Confirm with OK.
4. Confirm DELETE: YES with OK.
Groups
· Groups
Groups
You can combine several telephone book entries into a
group. A message is sent to all members of this group in
succession.
Adding Group Entries
1. Press OK, 13 and OK.
2. Use [ to select the group you would like to cre-
ate.
3. Confirm with OK. You can add entries to the
group, display the members of the group, delete the
group or send a fax to the group.
4. Select with [ADD MEMBER?.
5. Confirm with OK.
6. Use [ to select the entry you would like to add to
the group.
7. Confirm with OK.
8. Repeat steps 4 to 6 to add additional entries to the
group.
9. Press j to end the input.
Displaying Group Entries
1. Press OK, 13 and OK.
2. Use [ to select the group you would like to display.
3. Confirm with OK.
4. Select with [VIEW MEMBERS?.
5. Confirm with OK.
6. Page through the entries of the group with [.
7. Press j twice to return to the starting mode.
Deleting Individual or All Group
Entries
Deleting an Individual Entry
1. Press OK, 13 and OK.
2. Using [ select the group from which you would
like to delete entries.
3. Confirm with OK.
4. Select with [DELETE MEMBER?.
5. Confirm with OK.
6. Using [ select the entry which you would like to
delete.
7. Confirm with OK.
8. Select with [DELETE: YES.
9. Confirm with OK. The entry is deleted.
Deleting a Group
1. Press OK, 13 and OK.
2. Using [ select the group you would like to delete.
3. Confirm with OK.
4. Select with [DELETE MEMBER?.
5. Confirm with OK.
6. Select with [DELETE: ALL.
7. Confirm with OK. All entries in the group are deleted.
14 Philips · PPF 725 · PPF 755
Page 15
Short Dial
· Short Dial
(model dependent)
(model dependent)
Short Dial
You can assign short dial numbers to frequently dialled
telephone numbers. You can load these numbers quickly with the short dial key and the number keys.
Assigning or Editing Short Dial
Entry
1. Hold Ý pressed (for at least two seconds).
Access Function
You can also call the function by pressing
OK, 14 and OK.
2. Use [ or the respective number key to select the
short dial number you would like to assign or
change.
CAUTION!
Overwriting Short Dial Entries!
If you select a short dial number that is already assigned, the entry is overwritten.
3. Confirm with OK.
4. Use [ to select the telephone book entry you
would like to assign as a short dial entry.
5. Confirm with OK.
Deleting a Short Dial Entry
The Telephone Book Entry is Deleted!
CAUTION!
The Telephone Book Entry is Deleted!
This function not only deletes the short dial
entry, it also deletes the entire entry from the
telephone book. Overwrite the short dial entry if you would like to change the assignment.
1. Press Ý.
Access Function
You can also call the function by pressing
OK, 14 and OK.
2. Use [ or the respective number key to select the
entry you would like to delete.
3. Press C.
4. Confirm the deletion with OK.
Calling Line Identification
(CLIP)
· Calling Line Identification (CLIP)
Function is not supporte d in all countries an d networks
(Function is not supported in all countries and
networks)
CLIP Definition
The number of an incoming call appears on the display.
For this function to work, the Calling Line Identification
Presentation (CLIP) must be activated for your telephone line. Enquire with your telephone company. Caller Line Identification may be associated with a fee.
Setting the Country Correctly
Setting the Country Correctly
If the Caller Line Identification does not work
even though the function is activated for your
telephone line, check if you have set the correct
country (see also chapter Selecting the Country,
page 28).
Missed Calls
· Missed Calls
Missed Calls
If you received a call while away, the ä - key flashes.
1. Press ä.
2. Using [, you can page through the list of missed
calls.
Additional Messages
If you have received additional messages,
first select the missed calls using [ and
confirm with OK.
3. To call back, pick up the handset.
Displaying Telephone Book Names
Displaying Telephone Book Names
Your device displays the name with which you
have saved the number in the telephone book.
The number and name will not be shown if the
caller suppresses his number.
EN
Telephone Functions · Short Dial 15
Page 16
5 Answering Machine
EN
Answering Machine
(model dependent)
(model dependent)
Help 3 · Answering Mach ine
Printing Answering Machine Functions
Press î and 3 to print an overview of the answering machine functions.
Switching On and Off
· Switching On and Off
Switching On/Off on the DeviceAnonymous Outgoing Mes sage
Using Anonymous Outgoing Messages
If you do not record a personal announcement,
the answering machine uses the anonymous announcement set by the factory.
Press b three times to turn the answering machine on
or off. If the answering machine is turned on, the symbol
— appears on the display.
Activation
Access Function
You can also call the function by pressing OK,
71 and OK.
Editing the Outgoing
Message
· Editing the Outgoing Message
Recording the Outgoing Message
Recording the Outgoing Message
During playback, press C and OK in order to
delete the currently playing outgoing message.
Using [, set the volume. Stop the playback
with j.
Recording the Outgoing Message
1. Press b.
2. Select with [OUTGOING MSG..
3. Confirm with OK.
Access Function
You can also call the function by pressing
OK, 75 and OK.
4. Select with [MESSAGE: RECORD.
5. Confirm with OK.
6. Press OK to record an outgoing message. Wait for
the confirmation tone before you say your text.
Length of Outgoing Message
The outgoing message must be longer than
ten seconds and shorter than twenty seconds.
7. Press OK to end the recording. The recording is
played back.
Recording the Outgoing Message
Recording the Outgoing Message
If the volume of the outgoing message is too
low, rerecord the same. For recording, lift up
the telephone handset of the device and speak
the text into the microphone.
Playing Back the Outgoing
Message
1. Press b.
2. Select with [OUTGOING MSG..
3. Confirm with OK.
Access Function
You can also call the function by pressing
OK, 75 and OK.
4. Select with [MESSAGE: PLAY.
5. Confirm with OK. The outgoing message is played
back.
Using Anonymous Outgoing
Messages
Anonymous Outgoing Message
You can replace your personal outgoing message with
the factory default anonymous message.
1. Press b.
2. Select with [OUTGOING MSG..
3. Confirm with OK.
Access Function
You can also call the function by pressing
OK, 75 and OK.
4. Select with [MESSAGE: DEFAULT.
5. Confirm with OK. The outgoing message is played
back.
Using Announcement without
Recording Message
Outgoing Message Without Recording of Messages
You can record an outgoing message which the caller
hears for which no message can be recorded in reply (=
external memo).
1. Press b.
2. Use [ to select EXTERN. MEMO.
3. Confirm with OK.
Access Function
You can also call the function by pressing
OK, 76 and OK.
4. Use [ to select whether you would like the outgoing message to be switched on/off without recording the message.
5. Confirm with OK.
Overwriting Existing Outgoing
Message
When you record an outgoing message, you
are asked, if you would like to use the old
outgoing message or would like to record a
new one. Confirm with OK.
16 Philips · PPF 725 · PPF 755
Page 17
6. Recording a New Outgoing Message: Press
OK to record an outgoing message. Wait for the
confirmation tone before you say your text.
Length of Outgoing Message
The outgoing message must be longer than
ten seconds.
7. Press OK to end the recording. The recording is
played back.
Listening to Messages
· Listening to Messages
Listening to Messages
Listening to Messages
Press # to play the next message. With the
number keys, you can load the desired message
directly. During playback, press C and OK in
order to delete the currently playing outgoing
message. Using [, set the volume. Stop the
playback with j.
Listening to New Messages
Indication of New Messag es
If new messages have been received on the answering
machine, the ä key blinks. The number of the new
messages is shown on the display.
1. Press ä.
2. Confirm with OK.
3. The new messages are played back.
Playing Messages again
1. Press b.
2. Select with [MESSAGES.
3. Confirm with OK.
Access Function
You can also call the function by pressing
OK, 72 and OK.
4. Select with [MESSAGE: PLAY.
5. Confirm with OK. The messages are played back.
Deleting Messages
· Deleting Messages
Deleting Individual Message
During playback, press C and OK in orde r to de lete t he
currently playing outgoing message.
Deleting Messages already Played
Deleting New Messages
Deleting New Messages
Messages not yet heard must be heard first before deleting them.
1. Press b.
2. Select with [MESSAGES.
3. Confirm with OK.
Access Function
You can also call the function by pressing
OK, 72 and OK.
4. Select with [MESSAGE: DELETE.
5. Confirm with OK. The heard messages are deleted.
Deleting Heard Messages
You can also delete the already heard messages by pressing C and OK in the starting
mode.
Setting up Forwarding and
Remote Access
· Setting up Forwarding and Remote Access
Entering Access Code
Access Code
You must enter an access code to be able to receive
transferred messages, or listen to and control your answering machine from other telephones.
Remote Control On/Off
Remote Control On/Off
The remote control is switched off with the factory-installed access code (0000). Change the
access code to switch on the remote control. If
you want to switch the remote control off enter
the factory-installed code (0000) again.
1. Press b.
2. Select with [ACCESS CODE.
3. Confirm with OK.
Access Function
You can also call the function by pressing
OK, 79 and OK.
4. Enter a four-digit code.
CAUTION!
No Identically PIN Codes!
The access code may not be identical to
the VIP code.
5. Confirm with OK.
Forwarding Messages
Forwarding Messages
The device forwards messages to a specified telephone
number. Once the configured number of messages is
reached, the device calls the number. If the call is answered, a greeting text is played. Then the person on
the line must enter the access code. If no code is entered or an incorrect code is entered three times, the
device hangs up.
1. Press b.
2. Select with [FORWARDING.
3. Confirm with OK.
Access Function
You can also call the function by pressing
OK, 77 and OK.
4. Use [ to select whether you would like to switch
forwarding on or off.
5. Confirm with OK.
6. Enter the number to which the received messages
should be forwarded.
7. Confirm with OK.
EN
Answering Machine · Listening to Messages 17
Page 18
8. Use [ to select how many messages should be
EN
collected and forwarded together.
9. Confirm with OK.
Overwriting Existing Outgoing
Message
When you record a message, you are asked,
if you would like to use the old message or
would like to record a new one. Confirm
with OK.
10. Recording a new outgoing message: Press OK
to record an outgoing message. Wait for the confirmation tone before you say your text.
11. Press OK to end the recording. The recording is
played back.
Using Remote Access
· Using Remote Access
Remote Control
You can hear and delete new messages, record a new
outgoing message or switch answering machine on or
off with a telephone call.
Tone Dialling
Tone Dialling
The telephone on this connection must be set
to tone dialling. Press a key within 50 seconds,
otherwise the connection is cut-off (country
and network dependent).
1. Call your number.
2. Wait, until the answering machine switches on and
plays the outgoing message.
3. Enter the access code.
4. The device interrupts the outgoing message and
plays new messages. If no new messages have been
received, you will hear two confirmation tones.
Conserving Function of Fax
Reception Mode
If you select the 5/2 option for the number
of rings of the answering machine, the answering machine switches on after two
rings, when you have received new messages. If there are no new messages, the device
rings five times. If the device does not pick
up after two rings, you have no new messages. You can terminate the remote access
without incurring any telephone costs.
5. The functions listed below are available using the
numeric keys.
6. Hang up to end the remote access.
Remote Control Functions
· Remote Control Functions
Aborting Current Functio n
Aborting Current Function
Occasionally the answering machine might not
react to your entry—for example while you are
listening to a message. Cancel the current function by pressing ‰. Select the next function
with the appropriate number key.
Listening to Messages
Hearing Current Message Again: Press ‚.
Listening to All Messages: Press ƒ.
Listening to Next Message: Press „.
Deleting Messages
To Delete the Current Message: Press ‡ while lis-
tening to the message.
Deleting All Messages: Press ‡ after listening to all
the messages.
Press ‡ again within five seconds to confirm the dele-
tion.
Outgoing Message
Listening to the Outgoing Message Press †.
Recording a New Outgoing Message:
1. Press ….
2. Wait for the confirmation tones.
3. Press ….
4. Wait for the long confirmation tone before beginning with the text.
5. Press … to end the recording.
Control Functions
Aborting Last Function: Press ‰.
Switching Off Answering Machine Press ˆ.
Switching On Answering Machine Press Š.
Switching Answering Machine On
Conserving Function of Fax Reception
Mode
If the answering machine is switched off you
have to enter the access code while the fax
switch analyzing the incoming signal. After the
4th ring the tone heard changes (factory settings
of the number of rings for fax switch) (see also
chapter Setting the Fax Switch, page 29). Press
Š, to activate the answering machine. Afterwards you can call additional functions.
18 Philips · PPF 725 · PPF 755
Page 19
Recording Internal Memos
· Recording Internal Memos
Internal Memos on the DeviceInternal Memos
You can record voice messages (= memos), which can
be played as messages. The limit on duration of recording set for messages applies even to the recording duration of memos.
Recording Length for Memos
Recording Length for Memos
The configured recording length for incoming
messages also limits the length of the internal
memos.
1. Press b.
2. Use [ to select QUICK NOTE.
3. Confirm with OK.
Access Function
You can also call the function by pressing
OK, 73 and OK.
4. Press OK to record a voice message. Wait for the
confirmation tone before you say your text.
5. Press OK to end the recording. The recording is
played back. After that the ä key starts flashing. The voice message is displayed as a new message.
Modifying the Settings
· Modifying the Settings
Entering the VIP Code
VIP Code
If callers enter the VIP code, the device continues to
ring, even if the answering machine has taken over the
call. With this function, certain persons can reach you
even if you have set the number of rings to zero.
No Identically PIN Codes!
CAUTION!
No Identically PIN Codes!
The VIP code may not be identical to the access code for remote control.
1. Press b.
2. Select with [VIP CODE.
3. Confirm with OK.
Access Function
You can also call the function by pressing
OK, 78 and OK.
4. Enter a four-digit code.
5. Confirm with OK.
Setting the Recording Duration
Recording Length
You can limit the length of the incoming messages and
internal memos.
1. Press b.
2. Select with [RECORD. TIME.
3. Confirm with OK.
Access Function
You can also call the function by pressing
OK, 74 and OK.
4. Use [ to select the desired recording length or
unlimited time (automatic).
5. Confirm with OK.
EN
Answering Machine · Recording Internal Memos 19
Page 20
6 Fax
EN
Fax
Help 4 · Fax
Printing Informations for Fax
Transmission
Press î and 4 to print instructions for sending fax messages and for configuring the fax
switch.
Unsuitable Documents!
CAUTION!
Unsuitable Documents!
Do not insert any documents into the device
that ...
... are wet, have been edited with correction
fluid, are soiled or have a coated surface.
… that are written on with a soft pencil, with
paint, chalk or charcoal.
… originate from newspapers or magazines
(printing ink).
… that are held together with office or notebook staples or with tape or glue.
… are pasted with note papers.
… are creased, crumpled or torn.
10 Documents · A5/A4
Use documents with sizes A5 or A4 with 60 to 100 g/
2
m
weight. You can insert up to ten documents at a
time.
Fax
Cancel Transmission
Press j to eject the documents without sending them.
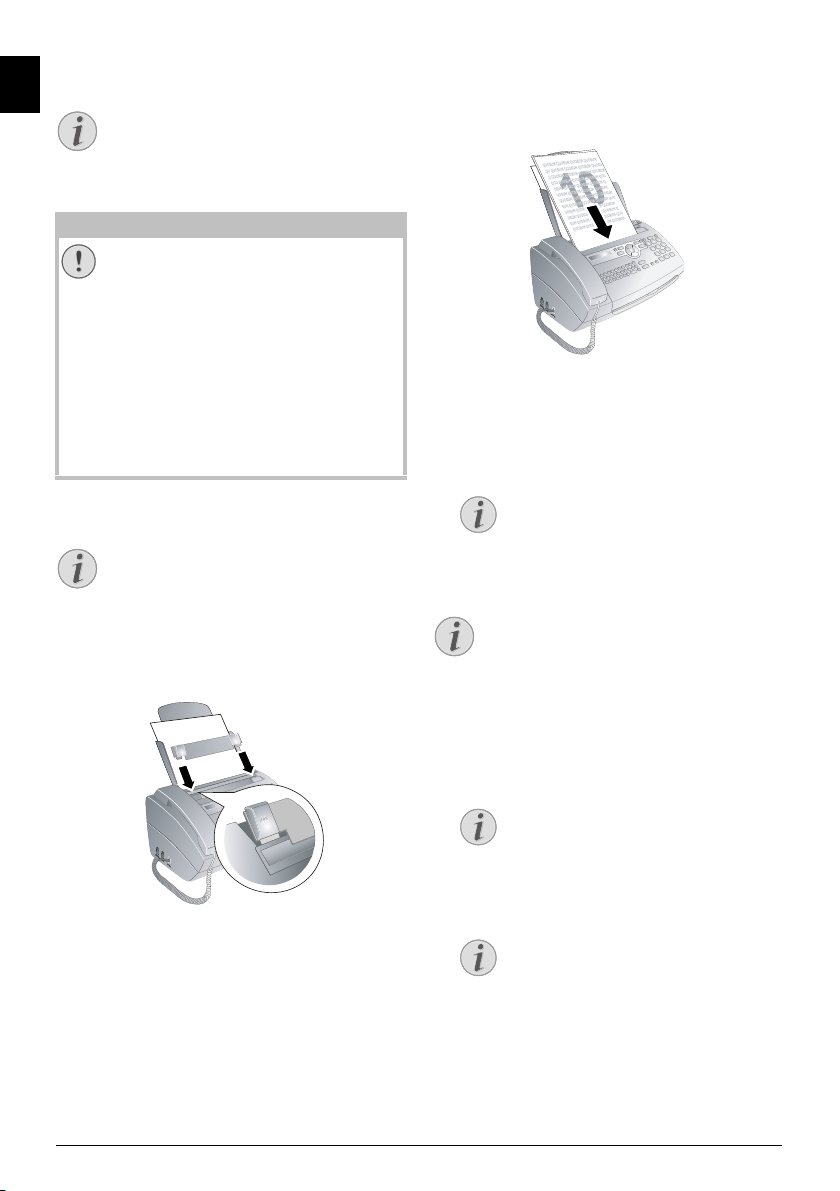
Sending a Fax
· Sending a Fax
1. Insert the additional document support on the document feeder.
2. Insert the documents face up into the document
feeder. The top most document will be fed in first.
3. Set the desired resolution. You can choose between RESOL.: STANDARD (for documents without special features), RESOL.: FINE (for texts
with small print or drawings) and RESOL.: PHO-
TO (for photos). Press RES. The configured resolu-
tion appears on the display. Press RES again to
change the resolution.
Adjust contrast
You can adjust the preset contrast (see also
chapter Adjust contrast, page 28).
4. Dial the desired number. There are several ways to
do this:
5. Press o.
Busy Number
Automatic Redial
If the subscriber is busy, the device dials the
number again after some time. Press j, in order to cancel the transmission process. After
the transmission, the device prints out a transmission report depending on the settings.
Manual Dialling: Dial the desired number using the
numeric keypad.
Telephone Book
Telephone Book:
1. Press m.
Access Function
You can also search for an entry in the telephone book by pressing OK, 11 and
OK.
2. Select an entry using [. Enter the starting letters
with the numeric keypad to quickly navigate through
the telephone book.
Multiple Categories for One Entry
You can save an entry multiple times with
the same name but in a different category. In
the telephone book, the first letter of the
category appears after the entry.
Quick search/entering initial letters with the letter keypad: Enter the initial letters with the letter key-
pad to quickly navigate through the telephone book.
20 Philips · PPF 725 · PPF 755
Page 21
Short Dial: Press Ý. Select the desired entry using
[ or with the numeric keys.
Recalling Short Dial Number
Access Function
You can also load short dial entries by holding
the respective number key pressed (for at least
two seconds).
Redial List
Redial List: Press @. Use [ to select an entry from
the list of the dialled numbers.
Outgoing Calls
Access Function
You can also load the redial list by pressing OK,
22 and OK.
Caller List: Press and hold @ (at least two seconds).
Use the [ to select an entry from the list of callers.
Calls Received
Access Function
You can also load the caller list by pressing OK,
21 and OK.
CLIP Prerequisite
Calling Line Identification (CLIP)
For this function to work, the Caller Line Identification (CLIP) must be activated for your telephone line (country and network dependent).
The number and name will not be shown if the
caller suppresses his number.
Sending Fax Manually
· Sending Fax Manually
1. Insert the document.
2. Enter the desired number using the numeric keypad
or select a saved entry.
3. Press l.
4. Press o.
Direct Inward Dialling or
Selecting Sub-address
· Direct Inward Dialling or Selecting Sub -address
Direct Inward Dialling or Sub-address
You can send a fax to a direct-inward dialling number or
a sub addressor or call from a direct-inward dialling
number or sub address - for example to use a certain
service of a fax database provider. For this purpose, attach the direct-inward dialling number or sub address
with a short dialling pause to the fax number.
1. Enter the desired number using the numeric keypad
or select a saved entry.
2. Hold R pressed (for at least two seconds).
3. Enter the direct-inward dialling number or sub address.
4. Press o. The direct-inward dialling number or sub
address is dialled only after a short pause.
Eavesdropping while
Connection is Established
· Eavesdropping while Connection is Established
Type 1 (kleiner Core)
(PPF¦725)
Eavesdropping while Connection is Established
You can listen while a connection is established, for example if a fax transmission constantly fails.
Enter the desired number using the numeric keypad or
select a saved entry. Press l.
No Hands-free Operation Possible
No Hands-free Operation Possible
Hands-free operation is not possible with this
function. You cannot answer if the subscriber
picks up.
Sending to Multiple
Recipients (= Broadcasting)
· Sending to Multiple Recipients (= Br oadcasting)
Broadcast Transmissions
You can send one fax to multiple recipients in succession.
Entering Recipients Individually
1. Insert the document.
2. Press OK, 34 and OK. The document is now
read.
3. Enter the desired number using the numeric keypad
or select a saved entry.
4. Confirm with OK.
5. Enter the next telephone numbers.
6. Confirm with OK. You can enter up to 25 recipients.
7. Press o. The device transmits the fax message successively to all recipients.
Sending a Fax to a Group
1. Insert the document.
2. Press OK, 13 and OK.
3. Use [ to select the group to which you would like
to send a fax.
4. Confirm with OK.
5. Select with [SEND FAX?.
6. Confirm with OK.
Transmission to Multiple Recipients
Transmission to Multiple Recipients
If your device cannot reach a recipient, the fax
message is sent to the other recipients. After
the device has called all recipients, it once again
dials the numbers that previously could not be
reached.
EN
Fax · Sending Fax Manually 21
Page 22
Sending Fax Later
· Sending Fax Later
Sending Fax Later
EN
If you would like to make use of the lower telephone
tariffs or if the recipient can be reached at some specific
time only, you can send the fax at a later time—within
24 hours.
1. Insert the document.
2. Press OK, 33 and OK.
3. Enter the time, at which the document should be
transmitted, e.g. 1400 for 2 pm.
4. Confirm with OK.
5. Enter the desired number using the numeric keypad
or select a saved entry.
6. Selecting a Saved Entry: Confirm the selected
entry using OK.
7. Press o. The device goes into standby mode and
transmits the fax at the entered time. You can continue to make telephone calls and receive faxes
Sending Fax Later
Cancel a Scheduled Fax Transmission
Press j to eject the document. This interrupts
the standby mode.
Fax Reception
· Fax Reception
Fax Reception
If you have not changed the factory settings, received
faxes will be printed out automatically. If no paper or no
ink film is inserted, the device saves the incoming faxes.
The ä key blinks. Once paper or a new ink film is
inserted, the saved faxes are printed out.
Paper Not Inserted Correctly
Paper Not Inserted Correctly
Check if you have inserted clamped paper correctly. The lever on the right hand side next to
the paper feeder must be folded backwards.
Message Memory Full
If the message memory is full, no additional messages
can be received. A warning appears on the display. Follow the specifications in the technical data.
Delete Fax Memory Service Code
Delete Fax Messages Sent
If there are problems with printing out saved fax
messages, a service code is available (see also
chapter Using Service Codes, page 37).
Receiving Fax Manually
· Receiving Fax Ma nually
Select manual reception under number of rings of the
fax switch (see also chapter Setting the Fax Switch, page
29). The device will not receive faxes on its own. This
setting is useful, when you want to receive faxes via a
modem connected to a computer.
Receiving Fax Manually
You can start fax reception manually, by pressing o.
Polling Faxes
· Polling Faxes
Fax Polling
With the fax polling function, you can retrieve faxes that
lie ready in the dialled device. You can keep a document
ready in your device, which can be polled by others.
Polling Faxes Directly
1. Enter the desired number using the numeric keypad
or select a saved entry.
2. Hold o pressed (for at least two seconds).
Polling Secure Faxes
Secure Fax Polling
With this function, you can poll faxes that are protected
with a code.
1. Press OK, 31 and OK.
2. Enter the code.
3. Confirm with OK.
4. Enter the desired number using the numeric keypad
or select a saved entry.
5. Press o.
Polling Send of Faxes
Unauthorised Fax Polling!
CAUTION!
Unauthorised Fax Polling!
Protect your document against unauthorised
polling with a code.
Secure Fax Polling
A caller who knows the code can poll the fax from your
device. You can continue to make telephone calls and
receive faxes
1. Insert the document.
2. Press OK, 32 and OK.
3. Enter a code (max. 20 characters).
4. Confirm with OK.
Sending Fax Later
Cancel a Scheduled Fax Transmission
Press j to eject the document. This interrupts
the standby mode.
Using Fax Templates
· Using Fax Templates
Fax Templates
Five fax templates, which you can use, are stored in your
device. With these templates you can quickly create, for
example, a short fax note or an invitation.
1. Press OK, 43 and OK.
2. Use [ to select the template you would like to
print.
3. Confirm with OK. The device prints the template.
4. Fill the template and send it to the desired recipient
per fax.
22 Philips · PPF 725 · PPF 755
Page 23
7 Copier
Copier
Help 5 · Copier
Printing Informations for Copying
Press î and 5 to print the help for copying.
10 Documents · A5/A4
Use documents with sizes A5 or A4 with 60 to 100 g/
2
m
weight. You can insert up to ten documents at a
time.
Inserting Documents
· Inserting Documents
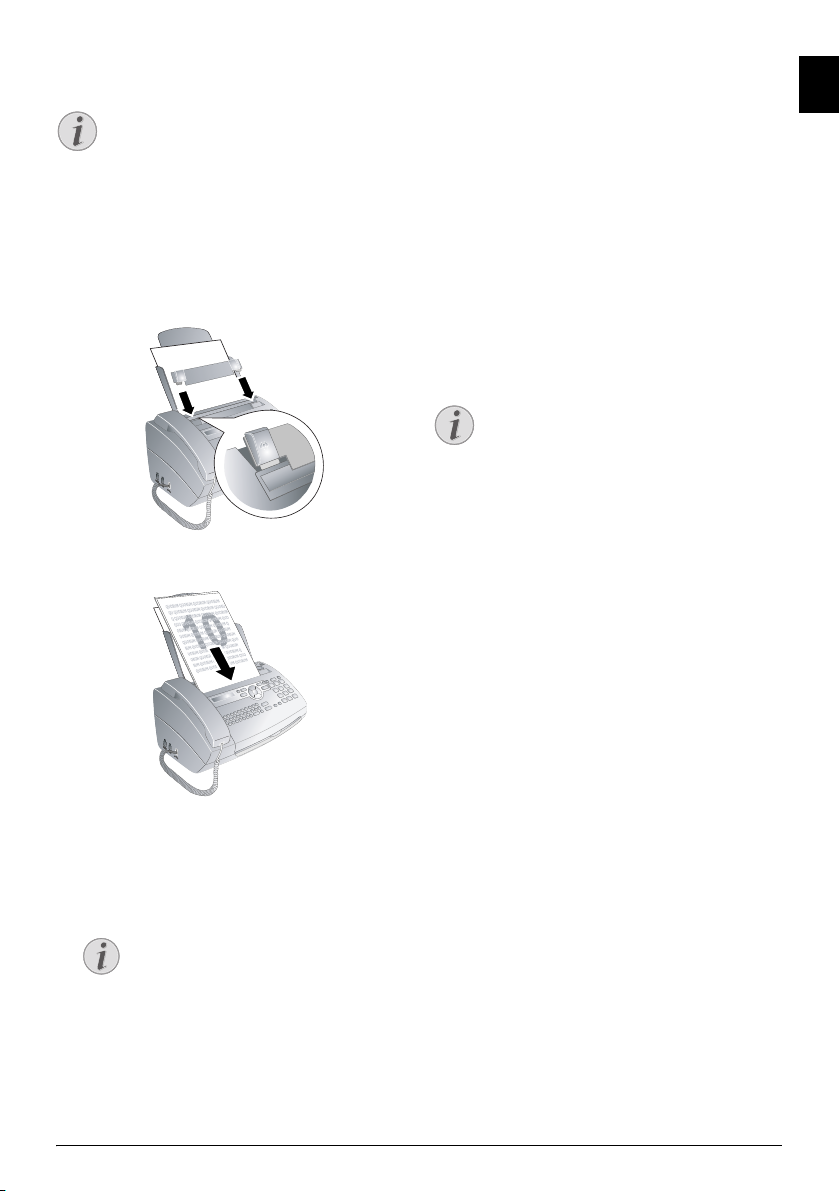
1. Insert the additional document support on the document feeder.
2. Insert the documents face up into the document
feeder. The top most document will be fed in first.
Making a Copy
· Making a Copy
Press COPY briefly. The copy is created.
Creating Multiple Copies
· Creating Multiple Copies
1. Hold COPY pressed (for at least two seconds).
2. Enter the number of times you would like to copy
the document (maximum of 15 copies).
3. Press COPY.
4. Using [ select whether to reduce or enlarge the
document in size when copying. You can magnify up
to 200 percent or reduce to as small as 50 percent
of the original size.
5. Confirm with OK. The copy is created.
Copier
Cancel Copying
Press j to eject the documents without copying them.
EN
3. Set the desired resolution. You can choose between RESOL.: STANDARD (for documents without special features), RESOL.: FINE (for texts
with small print or drawings) and RESOL.: PHO-
TO (for photos). Press RES. The configured resolu-
tion appears on the display. Press RES again to
change the resolution.
Adjust contrast
You can adjust the preset contrast (see also
chapter Adjust contrast, page 28).
Copier · Inserting Documents 23
Page 24
8 SMS
EN
SMS
(model dependent)
(model dependent)
Function is not supported in all coun tries and networks
(Function is not supported in all countries and
networks)
Help 8 · SMS
Printing Instructions for SMS Functions
Press î and 8 to print the instructions for
SMS functions.
SMS Requirements
· SMS Requirements
CLIP for SMS
Your device is preset for using the SMS (Short Messaging Service) services. Caller Line Identification (CLIP)
must be activated for the SMS to work. It is possible that
you will not be able to send and receive SMS messages
from a private branch exchange (depending on the
country and network).
SMS with Secret Number
SMS with Secret Number
Should you face problems in sending SMS, the
reason for the same could be that you are using
a secret number or that the device is connected
to an old ISDN System.
SMS Requirements
SMS Requirements
Ask your telephone service provider ...
... whether you must register for the SMS Service.
... to which mobile telephone service providers
you can send SMS
... which costs are applicable.
... which functions are available.
Sending SMS
· Sending SMS
1. Press _.
2. Confirm with OK.
Access Function
You can also call the function by pressing
OK, 61 and OK.
SMS Templates
The last five SMS messages written remain
saved as templates. Press @ until the desired message appears.
3. Enter the text using the letter keypad. Enter capital
letters by pressing and holding + key. You can delete
individual characters using \. You can enter space
using ½. You can enter a line break using |. Press
CTRL and the respective letter key to enter the
special character printed above it.
You can enter 160 characters.
Navigating and Printing
You can move the cursor using [. Use C
to delete individual characters. Press and
hold C (at least two seconds) to delete the
entire text. Press COPY to print the message before sending it.
4. Confirm with OK.
5. Enter the desired number using the numeric keypad
or select a saved entry.
Sending to Multiple Recipients (=
Broadcasting)
You can send an SMS message to up to five
recipients. Press OK after entering the
number.
6. Press _. The message is sent.
Notification by SMS
· Notification by SMS
SMS Notification
You can have an SMS message sent to a telephone
number of your choice when faxes or SMS messages are
received or the answering machine receives calls or
voice messages in your absence.
1. Press OK, 65 and OK.
2. Use [ to select whether you would like to be informed about new SMS messages.
3. Confirm with OK.
4. Use [ to select whether you would like to be informed about calls in your absence.
5. Confirm with OK.
6. Use [ to select whether you would like to be informed about new fax messages.
7. Confirm with OK.
8. Use [ to select whether you would like to be informed about new messages on the answering machine.
9. Confirm with OK.
10. Enter the number to which the SMS should be sent.
11. Confirm with OK. A message appears on the display stating the notification by SMS is activated.
Receiving SMS Messages
· Receiving SMS Messages
Receiving an SMS on the De vicePaper Not Inserted Correctly
Paper Not Inserted Correctly
Check if you have inserted clamped paper correctly. The lever on the right hand side next to
the paper feeder must be folded backwards.
SMS Reception
Received SMS messages are printed out automatically. If
you have turned the automatic printing function off, the
SMS messages will be stored. Your device can store up
to 30 SMSs.
Reading SMS Messages
· Reading SMS Messages
Reading an SMS on the Device
After reception of a new SMS message, the ä key
lights up.
1. Press ä.
2. Select the SMS using [.
3. Press ä. The Read SMS menu opens.
24 Philips · PPF 725 · PPF 755
Page 25
Loading Previously Read SMS
Messages
1. Press OK, 62 and OK.
2. Using [ select the SMS that you would like to
read. Unread SMS messages are marked with a *.
3. Confirm with OK.
Navigating and Printing
You can move the cursor using [. Press
COPY to print the SMS message.
4. Press j to return to the SMS list.
Calling Further SMS Functions
Press OK to call additional SMS functions.
Calling SMS Functions
· Calling SMS Functions
SMS Functions on the Device
1. While reading an SMS message, press OK to load
additional SMS functions.
2. Use [ to select an option: You can display infor-
mation about the SMS message, print or delete the
message, forward the message to another recipient
or send an SMS response. You can return to the list
of SMS messages, or view the next or previous SMS
message.
3. Confirm with OK.
Printing SMS Messages
· Printing SMS Messages
Printing an SMS on the Device
1. Press OK, 63 and OK.
2. Using [ select the SMS message you would like to
print.
PRINT: ALL—Prints all received and composed
SMS messages that you have saved
PRINT: INBOX—Prints all received SMS messag-
es
PRINT: OUTBOX—Prints all sent SMS messages
that you have saved
PRINT: NEW—Prints all unread SMS messages
3. Confirm with OK.
Printing an Individual SMS message
If you would like to print an individual SMS
message, load the message. Press COPY to
print the message.
Deleting SMS Messages
· Deleting SMS Messages
Deleting an SMS on the DeviceSMS Deleti on Introduction
If the message memory is full, the device cannot receive
any more messages. Delete SMS messages to free up
memory.
1. Press OK, 64 and OK.
2. Use [ to select the SMS messages you would like
to delete:
DELETE: ALL SMS—Deletes all received and
composed SMS messages that you have saved
DELETE: READ SMS—Deletes all read SMS messages
DELETE: SENT SMS—Deletes all sent SMS messages that you have saved
3. Confirm with OK.
4. Confirm the deletion with OK.
Deleting Single SMS Message
If you would like to delete an individual SMS
message, load the message. Press OK, and
using [ select DELETE. Confirm with OK.
Modifying the Settings
· Modifying the Settings
Changing Transmitting and
Receiving Numbers
Send and Receive Numbers
All numbers that you need to send and receive SMSs are
stored in your device. In case you moved to another telephone service provider, you must change these numbers. You can set your device for two SMS service
providers.
1. Press OK, 66 and OK.
2. Use [ to select the SMS service provider that you
would like to set.
3. Confirm with OK.
4. Enter the number for sending SMSs.
5. Confirm with OK.
6. Enter the number for receiving SMSs.
7. Confirm with OK.
8. Use [ to select the SMS service provider through
which you would like to send SMSs.
9. Confirm with OK.
Receiving SMS Messages
You can receive SMS messages via both providers.
EN
SMS · Calling SMS Functions 25
Page 26

Turning Off the Automatic
EN
Printing
Automatic Printing
You can deactivate the automatic printing of SMS messages.
1. Press OK, 66 then OK repeatedly until
PRINT SMS: YES appears on the display.
2. Using [ indicate whether you would like to turn
printing on or off.
3. Confirm with OK.
Switching SMS Reception On and
Off
Switching SMS Reception Off
If you are using a cordless telephone with SMS function
on the same telephone line, then the specific device at
which you will receive an SMS message will depend on
the specific manufacturer. Only one of the devices will
receive the SMS message. Try to turn off the SMS reception on your cordless telephone. If this is not possible,
switch off SMS reception on the device. You can continue to send SMS messages even while SMS reception is
switched off.
Switching SMS Reception Off
1. Press OK, 45 and OK.
2. Enter the service code 31207.
3. Confirm with OK.
4. Select with [SURE: YES.
5. Confirm with OK.
Cancelling Entry
If you have entered the incorrect code, you
can cancel the entry with SURE: NO.
Switching SMS Reception On
1. Press OK, 45 and OK.
2. Enter the service code 41206.
3. Confirm with OK.
4. Select with [SURE: YES.
5. Confirm with OK.
Cancelling Entry
If you have entered the incorrect code, you
can cancel the entry with SURE: NO.
26 Philips · PPF 725 · PPF 755
Page 27
9 Fun and Games
Fun and Games
Help 7 Games and Fun
Printing informations for the Games and
Fun functions
Press î and 7 to print the instructions for
the Games and Fun functions of your device.
Sudoku
· Sudoku
Sudoku
Sudoku is a Japanese number puzzle. The game has 3 ×
3 squares divided into 3 × 3 fields. Depending on the difficulty level, lesser or more digits are already given at the
beginning of the game. The aim of the game is to fill digits from 1 to 9 in the game field is such a way that each
digit appears only once in a row, a column and each of
the nine blocks. There is only one solution.
Last Solution Available
Last Solution Available
The solution of the last printed game is saved.
The solutions of earlier games are no longer
availa ble.
Printing a Game
1. Press OK, 48 and OK.
2. Select with [SUDOKU:NEW.
3. Confirm with OK.
4. Using [ select the difficulty level.
5. Confirm with OK.
6. Enter, how many copies of the Sudoku you would
like to print (maximum 9 copies).
7. Confirm with OK.
8. Using [ select if you would like to print the solution.
9. Confirm with OK.
Sudoku for Every Day
Sudoku for Every Day
You can have a new Sudoku automatically printed each
day.
1. Press OK, 48 and OK.
2. Select with [SUDOKU:AUTO.
3. Confirm with OK.
4. Enter the time, e.g. 14 00 for 2 pm.
5. Confirm with OK.
6. Using [ select the difficulty level.
7. Confirm with OK.
8. Enter, how many copies of the Sudoku you would
like to print (maximum 9 copies).
9. Confirm with OK.
10. Using [ select if you would like to print the solution.
11. Confirm with OK.
12. Using [ indicate whether you would like to turn
printing on or off.
13. Confirm with OK.
Sudoku for Every Day
Switching Off Function
You can turn off the daily Sudoku print by selecting the function as described above and by
switching off the automatic printing under point
12.
EN
Printing the Last Game Again
1. Press OK, 48 and OK.
2. Select with [SUDOKU:LAST.
3. Confirm with OK.
4. Enter, how many copies of the Sudoku you would
like to print (maximum 9 copies).
5. Confirm with OK.
6. Using [ select if you would like to print the solution.
7. Confirm with OK.
Printing the Solution
1. Press OK, 48 and OK.
2. Select with [SUDOKU:SOLUTION.
3. Confirm with OK.
Fun and Games · Sudoku 27
Page 28
10 Settings
EN
Settings
Cursor Navigation 1
Navigating in the Editor
You can move the cursor using [. Use C to
delete individual characters. Press j to close
the menu and return to the starting mode.
Entering the Date and Time
· Entering the Date and Time
1. Press OK, 91 and OK.
2. Enter the time, e.g. 1400 for 2 pm.
3. Enter the date (two digits each) e.g.
080627 for 08.06.27.
4. Confirm with OK.
Time and Date After a Short Power Failure
Time and Date After a Short Power
Failure
You must check the time and date after a short
power failure. Confirm with OK.
Selecting the Language
· Selecting the Language
1. Press OK, 92 and OK.
2. Use [ to select the desired display language.
3. Confirm with OK.
Entering Number
· Entering Number
Page Header
Your name and number are added together with date,
time and page number at the top edge of each fax transmission (= header).
1. Press OK, 94 and OK.
2. Enter your number. Using # or * you can enter
a plus sign.
3. Confirm with OK.
Entering Name
· Entering Name
1. Press OK, 95 and OK.
2. Enter the name using the letter keypad. Enter capital
letters by pressing and holding + key. You can delete
individual characters using \. You can enter space
using ½. Press CTRL and the respective letter key
to enter the special character printed above it.
Navigating in the Editor
You can move the cursor using [. Use C
to delete individual characters.
3. Confirm with OK.
Selecting the Country
· Selecting the Country
Setting the Country Correctly
CAUTION!
Setting the Country Correctly!
You must set the country in which you are operating the device. Otherwise your device is
not adapted to the telephone network. If your
country is not included in the list, you must
select a different setting and use the correct
telephone cable for the country. Consult your
retailer.
Reset When Setting the Country
CAUTION!
Settings will be Deleted!
When you select a new country, all settings
are reset to the factory defaults for that country. Saved data remains intact. Check the
number entered for the header.
1. Press OK, 93 and OK.
2. Use [ to select the country in which you are operating the device.
3. Confirm with OK.
4. Select with [SURE: YES.
5. Confirm with OK.
Adjust contrast
· Adjust contrast
Adjust contrast
For copying and printing of fax messages, you can select
different contrast levels.
1. Press OK, 44 and OK.
2. Using [, select the desired contrast:
CONTR.:LIGHT- For brighter copies and fax
transmission
CONTR.:NEUTRAL—For all types of originals (for
example white text on black background or documents with coloured background)
CONTR.:OPTIMISED (Factory settings)—Optimized adaptation for text and photo printing
CONTR.:DARK- For darker copies and fax transmission (for example documents with faint printing)
3. Confirm with OK.
Modifying the Basic Settings
Modifying the Basic Settings
The changed settings are stored as new default
settings. If you select a special function for a
one-time process, take care to restore the default settings or factory settings after that.
28 Philips · PPF 725 · PPF 755
Page 29

Reducing Transmission
Speed
· Reducing Transmission Speed
Reducing Transmission Speed
The device adapts the transmission speed to the line
quality. This may take some time, especially for overseas
connections. Set a lower transmission speed if you are
sending faxes into networks with poor line quality.
1. Press OK, 38 and OK.
2. Use [ to set whether you would like to use a low-
er transmission speed.
3. Confirm with OK.
Switching Page Adjustment
On and Off
· Switching Page Adjustment On and Off
Page Adjustment
In order that no information is lost, received faxes are
reduced in size when printed.
1. Press OK, 37 and OK.
2. Use [ to select whether you would like to switch
size reduction on or off.
3. Confirm with OK.
Setting the Ring Tones
· Setting the Ring Tones
Selecting the Ring Tone
Ring Tones
You can select from among ten different ring tones.
1. Press OK, 55 and OK.
2. Use the number keys 0 to 9 to select a ring
tone. Using [, set the volume.
3. Confirm with OK.
Adjust volume level
Setting the Ring Tone Volume
You can adjust the volume of the ring tone when the device is ringing or when you set the ring tone. You can
save different volumes for the ™ (day) and ˜ (night)
modes (see also chapter Setting the Fax Switch, page 29).
Setting the Volume on the Device
Using [ you can set adjust the volume when the device is ringing.
Setting the Fax Switch
· Setting the Fax Switch
Fax Switch
The built-in fax switch of your device distinguishes between fax messages and telephone calls. Faxes are automatically received, telephone calls can be received—
even on additionally connected devices. While the device is checking the call, it continues to ring.
Day and Night Mode
You can set how often the device should ring before
picking up separately for the modes ™ (day) and ˜
(night). This makes it possible for you to receive faxes
silently at night without getting disturbed.
Press º/» to switch between day and night mode.
With the activated timer ›, the device switches between the modes ™ (day) and ˜ (night) at the configured
times.
Setting the Day Mode
1. Press OK, 51 and OK.
2. (Only for devices with built-in answering machine):
Using [ select the number of rings for the answering machine. The answering machine responds after
these many number of rings.
Conserving Function of Fax
Reception Mode
If you select the 5/2 option for the number
of rings of the answering machine, the answering ma chine switches on after two
rings, when you have received new messages. If there are no new messages, the device
rings five times. If the device does not pick
up after two rings, you have no new messages. You can terminate the remote access
without incurring any telephone costs.
3. Confirm with OK.
4. (Only for devices without built-in answering ma-
chine): Using [ select the total number of rings. .
The device stops the ring after these total number
of rings and accepts a call or a possible silent fax.
5. Confirm with OK.
6. Use [ to select the number of rings for the fax
switch. After the number of rings, the fax switch
switches on and distinguishes between fax transmissions and telephone calls. While the device is checking the call, it continues to ring.
7. Confirm with OK.
8. Using [, set the volume.
9. Confirm with OK.
Silent Fax Transmission
Silent Fax Transmission
Older devices do not transmit any fax-tone (=
CNG tone) as an announcement for fax transmission (= silent fax transmission). If the total
number of rings has been set to a value using 7,
silent fax transmissions cannot be received automatically.
Setting the Night Mode
1. Press OK, 52 and OK.
2. Configure the same settings as for the day mode
(see steps 2 to 9).
Setting the Timer
Timer
The timer switches between the modes ™ (day) and ˜
(night) at the configured times.
1. Press OK, 53 and OK.
2. Enter the time at which the device should switch to
™ (day) mode, for example 0600 for 6
o'clock a.m.
3. Confirm with OK.
4. Enter the time at which the device should switch to
˜ (night) mode, for example 2200 for 10
o'clock p.m.
5. Confirm with OK.
EN
Settings · Reducing Transmission Speed 29
Page 30

Special Settings
EN
Silent Fax Reception
If you would like to accept a fax without preceding rings,
set the number of rings of the fax switch to 0.
Switching Off All Rings
All Rings Off
If you don't want to be disturbed, e.g. in the night, by any
incoming calls, you can set the number of rings to 0. The
device switches immediately to silent fax reception.
Printing Lists and Help Pages
· Printing Lists and Help Pages
Printing Numbers and Entries
List of Numbers
The list of numbers and entries contains the last ten
calls received and numbers dialled as well as the saved
entries and groups.
Press OK, 23 and OK. The list is printed.
Printing Call Log
Call Log
The call log contains the last 50 dialled numbers.
1. Press OK, 41 and OK.
2. Using [ indicate whether you would like to turn
printing on or off.
3. Confirm with OK.
4. Switch on printing: Use [, to select whether
the call list should be printed immediately or after
every 50 calls.
5. Confirm with OK.
Printing the Telephone Book
Press OK, 17 and OK. The device prints a list with
the telephone book entries and saved assignments.
Printing Fax Journal
Fax Journal
The fax journal is a list of the last ten faxes sent and received.
1. Press OK, 35 and OK.
2. Using [ indicate whether you would like to turn
printing on or off.
3. Confirm with OK.
4. Switch on printing: Use [, to select whether
the fax journal should be printed immediately or after every ten transmissions.
5. Confirm with OK.
Printing Transmission Report
Printing Transmission Report
After every transmission, the device prints out a transmission report. If a transmission error occurs, an error
report is printed out. You can switch off printing of the
transmission report.
1. Press OK, 36 and OK.
2. Using [ indicate whether you would like to turn
printing on or off.
3. Confirm with OK.
Printing Help Pages
Help 1 · Overview
Press î and 1 to print an overview of the help pages.
Help 3 · Telephone Book
Press î and 3 to print an overview of the telephone
book and answering machine functions (model dependent).
Help 4 · Fax Transmission
Press î and 4 to print instructions for sending fax
messages and for configuring the fax switch.
Help 5 · Copier
Press î and 5 to print the help for copying.
Help 6 · Function List
Press î and 6 to print a list of all functions and settings of your device.
Help 7 Games and Fun
Press î and 7 to print the instructions for the
Games and Fun functions of your device.
Help 8 · SMS
Press î and 8 to print the instructions for SMS functions (model dependent).
Starting Initial Installation
· Starting Initial Installation
1. Press î and 2.
2. The device prints out a help page and starts the initial installation process.
30 Philips · PPF 725 · PPF 755
Page 31
11 Telephone Lines and Additional Devices
Telephone Lines and Additional Devices
EN
Configuring Telephone Lines
and Services
· Configuring Telephone Lines and Ser vices
PABX Systems
PABX Systems
Private branch exchanges (PABX) are typical in many offices and some households. You must dial an outside
line access code in order to get a connection to the
public telephone network (PSTN) from a PABX.
Additional Telephone No Extension
Additional Telephone No Extension
An additional telephone connected to the device on a telephone socket is not considered an
extension.
1. Press OK, 96 and OK.
2. In some countries you can set the dialling process
to pulse dialling or tone dialling (DTMF tones). Use
[ to select the desired dialling process.
Selecting the Dialling Process
Only use pulse dialling if tone dialling is not
yet activated for your telephone line.
3. Confirm with OK.
4. Use [ to set whether you operate your device on
an extension.
5. Confirm with OK.
6. Configuring an extension: Enter the outside line
access code with which you reach the public telephone network. This is usually 0.
Incorrect Outside Line Access Code
In rare cases, the outside line access code
may be a different number or a two-digit
number. For older telephone systems, the
outside line access code can be R (= Flash).
Press R to enter this outside line access
code. If the connection to the public telephone network is not possible, contact your
telephone system supplier.
7. Confirm with OK.
8. When finished, the device tests the telephone line.
Confirm with OK.
9. Your device checks whether it can establish a connection with the public telephone network. If it cannot establish the connection, you are once again
asked for input.
ISDN Connection
ISDN Connection
Your device is an analogue fax device (Group 3). It is not
an ISDN device (Group 4), and therefore it cannot be
operated directly on an ISDN connection. In order to
do this, you need either an analogue adapter or a connection for analogue terminals. Details for ISDN connections can be found in the instructions provided with
the terminal adapter or the dial-up router.
Voice Mailbox
You cannot simultaneously use the answering machine
facility of your telephone service provider (= voice-mail
box) and receive faxes on your devices. Get the mailbox function for your telephone line deactivated or set
the number of rings for the fax switch to lower than 5
on your device (see also chapter Setting the Fax Switch,
page 29). When the fax switch accepts the call, the mailbox of the service provider does not step in. Enquire
with your telephone company.
Connecting Additional
Devices
· Connecting Additional Devices
Additional Devices
You can operate additional devices on a telephone line,
such as cordless telephones, answering machines, modems or charge counters.
SMS Reception with Additional Telephone
SMS Reception with Additional
Telephone
If you are using cordless telephone with SMS
function on the same connection, then the specific device at which you will receive and SMS
message will depend on the specific manufacturer. Only one of the devices will receive the SMS
message. Try to turn off the SMS reception on
your cordless telephone.
DSL Connection
DSL Connection
In the event that you use a DSL modem: Connect the
device to the slot intended for analogue telephones/fax
machines! For additional information, please consult the
operating manual of your DSL system. Ask your telephone or internet service provider if necessary.
Telephone Lines and Additional Devices · Configuring Telephone Lines and Services 31
Page 32
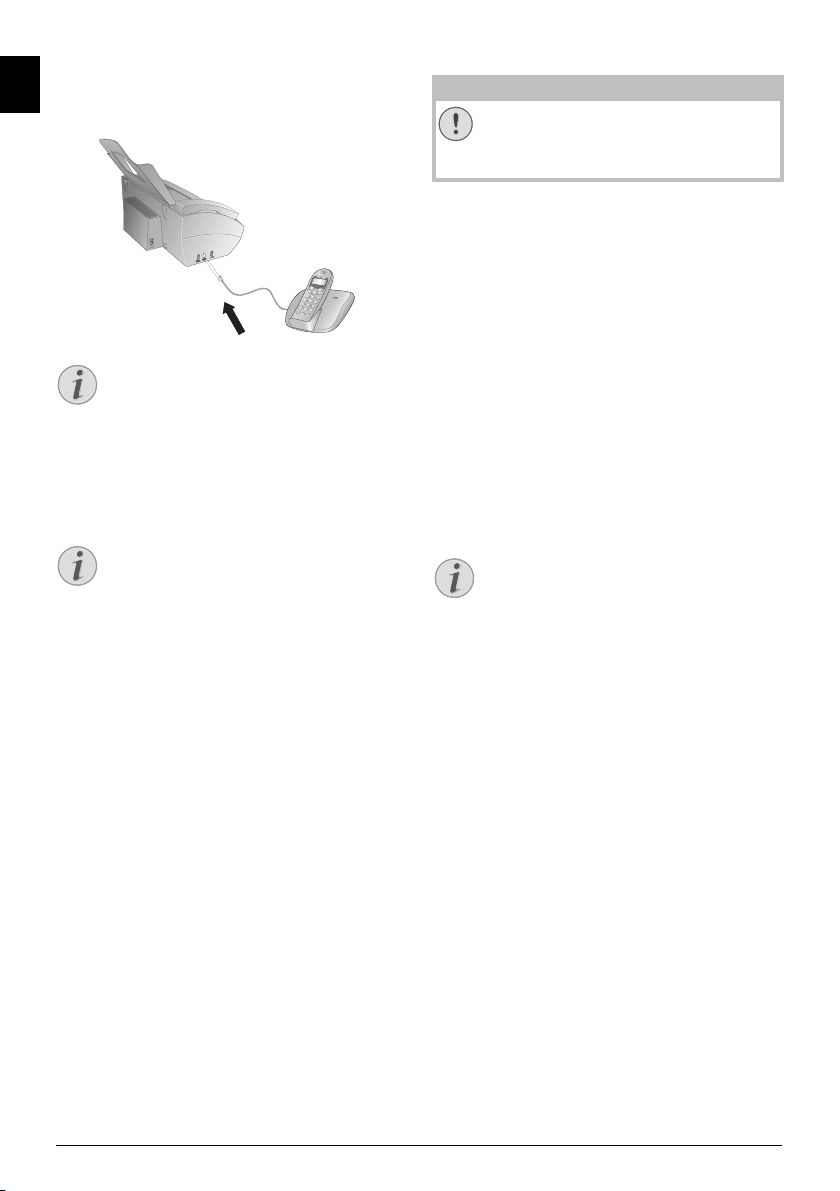
Connection to the Device
Connection to the Device
EN
You can connect additional devices directly to your device. Insert the telephone cable of the additional device
into the EXT socket (RJ-11-connection) on the device.
Externe Geräte anschließen
Direct Connection Recommended
Direct Connection Recommended
We recommend direct connection to the device because this allows the fax switch to function optimally and to control the additional
devices.
Connection to the Telephone Line
Order of Connections
In order for the fax switch to function, the device must
be first in the series if multiple devices are connected to
the same telephone socket. Follow the correct order.
Connection to the First Telephone Socket
Connection to the First Telephone
Socket
If you have multiple telephone sockets for the
same telephone line, the device must be connected to the first telephone socket.
Using Additional Telephones
(Easylink)
· Using Additional Telephones (Easylink)
Easylink
With the Easylink function you can control your device
with additional telephones. To use this function, additional telephones must be set to the tone dialling mode
(DTMF/MFV tones) (for this purpose see the operating
manual of your additional telephone).
Changing Code
Changing Easylink Code s!
CAUTION!
Changing Easylink Codes!
Only change the codes if it is absolutely necessary. The codes must begin with * or #
and must be different.
1. Press OK, 54 and OK.
2. Enter the new code for starting fax reception.
3. Confirm with OK.
4. Enter the new code for taking over the line on an
additional device.
5. Confirm with OK.
Using an External Answering
Machine
For the best operation, the answering machine must be
connected to the EXT socket of the device. The numbers of rings set for the external answering machine
should be less than the one set under FAX RINGS by
at least two.
Example of the setting:
Number of Rings of the External Answering Machine 1
FAX RINGS3
(see also chapter Setting the Fax Switch, page 29)
External Answering Machine
External Answering Machine
The outgoing message must be shorter than ten
seconds. Avoid music in your announcement.
Using an External Answering Machine
If the external answering machine has a “conserving
function” (i.e. a function that changes the number of
rings as soon as new messages have been recorded),
switch it off.
If the external answering machine records fax signals,
but your device cannot receive faxes, inspect the connection of the external answering machine.
Starting Fax Reception
If you pick up at an additional device and hear that you
are receiving a fax (whistling tone or silence), you can
start the fax reception by pressing *5 on the additional telephone or pressing o on the device.
Taking Over the Line
If you pick up on an additional telephone and the device
continues to ring or attempts to receive a fax, you can
disconnect the device from the line. Press ** on
the additional telephone.
32 Philips · PPF 725 · PPF 755
Page 33
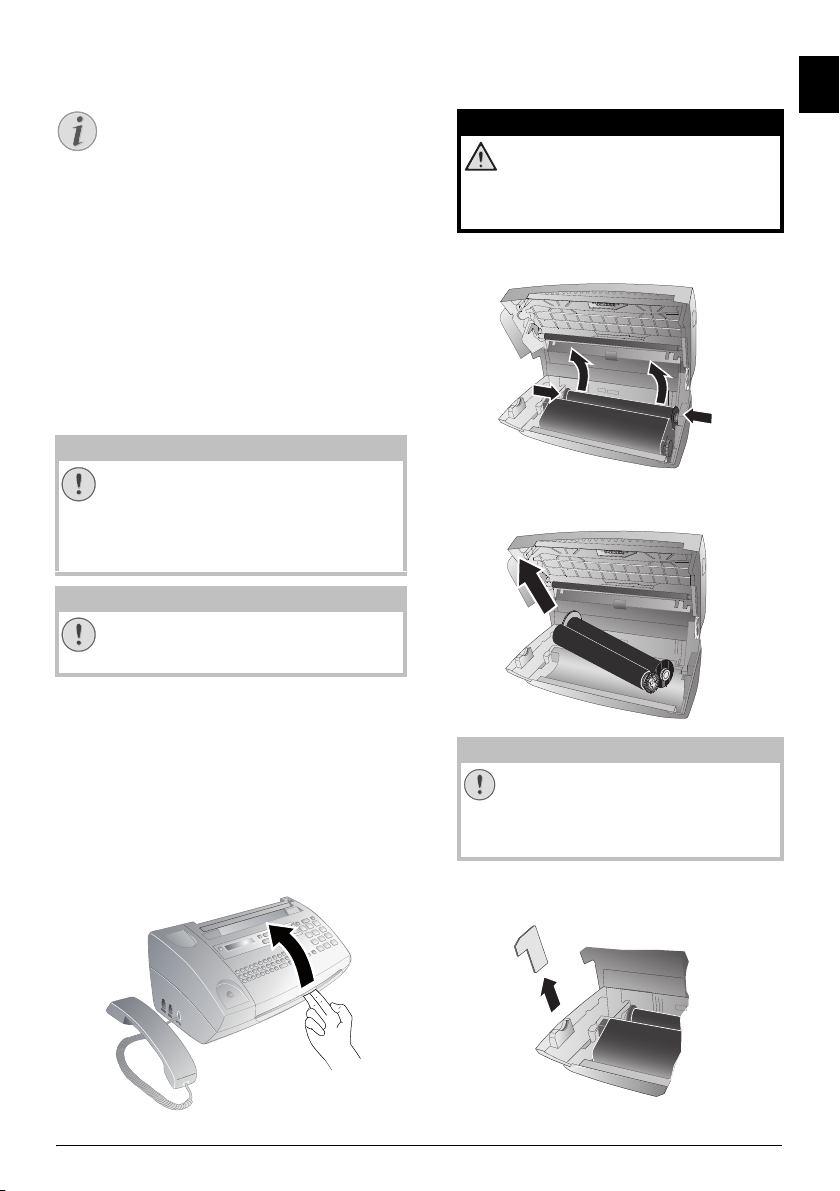
12 Service
Service
Disruptions
Troubleshooting
Should disruptions occur, follow the instructions on the display and on the error report.
Checking the Ink Film
Reserve
· Checking the Ink Film Reserve
1. Press OK, 46 and OK.
2. The number of pages that can still be printed with
the ink film is shown on the display.
3. Press j to return to the starting mode.
If the ink film used up or if there is no ink film in the device, a message appears on the display.
Changing the Ink Film
· Changing the Ink Film
Use Original Consumable Materi als!
CAUTION!
Use Original Consumable Materials!
Use only original consumable materials. These
are available from a specialised retailer or
through our order service (see back side of
this user manual). Other consumable materials can cause damage to the device.
Observe Packaging Instructions
CAUTION!
Observe Packaging Instructions
Follow the instructions on the packaging of
the consumable materials.
Introduction Plug’n’Print Card
For receiving or copying documents, an ink film must be
inserted in your device. Your device is delivered with an
already inserted free ink film for a few test pages. For
this ink film, you do not require any Plug’n’Print card (=
chip card with information regarding ink film capacity).
For every next ink film that you insert, you must load
the capacity memory with the included plug'n'play card.
1. Remove the paper from the paper feeder and take
the paper tray out of the device.
2. Open the device by lifting the panel using grip in the
centre and folding it up.
EN
DANGER!
Device can Close with a Snap!
Lock the cover of the device completely
into place when opening the device. You
could be injured if the cover falls while you
are working on the device.
3. Grip the rear ink film roll at both the sides and place
it next to the front ink film roll.
4. Remove both the rolls from the device. The used
ink film cannot be reused.
CAUTION!
Data on Used Ink Films!
The messages and copies you have printed
out can be read from used ink films. Consider data protection issues when disposing of used ink films.
5. Pull the used Plug’n’Print card out of the plug socket
on the left hand side next to the ink film tray. The
Plug’n’Print card cannot be reused.
Service · Checking the Ink Film Reserve 33
Page 34
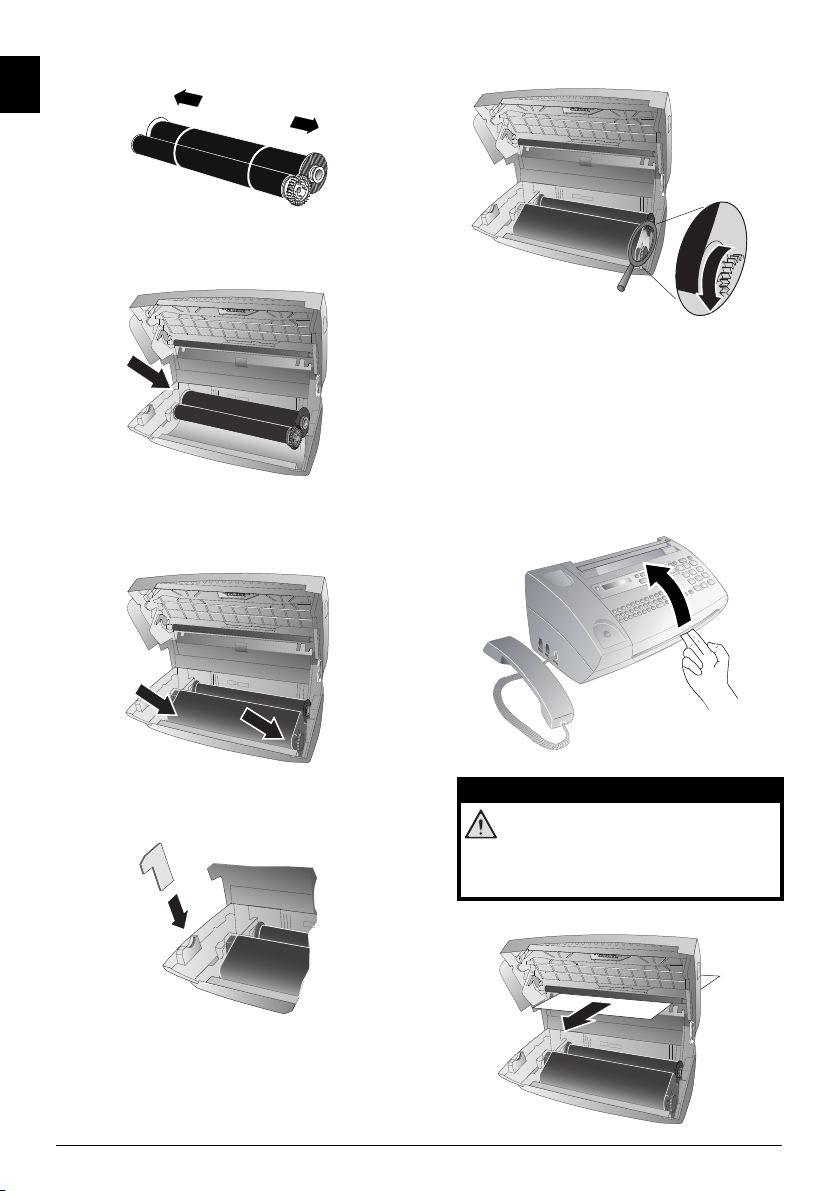
6. Carefully remove the rubber bands from the new
EN
ink film. Make sure that the film is not damaged!
7. Place the larger roll with the ink film in the rear ink
film tray. The blue gear wheel must be on the right
hand side.
8. Place the smaller roll without ink film in the front
tray. The blue gear wheel must be on the right hand
side and the pin must be inserted in the depression
on the left hand side.
10. Turn the blue gear wheel forward to tension the ink
film. The ink film must not have any creases.
11. Close the device. Insert the paper tray in the opening provided for it behind the paper feeder. Insert
paper again.
Fixing a Paper Jam
· Fixing a Paper Jam
1. Remove the paper from the paper feeder and take
the paper tray out of the device.
2. Open the device by lifting the panel using grip in the
centre and folding it up.
9. Break the chip card from the Plug’n’Print card. Insert the chip car d in th e plug socke t o n the left han d
side next to the ink film tray.
Device can Close with a Snap!
Lock the cover of the device completely
DANGER!
into place when opening the device. You
could be injured if the cover falls while you
are working on the device.
3. Carefully pull out the paper.
34 Philips · PPF 725 · PPF 755
Page 35
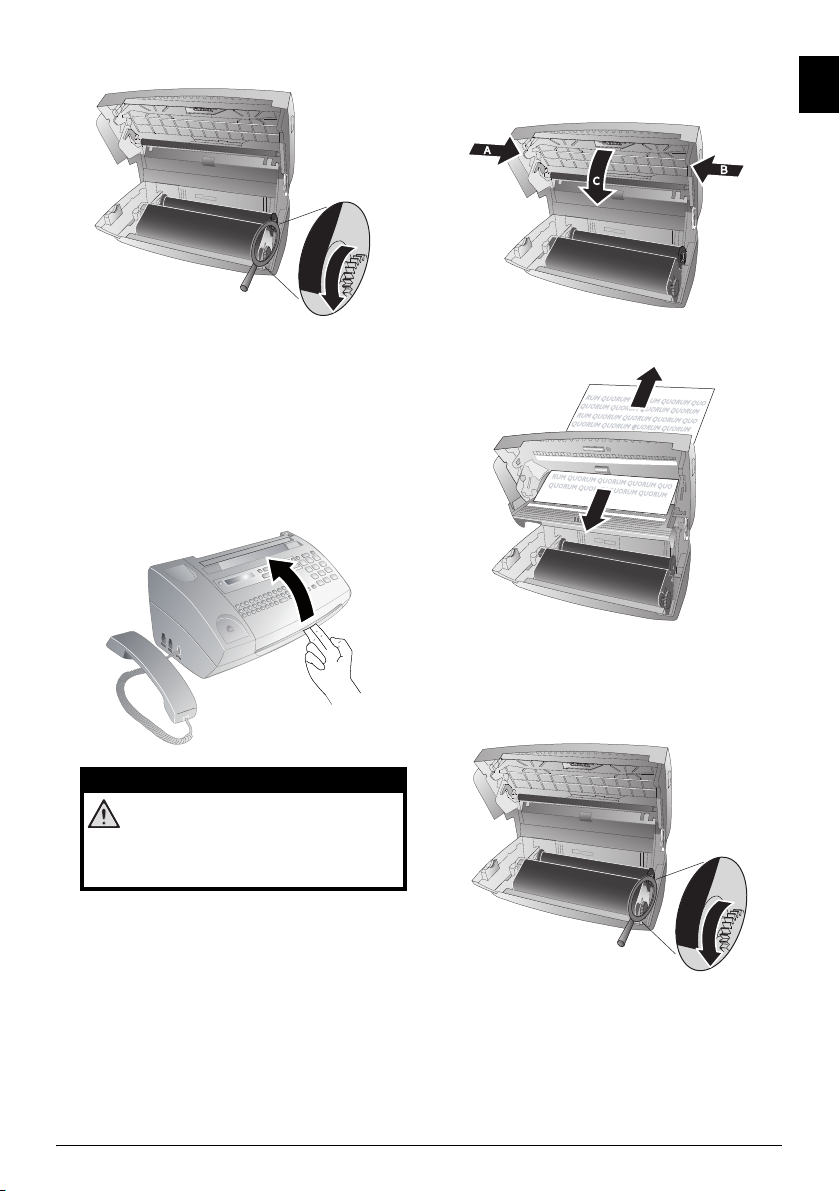
4. Turn the blue gear wheel forward to tension the ink
film. The ink film must not have any creases.
3. Open the scanner cover and the cover of the automatic document feeder by first pushing the support
(A) and then the support (B) inside. The cover (C)
falls freely.
EN
5. Close the device. Insert the paper tray in the opening provided for it behind the paper feeder. Insert
paper again.
Fixing a Document Jam
· Fixing a Document Jam
1. Remove the paper from the paper feeder and take
the paper tray out of the device.
2. Open the device by lifting the panel using grip in the
centre and folding it up.
DANGER!
Device can Close with a Snap!
Lock the cover of the device completely
into place when opening the device. You
could be injured if the cover falls while you
are working on the device.
4. Carefully pull the document to the front or to the
back out of the device.
5. Close the scanner cover and the cover of the automatic document feeder. Both the supports must securely snap into place.
6. Turn the blue gear wheel forward to tension the ink
film. The ink film must not have any creases.
7. Close the device. Insert the paper tray in the opening provided for it behind the paper feeder. Insert
paper again.
Service · Fixing a Document Jam 35
Page 36
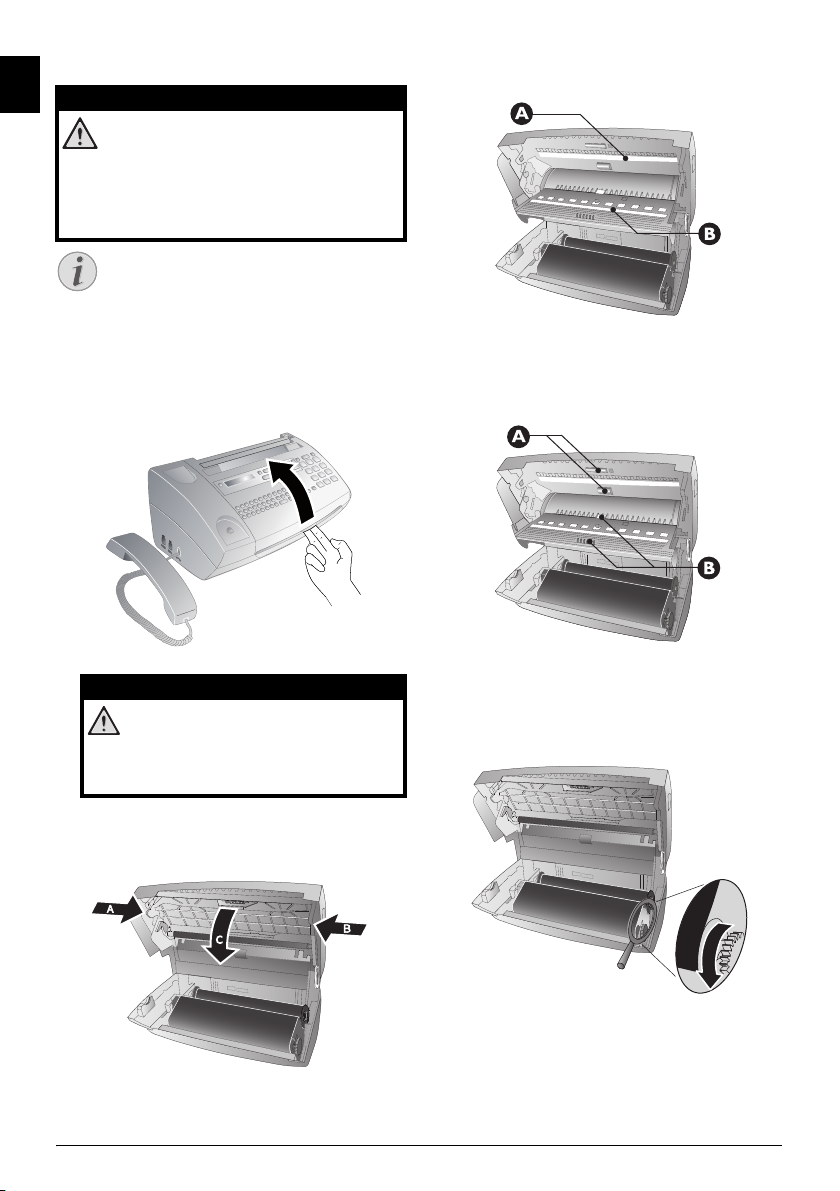
Cleaning
· Cleaning
Instructions for Cleaning!
EN
Instructions for Cleaning!
Unplug the device from the power socket before cleaning it. Use a soft, lint-free cloth.
Never use liquid or easily flammable cleansers
(sprays, abrasives, polishes, alcohol, etc.). Do
not allow any moisture to reach the interior
of the device.
Fax Cleaning Sheets
Fax Cleaning Sheets
Special fax cleaning sheets are available as accessories from our call centre. Insert a sheet into
the document feeder. Press j; the page is ejected. Repeat this process at a few times.
1. Remove the paper from the paper feeder and take
the paper tray out of the device.
2. Open the device by lifting the panel using grip in the
centre and folding it up.
DANGER!
4. Lightly wipe the upper side of the scanner glass (A)
and the lower side of the document feeder/scanner
film (= white plastic plate) (B) with a cloth.
5. Clean the feed roller (A) and the underside of the
support pad of the feeder roller (B) with a soft, lintfree cloth moistened with cleaning alcohol
(96 percent). Rotate the feed roller; You must clean
the entire roller.
DANGER!
Device can Close with a Snap!
Lock the cover of the device completely
into place when opening the device. You
6. Close the scanner cover and the cover of the automatic document feeder. Both the supports must securely snap into place.
7. Turn the blue gear wheel forward to tension the ink
film. The ink film must not have any creases.
could be injured if the cover falls while you
are working on the device.
3. Open the scanner cover and the cover of the automatic document feeder by first pushing the support
(A) and then the support (B) inside. The cover (C)
falls freely.
8. Close the device. Insert the paper tray in the opening provided for it behind the paper feeder. Insert
paper again.
36 Philips · PPF 725 · PPF 755
Page 37
Checking the Firmware
Version
· Checking the Firmware Version
1. Press OK, 47 and OK.
2. The model designation and the configured country
appear on the display.
3. Confirm with OK.
4. The information on the firmware version of the device is displayed.
5. Confirm with OK.
Using Service Codes
· Using Service Codes
Introduction
The service codes delete all the changed settings and
your device is reset to factory settings. It may be possible that the device with the changed settings reacts differently than expected.
Using Service Codes
CAUTION!
Settings will be Deleted!
Only use the service codes if this is absolutely
necessary. Some service codes also delete
saved messages and telephone book entries.
1. Press OK, 45 and OK.
2. Enter a service code:
7117—Deletes all changed settings and
saved data. The device is reset to factory settings
and the initial installation process is started.
7140—Deletes all changed settings.
Saved data and telephone book entries remain intact.
7227—Deletes saved faxes, when there
are problems with printing.
3. Confirm with OK.
4. Select with [SURE: YES.
5. Confirm with OK.
Cancelling Entry
If you have entered the incorrect code, you
can cancel the entry with SURE: NO.
EN
Power Cycling
· Power Cycling
If a problem occurs that cannot be corrected with the
instructions in this user manual (see also the help below), follow the steps given here.
1. Pull out the power plug.
2. Wait at least ten seconds, then plug the power plug
back into the socket.
3. Follow the instructions on the display and in the error report. If the problem repeats, please contact
our technical customer service or your retailer.
Service · Checking the Firmware Version 37
Page 38
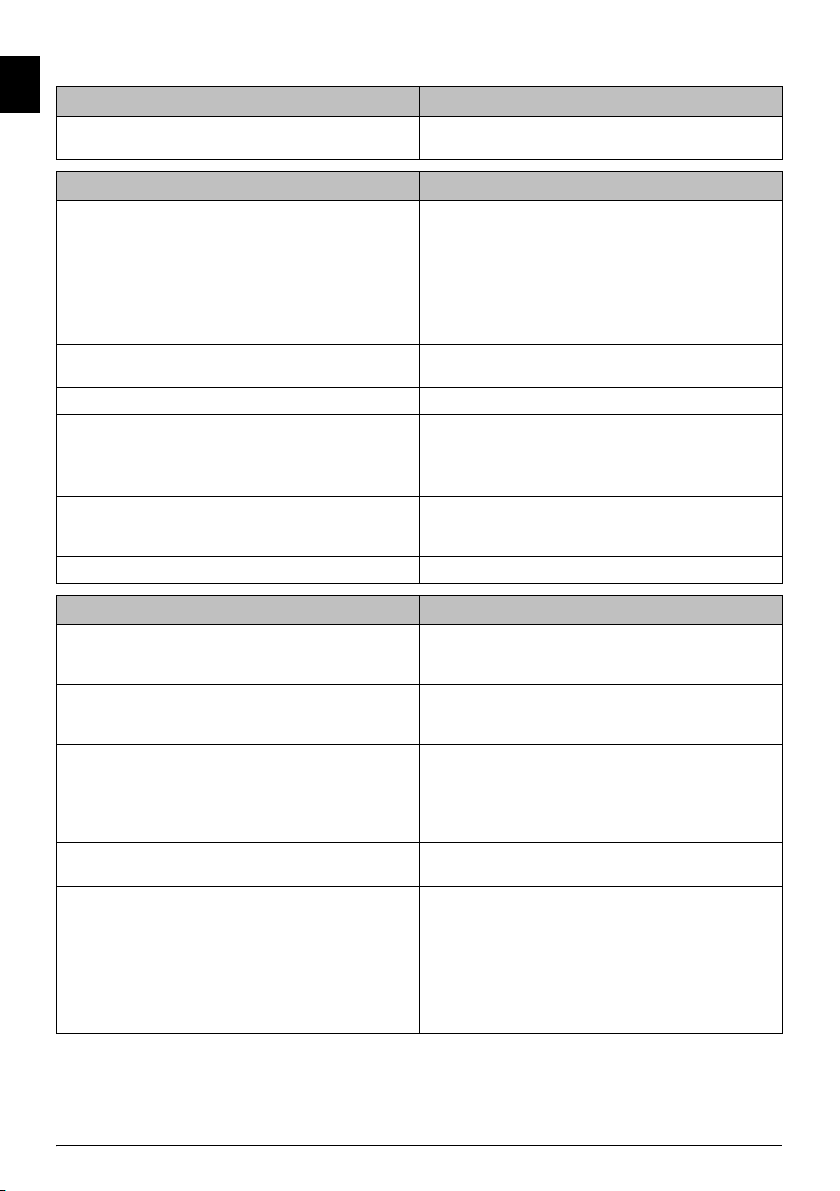
Troubleshooting
· Troubleshooting
EN
General Information
The time and date flash on the display. You must check the time and date after a short power
Problems when Faxing or Printing
Faxes sent are of poor quality. Change the resolution from RESOL.: STANDARD to
The device produces black lines when sending or printing.
Copy is blank. Insert the documents face up into the document feeder.
Printing is interrupted. Paper or document jam, no paper or ink film. Follow the
No printing Check if you have inserted clamped paper correctly. The
Documents are not properly fed. Clean the scanner and the document feed slot.
Problems with the Connection
The device rings once, remains silent for a short while
and starts ringing again.
No dial tone Check the installation of the device. Connect the tele-
Fax transmissions are constantly interrupted. Try to send the fax manually: Press l, and dial the
You hear a whistling tone or silence in the handset. The call is a fax: Press o on the device. Press *5
No fax reception or a short fax audio signal as message
on the answering machine
failure. Confirm with OK.
RESOL.: FINE or RESOL.: PHOTO.
Change the contrast.
Clean the scanner and the document feed slot.
Test the device by making a copy of the document. If the
device is in order, the device of the recipient might be
defective.
Clean the scanner and the document feed slot.
instructions on the display and in the error report.
There could be a small pause after printing several pages.
The device continues printing automatically.
lever on the right hand side next to the paper feeder
must be folded backwards.
This is absolutely normal. The fax switch checks the call
after the first ring. If it is a voice call, the device continues
to ring.
phone cable to the socket marked LINE. Insert the telephone plug into your PTT line socket.
number. If the recipient is using an answering machine,
wait until you hear a whistling tone. Press o.
It is possible that the recipient's device is not ready to
receive.
on the additional telephone. Hang up.
Using function 51, set the number of rings for the fax
switch to 4 and the total number or the number of rings
for the answering machine (model dependent) to 5 (see
also chapter Setting the Fax Switch, page 29).
You cannot simultaneously use the answering machine
facility of your telephone service provider (= voice-mail
box) and receive faxes on your devices (see also chapter
Voice Mailbox, page 31).
38 Philips · PPF 725 · PPF 755
Page 39

13 Appendix
Appendix
EN
Technical Data
· Technical Data
Dimensions
Dimensions (L¦×¦H¦×¦W) 303¦×¦126¦×¦195¦mm
Weight
Weight 1,9¦kg
Mains Connection
Mains Connection 220¦–¦240¦V¦~ /
Power Consumption
Power Consumption
Stand-by Mode
Stand-by Mode <¦1,0¦W
Transmission
Transmission <¦20¦W
Recommended Ambient
Recommended Ambient 18¦–¦28¦ºC
Relative Humidity
Relative Humidity 20¦–¦80¦%
Connection Type
Connection Type PSTN · PABX
Dialling Mode
Dialling Mode Tone / pulse dialling
(country dependent)
Standards
Safety EN 60950-1
Safety EN¦60950-1
Emissions EN 55022 Cla ss B
Emissions EN¦55022 Class B
Immunity to Electrical Noise EN 55024
Immunity EN¦55024
Scanner
Scan Width
Scan Width 212¦mm
Horizontal Resolution
Horizontal Resolution 8 dots/mm
Vertical Resolution Standard
Vertical Resolution
Standard: 3,85 lines/mm
Vertical Resolution Fine
Fine: 7,70 lines/mm
Memory
Telephone Book (Low)
Telephone Book up to 50 entries
Telephone Book (High)
Voice Messages (Type 2)
Voice Messages up to 30 minutes
Fax Messages
Fax Messages up to 50 pages
SMS Messages
(standard test letter)
SMS Messages up to 30
50¦–¦60¦Hz
(non-condensing)
(PPF¦725)
up to 200 entries
(PPF¦755)
(PPF¦755)
Paper
Capacity
Capacity 50 sheets
Size
Size A4 · 210¦×¦297¦mm
Thickness
Thickness 0,07¦–¦0,11¦mm
Weight
Weight 60¦–¦90¦g/m
Document Feed Slot
Capacity
Capacity 10 sheets
Width
Width 148¦–¦212¦mm
Length
Length 100¦–¦600¦mm
Thickness
Thickness 0,06¦–¦0,15¦mm
Fax
Type Group 3
Type Group 3
Compatibility
Compatibility ITU-T¦T.30
Data Compression
Data Compression MH · MR
Modulation (Low)
Modulation V.21 · V.27ter · V.29
Modulation (High)
(PPF¦725)
V.17 · V.21 · V.27ter ·
V. 2 9
Transmission Speed (Low)
(PPF¦755)
Transfer Speed 9.600¦bps
Transmission Speed (High)
(PPF¦725)
14.400¦bps
(PPF¦755)
Subject to Change
Technical specifications subject to change without notice.
You can find the complete warranty conditions on our
website www.fax.philips.com
Appendix · Technical Data 39
Page 40
EN
The CE symbol confirms conformity with the EU directives that apply to the device.
Declaration of Conformity
(DoC)
· Declaration of Conformity (DoC)
Hereby, Sagemcom Documents SAS declares that
this PPF¦725, PPF¦755 is in compliance with the essential requirements and other relevant provisions of the
Directives 2006/95/EG and 2009/125/CE.
WWW
You can find the complete Declaration of Conformity
on our website www.fax.philips.com
Energy Star 2007
Energy Star
As a participant in the ENERGY STAR programme,
Sagemcom Documents SAS has made sure that this device complies with the ENERGY STAR requirements.
Recycling
Packaging: To facilitate packaging recycling, please
conform to your local selective recycling rules.
Batteries: Old batteries have to be deposited in designated collection areas.
WEEE
Product: The crossed out dustbin logo on your product signifies it is classified as Electrical and Electronic
Equipment covered by special disposal regulations.
To enforce recycling, recovery of The Waste Electrical
and Electronic Equipment (WEEE) and to protect the
environment and human health, European regulations
requires that you selectively collect waste equipment
using one of the following options :
• Your retailer will take your equipment back if you are
buying a replacement product.
Waste equipment can also be deposited in designat-
ed collection areas.
The paper and cardboard packaging used can be disposed of as recyclable paper. Have the plastic wrapping
and Styrofoam packaging recycled or dispose of it in the
non-recyclable waste, depending on the requirements in
your country.
Trademarks: The references mentioned in this manual
are trademarks of the respective companies. The lack of
the trademarks É and Ë does not justify the assump-
tion that these dedicated terminologies are free trademarks. Other product names used herein are for
identification purposes only and may be trademarks of
their respective owners. Sagemcom disclaims any and all
rights in those marks.
Reproduction Not Permitted
The reproduction of certain documents (e.g. by scanning, printing, copying) is prohibited in many countries.
The list of such documents below is not intended to be
complete, it only offers a general overview. In case of
doubt, consult your legal advisor.
• Passports (personal identification)
Entrance and exit visa papers (immigration papers)
Military service documents
Bank notes, travel checks, payment orders
Postage stamps, tax stamps (stamped or unstamped)
Loan papers, certificates of deposit, bonds
Documents protected by copyright
Follow the statutory regulations of your country with
regard to the legal validity of fax transmissions—particularly in connection with the validity of signatures,
meeting delivery deadlines or disadvantages resulting
from the loss of quality in the transmission, etc.
Take care to maintain the statutory regulations of your
country regarding telecommunications secrecy and data
privacy.
This product is intended for use on an analogue public
telecommunications network (PSTN) and in the country specified on the packaging. Use in other countries
can result in faulty functioning.
For more information, please contact the technical service centre for your country. Should problems arise during use of your device, please contact your retailer first.
Neither Sagemcom nor its affiliates shall be liable to the
purchaser of this product or third parties for damages,
losses, costs, or expenses incurred by the purchaser or
third parties as a result of accident, misuse, or abuse of
this product or unauthorized modifications, repairs, or
alterations to this product, or failure to strictly comply
with Sagemcom operating and maintenance instructions.
Sagemcom shall not be liable for any damages or problems arising from the use of any options or any consumable materials other than those designated as original
Sagemcom products or Sagemcom approved products.
Sagemcom shall not be held liable for any damage resulting from electromagnetic interference that occurs from
the use of any interface cables other than those designated as Sagemcom products.
All rights reserved. No part of this publication may be
reproduced, stored in a retrieval system or transmitted
in any form or by any means, electronic, mechanical,
photocopying, recording, or otherwise, without the prior written permission of Sagemcom. The information
contained herein is designed only for use with this product. Sagemcom is not responsible, if this information is
applied to other devices.
This user manual is a document that does not represent
a contract.
Errors, printing errors and changes are reserved.
Copyright © 2012 Sagemcom Documents SAS
40 Philips · PPF 725 · PPF 755
Page 41

EN
Appendix · Declaration of Conformity (DoC) 41
Page 42

EN
42 Philips · PPF 725 · PPF 755
Page 43

EN
Appendix · Declaration of Conformity (DoC) 43
Page 44

Rückseite
Customer Information
Introduction 1
As part of our continuing quest for total customer satisfaction, all of our products are made with ease-of-use
and reliability in mind.
Introduction 2
In your user manual you will find all the information required to use your machine. If, after consulting your
user manual, you still require assistance, you should
contact our Call Centre. Our personnel are highly
trained specialists who can ensure that you receive the
maximum benefit from your product.
Introduction 3
We can assist your more quickly if you do not call us
from the machine, rather an external telephone. Keep a
printout of the settings as well as the serial number of
the machine handy. The serial number can be found on
the type label.
United Kingdom
Telephone: 08 45 - 090 03 15
Fax: 08 70 - 124 02 02
Spaltenumbruch
%%%Spaltenumbruch$$$
Introduction 1
You can order original accessories from our homepage
or—in some countries (see below)—per telephone on
our toll-free number.
Introduction 2
Use only original consumable materials. The warrantee
does not cover damages to the device resulting from
other consumables.
United Kingdom
Telephone: 0800 - 358 08 07
E-Mail
E-Mail: [email protected]
Internet
Internet: www.fax.philips.com
PHILIPS and the PHILIPS’ Shield Emblem are registered trademarks of Koninklijke Philips Electronics N.V.
and are used by Sagemcom under license from Koninklijke Philips Electronics N.V.
Sagemcom Documents SAS
Documents Business Unit
Headquarters : 250, route de l’Empereur
92500 Rueil-Malmaison Cedex · FRANCE
Tel: +33 (0)1 57 61 10 00 · Fax: +33 (0)1 57 61 10 01
www.sagemcom.com
Simplified Joint Stock Company · Capital 8.479.978 € · 509 448 841 RCS Nanterre
PPF 725 · PPF 755
UK · INT
253499967-A
 Loading...