

Page 1

1
Dear customer,
The fax machine you have purchased prints on normal paper by
means of an ink film. It also enables you to use additional devices,
such as cordless phones. Your fax machine is also equipped with
functions that facilitate the installation and use.
Sending and receiving fax messages
To send a fax message that is more than one page, you can place
up to ten pages into the document feeder. In case you run out of
paper, faxes are stored until you print them out.
Scanner
Your fax machine comes with a detachable scanner. This enables
you to fax or copy documents that cannot be fed into the fax
machine, such as pages out of books and magazines.
In addition, this fax machine provides copier features like: multipage copy, document enlargement and reduction as well as contrast adjustment, which are typical for regular copy machines.
Additional (cordless) telephones
Your fax machine fully supports the use of additional devices,
such as telephones, cordless telephones, external answering machines or any other telecommunication devices suitable. You can
transfer calls from the fax machine to a (cordless) telephone and
vice versa. You can also start fax reception from an additional
phone or stop the built-in answering machine—if your fax machine has such a device—to start a telephone conversation.
Help key
If you press HELP/INSTALL twice, your fax machine will print
out a page describing the basic functions. It also provides information about additional help pages concerning fax machine use.
Overview
! Never expose your fax machine to rain or any other
form of moisture, in order to prevent the risk of
electric shock or fire.
! In a thunderstorm, disconnect the fax machine from
both the mains and the telephone line. If you are
unable to disconnect the fax machine, do not use it
and do not telephone due to the danger of lightning
strike and/or damage to the device.
Quick and easy installation
EASY INSTALL will guide you through the installation of your
fax machine. Press HELP/INSTALL for more than two seconds
and a sheet will be printed out. Using this sheet together with the
display prompts to aid the installation of your machine. Once
you have gone through these steps the machine will automatically
configure itself.
Fax switch and modes
SMUSMU
SMUSMU
SMU
The fax switch separates fax and voice messages. For example, it
can receive fax messages silently, i. e. without ringing to avoid
causing a disturbance.
The operating modes S and M for day and night operation
allow you to decide on different modes during the day and at
night; how often the machine should ring prior to receipt of faxes
or before the answering machine is turned on; e. g. during daytime it is assumed that calls should ring. After a set time the fax
reception is turned on and messages can be left on the (internal or
external) answering machine. At night it is assumed that disturbances are minimised. Faxes are then received silently and calls
ring more quietly.
The timer U makes your fax machine switch automatically between S and M modes. The built-in clock makes your fax machine switch to M at 10 pm and back to S at 6 am. Of course
you can change these times according to your individual needs or
switch off the timer. The display will show the current settings.
Page 2

2
Safety instructions
Please read all warning notices and instructions and follow
them precisely.
Never connect the telephone in damp rooms unless the wall
sockets are specially designed for humid conditions. Never
touch the power plug, connection to the mains or telephone
socket with wet hands.
Never touch uninsulated or telephone or power cables with
damaged insulation, unless the telephone cable is disconnected from the telephone line and/or the power cable is
disconnected from the power line.
Never install the fax machine close to radiators or air
conditioners. Avoid operating the fax machine in direct
sunlight.
Place the fax machine on a flat surface and ensure a
minimum clearance of 10 cm between the fax machine and
other machines and objects.
Make sure that your fax machine is stable and rests squarely
on the supporting surface. Any fall can cause severe damage
to the fax machine and/or injury to people, especially small
children.
Make sure that air circulates freely around the fax machine.
Do not operate the fax machine in closed boxes, cupboards,
cabinets etc. Leave a clear space of 10 cm around the
ventilation grilles of the fax machine. Never cover the fax
machine (tablecloths, paper, folders etc.). Do not place the
fax machine on beds, tablecloths, cushions, sofas, carpets or
other soft underlays due to the danger of overheating and
subsequent fire.
Ensure safe cable laying (danger of stumbling, damage to
the cable or the fax machine).
Disconnect the fax machine from the mains and telephone
line before cleaning the surface of the machine.
Never use liquid or gaseous cleaning agents (sprays, scouring
agents, polishes etc.).
Do not allow any liquid to enter the fax machine. Otherwise
there is a risk of electric shock or other injury to people and
severe damage to the fax machine. If any liquid does enter
the fax machine, immediately remove the power plug and
have the fax machine professionally inspected.
If the display breaks, a mildly corrosive liquid may leak out.
Avoid contact with skin and eyes.
In case of any damage caused to the housing of your fax
machine in particular to power cables please remove the
mains plug and call your service repair centre. The housing
of your fax machine may only be opened by authorised
service personnel.
Your fax machine has been tested in conformity with
standards UL 1950, EN 60950 and IEC 950 respectively,
and may only be operated with telephone systems and
power equipment which meet these standards.
International guarantee
PHILIPS products have been designed and manufactured to the
highest quality standards. If, unfortunately, something should go
wrong with this product, PHILIPS guarantees free of charge labour and replacement parts during a period of twelve months
from date of purchase. This international PHILIPS guarantee
complements the existing national guarantee obligations to you
of dealers and PHILIPS in the country of purchase and does not
affect your statutory rights as a customer.
The PHILIPS guarantee applies provided the products are handled properly for its intended use, in accordance with its operating instructions and upon presentation of the original invoice or
cash receipt, indicating the date of purchase, dealer’s name and
model and production number of the product.
The guarantee may not apply if:
the documents have been altered in any way or made
illegible;
the model or production number on the product has been
altered, deleted, removed or made illegible;
repairs or product modifications and alterations have been
executed by unauthorised service organisations or persons;
damage is caused by accidents including but not limited to
lightning, water or fire misuse or neglect;
damage is caused by a power surge after a power cut.
Please note that the product is not defective under this guarantee
in the case where modifications become necessary in order for the
product to comply with local or national technical standards which
apply in countries for which the product was not originally designed and/or manufactured. Therefore always check whether a
product can be used in a specific country.
In case your PHILIPS product is not working correctly or is defective, please contact your PHILIPS dealer. In the event you require service whilst in another country, a dealer address can be
given to you by the PHILIPS Consumer Help Desk in that country.
In order to avoid unnecessary inconvenience, we advise you to
read the operating instructions carefully before contacting your
dealer. If you have questions which your dealer cannot answer or
any related question please send these in writing to our address or
telephone your customer information service.
PHILIPS cannot be held liable for faulty or incompletely received
information.
Page 3

3
Table of contents
1 Introduction
Overview......................................... 1
Safety instructions ...........................................................2
International guarantee ...................................................2
1 Introduction................................. 3
Overview of the machine ................................................4
Description of machine ................................................... 4
General view of functions ................................................5
Location of controls ........................................................6
2 Installation ................................... 8
Location .........................................................................8
Connecting the fax machine ............................................8
Replacing the ink film .....................................................9
Removing the old ink film .............................................. 9
Loading the new ink film ................................................9
Loading paper .............................................................. 10
Removing paper ........................................................... 11
Paper jam .....................................................................11
Easy Install ................................................................... 11
Connecting additional devices .......................................11
Private branch exchange—line type ...............................12
3 Basic functions........................... 13
HELP function .............................................................13
Time and date .............................................................. 13
Entering your number .................................................. 13
Entering your name ......................................................13
Correction ....................................................................14
Language of display ...................................................... 14
Type of ring signal ........................................................ 14
Volume of the ring signal .............................................. 14
Volume of the loudspeaker ............................................14
4 Fax switch .................................. 15
Setting the Mode SM ................................................ 15
Special settings ..............................................................16
Mode U ......................................................................16
EASYLINK .................................................................. 16
External answering machine ..........................................17
5 Telephone ................................... 18
Making a call ................................................................18
Redial ...........................................................................18
Short dial n .........................................................18
Telephone book a ............................................... 18
List of telephone numbers .............................................19
Call transfer .................................................................. 19
Hands-free operation* ...................................................19
Mute ............................................................................19
Calling line identification .............................................. 19
6 Fax .............................................. 20
Feeding documents in ................................................... 20
Sending faxes ................................................................ 20
Broadcast...................................................................... 20
Image quality ................................................................21
Transmission report—error report ................................. 21
Overseas function—Transmission.................................. 21
Size compression ........................................................... 21
Fax journal ...................................................................21
Polled reception ............................................................ 21
Polling send .................................................................. 22
Send later ..................................................................... 22
Paperless fax reception................................................... 22
7 Scanner ...................................... 23
Scanning ...................................................................... 23
Copying .......................................................................23
Contrast .......................................................................24
8 Answering machine* ................. 25
Switching on and off .....................................................25
Recording a message ..................................................... 25
Duration of recording ...................................................25
Listening to messages ....................................................25
Play back volume .......................................................... 25
Deleting messages .........................................................25
Forwarding messages ..................................................... 25
Recording a conversation .............................................. 26
VIP code ......................................................................26
Memo .......................................................................... 26
Remote control ............................................................. 27
9 Hints & Tips ............................... 28
Service code .................................................................. 32
Care and maintenance instructions ................................ 32
Clean the scanner glass .................................................. 32
Clean printer roller ....................................................... 33
10 Appendix .................................. 34
Technical data............................................................... 34
Glossary .......................................................................34
Index .............................................. 36
* only with built-in answering machine
Page 4
4
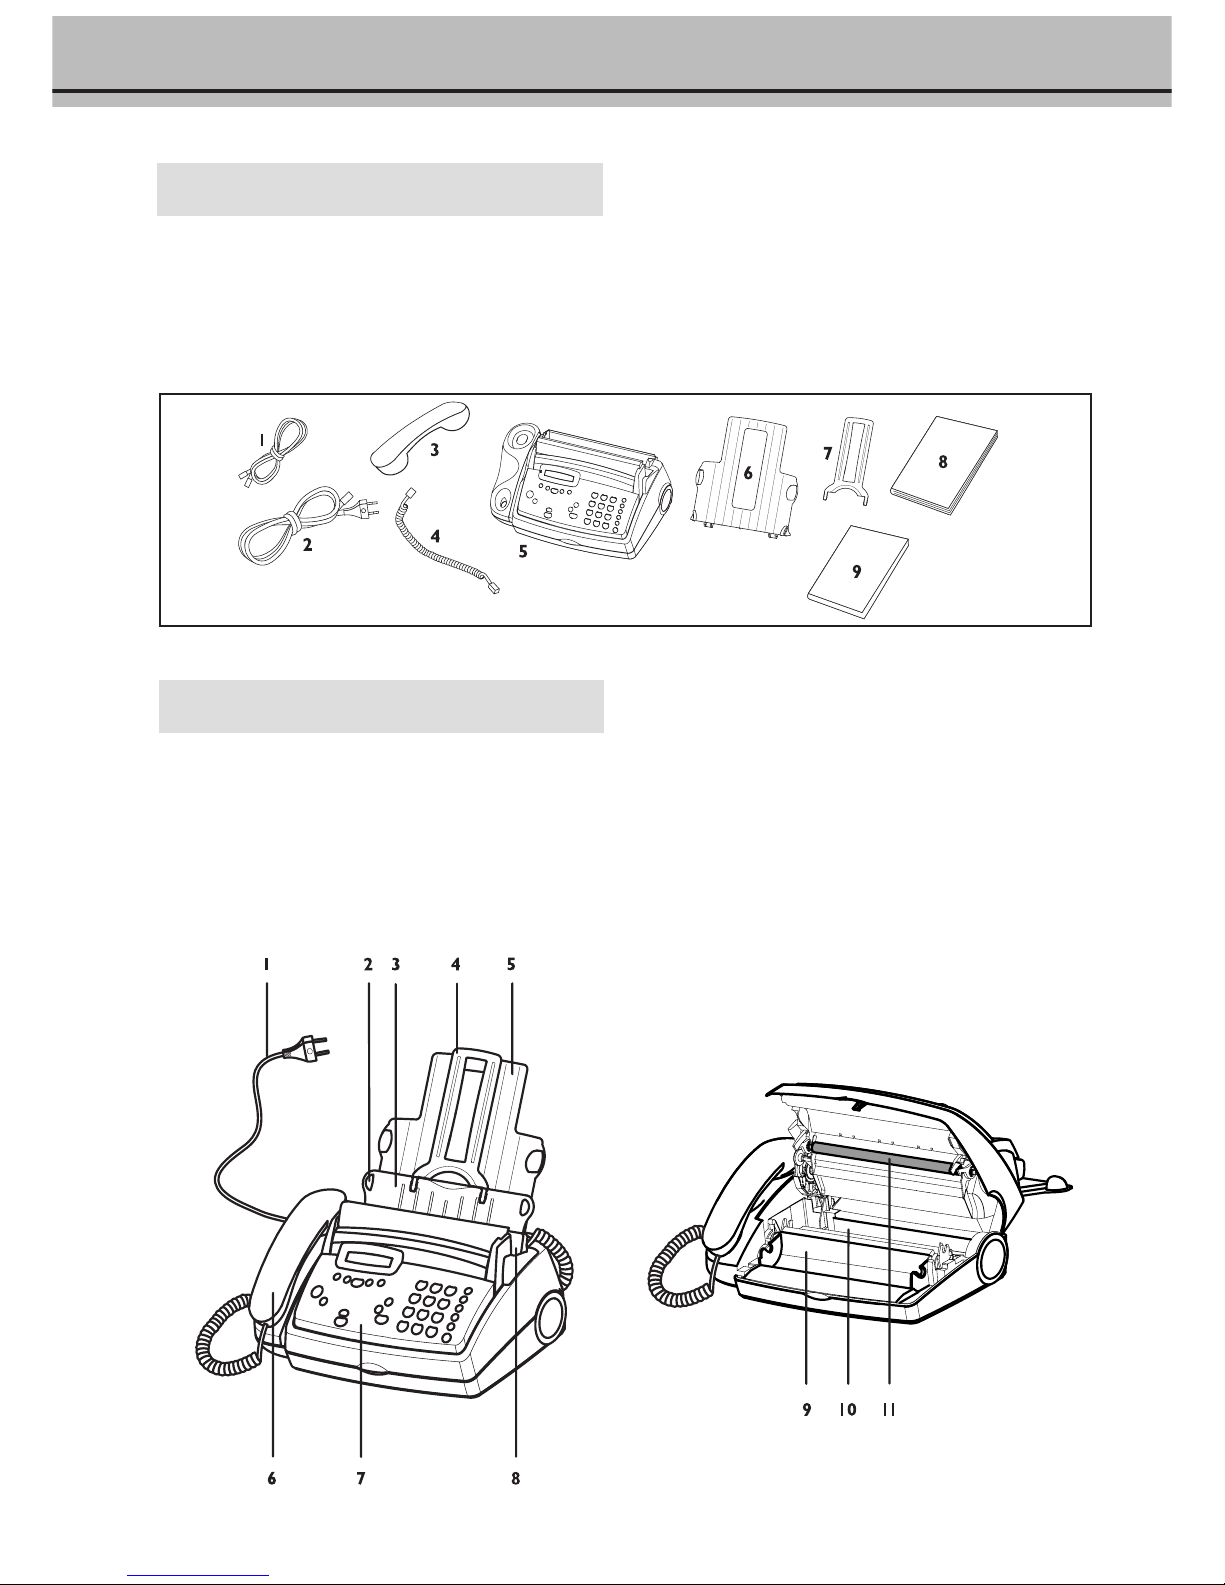
Description of machine
1 Mains cable with power plug
2 Document guide
3 Paper feed flap
4 Document support
5 Paper tray
6 Telephone handset
Overview of the machine
The following items are included in the packaging:
1 Telephone cable with plug
2 Mains cable with plug
3 Telephone handset
4 Spiral cable for telephone handset
5 Fax machine
6 Paper tray
7 Document support
8 User manual
9 Installation guide
7 Operation panel
8 Scanner
9 Front ink film compartment
10 Rear ink film compartment
11 Printer roller
Page 5
5
General view of functions
You can print out a list of functions by pressing MENU three
times.
1 Setup Page
11 Set language
(select the language of the display text) ......................... 14
12 Set time and date
(setting time and date) ................................................. 13
13 Your telephone number
(enter your telephone number) ..................................... 13
14 Your name
(enter your name) ........................................................ 13
15 Line type
(setting the private branch exchange) ............................ 12
2 Fax
21 Transmission speed/overseas function
(setting for half-speed transmission).............................. 21
22 Polled reception
(you can call up fax messages) ...................................... 21
23 Polling send
(your fax message can be fetched) ................................. 22
24 Send later
(faxes will be sent later) ................................................ 22
25 Broadcast
(same fax will be sent to more than one party) ............... 20
3 Fax switch
31 Day
(setting the DAY operating mode S) .......................... 15
32 Night
(setting the NIGHT operating mode M) ...................... 15
33 Timer
(setting the TIMER operating mode U) ...................... 16
34 Easylink
(codes for use with additional telephones) ................16, 17
15-MaY-02 12:30
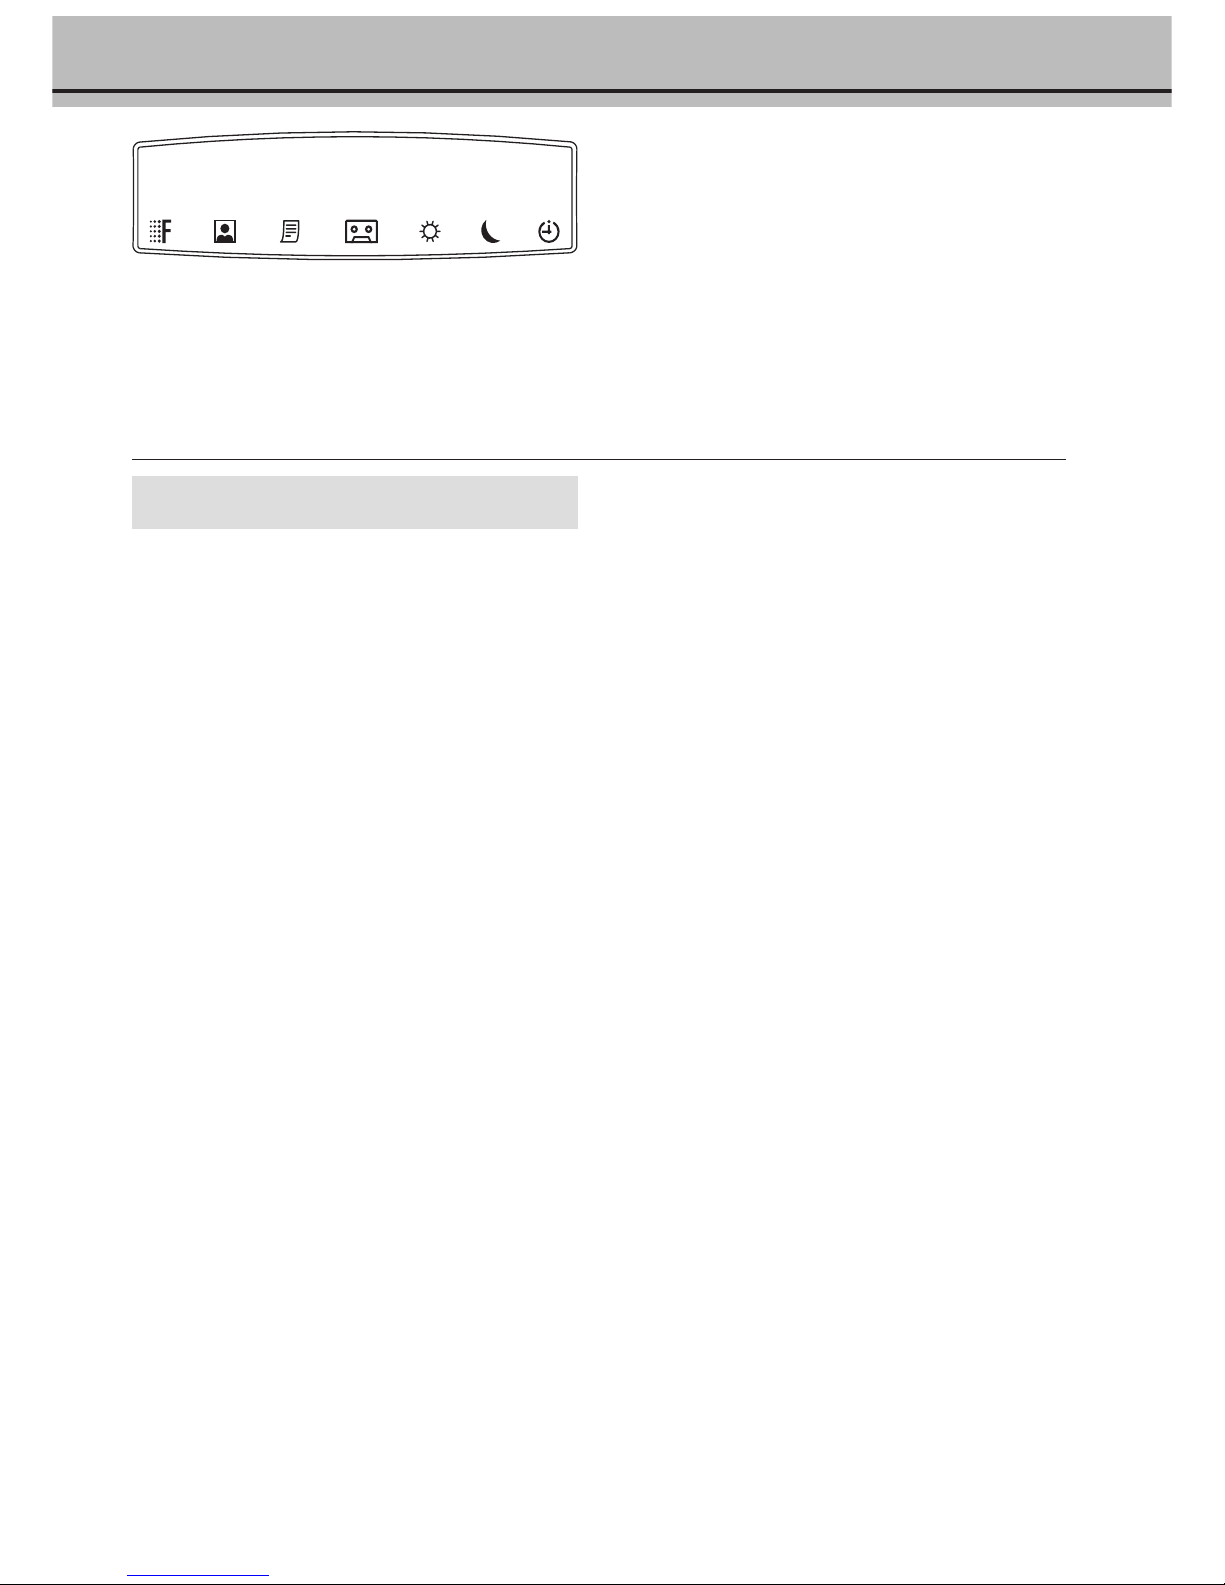
The symbols on the display indicate the current operating status:
FINE f/PHOTO F
indicates whether you are sending or copying with a higher picture quality or with grey tones. If neither of the two symbols is
visible, the standard resolution is selected. To change the resolution use FINE/PHOTO.
4 Others Page
41 Fax journal
(log of the last ten fax documents received and sent) ...... 21
42 Dialling list
(print out of stored names and numbers) ...................... 19
43 Transmission report
(automatic print out of transmission protocols) ............. 21
44 Ringer types
(selection between ten ringer types) .............................. 14
45 Service code
(deleting personal settings) ........................................... 32
46 Size compression
(size compression of received fax messages) ................... 21
47 Set contrast
(setting of contrast for copy / fax transmission) ............. 24
5 Answering machine
(for fax machines with built-in answering machine)
51 Recording time
(setting for recording duration of calls) ......................... 25
52 Access code
(setting the code for the remote control of the
answering machine and for message forwarding) ........... 27
53 VIP code
(authorised callers can override
the answering machine) ............................................... 26
54 Memo mode
(message for the caller without the
possibility to leave a message) ....................................... 26
55 Forwarding
(messages forwarded to
another telephone number) .....................................25, 26
h
is visible when the document memory contains faxes.
b*
)
shows that the built-in answering machine is switched on.
S/M/
U
Three symbols on the display indicate the current settings. You
can choose the mode desired with the key SM.
* only for fax machine with built-in answering machine
Page 6
6
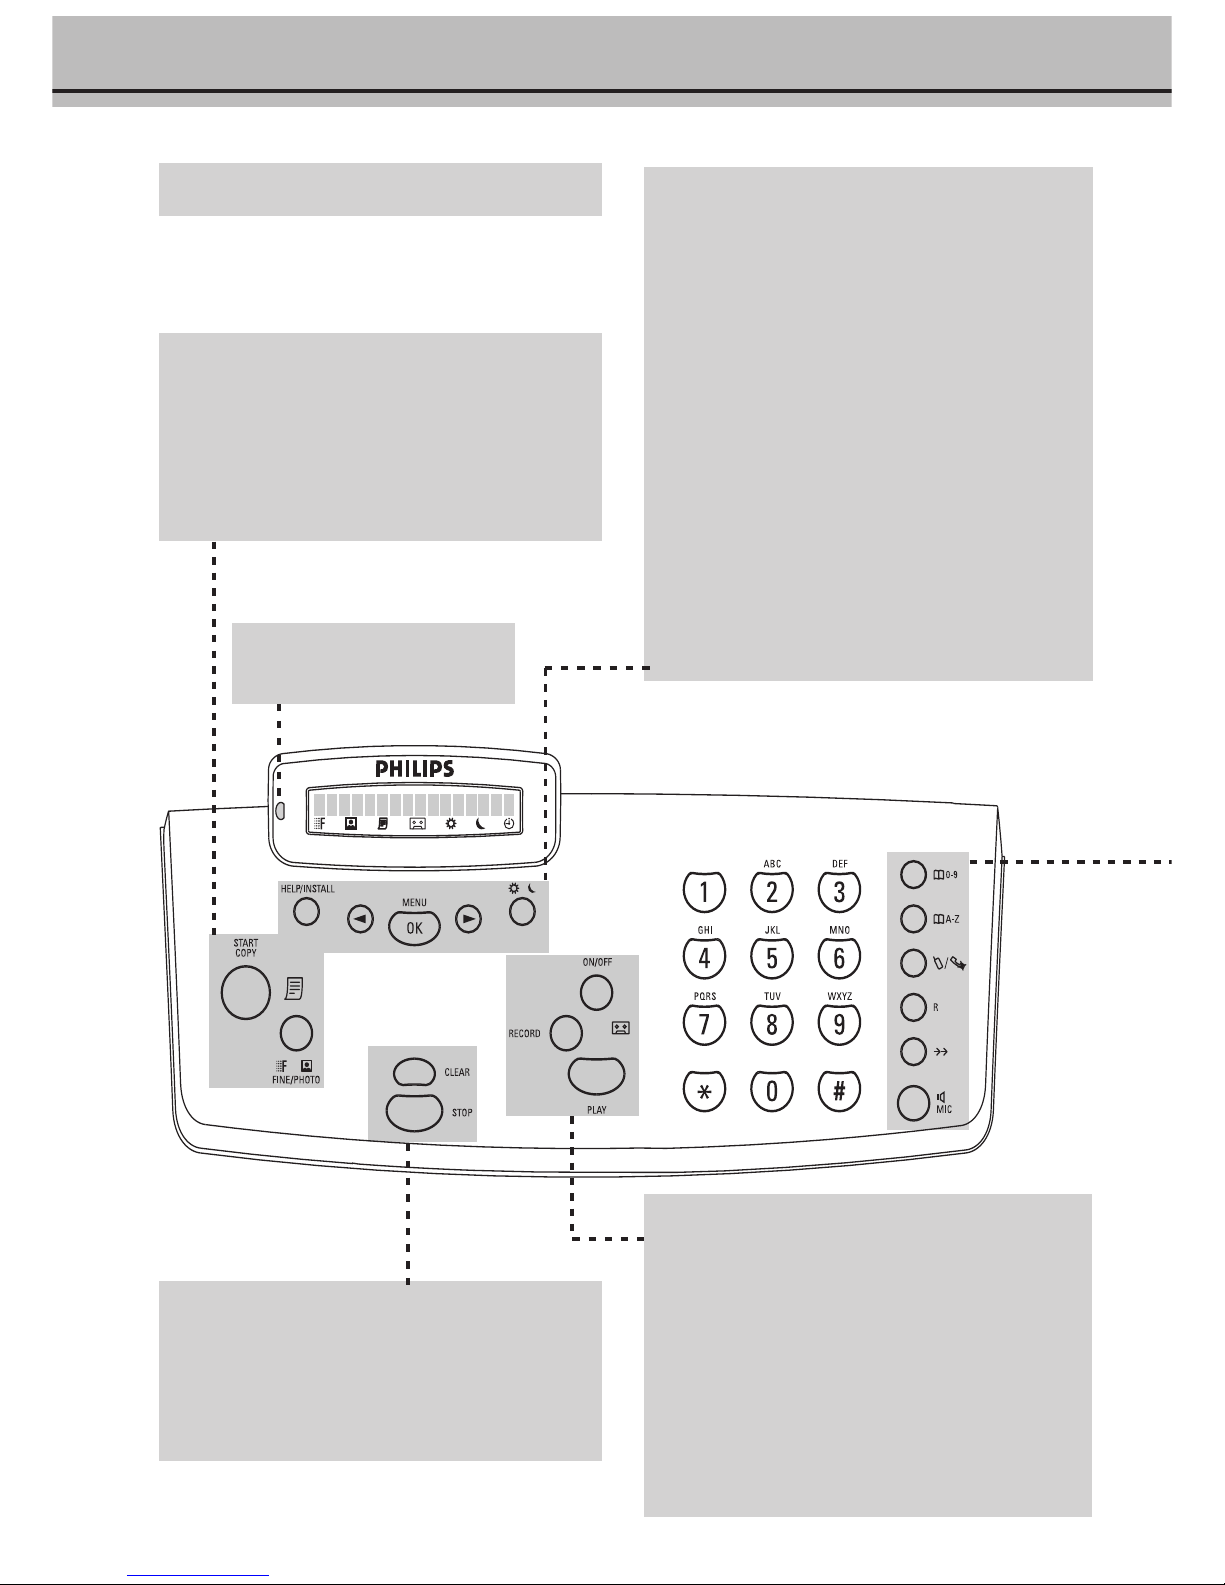
Location of controls
START/COPY
press briefly: to start fax transmission or to copy a document
press and hold (two seconds): to multiple copy an inserted
document / rapid call-up of faxes
FINE
f f
f f
f /PHOTO
FF
FF
F
to select a higher resolution when copying or sending
(for text and graphics—FINE; for photographs—PHOTO)
STOP
stops procedures
CLEAR
press briefly: to delete messages / entries / individual symbols
press and hold (two seconds): to cancel the whole entry
for fax machine with built-in answering machine:
ON/OFF
to activate / deactivate answering machine
RECORD
press briefly: to record an internal memo
press and hold (two seconds): to record a new outgoing mes-
sage
PLAY
To play back messages. The key flashes when new messages
and memos have been recorded. After playback the key stays
lit until messages have been deleted.
HELP/INSTALL
press briefly (twice): print operating instructions for the most
important functions with references to additional help pages
press and hold (two seconds): to start the automatic installation of your fax machine / printout of Easy Install
<<
<<
<
to select options / to adjust the volume / to move cursor to
left of display
MENU/OK
for calling up functions / to confirm entries
>>
>>
>
to select options / to adjust the volume / to insert a space
when entering a name / to move cursor to right of display
S MS M
S MS M
S M
to select the different operation modes
press briefly: to choose between S and M
press and hold (two seconds): operating mode
U U
U U
U on/off
Display lamp
If this lamp flashes, please read the
message on the display.
Page 7

7
nn
nn
n
press briefly: to select a phone number quickly
press and hold (two seconds): to store a telephone number
aa
aa
a
press briefly: to call up a name entry
press and hold (two seconds): to store a name entry
TT
TT
T
temporary mute of microphone during a call / transferring a
call from the fax machine to another telephone (only for serial connections, see Glossary)
RR
RR
R
press briefly: for special functions, e. g. for the use with a
private branch exchange and for using various functions provided by your service provider (call waiting etc.)
press and hold (two seconds): to insert a dialling pause between two figures
PPPP
PPPP
PP
press briefly: to repeat the last five numbers you have dialled
press and hold (two seconds): to browse the list of callers
DIAL / l MIC
for dialling without lifting the handset. For devices with builtin answering machine for hands-free operation.
Page 8
8
! Neither telephone nor fax will operate during power
failure.
! Your fax machine was built for exclusive use in the
country of purchase. It complies with the local
network specifications.
Location
1 The fax machine must stand securely on a smooth, flat,
horizontal surfaces (no soft surface such as carpets etc.).
2 Avoid exposure to direct sunlight (the ink film is heat-
sensitive) and close proximity with heaters, radios and TV
sets, air conditioning vents, dust, water and chemicals is not
advised.
3 Avoid heat build-up by ensuring that the machine is not
covered. Place the fax in such a way as to ensure free circulation of air around it.
4 If you would like to use a cordless phone, there should be a
distance of at least 15 cm in between the fax machine and
the base station, otherwise you may hear acoustic interference in your handset.
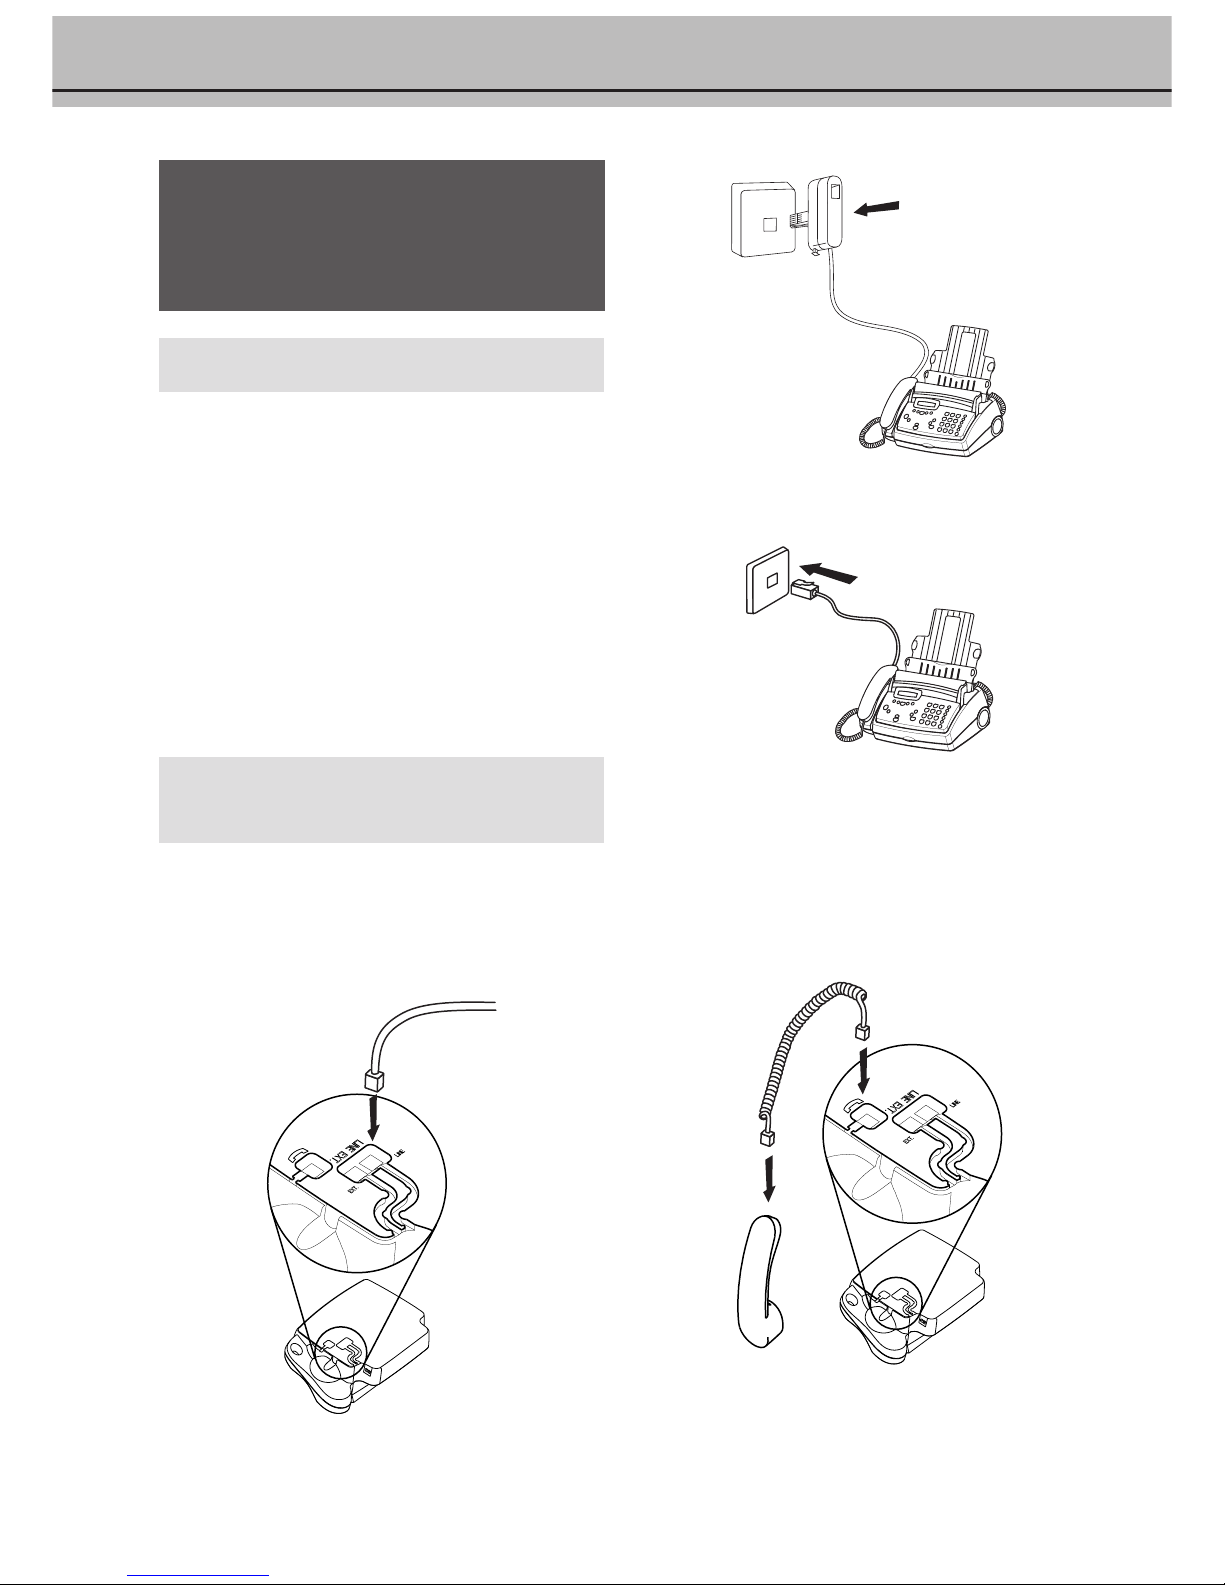
Connecting the fax
machine
To the telephone socket
Connect the telephone cable to the fax machine by inserting it in
the socket on the bottom of the machine identified with LINE.
Insert the cable in the groove provided.
In the UK
For all other countries
Handset to the fax machine
Insert one end of the spiral cable into the socket of the handset
and the other end of the spiral cable into the socket identified
with a handset symbol, on the bottom of the machine, and press
it into the specially provided cable groove.
2 Installation
Page 9
9
To the power supply
1
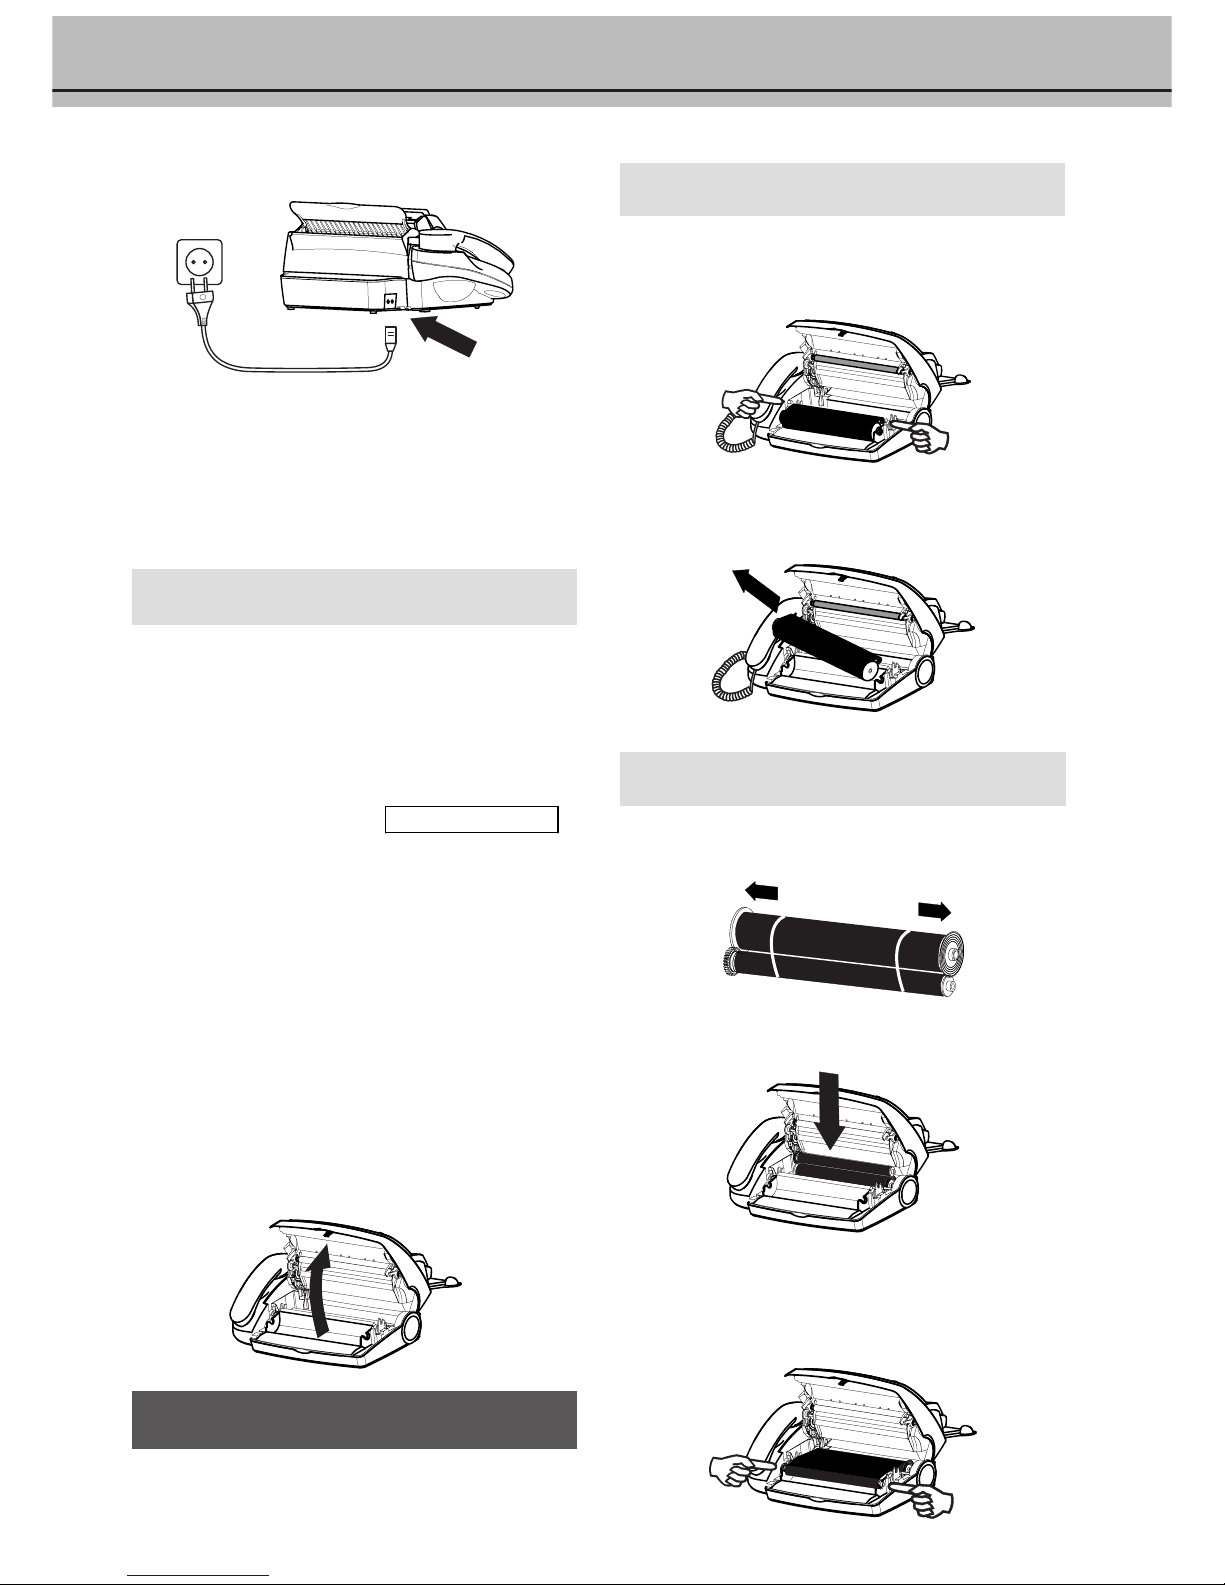
Plug the power connector into the back of the fax
machine. Plug the mains cable into the wall socket. The
machine will carry out an internal test. Afterwards you
need to enter the current time and date.
2 Use the dial pad to enter the correct time and date.
Confirm with OK.
Replacing the ink film
You cannot receive or copy documents unless an ink film is
loaded in the fax machine. For this reason a test ink film has
been inserted into your machine. The commercially available
ink film PFA 321 has a capacity of approx. 260 pages.
If the ink film is finished or if there is no ink film in the fax
machine, the red display lamp flashes, and the following message appears:
refill inkfilm
1 Before loading a new ink film you must remove the paper
from the paper feed mechanism! Also follow the instructions on your ink film packaging!
2
Philips ink films provide you with the best performance
and printing quality. Our tests have shown that the use of
other ink film may result in the machine not functioning
correctly due to the build-up of static electricity. Therefore, for the protection of your machine, we have included
a unique yellow sheet with each approved ink film,
without which the machine will not work. Please be aware
that your Philips guarantee may not apply if your machine
is damaged by the use of other ink film than approved
Philips film!
3
Open the machine by carefully lifting the operation panel
at the recess in the middle.
! For use with Philips ink films only.
Removing the old ink film
1
Lift the rear ink film roll holding both sides with your index
fingers upwards, in order to remove it out of its seat and
place it next to the front ink film roll.
2 Remove both ink film rolls. They cannot be reused. Dispose
of the ink film rolls with normal waste. Load a new ink film,
because your fax machine cannot work correctly without it.
Loading the new ink film
1 Carefully remove the rubber rings from the new ink film.
Take care not to damage the ink film.
2 Lay the large roll in the grooves provided in the rear ink film
compartment.
3
Now take the small roll and lay it in the front ink film
compartment. Please make sure that the smaller roller is
inserted into the side identations.
Page 10
10
4
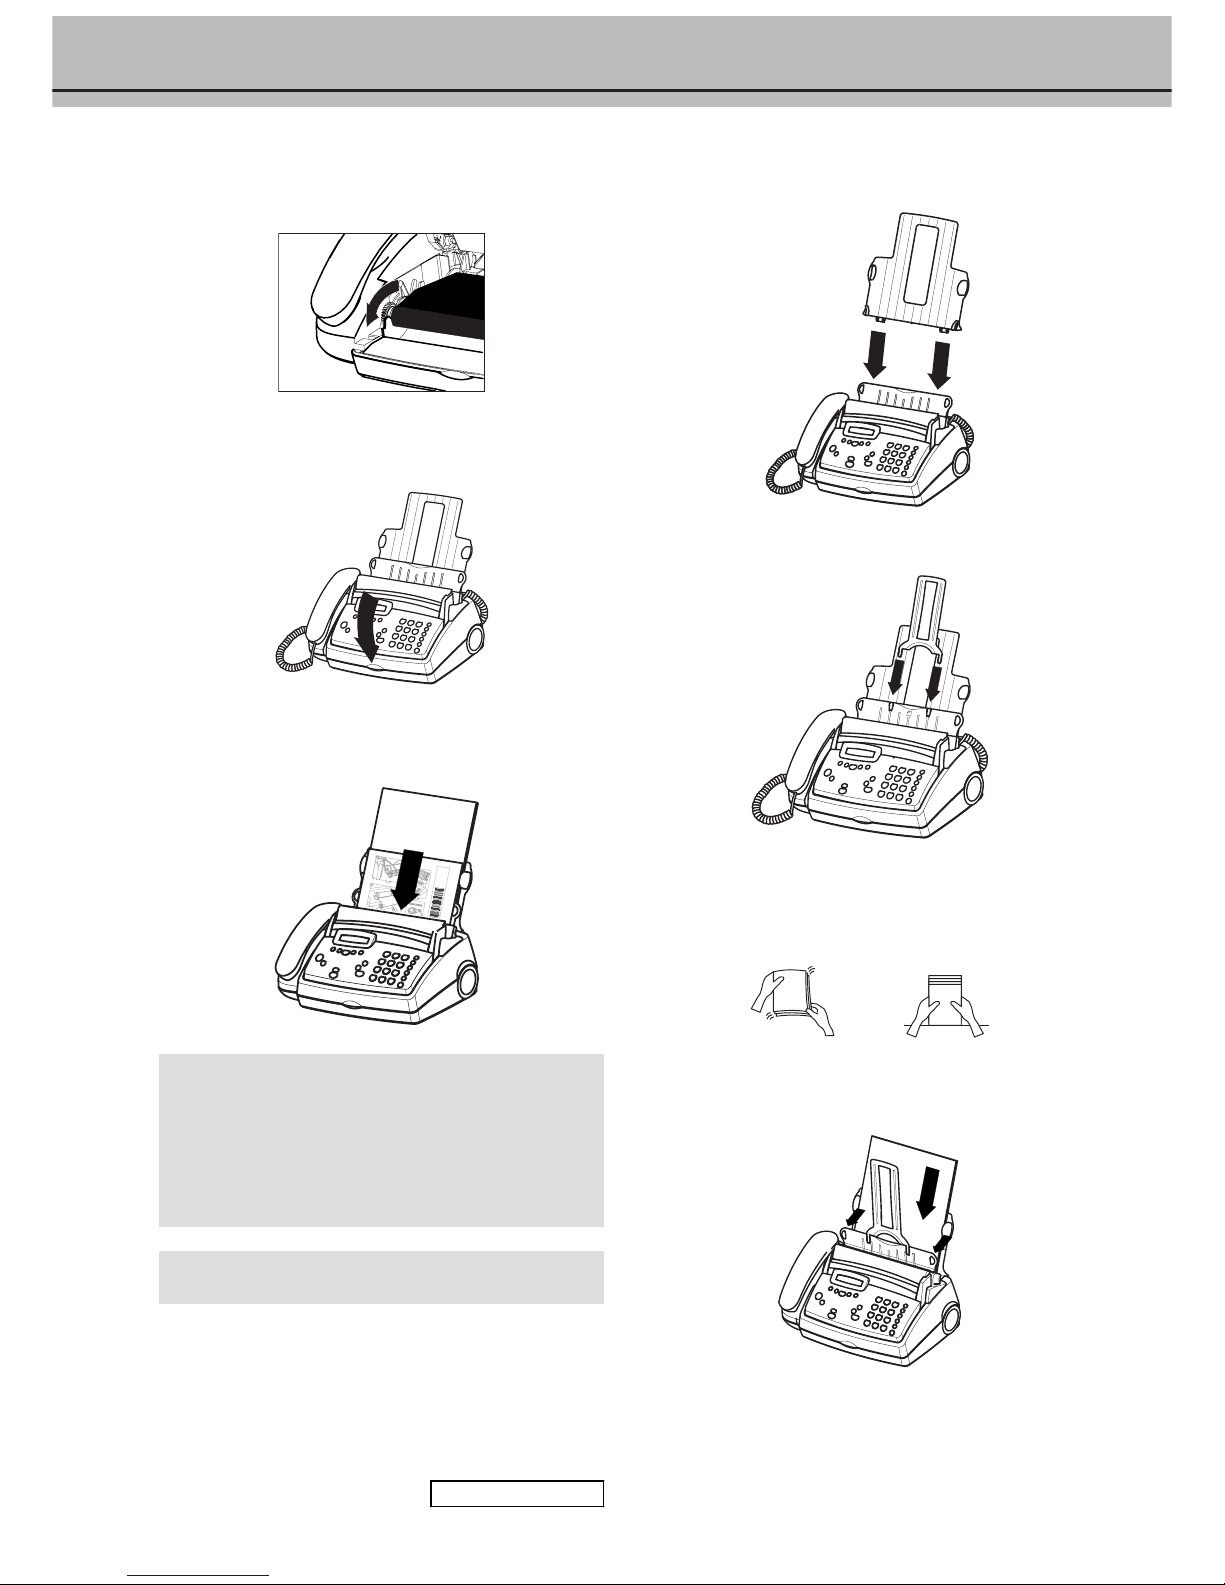
Turn small roll forward to tension the ink film. Make sure
that the ink film is not creased.
5 Close the machine by swinging the operation panel forward,
until it snaps in.
6 Insert the yellow sheet with the printed side upwards and
press START/COPY.
A silver strip is fixed to the start of the ink film, so the
quality of the first few pages may be impaired.
The yellow sheet identifies the inserted ink film and
protects you from using ink films of other brands which
may lead to your fax machine not functioning correctly.
Loading paper
Before you can copy documents, paper must be loaded in your
fax machine. Please use only the following paper format:
standard A4, 210 x 297 mm. The fax machine works with
normal paper used for writing and copying and has been
optimised for smooth 80g/m
2
papier. The smoother the paper
surface the better the print quality. If there is no paper in the fax
machine the red display lamp flashes and on the display
appears:
OUT OF PAPER
1
Insert the paper tray in the slots provided behind the paper
feed mechanism.
2 Stick the paper support insertion in the openings provided
on the paper feed flap.
3 To prevent several sheets being drawn into the machine at
once, first fan out the paper to separate the sheets and then
straighten the stack on a flat surface before inserting it into
the paper feed.
4
Pull the paper feed flap fully forward until it stops. Insert
several sheets of A4 paper (80 g) up to the end-stop in the
paper feed mechanism (max. 50 sheets).
Page 11
11
5
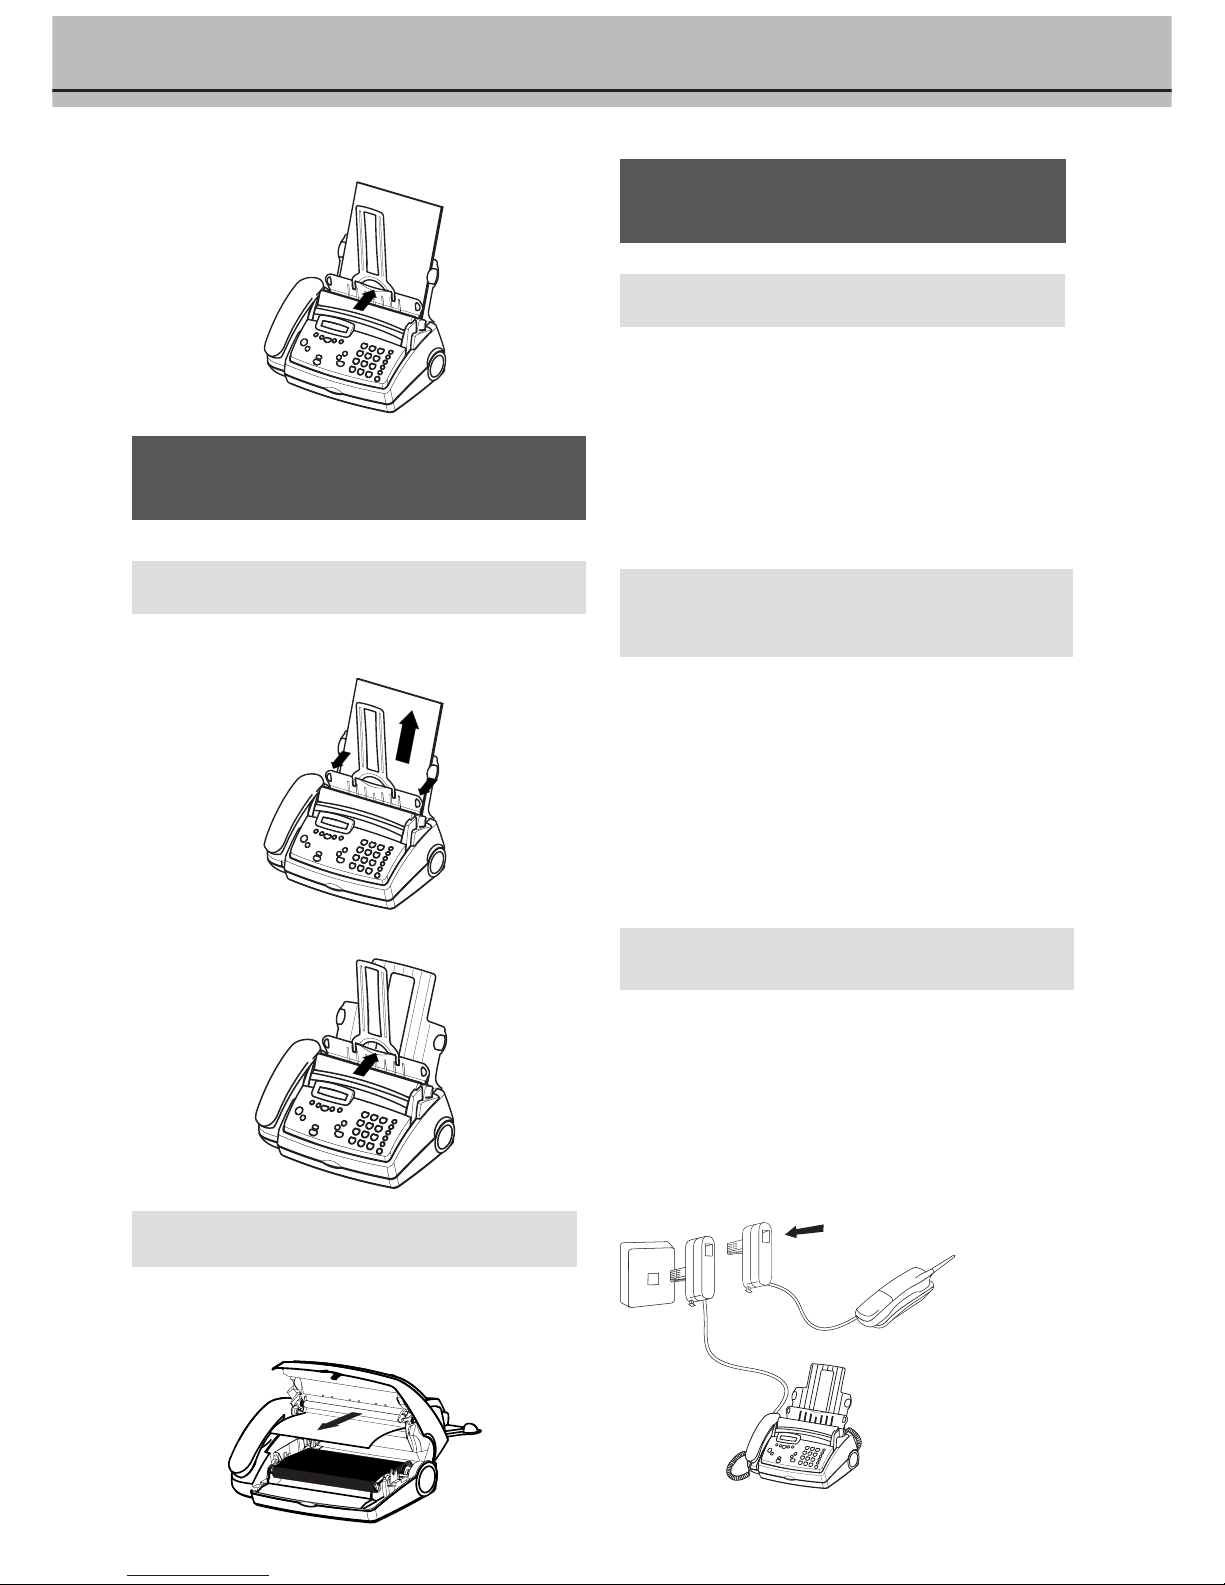
Close the paper feed flap.
! Never load paper while the fax machine is printing!
Do not use paper that has already been printed on one
side! This could lead to a paper jam.
Removing paper
1 Pull the paper feed flap forward.
2 Pull the paper out.
3 Close the paper feed flap.
Paper jam
Open the operation panel. Pull the paper carefully outwards from
the inside. Before closing the panel the ink film roll must be tensioned by turning the front ink film roll forwards.
! Do not pull the paper out from the top of the machine
because doing so can tear the paper and disrupt the
functionality of the fax machine.
Easy Install
Using EASY INSTALL your fax machine will be configured ac-
cording to your local conditions.
1 Press HELP/INSTALL for at least two seconds. Your fax
machine will print one page with the header EASY INSTALL. Pull out the page firmly.
2 Your fax machine will then guide you on the display through
the first settings such as your telephone number and your
name.
Connecting additional
devices
In addition to your fax machine, you can also connect other devices, such as additional telephones, call-fee indicators, answer-
ing machines or modems to a single telephone line [for UK: As
long as the Ringer Equivalent Number (REN value) on the line
doesn’t exceed 4. The REN value of this fax is 1].
To the same socket
(not in all countries)
You can connect additional devices to the same
telephone plug.
Make sure that the fax machine is the first device connected
to the line.
a) Connecting to the telephone socket
b) Connecting the handset to the fax machine
c) Connecting additional devices to the telephone plug
Connecting additional devices to the same socket ensures
you the optimal function of your active fax switch
(e. g. call transfer). Your fax machine can control the
additional devices.
Page 12
12
To separate sockets
(not in all countries)
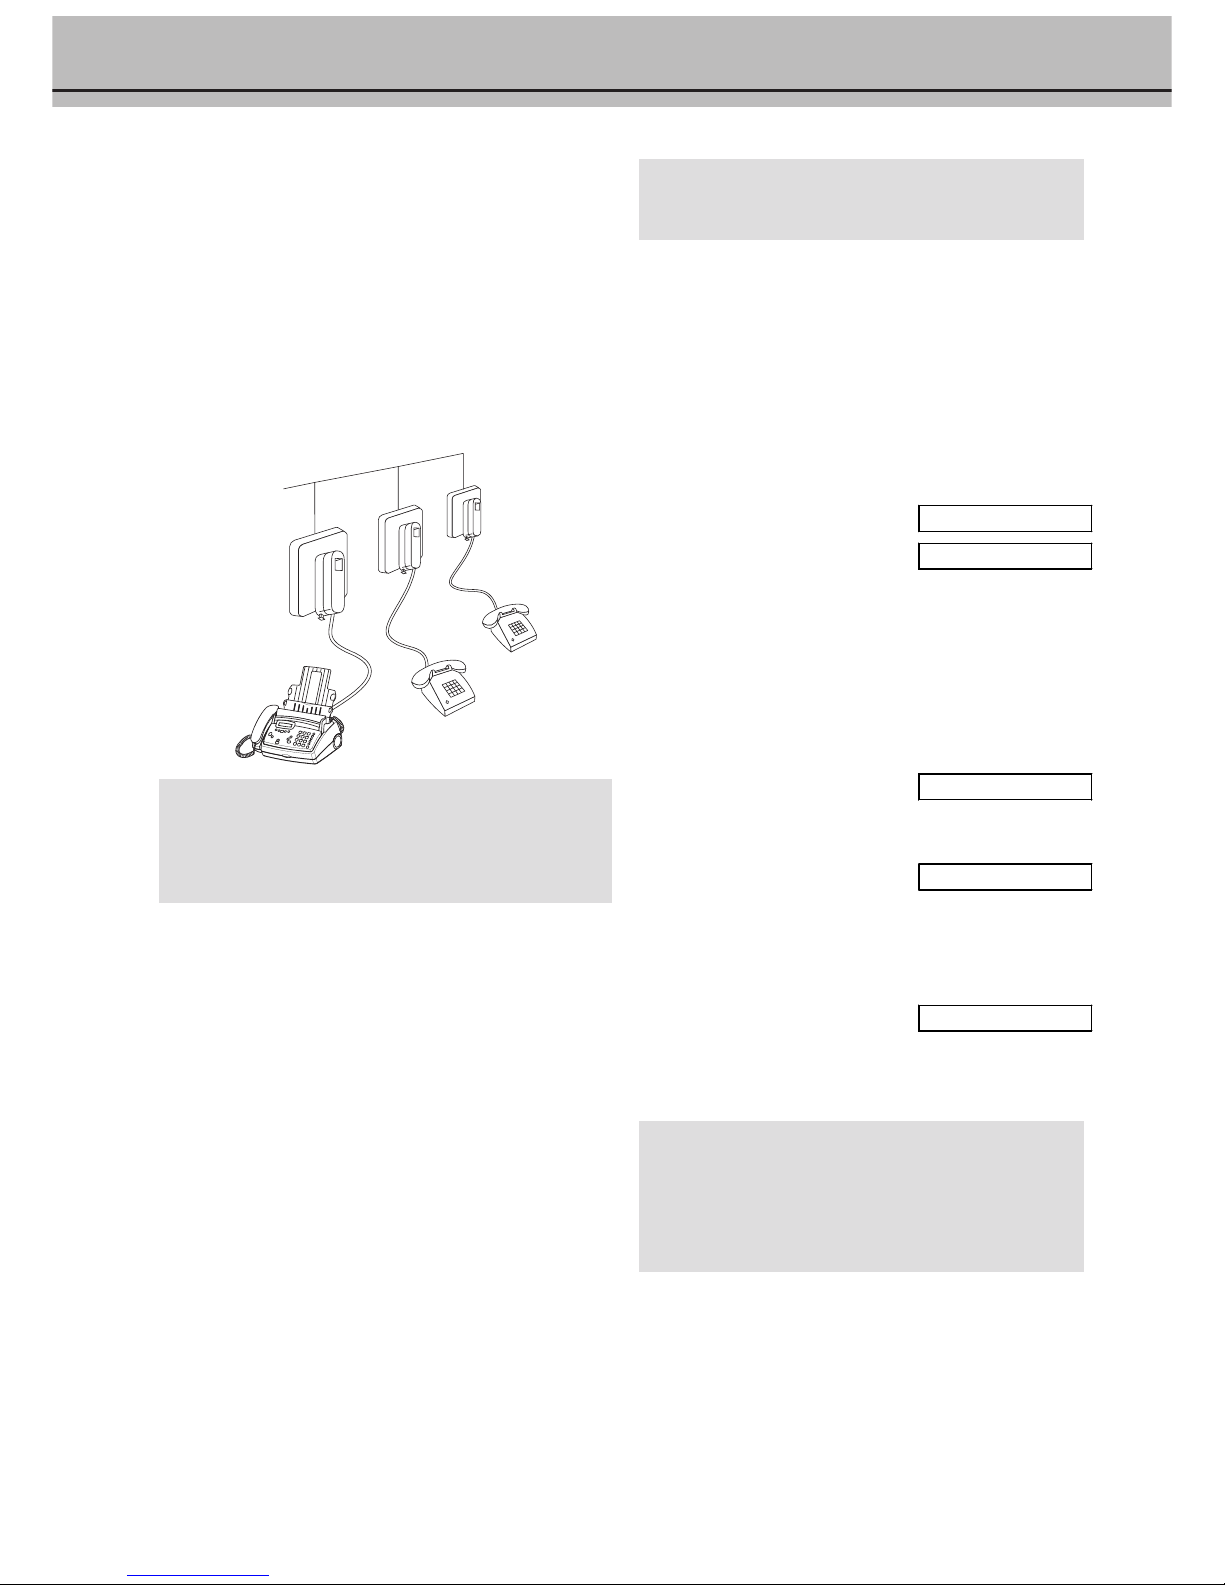
You can connect additional devices to separate sockets on the same
line even if they are in different rooms. Make sure that the fax
machine is the first device connected.
Please note: If you connect additional devices to separate sockets
(e. g. in separate rooms) your active fax switch cannot control them
(which means that your fax machine behaves like any ordinary fax
machine). For this reason e. g. call transfer is not possible. Therefore we recommend you to connect your additional devices to the
same socket.
If you intend using special auxiliary devices with your fax
machine, please contact your dealer.
If you wish to receive faxes via modem, you must set your
fax machine to MANUAL RECEPTION.
Connecting to ISDN
Your fax machine is not an ISDN fax (group 4), but an analogue
fax machine (group 3). Therefore it cannot be used directly on an
ISDN connection. You will need an (analogue) adapter or an ISDN
connection for analogue devices. For further information please
refer to your ISDN instructions.
Connecting to a private branch exchange
(PABX)
Private branch exchange systems are very common in large companies. ISDN connections are private branch exchanges and are used
very often in private households. To get a connection from a private branch exchange to the public network you have to dial a key
to obtain the outside line.
An additional telephone which is connected to a normal telephone
line together with your fax machine must not be mixed up with a
private branch exchange.
If you wish to use your fax machine on a PABX you have to change
some settings in function 15.
Private branch exchange
line type
In the UK you can select with function 15 the connection to a
private branch exchange.
In all other countries it is also possible to select the telephone line
type with this function. Press MENU 15, then OK , select
with </> and confirm with OK. Continue with point 2.
1
Select function 15 by pressing MENU and then entering the
digits 15. Press OK.
2 You can switch on the PABX operation using </>. Press
OK.
PABX: NO
PABX: yes
3
Now enter the key that has to be pressed to obtain an outside
line (this outside line access code must be obtained from the
manufacturer). This is either 0, R (in some systems also
described as FLASH) or a number key. Press OK.
4
Press OK. Your machine will then check that the outside line
can be obtained.
5 ... if the check is successful, briefly appears:
CHECK OK
6
... if the check is unsuccessful, briefly appears:
CHECK NOT OK
7
You will be asked to repeat the entry. Check the key for
obtaining an outside line. However, if you have chosen the
correct key and on the display still appears the message
CHECK NOT OK
delete the key for obtaining the outside line by pressing
CLEAR.
In case your PABX requires R to obtain an outside line but
it is still not possible to get through to the line, your system
might not be according to the regulations. Therefore some
technical settings have to be changed on your fax machine.
Please refer to your Fax Call Centre.
Page 13
13
Grundeinstellung
! If you press a wrong key by mistake, press the STOP
key as often as necessary to return to the original
position.
If you want to keep a note of the factory settings on your
machine for later, we recommend printing out a function
list before you change any of the settings (press MENU
three times).
If you want to delete your individual settings, you can do
so in function 45 Service code (see chapter Hints and Tips
/ Service code).
“Your name” and “your telephone number” are transmitted
at the top of each page (the first 4 mm) together with the
date, time and page number.
HELP function
1 Press HELP/INSTALL twice. You will receive a printout
explaining how to use the most important functions. It also
specifies how to obtain further HELP pages concerning
other features of your fax machine.
Time and date
1 Select function 12 by pressing MENU and numbers 1 and
2.
2 Press OK.
3 Enter the correct time using the number keys (e. g.
0915 for 9:15). Your fax machine will now ask you for
the correct date (e. g. 150502 for May 15, 2002).
4 Press OK.
Entering your number
Use # or * to enter the “+”, that is often used in international
fax numbers in front of the country code, and > to enter a space.
The maximum number of digits you can use for your number
is 20.
1 Select function 13 by pressing MENU and numbers 1 and
3.
2 Press OK.
3 Enter your telephone or fax number (Country codes: UK
+44, Ireland +353, Hong Kong +852, Singapore +65).
4 Press OK. Your number is now stored.
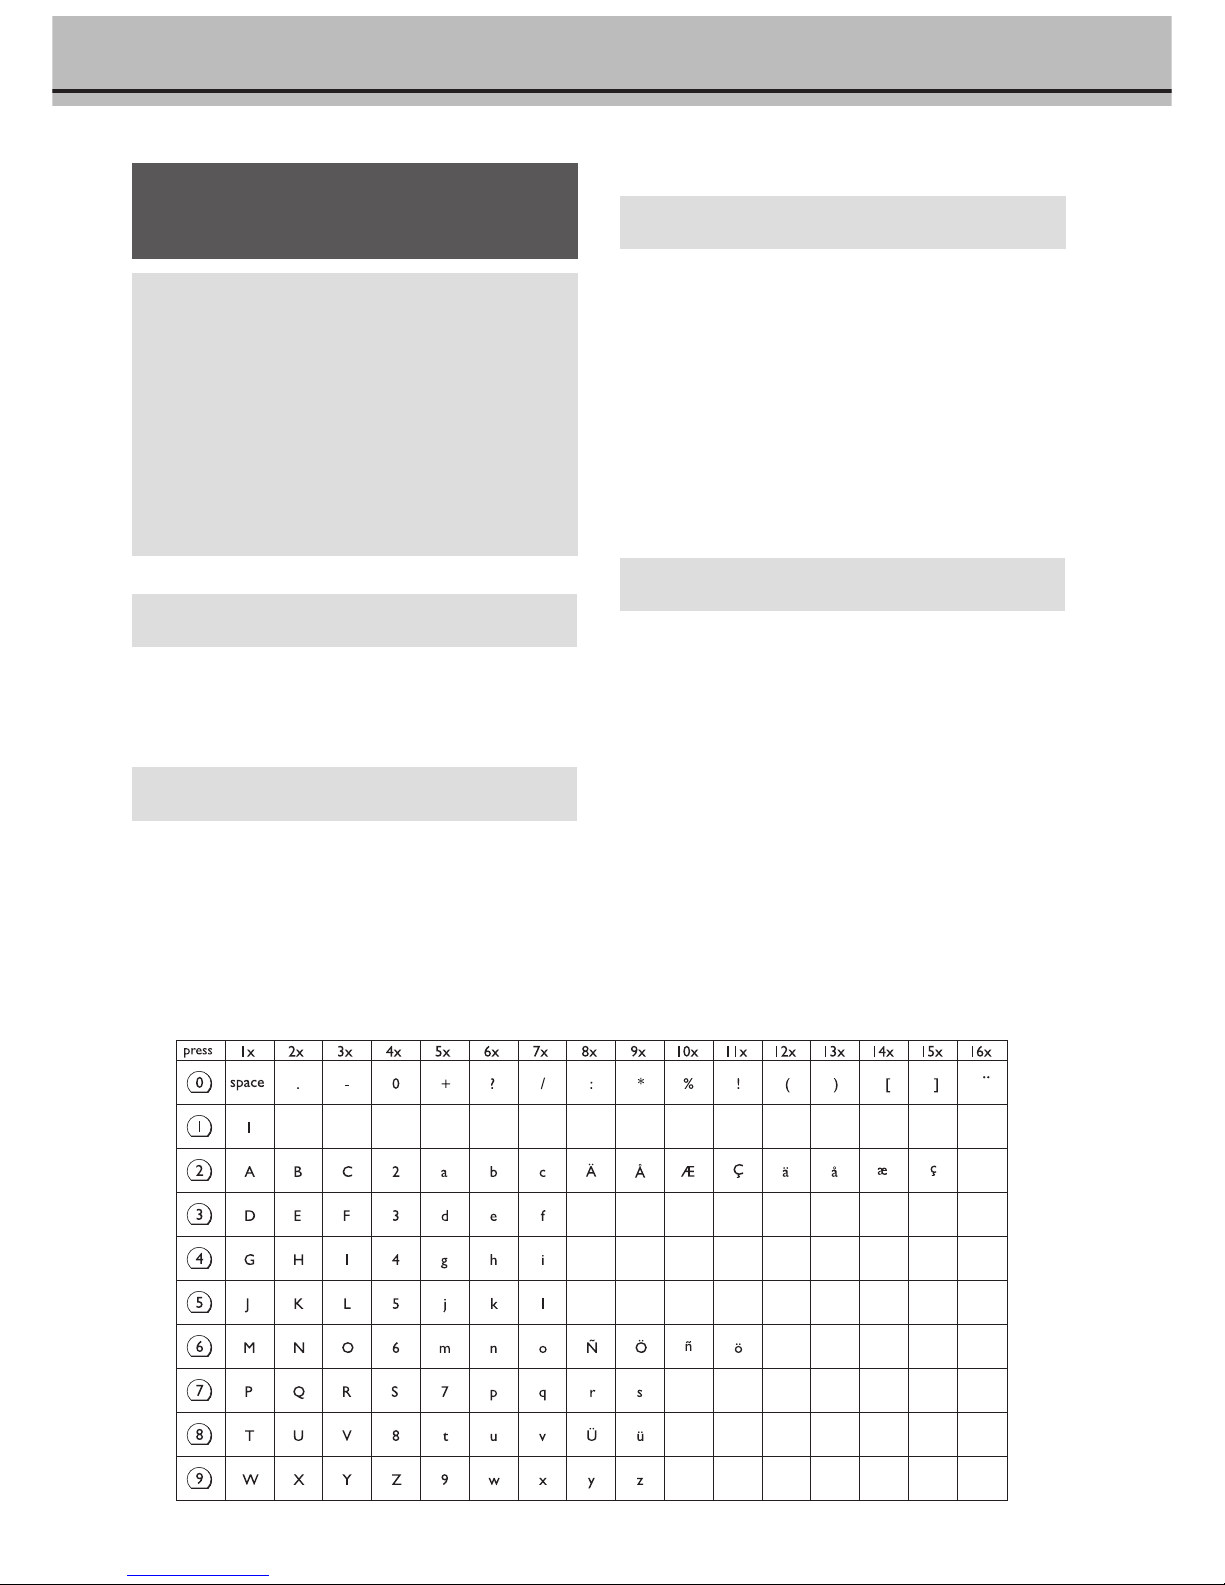
Entering your name
When you enter a name (maximum 32 digits), the number keys
are used to enter letters. Every key has a number of different characters. The table below shows which characters are entered by
which key. Every time you press a particular key you will call up
the next character. After the last character the sequence starts again
from the beginning.
1 Select function 14 by pressing MENU and numbers 1 and
4.
2 Press OK.
3 Use the dial pad to enter a name. After pressing > the cursor
moves one position to the right.
4 Confirm with OK. Your name is now stored.
3 Basic functions
Page 14

14
Correction
If you have entered a wrong letter or number in function 13 or 14
you can correct the mistake during the entering as well as later. If
you want to make your corrections later you have to select the
functions for entering numbers or names once again.
1 Position the cursor on the right side of the character you
want to change with </>. Press CLEAR to delete the
character. A long press on CLEAR will delete the whole line.
2 Now enter the correct characters by using the keyboard.
Confirm with OK.
Language of display
1 For selecting the language of the display and the reports,
press MENU and numbers 1 and 1 and press OK.
2 Select the desired language with </> and confirm with
OK.
Type of ring signal
You can choose between ten different ring signals.
1 Enter function 44. Press MENU and numbers 4 and 4
and then OK.
2 Select the desired ring signal with 0 to 9.
3 Confirm your setting with OK.
Volume of the ring signal
Y
ou can adjust the volume of the ring signal if the fax machine
is in stand-by mode or if it is just ringing. Please note that
different volumes can be set in S and M mode (see Fax
switch).
1 By pressing </> the display shows the current setting for
about three seconds.
2 Change the volume by pressing </> until the desired
volume is achieved.
Volume of the loudspeaker
1
You can adjust the volume of the loudspeaker at any time
by pressing DIAL (without built-in answering machine)
or l (with built-in answering machine).
2 By pressing </> the display shows the current setting. If
you wish to adjust the displayed value, press </> until the
desired volume is achieved.
3 Finish your entry by pressing STOP.
Page 15
15
Die Faxweiche
The intelligent fax switch enables you to phone and fax
from the same telephone connection and use additional
devices. The fax switch separates fax and voice messages.
For example, it can receive fax messages silently, i. e.
without ringing to avoid causing a disturbance.
The operating modes S and M for day and night
operation allow you to decide on different modes during
the day and at night; how often the machine should ring
prior to receipt of faxes or before the answering machine
is turned on.
Example:
During daytime it is assumed that calls should ring.
After a set time the fax reception is turned on and
messages can be left on the (internal or external)
answering machine. At night it is assumed that disturbances are minimised. Faxes are then received silently
and calls ring more quietly.
You may change-over the operating mode between S
and M of your fax machine automatically using the
timer function U. The integral clock ensures that your
machine is changed over at 10 pm to M and at 6 am to
S. Of course you may adjust these times to suit your
own requirements. The display allows you to check the
current operating status. You change-over between S
and M by briefly pressing S/M until the display shows
the required symbol.
Setting the Mode
SMSM
SMSM
SM
with built-in answering machine
Display Possible settings
TAM RINGS:
0, 1, 2, 3, 4, 5, 6,
7, 5/2
FAX RINGS:
0, 1, 2, 3, 4, 5,
MANUAL RECEPTION
RINGER VOL.:
Low, Medium,
High
LISTEN-IN:
ON, OFF
1 Select function 31 (Day) by pressing MENU and numbers
3 and 1. Confirm with OK.
2 Select number of rings with u before your answering
machine will be activated.
TAM RINGS: 5/2
3 Confirm your entry with OK.
4 Now enter the number of ringing signals, after which the
automatic fax switch should accept the call and separate faxes
from voice messages. Although the caller will continue to
hear slightly different ringing tones after this time, charges
will already accrue.
FAX RINGS: 5
5 Confirm your entry with OK.
6 Using </>, determine the ringer volume when receiving a
call. Press OK.
RINGER VOL.:HIGH
7 Select with </> if the caller should be heard while leaving a
message.
LISTEN-IN: ON
8 Confirm with OK. To activate mode M select MENU 32
(Night) and repeat steps 2 to 7.
without built-in answering machine
Display Possible settings
TOTAL RINGS:
0, 1, 2, 3, 4, 5,
6, 7
FAX RINGS:
0, 1, 2, 3, 4, 5,
MANUAL RECEPTION
RINGER VOL.:
Low, Medium,
High
1 Select function 31 (Day) by pressing MENU and numbers
3 and 1. Confirm with OK.
2 Using u, set the total number of rings before the fax
reception commences.
TOTAL RINGS: 5
3 Confirm your entry with OK.
4 Now enter the number of ringing signals after which the fax
switch should accept the call and separate faxes from voice
messages. Although the caller will continue to hear slightly
different ringing tones after this time, charges will already
accrue.
FAX RINGS: 5
5 Confirm your entry with OK.
6 Using u, determine the ringer volume when receiving a
call. Press OK.
RINGER VOL.:HIGH
4 Fax switch
Page 16

16
7 Confirm with OK. To activate mode M select MENU32
(Night) and repeat steps 2 to 7.
If you cannot receive any faxes, you may have set both
ringing signal numbers too high (see points 2 and 4). Set
both ringing signal numbers to values lower than five .
If you are using other devices apart from the fax machine
(telephones, answering machines), which are not connected
by serial links (see Glossary), the ringing pattern may
change as follows: Other devices ring as often as set under
FAX RINGS
. Your fax will ring as often as set under
TAM RINGS
or
TOTAL RINGS
.
Special settings
Silent fax reception
FAX RINGS: 0
To receive faxes without any ring signals, set the amount of ring
signals in FAX RINGS to 0.
Completely silent operation
You should use this option only with devices with integral answering machines. If, for example, you do not wish to be dis-
turbed by calls or faxes arriving at night, you may set the number
of ringing signals to 0. Faxes are then received silently and calls are
immediately answered by the answering machine, provided you
have switched the answering machine on.
For devices without integral answering machine the fax switch is
turned off, i. e. your device immediately switches over to fax reception and will not ring, when calls are received (the caller hears
a whistling tone).
For this reason calls cannot be recorded by any external
answering machine which may be connected.
Manual fax reception
MANUAL RECEPTION
If you select MANUAL RECEPTION, then faxes are only automatically printed out by your fax machine, if you activate
the fax reception by pressing START. This may be sensible for
example, if you wish to receive your faxes by modem at your
computer.
Economy operating modeanswering machine*
TAM RINGS: 5/2
If you select option 5/2 at
TAM RINGS:
, then your answering
machine will start after two ringing signals instead of after five,
when you receive messages. Via the remote access function you
have the opportunity to check, whether your answering machine
holds any messages without incurring telephone cost (if your answering machine turns itself on after only two ringing signals you
will know, that new messages have been left). After listening to
your new messages your answering machine will, at the next call,
switch itself on again after five ringing signals.
Mode
UU
UU
U
The default operating mode set in the factory is S. You may
also select operating mode U. In mode U your machine
switches automatically between S and M. The factory setting provides that your machine switches at 10 pm to M and
at 6 am back to S.
UU
UU
U activating/deactivating
1
If you want to switch on function U, press SM for two
seconds, until you hear a confirmation tone and U
appears on the display.
2 If you want to switch off function U, press SM for two
seconds, until you hear a confirmation tone and U disap-
pears. On the display appears S or M.
UU
UU
U configuring/checking
1 Select function 33 by pressing MENU and numbers 3
and 3. Press OK.
2 Enter the time at which you want your fax machine to
switch automatically to S and confirm with OK.
3 Enter the time at which you want your fax machine to
switch automatically to M. To confirm your settings press
OK.
EASYLINK
Setting additional devices
The three codes below will help you, when you receive a call on
an additional telephone and wish to transfer a call or fax to your
fax machine.
1 Code for starting your fax machine from another telephone:
*5
2 Serial connection (see Glossary): Code for transferring a call
from another telephone connected serial to your fax
machine: *0
Please note that when using this code you have to replace
the handset of your additional device after you have entered
the code. See chapter Telephone / Call transfer.
3 Parallel connection (see Glossary): Code for turning off the
answering message, if the answering machine is switched on:
** For fax machines without built-in answering
machine this code is used to switch off the fax machine.
To be able to use this function you must set your additional or
cordless telephone to tone dialling. If your telephone service is
not compatible with this dialling method and requires pulse dialling, you must temporarily set your additional device to transmit
tone dial signals. Please refer to the operating instructions of your
additional device to find out how to make this temporary adjustment.
* only with built-in answering machine
Page 17
17
Die Faxweiche
! Only change the specified EASYLINK codes if
absolutely necessary!
If you need to change the pre-set codes, select MENU 34 and
press OK. Enter a two digit code. The first digit should be the
sign * or #. Confirm with OK. Execute this procedure for
each of the three codes.
Please note that the three EASYLINK codes must be
different. Otherwise on the display appears:
CODE NOT OK
External answering
machine
Connect the answering machine as described in chapter Installation / Connecting additional devices.
To provide for the optimum performance of an external answering machine, set this device to ring once or twice. To avoid
the automatic acceptance of calls by the fax switch, you must
set
FAX RINGS:
and
TOTAL RINGS:
to a value at least two
ringing signals higher than the setting of the external answering machine.
If you switch off the external answering machine, calls are accepted by the fax switch (see sub-heading Setting the operating mode SM / without built-in answering machine)
Setting example:
ANSWERING MACHINE RINGS 2
FAX RINGS 4
TOTAL RINGS 4
Tips:
1 The answering message of your answering machine should
be shorter than 10 secs.
2 Please avoid music in your answering message.
3 If your fax machine is unable to recognise older fax machine
models, which do not transmit those signals that are commonly used in today's technology, you should advise your
callers in your answering message to press * and 5
followed by START to commence the fax reception.
4 If the automatic fax reception is impossible, press START to
manually begin receiving the fax.
5 If your answering machine provides an “economy function”
(e. g. a function which changes the number of ringing signals
as soon as a message was recorded), you should preferably
switch this function off.
6 It is possible that the answering machine not only counts the
messages received, but also the number of fax calls.
7 Please ensure that the code for starting the fax reception from
other telephones (factory setting * and 5) is not the same
as for remote access to recorded messages. Where necessary
the code for function 34 may be changed (see sub-heading
EASYLINK).
8 If your answering machine accepts the call but your fax
machine does not stop ringing, try and install your answering machine by serial connection, for example by connecting
it to the same telephone socket or to the EXT. port of your
fax machine (see chapter Installation / Connection of
additional devices).
9 If your answering m/c cannot accept calls, your fax machine
will automatically start to receive faxes after the no. of ringing
signals set in TOTAL RINGS has been received.
10
If your external answering machine records fax signals, but
your fax machine cannot receive any faxes, check the
connection of your external answering machine. Connect the
external answering machine to the same telephone socket or
to the EXT. port of your fax machine (see chapter Installa-
tion / Connection of additional devices).
Page 18

18
If you enter a wrong digit, delete it by using CLEAR.
Then lift the handset.
The R key allows you to use various services offered by
the telephone service provider (call waiting, toggling
calls, etc.). Contact your telephone service provider for
more information.
If you have not connected your fax machine to the mains,
it will not function at all—even for making telephone
calls.
Making a call
1 Dial the desired number.
2 Lift the handset. If you want to dial with the handset
replaced press DIAL/l. As soon as the other party
answers, lift the handset and speak.
You can also first lift the handset and then dial the
number.
Redial
With PP you can redial the last five numbers you have dialled previously.
1 Press PP.
2 Press </> until desired number appears on the display.
If you want to edit the number press OK and make the
desired changes.
3 Lift the handset or press DIAL/l to dial.
Delete stored numbers
With CLEAR you can delete the numbers you do not need
anymore from the redial memory.
1 Briefly press CLEAR.
2 Choose with </> whether to delete only the last
number displayed or all five numbers.
3 Press OK to execute the cancel command.
Short dial
nn
nn
n
There are short dialling keys available, which you can use to
store numbers you dial frequently.
Storing numbers
1 Press n for two seconds.
2 Choose a number between 0 and 9.
3 Use the dial pad to enter a name. After pressing > the cursor
moves one position to the right. Press OK.
4 Enter the telephone number you wish to store and confirm
with OK.
Using short dial
1 Press n and choose a number between 0 and 9. The
stored name or telephone number appears on the display. In
order to edit the number press OK and make the desired
changes.
2 Lift the handset. In case you want to send a fax message,
press START.
Correcting entries
1 Press n and select an entry by using the number
keys. The stored name and number appear on the display.
2 Press n for two seconds. Select wrong character
with </>.
3 Press CLEAR to delete wrong character.
4 Enter desired character and confirm with OK.
Deleting entries
1 Press n and then a key between 0 and 9. The stored
name or telephone number appears on the display.
2 Press CLEAR. Select with </> whether to actually delete
entry.
3 Press OK to delete entry.
Telephone book
aa
aa
a
The telephone book function on your fax machine has a capacity for about 200 numbers and names. The exact figure
depends on the length of each entry. You can also store numbers during a telephone conversation.
Storing numbers
1 Press a for two seconds.
2 Use the dial pad to enter a name. After pressing > the cursor
moves one position to the right. Then press OK.
3 Enter a telephone number and confirm with OK.
Using the telephone book
1 Press a.
2 Select with u. The stored name or telephone number
appears on the display.
3 Pick up the handset. In case you want to send a fax message,
press START.
5 Telephone
Page 19

19
Das Telefon
Correcting entries
1 Press a and select the entry you want to edit with
u (see above).
2 Press a for two seconds. Select wrong character with
u.
3 Press CLEAR to delete wrong character.
4 Enter correct character and confirm with OK.
Deleting entries
1 Press a and select entry you want to delete with u.
2 Press CLEAR. Select with u whether to actually delete
entry.
3 Confirm with OK to delete entry.
Editing stored numbers may be particularly relevant
when, for example, the number of a net operator should
be stored as pre-fix code.
List of telephone numbers
1 Choose function 42 to print a list of your stored Short dial
and Telephone book numbers. Press MENU 4 2 .
2 Press OK. Your fax machine will then print out the list.
Call transfer
You can transfer an existing phone call from your fax machine
to an additional telephone and vice versa. This description
only refers to telephones connected serial (see Glossary).
From fax machine to an additional telephone
1 Press T during the phone call and replace the handset.
2 Your other telephone will ring for about 30 seconds. If the
handset is not lifted in time, the fax machine takes over the
call again and rings for about 20 seconds. If you do not lift
the handset in time the call will be disconnected.
From an additional telephone to the fax machine
1 Press * and 0 during the phone call. If the connection
is established successfully, you will hear a tone. Replace
the handset of the additional telephone within three
seconds.
2 Your fax machine will ring for about 30 seconds. If the
handset is not lifted in time, the additional device takes
over the call again and rings for about 20 seconds. If you
do not lift the handset in time the call will be disconnected.
Hands-free operation
(only with built-in answering machine)
You can make a call without using the handset or let persons in
the same room participate at the conversation. Therefore press l
after having dialled or during the call. Replace the handset. The
microphone and the loudspeaker are being activated.
Mute
You can mute the microphone of the handset so that the other
party cannot hear you any more.
1 Press T. You will still hear the person on the other
end of the line at reduced volume.
2 If you want to continue your conversation, press T
again.
Calling line identification
(not available in all countries)
Your fax machine is capable of showing the caller’s telephone
number before you lift the handset. To have this feature at your
disposal you must subscribe to it via your telephone service provider. The use of this feature is subject to network selection.
1 The telephone numbers of the last ten received calls are
stored.
2 To call up the caller’s list keep PP pressed for two
seconds.
3 Using </> you can now step through the entries. The
new entries are marked with an “
*
”.
4 To call back the displayed number just lift the handset.
Your fax machine starts dialling.
5 To delete an entry press CLEAR. Choose with </> and
confirm deletion by pressing OK.
If you set
FAX RINGS
with MENU 31 or 32 to 0,
then the telephone number cannot be displayed on your
external telephones.
Page 20
20
The following points are the most common causes of
errors when sending faxes! Don’t send
... pages from newspapers (printer’s ink).
... stapled pages or pages held together with
paperclips. Remove all staples and clips before
sending.
... creased or torn pages.
... wet pages or pages with corrections made
with correction fluid; dirty pages or pages with
a glossy or laminated surface.
... pages joined with sticky tape or glue, with
adhesive stickers such as “post-it®” notes, or
pages which are too thin or too thick.
... pages written in faint pencil, crayon, chalk
or artist’s charcoal.
Documents smaller than A5 risk getting stuck in the
machine.
Write clearly and legibly. Only use pens with dark ink
(black/dark-blue, not yellow/orange/light green).
Documents printed on your fax machine are visible on
the used up ink film. In case of confidential texts the ink
film should be destroyed after usage.
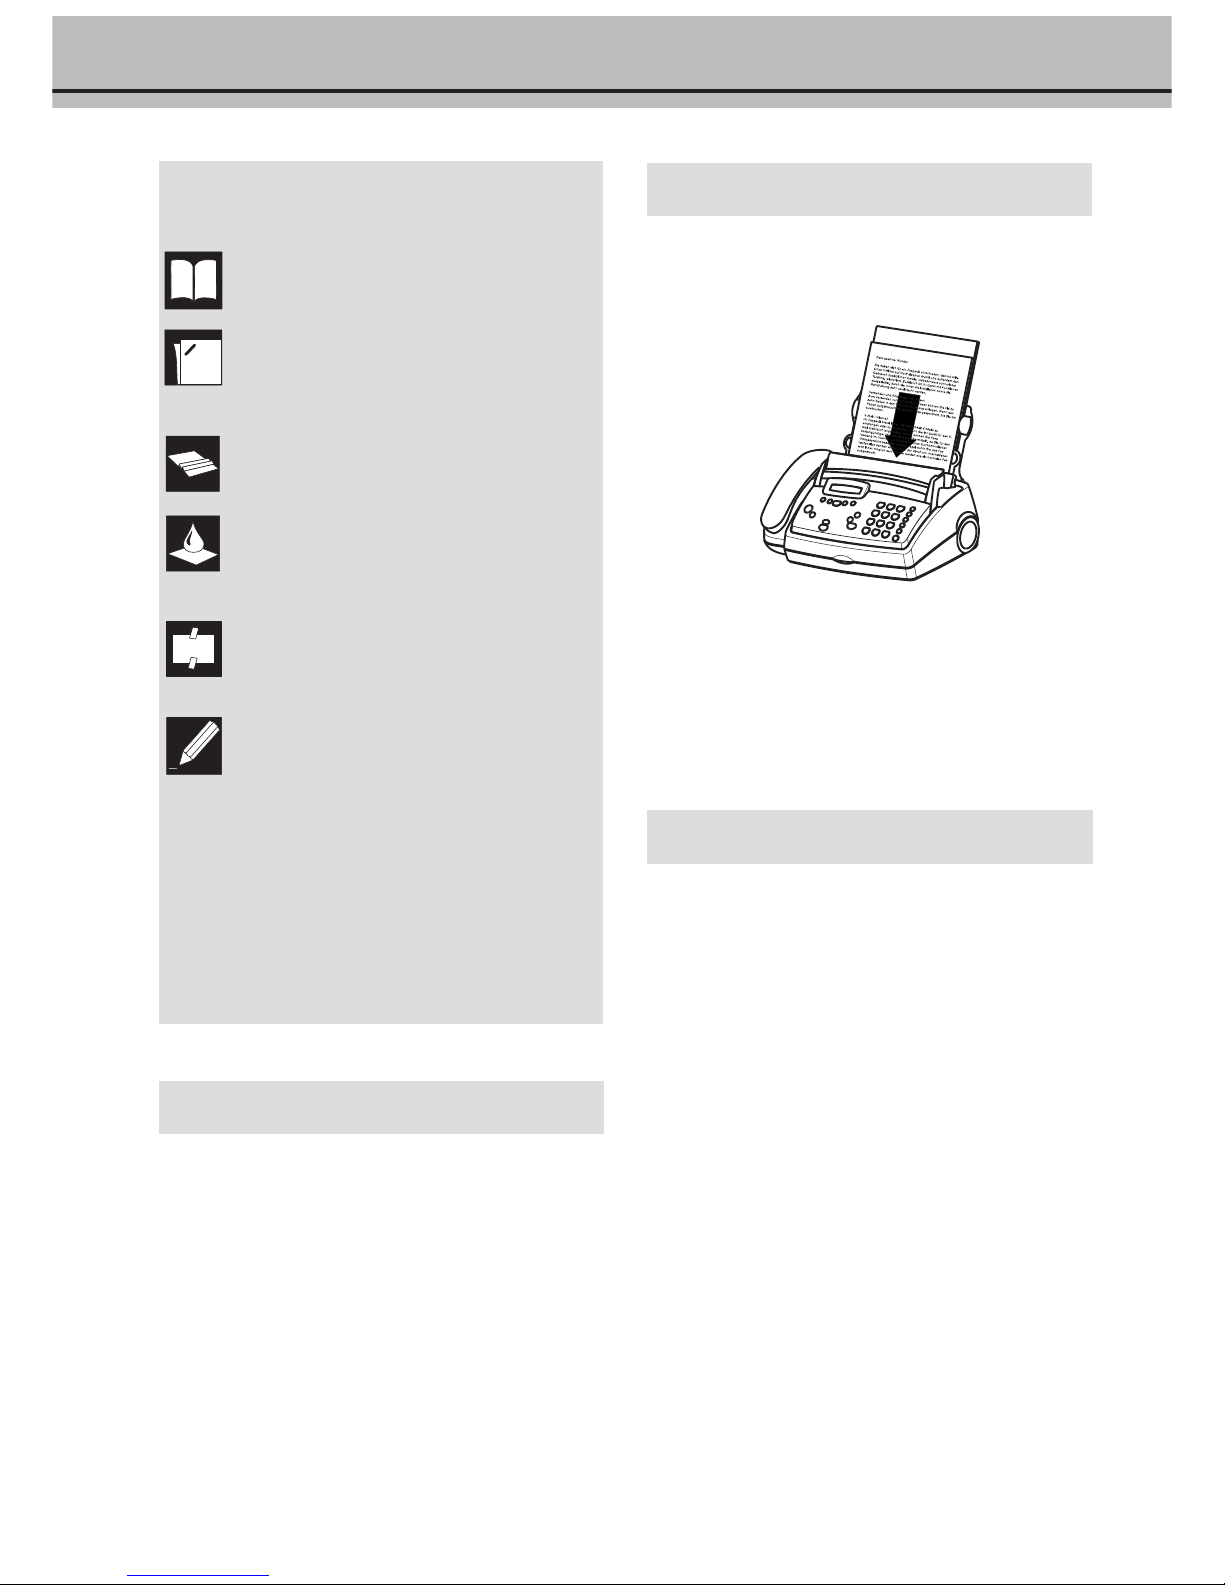
Feeding documents in
1 To avoid more than one page being fed at the same time,
first fan out the stack and then straighten it on a smooth
surface.
2 Insert your documents (max. 10 sheets) loosely with the
printed side up into the document feed slot. In case a
document jam occurs, remove the scanner from the
device and remove the document.
Sending faxes
1 Dial the number you require.
2 Insert your documents face up into the document feed
slot (max. ten pages).
3 If you want to select a higher resolution, press FINE/
PHOTO.
4 Press START. Transmission now begins. In case the
connection is not successful your fax machine will redial
later.
5 If you want to interrupt transmission, press STOP.
Broadcast
This feature is very useful, in case you want to send the same
document to more than one party (Circular send).
1 Insert the document face up into the document feed slot.
If you want to select a higher resolution, press FINE/
PHOTO.
2 Select MENU 25. Press OK. The inserted document
will be stored into the memory.
3 Enter the first telephone number and press OK. This will
be your first entry in the recipient list. Repeat the procedure until you have entered data for max. five recipients.
4 To send the document press START. The document will
be sent successively to every party entered. If transmission
to one of the recipients is not possible your fax machine
will
continue transmission according to the list and retry
transmission to the party missed. After transmission a
transmission report will be printed out automatically.
6 Fax
Page 21

21
Das Fax
Image quality
If you want to improve the image quality you can choose between the options FINE
ff
ff
f (for small print or fine drawings)
and PHOTO
FF
FF
F (for photographs and pictures). Press FINE/
PHOTO as often as needed until the pointer for the desired
resolution lights up. Document transmission will take longer
in the FINE/PHOTO operating mode. After transmitting or,
if there is no document in the feed slot, after 40 seconds the
fax machine will automatically return to standard resolution.
Transmission report
error report
Your fax machine can print a transmission report every time
you have sent a document. This way you are given confirmation that your document has been received. If an error occurs
during transmission you will be informed on the error report.
The printing of a transmission report can be switched on and
off while the error report is always printed.
1 Call up function 43. Press MENU 4 3 and OK.
2 Select with </> and confirm with OK.
Overseas function
Transmission
Your fax machine automatically adjusts its transmission speed
to the quality of the telephone line. Especially in case of overseas transmissions this process can take more time. If the poor
line quality is already known it is useful to set the machine at
a slower speed from the very beginning using </> in function 21. This will save time and charges the automatic adjustment would require.
1
Press MENU, 2 1 and OK.
2
Select a slower speed with u and confirm with OK.
Size compression
To make sure that received faxes that are slightly longer than
A4 size are printed on one page, these pages are slightly reduced vertically. If you do not wish to use this facility, you
can switch off reduction using function 46.
1
Press MENU, 4 6 and OK.
2
Select with u and confirm with OK.
Fax journal
The fax journal is a list of the last ten received and transmitted
faxes.
1 Call up function 41 by pressing MENU, 41 and OK.
2 Select with </> if, and when the fax journal will be
printed out (immediately or after ten transmissions).
3 Confirm your choice with OK.
Polled reception
By means of this function documents which have been prepared for collection from another fax machine can be retrieved.
Quick polling
1 Dial the desired number with the handset replaced and
press START for a longer time.
2 In case you want to enter a sub address or a code as well
(check polling with code) enter the telephone number
first and close with R. Attach desired sub address or code
and press START for a longer time. (e. g.
12345R17Rcode or
12345RRcode).
Polling with code
If your correspondent has entered a code to protect the document to be retrieved please follow this procedure:
1 Select MENU 2 2. Press OK.
2 Enter the code and confirm with OK.
3 Enter the telephone number and press START. In case it
does not work try to poll manually. Lift the handset, dial
the required number and then press START.
Polling codes work in accordance with the ITU international standard. However, there are manufacturers who
use other processes and whose machines are therefore
not compatible.
If you want to send faxes to fax databases or if you want
to poll from these, some databases have a sub-address
which you can add to the telephone number. This will
save you money in telephone charges. First enter the
telephone number of the database and then press R.
Then enter the required sub-address. If you are not sure
whether your fax polling service supports sub-addresses,
please contact your polling service operator.
Page 22

22
Polling send
Y
ou can allow a document to be polled from your fax ma-
chine.
1 Insert the document in the document feed slot.
2 If you wish to protect the document from unauthorised
access, enter a code with function 23. Press MENU, 2
3 and confirm with OK. The document can now be
polled by a person in possession of this code. You can still
make telephone calls while this function is activated.
3 The operation is interrupted as soon as you remove the
document.
Send later
If you wish to make use of cheaper telephone rates, or if your
fax correspondent is only available at particular times, you can
program automatic transmission of a fax at a later time (within
24 hours).
1 Select function 24 by pressing MENU 2 4 and OK.
Enter the time when you wish the document to be sent.
2 Press OK and insert the document.
3 Dial the desired telephone number and then press
START or OK.
4 The fax machine is now ready to send the inserted
document. You can still make telephone calls while this
function is activated.
5 If you remove the inserted document the stand-by mode
is cancelled.
Paperless fax reception
If there is no paper in the paper feed mechanism or if the ink
film is finished, any incoming fax will be received into memory
(storage capacity for devices without answering machines is
approximately 25 pages, for devices with answering machines
approximately 50 pages according to ITU-TS Test document).
The symbol h appears on the display to indicate that the
memory contains documents. As soon as paper and/or ink
film are loaded, the fax machine automatically prints out all
documents in memory.
When a fax message has been fully printed, it is deleted automatically from memory. If the printing process is interrupted,
all fax messages not printed completely remain in memory. If
the memory is full, no more pages can be stored. The red
display lamp flashes and on the display appears:
MEMORY FULL
Page 23
23
Weitere Funktionen
Scanning
The detachable scanner allows you to copy or fax documents
which cannot be fed into the fax machine due to their size or
thickness (e. g. books, magazines). The scanned area can be
printed out or sent as a fax message.
! Please do not touch the glass on the bottom of the
scanner with your fingers to avoid fingerprints which
might affect the scanning quality (see chapter Hints
and Tips / Care and maintenance instructions).
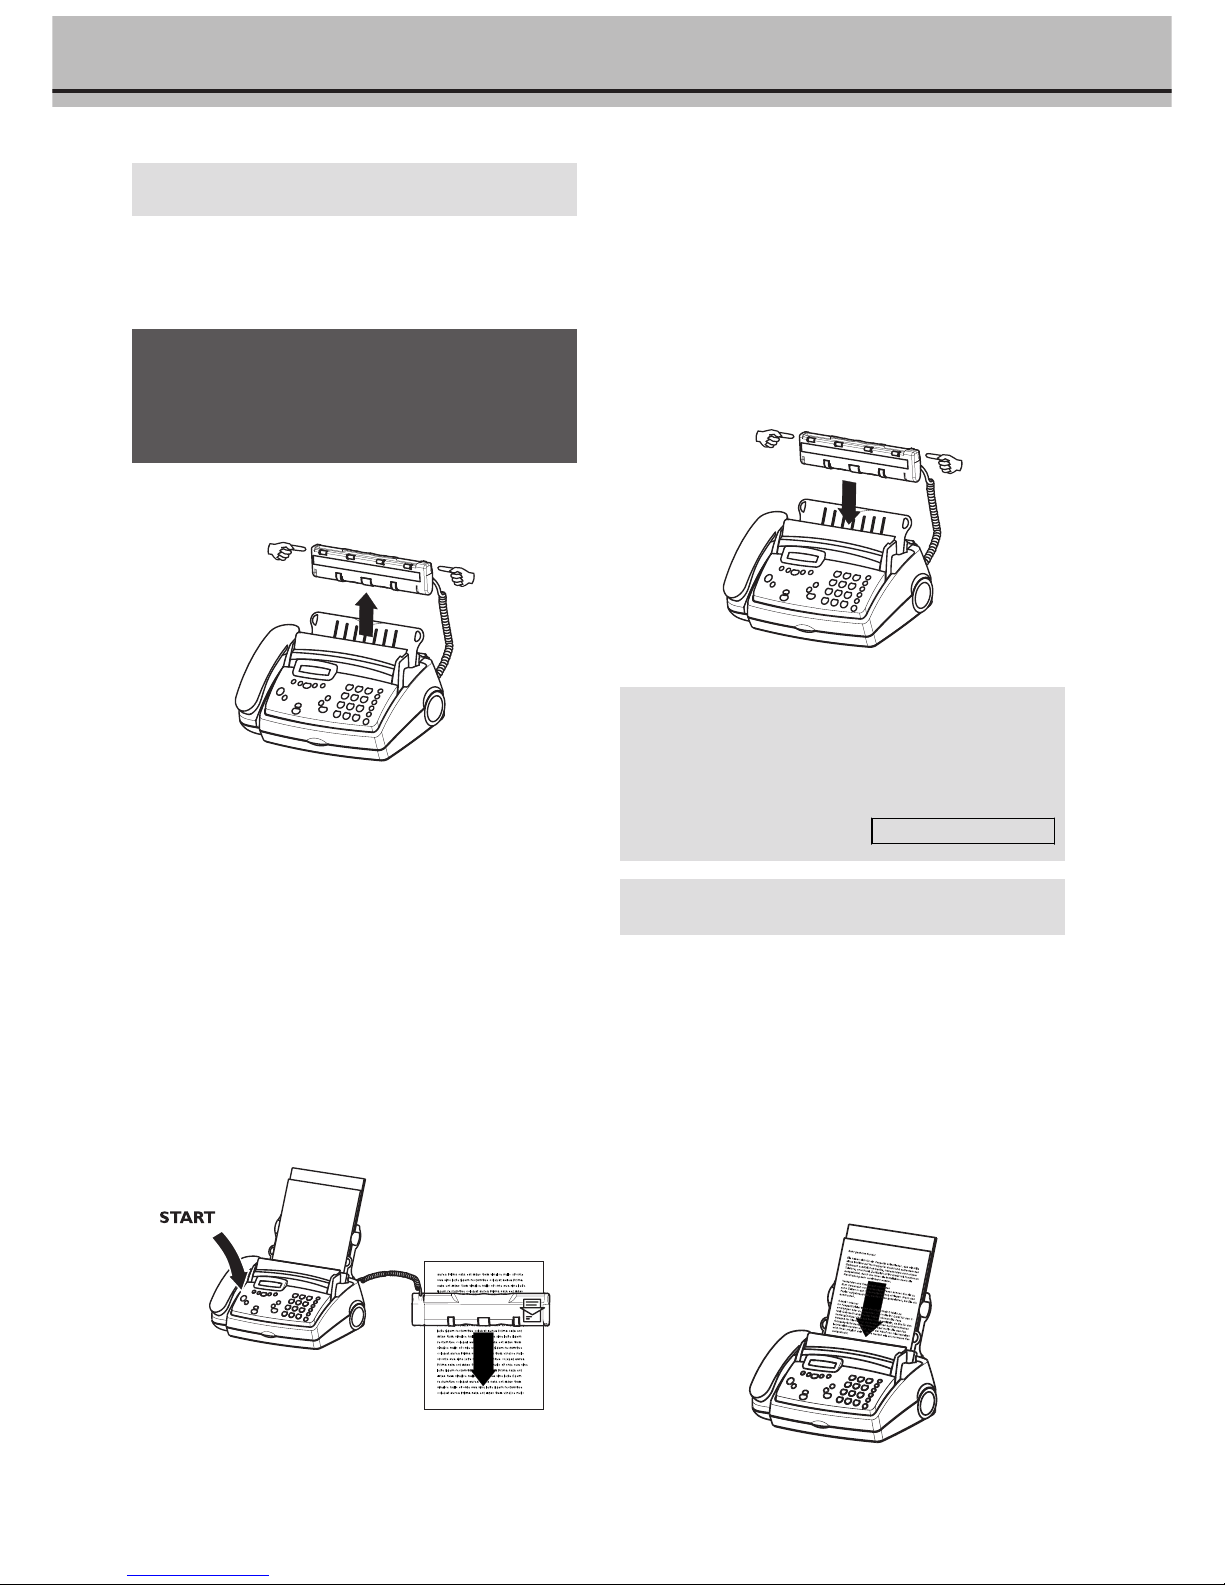
1 Detach the scanner from the fax machine by pulling it
forward and then lifting it upwards on both sides.
2 If you want to improve the image quality, you can achieve
this by pressing FINE/PHOTO. However, this will scan
the document at a slower speed (see chapter Fax /Image
quality).
3 Press START. Whenever the machine is ready for scan-
ning you will hear a confirmation tone.
4 Press the scanner slightly against the document. Slowly
move the scanner over the document from top to bottom.
The available memory capacity is being indicated on the
display while scanning. The correct speed for moving the
scanning device is indicated with short confirmation
tones. If you move too fast, you will hear a warning signal
indicating that the scanning process of the document was
not successful. Start the scanning again.
5 After the scanning process is completed the document will be
printed if you press START or automatically after approxi-
mately four seconds. Documents larger than A4 will be split
up into more than one page automatically.During the
printing process printed information will be simultaneously
erased from the memory. Press STOP or CLEAR to
terminate printout.
6 Place the scanning device face front into the fax machine
after use. Press both sides of the scanner down until you hear
a definite click.
The best copy quality will be achieved if you are copying
with the scanner inserted (see chapter Copying).
In case you scanner was not put in correctly the indicator
lamp flashes and on the display appears
CHECK SCANNER
Copying
You can use your fax machine to make copies of an original. You
may also choose PHOTO F and FINE
ff
ff
f resolution (see chap-
ter Fax / Image quality).
1
Place your documents face up in the document feeder.
The documents must rest against the document guide. To
prevent several sheets being drawn into the machine at
once, please straighten the documents to the same height
before inserting them in the document feed (see chapter
Fax / Feeding documents in). You can load up to ten
pages at once.
7 Scanner
Page 24
24
2 Select the desired resolution with FINE/PHOTO. To make
only one copy of the original, briefly press START. The
copying process starts immediately.
In order to make more than one copy press START/COPY
(for at least two seconds). The display will show the actual
number of copies. If you want to change this figure enter the
desired number with the number keys (max. 50). Press
START or OK.
3 Choose whether to reduce or enlarge the document in size
when copying. Your machine provides the following options:
ZOOM ENLARGE:200
ZOOM ENLARGE:150
ZOOM REDUCE: 75
ZOOM REDUCE: 50
ZOOM NORMAL: 1:1
Select the desired option with </> and confirm with OK.
The machine stores the first page of the document into
memory and starts copying. If desired number of copies has
been achieved, the next page will be stored etc. Automatic
sorting is therefore not an option!
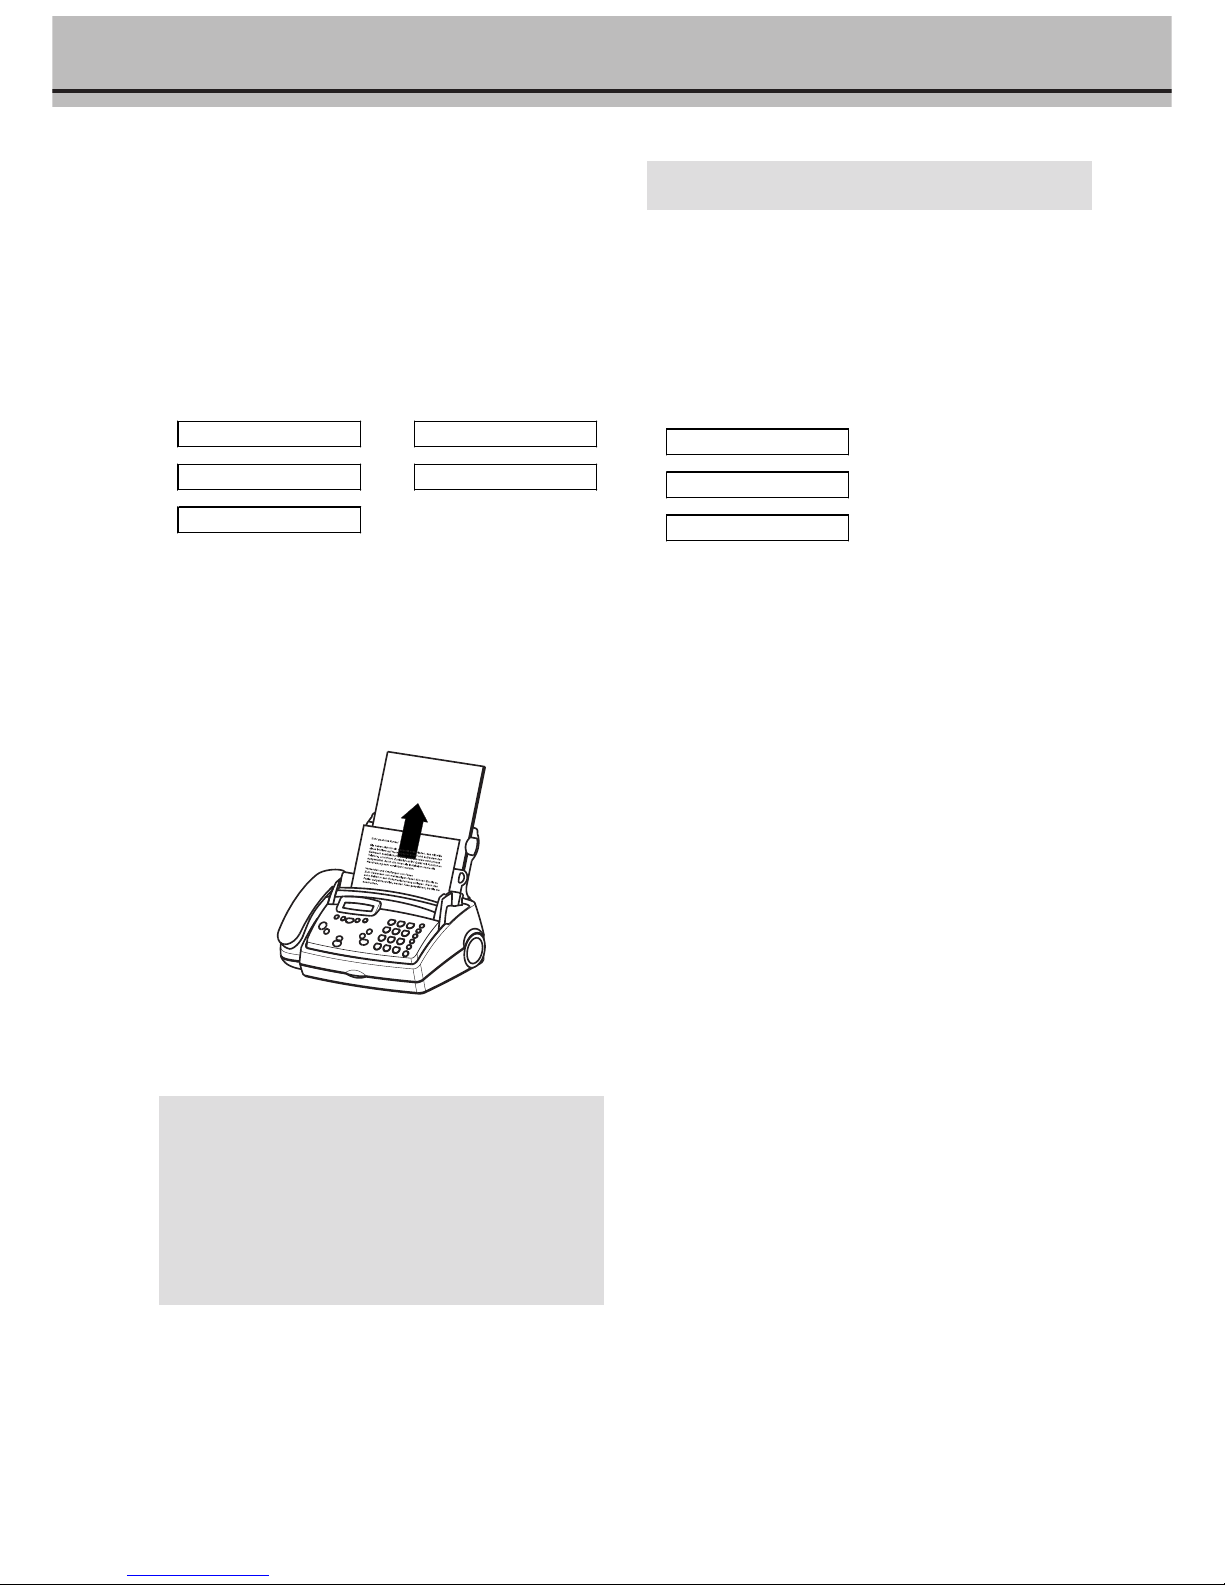
4 The document that has been pulled through will come out
on the top side of the fax machine.
5 To stop copying press STOP. The document and the copy
will be ejected.
You can only enlarge or reduce documents with the
scanner inserted.
In case a paper jam occurs or the ink film or the
memory capacity is used up the copying process automatically stops.
If documents have jammed, first remove the scanner
from the machine and then the document. Refit the
scanner according to instructions.
Contrast
The factory default for this feature has been set to medium.
With function 47 you can adjust the contrast quality (brightness) for documents you want to copy or send as a fax message, e. g. dark photos or forms with coloured background.
1 Press MENU, 47 and OK.
2 With </> you can choose between three different
options:
CONTRAST: LOW
CONTRAST: MEDIUM
CONTRAST: HIGH
3 Confirm your choice with OK.
Page 25

25
Der Anrufbeantworter
8 Answering machine
Your fax machine is equipped with a digital telephone
answering machine. All recorded messages are stored in a
solid-state electronic memory which has a recording
capacity of up to 30 minutes. There is neither a magnetic
tape nor a cassette.
Your answering machine is factory-programmed with a
recorded outgoing message. If you want to record your own
outgoing message, proceed as described under “Recording a
message”. Write down your messages before you record
them.
Make sure that your fax machine stands on a hard, flat
surface, because otherwise the microphone may be covered.
Switching on and off
Activate or deactivate your fax machine with ON/OFF. Activate mode is indicated with the symbol b on the display.
Recording a message
1 Hold down RECORD for two seconds. Press RECORD
again, until you hear a confirmation tone. Lift the handset
and start to record your message.
2 A black bar indicates you how much memory is available for
the outgoing message (max. 20 seconds).
3 Stop recording by pressing RECORD or STOP.
4 The new answering message is automatically replayed. By
pressing </> you can change the volume of the message.
5 To hear the message again, press RECORD for a while (two
seconds) and then PLAY.
Duration of recording
1 Select MENU 51 and press OK.
2 Press </> to choose between 30, 60, 120 seconds or the
AUTO mode (unlimited recording time). Please note that
AUTO mode is not available in all countries.
3 Confirm with OK.
Listening to messages
1 If PLAY flashes, messages have been recorded for you. Press
PLAY to listen to the first message. The date and time the
message was received will be shown on the display.
2 The next message will be replayed if you press PLAY while
listening to any message. (If you want to switch to the first
message, while listening to the other messages, press 1.
3 After listening to your messages PLAY will stay on until all
messages have been erased.
Play back volume
1 Press </> while playing back messages. The current
volume setting will be displayed.
2 Press </> to obtain the desired volume.
Deleting messages
Single messages
1 If you want to delete the message which is currently being
played, press CLEAR.
2 You will be asked on the display if you really want to delete
this message. Press CLEAR again.
All messages
1 Press CLEAR after having listened to all messages.
2 If you actually want to delete all messages, press CLEAR
again. To interrupt the deleting process press STOP.
Forwarding messages
Your fax machine can automatically forward all incoming messages to another telephone number. Enter the telephone
number to which you wish recorded calls to be forwarded.
You can select the number of messages to be forwarded each
time. Your fax machine will wait until the selected number of
messages has been received and then calls the desired number
automatically. A text announcing the call forwarding is transmitted when the connection is made. Then the party to which
the calls are being forwarded needs to enter the access code
(see function 52). If the correct access code is not entered within
40 seconds, your fax machine will disconnect the call.
1 In case your answering machine is deactivated turn it on with
ON/OFF. The symbol b appears on the display.
2 Select MENU 55 and press OK.
3 Choose with </> and confirm with OK.
(only with built-in answering machine)
Page 26
26
4 Enter the telephone number your messages should be
forwarded to and press OK.
5 Choose with </> the number of messages you want to be
forwarded each time.
6 To record a new forwarding message, press OK.*
7 Press RECORD. Wait for the confirmation tone and start
speaking. An example of an announcement might be: “Hello,
there are messages for Mr. Smith; please enter the access code.”
Position yourself about 20 cm from the fax machine. A black
bar will indicate how much memory is available.
8 Press STOP when you have finished. The forwarding
message will be played back.
9 The fax machine is now switched to stand-by mode.
* If a message has already been recorded
a Press OK.
b S
elect with </>. If you wish to record a new forwarding
message, select YES. If you want to use the existing
message, select NO. Press OK to confirm.
REC. MESSAGE:YES
REC. MESSAGE: NO
c Follow the process described above from paragraph 7.
Recording a conversation
You can record a telephone conversation with your fax machine.
1 Press RECORD during a telephone conversation.
2 To stop recording, replace handset or press STOP.
3 The recorded conversation can be played back and
deleted like any recorded message.
You can not record a telephone conversation while
hands-free operation is activated.
VIP code
Ringing despite answering machine
Persons you had given this code, can make the telephone ring
after the answering machine has taken the call. This is useful if
both ring counts in function 31 and 32 have been set to 0.
1 To enter the code select MENU 53 and press OK. Enter
a four digit code. Confirm with OK.
2 This code must not be identical with the access code
(function 52).
Memo
External memo
With this function, you can record a message which the caller
can hear without being able to leave a message in return. For
this the answering machine must be switched on.
1 Select MENU 54 and press OK. Choose the external
memo mode by pressing </>. Confirm with OK. (If you
already have recorded a memo you want to use again, just
press OK once more.)
2 Press RECORD and wait for the confirmation tone. Start to
speak. Press RECORD or STOP when you are finished. The
message will be played back.
Internal memo
You can record a personal message with this function. Messages can be heard on the fax machine itself or by remote control from a telephone. Briefly press RECORD twice and wait
for the confirmation tone. Record the desired message. A black
bar on the display indicates the remaining recording time. To
end recording press RECORD or STOP. Internal memos can
be played back and deleted like any other message.
Page 27
27
Der Anrufbeantworter
Remote control
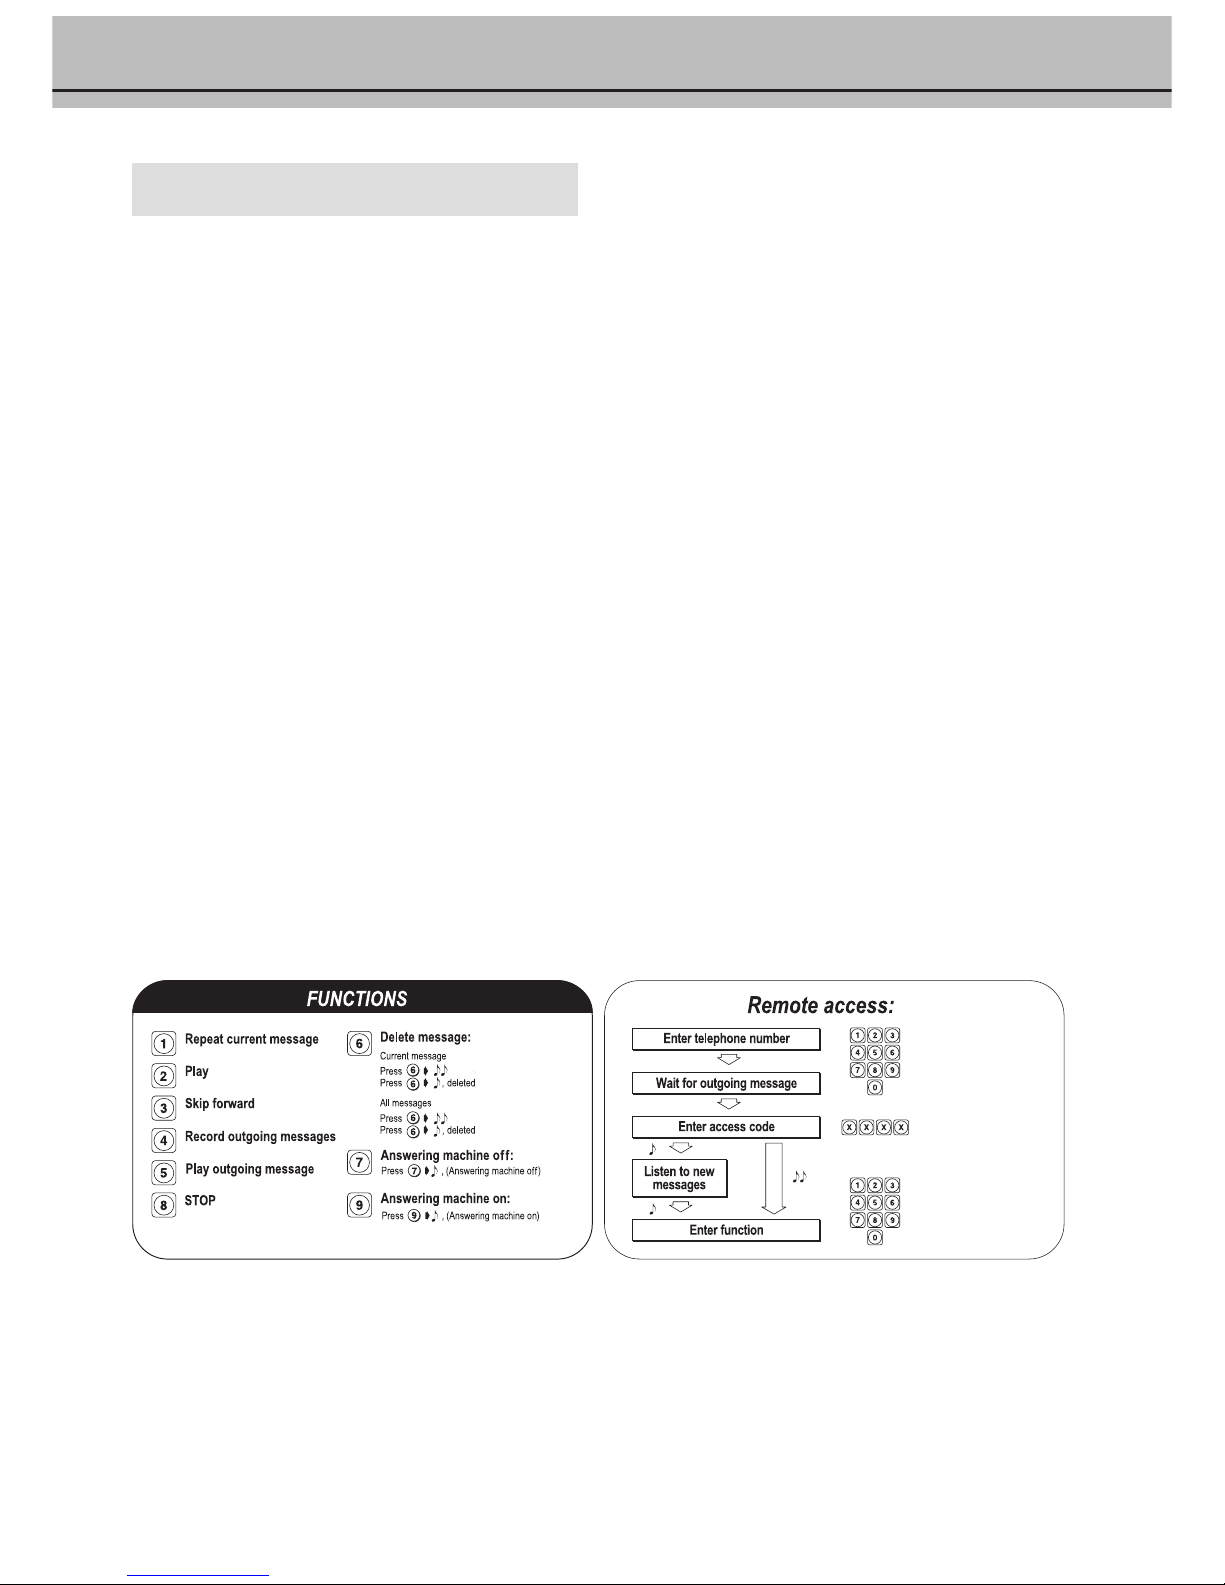
You can also control the answering machine functions on your
fax from any telephone using tone dialling. Before you can use
remote control you have to enter an access code in function
52 (this code will also be used for function 55 Forwarding).
Preparing your fax machine for remote access
1 Select MENU 52 and press OK.
2 Enter a four digit code.
3 Press OK. The code is now stored.
Remote access of the answering machine
1 If you want to listen to the messages recorded from
another telephone, call your fax machine and wait for the
answering machine to play the message.
2 Enter the four-digit code. The outgoing message will be
interrupted and you will hear a confirmation tone. The
new messages will be played back. If no new messages
have been recorded, you will hear a second confirmation
tone.
3 Then you can enter commands as usual or terminate the
remote control by replacing the handset.
Overview of commands
1 The message you are just listening to will be repeated.
2 Your messages will be played back.
3 Move to the next message.
4 Record a new outgoing message. If you press 4 again after
two confirmation tones, you will hear a long confirmation
tone. Record the new outgoing message and finish with 4.
5 The current outgoing message will be replayed.
6 The current message will be deleted. If you press 6 after
having listened to all messages, all messages will be deleted. In
both cases you will hear a confirmation tone after the first
time you press the key. Press 6 again within five seconds to
execute the deleting command.
7
Switch answering machine off.
8 The current command will be interrupted.
9 Switch answering machine on.
Page 28
28
The following table contains an overview of the most frequent
operating errors or problems and their possible causes and
remedies. Before calling our service desk, please consult this table.
If you can not rectify a fault using the instructions provided, please
do as follows:
1
Disconnect the mains.
2
Wait at least ten seconds and reconnect.
3
If the fault reoccurs, please contact your customer information center.
Error
You or your fax correspondent receive
blank pages.
Faxes are of poor quality.
Your fax or your recipient’s fax machine
produces black lines when printing.
Your fax machine produces white lines
when receiving or copying.
You can not send faxes.
The device does not draw the document
in during copying or sending.
Possible cause
Your fax correspondent sends the
wrong (blank) side of a document.
The printer or scanner is faulty.
The document contains photographs or small print.
The document lacks contrast.
Your fax machine is faulty.
There is paper in the sheet feeder.
The scanner is dirty.
Your fax machine is faulty.
Thermal printhead is dirty.
Scanner not put in.
Scanner has not clicked in.
Remedy
Your fax correspondent must feed the
document properly.
Test the fax machine by making a
copy. If your copy is faultless the
correspondent's fax machine might be
defective. Call service if necessary.
Change the resolution setting to FINE
or PHOTO.
Check the document or set a higher
contrast with function 47 (see chapter
Scanner / Contrast).
Test the fax machine by making a
copy. If your copy is faultless the
correspondent's fax machine might be
defective. Call service if necessary.
Open the operation panel and remove
the paper from the document feed
slot.
Clean the scanner with a cloth (see
Care and maintenance instructions).
Test the fax machine by making a
copy. If your copy is faultless the
correspondent's fax machine might be
defective. Call service if necessary.
Copy a black page several times until
the lines disappear.
Please put in scanner (see chapter
Scanner).
Press both sides of the scanner down
until you hear a definite click.
9 Hints & Tips
Page 29
29
Störungen
Error
The scanned copy is printed out
with white or black stripes.
The copy of the scanned document
is mirror-inverted.
TRANSM. ERROR
Error report
NO CONNECTION
or
REDIAL FAILED
NO LOOP CURRENT
NO DIALTONE
When you lift the receiver of your
fax machine you do not hear the dial
tone.
busy
or
fax transmissions are constantly
interrupted
You cannot receive any faxes.
You cannot phone or send faxes.
Possible cause
The scanner was not placed correctly
on the document.
The scanner was moved in the wrong
direction.
The telephone connection is of poor
quality.
The recipient has a paper jam or has
run out of paper.
Your fax partner’s line is busy, does not
answer or a different device like an
answering machine answers.
Improper installation or plug-in of fax
machine.
You are connected to a PABX system.
You have connected your telephone
cable to the socket identified with
EXT.
You have connected the telephone
cable to the socket marked with EXT.
Your fax correspondent has a fax
machine that cannot receive the usual
standard identifying signals.
You have set the number of rings too
high for the answering machine or the
total number of ringing signals for a
device without answering machine.
You are operating your fax machine
on a private branch exchange and have
not set it accordingly.
Remedy
Press the scanner firmly against the
document or put the document on a
flat surface.
Move the scanner in the direction
marked with an arrow across the
document (symbol on the right side
of the scanner).
Try again or send the fax at reduced
speed (function 21).
Call your fax partner or try to
transmit at a later stage.
Try later or draw your fax partner’s
attention to a possible installation
fault.
Check the installation of your fax
machine.
Check the settings in function 15.
Connect your telephone cable to the
socket on the bottom of your fax
machine identified with LINE.
Plug the telephone cable into the
socket marked with LINE on the
base of the fax machine.
Try to send the fax manually: press
DIAL/l and dial the fax number.
You will hear the call being established. If the recipient is using an
automatic answering machine, wait
until you hear a tone after the prerecorded message. Press START.
Set the number of ringing signals for
the answering machine or the total
number of ringing signals with
function 31 or 32 to lower than five.
In function 15, select
PABX: yes
.
Page 30
30
Error
When you receive a phone call, after
the first ring your correspondent
does not hear the usual ringback
tone.
Your fax machine rings once, then
there is a moment of silence and
another ring signal after that.
You do not hear the dial tone when
using your cordless telephone.
You cannot transfer calls from the
additional phone to the fax machine.
Your external answering machine
records fax signals but your fax
machine does not receive these fax
messages.
Copy is blank.
On lifting the handset you hear a
tone or silence.
Possible cause
Your correspondent is being informed
that the fax machine has taken the call
already and that he has to pay charges.
Your machine checks whether it is a
phone or a fax correspondence.
This process is perfectly normal!
The connection of your cordless phone
might be incorrect.
Your auxiliary devices are not set to
tone dialling.
You have not connected your external
answering machine correctly.
Document loaded the wrong way up.
Printer or scanner faulty.
The caller is trying to send a fax.
Remedy
In function 31 or 32 you can put
the tollfree rings to a higher level
under
FAX RINGS
(see chapter
Fax switch / Setting the operating
mode).
You have just noticed how the
automatic fax switch operates. After
the first ring signal the fax machine
takes over the call. When the fax
machine has recognised that the
incoming call is a telephone
correspondence, the fax machine
will continue to ring.
The connection of your cordless
phone might be incorrect. Check
whether the cordless phone was
installed correctly (see chapter
Installation / Connecting additional
devices).
For further information as to how
you change your device to tone
dialling see the instructions of your
additional telephones. Otherwise
you have not configured your
external phones to be in serial with
your fax unit (see chapter Installa-
tion / Connecting additional
devices).
Connect your answering machine as
described in the chapter Installation
/ Connecting additional devices.
Load the document with the
printed side up.
Service.
On the fax machine: press START.
On the additional phone: press *
and 5. Then replace the handset.
Page 31
31
Störungen
Error
On lifting the handset of an additional
telephone you hear in the background
some brief tones or, depending on the
device type, the activated outgoing
message of your own built-in answering machine.
Received documents do not appear as
normal at the front of the fax machine.
Only for fax machines with built-in
answering machine:
You have switched on your answering
machine and cannot receive any faxes.
PAPER JAM
DOCUMENT JAM
external phone
INKFILM LOW
Remedy
Press * twice to switch off the
tones or the outgoing message. You
can now make a call without
interferences (see chapter Fax
switch).
Open the operation panel. Leave
the paper refill flap closed. Pull the
crumpled paper out carefully from
inside.
Record a message without music.
Record a shorter announcement (no
longer than 20 seconds).
Open the operation panel and pull
the paper carefully outwards from
the inside.
Remove the scanner and pull the
paper carefully outwards in one
direction.
This is not a fault!
Get a new ink film.
Possible cause
Your additional telephone is connected in parallel.
Paper jam.
You use background music.
Your outgoing message is too long.
One sheet or more sheets of paper
were not drawn in straight.
Too many sheets inserted (more than
50 sheets).
One document was not drawn in
straight or more documents were both
drawn in at the same time.
You are now using an additional
telephone.
Your ink film is nearly used up.
Page 32
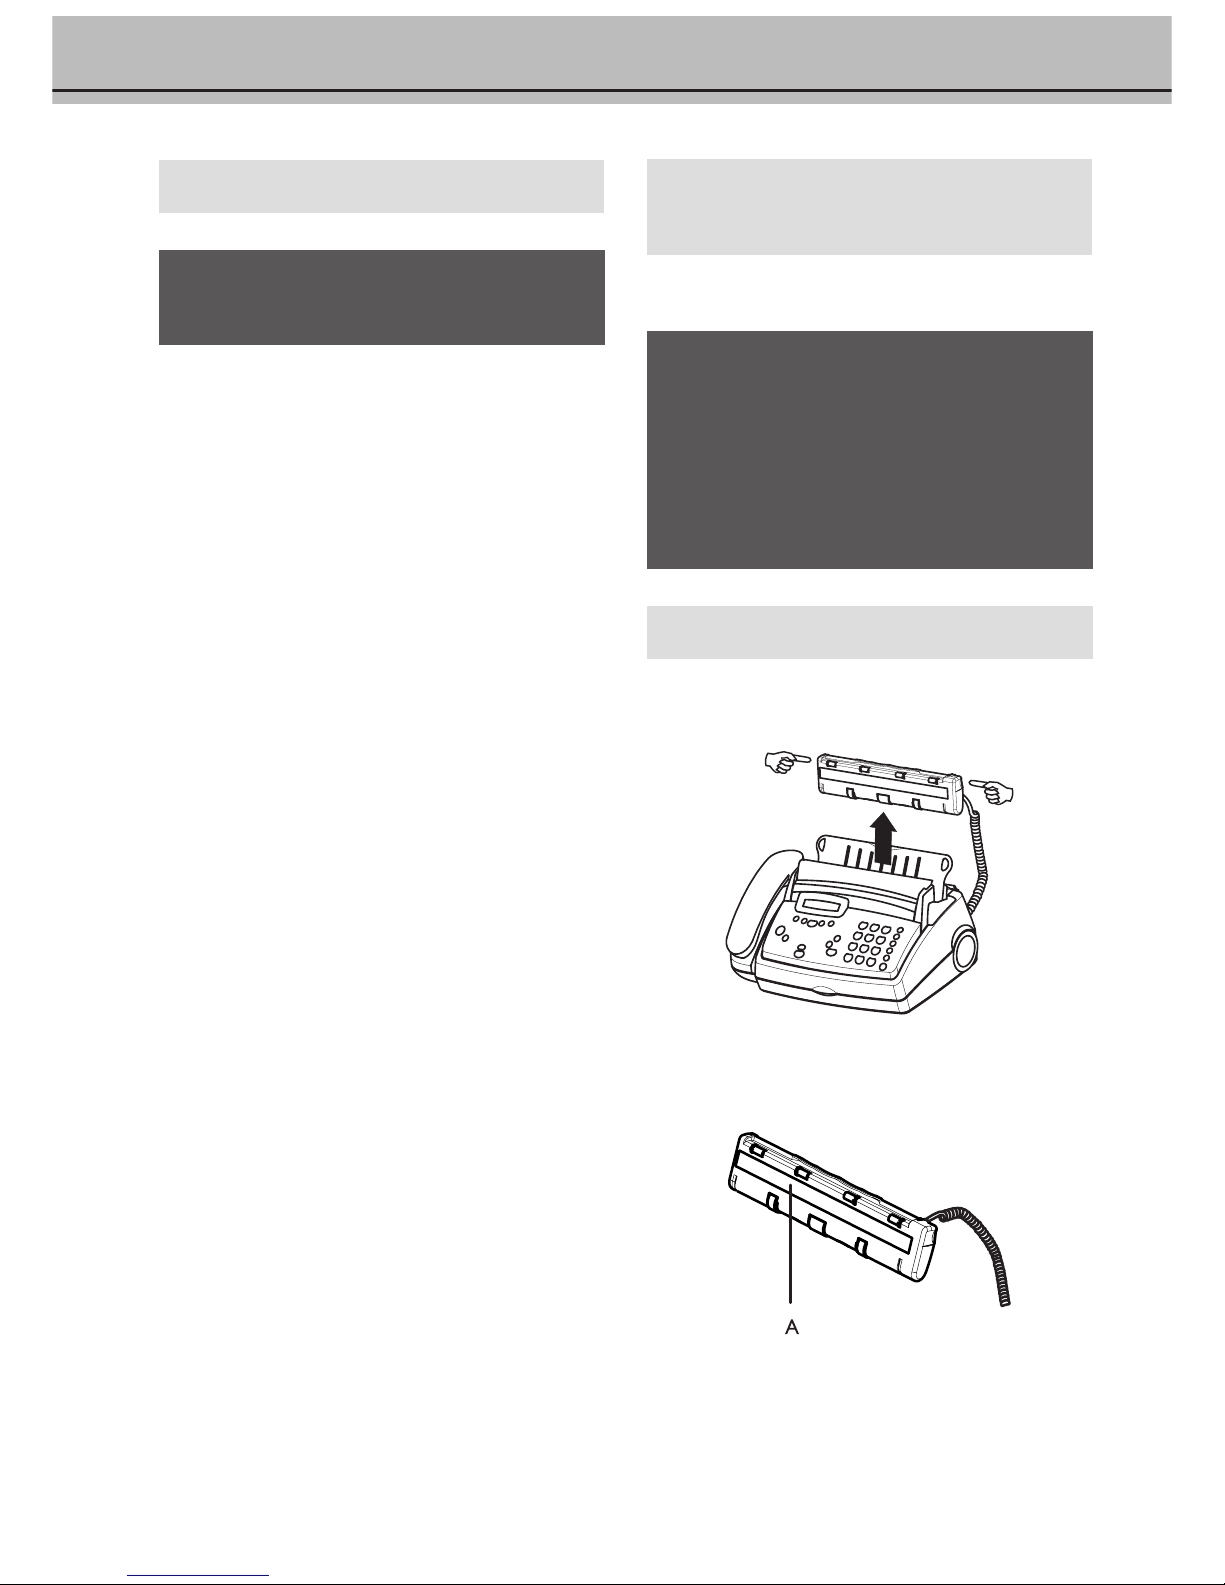
32
Care and maintenance
instructions
The scanner glass and rollers of your fax machine should be cleaned
of paper dust and scuff when necessary.
! Before opening the fax machine, make sure that you
are electrically discharged by e. g. touching the metal
housing of a grounded appliance, a water pipe or
radiator.
! Use a soft, fluff-free cloth lightly moistened with a
little alcohol (96%). You can also use a special cloth
for cleaning fax machines, which is available on the
market. Do not allow any moisture to penetrate inside
the device.
Clean the scanner glass
1 Carefully remove the scanner by pulling it upwards on both
sides.
2 Place the scanner in front of you with the scanning glass
surface face up.
3 Gently wipe the glass surface with a soft cloth (A).
4 Before you re-install the scanner, also wipe the scanner
compartment.
Service code
! Only use this function when absolutely necessary. If
you are satisfied with your changes to the factory
settings you should not use this function.
Function 45 (Service code) is used to delete some or all of your
changes to the factory settings. This function enables you to
partially or fully reconfigure your device. It is especially helpful if
you have modified settings but find that your fax machine does
not respond as expected.
After deleting some or all of your custom settings please rerun
EASY INSTALL.
The following codes are at your disposal:
Code No. 7117
This code erases all your modifications to the factory settings.
The fax machine will therefore react in exactly the same way as on
first installation.
Code No. 7140
When you enter this code, all your entered settings and data will
be erased, except for:
•
your personal outgoing message on your built-in answering
machine
• received messages
• stored short dial numbers
• stored telephone book numbers
• your name
• your telephone number
Example for using a service code:
1 Select MENU 45 and press OK. Enter the service code
(7117 or 7140). Press OK.
2 With </> you can select whether you really want to delete
your settings. Confirm with OK. Your fax machine will be
reset to its original configuration.
Page 33
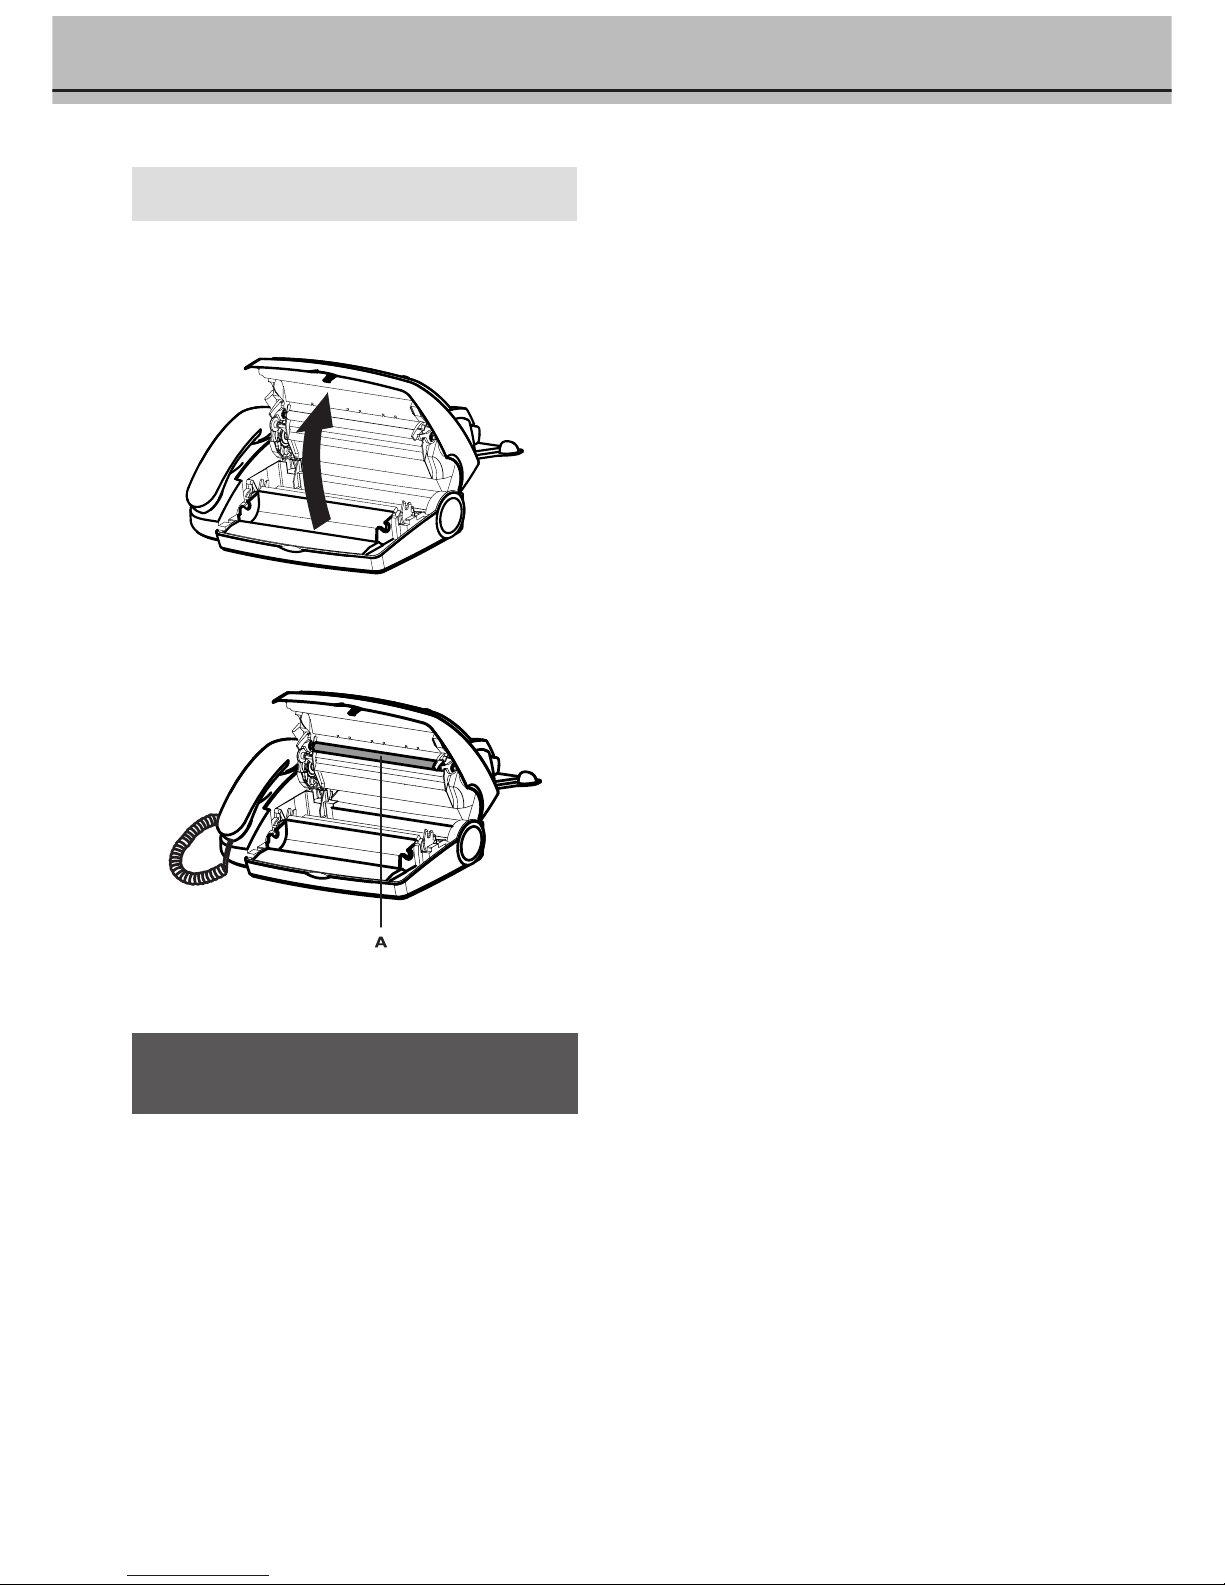
33
Störungen
Clean printer roller
If the paper feed mechanism contains paper please remove it.
1 Open the operation panel by carefully lifting it upwards at
the recess in the middle.
2 Using a cloth as described above, wipe the printer roller (A).
To clean the entire roller turn the roller by hand.
3 When cleaning is complete close the operation panel.
! Do not use the fax cleaners available on the market
which are drawn through the machine automatically.
By doing so you can damage your fax machine!
Page 34

34
10 Appendix
Technical data
Compatibility ITU Group 3
Type of connection outside line (PSTN) / extension (PABX)
Flash times outside line (PSTN): 100 ms
extension (PABX): 100 ms
Size of document width: single sheet 148–217 mm
several sheets 148–217 mm
length: single sheet 100–600 mm
several sheets 148–297 mm
thickness: single sheet 0.05–0.2 mm
several sheets 0.07–0.15 mm
Printing paper A4 210 x 297 mm, 80 g/m
2
Largest scanning width 216 ± 1 mm
Resolution horizontal: 8 points/mm (200 dpi)
vertical: standard 3.85 lines/mm
fine 7.7 lines/mm
Photo mode 16 grey tones (fax machine
without integrated answering machine)
64 grey tones (fax machine
with integrated answering machine)
Contrast control automatic and manual
Copying fine and photo resolution
Data compression MH, MR
Modulation V29bis, V27ter, V21
Transmission speeds 9600/7200/4800/2400 bps
Sound power level stand by mode: <30 dBA
copy mode: <53 dBA
Printing method ink film printer
Fax paper standard A4 letter
210 x 297 mm (document)
Document feed up to 10 letters (80 g/m²)
Fax switch DAY/NIGHT/TIMER
Dimensions 356 x 240 x 163 mm (without paper tray)
Weight about 3 kg
Power consumption stand by: about 2 W
telephoning: about 5 W
sending a standard letter: ca. 20 W
receiving a standard letter: ca. 35 W
Power supply 220–240 V / 50–60 Hz
Speech recording time up to 30 minutes
Speech output yes
Allowed operating
environment temperature: 5–40 °C
relative humidity: 15–85 % RH
not condensing
Recommended operating
environment in use: temperature: 17–28 °C
relative humidity: 20–80 % RH
not condensing
Recommended operating
environment in unplugged
status (ready for operation
with loaded ink film and
paper): temperature: 0–45 ° C
relative humidity: 15–85 % RH
not condensing
Interference suppression:
emission corresponding to EN 55022 class B
immunity corresponding to EN 50082-1
and EN 55024
Glossary
additional device, additional telephone: You can operate your fax machine together with additional devices such as (cordless) telephones, an answering machine etc. on a single telephone line. You have to enter some specific settings.
calling line identification: When you receive a telephone call, the number of the
calling party will be shown on the display (not supported by all network providers).
memory: Messages of the built-in answering machine as well as fax messages
that had not been printed will be stored in this memory.
document: The written note you want to send by fax to another party.
DTMF: short for “Dual Tone Multiple Frequency”. With this signal you can
start fax reception from an additional telephone which has tone dialling.
fax switch, automatic and manual receive: The fax switch analyses incoming
calls and detects whether it is a normal call or a fax call. If you have chosen
automatic receive a fax will be received automatically and silently. If you have
chosen manual receive, the fax switch is not operating and faxes can only be
received by pressing START.
Home Telephone System (HTS): Many private households have installed a home
telephone system. Such a system offers the possibility of internal communication but operates on only one single telephone line.
hook-flash function: The R key enables you to use additional services that are
provided by your telephone company.
incoming message: The message a caller can leave when your answering machine
is switched on and he speaks after the beep tone.
ink film: An “ink” coated foil (similar to a ribbon) for printing out on plain
paper.
ITU: International Telecommunication Union, which also sets standards.
outgoing message (OGM): As a factory setting an outgoing message is recorded.
When your answering machine is switched on the caller hears this message
which is followed by a beep tone.
paper: standard A4 paper 210x297 mm, 80 g/m
2
parallel: Your connection is parallel, if you make a call with another telephone
and your fax machine does not respond as described under “serial” (see serial).
polling: You can collect documents which have been prepared for collection at
a remote fax machine.
private branch exchange (PABX): Private branch exchange systems are common
in most large companies. They provide a kind of internal telephone network.
In order to connect to the public network you must first dial an outside line.
pulse dialling: The old dialling mode is pulse dialling. Every number key has a
specific number of pulses assigned to it.
scanner: input device for copying and faxing documents
sender identification: On most fax machines the name and the number of the
user can be entered. This so-called sender identification will be printed on the
fax receipt and will also appear on the display of the fax correspondent’s ma-
chine.
serial: Your connection is serial, if you make a call from another telephone and
at the same time the red display lamp flashes and the display shows
external phone
(see parallel).
tone dialling: Tone dialling is the modern dialling mode. Every key has a differ-
ent tone assigned to it.
Page 35
35
DECLARATION OF CONFORMITY
We,
ÖSTERREICHISCHE PHILIPS INDUSTRIE GMBH, Internet Fax Appliances
Gutheil-Schoder-Gasse 10
A-1102 Wien, Österreich
declare under our sole responsibility that the product
Plain paper Fax
PHILIPS PPF 450
________________________________________________________________________________________
to which this declaration relates is in conformity with the following standard(s) or other normative
document(s):
vvvvvvvvvvvvvvvvvvvvvvvvvvvvvvvvvvvvvvvvvvvvvvvvvvvvvvv
Safety:
EN 60950:1992 + A1:1993 + A2:1993 + A3:1995 + A4:1997 + A11:1997
Electromagnetic Compatibility:
EN 55022:1998 class B, EN 50082-1:1997, EN 55024:1998
vvvvvvvvvvvvvvvvvvvvvvvvvvvvvvvvvvvvvvvvvvvvvvvvvvvvvvv
following the provisions of the Directive 1999/5/EC on radio equipment and telecommunication
terminal equipment and the mutual recognition of their conformity.
Wien, 2001-02-06 Paul SANDBERG
Managing Director
=====================================================================================
DECLARATION OF CONFORMITY
We,
ÖSTERREICHISCHE PHILIPS INDUSTRIE GMBH, Internet Fax Appliances
Gutheil-Schoder-Gasse 10
A-1102 Wien, Österreich
declare under our sole responsibility that the product
Plain paper Fax
PHILIPS PPF 470
________________________________________________________________________________________
to which this declaration relates is in conformity with the following standard(s) or other normative
document(s):
vvvvvvvvvvvvvvvvvvvvvvvvvvvvvvvvvvvvvvvvvvvvvvvvvvvvvvv
Safety:
EN 60950:1992 + A1:1993 + A2:1993 + A3:1995 + A4:1997 + A11:1997
Electromagnetic Compatibility:
EN 55022:1998 class B, EN 50082-1:1997, EN 55024:1998
vvvvvvvvvvvvvvvvvvvvvvvvvvvvvvvvvvvvvvvvvvvvvvvvvvvvvvv
following the provisions of the Directive 1999/5/EC on radio equipment and telecommunication
terminal equipment and the mutual recognition of their conformity.
Wien, 2001-02-06 Paul SANDBERG
Managing Director
Page 36

36
Index
A
Access code 27
Additional device
Definition 34
Additional devices 1
Connection 11
Additional telephone 19
ALT key 7
Answering device 1
Answering machine
Switch on and off 25
Volume 25
Auto mode 25
B
Basic functions 13
C
Call
Making 18
Call transfer 19
Call waiting 18
Calling Line Identification 19
Calling line identification
Definition 34
CE mark 40
Check Display 10
Paper jam 11
Circular send 20
CLEAR 7
Clear 6
Clear key 25
CLID 19
Clock 1
Code
Access code 27
Service 32
VIP code 26
Commands for remote control 27
Compatibility 34
Completely silent operation 16
Compression
Data 34
Confirmation tone 27
Connecting
Additional devices to the same
socket 11
ISDN 12
PABX 12
Connection
Additional devices 11
Parallel 34
Serial 34
Type 34
Consumption (power) 34
Contrast 24
Controls
location 6
Conversation
Record 26
Copy key 23
Copying 23
Cordless telephone 1
Correct
Entries 18, 19
Correction 14, 18
D
Data
Technical 34
Data compression 34
Date 13
Day 1, 13, 17
Day mode 15
Delayed send 22
Delete
Entries 19
Entry 18
Message 25
Numbers 18
Description
Machine 4
Dial key 18
DIAL/MIC 7
Dimensions 34
Display 5
Language 14
Display lamp 6
DMM 5
Explanation 34
Document
Feed in 20
DTMF
Explanation 34
Duration
Recording 25
Duration of recording 25
E
Easy Install 1, 11
EASYLINK 16
Entering
Name 13
Number 13
Environment protection 40
Error report 21
External memo 26
F
Fax
Journal 21
Fax message
Receiving 1
Sending 1
Fax reception
Paperless 22
Fax switch 1, 15, 34
Faxe s
Send 20
Feed in
Document 20
Fine key 23
Fine setting 23
Fine/Photo 6
Flash times 34
Function
Overseas 21
Function list 13
Functions
general view 5
G
General view
functions 5
Glossary 34
Grey tones 34
Guarantee 2
H
Hands-free operation 19
Handset
Dial/Mic key 18
Mute 19
Help function 13
Help key 1, 11, 13
Help/Install 6
Hook-Flash-Function 34
HTS
Explanation 34
I
Image quality 21
Ink film 34
Loading 9
Removing 9
Replacing 9
Install key 11, 13
Installation 1, 8
Instructions
Care and maintenance 32
Interference suppression 34
Internal memo 26
International guarantee 2
ISDN 12
ITU 34
J
Journal 21
L
Language
Display 14
Line 8
List
Telephone numbers 19
List of telephone numbers 19
Print 19
Loading
Ink film 9
Paper 10
Location 8
Location of controls 6
Loudspeaker 19
Volume 14
M
Machine
Description 4
Overview 4
Manual fax reception 16
Memo 26
Menu key 13
Menu/OK 6
Message 25
Delete 25
Mic key 18, 19
Microphone 19
Mode
Day (Sun) 17
Modulation 34
Month 13
Moon (symbol) 15
Mute 19
N
Name
Entering 13
Night 1
Night mode 15
Number
Entering 13
Numbers
Delete 18
O
Other devices 19
Connection 11
Overseas function 21
Overview
Machine 4
P
PABX 12
Explanation 34
Packaging 40
Paper
Format 21
Loading 10
Paper jam 11
Removing 11
Size 34
Paper format 10, 34
Paper tray 10
Paperless
Fax reception 22
Parallel 11
Connection 34
Pause key 25
Photo key 23
Photo mode 34
Photo setting 23
Play 6
Play back volume 25
Play key 25
Polled reception 21
Polling
Explanation 34
Quick 21
Send 22
Polling with code 21
Power consumption 34
Power supply 34
Print
List of telephone numbers 19
Private branch exchange 12
Pulse dialling
Explanation 34
R
R key 7, 18
Receive
Automatic 34
Manual 34
Record 6, 25
Conversation 26
Record key 25, 26
Recording
Duration 25
Recording time 25
Recycling 40
Page 37

37
Redial 7, 18
Remote control 27
Removing
Ink film 9
Paper 11
Replacing
Ink film 9
Report
Error report 21
Transmission report 21
Resolution 23
Technical data 34
Ring signal 14
Type 14
Volume 14
Ringing
Despite answering device 26
S
Safety instructions 2
Scanner 1
Explanation 34
Scanning 23
Scanning width 34
Send
Delayed 22
Faxes 20
Sender identification
Explanation 34
Serial 11
Connection 34
Service 2
Service code 32
Use 32
Setting
Day mode 15
Night mode 15
Shift key 7
Short dial 7, 18
Silent fax reception 16
Size
Document 34
Size compression 21
Space key 7
Special settings 16
START 7
Start/Copy 6
STOP 7
Stop 6
Storing numbers 18
Sun (symbol) 15, 17
T
Technical data 34
Telephone 18
Record a conversation 26
Telephone book 7, 18
List of numbers 19
Telephone cable 8
Telephone numbers
List 19
Time 13, 22
Timer 1, 5, 15, 16
Timer mode 16
Activate 16
Check 16
Configure 16
Deactivate 16
Tipps 28
Toggling calls 18
Tone dialling
Explanation 34
Transmission report 21
Transmission speed 34
V
VIP code 26
Volume 25
Loudspeaker 14
Ring signal 14
W
Weight 34
Y
Year 13
Page 38

38
Page 39

39
Page 40
40
The CE mark confirms that the
machine corresponds to the relevant
guidelines of the European Union.
This product is intended for use on
an analogue public switched network
(PSTN) and for use in the country
indicated on the label of the box. The
usage in other countries could cause
malfunction.
Copyright © 2001
5103 506 1796.1 GB/INT (SG12/17P)
1718
Initially contact your dealer if problems occur during operation.
This operation manual has been
printed on chlorine-free, recycled
paper, in line with the highest standards of environmental friendliness.
The used cardboard packaging as
well as the cardboard protecting your
facility at its sides made of waste paper can be recycled like waste paper;
corresponding to your country’s de-
mands dispose the plastic foils either
for recycling or with your rubbish.
This electronic facility contains recyclable material. At the end of use
of this facility please inform yourself
about the corresponding recycling
demands of your country.
Technical changes and errors excepted.
 Loading...