

Page 1

Institutional
Television
Instructions for use
PA0II3C
PA0I27C
PA0I32C
*
PA90I9C
PA9027C
PA9032C
PPCI27C
PPCI32C
PPCI36C
PPC927C
PPC932C
SC3I32N
SC3I36N
TELEVISION
3135 015 20912
Page 2

Introduction
Your Philips Institutional Television tuning system is set to operate in either "Consumer" or "Commercial" type product modes. In the
Consumer mode the tuning system operates as a standard TV, allowing normal initial power ON, channel selection, and volume control
(as well as a variety of select Menu features). Use the supplied remote control to adjust the TV in the Consumer mode. Refer to the
"On-Screen Features (Consumer)" section in this manual for descriptions on the use and operation of Consumer mode Menu controls.
Use a T374AH (RG4172-BK03) remote with its TV Setup, Guest, and Data Communication Mode capabilities to set the TV for the
various Commercial mode settings. (Note: On some select Institutional TV models you may also be able to use the buttons at the set to
select a Setup Mode. Again, this may not apply or be available on your current model. Commercial setup and verification procedures
may be performed which are backward compatible with previous Commercial chassis setup remotes. (See T374AH Remote Control
Instructions, part # IB7166E002, for specific operating details.)
CONSUMER ONSCREEN MENU
(For basic television Menu and supplied remote operation instructions, refer to
the Onscreen Features (Consumer) section of this owner’s manual.)
LANGUAGE ENGLISH
CHANNEL INSTALL
CABLE TUNING 0N
BRIGHTNESS
COLOR lili
CONTRAST
SHARPNESS
TINT
NOISE REDUCTION
SOUND MODE
SAP
TREBLE
BASS liliULTRA BASS
INCREO STEREO
AVL
VOLUME BAR OH
AUDIO/VIDEO MUTE
REMINDER
CC
V-CHIP SETUP
SLEEPTIMER
SET TIME 12:00 PM
CLOCK DISPLAY ON
EXIT
W
...........
.........
mili-- 29
linill- 40
-+..... 0
STEREO
illll-— 31
.......
34
22
OFF
OFF
- -t— i
OFF
OFF
BLUE
OFF
OFF
ON
31
ON
►
►
►
COMMERCIAL SETUP MENU
(For Menu control operations and use, refer to the OnScreen Features
1 TV SETUP MENU
LANGUAGE
CHANNEL INSTALL
IPROPI.IIS SETUP
CABLE TUNING
BRIGHTNESS
COLOR
CONTRAST
SHARPNESS
TINT
NOISE REDUCTION
SOUND MODE
AUUlU UUI
BALANCE
TREBLE
BASS
ULTRA BASS
INCREO STEREO
AVL
VOLUME BAR
MINVOLUME
MAX VOLUME
SWITCH ON VOLUME
SWITCH ON CHANNEL
POWER ON
CHANNEL DISPLAY
KEYBOARD LOCK
ESP
AUDIO/VIDEO MUTE
WELCOME MESSAGE
CHANNELGUIDE
REMINDER
3 DIGIT ENTRY
A/CH A/V SWITCH
V-CHIP MENU ITEM
SAVE V-CHIP
V-CHIP SETUP
SLEEPTIMER
SECURITY
EXIT
(Commercial) section of this owner’s manual.)
1
ENGLISH
►
________
y
ON
34
22
llli-
29
40
0
....
f-
OFF
STEREO
l-IXbU
-f--
\[
.....
31
h
.......
31
ON
OFF
OFF
ON
miiiiiiiiiiiiiii 63
STANDARD
STANDARD
STANDARD
ALL
OFF
OFF
BLUE
OFF
ON
OFF
ON
OFF
OFF
ON
ON
OH ;
OFF/
STANDARD
►
0
►
1 PROPLUS SETUP MENU i
SET TIME 3;3fl PM
SET DAY
CLOCK DISPLAY ON
lACCESS LEVEL
EDIT EVENTS
EXIT
FRIDAY
TññÍFñl
Within the TV SETUP MENU (as selected with the T374AH
remote control) use the “PROPLUS SETUP MENU ACCESS LEVEL” control to place the television in either the
CONSUMER, COMMERCIAL, LOCKED, or UNLOCKED
mode.
When CONSUMER is the selected mode, the TV functions
as a standard consumer television (Philips RC-5 system) and
accepts standard remote control commands. Events are
ignored and the television is used for normal TV viewing (in
place of any commercial /professional special event applica
tions).
When UNLOCKED is the selected mode, the TV functions
the same as in the Consumer Mode. When an event is active,
no menu is available unless the Setup Code or Setup Remote
is used. (Channel selection either is not allowed or is restrict
ed to the event channel ring - depending upon the event pro
gramming.)
When COMMERCIAL is the selected mode, the Consumer
menu is limited to three Menu items - CLOSED CAPTION
(CC); SLEEPTIMER; and V-CHIP SETUP. Channel selec
tion and tuning are also restricted to channels in the standard
channel ring. When an event is active, no menu is available
unless the Setup Code or Setup Remote is used. (Channel
selection either is not allowed or is restricted to the event
channel ring - depending upon the event programming.)
When LOCKED is the selected mode, the TV may be used
/
only during an event. If no event is active, the TV cannot be
turned ON (unless the Setup Code is used to enter the Setup
/
^ Menu or the Setup Remote is used). When an event is active,
no menu is available unless the Setup Code or Setup Remote
'¿"fockEDi jg used. (Channel selection either is not allowed or is restrict
ed to the event channel ring - depending upon the event pro
gramming.)
Note: Use of various Audio/Video connection jacks, or
other input modes on the rear of the set, is dependent on
whether the TV has a Pro Video Kitl Expansion, or other
Smart Card Assembly, jackpanel installed. Please refer to
the separate setup and use information that will detail the
various Audio and Video connections possible with these
type modules. Also, please be aware that dependent upon
the type of Smart Card module installed with the set that
certain select “event” program features may be affected or
not be operable.
Page 3
SAFETY INSTRUCTIONS - Read before operating equipment
This product was designed and manufactured to meet strict quality and
safety standards. There are, however, some installation and operation pre
cautions which you should be particularly aware of.
1. Read Instructions
be read before the appliance is operated.
Retain Instructions
2.
be retained for future reference.
Heed Warnings
instructions should be adhered to.
Follow Instructions
4.
followed.
Water and Moisture
5.
- for example, near a bathtub, washbowl, kitchen sink, laundry tub,
in a wet basement or near a swimming pool, etc.
Carts and Stands
6.
stand that is recommended by the manufacturer.
6A.
Tilt/Stability
6B.
national global safety standards for tilt and stability properties of its
cabinet design.
• Do not compromise these design standards by applying exces
sive pull force to the front, or top, of the cabinet which could
ultimately overturn the product.
• Also, do not endanger yourself, or children, by placing elec
tronic equipment/toys on the top of the cabinet. Such items
could unsuspectingly fall from the top of the set and cause
product damage and/or personal injury.
Wall or Ceiling Mounting
wall or ceiling only as recommended by the manufacturer.
Ventilation
8.
position does not interfere with its proper ventilation. For example,
the appliance should not be situated on a bed, sofa, rug, or similar
surface that may block the ventilation openings; or, placed in a builtin installation, such as a bookcase or cabinet that may impede the
flow of air through the ventilation openings.
Heat
9.
10.
- The appliance should be situated away from heat sources
such as radiators, heat registers, stoves, or other appliances (includ
ing amplifiers) that produce heat.
Power Sources
ply only of the type described in the operating instructions or as
marked on the appliance.
- All the safety and operating instructions should
- The safety and operating instructions should
- All warnings on the appliance and in the operating
- All operating and use instructions should be
- The appliance should not be used near water
- The appliance should be used only with a cart or
An appliance and cart combination should be moved
with care. Quick stops, excessive force, and uneven sur
faces may cause the appliance and cart combination to
overturn.
- All televisions must comply with recommended inter
- The appliance should be mounted to a
- The appliance should be situated so that its location or
- The appliance should be connected to a power sup
11. Power-Cord Protection
that they are not likely to be walked on or pinched by items placed
upon or against them, paying particular attention to cords and plugs,
convenience receptacles, and the point where they exit from the
appliance.
12. Cleaning
by the manufacturer.
13. Power Lines
power lines.
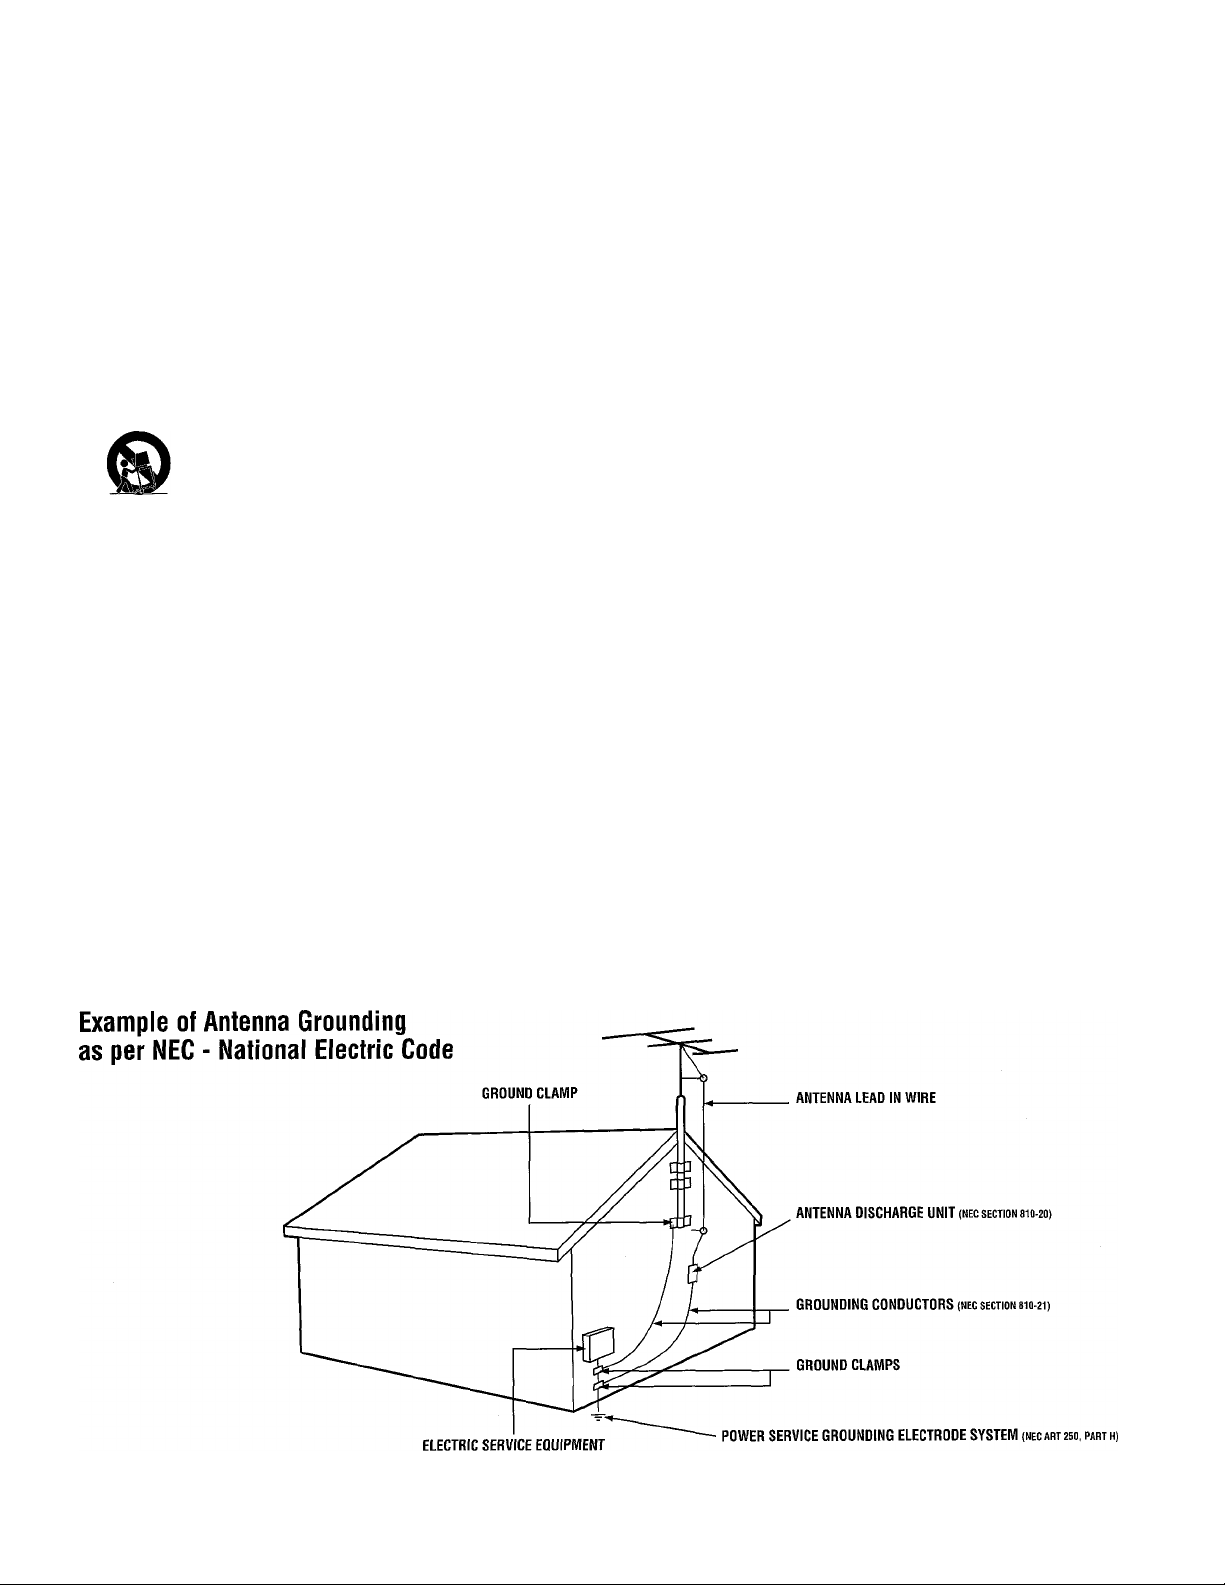
14. Outdoor Antenna Grounding
the receiver, be sure the antenna system is grounded so as to pro
vide some protection against voltage surges and built up static
charges.
Section 810 of the National Electric Code, ANSI/NFPA No. 70-1984,
provides information with respect to proper grounding of the mats
and supporting structure grounding of the lead-in wire to an anten
na discharge unit, size of grounding connectors, location of antennadischarge unit, connection to grounding electrodes and require
ments for the grounding electrode. See Fig. below.
15. Non-use Periods
unplugged from the outlet when left unused for a long period of time.
16.
Object and Liquid Entry
fall and liquids are not spilled into the enclosure through openings.
17. Damage Requiring Service
qualified service personnel when:
A.
The power supply cord or fhe plug has been damaged; or
B.
C.
The appliance has been exposed to rain; or
D.
The appliance does not appear to operate normally or exhibits a
E.
The appliance has been dropped, or the enclosure damaged.
18. Servicing
beyond that described in the operating instructions. All other servic
ing should be referred to qualified service personnel.
Note to the CATV system installer;
CATV system installer's attention to Article 820-40 of the NEC that pro
vides guidelines for proper grounding and, in particular, specifies that the
cable ground shall be connected to the grounding system of the building,
as close to the point of cable entry as practical.
- The appliance should be cleaned only as recommended
- An outdoor antenna should be located away from
Objects have fallen, or liquid has been spilled into the appliance;
or
marked change in performance; or
- The user should not attempt to service the appliance
- Power supply cords should be routed so
- If an outside antenna is connected to
- The power cord of the appliance should be
- Care should be taken so that objects do not
- The appliance should be serviced by
This reminder is provided to call the
Page 4

Tabi.e of Contents
Introduction
Consumer and Commercial Menus
Safety/Precautions
Table of Contents.....................................................4
Features....................................................................5
Hooking Up Your TV..............................................6
Basic TV and Remote Control Operation
Using the TV Remote Control
...................................................
..................................
............
.................
r 1 Onscreen Features (Consumer)
How to Use the On-Screen Menu
How to Set the TV for Cable TV Operation
Channel Installation Control Features:
- Adding Channels in Memory (Auto Program) .11
- Adding Channels in Memory (Manually)
- Using the Input Mode Control
- Using the Channel Label Control
How to Adjust the TV Color................................14
Using the Stereo (& SAP) Control
Using the Bass, Treble, Balance Controls............15
How to Set the Incredible Stereo Control
Using the Automatic Volume Limiter Control
How to Set the Volume Bar Control....................16
How to Set the Audio/Video Mute Control
How to Set the Channel Reminder
How to Select the Closed Caption Feature
Using the V-Chip or Content Advisory Control...19
- V-Chip TV Ratings Guidelines
- V-Chip Movie Ratings Guidelines
Setting the Sleep Timer
Using the Set Time Control
Using the Clock Display Control
How to Set the On-Screen Language Control
Using the External Speaker Terminals.................23
Using the Audio Output Jacks............................24
Using the Front Audior/ideo Input Jacks............24
......................................
.........................
.................................
................
........
..........
....................
.....................
............
.........
.....................
.........
........................
..................
.......................
......
13
13
14
....
17
20
21
22
22
3
10
12
15
16
17
18
22
23
Remote Control Operation with
2
7
8
Accessory Devices (VCRs. Cable TV
B
Converters. DVDs, etc.)
Setting the Remote to Work Other Devices
- Direct Number Entry Method..............................26
- Search Method.....................................................27
- Direct Entry Remote Control Code Numbers..28-29
Using the Remote’s VCR Buttons
.........................
..........
25
30
Onscreen Features (Commercial)
9
Description of Onscreen Controls
........
31-33
General Information
Tips if Something Isn’t Working
Glossary of Television Terms................................35
Index
......................................................................
Limited Warranty ..................................................36
NO'I Ik riiis (»wner's manual is used with several diflerenl television models. Not all features (and drawings)
discussed in this manual will necessarily match tlio.se
found with your television set. This is normal and does
not require you eontaeting your dealer or requesting
Because of continuous product improvements, the informa
tion mentioned in the documents accompanying your prod
uct are subject to change without notice.
............
34
35
Know these
safety symbols
CAUTION
RISK OF ELECTRIC SHOCK
A
CAUTION: TO REDUCE THE RISK OF ELECTRIC SHOCK, DO NOT
REMOVE COVER (OR BACK). N0 U8ER4ERVICEABLE PARTS
INSIDE. REFER SERVICING TO QUALIFIED SERVICE PERSONNEL.
DO NOT OPEN
PHILIPS Visit our World Wide Web Site at http://www.philipsitv.com
A
A This “bolt of lightning” indicates uninsulated material within your unit which may cause an electrical shock. For
the safety of everyone in your household, please do not remove the product covering.
The “exclamation point” calls attention to features for which you should read the enclosed literature closely to
prevent operating and maintenance problems.
WARNING: TO PREVENT FIRE OR SHOCK HAZARD, DO NOT EXPOSE THIS EQUIPMENT TO RAIN OR MOIS
TURE.
CAUTION: To prevent electric shock, match wide blade of plug to wide slot, and fully insert.
ATTENTION: Pour éviter les chocs électriques, introduire la lame la plus large de la fiche dans la borne correspon
dante de la prise et pousser jusqu’au fond.
Page 5

Features
Philips exclusive "Pro Video" control tuning soft
ware which allows operation of the TV in either
"Consumer" or "Commercial" modes (depending upon
its applied purpose and use).
Audio/Video jack panel for direct connections with
VCRs (or other video accessories) for quality TV pic
ture and sound playback. Note: Use of various
Audio/Video connection jacks, or input modes (i.e.,
S-VIDEO, etc.), is dependent on whether the TV has
a Pro Video Kitl Expansion, or other Smart Card
Assembly, jackpanel installed. Please refer to the sep
arate setup and use information that will detail the
various Audio and Video connections possible with
these type modules. Also, please be aware that
dependent upon the type of Smart Card module
installed with the set that certain select “event” pro
gram features may be affected or not be operable.
Infrared Remote Control which operates your TV
set and a variety of Infrared (IR) wireless remote con
trol VCRs, Cable TV Converters, DVDs, and other
accessory equipment.
Standard broadcast (VHF/UHF) or Cable TV
(CATV) channel capability.
Stereo Ready TV with built-in audio amplifier and
twin speaker system for receiving TV programs
broadcast in stereo sound.
Closed Captioning which allows the viewer to read
TV program dialogue or voice conversations as on
screen text.
Automatic Programming of channels for quick and
easy selection of favorite stations available in your
area.
As you unpack your TV please note that the fol
lowing items have been included with your set:
• Owner's Manual
- Safety Tip Information
• Warranty Registration Card
• Remote Control Transmitter
• Batteries for Remote Control Use
Please take a few minutes to complete your regis
tration card. The serial number for the TV is on
the back of the set.
Refer to the back of this manual for instructions
on the cleaning and care of the TV.
End-of-Life disposal
Your new institutional television and its packag
ing contain materials that can be recycled and
reused. Specialized companies can recycle your
product to increase the amount of reusable mate
rials and minimize the amounts which need to be
properly disposed.
Your product also uses batteries which should not
be thrown away when depleted, but should be
handed in and disposed of as small chemical
waste.
Please find out about the local regulations on how
to dispose of your old television, batteries, and
packaging materials whenever you replace exist
ing equipment.
On-Screen Features (in either English, French, or
Spanish) which show helpful messages for setting of
TV controls.
Parental Control for “Censoring” or blocking out
channels to keep children from watching undesirable
programming. Parental guideline and Movie Rating
settings can also be used as part of the new Content
Advisory Data system available with TV program
ming.
Automatic Volume Limiter for the control of TV
volume levels during program changes or commercial
breaks.
Sleep Timer which automatically turns off the TV at
preset times.
Copyright © 2001 Philips Consumer Electronics Company. All rights reserved.
5
Page 6
mi
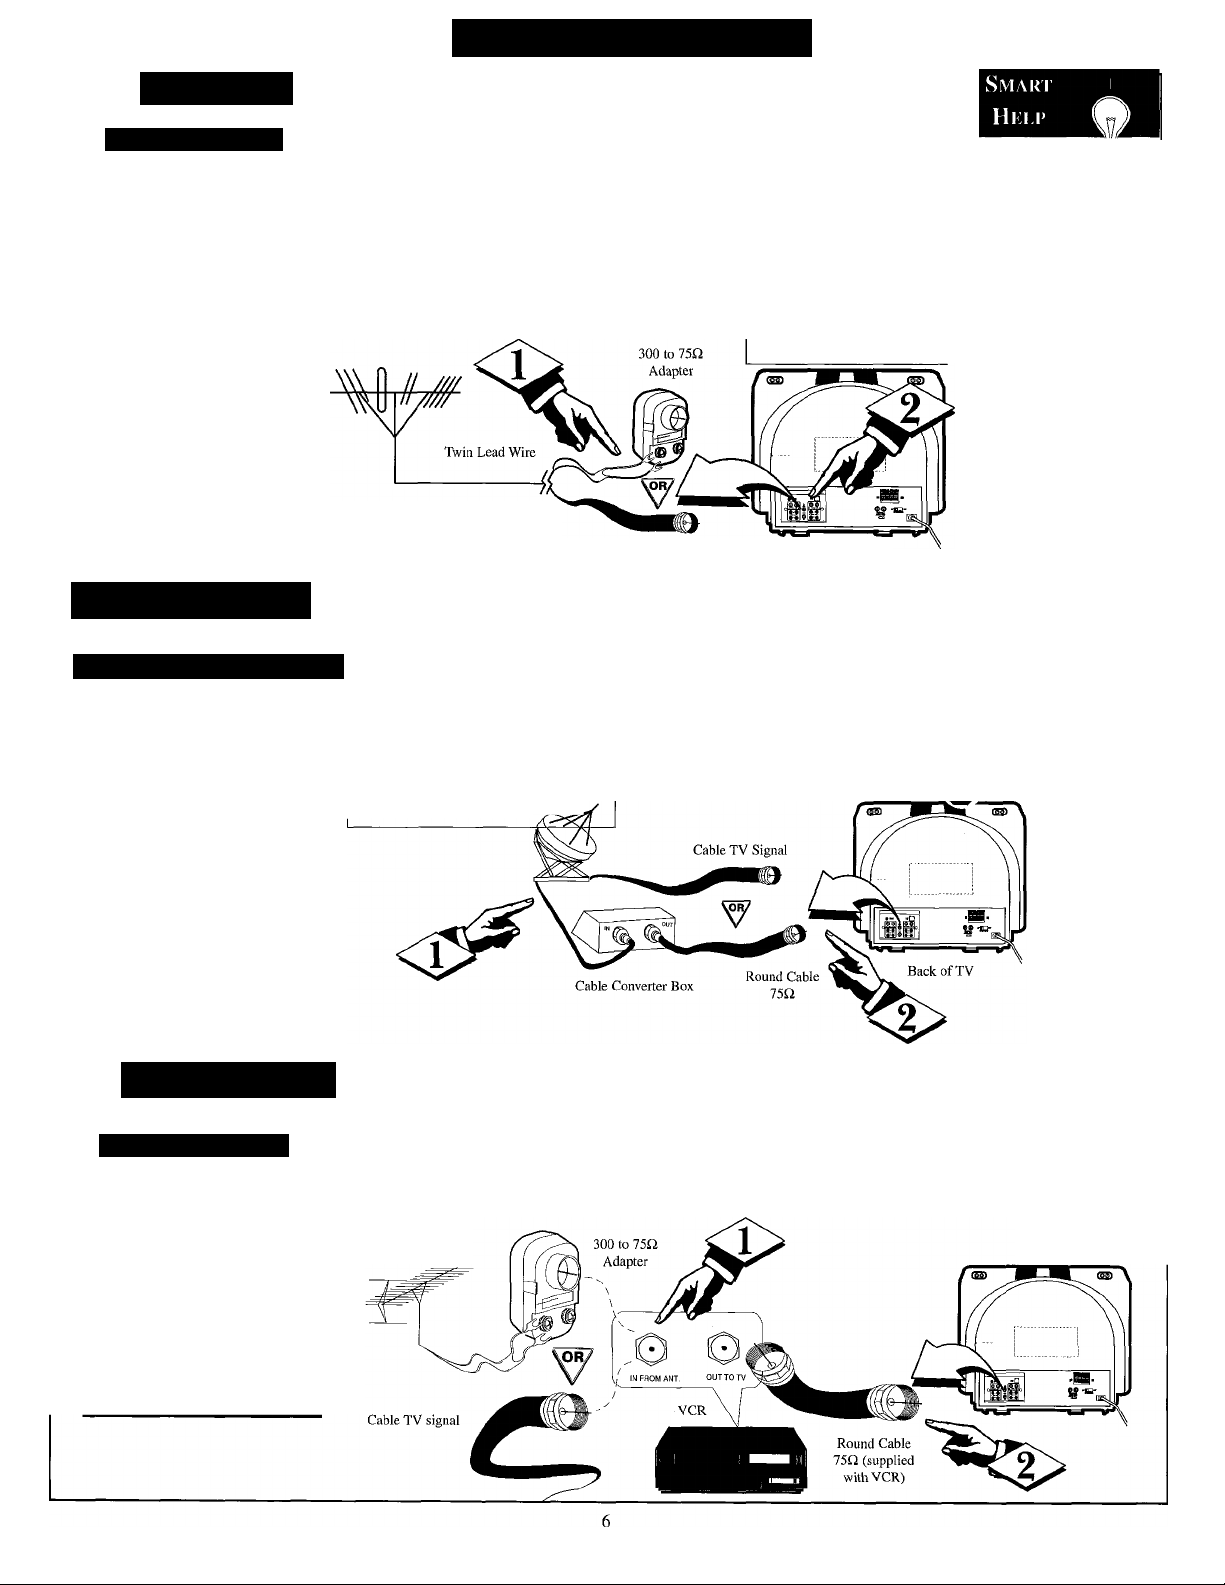
HooKiNC Up Your TV
Antenna
Outdook/Indoor
combination (outdoor
or indoor) antenna
A
receives normal broadcast
channels 2-13 (VHF) and
14-69 (UHF). Your con
nection to such an antenna
is easy since there is only
one antenna plug (75Q.
ANT ¡CABLE) on the hack
of your TV - and that’s
where the antenna goes.
2] Cable TV
C/Vliu; iNRin/CONVKRTKR
our Cable TV signal
may be a single (75
y
ohm) cable or a Cable
Converter Box installation.
In either case, the connec
tion to the TV is easy.
:gin)-
your antenna has a
round cable (75 ohm) on the
end, then you're ready to con
nect it to the TV.
If your antenna has flat twinlead wire (300 ohm), you first
need to attach the antenna wires
to the screws on a 300 to 75
ohm adapter.
Combination VHF/UHF Antenna
(Outdoor or Indoor)
r<X>if your Cable TV sig
nal is a single round cable (75
ohm), you're ready to connect
to the TV. Go to step 2.
If you have a Cable
Converter Box: Connect the
Cable TV signal to the IN plug
on the Cable Converter Box.
<P
Push the round end of the
adapter (or antenna) onto the
75Q ANT/CABLE plug on the
rear of the TV. If the round end
of the antenna wire is threaded,
screw it down tight.
----------------------------------
Note: Rear view of the model
TV is shown with an optional
ProKit 1 type module installed
for RF Input plug connections.
Round Cable 75Q
<l>
Connect the Cable TV signal to
the 75G ANT/CABLE plug on the TV.
If you have a Cable Converter Box:
Use a round cable (75Q) to connect the
OUT plug on the Cable Converter Box
to the 75Q ANT/CABLE plug on the
TV. m
Back of TV
1^
Remember, g
set the TV for the
type signal you've
connected (see page
9)^
___________
Note: For homes
with separate UHF
and VHF antennas,
you will need an
optional combiner
to connect to the
TV. To order any
optional accessory,
contact your dealer
or call the toll-free
accessory ordering
number (1-800-851-
8885).
VCR TO TV
IU.sk; Connkction
nrfie basic Antenna, or
J. Cable, to VCR to TV
connection is shown to the
right. For more informa
tion on hookups with
Cable Converter Boxes,
refer to your VCR and
Cable Converter Box
Owner's Manuals.
zGINL
^^^^Connect your
Antenna or Cable TV signal
to the IN FROM ANT(enna)
plug on the VCR.
Outdoor VHF/UHF
Antenna
<i>
Connect the OUT TO TV plug
on the VCR to the 75Q ANT/CABLE
plug on the TV (connecting cable sup
plied with the VCR).
Back of TV
Page 7

Basic TV and Remote Control Operation
fBEGIN]
Press the POWER button to
I turn on the TV.
Press the VOL(ume) A/T
I buttons to adjust the sound level.
Press the CH(annel) A/ T
buttons to select TV channels.
6 CH WXYZ
<$>.
toward the remote sensor on
the TV when operating the TV
with the remote.
Note: Always press two number
buttons on the remote when
selecting channels. For example:
press "0," then "6," for channel 6.
To load the supplied batteries
into the remote:
1. Remove the battery
compartment lid on the
back of the remote.
2. Place the batteries (two
AA) in the remote. Be
sure the (+) and (-) ends
of the batteries line up
as marked inside the case.
3. Reattach the battery
compartment lid.
Point the remote control
12:00 PM
, o Veee7 cdc25
Note: The TVOLUMEA buttons can
be used as an AV SWITCH source
control to quickly select the FRONT
Auxiliary Input jacks on the TV for
operation.
(The TVOLUMEA buttons can also
be pressed simultaneously to switch
the set between Auxiliary and Antenna
input modes or, in Commercial mode,
to display the Features menu.)
Smart Help
Remember, the tuned
g channel number will appear
when you change the channel. You
also may press the STATUS button
on the remote control to see the
current channel number.
Page 8

Smari' Hklp
Remember, always point
the remote control toward
the remote sensor on the TV when
operating the TV with the remote.
UsiN(i THE TV Remote Control
Sleep Button
Press to set the TV to automatically turn
itself OFF. Also can be used as an Enter but
ton when sending channel commands to
remote controlled cable converters or VCRs.
Status/Exit Button
Press to see the current channel number on the
TV screen. Also press to clear the TV screen
after control adjustments.
A/r,H-Record Button
Press to toggle between the currently viewed
channel and the previously viewed channel.
When in the VCR mode, press to start the
recording of a video tape,
TV/VCR/ACC Mndp Switch
Slide to TV position to control TV functions;
VCR to control VCR functions; and ACC for
Cable Converter, DBS, DVD, etc. functions.
SmartSound^*^ Button
Available on select models only, may not
operate or apply to your set.
Press to select from a list of SmartSound
controls (which are factory preset sound con
trol levels set for different types of listening
modes and types of programming.)
Menu Button
Press for the onscreen menu to appear. Press
the Menu button repeatedly to move forward
through the current onscreen feature control
selections.
Cursor Button.s
Use these buttons to select and adjust the
TV's onscreen menu. Also used with a VCR
for PLAY, FAST FORWARD, REWIND, and
STOP functions.
Volume t+I. (-) Buttons
Press to adjust the TV sound level up and
down.
Mute Button
Press to turn the sound OFF on the TV.
“MUTE” appears onscreen to confirm that no
sound will be heard through through the TV
speakers. Press the Mute button again to
return TV sound to its previous listening level.
SLEEP
"AÌCHN9.TATUS/EXIT CC / CLOCK
J-TV RECORD
■/“ ©
1
Lacc
© ® ®\
1 ®
1
SMART
(O)
1
SOUND
^
I MENUV
VOL/
@
®
MUTE
®
®
SMART
CO
PICTURE N.
S S U R f ) I I
TV/VCR
Power Button
Press to turn the TV (or select VCR,
Cable Converter, etc.) ON and OFF.
CC Button
Press to select Closed Caption options
within the menu. (Refer to the Owner’s
Manual for details.)
Clork-TV/VC.R Button
Available on select models only, may
not operate or apply to your set.
Press to select TV Clock menu options
With remote switch in the VCR position
press to view the playback of a tape
(VCR indicator will light on front of
VCR). Press again to place the VCR in
the TV mode to view one program
while recording another program (VCR
indicator will go off on the VCR).
Number Buttons
Press the number buttons to select TV
channels. When selecting single digit
channels, press the number of the desired
channel. The TV will pause for a few
seconds then tune to the selected chan
nel. (Note; you can also press "0" first,
then the desired number.) For channels
"100" and above, you must program the
desired channels into the TV’s channel
memory.
SmartPicture™ Button
Available on select models only, may
not operate or apply to your set.
Press to select from a list of
SmartPicture controls (which are facto
ry preset picture levels set for different
types of viewing sources and pro
grams.)
Surf Button
Available on select models only, may
not operate or apply to your set.
Press to quickly select from a series of
previously viewed channels. When the
remote control is in the VCR mode, press
the Surf button to pause the playback of a
video tape.
Channel f-t-). (-) Buttons
Press to change the tuned channel. Only
channels “saved” into the TV’s program
channel memory ring will be available
for selection.
Page 9
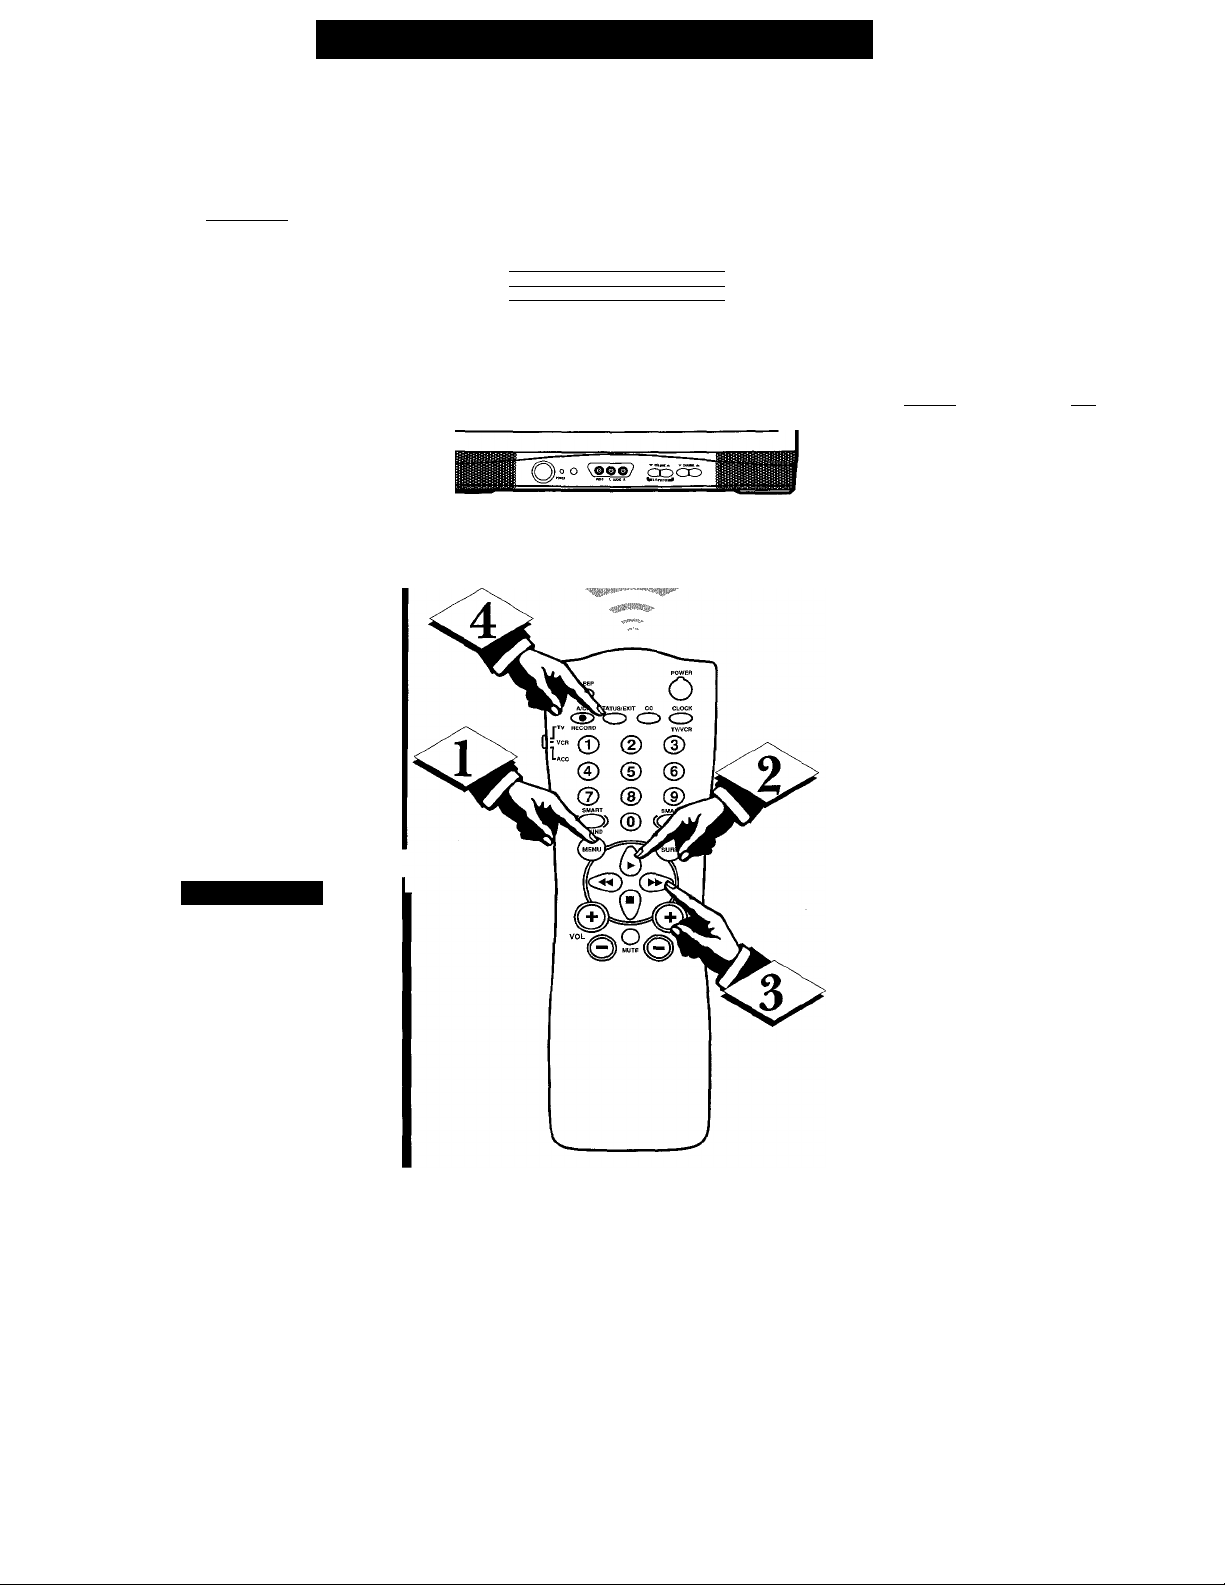
How TO Use the On-Screen Menu
TJ'eatures for your TV can be
± adjusted from a Menu screen
shown on the TV. Each Menu item
can be adjusted by viewing the
screen and pressing a button.
tBEGIN)
Press the Menu button on the
remote. The on-screen menu
appears.
<1^1^ Press Menu button repeated
ly, or use the Cursor (A) Up and
Down (T) buttons on the
remote, to select a feature control.
A highlight bar will show the
selected feature.
Press the Cursor Right (►)
and Left (-^ )buttons on the
remote to adjust the selected
onscreen feature control.
<l>
Press the STATUS/EXIT but
ton on the remote to remove the
on-screen menu.
(You can also use the EXIT con
trol within the onscreen Menu to
remove the Menu from the TV
screen, or wait for the Menu
screen to time out.)
LANGUAGE ENGLISH
ICHANNEL INSTALL
dAftLEtUNlUii Tir
BRIGHTNESS
COLOR llllllh—
CONTRAST
SHARPNESS ■■II- 40
TINT
NOISE REDUCTION OFF CHANNEL INSTALLATION
MAIN MENU
ll■-- • 34
llllllh--
22
29
0
CHANNEL TV 4
CHANNEL RING
INPUT
LABEL
AUTO PROGRAM
EXIT
- Consumer Onscreen Menu Mode (In other Commercial mode settings (i.e.,
Unlocked, etc.) not all select control
items will appear as shown above.)
DELETED
ANTENNA
o
Smart Help
^\5/ifthT on-screen menu
g disappears and you are not
finished, press the MENU button.
The on-screen menu will return.
Note: Selection and use for both
the Consumer and Commercial
mode onscreen Menu feature con
trols will work in basically the
same manner.
Page 10
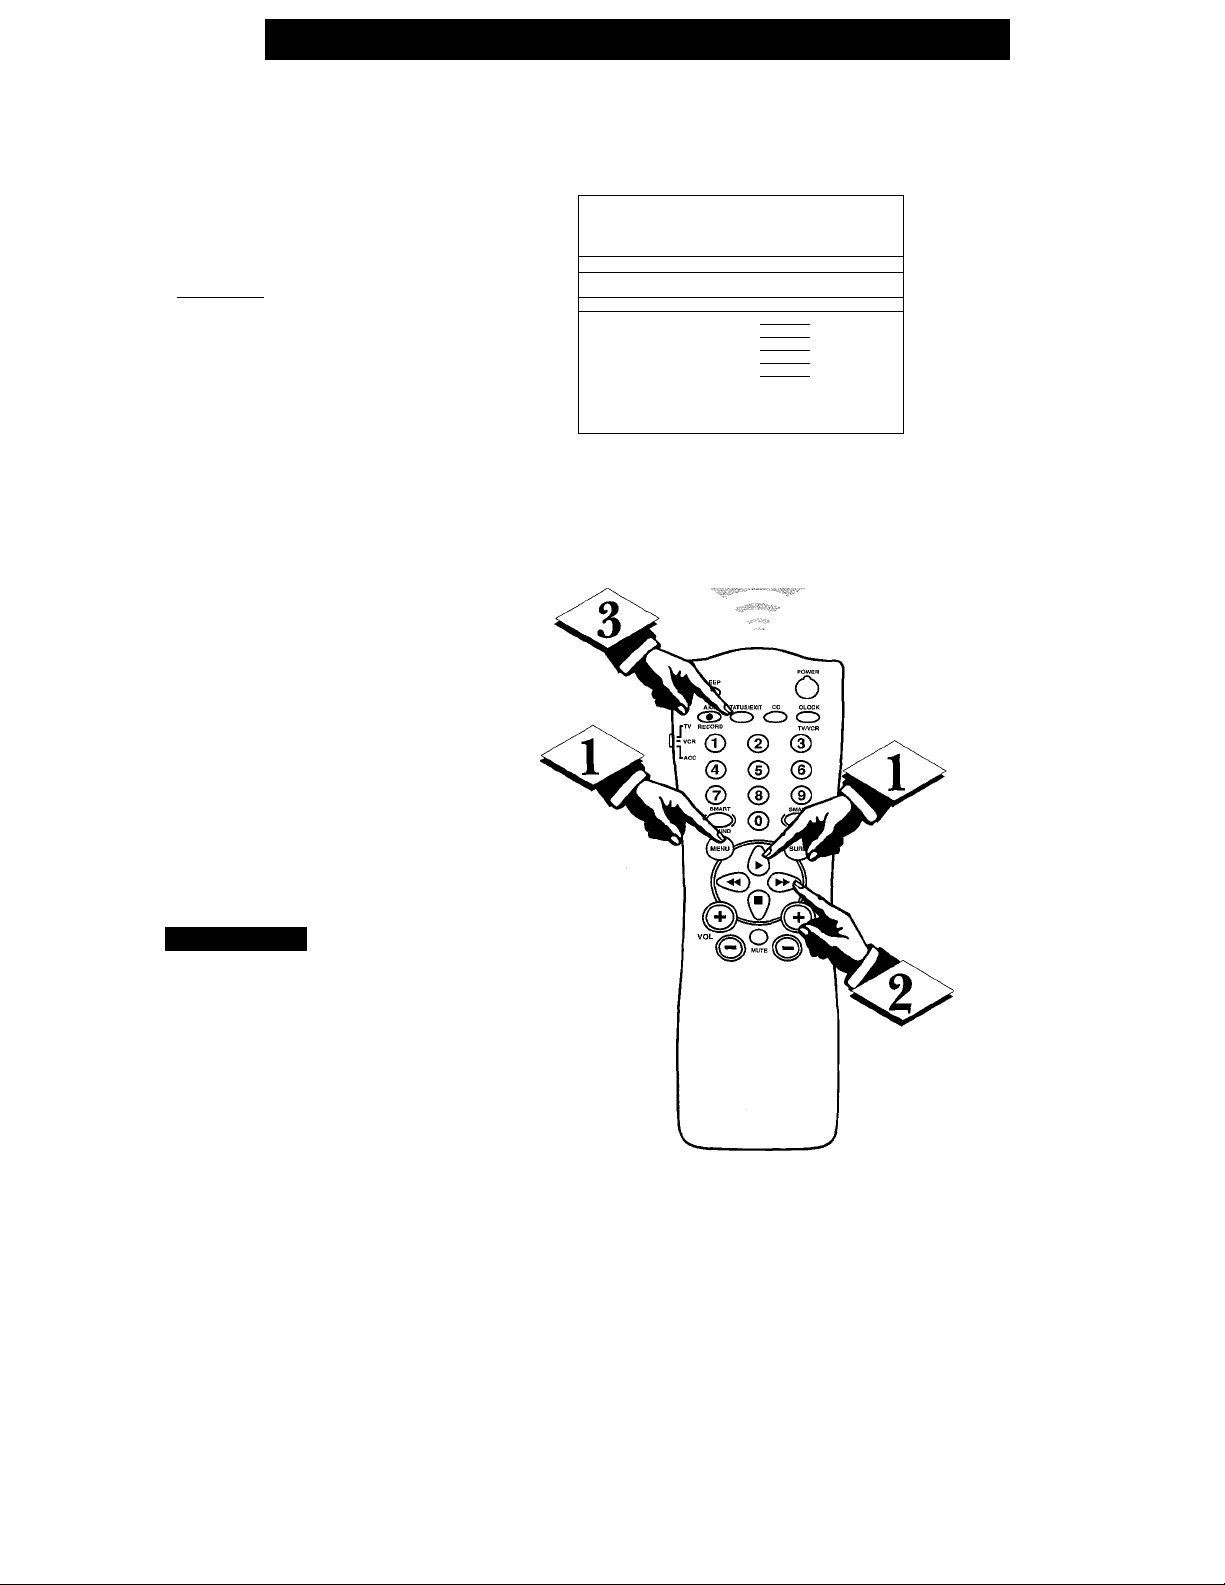
How TO Set the TV eor Cabee TV Operation
ake sure the TV is set to
pick up either Cable TV
M
stations or Antenna signals. In
other words, the TV needs to
know whether you’ve connected a
Cable TV signal or a normal
antenna to its 75Q. ANTICABLE
plug.
(BEGINS
With the Menu onscreen
press the Menu button repeat
edly , or use the Cursor (A) Up
and Down (T) buttons, to select
CABLE TUNING with the TV’s
highlight control bar.
1 MAIN MENU 1
LANGUAGE ENGLISH
CHANNEL INSTALL
ICABLE TUNING
BRIGHTNESS
COLOR
CONTRAST
SHARPNESS iinil-■ 40
TINT
NOISE REDUCTION
Hill-
■li....
- -H- - -
—fyiOTF]
■ 22
0N|Wn
29
0
OFF
<l>
Press the Cursor Right (►)
or Left (-^ )button on the
remote to select:
ON - If you no have Cable
TV connected to the TV.
Channels 1-125 may be
selected. Or, select
OFF -If you have an Antenna
connected to the TV,
Channels 2-69 may be
selected.
<J> Press STATUS/EXIT to
remove the on-screen menu.
Smart Hki.r
Try it out. Press the
■CH(annel) +, - buttons to
scan the channels. Remember, the
TV has been set at the factory to
select certain channel numbers.
See the next page to set the TV to
select the channels in your area.
10
Page 11

Channel Installation: Adding Channels (AutoProgram
\Zour TV can automatically set
J. itself for local area (or Cable
TV) channels. This makes it easy
for you to select only the TV sta
tions in your area when you use
the CH(annel) +, - buttons.
CBEOIN)
<i>
With the Main Menu
onscreen press the Menu button
repeatedly , or use the Cursor
(A) Up and Down (T) buttons,
to select CHANNEL INSTALL
with the TV’s highlight control
bar.
Press the Cursor Right (►)
<S>
or Left (-^ )button on the
remote to select the Channel
Installation control Menu.
Press the Menu, or Cursor
Down (T), button to select
AUTO PROGRAM with the
highlight control bar.
LANGUAGE ENGLISH
ICHANNEL INSTALL
CABLE TUNING ON
BRIGHTNESS
COLOR
CONTRAST
SHARPNESS
TINT
NOISE REDUCTION
iVlAJN MENU
iiiiiih-iiiiih—
IIIIIIH
...
llllll¡lllllh-
C^CID
• 40
OFF
34
22
29
0
1 CHANNEL INSTALLATION I
CHANNEL
CHANNEL RING
INPUT
LABEL
lAUTO PROGRAM
EXIT
I
AUTO-PROGRAMMING ACTIVE
TV 4
DELETED
ANTENNA
i )
►1
Press the Cursor Right (►)
or Left (-^ )button on the
remote to start the TV’s automat
ic search for area channels.
Flashing channel numbers will
count upward on the screen as the
TV looks for channels to "SAVE.”
Press any button (on the TV or
the remote) to stop the channel
search at any time. When the
channel search is completed, the
TV will return to normal channel
viewing and operation.
<5> Press the STATUS button to
remove the on-screen menu.
/ Smart Help
Remember, if you want
8 to drop any unwanted chan
nels from the TV's memory, see
the next page to "Manually" add
and delete channels.
Note; As the TV searches for
channels to "SAVE" into memory,
the on-screen display may move
(or jitter slightly). This is normal
operation and does not indicate a
need for service.
PRESS ANY KEY TO STOP
“RED” channel numbers have been SAVED to the
TV’s program memory.
“WHITE” channel numbers are not present in
the TV’s program scan memory.
11
Page 12
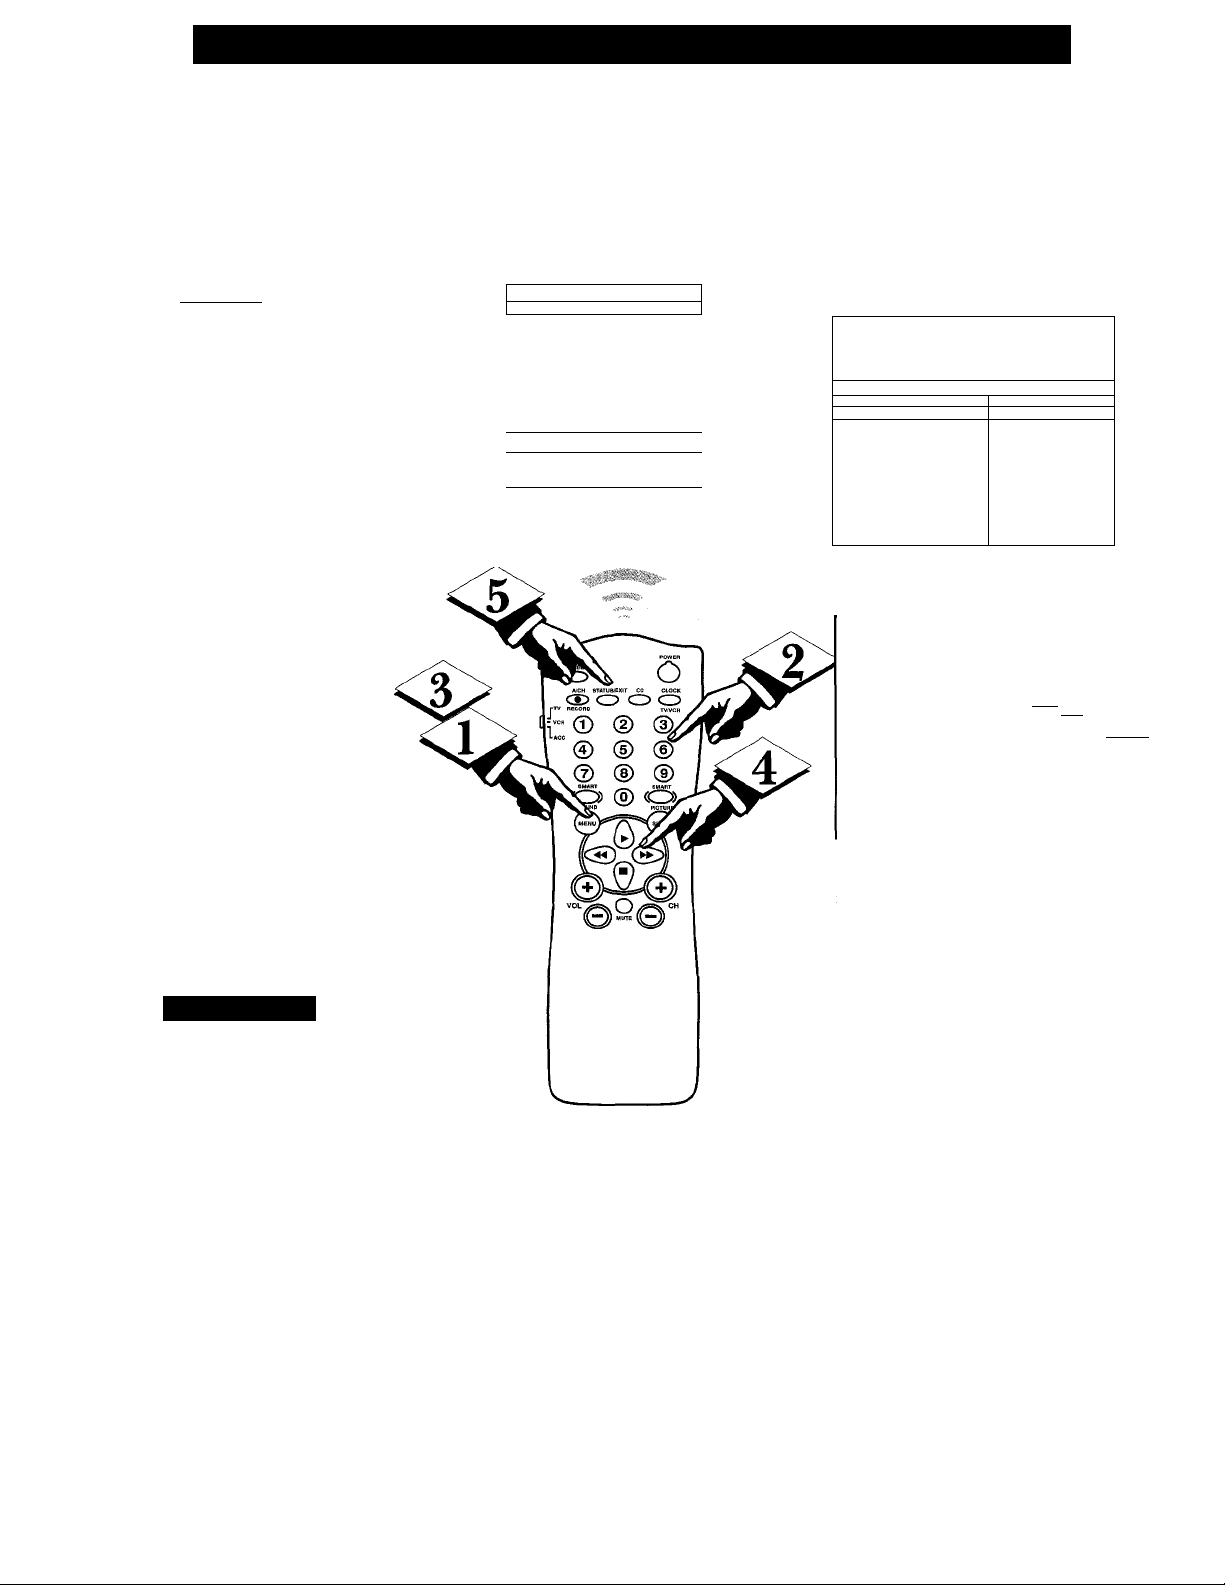
□
Channel Installation: Ai)DiN(i Channels (Manually)
uto Programming (see previ
ous page) adds all the chan
A
nels it can find (on your Antenna
or Cable TV system) into the TV's
memory. You may add other chan
nels, or drop unwanted channels
from the list of channels in the
TV's memory.
iBEQIN)
With the Channel
Installation Menu onscreen
press the Menu button, or use
the Cursor (A) Up and Down
(▼) buttons, to select CHANNEL
with the TV’s highlight control
<!>'"
Press the Number, or CH(+,-),
buttons to select the channel you
^ want to SAVE (or DELETE).
<l>
Press the Menu, or Cursor
Down (T), button to select
CHANNEL RING with the high-
^ light control bar.
Press the Cursor Right (►) or
Left (-^ )button on the remote
to SAVE (or DELETE) the select
ed channel number into memory.
Repeat steps 2-4 for each channel
you wish to add (or delete).
^^ress the STATUS/EXIT button
to remove the menu when you are
finished.
Smaki Hki.i’
Try it out. Press the
iCH(annel) +, - buttons.
The channels you SAVED should
appear. The channels you
DELETED should not appear.
If you need to SAVE (or
DELETE) a channel above 100,
use the CH (+, -) buttons. The
consumer remote control number
buttons can not select channels
above 99 (unless the 3 DIGIT
ENTRY Commercial mode Menu
control has been set to receive
such channel entries).
CHANNEL INSTALLATION
CHANNEL
CHANNEL RING
INPUT ANTENNA
LABEL
AUTO PROGRAM
EXIT
1
Iv 4
mrm:
( )
►
►
1 CHANNEL INSTALLATION 1
HHANNEI. TV 4
{CHANNEL RING saved!
INPUT
LABEL
AUTO PROGRAM
EXIT
CHMNEL INSTALLATION
CHANNEL
CHANNEL ftltie
INPUT
LABEL
AUTO PROGRAM
EXIT
Remember, you may add the FRONT (AA^);
AUX{iliary); and S-VIDEO inputs into the
TV’s channel scan program memory. Then, by
pressing the CH(annel) +, - buttons you may
quickly select the Audio/Video Input jacks on
the front and rear of the TV.
Select CHANNEL in the onscreen menu, then
press the CH (+, -) buttons to select either
FRONT (A/V)/ AUX(iliary)/ or S-VIDEO
inputs. Note: The AUX(iliary) Video modes
are located between the lowest and highest
channel numbers within the CHANNEL con
trol.
ANTENNA
TV ■
ANTENNA
( )
t
FRO.
)
SVIDEO I
12
Page 13
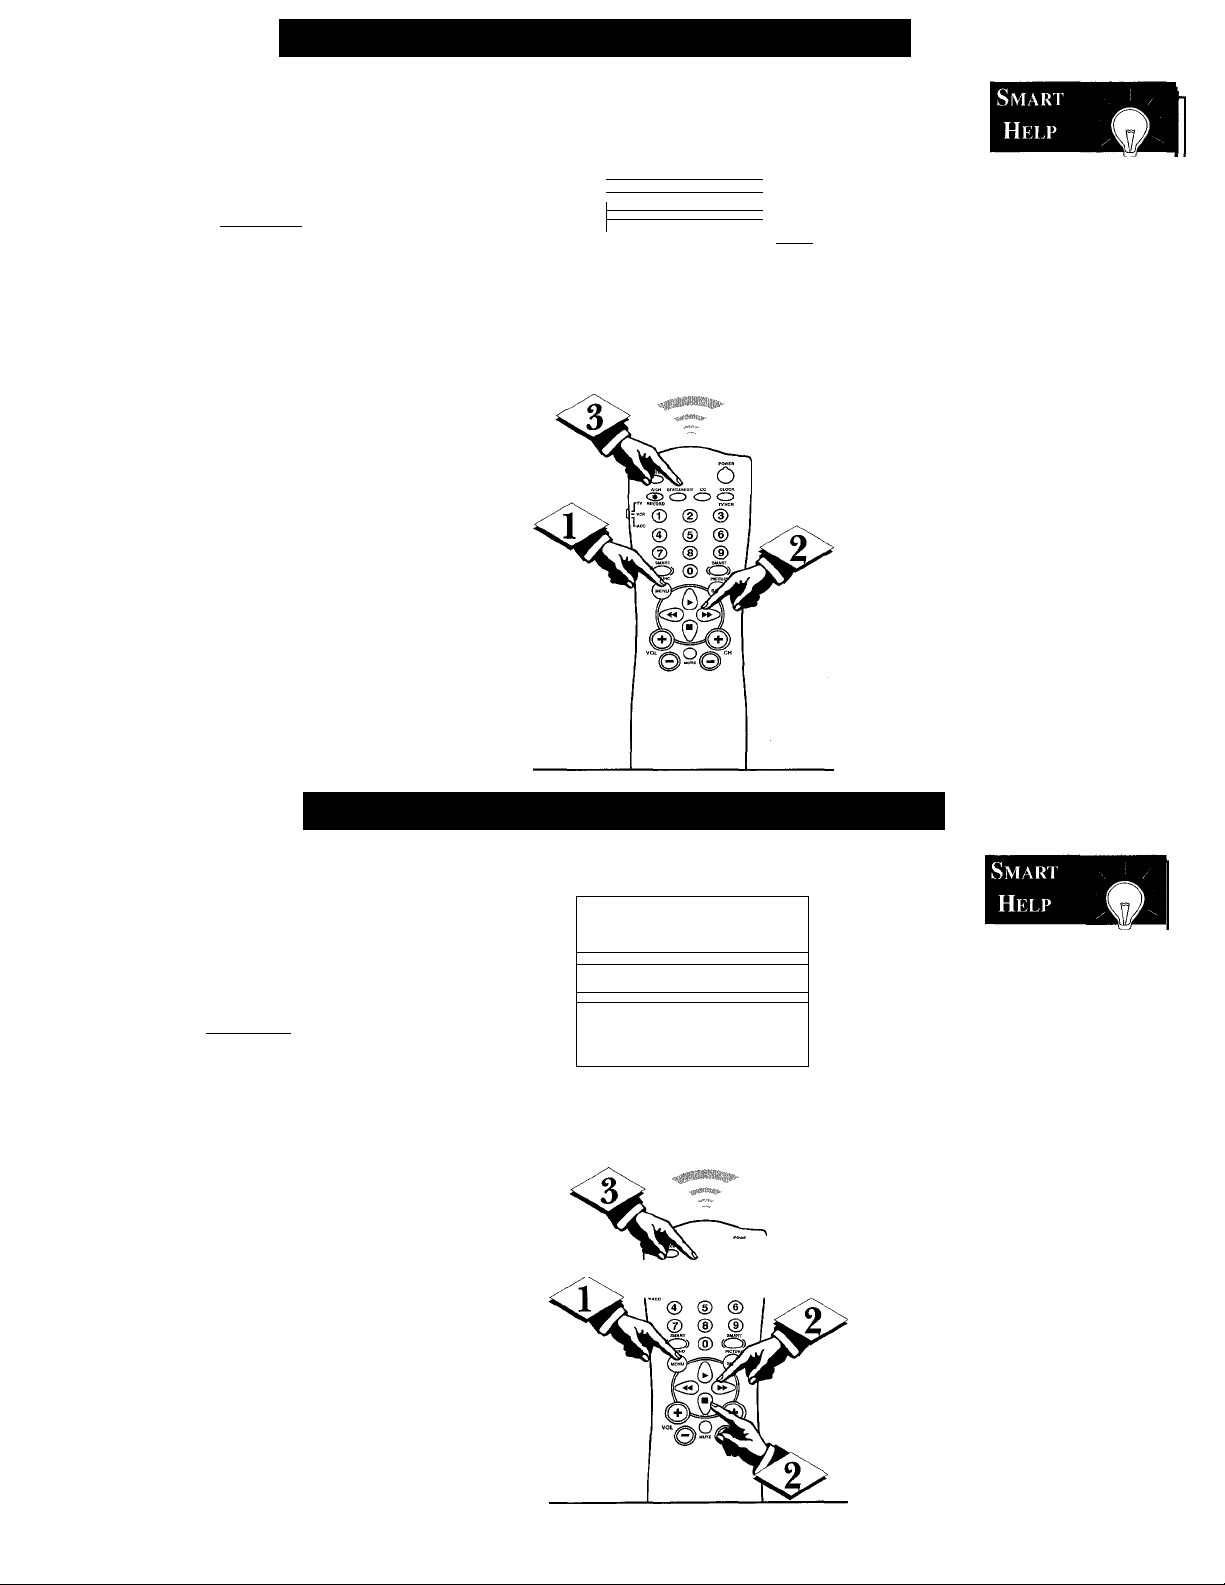
Channel Installation: Input Control
'The Channel Installation Input
-L control directs the TV to select
an indicated input source (Auxiliary,
Antenna, Front AIV, etc.) whenever a
specific channel number is tuned.
fBEGIN]
<l> With the Channel Installation
Menu onscreen press the Menu
button, or use the Cursor (A) Up
and Down (T) buttons, to select
INPUT with the TV’s highlight con
trol bar.
Press the Cursor Right (►) or
Left (-^ )button on the remote to
turn select the desired signal input
mode (Antenna, Front AfV, etc.).
Press the STATUS/EXIT button
to remove the menu.
CHANNEL INSTALLATION |
CHANNEL
IHANNaRIHG OeiETED
NPUT
LABEL
ANTF^Nfl!
Remember,
TV 4
( LEW
SyiDEQ 1
please refer to the
additional setup and
use information sup
plied with those
models equipped
with a ProKit 1, or
other Smart Card
Expansion Assembly,
jackpanel. This infor
mation will detail all
the various Audio
and Video connec
tions possible with
this type of module.
Channel Installation: Label Control
Channel Label can be set for a
symbol, letter, or number callout
A
(up to eight characters in length)
that will appear with the TV’s
onscreen channel numbers. Example:
WKYZ - for a TV station’s call lel-
CBEGIK)
With the Channel Installation
Menu onscreen press the Menu
button, or use the Cursor (A) Up
and Down (▼) buttons, to select
LABEL with the TV’s highlight con
trol bar.
Press the Cursor Right (►) or
Left (-^ (button on the remote to
select the separate character spaces
within the LABEL control. Use the
Cursor (A) Up and Down (T) but
tons to select the specific letters or
symbols for the highlighted space.
11 WXYZ
1 CHANNEL INSTALLATION 1
CHANNEL
CHANNELRING OELETEO
INPUT ANTFNNA
ILABEL
AUTO PflOGflAM
EXIT ►
(WXYZ 11
. o
o
IF-© ® ®
Remember,
TV 4
►
if you want to con
tinue to write new
Labels for additional
channels, just press
the Channel Number
(or the CH +,-) but
tons with the
LABEL control
highlighted. Then
use the Cursor (A)
Up and Down (T)
buttons to select the
characters for the
next channel Label.
<J> Press the STATUS/EXIT but
ton to remove the menu when com
pleted.
13
Page 14
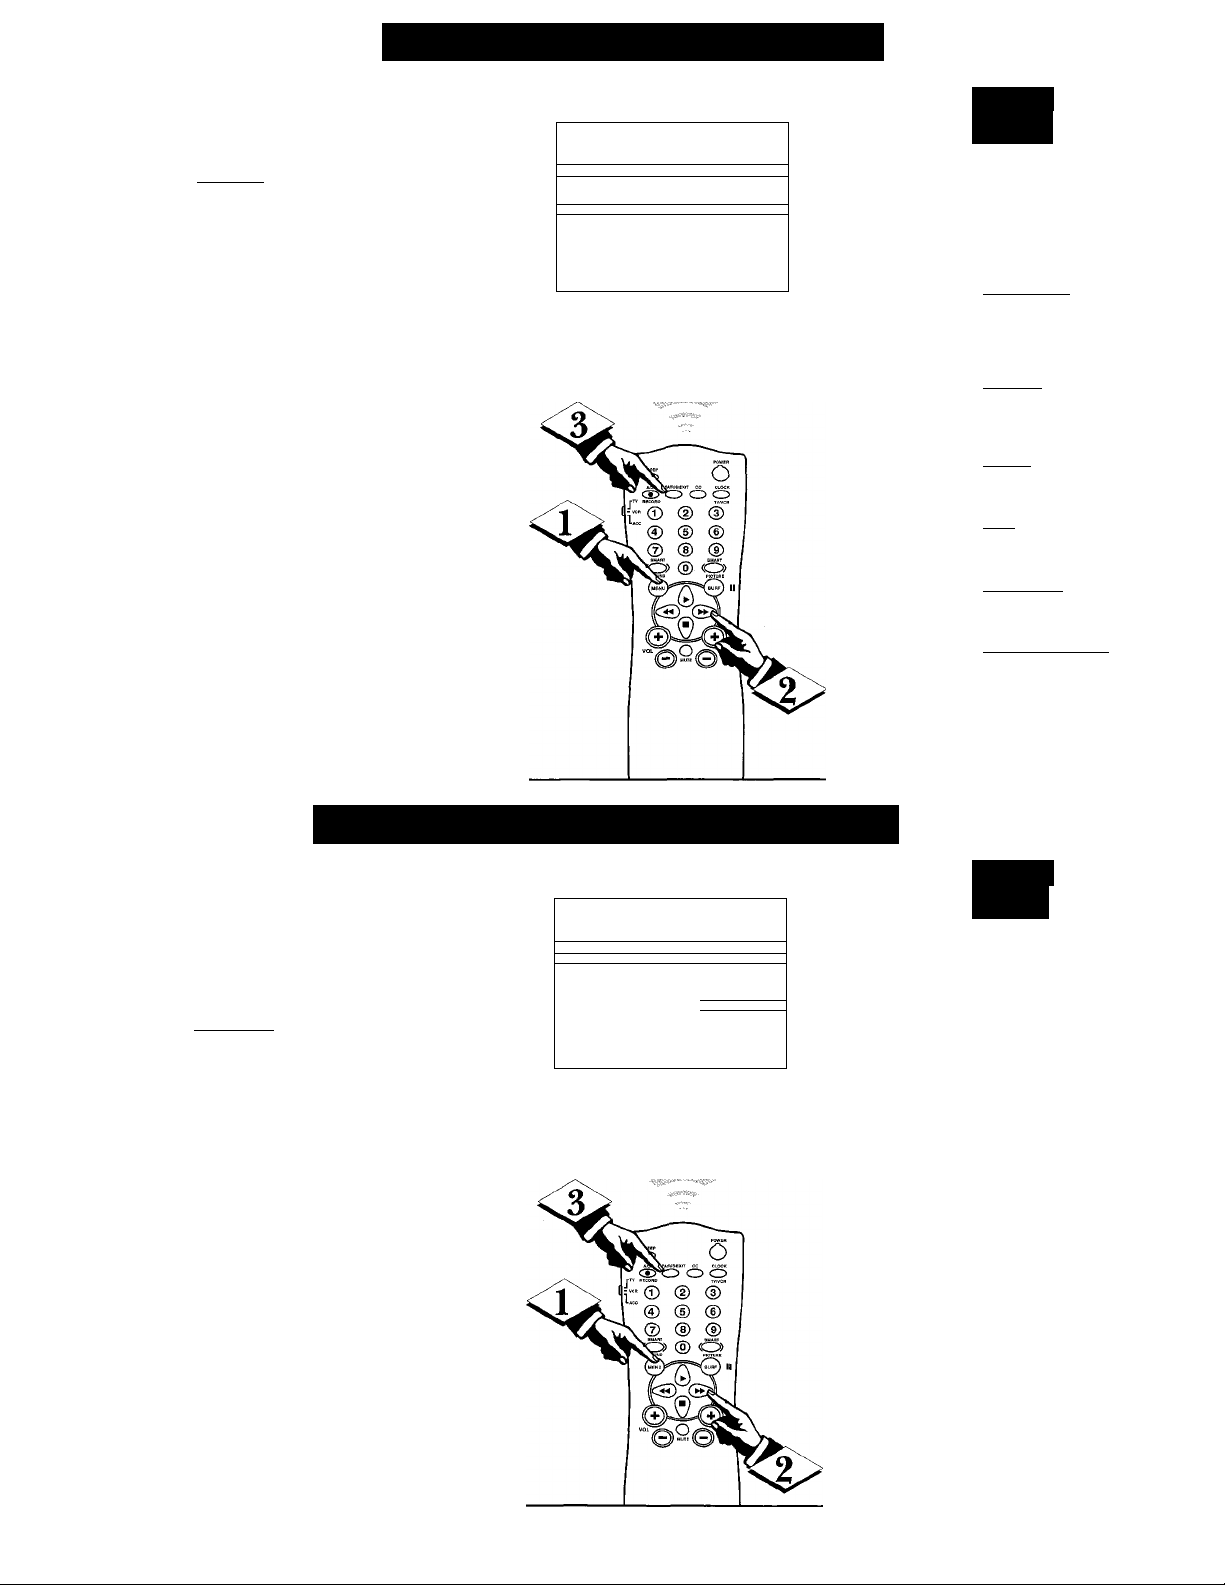
□
How TO Adjust the TV Color
o adjust your TV color and pic
ture controls, select a channel,
T
then follow these steps:
iBEaiN)
With the Main Menu onscreen
press the Menu button repeatedly,
or use the Cursor (A) Up and
Down (T) buttons, to select the
desired control (BRIGHTNESS,
COLOR, etc.) with the TV’s high
light control bar.
Press the Cursor Right (►) or
Left (-^ ) button on the remote to
adjust the control.
The sliding bar scale, and number
value indicator (0-63), will change
onscreen as adjustments are made.
Press the STATUS/EXIT button
to remove the menu when you are
finished.
1 MAIN MENU 1
LANGUAGE ENGLISH
CHANNEL INSTALL
CAHIPTIIMINR ON
IBRIRHTNFS.«: Will
COLOR
CONTRAST
SHARPNESS lliil"- 40
TINT
NOISE REDUCTION
nil—
iiiiiii-"- 29
--H
......
Smart
Hki.p
Remember,
►
34 1
ii
G
ON
when the bar scale
is centered, the con
trols are at normal
levels.
BRIGHTNESS - Press
Cursor (►) or (•^) until
the darkest parts of the pic
ture are as bright as you pre
fer.
PICTURE - Press Cursor
(►) or ) until the light
est parts of the picture show
good detail.
COLOR - Press Cursor
(►) or ) to add or elimi
nate color.
TINT - Press Cursor (►)
or ) to obtain natural
skin tones.
SHARPNESS - Press
Cursor (►) or (-^ ) to
improve detail in the picture.
NOISE REDUCTION -
Press Cursor (►) or )
to reduce possible signal
noise or interference in the
picture.
'^^our TV is able to receive
J. broadcast stereo TV pro
grams. The TV is equipped with
an amplifier and twin speaker
system through which the stereo
sound can be heard.
IBEQINl
With the Main Menu
<i>
onscreen press the Menu but
ton repeatedly, or use the
Cursor (A) Up and Down (T)
buttons, to select the SOUND
MODE control with the TV’s
highlight control bar.
Press the Cursor Right (►)
or Left (-^ ) button on the
remote to turn ON the Stereo
mode.
<|> Press the STATUS/EXIT but
ton to remove the menu.
1^
UsiN(i THE Stereo & SAP Controls
1 MAIN MENU 1
ISDUNO MOriF STEREfll
SAP
AUDIO OUT FIXED
BALANCE
TREBLE Hill—31
BA&S
ULTRA BASS ON
IMCREQ STEREO
AVI.
14
......li.......
m 31
OFF
a
OFF
OFF
Smart
Help
Note; Second S
Audio Program
(SAP) is part of the
stereo broadcast
system. Sent as an
additional audio
channel SAP can be
heard apart from the
current TV program
sound. TV stations
are free to use SAP
for any number of
purposes, but many
experts believe it
will be used for for
eign language trans
lations of TV shows
(or for weather and
news bulletins).
If a SAP signal is
not present with a
selected program
the SAP option can
not be selected
Page 15
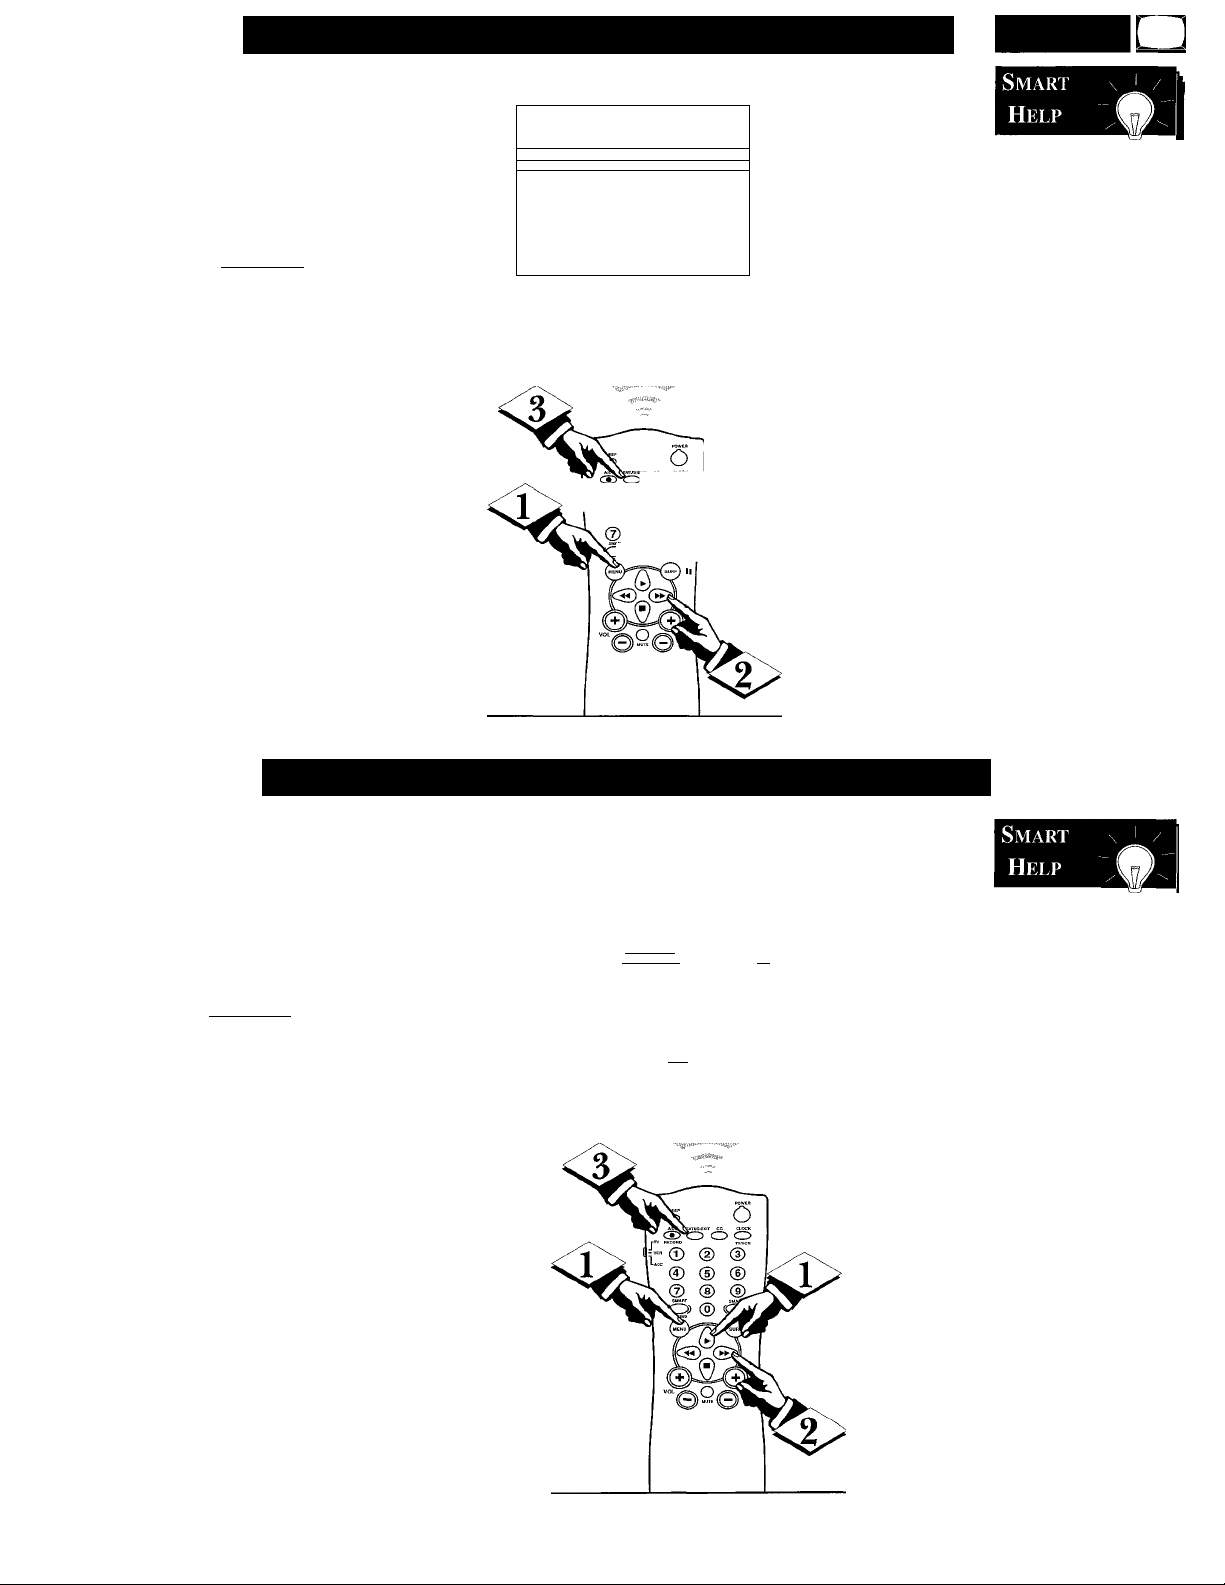
Using the Bass, Treble, Balance Controls
~\^our TV has individual sound
A. adjustment controls. The
speaker BALANCE, TREBLE
(high frequency), and BASS (low
frequency) controls may be used
to adjust the sound quality of TV
programs.
fBEOIN]
<i>
With the Main Menu
onscreen press the Menu but
ton repeatedly, or use the
Cursor (A) Up and Down (T)
buttons, to select the BAL
ANCE (TREBLE or BASS) con
trol with the TV’s highlight con
trol bar.
Press the Cursor Right (►)
or Left ) button on the
remote to adjust the sound to the
level you prefer.
Press the STATUS/EXIT
button to remove the menu.
1 MAIN MENU 1
IRAIANOF
TREBLE m— 31 w
8ASS
ilLTR.ft BASS ON \
ifJGRED STEREO OFF N
AVL OFF
VOLUME BAB
AUDIO,/VIDEO MUTE
REMINDER OFF
nn- - 31 ^
SLUE
—01
ON
' O Q
10© @ @
“ ® ® ©
® ®
> ® (O)
Note: The sliding bar scale (and number
value indicator) will change onscreen as
sound adjustments are made.
For example: with the BALANCE con
trol bar scale set to center (0 number
indicator), the sound coming from the
TV’s Left and Right cabinet speakers are
equally balanced. Move the BALANCE
bar scale control to the Right or Left and
sound playback will shift accordingly.
Remember,
Besides normal
BASS sound control
adjustments, you
also can set an Ultra
Bass audio range
control that will cre
ate an even deeper,
fuller low frequency
playback sound
which can be heard
through your TV
speakers.
How TO Set the Incredible Stereo Control
\Zour TV has already been preA set at the factory for a full
time Stereo mode setting. But you
can add even greater depth and
dimension to TV program sound
reception by using the Incredible
Stereo sound control.
(BEOIN)
With the Main Menu
onscreen press the Menu button
repeatedly , or use the Cursor
(A) Up and Down (T) buttons,
to select INCREDIBLE STEREO
with the TV’s highlight control
bar.
Press the Cursor Right (►)
or Left (-^ )button on the
remote to turn INCRED.
STEREO On (or Off).
<|> Press the STATUS/EXIT
button to remove the menu.
C
BALANCE
TREBLE
BASS
ULTRA BASS
lINCRED STEREO
AVI
VOLUME BAR
AUDiO/VlOEO MUTE
REMINDER
o yeeo/ c55c0
Remember,
with the Incredible
QNl
Stereo control
turned ON even
monaural (mono)
audio source materi
al can be heard
through the rear
External Speaker
sound connection
terminals on the TV.
15
Page 16
□ I
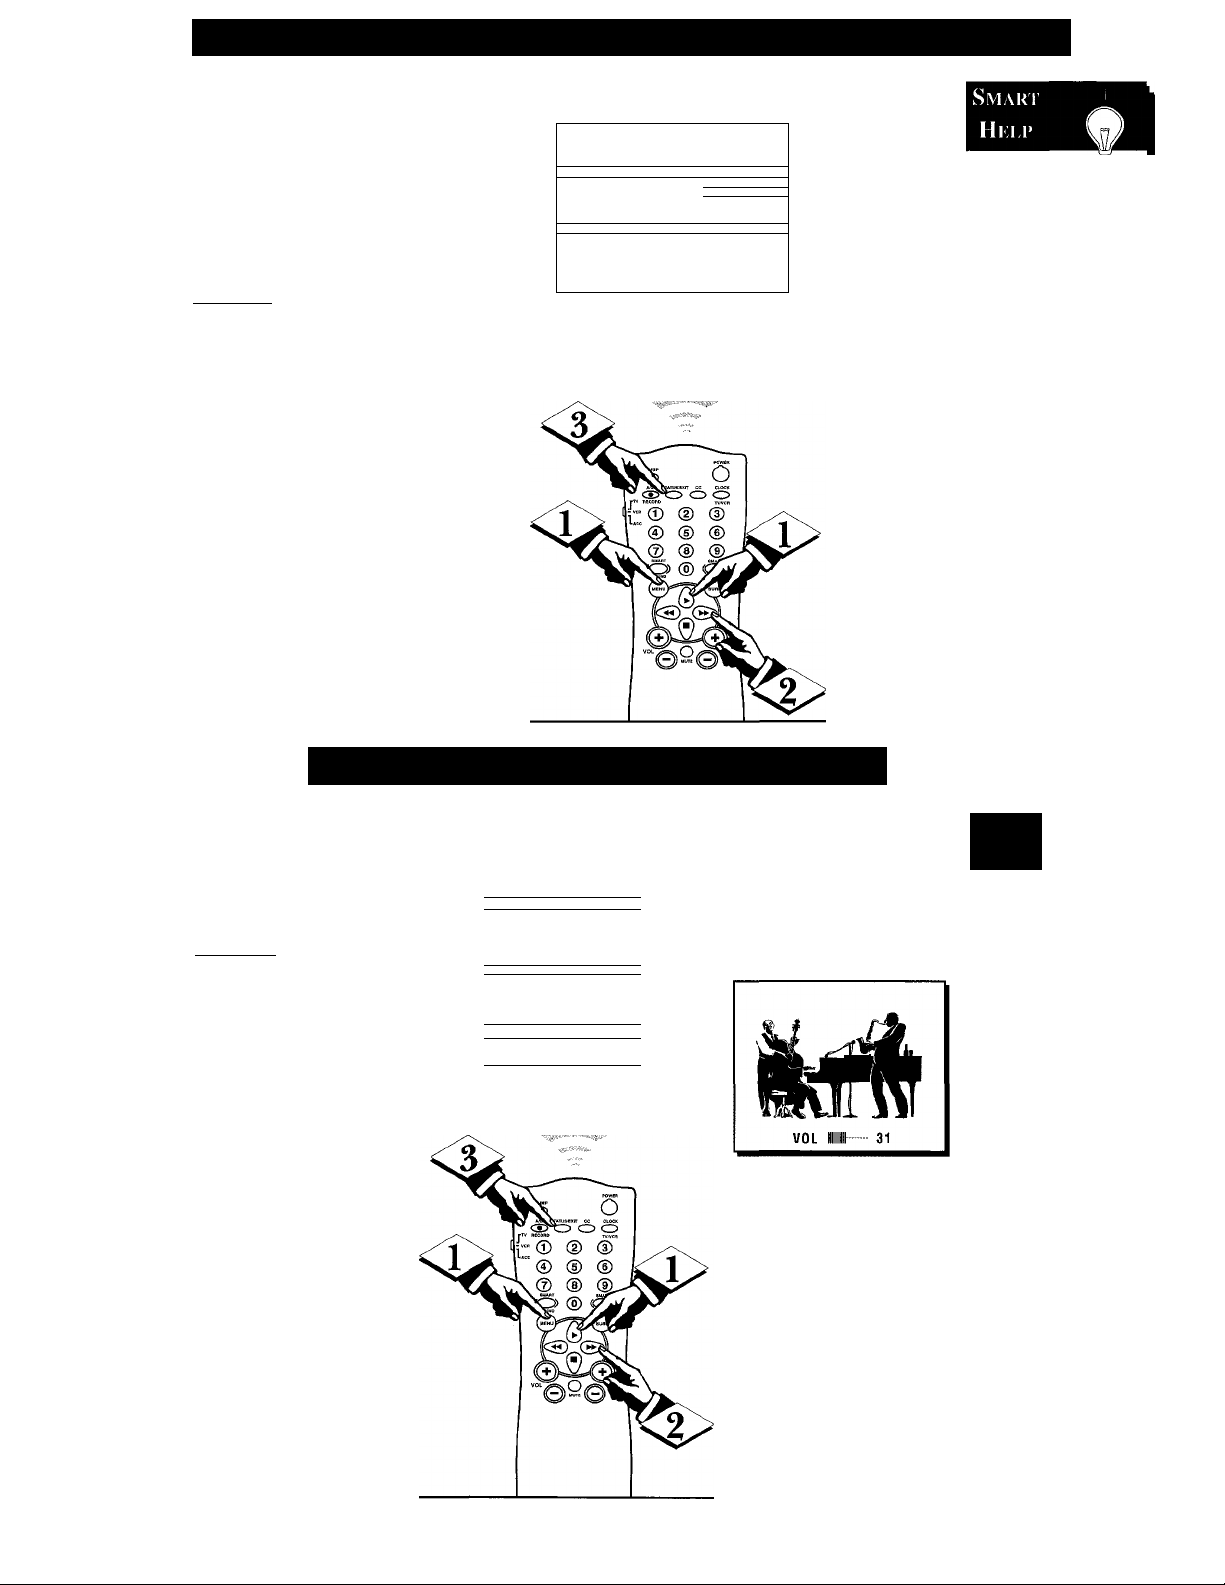
Using the Automatic Volume Limiter (AVL) Control
utomatic Volume Limiter (AVL)
allows you to preset a desired
A
volume level that the TV sound will
not go above or exceed. This makes
for an even, more consistent sound
by reducing the “peaks” and “val
leys" that can occur during commer
cials and other program breaks.
iBEGINl
With the Main Menu onscreen
<ï>
press the Menu button repeatedly ,
or use the Cursor (A) Up and
Down (▼) buttons, to select AVL
with the TV’s highlight control bar.
Press the Cursor Right (►) or
<l>
L(
Left (-^ ) button on the remote to
tu
turn the AVL control On (or Off).
Press the STATUS/EXIT button
to remove the menu.
1 MAIN MENU !
SALANCf --•»
TREBLE
BASS
UlTflAfiASS ON
.INCHED STEREO OFF
lAVL TO
1/OLUME BAR
AUDIO/VIDEO MUTE BLUE
REMINDER
....
1№
.....
m— 31
0
31
ON
OFF
Remember,
AVL works for
sound levels com
ing from the
Antenna/Cable
Input on the rear of
the TV (RF Audio),
or the AUX(iliary)
audio inputs for
models that are
properly equipped
(with jackpanel
expansion kit mod
ules such as Pro Kit
1).
UsiN(i THE TV Volume Bar Control
T
Tse the Volume Bar control to see
Cy the TV’s volume level settings
on the TV screen. The Volume Bar
will appear when the VOL(ume) but
tons are pressed.
(BEGIN]
With the Main Menu onscreen
<L>
press the Menu button repeatedly ,
or use the Cursor (A) Up and
Down (▼) buttons, to select VOL
UME BAR with the TV’s highlight
control bar.
Press the Cursor Right (►) or
Left (-^ )button on the remote to
turn VOLUME BAR control On (or
Off).
<|> Press the STATUS/EXIT button
to remove the menu.
1^1
I MAIN MENU I
BALANCE
TREBLE
BASS
ULTRABASS
INCHED STEREO
¡VOLUME BAR ONI
AUOIO/VIDEO MUTE
REMINDER
iQ^o \eo_o/
-••t
....
nn-— 31
D
№ 31
OFF
BLUE
OFF
Smari
Hi 1.1*
Try it out.
Press the VOL(ume)
ON
A Up and Down T
buttons. The
Volume Bar should
appear onscreen.
16
Page 17
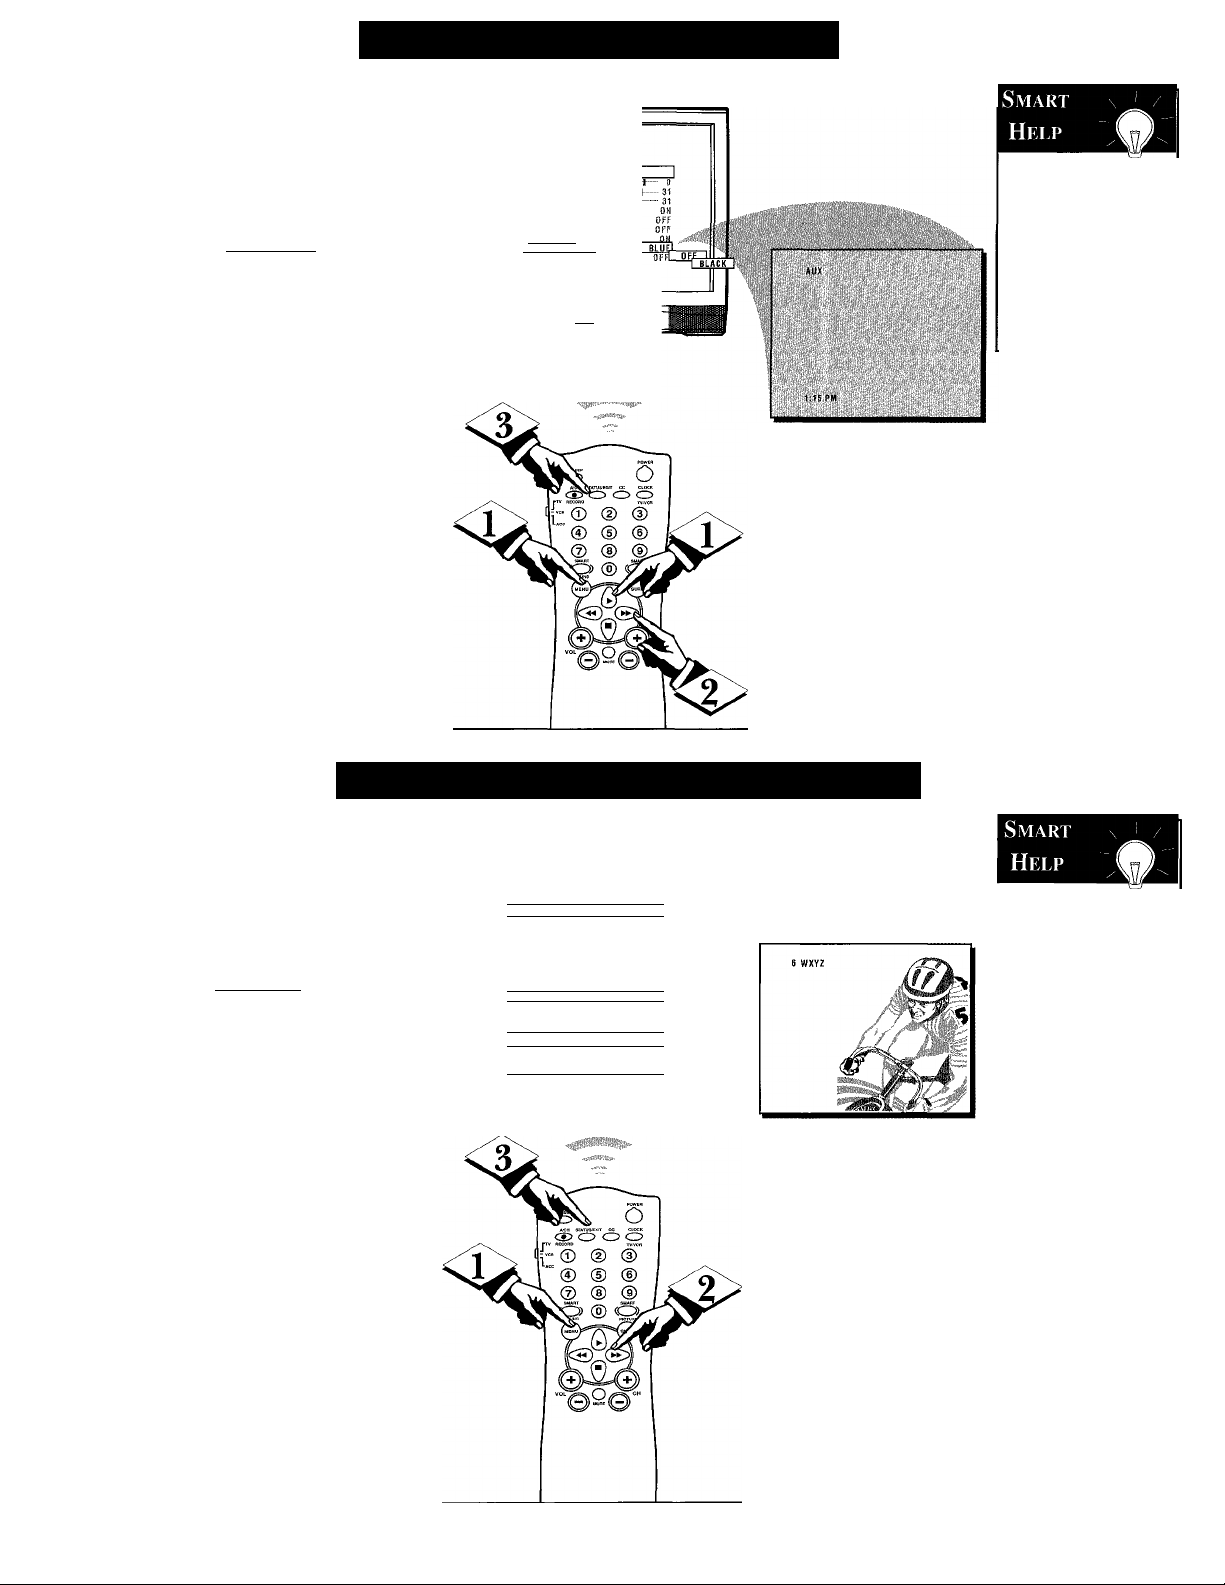
Using the Audio/Video Mute
'XZou can use the AudiofVideo Mute
J. control option to set the back
ground color for the TV screen
(when the TV is set to a blank chan
nel that is not receiving an active
video signal).
CBEOIN)
<i> With the Main Menu onscreen
press the Menu button repeatedly ,
or use the Cursor (A) Up and
Down (T) buttons, to select
AUDIO/VIDEO MUTE with the
TV’s highlight control bar.
BALANCE
TREBLE
8ASS
ULTRA BASS
INCRED STEREO
AVL
VOLUME BAB
lAUDID/UIDEO MUTE
REMINOER
0 o \o o o ) 0000
Try it out.
Press the CH (+, -)
buttons. The TV’s
background screen
will appear in the
selected color for
nonactive TV chan
nels.
Press the Cursor Right (►) or
<l>
Left (-^ )button on the remote to
set AUDIO/VIDEO MUTE control
to Blue, Black, or Off (normal static
appears with non active channels).
Press the STATUS/EXIT button
to remove the menu.
----
'Xli/lth the Channel Reminder
y \ control On the current channel
number (with a Label callout, if it
also has been previously set) will
remain onscreen during normal TV
operation and use.
fBEGIW)
With the Main Menu onscreen
press the Menu button repeatedly,
or use the Cursor (A) Up and
Down (T) buttons, to select
REMINDER with the TV’s highlight
control bar.
Selected Background Color appears
on channels that do not receive a signal.
How TO Set the Channel Reminder
1 MAIN MENU 1
BALANCE
TREBLE
BASS
ULTRAÖASS
INGREO STEREO
AVI
VOLUME BAR
AUOIO/VIOEf) MUTE
IRFMINPFR ONI
|Q_oo \ee_e/
.....
u- 0
M»---- 31
BLUE
OFF
OFF
ON
ON
1
The Clock ^
Display control can
also be used to view
current time settings
onscreen if desired.
(See page 22 for
details).
Press the Cursor Right (►) or
<l>
Left (-^ ) button on the remote to
turn the REMINDER control On (or
Off).
<3> Press the STATUS/EXIT but
ton to remove the menu.
17
Page 18
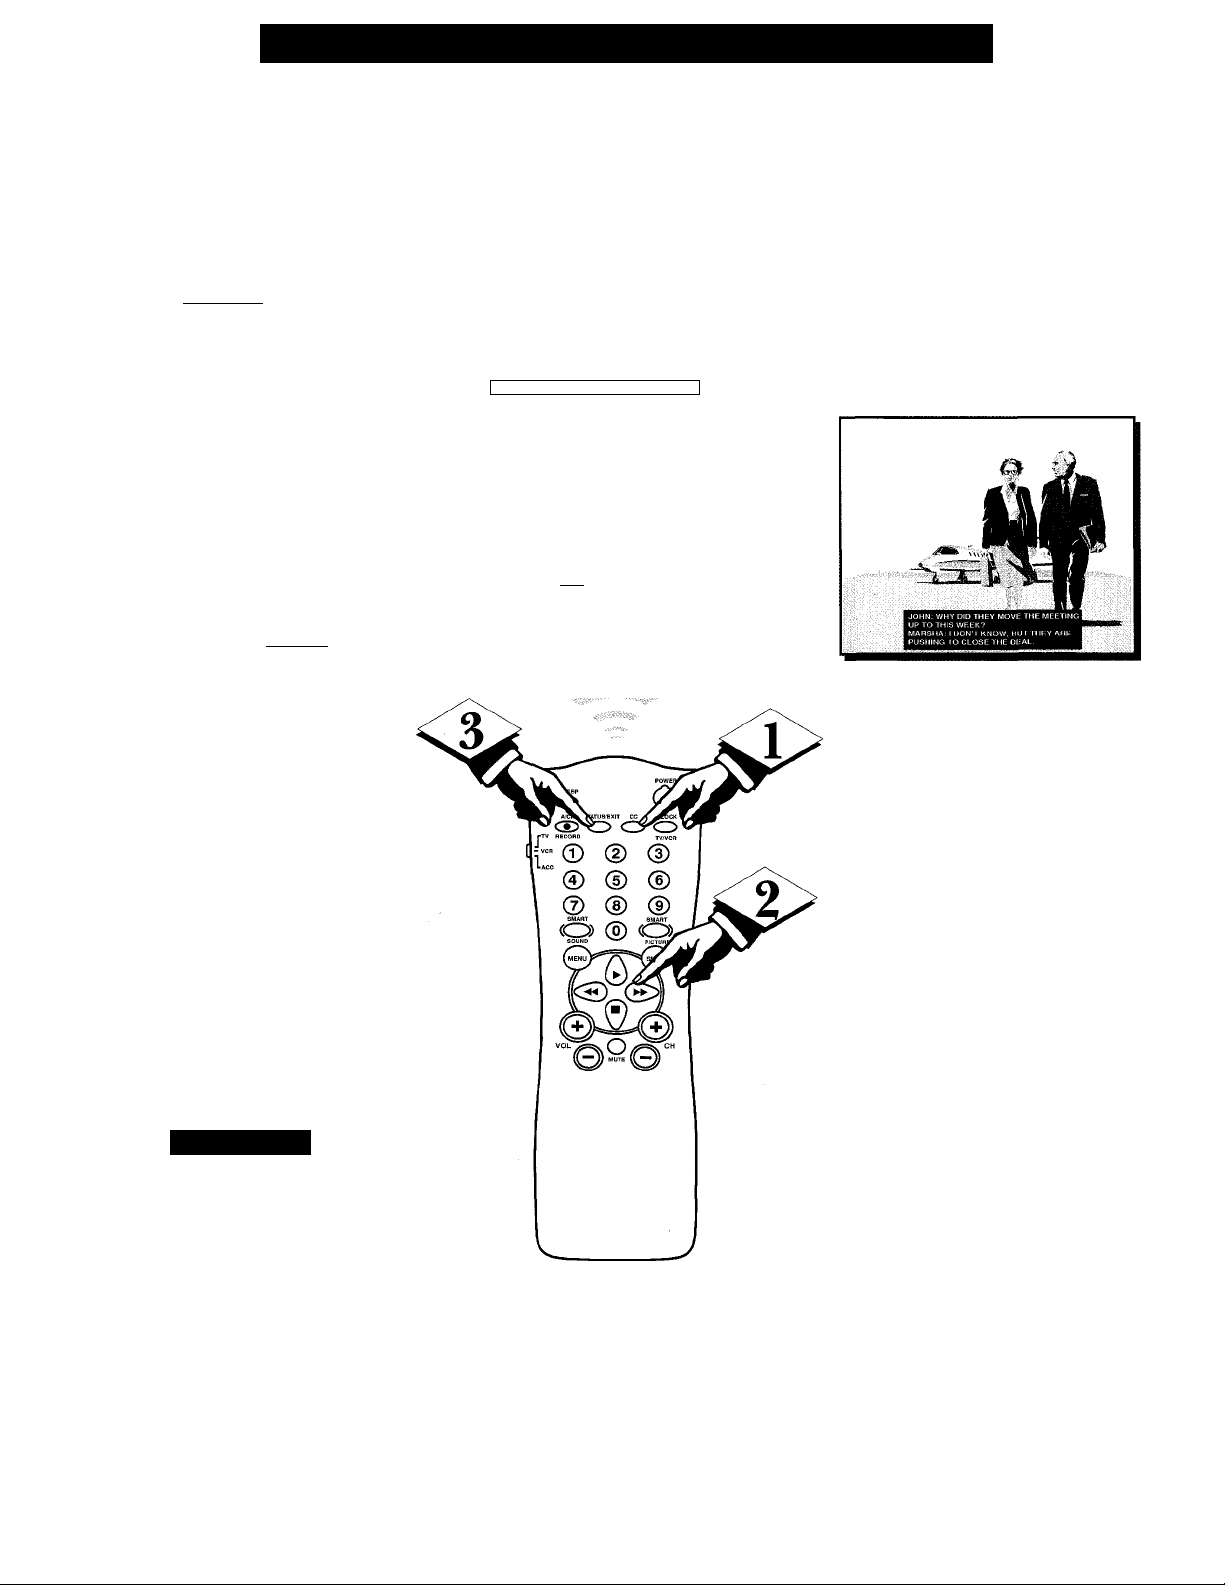
How TO Select the Closed Caption Feature
losed Captioning allows you to
read the voice content of televi
C
sion programs on the TV screen.
Designed to help the hearing
impaired, this feature uses on
screen "text boxes" to show dia
logue and conversations while the
TV program is in progress.
fBEGINl
4>
<l>
Press the CC button on the
remote, or use the Menu button
and Main Menu, to select CC
(Close Caption) with the TV’s
highlight control bar.
Press the Cursor Right (►) or
Left (-^ (button on tbe remote to
select the desired Closed Caption
(CC) mode, for example, CC-1.
CC-1, 2 modes:
Dialogue and descriptions
for the program appear
on-screen. Note: Usually CC-1
is the most used mode to view
captioned material.
CC ON MUTE:
Used to set the TV to turn On
the Closed Caption mode
whenever the MUTE button on
remote is pressed.
NOTE: Not all TV programs and product commercials are broadcast with
Closed Caption (CC) information included. Neither are all Closed Caption
modes (CC 1 and CC 2) necessarily being used by a broadcast station during
the transmission of a closed caption program. Refer to your area's TV pro
gram listings for the stations and times of Closed Caption shows.
CC
V-CHIP SETUP
SLEEPTIIVIER
SET TIME
CLOCK DISPLAY
EXIT
LANGUAGE ENGLISH
CHANNEL INSTALL
CABLE TUNING ON
MAIN MENU
1 o Vooey ¿^03
f.C-1
ON
12:00 PM
ON
►
►
►
CLOSE CAPTION (CC-1) mode
Example Display
Press the STATUS/EXIT but
ton after you select a mode. The
menu will disappear and Closed
Captioning (if available for the cur
rently selected TV program) will
appear on the TV screen.
To cancel Closed Captioning, select
OFF at step 2 above.
Smart Hkfp
Remember, broadcast
8 stations will often use
spelling abbreviations, symbols,
dropouts, and other grammatical
shortcuts in order to keep pace
with the on-screen action. These
factors vary upon the source of the
captioned text material and do not
indicate a need for TV service.
18
Page 19
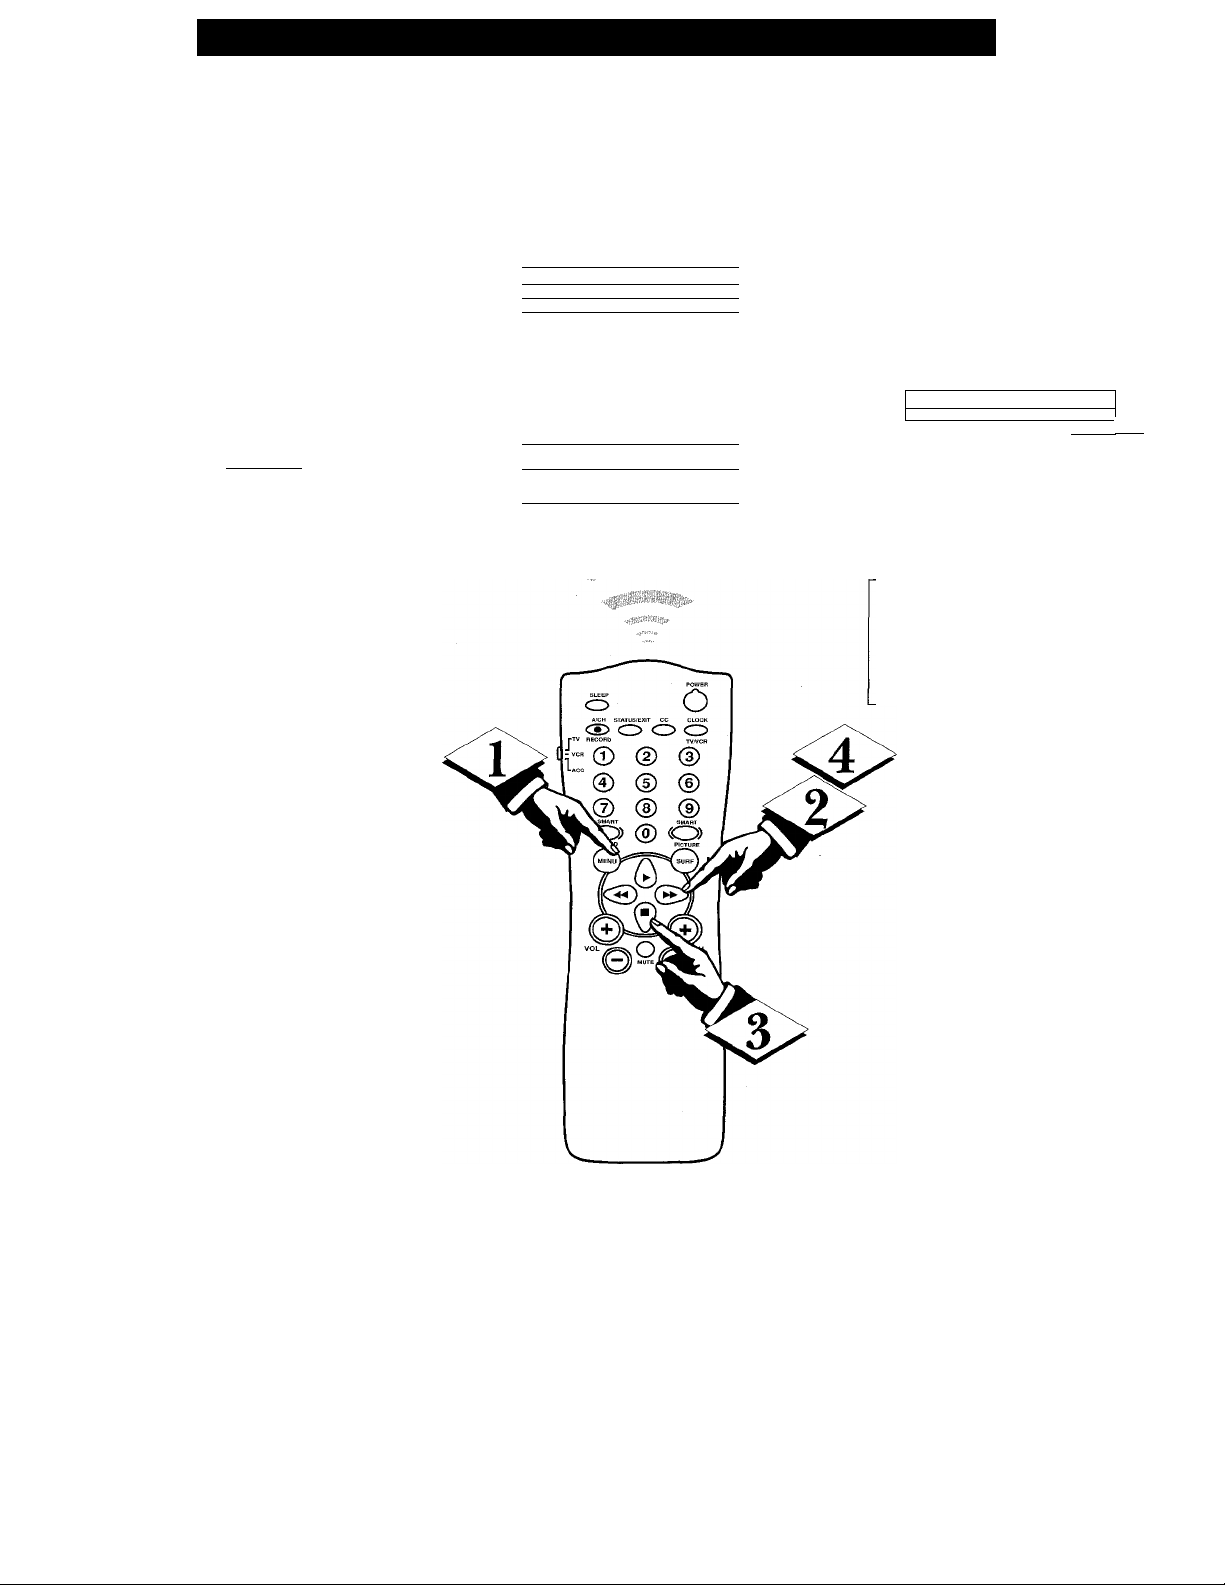
Using the V-Chip or Content Advisory Control
new Program Content Advisory
system is available to censor TV
A
program material for viewing. TV
Ratings and Movie Ratings advisory
data will soon be contained within
the broadcast signals of received TV
programs. When setup by the viewer,
the TV can respond by blocking or
denying access to TV shows (based
on whether the program meets or
exceeds the limitations you select as
viewable). Refer to the following
page sections for explanations on the
different Rating system levels and
their uses.
[BEaiN)
With the Main Menu onscreen
<£>
press the Menu button repeatedly ,
or use the Cursor (A) Up and
Down (▼) buttons, to select V-
CHIP SETUP with the TV’s high
light control bar.
Press the Cursor Right (►) or
<t>
Left (-^ ) button on the remote to
select the V-CHIP SETUP controls
screen.
1 MAIN MENU 1
cr. CC- 1
IV-CHIP SETUP
SlEE P tlM ^ R
SET T IM E
CLO C K DIS P LA Y
EXIT
LANGUAGE
CHANNEL INSTALL
CABLE TUNING
1 0-°-°
12:0 0 P M
ENGLISH
oy
ON
►
►
ON
SSco I
!□
►I
V-CHIP SETUP
MASTER DISABLE
TV RATINGS
MOVIE RATINGS
EXI T
NOTE: In normal Content Advisory
system operation the TV screen will
display a message when program
ming is blocked by a Movie Rating
or Parental Guideline.
ON
0FF~l
►
►
Press the Menu button, or use
<l>.
the Cursor (A) Up and Down (▼)
buttons, to select the Master Disable
control.
Press the Cursor Right (►) or
Left (-^) button to turn the Master
Disable control Off (or On).
With Master Disable in the “OFF”
position; All specific TV and Movie
Rating settings for blocking or cen
soring of programs will take place.
With Master Disable in the “ON”
position: All specific TV and Movie
Rating settings for blocking or cen
soring of programs will not take
place (or be disabled).
Continue to the next page for com
plete details on the specific TV
Rating and Movie Rating settings.
1^1
19
Page 20
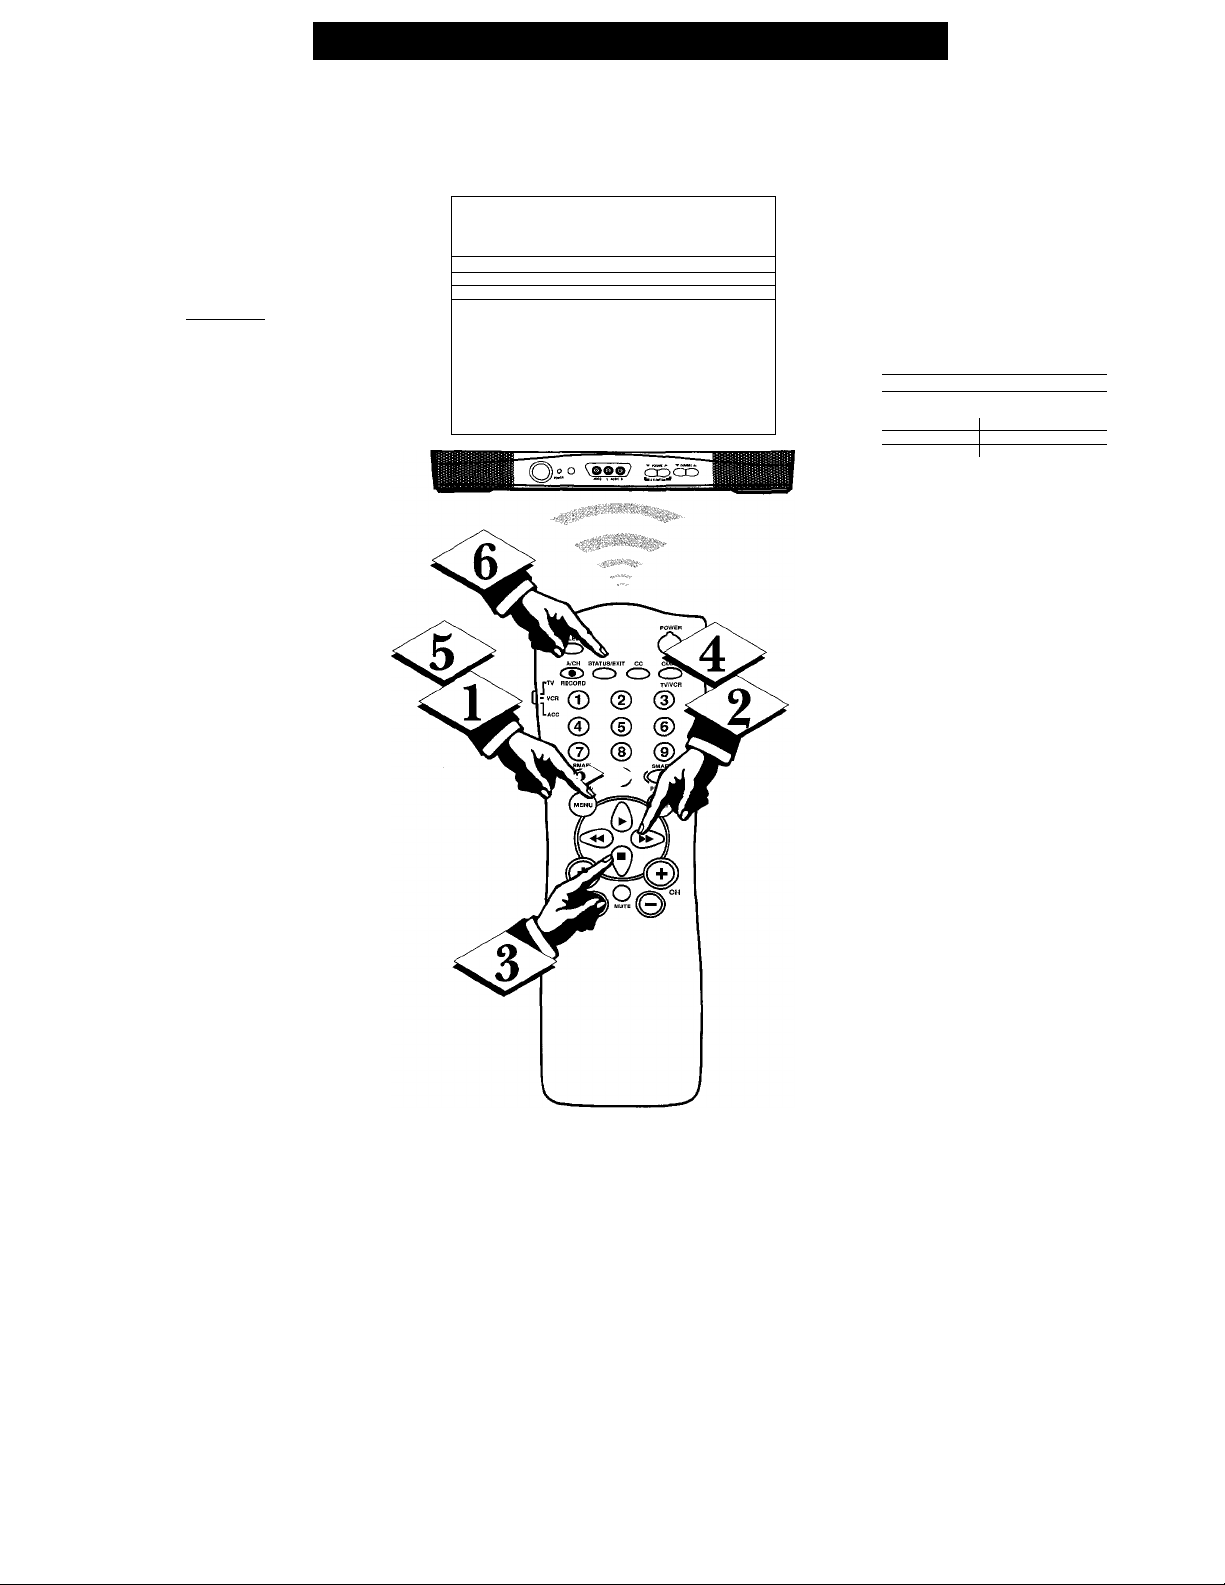
□
he TV Ratings control can be
very specific in the degree and
T
extent of program material cen
sored for TV viewing. Sub-settings
fora variety of blocking factors
can be manually switched On or
Off for use within the major TV
Ratings categories (TV-Y7, TVPG, etc.).
[BEQIK]
<£>
With the V-CHIP SETUP
Menu onscreen press the Menu
button repeatedly, or use the
Cursor (A) Up and Down (T)
buttons, to select TV RATINGS
with the TV’s highlight control
bar.
Press the Cursor Right (►) or
Left (-^ ) button on the remote
to use the TV RATINGS selection
chart.
Press the Menu button
repeatedly, or use the Cursor
(A) Up and Down (T) buttons,
to select the desired TV RAT
INGS level. For example, TV-PG.
Press the Cursor Right (►) but-
ton on the remote to select the
specific category (ALL, V, S, L,
D) within the TV RATING.
A blinking indicator will show
which category bracket is active.
Press the Menu button, or use
Cursor (A) Up and Down
(▼), on the remote to select (X)
the specific blocking category for
use.
Note: Selecting “ALL” (or indi
vidually adjusting the V, S, L, D
settings) for any one rating will
set all other higher level ratings to
be automatically blocked as well.
<§> Press STATUS/EXIT to save
the specific TV Rating setting.
Then press the remote control
Cursor buttons to move to the
next category area for setup or
use.
Using the V-Chip TV Ratings Control
The TV-Y7; TV-PG; TV-14; and TV-MA guidelines also include customized settings for various
additional items such as V (violence), S (sexual
situations), L (coarse language), and D (sugges
tive dialogue). These additional settings are cate
I V-CHIP SETUP
MASTER DISABLE OFF
ITV RATINGS
MÒVIE Ratings
EXIT
►1
1
►
►
gory specific and can be individually selected for
use as desired.
ITV RATINGS ALL V S L DI
TV-Y
TV-Y7 ) 1 1
TV-G
IriTpG XI [ Ì f II 1 [ 11
TV-14 X 1 1 It 1 n 1 1
TV-MA
EXIT
• TV-Y - Appropriate for all children:
Designed for a very young audience, including
children ages 2-6. This type of programming is
not expected to frighten younger children.
• TV-Y7 -Appropriate for children seven
and older: It may be more appropriate for chil
dren who have acquired the development skills
needed to distinguish between make-believe and
reality. This programming may include mild fan
tasy and comic violence.
• TV-G - General Audience: This type of
programming contains little or no violence, no
strong language, and little or no sexual dialogue
or situations.
• TV-PG - Parental Guidance suggested:
This type of programming contains one or more
of the following: Moderate violence (V), some
sexual situations (S), infrequent coarse language
(L), or some suggestive dialogue (D).
• TV-14 - Unsuitable for children under
14: This type of programming contains one or
more of the following; intense violence (V),
intense sexual situations (S), strong coarse lan
guage (L), or intensely suggestive dialogue (D).
• TV-MA - Mature audience only: This
type of programming contains one or more of the
following: graphic violence (V), explicit sexual
situations (S), or crude indecent language (L).
• (V) - Violence
• (S) - Sexual situations
• (L) - Language
• (D) - Inappropriate dialogue
1
)
X 1 I J 1 1 ( ]
►
20
Page 21
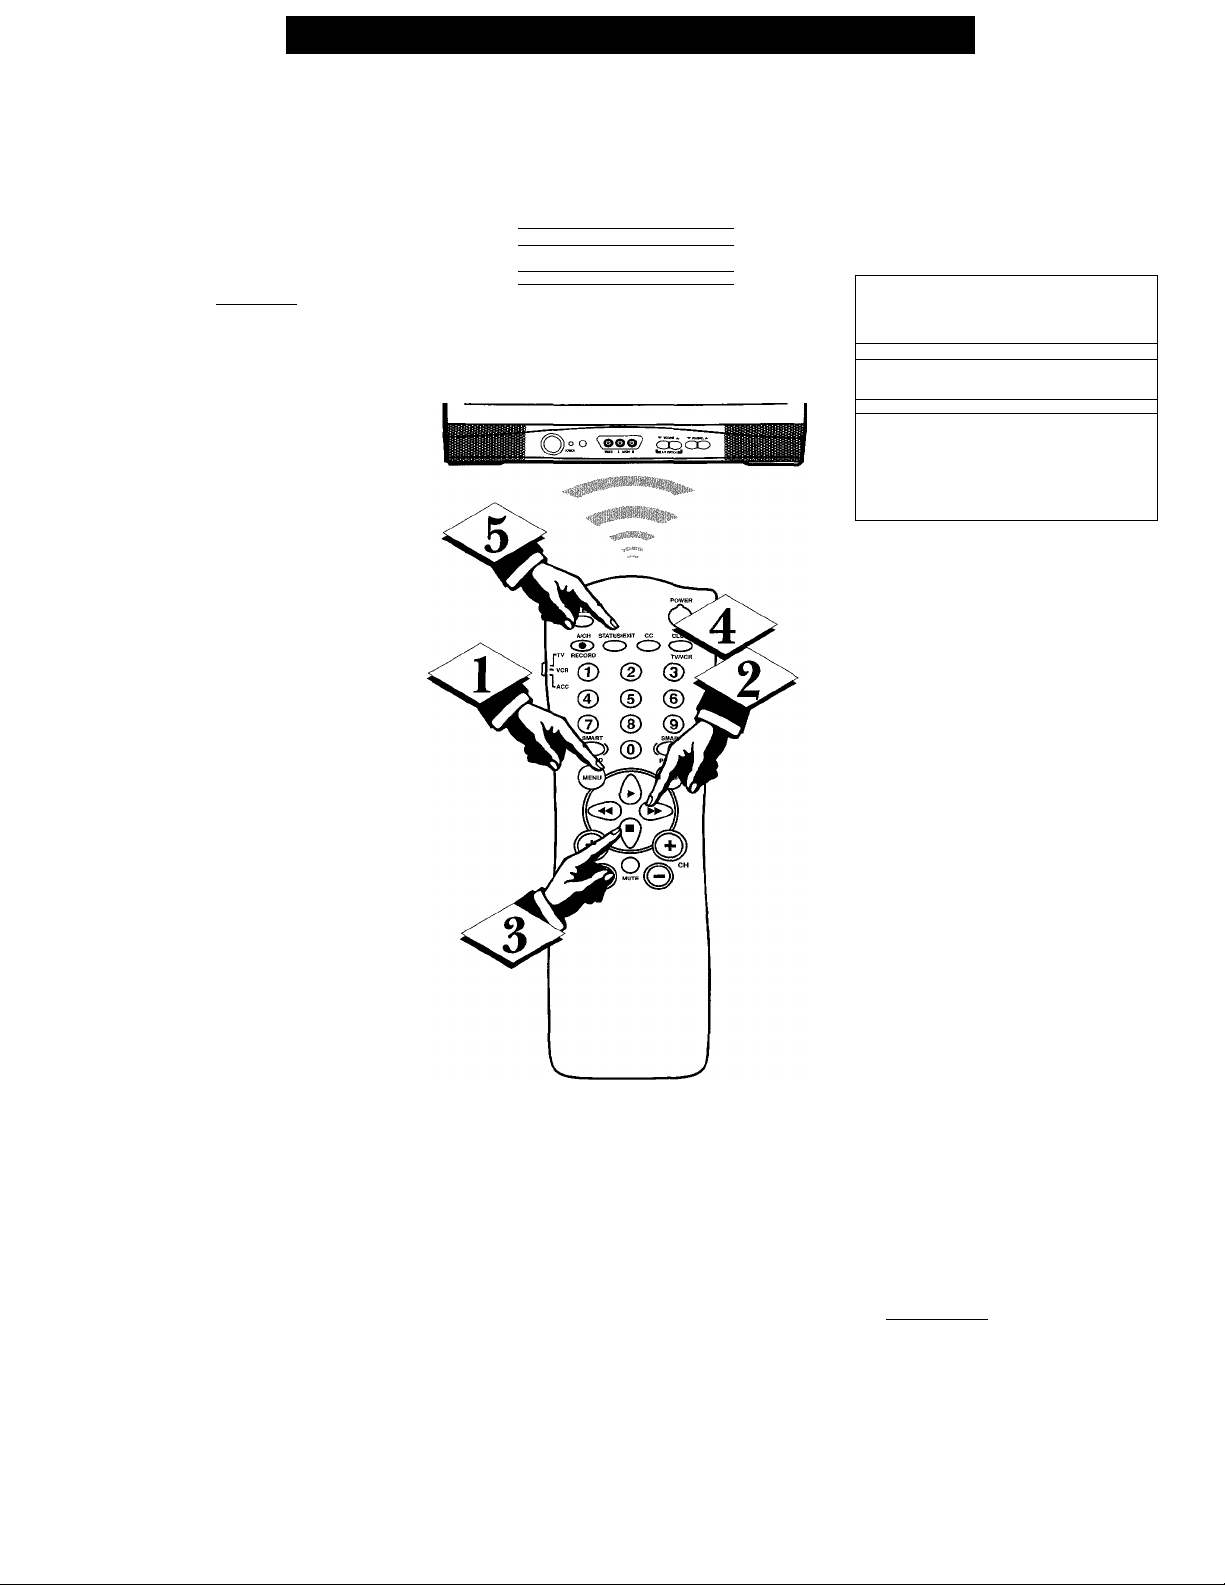
ovie Ratings set viewing
access levels for TV pro
M
gramming according to current
Motion Picture Association of
America (MPAA) ratings. These
ratings are similar to the cate
gories used with the rated movies
appearing in cinema theaters and
with video rental material.
[BEGIN)
With the V-CHIP SETUP
<i>
Menu onscreen press the Menu
button repeatedly, or use the
Cursor (A) Up and Down (T)
buttons, to select MOVIE RAT
INGS with the TV’s highlight
control bar.
Press the Cursor Right (►) or
Left (-^ ) button on the remote
to use the MOVIE RATINGS
selection chart.
Press the Menu button
<l>
repeatedly, or use tbe Cursor
(A) Up and Down (▼) buttons,
to select the desired MOVIE
RATINGS level. For example, R.
Press the Cursor Right (►) or
Left (-^ ) button on the remote
to BLOCK (or VIEW) the select
ed Movie category.
Note: When a selected Movie
Rating is “BLOCKED” all higher
level ratings are automatically
blocked as well (although each
individual Movie Rating can be
manually selected and turned On
or Off as desired). Programs with
lower than the selected rating
level are allowed for viewing or
unblocked.
Press STATUS/EXIT to save
<l>
the Movie Ratings settings and
return to the V-CHIP Setup Menu
screen.
Using the V-Chip Movie Ratings Control
1 V-CHIPSETUP
5'^ASTER DISABLE
TV RATINGS
IMOVIE RATINGS
EXIT
OFF
1
►
1
G
PG VIEW
PG-13
Ir
NC-17 BLOCKED
X
NR
EXIT
• G - General Audience; Most parents
would find this program suitable for all
ages. This type of programming contains lit
tle or no violence, no strong language, and
little or no sexual dialogue or situations.
• PG - Parental Guidance: This program
ming contains material that parents may find
unsuitable for younger children. It may con
tain one or more of the following: Moderate
violence, some sexual situations, infrequent
coarse language, or some suggestive dialogue.
• PG-13; This programming contains materi
al that parents may find unsuitable for
children under the age of 13. It contains one
or more of the following: violence, sexual
situations, coarse language, or suggestive
dilogue.
• R - Restricted: This programming is
specifically designed for adults. Anyone
under the age of 17 should only view this
programming with an accompanying parent
or adult guardian. It contains one or more of
the following: intense violence, intense sexual
situations, strong coarse language, or intense
ly suggestive dialogue.
• NC-17 - No one under 17 admitted:
This type of programming should be viewed
by adults only. It contains graphic violence,
explicit sex, or crude indecent language.
• X - Mature audience only: This type of
programming contains one or more of the fol
lowing: very graphic violence, very graphic
and explicit or indecent sexual acts, very
coarse and intensely suggestive language.
• NR - No Rating: Broadcasters can
decide not to encode any kind of content
advisory ratings with their programming.
The NO RATING (NR) Movie category
allows the viewer the option to block any
movie broadcast without content advisory
data included.
MOVIE RATINGS I
VIEW
VIEW
BLOCKEDI
BLOCKED
BLOCKED
►
21
Page 22
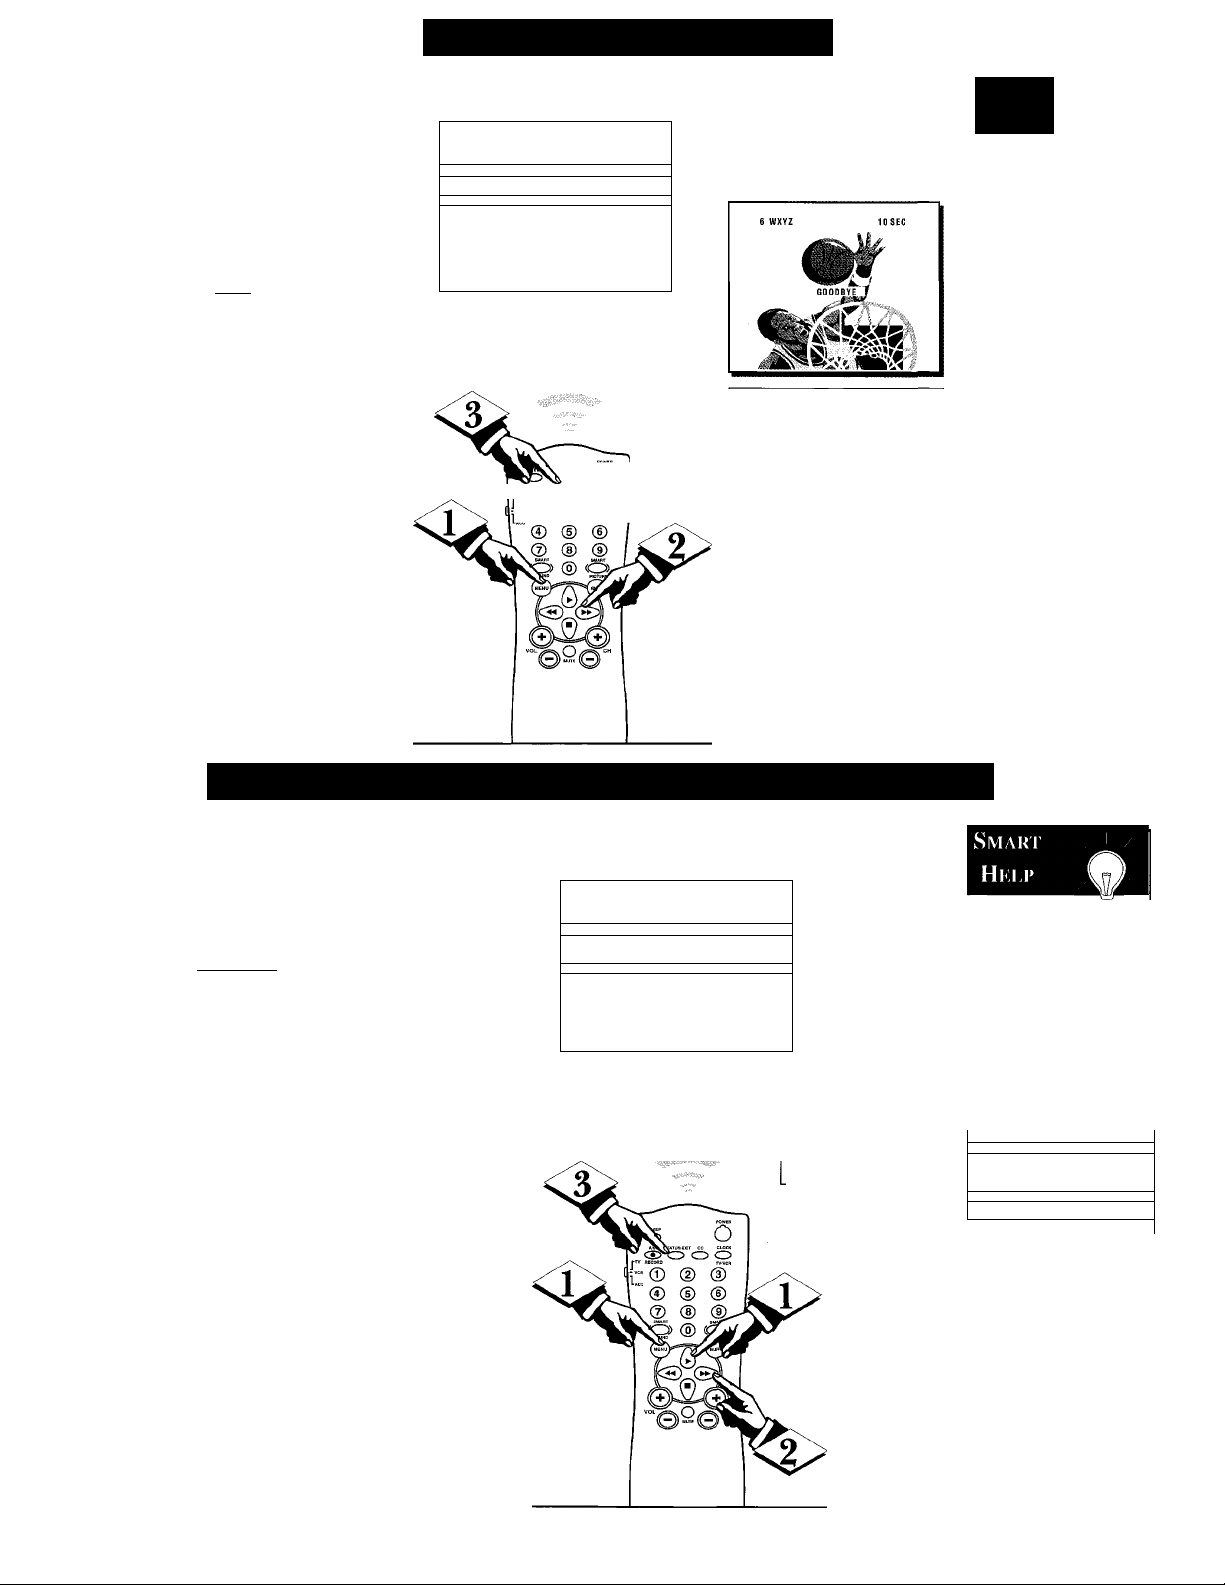
Setting the Sleep Timer
ave you ever fallen asleep in
front of the TV, only to have
H
it wake you up at two in the
morning with a test pattern
screeching in your ears? Well,
your TV can save you all that
trouble by automatically turning
itself off.
ioiiC
Q
<S>
With the Main Menu
onscreen press the Menu button
repeatedly, or use the Cursor
(A) Up and Down (T) buttons,
to select SLEEPTIMER with the
TV’s highlight control bar.
Press the Cursor Right (►)
or Left (-^ ) button on the
remote to select the amount of
time before you want the TV to
shut itself off (between 15 min
utes and 240 minutes).
<l>
Press STATUS/EXIT to
remove the menu.
1 MAIN MENU
cc OFF
V-OHIPSETUP
181 FFPTIMER
SettiWH
CLOCK UISPLAV
EXIT
LANGUAGE
CHANNEL INSTALL
CABLE TUNING ON
12:00 PM
ENGLISH
. ® c5”c> S
“ © @ @
Smart
Hki.i*
Remember,
1
isl .
ON
►
►
you can refer to the
Sleeptimer Menu
control to see how
many minutes are
left before the TV
shuts itself off.
To cancel a SLEEP
TIMER setting:
select OFF at step
An onscreen countdown will
appear on the TV during the last
minute before the set is to shut off.
A “GOODBYE” message will also
show onscreen during the last ten
seconds of the countdown.
2; or, pressing a
button on the TV or
remote during the
last minute of the
Sleeptimer count
down will cancel a
setting; or, turning
the TV off, then on
again, will also can
cel a setting.
UsiNCi THE Set Time & Clock Display Controls
'our TV has an on-screen clock.
During normal use the clock
y
appears onscreen with every channel
change (and when the STATUS but
ton is pressed).
[BEGINl
<£>
<^> Press the remote's number but
With the Main Menu onscreen
press the Menu button repeatedly ,
or use the Cursor (A) Up and
Down (▼) buttons, to select SET
TIME with the TV’s highlight con
trol bar.
Press the Cursor Right (►) or
Left (-^ ) button on the remote to
select the onscreen clock for adjust
ment.
tons, or use the Cursor (A) Up and
Down (T) buttons, to enter the cur
rent time. (Press "0" first for single
digit hour entries.)
1 MAIN MENU 1
cc
V-CHIP SETUP
SLEEPTIMER
pTTiME l)1:4S PMI
CLOCK OISPLAY
EXIT
LANGUAGE ENGLISH \
CHANNEL INSTALL
CA8LETUNING ON '
OFF
►
ON
TJnW
► ^
► \
Press the number “1” and
“0”, or use the Cursor
(A)/(T),
AM/PM clock settings.
buttons for the
Remember,
in order for the
clock to appear on
the TV screen, with
channel changes,
etc., the CLOCK
DISPLAY Menu
control must also be
set to the ON posi
tion.
1 MAIN MENU 1
L'-GHIP SETUP
SLEEPTIMER
SETTIMf
ICLOCK DISPLAY ON I
TOT
-------
------------------
fl1-45 PM
“■ F
OFF
►
ON
Press the STATUS/EXIT button to
remove the menu and start the clock.
22
Page 23
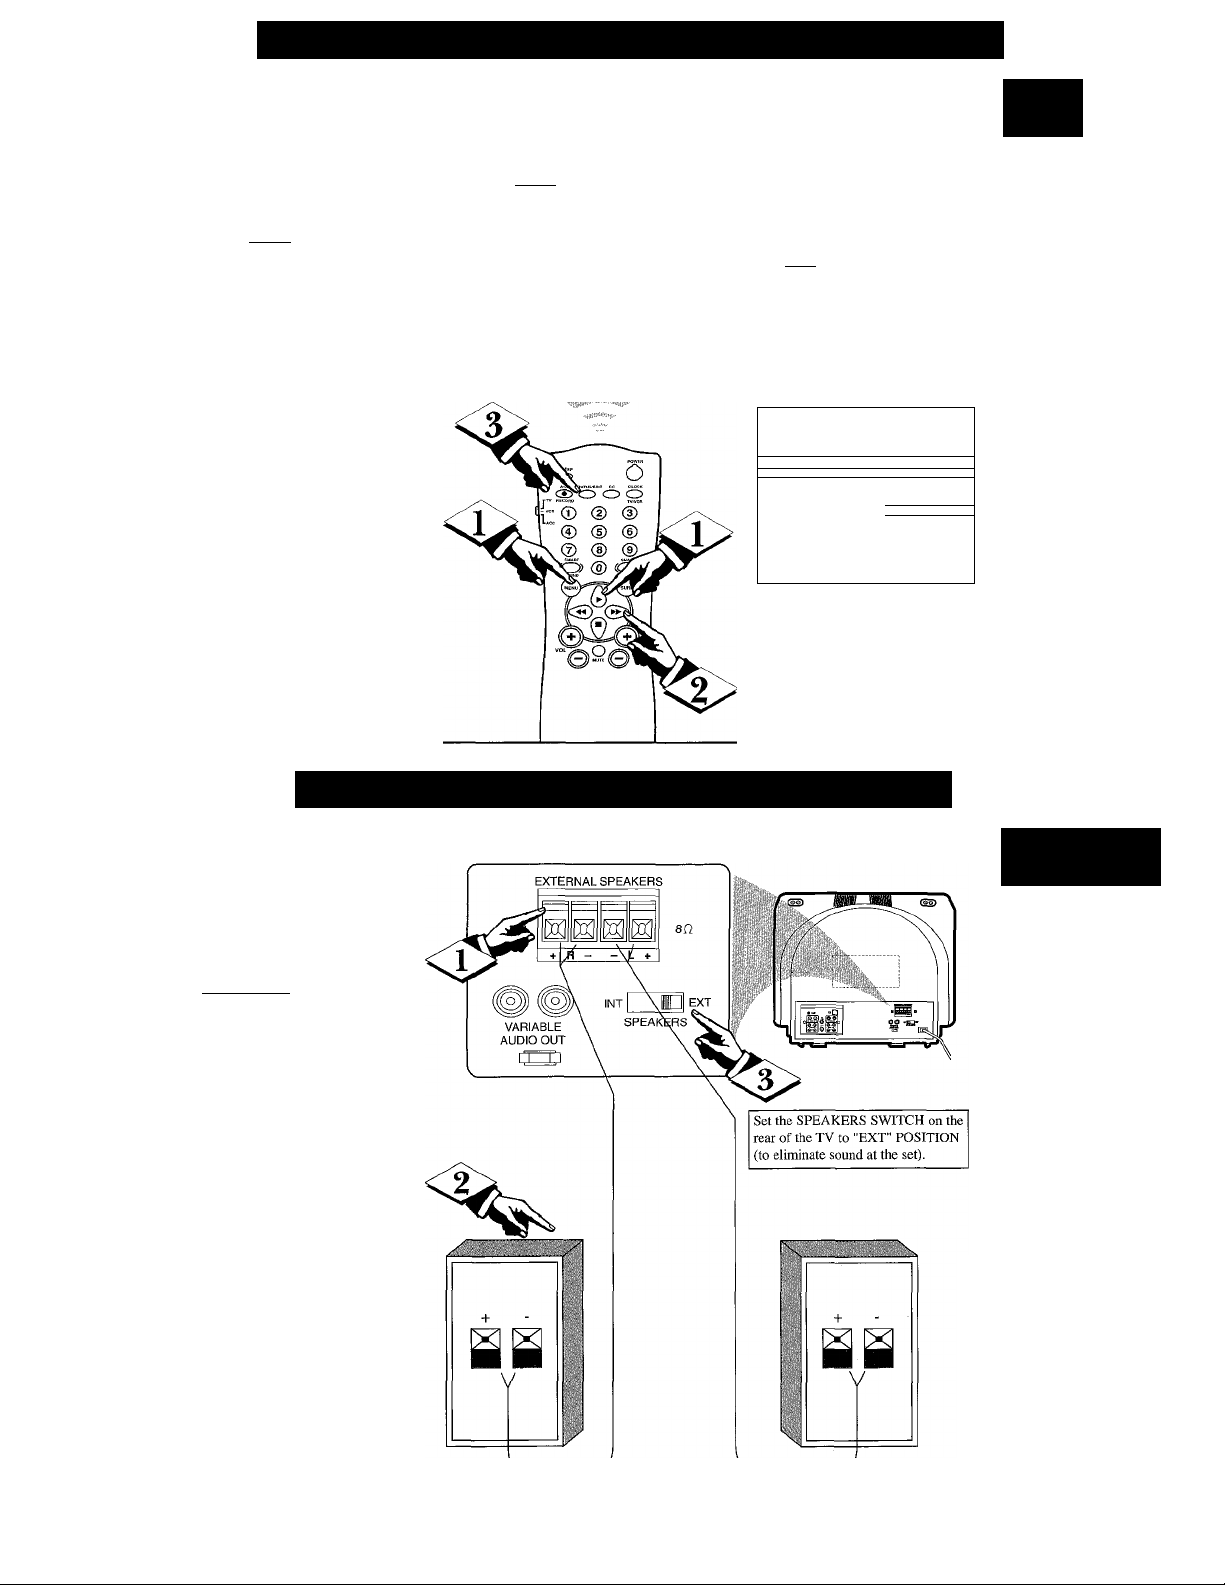
How TO Use the On-Screen Language Option
T^or our French and Spanish
L speaking TV owners, an on
screen LANGUAGE option is
available. You may set the TV’s
onscreen menu to appear in either
English, French, or Spanish text.
ioiR)
a
<î>
With the Main Menu
onscreen press the Menu button
repeatedly, or use the Cursor
(A) Up and Down (T) buttons,
to select LANGUAGE with the
TV’s highlight control bar.
Press the Cursor Right (►) or
<i>
Left (-^ ) button on the remote
to select English, French (FRAN
ÇAIS), or Spanish (ESPAÑOL).
Text in the onscreen Menu will
appear in the selected language.
Press STATUS/EXIT to remove
the menu.
ILANGUAGE
CHANNEL INSTALL
CABLETUNiNQ
BRIGHTNESS
COLOR
CONTRAST
SHARPNESS
TINT
NOiSF. REDUCTION
ILANGUE
CHANNELINSTALL
SVNT.DE BANDE
BRILLANCE
COÜLEÜR
CONTRASTE
NETTETE
TEINTE
REOliCTION Dli BRUIT
1 inmMA
INSTAI, CANALES
SINTONIA DE BANDA
BRILLO m » 34
COLOR M i
CONTRASTE
NITIDEZ SBB— 40
TINTE
REDUCCION OERUlOO NO
ESPANGI 1
.........
DII
-----
-HH- 0
Smart
Help
Remember, %
the Language con
trol only makes the
TV's onscreen
Menu items appear
in French or
Spanish text. It does
not change the lan
guage of other
onscreen text fea
tures, such as
Closed Captioning.
►
SI
22
29
Using the External Speaker Terminals
set of External Speaker termi
nals is located on the rear of
A
the TV. These speaker terminals
allow you to connect optional
external speakers for RightILeft
channel stereo sound.
CBEGIN)
Connect both external speak
<s>
ers to the correct EXTERNAL
SPEAKER (Left/Right) terminals
on the TV. See Smart Help Note
for additional details on connec
tions.
Place the external speakers to
<l>
maximize the Left and Right
channel stereo sound separation
(within current room dimensions).
<|> Set the SPEAKERS switch
(on the rear of the TV) to the
"EXT(ernal)" position.
Smart \ ' /
Help
Remember, g
be sure the (-t) and
(-) speaker wires
are connected to the
correct R(ight) and
L(eft) speaker ter
minals on the TV.
Recommended
speakers are 8 ohm,
15 watt minimum.
Note: Lift up on the
(Red & Black)
Speaker Wire
Clamps when
inserting the speak
er wire into the cor
rect terminal. Press
the Clamp back
down to secure the
wire in place.
Not available on
model PA0113C
23
Page 24
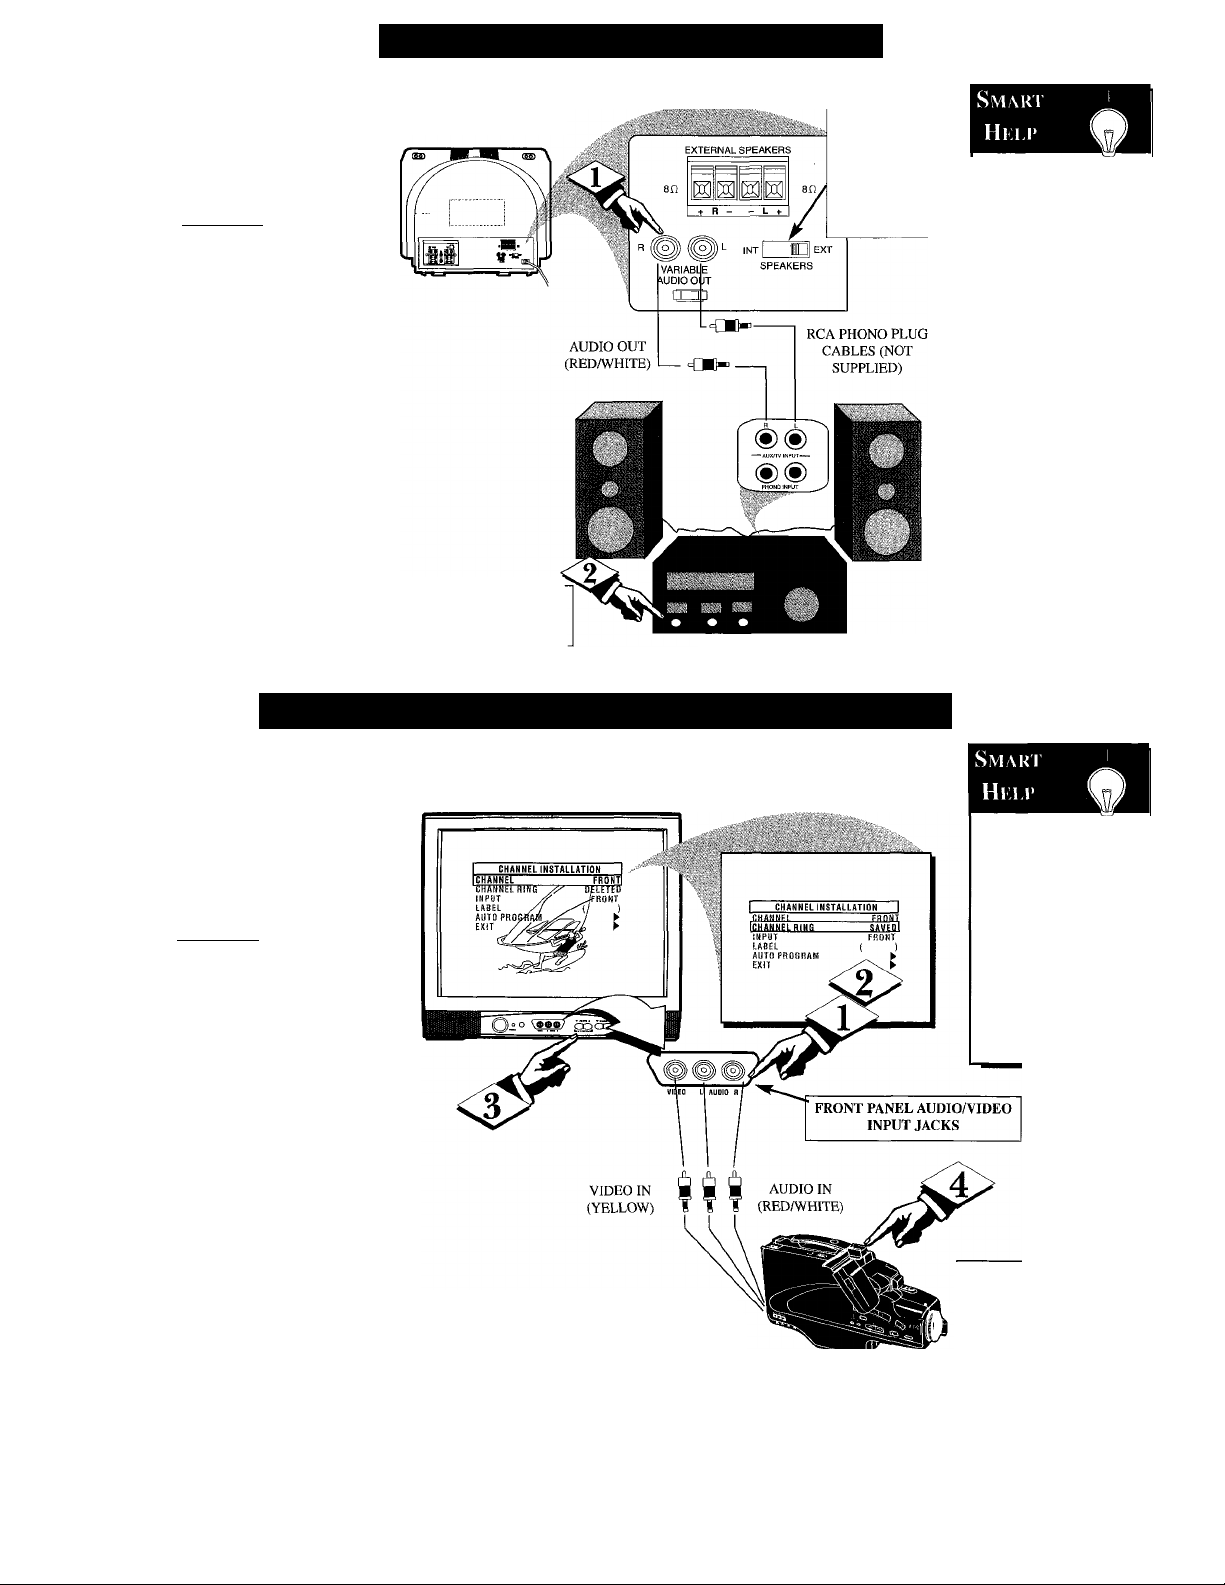
□ I
UsiN(i THE Audio Output Jacks
ould you like to hear TV pro
grams through your audio hi-
W
fi system? The TV's Audio Output
jacks ojfer you this sound playback
option.
fBEOINl
Connect the R(ight) and L(eft)
VARIABLE AUDIO OUT jacks
on the TV to the R and L Audio
Input jacks on your amplifier or
sound system.
Set the audio system's volume to
normal listening level.
T\irn On the TV and the audio
<l>
system. You can now adjust the
sound level coming from the audio
system with the Volume AT but
tons on the TV or remote. (Also
see the Smart Help section for fur
ther audio mode and sound adjust
details.
BACK OF TV
The audio system may have
to be in AUX(iliary) mode
to play sound from the TV.
AUDIO SYSTEM
Sound from the TV's
internal speakers
may be eliminated
by setting the
SPEAKERS switch
on the rear of the set
to EXT.
Not available on
Note: You can fl
use the TV’s AUDIO
OUT Menu control
to set the rear Audio
Outputs to operate in
either a Fixed or
Variable sound
mode.
“VARIABLE” allows
you to adjust the
playback of pro
gram sound using
TV’s Volume control
buttons. “FIXED” is
intended to make
sound adjustments
on the external Audio
System equipment.
model PA0113C
TT'or more convenient Direct
± playback connections the TV's
Front Input Jackpanel can be used.
These easily accessed AudiolVideo
Inputs allow for quick playback
connections, particularly for view
ing of Camcorder tape recordings.
(BEOINl
Connect the VIDEO OUT
<i>
jack from the Camcorder to the
VIDEO IN jack on the front of the
TV.
Connect the AUDIO OUT
jacks R(ight) and L(eft) from the
Camcorder to the AUDIO IN jacks
on the front of the TV.
<l>
Select the "FRONT" INPUT
source control on the TV.
Note: You can use the AfW
SWITCH buttons on the front of
the TV. (Or, you can Save the
FRONT Inputs as part of the TV’s
Channel Ring. See Smart Help).
T\irn the Camcorder ON and
press PLAY to view the tape on
the TV.
UsiN(i THE Front Audio/Video Input Jacks
PICTURE AND SOUND FROM PLAYBACK
OF CAMCORDER TAPE
AUDIOmDEO
OUTPUT JACKS
ON CAMCORDER
CAMCORDER
Remember, g
if you have added
the FRONT Inputs
to the TV’s channel
memory ring (see
page 12), you can
just press the
Channel -i-,- buttons
to select the
FRONT AA^ mode.
If you have a single (monaural)
Audio Output Camcorder, "Y"
connectors are available to
complete your connection.
Contact your dealer, or local
electronic parts supply store, to
order optional accessories.
24
Page 25

Setting the Remote Control To Work With Other Devices
our remote control is set to
work your TV and many
F
infrared remote (IR) control
VCRs, Cable Boxes, Satellite
Systems, DBS, DVD, etc.
However, an easy onetime step
may be necessary before the
remote will work your accessory.
Try this initial check to see if
going on to the following section
is necessary.
[BEGIN)
<T> Place the TV/VCR/ACC
Mode Switch in the proper posi
tion.
VCR
SLEEP
o
A/CH STATUS/EXIT CC
C55 O O
-TV RECORD
,c»
0
1
■ACC
(D
4>
<l> Does the remote turn the
Point the remote control at
the device and press the POWER
button.
device ON?
If YES, stop and try other func
tion buttons on the remote. If
they also work the device, then
the remote is ready and no fur
ther steps are needed.
If NO, continue...
First look up a THREE-DIGIT
remote control number for your
brand of Device before going
through the simple steps on the
following page.
Find your Accessory Device
Three-Digit Codes listed on
pages 28-29.
"Y
Satellite Receiver
Cable Converter
@
SMAH1
O
SOUND
w
id;
® \
v\x @ ®
Smart Help
Remember, if more than
M one number is listed, you may
have to try more than the first ThreeDigit code given in order to locate
your Device’s proper remote code.
25
Page 26
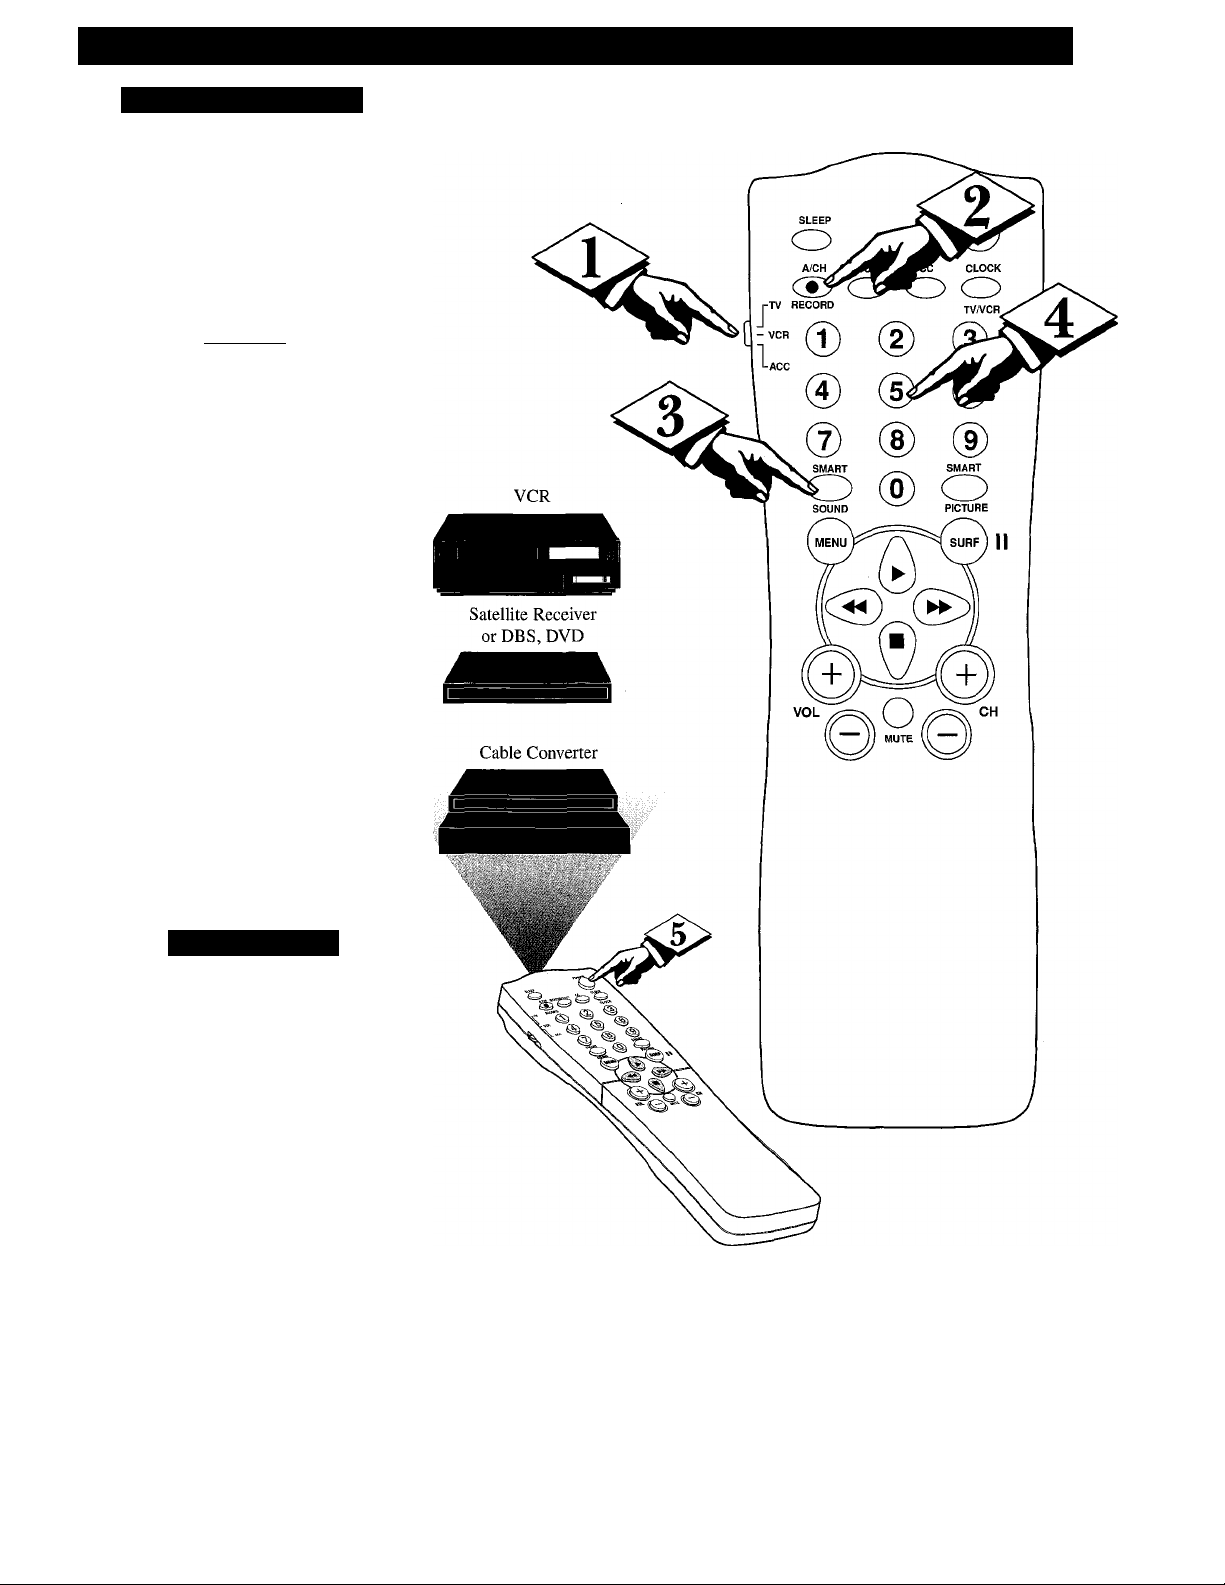
Setting the Remote Control To Work With Other Devices
Direct Access Method
A Tow that you have looked up
1 V the three-digit Remote Code
Number for your brand of device,
you are ready to follow the sim
ple steps shown below.
Please read through steps 1-4
before beginning.
(BEGINt
Place the TV/VCR/ACC
Mode Switch in the proper posi
tion.
Press the (A/CH) • RECORD
button on the remote control and
release.
Press the SmartSound button
on the remote within 30 seconds,
then release.
Enter the THREE-DIGIT
REMOTE CODE NUMBER
for your desired device. The
remote is now ready to send
commands to the unit.
Point the remote at the
Device. Press the POWER button
on the remote to turn the unit
ON.
SiviARi Hi:m>
Remember, if this doesn’t
i work the first time, repeat steps
using the same remote code number.
After a second try and the remote
does not operate your device, see if
there is another three-digit code num
ber listed for your device and repeat
the steps above using the new num
ber.
If after repeated attempts the code
number method does not work your
device, try the SEARCH METHOD
on the following page.
26
Page 27
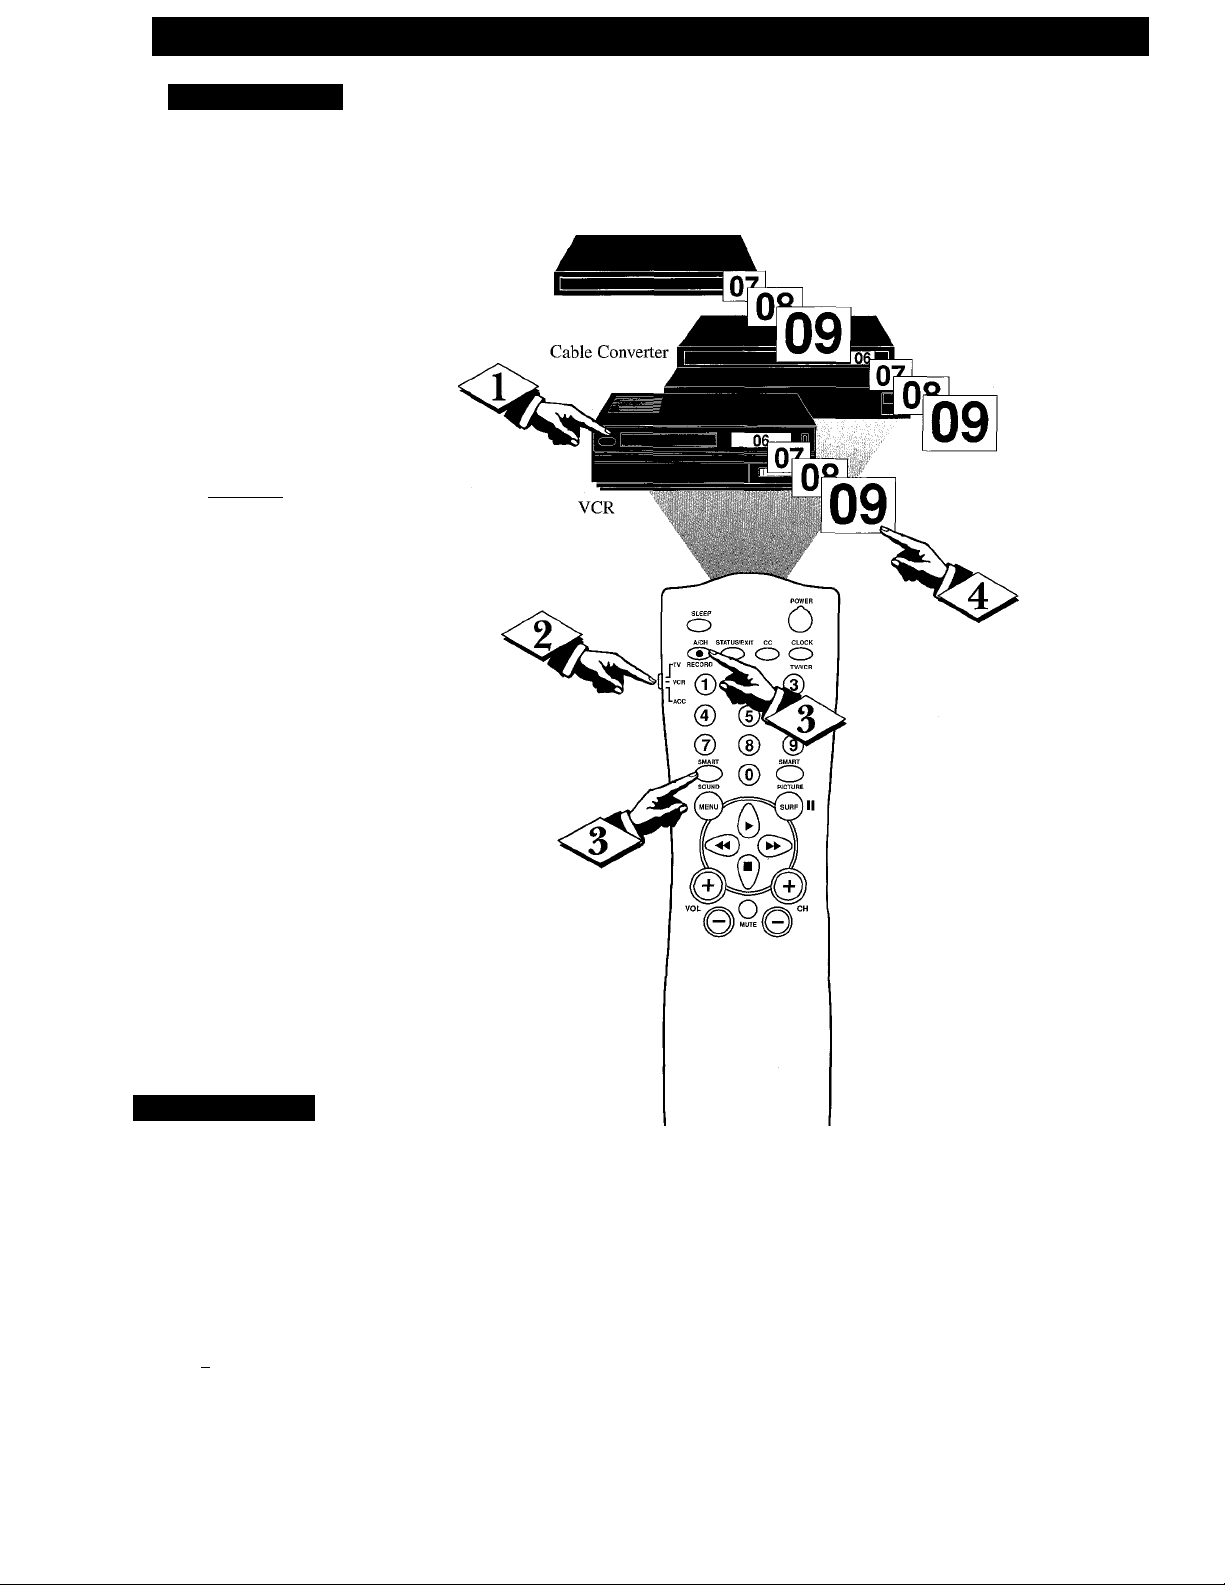
Setting the Remote Control To Work With Other Devices
Search Method
our TV remote can be set to
work various external devices
F
such as VCRs, Cable Boxes,
Satellite Receivers, DBS, DVD,
etc. by what is called the search
method.
If the “Remote Code’’ number
method shown on the previous
pages did not set your remote to
work your external device, then
follow the easy steps listed below.
Please read steps 1-4 before
beginning.
Cbegin)
Press the POWER button on
the device your are attempting to
program to turn it ON.
Satellite Receiver
<i>
<|> Press the (A/CH) • RECORD
Place the TV/VCR/ACC
Mode Switch in the proper posi
tion.
and the SMART SOUND but
tons simultaneously and hold
them down.
The device will begin to
change channels after the
remote identifies the correct
code. When the channels start to
change release the A/CH
RECORD and SMART SOUND
buttons. The remote should be
ready to operate the device.
I / Smart Help
This method can take up to
g two minutes to complete.
Don’t let the device scan up more
than five channels. If you do the
remote may pass up the right code,
and another two minute search cycle
will have to be repeated.
If no channel change happens within
two minutes, repeat steps 1-4.
Should a channel change still not
occur, the remote will not work with
the desired device.
27
Page 28

Remote Control Direct Entry Codes
VCR CODE NO.
Admiral
..............
Advantz
..............
Adventure ....
Aiko ...................
Aiwa
..................
Akai
................
Alba
....................
Amercian High
Amstrad
..............
Asha
..................
Audiovox
Baird
...................
Beaumark ....
Bell & Howell .
Blaupunkt
Brandt
................
Broksonic .... ..121, 184,211,295, 361 Motorola . .
Bush
..................
CCE
....................
Calix
...................
Canon
................
Capehart
Carver
................
Citizen
................
Colt
.....................
Combitach ....
Craig
..................
Curtis Mathes .
Cybermax . . . .
Daewoo ............
Daytron
..............
Denon
................
Dynatech
Electrophonic ..
Emerex
..............
Emerson . .. .000, 002, 036, 037, 043, 061 Philco .... ...........................................035
....................
......................
Ferguson ....
Fisher
................
Fuji .....................
Funai...................
GE
.....................
Garrard
..............
Go Video ....
Gold Star
Gradiente
Grundig
Harman/Kardon
Harwood
Headquarter . . .
Hinari .................
Hitachi
Ingersol
JVC..................008, 041, 067, 208, 384, 486
Jensen
KEC
KLH
Kenwood ....
Kodak
LXl
Lloyd’s
............
Hl-Q
..................
Harley Davidson
................
..............
................
....................
..................
................
...................
...............
......................................
......................................
......................................
......................................
. .000, 037, 307, 348, 352 MGN Technology
041, 049, 053, 061, 106, 315 MTC ............
......................................
......................................
.............................
......................................
...........
......................................
......................................
......................................
......................................
...........
....................
....................
......................................
.............................
......................................
............
............
............
............
......................................
......................................
.............................
.............................
......................................
......................................
. .037, 047, 072, 240, 271 Optimus . . .
....................
.............................
....................
......................................
......................................
......................................
......................................
......................................
068, 088, 121, 164, 208, 209,
211,212, 278, 295, 361,479 Pilot
....................
...........
047, 054, 066, 104 Portland . ..
.............................
......................................
...........
035, 060, 065, 202 Protec .... .............................................072 CABLE REMOTE
......................................
....................
.............................
.............................
...........
003, 007, 195, 347 RCA ............
......................................
....................................
.............................
............
.............................
......................................
.............................
...........
000, 004, 041, 042,
...........
065, 105, 168, 235
......................................
......................................
.............................
......................................
...........
038, 041, 067, 384
.............................
......................................
.............................
REMOTE
048
358 Logik
000 MEI..............
278
352 Magnavox ..
035
325, 332 Matsui ....
240 Matsushita .
037
107
240 .047, 048, 104, 240, 266, 307
104 Metz
003, 006, 154 Minolta ... ..................................042, 105 Sunkel ....
187, 320, 321
352 Multitech . . ..................................000, 072 Symphonic .
072, 278
037
035
020
081, 146 Noblex .... ...........................................240 Teknika . ..
037, 278
072
352
035, 041, 060
051, 240 Optonica . .
020, 045, 276
020 Panasonic .
042
000 Penney ....
037
032 Pentax ....
107, 320, 321
033, 035
000 Profitronic .
000
232, 279, 432 Quarter . . .
037, 038 Quartz ....
000, 406 Quasar . ...
047
000
038, 075 Radix
068, 072
046 Realistic . . .
004, 352
004 SEG
041 STS
037, 278 Saba
072
035, 037 Samsung . . .
037 Sanky
000, 206
Loewe ....
............
MGA
............
Marta
...........
Memmorex
Memorex . .
............
Mitsubishi . .
NAD
...........
NEC
..............
Nikko ....
Nikon
Nordmende.
Okano .... ...........................................346 Tansal ....
Olympus . . ....................................035, 226
Orion
............
Philips . . . .
.............
Pioneer....
Profax ....
Pulsar
...........
Radio Shack
...........
Randex . . .
Ricoh
............
Runco ....
.............
SEl
..............
..............
..............
Saisho ....
Salora ....
Sansui
...........................................004 Sanyo
..................................004, 072 S avilie
...........................................035
..................................043, 061 Sears
.....................................
..................................000, 240
.........
000, 035, 081, 146, 181 Shintom . . . . ...........................................072
...........................................037
...........................
...........................
...........................................307
... .000, 035, 037, 039, 046, Sinudyne . . ...........................................004
..................................003, 347
.043, 061, 067, 075, 173, 443
..................................035, 048 Sylvania . . . .000, 035,043, 081, 103, 110
...........................................058
.........
036, 040, 041, 067, 104 Tatung .... ...........................................041
..........
..........
...........
...........................................037
....................................
...........................
................
...........................
...........................................062
.........
................
...........................
................
...........................
...........................
.........
...........................................037
....................................
.............................................
.............................................
.............................................
....................................
.............................................046
.............................................
..................
..................
..................
....................................
.............................................
.............................................
.........
................
....................................
...........................................039 Cableview .
...........................................322 Century .. .
.............................................004
.............................................
...........................
...........................................004 Comtec ...
...........................................075 Comtronics
..................
....................................
..................
037, 048, 058, 104,
004, 295, 348, 352, 479
035, 077, 162, 225,
035, 037, 038, 040,
035,062, 081, 110, 403
035, 077, 162, 454
042, 060, 065, 077, Andover ...
105, 106, 149, 202 Antronix ..
000, 035, 037, 045, 047 Cable Star .
048, 062, 066, 104
045,051,053,240 Contec ....
000, 041, 067, 271
REMOTE REMOTE
CODE NO. CODE NO.
004, 348, 352 Shoral ............ ...........................................004
035, 162, 454 Siemens ... ...........................................003
297, 320, 321
162, 432, 454 Toshiba ....
226, 378, 454 Universum .
042, 065, 105
042, 065, 105
297, 320, 321 Colour Voice
...........
...........
Scott
..............
240
034, 253
058, 067 XR-1000 ..
020 Yamaha . ..
322 Zenith
240
039, 051
046
000, 037 Archer ....
037 Balcor ....
037 British Telecom
034, 253
042 Clyde
039, 048 Cryptovision
...........
Sharp
............
Shogun ....
Singer .... ...........................................072
Sony
............
Sunpak . . . ...........................................253
TMK
............
Teac..............
Technics . . . ..................................035, 162
Telefunken .
Thomas . . . ...........................................000
Thomson . .
Totavision . ..................................037, 240
Towada . ..
Unitech . . . ...........................................240
Vactor .... ...........................................045
Vactor Research.................................038, 040
Video Concepts
Videosonic . ...........................................240
Wards . .000, 035, 042, 047, 048, 060, 062,
...........
CONVERTOR CODE NO.
ABC ............
Aliegio ....
Cablatenna .
Cabletime . .
Citizen ....
...........
Deceat ....
.........
046, 047, 104, 240, 268
...........................................352
.043,045, 121, 164,211,212
. . . .000, 035, 037, 042, 046,
.........
047, 054, 066, 104, 105
..................................046, 062
..................................051,240
. . . .000,011,022, 032, 033,
..................
...........................................348
...........................................000
.........................
..................................000, 041
...........................
...........................
...........................................322
...........................................320
.........
...........................................322
...........................................325
........................
...........................
...........................................038
..................
................
..................
...........................................153
...........................................544
...........................................022
....................................
...........................................056
..........................................
...........................................056
...........................................022
..................
...........................................022
...........................................153
...........................................153
...........................................086
..................................025,031
...........................................274
...........................................040
...........................................019
...........................................600
...........................................423
034, 035, 253, 275
036, 208, 240
000, 035, 037
187, 320, 321
043, 045, 066, 212, 366
040, 045, 061
.072, 081, 149, 161, 212, 240
000, 035, 072
000, 033, 034, 039
001, 003, 007, 008,
011,013,014,017
022, 153
105
161,271,377, 448
28
Page 29

Remote Control Direct Entry Codes
CABLE
CONVERTOR
Eastern
...........................
Everquest
Filmnet
Focus
France Telecom
GC Electronics
GEC ..............................
Ganard
Gemini
General Instrument . . .
Gold Star
Grundig
Hamlin............................
Hitachi
Hytex
Jasco
Jerrold ........................... 003,011,012,014,
M.N.E, T.
MNet..............................
Macon............................
Magnavox
Memorex
Movie Time
NSC
Oak .............................
Optimus
Panasonic
Paragon
Philips . .025, 027, 031, 153, 242, 290, 334
Pioneer
Popular Mechanics . . . .
Pulsar
RCA ................................
Radio Shack ....................
Recoton............................
Regal
Regency
Rembrandt
Runco ..............................
SL Marx
Salora ..............................
Samsung
Satbox..............................
Scientific Atlanta .... . .. .008, 017, 477 Best
Signal ............................
Signature
Sprucer
Star Sight
Starcom..........................
Stargate
Starquest
Sylvania
TV85................................
Tandy ..............................
TeIe+1
Teleservice.......................
Teleview
Texscan ...........................
Timeless
Tocom
Toshiba
Tudl
Tusa
Unike
.......................
.........................
............................
.............
.............
...........................
...........................
.......................
.........................
...........................
.............................
.............................
......................
.....................
.......................
...................
...............................
.........................
.......................
............................
...........................
..............................
..............................
..........................
.....................
.........................
.........................
.........................
...........................
.........................
.........................
..........................
...........................
............................
.........................
.........................
...........................
...........................
.................................
.................................
.............................
..................
..................
.........................
.........................
.........................
.........................
.........................
.........................
.........
.........
.........................
.........................
.009, 020, 034, 259
......................
.........................
.........................
.015, 024, 276, 476
.........................
.........................
.........................
.........
.........................000 Philips
.........................
................
................
.........................021 Toshiba ..................... ................................790
.........................
................533, 753
.........................
.........................
.........................
.........................
.........................
................
.........................
................
.........................
.........................
.........................
.........................040
.........................
................
.........................
.........................
.........................542
................003, 015
................
.........................
.........................001
.........................063 DDC
.........................
.........................
.........................281
.........................040
.........................
.........................274
.........................
.........................286
.........................015
................
REMOTE CABLE
CODE NO.
002, 274 United Artists ....
015, 040 United Cable ....
443
400
451
056
086 Westminster
153 Wolsey Gaine ....
015, 070, 242
011,276,476
040 Luxor
529
CONVERTOR CODE NO. Satellite CODE NO.
Universal
Videoway
Viewstar
Visi Cable+
Zenith
Zentek
DBS
on
007
153 HTS......................... ................................775 Minerva
443 Jerrold
443
033
027, 032, 334
063
063, 070 RCA
007, 019
. . . .000, 021, 107 Uniden.......................
000
400 AST
000 Akai........................... ................................515
021 Alba
015 Aldea
400 Amstrad . . . .080, 252, 345, 461, 509, 689 Saba..................
020, 259
002 Anitron
011,070 Armstrong
000 Astra.......................... ................................108
040
382 Axis
375
015, 040 Boca
Oil
021
015, 040
015
258
443
001
... .012, 013, 059
000
022, 153
Alpha Star
EchoStar
Hitachi
Hughes Network System
Magnavox
Memorex
Panasonic
Primestar
Sony
Satellite CODE NO.
Ankaro
Avalon.......................
ВТ..............................
Веко
Bush
Cambridge
Channel Master .. .
Commlink
Connexions
Conrad.......................
Crown
DNT
EchoStar
Farguson
Fidelity
Finiux
Fuba...........................
G-Bat.........................
Galaxis
Gooding
Grundig
Hinari
................
................
..................
............
............
......................
.....................
...............
.................
....................
.....................
..............
...................
..................
....................
...................
.........................
.........................
...........................
.........................
........................
.....................
.....................
.................
...........................
.........................
...........................
.........................
.........................
.................
.................
..............
.......................
.........................
.........................
....................
..................
.....................
.......................
.....................
....................
...................
.......................
REMOTE
................................007
................................003 Houston
... .022, 056, 153, 191
................................250 ITT
................
................................461 JVC
................................105 Kathrein
................................544
................
................................400
027, 063, 258 Intervision . . . .........................................592
000, 054, 525 Lennox
REMOTE
CODE NO.
................................772
................................775 Mediamarkt ..
................................819 Mintec
............................
................................627
......................
................................724
................................701 Nordmende ..
......................
................................627 Pace
................................566
................................639
................................724
749 Morgan’s .... ................................243, 513
722, 724 Nikko ............... ................................360, 713
722, 724
REMOTE
................................351 RFT
.............
................................288 SEG
................................183 Satec
................................243
................................396 Skymaster .. .
................................369
......................
................................189
................................369 Sunstar
.......................243,513
................................067 Techni Sat ...
......................
................................362
................................288 Triad
................................396 Universum . . .
................................607
................................243 Wisi
................................362
................................396
................................396
................................252 Mitsubishi . . .
......................
.......................369, 396
................................183 Pioneer
................................286
................................571
................................183
352,515,613 SAT
..............220, 288, 369
515, 668 Star Trak ....
344, 515
. . .067, 183, 189, 336
108, 397
. . .173, 189, 571, 750
Hirschmann . .
............
Huth
..................
..................
...................
La Sat
Lupus
Manhatten . . .
Maspro
Matsui
Newhaus ....
Nokia
Orbitech
Paliadium ....
Palsat
Philips
Phonotrend . . .
Plasmatic ....
Proset
Quadral
Radix
Salora
Schwaiger . . .
Seemann
Sony
Strong
Tantec ..............
Teleka
Tonna
Vtech
DVD
Kenwood ....
Panasonic ....
Philips
RCA
Sony
Toshiba
............
.........
............
..............
................
..............
..............
............
..............
................
...........
..................
................
..............
..............
............
..................
................
..................
..................
..............
................
...........
................
..............
............
..............
..............
................
................
..................
..............
............
................
................
...........
REMOTE
................................397, 573
.........................................668
.......................220, 243, 268
.........................................108
................................515, 571
.............
092, 504, 622, 658
................................513,607
.........................................592
.........................................369
................................108, 573
.........................................592
.......................092, 336, 750
.........................................571
.........................................248
......................................
......................................
......................................
......................
......................................
......................................
.. .067, 183, 336, 455, 791
......................................
......................................
.............
.............................
......................................
......................................
.............................
.............................
......................................
.............................
......................................
......................................
......................................
......................................
.............................
....................
.............................
......................................
......................................
......................................
......................................
......................................
.............................
.............................
......................................
......................................
......................................
......................................
.............................
108, 397, 573
200, 292, 571, 750
396, 578, 626
571
576
220
362
501
571
501
288, 592
442
288
362, 628
220, 288
396
351,461
369
336
108
183
183, 504
288, 626
704
421
421
513
336
262, 501
243, 613
668
351
571
351
351, 396
REMOTE
CODE NO.
......................................
......................................
......................................
......................................
......................................
......................................
......................................
......................................
534
521
490
539
550
522
552
503
29
Page 30
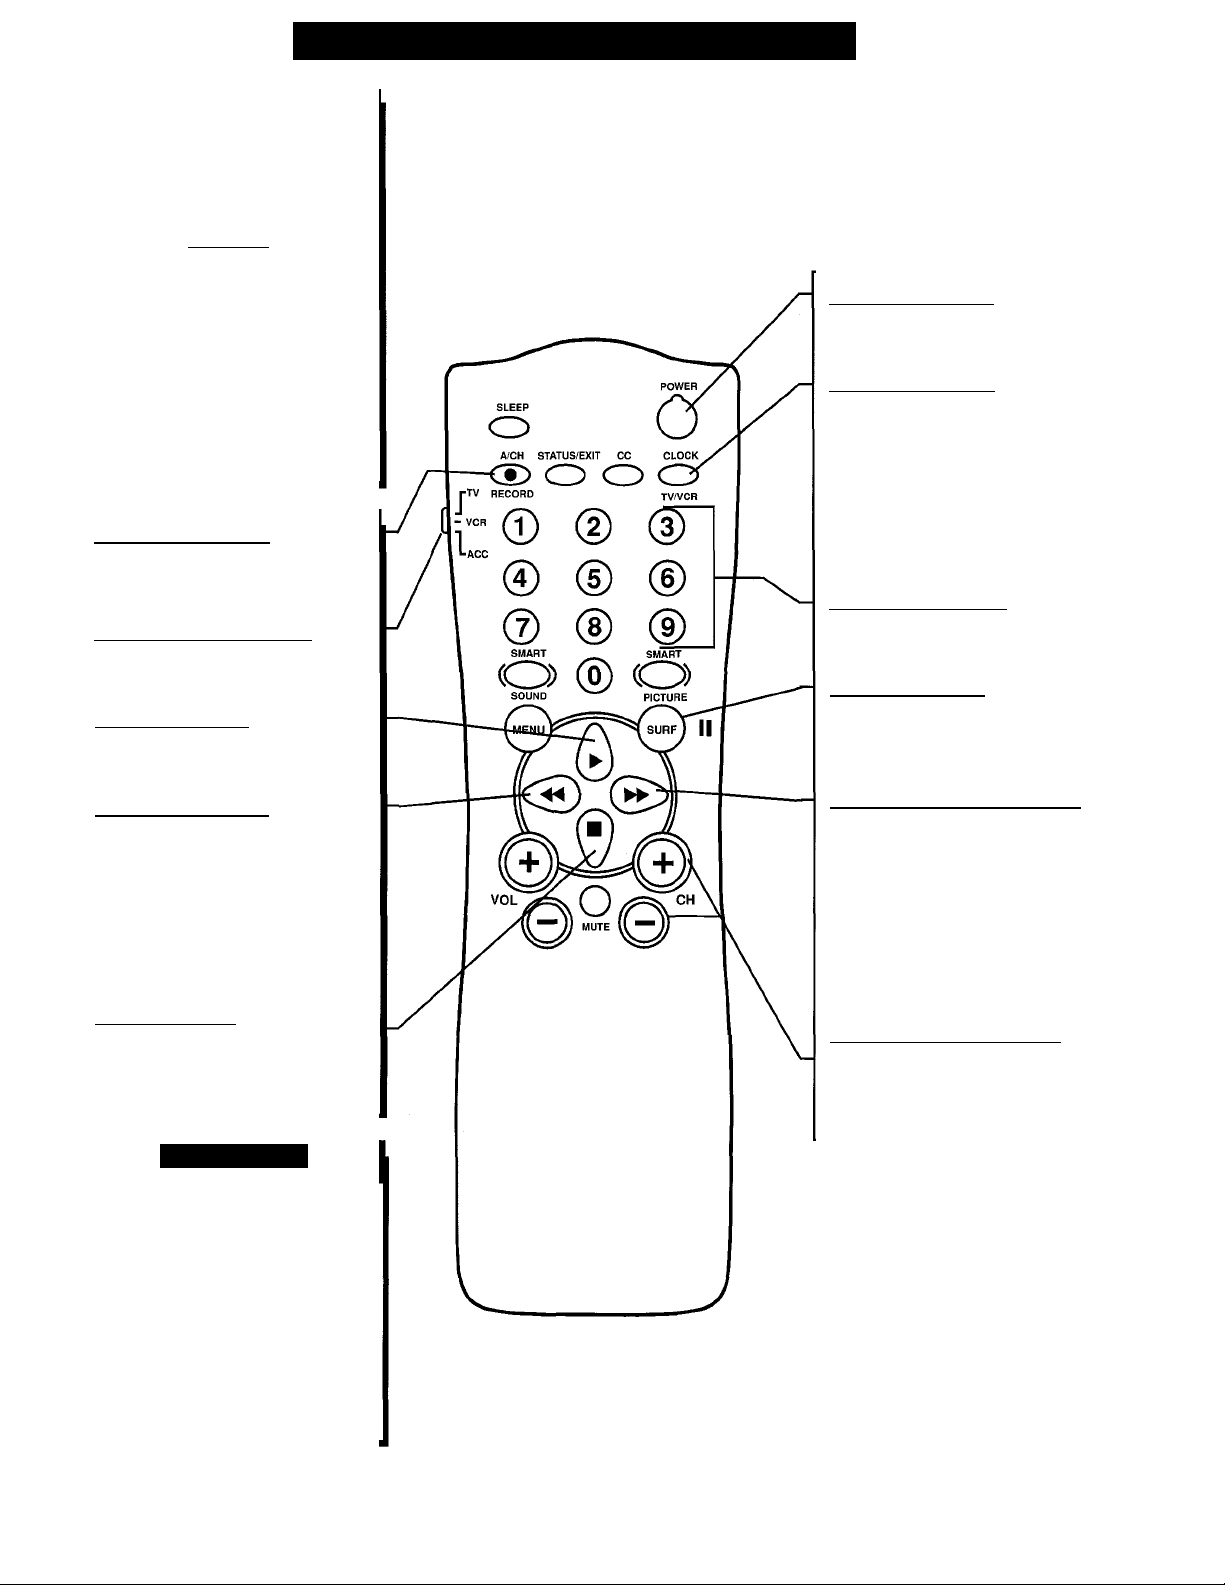
Using the Remote’s VCR Buttons
WJh^n using the TV remote
yy with aVCR, first make cer
tain it is set to control your VCR
(by the REMOTE CODE or
SEARCH method).
(BEGIN!
<i>
Set the TV/VCR/ACC mode
switch to VCR on the remote.
I
<l>
Point the top of the remote
toward the front of the VCR
(remote sensor window) when
pressing the buttons.
RECORD BUTTON •
Hold the (A/CH) • RECORD button
down to begin a VCR recording.
VCR SYSTEM SWITCH
Set in the VCR position to send
remote commands to the VCR.
PT .AY BUTTON b-
Press to begin playback of a
video tape.
REWIND BUTTON
Press to rewind tapes. For some
VCR’s the STOP button may
have to be pressed first, then
REWIND. In playback mode
hold down the button to view
picture moving rapidly in
reverse.
STOP BUTTON ■
Press to stop the motion of a tape
in playback, rewind, fast forward,
etc.
POWER BUTTON
Press to turn the VCR ON and
OFF.
TV/VCR BUTTON
Press while in the VCR mode (VCR
indicator on the front of the unit
will light) to view the playback of a
tape. Press again to place in the TV
position (VCR indicator light will
go off) to view one program while
recording another program.
NUMBER BUTTON
Press buttons for direct VCR
channel selections.
PAUSE BUTTON II
Press to temporarily stop the tape
during a playback or recording.
Press again to release Pause,
FAST FORWARD BUTTON
Press to rapidly advance the tape.
For some VCR’s you may need
to press the STOP button first,
then the FAST FORWARD but
ton. In playback mode hold the
button down to view the picture
moving rapidly in the forward
direction.
CHANNEU M- BUTTONS
Press to scan up or down through
the VCR channel numbers.
Smari Hki.p
Remember, the VCR but-
8 tons on the remote will not
operate your VCR if those features
are not found on your VCR remote
control.
Note: All VCR functions (particularly
Search, Rewind, Fast Forward, etc.)
will operate the same as with the orig
inal VCR remote control provided
with the VCR.
30
Page 31

Description of On-Screen Controls (commercial mode)
o
epending on the model
and its features, some or
D
COMMERCIAL SETUP MENU
all of the display functions
and features described here
will be valid. Note: Certain
features which are found in
both the Commercial and
Consumer modes may be
selected and adjusted in the
same manner (for example:
Language, Cable Tuning,
Brightness etc.). Many of
these shared onscreen Menu
features are already described
and explained in detail in the
preceding Consumer mode
sections.
To perform setup operations
for the TV Setup Commercial
modes, a T374AH remote with
its TV Setup, Guest, and Data
Communication Mode capa
bilities can be used. To set the
TV to Commercial or
Consumer mode, select a
mode in the ACCESS LEVEL
option of the PROPLUS
SETUP MENU. Note: Lor
some select Institutional
Television models the buttons
on the front of the TV can also
be used to select Commercial
mode settings. Other
Commercial setup and verifi
cation procedures may also be
performed from the T374AH
remote. (See T374AH Remote
Control Instructions, part #
IB7166E002,for details.)
CHANNEL - When highlighted, enter the desired channel number using the Number but
tons you wish to edit. The following control items, contained within the Channel
Installation menu, will effect the chosen channel.
USER RING - When highlighted, press the Cursor Right (►) or Left (-^ ) buttons on the
remote to choose SAVED (or DELETED). When SAVED is selected, the channel will
remain or be added to the TV’s program memory. When DELETED is selected, the channel
will be dropped from the TV’s program memory and will not appear when the TV channels
are scanned (using the Channel -i-,- buttons).
EVENT RING - When highlighted, press the Cursor Right (►) or Left (-^) buttons on the
remote to choose SAVED (or DELETED). When SAVED is selected, the channel will
remain or be added to the channels that can be selected during an event.
INPUT - When highlighted, press the Cursor Right (►) or Left (-^ ) buttons on the remote
to select ANTENNA, ERONT, AUX, or S-VIDEO input signal options. The Input control
directs the TV to select the specific indicated input whenever this channel is tuned.
1 TV SETUP MENU 1
LANGUAGE ENGLISH
ICHANNEL INSTALL
SETUP
CABLE TUNING ON
BRIGHTNESS
COLOR
CONTRAST
SHARPNESS
TINT
NOISE REDUCTION
SOUND MODE
■ümnun
BALANCE
TREBLE
BASS
ULTRA BASS
INCRED STEREO
AVL
VOLUME BAR
MIN VOLUME
MAX VOLUME
SWITCH ON VOLUME
SWITCH ON CHANNEL
POWER ON
CHANNEL DISPLAY
KEYBOARD LOCK
ESP
AUDIO/VIDEO MUTE
WELCOME MESSAGE
CHANNEL GUIDE
REMINDER
3 DIGITENTRY
A/CH A/V SWITCH
^XvECC
V-CHIPMENU ITEM
SAVEV-CHIP
V-CHIPSETUP
SLEEPTIMER
SECURITY
EXIT
lllllh--
■IT---
llllill--
—t
.
STEREO
*
--•f-
llllli-—
llllli---
I
----
tlillillil 63
STANDARD
STANDARD
STANDARD
BLUE
STANDARD
OFF
31
31
ON
OFF
OFF
ON
0
ALL
OFF
OFF
OFF
ON
OFF
ON
OFF
OFF
ON
ON
ON
OFF
34
22
29
40
► 1
►
0
►
CHANNEL INSTALLATION
CHANNEL TV 1
USER RING
EVENT RING
INPUT
LABEL
VIDEO BLANK
AUDIO BLANK
AUTO PROGRAM
EXIT
SAVED
DELETED
ANTENNA
(CHAN 001)
The Menu option Audio
Out (Fixed or Variable)
is not available on
model PA0113C
►
Channel Installation Sub-Menu
OFF
OFF
►
►
TABEL - When highlighted, press the Cursor Right (►) button on the remote to select the
first character space area. Then press the Cursor Up (A) and Down (T) buttons to scroll
through the list of available letter characters/numbers/& symbols provided for your labeling use. Press the Cursor Right (►) button to
highlight the next character space and continue to repeat the process until the complete label or channel title has been entered. The
Channel Label will appear in the corner of the TV screen beside the selected channel number.
VIDEO BIANK - When highlighted, press the Cursor Right (►) or Left (-4) buttons to turn the VIDEO BLANK control ON (or
OFF). When ON, no video will be shown when this specific channel is tuned. When OFF, normal viewing of video for this specific
channel will take place.
AUDIO BLANK - When highlighted, press the Cursor Right (►) or Left ) buttons to turn the AUDIO BLANK control ON (or
OFF). When ON, no sound will be heard through the TV speakers when the channel is tuned. When OFF, normal sound playback
will be heard for the selected channel.
AUTO PROGRAM - When highlighted, press the Cursor Right (►) or Left (-^ ) buttons to begin an automatic channel search for
all available received signal programs. Any channels found will be SAVED i n the TV’s program memory. These channels can then
be selected for viewing by pressing the Channel (+,-) buttons.
31
Page 32

□ I
Description of On-Screen Controls (commercial) contincei)
LANGUAGE - See page 23 on the use of the English/Francais/or
Español Menu language option control. Note: This control is intend
ed for onscreen Menu items. The language of Labels, Closed
Captioning, and other Channel Guide information will not change.
CHANNEL INSTALL - See previous page for details on Sub-
Menu containing Program Channel, Input, Label, AJV Blank, and
Auto Program controls.
PROPLUS SETUP - See page 2 and 33 for detail use of the Sub-
Menu eontaining Access Level (Consumer, Commercial, Locked,
Unlocked) and Event programming controls.
CABLE TUNING - See page 10 on the use of the Cable TV chan
nel selection mode control.
COLOR AD.TUST CONTROT.S - See page 14 for adjustments of
Brightness, Contrast, Noise Reduction, etc. picture controls.
Aumo An.rUST CONTROLS - See page 14 for sound control
adjustments (Bass, Balance, etc.). Page 15 for Incredible Stereo.
Page 16 for Automatic Volume Limiter and Volume Bar.
MTN VOLUME tMiniimim Voliimel - Highlight MIN VOLUME,
then press the Cursor Right (►) or Left (-^ ) buttons to set the min
imum allowable volume level for TV sound.
MAX VOLUME (Maximum Volmnel - Highlight MAX VOL
UME, then press the Cursor Right (►) or Left (-^ ) buttons to set
the maximum allowable volume for TV sound.
SWITCH ON VOLUME - Highlight SWITCH ON VOLUME,
then press the Cursor Right (►) button to select a desired volume
level. The volume will be at the preset level every time you turn on
the TV. If STANDARD is selected, the last volume level will be
used.
SWITCH ON CHANNET. - Use this feature to have the TV tune
to the same channel (or signal source) every time you turn ON the
TV. Highlight SWITCH ON CHANNEL, then press the Cursor
Right (►) or Left (-^ ) buttons to select FRONT, AUX, S-VIDEO,
STANDARD, or any channel 1 - 125. (You can also use the
Number buttons to select a channel.) If STANDARD is selected, the
last viewed channel will be used.
POWER ON - Highlight POWER ON, then press the Cursor Right
(►) or Left (-^) buttons to select FORCED. This disables the
POWER button on the front of the TV. The TV is now activated
when the AC power cord is plugged into an outlet. With a consumer
remote, the TV will not turn ON or OFF. In the STANDARD mode.
The TV will return to normal operation.
CHANNEL DISPLAY - Highlight CHANNEL DISPLAY, then
press the Cursor Right (►) or Left (-^) buttons to select ALL,
NONE, NUMBER, or LABEL. “NONE” disables any on-screen
displays, except SLEEP TIMER and MUTE. NONE also disables
the consumer remote’s Number or Channel +,- buttons for channel
selection. “ALL” allows the Channel Number, Channel Label, or
Channel Guide to appear. “NUMBER” allows only the Channel
Number to be displayed onscreen. “LABEL” allows the onscreen
Label to appear as set under the Channel Installation Menu control.
KEYBOARD LOCK - Highlight KEYBOARD, then press the
Cursor Right (►) or Left (-^) buttons to select ON (or OFF).
“OFF’ disables all the buttons on the front panel of the TV from
manual operation. “ON” enables all buttons on the front of the TV
to operate.
ESP - Energy Saving Programmability (ESP) allows you to select
an amount of time (in hours) before the TV will automatically turn
OFF. The TV must remain on continuously during the amount of
time you select. If the power is switched off, the ESP timer will be
reinitialized. Highlight ESP, then press the Cursor Right (►) or Left
(•^) buttons to select the number of hours (1 - 99) before the TV
turns OFF. (You may also use the Number buttons to enter the num
ber of hours).
AUDIO/VIDEO MUTE - See page 17 for details on how the TV
screen color can be set for blanked out channels.
WELCOME MESSAGE - Highlight WELCOME MESSAGE,
then press the Cursor Right (►) or Left (-^) buttons to display the
Welcome Message sub-menu. Within this Menu the Message can
be turned ON or OFF. Two lines of information (LINE 1, LINE 2)
can be displayed onscreen when the TV is powered ON. Use the
Cursor Up (A) and Down (T) buttons to scroll the characters,
symbols, and numbers available for the message. “CLEAR” will
cancel any message written.
CHANNEL GUIDE - Highlight CHANNEL GUIDE, then press
the Cursor Right (►) or Left (-^) buttons to select OFF, ON, or
POWER ON. If you select POWER ON, the Channel Guide (a list
of channels that are labeled) will appear when you turn the TV ON.
The Channel Guide will appear also when you press the CH GDE
button on the remote. If you select ON, the Channel Guide will
appear only when you press CH GDE. (Also, if you select POWER
ON or ON, make sure DISPLAYS is set to ALL.) If you select OFF,
the Channel Guide will not appear when you press CH GDE.
Remember, only the programmed channels that are Labeled (within
the Channel Installation Menu) will appear in the Channel Guide.
REMINDER - Highlight REMINDER, then press the Cursor Right
(►) or Left ) buttons to select ON. The current channel number,
and Label (if assigned), will appear onscreen at all times. (Make
sure CHANNEL DISPLAY control is set to ALL and Closed
Captioning is set to OFF. The “OFF” position allows the channel
number to appear briefly when the channel is selected, then it will
disappear.
2 DIGIT ENTRY - Highlight 3 DIGIT ENTRY, then press the
Cursor Right (►) or Left (-^ ) buttons to select ON (or OFF).
“ON” allows three digit channel number entries in order to select
channels above 99.
A/CH A/V SWITCH - Highlight A/CH AN SWITCH, then press
the Cursor Right (►) or Left (-^) buttons to select ON (or OFF).
“ON” allows the A/CH button on the remote to also select signal
input sources (ANTENNA, FRONT, AUX, S-VIDEO). “OFF” sets
A/CH to switch only between the last viewed and current channel
selections.
CC (Closed Captioning) - See page 18 for setup and use of
Closed Caption mode viewing. Note: CCl is the captioned mode
used most often by broadcasters. CC ON MUTE will automatically
display the Closed Caption mode when the remote’s MUTE button
is pressed.
SAVE CC - Highlight SAVE CC, then press the Cursor Right (►)
or Left (-4 ) buttons to select ON (or OFF). “ON” will save the CC
mode you have selected, even if the TV Power is turned OFF.
“OFF” will turn off the selected CC mode when the TV is turned
OFF.
V-CHIP MENU ITEM - Highlight V-CHIP MENU ITEM, then
press the Cursor Right (►) or Left (-^ ) buttons to select ON (or
OFF). “ON” allows for V-CHIP control items to be shown in the
Features Menu. “OFF” will not display the V-CHIP control options.
32
Page 33

Description of On-Screen Controls (commercial) continued
SAVE V-CHTP - Highlight SAVE V-CHIP, then press the Cursor
Right (►) or Left (-^ ) buttons to select ON (or OFF). “ON”will
save the current V-CHIP control settings within the TV’s memory.
V-CHTP SETUP - Highlight V-CHIP SETUP, then press the Cursor
Right (►) or Left (-^) buttons to select the V-CHIP sub-menu. Use
the various TV and Movie Ratings system settings to block or cen
sor the viewing of TV programming. See pages 19-21 for further
details on the Ratings settings and their use.
ST.EEPTIMER - See page 22 for details on setting the TV to auto
matically shut itself OFF (according to preset time intervals of 15240 minutes).
ProPlus Setup Edit Events Sub-Menu
{ PROPLUS SETUP MENU 1
SET TIME
SET DAY
CLOCK DISPLAY
ACCESS LEVEL
lEDIT EVENTS
EXIT
J~1VENT MENU - Allows access
to another sub-menu where
event specific settings are made.
The Menu control options set up
and allow for programmed opera
tion of TV controls for up to seven
separate and specific events. Each
of the individual events can be set
for Day(s) of the week, Turn On
time, Turn Off time and preset
channel selection.
3:30 PIVI
FRIDAY
ON
1nCKEO
►1
►
EVENTI
EVENT 2
EVENT 3
EVENT 4
EVENT S
EVENT 6
EVENT?
EXIT
EVENT MENU
SECURITY - Highlight SECURITY, then press the Cursor Right
(►) or Left (-^) buttons to select STANDARD (or HIGH). Note;
The Security control item will not be in the Menu when using the
Consumer remote, but (when “STANDARD” security level has
been selected) a consumer remote button sequence (31, 97, 53,
MUTE) can be used to access to the SETUP MENU. With “HIGH”
security level selected, access to the SETUP MENU is only allowed
with a commercial Setup Remote.
EXIT - Highlight EXIT, then press the Cursor Right (►) or Left
(-^) buttons to select YES. The onscreen menu will disappear. The
onscreen menu also disappears after 60 seconds if there has been no
use of the displays.
►
►
►
EVENT ENABLED ON
ON TIME
OFF TIME
DAYS ACTIVE -MT--FCHANNEL TV 10
POWER
AVAILABLE RING
EXIT
EVENT 1
11:00 AM
1:00 PM
FORCED
USER
►
EVENT 1 -7 - Highlight an Event, for example, EVENT 1. Then,
press the Cursor Right (►) or Left (-^ ) buttons. You may now set
the ON TIME, OFF TIME, CHANNEL, and DAYS ACTIVE
for the specific Event 1. To adjust the ON/OFF TIME items, use
the Cursor Right (►) or Left (-^) buttons to highlight the desired
hour and minute number space, then use the Cursor A / T but
tons to set each item. (Note: The Channel Number buttons on the
remote can also be used to set the time. Press 1 for AM setting,
press 0 for PM setting.) Repeat this procedure to set the ON/OFF
TIME, CHANNEL, and select DAYS for each desired Event.
EVENT ENABLED - Highlight EVENT ENABLED, then press
the Cursor Right (►) or Left (-^) buttons to place the specific
Event program settings into the TV’s memory (ON). “OFF” will
not allow the Event settings to take place.
CHANNEI. - This feature allows you to choose the channel to
which the TV will tune for the Event. Highlight CHANNEL, then
press the Cursor Right (►) or Left (-^ ) buttons to select FRONT,
AUX, S-VIDEO, or a channel between 1-125. (You may also use
the Number buttons to select a channel.)
POWER - Highlight POWER, then press the Cursor Right (►)
or Left (-^) buttons to select FORCED or STANDARD. This
feature is similar to the POWER ON feature in the TV Setup
menu, but this feature only operates during an Event. When
FORCED is selected, the TV will ignore any commands during
an Event. (POWER ON in the Setup menu must be set to STAN
DARD.) When STANDARD is selected, the TV will operate nor
mally.
AVATLARLE RING - Highlight AVAILABLE RING, then press
the Cursor Right (►) or Left (-^) buttons to select EVENT,
NONE, or USER. This either saves the selected channel number
into either one of the existing CHANNEL INSTALLATION
“EVENT” or “USER” program memory rings (see page 31), or
places the channel as a nonselectable “NONE” category.
EXIT - To return to previous ProPlus Menu Setup screens, high
light EXIT, then press the Cursor Right (►) or Left (-^ ) buttons
to move back one Menu screen at a time.
33
Page 34

lease make these simple
checks before calling for
P
service. Theses tips can save you
time and money since charges for
TV installation and adjustment of
customer controls are not cov
ered under your warranty.
No Power
No Picture
Tips If Something Isn’t WoRKiNCi
CAUTION: A video source (such as a video game, Compact Disc Interactive - CDI, or
TV information channel) which shows a constant non-moving pattern on the TV screen
can cause picture tube damage. When your TV is continuously used with such a source,
the pattern of the non-moving portion of the game (CDI, etc.) could leave an image per
manently on the picture tube. When not in use, turn the video source OFF. Regularly
alternate the use of such video sources with normal TV viewing.
Check the TV power cord. Unplug the TV, wait 10 seconds, then reinsert plug into
outlet and push POWER button again.
Check to be sure outlet is not on a wall switch.
Check MODE access in Setup Menu (see page 2) for correct operation mode. Also
check POWER ON and KEYBOARD controls for commercial users.
• Check antenna connections on the rear of the TV. Are they properly secured to the
antenna plug on the TV?
• Check the CABLE TUNING control for correct position. Check A/V MUTE, ACCESS
LEVEL, VIDEO BLANK, and EVENT MENU controls for correct setting in Setup
Menu for commercial users.
• Check INPUT (under CHANNEL INSTALLATION in CONSUMER mode) for correct
position. FRONT, AUX, or S-VIDEO positions without a supplied video signal source
will result in a blank screen.
No Sound
Remote Does Not
Work
TV Displays Wrong
Channel or No
Channels Above 13
Check the VOLUME buttons. Check AUDIO BLANK and MAX VOL in Setup
Menu for commercial users.
Check the MUTE button on the remote control.
Check the SPEAKER on-screen Menu control and EXTERNAL SPEAKER switch on
rear of TV. OFF position will eliminate sound at the set. (not available on PA0113C.)
If attempting auxiliary equipment hook-ups, check audio jack connections.
Check batteries. Replace with A A Heavy Duty (Zinc Chloride) or Alkaline batteries
if necessary.
Clean the remote and the remote sensor window on the TV.
Check the TV power cord. Unplug the TV, wait 10 seconds, then reinsert plug into
outlet and push POWER button again.
Check to be sure TV outlet is not on a wall switch.
Repeat channel selection.
Add desired channel numbers (CHANNEL RING control) into TV memory.
Check CABLE TUNING ON/OFF control for correct position.
This TV is equipped with protective circuitry that shuts the TV off in case of moderate
power surges. Should this occur turn the TV back on by pressing the POWER button
once or twice, or unplug (wait 10 seconds) and then replug the power cord at the AC
outlet. This feature is NOT designed to prevent damage due to high power surges such
as those caused by lightning, which is not covered by your warranty.
Cleaning and Care
• To avoid possible shock hazard be sure the TV is unplugged from the electrical outlet before cleaning.
• When cleaning the TV screen, take care not to scratch or damage the screen surface (avoid wearing jewelry or using
anything abrasive). Wipe the front screen with a clean cloth dampened with water. Use even, easy, vertical strokes when
cleaning.
• Gently wipe the cabinet surfaces with a clean cloth or sponge dampened in a solution of cool clear water. Use a clean
dry cloth to dry the wiped surfaces.
• Occasionally vacuum the ventilation holes or slots in the cabinet back.
• Never use thinners, insecticide sprays, or other chemicals on or near the cabinet, as they might cause permanent marring
of the cabinet finish.
34
Page 35

Glossary of Television Terms
Coaxial Cable ■ A single solid antenna wire normally matched with a
metal plug (F-type) end connector that screws (or pushes) directly
onto a 75 Ohm input found on the Television or VCR.
Closed Caption - Broadcast standard which allows you to read the
voice content of television programs on the TV screen. Designed to
help the hearing impaired this feature uses on-screen "text boxes" to
show dialogue and conversations while the TV'program is in progress.
BNC Connector - A twist-lock connector for various types of RG-
type coaxial cables. Also referred to as Bayonet Nut Coupler.
Display - An on screen message or graphics that helps the user operate
and adjust his Television feature controls. See On Screen Displays
(OSD).
Direct Audio/Video Inputs - Located on the rear of the TV, these con
nectors (RCA phono type plug) are used for the input of audio and
video signals. Designed for use with VCRs (or other accessories) in
order to receive higher picture resolution and offer sound connection
options.
Event - Defines operation of the TV control system. Each event can
be programmed for the day(s) of the week; turn ON time; turn OFF
time; and channel.
Multichannel Television Sound (MTS) - The broadcast standard that
allows for stereo sound to be transmitted with the TV picture.
On Screen Displays (OSD) - Refers to the wording or messages gen
erated by the television (or VCR) to help the user with specific feature
controls (color adjustment, programming, etc.).
Menu - An onscreen listing of feature controls shown on the Television
screen that are made available for user adjustments.
Programming - The procedure of adding or deleting channel numbers
into the Television’s memory circuits. In this way the Television “remem
bers” only the locally available or desired channel numbers and skips
over any unwanted channel numbers.
Remote Sensor Window - A window or opening found on the Television
control panel through which infrared remote control command signals are
received.
Second Audio Program (SAP) - Another or additional audio channel
provided for in the Multichannel Television Sound (MTS) broadcast stan
dard. The most frequently proposed use for SAP is the simultaneous
bilingual broadcast of TV program material.
Setup Code - Special sequence of button presses used to access the
Setup Menu when the Setup Remote is not available.
Setup Remote - Remote control transmitter used by installer to set up
commercial functions and modes of operation.
Status - Allows the user to quickly confirm what channel number is cur
rently being viewed. Status can also be used to clear the Television of on
screen displays or information (rather than waiting for the displays to
“time out” or automatically disappear from the screen).
Twin Lead Wire - The more commonly used name for the two strand
300 Ohm antenna wire used with many indoor and outdoor antenna sys
tems. In many cases this type of antenna wire requires an additional
adapter (or balun) in order to connect to the 75 Ohm Input terminals of
more recent Televisions and VCRs.
Accessories/Optional.........................................................................2, 5, 6
Adapter Connector........................................................................6, 23, 24
Add/Delete Channels....................................................................11-12, 31
Alternate Channel (A/CH)........................................................................8
Audio/Video Input lacks
Battery Installation....................................................................................8
Cable TV Connections/Settings........................................................6, 10
Channel Display...........................................................................7, 13, 17
Channel Program Memory
Channel Reminder...................................................................................17
Closed Captioning...................................................................................18
Clock Set and Display.............................................................................22
Controls/TV
Controls/Remote....................................................................................7,8
Features..................................................................................................... 5
First Time Use.......................................................................................7, 8
Glossary TV Terms.................................................................................35
Input Control.....................................................................................13, 24
Inputs/Audio and Video
Language Option.....................................................................................23
Memory/Program Channels
Menu Button..........................................................................................8, 9
..............................................................................................
.............................................................
......................................................
..............................................................
....................................................
2, 5, 6, 24
2, 11-12, 31
2, 5, 6, 24
2, 11-12, 31
Index
7
Minus(-)/PIus (-I-) Buttons....................................................................7, 8
Output (Audio) Jacks...............................................................................24
Precautions/Safety.................................................................................3, 34
Programming Channels............................................................2, 11-12, 31
ProPlus Setup.........................................................................................2, 31
Remote Control
Requesting Service..............................................................................34, 36
RF Coaxial Cable
Safety/Precautions.................................................................................3, 34
Sensor (Remote)........................................................................................7
Setup Modes.......................................................................................... 2, 31
Sleep Timer..............................................................................................22
Speaker Terminal Connections
Status Button..........................................................................................8, 9
Stereo.......................................................................................................14
Tips for Service
V-Chip Content Advisory..................................................................19-21
VCR/TV Connections
Volume Bar Control................................................................................16
Warranty..................................................................................................36
...........................................................................
......................................................................................
...............................................................
.......................................................................................
...............................................................................
7-8, 25-30
23
34
6
6
35
Page 36

LIMITED WARRANTY
COLOR TELEVISION
One Year Free Labor
One Year Free Service on Parts (Two Years Free Service on Color Picture Tube)
This product can be repaired in-home.
WHO IS COVERED?
You must have proof of purchase to receive warranty service. A sales
receipt or other document showing that you purchased the product is
considered proof of purchase.
WHAT IS COVERED?
Warranty coverage begins the day you buy your product. For one year
thereafter, all parts will be repaired or replaced, and labor is free.
From one to two years from the day of purchase, you pay for the
replacement or repair of all parts except the picture tube, and for all
labor charges. After two years from the day of purchase, you pay for
the replacement or repair of all parts, and for all labor charges. All
parts, including repaired and replaced parts, are covered only for the
original warranty period. When the warranty on the product expires,
the warranty on all replaced and repaired parts also expires.
WHAT IS EXCLUDED?
Your warranty does not cover;
• labor charges for installation or setup of the product, adjustment of
customer controls on the product, and installation or repair of
antenna systems outside of the product.
• product repair and/or part replacement because of misuse, acci
dent, unauthorized repair or other cause not within the control of
Philips Consumer Electronics Company.
• reception problems caused by signal conditions or cable or antenna
systems outside the unit.
• a product that requires modification or adaptation to enable it to
operate in any country other than the country for which it was
designed, manufactured, approved and/or authorized, or repair of
products damaged by these modifications.
• incidental or consequential damages resulting from the product.
(Some states do not allow the exclusion of incidental or consequen
tial damages, so the above exclusion may not apply to you. This
includes, but is not limited to, prerecorded material, whether copy
righted or not copyrighted.)
WHERE IS SERVICE AVAILABLE?
Warranty service is available in all countries where the product is offi
cially distributed by Philips Consumer Electronics Company. In coun
tries where Philips Consumer Electronics Company does not distribute
the product, the local Philips service organization will attempt to pro
vide service (although there may be a delay if the appropriate spare
parts and technical manual(s) are not readily available).
MAKE SURE YOU KEER..
Please keep your sales receipt or other document showing proof of
purchase. Attach it to this owner’s manual and keep both nearby.
Also keep the original box and packing material in case you need to
return your product.
BEFORE REQUESTING SERVICE...
Please check your owner's manual before requesting service.
Adjustments of the controls discussed there may save you a service call.
TO GET WARRANTY SERVICE IN U.S.A.,
PUERTO RICO OR U.S. VIRGIN ISLANDS...
Contact a Philips factory service center (see enclosed list) or author
ized service center to arrange repair.
(In U.S.A., Puerto Rico and U.S.Virgin Islands, all implied warranties,
including implied warranties of merchantability and fitness for a particuiar purpose, are limited in duration to the duration of this express war
ranty. But, because some states do not allow limitations on how long
an implied warranty may last, this limitation may not apply to you.)
TO GET WARRANTY SERVICE IN CANADA...
Please contact Philips at:
I -800-661-6162 (French Speaking)
1-800-363-7278 (English Speaking)
(In Canada, this warranty is given in lieu of all other warranties. No
other warranties are expressed or implied, including any implied war
ranties of merchantability or fitness for a particular purpose. Philips is
not liable under any circumstances for any direct, indirect, special, inci
dental or consequential damages, howsoever incurred, even if notified
of the possibility of such damages.)
REMEMBER...
Please record the model and serial numbers found on the product
below. Also, please fill out and mail your warranty registration card
promptly. It will be easier for us to notify you if necessary.
MODEL#
SERIAL#
_____________________________________________________________
______________________________________________________________
This warranty gives you specific legal rights. You may have other rights which vary from state/province to statelpiovince
Philips Service Company, P.O. Box 2976, Longview,TX 75606, (903) 242-4800
36
 Loading...