

Page 1
HD3095
1
2
3
Menu
Rice/Quinoa
or
Risotto
Start/Cancel
Touch for 3s
5
Menu
Slow Cook
Cooking
time
7
Important:
• When cooking at a temperature higher than
272°F/130°C and for more than 1 hour, the top
lid must be opened during cooking.
Reheating (Fig. 6)
1 Evenly distribute food in the inner pot.
Multicooker
User Manual
Always here to help you
Register your product and get support at
www.philips.com/welcome
Question?
Question?
Contact
Contact
Philips
Philips
8823 095 8754 2
ENGLISH
IMPORTANT
SAFEGUARDS
When using electrical appliances, basic safety
precautions should always be followed including the following:
1. Read all instructions.
2. Do not touch hot surfaces. Use handles
or knobs. Always use oven pads or mitts
when handling hot material.
3. To protect against electrical shock do not
immerse cord, plugs or appliance base in
water or other liquid. If appliance base falls
into water, unplug the cord from outlet
immediately. Do not reach into the liquid.
4. Close supervision is necessary when any
appliance is used by or near children or
invalids. Children should not play with the
appliance.
5. Unplug from outlet when not in use and
before cleaning. Allow to cool before putting on or taking off parts.
6. Do not expose the multicooker to high
temperatures or place it on a working or
still hot stove or cooker.
7. Do not operate the appliance with a damaged power cord or plug, inner pot, sealing
ring or after the appliance malfunctions or
has been damaged in any manner or is not
operating properly. For assistance in the
U.S. and Canada only, call 1-866-309-8817.
8. The use of accessory attachments not recommended by the appliance manufacturer
may cause injuries.
9. Do not block any ventilation openings.
Install in accordance with the manufacturer’s instructions.
10. Do not use outdoors.
11. This appliance is not a deep fryer.
12. Do not let cord hang over edge of table or
counter, or touch hot surfaces.
13. Do not place on or near a hot gas or electric burner, or in a heated oven.
14. Do not operate or immerse the appliance
in water or under running water.
15. Extreme caution must be used when moving an appliance containing hot oil, grease
or other hot liquids.
16. Do not exceed the maximum water level
indicated in the inner pot to prevent overflow.
1
2
3
4
5
14
Keep Warm
Menu
12
Power on Preset
Rice/Quinoa
Cooking
time
Risotto
Oatmeal
Preset timer
Slow Cook
Child lock/
Touch for 3s
Bake/Roast
11
13
A
B
C
D
E
17. Do not place cooking utensils inside
the pot while cooking, keeping warm or
reheating.
18. Always attach plug to appliance first, then
plug the cord into the wall outlet. To disconnect, turn any control to “cancel”, then
remove plug from wall outlet.
19. Make sure the heating element, temperature sensor and the outside of the inner
pot are clean and dry before putting plug
in power outlet.
20. Make sure your hands are dry before
plugging the appliance into an outlet or
pressing any of the buttons on the control
panel.
21. Do not use this appliance for other than
intended use.
22. Use extreme caution when removing the
inner pot and/or disposing of hot grease or
liquids. The inner pot and steamer may be
hot and heavy during and after the cooking
process.
23. Do not clean with metal scouring pads.
Pieces can break off the pad and touch
electrical parts, creating a risk of electric
shock.
24. Use only on properly grounded outlet.
25. A short power-supply (or detachable power-supply cord) should be used to reduce
the risk resulting from becoming entangled
in or tripping over a longer cord.
26. Extension cords may be used if care is
exercised in their use. If an extension cord
is used: The marked electrical rating of
the cord must be as great as the rating of
the appliance. The longer cord should be
arranged so that it will not drape over the
edge of the counter or table top where
it could be pulled by children or tripped
over unintentionally. If the appliance is of
grounded type, the extension cord should
be a grounded-type 3-wire cord.
27. CAUTION: To ensure continued protection against risk of electric shock, connect
to properly grounded outlets only. Risk
of electric shock, cook only in removable
inner pot.
28. Do not place any of the following materials
in the appliance: paper, cardboard, plastic
and the like.
29. This appliance is not intended to be operated by means of an external timer or a
separate remote control system.
30. Use on a flat stable, heat-resistant surface
away from water or any heat source.
31. This appliance operates at high temperatures which may cause burns. Do
not touch hot surfaces, parts or inside of
appliance while operating. Allow appliance
to cool down completely before moving,
handling or cleaning.
32. During cooking, hot steam is released
through the steam vent openings or when
you open the lid. Keep hands and face away
www.philips.com/welcome
User manual
15
www.philips.com/welcome
Recipe
Keep Warm
Boil/Steam
Manual
Yogurt
Stew/Soup
Brown/Sauté
Start/Cancel
Touch for 3s
Temp.
F
G
H
from steam and air outlet openings. Do
not insert any object or substances into
the steam vent.
33. Never use the multicooker without the
inner pot in place. Always put the inner
pot in the multicooker before you put the
plug in the power outlet and switch it on.
Do not use the inner pot if it is warped or
deformed in any way.
34. Avoid sudden temperature changes, such
as adding refrigerated foods into a heated
pot.
35. This appliance is for household use only.
SAVE THESE
INSTRUCTIONS
Consuming raw or undercooked meats, poultry,
seafood, shellfish or eggs may increase your risk
of foodborne illness.
Introduction
Congratulations on your purchase and welcome
to Philips! To fully benefit from the support
that Philips offers, register your product at
www.Philips.com/welcome.
The Philips Multicooker is about to become your
own personal chef and will cook many tasty dishes
very simply.
Refer to the Recipe Book for recipes, cooking
temperatures, times and tips.
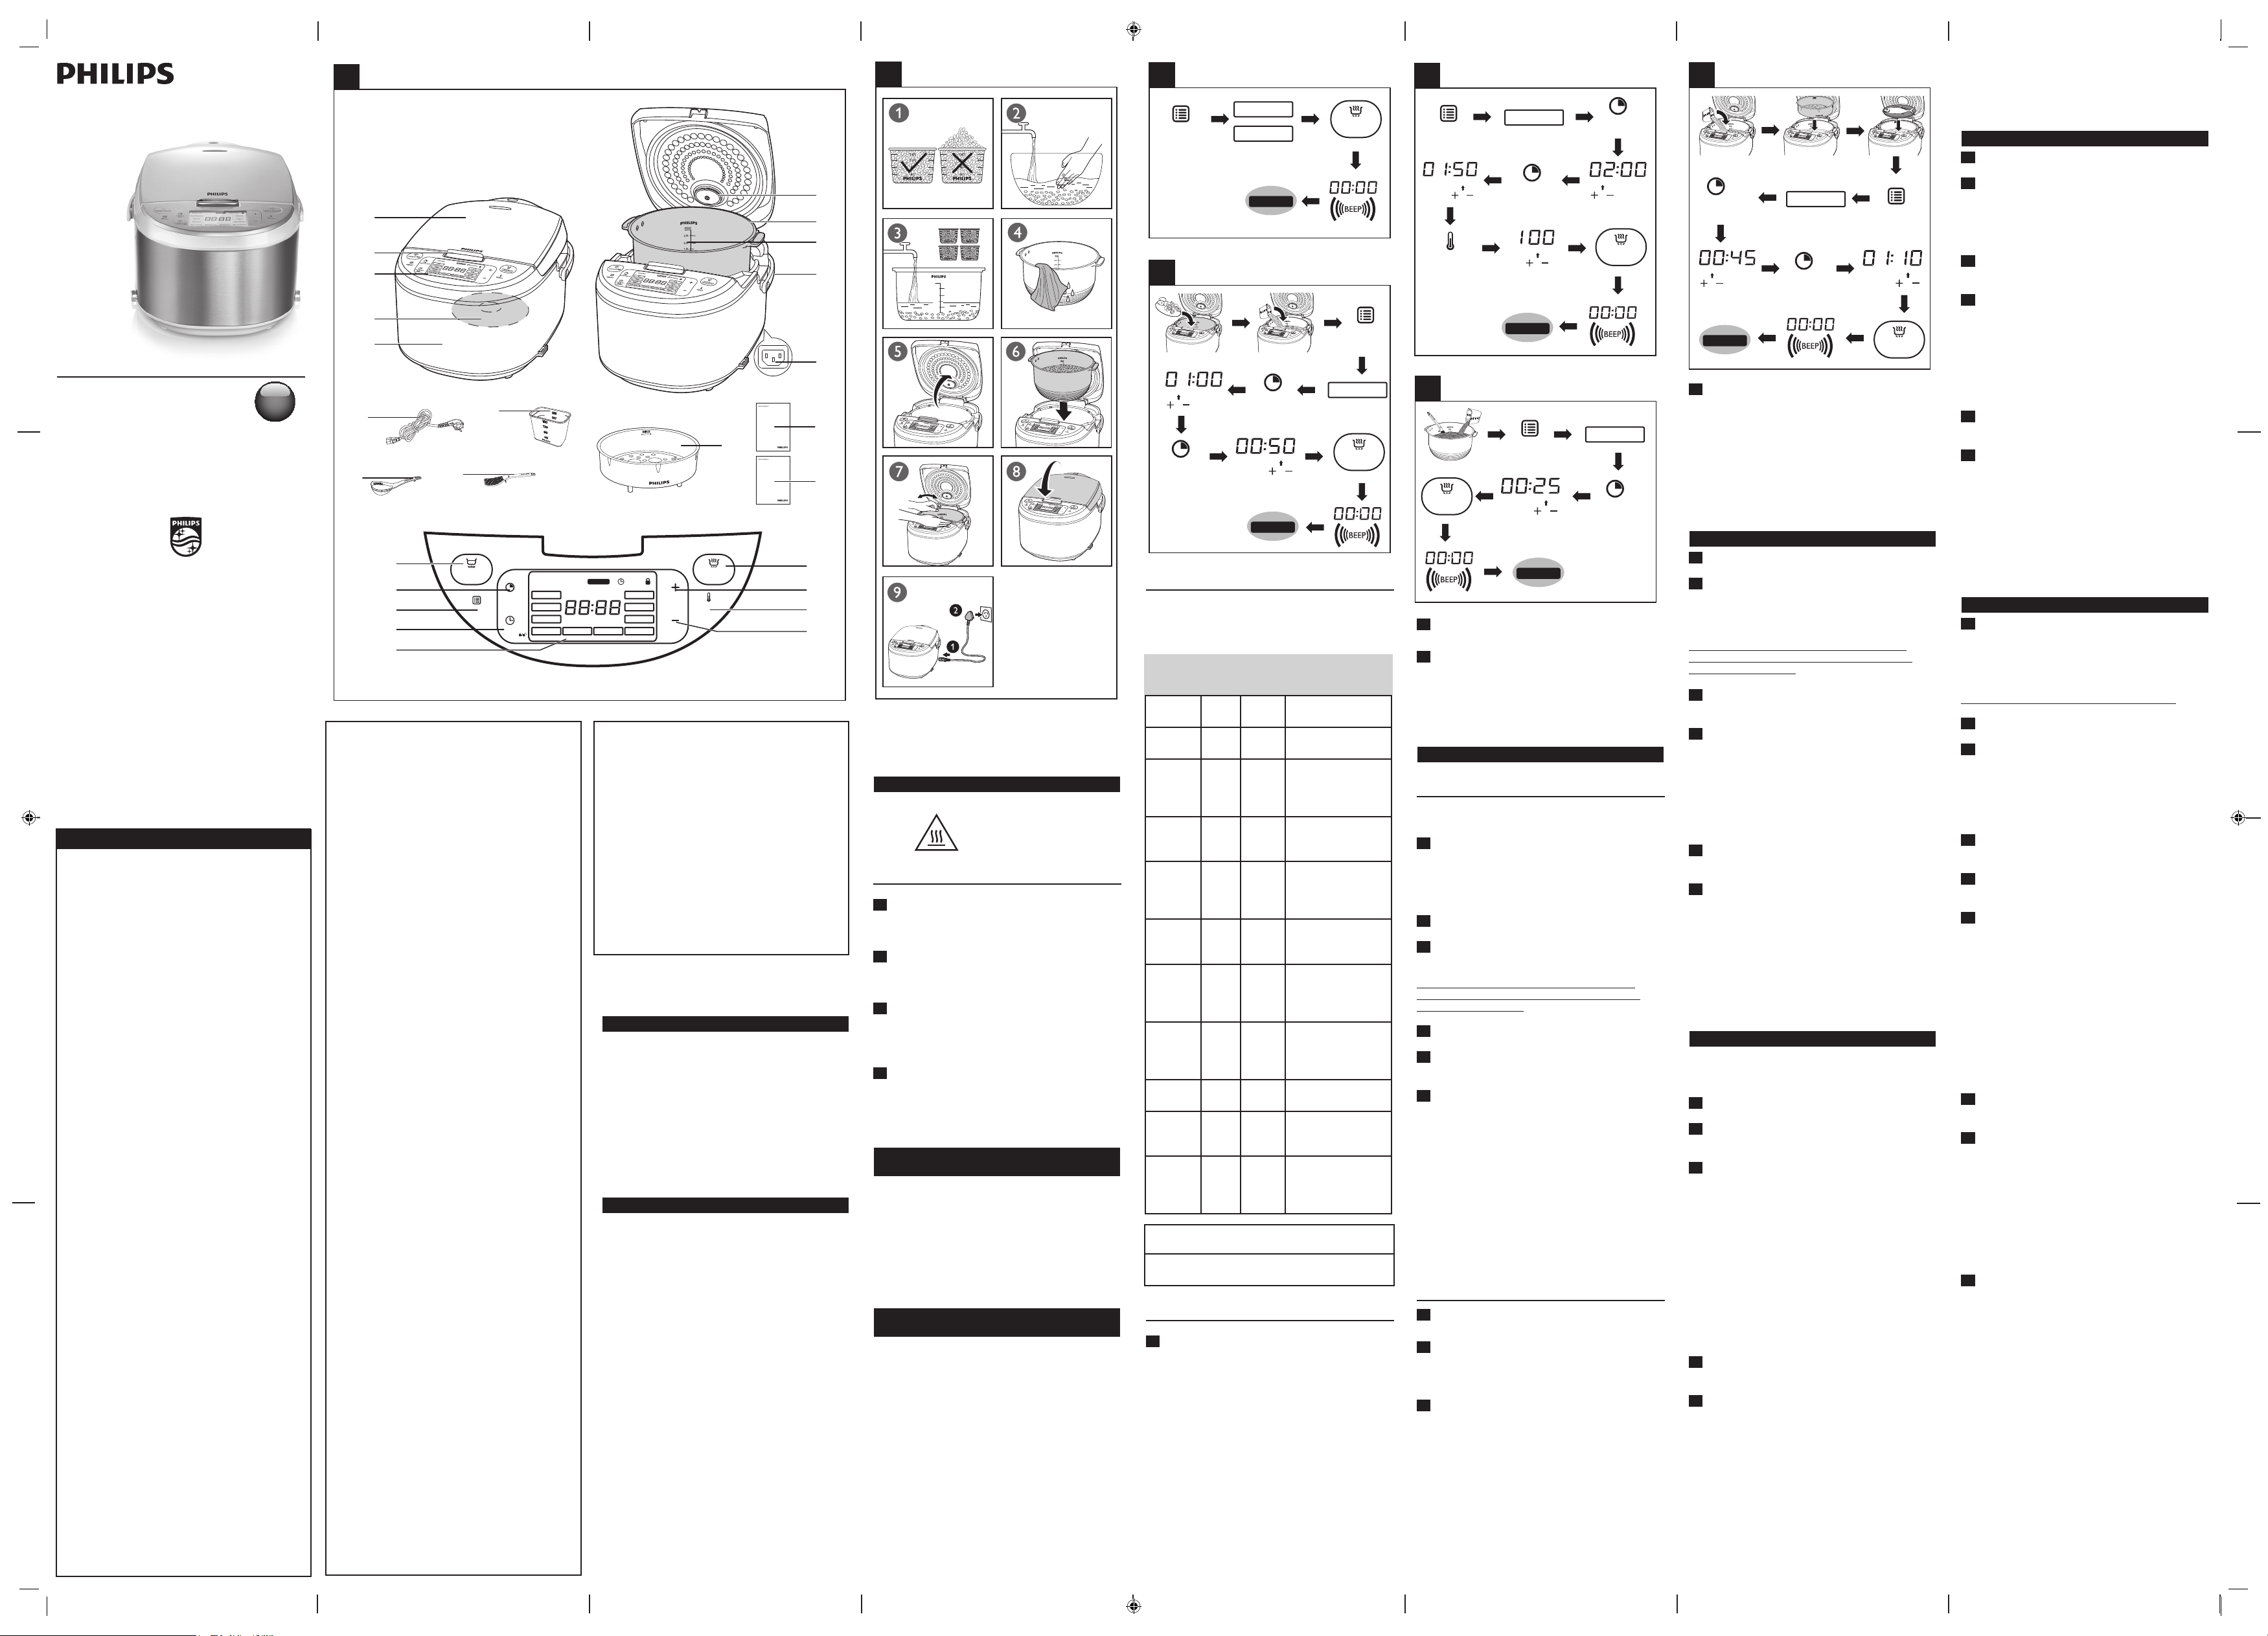
General product description (Fig. 1)
1 Detachable top lid
2 Lid release button
3 Control panel
A Keep Warm button
B Cooking time button
C Menu button
D Preset timer and child lock button
E Display screen
F Start/Cancel button
G Increase button
H Temperature button
I Decrease button
4 Heating element
5 Main unit
6 Detachable steam vent cap
7 Inner pot
8 Water level indications
9 Cooker handle
10 Power socket
11 Power cord
12 Measuring cup with 180mL (6 fl oz) capacity
13 Spoon
14 Rice scoop
15 Multi-use steam basket
16 User manual
17 Recipe Book
2 If food is dry, add some water or broth to
prevent it from becoming too dry or sticking.
The quantity of the water or broth depends
on the amount of food or your own preference.
3 Follow steps 6 and 7 in “Preparations before
cooking” section.
4 Press the “Menu” button until the desired
cooking function is displayed on the screen
along the default cooking time.
◗ To set a different cooking time, press the
“Cooking time” button and follow the direc-
10
6
Keep Warm
7
8
Temp.
9
MAX
2.5L
2.0L
1.5L
1.0L
0.5L
4
Menu
Cooking
time
Keep Warm
Start/Cancel
Touch for 3s
Cooking
time
Keep Warm
Boil/Steam
Cooking
time
Menu
Start/Cancel
Touch for 3s
tions in the “Set your own cooking time” sec-
16
17
Cooking
time
Cooking
time
Keep Warm
Stew/Soup
Start/Cancel
Touch for 3s
Programs with preset cooking times
6
Start/Cancel
Touch for 3s
Rice/Quinoa
Menu
Cooking
time
Keep Warm
Press the “Menu” button to choose a specific
program with a corresponding preset amount of
I
Note: The measuring cup included with the multicooker is not a standard U.S. 8 oz measuring cup
and should not be used as such.
Using the multicooker
This product is for household use only.
Do not touch hot surfaces.
Use handles or knobs.
cooking time.
Program Adjustable Cooking Preset
cooking time start time
time
Rice/
No 40 min 1 hour -24 hours
Quinoa
Risotto No 30-40
1 hour -24 hours
min
Brown/
Sauté
5 min
to
1 hr
15 min Open lid during
cooking. Preset
function cannot
be used
Oatmeal 5 min
10 min 1 hour -24 hours
to 2
hrs
Before first use
1 Take out all the accessories from the inner
pot. Remove all packaging materials from the
inner pot.
Stew/
Soup
Yogurt 6 hrs
20
min
to 10
hrs
1 hr 1 hour -24 hours
8 hrs 1 hour - 24 hours
to 12
2 Clean the parts of the multicooker thorough-
ly before using the multicooker for the first
time (see chapter ‘Cleaning’).
3 Add a half pot full of water to the inner pot,
close the lid and use the “Boil/Steam” function to keep water boiling for 5 minutes (see
chapter “Boiling”).
Manual 5
Boil/
steam5 mins
hrs
2 hrs 1 hour - 24 hours
mins
to 10
hrs
45 min 1 hour - 24 hours
to 2
4 Unplug the appliance, wait until the pot has
cooled down to pour out the water.
Note: Make sure all parts are completely dry before
you start using the multicooker.
Keep Warm Mode and Automatic
shut-off
When the selected or set cooking timing is finished,
you will hear 4 beeps. The multicooker will then
automatically switch to the “Keep Warm” mode
which lasts for 12 hours. In the “Keep Warm”
mode, the display will track the elapsed time for up
to 12 hours. Then the multicooker will automatically shut off. You may also switch the multicooker
off by unplugging from power outlet.
Keep
Warm
Slow
cook
Bake/
Roast
Fahrenheit 105-120-140-160-175-195-
(approx.) 210-230-250-270-285-300-320°F
Celsius 40-50-60-70-80-90-100-110-120-
130-140-150-160°C
hrs
No
1 hr
5 hrs 1 hour - 24 hours
to 15
hrs
20
45 min 1 hour - 24 hours
mins
to 2
hrs
Choosing a program or setting
Set your own cooking time
cooking times
Each program or function except "Brown/Saute"
has a preset default cooking time associated with
it. You may either choose a program with a preset
amount of time or set your own amount of cooking time.
1 To set a different cooking time, press the
“cooking time” button. The hour unit starts
flashing on the display.
◗ Press the increase (+) or decrease (-) button
to set the hour unit.
◗ After the hour unit is set, press the “Cooking
2 Press and hold the “Start/Cancel” button for
3 seconds to start the cooking process.
3 When the cooking is finished, you will hear
4 beeps and the multicooker will switch to
“Keep Warm” mode automatically and the
progression of minutes will show on the
display screen. To switch off, unplug the multicooker.
Cooking rice, quinoa or risotto
Preparations before cooking (Fig. 2)
Before using the multicooker, follow below
preparations:
1 Measure the rice, quinoa or risotto using the
measuring cup provided. The recommended
rice/water ratio is 1:2. The quantity of the
water depends on the amount of rice, quinoa
or risotto or your own preference.
2 Wash the rice thoroughly.
3 Put the pre-washed rice in the inner pot.
Smooth the surface.
Note: Do not exceed the maximum water level
indicated in the inner pot, as this may cause the
multicooker to overflow.
4 Press the lid release button to open the lid.
5 Wipe the outside of the inner pot dry, then
put it in the multicooker.
6 Close the lid of the multicooker, and put the
plug in the power outlet.
Important:
• Make sure the inner pot handle fits into the
recesses of the cooker body, and that the inner
pot is in proper contact with the heating element.
• Make sure the outside of the inner pot is dry
and clean, and there is no foreign residue on
the heating element or the magnetic switch.
• Make sure the steam valve is clean and not
blocked before each cooking process, and that
it is properly closed during cooking.
Begin Cooking (Fig. 3)
1 Follow the steps 1-7 in “Preparations before
cooking” section.
2 Press and hold the “Menu” button until the
“Rice/Quinoa” or “Risotto” function is displayed on the screen along with the default
cooking time.
3 Press and hold the “Start/Cancel” button for
3 seconds to start the cooking process.
time” button again, and the minute unit starts
flashing on the display.
◗ Press the increase (+) or decrease (-) button
to set the minute unit.
4 When the cooking is finished, you will hear
4 beeps and the multicooker will switch to
“Keep Warm” mode automatically and the
progression of minutes will show on the display screen.
◗ To cancel an ongoing cooking process, press
and hold the “Start/Cancel” button for 3 seconds. The multicooker will be in standby mode.
◗ To switch off, unplug the multicooker.
Cooking stew (Fig. 4)
1 Put ingredients for the stew in the inner pot.
2 Add water, broth or stock to the inner
pot. The quantity of liquid depends on the
amount of food in the inner pot and your
own preference or recipe.
Note: Do not exceed the maximum water level
indicated in the inner pot, as this may cause the
multicooker to overflow.
3 Follow steps 6 and 7 in “Preparations before
cooking” section.
4 Press the “Menu” button until the “Stew/
Soup” function is displayed on the screen
along with the default cooking time.
◗ To set a different cooking time, press the
“Cooking time” button and follow the directions in the “Set your own cooking time” section.
5 Press and hold the “Start/Cancel” button for
3 seconds to start the cooking process.
6 When the cooking is finished you will hear
4 beeps and the multicooker will switch to
“Keep Warm” mode automatically and the
progression of minutes will show on the display screen.
◗ To cancel an ongoing cooking process, press
and hold the “Start/Cancel” button for 3 seconds. The multicooker will be in standby mode.
◗ To switch off, unplug the multicooker.
Manual mode (Fig. 5)
You may use the manual mode to cook food
with more control over the cooking time and
temperature.
1 Put the ingredients in the inner pot.
2 Follow steps 6 and 7 in “Preparations before
cooking” section.
3 Press the “Menu” button until the desired
cooking function is displayed on the screen.
◗ To set a different cooking time, press the
“Cooking time” button and follow the directions in the “Set your own cooking time” section.
◗ To set a different cooking temperature, press
the “Temp” button, then press the increase (+)
or decrease (-) button to set the desired temperature.
◗ The default cooking temperature is 210°F /
100°C. You can select the temperature from
105°F/40°C to 320°F/160°C.
4 Press and hold the “Start/Cancel” button for
3 seconds to start the cooking process.
5 When the cooking is finished you will hear
4 beeps and the multicooker will switch to
“Keep Warm” mode automatically and the
progression of minutes will show on the display screen.
◗ To cancel an ongoing cooking process, press
and hold the “Start/Cancel” button for 3 seconds. The multicooker will be in standby mode.
◗ To switch off, unplug the multicooker.
tion.
5 Press and hold the “Start/Cancel” button for
3 seconds to start the cooking process.
6 When the cooking is finished you will hear 4
beeps and the multicooker switches to “Keep
Warm” mode automatically and the progression of minutes will show on the display
screen.
◗ To cancel an ongoing cooking process, press
and hold the “Start/Cancel” button for 3 seconds. The multicooker will be in standby mode.
◗ To switch off, unplug the multicooker.
Steaming (Fig. 7)
1 Measure a few cups of water using the sup-
plied multicooker measuring cup.
◗ The quantity of water depends on the amount
of food in the steam basket.
Do not immerse the steam basket in water.
2 Pour the water into the inner pot.
3 Put the steam basket into the inner pot.
◗ The steam basket has a removable bottom. You
may release the bottom from the steam basket and put it in the inner pot to steam food
directly. Do not immerse the bottom in water.
4 Put the food or plate of food on top of the
bottom of the steam basket.
5 Follow steps 6 and 7 in “Preparations before
cooking”.
6 Press the “Menu” button until the “Boil/
Steam” function is displayed on the screen
along with the default cooking time.
◗ To set a different cooking time, press the
“Cooking time” button and follow the directions in the “Set your own cooking time” section.
◗ The cooking time will not start tracking until
the water actually comes to a boil. Once the
water starts to boil, the multicooker will then
maintain the boiling temperature for 10 minutes or the selected cooking time.
7 Press and hold the “Start/Cancel” button for
3 seconds to start the cooking process.
8 When the cooking is finished you will hear 4
beeps and the multicooker switches to “Keep
Warm” mode automatically and the progression of minutes will show on the display
screen.
◗ To cancel an ongoing cooking process, press
and hold the “Start/Cancel” button for 3 seconds. The multicooker will be in standby mode.
◗ To switch off, unplug the multicooker.
9 Open the lid and carefully take out the food
from the plate or steam basket.
Important:
• Keep hands and face away from steam and air
outlet openings.
• Do not cook food in the inner pot and use the
steam basket at the same time, otherwise the
feet of the detachable bottom might be in contact with the food.
• During steaming, make sure that food in the
steam basket does not exceed the MAX indication on the inside of the steam basket, other-
wise the steam vent hole will be blocked, and
pressure will build up inside of the appliance,
causing the top lid to burst open.
• Do not put more than 2kg (4.5 lb) of food in
the steam basket, as the steam basket might slip
into the inner pot and the detachable bottom
might fall off.
14_HD3095_Multicooker_EN.indd 1 10/15/14 3:50 PM
Page 2
8
Boil/Steam
Menu
Cooking
time
Start/Cancel
Touch for 3s
Cooking
time
Keep Warm
9
Menu
Cooking
time
Start/Cancel
Touch for 3s
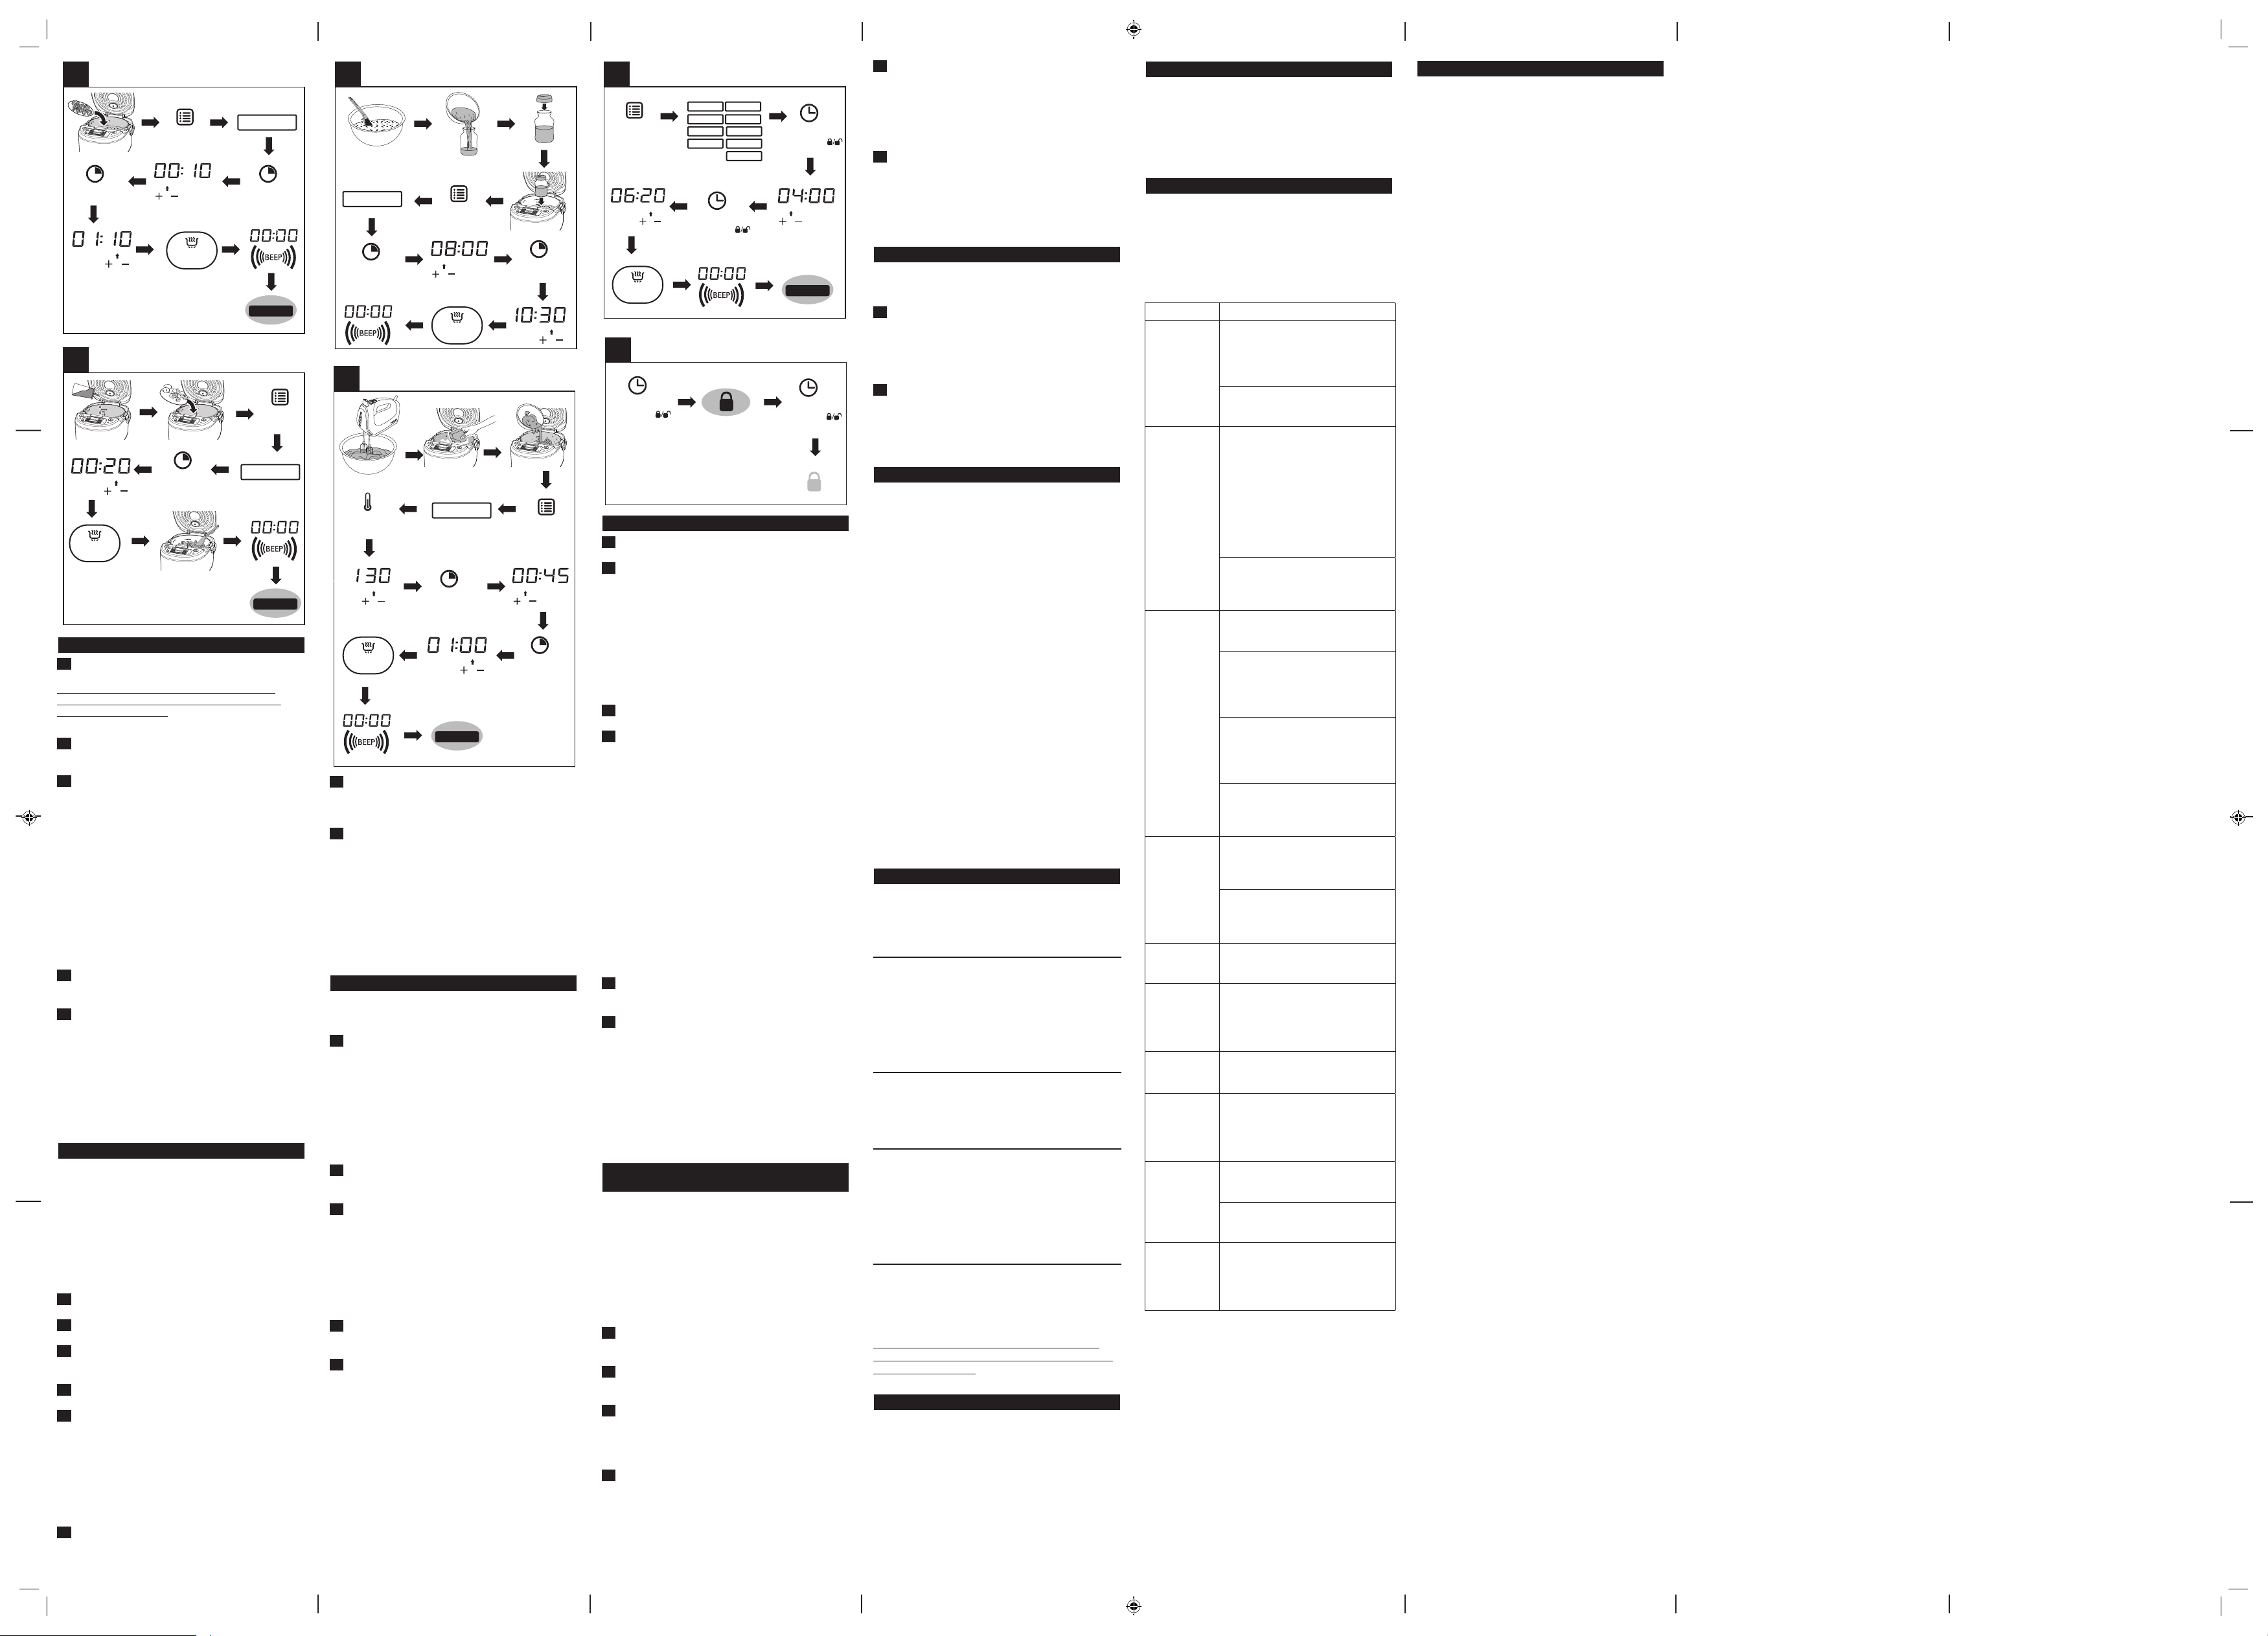
Boiling (Fig. 8)
1 Put ingredients and water into the inner pot.
Note: Do not exceed the maximum water level
indicated in the inner pot, as this may cause the
multicooker to overflow.
2 Follow steps 6 and 7 in “Preparations before
cooking”.
3 Press the “Menu” button until the “Boil/
Steam” function is displayed on the screen
along with the default cooking time.
◗ To set a different cooking time, press the
“Cooking time” button and follow the directions in the “Set your own cooking time” section.
◗ The cooking time will not start tracking until
the water actually comes to a boil. Once the
water starts to boil, the multicooker will then
maintain the boiling temperature for 10 minutes or the selected cooking time.
4 Press and hold the “Start/Cancel” button for
3 seconds to start the cooking process.
5 When the cooking is finished you will hear 4
beeps and the multicooker switches to “Keep
Warm” mode automatically and the progression of minutes show on the display screen.
◗ To cancel an ongoing cooking process, press
and hold the “Start/Cancel” button for 3 seconds. The multicooker will be in standby mode.
◗ To switch off, unplug the multicooker.
Brown/Sauté (Fig. 9)
The lid must be open when cooking food at a
temperature higher than 270°F/130°C or for
more than 50 minutes or when brown/sauteing at
a temperature higher than 210°F/100°C for more
than 1 hour.
This function may be not used for deep fry, and
the amount of oil may not exceed the water level
of 0.5L (2 c) as indicated in the inner pot.
1 Pour some cooking oil into the inner pot.
2 Put food and ingredients into the inner pot.
3 Follow step 6 in “Preparations before cook-
ing”.
4 Put the plug in the power outlet.
5 Press the “Menu” button until the “Brown/
Sauté” function is displayed on the screen
along with the default cooking time.
◗ To set a different cooking time, press the
“Cooking time” button and follow the directions in the “Set your own cooking time” section.
Brown/Sauté
Keep Warm
10
Yogurt
Menu
Cooking
time
Start/Cancel
Touch for 3s
Cooking
time
11
Temp.
Start/Cancel
Touch for 3s
7 During cooking, stir the food constantly with
a spatula (a wooden spatula is recommended).
8 When the cooking is finished you will hear 4
beeps and the multicooker switches to “Keep
Warm” mode automatically and the progression of minutes will show on the display
screen.
◗ To cancel an ongoing cooking process, press
and hold the “Start/Cancel” button for 3 seconds. The multicooker will be in standby mode.
◗ To switch off, unplug the multicooker.
Making yogurt (Fig. 10)
You can make yogurt directly in the inner pot or
using glass bottles or jars.
1 Whisk the ingredients for the yogurt well
and pour directly into the inner pot.
◗ If you prefer using a glass container, pour
mixture into a microwave safe glass container.
Cover the container. Place the container into
the inner pot. Pour enough water into the
inner pot to be sure half of the glass container
is immersed in water.
2 Follow steps 6 and 7 in “Preparations before
cooking”.
3 Press the “Menu” button until “Yogurt” func-
tion is displayed on the screen along with the
default cooking time.
◗ To set a different cooking time, press the
“Cooking time” button and follow the directions in the “Set your own cooking time” section.
4 Press and hold the “Start/Cancel” button for
3 seconds to start the cooking process.
5 When the cooking is finished you will hear 4
beeps and the multicooker will be in standby
mode automatically.
◗ To cancel an ongoing cooking process, press
and hold the “Start/Cancel” button for 3 seconds. The multicooker will be in standby mode.
◗ To switch off, unplug the multicooker.
Bake/Roast
Menu
Cooking
time
Cooking
time
Keep Warm
12
Menu
Start/Cancel
Touch for 3s
Rice/Quinoa
Risotto
Oatmeal
Slow Cook
Preset timer
Child lock/
Touch for 3s
Bake/Roast
Boil/Steam
Manual
Yogurt
Stew/Soup
Preset timer
Child lock/
Touch for 3s
Keep Warm
13
Preset timer
Child lock/
Touch for 3s
Bake/Roast (Fig. 11)
1 Put the ingredients to bake in the inner pot.
2 Follow step 6 in “Preparations before cook-
ing”.
Important:
• Keep the top lid closed when baking a cake.
• The lid must be open when baking food at a
temperature higher than 270°F/130°C or for
more than 50 minutes or when baking at a
temperature higher than 210°F/100°C for more
than 1 hour.
3 Put the plug in the power outlet.
4 Press the “Menu” button until “Bake/Roast”
function is displayed on the screen along with
the default cooking time.
◗ To set a different cooking time, press the
“Cooking time” button and follow the directions in the “Set your own cooking time” section.
◗ The default baking temperature is 270°F/130°C.
You can select the temperature from
105°F/40°C to 320°F/160°C.
◗ To set a different cooking temperature, press
the “Temp” button, then press the increase (+)
or decrease (-) button to set the desired temperature.
Tip: Baking a cake at 270°F/130°C for 45 minutes
usually delivers the best cooking result.
5 Press and hold the “Start/Cancel” button for
3 seconds to start the cooking process.
6 When the cooking is finished you will hear 4
beeps and the multicooker switches to “Keep
Warm” mode automatically and the progression of minutes will show on the display
screen.
◗ To cancel an ongoing cooking process, press
and hold the “Start/Cancel” button for 3 seconds. The multicooker will be in standby mode.
◗ To switch off, unplug the appliance.
Preset timer for delayed cooking
(Fig. 12)
You can preset the delayed cooking time in different cooking modes. The preset timer is available
from 10 minutes to 24 hours.
◗ The preset timer is not available in “Brown/
Sauté” mode.
◗ If the preset time is shorter than the cooking
time, the multicooker will start the cooking
process immediately.
1 Follow steps 6 and 7 in “Preparations before
cooking”.
2 Press the “Menu” button until the desired
cooking function is displayed on the screen.
3 Press the “Preset timer” button.
◗ The default preset time of the chosen function
is displayed on the screen.
4 Press the increase (+) or decrease (-) button
to set the preset time.
Preset timer
Child lock/
Touch for 3s
5 Press and hold the “Start/Cancel” button for
3 seconds to confirm the preset timer.
◗ After the preset time is set, you can press and
hold the “Start/Cancel” button for 3 seconds
to deactivate the preset function.
6 The cooking will be finished when the preset
time has elapsed. You will hear 4 beeps and
the multicooker switches to keep warm or
standby mode automatically.
◗ To switch off, unplug the multicooker.
Setting up child lock (Fig. 13)
To protect your child from using the multicooker,
you may set up the child lock function.
1 Press and hold the “Preset timer” button for
3 seconds to enter the child lock mode.
◗ The child lock icon appears on the display
screen.
2 To unlock, press and hold the “Preset timer”
button for 3 seconds again.
◗ The child lock icon disappears from the display
screen.
“Keep Warm” and “standby” mode
The multicooker provides you with easy control
over the “Keep Warm” function.
◗ After you have selected the cooking function, if
you press and hold the “Start/Cancel” button
for 3 seconds directly, the “Keep Warm” indicator will light up. After the cooking is finished
the multicooker will switch to keep warm
mode directly.
◗ After you have selected the cooking function,
if you press the “Keep Warm” button before
pressing the “Start/Cancel” button, the “keep
warm” indicator will be off. After the cooking
is finished the multicooker will be in “standby”
mode. If the display shows "ECO", it means the
appliance is in standby mode.
◗ To switch off, unplug the multicooker.
Note:
• Except for the yogurt-making function, all cooking functions will allow the product to go into
the “Keep Warm” mode.
• In “standby” mode, you can press the “Keep
Warm” button to enter the “Keep Warm”
mode.
• In “Keep Warm” mode, you can press the
“Keep Warm” button to enter the “standby”
mode.
Cleaning and Maintenance
Unplug the multicooker and wait until the multicooker has cooled down sufficiently before cleaning it.
Interior
To clean the inside of the outer lid and the main
body:
◗ Wipe with a damp cloth.
◗ Make sure to remove all the food residues
stuck to the multicooker.
Heating element:
◗ Wipe with a damp cloth.
◗ Remove food residues with a damp cloth or
toothpick.
Exterior of the main body:
◗ Wipe with a cloth dampened with warm, soapy
water.
◗ Only use a soft, dry cloth to wipe the control
panel.
◗ Make sure to remove all the food residues
around the control panel.
Accessories
◗ Soak the rice scoop, spoon, inner pot, steam
basket, and steam vent cap in hot soapy water
and clean with a soft cloth or sponge.
◗ All accessories are also dishwasher safe.
This appliance has no other user-serviceable
parts. For assistance in the U.S. or Canada only
call 1-866-309-8817.
Environment
Do not throw away the appliance with normal
household waste at the end of its life, but hand it
in at an official collection point for recycling. By
doing this, you can help to preserve the environment.
Specifications
Model Number: HD3095
Rated power output: 860W
Rated capacity: 4.0L / 4 qt
For rated voltage and frequency information, refer
to the typeplate on the product. Product information is subject to change without prior notice.
Troubleshooting
This chapter summarizes the most common
problems you might encounter with the
appliance. If you are unable to solve the
problem with the information below, visit
www.philips.com/support or in the U.S. or
Canada only, call 1-866-309-8817 for assistance.
Problem Solution
The light on
the button
does not go
on.
There is a connection problem.
Check if the power cord is connected to the cooker properly
and if the plug is inserted firmly
into the power outlet.
The light is defective. In the U.S.
or Canada only, call 1-866-3098817 for assistance.
The display
does not
function.
The multicooker is not connected to the power supply. If there
is no power supply, the power
failure backup function does not
work and the display does not
function. Check if the power cord
is connected to cooker properly,
if the plug is inserted firmly into
power outlet and outlet is
operational.
The display screen has a
malfunction. In the U.S. or Canada
only, call 1-866-309-8817 for
assistance.
The food is
not cooked.
You did not press and hold
the “Start/Cancel” button for
3 seconds before cooking.
Make sure there is no foreign
residue on the heating element
and the outside of the inner pot
before switching the multicooker
on.
The inner pot is not in proper
contact with the heating element.
Make sure that the inner pot
handle fits into the recesses of
the cooker body.
The heating element is damaged,
or the inner pot is deformed.
In the U.S. or Canada only, call
1-866-309-8817 for assistance.
The cooker
does not
switch to
“Keep
Warm”
mode automatically.
You have pressed the “Keep
Warm” button before pressing
the “Start/Cancel” button. See
chapter “Keep Warm” mode.
The temperature control is
defective. In the U.S. or Canada
only, call 1-866-309-8817 for
assistance.
The rice is
scorched.
You have not rinsed the rice
properly. Rinse the rice until the
water runs clear.
Water spills
out of the
multicooker
during
cooking.
The cake
result is too
hard.
I cannot
get to the
desired
cooking
Make sure the water does not
exceed the maximum water level
indicated in the inner pot, as this
may cause the appliance to overflow during cooking.
Whisk the cake mixture well and
follow the instructions in the
user manual.
Press the “Menu” button repeatedly to select the desired function as shown by the display
screen.
function.
Rice smells
bad after
cooking.
Clean the inner pot with some
dishwashing detergent and warm
water.
After cooking, make sure the
steam vent cap, top lid and inner
pot are cleaned thoroughly.
Error
message (E1,
E2, E3, or E4)
appears on
There is a malfunction in your
multicooker. In the U.S. or
Canada only, call 1-866-309-8817
for assistance.
the display.
Warranty and service
If you need information, support, or if
you have a problem, please visit
www.philips.com/support or in the U.S. or
Canada only, call 1-866-309-8817 for assistance.
One Year Limited Warranty
Philips warrants that this product shall be free
from defects in material, workmanship and
assembly, under normal use, in accordance with
the specifications and warnings, for a period of
one year from the date of purchase. This warranty extends only to the original purchaser of
the product, and is not transferable. To exercise
your rights under this warranty, you must provide proof of purchase in the form of an original
sales receipt that shows the product name and
the date of purchase. For customer support or
to obtain warranty service, please visit our website www.philips.com/support. THERE ARE NO
OTHER EXPRESS OR IMPLIED WARRANTIES.
Philips’ liability is limited to repair or, at its sole
option, replacement of the product. Incidental,
special and consequential damages are disclaimed
where permitted by law. This warranty gives
you specific legal rights. You may also have other
rights that vary from state to state, province to
province or country to country.
In U.S. only
Manufactured for:
Philips Consumer Lifestyle
A Division of Philips Electronics North America
Corporation
P.O. Box 10313, Stamford, CT 06904
In Canada only
Manufactured for:
Philips Electronics Ltd.
281 Hillmount Road
Markham, ON L6C 2S3
Manufactured for:
- Colombia: 01-800-700-7445
- Costa Rica: 0800-507-7445
- República Dominicana: 1-800-751-2673
- Ecuador: 1-800-10-1045
- El Salvador: 800-6024
- Guatemala: 1-800-299-0007
- Honduras: 8002-791-9273
- Mexico: 01800504 6200
- Nicaragua: 1-800-507-0018
- Panama: 800-8300
PHILIPS and Philips Shield are Registered
Trademarks of Koninklijke Philips N.V.
© 2014 Philips Electronics North America
Corporation. All Rights Reserved.
6 Press and hold the “Start/Cancel” button for
3 seconds to start the cooking process.
14_HD3095_Multicooker_EN.indd 2 10/15/14 3:50 PM
 Loading...