

Page 1

Register your product and get support at
www.philips.com/welcome
PET944
EN User manual 3
DA Brugervejledning 21
DE Benutzerhandbuch 39
ES Manual del usuario 57
FR Mode d’emploi 75
IT Manuale utente 93
NL Gebruiksaanwijzing 111
SV Användarhandbok 129
Page 2

Contents
1 Important 4
Important safety instructions 4
Notice 6
2 Your portable DVD player 7
Introduction 7
What’s in the box 8
Overview of the main unit 9
Overview of the remote control 11
3 Get started 13
Charge the battery 13
Install remote control battery 14
English
Connect additional equipment 14
4 Use your player 15
Turn on 15
Select OSD language 15
Play discs 16
Play options 16
Play from SD card 17
5 Adjust settings 18
6 Product information 19
7 Troubleshooting 20
EN
3
Page 3

1 Important
Important safety instructions
a Read these instructions.
b Keep these instructions.
c Heed all warnings.
d Follow all instructions.
e Do not use this apparatus near water.
f Clean only with dry cloth.
g Do not block any ventilation openings. Install in accordance with the
manufacturer’s instructions.
h Do not install near any heat sources such as radiators, heat registers,
stoves, or other apparatus (including amplifi ers) that produce heat.
i Protect the power cord from being walked on or pinched, particularly
at plugs, convenience receptacles, and the point where they exit from
the apparatus.
j Only use attachments/accessories specifi ed by the manufacturer.
k Use only with the cart, stand, tripod, bracket, or table
specifi ed by the manufacturer or sold with the apparatus.
When a cart is used, use caution when moving the cart/
apparatus combination to avoid injury from tip-over.
l Unplug this apparatus during lightning storms or when unused for long
periods of time.
m Refer all servicing to qualifi ed service personnel. Servicing is required
when the apparatus has been damaged in any way, such as power-supply
cord or plug is damaged, liquid has been spilled or objects have fallen
into the apparatus, the apparatus has been exposed to rain or moisture,
does not operate normally, or has been dropped.
n Apparatus shall not be exposed to dripping or splashing.
o Do not place any sources of danger on the apparatus (e.g. liquid fi lled
objects, lighted candles).
p This product may contain lead and mercury. Disposal of these materials
may be regulated due to environmental considerations. For disposal
or recycling information, please contact your local authorities or the
Electronic Industries Alliance: www.eiae.org.
4
EN
Page 4

Warning
Never remove the casing of this apparatus. •
Never lubricate any part of this apparatus.•
Never place this apparatus on other electrical equipment.•
Keep this apparatus away from direct sunlight, naked fl ames or heat. •
Never look into the laser beam inside this apparatus.•
Ensure that you always have easy access to the power cord, plug or adaptor to •
disconnect this apparatus from the power.
Hearing safety
Listen at a moderate volume.
Using headphones at a high volume can impair your hearing. This product •
can produce sounds in decibel ranges that may cause hearing loss for a
normal person, even for exposure less than a minute. The higher decibel
ranges are offered for those that may have already experienced some
hearing loss.
Sound can be deceiving. Over time your hearing ‘comfort level’ adapts •
to higher volumes of sound. So after prolonged listening, what sounds
‘normal’ can actually be loud and harmful to your hearing. To guard
against this, set your volume to a safe level before your hearing adapts
and leave it there.
English
To establish a safe volume level:
Set your volume control at a low setting. •
Slowly increase the sound until you can hear it comfortably and clearly, •
without distortion.
Listen for reasonable periods of time:
Prolonged exposure to sound, even at normally ‘safe’ levels, can also •
cause hearing loss.
Be sure to use your equipment reasonably and take appropriate breaks.•
Be sure to observe the following guidelines when using your headphones.
Listen at reasonable volumes for reasonable periods of time.•
Be careful not to adjust the volume as your hearing adapts.•
Do not turn up the volume so high that you can’t hear what’s around you.•
You should use caution or temporarily discontinue use in potentially •
hazardous situations. Do not use headphones while operating a
motorized vehicle, cycling, skateboarding, etc.; it may create a traffi c
hazard and is illegal in many areas.
EN
5
Page 5
Caution
Use of controls or adjustments or performance of procedures other than herein •
may result in hazardous radiation exposure or other unsafe operation.
Notice
Any changes or modifi cations made to this device that are not expressly
approved by Philips Consumer Lifestyle may void the user’s authority to
operate the equipment.
This product complies with the radio interference requirements of
the European Community.
This product complies with the requirements of the following directives and
guidelines: 2004/108/EC + 2006/95/EC
Environmental information
All unnecessary packaging has been omitted. We have tried to make the
packaging easy to separate into three materials: cardboard (box), polystyrene
foam (buffer) and polyethylene (bags, protective foam sheet.)
Your system consists of materials which can be recycled and reused if
disassembled by a specialized company. Please observe the local regulations
regarding the disposal of packaging materials, exhausted batteries and old
equipment.
Recycling
Your product is designed and manufactured with high quality
materials and components, which can be recycled and reused.
When you see the crossed-out wheel bin symbol attached to a
product, it means the product is covered by the European Directive
2002/96/EC:
Never dispose of your product with other household waste. Please
inform yourself about the local rules on the separate collection of
electrical and electronic products. The correct disposal of your old product
helps prevent potentially negative consequences on the environment and
human health.
Your product contains batteries covered by the European Directive 2006/66/
EC, which cannot be disposed of with normal household waste.
When you see the crossed-out wheel bin symbol with the chemical
symbol ‘Pb’, it means that the batteries comply with the requirement
set by the directive for lead:
Pb
6
EN
Page 6
Please inform yourself about the local rules on separate collection of
batteries. The correct disposal of batteries helps prevent potentially negative
consequences on the environment and human health.
Always bring your product to a professional to remove the built-in battery.
The making of unauthorized copies of copy-
protected material, including computer programs,
fi les, broadcasts and sound recordings, may be an
infringement of copyrights and constitute a criminal offence. This equipment
should not be used for such purposes.
Recording and playback of material might require consent. See Copyright Act
1956 and The Performer’s Protection Acts 1958 to 1972.
“DivX, DivX” Certifi ed, and associated logos are trademarks of
DivX, Inc. and are used under license.
This apparatus includes this label:
English
Norge
Typeskilt fi nnes på apparatens underside.
Observer: Nettbryteren er sekundert innkoplet. Den innebygde netdelen er
derfor ikke frakoplet nettet så lenge apparatet er tilsluttet nettkontakten.
For å redusere faren for brann eller elektrisk støt, skal apparatet ikke utsettes
for regn eller fuktighet.
2 Your portable DVD player
Congratulations on your purchase, and welcome to Philips! To fully benefi t from
the support that Philips offers, register your product at www.philips.com/welcome.
Introduction
Your portable DVD player plays digital video discs that conform to the universal
DVD Video standard. With it, you can play movies with true cinema picture quality
and stereo or multi-channel sound (depending on disc and playback set-up).
EN
7
Page 7
You can also select sound track, subtitle languages, and different angle of view
(again depending on DVD disc). Besides, you can restrict the play of discs that are
not suitable for children.
You can play the following discs on the DVD player (including CD-R, CD-RW,
DVD±R and DVD±RW):
DVD-Video
Video CD
Audio CD
MP3 CD
DivX
Discs with JPEG fi les
What’s in the box
Check and identify the contents of your package:
Portable DVD player•
Remote control•
AC power adaptor, DSA-15P-12 EU 090135 (DVE) •
Car adaptor•
AV cable •
Stand•
User Manual•
Quick Start Guide•
8
EN
Page 8
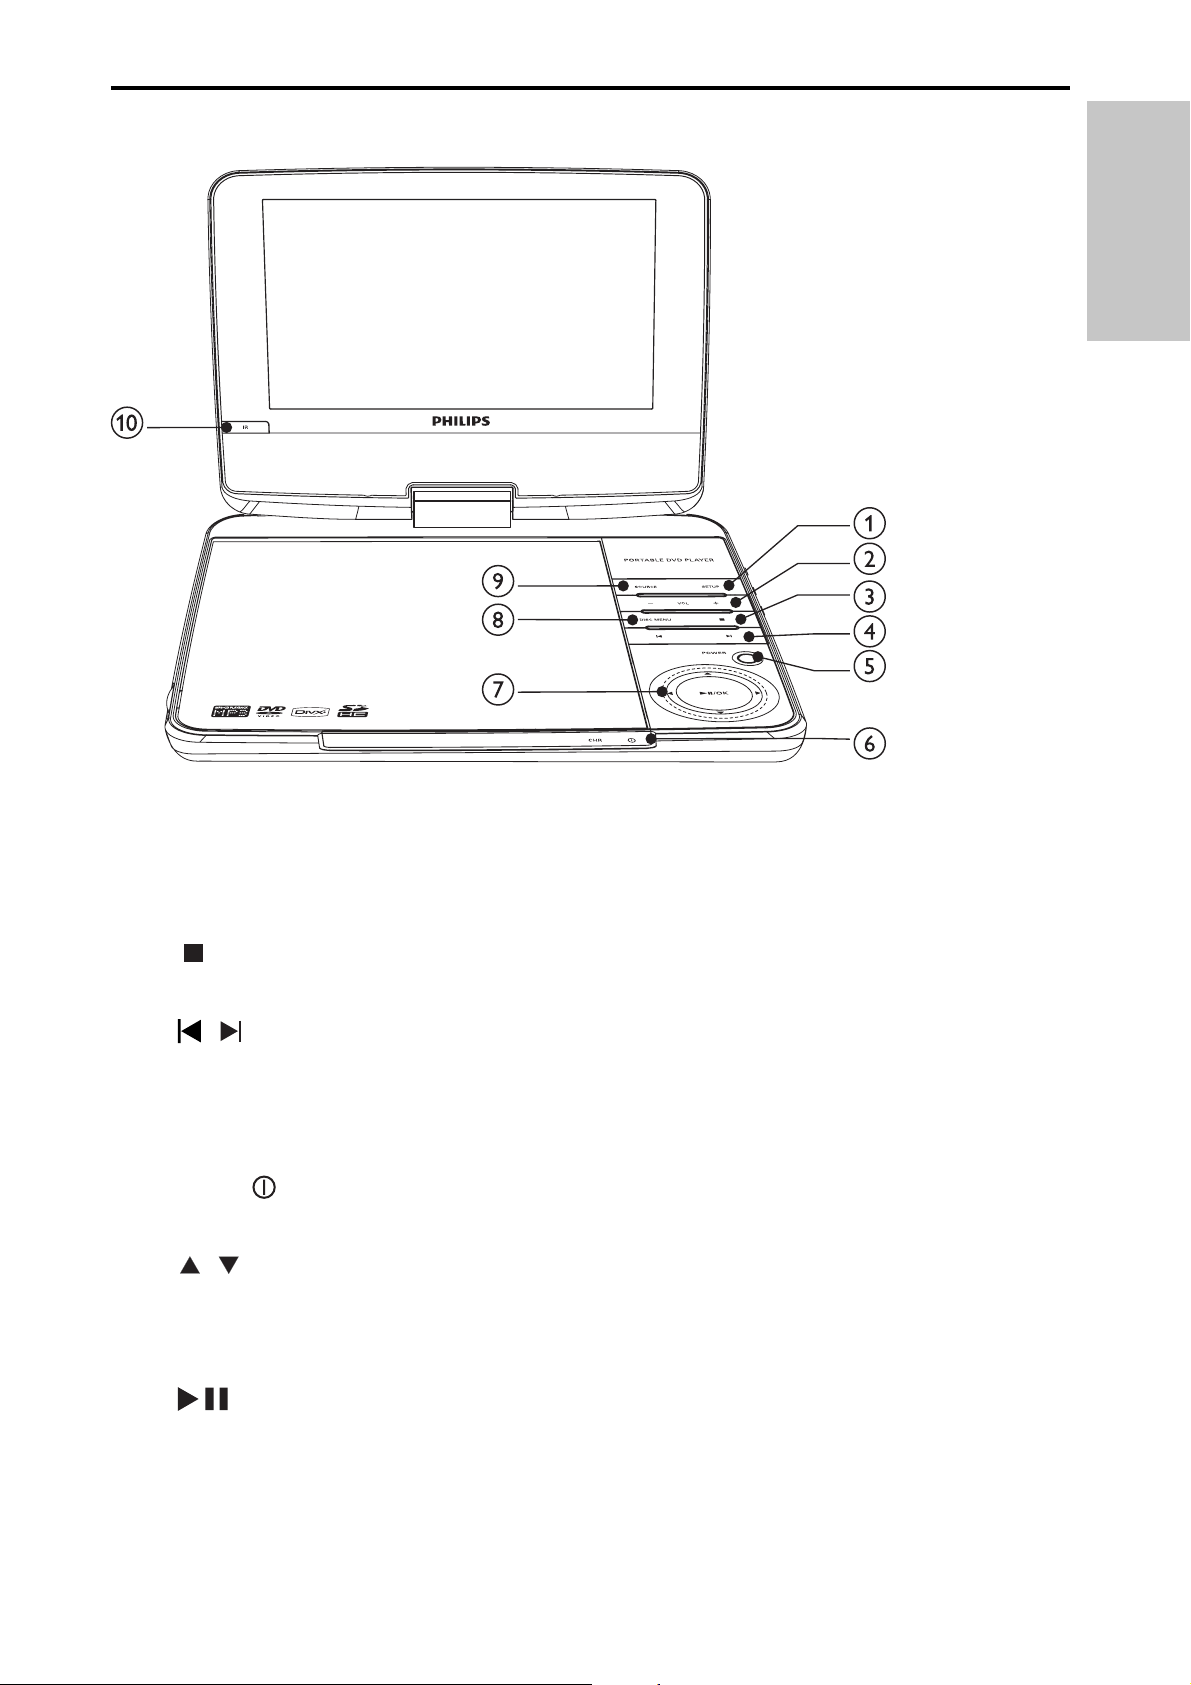
Overview of the main unit
English
a SETUP
Accesses or exits the setup menu.•
b - VOL +
Increases or decreases volume.•
c
Stops disc play.•
d
e POWER
f CHR /
g
,
Skips to the previous or next title, chapter, or track.•
Turns on/off DVD player.•
Charging indicator/Power indicator•
, , 1, 2
Navigates through the menus.•
1, 2
Searches backward/forward at different speeds. •
/OK
Confi rms an entry or selection.•
Starts, pauses or resumes disc play.•
EN
9
Page 9
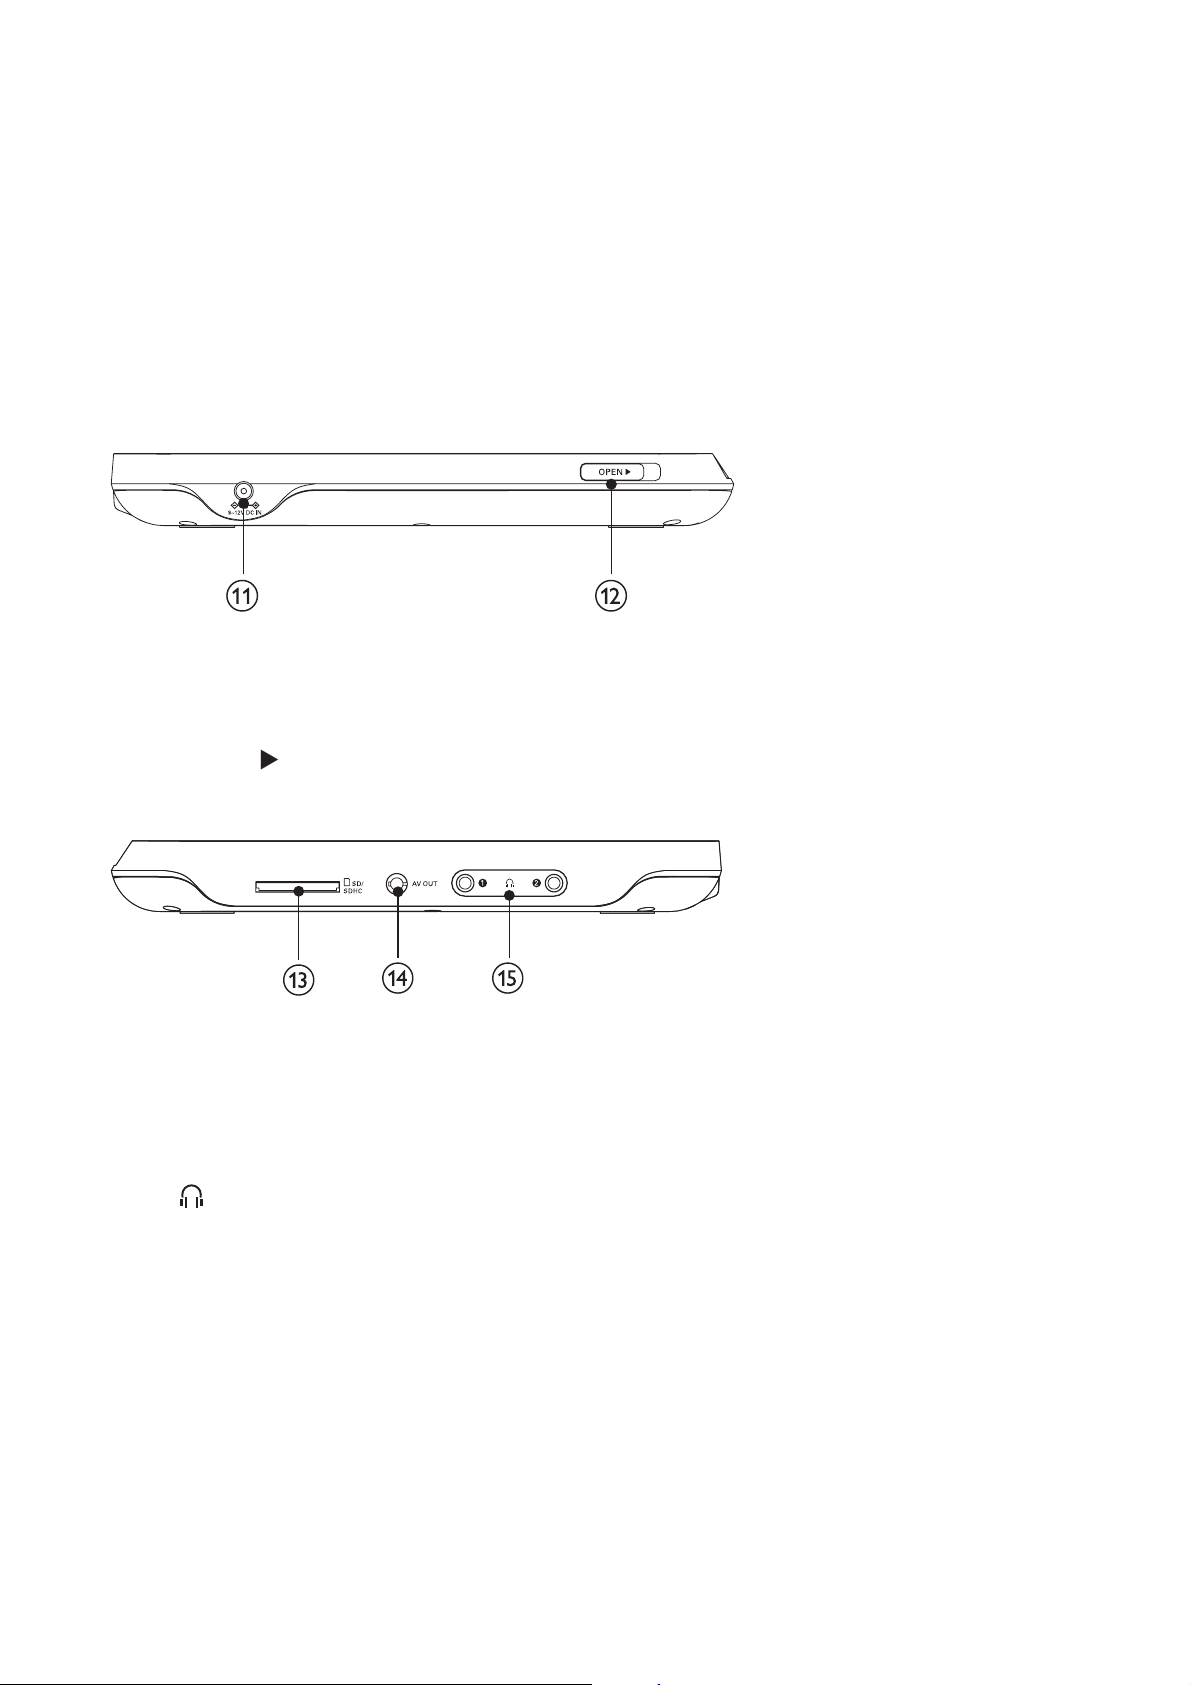
h DISC MENU
For DVD, accesses or exits disc menu.•
For VCD, turns on or off PBC (Playback Control) mode.•
For VCD version 2.0 or SVCD with PBC turned on, returns to the •
menu.
i SOURCE
Switches between DVD and SD.•
j IR
Remote control sensor•
k DC IN
Power supply socket•
l OPEN
Opens the disc compartment.•
m SD/SDHC
SD card slot•
n AV OUT
Selects video output format to TV system.•
o
Headphone jack•
10
EN
Page 10
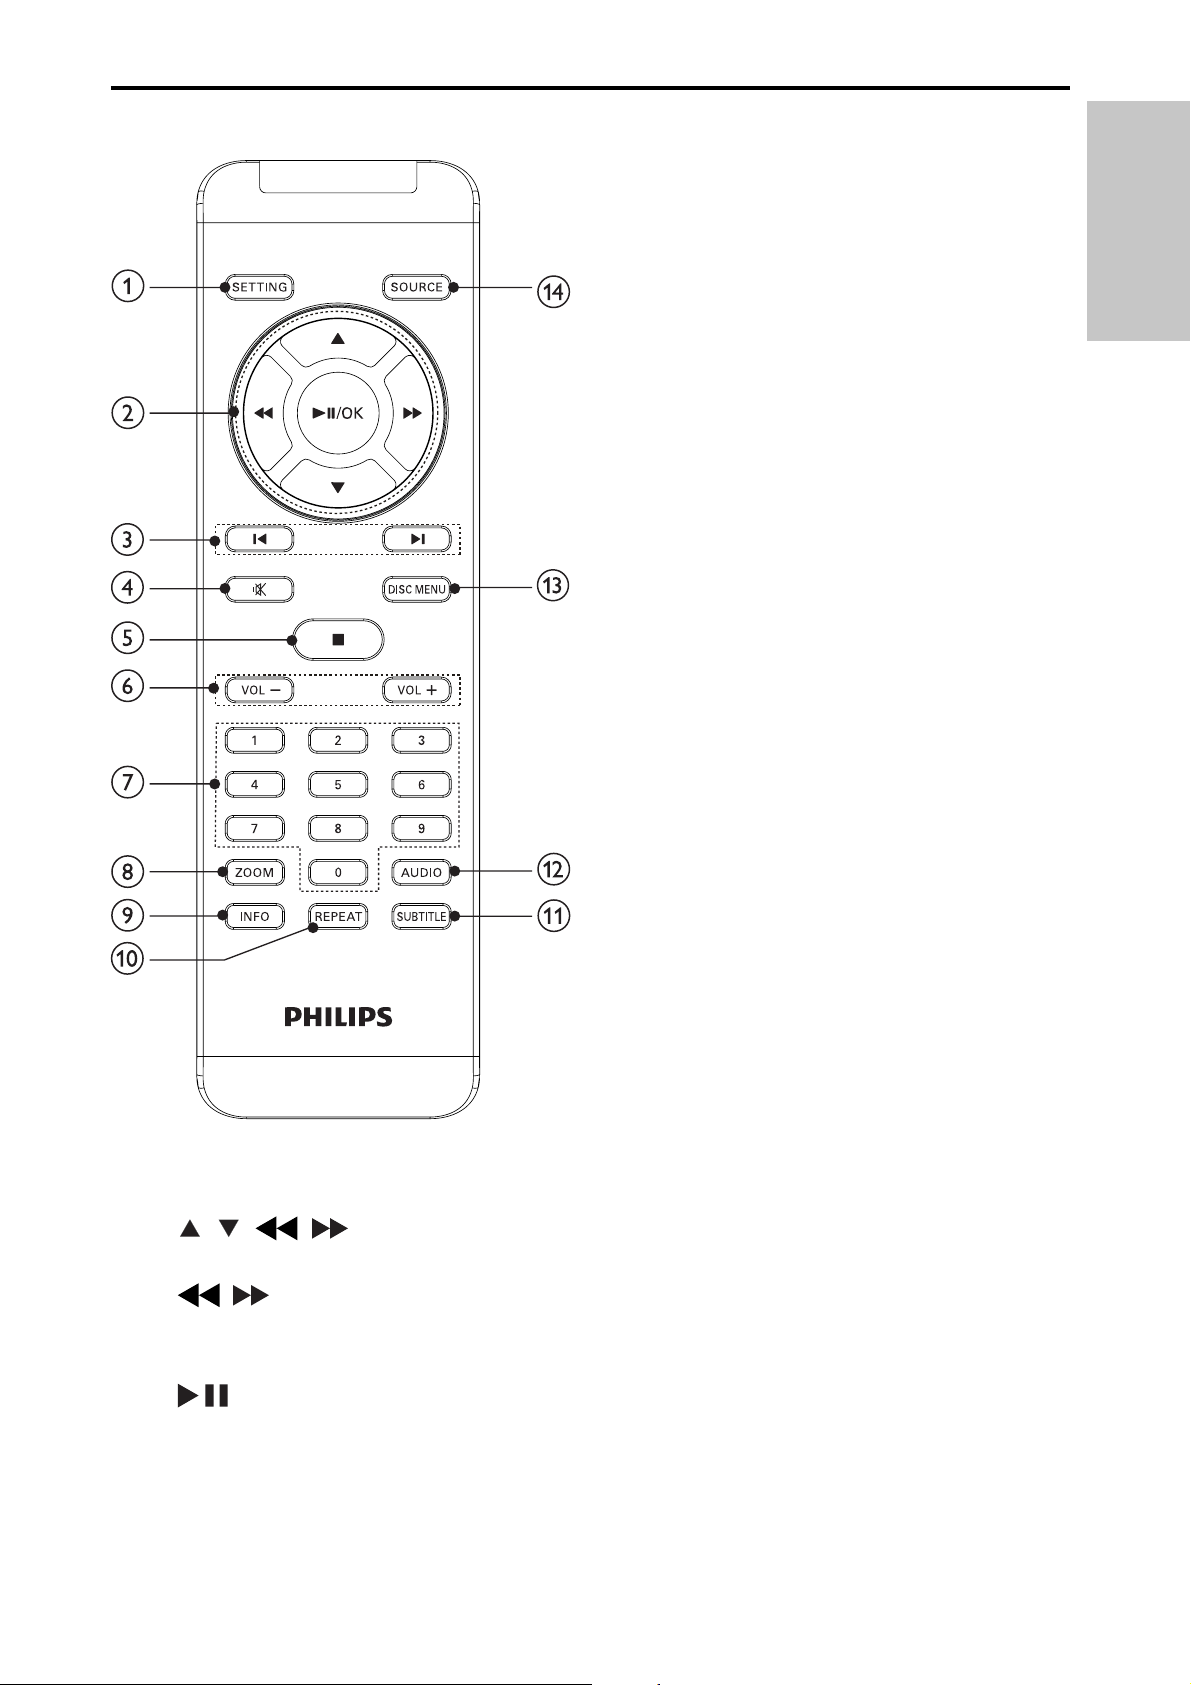
Overview of the remote control
English
a SETTING
Accesses or exits the setup menu.•
b
, , ,
Navigates through the menus.•
,
Searches backward/forward at different speeds. •
Rotates pictures anti-clockwise/clockwise. •
/OK
Confi rms an entry or selection.•
Starts, pauses or resumes disc play.•
EN
11
Page 11

c ,
Skips to the previous or next title, chapter, or track.•
d
Mutes or restores audio output.•
e
Stops disc play.•
f - VOL +
Increases or decreases volume.•
g 0-9
Numeric keypad•
h ZOOM
Zooms in or out.•
i INFO
Displays play information.•
j REPEAT
Repeats a chapter/track/title.•
k SUBTITLE
Selects DVD subtitle language.•
l AUDIO
For DVD, selects an audio language.•
For VCD, selects an audio mode.•
m DISC MENU
For DVD, accesses or exits disc menu.•
For VCD, turns on or off PBC (Playback Control) mode.•
For VCD version 2.0 or SVCD with PBC turned on, returns to the •
menu.
n SOURCE
Switches between DVD and SD.•
12
EN
Page 12
3 Get started
Caution
Use the controls only as stated in this user manual.•
Always follow the instructions in this chapter in sequence.
If you contact Philips, you will be asked for the model and serial number of your
player. The model number and serial number are on the bottom of your player.
Write the numbers here:
Model No. __________________________
Serial No. ___________________________
Charge the battery
Caution
English
Risk of product damage! Ensure that the power supply voltage corresponds to the •
voltage printed on the bottom of the player.
Use only the supplied AC adaptor to charge the battery.
•
Note
The type plate is located on the bottom of the player.•
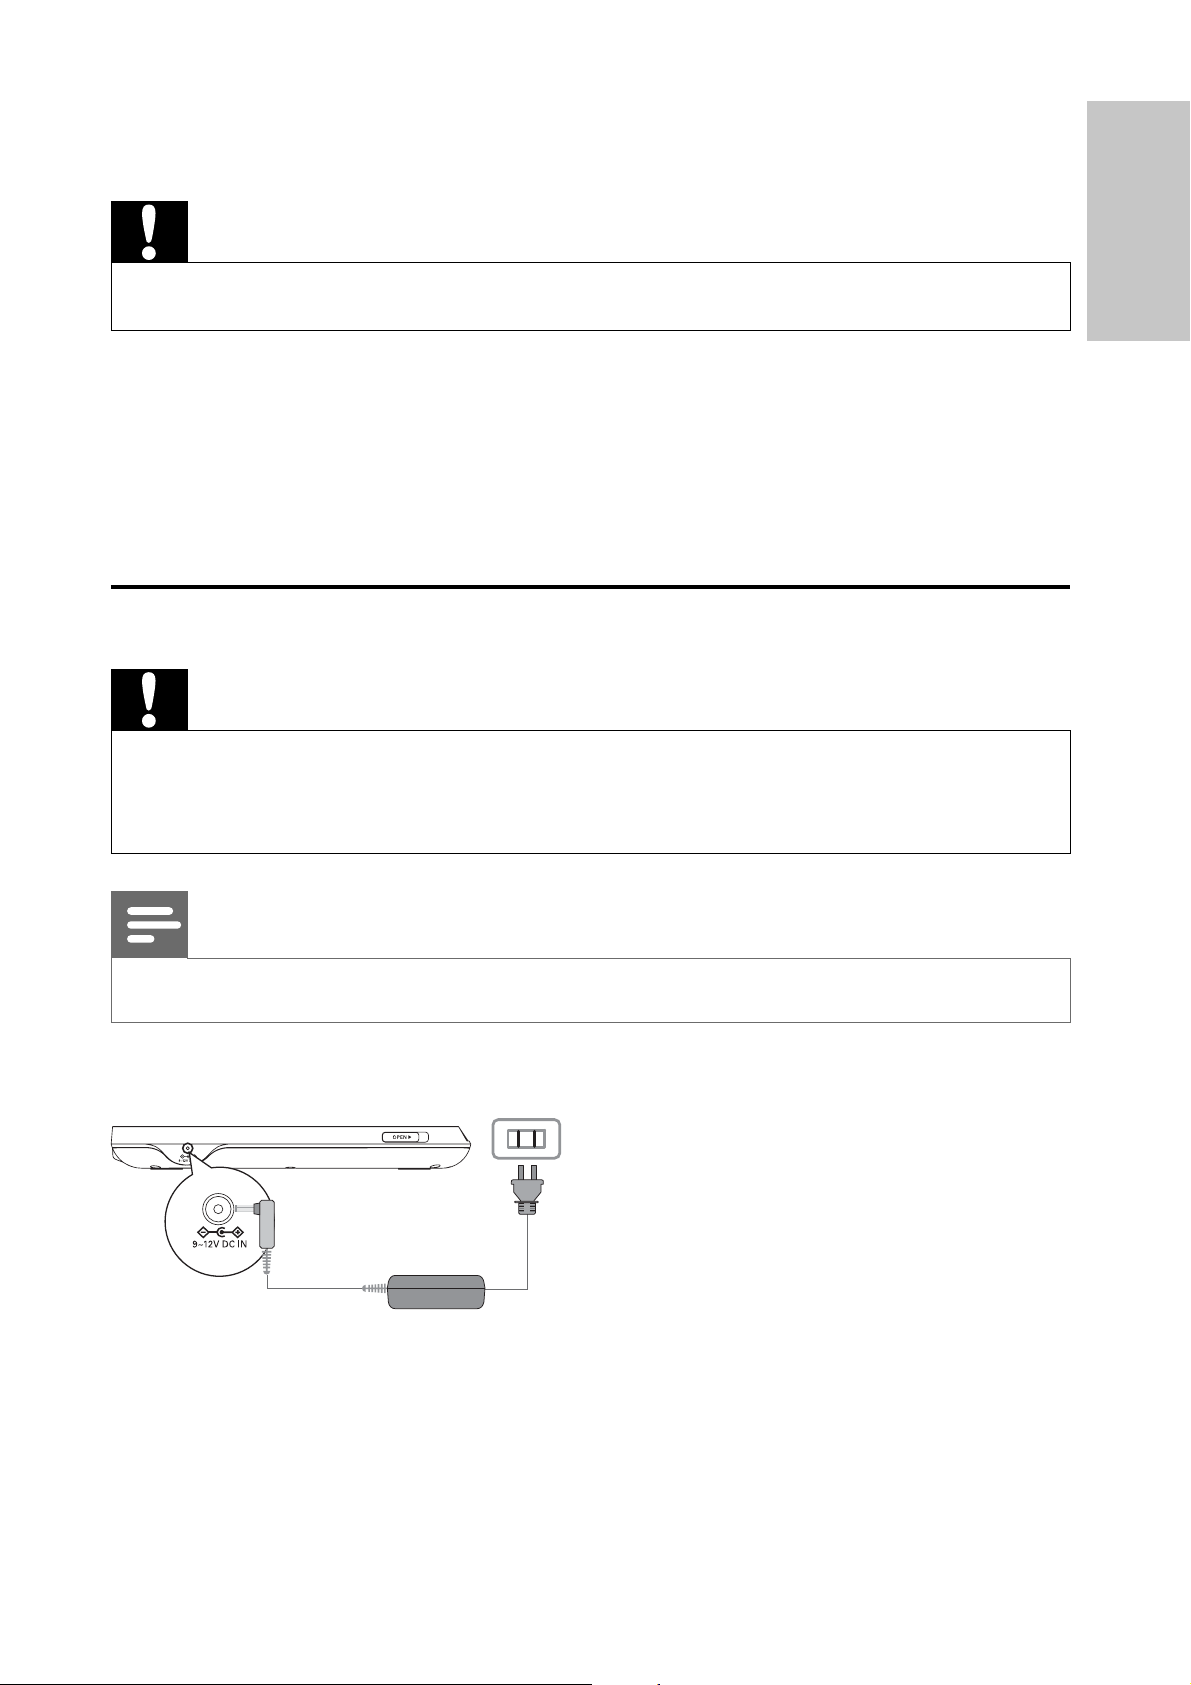
1 Connect the supplied AC adaptor to the player and to the AC outlet.
The charge indicator turns on. When the player is not in use, it will take »
about 8 hours to fully charge it. However, when in use, it will take more
than 16 hours to fully charge it.
When the battery is fully charged, the charge indicator turns off.»
EN
13
Page 13
Install remote control battery
Caution
Risk of explosion! Keep batteries away from heat, sunshine or fi re. Never discard •
batteries in fi re.
Risk of decreased battery life! Never mix different brands or types of batteries.
•
Risk of product damage! When the remote control is not used for long periods, •
remove the batteries.
•
Perchlorate Material - special handling may apply. See www.dtsc.ca.gov/
hazardouswaste/perchlorate.
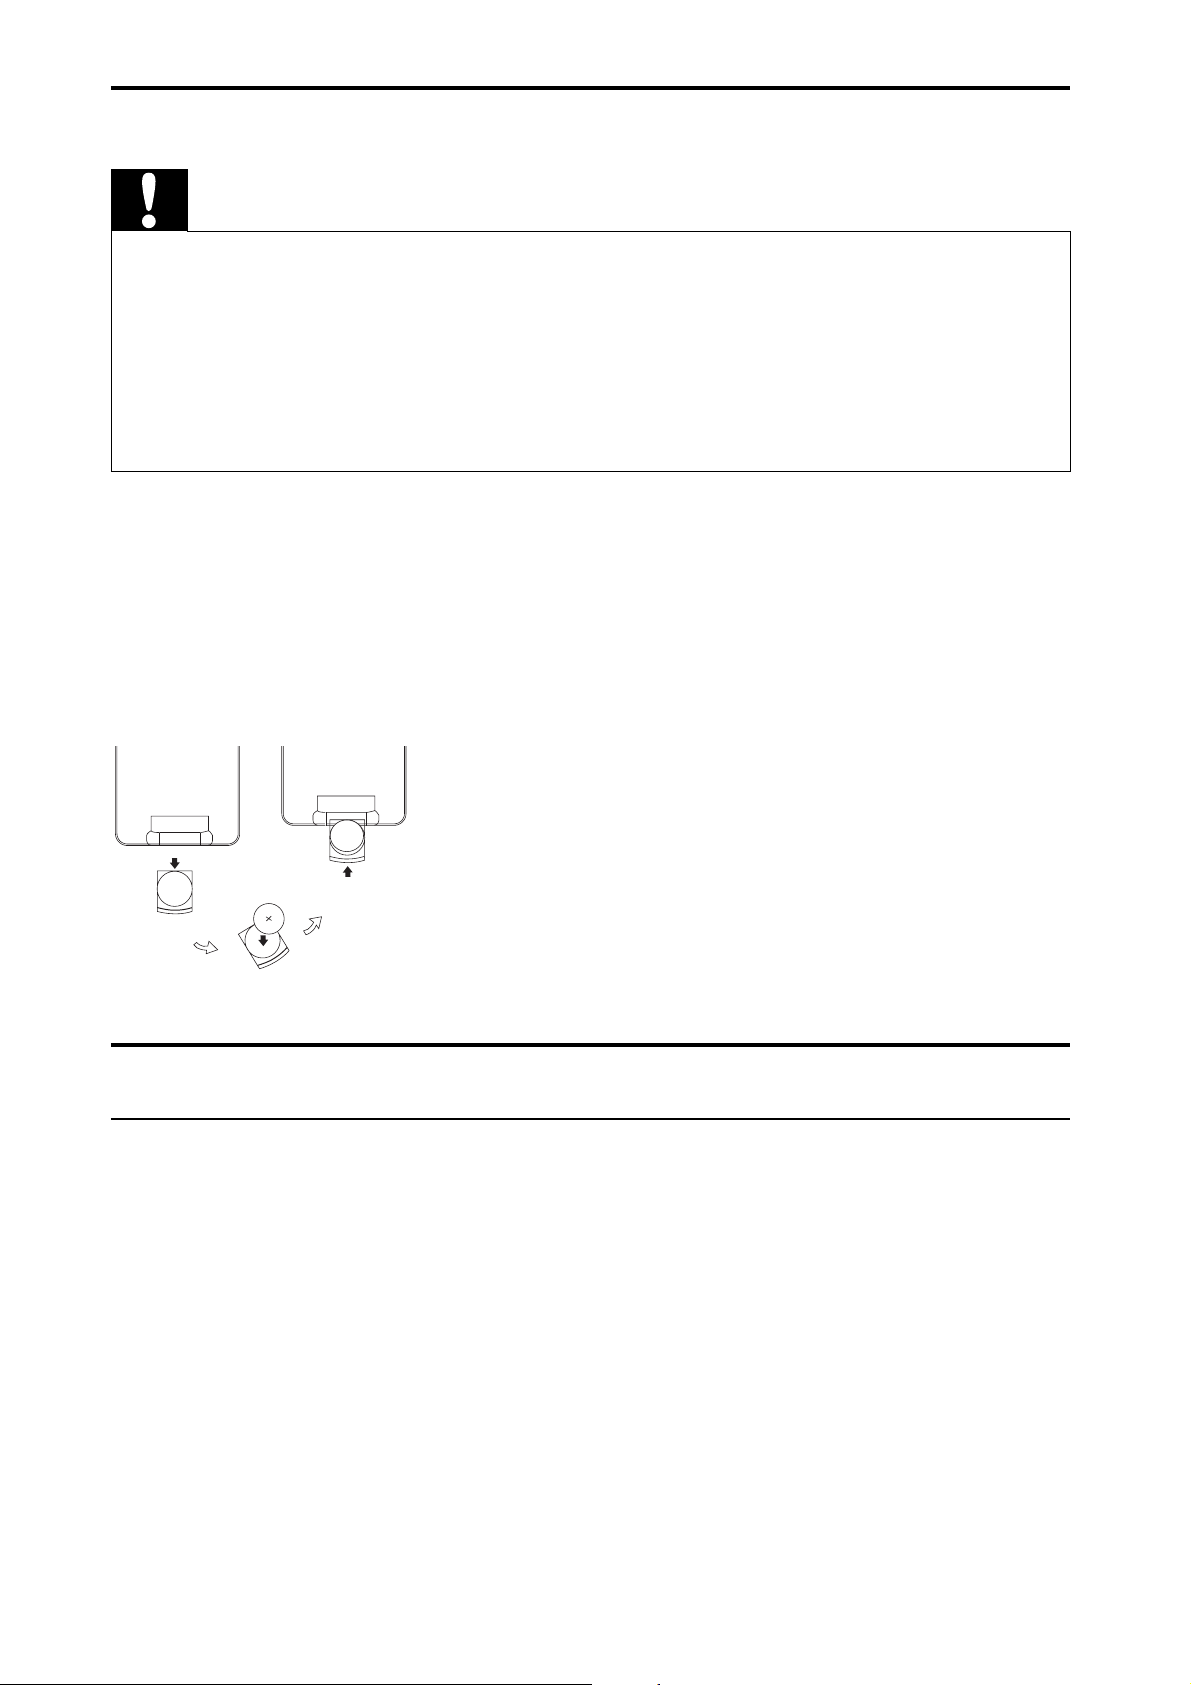
For fi rst-time use:
1 Remove the protective tab to activate the remote control battery.
To replace the remote control battery:
1 Open the battery compartment.
2 Insert 1 CR2025 battery with correct polarity (+/-) as indicated.
3 Close the battery compartment.
Connect additional equipment
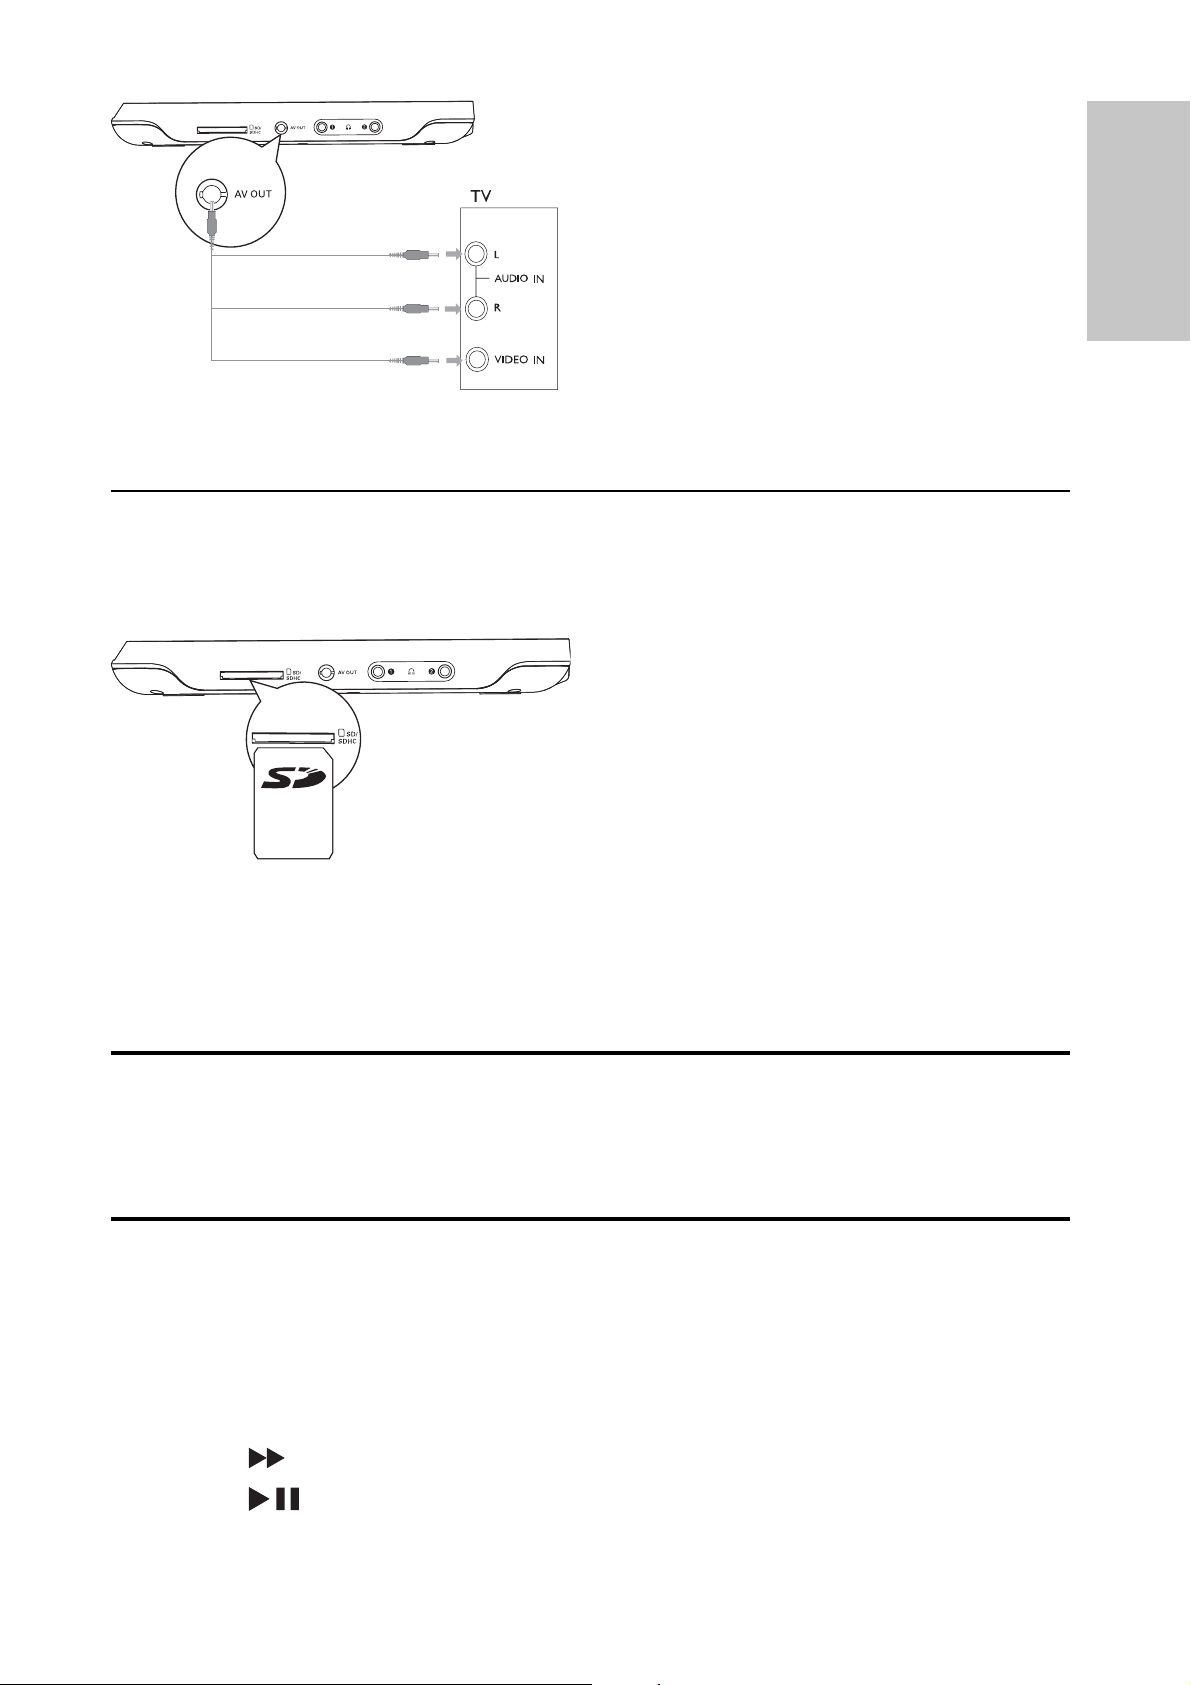
Connect a TV
You can connect the player to a TV to enjoy DVD.
Match the color of the AV cables (not supplied) with the jacks: the yellow •
cable is for the yellow video jack, the red/white cable is for the red/white
audio jacks.
14
EN
Page 14
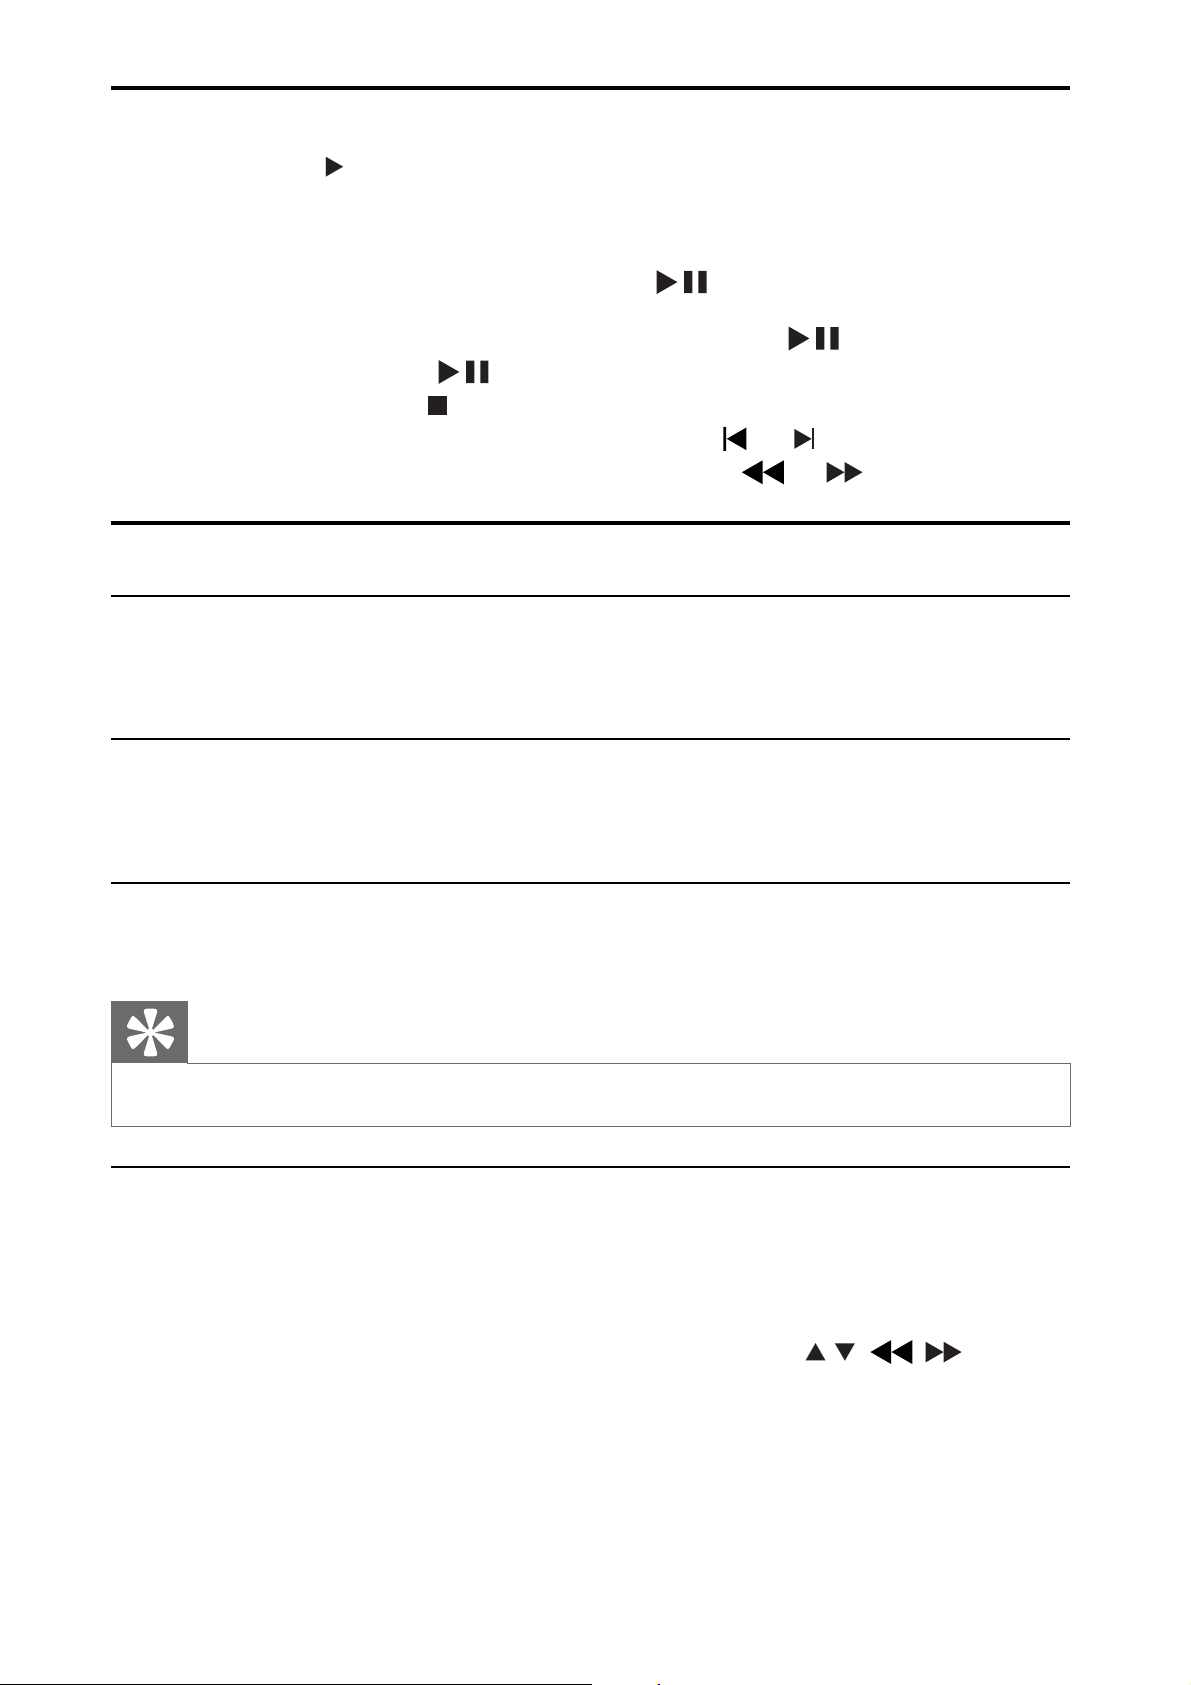
Connect an SD card
Connect the SD card to the SD CARD jack.
English
4 Use your player
Turn on
Press POWER.
The» POWER indicator turns on.
Select OSD language
You can choose a different language for the on-screen display text.
1 Press SETTING.
The setup menu appears.»
2 Select [Language] > [On Screen Display].
3 Press to select an option.
4 Press /OK to confi rm.
5 Press SETTING to exit.
EN
15
Page 15
Play discs
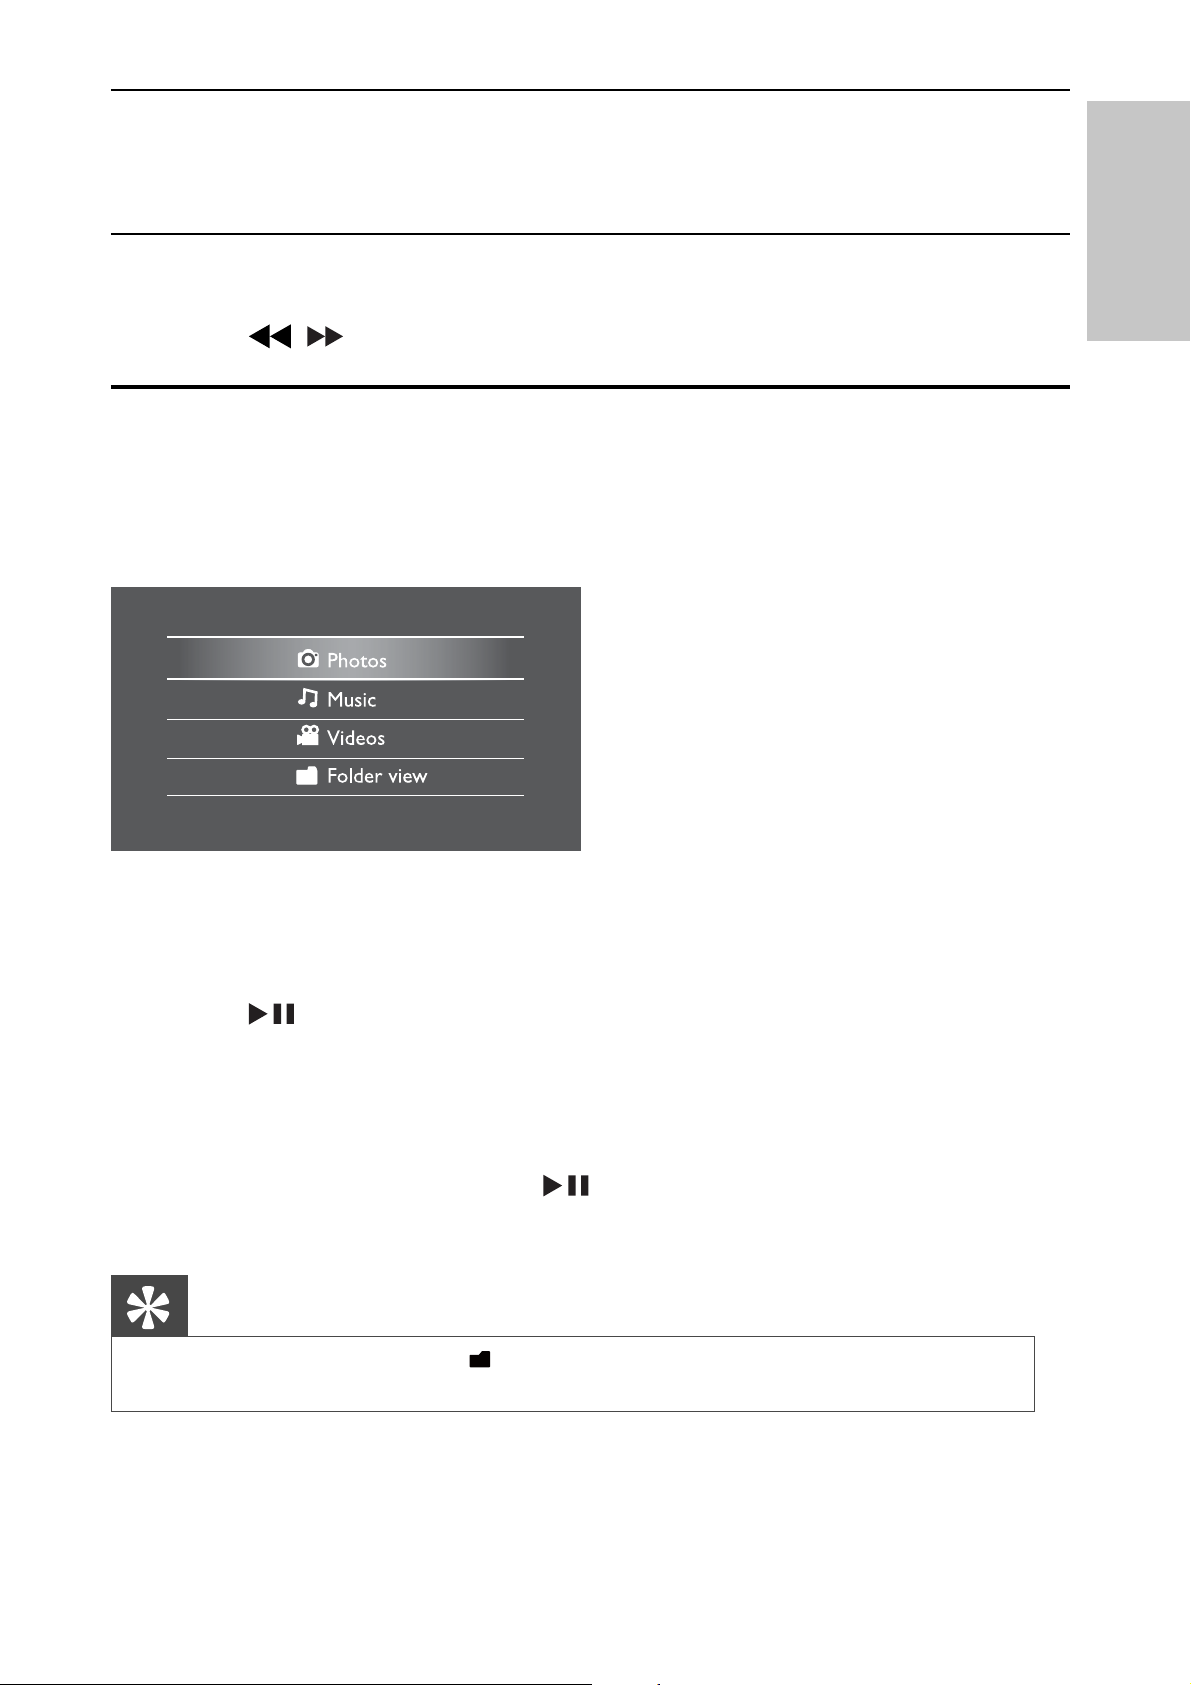
1 Slide OPEN on the player.
2 Insert the disc with label side facing up.
3 Push down to close the disc compartment.
Play starts automatically. If not, press »
/OK.
If a menu appears, select an item, then press •
To pause, press •
To stop, press •
To select the previous/next item, press •
To start search within video/audio, press •
/OK. Press again to resume play.
twice.
or .
Play options
Select audio language
For DVDs that contain two or more audio languages.
During play, press • AUDIO repeatedly until the language is selected.
Select subtitle language
For DVDs that contain two or more subtitle languages.
During play, press • SUBTITLE repeatedly until the language is selected.
Repeat
/OK to start play.
or once or more.
During play, press • REPEAT repeatedly to repeat a chapter/track/title.
Tip
For VCDs, if PBC is on, you cannot repeat items.•
Zoom
For DVDs, VCDs and JPEG CDs, you can zoom in and out for video images or
pictures.
1 Press ZOOM repeatedly to zoom in and out.
2 When the video image or picture is enlarged, press , , , to pan
through it.
16
EN
Page 16
Select audio mode
When you play VCDs, you can select an audio mode.
Press • AUDIO repeatedly to select audio channel: [L/R], [L/L], or [R/R].
Rotate pictures
For JPEG CDs only. While the JPEG is displayed:
Press •
/ to rotate anti-clockwise/clockwise.
Play from SD card
Insert an SD card into the SD card slot.
1
Press SOURCE.
2
The home menu appears.
»
English
To view photos:
Select [Photos] from the home menu.
1
Thumbnail previews of the photos stored in the card are displayed.
»
Press /OK.
2
A slideshow of the stored photos starts from the photo selected.
»
To listen to music or view videos:
Select [Music]/[Videos] from the home menu.
1
Select a folder/fi le, then press /OK.
2
The fi le is played.
»
Tip
Alternatively, you can select • from the main menu and fi nd your fi les in folder
view.
EN
17
Page 17
5 Adjust settings
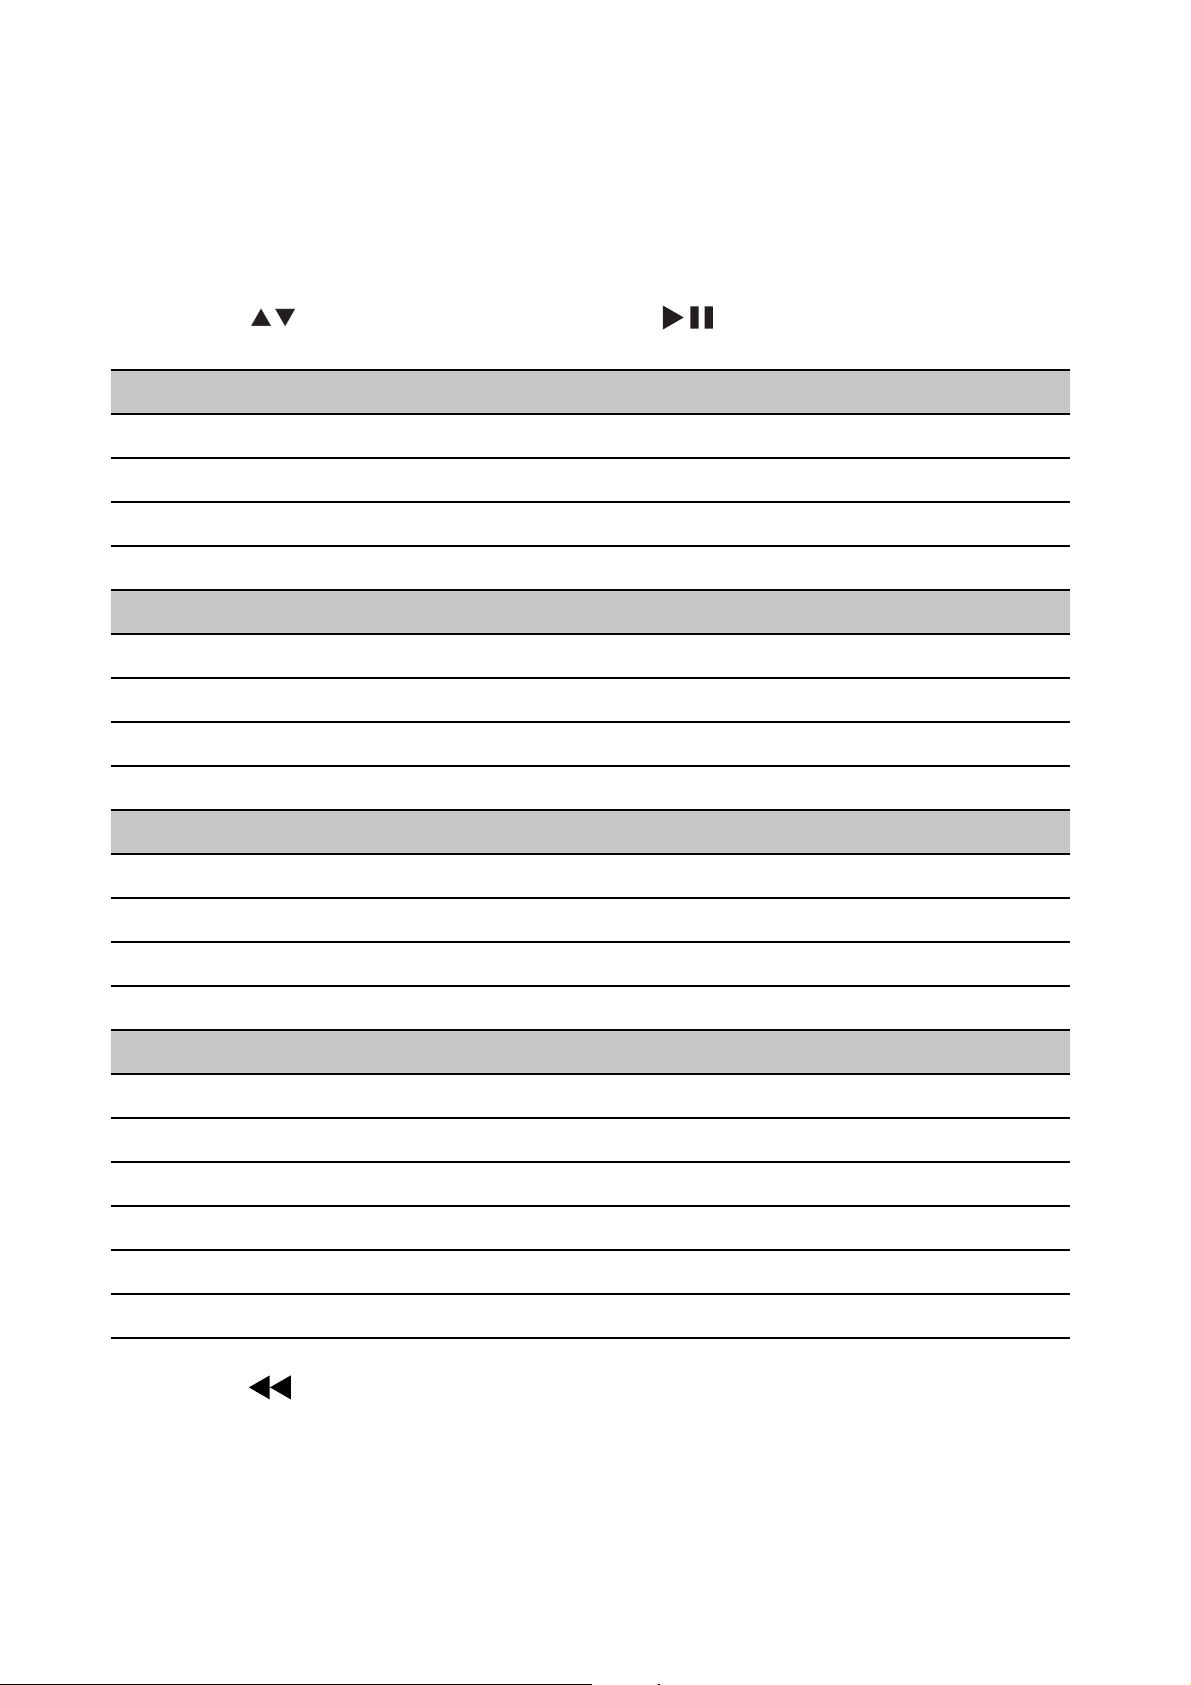
To maximize your play experience, use SETTING to fi ne tune your settings.
1 Press SETTING.
The setup menu is displayed.»
2 Press to select an option and press /OK to confi rm.
[Language]
[On Screen Display] Select on-screen display language.
[Menu] Select DVD menu language.
[Audio] Select audio language.
[Subtitle] Select DVD subtitle language.
[Screen]
[Power Save] Adjust the brightness level of screen backlight.
[Display Type] Select display ratio.
[Brightness] Adjust screen brightness.
[Contrast] Adjust screen contrast.
[Photo]
[Slideshow Frequency] Select intervals for JPEG play.
[Slideshow Effect] Select slideshow effect for JPEG play.
[Display Format] Select display format.
[Photo Display] Select photo display mode.
[Custom]
[Parental Control] Select parental level.
[DivX VOD] Get DivX registration code.
[DivX Subtitle] Select DivX subtitle language.
[Angle Mark] Select angle mark display options.
[Password] Change password (3308 by default).
[Default] Restore original settings.
3 Press to go back to previous menu level.
4 Press SETTING to exit.
18
EN
Page 18
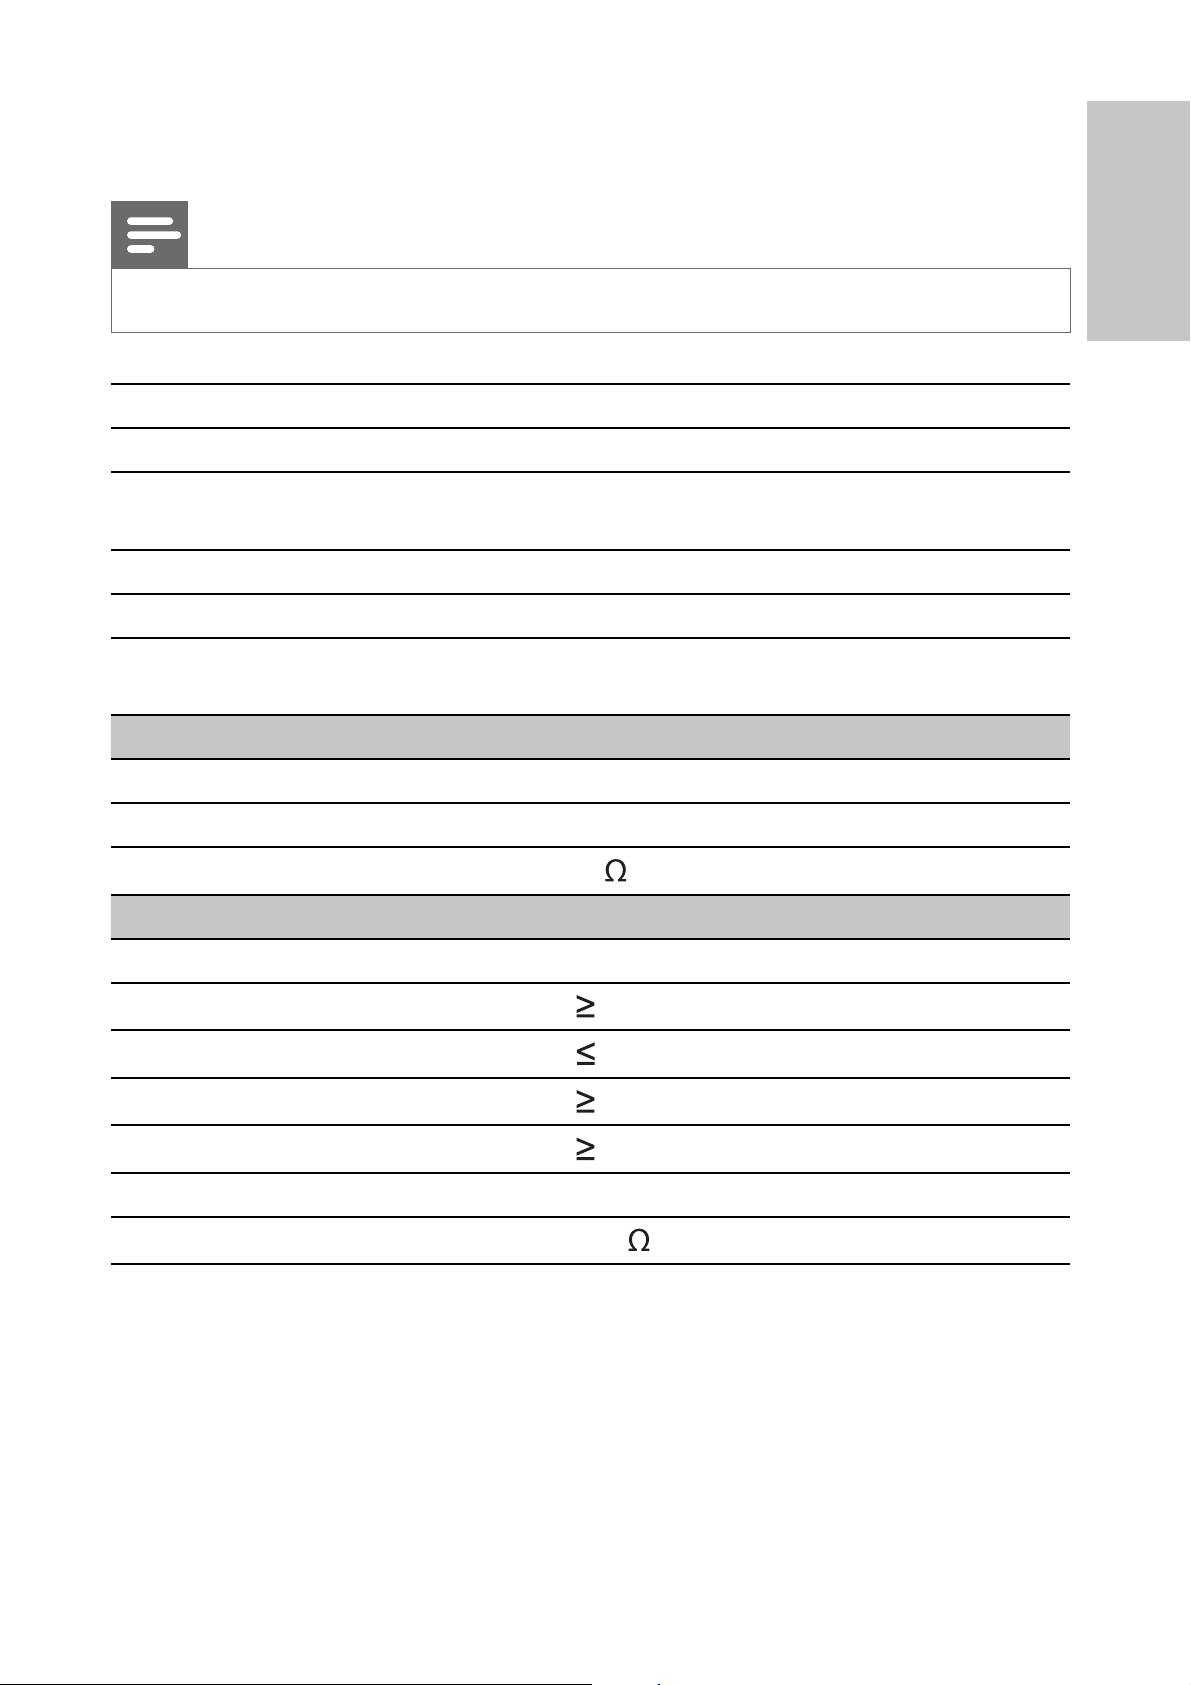
6 Product information
Note
Product information is subject to change without prior notice.•
Dimensions 240 x 178.5 x 32 mm
Weight 1.0 kg
Power supply Input: 100-240V 50/60Hz 0.5A
Output: DC 9V 1.5A
Power consumption 13.5 W
Operating temperature range 0-45°C
Laser wavelength DVD: 655 nm
CD: 785 nm
Video out
Video system NTSC & PAL
English
Output level 1Vp - p ± 20%
Load impedance
Audio out
Frequency response 20Hz-20KHz ± 1dB
Signal/noise ratio
Audio distortion + noise
Channel separation
Dynamic range
Audio out (analog audio) Output level: 2V ± 10%
Load impedance
75
80 dB
-80 dB(1KHz)
80 dB
80 dB
10 K
EN
19
Page 19

7 Troubleshooting
Warning
Risk of electric shock. Never remove the casing of the player. •
To keep the warranty valid, never try to repair the system yourself.
If you encounter problems when using the player, check the following points
before requesting service. If the problem remains unsolved, register your player
and get support at www.philips.com/welcome.
No power
Ensure that both plugs of the mains cord are properly connected.•
Ensure that there is power at the AC outlet.•
Check if the built-in battery is drained.•
No sound
Ensure that the AV cable is connected correctly.•
Distorted picture
Clean the disc. With a clean, soft, lint-free cloth, wipe the disc outwards •
from the center.
Make sure that the video output format of the disc is compatible with the •
TV.
Change the video output format to match your TV or program.•
The LCD is manufactured using high precision technology. You may, •
however, see tiny black points and/or bright points(red, blue, green)
that continuously appear on the LCD. This is a normal result of the
manufacturing process and does not indicate a malfunction.
Cannot play disc
Ensure the disc label is upwards.•
Clean the disc. With a clean, soft, lint-free cloth, wipe the disc outwards •
from the center.
Check if the disc is defective by trying another disc.•
No response to the remote control
Ensure that the path between the remote control and the player is clear •
from obstacles.
From a close distance, point the remote control directly at the player.•
Replace the remote control batteries.•
The function does not work for this disc. Refer to the disc instructions.•
The player feels warm
When the player is in use for a long period of time, its surface will be •
heated. This is normal.
20
EN
Page 20

© 2009 Koninklijke Philips Electronics N.V.
All rights reserved.
 Loading...