

Page 1
4.1 Charge the DVD player
Plug in the AC/DC adaptor
• The RED LED indicates that charging is in progress.
When the set is not in use, it will take about 4 hours to
fully charge it. However, when in use, it will take more
than 8 hours to fully charge it.*
• The RED LED will turn off when the set is fully
charged. When the low battery icon appears on the
screen, please charge the player.
* Rechargeable batteries have a limited number of charge cycles
and may eventually need to be replaced. Battery life and number of
charge cycles vary by use and settings.
4.2 Powering your remote control
1 Open the battery compartment. Remove the
protective plastic tab (first time users only).
2 Insert 1 x lithium 3V battery, type CR2025, then
close the compartment.
CAUTION
User manual
PET830
Portable DVD player
1
2
3
2
5
3
4
1
6
7
8
9
10
11
12
13
14
15
16
Printed in China wk7234
Specifications are subject to change without notice.
Trademarks are the property of Koninklijke Philips Electronics N.V.
or their respective owners
2006 © Koninklijke Philips Electronics N.V. All rights reserved.
12 3
12
13
45 678
9
10
11
14
15
17
16
English
1 Control elements and functional components
5 Start up
2 Introduction
4 Charging the units
3 General information
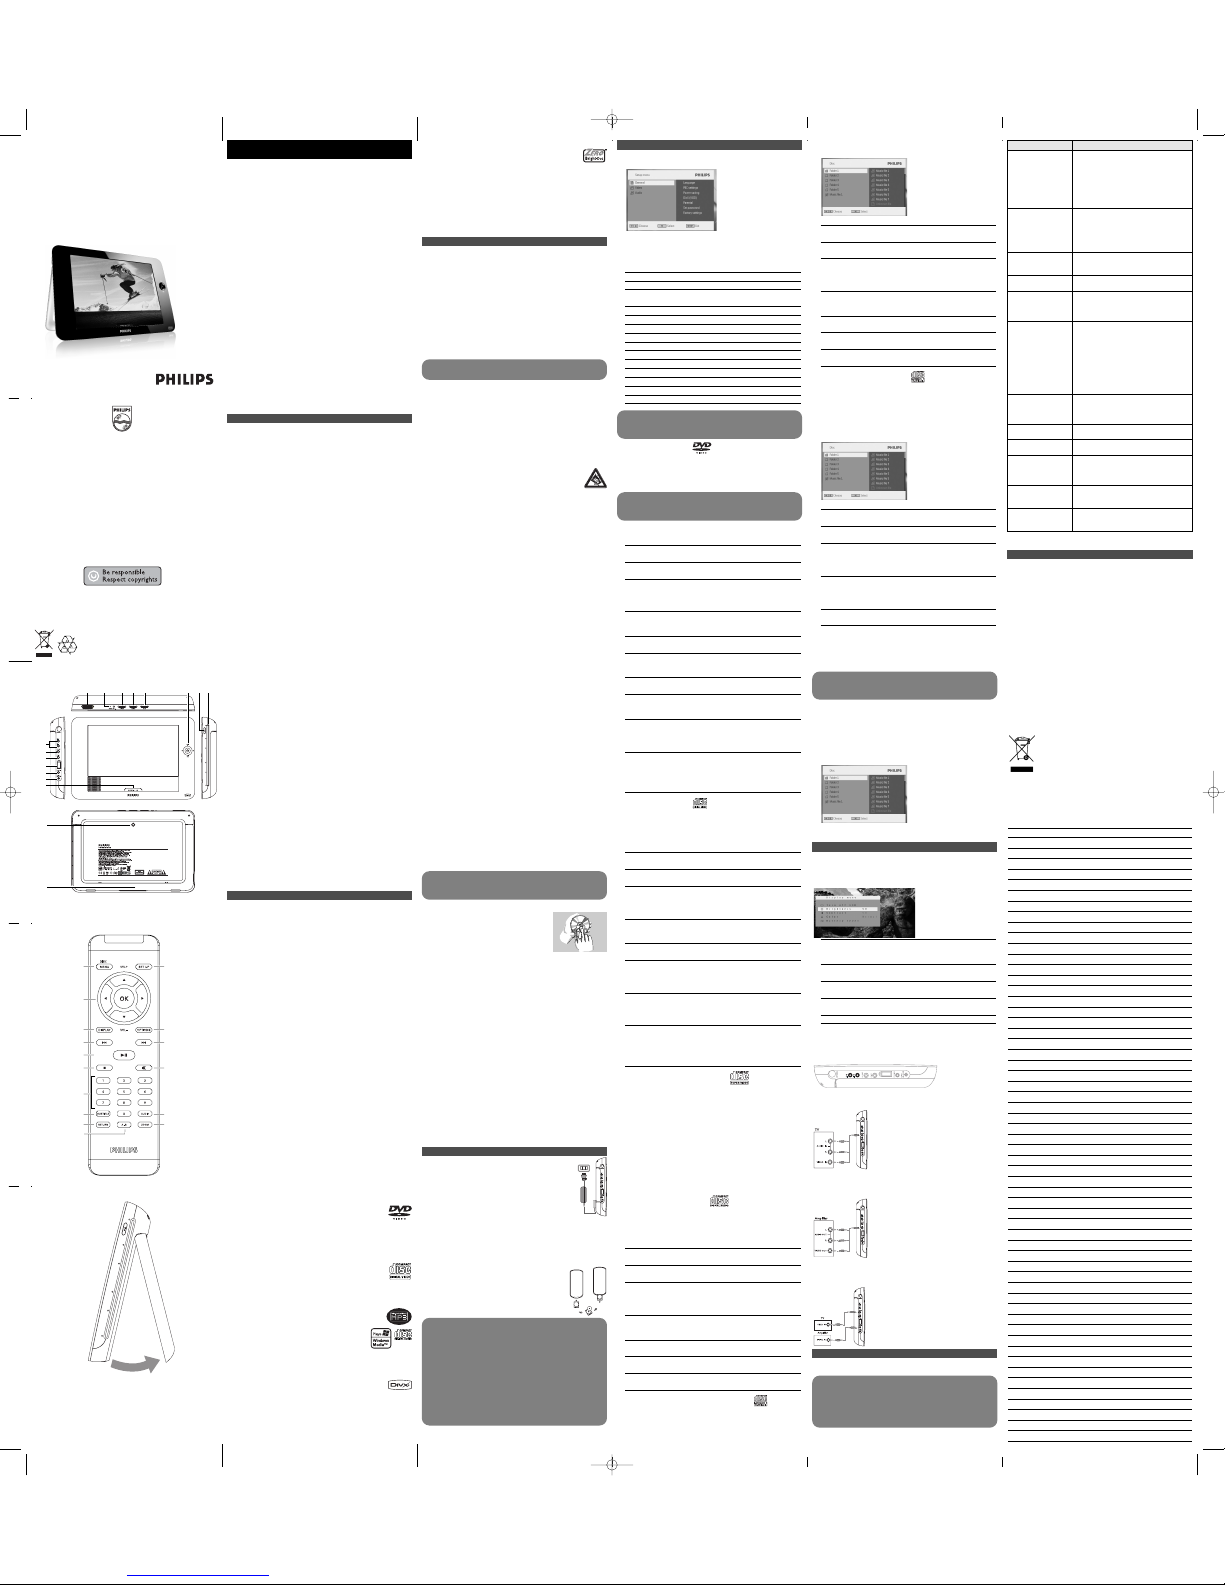
1.1 Top of the player (see figure 1)
1 POWER ON/OFF
Switch the player on / off
2 RESET Reset the player when it hangs
3 DISPLAY Adjust the display value of the system
4 OPTIONS Access additional functions
5 MENU Display the DVD disc menu
1.2 Left side of the player (see figure 1)
9 Headphone jack
10 AV OUT Audio video output
11 AV IN Audio video input
12 USB USB connector
13 Coaxial Digital audio output
14 DC IN Charger / Adapter connection for power supply
1.3 Front side of the player (see figure 1)
6 2; OK or play/pause
3 / 4 Up/down navigation key or up/down volume
control during playback
J( / )K Left/right navigation key or previous/next track
or fast search backward/forward
15 POWER•IR•CHG
POWER Power LED in green
IR IR sensor
Charging Charging LED appears in RED during charging
and goes off when fully charged.
1.4 Right side of the player (see figure 1)
7 9 / Press once to stop playback. Press twice to eject
the disc
8 Disc slot
1.5 Right side of the player (see figure 1)
16 Car mounting screw hole
17 Stand
1.6 Remote Control (see figure 2)
1 MENU Display MENU page
2 3, 4, 1, 2 Up / down / left / right navigation key
OK Confirm selection
VOL+ / - Volume control
3 DISPLAY Adjust the display value of the system
4 J( Skip to previous chapter, track or title
5 2; Start / pause / resume playback
6 9 Press twice to stop playback
70- 9 Numeric keypad
8
SUBTITLE
Subtitle language selector
9 RETURN For VCD menu page
10 A - B To repeat or loop a sequence in a title
11 SETUP Enter SETUP menu
12 OPTION Access additional functions
13 )K Skip to next chapter, track or title
14 s Mute player volume
15 AUDIO Audio language selector
16 ZOOM Enlarge video image
1.7 Desk stand of the player (see figure 3)
You can prop up the DVD player on your table for movie
watching.
Pull out the stand at the rear of the player.
2.1 Your portable DVD player
Your portable DVD player plays digital video discs conforming to
the universal DVD Video standard. With it, you will be able to
enjoy full-length movies with true cinema picture quality, and
stereo or multichannel sound (depending on the disc and on your
playback set-up).
The unique features of DVD-Video, such as selection of soundtrack
and subtitle languages, and of different camera angles (again
depending on the disc), are all included.
What’s more, parental lock lets you decide which discs your
children will be able to see. You will find your player remarkably
easy to use with the On-Screen Display and player display in
combination with the remote control.
2.2 Unpacking
First check and identify the contents of your package, as listed
below:
• Portable DVD player • Remote Control
• Car adaptor (12V) • AC power adaptor
• Protective pouch • Car headrest mounting kit
• User manual
2.3 Placement
• Place the player on a firm, flat surface.
• Keep away from domestic heating equipment and direct sunlight.
• If the player cannot read CDs/DVDs correctly, try using a
commonly available cleaning CD/DVD to clean the lens before
taking the player to be repaired. Other cleaning methods may
destroy the lens.
• Always keep the disc door closed to avoid dust on the lens.
• The lens may cloud over when the player is suddenly moved
from cold to warm surroundings. It is then not possible to play a
CD/DVD. Leave the player in a warm environment until the
moisture evaporates.
2.4 Playable disc formats
In addition to DVD-Video disc, you will also be able to play all
Video CDs, CDs, CDR, CDRW,DVD±R and DVR±RW.
2.4.1 DVD-Video
Depending on the material on the disc (a movie, video
clips, a drama series, etc.) these discs may have one or
more Titles, and each Title may have one or more
Chapters. To make access easy and convenient, your player lets
you move between Titles, and also between Chapters.
2.4.2 Video CD
Depending on the material on the disc (a movie, video
clips, a drama series, etc.) these discs may have one or
more Tracks, and tracks may have one or more indexes,
as indicated on the disc case.To make access easy and
convenient, your player lets you move between tracks and
between indexes.
2.4.3 Audio CD / MP3 CD / WMA CD
Audio CDs / MP3 CD / WMA CD contain music tracks
only. You can play them in the conventional way
through a stereo system using the keys on the
remote control and/or main unit, or via the TV
using the On Screen Display (OSD).
2.4.4 CD with JPEG files
You can also view JPEG still photos on this player.
2.4.5 DivX video discs
DivX is a popular media technology created by DivX, Inc.
DivX media files contain highly compressed video with
high visual quality that maintains a relatively samll file size. DivX
files can also include advanced media features like menus, subtitles,
and alternate audio tracks. Many DivX media files are available for
download online, and you can create your own using your personal
content and easy-to-use tools from DivX.com.
1 Control elements
and functional
components
1.1 Top of the player
1.2 Left side of the player
1.3 Front side of the player
1.4 Right side of the player
1.5 Right side of the player
1.6 Remote Control
1.7 Desk stand of the player
2 Introduction
2.1 Your portable DVD
player
2.2 Unpacking
2.3 Placement
2.4 Playable disc formats
2.4.1 DVD-Video
2.4.2 Video CD
2.4.3 Audio CD / MP3 CD /
WMA CD
2.4.4 CD with JPEG files
2.4.5 DivX video discs
3 General information
4 Charging the units
4.1 Charge the DVD player
4.2 Powering your remote
control
5 Start up
5.1 Setup
5.2 Playback DVD
5.3 Playback VCD
5.4 Playback Super (S)-VCD
5.5 Playback Music CD
5.6 Playback Music
MP3/WMA-CD
5.7 Playback Picture-CD
5.8 Playback from USB
6 Addition Functions
6.1 DISPLAY Menu
6.2 Connection
6.2.1 Headphone
6.2.2 TV
6.2.3 AV input
6.2.4 Coaxial
7 Troubleshooting
8 Technical data
Content
Power Sources
This unit operates on a supplied AC adaptor, car adapter, or a
rechargeable battery pack.
• Make sure that the input voltage of the AC adaptor is in line
with the local voltage. Otherwise, the AC adaptor and unit may
be damaged.
• Do not touch the AC adaptor with wet hands to prevent
electric shock.
• When connecting with car power (cigarette lighter) adaptor, be
sure the input voltage of the adaptor is identical with car voltage.
• Unplug the AC adaptor from the outlet or remove the battery
pack when the unit is not used for long periods of time.
• Hold the plug to disconnect the AC adaptor. Do not pull the
power cord.
2.4.6 Zero Bright Dot
TM
Enjoy highest-quality images that are free from annoying
blank spots on the LCD screen. LCD displays commonly
have imperfections, termed as 'bright dots' by the LCD industry. A
limited number of bright dots were once considered an inevitable
side effect of LCD mass production. With Philips' strict quality
control procedures used in our Portable DVD Players, our LCD
displays are produced with zero tolerance for bright dots. Select
Portable DVD Players come with Philips Zero Bright DotTMPolicy
to guarantee optimal screen quality.
Warranty service varies from region to region. Contact your local
Philips representative for more detailed information.
Safety and maintenance
• Do not disassemble the unit for laser rays are dangerous to
eyes.
Any service should be done by qualified service personnel.
• Unplug the AC adaptor to cut the power if liquid or objects get
inside the unit.
• Take care not to drop the unit or subject it to strong shocks,
which may cause malfunction.
Hearing Safety
Listen at a moderate volume.
• Using headphones at a high volume can impair your
hearing. This product can produce sounds in decibel
ranges that may cause hearing loss for a normal person,
even for exposure less than a minute. The higher decibel ranges
are offered for those that may have already experienced some
hearing loss.
• Sound can be deceiving. Over time your hearing “comfort level”
adapts to higher volumes of sound. So after prolonged listening,
what sounds “normal” can actually be loud and harmful to your
hearing. To guard against this, set your volume to a safe level
before your hearing adapts and leave it there.
To establish a safe volume level:
• Set your volume control at a low setting.
• Slowly increase the sound until you can hear it comfortably and
clearly, without distortion.
Listen for reasonable periods of time:
• Prolonged exposure to sound, even at normally “safe” levels,
can also cause hearing loss.
• Be sure to use your equipment reasonably and take appropriate
breaks.
Be sure to observe the following guidelines when using
your headphones.
• Listen at reasonable volumes for reasonable periods of time.
• Be careful not to adjust the volume as your hearing adapts.
• Do not turn up the volume so high that you can’t hear what’s
around you.
• You should use caution or temporarily discontinue use in
potentially hazardous situations.
• Do not use headphones while operating a motorized vehicle,
cycling, skateboarding, etc.; it may create a traffic hazard and is
illegal in many areas.
• Important (for models with by-packed headphones): Philips
guarantees compliance with the maximum sound power of its
audio players as determined by relevant regulatory bodies only
with the original model of provided headphones. In case this one
needs replacement, we recommend that you contact your
retailer to order a model identical to that of the original
provided by Philips.
• Traffic safety: do not use while driving or cycling as you may
cause an accident.
• Do not expose to excessive heat caused by heating equipment
or direct sunlight.
• This product is not waterproof: do not allow your player to be
submersed in water. Water entering the player may cause major
damage.
• Do not use any cleaning agents containing alcohol, ammonia,
benzene, or abrasives as these may harm the player.
• Apparatus shall not be exposed to dripping or splashing. Do not
place any sources of danger on the appartus (e.g. liquid filled
objects,lighted candles)
• Do not touch the lens!
Handling discs
• Do not attach paper or tape to the disc.
• Keep the disc away from direct sunlight or
heat sources.
• Store the disc in a disc case after playback.
• To clean, wipe the disc outwards from the
center with a soft, lint-free clean cloth.
On handling the LCD screen
The LCD is manufactured using high precision technology. You may,
however, see tiny black points and/or bright points (red, blue,
green) that continuously appear on the LCD. This is a normal result
of the manufacturing process and does not indicate a malfunction.
Environmental information
We have reduced the packaging to its minimum and made it easy
to separate into mono materials: cardboard, PS, PE and PET.
Your set consists of material which can be recycled if disassembled
by a specialized company. Please observe the local regulations to
dispose of packaging, exhausted batteries and old equipment.
Copyright information
“DivX, DivX” Certified, and associated logos are trademarks of
DivX, Inc. and are used under license.”
All other brand and product names are trademarks of their
respective companies or organizations.
Unauthorized duplication of any recordings downloaded from the
internet or made from CDs / VCDs / DVDs is a violation of
copyright laws and international treaties.
The Windows Media and the Windows logo are registered
trademarks of Microsoft Corporation in the United States and/or
other countries.
When the player is in use for a long period of time, the
surface will be heated. This is normal.
Please always use supplied AC/DC adaptor (AY4117)
4 Use navigation keys 1, 2, 3, 4 to select an item from the DVD
disc menu, such as play now, select languages and subtitle.
5 The following functions are available during playback:
Pause Press 2; to pause playback. You can resume
playback by pressing 2; again
Previous/NextBriefly press J( or )K once or several times to
select your desired chapters
Fast backward / Fast forward
Keep pressing J( or )K will search in fast
speed, 2X, 4X, 8X… Then, press 2; to resume
normal playback
Volume Control
Press 3 or 4 briefly or repeatedly to increase
or decrease the sound volume
Stop Briefly press 9 on the right side of the player to
stop playback
Subtitle Change subtitle display. The function is available
by pressing either the SUBTITLE or
OPTIONS key
Language Change language. The function is available by
pressing either the AUDIO or OPTIONS key
Angle Change the viewing angle provided in the DVD
disc. The function is available by pressing the
OPTIONS key.
Zoom Zoom in the screen, and then use the
navigation keys to pan the screen. The function
is available by pressing either the ZOOM or
OPTIONS key
A-B Repeat Set repeat loop playback. Press A-B to set the
starting point and press A-B again to set the
ending point. Then, the player will repeat the
loop playback. Press A-B to cancel the loop
playback
5.3 Playback VCD
1 Briefly press the POWER ON button on top of the player to
switch on the set.
2 Insert the VCD into the disc slot on the right side of the player.
3 The set will start to play the disc automatically.
4 The following functions are available during playback:
Pause Press 2; to pause playback. You can resume
playback by pressing 2; again
Previous/NextBriefly press J( or )K once or several times to
select your desired track
Fast backward / Fast forward
Keep pressing J( or )K will search in fast
speed, 2X, 4X, 6X or 8X. Then, press 2; to
resume normal playback
Volume Control
Press 3 or 4 briefly or repeatedly to increase
or decrease the sound volume
Stop Briefly press 9 on the right side of the player to
stop playback
Audio Some VCDs only contain 2 languages for
selection. You can change the language using this
function. The function is available by pressing
either the AUDIO or OPTIONS key
Zoom Zoom in the screen, and then use the
navigation keys to pan the screen. The function
is available by pressing either the ZOOM or
OPTIONS key
A-B Repeat Set repeat loop playback. Press A-B to set the
starting point and press A-B again to set the
ending point. Then, the player will repeat the
loop playback. Press A-B to cancel the loop
playback
5.4 Playback Super (S)-VCD
(Super) Video CDs may feature PBC (Play Back Control). This
allows you to play the video CDs interactively, following the menu
on the display.
1 Briefly press the POWER ON button on top of the player to
switch on the set
2 Insert the (S)VCD into the disc slot on the right side of the player.
If PBC is on, the disc index menu will appear on the screen.
3 Use numeric keypad 0-9 to input your selection or select a play
option.
4 Press RETURN on the remote control to return to the
previous menu.
5 To turn Playback Control mode on/off, please go to SETUP
and select PBC settings.
5.5 Playback Music CD
1 Briefly press the POWER ON button on top of the player to
switch on the set.
2 Insert the DVD into the disc slot on the right side of the player.
3 The set will start to play the disc automatically.
4 The following functions are available during playback:
Pause Press 2; to pause playback. You can resume
playback by pressing 2; again
Previous/NextBriefly press J( or )K once or several times to
select your desired track
Fast backward / Fast forward
Keep pressing J( or )K will enter the fast
search mode. Then, press brief will change the
searching speed to 2X, 4X, 6X, 8X, 16x or 32x.
Volume Control
Press 3 or 4 briefly or repeatedly to increase
or decrease the sound volume
Repeat Press OPTIONS key to select Repeat 1 track
or Repeat all tracks
Shuffle Press OPTIONS key to turn shuffle playback
on or off
Stop Briefly press 9 on the right side of the player to
stop playback
5.6 Playback Music MP3/WMA-CD
1 Briefly press the POWER ON button on top of the player to
switch on the set.
2 Insert the DVD into the disc slot on the right side of the player.
3 The set will start to play the disc automatically.
WARNING Under no circumstances should you try to
repair the set yourself as this will invalidate the guarantee.
If a fault occurs, first check the points listed, before taking the
set for repair. If you are unable to solve a problem by
following these hints, consult your dealer or service centre.
• Batteries contain chemical substances, so they should be
disposed of properly.
• Danger of explosion if battery is incorrectly replaced.
Replace only with the same or equivalent type.
• Incorrect use of batteries can cause electrolyte leakage and
will corrode the compartment or cause the batteries to
burst.
• Remove the batteries if the set is not to be used for a long
time.
• Perchlorate Material – special handling may apply. See
www.dtsc.ca.gov/hazardouswaste/perchlorate.
Transfering and recording of data from the DVD to the USB
port is not possible.
5.1 Setup
1 Press SETUP. A list of features is shown.
2 Use 3 / 4 to highlight your selection.
3 Use J( or )K to enter a sub-menu
4 Use the navigation keys to highlight your desired setting and
press OK to confirm.
5 The SETUP menu includes:
General
Language Set On Screen Display (OSD) languages
PBC settings Set Playback Control function ON/OFF. This
feature is available for Super VCD.
Power save Set Power Saving mode ON/OFF
DivX (VOD) Get the DivX (Video-On-Demand) code
Parental Set parental options
Set password Change password (default: 1369)
Factory settings Restore factory settings
Video
TV Display Set screen display aspect ratio
TV standard Set video output format to TV system
Audio
Dolby Set Dolby output
Digital (SPDIF) Set digital output format
4 Use navigation keys to select the folder and MP3/WMA file to
be played.
5 The following functions are available during playback:
Pause Press 2; to pause playback. You can resume
playback by pressing 2; again
Previous/NextBriefly press J( or )K once or several times to
select your desired track
Fast backward / Fast forward
Keep pressing J( or )K will search in fast
speed. Then, press 2; to resume normal
playback
Volume Control
Press 3 or 4 briefly or repeatedly to increase
or decrease the sound volume
Repeat Press OPTIONS key to select Repeat 1 track
or Repeat all tracks
Shuffle Press OPTIONS key to turn shuffle playback
on or off
Stop Briefly press 9 on the right side of the player to
stop playback
5.7 Playback Picture-CD
The player can only read pictures in JPEG format.
1 Briefly press the POWER ON button on top of the player to
switch on the set.
2 Insert the DVD into the disc slot on the right side of the player.
3 The set will start to play the disc automatically.
4 Use navigation keys to select the folder and JPEG file to be
played.
5 The following functions are available during playback:
Pause Press 2; to pause playback. You can resume
playback by pressing 2; again
Previous/NextBriefly press J( or )K once or several times to
select your desired track
Rotate Press OPTIONS key to select rotate mode.
Then, use 1 to rotate the picture clockwise.
Use 2 to rotate the picture anti-clockwise.
Press OPTIONS key to exit rotate mode.
Zoom Zoom in the screen, and then use the
navigation keys to pan the screen. The function
is available by pressing either the ZOOM or
OPTIONS key
Stop Briefly press 9 on the right side of the player to
stop playback
6 At the end of the playback, press 9 / to eject the disc from the
player.
5.8 Playback from USB
This USB port supports the playback of JPEG / MP3 / WMA /
DivX / MPG-4 files.
8 Technical data
Dimensions 25.5 x 17.0 x 3.1 cm
7.5 x 5.75 x 1.5 inches
Weight 0.97 kg / 2.13 lb
AC power adaptor DC 9V 1.8A
Power Consumption ≤ 20W
Operating temperature range
0 - 50°C (32 - 122°F)
Laser wavelength 650nm
Video system NTSC / PAL / AUTO
PHILIPS reserves the right to make design and specification
changes for product improvement without prior notice.
Modifications not authorized by the manufacturer may
void users authority to operate this device.
All rights reserved.
1 Briefly press the POWER ON button on top of the player to
switch on the set.
2 Insert a USB flash drive or USB memory card reader into the
USB port.
3 The player will automatically browse and show the contents in
the USB flash device.
4 Use navigation keys to select the file you want to access, then
press OK to play it.
5 At the end of the playback, unplug the USB flash drive or USB
memory card from the player
6 Addition Functions
6.1 DISPLAY Menu
When you press DISPLAY during playback, the following menu
will appear and you can access the corresponding function and
information:
Turn off LCD You can turn off the screen in some situations,
such as when connected to TV or playing music
discs. This can save the battery power
Brightness It allows you to adjust the brightness of the
screen
Contrast It allows you to adjust the contrast of the
screen
Color It allows you to adjust the color of the screen
from cool, warm and normal.
Battery level It shows the battery level
6.2 Connection
6.2.1 Headphone
Connect the headphone to either one of the headphone jacks on
the side of the player.
6.2.2 TV
You can connect the player to a TV and enjoy your DVD.
6.2.3 AV input
You can connect to other devices such as Digital Video Recorder,
Digital Camera, etc.
6.2.4 Coaxial
It provides digital audio output signal that you can connect to your
home theater equipment to decode the digital audio signal.
Yellow
White
Red
Yellow
White
Red
Yellow
7 Troubleshooting
If it appears that the DVD-Video player is faulty, first consult this
checklist. It may be that something has been overlooked.
Symptom Remedy
No power • Check if both plugs of the mains cord
are properly connected.
• Check if there is power at the AC
outlet by plugging in another appliance.
• Check if battery pack is inserted
appropriately.
• Check if car adaptor is connected
appropriately.
Distorted picture • Check the disc for fingerprints and clean
with a soft cloth, wiping from centre to
edge.
• Sometimes a small amount of picture
distortion may appear. This is not a
malfunction.
Completely distorted
picture / no colour in
the TV screen
The NTSC/PAL setting may be in the
wrong status. Match your TV’s setting with
the player’s setting.
No sound Check audio connections. If using a HiFi
amplifier, try another sound source.
Disc can’t be played • Ensure the disc label is upwards.
• Clean the disc.
• Check if the disc is defective by trying
another disc.
Do not load any 8-cm
mini DVD discs into
the player.
The DVD player does not play mini DVD
discs. If the disc gets stuck inside the
player, press 9 / twice to eject the disc.
Try the following steps if the disc remains
stuck inside the player.
1 Power off and then power on the
player. Press 9 / to eject the disc.
2 If this does not work, hold the player
with the slot facing down, gently shake
the player until the disc comes out.
The player does not
respond to the remote
control
Aim the remote control directly at the
sensor on the front of the player. Avoid all
obstacles that may interfere with the signal
path. Inspect or replace the batteries.
Distorted or B/W
picture with DVD
Use only discs formatted according to the
TV-set used (PAL/NTSC).
No audio at digital
output
• Check the digital connections.
Player does not
respond to all
operating commands
during playback
• Operations are not permitted by the
disc.
• Refer to the instructions in the disc
inlay.
Player feels warm When the player is in use for a long period
of time, the surface will be heated.
This is normal.
Display goes dimmer
when AC is unplugged
The unit is saving power to ensure longer
playtime with battery. It is normal.
Adjust the brightness in the SETUP menu.
This set complies with the radio interference requirements of the
European Union.
IMPORTANT Do not load 8-cm mini DVD disc into the
player. The DVD player does not play mini DVD disc.
Video setup is available to be changed only when playback is
stopped.
Copyright information
The making of unauthorized copies of copy-protected material,
including computer programmes, files, broadcasts and sound
recordings, may be an infringement of copyrights and constitute a
criminal offence. This equipment should not be used for such
purposes.
Disposal of your old product
Your product is designed and manufactured with high
quality materials and components, which can be recycled
and reused.
When this crossed-out wheeled bin symbol is attached
to a product, it means the product is covered by the
European Directive 2002/96/EC.
Please be informed about the local separate collection system for
electrical and electronic products.
Please act according to your local rules and do not dispose of your
old product with your normal household waste. The correct
disposal of your old product will help prevent potential negative
consequences to the environment and human health.
5.2 Playback DVD
1 Briefly press the POWER ON button on top of the player to
switch on the set.
2 Insert the DVD into the disc slot on the right side of the player.
3 The player will start to play the disc automatically.
PET830_ifu_93.qxd 2007-06-07 10:44 Page 1
Page 2
4.1 为 DVD 播放器充电
插上直流/交流适配器
• RED (红色) 的LED 表示充电正在进行。设备未
使用时,完全充电大约需要 4 个小时。然而当设
备在使用中时,完全充电大约需要 8 个小时。*
• 设备完全充电后,RED (红色) 的 LED 将熄灭。
当屏幕上出现低电量图标时,请为播放器充电。
* 可充电电池的充电循环次数有一定的数量限制并最终需要更换。
电池寿命和充电循环次数因使用方式和设定而不同。
4.2 开启您的遥控器
1 打开电池盒。移除保护塑料片 (仅第一次使
用时)。
2 插入一枚型号为 CR2025 的 3V 锂电池,
然后关上电池盒。
用户手册
P
ET830
便携式 DVD 播放器
1
2
3
2
5
3
4
1
6
7
8
9
10
11
12
13
14
15
16
中国印刷
wk7202
规
格更改恕不另行通知。
商标为荷兰皇家飞利浦电子股份有限公司或
其各自所有者的专有财产。
2
007 © 荷兰皇家飞利浦电子股份有限公司。版权所有。
12 3
12
13
45 678
9
10
11
14
15
17
16
中文
1 控制元件和功能组件
5 启动
2 介绍
4 装置充电
3 一般信息
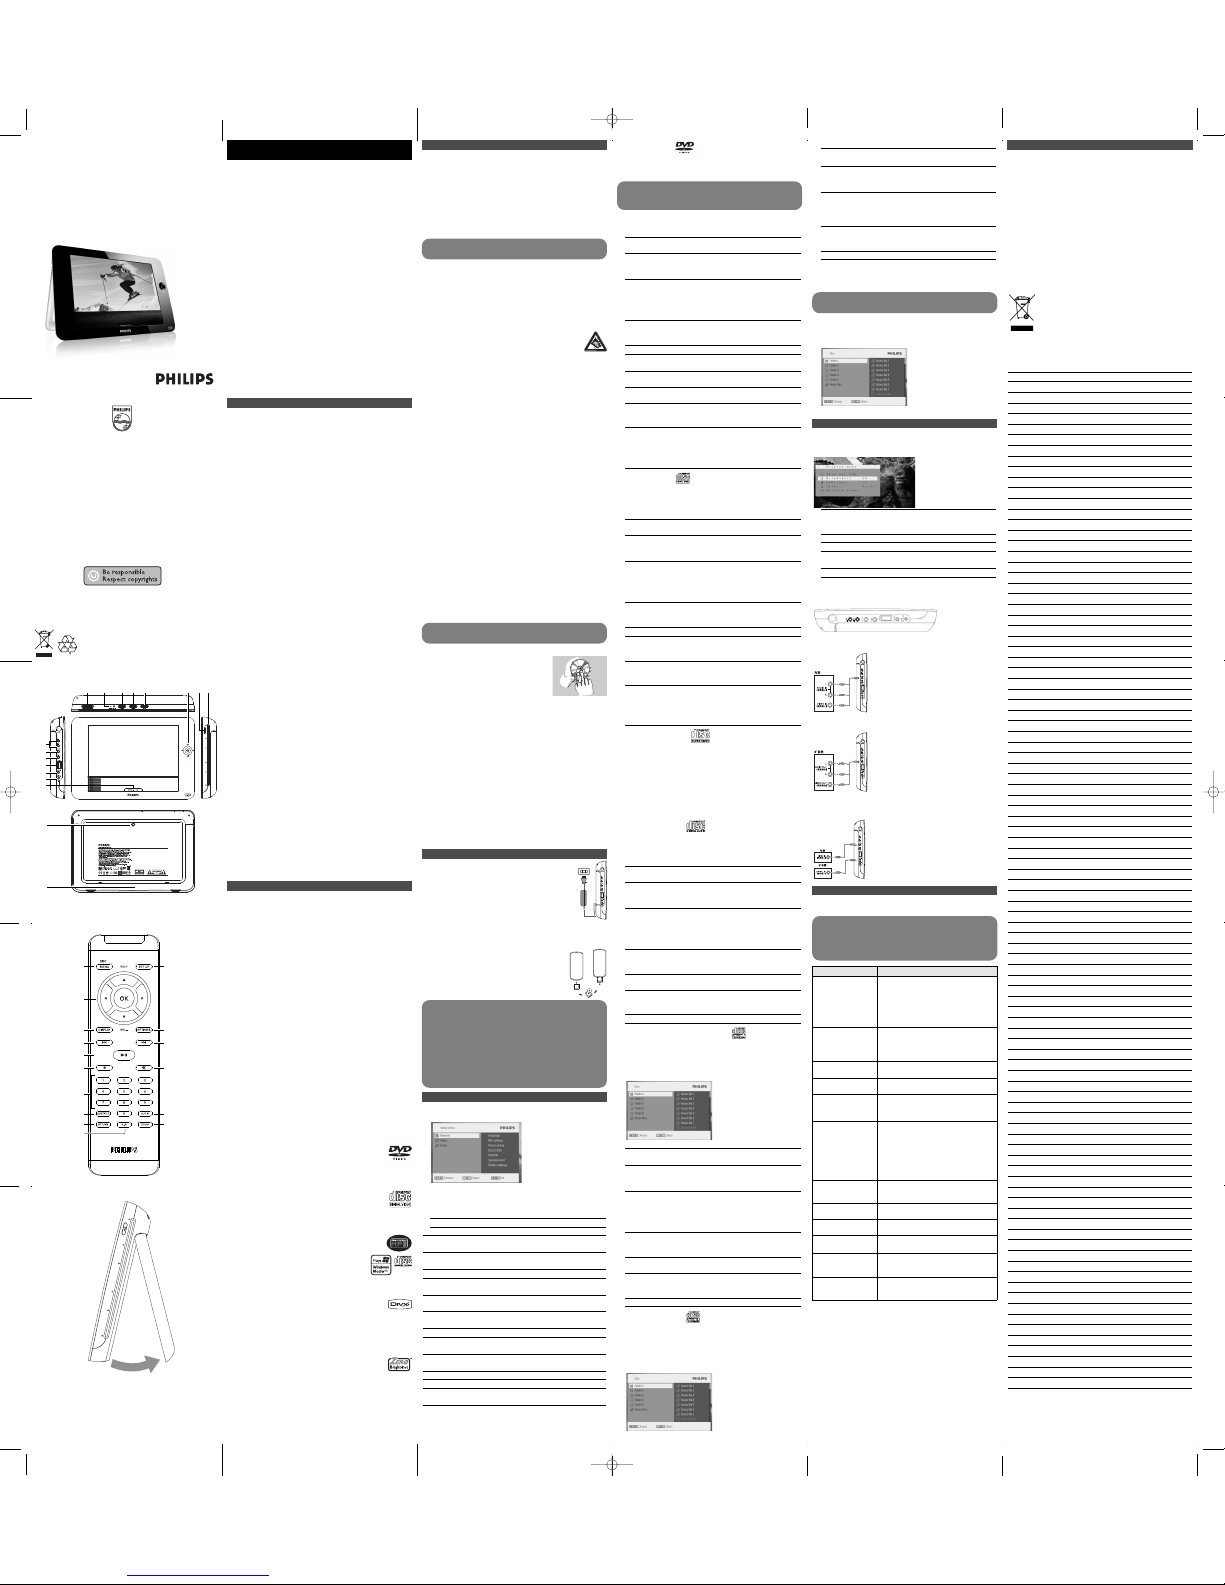
1.1 播放器顶部 (参见图1)
1
POWER ON/OFF (电源开关)
开
启/关闭播放器
2
RESET (重启) 当机时重启播放器
3 DISPLAY (显示) 调整系统的显示值
4 OPTIONS (选项) 进入附加功能
5
MENU (菜单) 显示 DVD 光盘 MENU (菜单) 页
1.2 播放器左侧 (参见图1)
9
耳机插孔
1
0 AV OUT (音频/视频输出)
音频/视频输出
11 AV IN (音频/视频输入)
音
频/视频输入
1
2 USB USB 连接器
13
Coaxial(同轴插孔)
数字音频输出
14 DC IN 用于充电器/适配器连接的电源插座
1.3 播放器正面 (参见图1)
6 2; OK (确认) 或 播放/暂停
3
/ 4 播放时上/下导航键或上/下调节音量
J( / )K 左/右导航键或上一曲目/下一曲目或
快
进/快退
1
5 POWER•IR•CHG (电源/远程感应器/充电)
POWER 电源指示灯 (绿色)
I
R 远程感应器
C
harging 充电时,电源指示灯为红色;充电完成
时,指示灯熄灭。
1.4 播放器右侧 (参见图1)
7 9 / 按键一次停止播放按键两次弹出光盘
8 光盘插槽
1.5 播放器右侧 (参见图1)
16 汽车安装螺钉孔
17 支架
1.6 遥控器 (参见图2)
1 MENU (菜单) 显示MENU (菜单) 页
2 3, 4, 1, 2 上/下/左/右导航键
OK (确认) 确认选择
VOL+ / - 音量控制
3 DISPLAY (显示) 调整系统的显示值
4 J( 返回上一章、曲目或标题
5 2; 开始 / 暂停 / 恢复播放
6 9 按键两次停止播放
7 0 - 9 数字键盘
8 SUBTITLE (字幕) 字幕语言选择器
9 RETURN (返回) 适用于 VCD 菜单页
10 A - B 重复或循环标题中的一个次序
11 SETUP (设定) 进入 SETUP (设定) 菜单
12 OPTION (选项) 进入附加功能
13 )K 跳至下一章、曲目或标题
14 s 播放器静音
15 AUDIO (音效) 音频语言选择
16 ZOOM (缩放) 放大视频图像
1.7 播放器桌面支架 (参见图3)
您可以放置 DVD 播放器于桌面欣赏电影。
拉出播放器背面的支架。
2.1 您的便携式 DVD 播放器
您的便携式 DVD 播放器播放符合通用DVD 视频标准的数字视
频光盘。拥有它, 您可以享受完全 长度的真实影院画 面质量、
享受立体声或多声道音效 (取决于光盘和播放设定) 的电影。
视频的独特特征, 如选择声道和字 幕语言、选择不同 镜头角度
(同样取决于光盘),都包括在内。
此外,父母锁让您 决定您的孩子可 以观看哪些光盘。 有了屏幕
显示和播放器显示 屏与遥控器的结 合,您会发现您的 播放器使
用起来非常简单。
2.2 启封包装
首先检查并识别包装中的物品,如下所列:
• 便携式 DVD 播放器 • 遥控器
• 汽车适配器 (12V) • 交流电源适配器
• 保护袋 • 汽车头枕安装包
• 用户手册
2.3 放置
• 将播放器放置在稳固、平坦的表面。
• 远离家用供热设备并避免阳光直射。
• 如果播放器不能正确读取CD/DVD,在送去维修之前尝试使用
一般可用到的清洁 CD/DVD 清洁镜头。其他清洁方法可能会
损坏镜头。
• 一直保持关闭光盘门以避免镜头沾上灰尘。
• 镜头在播放器突然由 冷的环境带到温暖环 境时,会凝结云状
水珠。这时无法播放CD/DVD。将播放器放在温暖的环境中直
到水汽蒸发。
2.4 可播放光盘格式
除 DVD 视频光盘外,您还可以播放所有
VCD、CD、CDR、CDRW、DVD±R 和 DVR±RW。
2.4.1DVD 视频
取决于光盘上的内容 (电影、视频片断、系列剧等),
这些光盘可能有一个或多个标题,而每个标题可能有
一个章节或更多章。为使访问简单方便,播放器允许
您能够在不同的标题和章节之间移动。
2.4.2VCD 视频光盘
如光盘盒所示,取决于VCD 视频光盘上的内容 (电影、
视频片断、系列剧等),光盘可能具有一个或更多的轨
道,而每个轨道可能有一个或多个索引。为使访问简
单方便,播放器允许您能够在不同的轨道和索引之间
移动。
2.4.3音频光盘 / MP3 / WMA 光盘
音频光盘 / MP3 / WMA 光盘 只包含音乐轨道。您可
以使用遥控器和 / 或主装置上的键通过立体声系统以
一贯方式播放他们,或者使用屏幕显示 (OSD)
通过电视机播放。
2.4.4附有 JPEG 文件的光盘
您也可以在播放器上观看 JPEG 静止照片。
2.4.5DivX 视频光盘
DivX 是 DivX 有限公司发明的受欢迎媒体技术。DivX
媒体文件含有高度压缩、高画质的视频,却保持了较
小的文件大小。DivX 文件还可以包括高级媒体功能,如菜单、
字幕和交替音轨。许多 DivX 媒体文件都可以在线下载,您也
可以使用自己的个人内容和来自 DivX.com 的易用工具创建自
己的媒体文件。
2.4.6Zero Bright Dot
TM
(零亮点)
享受最高质量的图像 (L CD 显示屏上没有烦人的 空白
点)。LCD 显示屏通常有缺陷,被 LCD 行业中被称为
“亮点”。有限数量的亮点曾被认为是 LCD 行业大规模生产不
可避免的副作用。飞利浦便携式 DVD 播放器采用了严格的质量
控制程序,其 LCD 显示屏生产时的亮点允许量为零。选择符合
Philips Zero Bright Dot
TM
(飞利浦零亮点) 政策的便携式 DVD
播放器能保证最佳 屏幕质量。保修 服务因地区而异。 如需更多
详细信息,请联系您当地的飞利浦代表。
1 控制元件和功能组件
1.1 播放器顶部
1.2 播放器左侧
1.3 播放器正面
1.4 播放器右侧
1.5 播放器右侧
1.6 遥控器
1.7 播放器桌面支架
2 介绍
2.1 您的便携式 DVD
播放器
2.2 启封包装
2.3 放置
2.4 可播放光盘格式
2.4.1 DVD 视频
2.4.2 VCD 视频光盘
2.4.3 音频光盘 / MP3 / WMA
光
盘
2
.4.4 附有 JPEG 文件的光盘
2
.4.5 DivX 视频光盘
3 一般信息
4 装置充电
4.1 为 DVD 播放器充电
4.2 开启您的遥控器
5 启动
5.1 设定
5.2 播放 DVD
5.3 播放 VCD
5.4 播放超级 VCD
5.5 播放音乐光盘
5.6 播放音乐 MP3/WMA
光盘
5.7 播放图像光盘
5.8 从 USB 播放
6 附加功能
6.1 DISPLAY (显示) 目录
6.2 连接
6.2.1 耳机
6.2.2 电视
6.2.3 音频视频输入
6.2.4 同轴插孔
7 疑难解答
8 技术数据
目录
电源
本装置使用提供的交流适配器、汽车适配器或可充电电池组。
•
确定交流适配器的输 入电压与当地电压相 符。否则可能损坏
交
流适配器和本装置。
•
湿手切勿触摸交流适配器以防电击。
•
与汽车电源(点烟器 )适配器连接时,确 保适配器输入电压
与汽车电压一致。
•
长时间不 使用本 装置时 从电源 插口拔 出交流 适配器 或移除
电
池。
•
握住插头来断开交流适配器。切勿拉电源线。
安全和维护
• 激光射线对眼睛有害,切勿拆开本装置。
任何服务均应由合格的服务人员执行。
•
如果液体 或杂物 进入本 装置内 部,拔 掉交流 电适配 器切断
电
源。
•
小心勿摔着本装置或使其遭受强烈震动,这样会导致故障。
安全收听
收
听时音量要适中。
•
耳机音量过高会损坏您的听力。此产品可以产生
分
贝强度足以损坏正常人听觉的声音,即使暴露
在
此音量下的时间不超过一分钟。较高的分贝范
围是为听力已经受损的人士准备的。
• 声音有时会给您错觉 。听了一段时间,听 觉“舒适度”就会
适
应更高的音量。因此 ,听得太久,“正常 ”的音量实际上
已
经很大声,并且会损 害您的听力。为了预 防这个问题,请
在
听觉适应 一定的 音量前 先将音 量调至 安全水 平并保 持该
音量。
设定安全的音量:
•
先将音量控制设定在一个低水平。
•
然后慢慢提高,直到您听起来舒服清晰且完全没有失真。
收
听时间应有所节制:
• 即使在“安全”水平下,长时间收听也会损害听力。
• 请务必适度使用您的设备,并适时暂停休息。
使
用耳机时务必遵守以下规范。
•
收听的音量和时间应适度。
•
注意不要根据您听力的适应程度调节音量。
• 请勿将音量调节得过高而使您无法听到周围的声音。
• 身处有潜在危险的场所时,请小心或暂停使用耳机。
•
开车、骑自行车、溜 冰时请勿使用耳机; 否则会造成交通危
险
,这在许多国家都属违法行为。
•
重要事项 (对于提供耳机的型号):飞利浦仅确保原装耳机型
号符合相关管理机构 规定的音频播放器的 最大音量。如果需
要更换耳机,我们建 议您与经销商联系订 购与飞利浦提供的
原装耳机型号相同的耳机。
•
交通安全:驾车或骑自行车时请勿使用,否则可能造成事故。
•
切勿使播放器暴露于过热环境,如加热设备附近或直接日照。
• 本装置不防水:切勿 将播放器浸入水中。 播放器中进水将导
致严重损坏。
•
切勿使用任何含酒精 、氨水、苯或研磨剂 的清洁剂,否则会
损坏播放器。
• 设备不能受到液体滴 洒。切勿放置任何有 危险的物体设备上
(如盛满液体的物体、点燃的蜡烛等)
• 切勿触摸镜头!
使用光盘
• 切勿在光盘上粘贴纸条或胶带。
• 避免光盘受阳光直射并使其远离热源。
• 播放后存放光盘于光盘盒中。
• 使用柔软、不含麻的干净布从里向外清
洁光盘。
关于液晶屏幕的使用
液晶屏幕 为高精科 技产品。 然而您 可能会看 见黑点和 /或亮 点
(红、蓝、绿) 连续地出现在液晶屏幕上。这是制造 过程的正常
结果,并不表明这是故障。
环境信息
我们已经最大限度地减少包装材料并使其能易于分成单一材料:
纸板、PS (聚苯乙烯)、PE (聚乙烯) 和 PET (聚酯)。
组成您的装置的材 料如果由专业公 司分解,可以被回 收。请遵
守当地法规处理包装材料、废旧电池和旧设备。
版权信息
“DivX, DivX”已通过认证,其相关标志为 DivX 有限公司的商
标,未经许可不得使用。
所有其他的商标和产品名称为其相应公司或组织的商标。
未经授权对任何从互联网下载记录或对 CD/VCD/DVD 复制都是
违反版权法规和国际条约的行为。
Windows Media 和 Windows 标志是微软公司在美国和/或其他
国家的注册商标。
播放器长时间使用后,表面会变热。这是正常的。
请始终使用提供的直流/交流适配器 (AY4117)
4 使用导航键 1, 2, 3, 4 从 DVD 光盘菜单中选择一个项目,如
现
在播放、选择语言和字幕等。
5
以下功能在播放时可用:
P
ause (暂停) 按下 2; 键可暂停播放。您可以再次按下
2; 键以继续播放。
Previous (上一首) / Next (下一首)
轻
按 J( (或) )K 键或多次可选择您需要的
章
节。
F
ast backward (快退) / Fast forward (快进)
按住不放等到进入快进快退模式 后反复按
J( (或) )K 键将进行快速、2 倍速度、4 倍
速
度或 6 倍速度的搜索。然后按下 2; 键
可
继续正常播放。
V
olume Control (音量控制)
轻按 3 或 4 键或反复按它们可增加或减
少音量。
S
top (停止) 轻按播放器右侧的 9 键可停止播放。
S
ubtitle (字幕) 更改字幕显示。按下 SUBTITLE (字幕)
或 OPTIONS (选项) 键可使用本功能。
Language (语言) 更改语言。按下 AUDIO (音效) 或
O
PTIONS (选项) 键可使用本功能。
A
ngle (视角) 更改 DVD 光盘提供的观看视角。按下
O
PTIONS (选项) 键可使用本功能。
Zoom (缩放) 放 大屏 幕 ,然 后 使 用导 航 键 移动 图 片
屏幕。按下 ZOOM (缩放) 或 OPTIONS
(
选项) 键可使用本功能。
A
-B Repeat (A-B 重复)
设定重复循环播放。按下A-B 设定开始点
并再次按下 A-B 设定结束点。然后播放器
将
进行重复循环播放。按下A-B 可取消循
环
播放。
5.3 播放 VCD
1 长按播放器主机上的 POWER ON (电源开关) 键启动装置。
2
将 VCD 插入播放器右侧的光盘插槽。
3
播放器将自动开始播放光盘。
4
以下功能在播放时可用:
Pause (暂停) 按下 2; 键可暂停播放。您可以再次按下
2; 键以继续播放。
P
revious (上一首) / Next (下一首)
轻
按 J( 或 )K 键或多次可选择您需要的
曲
目。
Fast backward (快退) / Fast forward (快进)
按
住不放等到进入快进快退模式后 反复按
J( (或) )K 键将进行快速、2 倍速度、4 倍
速度或 6 倍速度的搜索。然后按下 2; 键
可
继续正常播放。
Volume Control (音量控制)
轻按 3 或 4 键或反复按它们可增加或减少
音
量。
Stop (停止) 轻按播放器右侧的 9 键可停止播放。
Audio (音频设置) 一些 VCD仅有 2 种语言可供选择。您可以
使用本功能更改语言。按下AUDIO(音效)
或 OPTIONS (选项) 键可使用本功能。
Zoom (缩放) 放 大屏 幕 ,然 后 使 用导 航 键 移动 图 片
屏幕。按下 ZOOM (缩放) 或 OPTIONS
(选项) 键可使用本功能。
A-B Repeat (A-B 重复)
设定重复循环播放。按下A-B 设定开始点
并再次按下 A-B 设定结束点。然后播放器
将进行重复循环播放。按下A-B 可取消循
环播放。
5.4 播放超级 VCD
(超级) VCD 可能具有 PBC (播放控制) 功能。这使您能够按照
显示屏上的菜单交互式播放 VCD。
1 轻按播放器主机上的 POWER ON (电源开关) 键启动装置
2 将 (超级) VCD 插入播放器右侧的光盘插槽。PBC 开启时,
屏幕上将出现光盘索引菜单。
3 使用数字键盘 0 – 9 输入您的选择或选择一个播放选项。
4 按下遥控器上的 RETURN (返回) 键返回前一个菜单。
5 要开启/ 关闭播放控制模 式,请进入 SE TUP (设定 ) 并选择
PBC settings (PBC 设定)。
5.5 播放音乐光盘
1 长按播放器主机上的 POWER ON (电源开关) 键启动装置。
2 将 DVD 插入播放器右侧的光盘插槽。
3 播放器将自动开始播放光盘。
4 以下功能在播放时可用:
Pause (暂停) 按下 2; 键可暂停播放。您可以再次按下
2; 键以继续播放
Previous (上一首) / Next (下一首)
轻按 J( 或 )K 键或多次可选择您需要的
曲目。
Fast backward (快退) / Fast forward (快进)
按住不放等到进入快进快退模式 后反复按
J( ( 或) )K 键将进入快速搜索模式。然
后轻按将使搜索速度变为 2 倍、4 倍、6
倍、8 倍、16 倍或 32 倍。
Volume Control (音量控制)
轻按 3 或 4 键或反复按它们可增加或减
少音量。
Repeat (重复) 按下 OPTIONS (选项) 键可选择重复 1 个
曲目或重复所有曲目。
Shuffle (随机播放)
按下 OPTIONS (选项) 键可开启或关闭
随机播放。
Stop (停止) 轻按播放器右侧的 9 键可停止播放。
5.6 播放音乐 MP3/WMA 光盘
1 长按播放器主机上的 POWER ON/OFF (电源开关) 键启动
装置。
2 将 DVD 插入播放器右侧的光盘插槽。
3 播放器将自动开始播放光盘。
4 使用导航键选择文件夹和要播放的 MP3/WMA 文件。
5 以下功能在播放时可用:
Pause (暂停) 按下 2; 键可暂停播放。您可以再次按下
2; 键以继续播放。
Previous (上一首) / Next (下一首)
轻按 J( 或 )K 键或多次可选择您需要的
曲目。
Fast backward (快退) / Fast forward (快进)
按住不放等到进入快进快退模式 后反复按
J( (或) )K 键将进行快速、2 倍速度、4 倍
速度或 6 倍速度的搜索。然后按下 2; 键
可继续正常播放。
Volume Control (音量控制)
轻按 3 或 4 键或反复按它们可增加或减
少音量。
Repeat (重复) 按下 OPTIONS (选项) 键可选择重复 1 个
曲目或重复所有曲目。
Shuffle (随机播放)
按下 OPTIONS (选项) 键可开启或关闭随
机播放。
Stop (停止) 轻按播放器右侧的 9 键可停止播放。
5.7 播放图像光盘
播放器只能读取 JPEG 格式的图像。
1 长按播放器主机上的 POWER ON/OFF (电源开关) 键启动
装置。
2 将 DVD 插入播放器右侧的光盘插槽。
3 播放器将自动开始播放光盘。
4 使用导航键选择文件夹和要播放的 JPEG 文件。
警告在任何情形 您都不得尝试自 己修理本装置, 因为这样
会使保单失效 。如果发生故 障,在送去维 修之前,首 先检
查所列的要点 。如果您不能 用通过下列的 提示解决问 题,
那么向您的经销商或服务中心请教。
注意
• 电池包含化学物质,请妥善处置。
• 电池更 换不当 将导 致爆炸 危险 。请用 相同或 相等 类型
更换。
• 电池使用不当将 导致电解液泄 漏并腐蚀电池盒 或者导致
电池爆炸。
• 长时间不使用时请取出电池。
• 高氯酸盐物质 – 可能需要特殊处理。请参见
www.dtsc.ca.gov/hazardouswaste/perchlorate.
但
无法将数据从 DVD 传输或记录到 USB 端口中。
5.1 设定
1 按下 SETUP (设定) 这时会出现一个功能列表。
2 使用 3 / 4 突出显示您的选择。
3 使用 J( (或) )K 进入子菜单
4 使用导航键突出显示您需要的设定并按下 OK 进行确认。
5 SETUP (设定) 菜单包括:
一般设置
Language (语言) 设定屏幕显示 (OSD) 语言
PBC settings 开启/关闭播放控制功能。超级 VCD 具有
(PBC 设置) 此功能。
Power save 开启/关闭省电模式
(省电模式)
DivX (VOD) 获取 DivX (VOD) 代码
Parental 设定家长指引选项
(家长指引)
Set password 修改密码 (默认: 1369)
(设置密码)
Factory settings 恢复出厂设定
(出厂设置)
视频设置
TV Display 设定屏幕显示纵横比
(TV 显示)
TV standard 将视频输出格式设为电视系统
(TV 标准)
音频设置
Dolby (杜比) 设定杜比环绕声输出
Digital (SPDIF) 设定数字输出格式
(数字 (SPDIF))
5
以下功能在播放时可用:
P
ause (暂停) 按下 2; 键可暂停播放。您可以再次按下
2
; 键以继续播放。
Previous (上一首) / Next (下一首)
轻
按 J( 或 )K 键或多次可选择您需要的
曲
目。
R
otate (旋转) 按下 OPTIONS (选项) 键可选择旋转模
式。然后使用 2 键顺时针旋转图像。使用
1
键逆时针旋转图像。按 下 OPTIONS
(
选项) 键可退出旋转模式。
Z
oom (缩放) 放 大屏 幕 ,然 后 使 用导 航 键 移动 图 片
屏幕。按下 ZOOM (缩放) 或 OPTIONS
(选项) 键可使用本功能。
S
top (停止) 轻按播放器右侧的 9 键可停止播放。
6
播放结束时,按下 9 / 使光盘从播放器中弹出。
5.8 从 USB 播放
U
SB 端口支持JPEG / MP3 / WMA/ DivX/ MPG-4文件的播放。
8 技术数据
尺
寸 25.5 x 17.0 x 3.1 厘米
7
.5 x 5.75 x 1.5 英寸
重量 0.97 公斤 / 2.13 磅
电源 DC 9V 1.8A
功
率 ≤ 20W
使
用温度范围 0 - 50°C (32 - 122°F)
激
光波长 650nm
视频制式 NTSC/ PAL / AUTO
飞
利浦保留为改进产 品而更改其设计 和规格的权利,恕 不事先
通
知。服务商如未经 制造商授权擅自 改动产品,可能会 使其操
作
本设备的权利失效。版权所有。
1 长按播放器主机上的 POWER ON (电源开关) 键启动装置。
2
将 USB 闪存盘或 USB 记忆卡读卡器插入 USB 端口。
3
播放器将自动浏览并显示 USB 闪存设备中的内容。
4
使用导航键选择您想要存取的文件,然后按 OK 播放它。
5
播放结束时,将USB 闪存盘或 USB 记忆卡从播放器中拔出。
6 附加功能
6.1 DISPLAY (显示) 目录
如
果在播放时按下 DISPLAY (显示),下面的菜单将出现,您
可
以获得相应的功能和信息:
关闭 LCD 在与电视相连或播放音乐光盘等情况下,
您可以 关闭屏 幕。 这样可 以节 省电池 的
电
量。
亮
度 使您能够调整屏幕的亮度。
对比度 使您能够调整屏幕的对比度。
颜
色 使您能够根据冷、暖和标准色彩调整屏幕
的
颜色。
电
量 显示电池的电量。
6.2 连接
6
.2.1耳机
将耳机连接到播放器任意一侧的耳机插孔。
6.2.2电视
您可以将播放器连接到电视上观看 DVD。
6.2.3音频视频输入
您可以与数字视频录像机或数码相机等其他设备连接。
6.2.4同轴插孔
它提供数字音频输 出信号,您可以 将该信号连接到家 庭影院设
备以对数字音频信号解码。
黄色
白色
红色
黄色
白色
红色
黄
色
7 疑难解答
如果 DVD 视频播放器有故障,请先参照这张检验表。可能有被
忽视的东西。
症状 修理
没有电源 • 检查电 源线 的 两个 插头 是 否适 当地
连接。
• 插入另外一 个设备检 查交流电外 接口
是否有电。
• 检查电池组是否正确插入。
• 检查汽车适配器是否正确连接。
画面失真 • 检查光盘上是否 有指纹并 用软布从中
心到边缘清洁光盘。
• 有时少量图 像失真可 能发生。这 不是
故障。
完全失真的图像/电视
屏幕上没有颜色
NTSC/PAL 设定可能处于错误状态。使
您的电视设定与您的播放器设定匹配。
没有声音 检查音频连接。如果使用 HiFi 扩音器,
尝试另一个声源。
无法播放光盘 • 确保光盘标签朝上。
• 清洁光盘。
•
尝试另外一张盘,检查光盘是否损坏。
请勿插入 8 厘米迷你
DVD 光盘。
本 DVD 播放器不支持迷你 DVD 光盘。
如果光 盘无 法弹出 ,请 按下 9 两 次。
若还是无法弹出,请尝试以下步骤:
1 关闭播 放器,然 后再开启 播放器。按
下 9 两次以弹出光盘。
2 若 以上 方法 无 法弹 出光 盘 ,握 住播
放器,插槽 朝下,轻 晃播放器直 到光
盘退出。
播放器不响应遥控器 用遥 控器 直 接瞄 准在 播 放器 前的 感 应
器。消除 所有对光 路的干扰 。检查或 更
换电池。
DVD 图像失真或黑白图像仅使用依照电视机使用的格式化的光盘
(PAL/NTSC)。
数字输出口无音频 • 检查数字连接
播放时播放器不响应
所有的操作命令
• 光盘不允许这些操作。
• 参见光盘的说明。
播放器发热 播放器长时 间使用后 ,表面会 变热。这
是正常的。
拔下 AC 接头后,显
示器变暗
装置正在省电,以确保电池达到更长的播
放时间。这是正常现象。可以在 SETUP
(设定) 菜单中调节亮度。
本装置符合欧盟的无线电干扰要求。
重
要请勿插入 8 厘米迷你 DVD 光盘。本 DVD 播放器不支
持迷你 DVD 光盘。
版权信息
未
经授权而制作包括 电脑程序、文件 、广播和录音在内 的版权
保护材料的复本均 违反了版权法并 构成刑事犯罪。本 设备不得
用于此类用途。
旧产品的处理
您
的产品是由可以再生利用的优质材料和组件设计、
制
造而成的。
如果某一件产品上贴有交叉轮状回收箱标志,则表示
该产品受第 2002/96/EC 号(欧洲规章)的保护。
请
了解当地有关电气和电子产品收集的专属制度。
请
遵守当 地的规 定,不 要将废 旧产品 与一般 家庭废 品一起 处
理
。正确处理您的废 旧产品,利于防 止对环境和人类健 康产生
潜在负面影响。
5
.2 播放 DVD
1
长按播放器主机上的 POWER ON (电源开关) 键启动装置。
2
将 DVD 插入播放器右侧的光盘插槽。
3
播放器将自动开始播放光盘。
PET830_ifu_93-CS.qxd:PET830_ifu_93.qxd 6/4/07 5:19 PM Page 1
 Loading...