

Page 1
Por table DVD Player
PET702
Thank you for choosing Philips.
Need help fast?
Read your Quick Start Guide and/or
User Manual first for quick tips
that make using your Philips product
more enjoyable.
If you have read your instructions
and still need assistance,
you may access our online help at
www.philips.com/welcome
or call
1-888-PHILIPS (744-5477)
while with your product.
Philips vous remercie de
votre confiance.
Besoin d'une aide
rapide?
Le Guide rapide de début et Manuel de
l'utilisateur regorgent d'astuces destinées à
simplifier l'utilisation de votre produit Philips.
Toutefois, si vous ne parvenez pas à résoudre
votre probléme, vous pouvez accéder à
notre aide en ligne à l'adresse
www.philips.com/welcome
ou formez le
1-800-661-6162 (Francophone)
1-888-PHILIPS (744-5477) (English speaking)
Veillez à avoir votre produit à
portée de main.
Gracias por escoger Philips
Necesita ayuda
inmediata?
Lea primero la Guía rápida del comienzo
o el Manual del usuario, en donde encontrará
consejos que le ayudarán a disfrutar
plenamente de su producto Philips.
Si después de leerlo aún necesita ayuda,
consulte nuestro servicio de
asistencia en línea en
www.philips.com/welcome
o llame al teléfono
1-888-PHILIPS (744-5477)
y tenga a mano el producto.
(and Model / Serial number)
(et model / serial nombre)
(y número de model / serial)
Register your product and get support at
www.philips.com/welcome
Page 2
Registering your model with PHILIPS makes you eligible for all of the valuable benefits listed below,so don't miss out.
Complete and return your Product Registration Card at once, or register online at www.philips.com/welcome to
ensure:
Return your Product Registration Card or register online at
www.philips.com/welcome today to get the very most from your purchase.
Visit our World Wide Web Site at http://www.philips.com/welcome
Congratulations on your purchase,
and welcome to the “family!”
Dear PHILIPS product owner:
Thank you for your confidence in PHILIPS.You’ve selected one of
the best-built, best-backed products available today.We’ll do everything in our power to keep you happy with your purchase for many
years to come.
As a member of the PHILIPS “family,” you’re entitled to protection
by one of the most comprehensive warranties and outstanding
service networks in the industry.What’s more, your purchase guarantees you’ll receive all the information and special offers for which
you qualify,plus easy access to accessories from our convenient
home shopping network.
Most importantly,you can count on our uncompromising commitment to your total satisfaction.
All of this is our way of saying welcome - and thanks for investing
in a PHILIPS product.
P.S. To get the most from your PHILIPS purchase, be
sure to complete and return your Product Registration
Card at once, or register online at:
www.philips.com/welcome
For Customer Use
Enter below the Serial No.which is located on the rear of the cabinet. Retain this
information for future reference.
Model No.__________________________
Serial No. ________________________
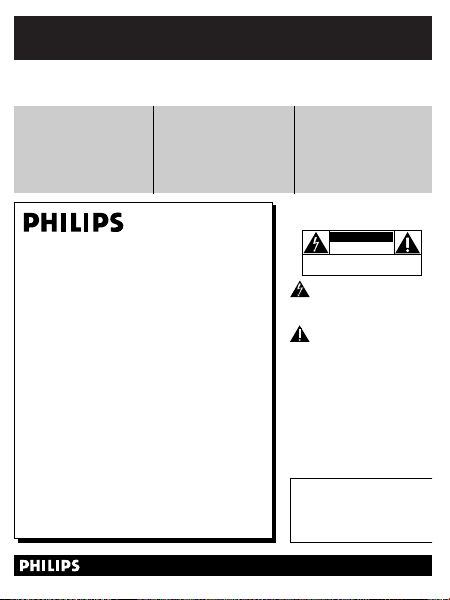
Know these
safetysymbols
This “bolt of lightning” indicates unin-
sulated material within your unit may
cause an electrical shock. For the safety of
everyone in your household, please do not
remove product covering.
The “exclamation point” calls atten-
tion to features for which you should
read the enclosed literature closely to prevent operating and maintenance problems.
WARNING:To reduce the risk of fire or
electric shock, this apparatus should not be
exposed to rain or moisture and objects
filled with liquids, such as vases,should not
be placed on this apparatus.
CAUTION:To prevent electric shock,
match wide blade of plug to wide slot, fully
insert.
ATTENTION:Pour éviter les choc électriques, introduire la lame la plus large de la
fiche dans la borne correspondante de la
prise et pousser jusqu’au fond.
CAUTION
RISK OF ELECTRIC SHOCK
DO NOT OPEN
CAUTION: TO REDUCE THE RISK OF ELECTRIC SHOCK, DO NOT
REMOVE COVER (OR BACK). NO USER-SERVICEABLE PARTS
INSIDE. REFER SERVICING TO QUALIFIED SERVICE PERSONNEL.
*Proof of
Purchase
Returning the enclosed card guarantees
that your date of purchase will be on file,
so no additional paperwork will be
required from you to obtain warranty
service.
*Product Safety
Notification
By registering your product,you'll receive
notification - directly from the manufacturer - in the rare case of a product
recall or safety defect.
*Additional Benefits
Registering your product guarantees that
you'll receive all of the privileges to
which you're entitled, including special
money-saving offers.
Page 3

1.
Read these instructions.
2.
Keep these instructions.
3.
Heed all warnings.
4.
Follow all instructions.
5.
Do not use this apparatus near
water.
6.
Clean only with dry cloth.
7.
Do not block any ventilation
openings. Install in accordance with
the manufacturer´s instructions.
8.
Do not install near any heat sources
such as radiators, heat registers, stoves, or
other apparatus (including amplifiers) that
produce heat.
9.
Do not defeat the
safety purpose of the
polarized or
grounding-type plug.
AC Polarized
Plug
IMPORTANT SAFETY INSTRUCTIONS
Page 4

A polarized plug has two blades with one
wider than the other. A grounding type plug
has two blades and a third grounding prong.
The wide blade or the third prong are
provided for your safety. If the provided plug
does not fit into your outlet, consult an
electrician for replacement of the obsolete
outlet.
10.
Protect the power cord from being
walked on or pinched, particularly at plugs,
convenience receptacles, and the point
where they exit from the apparatus.
11.
Only use attachments/accessories
specified by the manufacturer.
12.
Use only with the cart, stand,
tripod, bracket, or table specified
by the manufacturer or sold with
the apparatus. When a cart is
used, use caution when moving
the cart/apparatus combination
to avoid injury from tip-over.
Page 5

13 .
Unplug this apparatus during lightning
storms or when unused for long periods of
time.
14 .
Refer all servicing to qualified service
personnel. Servicing is required when the
apparatus has been damaged in any way,
such as power-supply cord or plug is
damaged, liquid has been spilled or objects
have fallen into the apparatus, the apparatus
has been exposed to rain or moisture, does
not operate normally, or has been dropped.
15.
Battery usage
CAUTION
– To
prevent battery leakage which may result in
bodily injury, property damage, or damage
to the unit:
●
Install all batteries correctly, + and - as
marked on the unit.
●
Do not mix batteries (old and new or
carbon and alkaline, etc.).
●
Remove batteries when the unit is not used
for a long time.
Page 6

16.
Apparatus shall not be exposed to
dripping or splashing.
17.
Do not place any sources of danger
on the apparatus (e.g. liquid filled
objects, lighted candles).
18.
This product may contain lead and mercury.
Disposal of these materials may be regulated
due to environmental considerations.
For disposal or recycling information,
please contact your local authorities
or the Electronic Industries Alliance :
www.eiae.org.
EL 6475-E005: 04/01
Page 7

PHILIPS LIMITED WARRANTY ONE (1) YEAR
WARRANTY COVERAGE:
PHILIPS warranty obligation is limited to the terms set forth below.
WHO IS COVERED:
Philips warrants the product to the original purchaser or the person receiving the product
as a gift against defects in materials and workmanship as based on the date of original
purchase ("Warranty Period") from an Authorized Dealer. The original sales receipt
showing the product name and the purchase date from an authorized retailer is considered
such proof.
WHAT IS COVERED:
The Philips warranty covers new products if a defect arises and a valid claim is received by
Philips within the Warranty Period. At its option, Philips will either (1) repair the product
at no charge, using new or refurbished replacement parts, or (2) exchange the product
with a product that is new or which has been manufactured from new, or serviceable used
parts and is at least functionally equivalent or most comparable to the original product in
Philips current inventory, or (3) refund the original purchase price of the product.
Philips warrants replacement products or parts provided under this warranty against
defects in materials and workmanship from the date of the replacement or repair for ninety
(90) days or for the remaining portion of the original product's warranty, whichever
provides longer coverage for you. When a product or part is exchanged, any replacement
item becomes yourproperty and the replaced item becomes Philips' property. When a
refund is given, your product becomes Philips' property.
Note:Any product sold and identified as refurbished or renewed carries a ninety
(90) day limited warranty.
Replacement product can only be sent if all warranty requirements are met.
Failure to follow all requirements can result in delay.
WHAT IS NOT COVERED - EXCLUSIONS AND LIMITATIONS:
This Limited Warranty applies only to the new products manufactured by or for Philips
that can be identified by the trademark, trade name, or logo affixed to it. This Limited
Warranty does not apply to any non-Philips hardware product or any software, even if
packaged or sold with the product. Non-Philips manufacturers, suppliers, or publishers may
provide a separate warranty for their own products packaged with the bundled product.
Philips is not liable for any damage to or loss of any programs, data, or other information
stored on any media contained within the product, or any non-Philips product or part not
covered by this warranty. Recovery or reinstallation of programs, data or other
information is not covered under this Limited Warranty.
This warranty does not apply (a) to damage caused by accident, abuse, misuse,
misapplication, or non-Philips product, (b) to damage caused by service performed by
anyone other than Philips or Philips Authorized Service Location, (c) to a product or a part
that has been modified without the written permission of Philips, or (d) if any Philips serial
number has been removed or defaced, or (e) product, accessories or consumables sold
"AS IS" without warranty of any kind by including refurbished Philips product sold "AS IS"
by some retailers.
Page 8

This Limited Warranty does not cover:
• Shipping charges to return defective product to Philips.
• Labor charges for installation or setup of the product, adjustment of customer controls
on the product, and installation or repair of antenna systems outside of the product.
• Product repair and/or part replacement because of improper installation, connections to
improper voltage supply, abuse, neglect, misuse, accident, unauthorized repair or other
cause not within the control of Philips.
• Damage or claims for products not being available for use, or for lost data or lost
software.
• Damage occurring to product during shipping.
•A product that requires modification or adaptation to enable it to operate in any country
other than the country for which it was designed, manufactured, approved and/or
authorized, or repair of products damaged by these modifications.
•A product used for commercial or institutional purposes (including but not limited to
rental purposes).
• Product lost in shipment and no signature verification receipt can be provided.
• Failure to operate per Owner's Manual.
TO OBTAIN ASSISTANCE IN THE U.S.A.,PUERTORICO,OR U.S.VIRGIN
ISLANDS…
Contact Philips Customer Care Center at:
1-888-PHILIPS (1-888-744-5477)
TO OBTAIN ASSISTANCE IN CANADA…
1-800-661-6162 (French Speaking)
1-888-PHILIPS (1-888-744-5477) - (English or Spanish Speaking)
REPAIR OR REPLACEMENT AS PROVIDED UNDER THIS WARRANTY IS THE
EXCLUSIVE REMEDY FOR THE CONSUMER. PHILIPS SHALL NOT BE LIABLE FOR
ANY INCIDENTAL OR CONSEQUENTIAL DAMAGES FOR BREACH OF ANY EXPRESS
OR IMPLIED WARRANTY ON THIS PRODUCT. EXCEPT TO THE EXTENT
PROHIBITED BY APPLICABLE LAW, ANY IMPLIED WARRANTY OF
MERCHANTABILITY OR FITNESS FOR A PARTICULAR PURPOSE ON THIS PRODUCT
IS LIMITED IN DURATION TO THE DURATION OF THIS WARRANTY.
Some states do not allow the exclusions or limitation of incidental or consequential
damages, or allow limitations on how long an implied warranty lasts, so the above
limitations or exclusions may not apply to you.
This warranty gives you specific legal rights. You may have other rights which vary from
Philips, P.O. Box 671539,Marietta, GA. 30006-0026
state/province to state/province.
Page 9

Canada
English
This digital apparatus does not exceed the Class
B limits for radio noise
emissions from digital apparatus as
set out in the Radio Interference Regulations of
the Canadian Department of Communications.
Français
Cet appareil numérique n'émet pas de bruits
radioélectriques dépassant les
limites applicables aux appareils numériques de
Classe B prescrites dans le Règlement sur le
Brouillage Radioélectrique édicté par le Ministère
des Communications du Canada.
The set complies with the FCC-Rules, Part 15 and with 21
CFR 1040.10. Operation is subject to the following two
conditions:
1. This device may not cause harmful interference, and
2. This device must accept any interference received,
including interference that may cause undesired
operation.
Page 10
1
1
2
3
4
5
6
78 9
13 14 15
10 11 12
Page 11

2
1234
5
6
11
7
8
9
10
12
13
14
Page 12

English
Congratulations on your purchase and welcome to Philips!
To fully benifit from the support that Philips offers, register your product
at www.philips.com/welcome.
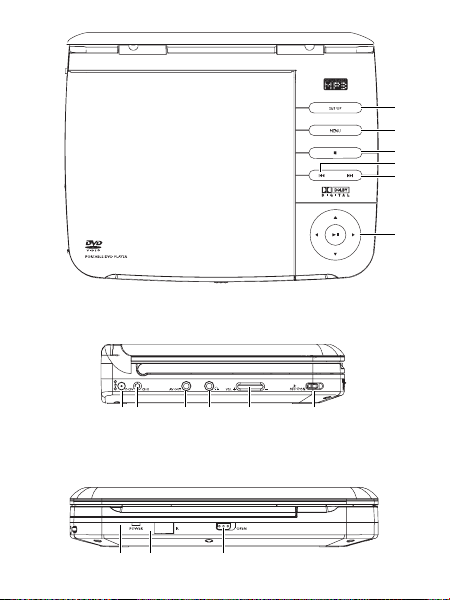
FUNCTIONAL OVERVIEW
Main unit controls ( see figure 1)
1 SETUP ....................Switch the aspect ratio between 16:9 or 4:3.
2 MENU.....................Display the MENU page.
3 9 .............................Stop playback.
4 J( ............................Skip to the previous chapter, track or title.
5 § ............................Skip to the next chapter, track or title.
6 3, 4, 1, 2 ...........Navigate in a menu.
2;.........................Start or interrupt playback.
...........(1 / 2) search backward/forward in a disc at different
speeds.
.........................Confirm a selection.
Left of player ( see figure 1)
7 DC 9V .....................Power supply socket.
8 CHG ........................Charge indicator.
9 AV OUT ..................Audio/Video output jack.
p.............................Headphone jack.
0
! VOL F ................Volume control.
@ OFF y ON...............Switch the power on/off.
Front of player ( see figure 1)
# POWER ..................Power indicator
$ IR.............................Remote sensor
% OPEN .....................Open the disc door to insert or remove disc.
Page 13

FUNCTIONAL OVERVIEW
Remote controls ( see figure 2)
1 SETUP ....................Enter or exit the system menu.
2 DISPLAY ................Display information on TFT during playback.
3 ZOOM.....................Enlarge or reduce a picture or active image on the TFT.
4 SUB ........................Select a subtitle language.
5 § ............................Skip to the next chapter, track or title.
6 J( ............................Skip to the previous chapter, track or title.
7 3, 4, 11 , 22 .....Navigate in a menu.
ENTER ....................Confirm a selection.
;
...........................Start or interrupt playback.
8 2
9 9 .............................Stop playback.
0 0-9 ...........................Numeric Keypad
! REPEAT 1/ALL.......Repeat a chapter/track/title.
A-B... ......................Repeat playback of a specific section on a disc.
@ MENU.....................Enter or exit the disc contents menu.
# AUDIO ....................Select an audio language when playing a DVD disc or
$ ANGLE....................Select DVD camera angle.
.....(11 / 22) search backward/forward in a disc at different
speeds.
select an audio mode (Stereo, Mono-Left or Mono-Right)
when playing a VCD/CD disc.
Page 14

INTRODUCTION
Your portable DVD player
Your portable DVD player plays digital video discs conforming to the universal
DVD Video standard. With it, you will be able to enjoy full-length movies with
true cinema picture quality, and stereo or multichannel sound (depending on the
disc and on your playback set-up).
The unique features of DVD-Video, such as selection of soundtrack and subtitle
languages, and of different camera angles (again depending on the disc), are all
included.
What’s more, parental lock lets you decide which discs your children will be able
to see. You will find your player remarkably easy to use with the On-Screen
Display and player display in combination with the remote control.
Unpacking
First check and identify the contents of your package, as listed below:
• Portable DVD player • Remote Control
• Car adaptor (12V) • Audio / Video cable
• User Manual • Warranty
• AC power adaptor, DSA-9W-09 F (DVE) or AY4132(PHILIPS)
Placement
• Place the player on a firm, flat surface.
• Keep away from domestic heating equipment and direct sunlight.
• If the player cannot read CDs/DVDs correctly, try using a commonly available
cleaning CD/DVD to clean the lens before taking the player to be repaired.
Other cleaning methods may destroy the lens.
• Always keep the disc door closed to avoid dust on the lens.
• The lens may cloud over when the player is suddenly moved from cold to warm
surroundings. It is then not possible to play a CD/DVD. Leave the player in a warm
environment until the moisture evaporates.
Page 15

INTRODUCTION
About Built-in Rechargeable Battery
Precautions related to battery recharge
1 Once the battery is fully discharged, immediately recharge it (regardless of
whether you plan to use the battery or not) in order to maximize the battery
life.
2 To charge the battery, please directly connect this DVD player to AC mains
and the charge indicator will turn on.
Using and maintaining your rechargeable batteries
1 Please make sure you always use only the AC adapter included with the play-
er to recharge your batteries.
2 Recharge efficiency will degrade when the environmental temperature drops
3 The lasting time of the fully charged battery when a headphone is connected
o
F (10oC) or exceed 95oF (35oC).
below 50
to the DVD player is approximately 2 hours.
Playable disc formats
In addition to DVD-Video disc, you will also be able to play all Video CDs and
audio CDs (including CD
±R, CD±RW,DVD±R and DVD±RW).
DVD-Video
Depending on the material on the disc (a movie, video clips, a
drama series, etc.) these discs may have one or more Titles, and
each Title may have one or more Chapters. To make access easy
and convenient, your player lets you move between Titles, and
also between Chapters.
CD with JPEG files
You can also view JPEG still photos on this player.
Page 16

INTRODUCTION
Video CD
Depending on the material on the disc (a movie, video clips, a drama
series, etc.) these discs may have one or more Tracks, and tracks
may have one or more indexes, as indicated on the disc case.To
make access easy and convenient, your player lets you move between tracks and
between indexes.
Audio CD / MP3 CD
Audio CDs / MP3-CD contain music tracks only. You can play
them in the conventional way through a stereo system using the keys on the
remote control and/or main unit, or via the TV using the On Screen Display (OSD).
Page 17

GENERAL INFORMATION
Power Sources
This unit operates on a supplied AC adapter and car adapter.
• Make sure that the input voltage of the AC adaptor is in line with the local voltage. Otherwise, the AC adaptor and unit may be damaged.
• Do not touch the AC adaptor with wet hands to prevent electric shock.
• When connecting with car power (cigarette lighter) adaptor, be sure the
input voltage of the adaptor is identical with car voltage.
• Unplug the AC adaptor from the outlet when the unit is not used for long periods of time.
• Hold the plug to disconnect the AC adaptor. Do not pull the power cord.
Safety and maintenance
• Do not disassemble the unit for laser rays are dangerous to eyes.
Any service should be done by qualified service personnel.
• Unplug the AC adaptor to cut the power if liquid or objects get inside the unit.
• Take care not to drop the unit or subject it to strong shocks, which may
cause malfunction.
• Important (for models with by-packed headphones): Schneider guarantees compliance with the maximum sound power of its audio players as
determined by relevant regulatory bodies only with the original model of provided headphones. In case this one needs replacement, we recommend that you
contact your retailer to order a model identical to that of the original provided
by Philips.
• Traffic safety: do not use while driving or cycling as you may cause an accident
• Do not expose to excessive heat caused by heating equipment or
direct sunlight.
• This product is not waterproof: do not allow your player to be submersed
in water. Water entering the player may cause major damage.
• Do not use any cleaning agents containing alcohol, ammonia, benzene,
or abrasives as these may harm the player.
• Apparatus shall not be exposed to dripping or splashing. Do not place any
sources of danger on the appartus (e.g. liquid filled objects,lighted candles)
• Do not touch the lens!
• Excessive sound pressure from earphones and headphones can cause hearing
loss.
• Battery shall not be exposed to excessive heat such as sunshine, fire or the like.
Note: When the player is in use for a long period of time, the surface will be
heated. This is normal.
Page 18

GENERAL INFORMATION
Hearing Safety
Listen at a moderate volume:
• Using headphones at a high volume can impair your hearing. This
product can produce sounds in decibel ranges that may cause hearing
loss for a normal person, even for exposure less than a minute. The
higher decibel ranges are offered for those that may have already experienced
some hearing loss.
• Sound can be deceiving. Over time your hearing "comfort level" adapts to higher volumes of sound. So after prolonged listening, what sounds "normal" can
actually be loud and harmful to your hearing. To guard against this, set your volume to a safe level before your hearing adapts and leave it there.
To establish a safe volume level:
• Set your volume control at a low setting.
• Slowly increase the sound until you can hear it comfortably and clearly, without
distortion.
Listen for reasonable periods of time:
• Prolonged exposure to sound, even at normally "safe" levels, can also cause
hearing loss.
• Be sure to use your equipment reasonably and take appropriate breaks.
Be sure to observe the following guidelines when using your headphones:
• Listen at reasonable volumes for reasonable periods of time.
• Be careful not to adjust the volume as your hearing adapts.
• Do not turn up the volume so high that you can't hear what's around you.
• You should use caution or temporarily discontinue use in potentially hazardous
situations.
• Do not use headphones while operating a motorized vehicle, cycling, skateboarding, etc.; it may create a traffic hazard and is illegal in many areas.
Page 19

GENERAL INFORMATION
Handling discs
• Do not attach paper or tape to the disc.
• Keep the disc away from direct sunlight or heat
sources.
• Store the disc in a disc case after playback.
•To clean, wipe the disc outwards from the center
with a soft, lint-free clean cloth.
On handling the LCD screen
The LCD is manufactured using high precision technology. You may, however, see
tiny black points and/or bright points(red,blue,green) that continuously appear on
the LCD. This is a normal result of the manufacturing process and does not indicate a malfunction.
Environmental information
We have reduced the packaging to its minimum and made it easy to separate into
mono materials: cardboard, PS, PE and PET.
Your set consists of material which can be recycled if disassembled by a specialized company. Please observe the local regulations to dispose of packaging,
exhausted batteries and old equipment.
Copyright information
All other brand and product names are trademarks of their respective companies
or organizations.
Unauthorized duplication of any recordings downloaded from the internet or made
from CDs / VCDs / DVDs is a violation of copyright laws and international
treaties.
Page 20

PREPARATIONS
Power supply
Using the AC / DC adaptor
Turn off the player before connecting the supplied
adapter to it and the main power supply (as
shown). The player must be turned off when the
battery charges.
TIP
✔
To avoid damage to the player, switch off before plugging or unplugging the
AC adaptor.
Using the car adapter
Connect the supplied car adapter to the set and the car cigarette lighter outlet.
TIP
✔
• To avoid damage to the player, switch off before plugging or unplugging
the car adaptor.
• When connecting with car power (cigarette lighter) adaptor, be sure the
input voltage of the adaptor is identical with car voltage.
• Make sure the temperature is below 35oC when the DVD player is con-
nected to DC 16.0V in a car.
Powering your remote control
1 Open the battery compartment. Remove the protective
plastic tab (first time users only).
2 Insert 1 x lithium 3V battery, type CR2025, then close
the compartment.
CAUTION
- Batteries contain chemical substances, so they should be disposed of
properly.
- Danger of explosion if battery is incorrectly replaced. Replace only with
the same or equivalent type.
- Incorrect use of batteries can cause electrolyte leakage
and will corrode the compartment or cause the batteries to burst.
Page 21

PREPARATIONS
Remove the battery if the remote control is not to be used for a long time.
Connections
Connecting headphones
Connect the headphones into the p jack of
your set.
Connecting additional equipment
• Turn off your set before connecting to any additional equipment.
• You can connect the player to a TV or an amplifier to enjoy DVDs or karaoke.
AV OUT
Connect the desired device to this terminal directly (no setting needed in the DVD
mode).
White
Red
Yellow
Page 22

GENERAL EXPLANATION
About this manual
This manual gives the basic instructions for operating this DVD player.
Some DVD discs however are produced in a way that requires specific operation or allows only limited operation during playback. In these cases the
player may not respond to all operating commands. When this occurs,
please refer to the instructions in the disc inlay. When a “ ” appears on
the screen, the operation is not permitted by the player or the disc.
Remote control operation
• Unless otherwise stated, all operations can be carried out with the remote
control. Always point the remote control directly at the player, making
sure there are no obstructions in the path of the infrared beam.
• When there are corresponding keys on the main unit, they can also be used.
Menu navigation
• Your player has an intuitive menu navigation system to guide you through
various settings and operations.
• Use the function keys to activate / disable relevant operations.
• Use 3, 4, 1, 2 to browse through menus.
• Press ENTER key to confirm your selection.
Page 23

BASIC FUNCTIONS
Switching on for OSD language setup
English is the default language of your player’s on screen display. You may choose to
use English, French, Spanish, German or Portuguese for your player’s on screen display.
Region OSD Language Options
Europe English, French, Spanish
1 Slide the POWER switch to ON to switch on the play-
er.
2 Press SETUP for the setup menu.
3 Select General Setup Page and press ENTER.
4 Scroll and select OSD Language and press 2 to
select from OSD language options.
5 Select your preferred language and press ENTER.
Loading discs and switching on
1 Slide OPEN to open the disc door.
2 Insert your chosen disc, label side up (also when a double sided
DVD disc is inserted). Make sure it is sitting properly in the correct recess.
3 Gently push to close the door.
4 Slide the POWER switch to ON to switch on the player.
✔
TIP
A normal mechanical noise is heard during playback.
Page 24

BASIC FUNCTIONS
Playing a DVD disc
After switching on, inserting the disc and closing the door, playback starts automatically. The screen shows the type of disc loaded. The disc may invite you to
select an item from a menu. Use the 3, 4, 11, 22 keys to highlight your selection,and press ENTER.
Note: Since it is usual for DVD movies to be released at different times in different regions of the world, all players have region codes and discs can have an
optional region code. If you load a disc of a different region code to your player,
you will see the region code notice on the screen. The disc will not play, and
should be unloaded.
Playing an audio or video CD disc
• After switching on, inserting the disc and closing the door, playback starts automatically. The screen shows the type of disc loaded as well as information
about the disc’s contents.
• While playing VCD with MTV/Karaoke, press number keys(0-9) to select the
track and press 2
menu of the selection.
;
or ENTER to play the track. Press MENU to go back to
Page 25

BASIC FUNCTIONS
Playing an MP3 CD
The following playback features are available for MP3 CDs.
Please refer to the corresponding sections for more information.
Volume control, skipping tracks, searching, repeat, shuffle, etc.
Use the 3, 4 keys to highlight your selected music folder.
Press ENTER to play.
Playing a JPEG discs
Use the 3, 4, 11, 22 keys to highlight your selected picture folder.
Press ENTER. The player will then automatically enter the slide show mode.
During playback, you can:
• Use the 3, 4, 11, 22 to rotate the picture.
• Use the 3 to filp up/down.
• Use the 4 to flip left/right.
• Press MENU to go back to folder screen.
• Press 9 to go to group preview.
• Use the 3, 4, 11, 22 to highlight the preview picture and access the
on-screen functions.
• Press ZOOM repeatedly to display the picture with different scales.
• Use the 3, 4, 11, 22 to view the zoomed picture (for picture zoomed in
only).
Note: Unless stated otherwise, all operations described are based on remote control operation.
Page 26

GENERAL FEATURESS
Moving to another title / track / chapter
When a disc has more than one title or
track, you can move to another
title/track/chapter as follows:
• Press § briefly during play to select
the next title/ track / chapter.
• Press J( briefly during play to step
back to the previous title/track/chapter.
• To go directly to any title, track or chapter, enter the corresponding number
using the numerical keys (0-9).
Search
During playback, press 22 repeatedly for
the following forward search options:
Press 11 repeatedly for the following
backward search options:
11 22
2 X backwards 2 X forward
4 X backwards 4 X forward
8 X backwards 8 X forward
16 X backwards 16 X forward
32 X backwards 32 X forward
normal speed normal speed
;
Press ENTER or 2
to resume normal playback.
Page 27

GENERAL FEATURES
Changing the audio output (for VCD/CD)
Press AUDIO repeatedly for the following audio options.
x 1 Mono left x 2 Mono right
x 3 Stereo
✔
TIP
This key is used to select audio languages during DVD playback.
ZOOM
The Zoom function allows you to enlarge the video image and to pan
through the enlarged image. Press ZOOM repeatedly to
select the following zooming options.
Zoom x 1 2X Zoom x 2 3X
Zoom x 3 4X Zoom x 4 1/2
Zoom x 5 1/3 Zoom x 6 1/4
Zoom x 7 normal
✔
TIP
During JPEG operation, the sequence is 100%, 125%, 150%, 200%, 50%,
75% and normal.
REPEAT
Press REPEAT 1/ALL repeatedly for the following repeat options:
DVD actions MP3 actions CD actions JPEG actions
x 1 repeats chapter repeats one repeats track repeats one
x 2 repeats title repeats folder repeats all repeats all
x 3 repeats all cancels repeat cancels repeat cancels repeat
x 4 cancels repeat
Page 28

GENERAL FEATURES
✔
TIP
The repeat function is also available for JPEG. The actions may vary for different media being played.
Repeat A - B
To repeat or loop a sequence in a title:
• Press A
- B at your chosen starting point;
A appears on the screen.
• Press A
- B again at your chosen end point;
AB appears on the display, and the repeat sequence
begins.
• To exit the sequence, press A
- B.
Volume Control
• Use the rotatary switch on the left side
of the unit to increase or decrease playback volume.
Page 29

GENERAL FEATURES
DISPLAY
Press DISPLAY on the remote repeatedly for the following display options:
x 1 Title elapsed Single elapsed
x 2 Title remained Single remained
x 3 Chapter elapsed Total elapsed
x 4 Chapter remained Total remained
X5 Display off Display off
DVD CD/VCD
✔
TIP
During JPEG operation, pressing this button enables you to select 17
slideshow modes.
Page 30

SPECIAL DVD FEATURES
Checking the contents of DVD-Video discs: MENU.
For titles and chapters, selection menus may be included on the disc.
The DVD’s menu feature allows you to make selections from these menus. Press
the appropriate numerical key; or use the 3, 4, 11, 22 keys to highlight your
selection, and press ENTER.
Disc menu
Press MENU. The menu may list, for example, camera
angles, spoken language and subtitle options, and chapters
for the title.
Changing the language
Press AUDIO. If the current disc has different langauge
options, this now appears on the screen.
Press AUDIO repeatedly until you have reached
your desired language option.
Subtitle
Press SUB. If the current disc has different subtitles options,
this now appears on the screen.
Press SUB repeatedly until you have reached
your desired subtitles option.
✔
TIP
The above two features depend on whether your disc contains any language
or subtitle options.
Page 31

SPECIAL DVD FEATURES
Playing a title
1 Press MENU to enter the disc title menu.
2 Use 11 , 22, 3, 4 or numeric keys (0-9) to select a play option.
3 Press ENTER to confirm.
Page 32

SETUP OPERATIONS
To maximize your playback experience, use SETUP to fine tune your settings.
Use the 3, 4, 11, 22 keys to highlight your selection, and press ENTER.
1 Press SETUP. A list of features is shown.
2 Use the 3 4 keys to highlight your selection.
When the cursor highlights these settings, press ENTER to:
General Setup Page select display and other options
Video Setup Page select video options
Password Setup Page select password options
Preference Page select playback preferences
Exit exit the system menu
3 Press 11 to abort current settings or go back to previous menu level.
4 Press SETUP to exit.
General Setup Page
When the cursor highlights these settings, press ENTER to:
TV Display select display ratio
Angle Mark select angle mark display options
OSD Language select onscreen display language
Screen Saver select screen saver options
Last Memory select last playback memory options
Press 11 to abort current settings or go back to previous menu level.
Note: Before using the 3,4 keys to select your desired angle mark, ensure the
disc has been recorded with angle mark and you have enabled the angle mark
option in the system menu.
Page 33

SETUP OPERATIONS
Video Setup Page
When the cursor highlights these settings, press ENTER to:
Brightness select brightness level
Contrast select contrast level
Press 11 to abort current settings or go back to previous menu level
Password Setup Page
When the cursor highlights these settings, press ENTER to:
Password change existing password (3308 by default)
Press 11 to abort current settings or go back to previous menu level
Note: Parental options are only selectable when password mode is deactivated.
Preference Page
When the cursor highlights these settings, press ENTER to:
Audio select audio language options
Subtitle select subtitle language options
Disc Menu select disc menu language options
Parental select parental options
Default restore factory settings
Press 11 to abort current settings or go back to previous menu level.
Page 34

TROUBLESHOOTING
If it appears that the DVD-Video player is faulty, first consult this checklist.
It may be that something has been overlooked.
WARNING
Under no circumstances should you try to repair the set yourself as this
will invalidate the guarantee.
If a fault occurs, first check the points listed, before taking the set for
repair. If you are unable to solve a problem by following these hints,
consult your dealer or service centre.
Symptom Remedy
No power – Check if both plugs of the mains cord are
Distorted picture – Check the disc for fingerprints and clean with
Completely distorted – The PAL setting may be in the wrong
picture / no colour in status. Match your TV’s setting with the
the TV screen player’s setting.
No sound – Check audio connections. If using a HiFi
properly connected.
– Check if there is power at the AC outlet by
plugging in another appliance.
– Check if the built-in battery is drained.
– Check if car adaptor is connected appropriately.
a soft cloth, wiping from centre to edge.
– Sometimes a small amount of picture distor-
tion may appear. This is not a malfunction.
amplifier, try another sound source.
Page 35

TROUBLESHOOTING
Symptom Remedy
Disc can’t be played – Ensure the disc label is upwards.
The player does not – Aim the remote control directly at the
respond to the remote sensor on the front of the player. Avoid all
control obstacles that may interfere with the signal
Distorted or B/W – Use only discs formatted according to the
picture with DVD TV-set used (PAL).
Player does not respond – Operations are not permitted by the disc.
to all operating commands – Refer to the instructions in the disc inlay.
during playback
Player feels warm – When the player is in use for a long
Display goes dimmer when – The unit is saving power to ensure longer
AC is unplugged playtime with battery. It is normal.
This set complies with the radio interference requirements of the
European Union.
– Clean the disc.
– Check if the disc is defective by trying another
disc.
path. Inspect or replace the batteries.
period of time, the surface will be heated.
This is normal.
Adjust the brightness using the rotary brightness control.
Page 36

TECHNICAL DATA
Dimensions 210 x 178 x 39 mm
Weight 0.79 kg / 0.36 pounds
Power supply DC 9V 1.0A
Power Consumption 9W
Operating temperature range 0 - 45°C
Laser wavelength 650nm
Video system NTSC
Frequency response 20Hz ~ 20KHz ± 1dB
Signal/noise ratio ≥ 80dB
Audio distortion + noise ≤ -80(1KHz)
Channel separation ≥ 80dB
Dynamic range ≥ 80dB
Audio out (analog audio) Output level: 2V ± 10%
Load impedance: 10KΩ
Video out Output level: 1Vp - p ± 20%
Load impedance: 75Ω
PHILIPS reserves the right to make design and specification
changes for product improvement without prior notice.
Modifications not authorized by the manufacturer may void users
authority to operate this device.
All rights reserved.
8.3 x 7.0 x 1.5 inches
Page 37

CLASS 1
LASER PRODUCT
Specifications are subject to change without notice.
Trademarks are the property of Koninklijke Philips Electronics N.V.
2007© Koninklijke Philips Electronics N.V. All rights reserved.
or their respective owners
Printed in China wk804
 Loading...