

Philips PET1000-00 User Manual
PET1000_ENG.QXD 4/11/05 10:07 AM Page 1
user manual
manuel d’utilisation | manual del usuario | benutzerhandbuch
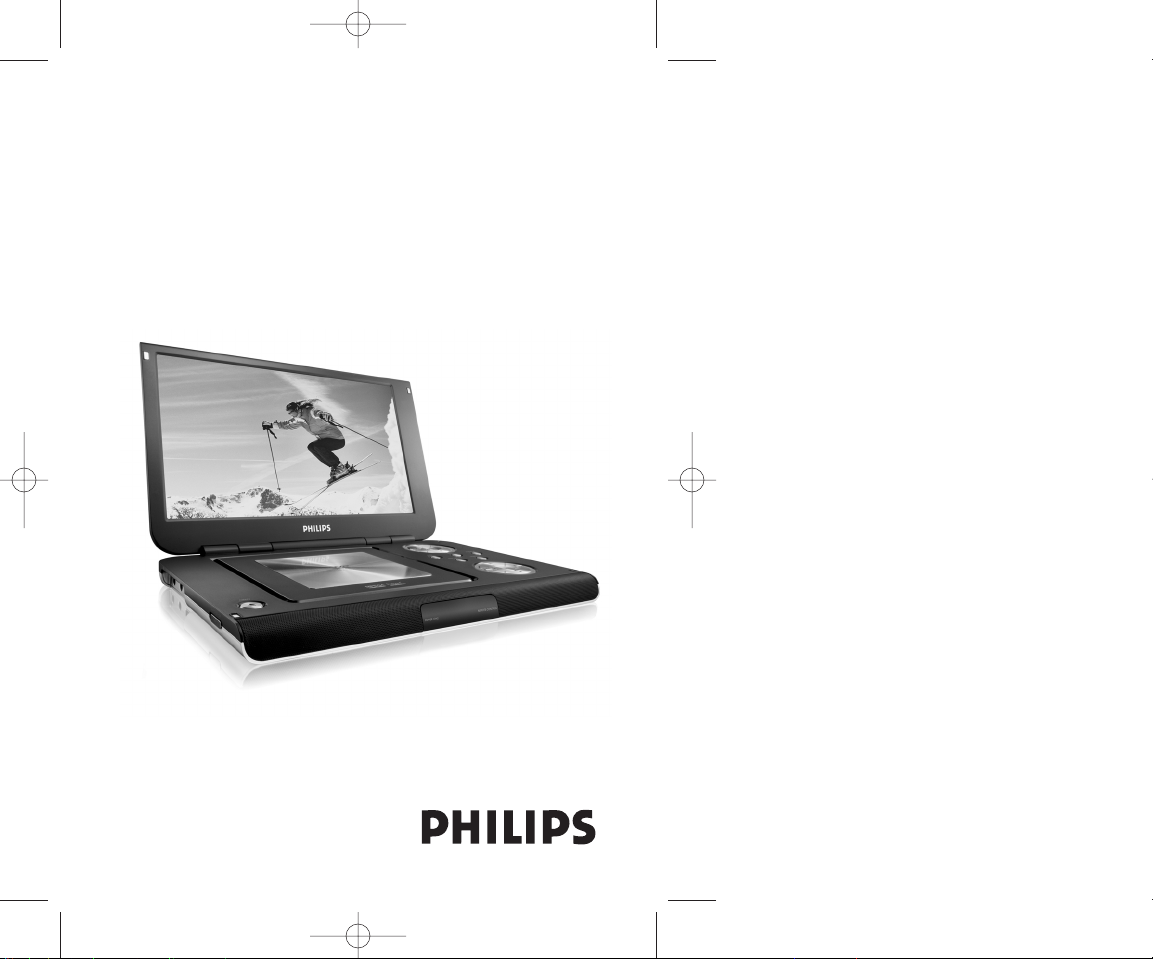
Portable DVD Player

Important notes for users in the UK
This set complies with the radio interference requirements of the
European Union.
Mains plug
This apparatus is fitted with an approved 13 Amp plug.To change a fuse in this
type of plug proceed as follows:
1. Remove fuse cover and fuse.
2. Fix new fuse which should be a BS1362 5 Amp,A.S.T.A. or BSI approved type.
3. Refit the fuse cover.
If the fitted plug is not suitable for your socket outlets, it should be cut off and an
appropriate plug fitted in its place. If the mains plug contains a fuse, this should
have a value of 5 Amp. If a plug without a fuse is used, the fuse at the
distribution board should not be greater than 5 Amp.
Note:The severed plug must be disposed of to avoid a possible shock hazard
should it be
inserted into a 13 Amp socket elsewhere.
How to connect a plug
The wires in the mains lead are coloured with the following code: blue = neutral
(N), brown = live (L).As these colours may not correspond with the colour
markings identifying the terminals in your plug, proceed as follows:
• Connect the blue wire to the terminal marked N or coloured black.
• Connect the brown wire to the terminal marked L or coloured red.
• Do not connect either wire to the earth terminal in the plug, marked E (or e)
or coloured green (or green and yellow).
• Before replacing the plug cover, make certain that the cord grip is clamped
over the sheath of the lead - not simply over the two wires.
Copyright in the U.K.
Recording and playback of material may require consent. See Copyright Act
1956 and The Performer’s Protection Acts 1958 to 1972.
CAUTION!
Apparatus shall not be exposed to dripping or splashing. Do not place any
sources of danger on the appartus (e.g. liquid filled objects,lighted candles)
PET1000_ENG.QXD 4/11/05 10:07 AM Page 2

1
English
Functional Overview ––––––––––––––––––––––––––––––––––– 2-3
Remote Control ––––––––––––––––––––––––––––––––––––––– 4-5
Introduction ––––––––––––––––––––––––––––––––––––––––––– 6-7
General information
Power Sources –––––––––––––––––––––––––––––––––––––––––– 8
Safety and maintenance ––––––––––––––––––––––––––––––––––– 8
Handling discs –––––––––––––––––––––––––––––––––––––––––– 9
Environmental & copyright information ––––––––––––––––––––––– 9
Preparations
Power supply ––––––––––––––––––––––––––––––––––––––– 10-11
Connections –––––––––––––––––––––––––––––––––––––––– 12-14
General explanation
About this manual –––––––––––––––––––––––––––––––––––––– 15
Remote control operation –––––––––––––––––––––––––––––––– 15
Menu navigation –––––––––––––––––––––––––––––––––––––––– 15
Basic functions
Switching on for OSD language setup ––––––––––––––––––––––– 16
Loading discs and switching on –––––––––––––––––––––––––––– 16
Playing a DVD disc –––––––––––––––––––––––––––––––––––––– 17
Playing an audio or video CD disc –––––––––––––––––––––––––– 17
Playing Divx
®
disc––––––––––––––––––––––––––––––––––––––– 17
Playing an MP3-CD ––––––––––––––––––––––––––––––––––––– 18
Playing a JPEG discs ––––––––––––––––––––––––––––––––––––– 18
General Features
Moving to another title / track / chapter ––––––––––––––––––––– 19
Still picture and step frame ––––––––––––––––––––––––––––––– 19
Search ––––––––––––––––––––––––––––––––––––––––––––––– 19
Slow motion –––––––––––––––––––––––––––––––––––––––––– 20
Changing the audio output ––––––––––––––––––––––––––––––– 20
Zoom ––––––––––––––––––––––––––––––––––––––––––––––– 20
Mute –––––––––––––––––––––––––––––––––––––––––––––––– 20
Repeat ––––––––––––––––––––––––––––––––––––––––––––––– 20
Repeat A>B ––––––––––––––––––––––––––––––––––––––––––– 21
Play modes ––––––––––––––––––––––––––––––––––––––––––– 21
Volume Control –––––––––––––––––––––––––––––––––––––––– 21
Monitor –––––––––––––––––––––––––––––––––––––––––––––– 21
Sound ––––––––––––––––––––––––––––––––––––––––––––––– 21
Special DVD features
Disc menu –––––––––––––––––––––––––––––––––––––––––––– 22
Camera angle ––––––––––––––––––––––––––––––––––––––––– 22
Changing the language ––––––––––––––––––––––––––––––––––– 22
Subtitles –––––––––––––––––––––––––––––––––––––––––––––– 22
OSD operations –––––––––––––––––––––––––––––––––––––––– 23
SETUP operations ––––––––––––––––––––––––––––––––––– 24-26
Troubleshooting –––––––––––––––––––––––––––––––––––––– 27-28
Technical data –––––––––––––––––––––––––––––––––––––––––– 29
Contents
PET1000_ENG.QXD 4/11/05 10:07 AM Page 1
2
English
Left of player
Right of player
Main unit controls
Front of player
DVD PLAYER LAYOUT
PET1000_ENG.QXD 4/11/05 10:07 AM Page 2

3
English
CAUTION
Use of controls or adjustments or performance of
procedures other than herein may result in hazardous
radiation exposure or other unsafe operation.
1 3, 4, 1, 2,
Up / down / left / right cursor
OK
Confirms selection
2 OSD
On Screen Display on / off
MENU
Displays MENU page
VIDEO OUT
Selection video format
– COMPONENT OUT(YPBPR)
– COMPONENT OUT(YCBCR)
– A/V or S-VIDEO OUT
– A/V IN (AUX)
MONITOR
Selection display
To adjust the brightness with
12
To adjust the color with 12
To adjust the screen of 16:9
or 4:3 with 12
SOUND
Turn virtual on/off
3 ;
Pauses playback
2
Starts / resumes playback
9
Press twice to stop playback
J( / §
For previous (J( ) or next (§)
chapters, tracks or titles
5 / 6
Search backward (5 ) or search
forward (6)
4 0 OPEN
Opens disc door to insert or
remove disc
5 POWER/CHG
Power and charging indicator
IR
Remote sensor
6 ON .POWER .OFF
Switches the player on / off
7
Headphones jack
8 VOLUME F
Volume control
9 A/V OUT
Audio/Video output jack
0 A/V IN
Audio/Video input jack
! DIGITAL AUDIO OUT
Digital audio output jack
@ S-VIDEO
S-Video output jack
# COMPONENT VIDEO
Component video output jack
$ DC IN 9V
Po wer supply socket
Functional Overview
PET1000_ENG.QXD 4/11/05 10:07 AM Page 3
4
English
REMOTE CONTROL LAYOUT
PET1000_ENG.QXD 4/11/05 10:07 AM Page 4
5
English
1 3, 4, 1, 2
Up / down / left / right cursor
OK
Confirms selection
2 VOL
++ // −−
Volume control
3 J( / §
For previous (J( ) or next (§)
chapters, tracks or titles
;
Pauses playback
2
Starts / resumes playback
9
Press twice to stop playback
5 / 6
Search backward (5 ) or search
forward (6)
4 OSD
On Screen Display on / off
.
Slow motion
5 AUDIO
Audio langauge selector
ZOOM
Enlarges video image
6 A > B
To repeat or loop a sequence
in a title
PLAY-MODE
Selects play order options
7 0 - 9
Numeric keypad
8 MUTE
Muting player volume
REPEAT
Repeats chapter / title / disc
9 RETURN
For VCD menu page
ANGLE
Selects DVD camera angle
0 SUBTITLE
Subtitle language selector
LANGUAGE
Language selector
! MENU
Displays MENU page
@ SETUP
Enters SETUP menu
Remote Control
PET1000_ENG.QXD 4/11/05 10:07 AM Page 5

Your portable DVD player
Your portable DVD player plays digital video discs conforming to the
universal DVD Video standard.With it, you will be able to enjoy full-length
movies with true cinema picture quality, and stereo or multichannel sound
(depending on the disc and on your playback set-up).
The unique features of DVD-Video, such as selection of soundtrack and
subtitle languages, and of different camera angles (again depending on the
disc), are all included.
What’s more, parental lock lets you decide which discs your children will be
able to see.You will find your player remarkably easy to use with the OnScreen Display and player display in combination with the remote control.
Unpacking
First check and identify the contents of your package, as listed below:
• Portable DVD player • Remote Control
• Car adaptor (12V) • AC power adaptor
• Rechargeable battery pack • User Manual
• Warranty • Audio / Video cable
• S-Video cable • Component Video cable
• Travel bag (subject to region)
Placement
• Place the player on a firm, flat surface.
• Keep away from domestic heating equipment and direct sunlight.
• If the player cannot read CDs/DVDs correctly, try using a commonly
available cleaning CD/DVD to clean the lens before taking the player
to be repaired. Other cleaning methods may destroy the lens.
• Always keep the disc door closed to avoid dust on the lens.
• The lens may cloud over when the player is suddenly moved from cold
to warm surroundings. It is then not possible to play a CD/DVD.
Leave the player in a warm environment until the moisture evaporates.
6
Introduction
English
PET1000_ENG.QXD 4/11/05 10:07 AM Page 6
Playable disc formats
In addition to DVD-Video disc, you will also be able to play all Video CDs
and audio CDs (including CDR, CDRW, DVDR and DVD+RW).
DVD-Video
Depending on the material on the disc (a movie, video
clips, a drama series, etc.) these discs may have one or
more Titles, and each Title may have one or more
Chapters.To make access easy and convenient, your
player lets you move between Titles, and also between
Chapters.
Video CD
Depending on the material on the disc (a movie, video clips,
a drama series, etc.) these discs may have one or more
Tracks, and tracks may have one or more indexes, as
indicated on the disc case.To make access easy and
convenient, your player lets you move between tracks and
between indexes.
Audio CD / MP3 CD
Audio CDs / MP3 CD contain music tracks only. You can
play them in the conventional way through a stereo system
using the keys on the remote control and/or main unit, or
via the TV using the On Screen Display (OSD).
CD with JPEG files
You can also view JPEG still photos on this player.
DivX video discs
You can also view discs containing DivX®video on this
player.
• Official DivX®CertifiedTMproduct
• Plays DivX®5, DivX®4, DivX®3, and DivX®VOD
video content.
7
English
PET1000_ENG.QXD 4/11/05 10:07 AM Page 7

8
English
Power Sources
This unit operates on a supplied AC adapter, car adapter, or a rechargeable
battery pack.
• Make sure that the input voltage of the AC adaptor is in line with the local
voltage. Otherwise, the AC adaptor and unit may be damaged.
• Do not touch the AC adaptor with wet hands to prevent electric shock.
• When connecting with car power (cigarette lighter) adaptor, be sure the
input voltage of the adaptor is identical with car voltage.
• Unplug the AC adaptor from the outlet or remove the battery pack when
the unit is not used for long periods of time.
• Hold the plug to disconnect the AC adaptor. Do not pull the power cord.
Safety and maintenance
• Do not disassemble the unit for laser rays are dangerous to eyes.
Any service should be done by qualified service personnel.
• Unplug the AC adaptor to cut the power if liquid or objects get inside the unit.
• Take care not to drop the unit or subject it to strong shocks, which may
cause malfunction.
• Hearing safety: listen at a moderate volume. Using headphones at high
volume can impair your hearing.
• Important (for models with bypacked headphones): Philips guarantees
compliance with the maximum sound power of its audio players as
determined by relevant regulatory bodies only with the original model of
provided headphones. In case this one needs replacement, we recommend
that you contact your retailer to order a model identical to that of the
original provided by Philips.
• Traffic safety: do not use while driving or cycling as you may cause an accident
• Do not expose to excessive heat caused by heating equipment or
direct sunlight.
• This product is not waterproof: do not allow your player to be submersed
in water.Water entering the player may cause major damage.
• Do not use any cleaning agents containing alcohol, ammonia, benzene,
or abrasives as these may harm the player.
• Do not touch the lens!
Note:When the player is in use for a long period of time, the surface will be
heated.This is normal.
General information
PET1000_ENG.QXD 4/11/05 10:07 AM Page 8
 Loading...