

Page 1

PC Camera
User Guide
PCA635VC
Page 2
This manual covers the installation, usage and troubleshooting of the Philips PCA635VC Camera and Videogram software. You will notice, to get up and running quickly, that a separate Quick Start guide has been included. This manual
should be used along with the Quick Start guide and referenced when you need a more complete explanation.
In addition, on-line help is available inside the Videogram Creator application. A “Read Me” file can be found in the program group where you install the Videogram Creator software. If you install the Videogram Creator software to its default
folder then you may access this by clicking on “Start,” followed by “Programs,” then the “Philips PCA635VC Camera”
program group and finally click on “Read Me.” The “Read Me” file contains information that was not available at the time
this manual was created.
To save you time, at the beginning of each Chapter, please notice that there is a short summary of what that Chapter
covers. Also, an index and glossary are available towards the end of this manual for quick reference. If you get stuck, please
refer to Chapter 11, “Frequently Asked Questions.” For more advanced uses, investigate Chapter 9, “Advanced Features.”
This chapter will help you optimize your system for Videogram capture as well as assist you in creating Videograms for
Internet Websites.
Manual Conventions
Look for the following symbols to identify items of importance.
Requires Extra Attention
Helpful Tips
Valuable Information
Important–These settings affect whether or not you see video.
22
About This Manual
Page 3

About This Manual 2
Manual Conventions 2
Table Of Contents 3
About Your Philips PCA635VC 6
Bundled Software 6
Videogram Creator 6
Chapter 1 Before You Begin 7
Check the Package Contents 7
Minimum System Configuration 7
Optimum System Configuration 7
Safety Tips 8
Maintenance 8
Chapter 2 Setup & Installation 9
Installing Philips PCA635VC Unit 9
connecting the camera, the microphone and the adapter
directing the camera
Chapter 3 Software Installation 10
STEP 1: Re-Connect the Power
STEP 2: Turn On the System and Launch Windows 95
STEP 3: Insert CD-ROM 1
STEP 4: Click the “Start” Button and then “Run”
STEP 5: Enter Program Name
STEP 6: Follow the Installer Directions
QuickVideo Software on System 11
Philips PCA635VC Program Group
Videogram Player Group
Philips PCA635VC Setup Wizard
Table Of Contents
3
Page 4

Chapter 4 Videogram Creator Software 14
Opening the Videogram Creator application 15
Video & Audio Settings 15
Settings Control Panel
OK & CANCEL Buttons
Format 15
Quality
Size
Adjust 16
Video 17
Audio 17
Capture Audio
Frequency
Size
Channels
Image 18
Size
Subject
Quality
The Main Window 19
File Menu Bar
File Menu
Edit Menu
Tools Menu
Help
Video Toolbar 20
Sound Toolbar 21
Chapter 5 Creating & Saving Videograms 22
Videograms and AVI Video Files Compared 22
3 Easy Steps for Video Creation 22
STEP 1 - Preview Video
STEP 2 - Record & Play Video
STEP 3 - Send/Save a Videogram
Sending Videograms
Saving Videograms
Send Videogram Dialog Box Settings
Helpful Hints for Sending Videograms 27
MIME versus UUencode
Sending Videograms Without Attaching The Player
Using Videograms With Non-MAPI Email Programs 28
Sending Videograms with non-MAPI Email Programs
Receiving Videograms with a non-MAPI Email Program
Chapter 6 Playing Videograms 29
Under Windows 95 29
Under Windows 3.1x 29
Streaming Videogram Player 29
Playing Non-Executable Videogram Files 29
4
Page 5

Chapter 7 Grabbing Snapshot Images 32
Capturing a Snapshot 32
STEP 1: Preview Video
Live Video
STEP 2: Grab Still
Live Video
STEP 3: View the Bit Mapped Image
STEP 4: Save and Send
Grabbing Snapshot Images from Pre-Recorded Video 34
Picturegram 34
Chapter 8 Adding Narration & Audio 35
Add Live Sound 35
Record Audio or Narration
Add Pre-Recorded Sound 35
STEP 1: Select Insert Audio under the Edit menu
STEP 2: Select an Audio File to Insert
Chapter 9 Using Videograms 36
Sending with E-Mails 36
Family
Salespeople
Business Consultants
Training
Internet Sites
Using In Presentations 36
Presenters
Adding Videograms To Presentation Software
Stand-Alone Videogram Presentations
Chapter 10 Advanced Features 38
Video Streaming 38
Standard Internet File Download
With Videogram Streaming
Adding Videograms To Internet Sites 38
Viewing Videograms On Internet Sites 39
Optimizing System for Video Capture & Playback 39
Video Capture Optimization
What Happens When Capturing Video
Parallel Port Recommendations
Processor, Hard Disk & Controller Recommendations
Video Playback Optimization
When Playing Back Video
System Recommendations
Graphics Card Recommendations
Chapter 11 Frequently Asked Questions 42
Chapter 12 Specifications 46
Glossary Of Terms 47
5
Page 6

Your Philips PCA635VC Camera is the easiest way to capture and send video from your desktop or laptop computer. The
Philips PCA635VC along with Videogram Creator Software, incorporates the latest in video capture and playback technology into a high quality, compact video camera. With the PCA635VC you can capture full-motion video at resolutions up
to 320X240 (CIF Standard) at 30 frames per second through the parallel port. There is no need to open your computer to
enhance all your communications with video, quickly and easily. And you can also capture high resolution still images.
Bundled Software
Videogram Creator
The Videogram Creator software allows you to compress captured video files, embed the Videogram Player inside the file,
and play it back on any Windows 3.1x, Win 95 or Windows NT system without installing the Player on the target system.
This makes it perfect for sending Videograms through email. The compression is so great that a 1-minute Videogram with
the Player fits on a standard, 31/2 -inch, 1.44MB floppy disk.
•
When to Use Videograms
Videograms are perfect for any situation where you want to share more than just words or you want to share the experience in person but can’t-birthdays; thank you messages; a child’s first steps or words; a motivational speech; a sales
call; a product demonstration. You can attach Videograms to email messages, post them to Websites, or create them so
that others can stream the Videogram from your Website in real-time. See Chapter 8 for more ideas and examples.
Microsoft NetMeeting
Using your PC and the Internet, you can now hold face-to-face conversations with friends and family around the world.
Video is just one of the powerfull features of NetMeeting 2.0. Its data conferencing features let you collaborate with a
group of people from within any Windows application - drawing on a shared whiteboard, sending text messages, and
transferring files. And NetMeeting’s real-time audio lets you talk to other people over the Internet, even if you use a
14.4 kbps modem. NetMeeting’s video, audio, and data conferencing are all based on industry standards, so you can communicate with people using compatible products.
For the latest version of this program and for more information on this sorftware, go to the Microsoft webside:
www.microsoft.com.
About Your Philips PCA635VC
6
Page 7

This chapter provides a checklist of items you need to ensure a smooth installation including a section on general safety.
Before installation, make sure that your Philips PCA635VC was shipped complete (“Package Contents”) and then verify
that your system meets the minimum requirements (“System Requirements”).
Check the Package Contents
Please check your Philips PCA635VC package for the items shown below. If any of the items are missing, contact immediately at one of the numbers or addresses listed at the beginning of this manual.
•
Philips PCA635VC attaches to the parallel port of your PC and remains outside the computer. There is no need to
open your computer to use the Philips PC Camera. Connect your video sources to the Philips PCA635VC Camera to
begin digitizing (or capturing) video into your computer.
•
User Manual - Use this if you are familiar with computer peripheral installations and want to get up and running
quickly.
•
Philips PCA635VC Bundled Software (CD-ROM) - Install the Philips PCA635VC Videogram Creator Software and
the electronic User Guide.*
Minimum System Configuration
This section itemizes what is required and recommended for installation of your Philips PCA635VC and related software.
It is assumed that you already have a computer, monitor, keyboard, mouse, etc..
Your system must meet or exceed the following minimum requirements to use the Philips PCA635VC Camera and related
software:
•
Windows 95
•
Pentium 75 or faster PC
•
Bi-directional Parallel Port (ECP Parallel Port for optimal performance)
NOTE: Your Philips PCA635VC Camera is backwards compatible and supports standard Bi-directional Parallel Printer
Ports. Please take a look at the “Read Me” document inside the Philips PCA635VC program group for additional information.
•
16MB RAM
•
23MB of free hard disk space (video files may require more disk space)
•
CD-ROM drive for application software and drivers
Optimum System Configuration
A more optimum system configuration for using the Philips PCA635VC might be:
•
Windows 95 with no other video capture devices installed
•
Pentium 133 or faster PC
•
An available ECP parallel printer port
•
32MB RAM
•
High Speed Hard Drive Controller & Drive(s)
•
At least 23MB of free hard disk space
•
CD-ROM drive for application software and drivers
•
A Windows sound system or SoundBlaster-compatible audio capability with speakers
NOTE: This product is not MAC compatible
Additional information regarding system optimization for video capture and playback can be found in Chapter 10,
“Advanced Features”.
Before You Begin
7
Page 8

Safety Tips
Before you install this product, be sure to safeguard yourself, your computer system and the Philips PCA635VC. It is
recommended that you follow these precautions in addition to any precautions you may have found in other documents
for your computer.
•
Shut down and disconnect system power prior to plugging and unplugging connectors.
•
Do not plug an excessive amount of devices into a power outlet and do not run more than one power strip off any
outlet.
•
On rare occasions, some installations of the Philips PCA635VC may require opening the system itself to install a compatible ECP parallel printer port card (obtained from local computer store). If you find this necessary, be careful of the
sharp edges inside the computer and note the safety instructions of the product you are installing.
Maintenance
If you observe the following guidelines, you will prevent defects and the camera will be used safely.
• The outside of the camera can be cleaned with a soft cloth.
• Do NOT use cleaning fluids based on alcohol, methylated spirit, ammonia, etc..
• Avoid direct contact with water.
• If the lens has to be cleaned, use a special lens cleaning tissue, available at any good camera store.
• You can use the camera only indoors.
• Keep the camera free from oil, vapour, steam, moisture and dust.
• Keep the camera away from a heater, lighting equipment and direct sunlight.
• Never direct the lens of your camera towards the sun.
To prevent fire or shock hazard, do not exposure this camera to rain or moisture. Do not attempt to disassemble the camera. In order to prevent shock and fire hazard, do not remove screws or covers.
There are no userserviceable parts inside.
Important: Use a power that meets the requirements according to EN 60950 only. For USA: Use a UL listed 5V, 2.5 Watt
DC power supply compliant with UL 1950.
8
Page 9
This chapter walks you through the installation and setup process for your Philips PCA635VC unit. Some of the diagrams
in this section may look different than your system. This user’s guide is designed to be used along with any existing documentation that you have collected for your computer.
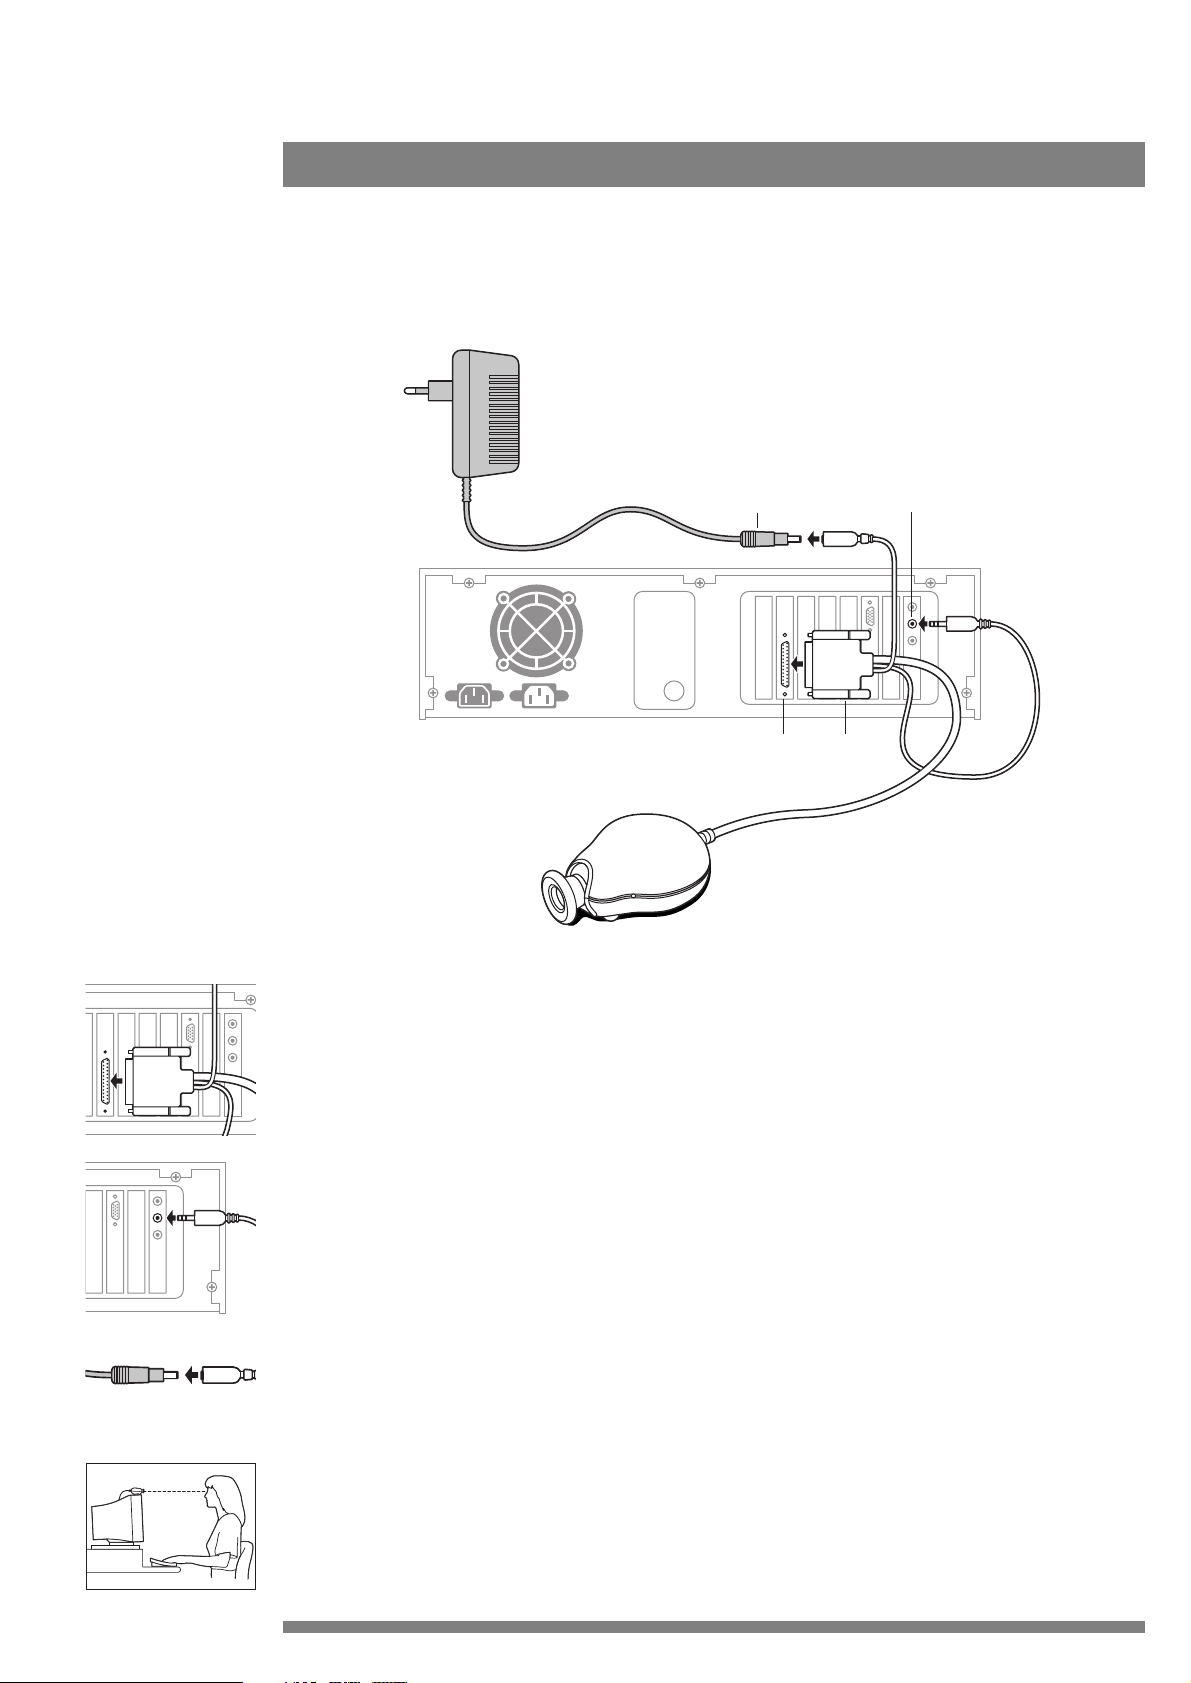
The following diagram is an overview of all the wiring connections for Philips PCA635VC.
Connect the camera, the microphone and the adapter
1 Switch off the computer.
2 Connect the connector at the end of the camera cable to the parallel port of the computer.
3 Protruding from the connector which is now connected to the parallel port are two short cables with small connectors,
One of these two connectors fits into the line in of the sound card. Take hold of the small connector and push it firmly and fully into the line in of the sound card.
4 Connect the remaining small connector into the connector of the adapter cable.
Directing the camera
5 The position of the camera and the amount of light available have a great effect on the quality of the video images.
Preferably position the camera at eye level and less than a metre away from what you want to record. Ensure that as
much light as possible is falling on the object you want to record.
Setup & Installation
9
2
Drawings
not to scale
Camera
Adapter
Parallel port
Parallel connec-
tor
Sound card
Line In
Adapter connector
to camera
connector...
...to
adapter
Page 10
This Chapter describes installation of the Philips PCA635VC software, including the Videogram Creator and Player software. Due to the true 32-bit nature of the software, the installation will only work under Windows 95.
STEP 1: Re-Connect the Power
During the hardware setup we instructed you to unplug the computer system from the wall outlet or power strip. If you
did this, please plug the system’s power back in. Next, plug the power adapter of the camera into a wall outlet or power
strip.
STEP 2: Turn On the System and Launch Windows 95
Turn on your computer system in the normal manner. Windows 95 will boot automatically if it is installed to its default
configuration.
If the system does not power on, make sure no connections came loose during installation of the Philips PCA635VC. If
something is loose, reconnect it and try powering on again. Be sure to pay special attention to the monitor and power
cords-check to see that they are still connected to the back of the computer and/or plugged in to the power strip.
STEP 3: Insert CD-ROM
Place the Philips PCA635VC CD-ROM into your CD-ROM drive (typically D:) referred to as X: for the remainder of
these steps. If your copy of Windows 95 supports Auto Play, the dialog box in Step 6 will automatically appear in a few
seconds. Otherwise, proceed to Step 4.
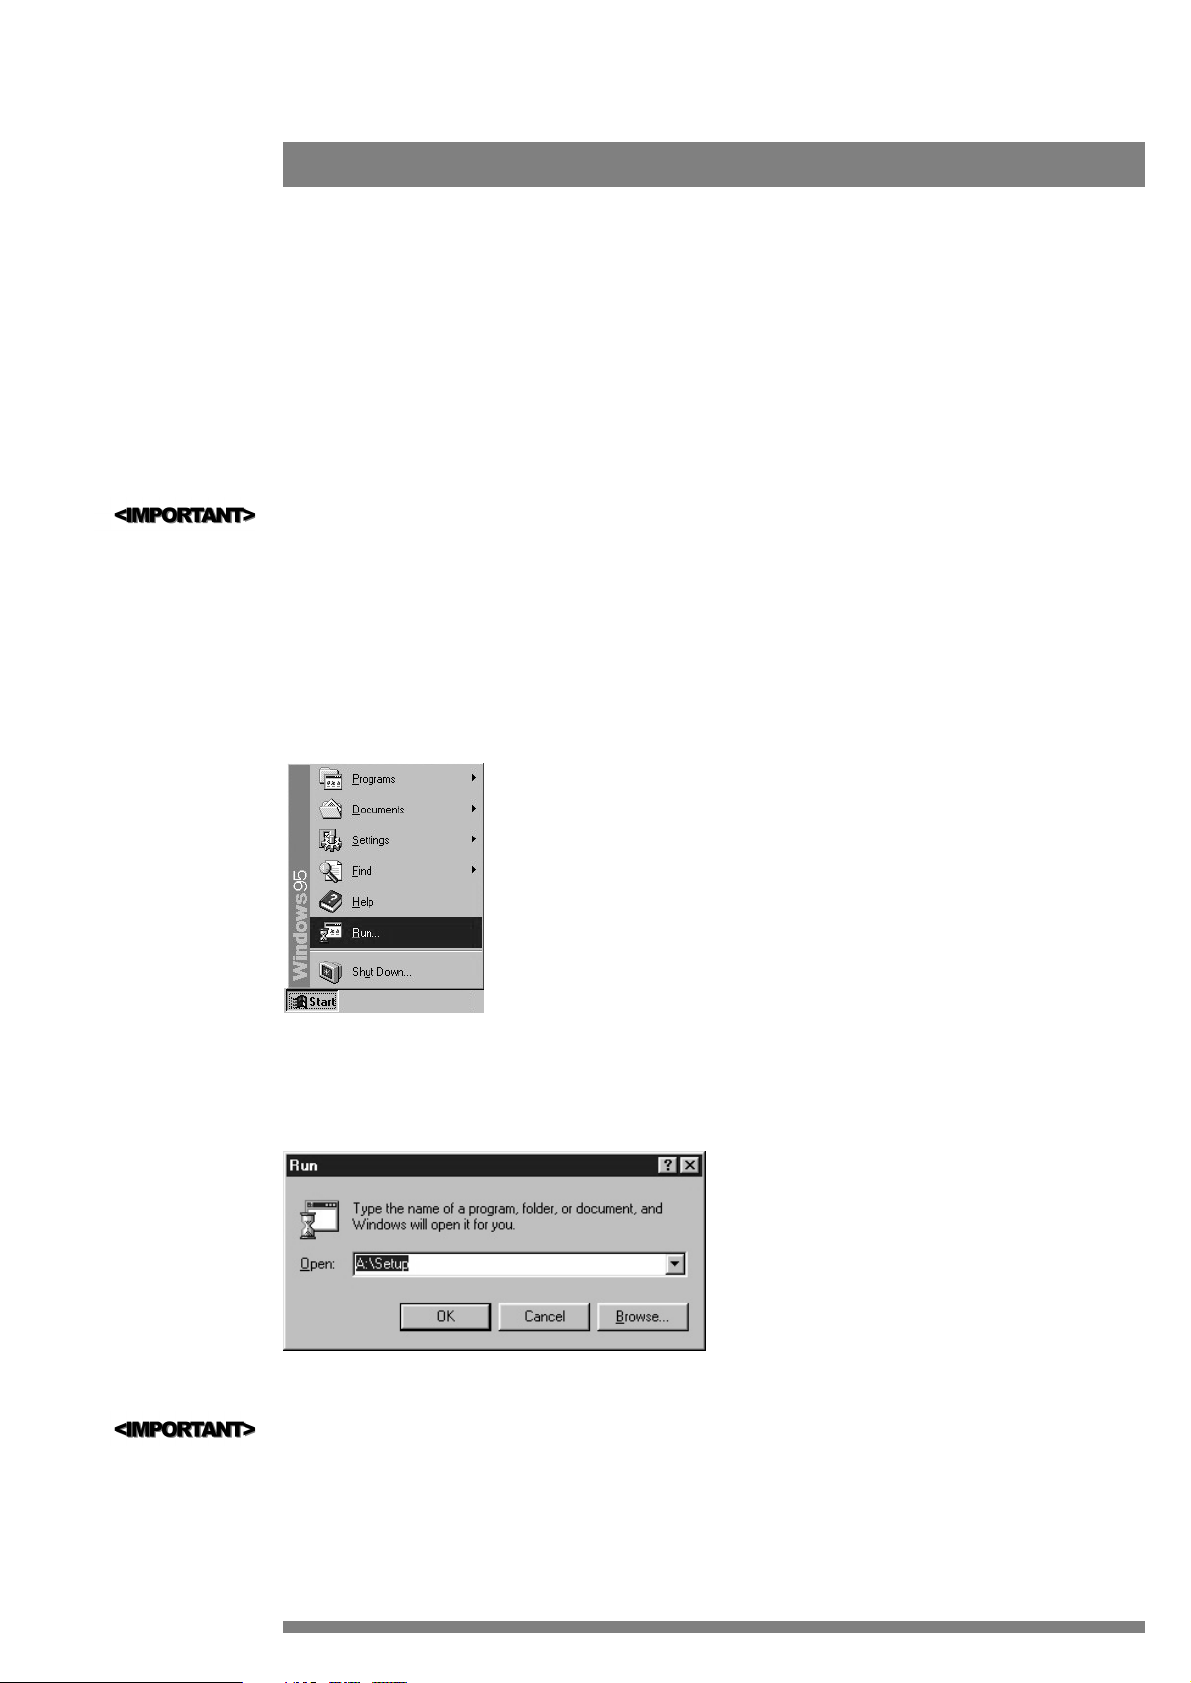
STEP 4: Click the “Start” Button and then “Run”
STEP 5: Enter Program Name
In the Dialog box that appears, type the following:
Remember which drive you put the CD-ROM into in STEP 3. Replace X: with that drive letter or you may receive an
error.
10
Windows Start Bar
Windows Run dialog Box
Software Installation
3
Page 11
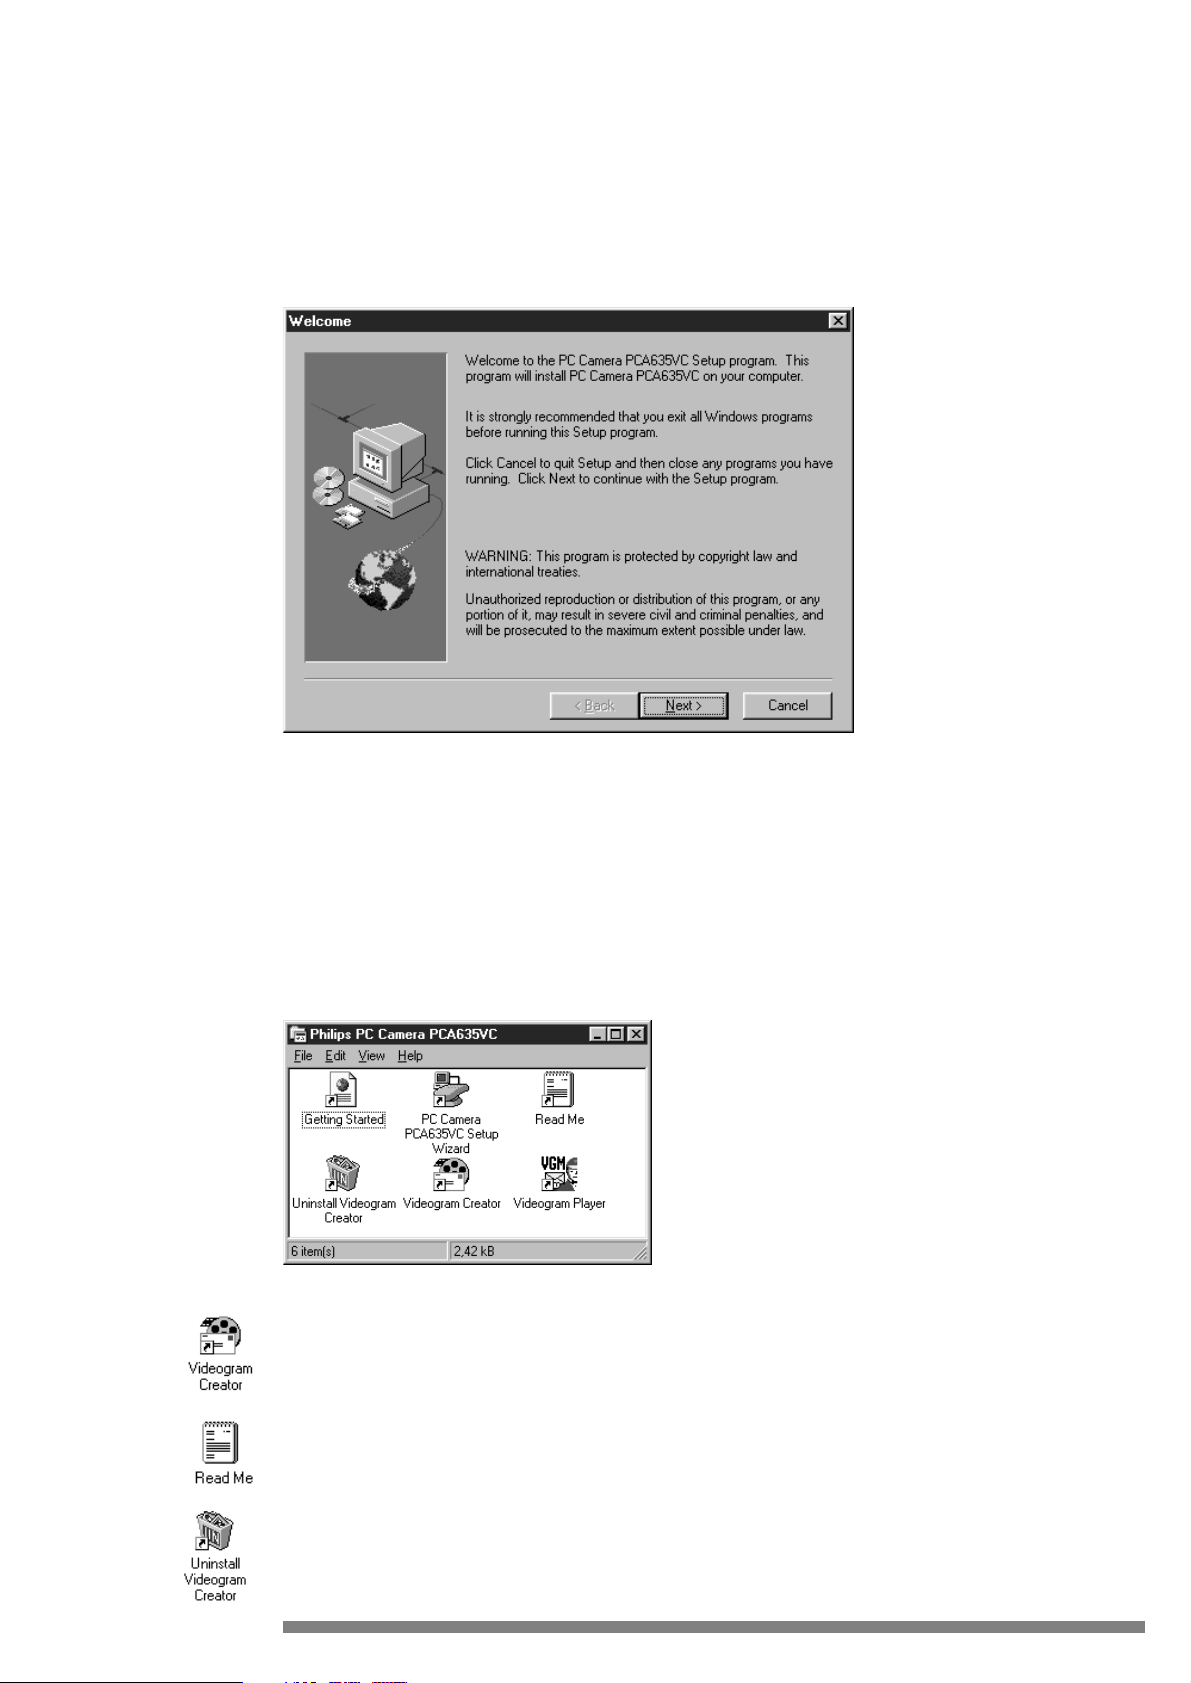
STEP 6: Follow the Installer Directions
The following dialog box will appear. If nothing happens, restart your system and try it again. If it still doesn’t work make
sure the drive works by trying another CD.
Follow the simple on-screen instructions to complete the installation.
QuickVideo Software on System
Once you have finished installing the software two new groups and icons will be created for you. You may access them by
clicking on the “Start” Button and checking the “Programs” folder.
Philips PCA635VC Program Group
Videogram Creator - Application to easily capture and create Videograms.
Read Me - Text file that contains the latest release updates.
Uninstall Philips PCA635VC - Application to remove Philips PCA635VC software from computer.
11
Philips PCA635VC Program Group Window
Page 12

Philips PCA635VC Setup Wizard - Walks you through the installation and set-up of your Philips PCA635VC, including
properly configuring your parallel port.
Philips PCA635VC Electronic User Guide - Online User Guide in Adobe Acrobat format.
Videogram Player Group
Videogram Player - Standalone player that is installed on the system hard drive and allows for the creation and sending of
Videgrams without a player built into the file. The Videogram Player is ideal for use by frequent receivers of Videograms as
it speeds file downloading and reduces the total file size.
Philips PCA635VC Setup Wizard
You will need to re-start Windows 95 for the installation to take effect. After re-starting Windows 95 for the first time following installation, the Philips PCA635VC Setup Wizard will automatically appear and guide you through the setup process for your Philips PCA635VC.
The Setup Wizard will determine how your parallel port is configured. The port should be configured as an ECP or Bidirectional port for Philips PCA635VC to work.
Next, the Wizard will help you configure the video input on your Philips PCA635VC.
12
Videogram Program Group
Page 13

Then, the Wizard will help you configure the audio on your Philips PCA635VC.
Enter Internet settings, then you’re ready to begin recording with Philips PCA635VC.
13
Page 14

This Chapter discusses the Videogram Creator software. With the Videogram Creator software you can begin capturing,
creating, and sending Videograms. This Chapter will explain the different aspects and features of this software, and will
show you how to adjust settings to create the best Videograms with your system.
Vital settings that control whether or not you see video are described in this section, so it’s worth reading. These settings
are labeled with the Vital Setting tag.
Opening the Videogram Creator application
To access this application click on the “Start” button and then “Programs,” “Philips PCA635VC” and finally click on the
Videogram Creator” icon (as shown below).
Provided the Philips PCA635VC unit and the Videogram Creator software were properly setup, as described in Chapters
2 & 3, this will bring up the Videogram Creator application. See page 44 for a diagram of the Videogram Creator interface.
If the system stops responding AND does not load the software then you should check to make sure that your system
meets the Minimum System Requirements and double-check the connections from the system to the Philips PCA635VC
unit.
If the following message appears, then a valid sound card is NOT installed.
The Philips PCA635VC captures sound by using an existing sound card in the system. If you do not have a sound card,
then simply click “OK” and ignore this message. Ignoring this message does not affect video capture, however it will disable sound capability in the Philips PCA635VC application.
Test your sound card with Microsoft “Sound Recorder” which comes with Windows 95. Access this application under
“Start”, then “Programs”, followed by “Accessories”, “Multimedia”, then click on the “Sound Recorder” icon. If your sound
card is installed correctly this test will be successful, otherwise, contact the sound card manufacturer for information on
how to enable it under Windows 95.
Philips PCA635VC may not support all sound cards. Usually, if your board works with Microsoft “Sound Recorder” then
it will also work with the Philips PCA635VC system and Videogram Creator application.
14
Videogram Creator Software
4
Launching the Videogram Creator Application
Page 15
Video & Audio Settings
Before you begin using the Videogram Creator, it’s important that you learn how to control video and audio.
You may want to experiment with these settings later to optimize video capture for your system. More information regarding “Optimizing System for Video Capture” can be found in Chapter 10 located towards the end of this manual.
Settings Control Panel
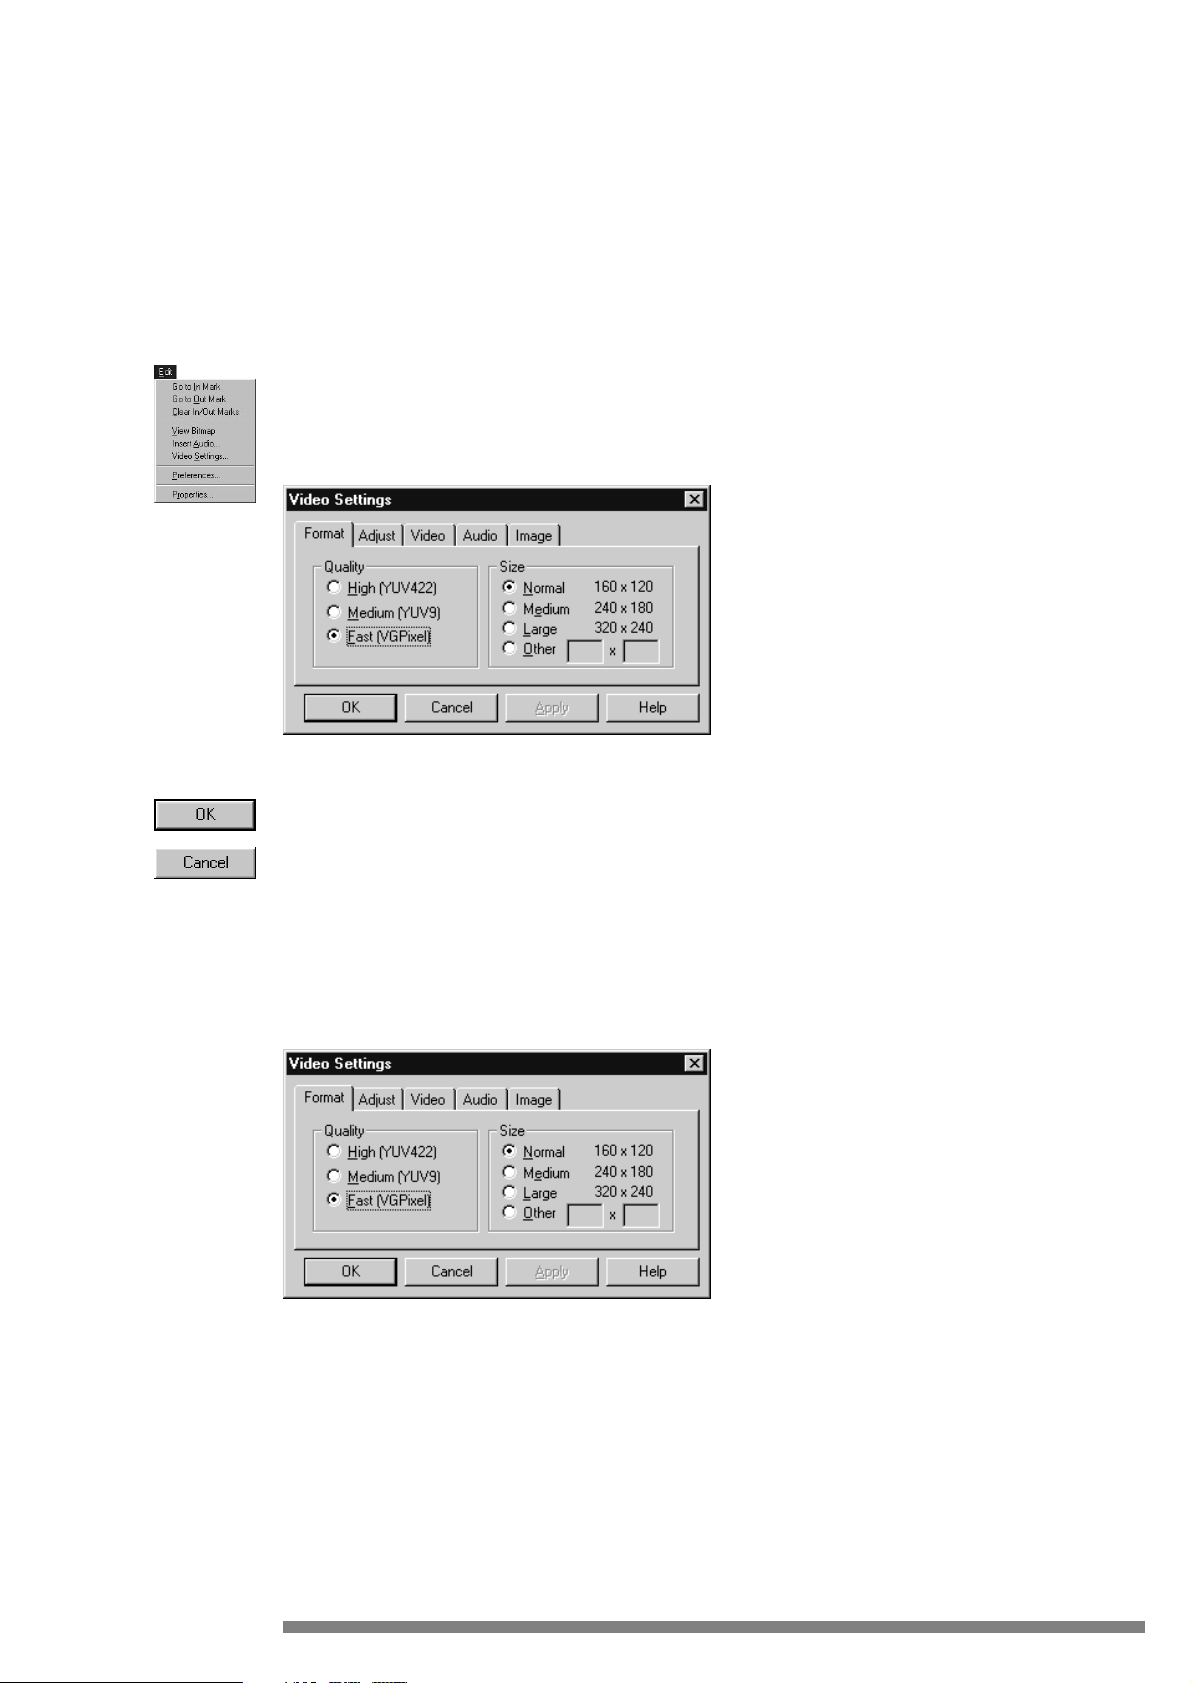
From the Videogram Creator application, click on the “Edit” option on the menu bar and select “Video Settings.” The following “Video Settings” control panel will appear. Use the Tabs located across the top to access the different settings for
video, audio and image capture. This section is broken down into separate tabs to make the information easier to use.
OK & CANCEL Buttons
These are found in a large number of Windows applications and they mean the same thing here. When you’re done
making changes, click OK to accept them and close the “Setting” dialog box or click CANCEL to abort all changes and
close the “Setting” dialog box.
Format
Quality
Select one of these settings to make captured video look better or play faster.
These settings tell the Videogram Creator software how much color and definition information you would like in the
video files you capture. Color and definition combine to enhance the quality of the video files. High quality will produce
the best visual results, however, it does create larger files and puts greater demands on slower systems.
•
High Quality (YUV 4:2:2) - Select this option to maximize the quality of the video; video files will take up more
space on the hard drive by selecting this option (better quality = more room needed to store video), but will contain
more information to bring out colors and definition.
•
Medium Quality (YUV 9) - This option produces good-quality video with good color and definition while consuming
less disk space.
15
Edit Menu
Standard
Windows
Buttons
Video & Sound Settings Control Panel
Format Tab - Settings Control Panel
Page 16

•
Fast (VGPixel) - Select this option to capture video at a higher frame rate; color and overall definition of the video will
be less than the High or Medium settings. This is your best choice for most Videograms and the default setting.
Size
Select one of these options to adjust the size of the video captured.
The size setting tells the Videogram Creator application how large or small the video clip should be captured and displayed
at. Larger video clips save more information on the video captured and, as a result, create larger files that require higherperformance systems to play smoothly. Size is determined by the number of pixels (the dots that the computer uses to display images), and are the units of measurement for images. For example, if a video clip is 160x120 it would be exactly 160
pixels from left to right (horizontal) and 120 pixels from top to bottom (vertical).
•
Normal - 160x120
•
Medium - 240x180
•
Large - 320x240
•
Other - Select this and, using the keyboard, type in the desired size; the smallest setting available is 80x60 and the largest is 320x240
Adjust
Move slider bars to change the way the video looks.
Change these settings if the video is too dark, bright or the colors appear out of balance.
Change these settings if the video is too dark, bright or the colors appear to be out of balance.
Mirror - Mirror the image horizontally.
Flickerless - In an environment with fluorescent light a slightly noticeable flickering and coloring of the picture may
occur. In this situation it is recommended to mark the checkbox.
Backlight compensation - Turn on the backlight compensation to improve the image quality when you have a scene
where the background has a high illumination level (for instance when you sit in front of a window).
Auto White Balance - When the whitebalance is in the fixed mode, the automatic white balance is switched off. The
actual color setting is stored and is not influenced by controls of the camera. The procedure to obtain a perfect color repro-
16
Format Tab - Settings Control Panel
Adjust Tab - Settings Control Panel
Page 17

duction is as follows: put the Auto White Balance switch on, hold a white paper in front of the camera and switch over
after a few seconds from auto to fixed mode. Now the color settings are stored in the camera, even when you switch off the
power of the camera. When light conditons change it is recommended to put the Auto White Balance mode in auto mode
(on).
Contrast - Affects the contrast between the light and the dark area of the video. Move the slider to the left to reduce
contrast (make the colors more alike) and to right to increase the contrast (make the colors greater in difference).
Click the DEFAULT button (shown left) to return all options to the factory preset settings.
Video
Select one of these options to adjust the video capture speed.
Video is made up of many still frames (pictures). When these still pictures are viewed in rapid succession, it creates a sense
of motion. Speed is determined by how many frames are displayed (or captured) each second. These options directly affect
the file size of the video capture and is dependent on the performance of the hard drive to keep up with the frame rate.
•
Fast - Large video file size captured at up to 30 frames per second, however, the rate may vary depending on the system you are using and the frame size of the video you are capturing.
•
Normal - Default setting, creating moderate video file size captured at up to 15 frames per second.
•
Slow - Select this option to display and capture video at 7 frames per second and to conserve hard drive space.
•
Other - Use this option to manually type in a frame rate between 1 to 30.
Some systems may require optimization, as described in Chapter 10, to successfully capture at faster frame rates.
Audio
These settings are only applicable to systems with sound cards.
17
Video - Settings Control Panel
Audio Tab - Settings Control Panel
Page 18

Capture Audio
This box must be checked before attempting to capture any audio.
Frequency
Select one of these options to choose the audio frequency for sound capture.
The settings offer you the ability to balance sound quality with the size of your sound file. A low frequency setting (8KHz)
will produce lower sound quality in a much smaller file size whereas a high frequency setting (44KHz) would mimic CD
quality but produce a much larger file size.
•
8 kHz - Use this setting when small file size is a must.
•
11 kHz - Default setting, this provides normal sound quality and minimal file size.
•
22 kHz - Choose this option for good sound quality (larger file size).
•
44 kHz - Select this when the highest quality sound is required and file size is not a concern.
Size
Select one of these options to indiciate the resolution of the audio. Save more bits of information to reproduce the highest
possible quality. More bits means the captured audio will also demand more on a systems performance and will make a
captured file size larger.
•
8 bit - Select this option to make captured audio file smaller. Audio quality will be reproduced with a minimum
amount of information.
•
16 bit - Choose this to capture the highest quality audio. The audio file will contain the maximum amount of information and generate a larger file size than the 8 bit option.
Chapter 10 itemizes what is necessary to optimize a system’s performance to capture at higher quality settings.
Image
Size
Select one of these options to indicate the size and quality of images (snapshots) you capture.
•
320 x 240 - Default setting, creates images for use in Internet sites or other areas where small file size is highly desired.
•
640 x 480 - Great for slideshow presentations, select this option for good quality and moderate file size.
•
1024 x 768 - Approaching print quality, choose this setting for higher quality snapshots (larger file size).
•
1600 x 1200 - Print quality, select this option for the highest quality capture (largest file size).
Subject
Change this setting to eliminate motion blur in image capture or enhance the image quality when capturing from still
video.
•
Motion Video - Select this option when capturing images from moving scenes (such as sporting events). This setting
will help take the blur out of the snapshot.
•
Still Video - Choose this setting to optimize the still quality from video that does not move or stationary objects in
front of a stationary (not hand-held) camera.
18
Frequency Options
Size Options
Image Tab - Settings Control Panel
Size Options
Type Options
Page 19

Quality
Select on one of the settings to gain better image resolution or to save file size in snapshots.
These options directly affect the quality (depth, resolution) in snapshots and capture speed. The higher the Quality setting,
the better the image will appear. Subsequently, higher Quality settings will result in a little more time to compress the
snapshot file. es.
•
Normal - Default setting, select this for faster compression time with acceptable image quality.
•
Medium - Choose this option for better quality snapshots and moderate compression speed.
•
High - Use this setting when compression speed is not an issue and the highest possible quality is required.
The Main Window
This section explains the user interface of the Philips PCA635VC Videogram Creator software.
Featuring a standard title bar used by all Windows applications, this not only informs you that you’re looking at the
“Videogram Creator” application but also provides the status of the application. For example, if you’ve already captured
video and it’s playing, this title bar will inform you that it is in PLAYBACK mode. Below the title bar are menu items. Respectively from left to right, “Files”, “Tools” and “Help.”
On the left side of the Window are the steps necessary to preview, capture and save or send your Videogram files. You can
click on these areas, or use the control bar at the bottom (shown below).
File Menu Bar
The file menu, as found in many standard Windows applications, is a more standardized way to launching many of the
same functions found in the on-screen buttons.
File Menu
This menu provides controls for opening, saving and exiting programs.
•
Open… - Opens dialog box to open video or image files
•
Open Last - Opens the last video or snapshot file
•
Open Test Pattern - Opens a test pattern image that shows a range of color and gray scales to adjust your display.
•
Save As… - Opens dialog box to save the current snapshot or video clip. Use this to save video in the .AVI format and
snapshots in the .BMP format.
•
Recent File - The most recent video or image file opened. You can see several files here.
19
Quality Options
File Menu
Preview video
button
Record video
button
Send videogram
button
Title bar
Video window
Tool bar
Status AreaVideogram Creator Application
File Menu
Page 20

•
Play Videograms - Plays the most recently created Videograms.
•
Exit - Closes the Videogram Creator application
Edit Menu
Here you’ll find sound and video settings.
•
Go to In Mark* - Jumps to marked In-point in the selected video
•
Go to Out Mark* - Jumps to marked Out-point in the selected video
•
Clear In-Out Marks* - Removes all marked In and Out points in the selected video
•
View Bitmap** - Opens a separate image-viewing window to view and inspect (with zoom feature) image captured.
•
Insert Audio** - Adds an existing sound file (.WAV) to the captured image or video clip
•
Video Settings - Opens the video, audio, and image-capture setting controls
•
Preferences - Opens a dialog box to set default file location and size for video captures, file location for image captures,
and count down counts for video and image captures. You can also set internet modem speed for optimal Videogram
creation.
•
Properties - Gives you information on the video in the display window.
* Only active after video has been captured
** Only active after a still image has been captured
Tools Menu
This menu provides tools for sound and video.
•
Volume Control - Launches the sound mixer for sound card
•
Videogram Player - Launches the Videogram Player application Help Menu - Information
Help
This menu provides important information about the application
•
User Guide-Launch the electronic User Guide and Adobe Acrobat player
•
About Videogram Creator- company information, application name and version number
Video Toolbar
The video toolbar is a set of easily identifiable buttons that give you complete control over video and sound. These buttons
are as follows:
Record Video - Activates video and sound capture.
Play - Active only after video has been captured, this button allows you to view the motion video clip and hear the sound
you captured.
Pause - Active only after a video is playing, this button stops the playing video and sound clip at a specific point; clicking
again will playback the video/sound clip at the point it was stopped.
Stop - Active only after a video is playing, this button, ceases the playback of the video and sound clip.
Rewind - Active only after a video clip has been captured, hold button down for fast rewind, click button once to move
the video clip back one frame at a time.
20
Edit Menu
ToolsMenu
Help Menu
Page 21

Fast Forward - Active only after a video clip has been captured, hold button down for fast forward, click button once to
move the video clip forward one frame at a time.
Slider Control - Active only after a video clip has been captured, this displays the current position of the video/sound clip
and allows users to move to different points within the clip by clicking and dragging the slider handle; left = backward,
right = forward. Click once to either the left or right side of the slider handle to move the clip one frame at a time either
backward or forward respectively.
Mark In - Referred to as “trim in” in professional systems, this button controls the starting point for playback (and saving)
of the video clip; more detailed information on its use can be found in Chapter 10 titled “Advanced Features.”
Mark Out - Referred to as “trim out” in professional systems, this button controls the ending point for playback (and saving) of the video clip; more detailed information on its use can be found in Chapter 10 titled “Advanced Features.”
Grab Still - This button freezes the video image as a photograph that can be saved as a BMP file. Refer to Chapter 7,
“Grabbing Still Images” for more information on its use.
Record Audio - Activates audio-only capture and brings up a new tool bar as described in the next section.
Sound Toolbar
Click the Record Audio button ( ) in the Video Tool Bar to launch the Sound Tool Bar.
A sound card must be properly setup to access this area of the application (not included).
Many of these buttons are similar to the video buttons. However, they are applicable only to audio rather than video and
audio. The buttons are as follows:
Record Audio - Activates sound capture.
Recording Volume Control - Changes the level for the input audio source.
Left & Right Status - Shows the audio levels for the left (L) and right (R) channels.
Back To - Takes you back to the Record Video/Grab Still screen.
21
Page 22

This Chapter walks you through capturing, saving and playing back both Videograms and standard Microsoft video (.AVI)
files.
Videograms and AVI Video Files Compared
The difference between Videograms and AVI Video files is size. Microsoft .AVI Video files serve as the base file format for
Videograms. Videograms dramatically compress the AVI files into substantially smaller, self-executing, video files.
Videograms can be created with or without a built-in player. Creating a Videogram with a built-in player produces an executable (.EXE) Videogram file that can be viewed by simply clicking on the file. Creating a Videogram without a built-in
player produces a non-executable Videogram (.VGM) that can be viewed with the Videogram Player Application (described in following Chapter).
Before you start capturing make sure the Philips PCA635VC is positioned correctly and there’s plenty of lighting (see
Chapter 2, Step 5).
3 Easy Steps for Video Creation
Capturing and creating a Videogram is as easy as one-two-three.
Launch the Videogram Creator application. Click on the “Start” button followed immediately by “Programs” and open the
“Philips PCA635VC” folder. Next, click on the Videogram Creator application. If this application does not start, go back
to Chapter 4 and verify that the software and driver settings are correct.
Please notice that there are three large buttons conveniently located on the left side of the application screen. They are
labeled PREVIEW, RECORD, and SEND.
Each of these buttons represent a step in the process of creating and saving video files. Follow along as we walk through
these steps to create a video file of your own.
22
Creating & Saving Videograms
5
Page 23

STEP 1 Preview Video
When you first open the Videogram Creator application you will be in the “Preview” mode. In the “Preview” mode, video
displays from the Philips PCA635VC.
If video is not displayed when you click on the preview button AND all the connectors are tightly plugged in, then go
back to Chapter 5 and make sure that all of the Vital Settings are correctly set.
ADVANCED
In this mode you’ll want to check the quality of the video. Settings used to change the way the video looks are described
in Chapter 5. Now is the time to correct these settings before continuing to Step 2. Also make minor adjustments to
the position or angle of the camera and adjust the overall lighting if needed.
STEP 2 Record & Play Video
After you have previewed the video and adjusted your settings, click on the “Record” button (shown left). This button sets
up the video capture mode. Notice after clicking this button that the following Recording Count Down will appear:
When the “1” disappears, the system begins recording video (you can adjust the length of the countdown from five to zero
seconds by selecting the “Edit” menu, then “Preferences”). In the lower section of the Videogram Creator software window
a display is constantly informing you how many frames have been captured and how many (if any) have been dropped.
To stop recording video, simply click the left mouse button when the arrow is postioned over the record button or hit the
ESC key on the keyboard.
There will be a still image of the first frame in the video clip you just recorded. Locate the Tool Bar at the bottom of the
video window and click on the Play button (shown left). This button works just like the Play button on your VCR as well
as the other buttons next to it. These common symbols are used to represent STOP, REWIND, PLAY, FAST FORWARD
and PAUSE.
23
Videogram Creator Window
Recording Count Down
Page 24

ADVANCED
Dropping frames is normal and will vary from system to system depending on the system performance, as well as the type
and size of video being captured. Experiment with different settings as described in Chapter 4, you can improve the system
performance and drop fewer frames. However, the real judge is your eyes. Click the “OK” button with your mouse and
play the video back.
If the system is dropping too many frames, check out the “Optimizing System for Capture and Playback” in Chapter
10. This itemizes what is necessary to improve system performance.
STEP 3 Send/Save a Videogram
Once you’ve captured your video, click on the “Internet Send” button (shown at left) to begin actually making a
Videogram. This brings up the Send Videogram dialog box.
Type the name of your Videogram in the Videogram Title box. The rest of the settings can be left at the defaults, or you
can read more about them under “ADVANCED” starting on page 55. Now you have the choice of Sending or Saving the
Videogram.
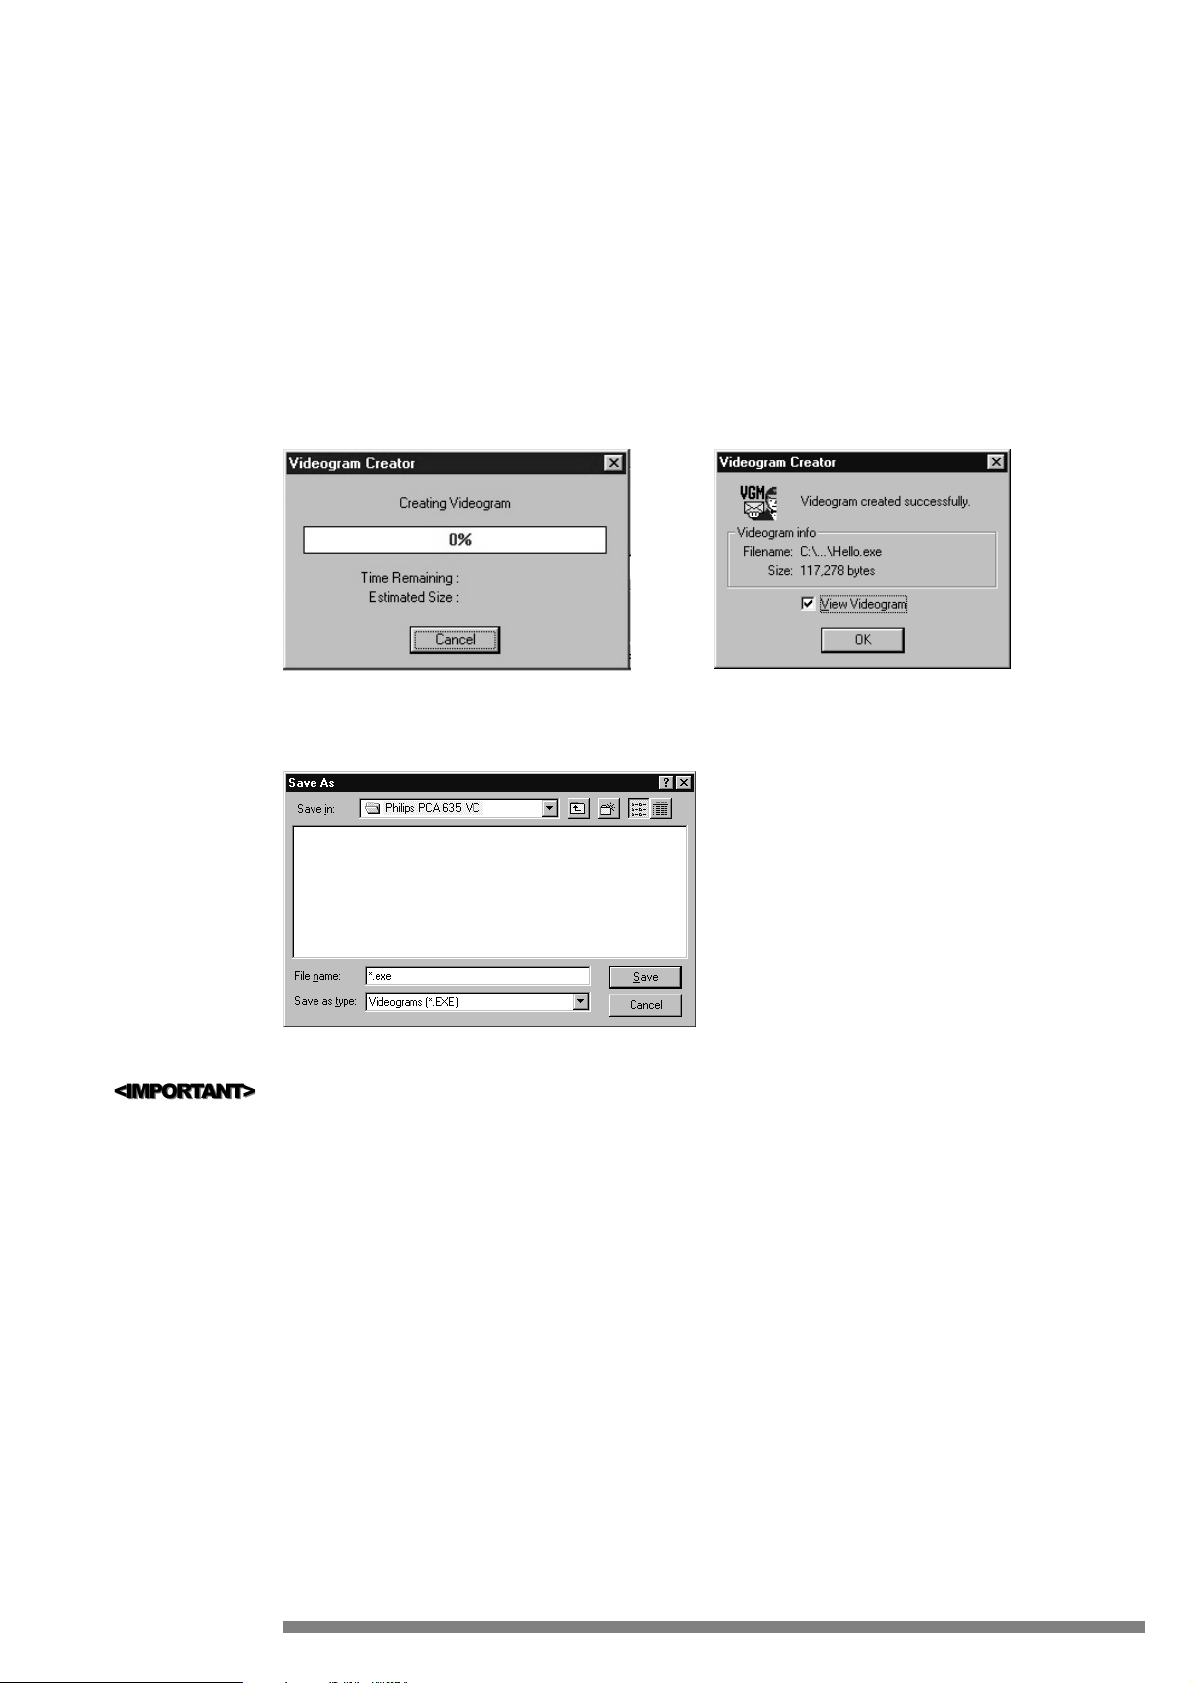
Sending Videograms
To send your Videogram via email, click on the “Send” button on the lower left. The first screen you will see is the one
that shows the Videogram being created. In this step the file is being compressed and the player is being embedded within
the file. The second screen shows the completed Videogram file size and the estimated time it will take to send the file.
If you don’t have a MAPI (Messaging Application Programming Interface)-compliant e-mail program (see Chapter11FAQs), the Videogram Creator software will prompt you to Save the file and attach it later to an e-mail message within the
e-mail application.
24
Send Videogram Dialog Box
Page 25
Once the Videogram is created, an e-mail window will appear (in this example, the window is from Microsoft Exchange).
Simply type in the e-mail address of your recipients, the file is already attached.
Saving Videograms
An alternative to sending the Videogram directly is to Save the Videogram. This allows you to post the Videogram to a
Webpage, send it out using an e-mail system that is not MAPI-compliant, copy it to a floppy disk, etc.
To save a Videogram, click on the “Save” button second from the lower left. This begins the compression process, where
the Videogram is created. You will see the following two screens.
Next you will be prompted to name the Videogram file and identify where it should be saved.
The file type will be a self-running executable (.EXE) file if you checked “Create Videogram with Player” as described earlier in this section. If this setting was not checked, the file type will be a standard player-less Videogram (.VGM) file.
Type in a file name and click on the “Save” button to save the file.
25
Save As Dialog Box
Page 26

ADVANCED
Before starting the Videogram compression process by clicking on the “Internet Send” button, you can set the start and
end points of the video by using the Mark In and Mark Out buttons (shown at left) on the Video Toolbar. Simply find the
desired starting point on the video then click the Mark In button. Find the desired ending point then click the Mark Out
button. Now you can continue with Step Three.
Send Videogram Dialog Box Settings
In the Send Videogram dialog box (see page 54) you have several choices that will affect compression of the Videogram.
Limit Videogram File size
This allows the user to preset maximum size of the Videogram created for sending purposes. Given a smaller file size,
quality and/or resolution will be compromised to fit the prescribed file size.
Add Player to Videogram
Check this to create a self-playing, executable (.EXE) Videogram file that can be viewed by simply clicking on the file.
Remove the check to create a Videogram (.VGM) file that requires the Videogram Player application to view. Choosing to
add the Player adds approximately 110KB to the file size. However, if you are planning to offer the Videogram as a streaming video file over the World Wide Web (Internet), do not add the Player, as streaming Videograms require that the
Player be installed on the recipient’s system.
Videograms may only be streamed over the Web (described in Chapter 10) if they are in .VGM format. Be sure to leave
this setting unchecked to create a .VGM file.
Video Type
Select one of these options to further optimize Videogram performance.
•
Full Motion Video - Select this Type if you are compressing a Videogram that consists of moving images (like sporting
events or anything involving small children). This also includes hand-held camera work.
•
Still Image/Slide - Select this Type if you are compressing a Videogram that consists primarily of still images and slides
or video that has very little movement. Since Videogram Creator evaluates the movement between frames, this type of
file will be smaller and of higher quality.
ADVANCED
Video Quality
Select one of these options to indicate the video color and definition.
•
High - Creates a Videogram with the MAXIMUM AMOUNT of video information to reproduce the video color and
definition. This option provides the least compression and highest quality.
•
Medium - Saves video with an ABOVE AVERAGE amount of raw video information to reproduce the video color
and definition. This option provides good compression and good quality which works great for business presentations.
•
Normal - The recommended setting, providing a GOOD BALANCE of video quality and compression to reproduce
the video color and definition. Optimized for person to person communications, this setting normally provides very
acceptable quality.
•
Low - Saves video with the MINIMUM AMOUNT of raw video information to reproduce the video color and
definition. This option provides maximum video compression and produces adequate quality; excellent for casual messages.
•
Slide - Gives you a still image (160 x 120) that you can narrate for the smallest file size.
•
120 x 88 (15fps) & 120 x 88 (7fps) - Gives you the smallest moving Videogram file, optimal for sending over slower
modem speeds.
Selecting High Quality retains most video information and as a result creates larger file sizes than the lower quality settings. However, lower quality setting produce smaller files that conserves hard drive space and speeds up video playback.
26
Video Qualtiy
Options
Mark In Mark Out
Page 27

Audio Type
Select one of these options to indicate the sound optimization.
•
Generic - This setting saves the maximum amount of information to reproduce a wide range of sounds and is optimized for music and other demanding audio files. This setting will cause the file to consume more space on the hard
drive.
•
Speech - This setting saves less information to reproduce sound optimized for vocal patterns (which require less information than music). This option also conserves hard drive space.
•
No Audio - Use this setting if no sound card is installed in system or if you simply do not want sound saved with the
video clip.
ADVANCED
Audio Quality
Select one of these options to indicate the sound reproduction quality.
•
High - Saves video with the MAXIMUM AMOUNT of raw sound information to reproduce tonal depth and fidelity.
This option provides the least compression and highest quality.
•
Medium - Saves video with an ABOVE AVERAGE amount of sound information to reproduce tonal depth and fidelity. This option provides minimal compression and good quality.
•
Normal - This is the recommended setting, providing a GOOD BALANCE of raw sound and compression to reproduce tonal depth and fidelity. This setting normally provides decent quality.
•
Low - Saves video with the MINIMUM AMOUNT of raw video information to reproduce tonal depth and fidelity.
This option provides maximum video compression and produces adequate quality.
Helpful Hints for Sending Videograms
MIME versus UUencode
These are two electronic mail encoding systems. Different e-mail systems use these two methods. Microsoft Exchange predominately uses MIME, while CC Mail and Lotus Notes use UUencode. A Videogram sent in MIME cannot be viewed
by someone on a UUencode e-mail system, and vice-versa. However, most e-mail systems now offer the choice of sending
options (UUencode or MIME). The easiest way to overcome this obstacle is to ask the person to whom you are sending
the e-mail which option they use before you send.
File Size
Many Internet Service Providers (ISPs) and corporate systems have maximum file size limitations that automatically delete
larger files. Creating a smaller Videogram will also reduce the download time if the recipient is retrieving e-mail over a
standard telephone line and modem connection.
The Send Time estimates are approximate. To create a smaller Videogram, change your options under Video Quality.
Selecting “Slide”, “240 x 160 (15fps)” or “240 x 120 (7fps)” during Videogram creation will dramatically reduce the file
size. In general, most files under 300KB to 1MB will get through your typical internet service provider’s file size limitations.
Sending Videograms Without Attaching The Player
This saves approximately 110KB in file size, which can be significant if the Videogram itself is small. This is also good strategy if you send a fair amount of Videograms to one person, since they can install the Player once and view any Videogram
file. You can send them the Player (SETUP32.EXE for Windows 95 or SETUP16.EXE for Windows 3.1x in the
27
Page 28

Videogram Player folder), or they can download it from the Alaris Website (http://www.alaris.com). Creating Videograms
without the Player will not only save file space, but upload and download times.
Using Videograms With Non-MAPI Email Programs
With non-MAPI email programs such as America Online (AOL), you cannot launch the email program directly from
the Videogram Creator application. But you can still send Videograms using the non-MAPI email program. You simply
have to save the files first. Follow the directions for saving a file, and remember where you save it.
Sending Videograms with non-MAPI Email Programs
With non-MAPI compliant email programs, you have to attach a previously-saved Videogram file to your e-mail message.
You simply follow the same process that you would to attach any file to an e-mail message.
Step by step procedure
1 Create and save the Videogram using Videogram Creator.
2 Start your email program.
3 Click Mail from menu bar and select Compose Mail.
4 Fill in all the information as if you were sending a normal e-mail.
5 Click the Attach icon. Browse and select the Videogram you want to send.
6 Click OK to accept attachment.
7 Click send to transmit your message. At this point, the Videogram will be transfered to your email file.
8 When the file transfer is done and you receive the message “File Transfer Complete”, the e-mail has been sent.
Receiving Videograms with a non-MAPI Email Program
Typically, once a Videogram is sent to an to your ISP account, it is stored on the ISP’s server. When you log onto to your
service provider, the program will indicate that you have new mail. Simply download the Videogram the same way you
would any other file you receive by e-mail.
Step by step procedure
1 Start your email program.
2 Click Mail from menu bar and select Read New Mail.
3 You will be notified that this message includes an attachment. Click Download File to begin downloading the
Videogram. At this point, you can specify where the file should go, otherwise it will probably save to the default location
4 At the end of download, you can use the Windows Explorer to locate the Videogram you just downloaded and double-
click on it to play (if it’s saved as a .EXE file), or use the Videogram Player application to open a Videogram saved as a
.VGM file.
Note: Download times are a function of file size, modem speed, and network usage. Trying to download a large image
with high frame rates over a 14.4kbps modem during prime use times will be a trying experience. We recommend creating
files that are under 1MB in size to minimize download times.
28
Page 29

There are two types of Videograms that you can play: self-executing Videograms that include the Player in the file, and
Videograms that require the Player to be installed on the playing system. Playback for both of these files is described in
this chapter. For best results, both types of Videograms should be played back on a minimum
486DX/2 66 system (as described in Chapter 1, Minimum System Requirements).
Under Windows 95
You can play Videograms with a built-in Player (.EXE files) under Windows 95 in one of two ways:
•
From “Start”, click on “Programs”, then select “Windows Explorer”. Locate the Videogram file and double-click on it
to begin playing.
•
From “Start”, click on “Run”, then click the Browse button. Locate the Videogram file and double-click on it to begin
playing.
Under Windows 3.1x
You can play Videograms with a built-in Player (.EXE files) under Windows 3.1x in one of two ways:
•
From “File Manager” in the “Main” group of “Program Manager”, locate and double-click on the Videogram file.
•
From the “Program Manager” title bar, click on “File” and “Run”. Use the Browse button to locate the Videogram file.
Double-click on the Videogram file. Click the “Run” button to start playing the Videogram file.
Streaming Videogram Player
Playing Non-Executable Videogram Files
These are the Videograms with the file extension .VGM. The Videogram Creator Application, as described in Chapter 3,
will allow Videograms to be created without a built-in player to further decrease the Videogram’s file size. This is ideal for
frequent Videogram receivers and eliminates wasted hard drive space by only having one Videogram Player.
Updates to this player are available free of charge from the Home Page on the Internet at http://www.alaris.com
You can playback Videogram files without a built-in player (.VGM) under Windows 3.1 and 95 by using the Videogram
Player application. By double-clicking on the “Videogram Player” icon in the “ Videogram” program group you can launch
the Videogram Player Application.
This will launch the Videogram Player Application as shown here:
29
Playing Videograms
6
Vediogram Program Group
Streaming Videogram Player
Page 30

Clicking on the menu button in the lower left hand corner of the Videogram Player software, will make the following
“Application” menu will appear:
Use the Streaming Videogram Player Menu to access the following functions:
•
Open File… - Open a Videogram file with .VGM extension to play. This is a Videogram saved without a built-in
player. Simply locate a .VGM file, double-click on it, and click on “OK” to open a file to play.
•
Open URL… - This is the “Uniform Resource Locator” which allows a video to be streamed and viewed from a network URL address. This will open an Internet address, provided a streaming Videogram resides there.
•
Configure… - Use this to select various playback parameters. It will open the following “Configure” window.
30
Menu
Button
Streaming Vediogram Player Menu
Open File Dialog Box
Open URL Window
Configure Dialog Box
Page 31

• Skip Frames if behind (checkbox) - By default this is left checked to optimize the viewing speed and to keep the
sound synchronized. When this option is not checked, all frames will be played back in the Videogram regardless
of sound synchronization.
• Sound - Use this slider to adjust the playback volume of the Videogram without affecting the master volume set-
tings of your system.
• Mute (checkbox) - By default this is left unchecked. When checked, this will cause the sound to be nonexistent.
We recommend that you leave this unchecked to avoid future troubleshooting if your Videograms do not playback
with sound.
• Size - This displays what the current Videogram size is and allows you to “edit” what the Videogram will be played
back at.
• Use DCI/Direct Draw if available - We strongly recommend that you leave this checked. Many newer graphics
cards support these video optimization standards and absorb part of the processing requirements that the computer
itself would normally handle.
•
View License Agreement - This is the standard agreement for use of Videograms.
•
Help - On-line index for help with the Videogram Player Application.
•
About Videogram Player - Informs you of version number and copyright.
•
Move - Moves the Videogram Player window.
•
Close - Exits the Videogram Player.
You can adjust the sound of your Videogram by clicking on the sound button in the lower right corner of the Videogram
Player window (shown at left). The following dialog box will appear to adjust Videogram volume and allows you to silence
the sound.
Click on the play button after you have loaded a Videogram to play it back (shown at left).
31
Skip Frames Option
Volume
Mute
Size Settings
DCI/DirectDraw Option
Sound Control
Sound
Button
Play
Button
Page 32

One of the great things about the Philips PCA635VC is that, in addition to capturing video clips, it also captures single
images, or snapshots. Snapshots are great for everything from wallpaper for the Windows desktop to images for Internet
web pages and they’re extremely easy to grab with the Philips PCA635VC. Follow the step-by-step instructions in this
Chapter to capture your own snapshots.
Capturing a Snapshot
The same adjustments used to improve the quality for video capture work equally as well for capturing snapshots. All of
these video adjustments are described in Chapter 3. For best results make sure the Philips PCA635VC is positioned correctly and there’s plenty of overall lighting (see Chapter 2, Step 5).
Snapshots are captured within the Videogram Creator application. This, of course, is the same application used to capture
video. Launch this application by clicking on the Videogram Creator application icon in the Philips PCA635VC program
group (Chapter 5 describes this in detail).
To use a still image from another program or one that you have previously saved (many file types are supported), open the
image from the “File” menu, then skip ahead to Step Three.
The following steps reference the “Grab Still” button. It is illustrated in the image below.
STEP 1: Preview Video
Live Video
With the Philips PCA635VC and pointing towards the subject, click on the Preview Button. Motion video should now
appear in the Video Window, if it hasn’t already.
32
Grabbing Snapshot Images
7
Videogram Creator Appliciation
Page 33

STEP 2: Grab Still
Live Video
Watch the motion video carefully for a scene that you would like to capture a snapshot of. Click on the “Grab Still”
Button to freeze this image.
Depending on the image size (described in Chapter 4) and system performance (Chapter 10) this could take a few seconds
to a few minutes.
33
Capturing & Processing Image
Page 34

STEP 3: View the Bit Mapped Image
The Video Window in the Videogram Creator application provides a preview of the image captured. For closer inspection
of the image, you can pull up a separate window containing your BMP.
From the “Edit” menu, click on “View Bitmap” to bring up the Snapshot Inspection Window. Click the right (or usual)
mouse button to zoom in and the left (or secondary) to zoom out.
STEP 4: Save and Send
This function is identical to the Save and Send function of a motion Videogram as described in Chapter 5.
Grabbing Snapshot Images from Pre-Recorded Video
To use pre-recorded video from you hard disk, go to the “File” menu and select the open option. Select the directory or
folder that contains you AVI file(s) and open the file of your choice.
Once your file has been selected, use the player control buttons on the “Video Toolbar” at the bottom of the main screen
to review the video and find the scene you would like to capture. Click the “Grab Still” button to freeze and capture your
image.
Picturegram
A Picturegram is a still grab plus voice narration. It can be prepared and sent like a Videogram except that the size will be a
lot smaller. One can create Picturegrams of sizes up to 1600x1200 pixels. Sometimes it can be a more effective way to
communicate
Proceed to Chapter 8 for information on how to add a voice-over to your new image capture. By doing this you can add
narration to still images and create Picturegrams.
34
Snapshot Inspection Window
Edit Menu
Page 35

A great way to enhance any video capture is to add sound. This is not limited to just video. It is easy to add music or narration to a snapshot as well. This Chapter walks you through a step-by-step procedure on adding sound to a snapshot or
video capture.
Before starting, a captured video snapshot or image must be visible in the video window in the main menu of the
Videogram Creator program. This will be referred to as “current video clip”.
Add Live Sound
Record Audio or Narration
Recording live sound requires a functioning sound card to be installed (not included).
Using the Sound Toolbar (launched by clicking ), record your narration or sound and click on the “Back To” button.
You may save the recorded sound or narration as a .WAV file by clicking on “Save...” or click “Replace” to add the live
sound to the
current video clip or image.
Clicking “Replace” will erase and overwrite any previously recorded sound in the current video clip.
Add Pre-Recorded Sound
STEP 1: Select Insert Audio under the Edit menu
STEP 2: Select an Audio File to Insert
Select the file you just recorded, a file previously recorded file, or a file available from a royalty-free CD-ROM (please do
not violate copyright laws by using copyrighted audio files without permission of the creators or owners). After you have
seleted the file, click the “Back To” button on the Sound Tool Bar as described on Page 73 under the “Add Live Sound”
section and then click “Replace” to add the sound to your video or snapshot image. Remember to have a video clip or
image in the video window of the Videogram Creator application before starting.
35
Adding Narration & Audio
8
Sound Toolbar (see Chapter 4 for more detail)
Replace/Save Dialog Box
Edit Menu - Videogram Creator Application
Page 36

The Videogram Creator application makes it easier than ever to share information. Capture a picture and send a thousand
words or simply send a self-running and compact Videogram. Join us as we attempt to document a few new ways to share
information.
Sending with E-Mails
Family
E-mails have become a part of everyday life for millions of people. Mom’s telling everybody about the new baby, dad’s sharing information in a new car club. The whole family is getting into electronic communication and what better way to
enhance this than with a Videogram? Mom could be “showing” the new baby. Dad could be “showing” his ‘65 Mustang
convertible. Videograms are sure to win hearts at Valentines day and make everyone happy on any holiday.
Salespeople
Land that next sale by sending a Videogram e-mail to your customers. It will separate you from your competition. It shows
that you care enough to “show” people instead of “tell” them. In today’s high-speed information era there’s no room for
‘almost’. Videograms also make a great conversation piece and are sure to be remembered.
Business Consultants
Share that great new insight or idea with a Videogram. Concepts are often difficult to describe in a few sentences. Simply
send your prospective client a Videogram, showing them exactly what you mean. You can even interactively combine voice,
face and drawings or sketches. Plus you can get it to them in minutes, instead of overnight.
Training
We never stop learning and what better way to learn then with video. Whether you’re training sales people on new products or providing an employee with basic information -Videograms will work great. Simply create a Videogram by following the earlier sections titled “ADDING VIDEOGRAMS TO PRESENTATION SOFTWARE” or “STAND-ALONE
VIDEOGRAM PRESENTATIONS.”
Internet Sites
Liven up otherwise “lifeless” web pages with full-motion video and sound without having visitors wait to see it. The video
and sound play as they are being captured, or downloaded, by any popular Internet browser (Microsoft Internet Explorer,
Netscape Navigator, etc.). In other words, “streamed.” You can add Videograms to your web site by following the step-bystep instructions in Chapter 10 titled “Advanced Features.”
Using In Presentations
Presenters
Video clips created with the Videogram Creator play great within presentation software packages like Microsoft
PowerPoint. Add impact and a sense of immediacy to your message. Add a Videogram with the President talking and another with a quick tour of the building.
Adding Videograms To Presentation Software
If you can point and click a mouse, then you can add a video clip to your next presentation. First you’ll need to make sure
your presentation software accepts standard Microsoft AVI video files. This can easily be done by quickly referencing the
manual, or on-line help, that is provided with your presentation software. Look for the keywords “Video” or “AVI.” Once
you’ve verified that it should work, you’ll need source material. Open the Videogram Creator application and capture a
video clip but don’t save it as a Videogram. Rather, from the “File” menu click on “Save As,” type in a filename and click
“Save.” Add it to the presentation.
To locate existing .AVI files on the computer, click on the “Start” button then “Find” and “Files or Folders.” Type *.AVI
in the “Named:” entry box and click the “Find Now” button. The magnifying glass will spin a few times and identify all
the video files on your system’s C drive (change the “Look in” entry box for another drive).
36
Using Videograms
9
Page 37

Stand-Alone Videogram Presentations
You don’t need a fancy presentation software package installed on every system to enjoy the benefits of video-enhanced
presentations. In fact, with a small investment of time, you can create stand-alone and self-running Videogram presentations. To begin you’ll need a standard AVI video and sound editing software package to import AVI files created using the
Philips PCA635VC Videogram Creator application. After you’re satisfied with your production, save this presentation to a
Microsoft standard AVI file on your hard drive. Load this AVI file into the Videogram Creator application and click on the
Videogram Creator “Send” button. Be sure to check “Include Videogram Player” and you’ll have a self-running presentation that you can send to anyone.
37
Page 38

Video Streaming
Videogram Streaming is basically a standard Internet file download taken one step further. A standard file download on the
Internet may be accomplished by simply clicking on a link to a file. For example, by clicking on a link to
http://www
.yoursite.com/file.exe, the FILE.EXE will be transferred to your hard drive. FILE.EXE may NOT be accessed
until the download is completed. This works fine for most situations but may not be desirable when the video and sound
files are extremely large and will take a considerable amount of time for downloading.
Thanks to the Videogram Player application, streaming Videograms allows Internet site visitors to watch video and hear
sound in real time. For example, by clicking on a link to the fictional http://www
.yoursite.com/vgram.vgx, VGRAM.VGX
will “point” to an actual Videogram file (.VGM) at WWW.YOURSITE.COM and play the Videogram in real time, while
downloading. This .VGX or .VGM file is the step beyond a standard Internet file download.
Standard Internet File Download
Typically, with your Internet Browser, you click on the video file link, and then wait while the file is downloaded in its
entirety to your hard drive.
With Videogram Streaming
With your Internet Browser, you click on the Videogram Pointer File (.VGX or .VGP) or the actual .VGM file. The
Videogram File (.VGM) Is “Called”, and the video & sound is sent to your monitor & speakers without saving the file to
your hard drive (you have the option of also saving the file to your hard drive).
A .VGX file is a standard text file that is used to identify, or “point,” to the location of where a Videogram file (.VGM) is
located. A .VGP file is intended for use ONLY with the Streaming Videogram Netscape Plug-In. The contents of both a
.VGX and .VGP file will look similar to this:
http://www
.yoursite.com/myvgram.vgm
The Streaming Videogram Player can be run as a stand-alone application to play back any Videogram .VGM files, .VGX
and .VGP “pointer files,” including standard Videograms .EXE. The Videogram Player’s main use is as a Helper Application that is launched by your browser.
The difference between .VGX and .VGP files are simply that one is used to launch the stand-alone Streaming Videogram
Player (.VGX) and the other is used to launch the Netscape Plug-In (.VGP).
Adding Videograms To Internet Sites
Follow the steps below to setup streaming videos on an internet site
1 Set up your web servers to insert the above MIME types on files with extensions of “VGX”, “VGP” and “VGM” as
follows:
type=video/x-videogram ext=vgm,vgx
type=video/x-videogram-plugin ext=vgp
2 Create a .VGM Videogram file as described in Chapter 3. This is a Videogram without the built-in Videogram player.
3 Upload the .VGM file to your Internet site and be sure to note the exact location, like:
http://www
.yoursite.com/myvgram.vgm.
4 Using a standard text editor like Windows Notepad (located in the “Accessories” group), create a new file containing
the location of the .VGM file. For example:
http://www
.yoursite.com/myvgram.vgm
Save this file as a standard text file with a .VGX (or .VGP for Netscape Plug-In) extension. For example:
MYVGX.VGX
(MYVGP.VGP for Netscape Plug-In)
38
Advanced Features
10
Page 39

5 Upload the .VGX (or .VGP) file to your Internet site, where your Internet page (.HTM) files are located, and be sure
to note the exact location, like:
http://www
.yoursite.com/myvgx.vgx.
6 Edit one of your Internet pages (.HTM) to include a link to the .VGX (or .VGP) file by adding a line similar to:
<a href=”http://www.yoursite.com/myvgx.vgx”>My Videogram File
Viewing Videograms On Internet Sites
Follow the steps below to view streaming videos on an internet site
1 Download the Videogram Player Setup program from the Internet Site by visiting the appropriate location listed
below. When asked by your browser about where to save the file, specify C:\TEMP (or any temporary directory).
•
For Windows 3.1 and 3.11 (16 Bit Version):
http://www
..com/vgplayer/setup16.exe
•
For Windows 95 (32 Bit Version):
http://www
..com/vgplayer/setup32.exe
Please feel free to provide a direct link to these locations on your Internet site so visitors can download the Streaming
Videogram Player Application to view Videograms.
2 After the file has been downloaded, choose RUN from the FILE menu in Program Manager or from the START menu
in Windows Explorer and enter C:\TEMP\SETUP16.EXE or C:\TEMP\SETUP32.EXE depending upon which file
you downloaded. The installation program will guide you through the rest of the installation.
The installation will automatically detect if Netscape is currently on system. If it is, the Videogram Netscape Plug-In
will be installed. This will allow the Netscape browser to launch .VGP Videogram “pointer” files. Additional information on this topic may be found at the Internet site on a specific page.
http://www
..com/vgstream.htm
3 After you have downloaded and installed the Videogram Player, try streaming some Videograms from our test page at:
http://www
..com/vgtest.htm
Optimizing System for Video Capture & Playback
There are a couple of tricks to turning your computer into an optimized video-capturing & playing system. We’ve documented a few here in order to help you get the most out of your new Philips PCA635VC.
Video Capture Optimization
The Philips PCA635VC capture system offers hardware compression in addition to software compression. However, even
with hardware compression, the amount of data that needs to be stored during video capture is still very large. Below we
have outlined the flow of video through the system and areas that will affect the system’s ability to process it.
What Happens When Capturing Video
This is an outline of the Philips PCA635VC capture process.
1 Philips PCA635VC Sends Video to Computer’s Parallel Port
2 Computer’s Processor Directs Video to Hard Drive Controller or RAM (if available)
3 Hard Drive Controller Routes Video to Hard Drive
As you may have noticed, the system’s parallel port, processor speed, hard disk controller, hard disk and RAM are key factors in video capture. These all combine to determine the video frame rate per second. An “Optimum System Configuration” was detailed at the beginning of this manual in Chapter 1 titled “Before you Begin.” This was used as our general
reference system when testing the Philips PCA635VC. The “Minimum System Configuration,” also in Chapter 1, was our
low-end reference system. The video worked well on both, however, the “Optimum System Configuration” captured at a
higher video frame rate.
39
Page 40

Parallel Port Recommendations
The parallel port is the first contact a computer system has with the video information using the Philips PCA635VC. You
can have the fastest hard drive, hard drive controller, computer processor and RAM and still not see an improvement in
video capture if the video originated at a slow Parallel Port. We strongly recommend that you use a fast parallel port connection when optimizing a system for video capture.
At the time this manual was created, there are 3 common types of parallel ports available in systems- Uni-directional, Bidirectional and the one we strongly recommend, ECP. Some systems have the ability to offer multiple parallel port options
through the system’s Bios Setup. Here an advanced computer user can tell the system that the on-board (built into motherboard) parallel port to utilize the ECP standard instead of Uni-directional or Bi-directional. It should also be noted that
some systems do not have an on-board parallel port, rather they have a separate card that occupies a slot in the system. In
which case, it may be advantageous to upgrade the system to one with an ECP parallel port. This could be done with a
stand-alone card (preferably PCI based) or new motherboard.
Processor, Hard Disk & Controller Recommendations
After the video passes through the parallel port it is handled by the system processor and forwarded to the hard disk and
controller. All of today’s multimedia applications require fast processors. We recommend using at least a Pentium 75 when
working with video or any multimedia applications. The hard disk and hard disk controller will provide for additional
frame rate capture ability over just using an ECP parallel port (described earlier). Before you buy your next “Video” hard
drive, contact the prospective hard drive manufacturers and tell them to give you the SUSTAINED DATA TRANSFER
RATE for the hard drive. The higher the value in megabytes, the better your video and audio capture performance will be.
Most of today’s hard disks and controllers are compatible with ATA mode 3 or 4. ATA mode 3 implies a transfer rate of
11MB/second and ATA mode 4 implies a transfer rate of 16MB/second. HOWEVER, THIS ONLY REFLECTS THE
TRANSFER RATE TO AND FROM THE HARD DISK BUFFER (AKA: CACHE) AND DOES NOT INDICATE
THE ACTUAL SUSTAINED DATA TRANSFER RATE. Simply stated, the sustained data transfer rate is what informa-
tion transfer is maintained 100 % of the time. Very few hard drive manufactures even list the sustained data transfer rate
in their specifications. This is probably because it’s more impressive to say that they have a 16MB/second transfer rate
instead of less than 1MB/second sustained.
Disable the system’s WRITE CACHE. This will improve the capture performance. In addition, your system’s WRITE
CACHE settings may need to be adjusted if you are using a fast system with a fast hard drive and hard drive controller.
More specifically, you may try disabling the write cache altogether in the operating system bios and hard drive controller
setup. In most other situations write cache is desirable, however, when capturing video this buffer is not large enough and
only inhibits video transfer to the hard drive by writing information later and then trying to catch up later.
De-fragment your hard drive often to optimize video/sound capture performance. Do you already have a fast hard drive
and controller? There is a way to further optimize your hard drive performance. It’s called de-fragmenting your hard drive.
There is a hard disk de-fragment utility built into Windows 95 and a number of system “first aid” software packages contain this as well. De-fragmenting your hard drive will keep all the video in one location, this way the hard drive doesn’t
spend all of its time looking for a place to put video during capture.
Video Playback Optimization
Video files, in general, play better on newer multimedia computer systems and Videograms run better than standard video
files, thanks to the compression. Our first recommendation when playing back video is to make sure you’re playing back
Videograms which can be self-running (.EXE) or (.VGM). For further optimization we’ll need to look at the computer
system again. As with video capture, playing video requires the video information to flow through the computer system
(shown below).
When Playing Back Video
The following is an outline of the video playback process
1 Computer’s Processor Requests Video from Hard Drive Controller
2 Hard Drive Controller Requests Video from Hard Drive
3 Hard Drive Sends Video to Hard Drive Controller
4 Hard Drive Controller Sends Video through System Bus to the video card
40
Page 41

System Recommendations
Increase your windows display resolution from 256 colors to 64,000 or 16.7 million colors to greatly enhance video viewing.
In general, we recommend that you use a Pentium 90 or faster computer with a Hicolor (64,000 color, 16-bits per pixel)
or Truecolor (16.7 million color, 24-bits per pixel) display to view Videograms. Videograms will play on slower systems
and on displays with 256 colors but playback quality may suffer. Please refer to the manual that came with your display or
graphics adapter (VGA card) for more information regarding color display setup.
Your computer’s processor, hard drive, hard drive controller, display adapter and amount of system RAM all play a key role
in assisting the playback of Videograms.
The Videogram player will run better if any of the following hardware or software are installed on your system. Each of
these items are detected by the Videogram player and will be utilized during playback. More information can be found in
the previous section,”Video Capture Optimization”on each of these items. The requirements for video capture and playback are very similar.
•
Faster CPU (recommend Pentium 133 or faster)
•
Windows 95 - performance is better on HD access and video display
•
Fast Hard Drive and Controller
•
Display adapter that provides DCI support in Windows 3.x
•
Display adapter that provides DirectDraw support in Windows 95
In systems where memory is at minimum levels (4MB for Windows 3.x, 8MB for Windows 95), adding more memory
will enhance video playback performance.
Check your graphics card documentation or with the manufacturer if you are unsure whether your graphics card will support DCI and DirectDraw.
Graphics Card Recommendations
Before you buy your next graphics adapter make sure it supports DCI, DirectDraw or a similar standard. This will enhance overall system performance.
Your system’s graphics or display adapter (VGA Card) plays an important role in the capturing process. If the graphics
adapter does not support DCI (Intel/Microsoft standard: Direct Control Interface) or DirectDraw (Microsoft Standard)
then your system’s processor will have an additional amount of processing to handle. The advantage to DCI and
DirectDraw is that they pull routine video graphics processing away from the system processor to free it up for more important tasks - like capturing and playing back video.
41
Page 42

Q. What is a Videogram?
A Videogram is a file containing highly compressed video and audio. A Videogram typically will include the
player so that any Windows PC user can play the file back on their computer. With Videogram technology, you
can fit over 60 seconds of video and audio on a single 3.5 inch floppy, so, for the first time you can deliver highquality video on a floppy, through email, or over the Internet.
Q. What are the system requirements to make a Videogram using Philips PCA635VC?
System Requirements:
Minimum Optimal
• Pentium 75 • Pentium 133
• 16MB • 32MB
• Windows 95 • Same
• CD ROM • Same
• 23 MB free hard disk space • 23 MB or more free disk space for captured video
• Sound card or sound capability • Sound card or multimedia kit
Q. What kind of PC do I need to play back a Videogram?
Videograms were designed to run on any 486 DX4 or above PC with Windows 3.1x, Windows 95 or Windows
NT (even OS/2) without any special hardware or software. Users with higher performance PCs will enjoy better
quality during playback.
Q. What do I need to create a Videogram?
You will need the Philips PCA635VC Camera and Videogram Creator software. Both products are included
with your purchase.
Q. What are the minimum system requirements for using a Philips PCA635VC?
You will need a minimum of a Pentium 75 Windows 95 PC or notebook. You must have an ECP or bi-directional parallel port to connect the Philips PCA635VC. To record and play back sound, you need to have a
sound card. You will also need at least 16MB of RAM and 23MB of free disk space (substantially more of each
is recommended).
Q. Do I need a Pentium computer to play a Videogram?
No. Videograms will play back even on 486 machines. All you need is Windows 3.1x and a sound card with
speakers to listen to the audio. Users with higher performance computers will get better quality during playback.
Q. Will the Videogram play on my Macintosh?
Not currently.
Q. Do I need to have a sound card to use Philips PCA635VC?
No. You can capture video without a sound card, however, you will not capture audio. To capture audio with the
video and playback sound, you will need a sound card.
Q. What type of compression does Philips PCA635VC use, and will that affect my video conferencing software?
Philips PCA635VC supports three types of input data: YUV 422, YUV 9 and VGPixel. The VGPixel codec delivers the highest compression, which allows for higher frame rates during capture.
Philips PCA635VC will work with any video conferencing software that supports Video for Windows without
interference because Philips PCA635VC is compliant with Video for Windows.
Q. Will others be able to use AVI files that I create from captured Video?
Yes. Just save the AVI file in an uncompressed format by going to: “FILE” and selecting “SAVE AS.”
Q. My notebook computer has no audio input capability. Will Philips PCA635VC still work, and how will I get
audio into my Videograms?
You can still capture video without the audio. You can add audio later if you have an audio track that you want
to play with the video taken. Philips PCA635VC supports audio dubbing or the replacement of existing audio
track with new audio.
42
Frequently Asked Questions
11
Page 43

Q. What is MAPI and do I need a MAPI compliant e-mail system to use Philips PCA635VC?
MAPI stands for Messaging Application Programming Interface. This interface allows different applications to
interact using e-mail messaging. If you have a MAPI-compliant e-mail system, an e-mail window will automatically appear when you are ready to send a Videogram. Microsoft Exchange, Eudora Pro v3.0, Pronto 97, and Zmail Pro are all examples of MAPI Compliant e-mail systems.
You do not need to have a MAPI-compliant e-mail system in order to send Videograms. You can still send
Videograms by first saving the Videogram to a file, and then attaching the saved file to your e-mail message.
Netscape 3.0, Internet Explorer, Emissary and America Online (AOL) are all examples of non-MAPI-compliant
e-mail systems.
Q. Does Philips PCA635VC work with America Online (AOL)?
Yes. In order to send a Videogram with AOL you will need to save your Videogram in a file, launch the e-mail
system separately and send the Videogram as an e-mail attachment.
Q. I already have a printer (or Zip drive) attached to my parallel port, can I still use a Philips PCA635VC? How
do I connect Philips PCA635VC if my printer port is already in use?
You can use the Philips PCA635VC with other devices requiring a parallel port simply by adding a mechanical
switch box. A switch box features one cable connecting to the computer’s parallel port, and two or more parallel
ports on the switch box. You simply plug your Philips PCA635VC into one of the switch box’s parallel ports,
then connect your other parallel port-based products to the remaining ports. To work with the Philips
PCA635VC, simply select the appropriate port with the switch on the front and begin working. To change devices, simply turn the switch on the front.
In this way, the switch box enables you to connect both the Philips PCA635VC and a printer (or Zip drive) to
ONE parallel port. Any standard mechanical switch box from any computer store will work. DO NOT USE an
electronic switch box.
Q. Will Philips PCA635VC work with an EPP parallel port?
Not currently. The parallel port must be either configured in ECP or Bi-directional mode. Refer to your systems
users manual or documentation to find out how to configure your system to ECP or Bi-directional mode.
Q. What types of parallel ports are supported by Philips PCA635VC?
Philips PCA635VC supports both ECP (recommended) and Bi-directional parallel port configurations.
Q. What is ECP?
There are several ways that data can be transmitted via the parallel port. Currently three are most often employed - EPP, Bi-directional, and ECP. ECP (Enhanced Capability Port) is the most current configuration. Philips
PCA635VC supports both ECP and Bi-directional modes.
Q. What is a VGM file?
A file with a “VGM” extension is a Videogram without the embedded Videogram Player. These files are created
for distribution to those who already have a Videogram Player. The current embedded Videogram Player requires around 110KB of storage, creating a Videogram without the player will save this storage. In order to play a
.VGM file, the user will need to download the approximately 400KB Videogram Player (or it can be attached in
an e-mail). A .VGM file can be created using the Philips PCA635VC Camera and choosing not to include the
Player when creating a Videogram.
43
Page 44

Q. How do I save video captured using Philips PCA635VC to an AVI or MOV file?
Any video that has been captured with Philips PCA635VC can be saved as an uncompressed AVI file. Under
“FILE” click on “Save As” and then choose AVI format. Currently, MOV (QuickTime) files are not supported
directly by the Videogram Creator software. However, you can bring a file captured using Philips PCA635VC
into an application such as Adobe Premiere and save it as a QuickTime MOV file.
Q. Can I make a Videogram that will run at 30 frames per second? Do I need 30 fps?
You can capture video using the QuickVideo Transport or the Philips PCA635VC PC camera at 320x240 resolution and 30 frames per second. However, these high-resolution, high frame-rate videos become very large files.
Due to the size of larger format files, a standard of 160x120 at 15 frames per second has been adopted by most
distributors of video on the World Wide Web. Compared to a video at 320x240 and 30 fps, the lower resolution
file contains 8 times less data in its uncompressed form.
Although 30 frames per second (and 60 interlaced fields) is the standard for broadcast NTSC video and television, other frame rates have been successfully used in other mediums. For example, movies shot on film record
at 24 frames per second, and in Europe, the PAL and SECAM standards specify 25 frames per second (and 50
fields). The usual compromise between accurate display of full motion video and file size is 15 frames per
second.
As communication bandwidth, storage capacity and compression technology advance, the standard for video distribution in electronic form may move to higher resolutions and higher frame rates. For the time being, a higher
resolution of 320x240 is more likely the next advance rather than increasing the frame rate above 15 fps. The
advantages of the higher resolution probably outweigh the greater motion tracking of an increased frame rate.
Q. What is the real difference between 15 and 30 frames per second? Are there certain applications where 30 fps
would be required?
The difference between 15 frames per second (fps) and 30 fps is how much motion will be captured and conveyed when the video is played back (this affects the apparent smoothness of motion). The file size will also be
affected since there will be twice as much data at 30 fps. Most video providers over the web have standardized
on 15 fps (some use video captured at even lower frame rates - 8, 10 or 12 fps) recognizing that 15 fps gives a
very good representation of motion (as can be seen in the Videograms we have posted on our web site).
We have found that for most applications, 15 fps is sufficient but we recognize that there will be certain situations where 30 fps is required. This may include situations where smooth continuous motion is absolutely needed. That is why the QuickVideo Pro and Philips PCA635VC support 30 fps capture and the Videogram
Creator and Player support 30 fps playback. Users should recognize that file sizes will be much larger, and without an extremely fast computer, performance will be most likely degraded during playback. This degradation
during playback can result in dropped frames and even a loss of synchronization (sync) between audio and
video. This is often seen as more disturbing to the viewer than a lower frame rate.
Q. How long does it take to compress a file into a Videogram?
Most of the work in creating a Videogram is performed by the host processor. So the time required to create a
Videogram will depend on the system CPU speed and the amount of memory (RAM). In some cases, the hard
disk performance will also have an impact. Typically, it will take between 3 and 5 times the duration of the actual video clip to create a Videogram on a Pentium system running at 90 MHz. The exact time will depend on
how much activity is contained in the video clip and the audio and video codec chosen for the compression.
Q. Will a faster system shorten the time required to make a Videogram?
Yes. See above.
Q. Will a faster system improve video capture quality?
If the Philips PCA635VC is used in a Pentium 90 system, you should be able to capture video without problems
up to 320x240 resolution. When using a slower machine there is the possibility that your system will drop frames during video capture (if the system is not fast enough to transfer the captured data to your hard disk, frames
will be dropped from the video stream). The components in the system that will affect whether frames are dropped are CPU/system bus speed, amount of system memory, and hard disk performance.
We recommend a 133-MHz Pentium with at least 16 MB of memory and a fast hard disk drive. Hard disk drive
performance is measured by data transfer rate and seek time. A larger data cache in the hard disk will not help
with a large stream of video data. In general, SCSI hard disks will perform better due to the faster data transfer
rates of the SCSI interface. SCSI drives are typically faster in seek times as well. For our own video capture sys-
44
Page 45

tems, we use 1 GB or larger drives with data transfer rates of at least 11 MB/second (ATA Mode 3) and seek
times of 14 ms or less.
In general, we recommend that you have a display with at least 256 colors and preferably 64K colors minimum.
Videogram Creator will work on systems even with 16 colors but the quality will be very poor since the original
data was compressed from 16 million colors. Videograms created on systems displaying less than 64K colors will
appear to have more compression artifacts due to the compression of colors necessary to reduce 16 million colors
down to 64K.
Q. Does the recipient of a Videogram need to have a multimedia kit, or a sound card and speakers, to play it
back?
Yes, in order to hear the audio portion of the Videogram. Without a sound card and speakers, the audio cannot
be played back. The video, however, will run normally.
In general, we recommend that a recipient have at least a display with 256 colors and preferably 64K colors
minimum. The Videogram will play on systems even with 16 colors but the quality will be very poor since the
original data was compressed from 16 million colors. In systems with 256 colors or less, additional work must
be done to map the colors to the limited set. This will slow down playback and cause more frames to be dropped.
Q. What are the parameters you can adjust when creating a Videogram?
You can adjust the resolution of the Videogram, the audio and video codecs used for compression and the quality level of the compression. You can trim the beginning and ending points of the video clip, and you can also
specify the title (appears in the title bar during playback) of the Videogram.
Q. Can I capture using an editing program, such as Adobe Premiere? How do I do this?
Yes. You can capture video directly from Adobe Premiere. You can also capture video using Videogram Creator
and save it to an AVI file using the Save Captured Video to File command in the File Menu. Adobe Premiere
can then read the AVI file.
Q. In what formats can I save video clips captured with the Philips PCA635VC Camera?
Philips PCA635VC capture video in a standard AVI format. Only after the captured video has been compressed
into a Videogram is the file saved as an ‘.EXE’ or ‘.VGM’. The captured video can also be saved as an AVI file.
Q. How does Videogram compression compare to QuickTime?
QuickTime is a file format standard for video and audio first used on the Macintosh. QuickTime movies typically have an extension of MOV on a PC and are similar to Video for Windows files (which have an AVI extension). Both file formats support different video and audio codecs including Indeo and Cinepak. When comparing compression ratios, users should compare the VG codec to Indeo, Cinepak, MPEG, Microsoft Video, or
any others. In general the ’ codecs are 2 to 3 times more efficient in both audio and video compression.
45
Page 46

Optical
Sensor 1/4” CCD
Pixels PAL (HxV) 512x582
NTSC (HxV) 512x492
Illumination 10 - 100000 lux
Integrated lens 3.8mm, F2.0
Resolutions
Streaming video resolutions
NTSC (HxV) 320x240 / 240x180 / 160x120
PAL (HxV) 352x288 / 264x216 / 176x144
Still image resolutions
NTSC/PAL (HxV) 320x240 / 640x480 / 1024x768 / 1600x1200
Performance
Video Frame Rate
Res. 160x120 Up to 30 fps
Res. 320x240 Up to 15 fps
Camera adjustment parameters
Contrast Variable
Automatic white balance On/off
Backlight compensation On/off
Flickerless On/off
Interfacing
Cable 2m
Power supply DC jack
Audio 3.5 mm stereo jack
Minimal system requirements
Processor Pentium 100MHz
RAM 16MB
Operating System Windows95
Parallel Port Both bi-directional and ECP mode parallel ports are supported. ECP mode is
advised for fastest framerate.
Hard disk space 25MB free hard disk space
CD-ROM drive Required for application software and drivers.
Soundcard and speakers Recommended
Software
TWAIN driver interface (For still image applications)
Windows95 driver (Support for Video for Windows)
Microsoft NetMeeting
Alaris Videogram Creator
Audio
Microphone Integrated
Output Line
Harmonic distortion < 1% (at 1kHz)
Physical specifications
Dimensions 70x45x97mm (WxHxD)
Power consumption
Standby < 0.5 Watt
On < 2.75 Watt
Temperature 10 - 45 °C
Power supply DC 5.5V ±2.5%, 500 mA, 2.75 VA
Humidity
Operating 20 - 90% RH
Storage 10 - 90% RH
© Alaris, Inc. 1995 - 1998 / © Philips Consumer Electronics BV 1998
46
Specifications
12
Page 47

Active Video Area The section, or region, of the application that displays live motion video.
Aspect Ratio The length compared to the width of the video window. For example, a standard television has a 3
to 4 aspect ratio (for every 3 pixels of height there are 4 pixels for length).
AVI The Microsoft standard file format for combined video and sound files on the PC. This is part of
Video for Windows.
BMP Often referred to as “Bitmap,” this is the Microsoft standard PC file format for images.
Codec This is used to reference a compression format for creating sound and video streams on the com-
puter.
Composite Often referred to as an “RCA” adapter, or plug, this is a standard connector type used on many
VCRs, TVs, camcorders and other video and sound equipment.
Compression Term used to describe a process of compacting or squeezing video and sound information into a
smaller than normal size. For example, 2 to 1 compression would indicate that 2 pixels would now
only occupy the space of 1 pixel.
DCI “Direct Control Interface” was developed primarily by Intel and Microsoft to help develop a com-
mon standard for the passing of video information in the PC.
DirectDraw The latest standard developed primarily by Microsoft to help develop a common method for the
passing of video information in the PC.
EXE Often referred to as “Executable,” this is the standard file format for programs on the PC.
Frame A single image in a video stream.
Frame Rate Typically judged in seconds (fps, frames per second), this refers to the number of single images
that will be displayed or captured in a video stream.
Pixel The smallest square or round element in an image. These are the “building blocks” that when
alone are only one color, but when combined with others form complete images.
Playback Window The window within the QuickVideo Capture Application that is used to display previously captu-
red video.
Preview Window The window within the QuickVideo Capture Application that is used to display live, or moving,
video.
RCA Connector Often referred to as an “Composite” adapter, or connector, this is a standard connector type used
on many VCRs, TVs, camcorders and other video and sound equipment.
Resolution Typically used in the context of pixels, this is used to describe overall video size. This is relative to
quality in that the higher the resolution, the better the quality and the more pixels.
S-Video Also referred to as “S-VHS,” “HI-8,” “Y-C” and “Super Video,” this is a connector-found on hig-
her-end consumer video equipment-that separates brightness and color information. This is literally double the quality of composite video. In addition, this standard eliminates color bleeding in
video.
Video for Windows Developed by Microsoft, this is a standard for displaying video on the Windows desktop.
Window’s 95 has this built in, however, this must be installed separately on Windows 3.1 and
3.11.
Video Stream A collection of images that combine to form motion–or moving–pictures (also known as movies
or video clips).
47
Glossary Of Terms
13
 Loading...