

Page 1
© 2011 Koninklijke Philips Electronics N.V.
All rights reserved.
PB9001_37_UM_V3.2
Philips Consumer Lifestyle
A division of Philips Electronics North America Corporation
P.O. Box 10313
Stamford, CT 06904
Phone: 1-888-PHILIPS (744-5477)
Meet Philips at the Internet
http://www.philips.com/welcome
Page 2
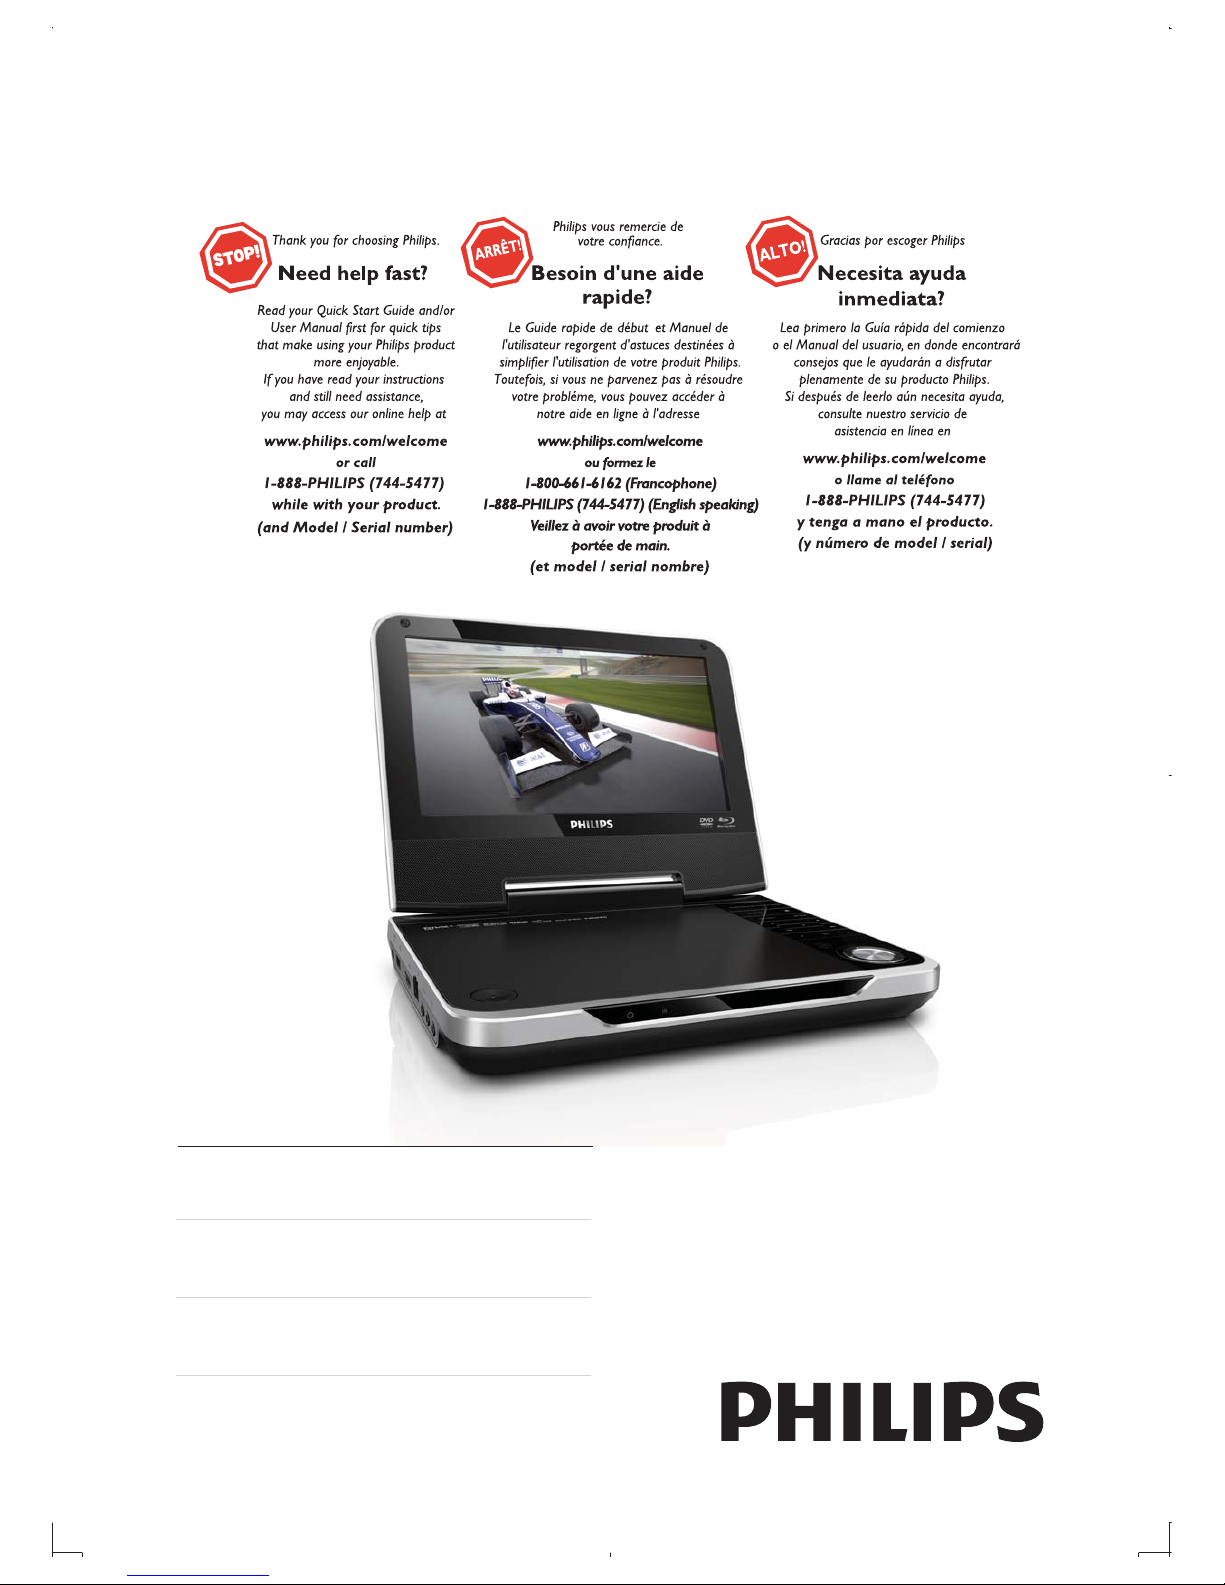
Register your product and get support at
www.philips.com/welcome
PB9001
EN User manual
ES Manual del usuario
FR Mode d’emploi
Page 3

Canada
English:
This digital apparatus does not exceed the Class B limits for radio noise
emissions from digital apparatus as set out in the Radio Interference
Regulations of the Canadian Department of Communications.This Class B
digital apparatus complies with Canadian ICES-003.
Français:
Cet appareil numérique n’émet pas de bruits radioélectriques dépassant
les limites applicables aux appareils numériques de Classe B prescrites dans
le Règlement sur le Brouillage Radioélectrique édicté par le Ministère des
Communications du Canada. Cet appareil numérique de la classe B est
conforme à la norme NMB-003 du Canada.
The set complies with the FCC-Rules, Part 15 and with 21 CFR 1040.10.
Operation is subject to the following two conditions:
1. This device may not cause harmful interference, and
2. This device must accept any interference received, including interference
that may cause undesired operation.
L’appareil est conforme à la réglementation FCC, section 15, et à la
norme 21 CFR 1040.10. Son utilisation est soumise à deux conditions :
1. L’appareil ne doit pas provoquer d’interférences nuisibles, et
2. L’appareil doit supporter les interférences reçues, y compris les
interférences empêchant son fonctionnement correct.
Page 4
3
English
EN
Contents
1 Important 7
Important Safety Instructions 7
Hearing safety 9
Notice 10
Trademark notice 12
2 Your portable Blu-ray disc player 14
What’s in the box 14
Overview of the main unit 15
Overview of remote control 17
3 Get started 19
Prepare the remote control 19
Charge the battery 19
Connect a TV 21
4 Use your portable Blu-ray disc player 22
Turn on 22
Play a disc 24
Play media files via USB 24
Basic play control 25
Video, audio and picture options 26
5 Use your portable Blu-ray disc player 29
DivX videos 29
BonusView on Blu-ray 30
Set up a network 30
BD-Live on Blu-ray 31
Use Philips EasyLink 32
Page 5
4 EN
6 Change settings 34
Picture 35
Sound 35
Network 36
Preference 36
Advanced options 38
LCD screen 39
7 Update software 40
Update software via the Internet 40
Update software via USB 40
8 Specifications 41
9 Troubleshooting 43
Page 6
5
English
EN
Register online at www.philips.com/welcome today to
get the very most from your purchase.
*Product Safety Notification *Additional Benefits
By registering your product, you'll receive notification - directly
from the manufacturer.
Registering your product guarantees that you'll receive all of
the privileges to which you’re entitled, including special moneysaving offers.
For Customer Use
Enter below the Serial No. which is located on the rear of the cabinet. Retain this
information for future reference.
Model No.__________________________
Serial No. ________________________
This “bolt of lightning” indicates unin-
sulated material within your unit may
cause an electrical shock. For the safety of
everyone in your household, please do not
remove product covering.
The “exclamation point” calls atten-
tion to features for which you should
read the enclosed literature closely to prevent operating and maintenance problems.
WARNING:To reduce the risk of fire or
electric shock, this apparatus should not be
exposed to rain or moisture and objects
filled with liquids, such as vases, should not
be placed on this apparatus.
CAUTION: To prevent electric shock,
match wide blade of plug to wide slot, fully
insert.
ATTENTION: Pour éviter les choc électriques, introduire la lame la plus large de la
fiche dans la borne correspondante de la
prise et pousser jusqu’au fond.
Congratulations on your purchase,
and welcome to the “family!”
Dear PHILIPS product owner:
Thank you for your confidence in PHILIPS.You’ve selected one of
the best-built, best-backed products available today.We’ll do everything in our power to keep you happy with your purchase for many
years to come.
As a member of the PHILIPS “family,” you’re entitled to protection
by one of the most comprehensive warranties in the industry.
What’s more, your purchase guarantees you’ll receive all the
information and special offers for which you qualify, plus easy access
to accessories from our convenient home shopping network.
Most importantly, you can count on our uncompromising commitment to your total satisfaction.
All of this is our way of saying welcome - and thanks for investing
in a PHILIPS product.
P.S. To get the most from your PHILIPS purchase, be
sure to register online at:
www.philips.com/welcome
Registering your model with PHILIPS makes you eligible for all of the valuable benefits listed below,so don't miss out.
Register online at www.philips.com/welcome to ensure:
Page 7

6 EN
PHILIPS LIMITED WARRANTY
ONE (1) YEAR
WARRANTY COVERAGE:
PHILIPS warranty obligation is limited to the terms set forth
below.
WHO IS COVERED:
Philips warrants the product to the original purchaser or the person receiving the product as a gift against defects in materials and
workmanship as based on the date of original purchase
(“Warranty Period”) from an Authorized Dealer. The original
sales receipt showing the product name and the purchase date
from an authorized retailer is considered such proof.
WHAT IS COVERED:
The Philips warranty covers new products if a defect in material
or workmanship occurs and a valid claim is received by Philips
within the Warranty Period. At its option, Philips will either (1)
repair the product at no charge, using new or refurbished
replacement parts, or (2) exchange the product with a product
that is new or which has been manufactured from new, or serviceable used parts and is at least functionally equivalent or most
comparable to the original product in Philips current inventory,
or (3) refund the original purchase price of the product.
Philips warrants replacement products or parts provided under
this warranty against defects in materials and workmanship from
the date of the replacement or repair for ninety (90) days or for
the remaining portion of the original product’s warranty,
whichever provides longer coverage for you. When a product or
part is exchanged, any replacement item becomes your property
and the replaced item becomes Philips’ property. When a refund
is given, your product becomes Philips’ property.
Note: Any product sold and identified as refurbished or
renewed carries a ninety (90) day limited warranty.
Replacement product can only be sent if all warranty
requirements are met. Failure to follow all requirements
can result in delay.
WHAT IS NOT COVERED - EXCLUSIONS AND LIMITATIONS:
This Limited Warranty applies only to the new products manufactured by or for Philips that can be identified by the trademark,
trade name, or logo affixed to it. This Limited Warranty does not
apply to any non-Philips hardware product or any software, even
if packaged or sold with the product. Non-Philips manufacturers,
suppliers, or publishers may provide a separate warranty for their
own products packaged with the bundled product.
Philips is not liable for any damage to or loss of any programs,
data, or
other information stored on any media contained within
the product, or any non-Philips product or part not covered by
this warranty. Recovery or reinstallation of programs, data or
other information is not covered under this Limited Warranty.
This warranty does not apply (a) to damage caused by accident,
abuse, misuse, neglect, misapplication, or non-Philips product, (b)
to damage caused by service performed by anyone other than
Philips or Philips Authorized Service Location, (c) to a product or
a part that has been modified without the written permission of
Philips, or (d) if any Philips serial number has been removed or
defaced, or (e) product, accessories or consumables sold “AS IS”
without warranty of any kind by including refurbished Philips
product sold “AS IS” by some retailers.
This Limited Warranty does not cover:
F Shipping charges to return defective product to Philips.
Fabor charges for installation or setup of the product, adjust-
ment of customer controls on the product, and installation or
repair of antenna/signal source systems outside of the product.
F!roduct repair and/or part replacement because of improper
installation or maintenance, connections to improper voltage
supply, power line surge, lightning damage, retained images or
screen markings resulting from viewing fixed stationary content for extended periods, product cosmetic appearance items
due to normal wear and tear, unauthorized repair or other
cause not within the control of Philips.
Famage or claims for products not being available for use, or
for lost data or lost software.
Famage from mishandled shipments or transit accidents when
returning product to Philips.
F product that requires modification or adaptation to enable
it to operate in any country other than the country for which
it was designed, manufactured, approved and/or authorized, or
repair of products damaged by these modifications.
F product used for commercial or institutional purposes
(including but not limited to rental purposes).
F!roduct lost in shipment and no signature verification receipt
can be provided.
Failure to operate per Owner’s Manual.
TO OBTAIN ASSISTANCE IN THE U.S.A., PUERTO
RICO, OR U.S. VIRGIN ISLANDS…
Contact Philips Customer Care Center at:
1-888-PHILIPS (1-888-744-5477)
TO OBTAIN ASSISTANCE IN CANADA…
1-800-661-6162 </8-2Speaking)
1-888-PHILIPS (1-888-744-5477) - (English or Spanish
Speaking)
REPAIR OR REPLACEMENT AS PROVIDED UNDER THIS
WARRANTY IS THE EXCLUSIVE
REMEDY #THE CONSUMER. PHILIPS SHALL NOT BE LIABLE #ANY INCIDENTAL OR CONSEQUENTIAL DAMAGES
#BREACH
ANY EXPRESS OR IMPLIED WARRANTY ON THIS PRODUCT. EXCEPT TO THE EXTENT PROHIBITED BY APPLICABLE
LAW, ANY IMPLIED WARRANTY MERCHANTABILITY OR
%$$ #A PARTICULAR PURPOSE ON THIS PRODUCT
IS LIMITED IN DURATION TO THE DURATION THIS
WARRANTY.
Some states do not allow the exclusions or limitation of incidental or consequential damages, or allow limitations on how long an
implied warranty lasts, so the above limitations or exclusions may
not apply to you.
This warranty gives you specific legal rights. You may have other rights which vary from state/province to state/province.
3140 035 50201
Philips, P.O. Box 10313 Stamford, CT 06904
Page 8
7
1 Important
Important Safety Instructions
a Read these instructions.
b Keep these instructions.
c Heed all warnings.
d Follow all instructions.
e Do not use this apparatus near water.
f Clean only with dry cloth.
g Do not block any ventilation openings. Install in accordance with
the manufacturer’s instructions.
h Do not install near any heat sources such as radiators, heat
registers, stoves, or other apparatus (including amplifiers) that
produce heat.
i For countries with a polarized mains, do not defeat the safety
purpose of the polarized or grounding-type plug. A polarized plug
has two blades with one wider than the other. A grounding type
plug has two blades and a third grounding prong. The wide blade or
the third prong are provided for your safety. If the provided plug
does not fit into your outlet, consult an electrician for replacement
of the obsolete outlet.
Caution: To prevent electric shock, match the wide blade of the plug
to the wide slot, fully insert.
j Protect the power cord from being walked on or pinched,
particularly at plugs, convenience receptacles, and the point where
they exit from the apparatus.
k Only use attachments/accessories specified by the manufacturer.
l Use only with the cart, stand, tripod, bracket, or table specified by
the manufacturer or sold with the apparatus. When a cart is used,
use caution when moving the cart/apparatus combination to avoid
injury from tip-over.
English
EN
Page 9
8
m Unplug this apparatus during lightning storms or when unused for
long periods of time.
n Refer all servicing to qualified service personnel. Servicing is
required when the apparatus has been damaged in any way, such
as power-supply cord or plug is damaged, liquid has been spilled
or objects have fallen into the apparatus, the apparatus has been
exposed to rain or moisture, does not operate normally, or has
been dropped.
o Battery usage CAUTION – To prevent battery leakage which may
result in bodily injury, property damage, or damage to the unit:
Install all batteries correctly, + and - as marked on the unit. •
Do not mix batteries (old and new or carbon and alkaline, etc.).•
Remove batteries when the unit is not used for a long time.•
p
Batteries (battery pack or batteries installed) shall not be exposed
to excessive heat such as sunshine, fire or the like.
q Apparatus shall not be exposed to dripping or splashing.
r Do not place any sources of danger on the apparatus (e.g. liquid
filled objects, lighted candles).
s This product may contain lead and mercury. Disposal of these
materials may be regulated due to environmental considerations.
For disposal or recycling information, please contact your local
authorities or the Electronic Industries Alliance: www.eiae.org.
t Where the MAINS plug or an appliance coupler is used as the
disconnect device, the disconnect device shall remain readily
operable.
Caution
Use of controls or adjustments or performance of procedures other than herein •
may result in hazardous radiation exposure or other unsafe operation.
EN
Page 10
9
Warning
Never remove the casing of this apparatus. •
Never lubricate any part of this apparatus. •
Never place this apparatus on other electrical equipment. •
Keep this apparatus away from direct sunlight, naked flames or heat. •
Never look into the laser beam inside this apparatus. •
Ensure that you always have easy access to the power cord, plug or adaptor to •
disconnect this apparatus from the power.
Hearing safety
Listen at a moderate volume.
Using headphones at a high volume can impair your hearing. This •
product can produce sounds in decibel ranges that may cause hearing
loss for a normal person, even for exposure less than a minute. The
higher decibel ranges are offered for those that may have already
experienced some hearing loss.
Sound can be deceiving. Over time your hearing ‘comfort level’
•
adapts to higher volumes of sound. So after prolonged listening, what
sounds ‘normal’ can actually be loud and harmful to your hearing. To
guard against this, set your volume to a safe level before your hearing
adapts and leave it there.
To establish a safe volume level:
Set your volume control at a low setting.
•
Slowly increase the sound until you can hear it comfortably and •
clearly, without distortion.
Listen for reasonable periods of time:
Prolonged exposure to sound, even at normally ‘safe’ levels, can also
•
cause hearing loss.
Be sure to use your equipment reasonably and take appropriate •
breaks.
Be sure to observe the following guidelines when using your headphones.
Listen at reasonable volumes for reasonable periods of time.
•
Be careful not to adjust the volume as your hearing adapts.•
Do not turn up the volume so high that you can’t hear what’s around •
you.
English
EN
Page 11
10
You should use caution or temporarily discontinue use in potentially •
hazardous situations. Do not use headphones while operating a
motorized vehicle, cycling, skateboarding, etc.; it may create a traffic
hazard and is illegal in many areas.
Notice
This product complies with the radio interference requirements of the
European Community.
Any changes or modifications made to this device that are not expressly
approved by Philips Consumer Lifestyle may void the user’s authority to
operate the equipment.
Your product is designed and manufactured with high quality materials and
components, which can be recycled and reused.
When you see the crossed-out wheel bin symbol attached to a product, it
means the product is covered by the European Directive 2002/96/EC:
Notice for the USA
This equipment has been tested and found to comply with the limits for
a Class B digital device, pursuant to part 15 of the FCC Rules. These
limits are designed to provide reasonable protection against harmful
interference in a residential installation. This equipment generates, uses,
and can radiate radio frequency energy and, if not installed and used in
accordance with the instruction manual, may cause harmful interference to
radio communications.
However, there is no guarantee that interference will not occur in a
particular installation. If this equipment does cause harmful interference
to radio or television reception, which can be determined by turning
the equipment off and on, the user is encouraged to try to correct the
interference by one or more of the following measures:
Relocate the receiving antenna.
•
Increase the separation between equipment and receiver.•
EN
Page 12
11
Connect the equipment into an outlet on a circuit different from that •
to which the receiver is connected.
Consult the
• dealer or an experienced radio/TV technician for help.
Environmental information
All unnecessary packaging has been omitted. We have tried to make
the packaging easy to separate into three materials: cardboard (box),
polystyrene foam (buffer) and polyethylene (bags, protective foam sheet.)
Your system consists of materials which can be recycled and reused
if disassembled by a specialized company. Please observe the local
regulations regarding the disposal of packaging materials, exhausted
batteries and old equipment.
Disposal of your old product and batteries
Your product is designed and manufactured with high quality materials and
components, which can be recycled and reused.
Never dispose of your product with other household waste. Please inform
yourself about the local rules on the separate collection of electrical and
electronic products and batteries. The correct disposal of these products
helps prevent potentially negative consequences on the environment and
human health.
Your product contains batteries, which cannot be disposed of with normal
household waste.
Please inform yourself about the local rules on separate collection of
batteries. The correct disposal of batteries helps prevent potentially
negative consequences on the environment and human health.
Please visit
www.recycle.philips.com for additional information on a
recycling center in your area.
Caution
Removal of the built-in battery invalidates the warranty and may destroy the •
product.
Always bring your product to a professional to remove the built-in battery.
English
EN
Page 13
12
The making of unauthorized copies of copy-protected material, including
computer programs, files, broadcasts and sound recordings, may be
an infringement of copyrights and constitute a criminal offence. This
equipment should not be used for such purposes.
This item incorporates copy protection technology that is protected by
U.S. patents and other intellectual property rights of Rovi Corporation.
Reverse engineering and disassembly are prohibited.
Recording and playback of material might require consent. See Copyright
Act 1956 and The Performer’s Protection Acts 1958 to 1972.
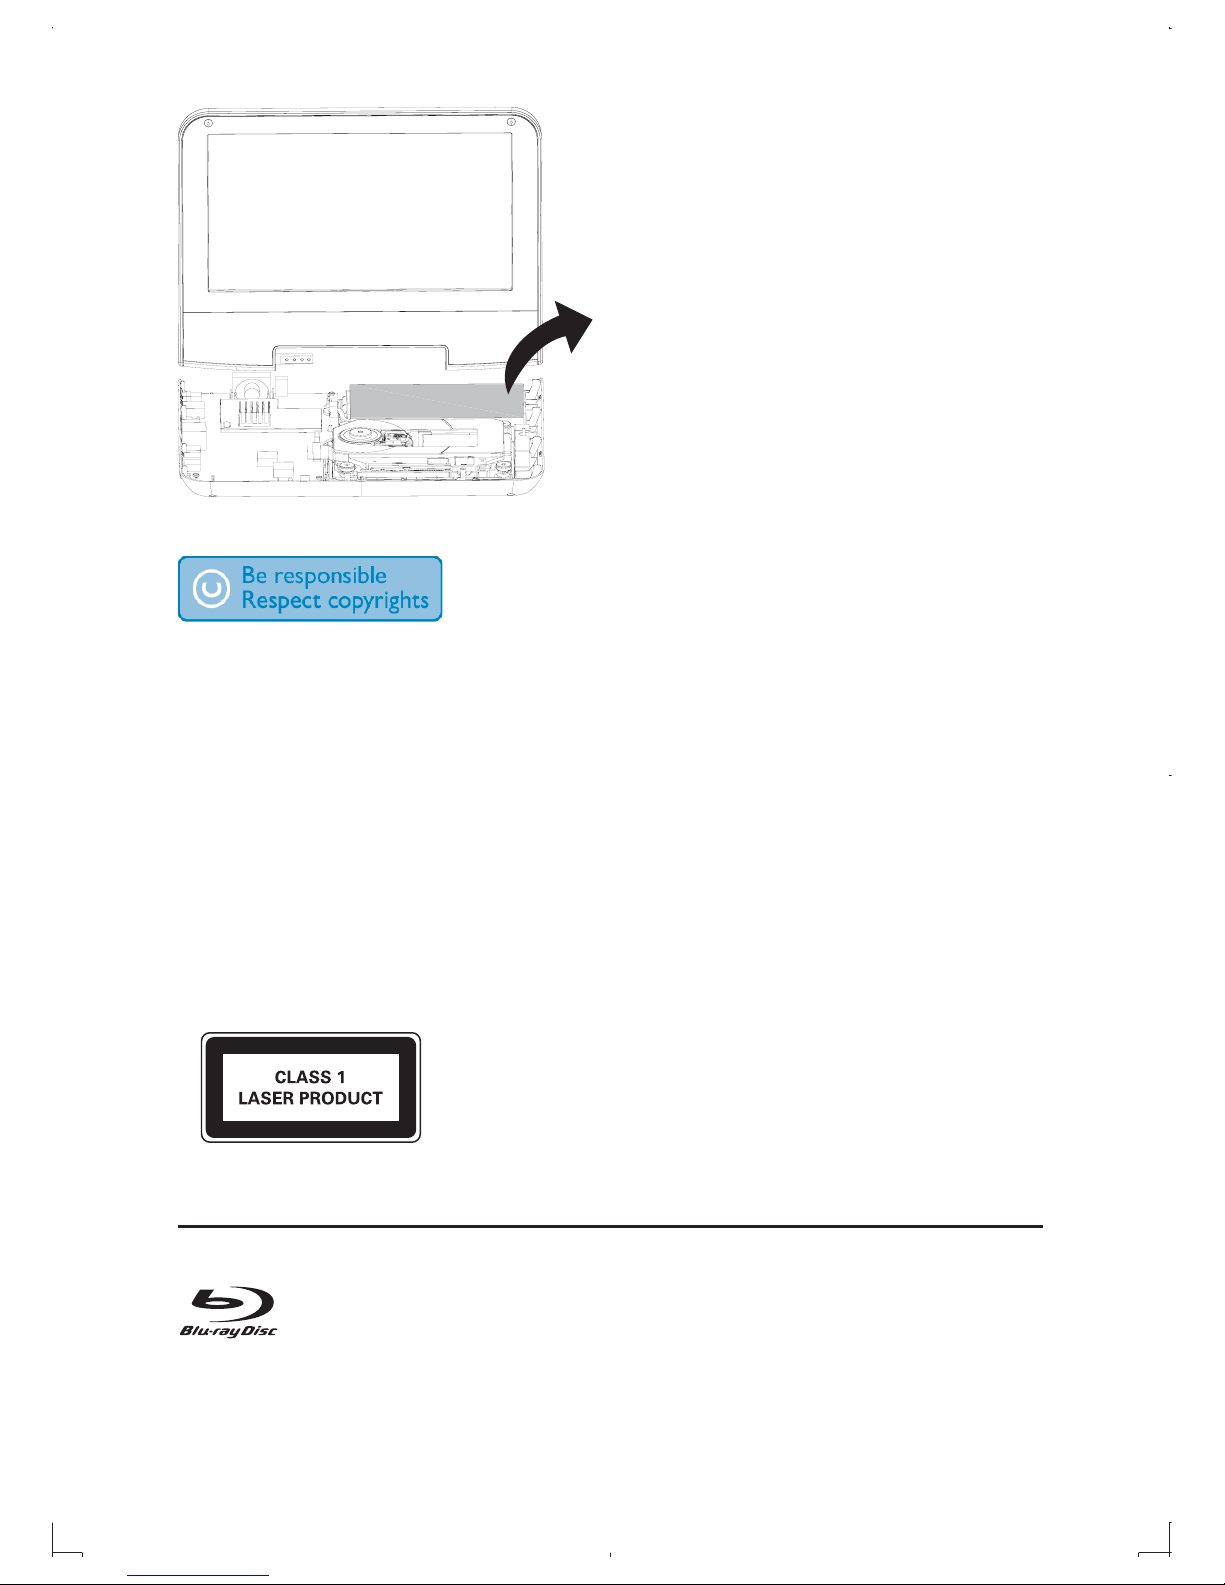
This apparatus includes this label:
Trademark notice
EN
Page 14
13
‘Blu-ray Disc’ and ‘Blu-ray Disc’ logo are trademarks.
HDMI, the HDMI logo, and High-Definition Multimedia Interface are
trademarks or registered trademarks of HDMI licensing LLC in the United
States and other countries.
Manufactured under license from Dolby Laboratories. Dolby and the
double-D symbol are trademarks of Dolby Laboratories.
Manufactured under license under U.S. Patent #’s: 5,451,942; 5,956,674;
5,974,380; 5,978,762; 6,226,616; 6,487,535; 7,212,872; 7,333,929; 7,392,195;
7,272,567 & other U.S. and worldwide patents issued & pending. DTS
and the Symbol are registered trademarks, & DTS-HD, DTS-HD Master
Audio, and the DTS logos are trademarks of DTS, Inc. Product includes
software. © DTS, Inc. All Rights Reserved.
ABOUT DIVX VIDEO: DivX® is a digital video format created by DivX,
Inc. This is an official DivX Certified
®
device that plays DivX video. Visit
divx.com for more information and software tools to convert your files
into DivX video.
ABOUT DIVX VIDEO-ON-DEMAND: This DivX Certified
®
device must
be registered in order to play purchased DivX Video-on-Demand (VOD)
movies. To obtain your registration code, locate the DivX VOD section
in your device setup menu. Go to vod.divx.com for more information on
how to complete your registration.
DivX
®
, DivX Certified®, DivX Plus™ HD and associated logos are
registered trademarks of DivX, Inc. and are used under license.
DivX Certified
®
to play DivX® and DivX Plus™ HD (H.264/MKV) video
up to 1080p HD including premium content.
English
EN
Page 15
14
BONUSVIEW™
‘BD LIVE’ and ‘BONUSVIEW’ are trademarks of Blu-ray Disc Association.
‘AVCHD’ and ‘AVCHD’ logo are trademarks of Matsushita Electric
Industrial Co., Ltd and Sony Corporation.
‘DVD Video’ is a trademark of DVD Format/Logo Licensing Corporation.
Windows Media and the Windows logo are trademarks, or registered
trademarks of Microsoft Corporation in the United States and/or other
countries.
2 Your portable Blu-ray disc player
Congratulations on your purchase, and welcome to Philips! To fully benefit
from the support that Philips offers, register your product at www.philips.
com/welcome.
What’s in the box
Check and identify the contents of your package:
Portable Blu-ray disc player x 1•
AC power adapter (SP-03A1202000-U) x 1•
Car adaptor x 1•
Remote control x 1•
AV adapter cable x 1•
Carry bag x 1•
User manual x 1•
Quick start guide x 1•
EN
Page 16
15
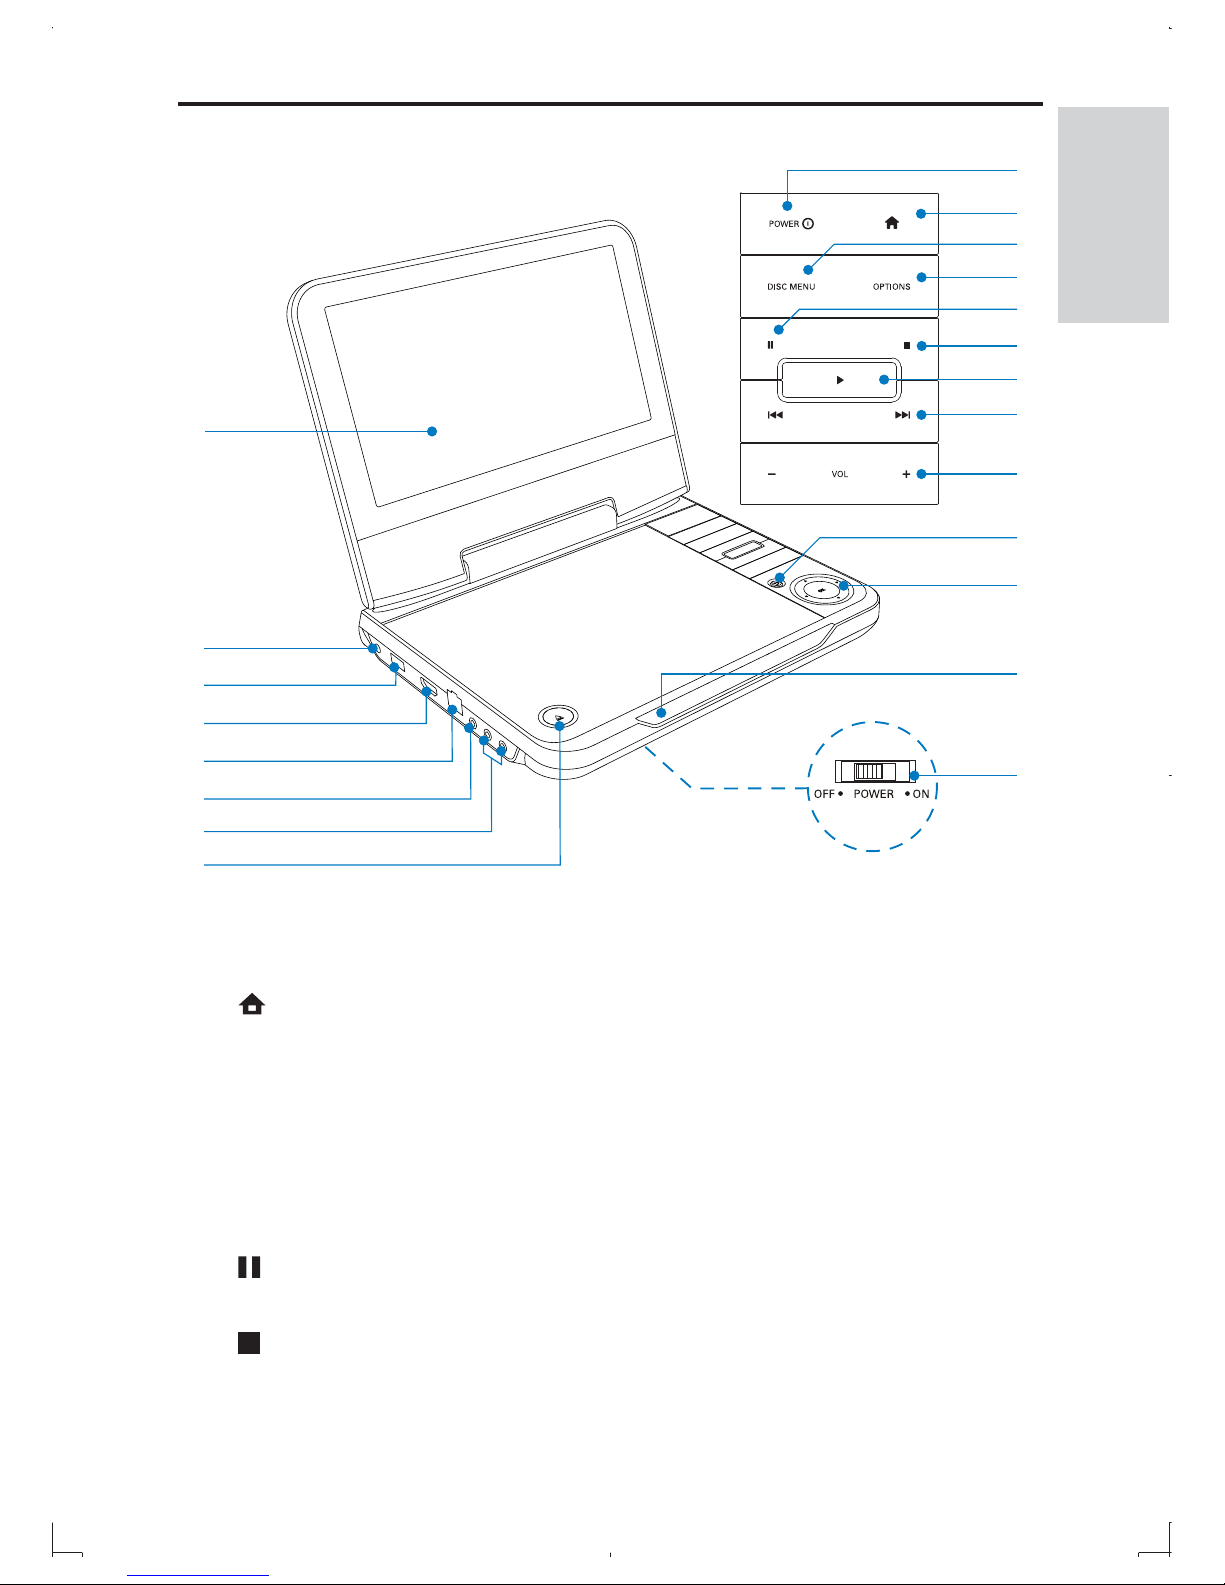
Overview of the main unit
a POWER
Turn on this player or switch to standby mode.•
b
Access or exit the home menu.•
c DISC MENU
• Blu-ray disc: Access or exit the pop-up menu.
• DVD: Access or exit the disc menu.
d OPTIONS
Access options for the current activity or selection.
•
e
Pause play.•
f
Stop play.•
a
u
t
s
r
q
p
o
n
b
d
c
e
g
f
h
i
k
l
m
j
English
EN
Page 17
16
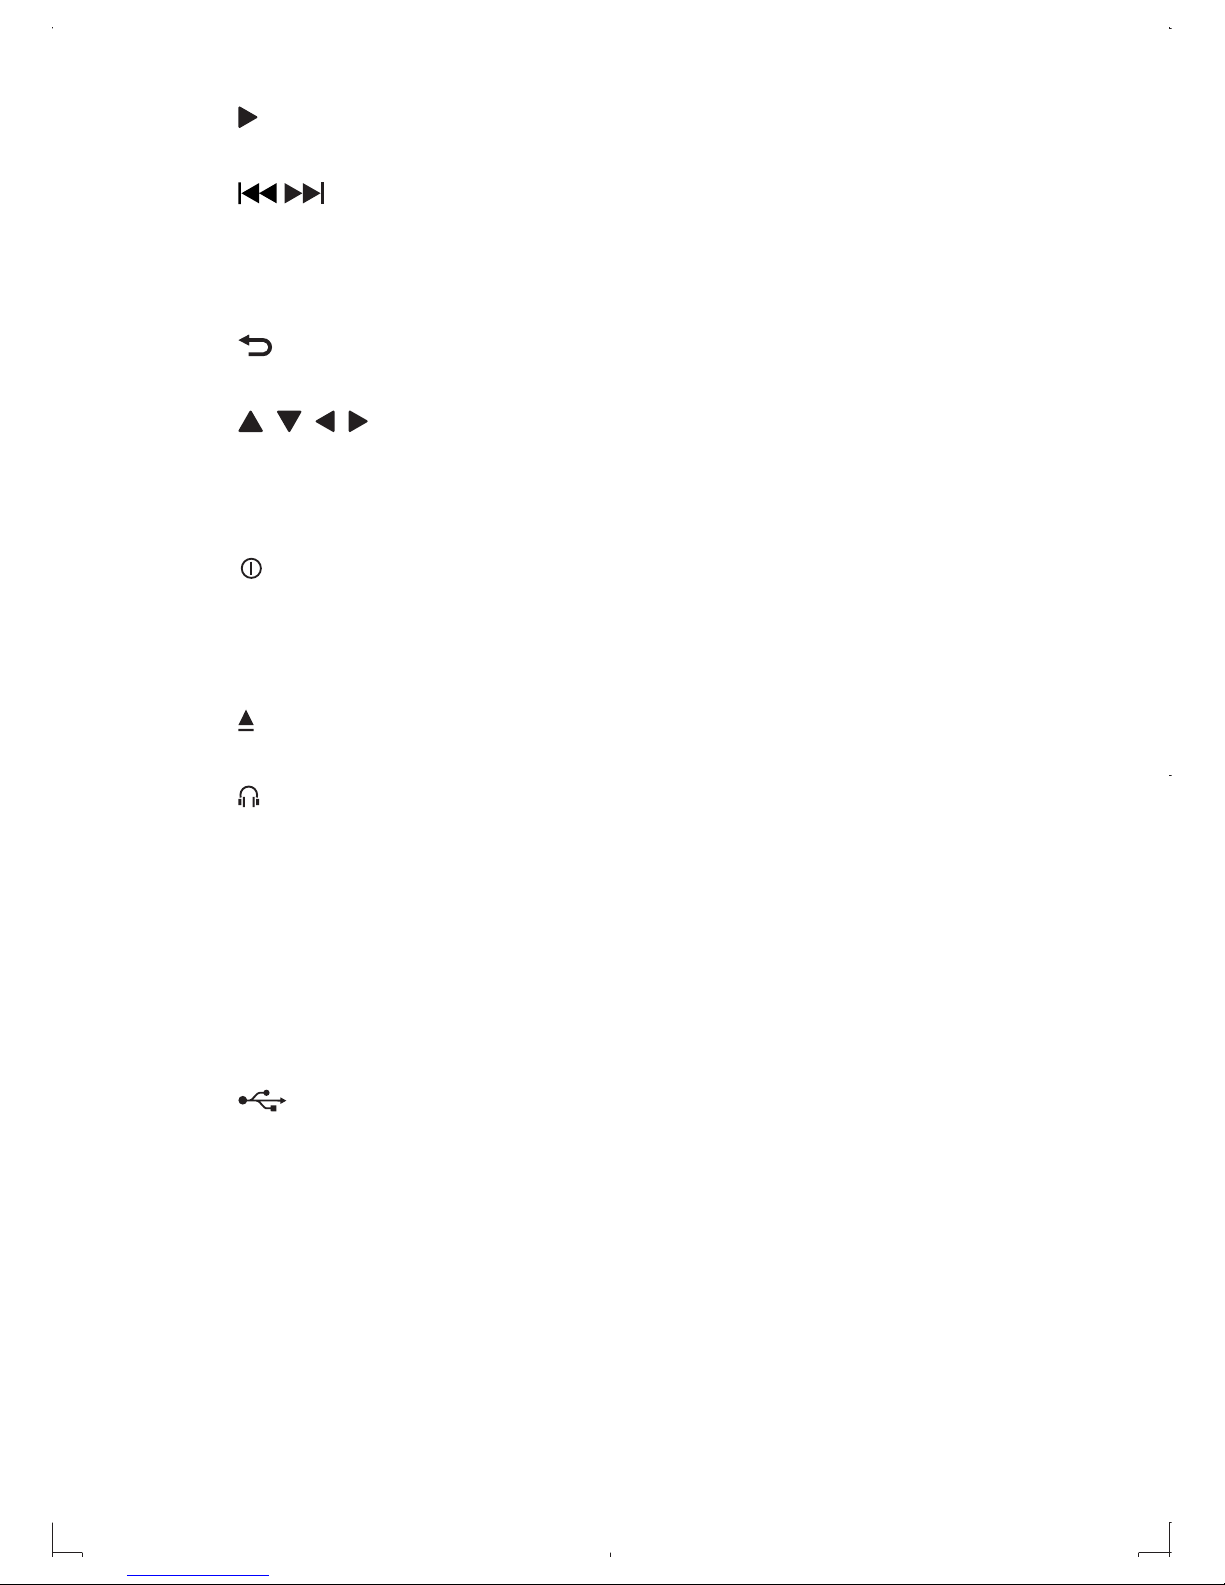
g
Start or resume play.•
h /
Skip to the previous or next title, chapter, or track.•
i - VOL +
Increase or decrease volume.•
j BACK
Return to a previous menu.
•
k , , ,
Navigate through the menus.•
OK
Confirm an entry or selection.•
l /IR
Power indicator/Charging indicator/Remote control sensor•
m OFF•POWER•ON
Power on/off this player.•
n
Open the disc cover.•
o
Headphone jack.•
p AV OUT
Audio/video output jack.•
q LAN
Ethernet port.•
r HDMI
HDMI output jack.•
s
USB socket.•
t DC IN
Power supply socket.•
u LCD screen
EN
Page 18
17
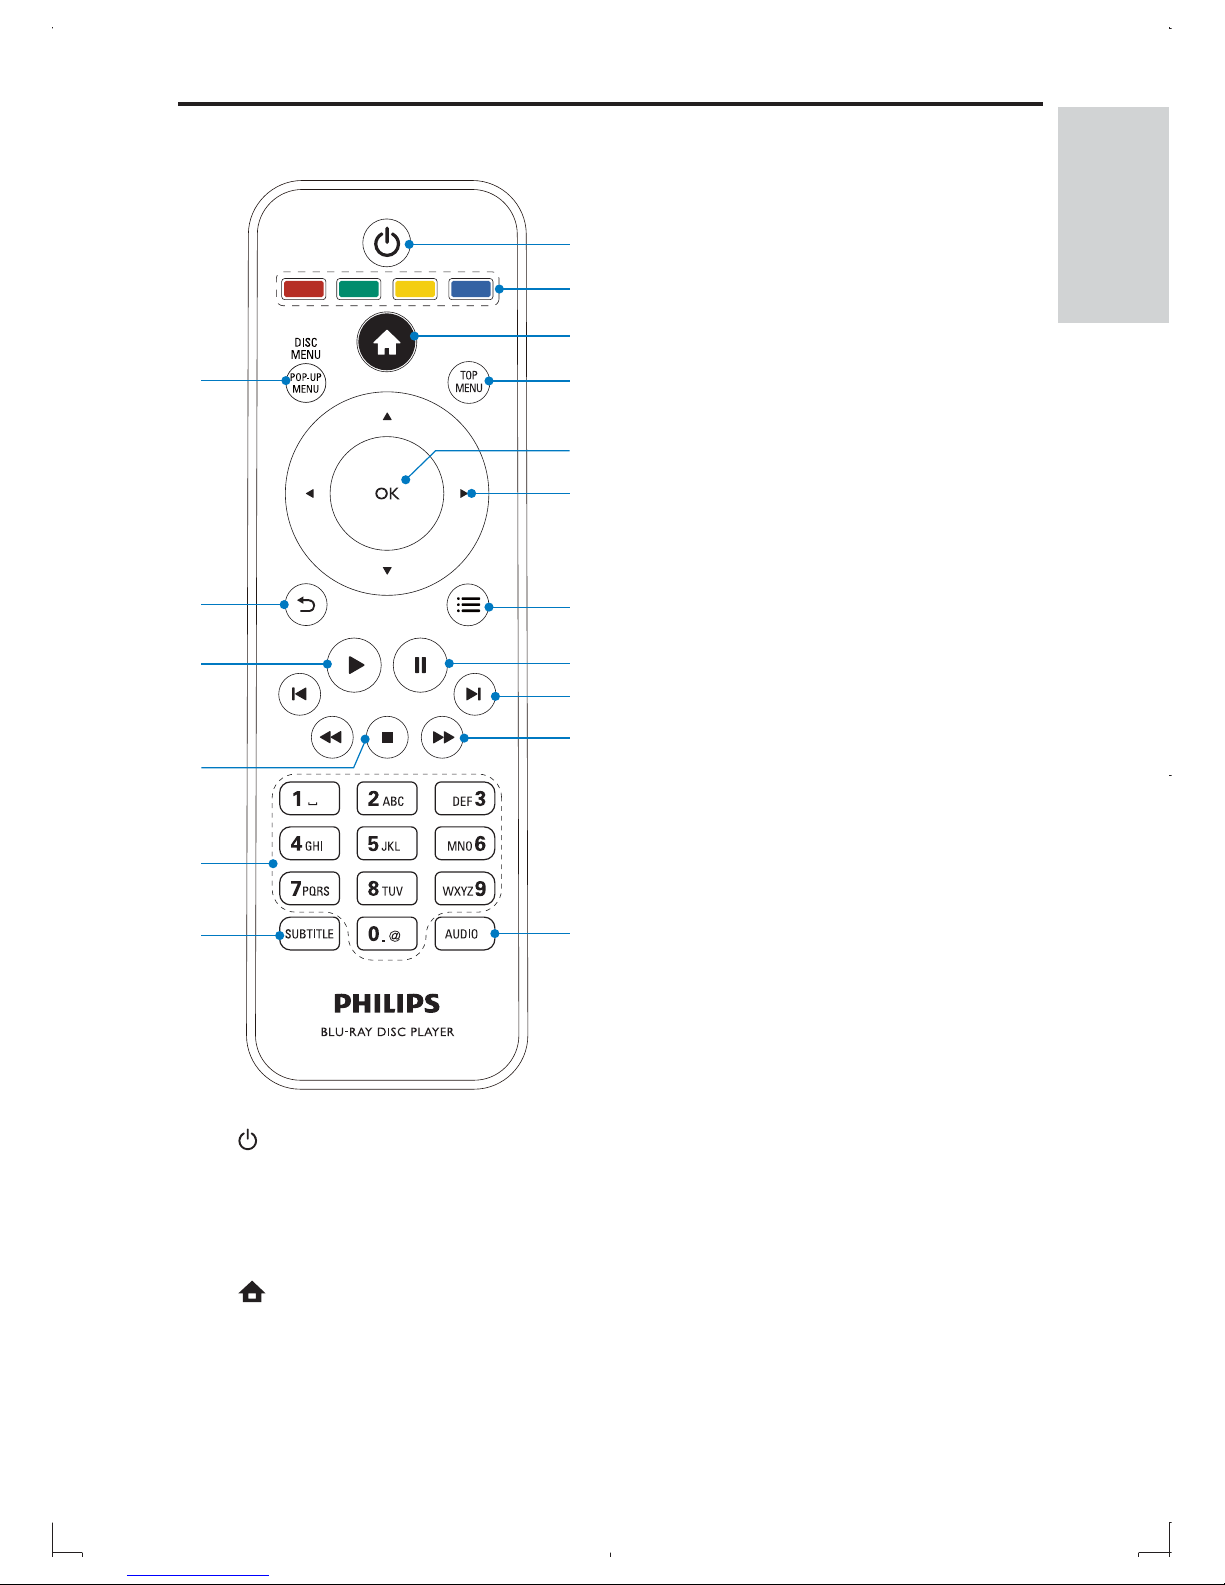
Overview of remote control
a
Switch this player to standby mode. •
b Color buttons
• Blu-ray disc: Select tasks or options.
c
Access the home menu.•
q
p
o
n
h
i
j
e
g
f
d
a
b
c
m
l
k
English
EN
Page 19
18
d TOP MENU
• Blu-ray disc: Display the top menu.
• DVD: Display the title menu.
e OK
Confirm an entry or selection.
•
f
Navigate the menus.•
g
Access options for the current activity or selection.•
h
Pause play.•
i /
Skip to the previous or next title, chapter, or track.•
j /
Search backward or forward.•
k AUDIO
Select an audio language on a disc.
•
l SUBTITLE
Select a subtitle language on a disc.
•
m Alphanumeric buttons
Select an item to play.
•
Enter values.•
n
Stop play.•
o
Start or resume play.•
p
Return to a previous menu.•
q DISC MENU / POP-UP MENU
• Blu-ray disc: Access or exit the pop-up menu.
• DVD: Access or exit the disc menu.
EN
Page 20
19
3 Get started
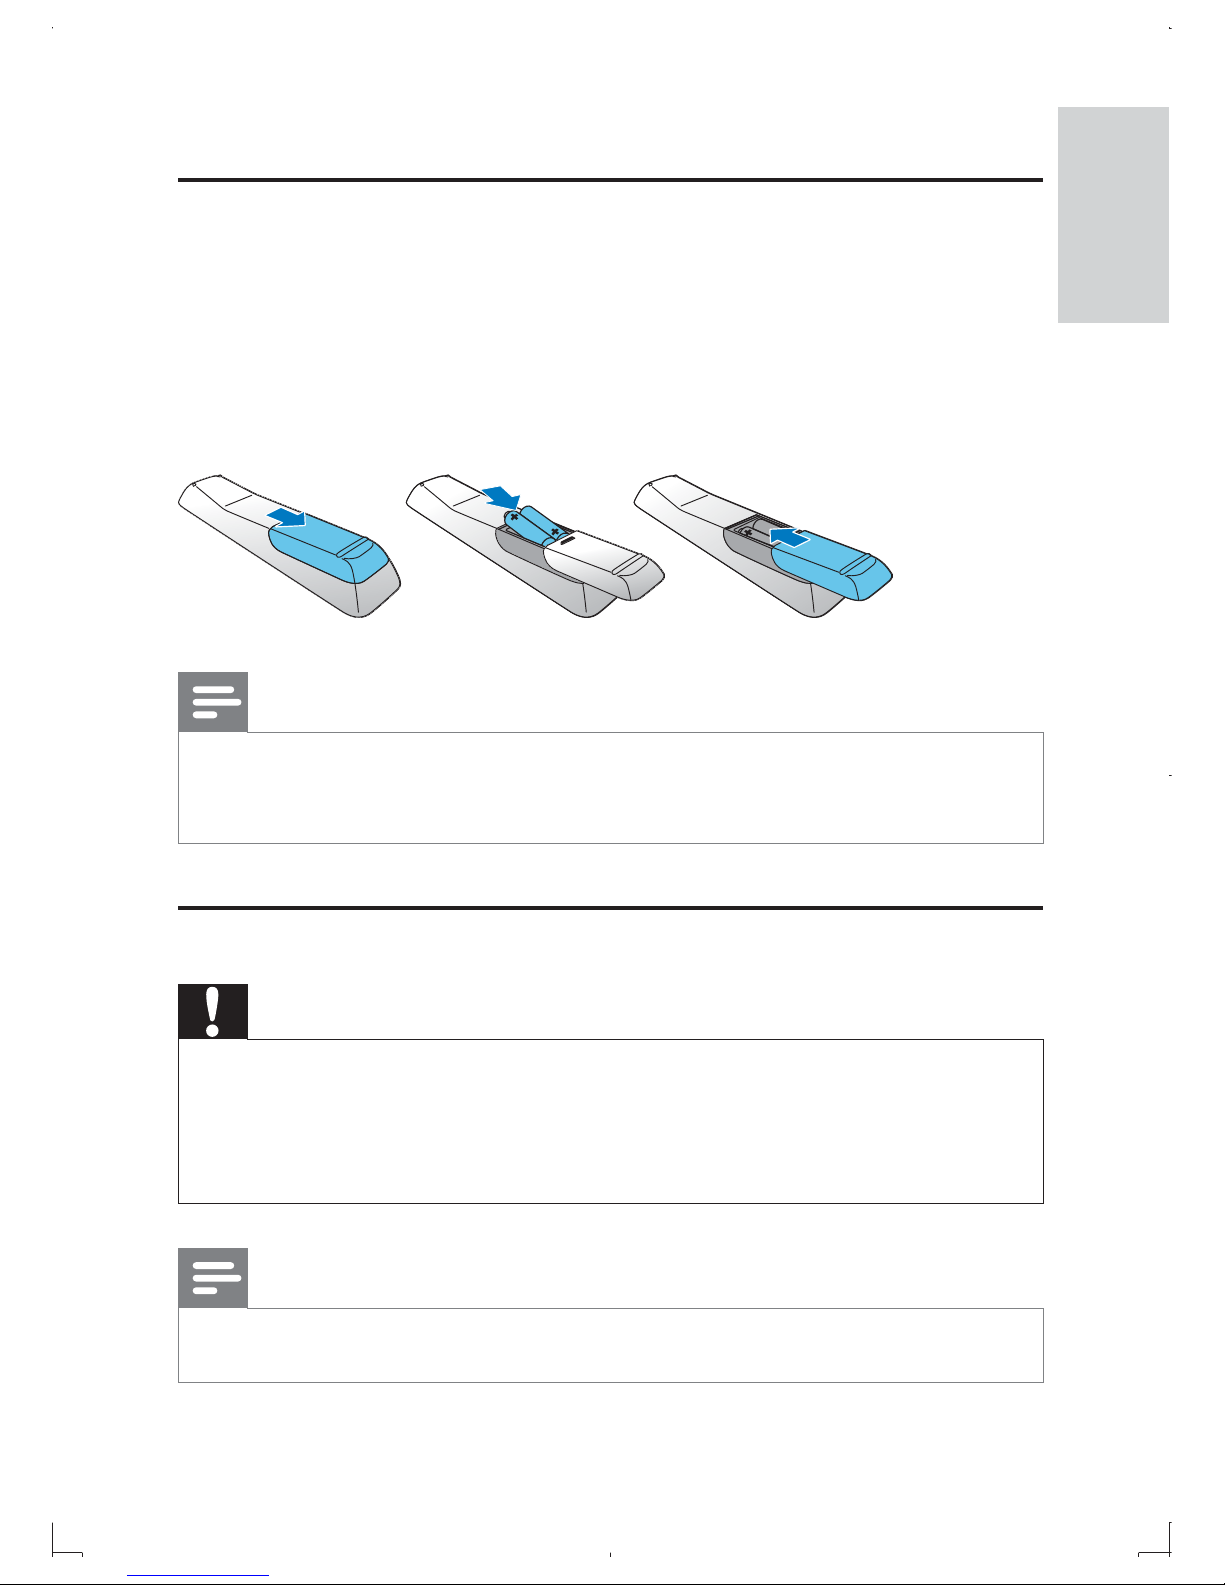
Prepare the remote control
1 Press and push the battery compartment to slide it open (see “1” in
the illustration).
2 Insert two AAA batteries with correct polarity (+/-) as indicated.
3 Push and slide back the battery compartment (see “3” in the
illustration).
Note
If you are not going to use the remote control for a long time, remove the batteries. •
Do not mix batteries (old and new or carbon and alkaline, etc.). •
Batteries contain chemical substances, so they should be disposed of properly. •
Charge the battery
Caution
Risk of product damage. Ensure that the power supply voltage corresponds to the •
voltage printed on the bottom of the player.
Use only the supplied AC adaptor to charge the battery.
•
Danger of explosion if battery is incorrectly replaced. Replace only with the same or •
equivalent type.
Note
The type plate is located on the bottom of the player. •
123
English
EN
Page 21
20
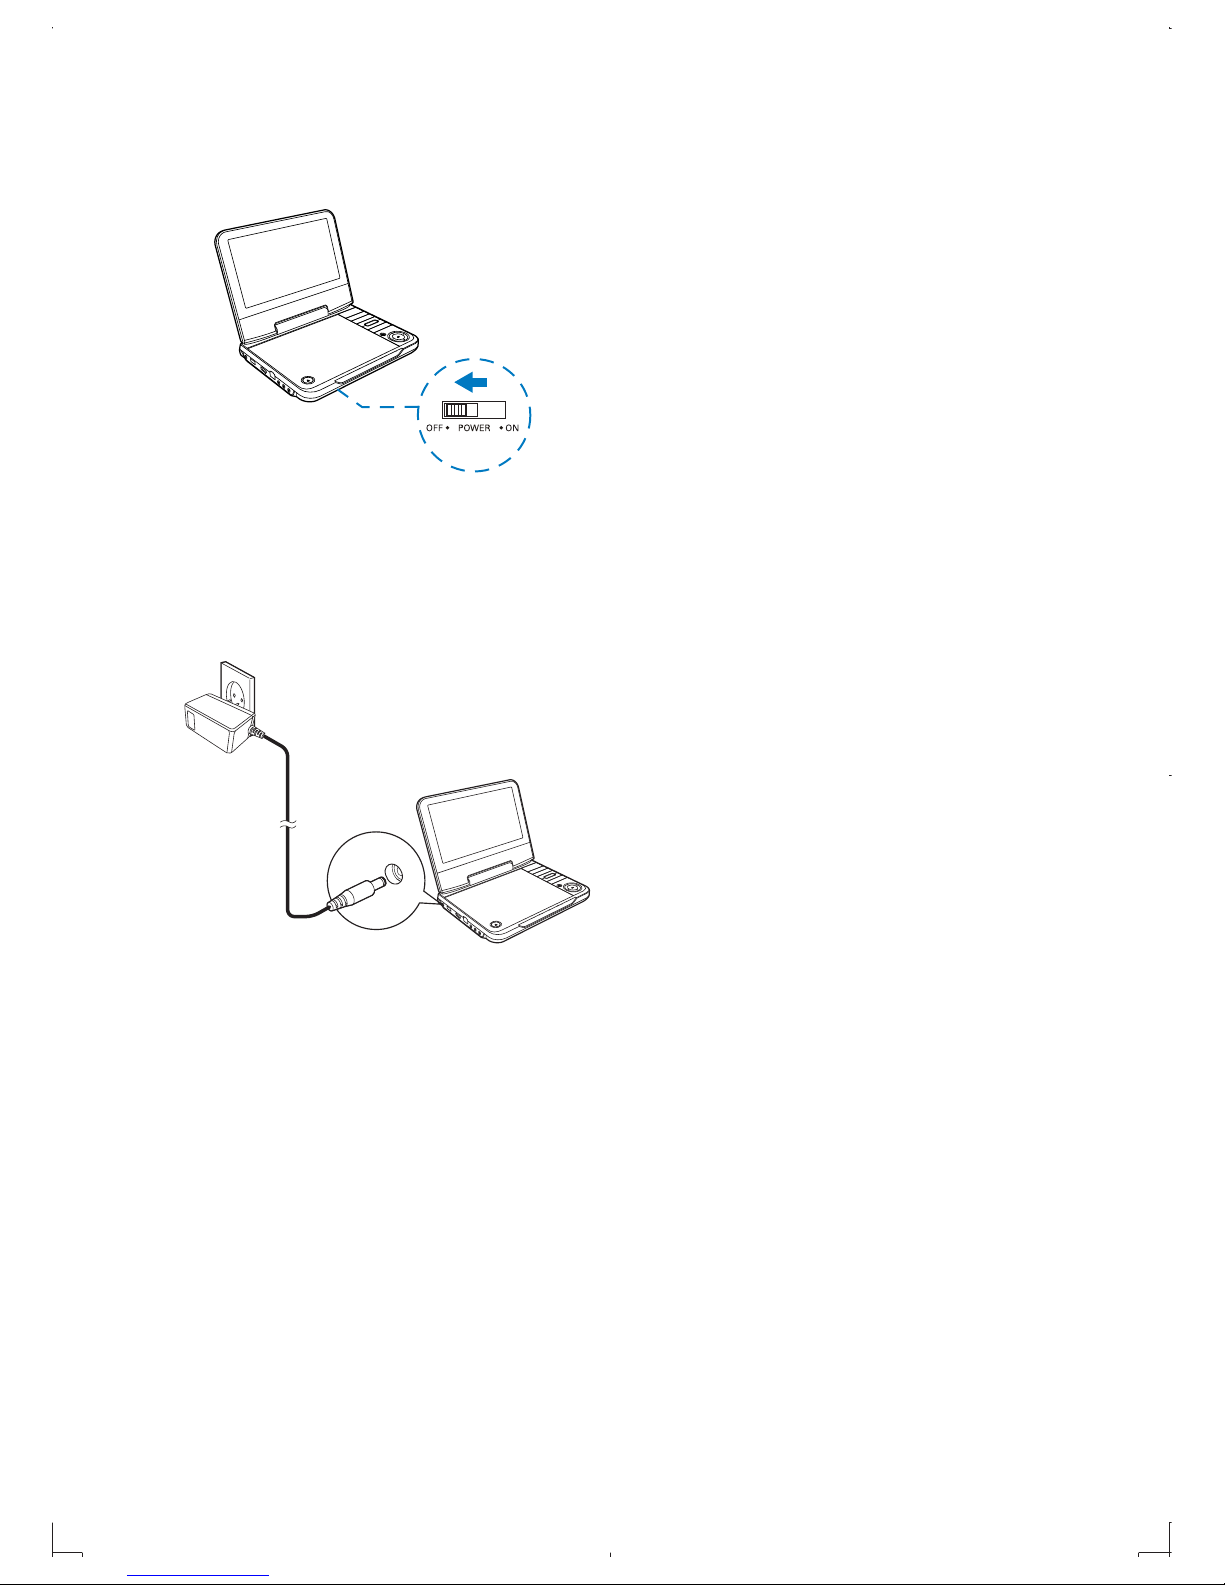
To fast charge the battery,
1 Slide the OFF•POWER•ON switch to OFF position.
2 Connect the supplied AC adaptor to:
• DC IN jack on the player.
Power outlet.
•
The • CHR indicator turns on (red).
When the battery is fully charged, the • CHR indicator turns off.
You can also charge the battery during play.
1 To charge the battery, connect the supplied AC adaptor to:
• DC IN jack on the player.
Power outlet.
•
EN
Page 22
21
Connect a TV
Caution
Turn off your player before connecting it to a TV. •
You can connect the player to your TV to enjoy Blue-ray disc movies.
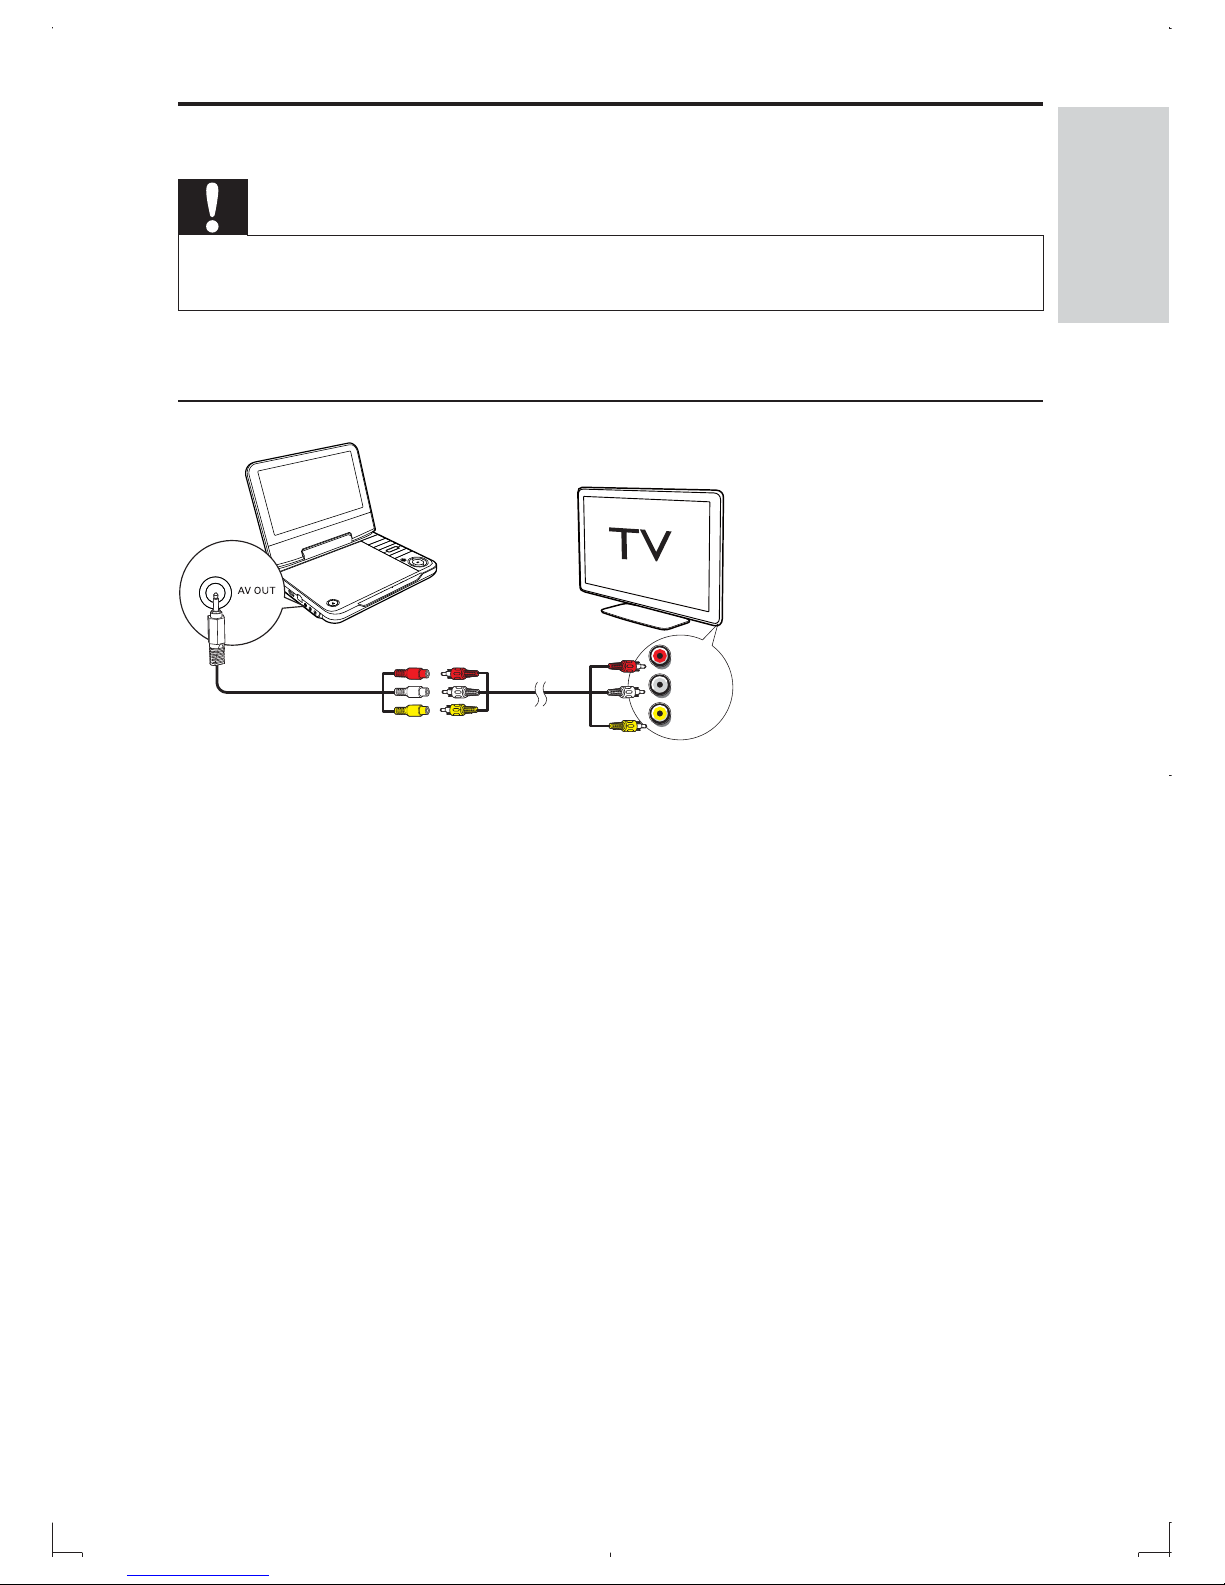
Use an AV cable
1 Insert the supplied AV adaptor cable into the AV OUT jack of this
player.
2 Connect a AV cable (not supplied) to:
the audio/video jacks of your TV.•
the audio/video terminals of the AV adaptor cable. •
3 Match the colors of the AV cable with the jacks:
the yellow cable is for the video jack•
the red/white cable is for the audio jacks.•
4 Turn on the player and your TV.
5 Find the AV input source on your TV (For details, refer to the user
manual of your TV).
L
R
VIDEO IN
English
EN
Page 23
22
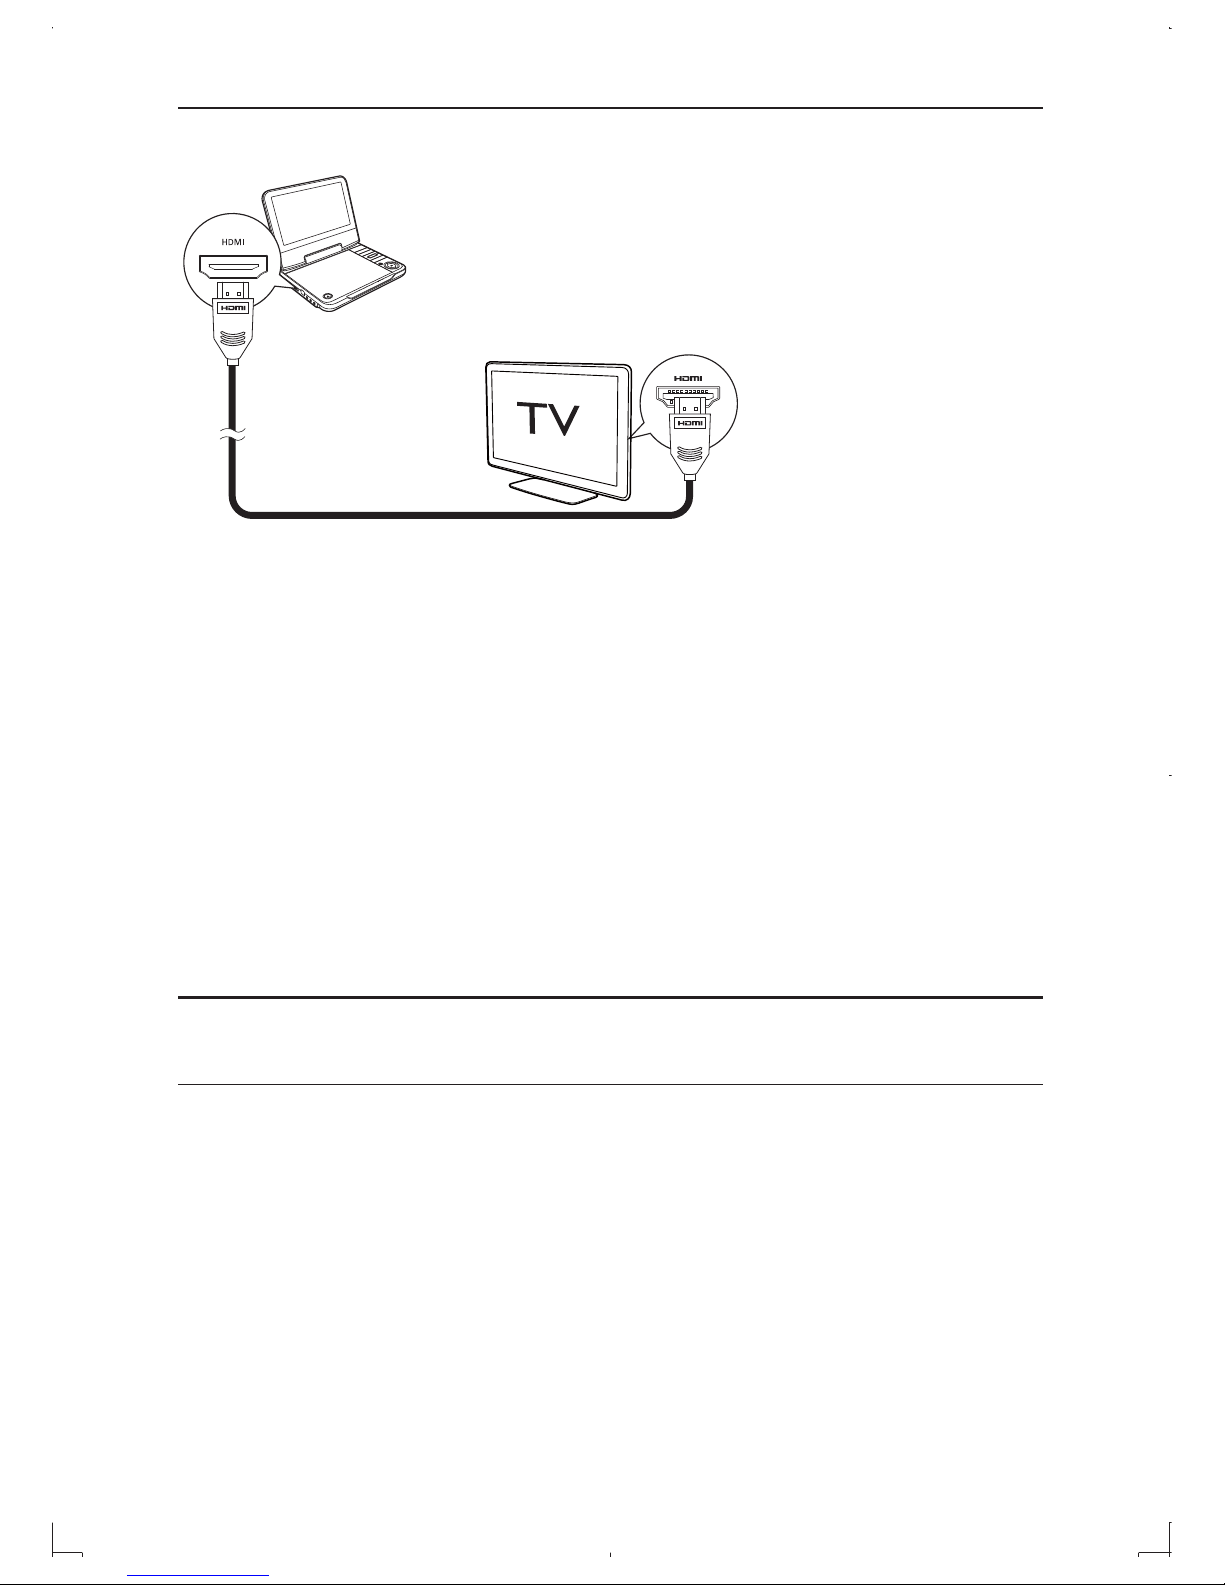
Use an HDMI cable
1 Connect the HDMI cable (not supplied) to:
the
• HDMI jack of this player.
the HDMI jack of your TV.•
2 Turn on the player and your TV.
3 Find the HDMI input source on your TV (For details, refer to the
user manual of your TV).
4 Use your portable Blu-ray disc
player
Turn on
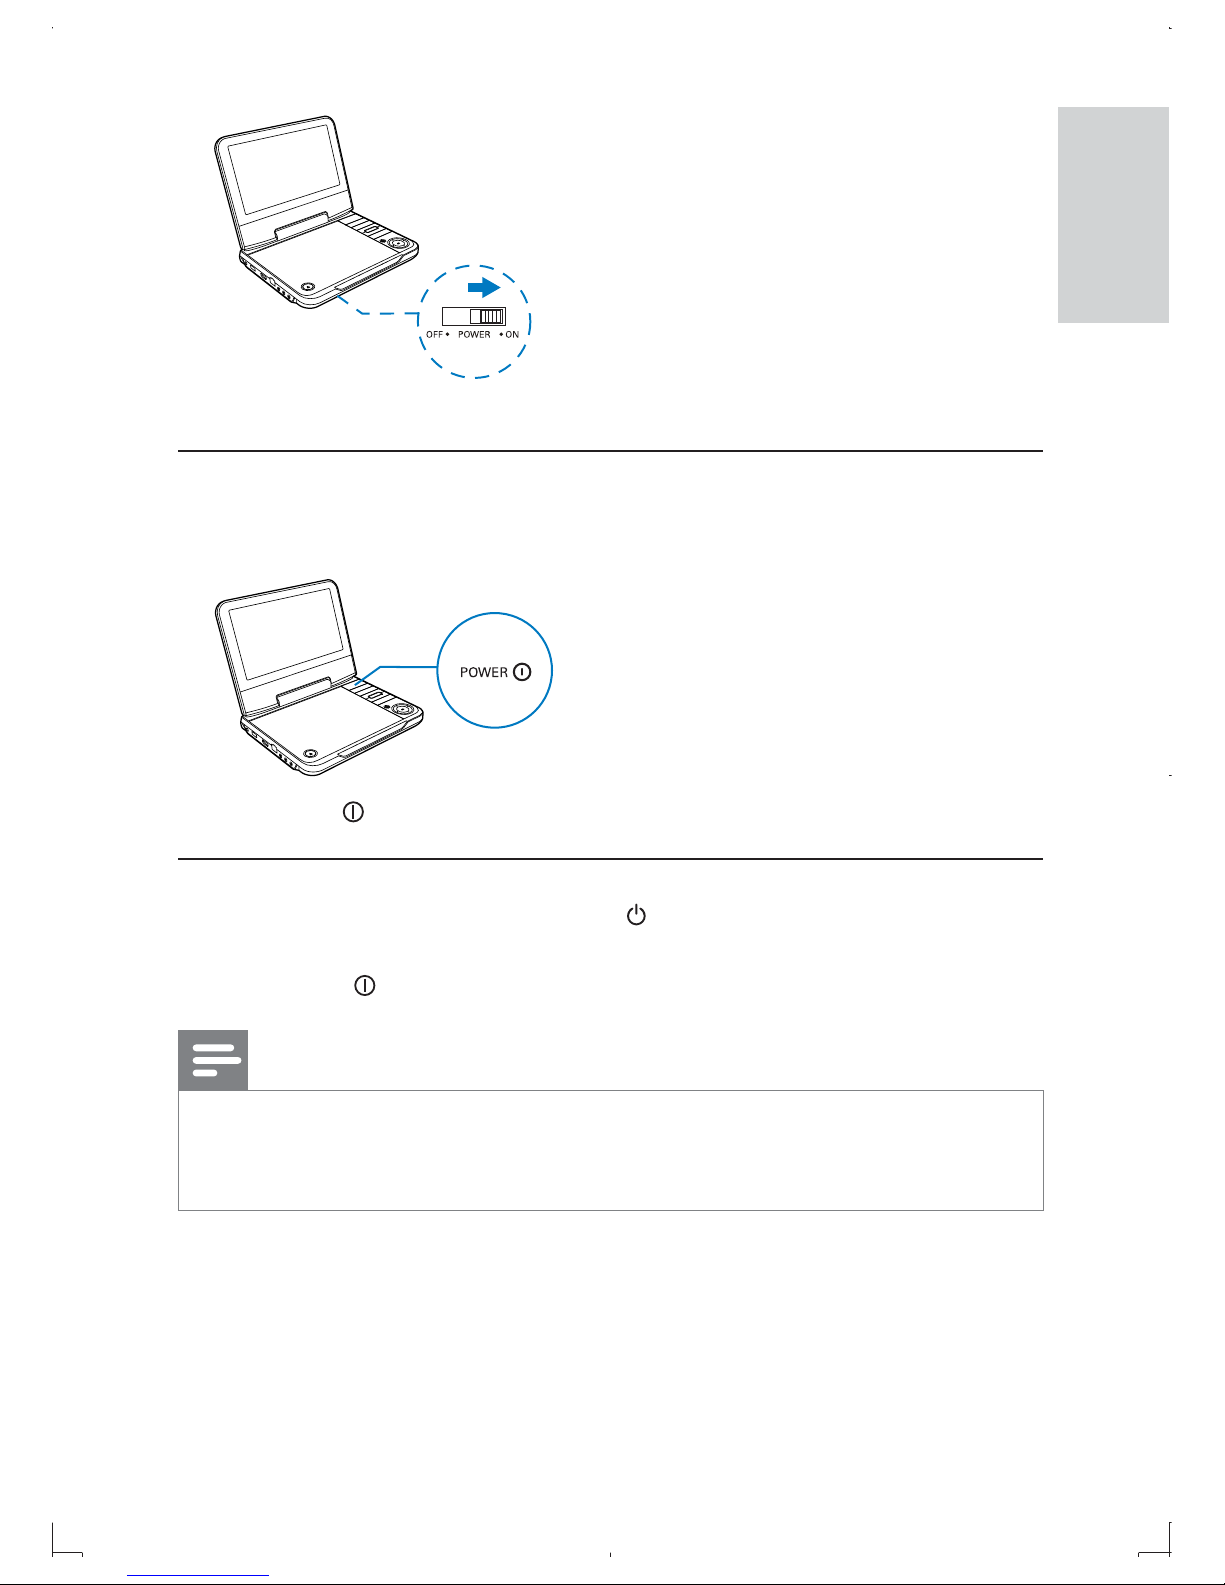
For first-time use:
1 To turn on the battery switch, slide the OFF•POWER•ON switch to
the ON position.
EN
Page 24
23
For normal use:
1 To turn on the player, press POWER on the player.
The » indicator turns on (green).
To switch the player to standby, press POWER on the player.
You can also press and hold
• on the RC for three seconds, and
then release it.
The
• indicator turns off.
Note
If you do not intend to use this player for a long time, slide the •
OFF•POWER•ON switch to the OFF position to protect the battery from
exhaustion.
English
EN
Page 25
24
Play a disc
Caution
Risk of damage to the player! During play, never move the unit. •
Never put any object other than a disc into the disc compar tment. •
Never look at the laser beam inside the player. •
Never play discs with accessories such as disc stabilizer rings or disc treatment •
sheets.
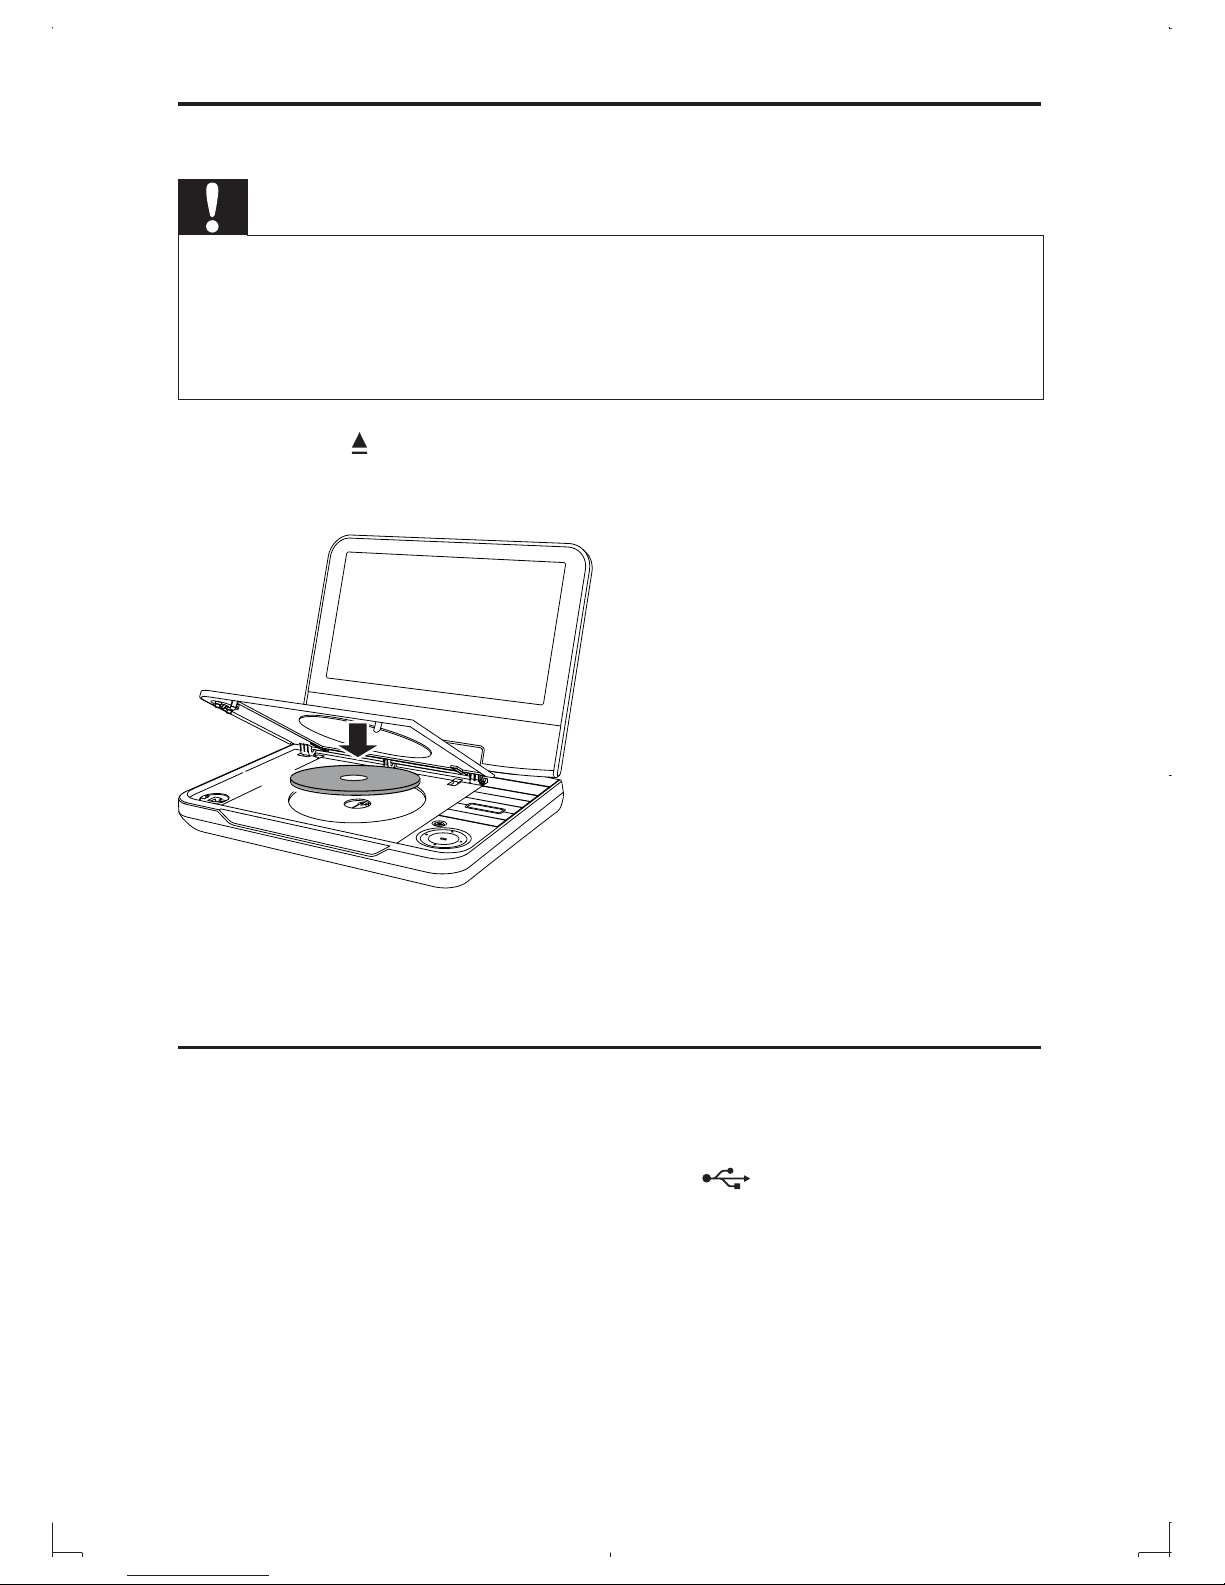
1 Press the button on the player to open the disc cover.
2 Place a disc into the tray with the label side up.
3 Close the disc cover.
The player starts playing automatically. »
Play media files via USB
To play picture, music, and video files from a USB storage device,
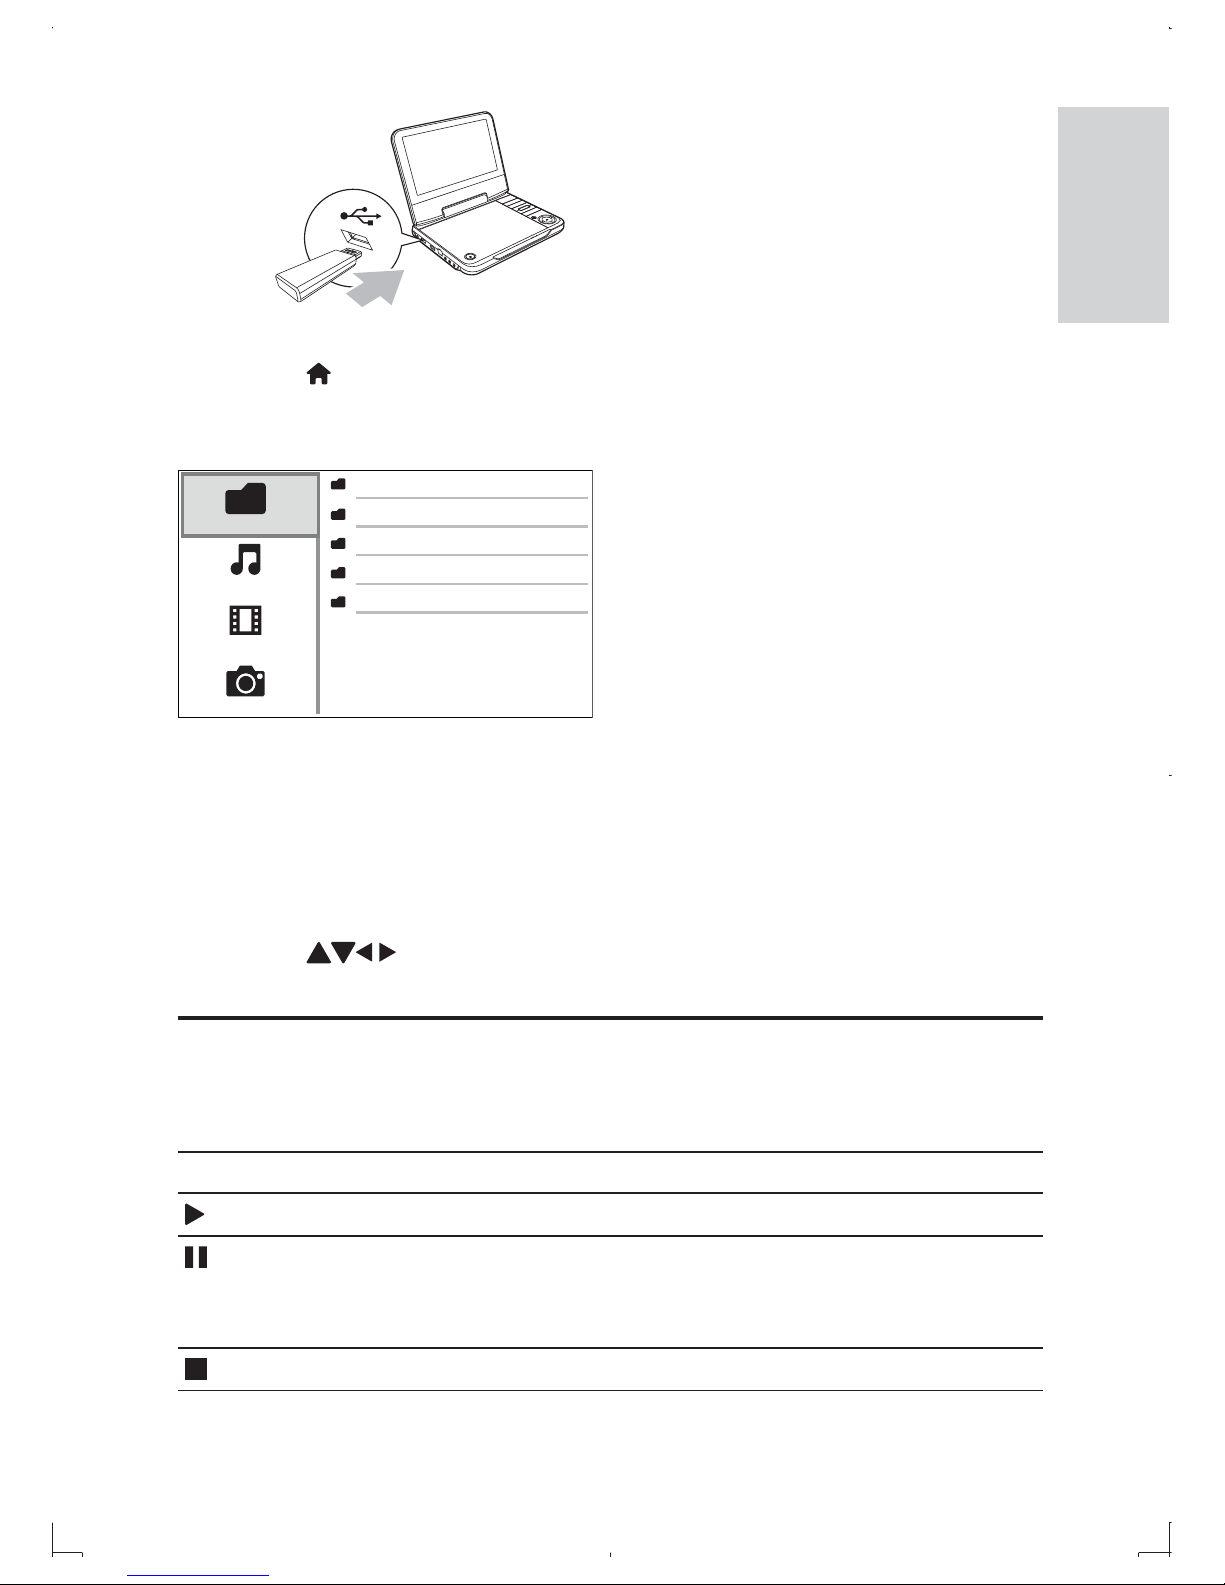
1 Connect the USB storage device to the (USB) jack.
EN
Page 26
25
2 Press , and select [browse USB].
The file browser is displayed. »
To find music files, go to » [music].
To find video files, go to » [video].
To find picture files, go to » [pictures].
To browse media files in the folder structure mode, go to » [folders].
3 Press to select a media file and press OK to play.
Basic play control
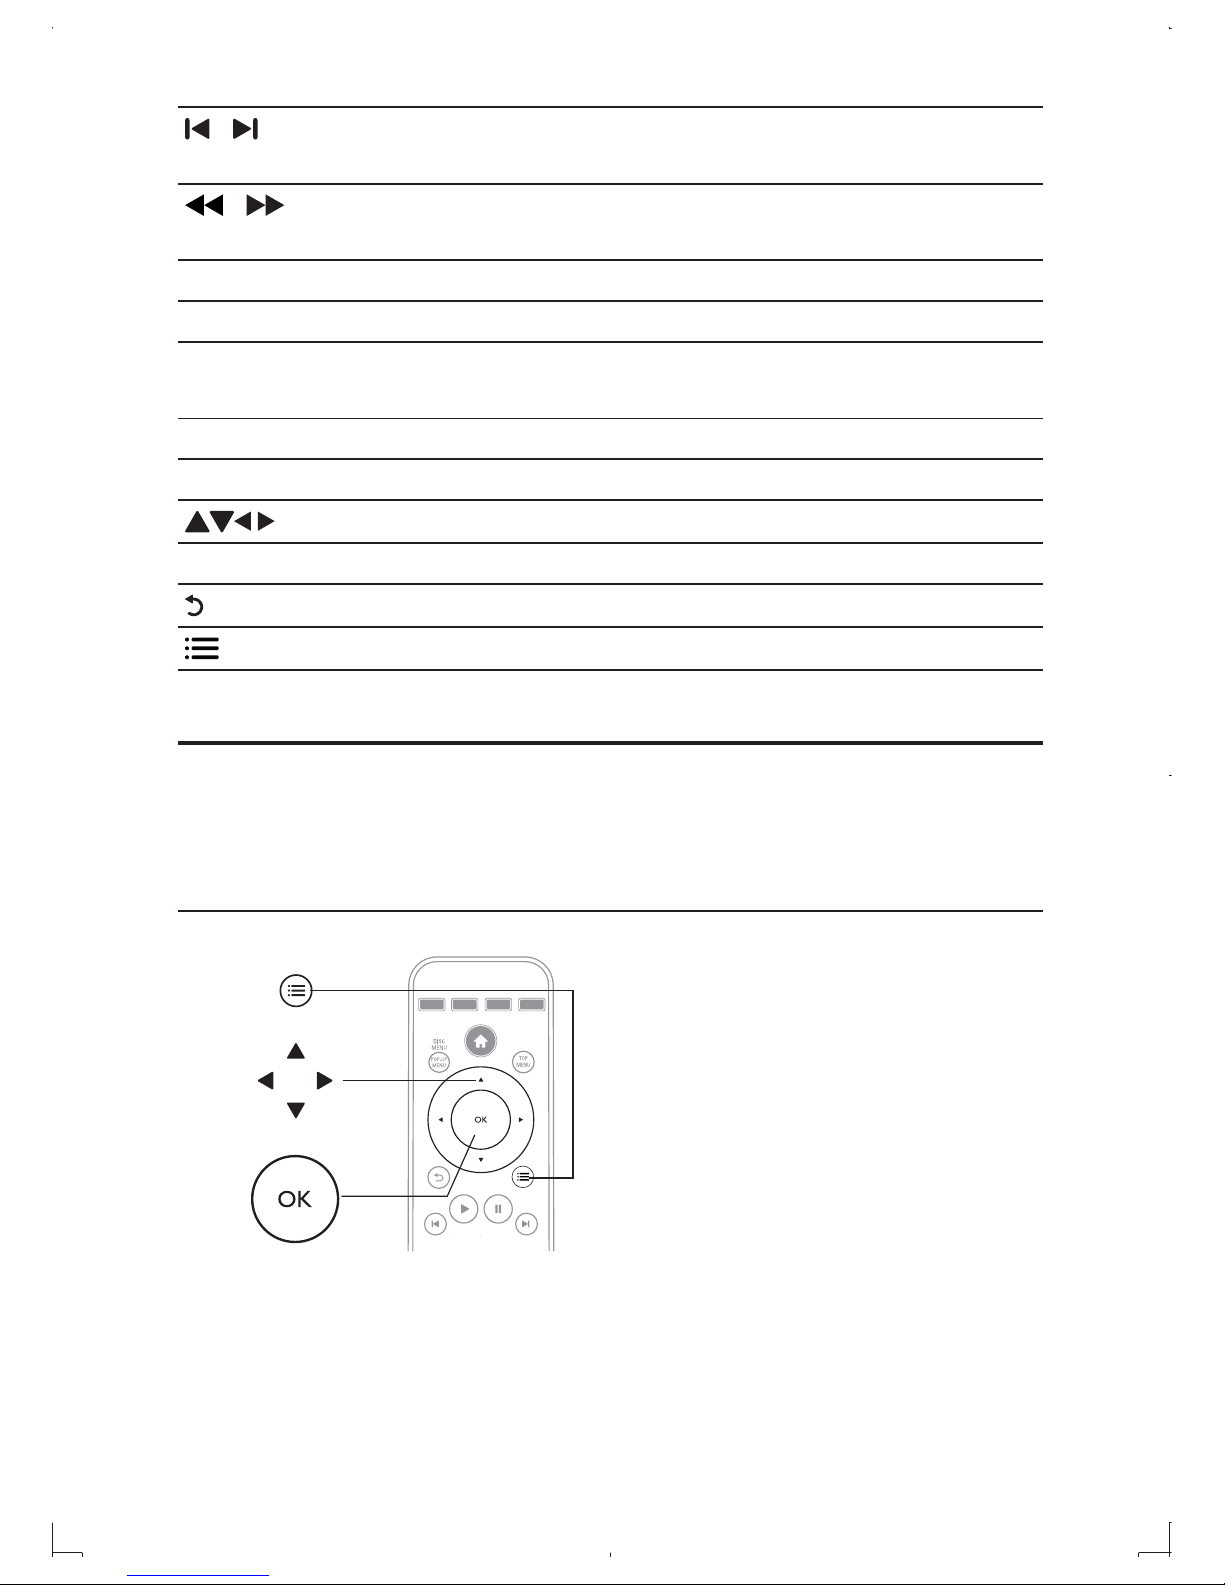
Follow the instructions to control your play .
Button Action
Start or resume play.
Pause play.
Press repeatedly to slow forward frame by
frame.
Stop play.
picture
work
fonts
music
video
folders
music
video
picture
English
EN
Page 27
26
/
Skip to the previous or next track, chapter or
file.
/
Fast backward or forward.
Press repeatedly to change the search speed.
AUDIO Select an audio language.
SUBTITLE Select a subtitle language.
DISC MENU / POP-
UP MENU
Access or exit the disc menu.
TOP MENU Access the main menu of a video disc.
Color buttons Select tasks or options for Blu-ray discs.
Navigate the menus.
OK Confirm a selection or entry.
Return to a previous menu.
Access more options during play.
Video, audio and picture options
You can specify options for video or picture play from a disc or a USB
storage device.
Video options
Access more options during video play.
• [Audio Language]: Select an audio language.
• [Subtitle Language]: Select a subtitle language.
a
b
c
EN
Page 28
27
• [Subtitle Shift]: Change the subtitle position on the screen. Press
to change the subtitle position.
• [Info]: Display play information.
• [Character Set]: Select a character set that supports the DivX video
subtitle (only for DivX videos).
• [Time Search]: Skip to a specific time via the numeric buttons on the
remote control.
• [2nd Audio Language]: Select the second audio language (only for
Blu-ray discs that support BonusView).
• [2nd Subtitle Language]: Select the second subtitle language (only for
Blu-ray discs that support BonusView).
• [Titles]: Select a title.
• [Chapters]: Select a chapter.
• [Angle List]: Select a camera angle.
• [Menus]: Display a disc menu.
• [PIP Selection]: Display a picture-in-picture window.
• [Zoom]: Zoom into a video picture. Press to zoom in or zoom
out.
• [Repeat]: Repeat a chapter or title.
• [Repeat A-B]: Repeat a specific section within a chapter for repeat
play, or turn off repeat mode.
• [Picture Settings]: Select a predefined color setting.
• [LCD Setup]: Adjust the LCD screen settings.
• [Setup]: Access the setup menu.
Note
Available video options depend on the video source. •
English
EN
Page 29
28
Picture options
Access more options during a slideshow.
• [Rotate +90]: Rotate a picture 90 degrees clockwise.
• [Rotate -90]: Rotate a picture 90 degrees counter-clockwise.
• [Zoom]: Zoom into a picture. Press to zoom in or zoom out.
• [Info]: Display picture information.
• [Duration per slide]: Set a display interval for a slideshow.
• [Slide Animation]: Select a transition effect for a slideshow.
• [Picture Settings]: Select a predefined color setting.
• [Repeat]: Repeat a selected folder.
• [LCD Setup]: Adjust the LCD screen settings.
• [Setup]: Access the setup menu.
Audio options
Press repeatedly to select an play option.
Repeat the current track.•
Repeat all the tracks on the disc or folder.•
Play audio tracks in a random loop.•
Turn off a repeat mode.•
a
b
c
a
EN
Page 30
29
5 Use your portable Blu-ray disc
player
DivX videos
You can play DivX videos from a disc or a USB storage device.
VOD code for DivX
Before you purchase DivX videos and play them on this player, register this
player on www.divx.com using the DivX VOD code.
To display the DivX VOD c`ode,
•
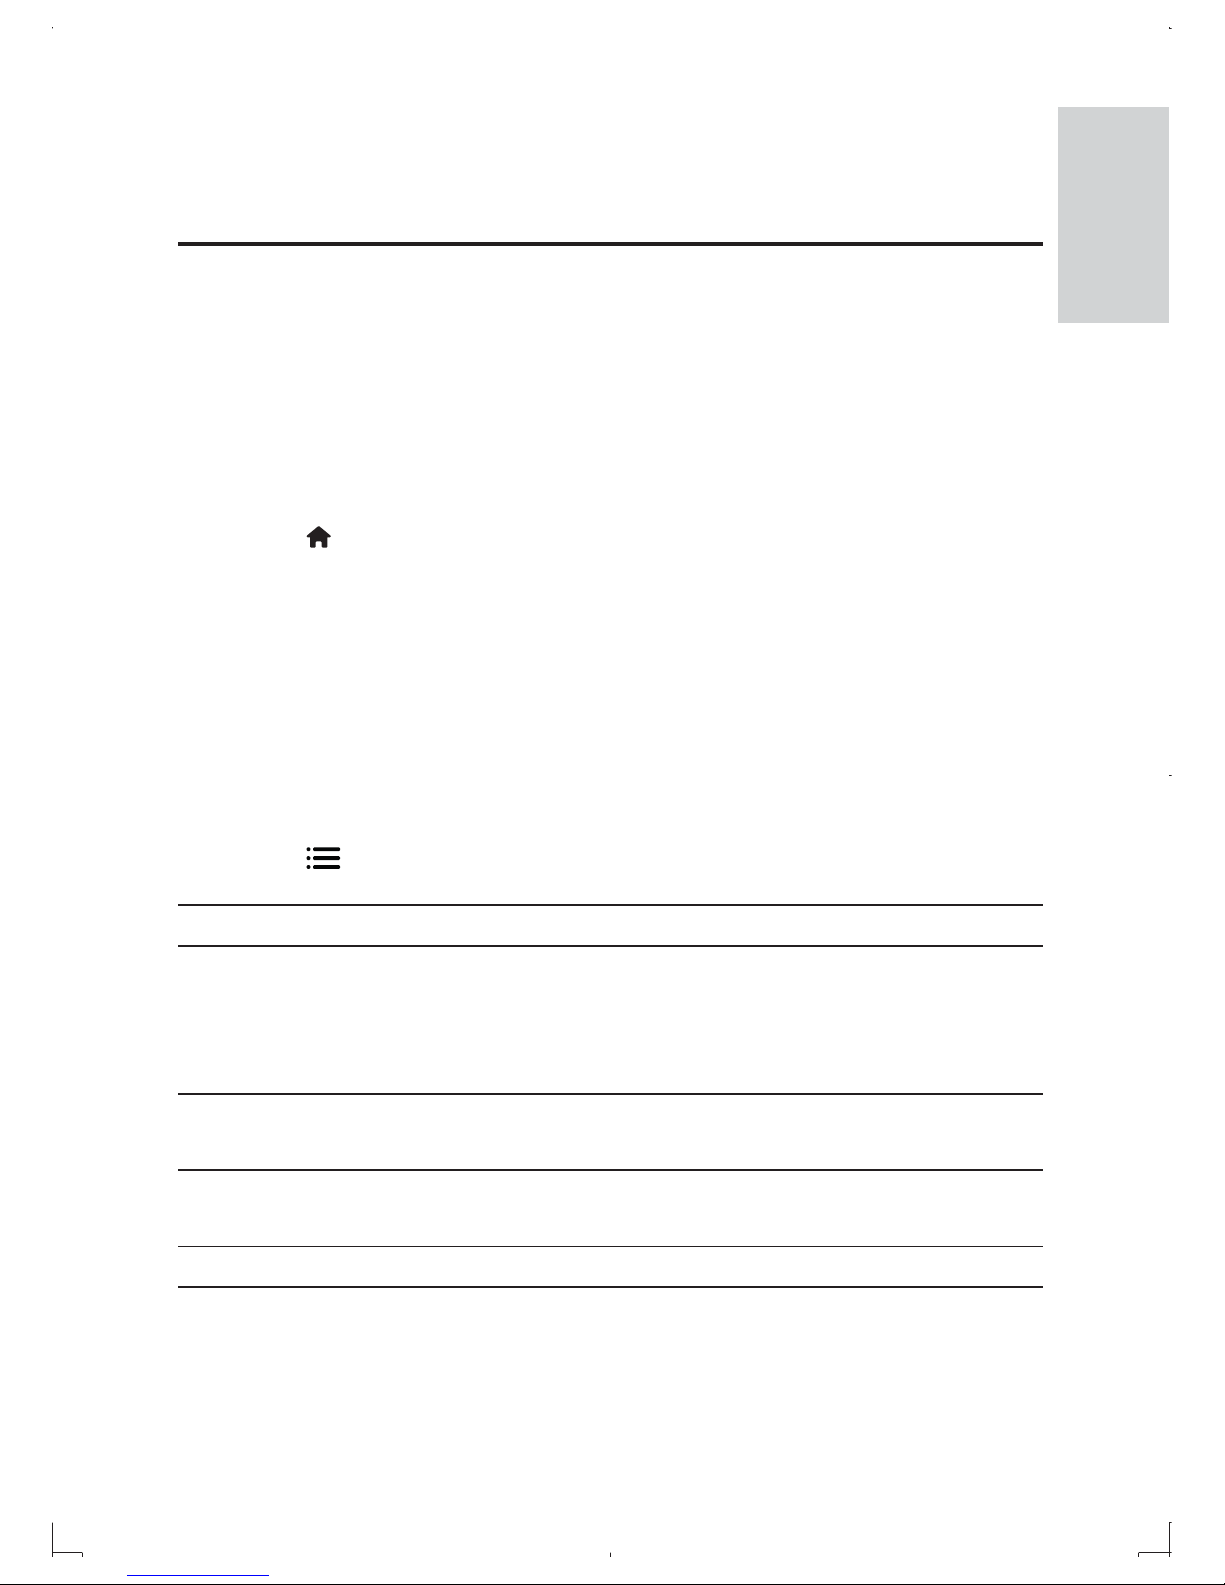
1 press , and select [Setup].
2 Select [Advanced] > [DivX
®
VOD Code].
DivX subtitles
Press SUBTITLE to select a language.
If the DivX subtitle is incorrect, change the character set that
•
supports the subtitle.
To select a character set,
•
1 Press , and select [Character Set].
Character set Languages
[Standard] English, Irish, Danish,Estonian, Finnish,
French,German, Italian, Portuguese, Luxembourgish,
Norwegian (Bokmål and Nynorsk),Spanish, Swedish,
Turkish
[Central Europe] Polish, Czech, Slovak, Albanian, Hungarian, Slovene,
Croatian, Serbian (Latin script), Romanian
[Cyrillic] Belarusian, Bulgarian, Ukrainian, Macedonian,
Russian, Serbian
[Greek] Greek
English
EN
Page 31
30
Note
To play DivX DRM protected files from a USB storage device, connect this player to •
a TV through HDMI.
To use the subtitles, make sure that the subtitle file has the same name as the DivX
•
video file name. For example, if the DivX video file is named “movie.avi”, save the
subtitle file as “movie.srt”, or “movie.sub”.
This player can play subtitle files in the following formats: .srt, .sub, .txt, .ssa, and .smi.
•
BonusView on Blu-ray
View special content (such as commentaries) in a small screen window.
This feature is only applicable to Blu-ray discs compatible with BonusView
(also known as picture in picture).
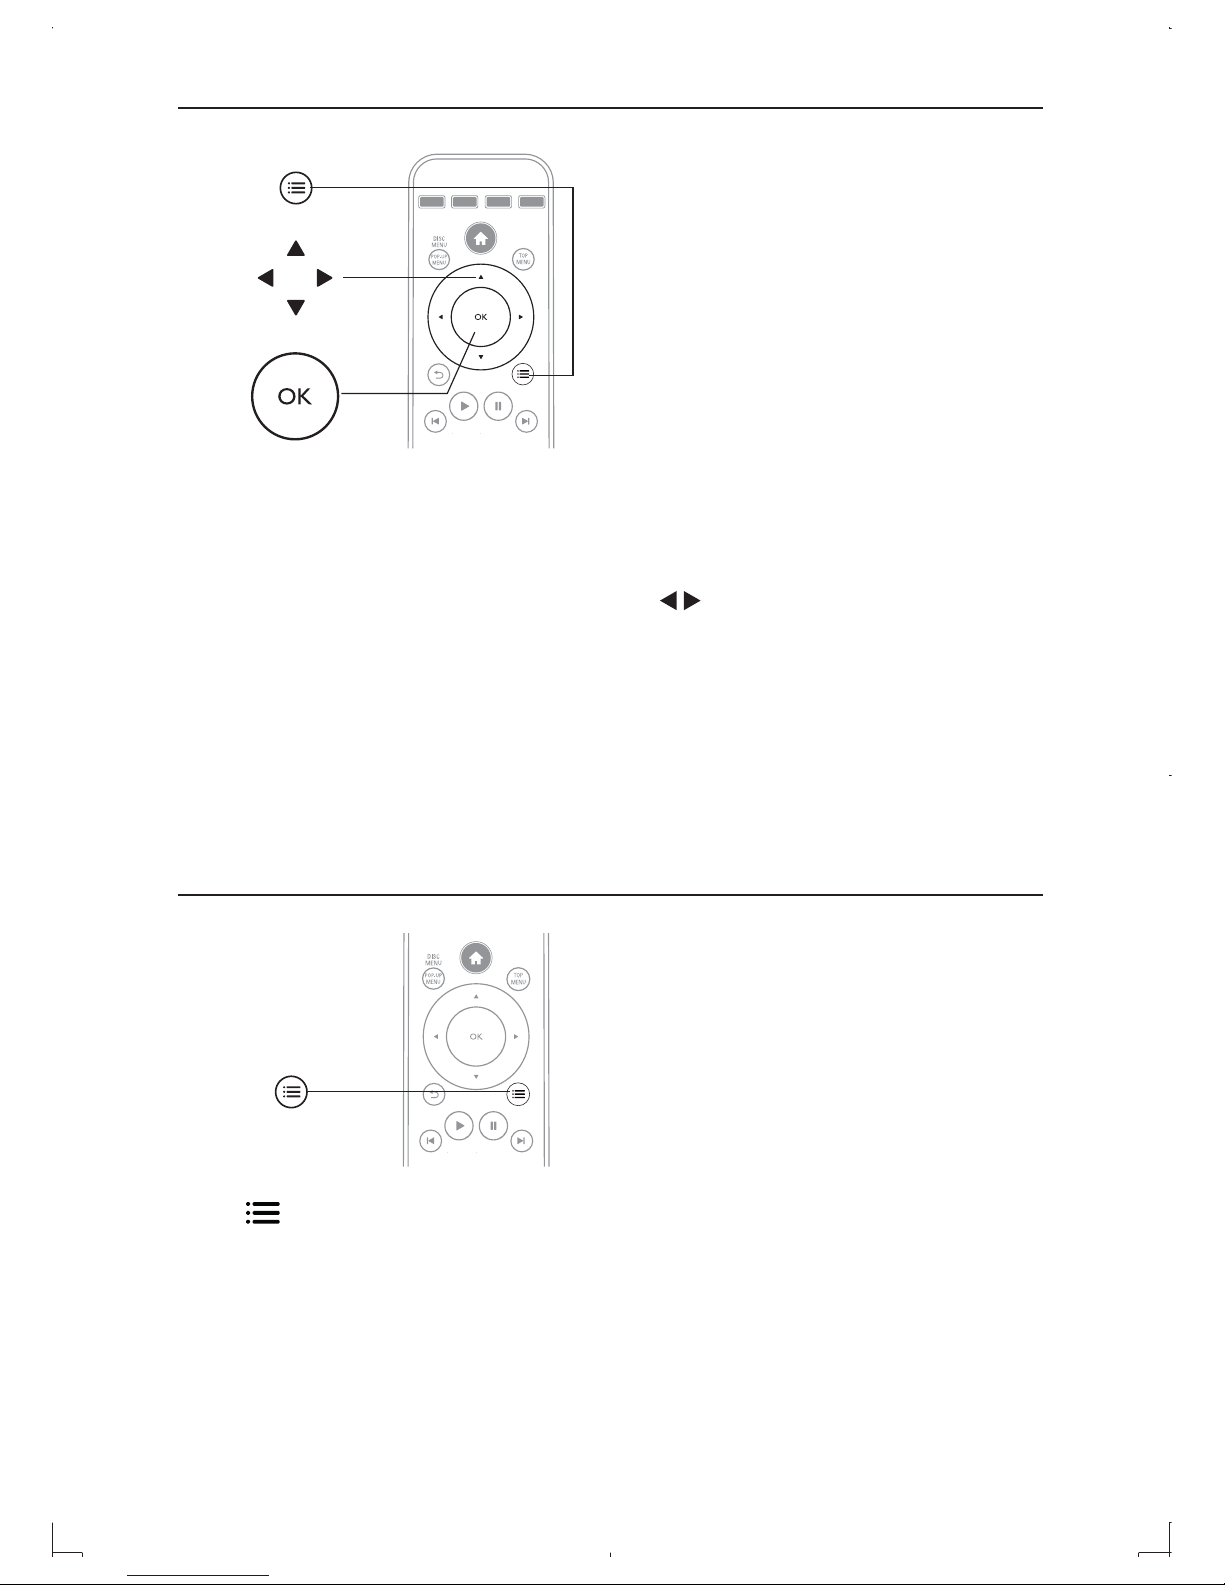
1 During play, press .
The options menu is displayed. »
2 Select [PIP Selection] > [PIP], and press OK.
PIP options [1]/[2] depend on the video contents. »
The secondary video window is displayed. »
3 Select [2nd Audio Language] or [2nd Subtitle Language], and press
OK.
Set up a network
You can access the following services through the Internet:
BD-Live: access online bonus features (applicable to Blu-ray discs that
•
are BD-Live enabled)
Update software: update the software of this player.
•
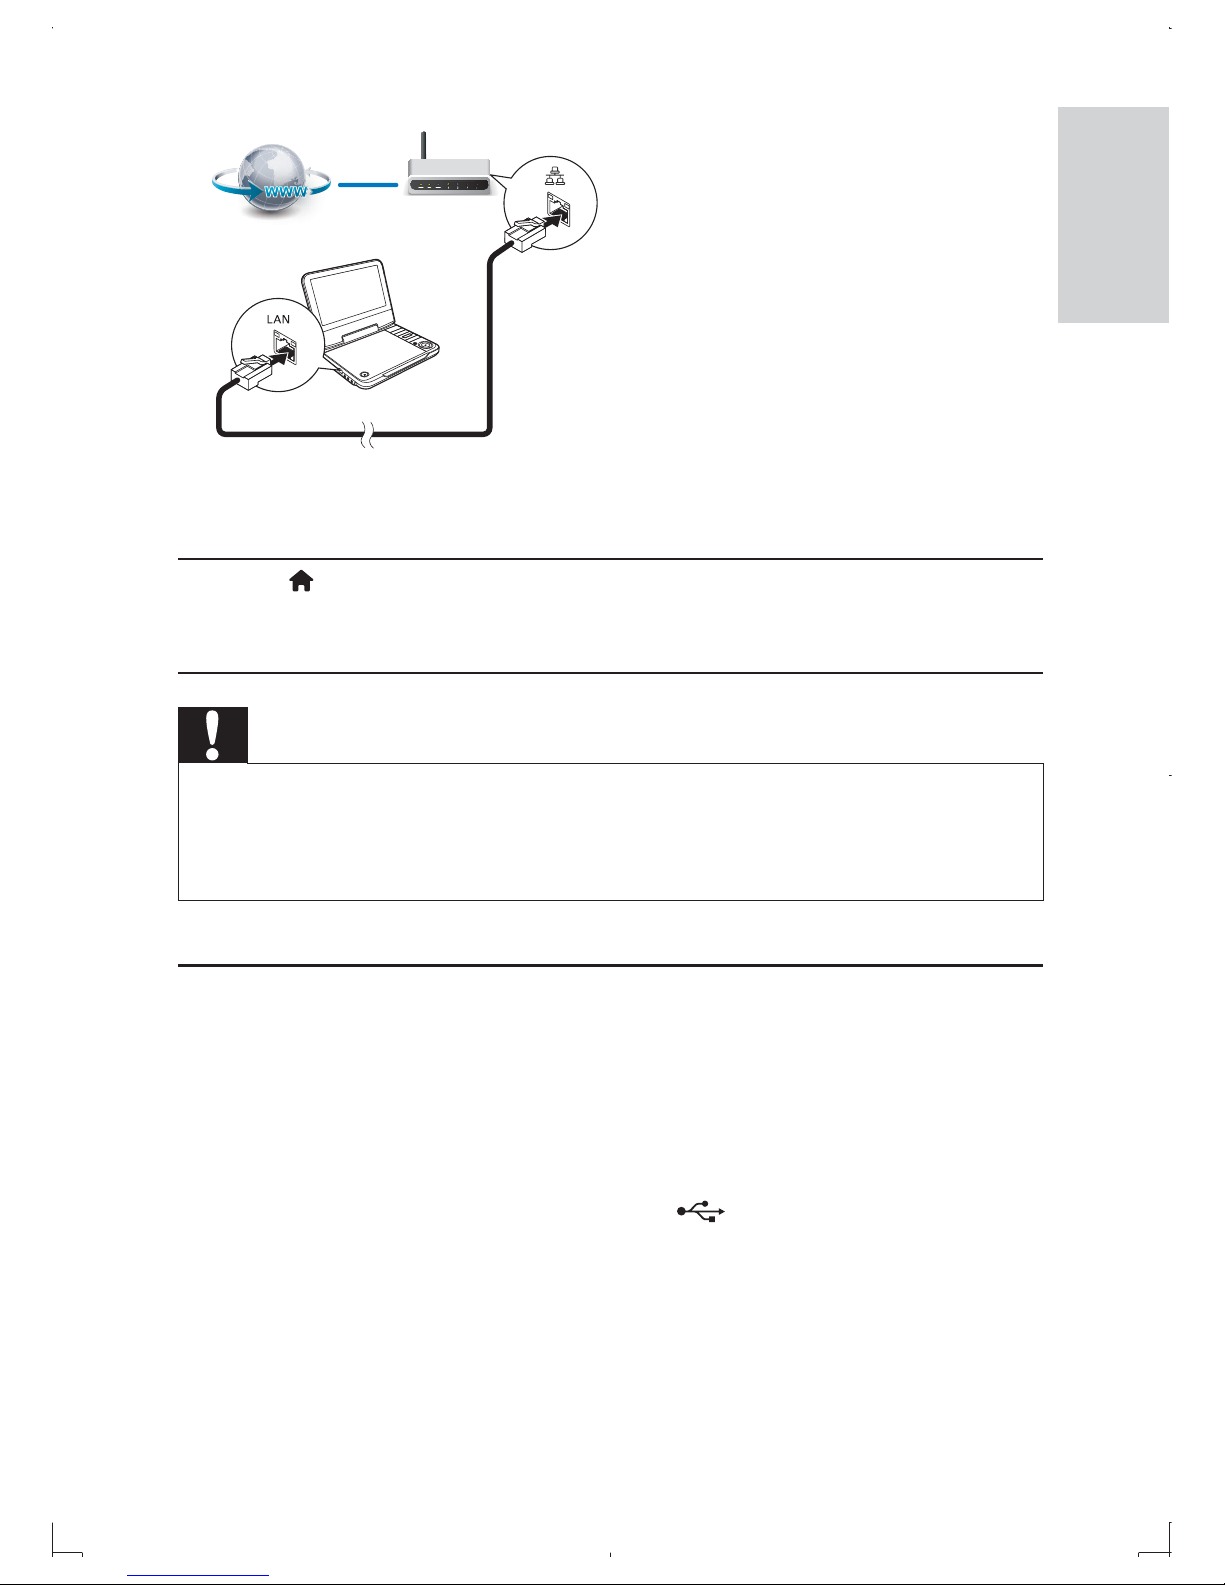
To set up a network,
1 Connect this player to
• LAN port.
LAN port on a router with Internet connection.•
EN
Page 32
31
2 Perform the network installation.
1), Press , and select [Setup].
2), Select [Network Setup] > [Network Installation].
3), Follow the on-screen instructions to complete the network setup.
Caution
Before you connect to a network, familiarize yourself with the network router, •
media server software for DLNA, and networking principles. If necessary, read
documentation accompanying network components. Philips is not responsible for
lost, damaged or corrupt data.
BD-Live on Blu-ray
You can access exclusive online services, such as movie trailers, games,
ringtones and other bonus contents.
1 Prepare the Internet connection and set up a network (see “Set up a
network”).
2 Connect a USB storage device to the (USB) jack of this player.
A USB storage device is used to store the downloaded BD-Live
•
content.
3 Play a disc that is BD-Live enabled.
4 On the disc menu, select the BD-Live icon, and press OK.
English
EN
Page 33
32
BD-Live starts loading. »
5 On the BD-Live interface, select an item to access.
Note
This feature is only applicable to Blu-ray discs that are BD-Live enabled. •
BD-Live services vary from discs and countries. •
When you use BD-Live, data on the disc and this player are accessed by the content •
provider
Use a USB storage device with at least 1GB of free space to store the download.
•
To delete the downloaded BD-Live content,
1 Press , and select [Setup].
2 Select [Advanced] > [Clear memory].
Use Philips EasyLink
This player supports Philips EasyLink which uses the HDMI CEC (Consumer
Electronics Control) protocol. You can use a single remote control to control
EasyLink compliant devices that are connected through HDMI.
1 Connect the HDMI CEC compliant devices through HDMI, and
turn on the HDMI CEC operations on the TV and other connected
devices (see the user manual of the TV or other devices for details).
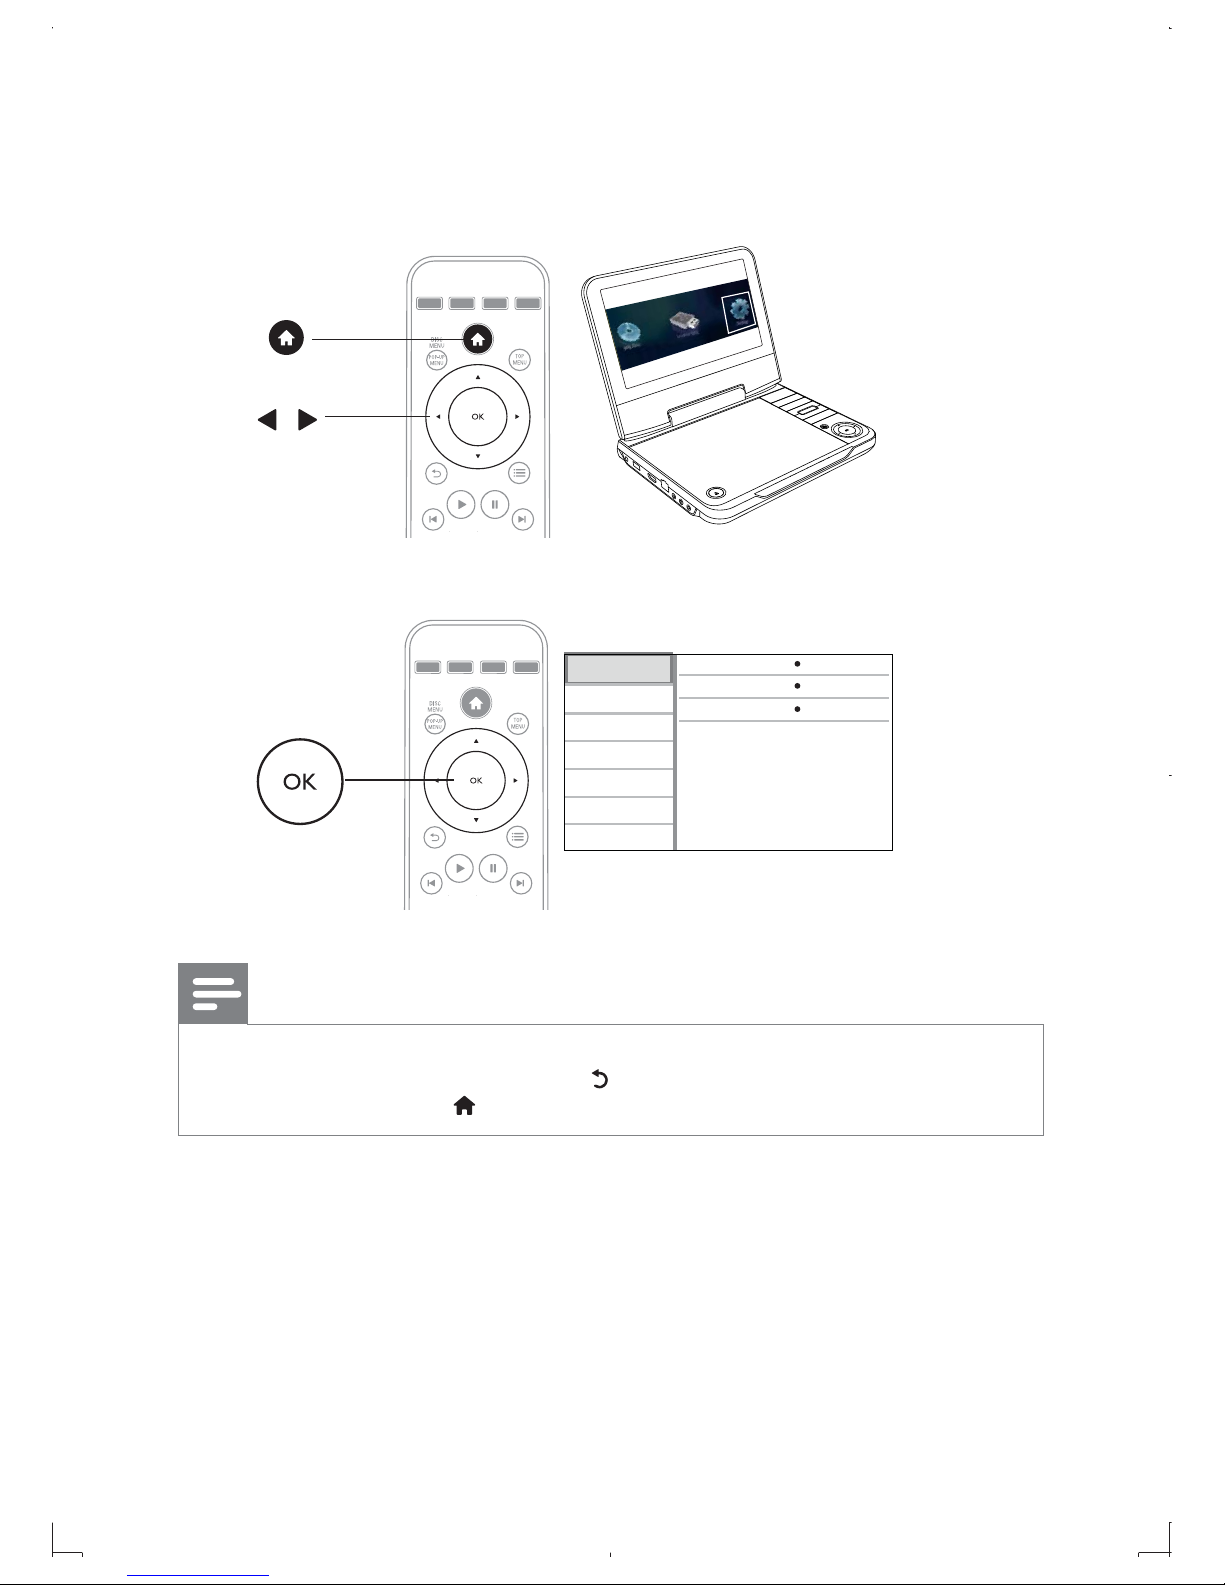
2 Press .
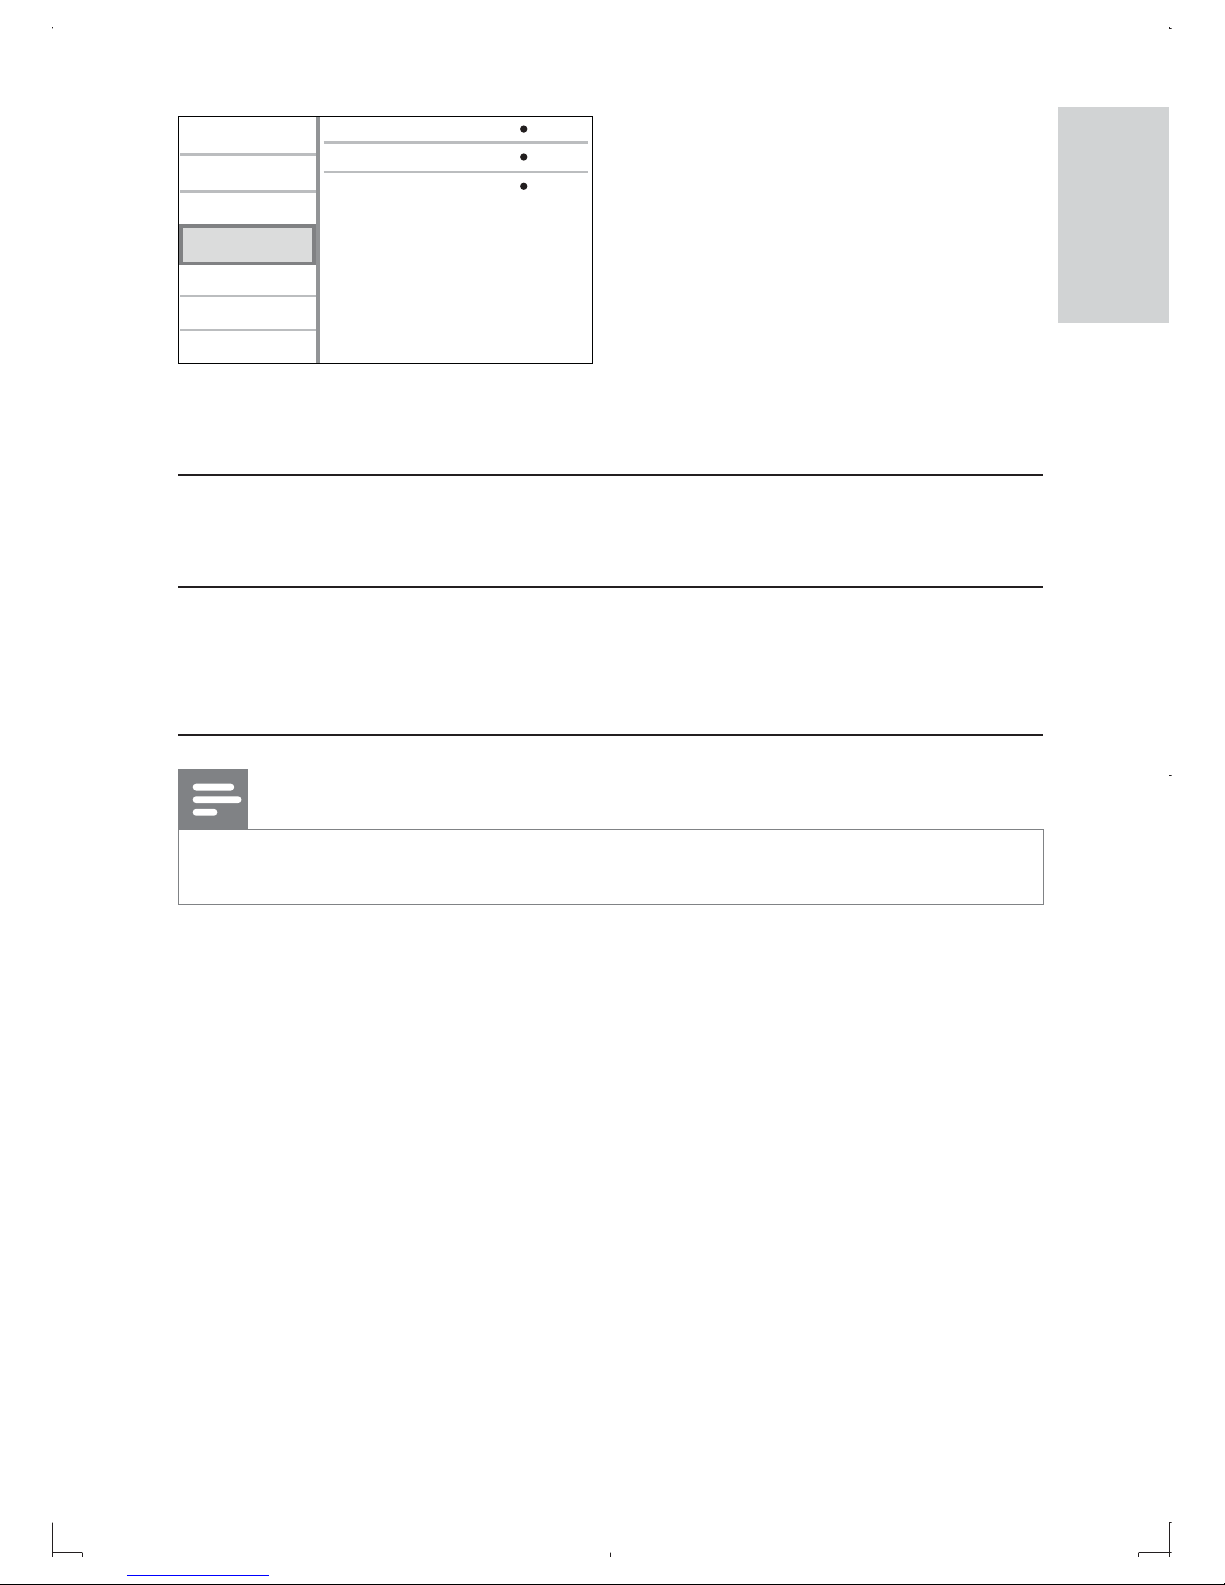
3 Select [Setup]> [EasyLink Setup].
4 Select [On] under the options:
• [EasyLink] > [On]
• [One Touch Play] > [On]
• [One Touch Standby] > [On]
EN
Page 34
33
EasyLink function is turned on.•
One Touch Play
When you play a disc with this player, the connected HDMI CEC TV
automatically switches to the HDMI input channel.
One Touch Standby
When you switch a connected device (for example TV) to the standby
mode with its own remote control, this player switches to the standby
mode automatically.
Note
Philips does not guarantee 100% interoperability with all HDMI CEC devices. •
Video Setup
Advanced
Audio Setup
Network Setup
Preference
EasyLink Setup
EasyLink
One Touch Play
On
On
On
One Touch Standby
LCD Setup
English
EN
Page 35
34
6 Change settings
You can change the settings of this player in the setup menu.
Note
You cannot change a menu option that is grayed out. •
To return to the previous menu, press • .
To exit the menu, press
• .
a
b
Video Setup
Advanced
Audio Setup
Network Setup
Preference
EasyLink Setup
TV Display
HDMI Video
1080p
On
16:9 Widescreen
HDMI Deep Color
LCD Setup
c
EN
Page 36
35
Picture
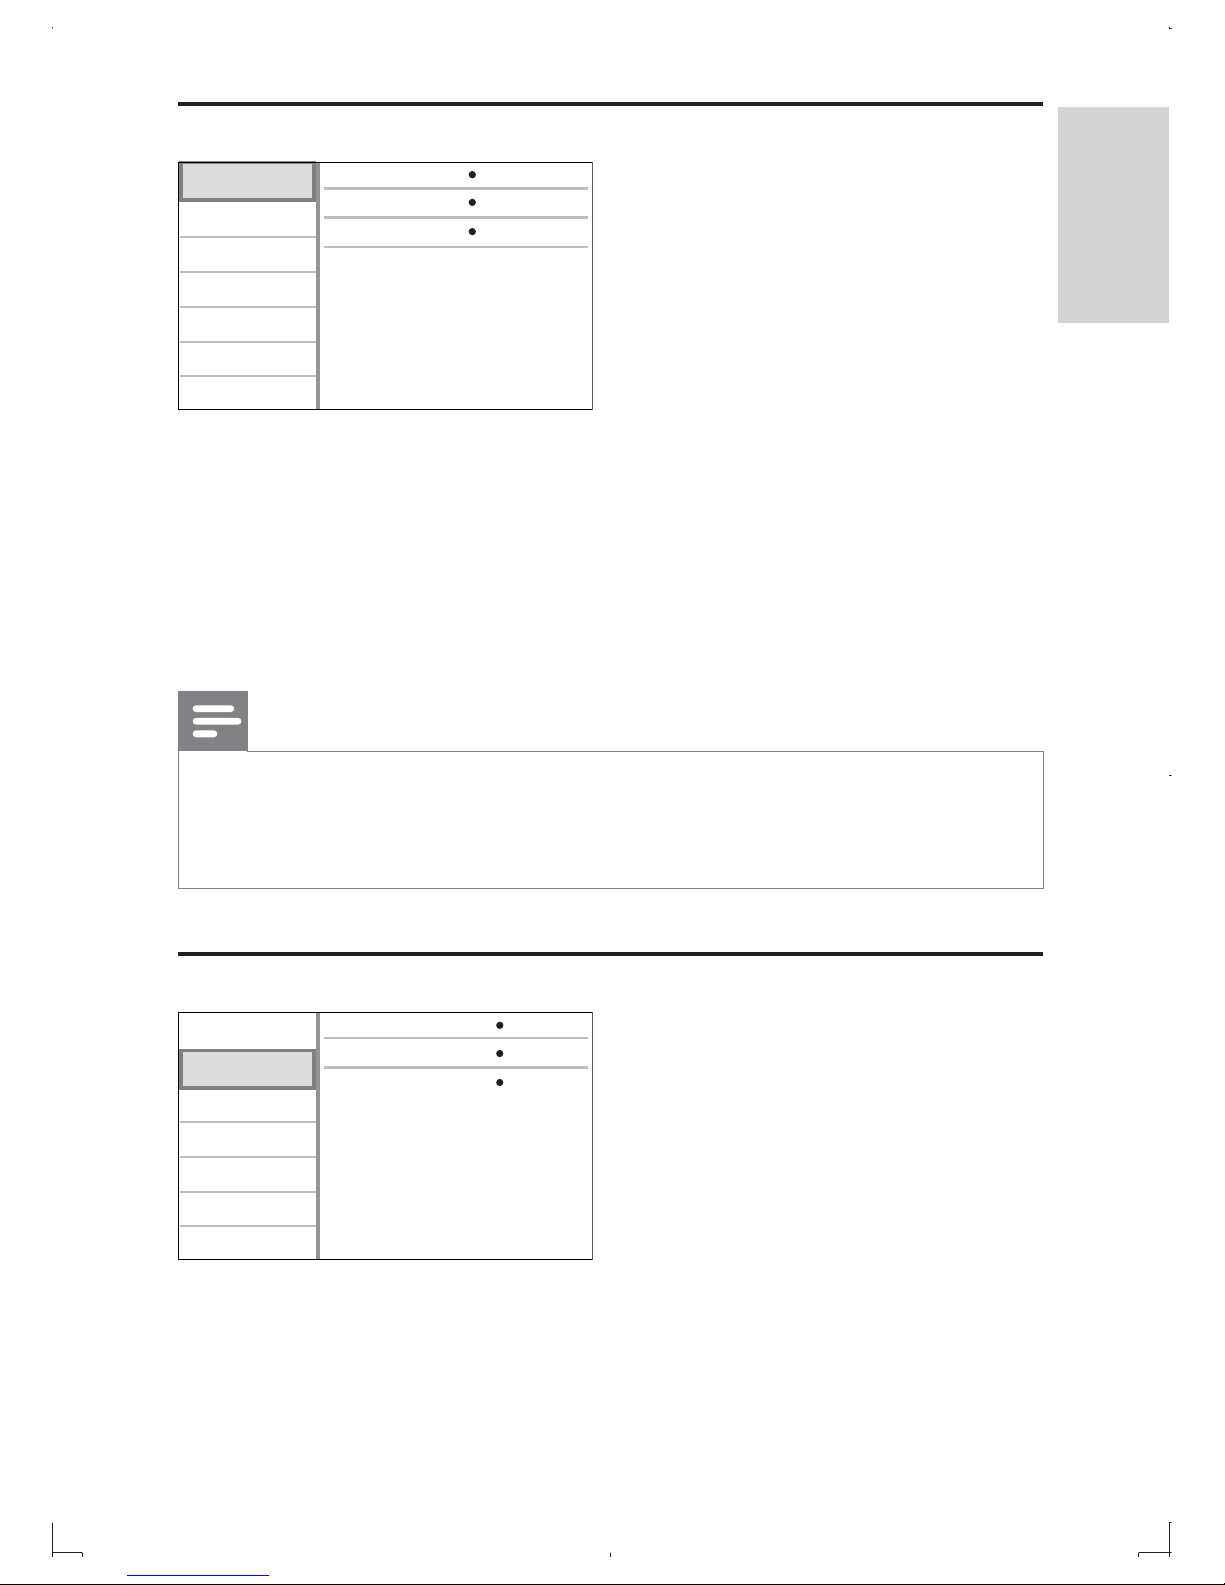
[TV Display]: Select a picture display format to fit your TV screen.
[HDMI Video]: Select an HDMI video resolution.
[HDMI Deep Color]: Display colors with more shades and hues when the
video content is recorded in Deep Color mode and the TV supports this
feature.
Note
For settings related to HDMI, you need to connect this player to your TV through •
HDMI.
For the composite connection (via the
• AV OUT jack), select a video resolution of
480i/576i or 480p/576p under [HDMI Video] to enable video output.
Sound
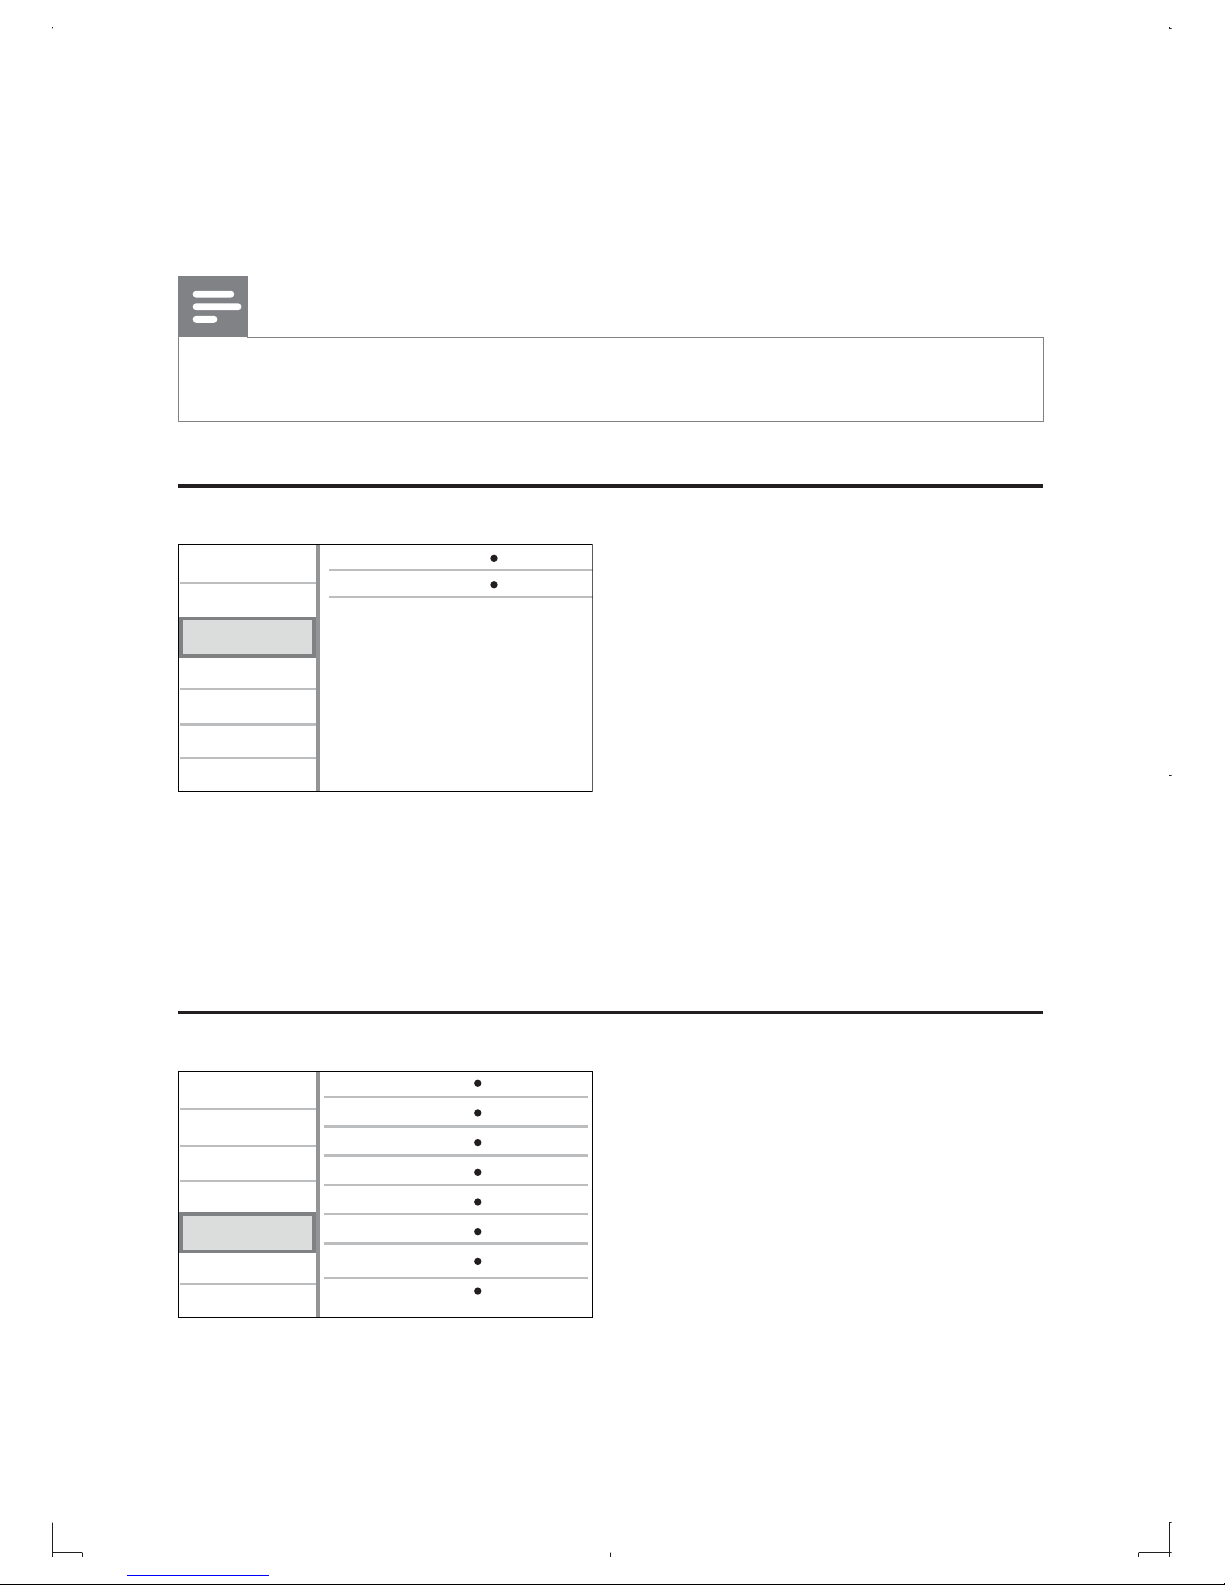
[Night Mode]: Equalize loud sound and soft sound. Enable this feature to
watch movies at a low volume at night.
Video Setup
Advanced
Audio Setup
Network Setup
Preference
EasyLink Setup
TV Display
HDMI Video
1080p
On
16:9 Widescreen
HDMI Deep Color
LCD Setup
Video Setup
Advanced
Audio Setup
Network Setup
Preference
EasyLink Setup
Night Mode
Neo 6
Auto
Off
AutoHDMI Audio
LCD Setup
English
EN
Page 37
36
[Neo 6]: Enable or disable a surround sound effect which is converted from
DTS 2.0 channel audio.
[HDMI Audio]: Set an HDMI audio format when this player is connected
through HDMI.
Note
For settings related to HDMI, the TV must be connected through HDMI. •
Night mode is only available for Dolby encoded DVD and Blu-ray discs. •
Network
[Network Installation]: Start network installation to connect the player to
the network.
[View Network Settings]: Display the current network status.
Preference
View Network Settings
Network Installation
Video Setup
Advanced
Audio Setup
Network Setup
Preference
EasyLink Setup
LCD Setup
Video Setup
Advanced
Audio Setup
Network Setup
Preference
EasyLink Setup
Menu Language
Parental Control
Disc Menu
Audio
English (ENG)
English
English (ENG)
Chinese (CHI)
Off
On
On
Subtitle
Screen Saver
Change Password
LCD Setup
VCD PBC
EN
Page 38
37
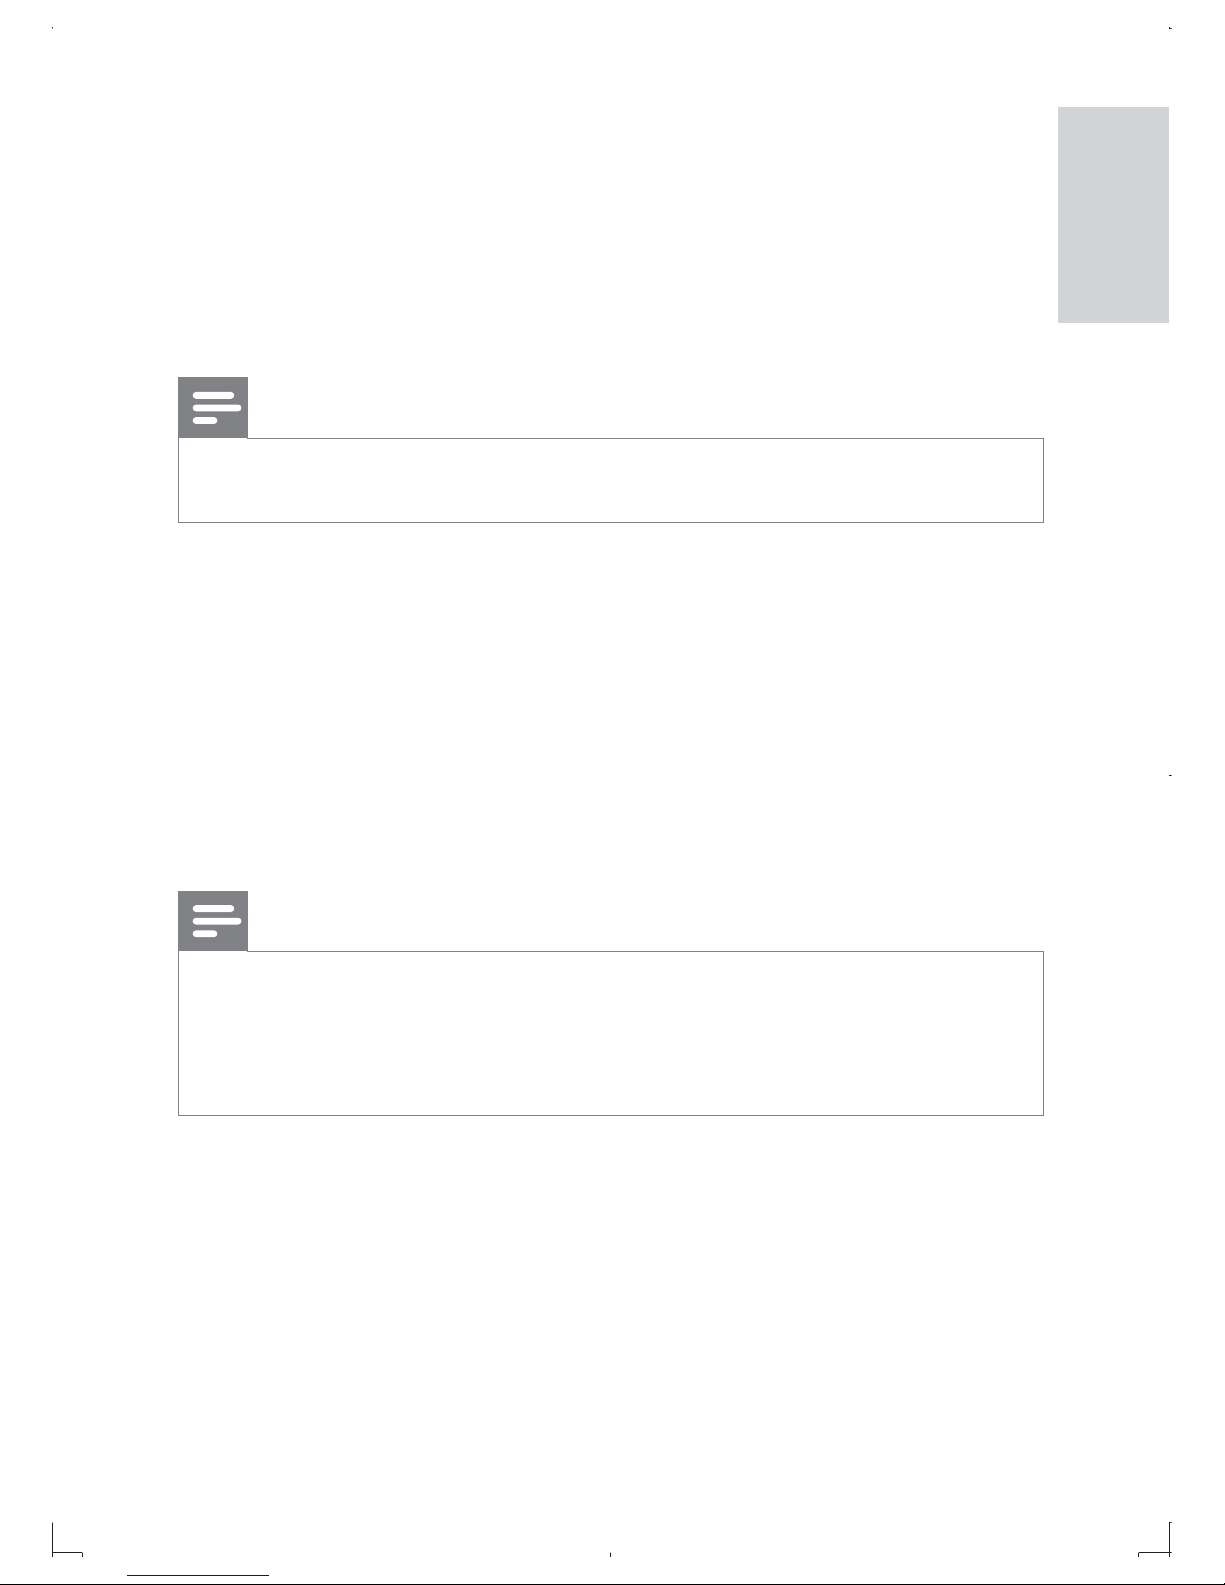
[Menu language]: Select a language for the onscreen menu .
[Audio]: Select an audio language for video.
[Subtitle]: Select a subtitle language for video.
[Disc Menu]: Select a menu language for a video disc.
[Parental Control]: Set the rating level to a disc. Restrict the play of a disc to
children. These discs must be recorded with rating levels.
Note
Input “0000” to access the restriction options. To play all discs without rating •
restrictions, select level “8”.
[Screen Saver]: Enable or disable the screen saver function. If enabled, the
screen saver is activated after 10 minutes of inactivity (for example, in pause
or stop mode).
[Change Password]: Set a password to play a restricted disc. Input “0000” if
you do not have a password or if you forgot your password.
[VCD PBC]: Display or skip the content menu for VCD and SVCD.
[Sleep Timer]: Enable a countdown timer to switch this player to standby
mode after a specific period of time.
Note
If your preferred language is not available for disc language, audio or subtitle, you can •
select [Other] from the menu options and input 4-digit language code which can be
found at the back of this user manual.
If you select a language which is not available on a disc, this player uses the default
•
language of the disc.
English
EN
Page 39
38
Advanced options
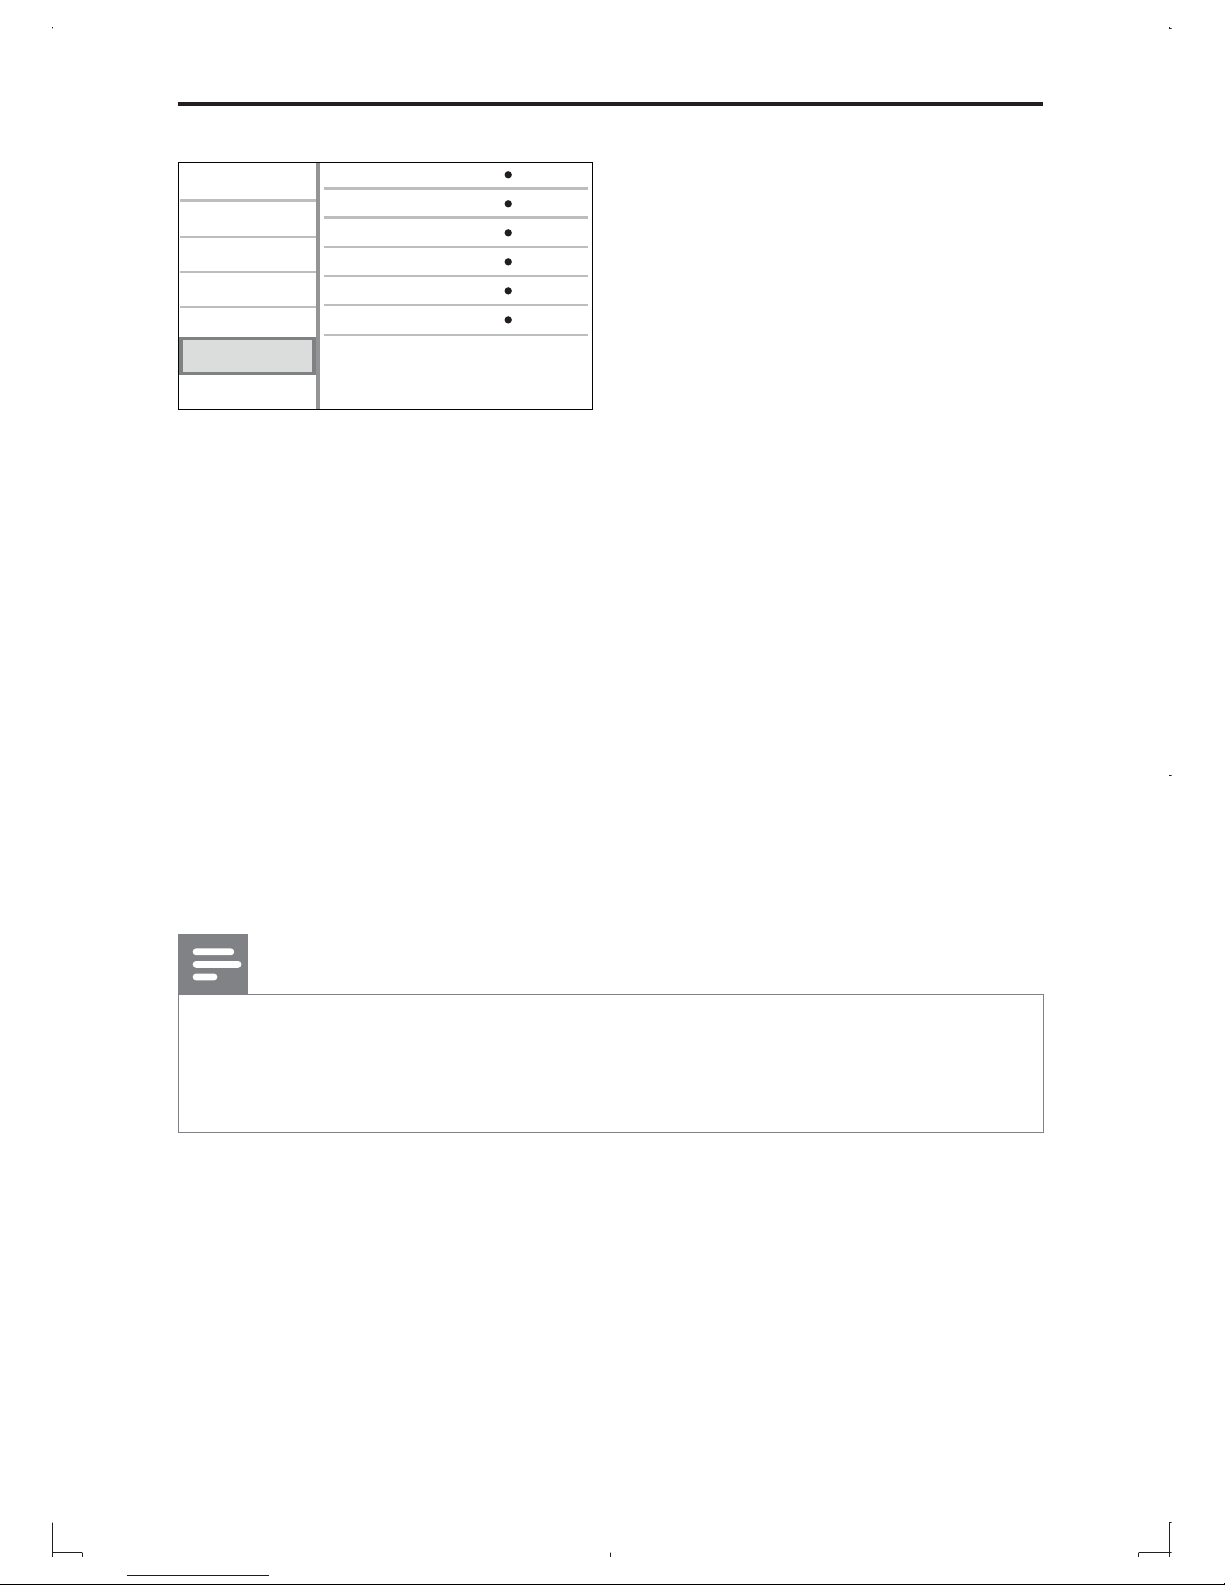
[BD-Live Security]: Restrict or allow access to BD-Live (only for non-
commercial, users-created Blu-Live discs).
[Software Update]: Select to update software from a network or from USB
storage device.
[Clear memory]: Delete the downloaded BD-Live content on the USB
storage device.
[DivX
®
VOD Code]: Display the DivX® registration code or the
deregistration code for this player.
[Version Info.]: Display the software version of this player.
[Restore default settings]: Reset this player to the default settings made at
the factory.
Note
You cannot restrict Internet access on commercial Blu-ray discs. •
Before you purchase DivX videos and play them on this player, register this player on •
www.divx.com with the DivX VOD code.
You cannot reset a parental control setting to the default value.
•
Video Setup
Advanced
Audio Setup
Network Setup
Preference
EasyLink Setup
BD-Live Security
Version Info.
DivX® VOD Code
Software Update
Off
Clear memory
Restore default setting
LCD Setup
EN
Page 40
39
LCD screen
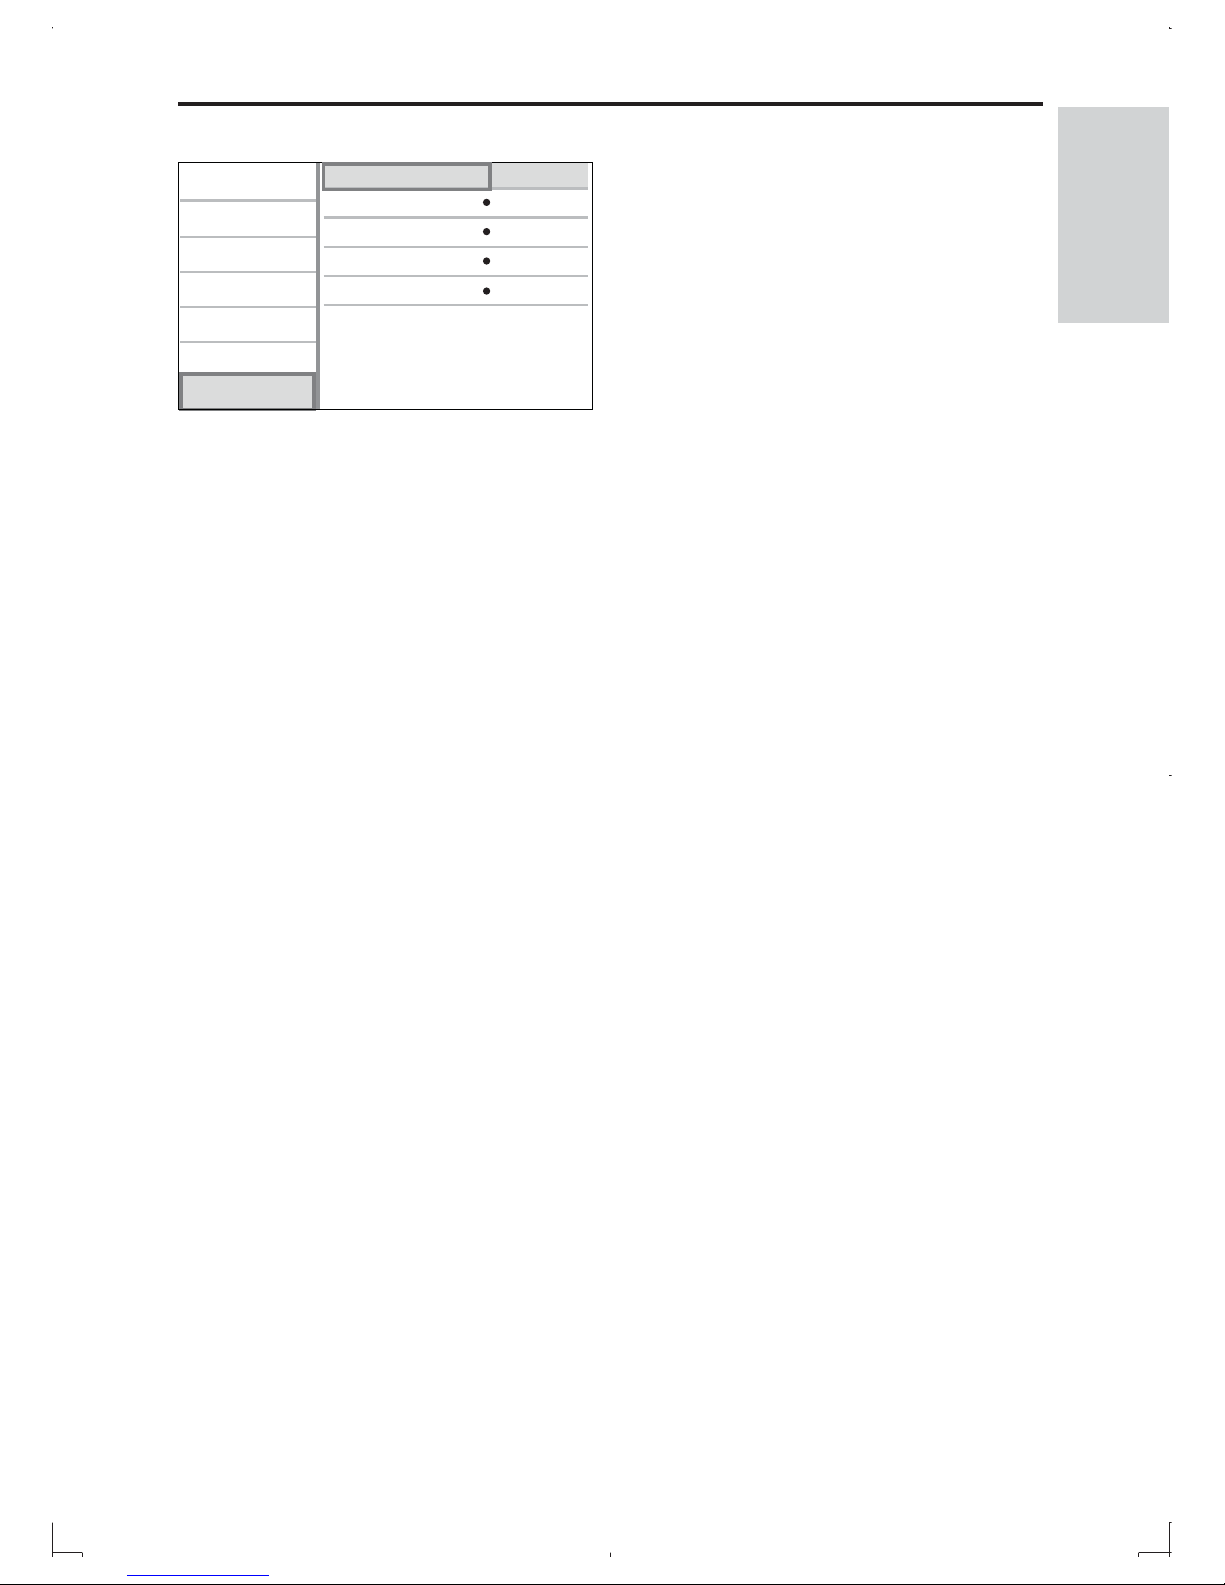
[Brightness]: Set the brightness level of the LCD screen.
[Contrast]: Set the contrast level of the LCD screen.
[Colour]: Set the saturation level of the LCD screen.
[Hue]: Set the hue level of the LCD screen.
[Screen]: Set the aspect ratio of the LCD screen.
Video Setup
Advanced
Audio Setup
Network Setup
Preference
EasyLink Setup
Brightness
Screen
Hue
Contrast
15
20
17
0
Full Screen
Colour
LCD Setup
English
EN
Page 41
40
7 Update software
Before you update the software of this player, check the current software version:
1 Press , and select [Setup].
2 Select [Advanced] >[Version Info.] , and press OK.
The software version information is displayed . »
Update software via the Internet
1 Connect the player to the Internet (see “Set up a network”).
2 Press , and select [Setup].
3 Select [Advanced] > [Software Update]> [Network].
If an upgrade media is detected, you are prompted to start the update. »
4 Follow the instructions on the screen to update the software.
Update software via USB
1 Check the latest software version on www.philips.com/support.
Search for your model and click on “Software and drivers”.•
2 Download the software into a USB storage device.
a Unzip the download, and make sure that the unzipped folder is
named “UPG_ALL”.
b Put the “UPG_ALL” folder in the root directory.
3 Connect the USB storage device to the (USB) jack on this player.
4 Press , and select [Setup].
5 Select [Advanced] > [Software Update]> [USB].
If an upgrade media is detected, you are prompted to start the update. »
6 Follow the instructions on the screen to update the software.
Caution
Do not turn off the power or remove the USB storage device when the software •
update is in progress because you might damage this player.
EN
Page 42
41
8 Specifications
Note
Specifications are subject to change without notice •
Region code
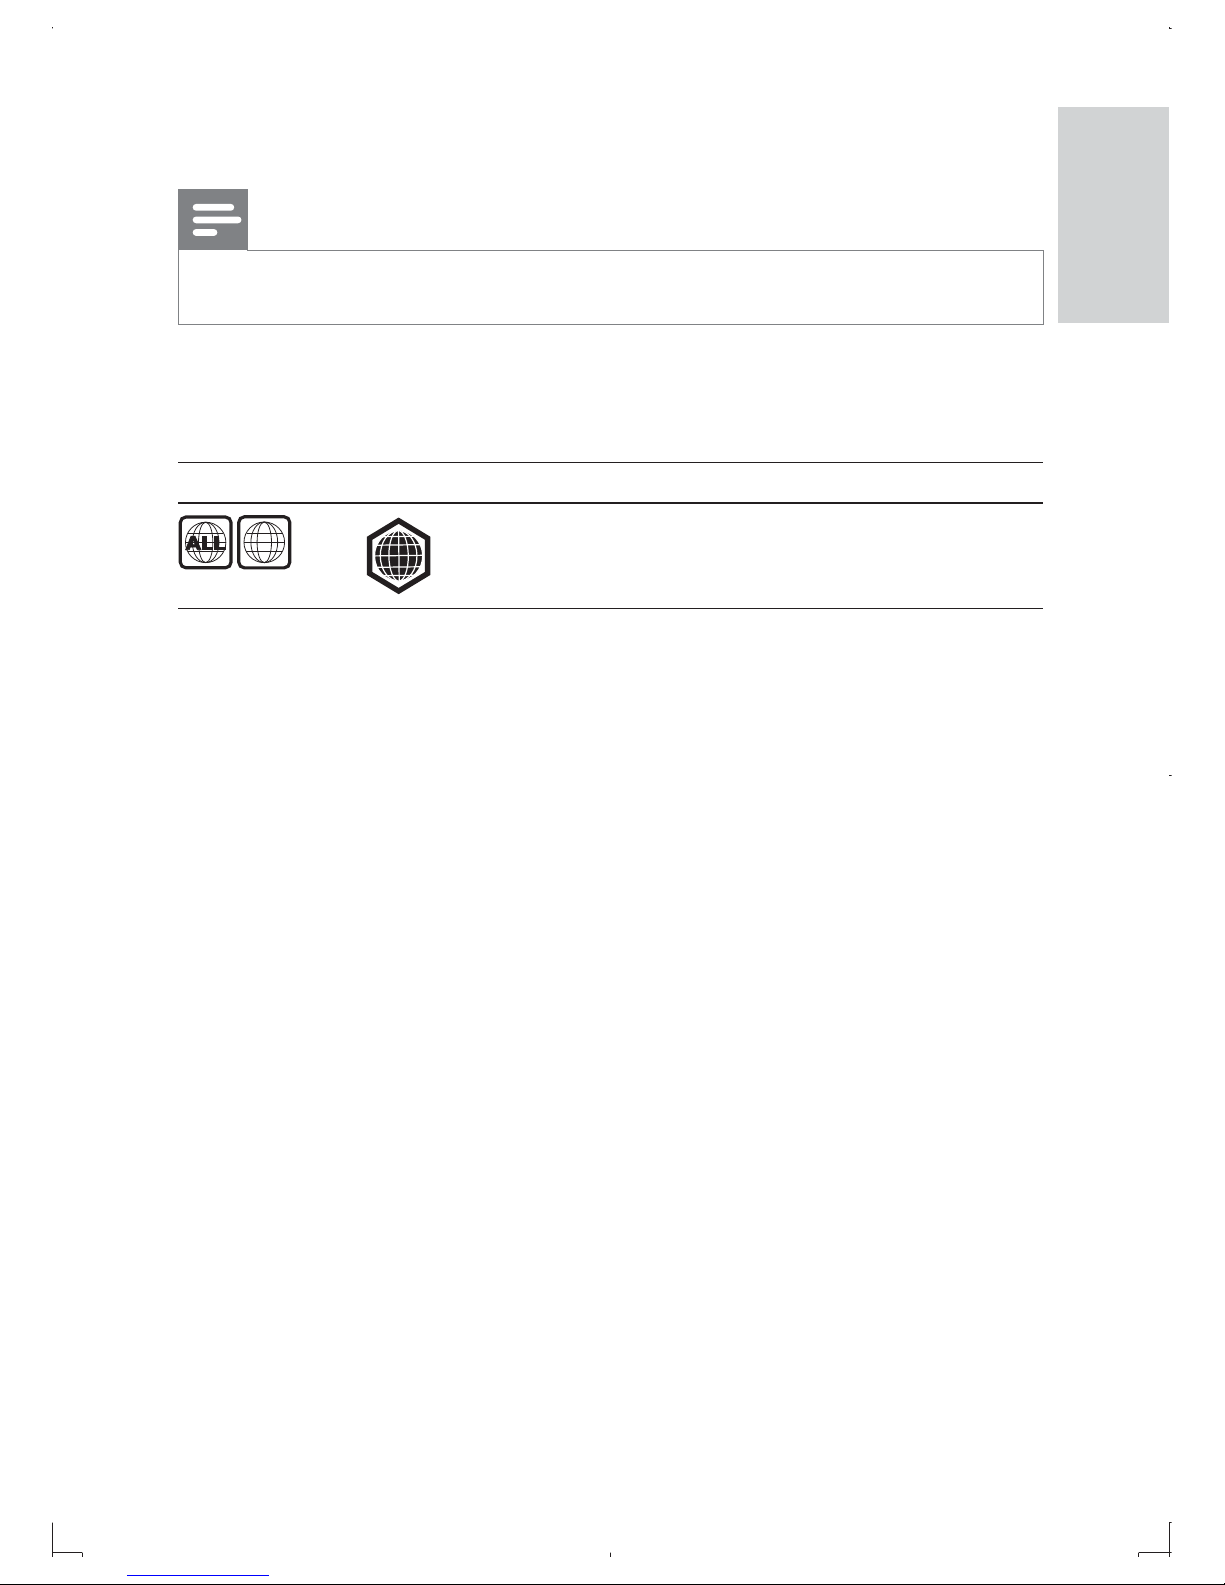
This player can play discs with the following region codes.
DVD Blu-ray Countries
U.S.A and Canada
Playable media
BD-Video
•
DVD-Video, DVD+R/+RW, DVD-R/-RW, DVD+R/-R DL (Dual •
Layer)
VCD/SVCD
•
Audio CD, CD-R/CD-RW, MP3 media, WMA media, JPEG files•
DivX Plus HD media, MKV media•
USB storage device•
File format
Video: .avi, .divx, .mp4, .mkv•
Audio: .mp3, .wma, .wav•
Picture: .jpg, .gif, .png•
Video
Signal system: PAL / NTSC
•
Composite video output: 1 Vp-p (75 ohm)•
HDMI output • 480i, 480p, 576i, 576p, 720p, 1080i, 1080p, 1080p24
1
A
English
EN
Page 43

42
Audio
HDMI output
•
Sampling frequency:•
MP3: 32 kHz, 44.1 kHz, 48 kHz•
WMA: 44.1 kHz, 48 kHz•
Constant bit rate:•
MP3: 112 kbps - 320 kpbs•
WMA: 48 kpbs - 192 kpbs•
USB
Compatibility: Hi-Speed USB (2.0)
•
Class support: USB Mass Storage Class (UMS)•
File system: FAT16, FAT32•
Support HDD (a portable hard drive disc): an external power source •
may be needed.
Main unit
Power supply rating: AC 100-240V~, 50 Hz
•
Power consumption: 10 W•
Power consumption in standby mode: < 0.25 W•
Dimensions: 240 x 200 x 47.2 (mm)•
Net Weight: 1.35 kg•
Laser Specification
Laser Type (Diode): AlGaInN (BD), AlGaInP (DVD/CD)•
Wave length: 440-410nm (BD), 650-663nm (DVD), 770-800nm •
(CD)
Output power: 20mW (BD), 7mW (DVD), 7mW (CD)•
EN
Page 44
43
9 Troubleshooting
Warning
Risk of electric shock. Never remove the casing of the player. •
To keep the warranty valid, never try to repair the player yourself.
If you have problems using this player, check the following points before
you request service. If you still have a problem, register your player and get
support at www.philips.com/welcome.
If you contact Philips, you will be asked for the model and serial number of
this player. The model number and serial number are on the back of this
player. Write the numbers here:
Model No. __________________________
Serial No. ___________________________
Main unit
The buttons on this player do not work.
Disconnect this player from the power supply for a few minutes, and •
then reconnect.
No power
Ensure that both plugs of the mains cord are properly connected. •
Ensure that there is power at the car cigarette lighter or AC outlet. •
The player feels warm
When the player is in use for a long period of time, its surface will be
•
heated. This is normal.
Picture
No picture.
Make sure that the TV is switched to the correct source input for this •
player.
English
EN
Page 45

44
No picture on HDMI connection.
Make sure that the HDMI cable is not faulty. If it is faulty, replace with •
a new HDMI cable.
On the remote control, press • and then press “731” (numeric
buttons) to recover picture display. Or wait for 10 seconds for auto
recovery.
If this player is connected to an unauthorized display device with an
•
HDMI cable, the audio and video signals may not be output.
The disc does not play high-definition video.
Make sure that the disc contains high-definition video.
•
Make sure that the TV supports high-definition video. •
Distorted picture
Clean the disc. With a clean, soft, lint-free cloth, wipe the disc •
outwards from the center.
Make sure that the video output format of the disc is compatible with •
the TV.
Change the video output format to match your TV or program. •
The LCD is manufactured using high precision technology. You may, •
however, see tiny black points and/or bright points(red, blue, green)
that continuously appear on the LCD. This is a normal result of the
manufacturing process and does not indicate a malfunction.
Sound
No audio output from the TV.
Make sure that the audio cables are connected to the audio input of
•
the TV.
Make sure that the TV is switched to the correct source input for this •
player.
No audio output from the loudspeakers of the external audio device
(home theater or amplifier).
Make sure that the audio cables are connected to the audio input of
•
the audio device.
Switch the external audio device to the correct audio source input.•
EN
Page 46

45
No sound on HDMI connection.
You may not hear any sound from the HDMI output if the connected
•
device is non-HDCP compliant or only DVI-compatible.
Play
Cannot play a disc.
Clean the disc. •
Make sure that the disc is correctly loaded.•
Make sure that this player supports the disc. See “Product •
specifications”.
Make sure that this player supports the region code of the DVD or
•
BD.
For DVD±RW or DVD±R, make sure that the disc is finalized.•
Cannot play DivX video files.
Make sure that the DivX video file is complete. •
Make sure that the video file name extension is correct. •
To play DivX DRM protected files from a USB storage device, •
connect this player to a TV through HDMI.
DivX subtitles do not display correctly.
Make sure that the subtitle file has the same name as the DivX video •
file.
Make sure that the subtitle file has an extension name supported by •
this player (.srt, .sub, .txt, .ssa, or smi).
Cannot read the contents of a connected USB storage.
Make sure that the format of the USB storage device is compatible •
with this player.
Make sure that the file system on the USB storage device is •
supported by this player.
For a portable hard drive disc (HDD), an external power source may •
be needed.
English
EN
Page 47

46
‘No entry’ or ‘x’ sign appears on the TV.
The operation is not possible. •
EasyLink feature does not work.
Make sure that this player is connected to the Philips brand EasyLink
•
TV, and the EasyLink option is turned on (see “User your Blu-ray
disc/ DVD player” > “Use Philips EasyLink”).
Cannot access BD-Live features.
Make sure that this player is connected to the network (see “Use
•
your Blu-ray disc/ DVD player” > “Set up a network”).
Make sure that the network installation is made (see “Use your Blu-•
ray disc/ DVD player” > “Set up a network”).
Make sure that the Blu-ray disc supports BD-Live features.
•
Clear memory storage (see “Change settings” > “Advanced options •
(BD-Live security, clear memory...)”).
EN
Page 48
46 FR
Language code
Abkhazian 6566
Afar 6565
Afrikaans 6570
Amharic 6577
Arabic 6582
Armenian 7289
Assamese 6583
Avestan 6569
Aymara 6589
Azerhaijani 6590
Bahasa Melayu 7783
Bashkir 6665
Belarusian 6669
Bengali 6678
Bihari 6672
Bislama 6673
Bokmål, Norwegian 7866
Bosanski 6683
Brezhoneg 6682
Bulgarian 6671
Burmese 7789
Castellano, Español 6983
Catalán 6765
Chamorro 6772
Chechen 6769
Chewa; Chichewa; Nyanja 7889
9072
Chuang; Zhuang 9065
Church Slavic; Slavonic 6785
Chuvash 6786
Corsican 6779
Česky 6783
Dansk 6865
Deutsch 6869
Dzongkha 6890
English 6978
Esperanto 6979
Estonian 6984
Euskara 6985
6976
Faroese 7079
Français 7082
Frysk 7089
Fijian 7074
Gaelic; Scottish Gaelic 7168
Gallegan 7176
Georgian 7565
Gikuyu; Kikuyu 7573
Guarani 7178
Gujarati 7185
Hausa 7265
Herero 7290
Hindi 7273
Hiri Motu 7279
Hrwatski 6779
Ido 7379
Interlingua (International)7365
Interlingue 7365
Inuktitut 7385
Inupiaq 7375
Irish 7165
Íslenska 7383
Italiano 7384
Ivrit 7269
Japanese 7465
Javanese 7486
Kalaallisut 7576
Kannada 7578
Kashmiri 7583
Kazakh 7575
Kernewek 7587
Khmer 7577
Kinyarwanda 8287
Kirghiz 7589
Komi 7586
Korean 7579
Kuanyama; Kwanyama 7574
Kurdish 7585
Lao 7679
Latina 7665
Latvian 7686
Letzeburgesch; 7666
Limburgan; Limburger 7673
Lingala 7678
Lithuanian 7684
Luxembourgish; 7666
Macedonian 7775
Malagasy 7771
Magyar 7285
Malayalam 7776
Maltese 7784
Manx 7186
Maori 7773
Marathi 7782
Marshallese 7772
Moldavian 7779
Mongolian 7778
Nauru 7865
Navaho; Navajo 7886
Ndebele, North 7868
Ndebele, South 7882
Ndonga 7871
Nederlands 7876
Nepali 7869
Norsk 7879
Northern Sami 8369
North Ndebele 7868
Norwegian Nynorsk; 7878
Occitan; Provencal 7967
Old Bulgarian; Old Slavonic 6785
Oriya 7982
Oromo 7977
Ossetian; Ossetic 7983
Pali 8073
Panjabi 8065
Persian 7065
Polski 8076
Português 8084
Pushto 8083
Russian 8285
Quechua 8185
Raeto-Romance 8277
Romanian 8279
Rundi 8278
Samoan 8377
Sango 8371
Sanskrit 8365
Sardinian 8367
Serbian 8382
Shona 8378
Shqip 8381
Sindhi 8368
Sinhalese 8373
Slovensky 8373
Slovenian 8376
Somali 8379
Sotho; Southern 8384
South Ndebele 7882
Sundanese 8385
Suomi 7073
Swahili 8387
Swati 8383
Svenska 8386
Tagalog 8476
Tahitian 8489
Tajik 8471
Tamil 8465
Tatar 8484
Telugu 8469
Thai 8472
Tibetan 6679
Tigrinya 8473
Tonga (Tonga Islands) 8479
Tsonga 8483
Tswana 8478
Türkçe 8482
T
urkmen 8475
Twi 8487
Uighur 8571
Ukrainian 8575
Urdu 8582
Uzbek 8590
Vietnamese 8673
Volapuk 8679
Walloon 8765
Welsh 6789
Wolof 8779
Xhosa 8872
Yiddish 8973
Yoruba 8979
Zulu 9085
Ё᭛
 Loading...