

Page 1
16
16Monitoring tcGas
The tcGas module measures the partial pressure of the oxygen and carbon dioxide that diffuses through
the skin, thereby providing a measure of these gases in the capillary blood.
The monitor’s settings for altitude and barometric pressure influence the measurement. The tcpO
tcpCO
halothane, can cause incorrect or drifting readings.
Transcutaneous measurements cannot replace arterial blood gas monitoring. However, you can use
transcutaneous monitoring to reduce the frequency of arterial sampling. The values at tissue level will
not be the same as those measured arterially because the measurement is transcutaneous. They correlate
with (track closely) the arterial values. For example, a drop in transcutaneous values usually indicates a
corresponding drop in arterial values.
Transcutaneous values will not always correlate with blood samples taken from the capillary blood of
the heel (heelsticks or astrups).
measurement is valid for an infant patient not under gas anesthesia. Anesthetic agents, such as
2
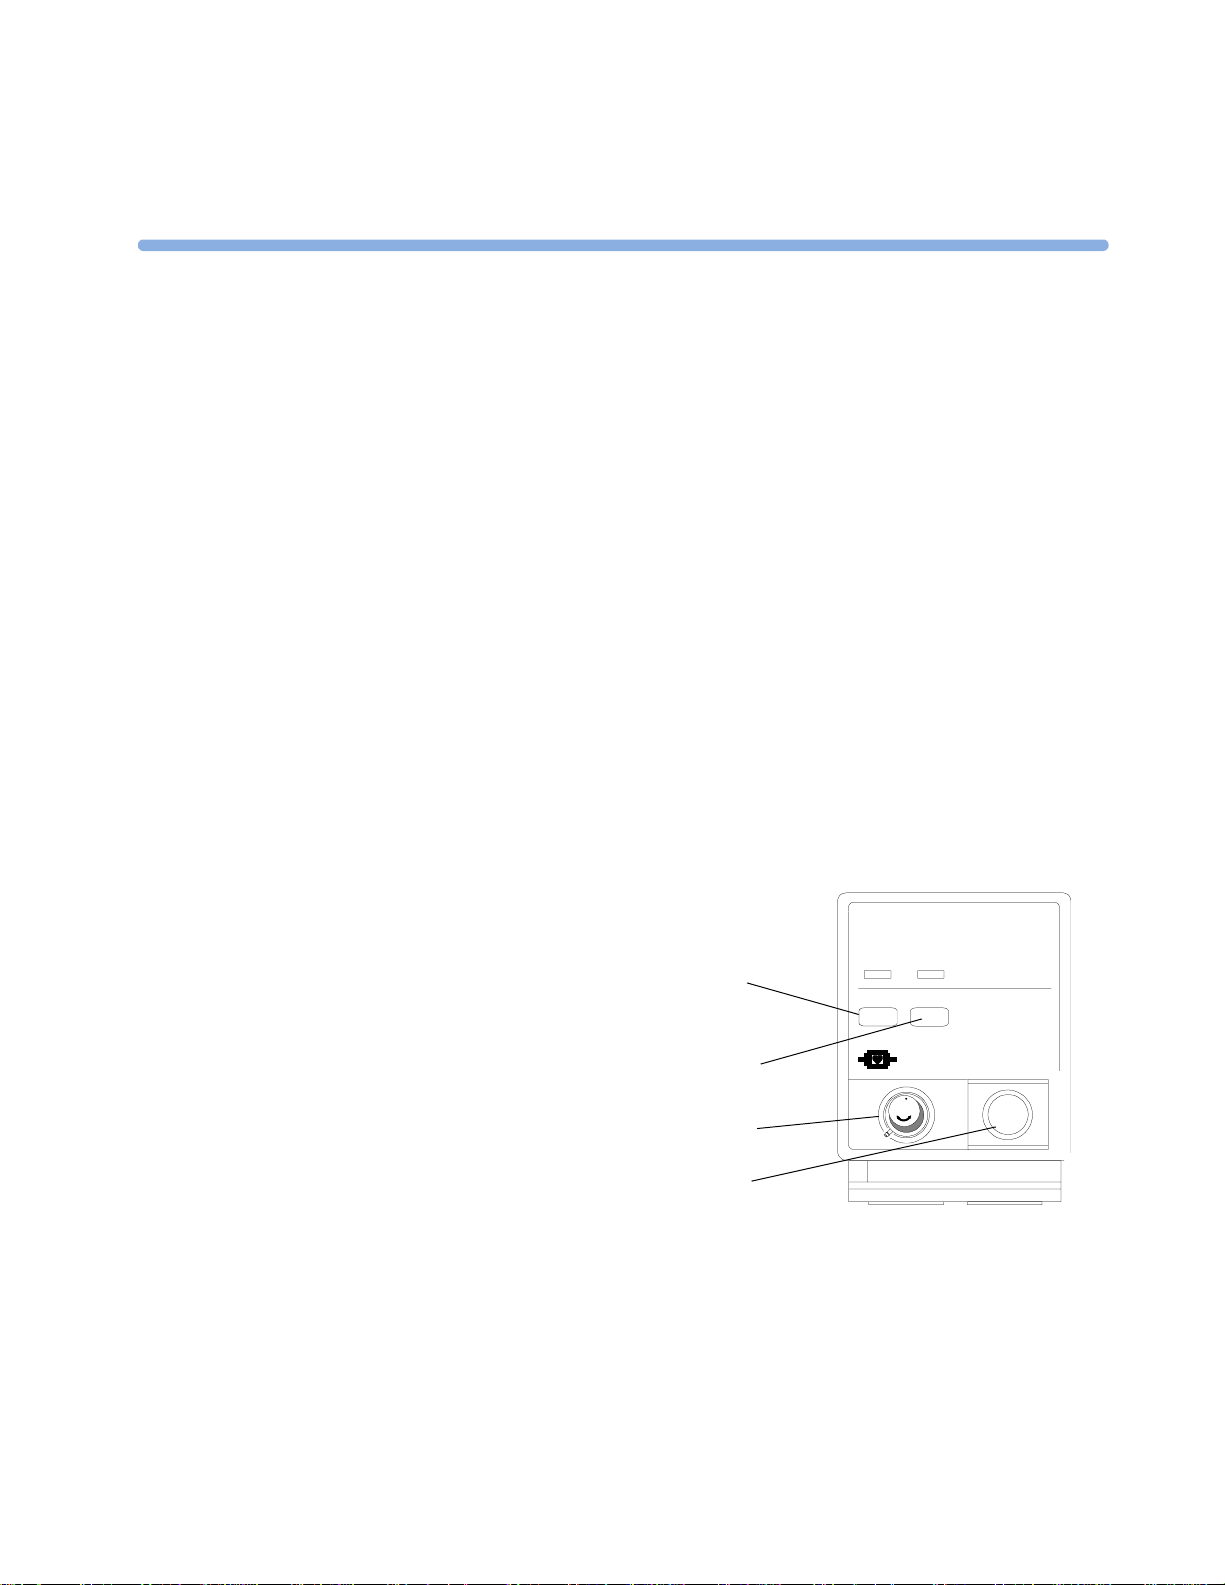
Identifying tcGas Module Components
1 press to enter Setup tcGas menu
2 press to start calibration
3 calibration chamber
4 transducer connector
1
2
tcGas
M1018A
O2/CO2
CAL
80 x 70
/
2
3
4
195
Page 2

16 Monitoring tcGas Setting the tcGas Sensor Temperature
Setting the tcGas Sensor Temperature
1 In the Setup tc Gas menu, select Transducer Temp.
2 Choose a temperature value appropriate for your patient’s age, weight and physical condition in
accordance with your hospital policy.
Usually, a higher transducer temperature gives a better correlation and a quicker response time.
However, higher temperatures also increase the risk of skin burns. Most physicians prefer a
temperature between 42°C (107° F)
Usually, the higher the transducer temperature, the less the site time should be. Whenever you
change the temperature setting, the monitor forces you to make a new calibration.
and 44°C (111° F), and a site time of four hours or less.
Using the tcGas Site Timer
Availability and behavior of the site timer depend on your monitor’s configuration.
WARNING Prolonged continuous monitoring may increase the risk of undesirable changes in skin characteristics,
such as irritation, reddening, blistering or burns. If the site timer is disabled, the transducer will heat
indefinitely while on a patient. Change the site regularly, in accordance with medical procedures in
your hospital.
Setting the tcGas Site Timer
The site timer helps reduce the risk of skin burn by ensuring that the transducer is used at one site for
no longer than a predefined period. It reminds you when this period expires.
1 In the Setup tc Gas menu, select Site Time.
2 Choose the time you want the transducer to remain on the measurement site. The optimum time
depends on the transducer temperature and your patient’s skin sensitivity.
The site timer starts automatically when you remove the calibrated transducer from the calibration
chamber. If you return the transducer to the chamber and then remove it again, the site time continues
to count down the remaining time; it does not start a new time period. The time remaining before the
site timer expires appears in the status line which is visible as long as the Setup tcGas menu is
open. When the time expires, the monitor sounds a tone and a displays a change site INOP. The
monitor either switches off the transducer heating or continues monitoring, depending on its
configuration. Although you can reuse the transducer for up to two hours after the heating is switched
off, without making a new calibration, you are recommended to recalibrate before applying it to a
patient. After two hours without heat, you must recalibrate.
During the initial few minutes of use, the monitor eliminates false alarms by temporarily suppressing
tcGas alarms. It displays the “STABILIZING” INOP. After you apply the transducer to the skin, the
instrument reading slowly assumes a steady value. The reading stabilizes when the measurement site is
warm and local hyperemization is complete. This takes 10 to 20 minutes for the tcpO
three to seven minutes for tcpCO
reading and
.
2
2
196
Page 3

Setting the tcGas Barometric Pressure 16 Monitoring tcGas
Restarting the tcGas SiteTimer
To restart the site timer without recalibration (for example, after the site time has elapsed):
1 In the Setup tc Gas menu, select Site Time.
2 Enter and confirm your desired time.
Disabling the tcGas Site Timer
Depending on your monitor’s configuration, you might be able to disable the site timer. Remember,
this means that the transducer heats indefinitely while on a patient.
1 In Setup tcGas menu, select Site Timer and switch this to Disabled.
2 Select the Confirm popup key.
Setting the tcGas Barometric Pressure
Altitude and barometric pressure affect tcGas values. The monitor derives barometric pressure from its
altitude setting. If you want to set the true barometric pressure you must do this before starting a
calibration - changes after calibration do not influence tcGas values. The monitor remembers this
pressure setting until you enter a new one.
1 In the Setup tc Gas menu, select AmbientPress.
2 Enter the current barometric pressure reading indicated by your barometer.
3 Select the Confirm popup key.
Remembraning the tcGas Transducer
CAUTION The tcGas transducer is thin and flexible. You must treat it with care. Avoid kinking, bending or
pulling the cable.
Remembrane the transducer if the electrolyte in your transducer has dried out or:
• if the transducer is new
• if you are using the transducer with a new patient
• if the membranes are damaged (scratched or wrinkled)
• after five days of continued use or 28 days of storage.
197
Page 4

16 Monitoring tcGas Remembraning the tcGas Transducer
1 Unscrew the protection cap from the transducer and
hook the O-ring remover under both O-rings to remove
them.
2 Remove both of the clear plastic membranes using your
fingers.
3 Clean the transducer head, including the groove and
rim, with absorbent paper to remove all old electrolyte
(old electrolyte causes incorrect values) and apply
approximately two drops of electrolyte solution to the
transducer head.
4 Press the transducer head downwards into an unused
membrane replacer until the replacer retracts as far as it
can and you hear a click. Discard used replacer.
5
Remove any surplus electrolyte solution on the outside of the membranes with a soft tissue.
6 Make sure that the new membranes are secured by two O-rings on the transducer. If any air
bubbles are visible under the membranes, repeat this procedure - air bubbles will cause incorrect
readings.
7 After 24 hours you can calibrate the transducer. You must remembrane all new and dried out
transducers twice before calibration.
New/Dried Out Transducers
Remembrane all new or dried out transducers twice before using. After the first remembraning, unplug
the transducer from the module and leave it for 24 hours with the cap on. Remembrane again before
calibrating.
Storing tcGas Transducers
198
If you need to store a sensor for more than 24 hours, protect it for up to 28 days by putting two drops
of electrolyte solution into the cap. Screw the cap on the sensor. Remembrane if it dries out or after 28
days.
Page 5

Calibrating the tcGas Transducer 16 Monitoring tcGas
Calibrating the tcGas Transducer
You can use either a Philips (15210B) or a Radiometer TCC3 calibration unit and a gas cylinder whose
pressure indicator is above the ‘out-of-gas’ zone (black on 15210B, red on TCC3). To maintain
accuracy, it is recommended to calibrate the transducer every four hours, even if the monitor does not
prompt you to do so. You MUST calibrate when:
• you remembrane the transducer
• you change the transducer heat setting
• you doubt the measurement accuracy
• you start a new monitoring period or use a new site
• the monitor displays the “calibration required” INOP message.
1 Connect the calibration unit to the inlet on the side of the module’s calibration chamber using the
recommended gas tubing. Different tubing will cause inaccurate measurements.
2 Plug the transducer cable into the module. Swing the calibration chamber cover open and insert
the transducer into the chamber. Close the cover to secure the transducer. Set the transducer
temperature at the monitor now.
3 On the 15210B calibration unit, turn the timer control clockwise as far as you can. On the
Radiometer calibration unit, press the button with the green arrow once.
199
Page 6

16 Monitoring tcGas Calibrating the tcGas Transducer
Press CAL on the module until the light above the key comes on and wait (three - 20 minutes) for
4
the “calibration complete” message to appear on the monitor. Alternatively, in the
menu, select Start Calibration. To save gas on 15210B, if the timer control dial is not in the
start position when the monitor displays the calibration complete message, turn the dial counterclockwise to the start position. For TCC3, if the green light is still flashing when INOP “tcGas
CalRunning” disappears, press the green arrow button again.
Setup tcGas
Calibration Failure
If calibration fails, the monitor displays “...tcGas transducer or Cal Unit malf” and the
CAL FAILED INOP for the measurement.
Troubleshooting tcGas Calibration
Perform each of the following steps, in order, until calibration is successful.
1 Check the calibration unit, then recalibrate, remembering to turn on the gas supply on the
calibration unit. If the pressure indicator reading is in the out of gas zone, there is insufficient gas
in the cylinder. Connect the gas tubing firmly to the calibration unit and to the module’s
calibration chamber.
2 If Step 1 fails, check whether you need to activate the transducer (necessary if the electrolyte has
dried out or if you have a new transducer). Remembrane the transducer, removing the old
membranes, and cleaning the transducer head thoroughly.
3 Calibrate a second time.
4 If Step 2 is unsuccessful, calibrate again. This calibration may be required to stabilize the
electrochemical system in the transducer.
5 Only if the above steps are unsuccessful (you have activated and remembraned the transducer and
calibration has still failed twice), replace the transducer.
200
Page 7

Applying the tcGas Transducer 16 Monitoring tcGas
Applying the tcGas Transducer
1 Peel protection film from fixation ring. Using a finger, press the sticky side of the ring on to clean,
dry skin. Press around the outside to ensure a good seal. Apply three to five drops of contact fluid
in the ring’s center. Remove transducer from chamber.
2 Align the arrow on the transducer with the tab on the ring and fasten by turning turn a quarter-
turn clockwise. Wait 10-20 minutes for readings to stabilize.
3 Apply the transducer as soon as possible after you see the “...calibration complete” message. If you
wait longer than 30 minutes, the heat supply to the transducer switches off to prevent the
electrolyte from drying out and a new calibration is necessary.
Optimize the measurement by selecting a site with high capillary density and blood flow, thin
epidermis and no cardiovascular disorders. Most physicians use the abdomen, chest and back.
WARNING You must either remove the transducer before defibrillating, or remembrane and calibrate the
transducer after defibrillating.
CAUTION To avoid transducer damage, remove it from the patient during high frequency surgical procedures.
201
Page 8

16 Monitoring tcGas Finishing tcGas Monitoring
Selecting the tcGas HeatPowerDisplay Mode
The heat power display gives an indication of the skin’s perfusion below the transducer and of the
transducer’s contact with the skin. If the transducer loses contact, the heat power value drops
significantly. When perfusion is poor you need less heat power to maintain the transducer temperature.
♦ In the Se tu p tcGas menu, select HeatPowerDisplay to toggle between Relative and
Absolute. Choose Relative when the skin temperature is stable (the STABILIZING INOP
disappears). This indicates subsequent changes in the relative heat power (and therefore changes in
perfusion or transducer contact) since the last zeroing.
Zeroing the tcGas Relative Heat Power
When you start a calibration, the HeatPowerDisplay is set to Absolute. When you switch to
Relative, it automatically zeros. Zero again if you change application site.
Finishing tcGas Monitoring
♦ Replace the transducer in the calibration chamber.
When changing the application site after a measuring period, some users leave the fixation rings in
position to allow them to quickly move the transducer from site to site. Always unscrew the transducer
from the fixation ring before removing the fixation ring from the skin.
TcGas Corrections
Transcutaneous pCO2 values tend to be higher than arterial values due to the metabolic processes of
the skin and the effect of heating on the blood under the transducer. Depending on your monitor’s
configuration, one or both of these corrections may automatically apply.
Temperature Correction for tcpCO
The transducer temperature causes an increase in partial CO2 pressure. Your monitor may be
configured to correct this.
♦ In the Setup tcpGas menu, look at the menu item CO2 Co rrectio n. If correction is enabled,
it is set to
Metabolism Correction for tcpCO2
CO2 production in the epidermis increases the CO2 value. Your monitor may be configured to
automatically deduct a metabolism factor (only applies when
♦ In the Se tu p tcGas menu, look at the value shown for the menu item MetabolismFactor.
This is deducted from the CO
On.
value.
2
2
CO2 Correction is on).
202
 Loading...