

Page 1

10
107B2 CM24 GSIII
Go to cover page
DDC Instructions
1. General
DDC Data Re-programming
In case the main EEPROM with which store all factory
settings were replaced because a defect,repaired monitor the serial
numbers have to be re-programmed.
It is advised to re-soldered the main EEPROM from
the old board onto the new board if circuit board have been replaced, in
this case the DDC data does not need to be re-programmed.
Additional information
Additional information about DDC (Display Data Channel) may be
obtained from Video Electronics Standards Association (VESA).
Extended Display Identification Data(EDID) information may be also
obtained from VESA.
DDC EDID structure
For the monitor : Standard Version 3.0
Structure Version 1.2
Software DDC
with Software DDC
2. System and equipment requirements
1. An i486 (or above) personal computer or compatible.
2. Microsoft operation system Windows 95/98.
3. EDID301.EXE program (3138 106 10103) shown as Fig. 1
4. Software DDC Alignment kits (4822 310 11184) shown as Fig. 2.
The kit contents: a. Alignment box x1
Note: The EDID301.EXE (Release Version 1.58, 20000818)is a
windows-based program, which cannot be run in MS-DOS.
b. Printer cable x1
c. D-Sub cable x1
EDID301.EXE
Ver:1.58
Figure 1
Diskette with EDID301.EXE
3. Pin assignment
A. 15-pin D-Sub Connector
The 15-pin D-sub connector (male) of the signal cable
on the 3rd row for DDC feature :
1
6
11
Pin No. Assignment
1 Red video input
2 Green video input
3 Blue video input
4 Identical output - connected to pin 10
5
6 Red video ground
7
8 Blue video ground
9 No pin
10 Logic ground
11 Identical output - connected to pin 10
12 Serial data line (SDA)
13 H.Sync/H+V
14 V. Sync (VCLK for DDC)
15 Data clock line (SCL)
Salf test
Green video ground
5
10
15
Back
DC 8V~12V
To Monitor
Fig. 2 Alignment Kits
Power indicator
Video Card
To Printer
Forward
Page 2
DDC Instructions (Continued)
107B2 CM24 GSIII
Go to cover page
11
4. Configuration and procedure
There is no Hardware DDC (DDC IC) anymore. Main EEPROM stores
all factory settings and DDC data (EDID code) which is so called
Software DDC. The following section describes the connection and
procedure for Software DDC application. The main EEPROM can be reprobrammed by enabling "factory memory data write" function on the
DDC program (EDID301.EXE).
*** INITIALIZE ALIGNMENT BOX ***
In order to avoid that monitor entering power saving mode due to
sync will cut off by alignment box, it is necessary to initialize
alignment box before re-programming DDC Data. Following steps
show you the procedures and connection.
Step 1
: Supply 8~12V DC power source to the Alignment box by
plugging a DC power cord or using batteries.
Step 2
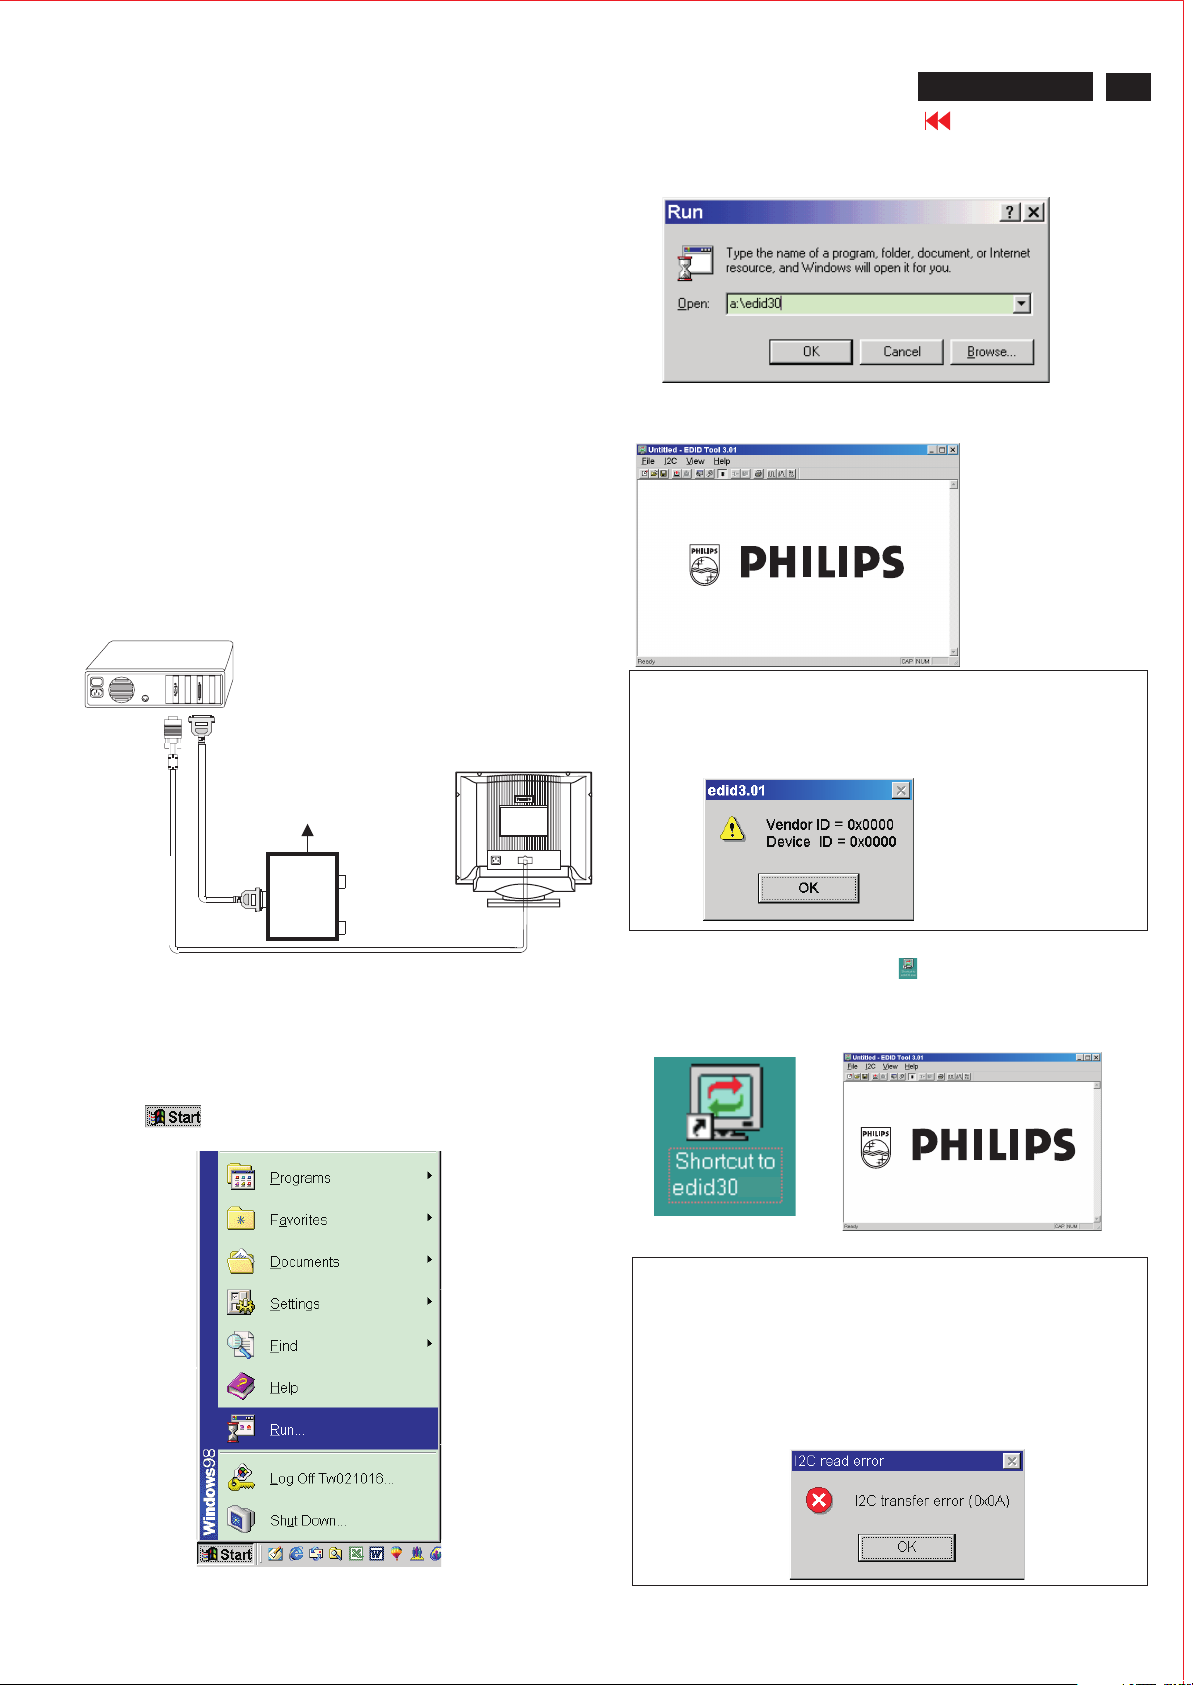
: Connecting printer cable and video cable of monitor as
shown in Fig.3.
PC
Fig. 3
Rear view of the monitor
DC Power
8~12 V
~
~
To video card
Step 3: Installation of EDID301.EXE
Method 1: Start on DDC program
Start Microsoft Windows.
1. Insert the disk containing EDID30.EXE program into floppy disk drive.
2. Click , choose Run at start menu of Windows 95/98 as
shown in Fig. 4.
To printer port (LTP1)
Printer
Port
To
Monitor
To P C
Video cable
3. At the submenu, type the letter of your computer's floppy disk drive
followed by :EDID301 (for example, A:\EDID301, as shown in Fig. 5).
Fig. 5
4. Click button. The main menu appears (as shown in Fig. 6).OK
This is for initialize alignment box.
Fig. 6
Note 1: If the connection is improper, you will see the following error
message (as shown in Fig. 7) before entering the main menu.
Meanwhile, the (read EDID) function will be disable. At this time,
please make sure all cables are connected correctly and fixedly,
and the procedure has been performed properly.
Fig. 7
Method 2: After create a shortcut of EDID301.EXE
: Double click EDID301 icon (as shown in Fig. 8) which is
on the screen of Windows Wallpaper.
Bring up main menu of EDID301 as shown in Fig. 9.
This is for initialize alignment box.
3Back
Fig. 4
1
Fig. 8
Note 2: During the loading, EDID301 will verify the EDID data which just
loaded from monitor before proceed any further function, once
the data structure of EDID can not be recognized, the following
error message will appear on the screen as below. Please
confirm following steps to avoid this message.
1. The data structure of EDID was incorrect.
2. DDC IC that you are trying to load data is empty.
3. Wrong communication channel has set at configuration setup
windows.
4. Cables loosed or poor contact of connection.
Fig. 9
Forward4
Page 3
12
107B2 CM24 GSIII
Go to cover page
DDC Instructions (Continued)
Re-programming EEPROM (Software DDC)
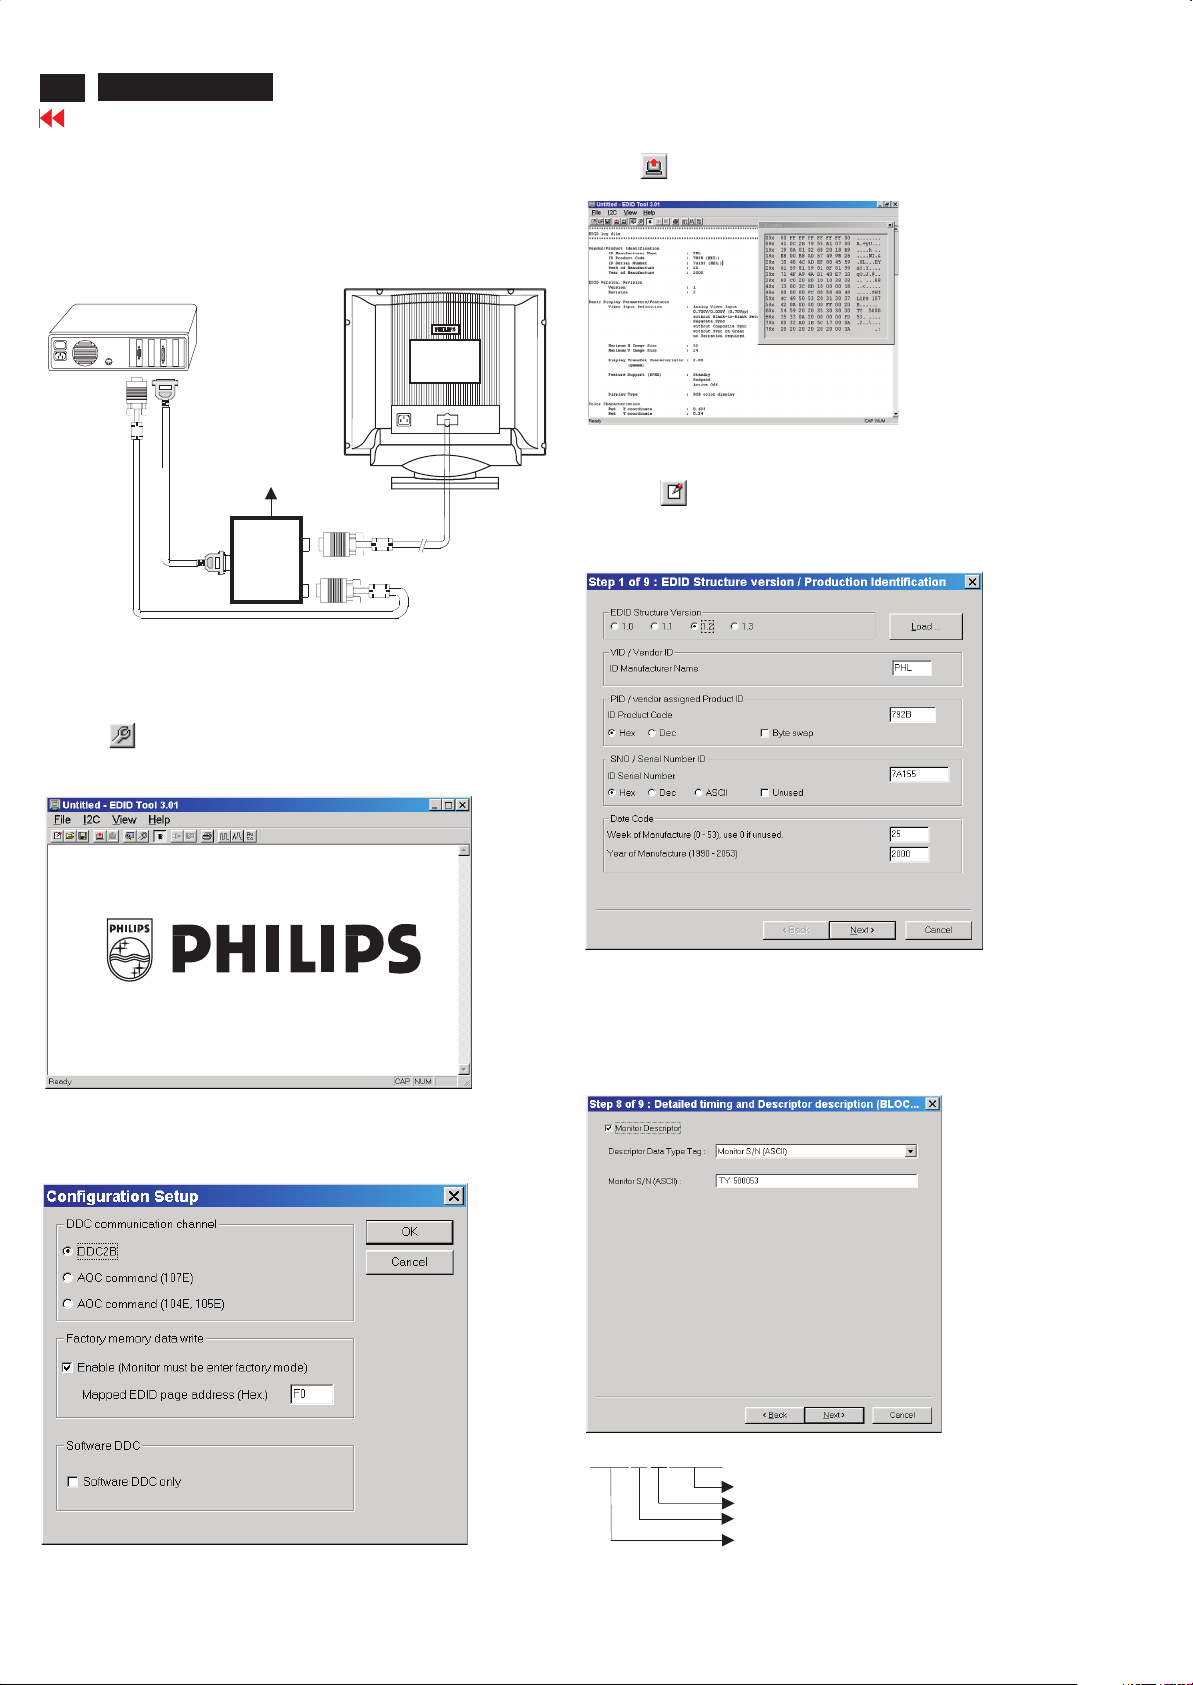
Step 1: After initialize alignment box, connecting all cables and
box as shown in Fig. 10
Rear view of the monitor
PC
Fig. 10
DC Power
8~12 V
~
~
To video card
To printer port (LTP1)
Printer
Port
To
Monitor
To P C
Step 2: Read DDC data from monitor
1-1 Click the left key of Mouse, or hit any key on the keyboard,
then the characters disappear from the screen.
1-2 Click icon as shown if Fig. 11 from the tool bar to bring up
the "Configuration Setup" windows as shown in Fig. 12.
Video cable
4. Click icon (Read EDID function) to read DDC EDID data from
monitor. The EDID codes will display on screen as shown in Fig. 13.
Fig. 13
Step 3: Modify DDC data (verify EDID version, week, year)
1. Click (new function) icon from the tool bar, bring up
Step 1 of 9 as shown in Fig. 14 .
EDID301 DDC application provides the function selection and
text change (select & fill out) from Step 1 to Step 9.
Fig. 14
2. Select the DDC2B as the communication channel.
Select " " & fill out " " for Mapped EDID page address
Enable F0
as shown in Fig. 12.
3. Click OK button to confirm your selection.
3Back
Fig. 11
Fig. 12
Step 4: Modify DDC data (Monitor Serial No.)
1. Click till the Step 7 of 9 window appears as shown in Fig. 15.
Next
2. Fill out the new Serial No. (for example, TY 500053).
3. Click till the last step window appears, then click to exit
Next Finish
the Step window.
----->
a space
Definition of Serial Number
TY000028000001
----->
two space
Serial Number (U.S.A: 8 digit)
Week
Year
TY Code
TY----Chungli
CX----Dong Guan
HD----Hungary
BZ----Suzhou
Fig. 15
(Others regions: 6 digit)
Forward4
Page 4
DDC Instructions (Continued)
Step 5: **Configuration Setup & Enter Factory Mode **
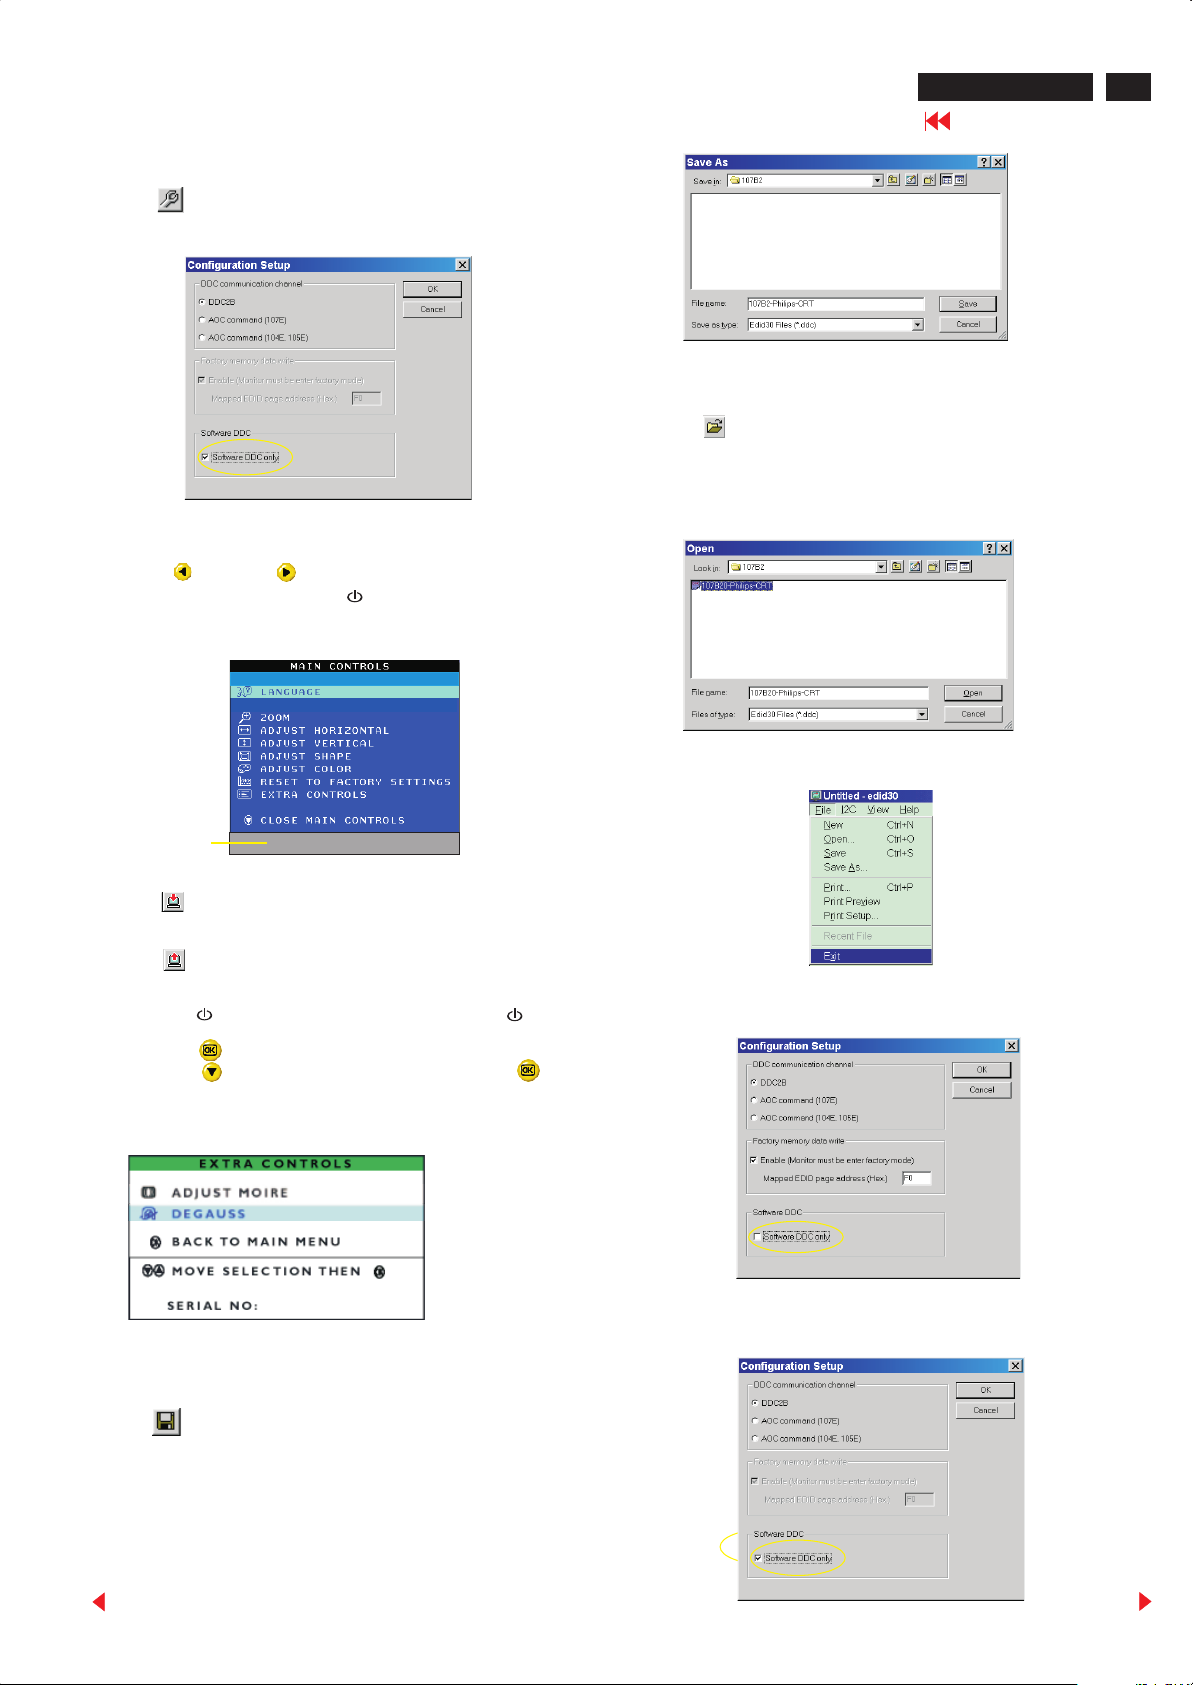
1. Click icon from the tool bar to bring up the Configuration Setup
windows again. Then, select "Software DDC only" as shown in Fig.
16. Click "OK".
107B2 CM24 GSIII
Go to cover page
13
Fig. 19
Fig. 16
Access factory mode:
- Turn off monitor (don't turn off PC)
- Press " " and " " simultaneously on the front
control panel, then press " ",wait till the OSD menu
with characters " factory mode (below OSD menu)" come
on the screen of monitor.
00115
Fig. 17
Factory
Mode
Indicator
Step 6: Write DDC data
1. Click (Write EDID) icon from the tool bar to write DDC data.
Bring up "Writing 0%~100%, ready" a progressing bar on the left
down corner.
2. Click (Read EDID) to confirm it.
Step 7: Confirm Serial Number in User Mode
1. Press the button to turn off the monitor. Press the button
again to turn on the monitor.
2. Press the button to bring up the OSD Main Menu.
3. Press the button to select Extra Control, press the button
to confirm your selection.
4. Confirm the Serial Number is updated as shown in Fig. 18.
MODEL SELECT
MODEL SELECT
GS3 107B2 V1.41 20000630
2. Click .Save
Step 9: Load DDC data
1. Click from the tool bar.
2. Select the file you want to open as shown in Fig. 20.
3. Click .
4. Access "Factory Mode" and enable "Software DDC only" as shown
5. Write EDID.
Step 10: Exit DDC program
Pull down the File menu and select Exit as shown in Fig. 21.
(EDID Tool 3.01)
Open
in Fig. 16.
Fig. 20
Fig. 21
Note1 : In User Mode: Read DDC data only
Before read EDID code, please confirm that the Software
DDC only is disabled as shown in Fig. 22.
Fig. 22
Fig. 18
TY 123456
Step 8: Save DDC data
Sometimes, you may need to save DDC data as a text file for using
in other IC chip. To save DDC data, follow the steps below:
1. Click (Save) icon (or click "file"-> "save as") from the tool bar
and give a file name as shown in Fig. 19.
The file type is EDID301 file (*.ddc) which can be open in WordPad.
By using WordPad, the texts of DDC data & table (128 bytes, hex
code) can be modified. If DDC TEXTS & HEX Table are completely
correct, it can be saved as .ddc flie to re-load it into EEPROM for
DDC Data application.
Back
Note2:InFactory Mode: Read/Write DDC data
Before Read/Write EDID code, please confirm that the
Software DDC only is enabled as shown in Fig. 23.
Fig. 23
Forward
 Loading...