

Page 1
DDC Instructions
There are two chips (IC) to store the serial number of monitor
as below.
DDC IC (with EDID data)
OSD IC (EEPROM)
To write the serial number of monitor to DDC IC and OSD IC
simultaneously.
Please follow the indications as below.
109P2 GS3 CM25
Go to cover page
9
Additional information :
Additional information about DDC (Display Data Channel)
may be obtained from Video Electronics Standards
Association (VESA).
Extended Display Identification (EDID) information may be
also be obtained from VESA.
Pin assignment
9
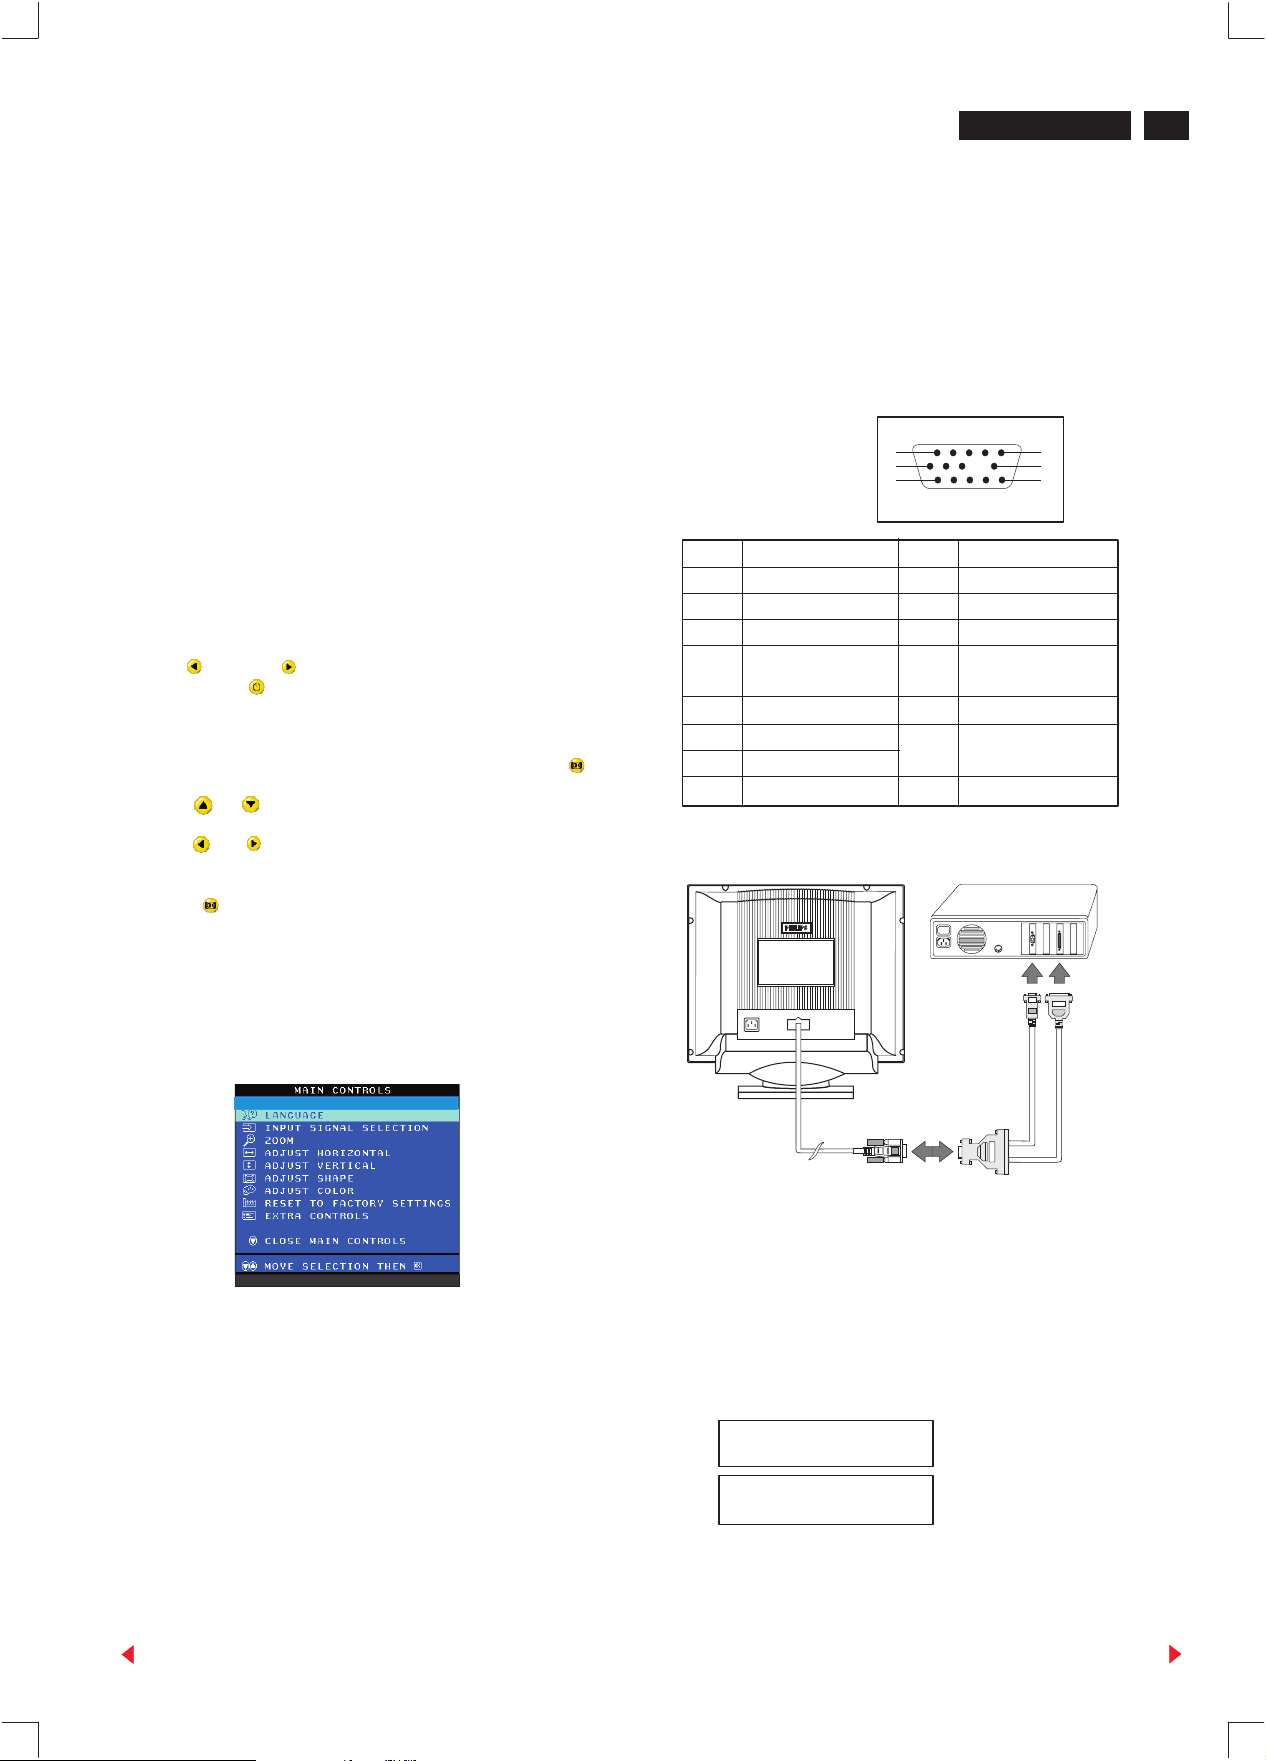
- Access the factory mode of monitor.
- Execute DDCV2A F0.EXE
- Follow DDC instructions to write serial number to DDC IC and OSD
IC.
- Turn off monitor (leave factory mode).
- Press OSD button, select MONITOR STATUS, verify the updated
serial number of monitor.
To access factory mode:
-
Turn off monitor (don't turn off PC)
- Hold " " and " " simultaneously on the front control panel,
then press " ", wait till the OSD menu with characters "
factory mode (below OSD menu)" come on the screen of monitor
as shown in Fig. 1 .
- If OSD menu disappears on the screen of monitor, press " "
again (anytime), then the OSD menu comes on the screen again.
- using " , " : to select OSD menu.
" " : to increase or decrease the setting.
,
- Using " " to confirm the selection.
To leave factory mode
The 15-pin D-sub connector (male) of the signal cable (3 rows)
for DDC feature :
1
6
11
Pin No. Assignment Pin No. Assignment
1 Red video input 9 No pin
2 Green video input 10 Logic ground
3 Blue video input 11 Connected to pin 10
4 Connected to pin 10 12 Serial data line
(SDA)
5 Ground 13 H.sync/H+V
6 Red video ground 14 V. sync (VCLK for
7 Green video ground DDC)
8 Blue video ground 15 Data clock line(SCL)
5
10
15
Connection
(Rear of the monitor)
* After alignment of factory mode, turn off monitor (if you do not turn
off monitor, the OSD menu is always at the factory mode), then turn
on monitor again (at this moment, the OSD menu goes back to
user mode).
Fig 1
00195
109P V3.08 000601
DDC Instructions
This [DDC Module (DDC cable)= 4822 320 12004(=4822 724 27550)]
and
[DDC V2(DDCV2A .EXE) software(3.5" disk)=3138 106 10065 ]
are used for "BU Monitor - Chungli product range" which
incorporates a DDC1/DDC2B function that allows
bi-directional communication between the monitor and
PC system for optimal video configuration.
[January 31 2000, Revision 3.3] ,which upgrades the software and
service information(4822 727 21027 & 4822 727 21038) , is fully
compatible with previous one (DDCV2A F0.E
XE).
To video card
Video cable
DDC data re-programming
1. General
In case the DDC data memory IC, replaced due to a defect the
data contents of this IC have to be re- programmed via a PC.
In case of replacement of the video (or deflection) board it is
advised to re-soldered DDC IC from the old board onto the new
board, in this case the IC dose not need to be re-programmed.
2. DDCV2A.EXE can be used for :
EDID Structure Version/Revision
Version : 1
Revision : 0 (text file)
and
Version : 1
Revision : 2 (.hex file)
To printer port (LTP1)
Back
Forward
Page 2

10
109P2 GS3 CM25
Go to cover page
9
DDC Instructions (Continued)
DDC Reprogramming Instructions (for
PHILIPS models)
System Requirements
DDC Module (DDC cable), P/N = 4822 320 12004
An Intel 386 (or above) PC or compatible
DOS 6.0 or above
DDCV2A.EXE software
Procedure
Connect DDC Cable between PC and Monitor.
Turn on Monitor and PC.
Access Factory Mode of monitor.
Verify Factory Mode by OSD function of monitor.
Insert diskette in Drive a: Select Run "DDCV2A F0(Zero).EXE"
or Win. (hit the space bar once )
DOS
Verify the data and version of DDC application software.
It should be : January 31 2000
Revision 3.3
Press "Enter" at the introduction screen
Menu Configuration:
File R/W Setup Quit
Load EDID Write EDID to EEPROM Options
Load txt file (V1.0) Read From EEPROM Barcode format
Save EDID Edit EDID Code
Save txt File Auto Scan
Convert EDID Code
Os shell
Exit
under
How to write DDC hex files to Monitor
Use arrow keys to highlight "Options" under the Setup menu,
press "Enter"
Tab down to ID Serial Number, use down arrow key to place
the asterisk (*) beside "store in DEC with LSB first". Press
"control/enter" to save.
(Ensure the top asterisk (*) is beside in store in HEX with LSB
first.)
Use arrow keys to highlight "Load EDID" under the file menu,
press "Enter".
Use arrow keys to highlight "PHILIPS\", Press "Enter".
Use arrow keys to highlight "the model list under subdirect",
press "Enter".
Use arrow keys to highlight "Write EDID to EEPROM" under
the R/W menu, press "Enter".
Use arrow keys to highlight "Read from EEPROM" under the
R/W menu, press "Enter".
Use arrow keys to highlight "Edit EDID Code" under the R/W
menu, press "Enter".
Verify the ID Serial number on the screen matches the serial
number of the unit.
Verify EDID Structure Version is "Version :2, Revision :1
11
Press "ESC"
General :
1.How to change drive
Use arrow keys to highlight "Options" under the Setup
menu, press "Enter".
Press "F2", then press "ESC", fill in "A" or "C".
[(If your .HEX files for different Model numbers in drive "A",
then fill in "A").,
(If your .HEX files for different Model numbers in drive "C",
then fill in "C").
Normally, to read DDC data from EEPROM of Monitor is
enough.]
Press "Enter", then press "ESC"
2.
How to select .HEX files for different Model numbers
example:
Use arrow keys to highlight "Load EDID" under the File
menu, press "Enter"
Bring up PHILIPS\ press "Enter"
Bring up ..\
109P2 GSIII select, press "Enter"
Bring up ..\ at this highlight area, press
00MITS.HEX select for 109P20/00(MITS CRT)
ß
"Enter", then go back to last
screen
ß
12
Use arrow keys to highlight "Quit", Press "Enter".
Menu Configuration:
File R/W Setup Quit
Load EDID Write EDID to EEPROM Options
Load txt file (V1.0) Read From EEPROM Barcode format
Save EDID Edit EDID Code
Save txt File Auto Scan
Convert EDID Code
Os shell
Exit
Back
Forward
Page 3
DDC Instructions (Continued)
How to change the Year, Week & Serial
number of Monitor [for PHILIPS(BRANDED)
models]
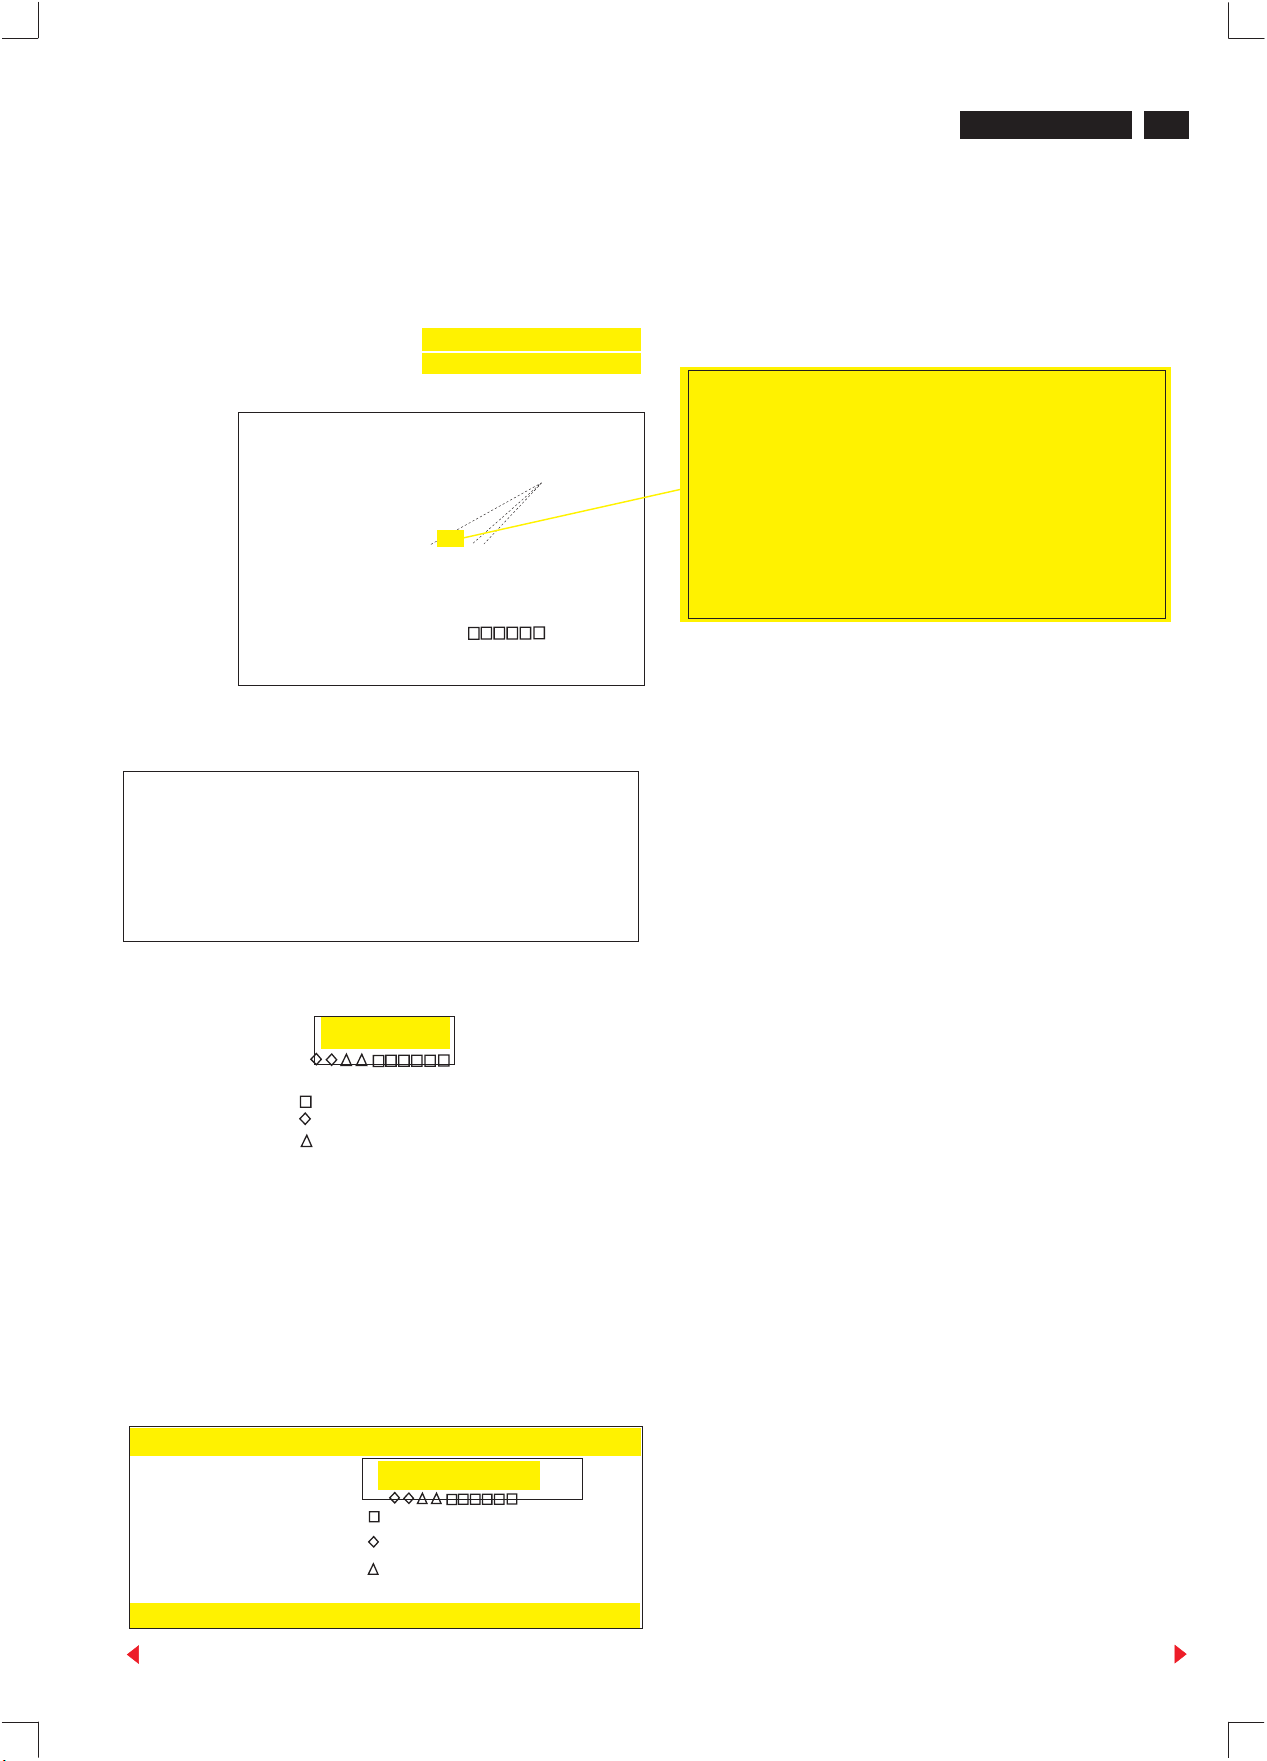
Use arrow keys to highlight "Barcode format", under the Setup menu,
press "Enter".
Bring up : Barcode example : 9925123456
continued: Barcode example : 9925123456
Barcode format : YYWWSSSSSS
----------------------------------------------------------
Barcode format : YYWWSSSSSS
---------------------------------------------------------Manufacture Year : 1999
Manufacture Week : 25
Serial No. : 123456
Serial No. ASCII : _ TY _ _ 123456
================================
EDID [16] Week : 19
EDID [17] Year : 09 [Year-1990]
EDID [12..15] : 0001e240
EDID [77 -89] : TY
data correct ? (Y/N) Y
TY
press "space"
109P2 GS3 CM25
9
¬
Fill in 9925123456, press "Enter"
Fill in YYWWSSSSSS, press "Enter"
¬
Factory code for each site is as below.
Brazil H C (48h,43h)
Chungli T Y (54h,59h)
Delta G K(47h,4Bh)
Juarez Y A(59h,41h)
Shenzshen C X(43h,58h)
Suzhou BZ (42h,5Ah)
Szombathely HD (48h,44h)
Fill in "Y", don't press "Enter"
¬
11
Go to cover page
There is a description at the lower of the screen for Barcode format as
below.
Barcode format : Y,W,S,X,- (year,week,s/no,ignore,fixed)
Y stands for "year".
W stands for "week".
S stands for "s/no (serial number)".
X stands for "ignore". Allow user to fill in any 'character' or 'numeric'.
- stands for "fixed". User have to fill in Special 'character' or 'numeric'
for "AutoScan" if user fill in '-' at "Barcode format :".
Use arrow keys to highlight "Auto Scan" under the R/W menu, press
"Enter".
Bring up: Auto Scan year, week, serial
Serial Number
Year Code
Week Code
don't care
¬
number can be
changed.
*
(If monitor is not at Factory Mode, access Factory Mode at
this moment.)
Fill in "Barcode data (for instance: 0030123456)" beside AutoScan,
press "Enter".
After 10 seconds around, bring up:
File R/W Setup Quit
Write EDID to EEPROM
Read From EEPROM
Edit EDID Code
Auto Scan
Factory writing ...100% (58) (f8) (7f) (12).
*
Back
Press "ESC" "ESC", return to R/W menu.
Select "Edit EDID code", press "Enter".
Verify "ID Serial No.".............
Turn off monitor, then turn on monitor again.
Press OSD button, select "MONITOR STATUS", press OSD button
again.
Verify "SERIALNO".
(Leave OSD function).
Use arrow keys to highlight "QUIT", press "Enter".
Forward
Page 4
109P2 GS3 CM25
12
Go to cover page
9
DDC Instructions (Continued)
How to change the Year, Week & Serial
number of Monitor [for PHILIPS(PCEC)
models]
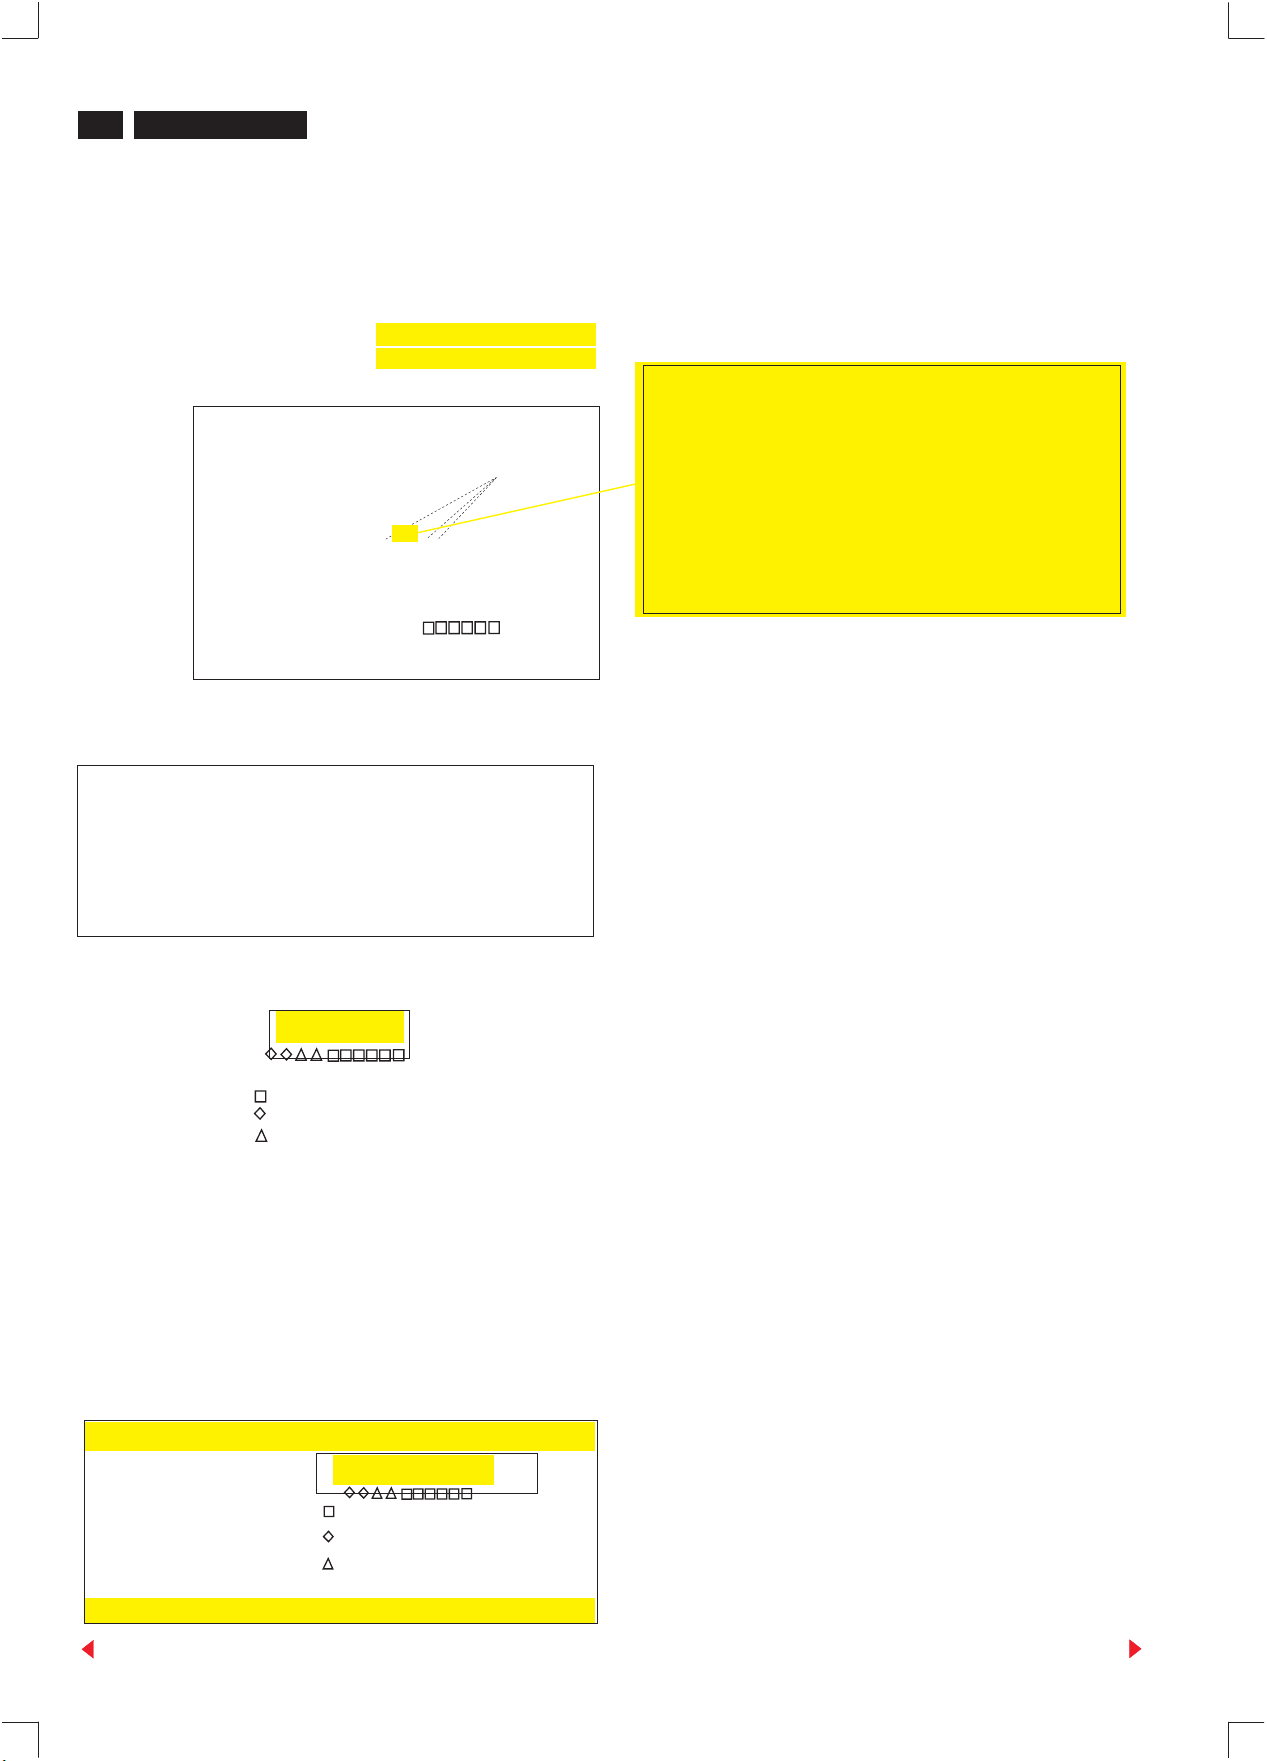
Use arrow keys to highlight "Barcode format", under the Setup menu,
press "Enter".
Bring up : Barcode example : 003412345678
continued: Barcode example : 003412345678
Barcode format : YYWWSSSSSSSS
----------------------------------------------------------
Barcode format : YYWWSSSSSSSS
---------------------------------------------------------Manufacture Year : 1999
Manufacture Week : 34
Serial No. : 12345678
Serial No. ASCII : _ TY _ _ 12345678
================================
EDID [16] Week : 22
EDID [17] Year : 09 [Year-1990]
EDID [12..15] : 00bc614e
EDID [77 -89] : TY
data correct ? (Y/N) Y
TY
press "space"
¬
Fill in 993412345678, press "Enter"
Fill in YYWWSSSSSSSS, press "Enter"
¬
Factory code for each site is as below.
Brazil H C (48h,43h)
Chungli T Y (54h,59h)
Delta G K(47h,4Bh)
Juarez Y A(59h,41h)
Shenzshen C X(43h,58h)
Suzhou BZ (42h,5Ah)
Szombathely HD (48h,44h)
Fill in "Y", don't press "Enter"
¬
There is a description at the lower of the screen for Barcode format as
below.
Barcode format : Y,W,S,X,- (year,week,s/no,ignore,fixed)
Y stands for "year".
W stands for "week".
S stands for "s/no (serial number)".
X stands for "ignore". Allow user to fill in any 'character' or 'numeric'.
- stands for "fixed". User have to fill in Special 'character' or 'numeric'
for "AutoScan" if user fill in '-' at "Barcode format :".
Use arrow keys to highlight "Auto Scan" under the R/W menu, press
"Enter".
Bring up: Auto Scan year, week, serial
Serial Number
Year Code
Week Code
don't care
¬
number can be
changed.
*
(If monitor is not at Factory Mode, access Factory Mode at
this moment.)
Fill in "Barcode data (for instance: 003412345678)" beside AutoScan,
press "Enter".
After 10 seconds around, bring up:
File R/W Setup Quit
Write EDID to EEPROM
Read From EEPROM
Edit EDID Code
Auto Scan
Factory writing ...100% (58) (f8) (7f) (12).
*
Back
Press "ESC" "ESC", return to R/W menu.
Select "Edit EDID code", press "Enter".
Verify "ID Serial No.".............
Turn off monitor, then turn on monitor again.
Press OSD button, select "MONITOR STATUS", press OSD button
again.
Verify "SERIALNO".
(Leave OSD function).
Use arrow keys to highlight "QUIT", press "Enter".
Forward
 Loading...