

Page 1

PHILIPS
£norelco
D-Finer
precision
trimmer
NT9130
Cordless
Hair Remover
Register your product and get support at
www.philips.com/norelco
i
Page 2

ENGLISH
IMPORTANT
SAFEGUARDS
When using a battery-operated appliance, basic
precautions should always be followed, including
the following;
Read these instructions before using this appliance.
WARNING
To reduce the risk of burns, fire or injury
to persons:
1. Close supervision is necessary when this
appliance is used by, on, or near children or
invalids.
1. Use this appliance for its intended household
use as described in this manual. Do not use
attachments not recommended by Philips
Electronics North America Corporation.
3. Never operate this appliance if it is not
working properly, or if it has been dropped
or damaged. For assistance call 1-800-243-
3050.
4. Keep the appliance away from heated
surfaces.
5. Never drop or insert any object into any
opening.
6. Do not use outdoors or operate where
aerosol (spray) products are being used or
where oxygen is being administered.
7. Never put the appliance in direct sunlight
or store at a temperature above 140°R
8. Do not use this appliance with a damaged or
broken cutter, as facial injury may occur.
9. Always put the protective cap on trimmer
before storing.
10. This appliance is for use on human facial hair
only. Do not use this appliance for any other
purpose,
11
bo not attempt to recharge alkaline, heavyduty or regular batteries in a nickel-cadmium
battery charger.
12. If appliance will not be used on a regular
basis, remove the battery to prevent possible
damage due to chemical leakage. If battery
does leak, remove it carefully. Do not allow
bare skin to touch leaking fluid.
13. Dispose of battery properly. Do not
incinerate. Battery may explode if
overheated. Do not wrap in metal or
aluminum foil. Wrap in newspaper before
discarding. It is suggested that you contact
your local town or city to determine proper
battery redemption site(s) in your area.
SAVETHESE
INSTRUCTIONS
Put It to the Test
Like many new products, your Philips Norelco
nose and ear hair trimmer may take a little getting
used to. If you are using a battery operated hair
remover for the first time, or if you've been using
a different brand, your skin may need time to
adapt. Give yourself a little time to practice and
determine the best motions for the best results.
Throw your scissors away and put your new
trimmer to the test. We guarantee precise results
or Philips Norelco will refund you the full purchase
price as long as the request is received within 45
days of purchase.
Page 3
Before Using
► Use this appliance for its intended household
use as described in this manual.
I Before using, check trimmer for wear or
damage. If the trimmer shows signs of wear or
damage, do not use the trimmer as injury may
occur.
► Be certain that your skin is clean. If you have
sensitive skin, you may wish to apply talcum
powder before and/or after use.
I It is not necessary to press hard to get a close
result. Pressing too hard may cause skin
irritation, and the trimmer will not
function properly. In addition, do not use
deodorant or alcohol-based lotions
immediately before or after using. You may,
however, want to use talcum powder.
► Clean the trimmer after each use. For
instructions see chapter ‘Cleaning’.
I If trimmer gets warm during use, turn trimmer
off and clean the appliance following the
cleaning instructions.
► Do not use while bathing, showering or
immerse trimmer in water or other liquids as
damage to the trimmer may occur.
► For hygienic reasons, it is recommended that
the trimmer be used by only one person.
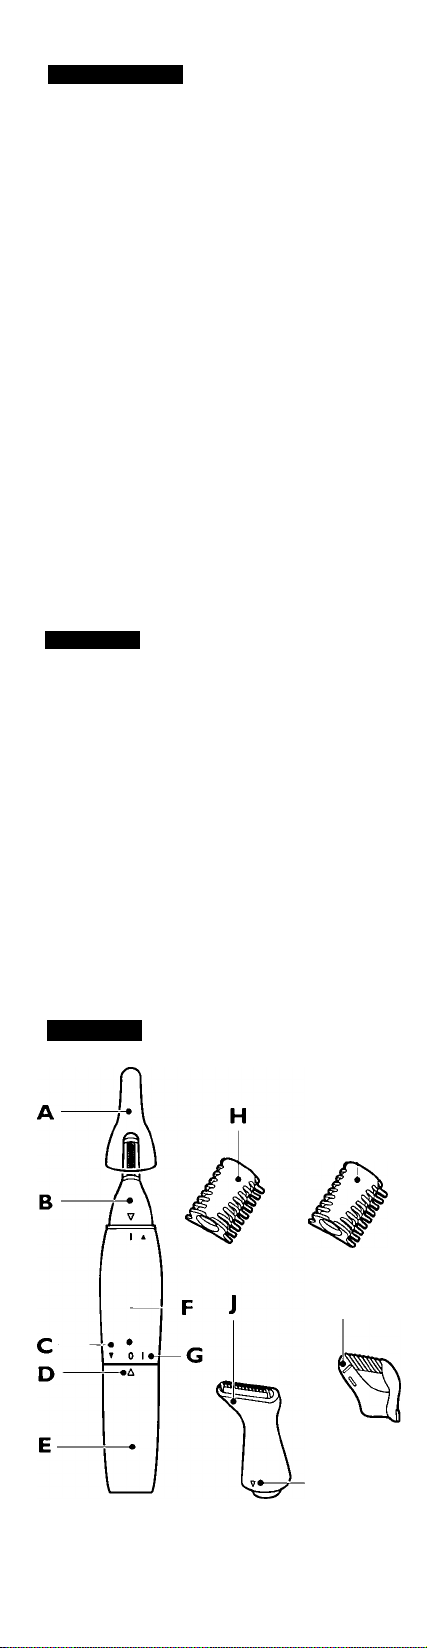
Features
A Protective Cap
B Trimmer Head
C Battery Compartment ‘Open’ Indicator
D Setting Indicator
E Battery Compartment
F Trimmer‘Off’ Indicator (0)
G Trimmer‘On’Indicator (I)
H Short Eyebrow Comb (1/8 in./3mm)
I Long Eyebrow Comb (3/16 in./Smm)
J Precision Trimmer Head
K Setting Indicator
L Detailer Comb
M Cleaning Brush
Storage Pouch
1 “AA” 1.5 Volt Alkaline Battery
Full Two-Year Warranty
45-Day Money-Back Guarantee
Features
K
Page 4
UÉJ
ИН
V*
H
H lU
~Щ
»AB
-------------
HI
Щ
Ф
Page 5

Inserting the Battery
I Make sure your hands and trimmer are
dry when inserting the battery.
► This appliance requires 1 “AA” 1.5 volt
alkaline battery.
► A new battery has an operating time of up to
2 hours.
► Keep the appliance at a temperature between
40°F and 100°F.
► Do not keep the appliance in direct sunlight.
D
Make sure trimmer is in the Off (0) position.
Q Turn the battery compartment to the left
so that the setting indicator points to the
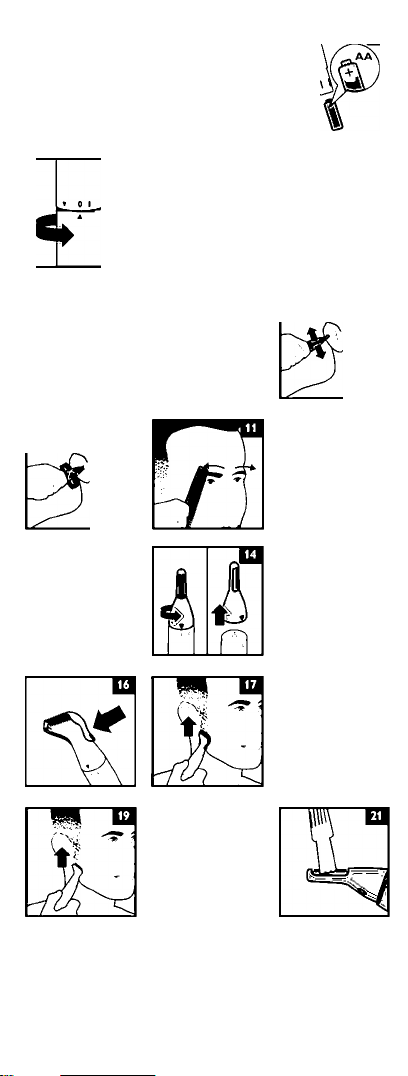
‘open’ indicator (fig. 1).
Q Remove the battery compartment by pulling
it downwards (fig. 2).
D Put the battery in the battery compartment as
shown making sure the (+) and (-) markings
on the end of the battery match the (+) and (-)
markings on the battery compartment (fig. 3).
Q If the battery is not inserted properly, the
appliance will not work.
Q Slide the battery compartment cover back
onto the trimmer.
Q Turn the battery compartment to the right
so that the setting indicator points to the
‘Off’ (0) indicator (fig. 4).
► If the appliance will not be used on a regular
basis, remove the battery when storing the
appliance to prevent possible damage due to
chemical leakage.
► If the battery does leak, remove carefully.
Never allow your bare skin to come into
contact with the leaking fluid.
Using the Trimmer
► You can use the trimmer to trim nose hair, ear
hair or neck hair.
► Use the eyebrow combs to trim your
eyebrows to a uniform hair length.
► Use the precision trimmer head to shape
and maintain beard, sideburns and neck hair.
► If using the precision head trimmer for the
the first time, attach the detailer comb to
prevent trimming hairs too short.
► Test trimmer on a small area of your arm or
leg. If any sensitivity occurs, discontinue using
immediately. Do not use trimmer on sensitive
or irritated skin.
► Turn trimmer off before putting on or taking
off attachments or cleaning.
Trimming Nose Hair
n Make sure nasal passages are clean before
trimming.
Q Remove the Protective Cap by pulling it off
the trimmer (fig. 5).
B Turn trimmer ON by turning the battery
compartment to the right until the setting
indicator points to the ‘ I ’ (on) indicator
(fig-6).
□ Carefully insert the trimmer tip into one
nostril.
CAUTION: DO NOT INSERT THE TIP
MORE THAN %"/6mm INTO NOSTRIL.
B Slowly move the trimmer tip in and out of
each nostril to remove unwanted hair (fig. 7).
B For best results, make sure the side of the tip
is held firmly against the skin. This will
reduce the tickling effect that can occur.
Q Turn trimmer OFF by turning the battery
compartment to the left until the setting
indicator points to the ’0’ (off) indicator
(fig-8).
lil Clean trimmer immediately after using.
Page 6

Trimming Ear Hair
n Clean outer area of ear and make sure it is
free of wax.
B Remove the Protective Cap by pulling it off
the trimmer (fig. 5).
H Turn the trimmer ON by turning the battery
compartment to the right until the setting
indicator points to theT (on) indicator
(fig- 6).
Q Pull ear flat to head with one hand and hold
trimmer with the other hand.
B Move trimmer tip around edges of ear to
remove hairs extending beyond the outer ear.
(fig. 9). Carefully insert trimmer tip into outer
ear no more than '/i76mm (fig. 10).
CAUTION;To avoid injury do not put any part
of the trimmer into the ear. Do not insert
the trimmer further than '/4"/6mm into the ear
as this could cause damage to the eardrum.
□ Clean trimmer immediately after using.
Trimming Eyebrows
n Comb eyebrows in the direction of hair
growth (fig. 11).
B For trimming hairs 1/8 in./3mm use the
‘short’ comb and for trimming hairs 3/16 in./
5mm use the ‘long’ comb,
k If trimming for the first time, start by using the
‘long’ comb to prevent accidentally trimming
hairs too short.
B Slide the eyebrow comb onto the trimmer
cutting element (fig. 12).The comb will only
fit properly in one direction.
Make sure the comb slides into the grooves
on both sides of the trimmer.
Q Move the comb over the eyebrow against
the direction of hair growth from the outer
tip towards the base of the nose (fig. 13).
BE CAREFUL TO KEEP TRIMMER AWAY FROM
EYES AND EYELASHES.
H Clean trimmer immediately after using.
Precision trimming with detailer comb
k With the detailer comb you can trim hairs to
a length of 1/4 in/6mm.
D Remove trimmer head by turning the
trimmer head to the right until the setting
indicator points to the ‘open’ indication and
pull upwards to remove (fig. 14).
B Attach precision trimmer head by aligning
the setting indicator with the ‘open’
indication and put the precision head on
the motor unit (fig. 15).
B Push the detailer comb onto the precision
trimmer head (fig. 16).
B Turn the precision head to the left until the
setting indicator points to the ‘On’ indicator.
B Place the trimmer gently on the skin and
move the appliance slowly over the skin
against the direction of hair growth (fig. 17).
k Make smooth and gentle movements making
sure the surface of the comb always stays in
contact with the skin.
□ Clean trimmer immediately after using.
Page 7

Precision trimming without
detailer comb
I With the precision trimmer head you can trim
hairs to a length of 3/64 in/1mm for a stubble
look.
n Remove the detailer comb from the precision
trimmer head (fig. 18).
B Place the trimmer gently on the skin and
move the appliance slowly over the skin
against the direction of hair growth (fig. 19).
I Make smooth and gentle movements making
sure the surface of the comb always stays in
contact with the skin.
I For optimum trimming, pull skin taut with one
hand while using.
B Clean trimmer immediately after using.
Cleaning and Maintenance
I Do not apply pressure or touch trimmer with
hard objects as this may dent or damage trimmer.
I Never use the appliance if the trimmer is
damaged or broken.
I The trimmer does not need any lubrication
(oil).
After Each Use
I Clean the trimmer every time you have
used it.
I Do not use compressed air, abrasive cleaning
detergents, scouring pads or cloths, acetone etc.
to clean the appliance.
a
Turn the trimmer OFF.
B Rinse the trimmer head under warm water
(fig. 20).
B Turn the trimmer ON.
B Rinse the trimmer head under warm water
again to remove any remaining hair/residue
from the trimmer.
Note:You can also use the cleaning brush to dean
the trimmer head (fig. 211.
B Rinse the eyebrow combs under warm water
(fig. 22).
□ Rinse the precision trimmer head and
detailer comb under warm water (fig. 23).
Note:You can also use the cleaning brush to clean
the eyebrow combs, precision trimmer head and
detailer comb.
Q Turn trimmer OFF and allow to air dry
completely.
Do not use a towel to dry the trimmer as
damage could occur.
□ Put the protective cap on the trimmer for
storage.
This appliance has no other user-serviceable parts.
For assistance call 1-800-243-3050.
Assistance
For assistance visit our website:
www.philips.com/support or call toll free:
1-800-243-3050
Online information is available 24 hours a day,
7 days a week
Registration
Congratulations on your purchase and welcome
to Philips Norelco!
To fully benefit from the support that Philips
Norelco offers, register your product at
www.philips.com/norelco
Page 8

4222 002 8231 1
Full Two-Year Warranty
Philips Electronics North America Corporation warrants each new Philips
Norelco product. Model NT9130 (except cutters), against defects in
nnaterials or workmanship for a period of two years from the date of
purchase, and agrees to repair or replace any defective product without
charge.
IMPORTANTtThis warranty does not cover damage resulting from
accident misuse or abuse, lack of reasonable care, the affixing of any
attachment not provided with the product or loss of parts or subjecting
the product to any but the specified batteries.* Use of unauthorized
replacement parts will void this warranty
PHILIPS ELECTRONICS NORTH AMERICA CORPORATION
WILL NOT PAY FOR WARRANTY SERVICE PERFORMED BY
A NON-AUTHORIZED REPAIR SERVICE AND WILL NOT
REIMBURSE THE CONSUMER FOR DAMAGE RESULTING FROM
WARRANTY SERVICE PERFORMED BY A NON-AUTHORIZED
REPAIR SERVICE. NO RESPONSIBILITY IS ASSUMED FOR ANY
SPECIAL. INCIDENTAL OR CONSEQUENTIAL DAMAGES.
In order to obtain warranty service, simply go to www.philips.com/
norelco or call 1-800-243-3050 for assistance. It is suggested that for your
protection you return shipments of product by insured mail, insurance
prepaid. D^age occurring during shipment is not covered by this
warranty.
NOTE: No other warranty, written or oral, is authorized by Philips
Electronics North America Corporation.This warranty gives you specific
legal rights, and you may also have other rights which vary from state to
state, ^me states do not allow the exclusion or limitation of incidental
or consequential damages, so the above exclusion and limitations may not
apply to you.
•Read enclosed instructions carefully.
Manufactured for:
Philips Consumer Lifestyle
A Division of Philips Electronics North An>erica Corporation
RO. Box 10313. Stamford. CT 06904
Norelco is a Regstered Trademark of №ilips Electronics
Nordi America Corporation.
PHILIPS is a Registered Trademark of Koninldijke Philips Electronics N.V.
© 2012 Philips Electronics North America CorporatioaAJI Rights Reserved.
PHILIPS
^NORELCO
45-DAY MONEY-
BACK GUARANTEE
If you are not fully satisfied with your Philips Norelco
Product, Philips Norelco will refund you the full
purchase price.
The product must be shipped prepaid by insured
mail, insurance prepaid, and have the original
sales receipt, indicating purchase price and
the date of purchase, enclosed. We cannot be
responsible for lost mail. The product must be
postmarked no later than 4S days from the date
of purchase. Philips Norelco reserves the right to
verify the purchase price of the product and limit
refunds not to exceed suggested retail price.
To obtain money-back guarantee return authorization
form, call 1-800-243-3050 for assistance. Please allow
4-6 weeks for delivery of check.
 Loading...