

Philips Norelco G270/60, Norelco G270/70, Norelco G270 User Manual
5 in 1
Grooming
Kit
G270
Rechargeable
Cordless
Full Size Trimmer
4203 000 53732

ENGLISH
IMPORTANT
SAFETY
INSTRUCTIONS
When using an electrical appliance, basic safety
precautions should always be followed,including
the following:
Read all instructions before using this
Features
appliance.
DANGER
To reduce the risk of electric shock:
1. Do not reach for a Groomer that has fallen
into water. Unplug immediately.
2. Do not use while bathing or in a shower.
3. Do not place or store Groomer where it
can fall or be pulled into a tub or sink.Do
not place in or drop into water or other
liquid.
4. Always unplug this Groomer from the
electrical outlet immediately after using,
except when Groomer is (re)charging.
5. Unplug Groomer before cleaning.
6. When discarding Groomer, unplug Groomer
to remove rechargeable battery. See Batter y
Removal instruction sheet.
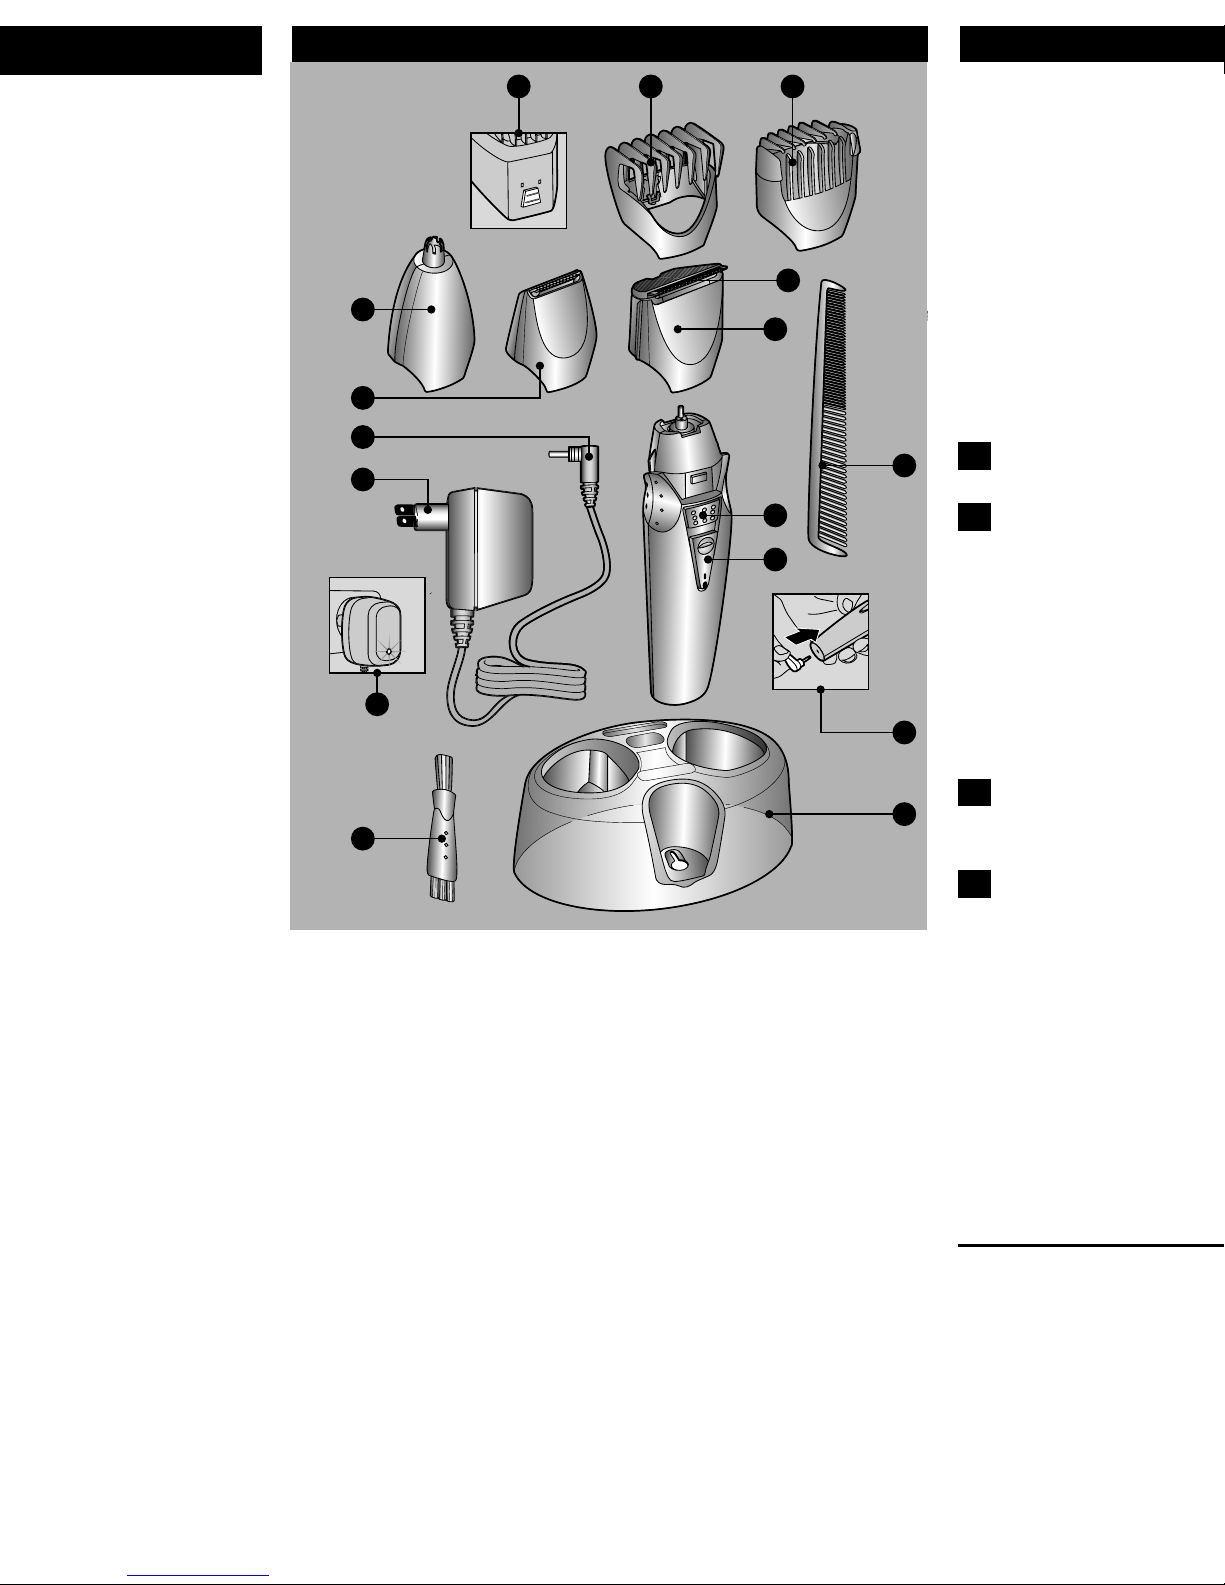
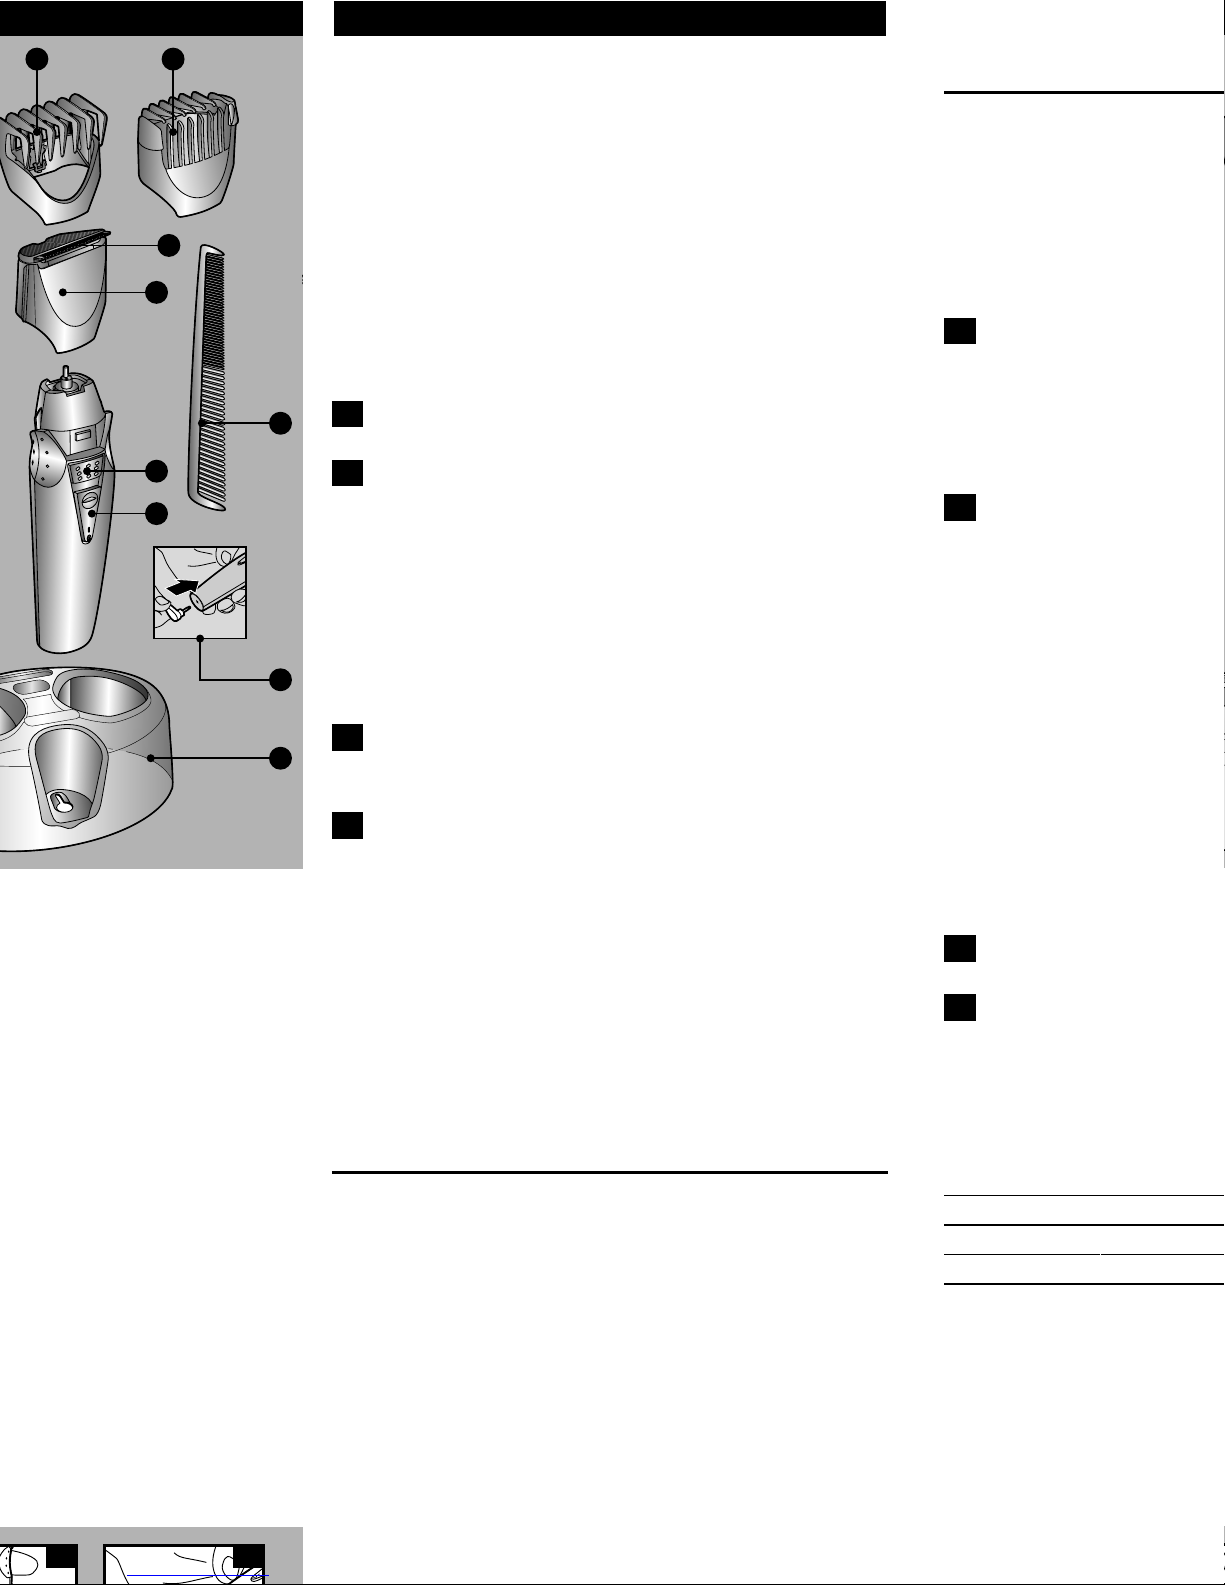
fig. 1
A. Neckline & Sideburn Trimmer Attachment
WARNING
To reduce the risk of burns, fire, electric
shock or injury to persons:
1. Close supervision is necessar y when
this appliance is used by, on, or near children
or invalids.
2. Use this Groomer for its intended
household use as described in this manual.
Do not use attachments not recommended
by Philips Electronics North America
Corporation.
3. Never operate this Groomer if it has a
damaged cord or plug,if it is not working
properly, if it has been dropped,damaged, or
dropped into water. Return the Groomer to
an Authorized Norelco Service Location for
examination and repair.
4. Keep the Groomer, cord and any
attachments away from heated surfaces.
5. Never drop or insert any object into any
opening.
6. Do not operate, charge or plug in Groomer
outdoors or where aerosol (spray) products
are being used or where oxygen is being
administered.
7. Do not use this Groomer with a damaged
or broken cutter, or cutting unit as injury
may occur.
8. Always attach plug to Groomer first, then to
outlet.To disconnect, turn on/off switch to
“OFF” position (switch is down),then
remove plug from outlet.
9. To prevent possible damage to the cord,do
not wrap cord around the Groomer.
10. Never put Groomer in direct sunlight or
store at a temperature above 140°F.
11. This Groomer is for use on human facial
hair only. Do not use this Groomer for any
other purpose.
12. Always store your Groomer, attachments
and power plug in a moisture-free area.
Make sure the cord is disconnected from the
Groomer.
SAVE THESE
INSTRUCTIONS
IMPOR TANT:YOUR GROOMER CONTAINS
A NICKEL-CADMIUM RECHARGEABLE
BATTER Y.
See Battery Removal instruction sheet.
IMPORTANT: The power plug contains a
transformer. Do not cut off the power
plug to replace it with another plug as this
will cause a hazardous condition.
B. Full Width T rimmer Attachment
C. Lifetime Self-Sharpening 3-Dimensional
Rounded Stainless Steel Cutter Blades
D. AccuControl Beard & Moustache Trimmer
Guide Comb
E. Hair Clipping Comb
F. 9 Position Hair Length Selector
G. Release Button
H. On/Off Slide Switch
I. Socket for appliance plug
J. Cleaning Brush
K. Styling Comb
L. LED Charging Indicator Light on Adaptor
M. Appliance Plug
N. Charging Plug
O . Nose, Ear , Eyebrow T rimmer Attachment
P. Charging/Storage Stand
Full Two-Y ear W arranty
60-Day Money-Back Guarantee
2 3 4
5 6 7
8 9 10
11 12 13
MAX 0.5cm
14 15
MAX 0.5cm
16
17 18 19
Features
To Charge/Recharge
O
A
M
N
F
E
D
◗ Fully charge Groomer before using for the
first time or after non-use for a long period of
time.
◗ Batter y performance is best if you recharge
only when the battery is (almost) completely
empty.
C
◗ Charging or recharging at temperatures below
40˚F or higher than 95˚F adversely affects
B
lifespan of the battery.
◗ Continuously recharging Groomer will reduce
lifespan of battery.
K
G
H
1 Be cer tain Groomer is OFF.
2 You may charge the Groomer:
◗ In the charging stand by inserting the plug into
the socket located in the bottom of the
charging stand (fig.2). Place the Groomer
directly on the charging pin in the stand (fig. 3).
L
◗ By inser ting the charging plug directly into the
I
Groomer (fig.4).
J
fig. 1
A. Neckline & Sideburn Trimmer Attachment
B. Full Width T rimmer Attachment
C. Lifetime Self-Sharpening 3-Dimensional
Rounded Stainless Steel Cutter Blades
D. AccuControl Beard & Moustache Trimmer
Guide Comb
E. Hair Clipping Comb
F. 9 Position Hair Length Selector
G. Release Button
H. On/Off Slide Switch
I. Socket for appliance plug
J. Cleaning Brush
K. Styling Comb
L. LED Charging Indicator Light on Adaptor
M. Appliance Plug
N. Charging Plug
O . Nose,Ear ,Eyebrow Trimmer Attachment
P. Charging/Storage Stand
Full Two-Y ear W arranty
60-Day Money-Back Guarantee
Norelco
P
Use only the cord provided.
4 After a few moments, the green Charging
Indicator Light on the power plug will light
to indicate the Groomer is charging (fig.5).
.
3 Plug charging plug into any 120V AC outlet.
◗ It will take approximately 10 hours to fully
charge the Groomer for a cordless trimming
time of up to 35 minutes.
◗ Disconnect the cord and unplug from
electrical outlet.
Optimize the working life
of the battery
◗ After the Groomer has been charged for the
first time, do not recharge the Groomer
between trimming sessions.Continue using it
until the battery is completely empty.
◗ Do not charge for more than 24 hours.
◗ Do not keep cord permanently plugged in.
◗ Discharge/run down the batter y completely
twice a year by letting the motor run until it
stops.
◗ If the Groomer hasn’t been used for a long
2 3 4
full 10 hours.
Cordless T rimming
1 Charge according to directions.Unplug
Personal Groomer from outlet.
MAX 0.5cm
5 6 7
8 9 10
11 12 13
14 15
MAX 0.5cm
2 Slide ON/OFF switch ON to begin trimming.
3 If the battery is empty and you want to trim
your beard,charge the Groomer for at least
3 hours and you will have enough power for
one use (10 minutes).
Put It T o The Test
Like many new products,your Norelco Personal
Groomer may take a little getting used to.If you
are using an electric Personal Groomer for the
first time, or if you’ve been using a different br and,
take the time to acquaint yourself with your new
Personal Groomer.
Your Personal Groomer features the unique
AccuControl System combined with adjustable
Length Settings to make trimming facial hair s
or hair clipping goof proof.
16
Throw your scissors away and put your new
Personal Groomer to the test.We guarantee
precise, professional results or Norelco will refund
you the full purchase price.
17 18 19
20 21 22
23 24 25
26 27 28
AccuControl System
The unique Norelco AccuControl System puts
you in complete control while trimming your
facial hairs with no pr ior exper ience needed.The
flexing Guide Comb adjusts automatically to hug
the contours of your face for a trim that is both
even and accurate. And, it’s easy to maneuver
over those hard-to-reach areas such as the throat
and chin.The Hair Length Selector allows you to
choose among 9 preset hair lengths and clicks
into position so you can control the exact hair
length you desire or vary the length of your facial
hair. The Hair Clipping Comb also features 9
preset hair lengths and clicks into position so you
can control the exact hair length you desire. The
Norelco Personal Groomer for professional,goof-
proof results ever y time or your money back.
Trimming
◗ Make sure hair is clean and dry.
◗ Always comb the hair with the styling comb in
the direction of growth before you start
trimming.
Do not mo
ve the Groomer too fast. Make
To Charge/Recharge
E
D
◗ Fully charge Groomer before using for the
Trimming your Beard & Moustache
with AccuControl Guide Comb
Attachment
first time or after non-use for a long period of
time.
◗ Batter y performance is best if you recharge
only when the battery is (almost) completely
empty.
C
◗ Charging or recharging at temperatures below
40˚F or higher than 95˚F adversely affects
B
lifespan of the battery.
◗ Continuously recharging Groomer will reduce
lifespan of battery.
◗ Use this Groomer for its intended household
use as described in this manual.
◗ Make sure that the Groomer is fully charged
before you star t trimming. This Groomer will
not operate while cord is connected to
electrical outlet.
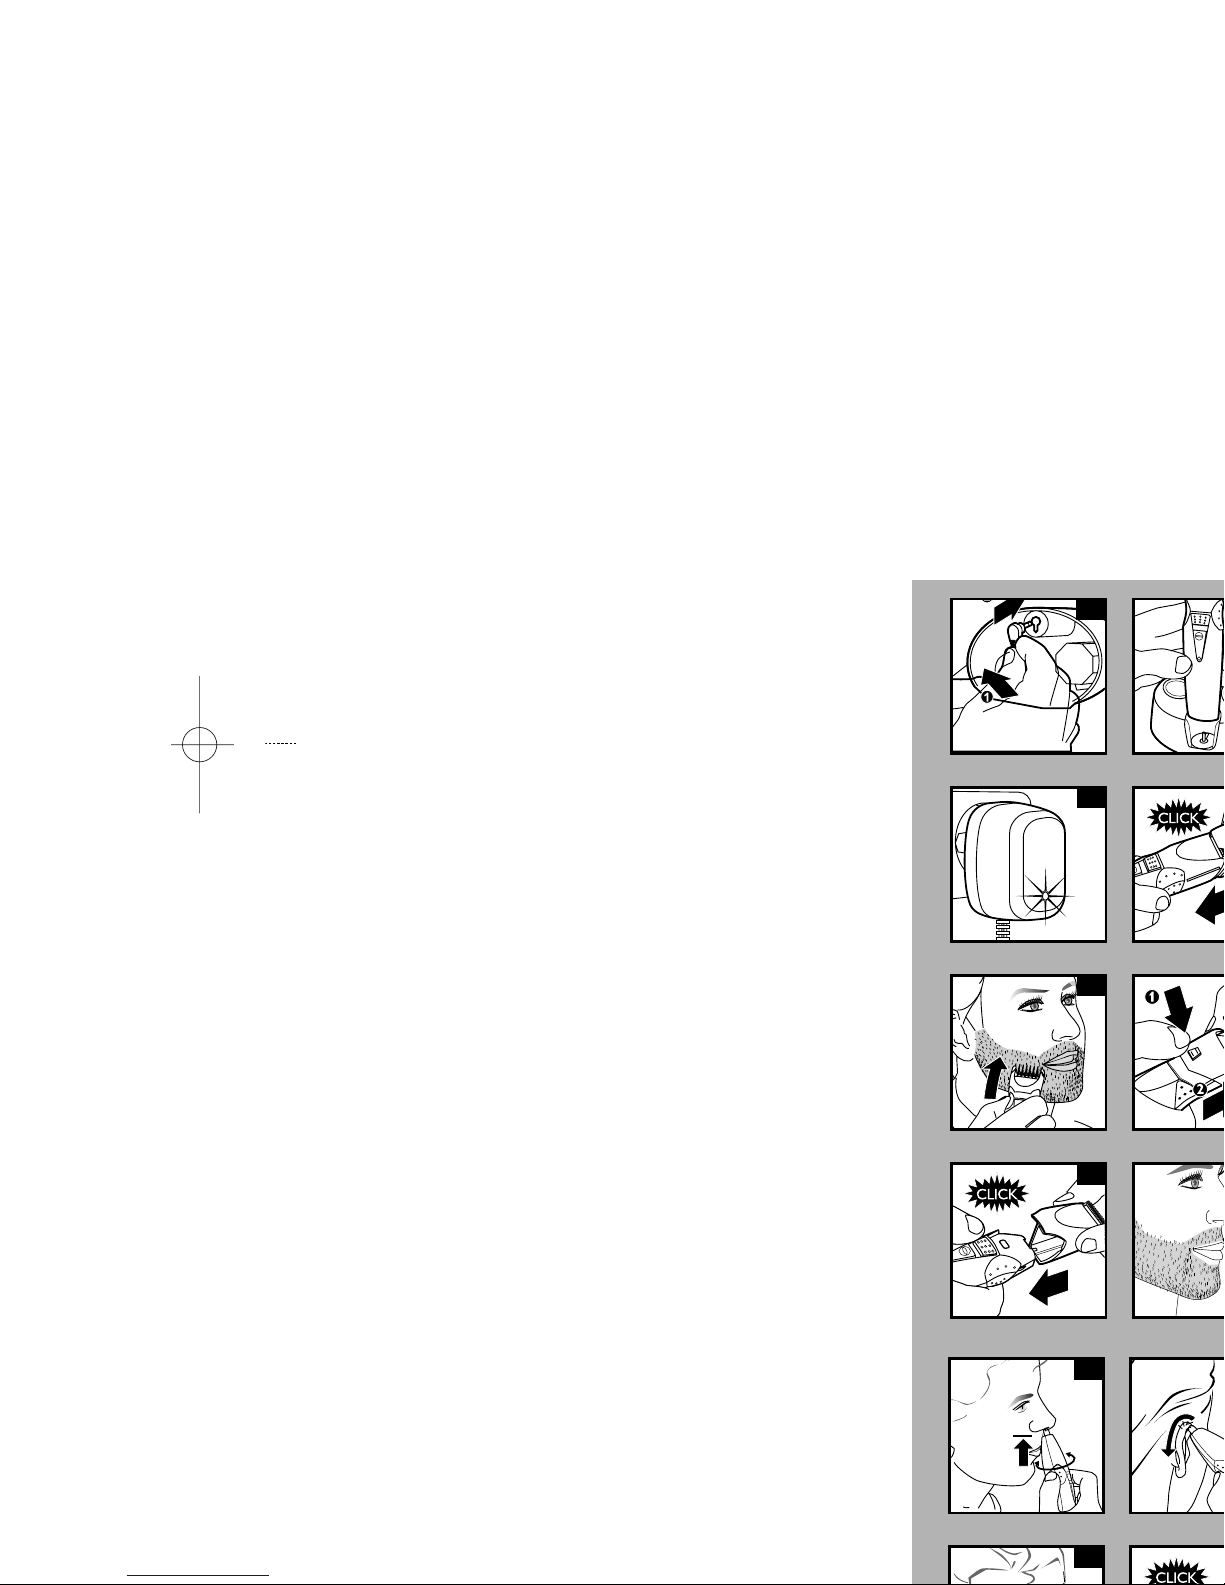
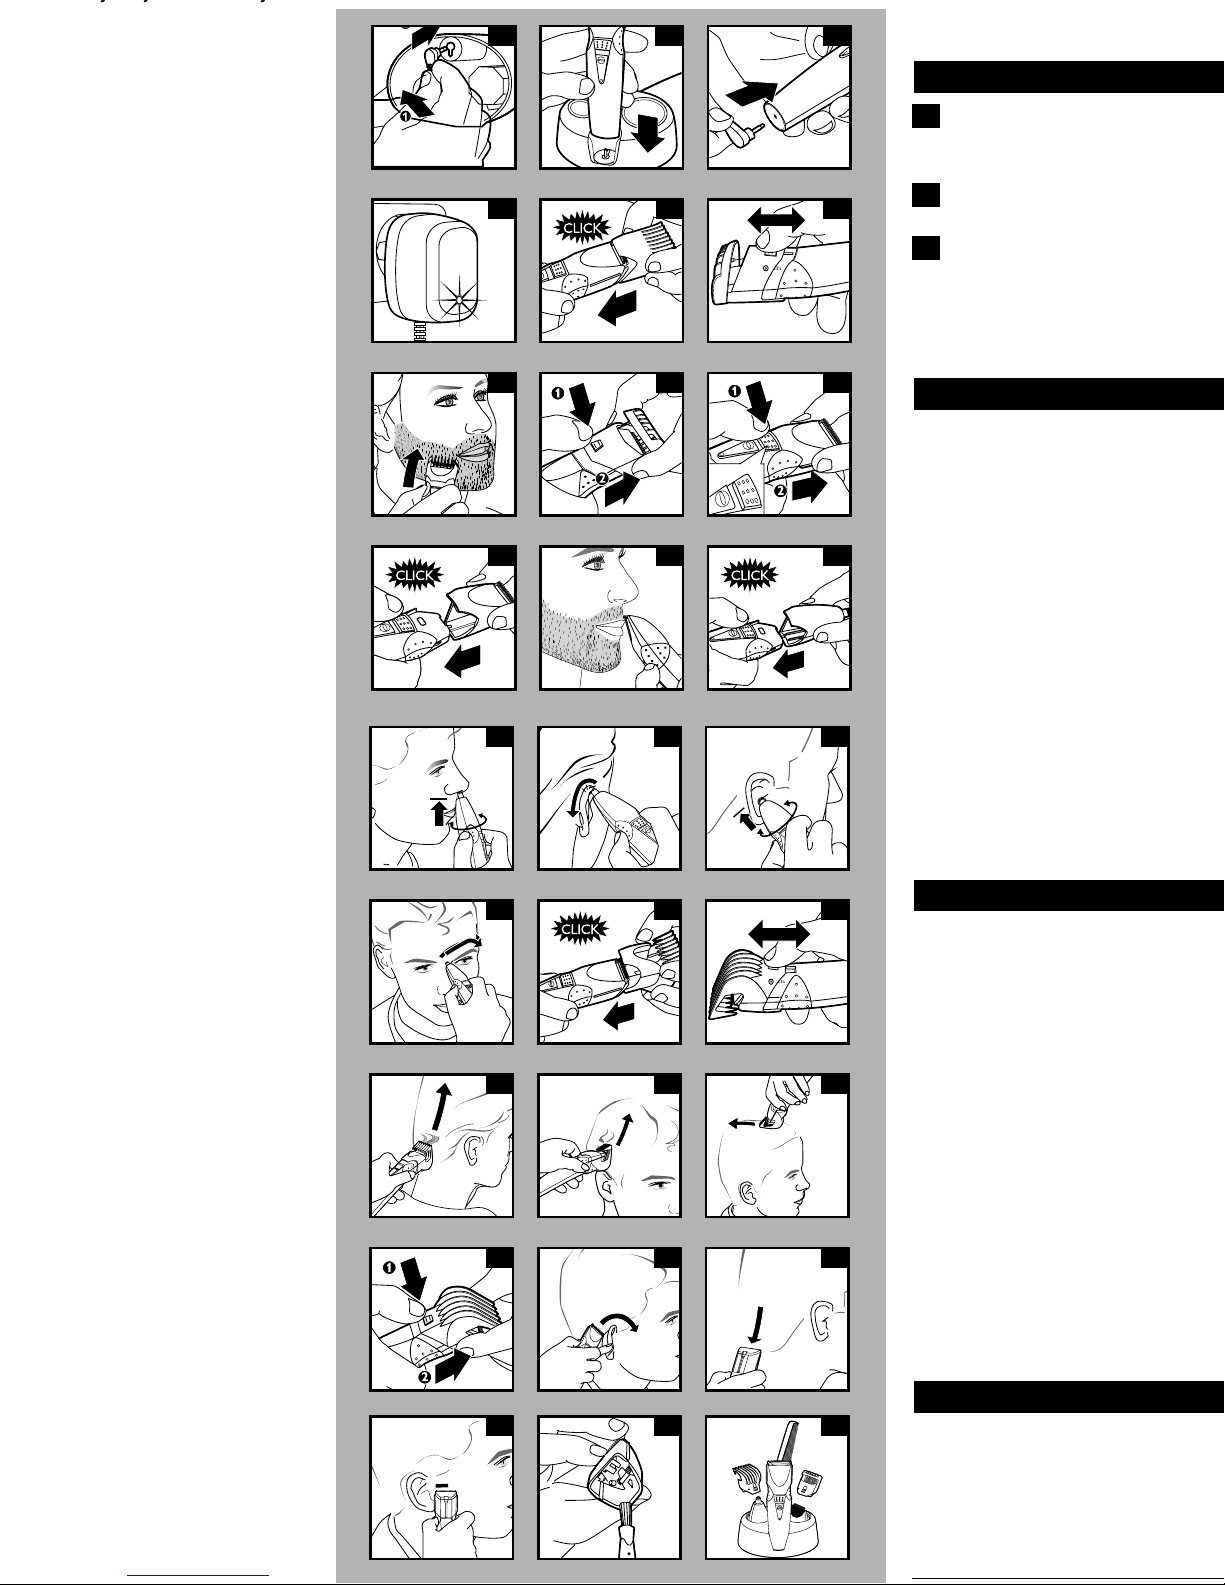
1 Put the AccuControl comb on the full width
trimmer attachment until you hear it click
into place (fig.6).The AccuControl comb will
K
1 Be certain Groomer is OFF.
not work with the smaller neckline and
sideburn trimmer attachment.
G
2 You may charge the Groomer :
Norelco
H
◗ In the charging stand by inserting the plug into
the socket located in the bottom of the
charging stand (fig.2). Place the Groomer
directly on the charging pin in the stand (fig. 3).
◗ By inser ting the charging plug directly into the
I
Groomer (fig.4).
3 Plug charging plug into any 120V AC outlet.
P
Use only the cord provided.
4 After a few moments,the green Charging
Indicator Light on the power plug will light
to indicate the Groomer is charging (fig.5).
.
◗ It will take approximately 10 hours to fully
charge the Groomer for a cordless trimming
time of up to 35 minutes.
◗ Disconnect the cord and unplug from
electrical outlet.
Optimize the working life
of the battery
2 Press the Hair Length Selector and slide it to
the desired trimming length setting. The
selected setting number will appear in the
window to the left of the Hair Length
Selector (fig.7).See Table 1 for settings.
◗ If you are trimming for the first time,start by
using the AccuControl comb at the maximum
trimming length setting (#9) to prevent
accidentally trimming hairs too short.As you
become familiar with the settings,adjust Hair
Length Selector to desired trimming length.
Selector will "click" into position at each
setting.
3 Switch the Groomer ON.
4 To trim in the most effective way, move the
Groomer against the direction of hair
growth.Make sure the surface of the Guide
Comb always stays in contact with the skin
(fig.8).
◗ After the Groomer has been charged for the
first time, do not recharge the Groomer
between trimming sessions.Continue using it
until the battery is completely empty.
◗ Do not charge for more than 24 hours.
◗ Do not keep cord permanently plugged in.
◗ Discharge/run down the batter y completely
twice a year by letting the motor run until it
stops.
◗ If the Groomer hasn’t been used for a long
period of time, it must be recharged for a
full 10 hours.
NO
TE: Since all hairs do not grow in the same
direction, you may want to try different trimming
directions (i.e., upwards,
Practice is best f
◗ If a lot of hair has accumulated in the Guide-
or optimum results.
downwards, or across).
Comb,remove the comb and blow and/or
shake the hair out of the comb.You can also
use the cleaning brush provided to remove
hair from the comb area.
◗ REMEMBER:You must reset the hair length
selector back to your desired setting every
time you replace the guide comb on the
appliance.
 Loading...