

Page 1

Micro HIFI System
CD
S
H
U
F
F
L
E
P
R
O
G
R
A
M
D
B
B
I
O
I
O
IO
II
I
O
I
I
I
O
I
I
I
O
I
I
I
O
I
O
I
I
I
O
P
E
N
C
L
O
S
E
P
R
ES
ET
TU
N
IN
G
M
Z
3
C
O
M
P
A
C
T
A
U
D
IO
S
Y
S
T
E
M
I
O
I
O
IO
II
I
O
I
I
I
O
I
I
I
O
I
I
I
O
I
O
I
I
I
O
P
E
N
C
L
O
S
E
P
R
ES
E
T
TU
N
IN
G
M
Z
3
C
O
M
P
A
C
T
A
U
D
IO
S
Y
S
T
E
M
CD
T
A
P
E
T
U
N
ER
TIM
ER
A
U
X
S
LE
EP
D
B
B
D
S
C
IN
C
.S
U
R
R
,
M
U
TE
SIDE
N
E
W
S
/
T
A
V
O
L
U
M
E
+
–
SHUFFLE
REPEAT
PROGRAM
MZ-3
Page 2

INDEX
English..................................................................................... 4
Français................................................................................14
Español ................................................................................. 24
Deutsch ................................................................................ 34
Nederlands......................................................................... 44
Italiano................................................................................... 54
Português ........................................................................... 64
Dansk ..................................................................................... 74
Svenska ............................................................................... 84
Suomi ..................................................................................... 94
Polski..................................................................................... 104
Έλληνικά ...................................................................... 114
Important notes for users in the U.K.
Mains plug
This apparatus is fitted with an approved moulded 13
Amp plug. To change a fuse in this type of plug proceed
as follows:
1 Remove fuse cover and fuse.
2 Fix new fuse which should be a BS1362 5 Amp,
A.S.T.A. or BSI approved type.
3 Refit the fuse cover.
If the fitted plug is not suitable for your socket outlets, it
should be cut off and an appropriate plug fitted in its
place.
If the mains plug contains a fuse, this should have a value
of 5 Amp. If a plug without a fuse is used, the fuse at the
distribution board should not be greater than 5 Amp.
Note: The severed plug must be disposed to avoid a
possible shock hazard should it be inserted into a 13 Amp
socket elsewhere.
How to connect a plug
The wires in the mains lead are coloured with the
following code: blue = neutral (N), brown = live (L).
As these colours may not correspond with the colour
markings identifying the terminals in your plug, proceed
as follows:
• Connect the blue wire to the terminal marked N or
coloured black.
• Connect the brown wire to the terminal marked L or
coloured red.
• Do not connect either wire to the earth terminal in the
plug, marked E (or e) or coloured green (or green and
yellow).
Before replacing the plug cover, make certain that the
cord grip is clamped over the sheath of the lead - not
simply over the two wires.Copyright in the U.K.: Recording
and playback of material may require consent. See
Copyright Act 1956 and The Performer’s Protection Acts
1958 to 1972.
n Norge
Typeskilt finnes på apparatens underside.
Observer: Nettbryteren er sekundert innkoplet. Den innebygde
netdelen er derfor ikke frakoplet nettet så lenge apparatet er
tilsluttet nettkontakten.
For å redusere faren for brann eller elektrisk støt; skal apparatet
ikke utsettes for regn eller fuktighet.
i Italia
DICHIARAZIONE DI CONFORMITA’
Si dichiara che l’apparecchio MZ3 Philips risponde alle
prescrizioni dell’art. 2 comma 1 del D. M. 28 Agosto 1995
n. 548.
Fatto a Eindhoven, il 25-02-2000
Philips Consumer Electronics
Philips, Glaslaan 2
5616 JB Eindhoven, The Netherlands
2
Page 3
C
D
S
H
U
F
F
L
E
P
R
O
G
R
A
M
D
B
B
I
O
I
O
I
O
I
I
IO
II
IOII
IO
II
IO
IOI II
OPEN
CLOSE
PRESET
TUNING
I
O
I
O
I
O
I
I
IOII
IOII
IOII
IOIO
I II
OPEN
CLOSE
PRESET
TUNING
MZ3 COM
PACT AUDIO SYSTEM
CD
TAPE
TUN
ER
TIM
ER
AUX
SLEEP
DBB
DSC
IN
C.SURR
M
UTE
REPEAT
PROGRAM
SHUFFLE
–
2
9
;
K
J
5
6
+
SIDE
NEW
S/TA
VOLUM
E
8
6 7
23 54
1
0
9
(
MZ3 rds / 21/22 lines OL
8 Ω
LEFT
+
RIGHT
+
LEFT
–
RIGHT
–
AUX in
RL
LINE out
RL
speakers
DIGITAL
out
AM
aerial
FM
aerial
75 Ω
!
@%
^
#
*&
$
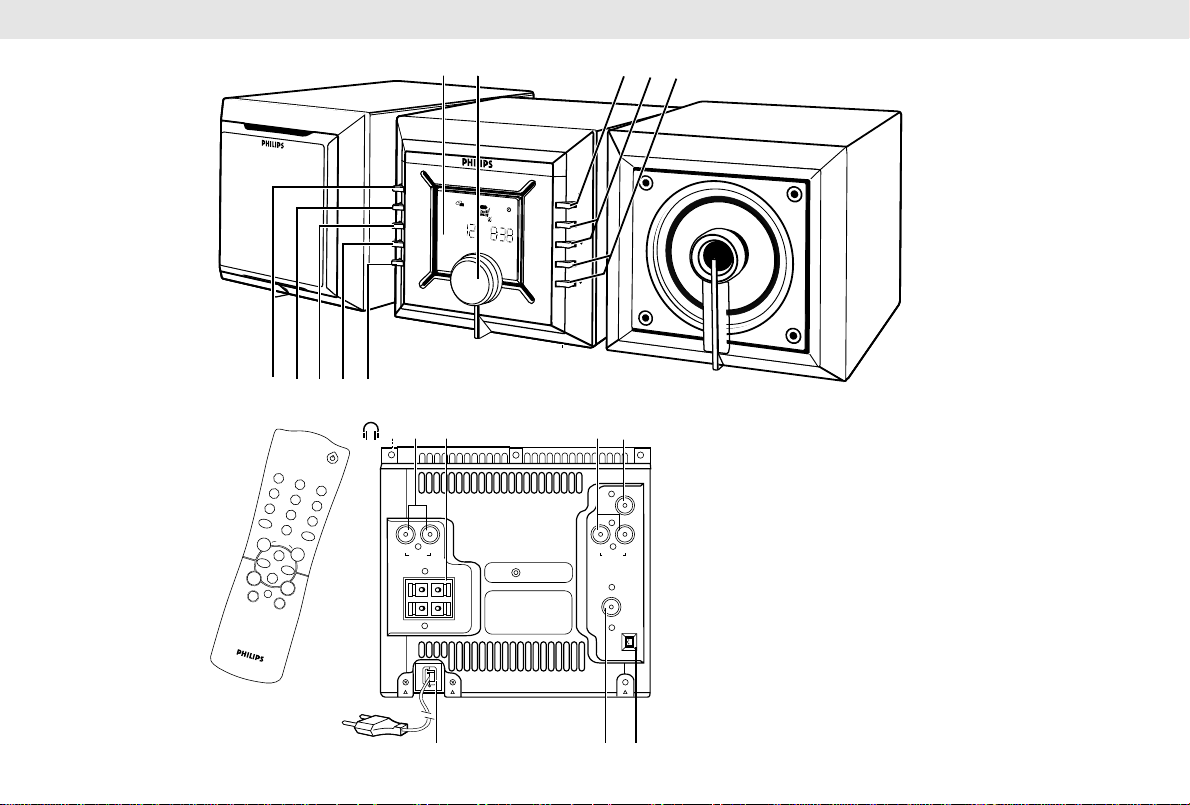
CONTROLS AND CONNECTIONS
3
Page 4

CONTROLS AND CONNECTIONS
Top and front panels
1 STANDBY/ ON y . switches the set to standby/on
English
2 SOURCE. . . . . . . . selects the sound source for
Tuner: . . . . . . . . . selects waveband
3 PROGRAM
CD: . . . . . . . . . . . programmes tracks and reviews the
Tuner: . . . . . . . . . programmes tuner stations manually
Timer: . . . . . . . . . activates, sets and deactivates the
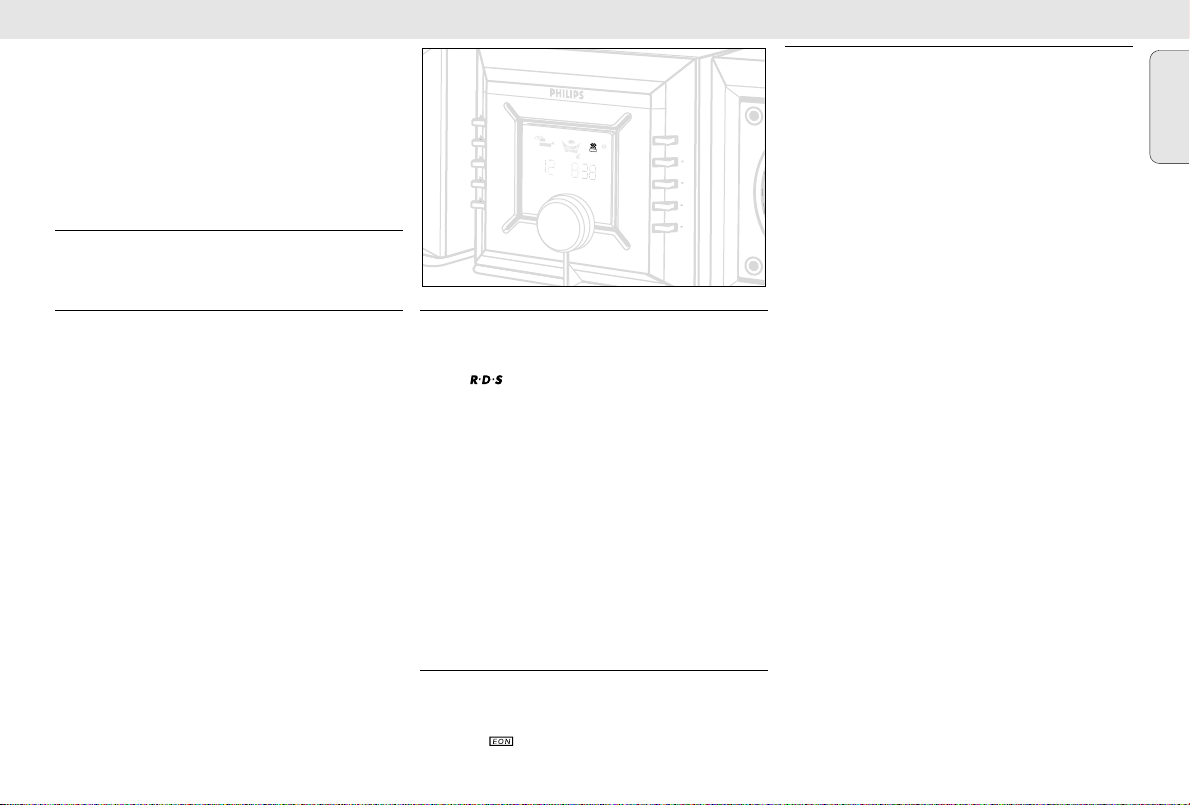
4 RDS/CLOCK . . . . . displays RDS information
CD: . . . . . . . . . . . selects shuffle and repeat options,
5 SOUND CONTROL
DBB. . . . . . . . . . . (Dynamic Bass Boost)
DSC. . . . . . . . . . . (Digital Sound Control)
INCREDIBLE
SURROUND. . . . . creates a super-enhanced stereo
6 Display. . . . . . . . shows the status of the set
7 VOLUME . . . . . . . adjusts the volume level and sound
8 OPEN/CLOSE . . . . opens/ closes the CD tray
9 2; or PRESET 3 starts and pauses CD playback;
4
CD/TUNER /CD RW /AUX;
switches on the set
programme;
or automatically;
timer function
sets the clock function
e.g. repeats a track/ CD programme/
entire CD;
plays tracks in random order
enhances the bass
selects sound characteristics:
OPTIMAL/CLASSIC/JAZZ/POP
effect
settings;
adjusts the hour and minutes for the
clock/ timer functions
selects a preset tuner station (up);
9 or PRESET 4 . . stops CD playback or erase a CD
0 2™, ¡1 or TUNING 3,4
CD: . . . . . . . . . . . fast searches back and forward
Tuner: . . . . . . . . . (up, down) tunes to radio stations
programme;
activates/ deactivates demo mode;
selects a preset tuner station (down)
within a track;
skips to subsequent/ beginning of a
current track or previous track
Back panel
! p . . . . . . . . . . . . . 3.5 mm (16-150 Ω) stereo
@ AUX IN
RIGHT/ LEFT . . . . connects to the audio output of an
# SPEAKERS 8 Ω . . connects to the supplied speakers
$
LINE OUT
LEFT/RIGHT
% DIGITAL OUT . . . . connects to a CD-(RW) system for
^ AC MAINS. . . . . . after all other connections have
&
FM AERIAL 75
* AM (MW) AERIAL connects to the supplied AM (MW)
headphone socket
additional appliance
. . . . . connects to the audio input of an
additional appliance
digital CD recording, or another
system for alternative sound output
been made, connect the mains plug
to the wall socket
Ω . connects to the supplied aerial wire
or an aerial wall connection
frame aerial
Remote control
y . . . . . . . . . . . . . . switches the set to standby
CD,TUNER,AUX,CDR . selects the respective sound source
TIMER . . . . . . . . . . . . activates and deactivates the timer
SLEEP . . . . . . . . . . . . activates and deactivates the
sleeper time;
selects sleeper time
DBB. . . . . . . . . . . . . . (Dynamic Bass Boost)
DSC. . . . . . . . . . . . . . (Digital Sound Control)
INCR.SURR . . . . . . . . creates a super-enhanced stereo
MUTE . . . . . . . . . . . . interrupts and resumes sound
BAND . . . . . . . . . . . . selects waveband
NEWS/TA . . . . . . . . . activates RDS news (not all
VOLUME –, + . . . . . . adjusts volume level
2; . . . . . . . . . . . . . . starts/ pauses CD playback
¡, ™
CD: . . . . . . . . . . . . . . skips to the beginning of a current
Tuner: . . . . . . . . . . . . (down, up) selects a preset radio
9 . . . . . . . . . . . . . . stops CD playback or erases a CD
5, 6
CD: . . . . . . . . . . . . . . . .
Tuner: . . . . . . . . . . . . . .
REPEAT . . . . . . . . . . . repeats a track/ CD programme/
SHUFFLE . . . . . . . . . . plays CD tracks in random order
PROGRAM
CD: . . . . . . . . . . . . . . programmes tracks and reviews the
. . . . . . . . . . . programmes radio stations or starts
Tuner
:
Notes:
• select the desired sound source first (e.g. CD,CD R),
then press the required function key (e.g. 2).
• the CD function keys on the remote control can be used
for a CD R.
enhances the bass
selects sound characteristics:
OPTIMAL/CLASSIC
effect
reproduction
versions) and Traffic Announcement
track/ previous/ subsequent track;
station
programme
searches backwards or forwards
within a track/CD;
(down, up) tunes to radio stations;
entire CD
programme;
Auto programming
/JAZZ/POP
Page 5
GENERAL INFORMATION
AUX i
CAUTION
POWER SUPPLY
12
Use of controls or adjustments or performance of procedures other than herein may result in hazardous
radiation exposure
Supplied accessories
- 2 speaker boxes
- remote control with batteries
- AM (MW) frame aerial
- FM aerial wire
General maintenance
• Do not expose the set, batteries, CDs or cassettes to
humidity, rain, sand or excessive heat caused by heating
equipment or direct sunlight.
• To clean the set, use a soft, slightly dampened chamois
leather. Do not use any cleaning agents containing
alcohol, ammonia, benzene or abrasives as these may
harm the housing.
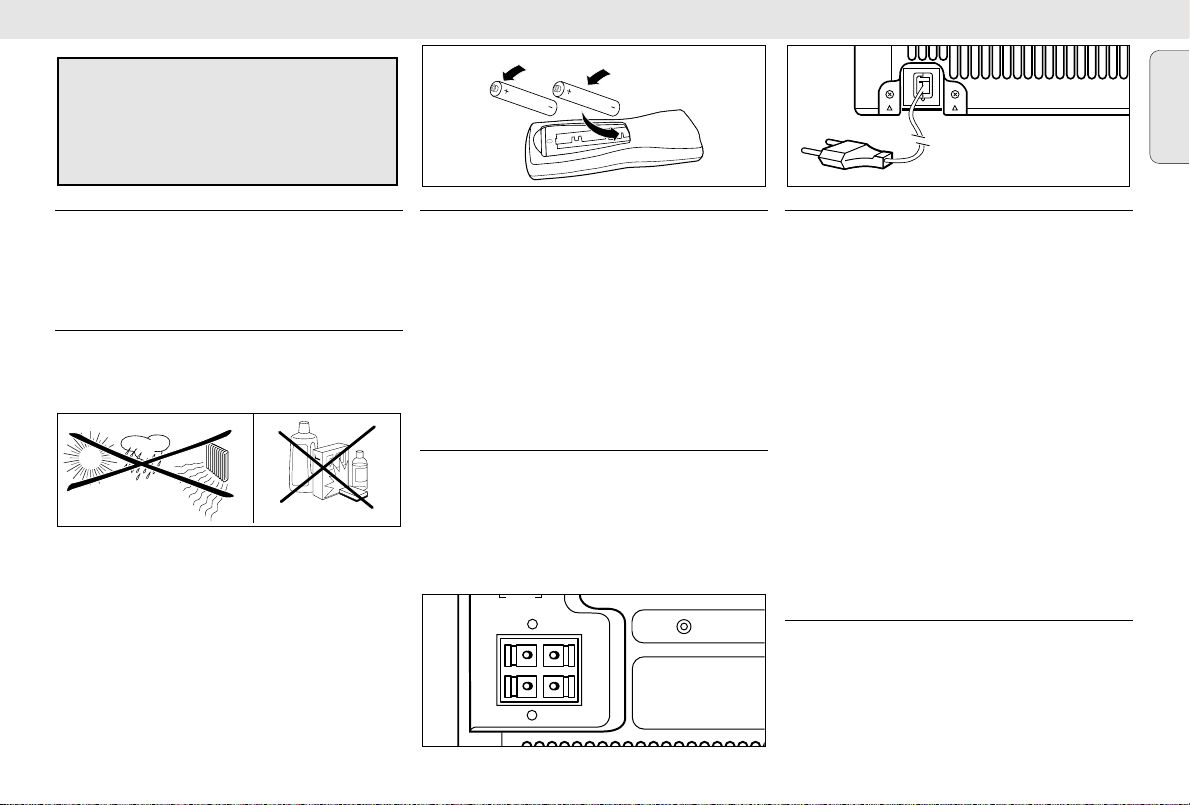
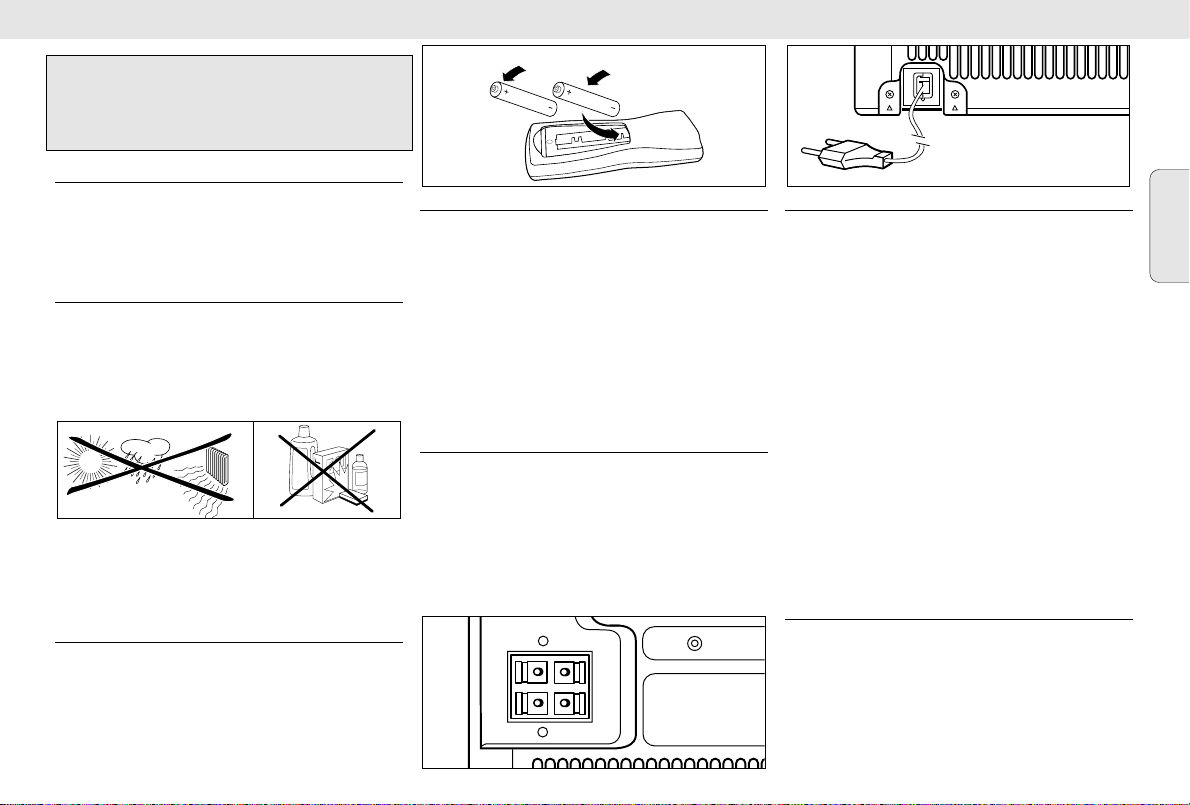
Batteries for the remote control
• Open the battery compartment and insert two batteries,
type AA, R06 or UM3 (preferably alkaline) with the
correct polarity as indicated by the + and – symbols
inside the compartment.
Important! Remove the batteries if they are exhausted or if
the unit is not to be used for a long time.
Batteries contain chemical substances, so they
should be disposed of properly.
Speaker connections
The speaker terminals are click-fit connectors. Use them as
shown below.
– Connect the unmarked wire to the red terminal and the
marked black wire to the black terminal.
• When headphones are inserted into the headphone
socket the speakers are disconnected.
RIGHT
n
speakers
8 Ω
LEFT
–
–
LEFT
RIGHT
+
+
English
Power supply
1 Check if the mains voltage, as shown on the type plate
located on the bottom of the set, corresponds to your
local mains voltage. If it does not, consult your dealer or
service centre.
2 If your set is equipped with a voltage selector on the
bottom of the set, adjust the selector so that it matches
with the local mains.
3 Connect the mains plug to the wall socket and the set is
now ready for use.
™ The clock display …: …flashes.
4 To disconnect the set from the mains completely,
remove the plug from the wall socket.
For users in the UK, please follow the instructions on page 2.
POWER-SAVING AUTOMATIC STANDBY
As a power-saving feature, the unit automatically switches
to standby if:
• 15 minutes after a CD has reached the end and no
control is operated.
• after more than 24 hours no controls are operated
Safety information
• Place the set on a hard and flat surface so that the
system does not tilt. Make sure there is adequate
ventilation to prevent the system from overheating.
• The mechanical parts of the set contain self-lubricating
bearings and must not be oiled or lubricated.
This set complies with the radio interference
requirements of the EU.
5
Page 6
CONNECTIONS
DBB
CD
S
H
U
F
F
L
E
P
R
O
G
R
A
M
D
B
B
I
O
I
O
IO
II
I
O
I
I
I
O
I
I
I
O
I
I
I
O
I
O
I
I
I
O
P
E
N
CL
O
S
E
PR
E
SE
T
T
U
N
IN
G
M
Z
3
C
O
M
P
A
C
T
A
U
D
IO
S
Y
S
T
E
M
I
O
I
O
IO
II
I
O
I
I
I
O
I
I
I
O
I
I
I
O
I
O
I
I
I
O
P
E
N
CL
OS
E
P
R
E
SE
T
TU
N
IN
G
BASIC FUNCTIONS
AUX IN
You can connect the audio left and right OUT terminals of
English
another sound system, e.g. CDR, cassette recorder to the
corresponding left and right AUX IN terminals at the rear of
the set.
• Use the MZ-3 sound controls to adjust the sound of the
other system.
• For playback of a connected CD-R(W), select the
CD-R(W) source.
LINE OUT (not for CDR-W)
You can connect the LINEIN terminal of a DAT or tape
recorder to the LINE OUT terminal at the rear of the set.
• Adjust the sound with the controls of the other system.
• When recording with a CD-R(W), select the CD source
on the MZ-3.
DIGITALOUT (CD mode only)
You can connect the DIGITALIN terminal of a CD-R(W) or
an external DAC player to the DIGITAL OUTterminal at
the rear of the set.
• When recording with a CD-R(W), select the CD source
on the MZ-3.
• For playback of a connected CD-R(W), select the
CD-R(W) source.
DIGITAL
RL
6
out
LINE out
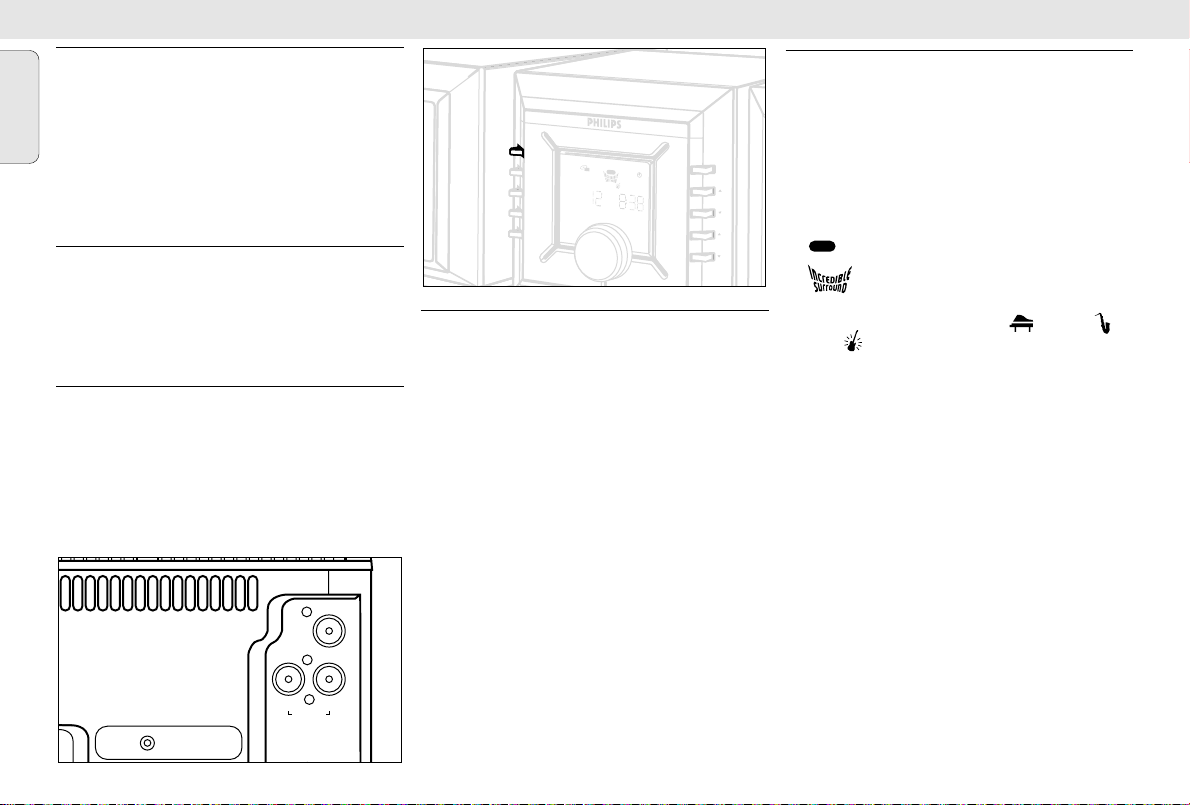
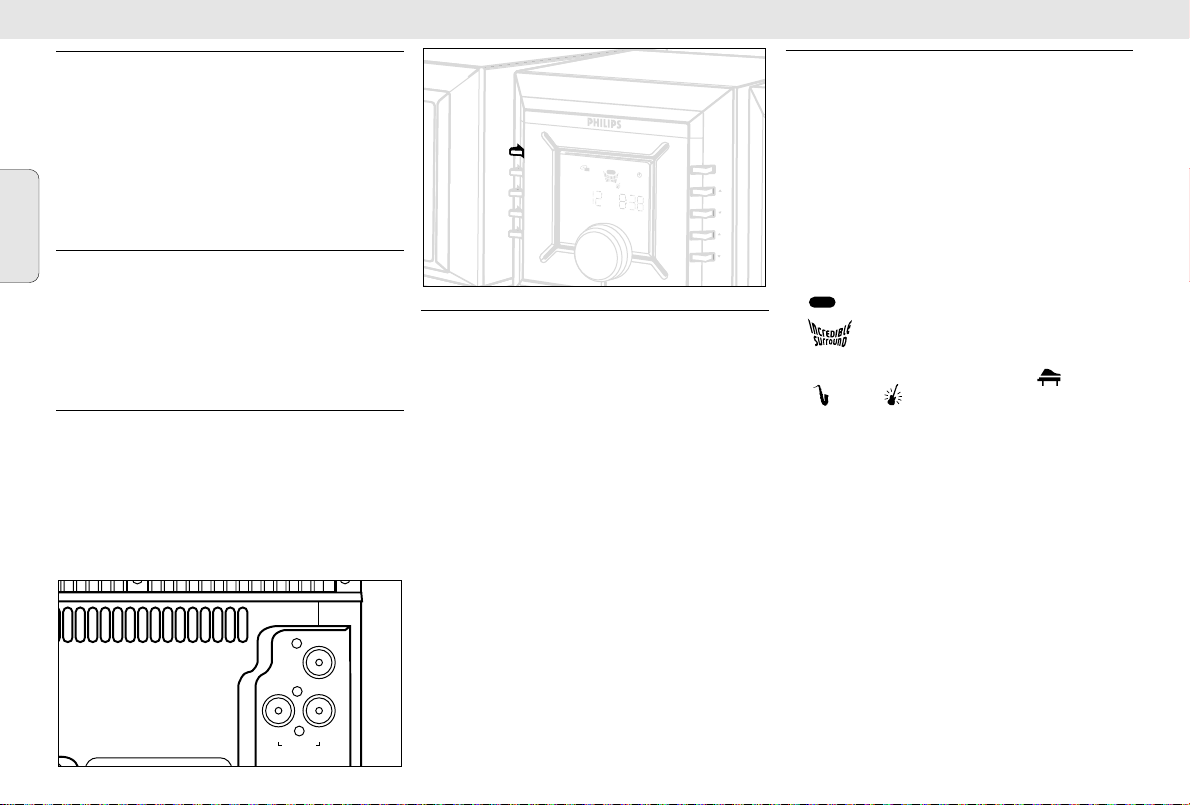
Switching on
There are 3 ways to switch the set on:
• press y STANDBY/ ON on the set and the last selected
source switches on;
• press SELECT SOURCE on the set and the last selected
source switches on;
• press CD, TUNER, CDR or AUX on the remote control.
To switch the set to standby, press y STANDBY/ ON once
on the set (y on the remote control).
– The volume level, interactive sound settings, last
selected source and tuner presets will be retained in the
set's memory.
Adjusting volume and sound
1 Turn the VOLUME control anti-clockwise to decrease or
clockwise to increase volume on the set (or press
VOLUME –, + on the remote control).
™ Display shows the volume level VOL and a number
from 0-32.
2 Press DBB, INCR.SURR or DSC on the remote control
once or more to select the desired sound effects:
,
and
OPTIMAL (no indication) /CLASSIC ()/JAZZ ()
/POP ()/OPTIMAL... .
Notes:
– The effect of INCREDIBLE SURROUND may vary with
different types of music.
– You can also select the desired sound effects from the
set (See Using the SOUND CONTROL)
3 Press MUTE on the remote control to interrupt sound
reproduction instantly.
– Playback will be continued without sound and the
display shows MUTE.
4 To activate sound reproduction you can:
– press MUTE again;
– adjust the volume controls;
– change source.
Page 7
Using the Sound Control
O
P
E
N
C
L
O
S
E
P
R
E
S
E
T
M
C 158 COM
PACT AUDIO SY
STEM
O
P
E
N
C
L
O
S
E
P
R
E
S
E
T
MC 158 COM
PACT AUDIO SYSTEM
FM MW LW AM PM
R
E
P
E
A
T
A
L
L
DBB
C
D
T
U
N
E
R
S
T
E
R
E
O
N
E
W
S
S
L
E
E
P
E
O
P
R
O
G
R
A
M
S
H
U
F
F
L
E
M
M
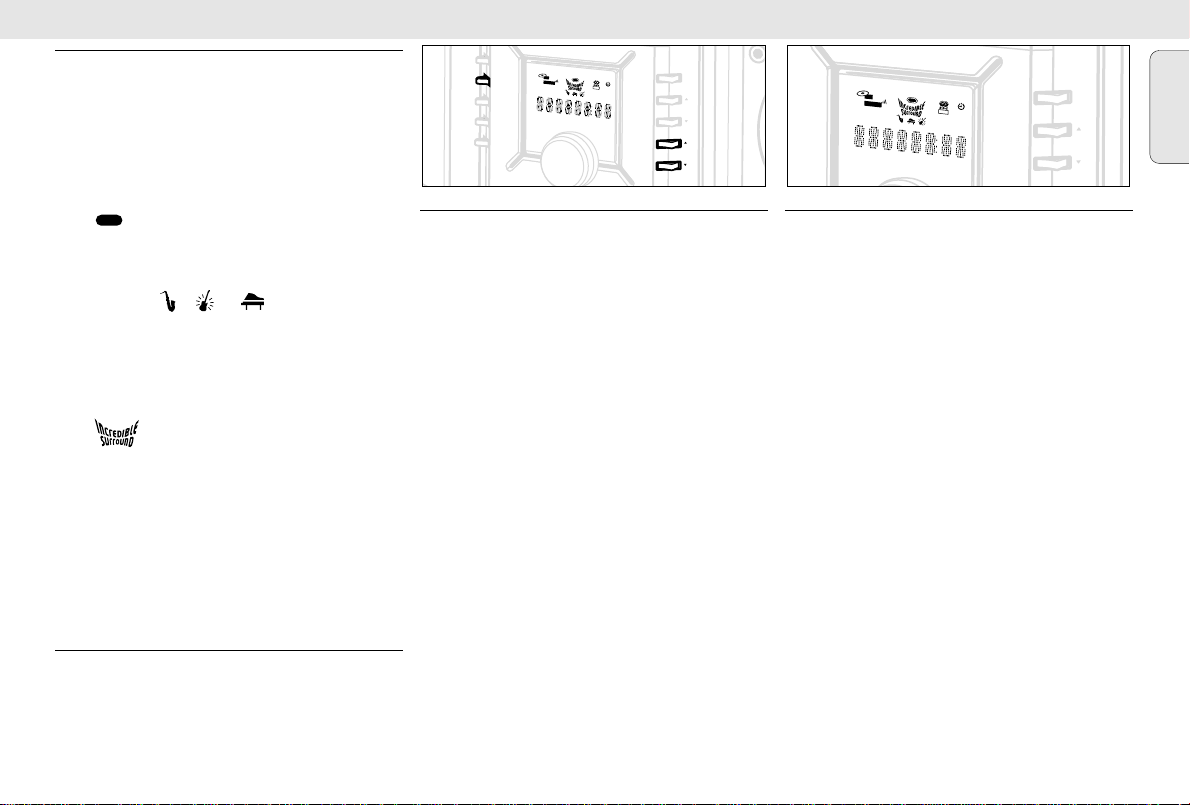
You can also adjust the sound settings exclusively on the
set:
1 Press SOUNDCONTROL once or more to select the
various options:
• once:
display shows DBB OFF;
if DBB is activated, display shows DBB ON and
DBB
,
• twice:
display shows DSC status OPTIMAL.
(display shows JAZZ, POP, or CLASSIC and the
respective , or symbol if selected)
• three times:
display shows Incredible Surround (IS) status
IS OFF.
if IS is activated, display shows IS ON and
.
2 For each sound setting, turn the VOLUME control in any
direction to select ON, OFF or DSC options.
3 Press SOUNDCONTROL again to confirm.
• Display shows the next sound setting to the adjusted.
• After the IS setting is confirmed,the display shows
the volume level VOL briefly, before returning to the
current playback display.
Demo mode
• In standby, press 9 on the set for more than 5 seconds.
• Repeat step to deactivate.
™ Demo messages scroll continously across the display.
™ DEMO OFF scrolls across the display.
CLOCK
C
C
1
1
5
5
8
8
C
C
O
O
M
M
P
P
A
I
I
O
O
I
I
O
O
I
I
O
O
I
I
I
I
I
I
O
O
I
I
I
I
I
I
O
O
I
I
I
I
I
I
O
O
I
I
O
O
I
I
I
I
I
I
Setting the clock
There are two possible methods for setting the clock:
manually or automatically by using RDS.
Automatic clock setting (RDS versions only)
1 Tune to a RDS station (see TUNER).
2 Press RDS/ CLOCK for 2 seconds or more.
™ SEARCH RDS TIME is displayed for a
maximum of 90 seconds; the time is then displayed.
™ NO RDS TIME is displayed if no time signal has
been received and you will have to set the clock
manually.
Manual clocksetting
1 In standby, press CLOCK.
™ The clock digits for the hours flash 0:00.
2 Turn VOLUME to set the hours: clockwise for hours up;
anti-clockwise for hours down.
3 Press CLOCK again.
™ The clock digits for the minutes flash 0:00.
4 Turn VOLUME to set the minutes: clockwise for minutes
up; anti-clockwise for minutes down.
5 Press CLOCK to confirm the time.
A
C
C
T
T
A
A
U
U
D
D
IO
IO
S
S
Y
Y
S
S
T
T
E
E
M
M
CD
DBB
T
U
N
E
R
R
E
P
E
A
T
A
L
L
E
O
S
L
E
P
R
O
G
R
A
M
E
P
S
H
U
S
F
T
F
E
L
R
E
E
O
N
E
W
S
FM MW LW AM PM
N
N
PE
PE
O
O
SE
SE
LO
LO
C
C
T
T
E
E
ES
ES
R
PR
P
G
G
IN
IN
N
N
U
TU
T
TIMER
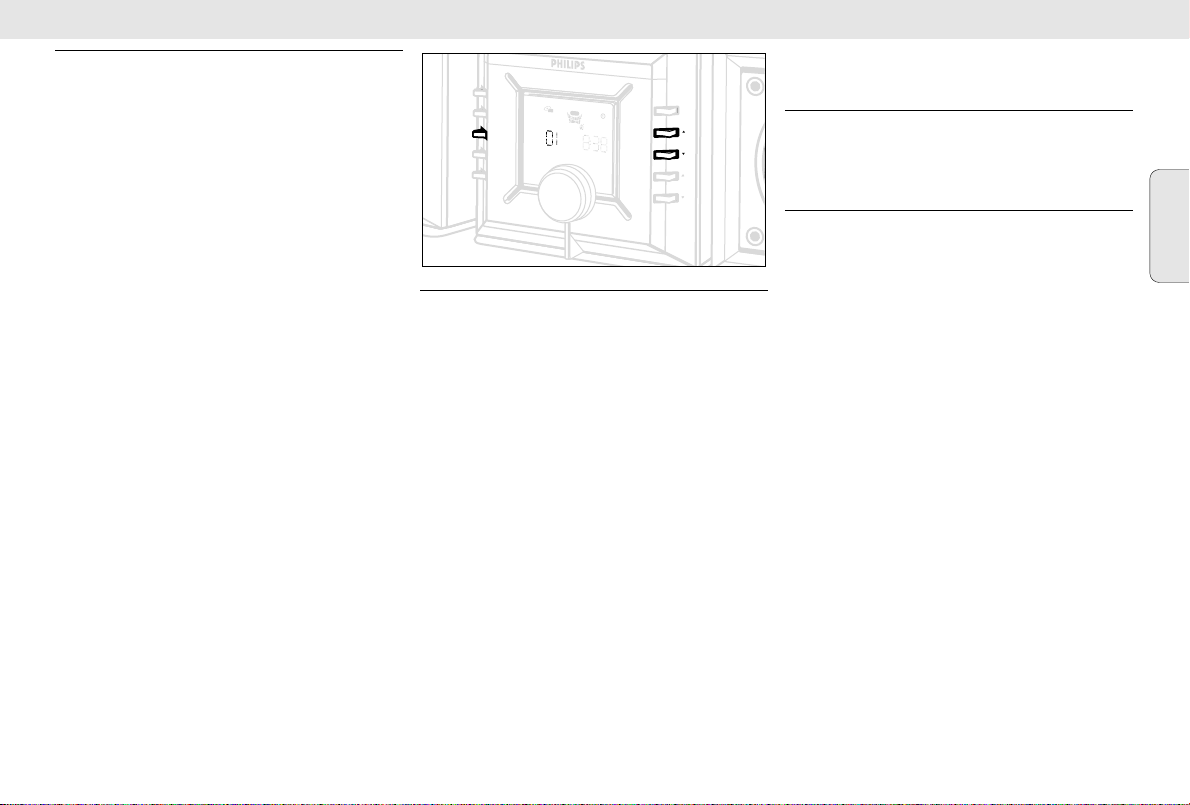
Setting TIMER
• The unit can be used as an alarm clock, whereby the set
is switched on at a set time. The clock time needs to be
set first before the timer can be used.
• During setting, if more than 90 seconds elapses without
a button being pressed the unit quits the timer setting
mode.
1 Press PROGRAM on the set for 2 seconds or more in
standby mode.
™
Display shows TUNER or CD and Nflashes
™
Display shows SET CLOCK TIME if the clock has
not been set
2 Turn VOLUME clockwise.
™
Display sequence shows CD, TUNER, CD...
3 Press PROGRAM (on the set) to confirm source.
™ Display shows ON 0:00, the clock digits for the
hours; 0:00 flash.
4 Turn VOLUME to set the hours: clockwise for hours up;
anti-clockwise for hours down.
English
7
Page 8

TIMER/ SLEEP
CD
S
H
U
F
F
L
E
P
R
O
G
R
A
M
D
B
B
I
O
I
O
IO
II
I
O
I
I
I
O
I
I
I
O
I
I
I
O
I
O
I
I
I
O
P
EN
C
LO
S
E
P
R
E
S
ET
T
U
N
IN
G
M
C
1
5
8
C
O
M
P
A
C
T
A
U
D
IO
S
Y
S
T
E
M
I
O
I
O
IO
II
I
O
I
I
I
O
I
I
I
O
I
I
I
O
I
O
I
I
I
O
P
EN
C
LO
S
E
P
R
E
SE
T
T
U
N
IN
G
M
C
1
5
8
C
O
M
P
A
C
T
A
U
D
IO
S
Y
S
T
E
M
CD PLAYER
5 Press TIMER or PROGRAM again.
English
™ The clock digits for the minutes flash.
6 Turn VOLUME to set the minutes: clockwise for minutes
up; anti-clockwise for minutes down.
7 Press TIMER or PROGRAM to confirm the time.
– The timer is now set and activated.
Display shows N
.
Activating and deactivating TIMER
Press either:
• on the remote control,
TIMER during playback or in standby mode.
• on the set,
PROGRAM in standby mode.
™ Display showsN if activated, and disappears if
deactivated.
Activating and deactivating SLEEP
The sleep timer enables the unit to switch off by itself after
a set period of time. The clock time needs to be set first
before the sleep timer can be used.
• During playback to select and activate your desired
sleep time, press SLEEP on the remote control once or
more.
™ Display shows SLEEP and one of the sleep time
options in sequence: 60, 45, 30, 15, SLEEP
OFF, 60...
• To deactivate, press SLEEP on the remote control once
or more until SLEEP OFF is shown, or press to
standby on the set or remote control.
™ SLEEP disappears from the display.
Playing a CD
This CD player plays Audio Discs including CD-Recordables
and CD-Rewritables.
• CD-ROM, CD-I, CDV, VCD, DVD, MP3 or computer CDs,
however, are not possible.
1 Select CD source.
2 Press OPEN/CLOSE to open the CD tray.
™ OPEN is displayed when you open the CD
compartment.
3 Insert a CD with the printed side facing up and press
down on OPEN/CLOSE to close the CD tray.
™ READ is displayed as the CD player scans the
contents of a CD, and then the total number of tracks
and playing time are shown.
™ NO DISC is displayed if you have inserted no
disc.
™ DISC NOT READABLEscrolls across the
display if you insert a CD incorrectly or a non
finalised CD-R(W).
4 Press 2; to start playback.
™ Current track number and elapsed playing time of the
track are displayed during CD playback.
5 To interrupt playback press 2; . Press 2; again to
resume playback.
™ The display freezes and the elapsed playing time
flashes when playback is interrupted.
6 To stop CD playback, press 9.
Note: CD play will also stop when:
– the CD tray is opened;
– the CD has reached the end;
– you select another source: TAPE, CD R or AUX.
Selecting a different track
• Press ¡1 or 2™ on the set, (on the remote control
¡ or ™) once or repeatedly until the desired track
number appears in the display.
• If you have selected a track number shortly after loading
a CD or in the PAUSE position, you will need to press
2; to start playback.
Finding a passage within a track
1 Press and hold down on ¡1 or 2™ (on the remote
control 11 or 22 ).
– The CD is played at high speed and low volume.
2 When you recognize the passage you want,
release 11 or 22.
– Normal playback continues.
Note: During a CD programme or if SHUFFLE/ REPEAT acti-
ve, searching is only possible within the same track.
8
Page 9

Different play modes: SHUFFLE and REPEAT
CD
S
H
U
F
F
L
E
P
R
O
G
R
A
M
D
B
B
I
O
I
O
IO
II
I
O
I
I
I
O
I
I
I
O
I
I
I
O
I
O
I
I
I
O
PE
N
C
LO
SE
P
R
ES
E
T
T
U
N
IN
G
M
C
1
5
8
C
O
M
P
A
C
T
A
U
D
IO
S
Y
S
T
E
M
I
O
I
O
IO
II
I
O
I
I
I
O
I
I
I
O
I
I
I
O
I
O
I
I
I
O
P
EN
C
LO
SE
P
R
ES
ET
T
U
NIN
G
M
C
1
5
8
C
O
M
P
A
C
T
A
U
D
IO
S
Y
S
T
E
M
You can select and change the various play modes before
or during playback. The play modes can also be combined
with PROGRAM.
SHUFFLE . . . . . . . . . . tracks of the entire CD/ programme
are played in random order
SHUFFLE and
REPEAT ALL. . . . . . . . to repeat the entire CD/ programme
continuously in random order
REPEAT ALL. . . . . . . . repeats the entire CD/ programme
continuously
REPEAT . . . . . . . . . . . repeats the current track
continuously
1 To select your play mode before or during playback,
press either
• on the remote control SHUFFLE or REPEAT
• on the set CLOCK repeatedly until the display shows the
desired function.
2 Press 2; to start playback if in the STOP position.
™ If you have selected SHUFFLE, playback starts
automatically.
Programming track numbers
Programme in the STOP position to select and store your CD
tracks in the desired sequence. If you like, store any track more
than once. Up to 40 tracks can be stored in the memory.
1 Press PROGRAM on the set or remote control to enter
the programming mode.
™ A track number is shown and PROGRAM flashes.
2 Use the ¡1 or 2™ on the set, (on the remote control
¡ or ™) to select your desired track number.
5 To start playback of your CD programme, press 2; .
Reviewing the programme
• In STOP mode, press and hold down PROGRAM on the
set or remote control, until the display shows all your
stored track numbers in sequence.
Erasing a programme
You can erase the programme by:
– pressing 9 once in the STOP position;
– pressing 9 twice during playback;
– opening the CD tray.
• CLEARED is shown briefly and PROGRAM disappears
from the display.
English
3 To return to normal playback, press the respective
SHUFFLE or REPEAT button until the various
SHUFFLE/ REPEAT modes are no longer displayed.
– You can also press 9 to cancel your play mode.
3 Press PROGRAM to confirm the track number to be
stored.
™ The number of tracks programmed and total playing
time of the programme is shown briefly, then the
selected track and PROG.
…
™
: …is shown if total playing time is 100
minutes or more.
4 Repeat steps 2-3to select and store all desired tracks.
™ FULL is displayed if you attempt to programe more
than 40 tracks.
9
Page 10

TUNER
I
O
I
O
I
O
I
I
I
O
I
I
I
O
I
I
I
O
I
O
I
I
I
O
PEN
C
LO
S
E
P
R
ES
ET
T
U
NIN
G
M
C
1
5
8
C
O
M
P
A
C
T
A
U
D
IO
S
Y
S
T
E
M
I
O
I
O
I
O
I
I
I
O
I
I
I
O
I
I
I
O
I
O
I
I
I
O
P
EN
C
LO
S
E
PR
ES
ET
TU
N
ING
M
C
1
5
8
C
O
M
P
A
C
T
A
U
D
IO
S
Y
S
T
E
M
DBB
CD
T
U
N
E
R
P
R
O
G
R
A
M
S
H
U
F
F
L
E
X
CD player and CD handling
English
• If the CD player cannot read CDs correctly, use a
commonly available cleaning CD to clean the lens before
taking the set to repair. Other cleaning methods may
destroy the lens.
• The lens of the CD player should never be touched!
• Sudden changes in the surrounding temperature can
cause condensation to cloud over on the lens of your CD
player. Playing a CD is then not possible. Do not attempt
to clean the lens but leave the set in a warm
environment until the moisture evaporates.
• Always keep the CD compartment closed to avoid dust
on the lens.
• To take a CD out of its box, press the centre spindle
while lifting the CD. Always pick up the CD by the edge
and return the CD to its box after use to avoid
scratching and dust.
• To clean the CD, wipe in a straight line from the centre
towards the edge using a soft, lint-free cloth. Do not use
cleaning agents as they may damage the disc.
• Never write on a CD or attach any stickers to it.
Tuning to radio stations
1 Select TUNER source.
™ TUNER is displayed briefly.
2 Press BAND (or SOURCE on the set for 2 or more
seconds) to select your waveband.
3 To tune to a station, press TUNING ¡1 or 2™ (on the
remote control 11 or 22 ) and release when search
tuning starts.
™ The radio automatically tunes to a station with
sufficient reception. Display indication during
automatic tuning: SEARCH.
™ If a FM station is received in stereo, STEREO is
shown.
4 Repeat step 3if necessary until you find the desired
station.
• To tune to a weak station, press 5 or 6 briefly and
repeatedly until you have found optimal reception.
Programming radio stations
You can store up to a total of 40 radio stations in the
memory.
Automatic programming
Automatic programming will start with a chosen preset
number. From this preset number upwards, former programmed radio stations will be overwritten. The unit will only
programme stations which are not in the memory already.
1 Press PRESET 4 or 3 (¡ or ™ on the remote control) to
select the preset number where programming should
start.
Note: If no preset number is selected, default is
preset 1 and all your presets will be overwritten.
2 Press PROGRAM on the set or remote control for more
than 2 seconds to activate programming.
™ AUTO is displayed and available stations are
programmed in order of waveband reception
strength: FM followed by MW (AM) and then LW. The
last preset automatically stored will then be played.
™ Press 9 on the set to interrupt auto programming.
Manual programming
1 Tune to your desired station (see Tuning to radio
stations).
2 Press PROGRAM on the set or remote control to activate
programming.
™ PROGRAM flashes in the display.
3 Press PRESET 4 or 3 (¡ or ™ on the remote control) to
allocate a number from 1 to 40 to this station.
10
Page 11
RDS
I
O
I
O
I
O
I
I
I
O
I
I
I
O
I
I
I
O
I
O
I
I
I
O
PE
N
CL
O
S
E
P
R
ES
E
T
T
U
N
IN
G
M
C
1
5
8
C
O
M
P
A
C
T
A
U
D
IO
S
Y
S
T
E
M
I
O
I
O
I
O
I
I
I
O
I
I
I
O
I
I
I
O
I
O
I
I
I
O
P
E
N
CL
O
S
E
P
RE
S
E
T
T
U
N
IN
G
M
C
1
5
8
C
O
M
P
A
C
T
A
U
D
IO
S
Y
S
T
E
M
DBB
CD
T
U
N
E
R
P
R
O
G
R
A
M
S
H
U
F
F
L
E
E
O
4 Press PROGRAM again to confirm the setting.
™ PROGRAM disappears, the preset number and the
frequency of the preset station are shown.
5 Repeat the above four steps to store other stations.
• You can overwrite a preset station by storing another
frequency in its place.
Tuning to preset stations
Press PRESET 4 or 3 (¡ or ™ on the remote control) until
the desired preset station is displayed.
Changing tuning grid (some versions only)
In North and South America the frequency step between
adjacent channels in the AM and FM band are 10 KHz and
100 KHz respectively. In the rest of the world this step is
9 KHz and 50 KHz. Usually the frequency step has been
preset in the factory for your area if not:
1 Select TUNER source.
2 Press 9 on the set for at least 5 seconds.
™ The display shows either GRID 9 or GRID10.
Note: All preset stations will be lost and need to be repro-
grammed.
RDS (some versions only)
Radio Data System is a service that allows FM stations
to show additional information. If you are receiving a RDS
station, and the station name are displayed.
When automatic programming is used, RDS stations will be
programmed first.
Scrolling through different RDS information
• Press RDS/ CLOCK briefly and repeatedly to scroll
through the following information (if available):
– Station name
– Programme type such as NEWS, SPORT, POP M...
– Radio text messages
– Frequency
Note: If you press RDS/ CLOCK and the RDS signal is not
available NO RDS is displayed.
EON
Enhanced Other Network allows you to search for an
RDS station offering a certain programme type. If EON is
available, is shown.
Searching programme type (PTY)
PTY helps you find a desired programme type. To enable
PTY, first programme RDS stations into the tuner memory
(see Programming radio stations).
1 While receiving an RDS station, press RDS/ CLOCK
briefly until the programme type is displayed.
2 Press 2; or 9 on the set (¡ or ™ on the remote control)
until the desired programme type is displayed.
3 Press and hold down on TUNING 2™ ( 6 on the remote
control) to start searching.
– The radio tunes to a RDS station broadcasting this
programme type. If the programme type is not
available TYPE NOT FOUND is displayed.
• RDS Programme types
NO TYPE . . . . . . . No RDS programme type
NEWS . . . . . . . . . . . News services
AFFAIRS . . . . . . . Politics and current affairs
INFO . . . . . . . . . . . Special information programmes
SPORT . . . . . . . . . . Sports
EDUCATE . . . . . . . Education and advanced training
DRAMA . . . . . . . . . . Radio plays and literature
CULTURE . . . . . . . Culture, religion and society
SCIENCE . . . . . . . Science
VARIED. . . . . . . . . Entertainment programmes
POP M . . . . . . . . . . Pop music
ROCK M . . . . . . . . . Rock music
MOR M . . . . . . . . . . Light music
LIGHT M . . . . . . . Light classical music
CLASSICS . . . . . . Classical music
OTHER M . . . . . . . Special music programmes
English
11
Page 12

NOTES
RDS News and Traffic Announcement (TA)
English
You may set up the tuner in such a way that listening to
any sourceis interrupted by the news of a RDS station. This
only works if the RDS station broadcasts a NEWS signal
while sending the news.
1 Tune to the desired RDS station.
2 Press NEWS/TA once or more on the remote control to
select the news option.
™ NEWS ON, TA ON or OFF is displayed briefly.
™
NEWS
is displayed if you have activated the NEWS or
TA option and NEWS ON or TA ON is shown briefly.
Changing listening source will not disarm the
function.
Notes:
• When you receive RDS news or traffic announcements
during CD playback, playback will pause and you will be
able to hear the NEWS/TA. NEWS flashes in the display
during the broadcast. Playback resumes after the
broadcast has finished.
• If you are using the RDS NEWS/TA announcement with
an EON station, the whole network is searched for the
respective NEWS/TA.
Disarming RDS News and Traffic Announcement
There are a number of ways to disarm the news feature:
• Press NEWS/TA on the remote control during reception
of the news option.
• Press standby on the set or remote control.
• Tune to a non-RDS-station.
Environmental information
All unnecessary packaging material has been omitted. We
have done our utmost to make the packaging easy to separate into three mono-materials: cardboard (box), expandable polystyrene (buffer), polyethylene (bags, protective
foam).
Your set consists of materials which can be recycled if disassembled by a specialized company. Please observe the
local regulations regarding the disposal of packing
materials, exhausted batteries and old equipment.
12
Page 13

TROUBLESHOOTING
TECHNICAL DATA
WARNING
Do not open the set as there is a risk of electric
shock! Under no circumstances should you try to
repair the set yourself, as this will invalidate the
warranty
If a fault occurs, first check the points listed below before
taking the set for repair.
If you are unable to remedy a problem by following these
hints, consult your dealer or service centre.
Problem Possible cause Remedy
No sound /power Volume not adjusted Adjust the VOLUME
Headphones connected Disconnect headphones
AC mains not securely plugged to wall outlet Plug in properly
No reaction to Electrostatic discharge Disconnect the unit from the mains supply
controls reconnect affter a few seconds
TIMER/SLEEPER Clock time not set Set the correct clock time
does not work
Severe radio hum or Electrical interference: set too close to TV, Increase the distance
noise VCR or computer
Poor radio reception Weak radio signal FM: Direct the FM aerialwire for optimum
reception
NO DISC or CD badly scratched or dirty Replace/ clean CD, see Maintenance
DISC NOT CD-R(W) is blank or the disc is not finalised Use a finalised CD-R(W)
READABLE Laser lens steamed up Wait until lens has cleared
indication
The CD skips tracks CD damaged or dirty Replace or clean CD
SHUFFLE or PROGRAM is active Switch off SHUFFLE / PROGRAM
Remote control does Batteries exhausted Insert fresh batteries
not function properly Batteries incorrectly inserted Insert the batteries correctly
Distance/ angle between the set too large Reduce the distance/ angle
Amplifier
Output power . . . . . . . . . . . . . . . . . . . . . . . 2 x 15 W RMS
Output power. . . . . . . . . . . . . . . . . . . . . . . . 250 W PMPO
Digital out. . . . . . . . . . . . . . . . . . . . . . . . . . . . 0.5 V, 75 Ω
Line out. . . . . . . . . . . . . . . . . . . . . . . . . . . . 0.5 V, 1000 Ω
Signal-to-noise-ratio . . . . . . . . . . . . . . . . . ≥ 65 dBA (IEC)
Input sensitivity AUX . . . . . . . . . . . . . . . . 0.5 V (max. 2 V)
Impedance loudspeakers . . . . . . . . . . . . . . . . . . . . . . 8 Ω
Impedance headphones . . . . . . . . . . . . . . . 32 Ω -1000 Ω
Tuner
FM waveband. . . . . . . . . . . . . . . . . . . . . . 87.5 - 108 MHz
MW (AM) waveband . . . . . . . . . . . . . . . . . 531- 1602 kHz
LW waveband . . . . . . . . . . . . . . . . . . . . . . . 153 - 279 kHz
Sensitivity at 75 Ω
– mono, 26 dB signal-to-noise ratio . . . . . . . . . . . . 2.8 µV
– stereo, 46 dB signal-to-noise ratio . . . . . . . . . . 61.4 µV
Selectivity . . . . . . . . . . . . . . . . . . . . . . . . . . . . . . ≥ 28 dB
Total harmonic distortion. . . . . . . . . . . . . . . . . . . . . ≤ 5%
Frequency response. . . . . . . . . . . . 63 - 12,500 Hz (± 3 dB)
Signal-to-noise-ratio . . . . . . . . . . . . . . . . . . . . . ≥ 50 dBA
CD player
Frequency range. . . . . . . . . . . . . . . . 20 - 20,000 Hz (8 dB)
Signal-to-noise-ratio . . . . . . . . . . . . . . . . . . . . . . . 75 dBA
Speakers
2-Way Bass reflex system
Dimensions (wxhxd). . . . . . . . . . . . . . . . . 164 x 158 x 239
General
Dimensions (wxhxd). . . . . . . . . . . . . . . . . 164 x 158 x 254
Weight (with / without speakers) . . . . approx 7.5 / 3.0 kg
Standby power consumption. . . . . . . . . . . . . . . . . . < 7 W
English
Subject to modification
13
Page 14

COMMANDES ET CONNEXIONS
Panneau avant et section supérieure
1 STANDBY/ON y .
2 SOURCE. . . . . . . . sélection de mode pour CD/ TUNER/
Tuner : . . . . . . . . sélection de la bande de fréquences
3 PROGRAM
CD: . . . . . . . . . . . programmation des plages et aperçu
Français
Tuner: . . . . . . . . . programmation manuelle ou
Timer: . . . . . . . . . activation, réglage et désactivation
4 RDS/CLOCK . . . . . affichage de l’information RDS;
CD: . . . . . . . . . . .
5 SOUND CONTROL
DBB . . . . . . . . . . (Dynamic Bass Boost)
DSC . . . . . . . . . . (Digital Sound Control)
INCREDIBLE
SURROUND. . . . . crée un effet stéréo très prononcé
6 Display. . . . . . . . affiche l’état de l’appareil
7 VOLUME . . . . . . . réglage du volume et des
8 OPEN/CLOSE . . . . ouverture/ fermeture du plateau CD
9 2; ou PRESET 3 démarrage et mise en pause de la
14
mise en veille ou en marche de l’appareil
CD RW / AUX;
mise en marche de l’appareil
du programme;
automatique des stations du tuner;
de la fonction minuterie
réglage de la fonction horloge
sélection des options de lecture
aléatoire (shuffle) et de répétition
(repeat), par exemple répéter une
plage/ un programme CD/ un CD entier;
lecture des plages dans un ordre aléatoire
Accentuation des basses
Sélection des caractéristiques
sonores : OPTIMAL/CLASSIC/JAZZ/POP
paramètres sonores;
réglage de l'heure et des minutes pour
les fonctions d’horloge/de minuterie
lecture du CD;
sélection d’une station de radio
préréglée (par incrément);
Remarques: • sélectionnez d'abord la source sonore désirée (par exemple CD, CD R) et appuyez ensuite sur la touche de fonction correspondante (par exemple. 2)
• les touches de fonction CD sur la télécommande peuvent être utilisées pour un CD R.
9 ou PRESET 4 . pour arrêter la lecture du CD ou
effacer un programme CD; active /
désactive le mode de démonstration;
sélection d’une station de radio
préréglée (par décrément)
0 2™, ¡1 ou TUNING 3,4
CD: . . . . . . . . . . . effectuer une recherche rapide avant
ou arrière au sein d’une plage;
passer au début de la plage en
cours/suivante ou précédente
Tuner: . . . . . . . . . (haut, bas) rechercher des stations
de radio
Panneau arrière
! p . . . . . . . . . . . . .
@
AUX IN RIGHT/ LEFT
# SPEAKERS 8 Ω . .
$ LINE OUT
LEFT/ RIGHT . . . . pour connecter l’entrée audio d'un
% DIGITAL OUT . . . .
^ AC MAINS . . . . . une fois que tous les branchements
& FM AERIAL 75 Ω pour brancher le fil d'antenne fourni
* AM (MW) AERIAL pour brancher la boucle d’antenne
prise casque stéréo 3,5 mm (16-150 Ω)
pour connecter la sortie audio d'un
appareil complémentaire
pour connecter les haut-parleurs fournis
appareil complémentaire
pour connecter un système CD-(RW)
afin d’effectuer des enregistrements
numériques de CD, ou un autre système
pour une sortie sonore alternative
ont été effectués, branchez le
cordon d'alimentation dans la prise
de courant murale
ou une prise d'antenne murale
AM (MW) fournie
Télécommande
y . . . . . . . . . . . . . . mise en position d’attente de
CD, TUNER, AUX, CDR
l’équipement
pour sélectionner la source sonore
respective
TIMER . . . . . . . . . . . . active et désactive la minuterie
SLEEP . . . . . . . . . . . .
DBB . . . . . . . . . . . . . (Dynamic Bass Boost)
DSC . . . . . . . . . . . . . (Digital Sound Control)
INCR.SURR . . . . . . . . crée un effet stéréo très prononcé
MUTE . . . . . . . . . . . . interruption et reprise de la
BAND . . . . . . . . . . . . sélection de la bande de fréquences
NEWS/TA . . . . . . . . .
VOLUME –, + . . . . . . réglage du volume
2; . . . . . . . . . . . . . . démarrage/ suspension de la lecture
¡, ™
CD: . . . . . . . . . . . . . . pour passer au début de la plage en
Tuner: . . . . . . . . . . . (bas, haut) sélectionner une station
9 . . . . . . . . . . . . . . arrêter la lecture du CD ou effacer
5, 6
CD :. . . . . . . . . . . . . .
Tuner : . . . . . . . . . . .
REPEAT . . . . . . . . . . . répéter une plage/un programme
SHUFFLE . . . . . . . . . . lire les plages d’un CD dans un ordre
PROGRAM
CD: . . . . . . . . . . . . . . programmer les plages et visualiser
Tuner: . . . . . . . . . . . programmer les stations radio ou
active et désactive l’heure
d’extinction;
l’heure d’extinction
accentuation des basses
sélection des caractéristiques
sonores: OPTIMAL/CLASSIC
restitution sonore
mise en service de l’annonce de nouvelles RDS (pas pour toutes les versions)
et des informations sur le trafic
du CD
cours/ précédente ou suivante;
de radio préréglée;
un programme CD
effectuer une recherche en arrière ou
en avant au sein d’une plage/ d’un CD;
(bas, haut) rechercher des stations
radio;
CD/ un CD entier;
aléatoire
le programme;
démarrer la programmation
automatique
pour sélectionner
/JAZZ/POP
Page 15
INFORMATIONS D’ORDRE GENERAL
AUX in
12
ATTENTION
L’utilisation des commandes ou réglages ou le non-respect des procédures ci-incluses peuvent se traduire par une exposition dangereuse à l’irradiation.
Accessoires livrés avec l’équipement
- 2 haut-parleurs
- télécommande avec piles
- boucle d'antenne AM (MW)
- fil d’antenne FM
Entretien général
• N’exposez jamais l’appareil, les piles, les disques
compacts ou les cassettes à l'humidité, la pluie, au
sable ni à la chaleur excessive d’une installation de
chauffage ou à la lumière du soleil.
• Pour nettoyer l’appareil, utilisez une peau de chamois
douce, légèrement humide. N’utilisez aucun détergent
contenant de l'alcool, de l'ammoniaque, du benzène ou
des abrasifs; vous risqueriez en effet d’abîmer la façade
extérieure de l’appareil.
Informations relatives à l'environnement
Tous les matériaux d'emballage inutiles ont été supprimés.
Nous avons fait de notre mieux pour que les matériaux
d'emballage puissent être triés facilement en trois catégories : carton (boîte), polystyrène expansible (matériel tampon), polyéthylène (sachets, mousse de protection).
ALIMENTATION
Piles pour télécommande
• Ouvrez le compartiment de piles, puis insérez de la
manière indiquée six piles de type AA, R06 ou UM3 (de
préférence des piles alcalines), en respectant la polarité
correcte, comme indiqué par les symboles (+) et (–) à
l’intérieur du compartiment.
Important! Enlevez les piles si elles sont usagées ou si
l’appareil ne doit pas être utilisé pendant une
longue période.
Les piles contiennent des substances chimiques,
donc elles devront être mises proprement au rebut.
Branchement des haut-parleurs
Les haut-parleurs sont raccordés à l’aide de connecteurs à
encliquetage. Utilisez-les de la façon indiquée ci-dessous.
– Connectez le fil sans repère à la borne rouge et le fil à
repère noir à la borne noire.
• Lorsque la prise casque est utilisée, les haut-parleurs
sont désactivés.
speakers
8 Ω
LEFT
RIGHT
+
+
RIGHT
LEFT
–
–
Tension d’alimentation
1 Vérifiez que la tension d’alimentation indiquée sur la plaque
signalétique située sous l’appareil correspond à la tension
du réseau. Dans le cas contraire, contactez votre revendeur ou
le service après-vente.
2 Si votre appareil dispose d'un sélecteur de tension sur sa
face arrière, réglez-le en fonction de la tension du réseau.
3 Il ne vous reste plus désormais qu’à brancher le cordon
d'alimentation dans la prise murale pour pouvoir utiliser
l’appareil.
™ L’affichage de l’horloge …: …clignote.
4 Pour déconnecter entièrement l’appareil, débranchez le
cordon de la prise murale.
VEILLE AUTOMATIQUE
Grâce à sa fonction de gestion de l’énergie, l’appareil se
met automatiquement en veille lorsque :
• aucune opération n’est effectuée dans les 15 minutes
qui suivent l’arrêt d’un CD;
• aucune opération n’est effectuée en 24 heures.
Informations relatives a la sécurité
• Installez l’appareil sur une surface rigide et plate de façon à
ce qu’il ne puisse pas être incliné. Vérifiez que l’air circule
facilement autour de l’appareil afin d’éviter toute surchauffe.
• Les pièces mécaniques de l’appareil contiennent des paliers
autolubrifiants et elles ne doivent donc pas être huilées ni
lubrifiées.
Ce matériel satisfait aux impératifs de brouillage
radio de la Communauté Européenne.
Français
15
Page 16
CONNEXIONS
DBB
CD
S
H
U
F
F
L
E
P
R
O
G
R
A
M
D
B
B
I
O
I
O
IO
II
I
O
I
I
I
O
I
I
I
O
I
I
I
O
I
O
I
I
I
O
P
E
N
CL
O
S
E
PR
E
SE
T
T
U
N
IN
G
M
Z
3
C
O
M
P
A
C
T
A
U
D
IO
S
Y
S
T
E
M
I
O
I
O
IO
II
I
O
I
I
I
O
I
I
I
O
I
I
I
O
I
O
I
I
I
O
P
E
N
CL
OS
E
P
R
E
SE
T
TU
N
IN
G
F0NCTIONS DE BASE
AUX IN
Vous pouvez connecter les bornes audio OUT gauche et
droite d’un autre appareil, par exemple CDR, lecteur de
cassettes, aux bornes gauche et droite AUX IN correspondantes situées à l'arrière de l’appareil.
• Utilisez les boutons de réglage du son du MZ-3 pour
régler le son de l'autre système.
Français
• Pour lire un CD-R(W) connecté, sélectionnez la source
CD-R(W).
LINE OUT (pas pour le CDR-W)
Vous pouvez connecter la borne LINE IN d’un DAT ou d’un
magnétophone à la borne LINE OUT à l'arrière de l’appareil.
• Réglez le son à l’aide des boutons de réglage de l'autre
système.
• Lorsque vous effectuez un enregistrement avec un CDR(W), sélectionnez la source CD sur le MZ-3.
DIGITAL OUT (mode CD uniquement)
Vous pouvez connecter la borne DIGITAL IN d'un CD-R(W)
ou d’un lecteur DAC externe à la borne DIGITAL OUTà
l'arrière de l’appareil.
• Lorsque vous effectuez un enregistrement avec un
CD-R(W), sélectionnez la source CD sur le MZ-3.
• Pour lire un CD-R(W) connecté, sélectionnez la source
CD-R(W).
16
DIGITAL
out
RL
LINE out
Réglage du volume et du son
1 Tourner le bouton VOLUME dans le sens inverse des
aiguilles d'une montre ou dans le sens des aiguilles
d'une montre pour diminuer ou augmenter
respectivement le volume de l’appareil (ou appuyez sur
VOLUME –, + de la télécommande).
™ L’écran affiche le niveau du volume VOL et un
chiffre entre 0 et 32.
2 Appuyez une ou plusieurs fois sur DBB, INCR.SURR ou
DSC sur la télécommande pour sélectionner les effets
sonores désirés :
,
Mise en marche
L’appareil peut être mis en marche de 3 façons différentes :
• appuyez sur y STANDBY/ON sur l’appareil et la dernière
source sélectionnée est activée;
• appuyez sur SELECT SOURCE sur l’appareil et la dernière
source sélectionnée est activée;
• appuyez sur CD, TUNER, CDR ou AUX sur la
télécommande.
Pour mettre l’appareil en veille, appuyez une fois sur
y STANDBY/ON sur l’appareil (y sur la télécommande).
– Le niveau du volume, les réglages de son interactifs, la
dernière source sélectionnée et les présélections du
syntoniseur seront conservés dans la mémoire de
l’appareil.
OPTIMAL (aucune indication) /CLASSIC ()/JAZZ
()/POP ()/OPTIMAL... .
Remarques :
– L'effet INCREDIBLE SURROUND peut varier en fonction
du type de musique.
– Vous pouvez également sélectionner les effets sonores
désirés directement sur l’appareil (Voir Utilisation du
bouton SOUND CONTROL).
3 Appuyez sur MUTE sur la télécommande pour
interrompre instantanément la restitution sonore.
– La lecture se poursuit sans son et l’écran affiche
MUTE.
4 Pour activer la restitution sonore vous pouvez :
– appuyer une nouvelle fois sur MUTE;
– utiliser les boutons de réglage du volume;
– changer la source.
et
Page 17

Utilisation du bouton Sound Control
IO
IO
IO
II
IO
II
IO
II
IO
IO
O
C
P
R
MC 158 COM
PACT AUDIO SYSTEM
IOIO
IO
II
IO
II
IO
II
IO
IO
O
C
P
R
MC 158 COM
PACT AUDIO SYSTEM
FM AM PM
R
E
P
E
A
T
A
L
L
DBB
C
D
T
U
N
E
R
S
T
E
R
E
O
N
E
W
S
S
L
E
E
P
P
R
O
G
R
A
M
S
H
U
F
F
L
E
Vous pouvez également régler les paramètres sonores
exclusivement sur l’appareil :
1 Appuyez une ou plusieurs fois sur SOUND CONTROL
pour sélectionner les diverses options :
• une fois:
L’écran affiche DBB OFF;
Si DBB est activé, l’écran affiche DBB ON et
DBB
,
• deux fois:
L’écran affiche DSC état OPTIMAL.
(L’écran affiche JAZZ, POP, ou CLASSIC et les
symboles , respectifs s’ils sont
sélectionnés)
• trois fois:
L’écran affiche Incredible Surround (IS) état
IS OFF.
Si IS est activé, l’écran affiche IS ON et
2 Pour chaque réglage sonore, tournez le bouton VOLUME
dans n'importe quelle direction pour sélectionner les
options ON, OFF ou DSC.
3 Appuyez une nouvelle fois sur SOUND CONTROL pour
confirmer.
• L’écran affiche le réglage sonore suivant à effectuer.
• Une fois que le réglage IS a été confirmé, l’écran
Mode de démonstration
• Lorsque l’appareil est en veille, appuyez sur 9 pendant
plus de 5 secondes.
™ Des messages de démonstration défilent en continu
• Répétez l’opération pour désactiver.
™ DEMO OFF défile sur l’écran.
.
affiche brièvement le niveau du volume VOLpuis
revient à l’affichage de la lecture en cours.
sur l’écran
HORLOGE
M
M
C
C
1
1
5
5
8
8
C
C
O
O
M
M
P
P
A
I
I
O
O
I
I
O
O
I
I
O
O
I
I
I
I
I
I
O
O
I
I
I
I
I
I
O
O
I
I
I
I
I
I
O
O
I
I
O
O
I
I
I
I
I
I
Réglage de l'horloge
On distingue deux méthodes de réglage possibles de l’horloge:manuelle ou automatique à l’aide de RDS.
Réglage automatique d’horloge
(seulement les versions RDS)
1 Réglez sur un émetteur RDS (voir SYNTONISEUR).
2 Appuyez sur RDS/ CLOCK pendant 2 secondes ou plus.
™ SEARCH RDS TIME est affiché pendant 90
secondes au maximum; ensuite, l’heure est affichée.
™ NO RDS TIME
signal d’heure n’a été reçu. Dans ce cas, vous serez dans
l’obligation de régler l’horloge manuellement.
Réglage manuel d’horloge
1 En mode d’attente, appuyez sur CLOCK.
™
Les chiffres d’horloge pour les heures 0:00 clignotent.
2 Tournez VOLUME pour régler les heures: dans le sens
horaire pour avancer et dans le sens anti-horaire pour
revenir en arrière
3 Appuyez à nouveau sur CLOCK.
™ Les chiffres d’horloge pour les minutes 0:00
clignotent.
4 Tournez VOLUME pour régler les minutes: dans le sens
horaire pour avancer et dans le sens anti-horaire pour
revenir en arrière.
5 Appuyez sur CLOCK pour confirmer l’heure.
A
C
C
T
T
A
A
U
U
D
D
IO
IO
S
S
Y
Y
S
S
T
T
E
E
M
M
CD
DBB
T
U
N
E
R
R
E
P
E
A
T
A
L
L
S
L
E
P
R
O
G
R
A
E
M
P
S
H
U
S
F
T
F
E
L
R
E
E
O
N
E
W
S
FM AM PM
O
O
C
C
R
P
PR
U
U
T
T
est affiché ce qui signifie qu’aucun
N
N
PE
PE
E
E
S
OS
O
L
L
T
T
E
E
ES
ES
G
G
IN
IN
N
N
MINUTERIE (TIMER)
Réglage de la minuterie
• L’appareil peut être utilisé comme réveil, auquel cas il
se met en marche à une heure prédéfinie. Pour pouvoir
utiliser la minuterie, l’horloge doit d’abord être mise à
l’heure.
• Si, au moment du réglage, aucun bouton n’est utilisé
pendant plus de 90 secondes, l’appareil sort du mode de
réglage de la minuterie.
1 En mode veille, appuyez sur PROGRAM sur l’appareil
pendant au moins 2 secondes.
™ L’écran affiche TUNER ou CD et N clignote.
™ L’écran affiche SET CLOCK TIME (réglez
l’heure de l’horloge) si l'horloge n'a pas été réglée.
2 Tournez VOLUME dans le sens des aiguilles d'une
montre.
™ L’écran affiche la séquence CD, TUNER, CD...
3 Appuyez sur PROGRAM (sur l’appareil) pour confirmer la
source.
™ L’écran affiche ON 0:00 (marche), les chiffres
d’horloge pour les heures 0:00 clignotent.
4 Tournez VOLUME pour régler les heures: dans le sens
des aiguilles d'une montre pour avancer; dans le sens
inverse des aiguilles d'une montre pour reculer.
Français
17
Page 18

TIMER/SLEEP
CD
S
H
U
F
F
L
E
P
R
O
G
R
A
M
D
B
B
I
O
I
O
IO
II
I
O
I
I
I
O
I
I
I
O
I
I
I
O
I
O
I
I
I
O
P
EN
C
LO
S
E
P
R
E
S
ET
T
U
N
IN
G
M
C
1
5
8
C
O
M
P
A
C
T
A
U
D
IO
S
Y
S
T
E
M
I
O
I
O
IO
II
I
O
I
I
I
O
I
I
I
O
I
I
I
O
I
O
I
I
I
O
P
EN
C
LO
S
E
P
R
E
SE
T
T
U
N
IN
G
M
C
1
5
8
C
O
M
P
A
C
T
A
U
D
IO
S
Y
S
T
E
M
LECTEUR CD
5 Appuyez de nouveau sur TIMER ou sur PROGRAM.
™ Les chiffres de l'horloge pour les minutes clignotent.
6 Tournez VOLUME pour régler les minutes: dans le sens
des aiguilles d'une montre pour avancer; dans le sens
inverse des aiguilles d'une montre pour reculer.
Français
7 Appuyez sur TIMER ou sur PROGRAM pour confirmer l’heure.
– La minuterie est désormais réglée et activée.
L’affichage indique N.
Activation et désactivation de la minuterie (TIMER)
Appuyez soit:
• sur la télécommande,
sur TIMER pendant la lecture ou en mode veille;
• sur l’appareil,
sur PROGRAM en mode veille.
™ N est affiché sur l’écran si elle est activée et
disparaît si elle est désactivée.
Activation et désactivation du programmateur
d’extinction (SLEEP)
Le programmateur d’extinction permet à l’appareil de
s’éteindre de lui-même après une durée déterminée. Pour
pouvoir utiliser le programmateur d’extinction, l’horloge
doit d’abord être mise à l’heure.
• Pendant la lecture, pour sélectionner et activer l’heure
d’extinction désirée, appuyez une ou plusieurs fois sur
SLEEP sur la télécommande.
• Pour désactiver, appuyez une ou plusieurs fois sur SLEEP
18
™ SLEEP s’affiche sur l’écran ainsi que l’une des
options d’heure d’extinction, dans l’ordre : 60, 45,
30, 15, SLEEP OFF, 60...
sur la télécommande jusqu’à ce que l’indication
SLEEP OFF s’affiche ou appuyez sur STANDBY sur
l’appareil ou sur la télécommande.
™ SLEEP disparaît de l’écran.
Lecture d’un CD
Ce lecteur de CD lit des disques audio y compris les CD-R
(enregistrables) et les CD-RW (réinscriptibles).
• Les CD-ROM, CD-I, CDV, VCD, DVD, MP3 ou CD pour
ordinateurs, ne sont par contre pas compatibles.
1 Sélectionnez la source CD.
2 Appuyez sur OPEN/CLOSE pour ouvrir le plateau CD.
™ OPEN est affiché lorsque vous ouvrez le
compartiment CD.
3 IIntroduisez un CD avec la face imprimée orientée vers
le haut et appuyez sur OPEN/CLOSE pour fermer le
compartiment CD.
™ READ est affiché lorsque le lecteur parcourt le
contenu du CD, et le nombre total de plages et la
durée de lecture sont affichés.
™ NO DISC est affiché lorsque le compartiment CD
est vide.
™ DISC NOT READABLE passe en revue sur
l’affichage si vous avez introduit un CD
incorrectement ou un CD-R(W) pas bien fini.
4 Appuyez sur 2; pour démarrer la lecture.
™ Le numéro de la plage lue et la durée de lecture
écoulée de la plage sont affichés pendant la lecture
du CD.
5 Pour interrompre la lecture, appuyez sur 2;. Appuyez de
nouveau sur 2; pour reprendre la lecture.
™ L’affichage se fige et la durée de lecture écoulée
clignote lorsque la lecture est interrompue.
6 Pour arrêter la lecture du CD, appuyez sur 9.
Remarque : la lecture du CD s'arrête également lorsque:
– le plateau CD est ouvert;
– le CD est arrivé à la fin;
–
vous sélectionnez une autre source :
TAPE, CD RW ou AUX.
Sélection d'une autre plage
• Appuyez une ou plusieurs fois sur ¡1 ou sur 2™ sur
l’appareil, (sur la télécommande ¡ ou ™) jusqu’à ce que
le numéro de la plage désirée apparaisse sur l’écran.
• Si vous avez sélectionné un numéro de plage juste après
avoir chargé un CD ou en PAUSE, vous devrez appuyer
sur 2; pour démarrer la lecture.
Rechercher un passage sur une plage
1 Maintenez enfoncée ¡1 ou 2™ (sur la télécommande
11 ou 22).
– Le CD est lu à vitesse rapide et à faible volume.
2 Lorsque vous reconnaissez le passage que vous
souhaitez écouter, relâchez 11 ou 22.
– La lecture reprend normalement.
Remarque : Au cours d’un programme CD ou si SHUFFLE/
REPEAT est activée, la recherche ne peut
s’effectuer qu’à l’intérieur d’une même plage.
Page 19
Autres modes de lecture: SHUFFLE et REPEAT
CD
S
H
U
F
F
L
E
P
R
O
G
R
A
M
D
B
B
I
O
I
O
IO
II
I
O
I
I
I
O
I
I
I
O
I
I
I
O
I
O
I
I
I
O
PE
N
C
LO
SE
P
R
ES
E
T
T
U
N
IN
G
M
C
1
5
8
C
O
M
P
A
C
T
A
U
D
IO
S
Y
S
T
E
M
I
O
I
O
IO
II
I
O
I
I
I
O
I
I
I
O
I
I
I
O
I
O
I
I
I
O
P
EN
C
LO
SE
P
R
ES
ET
T
U
NIN
G
M
C
1
5
8
C
O
M
P
A
C
T
A
U
D
IO
S
Y
S
T
E
M
Vous pouvez sélectionner et changer les divers modes de
lecture avant ou pendant la lecture. Les modes de lecture
peuvent aussi être combinés avec PROGRAM.
SHUFFLE . . . . . . . . . . les plages du CD entier /
du programme sont lues dans un
ordre aléatoire
SHUFFLE et
REPEAT ALL. . . . . . . . pour répéter le CD entier /
le programme continuellement dans
un ordre aléatoire
REPEAT ALL. . . . . . . . pour répéter le CD entier /
le programme continuellement
REPEAT . . . . . . . . . . . pour répéter continuellement la
plage en cours
1 Pour choisir votre mode de lecture avant ou pendant la
lecture, appuyez soit:
• sur SHUFFLE ou REPEAT sur la télécommande;
• sur CLOCK sur l’appareil de façon répétée jusqu’à faire
apparaître la fonction souhaitée.
Programmation des numéros de plage
Vous devez être sur STOP pour sélectionner et mémoriser
vos plages de CD dans l’ordre souhaité. Vous pouvez, si
vous le souhaitez, mémoriser une plage plusieurs fois.
Jusqu’à 40 plages peuvent être mémorisées.
1 Appuyez sur PROGRAM sur l’appareil ou sur la
télécommande pour passer en mode programmation.
™ Un numéro de plage s’affiche et PROGRAM clignote.
5 Pour démarrer la lecture de votre programme CD, appuyez
sur 2;.
Visualisation du programme
• Lorsque vous êtes sur STOP, maintenez la touche PROGRAM
de l’appareil ou de la télécommande enfoncée pour afficher
dans l’ordre tous les numéros de plage mémorisés.
Effacement d'un programme
Vous pouvez effacer le programme en:
– appuyant une fois sur 9 en position STOP;
– appuyant deux fois sur 9 pendant la lecture;
– ouvrant le plateau CD.
• CLEARED s’affiche brièvement et PROGRAM disparaît de
l’écran.
Français
2 Appuyez sur 2; pour démarrer la lecture si vous êtes
sur STOP.
™ Si vous avez sélectionné SHUFFLE, la lecture démarre
automatiquement.
3 Pour revenir au mode de lecture normal, appuyez
respectivement sur le bouton SHUFFLE ou REPEAT
jusqu’à ce que les divers modes SHUFFLE/ REPEAT ne
soient plus affichés.
– Vous pouvez également appuyer sur 9 pour annuler
votre mode de lecture.
2 Utilisez ¡1 ou 2™ sur l’appareil, (sur la télécommande
¡ ou ™) pour sélectionner le numéro de plage désiré.
3 Appuyez sur PROGRAM pour confirmer la plage à mémoriser.
™
Le nombre de plages programmées et la durée de lecture
totale du programme s’affichent brièvement, puis la
plage sélectionnée et PROG apparaissent sur l’écran.
…
™
: …s’affiche si la durée totale de lecture est de
100 minutes ou plus.
4 Répétez les étapes 2-3pour sélectionner et mémoriser
toutes les plages souhaitées.
™ FULL s’affiche si vous essayez de programmer
plus de 40 plages.
19
Page 20

SYNTONISEUR NUMERIQUE
I
O
I
O
I
O
I
I
I
O
I
I
I
O
I
I
I
O
I
O
I
I
I
O
PEN
C
LO
S
E
P
R
ES
ET
T
U
NIN
G
M
C
1
5
8
C
O
M
P
A
C
T
A
U
D
IO
S
Y
S
T
E
M
I
O
I
O
I
O
I
I
I
O
I
I
I
O
I
I
I
O
I
O
I
I
I
O
P
EN
C
LO
S
E
PR
ES
ET
TU
N
ING
M
C
1
5
8
C
O
M
P
A
C
T
A
U
D
IO
S
Y
S
T
E
M
DBB
CD
T
U
N
E
R
P
R
O
G
R
A
M
S
H
U
F
F
L
E
X
Entretien du lecteur de CD et des CD
• Si le lecteur de CD ne parvient pas à lire correctement
les CD, utilisez un CD de nettoyage en vente dans le
commerce pour nettoyer la lentille avant d’envoyer
l’appareil en réparation. Toutes les autres méthodes de
nettoyage sont susceptibles d’endommager la lentille.
• Ne touchez jamais la lentille du lecteur de CD!
Français
• Des changements brusques de température peuvent
entraîner une formation de buée sur la lentille de votre
lecteur de CD. La lecture d'un CD devient alors
impossible. N'essayez pas de nettoyer la lentille; laissez
plutôt l’appareil dans un environnement chaud jusqu’à
ce que l'humidité ait disparu.
• Laissez toujours le compartiment CD fermé pour éviter
que de la poussière ne se dépose sur la lentille.
• Pour extraire un CD de son boîtier, appuyez sur l’axe
central tout en soulevant le CD. Attrapez toujours le CD
par le bord et remettez-le dans son boîtier aussitôt
après utilisation de façon à le protéger contre les
rayures et de la poussière.
• Pour nettoyer le CD, utilisez un chiffon doux non
pelucheux en procédant en ligne droite du centre vers le
bord. N’utilisez pas de détergents; ces derniers risquent
en effet d’abîmer le disque.
• Ne jamais écrire sur un CD ni y apposer d’autocollants.
20
Recherche des stations radio
1 Sélectionnez la source TUNER.
™ TUNER s’affiche brièvement.
2 Appuyez sur BAND (ou SOURCE sur l’appareil pendant
au moins 2 secondes) pour sélectionner votre bande de
fréquences.
3 Pour rechercher une station, appuyez sur TUNING ¡1
ou 2™ (sur la télécommande 11 ou 22) et relâchez le
bouton lorsque la recherche démarre.
™ La radio s’arrête automatiquement lorsque la
réception est suffisante. Pendant la recherche
automatique, l’écran affiche: SEARCH.
™ Si une station FM est reçue en stéréo, STEREO est
affiché.
4 Répétez l’étape 3si nécessaire jusqu’à ce que vous
trouviez la station désirée.
• Pour rechercher une station dont le signal est plus faible,
appuyez sur 5 ou 6 brièvement et de façon répétée
jusqu’à ce que vous trouviez la réception optimale.
Programmation des stations de radio
Vous pouvez mémoriser jusqu'à 40 stations de radio.
Programmation automatique
La programmation automatique démarre avec un numéro
de présélection déterminé. A partir de ce numéro présélectionné, les stations de radio préalablement programmées
seront effacées. L’appareil programmera uniquement les
stations qui ne sont pas déjà en mémoire.
1 Appuyez sur PRESET 4 ou 3 (¡ ou ™ sur la télé-
commande) pour sélectionner le numéro de présélection
à partir duquel la programmation doit démarrer.
Remarque: si aucun numéro de présélection n'est
sélectionné, la présélection 1 sera utilisée par
défaut et toutes vos présélections seront
effacées.
2 Appuyez sur PROGRAM sur l’appareil ou sur la
télécommande pendant 2 secondes au minimum pour
activer la programmation.
™ AUTO s’affiche et les émetteurs disponibles
programmés dans l’ordre de la puissance de
réception de la bande: FM suivi de MW (AM) et
ensuite LW. Le dernier préréglage automatiquement
mémorisé est alors choisi.
™ Appuyez sur 9 sur l’appareil pour interrompre la
programmation automatique.
Programmation manuelle
1 Recherchez la station souhaitée (voir Recherche des
stations radio).
2 Appuyez sur PROGRAM sur l’appareil ou sur la
télécommande pour activer la programmation.
™ PROGRAM clignote sur l’écran.
Page 21

RDS
I
O
I
O
I
O
I
I
I
O
I
I
I
O
I
I
I
O
I
O
I
I
I
O
PE
N
CL
O
S
E
P
R
ES
E
T
T
U
N
IN
G
M
C
1
5
8
C
O
M
P
A
C
T
A
U
D
IO
S
Y
S
T
E
M
I
O
I
O
I
O
I
I
I
O
I
I
I
O
I
I
I
O
I
O
I
I
I
O
P
E
N
CL
O
S
E
P
RE
S
E
T
T
U
N
IN
G
M
C
1
5
8
C
O
M
P
A
C
T
A
U
D
IO
S
Y
S
T
E
M
DBB
CD
T
U
N
E
R
P
R
O
G
R
A
M
S
H
U
F
F
L
E
E
O
3 Appuyez sur PRESET 4 ou 3 (¡ ou ™ sur la
télécommande) pour affecter un numéro de 1 à 40 à
cette station.
4 Appuyez sur PROGRAM de nouveau pour confirmer le
réglage.
™ PROGRAM disparaît et le numéro de présélection et la
fréquence de la station présélectionnée s’affichent.
5 Répétez les quatre opérations précédentes pour mettre
en mémoire d'autres stations.
• Vous pouvez effacer une station présélectionnée en
mémorisant une autre fréquence à sa place.
Recherche des stations préréglées
Appuyez sur PRESET 4 ou 3 (¡ ou ™ sur la télécommande) jusqu’à ce que la station préréglée soit affichée.
Changement de grille de réglage
(pour certaines versions seulement)
En Amérique du Nord et du Sud, le pas de fréquence entre
les canaux adjacents sur la bande AM et FM est de
10 KHz et de 100 KHz respectivement. Dans le reste du
monde, ce pas est de 9 KHz et de 50 KHz. Généralement
le pas de fréquence a été présélectionné à l'usine en fonction de votre zone; dans le cas contraire:
1 Sélectionnez la source TUNER.
2 Appuyez sur 9 sur l’appareil pendant au moins
5 secondes.
™
Remarque: Toutes les stations préréglées seront perdues et
L’écran affiche soit GRID 9 soit GRID10.
devront être reprogrammées.
RDS (pas pour toutes les versions)
Le Système de Données Radio est un service qui permet
aux émetteurs FM d’envoyer des informations complémentaires. Si vous recevez un signal d’un émetteur RDS,
et le nom de l’émetteur sont affichés.
En mode de programmation automatique, les émetteurs
RDS sont programmés en premier lieu.
Défilement des différentes informations RDS
• Appuyez brièvement et à plusieurs reprises sur RDS/
CLOCK pour faire défiler les informations suivantes
(si disponible):
– Nom de l’émetteur
– Type de programme tels que: NEWS, SPORT, POP M, ....
– Messages de texte radio
– Fréquence
Remarque:
Si vous appuyez sur RDS/ CLOCK et aucun signal RDS
n’est disponible, l’affichage indique NO RDS.
EON
Enhanced Other Network (= Autres Réseaux Sollicités) vous per-
met de rechercher un émetteur RDS ayant un certain type de programmation. Si EON est disponible, sera affiché.
Recherche d’un type de programme (PTY)
PTY vous permet de trouver un type de programme à votre
choix. Pour autoriser PTY, programmez d’abord les stations
RDS dans la mémoire de syntoniseur (Voir Réglage sur les
émetteurs radio).
1 A la réception d’un émetteur RDS, appuyez brièvement
sur RDS/ CLOCK jusqu’à ce que le type de programme
soit affiché.
2 Appuyez sur 2; ou 9 de l’appareil (¡ ou ™ de la
télécommande) jusqu’à ce que le type de programme
souhaité soit affiché.
3 Maintenez enfoncé TUNING 2™ (6 de la
télécommande) pour commencer la recherche.
– La radio cherche alors un émetteur RDS diffusant le
type de programme en question. Si ce type de
programme n’est pas disponible, TYPE NOT
FOUND sera affiché.
• Types de programme RDS
NO TYPE . . . . . . . Aucun type de programme RDS
NEWS . . . . . . . . . . . Service d’informations
AFFAIRS . . . . . . . Affaires politiques et courantes
INFO . . . . . . . . . . . Programme d’informations spéciaux
SPORT . . . . . . . . . . Sports
EDUCATE . . . . . . . Education et formation pour initiés
DRAMA . . . . . . . . . . Pièces radiodiffusées et littérature
CULTURE . . . . . . . Culture, religion et société
SCIENCE . . . . . . . Sciences
VARIED. . . . . . . . . Programmes de divertissement
POP M . . . . . . . . . . Musique Pop
ROCK M . . . . . . . . . Musique Rock
MOR M . . . . . . . . . . Musique légère
LIGHT M . . . . . . . Musique classique légère
CLASSICS . . . . . . Musique classique
OTHER M . . . . . . . Programmes spéciaux de musique
Français
21
Page 22

NOTES
Annonce de nouvelles RDS et les informations
sur le trafic (TA)
Vous pouvez régler la radio de telle façon que l’écoute
d’une des sources sera immédiatement interrompue s’il y a
des nouvelles en provenance d’un émetteur RDS. Ceci ne
fonctionne que si l’émetteur RDS diffuse un signal NEWS
pendant l’émission d’informations.
Français
1 Sélectionnez l’émetteur RDS souhaité.
2 Appuyez une ou plusieurs fois sur NEWS/TA de la
télécommande pour sélectionner l’annonce de nouvelles.
™ NEWS ON (NEWS activé), TA ON (TA activé) ou
OFF (désactivé) est affiché brièvement.
™ NEWS est affiché dès que vous activez l’option NEWS
ou TA et NEWS ON ou TA ON apparaît brièvement.
Même si vous changez de source d’écoute, la
fonction ne sera pas mise hors service.
Remarques:
• Dès que vous recevez des nouvelles RDS ou des
informations sur le trafic pendant la lecture CD, la
lecture s’arrête pour vous permettre d’écouter les
informations. Pendant l’émission NEWS clignote sur
l’affichage. La lecture reprend directement après
l’émission de ces informations.
• Si vous utilisez l’annonce de nouvelles RDS NEWS/TA
sur un émetteur EON, il y aura recherche d’informations
sur le réseau total.
Désactivation de l’annonce des nouvelles RDS et les
informations sur le trafic
Il y a plusieurs façons de désactiver l’option informations:
• Appuyez sur NEWS/TA de la télécommande pendant le
réception des nouvelles.
• Appuyez sur la touche de veille de l’appareil ou de la
télécommande.
• Syntonisez sur une station sans RDS.
22
Informations relatives à l'environnement
Tous les matériaux d'emballage superflus ont été
supprimés. Nous avons fait notre possible afin que
l'emballage soit facilement séparable en trois types de
matériaux: carton (boîte), polystyrène expansible (matériel
tampon) et polyéthylène (sachets, feuille de protection en
mousse).
Votre appareil est composé de matériaux pouvant être
recyclés et réutilisés s'il est démonté par une firme spécialisée. Veuillez observer les règlements locaux en
vigueur sur la manière de vous débarrasser des
anciens matériaux d'emballage, des piles usées et
de votre ancien appareil.
Page 23

DEPANNAGE
CARACTERISTIQUES TECHNIQUES
AVERTISSEMENT
N'ouvrez pas l’appareil pour éviter tout risque de
choc électrique ! Vous ne devez en aucun cas
essayer de réparer l’appareil vous-même; cela annulerait la garantie
Si une panne survenait, vérifiez d'abord les points indiqués
ci-dessous avant de faire appel à un réparateur.
Si ces indications ne vous permettent pas de résoudre le
problème, contactez votre revendeur ou le service aprèsventes.
Problème Cause possible Solution
Pas de son /puissance
Boutons sans Décharge électrostatique Débranchez l’appareil
effet rebranchez-le après quelques secondes
TIMER/SLEEPER Heure de l’horloge non réglée Réglez l’heure de l’horloge
ne fonctionne pas
Bourdonnement ou Interférence électrique : l’appareil est trop Eloignez-le du omniprésents
bruit de fond proche de la TV, magnétoscope ou
Mauvaise réception Signal radio faible FM: Orientez le fil d'antenne pour obtenir la
meilleure radio réception possible
Indication CD rayé ou sale Remplacez/ nettoyez le CD, voir Entretien
NO DISC ou Le CD-R(W) est vierge ou le disque n'est Utilisez un CD-R(W) reconnu
DISC NOT pas reconnu
READABLE Le CD-R(W) est vierge ou le disque n’est pas Utilisez un CD-R(W) bien fini
Le CD saute des Le CD est endommagé ou sale Remplacez ou nettoyez le CD
plages SHUFFLE ou PROGRAM est actif Désactivez SHUFFLE / PROGRAM
La télécommande Les piles sont épuisées Utilisez des piles neuves
ne fonctionne pas Les piles sont mal insérées Placez les piles correctement
correctement Distance/ angle avec l’appareil trop important Réduisez la distance/ l'angle
Volume non ajusté Réglez le VOLUME
Casque connecté Débranchez le casque
Cordon d'alimentation mal branché dans Rebranchez-le correctement
la prise murale
de l’ordinateur
bien fini
Lentille laser couverte de buée Attendez que la buée disparaisse
Amplificateur
Puissance de sortie . . . . . . . . . . . . . . . . . . 2 x 15 W RMS
Puissance de sortie . . . . . . . . . . . . . . . . . . . 250 W PMPO
Sortie numérique . . . . . . . . . . . . . . . . . . . . . . 0,5 V, 75 Ω
Sortie de ligne . . . . . . . . . . . . . . . . . . . . . . 0,5 V, 1000 W
Rapport signal/bruit. . . . . . . . . . . . . . . . . . ≥ 65 dBA (IEC)
Sensibilité d’entrée AUX . . . . . . . . . . . . . 0,5 V (max. 2 V)
Impédance haut-parleurs . . . . . . . . . . . . . . . . . . . . . . 8 Ω
Impédance écouteurs. . . . . . . . . . . . . . . . . 32 Ω -1000 Ω
Syntoniseur
Fréquence FM. . . . . . . . . . . . . . . . . . . . . . 87,5 - 108 MHz
Fréquence AM. . . . . . . . . . . . . . . . . . . . . . 530 - 1700 kHz
Sensibilité à 75 Ω
– mono, 26 dB rapport signal/bruit. . . . . . . . . . . . . 2,8 µV
– stéréo, 46 dB rapport signal/bruit . . . . . . . . . . . 61,4 µV
Sélectivité . . . . . . . . . . . . . . . . . . . . . . . . . . . . . . ≥ 28 dB
Distorsion harmonique totale. . . . . . . . . . . . . . . . . . ≤ 5%
Réponse de fréquence . . . . . . . . . . 63 - 12.500 Hz (± 3 dB)
Rapport signal/bruit. . . . . . . . . . . . . . . . . . . . . . ≥ 50 dBA
Lecteur de CD
Gamme de fréquence. . . . . . . . . . . . . . . . . 20 - 20.000 Hz
Rapport signal/bruit. . . . . . . . . . . . . . . . . . . . . . . . 75 dBA
Haut-parleurs
Système réflex basses à 2 voies
Dimensions (lxhxp). . . . . . . . . . . . . . . . . . 164 x 158 x 239
Généralités
Dimensions (lxhxp). . . . . . . . . . . . . . . . . . 164 x 158 x 254
Poids (avec/sans les haut-parleurs) . . . . . env. 7,5 / 3,0 kg
Consommation de puissance en attente . . . . . . . . . < 7 W
Sujet à toutes modifications sans avis préalables
Français
23
Page 24

CONTROLES Y CONEXIONES
Paneles superiores y frontales
1 STANDBY/ON y . cambia el equipo a la posición de
2 SOURCE. . . . . . . . selecciona la fuente de sonido para
Tuner: . . . . . . . . . selecciona la banda
3 PROGRAM
CD: . . . . . . . . . . . programa las piezas musicales e
Tuner: . . . . . . . . .
Timer: . . . . . . . . . activa, ajusta y desactiva la función
Español
4 RDS/CLOCK . . . . . visualiza información RDS;
CD: . . . . . . . . . . . selecciona las opciones aleatoria y
5 SOUND CONTROL
DBB. . . . . . . . . . . (Dynamic Bass Boost)
DSC. . . . . . . . . . . (Digital Sound Control)
INCREDIBLE
SURROUND. . . . . crea un efecto estéreo superre
6 Pantalla . . . . . . . muestra el estado del equipo
7 VOLUME . . . . . . . ajusta el volumen y los ajustes del
8 OPEN/CLOSE . . . . abre/ cierra la bandeja del CD
9 2; o PRESET 3 comienzo y pausa de la reproducción
24
espera/on
CD/TUNER /CD RW /AUX;
enciende el equipo
indica el programa;
programa las estaciones del sintonizador
automática o manualmente;
del temporizador
activa el reloj
repetición, por ejemplo, repite una
pieza musical/programa del CD/
CD completo;
reproduce piezas musicales en
secuencia aleatoria
realza los tonos grave
selecciona las características del
sonido: OPTIMAL/CLASSIC/JAZZ/POP
sonido;
ajusta la hora y los minutos para el
reloj/ funciones del temporizador
del CD; selecciona una emisora
sintonizada (avance);
Nota: • seleccione primero la fuente de sonido deseada (por ej. CD,CD R), a continuación pulse la tecla de función precisada (por ej. 2).
• las teclas de función para CD en el mando a distancia también se puede usar para un CD R.
9 o PRESET 4. . . para la reproducción del CD o borra
0 2™, ¡1 o TUNING 3,4
CD: . . . . . . . . . . . avance y retroceso rápido dentro de
Tuner: . . . . . . . . . (avance, retroceso) sintoniza
un programa CD; activa/ desactiva el
modo de demostración;
selecciona una emisora sintonizada
(retroceso)
una pieza musical;
salta al principio de la pieza musical
actual o anterior
emisoras de radio
Panel trasero
! p . . . . . . . . . . . . . 3,5 mm (16-150 Ω) jack auriculares
@ AUX IN
RIGHT/ LEFT . . . . conecta con la salida audio de un
# SPEAKERS 8 Ω . .
$
LINE OUT
LEFT/RIGHT
% DIGITAL OUT . . . . conecta con un sistema CD-(RW)
^ AC MAINS. . . . . . una vez efectuadas todas las
&
FM AERIAL 75
* AM (MW) AERIAL conecta a la antena AM (MW) de
estereofónicos
aparato adicional
conecta con los altavoces suministrados
. . . . . conecta con la entrada audio de un
aparato adicional
para la grabación digital de CD,
o con otro sistema para alternativa
salida del sonido
conexiones, conecte el cable de
alimentación al enchufe de pared.
Ω .
conecta al cable de antena suministrado o al enchufe de antena de pared
cuadro suministrada
Mando a distancia
y . . . . . . . . . . . . . .
CD,TUNER,AUX,CDR . selecciona la fuente de sonido en
cambia el equipo a la posición de espera
cuestión
TIMER . . . . . . . . . . . . activa, ajusta y desactiva la función
SLEEP . . . . . . . . . . . . activa, ajusta y desactiva la hora de
DBB. . . . . . . . . . . . . . (Dynamic Bass Boost)
DSC. . . . . . . . . . . . . . (Digital Sound Control)
INCR.SURR . . . . . . . . crea un efecto estéreo superrealista
MUTE . . . . . . . . . . . . interrumpe y reinicia la reproducción
BAND . . . . . . . . . . . . selecciona la banda
NEWS/TA . . . . . . . . .
VOLUME –, + . . . . . . ajusta el nivel del volumen
2; . . . . . . . . . . . . . . inicia/ pausa la reproducción del CD
¡, ™
CD: . . . . . . . . . . . . . . salta al principio de la pieza musical
Tuner: . . . . . . . . . . . . (avance, retroceso) selecciona una
9 . . . . . . . . . . . . . . para la reproducción del CD o borra
5, 6
CD: . . . . . . . . . . . . . . . .
Tuner: . . . . . . . . . . . . . .
REPEAT . . . . . . . . . . . repite una pieza musical /programa
SHUFFLE . . . . . . . . . . reproduce las piezas musicales de
PROGRAM
CD
:
. . . . . . . . . . . . . . programa las piezas musicales e
Tuner: . . . . . . . . . . .
del temporizador
dormitado;
selecciona la hora de dormitado
realza los tonos graves
selecciona las características del
sonido: OPTIMAL/CLASSIC/JAZZ/POP
del sonido
enciende los anuncios de noticias RDS
(no en todos los modelos) y Tráfico
actual/ anterior/ siguiente;
emisora de radio sintonizada
un programa CD
avance y retroceso rápido dentro de
una pieza musical/CD;
(retroceso, avance) sintoniza
emisoras de radio;
del CD/ CD completo;
un CD en un orden arbitrario
indica el programa;
programa emisoras de radio o comienza
la programación automática.
Page 25

INFORMACIÓN GENERAL
AUX in
ATENCIÓN
El uso de mandos o ajustes o la ejecucción de métodos que
no sean los aquí descritos puede ocasionar peligro de
exposición a radiación.
Accesorios suministrados
– 2 cajas acústicas
– mando a distancia con pilas
– Antena AM (MW) de cuadro
– Cable para antena FM
Mantenimiento general
• No exponga el equipo, las pilas, CDs o casetes a la
humedad, lluvia, arena o calor excesivo causado por
aparatos calefactores ni a la luz solar directa.
ALIMENTACIÓN
12
Pilas para el mando a distancia
• Abra el compartimento de las pilas y coloque dos pilas
tipo AA, R06 o UM3 (preferentemente alcalina) con la
polaridad correcta tal y como indica el signo + y – en el
interior del compartimento.
¡Importante! Extraiga las pilas cuando estén vacías o
cuando no se use el equipo durante un largo
período de tiempo.
Pilas contienen sustancias químicas, pues deben
ser eliminadas de la forma correcta.
Alimentación
1 Compruebe que el la alimentación, indicada en la placa
de tipo en el fondo del equipo corresponde con el
voltaje en su país. De no ser así, consulte a su distribuidor
o centro de asistencia técnica.
2 Si el equipo está equipado con un selector de voltaje en el
fondo del aparato, ponga el selector en el voltaje de su país.
3 Conecte el cable eléctrico al enchufe de pared y su
equipo está ahora listo para su uso.
™ El display del reloj …: …parpadea.
4 Para desconectar el equipo por completo de la
alimentación eléctrica, desenchúfelo.
Español
• Limpie el equipo con una gamuza húmeda. No limpie
con productos de limpieza que contengan alcohol,
amoniaco, gasolina o abrasivos ya que pueden dañar el
alojamiento.
Conexiones para altavoces
Los terminales de altavoces son conectores clic. Use los
terminales según se muestra abajo.
– Conecte el cable no marcado al borne rojo y el cable
negro marcado al borne negro.
• Cuando los auriculares están insertados en el jack de
los mismos, los altavoces están desconectados.
speakers
8 Ω
LEFT
RIGHT
+
+
RIGHT
LEFT
–
–
POSICIÓN DE ESPERA AUTOMÁTICA PARA EL AHORRO DE ENERGÍA
Para ahorrar energía, el equipo cambia automáticamente a
la posición de espera:
• 15 minutos después de que un CD haya terminado y no
se haya activado ningún control;
• después de pasadas 24 horas sin activarse ningún control.
Información de Seguridad
• Coloque el equipo en una superficie sólida y plana de
forma que quede estable. Procure que haya suficiente
ventilación para evitar el sobrecalentamiento del equipo.
• Las piezas mecánicas del equipo contienen cojinetes
autolubricantes y no necesitan ser engrasados.
Este aparato satisface las normas relativas a la interferencia radioeléctrica de la Comunidad Europea.
25
Page 26

CONEXIONES
DBB
CD
S
H
U
F
F
L
E
P
R
O
G
R
A
M
D
B
B
I
O
I
O
IO
II
I
O
I
I
I
O
I
I
I
O
I
I
I
O
I
O
I
I
I
O
P
E
N
CL
O
S
E
PR
E
SE
T
T
U
N
IN
G
M
Z
3
C
O
M
P
A
C
T
A
U
D
IO
S
Y
S
T
E
M
I
O
I
O
IO
II
I
O
I
I
I
O
I
I
I
O
I
I
I
O
I
O
I
I
I
O
P
E
N
CL
OS
E
P
R
E
SE
T
TU
N
IN
G
FUNCIONES PRINCIPALES
AUX IN
Es posible conectar los bornes OUT derecho e izquierdo de
otro sistema de sonido, por ej. CDR, cinta a los bornes AUX
IN correspondientes izquierdo y derecho en la parte trasera
del equipo.
• Use los controles de sonido MZ-3 para ajustar el sonido
del otro sistema.
• Para la reproducción de un CD-R(W) conectado,
seleccione la fuente CD-R(W).
LINE OUT (no para CDR-W)
Es posible conectar el borne LINE IN de un grabador DAT o
de casete al borne LINE OUT en la parte trasera del equipo.
Español
• Ajuste el sonido con los controles del otro sistema.
• Para grabar con un CD-R(W), seleccione la fuente CD en
MZ-3.
DIGITAL OUT(sólo modo CD)
Es posible conectar el borne DIGITAL INde un CD-R(W) o
de un reproductor DAC externo al borne DIGITAL OUTen
la parte trasera del equipo.
• Para grabar con un CD-R(W), seleccione la fuente CD en
MZ-3.
• Para la reproducción de un CD-R(W) conectado,
seleccione la SOURCE CD-R(W).
DIGITAL
out
RL
LINE out
26
Ajuste del volumen y del sonido
1 Para reducir el volumen, gire el botón VOLUME del
equipo en el sentido contrario a las agujas del reloj y
para aumentar el volumen, gire dicho botón en el
sentido de las agujas del reloj (o pulse VOLUME –, + en
el mando a distancia).
™ Muestra el nivel de volumen VOL y un número de
0 a 32.
2 Pulse DBB, INCR.SURR o DSC en el mando a distancia
una o más veces para seleccionar los efectos sonoros
deseados:
,
Encender
Existen tres maneras para encender el equipo:
• oprima el botón ySTANDBY/ON en el equipo y la
última fuente anteriormente seleccionada quedará
activada;
• oprima el botón SELECT SOURCE en el equipo y la
última fuente anteriormente seleccionada quedará
activada;
• pulse CD, TUNER, CDR o AUX en el mando a distancia.
Para cambiar el equipo a la posición de espera, pulse una
vez ySTANDBY/ON en el equipo ( y en el mando a
distancia).
– En la memoria del equipo será almacenado el nivel del
volumen, los ajustes de sonido interactivo, la última
OPTIMAL (no indicación) /CLASSIC ()/JAZZ ()
/POP ()/OPTIMAL... .
Nota:
– El efecto de INCREDIBLE SURROUND puede variar con
los diferentes tipos de música.
– También es posible seleccionar los efectos sonoros
deseados del equipo (Véase: Usar el SOUND CONTROL).
3 Para la interrupción instantánea de la reproducción del
sonido, pulse MUTE en el mando a distancia .
– La reproducción continuará sin sonido y en el display
fuente y emisora seleccionadas.
4 Para activar la reproducción del sonido:
– pulse de nuevo MUTE;
– ajuste los controles de volumen;
– cambie la fuente.
y
se mostrará MUTE.
Page 27
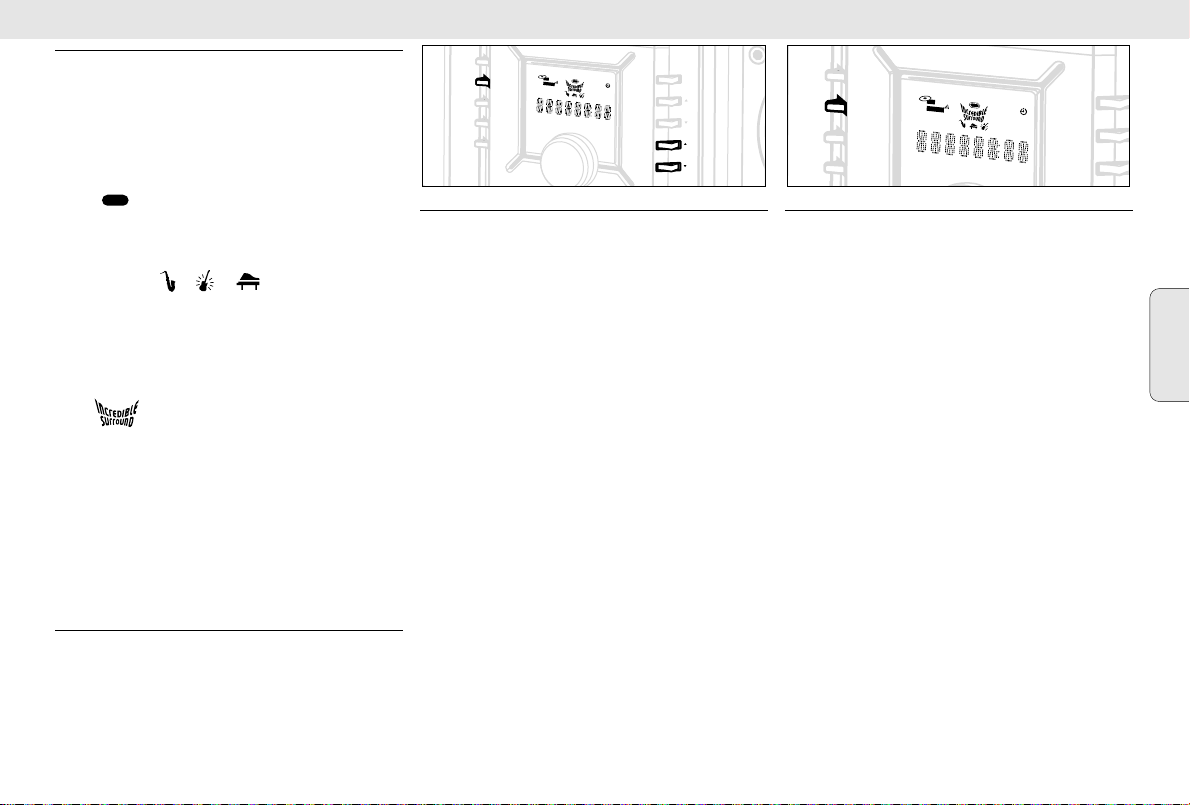
Usar el Sound Control
IO
IO
IO
II
IO
II
IO
II
IO
IO
O
C
P
R
MC 158 COM
PACT AUDIO SYSTEM
IOIO
IO
II
IO
II
IO
II
IO
IO
O
C
P
R
MC 158 COM
PACT AUDIO SYSTEM
FM AM PM
R
E
P
E
A
T
A
L
L
DBB
C
D
T
U
N
E
R
S
T
E
R
E
O
N
E
W
S
S
L
E
E
P
P
R
O
G
R
A
M
S
H
U
F
F
L
E
También es posible modificar los ajustes del sonido en el equipo:
1 Para seleccionar las varias opciones, pulse una o varias
veces SOUND CONTROL:
• una vez:
el display muestra DBB OFF;
si DBB está activado, el display muestra DBB ON
DBB
y,
• dos veces:
el display muestra estado del DSC OPTIMAL.
(el display muestra JAZZ, POP, o CLASSIC y el
respectivo , o o símbolo, si ha sido
seleccionado)
• tres veces:
el display muestra el estado Incredible Surround (IS)
IS OFF, si IS está activado, el display muestra
IS ON y
.
2 Para cada uno de los ajustes del sonido, gire el botón
VOLUME control en la dirección correspondiente para
seleccionar la opción ON, OFF o DSC.
3 Para confirmar, pulse de nuevo SOUNDCONTROL.
• El display muestra el siguiente ajuste del sonido que
se debe programar.
• Una vez confirmado el ajuste IS, el display mostrará
brevemente el nivel del volumen VOL, antes de
volver a indicar la reproducción actual.
Modo de demostración;
• Con el equipo en posición de espera, mantenga oprimida
• Repita la operación para desactivar el modo Demo.
la tecla 9 en el equipo durante más de 5 segundos.
™ Los mensajes Demo se desplazan continuamente en
el display.
™ El texto DEMO OFF se desplaza en el display.
RELOJ
M
M
C
C
1
1
5
5
8
8
C
C
O
O
M
M
P
P
A
I
I
O
O
I
I
O
O
I
I
O
O
I
I
I
I
I
I
O
O
I
I
I
I
I
I
O
O
I
I
I
I
I
I
O
O
I
I
O
O
I
I
I
I
I
I
Ajuste del reloj
Existen dos métodos de ajustar el reloj:
manual o automáticamente con RDS.
Ajuste automático del reloj (sólo para modelos RDS)
1 Sintonice con una emisora RDS (vea SINTONIZADOR).
2 Mantenga pulsado RDS/ CLOCK durante dos segundos o más.
™ SEARCH RDS TIME (búsqueda de la hora
RDS) aparece en pantalla durante un máximo de
90 segundos. A continuación aparece la hora.
™ Si aparece en pantalla NO RDS TIME (no hay
hora RDS), no se ha recibido la señal de la hora en
cuyo caso deberá ajustar el reloj manualmente.
Ajuste manual del reloj
1 En modo de espera, pulse CLOCK.
™ Los dígitos del reloj para las horas 0:00 parpadean.
2 Gire VOLUME para ajustar las horas: en la dirección de
las agujas del reloj para subir; en dirección opuesta para
bajar.
3 Vuelva a pulsar CLOCK.
™ Los dígitos del reloj para los minutos 0:00
parpadean.
4 Gire VOLUME para ajustar los minutos: en dirección a
las agujas del reloj para subir y en dirección opuesta
para bajar.
5 Pulse CLOCK para confirmar la hora.
A
C
C
T
T
A
A
U
U
D
D
IO
IO
S
S
Y
Y
S
S
T
T
E
E
M
M
CD
DBB
T
U
N
E
R
R
E
P
E
A
T
A
L
L
S
L
E
P
R
O
G
R
A
E
M
P
S
H
U
S
F
T
F
E
L
R
E
E
O
N
E
W
S
FM AM PM
N
N
PE
PE
O
O
E
E
S
OS
O
L
L
C
C
T
T
E
E
ES
ES
R
P
PR
G
G
IN
IN
N
N
U
U
T
T
TIMER
Ajuste del TIMER
• Es posible usar el equipo como un reloj de alarma para
que suene a la hora por Vd. ajustada. Antes de poder
usar el temporizador, es necesario poner el reloj en hora.
• Si, durante la operación de ajuste, no se pulsa ningún
botón durante más de 90 segundos, el equipo saldrá del
modo de 'ajuste temporizador'.
Español
1 En el modo de posición de espera, pulse durante
2 segundos o más el botón PROGRAM en el equipo.
™ El display muestra TUNER o CD N parpadea.
™ El display muestra SET CLOCK TIME si el
reloj no está puesto en hora.
2 Gire VOLUME en sentido contrario a las agujas del reloj.
™ El display muestra consecutivamente:
CD, TUNER, CD...
3 Pulse PROGRAM (en la unidad) para confirmar la fuente
de sonido.
™ El visualizador muestra ON 0:00 (encender), los
dígitos del reloj para la hora 0:00 parpadean.
4 Para ajustar las horas, gire el botón VOLUME: en
sentido de las agujas del reloj para aumentar las horas y
en sentido contrario para reducir las horas.
27
Page 28

TIMER/SLEEP
CD
S
H
U
F
F
L
E
P
R
O
G
R
A
M
D
B
B
I
O
I
O
IO
II
I
O
I
I
I
O
I
I
I
O
I
I
I
O
I
O
I
I
I
O
P
EN
C
LO
S
E
P
R
E
S
ET
T
U
N
IN
G
M
C
1
5
8
C
O
M
P
A
C
T
A
U
D
IO
S
Y
S
T
E
M
I
O
I
O
IO
II
I
O
I
I
I
O
I
I
I
O
I
I
I
O
I
O
I
I
I
O
P
EN
C
LO
S
E
P
R
E
SE
T
T
U
N
IN
G
M
C
1
5
8
C
O
M
P
A
C
T
A
U
D
IO
S
Y
S
T
E
M
REPRODUCTOR DE CD
5 Pulse de nuevo TIMER o PROGRAM.
™ Los dígitos para los minutos parpadean.
6 Para ajustar los minutos, gire el botón VOLUME: en
sentido de las agujas del reloj para aumentar los
minutos y en sentido contrario para reducir los minutos.
7 Para confirmar la hora puesta, pulse TIMER o PROGRAM.
– El temporizador está ahora programado y activado.
El display muestra N.
Activar y desactivar TIMER
Pulse:
Español
• bien en el mando a distancia,
la tecla TIMER durante la reproducción o en el modo de
espera;
• o bien en el equipo,
el botón PROGRAM en el modo de espera.
™ El display muestra N si está activado, y este
símbolo desaparecerá si queda desactivado.
Activar y desactivar SLEEP
El temporizador de dormitado permite que el equipo se
desconecte por sí solo después del tiempo anteriormente
programado. Antes de poder usar el temporizador de dormitado, es necesario poner el reloj en hora.
• Para seleccionar y activar el tiempo de dormitado,
durante la reproducción pulse SLEEP en el mando a
distancia una o varias veces.
• Para desactivar, pulse SLEEP en el mando a distancia
28
™ El display muestra SLEEP y una de las opciones
del tiempo de dormitado en la secuencia:
60, 45, 30, 15, SLEEP OFF, 60...
una o varias veces hasta que aparezca SLEEP OFF,
o pulse en standby en el equipo o en el mando a
distancia.
™ La indicación SLEEP desaparece del display.
Reproducir un CD
Este reproductor de CD es apto para Audio Discs incluyendo CD-Recordables y CD-Rewritables.
• Sin embargo, no es posible reproducir CD-ROM, CD-I,
CDV, VCD, DVD, MP3 o CDs para ordenadores.
1 Seleccionar la fuente CD.
2 Para abrir la bandeja del CD, pulse OPEN/CLOSE.
™ Cuando se abra el compartimento del CD, el display
indicará OPEN.
3 Inserte un CD con la etiqueta hacia arriba y oprima
OPEN/CLOSE para cerrar la bandeja del CD.
™ En el display aparecerá READ en señal de que el
aparato está leyendo el índice. A continuación
indicará el número de piezas musicales y la duración
total del CD.
™ El display mostrará NO DISC si no se ha
introducido un disco.
™ El texto DISC NOT READABLE se desplazará
por el display si se ha introducido un CD
incorrectamente o un CD no finalizado CD-R(W).
4 Pulse 2; para comenzar la reproducción.
™ Durante la reproducción del CD, se mostrarán el
número y el tiempo transcurrido de la pieza musical
que se está escuchando.
5 Para interrumpir la reproducción, pulse 2;. Pulse 2; de
nuevo para iniciar de nuevo la reproducción.
™ El display ´se congela´ y el tiempo transcurrido
parpadeará cuando se interrumpa la reproducción.
6 Para parar la reproducción del CD, pulse 9.
Nota: El reproductor de CD también se parará cuando:
– se abra la bandeja del CD;
– el CD haya terminado;
– se seleccione otra fuente: TAPE, CD RW o AUX.
Seleccionar diferente pieza musical
• Pulse ¡1 o 2™ en el equipo, (en el mando a distancia
¡ o ™) una o repetidas veces hasta que en el display
aparezca el número de la pieza deseada.
• Si se ha seleccionado determinada pieza musical nada
más cargar un CD o en la posición PAUSE, se debe
pulsar 2; para comenzar la reproducción.
Buscar determinado pasaje en una pieza
musical
1 Pulse y mantenga oprimido ¡1 o 2™ (en el mando a
distancia 11 o 22 ).
– El CD es reproducido a alta velocidad y baja volumen.
2 Cuando reconozca el pasaje deseado, suelte 11 o 22.
– El disco continúa reproducirse a velocidad normal.
Nota: Durante un programa de CD o si SHUFFLE/ REPEAT
está activado, sólo es posible buscar en la misma
pieza musical.
Page 29

Diferentes modos de reproducción:
CD
S
H
U
F
F
L
E
P
R
O
G
R
A
M
D
B
B
I
O
I
O
IO
II
I
O
I
I
I
O
I
I
I
O
I
I
I
O
I
O
I
I
I
O
PE
N
C
LO
SE
P
R
ES
E
T
T
U
N
IN
G
M
C
1
5
8
C
O
M
P
A
C
T
A
U
D
IO
S
Y
S
T
E
M
I
O
I
O
IO
II
I
O
I
I
I
O
I
I
I
O
I
I
I
O
I
O
I
I
I
O
P
EN
C
LO
SE
P
R
ES
ET
T
U
NIN
G
M
C
1
5
8
C
O
M
P
A
C
T
A
U
D
IO
S
Y
S
T
E
M
SHUFFLE y REPEAT
Es posible seleccionar y cambiar los diferentes modos de
reproducción antes y durante la reproducción misma.
También es posible combinar los modos de reproducción
con PROGRAM.
SHUFFLE . . . . . . . . . . todas las piezas del CD/ programa
se reproducen en un orden arbitrario
SHUFFLE y
REPEAT ALL. . . . . . . . para repetir continuamente todo el
CD/ programa en un orden arbitrario
REPEAT ALL. . . . . . . . repite continuamente todo el CD/
programa
REPEAT . . . . . . . . . . . repite continuamente la pieza que se
está escuchando
1 Para seleccionar el modo de reproducción antes o
durante la reproducción misma, pulse:
• en el mando a distancia SHUFFLE o REPEAT;
• o bien en el equipo el botón CLOCK repetidamente hasta
que el display muestre la función deseada.
2 Pulse 2; para comenzar la reproducción desde la
posición STOP.
™ Si se ha seleccionado SHUFFLE, la reproducción
comenzará automáticamente.
Programar números de piezas musicales
Para seleccionar y programar sus piezas musicales en la
secuencia deseada, programe en la posición STOP. Si lo
desea, se puede programar una misma pieza más de una
vez. En la memoria se puede programar hasta 40 piezas
musicales.
1 Pulse PROGRAM en el equipo o en el mando a distancia
para entrar en el modo de programación.
™ Aparecerá el número de una pieza y PROGRAM
parpadeará.
2 Use el ¡1 o 2™ en el equipo, (en el mando a distancia
¡ o ™) para seleccionar el número de la pieza deseada.
4 Repita los pasos 2-3para seleccionar y programar todas
las piezas deseadas.
™ FULL se mostrará si se intenta programar más de
40 piezas.
5 Para comenzar la reproducción de su programa del CD,
pulse 2; .
Indicación del programa
• En el modo STOP, pulse y mantenga oprimido PROGRAM
en el equipo o en el mando a distancia, hasta que en el
display se vea, una detrás de otra, todas las piezas
programadas.
Borrar un programa
Para borrar el programa, proceda como sigue:
– oprima 9 una vez en la posición de STOP;
– oprima 9 dos veces durante la reproducción;
– abrir la bandeja del CD.
• CLEARED aparecerá brevemente y PROGRAM
desaparecerá del display.
Español
3 Para volver a la reproducción normal, pulse el botón
respectivo SHUFFLE o REPEAT hasta que en el display ya
no aparezcan los distintos modos SHUFFLE/ REPEAT.
– Para anular el modo de reproducción, también se
puede pulsar 9.
3 Pulse PROGRAM para confirmar que la pieza ha de ser
puesta en la memoria.
™ Brevemente se mostrará el número de las piezas
programadas y el tiempo total de reproducción del
programa, y a continuación la pieza elegida y PROG.
…
™
: …aparecerá si el tiempo total de
reproducción es de 100 minutos o más.
29
Page 30

TUNER
I
O
I
O
I
O
I
I
I
O
I
I
I
O
I
I
I
O
I
O
I
I
I
O
PEN
C
LO
S
E
P
R
ES
ET
T
U
NIN
G
M
C
1
5
8
C
O
M
P
A
C
T
A
U
D
IO
S
Y
S
T
E
M
I
O
I
O
I
O
I
I
I
O
I
I
I
O
I
I
I
O
I
O
I
I
I
O
P
EN
C
LO
S
E
PR
ES
ET
TU
N
ING
M
C
1
5
8
C
O
M
P
A
C
T
A
U
D
IO
S
Y
S
T
E
M
DBB
CD
T
U
N
E
R
P
R
O
G
R
A
M
S
H
U
F
F
L
E
X
Reproductor de CD y el tratamiento de CD
• Si el reproductor de CD no puede leer correctamente los
CDs, limpie la lente con un CD limpiador antes de llevar
el equipo a reparar. Otros métodos de limpieza pueden
destruir la lente.
• ¡Nunca toque la lente del reproductor de CD!
• Cambios bruscos de la temperatura ambiental pueden
Español
dar lugar a la formación de condensación en la lente del
reproductor de CD. En tal caso, no es posible escuchar
un CD. No intente limpiar la lente, pero ponga el equipo
en un ambiente caliente hasta que la condensación se
evapore.
• Para evitar que se acumule polvo en la lente, tenga el
compartimento del CD siempre cerrado.
• Para sacar un CD de su caja, oprima el centro al sacar el
CD. Siempre los discos por el borde y guárdelos después
de usarlos en su caja.
• Para limpiar el CD, pase un paño suave que no suelte
pelusilla desde el centro hacia el borde. No utilice
productos de limpieza, pues pueden dañar la cara del
disco.
• Nunca escriba o pegue etiquetas en un disco .
30
Sintonización de emisoras de radio
1 Seleccione la fuente TUNER.
™ TUNER se mostrará brevemente.
2 Pulse BAND (o SOURCE en el equipo durante
2 segundos o más) para seleccionar la banda de onda
deseada.
3 Para sintonizar una emisora, pulse TUNING ¡1 o 2™
(en el mando a distancia 11 o 22) y suelte cuando
comience a buscar.
™ La radio sintonizará automáticamente una emisora
suficientemente potente. Indicación en el display
durante la sintonización automática: SEARCH.
™ Si la recepción de una emisora FM es en estéreo, se
mostrará STEREO.
4 Si es necesario para encontrar la emisora deseada,
repita el paso 3.
• Para sintonizar una emisora débil, pulse brevemente y
repetidamente 5 o 6 hasta que la recepción sea
óptima.
Programar emisoras de radio
En la memoria se pueden poner en total 40 emisoras.
Programación automática
La programación automática comenzará con un número
seleccionado de presintonías. Una vez sobrepasado este
número de presintonías, las emisoras anteriormente programadas serán sobreescritas. Sólo se programarán emisoras que todavía no están en la memoria.
1 Pulse PRESET 4 o 3 (¡ o ™ en el mando a distancia)
para seleccionar el número de la presintonía donde la
programación ha comenzado.
Nota: Si no se ha seleccionado un número de presintonía,
el número por defecto es 1 y todas las presintonías
serán sobreescritas.
2 Pulse PROGRAM en el equipo o en el mando a distancia
durante más de 2 segundos para activar la
programación.
™ AUTO aparecerá en el display y las emisoras
disponibles se almacenan de acuerdo a la intensidad
de recepción de las ondas: emisoras de FM seguidas
de MW (AM) y a continuación LW. Seguidamente se
sintoniza la última presintonía almacenada
automáticamente.
™ Pulse 9 en el equipo para interrumpir la
programación automática.
Programación manual
1 Sintonice la emisora deseada (véase Sintonización de
emisoras de radio).
2 Pulse PROGRAM en el equipo o en el mando a distancia
para activar la programación.
™ PROGRAM parpadea en el display.
Page 31

RDS
I
O
I
O
I
O
I
I
I
O
I
I
I
O
I
I
I
O
I
O
I
I
I
O
PE
N
CL
O
S
E
P
R
ES
E
T
T
U
N
IN
G
M
C
1
5
8
C
O
M
P
A
C
T
A
U
D
IO
S
Y
S
T
E
M
I
O
I
O
I
O
I
I
I
O
I
I
I
O
I
I
I
O
I
O
I
I
I
O
P
E
N
CL
O
S
E
P
RE
S
E
T
T
U
N
IN
G
M
C
1
5
8
C
O
M
P
A
C
T
A
U
D
IO
S
Y
S
T
E
M
DBB
CD
T
U
N
E
R
P
R
O
G
R
A
M
S
H
U
F
F
L
E
E
O
3 Pulse PRESET 4 o 3 (¡ o ™ en el mando a distancia)
para dar un número de 1 a 40 a esta emisora.
4 Pulse de nuevo PROGRAM para confirmar el número
programado.
™ PROGRAM desaparece y aparece el número de la
presintonía y la frecuencia de la emisora
presintonizada.
5 Repita los 4 pasos anteriores para programar más
emisoras.
• Es posible sobreescribir una emisora presintonizada,
grabando otra frecuencia en su lugar.
Sintonización de emisoras presintonizadas
Pulse PRESET 4 o 3 (¡ o ™ en el mando a distancia)
hasta que en el display aparezca la emisora presintonizada
deseada.
Cambiar sintonización de grid
(sólo en algunas versiones)
En los Estados Unidos y Sudamérica el paso de frecuencia
entre canales adyacentes en la banda AM y FM es 10 KHz
y 100 KHz respectivamente. En el resto del mundo este
paso es 9 KHz y 50 KHz. El paso de frecuencia suele venir
preajustado en la fábrica para la región en cuestión, de no
ser así:
1 Seleccione la fuente TUNER.
2 Pulse 9 en el equipo durante al menos 5 segundos.
™ El display mostrará GRID 9 o GRID10.
Nota: Todas las emisoras presintonizadas se perderán y
deberán programarse de nuevo.
RDS (no en todos los modelos)
Radio Data System es un servicio radiofónico mediante el
cual las emisoras de FM pueden transmitir información adicional. Si está sintonizando con una emisora RDS, y
el nombre de la emisora aparecen en pantalla.
Cuando se utiliza el modo de programación automática, se
programan primero las emisoras RDS.
Visualización en pantalla de diferente información RDS
• Pulse RDS/ CLOCK breve y repetidamente para pasar de
una información a otra (si se emite):
– Nombre de la emisora
– Tipo de programa como NEWS (noticias), SPORT
(deportes), POP M...
– Mensajes de radio (texto)
– Frecuencia
Aviso: Si pulsa RDS/CLOCK y la señal RDS no está disponi-
ble, la pantalla indica NO RDS.
EON
Enhanced Other Network le permite la búsqueda de una
emisora RDS que ofrezca un tipo de programa en particular.
Si EON está disponible la pantalla muestra .
Búsqueda de un tipo de programa (PTY)
PTY le ayuda a encontrar un tipo de programa. Para activar
PTY, programe primero las emisoras RDS en la memoria del
sintonizador(vea, Programación de emisoras).
1 Cuando sintoniza con una emisora RDS, pulse
brevemente RDS/ CLOCK hasta que se visualice ese tipo
de programa.
2 Pulse 2; o 9 en la unidad (¡ o ™ en el mando a
distancia) hasta que se visualice el tipo de programa
deseado.
3 Mantenga pulsado TUNING 2™ (6 en el mando a
distancia) para comenzar la búsqueda.
™ La radio sintoniza una emisora RDS emitiendo ese
tipo de programa. Si el tipo de programa no está
disponible aparece TYPE NOT FOUND.
• Tipos de programas RDS
NO TYPE . . . . . . .
NEWS . . . . . . . . . . . Servicio de noticias
AFFAIRS . . . . . . . Política y sucesos del día
INFO . . . . . . . . . . .
SPORT . . . . . . . . . . Deportes
EDUCATE . . . . . . . Educación y formación avanzada
DRAMA . . . . . . . . . . Teatro y literatura
CULTURE . . . . . . . Cultura, religión y sociedad
SCIENCE . . . . . . . Programas científicos
VARIED. . . . . . . . . Programas de entretenimiento
POP M . . . . . . . . . . Música pop
ROCK M . . . . . . . . . Música rock
MOR M . . . . . . . . . . Música ligera
LIGHT M . . . . . . . Música clásica ligera
CLASICS . . . . . . . Música clásica
OTHER M . . . . . . . Programas de música especiales
No hay ningún tipo de programa RDS
Programas especiales de información
Español
31
Page 32

NOTA
Avisos de Noticias RDS (NEWS) y Tráfico (TA)
Se puede ajustar el sintonizador para que interrumpa con
las noticias de una emisora RDS mientras se está
escuchando una de las fuentes. Esto solamente es posible
si la emisora RDS emite señales de NEWS (noticias) al
mismo tiempo que se emiten las noticias.
1 Sintonice con la emisora RDS que desee.
2 Pulse NEWS/TA una o más veces en el mando a
distancia para seleccionar la opción de noticias.
™ Se visualiza brevemente NEWS ON (NEWS
activado), TA ON (TA activado) o OFF
Español
(desactivado).
™ Si ha activado la opción de noticias o de tráfico, se
visualiza NEWS y aparece brevemente NEWS ON o
TA ON. Un cambio de fuente de sonido no desactivará
esta función.
Advertencias:
• Cuando reciba los noticias RDS o anuncios del tráfico
durante la reproducción de un CD, ésta se detendrá y
podrá escuchar las noticias/tráfico. Durante la
transmisión NEWS parpadea en la pantalla. Al finalizar la
transmisión se reanuda la reproducción.
• Si utiliza el aviso de noticias RDS NEWS/TA de una
emisora EON, la búsqueda se realiza por toda la red.
Desactivación de los avisos de noticias RDS o tráfico
Existen varias maneras de desactivar la función de noticias:
• Pulse NEWS/TA en el mando a distancia mientras recibe
las noticias.
• Pulse la tecla de espera en la unidad o en el mando a
distancia.
• Sintonice una emisora que no tenga RDS.
Información medioambiental
Se ha prescindido de cualquier material de embalaje
innecesario. Hemos puesto el mayor empeño para que el
embalaje sea fácilmente separable en tres materiales:
cartón (caja), poliestireno expandible (amortiguación) y
polietileno (bolsas, plancha protectora de espuma)
Los materiales que componen el equipo se pueden reciclar
y reutilizar si son desmontados por una empresa
especializada. Observe las normas locales concer-
nientes a la eliminación de los materiales de embalaje, pilas usadas y equipos desechables.
32
Page 33

SOLUCIÓN DE PROBLEMAS
INFORMACIÓN TÉCNICA
ADVERTENCIA
¡No abra el equipo, ya que puede recibir un choque
eléctrico! De ninguna manera, intente reparar el
equipo Vd. mismo, ya que invalidará la garantía
Si se presenta una avería, primero controle los puntos
abajo listados antes de llevar a reparar el equipo.
Si no es posible resolver el problema siguiendo estas instrucciones, consulte al distribuidor o centro de asistencia
técnica.
Problema Posible causa Solución
No sonido/potencia Volumen no ajustado Ajustar el VOLUME
Auriculares conectados Desconectar los auriculares
Cable eléctrico no correctamente enchufadot Enchufar correctamente
No responde a Descarga electroestática Desconectar el equipo de la alimentación
los mandos conectar de nuevo después de unos segundos
TIMER/SLEEPER La hora del reloj no está puesta Poner la hora correcta
no funciona
Zumbido o ruido grave
de radio de TV, VCR u ordenador
Recepción de radio Señal débil de radio FM: Gire la antena FM para recepción óptima
muy mal
NO DISC o CD muy rasgado o sucio Cambiar/ limpiar CD, véase Mantenimiento
DISC NOT CD-R(W) es virgen o disco no finalizado Use un CD-R(W) finalizado
READABLE Lente láser condensada Esperar hasta que se haya secado
indication
El CD salta piezas CD dañado o sucio Cambiar o limpiar CD
Mando a distancia no
funciona Pilas incorrectamente colocadas Colocar las pilas correctamente
debidamente Distancia/ ángulo entre el equipo demasiado Reducir la distancia/ ángulo
EInterferencia eléctrica: equipo muy cerca Aumentar la distancia
SHUFFLE o PROGRAM está activado Desactivar SHUFFLE / PROGRAM
Pilas vacías Poner pilas nuevas
grande
Amplificador
Potencia de salida . . . . . . . . . . . . . . . . . . . 2 x 15 W RMS
Potencia de salida . . . . . . . . . . . . . . . . . . . . 250 W PMPO
Digital out. . . . . . . . . . . . . . . . . . . . . . . . . . . . 0,5 V, 75 Ω
Line out. . . . . . . . . . . . . . . . . . . . . . . . . . . . 0,5 V, 1000 Ω
Relación señal-ruido. . . . . . . . . . . . . . . . . . ≥ 65 dBA (IEC)
Sensibilidad de entrada AUX . . . . . . . . . . 0,5 V (max. 2 V)
Impedancia altavoces. . . . . . . . . . . . . . . . . . . . . . . . . 8 Ω
Impedancia auriculares. . . . . . . . . . . . . . . . 32 Ω -1000 Ω
Sintonizador
Banda FM . . . . . . . . . . . . . . . . . . . . . . . . 87,5 - 108 MHz
Banda AM . . . . . . . . . . . . . . . . . . . . . . . . . 530- 1700 kHz
Sensibilidad a 75 Ω
– mono, 26 dB relación señal-ruido . . . . . . . . . . . . 2,8 µV
– stereo, 46 dB relación señal-ruido . . . . . . . . . . . 61,4 µV
Selectividad . . . . . . . . . . . . . . . . . . . . . . . . . . . . . ≥ 28 dB
Distorsión armónica total. . . . . . . . . . . . . . . . . . . . . ≤ 5%
Respuesta de frecuencia. . . . . . . . 63 - 12,500 Hz (± 3 dB)
Relación señal-ruido . . . . . . . . . . . . . . . . . . . . . ≥50 dBA
Reproductor de CD
Margen de frecuencias. . . . . . . . . . . 20 - 20.000 Hz (8 dB)
Relación señal-ruido . . . . . . . . . . . . . . . . . . . . . . . 75 dBA
Altavoces
Sistema bass reflex de 2 vías
Dimensiones (AnxAlxPr). . . . . . . . . . . . . . 164 x 158 x 239
Generalidades
Dimensiones (AnxAlxPr). . . . . . . . . . . . . . 164 x 158 x 254
Peso (con / sin altavoces). . . . . aproximadam. 7,5 / 3,0 kg
Consumo eléctrico posición de espera . . . . . . . . . . < 7 W
Español
Sujeto a cambios
33
Page 34

BEDIENELEMENTE UND ANSCHLÜSSE
Oberes und vorderes Bedienfeld
1 STANDBY/ ON y . schaltet das Gerät auf Bereitschaft
2 SOURCE. . . . . . . . wählt die Klangquelle für
Tuner: . . . . . . . . . wählt Wellenbereich
3 PROGRAM
CD: . . . . . . . . . . . programmiert Titel und überprüft das
Tuner: . . . . . . . . . programmiert Tunersender manuell
Timer: . . . . . . . . . aktiviert und deaktiviert die Timer-
4 RDS/CLOCK . . . . . zeigt RDS-Informationen an;
CD: . . . . . . . . . . .
Deutsch
5 SOUND CONTROL
DBB. . . . . . . . . . . (Dynamic Bass Boost)
DSC. . . . . . . . . . . (Digital Sound Control)
INCREDIBLE
SURROUND. . . . . sorgt für einen super-optimierten
6 Display. . . . . . . . zeigt den Gerätestatus
7 VOLUME . . . . . . . stellt den Lautstärkepegel ein und
8 OPEN•CLOSE . . . öffnet/ schließt die CD-Lade
9
2; oder PRESET 3
34
(Standby)/ein
CD/ TUNER / CD RW / AUX;
schaltet das Gerät ein
Programm;
oder automatisch;
Funktion und legt sie fest
legt die Uhrzeit-Funktion fest
wählt Shuffle- und Wiederholungsoptionen, z.B. wiederholt einen Titel /
ein CD-Programm/ eine gesamte CD;
spielt Titel in zufälliger Reihenfolge ab
optimiert die Tiefen (Bass)
wählt Klangeigenschaften:
JAZZ/POP
/CLASSIC/
OPTIMAL
Stereo-Effekt
legt die Klangeinstellungen fest;
stellt die Stunden und Minuten für
die Uhrzeit-/ Timer-Funktionen ein
beginnt und unterbricht das CDAbspielen; wählt einen
vorgewählten Tunersender (auf);
Hinweise: • die gewünschte Klangquelle zuerst wählen (z.B. CD, CD R), dann die erforderliche Funktionstaste (z.B. 2) drücken.
• die CD-Funktionstasten auf der Fernbedienung können für eine CD R benutzt werden.
9 oder PRESET 4 hält CD-Abspielen an oder löscht ein
CD-Programm; aktiviert/ deaktiviert
Demo-Modus; wählt einen
vorgewählten Tunersender (ab);
0 2™, ¡1 oder TUNING 3,4
CD: . . . . . . . . . . . sucht innerhalb eines Titels schnell
rückwärts und vorwärts; springt zum
folgenden Titel/an den Anfang eines
aktuellen oder vorigen Titels;
Tuner: . . . . . . . . . (auf, ab) stellt auf Radiosender ein
SLEEP . . . . . . . . . . . . aktiviert und deaktiviert die
Sleeper-Zeit; wählt Sleeper-Zeit
DBB. . . . . . . . . . . . . . (Dynamic Bass Boost)
optimiert die Tiefen (Bass)
DSC. . . . . . . . . . . . . . (Digital Sound Control)
wählt Klangeigenschaften:
OPTIMAL/CLASSIC/JAZZ/POP
INCR.SURR . . . . . . . . sorgt für einen super-optimierten
Stereo-Effekt
MUTE . . . . . . . . . . . . unterbricht Sound-Wiedergabe und
setzt sie fort
Rückwand
! p . . . . . . . . . . . . . Stereo-Kopfhörerbuchse 3,5 mm
@ AUX IN
RIGHT/ LEFT . . . .
# SPEAKERS 8 Ω . . die mitgelieferten Lautsprecher hier
$
LINE OUT
LEFT/RIGHT
% DIGITAL OUT . . . .
^ AC MAINS. . . . . . nachdem alle anderen Anschlüsse
&
FM AERIAL 75
* AM (MW) AERIAL die mitgelieferte AM- (MW-)
(16-150 Ω)
den Audioausgang eines zusätzlichen
Gerätes hier anschließen
anschließen
. . . . . den Audioeingang eines zusätzlichen
Gerätes hier anschließen
Anschluss an ein CD-(RW) System für
digitale CD-Aufzeichnung, oder ein anderes
System für alternativen Klangausgang
erfolgt sind, das Netzkabel an die
Steckdose anschließen.
Ω . den mitgelieferten Antennendraht
oder einen Antennenwandanschluß
hier anschließen
Rahmenantenne hier anschließen
BAND . . . . . . . . . . . . wählt Wellenbereich
NEWS/TA . . . . . . . . .
aktiviert RDS-Nachrichten (nicht bei allen
Ausführungen) und Verkehrsdurchsagen
VOLUME –, + . . . . . . stellt den Lautstärkepegel ein
2; . . . . . . . . . . . . . . beginnt mit dem/unterbricht das
CD-Abspielen
¡, ™
CD: . . . . . . . . . . . . . .
springt an den Anfang eines aktuellen
Titels / vorigen/ nachfolgenden Titels;
Tuner: . . . . . . . . . . . . (ab, auf) wählt einen vorgewählten
Radiosender
9 . . . . . . . . . . . . . . hält CD-Abspielen an oder löscht ein
CD-Programm
5, 6
CD: . . . . . . . . . . . . . . sucht innerhalb eines Titels/einer CD
rückwärts oder vorwärts;
Tuner: . . . . . . . . . . . (ab, auf) stellt auf Radiosender ein;
REPEAT . . . . . . . . . . . wiederholt einen Titel /
ein CD-Programm/ eine gesamte CD;
SHUFFLE . . . . . . . . . .
spielt CD-Titel in zufälliger Reihenfolge ab
PROGRAM
CD: . . . . . . . . . . . . . . programmiert Titel und überprüft das
Fernbedienung
y . . . . . . . . . . . . . . schaltet das Gerät auf Bereitschaft
(Standby)
CD,TUNER,AUX,CDR . wählt die jeweilige Klangquelle
Tuner: . . . . . . . . . . . programmiert Radiosender oder
Programm;
beginnt mit dem automatischen
Programmieren.
TIMER . . . . . . . . . . . . aktiviert und deaktiviert den Timer
Page 35

ALLGEMEINE INFORMATIONEN
AUX i
STROMVERSORGUNG
ACHTUNG
Die Benutzung von Bedienelementen bzw.
Einstellungen oder die Durchführung von Verfahren,
die hier nicht aufgeführt sind, kann zu gefährlicher
Exposition an Strahlung führen
Mitgeliefertes Zubehör
– 2 Lautsprecherboxen
– Fernbedienung mit Batterien
– AM- (MW-) Rahmenantenne
– FM-Antennendraht
Allgemeine Pflege
• Gerät, Batterien, CDs oder Cassetten nicht Feuchtigkeit,
Regen, Sand oder übertriebener Wärme, die auf
Heizanlagen oder direkte Sonneneinstrahlung
zurückzuführen ist, aussetzen.
• Zur Reinigung des Gerätes wird ein weiches, leicht
angefeuchtetes Ledertuch benutzt. Keine
Reinigungsmittel verwenden, die Alkohol, Ammoniak,
Benzol oder scheuernde Bestandteile enthalten, weil
dadurch das Gehäuse beschädigt werden könnte.
Dieses Produkt entspricht den Funkentstör-vorschriften der EU.
12
Batterien für die Fernbedienung
• Das Batteriefach öffnen und zwei Batterien (Typ AA,
R06 oder UM3 - vorzugsweise Alkalibatterien)
einsetzen, wobei die richtige Polarität anhand der
Symbole „+" und „–" im Fach zu beachten ist.
Wichtig! Die Batterien herausnehmen, wenn sie erschöpft sind
oder das Gerät längere Zeit nicht benutzt wird.
Batterien enthalten Chemikalien, weshalb sie
vorschriftsmäßig zu entsorgen sind.
Lautsprecheranschlüsse
Bei den Lautsprecherklemmen handelt es sich um
Rastverbinder. Sie wie nachstehend dargestellt benutzen.
• Den unmarkierten Draht an die rote Klemme und den
markierten Draht an die schwarze Klemme anschließen.
• Wenn Kopfhörer an die Kopfhörerbuchse angeschlossen
sind, sind die Lautsprecher abgeschaltet.
n
speakers
8 Ω
RIGHT
LEFT
–
–
RIGHT
LEFT
+
+
Netz
1 Nachprüfen, ob die auf dem Typenschild (auf der
Geräteunterseite) angegebene Netzspannung der örtlichen
Netzspannung entspricht. Ist dies nicht der Fall, sich an Ihren
Händler oder Ihr Kundendienstzentrum wenden.
2 Falls Ihr Gerät auf der Unterseite mit einem
Spannungswähler ausgerüstet ist, ist er auf die örtliche
Netzspannung einzustellen.
3 Das Netzkabel an die Steckdose anschließen, und das
Gerät ist jetzt einsatzbereit.
™ Die Uhrzeitanzeige …: …blinkt.
4
Zur völligen Wegnahme des Gerätes von der Stromversorgung
den Netzstecker aus der Steckdose herausziehen.
ENERGIESPARENDE AUTOMATISCHE STANDBY-FUNKTION
Als energiesparendes Leistungsmerkmal schaltet das Gerät
automatisch auf Standby um:
• 15 Minuten, nachdem eine Cassette oder CD das Ende
erreicht hat und kein Bedienelement betätigt wurde.
• wenn nach mehr als 24 Stunden keine Bedienelemente
betätigt wurden.
Sicherheitsinformationen
• Das Gerät auf eine harte, ebene Oberfläche stellen,
damit das System waagerecht steht. Sicherstellen, dass
ausreichende Lüftung vorhanden ist, um Überhitzen des
Systems zu verhindern.
•
Die mechanischen Teile des Gerätes enthalten selbst-schmierende
Lager und dürfen nicht geölt oder geschmiert werden.
Deutsch
35
Page 36

ANSCHLÜSSE
DBB
CD
S
H
U
F
F
L
E
P
R
O
G
R
A
M
D
B
B
I
O
I
O
IO
II
I
O
I
I
I
O
I
I
I
O
I
I
I
O
I
O
I
I
I
O
P
E
N
CL
O
S
E
PR
E
SE
T
T
U
N
IN
G
M
Z
3
C
O
M
P
A
C
T
A
U
D
IO
S
Y
S
T
E
M
I
O
I
O
IO
II
I
O
I
I
I
O
I
I
I
O
I
I
I
O
I
O
I
I
I
O
P
E
N
CL
OS
E
P
R
E
SE
T
TU
N
IN
G
GRUNDFUNKTIONEN
AUX IN
Sie können – bei Audio – die linken und rechten OUT
Klemmen eines anderen Sound-Systems – z.B. CDR,
Cassettenrecorder – an die entsprechenden linken und rechten AUX IN Klemmen auf der Geräterückseite anschließen.
• Die Klangregler des MZ-3 zur Klangeinstellung des
anderen Systems benutzen.
• Zum Abspielen eines angeschlossenen CD-R(W) die
Quelle CD-R(W) wählen.
LINE OUT (nicht bei CDR-W)
Sie können die LINE IN Klemme eines DAT-Recorders oder
Tonbands an dieLINE OUT Klemme auf der
Geräterückseite anschließen.
• Den Klang mit den Bedienelementen des anderen
Systems einstellen.
• Bei der Aufnahme mit einem CD-R(W) wird die Quelle
CD am MZ-3 gewählt.
DIGITAL OUT (nur CD-Modus)
Sie können die DIGITAL INKlemme eines CD-R(W) oder
Deutsch
eines externen DAC-Spielers an die DIGITAL OUTKlemme
auf der Geräterückseite anschließen.
• Bei der Aufnahme mit einem CD-R(W) wird die Quelle
CD am MZ-3 gewählt.
• Zum Abspielen eines angeschlossenen CD-R(W) die
Quelle CD-R(W) wählen.
36
DIGITAL
out
RL
LINE out
Einschalten
Es gibt 3 Möglichkeiten zum Einschalten des Gerätes:
• y STANDBY/ ON am Gerät drücken, und die zuletzt
gewählte Quelle wird eingeschaltet;
• SELECT SOURCE am Gerät drücken, und die zuletzt
gewählte Quelle wird eingeschaltet;
• CD, TUNER, CDR oder AUX auf der Fernbedienung
drücken.
Um das Gerät auf Standby zu schalten y STANDBY/ ON
einmal am Gerät drücken (y auf der Fernbedienung).
– Der Lautstärkepegel, die interaktiven Sound-
Einstellungen, die zuletzt gewählte Quelle und
Tunervorwahlen werden im Gerät abgespeichert.
Einstellen von Lautstärke und Klang
1 Den VOLUME Regler zum Verringern gegen den
Uhrzeigersinn oder zum Erhöhen im Uhrzeigersinn am
Gerät drehen (oder VOLUME –, + auf der Fernbedienung
drücken).
™ In der Anzeige erscheinen der Lautstärkepegel VOL
und eine Zahl von 0-32.
2 DBB, INCR.SURR oder DSC auf der Fernbedienung
einmal oder mehrmals drücken, um die gewünschten
Soundeffekte zu wählen:
,
und
OPTIMAL (ohne Anzeige) /CLASSIC ()/JAZZ ()
/POP ()/OPTIMAL... .
Hinweise:
– Der Effekt von INCREDIBLE SURROUND kann bei
unterschiedlichen Musiktypen schwanken.
– Sie können auch den gewünschten Soundeffekt am
Gerät wählen (siehe Benutzung von SOUND CONTROL).
3 MUTE auf der Fernbedienung drücken, um Sound-
Wiedergabe sofort zu unterbrechen.
– Das Abspielen wird ohne Sound fortgesetzt, und in der
Anzeige erscheint MUTE.
4 Zur Reaktivierung der Sound-Wiedergabe können Sie:
– MUTE erneut drücken;
– die Lautstärkeregler einstellen;
– andere Quelle wählen.
Page 37

Benutzung von Sound Control
O
P
E
N
C
L
O
S
E
P
R
E
S
E
T
M
C 158 COM
PACT AUDIO SY
STEM
O
P
E
N
C
L
O
S
E
P
R
E
S
E
T
MC 158 COM
PACT AUDIO SYSTEM
FM MW LW AM PM
R
E
P
E
A
T
A
L
L
DBB
C
D
T
U
N
E
R
S
T
E
R
E
O
N
E
W
S
S
L
E
E
P
E
O
P
R
O
G
R
A
M
S
H
U
F
F
L
E
M
M
Sie können die Klangeinstellungen auch exklusiv am Gerät
vornehmen:
1 SOUND CONTROL einmal oder mehrmals drücken, um
die verschiedenen Optionen zu wählen:
• einmal:
in der Anzeige erscheint DBB OFF;
wenn DBB aktiviert ist, erscheint in der Anzeige
DBB ON und ,
• zweimal:
in der Anzeige erscheint der DSC Status OPTIMAL
(in der Anzeige erscheint JAZZ, POP oder CLASSIC
und das jeweilige , oder Symbol,
falls gewählt).
• dreimal:
in der Anzeige erscheint Incredible Surround (IS)
Status IS OFF (IS aus);
wenn IS aktiviert ist, erscheint in der Anzeige
IS ON (IS ein) und
2 Bei jeder Klangeinstellung den Regler VOLUME in
beliebige Richtung drehen, um ON, OFF oder die DSC
Optionen zu wählen.
3 SOUND CONTROL zur Bestätigung erneut drücken.
• In der Anzeige erscheint die nächste vorzunehmende
Klangeinstellung.
• Nach Bestätigung der IS Einstellung erscheint in der
Anzeige kurz der Lautstärkepegel VOL, bevor kurz
zur aktuellen Abspielanzeige zurückgekehrt wird.
Demo-Modus
• In Standby 9 am Gerät mehr als 5 Sekunden lang drücken.
™ Demo-Meldungen rollen ununterbrochen über die Anzeige.
• Zur Deaktivierung: Schritt wiederholen.
™ DEMO OFF rollt über die Anzeige.
.
DBB
UHR(ZEIT)
C
C
1
1
5
5
8
8
C
C
O
O
M
M
P
P
A
I
I
O
O
I
I
O
O
I
I
O
O
I
I
I
I
I
I
O
O
I
I
I
I
I
I
O
O
I
I
I
I
I
I
O
O
I
I
O
O
I
I
I
I
I
I
Einstellen der Uhrzeit
Es gibt zwei Methoden für die Einstellung der Uhrzeit:
manuell oder automatisch anhand von RDS.
Automatische Uhrzeiteinstellung (nur bei RDS-Ausführungen)
1 Auf einen RDS-Sender einstellen (siehe TUNER).
2 RDS/ CLOCK 2 Sekunden oder länger drücken.
™ SEARCH RDS TIME wird maximal
90 Sekunden lang angezeigt; dann wird die Zeit
angezeigt.
™ NO RDS TIME wird angezeigt, wenn kein
Zeitsignal empfangen wurde, und Sie müssen die
Uhrzeit manuell einstellen.
Manuelle Uhrzeiteinstellung
1 In Standby CLOCK drücken.
™ Die Uhrzeitziffern für die Stunden blinken 0:00.
2 VOLUME drehen, um die Stunden einzustellen: im
Uhrzeigersinn für Stunden auf; gegen den Uhrzeigersinn
für Stunden ab.
3 CLOCK erneut drücken.
™ Die Uhrzeitziffern für die Minuten blinken 0:00.
4 VOLUME drehen, um die Minuten einzustellen: im
Uhrzeigersinn für Minuten auf; gegen den Uhrzeigersinn
für Minuten ab.
5 CLOCK drücken, um die Zeit zu bestätigen.
A
C
C
T
T
A
A
U
U
D
D
IO
IO
S
S
Y
Y
S
S
T
T
E
E
M
M
CD
DBB
T
U
N
E
R
R
E
P
E
A
T
A
L
L
E
O
S
L
E
P
R
O
G
R
A
M
E
P
S
H
U
S
F
T
F
E
L
R
E
E
O
N
E
W
S
FM MW LW AM PM
N
N
PE
PE
O
O
SE
SE
LO
LO
C
C
T
T
E
E
ES
ES
R
PR
P
G
G
IN
IN
N
N
U
TU
T
TIMER
Timer einstellen
• Das Gerät kann als Wecker benutzt werden, wobei das
Gerät zu einer festgelegten Zeit eingeschaltet wird.
Zuerst muß die Uhrzeit eingestellt werden, bevor der
Timer benutzt werden kann.
• Wenn – während der Einstellung – mehr als
90 Sekunden vergehen, ohne dass eine Taste gedrückt
wird, verlässt das Gerät den Timer-Einstellmodus.
1 PROGRAM am Gerät für 2 Sekunden oder mehr im
Standby-Modus drücken.
™ In der Anzeige erscheint TUNER oder CD,
und N blinkt
™ In der Anzeige erscheint SET CLOCK TIME
(Uhrzeit einstellen), falls die Uhrzeit nicht eingestellt
worden ist
2 VOLUME im Uhrzeigersinn drehen.
™ In der Anzeigefolge erscheint CD, TUNER, CD...
3 PROGRAM (am Gerät) zur Bestätigung der Quelle
drücken.
™ In der Anzeige erscheint ON 0:00, die
Uhrzeitziffern für die Stunden; 0:00 blinkt.
4 VOLUME drehen, um die Stunden einzustellen: im
Uhrzeigersinn für Stunden auf; gegen den Uhrzeigersinn
für Stunden ab.
Deutsch
37
Page 38

TIMER/ SLEEP
CD
S
H
U
F
F
L
E
P
R
O
G
R
A
M
D
B
B
I
O
I
O
IO
II
I
O
I
I
I
O
I
I
I
O
I
I
I
O
I
O
I
I
I
O
P
EN
C
LO
S
E
P
R
E
S
ET
T
U
N
IN
G
M
C
1
5
8
C
O
M
P
A
C
T
A
U
D
IO
S
Y
S
T
E
M
I
O
I
O
IO
II
I
O
I
I
I
O
I
I
I
O
I
I
I
O
I
O
I
I
I
O
P
EN
C
LO
S
E
P
R
E
SE
T
T
U
N
IN
G
M
C
1
5
8
C
O
M
P
A
C
T
A
U
D
IO
S
Y
S
T
E
M
CD-SPIELER
5 TIMER oder PROGRAM erneut drücken.
™ Die Uhrzeitziffern für die Minuten blinken.
6 VOLUME drehen, um die Minuten einzustellen: im
Uhrzeigersinn für Minuten auf; gegen den Uhrzeigersinn
für Minuten ab.
7 TIMER oder PROGRAM zur Bestätigung der Zeit drücken.
– Der Timer ist jetzt eingestellt und aktiviert.
In der Anzeige erscheint N.
Timer aktivieren und deaktivieren
Man drückt entweder:
• auf der Fernbedienung,
TIMER beim Abspielen oder im Standby-Modus.
• am Gerät,
PROGRAM im Standby-Modus.
™ In der Anzeige erscheint N, falls aktiviert, und
Deutsch
verschwindet, falls deaktiviert.
Sleep-Funktion aktivieren und deaktivieren
Sleep-Funktion aktivieren und deaktivieren. Der Sleep-Timer
ermöglicht es dem Gerät, sich nach einem festgelegten
Zeitraum selbst abzuschalten. Zuerst muß die Uhrzeit eingestellt werden, bevor der Sleep-Timer benutzt werden kann.
• Um Ihre gewünschte Sleep-Zeit beim Abspielen zu
wählen und zu aktivieren, wird SLEEP auf der
Fernbedienung einmal oder mehrmals gedrückt.
™ In der Anzeige erscheint SLEEP und eine der
• Zum Deaktivieren wird SLEEP auf der Fernbedienung
38
Sleep Time-Optionen in der Reihenfolge:
60, 45, 30, 15, SLEEP OFF, 60...
einmal oder mehrmals gedrückt, bis SLEEP OFF
(SLEEP aus) gezeigt wird, oder dies – für Standby – am
Gerät oder auf der Fernbedienung drücken.
™ SLEEP verschwindet aus der Anzeige.
Abspielen einer CD
Dieser CD-Spieler spielt Audio Discs einschließlich CD-R
und CD-R(W) ab.
• CD-ROM, CD-I, CDV, VCD, DVD, MP3 oder Computer-CDs
sind jedoch nicht möglich.
1 CD als Quelle wählen.
2 OPEN/CLOSE drücken, um das CD-Fach zu öffnen.
™ OPEN (offen) wird angezeigt, wenn Sie das CD-Fach
öffnen.
3 Eine CD, mit bedruckter Seite nach oben, einlegen und
auf OPEN/CLOSE drücken, um die CD-Lade zu schließen.
™ READ wird angezeigt, während der CD-Spieler den
Inhalt einer CD absucht, und die Gesamtzahl Titel und
die Abspielzeit werden dann angezeigt.
™ NO DISC wird angezeigt, wenn Sie keine CD
eingelegt haben.
™ DISC NOT READABLE rollt über die Anzeige,
wenn Sie eine CD falsch oder eine nicht fertige
CD-R(W) einlegen.
4 2; drücken, um mit dem Abspielen zu beginnen.
™ Aktuelle Titelnummer und vergangene Abspielzeit des
Titels werden während des CD-Abspielens angezeigt.
5 Zur Unterbrechung des Abspielens 2; drücken. 2;
erneut drücken, um mit dem Abspielen fortzufahren.
™
Die Anzeige wird zum Festbild, und die vergangene
Abspielzeit blinkt, wenn das Abspielen unterbrochen wird.
6 Zum Anhalten des CD-Abspielens 9 drücken.
Hinweis: CD-Abspielen hört auch dann auf, wenn:
– die CD-Lade geöffnet wird;
– die CD am Ende angekommen ist;
–
Sie eine andere Quelle wählen: TAPE, CD R oder AUX.
Wahl eines anderen Titels
• ¡1 oder 2™ am Gerät (¡ oder ™ auf der
Fernbedienung) einmal oder wiederholt drücken, bis die
gewünschte Titelnummer in der Anzeige erscheint.
• Wenn Sie eine Titelnummer kurz nach Einlegen einer CD
oder in der PAUSE-Position gewählt haben, müssen 2;
drücken, um mit dem Abspielen zu beginnen.
Suche nach einer Passage innerhalb eines Titels
1 ¡1 oder 2™ drücken und gedrückt halten
(11 oder 22 auf der Fernbedienung).
– Die CD wird mit geringer Lautstärke und hoher
Geschwindigkeit abgespielt.
2 11 oder 22 loslassen, sobald Sie die gewünschte
Passage erkennen.
– Normales Abspielen wird fortgesetzt.
Hinweis: Während eines CD-Programms oder wenn
SHUFFLE/ REPEAT aktiv ist, ist die Suche nur
innerhalb desselben Titels möglich.
Page 39

Verschiedene Abspielmodi: SHUFFLE und
CD
S
H
U
F
F
L
E
P
R
O
G
R
A
M
D
B
B
I
O
I
O
IO
II
I
O
I
I
I
O
I
I
I
O
I
I
I
O
I
O
I
I
I
O
PE
N
C
LO
SE
P
R
ES
E
T
T
U
N
IN
G
M
C
1
5
8
C
O
M
P
A
C
T
A
U
D
IO
S
Y
S
T
E
M
I
O
I
O
IO
II
I
O
I
I
I
O
I
I
I
O
I
I
I
O
I
O
I
I
I
O
P
EN
C
LO
SE
P
R
ES
ET
T
U
NIN
G
M
C
1
5
8
C
O
M
P
A
C
T
A
U
D
IO
S
Y
S
T
E
M
REPEAT
Sie können die diversen Abspielmodi vor dem oder beim
Abspielen wählen und ändern. Die Abspielmodi können
auch mit der Programmierfunktion kombiniert werden.
SHUFFLE . . . . . . . . . . Titel der gesamten CD/ des
Programms werden in zufälliger
Reihenfolge abgespielt
SHUFFLE und
REPEAT ALL. . . . . . . . wiederholt die gesamte CD/ das
Programm ununterbrochen in
zufälliger Reihenfolge
REPEAT ALL. . . . . . . . wiederholt die gesamte CD/ das
Programm
REPEAT . . . . . . . . . . . wiederholt den aktuellen Titel
ununterbrochen
1 Zur Auswahl Ihres Abspielmodus vor dem oder beim
Abspielen drücken Sie entweder
• SHUFFLE oder REPEAT auf der Fernbedienung;
• CLOCK wiederholt am Gerät, bis die gewünschte
Funktion in der Anzeige erscheint.
2 2; drücken, um mit dem Abspielen zu beginnen, wenn
in der STOP-Position befindlich.
™ Das Abspielen beginnt automatisch, wenn Sie
SHUFFLE gewählt haben.
3 Zur Rückkehr zum normalen Abspielen die jeweilige
SHUFFLE oder REPEAT Taste drücken, bis die diversen
9 drücken.
SHUFFLE/ REPEAT Modi nicht mehr angezeigt werden.
- Zum Aufheben Ihres Abspielmodus können Sie auch
Programmieren von Titelnummern
In der STOP-Position programmieren, um Ihre CD-Titel in
der gewünschten Reihenfolge zu wählen und zu speichern.
Wenn Sie wollen, können Sie einen Titel mehr als einmal
speichern. Bis zu 40 Titel können abgespeichert werden.
1 PROGRAM am Gerät oder auf der Fernbedienung
drücken, um zum Programmiermodus überzugehen.
™ Eine Titelnummer wird gezeigt, und PROGRAM blinkt.
2 ¡1 oder 2™ am Gerät (¡ oder ™ auf der
Fernbedienung) benutzen, um Ihre gewünschte
Titelnummer zu wählen.
3 PROGRAM drücken, um die zu speichernde Titelnummer
zu bestätigen.
™ Die Anzahl programmierter Titel und die insgesamte
Abspielzeit des Programms werden kurz angezeigt,
dann der gewählte Titel und PROG.
…
™
: …wird gezeigt, wenn die insgesamte
Abspielzeit 100 Minuten oder mehr beträgt.
4 Schritt 2-3 wiederholen, um alle gewünschten Titel zu
wählen und zu speichern.
™ FULL wird angezeigt, wenn Sie versuchen, mehr
als 40 Titel zu programmieren.
5 2; drücken, um mit dem Abspielen Ihres CD-Programms
zu beginnen.
Überprüfen des Programms
• Im STOP-Modus: PROGRAM am Gerät oder auf der
Fernbedienung drücken und gedrückt halten, bis all Ihre
gespeicherten Titelnummern der Reihe nach in der
Anzeige erscheinen.
Löschen eines Programms
Sie können das Programm durch folgendes löschen:
– einmaliges Drücken von 9 in der STOP-Position;
– zweimaliges Drücken von 9 beim Abspielen;
– Öffnen der CD-Lade.
• CLEARED wird kurz angezeigt, und PROGRAM
verschwindet aus der Anzeige.
Deutsch
39
Page 40

TUNER
I
O
I
O
I
O
I
I
I
O
I
I
I
O
I
I
I
O
I
O
I
I
I
O
PEN
C
LO
S
E
P
R
ES
ET
T
U
NIN
G
M
C
1
5
8
C
O
M
P
A
C
T
A
U
D
IO
S
Y
S
T
E
M
I
O
I
O
I
O
I
I
I
O
I
I
I
O
I
I
I
O
I
O
I
I
I
O
P
EN
C
LO
S
E
PR
ES
ET
TU
N
ING
M
C
1
5
8
C
O
M
P
A
C
T
A
U
D
IO
S
Y
S
T
E
M
DBB
CD
T
U
N
E
R
P
R
O
G
R
A
M
S
H
U
F
F
L
E
X
Umgang mit CD-Spieler und CD
• Wenn der CD-Spieler CDs nicht richtig lesen kann, eine
handelsübliche Reinigungs-CD zur Reinigung der Linse
benutzen, bevor das Gerät zur Reparatur gegeben wird.
Andere Reinigungsmethoden können die Linse zerstören.
• Die Linse des CD-Spielers sollte niemals berührt werden!
• Plötzliche Änderungen der Umgebungstemperatur
können zu Kondensation führen, und die Linse des CDSpielers kann beschlagen. Abspielen einer CD ist dann
nicht möglich. Nicht versuchen, die Linse zu reinigen,
sondern des Gerät in einer warmen Umgebung lassen,
bis die Feuchtigkeit verdunstet.
• Das CD-Fach stets geschlossen halten, um Staub auf der
Deutsch
Linse zu vermeiden.
• Zur Herausnahme einer CD aus ihrer Schutzhülle die
Zentralspindel beim Anheben der CD drücken. Die CD stets am
Rand anheben und nach Gebrauch wieder in ihre Schutzhülle
einlegen, um Kratzer und Staubeinwirkung zu vermeiden.
• Die CD durch eine geradlinige Bewegung von der Mitte zum
Rand mit einem weichen, fusselfreien Tuch reinigen. Keine
Reiniger benutzen, da sie den Tonträger beschädigen können.
• Niemals auf eine CD schreiben oder Aufkleber an ihr anbringen.
40
Einstellen auf Radiosender
1 TUNER als Quelle wählen.
™ TUNER wird kurz angezeigt.
2 BAND (oder SOURCE am Gerät 2 Sekunden oder länger)
drücken, um Ihren Wellenbereich zu wählen.
3 Zum Einstellen auf einen Sender TUNING ¡1 oder 2™
(11 oder 22 auf der Fernbedienung) drücken und
loslassen, wenn der Suchlauf beginnt.
™ Das Radio wird automatisch auf einen Sender mit
ausreichend Empfang eingestellt. Display-Anzeige bei
automatischem Suchlauf: SEARCH.
™ Wenn ein FM-Sender in Stereo empfangen wird, wird
STEREO gezeigt.
4 Schritt 3 ggf. wiederholen, bis Sie den gewünschten
Sender finden.
• Zum Einstellen auf einen schwachen Sender 5 oder 6
kurz und wiederholt drücken, bis sich optimaler Empfang
ergeben hat.
Programmieren von Radiosendern
Sie können bis zu 40 Radiosender speichern.
Automatisches Programmieren
Automatisches Programmieren beginnt mit einer gewählten
Vorwahlnummer. Von dieser Vorwahlnummer aufwärts werden frühere programmierte Radiosender überschrieben. Das
Gerät programmiert nur Sender, die sich nicht bereits im
Speicher befinden.
1 PRESET 4 oder 3 (¡ oder ™ auf der Fernbedienung)
drücken, um die Vorwahlnummer zu wählen, wo die
Programmierung beginnen sollte.
Hinweis: Wenn keine Vorwahlnummer gewählt wird, ist
Vorwahl 1 der Vorgabewert, und all Ihre
Vorwahlen werden überschrieben.
2 PROGRAM am Gerät oder auf der Fernbedienung für
mehr als 2 Sekunden drücken, um die Programmierung
zu aktivieren.
™ AUTO wird angezeigt, und verfügbare Sender
werden in der Reihenfolge der WellenbereichsEmpfangsstärke programmiert: FM- gefolgt von MW(AM-) und dann LW-Sendern. Die letzte, automatisch
gespeicherte, Vorwahl wird dann abgespielt.
™ 9 am Gerät drücken, um das automatische
Programmieren zu unterbrechen.
Manuelles Programmieren
1 Auf Ihren gewünschten Sender einstellen (siehe
Einstellen auf Radiosender).
2 PROGRAM am Gerät oder auf der Fernbedienung
drücken, um die Programmierung zu aktivieren.
™ PROGRAM blinkt in der Anzeige.
Page 41

RDS
I
O
I
O
I
O
I
I
I
O
I
I
I
O
I
I
I
O
I
O
I
I
I
O
PE
N
CL
O
S
E
P
R
ES
E
T
T
U
N
IN
G
M
C
1
5
8
C
O
M
P
A
C
T
A
U
D
IO
S
Y
S
T
E
M
I
O
I
O
I
O
I
I
I
O
I
I
I
O
I
I
I
O
I
O
I
I
I
O
P
E
N
CL
O
S
E
P
RE
S
E
T
T
U
N
IN
G
M
C
1
5
8
C
O
M
P
A
C
T
A
U
D
IO
S
Y
S
T
E
M
DBB
CD
T
U
N
E
R
P
R
O
G
R
A
M
S
H
U
F
F
L
E
E
O
3 PRESET 4 oder 3 (¡ oder ™ auf der Fernbedienung)
drücken, um diesem Sender eine Nummer von 1 bis 40
zuzuordnen.
4 PROGRAM erneut drücken, um die Einstellung zu
bestätigen.
™ PROGRAM verschwindet, die Vorwahlnummer und
die Frequenz des Vorwahlsenders werden gezeigt.
5 Die vier o.g. Schritte wiederholen, um weitere Sender
abzuspeichern.
• Sie können einen Vorwahlsender durch Speichern einer
anderen Frequenz an seiner Stelle überschreiben.
Einstellen auf Vorwahlsender
PRESET 4 oder 3 (¡ oder ™ auf der Fernbedienung) drücken,
bis der gewünschte Vorwahlsender angezeigt wird.
Ändern des Frequenzschritts
(nur bei einigen Ausführungen)
In Nord- und Südamerika beträgt der Frequenzschritt zwischen benachbarten Kanälen im AM- und FM-Bereich
10 KHz bzw. 100 KHz. In der restlichen Welt beträgt dieser
Schritt 9 KHz und 50 KHz. Normalerweise wird der
Frequenzschritt für Ihre Region werksseitig voreingestellt;
wenn nicht:
1 TUNER als Quelle wählen.
2 9 am Gerät mindestens 5 Sekunden lang drücken.
™ In der Anzeige erscheint entweder GRID 9 oder
Hinweis: Alle Vorwahlsender gehen verloren und müssen
GRID10.
erneut programmiert werden.
RDS (nur bei einigen Ausführungen)
Radio Data System ist ein Service, der es FM-Sendern
erlaubt, zusätzliche Informationen zu zeigen. Wenn Sie
einen RDS-Sender empfangen, werden und der
Sendername angezeigt. Wenn automatische
Programmierung benutzt wird, werden RDS-Sender zuerst
programmiert.
Durchgehen der verschiedenen RDS-Informationen
• RDS/ CLOCK kurz und wiederholt drücken, um die
folgenden Informationen durchzugehen (falls verfügbar):
– Sendername
– Programmtyp wie z.B. NEWS, SPORT, POP M...
– Radiotextmeldungen
– Frequenz
Hinweis: Wenn Sie RDS/ CLOCK drücken und das RDS-Signal
nicht verfügbar ist, wird NO RDS angezeigt.
EON
Enhanced Other Network erlaubt Ihnen die Suche nach
einem RDS-Sender, der einen bestimmten Programmtyp
anbietet. Wenn EON verfügbar ist, wird gezeigt.
Programmtyp- (PTY) Suche
PTY hilft Ihnen, einen gewünschten Programmtyp zu finden.
Zur Aktivierung von PTY sind zuerst RDS-Sender in den
Tuner-Speicher einzugeben (siehe Programmieren von
Radiosendern).
1 Beim Empfang eines RDS-Senders wird RDS/ CLOCK
kurz gedrückt, bis der Programmtyp angezeigt wird.
2
2; oder 9 am Gerät (¡ oder ™ auf der Fernbedienung)
drücken, bis der gewünschte Programmtyp angezeigt wird.
3 TUNING 2™ (6 auf der Fernbedienung) drücken und
gedrückt halten, um mit der Suche zu beginnen.
– Das Radio wird auf einen RDS-Sender, der diesen
Programmtyp ausstrahlt, eingestellt. Wenn der
Programmtyp nicht verfügbar ist, wird
TYPE NOT FOUND angezeigt.
• RDS-Programmtypen
NO TYPE . . . . . . . Kein RDS-Programmtyp
NEWS . . . . . . . . . . . Nachrichtendienste
AFFAIRS . . . . . . . Politik und Weltgeschehen
INFO . . . . . . . . . . . Sonderinformationsprogramme
SPORT . . . . . . . . . . Sport
EDUCATE . . . . . . . Erziehung und höhere Ausbildung
DRAMA . . . . . . . . . .
CULTURE . . . . . . . Kultur, Religion und Gesellschaft
SCIENCE . . . . . . . Wissenschaft
VARIED. . . . . . . . . Unterhaltungsprogramme
POP M . . . . . . . . . . Popmusik
ROCK M . . . . . . . . . Rockmusik
MOR M . . . . . . . . . . Leichte Musik
LIGHT M . . . . . . . Leichte klassische Musik
CLASSICS . . . . . . Klassische Musik
OTHER M . . . . . . . Musiksonderprogramme
(Theater)stücke und Literatur im Radio
Deutsch
41
Page 42

HINWEISE
RDS-Nachrichten und -Verkehrsdurchsagen
(Traffic Announcement, TA)
Sie können den Tuner so einrichten, dass, wenn man einer
beliebigen Quelle zuhört, dies durch Nachrichten eines
RDS-Senders unterbrochen wird. Dies gelingt nur, wenn der
RDS-Sender beim Durchgeben der Nachrichten ein NEWSSignal ausstrahlt.
1 Auf den gewünschten RDS-Sender einstellen.
2 NEWS/TA einmal oder mehrmals auf der Fernbedienung
drücken, um die Nachrichtenoption zu wählen.
™ NEWS ON, TA ON oder OFF wird kurz
angezeigt.
™ NEWS wird angezeigt, wenn Sie die Nachrichten- oder
TA-Option aktiviert haben und NEWS ON oder TA ON
kurz gezeigt wird. Ändern der Hörquelle deaktiviert
die Funktion nicht.
Hinweise:
• Wenn Sie RDS-Nachrichten oder -Verkehrsdurchsagen
Deutsch
beim CD-Abspielen empfangen, wird das Abspielen
unterbrochen, und Sie können die NEWS/TA
(Nachrichten /Verkehrsdurchsage) hören. NEWS blinkt
während der Sendung in der Anzeige. Abspielen wird
nach Ende der Sendung fortgesetzt.
• Wenn Sie die RDS NEWS/TA-Funktion mit einem EONSender benutzen, wird das gesamte Netz auf die
entsprechenden NEWS/TA abgesucht.
Deaktivieren von RDS-Nachrichten und -Verkehrsdurchsagen
Die Nachrichtenfunktion kann auf mehrere Weisen deaktiviert werden:
•
NEWS/TA auf der Fernbedienung während des
Empfangs der Nachrichtenoption drücken.
•
Die Standby-Taste am Gerät oder auf der Fernbedienung
drücken.
•
Auf einen RDS-fremden Sender einstellen.
42
Umweltinformationen
Alles überflüssige Verpackungsmaterial wurde vermieden.
Wir haben unser möglich-stes getan, damit die Verpackung
leicht in drei Monomaterialien aufteilbar ist: Wellpappe
(Schachtel), expandierbares Polystyrol (Puffer) und
Polyäthylen (Beutel, Schutzschaum).
Ihr Gerät besteht aus Materialien, die von darauf
spezialisierten Betrieben wiederverwertet werden können.
Bitte halten Sie sich beim Entsorgen von
Verpackungsmaterial, erschöpften Batterien und
alter Ausrüstung an örtliche Bestimmungen.
Page 43

FEHLERSUCHE
TECHNISCHE DATEN
WARNHINWEIS
Das Gerät nicht öffnen, weil Stromschlaggefahr besteht! Unter gar keinen Umständen sollten Sie versuchen, das Gerät selbst zu reparieren, weil die
Garantie dadurch erlischt.
Wenn ein Fehler auftritt, zuerst die nachstehenden Punkte
überprüfen, bevor das Gerät zur Reparatur gegeben wird.
Wenn Sie das Problem nicht durch Befolgen dieser
Ratschläge lösen können, sollten Sie sich an Ihren Händler
oder an Ihr Reparaturzentrum wenden.
Problem Mögliche Ursache Abhilfe
Kein Sound/ Lautstärke nicht eingestellt Die Lautstärke mit VOLUME einstellen
keine Leistung Kopfhörer angeschlossen Kopfhörer herausziehen
Netzkabel nicht fest an Steckdose Ordnungsgemäß anschließen
angeschlossen
Gerät spricht auf kein
Bedienelement an Gerät nach ein paar Sekunden wieder anschließen
TIMER/SLEEPER Uhrzeit nicht eingestellt Die richtige Uhrzeit einstellen
funktioniert nicht
Heftiges Brummen Elektrische Störung: Gerät zu nahe am Fernseher, Den Abstand vergrößern
oder Rauschen Videorecorder oder Computer
Schlechter Schwaches Radiosignal FM: den FM-Antennendraht für
Radioempfang optimalen Empfang ausrichten
Anzeige CD stark zerkratzt oder verschmutzt CD austauschen/reinigen, siehe Pflege
NO DISC oder CD austauschen/reinigen, siehe Pflege Eine fertige CD-R(W) benutzen
DISC NOT Laserlinse ist beschlagen Warten, bis Linse sich akklimatisiert hat
READABLE
Die CD überspringt CD beschädigt oder verschmutzt CD austauschen oder reinigen
Titel SHUFFLE oder PROGRAM ist aktiv SHUFFLE / PROGRAM abschalten
Fernbedienung Batterien erschöpft Neue Batterien einsetzen
funktioniert nicht Batterien falsch eingesetzt Batterien richtig einsetzen
ordnungsgemäß Abstand/Winkel zum Gerät ist zu groß Den Abstand/Winkel verringern
Elektrostatische Entladung Den Gerätestecker ziehen und das Gerät
Verstärker
Ausgangsleistung . . . . . . . . . . . . . . . . . . . 2 x 15 W RMS
Ausgangsleistung . . . . . . . . . . . . . . . . . . . . 250 W PMPO
Digitalausgang . . . . . . . . . . . . . . . . . . . . . . . . 0,5 V, 75 Ω
Leitungsausgang. . . . . . . . . . . . . . . . . . . . . 0,5 V, 1000 Ω
Störabstand . . . . . . . . . . . . . . . . . . . . . . . . ≥ 65 dBA (IEC)
Eingangsempfindlichkeit AUX. . . . . . . . . . 0,5 V (max. 2 V)
Impedanz - Lautsprecher. . . . . . . . . . . . . . . . . . . . . . . 8 Ω
Impedanz - Kopfhörer. . . . . . . . . . . . . . . . . 32 Ω -1000 Ω
Tuner
FM-Wellenbereich . . . . . . . . . . . . . . . . . . 87,5 - 108 MHz
MW- (AM-) Wellenbereich . . . . . . . . . . . . 531 - 1602 kHz
LW-Wellenbereich. . . . . . . . . . . . . . . . . . . . 153 - 279 kHz
Empfindlichkeit bei 75 Ω
– Mono, 26 dB Störabstand . . . . . . . . . . . . . . . . . . 2,8 µV
– Stereo, 46 dB Störabstand . . . . . . . . . . . . . . . . 61,4 µV
Selektivität. . . . . . . . . . . . . . . . . . . . . . . . . . . . . . ≥ 28 dB
Gesamtklirrfaktor. . . . . . . . . . . . . . . . . . . . . . . . . . . ≤ 5%
Frequenzgang . . . . . . . . . . . . . . . . 63 - 12,500 Hz (± 3 dB)
Störabstand . . . . . . . . . . . . . . . . . . . . . . . . . . . . ≥ 50 dBA
CD-Spieler
Frequenzbereich. . . . . . . . . . . . . . . . 20 - 20,000 Hz (8 dB)
Störabstand. . . . . . . . . . . . . . . . . . . . . . . . . . . . . . 75 dBA
Lautsprecher
Baßreflexsystem (2-Wege)
Abmessungen (BxHxT) . . . . . . . . . . . . . . . 164 x 158 x 239
Allgemeine
Abmessungen (BxHxT) . . . . . . . . . . . . . . . 164 x 158 x 254
Gewicht (mit / ohne Lautsprecher). . . . . . . ca. 7,5 / 3,0 kg
Standby-Leistungsaufnahme. . . . . . . . . . . . . . . . . . < 7 W
Deutsch
Änderungen vorbehalten
43
Page 44

BEDIENINGSKNOPPEN EN AANSLUITINGEN
Boven- en voorkant
1 STANDBY/ ON y . om het apparaat op stand-by of
2 SOURCE. . . . . . . . om de geluidsbron te kiezen
Tuner: . . . . . . . . . om het golfgebied te kiezen
3 PROGRAM
CD: . . . . . . . . . . . om nummers te programmeren en
Tuner: . . . . . . . . . om radiozenders handmatig of
Timer: . . . . . . . . . om de timer in te schakelen, in te
4 RDS/CLOCK . . . . . om RDS-informatie in het display
CD: . . . . . . . . . . . om te kiezen uit de SHUFFLE- en
5 SOUND CONTROL
DBB. . . . . . . . . . . (Dynamic Bass Boost)
DSC. . . . . . . . . . . (Digital Sound Control)
Nederlands
INCREDIBLE
SURROUND. . . . . voor een overweldigend
6 Display. . . . . . . . geeft informatie over het apparaat
7 VOLUME . . . . . . . om het volumeniveau en de
8 OPEN/CLOSE . . . . om het cd-vak te openen/ te sluiten
9 2; of PRESET 3 om het afspelen van een cd te
44
aan te zetten
CD/TUNER /CD RW /AUX;
om het apparaat aan te zetten
om het programma te controleren;
automatisch te programmeren;
stellen en uit te schakelen
weer te geven; om de klokfunctie te
kiezen
REPEAT-mogelijkheden bijvoorbeeld
een nummer/ cd-programma/ hele
cd te herhalen; om de nummers in
willekeurige volgorde af te spelen
om de lage tonen te versterken
om de klankkleur te kiezen:
OPTIMAL/CLASSIC/JAZZ/POP
stereo-effect
klankinstellingen te wijzigen;
om de uren en de minuten in te
stellen voor de klok/ timer
starten en te onderbreken; om af te
stemmen op een geprogrammeerde
radiozender (omhoog);
Opmerkingen:• kies eerst de gewenste geluidsbron (bijv. CD, CD R) en druk vervolgens op de gewenste functietoets (bijv. 2).
9 of PRESET 4 . . om het afspelen van een cd te
. . . . . . . . . . . . . . om af te stemmen op een
0 2™, ¡1 of TUNING 3,4
CD: . . . . . . . . . . . om versneld achteruit en vooruit te
Tuner: . . . . . . . . . (omlaag, omhoog) om af te stemmen
Achterkant
! p . . . . . . . . . . . . . 3,5 mm-aansluitbus (16-150 Ω) voor
@ AUX IN
RIGHT/ LEFT . . . . voor het aansluiten van de audio-
# SPEAKERS 8 Ω . . voor het aansluiten van de
LINE OUT
$
LEFT/RIGHT
% DIGITAL OUT . . . . voor het aansluiten van een
^ AC MAINS. . . . . . verbind, nadat u alle andere
FM AERIAL 75
&
* AM (MW) AERIAL voor het aansluiten van de
Afstandsbediening
y . . . . . . . . . . . . . . om het apparaat stand-by te zetten
CD,TUNER,AUX,CDR . om de geluidsbron te kiezen
• de cd-toetsen op de afstandsbediening kunnen gebruikt worden voor een CD R.
TIMER . . . . . . . . . . . . om de timer in en uit te schakelen
beëindigen of om een cd-programma
te wissen; om het demonstratieprogramma aan/ uit te zetten;
geprogrammeerde radiozender
(omlaag);
zoeken binnen een cd-nummer;
om naar het volgende/ begin van het
huidige of vorige nummer te gaan
op een radiozender
een stereohoofdtelefoon
uitgang van een extern apparaat
bijgeleverde luidsprekers
. . . . . voor het aansluiten van de audio-
ingang van een extern apparaat
CD-(RW)-systeem voor digitale
cd-opnames, of van een andere
externe geluidsbron
aansluitingen gemaakt heeft, het
netsnoer met het stopcontact.
Ω . voor het aansluiten van de
bijgeleverde draadantenne of een
wandantenneaansluiting
bijgeleverde AM (MW)-raamantenne
SLEEP . . . . . . . . . . . . om inslapen met de timer in en uit
. . . . . . . . . . . . . . om de inslaaptijd in te stellen
DBB. . . . . . . . . . . . . . (Dynamic Bass Boost)
DSC. . . . . . . . . . . . . . (Digital Sound Control)
INCR.SURR . . . . . . . . voor een overweldigend stereo-effect
MUTE . . . . . . . . . . . . om het geluid tijdelijk uit en weer
BAND . . . . . . . . . . . . om het golfgebied te kiezen
NEWS/TA . . . . . . . . . om de RDS-nieuwsberichtfunctie
VOLUME –, + . . . . . . om het volumeniveau in te stellen
2; . . . . . . . . . . . . . . om het afspelen van een cd te
¡, ™
CD: . . . . . . . . . . . . . . om naar het begin van het huidige/
Tuner: . . . . . . . . . . . . (omlaag, omhoog) om af te stemmen
9 . . . . . . . . . . . . . . om het afspelen van een cd te
5, 6
CD: . . . . . . . . . . . . . . . .
Tuner: . . . . . . . . . . . . . . (omlaag, omhoog) om af te stemmen op
REPEAT . . . . . . . . . . . om een nummer/ cd-programma/
SHUFFLE . . . . . . . . . . om de nummers van een cd in
PROGRAM
CD
:
. . . . . . . . . . . . . . om nummers te programmeren en
Tuner: . . . . . . . . . . . om radiozenders te programmeren of
te schakelen;
om de lage tonen te versterken
om de klankkleur te kiezen:
OPTIMAL/CLASSIC/JAZZ/POP
aan te zetten
(niet op alle modellen) en
verkeersberichten in te schakelen
starten/ te onderbreken
vorige/ volgende nummer te gaan;
op een geprogrammeerde radiozender
beëindigen en om een cd-
programma te wissen
om achteruit en vooruit te zoeken
binnen een cd-nummer/cd;
een radiozender;
hele cd te herhalen;
willekeurige volgorde af te spelen
om het programma te controleren;
om het automatisch programmeren
te starten.
Page 45

ALGEMENE INFORMATIE
AUX i
Batterijen niet weggooien,
maar inleveren als KCA.
ñ
STROOMVOORZIENING
LET OP
Het gebruik van de toetsen en regelingen of het
toepassen van de aanwijzingen anders dan hier
beschreven, kan leiden tot blootstelling aan
gevaarlijke straling.
Bijgeleverde accessoires
- 2 luidsprekerboxen
- afstandsbediening met batterijen
- AM (MW)-raamantenne
- FM-draadantenne
Algemeen onderhoud
• Bescherm het apparaat, de batterijen, de cd’s en de
cassettes tegen vocht, regen, zand of extreem hoge
temperaturen zoals bij verwarmingsapparatuur of in de
felle zon.
• U kunt het apparaat schoonmaken met een zachte, licht
bevochtigde zeemlap. Gebruik geen schoonmaakmiddelen
die alcohol, spiritus, ammonia of schuurmiddel bevatten
want die kunnen het apparaat beschadigen.
Dit apparaat voldoet aan de radio-ontstoringseisen
van de Europese Unie.
12
Batterijen voor de afstandsbediening
• Open het batterijvak en plaats er zoals aangegeven
twee batterijen in, type AA, R06 of UM3 (bij voorkeur
alkaline), met de + en – polen op dezelfde manier als
aangegeven binnenin het batterijvak.
Belangrijk! Verwijder de batterijen als ze leeg zijn of als u
het apparaat gedurende langere tijd niet zult
gebruiken.
Batterijen bevatten chemicaliën en moeten daarom
op de juiste manier ingeleverd worden.
Aansluiten van de luidsprekers
Sluit de ongemerkte draad aan op de rode aansluitklem en
de zwarte gemerkte draad op de zwarte aansluitklem.
– Sluit de ongemerkte draad aan op de rode aansluitklem
en de zwarte gemerkte draad op de zwarte aansluitklem.
• Wanneer u een hoofdtelefoon aangesloten heeft op de
hoofdtelefoonaansluiting dan worden de luidsprekers
uitgeschakeld.
RIGHT
n
speakers
8 Ω
RIGHT
LEFT
+
+
LEFT
–
–
Netvoeding
1 Controleer of de netspanning op het typeplaatje de
onderkant van het apparaat overeenkomt met de
plaatselijke netspanning. Is dit niet het geval, neem dan
contact op met uw leverancier of serviceorganisatie.
2 Heeft het apparaat een netspanningskiezer, zet deze dan
indien nodig op de plaatselijke netspanning.
3 Steek de stekker van het netsnoer in het stopcontact en
u kunt het apparaat nu gebruiken.
™ Het klokdisplay …: …knippert.
4 Trek de stekker uit het stopcontact als u de netvoeding
helemaal uit wilt schakelen.
STROOMBESPARENDE AUTOMATISCHE STAND-BY
Om stroom te besparen schakelt het apparaat automatisch
stand-by indien:
• gedurende 15 minuten na het einde van een CD geen
enkele toets bediend wordt
• meer dan 24 uur geen enkele toets bediend is.
Veiligheidsvoorschriften
• Plaats het systeem op een harde en vlakke ondergrond
zodat het systeem niet omver kan vallen. Laat voldoende
ruimte rondom het apparaat om oververhitting te
voorkomen.
• De mechanische delen van het apparaat zijn voorzien
van zelfsmerende lagers en mogen dus niet gesmeerd of
geolied worden.
Nederlands
45
Page 46

AANSLUITINGEN
DBB
CD
S
H
U
F
F
L
E
P
R
O
G
R
A
M
D
B
B
I
O
I
O
IO
II
I
O
I
I
I
O
I
I
I
O
I
I
I
O
I
O
I
I
I
O
P
E
N
CL
O
S
E
PR
E
SE
T
T
U
N
IN
G
M
Z
3
C
O
M
P
A
C
T
A
U
D
IO
S
Y
S
T
E
M
I
O
I
O
IO
II
I
O
I
I
I
O
I
I
I
O
I
I
I
O
I
O
I
I
I
O
P
E
N
CL
OS
E
P
R
E
SE
T
TU
N
IN
G
BASISFUNCTIES
AUX IN
U kunt de linker- en rechter-audio-uitgangen OUT van een
ander geluidssysteem bijvoorbeeld een CD-R of cassetterecorder aansluiten op de overeenkomstige linker- en rechter-ingangen AUX IN op de achterkant van het apparaat.
• Gebruik de MZ-3-geluidsregelaars om de klank van het
andere systeem in te stellen.
• Kies voor afspelen van een aangesloten CD-R(W) de
bron CD-R(W).
LINE OUT (niet voor CDR-W)
U kunt de ingang LINE IN van een DAT- of
cassetterecorder aansluiten op de uitgang LINE OUT op de
achterkant van het apparaat.
• Stel de klank in met de toetsen van het andere systeem.
• Kies voor opnemen met een CD-R(W) de bron CD op de
MZ-3.
DIGITAL OUT (enkel bij de bron CD)
U kunt de ingang DIGITAL IN van een CD-R(W) of een
externe DAC-speler aansluiten op de uitgang
DIGITAL OUT op de achterkant van het apparaat.
• Kies voor opnemen met een CD-R(W) de bron CD op de
MZ-3.
• Kies voor afspelen van een aangesloten CD-R(W) de
bron CD-R(W).
Nederlands
DIGITAL
RL
46
out
LINE out
Aanzetten
U kunt het apparaat op 3 manieren aanzetten:
• druk op y STANDBY/ ON op het apparaat en de bron
die u als laatste gekozen had, wordt ingeschakeld;
• druk op SELECT SOURCE op het apparaat en de bron
die u als laatste gekozen had, wordt ingeschakeld;
• druk op CD, TUNER, CDR of AUX op de
afstandsbediening.
Om het apparaat stand-by te schakelen: druk eenmaal op
y STANDBY/ ON op het apparaat
(y op de afstandsbediening).
– Het volumeniveau, de interactieve geluidsinstellingen,
de laatst gekozen bron en de geprogrammeerde zenders
blijven bewaard in het geheugen van het apparaat.
Instellen van het volume en de klank
1 Draai de VOLUME-knop tegen de richting van de klok om
het volume van het apparaat zachter te zetten en in de
richting van de klok om harder te zetten (of druk op
VOLUME –, + op de afstandsbediening).
™ In het display verschijnt het volumeniveau VOL en
een cijfer van 0 tot 32.
2 Druk één of meerdere keren op DBB, INCR.SURR of DSC
op de afstandsbediening om de gewenste klankinstelling
te kiezen:
,
en
OPTIMAL (niets in het display) /CLASSIC ()/JAZZ
()/POP ()/OPTIMAL
Opmerkingen:
– Het effect van INCREDIBLE SURROUND kan verschillen
naargelang het type muziek.
– U kunt de gewenste klankinstellingen ook op het
apparaat kiezen (Zie Gebruiken van SOUND CONTROL).
3 Druk op MUTE op de afstandsbediening om het geluid
onmiddellijk uit te zetten.
– Het afspelen gaat verder maar zonder geluid en in het
display staat MUTE.
4 Om het geluid weer aan te zetten kunt u:
– opnieuw op MUTE drukken;
– het volume instellen;
– een andere bron kiezen.
... .
Page 47

Gebruiken van SOUND CONTROL
O
P
E
N
C
L
O
S
E
P
R
E
S
E
T
M
C 158 COM
PACT AUDIO SY
STEM
O
P
E
N
C
L
O
S
E
P
R
E
S
E
T
MC 158 COM
PACT AUDIO SYSTEM
FM MW LW AM PM
R
E
P
E
A
T
A
L
L
DBB
C
D
T
U
N
E
R
S
T
E
R
E
O
N
E
W
S
S
L
E
E
P
E
O
P
R
O
G
R
A
M
S
H
U
F
F
L
E
M
M
U kunt de klank ook uitsluitend op het apparaat instellen:
1 Druk één of meerdere keren op SOUND CONTROL om te
kiezen uit de verschillende mogelijkheden:
• eenmaal:
in het display verschijnt DBB OFF;
indien DBB ingeschakeld is, verschijnt in het display
DBB ON en ,
DBB
• tweemaal:
in het display verschijnt de DSC-instelling OPTIMAL.
(indien gekozen verschijnt in het display JAZZ, POP,
of CLASSIC met het bijbehorende , of
symbool.
• drie keer:
in het display verschijnt de Incredible Surround (IS)instelling IS OFF.
indien IS ingeschakeld is, verschijnt in het display
IS ON en .
2 Draai voor elke klankinstelling de VOLUME-knop in één
van de richtingen om te kiezen uit ON, OFF of de
verschillende DSC-instellingen.
3 Druk nogmaals op SOUND CONTROL om te bevestigen.
• In het display verschijnt de volgende klankinstelling
die u kunt wijzigen
• Nadat u de IS-instelling bevestigd heeft, verschijnt in
het display kort VOL en daarna verschijnt opnieuw
het display van de bron die aan het spelen is.
Demonstratieprogramma
• Vanuit stand-by, houdt u 9 op het apparaat langer dan
• Herhaal deze stap om uit te zetten
5 seconden ingedrukt.
™ De demonstratieboodschappen lopen keer op keer
™ DEMO OFF loopt over het display.
over het display.
KLOK
C
C
1
1
5
5
8
8
C
C
O
O
M
M
P
P
A
I
I
O
O
I
I
O
O
I
I
O
O
I
I
I
I
I
I
O
O
I
I
I
I
I
I
O
O
I
I
I
I
I
I
O
O
I
I
O
O
I
I
I
I
I
I
Instellen van de klok
De klok kan op twee manieren ingesteld worden:
handmatig of automatisch met behulp van RDS.
Automatisch instellen van de klok (enkel RDS-modellen)
1 Stem af op een RDS-zender (zie TUNER)
2 Houd RDS/ CLOCK 2 seconden of langer ingedrukt.
™ In het display verschijnt gedurende maximaal
90 seconden SEARCH RDS TIME. Daarna
verschijnt de tijd.
™ Indien in het display NO RDS TIME verschijnt
dan word er geen tijdsignaal ontvangen. In dit geval
zult u de klok handmatig in moeten stellen.
Handmatig instellen van de klok
1 Druk vanuit stand-by op CLOCK.
™ De cijfers die het uur aangeven 0:00 beginnen te
knipperen.
2 Draai VOLUME om de uren in te stellen: in de richting
van de klok om het uur hoger in te stellen; tegen de
richting van de klok om het uur lager in te stellen.
3 Druk opnieuw op CLOCK.
™ De cijfers die minuten aangeven 0:00, beginnen te
knipperen.
4 Draai VOLUME om de minuten in te stellen: in de
richting van de klok om de minuten hoger in te stellen;
tegen de richting van de klok om de minuten lager in te
stellen
5 Druk op CLOCK om de tijd te bevestigen.
A
C
C
T
T
A
A
U
U
D
D
IO
IO
S
S
Y
Y
S
S
T
T
E
E
M
M
CD
DBB
T
U
N
E
R
R
E
P
E
A
T
A
L
L
E
O
S
L
E
P
R
O
G
R
A
M
E
P
S
H
U
S
F
T
F
E
L
R
E
E
O
N
E
W
S
FM MW LW AM PM
N
N
PE
PE
O
O
SE
SE
LO
LO
C
C
T
T
E
E
ES
ES
R
PR
P
G
G
IN
IN
N
N
U
TU
T
TIMER
Instellen van de timer
• U kunt het apparaat als alarmklok gebruiken; het
apparaat wordt dan op een ingestelde tijd automatisch
ingeschakeld. Voor u de timer kunt gebruiken, moet u
eerst de klok ingesteld hebben.
• Als gedurende langer dan 90 seconden geen enkele
toets wordt ingedrukt dan sluit het apparaat het
instellen van de timer af.
1 Druk vanuit stand-by 2 seconden of langer op PROGRAM.
™
In het display verschijnt TUNER of CD en Nknippert.
™
Is de klok nog niet ingesteld dan verschijnt in het display
SET CLOCK TIME.
2 Draai VOLUME in de richting van de klok.
™
In het display verschijnt achtereenvolgens
CD, TUNER, CD...
3 Druk op PROGRAM (op het apparaat) om de bron te
bevestigen.
™ In het display verschijnt ON 0:00, en de cijfers
die het uur aangeven 0:00, beginnen te knipperen
4 Draai VOLUME om de uren in te stellen: in de richting
van de klok om het uur hoger in te stellen; tegen de
richting van de klok om het uur lager in te stellen.
Nederlands
47
Page 48

TIMER/ SLEEP
CD
S
H
U
F
F
L
E
P
R
O
G
R
A
M
D
B
B
I
O
I
O
IO
II
I
O
I
I
I
O
I
I
I
O
I
I
I
O
I
O
I
I
I
O
P
EN
C
LO
S
E
P
R
E
S
ET
T
U
N
IN
G
M
C
1
5
8
C
O
M
P
A
C
T
A
U
D
IO
S
Y
S
T
E
M
I
O
I
O
IO
II
I
O
I
I
I
O
I
I
I
O
I
I
I
O
I
O
I
I
I
O
P
EN
C
LO
S
E
P
R
E
SE
T
T
U
N
IN
G
M
C
1
5
8
C
O
M
P
A
C
T
A
U
D
IO
S
Y
S
T
E
M
CD-SPELER
5 Druk opnieuw op TIMER of PROGRAM.
™ De cijfers die de minuten aangeven, beginnen te
knipperen.
6 Draai VOLUME om de minuten in te stellen: in de richting
van de klok om de minuten hoger in te stellen; tegen de
richting van de klok om de minuten lager in te stellen.
7 Druk op TIMER of PROGRAM om de tijd te bevestigen.
– De timer is nu ingesteld en ingeschakeld.
In het display verschijnt N.
In- en uitschakelen van de timer
Druk op:
• op de afstandsbediening,
TIMER tijdens het afspelen of vanuit stand-by
• op het apparaat,
PROGRAM vanuit stand-by.
™ N verschijnt in het display als de timer ingeschakeld
is, en verdwijnt wanneer de timer uitgeschakeld wordt.
In- en uitschakelen van de functie SLEEP
Met de timer kunt u het apparaat voor het inslapen zichzelf
laten uitschakelen na een bepaalde tijd. Voor u de inslaapfunctie van de timer kunt gebruiken, moet u eerst de klok
ingesteld hebben.
Nederlands
• Druk één of meerdere keren op SLEEP op de
afstandsbediening tijdens het afspelen om de gewenste
inslaaptijd te kiezen en in te schakelen.
™ In het display verschijnt SLEEP en de verschillende
SLEEP-tijden worden één na één weergegeven:
• Om uit te schakelen drukt u één of meerdere keren op
48
60, 45, 30, 15, SLEEP OFF, 60...
SLEEP op de afstandsbediening tot SLEEP OFF
verschijnt, of druk op stand-by-toets op het apparaat of
op de afstandsbediening.
™ SLEEP verdwijnt uit het display.
Afspelen van een cd
Deze cd-speler is geschikt voor audio-cd’s, ook
CD-Recordables en CD-Rewritables.
• CD-ROM, CD-I, CDV, VCD, DVD, MP3 of computer cd’s,
zijn echter niet mogelijk.
1 Kies de bron CD.
2 Druk op OPEN/CLOSE om het CD vak te openen.
™ In het display verschijnt OPEN wanneer u het
cd-vak opent.
3 Plaats een cd in het vak met de bedrukte kant naar
boven en druk op OPEN/CLOSE om het cd-vak te sluiten.
™ In het display verschijnt READ terwijl de cd-speler
de inhoud van de cd scant, en vervolgens verschijnen
in het display het totale aantal nummers en de totale
speelduur van de cd.
™ NO DISC verschijnt als er geen cd in het apparaat
zit.
™ DISC NOT READABLE loopt over het display
als u de cd verkeerd geplaatst heeft of bij een niet
afgesloten CD-R(W).
4 Druk op 2; om het afspelen te starten.
™ Tijdens het afspelen verschijnen in het display het
huidige nummer en de verstreken speelduur van het
nummer dat speelt.
5 U kunt het afspelen tijdelijk onderbreken met de toets 2;.
Druk opnieuw op 2; om verder te gaan met afspelen.
™ Het display blijft stilstaan en de verstreken speelduur
op het moment dat het afspelen onderbroken werd,
knippert.
6 Druk op 9 om het afspelen van de cd te beëindigen.
Opmerking: Het afspelen wordt ook beëindigd:
– als u het cd-vak opent;
– aan het einde van de cd;
– als u een andere bron kiest: TAPE, CD-R of AUX.
Kiezen van een ander nummer
• Druk één of meerdere keren op ¡1 of 2™ op het
apparaat (op de afstandsbediening ¡ of ™) tot het
gewenste nummer in het display verschijnt).
• Heeft u een nummer gekozen kort nadat u een cd in de
speler geplaatst heeft of terwijl het afspelen tijdelijk
onderbroken is dan moet u op 2; drukken om het
afspelen te starten.
Zoeken naar een passage binnen een nummer
1 Houd ¡1 of 2™ ingedrukt (op de afstandsbediening
11 of 22 ).
– De cd wordt versneld en zachtjes afgespeeld.
2 Laat 11 of 22 los zodra u de gewenste passage
herkent.
– Het afspelen gaat op de normale manier verder.
Opmerking: Bij de SHUFFLE/ REPEAT-functie en tijdens het
afspelen van een programma kan enkel
gezocht worden binnen het nummer dat speelt.
Page 49

Verschillende manieren van afspelen: SHUFFLE
CD
S
H
U
F
F
L
E
P
R
O
G
R
A
M
D
B
B
I
O
I
O
IO
II
I
O
I
I
I
O
I
I
I
O
I
I
I
O
I
O
I
I
I
O
PE
N
C
LO
SE
P
R
ES
E
T
T
U
N
IN
G
M
C
1
5
8
C
O
M
P
A
C
T
A
U
D
IO
S
Y
S
T
E
M
I
O
I
O
IO
II
I
O
I
I
I
O
I
I
I
O
I
I
I
O
I
O
I
I
I
O
P
EN
C
LO
SE
P
R
ES
ET
T
U
NIN
G
M
C
1
5
8
C
O
M
P
A
C
T
A
U
D
IO
S
Y
S
T
E
M
en REPEAT
U kunt de verschillende manieren van afspelen kiezen of
wijzigen voor of tijdens het afspelen. U kunt deze manieren
van afspelen ook met de programmeerfunctie combineren.
SHUFFLE . . . . . . . . . . alle nummers van de cd / van het
programma worden in willekeurige
volgorde afgespeeld
SHUFFLE en
REPEAT ALL. . . . . . . . de hele cd/ het hele programma
wordt in willekeurige volgorde
telkens opnieuw herhaald
REPEAT ALL. . . . . . . . de hele cd/het hele programma
wordt keer op keer herhaald
REPEAT . . . . . . . . . . . het huidige nummer wordt telkens
opnieuw herhaald
1 Kies de gewenste manier van afspelen door voor of
tijdens het afspelen te drukken op de toets
• SHUFFLE of REPEAT op de afstandsbediening
• CLOCK op het apparaat tot de gewenste manier in het
display verschijnt.
2 Staat de speler stil, druk dan op 2; om het afspelen te
starten.
™ Heeft u SHUFFLE gekozen dan gaat het afspelen
meteen van start.
3 Wilt u weer op de normale manier verder gaan met
afspelen, druk dan op de toets SHUFFLE of REPEAT tot in
het display geen enkele SHUFFLE/ REPEAT manier nog
aangegeven wordt.
– U kunt ook op 9 drukken om de manier van afspelen
af te sluiten.
Programmeren van nummers
Terwijl de speler stilstaat, kunt u de nummers op uw cd kiezen
en in de gewenste volgorde programmeren. Desgewenst kunt u
elk nummer ook meer dan eens programmeren. In het totaal
kunnen 40 nummers in het geheugen opgeslagen worden.
1 Druk op PROGRAM op het apparaat of op de
afstandsbediening om het programmeren te starten.
™ Er verschijnt een nummer en PROGRAM knippert.
2 Gebruik ¡1 of 2™ op het apparaat (op de
afstandsbediening ¡ of ™) om het gewenste nummer te
kiezen.
3 Druk op PROGRAM om het nummer dat u wilt
programmeren te bevestigen.
™ Het aantal geprogrammeerde nummers en de totale
speelduur van het programma verschijnt kort, en
vervolgens het gekozen nummer en PROG.
…
™
: …verschijnt als de totale speelduur
100 minuten of meer bedraagt.
4 Herhaal de stappen 2 -3 om op deze manier alle
gewenste nummers te kiezen en te programmeren.
™ FULL (vol) verschijnt in het display als u meer dan
40 nummers probeert te programmeren.
5 Druk op 2; om het afspelen van het cd-programma te
starten.
Controleren van het programma
• Houd, terwijl de speler stilstaat, PROGRAM op het
apparaat of op de afstandsbediening ingedrukt totdat de
nummers die u geprogrammeerd heeft één voor één in
het display verschijnen.
Wissen van het programma
U kunt een programma wissen door:
– eenmaal op 9 te drukken terwijl de speler stilstaat;
– tweemaal op 9 te drukken tijdens het afspelen;
– het cd-vak te openen.
• CLEARED wordt kort weergegeven en PROGRAM
verdwijnt uit het display.
Nederlands
49
Page 50

TUNER
I
O
I
O
I
O
I
I
I
O
I
I
I
O
I
I
I
O
I
O
I
I
I
O
PEN
C
LO
S
E
P
R
ES
ET
T
U
NIN
G
M
C
1
5
8
C
O
M
P
A
C
T
A
U
D
IO
S
Y
S
T
E
M
I
O
I
O
I
O
I
I
I
O
I
I
I
O
I
I
I
O
I
O
I
I
I
O
P
EN
C
LO
S
E
PR
ES
ET
TU
N
ING
M
C
1
5
8
C
O
M
P
A
C
T
A
U
D
IO
S
Y
S
T
E
M
DBB
CD
T
U
N
E
R
P
R
O
G
R
A
M
S
H
U
F
F
L
E
X
Onderhoud van de cd-speler en de cd’s
• Indien de cd-speler de cd’s niet correct kan lezen,
gebruik dan een standaard verkrijgbare schoonmaak-cd
om de lens schoon te maken voor u het apparaat ter
reparatie aanbiedt. Andere manieren van schoonmaken
kunnen de lens beschadigen.
• Raak de lens van de cd-speler nooit aan!
• Als u het apparaat van een koude naar een warme
omgeving verplaatst, kan de lens van de cd-speler
beslaan. De cd-speler werkt dan niet zoals het hoort.
Laat de cd-speler enige tijd acclimatiseren in een warme
omgeving tot de condens verdwenen is.
• Houd het cd-vak altijd dicht om te voorkomen dat er stof
op de lens komt.
• U kunt de cd het eenvoudigst uit het doosje nemen door
in het midden te drukken terwijl u de cd optilt. Houd de
cd’s altijd bij de rand vast en berg ze na gebruik weer op
in het doosje om te voorkomen dat er krassen of vuil op
komen.
Nederlands
• Maak de cd schoon door met een zachte, pluisvrije doek
vanuit het midden in een rechte lijn naar de rand te
wrijven. Schoonmaakmiddelen kunnen de cd
beschadigen.
• Schrijf nooit op een cd en plak er geen stickers op.
50
Afstemmen op een radiozender
1 Kies de bron TUNER
™ TUNER verschijnt kort in het display.
2 Druk op BAND (of houd SOURCE op de afstands-
bediening 2 seconden of langer ingedrukt) om het
gewenste golfgebied te kiezen.
3 Druk opTUNING ¡1 of 2™ (op de afstandsbediening
11 of 22) om af te stemmen op een zender en laat los
wanneer het zoeken naar een zender begint.
™ De radio stemt automatisch af op een zender die
sterk genoeg is. Tijdens het automatisch afstemmen
verschijnt in het display SEARCH.
™ Als een FM-zender in stereo ontvangen wordt dan
verschijnt STEREO.
4 Herhaal indien nodig stap 3tot u de gewenste zender
gevonden heeft.
• Om af te stemmen op een zwakke zender: druk
herhaaldelijk kort op 5 of 6 tot de ontvangst
optimaal is.
Programmeren van radiozenders
U kunt in het totaal 40 radiozenders in het geheugen
programmeren.
Automatisch programmeren
Het automatisch programmeren start bij een gekozen
zendernummer. Vanaf dit nummer zullen alle hogere, eerder
geprogrammeerde radiozenders overschreven worden. Het
apparaat programmeert enkel zenders die nog niet in het
geheugen opgeslagen zijn.
1 Druk op PRESET 4 of 3 (¡ of ™ op de
afstands-bediening) om het nummer te kiezen vanaf
waar u het programmeren wilt laten starten.
Opmerking: Als u geen zendernummer gekozen heeft,
wordt standaard nummer 1 gekozen en worden
alle geprogrammeerde zenders overschreven.
2 Druk langer dan 2 seconden op PROGRAM op het
apparaat of op de afstandsbediening om het
programmeren te starten.
™ AUTO verschijnt in het display en de beschikbare
zenders worden geprogrammeerd in volgorde van
sterkte van het golfgebied: FM gevolgd MW (AM) en
vervolgens LW-zenders. De zender die als laatste
automatisch geprogrammeerd werd, begint dan te
spelen.
™ Druk op 9 op het apparaat om het automatisch
programmeren te onderbreken.
Handmatig programmeren
1 Stem af op de gewenste radiozender (zie Afstemmen op
een radiozender).
2 Druk op PROGRAM op het apparaat of op de
afstandsbediening om het programmeren te starten.
™ PROGRAM knippert in het display.
Page 51

RDS
I
O
I
O
I
O
I
I
I
O
I
I
I
O
I
I
I
O
I
O
I
I
I
O
PE
N
CL
O
S
E
P
R
ES
E
T
T
U
N
IN
G
M
C
1
5
8
C
O
M
P
A
C
T
A
U
D
IO
S
Y
S
T
E
M
I
O
I
O
I
O
I
I
I
O
I
I
I
O
I
I
I
O
I
O
I
I
I
O
P
E
N
CL
O
S
E
P
RE
S
E
T
T
U
N
IN
G
M
C
1
5
8
C
O
M
P
A
C
T
A
U
D
IO
S
Y
S
T
E
M
DBB
CD
T
U
N
E
R
P
R
O
G
R
A
M
S
H
U
F
F
L
E
E
O
3 Druk op PRESET 4 of 3 (¡ of ™ op de
afstandsbediening) om een nummer van 1 tot 40 toe te
kennen aan deze zender.
4 Druk opnieuw op PROGRAM om te bevestigen.
™ PROGRAM verdwijnt uit het display, en het
nummer en de frequentie van de geprogrammeerde
zender verschijnen.
5 Herhaal deze vier stappen om nog meer zenders op te
slaan.
• U kunt een geprogrammeerde zender wissen door een
andere frequentie op dezelfde plaats op te slaan.
Afstemmen op een geprogrammeerde zender
Druk op PRESET 4 of 3 (¡ of ™ op de afstandsbediening)
tot het nummer van de gewenste zender in het display verschijnt.
Wijzigen van de afstemstap
(niet op alle modellen)
In Noord- en Zuid-Amerika is de afstemstap tussen twee
naast elkaar liggende kanalen op de AM- en de FM-band
10 KHz respectievelijk 100 KHz In de rest van de wereld is
dit 9 KHz en 50 KHz. Normaal gezien is de afstemstap
reeds in de fabriek ingesteld voor uw gebied, zo niet:
1 Kies de bron TUNER.
2 Houd 9 op het apparaat langer dan 5 seconden
ingedrukt.
™ In het display verschijnt GRID 9 of GRID10.
Opmerking: Alle geprogrammeerde zenders gaan hierdoor
verloren en moeten opnieuw geprogrammeerd
worden.
RDS (niet op alle modellen)
Radio Data System is een dienst van de zendstations
waarbij FM-zenders extra informatie uitzenden.
Als u een RDS-zender ontvangt dan verschijnen in het
display en de zendernaam.
Bij het automatisch programmeren zullen RDS-zenders als
eerste geprogrammeerd worden.
De verschillende soorten RDS-informatie in het display
• Druk herhaaldelijk kort op RDS/ CLOCK om de volgende
soorten informatie om de beurt in het display te laten
verschijnen (indien beschikbaar):
– Zendernaam
– Het type programma zoals NEWS, SPORT, POP M...
– Tekstboodschappen
– Frequentie
Opmerking: Als u op RDS/ CLOCK drukt en er is geen
RDS-signaal beschikbaar dan verschijnt in het
display NO RDS.
EON
Enhanced Other Network zorgt ervoor dat u een
RDS-zender kunt zoeken die een bepaald programmatype
uitzendt. Als EON beschikbaar is dan verschijnt .
Zoeken naar een programmatype (PTY)
PTY helpt u een bepaald programmatype te vinden.
Om PTY in te schakelen moet u eerst RDS-zenders in het
geheugen van de tuner programmeren (zie Programmeren
van radiozenders).
1 Druk, terwijl u een RDS-zender ontvangt, kort op RDS/
CLOCK tot in het display een programmatype verschijnt.
2 Druk op 2; of 9 op het apparaat (¡ of ™ of op de
afstandsbediening) tot het gewenste programmatype in
het display verschijnt.
3 Houd TUNING ingedrukt 2™ ( 6 op de
afstandsbediening) om het zoeken te starten.
– De radio stemt af op een RDS-zender die dit type
programma uitzendt. Indien het programmatype niet
beschikbaar is, verschijnt in het display
TYPE NOT FOUND .
• RDS-programmatypes
NO TYPE . . . . . . . Geen RDS-programmatype
NEWS . . . . . . . . . . . Nieuwsberichten
AFFAIRS . . . . . . . Politiek en actualiteiten
INFO . . . . . . . . . . . Speciale informatieve programma’s
SPORT . . . . . . . . . . Sports
EDUCATE . . . . . . . Educatieve programma’s
DRAMA . . . . . . . . . . Radiospelen en literatuur
CULTURE . . . . . . . Cultuur, religie en maatschappij
SCIENCE . . . . . . . Wetenschap
VARIED. . . . . . . . . Amusementsprogramma’s
POP M . . . . . . . . . . Popmuziek
ROCK M . . . . . . . . . Rockmuziek
MOR M . . . . . . . . . . Lichte muziek
LIGHT M . . . . . . . Licht klassieke muziek
CLASSICS . . . . . . Klassieke muziek
OTHER M . . . . . . . Speciale muziekprogramma’s
Nederlands
51
Page 52

OPMERKINGEN
RDS-nieuwsbericht (NEWS) en
verkeersberichten (TA)
U kunt de radio zo instellen dat de bron waar u naar luistert
onderbroken wordt wanneer een RDS-zender een
nieuwsbericht verstuurt. Dit werkt enkel indien de
RDS-zender een NEWS-signaal meestuurt met het
nieuwsbericht.
1 Stem af op de gewenste RDS-zender.
2 Druk één of meerdere keren op NEWS/TA op de
afstandsbediening om de nieuwsberichtfunctie te kiezen.
™ NEWS ON, TA ON of OFF verschijnt kort in het
display.
™
NEWS
verschijnt in het display als u de nieuwsbericht-
of verkeersberichtenfunctie ingeschakeld heeft en
NEWS ON of TA ON wordt kort weergegeven. Als u een
andere bron kiest, wordt de functie niet uitgeschakeld.
Opmerkingen:
• Wanneer u een RDS-nieuws- of verkeersbericht ontvangt
terwijl de cd speelt dan wordt de cd onderbroken en kunt
u naar het bericht luisteren. NEWS knippert in het display
tijdens de uitzending van het bericht. De cd begint
opnieuw te spelen als het bericht voorbij is.
• Als u de RDS-nieuwsbericht- of de
verkeersberichtfunctie gebruikt bij een EON-zender dan
Nederlands
wordt over de hele band gezocht naar berichten.
Uitschakelen van het RDS-nieuwsbericht en de
verkeersberichten
U kunt de berichtenfunctie op verschillende manieren uitschakelen:
• Druk op NEWS/TA op de afstandsbediening terwijl u
een nieuwsbericht ontvangt.
• Druk op de stand-by-toets op het apparaat of op de
afstandsbediening.
• Stem af op een zender zonder RDS.
52
Met het oog op het milieu...
Wij hebben alle overbodig verpakkingsmateriaal
weggelaten en ervoor gezorgd dat de verpakking
gemakkelijk in drie materialen te scheiden is:
karton (doos), polystyreenschuim (buffer) en polyethyleen
(zakken, beschermfolie).
Uw systeem bestaat uit materialen die door een
gespecialiseerd bedrijf gerecycleerd en hergebruikt kunnen
worden. Informeer waar u verpakkingsmateriaal,
lege batterijen en oude apparatuur kunt inleveren.
Page 53

VERHELPEN VAN STORINGEN
TECHNISCHE GEGEVENS
WAARSCHUWING
Maak het apparaat niet open want dan loopt u het
risico een elektrische schok te krijgen! Probeer in
geen geval zelf het apparaat te repareren want dan
vervalt de garantie.
Als zich een probleem voordoet, controleer dan eerst de
punten op de onderstaande lijst voor u het apparaat ter
reparatie aanbiedt.
Kunt u het probleem niet oplossen aan de hand van deze
aanwijzingen, raadpleeg dan uw leverancier of
serviceorganisatie.
Probleem Mogelijke oorzaak Oplossing
Geen geluid/voeding Het volume staat te zacht Zet het volume harder met VOLUME
De hoofdtelefoon is aangesloten Haal de stekker van de hoofdtelefoon uit het
apparaat
Het netsnoer zit niet goed in het stopcontact Sluit het netsnoer goed aan
De toetsen reageren Elektrostatische ontlading Haal de stekker van het apparaat uit het stop
niet contact, sluit enkele seconden later weer aan
De timer/ inslaap- De klok is niet ingesteld Stel de tijd in op de klok
functie werkt niet
Veel ruis of brom Elektrische interferentie: het apparaat Zet ze verder van elkaar af
staat te dicht bij een tv, videorecorder of
computer
Slechte Zwak radiosignaal FM: richt de FM-draadantenne voor de beste
radio-ontvangst ontvangst
NO DISC of Krassen of vuil op de cd Vervang de cd/ maak deze schoon, zie
DISC NOT Onderhoud
READABLE De CD-R(W) is blanco of de cd is niet afgesloten Gebruik een afgesloten CD-R(W)
in het display De lens van de laser is beslagen Wacht tot de lens geacclimatiseerd is
De cd-speler slaat De cd is beschadigd of vuil Vervang de cd of maak deze schoon
nummers over De programmeer- of SHUFFLE-functie is Zet de programmeer- of SHUFFLE-functie uit
ingeschakeld
De afstandsbediening De batterijen zijn leeg Vervang de batterijen
werkt niet niet zoals De batterijen zijn verkeerd geplaatst Plaats de batterijen op de juiste manier
het hoort U zit te ver of niet goed recht voor het apparaat Ga dichterbij of recht voor het apparaat zitten
Versterker
Uitgangsvermogen. . . . . . . . . . . . . . . . . . . 2 x 15 W RMS
Uitgangsvermogen. . . . . . . . . . . . . . . . . . . . 250 W PMPO
Signaal/ruis-verhouding. . . . . . . . . . . . . . . ≥ 65 dBA (IEC)
Digital out. . . . . . . . . . . . . . . . . . . . . . . . . . . . 0,5 V, 75 Ω
Line out. . . . . . . . . . . . . . . . . . . . . . . . . . . . 0,5 V, 1000 Ω
Ingangsgevoeligheid AUX. . . . . . . . . . . . . 0,5 V (max. 2 V)
Impedantie, luidsprekers . . . . . . . . . . . . . . . . . . . . . . 8 Ω
Impedantie, hoofdtelefoon . . . . . . . . . . . . . 32 Ω -1000 Ω
Tuner
FM-band. . . . . . . . . . . . . . . . . . . . . . . . . . 87.5 - 108 MHz
MW (AM)-band . . . . . . . . . . . . . . . . . . . . . 531- 1602 kHz
LW-band . . . . . . . . . . . . . . . . . . . . . . . . . . . 153 - 279 kHz
Gevoeligheid bij 75 Ω
– mono, 26 dB signaal/ruis-verhouding . . . . . . . . . 2,8 µV
– stereo, 46 dB signaal/ruis-verhouding. . . . . . . . 61,4 µV
Selectiviteit . . . . . . . . . . . . . . . . . . . . . . . . . . . . . ≥ 28 dB
Totale harmonische vervorming . . . . . . . . . . . . . . . . ≤ 5%
Frequentiebereik . . . . . . . . . . . . . . 63 - 12.500 Hz (± 3 dB)
Signaal/ruis-verhouding. . . . . . . . . . . . . . . . . . . ≥ 50 dBA
Cd-speler
Frequentiebereik. . . . . . . . . . . . . . . . 20 - 20.000 Hz (8 dB)
Signaal/ruis-verhouding. . . . . . . . . . . . . . . . . . . . . 75 dBA
Luidsprekers
2-wegs bassreflexsysteem
Afmetingen (b x h x d) . . . . . . . . . . . . . . . 164 x 158 x 239
Algemeen
Afmetingen (b x h x d) . . . . . . . . . . . . . . . 164 x 158 x 254
Gewicht (met/zonder luidsprekers). . . ongeveer 7,5/3,0 kg
Stroomverbruik in stand-by . . . . . . . . . . . . . . . . . . . < 7 W
Wijzigingen voorbehouden
Nederlands
53
Page 54

COMANDI E COLLEGAMENTI
Pannello superiore ed anteriore
1 STANDBY/ ON y . mette l'apparecchio in modo
2 SOURCE. . . . . . . . seleziona la sorgente sonora per
Sintonizzatore:.
3 PROGRAM
CD: . . . . . . . . . . .
Sintonizzatore: . programma la sintonizzazione delle
Timer: . . . . . . . . . attiva, imposta e disattiva la
4 RDS/CLOCK . . . . . visualizza informazione RDS,
CD: . . . . . . . . . . .
5 SOUND CONTROL
DBB. . . . . . . . . . . (Dynamic Bass Boost)
DSC. . . . . . . . . . . (Digital Sound Control)
INCREDIBLE
SURROUND. . . . . crea un fenomenale effetto stereo
6 Display. . . . . . . .
7 VOLUME . . . . . . .
8 OPEN/CLOSE . . . . apre/ chiude la piastra CD
Italiano
9 2; o PRESET 3 avvia e interrompe la lettura del CD
9 o PRESET 4. . . sarresta la lettura del CD o cancella
54
standby/accende
CD/ TUNER / CD RW / AUX;
accende l'apparecchio
seleziona la banda delle lunghezze d'onda
programma brani e rivede il programma;
stazioni manualmente o
automaticamente;
funzione del timer
imposta la funzione dell'orologio
seleziona e ripete le opzioni, es. ripete un
brano/ programma CD / tutto il CD;
riproduce brani in ordine casuale
potenzia i suoni bassi
potenzia le caratteristiche sonore:
OPTIMAL/CLASSIC/JAZZ/POP
super-potenziato
visualizza informazioni sull'apparecchio
regola il livello del volume e le
impostazioni del suono;regola le ore ed i
minuti dell'orologio/e le funzioni del timer
seleziona le stazioni radio
preimpostate (alto);
un programma CD;
attiva disattiva modo demo;
. . . . . . . . . . . . . . seleziona le stazioni radio
0 2™, ¡1 o TUNING 3,4
CD: . . . . . . . . . . . . . .
Sintonizzatore. . . . . (in alto in basso) sintonizza sulle
preimpostate (basso);
ricerca rapida indietro ed avanti in un
brano;
salta al successivo brano/all’inizio del
brano corrente o un brano precedente
stazioni radio
Pannello posteriore
! p . . . . . . . . . . . . . presa per la cuffia stereo di 3,5 mm
@ AUX IN
RIGHT/ LEFT . . . .
# SPEAKERS 8 Ω . . per il collegamento delle casse
$
LINE OUT
LEFT/RIGHT
% DIGITAL OUT . . . . per il collegamento di un sistema di
^ AC MAINS. . . . . . dopo che tutti i collegamenti sono
&
FM AERIAL 75
* AM (MW) AERIAL
(16-150 Ω)
per il collegamento di un apparecchio
aggiuntivo all'uscita audio
acustiche fornite
. . . . . per il collegamento di un
apparecchio aggiuntivo all'entrata
CD-(RW) per registrazione digitale su
CD, o un altro sistema per un
alternativo suono a all'uscita
stati effettuati, collegare la spina di
rete alla presa a muro
Ω . per il collegamento del cavo
dell'antenna in dotazione o di
un'antenna a muro
per il collegamento del cavo dell'antenna
in dotazione AM (FM) a telaio
Telecomando
y . . . . . . . . . . . . . . mette l'apparecchio
CD,TUNER,AUX,CDR .
TIMER . . . . . . . . . . . . attiva e disattiva il timer
SLEEP . . . . . . . . . . . . attiva e disattiva il spegnimento
seleziona la rispettiva sorgente sonora
automatico;
seleziona l'ora di spegnimento
automatico
DBB. . . . . . . . . . . . . . (Dynamic Bass Boost)
DSC. . . . . . . . . . . . . . (Digital Sound Control)
INCR.SURR . . . . . . . . crea un fenomenale effetto stereo
MUTE . . . . . . . . . . . . interrompe e riprende la riproduzione
BAND . . . . . . . . . . . . seleziona la lunghezza d'onda
NEWS/TA . . . . . . . . . abilita la funzione di annuncio del
VOLUME –, + . . . . . . regola il livello del volume
2; . . . . . . . . . . . . . . avvia/ interrompe la lettura del CD
¡, ™
CD: . . . . . . . . . . . . . . salta all'inizio di un brano corrente/
Sintonizzatore: . . . . (basso, alto) seleziona le stazioni
9 . . . . . . . . . . . . . . arresta la lettura del CD e cancella il
5, 6
CD: . . . . . . . . . . . . . . . .
Sintonizzatore:
REPEAT . . . . . . . . . . . ripete un brano/ programma CD/
SHUFFLE . . . . . . . . . .
PROGRAM
CD: . . . . . . . . . . . . . .
Sintonizzatore: . . . . programma le stazioni radio o avvia
Note:
• selezionare innanzi tutto la sorgente sonora desiderata
(ad es.. CD,CD R), quindi premere il tasto funzione selezionato (ad es .2).
• i tasti di funzioni sul telecomando possono essere usati
per un CD R
potenzia i suoni bassi
potenzia le caratteristiche sonore:
OPTIMAL/CLASSIC/JAZZ/POP
del suono
notiziario RDS e le informazioni sul
traffico (non su tutti i modelli)
precedente/ successivo
radio preimpostate
programma del CD
ricerca indietro o in avanti in un
brano/CD;
. . . . .
(basso, alto) sintonizza sulle stazioni
radio;
tutto il CD;
legge i brani del CD in ordine casuale
programma i brani e rivede il programma;
la programmazione automatica
Page 55

INFORMAZIONE GENERALE
AUX i
ATTENZIONE
L'uso di comandi o di regolazioni o di prestazioni delle
procedure oltre a quelle qui indicate possono causare
radiazioni pericolose.
ALIMENTAZIONE
12
Accessori in dotazione
- 2 casse per altoparlanti
- telecomando con batterie
- antenna a telaio AM/MW
- cavo per antenna FM
Manutenzione generale
• Non esporre l'apparecchio, le batterie, i CD o le cassette
ad umidità, pioggia, sabbia o calore eccessivo generato
da radiatori o da una diretta esposizione ai raggi solari.
• Si può pulire l'apparecchio con un panno di pelle di
daino, leggermente inumidito. Non utilizzare agenti che
contengano alcool, ammoniaca, benzina o abrasivi che
potrebbero danneggiare l'alloggiamento.
Batterie per il telecomando
• Aprire l’alloggiamento delle batterie ed inserirvi nel
modo illustrato due batterie di tipo AA, R06 o UM3
(preferibilmente alcaline), secondo la polarità indicata
dai simboli (+) e (-) all’internodell’alloggiamento.
Importante! Estrarre le batterie scariche o se si pensa di
non utilizzare l'unità per lungo tempo.
Le batterie contengono sostanze chimiche, pertanto
devono essere smaltite in modo corretto.
Collegamenti degli altoparlanti
I terminali degli altoparlanti sono connettori ad inserimento
a scatto. Essi devono essere utilizzati nel modo illustrato
qui di seguito.
– Collegare al terminale rosso il filo non contrassegnato
ed al terminale nero il filo contrassegnato nero.
• Il collegamento delle cuffie disattiva gli altoparlanti.
RIGHT
n
speakers
8 Ω
RIGHT
LEFT
+
+
LEFT
–
–
Alimentazione di rete
1
Controllare che la tensione di rete indicata sulla
targhetta sul fondo dell'apparecchio corrisponda alla
tensione di rete locale. Se ciò non dovesse essere,
consultare il rivenditore o il centro assistenza, nel caso
contrario consultare il rivenditore o il centro di assistenza.
2
Se l'apparecchio è dotato di un selettore di tensione sul fondo,
questo dovrà essere regolato sulla tensione di rete locale.
3 Collegare la spina di rete alla presa a muro ed a questo
punto l'apparecchio è pronto per l'uso.
™ Il display dell'orologio lampeggia …: ….
4 Per scollegare completamente l'apparecchio dalla rete,
estrarre la spina di rete dalla presa a muro
RISPARMIO D'ENERGIA IN STANDBY AUTOMATICO
Quale funzione per il risparmi di energia, l'unità automaticamente si mette in standby se:
• 15 minuti dopo un CD ha raggiunto la fine nessun
comando viene azionato.
• dopo più di 24 ore nessun comando è stato azionato.
Informazioni di sicurezza
•
Poggiare l’apparecchio su di una superficie solida e piatta,
in modo che non stia inclinato. Controllare vi sia sufficiente
ventilazione per impedire che il sistema si surriscaldi.
• Le parti meccaniche dell'apparecchio contengono dei
cuscinetti autolubrificanti, che non devono essere oliati
né lubrificati.
Questo apparecchio è conforme ai requisiti sulle
interferenze radio della Comunità Europea.
Italiano
55
Page 56

COLLEGAMENTI
DBB
CD
S
H
U
F
F
L
E
P
R
O
G
R
A
M
D
B
B
I
O
I
O
IO
II
I
O
I
I
I
O
I
I
I
O
I
I
I
O
I
O
I
I
I
O
P
E
N
CL
O
S
E
PR
E
SE
T
T
U
N
IN
G
M
Z
3
C
O
M
P
A
C
T
A
U
D
IO
S
Y
S
T
E
M
I
O
I
O
IO
II
I
O
I
I
I
O
I
I
I
O
I
I
I
O
I
O
I
I
I
O
P
E
N
CL
OS
E
P
R
E
SE
T
TU
N
IN
G
FUNZIONI BASE
AUX IN
Si possono collegare i terminali OUT audio destro e sinistro per un altro sistema sonoro, es. CDR, registratore di
cassette ai corrispondenti terminali destro e sinistro
AUX IN sul retro dell'apparecchio.
• Usare i comandi del suono dell'MZ-3 per regolare il
suono dell'altro sistema.
• Per la lettura di un CD-R(W) collegato, selezionare la
sorgente CD-R(W)
LINE OUT (non per CDR-W)
Si può collegare il terminale LINE IN di una cassetta audio
digitale (DAT) o di un registratore di nastro al terminale
LINE OUT sul retro dell'apparecchio.
• Regolare il suono mediante i comandi dell'altro sistema.
• Per la registrazione su di un CD-R(W), selezionare la
sorgente CD sull'MZ-3
DIGITALOUT (Solo nel modo CD)
Si può collegare il terminale DIGITAL INdi un CD-R(W)
oppure un lettore di cassette audio digitale (DAC) al terminale DIGITAL OUT sul retro dell'apparecchio.
• Per la registrazione di un CD-R(W), selezionare la
sorgente CD sull'MZ-3.
• Per la lettura di un CD-R(W) collegato, selezionare la
sorgente CD-R(W).
DIGITAL
RL
Italiano
56
out
LINE out
Accensione
I modi per accendere l'apparecchio sono tre:
• premere y STANDBY/ ON sull'apparecchio per attivare
l'ultima sorgente selezionata;
• premere SELECT SOURCE sull'apparecchio per attivare
l'ultima sorgente selezionata;
• premere CD, TUNER, CDR orAUX sul telecomando.
Per portare l'apparecchio in modo standby premere una
volta y STANDBY/ ON sull'apparecchio
(y sul telecomando).
– Il volume, le impostazioni sonore interattive, l'ultima
sorgente selezionata e le preimpostazioni della radio
resteranno nella memoria dell'apparecchio.
Regolazione di volume e suono
1 Ruotare il comando VOLUME sull'apparecchio in senso
antiorario per diminuire il volume o in senso orario per
aumentarlo (o premere VOLUME –, + sul telecomando).
™ Il display visualizza il livello del volume VOL ed un
numero da 0 a 32.
2 Premere DBB, INCR.SURR o DSC sul telecomando una o
più volte per selezionare l'effetto suono desiderato:
,
e
OPTIMAL (nessuna indicazione) /CLASSIC ()/JAZZ
()/POP ()/OPTIMAL... .
Note:
– L’effetto di INCREDIBLE SURROUND può variare con i
diversi tipi di musica.
– Si può anche selezionare l'effetto suono desiderato
dall'apparecchio (Vedi Utilizzo del Sound Control).
3 Premere MUTE sul telecomando per interrompere
immediatamente la riproduzione sonora.
– La riproduzione continua senza sonoro ed il display
indica MUTE.
4 Per riattivare la riproduzione sonora:
– premere nuovamente MUTE;
– regolare i comandi del volume
– cambiare sorgente.
Page 57

Utilizzo del Sound Control
O
P
E
N
C
L
O
S
E
P
R
E
S
E
T
M
C 158 COM
PACT AUDIO SY
STEM
O
P
E
N
C
L
O
S
E
P
R
E
S
E
T
MC 158 COM
PACT AUDIO SYSTEM
FM MW LW AM PM
R
E
P
E
A
T
A
L
L
DBB
C
D
T
U
N
E
R
S
T
E
R
E
O
N
E
W
S
S
L
E
E
P
E
O
P
R
O
G
R
A
M
S
H
U
F
F
L
E
M
M
Si possono anche regolare le impostazioni del suono esclusivamente sull'apparecchio:
1 Premere SOUND CONTROL una o più volte per
selezionare le varie opzioni:
• una volta:
sul display si visualizza DBB OFF (DBB spento);
se DBB è attivato, sul display si visualizza DBB ON
(DBB acceso) e ,
DBB
• due volte:
sul display si visualizza lo stato DSC OPTIMAL.
(sul display si visualizza JAZZ, POP, o CLASSIC ed i
rispettivi , o il simbolo se selezionato)
• tre volte:
sul display si visualizza lo stato Incredible Surround
IS OFF IS OFF. Se IS è attivato, sul display si
visualizza IS ON e
2 Per ciascuna impostazione di suono, ruotare il comando
VOLUME in qualsiasi direzione per selezionare ON
(acceso), OFF (spento) o le opzioni DSC.
3 Premere SOUND CONTROL nuovamente per confermare.
• Sul display si visualizza la successiva impostazione
del suono da regolare.
Dopo aver confermato l'impostazione di IS, sul display si
•
visualizza brevemente il livello del volume VOL prima
di ritornare alla corrente visualizzazione di riproduzione.
Modo demo
• In standby, premere 9 sull'apparecchio per più di
• Ripetere il passo per disattivare.
display.
5 secondi.
™ Messaggi di demo scorrono in continuazione sul
™ DEMO OFF (demo spento) scorre sul display.
OROLOGIO
C
C
1
1
5
5
8
8
C
C
O
O
M
M
P
P
A
I
I
O
O
I
I
O
O
I
I
O
O
I
I
I
I
I
I
O
O
I
I
I
I
I
I
O
O
I
I
I
I
I
I
O
O
I
I
O
O
I
I
I
I
I
I
Regolazione dell'orologio
I metodi possibili per la regolazione dell'orologio sono due:
manuale o automatica mediante RDS.
Regolazione automatica dell'orologio
(solo per la versione RDS)
1 Sintonizzarsi su una stazione RDS (vedere
SINTONIZZATORE).
2 Premere RDS/ CLOCK per almeno due secondi o più.
™ Viene visualizzato SEARCH RDS TIME is
(ricerca ora RDS) per un massimo di 90 secondi;
appare, quindi, l'ora.
™
Se viene visualizzato NO RDS TIME (nessuna ore
RDS) non è stato ricevuto alcun segnale orario. In tal
caso, sarà necessario regolare l'orologio manualmente.
Regolazione manuale dell'orologio
1 In modo standby, premere CLOCK.
™
Le cifre dell'orologio relative alle ore lampeggiano 0:00.
2 Ruotare VOLUME per regolare le ore: in senso orario per
spostare le ore in avanti; in senso antiorario per
spostarle indietro.
3 Premere nuovamente CLOCK.
™
Le cifre dell'orologio relative ai minuti lampeggiano 0:00.
4
Ruotare VOLUME per regolare i minuti: in senso orario per
spostarli in avanti; in senso antiorario per spostarli indietro.
5 Premere CLOCK per confermare l'orario.
A
C
C
T
T
A
A
U
U
D
D
IO
IO
S
S
Y
Y
S
S
T
T
E
E
M
M
CD
DBB
T
U
N
E
R
R
E
P
E
A
T
A
L
L
E
O
S
L
E
P
R
O
G
R
A
M
E
P
S
H
U
S
F
T
F
E
L
R
E
E
O
N
E
W
S
FM MW LW AM PM
N
N
PE
PE
O
O
SE
SE
LO
LO
C
C
T
T
E
E
ES
ES
R
PR
P
G
G
IN
IN
N
N
U
TU
T
TIMER
Regolazione del timer
• L'unità può essere utilizzata come sveglia, per cui
l'apparecchio si accende ad una determinata ora. Per
usare la sveglia, è necessario impostare per l'ora
dell'orologio prima che il timer possa essere usato.
• Se, durante l'impostazione, non si preme alcun pulsante
entro 90 secondi, l'unità abbandona il modo regolazione
timer.
1 Premere PROGRAM sull'apparecchio per 2 secondi o più
in modo standby.
™
Sul display si visualizza TUNER o CD e N lampeggia.
™
Sul display si visualizza SET CLOCK TIME
(impostare l'ora dell'orologio) se l'orologio non è stato
impostato
2 Ruotare VOLUME in senso orario.
™
La sequenza del display visualizza CD, TUNER, CD...
3 Premere PROGRAM (sull'apparecchio) per confermare la
sorgente.
™ Sul display si visualizza ON 0:00, le cifre
dell'orologio per le ore; 0:00 lampeggiano.
4 Ruotare VOLUME per impostare le ore: in senso orario
per aumentarle; antiorario per diminuirle.
Italiano
57
Page 58

TIMER/ SLEEP
CD
S
H
U
F
F
L
E
P
R
O
G
R
A
M
D
B
B
I
O
I
O
IO
II
I
O
I
I
I
O
I
I
I
O
I
I
I
O
I
O
I
I
I
O
P
EN
C
LO
S
E
P
R
E
S
ET
T
U
N
IN
G
M
C
1
5
8
C
O
M
P
A
C
T
A
U
D
IO
S
Y
S
T
E
M
I
O
I
O
IO
II
I
O
I
I
I
O
I
I
I
O
I
I
I
O
I
O
I
I
I
O
P
EN
C
LO
S
E
P
R
E
SE
T
T
U
N
IN
G
M
C
1
5
8
C
O
M
P
A
C
T
A
U
D
IO
S
Y
S
T
E
M
LETTORE DI CD
5 Premere TIMER o PROGRAM nuovamente.
™ Le cifre dell'orologio relative ai minuti lampeggiano.
6 Ruotare VOLUME per impostare i minuti: in senso orario
per aumentarli; antiorario per diminuirli.
7 Premere TIMER o PROGRAM per confermare l'ora.
– Il timer è ora regolato e attivato.
Sul display si visualizza N
.
Attivazione e disattivazione del timer
Premere o:
• sul telecomando,
TIMER durante la riproduzione o in modo standby.
• sull'apparecchio,
PROGRAM in modo standby.
™ Sul display si visualizza N se attivato, e scompare
se disattivato.
Attivazione e disattivazione del spegnimento
automatico (SLEEP)
Il timer di spegnimento automatico consente all'unità di
spegnersi dopo un periodo di tempo stabilito. Per poter
usare la funzione di spegnimento automatico, è necessario
innanzi tutto impostare l'ora dell'orologio.
• Durante la riproduzione, per selezionare ed attivare il
tempo di spegnimento automatico desiderato, premere
una o più volte SLEEP sul telecomando.
™ Il display indica SLEEP ed una delle opzioni
dell'ora di spegnimento automatico in sequenza:
60, 45, 30, 15, SLEEP OFF, 60...
• Per disattivare la funzione, premere una o più volte
Italiano
58
SLEEP sul telecomando, sino a visualizzare
SLEEP OFF, oppure premere il tasto di standby
sull'apparecchio o sul telecomando.
™ SLEEP scompare dal display.
Riproduzione di un CD
Questo lettore di CD riproduce dischi audio, compresi i CDregistrabili ed i CD-ricopribili.
• Non si possono usare, tuttavia, CD-ROM, CD-I, CDV,
VCD, DVD o CD per computer
1 Selezionare la sorgente CD.
2 Premere OPEN/CLOSE per aprire il comparto del CD.
™ OPEN (apri) si visualizza quando si apre il comparto
del CD.
3 Inserire un CD con il lato inciso rivolto verso l'alto e
premere OPEN/CLOSE per chiudere il comparto CD.
™ Mentre il lettore esegue una scansione del contenuto
del CD, viene visualizzato READ (scansione),
insieme al numero totale di brani e al tempo di
lettura.
™ NO DISC (assenza disco) si visualizza se non si è
inserito un disco.
™ DISC NOT READABLE(disco non leggibile) si
visualizza sul display se si inserisce un CD in modo
errato oppure si è inserito un CD-R(W) non finalizzato.
4 Premere 2; per avviare la lettura.
™
Durante la lettura del CD, vengono visualizzati il numero di
brano corrente ed il tempo di riproduzione trascorso.
5 Per interrompere la lettura, premere 2; . Premere
nuovamente 2; per riprenderla.
™ Quando si interrompe la lettura, il display si blocca
ed il tempo di lettura trascorso lampeggia.
6 Per interrompere la lettura del CD, premere 9.
Nota: La lettura del CD si interrompe anche se:
– si apre il comparto CD;
– il CD è finito;
– si seleziona un'altra sorgente: TAPE, CD R o AUX.
Selezione di un brano diverso
• Premere una o più volte¡1 o 2™ sull'apparecchio, (sul
telecomando ¡ o ™) ripetutamente sino a visualizzare
sul display il numero di brano desiderato.
• Se si è selezionato un numero di brano poco dopo aver
caricato un CD o se si è in posizione di pausa, è
necessario premere 2; per avviare la riproduzione.
Individuazione di un passaggio all'interno di
un brano
1 Premere e tenere premuto ¡1 o 2™ (sul telecomando
11 o 22 ).
– Il CD viene letto ad alta velocità e basso volume.
2 Quando si individua il passaggio desiderato, rilasciare
11 o 22.
– La lettura del CD continua in modo normale.
Nota: durante un programma di CD o se è attivo
SHUFFLE/ REPEAT, è possibile eseguire la ricerca
solo all'interno dello stesso brano.
Page 59

I diversi modi di riproduzione: SHUFFLE e REPEAT
CD
S
H
U
F
F
L
E
P
R
O
G
R
A
M
D
B
B
I
O
I
O
IO
II
I
O
I
I
I
O
I
I
I
O
I
I
I
O
I
O
I
I
I
O
PE
N
C
LO
SE
P
R
ES
E
T
T
U
N
IN
G
M
C
1
5
8
C
O
M
P
A
C
T
A
U
D
IO
S
Y
S
T
E
M
I
O
I
O
IO
II
I
O
I
I
I
O
I
I
I
O
I
I
I
O
I
O
I
I
I
O
P
EN
C
LO
SE
P
R
ES
ET
T
U
NIN
G
M
C
1
5
8
C
O
M
P
A
C
T
A
U
D
IO
S
Y
S
T
E
M
Si possono selezionare o variare i modi differenti di lettura
riproduzione prima o durante la lettura. I modi di riproduzione
possono essere combinati con la funzione di programzione.
SHUFFLE . . . . . . . . . . tutti i brani del CD/ del programma
vengono riprodotti in ordine casuale
SHUFFLE e
REPEAT ALL. . . . . . . . per ripetere ininterrottamente il CD/
il programma in ordine casuale
REPEAT ALL. . . . . . . . ripete tutto il CD/ il programma in
continuazione
REPEAT . . . . . . . . . . . ripete ininterrottamente il brano
corrente
1 Per scegliere il modo di lettura prima o durante la
riproduzione, premere il pulsante o:
• SHUFFLE o REPEAT sul telecomando oppure;
• CLOCKripetutamente sull'apparecchio sino a visualizzare
sul display la funzione desiderata.
2 Premere 2; per avviare la riproduzione dalla posizione
di stop.
™ Se si è selezionato SHUFFLE, la riproduzione si avvia
automaticamente.
3 Per tornare al modo riproduzione normale, premere il
relativo pulsante SHUFFLE o REPEAT sino a quando i
modi SHUFFLE/ REPEAT scompaiono dal display.
– E' anche possibile premere 9 per annullare il modo di
riproduzione.
Programmazione dei numeri di brano
Con il programma in posizione stop, per selezionare e memorizzare i brani del CD nella sequenza desiderata. Se si desidera,
ogni brano può essere memorizzato più volte. E' possibile
memorizzare sino a 40 brani.
1 Premere PROGRAM sull'apparecchio o sul telecomando
per avviare il modo programmazione.
™ Viene visualizzato un numero di brano e PROGRAM
lampeggia.
2 Usare ¡1 o 2™ sull'apparecchio (sul telecomando
¡ o ™)per selezionare il numero di brano desiderato.
3 Premere PROGRAM per confermare il numero di brano
da memorizzare.
™ Vengono visualizzati brevemente il numero di brano
programmato ed il tempo totale di riproduzione del
programma, quindi il brano selezionato e PROG.
…
™
: …si visualizza se il tempo totale di
riproduzione è di 100 minuti o più.
4 Ripetere i passi 2e 3 per selezionare e memorizzare
tutti i brani desiderati.
™ FULL (pieno) appare se si cerca di programmare
oltre 40 brani.
5 Per avviare la riproduzione del programma del CD,
premere 2; .
Revisione del programma
• In modo STOP, premere e tenere premuto PROGRAM
sull'apparecchio o sul telecomando, sino a quando si
visualizza sul display tutti i numeri in sequenza dei brani
memorizzati.
Cancellazione di un programma
Si può cancellare un programma:
– premendo una volta 9 in posizione di stop;
– premendo due volte 9 durante la riproduzione;
– aprendo lo sportello del comparto CD aperto.
• CLEARED (cancellato) si visualizza brevemente e
PROGRAM program scompare dal display.
Italiano
59
Page 60

SINTONIZZATORE
I
O
I
O
I
O
I
I
I
O
I
I
I
O
I
I
I
O
I
O
I
I
I
O
PEN
C
LO
S
E
P
R
ES
ET
T
U
NIN
G
M
C
1
5
8
C
O
M
P
A
C
T
A
U
D
IO
S
Y
S
T
E
M
I
O
I
O
I
O
I
I
I
O
I
I
I
O
I
I
I
O
I
O
I
I
I
O
P
EN
C
LO
S
E
PR
ES
ET
TU
N
ING
M
C
1
5
8
C
O
M
P
A
C
T
A
U
D
IO
S
Y
S
T
E
M
DBB
CD
T
U
N
E
R
P
R
O
G
R
A
M
S
H
U
F
F
L
E
X
Manipolazione del CD e del lettore di CD
• Se il lettore non riesce a leggere correttamente i CD,
utilizzare un CD di pulizia disponibile sul mercato per
pulire la lente prima di richiedere la riparazione
dell'apparecchio. Altri metodi di pulizia potrebbero
distruggere la lente.
• Non toccare mai la lente del lettore di CD!
•
La lente del lettore di CD si può appannare a causa di un
improvviso cambiamento della temperatura ambiente. Ciò
impedisce la lettura di un CD. Non tentare di pulire la
lente ma lasciare l'apparecchio in un ambiente riscaldato,
sino a quando sarà evaporata l'umidità.
• Tenere sempre chiuso il coperchio del comparto, per
evitare depositi di polvere sulla lente.
• Per estrarre facilmente il CD dalla custodia, sollevarlo
premendo il perno centrale. Afferrare sempre il CD dal
bordo e rimetterlo nella relativa custodia dopo l'uso per
evitare graffi e polvere.
Italiano
• Per pulire il CD, passare su di esso in linea retta dal
centro verso il bordo un panno soffice e non peloso.
I prodotti per la pulizia possono danneggiare il disco.
• Non scrivere mai su un CD e non attaccare adesivi su di
esso.
60
Sintonizzazione sulle stazioni radio
1 Selezionare la sorgente TUNER.
™ TUNER viene visualizzato brevemente.
2 Premere BAND (oppure SOURCE per 2 o più secondi) per
selezionare la banda delle lunghezze d'onda.
3 Per sintonizzarsi su di una stazione, premere TUNING
¡1 o 2™ (sul telecomando 11 o 22 )e rilasciare
quando la ricerca di sintonizzazione inizia.
™ La radio si sintonizza automaticamente su una
stazione sufficientemente potente. Durante la
sintonizzazione automatica, il display indica:
SEARCH (ricerca).
™ Se una stazione FM è ricevuta in stereo, viene
indicato, STEREO .
4 Se necessario, ripetere il passo 3sino ad individuare la
stazione desiderata.
• Per sintonizzarsi su una stazione debole, premere
brevemente e ripetutamente 5 o 6 sino ad ottenere
una ricezione ottimale.
Programmazione delle stazioni radio
È possibile memorizzare sino a 40 stazioni radio.
Programmazione automatica
La programmazione automatica si avvia con un numero
preimpostato selezionato. Da tale numero preimpostato in
avanti, verranno sovrascritte le stazioni radio programmate
in precedenza. L'unità programma soltanto stazioni che non
siano già memorizzate.
1 Premere PRESET 4 o 3 (¡ o ™ sul telecomando) per
selezionare il numero preimpostato da cui si dovrà
avviare la programmazione.
Nota: se non si è selezionato alcun numero preimpostato,
il valore di default è 1 e tutte le preimpostazioni verranno sovrascritte.
2 Premere PROGRAM sull'apparecchio o sul telecomando
per oltre 2 secondi per attivare la programmazione.
™
Viene visualizzato AUTO e le stazioni disponibili
vengono programmate secondo l'ordine di potenza di
ricezione della banda delle lunghezze d'onda: stazioni
FM seguite (MW), quindi da LW. Viene quindi attivata la
lettura dell'ultima preimpostazione memorizzata
automaticamente.
™ Premere 9 sull'apparecchio per interrompere la
programmazione automatica.
Programmazione manuale
1 Sintonizzarsi sulla stazione desiderata (vedere
Sintonizzazione sulle stazioni radio).
2 Premere PROGRAM sull'apparecchio o sul telecomando
per attivare la programmazione.
™ PROGRAM lampeggia sul display.
3 Premere PRESET 4 o 3 (¡ o ™ sul telecomando) per
assegnare un numero da 1 a 40 questa stazione.
Page 61

RDS
I
O
I
O
I
O
I
I
I
O
I
I
I
O
I
I
I
O
I
O
I
I
I
O
PE
N
CL
O
S
E
P
R
ES
E
T
T
U
N
IN
G
M
C
1
5
8
C
O
M
P
A
C
T
A
U
D
IO
S
Y
S
T
E
M
I
O
I
O
I
O
I
I
I
O
I
I
I
O
I
I
I
O
I
O
I
I
I
O
P
E
N
CL
O
S
E
P
RE
S
E
T
T
U
N
IN
G
M
C
1
5
8
C
O
M
P
A
C
T
A
U
D
IO
S
Y
S
T
E
M
DBB
CD
T
U
N
E
R
P
R
O
G
R
A
M
S
H
U
F
F
L
E
E
O
4 Premere nuovamente PROGRAM per confermare
l'impostazione.
™ PROGRAM scompare e vengono indicati il numero
preimpostato e la frequenza della stazione
preimpostata.
5 Ripetere i suddetti quattro passi, per memorizzare le
altre stazioni.
• Si può sovrascrivere una stazione preimpostata,
memorizzando al posto di questa un'altra frequenza.
Sintonizzazione sulle stazioni preimpostate
Premere PRESET 4 o 3 (¡ o ™ sul telecomando) sino a
visualizzare il numero prestabilito della stazione desiderata.
Variazione della rete di sintonia (solo alcune
versioni)
Nel Nord e nel Sud America, il passo di frequenza fra canali adiacenti nella gamma AM e FM è 10 KHz e 100 KHz rispettivamente. Negli altri paesi, questo passo è 9 KHz e
50 KHz. Di norma, il passo di frequenza viene preimpostato
in fabbrica in base all'area di utilizzo. Altrimenti:
1 Selezionare la sorgente TUNER.
2 Premere 9 sull'apparecchio per almeno 5 secondi
™ Il display visualizza GRID 9 o GRID10.
Nota: Tutte le stazioni preimpostate e le regolazioni dell'o-
rologio andranno perse e dovranno essere riprogrammate.
RDS (solo alcune versioni)
Radio Data System è un servizio che consente alle stazio-
ni FM di inviare delle informazioni aggiuntive. Se si riceve
una stazione RDS, vengono visualizzati ed il nome
della stazione.
Se si usa la programmazione automatica, vengono programmate innanzi tutto le stazioni RDS.
Scorrimento fra le diverse informazioni RDS
• Premere brevemente e ripetutamente RDS/ CLOCK
sull'unità per scorrere le seguenti informazioni (se
disponibili):
– Nome della stazione
– Tipo di programma, come: NEWS, SPORT, POP M...
– Messaggi di testo della radio
– Frequenza
Nota: Se si preme RDS/ CLOCK ed il segnale RDS non è
disponibile si visualizza NO RDS (Assenza RDS).
EON
Enhanced Other Network consente di ricercare una sta-
zione RDS che trasmette un determinato tipo di programma. Se EON è disponibile, viene visualizzato,
Ricerca del tipo di programma (PTY)
PTY aiuta ad individuare un tipo di programma desiderato.
Per abilitare PTY, programmare innanzi tutto le stazioni RDS
nella memoria del sintonizzatore (vedere Programmazione
delle stazioni radio).
1
Durante la ricezione di una stazione RDS, premere brevemente
RDS/CLOCK sino a visualizzare il tipo di programma.
2
Premere 2; o 9 sull'apparecchio (¡ o ™ sul telecomando)
sino a visualizzare il tipo di programma desiderato.
3 Premere e tenere premuto TUNING 2™ ( 6 sul
telecomando) per avviare la ricerca.
– La radio si sintonizza su una stazione RDS che stia
trasmettendo questo tipo di programma. Se il tipo di
programma non è disponibile, appare
TYPE NOT FOUND.
• Tipi di programmi RDS
NO TYPE . . . . . . . Nessun tipo di programma RDS
NEWS . . . . . . . . . . . Servizi del notiziario
AFFAIRS . . . . . . . Politica ed attualità
INFO . . . . . . . . . . . Programmi di informazioni
straordinarie
SPORT . . . . . . . . . . Sport
EDUCATE . . . . . . . Educazione ed addestramento
avanzato
DRAMA . . . . . . . . . . Commedie radiofoniche e letteratura
CULTURE . . . . . . . Cultura, religione e società
SCIENCE . . . . . . . Scienza
VARIED. . . . . . . . . Programmi di intrattenimento
POP M . . . . . . . . . . Musica pop
ROCK M . . . . . . . . . Musica rock
MOR M . . . . . . . . . . Musica leggera
LIGHT M . . . . . . . Musica classica leggera
CLASSICS . . . . . . Musica classica
OTHER M . . . . . . . Programmi speciali di musica
Italiano
61
Page 62

NOTE
Notiziario RDS ed Informazioni sul traffico (TA)
La radio può essere impostata in modo che l'ascolto di un
CD o di un nastro venga interrotto dal notiziario di una stazione RDS. Questa funzione è disponibile solo se la stazione RDS trasmette un segnale NEWS durante la trasmissione del notiziario.
1 Sintonizzarsi sulla stazione RDS desiderata.
2 Premere una o più volte NEWS sul telecomando, per
selezionare l'opzione relativa al notiziario.
™ Viene visualizzato brevemente NEWS ON, TA ON
o OFF
™
NEWS
si visualizza se è stata attivata l'opzione
relativa al notiziario o alle informazioni sul traffico e
NEWS ON o TA ON viene visualizzato brevemente. Se si
seleziona una sorgente di ascolto diversa, non si
disabilita la funzione.
Note:
• Se si ricevono il notiziario RDS o le informazioni sul
traffico durante la lettura di un CD, questa si
interrompe, per consentire all'utente l'ascolto del
notiziario/delle informazioni sul traffico. NEWS
lampeggia sul display durante la trasmissione. La lettura
riprende al termine della trasmissione.
• Se si usa la funzione di annuncio del notiziario RDS/le
informazioni sul traffico con una stazione EON, il tipo di
programma selezionato viene ricercato su tutta la rete.
Disabilitazione della funzione Notiziario RDS
ed Informazioni sul traffico
La funzione notiziario può essere disabilitata in diversi modi:
Italiano
• Premere NEWS/TA sul telecomando durante la ricezione
del notiziario.
• Premere il tasto di standby sull'apparecchio o sul
telecomando.
• Sintonizzazione su una stazione non RDS.
62
Informazioni ambientali
Non è stato utilizzato materiale d’imballaggio in eccesso.
È stato fatto il possibile per rendere il materiale
d’imballaggio facilmente scomponibile in tre monomateriali: cartone (scatola), polistirene espanso (paracolpi) e polietilene (buste, fogli protettivi in espanso).
In caso di malfunzionamento, controllare innanzi tutto i
punti elencati di seguito prima di richiedere la riparazione
dell’apparecchio. Se non si è in grado di risolvere il
problema con queste indicazioni, consultare il
rivenditore o il servizio assistenza.
Page 63

INDIVIDUAZIONE DEI MALFUNZIONAMENTE
DATI TECNICI
ATTENZIONE
Non apprire l’apparecchio, per non correre il rischio
di scosse elettriche! Non cercare in nessun caso di
riparare l’apparecchio da soli, perché ciò invaliderebbe la garanzia.
In caso di malfunzionamento, controllare innanzi tutto i
punti elencanti di seguito prima di richierdere la riparazione dell’apparecchio. Se non si è in grado di risolvere il problema con queste indicazioni, consultare il rivenditore o il
servizio assastenza.
Problema Possibile causa Rimedio
Assenza di suono / Volume non regolato Regolare il VOLUME
alimentazione Le cuffie sono collegate Scollegare le cuffie
Il conduttore di rete non è inserito bene nella presa Inserire bene il condurrore di rete
Nessuna reazione Scarica elettrostatica Scollegare l'unità dall'alimentazione di rete e
ai comandi ricollegarla dopo pochi secondi
Il timer/ spegnimento L'ora dell'orologio non è stata impostata Impostare l'ora corretta dell'orologio
automatico non
funziona
Forti ronzii o disturbi Interferenze elettriche: l'apparecchio è troppo Aumentare la distanza
della radio vicino a TV, VCR o computer
Debole ricezione Debole segnale radio FM: Indirizzare il cavo dell'antenna FM per
radio ricezione ottimale
NO DISC o Il CD è molto graffiato o sporco Sostituire/ pulire il CD, vedi Manutenzione
DISC NOT Il CD-R(W) è vuoto o il disco non è finalizzato Usare un CD-R(W) finalizzato
READABLE La lente al è appannata Attendere sino a quando la lente si schiarisca
indicazione
Il CD salta dei brani Il CD è danneggiato o sporco Sostituire o pulire il CD
SHUFFLE o PROGRAM è attivo Spegnere SHUFFLE / PROGRAM
Il telecomando non Le batterie sono scariche Inserire nuove batterie
funziona bene Le batterie sono state inserite male Inserire correttamente le batterie
Distanza/ angolo tra l'apparecchio troppo grande Ridurre la distanza/ l'angolo
Amplicatore
Potenza di uscita . . . . . . . . . . . . . . . . . . . . 2 x 15 W RMS
Potenza di uscita . . . . . . . . . . . . . . . . . . . . . 250 W PMPO
Digitale in uscita . . . . . . . . . . . . . . . . . . . . . . . 0.5 V, 75 Ω
Linea in uscita . . . . . . . . . . . . . . . . . . . . . . . 0.5 V, 1000 Ω
Rapporto segnale-rumore . . . . . . . . . . . . . . ≥ 65 dBA (IEC)
Sensibilità di ingresso AUX . . . . . . . . . . . 0.5 V (max. 2 V)
Impedenza, altoparlanti . . . . . . . . . . . . . . . . . . . . . . . 8 Ω
Impedenza, cuffie. . . . . . . . . . . . . . . . . . . . 32 Ω -1000 Ω
Sintonizzatore
Gamma FM. . . . . . . . . . . . . . . . . . . . . . . . 87.5 - 108 MHz
Gamma MW. . . . . . . . . . . . . . . . . . . . . . . . 531- 1602 kHz
Gamma LW . . . . . . . . . . . . . . . . . . . . . . . . . 153 - 279 kHz
Sensibilità a 75 Ω
– mono, 26 dB rapporto segnale-rumore . . . . . . . . 2.8 µV
– stereo, 46 dB rapporto segnale-rumore. . . . . . . 61.4 µV
Selettività. . . . . . . . . . . . . . . . . . . . . . . . . . . . . . . ≥ 28 dB
Distorsione armonica totale. . . . . . . . . . . . . . . . . . . ≤ 5%
Risposta in frequenza . . . . . . . . . . 63 - 12,500 Hz (± 3 dB)
Rapporto segnale-rumore. . . . . . . . . . . . . . . . . . ≥ 50 dBA
Lettore di CD
Gamma di frequenza . . . . . . . . . . . . 20 - 20,000 Hz (8 dB)
Rapporto segnale-rumore . . . . . . . . . . . . . . . . . . . 75 dBA
Altoparlanti
Sistema di riflessione dei bassi a 2-vie
Dimensioni (lxaxp) . . . . . . . . . . . . . . . . . . 164 x 158 x 239
Generalità
Dimensioni (lxaxp) . . . . . . . . . . . . . . . . . . 164 x 158 x 254
Peso (con / senza altoparlanti) . . . . . . . . circa 7.5 / 3.0 kg
Consumo di potenza in modo standby. . . . . . . . . . . < 7 W
Soggetto a modifiche
Italiano
63
 Loading...