

Page 1
MZ1000
owner’s guide
MZ1100
MZ1200
1
3139 115 21641
Page 2
PHONES
AUX IN
LINE OUT
TO POWER
UNIT
AM
FM
ANTENNA
R
R
L
L
Guia de
Guia de
Ligação
Ligação
MZ-1000
MZ-1000
MZ-1100
MZ-1100
MZ-1200
MZ-1200
12nc : 3139 115 21851
1
2
3
Page 3
Guia de
Guia de
Utilização
Utilização
Répida
Répida
õ Ouvir estações de rádio
Primeira ligação...
As características de leitura
detalhadas e funções adicionais
são descritas no manual do
utilizador fornecido.
1 A mensagem “AUTO INSTALL PRESS PLAY” aparece no visor.
2 Prima PLAY•PAUSE ÉÅ no sistema.
3 Depois de terminar, é possível ouvir a última estação de rádio sintonizada.
Se “P” aparecer no visor, pode premir S T para seleccionar as estações de rádio
memorizadas anteriores/seguintes.
Para sintonizar uma estação de rádio de recepção fraca ou não memorizada, prima ÉÅ
para desactivar o modo de memorização (“P” desaparecerá do visor) e, depois, S T.
õ Ler um CD/MP3-CD
1 Coloque um CD CD/MP3 com a etiqueta virada para a direita.
2 Para MP3-CD, prima S T para seleccionar o álbum seguido de ÉÅ para confirmar e,
depois, prima novamente S T para seleccionar a faixa.
Para CD, prima S T para seleccionar a faixa.
3 Prima ÉÅ para iniciar a leitura.
Durante a leitura, prima breve e repetidamente S T para pesquisar para trás/frente.
Durante a leitura, prima breve e repetidamente S T para saltar para trás/frente.
4 Prima Ç para parar a leitura.
5 Para retirar o disco, prima STOP•EJECT Ç.
õ Acertar o Relógio
1 No modo de espera, prima CLK/TIMER.
2 Prima ou mantenha premido S T para acertar os minutos e a hora.
3 Prima PROGRAM para seleccionar o modo de relógio no formato de 12 ou 24 horas.
4 Prima CLK/TIMER para confirmar as definições das horas.
õ Passar para ou acordar com modo de espera Economia de Energia
1 Mantenha premido ECO POWER ou B para ligar o modo de espera Economia de Energia.
2 Prima ECO POWER no sistema ou MP3-CD, TUNER ou AUX no controlo remoto para
acordar no modo de espera Economia de Energia.
Page 4

Important notes for users in the
U.K.
Mains plug
This apparatus is fitted with an approved 13
Amp plug. To change a fuse in this type of plug
proceed as follows:
1 Remove fuse cover and fuse.
2 Fix new fuse which should be a BS1362 5 Amp,
A.S.T.A. or BSI approved type.
3 Refit the fuse cover.
If the fitted plug is not suitable for your socket
outlets, it should be cut off and an appropriate
plug fitted in its place.
If the mains plug contains a fuse, this should
have a value of 5 Amp. If a plug without a fuse
is used, the fuse at the distribution board
should not be greater than 5 Amp.
Note: The severed plug must be disposed of to
avoid a possible shock hazard should it be
inserted into a 13 Amp socket elsewhere.
How to connect a plug
The wires in the mains lead are coloured with
the following code: blue = neutral (N),
brown = live (L).
¶ As these colours may not correspond with the
colour markings identifying the terminals in
your plug, proceed as follows:
– Connect the blue wire to the terminal
marked N or coloured black.
– Connect the brown wire to the terminal
marked L or coloured red.
– Do not connect either wire to the earth
terminal in the plug, marked E (or e) or
coloured green (or green and yellow).
Before replacing the plug cover, make certain
that the cord grip is clamped over the sheath
of the lead - not simply over the two wires.
Italia
DICHIARAZIONE DI CONFORMITA’
Si dichiara che l’apparecchio MZ1000, MZ1100,
MZ1200, Philips risponde alle prescrizioni dell’art.
2 comma 1 del D.M. 28 Agosto 1995 n. 548.
Fatto a Eindhoven
Philips Consumer Electronics
Philips, Glaslaan 2
5616 JB Eindhoven, The Netherlands
Norge
Typeskilt finnes på apparatens underside.
Observer: Nettbryteren er sekundert
innkoplet. Den innebygde netdelen er
derfor ikke frakoplet nettet så lenge
apparatet er tilsluttet nettkontakten.
For å redusere faren for brann eller elektrisk
støt, skal apparatet ikke utsettes for regn eller
fuktighet.
CAUTION
Use of controls or adjustments or
performance of procedures other than
herein may result in hazardous
radiation exposure or other unsafe
operation.
Copyright in the U.K.
Recording and playback of material may
require consent. See Copyright Act 1956 and
The Performer’s Protection Acts 1958 to 1972.
2
3139 115 21641
Page 5

DK
Advarsel: Usynlig laserstråling ved åbning
når sikkerhedsafbrydere er ude af funktion.
Undgå utsættelse for stråling.
Bemærk: Netafbryderen er sekundært
indkoblet og ofbryder ikke strømmen fra
nettet. Den indbyggede netdel er derfor
tilsluttet til lysnettet så længe netstikket
sidder i stikkontakten.
S
Klass 1 laseraparat
Varning! Om apparaten används på annat
sätt än i denna bruksanvisning specificerats,
kan användaren utsättas för osynlig
laserstrålning, som överskrider gränsen för
laserklass 1.
Observera! Stömbrytaren är sekundärt
kopplad och bryter inte strömmen från
nätet. Den inbyggda nätdelen är därför
ansluten till elnätet så länge stickproppen
sitter i vägguttaget.
SF
Luokan 1 laserlaite
Varoitus! Laitteen käyttäminen muulla
kuin tässä käyttöohjeessa mainitulla tavalla
saattaa altistaa käyttäjän
turvallisuusluokan 1 ylittävälle
näkymättömälle lasersäteilylle.
Oikeus muutoksiin varataan. Laite ei
saa olla alttiina tippu-ja roiskevedelle.
Huom. Toiminnanvalitsin on kytketty
toisiopuolelle, eikä se kytke laitetta irti
sähköverkosta. Sisäänrakennettu verkkoosa on kytkettynä sähköverkkoon aina
silloin, kun pistoke on pistorasiassa.
3139 115 21641
3
Page 6

4
3139 115 21641
Page 7

Index
English ------------------------------------------------6
Français -------------------------------------------- 24
Español --------------------------------------------- 42
Deutsch--------------------------------------------- 60
Nederlands ---------------------------------------- 78
Italiano---------------------------------------------- 96
English
Français
EspañolDeutschNederlandsItalianoSvenskaDanskSuomi
Svenska ------------------------------------------- 114
Dansk --------------------------------------------- 132
Suomi --------------------------------------------- 150
Português ---------------------------------------- 168
∂ППЛУИО¿ ----------------------------------------- 186
Polski ---------------------------------------------- 204
3139 115 21641
Português
∂ППЛУИО¿
Polski
5
Page 8

Índice
Informações Gerais
Informações Ambientais..................................169
Manutenção ....................................................... 169
Informações sobre segurança........................ 169
Ligações
Acessórios fornecidos.....................................170
Ligações na Retaguarda..........................170–171
Preparativos
Antes de utilizar o controlo remoto........... 172
Substituir a bateria (lítio CR2025) do
controlo remoto .............................................. 172
Colocar o módulo eléctrico .......................... 172
Apresentação de
Funcionalidades................................... 173
Recepção de Rádio
Plug & Play..........................................................174
Primeira configuração/ligação
Reinstalação do “Plug and Play”
Ligar o modo sintonizador............................. 174
Memorizar estações de rádio...............175–176
Programação de Posições Automáticas
Programa de Posições Manual
Ouvir estações de rádio
Apagar uma Estação de Rádio Memorizada
Relógio/Temporizador
Sobre o Relógio................................................ 180
Acertar o relógio
Sobre o Temporizador .................................... 181
Definição do Temporizador
Cancelar/Desactivar o temporizador
Activar o temporizador para a última definição
Outras Funcionalidades
Ligar..................................................................... 182
Passar para o modo de espera Economia de
Energia
Passar para o modo de espera
Passar para o modo activo
Controlo de som..............................................182
Regular o nível de Baixas/Altas Frequências
Activar/desactivar o efeito Surround Incrível
Outras Ligações
Ligar dispositivos externos ............................ 183
Ligar um dispositivo externo para ouvir
música/som
Ligar um dispositivo externo para gravação
analógica
Escutar uma fonte externa............................. 183
Especificações........................................ 184
Resolução de Problemas.............185
Português
Funcionamento do CD/MP3-CD
Discos para leitura ...........................................177
Colocar/retirar o disco .................................. 177
Colocar o disco
Retirar o disco
Ler um CD/MP3-CD ...................................... 178
Seleccionar um álbum/faixa MP3 ................. 179
Memorizar estações de rádio........................ 179
Programação MP3-CD
168
3139 115 21642
Page 9
Informações Gerais
Este produto satisfaz os requisitos
relativos a interferências
radioeléctricas da União Europeia.
A placa de tipo encontra-se na retaguarda
da aparelhagem.
Informações Ambientais
Todo o material de embalagem desnecessário foi
omitido. Tentámos fazer com que a embalagem
fosse facilmente dividida em três materiais:
cartão (caixa), esferovite (amortecedor) e
polietileno (sacos, folha de espuma de
protecção).
A aparelhagem é constituída por materiais
recicláveis e reutilizáveis se for desmontada por
uma empresa especializada. Os regulamentos
locais relativos ao descarte de materiais de
embalagem, baterias usadas e equipamento
antigo devem ser cumpridos.
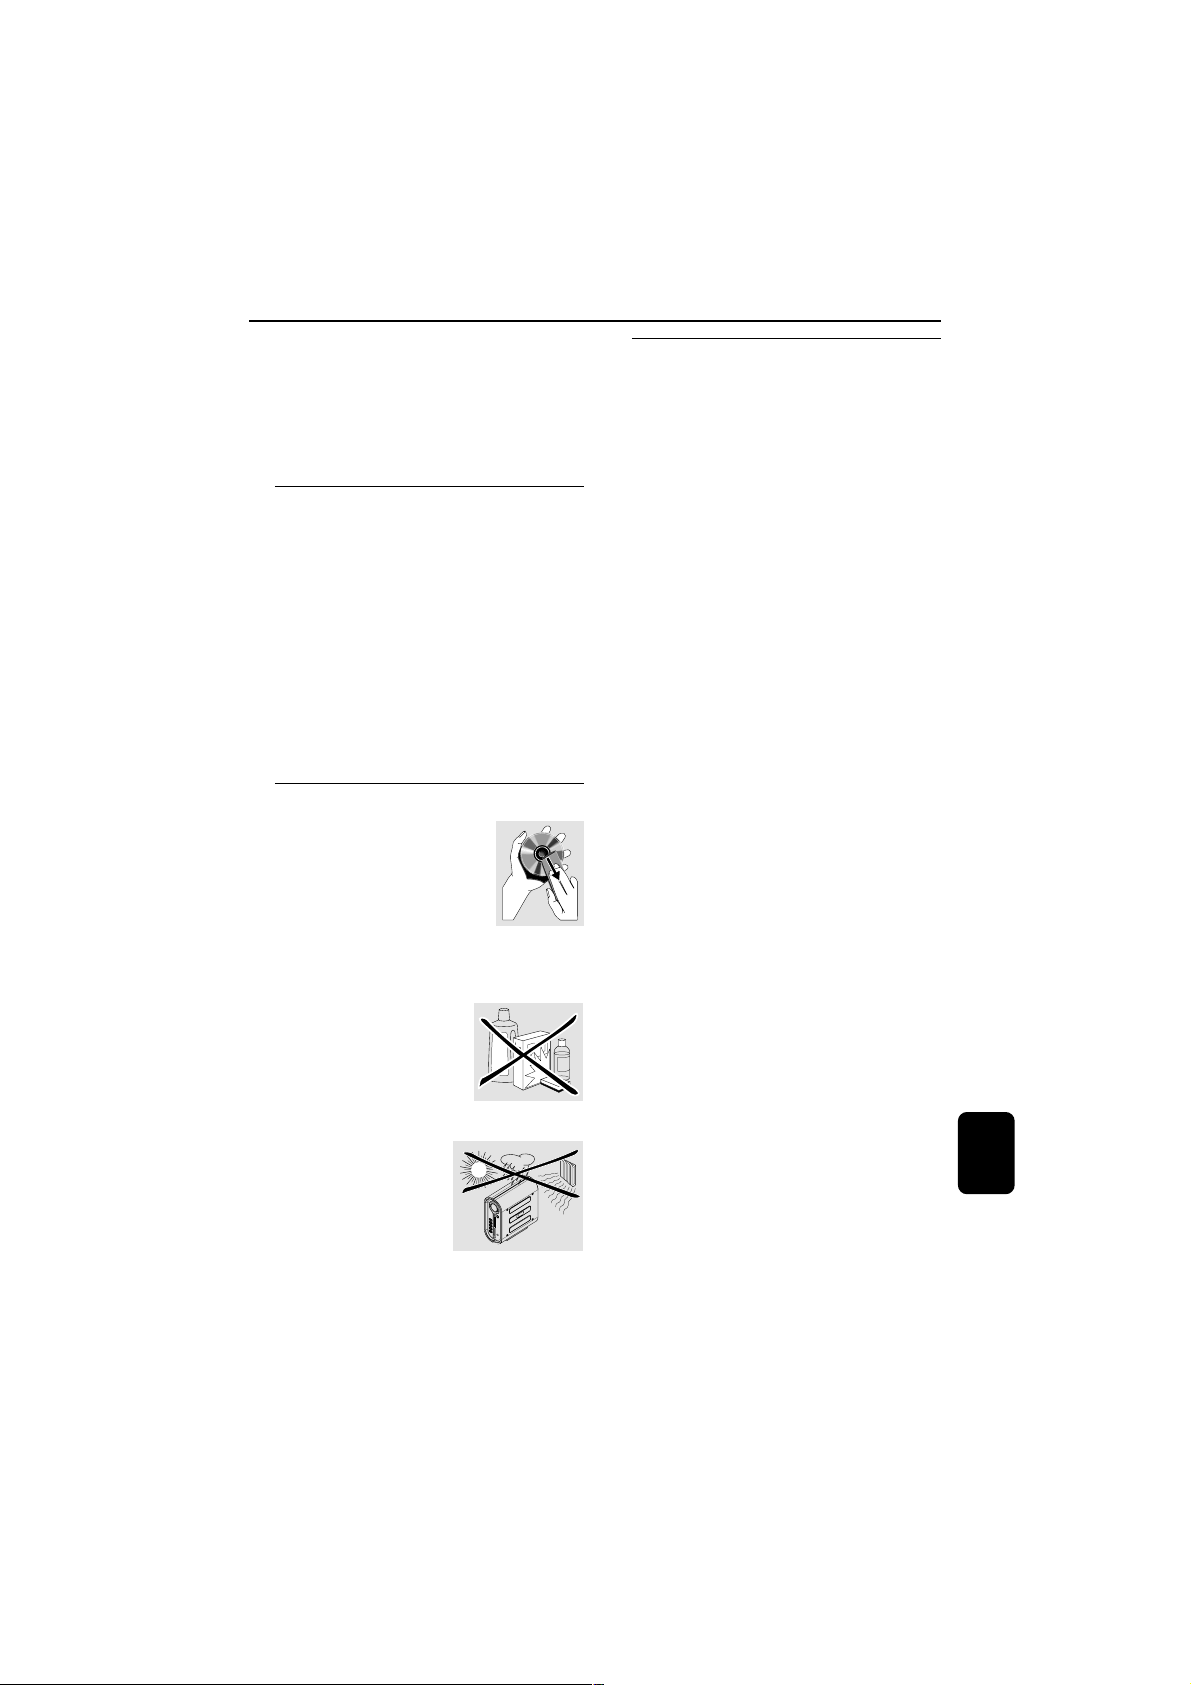
Manutenção
Para limpar um CD, limpe-o em
linha recta partindo do centro
para a bor-da, usando um pano
macio não felpudo. Os
detergentes podem danificar o
disco! Escreva apenas no lado
impresso do CD ou CDRW e só com uma
caneta com ponta de feltro.
Limpe a aparelhagem com
um pano macio, ligeiramente
húmido e sem cotão.
Não utilize agentes de
limpeza porque poderão
provocar a corrosão.
Informações sobre segurança
● Coloque a aparelhagem numa superfície plana,
rígida e estável.
● Coloque a aparelhagem num local com
ventilação correcta para impedir a acumulação
de calor no seu interior. Deixe no mínimo um
espaço de 10 cm atrás e por cima da
aparelhagem e 5 cm nos lados.
● Se a aparelhagem for transferida directamente
de um local frio para um local quente ou for
colocada num compartimento muito húmido, é
possível a formação de condensação na lente da
unidade de leitura de discos no interior da
aparelhagem. Se isso acontecer, o leitor de CDs
não terá um funcionamento normal. Deixe a
aparelhagem ligada durante cerca de uma hora
sem nenhum disco introduzido para ser possível
uma leitura normal.
● As peças mecânicas da aparelhagem contêm
chumaceiras auto-lubrificantes e, por isso, não
devem ser oleadas nem lubrificadas.
● Se a aparelhagem for comutada para o modo
Espera, continua a haver consumo de energia.
Para desligar completamente a aparelhagem,
retire o cabo eléctrico da respectiva tomada.
● Para evitar o sobreaquecimento da aparelhagem,
foi incorporado um circuito de segurança. Assim,
em condições extremas, é possível que a
aparelhagem comute automaticamente para o
modo Espera. Nesse caso, deixe a aparelhagem
arrefecer antes de voltar a utilizá-la.
Não exponha a
aparelhagem, as pilhas ou
os CDs à humidade, chuva,
areia ou calor excessivo
(causado por equipamento
de aquecimento ou pelos
raios directos do sol).
Português
169
3139 115 21642
Page 10

Ligações
Acessórios fornecidos
Módulo
eléctrico
Power box
Antena AM
AM antenna
Speakers
Altifalantes
Controlo
Remote
remoto
control
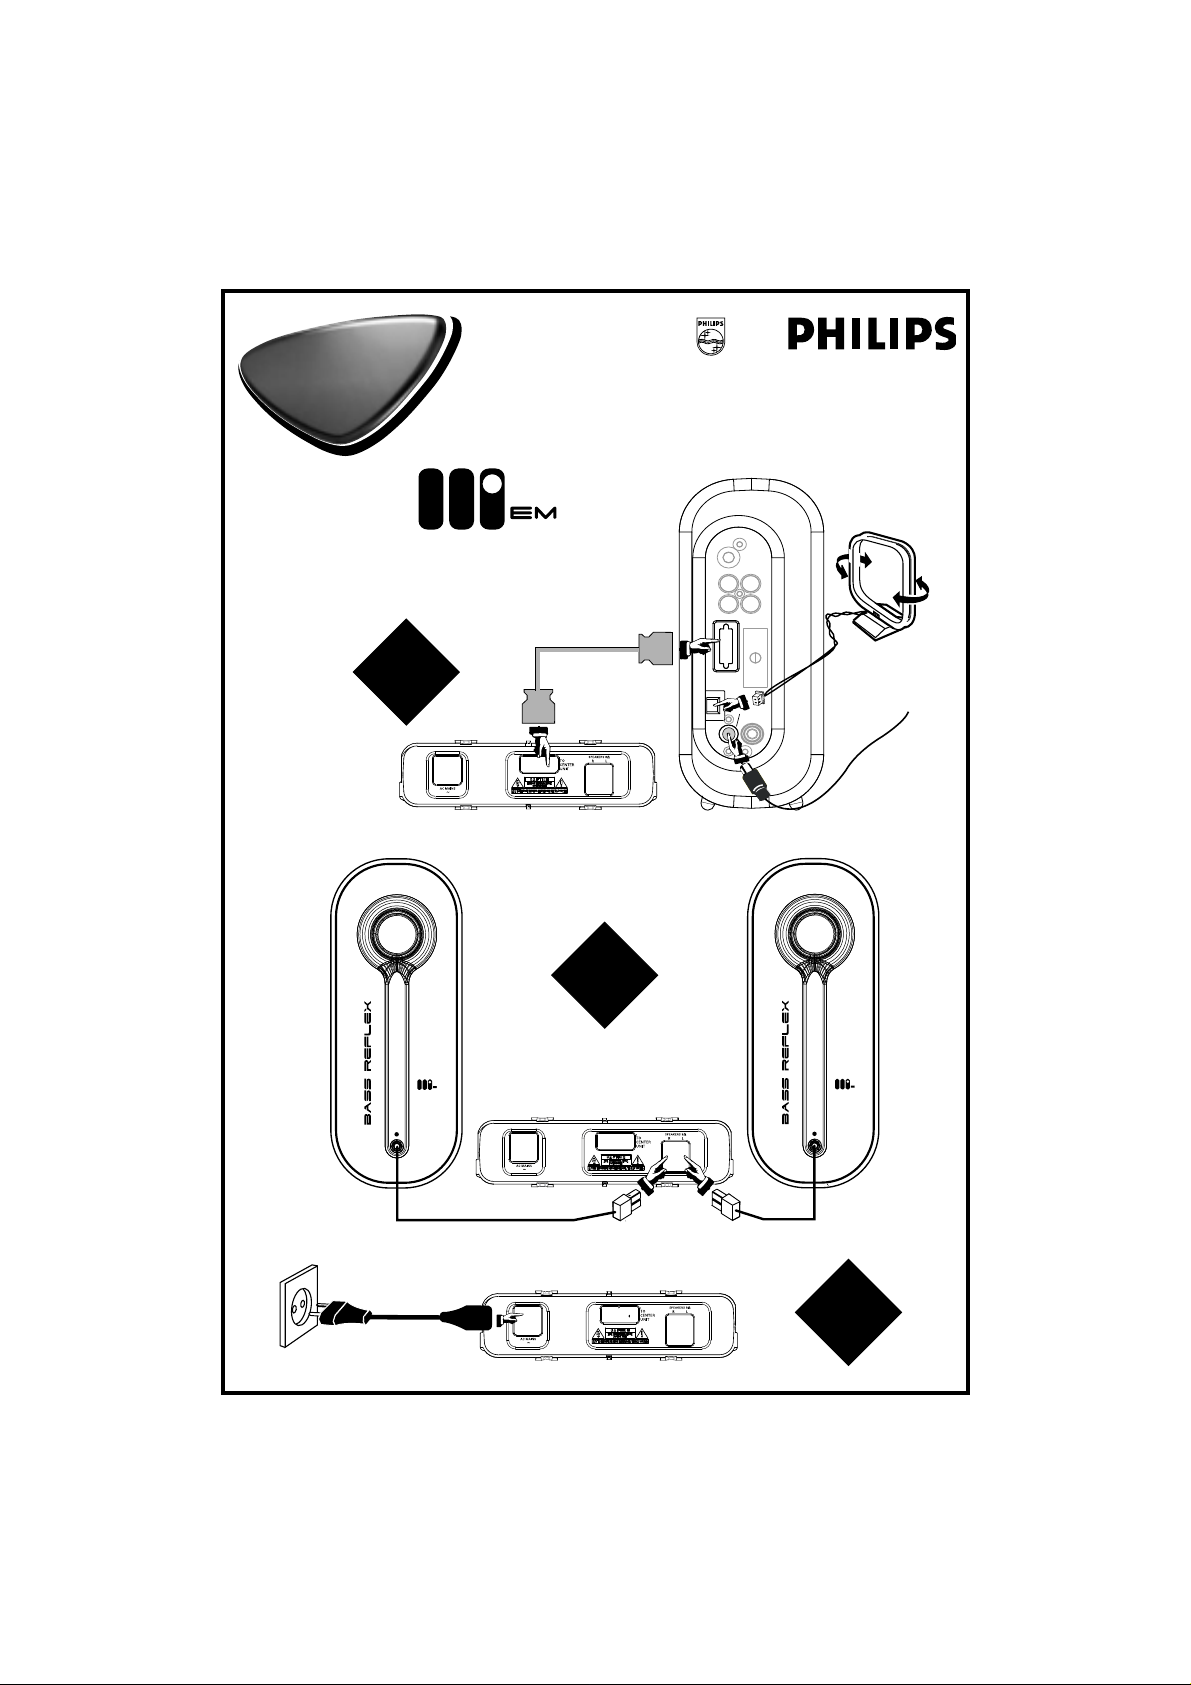
Ligações na Retaguarda
ADVERTÊNCIA!
– Nunca faça nem altere ligações com a
aparelhagem ligada.
– Ligue o cabo eléctrico do “módulo
eléctrico” à saída eléctrica somente
depois de ter concluído todas as ligações.
● Regule a posição da antena para obter uma boa
recepção.
● Posicione a antena tão longe quanto possível de
um televisor, videogravador ou qualquer outra
fonte de radiações.
● Para uma melhor recepção estéreo FM, ligue a
antena FM exterior.
● Só é possível ligar os altifalantes fornecidos.
● O equipamento opcional e os cabos de ligação
não são fornecidos.
● Se ligar equipamento com uma saída mono
(um único terminal de saída áudio), ligue-o ao
terminal esquerdo AUX IN. Em alternativa,
é possível utilizar um cabo “simples para duplo”
com som mono.
● Não ligue ao mesmo tempo equipamento aos
terminais LINE OUT e AUX IN.
Caso contrário, será produzido um ruído e
haverá a probabilidade de avarias.
Português
170
Antena
Telescopic
telescópica
antenna
Cabo eléctrico
Power cord
Antena FM
FM antenna
Cabo de
interconnect
cable
interligação
3139 115 21642
Page 11

AM
FM
ANTENNA
Fixe o engate
na ranhura
R
R
TO POWER
Ligações
ligação de
antena FM
alternativa
PHONES
AUX IN
L
L
LINE OUT
UNIT
AM
FM
ANTENNA
➠
➠
➠
Português
➠
171
3139 115 21642
Page 12

Preparativos
A
C
R
2
0
2
5
L
I
T
H
I
U
M
B
➠
Antes de utilizar o controlo
remoto
1 Retire o plástico de protecção.
2 Seleccione a fonte que pretende controlar,
premindo uma das teclas de selecção de fonte
existentes no controlador remoto (por exemplo,
MP3-CD, TUNER).
3 Depois, seleccione a função pretendida
(por exemplo É, S, T).
Substituir a bateria
(lítio CR2025) do controlo remoto
1 Desloque o botão ligeiramente para A esquerda.
2 Retire o compartimento de bateria B.
3 Coloque uma bateria e introduza na totalidade
o compartimento respectivo na sua posição
original.
ATENÇÃO!
As baterias contêm substâncias químicas,
por isso, o seu descarte deve ser criterioso.
☞
☞
plástico
protector
Colocar o módulo eléctrico
● Coloque o módulo eléctrico tão próximo da
fonte eléctrica quanto possível.
● Não coloque este módulo em espaços fechados,
não o cubra nem tape os ventiladores.
● Não introduza nem deixe cair nada neste
Português
módulo através dos ventiladores porque poderá
ficar seriamente danificado.
172
☞
3139 115 21642
Page 13
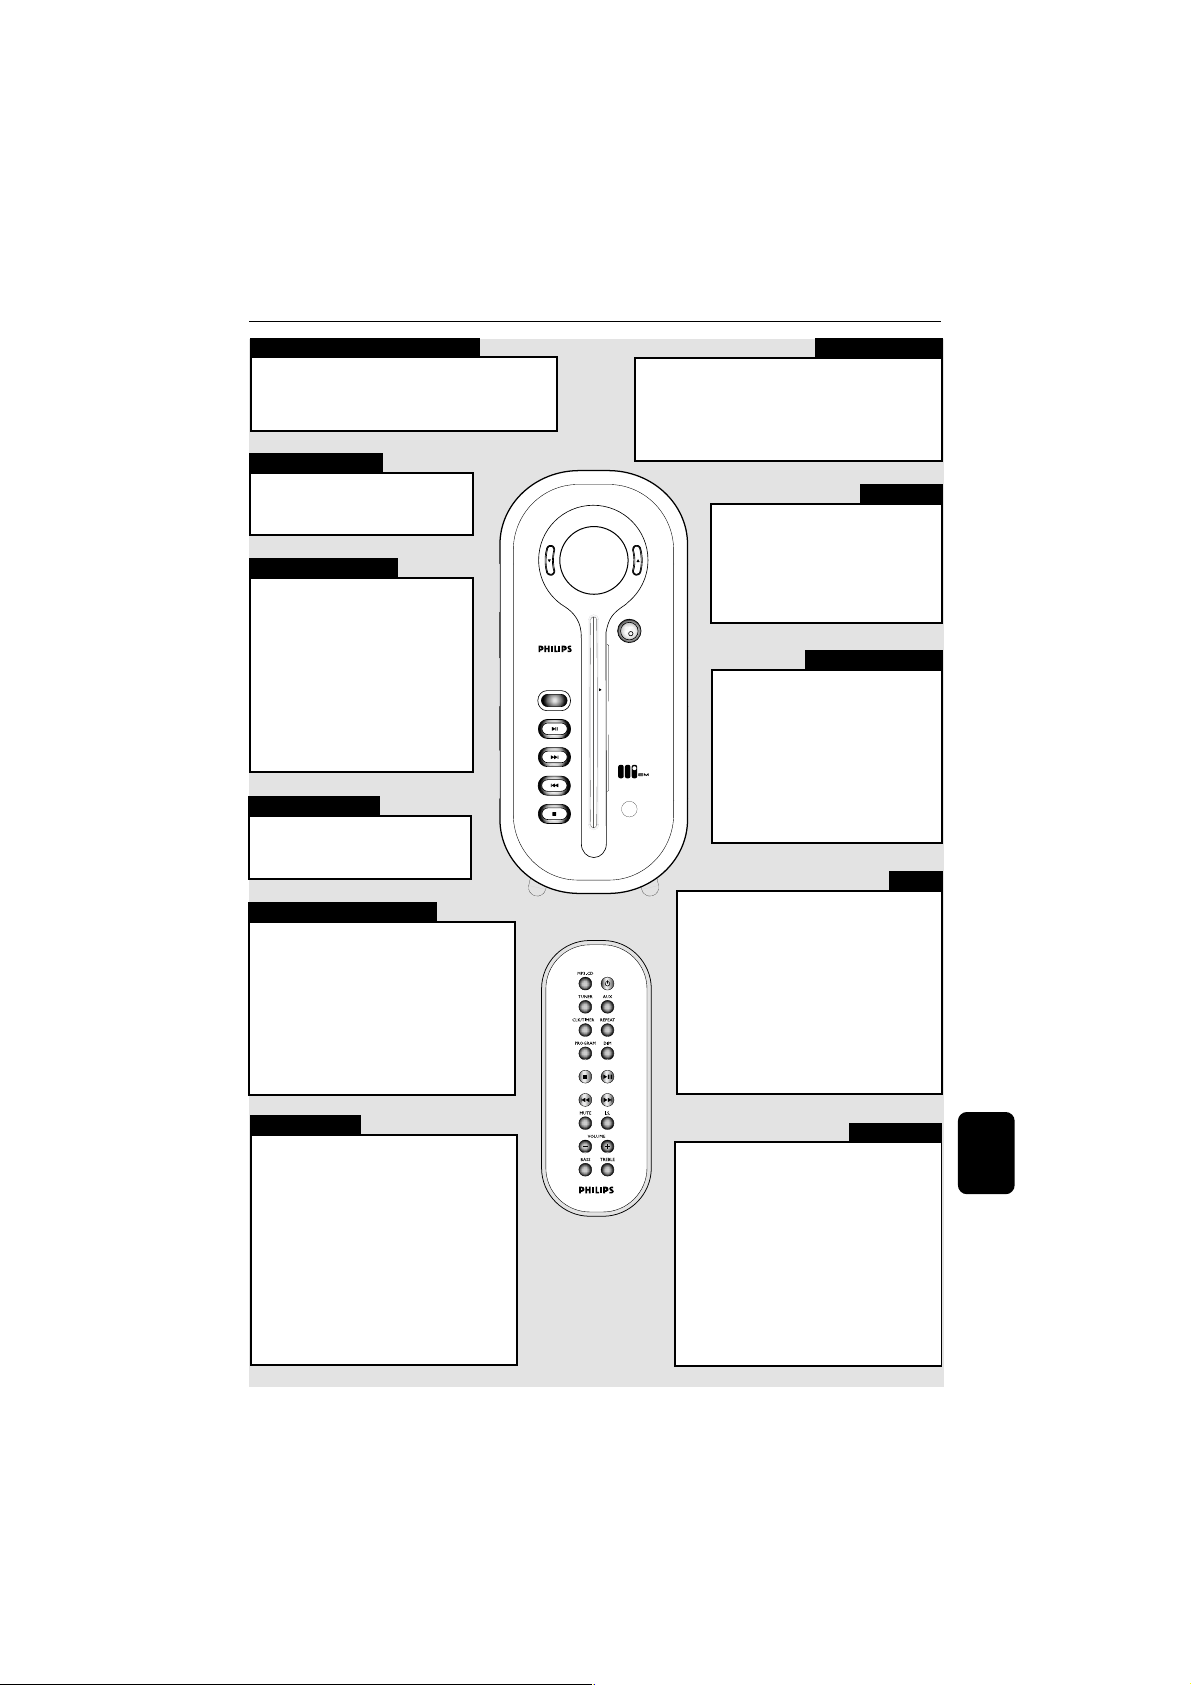
Apresentação de Funcionalidades
Espera Economia de Energia
ECO POWER ou y
- prima e mantenha premido para comutar o sistema para
o modo de espera baixa energia.
Modo de espera
ECO POWER ou y
- prima brevemente para entrar no modo
de espera.
Selecção de fonte
SOURCE Prima repetidamente
MP3-CD / TUNER / A UX
- Prima para introduzir o modo de fonte
- No modo sintonizador, prima TUNER
- No modo AUX, prima AUX para
SOURCE- para seleccionar :
CD ™ TUNER-FM ™ MW ™
AUX ™ CDR ™ CD ...
seleccionada.
para alternar entre FM e MW.
alternar entre o modo AUX e CDR.
Esbater o visor
DIM prima para seleccionar níveis
de brilho médios ou totais
no ecrã do visor.
Relógio/Temporizador
CLK/TIMER
- prima para visualizar ou para entrar no modo de
acerto do relógio.
- prima e mantenha premido para entrar no modo
de acerto do temporizador.
PROGRAM
- prima para alterar o modo de acerto do relógio:
24 ou 12 horas.
S T prima para acertar os minutos e as
horas.
VOL VOL
CD GRAPHIC THIS SIDE
ECO
POWER
SOURCE
PLAY•PAUSE
SEARCH
STOP•EJECT
8
cm DISC
iR
Plug & Play
ÉÅ - no modo de espera, prima e mantenha
Ç - prima para sair.
premido para iniciar o modo “Plug & Play”.
- prima brevemente para iniciar a instalação
“Plug & Play”.
Volume
VOL 34, VOLUME +/-
- prima para ara aumentar/diminuir o
volume.
MUTE
- prima para silenciar ou restaurar o volume.
Controlo de som
I.S. prima para ligar/desligar o
BASS / - prima para seleccionar tons
TREBLE baixos/altos Efeito de som
ÉÅ - prima para iniciar ou interromper a
S T - prima brevemente para seleccionar
Ç - no modo de leitura, prima para
REPEAT prima para seleccionar a repetição da
efeito sonoro surround
incrível.
tone sound effect.
- prima VOLUME+/-no
controlo remoto para mudar
o nível de tom.
leitura.
uma faixa pretendida.
- prima e mantenha premido para
pesquisar para trás/frente.
parar o disco.
- no modo de paragem, prima para
ejectar o disco.
faixa actual, repetição da totalidade do
disco ou desligar o modo de repetição.
CD
Sintonizador
ÉÅ prima para alternar entre o modo
S T - prima para seleccionar a estação de
PROGRAM
- prima para iniciar a programação de memorização
de posições manual.
- prima e mantenha premido para iniciar a
programação de memorização de posições
automática.
Ç prima para interromper a programação
sintonizador de frequências e
selecção de número de memórias.
rádio memorizada.
- prima para mudar de frequência
radioeléctrica.
ou apagar uma memória seleccionada.
ÉÅ - prima para iniciar ou interromper a
S T - prima para seleccionar um álbum/
Ç - no modo de leitura, prima para
REPEAT prima para seleccionar a repetição da
leitura.
- prima para introduzir o modo de
selecção de faixa.
faixa pretendido.
parar o disco
- no modo de paragem, prima para
ejectar o disco.
- prima para introduzir o modo de
selecção de álbum.
faixa actual, repetição da totalidade do
disco ou desligar o modo de repetição.
3139 115 21642
MP3-CD
Português
173
Page 14

Recepção de Rádio
PLAY•PAUSE
➠
PLAY•PAUSE
PLAY•PAUSE
Plug & Play
O “Plug and Play” permite memorizar
automaticamente todas as estações de rádio,
começando pelas de FM seguidas das de MW.
Depois de todas as estações de rádio disponíveis
terem sido memorizadas ou a totalidade das 40
memórias estar ocupada, a última estação de
rádio memorizada será reproduzida.
ö Primeira configuração/ligação
ö Reinstalação do “Plug and Play”
➜ Todas as estações rádio anteriormente
memorizadas serão substituídas.
Notas:
– Se durante o "Plug & Play" não for detectada
nenhuma frequência estéreo, aparecerá
a mensagem "CHECK ANTENNA".
– Durante o “Plug & Play”, se não for premido
nenhum botão no espaço de 15 segundos,
a aparelhagem abandonará automaticamente
o modo "Plug & Play".
Para sair sem memorizar o "Plug & Play"
● Prima Çna aparelhagem.
➜ Se não terminar a instalação do "Plug & Play",
a funcionalidade será reiniciada da próxima vez
que a aparelhagem for novamente ligada.
Português
☞
☞
ligue o cabo
eléctrico.
No modo de espera,
prima e mantenha
Ligar o modo sintonizador
● Prima repetidamente SOURCE ou TUNER
para a banda FM ou MW.
174
☞
VOL VOL
SOURCE
PLAY•PAUSE
SEARCH
STOP•EJECT
CD GRAPHIC THIS SIDE
ECO
POWER
➭
MZ
1100
iR
➭
SOURCE
TUNER
CD ➔ TUNER-FM
➔
➠
CDR
TUNER-FM î MW
➠
➔
AUX
➔
MW
➔
3139 115 21642
Page 15

Memorizar estações de rádio
/
P 01
99 80
PROG
P 01
99 80
/
PROG
/
P 01
99 80
➠
➠
É possível memorizar um máximo de 40
estações de rádio.
IMPORTANTE!
Se “P” aparecer no visor, só activa a
selecção do número das memórias.
Prima ÉÅ para alternar entre a
sintonização de frequências e a selecção
do número de memórias.
Recepção de Rádio
ö Programação de Posições
Automáticas
Permite programar automaticamente todas as
estações de rádio disponíveis a partir de um
número de memória seleccionado, começando
pelas de FM seguidas das de MW.
Se não for seleccionado nenhum número de
posição, a predefinição automática terá início na
posição (1) e todas as anteriores predefinições
serão apagadas.
Notas:
– Se uma estação de rádio tiver sido memorizada
numa das memórias, não voltará a ser
memorizada noutra memória.
Para sair do modo de programação
● Prima PROGRAM ou Ç.
ö Programa de Posições Manual
Permite programar somente as estações de
rádio favoritas.
● Mantenha premido S T para
sintonização rápida e liberte quando a indicação
da frequência começara a mudar. Para sintonizar
uma estação de rádio de recepção fraca, prima
breve e repetidamente S T.
● Repita os mesmos passos para memorizar outras
estações de rádio.
Notas:
– Se tentar memorizar mais de 40 estações de
rádio, a mensagem “PROGRAM FULL” aparecerá
no visor.
– Durante a programação, se não premir nenhum
botão no espaço de 20 segundos, o sistema sairá
automaticamente do modo programa.
☞
☞
No modo de sintonizador,
veja se “P” aparece,
caso contrário
prima ÉÅ
No modo de sintonizador,
número de memória
seleccione um
memorize a definição e saia do
modo de programação
Prima e mantenha
premido até
aparecer “AUTO”
sintonizar uma
estação de rádio
seleccione um
número de memória
Português
175
3139 115 21642
Page 16

Recepção de Rádio
STOP•EJECT
/
➠
P 01
99 80
➠
Para sair do modo de memorização
manual
● Prima Ç
ö Ouvir estações de rádio
ö Apagar uma Estação de Rádio
Memorizada
Quando a estação de rádio memorizada
é eliminada
➜ A frequência radioeléctrica eliminada
permanece no visor até seleccionar outro
número memorizado.
➜ Os números predefinidos de todas as outras
estações de rádio memorizadas na onda com
um valor superior são também reduzidos de 1.
Nota:
– Se premir o botão STOP•EJECT (Ç) durante
menos de três segundos, ejectará o disco (se estiver
colocado) do respectivo tabuleiro.
No modo de sintonizador,
☞
veja se “P” aparece,
caso contrário
No modo de sintonizador,
☞
veja se “P” aparece,
caso contrário
➠
prima ÉÅ
prima ÉÅ
99 80
P 01
/
seleccione um
número de
memória
seleccione um
número de
memória
prima e mantenha
premido até
aparecer “PRESET
DELETED”
Português
176
3139 115 21642
Page 17

Funcionamento do CD/MP3-CD
STOP•EJECT
Discos para leitura
Este sistema pode ler :
– Todos os CDs áudio pré-gravados
(8cm/12cm)
– Todos os discos CDR áudio e CDRW áudio
finalizados
– MP3-CDs (CD-ROMs com faixas MP3)
álbuns máximos = 99
títulos máximos = 999 (dependendo do comprimento do
nome dos ficheiros)
ISO9660/Joliet ou formato UDF1.5
Taxa de bits = 32–256 kpbs, Taxa de bits variável
Marcas ID3 = V1.1, V2.2, V2.3, V2.4
Colocar/retirar o disco
ADVERTÊNCIA!
– Não coloque mais do que um disco no
respectivo tabuleiro.
– Ao colocar um disco de 8 cm,
introduza-o no centro do tabuleiro.
ö Colocar o disco
Introduza o disco ligeiramente na ranhura e
retire imediatamente os dedos.
➜ A mensagem "READ" aparece, seguida do
número total de faixas e tempo de leitura.
Notas:
– Coloque o disco com a etiqueta virada para a
direita.
– Ao colocar o disco em qualquer modo de fonte
faz comutar esse modo para o modo de disco.
– No que respeita ao CD-MP3, o tempo de leitura
do(s) disco(s) pode ser superior a 10 segundos
devido ao grande número de faixas contidas num
disco.
ö Retirar o disco
➜ Todas as faixas programadas são apagadas.
☞
☞
No modo de
paragem,
Português
177
3139 115 21642
Page 18

Funcionamento do CD/MP3-CD
Ler um CD/MP3-CD
É também possível aceder às funções
através dos mesmos botões do controlo
remoto.
Mudar para o modo de
disco
● Prima SOURCE (ou MP3-CD no
controlo remoto) para seleccionar o
modo CD.
VOL VOL
Iniciar/Interromper/
Retomar a leitura
● No modo de paragem, prima para
iniciar a leitura.
● No modo de leitura, prima para
interromper.
● INo modo de pausa, prima para
retomar.
➜ Durante a leitura, o número da
faixa e o tempo decorrido de leitura
da faixa actual são visualizados.
➜ Para discos MP3 de modo misto,
só será seleccionado um modo para
leitura, consoante o formato de
gravação.
SOURCE
PLAY•PAUSE
SEARCH
STOP•EJECT
CD GRAPHIC THIS SIDE
ECO
POWER
8
cm DISC
iR
Pesquisa rápida para
trás/frente
● No modo leitura, mantenha
premido o botão até atingir a
passagem pretendida.
➜ Para discos MP3, só é possível
pesquisar dentro da faixa actual.
Seleccionar uma faixa
pretendida
● Prima breve e repetidamente o
botão para ir para o início da faixa
actual/seguinte/anterior.
● No modo de paragem/
programa, mantenha premido o
botão para aumentar a velocidade
da selecção da faixa.
Parar a leitura/
Retirar o disco
● No modo de leitura, prima para
parar a leitura.
● No modo de paragem, prima para
ejectar o disco.
Repetir leitura
● Prima repetidamente REPEAT para seleccionar:
➜ Repetir a faixa actual – RPT acende-se.
➜ Repetir todas as faixas – RPT ALL acende-se.
Português
Para interromper a repetição
da leitura
● Prima repetidamente REPEAT até RPT ALL
desaparecer do visor.
Notas:
– Se o modo de programa estiver activo, repetirá
as faixas programadas.
– Ao retirar o disco da respectiva ranhura, isso
cancelará o modo de repetição.
178
3139 115 21642
Page 19

Funcionamento do CD/MP3-CD
/
01 01
ALBUM
TRACK
/
01 01
ALBUM
TRACK
/
➠
PROG
01
TRACK
10:80
➠
PROG
20
TRACK
98:80
ALBUM
TRACK
/
/
➠
PROG
01 01
TRACK
10:80
ALBUM
➠
PROG
01 01
TRACK
10:80
ALBUM
Seleccionar um álbum/faixa MP3
Se pretender alterar o álbum depois de
confirmada a selecção
1 Prima Ç enquanto o ícone TRACK está
intermitente.
2 Prima S T para seleccionar o álbum
pretendido e repita os passos 3-6.
Memorizar estações de rádio
É possível memorizar um máximo de 99
estações de rádio.
Se tentar programar mais de 99 faixas, a
mensagem “PROGRAM FULL”
aparecerá no visor. Neste caso:
➜ O sistema sairá automaticamente do modo
de programação.
➜ Se premir o botão Ç, todas as faixas
programadas serão apagadas.
➜ Se premir o botão ÉÅ, as faixas
programadas começarão a ser lidas.
Depois de coloque um disco MP3,
☞
No modo de paragem,
☞
para memorizar
outras faixas, repita
os passos 2 e 3
seleccione o número
de um álbum
seleccione um
número de faixa
seleccione um
número de faixa
pare no modo de
programação
confirme a selecção
do álbum
inicie a leitura
inicie a leitura
ö Programação MP3-CD
No modo de paragem,
☞
Notas:
– Durante a programação, se não premir nenhum
botão no espaço de 20 segundos, a aparelhagem
sairá automaticamente do modo Programa.
– O programa será apagado se a aparelhagem for
desligada da corrente eléctrica.
seleccione um
Para apagar a das faixas programadas
● No modo de paragem, prima Ç.
Depois de apagadas as faixas programadas,
prima Ç para retirar o disco.
número de faixa
para seleccionar
faixas de outro álbum,
prima Ç e repita os
passos 2 a 5
seleccione o número
de um álbum
pare no modo de
programação
para memorizar
outras faixas do
mesmo álbum, repita
os passos 4 e 5
inicie a leitura
Português
179
3139 115 21642
Page 20
Relógio/Temporizador
➠
/
➠
IMPORTANTE!
No modo Espera Economia de Energia,
não é possível utilizar a função de relógio
ou temporizador.
Notas:
– O acerto do relógio será cancelado se o cabo
eléctrico for desligado ou se houver um corte da
energia eléctrica.
– Durante o acerto do relógio, se não premir
nenhum botão no espaço de 90 segundos,
a aparelhagem sairá automaticamente do modo de
acerto do relógio.
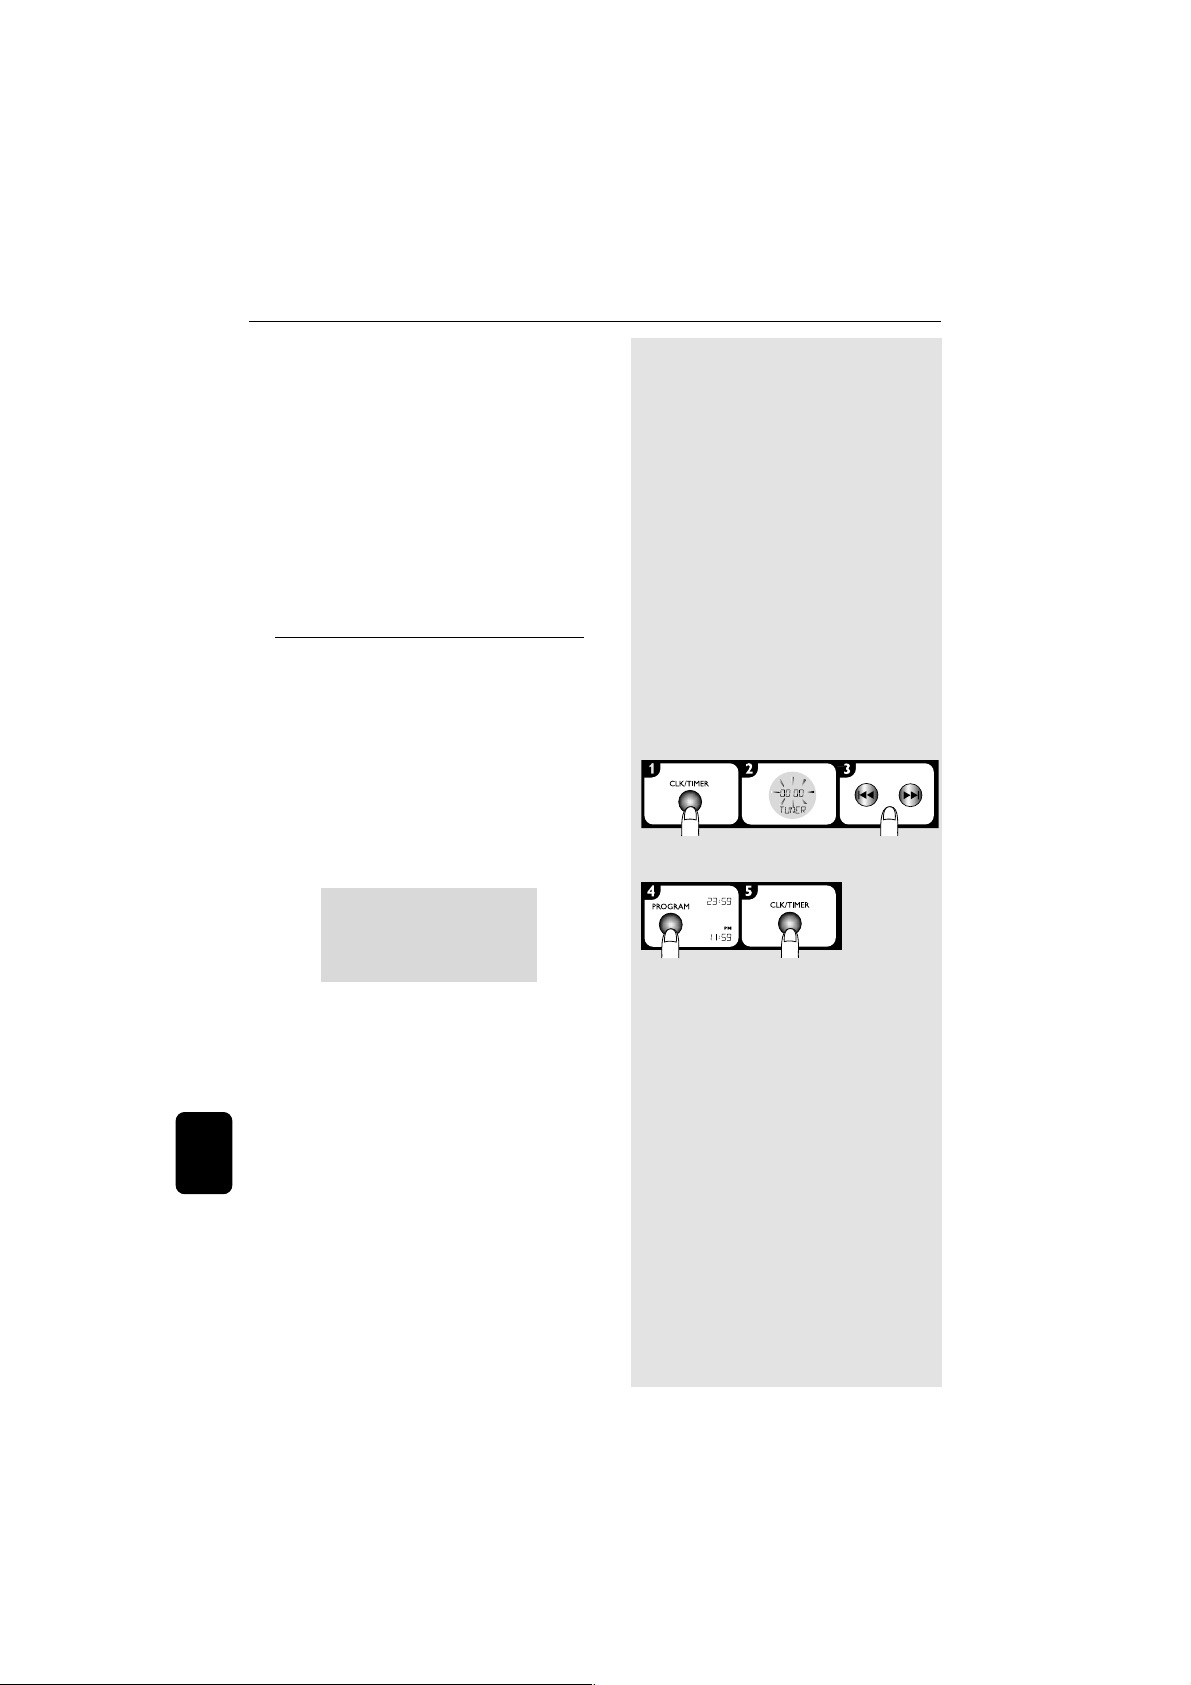
Sobre o Relógio
O relógio pode ser acertado no for mato de
12 ou 24 horas (por exemplo, "11:59 PM" ou
"23:59").
ö Acertar o relógio
Se premir e manter premido S T
durante mais de dois segundos, os minutos
mudam rapidamente. As mudanças nos minutos
passam para as horas (consulte o exemplo
apresentado a seguir).
AMPM
11:59
î
12:00
AMPM
î
AMPM
12:01
☞
No modo de espera,
acerte os minutos
e as horas
î
23:59 00:01
00:00
î
seleccione o modo
de relógio
Para visualizar o relógio em qualquer
modo de fonte
● Prima uma vez CLK/TIMER.
Português
Para sair sem memorizar a hora
acertada
● Prima Ç.
180
3139 115 21642
Page 21

Sobre o Temporizador
➠
➠
A aparelhagem pode ser ligada no modo CD ou
SINTONIZADOR a uma hora predefinida,
servindo de alarme.
Relógio/Temporizador
ö Definição do Temporizador
– Antes de definir o temporizador, certifique-se
de que o relógio está acertado.
– O temporizador será sempre ligado depois
de ter sido definido.
– O volume do temporizador aumentará
gradualmente do nível mínimo até atingir o
último nível de volume utilizado.
– Se a fonte CD for seleccionada, o
temporizador será activado lendo a primeira
faixa do disco ou a faixa programada. Se o
tabuleiro estiver vazio, mudará para o modo
Sintonizador.
– Se o modo Sintonizador for seleccionado, o
temporizador será activado reproduzindo a
última estação sintonizada.
ö Cancelar/Desactivar o temporizador
ö Activar o temporizador para a
última definição
☞
☞
☞
prima e mantenha
/
seleccione a fonte
de despertar
prima e mantenha
5
prima para confirmar e
regressar ao último
modo activo
/
acerte os minutos
e as horas
prima e mantenha
Português
181
3139 115 21642
Page 22
➭
IS
ECO
POWER
ECO
POWER
VOL VOL
SOURCE
CD GRAPHIC THIS SIDE
PLAY•PAUSE
SEARCH
iR
MZ
1100
STOP•EJECT
➭
➭
ECO
POWER
ECO
POWER
VOL VOL
SOURCE
CD GRAPHIC THIS SIDE
PLAY•PAUSE
SEARCH
iR
MZ
1100
STOP•EJECT
➭
➭
//
➭
/
/
-3 î -2 î -1
➠
➭
3 î 2 î 1 î 0
î
ECO
POWER
VOL VOL
SOURCE
CD GRAPHIC THIS SIDE
PLAY•PAUSE
SEARCH
iR
MZ
1100
STOP•EJECT
➭
SOURCE
➠
CD ➔ TUNER-FM
➔
➔
➔
AUX
CDR
MW
➔
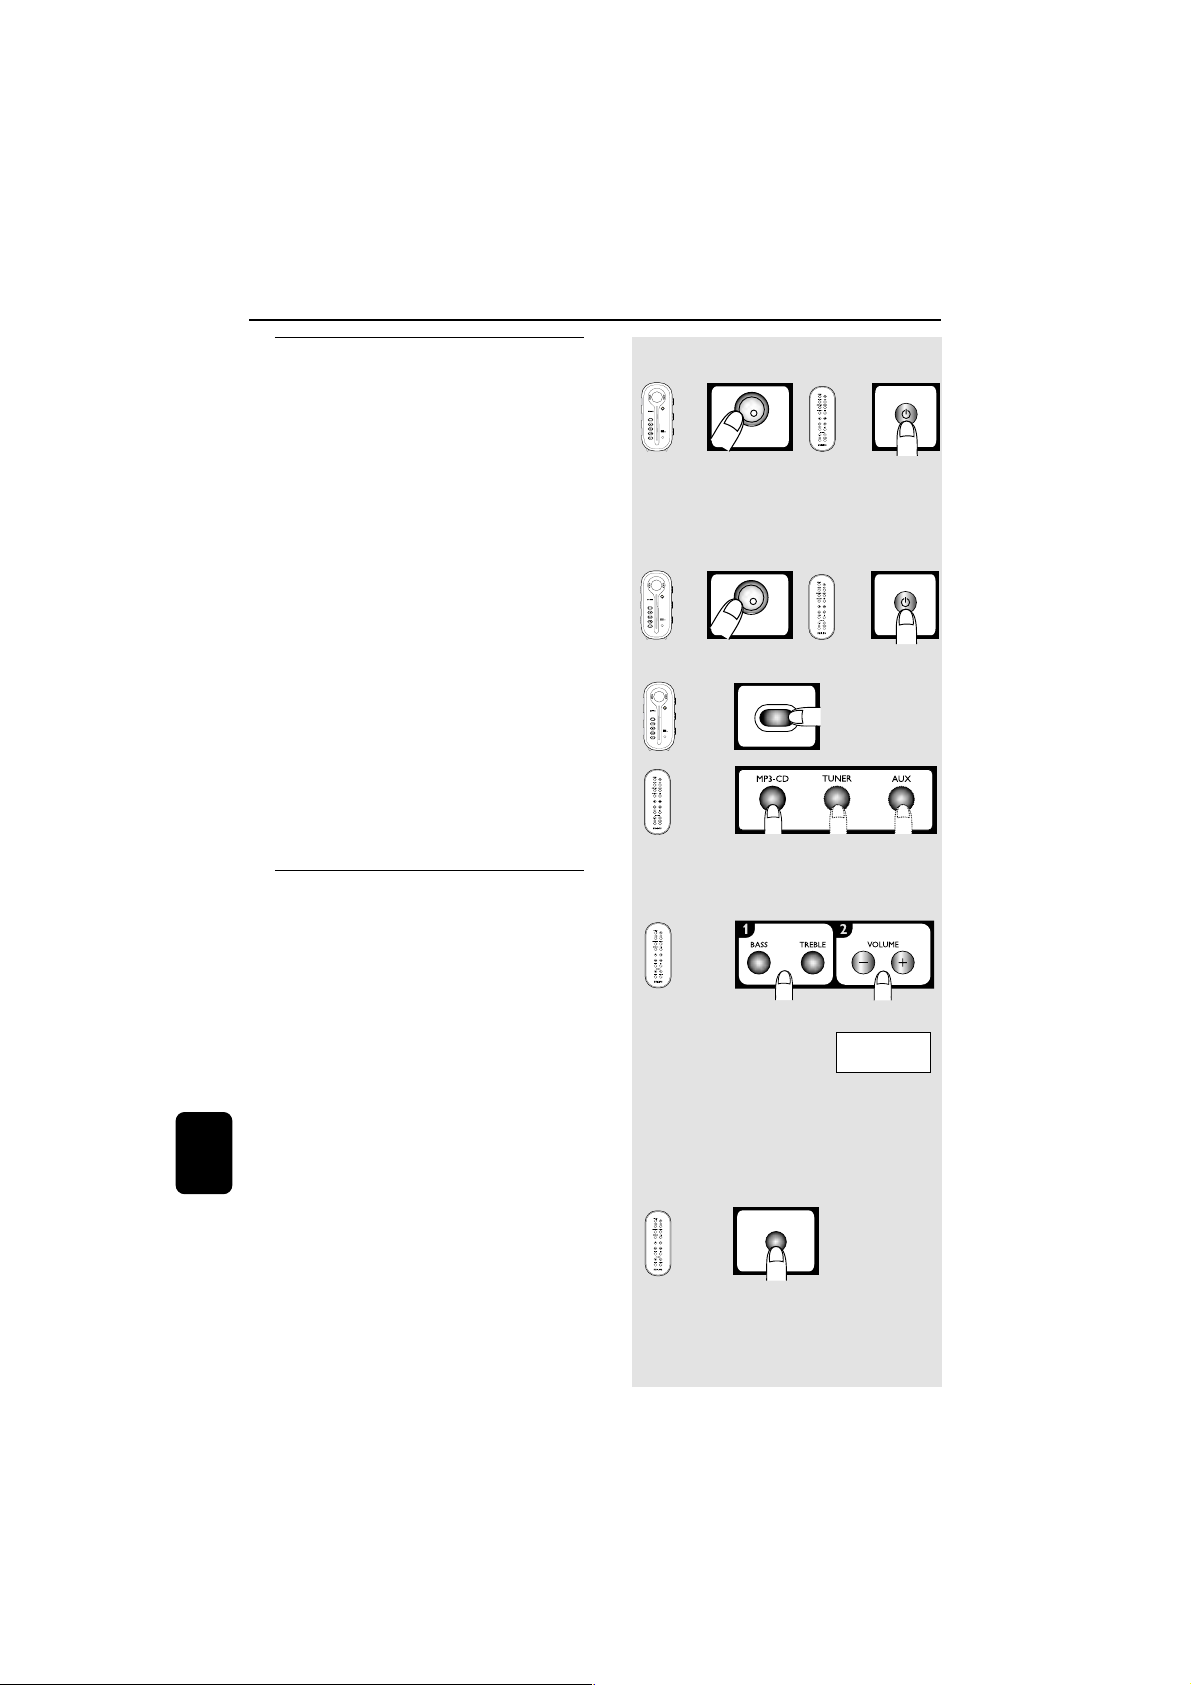
Outras Funcionalidades
Ligar
ö Passar para o modo de espera
Economia de Energia
Para poupar energia, é aconselhado passar o
sistema para o modo de espera Economia de
Energia ou desligá-lo totalmente da fonte
eléctrica se não for utilizado.
➜ O LED acende-se e fica vermelho.
➜ O ecrã do visor fica em branco.
ö Passar para o modo de espera
➜ O LED acende-se e fica verde.
ö Passar para o modo activo
Controlo de som
ö Regular o nível de Baixas/Altas
Frequências
As funcionalidades de BAIXAS FREQUÊNCIAS
(graves) e ALTAS FREQUÊNCIAS (agudos)
permitem programar as definições do
processador de som.
É possível utilizar o botão do volume para
regular o nível de baixas/altas frequências
Português
imediatamente depois de ter seleccionado a
respectiva funcionalidade de baixas/altas
frequências. Se o botão do volume não for
utilizado no espaço de 5 segundos, passará a ter
a sua função normal de controlo do volume.
☞
☞
☞
☞
prima e
mantenha
prima
brevemente
OU
OU
prima e
mantenha
prima
brevemente
ö Activar/desactivar o efeito
Surround Incrível
☞
A funcionalidade "Incredible Surround" amplia a
distância virtual entre as colunas frontais para
obtenção de um efeito estéreo
excepcionalmente largo e envolvente.
➜ Se for activado, a mensagem IS aparecerá.
182
3139 115 21642
Page 23

Ligar dispositivos externos
PHONES
AUX IN
LINE OUT
R
R
L
L
PHONES
AUX IN
LINE OUT
TO POWER
UNIT
AM
FM
ANTENNA
RRL
L
L
R
AUDIO OUT
AUX IN
LINE OUT
TO POWER
UNIT
AM
R
R
L
L
PHONES
AUX IN
LINE OUT
TO POWER
UNIT
AM
FM
ANTENNA
RRL
L
L
R
AUDIO IN
Outras Ligações
ö Ligar um dispositivo externo para
ouvir música/som
Ligue os terminais “AUDIO OUT” do dispositivo
externo (por exemplo, televisor, videogravador,
leitor de Discos Laser, leitor de DVDs e gravador
de CDs) aos terminais AUX IN do sistema.
ö Ligar um dispositivo externo para
gravação analógica
Ligue os terminais “AUDIO IN” do dispositivo
externo (por exemplo, gravador de CDs/
cassetes) aos terminais LINE OUT do sistema.
Escutar uma fonte externa
1 Prima repetidamente SOURCE ou AUX.
➜ Seleccione “AUX” quando estiver a ligar a um
televisor, videogravador ou leitor de discos laser.
➜ Seleccione “CDR” quando estiver a ligar a um
gravador DE CDs ou leitor de discos laser.
2 Lê o dispositivo externo.
● Ao seleccionar o modo CDR, qualquer
equipamento áudio ligado aos terminais LINE
OUT deste sistema micro será silenciado.
Não poderá gravar nem escutar o som em
equipamento ligado ao terminal LINE OUT.
☞
☞
☞
VOL VOL
SOURCE
PLAY•PAUSE
SEARCH
STOP•EJECT
CD GRAPHIC THIS SIDE
ECO
POWER
➭
MZ 1100
iR
➭
SOURCE
AUX
CD ➔ TUNER-FM
➔
➠
CDR
AUX î CDR
➠
➔
AUX
➔
➔
MW
Notas:
– Aconselha-se a não escutar nem gravar da
mesma fonte em simultâneo.
– Todas as funcionalidades de controlo de som
(IS., BASS/TREBLE, por exemplo) estão disponíveis
Português
para selecção.
– Consulte as instruções de funcionamento do
equipamento ligado para obter mais informações.
183
3139 115 21642
Page 24

Especificações
AMPLIFICADOR
Output power .................................................. 2 x 50 W MPO
...................................................................2 x 25 W RMS
Relação sinal – ruído ........................ ≥ 67 dBA (IEC)
Resposta de frequência ................... 50 – 16000 Hz
Sensibilidade de entrada
AUX / CDR In....................................... 500 mV / 1V
Saída
Colunas......................................................................≥ 8 Ω
Auriculares ......................................... 32 Ω – 1000 Ω
Saída de Linha..........500 mV ±2dB, > 22000 Ω
(1) (8 Ω, 1 kHz, 10% THD)
LEITOR DE CD/MP3-CD
Número de faixas programáveis............................ 99
Resposta de frequência ................... 20 – 20000 Hz
Relação sinal – ruído ..................................... ≥ 80 dBA
Separação de canais ........................≥ 60 dB (1 kHz)
Distorção total harmónica......................... < 0,003%
MPEG 1 Camada 3 (MP3-CD...... MPEG AUDIO
Taxa de bit do MP3-CD ................... 32 – 256 kbps
Resposta de Frequência..................32, 44,1, 48 kHz
SINTONIZADOR
Gama de ondas FM .........................87,5 – 108 MHz
Gamas de onda MW...................... 531 – 1602 kHz
Número de memórias ................................................. 40
Antena
FM .................... Fio de 75 Ω/Antena telescópica
AM .................................................. Antena de quadro
(128 kbps aconselhável)
MÓDULO ELÉCTRICO
(1)
Material ................................................................Polistireno
Energia eléctrica...................... 220 – 230 V / 50 Hz
Consumo de Energia
Activa .......................................................................... 33 W
Espera .................................................................... < 10 W
Espera Economia de Energia ........................≤ 1 W
Dimensões (l x a x e).........238 x 68 x 158 (mm)
Peso (sem colunas)................................................. 1,2 kg
ALTIFALANTES
Sistema................................................ Reflexo de baixos
Impedance........................................................................ 8 Ω
Woofer ....................................... 2 x 3” polipropeleno
Tweeter...........................Cúpula arrefecida de fluido
ferromagnético 1 x 18 mm
Dimensões (l x a x e)......112 x 245 x 235 (mm)
Peso ..................................................................... 2,9 kg cada
GERAL
Material
MZ1000.........................Polimetacrilato de metilo
MZ1100............................................ Borracha/Lucite
MZ1200............................................ Liga de alumínio
Unidade principal
Dimensões (l x a x e)..112 x 245 x 235 (mm)
Peso .......................................................................... 2,85 kg
As especificações e o aspecto exterior são
Português
184
3139 115 21642
Page 25

Resolução de Problemas
ADVERTÊNCIA!
Em nenhuma circunstância deverá tentar reparar a aparelhagem por si próprio porque,
se o fizer, a garantia perderá a validade. Não abra a aparelhagem porque há o risco de
choque eléctrico.
Se ocorrer uma avaria, verifique primeiramente os pontos enumerados a seguir antes de
levar a aparelhagem para reparação. Se não conseguir resolver um problema recorrendo
a estes conselhos, consulte o representante ou centro de assistência.
Problema
O disco é automaticamente ejectado.
A recepção de rádio é fraca.
O sistema não reage quando os botões são
premidos.
Não há som ou o som é de fraca.
As saídas sonoras esquerda e direita estão
invertidas.
O controlo remoto não funciona
correctamente.
Solução
✔ Coloque o disco com a etiqueta virada para a direita.
✔ Substitua ou limpe o disco, consulte "Manutenção".
✔ Utilize um CD-ROM finalizado ou um disco do formato
MP3-CD correcto.
✔ Se o sinal for demasiado fraco, regule a antena ou ligue
uma antena exterior para uma melhor recepção.
✔ Aumente a distância entre a aparelhagem e o televisor
ou videogravador.
✔ Desligue a ficha do cabo eléctrico durante um minuto.
✔ Regule o volume.
✔ Desligue os auriculares.
✔ Verifique se as colunas estão correctamente ligadas.
✔ Certifique-se de que o CD MP3 foi gravado no âmbito
da taxa de bits 32-256 kpbs com frequências de
amostragem a 32 kHz, 44,1 kHz ou 48 kHz.
✔ Verifique as ligações das colunas e o local.
✔ Seleccione a fonte (CD ou TUNER, por exemplo)
antes de premir o botão de função (É, S ,
✔ Reduza a distância entre o controlo remoto e a
aparelhagem.
✔ Substitua as baterias.
✔ Aponte o controlo remoto na direcção do sensor IR da
aparelhagem.
T).
O temporizador não funciona.
✔ Acerte correctamente o relógio.
✔ Prima CLK/TIMER para ligar o temporizador.
3139 115 21642
Português
185
 Loading...