

Page 1
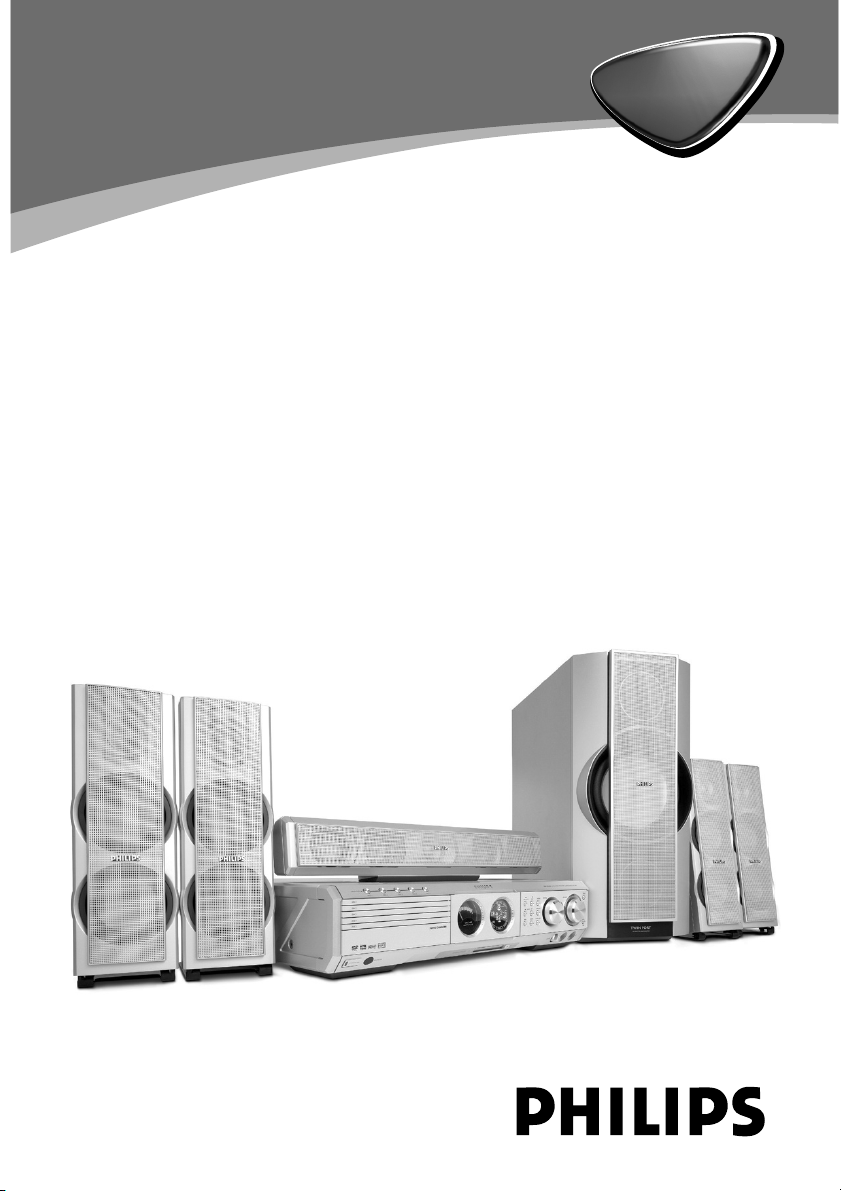
DVD VIDEO DIGITAL SURROUND SYSTEM
MX
5500D
MX
5500D
1
Page 2
México
(
Es necesario que lea cuidadosamente su instructivo de manejo.
PRECAUCIÓN - ADVERTENCIA
No abrir, riesgo de choque eléctrico
Verifique que el voltaje de alimentación
sea el requerido para su aparato
Para evitar el riesgo de choque eléctrico, no quite la tapa.
En caso de requerir servicio, dirijase al personal calificado.
Descripción: Sistema receptor/reproductor de DVD
Modelo : MX5500D/21
Alimentación: 110–127 / 220–240V~; 50–60 Hz
Consumo: 150 W
Importador: Philips Mexicana, S.A. de C.V.
Domicilio: Av. La Palma No. 6
Localidad y Tel: Edo. de México C.P. 52784
Exportador: Philips Electronics HK, Ltd.
País de Origen: China
Nº de Serie: ______________________________
ATENCIÓN
Col. San Fernando La Herradura
Huixquilucan
Tel. 52 69 90 00
LEA CUIDADOSAMENTE ESTE INSTRUCTIVO
ANTES DE USAR SU APARATO.
AVISO IMPORTANTE
Philips Mexicana, S.A. de C.V.no se hace
responsable por daños o desperfectos causados por:
– Maltrato, descuido o mal uso, presencia de
insectos o roedores (cucarachas, ratones etc.).
– Cuando el aparato no haya sido operarado
de acuerdo con el instructivo del uso, fuera
de los valores nominales y tolerancias de las
tensiones (voltaje), frecuencia (ciclaje) de
alimentación eléctrica y las características
que deben reunir las instalaciones auxiliares.
– Por fenómenos naturales tales como:
temblores, inundaciones,incendios, descargas
eléctricas, rayos etc. o delitos causados por
terceros
choques asaltos, riñas, etc.).
2
CAUTION
Use of controls or adjustments or
performance of procedures other
than herein may result in hazardous
radiation exposure or other unsafe
operation.
Page 3
OPEN•CLOSE
(*&%$#@!097531 2 4 6 8 ^
•
DISC 1 DISC 2 DISC 3 DISC 4 DISC 5
DISC 1
DISC 2
DISC 3
DISC 4
DISC 5
iR SENSOR
STANDBY-ON
5 DISC CHANGER
MEDIA SLOT
DVD VIDEO DIGITAL SURROUND SYSTEM
STOPPLAY•PAUSE SEATING
T
N
R
E
E
C
S
C
I
D
R
I
T
G
F
H
E
DVD
T
L
S
U
R
-
R
R
-
L
U
S
S
U
B
EJECT
SURROUND
SEARCH
PROG TUNING CLOCK• TIMER
SOURCE
VOLUME
MIC LEVEL MIC
TREBLE
BASS
$
#
&
)
¡
@
™
£
≤
∞
§
≥
TV/AV
DISC/
MEDIA
TUNER
AUX/DI
123
456
789
VOL
SOUND
0
DISC MENU
OK
PROGRAM
A-B
SURR.
SYSTEM MENU
SEATING ZOOM
PREV NEXT
STOP PLAY/PAUSE
REPEAT REPEATDISC SKIP
VOICE MUTE
DIM SLEEP SUB TV VOL
fl
fi
›
‹
¤
!
0
⁄
º
ª
3
3
Page 4

This product incorporates copyright
protection technology that is protected by
method claims of certain U.S. patents and
other intellectual property rights owned by
Macrovision Corporation and other rights
owners. Use of this copyright protection
technology must be authorized by
Macrovision Corporation, and is intended
for home and other limited viewing uses
only unless otherwise authorized by
Macrovision Corporation. Reverse
engineering or disassembly is prohibited.
Manufactured under license from Dolby
Laboratories. “Dolby”, “Pro-Logic” and the
double-D symbol are trademarks of
Dolby Laboratories. Confidential
Unpublished Works. ©1992-1997 Dolby
Laboratories, Inc. All rights reserved.
Manufactured under license from Digital
Theater Systems, inc. US Pat. No.
5,451,942 and other worldwide patents
issued and pending. “DTS” and “DTS
Digital Surround” are trademarks of
Digital Theater Systems, Inc. 1996 Digital
Theater Systems, Inc. All rights reserved.
4
Page 5
Index
English ------------------------------------------------ 6
Français -------------------------------------------- 46
Español --------------------------------------------- 86
------------------------------------------------------ 126
English
Français
Español
5
Page 6
Contents
English
General Information
Supplied accessories ......................................................... 8
Care and safety information ........................................ 8
Connections
Step 1: Set up the speakers.......................................... 9
Step 2: Placing the speakers and subwoofer ...... 9
Step 3: Connecting TV .................................................. 10
Using Composite Video jack (CVBS) ............ 10
Using Component Video jacks (Pr Pb Y) .... 10
Using S-Video jack ................................................... 11
Using an accessory RF modulator .................. 11
Step 4: Connecting speakers and subwoofer . 12
Step 5: Connecting FM/MW antennas ............... 12
Step 6: Connecting the power cord .................... 13
Connections (optional)
Connecting a VCR or Cable/Satellite Box ........ 14
Viewing and listening to the playback .......... 14
Using the VCR for recording DVDs .............. 14
Connecting digital audio equipment .................... 15
Listening to the playback ..................................... 15
Recording (digital) .................................................... 15
Functional Overview
Main unit and remote control ................................. 16
Control buttons available on the
remote only ................................................................. 17
Getting Started
Step 1: Inserting batteries into the
remote control ................................................................. 18
Using the remote control to operate the
system ............................................................................. 18
Step 2: Setting the clock .............................................. 18
Step 3: Setting the TV ................................................... 19
Changing the NTSC/PAL setting via the
remote control .......................................................... 19
Selecting the colour system that
corresponds to your TV ....................................... 19
Step 4: Selecting speaker layout .............................. 20
Changing seating control position .................. 20
Setting the speakers’ channels .......................... 21
Step 5: Setting language preference ..................... 21
Disc Operations
Playable discs ..................................................................... 22
Playing discs ........................................................................ 22
Turning on/off auto Eco standby mode ...... 23
Using the Disc Menu .................................................... 23
Basic playback controls ................................................ 23
Resuming playback from the last stopped
point (DVD/VCD)................................................... 23
Replacing discs without interrupting
playback ......................................................................... 23
Selecting various repeat functions ......................... 24
Repeat play mode ................................................... 24
Repeating a section within a
chapter/track ............................................................... 24
Programme favourite tracks
(audio CDs and VCDs) ....................................... 24–25
Clearing the programme ..................................... 25
Using the menu bar to programme ..................... 25
Playing MP3/Picture disc (Kodak, JPEG) ............. 26
Programme MP3 disc ................................................... 26
Media Slot Operations
About media slot ............................................................ 27
Playing JPEG pictures from memory card ......... 27
DVD Menu Options
Using the menu bar ...............................................28–29
Using the Karaoke feature ......................................... 29
Using the Setup Menu ................................................. 30
Setting the TV shape .............................................. 30
Setting the video output ...................................... 31
Screen saver - turning on/off ............................. 31
Setting the analogue output .............................. 31
Setting the digital output ..................................... 32
Setting the PCM output ....................................... 32
Night mode- turning on/off ............................... 33
Restoring the original settings ........................... 33
Restricting playback by parental control ..... 34
Changing the password ........................................ 35
6
Page 7

Tuner Operations
Tuning to r adio stations ............................................... 36
Presetting radio stations .............................................. 36
Using the Plug and Play ........................................ 36
Automatic presetting ............................................. 37
Manual presetting ..................................................... 37
Selecting a preset radio station ............................... 37
Deleting a preset radio station ........................ 37
Timer Operations
Setting the timer .............................................................. 38
Activating/Deactivating the timer ................... 38
Setting the Sleep timer ................................................ 39
Sound and Volume Controls
Sound Control .................................................................. 40
Selecting surround sound .................................... 40
Tur ning on/off clear voice effect ...................... 40
Changing subwoofer volume level ................. 40
Adjusting Bass/Treble level.................................. 40
Selecting digital sound effects ........................... 40
Volume Control ............................................................... 40
Other Functions
Switching on/off ............................................................... 41
Switching to active mode .................................... 41
Switching to Eco Power standby mode ...... 41
Switching to standby mode (view clock) ... 41
Dimming system’s display screen ........................... 41
Recording to an external device ............................ 41
Using the remote to operate your television ... 41
Contents
English
Troubleshooting ........................................... 42–43
Specifications .......................................................... 44
Glossary ......................................................................... 45
7
Page 8
General Information
10 cm
(4 inches)
10 cm
(4 inches)
10 cm
(4 inches)
DVD Home Cinema System
PHILIPS
English
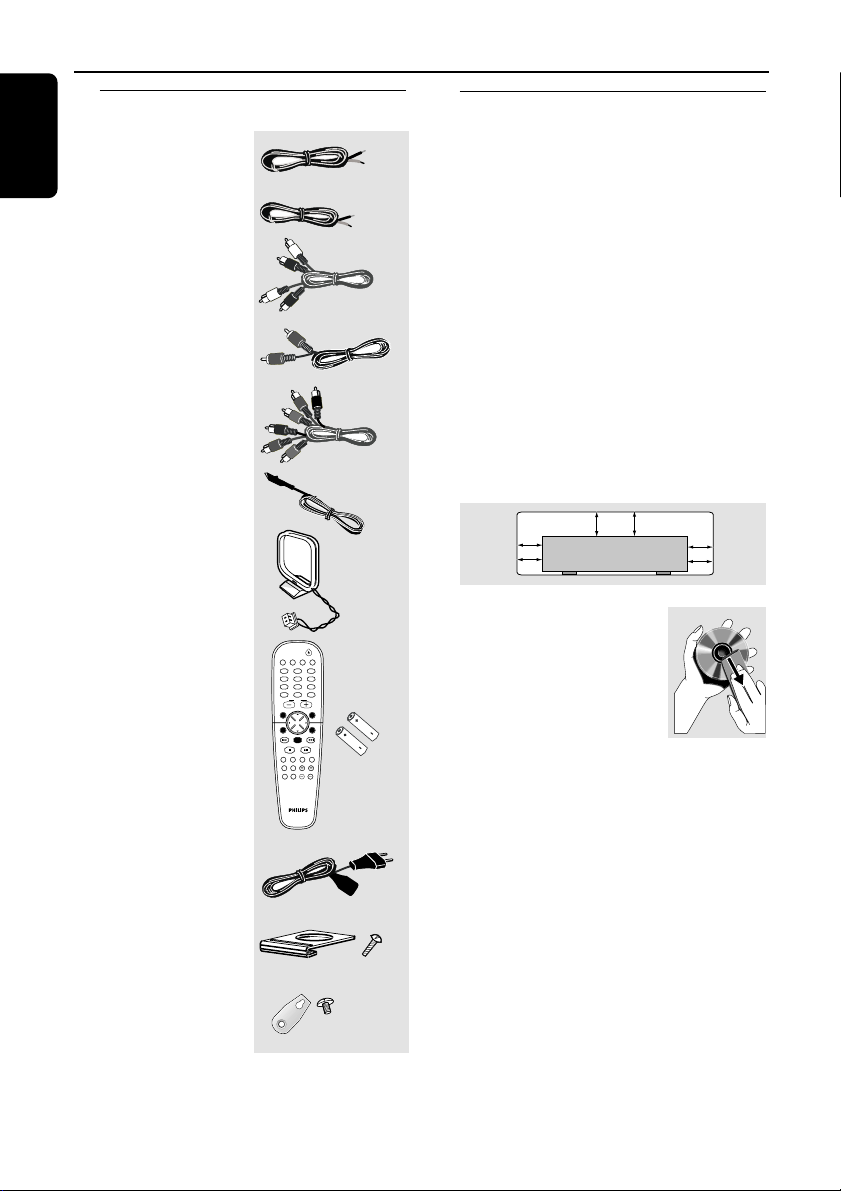
Supplied accessories
Speaker cables
Subwoofer cable
Audio cable
(white, red)
Composite video cable
(yellow)
Component video
cables
(red/blue/green)
FM wire antenna
MW loop antenna
Remote control and
two batteries
AC power cable
Mini speaker stands
and screws
SYSTEM MENU
DISC/
TUNER AUX/DI
MEDIA
TV/AV
123
456
789
SURR.
0
VOL
SEATING ZOOM
PREV NEXT
OK
STOP PLAY/PAUSE
REPEAT REPEATDISC SKIP
A-B
VOICE MUTE
DIM SLEEP SUB TV VOL
Care and safety information
Avoid high temperatures, moisture,
(5x)
SOUND
DISC MENU
PROGRAM
(8x)
(4x)
water and dust
– Do not expose the system, batteries or discs
to humidity, rain, sand or excessive heat (caused
by heating equipment or direct sunlight.) Always
keep the disc tray closed to avoid getting dust
on the lens.
Avoid condensation problem
– The lens may cloud over when the player is
suddenly moved from cold to warm
surroundings, making it impossible to play a disc.
Leave the player in the warm environment until
the moisture evaporates.
Do not block the vents
– Do not operate the DVD system in an
enclosed cabinet and allow about 10 cm(4
inches) of free space all around the player for
adequate ventilation.
Care of disc
– To clean a CD, wipe it in a
straight line from the centre
towards the edge using a soft,
lint-free cloth. Do not use
cleaning agent, as they may
damage the disc!
– Write only on the printed
side of a CDR(W) and only with a soft felttipped pen.
– Handle the disc by its edge, do not touch the
surface.
Care of the cabinet
– Use a soft cloth slightly moistened with a
mild detergent solution. Do not use a solution
containing alcohol, spirits, ammonia or abrasives.
Finding a suitable location
– Place the player on a flat, hard, stable surface.
Brackets and screws
8
(4x)
Page 9
Connections
Step 1: Set up the speakers Step 2: Placing the speakers
and subwoofer
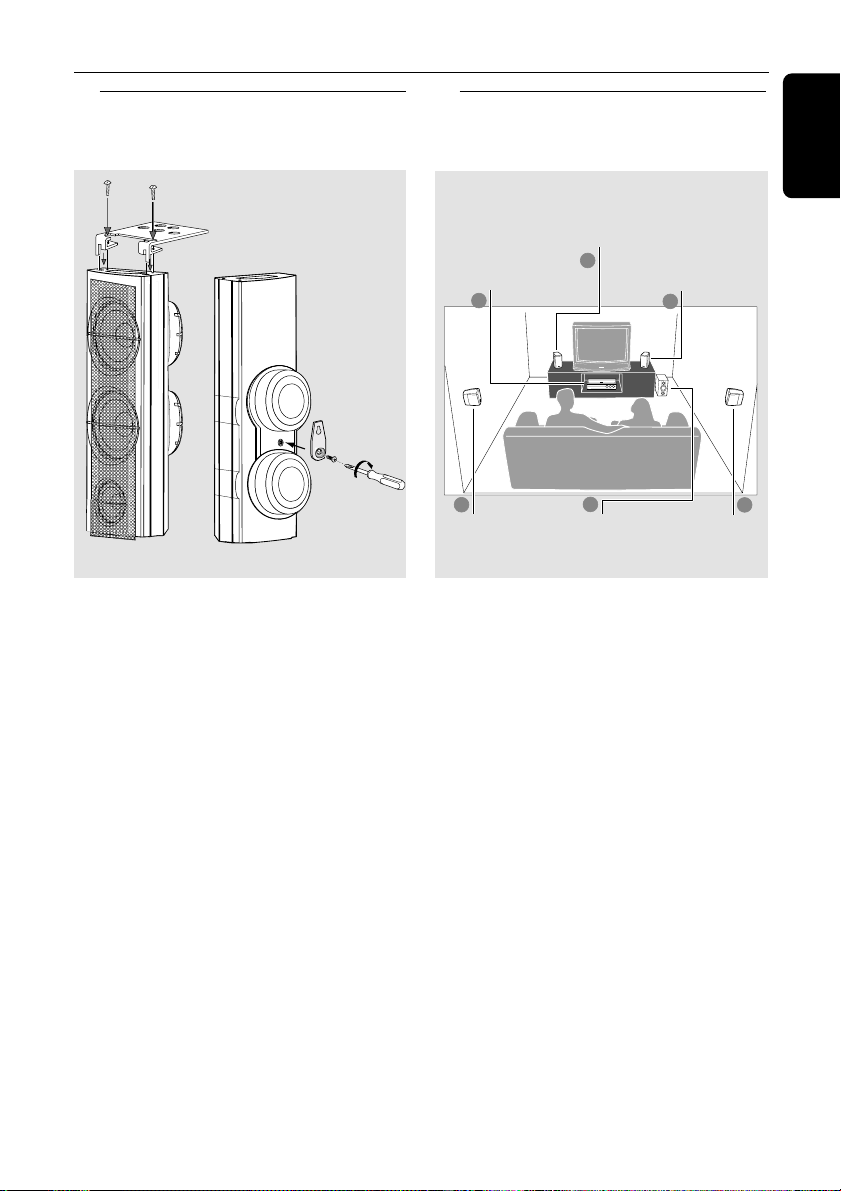
Front Speaker
(Left)
Centre speaker and
DVD system
2
1
Front Speaker
(Right)
1
English
1 OR 2
1 Before connecting the speakers to the DVD
system, firmly attach the mini speaker stands to
the front and the surround speakers using the
supplied screws.
OR
2 Alternatively, you can choose to mount the
speakers on the wall. Attach the supplied
bracket firmly to the rear of speakers using the
supplied screws. Then mount a screw (not
supplied) on the wall where the speaker is to be
hung and hook the speaker securely onto the
mounted screw.
CAUTION!
You should get a qualified person to
attach the brackets to the wall. DO
NOT do it by yourself to avoid
unexpected damage to the equipment
or injury to personnel.
3
Surround
Speaker (Left)
For best possible surround sound, all the
speakers (except the subwoofer) should be
placed at the same distance from the listening
position.
4
Subwoofer
Surround
Speaker (Right)
1 Place the front left and right speakers at equal
distances from the TV and at an angle of
approximately 45 degrees from the listening
position.
2 Place the centre speaker above the TV or the
DVD system so that the centre channel’s sound
is localised.
3 Place the surround speakers at normal listening
ear level facing each other or mounted on the
wall.
4 Place the subwoofer on the floor near the TV.
Notes:
– To avoid magnetic interference, do not position
the front speakers too close to your TV.
– Allow adequate ventilation around the DVD
system.
3
9
Page 10
P-SCAN
ON OFF
Pb
DIGITAL
OUT
DIGITAL
IN
AUX
IN
TVINLINE
OUT
AUDIO
VIDEO
OUT
CVBS
S-VIDEO
FM ANTENNA
MW
L
R
WOOFER SURROUNDCENTER FRONT
L
R
SL
SUB
SR
C
Y
AUDIO
OUT
Pr/Cr
Pb/Cb
Y
S-VIDEO
IN
VIDEO IN
COMPONENT
VIDEO IN
AUDIO
OUT
Pr/Cr
Pb/Cb
Y
S-VIDEO
IN
VIDEO IN
COMPONENT
VIDEO IN
2
1
3
Pr
Connections
English
Step 3: Connecting TV
COMPONENT
VIDEO IN
S-VIDEO
IN
Pr/Cr
AUDIO
OUT
Pb/Cb
MW
AUDIO
TVINLINE
2
FM ANTENNA
OUT
VIDEO
S-VIDEO
VIDEO IN
Y
1
OUT
CVBS
Pb
P-SCAN
ON OFF
Y
3
COMPONENT
VIDEO IN
S-VIDEO
IN
Pr/Cr
AUDIO
OUT
Pb/Cb
VIDEO IN
Y
L
R
C
SL
SR
SUB
WOOFER SURROUNDCENTER FRONT
DIGITAL
DIGITAL
AUX
OUT
IN
L
R
IN
IMPORTANT!
– You only need to make one video
connection from the following options,
depending on the capabilities of your TV
system.
– S-Video or Component Video
connection provides higher picture
quality. These options must be available
on your TV.
– Connect the DVD system directly to
the TV.
IMPORTANT!
– If both S-Video and Component
(Pr Pb Y) Video connections are used to
connect to your TV, the video signal will
automatically switch to S-Video when
you power up the DVD system. To set
the VIDEO OUT(put) to ‘Pr Pb Y’, see
page 31.
– The progressive scan video quality is
only possible through Component Video
(Pr Pb Y) output.
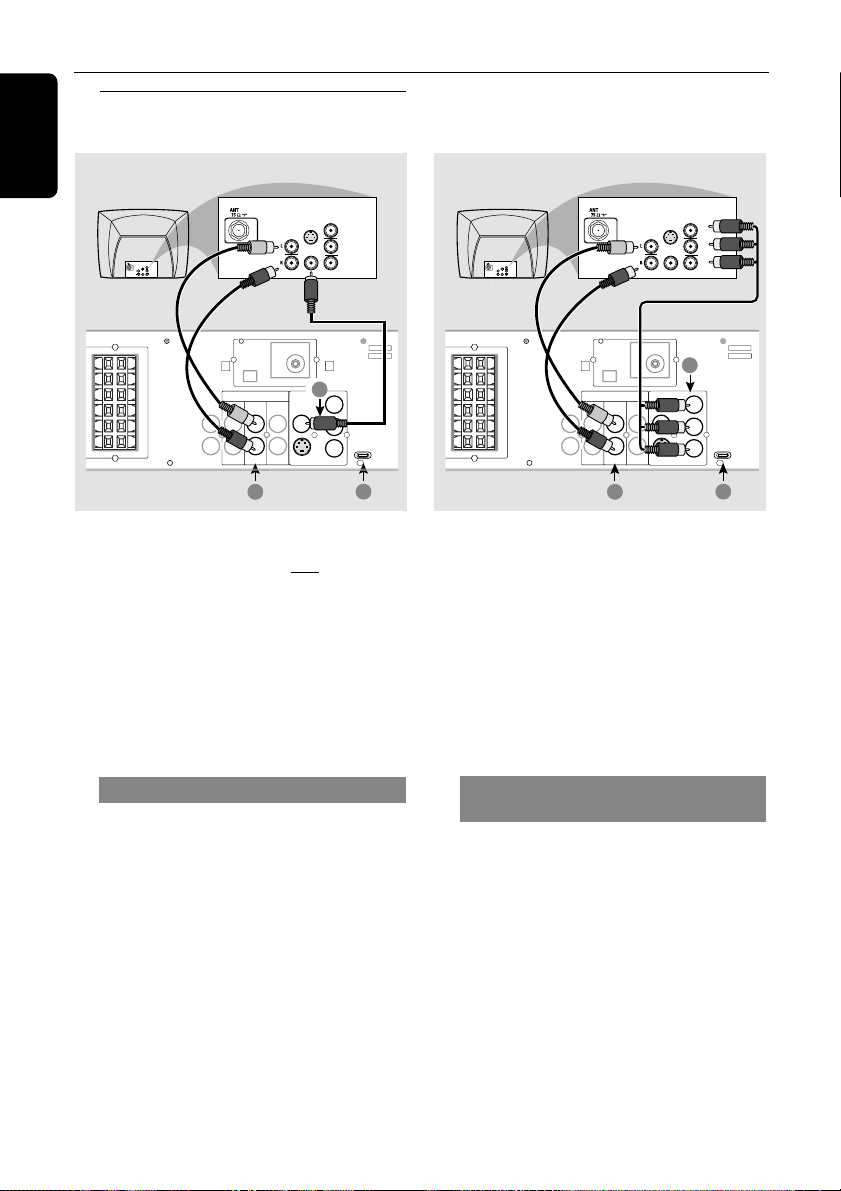
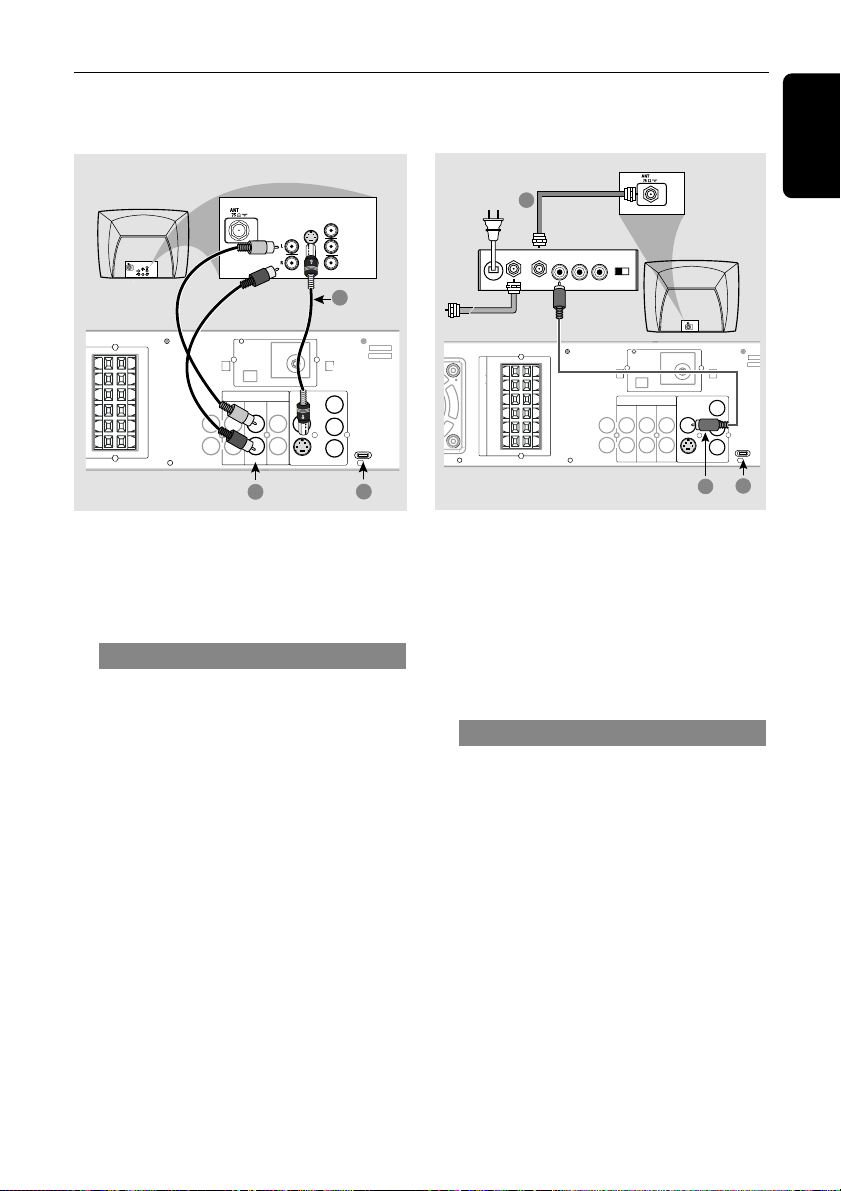
Using Compositer Video jack (CVBS)
1 Use the composite video cable (yellow) to
connect the DVD system’s CVBS jack to the
video input jack (or labelled as A/V In, Video In,
Composite or Baseband) on the TV.
2 To hear the TV channels through this DVD
system, use the audio cables (white/red) to
connect TV IN (L/R) jacks to the
corresponding AUDIO OUT jacks on the TV.
3 Set the P-SCAN switch to ‘OFF’.
10
Using Component Video jacks
(Pr Pb Y)
1 Use the component video cables (red/blue/
green) to connect the DVD system’s Pr Pb Y
jacks to the corresponding Component video
input jacks (or labelled as Pr/Cr Pb/Cb Y or
YUV) on the TV.
2 To hear the TV channels through this DVD
system, use the audio cables (white/red) to
connect TV IN (L/R) jacks to the
corresponding AUDIO OUT jacks on the TV.
3 If you are using a Progressive Scan TV (TV must
indicate Progressive Scan or ProScan capability),
set the P-SCAN switch to ‘ON’. Otherwise,
set it to ‘OFF’.
Page 11
Pb
DIGITAL
OUT
DIGITAL
IN
AUX
IN
TVINLINE
OUT
AUDIO
VIDEO
OUT
CVBS
S-VIDEO
FM ANTENNA
MW
L
R
SPEAKER SYSTEMS (4Ω)
SUB-
WOOFER SURROUNDCENTER FRONT
L
R
SL
SUB
SR
C
Pr
Y
AUDIO IN
R L
VIDEO
IN
TO TVINT IN
CH3 CH4
1
3
2
P-SCAN
ON OFF
Connections
COMPONENT
VIDEO IN
S-VIDEO
IN
Pr/Cr
AUDIO
OUT
Pb/Cb
COMPONENT
VIDEO IN
S-VIDEO
IN
Pr/Cr
AUDIO
OUT
Pb/Cb
VIDEO IN
Y
VIDEO IN
Y
1
L
R
C
SL
SR
SUB
WOOFER SURROUNDCENTER FRONT
DIGITAL
DIGITAL
MW
FM ANTENNA
AUDIO
VIDEO
OUT
TVINLINE
AUX
OUT
IN
L
R
IN
2
Pr
CVBS
OUT
Pb
P-SCAN
ON OFF
Y
S-VIDEO
3
IMPORTANT!
– If the picture is distorted, check the
Video Output setting. Make sure it is set
to ‘S-Video’, see page 31.
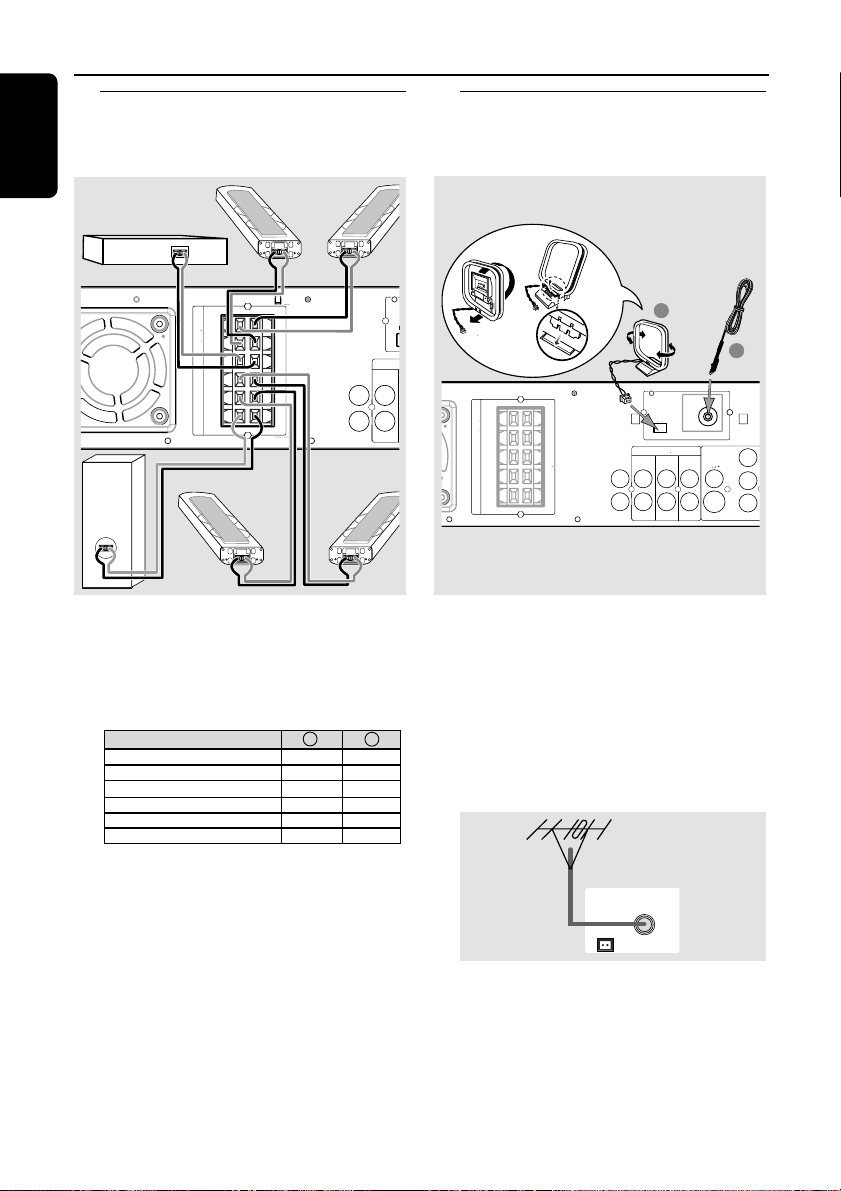
Using S-Video jack
1 Use the S-video cable (not supplied) to connect
the DVD system’s S-VIDEO OUT jack to the
S-Video input jack (or labelled as Y/C or S-VHS)
on the TV.
2 To hear the TV channels through this DVD
system, use the audio cables (white/red) to
connect TV IN (L/R) jacks to the
corresponding AUDIO OUT jacks on the TV.
3 Set the P-SCAN switch to ‘OFF’.
RF coaxial cable to TV
Back of RF Modulator
(example only)
Antenna or
Cable TV Signal
IMPORTANT!
– If your TV only has a single Antenna In
jack (or labelled as 75 ohm or RF In),
you will need an RF modulator in order
to view the DVD playback on the TV.
See your electronics retailer or contact
Philips for details on RF modulator
availability and operations.
Using an accessory RF modulator
1 Use the composite video cable (yellow) to
connect the DVD system’s CVBS jack to the
video input jack on the RF modulator.
2 Use the RF coaxial cable (not supplied) to
connect the RF modulator to your TV’s RF jack.
3 Set the P-SCAN switch to ‘OFF’.
English
11
Page 12
Connections
M
FM ANTENNA
MW
SPEAKER SYSTEMS (4Ω)
SUB-
WOOFER SURROUND CENTER FRONT
L
R
SL
SUB
SR
C
DIGITAL
OUT
DIGITAL
IN
AUX
IN
TVINLINE
OUT
AUDIO
VIDEO
OUT
CVBS
S-VIDEO
L
R
Pr
Pb
Y
1
2
➠
English
Step 4: Connecting speakers
and subwoofer
Front
Right
Centre
L
R
C
SL
WOOFER SURROUND CENTER FRONT
SR
SUB
SPEAKER SYSTEMS (4Ω)
SUB-
Surround
Right
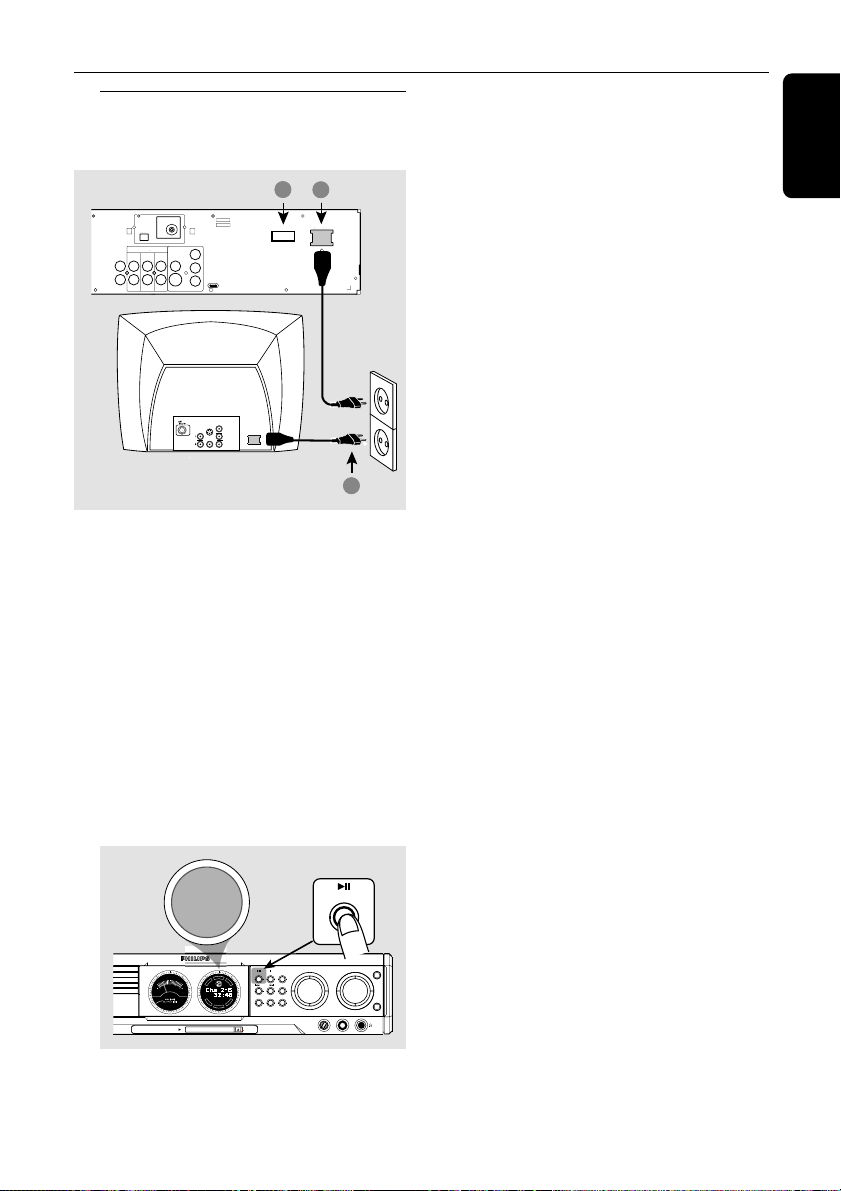
Connect the supplied speaker systems using the
supplied speaker cables by matching the colours
of the jacks and speaker cables. Fully insert the
stripped por tion of the speaker wire into the
jacks.
Speakers / Subwoofer - +
Front Left (FL) (L) black white
Front Right (FR) (R) black red
Centre (C) black green
Surround Left (SL) black blue
Surround Right (SR) black grey
Subwoofer (SUB) black purple
Front
Left
DIGITAL
OUT
L
R
DIGITAL
IN
Surround
Left
AUX
IN
Step 5: Connecting FM/MW
antennas
FM
antenna
fix the claw
into the slot
MW
antenna
1 Connect the supplied MW loop antenna to the
MW jack. Place the MW loop antenna on a
shelf or attach it to a stand or wall.
2 Connect the supplied FM antenna to the FM
jack. Extend the FM antenna and fix its ends to
the wall.
For better FM stereo reception, connect an
external FM antenna (not supplied).
Notes:
– Ensure that the speaker cables are correctly
connected. Improper connections may damage the
system due to short-circuit.
MW
FM ANTENNA
– Do not connect more than one speaker to any
one pair of
– Do not connect speakers with an impedance
lower than the speakers supplied. Please refer to
the SPECIFICATIONS section of this manual.
12
+/-
speaker jacks.
Notes:
– Adjust the position of the antennas for optimal
reception.
– Position the antennas as far as possible from
your TV, VCR or other radiation source to prevent
unwanted interference.
Page 13
Step 6: Connecting the power
cord
1
2
~ AC MAINS
MW
FM ANTENNA
AUDIO
VIDEO
OUT
DIGITAL
OUT
DIGITAL
IN
Pr
TVINLINE
AUX
CVBS
OUT
IN
L
Pb
R
Y
S-VIDEO
AUDIO
OUT
VOLTAGE SELECTOR
110V
220V
127V
240V
P-SCAN
ON OFF
COMPONENT
VIDEO IN
S-VIDEO
IN
Pr/Cr
~ AC MAINS
Pb/Cb
VIDEO IN
Y
2
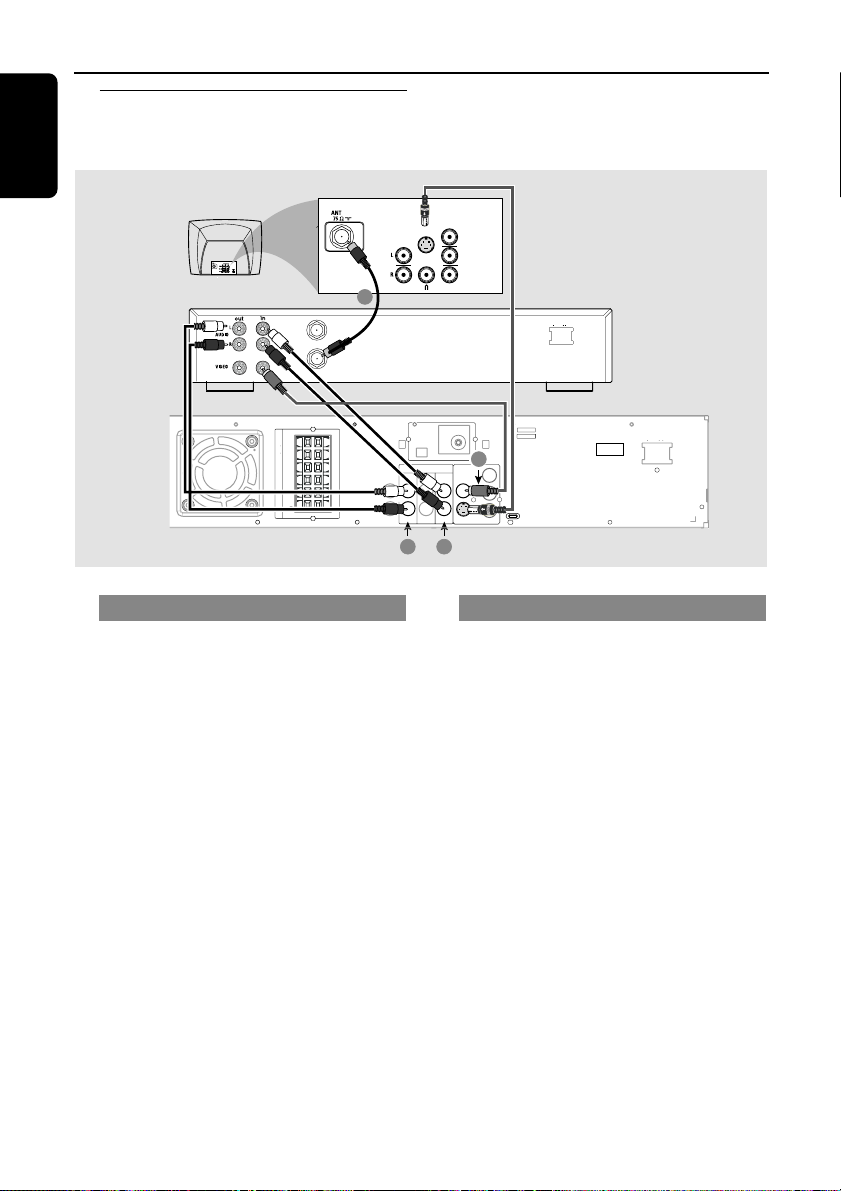
After everything is connected
properly,
1 Set the VOLTAGE SELECTOR to the local
power line voltage.
2 Plug in the AC power cord to the power outlet.
Never make or change any connections with the
power switched on.
Connections
English
On the DVD system,
"AUTO INSTALL - PRESS PLAY" may
appear on the display panel. Press ÉÅ on the
front panel to store all available radio stations or
press Ç to exit (see page 36 “Tuner
Operations”).
SEARCH
STOPPLAY•PAUSE SEATING
SURROUND
PLAY• PAUSE
DVD VIDEO DIGITAL SURROUND SYSTEM
SOURCE
MIC LEVEL MIC
TREBLE
VOLUME
BASS
AUTO INSTALL - PRESS PLAY
T
N
R
E
E
C
S
C
I
D
R
I
T
G
F
H
E
DVD
T
L
ISC CHANGER
MEDIA SLOT
PROG TUNINGCLOCK•TIMER
S
R
U
-
R
R
-
U
L
S
S
B
U
EJECT
13
Page 14
Connections (optional)
English
Connecting a VCR or
Cable/Satellite Box
SPEAKER SYSTEMS (4Ω)
SUB-
WOOFERSURROUND CENTER FRONT
Viewing and listening to the playback
1 Connect the VCR or Cable/Satellite Box to the
TV as shown.
2 Connect the DVD system’s AUX IN (R/L)
jacks to the AUDIO OUT jacks on the VCR or
cable/satellite box.
Before starting operation, press AUX/DI on
the remote to select “AUX” in order to activate
the input source.
ANT IN
TO TV
COMPONENT
VIDEO IN
S-VIDEO
IN
VIDEO IN
Pr/Cr
Pb/Cb
Y
AUDIO
OUT
1
P-SCAN
ON OFF
~ AC MAINS
VOLTAGE SELECTOR
110V
127V
~ AC MAINS
220V
240V
VCR or
Cable/Satellite
Box
L
R
C
SL
SR
SUB
MW
FM ANTENNA
3
AUDIO
VIDEO
OUT
TVINLINE
Pr
CVBS
OUT
Pb
Y
S-VIDEO
4
DIGITAL
AUX
OUT
IN
L
R
DIGITAL
IN
2
Using the VCR for recording DVDs
Some DVDs are copy-protected. You cannot
record or dub protected discs using a VCR.
3 Connect the DVD system’s CVBS jack to the
VIDEO IN jack on the VCR.
4 Connect the DVD system’s LINE OUT (R/L)
jacks to the AUDIO IN jacks on the VCR.
This will allow you to make analogue stereo
(two channel, right and left) recordings.
To view DVD playback while recording,
you must connect the DVD system to your TV
using the S-VIDEO (as shown above) or the
Component (Pr Pb Y) video connection.
14
Page 15
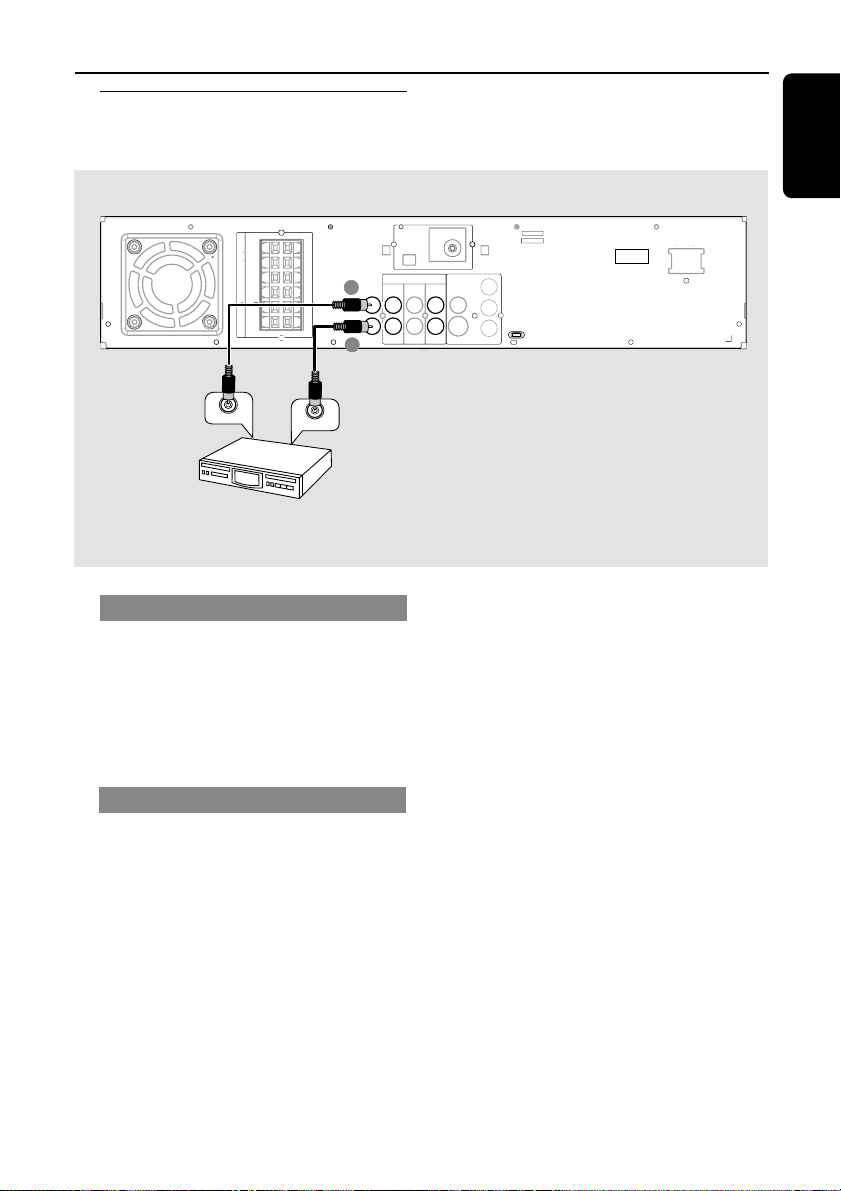
Connecting digital audio
equipment
Connections (optional)
English
L
R
C
DIGITAL
2
OUT
DIGITAL
IN
1
(for example)
CD Recorder
DIGITAL IN
SL
SPEAKER SYSTEMS (4Ω)
SR
SUB
SUB-
WOOFER SURROUNDCENTER FRONT
DIGITAL OUT
Listening to the playback
1 Connect the DVD system’s DIGITAL IN jack
to the DIGITAL OUT jack on a digital audio
device.
Before starting operation, press AUX/DI on
the remote to select “DI” in order to activate
the input source.
Recording (digital)
2 Connect the DVD system’s DIGITAL OUT
jack to the DIGITAL IN jack on a digital
recording device (DTS-Digital Theatre System
compatible, with a Dolby Digital decoder, for
example).
Before starting operation, set the DIGITAL
OUTPUT according to the audio connection.
(See page 32 “Setting the digital output”).
MW
FM ANTENNA
AUDIO
VIDEO
OUT
TVINLINE
AUX
IN
L
R
Pr
CVBS
OUT
P-SCAN
ON OFF
Y
S-VIDEO
VOLTAGE SELECTOR
~ AC MAINS
110V
220V
127V
240V
Notes:
– Some DVDs are copy-protected. You cannot
record the disc through a VCR or digital recording
device.
– Always refer to the owner’s manual of the other
equipment for complete connection and usage
details.
15
Page 16

Functional Overview (illustration on page 3)
English
Main unit and remote control
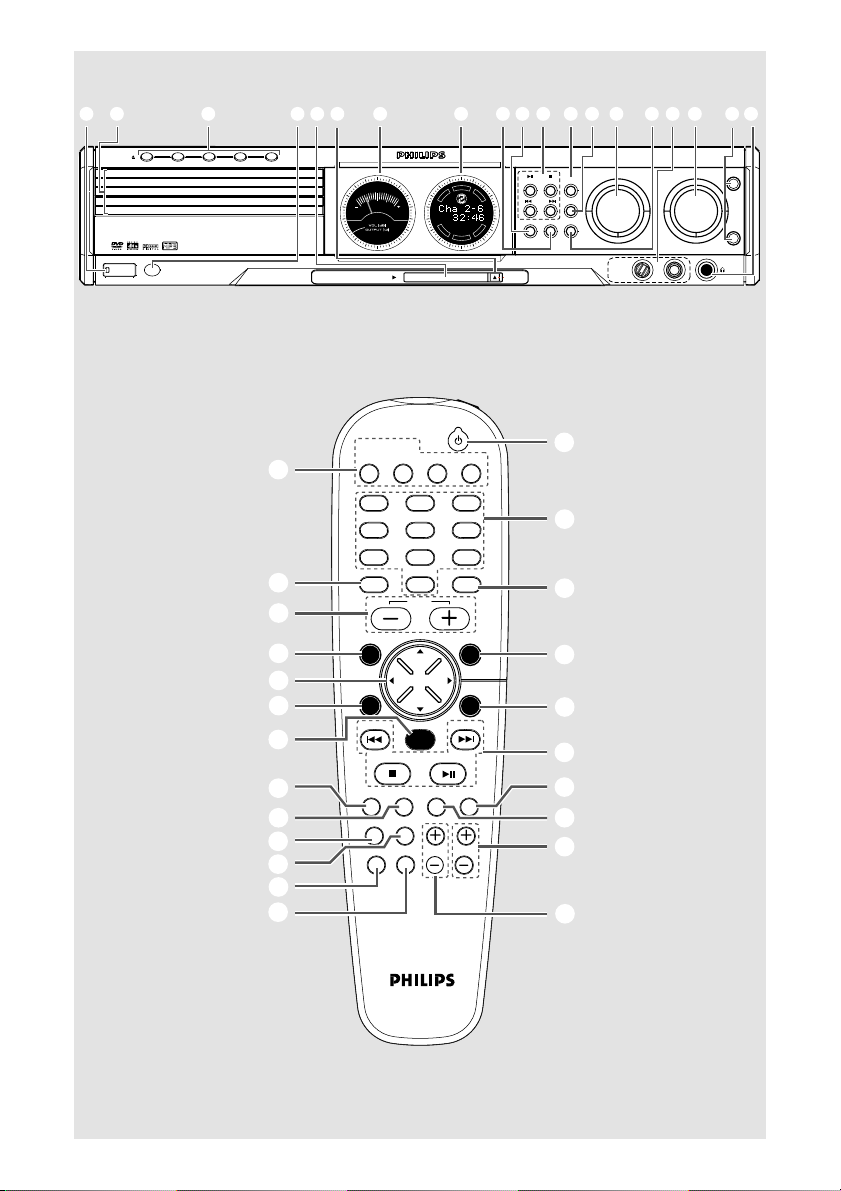
1 STANDBY ON
– Switches to Eco Power standby mode or turns
on the system.
– *Switches to standby mode.
2 Disc trays 1~5
3 OPEN•CLOSE 0 (DISC1~5)
– Opens/Closes the individual disc tray.
4 iR SENSOR
– Point the remote control towards this sensor.
5 MEDIA SLOT
– Plug the memor y card into the PC card adaptor
and insert it into the media slot for viewing.
6 EJECT 0
– Ejects the memor y card from the slot.
7 Speaker display panel
8 System display panel
9 TUNING
– Switches between frequency tuning and preset
tuning mode.
0 PROG (PROGRAM)
– DISC: starts programming.
– TUNER: starts *automatic/ manual preset
programming.
– CLOCK: selects 12- or 24-hour clock display.
! ÉÅ PLAY•PAUSE
– DISC: starts/pauses playback.
– TUNER: *enters Plug & Play mode and/or starts
preset radio station installation (only on the
main unit).
Ç STOP
– Exits an operation.
– DISC: stops playback or *clears a programme.
– TUNER: *erases a preset radio station.
S SEARCH T (PREV/NEXT)
– DISC: *searches backward/forward or selects a
track.
– TUNER: tunes the radio frequency up/down or
selects a preset radio station.
(On the remote, it can only tune the radio
frequency up/down).
– CLOCK: sets the minutes and hours.
@ SEATING (only available in Multi-channel
mode)
– Turns on/off the seating control on the TV. Use
the VOLUME control on the main unit or
joystick on the remote to select the desired
seating position.
# SURROUND (SURR.)
– Selects multichannel surround, 3D sound or
stereo mode.
$ SOURCE
– Selects the relevant active mode : TV/AV, DISC,
MEDIA SLOT, TUNER, AUX or DI.
– DISC: toggles between DISC and MEDIA SLOT.
– TUNER: toggles between FM and MW band.
– AUX/DI: toggles between AUX and DI (Digital
Input) mode.
% CLOCK•TIMER
– *Enter s clock or timer setting mode.
– Shows clock display for a few seconds.
^ MIC LEVEL
– Adjusts the mixing level when using the
microphone.
MIC
– Plug in the microphone jack.
& VOLUME (VOL +-)
– Adjusts the volume level.
* BASS / TREBLE
– Selects bass or treble sound. Use the VOLUME
control to select the desired enhancement level.
( n
– Plugging in the headphones jack. The speakers
output will be cancelled.
16
* = Press and hold the button for more than two seconds.
Page 17

Functional Overview
Control buttons available on the
remote only
) SYSTEM MENU (DVD mode only)
– Enter s or exits system setup menu.
¡ Joystick 1 2 3 4
– Selects movement direction in the menu.
– Use 1 2 to select a preset radio station.
™ OK
– Confirms a selection.
£ DISC SKIP
– Selects next disc tr ay for playback.
≤ REPEAT
– Selects various repeat modes.
∞ VOICE (only available in Multi-channel
mode)
– Turns on/off clear voice sound effect.
§ MUTE
– Mutes or restores the volume.
≥ DIM
– Turns on/off the dim mode.
• SLEEP
– Sets the sleep timer function.
ª SUB +-
– Adjusts subwoofer’s sound level.
º TV VOL +-
– Adjusts TV volume (Philips TV only).
⁄ REPEAT A-B
– Repeats a specific section on a disc.
¤ ZOOM
– Enlarges a picture on the TV screen.
‹ DISC MENU
– Enter s or exits disc contents menu.
– For VCD version 2.0 only;
In stop mode, turns on/off playback control
(PBC) mode.
During playback, returns to main menu.
› SOUND
– Selects a sound effect.
fi Numeric Keypad (0-9)
– Enter s a track/title number of the disc.
– Enters a number of a preset radio station.
fl B
– Switches to Eco Power standby mode.
– *Switches to standby mode.
English
* = Press and hold the button for more than two seconds.
17
Page 18
Getting Started
English
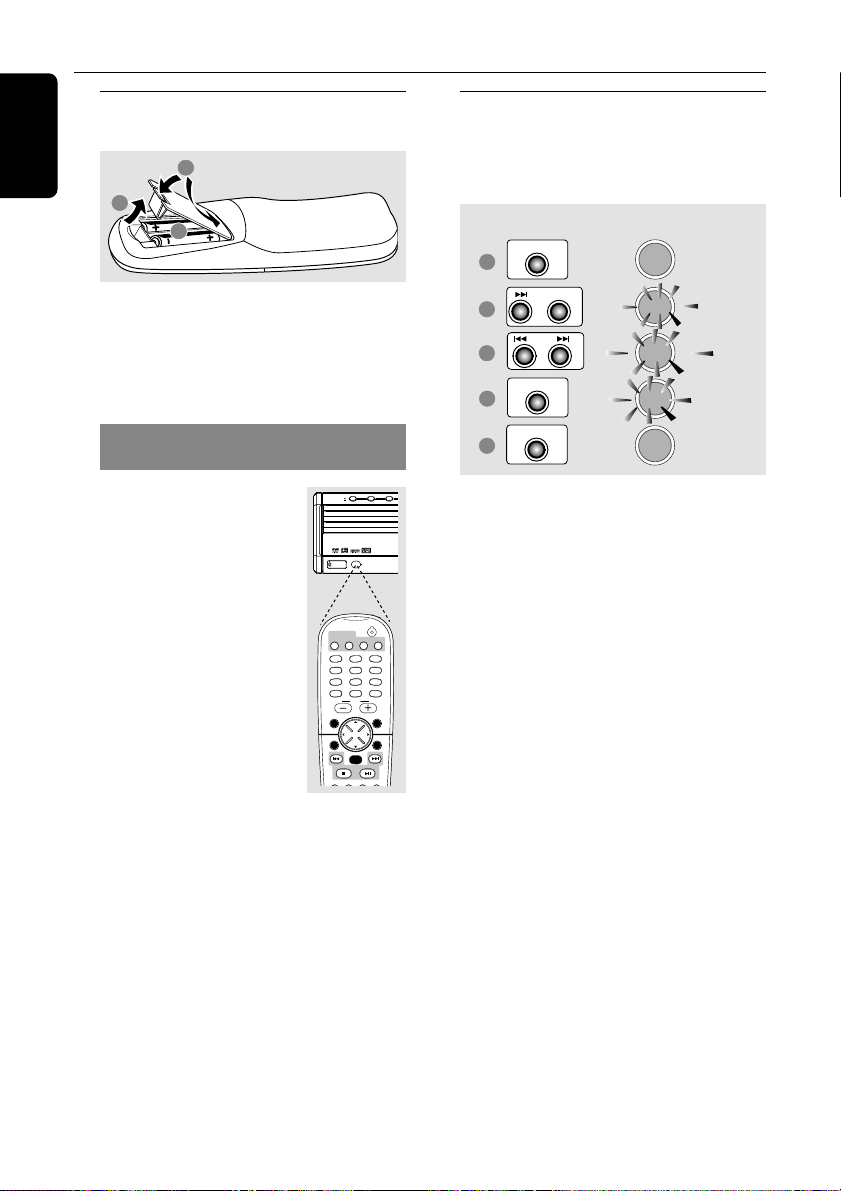
Step 1: Inserting batteries into
the remote control
3
1
2
1 Open the battery compartment.
2 Insert two batteries type R06 or AA, following
the indications (+-) inside the compartment.
3 Close the cover.
Using the remote control to operate
the system
1 Aim the remote control directly
at the remote sensor (iR) on the
front panel.
2 Select the source you wish to
control by pressing one of the
source select buttons on the
remote control (for example
TV/AV, TUNER).
3 Then select the desired function
(for example ÉÅ, S,
T).
CAUTION!
– Remove batteries if they are
exhausted or if the remote is not to be
used for a long time.
– Do not use old and new or different
types of batteries in combination.
– Batteries contain chemical substances,
so they should be disposed of properly.
OPEN•CLOSE
DISC 1 DISC 2 DISC 3
DISC 1
DISC 2
DISC 3
DISC 4
DISC 5
iR SENSOR
STANDBY-ON
DISC/
TUNER
MEDIA
TV/AV
123
456
789
SURR.
0
VOL
SYSTEM MENU
SEATING ZOOM
PREV NEXT
OK
STOP PLAY/PAUSE
REPEAT REPEATDISC SKIP
Step 2: Setting the clock
The clock can be set in either 12-hour or
24-hour mode ("12:00 AM" or "00:00" for
example).
2
3
4
5
6
buttons on
front panel
CLOCK•TIMER
CLOCK•TIMER
SEARCH
PROG
CLOCK•TIMER
DVD system’s
display panel
SELECT CLOCK OR TIMER
CLOCK
01:38 PM
13:38
13:38
1 Press STANDBY ON to switch on the DVD
system.
2 Press and hold CLOCK•TIMER until
"SELECT CLOCK OR TIMER" appears.
3 Press T (if necessary) to change the display
to "CLOCK", then press CLOCK•TIMER again
AUX/DI
to confirm.
4 Press S / T to set the minutes and hours.
SOUND
DISC MENU
To increase the speed, hold down S or T.
➜ The changes in minutes will roll over to the
hours.
5 Press PROG to change between 12-hour and
PROGRAM
24-hour clock mode.
6 Press CLOCK•TIMER again to store the
setting.
➜ The clock will start working.
To view the clock time in any active
mode
● Press CLOCK•TIMER.
➜ The clock will display for a few seconds.
Notes:
– If the DVD system is disconnected from the
power supply, it will erase the clock setting.
– If you do not press any buttons within 90
seconds, the system will exit clock setting mode.
18
Page 19
Auto
NTSC
PAL
Set TV system
TV Shape
TV System
Video Output
Screen Saver
DISC MENUSYSTEM MENU
SEATING ZOOM
PREV NEXT
OK
2 3
,
4
1
Getting Started
Step 3: Setting the TV
IMPORTANT!
Make sure you have completed all the
necessary connections. (See pages 10-11
“Connecting TV”).
1 Adjust SOURCE control until “DISC X”
appears on the display panel (or press
DISC/MEDIA on the remote).
2 Turn on the TV and set to the correct video-in
channel. You should see the blue Philips DVD
background screen on the TV.
➜ Usually this channel is between the lowest
and highest channels and may be called FRONT,
A/V IN, or VIDEO. See your TV manual for more
details.
➜ Or, you may go to channel 1 on your TV, then
press the Channel down button repeatedly until
you see the Video In channel.
➜ Or, the TV remote control may have a button
or switch that chooses different video modes.
➜ Or, set the TV to channel 3 or 4 if you are
using an RF modulator.
Changing the NTSC/PAL setting via
the remote control
DISC/
AUX/DI
TUNER
MEDIA
1 2
,
TV/AV
123
456
1 Press DISC/MEDIA on the remote to enter
disc mode.
➜ Make sure no MP3 or picture (Kodak, JPEG)
disc is in disc tray 1.
➜ Wait until the system finishes reading the
discs before proceeding to next step.
If playback begins, press Ç to stop playback.
2 Press and hold DISC/MEDIA on the remote
until “PAL ” or “NTSC” appears on the display
panel.
➜ To change the setting, repeat step 2.
Selecting the colour system that
corresponds to your TV
This DVD system is compatible with both
NTSC and PAL. In order for a DVD to play on
this DVD system, the colour system of the DVD,
the TV and the DVD system should match.
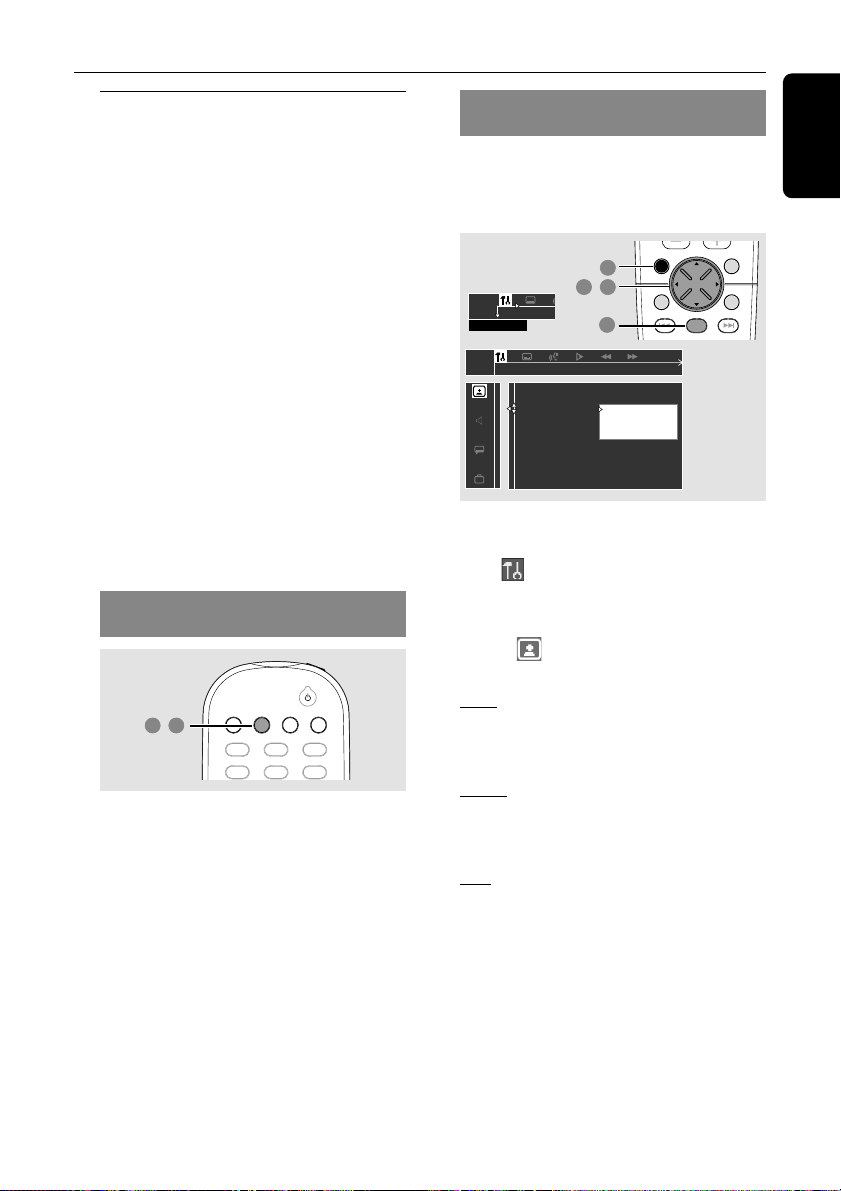
SETUP MENU
➠
1 In disc mode, stop playback and press
SYSTEM MENU.
2 Select icon and press 4.
3 Use the joystick (1 2 3 4) on the remote to
navigate in the menu.
Move to and press 2.
Move to ‘TV System’ and press 2.
Auto – Select this if the connected TV is
compatible with both NTSC and PAL (multi-
system). The output format will be in
accordance with the video signal of the disc.
NTSC – Select this if the connected TV is
NTSC system. It will change the video signal of a
PAL disc (VCD only) and output to NTSC
format.
PAL – Select this if the connected TV is PAL
system. It will change the video signal of an
NTSC disc and output to PAL format.
4 Select an item and press OK.
To remove the menu
Press SYSTEM MENU.
English
19
Page 20
Getting Started
DISC MENUSYSTEM MENU
SEATING ZOOM
VOL
789
0
SOUND
SURR.
3
1
2 4
,
English
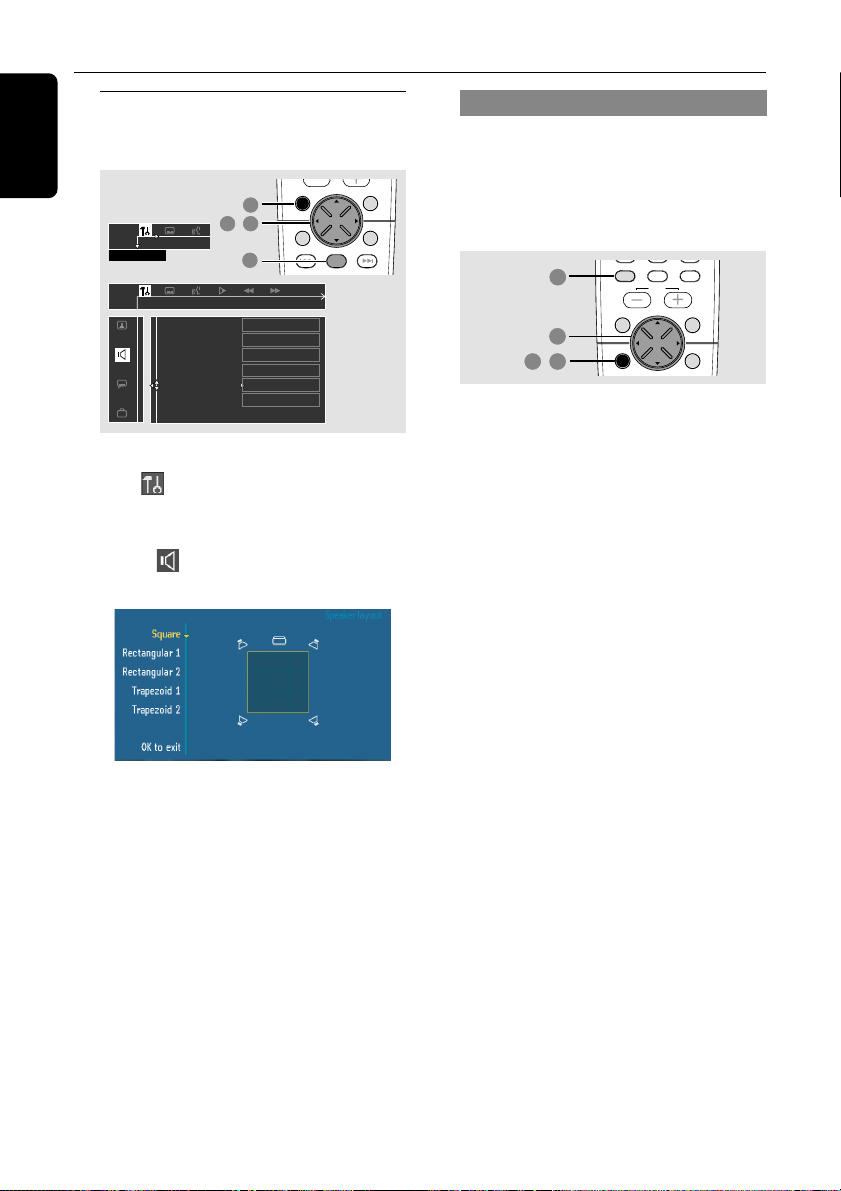
Step 4: Selecting speaker
layout
1
SETUP MENU
➠
2 3
Digital Output
Night mode
Analog Output
Speakers
Speaker Layout
PCM Output
Speaker Layout Settings
,
4
Off
Off
Multi-channel
Personal settings ...
Square
96 kHz
SEATING ZOOM
1 In disc mode, press SYSTEM MENU.
2 Select icon and press 4.
3 Use the joystick (1 2 3 4) on the remote to
navigate in the menu.
Move to and press 2.
Move to ‘Speaker Layout’ and press 2.
Personal
4 Select the layout that most closely resembles
your speakers’ arrangement, then press OK.
➜ The speaker output will adjust automatically
to suit the selected speaker layout settings
based on the seating position in the middle. To
change the seating position, see “Changing
seating control position”.
➜ If you choose ‘Personal’, the speaker output
will follow the settings in the ‘Speakers‘ menu
(see next page “Setting the speakers’
channels”).
PREV NEXT
OK
Changing seating control position
Normally, the best sound spot and the ideal
setting position is in the middle of the room.
With this ‘SEATING’ feature, it allows you to
DISC MENUSYSTEM MENU
select the current seating position in the room
and the speaker setting will automatically be
adjusted for optimum performance.
1 Press SURR. (or SURROUND on the front
panel) repeatedly to select ‘Multi-channel’.
2 Press SEATING.
➜ The seating control diagram which
represents your current speaker layout appears
on the TV screen. To change the speaker layout,
see “Selecting speaker layout”.
3 Use the joystick (1 2 3 4) on the remote (or
VOLUME control on the front panel) to select
your current seating position.
➜ During playback, you can hear the changing
of sound effect when you change the seating
position.
➜ If you do not press any buttons within five
seconds, the seating control diagram will exit
from the TV and the system will execute the last
selected seating position.
4 If you want to remove the seating control
feature, press SEATING twice.
➜ “PERSONAL SETTING” appear s and the
system will revert to the personal speaker
settings.
To remove the menu
Press SYSTEM MENU.
20
Page 21
Getting Started
English
Français
Parental Control
Password
Defaults
Menu Language
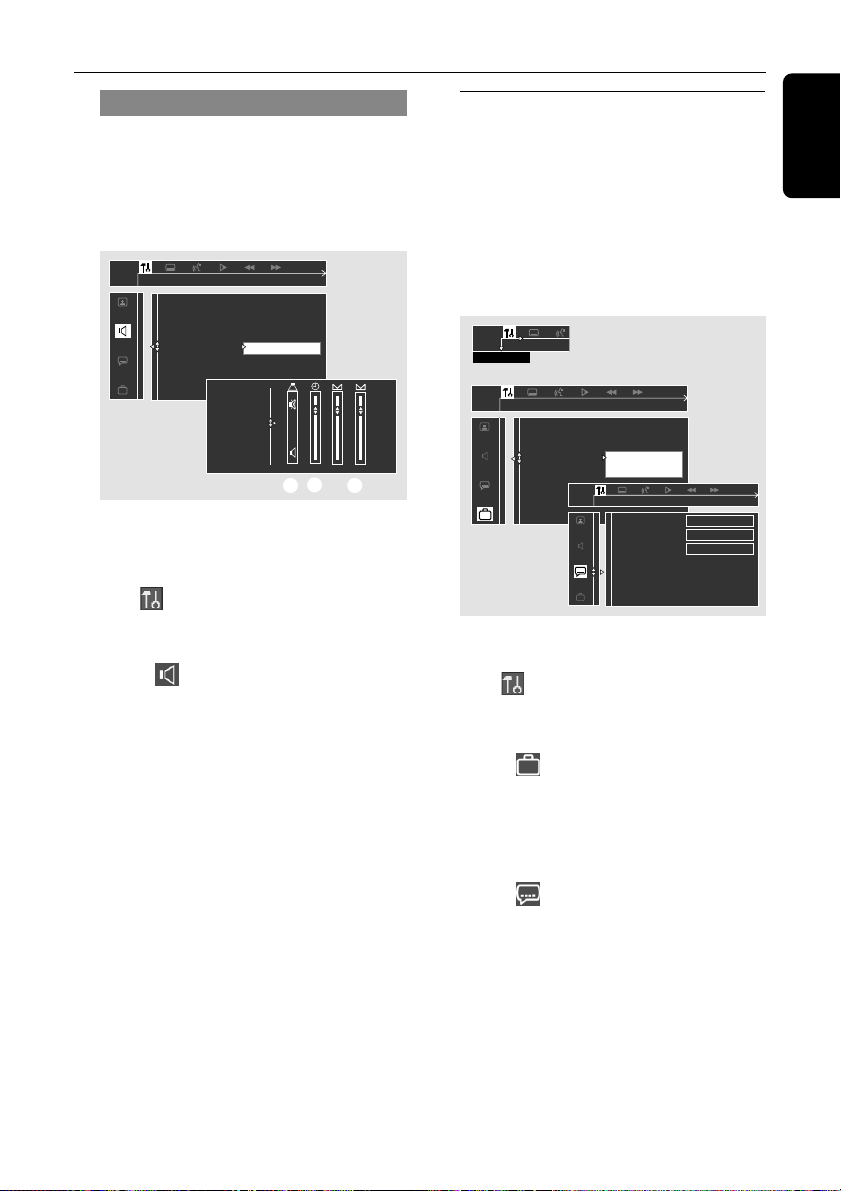
Setting the speakers’ channels
You can adjust the delay times (centre and
surround only) and volume level for individual
speakers. These adjustments let you optimise
the sound according to your surroundings and
setup. Speaker settings are only active on Multichannel audio outputs.
Digital Output
Night mode
Analog Output
Speakers
Speaker Layout
PCM Output
Set Speaker Settings
Personal setting ...
Front L & R
Center
Surr L & R
Sub Woofer
OK to exit
On 3 ms
3 dB 6 dB
A B C
1 Press SURR. (or SURROUND on the front
panel) repeatedly to select ‘Multi-channel’.
2 In disc mode, press SYSTEM MENU.
3 Select icon and press 4.
4 Use the joystick (1 2 3 4) on the remote to
navigate in the menu.
Move to and press 2.
Move to ‘Speakers’ and press 2.
5 Press 3 4 to select (Front L&R, Center,
Surr L&R, Sub Woofer), then press 2 to enter
the speaker setting menu.
➜ The test tone will be automatically generated.
6 Use 3 4 to adjust the settings for each
speaker to suit your surround sound needs. This
adjustments may include :
A Turning on or off the sound output.
B Delay time settings - use the longer delay
settings when the surround speakers are
closer to the listener than the front speakers.
C Adjusting the volume levels for one or both
speakers until the sound evens.
7 Press OK to confirm.
To remove the menu
Press SYSTEM MENU.
Step 5: Setting language
preference
You can select your preferred language settings
so that this DVD system will automatically
switch to the language for you whenever you
load a disc. If the language selected is not
available on the disc, the disc’s default setting
language will be used instead. Except the DVD
system’s menu language, it will remain once
selected.
SETUP MENU
➠
Audio Language
Subtitle
Disc Menu
Go to language setup page
English
English
English
1 In disc mode, stop playback and press SYSTEM
MENU.
2 Select icon and press 4.
3 Use the joystick (1 2 3 4) on the remote to
navigate in the menu.
Move to and press 2.
Move to ‘Menu Language’ and press 2.
4 Select a language and press OK.
5 Use the joystick (1 2 3 4) on the remote to
navigate in the menu.
Move to and press 2.
Move to one of the following and press 2.
–‘Audio Language’ (disc’s soundtrack)
–‘Subtitle’ (disc’s subtitles)
–‘Disc Menu’ (disc’s menu)
6 Select a language and press OK.
7 Repeat steps 5~6 for other settings.
To remove the menu
Press SYSTEM MENU.
21
English
Page 22
Disc Operations
English
IMPORTANT!
– DVD discs and players are designed
with regional restrictions. Before playing
a disc, make sure the disc is for the same
zone as your player.
– Depending on the DVD or VIDEO CD,
some operations may be different or
restricted.
– Do not push on the disc tray or put
any objects other than discs on the disc
tray. Doing so may cause the disc player
to malfunction.
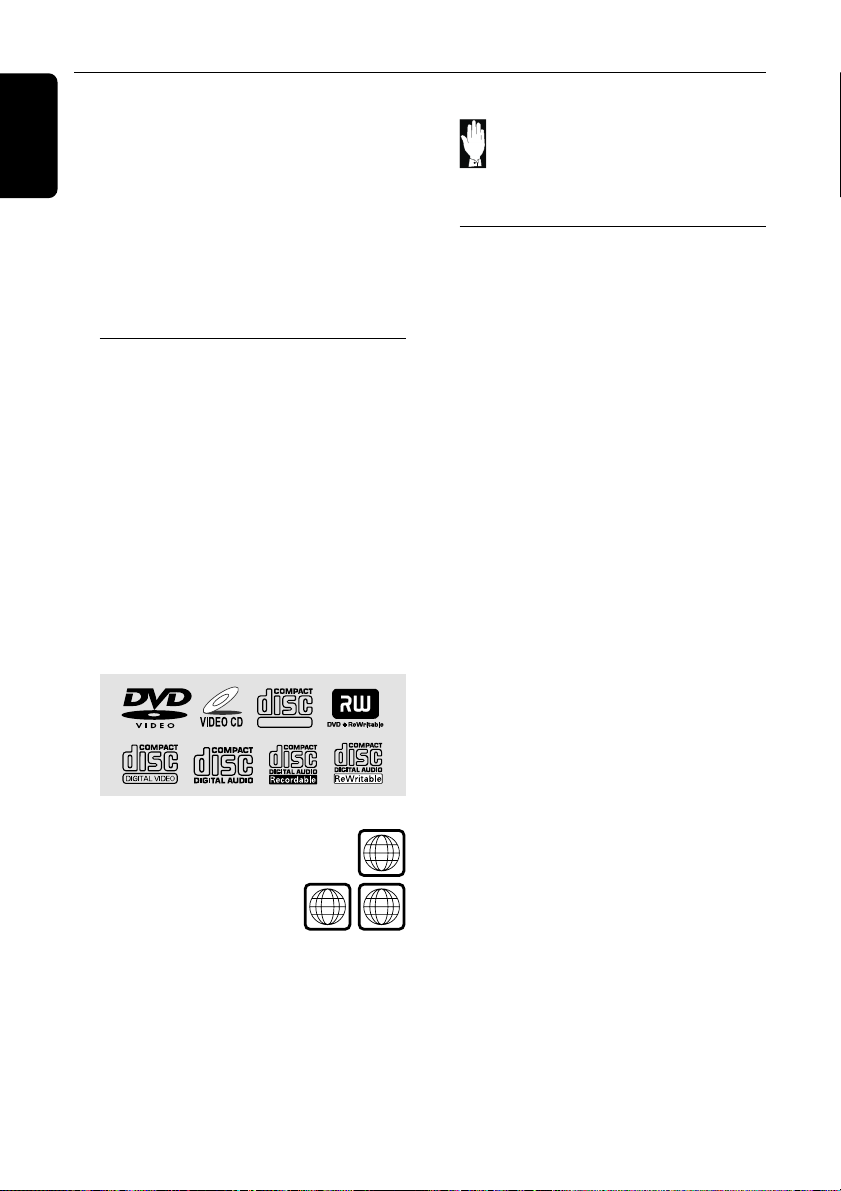
Playable discs
Your DVD home cinema system will
play:
– Digital Video Discs (DVDs)
– Video CDs (VCDs)
– Super Video CDs (SVCDs)
– Digital Video Discs + Rewritable(DVD+RW)
– Compact Discs (CDs)
– MP3 discs, picture (Kodak, JPEG) files on
CD-R(W).
– JPEG/ISO 9660 format.
– Maximum 30 characters display.
– Suppor ted sampling frequencies : 32 kHz,
44.1 kHz, 48 kHz
– Suppor ted Bit-rates : 32~256 (kbps),
variable bit rates
SUPER VIDEO
Region Codes
DVDs must be labelled for ALL regions
or for versions /21R-Region 3, or for
versions /21S-Region 4, i n
order to play on this DVD
system. You cannot play discs
that are labelled for other regions.
ALL
3
4
IMPORTANT!
If the inhibit icon (or X) appears on
the TV screen when a button is
pressed, it means the function is not
available on the current disc or at
the current time.
Playing discs
1 Adjust SOURCE control until “DISC X”
appears on the display panel (or press
DISC/MEDIA on the remote).
2 Turn on the TV power and set to the correct
Video In channel. (See page 19 “Setting the
TV”).
➜ You should see the blue Philips DVD
background screen on the TV.
3 Press one of the OPEN•CLOSE 0 button to
open the disc tray and load a disc, then press
the same button again to close the disc tray.
➜ Make sure the label side is facing up. For
double-sided discs, load the side you want to
play face up.
4 Repeat step 3 for loading a disc onto another
disc tray.
5 Playback will start automatically from the last
loaded disc.
➜ All the available discs will play once, then
stop.
➜ If a disc menu shows on the TV, see next
page on “Using the Disc Menu”.
➜ If the disc is locked by parental control, you
must enter your four-digit password. (See page
34-35).
● To obtain the best surround effects, see page 20
“Changing seating control position”.
Note:
– Only one tray can be opened at a time. If you
intend to open the second tray before closing the
first tray, the first tray will automatically close
before the second tray opens.
Note:
– If you are having trouble playing a certain disc,
remove the disc and try a different one. Improperly
formatted discs will not play on this DVD system.
22
Page 23
Disc Operations
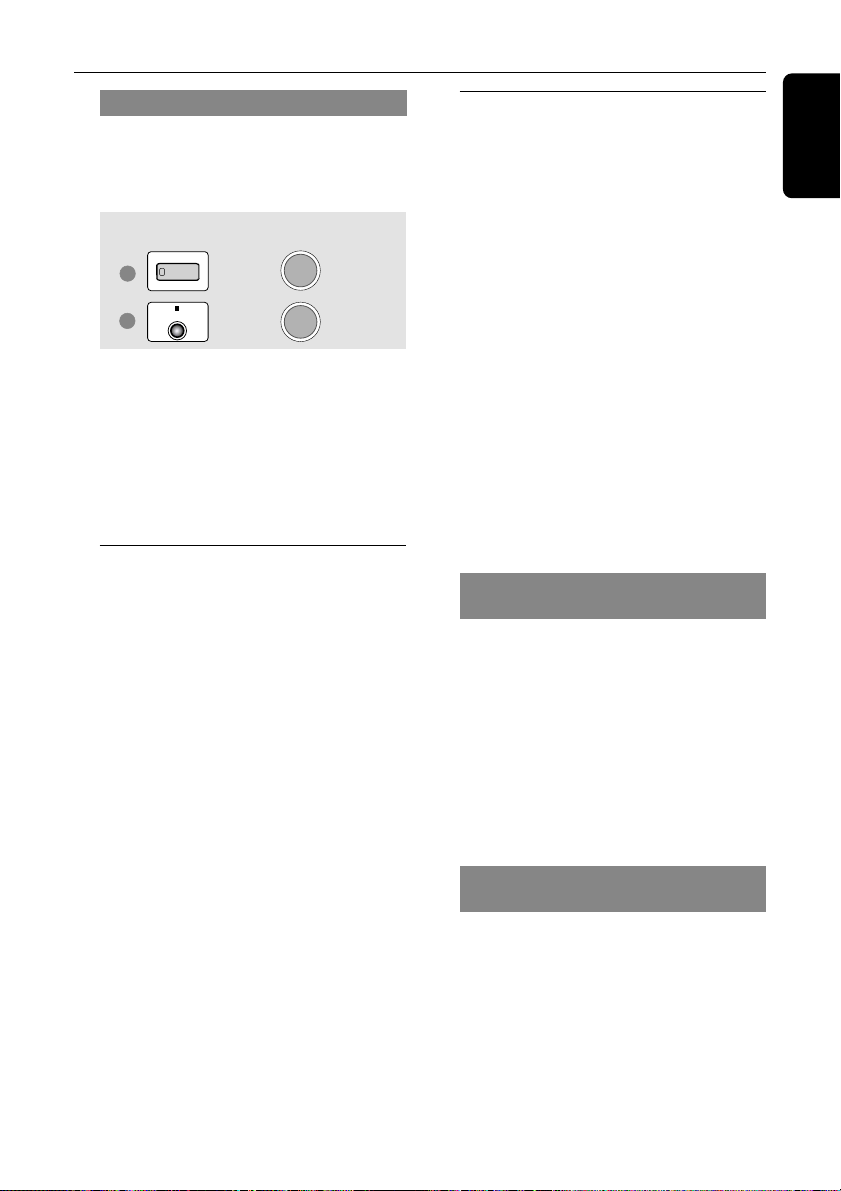
Turning on/off auto Eco standby mode
This is a power-saving feature, the system will
automatically switch to Eco standby mode if you
do not press any buttons within 30 minutes
after a disc has stopped playing.
1
2
buttons on
front panel
STANDBY-ON
STOP
DVD system’s
display panel
13:38
AUTO ECO ON
1 Press and hold STANDBY ON to switch the
system to standby mode.
➜ The clock appears.
2 Press and hold Ç until “AUTO ECO ON”
appears.
➜ To turn off the setting, repeat step 2 until
“AUTO ECO OFF” appears.
Using the Disc Menu
Depending on the disc, a menu may appear on
the TV screen once you load in the disc.
To select a playback feature or item
● Use the joystick (1 2 3 4) or numeric
keypad (0-9) on the remote, then press ÉÅ
or OK to start playback.
To access or remove the menu
● Press DISC MENU on the remote.
For VCD with Playback Control (PBC)
feature (version 2.0 only)
● In stop mode, press DISC MENU to toggle
between ‘PBC ON’ and ‘PBC OFF’, then the
playback will start automatically.
➜ If you select ‘PBC ON’, the disc menu (if
available) will appear on the TV. Use the Joystick
(1 2 34) to highlight your selection and press
OK to confirm or use the numeric keypad (0-9)
to select a play option.
● During playback, pressing DISC MENU will
return to the menu screen (if PBC is on).
Basic playback controls
Pausing playback
● Press ÉÅ.
➜ To resume normal playback, press ÉÅ
again.
Selecting another track/chapter
● Press S / T or use the numeric
keypad (0-9) to key in a track/chapter number.
Searching backward/forward
● Press and hold S / T, then press ÉÅ to
resume normal playback.
➜ While searching, pressing and holding
S / T again will increase the search speed.
Selecting next disc
● Press DISC SKIP.
➜ The selected disc will play once, then stop.
Stopping playback
● Press Ç.
Resuming playback from the last
stopped point (DVD/VCD)
● In stop mode and when the disc has not been
ejected, press ÉÅ.
To cancel the resume mode
● In stop mode, press Ç again.
Notes:
– Opening the current disc tray or selecting
another disc tray will cancel the resume feature.
– Resume option may not be available on some
discs.
Replacing discs without interrupting
playback
● Press OPEN•CLOSE 0 buttons of the
inactive disc trays.
For example, if currently disc tray 1 is playing,
you can replace the discs on disc trays 2~5.
English
23
Page 24
TV/AV
DISC/
MEDIA
TUNER
AUX/DI
REPEAT REPEATDISC SKIP
DISC MENU
PROGRAM
SYSTEM MENU
VOICE MUTE
SEATING ZOOM
PREV NEXT
STOP PLAY/PAUSE
A-B
VOL
456
123
789
0
SURR.
SOUND
OK
1
6
3
8
2 9
,
4
5
4 5
,
Disc Operations
English
Selecting various repeat
functions
Repeat play mode
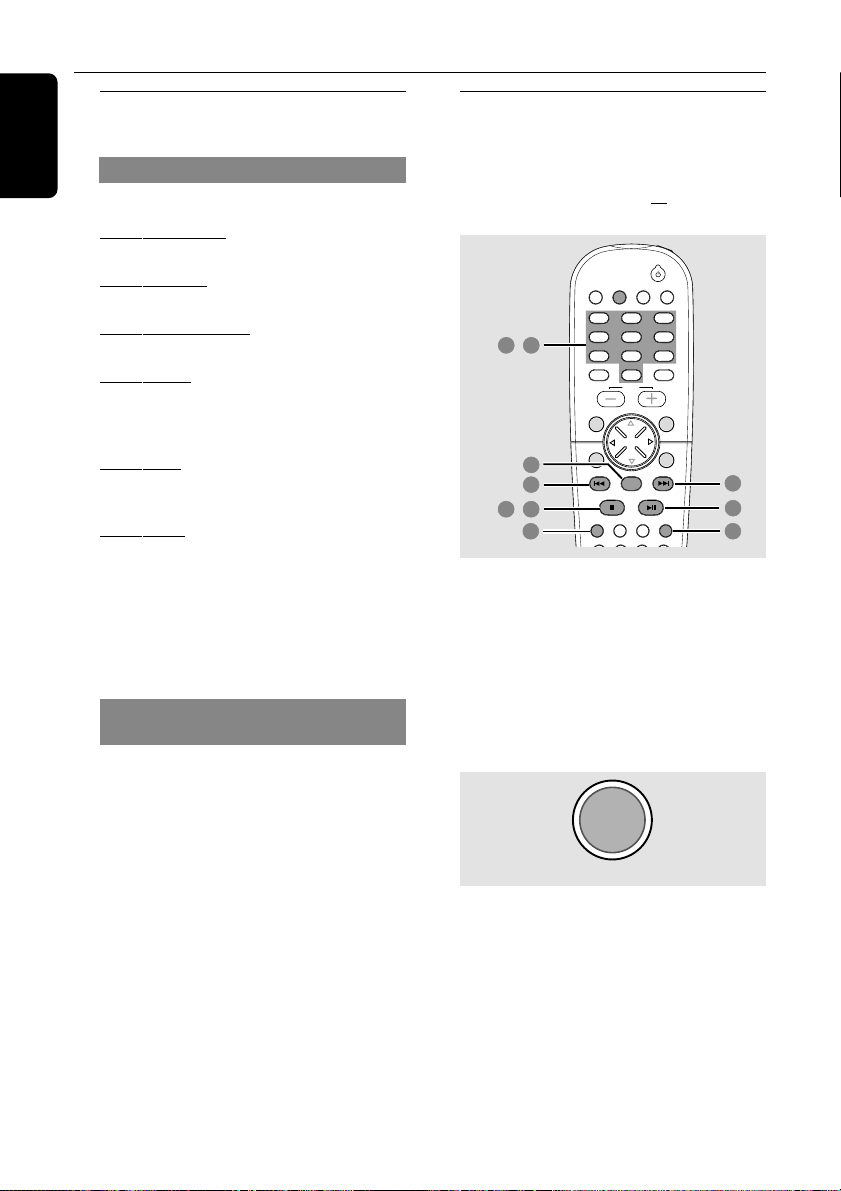
● While playing a disc, press REPEAT to select :
REPEAT CHAPTER (DVD)
– to repeat playback of the current chapter.
REPEAT ALBUM (MP3)
– to repeat playback of the current album.
REPEAT TRACK/TITLE
– to repeat playback of the current track/title.
REPEAT DISC (CD/VCD/SVCD)
– to repeat playback of the current disc or the
programmed tracks (if the programme mode is
active).
REPEAT ALL (CD/VCD/SVCD)
– to repeat playback of all available discs or the
programmed tracks.
REPEAT OFF
– to cancel the repeat mode.
Notes:
– Repeat play might not work correctly with some
DVDs.
– For VCD, if the PBC mode is switched on, repeat
play is not possible.
Repeating a section within a chapter/
track
1 While playing a disc, press REPEAT A-B at the
starting point.
2 Press REPEAT A-B again at the point to end
the section.
➜ The section A and B can be set only within
the same chapter/track.
➜ The section will now repeat continuously.
3 Press REPEAT A-B again to resume normal
playback.
Programme favourite tracks
(audio CDs and VCDs)
You can play the contents of the disc in the
order you want by programming the order of
the tracks to be played. Up to 99 tracks can be
stored.
1 Press DISC SKIP repeatedly to select a disc
tray containing audio CD or VCD.
➜ Wait until the system finishes reading the
discs before proceeding to next step.
2 When the playback begins, press Ç to stop
playback.
3 Press PROGRAM to enter programme mode.
➜ "PROGRAM FULL" appears if 99 tracks have
been programmed.
PROG XX
“XX” = number of programmed tracks
24
Page 25
DISC MENU
SYSTEM MENU
SEATING ZOOM
PREV NEXT
STOP PLAY/PAUSE
OK
1
4
2 3
,
Disc Operations
4 Press S, then use the numeric keypad
(0-9) to enter the disc number.
➜ "DISC X" appears.
5 Press T, then use the numeric keypad
(0-9) to enter the track number.
➜ "TRACK X" appears.
6 Press OK to store the track.
7 Repeat steps 4~6 to select other discs and
tracks.
8 Press ÉÅ to start programme playback.
➜ Only the tracks programmed from audio
CDs and VCDs will play.
9 Press Ç to stop playback or exit programme
mode.
Notes:
– Pressing OPEN•CLOSE button of the
programmed disc tray will erase the programme.
– If you do not press any buttons within 20
seconds, the system will exit programming mode.
Clearing the programme
● Stop playback, then press and hold Ç.
➜ PROG disappears from the display panel and
"PROGRAM CLEARED" appears.
Note:
– If the DVD system is disconnected from the
power supply, the programme will be erased.
Using the menu bar to
programme
IMPORTANT!
You have to turn on your TV and set to
the correct Video In channel. (See page 19
“Setting the TV”).
PROGRAM DISC TRACK
1
2
3
4
5
6
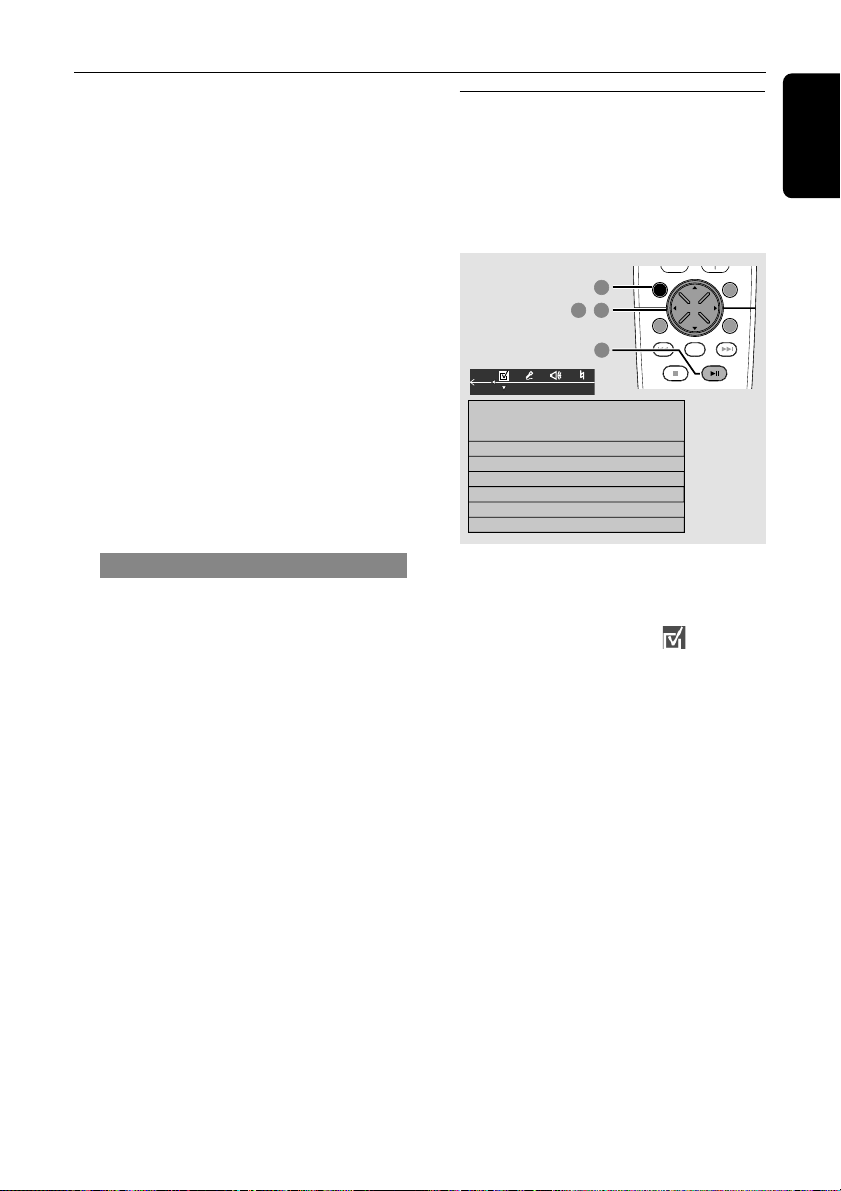
1 Stop playback, then press SYSTEM MENU.
➜ The menu bar will appear across the top of
the TV screen.
2 Use the joystick (1 2) to select and press 4
to enter the programme menu.
3 Use the joystick (1 2 3 4) to move within the
programme menu and use the numeric
keypad (0-9) to enter the disc and track
number to programme.
4 Press ÉÅ to start programme playback.
➜ Only the tracks programmed from audio
CDs and VCDs will play.
● In stop mode, you can press PROG on the
front panel to toggle between programme on
and off.
English
To clear the programme
● Stop playback, then press and hold Ç.
25
Page 26
REPEAT REPEATDISC SKIP
DISC MENU
PROGRAM
SYSTEM MENU
SEATING ZOOM
PREV NEXT
STOP PLAY/PAUSE
OK
1
6
2 3
,
5
3
Disc Operations
English
Playing MP3/Picture disc (Kodak,
JPEG)
IMPORTANT!
You have to turn on your TV and set to
the correct Video In channel. (See page 19
“Setting the TV”).
1 Load an MP3/Picture (Kodak, JPEG) disc.
➜ The disc reading time may exceed 30
seconds due to the complexity of the directory/
file configuration.
2 Playback will start automatically.
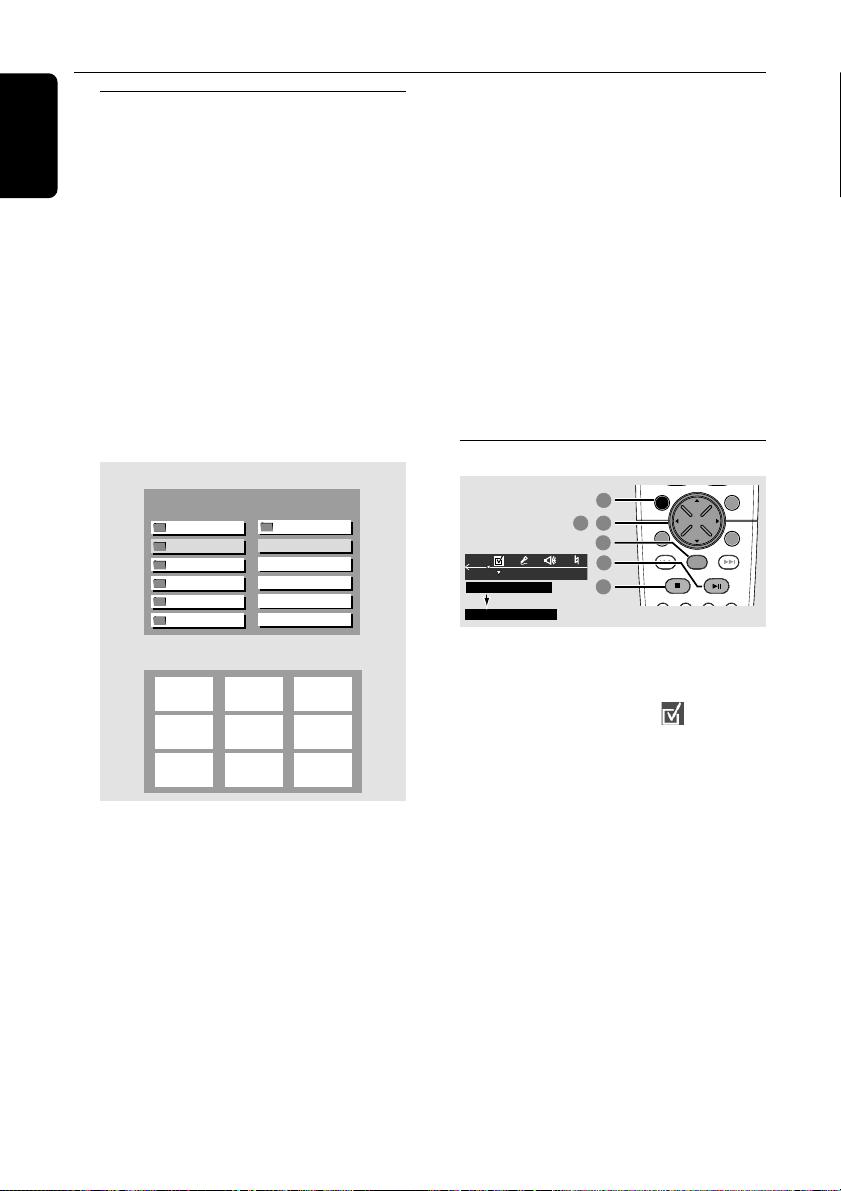
➜ With picture discs, 9 thumbnail pictures will
appear on the TV. Press ÉÅ to start the
slide-show playback.
➜ With MP3 discs, a list of albums/titles menu
will appear on the TV.
(example for MP3 disc menu)
Title : Title Name 1
Artist : Unknown
Root
BIG HITS
FAT POP HI
HOT RELEA
M. TV MUSIC
NOW THAT
(example for 9 thumbnail pictures display)
...
MP3
"Title Name 1"
MP3
"Title Name 2"
MP3
"Title Name 3"
MP3
"Title Name 4"
MP3
"Title Name 5"
ABC
DE F
GHI
During playback, you can;
● Press S / T to select another title/picture
in the current folder.
● Use the joystick (1 2 3 4) on the remote to
rotate/flip the picture files.
● Press ZOOM on the remote to turn on/off the
zoom effect. Then press S / T to change
the zoom ratio: 25, 50, 100, 150 or 200 (PCT Percentage).
● Press ÉÅ to pause/resume playback.
3 To stop playback, press Ç.
26
In stop mode, you can;
● Use the joystick (1 2 3 4) on the remote to
move within the menu and press OK to select
the desired file to play.
● In picture menu, you can use the joystick
(1 2 3 4) to select S or T in the menu
to view the previous/next page (if available).
Notes:
– Due to the recording nature of Digital Audio
MP3 (DAM), only digital audio music will play.
– It is normal to experience an occasional “skip”
while listening to your MP3 discs.
– Some files on Kodak or JPEG disc may be
distorted during playback due to the configuration
and characteristics of the disc.
Programme MP3 disc
14
15
16
17
18
PROGRAM
PROGRAM P 00 : 0000
1 Stop playback, then press SYSTEM MENU.
➜ The menu bar will appear across the top of
the TV screen.
2 Use the joystick (1 2) to select and press 4
to enter the programme menu.
3 Use the numeric keypad (0-9) or joystick
(1 2 3 4) to select the title number and press
OK.
4 Repeat step 3 to select title number.
5 Press Ç to stop the programming.
➜ A list of programmed tracks appears.
6 Press ÉÅ to star t programme playback.
● In stop mode, you can press PROG to toggle
between programme on and off.
To clear the programme
● Stop playback, then press and hold Ç.
Note:
– Repeat function is not possible during MP3
programme playback.
Page 27

Media Slot Operations
About media slot
The MEDIA SLOT allows you to playback the
contents (for example, digital still pictures)
stored in the memory card (PCMCIA) without
the need of using the device itself (for example,
digital camera, digital camcorder or MP player)
or a computer.
Memory cards (for example, Compact Flash,
Memory Stick, Smart Media, Secure Digital card,
Multimedia card) are a new form of compact,
portable, digital data exchange or storage
systems with compatible memory card devices
and versatile IC (Intergrated Circuit) recording
medium with a data capacity that exceeds a
floppy disc.
Precaution on handling the memory
card
– Do not attach any other material than the
supplied label on the label space.
– Do not touch the memory card connector
with fingers or metal objects.
– Do not bend, drop, disassemble or modify
the memory card.
– Do not allow the memory card to get wet.
– If you use a memory card that has been
initialised using a computer or if you initialise a
memory card attached to a camera using a USB
connection, further operation is not guaranteed.
– An image file that has been modified using an
image processing software may not open if it is
converted into a different file format.
Supported memory card format
File format: JPEG image (*.jpg).
Compatibility:
– *.jpg images recorded with a digital
camcorder or digital camera with memory
card function.
– JPEG images stored in a memory card using
a memory card adaptor for PC .
– MP3 files.
Directories:
– Memory card DPM (\DCIM\<dir>\8.jpg)
– Picture CD
Playing JPEG pictures from
memory card
1 Remove the memory card from your digital
camera and plug it into the PC card adaptor
(not supplied).
2 Insert the PC card adaptor into the media slot
on your player.
3 Adjust SOURCE control until “MEDIA SLOT”
appears on the display panel (or press
DISC/MEDIA twice on the remote).
4 Turn on the TV power and set to the correct
Video In channel. (See page 19 “Setting the TV”).
➜ If the memory card is recognised,
9 thumbnail pictures will appear on the TV.
5 You can also use the joystick (1 2 3 4) to make
your selection from the 9 thumbnail pictures. If
you press OK, the selected picture will show on
the TV screen. If you press ÉÅ, the slide-show
playback will begin from the selected picture.
During playback, you can;
● Press S / T to select another picture.
● Use the joystick (1 2 3 4) on the remote to
rotate/flip the picture files.
● Press ÉÅ to pause/resume playback.
6 To stop playback, press Ç.
7 To eject the memory card, press EJECT 0.
In stop mode, you can;
● Use the joystick (1 2 3 4) to select S or
T in the menu to view the previous/next
page (if available).
Notes:
– Some files on memory cards may be distorted
when played back.
– If you insert the PC card adaptor into the media
slot while watching a DVD playback, the picture/
sound from the disc may freeze/skip due to
electrical interference.
English
27
Page 28
DVD Menu Options
English
Using the menu bar
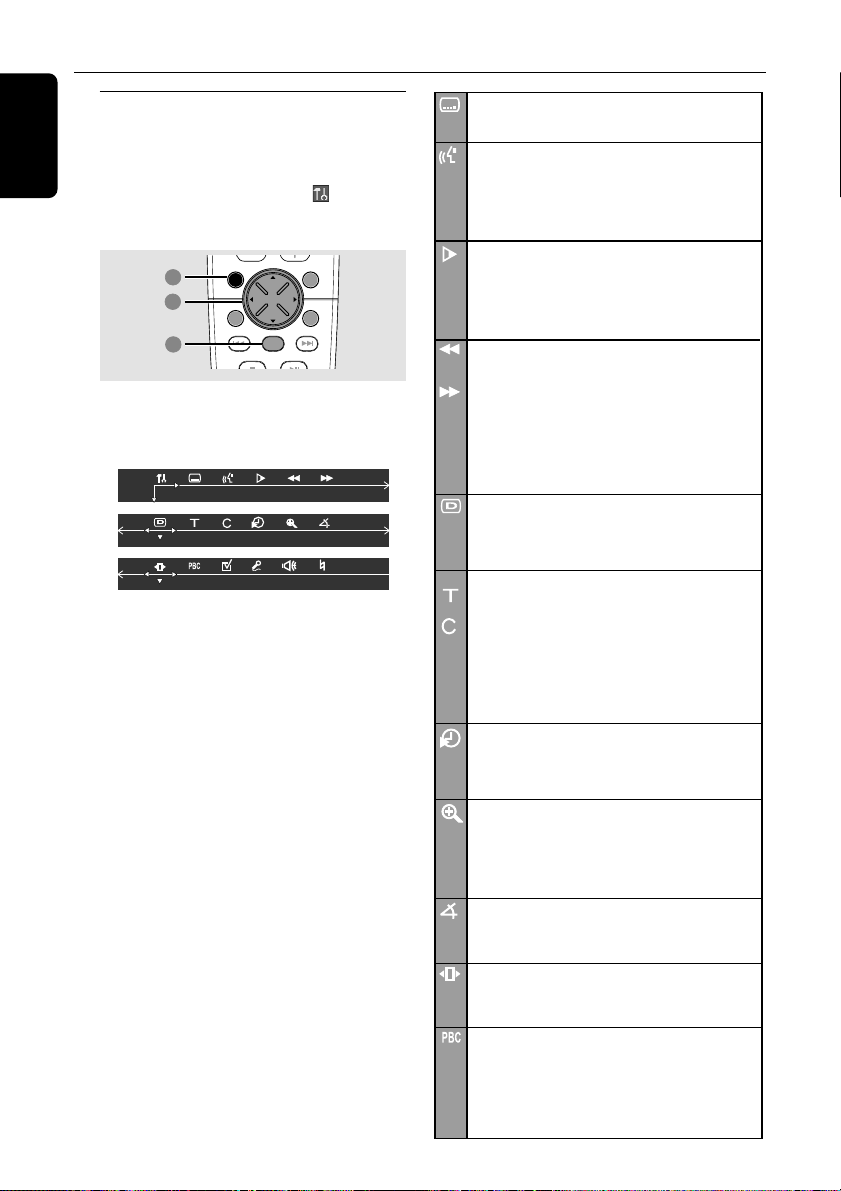
You can continue a number of operations
directly via the multiple menu bars on the TV
screen without interrupting the disc playback.
The exception is when you enter (SETUP
MENU), the playback will pause.
1
2
SEATING ZOOM
PREV NEXT
3
OK
STOP PLAY/PAUSE
1 In disc mode, press SYSTEM MENU.
➜ The menu bar will appear across the top of
the TV screen.
2 Use the joystick (1 2 3 4) on the remote to
navigate in the menu.
➜ Press 1 2 to move through the menu bar.
➜ Press 4 to enter the selection. If there are
multiple choices available, press 4 repeatedly to
select.
3 Press OK to confirm the selection.
➜ Playback will resume or begin automatically.
To remove the menu
Press SYSTEM MENU.
IMPORTANT!
– Some operations may be different or
restricted, depending on the disc format.
Refer to the jacket or case of the disc
you are playing.
– Changing the Subtitle Language and
Audio Language from the menu bar will
only apply to the current disc, it will not
change the default preset.
SUBTITLE
Select a subtitle language available on the DVD.
AUDIO
DVD : Select an audio soundtrack language available
on the DVD.
VCD : Select audio channels : LEFT VOCAL,
RIGHT VOCAL, MONO LEFT,
MONO RIGHT or STEREO.
SLOW MOTION
DISC MENUSYSTEM MENU
Select a slow playback speed. The volume will be
muted. To resume normal playback, press ÉÅ.
DVD : SF x2, SF x4, SF x8, SR x2, SR x4, SR x8.
VCD : SF x1, SF x2, SF x3.
(SF=Slow Forward, SR=Slow Rerverse)
FAST REVERSE
DVD : FR x2, FR x4, FR x6, FR x8.
VCD/MP3 : FR x1, FR x2, FR x3, FR x4.
FAST FORWARD
DVD : FF x2, FF x4, FF x6, FF x8
VCD/MP3 : FF x1, FF x2, FF x3, FF x4.
Select a search speed (backward/forward). The volume
will be muted. To resume normal playback,
press ÉÅ.
STATUS
Allows viewing of the current status of the disc
The information will vary depending on the disc
format.
Available on DVD only
TITLE SEARCH (TITLE XX:YY")
Select a Title for playback to begin.
CHAPTER SEARCH (CHAPTER XX:YY)
Select a Chapter for playback to begin.
"XX" - current title/chapter number.
"YY" - total number of title/chapter.
Use the numeric keypad (0-9) to change the
"XX" number, then press OK.
TIME SEARCH (TIME __:__:__)
Use the numeric keypad (0-9) to enter the
time (hours, minutes and seconds) at which you want
playback to begin.
ZOOM
Select an enlarge picture ratio : x1.5, x2.0, x3.0,
then press OK to confirm. Use the joystick to
move within the enlarged picture on the TV.
To resume normal playback, select 'ZOOM OFF'
from the menu.
ANGLE (for DVD only)
Select to view the same scene from different angles
if the DVD is recorded with multiple angles.
STEP FORWARD
Select to advance the still picture one frame
forward. To resume normal playback, press ÉÅ.
PBC ON/OFF (for VCD 2.0 with PBC feature)
Select between PBC On and Off.
'PBC OFF' - the playback will start automatically.
'PBC ON' - the disc menu (if available) will appear
on the TV. Use the numeric keypad (0-9) to
enter your choice.
.
28
Page 29
DVD VIDEO DIGITAL SURROUND SYSTEM
STOPPLAY•PAUSE SEATING
STANDBY-ON
iR SENSOR
DISC 1
DISC 2
DISC 3
DISC 4
DISC 5
DISC 1 DISC 2 DISC 3 DISC 4 DISC 5
TREBLE
BASS
SOURCE
VOLUME
PROG TUNINGCLOCK•TIMER
SURROUND
SEARCH
5 DISC CHANGER
OPEN•CLOSE
EJECT
MEDIA SLOT
DVD
D
I
S
C
S
U
R
-
R
R
I
G
H
T
C
E
N
T
R
E
L
E
F
T
S
U
B
S
U
R
-
L
MIC LEVEL MIC
DISC 2
DISC 3
DISC 4
DISC 5
DISC 3
DISC 4
3
POWER
ON/OFF
DISC 1
3
2
4
1
,
DISC MENUSYSTEM MENU
SEATING ZOOM
PREV NEXT
STOP PLAY/PAUSE
OK
5
8
6
7
,
,
8
6
7
,
,
DVD Menu Options
PROGRAM
Stop playback, then select this to enter the program
menu (see page 25 "Using the menu bar to program").
KARAOKE ON/OFF
Select between Karaoke feature on and off.
You must switch on the Karaoke feature before
adjusting the Echo level and key control.
ECHO LEVEL
Adjust the echo level between 0 to +7.
KEY CONTROL
Adjust the key level between -4 to +4, to suit your
vocal range.
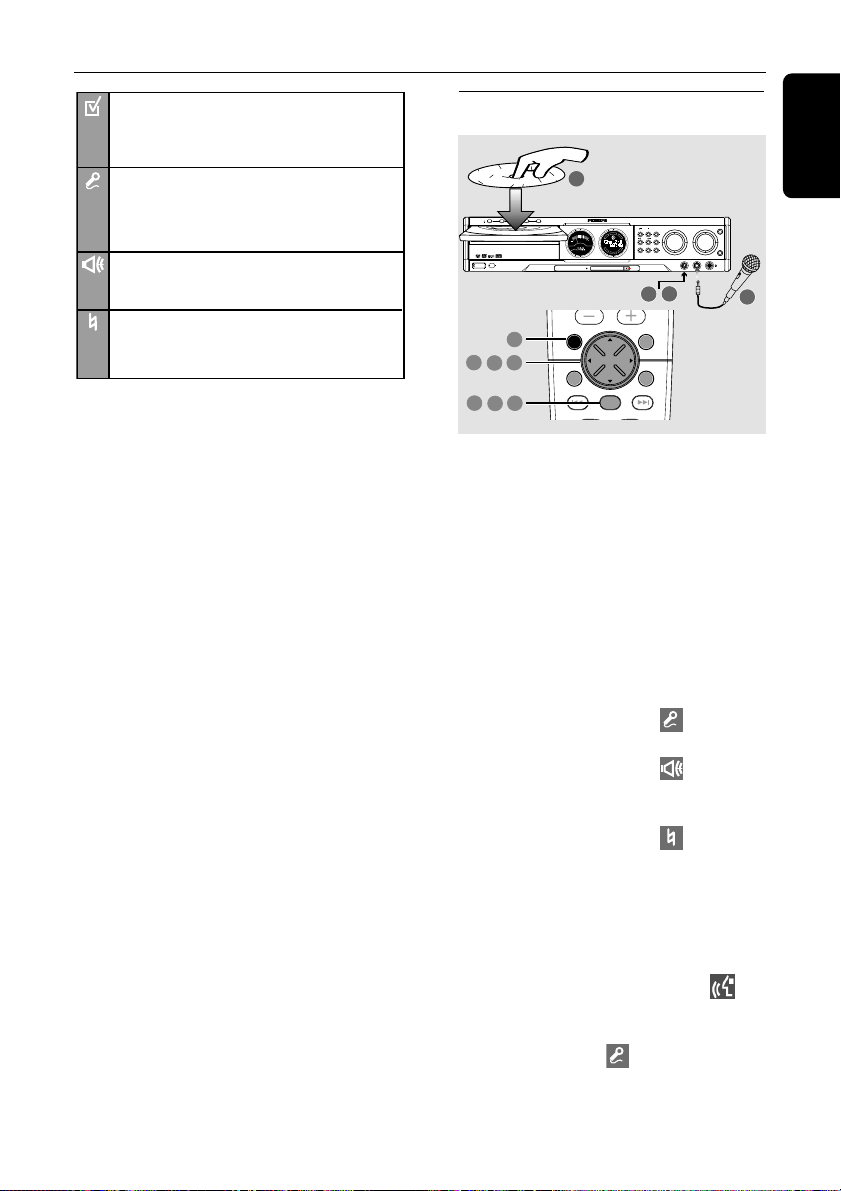
Using the Karaoke feature
English
1 Set the MIC LEVEL control at the front panel
to the minimum level (turn to left) to prevent
acoustic feedback when connecting the
microphone.
2 Plug in the microphone to the MIC input.
3 Load a karaoke disc.
4 Adjust the MIC LEVEL control to select the
microphone volume level.
5 Press SYSTEM MENU.
➜ The menu bar will appear across the top of
the TV screen.
6 Use the joystick (1 2) to select and press
43 to select Karaoke ON, then press OK.
7 Use the joystick (1 2) to select and press
43 to select a desired echo level, then press
OK.
8 Use the joystick (1 2) to select and press
43 to select a key level that suits your vocal
range, then press OK.
● Some VCDs or SVCDs are recorded on multiple
audio channels. For example, a Karaoke disc
may record music on the left channel and vocals
on the right channel. To choose an audio
channel, use the joystick (1 2) to select and
press 4 repeatedly to make your selection.
● If you wish to turn off the Karaoke, use the
joystick (1 2) to select and press 4 to
select Karaoke OFF, then press OK.
29
Page 30
DVD Menu Options
4:3 panscan
4:3 letterbox
16:9
Set TV shape mode
TV Shape
TV System
Video Output
Screen saver
English
Using the Setup Menu
This DVD setup is carried out via the TV,
enabling you to customise the DVD system to
suit your particular requirements.
1
2 3
,
4
SEATING ZOOM
PREV NEXT
OK
STOP PLAY/PAUSE
1 In disc mode, press SYSTEM MENU.
➜ Playback will pause.
2 Select icon and press 4 to enter the
setup menu. Then press 3 4 to select one of
the setup menu options and press 2 to
enter the menu.
SETUP MENU
Picture Setup
Sound Setup
Language Setup
Feature Setup
3 Use the joystick (1 2 3 4) on the remote to
navigate in the menu.
4 Press OK to confirm your selection.
➜ Playback will resume or begin automatically.
To remove the menu
Press SYSTEM MENU.
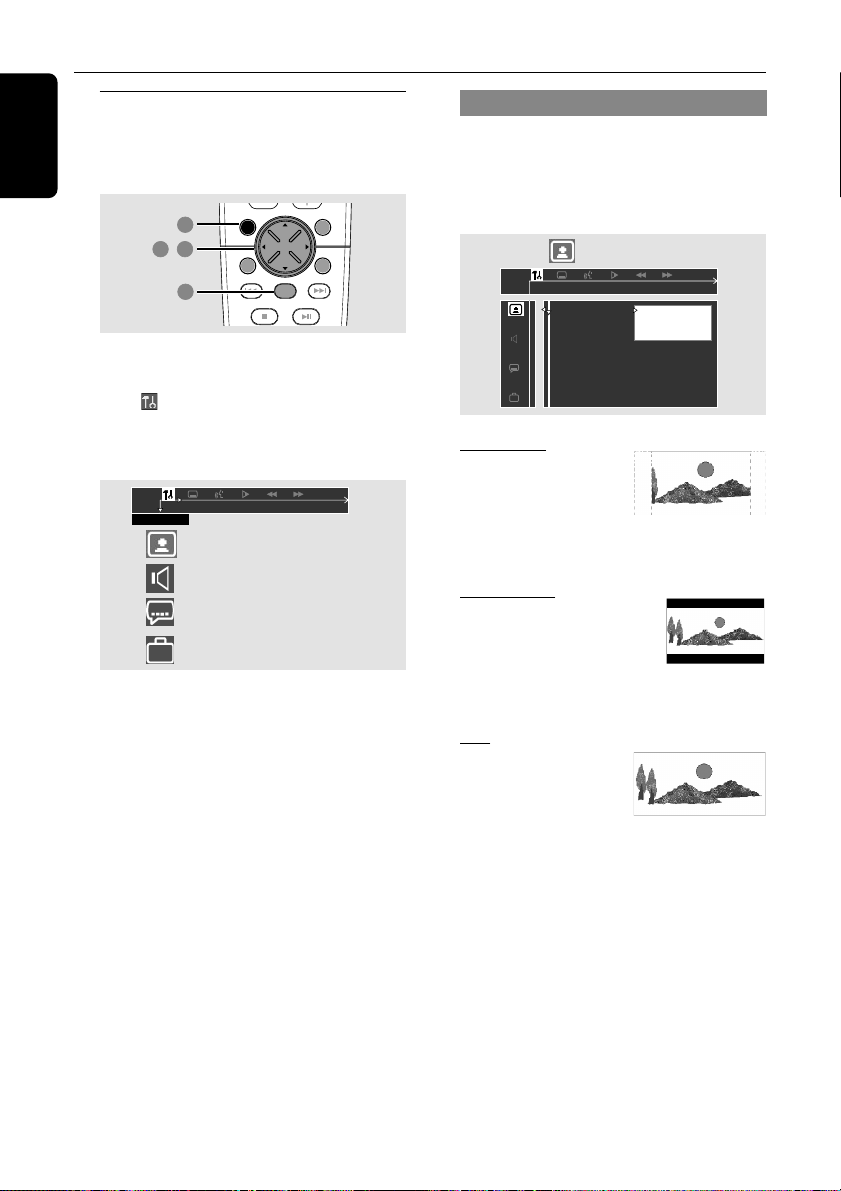
Setting the TV shape
The format you select must be available on the
disc. If it is not, the setting for TV Shape will not
affect the picture during playback.
DISC MENUSYSTEM MENU
Follow the steps of “Using the Setup Menu” and
select :
> TV Shape
4:3 panscan
Select this if you have a
conventional TV and your
DVD is not formatted for
wide screen viewing. A
wide picture will display on the whole TV screen
with a portion automatically cut off.
4:3 letterbox
Select this if you have a
conventional TV and your
DVD is formatted for wide
screen viewing. Black bars
appear on the upper and lower portions of the
TV screen.
16:9
Select this if you have a
wide screen TV (you must
also set your wide screen
TV to “full size”).
NOTE:
Some of the features in the Setup Menu
are described in “Getting Started”.
30
Page 31
DVD Menu Options
Stereo
3D Sound
Multi-channel
Set Analog Output
Digital Output
Analog Output
Night mode
Speakers
Speaker Layout
PCM Output
Setting the video output
Set the Video Output according to your video
connection.
Stop playback, then follow the steps of “Using
the Setup Menu” and select :
> Video Output
TV Shape
TV System
Video Output
Screen saver
Set Video Output
S-Video
Scart / Pr Pb Y
S-Video
Select this if you have connected the DVD
system to your TV using S-Video jack.
Scart / Pr Pb Y
Select this if you have connected the DVD
system to your TV using component video jacks.
(SCART - this feature is not available for this
model).
Note:
– You do not need to adjust the video output
setting if you are using CVBS jack (yellow) to
connect the DVD system to your TV.
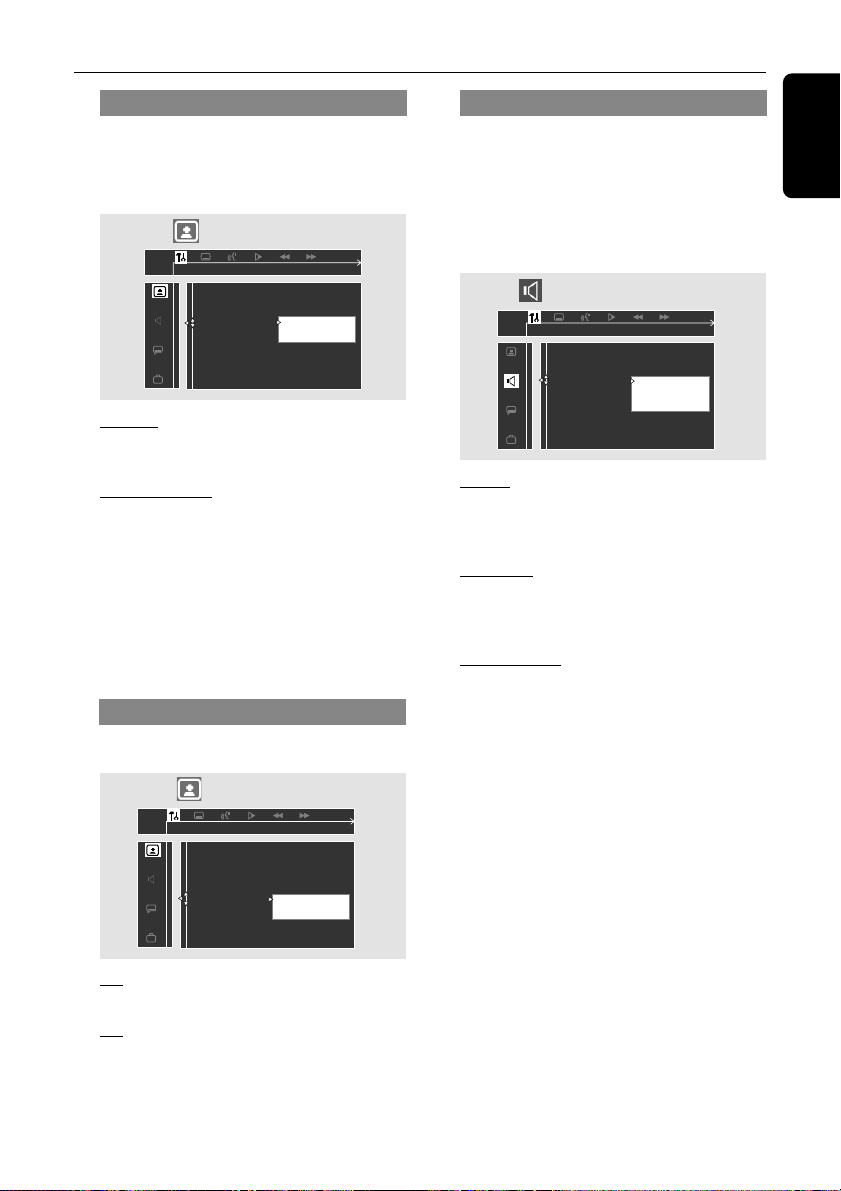
Setting the analogue output
Set Analogue Output to match your DVD
home cinema system’s playback capability. This
function can also be accessed via the SURR.
button on the remote control (or SURROUND
on the front panel).
Follow the steps of “Using the Setup Menu” and
select :
> Analogue Output
Stereo
Select this to change channel output to stereo
which delivers sound from only the two front
speakers and subwoofer.
3D Sound
Select this to change channel output to 3D
sound which delivers surround sound from only
the two front speakers and subwoofer.
Multi-channel
Select this to enable Multi-channel output.
English
Screen Saver - turning on/off
Follow the steps of “Using the Setup Menu” and
select :
> Screen saver
TV Shape
TV System
Video Output
Screen Saver
Screen Saver On or Off
Off
On
Off
Select this to disable the screen saver function.
On
Select this if you wish to dim the TV screen
when disc playback is stopped or paused for
more than five minutes. This will prevent your
display device from becoming damaged.
31
Page 32
DVD Menu Options
48 kHz
96 kHz
Set PCM output to 48K or 96K
Digital Output
Analog Output
Night mode
Speakers
Speaker Layout
PCM Output
English
Setting the digital output
Set Digital Output according to your optional
audio equipment connections.
Follow the steps of “Using the Setup Menu” and
select :
> Digital Output
Digital Output
Night mode
Analog Output
Speakers
Speaker Layout
PCM Output
Set Digital Output
Off
All
PCM only
Off
Select this to deactivate the digital output.
All
Select this if you have connected the digital
output to an optional piece of audio equipment
that has a multichannel decoder.
PCM only
Select this if the optional audio equipment is not
capable of decoding multichannel audio. After
that, proceed to “Setting the PCM output”.
Once you select ‘PCM only’, the surround mode
will automatically change to ‘STEREO’.
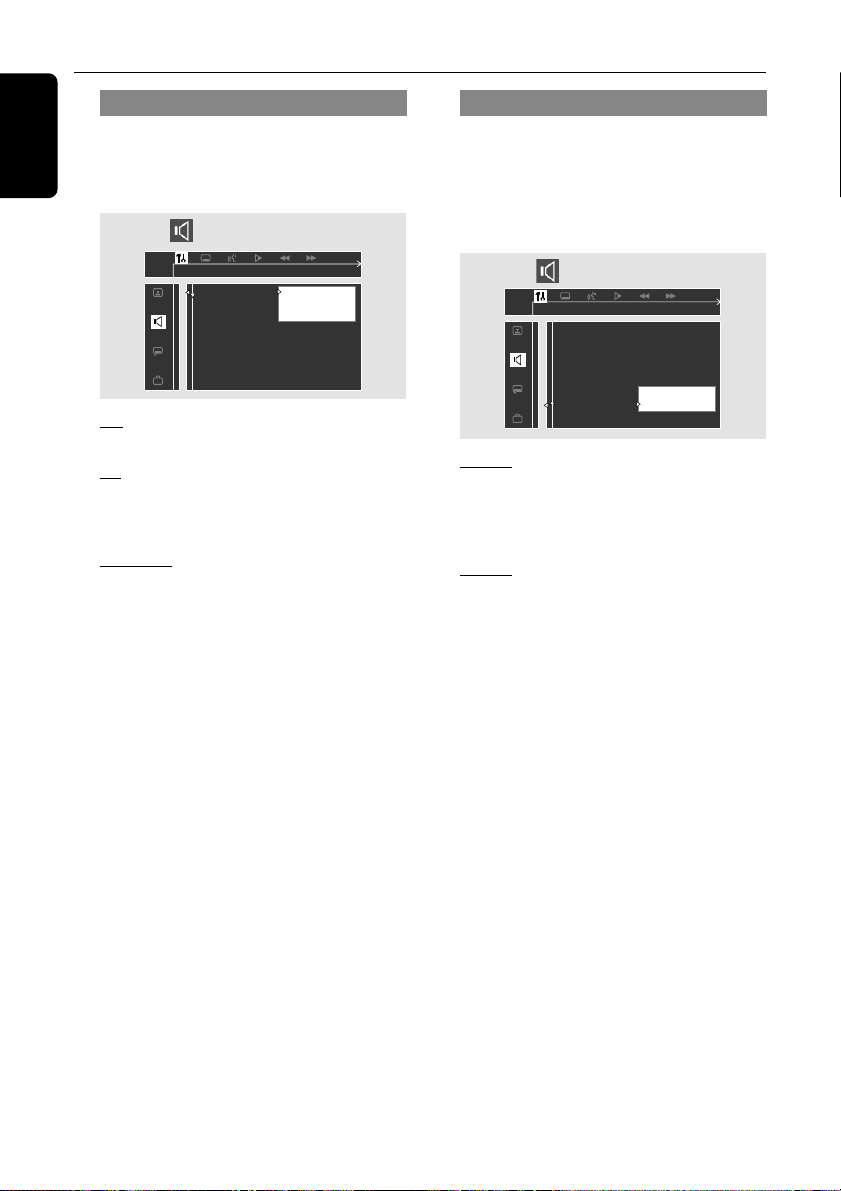
Setting the PCM output
Set your PCM (Pulse Code Modulation) output
only after you have set the system’s Digital
Output to ‘PCM only’. (See “Setting the digital
output”).
Follow the steps of “Using the Setup Menu” and
select :
> PCM Output
48 kHz
Select this if the optional audio equipment is
incapable of processing 96 kHz digital signal
input. The signal will then be converted to a
standard signal with sampling rates of 48 kHz.
96 kHz
Select this if the optional audio equipment is
capable of processing digital signal input with
sampling rates of 96 kHz. However, if the sound
output is distorted or there is no sound, select
‘48 kHz’ instead.
32
Page 33
DVD Menu Options
Reset
Load factory settings
Parental Control
Password
Defaults
Menu Language
Night mode - turning on/off
Follow the steps of “Using the Setup Menu” and
select :
> Night Mode
Digital Output
Night mode
Analog Output
Speakers
Speaker Layout
PCM Output
Set Night mode
Off
On
Off
Select this when you want to enjoy the
surround sound with its full dynamic range.
On
Select this to level out the volume. High volume
outputs will be softened and low volume
outputs are brought upward to an audible level.
This feature is only available for movies with
Dolby Digital mode.
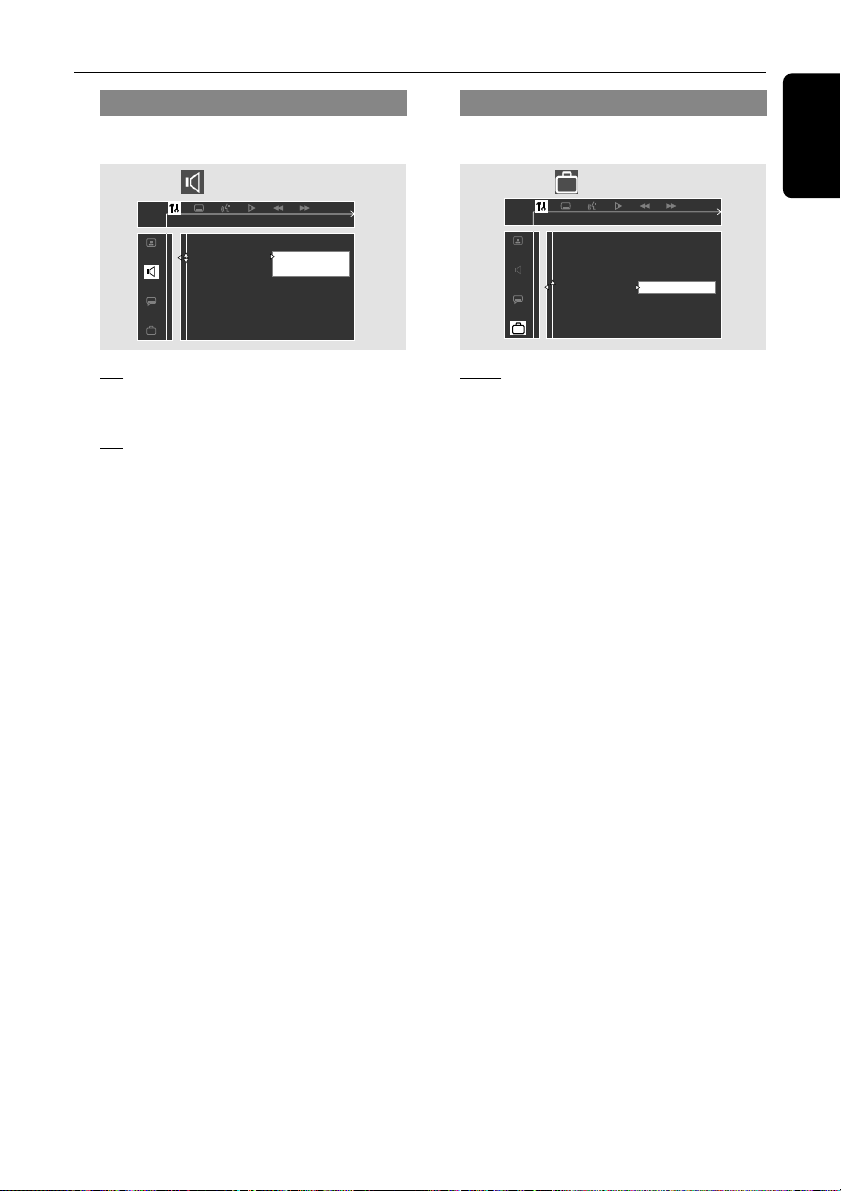
Restoring to original settings
Follow the steps of “Using the Setup Menu” and
select :
> Defaults
Reset
Pressing 2 on the remote will restore all the
items in the setup menu to the original factory
setting except for your Parental Control
password.
English
33
Page 34
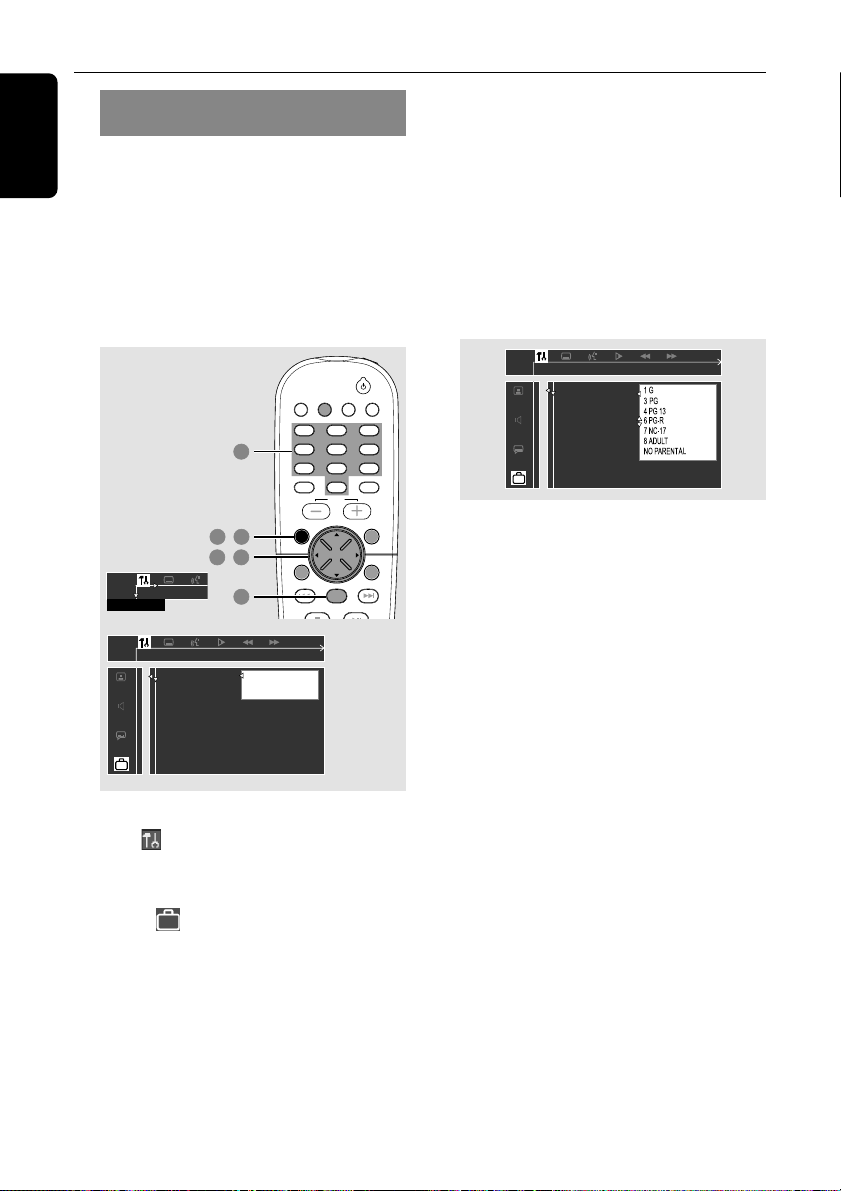
DVD Menu Options
Set Parental control
Parental Control
Password
Menu Language
Defaults
English
Restricting playback by Parental
Control
(only available in region 1 players)
Some DVDs may have a parental level assigned
to the complete disc or to certain scenes on the
disc. This feature lets you set a playback
limitation level. The rating levels are from 1 to 8
and are country dependent. You can prohibit
the playing of certain discs that are not suitable
for your children or have certain discs played
with alternative scenes.
TV/AV
4
1 6
,
SETUP MENU
➠
2 3
Parental Control
Password
Menu Language
Defaults
Set Parental control
,
5
__ __ __ __
Enter code
SEATING ZOOM
1 In disc mode, press SYSTEM MENU.
2 Select icon and press 4.
3 Use the joystick (1 2 3 4) on the remote to
navigate in the menu.
Move to and press 2.
Move to ‘Parental Control’ and press 2.
DISC/
AUX/DI
TUNER
MEDIA
123
456
789
0
VOL
OK
STOP PLAY/PAUSE
SOUND
DISC MENUSYSTEM MENU
SURR.
PREV NEXT
4 Use the numeric keypad (0-9) to enter
‘1234’ (default password) when you are asked
to enter the four-digit password. You will have
to enter the same code, exactly, twice.
➜ To change the password, see page 35
“Changing the password”.
5 Select a rating level and press OK.
➜ DVDs that are rated above the level you
selected will not play unless you enter your fourdigit password and choose a higher level rating.
To disable Parental Controls and have all discs
play, choose ‘NO PARENTAL’.
6 Press SYSTEM MENU again to remove the
menu.
Rating explanations
NO PARENTAL – It will play all discs.
8 ADULT – Mature material; should be viewed
only by adults due to graphic sexual
material, violence, or language.
7 NC-17 – No children under age 17; not
recommended viewing for children
under age 17.
6 PG-R – Parental Guidance - Restricted;
recommended that parents restrict
children under 17 from viewing or
allow to view only when supervised by
a parent or adult guardian.
4 PG13 – Material is unsuitable for children under
age 13.
3 PG – Parental Guidance suggested.
1 G – General Audience; recommended as
acceptable for viewers of all ages.
Note:
– Some DVDs are not encoded with a rating
though the movie rating may be printed on the
disc jacket. The rating level feature does not work
for such discs.
34
Page 35
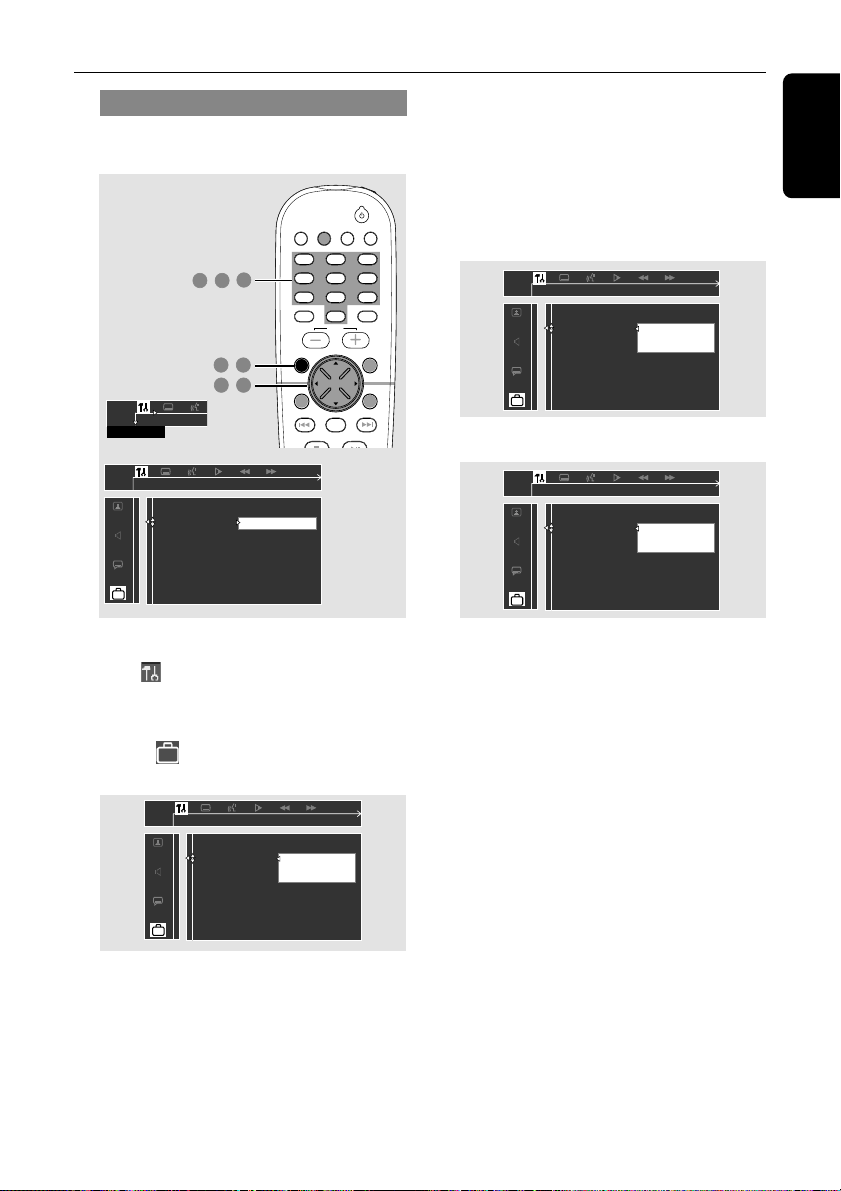
__ __ __ __
Enter code
Please enter new password
Parental Control
Password
Menu Language
Defaults
__ __ __ __
Enter code
Please reenter new password
Parental Control
Password
Menu Language
Defaults
DVD Menu Options
Changing the password
You can change the four-digit password used for
Parental Control. The default password is ‘1234’.
DISC/
AUX/DI
TUNER
MEDIA
TV/AV
123
456
789
SURR.
SEATING ZOOM
SOUND
0
VOL
PREV NEXT
OK
STOP PLAY/PAUSE
DISC MENUSYSTEM MENU
SETUP MENU
➠
4 5
Parental Control
Password
Menu Language
Defaults
Change password
,
,
1 7
,
2 3
,
6
Change
1 In disc mode, press SYSTEM MENU.
2 Select icon and press 4.
3 Use the joystick (1 2 3 4) on the remote to
navigate in the menu.
Move to and press 2.
Move to ‘Password’ and press 2.
4 Use the numeric keypad (0-9) to enter your
original four-digit password at “Enter code”.
➜ If you are asked to enter the code for the
first time, key in ‘1234’.
➜ If you forget your password, press Ç four
times to restore to the default password
(1234.)
5 Enter your new four-digit password.
6 Enter the same new four-digit password again.
7 Press SYSTEM MENU again to remove the
menu.
English
Parental Control
Password
Menu Language
Defaults
Please enter old password
__ __ __ __
Enter code
35
Page 36
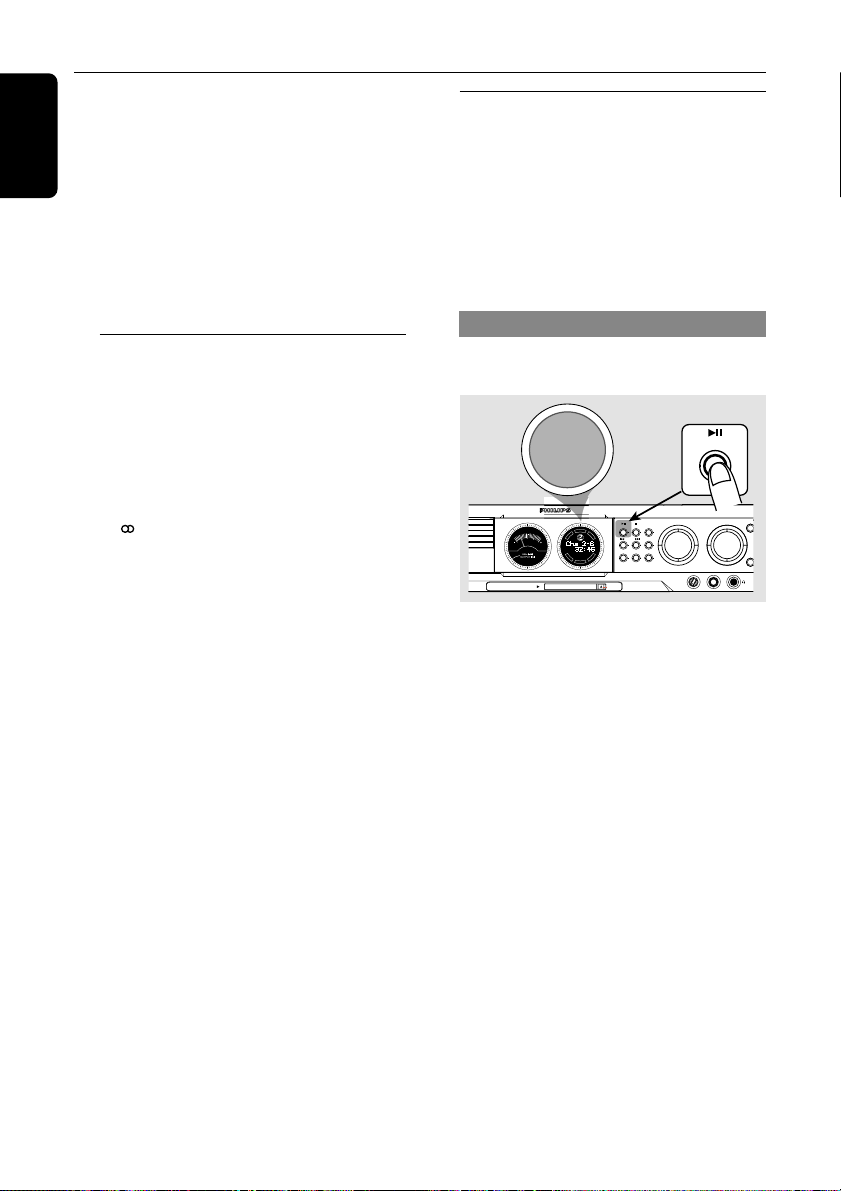
DVD VIDEO DIGITAL SURROUND SYSTEM
STOPPLAY•PAUSE SEATING
TREBLE
BASS
SOURCE
VOLUME
PROG TUNING CLOCK•TIMER
SURROUND
SEARCH
SC CHANGER
EJECT
MEDIA SLOT
DVD
D
I
S
C
S
U
R
-
R
R
I
G
H
T
C
E
N
T
R
E
L
E
F
T
S
U
B
S
U
R
-
L
MIC LEVEL MIC
PLAY• PAUSE
AUTO INSTALL - PRESS PLAY
Tuner Operations
English
IMPORTANT!
– Make sure the FM and MW antennas
are connected.
– The TUNING button on the front
panel is used to toggle between
frequency tuning and preset tuning.
When in preset tuning mode, pressing
S / T buttons on the front panel
will change the preset number.
Otherwise, pressing S / T will
change the radio frequency.
Tuning to radio stations
1 Press TUNER on the remote (or adjust
SOURCE control on front panel) to select
“FM TUNER” or “MW TUNER”.
2 Press and hold S / T on the remote until
the frequency indication starts to change, then
release.
➜ The next radio station will tune automatically.
➜ lights up for FM stereo reception.
3 To tune a weak station, press S / T briefly
and repeatedly until an optimal reception is
found.
● If you use S / T on the front panel for
frequency tuning, make sure the system is in
frequency tuning mode. If not, press TUNING.
➜ "FREQ MODE" appears.
Presetting radio stations
You can store up to 40 preset radio stations in
the memory, starting from FM and followed by
MW bands.
Notes:
– The system will exit presetting mode if no
button is pressed within 20 seconds.
– If no stereo frequency is detected during Plug
and Play, "
CHECK ANTENNA
" appears.
Using the Plug and Play
Plug and Play allows you to store all available
radio stations automatically.
1 Connect the system to the power supply,
"AUTO INSTALL - PRESS PLAY" appears.
OR
In Eco Power standby/standby mode,
press and hold ÉÅ on the front panel until
"AUTO INSTALL - PRESS PLAY" appears.
2 Press ÉÅ on the front panel to start
installation.
➜ "INSTALL TUNER" appears.
➜ All previously stored radio stations will be
replaced.
➜ Once completed, the last tuned radio station
will play.
36
Page 37
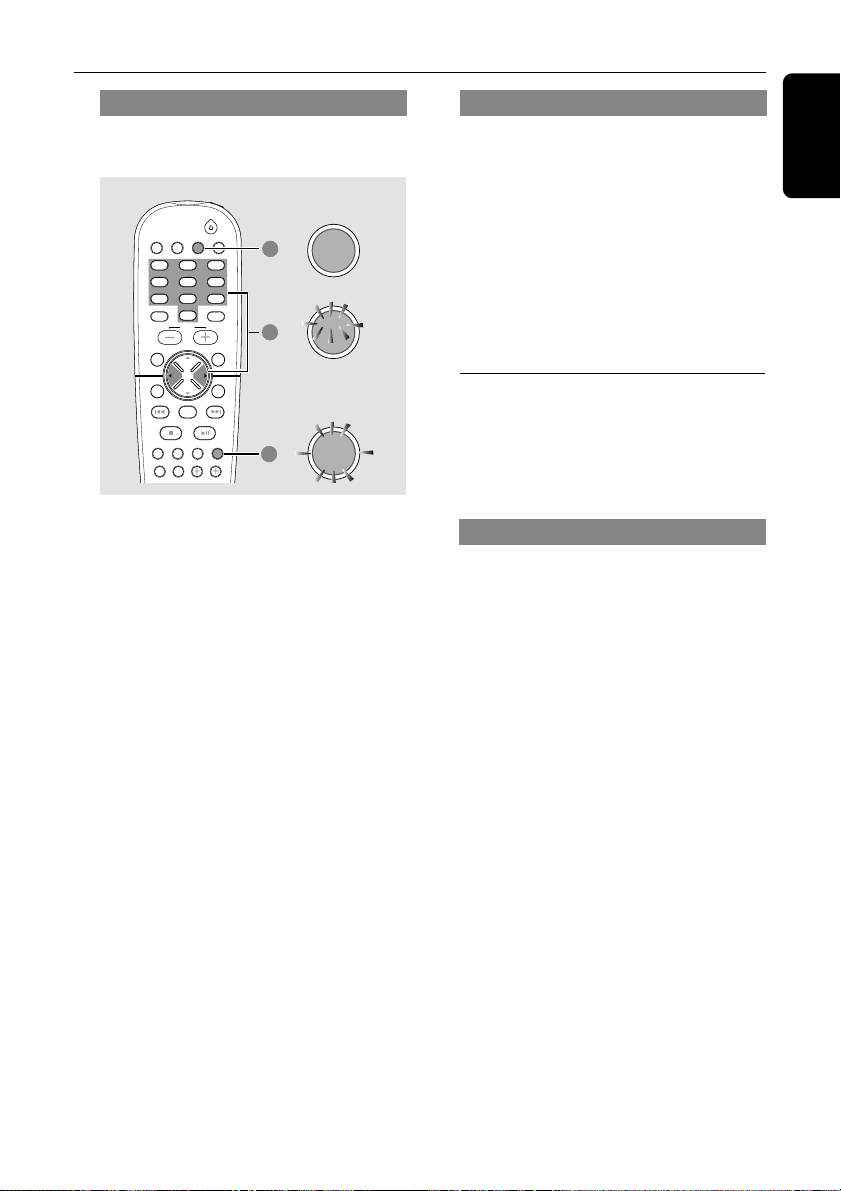
Tuner Operations
Automatic presetting
You can start the automatic presetting from a
selected preset number.
DVD system’s
display panel
DISC/
AUX/DI
TUNER
MEDIA
TV/AV
123
456
789
SURR.
0
VOL
SYSTEM MENU
SEATING ZOOM
PREV NEXT
OK
STOP PLAY/PAUSE
REPEAT REPEATDISC SKIP
A-B
VOICE MUTE
SOUND
DISC MENU
PROGRAM
1
2
3
FM TUNER
P01
FM 98:00
AUTO
PROGRAM
1 Press TUNER on the remote (or adjust
SOURCE control on front panel) to select
“FM TUNER” or “MW TUNER”.
2 Press 1 2 or use the numeric keypad (0-9)
to select a preset number to begin.
● If you use S / T on the front panel for
preset tuning, make sure the system is in preset
tuning mode. If not, press TUNING.
➜ "PRESET MODE" appears.
3 Press and hold PROGRAM (or PROG on the
front panel) until "AUTO PROGRAM" appears.
➜ If a radio station is stored in one of the
presets, the same radio station will not store
under another preset number.
➜ If no preset number is selected, automatic
preset will begin from preset (1) and all your
former presets will be overridden.
Manual presetting
You can choose to store only your favourite
radio stations.
1 In tuner mode, press PROGRAM (or PROG
on the front panel).
2 Press 1 2 or use the numeric keypad (0-9)
to select a preset number.
3 Press S / T on the remote to select a
radio station.
4 Press PROGRAM again to store.
Selecting a preset radio station
● Press 1 2 or use the numeric keypad (0-9)
to select a preset number.
➜ The preset number, radio frequency, and
waveband will appear.
Deleting a preset radio station
● Press and hold Ç until “PRESET DELETED”
appears.
➜ The current preset radio station will be
deleted and the next available preset radio
station will take its place.
➜ All other preset radio stations with higher
numbers will decrease by one.
English
37
Page 38
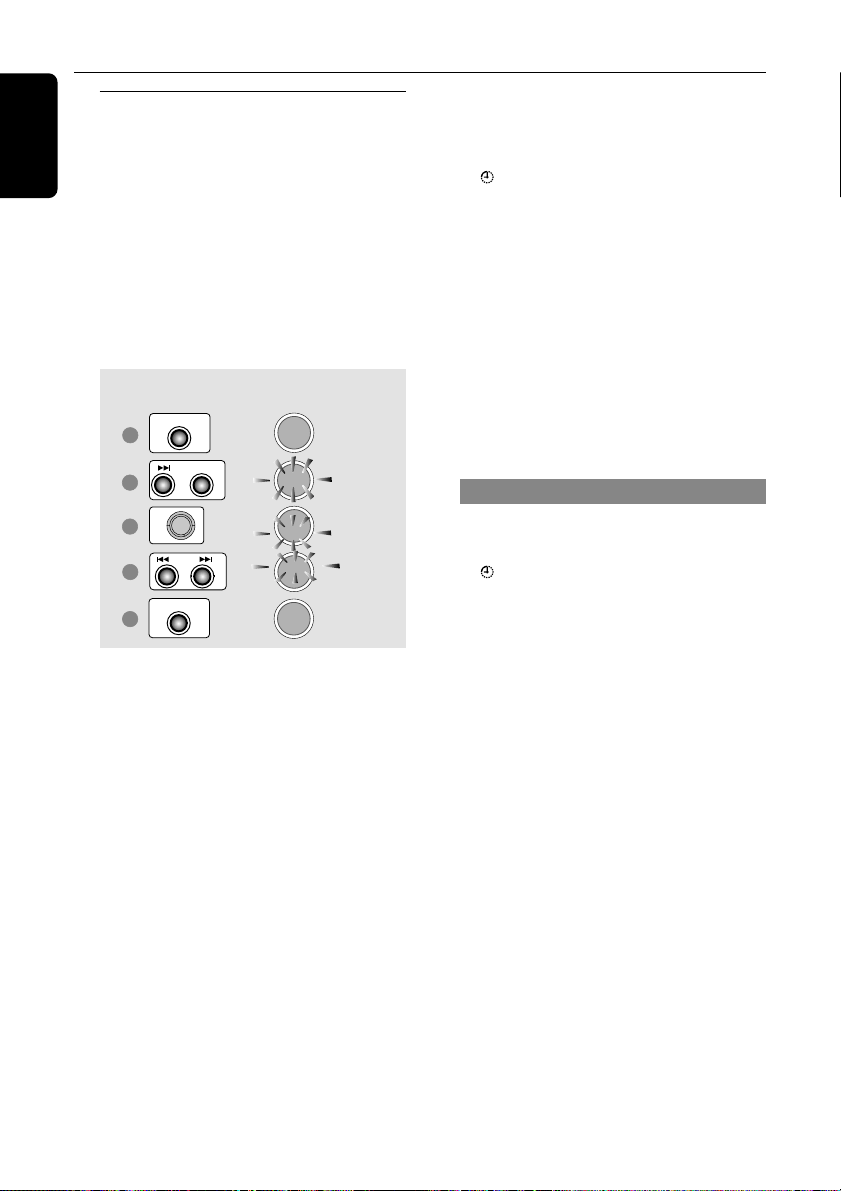
Timer Operations
English
Setting the timer
The system can switch on to DISC or TUNER
mode automatically at a preset time, serving as
an alarm to wake you up.
IMPORTANT!
– Before setting the timer, ensure that
the clock is set correctly.
– The volume of the timer will increase
gradually to the last tuned volume level.
If the last tuned volume level is too low,
the set will then increase to a
predetermined minimum audible level.
buttons on
front panel
2
3
4
5
6
CLOCK•TIMER
CLOCK•TIMER
SOURCE
SEARCH
CLOCK•TIMER
DVD system’s
display panel
SELECT CLOCK OR TIMER
TIMER
12:00AM
TUNER
12:00AM
DISC
10:38AM
DISC
1 Press STANDBY ON to switch on the DVD
system.
2 Press and hold CLOCK•TIMER until
"SELECT CLOCK OR TIMER" appears.
3 Press T (if necessary) to change the display
to "TIMER", then press CLOCK•TIMER again
to confirm.
4 Adjust SOURCE (or press DISC/MEDIA or
TUNER on the remote) to select the wake up
source (DISC or TUNER).
5 Press S / T to set the wake up time
(minutes and hours.)
To increase the speed, hold down S or T.
➜ The changes in minutes will roll over to the
hours.
6 Press CLOCK•TIMER again to store the
setting.
➜ Once the timer is set, it will always switch on
unless you deactivate it.
➜ icon will remain on the display panel. It
indicates the timer is activated.
● At the preset time, the selected sound
source will play for 30 minutes before it
switches to Eco Power standby mode (if
no button is being pressed within the time
frame).
➜ DISC – playing the first track of the last
selected disc. If the last selected disc tray is
empty, it will switch to the next available disc. If
all the disc trays are not available, it will switch
to Tuner mode.
➜ TUNER – playing the last tuned radio
station.
Activating/Deactivating the timer
1 Repeat steps 1~3 of “Setting the timer”.
2 Press Ç to turn off the timer.
➜ icon will disappear from the display panel
and "TIMER OFF" appears.
OR
Press CLOCK•TIMER to turn on the timer to
the last setting.
➜ The timer information will display for a few
seconds, then the system resumes its last active
source or stays in standby mode.
Note:
– The system will exit timer setting mode if no
button is pressed within 90 seconds.
38
Page 39

Setting the Sleep timer
The sleep timer enables the system to switch to
Eco Power standby mode automatically at a
preset time.
● Press SLEEP on the remote repeatedly until it
reaches the desired preset turn-off time.
➜ The selections are as follows (time in
minutes):
15 ™ 30 ™ 45 ™ 60 ™ 90 ™ 120 ™
OFF ™ 15 …
➜ SLEEP will show on the display panel, except
if "OFF" is selected.
➜ Before the system switches to Eco Power
standby mode, a countdown of 10 seconds is
displayed.
"SLEEP 10" ™ "SLEEP 9".... ™
"SLEEP 1" ™ "SLEEP"
To check or change the setting
● Press SLEEP once to show the remaining time
before switching off. If you continue pressing
the SLEEP button, the next Sleep Timer option
will appear on the display panel.
To cancel the sleep timer
● Press SLEEP repeatedly until "OFF" appears or
press the STANDBY ON button.
Timer Operations
English
39
Page 40

Sound and Volume Controls
English
Sound Control
IMPORTANT!
For proper surround sound, make sure
the speakers and subwoofer are
connected (see page 12).
Selecting surround sound
● Press SURROUND (SURR.) to select :
MULTI-channel, 3D SOUND or STEREO.
➜ The availability of the various surround sound
modes depends on the number of speakers
used and the sound available on the disc.
➜ The centre and surround speakers operate
only when the DVD home cinema system is set
to Multi-channel mode.
➜ The available output modes for Multi-channel
include: Dolby Digital, DTS (Digital Theatre
Systems) Surround, Dolby Surround and Dolby
Pro Logic.
➜ Stereo broadcasts or recordings will produce
some surround channel effects when played in a
surround mode. However, mono (single channel
sound) sources will not produce any sound from
the surround speakers.
Note:
– You are not able to select the surround sound
mode if the system menu/menu bar is turned on.
Turning on/off clear voice effect
You can enhance the centre and surround
sound outputs by activating the clear voice
sound feature if you have selected Multi-channel
as the surround mode.
● Press VOICE on the remote to select “CLEAR
VOICE ON”.
➜ To turn off the setting, press VOICE again to
select “CLEAR VOICE OFF”.
Changing subwoofer volume level
● Press SUB +/- on the remote to adjust
subwoofer volume level (-6dB to + 6dB).
Adjusting Bass/Treble level
The BASS (low tone) and TREBLE (high tone)
features enable you to define the soundprocessor settings.
1 Press BASS or TREBLE.
➜ The level indicator appears.
2 Within five seconds, use the VOLUME control
to adjust the Bass or Treble level (-3 to +3).
➜ If the volume control is not used within five
seconds, it will resume its normal volume control
function.
Selecting digital sound effects
Select a preset digital sound effects that matches
your disc’s content or that optimises the sound
of the musical style you are playing.
● Press SOUND on the remote.
When playing movie discs, you can select :
CONCERT, DRAMA, ACTION or SCI-FI.
When playing music discs or while in TUNER or
AUX/DI mode, you can select : ROCK,
DIGITAL, CLASSIC or JAZZ.
Volume control
● Adjust VOLUME control (or press
VOL +/-on the remote) to increase or
decrease the volume level.
➜ "VOL MIN" is the minimum volume level and
“VOL MAX” is the maximum volume level.
To listen through the headphones
● Connect the headphones plug to the n socket
at the front of the DVD system.
➜ The speakers will be muted.
To turn off the volume temporarily
● Press MUTE on the remote.
➜ Playback will continue without sound and
"MUTE" appears.
➜ To restore the volume, press MUTE again or
increase the volume level.
40
Page 41
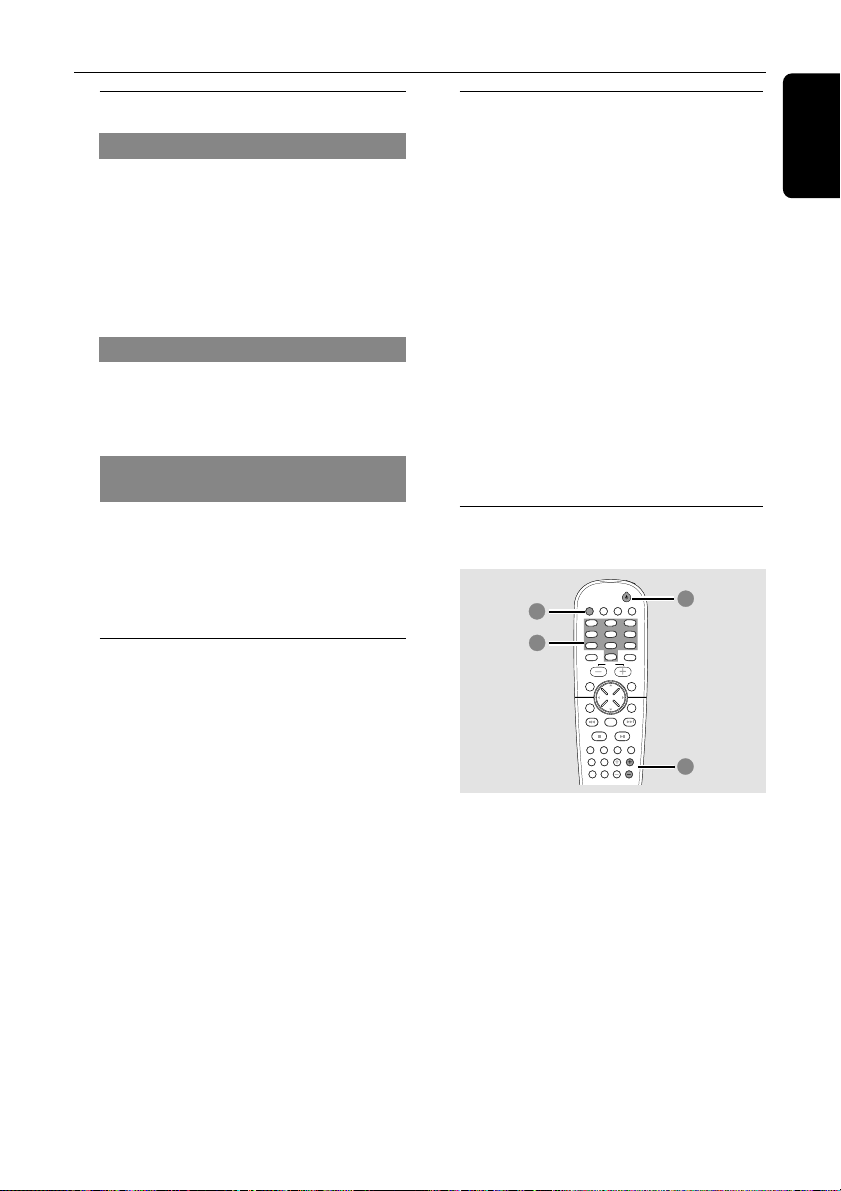
4
2
TV/AV
DISC/
MEDIA
TUNER
AUX/DI
REPEAT REPEATDISC SKIP
DISC MENU
PROGRAM
SYSTEM MENU
DIM SLEEP SUBW TV VOL
VOICE MUTE
SEATING ZOOM
PREV NEXT
STOP PLAY/PAUSE
A-B
VOL
OK
SOUND
SURR.
456
123
789
0
1
3
Other Functions
Switching on/off
Switching to active mode
● Adjust the SOURCE control to select :
DISC 1....DISC 5 ™ FM TUNER ™
MW TUNER ™ TV/AV ™ AUX ™ DI ™
MEDIA SLOT ™ DISC 1....
OR
Press DISC/MEDIA, TUNER, TV/AV or
AUX/DI on the remote.
Switching to Eco Power standby mode
● Press STANDBY ON (B).
➜ ECO POWER button lights up.
➜ The display screen will go blank.
Switching to standby mode (view
clock)
● Press and hold STANDBY ON (B).
➜ The clock appears.
➜ While in standby mode, pressing
CLOCK•TIMER button will switch the system to
Eco Power standby mode.
Dimming system’s display screen
● Press DIM repeatedly to select different levels
of brightness for the display screen.
Recording to an external device
1 Connect the external recording device to
LINE OUT or DIGITAL OUT.
(See pages 14, 15 “Connections-optional“).
2 Select the source to record from your DVD
system (DISC/MEDIA, TUNER, TV/AV or
AUX/DI) and start playback (if necessar y).
➜ You can only record from DISC if using
DIGITAL OUT to connect the external
recording device.
3 Start recording on the external recording
device.
Notes:
– All the sound control features are available for
selection.
– Refer to the owner’s manual of the connected
equipment for details.
Using the remote to operate
your television
English
1 Press TV/AV.
2 Press S / T or use the numeric
keypad (0-9) to select the TV’s channel.
3 Press TV VOL +/- to adjust the TV’s
volume level.
4 Press B to turn off your TV.
41
Page 42

Troubleshooting
English
WARNING
Under no circumstances should you try to repair the system yourself, as this will
invalidate the warranty. Do not open the system as there is a risk of electric shock.
If a fault occurs, first check the points listed below before taking the system for repair. If
you are unable to remedy a problem by following these hints, consult your dealer or
Philips for help.
Problem
No power.
No picture.
Distorted or poor picture.
Completely distorted picture or black/
white picture.
The aspect ratio of the screen cannot be
changed even though you have set the
TV display.
No sound or distorted sound.
The DVD system does not work.
– Check if the AC power cord is properly
connected.
– Press the STANDBY ON on the front of the
DVD system to turn on the power.
– Refer to your TV’s manual for correct Video In
channel selection. Change the TV channel until
you see the DVD screen.
– Press DISC on the remote.
– Switch the P-SC AN at the back panel to “OFF”
position if you are not using a Progressive Scan
TV.
– Check the video connection. If both S-Video
and Component (Pr Pb Y) Video connections
are used to connect to your TV, the video signal
will go to S-Video automatically every time
when you power up the DVD system. To
change the setting, refer to ‘Video Output’.
– Sometimes a small amount of picture distor tion
may appear. This is not a malfunction.
– Clean the disc.
– TVs have a colour system standard. If the disc’s
or DVD system’s colour system is different than
your TV’s colour system, the picture may be
distorted or colourless. Set to the correct ‘TV
System’ setting.
– The aspect ratio is fixed on the DVD disc.
– Depending on the TV, it may not be possible to
change the aspect ratio.
– Adjust the volume.
– Replace the speaker cables.
– Check the speaker connections and settings.
– Disconnect the headphones.
– Press PLAY to resume normal play mode if
necessary.
– Press the correct source button on the remote
(TV/AV or AUX, for example) to choose the
equipment that you want to hear through the
DVD system.
– Disconnect the power cord from the power
outlet for a few minutes. Reconnect the power
cord and try to operate again as usual.
Solution
42
Page 43

Troubleshooting
Problem
The DVD player does not start playback.
Cannot activate some features, such as
Angles, Subtitles, or multi-language
Audio.
There is no sound from the centre and
surround speakers.
Radio reception is poor.
The remote control does not function
properly.
The timer is not working.
The display panel is dark.
Low hum or buzz sound.
Solution
– Inser t a readable disc with the playback side
facing down.
– Check the disc type, colour system and region
code.
– Check for any scratches or smudges on the disc.
– Press SYSTEM SETUP to turn off the setup
menu screen.
– Change the rating level.
– Moisture has condensed inside the system.
Remove the disc and leave the system turned on
for about an hour.
– The features may not be available on the DVD.
– Changing the language for the sound or subtitle
is prohibited on the DVD.
– Make sure the centre and surround speakers are
connected correctly.
– Press SURROUND button to select a correct
surround sound setting.
– Make sure the source you are playing is
recorded or broadcast in surround sound (DTS,
Dolby Digital, etc.).
– If the signal is too weak, adjust the antenna or
connect an external antenna for better
reception.
– Increase the distance between the system and
your TV or VCR.
– Tune in to the correct frequency.
– Place the antenna far ther away from any
equipment that may be causing the noise.
– Select the source (DISC or TUNER, for
example) before pressing the function button
(ÉÅ, S , T.)
– Reduce the distance between the remote
control and the system.
– Replace the batteries with new ones.
– Point the remote control directly toward the IR
sensor.
– Check that the batteries are loaded correctly.
– Set the clock correctly.
– Press and hold CLOCK•TIMER to switch on the
timer.
– Press DIM again.
– Place the DVD system as far away as possible
from electrical devices that may be causing
interference.
English
43
Page 44
Specifications
AMPLIFIER SECTION
English
Output power 5400 W PMPO
- Stereo mode (DIN) 75 W + 75 W RMS
- Surround mode (1 kHz) 75 W RMS/channel
Frequency Response 100 Hz – 20 kHz / –3 dB
Signal-to-Noise Ratio > 65 dB (CCIR)
Input Sensitivity
- AUX In 880 mV
- TV In 350 mV
Output Sensitivity
- Headphone 32 Ω – 1000 Ω
- Line Out 600 mV
- Digital In acc IEC 60958 & IEC 61937
1 4ohm, 1 kHz, 10% THD
TUNER SECTION
Tuning Range FM 87.5 – 108 MHz
26 dB Quieting Sensitivity FM 20 dB
Image Rejection Radio FM 25 dB
IF Rejection Ratio FM 60 dB
Signal-to-Noise Ratio FM 60 dB
AM Suppression Ratio FM 30 dB
Harmonic Distortion FM Mono 3%
Frequency Response FM 180 Hz – 10 kHz / ±6 dB
Stereo Separation FM 26 dB (1 kHz)
Stereo Threshold FM 23.5 dB
MW 531 – 1602 kHz (9 kHz)
MW 530 – 1700 kHz (10 kHz)
MW 3162 mV/m
MW 28 dB
MW 24 dB
MW 40 dB
FM Stereo 3%
MW 5%
MAIN UNIT
1
Power Supply Rating
- For Version /21-21M 110 – 127 / 220 – 240 V;
50/60 Hz Switchable
- For Version /30 230 – 240 V; 50 Hz
Power Consumption 150 W
Dimensions (w x h x d) 435 mm x 100 mm x 360 mm
Weight 7.15 kg
SPEAKERS
Front speakers / Rear (surround) speaker
System triple driver
Impedance 4 Ω
Speaker drivers 2 x 3” woofer, 1 3/4” tweeter
Frequency response 120 Hz – 20 kHz
Dimensions (w x h x d) 94 mm x 280 mm x 70 mm
Weight 1.23 kg/each
CENTRE SPEAKER
System 5 multi directional driver
Impedance 4 Ω
Speaker drivers 4 x 2” woofer, 1 3/4” tweeter
Frequency response 120 Hz – 20 kHz
Dimensions (w x h x d) 435 mm x 72 mm x 63.5 mm
Weight 1.32 kg
SUBWOOFER
Impedance 4 Ω
Speaker drivers 6 1/2” woofer
Frequency response 30 Hz – 120 Hz
Dimensions (w x h x d) 195 mm x 433 mm x 391 mm
Weight 5.72 kg
DISC SECTION
Laser Type Semiconductor
Disc Diametre 12cm / 8cm
Video Decoding MPEG-2 / MPEG-1
Video DAC 10 Bits
Signal System PAL / NTSC
Video Format 4:3 / 16:9
Video S/N 56 dB (minimum)
Composite Video Output 1.0 Vp-p, 75 Ω
S-Video Output Y - 1.0 Vp-p, 75 Ω
C - 0.286 Vp-p, 75 Ω
Audio DAC 24 Bits / 96 kHz
Frequency Response 4 Hz – 20 kHz (44.1 kHz)
4 Hz – 22 kHz (48 kHz)
4 Hz – 44 kHz (96 kHz)
Digital Output SPDIF (Sony Philips Digital
Interface) Coaxial
- PCM IEC 60958
- Dolby Digital/DTS IEC 60958, IEC 61937
44
Specifications subject to change without prior
notice
Page 45

Glossary
Analogue: Sound that has not been turned into
numbers. Analogue sound varies, while digital sound
has specific numerical values. These jacks send audio
through two channels, the left and right.
Aspect ratio: The ratio of vertical and horizontal
sizes of a displayed image. The horizontal vs. vertical
ratio of conventional TVs. is 4:3, and that of widescreens is 16:9.
AUDIO OUT Jacks: Jacks on the back of the DVD
System that send audio to another system (TV, Stereo,
etc.).
Bit Rate: The amount of data used to hold a given
length of music; measured in kilobits per seconds, or
kbps. Or, the speed at which you record. Generally, the
higher the bit rate, or the higher the recording speed,
the better the sound quality. However, higher bit rates
use more space on a Disc.
Chapter: Sections of a picture or a music piece on a
DVD that are smaller than titles. A title is composed of
several chapters. Each chapter is assigned a chapter
number enabling you to locate the chapter you want.
Clear voice: It enables the digital sound processor
to extract the voice dynamics in movie dialog on all 5
surround channels without compromising on the
location accuracy and the width of the surround sound.
Component Video Out Jacks: Jacks on the back of
the DVD System that send high-quality video to a TV
that has Component Video In jacks (R/G/B, Y/Pb/Pr,
etc.).
Disc menu: A screen display prepared for allowing
selection of images, sounds, subtitles, multi-angles, etc
recorded on a DVD.
Digital: Sound that has been converted into
numerical values. Digital sound is available when you
use the DIGITAL AUDIO OUT COAXIAL or
OPTICAL jacks. These jacks send audio through
multiple channels, instead of just two channels as
analogue does.
Dolby Digital: A surround sound system developed
by Dolby Laboratories containing up to six channels of
digital audio (front left and right, surround left and right
and centre).
DTS: Digital Theatre Systems. This is a sur round
sound system, but it is different from Dolby Digital. The
formats were developed by different companies.
JPEG: A still-picture data compression system
proposed by the Joint Photographic Expert Group,
which features small decrease in image quality in spite
of its high compression ratio.
MP3: A file format with a sound data compression
system. “MP3” is the abbreviation of Motion Picture
Experts Group 1 (or MPEG-1) Audio Layer 3. By using
MP3 format. one CD-R or CD-RW can contain about
10 times as much data volume as a regular CD can.
Multichannel: DVD is specified to have each sound
track constitute one sound field. Multichannel refers to
a structure of sound tracks having three or more
channels.
Parental control: A function of the DVD to limit
playback of the disc by the age of the users according
to the limitation level in each country. The limitation
varies from disc to disc; when it is activated, playback
will be prohibited if the software’s level is higher than
the user-set level.
PCM (Pulse Code Modulation): A system for
converting analogue sound signal to digital signal for
later processing, with no data compression used in
conversion.
Playback control (PBC): Refers to the signal
recorded on video CDs or SVCDs for controlling
reproduction. By using menu screens recorded on a
Video CD or SVCD that supports PBC , you can enjoy
interactive-type software as well as software having a
search function.
Plug and Play: After power up, the system will
prompt the user to proceed with the automatic
installation of radio stations by simply pressing the
PLAY button on the main unit.
Progressive Scan: It displays all the horizontal lines
of a picture at one time, as a signal frame. This system
can convert the interlaced video from DVD into
progressive format for connection to a progressive
display. It dramatically increases the vertical resolution.
It dramatically increases the vertical resolution.
Region code: A system for allowing discs to be
played back only in the region designated beforehand.
This unit will only play discs that have compatible
region codes. You can find the region code of your unit
by looking on the product label. Some discs are
compatible with more than one region (or ALL
regions).
S-Video: Produces a clear picture by sending
separate signals for the luminance and the colour. You
can use S-Video only if your TV has S- video In jack.
Sampling Frequency: Frequency of sampling data
when analogue data is converted to digital data
Sampling frequency numerically represents how many
time the original analogue signal is sampled per second.
Seating control: It gives the user a perfect sound
and movie experience anywhere in the room, providing
maximum flexibility and real total immersion because
the user can choose their preferred seat.
Surround: A system for creating realistic threedimensional sound fields full of realism by arranging
multiple speakers around the listener.
Title: The longest section of a picture or music
feature on DVD, music, etc ., in video software, or the
entire album in audio software. Each title is assigned a
title number enabling you to locate the title you want.
VIDEO OUT jack: Jack on the back of the DVD
System that sends video to a TV.
English
45
 Loading...