

Page 1
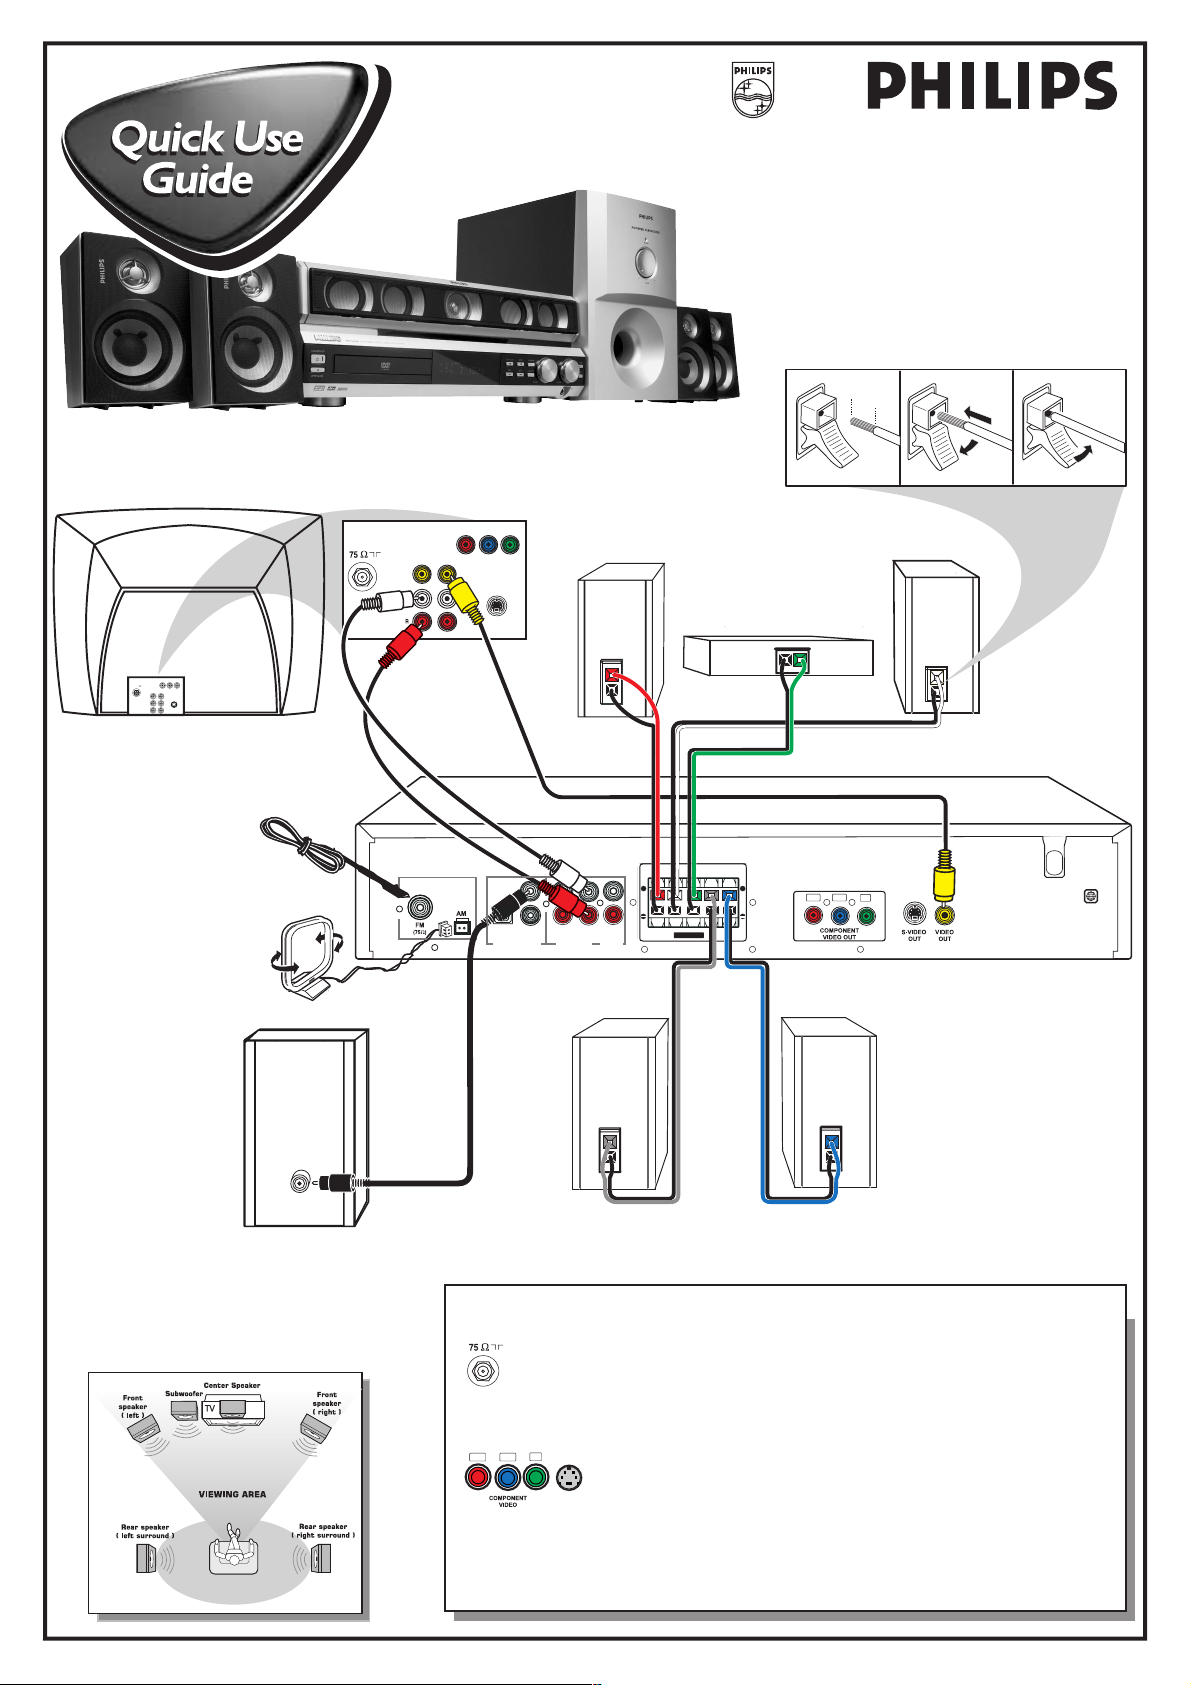
SPEAKERS
MX3660D
Printed in China
Use this simple and quick way to
watch your favorite DVD movie
and enjoy your Home Cinema
experience!
(Not all the cables supplied are required to complete the
abc
basic hook-up.)
Connecting Speaker Cable
.047"
(12mm)
PUSH IN
PUSH
DOWN
Pr/
CrPb/
CbY
75
V
I
N
OUT
VIDEO
L
AUDI
O
S-VIDEO
R
I
N
AM Antenna
FM Antenna
Rear of TV
(example only)
VIDEO
AUDIO
OUT IN
AM/FM
ANTENNA
Pr/Cr Pb/Cb Y
COMPONENT
VIDEO IN
S-VIDEO
IN
WOOFER
LINE OUT
OPTICAL COAXIAL AUX TV
DIGITAL OUT
Front Speaker
(Right)
AUDIO
OUT
+
L
R
AUDIO IN
Rear Speaker
(Surround Right)
Center Speaker
FL CFR SLSR
FL CFR
SPEAKERS
+
(4 )
Front Speaker
Pb/Cb
Pr/Cr
Y
Rear Speaker
(Surround Left)
(Left)
Rear of System
AUDIO
Subwoofer
INPUT
Recommended Speaker Setup
Helpful Hints
You only need to make one video connection to your TV in order to view the DVD playback.
If your TV has only a single Antenna In jack, you will need an accessory RF modulator.
The RF modulator converts the video from the DVD system so it can play through the TV’s
Antenna connector. Refer to your owner’s manual for proper connection.
ANTENNA IN
Additional Video Input Connections can provide better picture quality and image for DVD
movie playback (If your TV is compatible) :
Y
Pb/Cb
Pr/Cr
S-VIDEO
IN
Connect the DVD system VIDEO OUT(put) directly to the TV. Do not connect to a VCR first and
then to a TV. This type of connection may distor t the picture and sound playback.
When listening to TV programs, press TV/AV button on the remote to set the DVD system to
TV/AV mode in order for the sound to be heard.
Component Video (Pr/Cr Pb/Cb Y) provides the best picture quality.
OR
S-Video provides excellent picture quality.
Page 2

continue...
SUPER VIDEO
AV IN
STANDBY-ON
OPEN•CLOSE
DVD VIDEO DIGITAL SURROUND SYSTEM
PLAY•PAUSE
STOP BASS
PROGRAM
PREV NEXT SURROUND
TREBLE
VOLUMESOURCE
Make sure your DVD system and
TV are connected and turned on!
Playing a disc
1 Press DISC on the remote control.
You can also adjust the SOURCE button on the front panel until “DISC” appears on the display panel.
2 Turn on the TV and select the correct Video In mode.
You should see the blue Philips DVD background screen on the TV (if no disc in the DVD system).
Usually this channel is between the lowest and highest channels and may be called FRONT, A/V IN, or
VIDEO.
Or, you may go to channel 1 on your TV, then press the Channel down button repeatedly until you see the
Video In channel.
Or, your TV remote control may have a button or switch that chooses different video modes.
Do not use channel 3 or 4 on the TV unless you are using an RF modulator.
See your TV manual for more details.
3 Press OPEN•CLOSE 0 on the front of the DVD system and load a disc, then
press the OPEN•CLOSE 0 again to close the disc tray.
Make sure the disc label facing up. For double-sided discs, load the side you want to play facing up.
4 Playback will start automatically. If not, press ÉÅ button.
If a disc menu appears, use 3 4 1 2 buttons on the remote to make the necessary selection, then press
OK to confirm. Or, use the numeric keypad on the remote to select features. Follow the instructions
given in the disc menu.
5 To stop playback, press STOPÇ.
Region Codes
DVDs must be labeled for ALL regions or for
Region 1 in order to play on this DVD system.
DVD system Video Output Selection for Proper Playback
1) Press SYSTEM MENU button.
The icon will be highlighted in the menu bar on the TV
screen.
2) Press 4 button to select the Picture Setup Menu item
3) Press 2 button to enter the Menu.
4) Press 4 button to select ‘VIDEO OUT’ and 2 button to enter
the Menu.
5) Press 34 to select and highlight :
S-VIDEO - if you use the S-Video connection.
PR PB Y/SCART - if you use the Component Video
Pr/Cr Pb/Cb Y
6) Press OK button to confirm.
ALL 1
.
CVBS & S-VIDEO
Note: SCART control not
available for use with your DVD
system.
PR PB Y / SCART
Detailed playback features and additional functions are described in the
accompanying owner’s manual.
Page 3
DVD VIDEO DIGITAL SURROUND SYSTEM
Need help? Call us!
Philips representatives are ready to help you with any
questions about your new product. We can guide you
through Connections, First-time Setup, or any of the Features.
We want you to start enjoying your new product right away!
CALL US BEFORE YOU CONSIDER
RETURNING THE PRODUCT!
1-800-531-0039
or
Visit us on the web at www.philips.com
MX
MX
3660D
3660D
O
P
M
I
your Warranty
Registration Card
within 10 days
S
E
E
W
T
A
R
Return
H
I
Y
N
T
!
E
D
I
S
N
1
Page 4
CAUTION
RISK OF ELECTRIC SHOCK
DO NOT OPEN
CAUTION: TO REDUCE THE RISK OF ELECTRIC SHOCK, DO NOT
REMOVE COVER (OR BACK). NO USER-SERVICEABLE PARTS
INSIDE. REFER SERVICING TO QUALIFIED SERVICE PERSONNEL.
Return your Warranty Registration card today to
ensure you receive all the benefits you’re entitled to.
• Once your Philips purchase is registered, you’re eligible to
receive all the privileges of owning a Philips product.
Warranty
Verification
Registering your product within 10 days
confirms your right to maximum
protection under the terms and
conditions of your Philips warranty.
Owner
Confirmation
Your completed Warranty Registration
Card serves as verification of ownership
in the event of product theft or loss.
Congratulations on your purchase,
and welcome to the “family!”
• So complete and return the Warranty Registration Card
enclosed with your purchase at once, and take advantage
of these important benefits.
Model
Registration
Returning your Warranty Registration
Card right away guarantees you’ll
receive all the information and special
offers which you qualify for as the
owner of your model.
I
T
O
A
N
R
T
S
I
G
E
R
S
Y
Hurry!
A
D
0
N
E
E
D
E
D
W
I
T
H
I
1
N
Know these
ssaaffeettyy symbols
Dear Philips product owner:
Thank you for your confidence in Philips.You’ve selected one of the best-built,
best-backed products available today. And we’ll do everything in our power to
keep you happy with your purchase for many years to come.
As a member of the Philips “family,” you’re entitled to protection by one of the
most comprehensive warranties and outstanding service networks in the industry.
What’s more, your purchase guarantees you’ll receive all the information and
special offers for which you qualify, plus easy access to accessories from our
convenient home shopping network.
And most importantly you can count on our uncompromising commitment to
your total satisfaction.
All of this is our way of saying welcome – and thanks for investing in a Philips product.
Sincerely,
Lawrence J. Blanford
President and Chief Executive Officer
P.S. Remember, to get the most from your Philips product, you must
return your Warranty Registration Card within 10 days. So please
mail it to us right now!
This “bolt of lightning” indicates
uninsulated material within your unit
t
the safety of everyone in your household,
please do not remove product covering.
s
prevent operating and maintenance problems.
WARNING:
SHOCK HAZARD, DO NOT EXPOSE THIS
EQUIPMENT TO RAIN OR MOISTURE.
CAUTION:
match wide blade of plug to wide slot, and
fully insert.
For Customer Use
Enter below the Serial No. which is located
on the rear of the cabinet. Retain this
information for future reference.
Model No. ___________________________
may cause an electrical shock. For
The “exclamation point” calls attention
to features for which you should read
the enclosed literature closely to
TO PREVENT FIRE OR
To prevent electric shock,
MAC5097
2
Serial No. ____________________________
Visit our World Wide Web Site at http://www.philips.com
Page 5
Canada
English:
This digital apparatus does not exceed the Class
B limits for radio noise emissions from digital
apparatus as set out in the Radio Interference
Regulations of the Canadian Department of
Communications.
Français:
Cet appareil numérique n'emet pas de bruits
radioélectriques dépassant les limites applicables
aux appareils numériques de Class B prescrites
dans le Règlement sur le Brouillage
Radioélectrique édicté par le Ministère des
Communications du Canada.
Manufactured under license from Dolby Laboratories.
“Dolby”, “Pro-Logic”and the double-D symbol are
trademarks of Dolby Laboratories. Confidential
Unpublished Works. ©1992-1997 Dolby Laboratories, Inc.
All rights reserved.
Manufactured under license from Digital Theater Systems, Inc.
US Pat. No. 5,451,942, 5,956,674, 5,974,380, 5,978,762 and
other world-wide patents issued and pending. “DTS” and
“DTS Digital Surround” are registered trademarks of Digital
Theater Systems, Inc. Copyright 1996, 2000 Digital Theater
Systems, Inc. All Rights Reversed.
This product incorporates copyright protection technology
that is protected by method claims of certain U.S. patents
and other intellectual property rights owned by Macrovision
Corporation and other rights owners. Use of this copyright
protection technology must be authorized by Macrovision
Corporation, and is intended for home and other limited
viewing uses only unless otherwise authorized by
Macrovision Corporation. Reverse engineering or
disassembly is prohibited.
Index
English -------------------------------------------------------- 5
English
Français ------------------------------------------------------ 28
Français
Español ------------------------------------------------------ 51
Español
Laser
Type Semiconductor laser GaAIAs
Wave length 650nm
Output Power 7mW
Beam divergence 60 degree
The set complies with the FCC-Rules, Part 15
and with 21 CFR 1040.1. Operation is subject
to the following two conditions:
1. This device may not cause harmful
interference, and
2. This device must accept any interference
received, including interference that may
cause undesired operation.
CAUTION
Use of controls or adjustments or
performance of procedures other than
herein may result in hazardous radiation
exposure or other unsafe operation.
ATTENTION
L'utilisation des commandes ou réglages ou
le non-respect des procédures ci-incluses
peuvent se traduire par une exposition
dangereuse à l'irradiation.
ATENCIÓN
El uso de mando o ajustes o la ejecucción de
métodos que no sean los aquí descritos
puede ocasionar peligro de exposición a
radiación.
NOTE:
PICTURES SHOWN MAY BE DIFFERENT BETWEEN
COUNTRIES.
NEVER MAKE OR CHANGE CONNECTIONS WITH THE
POWER SWITCHED ON.
INDEX
3
Page 6
IMPORTANT SAFETY INSTRUCTIONS
1.
Read these instructions.
2.
Keep these instructions.
3.
Heed all warnings.
4.
Follow all instructions.
5.
Do not use this apparatus near water.
6.
Clean only with dry cloth.
7.
Do not block any ventilation openings.Install in
accordance with the manufacturer´s instructions.
8.
Do not install near any heat sources such as
radiators, heat registers, stoves, or other apparatus
(including amplifiers) that produce heat.
9.
Do not defeat the safety
purpose of the polarized or
grounding-type plug. A polarized plug
has two blades with one wider than
the other. A grounding type plug has two blades and a third
grounding prong.The wide blade or the third prong are
provided for your safety. If the provided plug does not fit
into your outlet, consult an electrician for replacement of
the obsolete outlet.
AC Polarized
Plug
11.
Only use attachments/accessories specified by the
manufacturer.
12.
13.
Unplug this apparatus during lightning storms or when
unused for long periods of time.
14.
Refer all servicing to qualified service personnel.
Servicing is required when the apparatus has been
damaged in any way, such as power-supply cord or plug is
damaged, liquid has been spilled or objects have fallen into
the apparatus, the apparatus has been exposed to rain or
moisture, does not operate normally, or has been dropped.
15.
Battery usage
leakage which may result in bodily injury, proper ty damage,
or damage to the unit:
●
Install all batteries correctly, + and - as marked on the unit.
●
Do not mix batteries (old and new or carbon and
alkaline, etc.).
Use only with the cart, stand, tripod,
bracket, or table specified by the manufacturer
or sold with the apparatus. When a cart is used,
use caution when moving the cart/apparatus
combination to avoid injury from tip-over.
CAUTION
– To prevent batter y
10.
Protect the power cord from being walked on or
pinched, particularly at plugs, convenience receptacles, and
the point where they exit from the apparatus.
WARNING!
To reduce the risk of fire or electric shock, this
apparatus should not be exposed to rain or
moisture, and objects filled with liquids, such as
vases, should not be placed on this apparatus.
●
Remove batteries when the unit is not used for a long time.
EL 6475-E004: 02/8
Class II equipment symbol
This symbol indicates that the unit has
a double insulation system
4
Page 7

Contents
Introduction and General
Information
Features ............................................................................... 6
Discs for playback ............................................................. 6
Player zone
Supplied accessories ......................................................... 6
Environmental information.............................................. 6
Installation ........................................................................... 6
Maintenance........................................................................ 6
Functional Overview
Front and Rear panels ...................................................... 7
Remote Control ................................................................ 8
Connections
Step 1: Connecting antennas........................................... 9
AM Indoor Loop Antenna
FM Indoor Antenna
FM Outdoor Antenna
Step 2: Connecting the speakers.................................. 10
Step 3: Connecting a TV ................................................. 10
Connecting additional components ............................10
Operations
Discs information ............................................................17
Basic playback............................................................ 17–18
Skipping to another track/chapter
Fast Search
Continue playback from the last stop point
Repeat play
Repeat A-B
Program favorite tracks
Special DVD/VCD features .....................................18-20
Changing subtitle language
Changing sound track language
Playing in slow motion mode
Searching for a particular passage
Display the disc information during playback
Moving to another title/chapter
Playback from a selected point
Zooming in
Viewing from another angle
Advancing by frames
Checking the contents of DVD
Special VCD/SVCD features ......................................... 20
Playback Control (PBC)
Special MP3-CD features............................................... 21
MP3-CD menu
English
Preparations
Inserting batteries into the remote control.............. 11
Switching on the system ................................................11
Setting up the surround sound system ............... 11–12
Placing the speakers
Changing the volume level
Setting up the subwoofer .............................................. 12
System Setup (DVD) ............................................... 12–14
General operation
Setting the picture
Setting the sound
Setting the language
Setting the features
Basic Functions
Selecting the surround sound mode ........................... 15
Selecting the digital sound effect ................................. 15
Volume control ................................................................ 16
Adjusting the tone........................................................... 16
Dimming the display screen .......................................... 16
Other Functions
Tuning to radio stations .................................................22
Presetting radio stations ................................................ 22
Listening to preset radio stations ................................ 22
Sleep timer setting ..........................................................22
Specifications .............................................23
Troubleshooting ......................................24
CONTENTS
5
Page 8

Introduction and General Information
1
English
Features
Your complete 7-piece DVD Digital Home Cinema System
creates the same dynamic sound qualities that you find in
full-fledged cinemas and incorporates some of the best
features in home theater technology.
Other features include:
Built-in DTS and Dolby
supporting Dolby
Lets you use the Home Cinema Audio System for a movietheater surround sound experience.
Additional Component Connections
Lets you connect other audio and audio/visual components
to the DVD system so you can use the system’s surround
sound speakers.
Night Mode
Lets you compress the dynamic range, reducing the
difference in loudness between different sounds in Dolby
Digital mode.
Parental Control (Rating Level)
Lets you set a ratings level so that your children cannot
watch a DVD that has a rating higher than you set.
Sleep Timer
Enables the system to switch to standby mode
automatically at a preset time.
R
R
Digital decoder,
ProLogic and virtual surround
Discs for playback
Your DVD player is able to play :
– All pre-recorded audio CDs
– All finalized audio CDR and audio CDRW discs
– All VCDs, Super VCDs and DVDs
– MP3-CDs (CD-ROMs with MP3 tracks)
SUPER VIDEO
Player zone
DVD discs and players are designed with regional
restrictions. Before playing a disc, make sure the disc is the
same zone as your player.
The region code for this DVD player is 1.
Supplied accessories
– Remote control with two AA batteries
– AM loop antenna and FM wire antenna
– Audio cable (white/red), video cable (yellow)
– Five satellite speakers, including five speaker cables
– Active subwoofer, including a connection cable
– This instruction booklet and Quick Use Guide
If any item is damaged or missing, contact your retailer or
Philips.
Environmental information
All unnecessary packaging has been omitted. We have tried
to make the packaging easy to separate into three materials:
cardboard (box), polystyrene foam (buffer) and
polyethylene (bags, protective foam sheet).
Your system consists of materials which can be recycled
and reused if disassembled by a specialized company. Please
observe the local regulations regarding the disposal of
packaging materials, exhausted batteries and old equipment.
Installation
● Place the player on a flat, hard, and stable surface.
● There must be sufficient room in front of the player for the
drawer to open.
● In a cabinet, allows about 10cm (4 inches) of free space all
around the player for adequate ventilation.
● Do not expose your player to extreme temperatures or
humidity.
Maintenance
● When a disc becomes dirty, clean it with a
cleaning cloth. Wipe the disc from the
center out, in a straight line.
● Do not expose the player, batteries or
discs to humidity, rain, sand or excessive
heat (caused by heating equipment or
direct sunlight). Always keep the disc tray closed to avoid
dust on the lens.
● Do not use solvents such as benzene, thinner, commercially
available cleaners, or anti-static spray intended for analog
discs.
● The lens may cloud over when the player is suddenly
moved from cold to warm surroundings, making it
impossible to play a disc. Leave the player in the warm
environment until the moisture evaporates.
6
INTRODUCTION AND GENERAL INFORMATION
Page 9

Front and Rear panels
Functional Overview
STANDBY-ON
DVD VIDEO DIGITAL SURROUND SYSTEM
OPEN•CLOSE
312 4 6580
1 STANDBY ON y
– to switch between power on and standby modes.
2 OPEN/CLOSE 0 (in Disc mode only)
– to open or close the disc tray.
3 Disc Tray
4 Display screen
– to display details for user’s information.
5 PLAY/PAUSEÉÅ (in Disc mode only)
– to start or interrupt disc playback.
6 PREV S / NEXT T
– in Disc mode, press to skip to the previous/next
chapter/track.
– in Disc mode, hold down to fast reverse/forward.
– in Tuner mode, to tune to a lower or higher radio
frequency.
7 STOP Ç (in Disc mode only)
– to stop playing the disc.
PLAY•PAUSE
STOP BASS
PROGRAM
PREV NEXT SURROUND
7
9
VOLUMESOURCE
!
@
TREBLE
#
8 SURROUND
– to select multichannel surround (Dolby Digital, DTS
or Dolby ProLogic) or stereo sound effect.
9 PROGRAM
– in Disc mode, to program disc tracks.
– in Tuner mode, to program preset radio stations.
0 SOURCE
– to select the desired source or external input source
(TV/AV, DISC, TUNER or AUX).
! VOLUME
– to adjust the master volume.
– to adjust the bass/treble tone level.
@ n
– to connect headphones.
# BASS / TREBLE
– to select Bass/Treble adjustment mode.
English
AM/FM
ANTENNA
1 2
WOOFER
L
LINE OUT
R
OPTICAL COAXIAL A UX TV
DIGITAL OUT
AUDIO IN
3
4 7 8 9 0 !
AUDIO
OUT
5
6
1 AM/FM ANTENNA
– connect to the AM loop antenna or FM antenna.
2 DIGITAL OUT-OPTICAL
– connect to audio equipment with digital-optical audio
input.
3 DIGITAL OUT-COAXIAL
– connect to audio equipment with digital-coaxial audio
input.
4 AUDIO IN (TV / AUX)
– connect to the analog audio outputs of a TV or VCR.
5 AUDIO OUT
– connect to the analog audio inputs of an external
recording device or amplifier.
6 WOOFER LINE OUT
– connect to an active subwoofer.
Pb/Cb
Pr/Cr
Y
COMPONENT
VIDEO OUT
S-VIDEO
OUT
VIDEO
OUT
7 SPEAKERS
– connect to the front, center and surround speakers.
8 COMPONENT VIDEO OUT (Pr/Cr Pb/Cb Y)
– connect to TV with Pr/Cr Pb/Cb Y inputs.
9 S-VIDEO OUT
– connect to a TV with S-video input.
0 VIDEO OUT
– connect to a TV with video input.
! AC Power Cord
– connect to a standard AC outlet.
Caution: Do not touch the inner pins of the jacks
on the rear panel. Electrostatic discharge may
cause permanent damage to the unit.
FUNCTIONAL OVERVIEW
7
Page 10
English
Remote Control
1
2
3
4
5
6
7
8
9
0
!
Notes for remote control:
– First, select the source you wish to control by
pressing one of the source select keys on the remote
control (DISC or TUNER, for example).
É
,
– Then select the desired function (
for example).
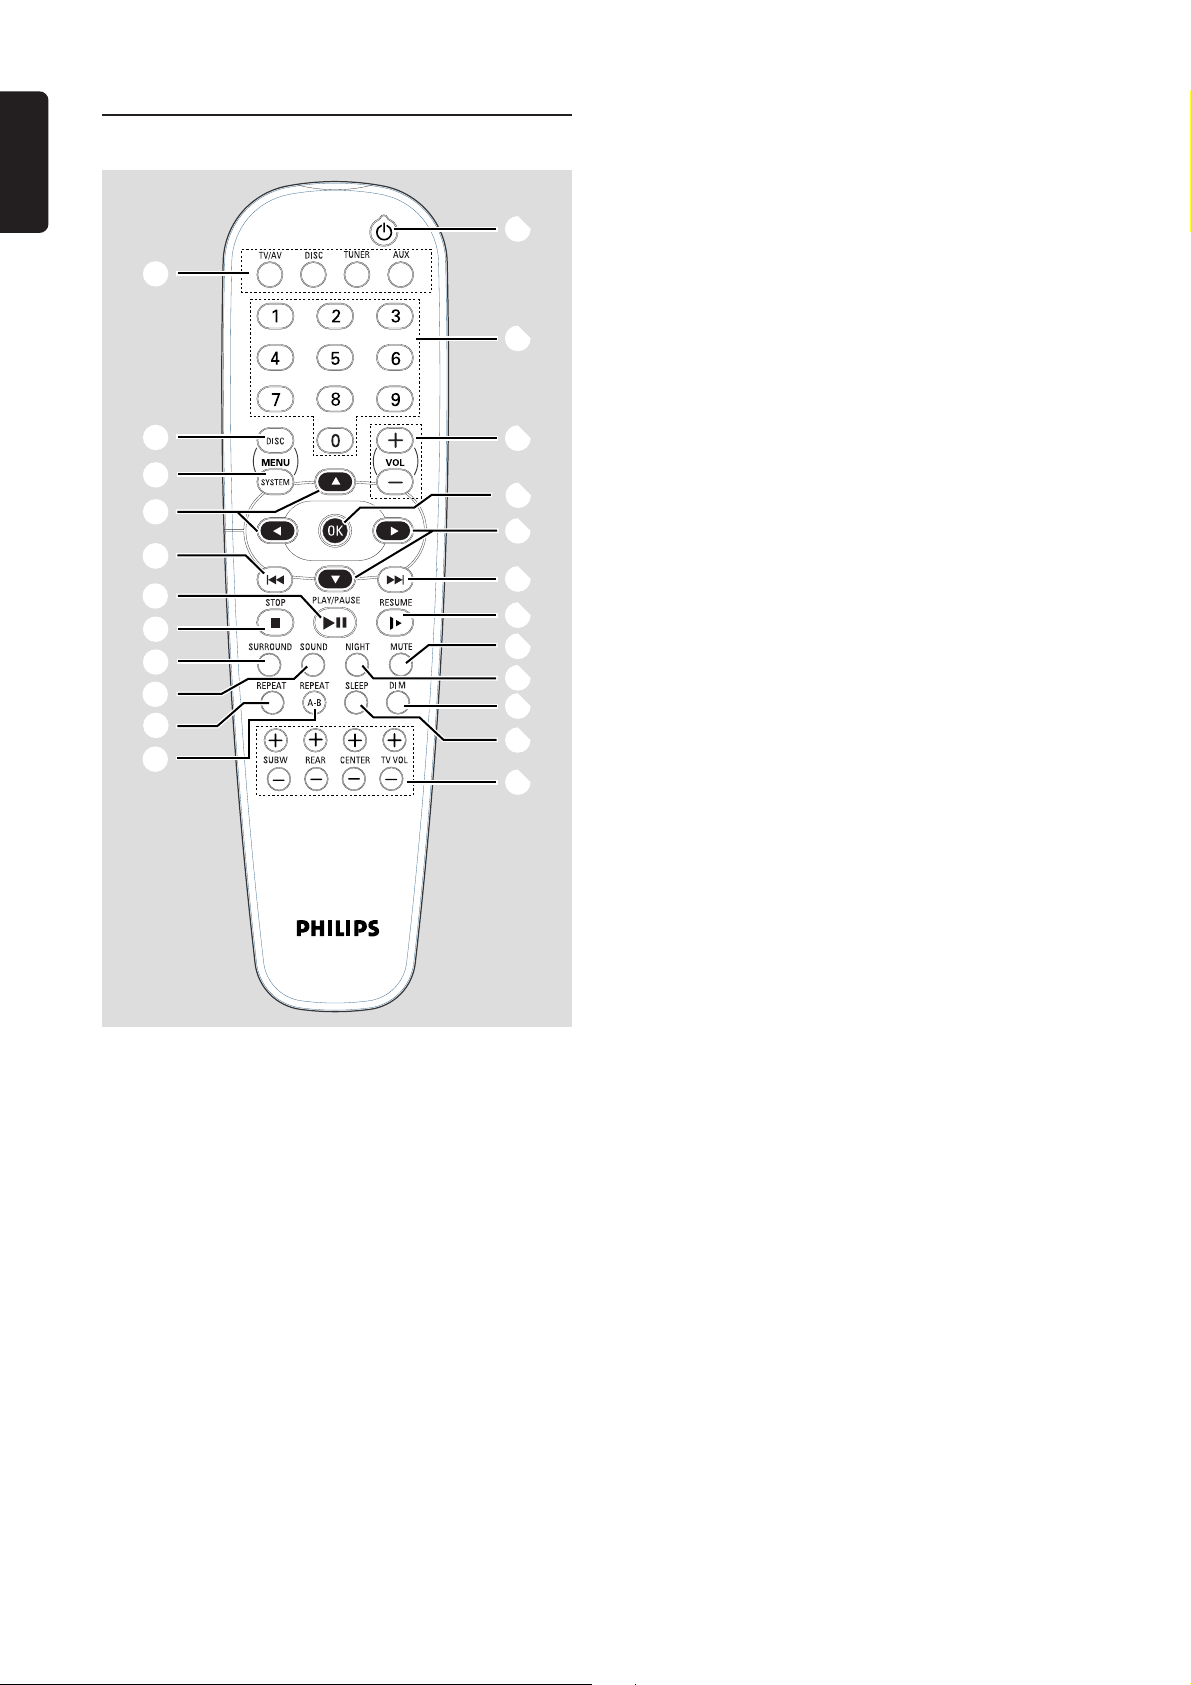
1 SOURCE
– to select the desired source (TV/AV, DISC, TUNER or
AUX).
2 DISC MENU (disc mode only)
– to enter or exit the disc contents menu.
3 SYSTEM MENU (disc mode only)
– to enter or exit the system menu bar.
4 3 4 1 2
– in Tuner mode, to select a preset radio station
number (1 or 2).
– to select movement direction in disc contents menu /
system menu bar.
S
,
(¡
()
((
*
4
(5
(&
(^
(%
($
#
@
T
5 S / T
– in disc mode, press to skip to the previous/next
chapter/track.
– in disc mode, hold down to fast reverse/forward the
disc.
– in Tuner mode, to tune to a lower or higher radio
frequency.
6 ÉÅ
– to start or interrupt disc playback.
7 Ç
– to stop playing the disc.
8 SURROUND
– to select multichannel surround (Dolby Digital, DTS
or Dolby ProLogic) or stereo sound effect.
9 SOUND
– to select the various sound effects : CONCERT,
DRAMA, ACTION, SCI-FI, CLASSIC, JAZZ, ROCK or
DIGITAL.
0 REPEAT
– to repeat chapter, track or disc.
! REPEAT A-B
– to repeat a specific section on a disc.
@ SUBW +/-
– to adjust the subwoofer’s level.
REAR +/-
– to adjust the rear (surround) speakers’ level.
CENTER +/-
– to adjust the center speaker’s level.
TV VOL +/-
– to adjust Philips television’s volume level.
# SLEEP
– to set the sleep (auto-off) timer function.
$ DIM
– to select different brightness for the display screen.
% NIGHT (DVD mode only)
– to optimize the dynamics of the sound output.
^ MUTE
– to interrupt or resume sound reproduction.
& RESUME
– to continue disc playback after an interruption.
* OK
– to enter or confirm the selection.
( VOL +/-
– to adjust the volume level.
) Numeric Keypad (0-9)
– to enter a track/title number of the disc.
– to enter a number of preset radio stations.
¡ y
– to switch to standby mode.
8
FUNCTIONAL OVERVIEW
Page 11
Connections
SPEAKERS
Rear of TV
(example only)
Front Speaker (Right)
Front Speaker (Left)
English
Center Speaker
75
V
S-VIDEO
I
N
Pr/
C
r
AUDI
O
U
T
O
Pb/
C
b
L
VIDEO I
N
Y
R
1
FM Antenna
AM Antenna
3
AM/FM
ANTENNA
WOOFER
L
LINE OUT
R
OPTICAL COAXIAL AU X TV
AUDIO IN
DIGITAL OUT
+
AUDIO
OUT
Rear Speaker
(Surround Right)
FL CFR SLSR
FL CFR
SPEAKERS
3
+
(4 )
Pb/Cb
Pr/Cr
Rear Speaker
(Surround Left)
Y
2
Rear of System
2
Subwoofer
AUDIO
INPUT
2
IMPORTANT!
– Before connecting the AC power cord to the
wall outlet, ensure that all other connections have
been made.
– Never make or change any connections with
the power switched on.
– The type plate is located at the rear or bottom
of the system.
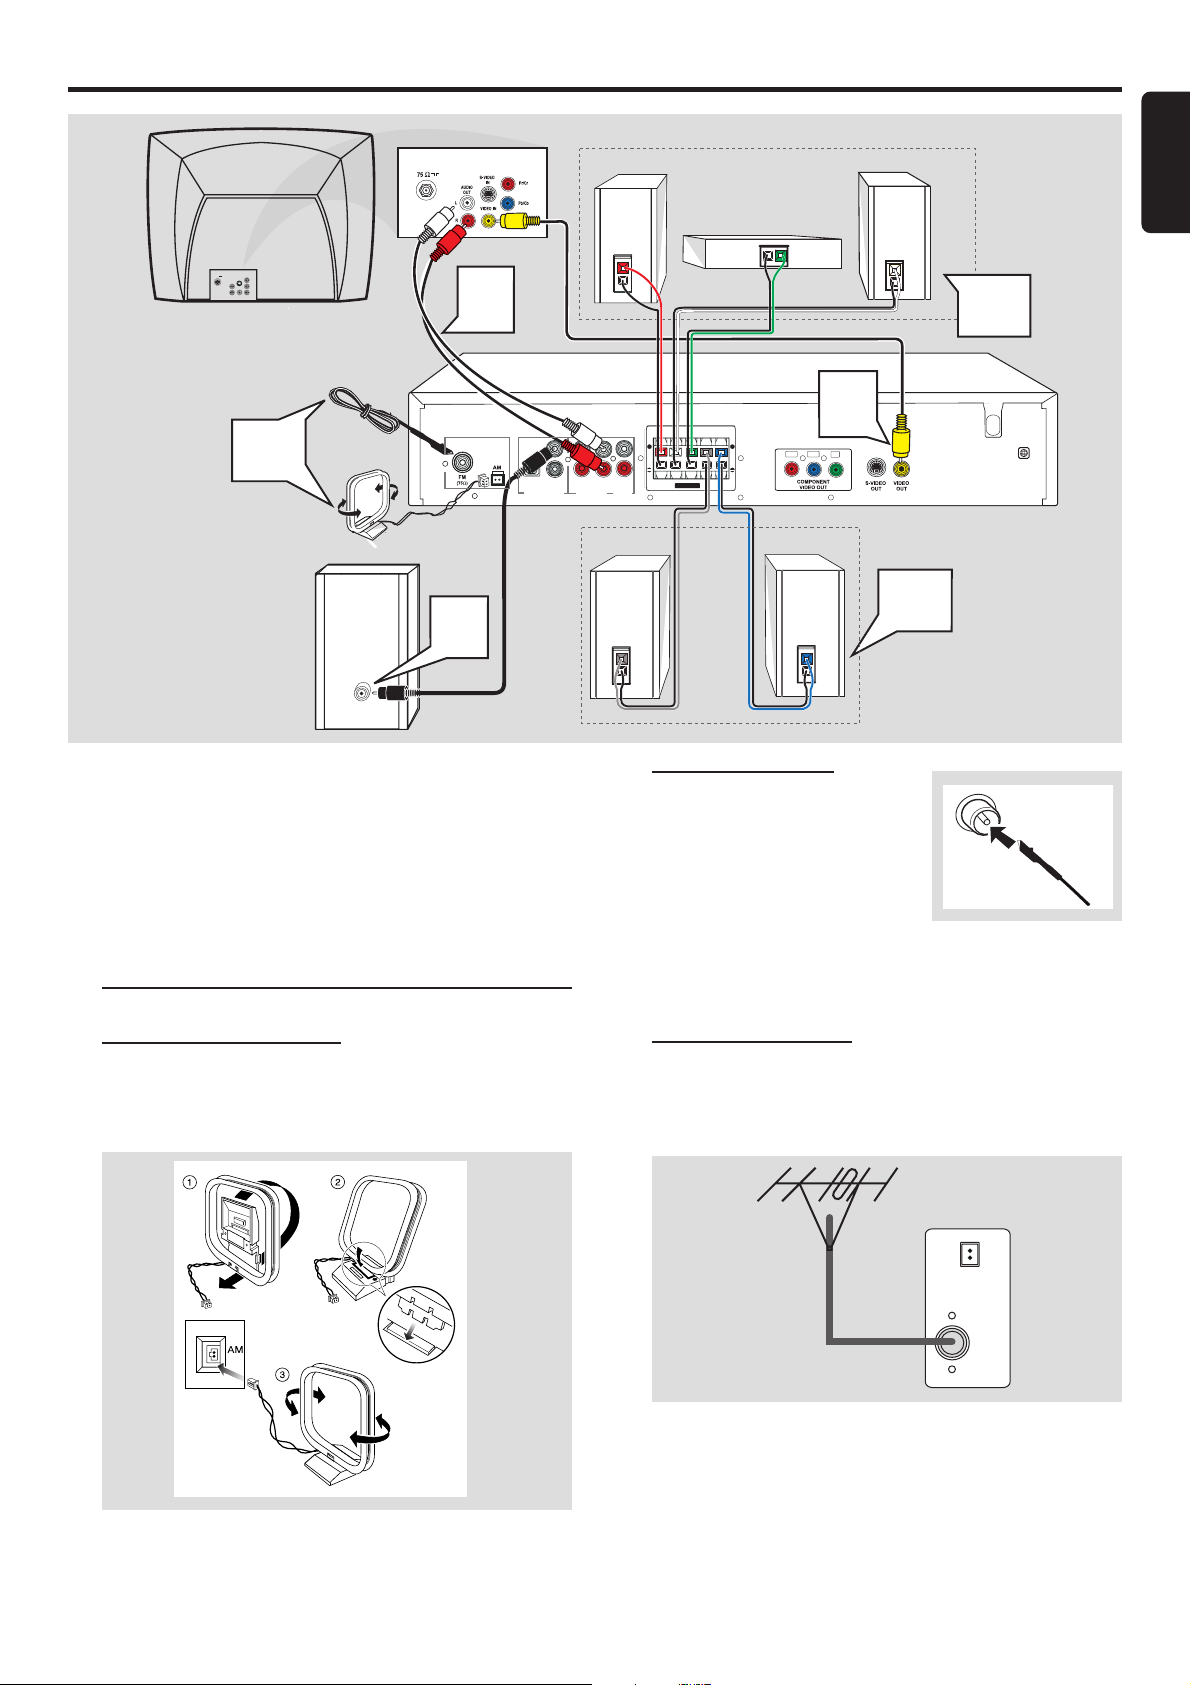
Step 1: Connecting antennas
AM Indoor Loop Antenna
Connect the supplied AM loop antenna to the AM
jack. Position the loop antenna to receive the clearest
sound.
Fix the claw
to the slot
FM Indoor Antenna
Connect the supplied FM
antenna to the FM jack. Move
the antenna in various directions
until the clearest signal is
received.
Note:
– Keep the antenna as far away as possible from the TV, VCR
or any radiation source to prevent unwanted noise.
FM Outdoor Antenna
For better FM reception, use a 75 ohm coaxial cable (not
supplied) to connect the system to an outdoor FM antenna
as shown.
AM
FM
(75 Ω)
CONNECTIONS
9
Page 12
English
Step 2: Connecting the
speakers
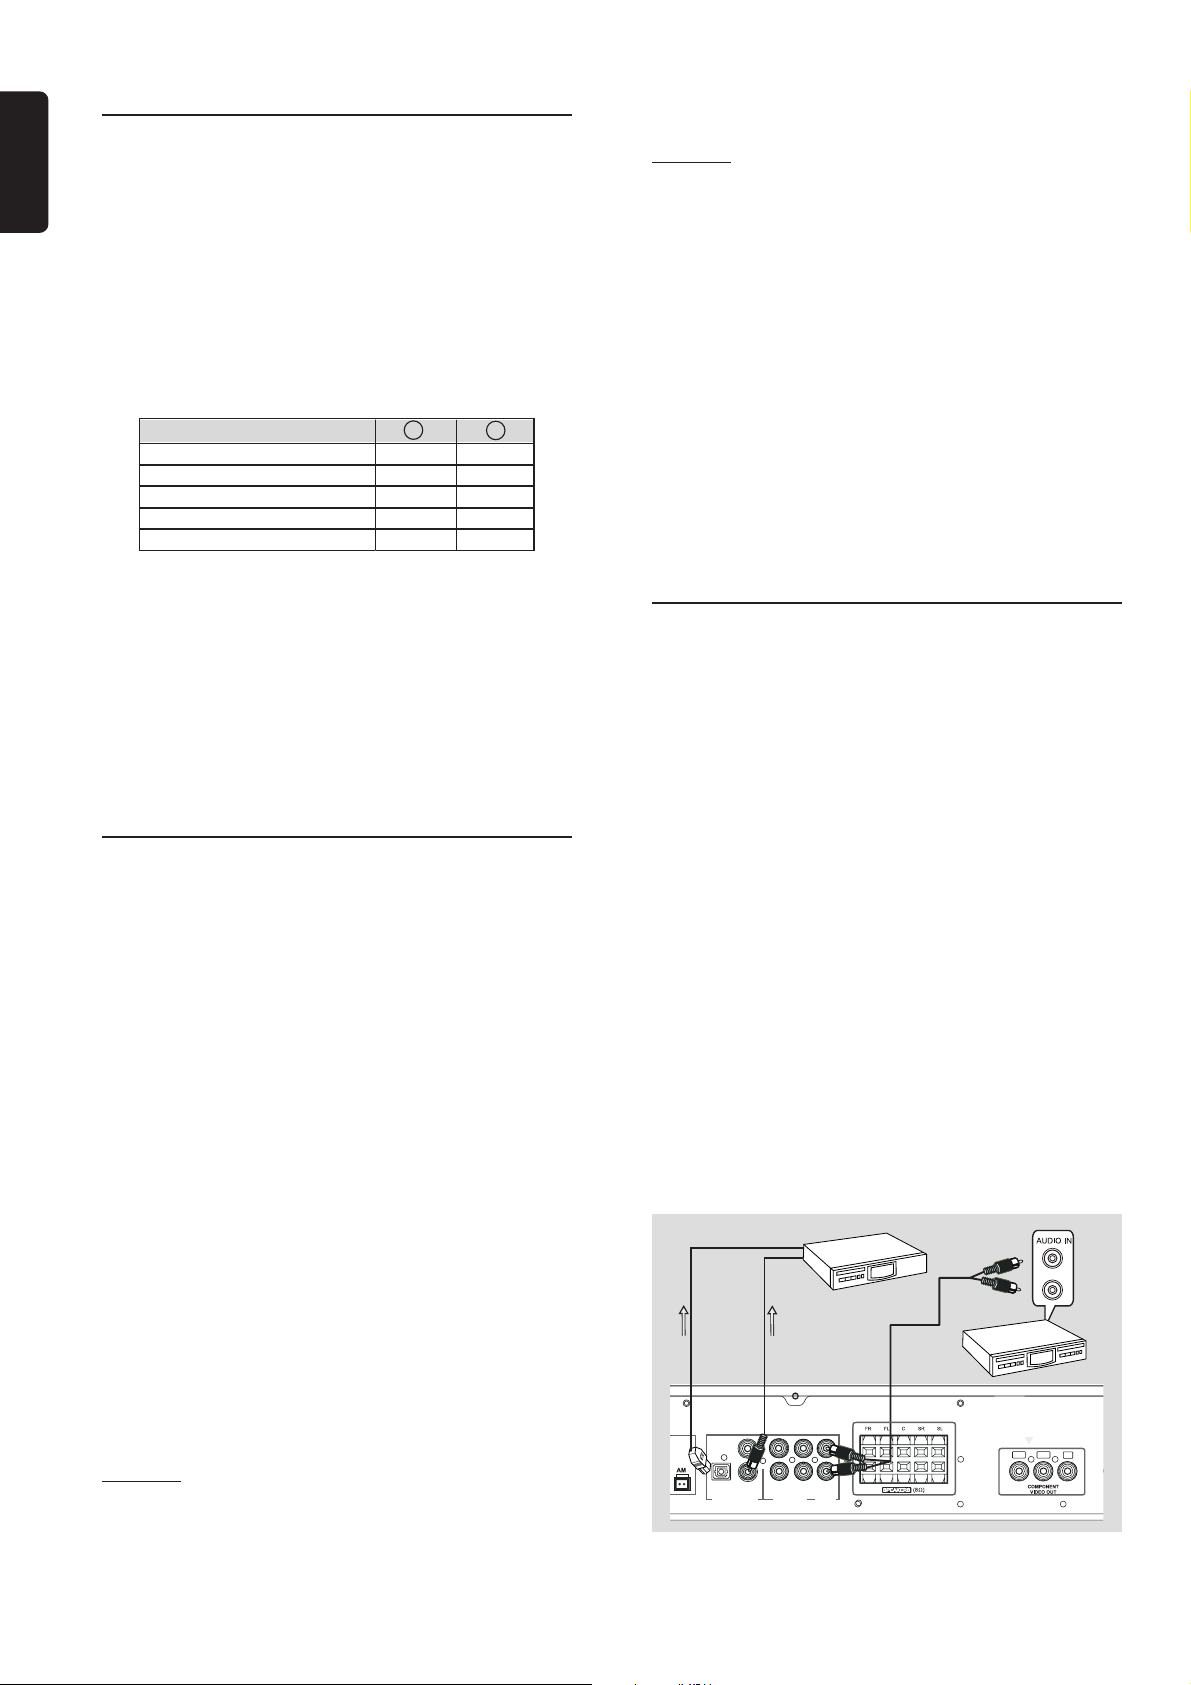
Connect the supplied speaker systems using the supplied
speaker cables by matching the colors of the jacks and
speaker cables.
1 Press up (or down) the speaker’s jack and fully insert the
stripped portion of the speaker cable into the jack, then
release.
2 Connect the subwoofer’s audio input to the WOOFER
LINE OUT jack and the speakers as follows :
Speakers
Front Left (FL) black white
Front Right (FR) black red
Center (C) black green
Surround Left (SL) black blue
Surround Right (SR) black gray
Notes:
– Ensure that the speaker cables are correctly connected.
Improper connections may damage the system due to shortcircuit.
– For optimal sound performance, use the supplied speakers.
– Do not connect more than one speaker to any one pair of
+/- speaker jacks.
– Do not connect speakers with impedance lower than the
speakers supplied. Please refer to the SPECIFICATIONS
section of this manual.
- +
Step 3: Connecting a TV
IMPORTANT!
– There are various ways to connect the system
to a TV (as shown in the illustration), it depends
on the capabilities of your TV system.
OR
Option 2
Use the component video cables (red/blue/green) (not
supplied) to connect the system’s Pr/Cr Pb/Cb Y jacks to
the corresponding Pr/Cr Pb/Cb Y input jacks on the TV.
IMPORTANT!
If S-VIDEO or Component video Pr/Cr Pb/Cb Y is
used for DVD playback connection, the system’s
VIDEO OUT setting will need to be set
accordingly. Details are on pages 12-13.
● If your TV only has an RF-style jack (Antenna In or
75 ohm)
You will need an RF modulator in order to view the
playback of DVD dics on your TV. Ask your dealer for
details on RF modulator availability and compatibility.
Follow the instructions provided with the RF modulator to
connect the DVD system to your TV
Connecting additional
components
● To connect additional components
Use the AUDIO OUT jacks
– for connecting to an amplifier, audio system or TV with
analog audio inputs.
– for connecting to a CD or Tape recorder to make an analog
recording.
Use the OPTICAL or COAXIAL jacks
– for connecting to an amplifier with DTS, Dolby Digital
decoder or CD recorder.
You will need to set the DVD system’s digital output to
“ALL” (refer to “Preparations - System setup (DVD)”).
To listen to the TV broadcast channels or VCR
●
playback through the home cinema sound
system
Use the supplied audio cables (white/red) to connect
AUDIO IN (TV or AUX) jacks to the corresponding
AUDIO OUT jacks on the TV, VCR or other audio/visual
components.
Before start operation, press TV/AV or AUX on the
remote control to activate the corresponding input source.
To view the DVD playback
●
Use the video cable (yellow) to connect the system’s
VIDEO OUT jack to the video input jack on the TV.
You can make an extra video connection with
●
one of the following options if your TV has the
same input connector
Option 1
Use the S-video cable to connect the system’s S-VIDEO
OUT jack to the S-Video input jack on the TV.
Notes:
– MP3 audio is not available on the digital output.
– Digital recording is only possible on a CD or VCD.
– Always refer to the instruction manual of the connected
equipment to make an optimal connection.
– Some DVD discs have anti-copying devices, so you will not
be able to record the disc through a VCR.
OPTICAL IN
COAXIAL IN
WOOFER
A
L
LINE OUT
R
OPTICAL COAXIAL AU X T V
DIGITAL OUT
AUDIO IN
AUDIO
OUT
Pb/Cb
Pr/Cr
Y
10
CONNECTIONS
Page 13
Preparations
Inserting batteries into the
remote control
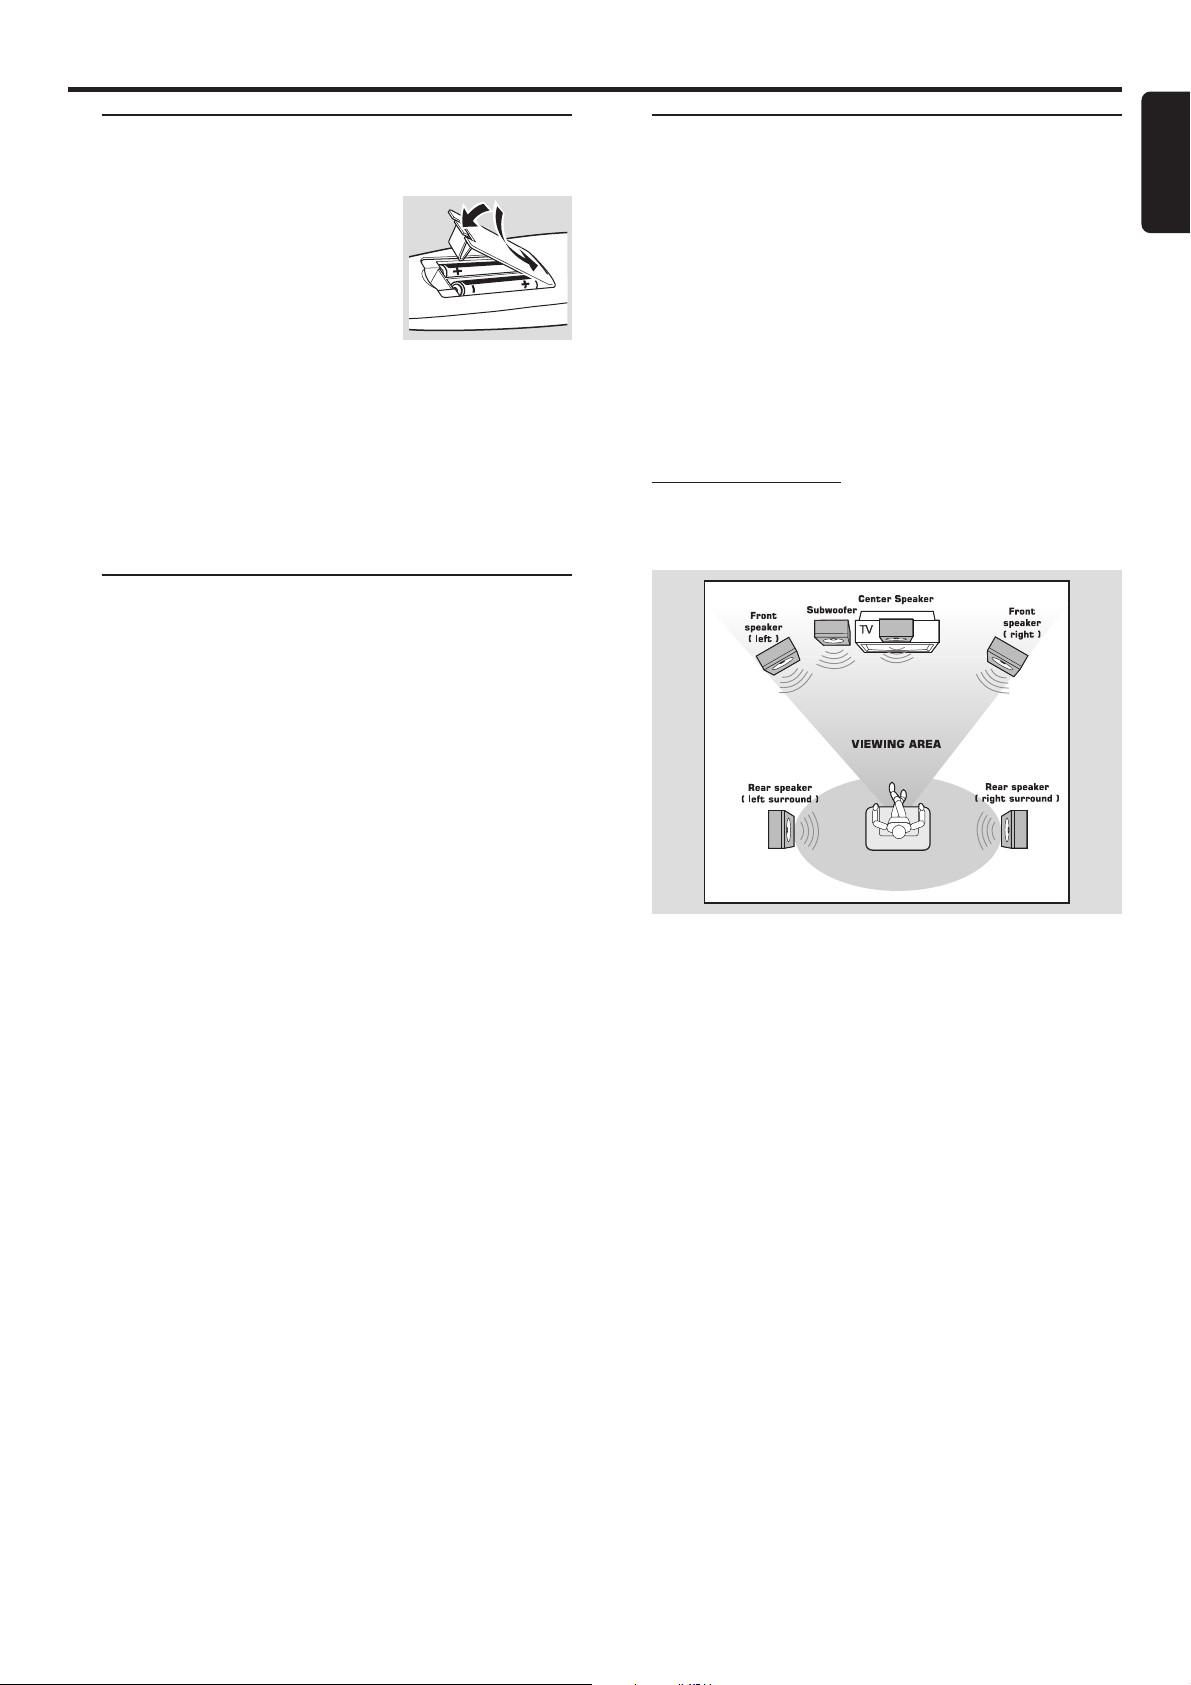
1 Open the battery compar tment.
2 Place the batteries in the
compartment with the correct
polarity as indicated by “+“ and “- “
symbols.
3 Close the cover.
CAUTION!
– Remove batteries if they are exhausted or will
not be used for a long time.
– Do not use old and new or different types of
batteries in combination.
– Batteries contain chemical substances, so they
should be disposed of properly.
Switching on the system
1 After completing all the connections, connect the AC
power cord of the player and subwoofer to the power
outlet.
2 Press STANDBY ON to switch on the last selected
source.
3 Adjust the SOURCE button (or press TV/AV, DISC,
TUNER or AUX) to select the input source.
➜ The selected source will be displayed.
● For viewing a DVD or VCD disc, a TV set needs to be
connected (refer to “Connections - Connecting a TV and
additional components”).
Switch on the TV and set to the correct video in channel
(for example, EXT1, EXT2, AV1, AV2). Refer to your TV
instruction manual for details.
➜ The default screen appears on the TV.
● You can connect other external components to the DVD
system in order to use the Home Theater Audio System’s
surround sound capabilities. For example, connect to a TV
and select TV/AV as the input source or connect to a VCR
and select AUX as the input source.
Setting up the surround sound
system
You must connect all the speakers and set up the system
properly in order to enjoy the Digital Cinema experience at
home (refer to “Connections - Connecting the speakers”).
You will have the feeling of being in the middle of the action
because sound is coming from everywhere around you.
The subwoofer can enhance the bass performance of your
system dramatically.
IMPORTANT!
Please sit at your usual listening position in order
to set up the speaker balance correctly.
Placing the speakers
To obtain the best surround effect, place the speakers as
follows.
1 Place the front left and right speakers at equal distances
from the TV and at an angle of approximately 45 degrees
from the listening position.
2 Place the center speaker above or below the TV so the
center channel’s sound is localized.
3 Place the surround speakers at normal listening ear level
facing each other or mounted on the wall.
4 Place the subwoofer on the floor near the TV.
English
Notes:
– To avoid magnetic interference, do not position the front
speakers too close to your TV.
– If the rear surround speakers are installed farther away
from the listening position than the front and center speakers,
it will weaken the surround effect.
– All speakers should be securely installed to prevent
accidents and improve sound quality.
PREPARATIONS
11
Page 14
English
Changing the volume level
You can change the speakers’ sound distribution to suit
your surround sound needs.
● Press CENTER +/- to adjust the level of the center
speaker.
➜ “CNT +XX DB” is displayed.
● Press REAR +/- to adjust the level of the rear
surround speakers.
➜ “RE +XX DB” is displayed.
System Setup (DVD)
The system setup is carried out via the TV, it enabling you
to customize the DVD system to suit your particular
requirement. If the preferred options selected are not
available on a disc, then the disc’s own preference will be
used.
IMPORTANT !
To access the System Setup menu, playback must
be stopped.
Note:
–“XX” denotes the volume level between -15db to 10db.
Setting up the subwoofer
1 Use the supplied subwoofer cable to connect the
subwoofer’s audio input jack to the WOOFER LINE
OUT of the DVD system.
2 Connect the subwoofer’s AC power cable to the wall
socket and switch on the power.
3 Rotate the VOLUME knob at the front panel of
subwoofer until you hear a click, clockwise to switch on and
counter-clockwise to switch off.
➜ The LED indicator will light up in green when the
subwoofer is switched on.
4 Select the phase polarity at the rear of the subwoofer at
either 0
effect in certain listening environment.
5 Press SUBW +/- to adjust the volume level of the
subwoofer (-15dB to 10dB).
➜ “SUB +XX DB” is displayed.
o
or 180o to determine better bass reproduction
General operation
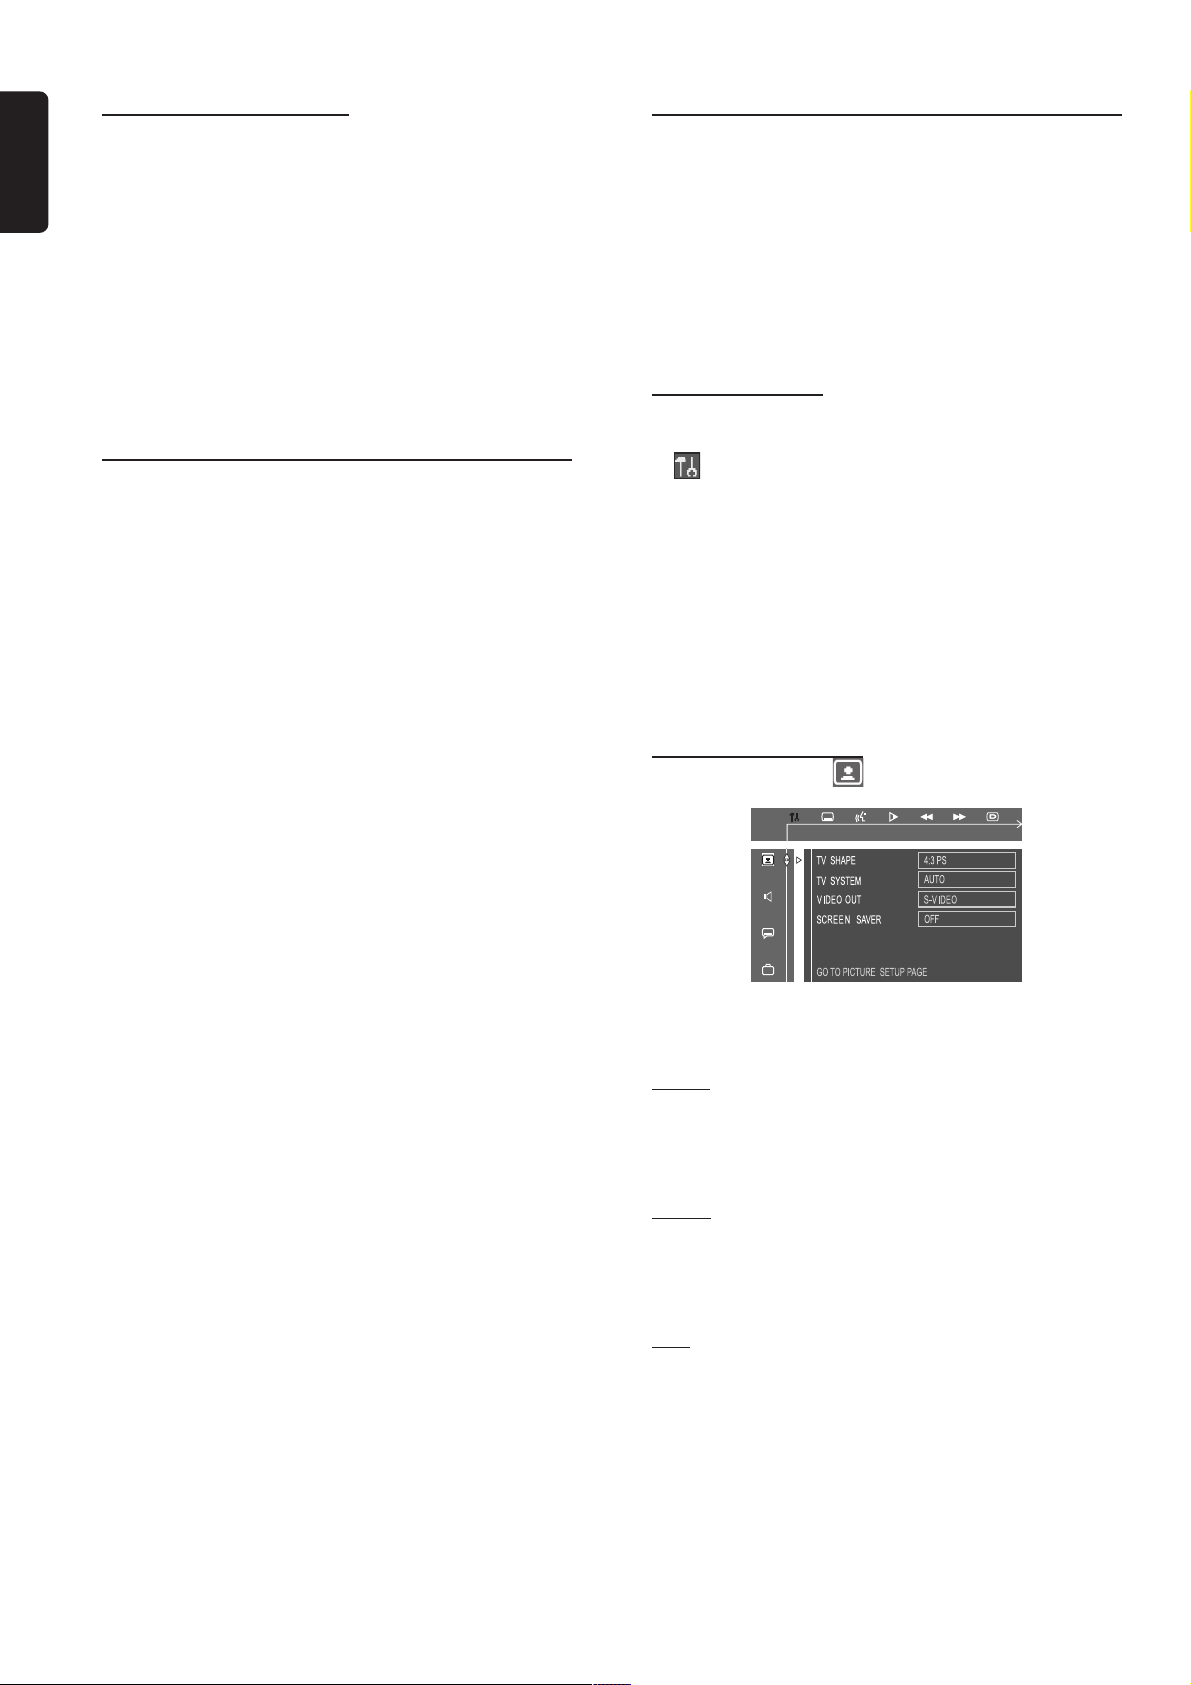
1 Press SYSTEM MENU.
icon will be highlighted in the menu bar on the TV
➜
screen.
2 Press 4 to activate the System Setup menu.
3 Use 1 2 34 keys to toggle through the functions and
select your preferred option.
4 Press OK to confirm a highlighted selection.
5 To exit the System Setup menu, press SYSTEM MENU
or OK.
The following items are available :
Setting the picture
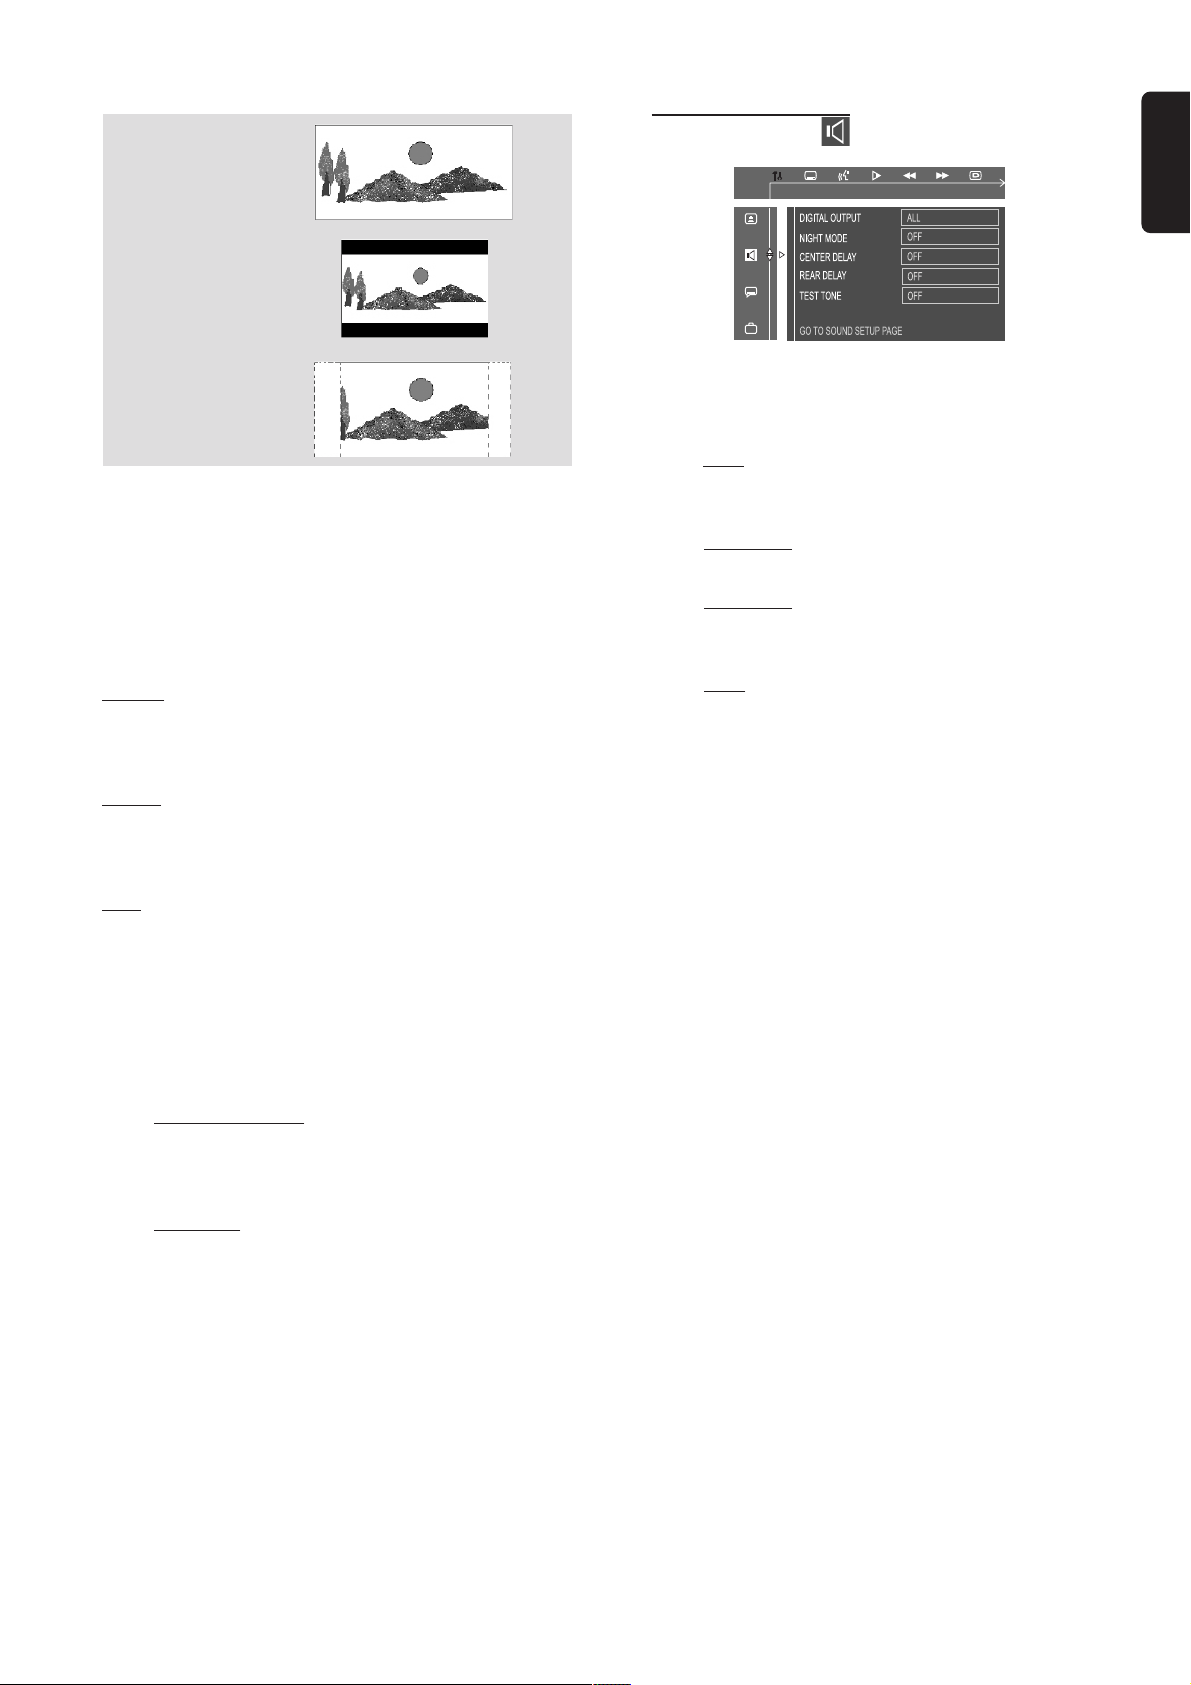
– TV Shape
Select the aspect ratio of the TV to be connected.
4:3 PS
– If you have a conventional TV set and your DVD is not
formatted for widescreen viewing, use this setting. A wide
picture is displayed on the whole TV screen with a portion
automatically cut off.
4:3 LB
– If you have a conventional TV set and your DVD is
formatted for widescreen viewing, use this setting. Wide
bands will be displayed on the upper and lower portions of
the TV screen.
16:9
– If you have a widescreen TV set, use this setting (you
must also set your widescreen TV to “full size”).
12
PREPARATIONS
Page 15
16:9
(Wide screen)
4:3 LB
(Letter Box)
Setting the sound
English
4:3 PS
(Pan Scan)
Note:
– If your DVD is not encoded to allow you to change the
aspect ratio, TV shape cannot be changed.
– TV System
Allows you to select the color system matching the
connected TV set.
AUTO
– If the connected TV is multi system, select this mode.
The output format will be in accordance with the video
signal of the disc.
NTSC
– If the connected TV is NTSC system, select this mode.
It will change the video signal of a PAL disc and output in
NTSC format.
PAL
– If the connected TV is PAL system, select this mode.
It will change the video signal of a NTSC disc and output in
PAL format.
– Video Out
Video out selection enables you to choose the type of
video output suitable for your DVD system.
¶ Select PR PB Y/SCART, if you have connected the video
output to your TV using the Component Video Out
(Pr/Cr Pb/Cb Y) jacks. (SCART feature is not available for
this model).
¶ Select S-VIDEO, if you have connected the video output
to your TV using S-Video jack.
– Screen Saver
If set to ON, when you leave the system in stop or pause
mode for more than one minute, the screen saver will be
activated. The default setting is OFF.
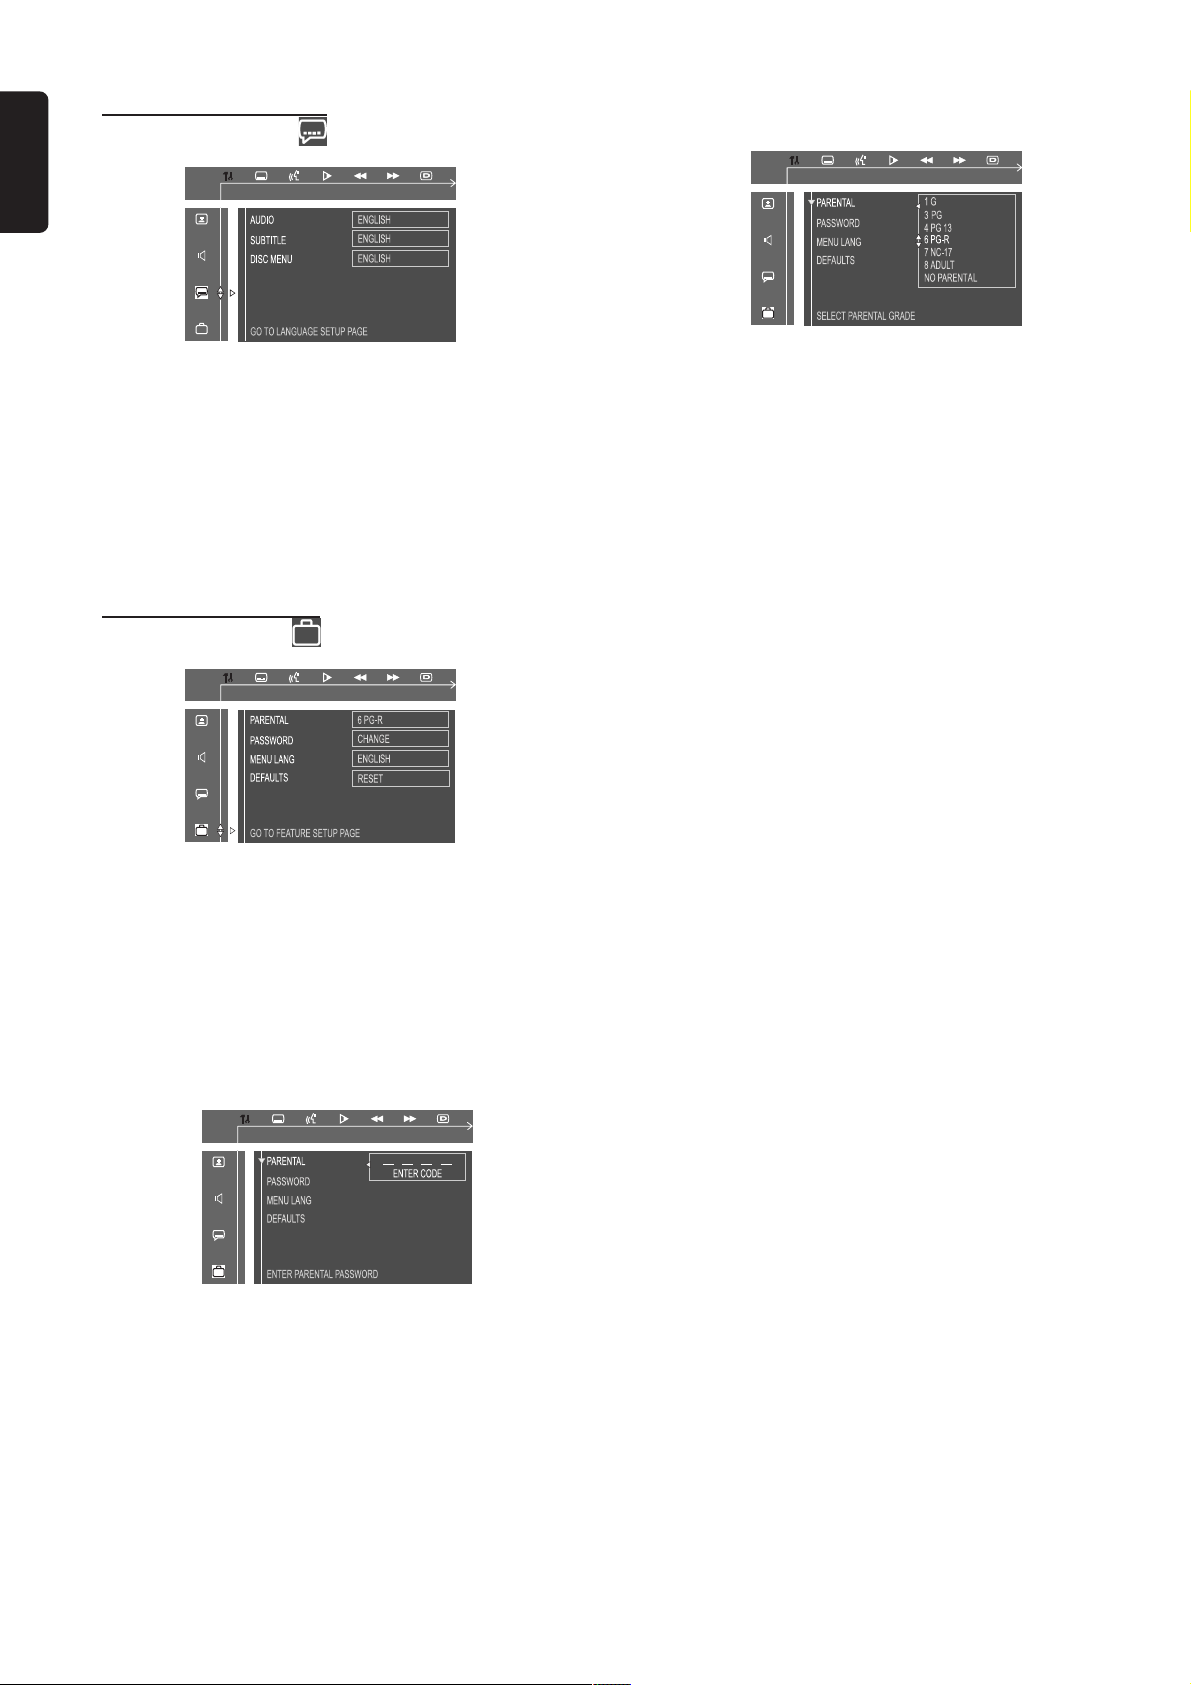
– Digital Output
Digital output selection enables you to specify the type of
digital output suitable for your DVD system.
¶ Select ALL, if you have connected the digital output
(COAXIAL or OPTICAL) to a multichannel decoder
receiver.
¶ Select PCM 96K if the external component is capable of
processing digital signal input with sampling rates of 96 kHz.
¶ Select PCM 48K if the external component is incapable of
processing 96 kHz digital signal input, then convert to
standard signal with sampling rates of 48 kHz.
¶ Select OFF to deactivate the digital output (COAXIAL or
OPTICAL).
– Night Mode
Set night mode to on to level out the volume. For
example, the disc will play at the same sound level
throughout the movie. The default setting is OFF.
Night function can also be accessed via the
remote control.
– Center Delay
If the listening position is closer to the center speaker than
the front speakers, you can set the center delay time to
improve the surround sound effect.
Options : 5ms, 3ms, 2ms, 1ms or OFF.
– Rear Delay
If the listening position is closer to the rear surround
speakers than the front speakers, you can set the rear delay
time to improve the surround sound effect.
Options : 15ms, 12ms, 9ms, 6ms, 3ms or OFF.
– Test Tone (disc mode only)
If set to ON, the system will test the speaker settings. The
test signal is generated through the left, center, right, and
surround speakers. The default setting is OFF.
PREPARATIONS
13
Page 16
English
Setting the language
2 Use 34 keys to select a rating level.
– Audio
– Subtitle
– Disc Menu
● This is to select the audio language, subtitle language and
the language used on TV screen menus or DVD menus that
will always be used for every disc to be played back. The
default setting is English.
● If the language selected is not available on the disc, the
original language designated by each disc will be selected.
Setting the features
– Parental
Enables setting of playback limitation level. Some DVDs may
have a parental level assigned to the complete disc or to
certain scenes on the disc. The rating levels are from 1 to 8
and are country dependent. You can prohibit the playing of
certain discs that are not suitable for your children or have
certain discs played with alternative scenes.
1 Enter the 4-digit code. If necessary, enter the code a second
time.
3 Press OK to confirm.
Rating - NO PARENT
If parental control is not activated, it will play all discs.
Rating - 1 to 8
If the player’s parental level is set below 8, only discs with a
lower or equal level will play. For example, if the player is
set to 5, only discs with ratings of 5, 4, 3, 2 and 1 will be
played. Higher rated scenes will not be played unless an
alternative that has the same rating or lower is available on
the disc. For example, consider a disc that generally is
suitable for most audiences, and it is rated at level 2 for the
most part. However, in the middle, there are also scenes
rated at 5 (not suitable for children).
To play a higher rated disc or scene than the level
set
● Enter the 4-digit code before resetting the rating level to a
higher number (go to “Password”).
If you forget the 4-digit code
1 Press Ç four times when prompted for the password
and the system will change back to the default password.
2 Go to “Password” and enter your new code.
Note:
– Some DVDs are not encoded with a rating though the
movie rating is printed on the disc jacket. The rating level
feature does not work for such discs.
– Password
To set a new password for the parental control or to
change the password. The password supplied as default is
1234.
14
PREPARATIONS
– Menu Language
Select the language for on screen display.
– Defaults
If RESET is selected, all the items in the setup menu will be
reset to default setting.
Page 17

Basic Functions
Selecting the surround sound
mode
IMPORTANT!
– For proper surround sound, make sure you have
followed the “Connections” and “Preparations”
procedures fully.
– The center and surround speakers only operate
when the system is set to surround sound mode
and the source material being played is recorded
or broadcast in Dolby Digital, DTS or Dolby Pro
Logic surround sound.
– Stereo broadcasts or recordings will produce
some surround channel effects when played in a
surround mode. However, monaural sources will not
produce any sound from the surround speakers.
● Press SURROUND to select surround or stereo mode.
➜ The availability of the various surround sound modes
depend on the number of speakers used and the incoming
sound information available on the disc. The available output
modes are shown below.
Dolby Digital Surround
Dolby Digital (also known as AC-3 or Dolby 5.1) and
MPEG Multichannel delivers a realistic and dynamic sound
similar to theater and cinema. It requires connection of all
five speakers (front left/right, center, surround left/right) and
subwoofer for correct Dolby Digital Surround sound
reproduction. Each channel plays its own unique role in
providing the right sound. Front left, center and right join
two surround speakers to reproduce high, mid and bass
frequencies in five full-range channels of surround. Bass
rumble, explosions and low frequency effects you feel are
delivered through the subwoofer. A large number of DVD
discs have been recorded in Dolby Digital Surround.
Matrix
A new surround playback system that delivers amazingly
rich and convincing four-channel surround outputs (front
left/right, surround left/right).
VSS (Virtual Surround Sound)
The ProLogic MPEG or Dolby Digital surround channel is
processed by a ‘vir tualizer’ DSP to add surround effect from
just the two front speakers.
Stereo
All sound is reproduced and played through the front left
and right speakers. This enables standard stereo
reproduction.
Selecting the digital sound
effect
The digital sound effects allow you to select from various
pre-set modes that control the frequency bands of sound
to optimize certain musical styles. It greatly enhances the
excitement and enjoyment of your favorite music.
● Press SOUND repeatedly to select the available sound
effect.
When playing a DVD/VCD, select :
– CONCERT, DRAMA, ACTION or SCI-FI
When playing a CD or in Tuner or Aux mode,
select :
– CLASSIC, JAZZ, ROCK or DIGITAL
English
DTS Surround
The DTS Surround is a cinema surround sound format that
offers superior digital audio performance. DTS offers more
clarity and definition especially for higher tones. The better
sound quality is a result of the limited sound compression
(3:1 instead of 11:1 for Dolby Digital) and the 20-bit
resolution.
Dolby Pro Logic Surround
The Dolby Pro Logic Surround system is a specially
encoded two-channel analog format that will produce
sound through four speaker channels (front left, center,
front right, monaural surround) when a Dolby Pro Logic
Decoder is used. It is also compatible with stereo systems
but the user will only have two-channel (front left & right)
of sound.
BASIC FUNCTIONS
15
Page 18

English
Volume control
Adjust VOLUME button (or press VOL +/-) to
increase or decrease the volume level.
➜ “VOL XX” is displayed. “XX”denotes the volume level.
For Philips TVs only
● Press TV VOL +/- on the remote control to adjust the
TV’s volume level.
To listen through the headphones
● Connect the headphones plug to the n socket at the
front of the player.
➜ The speakers will be muted.
To switch off the volume temporarily
● Press MUTE.
➜ Playback will continue without sound and "MUTE" is
displayed.
● To restore the volume, press MUTE again.
Adjusting the tone
The BASS (low tone) and TREBLE (high tone) feature
enables you to define the sound-processor settings.
1 Press BASS or TREBLE on the system to select Bass or
Treble sound feature.
2 While in Bass or Treble adjustment mode, adjust VOLUME
knob to select the desired Bass or Treble level.
Notes:
– The volume knob can be used to adjust Bass/Treble level
immediately after you have selected the respective Bass/Treble
sound feature. If the volume knob is not used within 5
seconds, it will become normal volume control function.
– If no button is pressed within a few seconds, the player will
exit the tone mode automatically.
Dimming the display screen
● Press DIM repeatedly to select different levels of
brightness for the display screen : HIGH, MID or LOW.
16
BASIC FUNCTIONS
Page 19
Operations
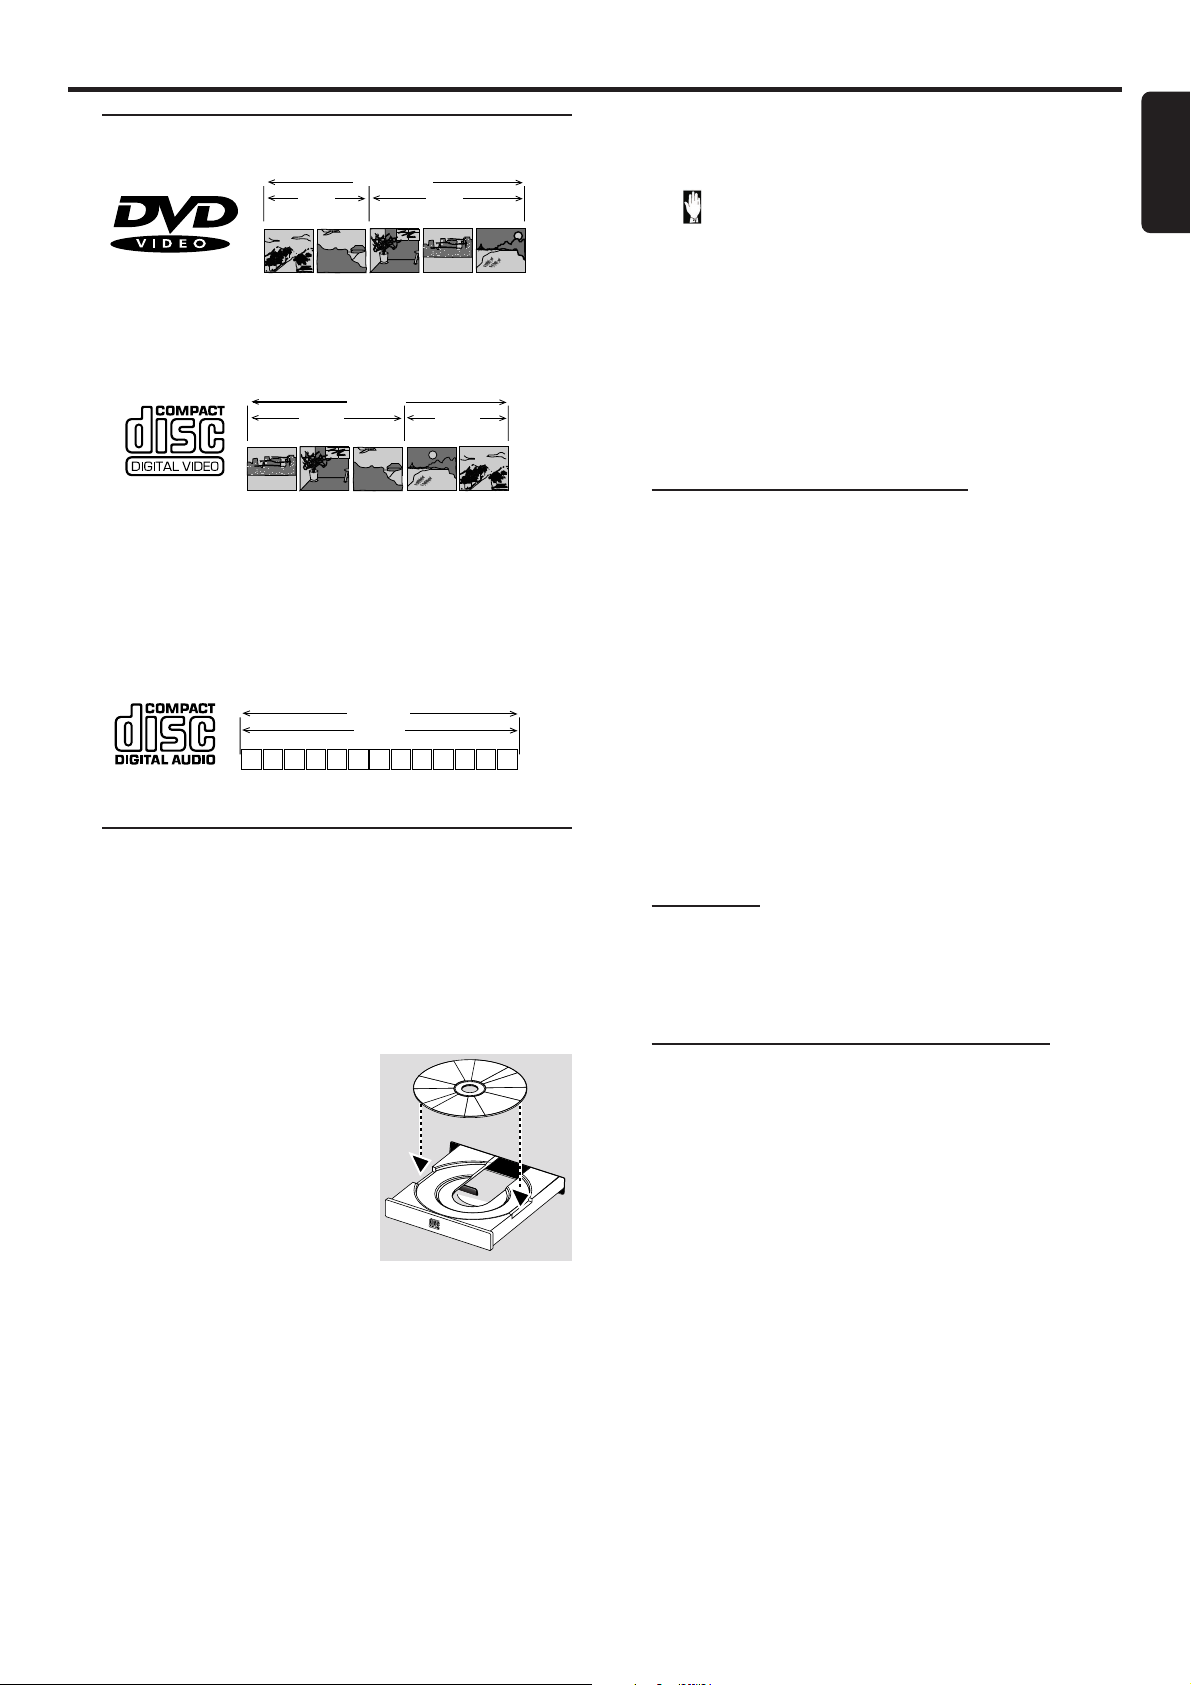
Discs information
DVD-VIDEO DISC
TITLE 1 TITLE 2
CHAPTER 1 CHAPTER 2 CHAPTER 1 CHAPTER 2 CHAPTER 3
● DVD video discs may have one or more Titles, and each
Title may have one or more Chapters.
● Playback stops at the end of each Title.
VIDEO CD
TRACK 1 TRACK 2
INDEX 1 INDEX 2 INDEX 1 INDEX 2 INDEX 3
● Video CDs may have one or more Tracks, and each Track
may have one or more Indexes.
● To make easy and convenient access, you can move
between Tracks and Indexes.
● Some Video CDs have Play Back Control (PBC), which is a
predefined playback sequence stored on the disc (refer to
“Special VCD/SVCD features”).
AUDIO CD
2 3 5 6 7 8 9 10 11 12 ...41
TRACKS
● Audio CDs contain only Tracks.
Basic playback
CAUTION!
– Do not move the disc player during playback, as
doing so may damage the DVD system.
– Do not push on the disc tray or put any objects
other than disc on the disc tray. Doing so may
cause the disc player malfunction.
Notes:
– Your player will not play discs that have a region code
different from the region code of your player.
– If the inhibit icon appears on the TV screen when a
button is pressed, it means the function is not available
on the disc you are playing.
To interrupt playback
● PressÉÅ.
➜ The picture freezes and the sound will be muted.
● To resume playback, pressÉÅ again.
To stop playback
● Press Ç.
Skipping to another track/chapter
● Press S or T repeatedly during playback to skip
backward or forward. Each press will take the disc to the
beginning of the previous or next track/chapter.
Note:
S
– If the REPEAT function has been set, pressing
T
will replay the same track/chapter.
or
To skip to the beginning of the current track/
chapter during playback
● Press S once.
To go directly to any track/chapter
● Use the numeric keypad (0-9) to enter the number of
the desired track/chapter.
Fast Search
1 Hold down S or T about two seconds to fast
reverse or forward the disc.
2 To resume normal play, pressÉÅ .
English
1 Press STANDBY ON y or
POWER y to switch the system
on.
2 Press OPEN/CLOSE 0 to open
the disc tray.
POWER ON/OFF
3 Load a disc with the label side
facing up.
4 Press OPEN/CLOSE 0 again to
close the tray.
➜ There will be a shor t delay while the player identifies
the disc and reads the menu from the disc.
● Some discs will start playing automatically, and others will
display the Disc Contents Menu on the TV screen. If the
menu is presented, use 341 2 keys to highlight your
selection and press OK to confirm. To select a play option,
press numeric keypad (0-9).
5 PressÉÅ to start playback.
Continue playback from the last stop point
● In stop mode and when a disc has not been ejected, press
RESUME to resume playback from the point at which it
stopped.
To cancel the resume mode
● Press Ç again.
Notes:
– When the player is disconnected from the power supply or
the disc tray is opened, the resume option will be cancelled
automatically.
– The resume option may not be available on some discs.
OPERATIONS
17
Page 20
English
Repeat play
You can only select the repeat play mode during playback.
For DVD - Repeat chapter/title/disc
● Press REPEAT repeatedly to select the following :
➜ “R-1” – repeat chapter.
➜ “R-A” – repeat title/disc.
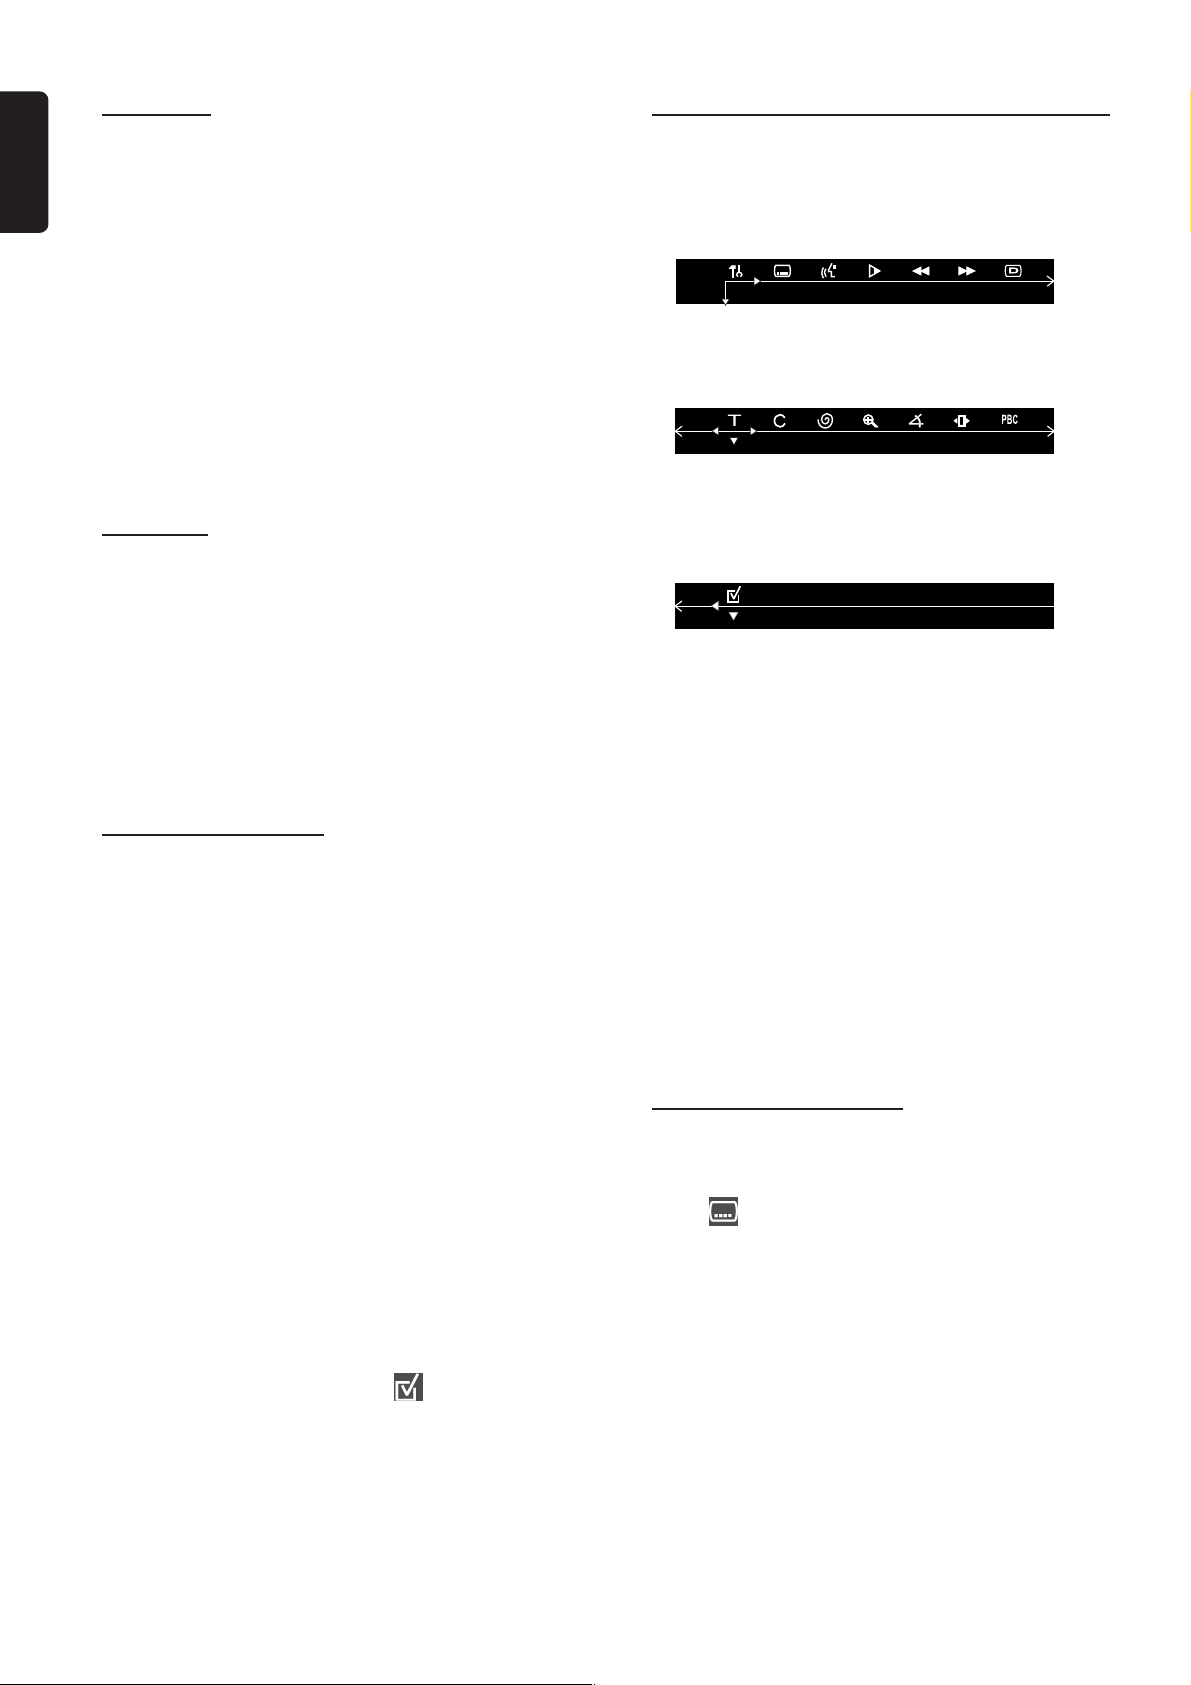
Special DVD/VCD features
A number of operations can be carried out directly via
the multiple menu bars on the TV screen without
interrupting disc playback.
For VCD/CD/MP3-CD - Repeat track/disc
● Press REPEAT repeatedly to select the following :
➜ “R-1” – repeat the current track.
➜ “R-A” – repeat the entire disc.
Notes:
– Repeat play might not work correctly with some DVDs.
– For VCD, repeat play is not possible during PBC playback.
Repeat A-B
You can play a specific section in a chapter/track repeatedly.
1 Press REPEAT A-B at your chosen starting point.
2 Press REPEAT A-B again at your chosen end point.
➜ The passage will now repeat continuously.
3 To resume normal play, press REPEAT A-B again.
Note:
– The section A and B can be set only within the same
chapter/track.
Program favorite tracks
You can play the contents of the disc in the order you want
by programming the order of the tracks to be played. Up to
99 tracks can be stored.
1 While playback is stopped, select or press PROGRAM to
enter program mode.
➜ “P 00:00” is displayed.
2 Use the numeric keypad (0-9) to input the track
number in the order you want.
➜ If you attempt to program more than 99 tracks, "FULL"
is displayed.
3 Press OK to store the track.
● Repeat steps 2-3 to store other tracks.
4 To start program play, pressÉÅ .
5 To stop playback, press Ç once.
6 To cancel the program, press Ç again.
From the left,
SETUP MENU ™ SUBTITLE ™ LANGUAGE ™ SLOW
™ FAST REVERSE ™ FAST FORWARD ™ STATUS
From the left,
TITLE SEARCH ™ CHAPTER SEARCH ™ TIME
SEARCH ™ ZOOM ™ ANGLE ™ STEP ™
PBC ON/OFF
From the left,
PROGRAM
IMPORTANT!
Some operations may be different or restricted,
depending on the disc format. Refer to the jacket
or case of the disc you are playing.
1 Press SYSTEM MENU.
➜ The menu bar will be displayed across the top of the
TV screen.
2 Press 1 or 2 to move through the menu bar.
3 Press 4 to select the highlighted icon and use 34 keys
to select your preferred option.
4 Press OK to confirm a highlighted selection.
5 To exit, press SYSTEM MENU or OK.
Changing subtitle language
This operation works only on DVDs with multiple subtitle
languages.
● Select
the desired language.
from the menu bar and press 4 key to select
Program function can also be accessed via the
menu bar
1 Press SYSTEM MENU and select from the menu
bar.
2 Repeat steps 2-6 listed above to program your favorite
tracks.
18
OPERATIONS
Page 21
Changing sound track language
This operation works only on DVDs with multiple
soundtrack language.
● Select
the desired language.
For VCD :
● Press 4 to select the desired audio channels for sound :
from the menu bar and press 4 key to select
LEFT VOCAL ™ RIGHT VOCAL ™ MONO LEFT
™ MONO RIGHT ™ STEREO ™ LEFT VOCAL
3 To resume normal play, pressÉÅ.
Note:
– The sound will be muted during fast reverse or forward
search.
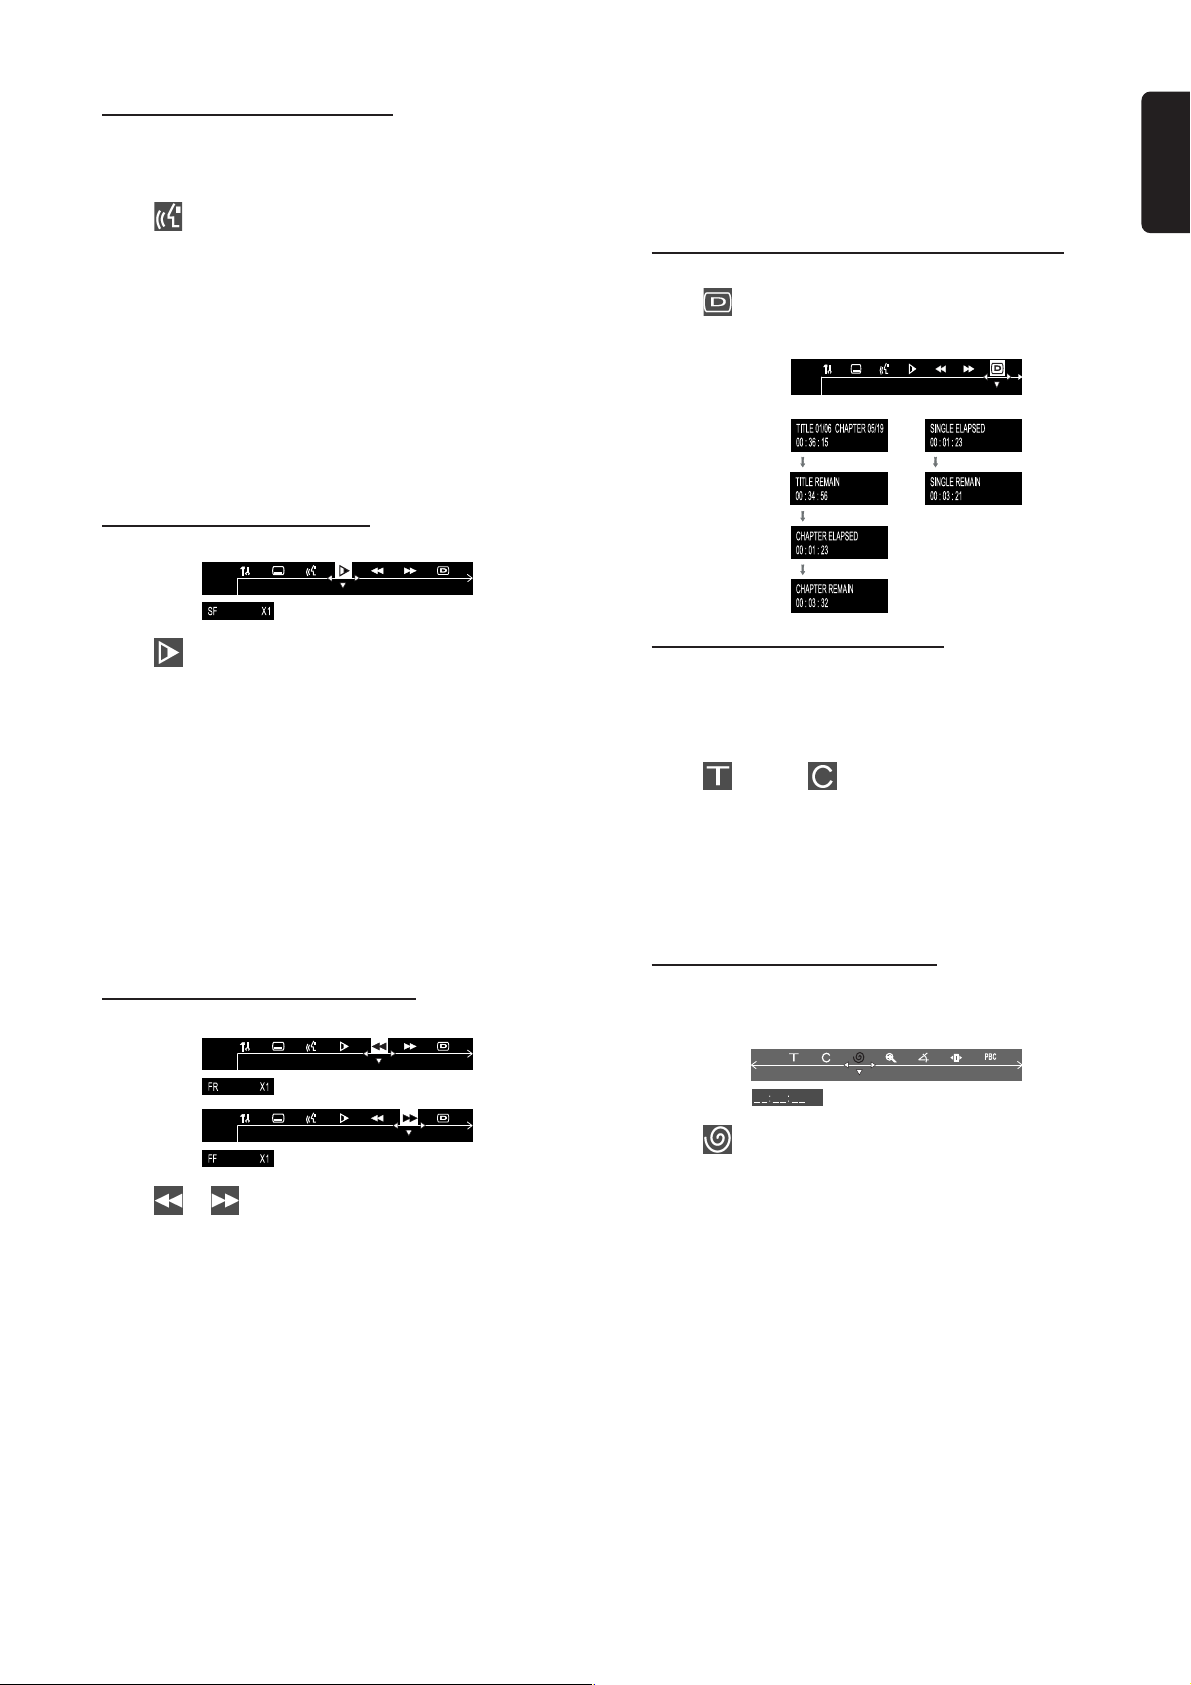
Display the disc information during playback
● Select
the following display informations :
from the menu bar and press 4 key to select
English
Note:
– When the desired language is not selected even after
pressing the button several times, it means the language is not
available on the disc.
Playing in slow motion mode
1 Select from the menu bar and press 4 key to select
the required slow motion speed :
SF x2 ™ SF x4 ™ SF x8 ™ SR x2 ™ SR x4 ™ SR x8 ™
SLOW OFF
(SF) = slow forward
(SR) = slow reverse
For VCD :
1 Press 4 key to select the required slow motion speed :
(forward) : SF x1 ™ SF x2 ™ SF x3 ™ OFF
2 To resume normal play, pressÉÅ.
Note:
– The sound will be muted during slow-motion play.
Searching for a particular passage
DVD
Moving to another title/chapter
Some discs may contain more than one title or chapter. If
the disc has a title or chapter menu recorded on it, you can
start playback from the selected item.
VCD (PBC ON)
1 Select (title) or (chapter) from the menu bar.
2 Use numeric keypad (0-9) to select a desired title/
chapter number and press OK to start playback.
Note:
– Selecting a title or chapter might not be possible on certain
discs.
Playback from a selected point
This function allows you to start playing at any chosen time
on the disc.
1 Select or from the menu bar to select fast reverse
search or fast foward search respectively.
2 Press 4 key to select the required search speed :
(reverse) : FR x2 ™ FR x4 ™ FR x6 ™ FR x8 ™ OFF
(forward) : FF x2 ™ FF x4 ™ FF x6 ™ FF x8 ™ OFF
For VCD :
2 Press 4 key to select the required search speed :
(reverse) : FR x1 ™ FR x2 ™ FR x3 ™ FR x4 ™ OFF
(forward) : FF x1 ™ FF x2 ™ FF x3 ™ FF x4 ™ OFF
1 Select from the menu bar.
2 Enter hours, minutes and seconds from left to right in the
time edit box using the numeric keypad (0-9).
➜ Each time an item has been entered, the next item will
be highlighted.
3 PressÉÅ to start playback.
OPERATIONS
19
Page 22
English
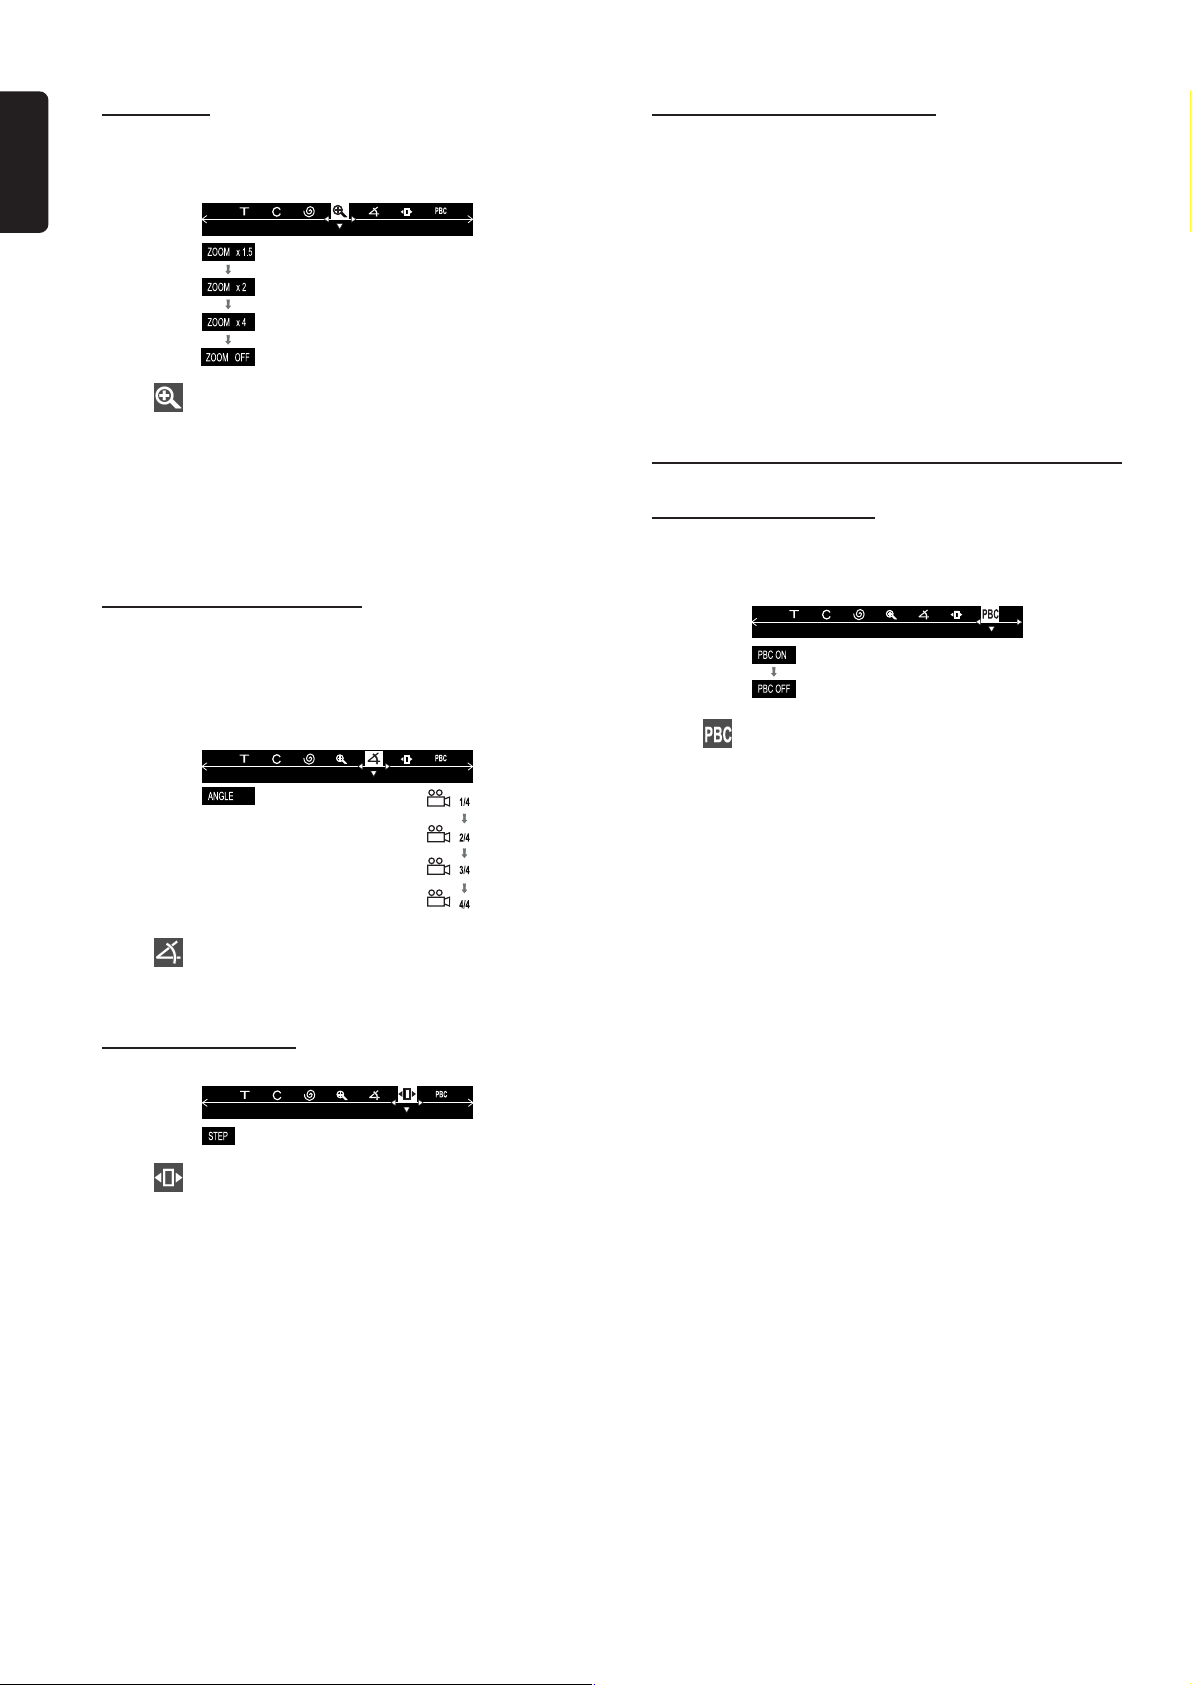
Zooming in
This function allows you to enlarge the picture on the TV
screen and to pan through the enlarged image.
1 Select from the menu bar and press 4 key repeatedly
to select a zoom factor : x1.5 ™ x2.0 ™ x4.0 ™ OFF.
Checking the contents of DVD
1 Press DISC MENU on the remote control.
➜ If the current title has a menu, the menu will appear on
the screen. Otherwise, the disc menu will be displayed.
2 Use 1 2 34 keys to select the desired title or chapter,
followed byÉÅ or OK.
➜ The selected title or chapter star ts playing.
Notes:
– The details of operation might differ depending on the DVD
disc.
– Selecting a title or disc might not be possible on certain
DVD discs.
2 To pan through the enlarged image, press OK to confirm
the zoom selection and use 1 2 34 keys to move the
zoomed picture left, right, up and down.
3 To exit ZOOM mode, select zoom factor to
“ZOOM OFF” from the menu bar.
Viewing from another angle
If the disc contains sequences recorded from different
camera angles, this allows you to view the picture from
different angles. The selections of angle are depending on
the disc format.
● Select from the menu bar and press 34 keys to select
the desired angle : 1/4, 2/4, 3/4 or 4/4.
➜ Playback changes to the selected angle.
Special VCD/SVCD features
Playback Control (PBC)
PBC playback allows you to play Video CDs interactively,
following the menu on the display.
● Select in the menu bar and press 4 key to select
PBC ON or PBC OFF.
When playing a disc with PBC function
● If “PBC OFF”, the system will start playback automatically.
● If “PBC ON”, the PBC menu (if available) will appear on the
TV screen for selection. Use the numeric keypad (0-9)
to enter your choice.
Note:
– If PBC mode is switched on, TIME SEARCH and REPEAT
functions are not available.
Advancing by frames
1 Select from the menu bar and press 4 key to play the
disc step by step (one frame each step).
2 To resume normal play, press ÉÅ.
20
OPERATIONS
Page 23

Special MP3-CD features
– JPEG format
– Max. 12 characters
– Max. nested directory is 7 levels
– The max. album number is 32
– Suppor ted VBR bit-rate
– Supported sampling frequencies for MP3 disc are :
32 kHz, 44.1 kHz, 48 kHz
– Supported Bit-rates of MP3 disc are: 32, 64, 96, 128,
192, 256 (kbps)
– The disc reading time may exceed 30 seconds due to
the large number of songs compiled onto one disc.
MP3-CD menu
1 Press DISC MENU to switch on the MP3-CD menu.
➜ The album menu appears on the TV screen.
2 To select a desired album, press 341 2 and followed by
OK orÉÅ to confirm.
➜ The title menu appears on the TV screen.
3 To select a desired title, press 341 2 and followed by OK
orÉÅ to start playback.
● You can also use the numeric keypad (0-9) to enter
your choice.
English
If the MP3-CD menu is switched off
● You can only play the existing selected title by pressing
ÉÅ button. While in playback mode, press S / T to
select the previous/next title.
➜ The title number will be displayed.
Only the following functions are possible for MP3 disc.
– STOP / PLAY / PAUSE / OK
– REPEAT (TITLE/ALBUM/DISC)
OPERATIONS
21
Page 24
Other Functions
English
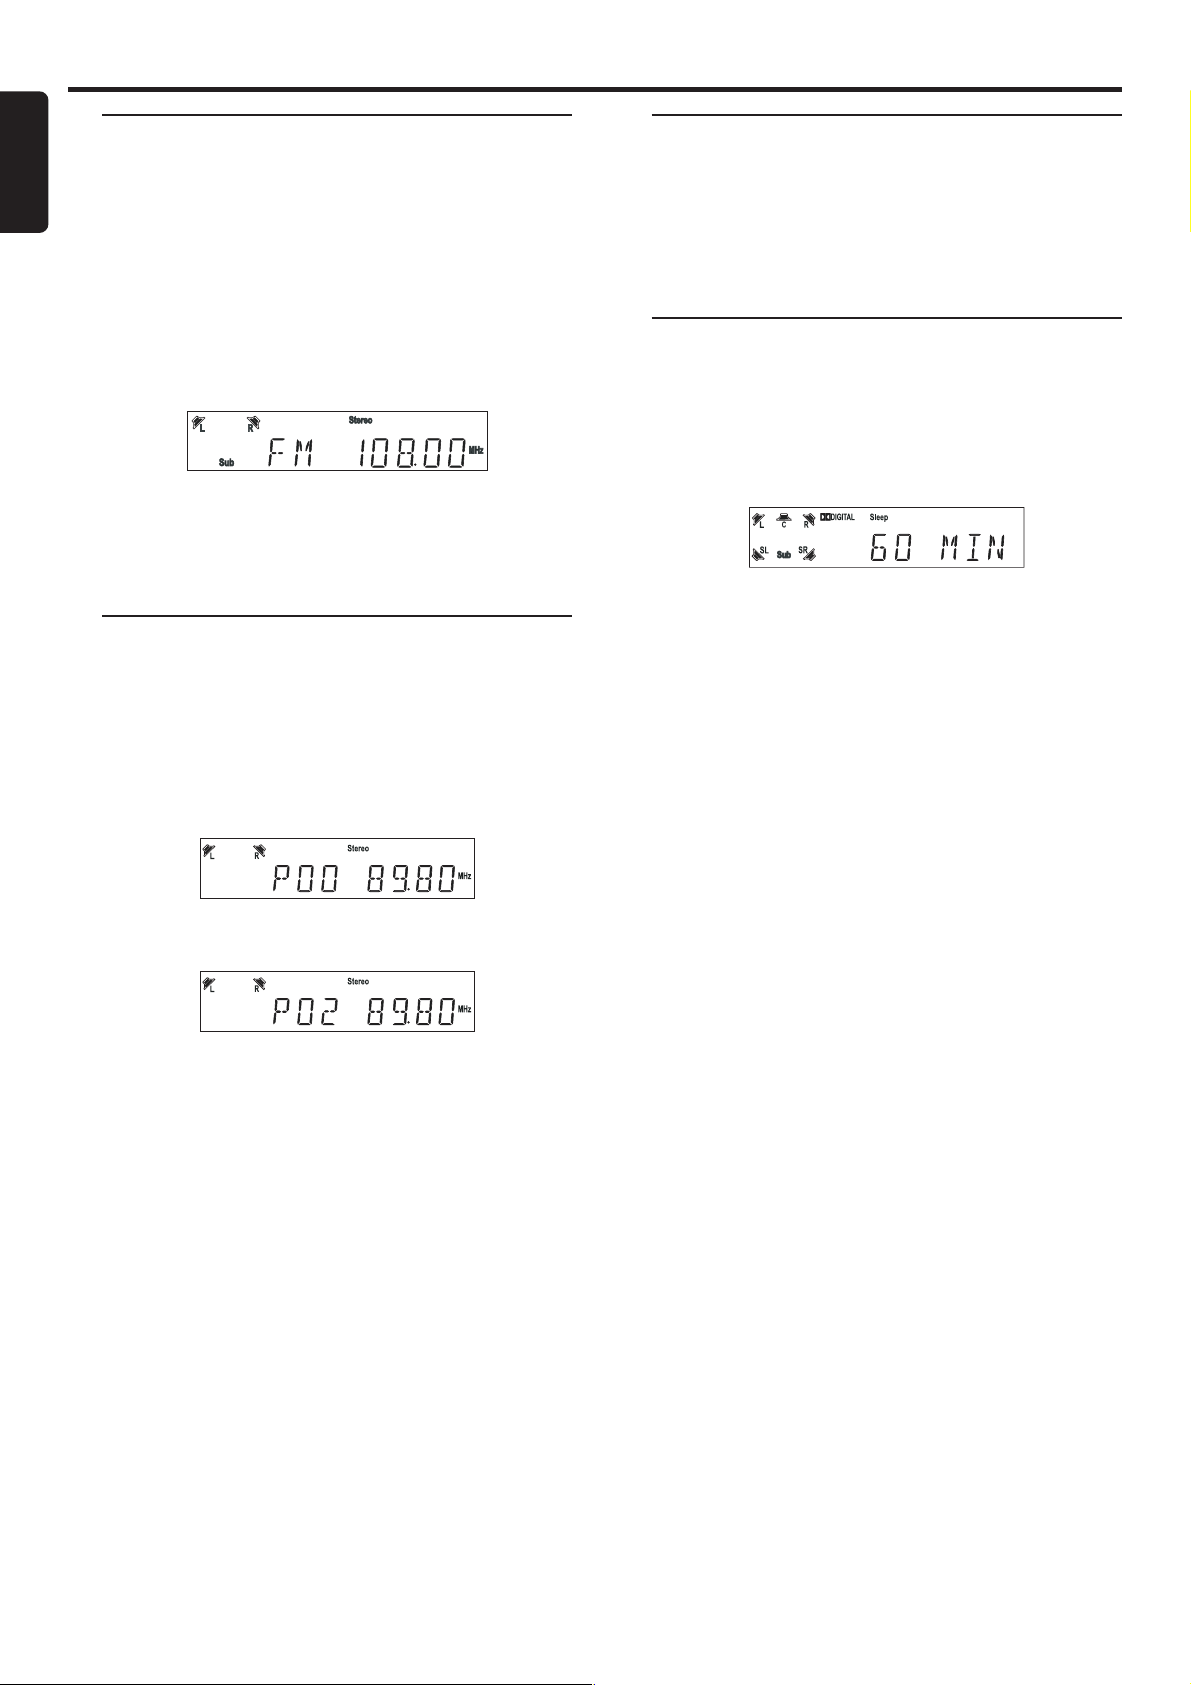
Tuning to radio stations
1 Press STANDBY ON to switch on the last selected
source.
2 Adjust SOURCE (or press TUNER) to select TUNER
mode.
3 Press TUNER again to select the desired band : FM or AM.
4 Press and hold S or T until the frequency indication
starts to change, then release.
➜ The system automatically tunes to the next strong radio
station.
● To tune to a weak station, press S or T briefly and
repeatedly until an optimal reception is found.
5 Repeat step 4 if necessary until you find the desired radio
station.
Presetting radio stations
You can preset up to 40 stations regardless of the
reception.
1 Tune to your desired radio station (refer to “Tuning to radio
stations”).
2 Press PROGRAM.
➜ “Program” appears.
Program
Listening to preset radio
stations
● In tuner mode, press 1 or 2 or use the numeric keypad
(0-9) to select the desired preset number.
➜ The preset number, radio frequency, and waveband are
displayed.
Sleep timer setting
The sleep timer enables the system to switch to standby
mode automatically at a preset time.
1 Press SLEEP repeatedly to select a preset time.
➜ The selections are as follows (time in minutes):
15 ™ 30 ™ 45 ™ 60 ™ 90 ™ 120™ OFF ™ 15...
2 When you reach the desired length of time, stop pressing
the SLEEP button.
➜ “Sleep” icon appears.
To check the remaining length of time after sleep
timer is activated
● Press SLEEP once.
To change the preset sleep timer
● Press SLEEP again while the remaining sleep timer is
shown.
➜ The display will show the next sleep timer options.
3 Use the numeric keypad (0-9) to select the desired
preset number.
Program
Note:
– If “Program” icon goes off before you select the desired
preset number, press PROGRAM again.
4 Press PROGRAM again to store the radio station.
● Repeat steps 1–4 to store other radio stations.
Notes:
– If you attempt to program more than 40 preset radio
stations, "FULL" is displayed.
– During programming, if no key is pressed within five
seconds, the system will exit the program mode automatically.
To deactivate the sleep timer
● Press SLEEP repeatedly until "OFF" is displayed, or press
the STANDBY ON button.
22
OTHER FUNCTIONS
Page 25

Specifications
AMPLIFIER SECTION
Output power
- Stereo mode (DIN) ....................................................................................2 x 50 W
- Surround mode (1 kHz) ..................................................... 50 W RMS/channel
Total Harmonic Distor tion ...............................10% at rated power (1 kHz)
Frequency Response ..................................................180 Hz – 14 kHz / ±1 dB
Signal-to-Noise Ratio ...................................................................... > 65 dB (CCIR)
Input Sensitivity..................................................................................................... 400 mV
TUNER SECTION
Tuning Range ....................................... FM 87.5 – 108 MHz (100 kHz steps)
......................................................................... AM 530 – 1700 kHz (10 kHz steps)
26 dB Quieting Sensitivity ......................................................................... FM 20 dB
26 dB Quieting Sensitivity ............................................................ AM 5000 µV/m
Image Rejection Radio ................................................................................. FM 25 dB
.................................................................................................................................. AM 28 dB
IF Rejection Ratio ............................................................................................ FM 60 dB
.................................................................................................................................. AM 24 dB
Signal-to-Noise Ratio .................................................................................... FM 55 dB
.................................................................................................................................. AM 35 dB
AM Suppression Ratio ................................................................................. FM 30 dB
Harmonic Distortion ............................................................................FM Mono 3%
......................................................................................................................... FM Stereo 3%
........................................................................................................................................ AM 5%
Frequency Response ......................................... FM 180 Hz – 10 kHz / ±6 dB
Stereo Separation .........................................................................FM 26 dB (1 kHz)
Stereo Threshold ......................................................................................... FM 23.5 dB
DVD SECTION
Laser Type ................................................................................................ Semiconductor
Disc Diameter .............................................................................................. 12cm / 8cm
Video Decoding .................................................................................................. MPEG-2
Video DAC ................................................................................................................ 10 Bits
Signal System ............................................................................................... PAL / NTSC
Video Format ..................................................................................................... 4:3 / 16:9
Video S/N ........................................................................................... 56 dB (minimum)
Composite Video Output ................................................................ 1.0 Vp-p, 75
S-Video Output ............................................................................. Y - 1.0 Vp-p, 75 Ω
........................................................................................................... C - 0.286 Vp-p, 75 Ω
Audio DAC................................................................... Direct Digital Amplification
Frequency Response ................................................. 4 Hz – 20 kHz (44.1 kHz)
................................................................................................... 4 Hz – 22 kHz (48 kHz)
................................................................................................... 4 Hz – 44 kHz (96 kHz)
Digital Output .................................................................. SPDIF Coaxial & Optical
SPEAKERS
Front speakers / surround speaker
System ........................................................................................................2-way shielded
Impedance ........................................................................................................................ 8 Ω
Speaker drivers ........................................................................ 3” full range, 1” piezo
Dimensions (w x h x d) ..................................... 96 mm x 155 mm x 95 mm
.................................................................................................. 3.78 x 6.10 x 3.74 (inch)
Weight............................................................................................................. 0.45 kg/each
................................................................................................................. 0.99 pounds/each
Center speaker
System .................................................................................. 5 multi directional driver
Impedance ........................................................................................................................ 8 Ω
Speaker drivers ...................................................... 4 x 2” woofer, 1 3/4” tweeter
Dimensions (w x h x d) ..................................435 mm x 72 mm x 63.5 mm
.................................................................................................. 17.13 x 2.83 x 2.5 (inch)
Weight......................................................................................................................... 1.32 kg
............................................................................................................................. 2.90 pounds
SUBWOOFER
Subwoofer (not magnetically shielded design)............................................ 6.5”
Output power .................................................................................. 50 W (4 Ω, DIN)
THD .............................................................................................................. 10% at 55 Hz
Reproduction frequency response .......................................... 40 Hz – 150 Hz
Phase switch ............................................................................................................ 0
Input sensitivity (Subwoofer In) .......................................................... 500 mVrms
AC power ................................................................................................... 120 V / 60 Hz
Power Consumption ...............................................32 W (at 1/8 Rated Power)
Dimensions (w x h x d) ................................ 200 mm x 310 mm x 350 mm
............................................................................................. 7.87 x 12.20 x 13.78 (inch)
Weight............................................................................................................................6.8 kg
.......................................................................................................................... 15.00 pounds
Ω
Specifications subject to change without prior notice
O
, 180
O
English
MISCELLANEOUS
Power Supply Rating ............................................................................. 120 V / 60 Hz
Power Consumption ........................................................................................... 160 W
Dimensions (w x h x d) ...................................435 mm x 78 mm x 360 mm
..................................................................................................... 17.1 x 3.1 x 14.2 (inch)
Weight............................................................................................................................5.1 kg
............................................................................................................................. 11.2 pounds
IR REMOTE CONTROL
Effective Range.............................................................................................. > 8 Meters
Number of Keys .............................................................................................................. 45
Battery (1.5V) ........................................................................................................ AA x 2
SPECIFICATIONS
23
Page 26
Troubleshooting
English
WARNING!
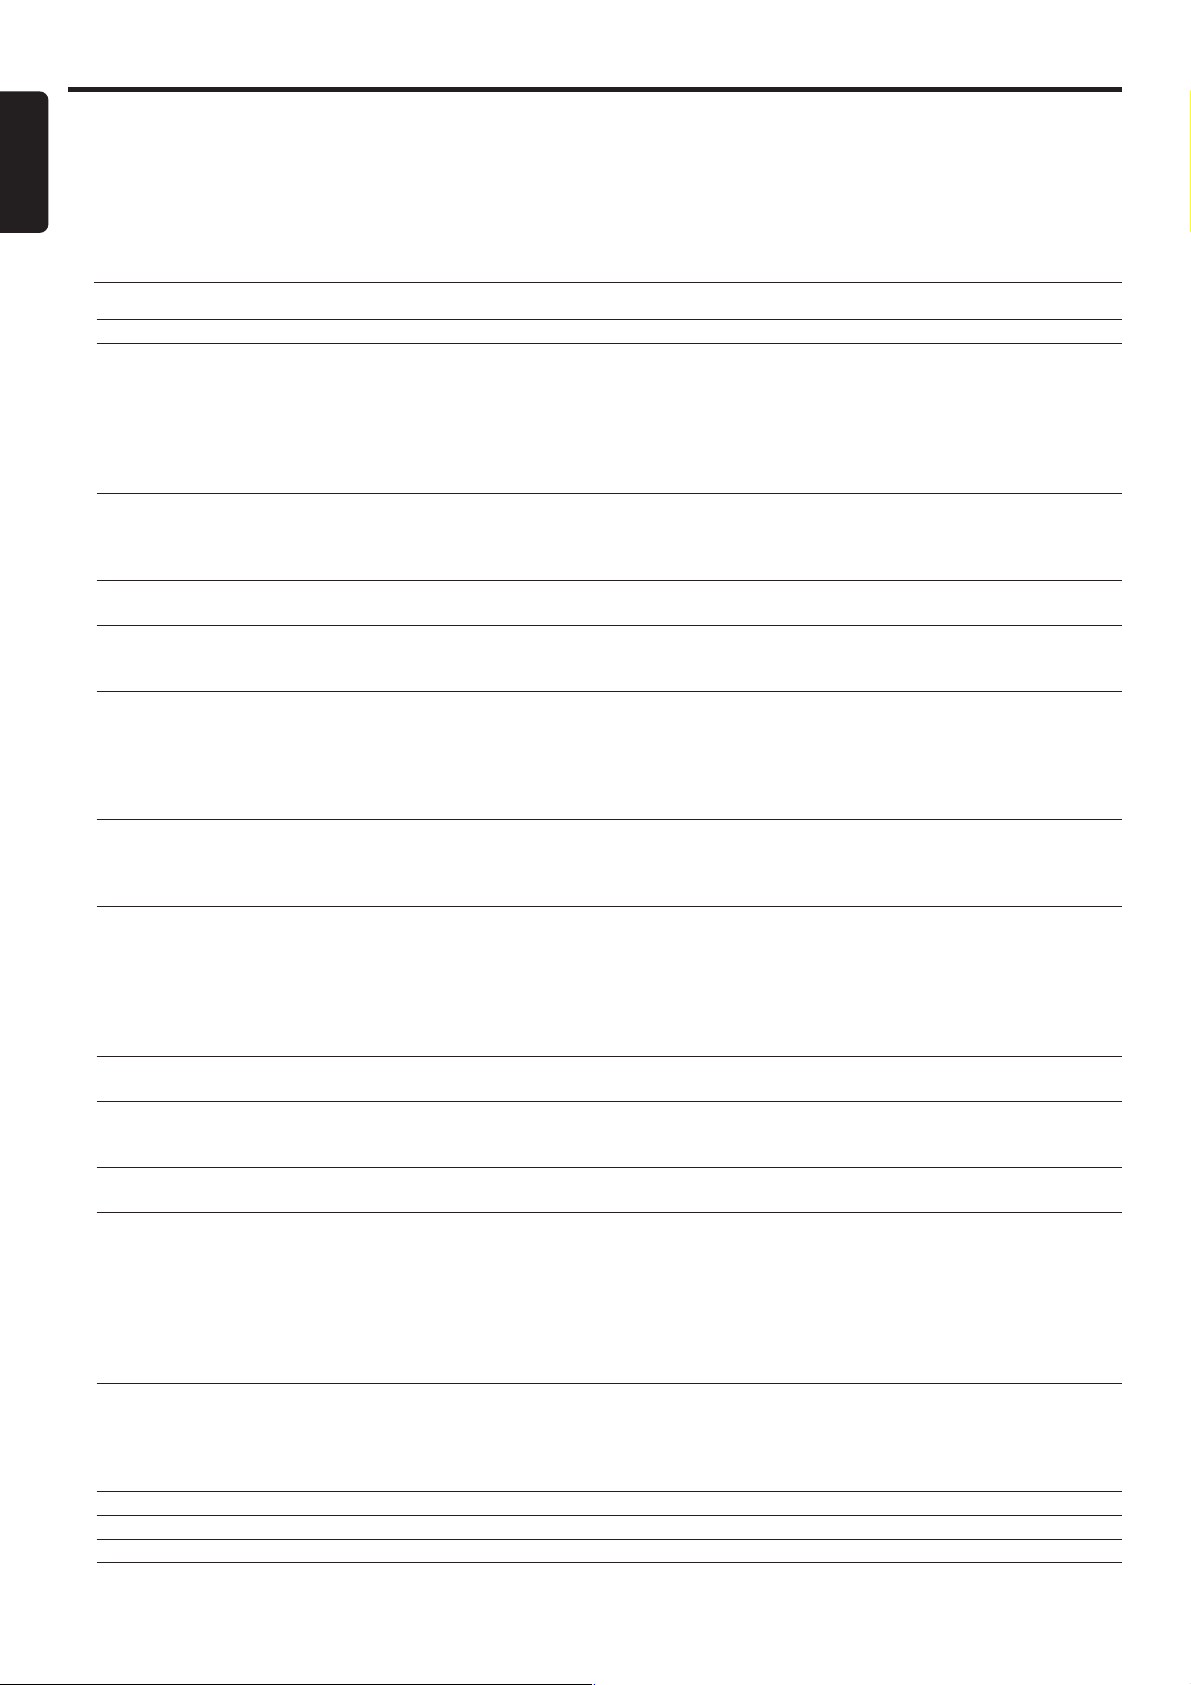
Under no circumstances should you try to repair the system yourself, as this will invalidate the warranty. Do
not open the system as there is a risk of electric shock.
If a fault occurs, first check the points listed below before taking the system for repair. If you are unable to
solve a problem by following these hints, consult your dealer or service center.
Problem Solution
No power. – Check if the AC power cord is properly connected.
No picture. – Select the appropriate video input mode on the TV.
– Check if the TV is switched on.
– Check the video connection.
– Set your TV to the correct Video In channel. These channels are usually near channel 00. Or,
you may have a button on the TV remote control that selects Auxiliary or A/V IN channel. See
your TV owner’s manual for details. Or, change channels at the TV until you see DVD screen
on the TV.
Distorted or poor picture. – Sometimes a small amount of picture distortion may appear. This is not a malfunction.
– Clean the disc.
– Check the video connection. You cannot use S-Video and Component Video connections at
the same time.
Completely distorted picture or – Make sure the NTSC/PAL setting at the DVD player matches the video signal of your
black/white picture. television (see “System Setup (DVD) - Setting the pictures - TV system”).
The aspect ratio of the screen – The aspect ratio is fixed on the DVD disc.
cannot be changed even though – Depending on the TV, it may not allow you to change the aspect ratio.
you have set the TV shape.
No sound or distorted sound. – Adjust the volume.
– Check that the speakers are connected correctly.
– Replace the speaker cables.
– Check the speaker settings.
– The system is in pause, slow motion or fast forward/reverse mode, press PLAY/PAUSE to
resume normal play mode.
No sound is heard from the – Use the CENTER +/- or REAR+/- to adjust the volume level.
center or rear speakers. – Check that the center or rear surround speakers are connected correctly.
– Use surround mode and make sure that the source material is recorded or broadcast in Dolby
Digital, DTS or Dolby Pro Logic surround sound.
The DVD player does not – Insert a readable disc with the playback side facing down.
start playback. – Check the disc type, color system and regional code. Check for any scratches or smudges on
the disc.
– Press SYSTEM MENU to turn off the setup menu screen.
– Cancel the parental control rating function or change the rating level.
– Moisture has condensed inside the system. Remove the disc and leave the system turned on
for about an hour..
The DVD system does not respond – Disconnect the power plug from the outlet and insert again.
when the buttons are pressed.
The language for the sound or – Multi-language sound or subtitle is not recorded on the DVD.
subtitle cannot be changed when – Changing the language for the sound or subtitle is prohibited on the DVD.
playing a DVD.
No image is output when a – Make sure the component is connected correctly.
function is selected. – Press the correct function button for the input source.
Considerable noise in radio – Tune in the correct frequency.
broadcasts. – Connect the antenna.
– Route RF (AC-3) and digital cables away from the antenna terminals and wires.
– Fully extend the FM wire antenna. Position for best reception and secure to a wall.
– Connect an outdoor FM or AM antenna.
– Adjust the direction and position for best reception.
– Turn off the equipment causing the noise or move it away from the DVD system.
– Place the antenna farther away from the equipment causing the noise.
The remote control does not – Point the remote control at the remote sensor of the unit.
function. – Reduce the distance to the player.
– Remove any possible obstacles.
– Replace the batteries with new ones.
– Check that the batteries are loaded correctly.
The display is dark. – Press DIM again.
Low hum or buzz sound. – Place the DVD system as far away as possible from electric devices with interference.
Low bass response. – Check all speakers for correct polarity.
24
TROUBLESHOOTING
Page 27

LIMITED WARRANTY
AUDIO SYSTEM
One Year Free Labor
One Year Free Service on Parts
This product must be carried in for repair.
WHO IS COVERED?
You must have proof of purchase to receive warranty service. A sales
receipt or other document showing that you purchased the product
is considered proof of purchase.
WHAT IS COVERED?
Warranty coverage begins the day you buy your product. For one
year thereafter, all parts will be repaired or replaced, and labor is
free.After one year from the day of purchase, you pay for the
replacement or repair of all parts, and for all labor charges.
All parts, including repaired and replaced parts, are covered only for
the original warranty period.When the warranty on the product
expires, the warranty on all replaced and repaired parts also expires.
WHAT IS EXCLUDED?
Your warranty does not cover:
• labor charges for installation or setup of the product, adjustment
of customer controls on the product, and installation or repair of
antenna systems outside of the product.
• product repair and/or part replacement because of misuse,
accident, unauthorized repair or other cause not within the
control of Philips.
• reception problems caused by signal conditions or cable or antenna systems outside the unit.
• a product that requires modification or adaptation to enable it to
operate in any country other than the country for which it was
designed, manufactured, approved and/or authorized, or repair of
products damaged by these modifications.
• incidental or consequential damages resulting from the product.
(Some states do not allow the exclusion of incidental or consequential damages, so the above exclusion may not apply to you.
This includes, but is not limited to, prerecorded material, whether
copyrighted or not copyrighted.)
• a product that is used for commercial or institutional purposes.
WHERE IS SERVICE AVAILABLE?
Warranty service is available in all countries where the product is
officially distributed by Philips. In countries where Philips does not
distribute the product, the local Philips service organization will
attempt to provide service (although there may be a delay if the
appropriate spare parts and technical manual(s) are not readily
available).
BEFORE REQUESTING SERVICE...
Please check your owner's manual for assistance. If you have additional
questions, call us at 1-800-531-0039.
TO GET WARRANTY SERVICE IN U.S.A.,
PUERTO RICO, OR U.S. VIRGIN ISLANDS...
Take the product to a Philips factory service center (see enclosed
list) or authorized service center for repair.When the product has
been repaired, you must pick up the unit at the center. Centers may
keep defective parts. (In U.S.A., Puerto Rico, and U.S.Virgin Islands, all
implied warranties, including implied warranties of merchantability
and fitness for a particular purpose, are limited in duration to the
duration of this express warranty. But, because some states do not
allow limitations on how long an implied warranty may last, this limitation may not apply to you.)
TO GET WARRANTY SERVICE IN CANADA...
Please contact Philips at:
1-800-661-6162 (French Speaking)
1-800-531-0039 (English or Spanish Speaking)
(In Canada, this warranty is given in lieu of all other warranties. No
other warranties are expressed or implied, including any implied warranties of merchantability or fitness for a particular purpose. Philips is
not liable under any circumstances for any direct, indirect, special,
incidental or consequential damages, howsoever incurred, even if
notified of the possibility of such damages.)
REMEMBER...
Please record below the model and serial numbers found on the
product.Also, please fill out and mail your warranty registration card
promptly. It will be easier for us to notify you if necessary.
MODEL # ________________________________________
SERIAL # ________________________________________
MAKE SURE YOU KEEP...
Please keep your sales receipt or other document showing proof of
purchase.Attach it to this owner’s manual and keep both nearby. Also
keep the original box and packing material in case you need to return
your product.
This warranty gives you specific legal rights.You may have other rights which vary from state/province to state/province.
Philips, P.O. Box 520890, Miami, FL 33152, USA, (402) 536-4171
EL4965E007 / 8-02
25
 Loading...