

Page 1

User Manual
1
RC9800i Touch Screen Remote Control User Manual
© Copyright 2004 Royal Philips Electronics, Interleuvenlaan 72 - 74, 3000 Leuven (Belgium).
Remark:
All rights are reserved. Reproduction in whole or in part is prohibited without prior consent of the
copyright owner.
Royal Philips Electronics is not liable for omissions or for technical or editorial errors in this manual
or for damages directly or indirectly resulting from the use of the RC9800i Touch Screen Remote
Control.
The information in this user guide may be subject to change without prior notice. All brand or
product names are trademarks or registered trademarks of their respective companies or
organizations.
Page 2
Important Information
■ Please read this guide carefully before using the RC9800i. Keep it for future
reference.
■ Install and connect the RC9800i Touch Screen Remote Control only in the order
described in this manual. This ensures optimal installation results. You must set up
your RC9800i before you can actually use it to control other devices.
■ During set-up and installation, we recommend that you have available the original
remote controls for your audio/video equipment, and other wireless network
components that you want to control with your RC9800i.
■ Broadband Internet access (min. 256 kbps) is required if you want to make optimal
use of the Internet functions of the RC9800i.
Safety Precautions
■ Before operating the system, check that the operating voltage indicated on the
power adapter matches the voltage of your local power supply. If it does not, please
consult your retailer.
■ Radio equipment for wireless applications is not protected against disturbance from
other radio services.
■ Do not expose the product to dripping or splashing.
■ Do not expose the product to excessive moisture, rain, sand or heat from heating
equipment or direct sunlight.
User Manual
2
■ Do not open the product. Consult the website http://www.philips.com/support if you
experience technical difficulties. If your problems cannot be solved by consulting
the website, contact your Philips retailer.
Website
To consult the latest User Manual and to find information on the most recent firmware
updates, please check the RC9800i Touch Screen Remote’s website:
http://www.homecontrol.philips.com.
Page 3

Contents of the Box
The RC9800i Touch Screen Remote Control box contains the following items:
■ The RC9800i;
■ A cradle and an adapter;
■ A USB cable;
User Manual
3
■ A User Manual that helps you to start using the RC9800i and getting the most out
of it;
■ A Quick Start Guide that supports you in getting the device up and running;
■ A CD with the following contents:
■ This manual in English, Finnish, Dutch, French, Swedish, Danish, Norwegian,
German, Greek, Italian, Spanish and Portuguese (in US only in English, Spanish
and French);
■ The Quick Start guide in English, Finnish, Dutch, French, Swedish, Danish,
Norwegian, German, Greek, Italian, Spanish and Portuguese (in US only in
English, Spanish and French);
■ The Philips Media Manager Software.
■ Warranty Information;
■ A Warranty Registration Card (only in US and Canada);
■ An End User License Agreement: Your use of the RC9800i is subject to your
agreement to be bound by and become a party to the Software End User License
Agreement included in the RC9800i box and any terms presented electronically to
you during setup of the RC9800i.
Page 4
Contents
Pick Up Your RC9800i and Take a Good Look 6
On and Off 6
First-Time Power On 6
Everyday Use 6
The Touch Screen 7
The Hard Keys 7
The Network Activity Indicator 8
Charging the RC9800i 8
The Cradle as Digital Music Media Adapter 8
The USB Connector 9
Learning the Basics 10
Controlling Legacy Audio/Video Devices 10
What You Should Know About Home Networking 11
Home Networking and Connected Devices 11
Wireless Connectivity 12
What You Should Know About Activity-Based Control 12
Watch Activities 13
Listen Activities 13
Getting the Settings Right 14
RC9800i Settings 14
Calibrating the Touch Screen 14
End User License Agreement 14
Selecting Your Location 15
Network Settings 15
Date & Time Settings 17
Set Up Rooms and A/V Devices 18
Set Up Rooms 18
Set Up Devices 19
Set Up Activities 25
User Manual
4
Getting the Most Out of It 26
Homepage 26
System Management Area 27
Smart Navigation 27
Home Hard Key 27
Back Hard Key 27
Page Hard Key 27
Activities 29
Watching Cable TV 29
Watching Satellite TV 31
Watching Broadcast TV 31
Watching DVD 31
Watching PVR 31
Watching Video Tape 32
Watching a Program Using EPG 32
Watching Digital Pictures From Your PC on Your TV 34
Watching Digital Pictures From Your PC on the RC9800i 35
Page 5

Contents
Playing Games 36
Listening to a CD 36
Listening to a DVD 37
Listening to Broadcast Radio 37
Listening to Cable Radio 37
Listening to Satellite Radio 37
Listening to Audio Files From Your PC via the Audio System 38
Listening to MP3 Files From Your PC via the RC9800i 38
Synchronization Wizard 39
Individual Device Control 40
“Device Off”, “Activity Off” and “Room Off” 41
Adjusting the Settings 42
Accessing the Settings 42
RC9800i Setup 42
Power Settings 42
Screen Settings 43
Network Settings 43
Audio Settings 43
Date & Time 43
Set Up Rooms & A/V Devices 43
Add/Edit Rooms 44
Add/Edit A/V Devices 44
Electronic Program Guide (EPG) 46
Service-related Settings on the PC 46
Settings on the RC9800i 47
User Manual
5
Installing the Software 51
Installing Philips Media Manager 51
Advanced Philips Media Manager Use 51
Philips Media Manager on More PCs 51
Organizing Media Files 51
Creating Playlists 51
Upgrading the Firmware 52
List of Symbols 53
Tips and Troubleshooting 54
Online Information 56
Support for Your Philips Connected Planet Product 56
Te chnical Specifications 57
Environmental Information 58
Communications Regulation Information 58
Glossary 60
Index 61
Page 6

Pick Up Your RC9800i and Take a Good Look
Congratulations on the purchase of your new RC9800i Touch Screen Remote Control!
This device is a “must have” if you want to enjoy a real state-of-the-art home
entertainment experience. You will see that using the RC9800i is very easy.
Before going into details, let’s first have a look at the RC9800i itself.
In this chapter you will get acquainted with the various elements of the RC9800i.
You will learn:
■ how to turn the RC9800i on and off;
■ how to operate the touch screen;
■ how to use the hard keys;
■ how to charge the device by means of a cradle;
■ the purpose and use of the USB connector.
Note You must set up your RC9800i before you actually can use it to control other devices.
This set-up procedure is explained later on in this manual.
■ On and Off
First-Time Power On
The first time you use your RC9800i,
you switch it on with the On/Off
Switch by means of a pointed object,
e.g. tip of a pen. The On/Off Switch is
located at the bottom of the RC9800i.
On/Off Switch
User Manual
6
Note The first time you activate your RC9800i, an initial setup wizard appears. This
wizard will assist you in setting up your RC9800i. You must go through this initial setup
before you actually can use the RC9800i to control other devices.
Before you proceed, we advise you to fully charge your RC9800i. See page 8 for more
information on how to charge the device.
Everyday Use
During normal everyday use, the RC9800i will automatically go into standby mode
when it isn’t being used. Since you can leave the RC9800i on all the time, you don’t
need to switch the RC9800i off with the On/Off Switch. Leaving your device on also
gives you the advantage of not having to wait for the device to start up.
To wake up the RC9800i from standby mode, simply tap the touch screen.
Page 7

Pick Up Your RC9800i and Take a Good Look
■ The Touch Screen
The RC9800i has a landscape-oriented touch
screen. You can operate the touch screen either
with your fingers or with a small stylus-like object
with a blunt tip.
Attention! Never use a ballpoint pen tip or other
sharp object. These objects can damage the
touch screen.
■ The Hard Keys
At the right-hand side of your RC9800i’s touch screen you will find several hard keys.
Volume
Channel
Mute
Page
Cursor
Home
Back
User Manual
7
After you have properly set up the RC9800i, you can use the hard keys for the following
functions:
■ Channel: Press this hard key to go one TV Channel up or down.
■ Volume: Press this hard key to control the volume.
■ Mute: Press this hard key to mute the device that is being controlled.
■ Page: Press this hard key to cycle through several screens in a loop. When only one
page is available, the Page hard key is inactive.
■ Cursor: Up-Down-Left-Right and OK hard keys. The action resulting from pressing the
cursor depends on what is shown on the touch screen. In general the cursor keys allow
you to navigate around.
The Up and Down hard keys can be either partially or fully pressed:
■ Partially: To move through a list one item at a time, partially press the up or down
key.
■ Fully: To move quickly through a list, fully press the up or down key.
■ The OK hard key in the middle of the cursor is used to confirm a selection and to
trigger the corresponding action.
■ Back: To quickly move back through the series of screens that you have been viewing,
press the Back key. For more information see ‘Smart Navigation’ on page 27.
■ Home: Press this hard key to return to the Homepage.
Page 8
Pick Up Your RC9800i and Take a Good Look
■ The Network Activity Indicator
At the top of your RC9800i there is an area that emits a blue light whenever the device
is communicating in a wireless network.
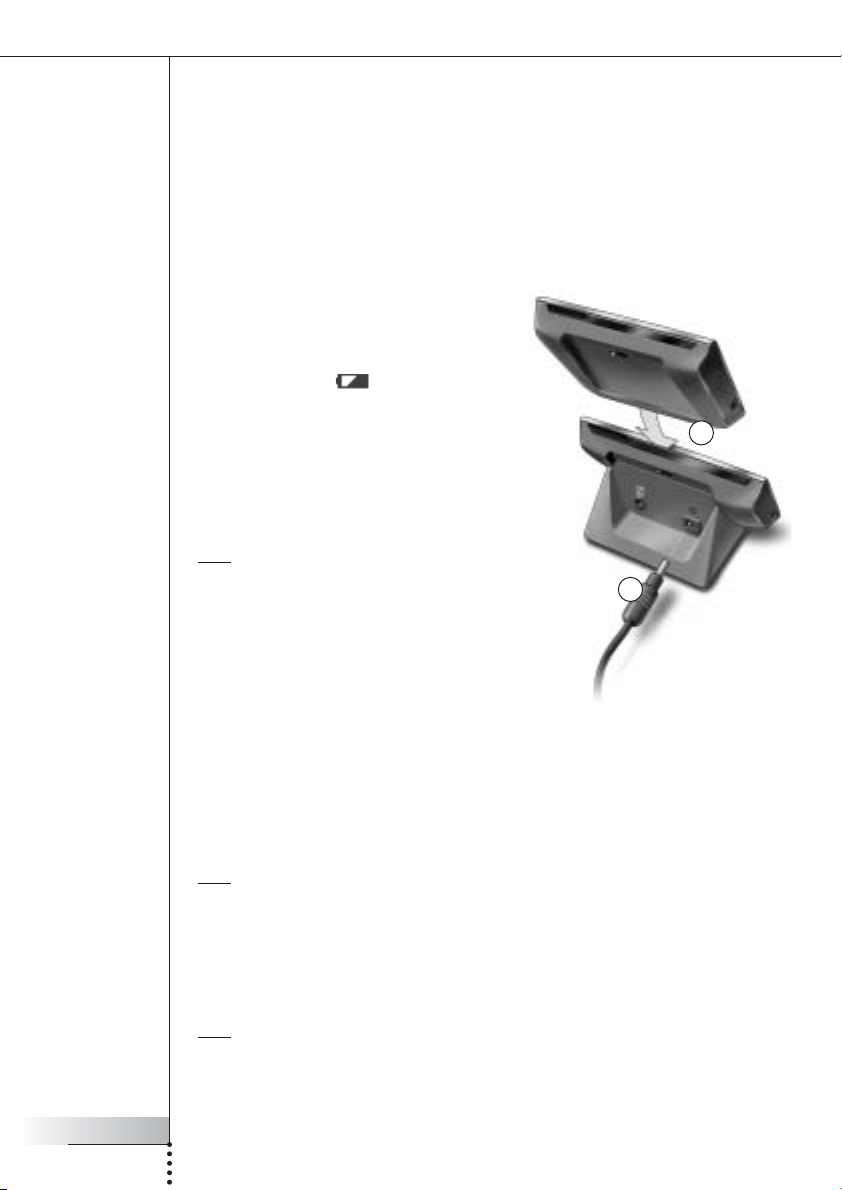
■ Charging the RC9800i
The battery level of the RC9800i is displayed on the touch screen. At any time you can
charge the device as follows:
1 Plug the power adapter into the cradle.
2 Dock the RC9800i in the cradle.
The RC9800i is being charged and an
animation of the battery icon appears on
the touch screen .
It takes about 3 hours to fully charge the RC9800i.
When the RC9800i is in standby mode, the
battery lasts for approximately 2 weeks.
However, we advise you to recharge the device
frequently.
Note When the RC9800i is in standby mode, it will
beep from time to time when the battery is
getting low.
1
2
The Cradle as Digital Music Media Adapter
Besides using the cradle for charging the RC9800i, you can also use it as a digital
music Media Adapter.
Note A Media Adapter is a wireless digital device that allows movies, pictures or music
files to be streamed from a PC to non-networked audio-video devices like conventional
TVs and audio systems. A digital music Media Adapter has less functionality in that
it only allows music files to be streamed.
When you connect the cradle to the amplifier of your audio system by means of an
audio extension cable, the cradle will function as a digital music Media Adapter.
User Manual
8
Note The audio extension cable is not included.
Page 9
Pick Up Your RC9800i and Take a Good Look
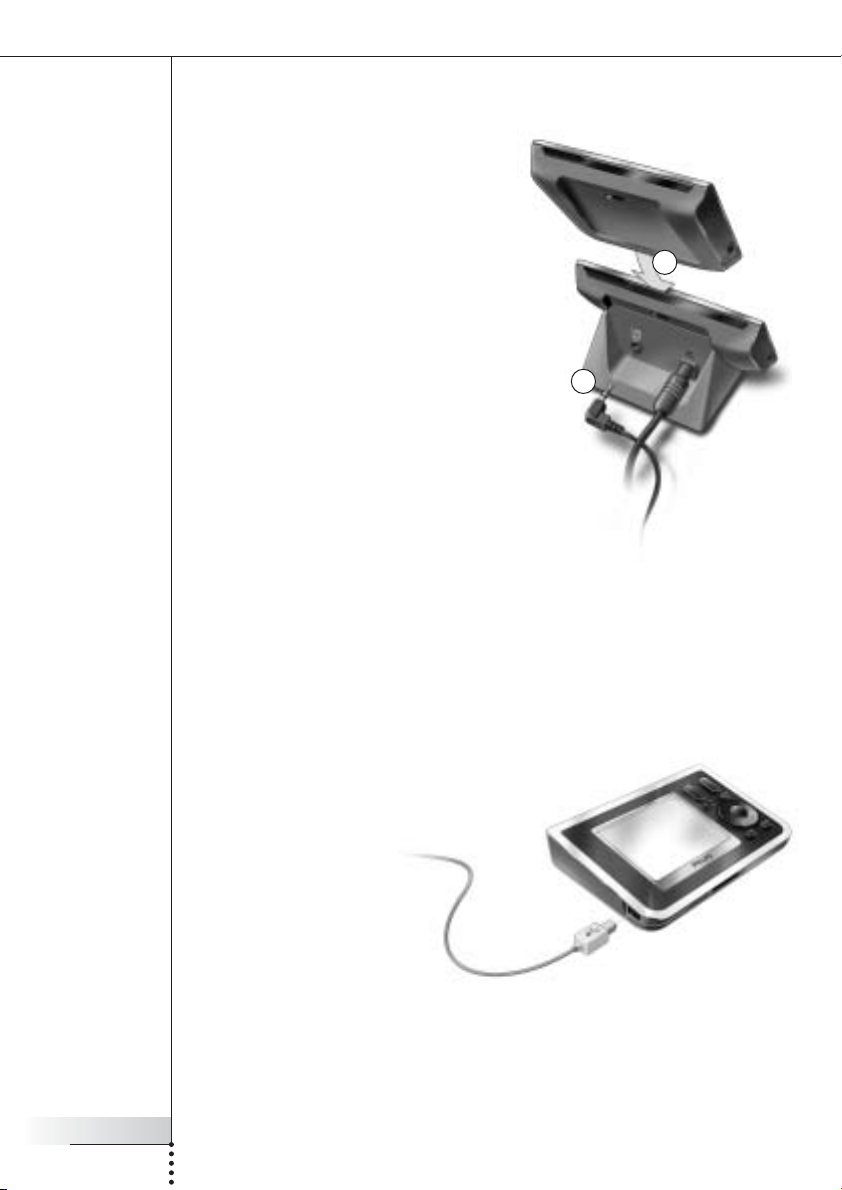
To turn the cradle into a digital music Media Adapter, proceed as follows:
1 Plug one end of the audio extension
cable (not included) into the analog
3.5 mm Line Out port of the cradle.
2 Plug the other end of the cable into an
audio input of your audio system’s
amplifier and select this input on your
amplifier as the current signal source.
3 Dock the RC9800i in the cradle.
If the RC9800i is playing music via its
speaker, the RC9800i will be muted.
The audio content can now be played on
your audio system.
1
3
■ The USB Connector
The mini USB connector is located at the left-hand side of your RC9800i.
You will be using this USB connector to connect to a PC in order to download new
firmware when it becomes available. For further information, see ‘Upgrading the
Firmware’ on page 52.
User Manual
9
Page 10
Learning the Basics
In this chapter, you will get to know more about:
■ Controlling legacy audio/video devices;
■ Home networking;
■ Activity-Based Control.
■ Controlling Legacy Audio/Video Devices
Legacy audio-video devices are non-networked devices that are typically operated by
means of a remote control. Your TV, for example, is such a device. When you press a
button on the TV’s remote control (e.g. Mute), the remote control sends an Infrared (IR)
signal to the TV. The TV receives this signal and executes the command (in this case:
mutes the speakers).
Today, most households own many legacy A/V devices. Since most, if not all, of these
devices come with their own remote control, the coffee table gets pretty crowded.
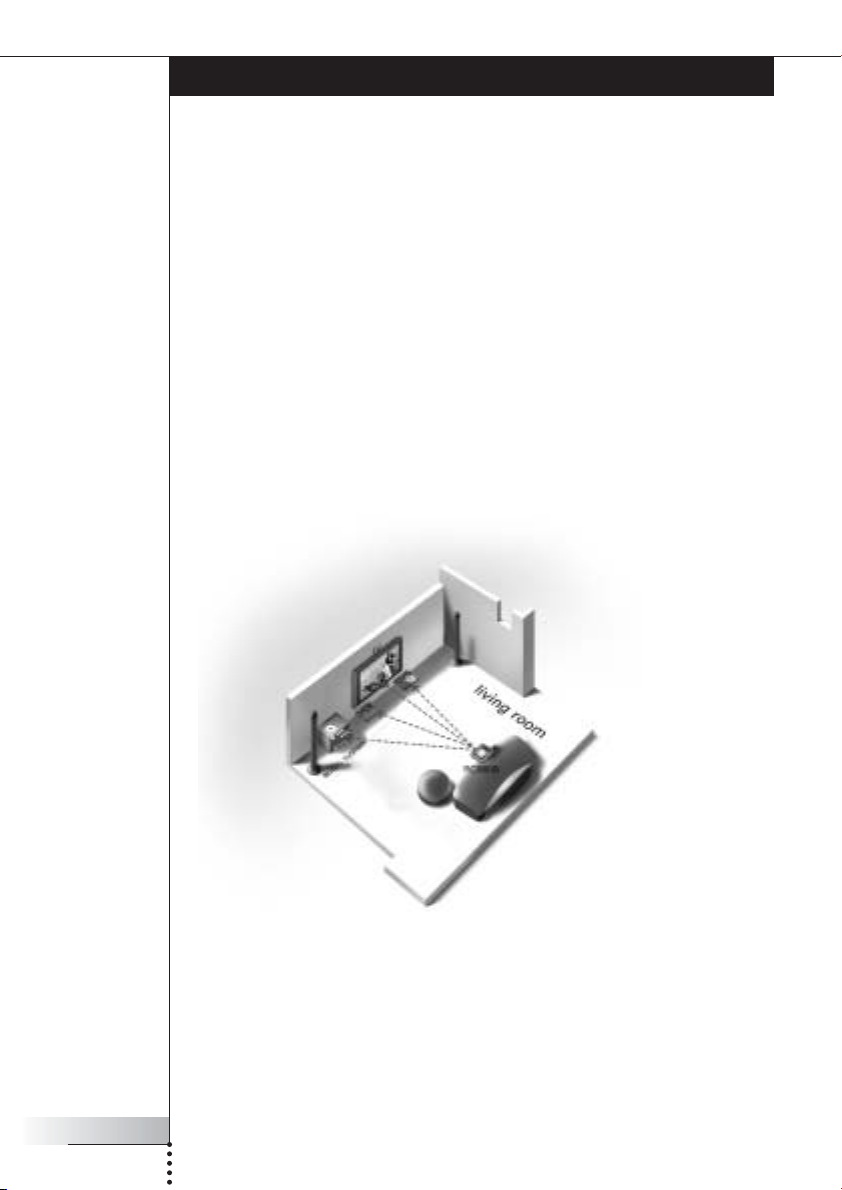
In this situation, the RC9800i is the perfect solution for you. The RC9800i is a universal
remote control that can control a wide variety of devices, such as TVs, VCRs, DVD
players and so on.
User Manual
10
In the home plan above, you can see the RC9800i functioning as a universal remote
control: it is controlling the audio system, the flat screen TV, the VCR and the DVD.
Page 11
Learning the Basics
■ What You Should Know About Home Networking
Home Networking and Connected Devices
The RC9800i goes one step further than ordinary universal remotes. The RC9800i is
revolutionary in that it can also operate most of the connected devices in your home
network.
Connected devices are devices that comply with the UPnP (Universal Plug and Play)
A/V Protocol. UPnP allows various devices like PCs and intelligent networked
appliances (e.g. Media Adapters) to communicate with each other. More specifically,
UPnP allows connected devices to find each other and to communicate about their
capabilities and their content. Throughout this manual, connected devices are
understood to be compliant with the UPnP A/V Protocol.
User Manual
11
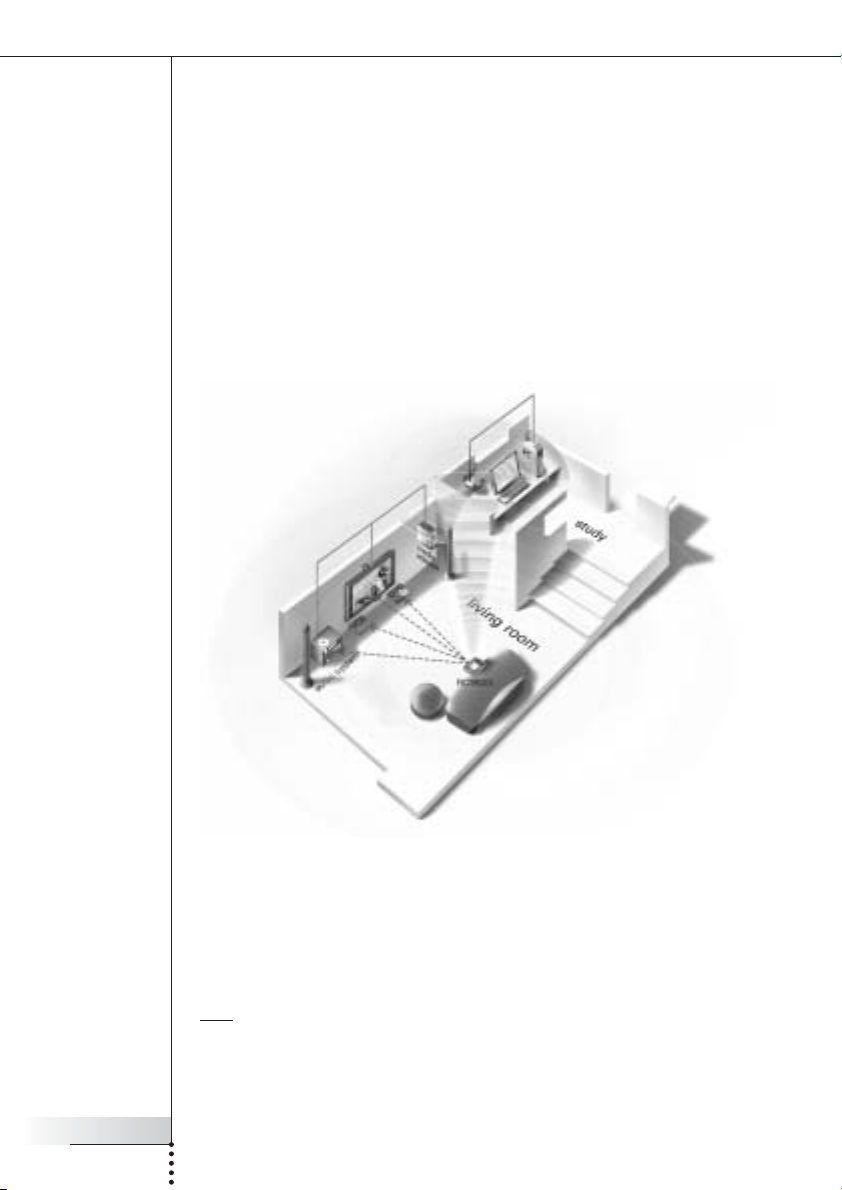
In the home plan above, a typical situation is depicted: A desktop PC (with peripherals
like monitor, mouse and keyboard) and a Wireless Access Point (WAP) are located in
the study.
In the living room, a flat screen TV is hanging on the wall. An audio system sits in the
left-hand corner and there is a Media Adapter in the right-hand corner. The Media
Adapter is wired to the flat screen TV or to the audio system.
Note A Media Adapter is a wireless digital device that allows movies, pictures or music
files to be streamed from a PC to non-networked audio-video devices like conventional
TVs and audio systems.
As you can see, the RC9800i on the couch in the living room, controls
not only legacy audio/video devices, such as the TV and the audio system,
but also connected devices such as the PC and the Media Adapter.
Page 12
Learning the Basics
Wireless Connectivity
Connected devices can be wired, yet nowadays they are becoming more and more part
of a wireless network. There are various technologies used for wireless networking.
Most of them are WiFi 802.11 variants, e.g. ‘802.11a’, ‘802.11b’ and ‘802.11g’. The
RC9800i can be operated in both 802.11b and 802.11g networks.
The RC9800i uses wireless technology to:
■ connect to networked entertainment devices, such as Philips Connected Planet TVs
or audio systems;
■ connect to PCs (the PC should be equipped with appropriate UPnP A/V compliant
software);
■ connect to bridge devices like UPnP A/V compliant Media Adapters;
■ access the Internet to download Electronic Program Guide data.
The center of the wireless home network is the Wireless Access Point (WAP). The
communication between devices in the wireless network is carried out via the WAP.
Attention! Most wireless devices can also operate in peer-to-peer mode. This means
that there is a direct wireless communication link between two communicating devices
without intervention of a Wireless Access Point. If you have set up devices in peer-topeer mode, we strongly recommend that you make your wireless home network operate
with a Wireless Access Point (WAP) and that you disable all peer-to-peer links.
For example, let’s see how an MP3-file, residing on the PC’s hard disk, can be played on
the audio system in the living room. After selecting the file on the RC9800i and
pressing the play button, the Media Adapter and the PC establish communication via
the WAP upon the RC9800i’s instruction. The file’s digital content is wirelessly
streamed from the PC to the Media Adapter. The Media Adapter then converts this
digital content into an analog signal that feeds into the audio system’s amplifier, and
from there it goes to the speakers.
User Manual
12
■ What You Should Know About Activity-Based Control
Your RC9800i comes equipped with a very powerful feature called Activity-Based
Control. Activity-Based Control allows you to automate and substantially simplify your
listening and viewing experience. When using Activity-Based Control you no longer
have the hassle of switching on/off devices and selecting the appropriate inputs
(sources). Instead, you indicate the activity you want to do, e.g. watch DVD on your flat
screen TV. The RC9800i will take care of switching on your flat screen TV and DVD,
while tuning the TV to the appropriate input (source).
Whether the controlled devices are connected devices or legacy A/V devices does not
really matter. The RC9800i blends them into a single unified control concept: ActivityBased Control.
To control all of your audio-video devices, the RC9800i needs to know where they are
located and how they are connected to each other. This is addressed during a one-
time set-up. During set-up, you tell your RC9800i, by means of an easy-to-use wizard,
which devices are available in a room and for which activities these devices are used.
Your RC9800i then knows, each time you use it, which devices and activities are
available in a specific room. Moreover, the RC9800i also knows how to switch the
Page 13

Learning the Basics
devices that are used for an activity on and off, and how to select the appropriate
inputs (sources). You, as a user, will not have to bother with any of this: The RC9800i
will take care of it all.
Activity-Based Control falls into two categories: watch activities and listen
activities.
Watch Activities
You can enjoy a whole range of ‘Watch’ Activities. Just a few examples:
■ Tonight, you’re going to watch a DVD movie on your flat screen TV. With the
RC9800i, you select the flat screen TV as the device on which you’ll be watching
the movie and the DVD player as the source that holds the content. Next, the
RC9800i will show you a screen with all of the relevant TV and DVD control buttons,
as if it were the TV’s and DVD’s remotes in one.
■ You want to watch television, but don’t know what is on. Take your RC9800i and
launch the Electronic Program Guide (EPG). You can select any program from the
EPG; the RC9800i will take care of tuning your TV to the appropriate channel.
■ Some friends are coming over to see your summer holiday pictures. It won’t be easy
for everyone to gather around the PC to view the photos. Why not view them on the
flat screen TV in the living room? With a Media Adapter connected to the TV, you
are all set, and with the RC9800i, you can control the whole viewing session,
including previewing photos on the RC9800i’s screen and setting up a slide show.
■ A couple of weeks ago, you went snowboarding with some friends. Now you would
love to see those pictures again. You can do that right away on the RC9800i’s
screen.
User Manual
13
Listen Activities
You can also perform various ‘Listen’ activities:
■ When you want to listen to a CD on your audio system, you no longer need to look
for the right remote. With your RC9800i you can control both your CD-player and
your audio system.
■ Instead of listening to a CD, you would like to enjoy some MP3 audio-files from your
PC. With the RC9800i you can browse through your PC folders, select your favorite
songs and play them on the RC9800i or on any connected audio system.
Note The undocked RC9800i features only a speaker intended for pre-listening. Enjoying
music via the RC9800i can be done best via the cradle, connected by an audio extension
cable to your audio system. For further information, please check ‘The Cradle as Digital
Music Media Adapter’ beginning on page 8.
To learn more about the activities you can perform with your RC9800i, please check
‘Activities’ beginning on page 29.
Page 14

Getting the Settings Right
When you start the RC9800i for the first time, a sequence of screens will guide you
through the initial setup process. During this setup process, you will be guided
through the most important settings concerning:
■ The RC9800i;
■ Your home situation, more specifically the rooms where you are going to use the
RC9800i;
■ The audio-video devices that you want to control with the RC9800i.
Setting up the RC9800i may take between 30 minutes and 2 hours, depending on the
amount of audio-video devices that you are going to control with it.
Note This initial setup process is carried out only during the first-time startup of the
RC9800i. However, you can modify all settings afterwards as explained in ‘Adjusting the
Settings’ beginning on page 42.
!
Attention!
Before you proceed, we advise you to charge your RC9800i for 3 hours.
■ RC9800i Settings
Calibrating the Touch Screen
On first use you have to calibrate the RC9800i’s touch screen. This ensures that the
touch screen will respond accurately when you touch it.
Note It is recommended that you calibrate the screen and go through the initial setup using
the blunt tip of a non-metallic stylus-like object. In daily use, you can operate the device
with your fingers.
Tap very precisely the center of the crosshairs that appear in the four corners of the
screen. The RC9800i may repeat this process a number of times, until its screen is
accurately calibrated.
User Manual
14
Note If you notice that after some time the touch screen no longer responds accurately to
the screen areas you are touching, you can recalibrate the touch screen. See ‘Screen
Settings’, on page 43.
End User License Agreement
The RC9800i will display a message informing you of the existence of the End User
License Agreement (EULA), included in the RC9800i box. Read this EULA carefully. Your
use of the RC9800i and its software is subject to your agreeing to be bound by and
become a party to he Software End User License Agreement included in the RC9800i
box and any license terms presented electronically to you during setup of the RC9800i
and/or printed terms included in the RC9800i box. Only if you agree to be bound by
these terms, choose I Agree. Otherwise discontinue using the RC9800i.
Page 15
Getting the Settings Right
Selecting Your Location
Next, you will be prompted to indicate what region you live in.
Attention! The location you select in this screen affects applications like the Electronic
Programming Guide, the remote control codes database and the questions asked during
setup.
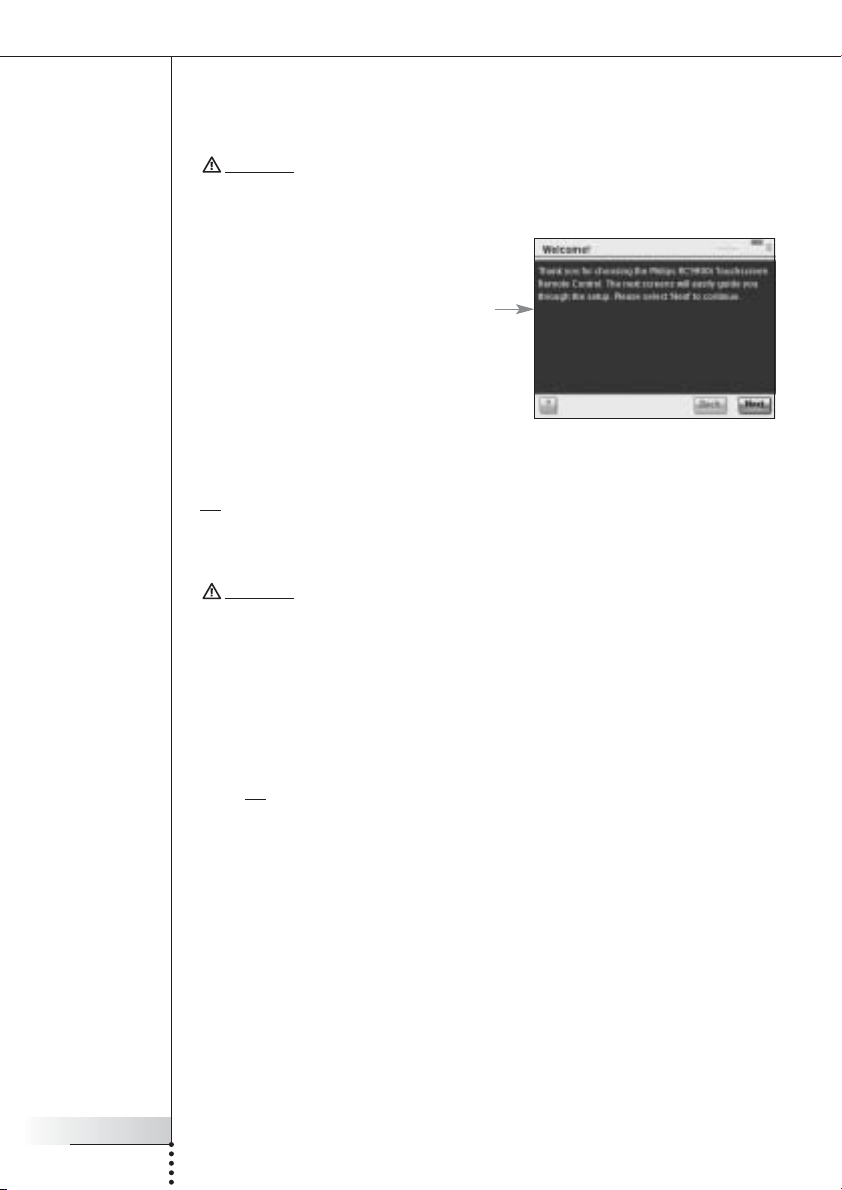
1 Select either North America or Europe.
The RC9800i will automatically restart to
configure the location settings and will then
display the following welcome screen.
2 Choose Next to start the setup process.
Network Settings
Tip Make sure that you have your Wireless Access Point (WAP) settings information at
hand. You will need this information in the following screens.
If you’re unfamiliar with network terminology, consult the ‘Glossary’ on page 60.
User Manual
15
Attention!
that there is a direct wireless communication link between two communicating devices
without intervention of a Wireless Access Point. If you have set up devices in
peer-to-peer mode, we strongly recommend that you make your wireless home network
operate with a Wireless Access Point (WAP) and that you disable all peer-to-peer links.
Most wireless devices can also operate in peer-to-peer mode. This means
1 Indicate whether you use the RC9800i with a wireless network or not.
■ If not, choose No and click Next. The screen ‘Date & Time Settings’ will
appear. In this case proceed with the setup on page 17.
Tip In the event that you have a wireless network set up in your home, choose Yes ,
even if you do not use the RC9800i to control other networked devices. This way,
if you want, the RC9800i can retrieve date and time information from dedicated
time servers on the Internet, see ‘Date & Time Settings’ beginning on page 17.
■ If you do use the RC9800i with a wireless network, choose Yes and click
Next.
A screen with the current network connection status will appear.
2 Indicate whether you want to continue using the current network
connection status or not.
■ If so, choose Next.
The screen ‘Date & Time Settings’ will appear. In this case proceed with the
setup on page 17.
■ If you want to connect to another network or alter the network settings,
choose Change.
The screen ‘RC9800i Network Settings’ will appear.
Page 16
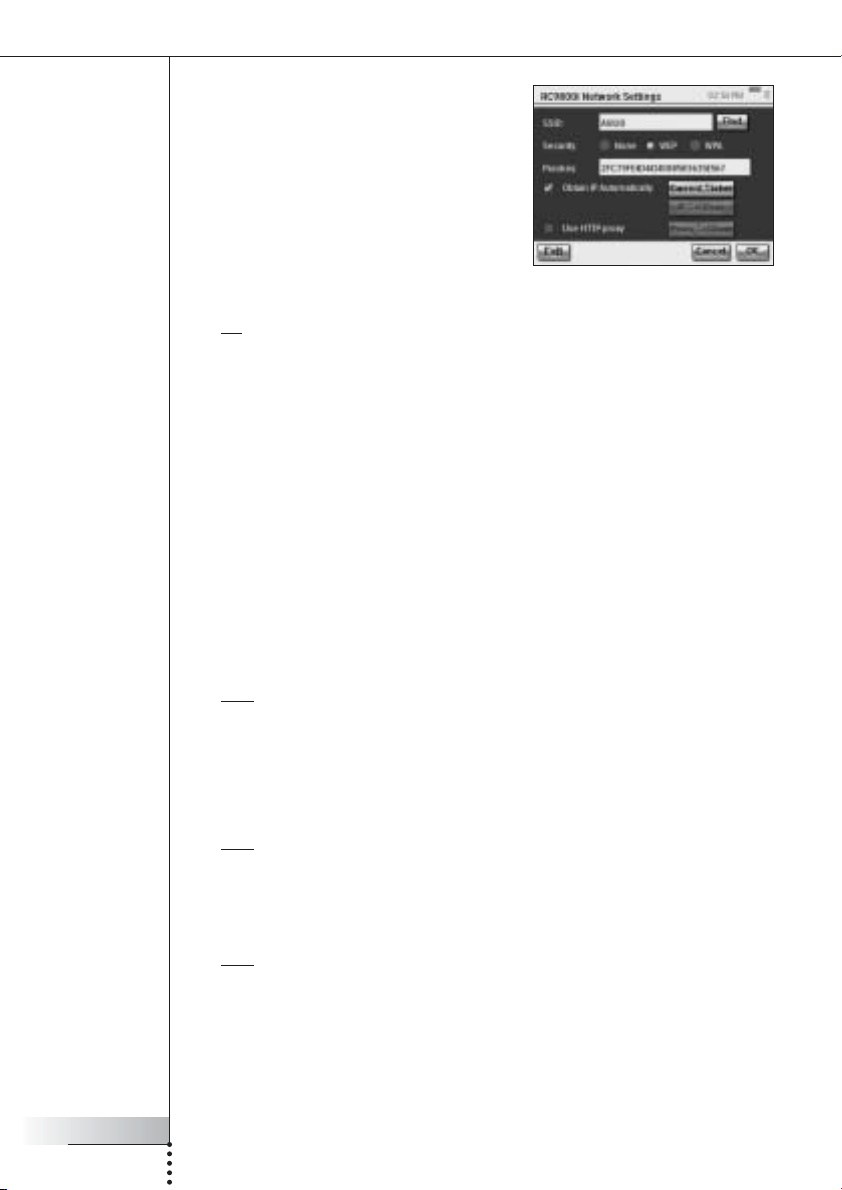
Getting the Settings Right
Change Network Settings
1 In the screen, ‘RC9800i Network
Settings’, enter the SSID number of your
wireless network.
1 Choose Find to find all available
wireless networks.
2 Select the SSID of the network you
want the RC9800i to connect to.
2 Select the appropriate Security settings that apply to your wireless network:
Tip Check the settings of your WAP.
■ None: Communication over your network will not be encrypted and can
therefore be captured and understood by other people in the proximity of your
network.
■ WEP: When you choose this option, you must enter your WEP Passkey. This
Passkey is a 64-bit (enter 10 characters) or a 128-bit (enter 26 characters)
hexadecimal (0...9, A,B,C,D,E,F) encryption key that secures your wireless
network by encoding all communication. Other people who do not have the
appropriate key will be unable to decipher the communication over your
network.
■ WPA: WiFi Protected Access is a network communication standard that
increases the level of data protection (encryption) and access control
(authentication) for existing and future WiFi wireless networks.
For security reasons, you are strongly advised to use WEP or WPA encryption for all
devices that are part of your wireless network.
User Manual
16
3 Select Obtain IP automatically to use a dynamic IP address.
Note When you select Obtain IP automatically, your Wireless Access Point (WAP)
will, by means of DHCP (Dynamic Host Configuration Protocol), automatically assign
IP addresses to your devices.
-orDeselect Obtain IP automatically and choose IP Settings to manually enter
your IP, DNS (Domain Name Server), Netmask and Gateway settings.
Note The Status button gives information concerning your IP address, Network and
MAC address.
4 If you connect to the Internet via a proxy server, select Use HTTP proxy and
choose Proxy Settings.
Note A proxy server is an intermediary between your own PC and the Internet to ensure
security, allow administrative control, provide a caching service and so on. If your
Internet Service Provider (ISP) uses such a proxy server, please check your ISP
documentation or your browser settings to retrieve the proxy settings.
5 Choose Next.
A screen will appear with the message that the RC9800i is applying your network
settings.
Page 17

Getting the Settings Right
Date & Time Settings
You can have the RC9800i retrieve date and
time information from dedicated time servers
on the Internet, or you can set the date and
time yourself.
Use a dedicated time server on the Internet
1 Select Get time from Internet.
2 Choose NTP settings.
The NTP settings appear:
3 Select RC9800i Default Time Server
from the list.
-orSelect a Custom Server and fill in the
server’s address.
4 Select 12 hour (AM/PM) if you want to use this time format. Otherwise the
RC9800i will use the 0-24 hours time format.
5 Choose Done.
6 Select a time zone.
List of timezones
(GMT – 12:00): International Dateline West
(GMT – 11:00): Midway Island, Samoa
(GMT – 10:00): Hawaii
(GMT – 09:00): Alaska
(GMT – 08:00): Pacific Time (US & Canada); Tijuana
(GMT – 07:00): Arizona, Mountain Time (US & Canada)
(GMT – 06:00): Central Time (US & Canada), Central America
(GMT – 05:00): Eastern Time (US & Canada), Indiana
(GMT – 04:00): Atlantic Time (US & Canada)
(GMT – 03:30): Newfoundland
(GMT – 03:00): Greenland
(GMT – 02:00): Mid Atlantic
(GMT – 01:00): Azores, Cape Verde Islands
GMT: Greenwich Mean Time: Dublin; Edinburgh; Lisbon; London
(GMT + 01:00): Amsterdam; Berlin; Bern; Rome; Stockholm; Vienna
(GMT + 01:00): Belgrade; Bratislava; Budapest; Ljubljana; Prague
(GMT + 01:00): Brussels; Copenhagen; Madrid; Paris
(GMT + 01:00): Sarajevo; Skopje; Sofija; Vilnius; Warsaw; Zagreb
(GMT + 02:00): Athens; Istanbul; Minsk
(GMT + 02:00): Bucharest
(GMT + 02:00): Helsinki; Riga; Tallinn
User Manual
17
7 Choose Next.
The RC9800i will now proceed with the setup of rooms and A/V devices.
Page 18

Getting the Settings Right
Set date and time yourself
1 Make sure that Get time from Internet is not selected.
2 Select 12 hour (AM/PM) if you want to use this time format. Otherwise the
RC9800i will use the 0-24 hours time format.
3 Select a time zone.
4 Set the date and time.
5 Choose Next.
The RC9800i will now proceed with the setup of rooms and A/V devices.
■ Set Up Rooms and A/V Devices
Next, the RC9800i will prompt you with questions to find out which rooms contain
audio-video equipment that you want to control with the RC9800i, as well as to learn
more about the nature of this equipment.
Set Up Rooms
User Manual
18
1 To continue, tap Next.
The screen ‘Set Up Rooms’ appears.
2 Choose Add.
The screen to add rooms appears.
Page 19
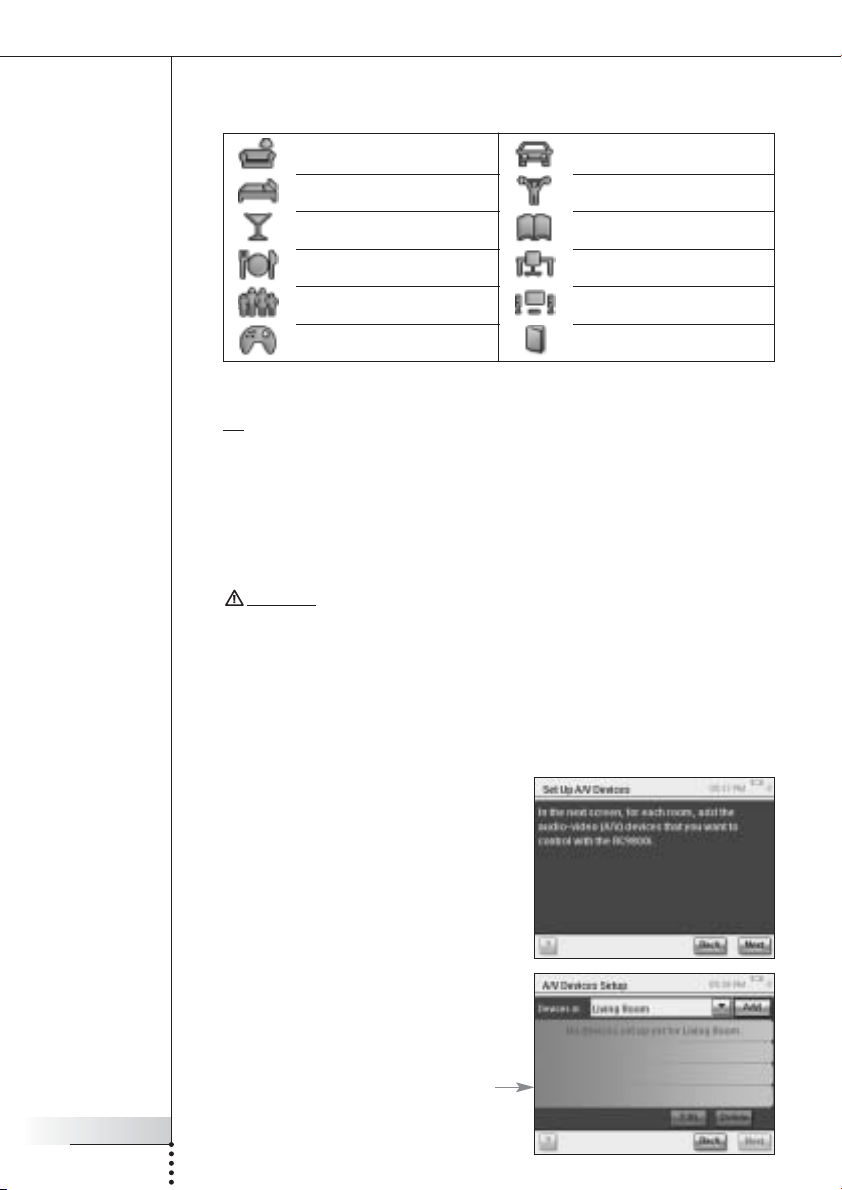
Getting the Settings Right
3 Select the room type of your choice, for example Living Room.
You can choose from the list below:
Living room
Bedroom
Bar
Dining room, Kitchen
Family room
Game room, Kids room
Garage
Gym, Exercise room
Library, Study
Office
Theater, Movie room
Other
The name of the room is filled out automatically. If desired, you can rename the room.
Tip If you have a room that is not in the list, select a room that most closely matches
your room and rename it.
4 Choose OK.
The screen ‘Set Up Rooms’ appears again. The newly added room is displayed in
the list. If you wish, you can add additional rooms.
You can also edit or delete rooms that are already in the list by selecting them and
choosing Edit or Delete.
Attention! You should add all the rooms that contain audio-video devices you want
to control with your R9800i. Please make sure to add all these rooms first before
proceeding with the remainder of the setup process, as you will not be able to add
rooms later on in the first-time setup process.
If you have forgotten to add a room or if you want to add a room later on, you can
add it afterwards as explained in ‘Add/Edit Rooms’ on page 44.
User Manual
19
5 After adding all your rooms, choose Next.
Set Up Devices
For each room you have added, you can now
add the A/V devices you want to control with
your RC9800i.
1 Choose Next.
2 Select a room of your choice.
For this example, let’s select the
Living Room.
Since you haven’t configured any devices
yet, an empty device list appears.
Page 20

Getting the Settings Right
3 Choose Add.
The screen ‘Set Up A/V Devices
Add a Device’ appears:
You can choose from the list below:
■ Amplifier
■ CD (CDR) player
■ Cable Box
■ DVD Player
■ DVDR (+HDD)
■ DVD - VCR
■ Game Console
4 Select a device located in the room currently selected that you
want to control with the RC9800i and choose Next.
For example, let’s select a TV.
The following screen appears:
l
■ Home Cinema /
Home Theater
■ Media Adapter
■ Media Center PC
■ PVR (DVR, Tivo,
Replay TV, …)
■ Projector
■ Receiver (Amplifier +
Tuner)
■ Satellite Receiver
■ TV
■ Tuner (Radio)
■ VCR
User Manual
20
5 Choose the alphabet buttons to jump to
the appropriate brand list.
Note These buttons work like buttons on a
cell phone: choose a button once to jump to a brand list starting with the first
character, choose it twice for a list that starts with the second character, three times
for the third character, and so on.
6 Select the brand of the device and choose Next.
For example, let’s select Philips as the TV’s brand.
A screen, where you can optionally enter a
model number, appears.
Note If you have multiple devices of the same
brand and type, we strongly advise you to
fill out the model number. This way, the
RC9800i will automatically copy all
relevant device information when you add
the next device of the same type, saving
you setup time.
If you don’t have this information, leave the text field blank and choose Next.
Note If the brand of your device is not in the list, simply choose any other brand in the
list.
Page 21

Getting the Settings Right
Determining Remote Control Codes
Good To Know:
About Remote Control Codes
Your RC9800i sends infrared (IR) signals to
your devices to trigger an action, e.g. to make
the VCR start recording.
For every action/function, the RC9800i sends
a specific IR signal, called a ‘remote control
code’. The codes for various functions of a
device are clustered in a ‘codeset’. Your
RC9800i comes with a huge database that
contains numerous remote control codesets
for all kinds of devices and brands.
There are 3 different ways to learn the remote control codes used by your device:
■ If you have the original remote control for the device, choose Learn & Match;
■ If you don’t have the original remote control or if Learn & Match didn’t find
matching remote control codes, choose Autoscan;
■ If neither Learn & Match or Autoscan found matching codes, choose
Select & Try.
Learn & Match
With this method, you use the device’s original remote control to determine the remote
control codes that your RC9800i has to use. The RC9800i will first tell you which
function it will learn. Then, follow the on-screen instructions until an animated picture
appears.
User Manual
21
1 Aim your device’s original remote
control to the RC9800i’s infrared sensor.
Keep it at a distance of approximately
5 cm / 2 inches. Make sure to aim at the
area between the two white stripes.
2 On the original remote control, press the button indicated by the RC9800i.
Keep it pressed until the RC9800i indicates that it has learned the remote
control code (or that it was unable to learn the code). Choose Skip if your
original remote control doesn’t feature the command asked for by the
RC9800i.
Note In some cases, depending on the kind of device you’re configuring, steps 1-2
above may be repeated several times. Also, depending on the kind of device, the
actual buttons to press may vary.
Page 22

Getting the Settings Right
When the RC9800i has determined the
appropriate remote control codes, the
‘Try & Learn Codeset’ screen will appear.
You can try the functions mentioned in the
list, to check whether the selected codes
work properly.
Note Buttons with text in red have no remote control code assigned to them. If you
want to use these functions with your RC9800i, you can learn them individually using
your original remote control. Some functions may not be available on your original
remote; you can then safely disregard them in the list.
3 Select a function and choose Try .
If the device doesn’t respond correctly to a function, choose Learn and perform the
procedure as described in steps 1-2 on page 21.
Tip It is strongly advised to verify that all functions that were available on your original
remote are also available on the RC9800i and that they do work correctly.
4 If the device responds correctly to the various functions, choose Next.
Note If the Learn & Match method was unable to determine the appropriate remote
control codes, or if you don’t have the original remote control, use the Autoscan
method.
User Manual
22
Autoscan
This method attempts to find a set of remote
control codes by automatically sending codes to
your device to find out which codes your device
reacts to. Make sure that your device is on and
follow the on-screen instructions, until a
progress bar appears:
1 When the device reacts, choose My Device Reacted.
A confirmation screen will appear.
2 To use the set of codes presented, choose Next. Otherwise, to resume
scanning, choose Back.
3 After choosing Next, the screen ‘Try & Learn’ will appear. You can try the
functions mentioned in the list to check whether the selected codes work
properly.
Page 23

Getting the Settings Right
Note Buttons with text in red have no remote control code assigned to them. If you
want to use these functions with your RC9800i, you can learn the codes individually
using your original remote control. Some functions may not be available on your
original remote; you can then safely disregard them.
4 Select a function and choose Try .
■ If the device doesn’t respond to the function, choose Learn and perform
the procedure as described in steps 1-2 on page 21.
Tip You are strongly advised to verify that all functions that were available on your
original remote are also available on the RC9800i and that they do work correctly.
If you find that many functions do not work correctly, it is likely that a better
matching set of codes can be found for your device. To find out if another set of
codes can be found for your device, choose Resume.
■ If the device responds correctly to the various functions, choose Next.
A confirmation screen will appear.
Note If the Autoscan method was unable to determine the appropriate remote control
codes, or if you don’t have the original remote, use the Select & Try method.
Select & Try
This method lets you select remote control codes and try them.
1 In the screen for IR Setup, choose
Select & Try.
The following screen will appear:
User Manual
23
2 Select a set of codes.
After choosing a codeset, you can try the
functions mentioned in the list, to check whether the selected set of codes works
properly. The list is populated with all the functions that are relevant for the device
type that you’re setting up.
3 Select a button and choose Try .
If you feel the selected set of codes is not working properly, i.e. many functions do
not trigger the appropriate action, you can select a different codeset to try.
Once you have identified the best matching codeset for your device, you can
manually learn incorrect or missing functions (missing functions have no remote
control codes assigned to them; they are marked in red.)
4 When finished, choose Next.
A confirmation screen will appear.
Page 24

Getting the Settings Right
Power on, channel switching and input selection
After having determined the correct remote control codes for a device, the RC9800i will
now determine the most appropriate methods for powering on, switching channels and
selecting inputs on the device.
Note In the following paragraph, the example of a TV is discussed. Depending on the kind
of device you’re configuring, some questions may be omitted.
Power on questions
Follow the on-screen instructions. The RC9800i will determine the best power on
method for the TV.
Channel switching questions
The RC9800i will now prompt you with questions to find the best method for tuning to
1, 2 and 3-digit channels. Follow the on-screen instructions.
Input selection questions
When the channel switching method is defined,
you will be asked a few questions about how
you select A/V inputs (i.e. audio-video sources
that feed audio-video signals into your
television), e.g. AV1, AV2, EXT1, EXT2, RGB or
YC2.
1 Use the and buttons to
browse through the different input
selection options.
Attention! Make sure that you carefully read all the options. Some options look very
similar, but differ considerably. Choose the input selection method that best matches
your situation.
User Manual
24
2 Choose Select this option when you have found the input selection method
that best matches the mechanism that your TV uses.
Note The sequence of screens discussed below depends on the option chosen.
For example, let’s select option 2/7 ‘Using a single button, I cycle through inputs
until I reach the one I want’.
3 Choose Next.
4 Follow the on-screen instructions.
You will be asked to turn on the TV and to try the TV’s input button.
5 Choose Next.
The following screen will appear:
Page 25

Getting the Settings Right
6 Choose Input to make the TV switch to an input. Indicate whether your TV
shows the signal from its tuner (i.e. broadcasted programs) or an input.
Repeat this step until all inputs, including the TV’s internal tuner, have been
added.
Tip You can add inputs with exactly the same name as they are worded on your TV.
You can also choose names of your own choice.
7 Choose Next and indicate which input is currently being displayed.
8 Choose Next.
You will receive a confirmation message when the TV details are successfully
added.
Note Repeat the ‘Set Up Device’ process for all devices that you want to control with
the RC9800i. Make sure also to add media adapters and other connected devices if
you want the RC9800i to control them.
■ Set Up Activities
In ‘Set Up Devices’, you have configured each individual device that you want to control
with the RC9800i. The RC9800i will now collect information on which devices are used
for activities (e.g. Watch a DVD, listen to a CD, etc.). This information will allow the
RC9800i to automate and simplify your listening and viewing experience by means of
Activity-Based Control.
Note If you want to know more about Activities and Activity-Based Control, please read
‘What You Should Know About Activity-Based Control’ on page 12. This background
information is not mandatory for completing the Activity Setup.
User Manual
25
In the course of the Activities Setup, all
activities will be configured room by room.
An introductory screen will automatically
appear.
1 Choose Next twice.
The following screen will appear.
2 Check the activities that are relevant for
you (i.e. things that you want to do with
your equipment and that you want to
control with the RC9800i).
Page 26

Getting the Settings Right
3 Choose Next and follow the on-screen instructions to configure all the
activities you have selected. This means indicating which devices are
involved in an activity, what A/V inputs are being used and, if applicable,
what channels the device(s) must tune to.
If you have configured devices in more than one room, steps 1-3 will be repeated
for every room.
A confirmation screen will appear when all
activities have been added successfully.
Your RC9800i is now fully set up and you can start using it!
Getting the Most Out of It
This chapter explains in detail the various features of the RC9800i. Here you can learn
how to maximize your entertainment experience.
First, the following concepts will be explained:
■ the Homepage, which is the starting point for all Activities;
■ the System Management Area, which is the heart of your RC9800i;
■ the Smart Navigation Concept, which allows quick and easy navigation by means
of the Home, Back and Page hard keys.
User Manual
26
Next, several Activities are discussed in detail. Finally, there is also an explanation on
how to control devices individually, outside of the context of activities.
■ Homepage
The Homepage of the RC9800i is the starting point for all activities.
At the top of the Homepage, the current room (in this case the living room) is displayed.
The Homepage itself lists the 3 available activities: Watch, Listen and Browse.
Controlled room
Possible activities you can
perform in this room
Tap this button to turn off
all devices in the selected
room
Page 27

Getting the Most Out of It
■ System Management Area
By choosing on the Homepage, you go to the System Management Area.
The System Management Area contains the following items:
■ Activities displays the Home Page with the available activities: Watch, Listen and
Browse. Depending on the room and the devices located in that room, the available
activities may differ.
■ Select a Different Room allows you to select a different room. For further
information, see ‘Good To Know: Changing the Room’ on page 36.
■ When you select Individual Device Control, a list will appear showing the
devices that you can watch or listen to in the chosen room. For each device, a
series of screens with remote control functions is available.
■ Settings allows you to change your RC9800i settings, add or edit rooms and A/V
devices information, and set up Internet services.
■ About contains information on the software version of your RC9800i.
User Manual
27
■ Smart Navigation
The Home, Page and Back hard keys allow you to navigate easily through the
RC9800i screens.
Home Hard Key
During daily use, to easily return to the Homepage, use the Home hard key. No matter
which screen is displayed, the RC9800i will show the Homepage.
Back Hard Key
Your RC9800i is equipped with a Back hard key, that is useful for quickly going back to
higher levels. Each time you press the Back hard key, you access the last screen you
viewed on a higher level. As this happens, screens at the same level are skipped.
Page Hard Key
Press this hard key to quickly move through the various remote control screens
belonging to a particular activity or device.
Note When only one page is available, the Page hard key is inactive.
Page 28

Getting the Most Out of It
Controlled room
Possible activities
you can perform in
this room
Homepage: Level 1
Choose Watch.
User Manual
28
Press
the Home
hard key.
Remote Control screen,
first page: Level 2
Remote Control screen,
second page: Level 2
Remote Control screen, Level 3
Press the Page hard key to
cycle through the different
remote control screens.
Choose Search.
Page 29

Getting the Most Out of It
■ Activities
In ‘What You Should Know About Activity-Based Control’ on page 12, you can read the
basics about Activity-Based Control. This will now be described in more detail.
Watching Cable TV
Tonight, a great movie is being broadcast. You’re going to have a cinema experience by
watching it on your living room’s flat screen TV. With the RC9800i you select the cable
box as the source that holds the content and the flat screen TV as the device you’ll be
watching the movie on.
To do so, proceed as follows:
1 On the Homepage, choose Watch.
The following screen will appear.
Note If you have multiple display devices in
the room, the RC9800i will prompt you to
select the display device you want to
watch.
Note
Icons in bottom bar may differ depending
on the activities you have set up.
2 Choose the cable box icon (the source that holds the content you
would like to enjoy).
The combined control screen
will appear.
This indicates the number of pages
available. Use the Page hard key to
scroll through the pages.
User Manual
29
These are the typical controls
for watching television via a
cable box.
3 Choose the digits corresponding to the channel you want to watch, the one
that broadcasts the movie.
The RC9800i will send remote control codes to tune the cable box to the
appropriate channel.
The RC9800i offers two ways to interact with the television and the cable box:
■ Choose a soft button on the control button page;
■ Press the hard keys on the RC9800i.
■ Channel up/down to switch channels;
■ Volume up/down/Mute to adjust the television’s volume;
■ Home to go to the RC9800i Homepage.
Page 30

Getting the Most Out of It
Good To Know: Combined Control Screens
Combined Control screens are the core elements of the Activity-Based Control concept.
They allow you to control the involved devices and their content during the activity.
You can cycle through the various control screens with the Page hard key.
For example, in the scenario above, the combined control screens for a cable box
hooked up to a TV appear. The first screen shows the most frequently used control
buttons for both devices. By pressing the Page hard key, you have access to additional,
less frequently used controls.
An example page of a combined control screen:
The following elements are part of a combined control screen:
■ The page number and the total number of pages available for this particular
activity:
■ The ‘activity’ bar with all the activities that the TV can participate in. The selected
activity is highlighted:
The most frequently used
controls for the television
and the cable device.
: TV, VCR, cable box (current selection), DVD;
User Manual
30
You can switch from one activity to another by simply tapping the icon of your
choice. Below is a list of all activities.
Watching broadcast TV
Watching Cable TV
Watching Satellite TV
Watching PVR
Watching Video Tape
Watching DVD/DVDR(+HDD)
Watching PC content
Note The number and nature of activity icons that are shown depend on the activities
that you configured during set up. To add activities, first add the appropriate device,
see ‘Add/Edit AV Devices’ on page 44.
Playing Games
Listening to CD
Listening to DVD
Listening to Broadcast Radio
Listening to Cable Radio
Listening to Satellite Radio
Listening to PC content
Page 31

Getting the Most Out of It
■ The ‘battery status’ indicator: . This indicator goes through 4 stages (full, 2/3,
1/3, minimum). When your RC9800i is docked and charging, the battery status
indicator is animated.
■ The ‘Time’ indicator: The time is indicated in HH.MM or HH.MM PM/AM format.
To change the time or time format, see page 43.
■ The ‘IR active’ indicator: . This indicator lights up when remote control codes
are being sent. In the event that the RC9800i has no remote control code available
for the button pressed, the IR indicator will turn red and the RC9800i will beep. You
can find out which codes are missing. See ‘Changing the remote control codes of a
device’ on page 45.
■ The ‘Network’ indicator: . The number of bars is an indication of the network
strength. In the event of the network strength becoming low, a single red bar will
be displayed.
Watching Satellite TV
To watch satellite TV, perform steps 1 to 3 as described in ‘Watching Cable TV’ on
page 29. Instead of selecting the cable box as the applicable source, select the satellite
receiver .
Watching Broadcast TV
To watch broadcast TV (i.e. use the TV’s internal tuner), perform steps 1 - 3 as
described in ‘Watching Cable TV’ on page 29. Instead of selecting the cable box as the
applicable source, select the TV’s internal tuner .
User Manual
31
Watching DVD
You’re going to watch a DVD movie on your TV in the living room.
To do so proceed as follows:
1 On the Homepage of your RC9800i,
choose Watch.
2 Select the DVD as the applicable
source.
The combined control screen TV-DVD
will appear.
The RC9800i will take care of switching your
TV to the DVD input.
3 In the combined control screen for
TV-DVD, choose the desired function.
Watching PVR
To watch PVR, perform steps 1 and 2 as described in ‘Watching DVD’. Instead of
selecting the DVD as the applicable source, select the PVR . In the combined
control screen for TV-PVR, choose the desired function.
Page 32

Getting the Most Out of It
Watching Video Tape
To watch a videotape, perform steps 1 and 2 as described in Watching DVD. Instead of
selecting the DVD as the applicable source, select the VCR . In the combined
control screen for TV-VCR, choose the desired function.
Watching a Program Using EPG
Let’s go back to the situation where you want to watch a movie on your flat screen TV
in the living room. In the event that you don’t know what is on, you may want to use
the Electronic Program Guide (EPG) to find out tonight’s program schedule.
The EPG displays television program information on the RC9800i. For example, you can
check which programs Station XYZ is broadcasting today between 7 and 9 pm.
Likewise, you can search for a sports program in any given time slot in the upcoming 7
days.
In order to be able to use the EPG, you must first perform some EPG service-related
settings, see ‘Electronic Program Guide (EPG)’ beginning on page 46.
Attention! Some service-related settings are to be performed on a PC using a Web
browser, NOT on the RC9800i. You must first perform these settings before you can use
the EPG on the RC9800i.
After you have performed the service settings, you can activate the EPG on your
RC9800i, download the television program data and start consulting them.
To access the EPG information on your RC9800i, proceed as follows:
User Manual
32
1 On the Homepage of your RC9800i, choose Watch.
2 Select the internal tuner , the cable box or the satellite box
as the applicable broadcast source. A combined control screen will then
appear.
3 Choose the Guide button.
The EPG screen will appear.
Note Make sure your date, time and time zone are correctly set. For further information on
Date & Time Settings, please see page 17.
Good To Know: Electronic Program Guide
The EPG application uses lists (US) or grids (Europe) to display the program listings.
Page 33

Getting the Most Out of It
■ TV station call signs are listed vertically according to their channel number. In
grids, the horizontal axis represents time in 2-hour slots. In lists, time slots are
displayed in 30-minute slots.
■ Color coding is used for the various program genres.
■ Program information: You can get additional program information by choosing the
highlighted program, or choosing OK. See ‘Consulting Program Information’ below.
■ Watch button : You can watch a highlighted program on television (if it is
now playing) by choosing the Watch button. See ‘Watching a Program from EPG’
below.
■ Search button : You can search for specific programs by genre(s) and by
time and date, see ‘Searching Programs’ on page 34.
Navigating the EPG Screen
You can navigate the EPG screen by means of the cursor keys. You can also select any
program simply by tapping the screen. To display another time slot, use the time
selector .
Attention! Moving the highlight from one program to another does NOT switch your
TV to the newly selected program. To actually watch a program, see ‘Watching a
Program from EPG’ below.
Consulting Program Information
To obtain more information on a program, you can consult the Program Information
Screen:
1 In the EPG grid/list, make sure that the highlight is on the program for
which you want more detailed information (e.g. by moving the highlight
with the cursor keys).
2 Tap the highlight or choose OK.
A screen with more detailed information will appear.
User Manual
33
Note Use the Back hard key to go back to the previous EPG screen.
Watching a Program from EPG
From the various EPG screens you can make the RC9800i tune your TV to the program
you want to watch. To do so, proceed as follows:
1 Make sure that the highlight is on the program that you want to watch (by
moving the highlight with the cursor keys or simply tapping the program’s
name).
2 Choose the Watch button (the Watch button is enabled only if the
highlighted program is currently being broadcast).
Switching Channels
To switch channels either:
■ use the channel up/down keys;
■ choose a station call sign in any of the EPG screens;
■ select a program and choose Watch.
In all of the above cases the RC9800i will tune your TV to the corresponding channel.
Page 34

Getting the Most Out of It
Searching Programs
To search for programs of a specific genre, proceed as follows:
1 In the EPG grid/list screen, choose
Search .
The following screen will appear.
2 You can search on the basis of day,
time and genre.
Refine the search criteria by selecting the
appropriate day, time and genres.
Tip You can choose multiple genres.
3 Choose Go.
The message ‘Searching’ will appear and
after a few seconds a screen with the
search results will appear.
User Manual
34
Watching Digital Pictures From Your PC on Your TV
Imagine the following scenario:
The grandparents are staying for the weekend. You’re going to show them the photos
of your child’s birthday party.
Note Watching Digital Pictures on your legacy television requires a UPnP-compliant Media
Adapter to convert the digital signals from your PC to analogue signals for your
television. For more information on Media Adapters, see ‘What You Should Know About
Home Networking’ on page 11.
You must also install the Philips Media Manager software. For further information,
please check ‘Installing the Software’ on page 51.
1 On the Homepage of your RC9800i, choose Watch.
2 Select PC .
The combined control screen Watch
will appear.
3 Select the PC where the pictures are
stored.
UPnP
l
Page 35

Getting the Most Out of It
4 Browse through the PC folders and
open the folder that contains the photos
of your child’s birthday party.
5 Choose a picture to be displayed on
your television. Select one of the
following options to browse through the
pictures:
■ Choose each picture individually that you want to display from the list,
and press Play (or press the OK key).
The picture that you selected will appear on the TV.
■ Choose the first picture you want to show from the list and press
Preview. The picture that you selected will appear on the RC9800i, next
press Play. To display the next picture on the television, choose the soft
buttons Next/Previous and press Play.
■ Run a slide show of all the pictures in one folder.
Choose Ctrl (Control) to display the slide show options.
Note Files that cannot be decoded are marked in gray. These files cannot be displayed on
the current display device.
Watching Digital Pictures From Your PC on the RC9800i
User Manual
35
Note To be able to watch digital pictures, you must install the Philips Media Manager
software first. For further information, please check ‘Installing the Software’ beginning
on page 51.
1 On the Homepage of your RC9800i, choose Browse.
2 Select the PC where the pictures are stored.
3 Browse the PC folders and open the folder that contains the pictures you
want to watch on RC9800i.
4 Select the picture in the PC folder.
5 Choose the Play soft button.
The selected picture is displayed on the RC9800i.
6 To go to the next/previous picture, choose the soft buttons Next/Previous
.
-or-
Press the Left/Right cursor key.
Page 36

Getting the Most Out of It
Playing Games
To play Games, perform steps 1 and 2 as described in ‘Watching DVD’. Instead of
selecting the DVD as the applicable source, select Games .
Note The activity ‘Playing Games’ mainly serves the purpose of switching your display
device to the appropriate input, so that you can view the content of your game console.
Once the RC9800i has switched the display device to the appropriate input, to actually
play games, you are advised to use the game pad that came with your game console.
Listening to a CD
You just bought a new CD and want to listen to it on the audio system in your bedroom.
Until now, we’ve only addressed living room activities. As you’re now going to use the
RC9800i in your bedroom, you must first make the RC9800i aware of this change of
room.
Good To Know: Changing the Room
Check the top of the Homepage to see if the room indication matches the current
location in which you’re using the RC9800i. If not, change the room.
For example, suppose that the present
controlled room is the living room, as
displayed on the Homepage:
User Manual
36
To change the room controlled by the RC9800i, proceed as follows:
1 On the Homepage, choose to access the System Management Area.
The ‘System Management Area’ screen will appear.
2 Choose Select a Different Room.
The screen with the available rooms will appear.
Current room
Note The list of rooms that is displayed is
based on the information that you provided
during setup. To add a room, or edit the
room name, see ‘Add/Edit Rooms’ on
page 44.
Page 37

Getting the Most Out of It
3 Select Bedroom.
The Homepage reappears. Note that the room indication now reads ‘Bedroom’.
Now, you’re all set to start listening to the CD on your bedroom’s audio system.
To listen to the CD in the bedroom, proceed as follows:
1 On the Homepage, choose Listen.
Note If you have multiple audio devices in the room, the RC9800i will prompt you to
select the audio device you want to listen to.
2 Select CD from the list of sources.
The corresponding combined control screen will appear.
The CD starts playing.
You can control the Volume with the RC9800i’s hard keys: Volume Up/Down, Mute.
The Home hard key allows you to switch to the RC9800i Homepage.
Listening to a DVD
To listen to a DVD, perform steps 1 to 2 as described in ‘Listening to a CD’ beginning on
page 36. Instead of selecting your CD, select your DVD .
Listening to Broadcast Radio
User Manual
37
1 On the Homepage of your RC9800i, choose Listen.
2 Select the Radio (via tuner) as the device that holds the content.
The corresponding combined control screen will appear.
3 Select the radio station you’d like to listen to.
Listening to Cable Radio
To listen to cable radio, perform steps 1 to 3 as described in ‘Listening to Broadcast
Radio’ on page 37. Instead of selecting the radio (tuner), select the Cable Radio .
Listening to Satellite Radio
To listen to satellite radio, perform steps 1 to 3 as described in ‘Listening to Broadcast
Radio’ on page 37. Instead of selecting the radio (tuner), select the Satellite Radio .
Page 38

Getting the Most Out of It
Listening to Audio Files From Your PC via the
Audio System
Note Listening to audio files on your non-networked audio system requires a UPnP-
compliant Media Adapter to convert the digital signals from your PC to analogue signals
for your audio system. For more information on Media Adapters, see ‘What You Should
Know About Home Networking’ on page 11.
You must also install the Philips Media Manager software. For further information,
please check ‘Installing the Software’ on page 51.
Instead of listening to a CD, you would like to enjoy some audio files from your PC.
To do so, proceed as follows:
1 Choose the appropriate room. See page 36 on how to do this.
2 On the Homepage of your RC9800i, choose Listen.
3 Select PC as the device that gives input to your speakers.
4 Select the PC that holds your audio files.
5 Browse the PC folders and open the
folder that contains the songs you want
to listen to via the speakers.
The song list will appear.
6 Select the song you want to listen to
and press the OK hard key or choose
Play .
The song will start playing.
User Manual
38
Listening to MP3 Files From Your PC via the RC9800i
Note To be able to listen to MP3 files, you must first install the Philips Media Manager
software. For further information, please check ‘Installing the Software’ on page 51.
Imagine the following scenario:
While you’re reading a book, you would love to have some music in the background.
Instead of using your audio system, you will use your RC9800i to listen to your MP3
audio-files.
To do so, proceed as follows:
1 On the Homepage of your RC9800i, choose Browse.
2 Select the PC.
3 Browse the PC folders and open the folder that contains the songs you
want to listen to on your RC9800i.
4 Select a song.
5 Choose the Play soft button.
The song will start playing.
Page 39

Getting the Most Out of It
Note Enjoying music via the RC9800i can best be done via the cradle, connected by means
of an audio extension cable to your audio system. See ‘The Cradle as Digital Music
Media Adapter’ on page 8.
To listen to MP3 files from your PC via the Docked RC9800i, repeat steps 1 - 6 as
described above and dock the RC9800i into the cradle. The RC9800i mutes and the
audio-system plays the music.
Synchronization Wizard
When the RC9800i sends remote control commands to the various devices involved in
an activity, it may happen that something blocks the ‘line of sight’ between the
RC9800i and the controlled device (e.g. somebody passing in front of the controlled
device). In that case the remote control signals will not reach the device they are
supposed to control. Consequently, your system may be desynchronized:
■ A device is powered off instead of on; or
■ a wrong input has been selected; or
■ a device has tuned to the wrong channel.
When such a situation occurs you can choose the question mark icon in the bottom
right corner of the combined control screen. This will start the synchronization wizard,
which brings up a screen that holds a few buttons that allow you, depending on the
activity, to change inputs, change channels and turn devices on and off. With these
buttons, you will be able to resynchronize your system.
Note Should you find out that your system is desynchronized every time that you launch a
certain activity, even when there is nothing blocking the remote control signals of
reaching the controlled devices, this indicates that the activity has not been correctly set
up.
In this case, revisit the settings for that activity and the devices that are used for it, see
‘Add/Edit A/V Devices’ on page 44. Also check that remote control codes use the correct
timing, see ‘Changing other device settings’ on page 46.
User Manual
39
Page 40

Getting the Most Out of It
■ Individual Device Control
With Individual Device Control you can control a single device outside of the
context of activities. Individual Device Control screens offer you more and less
frequently used functions than the combined control screens that you get when
controlling activities.
Follow the steps below to use Individual Device Control:
1 On the Homepage, tap .
The System Management Area will appear.
2 Choose Individual Device Control.
A list of available devices that you can
watch or listen to in the current room
will appear.
Depending on the information you provided during setup, the following devices may
be available:
User Manual
40
Television
Projector
VCR
DVD Player
DVDR (+HDD)
CD(R)Player
Satellite Receiver
Cable box
PVR
Note To add devices or edit device names, see ‘Add/Edit AV Devices’ on page 44.
DVD-VCR combo
Home Theater
Receiver
Amplifier
Tuner
Media Center PC
Media Adapter
Game Console
Page 41

Getting the Most Out of It
3 To check the remote control functions of a device, choose the device.
A series of screens with remote control
functions for that device will become
available. For example the following screen
is one of the screens for a VCR:
4 To move through the series of screens, use the Page hard key.
For each device, there is also one screen
with 8 user-defined buttons.
These are buttons to which you can assign
remote control functions yourself. For further
information on user-defined buttons, please
see ‘Changing the remote control codes of a
device’ on page 45.
User Manual
41
“Device Off”, “Activity Off” and “Room Off”
For your convenience, there are three types of buttons that allow you to turn devices
off simply by pressing a button: Device Off, Activity Off and Room Off.
Device Off
When controlling an individual device, on the first page, there is an Off button that
switches off the device you are currently controlling.
Activity Off
When in Activities, there is a similar button that switches off all devices involved in
the activity.
Note If you have multiple activities being performed simultaneously, the devices involved in
other activities will stay on.
Room Off
Finally, in the Home page, there is a Room Off button that switches off all devices in
the room.
Page 42

Adjusting the Settings
After the initial setup, whenever necessary, you can change the settings regarding:
■ Your RC9800i;
■ Your equipment e.g. editing, deleting or adding devices and rooms;
■ The available Internet services.
■ Accessing the Settings
1 The Settings section can be accessed from the System Management Area.
To go to the System Management Area,
choose on the Homepage.
2 Choose Settings.
The ‘Settings’ screen will appear.
User Manual
42
■ RC9800i Setup
To change the settings of your RC9800i, choose
RC9800i Settings. The ‘RC9800i Settings’
screen will appear:
Power Settings
In the Power Settings you can define 2 settings:
■ How many seconds the key backlight should stay on;
■ After how many seconds the RC9800i should go to sleep (Power Save).
To change these settings, choose or .
Page 43

Adjusting the Settings
Screen Settings
Adjusting the Brightness
In the Screen Settings you can adjust the brightness of your touch screen by choosing
or .
Calibrating
If you notice that after some time the touch screen no longer responds accurately to
the screen areas you are touching, you can recalibrate the touch screen. To do so, tap
very precisely the center of the crosshairs that appear in the four corners of the screen.
The RC9800i may repeat this process a number of times, until its screen is accurately
calibrated.
Network Settings
1 In the ‘RC9800i Settings’ screen, choose Network.
The ‘RC9800i Network Settings’ screen will appear.
2 Perform the steps as explained in ‘Network Settings’ on page 15.
3 Choose Back.
Audio Settings
In the Audio settings you can change the following items by choosing or :
■ Touch screen Volume: volume produced when tapping the RC9800i soft buttons;
■ Hard Key Volume: volume produced when pressing the RC9800i hard keys;
■ Alert Volume: volume produced by the RC9800i when an error occurs.
User Manual
43
You can test the changes you have made by choosing Try .
Date & Time
1 On the screen ‘RC9800i Settings’, choose Date & Time.
The ‘Date & Time Settings’ screen will appear.
2 Perform the steps as explained in ‘Date & Time Settings’ on page 17.
3 Choose Back.
■ Set Up Rooms & A/V Devices
To change your equipment settings, choose
Rooms & A/V Devices. The ‘Rooms & A/V
Devices’ screen will appear.
You can choose between two different options:
■ Add/Edit Rooms;
■ Add/Edit A/V Devices.
Page 44

Adjusting the Settings
Add/Edit Rooms
1 On the ‘Rooms & A/V Devices’ screen,
choose Add/Edit Rooms.
The ‘Set Up Rooms’ screen will appear.
2 To add a room, choose Add.
A screen will appear in which you can select
a room type and optionally rename it.
-or-
To edit room information, select a room
from the list and choose Edit.
A screen will appear in which you can change the room type and, if desired, rename
it.
-or-
To delete a room, select a room from the list and choose Delete.
The room will be deleted from the list.
3 Choose Back.
Attention! If you delete a room, all setup information that you provided regarding
the devices in the room will be deleted. It is therefore advisable to first assign these
devices to another room before deleting a room.
User Manual
44
Add/Edit A/V Devices
1 On the ‘Rooms & A/V Devices’ screen,
choose Add/Edit A/V Devices.
The ‘A/V Devices Setup’ screen
will appear.
2 Select a room.
The available devices for the selected room
appear in the list. Now you can add, edit or
delete devices. After having modified device
information you can (re)define the activities
in which these devices are involved (the
‘Activities’ button turns green).
Adding a Device
To add a device, perform the steps as explained in ‘Set Up Devices’ on page 19.
Deleting a Device
1 On the screen ‘Set Up A/V Devices’, choose the device you want to delete.
The selected device is highlighted.
2 Choose Delete.
Page 45

Adjusting the Settings
Moving a Device
1 Select a device and choose Edit.
The ‘Modify a Device’ screen will appear.
2 Choose Name/Room.
The ‘Modify Device Assignment’ screen will
appear.
3 In the Room list, select the room to
which you want to reassign the device
to.
Note If you want, you can optionally also rename the device.
4 Choose OK.
The RC9800i will display the ‘Set Up A/V Devices’ screen. The device is now
reassigned to the room you selected.
Changing the remote control codes of a device
1 On the screen ‘Set Up A/V Devices’, select a device and choose Edit.
The ‘Modify a Device’ screen will appear.
2 Choose IR Codeset.
The ‘Codes Setup’ screen will appear.
User Manual
45
The screen displays 3 possibilities to change your IR settings:
■ If some of your buttons don’t work and/or you want to learn/replace codes, use the
Try & Learn method. To do so, please perform steps 3 - 4 as described in ‘Learn &
Match’ beginning on page 21.
■ If you want to assign codes to user-defined buttons yourself, use the User buttons
method. To do so, take the following steps:
1 Choose User buttons.
The ‘Try & Learn - User Defined Buttons’ screen will appear.
Note All functions are red, since they are all unknown to the device.
2 Select a function.
The selected function will be highlighted.
3 Choose Learn.
Learn the function from your device’s original remote control.
Note To test the function and see if the device reacts, choose Tr y.
■ If you want to choose a different codeset, use the Select & Try method. To do so,
perform the steps described in ‘Select & Try’ beginning on page 23.
Page 46

Adjusting the Settings
Changing other device settings
1 On the screen ‘Set Up A/V Devices’, select a device and choose Edit.
The ‘Modify a Device’ screen will appear.
2 Choose Device Info.
The ‘Modify Device Details’ screen will
appear.
The Device Info Wizard will guide you through a
number of settings for the device that you have
selected. Choose OK to start the wizard.
Before proceeding with the wizard you can also
modify the IR control delays: different devices
of different brands have different timings for reacting when you turn on the device,
switch channels and select input. Normally the timing of these actions is automatically
defined during the initial setup. In the unusual event that this fails, you can edit the
delays manually. To do so, proceed as follows:
1 Choose Control Delays.
The ‘Control Delay Settings’ screen will
appear.
2 To edit the delays, click on the field.
User Manual
46
■ Electronic Program Guide (EPG)
Your RC9800i comes with a 1 year free-of-charge subscription to the Philips Internet
EPG Service. Before you can use the EPG application on the RC9800i, you first must
perform a few service-related settings.
Attention! Some service-related settings are to be performed on a PC using a
Web browser, NOT on the RC9800i.
Service-related Settings on the PC
The following service-related settings are to be done on the PC:
■ Subscribing to the EPG service;
■ Personalizing your subscription, i.e. choosing the TV stations for which you want
EPG data.
Subscribing to the EPG Service
1 On your PC, go to http://www.homecontrol.philips.com.
2 Follow the ‘Philips Internet EPG Service’ link.
3 Register and choose a username and password.
Page 47

Adjusting the Settings
4 Choose the link to create a subscription and follow the instructions.
5 In the screen that summarizes your subscription details, choose Next.
The ‘Create a subscription – Activation Key’ screen will appear. This screen
contains your activation key. Make a note of this key and choose Proceed to
Personalization.
Tip You will need the activation key later on to activate the EPG on your RC9800i.
Personalizing the EPG
You can personalize your EPG by indicating the stations you want to include in the
EPG. This list of stations is called a lineup. The EPG application on your RC9800i will
download and display only stations that are in the lineup(s) that you have defined, and
leave out stations that you don’t receive or are not interested in.
On your PC, perform the following steps to define your lineup(s). A wizard will guide
you through:
1 In the ‘Create a subscription – Activation Key’ screen, choose Proceed to
personalization.
2 In the Personalization Home Page, choose Add a lineup.
3 (US users only) Enter your ZIP code.
4 Choose the appropriate TV signal source (Cable, Satellite, Antenna), then
choose Next.
5 (US users only) If applicable, choose your provider.
6 Select the stations that you want EPG data for (European users: also
indicate the corresponding channel number). When done choose Finish
(European users: Choose Next).
7 (European users only) When satisfied with the selection you have made,
choose Finish. Otherwise choose Back.
User Manual
47
If you have multiple TV signal sources, e.g. a satellite receiver and a cable box, you can
define additional lineups (up to 4). In this case repeat steps 2 to 5 for all your TV signal
sources. When you have added all lineups, in the Personalization Home Page, choose
Advanced and assign a lineup ID to every TV signal source. Make a note of the lineup
IDs that you have assigned, as you will need them when doing the EPG-related settings
on the RC9800i.
Settings on the RC9800i
Once you have created an EPG subscription and received an activation key, you must
bind it to link your RC9800i to the subscription you made in order to make the EPG
available on the RC9800i. This so-called “Activating the EPG” is something that you
only have to do once.
Activating the EPG on the RC9800i
Note Make sure that your WiFi connection to the Internet is operational and that you have
your Activation Key available.
To activate the EPG on your RC9800i, proceed as follows:
Page 48

Adjusting the Settings
1 On the Homepage, choose .
The System Management Area
will appear.
2 Choose Settings.
The ‘Settings’ screen will appear.
3 Choose Services Setup.
The ‘Services Setup’ screen will appear.
User Manual
48
4 Choose Program Guide.
The ‘Electronic Program Guide Service
Setup’ screen will appear.
5 Choose Activation.
The ‘Electronic Program Guide Activation’
screen will appear.
6 Enter your Activation Key and choose
Activate.
The RC9800i will now be linked to your EPG
subscription on the EPG web site.
If the activation is successful, the message
‘Congratulations your EPG subscription is now activated’ will appear.
Page 49

Adjusting the Settings
Note If you receive a message saying that the EPG activation has failed, choose Done.
The ‘Setup Program Guide Service’ screen will appear again. In this case, consult
‘Tips and Troubleshooting’ on page 54.
If you have only one TV signal source, your RC9800i will now be ready to download
program data from the Philips Internet EPG Service. See ‘Downloading EPG Data’
below. If you have multiple TV signal sources, you should first assign to each of these
sources the lineup IDs that you defined when personalizing your subscription. See
‘Assigning Lineups to Devices’ on page 50.
Downloading EPG Data
Note Before you can start downloading EPG data you must activate the EPG on your
RC9800i (see page 47) and, in the event of multiple TV signal sources, you must assign
lineup IDs (see ‘Assigning Lineups to Devices’ on page 50).
Downloading EPG data is a completely automated process. You, as a user, need not do
anything: the EPG data, stored on your RC9800i, is automatically updated over the
Internet, every night between 1.00 AM and 7.00 AM.
Attention! Make sure that your RC9800i is within reach of your wireless network and
that it is sufficiently charged. If battery power is too low, the RC9800i will postpone
downloading of EPG data.
If you wish, you can update the EPG data on the spot. In order to do so, proceed as
follows:
1 On the Homepage, choose .
The System Management Area will appear.
User Manual
49
2 Choose Settings.
The ‘Settings’ screen will appear.
3 Choose Services Setup.
The ‘Services Setup’ screen will appear.
4 Choose Program Guide.
The ‘Electronic Program Guide Service Setup’ screen will appear.
5 Choose Program Guide.
The ‘Electronic Program Guide’ screen will appear.
6 Choose Download.
The following screen will appear:
This screen displays the latest download
status, and allows you to define the
RC9800i’s download pattern.
If you want to refresh the EPG data, choose
Download Now. The RC9800i will start
downloading EPG data from the Philips
Internet EPG Service.
Page 50

Adjusting the Settings
Assigning Lineups to Devices
If you have multiple TV signal sources and accordingly defined multiple lineups when
personalizing your EPG subscription, you should now assign your chosen lineup IDs to
the corresponding devices in your home.
Note Before attempting to assign lineups to devices, make sure that you have properly set
up the RC9800i to control the activities that involve the TV signal sources to which you
are going to assign lineup IDs (e.g. a cable box, the TV’s built-in tuner, etc.). To set up
activities, see ‘Set Up Activities’ on page 25.
1 On the Homepage, choose .
The System Management Area will appear.
2 Choose Settings.
The ‘Settings’ screen will appear.
3 Choose Services Setup.
The ‘Services Setup’ screen will appear.
4 Choose Program Guide.
The ‘Electronic Program Guide Service Setup’ screen will appear.
5 Choose Lineups.
The ‘Electronic Program Guide Lineups’
screen will appear. This screen contains a
list of TV signal sources.
6 For every TV signal source, select the
value in the drop down list that
corresponds to the lineup ID that you
chose for this TV signal source when
you personalized your EPG subscription.
7 When you have finished, choose Next.
User Manual
50
Using the EPG
To learn more about how to use the EPG on the RC9800i, please refer to ‘Watching a
Program Using EPG’ on page 32.
Page 51

Installing the Software
Note You need Windows 2000 or Windows XP on your PC to use this software.
■ Installing Philips Media Manager
This software makes the music, photo and movie files on your computer available for
transfer to a Philips Connected Planet device.
1 Place the RC9800i CD in your PC’s CD or DVD drive.
The CD will start automatically.
Note If the CD does not start automatically, double-click My computer. Then choose
the CD-ROM drive icon, and, finally, choose the Setup.exe to start the CD.
2 In the menu that appears, choose to install Philips Media Manager and
follow the on-screen instructions.
3 To start the program, choose Start > Programs > Philips Media Manager.
When opening the Philips Media Manager for the first time, you will be asked if you
want to add a folder and scan for media files.
4 Choose Add.
5 Select a folder or one or more media files and choose Open to add the
selected folder or files to the Media Manager window.
Note When you close the Media Manager window, its icon remains active in the status
notification area (lower right-hand corner of the desktop). This icon must remain visible.
Double-clicking the icon opens the Media Manager window.
User Manual
51
■ Advanced Philips Media Manager Use
Philips Media Manager on More PCs
The Philips Media Manager can run on more than one computer at the same time.
To do so, proceed as follows:
1 Install the Philips Media Manager in the same way as you did for the first
computer. Perform steps 1 to 5 of ‘Installing Philips Media Manager’.
2 In the Media Manager window, choose Settings.
3 Choose the Server tab and change the Server name.
Note This server name will appear in the top menu when you browse the directories
holding media. This way, you can keep separated all of the computers in the network
that are simultaneously running the Philips Media Manager.
Organizing Media Files
To help you organize and sort your media files, right-click a music track, photo or movie
and select Edit Media Information.
Creating Playlists
To create a playlist, right-click a music track or movie and select Add to Playlist.
Page 52

Upgrading the Firmware
You can upgrade the RC9800i firmware via USB.
Attention! Dock the RC9800i into its cradle while upgrading its firmware.
1 On your PC, open your Internet browser and go to
http://www.homecontrol.philips.com. Follow the link to the software
upgrades section.
2 Download the RC9800i Firmware Update Tool onto your PC.
3 Connect the RC9800i to your PC by means of the USB cable.
4 Dock the RC9800i in its cradle.
5 On the Homepage of the RC9800i, tap .
The System Management Area will appear.
6 Choose Settings.
The ‘Settings’ screen will appear.
7 Choose Services Setup.
The ‘Services Setup’ screen will appear.
8 Choose Software Updates.
The ‘Software Updates’ screen will appear.
9 Choose USB Update.
10 Start the RC9800i Firmware Update Tool on your PC.
11 Follow the instructions on the PC screen and on your RC9800i.
A series of messages will appear on the PC monitor. When the firmware is
upgraded, the RC9800i will reboot automatically.
User Manual
52
Tip You can check in the About area that a newer firmware is installed and running on your
RC9800i.
Page 53

User Manual
53
List of Symbols
Pause
Stop
Play; normal speed
Play reverse; normal speed
Fast forward
Fast reverse
Slow forward
Slow reverse
Eject
Recording
Navigate (down, right, left, up)
Next track
Previous track
Fast forward to index
Rewind to index
Forward Frame by frame
Reverse Frame by frame
Picture-in-picture shift
Picture-in-picture swap
Teletext mode
Page enlargement
TV and Teletext mixed
Last viewed program; previous program
Stand-by
Single or multi-digit selection
Movie expand, change screen size/aspect ratio
Actual time on screen
EPG/ Electronic Program Guide
Sound muting
Additional information on screen
Television mode
Page 54

Taking a First Look
Tips and Troubleshooting
You can quickly solve most problems that you encounter with the RC9800i by following the advice
in this chapter.
■ RC9800i device
My RC9800i switches off automatically
If your RC9800i is not being used, it will switch to standby mode. To wake the RC9800i, see
‘Everyday Use’ on page 6.
You can set the amount of time the RC9800i waits before going into sleep mode. For further
information, see Power Settings on page 42.
My RC9800i doesn’t respond
When the battery is running empty, your RC9800i may not respond anymore. You should then
recharge it, see ‘Charging the RC9800i’ on page 8.
If after recharging your device still does not respond, you may have to reset it. Under normal
circumstances you’ll never have to reset the RC9800i. However on rare occasions, if the touch
screen freezes or if you notice unusual behavior, you may need to perform a reset. Switch the
On/Off Switch off and, after a few seconds, on again. The Homepage will appear. The On/Off
Switch is located at the backside of the RC9800i, see page 6.
The soft buttons on my touch screen do not respond properly
If after some time the touch screen doesn’t respond correctly to the area that you are touching,
you should recalibrate the screen. To calibrate the touch screen, take the following steps:
1 On the homepage, choose .
The System Management Area will appear.
2 Choose Settings.
The ‘Settings’ screen will appear.
3 Choose RC9800i settings.
The ‘RC9800i Settings’ screen will appear.
4 Choose Screen.
5 Choose Calibrate screen.
6 Very precisely tap the crosshairs that appear in the four corners of the screen.
The RC9800i may repeat this process a number of times until its screen is accurately
calibrated.
How do I clear all settings on my RC9800i?
Reverting to the original configuration or factory settings restores the settings that were on your
RC9800i when you purchased it. To revert to Factory Settings, take the following steps:
User Manual
54
Attention!
you provided during the earlier setups.
1 On the Homepage choose .
The ‘System Management Area’ screen will appear.
2 Choose Settings.
The ‘Settings’ screen will appear.
3 Choose Erase All.
A screen asking for confirmation will appear. If you are sure you want to erase all settings,
choose OK. Otherwise choose Cancel.
4 The RC9800i will restart and launch the initial setup wizard.
Reverting to factory settings will delete all rooms and devices information that
Page 55

Tips and Troubleshooting
I don’t have a WiFi network at home. Can I use the RC9800i as a remote?
Of course you can. The RC9800i can also be used as a remote control for your non-networked
audio-video devices. For further information, please check ‘Controlling Legacy Audio/Video
Devices’ beginning on page 10.
Can I recharge the RC9800i any time I want?
Yes, you can. The RC9800i is equipped with a Li-polymer battery, which cannot be overcharged,
and can be charged even when the battery is not fully empty.
How can I clean my RC9800i?
When cleaning the RC9800i, remember these instructions:
■ Use a soft, damp cloth to clean your RC9800i.
■ If the touch screen is dirty, clean it with a soft cloth moistened with a diluted window-
cleaning solution.
■ Do not use a corrosive detergent or an abrasive sponge.
■ Avoid the use of excessive water.
■ Remote control codes
The devices do not respond to the commands I send
To use your RC9800i as a remote control, you must make sure that it uses the correct remote
control codes. To assign remote control codes, refer to ‘Determining Remote Control Codes’
beginning on page 21.
I can’t find the right set of codes for my device
If you can’t find the right set of codes, please use the Select & Try procedure. For further
information, refer to ‘Select & Try’ on page 23.
I have a function on my old remote control that I can’t find on the new one
You can make use of user-defined buttons. These are buttons to which you can assign remote
control codes yourself. For each device, you have 8 of these buttons available. For further
information, please check ‘Individual Device Control’ on page 40.
User Manual
55
■ Rooms and Devices
I can’t add a device
If you can’t add a device, you must check whether at least 1 room is defined. Refer to ‘Add/Edit
Rooms’ on page 44 to check which rooms are defined.
My brand is not in the list! What do I do?
If the brand of your device is not in the list, simply choose another brand. The algorithms that the
RC9800i uses are very powerful and may still be capable of finding a set of codes that works for
your device.
The room name already exists
You can use a room name only once. Either choose another name or rename the room that
currently has the name that you want to use. For more information, see ‘Add/Edit Rooms’ on
page 44.
■ Firmware upgrades
The USB Firmware Upgrade Tool does not work
If you can’t download the Firmware Upgrade, verify that your RC9800i is fully charged or docked in
the cradle, and that the USB cable is connected. Perform steps 1 to 9 on page 52 and verify that
your PC detects the device: on your PC choose My Computer and verify that your RC9800i is
displayed in the list.
Page 56

Tips and Troubleshooting
When upgrading software, the messages appear in the wrong language
1 On your PC, open your Internet browser and go to
http://www.homecontrol.philips.com. Follow the link to the software upgrades section.
2 Download and start the RC9800i Firmware Upgrade Tool;
3 Connect the RC9800i to your PC via the USB cable;
4 Switch the RC9800i off and on again, and keep the Back key pressed while the device
starts up;
5 Choose your language;
6 Follow the instructions on the PC screen and on your RC9800i.
■ EPG
I can’t activate the EPG
If you can’t activate your EPG, check the following:
■ Is your wireless network operational?
■ Can your device access the wireless network? See ‘Network Settings’ on page 15;
■ Have you entered the correct activation code? See ‘Electronic Program Guide (EPG)’ on
page 46.
I have activated the EPG application on my RC9800i, but it still doesn’t work
If the activation of the EPG was successful, but the EPG application still doesn’t work, check the
following:
■ Have you assigned your EPG lineup? See ‘Assigning Lineups to Devices’ beginning on page 50;
■ If there are no EPG Data displayed in the EPG application, check whether your Time, Date and
Time Zone settings are correct. See ‘Date & Time Settings’ on page 17;
■ Have valid EPG data been downloaded? To find out how to consult the EPG download status,
see ‘Downloading EPG Data’ on page 49. If the download is in progress, allow time for the
EPG to finish downloading.
■ Are the search criteria correct? If no items have been found in the EPG data, change your
search criteria/filters. See ‘Searching Programs’ on page 34.
If any download errors occurs, the Download Status screen will indicate the error.
Note
User Manual
56
Online Information
Consult http://www.homecontrol.philips.com to find the latest information on your RC9800i. You
will find, amongst other material, the most up to date version of this ‘Tips and Troubleshooting’
chapter.
Support for Your Philips Connected Planet Product
Philips products have been designed and manufactured in accordance with the highest quality
standards. If your Philips Connected Planet product is not working correctly, we recommend that
you check your user manual to verify that your product is properly connected and configured. The
website for Connected Planet support (http://www.philips.com/support) offers you all of the
information you need to optimally enjoy your product – this includes help to get started, frequently
asked questions and interactive troubleshooting.
Page 57

Technical Specifications
General Specifications
Operating temperature: 5°C to 45°C ( 41°F to 113°F)
Storage temperature: -25°C to +60°C (13°F to 140°F)
Dimensions: 102 (W) x 150 (L) x 26 (H) mm
4.01 (W) x 5.90 (L) x 1.02 (H) inch
Weight: 225 g (7.94 oz)
Display Color active matrix touch screen TFT LCD with white
LED backlight (320 x 240, 16bit color)
Diagonal screen size: 3,5 inch
Infrared (IR) capabilities
Transmitted code: RC5, RC6 and learnable format
Infrared wavelength: 950 nm ± 50 nm
IR learning distance: 2,5 - 10 cm (1-4 inch)
Learning frequency: 56 KHz carrier frequency and
455 KHz for some formats (B&O)
Memory 32 MB flash memory
32 MB SDRAM
Interfaces USB port for PC connection
Analog 3.5 mm Audio Line Out port on cradle
Wireless Connectivity
Standards: IEEE 802.11b WiFi module embedded
Wireless Data Rate: Up to 11 megabits per second (Mbps)
Frequency Band: 2.4 gigahertz (GHz)
Battery
Embedded Li-Pol battery: 1750mAH capacity (replaceable by a
Philips Service Center)
Nominal battery voltage: 3.7 V (Li-Pol battery pack)
Operating voltage: + 4.2 ➞ 3.0 V (Li-Pol battery pack)
Battery lifetime (typical): 3hrs continuous use
Standby time (typical): 14 days
Power Management Automatic power off
Battery low indication
Battery charging indication
Multimedia Application
Playback formats: MP3, m3u
Still Picture Playback Supported picture compression format: BMP, GIF, JPEG
User Manual
57
Attention! The specifications and design of this product are subject to change
without notice.
Page 58

Environmental Information
All redundant packaging has been omitted. We have done our utmost to make the packaging
easily separable into two materials: Cardboard and PET. Your set consists of materials that can be
recycled if disassembled by a specialized company.
Please observe the local regulations regarding the disposal of packaging, exhausted batteries and
old equipment.
Battery Disposal
Your device uses a rechargeable Li Polymer battery. Do not dispose the battery with
household waste. Contact your local waste disposal agency for the address of the
nearest battery deposit site.
Communications Regulation Information
FCC Declaration of Conformity
This device complies with Part 15 of the FCC Rules. Operation is subject to the following two
conditions:
■ This device should not cause harmful interference.
■ This device must accept any interference received, including interference that may cause
undesired operation.
This equipment has been tested and found to comply with the limits for a Class B digital device,
pursuant to part 15 of the FCC rule.
These limits are designed to provide reasonable protection against harmful interference in
residential installations. This equipment generates, uses, and can radiate radio frequency energy
and, if not installed and used in accordance with the instructions, may cause harmful interference
to radio communications.
However, there is no guarantee that interference will not occur in a particular installation. If the
equipment does cause harmful interference to radio or television reception, which can be
determined by turning the equipment off and on, the user is encouraged to try to correct the
interference by using one or more of the following measures:
■ Reorient or relocate the receiving antenna.
■ Increase the separation between the equipment and receiver.
■ Connect the equipment into an outlet on a different circuit from the receiver.
■ Consult the retailer or an experienced radio/TV technician for help.
User Manual
58
CAUTION User changes or modifications not expressly approved by the party
responsible for compliance may void the user’s authority to operate the equipment.
Notice for Canada / Remarque pour le Canada
This Class B digital apparatus complies with Canadian ICES-003.
Cet appareil numérique de la Classe B est conforme à la norme NMB-003 du Canada.
Page 59

Communications Regulation Information
Europe – EU Declaration of Conformity
Royal Philips Electronics hereby declares that this universal remote control is in compliance with
the essential requirements and other relevant provisions of the Radio & Telecom Terminal
Equipment Directive (R&TTE Directive) 1999/5/EC:
■ Radio: EN 300 328
■ EMC: ETSI EN 301 489-1, ETSI EN 301 489-17
■ Safety: EN60950
Finnish Philips Consumer Electronics, Remote Control Systems vakuuttaa täten että RC9800i tyyppinen
Dutch Hierbij verklaart, Philips Consumer Electronics, Remote Control Systems dat het toestel RC9800i in
French Par la présente, Philips Consumer Electronics, Remote Control Systems, déclare que l’appareil
Swedish Härmed intygar, Philips Consumer Electronics, Remote Control Systems, att denna RC9800i står I
Danish Undertegnede Philips Consumer Electronics, Remote Control Systems erklærer herved, at følgende
German Hiermit erklärt Philips Consumer Electronics, Remote Control Systems die Übereinstimmung des
Greek
Italian Con la presente Philips Consumer Electronics, Remote Control Systems dichiara che questo
Spanish Por medio de la presente, Philips Consumer Electronics, Remote Control Systems, declara que el
Portuguese Philips Consumer Electronics, Remote Control Systems declara que este RC9800i está conforme
laite on direktiivin 1999/5/EY oleellisten vaatimusten ja sitä koskevien direktiivin muiden ehtojen
mukainen.
overeenstemming is met de essentiële eisen en de andere relevante bepalingen van richtlijn
1999/5/EG.
RC9800i est conforme aux exigences essentielles et aux autres dispositions pertinentes de la
directive 1999/5/CE
överensstämmelse med de väsentliga egenskapskrav och övriga relevanta bestämmelser som
framgår av direktiv 1999/5/EG.
udstyr RC9800i overholder de væsentlige krav og øvrige relevante krav i direktiv 1999/5/EF
Gerätes RC9800i mit den grundlegenden Anforderungen und den anderen relevanten Festlegungen
der Richtlinie 1999/5/EG.
ΜΕ ΤΗΝ ΠΑΡΟΥΣΑ Philips Consumer Electronics, Remote Control Systems ∆ΗΛΩΝΕΙ ΟΤΙ
RC9800i ΣΥΜΜΟΡΦΩΝΕΤΑΙ ΠΡΟΣ ΤΙΣ ΟΥΣΙΩ∆ΕΙΣ ΑΠΑΙΤΗΣΕΙΣ ΚΑΙΤΙΣ ΛΟΙΠΕΣ
ΣΧΕΤΙΚΕΣ ∆ΙΑΤΑΞΕΙΣΤΗΣ Ο∆ΗΛΙΑΣ 1999/5/ΕΚ.
RC9800i è conforme ai requisiti essenziali ed alle altre disposizioni pertinenti stabilite dalla
direttiva 1999/5/CE.
RC9800i cumple con los requisitos esenciales y cualesquiera otras disposiciones aplicables o
exigibles de la Directiva 1999/5/CE
com os requisitos essenciais e outras disposições da Directiva 1999/5/CE.
User Manual
59
Declaration of Conformity (DoC)
The Declaration of Conformity can be found at http://www.homecontrol.philips.com/products/DoC
Marking
In accordance with CE marking regulations, the CE mark, the notified body number and the class 2
identifier are added to the equipment:
This device can be used in:
FR UK DE DK SV ES GR PT CH
AT BE FI IRE IT LU NL NO
Page 60

User Manual
60
Glossary
Bridge device Bridge devices are devices that convert signals. For example, a Media Adapter is
a bridge device. It converts PC residing digital video, pictures or audio files to analogue signals.
The Media Adapter receives input from the PC and transforms it into a number of analogue
video and audio outputs that feed into classical non-networked TVs or audio systems.
DHCP When a device communicates with another device, it must have a unique address to
identify itself. Such an address is called an IP address. DHCP or Dynamic Host Configuration
Protocol is an Internet Protocol that manages and automates the assignment of IP addresses on
the network (along with distributing information about the network’s broadcast address,
netmask, gateway address and DNS addresses). A device that uses DHCP, requests an open
address from a DHCP server each time it makes a connection to that server. An alternative is to
use a fixed IP address (see IP address).
DMA Digital Media Adapter A Digital Media Adapter is a wireless digital device that allows
movies, pictures or music files to be streamed from a PC to non-networked audio-devices like
classical TVs and audio systems.
DNS DNS stands for Domain Name Server. A domain name is a meaningful and easy-to-
remember name for an Internet address e.g. www.homecontrol.philips.com. A Domain Name
Server translates domain names to IP addresses. (see IP address)
EPG EPG stands for Electronic Program Guide. EPG is the electronic equivalent of a printed
television program guide.
Gateway A gateway is a network point that acts as an entrance to another network. More
specifically, a gateway connects two networks that use different protocols. This way, gateways
make it possible for members of one network to make use of another network.
Hard Key Hard keys refer to the buttons on the right hand side of the RC9800i’s touch screen.
IR IR or Infrared is used to control audio-video devices. For instance, when you press a button on a
TV’s remote control, the remote control sends an Infrared (IR) signal to the TV. The TV receives
this signal and executes the command.
IP address When a device communicates with another device, it must have a unique address to
identify itself. Such an address is called an IP address, e.g. 192.168.100.1. When you add a
device to a network, you can either assign a fixed IP address to it or you can use DHCP (see
DHCP).
Netmask A netmask masks the network part of an IP address so that only the host computer part
of the address remains. A frequently used netmask is 255.255.255.0.
NTP NTP stands for Network Time Protocol. This protocol is used to synchronize date and time
information in a network of computers.
PVR PVR stands for Personal Video Recorder. This device is also known as a DVR, or Digital Video
Recorder.
SSID A Service Set Identifier is a sequence of characters that uniquely identifies a wireless local
area network. This name allows devices to connect to the desired network when multiple
independent networks operate in the same physical area.
UPnP Universal Plug and Play (UPnP) is a standard that uses Internet and Web protocols to enable
devices such as PCs, peripherals, intelligent appliances, and wireless devices to be plugged into
a network and automatically know about each other. With UPnP, when you plug a device into the
network, the device will configure itself, acquire a IP address, and use a discovery protocol
based on the Internet’s Hypertext Transfer Protocol (HTTP) to announce its presence on the
network to other devices.
USB USB stands for Universal Serial Bus. It is a plug-and-play interface between a computer and
add-on devices (such as audio players, joysticks and printers).
With USB, a new device can be added to your PC without having to add an adapter card or turn
your computer off.
Page 61

Glossary
WAP Wireless Access Point or WAP is the center of a wireless home network. All communication
between devices in a wireless network is carried out via the WAP.
WEP Wired Equivalent Privacy (WEP) is a security protocol that provides a wireless local area
network (WLAN) with a high level of security and privacy by encoding all communication in the
network
WiFi WiFi or Wireless Fidelity is a term that is used for certain types of wireless local area
networks (WLANS) that make use of the 802.11 standard.
WPA WPA or WiFi Protected Access is a network communication standard that increases the
level of data protection (encryption) and access control (authentication) for existing and future
WiFi wireless networks.
Index
User Manual
61
Activity
listen, 13
watch, 13
Activity-Based Control, 12
Add Device, 44
Audio settings, 43
Autoscan, 22
Backlight
settings, 42
Battery
level, 8
Brightness, 43
Calibrate, 14, 43
Change Remote control codes, 45
Channel switching, 24
Charging, 8
Combined control screen, 30, 32
Communications Regulation Information, 59
Connected device, 11
Cradle, 8
as Media Adapter, 8
Date settings, 17, 43
Device
add, 44
change, 44
change Remote control codes, 45
legacy device, 10
move, 45
settings, 43
DHCP, 16, 61
DNS, 61
dynamic IP address, 16
Encryption, 16
Environmental Information, 59
EPG, 46
activation, 47
display, 50
download data, 49
information screen, 33
line up, 50
navigate, 33
Personalize, 47
search, 34
Subscribe, 46
switch a channel, 34
Equipment
add, 44
change, 44
EULA, 14
Firmware, 52
Gateway, 61
Hard keys, 7
Back, 27
Channel, 7
Cursor, 7
Mute, 7
Page, 7
Volume, 7
Home networking, 11
Individual Device Control, 40
Input selection, 24
IP, 61
IP address, 61
Learn & Match, 21
Legacy device, 10
Listen, 13
CD, 36
MP3 files, 38
Location
select, 15
Media Adapter, 34, 38
Move Device, 45
Page 62

Index
Netmask, 61
Network Activity Indicator, 8
Network settings, 15, 43
Network Time Sync, 17
On/Off Switch, 6
Online, 57
Peer-to-peer, 12, 15
Power
power adapter, 8
power on, 6
settings, 42
Power on, 24
Proxy
server, 16
settings, 16
PVR, 60
Red buttons, 23
Remote control codes
autoscan, 22
change, 45
determine, 21
learn, 21
select & try, 23
Room
add, 44
change, 36, 44
Screen settings, 43
Security Settings, 16
Settings
access, 42
Activity, 25
audio, 43
backlight, 42
date, 17, 43
network, 15, 43
proxy, 16
RC9800i, 14
screen, 43
time, 17, 43
time zone, 17
set-up, 13
SSID, 15, 60
Standby mode, 6, 8
Support, 56
Synchronize
network time, 17
System Manangement Area, 27
Technical specifications, 58
Battery, 58
Display, 58
General Specifications, 58
Infrared capabilities, 58
Interfaces, 58
Memory, 58
Power Management, 58
Wireless Connectivity, 58
Time settings, 17, 43
Time zone settings, 17
Touchscreen, 7
calibrate, 14
clean, 56
Troubleshooting, 55
Upgrade firmware, 52
UPnP, 61
USB, 9
firmware, 9
Upgrading, 52
Watch, 13
broadcast program, 29
digital pictures, 34
EPG, 32
WEP, 16, 60
WEP encryption, 16
WEP Passkey, 16
WiFi, 12, 47
Wireless Access Point, 12, 15
Wireless network, 12
WPA, 16
User Manual
62
Concept and Realization of this User Manual:
The Human Interface Group
De Regenboog 11, 2800 Mechelen (Belgium)
http://www.higroup.com
 Loading...