

Page 1
Always there to help you
Question?
Contact
Philips
Register your product and get support at
www.philips.com/welcome
MT3120
User manual
Page 2

Page 3

Contents
1 Important safety instructions 3
Call from the phonebook 13
Edit a record 13
Delete a record 14
Delete all records 14
2 Your handsfree phone 4
What is in the box 4
Overview of the phone 4
Main menu icons 4
Display icons 5
3 Get started 6
Fix the lanyard to the phone 6
Wear the phone 6
Switch on the handsfree phone 6
Congure your phone (country
dependent) 7
Set the country/language 7
Register your phone 7
Set the date and time 8
Charge the phone 8
Check the battery level 8
Standby mode 9
Check the signal strength 9
4 Calls 10
Make a call 10
Make an external call 10
End a call 10
Answer a call 10
Silence the ringer for an incoming call 11
Adjust the speaker volume 11
Mute the microphone 11
Headphones mode 11
7 Call log 15
Save a missed call number to the
phonebook 15
Return a call 15
Delete a call record 16
Delete all call records 16
8 Settings 17
Phone 17
Set the handset's ringtone volume 17
Set the handset's ringtone 17
Hang up conrmation 17
Silent mode 17
Set the key tone 18
Set the date and time 18
Auto lock 18
Set the display language 18
Set backlight of the LCD screen 18
Calibration 18
Alarm 19
Set the alarm 19
Turn off the alarm 19
Services 19
Call list type 19
ECO mode 19
Register your phone 20
Restore default settings 20
9 Technical data 21
5 Text and numbers 12
Enter text and numbers 12
Switch between the upper case and
lower case 12
6 Phonebook 13
View the phonebook 13
Add a record 13
10 Notice 22
Declaration of conformity 22
GAP standard 22
Compliance with EMF 22
Remove the integrated battery 23
11 Frequently asked questions 24
1EN
Page 4

12 Appendix 25
Text and number input tables 25
2 EN
Page 5

1 Important safety
instructions
Power requirements
The voltage on the network is classied as TNV3 (Telecommunication Network Voltages), as
dened in the standard EN 60950.
Warning
• The electrical network is classied as hazardous. The
only way to power down the charger is to unplug the
power supply from the electrical outlet. Ensure that the
electrical outlet is always easily accessible.
To avoid damage or malfunction
• This is a handsfree product with high speaker volume.
Make sure the product is not too close to your ear.
• This equipment is not designed to make emergency
calls when the power fails. An alternative has to be
made available to allow emergency calls.
• Do not allow the product to come into contact with
liquids.
• Do not expose the phone to excessive heat caused by
heating equipment or direct sunlight.
• Do not use any cleaning agents containing alcohol,
ammonia, benzene, or abrasives as these may harm
the set.
• Do not drop your phone or allow objects to fall on
your phone.
• Do not let children play with the lanyard.
• Use the clip and lanyard together to avoid dropping the
phone to the oor.
• Active mobile phones in the vicinity may cause
interference.
• The full functionality of the phone can only be
guaranteed when it is registered with a GAP
compatible base station.
Caution
• Use only the power supply listed in the user
instructions.
• Risk of explosion if battery is replaced by an incorrect
type.
• The battery is not designed to be replaced.
• Dispose of used batteries according to the instructions.
• Do not open the phone as you could be exposed to
high voltages.
• Do not let small metal objects come into contact with
the product. This can deteriorate audio quality and
damage the product.
• Metallic objects may be retained if placed near or on
the handset receiver.
• Do not use the product in places where there are
explosive hazards.
• For pluggable equipment, the socket-outlet shall
be installed near the equipment and shall be easily
accessible.
About operating and storage temperatures
• Operate in a place where temperature is
always between 0°C to +40°C (up to 90%
relative humidity).
• Store in a place where temperature is
always between -20°C and +45°C (up to
95% relative humidity).
• Battery life may be shorter in low
temperature conditions.
3EN
Page 6
2 Your handsfree
phone
Congratulations on your purchase! Your
handsfree phone is designed to free your hands
during phone calls and offer excellent voice
quality through it's built in loudspeaker and
microphone.
To fully benet from the support that Philips
offers, register your product at www.philips.
com/welcome.
What is in the box
Phone with clip
Guarantee
4XLFNVWDUWJXLGH
Quick start guide
Overview of the phone
Lanyard
Adapter for battery charging
4 EN
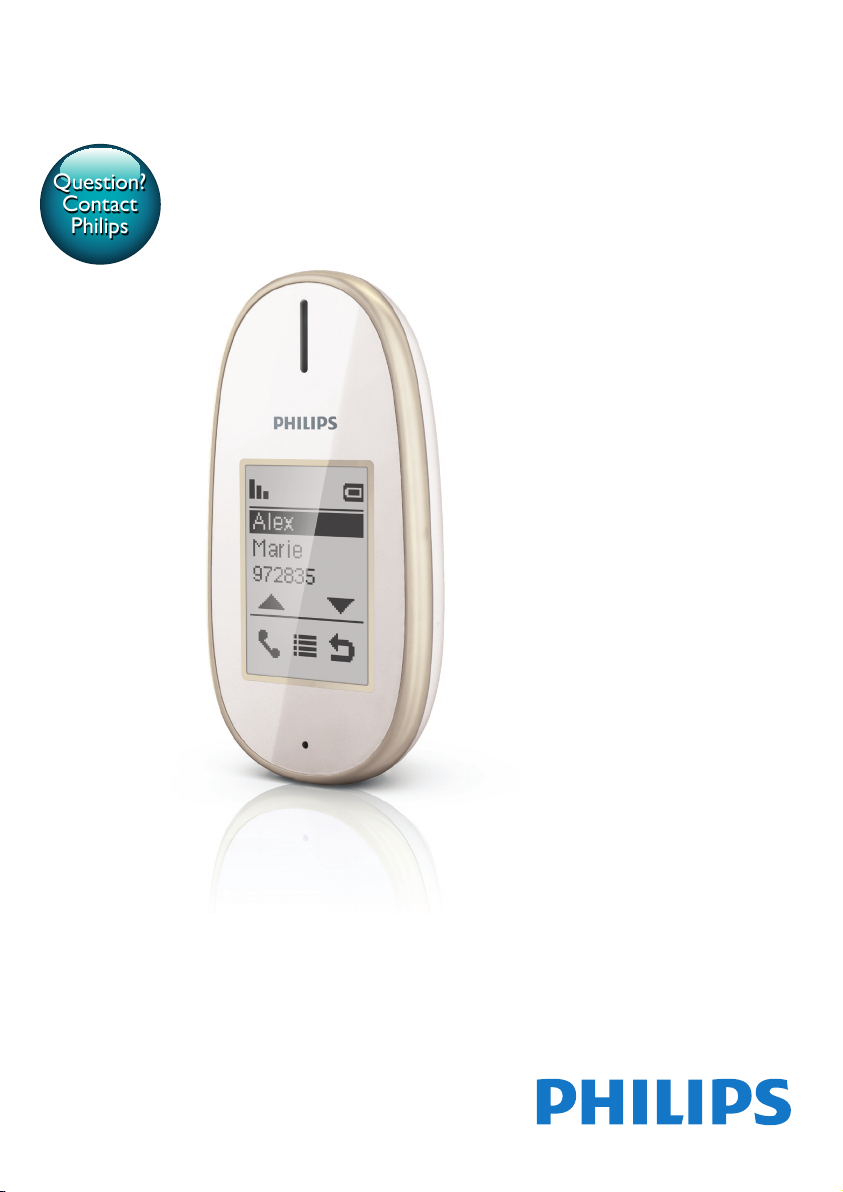
a Loud speaker
b Touch sensitive LCD screen
c Microphone
d Charging jack/Headphone jack (Headsets
with mic are not supported.)
e Clip
f On and off switch
g /
• Scroll through a list.
• Increase or decrease the volume.
Page 7

Main menu icons
The following is an overview of the menu
options that are available on your handsfree
phone. For detailed explanation of the menu
options, see the corresponding sections in this
user manual.
Icon Descriptions
[Call] - Make or pick up a call.
[Settings] - Customize the settings for
the phone, alarm and services.
[Phonebook] - add, edit, view and delete
phonebook entries etc.
[Call log] - Displays the call history of all
missed, dialed or received calls.
Display icons
In standby mode, the icons shown on the main
screen tell you what features are available on
your handset.
Icon Descriptions
Indicates the battery level (from full to
low).
When the handset is charging, the bars
keep scrolling until the battery is fully
charged or you unplug the adapter from
the phone.
The empty battery icon ashes and you
hear an alert tone.
The battery is low and needs recharging.
Displays the link status between the
handset and base station. The more bars
are shown, the better the signal strength
is.
Indicates an incoming call in the call log.
Indicates an outgoing call in the call log.
Indicates an unread missed call in the
call log.
Indicates a read missed call in the call log.
Indicates you are in a call.
Displayed when you browse the
phonebook.
The alarm clock is activated.
The ringer is off.
The headphone is plugged into the
phone.
The silent mode is activated.
5EN
Page 8
3 Get started
Caution
• Make sure that you have read the safety instructions in
the "Important safety instruction" section before you
connect and install your handset.
• A lanyard is provided together with the phone. You are
recommended to use the lanyard and the clip together
to prevent the phone from dropping.
• The phone works with any base station compliant
to the GAP standard. For information on the GAP
standard, see the chapter 'Notice'.
• This product is a DECT phone accessory that requires
a GAP compliant DECT base station for access to the
landline.
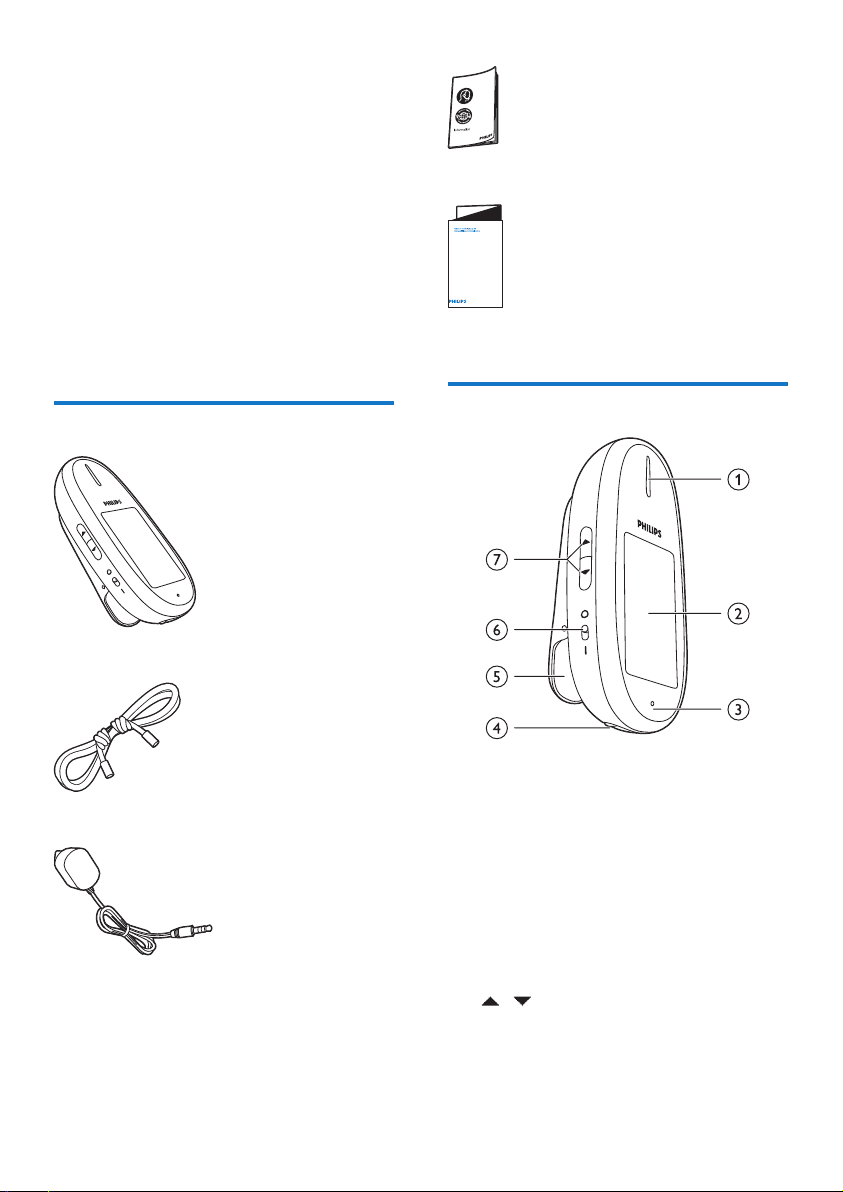
Fix the lanyard to the phone
Attach the lanyard as shown below:
You can lengthen or shorten the lanyard by
adjusting the distance between two knots.
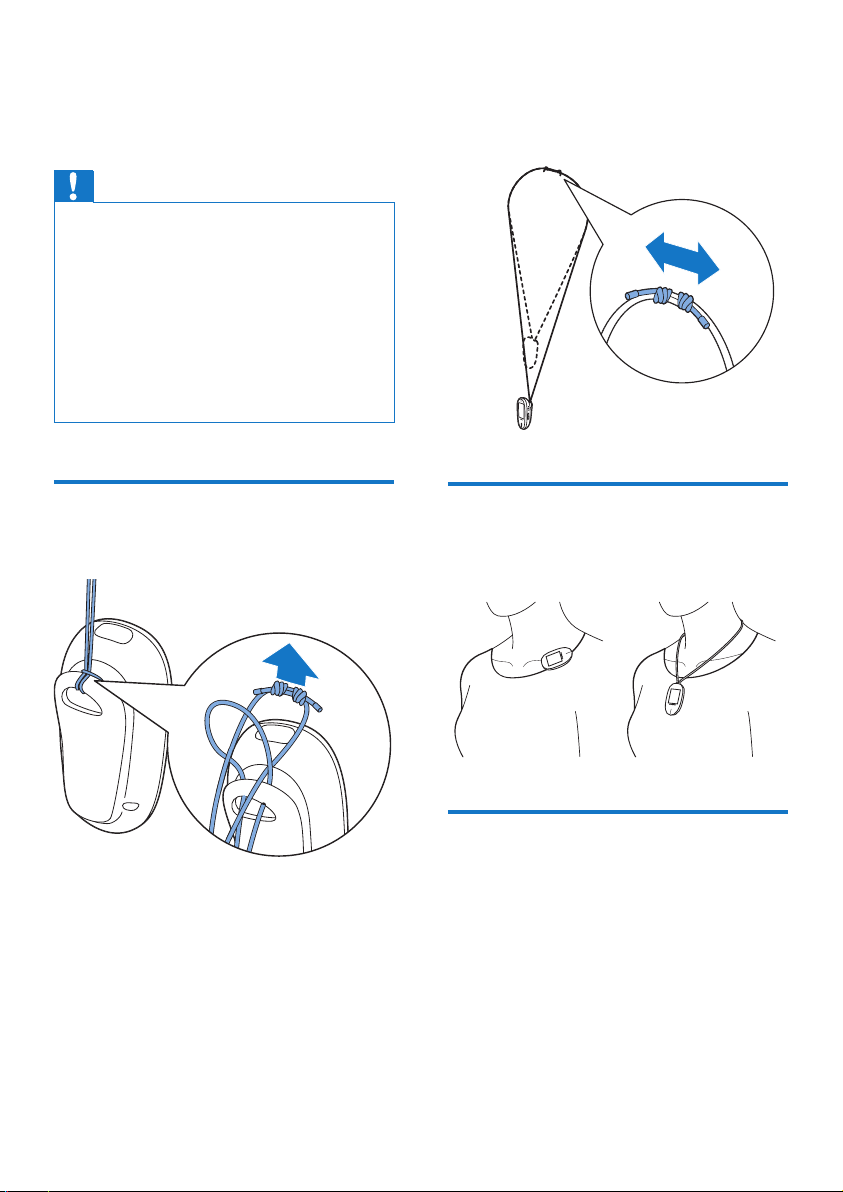
Wear the phone
Clip the phone to your collar or wear it around
your neck.
Switch on the handsfree phone
Switch on the handsfree phone as shown
below:
6 EN
Page 9

Note
• During normal use, it is not necessary to switch off the
phone at any time. Switch the phone off only during
extended period of non-use. In this case, time and date
settings will be lost.
Congure your phone
(country dependent)
When using your phone for the rst time it will
prompt you for initial setup information.
Set the country/language
Select your country/language, then tap to
conrm.
» The country/language setting is saved.
Register your phone
Your phone automatically asks you to register
the phone with your original cordless phone's
base station when you turn it on for the rst
time. If you skipped this step, refer to steps 1-3
below, otherwise continue after step 3.
1 Tap to access the main menu screen.
2 Select > [Services] > [Register], then
tap
to conrm.
3 Press the paging button on your original
cordless phone's base station for
approximately 10 seconds to set the base
station of your phone to registration mode.
Note
• Check in the user manual of your base station on how
to enter the registration mode. For most base stations,
this can be achieved by pressing the paging button for
5-10 seconds until you hear a conrmation signal.
• The phone tries to connect to the base station with a
series of standard passcodes automatically.
• A successful registration is indicated by a sound signal in
less than 30 seconds.
• If your base station uses the passcodes/PIN different
from the most common settings (e.g. 3456), you have
to enter this PIN/passcode manually by following steps
4 to 6.
• If you use a pin code with more than 4 digits, it cannot
be entered through the handsfree phone. In this case,
change your base stations pin code to a 4-digit pin code
(e.g.0000) and then resume the registration process.
Note
• The country/language setting option is country
dependent. If no welcome message is displayed, it
means the country/language setting is preset for your
country. Then you can set the date and time.
• You can re-set the language later (see 'Set the display
language' on page 18).
4 If your base station's passcode/PIN is not
auto-recognized, enter the base station's
passcode/PIN.
5 Select to make corrections.
6 Tap to conrm the passcodes/PIN.
» When you see a conrmation message,
registration is complete.
7EN
Page 10

Note
• You can nd the passcodes/PIN in the manual of your
original cordless phone with base (unless you changed
the standard PIN code).
• This phone is only able to connect to a base station
with the correct passcodes/PIN.
• If the passcodes/PIN is incorrect or no base is found
within a certain period, your handset displays a
notication message. Repeat the above procedure if
registration fails.
Set the date and time
Tip
• To set the date and time later, tap to skip this setting.
3 Tap to select a time format, then tap to
conrm.
Charge the phone
Your phone automatically asks you to set date
& time when you turn it on the rst time. If you
need to change the date and time, refer to the
steps below.
Set the date
1 Tap to access the main menu screen.
2 Select > [Phone] > [Date & time] >
[Set date], then tap
to conrm.
3 Tap / once or several times to enter
the date, then tap to conrm.
Set the time
1 Tap to access the main menu screen.
2 Select > [Phone] > [Date & time] >
[Set time], then tap
to conrm.
3 Tap / once or several times to enter
the date, then tap to conrm.
Set the date format
1 Tap to access the main menu screen.
2 Select > [Phone] > [Date & time] >
[Date format], then tap
to conrm.
3 Tap to select a date format, then tap to
conrm.
Set the time format
1 Tap to access the main menu screen.
2 Select > [Phone] > [Date & time] >
[Time format], then tap
to conrm.
Plug the charging adapter into the headset/
charging jack at the bottom of the phone.
» The handset starts charging.
Note
• Make sure that you switch on the phone for charging, it
only charges when switched on.
• Before rst use, charge the battery until the display
indicator shows a full charge.
• The phone might get warm while the batteries are
charging. This is normal.
• If your phone's battery has depleted completely after
long periods of non-use, it may take up to 20 minutes
for the phone to recharge until it powers up.
Your phone is now ready to use.
Check the battery level
The battery icon displays the current battery
level.
8 EN
Page 11

Indicates the battery level (from
full to low).
When the handset is charging,
the bars keep scrolling until the
battery is fully charged or you
unplug the adapter from the
phone.
The empty battery icon ashes.
The battery is low and needs
recharging.
If you are on the phone, you hear warning
tones when the battery is almost empty. You
can plug in the charger to continue the call. The
phone turns off after approximately 15 minutes
when the battery is completely empty.
Standby mode
Your phone is in standby mode when it is idle.
In standby mode, the phone's charge lasts
about a week. If the auto lock has been set, you
see a key icon on the idle screen. You need to
press the icon to activate the phone. The auto
lock feature is automatically disabled during an
incoming call.
Check the signal strength
Indicates the link status between
the handset and base station. The
more bars are shown, the better
the connection is.
• Make sure the handset is registered to the
base station before you make or receive
calls.
• If you hear warning tones when you are
on the phone, the handset is almost out
of battery or the handset is out of range.
Charge the battery or move the handset
nearer to the base station.
9EN
Page 12

4 Calls
Note
• When the power fails, the phone cannot access
emergency services.
• This is a handsfree phone. Make sure you keep an
optimal distance (15cm-1m) between your mouth,
ears and your phone. Do not hold your phone close
to your ears.
Make a call
You can make a call in these ways:
• Make an external call
• Call from the phonebook list
• Call from the call log
Make an external call
Note
• The call timer displays the talk time of your current call.
Note
• If you hear warning tones, the phone is almost out of
battery or out of range. Charge the battery or move
the phone close to the base station.
End a call
Tap .
Note
• The phone will ask for conrmation to hang up to
avoid accidental call termination. This conrmation can
be deactivated in the phone settings menu.
Answer a call
When the phone rings, tap to answer the
call.
1 Tap from the idle screen or main menu
screen.
» The keypad appears.
2 Dial the phone number, then tap .
» The number is dialed out.
» The duration of your current call is
displayed.
10 EN
Warning
• Always keep the phone away from your ear to avoid
ear damage.
Note
• The caller ID service is available if you have registered
to the caller ID service with your service provider.
• Whether or not the caller ID service is nally available
varies with different base stations.
Tip
• When there is a missed call, the phone displays a
notication message.
Page 13

Silence the ringer for an incoming call
When the phone rings, tap .
You can turn the ringer off permanently or for
specic time periods.
Adjust the speaker volume
Press / on the left side of the phone to
adjust the volume during a call.
» The speaker volume is adjusted and
the phone is back to the call screen.
Mute the microphone
1 Tap during a call.
» The handset displays [Mute on].
» The caller cannot hear you, but you
can still hear his voice.
2 Tap again to unmute the microphone.
» You can now communicate with the
caller.
Headphones mode
You can plug in any standard headphones (e.g.
Philips SHE7000) into the phone to listen in
greater privacy. The headphone jack is the same
jack as the charging jack. Headsets with mic are
not supported.
11EN
Page 14

5 Text and
numbers
You can enter text and numbers for phonebook
records and other menu items.
Enter text and numbers
1 Tap on the keypad to enter the character
and numbers.
2 Select to delete the character.
3 Press to add a space.
Switch between the upper case and lower case
By default, the rst letter of each word in a
sentence is upper case and the rest is lower
case. Tap Aa to switch between the upper case
and lower case letters during editing.
12 EN
Page 15

6 Phonebook
Add a record
This phone has a phonebook that stores up to
20 records. You can access the phonebook from
the handset. Each record can have a name up
to 14 characters long and a number up to 24
digits long.
View the phonebook
1 Tap to access the main menu screen.
2 Tap to access the phonebook list.
3 Tap on a phonebook entry.
» The phonebook entry is highlighted.
4 Select > [View], then tap to display
the information.
Tip
• Tap or to scroll up or down.
Note
• If your phonebook memory is full, the phone displays
a notication message. Delete some records to add
new ones.
1 Tap to access the main menu screen.
2 Tap to access the phonebook list.
3 Select to access the option menu.
4 Select [Add new], then tap to conrm.
5 Enter the name, then tap to conrm.
6 Enter the number, then tap to save.
» Your new record is saved.
Tip
• Press and hold # to insert a pause if you need to store
the access number or country code.
Call from the phonebook
1 Tap to access the main menu screen.
2 Tap to access the phonebook list.
3 Tap on a phonebook entry to highlight it.
4 Tap on the phonebook entry again to
make the call.
Tip
• Tap or to scroll up or down.
Edit a record
1 Tap to access the main menu screen.
2 Tap to access the phonebook list.
3 Tap on a phonebook entry.
13EN
Page 16

» The phonebook entry is highlighted.
4 Select > [Edit], then tap to conrm.
5 Edit the name, then tap to conrm.
6 Edit the number, then tap to save.
» The record is saved.
Tip
• Tap or to scroll up or down.
• The new phonebook entry overwrites the old one.
Delete a record
1 Tap to access the main menu screen.
2 Tap to access the phonebook list.
3 Tap on a phonebook entry.
» The phonebook entry is highlighted.
4 Select > [Delete], then tap to
conrm.
» The record is deleted.
Tip
• Tap or to scroll up or down.
Note
• Changes to the phonebook on your handsfree phone
does not impact the phonebook on other DECT
phones you are using.
Tip
• Tap or to scroll up or down.
Delete all records
1 Tap to access the main menu screen.
2 Tap to access the phonebook list.
3 Select > [Delete all], then tap to
conrm.
» The handset displays a conrmation
request.
4 Tap to conrm.
» All records are deleted.
14 EN
Page 17

7 Call log
The call log stores the call history of all missed,
received or dialed calls. The call history includes
up to 30 entries with the name and number
of the caller, call time and date. This feature is
available if you have registered for the caller ID
service with your service provider.
If the caller allows the display of his identity, you
can view his name or number. The call records
are displayed in chronological order with the
most recent received call at the top of the list.
Note
• If you pick up a call on your original phone but not the
handsfree phone, it will appear as a missed call on the
handsfree phone.
Save a missed call number to the phonebook
1 Tap from the idle screen or main menu.
» The call log is displayed.
2 Select a record, then tap to access the
option menu.
3 Select [Save number], then tap to
conrm.
4 Enter and edit the name, then tap to
conrm.
5 Enter and edit the number, then tap to
save.
» The record is saved.
Tip
Note
• Make sure the number in the call list is valid before you
can call back directly from the call list.
The following icons shown on the screen
inform you if you have incoming, outgoing and
missed calls.
Indicates an incoming call in the call log.
Indicates an outgoing call in the call log.
Indicates the unread missed call in the call
log.
Indicates the read missed call in the call log.
• Tap or to scroll up or down.
Return a call
1 Tap from the idle screen or main menu.
» The call log is displayed.
2 Tap on a call log record to highlight it.
3 Tap on the call log record again to make
the call.
Tip
• Tap or to scroll up or down.
15EN
Page 18

Delete a call record
1 Tap from the idle screen or main menu.
» The call log is displayed.
2 Select a record, then then tap to access
the option menu.
3 Select [Delete], then tap to conrm
» The handset displays a conrmation
requests.
4 Tap to conrm.
» The record is deleted.
Tip
• Tap or to scroll up or down.
Delete all call records
1 Tap from the idle screen or main menu.
» The call log is displayed.
2 Tap to access the option menu.
3 Select [Delete all], then tap to conrm
» The handset displays a conrmation
requests.
4 Tap to conrm.
» All record are deleted.
16 EN
Page 19

8 Settings
Phone
Set the handset's ringtone volume
You can select among 5 ringtone volume levels,
or [Off].
1 Tap to access the main menu screen.
2 Select > [Phone] > [Sounds] > [Ring
volume], then tap
3 Select a volume level, then tap to
conrm.
» The setting is saved.
to conrm.
Note
• When you activate the alarm, your phone still alerts
you even when silent mode is activated.
1 Tap to access the main menu screen.
2 Select > [Phone] > [Sounds] > [Silent
mode] > [On/off] > [On] or [Off], then
tap
to conrm.
» The setting is saved.
Note
• If you select [On], your handsfree phone does not ring
for incoming calls during a specied period. If you select
[Off], your handsfree phone rings for any incoming call
at any time.
Set the handset's ringtone
You can select from 5 ringtones.
1 Tap to access the main menu screen.
2 Select >[Phone]> [Sounds] > [Ring
tones], then tap
to conrm.
3 Select a ringtone, then tap to conrm.
» The setting is saved.
Hang up conrmation
You can choose whether the phone asks for
conrmation after
has been selected.
1 Tap to access the main menu screen.
2 Select > [Phone] > [Hang up
conrmation], then tap
to conrm.
3 Select [On]/[Off], then tap to conrm.
» The setting is saved.
Silent mode
You can set your phone to silent mode and
enable it for a specic duration when you do
not want to be disturbed. When the silent
mode is turned on, your handsfree phone does
not ring.
3 Select [Start & end], then tap to
conrm.
4 Set the start and end times, then tap to
conrm.
» The setting is saved.
» is displayed when silent mode is
active and the current time is outside
of the silent period.
when silent mode is active and the
current time falls into the silent period.
Exclude the contacts from silent mode
You can select the length of ring delay and
set the contacts to be excluded from the
phonebook. With this feature, callers that you
exclude or those that do not hang up before
the ring delay time will be able to reach you
even if silent mode is active. Ring delay is the
time during which rings will be muted before
they become audible on the phone.
is displayed
1 Tap to access the main menu screen.
2 Select > [Phone] > [Sounds] > [Silent
mode], then tap
to conrm.
3 Select [Exception], then tap to conrm.
4 Select [On/off] > [On] to activate the
setting, then tap
to conrm.
5 Then you have two options:
17EN
Page 20

• Select [Delay], then select a ring delay
option, then tap
• Select [Select number], then select the
contact which you want to exclude
from this setting. Tap
selected contact is highlighted with a
"*", then tap
to conrm.
to conrm. The
to leave the menu.
Set the display language
Note
• This feature only applies to models with multiple-
language support.
• Languages available for selection vary with different
countries.
Note
• If [Exception] is set to [On] and [Delay] option is
selected, the handset rings only after the time of ring
delay selected is reached.
• If the incoming call is from a contact highlighted with
a "*", your handsfree phone rings immediately. If the
contact is not highlighted with a "*", your handsfree
phone rings based on the ring delay option.
• If you exclude the contacts from silent mode or enable
ring delay, Make sure [Exception] is set as [On], for
those exceptions to be active.
Set the key tone
Key tone is the sound made when you press a
key on the handset.
1 Tap to access the main menu screen.
2 Select >[Phone]> [Sounds] > [Key
tone], then tap
to conrm.
3 Select [On]/[Off], then tap to conrm.
» The setting is saved.
Set the date and time
You can set the date and time for your phone.
Auto lock
You can set to automatically lock the screen on
your phone.
1 Tap to access the main menu screen.
2 Select >[Phone]> [Auto lock], then tap
to conrm.
3 You can choose between [Off], and auto
lock timeouts of 20, 40 and 60 seconds.
4 Tap to conrm.
» The setting is saved.
1 Tap to access the main menu screen.
2 Select > [Phone] > [Language], then tap
to conrm.
3 Select a language, then tap to conrm.
» The setting is saved.
Set backlight of the LCD screen
The handsfree phone display features a
backlight to allow good readability in dark
environments. You can set the time out for
the backlight to turn off when not using the
product.
1 Tap to access the main menu screen.
2 Select > [Phone] > [Backlight], then tap
to conrm.
3 Turn the backlight off or set automatic
backlight time out of 20, 40 or 60 seconds.
Longer timeouts can reduce battery life.
4 Tap to conrm.
Calibration
In rare cases the touch screen stops recognizing
input accurately. In such case, the screen needs
to be re-calibrated.
1 Tap to access the main menu screen.
2 Select > [Phone] > [Calibration], then
tap
to conrm.
3 Tap on the cross to conrm.
» The setting is saved.
18 EN
Page 21

Alarm
» The setting is saved.
Your phone has a built-in alarm clock.
Set the alarm
1 Tap to access the main menu screen.
2 Select > [Alarm], then tap to conrm.
3 Select [On/off] > [On], then tap to
conrm.
4 Select [Alarm time], then tap to
conrm.
5 Tap / once or several times to enter
an alarm time, then tap to conrm.
6 Select [Repetition], then tap to conrm.
7 Select an alarm occurrence, then tap to
conrm.
8 Select [Alarm tone], then tap .
9 Select a tone from options, then tap to
conrm.
» The alarm is set and is displayed on
the screen.
Tip
• Tap / to switch between [AM]/[PM] .
Note
• The alarm clock rings at the preset time every day until
it is set to [Off].
Turn off the alarm
When the alarm rings
Press any key to turn off the alarm.
Before the alarm rings
1 Tap to access the main menu screen.
2 Select > [Alarm] > tap to conrm.
3 Select [On/off] > [Off], then tap to
conrm.
Services
Call list type
You can set if you can see all calls or missed
calls from the call log.
Set the call list type
1 Tap to access the main menu screen.
2 Select > [Services] > [Call list type],
then tap
to conrm.
3 Select an option, then tap to conrm.
ECO mode
The handsfree phone supports Eco mode to
minimize transmission power and radiation.
1 Tap to access the main menu screen.
2 Select >[Services]> [Eco mode], then
tap
to conrm.
You can choose between two modes:
• [Off]: No reduction of transmission power.
• [On]:
• In Eco mode, transmission will be
reduced to minimize radiation. For
selected Philips models (CD48x,
CD49x, CD68x, CD69x and SE888),
both the handset and DECT base will
reduce transmission power drastically
when the handset is close to the base.
The transmission power increases
automatically only when the handset
is further away from the base. Make
sure that Eco mode is also enabled
for these models when selecting Eco
mode on your handsfree phone. In this
mode, the range will be reduced by
approximately 50%.
• If you register your handsfree phone
with another phone base not listed
above, the handsfree phone will reduce
transmission power automatically when
it is close to the base. The DECT base
19EN
Page 22

will maintain standard transmission
power. In this case, the range is not
affected.
Tip
• Apart from Eco mode for the reduction of the
transmission power and radiation, this handsfree phone
uses a power adapter which consumes very little power
in standby mode.
Register your phone
Register your phone manually to the base
station before use (see 'Register your phone'
on page 7).
Restore default settings
You can reset your phone settings to the
original factory settings.
1 Tap to access the main menu screen.
2 Select > [Services] > [Reset], then tap
to conrm.
» The handset displays a conrmation
request.
3 Tap to conrm.
» All settings are reset.
20 EN
Page 23

9 Technical data
Display
• Touch panel with white LCD backlight
General telephone features
• Display of caller number and caller name (if
the name is stored in phone book)
• Talk time: 10 hours
• Standby time: 160 hours
Battery
• Integrated battery: Li-Polymer
Adapter
Charger
• Philips: SSW-1920EU-2, Input: 100-240V
50/60Hz 0.2A, Output: 6V@500mA
• Philips: SSW-1920UK-2, Input:
100-240V50/60Hz 0.2A, Output:
6V@500mA
Power consumption
• Eco power supply with minimal power
consumption: 0.01W
Weight and dimensions
• 62 grams
• 90 x 43.5 x 29.5 mm (H x W x D)
Eco mode
Yes
Range
Indoor: 50m; Outdoor : 300m
Phonebook list and Call log
• Phonebook list with 20 entries
• Call log with 30 entries
21EN
Page 24

10 Notice
Declaration of conformity
Hereby Philips Consumer Lifestyle, declares
that the MT3120 is in compliance with the
essential requirements and other relevant
provisions of Directive 1999/5/EC. You can nd
the Declaration of Conformity on www.p4c.
philips.com.
This product has been designed, tested and
manufactured according the European R&TTE
directive 1999/5/EC.
GAP standard
The GAP standard guarantees that all DECT™
GAP handsets and base stations comply with
a minimum operating standard irrespective
of their make. The handset is GAP compliant,
which means it guarantees these minimum
functions: register it to a base station, make a
call and receive a call. More advanced features
may not be available if you use them with
other makes. To register and use this handset
with a GAP compliant base station of different
make, rst follow the procedure described in
the manufacturer's instructions, then follow
the procedure described in this manual for
registering a handset.
Compliance with EMF
the EMF standards applicable at the time of
producing the products.
Philips is committed to develop, produce and
market products that cause no adverse health
effects. Philips conrms that if its products are
handled properly for their intended use, they
are safe to use according to scientic evidence
available today.
Philips plays an active role in the development
of international EMF and safety standards,
enabling Philips to anticipate further
developments in standardization for early
integration in its products.
Your product is designed and manufactured
with high quality materials and components,
which can be recycled and reused.
When this crossed-out wheeled bin symbol is
attached to a product it means that the product
is covered by the European Directive 2002/96/
EC. Please inform yourself about the local
separate collection system for electrical and
electronic products.
Please act according to your local rules and
do not dispose of your old products with your
normal household waste.
Correct disposal of your old product helps to
prevent potential negative consequences for the
environment and human health.
Koninklijke Philips Electronics N.V. manufactures
and sells many products targeted at consumers,
which, like any electronic apparatus, in
general have the ability to emit and receive
electromagnetic signals.
One of Philips’ leading Business Principles is to
take all necessary health and safety measures
for our products, to comply with all applicable
legal requirements and to stay well within
22 EN
Your product contains a built-in rechargeable
battery covered by the European Directive
2006/66/EC, which cannot be disposed of with
normal household waste.
Please inform yourself about the local rules
on separate collection of batteries because
correct disposal helps to prevent negative
Page 25

consequences for the environmental and
12
human health.
Remove the integrated battery
If there is no collection/recycling system for
electronic products in your country, you can
protect the environment by removing and
recycling the battery before disposing the
phone.
3
When this logo is attached to a product, it
means a nancial contribution has been paid to
the associated national recovery and recycling
system.
Environmental information
All unnecessary packaging has been omitted.
We have tried to make the packaging easy to
separate into three materials: cardboard (box),
and polyethylene (bags, protective foam sheet.)
Your system consists of materials which can
be recycled and reused if disassembled by
a specialized company. Please observe the
local regulations regarding the disposal of
packaging materials, exhausted batteries and old
equipment.
23EN
Page 26

11 Frequently
asked questions
How to connect the handsfree phone to my
other phones?
Go to
No signal bars are displayed on screen.
My phone is not connected to the base
station/I cannot get a dial tone.
Your phone is not registered, i.e. linked to the
base station. Register the handset with the base
station.
If I fail to register the phone to the base
station, what do I do?
Your base memory is full. Unregister the unused
handsets and try again.
No dialing tone
The handset is connected to the power supply
but does not charge.
No display
> > [Services] > [Register].
Tip
• For information, see chapter 'Get started', section
'Register your phone'.
• The handset is out of range. Move it closer
to the base station.
• Make sure you have registered your phone
to the base station.
Tip
• For information, see chapter 'Get started', section
'Register your phone'.
• Check your phone connections.
• The handset is out of range. Move it closer
to the base station.
• Make sure there is power supply and the
charging adapter is plugged properly to the
phone.
• Make sure you switch on the phone.
• Make sure the batteries are charged.
• Make sure there is power and the phone is
connected to the charger.
Bad audio (crackles, echo, etc.)
• The handset is nearly out of range. Move it
closer to the base station.
• The phone receives interference from the
nearby electrical appliances. Move the base
station away from them.
• The phone is at a location with thick walls.
Move the base away from them.
The handset does not ring.
Make sure the handset ringtone is turned on.
The caller ID is not displayed.
• The service is not activated. Check with
your service provider.
• The caller's information is withheld or
unavailable.
• Not all DECT base stations support caller
ID service compatible with this phone.
I have a 6 digit pin code but I can only enter 4
digits on my handsfree phone.
If you use a pin code with more than 4 digits,
it cannot be entered through the handsfree
phone. In this case, change your base stations
pin code to a 4-digit pin code (e.g.0000) and
then resume the registration process.
Internal calls do not work on my handsfree
phone.
Placing internal calls from your handsfree phone
is not supported.
Note
• If the above solutions do not help, Switch off the phone,
then switch it on and try again.
24 EN
Page 27

12 Appendix
Text and number input tables
Key Upper case characters (for English/
French/ German/ Italian/Turkish/
Portuguese/Spanish/Dutch/Danish/
Finnish/Norwegian/ Swedish/Romanian/
Polish/Czech/Hungarian/Slovakian/
Slovenian/Croatian/Lithuanian/Estonian/
Latvian/Bulgarian)
0 Space . 0 , / : ; " ' ! ¡ ? ¿ * + - % \^ ~|
1 1 @ _ # = < > ( ) & € £ $ ¥ [ ] { } ¤ § ...
2 A B C 2 À Â Æ Á Ã Ä Å Ą Ā Ç Č
3 D E F 3 È É Ê Ë Ė Ę Ē Δ Φ
4 G H I 4 Ğ Í Ï Į Ī İ Γ
5 J K L 5 Λ
6 M N O 6 Ñ Ó Ô Õ Ö
7 P Q R S 7 Ş Š Π Θ Σ
8 T U V 8 Ù Ú Ü Ū Ų
9 W X Y Z 9 Ø Ω Ξ Ψ Ž
Key Lower case characters (for English/
French/ German/ Italian/Turkish/
Portuguese/Spanish/Dutch/Danish/
Finnish/Norwegian/Swedish)
0 Space . 0 , / : ; " ' ! ¡ ? ¿ * + - % \ ^ ~ |
1 1 @ _ # = < > ( ) & € £ $ ¥ [ ] { } ¤ §
…
2 a b c 2 à â æ á ã ä å ą ā ç č
d e f 3 è é ê ë ė ę ē Δ Φ
3
4 g h i 4 ğ í ì ï į ī ı Γ
5 j k l 5 Λ
6 m n o 6 ñ ó ô õ ö ò
7 p q r s 7 β ş š Π Θ Σ
8 t u v 8 ù ú ü ū ų μ
9 w x y z 9 ø Ω Ξ Ψ ž
Key Upper case characters (for Greek)
0 Space . 0 , / : ; " ' ! ¡ ? ¿ * + - % \^ ~|
1 1 @ _ # = < > ( ) & € £ $ ¥ [ ] { } ¤ § ...
2 A B Г 2 A B C Æ Ä Å Ç
3 Δ Ε Ζ 3 D E F É
4 Η Θ Ι 4 G H I
5 Κ Λ Μ 5 J K L
6 Ν Ξ Ο 6 M N O Ñ Ö
7 Π Ρ Σ 7 P Q R S
8 Τ Υ Φ 8 T U V Ü
9 Χ Ψ Ω 9 W X Y Z Ø
Key Lower case characters (for Greek)
0 Space . 0 , / : ; " ' ! ¡ ? ¿ * + - % \ ^ ~ |
1 1 @ _ # = < > ( ) & € £ $ ¥ [ ] { } ¤ §
…
2 α β γ 2 a b c à æ ä å
3 δ ε ζ 3 d e f è é
4 η θ ι 4 g h i ì
5 κ λ μ 5 j k l Λ
6 ν ξ ο 6 m n o ñ ö ò
7 π ρ σ ς 7 p q r s ß
8 τ υ φ 8 t u v ù ü
9 χ ψ ω 9 w x y z ø
Key Upper case characters (for Serbian)
0 Space . 0 , / : ; " ' ! ¡ ? ¿ * + - % \^ ~|
1 1 @ _ # = < > ( ) & € £ $ ¥ [ ] { } ¤ § ...
2 A B C Ђ Ć Č 2 А Б В Г
3 D E F Ј Đ 3 Д Е Ж З Δ Φ
4 G H I Љ 4 И Й К Л Γ
5 J K L Њ 5 М Н О П Λ
6 M N O Ћ 6 Р С Т У
7 P Q R S Җ Š 7 Ф Х Ц Ч Π Θ Σ ß
8 T U V 8 Ш Щ Ъ Ы
9 W X Y Z Ž 9 Ь Э Ю Я Ω Ξ Ψ
Key Lower case characters (for Serbian)
0 Space . 0 , / : ; " ' ! ¡ ? ¿ * + - % \ ^ ~ |
1 1 @ _ # = < > ( ) & € £ $ ¥ [ ] { } ¤ §
…
a b c Ђ Ć Č 2 А Б В Г
2
3 d e f Ј Đ 3 Д Е Ж З
4 g h i Љ 4 И Й К Л
5 j k l Њ 5 М Н О П
25EN
Page 28

6 m n o Ћ 6 Р С Т У
7 p q r s Җ Š 7 Ф Х Ц Ч Π Θ Σ ß
8 t u v Lj 8 Ш Щ Ъ Ы
w x y z Ž 9 Ь Э Ю Я Ω Ξ Ψ
9
Key Upper case characters (for Russian and
Ukrainian)
0 Space . 0 , / : ; " ' ! ¡ ? ¿ * + - % \^ ~|
1 1 @ _ # = < > ( ) & € £ $ ¥ [ ] { } ¤ § ...
2 А Б В Г 2 Ґ A B C Æ Ä Å Ç
3 Д Е Ё Ж З 3 Є D E F É Δ Φ
4 И Й К Л 4 І Ї G H I Γ
5 М Н О П 5 J K L Λ
6 Р С Т У 6 M N O Ñ Ö
7 Ф Х Ц Ч 7 P Q R S Π Θ Σ ß
8 Ш Щ Ъ Ы 8 T U V Ü
9 Ь Э Ю Я 9 W X Y Z Ø Ω Ξ Ψ
Key Lower case characters (for Russian and
Ukrainian)
0 Space . 0 , / : ; " ' ! ¡ ? ¿ * + - % \ ^ ~ |
1 1 @ _ # = < > ( ) & € £ $ ¥ [ ] { } ¤ §
…
2 а б в г 2 ґ a b c à æ ä å
д е ё ж з 3 є d e f è é Δ Φ
3
4 и й к л 4 і ї g h i ì Γ
5 м н о п 5 j k l Λ
6 р с т у 6 m n o ñ ö ò
7 ф х ц ч 7 p q r s Π Θ Σ ß
8 ш щ ъ ы 8 t u v ù ü
9 ь э ю я 9 w x y z ø Ω Ξ Ψ
26 EN
Page 29

Page 30

0979
Specifications are subject to change without notice
© 2012 Koninklijke Philips Electronics N.V.
All rights reserved.
 Loading...