

Page 1
QUICK USE GUIDE
CHANNEL SEARCH
Automatic channel search will find and
store all channels. Make sure to connect
the antenna.
Search channels
Skip Search
Start
TIME AND DATE
Please check the Date and if incorrect, navigate
right to correct the Date.
Time
Date
Done
09:00 PM
06.30.2004
OK
MRV660
12nc: 3139 246 14752
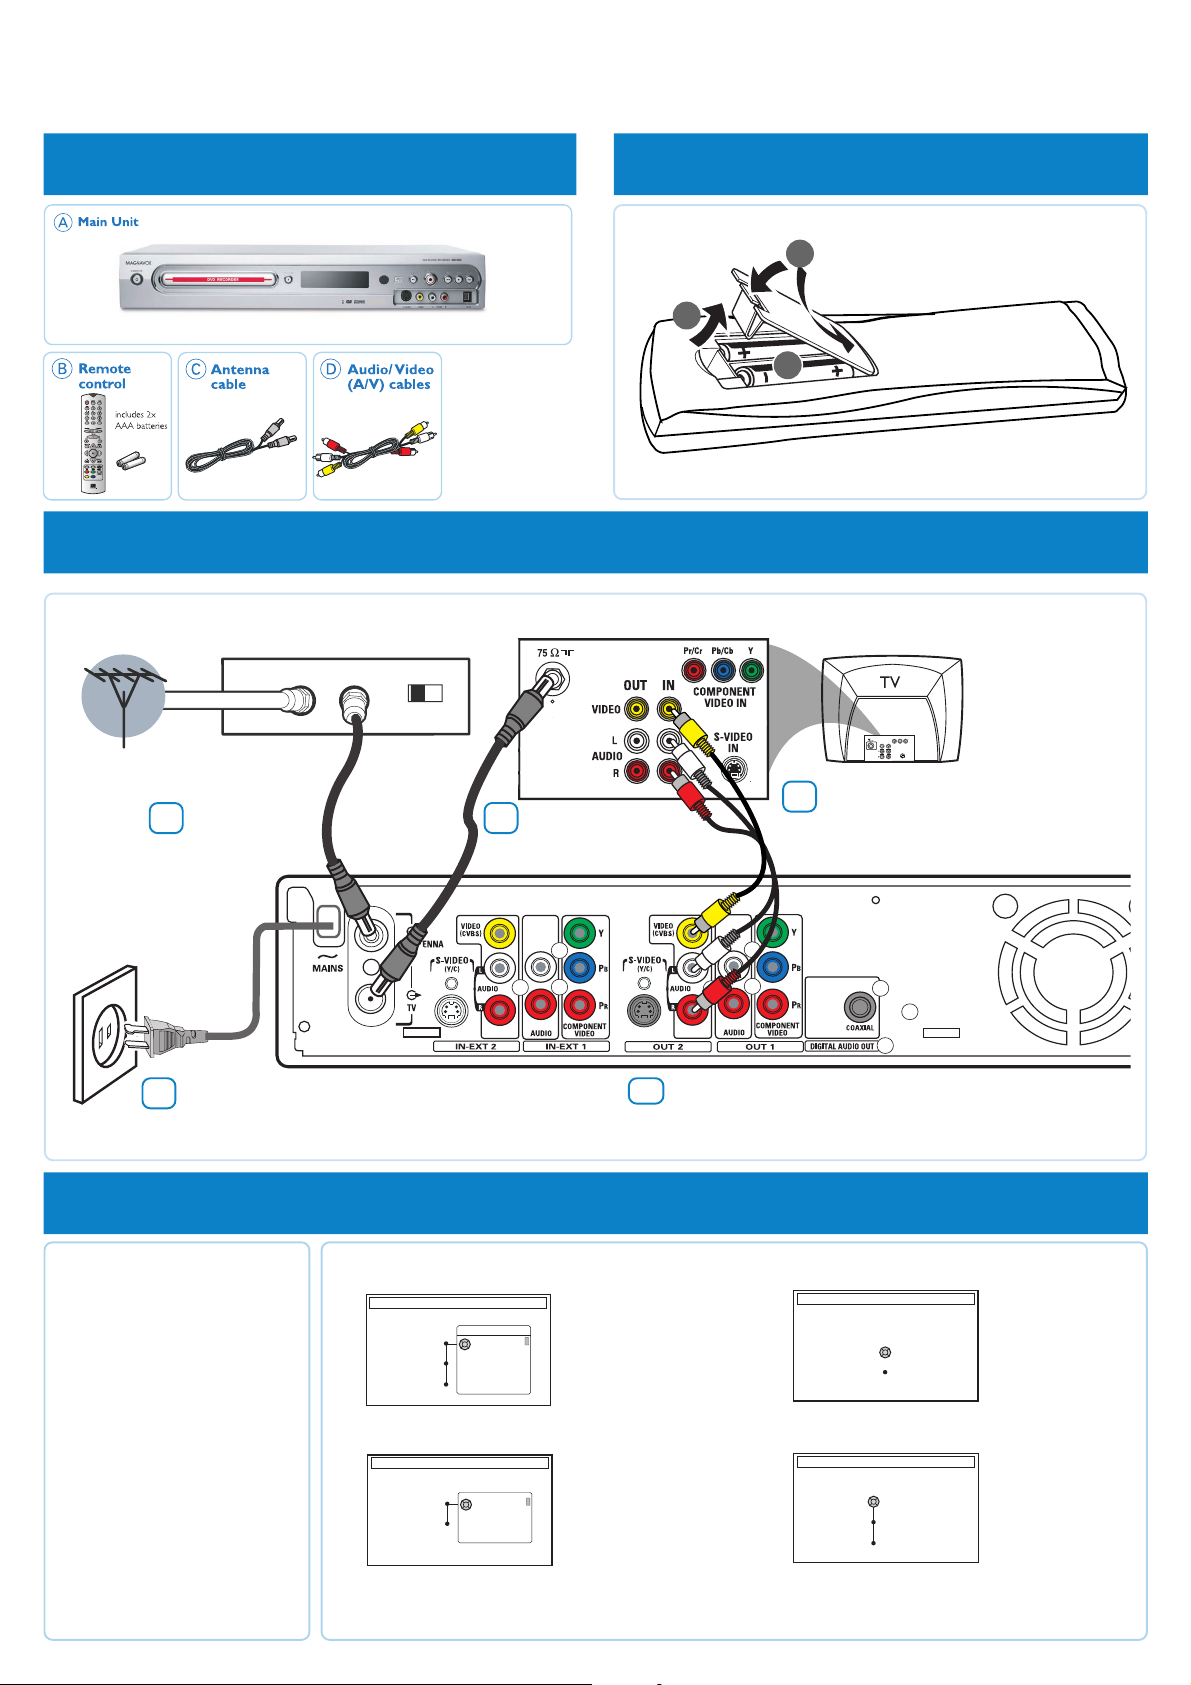
1 what’s in the box
(red/white/yellow)
3 connect DVD recorder
Cable or
satellite signal
Cable/satellite box jack panel
OUTIN
CH3 CH4
2 prepare remote control
3
1
2
Connect TV signal
3a
to ANTENNA IN
of DVD recorder
Connect to the
3e
power supply.
4 start first installation
4a Press STANDBY-ON2
on the DVD recorder to
turn it on.
➜ The message 'IS THE TV
ON?' appears on the display
panel.
4b Turn on the TV power.
Select the correct Video
In channel at the TV.
➜ The first installation menu
will appear on the TV.
Use 3 4 on the DVD recorder’s
remote control to select an item
in the menu. Press 2 to access the
selected item’s options and 1 to
confirm your selection.
4c { Language and Country } will appear on the TV.
LANGUAGE AND COUNTRY
Select Language and Country
Language
Country
Done
4d { TV Shape } menu will appear on the TV.
TV SHAPE
Select your TV shape
TV Shape
Done
When you complete, select { Done } in the menu and press OK on the remote control.
Connect antenna
3b
cable to TV OUT of
DVD recorder
Menu
English
Spanish
French
4:3 Panscan
4:3 Letterbox
16:9
Connect the AV cables (yellow plug)
3c
from the DVD recorder’s VIDEO
(CVBS) (OUT 2) jack to the Video
In jack at the back of your TV set.
back of DVD recorder
Connect the AV cables (red/white plugs)
3d
from the DVD recorder’s AUDIO L/R
(OUT 2) jack to the audio input jack at
the back of your TV set.
4e { Channel Search } menu will appear on the TV.
{Language}
- select on-screen display.
{Country}
- select country of your
residence.
4f { Time and Date } menu will appear on the TV.
{ TV Shape }
- select TV screen display.
The DVD recorder is ready for use!
{ Channel Search }
- Press OK ro start
automatic TV channel
search.
{ Time and Date }
Press 2 to enter correct
time and date. Use 34
keys to change the digit
and press 2 to go to
next digit. Press OK to
confirm
Page 2

5 start manual recording
3 4
6 start playback
5a Insert a recordable DVD+R(W) with the label facing up.
5b Press TUNER on the remote control to see the
list of TV programs, then use 3 4 keys to select the
program number you wish to record.
➜ If you wish to record from an additional device (e.g.
Video Cassette Recorder,) press 3 4 keys repeatedly to
select the corresponding external input channel. For
example, select { EXT2 } if you have connected the VCR
to IN-EXT2 jack at the back of the DVD recorder.
5c Press REC MODE to select a desired recording mode.
It defines the picture quality and the maximum
recording time for a disc.
5d Press RECORD 0 to start recording.
➜ If required, you can press RECORD 0 twice to start
a 30-minute recording. Each time you press
RECORD 0 button, you will add 30 minutes to the
recording time.
5e To stop the recording, press STOP 9.
➜ Wait until the message disappears from the display
panel before you remove the disc.
To playback a disc
6a Insert a disc with the label side facing up.
6b Playback will start automatically.
➜ If a dialog appears on the TV showing { Do you want
to access the disc content?}, press 3 4 keys to select
{Yes} to show the disc content or {No} to return to the
last active mode, then press OK to confirm.
➜ If a disc menu appears, use 1 2 3 4 keys to navigate
within the menu, highlight a title and press OK or
PLAY 2 to start playback.
6c To stop playback, press STOP 9.
To watch the TV programs
6d Press TUNER on the remote control, then use 3 4 keys
to select the program number.
To play a DVD+R on other DVD
players, you must finalize it first
6e Press EDIT on the remote control.
6f Use 3 4 keys to select { Finalize Disc } in the menu,
then press OK to start finalizing the DVD+R.
Once a DVD+R is finalized, no further recording
or editing is possible. Unfinalizing a DVD+R is not
possible.
GET PICTURE
•
Check the AV mode on TV. It may be called FRONT, A/V IN, or
VIDEO. Choose the different modes using TV remote control.
• Or, select CHANNEL 3 or 4 on the TV if you are using a
RF modulator or Cable/Satellite Box.
NEED HELP? Visit our website www.usasupport.magnavox.com
GET SOUND
•
Connect the AUDIO L/R (red/white) jacks at the back of the
DVD recorder to the corresponding AUDIO input jacks on a TV,
stereo system or receiver. Turn on the connected system and
select the appropriate channel.
 Loading...