

Philips MRV640-17B, MRV640 Quick start guide
Quick Use Guide
Connecting your DVD recorder to the TV
set/Initial installation
Attention ! Until the initial installation has been completed, the buttons on the front
will not function.
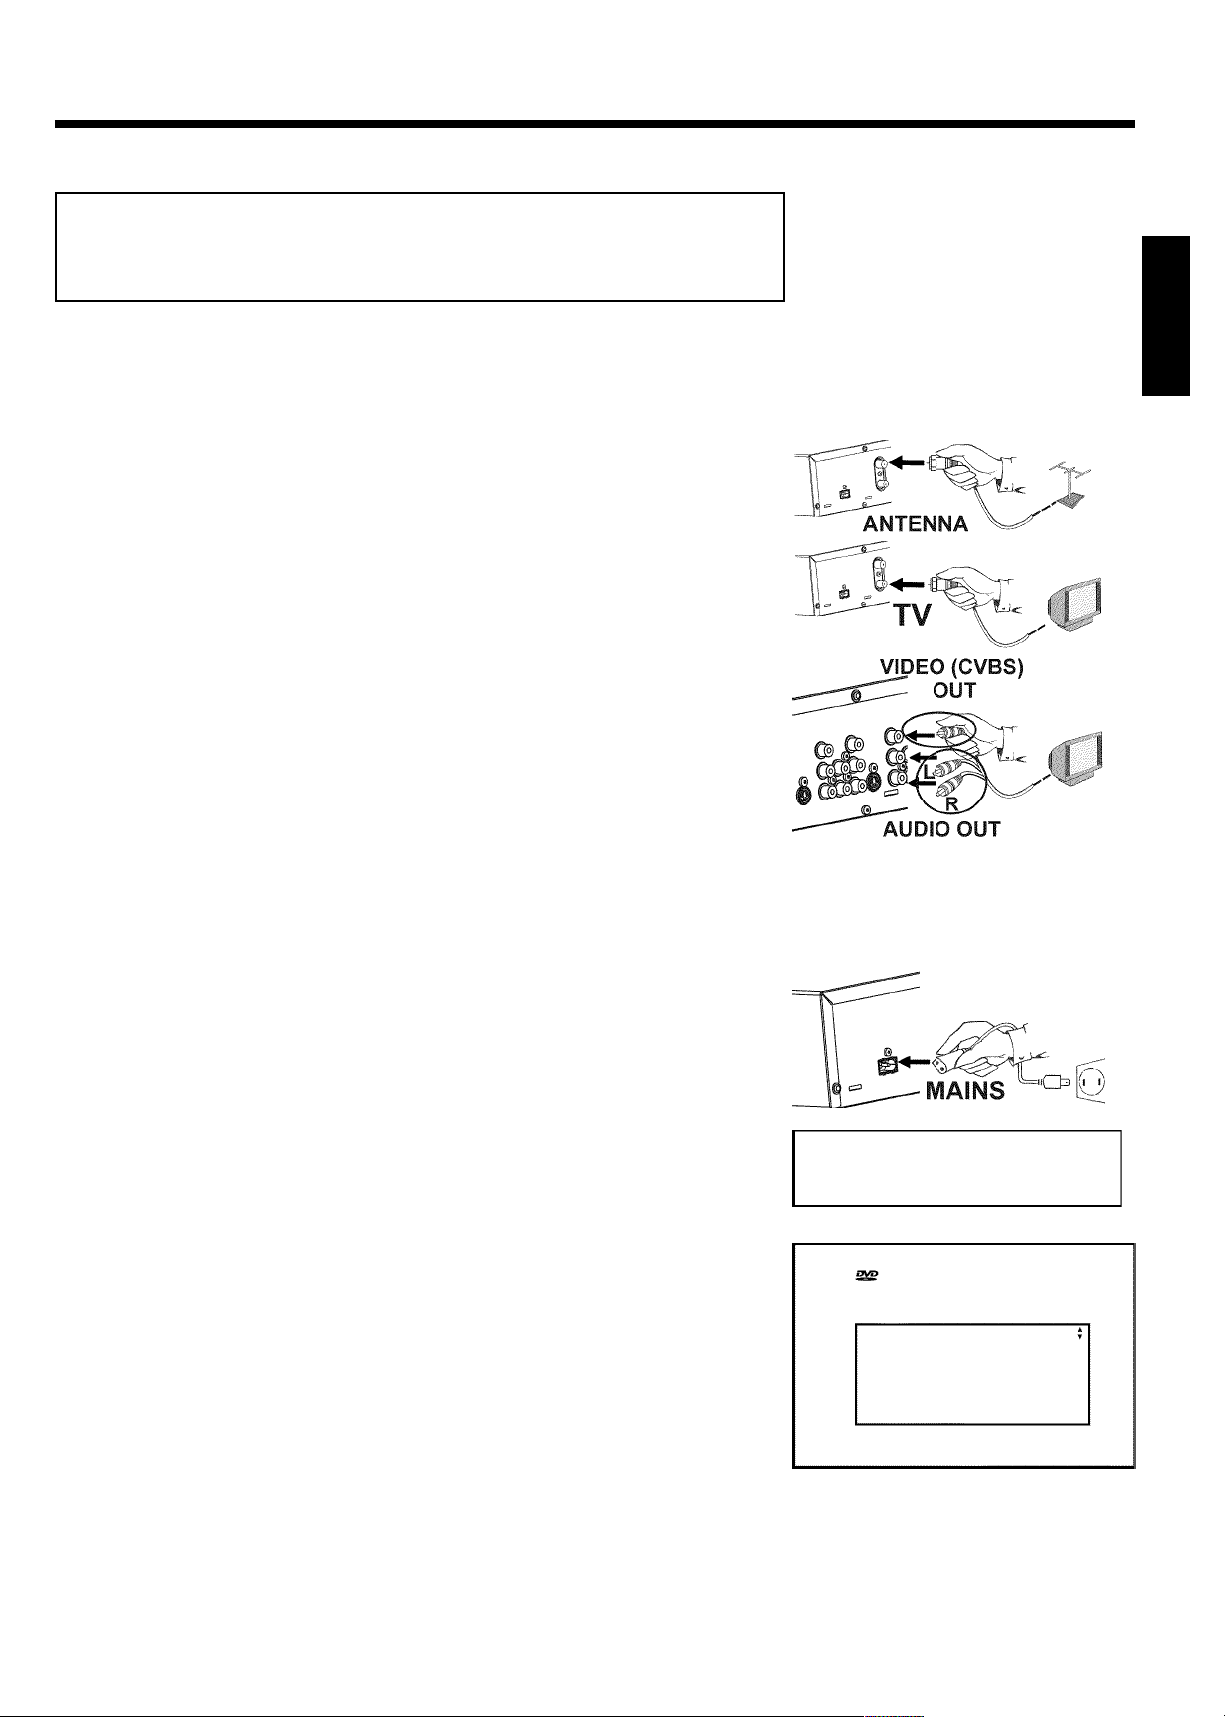
Remove the antenna or cable TV signal from your TV. Insert it
into the ANTENNA IN jack at the back of the DVD recorder.
1
Connect one end of the supplied RF coaxial cable to the TV
2
3
4
5
OUT jack at the back of the DVD Recorder and connect the
other end to the antenna input jack on TV.
Connect a video (CVBS) cable to the yellow VIDEO (CVBS)
OUT jacks at the back of the DVD Recorder and to the Video In
jack (usually yellow) of the TV (usually called Video in or AV in.
See your TV's instruction manual).
Connect an audio cable to the red/white L AUDIO R OUT jacks
at the back of the DVD Recorder (under VIDEO (CVBS) ) and
to the corresponding red/white audio input jacks of the TV
(usually called 'Audio in' or 'AV in'. See your TV's instruction
manual).
Switch on the TV. Switch the TV to the Video/Audio input
channel. For the channel number, please see your TV's instruction
manual.
ENGLISH
Connect the supplied power cable to the mains jack
6
4MAINS at the back of the DVD Recorder and to a power
supply.
The most important features of the DVD Recorder will appear
on the display.
After the initial installation is completed, this function will be
switched off.
Switch the DVD-recorder on using STANDBY-ON m .
'IS TV ON?' will appear on the display.
7
If necessary, select the channel number of the input socket at the
8
TV set.
The initial installation menu appears on the screen.
Select your preferred setting using B or A .
Confirm with OK .
9
After completing the steps mentioned above, follow the OSD (On Screen Display) to complete
the installation.
IS TV ON?
Initial Setup
Menu Language
English
Español
Français
Press OK to continue
Making a recording
ENGLISH
1
2
3
If necessary, switch to TV programming by pressing the
MONITOR button on the remote.
Use CHANNEL+ or CHANNEL- to select the channel you
want to record.
Recording via the external sockets
Select either the front socket ('CAM1') or the socket ('EXT1', 'EXT2') at
the back of the recorder, from which the recording is to be carried out
using CHANNEL+ or CHANNEL- .
Selecting the recording mode (quality)
You can select between 'M1' (camcorder recordings/1 hour), 'M2'(2
hours), 'M2x' (2,5 hours), 'M3' (3 hours) 'M4' (4 hours), 'M6' (6 hours)
or 'M8' (8 hours) using REC MODE .
SAFE RECORD
Usually, a recording starts at the point where the previous recording
ended. This will delete all subsequent recordings.
If a new recording is to be placed at the end of all recordings, hold
down REC/OTR n until 'SAFE REC' appears on the display.
To start recording, press REC/OTR n on the remote control
or RECORD n on the DVD recorder.
a 'NO SIGNAL' (no signal) will appear on the display
b Check whether the cable plugs fit correctly.
b If the recording is made from a video recorder, adjust the "tracking"
on the video recorder.
b In case of bad, non-standard video input signals, the DVD Recorder
may not be able to detect the signal.
Tip
Problem
Programming recordings
With the Recorder on, press TIMER on the remote control.
1
Select line 'Timer Programming' using B or A and confirm
2
3
with C .
The information will be displayed.
Select the entry field with D or C .
Enter information with B , A or the number buttons 0..9 .
In the entry field 'Date', you first enter the month and then the
date.
If all information is correct, press the OK button. The
information is stored in a TIMER block.
4
To end, press TIMER .
5
(WwnnNwWnNnnwNnWNwwnNWwnNnnNwwN) MRV640/17
Switch off the DVD recorder with STANDBY m .
6
A programmed recording will only function if the DVD recorder is switched off using
STANDBY m .
Timer
Timer Programming
Date
Ch.01Start
01/22
Mo-Fr/Weekly
Press SELECT
08:30AM
End
10:30AM
Rec
Mode
M1
To store
Press OK
3139 246 13802
4115/000
 Loading...