

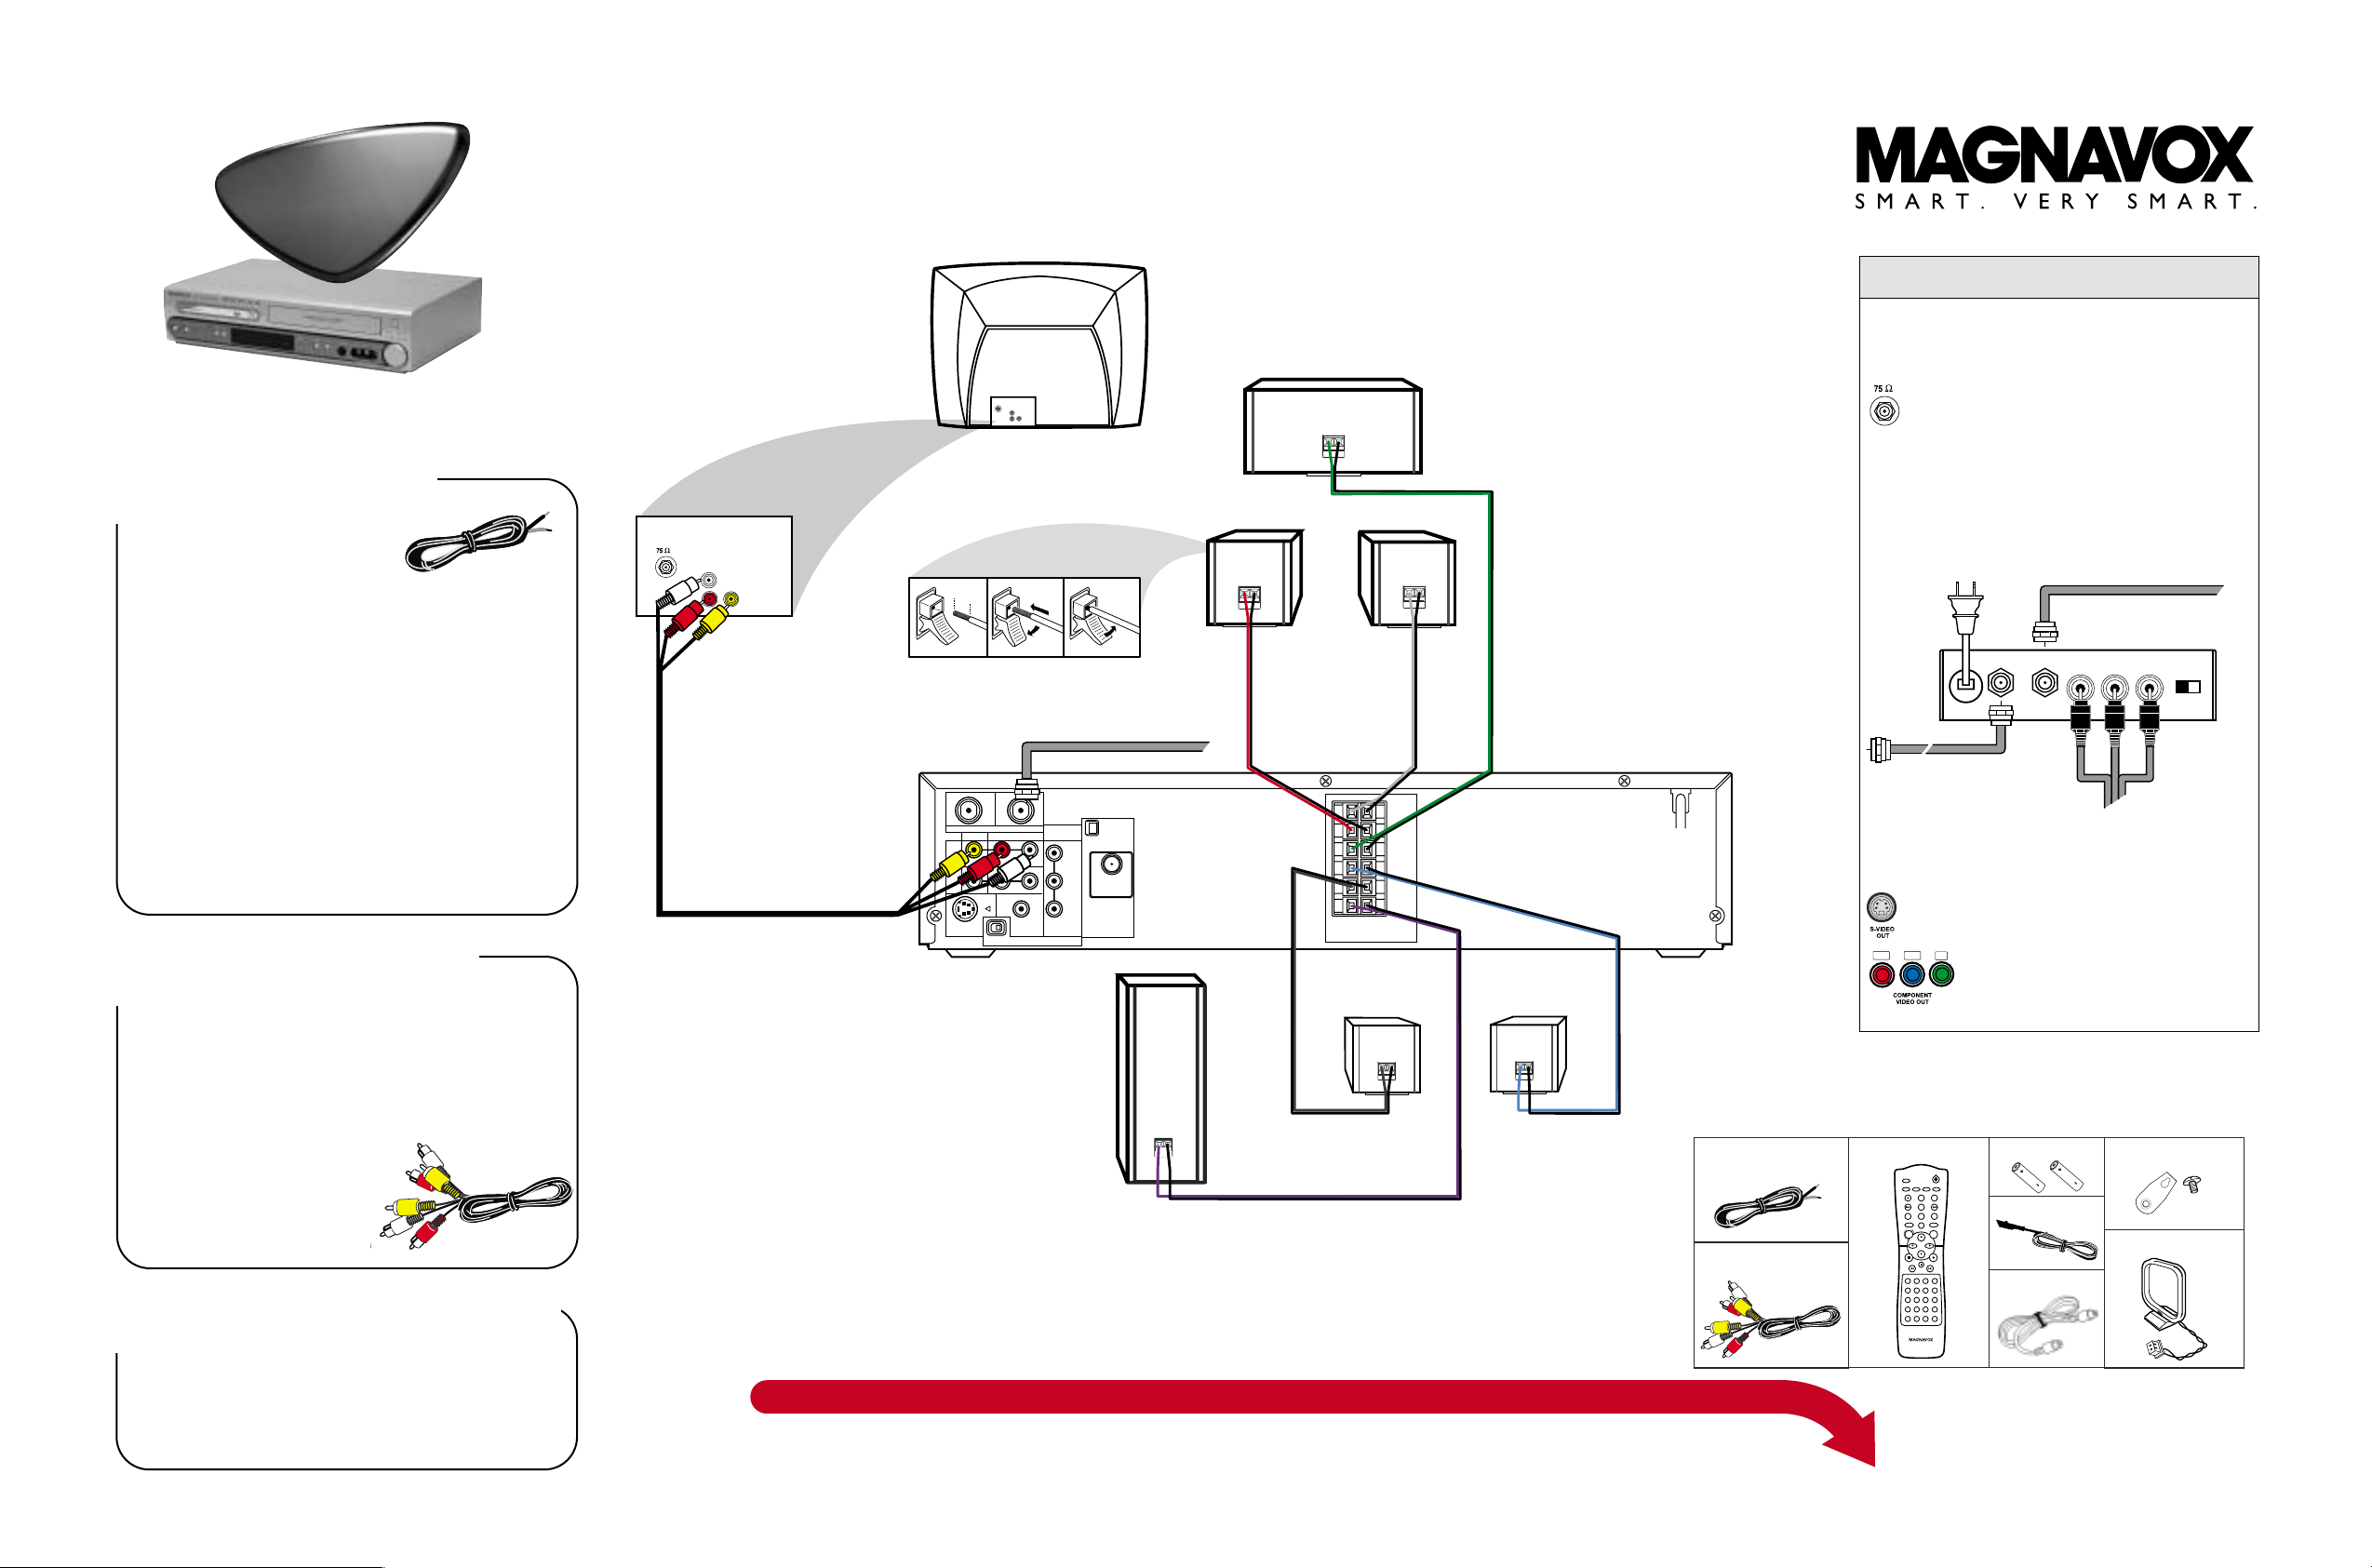
VIDEO/AUDIO CONNECTION
Connect the supplied yellow video cable to the
yellow VIDEO (DVD/VCR OUT) jack on the System
and to the VIDEO IN jack on the TV.
Connect the supplied red and white Audio cables
to the AUDIO (DVD/VCR OUT) jacks on the System
and to the AUDIO IN jacks on the TV.
IMPORTANT! All five speakers
will produce sound only when
the TV show is broadcast in a
Surround Sound format.
2
Use this simple and quick way to watch your favorite
DVD movie and enjoy your Home Cinema experience!
HELPFUL HINTS
These items should be in the box.
If not, call Magnavox at 1-800-705-2000.
C
onnecting your MRD500
Home Cinema System ...
See the other side to play a DVD and arrange the speakers.
1
Quick-Use
Guide
Quick-Use
Guide
Your TV determines which type of video connection you can make with the DVD Digital
Home Cinema System.
If your TV has a single Antenna In
jack, you need an RF Modulator to
view DVDs on your TV.
The RF Modulator converts the Video signal
from the System so it can play through the
TV’s Antenna In jack.
See your electronics retailer or contact
Magnavox for RF Modulator availability.
If your TV has S-Video or
Component (PbPrY) jacks,
connect the System using one of
these for a higher quality connection. See the Owner’s Manual for
details.
SPEAKER CONNECTIONS
a. • Connect the red/black
speaker wires to the FRONT
Right speaker and to the
System’s FR jacks.
• Connect the white/black speaker wires to the
FRONT Left speaker and to the System’s FL jacks.
• Connect the green/black speaker wires to the
CENTER speaker and to the System’s C jacks.
b. • Connect the gray/black speaker wires to the
REAR (Surround) Right speaker and to the SR
jacks on the System.
• Connect the blue/black speaker wires to the
REAR (Surround) Left speaker and to the SL
jacks on the System.
c. • Connect the purple/black speaker wires to the
Subwoofer and to the W jacks on the System.
Match the wire colors to the jack colors.
Colored wires go to the + jacks.
x
3
ANTENNA/CABLE TV CONNECTION
Connect your Antenna or Cable TV signal to
the System’s TV ANTENNA IN jack. This brings
TV channels into the System so you can use the VCR
to record TV programs.Watch TV programs by putting
the System in VCR mode and changing TV channels at
the System.
3
2
1a
1b
1c
Cable
CENTER Speaker
+ -
REAR OF TV
(example only)
FRONT Speaker (Right)
FRONT Speaker (Left)
AUDIO
(
IN
VIDEO
IN
Connecting Speaker Cables
.0
4
7
"
(1
2
m
m
)
abc
P
PUSH
DOWN
U
S
H
IN
Antenna or Cable TV Signal
OUT
IN
AM
DVD/
VCR
OUT
VCR
IN
S-VIDEO
TV ANTENNA
VIDEO
OUT
P I
AUDIO
R L
DIGITAL
AUDIO OUT
COAXIAL
PROGRESSIVE
COMPONENT
VIDEO OUT
Y
Pb/Cb
Pr/Cr
ANTENNA 75Ω
ANTENNA 75Ω
FM
(75Ω)
+ -
+ -
FL
FR
C
SL
SR
W
SPEAKER (4Ω)
ANT IN
Antenna or Cable TV Signal
Pb/Cb
Pr/Cr
Y
RF coaxial cable to TV
Back of RF Modulator
(example only)
TO TV
Audio/Video cables from
DVD Home Cinema System
VIDEO
IN
AUDIO IN
RL
CH3 CH4
+ -
+ -
+ -
Subwoofer
REAR (Surround)
Speaker (Right)
REAR (Surround)
Speaker (Left)
Speaker and
Subwoofer Cables
Audio/
Composite Video
Cable
(x6)
Remote Control
DISC
MENU
OK
1
2
3
456
789
A-B
0
+10
+—
2 AA Batteries
FM Wire Antenna
RF Coaxial Cable
Brackets and Screws
(x5)
AM Loop Antenna
Quick-Use
Surround Sound Speaker Setup
A
fter the speaker connections are complete, place the speakers
in their proper locations. The speaker arrangement allows you
to enjoy a Surround Cinema experience in your own home. You will
be able to hear realistic theater sound with audio signal separation
and pinpoint sound placement.
Playing a DVD
2
1
3
Press OPEN/CLOSE on the front of the System
to open the disc tray.
Load your Disc in the tray with the label facing
up. If a DVD is two-sided, make sure the label of the
side you want to play is facing up.
Press OPEN/CLOSE again to close the tray.
4
Play may start automatically. If not, press
PLAY B. If a Disc menu appears, use the ▼▲s B
and OK buttons on the remote (or the Number
buttons) to select features or start play from the
menu. Follow the instructions in the Disc menu.
See the Owner’s Manual for more Disc features.
5
To stop playing the Disc, press the STOP C button.
6
Press STANDBY ON yyon the front of the
System or its remote to turn on the power.
1
Turn on your TV. Select the correct Video In
channel (AV1,VIDEO, etc.) at the TV.Your TV
remote may have a VIDEO button that selects the
Video In channel. If not, go to your lowest TV
channel (1 or 2).Then press the Channel
down button on your TV until you see the DVD
screen on the TV (if no Disc is in the System).
2
To get the DVD picture on your TV
The DVD picture does not play on channel 3 or 4 of your
TV if you use the connection shown. Set your TV to the
Video In channel. There are two ways your TV might access the
Video In channel.
●
Go to channel 1 or 2 and press your TV’s Channel
Down button until you reach the Video In channel.
...3,2,1... FRONT - AV IN - VIDEO IN
●
Or, use the VIDEO button on your TV or its remote to set
the TV to the Video In channel. These buttons are not available
on all TVs or may be labelled differently. Check your TV
owner’s manual for details.
• To avoid magnetic interference, do not position the FRONT
speakers too close to your TV.
• If the REAR (Surround) speakers are farther from the listen-
ing position than the FRONT and CENTER speakers, it will
weaken the Surround effect.
• Secure all speakers to prevent accidents and improve sound
quality.
SPEAKER PLACEMENT
Place the FRONT Left and Right speakers at
equal distances from the TV. Turn the speakers to
a 45-degree angle from the listening position.
Place the CENTER speaker above (or below)
the TV to localize the center channel sound.
Place the REAR (Surround) speakers at normal listening ear level and facing each other (or
mounted on the wall with the supplied brackets).
Place the SUBWOOFER on the floor near the
TV.
EL6560E002
E9000UD / 0VMN03799
First-Time Setup
The first time you turn on the System, you must
complete the First-Time Setup for the VCR.This
changes the menu language and sets up TV channels.
For details, see the accompanying owner’s manual.
DVD Mode
Before using the remote control for DVD features, press the DVD button on the remote.
The System must be in DVD mode. The DVD
light will appear on the front of the System.
4
3
Quick-Use
Guide
Guide
MRD500VR
DVD/VCR/RECEIVER
PROGRESSIVE SCAN
STANDBY-ON SOURCE DVD VCR TUNER PLAY
IR
4 HEAD HI-FI STEREO
ONE TOUCH RECORDING ¥ LONG PLAY
TIMER
RECORD
REC
PLAY
VIDEO AUDIO R
AUDIO L
HEADPHONESTOP
OPEN/
CLOSE
VOL
SURR
STOP/EJECT
JAZZ CLASSIC
POP OPTIMAL
AV IN
(Do not use Channel 3 or 4
*
on the TV when using
the connection shown.)
Front
Speaker
(Left)
Rear Speaker
(Left Surround)
Subwoofer
Center Speaker
Above TV
VIEWING AREA
Front
Speaker
(Right)
Rear Speaker
(Right Surround)
TIMER SET
SETUP/
AUDIO/
PROG
BAND
REC
DISPLAY
SKIP/
CH
C-RESET
CLEAR
TITLE RETURNMODE/SPEED
TUNER
DISC
MENU
REW FF
PAUSE
1
2
456
789
0
+10
SOUNDSURROUND
SUBTITLE
3
REPEAT
VOLUME
STANDBY-ON
ANGLE
ZOOM
SKIP/
VCRDVD
OK
PLAYSTOP
SLOW
VCR/TV
SEARCH MODE
REPEAT
A-B
+—
CH
 Loading...