

Page 1
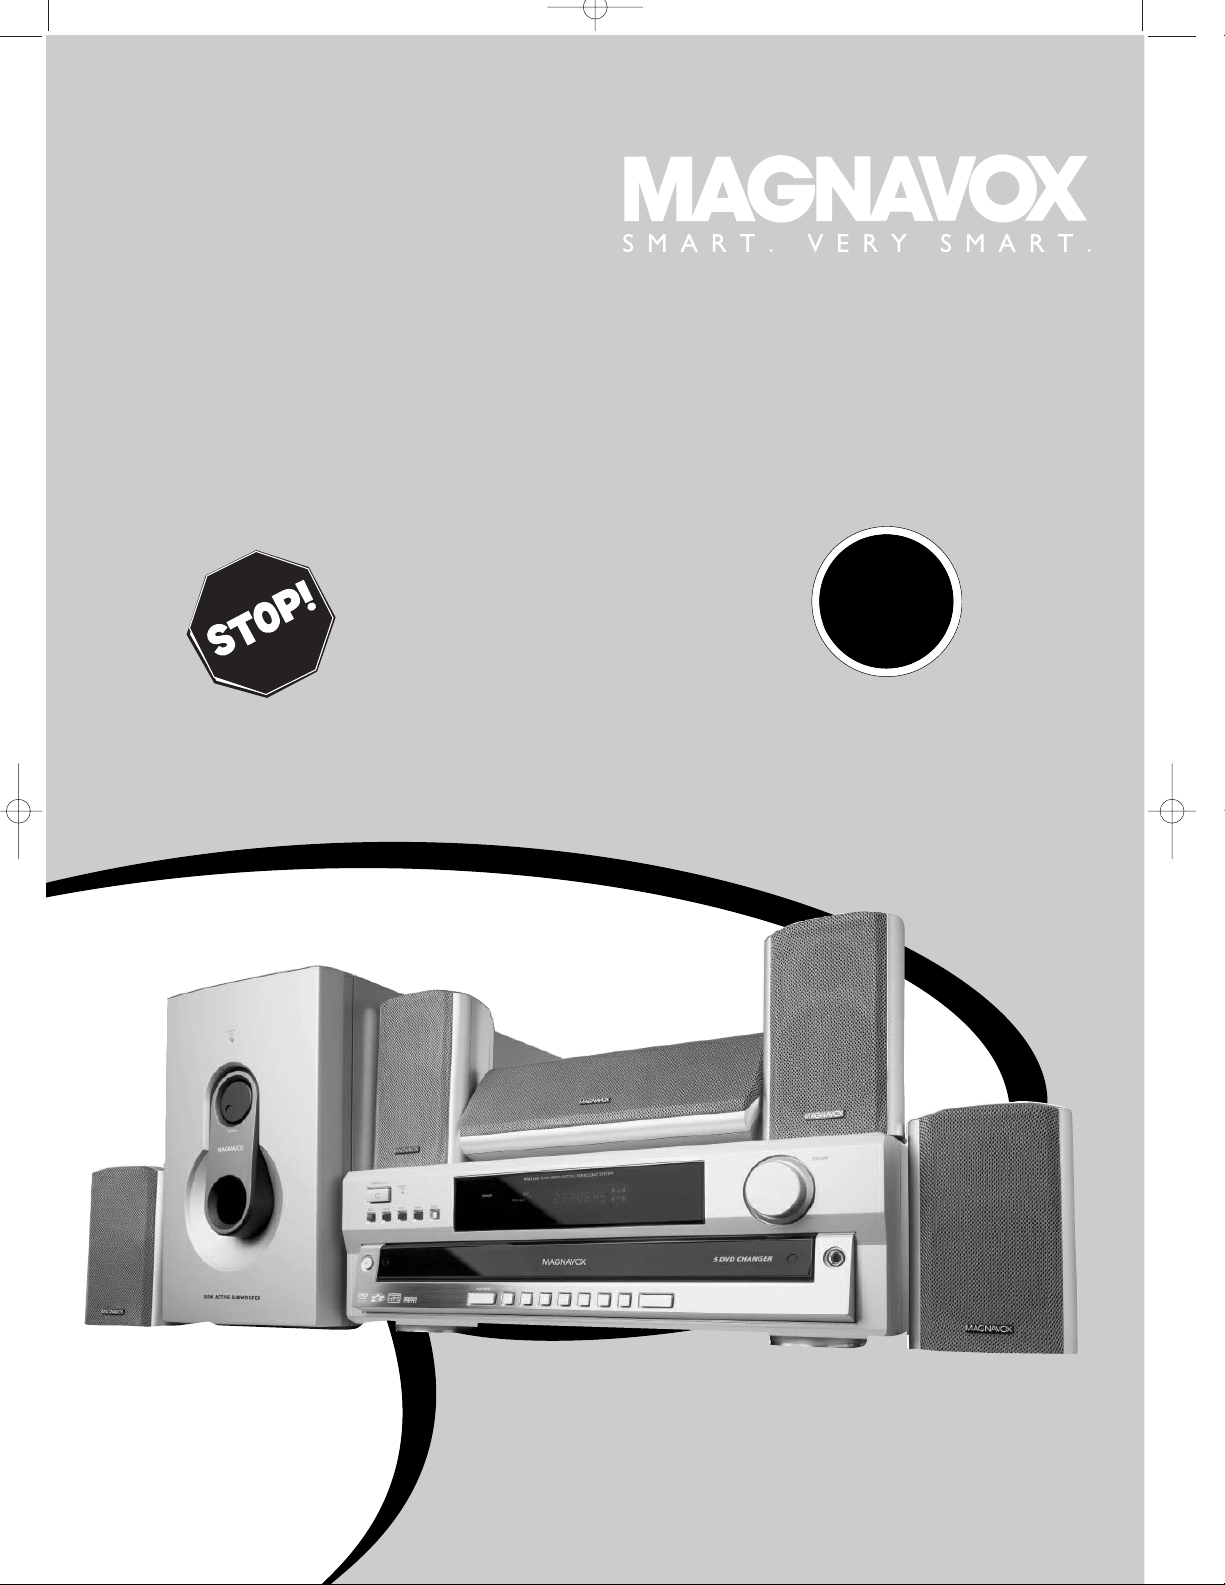
User guide
MRD-250 DVD HOME CINEMA SYSTEM
Read this first!
Congratulations on purchasing this Magnavox product.
We’ve included everything you need to get started.
If you have any problems, Magnavox Representatives can
help you get the most from your new product by explaining:
• Hookups,
• First Time Setup, and
• Feature Operation.
Do not attempt to return this product to the store.
For fast help, call us first!
1-800-705-2000
Thank you for making Magnavox a part of your home!
Return
your Warranty
Registration
Card within 10
days.
I
M
P
O
R
T
A
N
T
!
S
E
E
W
H
Y
I
N
S
I
D
E
mrd250book 2/14/03 10:49 AM Page 1
Page 2
Once your MAGNAVOX purchase is registered, you’re eligible to receive all the privileges of owning a MAGNAVOX
product. So complete and return the Warranty Registration Card enclosed with your purchase at once. And take
advantage of these important benefits.
Return your Warranty Registration card today to ensure you
receive all the
benefits
you’re entitled to.
For Customer Use
Enter below the Serial No. which is
located on the rear of the cabinet. Retain
this information for future reference.
Model No. ______________________
Serial No. ________________________
Congratulations on your purchase,
and welcome to the “family!”
Dear MAGNAVOX product owner:
Thank you for your confidence in MAGNAVOX. You’ve selected one of the best-built, best-backed products available today.
And we’ll do everything in our power to keep you happy with
your purchase for many years to come.
As a member of the MAGNAVOX “family,” you’re entitled to
protection by one of the most comprehensive warranties and
outstanding service networks in the industry.
What’s more, your purchase guarantees you’ll receive all the
information and special offers for which you qualify, plus easy
access to accessories from our convenient home shopping
network.
And most importantly you can count on our uncompromising
commitment to your total satisfaction.
All of this is our way of saying welcome-and thanks for investing
in a MAGNAVOX product.
Lawrence J. Blanford
President and Chief Executive Officer
P.S. Remember, to get the most from your
MAGNAVOX product, you must return your Warranty
Registration Card within 10 days. So please mail it to us
right now!
Know these
safetysymbols
This “bolt of lightning” indicates
uninsulated material within your
unit may cause an electrical shock. For
the safety of everyone in your household, please do not remove product covering.
The “exclamation point” calls atten-
tion to features for which you
should read the enclosed literature
closely to prevent operating and maintenance problems.
WARNING: TO PREVENT FIRE OR
SHOCK HAZARD, DO NOT EXPOSE
THIS EQUIPMENT TO RAIN OR MOISTURE.
CAUTION: To prevent electric shock,
match wide blade of plug to wide slot,
fully insert.
s
t
CAUTION
RISK OF ELECTRIC SHOCK
DO NOT OPEN
CAUTION: TO REDUCE THE RISK OF ELECTRIC SHOCK, DO NOT
REMOVE COVER (OR BACK). NO USER-SERVICEABLE PARTS
INSIDE. REFER SERVICING TO QUALIFIED SERVICE PERSONNEL.
Warranty
Verification
Registering your product within
10 days confirms your right to
maximum protection under the
terms and conditions of your
MAGNAVOX warranty.
Owner
Confirmation
Your completed Warranty
Registration Card serves as
verification of ownership in
the event of product theft
or loss.
Model
Registration
Returning your Warranty
Registration Card right away
guarantees you’ll receive all the
information and special offers
which you qualify for as the
owner of your model.
Visit our World Wide Web Site at http://www.magnavox.com
R
E
G
I
S
T
R
A
T
I
O
N
N
E
E
D
E
D
W
I
T
H
I
N
1
0
D
A
Y
S
Hurry!
mrd250book 2/14/03 10:49 AM Page 2
Page 3

Table of Contents 3
General Information
Table of Contents . . . . . . . . . . . . . . . . . . . . . . . . . . . . . . . . . . . . . . . . . . . . . . . . . . . . . . . . . . . . . . . . . . . . . . . . . . . . . . . . . .3
Safety Information . . . . . . . . . . . . . . . . . . . . . . . . . . . . . . . . . . . . . . . . . . . . . . . . . . . . . . . . . . . . . . . . . . . . . . . . . . . . . . . . . .4
Introduction . . . . . . . . . . . . . . . . . . . . . . . . . . . . . . . . . . . . . . . . . . . . . . . . . . . . . . . . . . . . . . . . . . . . . . . . . . . . . . . .5
DVD Receiver Controls
Remote Control . . . . . . . . . . . . . . . . . . . . . . . . . . . . . . . . . . . . . . . . . . . . . . . . . . . . . . . . . . . . . . . . . . . . . . . . . . . . . . . . .6-7
Front Panel . . . . . . . . . . . . . . . . . . . . . . . . . . . . . . . . . . . . . . . . . . . . . . . . . . . . . . . . . . . . . . . . . . . . . . . . . . . . . . . . . . . . . . .8
Rear Panel . . . . . . . . . . . . . . . . . . . . . . . . . . . . . . . . . . . . . . . . . . . . . . . . . . . . . . . . . . . . . . . . . . . . . . . . . . . . . . . . . . . . . . . .9
First Time Setup
First Time Setup . . . . . . . . . . . . . . . . . . . . . . . . . . . . . . . . . . . . . . . . . . . . . . . . . . . . . . . . . . . . . . . . . . . . . . . . . . . . . . . . . .10
Hookups - TV . . . . . . . . . . . . . . . . . . . . . . . . . . . . . . . . . . . . . . . . . . . . . . . . . . . . . . . . . . . . . . . . . . . . . . . . . . . . . . . . .11-13
Hookups - Speakers . . . . . . . . . . . . . . . . . . . . . . . . . . . . . . . . . . . . . . . . . . . . . . . . . . . . . . . . . . . . . . . . . . . . . . . . . . . . . . .14
Hookups - Optional . . . . . . . . . . . . . . . . . . . . . . . . . . . . . . . . . . . . . . . . . . . . . . . . . . . . . . . . . . . . . . . . . . . . . . . . . . . . . . .15
Hookups - VCR, Cable/Satellite box . . . . . . . . . . . . . . . . . . . . . . . . . . . . . . . . . . . . . . . . . . . . . . . . . . . . . . . . . . . . . . . . . . .16
Disc Playback
Quick Disc Playback . . . . . . . . . . . . . . . . . . . . . . . . . . . . . . . . . . . . . . . . . . . . . . . . . . . . . . . . . . . . . . . . . . . . . . . . . . . . . . .17
Playback Features . . . . . . . . . . . . . . . . . . . . . . . . . . . . . . . . . . . . . . . . . . . . . . . . . . . . . . . . . . . . . . . . . . . . . . . . . . . . . . . . .18
DVD Receiver System Menu Options
System Menu . . . . . . . . . . . . . . . . . . . . . . . . . . . . . . . . . . . . . . . . . . . . . . . . . . . . . . . . . . . . . . . . . . . . . . . . . . . . . . . . . . . . .19
TV Display . . . . . . . . . . . . . . . . . . . . . . . . . . . . . . . . . . . . . . . . . . . . . . . . . . . . . . . . . . . . . . . . . . . . . . . . . . . . . . . . . . . . . .20
Angle Mark, OSD Language . . . . . . . . . . . . . . . . . . . . . . . . . . . . . . . . . . . . . . . . . . . . . . . . . . . . . . . . . . . . . . . . . . . . . . . . .21
Video Out . . . . . . . . . . . . . . . . . . . . . . . . . . . . . . . . . . . . . . . . . . . . . . . . . . . . . . . . . . . . . . . . . . . . . . . . . . . . . . . . . . . . . . .22
Screen Saver, Speaker Delay . . . . . . . . . . . . . . . . . . . . . . . . . . . . . . . . . . . . . . . . . . . . . . . . . . . . . . . . . . . . . . . . . . . . . . . . .23
Test Tone, Digital Out . . . . . . . . . . . . . . . . . . . . . . . . . . . . . . . . . . . . . . . . . . . . . . . . . . . . . . . . . . . . . . . . . . . . . . . . . . . . .24
Dual Mono, Dynamic . . . . . . . . . . . . . . . . . . . . . . . . . . . . . . . . . . . . . . . . . . . . . . . . . . . . . . . . . . . . . . . . . . . . . . . . . . . . . .25
TV Type (NTSC/PAL), Language Options . . . . . . . . . . . . . . . . . . . . . . . . . . . . . . . . . . . . . . . . . . . . . . . . . . . . . . . . . . . . . . .26
Parental Controls . . . . . . . . . . . . . . . . . . . . . . . . . . . . . . . . . . . . . . . . . . . . . . . . . . . . . . . . . . . . . . . . . . . . . . . . . . . . . . . . .27
Password . . . . . . . . . . . . . . . . . . . . . . . . . . . . . . . . . . . . . . . . . . . . . . . . . . . . . . . . . . . . . . . . . . . . . . . . . . . . . . . . . . . . . . .28
Defaults . . . . . . . . . . . . . . . . . . . . . . . . . . . . . . . . . . . . . . . . . . . . . . . . . . . . . . . . . . . . . . . . . . . . . . . . . . . . . . . . . . . . . . . .29
Title, Angle . . . . . . . . . . . . . . . . . . . . . . . . . . . . . . . . . . . . . . . . . . . . . . . . . . . . . . . . . . . . . . . . . . . . . . . . . . . . . . . . . . . . . .30
Zoom, Goto . . . . . . . . . . . . . . . . . . . . . . . . . . . . . . . . . . . . . . . . . . . . . . . . . . . . . . . . . . . . . . . . . . . . . . . . . . . . . . . . . . . . .31
Repeat, Repeat A-B . . . . . . . . . . . . . . . . . . . . . . . . . . . . . . . . . . . . . . . . . . . . . . . . . . . . . . . . . . . . . . . . . . . . . . . . . . . . . . . .32
CD Features, Programming . . . . . . . . . . . . . . . . . . . . . . . . . . . . . . . . . . . . . . . . . . . . . . . . . . . . . . . . . . . . . . . . . . . . . . . . . .33
Playback Control (PBC), Audio Channels . . . . . . . . . . . . . . . . . . . . . . . . . . . . . . . . . . . . . . . . . . . . . . . . . . . . . . . . . . . . . . .34
Audio and Surround Sound Options
Sound Option . . . . . . . . . . . . . . . . . . . . . . . . . . . . . . . . . . . . . . . . . . . . . . . . . . . . . . . . . . . . . . . . . . . . . . . . . . . . . . . . . . . .35
MP3 Features . . . . . . . . . . . . . . . . . . . . . . . . . . . . . . . . . . . . . . . . . . . . . . . . . . . . . . . . . . . . . . . . . . . . . . . . . . . . . . . . . . . .36
Tuner Features . . . . . . . . . . . . . . . . . . . . . . . . . . . . . . . . . . . . . . . . . . . . . . . . . . . . . . . . . . . . . . . . . . . . . . . . . . . . . . . . . . .37
FM Reception, Sleep Timer . . . . . . . . . . . . . . . . . . . . . . . . . . . . . . . . . . . . . . . . . . . . . . . . . . . . . . . . . . . . . . . . . . . . . . . . . .38
Additional Information
Helpful Hints . . . . . . . . . . . . . . . . . . . . . . . . . . . . . . . . . . . . . . . . . . . . . . . . . . . . . . . . . . . . . . . . . . . . . . . . . . . . . . . . . .39-40
Glossary . . . . . . . . . . . . . . . . . . . . . . . . . . . . . . . . . . . . . . . . . . . . . . . . . . . . . . . . . . . . . . . . . . . . . . . . . . . . . . . . . . . . . . . .40
Specifications . . . . . . . . . . . . . . . . . . . . . . . . . . . . . . . . . . . . . . . . . . . . . . . . . . . . . . . . . . . . . . . . . . . . . . . . . . . . . . . . . . . . .41
Index . . . . . . . . . . . . . . . . . . . . . . . . . . . . . . . . . . . . . . . . . . . . . . . . . . . . . . . . . . . . . . . . . . . . . . . . . . . . . . . . . . . . . . . . . . .42
Limited Warranty . . . . . . . . . . . . . . . . . . . . . . . . . . . . . . . . . . . . . . . . . . . . . . . . . . . . . . . . . . . . . . . . . . . . . . . . . . . . . . . . .43
Manufactured under license from Dolby Laboratories. “Dolby” and the double-D symbol are trademarks of Dolby Laboratories. Confidential Unpublished Works.
©1992-1997 Dolby Laboratories, Inc. All rights reserved.
Manufactured under license from Digital Theater Systems, Inc. US Pat. No. 5,451,942, 5,956,674, 5,978,762 and under worldwide patents issued and pending.
“DTS” and “DTS Digital Surround” are trademarks of Digital Theater Systems, Inc. 1996, 2000 Digital Theater Systems, Inc. All rights reserved.
Copyright 2002 Magnavox Consumer Electronics North America
mrd250book 2/14/03 10:49 AM Page 3
Page 4

4 Safety Information
IMPORTANT SAFETY INSTRUCTIONS.
1. Read these instructions.
2. Keep these instructions.
3. Heed all warnings.
4. Follow all instructions.
5. Do not use this apparatus near water.
6. Clean only with dry cloth.
7. Do not block any ventilation openings. Install in accordance
with the manufacturer’s instructions.
8. Do not install near any heat sources such as radiators, heat
registers, stoves, or other apparatus (including amplifiers)
that produce heat.
9. Do not defeat the safety purpose of the polarized or
grounding-type plug. A polarized plug has two blades with
one wider than the other. A grounding type plug has two
blades and a third grounding prong. The wide blade or the
third prong are provided for your safety. If the provided
plug does not fit into your outlet, consult an electrician for
replacement of the obsolete outlet.
10. Protect the power cord from being walked on or pinched,
particularly at plugs, convenience receptacles, and the point
where they exit from the apparatus.
11. Only use attachments/accessories specified by the manufacturer.
12. Use only with the cart, stand, tripod, bracket, or table
specified by the manufacturer or sold with the apparatus.
When a cart is used, use caution when moving the
cart/apparatus combination to avoid injury from tip-over.
13. Unplug this apparatus during lightning storms or when
unused for long periods of time.
14. Refer all servicing to qualified service personnel. Servicing is
required when the apparatus has been damaged in any way,
such as power-supply cord or plug is damaged, liquid has
been spilled or objects have fallen into the apparatus, the
apparatus has been exposed to rain or moisture, does not
operate normally, or has been dropped.
15. Battery usage CAUTION - To prevent battery leakage that
may result in bodily injury, property damage, or damage to
the unit:
• Install all batteries correctly, with + and - aligned as
marked on the unit.
• Do not mix batteries (old and new or carbon and
alkaline, etc.).
• Remove batteries when the unit is not used for a long
time.
Copyright Protection
This product incorporates copyright protection technology
that is protected by method claims of certain U.S. patents and
other intellectual property rights owned by Macrovision
Corporation and other rights owners. Use of this copyright
protection technology must be authorized by Macrovision
Corporation, and is intended for home and other limited viewing uses only unless otherwise authorized by Macrovision
Corporation. Reverse engineering or disassembly is prohibited.
Federal Communications Commission (FCC)
The set complies with the FCC-Rules, Part 15 and with 21
CFR 1040.1. Operation is subject to the following two conditions:
1. This device may not cause harmful interference, and
2. This device must accept any interference received, including
interference that may cause undesired operation.
CAUTION
Use of controls or adjustments or performance of procedures
other than herein may result in hazardous radiation exposure
or other unsafe operation.
ATTENTION
L'utilisation des commandes ou réglages ou le non-respect des
procédures ci-incluses peuvent se traduire par une exposition
dangereuse à l'irradiation.
ATENCIÓN
El uso de mando o ajustes o la ejecucción de métodos que no
sean los aquí descritos puede ocasionar peligro de exposición a
radiación.
Important Information for Canada
This digital apparatus does not exceed the Class B limits for
radio noise emissions from digital apparatus as set out in the
Radio Interference Regulations of the Canadian Department of
Communications.
Cet appareil numérique n'emet pas de bruits
radioélectriques dépassant les limites applicables aux appareils
numériques de Class B prescrites dans le Règlement sur le
Brouillage Radioélectrique édicté par le Ministère des
Communications du Canada.
Installation
• Place the player on a flat, hard, and stable surface.
• There must be sufficient room in front of the DVD
Receiver for the Disc drawer to open.
• For cabinet installations, allow about 10cm (4 inches) of
free space all around the DVD Receiver for adequate
ventilation.
•Do not expose your DVD Receiver to extreme
temperatures or humidity.
mrd250book 2/14/03 10:49 AM Page 4
Class II equipment symbol
This symbol indicates that the unit has
a double insulation system
Page 5
Introduction 5
Welcome!
We hope you enjoy your complete DVD Home Cinema
System. This seven-piece, 200-watt system creates dynamic
sound quality and realism found only in cinemas. Features of
the DVD Home Cinema System include:
● Surround Sound options
● Night Mode: Reduces the range between high and low vol-
umes during Disc playback.
● Parental Controls: Sets a rating level so your children can-
not watch a DVD that has a rating higher than the level
you set.
● Sleep Timer: Turns the DVD Receiver to Standby Mode
(Off) at a preset time.
Package Contents
● Remote Control and two (2) AA batteries
● Audio and Video (Composite) cables
● Five speakers, including speaker wires
● Subwoofer, including connection cable and power cable
● AM loop antenna and FM wire antenna
● Owner’s manual, Quick-Use Guide and product registra-
tion materials
Environmental Information
All unnecessary packaging has been omitted. We have tried to
make the packaging easy to separate into three materials:
cardboard (box), polystyrene foam (buffer) and polyethylene
(bags, protective foam sheet).
Your system consists of materials which can be recycled and
reused if disassembled by a specialized company. Please
observe the local regulations regarding the disposal of packaging materials, exhausted batteries and old equipment.
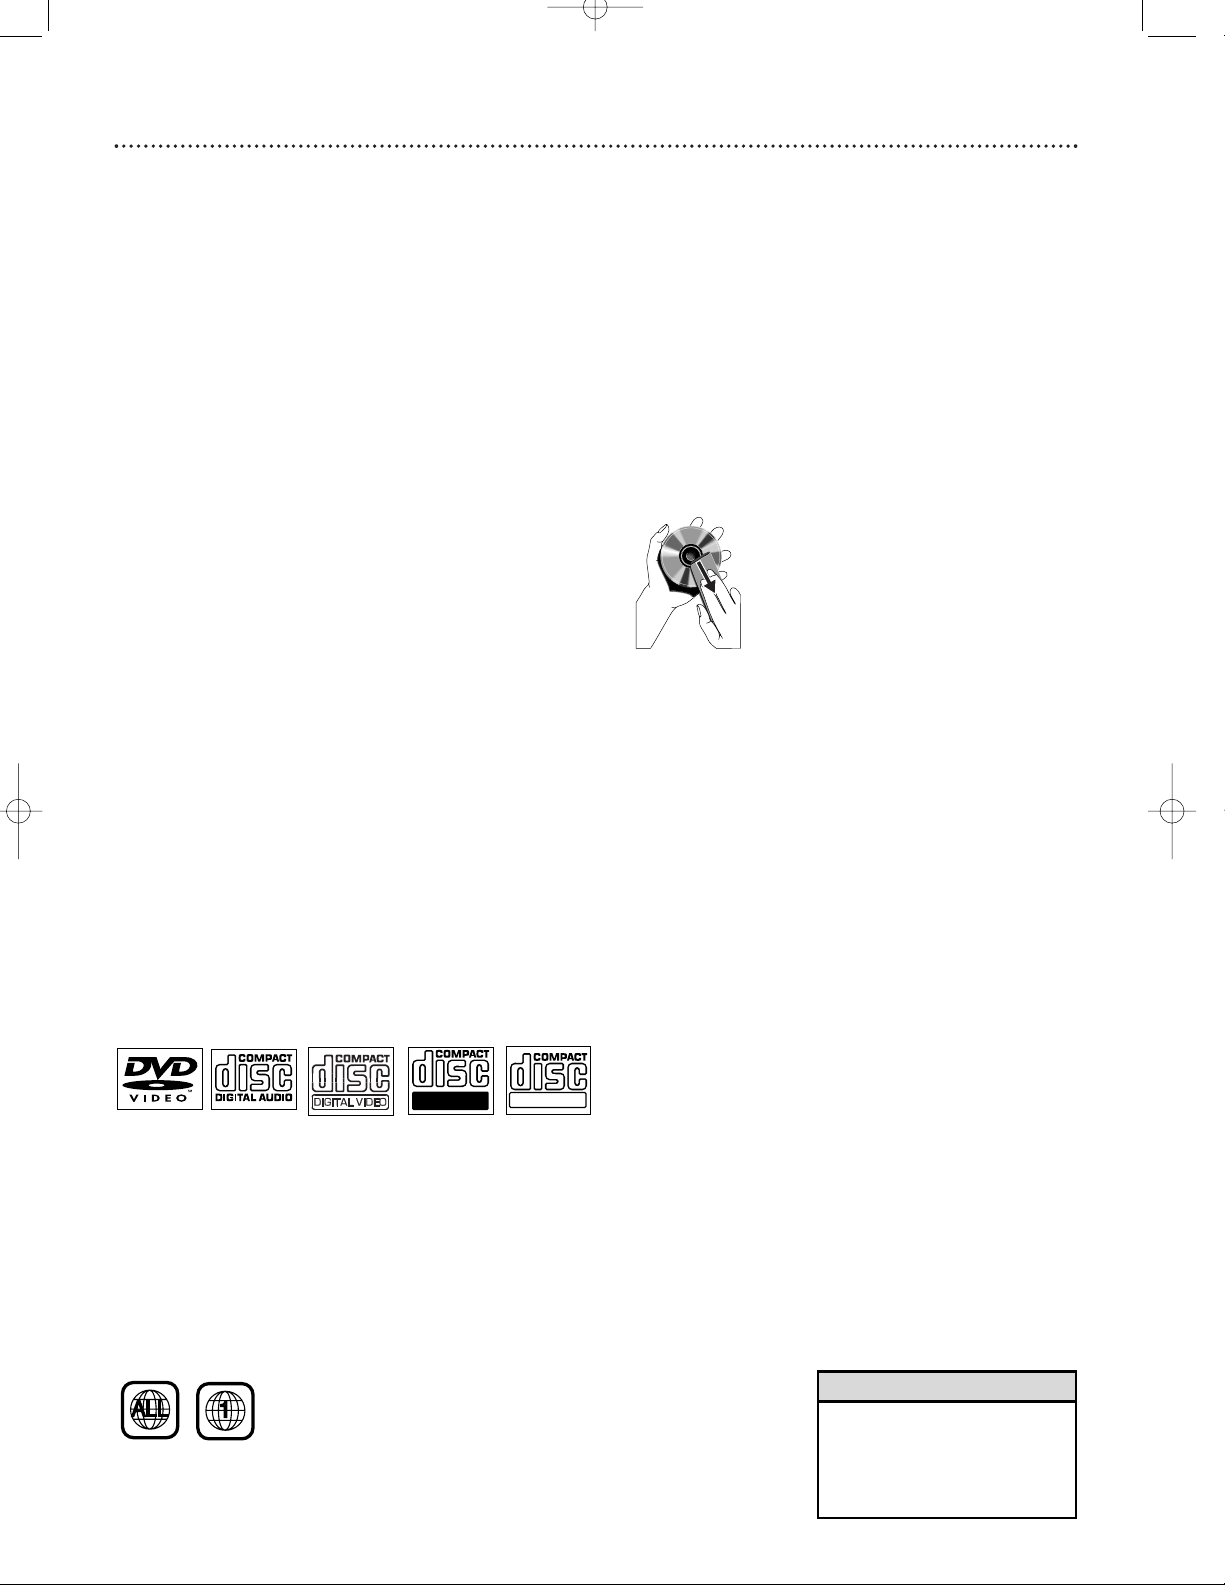
Playable Discs
This DVD Home Cinema System will play:
● Digital Video Discs (DVDs)
● Video Compact Discs (VCDs) or Super Video CDs
● All finalized Audio CDs
● MP3 files on Compact Disc Recordable (CD-R) or
Compact Disc Rewritable (CD-RW).
Region Codes
DVDs must be labeled for ALL regions or for Region 1 in
order to play on the DVD Receiver of this Home Cinema
System. You cannot play Discs that are labeled for other
regions. The region code for the DVD Receiver is 1 (one).
Look for the correct region symbol on your DVDs.
The number inside the globe refers to a region of the world.
Region 1 represents the United States of America, Canada,
upper regions of North America, Bermuda, the U.S. Virgin
Islands, and small regions near Australia.
Color Systems
Different color systems are available throughout the world.
DVD makers record DVDs in a certain color system. The
color system of the DVD may appear on the DVD or its case.
The most common color systems are NTSC, PAL, and
SECAM. NTSC is used primarily in the United States and
North America.
This DVD Receiver is compatible with both NTSC and PAL.
Follow the steps on page 26 to set the DVD Receiver to
NTSC or PAL. Choose a setting that matches the color system of your TV and your DVDs.
Maintenance and Cleaning
● Clean Discs with a cleaning cloth, wiping from the center
to the edge in a straight line. Do not wipe the Disc in a
circular motion.
● Do not use solvents such as benzine, thinner, commercial-
ly-available cleaners, or anti-static spray intended for analog discs.
● If the DVD Receiver cannot read Discs correctly, use an
accessory cleaning CD/DVD to clean the lens. Other
cleaning methods may destroy the lens. Always keep the
tray closed to avoid dust on the lens.
● The lens may cloud over if you suddenly move the DVD
Receiver from cold to warm room conditions. If lens
clouding occurs, you may not be able to play a Disc. Leave
the power on for about one hour with no Disc in the unit
until playback is possible.
● Do not expose the receiver, batteries, or discs to humidi-
ty, rain, sand, or excessive heat (from devices or direct
sunlight). Always keep the disc tray closed to avoid getting dust on the lens.
• If you are having trouble playing
a certain Disc, remove the Disc
and try a different one.
Improperly formatted Discs will
not play on this DVD Receiver.
Helpful Hint
Recordable
ReWritable
mrd250book 2/14/03 10:49 AM Page 5
Page 6
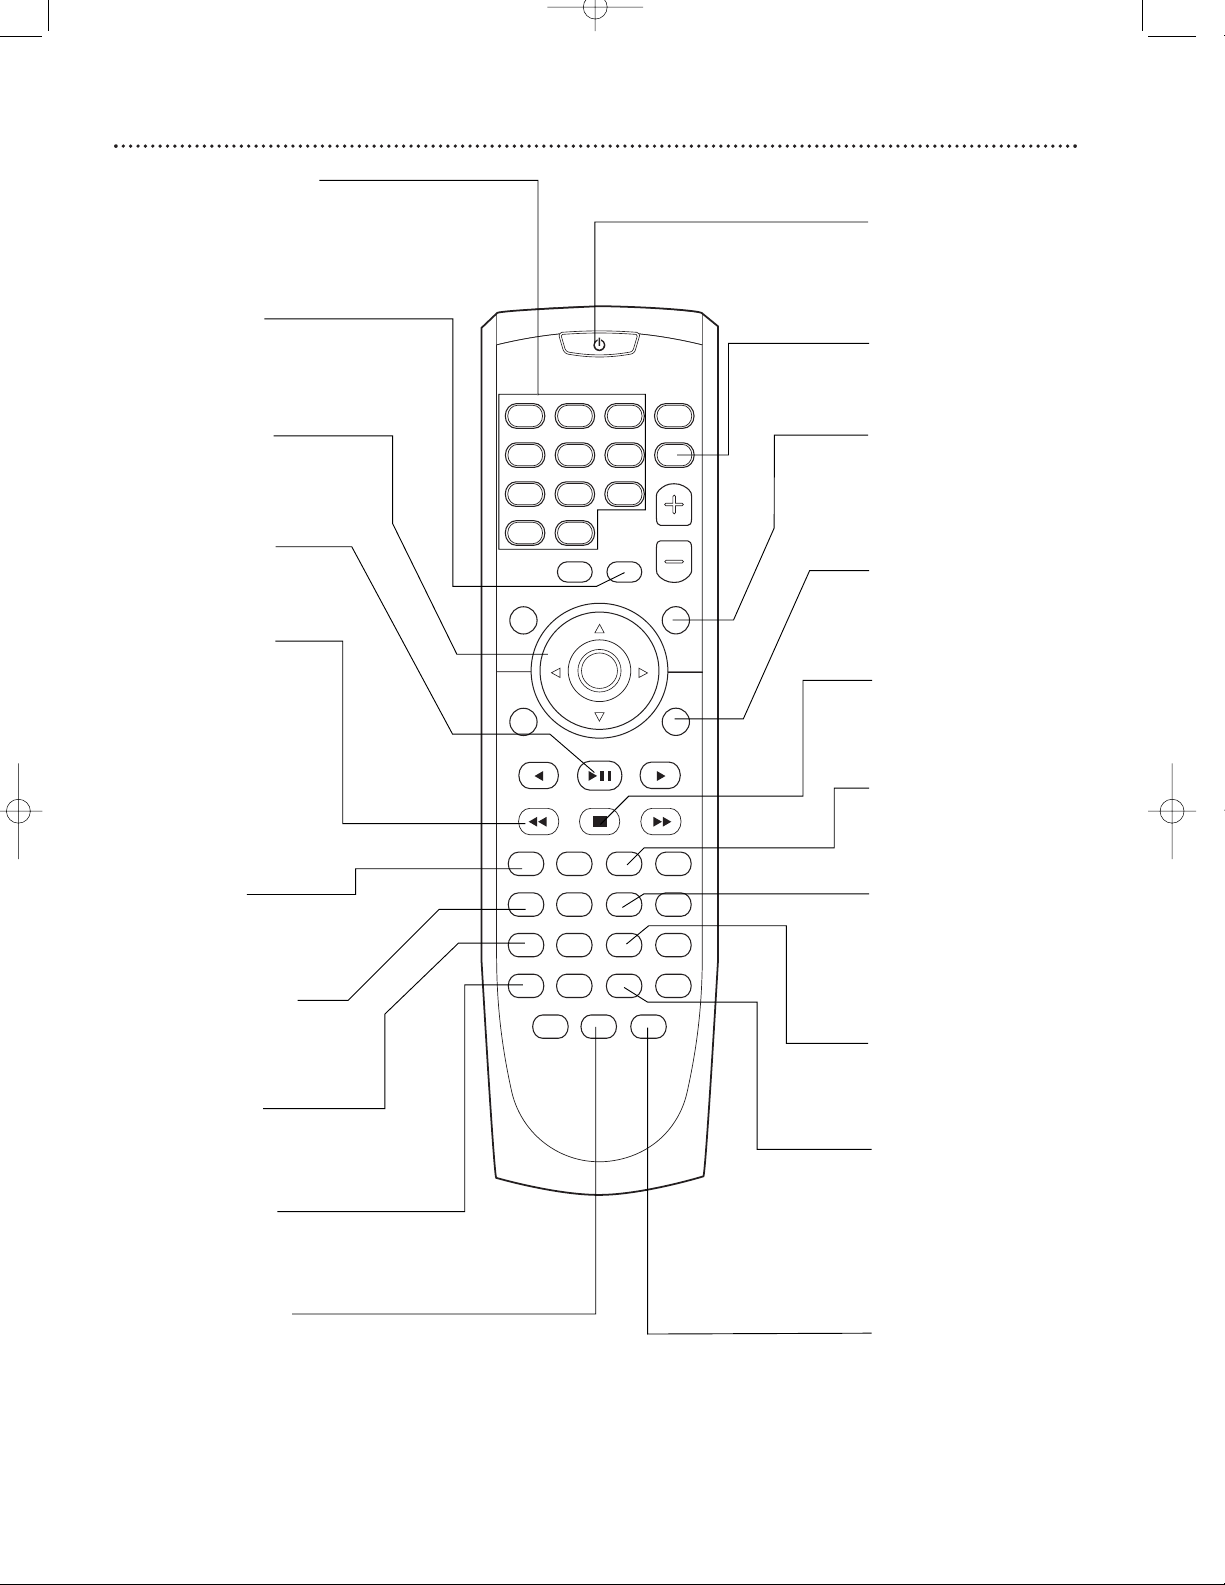
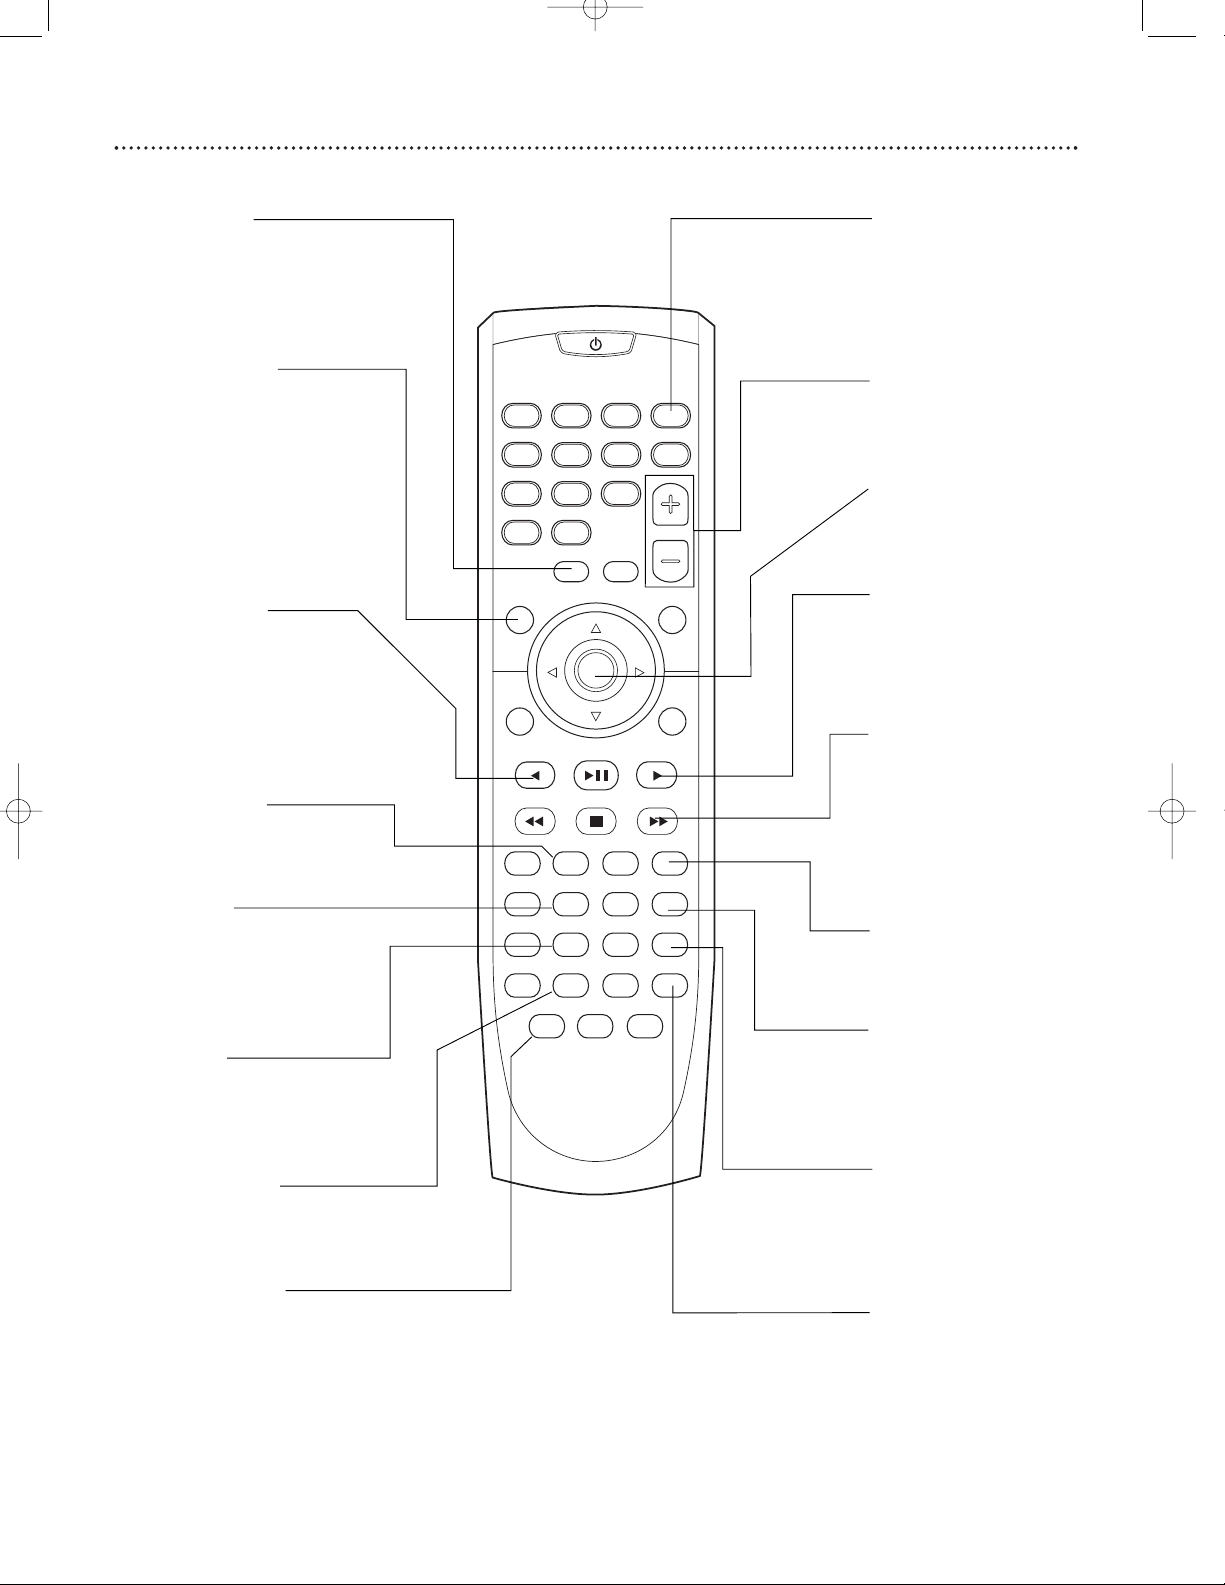
6 Remote Control
Standby or Power
yy
Button
Press to turn the DVD
Receiver on or off
(Standby).
Number (0-9) Buttons
Press to enter a
Track/Title number, radio
station, or TV channel,
depending on the mode of
the remote.
SLEEP Button
Press to set the Sleep
Timer.
MENU Button
Press to access or
remove a DVD Disc
Menu (remote must be in
DISC mode).
9 8 ; : Buttons
Press to move through a
DVD Disc Menu or the
DVD Receiver’s System
Menu.
REW E Button
In DISC mode, press to
search backward during
playback. Press repeatedly
to return to a previous
Chapter/Track or to the
beginning of the current
Chapter/Track. Details are
on page 18.
In TUNER mode, press to
tune to a radio station.
Details are on page 37.
PLAY/PAUSE 38
Button
Press to start or pause
Disc playback.
STOP C Button
Press to stop Disc playback.
REPEAT Button
Press to repeat playback
of a Chapter, Track or
Disc. Details are on page
32.
LANGUAGE Button
Press to select different
audio languages (or commentary tracks) available
on the DVD.
TITLE Button
Press to display the Title
menu (if it is available on
the disc). Details are on
page 30.
SLOW/MEM Button
Press to watch a disc at a
slower speed.
In Tuner mode, press to
save radio station to the
memory. Details are on
page 37.
ZOOM: Press to enlarge
a still picture on the TV
screen. Details are on
page 31.
SELECT Button
Press to choose a speaker
channel to adust with the
volume buttons. Details
are on page 35.
OPEN/CLOSE Button
Press to open and close
the disc tray.
N/P Button
Press to temporarily
change the color system
(NTSC/PAL).
SHUFFLE Button
Press to play the discs in
random order. Details are
on page 33.
AUDIO Button
Press to select the audio
channel. Details are on
page 34.
LISTENING Button
Press to select the listening mode. Details are on
page 35.
DISC SKIP Button
Press to select another
disc from the tray for
playback.
SOURCE
SLEEP
VOL
MUTE SELECT
DISPLAY
MENU
SET UP
PREV PLAY/PAUSE NEXT
REW STOP FF
TITLE ANGLE ZOOM GOTO
LANGUAGE SUBTITLE N/P DIM
REPEAT A/B SHUFFLE PROGRAM
DISC SKIP DISC NO SLOW/MEM CD MODE
ST/MONO LISTENING AUDIO
OPEN/
CLOSE
OK
123
456
78
>10 0
9
I
I
MAGNOVOX
mrd250book 2/14/03 10:49 AM Page 6
Page 7
Remote Control, cont’d 7
VOL(ume) +/– Buttons
Press to increase or
decrease the volume.
Source Buttons
Press to select a sound
source for the Receiver
(DVD/CD, TUNER (FM),
TUNER (AM), TV, or
AUX).
OK Button
Press to confirm menu
selections.
MUTE Button
Press to turn off the
sound. Press again to
restore the sound to its
previous level.
FF D Button
In DISC mode, press to
go to the next Chapter or
Track. Press and hold to
search forward. Details
are on page 18.
In TUNER Mode, press to
tune to a radio station.
Details are on page 37.
DIM Button
Press to select different
levels of brightness for
the DVD Receiver’s display panel.
SETUP Button
Press to enter or exit the
System Menu (remote
must be in DISC mode)
A/B Button
Press to repeat playback
of a specific section on a
Disc. Details are on page
32.
SUBTITLE:
Press to select the subtitle language available on
the DVD.
PROGRAM Button
Press to program tracks
in DVD/CD mode and
radio stations in TUNER
mode Details are on page
33.
ANGLE Button:
Press to select a different
camera angle. Details are
on page 21.
GOTO Button
Press to skip to a specific
point in the disc playback.
Details are on page 31.
CD MODE Button
Press to start playback of
all CDs in the disc tray.
Details are on page 33.
DISPLAY Button
Press to switch the On
Screen Display on or off.
PREV w Button
Press to skip to the previous track in DVD/VD
mode.
Press to tune the radio in
TUNER mode.
DISC NO. Button
Press to display the active
disc number.
ST/MONO Button
Press to switch between
mono and stereo mode in
TUNER (FM) mode.
SOURCE
SLEEP
VOL
MUTE SELECT
DISPLAY
MENU
SET UP
PREV PLAY/PAUSE NEXT
REW STOP FF
TITLE ANGLE ZOOM GOTO
LANGUAGE SUBTITLE N/P DIM
REPEAT A/B SHUFFLE PROGRAM
DISC SKIP DISC NO SLOW/MEM CD MODE
ST/MONO LISTENING AUDIO
OPEN/
CLOSE
OK
123
456
78
>10 0
9
I
I
MAGNOVOX
NEXT ∑ Button
Press to skip to the next
track in DVD/VD mode.
Press to tune the radio in
TUNER mode.
mrd250book 2/14/03 10:49 AM Page 7
Page 8

8 Front Panel
DVD/CDSTOP TUNER•BAND
TV/AUX MUTE SELECT PREVIOUS NEXT PLAY•PAUSE
Power
ON-OFF
OPEN¥CLOSE
DISC 1 DISC 2 DISC 3 DISC 4 DISC 5
STANDBY
ON
5 DISC DIRECT PLAY
DVD VIDEO DIGITAL SURROUND SYSTEM
VOLUME
5DVDCHANGER
iR Sensor
STANDBY-ON
(power) y Button
Press to turn the DVD
Receiver on or off
(Standby).
Disc Tray
Insert discs here. Load the
Disc with the label facing
up (shiny side facing
down). If the Disc is twosided, make sure the label
for the side you want to
play is facing up.
Standby LED indicator
Indicates that the system
is in standby mode
VOLUME
Use to adjust the volume.
DVD/CD Button
Press to select DVD/CD
mode,
Display Screen
Information about the current activity of the DVD
Receiver appears here.
; (Headphones)
Connect headphones (not
supplied) here.
SELECT Button
Use to select the speaker
channel to make adjustments.
Details are on page 35.
STOP 77Button
Press to stop Disc playback.
PLAY•PAUSE
38 Button
Press to play a Disc. or temporarily interrupt playback.
SEARCH•PREV
44
/
SEARCH•NEXT
¢¢
Button
In DISC mode, press to go to
previous or next Chapter or
Track. Press and hold for two
seconds to start a reverse
search during playback. Details
are on page 18.
In TUNER mode, press to
tune to a radio station. Details
are on page 37.
OPEN 0 Button
Press to open or close the
Disc Tray.
5 DISC DIRECT PLAY
(DISC 1-5)
Press to select a disc for
playback.
TUNER•BAND Button
Press to select TUNER
(AM or FM) mode.
TV•AUX Button
Press to select TV or
AUX mode,
MUTE Button
Press to mute playback
sound..
mrd250book 2/14/03 10:49 AM Page 8
Page 9
Rear Panel 9
FR
FL C SR SL
SPEAKERS (8‰)
CENTER
LINE OUT
AUDIO
OUT
AUDIO
IN
VIDEO
OUT
WOOFER
LINE OUT
TV AUX
S- VIDEO
OUT
Pr/Cr
Pb/Cb
Y
COMPONENT
VIDEO OUT
COAXIAL
OPTICAL
DIGITAL
OUT
AM
FM
(75‰)
AM/FM
ANTENA
L
R
AC POWER CORD
Connect to a standard AC outlet.
FM/AM ANTENNA
Connect the supplied AM loop antenna to the
AM jack. Connect the supplied FM antenna to
the FM (75 ohm) jack. Details are on page 10.
DIGITAL OUT-OPTICAL
Connect this jack to the Optical Digital Audio
In jack on other audio equipment. Details are
on page 15.
FR, FL, C, SR, SL SPEAKERS
Connect the front right (FR), front left (FL), center (C), surround right (SR), and surround left
(SL) speakers here. Details are on page 14.
Surround speakers are sometimes referred to as
the Rear speakers. These are the same.
DIGITAL OUT-COAXIAL
Connect this jack to the Coaxial Digital Audio
In jack on other audio equipment. Details are on
page 15.
AUDIO IN (TV/AUX)
Connect these jacks to the red and white
Audio Out jacks of a TV or VCR. This lets
you hear TV or VCR sound through the DVD
Receiver when it is in TV/AV or Auxiliary
(AUX) mode.
AUDIO OUT
Connect these jacks to the red
and white Audio In jacks of
other audio equipment. Details
are on page 15.
WOOFER LINE OUT
Connect the Subwoofer here.
The Volume knob on the front
of the Subwoofer must be
turned On in order for the
Subwoofer to work.
Pr/Cr Pb/Cb Y COMPONENT VIDEO
OUT
Use component video cables (not supplied) to
connect these jacks to the Component Video In
jacks on your TV. Details are on page 12.
S-VIDEO OUT
Use an S-Video cable (not supplied) to connect
this jack to the S-Video In jack on your TV.
Details are on page 13.
VIDEO OUT
Use a composite Video cable (supplied) to connect this jack to the Video In jack on your TV.
Details are on page 11.
CENTER LINE OUT
Connect to your TV’s CENTER
IN jack to use the TV as the
center speaker.
mrd250book 2/14/03 10:49 AM Page 9
Page 10
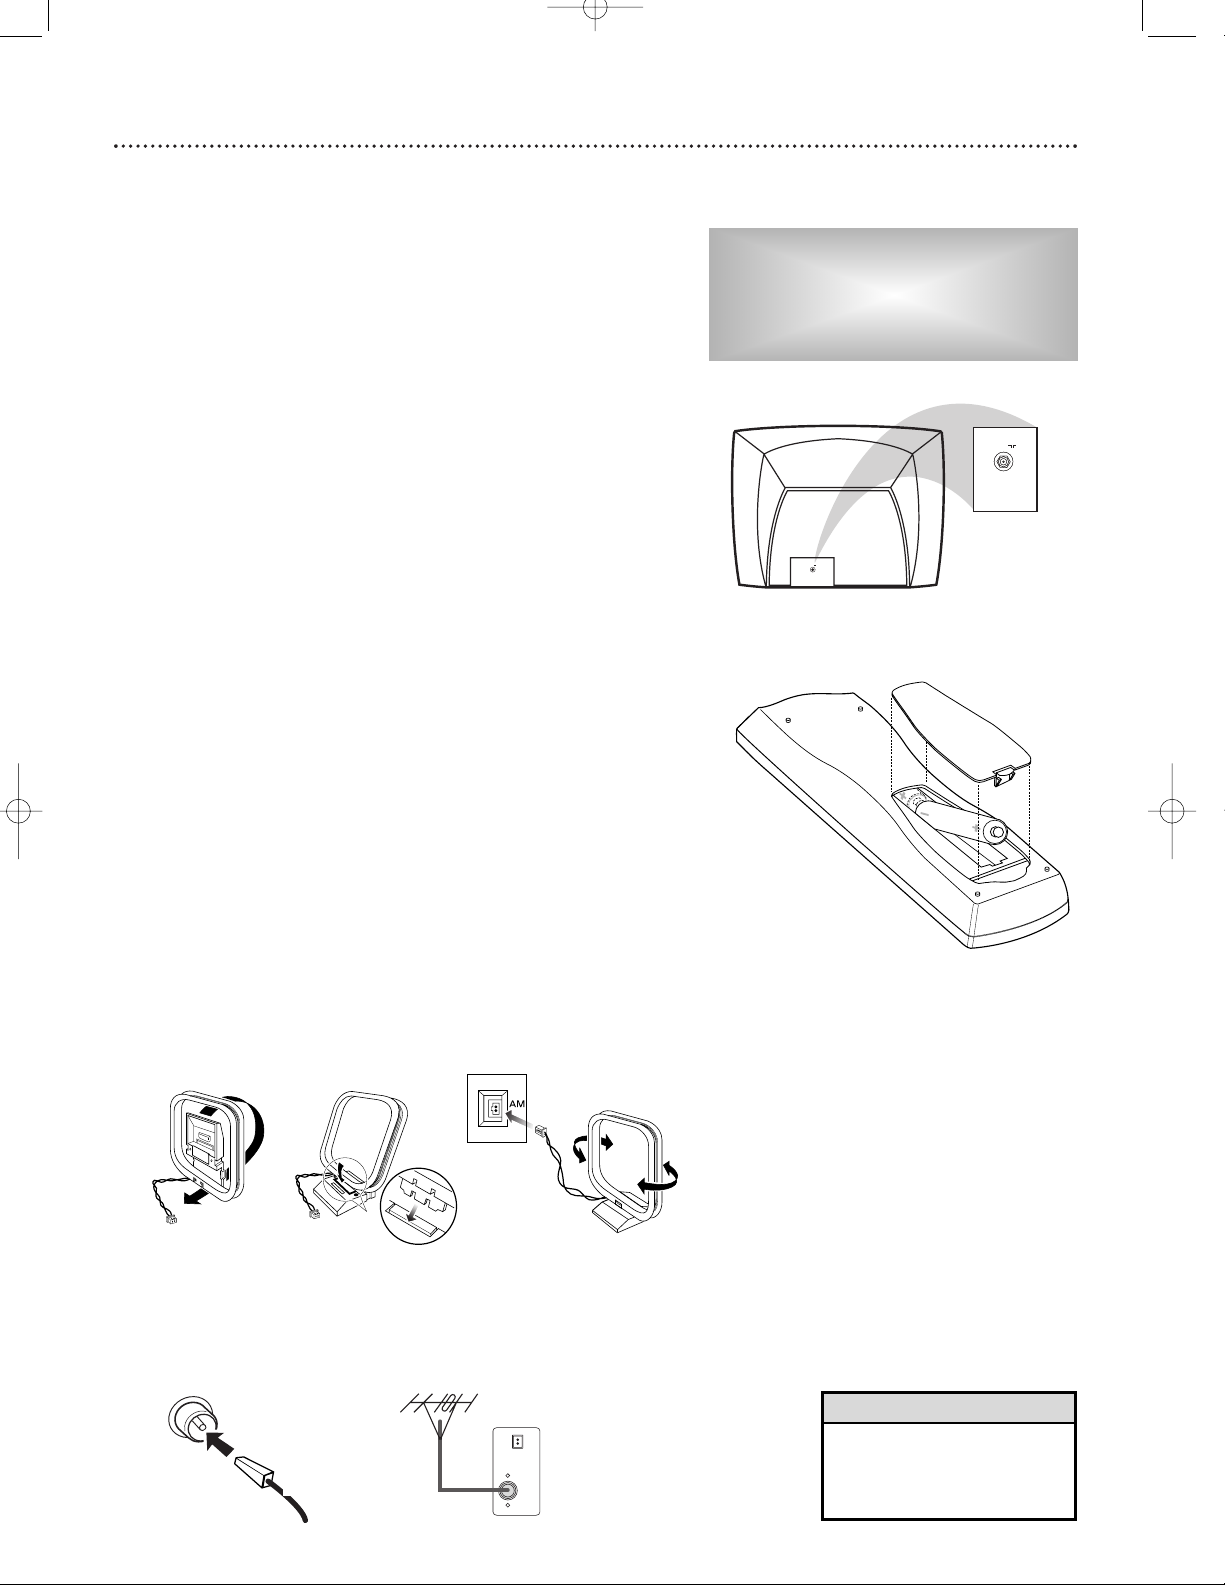
10 First Time Setup
Where Do You Start?
1
Disconnect all equipment from power. Connect equipment to
power only after you have finished hooking up everything. Do not
change connections with equipment connected to a power outlet.
2
Put the batteries in the remote control and connect the
AM and FM antennas as detailed below.
3
Connect the DVD Receiver to a Television using one of the
options detailed in your separate Quick-Use Guide (or on
pages 11-13).
●You need only one video connection between the DVD Receiver
and the TV. Use Composite Video (good picture quality), S-Video
(better picture), or Component Video (best picture). Use the best
connection available with your TV.
●Set the TV to the correct VIDEO IN channel. Such channels
may be called AUX(iliary) IN, AUDIO/VIDEO (A/V) IN, EXT1, SVIDEO, etc. These channels are often near channel 00 on your
TV. Or, your TV remote control may have a button or switch that
chooses different Video modes. With some TVs, you use the TV’s
menu to select a Video mode. See your TV manual for details.
4
Connect the speakers and Subwoofer to the DVD Receiver
as detailed in your Quick-Use Guide (or on page 14).
Battery Installation
1
Remove the battery compartment lid by pressing in the tab,
then lifting off the lid.
2
Place the batteries in the battery compartment, matching
the +/- markings on the batteries to the +/- markings inside the
remote.
3
Replace the battery compartment lid.
Antenna Connections
1
Connect the supplied AM loop antenna to the AM jack on
the rear of the DVD Receiver.
●Reposition the loop antenna to receive the clearest sound for area
stations. Attach the antenna to the base stand if desired.
2
Connect the supplied FM antenna to the FM jack on the
rear of the DVD Receiver. Extend and adjust the antenna until
the clearest station signal is received. For better FM reception, use a
75 ohm coaxial cable (not supplied) to connect the DVD Receiver
to an outdoor FM antenna as shown.
AM
FM
(75 Ω)
Outdoor FM
Antenna
(not supplied)
OR
Note: If your TV only has a single Antenna
In(put) jack, you will need an accessory RF
Modulator to view the DVD playback on your
TV. See your electronics retailer or contact
Magnavox for details on RF Modulator availability.
• To prevent unwanted noise,
keep the antenna as far away
as possible from the TV, VCR,
or any other radiation source.
Helpful Hint
mrd250book 2/14/03 10:49 AM Page 10
75 ⍀
75 ⍀
Rear of TV
75 ⍀
Put the claw
into the slot.
Page 11
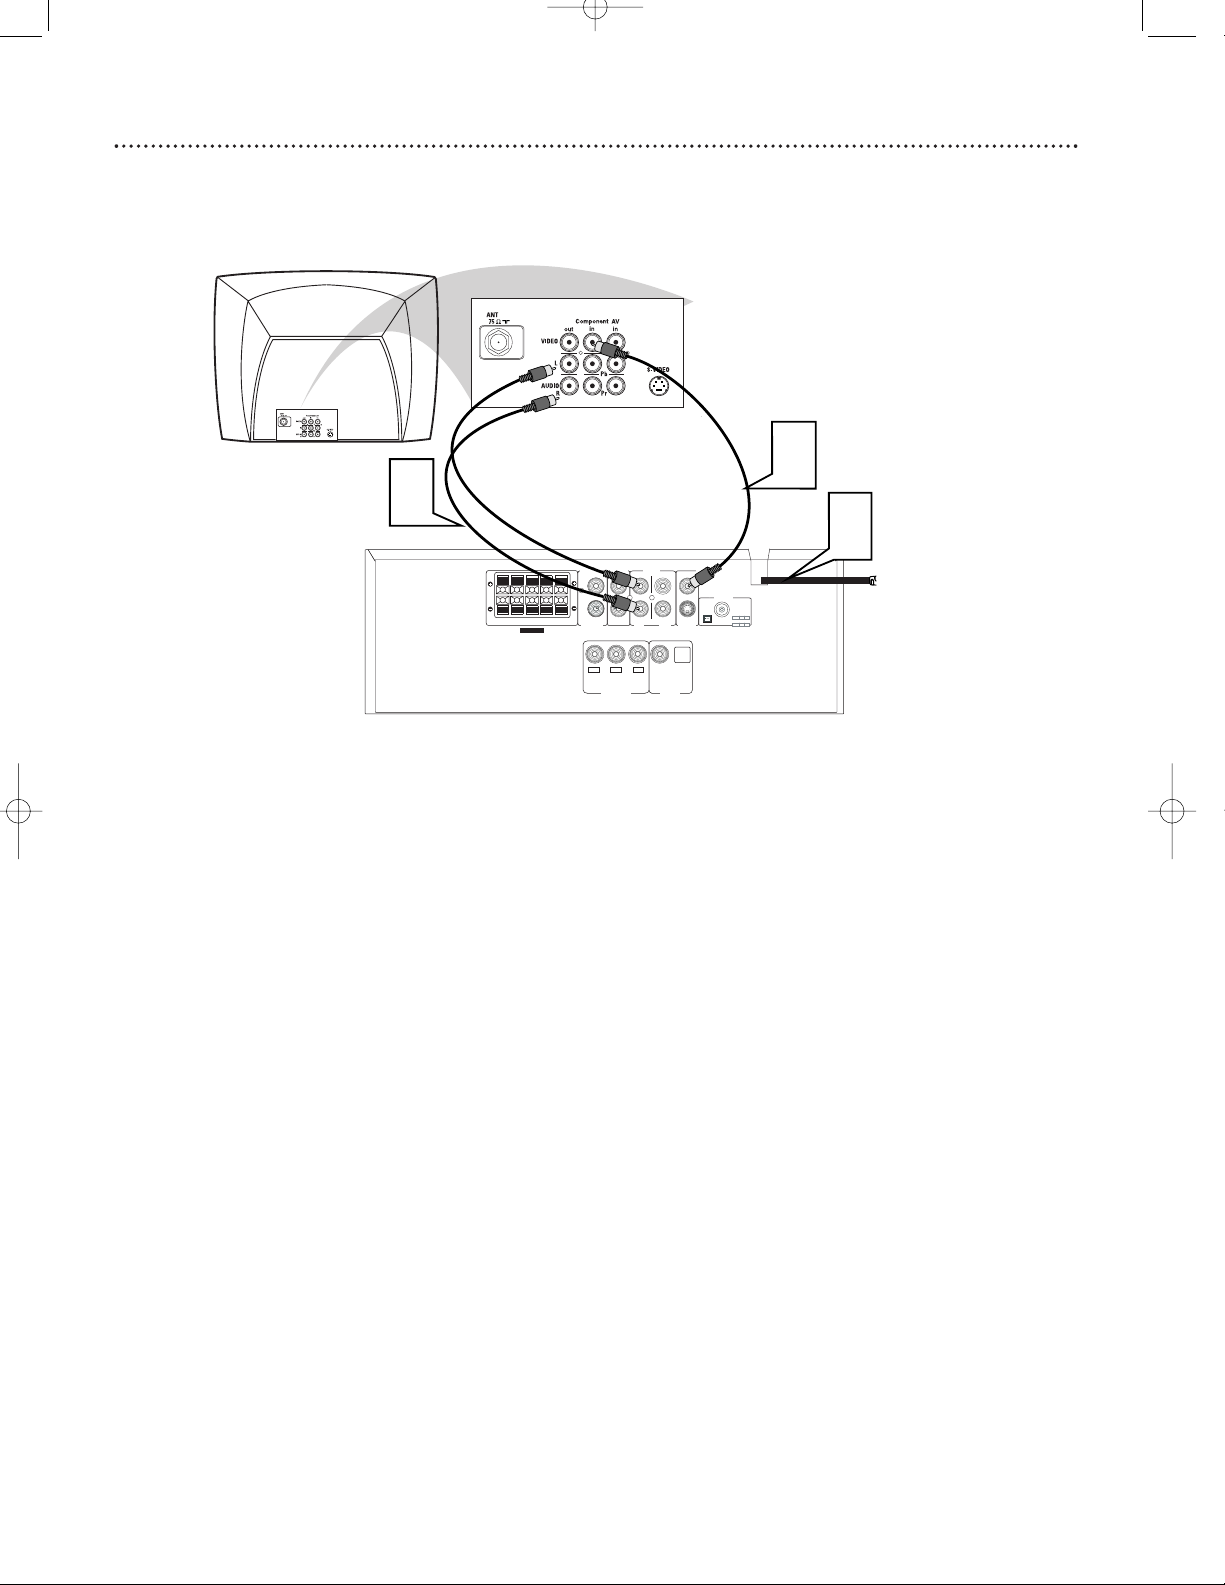
Hookups - TV 11
Connecting to a TV with a
Composite (yellow) Video In Jack
FR
FL C SR SL
SPEAKERS (8‰)
CENTER
LINE OUT
AUDIO
OUT
AUDIO
IN
VIDEO
OUT
WOOFER
LINE OUT
TV AUX
S- VIDEO
OUT
Pr/Cr
Pb/Cb
Y
COMPONENT
VIDEO OUT
COAXIAL
OPTICAL
DIGITAL
OUT
AM
FM
(75‰)
AM/FM
ANTENA
L
R
1
Connect the DVD Receiver’s yellow VIDEO OUT jack to
the VIDEO IN jack on your TV. Use the supplied composite
(yellow) RCA-style video cable.
2
To hear TV channels through the DVD Home Cinema System,
connect the supplied red and white audio cables to the
DVD Receiver’s red/white, right/left (TV) AUDIO IN jacks
and to the TV’S right/left AUDIO OUT jacks. Match the cable
colors to the jack colors.
3
Connect the power cords of the DVD Receiver and TV to a
power outlet.
4
Turn on the TV and set it to the correct Video In channel.
Go to the lowest TV channel and change channels down until you
find the Video In channel. (It is not channel 3 or 4 as it might be
when using a VCR.) See your TV owner’s manual for details.
5
Press STANDBY-ON yyon the front of the DVD Receiver to
turn on the DVD Receiver. The red Standby light will disappear.
2
1
3
mrd250book 2/14/03 10:49 AM Page 11
Page 12

Hookups - TV (cont’d) 12
Connecting to a TV with
Component Video In Jacks
FR
FL C SR SL
SPEAKERS (8‰)
CENTER
LINE OUT
AUDIO
OUT
AUDIO
IN
VIDEO
OUT
WOOFER
LINE OUT
TV AUX
S- VIDEO
OUT
Pr/Cr
Pb/Cb
Y
COMPONENT
VIDEO OUT
COAXIAL
OPTICAL
DIGITAL
OUT
AM
FM
(75‰)
AM/FM
ANTENA
L
R
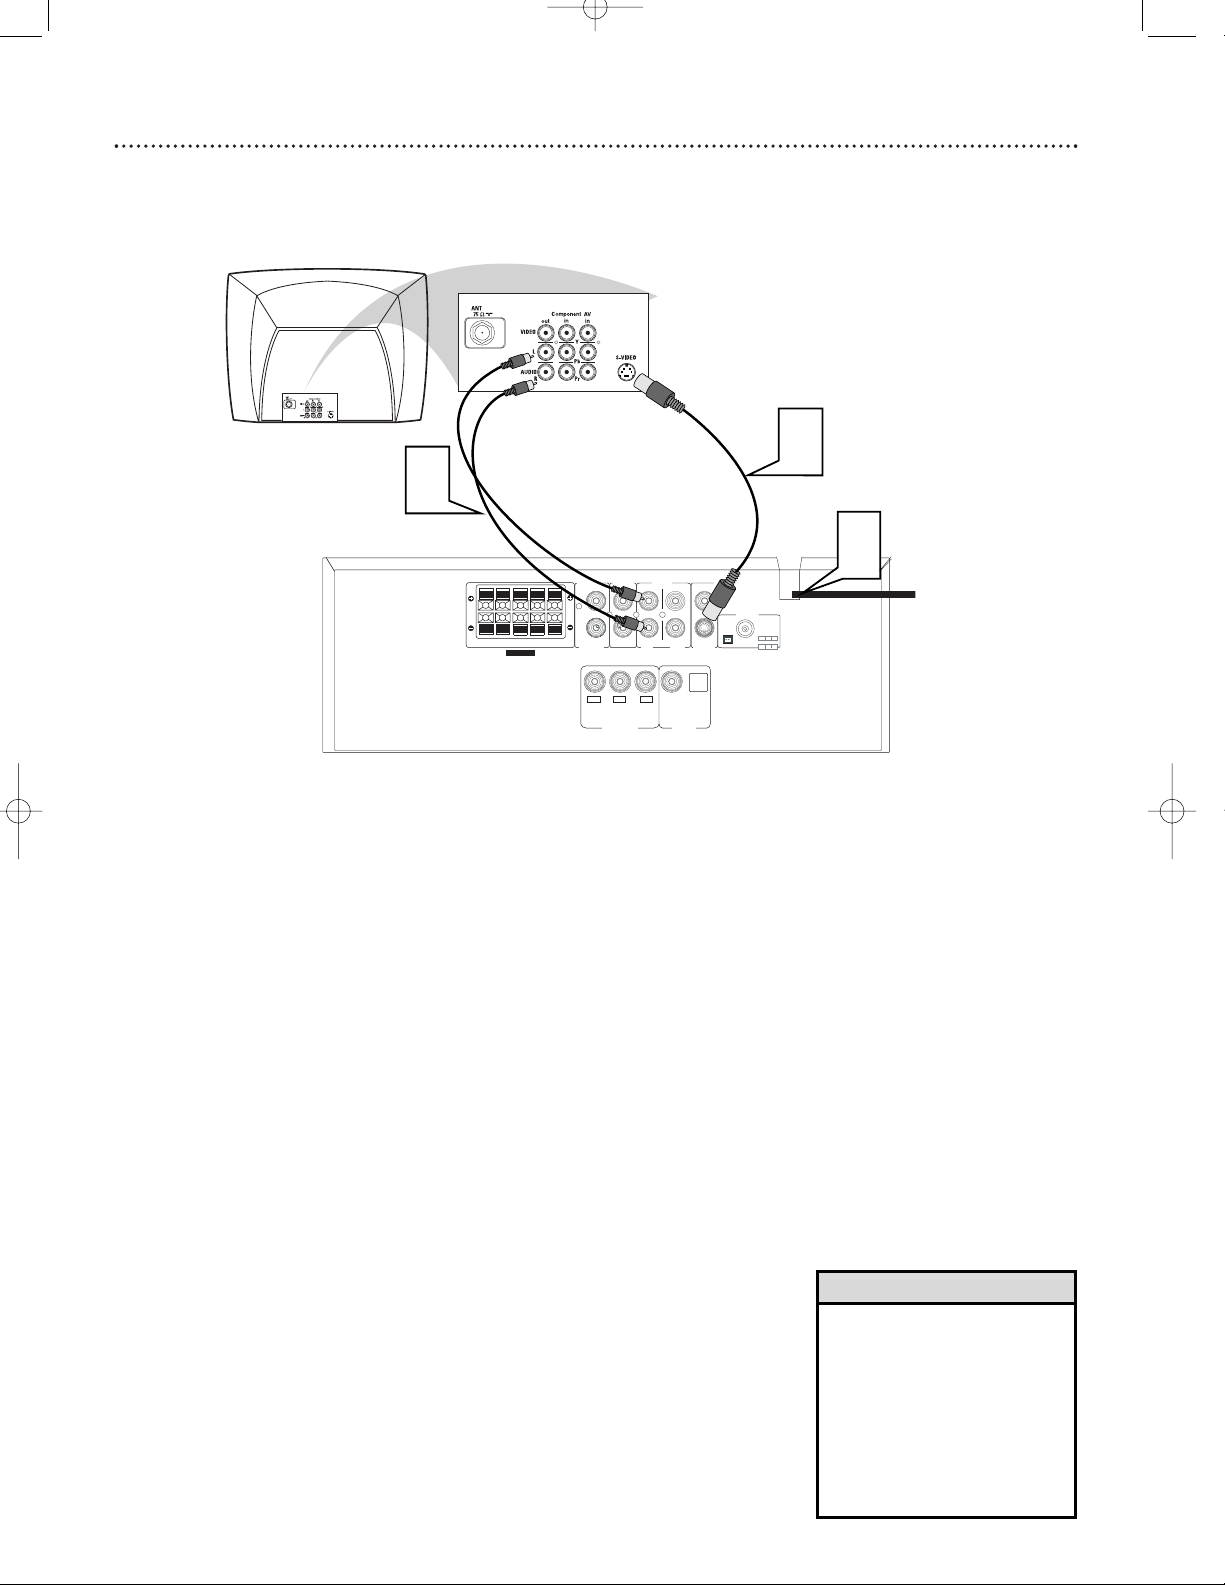
1
Connect the DVD Receiver’s Pr/Cr Pb/Cb Y COMPONENT
VIDEO OUT jacks to the matching Pr/Cr Pb/Cb Y VIDEO IN jacks
on the TV. You will need a component video cable (Green-Y; BluePb/Cb; Red- Pr/Cr) (not supplied). Match the cable colors to the
jack colors.
2
To hear TV channels through the DVD Home Cinema System,
connect the supplied red and white audio cables to the
DVD Receiver’s red/white, right/left (TV) AUDIO IN jacks
and to the TV’S right/left AUDIO OUT jacks. Match the cable
colors to the jack colors.
3
Connect the power cords of the DVD Receiver and TV to a
power outlet.
4
Turn on the TV and set it to the correct Component Video
In channel. Go to the lowest TV channel and change channels
down until you find the Component Video In channel. (It is not
channel 3 or 4 as it might be when using a VCR.) See your TV
owner’s manual for details.
5
Press STANDBY-ON yyon the front of the DVD Receiver to
turn on the DVD Receiver. The red Standby light will disappear.
6
Set VIDEO OUT to PR PB Y. Details are on page 22.
• On the TV, the Component
Video In jacks may be labeled
YUV or Pr/Cr Pb/Cb Y and may
be red, blue, and green.
Helpful Hint
-- GENERAL PAGE --
TV DISPLAY
SET VIDEO OUTPUT
ANGLE MARK
OSD LANG
SCR SAVER
MAIN PAGE
S-VIDEO
CR CB Y
VIDEO OUT
1
2
3
mrd250book 2/14/03 10:49 AM Page 12
Page 13
Hookups - TV (cont’d,) 13
Connecting to a TV with an S-Video In jack
FR
FL C SR SL
SPEAKERS (8‰)
CENTER
LINE OUT
AUDIO
OUT
AUDIO
IN
VIDEO
OUT
WOOFER
LINE OUT
TV AUX
S- VIDEO
OUT
Pr/Cr
Pb/Cb
Y
COMPONENT
VIDEO OUT
COAXIAL
OPTICAL
DIGITAL
OUT
AM
FM
(75‰)
AM/FM
ANTENA
L
R
1
Connect the DVD Receiver’s S-VIDEO OUT jack to the
S-VIDEO IN jack on your TV. You will need an S-Video cable
(not supplied).
2
To hear TV channels through the DVD Home Cinema System,
connect the supplied red and white audio cables to the
DVD Receiver’s red/white, right/left AUDIO IN jacks and to
the TV’S right/left AUDIO OUT jacks. Match the cable colors
to the jack colors.
3
Connect the power cords of the DVD Receiver and TV to a
power outlet.
4
Turn on the TV and set it to the correct S-Video In channel. Go to the lowest TV channel and change channels down until
you find the S-Video In channel. (It is not channel 3 or 4 as it might
be when using a VCR.) See your TV owner’s manual for details.
5
Press STANDBY-ON yyon the front of the DVD Receiver to
turn on the DVD Receiver. The red Standby light will disappear.
6
It is not necessary to set VIDEO OUT to S-VIDEO.
S-VIDEO is the DVD Receiver’s default setting. However, if your
picture is distorted, check the VIDEO OUT setting. Make sure it is
set to S-VIDEO. Details are on page 22.
1
2
3
•You only need one video connection between the TV and the
DVD Receiver. You cannot use SVideo and Component Video at
the same time.
• If you used the yellow VIDEO
OUT jack on the DVD Receiver
to connect it to the TV, you do
not need to adjust the VIDEO
OUT setting.
Helpful Hints
mrd250book 2/14/03 10:49 AM Page 13
Page 14

1
Connect the supplied Front speakers.
Connect the Front Right speaker to the Red/Black +/- FR (Front
Right) SPEAKER jacks on the rear of the DVD Receiver.
Connect the Front Left speaker to the White/Black +/- FL (Front
Left) SPEAKER jacks on the rear of the DVD Receiver.
2
Connect the supplied Center speaker to the Green/Black +/CENTER SPEAKER jacks on the rear of the DVD Receiver.
3
Connect the supplied Surround speakers.
Connect the Surround Right speaker to the Gray/Black +/- SR
(Surround Right) SPEAKER jacks on the rear of the DVD Receiver.
Connect the Surround Left speaker to the Blue/Black +/- SL
(Surround Left) SPEAKER jacks on the rear of the DVD Receiver.
4
Connect the supplied Subwoofer cable (with RCA plugs on
either end) to the WOOFER LINE OUT jack on the DVD
Receiver. Then connect the other end of the cable to the AUDIO
INPUT jack on the Subwoofer.
●Connect the Subwoofer’s power cord to the Subwoofer and to
a power outlet when connections are complete. Set the Subwoofer’s
Volume/On control to On.
●Use the SELECT and VOL +/-buttons on the remote to adjust
the volume level of the Subwoofer (-15dB to 10dB).
14 Hookups - Speakers
Connecting the Speakers
right
subwoofer
front
speakers
center
AUDIO
OUTPUT
left
right
left
FR
FL C SR SL
SPEAKERS (8‰)
CENTER
LINE OUT
AUDIO
OUT
AUDIO
IN
VIDEO
OUT
WOOFER
LINE OUT
TV AUX
S- VIDEO
OUT
Pr/Cr
Pb/Cb
T
COMPONENT
VIDEO OUT
COAXIAL
OPTICAL
DIGITAL
OUT
AM
FM
(75‰)
AM/FM
ANTENA
abc
.047"
(12mm)
Connecting Speaker Cable
PUSH IN
PUSH
DOWN
RELEASE
L
R
surround
speakers
Use the supplied speaker wires.
Match the color coded wiring. Connect
the +,- terminals on the Receiver (FR, FL,
etc.) to the correct +,- Speaker terminals.
1
4
2
3
mrd250book 2/14/03 10:49 AM Page 14
Page 15

Hookups - Optional 15
Connecting to a TV and Optional Audio Equipment
FR
FL C SR SL
SPEAKERS (8‰)
CENTER
LINE OUT
AUDIO
OUT
AUDIOINVIDEO
OUT
WOOFER
LINE OUT
TV AUX
S- VIDEO
OUT
Pr/Cr
Pb/Cb
Y
COMPONENT
VIDEO OUT
COAXIAL
OPTICAL
DIGITAL
OUT
AM
FM
(75‰)
AM/FM
ANTENA
L
R
Back of TV
(example only)
Rear of DVD Receiver
CD/Tape Recorder
(for analog recording
example only)
Red & White
Audio Cable
CD Recorder
(for digital recording
example only)
Coaxial Cable
Optical Cable
S-Video Cable
You must connect a TV to the DVD Receiver in order to view DVD playback. However, additional Home Cinema System connections are possible
for recording or other sound features.
Always refer to owner’s manual of the other equipment for complete connection and use details.
1
Connect the DVD Receiver to a TV (as shown on pages 11-13
or in your separate Quick-Use Guide). Make only one video connection, whichever fits your TV.
2
Connect the DVD Receiver’s AUDIO OUT jacks to the
AUDIO IN jacks on an external audio accessory (CD Recorder,
etc.) This will allow you to make analog Stereo (two channel, right
and left) recordings.
3
Or, connect either of the DVD Receiver’s DIGITAL OUT
jacks - OPTICAL or COAXIAL - to a Stereo that is DTS
(Digital Theater System) compatible, has a Dolby Digital decoder, or
has CD recording capability.
• If you used the DIGITAL OUT OPTICAL or COAXIAL jacks, set
DIGITAL OUTPUT to ALL on
the DVD Receiver. Details are
on page 24.
• Some DVDs are copy-protected.
You cannot record or dub protected Discs using a VCR or a
digital recording device.
• Digital recording is possible only
on a CD or Video CD.
• MP3 audio is a digital recording
option.
Helpful Hints
1
2
3
mrd250book 2/14/03 10:49 AM Page 15
Page 16

16 Hookups - Optional
Connecting to a VCR or Cable/Satellite Box
FR
FL C SR SL
SPEAKERS (8‰)
CENTER
LINE OUT
AUDIO
OUT
AUDIO
IN
VIDEO
OUT
WOOFER
LINE OUT
TV AUX
S- VIDEO
OUT
Pr/Cr
Pb/Cb
Y
COMPONENT
VIDEO OUT
COAXIAL
OPTICAL
DIGITAL
OUT
AM
FM
(75‰)
AM/FM
ANTENA
L
R
Back of TV
(example only)
ANT IN
TO TV
Back of VCR , Cable, or Satellite box
(example only)
Connecting a VCR or Cable/Satellite Box
You must connect the VCR or cable/satellite box to the TV to view VCR
playback or cable/satellite channels. However, you can connect the VCR or
cable/satellite box to the receiver in order to hear surround sound playback.
Always refer to owner’s manual of the other equipment for complete connection and use details.
1
Connect the DVD Receiver’s AUDIO IN AUX L/R jacks to
the AUDIO OUT L/R jacks on the VCR or cable/satellite box.
2
Select AUX mode to listen to the VCR or cable/satellite playback
on the surround sound speakers.
Connecting a VCR for Recording DVDs
To view DVD playback while recording, you must connect the Receiver to
your TV using a Component (Pr/Cr Pb/Cb Y) or S-Video connection.
See page 12-13 for details.
Some DVDs are copy-protected. You cannot record or dub protected
Discs using a VCR.
3
Connect the DVD Receiver’s AUDIO OUT L/R jacks to the
AUDIO IN L/R jacks on the VCR.
4
Connect the DVD Receiver’s VIDEO OUT jack to the VIDEO
IN L/R jack on the VCR.
• The receiver only uses all of the
surround sound speakers when
the incoming audio (from a
VCR, cable, or satellite) is in
surround sound format (Dolby
Digital, DTS, Dolby Pro Logic).
If the audio signal is in stereo
format, some of the speakers
will not be active.
Helpful Hints
SOURCE
SLEEP
VOL
MUTE SELECT
DISPLAY
MENU
123
456
78
>10 0
9
2
3
1
4
mrd250book 2/14/03 10:49 AM Page 16
Page 17

There are many playback features and options available on Discs. After
learning the basic operations of the DVD Receiver and the remote control,
refer to the latter sections of this manual to learn playback features.
1
Press STANDBY-ON y (or DISC) to turn on the DVD
Receiver. The red Standby light will disappear from the front of the
DVD Receiver.
2
Press the Source button on the remote control (or press
DVD/CD, Tuner, or AUX/TV on the receiver) to select a sound
source (or the equipment you want to hear).
●The DVD Receiver’s display panel will show the selected source
(TV/AV, AUX, AM/FM, etc.).
●Press DIM on the remote to adjust the brightness of the DVD
Receiver’s display panel.
3
Turn on your TV and set it to the correct Video In channel.
You should see the DVD Receiver’s background screen on the TV.
4
Press OPEN/CLOSE c on the front of the DVD Receiver to
open the Disc tray. Load your Disc in the tray, with the label facing
up as you place the Disc in the tray.
●If the Disc is two-sided, make sure the label of the side you want
to play is facing up.
5
Press DISC SKIP to rotate the tray to load more discs. Five discs
can be loaded onto the disc tray.
6
Press OPEN/CLOSE c again to close the tray. Playback may
begin automatically
7
If playback does not start automatically, press PLAY/PAUSE
Bk.
●If DVD playback does not start automatically, a DVD Disc Menu
may appear.
●If the Titles or Chapters are numbered, press a Number button to
select an item. Or, press 98 ; : to select an item, then press
OK.
8
To stop playback at any time, press STOP C.
DVD Disc Menus
DVD Disc Menus vary among DVDs. The DVD Disc Menus allow you to
choose different playback features from those available on the Disc.
If the DVD has a menu, access it by pressing DISC MENU on the remote
control. If the current Title of the current DVD has a specific Title Menu, it
may appear on the TV screen. Otherwise, the general DVD Disc Menu will
appear.
Use
99 88 ;; ::
to select a Title, Chapter, or other feature, then press
PLAY/PAUSE Bk or OK to start playing the Disc or to use a feature.
VOLUME
POWER ON/OFF
IR
SENSOR
OPEN/
CLOSE
DVD/CD TUNER TV/AUX MUTE SELECT
MRD 250 DVD VIDEO DIGITAL SURROUND SYSTEM
DISC 1 DISC 2 DISC 3 DISC 4 DISC 5
STANDBY
ON
MAGNOVOX
DVD VIDEO DIGITAL SURROUND SYSTEM
5 DVD CHANGER
5 DISC DIRECT PLAY
Quick Disc Playback 17
SOURCE
SLEEP
VOL
MUTE SELECT
DISPLAY
MENU
SET UP
PREV PLAY/PAUSE NEXT
REW STOP FF
TITLE ANGLE ZOOM GOTO
LANGUAGE SUBTITLE N/P DIM
REPEAT A/B SHUFFLE PROGRAM
DISC SKIP DISC NO SLOW/MEM CD MODE
ST/MONO LISTENING AUDIO
OPEN/
CLOSE
OK
123
456
78
>10 0
9
I
I
MAGNOVOX
• If the Disc is Locked by Parental
Control, you must enter the fourdigit code to unlock the Disc.
Details are on pages 32-33.
• DVDs have a region code. Your
DVD Receiver will not play Discs
that have a region code other
than 1 (one).
Details are on page 5.
• Resume may not be available
with some DVDs. Resume may
apply to some Video CDs also.
Helpful Hints
6
4
7
AV IN
or
EXT1
2
3
1
mrd250book 2/14/03 10:49 AM Page 17
Page 18

SOURCE
SLEEP
VOL
MUTE SELECT
DISPLAY
MENU
SET UP
PREV PLAY/PAUSE NEXT
REW STOP FF
TITLE ANGLE ZOOM GOTO
LANGUAGE SUBTITLE N/P DIM
REPEAT A/B SHUFFLE PROGRAM
DISC SKIP DISC NO SLOW/MEM CD MODE
ST/MONO LISTENING AUDIO
OPEN/
CLOSE
OK
123
456
78
>10 0
9
I
I
MAGNOVOX
18 Playback Features
VOLUME
POWER ON/OFF
IR
SENSOR
OPEN/
CLOSE
DVD/CD TUNER TV/AUX MUTE SELECT
MRD 250 DVD VIDEO DIGITAL SURROUND SYSTEM
DISC 1 DISC 2 DISC 3 DISC 4 DISC 5
STANDBY
ON
MAGNOVOX
5 DVD CHANGER
5 DISC DIRECT PLAY
Playback Buttons
Available on either the DVD
Receiver or Remote Control.
• During Repeat playback, pressing H or G will replay the
same Track or Chapter.
• Opening the disc tray or turning
off the DVD Receiver’s power
will cancel the Resume feature.
Playback will restart at the
beginning of the Disc as usual.
• Resume is not available on all
Discs.
Helpful Hints
Pausing Playback
1
Press PLAY/PAUSE Bk during playback to freeze the picture
and mute the sound.
2
Press PLAY/PAUSE Bk to resume regular playback.
Selecting Another Track/Chapter
1
Press H once during playback to go to the beginning of the cur-
rent Track/Chapter. Press H multiple times to go to previous
Tracks/Chapters.
2
Press G during playback to go to the beginning of the next
Track/Chapter. Press g multiple times to go to subsequent
Tracks/Chapters.
Searching
1
Press and hold H or g for about two seconds to fast reverse
or fast forward the Disc.
2
Press PLAY/PAUSE Bk to resume normal playback.
Stopping and Resuming Playback
1
Press STOP C to stop Disc playback.
2
Press PLAY BF to restart playback from the point at which it last
stopped.
Disc Number and Disc Skip
1
Press DISC NO during playback to display the current disc number.
2
Press DISC SKIP to go to the next disc.
mrd250book 2/14/03 10:49 AM Page 18
Page 19

SOURCE
SLEEP
VOL
MUTE SELECT
DISPLAY
MENU
SET UP
PREV PLAY/PAUSE NEXT
REW STOP FF
TITLE ANGLE ZOOM GOTO
LANGUAGE SUBTITLE N/P DIM
REPEAT A/B SHUFFLE PROGRAM
DISC SKIP DISC NO SLOW/MEM CD MODE
ST/MONO LISTENING AUDIO
OPEN/
CLOSE
OK
123
456
78
>10 0
9
I
I
MAGNOVOX
System Setup 19
Use the Setup Menu to set up the system’s features. Press SETUP to access
DVD Receiver’s Setup Menu.
The menu is divided into four categories. Use General Setup, Speaker
Setup, Audio Setup, and Preferences to set you receiver.
Press 98;:and OK to choose a Menu item and change the settings.
Even if a feature is set in the System Menu, it will not be available if the current Disc does not include that feature. Details are on pages 20-29.
1
Press SETUP. The System Menu appears on the TV screen.
2
Press 9 or 8 to move through the Menu.
3
Press OK to confirm a selection.
4
To exit, press SYSTEM MENU or OK.
• Features described in this manual may not be available on every
Disc. If the feature is not on the
Disc, you cannot use the DVD
Receiver to make the feature
available.
• When using the menu, a brief
description of the selected feature appears at the bottom of
the screen.
Helpful Hints
1,4
2-3
mrd250book 2/14/03 10:49 AM Page 19
SETUP MENU -- MAIN PAGE
GENERAL SETUP
SPEAKER SETUP
AUDIO SETUP
PREFERENCES
EXIT SETUP
GOTO GENERAL SETUP PAGE
Page 20

20 TV Display
SOURCE
SLEEP
VOL
MUTE SELECT
DISPLAY
MENU
SET UP
PREV PLAY/PAUSE NEXT
REW STOP FF
TITLE ANGLE ZOOM GOTO
LANGUAGE SUBTITLE N/P DIM
OPEN/
CLOSE
OK
123
456
78
>10 0
9
I
I
• If a desired Audio or Subtitle
language cannot be selected,
the language is not available on
the current Disc.
• Some DVDs only allow you to
change the Audio or Subtitle
language in the DVD Disc
menu. Refer to the DVD’s Disc
menu for details on changing
the Audio or Subtitle language.
Helpful Hints
TV Display
1
Press SETUP.
2
GENERAL SETUP will be selected, press OK.
3
TV DISPLAY will be selected. Press -.
4
Press 9 or 8 to select Normal / PS (pan & scan), Normal /
LB (Letterbox), or 16:9 (Widescreen), then press OK.
● Select 4:3 PS (pan & scan) if you want both sides of the picture to
be trimmed (or formatted to fit your TV screen). This setting is
possible only if the DVD is recorded in pan & scan or regular format. Check the Disc case for details.
● Select 4:3 LB (letterbox) if you want to see the picture with black
bars at the top and bottom of the screen. This looks like the picture you see when watching movies in a theater. This setting is possible only if the DVD was recorded in the letterbox or widescreen
format. Check the Disc case for details.
● Select 16:9 if you connected the DVD Receiver to a widescreen
TV. Also remember to set the TV to its “full size” setting.
5
Press SETUP to remove the Menu Bar.
Pan & Scan Letterbox
Widescreen (16:9)
1,5
2-4
mrd250book 2/14/03 10:49 AM Page 20
SETUP MENU -- MAIN PAGE
GENERAL SETUP
SPEAKER SETUP
AUDIO SETUP
PREFERENCES
EXIT SETUP
GOTO GENERAL SETUP PAGE
SET TV DISPLAY MODE
-- GENERAL PAGE --
TV DISPLAY
ANGLE MARK
OSD LANG
VIDEO OUT
SCR SAVER
MAIN PAGE
NORMAL/PS
NORMAL/LB
16:9
Page 21

Angle Mark, OSD Language 21
Angle Mark
When turned on the Angle Mark feature will place a [icon] on the screen
when the screen is recorded in multiple angles. Press ANGLE on the
Remote Control to select the angle you would like to view.
1
Press SETUP.
2
GENERAL SETUP will be selected, press OK.
3
Press 9 to select Angle Mark. Then Press -.
4
Press 8 or 9 to select ON or OFF.
5
Press SETUP to remove the Menu Bar.
SOURCE
SLEEP
VOL
MUTE SELECT
DISPLAY
MENU
SET UP
PREV PLAY/PAUSE NEXT
REW STOP FF
TITLE ANGLE ZOOM GOTO
LANGUAGE SUBTITLE N/P DIM
REPEAT A/B SHUFFLE PROGRAM
DISC SKIP DISC NO SLOW/MEM CD MODE
ST/MONO LISTENING AUDIO
OPEN/
CLOSE
OK
123
456
78
>10 0
9
I
I
OSD Language
Select your preferred On Screen Display (OSD) Language by using the
OSD LANG menu.
1
Press SETUP.
2
GENERAL SETUP will be selected, press OK.
3
Press 9 to select OSD LANG. Then Press -.
4
Press 8 or 9 to select a language: English, German, French, Italian,
or Spanish.
5
Press SETUP to remove the Menu Bar.
SOURCE
SLEEP
VOL
MUTE SELECT
DISPLAY
MENU
SET UP
PREV PLAY/PAUSE NEXT
REW STOP FF
TITLE ANGLE ZOOM GOTO
LANGUAGE SUBTITLE N/P DIM
REPEAT A/B SHUFFLE PROGRAM
DISC SKIP DISC NO SLOW/MEM CD MODE
ST/MONO LISTENING AUDIO
OPEN/
CLOSE
OK
123
456
78
>10 0
9
I
I
1,5
1,5
2-4
2-4
mrd250book 2/14/03 10:49 AM Page 21
SETUP MENU -- MAIN PAGE
-- GENERAL PAGE --
GENERAL SETUP
SPEAKER SETUP
AUDIO SETUP
PREFERENCES
EXIT SETUP
GOTO GENERAL SETUP PAGE
TV DISPLAY
ANGLE MARK
OSD LANG
VIDEO OUT
SCR SAVER
MAIN PAGE
ANGLE MARK ON/OFF
ON
OFF
SETUP MENU -- MAIN PAGE
GENERAL SETUP
GOTO GENERAL SETUP PAGE
SPEAKER SETUP
AUDIO SETUP
PREFERENCES
EXIT SETUP
SET OSD LANGUAGE
-- GENERAL PAGE --
TV DISPLAY
ANGLE MARK
OSD LANG
VIDEO OUT
SCR SAVER
MAIN PAGE
ENGLISH
GERMAN
FRENCH
ITALIAN
SPANISH
Page 22

SOURCE
SLEEP
VOL
MUTE SELECT
DISPLAY
MENU
SET UP
PREV PLAY/PAUSE NEXT
REW STOP FF
TITLE ANGLE ZOOM GOTO
LANGUAGE SUBTITLE N/P DIM
REPEAT A/B SHUFFLE PROGRAM
DISC SKIP DISC NO SLOW/MEM CD MODE
ST/MONO LISTENING AUDIO
OPEN/
CLOSE
OK
123
456
78
>10 0
9
I
I
MAGNOVOX
Video Out
Select the type of video connection you have set up between your TV and
DVD receiver.
1
Press SETUP.
2
GENERAL SETUP will be selected, press OK.
3
Press 9 to select VIDEO OUT. Then Press -.
4
Press 8 or 9 to select S-VIDEO or CR CB Y.
● Select S-VIDEO if you have used an S-VIDEO cable to make the
connection. This is the default setting.
● Select CR CB Y if you used the Component (Cr CB Y) cables to
make the connection.
5
Press SETUP to remove the Menu Bar.
SETUP MENU -- MAIN PAGE
GENERAL SETUP
SPEAKER SETUP
AUDIO SETUP
PREFERENCES
EXIT SETUP
GOTO GENERAL SETUP PAGE
-- GENERAL PAGE --
TV DISPLAY
SET VIDEO OUTPUT
ANGLE MARK
OSD LANG
SCR SAVER
MAIN PAGE
S-VIDEO
CR CB Y
VIDEO OUT
1,5
2-4
22 Video Out
mrd250book 2/14/03 10:49 AM Page 22
Page 23

Screen Saver, Speaker Delay 23
SOURCE
SLEEP
VOL
MUTE SELECT
DISPLAY
MENU
SET UP
PREV PLAY/PAUSE NEXT
REW STOP FF
TITLE ANGLE ZOOM GOTO
LANGUAGE SUBTITLE N/P DIM
REPEAT A/B SHUFFLE PROGRAM
DISC SKIP DISC NO SLOW/MEM CD MODE
ST/MONO LISTENING AUDIO
OPEN/
CLOSE
OK
123
456
78
>10 0
9
I
I
Screen Saver
Turn the screen saver (SCR SAVER) on or off.
1
Press SETUP.
2
GENERAL SETUP will be selected, press OK.
3
Press 9 to select SCR SAVER. Then Press -.
4
Press 8 or 9 to select ON or OFF.
5
Press SETUP to remove the Menu Bar.
SETUP MENU -- MAIN PAGE
GENERAL SETUP
SPEAKER SETUP
AUDIO SETUP
PREFERENCES
EXIT SETUP
GOTO GENERAL SETUP PAGE
-- GENERAL PAGE --
TV DISPLAY
SET SCREEN SAVER
ANGLE MARK
OSD LANG
SCR SAVER
MAIN PAGE
ON
OFF
VIDEO OUT
SOURCE
SLEEP
VOL
MUTE SELECT
DISPLAY
MENU
SET UP
PREV PLAY/PAUSE NEXT
REW STOP FF
TITLE ANGLE ZOOM GOTO
LANGUAGE SUBTITLE N/P DIM
REPEAT A/B SHUFFLE PROGRAM
DISC SKIP DISC NO SLOW/MEM CD MODE
ST/MONO LISTENING AUDIO
OPEN/
CLOSE
OK
123
456
78
>10 0
9
I
I
Speaker Delay
Set the delay according to how far your listening position is from the
speakers.
1
Press SETUP.
2
Press 9 to select SPEAKER SETUP. Then press OK.
3
Press 9 to select CNTR DELAY or REAR DELAY. Then Press .
4
Press 8 and 9 to set the delay.
5
Press SETUP to remove the Menu Bar.
SETUP MENU -- MAIN PAGE
GENERAL SETUP
SPEAKER SETUP
AUDIO SETUP
PREFERENCES
EXIT SETUP
GOTO SPEAKER SETUP PAGE
-- SPEAKER SETUP PAGE --
CNTR DELAY
SET CENTER DELAY
REAR DELAY
TEST TONE
MAIN PAGE
5MS
3MS
1MS
OFF
1,5
1,5
2-4
2-4
mrd250book 2/14/03 10:49 AM Page 23
Page 24

SOURCE
SLEEP
VOL
MUTE SELECT
DISPLAY
MENU
SET UP
PREV PLAY/PAUSE NEXT
REW STOP FF
OPEN/
CLOSE
OK
123
456
78
>10 0
9
I
I
Test Tone
Use the test tone to set the speakers to desired distance and volume.
1
Press SETUP.
2
Press 9 to select SPEAKER SETUP. Then press OK.
3
Press 9 to select TEST TONE. Then press -.
4
Press 8 and 9 to select ON or OFF.
5
Press SETUP to remove the Menu Bar.
SETUP MENU -- MAIN PAGE
GENERAL SETUP
SPEAKER SETUP
AUDIO SETUP
PREFERENCES
EXIT SETUP
GOTO SPEAKER SETUP PAGE
--SPEAKER SETUP PAGE--
CNTR DELAY
SET TEST TONE
REAR DELAY
TEST TONE
MAIN PAGE
ON
OFF
1,5
24 Test Tone, Digital Out
2-4
SOURCE
SLEEP
VOL
MUTE SELECT
DISPLAY
MENU
SET UP
PREV PLAY/PAUSE NEXT
REW STOP FF
TITLE ANGLE ZOOM GOTO
LANGUAGE SUBTITLE N/P DIM
REPEAT A/B SHUFFLE PROGRAM
DISC SKIP DISC NO SLOW/MEM CD MODE
ST/MONO LISTENING AUDIO
OPEN/
CLOSE
OK
123
456
78
>10 0
9
I
I
Digital Out
If you connected the DVD receiver to other equipment using the Digital
connections you will need to change the DVD Player’s Digital Output setting. The information in step 4 will help you make your choice.
1
Press SETUP.
2
Press 9 to select AUDIO SETUP. Then press OK..
3
DIGITAL OUT will be selected, press -.
4
Press 8 and 9 to select ALL, PCM 96K, PCM 48K, or OFF
then press OK.
● Choose ALL if you used the DIGITAL OUT - COAXIAL or
OPTICAL jack on the DVD Receiver to connect to optional audio
equipment.
● Choose PCM 96K if you connected the DVD Receiver to option-
al audio equipment that is capable of processing sampling rates of
96 kHz.
● Choose PCM 48K if you connected the DVD Receiver to option-
al audio equipment that cannot process sampling rates over 48K.
Check the owner’s manual of the optional audio equipment.
● Choose OFF if you did not connect the DVD receiver to any digi-
tal equipment.
5
Press SETUP to remove the Menu Bar.
SETUP MENU -- MAIN PAGE
GENERAL SETUP
SPEAKER SETUP
AUDIO SETUP
PREFERENCES
EXIT SETUP
GOTO AUDIO SETUP
--AUDIO SETUP PAGE--
DIGITAL OUT
DIGITAL OUT RELATED
DUAL MONO
DYNAMIC
MAIN PAGE
PCM 48K
OFF
ALL
PCM 96K
1,5
2-4
mrd250book 2/14/03 10:49 AM Page 24
Page 25

SOURCE
SLEEP
VOL
MUTE SELECT
DISPLAY
MENU
SET UP
PREV PLAY/PAUSE NEXT
REW STOP FF
TITLE ANGLE ZOOM GOTO
LANGUAGE SUBTITLE N/P DIM
REPEAT A/B SHUFFLE PROGRAM
DISC SKIP DISC NO SLOW/MEM CD MODE
ST/MONO LISTENING AUDIO
OPEN/
CLOSE
OK
123
456
78
>10 0
9
I
I
Dual Mono, Dynamic 25
SOURCE
SLEEP
VOL
MUTE SELECT
DISPLAY
MENU
SET UP
PREV PLAY/PAUSE NEXT
REW STOP FF
TITLE ANGLE ZOOM GOTO
LANGUAGE SUBTITLE N/P DIM
REPEAT A/B SHUFFLE PROGRAM
DISC SKIP DISC NO SLOW/MEM CD MODE
ST/MONO LISTENING AUDIO
OPEN/
CLOSE
OK
123
456
78
>10 0
9
I
I
Dynamic
Select the degree of audio dynamic compression you want. The greater
the compression the smaller the volume range.
1
Press SETUP.
2
Press 9 to select AUDIO SETUP. Then Press -.
3
Press 9 to select DYNAMIC. Then press OK.
4
Press 8 and 9 to select FULL, 7/8 - 1/8, or OFF.
● Choose FULL to completely compress the dynamic range. The
loudest levels are softened and the quietest levels are raised.
● Choose 7/8 1/8 to partially compress the volume range.
● Choose OFF to leave the volume range uncompressed.
5
Press SETUP to remove the Menu Bar.
Dual Mono
Select the audio channels when watching a VCD. Often different
languages will be encoded on separate audio channels.
1
Press SETUP.
2
Press 9 to select AUDIO SETUP. Then press OK..
3
Press 9 to select DUAL MONO. Then Press -.
4
Press 8 and 9 to select Stereo, L MONO, R
MONO, or MIX.
5
Press SETUP to remove the Menu Bar.
SETUP MENU -- MAIN PAGE
GENERAL SETUP
SPEAKER SETUP
AUDIO SETUP
PREFERENCES
EXIT SETUP
GOTO SPEAKER SETUP PAGE
--AUDIO SETUP PAGE--
DIGITAL OUT
DUAL MONO SETUP
DUAL MONO
DYNAMIC
MAIN PAGE
R-MONO
MIX
STEREO
L-MONO
SETUP MENU -- MAIN PAGE
GENERAL SETUP
SPEAKER SETUP
AUDIO SETUP
PREFERENCES
EXIT SETUP
GOTO SPEAKER SETUP PAGE
--AUDIO SETUP PAGE--
DIGITAL OUT
DYNAMIC RANGE COMPRESSION
DUAL MONO
DYNAMIC
MAIN PAGE
FULL
6/8
OFF
4/8
2/8
1,5
1,5
2-4
2-4
mrd250book 2/14/03 10:49 AM Page 25
Page 26

26 TV Type (NTSC, PAL), Language Options
SOURCE
SLEEP
VOL
MUTE SELECT
DISPLAY
MENU
SET UP
PREV PLAY/PAUSE NEXT
REW STOP FF
TITLE ANGLE ZOOM GOTO
LANGUAGE SUBTITLE N/P DIM
REPEAT A/B SHUFFLE PROGRAM
DISC SKIP DISC NO SLOW/MEM CD MODE
ST/MONO LISTENING AUDIO
OPEN/
CLOSE
OK
123
456
78
>10 0
9
I
I
TV Type
Set the DVD to match your TV format.
1
Press SETUP.
2
Press 9 to select Preferences. Then press OK.
3
TV TYPE will be selected, press OK.
4
Press 8 or 9 to select MULTI, NTSC, or PAL.
● Select MULTI if your TV is compatible with NTSC and PAL and you
want the DVD Receiver to automatically select the color system of
the current DVD.
● Select NTSC if you plan to play NTSC DVDs and your TV is NTSC-
compatible.
● Select PAL if your DVDs are recorded in the PAL color system and
your TV is PAL-compatible.
5
Press SETUP to remove the Menu Bar.
SETUP MENU -- MAIN PAGE
GENERAL SETUP
SPEAKER SETUP
AUDIO SETUP
PREFERENCES
EXIT SETUP
GOTO PREFERENCE PAGE
-- PREFERENCES PAGE --
TV TYPE
TV TYPE SETUP
AUDIO
SUBTITLE
DISC MENU
PARENTAL
MULTI
NTSC
PAL
PASSWORD
DEFAULTS
1,5
2-4
SOURCE
SLEEP
VOL
MUTE SELECT
DISPLAY
MENU
SET UP
PREV PLAY/PAUSE NEXT
REW STOP FF
TITLE ANGLE ZOOM GOTO
LANGUAGE SUBTITLE N/P DIM
REPEAT A/B SHUFFLE PROGRAM
DISC SKIP DISC NO SLOW/MEM CD MODE
ST/MONO LISTENING AUDIO
OPEN/
CLOSE
OK
123
456
78
>10 0
9
I
I
1,5
Audio, Subtitle, and Disc Menu Language
Some DVDs have multiple languages available for the Audio soundtrack,
Subtitles, or the DVD Disc Menu. You may select different languages in the
DVD Disc Menu or by following the steps below.
1
Press SETUP.
2
Press 9 to select PREFERENCES. Then press OK.
3
Press 9 to select AUDIO, SUBTITLE, or DISC MENU. Then
press -.
4
Press 8 or 9 to select your language preference. It the language
you select is not available on a disc, that disc’s original language will
be used.
5
Press SETUP to remove the Menu Bar.
SETUP MENU -- MAIN PAGE
GENERAL SETUP
SPEAKER SETUP
AUDIO SETUP
PREFERENCES
EXIT SETUP
GOTO PREFERENCE PAGE
-- PREFERENCES PAGE --
TV TYPE
PREFERRED MENU LANGUAGE
AUDIO
SUBTITLE
DISC MENU
PARENTAL
ENGLISH
FRENCH
SPANISH
PASSWORD
DEFAULTS
CHINESE
JAPANESE
2-4
mrd250book 2/14/03 10:49 AM Page 26
Page 27

Parental Controls 27
SOURCE
SLEEP
VOL
MUTE SELECT
DISPLAY
MENU
SET UP
PREV PLAY/PAUSE NEXT
REW STOP FF
TITLE ANGLE ZOOM GOTO
LANGUAGE SUBTITLE N/P DIM
REPEAT A/B SHUFFLE PROGRAM
DISC SKIP DISC NO SLOW/MEM CD MODE
ST/MONO LISTENING AUDIO
OPEN/
CLOSE
OK
123
456
78
>10 0
9
I
I
MAGNOVOX
Parental Controls
Some DVD and Video CD makers code the DVD/Video CD so it will only
play according to the level you set at the DVD Receiver. The Parental
Control level may apply to the complete Disc or to certain scenes on the
Disc. Follow the steps below to set the Parental Level at which you want
Discs to play.
1
Press SETUP.
2
Press 9 to select PREFERENCES. Then press OK.
3
Press 9 to select PARENTAL. Then press -.
4
Press 8 or 9 to select your Rating level. Then press OK.
5
Enter your password and press OK. If this is the first time setting the rating level and you have not already set a personal password, use the default password of 3308.
Parental Control Ratings:
The rating numbers compare to standard U.S. movie
ratings as follows:
1 - G - General Audience; recommended as accept-
able for viewers of all ages.
3 - PG - Parental Guidance suggested.
4 - PG-13 - Material is unsuitable for children under
age 13.
6 - R- Restricted; recommended that parents restrict
children under age 17 from viewing or allow chil-
dren to view only when supervised by a parent or
adult guardian.
7 - NC-17- No children under age 17; not recom-
mended viewing for children under age 17.
8 - Adult - Mature material; should be viewed only by
adults due to graphic sexual material, violence, or
language.
6
Press SETUP to remove the Menu Screen.
SETUP MENU -- MAIN PAGE
GENERAL SETUP
SPEAKER SETUP
AUDIO SETUP
PREFERENCES
EXIT SETUP
GOTO PREFERENCE PAGE
-- PREFERENCES PAGE --
TV TYPE
SET TO G
AUDIO
SUBTITLE
DISC MENU
PARENTAL
4 PG 13
5
6 PG-R
PASSWORD
DEFAULTS
7 NC-17
8 ADULT
1 G
2
3 PG
1,6
2-4
5
mrd250book 2/14/03 10:49 AM Page 27
Page 28

28 Password
SOURCE
SLEEP
VOL
MUTE SELECT
DISPLAY
MENU
SET UP
PREV PLAY/PAUSE NEXT
REW STOP FF
TITLE ANGLE ZOOM GOTO
LANGUAGE SUBTITLE N/P DIM
REPEAT A/B SHUFFLE PROGRAM
DISC SKIP DISC NO SLOW/MEM CD MODE
ST/MONO LISTENING AUDIO
OPEN/
CLOSE
OK
123
456
78
>10 0
9
I
I
MAGNOVOX
Changing or setting the Password
The default password is 3308. If you forget your password, enter 3308 in
step four, below, as the old password.
1
Press SETUP.
2
Press 9 to select PREFERENCES. Then press OK.
3
Press 9 to select PASSWORD. Then press -.
4
CHANGE will be selected, press OK.
5
Enter the old password and the new password twice. You
do not have to press any buttons to go to the next password field.
6
Press OK to save the changes.
7
Press SETUP to remove the Menu Screen.
SETUP MENU -- MAIN PAGE
GENERAL SETUP
SPEAKER SETUP
AUDIO SETUP
PREFERENCES
EXIT SETUP
GOTO PREFERENCE PAGE
-- PREFERENCES PAGE --
CHANGE PASSWORD
AUDIO
SUBTITLE
DISC MENU
PARENTAL
PASSWORD
DEFAULTS
CHANGE
MAIN PAGE
1,7
5
2-4,6
mrd250book 2/14/03 10:49 AM Page 28
Page 29

To reset the DVD Receiver to its original settings, reset the defaults.
1
Press SETUP.
2
Press 9 to select PREFERENCES. Then press OK.
3
Press 9 to select DEFAULT. Then press -.
4
Press 8 or 9 to select . Then press OK.
5
Press SETUP to remove the Menu Screen.
SOURCE
SLEEP
VOL
MUTE SELECT
DISPLAY
MENU
SET UP
PREV PLAY/PAUSE NEXT
REW STOP FF
TITLE ANGLE ZOOM GOTO
LANGUAGE SUBTITLE N/P DIM
REPEAT A/B SHUFFLE PROGRAM
DISC SKIP DISC NO SLOW/MEM CD MODE
ST/MONO LISTENING AUDIO
OPEN/
CLOSE
OK
123
456
78
>10 0
9
I
I
MAGNOVOX
SETUP MENU -- MAIN PAGE
GENERAL SETUP
SPEAKER SETUP
AUDIO SETUP
PREFERENCES
EXIT SETUP
GOTO PREFERENCE PAGE
-- PREFERENCES PAGE --
LOAD FACTORY SETTINGS
AUDIO
SUBTITLE
DISC MENU
PARENTAL
PASSWORD
DEFAULTS
RESET
MAIN PAGE
1,5
2-4
Defaults 29
mrd250book 2/14/03 10:49 AM Page 29
Page 30

30 Title, Angle
SOURCE
SLEEP
VOL
MUTE SELECT
DISPLAY
MENU
SET UP
PREV PLAY/PAUSE NEXT
REW STOP FF
TITLE ANGLE ZOOM GOTO
LANGUAGE SUBTITLE N/P DIM
REPEAT A/B SHUFFLE PROGRAM
DISC SKIP DISC NO SLOW/MEM CD MODE
ST/MONO LISTENING AUDIO
OPEN/
CLOSE
OK
123
456
78
>10 0
9
I
I
Title
Some DVDs may contain more than one title. If the disc has a title menu
you can begin playback from a specified title.
1
Press TITLE to display the disc’s Title Menu, if available.
2
Press 9 8 ; : or the number buttons (1-9, >10) to select the
desired title.
3
Press BF or OK to begin playback.
Angle
Some DVDs contain scenes that were recorded at different angles or perspectives. Use the Angle feature in the Menu Bar to view DVD playback
from a different angle.
Multiple angles must be available on the DVD. Check the DVD Disc Menu
or the DVD case for details and availability of multiple angles.
1
Press ANGLE to switch between the various angles.
● If you turn on the ANGLE MARK feature in the General Setup
menu an icon will be displayed when multiple angles are avail-
able.
1
2
3
SOURCE
SLEEP
VOL
MUTE SELECT
DISPLAY
MENU
SET UP
PREV PLAY/PAUSE NEXT
REW STOP FF
TITLE ANGLE ZOOM GOTO
LANGUAGE SUBTITLE N/P DIM
REPEAT A/B SHUFFLE PROGRAM
DISC SKIP DISC NO SLOW/MEM CD MODE
ST/MONO LISTENING AUDIO
OPEN/
CLOSE
OK
123
456
78
>10 0
9
I
I
1
mrd250book 2/14/03 10:49 AM Page 30
Page 31

Zoom, Goto 31
SOURCE
SLEEP
VOL
MUTE SELECT
DISPLAY
MENU
SET UP
PREV PLAY/PAUSE NEXT
REW STOP FF
TITLE ANGLE ZOOM GOTO
LANGUAGE SUBTITLE N/P DIM
REPEAT A/B SHUFFLE PROGRAM
DISC SKIP DISC NO SLOW/MEM CD MODE
ST/MONO LISTENING AUDIO
OPEN/
CLOSE
OK
123
456
78
>10 0
9
I
I
Zoom
Zooming allows you to enlarge the DVD or Video CD image and scan
through the picture.
1
Press ZOOM to enlarge the picture. Press the button again to
enlarge the picture by zoom x2. Press ZOOM a third time to turn
off the zoom.
2
Press 9 8 ; : to move down, up, left, or right through the
enlarged picture.
GoTo
Use the GOTO feature to skip to a desired Title or Chapter.
1
Press GOTO to display the current Title, Chapter, and Time.
2
Press ; or : to select title or chapter.
3
Use the number buttons (1-9, >10) to select the desired title or
chapter. Press >10 for each multiple of ten. For example to go to
chapter 24 press >10 twice, then 4 (10+10+4=24).
2
SOURCE
SLEEP
VOL
MUTE SELECT
DISPLAY
MENU
SET UP
PREV PLAY/PAUSE NEXT
REW STOP FF
TITLE ANGLE ZOOM GOTO
LANGUAGE SUBTITLE N/P DIM
REPEAT A/B SHUFFLE PROGRAM
DISC SKIP DISC NO SLOW/MEM CD MODE
ST/MONO LISTENING AUDIO
OPEN/
CLOSE
OK
123
456
78
>10 0
9
I
I
1
3
2
1
mrd250book 2/14/03 10:49 AM Page 31
Page 32

32 Repeat, Repeat A-B
PREV PLAY/PAUSE NEXT
REW STOP FF
TITLE ANGLE ZOOM GOTO
LANGUAGE SUBTITLE N/P DIM
REPEAT A/B SHUFFLE PROGRAM
DISC SKIP DISC NO SLOW/MEM CD MODE
ST/MONO LISTENING AUDIO
I
I
MAGNOVOX
SOURCE
SLEEP
VOL
MUTE SELECT
DISPLAY
MENU
SET UP
PREV PLAY/PAUSE NEXT
REW STOP FF
TITLE ANGLE ZOOM GOTO
LANGUAGE SUBTITLE N/P DIM
REPEAT A/B SHUFFLE PROGRAM
DISC SKIP DISC NO SLOW/MEM CD MODE
ST/MONO LISTENING AUDIO
OPEN/
CLOSE
OK
123
456
78
>10 0
9
I
I
Repeat
1
Press REPEAT to repeat the current chapter or track. Press again
to repeat the entire title (DVD) or disc (VCD or CD). Press
REPEAT a third time to repeat all discs (CD mode only).
2
Press REPEAT until REPEAT OFF is displayed to turn off the repeat
feature.
Repeat A to B
You can set the DVD Receiver to play only a specific portion of a chapter,
title, or track repeatedly.
1
Press A/B to set the starting point. “A to B SET A” displays.
2
Press A/B again to set the ending point. “A to B SET B” displays and the section repeats continuously.
3
Press A/B to resume normal playback. “A to B Cancelled”
displays.
● A to B can be set across a chapter. On a VCD it must be set with-
in a single track.
1-2
1-3
mrd250book 2/14/03 10:49 AM Page 32
Page 33

CD Features, Programming 33
SOURCE
SLEEP
VOL
MUTE SELECT
DISPLAY
MENU
SET UP
PREV PLAY/PAUSE NEXT
REW STOP FF
TITLE ANGLE ZOOM GOTO
LANGUAGE SUBTITLE N/P DIM
REPEAT A/B SHUFFLE PROGRAM
DISC SKIP DISC NO SLOW/MEM CD MODE
OPEN/
CLOSE
OK
123
456
78
>10 0
9
I
I
SOURCE
SLEEP
VOL
MUTE SELECT
DISPLAY
MENU
SET UP
PREV PLAY/PAUSE NEXT
REW STOP FF
TITLE ANGLE ZOOM GOTO
LANGUAGE SUBTITLE N/P DIM
REPEAT A/B SHUFFLE PROGRAM
DISC SKIP DISC NO SLOW/MEM CD MODE
ST/MONO LISTENING AUDIO
OPEN/
CLOSE
OK
123
456
78
>10 0
9
I
I
MAGNOVOX
CD Features
Several features are only available in CD mode.
CD Mode
1
Press CD MODE to begin playback of all CDs in the disc tray.
1
Shuffle
You can play all tracks on a single CD in random order. This is only available in CD mode.
2
Press SHUFFLE turn the Shuffle feature on and off.
● Playback must be stopped to activate Shuffle.
Programming Favorite Tracks
You can program the system to play up to 99 of your favorite tracks from
the CDs in the disc tray.
1
With the receiver in CD mode, press PROGRAM to enter the
program mode. “P xx:xx” appears on the display.
2
Press DISC SKIP to select the disc.
3
Press the number buttons to select the track to program.
4
Repeat steps 2-3 for each track (up to 99) you want to program.
5
Press PROGRAM to save the programmed tracks.
6
Press 38 to begin playing the saved program.
7
Press 7 to stop playback. Press 7 again to erase the program.
1,5
2
3
7
6
2
mrd250book 2/14/03 10:49 AM Page 33
Page 34

Playback Control (Video CD only)
Playback Control (PBC) is available on some Video CDs and provides interactive menus through which you can activate features or playback options.
1
Press MENU/PBC with playback stopped to turn PBC ON or OFF.
● Select PBC OFF-and Video CDs will start playback automatically
without the Playback Control interactive menus.
● Select PBC ON, and the PBC menu (if available) will appear on the
TV screen. Use the Number buttons (0-9) or follow the directions
in the PBC menu to start playback or select features.
SOURCE
SLEEP
VOL
MUTE SELECT
DISPLAY
MENU
SET UP
OPEN/
CLOSE
OK
123
456
78
>10 0
9
Audio Channel
Some VCDs are coded with different audio tracks on different channels.
You can select the desired audio channel.
1
Press AUDIO to select the audio channel: Audio 1, Audio 2, Audio
1 vocal, or Audio 2 vocal.
PREV PLAY/PAUSE NEXT
REW STOP FF
TITLE ANGLE ZOOM GOTO
LANGUAGE SUBTITLE N/P DIM
REPEAT A/B SHUFFLE PROGRAM
DISC SKIP DISC NO SLOW/MEM CD MODE
ST/MONO LISTENING AUDIO
I
I
MAGNOVOX
34 Playback Control(PBC), Audio Channels
1
• Time Search and Repeat are
not available when PBC is ON.
• You can only play, pause, or
repeat MP3 files (Title, Album,
or Disc).
•Albums may be referred to as
Folders.
• You can play JPEG files on the
DVD Receiver. For example, you
may have film developed by a
photographer who places the
pictures on a CD-R for you. If
the pictures are in JPEG format,
view the images by playing the
CD-R on the DVD Receiver.
Helpful Hints
1
mrd250book 2/14/03 10:49 AM Page 34
Page 35

SOURCE
SLEEP
VOL
MUTE SELECT
DISPLAY
MENU
SET UP
PREV PLAY/PAUSE NEXT
REW STOP FF
TITLE ANGLE ZOOM GOTO
LANGUAGE SUBTITLE N/P DIM
REPEAT A/B SHUFFLE PROGRAM
DISC SKIP DISC NO SLOW/MEM CD MODE
ST/MONO LISTENING AUDIO
OPEN/
CLOSE
OK
123
456
78
>10 0
9
I
I
DISPLAY
MENU
SET UP
PREV PLAY/PAUSE NEXT
REW STOP FF
TITLE ANGLE ZOOM GOTO
LANGUAGE SUBTITLE N/P DIM
REPEAT A/B SHUFFLE PROGRAM
DISC SKIP DISC NO SLOW/MEM CD MODE
ST/MONO LISTENING AUDIO
OPEN/
CLOSE
OK
I
I
MAGNOVOX
Sound Options 35
Speaker Tone and Level
You can change the sound production to suit your surround sound needs by
altering the tone (bass and treble) and volume for the speakers.
1
Press SELECT to choose the speaker or tone you want to adjust.
● You can select TREBLE LEVEL, BASS LEVEL, FRONT LEFT,
FRONT RIGHT, SURROUND LEFT, SURROUND RIGHT.
2
Press VOL + or - to adjust the level.
Listening Mode
Select a listening mode which matches your needs
1
Press LISTENING to select the desired listening mode.
● For DVDs select Dobly Digital, Dolby Pro Logic, or Stereo
● For VCDs, MP-3 CDs, or normal CDs select Dolby Pro Logic or
Stereo.
● Dolby Digital Surround - Also referred to as AC-3, Dolby 5.1,
or MPEG Multichannel - delivers a realistic, dynamic sound similar
to theater and cinema. Many DVDs are recorded in Dolby Digital
Surround.
All five speakers (front left, front right, center, surround left, and
surround right) and the Subwoofer of the DVD Home Cinema
System must be connected to the DVD Receiver.
● Dolby Pro Logic Surround - A specially encoded two-channel
analog format that produces sound through four speakers (Front
Left, Center, Front Right, and a single/monaural Surround) when
using a Dolby Pro Logic Decoder. Dolby Pro Logic Surround is
compatible with two-channel (right and left) Stereos, but you will
have sound only from two channels (the left and right).
● Stereo - All sound is reproduced and played through the Front
left/right speakers. This enables standard stereo reproduction.
1
2
1
mrd250book 2/14/03 10:49 AM Page 35
Page 36

MP3 Features
MP3 is a compression method that makes digital music files up to 10 times
smaller without losing significant sound quality. MP3 is common on the
Internet, letting you transfer Tracks to your computer and onto a CD
Recordable or CD Rewritable.
The DVD Receiver supports these MP3 characteristics. Keep these in mind
when you make Discs you plan to play on the DVD Receiver.
● Names of Albums, Artists, etc., with a maximum of 12 characters
● Maximum nested directory of seven levels
● Maximum of 32 Albums
● Sampling frequencies: 32 kHz, 44.1 kHz, 48 kHz
● Bit-rates (recording speeds): 32, 64, 96, 128, 192, and 256 kbps
and supported VBR bit rate.
1
After you insert a Disc with MP3 files, press MENU/PBC.
The Album menu or list will appear on the TV screen. It may take
the DVD Receiver up to 30 seconds to recognize the Disc due to
the amount of songs on the Disc.
2
Press
99 88 ;; ::
to select an Album or Track for playback.
You also can use the Number buttons to select a Track directly.
3
Press PLAY/PAUSE Bk or OK to confirm your selection
and begin playback.
4
Or, if an MP3 menu or file list does not appear, you can
play the currently selected Track or Album by pressing
PLAY/PAUSE Bk.
5
Press H or G to select the previous or next Track during play-
back. The current Track number will appear on the DVD Receiver’s
display panel.
• You can only play, pause, or
repeat MP3 files (Title, Album,
or Disc).
•Albums may be referred to as
Folders.
• You can play JPEG files on the
DVD Receiver. For example, you
may have film developed by a
photographer who places the
pictures on a CD-R for you. If
the pictures are in JPEG format,
view the images by playing the
CD-R on the DVD Receiver.
Helpful Hints
SOURCE
SLEEP
VOL
MUTE SELECT
DISPLAY
MENU
SET UP
PREV PLAY/PAUSE NEXT
REW STOP FF
TITLE ANGLE ZOOM GOTO
LANGUAGE SUBTITLE N/P DIM
REPEAT A/B SHUFFLE PROGRAM
DISC SKIP DISC NO SLOW/MEM CD MODE
ST/MONO LISTENING AUDIO
OPEN/
CLOSE
OK
123
456
78
>10 0
9
I
I
MAGNOVOX
2
3,4
5
36 MP3 Features
mrd250book 2/14/03 10:49 AM Page 36
Page 37

Tuner Features 37
STEREO
R
L
S
Program
PROG
STEREO
R
L
S
PROG
STEREO
R
L
S
SOURCE
SLEEP
VOL
MUTE SELECT
DISPLAY
MENU
SET UP
PREV PLAY/PAUSE NEXT
REW STOP FF
OPEN/
CLOSE
OK
123
456
78
>10 0
9
I
I
SET UP
PREV PLAY/PAUSE NEXT
REW STOP FF
TITLE ANGLE ZOOM GOTO
LANGUAGE SUBTITLE N/P DIM
REPEAT A/B SHUFFLE PROGRAM
DISC SKIP DISC NO SLOW/MEM CD MODE
ST/MONO LISTENING AUDIO
OPEN/
CLOSE
OK
I
I
MAGNOVOX
2,3
1
4,5
2,4
PREV PLAY/PAUSE NEXT
REW STOP FF
TITLE ANGLE ZOOM GOTO
LANGUAGE SUBTITLE N/P DIM
REPEAT A/B SHUFFLE PROGRAM
DISC SKIP DISC NO SLOW/MEM CD MODE
ST/MONO LISTENING AUDIO
I
I
MAGNOVOX
1
Tuning Radio Stations
1
Press Power yy(or STANDBY-ON yyon the front of the DVD
Receiver) to turn on the last selected sound source.
2
Press TUNER•BAND on the DVD Receiver(or press the
SOURCE dial on the remote) to select TUNER mode.
3
Press TUNER•BAND again to select FM or AM.
4
Press and hold H or G until the frequency indicator (station
number) starts to change, then release. The next radio station will
tune automatically.
5
To tune to a weak station, press H or G briefly and
repeatedly until the best possible reception is found.
Programming Radio Stations
You can preset up to 40 stations in memory.
1
Tune to the desired radio station as detailed above.
2
Press SLOW/MEM on the remote. “PROG” will appear on the
display panel.
3
Within five seconds, press the Number buttons (0-9) to
select a preset number.
● If “Program” disappears from the display panel before you select
a preset number, repeat steps 2-3.
4
Within five seconds, press SLOW/MEM to store the radio station. Repeat steps 1–4 to store other radio stations.
● If you try to program more than 40 preset radio stations, "FULL"
will appear on the display panel.
Selecting Preset Radio Stations
1
In Tuner mode, press h or g or use the Number buttons to select a preset station number. The preset station number,
radio frequency, and FM or AM will appear on the display panel.
mrd250book 2/14/03 10:49 AM Page 37
Page 38

SET UP
PREV PLAY/PAUSE NEXT
REW STOP FF
TITLE ANGLE ZOOM GOTO
LANGUAGE SUBTITLE N/P DIM
REPEAT A/B SHUFFLE PROGRAM
DISC SKIP DISC NO SLOW/MEM CD MODE
ST/MONO LISTENING AUDIO
OPEN/
CLOSE
OK
I
I
MAGNOVOX
38 FM Reception, Sleep Timer
Sleep Timer
The Sleep Timer turns the DVD Home Cinema System to Standby mode
(off) at a preselected time.
1
Press SLEEP repeatedly to select the amount of time after which
you want the DVD Receiver to turn off. You may choose (in minutes): 120 to 10 minutes in ten minute increments.
●To check the time remaining for the Sleep Timer (after you
have set it), press SLEEP once.
●To change the Sleep Timer, press SLEEP again while the Sleep
Timer minutes appear. The next Sleep Timer option will appear
on the display panel.
● To cancel the Sleep Timer, press SLEEP repeatedly to choose
OFF. Or, press STANDBY-ON yyto turn off the DVD Receiver.
FM Reception
1
Press ST/MONO to switch between FM Stereo and FM Mono
reception. If FM Stereo has background static or poor reception, try
FM Mono for a clearer reception.
1
SOURCE
SLEEP
VOL
MUTE SELECT
DISPLAY
MENU
SET UP
PREV PLAY/PAUSE NEXT
REW STOP FF
TITLE ANGLE ZOOM GOTO
LANGUAGE SUBTITLE N/P DIM
REPEAT A/B SHUFFLE PROGRAM
DISC SKIP DISC NO SLOW/MEM CD MODE
ST/MONO LISTENING AUDIO
OPEN/
CLOSE
OK
123
456
78
>10 0
9
I
I
1
mrd250book 2/14/03 10:49 AM Page 38
Page 39

Helpful Hints 39
WARNING!
Under no circumstances should you try to repair the system yourself, as this will invalidate the warranty. Do
not open the system as there is a risk of electric shock.
If you are having problems with your product, check this list of problems and possible solutions before requesting service.
You may be able to solve the problem yourself.
No power
• Press STANDBY-ON y on the front of the DVD Receiver to turn on the power.
•Make sure you connected the DVD Receiver’s power cord to an AC power outlet.
•Make sure the AC outlet has power by trying another appliance in the same outlet.
No picture
•Make sure the TV power is on.
•Check the video cables. Make sure the cable(s) are fastened securely to the DVD Receiver and TV.
• Set your TV to the correct Video In channel. These channels are usually near channel 00. Or, you may have a button on the
TV remote control that selects an Auxiliary or A/V IN channel. See your TV owner’s manual for details. Or, go to your lowest TV channel and change channels down until you see the DVD screen on the TV.
• You only need one video connection between the DVD Receiver and the TV.
• Adjust VIDEO OUT if you used S-Video or Component Video. Details are on page 22.
• Press the correct source button (TV/AV, DISC, TUNER, or AUX) to choose what you want to watch.
Distorted picture
• Check the Disc for fingerprints. Clean the Disc with a soft cloth, wiping from the center to the edge in a straight line.
• Sometimes a small amount of picture distortion may appear. This is not a malfunction.
The picture is distorted, the picture rolls, or the picture is only black and white.
• TVs have a color system standard, usually NTSC in the United States. If the Disc’s or DVD Receiver’s color system is different
than your TV’s color system, the picture may be distorted or colorless. Adjust the TV SYSTEM setting at the DVD Receiver.
Details are on page 26.
•Check the VIDEO OUT setting. Details are on page 22.
If you connected the DVD Receiver to a TV using S-Video cable (as described on page 13), set VIDEO OUT to S-VIDEO.
If you connected the DVD Receiver to a TV using Component video cable (red, green, and blue as described on page 11), set
VIDEO OUT to PR PB Y.
The sound is distorted or there is no sound.
•Make sure you did not connect any cables from the DVD Receiver to a Stereo’s “PHONO IN” jack.
• Make sure you did not connect the DIGITAL OUT - COAXIAL or OPTICAL jack on the DVD Receiver to an analog jack on
the Stereo. (Analog audio jacks are usually labeled as such and are usually red and white.)
• Check the speaker connections. Make sure cables are connected firmly to all equipment. Details are on page 14.
• Choose the correct Audio/Video In or Auxiliary channel at your TV. See your TV’s manual for details. Or, change channels at
the TV until you hear sound from the Disc that is in the DVD Receiver or until you see the DVD screen on your TV.
•Choose a different Audio setting. Details are on pages 18, 29, and 34. Check the Audio setting of a DVD in the DVD Disc
Menu, if available, and adjust as necessary.
•Choose the correct sound source at the DVD Receiver. Press TV/AV, DISC, TUNER, or AUX on the DVD Receiver’s
remote control to choose the equipment that you want to hear through the DVD Receiver.
• Check the Listening setting. Make sure it is compatible/available with the current Disc. Details are on page 35.
• Adjust the volume. Details are on page 35.
•Replace the speaker cables.
• Check the speaker settings. Details are on page 25.
• Sound is mute during slow motion, searching, or paused Disc playback. Press PLAY/PAUSE Bk to resume normal playback
and restore the sound.
Disc will not play.
•Make sure the Disc label is facing up. If you are playing a two-sided Disc, make sure the label of the side you want to play is
facing up when you place the Disc in the DVD Receiver’s disc tray. Details are on page 15.
•Check the Parental Controls. Details are on pages 27-28.
•Check the Region Code of the DVD. The DVD must be coded for All regions or Region 1 in order to play on this DVD
Receiver. Details are on page 5.
• See if the Disc is defective by trying another Disc. Make sure the Disc is not scratched or warped. Carefully clean the Disc.
•Check the color system of the DVD. It must be recorded in NTSC or PAL. Adjust the TV SYSTEM setting at the DVD
Receiver appropriately. Details are on page 26.
• Press SYSTEM MENU to remove the System Menu. Then try playing the Disc again.
•Moisture may have condensed inside the DVD Receiver. Remove the Disc and leave the DVD Receiver power on for about
an hour before trying to play Discs again. Moisture may condense inside the DVD Receiver if you move it suddenly from a
warm place to a cold environment, or vice versa.
An Audio CD will not play.
• Some Audio CDs available on the market are copy protected. These discs will not play on this DVD Receiver. See your retailer for options regarding non-protected Audio CDs.
The DVD Receiver does not respond to the remote control.
• Aim the remote control directly at the remote sensor on the front of the DVD Receiver, not your TV.
• Remove any obstacles between the DVD Receiver and the remote. Move closer to the DVD Receiver and try again.
mrd250book 2/14/03 10:49 AM Page 39
Page 40

Glossary
40 Helpful Hints (cont’d), Glossary
• Inspect or replace the batteries in the remote control.
• Use the SOURCE buttons (TV/AV, DISC, TUNER, AUX) to place the remote in the right mode. For example, when using the
remote to start Disc playback, press DISC first.
You cannot activate some features, such as Angles, Subtitles, or multi-language Audio.
• The feature may not be available on the Disc. Check the Disc case to see if the Disc has the feature. If the Disc does not have
the feature, the DVD Receiver cannot create the feature. This is not a malfunction of the DVD Receiver.
The DVD Receiver does not work.
•Disconnect the power cord from the power outlet for a few minutes. Reconnect the power cord and try to operate the
DVD Receiver again as usual.
There is no sound from the Center or Rear/Surround speakers.
• Press CENTER +/- or REAR+/- on the remote control to adjust the volume level.
•Make sure the Center and Rear/Surround speakers are connected correctly. Details are on page 14.
• Choose a correct Surround Sound setting. Surround Sound must be available on the current Disc or broadcast. Details are on
page 35.
Radio broadcasts are noisy or have considerable static.
• Tune to the correct frequency. Details are on page 37.
• Connect the antennas. Details are on page 10.
•Route Cable TV/RF/AC-3 and digital cables away from the antennas and speaker wires.
• Fully extend the FM wire antenna and position it for the best reception.
•Connect an outdoor FM or AM antenna.
• Turn off other equipment that is near the DVD Receiver. It may be causing interference. Move other equipment away from
the DVD Receiver. Move the DVD Receiver’s antennas away from the other equipment.
The display panel is dark.
• Press DIM repeatedly until you can see the information on the display panel.
You hear a low hum or buzz sound.
• Place the DVD Receiver as far as possible from electric devices that may cause interference.
Bass response is low.
• Check the polarity (+/- wires and jacks) of all the Speakers.
Analog
: Sound that has not been turned into numbers.
Analog sound varies, while digital sound has specific numerical
values. Analog sound is available when you use the red and
white audio jacks on your equipment. These jacks send audio
through two channels, the left and right.
AUDIO OUT Jack
s: Jacks on the back of the DVD
Receiver that send audio to another system (TV, Stereo, etc.).
Bit Rate
: The amount of data used to hold a given length of
music; measured in kilobits per seconds, or kbps. Or, the
speed at which you record. Generally, the higher the bit rate,
or the higher the recording speed, the better the sound quality. However, higher bit rates use more space on a Disc.
For example, an MP3 music file recorded at 32 kbps will
record slowly, use the least Disc space, and have the poorest
sound quality. But, an MP3 music file recorded at 96 kbps will
record quicker, use more Disc space, and have significantly
better sound quality.
Coaxial jack
: Sends digital audio to a Stereo, allowing you
to adjust the volume at the Stereo. The Stereo must have a
coaxial in jack. This connection provides the 5.1 channel surround sound as heard in movie theaters.
Component Video Ou
t Jacks: Jacks on the back of the
DVD Receiver that send high-quality video to a TV that has
Component Video In jacks.
Digital
: Sound that has been converted into numerical val-
ues. Digital sound is available when you use the DIGITAL
AUDIO OUT COAXIAL or OPTICAL jacks. These jacks
send audio through multiple channels, instead of just two
channels as analog does.
Dolby Digital
: A surround sound system that provides 5.1
channel sound as used in movie theaters.
DTS
: Digital Theater Systems. This is a surround sound sys-
tem, but it is different from Dolby Digital. The formats were
developed by different companies.
DVD
: Digital Video Disc.
Letterbox:
A TV aspect ratio setting (4:3). Displays the
video in full-width, with black bars at the top and bottom of
the TV screen. This format is similar to seeing a movie in a
theater. If the Disc does not include a letterbox format ,
selecting Letterbox may have no effect. (For example, some
DVDs are two-sided, with one side playing in Letterbox and
the other side playing in a normal format.)
OPTICAL Jack
: Converts electrical signals into optical sig-
nals before sending the audio to the Stereo. Optical audio is
not prone to external electrical influences and has less noise,
which reduces adverse effects on external equipment. Be sure
to keep the protective cap on the jack when the jack is not in
use. This keeps dust out of the jack.
Pan & Scan
: A TV aspect ratio setting (4:3). Displays the
video with full-height picture, with one or both sides of the
picture trimmed. Some movie companies refer to this as
“reformatting the picture to fit your TV screen.”
PR PB Y
: See Component Video Out Jacks.
S-Video
: Produces a clear picture by sending separate sig-
nals for the luminance and the color. You can use S-Video
only if your TV has an S-Video In jack.
VIDEO OUT Jack
:
Jack on the back of the DVD Receiver
that sends video to a TV.
Widescreen
: A TV aspect ratio setting (16:9). Displays the
video appropriately when you connect the DVD Receiver to
a widescreen TV.
mrd250book 2/14/03 10:49 AM Page 40
Page 41

Specifications 41
AMPLIFIER SECTION
Output power Stereo (DIN) . . . . . . . . . . . . . . . . .2 x 50 W
Output power Surround (1 kHz) . . . . . .20 W RMS/channel
Total Harmonic Distortion . . . .10% at rated power (1 kHz)
Frequency Response . . . . . . . . . . .180 Hz – 14 kHz / ±1 dB
Signal-to-Noise Ratio . . . . . . . . . . . . . . . . . .> 65 dB (CCIR)
Input Sensitivity . . . . . . . . . . . . . . . . . . . . . . . . . . . . .400 mV
TUNER SECTION
Tuning Range . . . . . . . . . .FM 87.5–108MHz (100kHz steps)
. . . . . . . . . . . . . . . . . . . . . .AM 530–1700kHz (10kHz steps)
26 dB Quieting Sensitivity . . . . . . .FM 20 dB/AM 3162 µV/m
Image Rejection Radio . . . . . . . . . . . . . .FM 25 dB/AM 28 dB
IF Rejection Ratio . . . . . . . . . . . . . . . . .FM 60 dB/AM 24 dB
Signal-to-Noise Ratio . . . . . . . . . . . . . . .FM 60 dB/AM 40 dB
AM Suppression Ratio . . . . . . . . . . . . . . . . . . . . . .FM 30 dB
Harmonic Distortion . . .FM Mono 3%/FM Stereo 3%/AM 5%
Frequency Response . . . . . . . . . . .FM 180Hz–10kHz / ±6 dB
Stereo Separation . . . . . . . . . . . . . . . . . . .FM 26 dB (1 kHz)
Stereo Threshold . . . . . . . . . . . . . . . . . . . . . . . .FM 23.5 dB
DVD SECTION
Laser Type . . . . . . . . . . . . . . . . . . . . . . . . . . .Semiconductor
Disc Diameter . . . . . . . . . . . . . . . . . . . . . . . . . . . .12cm/8cm
Video Decoding . . . . . . . . . . . . . . . . . . . . . . . . . . . .MPEG-2
Video DAC . . . . . . . . . . . . . . . . . . . . . . . . . . . . . . . . .10 Bits
Color System . . . . . . . . . . . . . . . . . . . . . . . . . . . .PAL/NTSC
Video Format . . . . . . . . . . . . . . . . . . . . . . . . . . . . . .4:3/16:9
Video S/N . . . . . . . . . . . . . . . . . . . . . . . . . .56 dB (minimum)
Composite Video Output . . . . . . . . . . . . . . . .1.0 Vp-p, 75 Ω
S-Video Output . . . . . . . . . . . . . . . . . . . .Y - 1.0 Vp-p, 75 Ω
. . . . . . . . . . . . . . . . . . . . . . . . . . . . . .C - 0.286 Vp-p, 75 Ω
Audio DAC . . . . . . . . . . . . . . . . . . . . . . . . .24 bits / 96 kHz
Frequency Response . . . . . . . . . . .4 Hz – 20 kHz (44.1 kHz)
. . . . . . . . . . . . . . . . . . . . . . . . . . . .4 Hz – 22 kHz (48 kHz)
. . . . . . . . . . . . . . . . . . . . . . . . . . . .4 Hz – 44 kHz (96 kHz)
Digital Output . . . . . . . . . . . . . . . . .SPDIF Coaxial & Optical
LASER
Type . . . . . . . . . . . . . . . . . . . . .Semiconductor laser GaAIAs
Wavelength . . . . . . . . . . . . . . . . . . . . . . . . . . . . . . . .650 nm
Output Power . . . . . . . . . . . . . . . . . . . . . . . . . . . . . . .7 mW
Beam Divergence . . . . . . . . . . . . . . . . . . . . . . . . . .60 degree
MISCELLANEOUS
Power Supply Rating . . . . . . . . . . . . . . . . . . . .120 V / 60 Hz
Power Consumption . . . . . . . . . . . . . . . . . . . . . . . . .120 W
Dimensions (w x h x d) . . . . . .435 mm x 78 mm x 360 mm
. . . . . . . . . . . . . . . . . . . . . . . . . . .17.1 x 3.1 x 14.2 (inches)
Weight . . . . . . . . . . . . . . . . . . . . . . . . . . . . .7.1 kg/15.62 lbs.
REMOTE CONTROL
Effective Range . . . . . . . . . . . . . . . . . . . . . . . .> Eight Meters
Number of Buttons . . . . . . . . . . . . . . . . . . . . . . . . . . . . . .45
Batteries (1.5V) . . . . . . . . . . . . . . . . . . . . . . . . . . . . . . .2 AA
SPEAKERS
Front speakers/ Rear (surround) speaker
System . . . . . . . . . . . . . . . . . . . . . . . . . . . . . .2-way satellite
Impedance . . . . . . . . . . . . . . . . . . . . . . . . . . . . . . . . . . . .8 Ω
Speaker drivers . . . . . . . . . . . . . . . . . . . . . .3” woofer, piezo
Dimensions (w x h x d) . . . . . . .94 mm x 155 mm x 88 mm
. . . . . . . . . . . . . . . . . . . . . . . . . . . . .3.7 x 6.1 x 3.5 (inches)
Weight . . . . . . . . . . . . . . .0.45 kg each or 0.99 pounds each
Center Speaker
System . . . . . . . . . . . . . . . . . . . . . . . . . . . . . .2-way satellite
Impedance . . . . . . . . . . . . . . . . . . . . . . . . . . . . . . . . . . . .8 Ω
Speaker drivers . . . . . . . . . . . . . . . . . . .2 x 3” woofer, piezo
Dimensions (w x h x d) . . . . . . .250 mm x 94 mm x 88 mm
. . . . . . . . . . . . . . . . . . . . . . . . . .9.84 x 3.70 x 3.46 (inches)
Weight . . . . . . . . . . . . . . . . . . . . . . . . . . . . .0.92 kg/2.02 lbs.
SUBWOOFER
Subwoofer (not magnetically shielded) . . . . . . . . . . . . . .6.5”
Output power . . . . . . . . . . . . . . . . . . . . . .75 W (4 Ω, DIN)
THD . . . . . . . . . . . . . . . . . . . . . . . . . . . . . . . . .10% at 80 Hz
Reproduction frequency response . . . . . . . .30 Hz – 150 Hz
Phase switch . . . . . . . . . . . . . . . . . . . . . . . . . . . . . . .0°, 180°
Input sensitivity (Subwoofer In) . . . . . . . . . . . . . .200 mVrms
AC power . . . . . . . . . . . . . . . . . . . . . . . . . . . .120 V / 60 Hz
Power Consumption . . . . . . . . . .53W (at 1/8 rated power)
Dimensions (w x h x d) . . . . .130 mm x 337 mm x 375 mm
. . . . . . . . . . . . . . . . . . . . . . . . . . .5.1 x 13.3 x 14.8 (inches)
Weight . . . . . . . . . . . . . . . . . . . . . . . . . . . . . .7.8 kg/17.2 lbs.
Specifications are subject to change without notice.
mrd250book 2/14/03 10:49 AM Page 41
Page 42

Index 42
5 Disc Direct Play . . . . . . . . . . . . . . .8
9 8 ; : Buttons . . . . . . . . . . . . . .6
; (Headphones) . . . . . . . . . . . . . . .8
A/B Button . . . . . . . . . . . . . . . . .7, 32
AC Power cord . . . . . . . . . . . . . . . .9
Analog . . . . . . . . . . . . . . . . . . . . . . .40
Angle Button . . . . . . . . . . . . . . . .7, 30
Angle Mark . . . . . . . . . . . . . . . . . . .21
Antenna . . . . . . . . . . . . . . . . . . . . .10
Audio Button . . . . . . . . . . . . . . .6, 34
Audio In (TV/Aux) Jack . . . . . . . . . . . 9
Audio Language . . . . . . . . . . . . . . . .26
Audio Out Jacks . . . . . . . . . . . . .9, 40
Bit Rate . . . . . . . . . . . . . . . . . . . . . .40
Cable Box . . . . . . . . . . . . . . . . . . . .16
CD Mode Button . . . . . . . . . . . .7, 33
Center Line Out Jack . . . . . . . . . . . .9
Coaxial jack . . . . . . . . . . . . . . . . . . .40
Color Systems . . . . . . . . . . . . . . . . .5
Component Video . . . . . .9, 12, 22, 40
Composite Video . . . . . . . . . . . . . .11
CR CB Y . . . . . . . . . . . . . . . . . . . . .22
Defaults . . . . . . . . . . . . . . . . . . . . . .29
Digital . . . . . . . . . . . . . . . . . . . . . . . .40
Digital Out . . . . . . . . . . . . . . . . .9, 24
Dim Button . . . . . . . . . . . . . . . . . . . .7
Disc Menu Language . . . . . . . . . . . .26
Disc Menus . . . . . . . . . . . . . . . . . . .17
Disc No. Button . . . . . . . . . . . . . . . .7
Disc Tray . . . . . . . . . . . . . . . . . . . . .8
Disc Skip Button . . . . . . . . . . . . . . . .6
Display Button . . . . . . . . . . . . . . . . .7
Display Screen . . . . . . . . . . . . . . . . .8
Dolby Digital . . . . . . . . . . . . . . . . . .40
DTS . . . . . . . . . . . . . . . . . . . . . . . .40
DVD . . . . . . . . . . . . . . . . . . . . . . . .40
DVD/CD Button . . . . . . . . . . . . . . . .8
Environmental Information . . . . . . . .5
Favorite Tracks . . . . . . . . . . . . . . . .33
FF D Button . . . . . . . . . . . . . . . . . .7
FM/AM Antenna . . . . . . . . . . . . . . . .9
Glossary . . . . . . . . . . . . . . . . . . . . .40
Goto Button . . . . . . . . . . . . . . . .7, 31
Helpful Hints . . . . . . . . . . . . . . . . . .39
Language Button . . . . . . . . . . . . . . . .6
Language Options . . . . . . . . . . . . . .26
Letterbox . . . . . . . . . . . . . . . . . . . .40
Listening Button . . . . . . . . . . . . .6, 35
Maintenance and Cleaning . . . . . . . . .5
Menu Button . . . . . . . . . . . . . . . . . . .6
MP3 Features . . . . . . . . . . . . . . . . .36
Mute Button . . . . . . . . . . . . . . . . .7, 8
N/P Button . . . . . . . . . . . . . . . . . . . .6
Next ∑ Button . . . . . . . . . . . . . .7, 8
Number (0-9) Buttons . . . . . . . . . . .6
OK Button . . . . . . . . . . . . . . . . . . . .7
Open 0 Button . . . . . . . . . . . . . . . . .8
Open/Close Button . . . . . . . . . . . . . .6
Optical Jack . . . . . . . . . . . . . . . . . . .40
OSD Language . . . . . . . . . . . . . . . .21
Package Contents . . . . . . . . . . . . . . .5
Pan & Scan . . . . . . . . . . . . . . . . . . .40
Parental Controls . . . . . . . . . . . . . . 28
Password . . . . . . . . . . . . . . . . . . . . . . .
Play/Pause 38 Button . . . . . . . . . . . . .6
Playable Discs . . . . . . . . . . . . . . . . . .5
Playback . . . . . . . . . . . . . . . . . . . . .18
Play•Pause 38 Button . . . . . . . . . . .8
Power y Button . . . . . . . . . . . . . . .6, 8
PR PB Y . . . . . . . . . . . . . . . . . . . . .40
Pr/Cr Pb/Cb Y Component Video . .2
Preset Radio Stations . . . . . . . . . . .37
PREV E Button . . . . . . . . . . . . . . .6
Prev w Button . . . . . . . . . . . . . . .7, 8
Program Button . . . . . . . . . . . . . . . .7
Programming Tracks . . . . . . . . . . . .33
Radio Stations . . . . . . . . . . . . . . . . .37
Region Codes . . . . . . . . . . . . . . . . . .5
Repeat Button . . . . . . . . . . . . . . .6, 32
S-Video . . . . . . . . . . . . . .9, 13, 22, 40
Safety Information . . . . . . . . . . . . . . . 4
Satellite Box . . . . . . . . . . . . . . . . . .16
Screen Saver . . . . . . . . . . . . . . . . . .23
Search Buttons . . . . . . . . . . . . . . . . .8
Searching . . . . . . . . . . . . . . . . . . . . .18
Select Button . . . . . . . . . . . . . . . .6, 8
Setup Button . . . . . . . . . . . . . . . . . . .7
Shuffle Button . . . . . . . . . . . . . . .6, 33
Sleep Button . . . . . . . . . . . . . . . .6, 38
Slow/Mem Button . . . . . . . . . . . . . . .6
Source Buttons . . . . . . . . . . . . . . . . .7
Speaker Settings . . . . . . . . . . . . . . .35
Speaker Delay . . . . . . . . . . . . . . . . .23
Speakers . . . . . . . . . . . . . . . . . . .9, 14
Specifications . . . . . . . . . . . . . . . . . .41
ST/Mono Button . . . . . . . . . . . . .7, 38
Standby Button . . . . . . . . . . . . . . .6, 8
Standby LED indicator . . . . . . . . . . .8
Stop C Button . . . . . . . . . . . . . . .6, 8
Subtitle . . . . . . . . . . . . . . . . . . . . . . .7
Subtitle Language . . . . . . . . . . . . . . .26
Subwoofer . . . . . . . . . . . . . . . . . . .14
System Setup . . . . . . . . . . . . . . . . . .19
Table of Contents . . . . . . . . . . . . . . .3
Test Tone . . . . . . . . . . . . . . . . . . . .24
Title Button . . . . . . . . . . . . . . . . .6, 30
Tuner . . . . . . . . . . . . . . . . . . . . . . .37
Tuner•Band Button . . . . . . . . . . . . . .8
TV Display . . . . . . . . . . . . . . . . . . .20
TV Type . . . . . . . . . . . . . . . . . . . . .26
TV•AUX Button . . . . . . . . . . . . . . . .8
VCR . . . . . . . . . . . . . . . . . . . . . . . .16
Video Out . . . . . . . . . . . . . . . . . . . .22
Video Out Jack . . . . . . . . . . . . . .9, 40
VOL(ume) +/– Buttons . . . . . . . . . . .7
Volume . . . . . . . . . . . . . . . . . . . . . . .8
Warranty . . . . . . . . . . . . . . . . . . . .42
Widescreen . . . . . . . . . . . . . . . . . . .40
Woofer Line Out Jack . . . . . . . . . . .9
Zoom . . . . . . . . . . . . . . . . . . . . .6, 31
mrd250book 2/14/03 10:49 AM Page 42
Page 43

MAGNAVOX AUDIO SYSTEM
One Year Free Exchange
This product must be carried in for an exchange.
LIMITED WARRANTY
EL6519E001 / 3-02
Magnavox, P.O. Box 520890, Miami, FL 33152 (402) 536-4171
WHO IS COVERED?
You must have proof of purchase to exchange the product. A sales
receipt or other document showing that you purchased the product
is considered proof of purchase. Attach it to this owner’s manual
and keep both nearby.
WHAT IS COVERED?
Warranty coverage begins the day you buy your product. For one
year thereafter, a defective or inoperative product will be replaced
with a new, renewed, or comparable product at no charge to you.
A replacement product is covered only for the original warranty
period. When the warranty on the original product expires, the
warranty on the replacement product also expires.
WHAT IS EXCLUDED?
Your warranty does not cover:
• labor charges for installation or setup of the product, adjustment
of customer controls on the product, and installation or repair
of antenna systems outside of the product.
• product repair and/or part replacement because of misuse, accident, unauthorized repair or other cause not within the control
of Magnavox.
• reception problems caused by signal conditions or cable or
antenna systems outside the unit.
•a product that requires modification or adaptation to enable it to
operate in any country other than the country for which it was
designed, manufactured, approved and/or authorized, or repair of
products damaged by these modifications.
• incidental or consequential damages resulting from the product.
(Some states do not allow the exclusion of incidental or consequential damages, so the above exclusion may not apply to you.
This includes, but is not limited to, prerecorded material,
whether copyrighted or not copyrighted.)
•a product that is used for commercial or institutional purposes.
WHERE IS EXCHANGE AVAILABLE?
You may exchange the product in all countries where the product is
officially distributed by Magnavox. In countries where Magnavox
does not distribute the product, the local Magnavox service organization will attempt to provide a replacement product (although
there may be a delay if the appropriate product is not readily available).
BEFORE REQUESTING EXCHANGE...
Please check your owner’s manual before requesting an exchange.
Adjustments of the controls discussed there may save you a trip.
EXCHANGING A PRODUCT IN U.S.A.,
PUERTO RICO, OR U.S. VIRGIN ISLANDS...
Contact your dealer to arrange an exchange. Or, ship the product,
insured and freight prepaid, and with proof of purchase enclosed, to
the address listed below.
Small Product Service Center
Magnavox
1001 Snapps Ferry Road
Plant 2, Building 6
Greeneville, TN 37743
(In U.S.A., Puerto Rico, and U.S. Virgin Islands, all implied warranties, including implied warranties of merchantability and fitness
for a particular purpose, are limited in duration to the duration of
this express warranty. But, because some states do not allow limitations on how long an implied warranty may last, this limitation may
not apply to you.)
EXCHANGING A PRODUCT IN CANADA...
Please contact Magnavox at:
1-800-661-6162 (French Speaking)
1-800-705-2000 (English Speaking or Spanish Speaking)
(In Canada, this warranty is given in lieu of all other warranties. No
other warranties are expressed or implied, including any implied
warranties of merchantability or fitness for a particular purpose.
Magnavox is not liable under any circumstances for any direct, indi-
rect, special, incidental or consequential damages, howsoever
incurred, even if notified of the possibility of such damages.)
REMEMBER...
Please record below the model and serial numbers found on the
product. Also, please fill out and mail your warranty registration
card promptly. It will be easier for us to notify you if necessary.
MODEL # ___________________________________________
SERIAL # ___________________________________________
This warranty gives you specific legal rights. You may have other rights
which vary from state/province to state/province.
Limited Warranty 43
mrd250book 2/14/03 10:49 AM Page 43
 Loading...