

Page 1
MMS 306/A 3.600 Acoustic Surround Power
EnglishFrançaisDeutschItalianoEspañol
Nederlands
Svenska
Suomi
5.1 channel Soft Flat Panel speaker system
Instructions for use
Mode demploi
Bedienungsanleitung
Istruzioni per l uso
Manualdel Usuario
Installationsanleitung
Brugsanrisning
Käyttöohje
Zalecenia dla uýytkownika
Kullaným Kýlavuzu
Pykoboäctbo ïo ýkcïëyaöèè
Instrukcja obstugi
Bruksanvising
Polski
Türkçe
Русский
NorskDansk
1
Page 2
SAFETY INSTRUCTIONS:
English
For US/Canada only
Français Deutsch Italiano Español
Nederlands
Svenska
Suomi Polski
Türkçe
Русский
Norsk Dansk
IMPORTANT SAFETY INSTRUCTIONS - Read before operating equipment
This product was designed and manufactured to meet strict quality and safety standards.
There are, however, some installation and operation precautions which you should be
particularly aware of.
1. Read these instructions - All the safety and operating instructions should be read
before the appliance is operated.
2. Keep these instructions - The safety and operating instructions should be retained for
future reference.
3. Heed all warnings - All warnings on the appliance and in the operating instructions
should be adhered to.
4. Follow all instructions - All operating and use instructions should be followed.
5. Do not use this apparatus near water - for example, near a bathtub, washbowl, kitchen
sink, laundry tub, in a wet basement or near a swimming pool, etc.
6. Clean only with a damp cloth. The appliance should be cleaned only recommended
by the manufacturer.
7. Install in accordance with the manufacturers instructions. Do not block any of the
ventilation openings. For example, the appliance should not be situated on a bed, sofa,
rug, or similar surface or placed in a built-in installation, such as a bookcase or cabinet
that may impede the flow of air through the ventilation openings.
8. Do not install near any heat sources such as radiators, heat registers, stoves, or other
apparatus (including amplifiers) that produce heat.
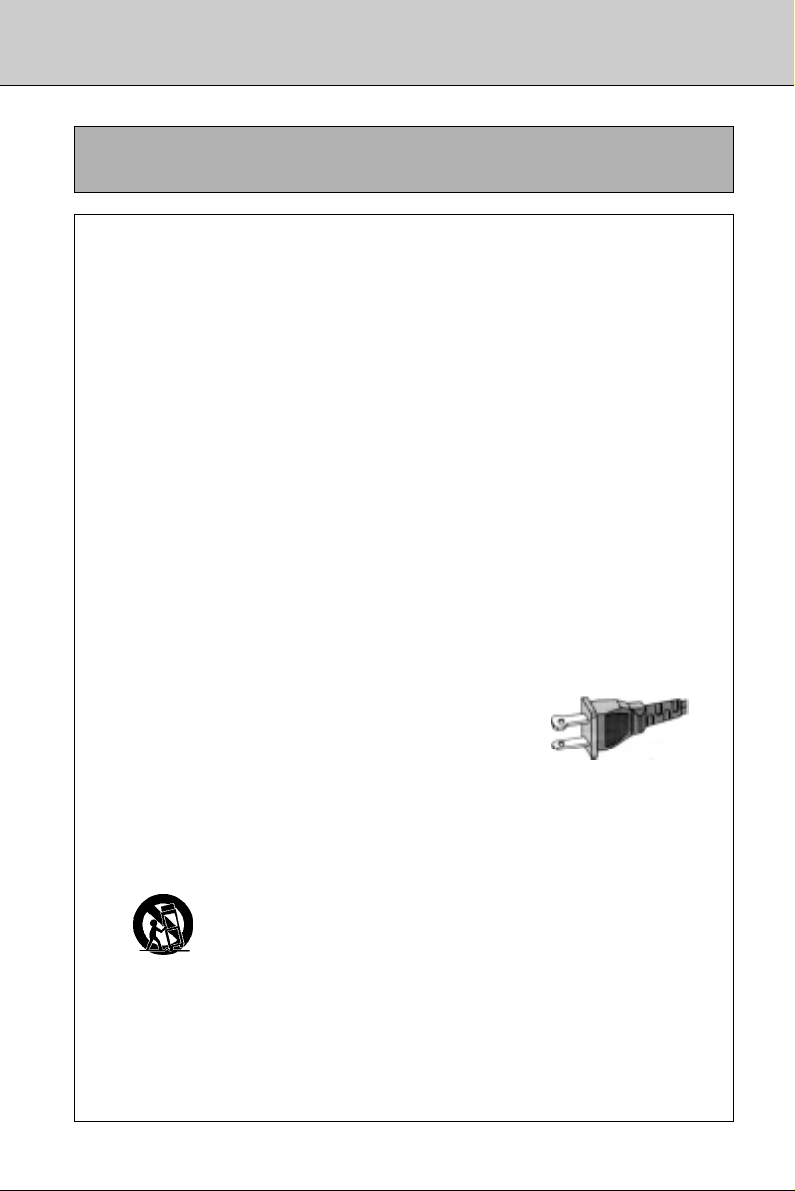
9. Do not defeat the safety purpose of the polarized or
grounding-type plug. A polarized plug has two blades with
one wider than the other. Match wide blade of plug to wide
slot, fully insert. A grounding type plug has two blades and a
third grounding prong. The wide blade or the third prong are
provided for your safety. If the provided plug does not fit into
your outlet, consult an electrician for replacement of the obsolete outlet.
10. Protect the power cord from being walked on or pinched particulary at plugs, convenience
receptacles, and the point where they exit from the apparatus.
11. Only use attachments/accessories specified by the manufacturer.
12. Use only with a cart, stand, tripod, bracket, or table specified by the
13. Unplug this apparatus during lightning storms or when unused for long periods of time.
14. Refer all servicing to qualified service personnel. Servicing is required when the
apparatus has been damaged in any way, such as power-supply cord or plug is damaged,
liquid has been spilled or objects have fallen into the apparatus, the apparatus has been
exposed to rain or moisture, does not operate normally, or has been dropped.
15. Warning! To reduce the risk of fire or electric shock, do not expose this appliance to rain
or moisture.
manufacturer, or sold with the apparatus. When a cart is used, use caution
when moving the cart/apparatus combination to avoid injury from tip-over.
AC
Polarized Plug
2
Page 3
12
7
4
2
3
9
8
6
5
3
1
456
7
89
3
NorskDansk
Русский
Türkçe
Polski
Suomi
Svenska
Nederlands
EnglishFrançaisDeutschItalianoEspañol
Page 4

English
Important notes for users in the U.K.
Norge
Français Deutsch Italiano Español
Nederlands
Svenska
Suomi Polski
Türkçe
Mains plug
This apparatus is fitted with an
approved 13 Amp plug.
To change a fuse in this type of plug
proceed as follows:
1 Remove fuse cover and fuse.
2 Fix new fuse which should be a
3 Refit the fuse cover.
If the fitted plug is not suitable for your
socket outlets, it should be cut off and
an appropriate plug fitted in its place. If
the mains plug contains a fuse, this
should have a value of 5 Amp. If a plug
without a fuse is used, the fuse at the
distribution board should not be greater
than 5 Amp.
Note: The severed plug must be
disposed of to avoid a possible shock
hazard should it be inserted into a 13
Amp socket elsewhere.
How to connect a plug
The wires in the mains lead are
coloured with the following code:
blue = neutral (N), brown = live (L).
As these colours may not correspond
with the colour markings identifying the
terminals in your plug, proceed as
follows:
Connect the blue wire to the
Connect the brown wire to the
Do not connect either wire to the
Русский
Before replacing the plug cover, make
certain that the cord grip is clamped
over the sheath of the lead - not simply
Norsk Dansk
over the two wires.
Copyright in the U.K.
Recording and playback of material
may require consent. See Copyright
Act 1956 and The Performer's
Protection Acts 1958 to 1972.
BS1362 5 Amp, A.S.T.A. or BSI
approved type.
terminal marked N or coloured
black.
terminal marked L or coloured red.
earth terminal in the plug, marked
E (or ) or coloured green (or green
and yellow).
Typeskilt finnes på apparatens
underside.
Observer: Nettbryteren er sekundert
innkoplet. Den innebygde netdelen er
derfor ikke frakoplet nettet så lenge
apparatet er tilsluttet nettkontakten.
For å redusere faren for brann eller
elektrisk støt, skal apparatet ikke
utsettes for regn eller fuktighet.
Deutschland
Hiermit wird bescheinigt, daß dieses
Gerät in Übereinstimmung mit den
Bestimmungen der
Amtsblattverfügung 1046/1984
funkentstört ist.
Der Deutschen Bundespost wurde
das Inverkehrbringen dieses Gerätes
angezeigt und die Berechtigung zur
Überprüfung der Serie auf
Einhaltung der Bestimmungen
eingeräumt.
4
Page 5

English ...........6
Français .......12
Deutsch ........18
Italiano .........24
Español ........30
Nederlands ..36
EnglishFrançaisDeutschItalianoEspañol
Nederlands
Svenska .......42
Suomi ...........48
Polski ...........54
.............60
Türkçe ..........66
Русский ........72
Norsk ............78
Dansk ..........84
Svenska
Suomi
Polski
Türkçe
Русский
NorskDansk
5
Page 6

Description
English
Français Deutsch Italiano Español
Nederlands
Svenska
Suomi Polski
Türkçe
Ultra-thin design, powerful 5.1 surround audio!
The A 3.600 Acoustic Surround Power / MMS
306 is the result of the ultimate fusion of Philips
acoustical core competencies. We created a 5.1-
channel speaker system that features five ultra-
thin soft flat panel speakers, a variety of mounting
options and an explosive wOOx subwoofer. The
set is the perfect choice for a space-saving hifi
audio solution.
This Soft Flat Panel speaker system is especially
designed to be a hifi multimedia 5.1-channel
speaker system. All together, there can be
connected up to three audio-visual sources at the
same time directly to the speaker system. Three
keys on the remote control are provided to make
your audio device selection:
INPUT 1 à 5.1-channel input
INPUT 2 à stereo input
INPUT 3 à stereo input
This 5.1-channel speaker system will enhance
dramatically your gaming and audio-visual
experience. It delivers the ultimate sound solution
during games and movies by providing thrilling
surround sound with an intense bass impact. For
optimum performance, the set is best used with
5.1-channel audio inputs.
When connecting stereo audio-visual sources to
the set, (INPUT 2 or INPUT 3), built in multi-channel
processing algorithms will indulge you sound from
all speakers around you.
Philips Advanced Technologies
wOOx
Anchored by a 50 watt subwoofer, the A 3.600
Acoustic Surround Power / MMS 306 system
employs Philips patented wOOx Bass Driver
technology to generate superior bass from a
deceptively small enclosure. The wOOx bass
drivers are composed of a unique dual suspension
design mounted in front of the subwoofer resulting
in a deeper, richer bass performance you would
expect from a larger subwoofer. With the
symmetrical construction of the wOOx Bass
Radiator, there is complete balance of the
membrane movement producing no discernable
distortion. As a result, gaming and movie effects
are more intense and music more enjoyable.
Soft Flat Panel Satellite Speakers
NXT* has developed a unique loudspeaker
technology that has redesigned the shape of
sound. Philips has taken a new step in optimizing
the implementation of NXTs* technology by adding
a High Frequency Booster. The High Frequency
Booster boosts the sound pressure at higher
frequencies, thereby enabling the use of a soft
panel material whose sound quality surpasses the
performance of many home audio systems.
*NXT Trade Mark of New Transducers Ltd.
Русский
Ultra thin, stylish design, superb acoustic quality
and high impact bass power from all around you!
Norsk Dansk
6
Trade Mark of New Transducers Ltd.
All Patent Rights Reserved.
Page 7

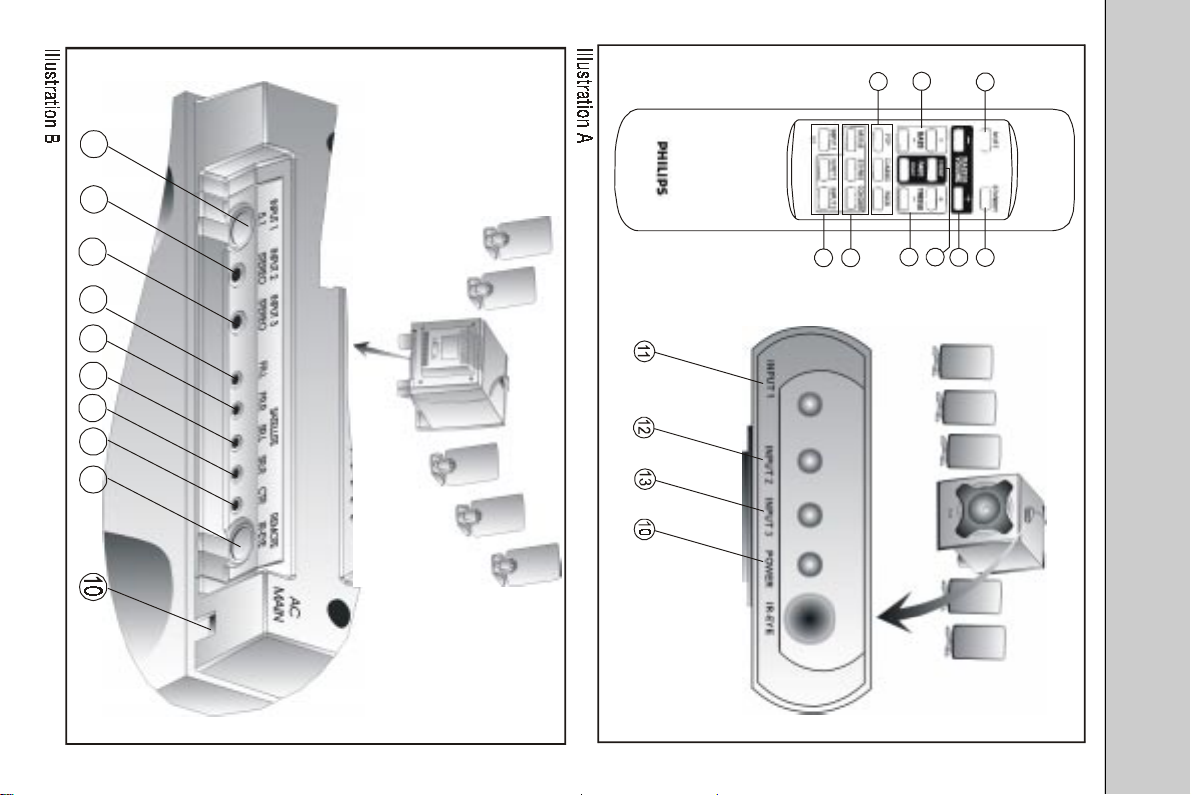
Explanation Remote Control
( See Illustration A, page 3)
Explanation Cable Connections
( See Illustration B, page 3)
Remote Control
1 STANDBY
To switch the speaker system into ON or OFF
(=STANDBY) mode
2 MUTE
To switch the speaker system into mute mode,
and normal mode again
3 MASTER VOLUME - / +
To adjust the master volume higher or lower
4 BASS - / +
To adjust the bass level according your personal
preference
5 FADE REAR / FRONT
To adjust the loudness of the rear and the front
satellite speakers
6 TREBLE - / +
To adjust the presence of the higher tones
according your personal preference
7 POP / CLASSIC / ROCK
Choose from either the POP, CLASSIC or ROCK
button for optimal pre-set sound reproduction
per genre
8 MOVIE / STEREO / CONCERT
When using a stereo source as input, choose
from either the
for optimal pre-set multi-channel sound
processing
9 INPUT 1 / INPUT 2 / INPUT 3
Make your choice of audio-visual source
selection. Two separate stereo input sources
and one 5.1-channel input source can be
connected to this 5.1-channel speaker system
Remote Control Receiver
10 POWER (LED)
The red color indicates that the system is in
standby mode.
11 INPUT 1 (LED)
The green color indicates that the system is
active and
12 INPUT 2 (LED)
The green color indicates that the system is
active and
13 INPUT 3 (LED)
The green color indicates that the system is
active and
Note:
Two green LEDs indicate that mute is activated.
MOVIE, STEREO or CONCERT button
INPUT 1 is selected
INPUT 2 is selected
INPUT 3 is selected
Inputs
1 INPUT 1: 5.1-channel
9 pin DIN jack to connect a 5.1-channel audio-
visual source
2 INPUT 2: stereo channel
3.5 mm stereo jack to connect a stereo audio-
visual source
3 INPUT 3: stereo channel
3.5 mm stereo jack to connect a stereo audio-
visual source
Satellite
4 FRL
To connect the front left satellite speaker
5 FRR
To connect the front right satellite speaker
6 SRL
To connect the surround left satellite speaker
7 SRR
To connect the surround right satellite speaker
8 CTR
To connect the center satellite speaker
Remote Control
9 IR-EYE
To connect the remote control IR-EYE
Power
10 AC-MAIN
Power cable to be connected to the AC outlet
WALL MOUNTING OPTION
The design of the satellites offers wall mounting
as an option
EnglishFrançaisDeutschItalianoEspañol
Nederlands
Svenska
Suomi
Polski
Türkçe
Русский
NorskDansk
7
Page 8

Installation (Illustration page 8)
English
Included Cables
1. 5.1 Audio Cable (DVD version only)
2. 5.1 Channel Soundcard Cable
Français Deutsch Italiano Español
3. Stereo TV / Audio Source Cable
4. Stereo 3.5 mm Cable
Speaker Connections
1. Connect the front left satellite speaker to FRL
2. Connect the front right satellite speaker to FRR
3. Connect the surround left satellite speaker to SRL
4. Connect the surround right satellite speaker to
5. Connect the center satellite speaker to CTR
Remote Control Connection
6. Connect the Remote Control IR-EYES connector
Nederlands
Signal Source Connections
7. Connections to INPUT 1 (9-pin DIN Connector)
(a) Connections from DVD player/ 5.1 audio source:
Svenska
Suomi Polski
Türkçe
(b) Connections from 5.1 channel soundcard:
8. Connections to INPUT 2 and INPUT 3 (3.5 mm stereo
(a) Connections from TV / audio source:
(b) Connections from CD/ MP3 player:
9. Connect the fixed mains power cord to the AC
Русский
10. Switch on (and switch off as well) the system
11. Tune the system using the controls on the
Norsk Dansk
OTE: Do not insert the power plug into the AC outlet
N
until all connections are made!
SRR
REMOTE IR-EYES and place the eye on top of
to the
your monitor / desktop PC / TV / other audio-
visual source
- 2 x RCA for front and rear RIGHT satellites (red)
- 2 x RCA for front and rear LEFT satellites (white)
- 1 x RCA for CENTER speaker (blue)
- 1 x RCA for LFE speaker (black)
- 1 x 3.5 mm stereo Jack for FRONT satellites (green)
- 1 x 3.5 mm stereo Jack for REAR satellites (white)
- 1 x 3.5 mm stereo Jack for LFE/ CENTER speaker
(orange)
Jack)
- 1 x RCA (red)
- 1 x RCA (white)
- 1 x 3.5 mm stereo Jack (HEADPHONE OUT / LINE OUT)
outlet
using the
STANDBY button on the remote control
soundcard/ sound source and / or the controls
on the remote control
INPUT 1
5.1
7
88 1
7a
7b
8a
8b
INPUT 2
STEREO
INPUT 3
FR.L FR.R SR.L SR .R CTR
STEREO
2345
SATELLITE
6
REMOTE
IR-EYE
9
RCA
3.5 mm jack
RCA
3.5 mm jack
AC MAIN
8
Page 9

Speaker Placement (Illustration page 9)
General
· Placing speakers behind curtains, furniture, or any other
objects will reduce the treble response, thus reducing
the stereo effect significantly.
· Each room has different acoustic characteristics and
the placement possibilities are often limited. You can
find the best position for your speakers by
experimenting. In general, the speakers should be
placed as symmetrical as possible in the room.
Front Satellite Speakers (figure a)
· The front left and right satellite speaker play stereo
music and the off-screen sounds of video playback.
· These satellites should be placed to the sides of your
TV or monitor.
· Viewed from the listeners position, the satellite speaker
connected to
left side, and the satellite speaker connected to
the subwoofer should be on the right side.
· The best stereo effect is obtained when the two front
satellite speakers and the listener form an equilateral
triangle.
· The optimum height for these speakers is when they
are placed at ear height (while seated).
Center Satellite Speaker (figure b)
· The center satellite speaker provides the on-screen
effects and dialog in Dolby Digital / Dolby Surround.
· It should be placed as close to the center of your TV /
monitor as possible (e.g. underneath or on top of your
TV / monitor).
· It should be directed at the listeners ear level while
seated.
FRL
at the subwoofer should be on the
FRR
at
EnglishFrançaisDeutschItalianoEspañol
Nederlands
Svenska
Suomi
Surround Satellite Speakers (figure c)
· The surround left and right satellite speaker provide
the surround effects in Dolby Digital / Dolby Surround
· These satellites may be placed in any convenient sites
alongside the listener, even sites slightly forward the
listeners position.
· The surround satellite speakers do not have to be at
exactly the same height as the front satellite speakers.
· Viewed from the listeners position, the satellite speaker
connected to
left side, and the satellite speaker connected to
the subwoofer should be on the right side.
· If you have side walls close to your listening position,
good placement for your surround satellites is slightly
behind your position and slightly above ear level.
SRL
at the subwoofer should be on the
SRR
at
Subwoofer (figure d)
· The subwoofers optimum place is on the floor close to
the wall. The closer it is to the corner, the stronger the
maximum bass output.
· The subwoofer is not magnetically shielded, so position
it at least 0.5 meter from the TV / monitor.
Polski
Türkçe
Русский
NorskDansk
9
Page 10

Specifications
Overall
· output power : 100 watts RMS
· THD : 10% @ 100 watts RMS
· frequency response : 40 20,000 Hz
· cross-over frequency : 200 Hz
· magnetically compensated
Pre-amplifier
· input impedance : >10K ohms
modes for optimal preset sound
ROCK
or
CLASSIC
,
Explanation Sound Presets
POP
Whether your input signal is from a stereo or 5.1 audio-visual
source, the set provides you the ability to chose from either
the
reproduction.
POP
For optimal sound reproduction while listening to modern pop
music, emphasizing the high and low frequencies.
CLASSIC
For optimal sound reproduction while listening to classical
music, exactly the way classic music is composed to be
· treble : ± 6dB @ 1.5dB per step
· clipping level : 2 V RMS
· digital volume : 32 steps @ 1dB per step
· bass : ± 9dB @ 1.8dB per step
perceived pure.
ROCK
For optimal sound reproduction while listening to rock music.
Also when youre playing games, this feature adds an
absolutely new dimension to your games / music.
Satellites
· drivers : 8 ohms Soft Flat 3.25x5.0
· output power : 5 x 10 watts RMS @ 10% THD
· frequency response : 200 20,000 Hz
Subwoofer
· drivers : 5.25 super woofer + 6 wOOx
· output power : 2 x 25 watts RMS @ 10% THD
· frequency response : 40 200 Hz
Remote Control
· # of functions : 19 key buttons
Dimensions
· satellites : 158 (H) x 82 (W) x 81 (D) mm
· subwoofer : 228 (H) x 190 (W) x 266 (D) mm
· remote control : 168 (L) x 38 (W) x 17 (D) mm
Even when the input signal is received from a stereo source
only, the speaker system provides three kinds of sound
presets for you to chose from to enhance, thus optimize, your
listening enjoyment.
MOVIE
Transfers the stereo input signal into a 5.1 channel movie
experience. It will give you the impression as if you are in the
middle of the scene.
CONCERT
Transfers the stereo input signal into a 5.1 channel concert
hall experience. It will give that live feeling as if you were
present at the concert yourself.
STEREO
Just for those who would like to hear stereo sound in its origi-
nal way stereo.
/ Cassette player, game consoles
· packaging : 284 (H) x 323 (W) x 384 (D) mm
Weight
· satellites : 5 x 0.2 kg
· subwoofer : 5.12 kg
System Requirements
· preferred : 5.1-channel sound source
· other possibilities : stereo sound source, MP3 / CD
heating equipment or direct sunlight). To reduce the risk of
fire or electric shock, do not expose this appliance to rain
or moisture. If fluid spills into the speakers, disconnect any
connections immediately and let the speakers dry before
reusing them.
lint-free cloth. Do not use any cleaning agents as they may
have a corrosive effect.
power supply. Wait a few seconds before reconnecting them
Safety
· Do not expose the speakers to excessive heat (caused by
· You may clean the speakers with a soft, slightly dampened
to the power supply.
· If the speakers do not operate, disconnect them from the
longer period of time - for example, youre going on a
vacation - it is recommended to switch off the system
completely and not to leave it in standby mode.
· If your intentions are not to use the speaker system for a
10
English
Français Deutsch Italiano Español
Nederlands
Svenska
Suomi Polski
Türkçe
Русский
Norsk Dansk
 Loading...