

Page 1
Instructions for use
3135 015 21201
Page 2

2
M-LINK™– ASTEP INTO THE FUTURE OF HOME CINEMA
FOLLOW SOME SIMPLE STEPS, AND
M-LINK™WILL BE READY TO GO
This Instructions for Use manual will show you how
to hook up the (infrared) IR Blaster (hook up the IR
Blaster before turning the TV ON, see page 4 for
details) and accessory devices, set up accessory
devices to work with M-Link™, have M-Link
™
learn remote control functions of the accessory
devices, review and test accessory-device functions,
delete accessory devices from the M-Link™system,
and program your Personal macro.
START YOUR ENTERTAINMENT FUN
WITH A
TOUCH OF A BUTTON
By pushing one of the colored macro buttons on the
remote control, you can set in motion a series of
accessory-device functions that will be performed
automatically, one after another.
• Home Video macro button—will automatical-
ly turn the TV and VCR ON, make the VCR
begin playing, and then turn ON an external
amplifier (stereo hi-fi system), if one is connected and set up with M-Link™. The TV Incredible
Surround and TV V. Dolby (if present in your
model of TV) sound features will be turned ON
if no external amplifier is present.
• Home Movie macro button—will automatical-
ly turn the TV and a DVD/LD/VCD player ON,
make the DVD/LD/VCD player begin playing,
and then turn ON an external amplifier (stereo
hi-fi system) if one is connected and set up with
M-Link™. The TV Multimedia feature will be
turned ON. The TV Incredible Surround and
TV V. Dolby (if present in your model of TV)
sound features will be turned ON if no external
amplifier is present.
• ITR/REC macro button—will automatically
turn the TV and a VCR ON and allow you to
begin recording a program, or to set a time to
record a program on the VCR.
• Personal macro button—will activate a series
of accessory-device functions that you creatively program yourself. If you want, automate the
functions that you use often. For example, you
can set up the macro to record DVD movies to
your VCR. Or You may want to use it to automatically turn ON or OFF all of the accessory
devices connected to your TV. You can program the macro in a variety of ways
In addition to the automation capability offered by
the macros, M-Link™will enable you to use buttons
on your TV remote control to work the various functions of the accessory devices (Stop, Pause, Rewind,
Scan Next, etc.).
C
ongratulations and thanks for buying Philips
product! Your TV set has the added value of
the unique M-Link™feature—a new standard that will
streamline your home cinema experience. Gone is the
need to use a bunch of remote controls to run your
entertainment equipment. M-Link™will allow you to
command everything with your TV remote! Control
up to five input devices (a cable box, satellite, VCR
[video cassette recorder], DVD [digital video disc
player], LD [laser disc player], VCD [video compact
disc player], or an STB [set top box]) and one output
device (external amplifier [stereo hi-fi]) with just the
one remote. Use the colored macro buttons to automate the running of movies and videos, to record programs on your VCR, or to have your devices automatically perform a series of functions of your choice.
Page 3

3
M-Link is a trademark of Philips Consumer Electronics Company.
Copyright © 2000 Philips Consumer Electronics Company. All rights reserved.
CONTENTS
This owner's manual is used with several different television models. Therefore, the ways in which featur es are discussed and illustrated here may not match exactly with
your particular model. This is normal and does not
require that you contact your dealer or request service.
The basic operation of M-Link™is the same among all
models.
FEATURES
• Introduction . . . . . . . . . . . . . . . . . . . . . . . . . . . . . . . . .2
• Features . . . . . . . . . . . . . . . . . . . . . . . . . . . . . . . . . . . .3
• Hooking up the IR Blaster . . . . . . . . . . . . . . . . . . . . . .4
• Hooking up Accessory Devices . . . . . . . . . . . . . . . . . .5
• M-Link™Remote Navigation and Macro Buttons . . . . .6
• Setting up a Philips Accessory Device . . . . . . . . . . . . .7
• Setting Up a New or Multibrand
Accessory Device . . . . . . . . . . . . . . . . . . . . . . . . . . .10
• Testing Learned Remote
Control Functions . . . . . . . . . . . . . . . . . . . . . . . . . . . .14
• Deleting Accessory Devices From
the M-Link™System . . . . . . . . . . . . . . . . . . . . . . . . . .15
• Reviewing Macro Functions . . . . . . . . . . . . . . . . . . . .16
• Programming Your Personal Macro . . . . . . . . . . . . . .17
• Deleting Functions from Your
Personal Macro . . . . . . . . . . . . . . . . . . . . . . . . . . . . .20
• Running Macros . . . . . . . . . . . . . . . . . . . . . . . . . . . . .21
• Tables for Recording Multibrand
Remote Control Functions . . . . . . . . . . . . . . . . . . . . .24
• Troubleshooting . . . . . . . . . . . . . . . . . . . . . . . . . . . . .26
• Index . . . . . . . . . . . . . . . . . . . . . . . . . . . . . . . . . . . . .28
Intelligent Control • the feature that allows your TV to
“talk” to the external multimedia devices.
Learning • the ability of the M-Link™microprocessor to
“learn” and store one set of code per accessory device, up to
a maximum of six different devices.
Macro Buttons • buttons on the TV’s remote control
(ITR/REC, HOME VIDEO, HOME MOVIES, and PERSONAL) that when pressed, enable you to set in motion a series of
accessory-device functions. You can program the Personal
macro key to carry out a series of functions of your choice.
Navi Menu • the easy-to-read and easy-to-navigate, onscreen
M-Link™menu.
NOTE: It is recommended that you read each section of
this manual to familiarize yourself with its content before
attempting to perform the instructional steps.
Page 4
4
HOOKING UP THE IR BLASTER
IR Blaster
IR Blaster
Cable
IR Shooters
(Optional)
Jack
Panel
(Back
of TV)
Television Front
Remote
Sensor
Window
IR Blaster
Cable Plug
IR Shooter
Placement
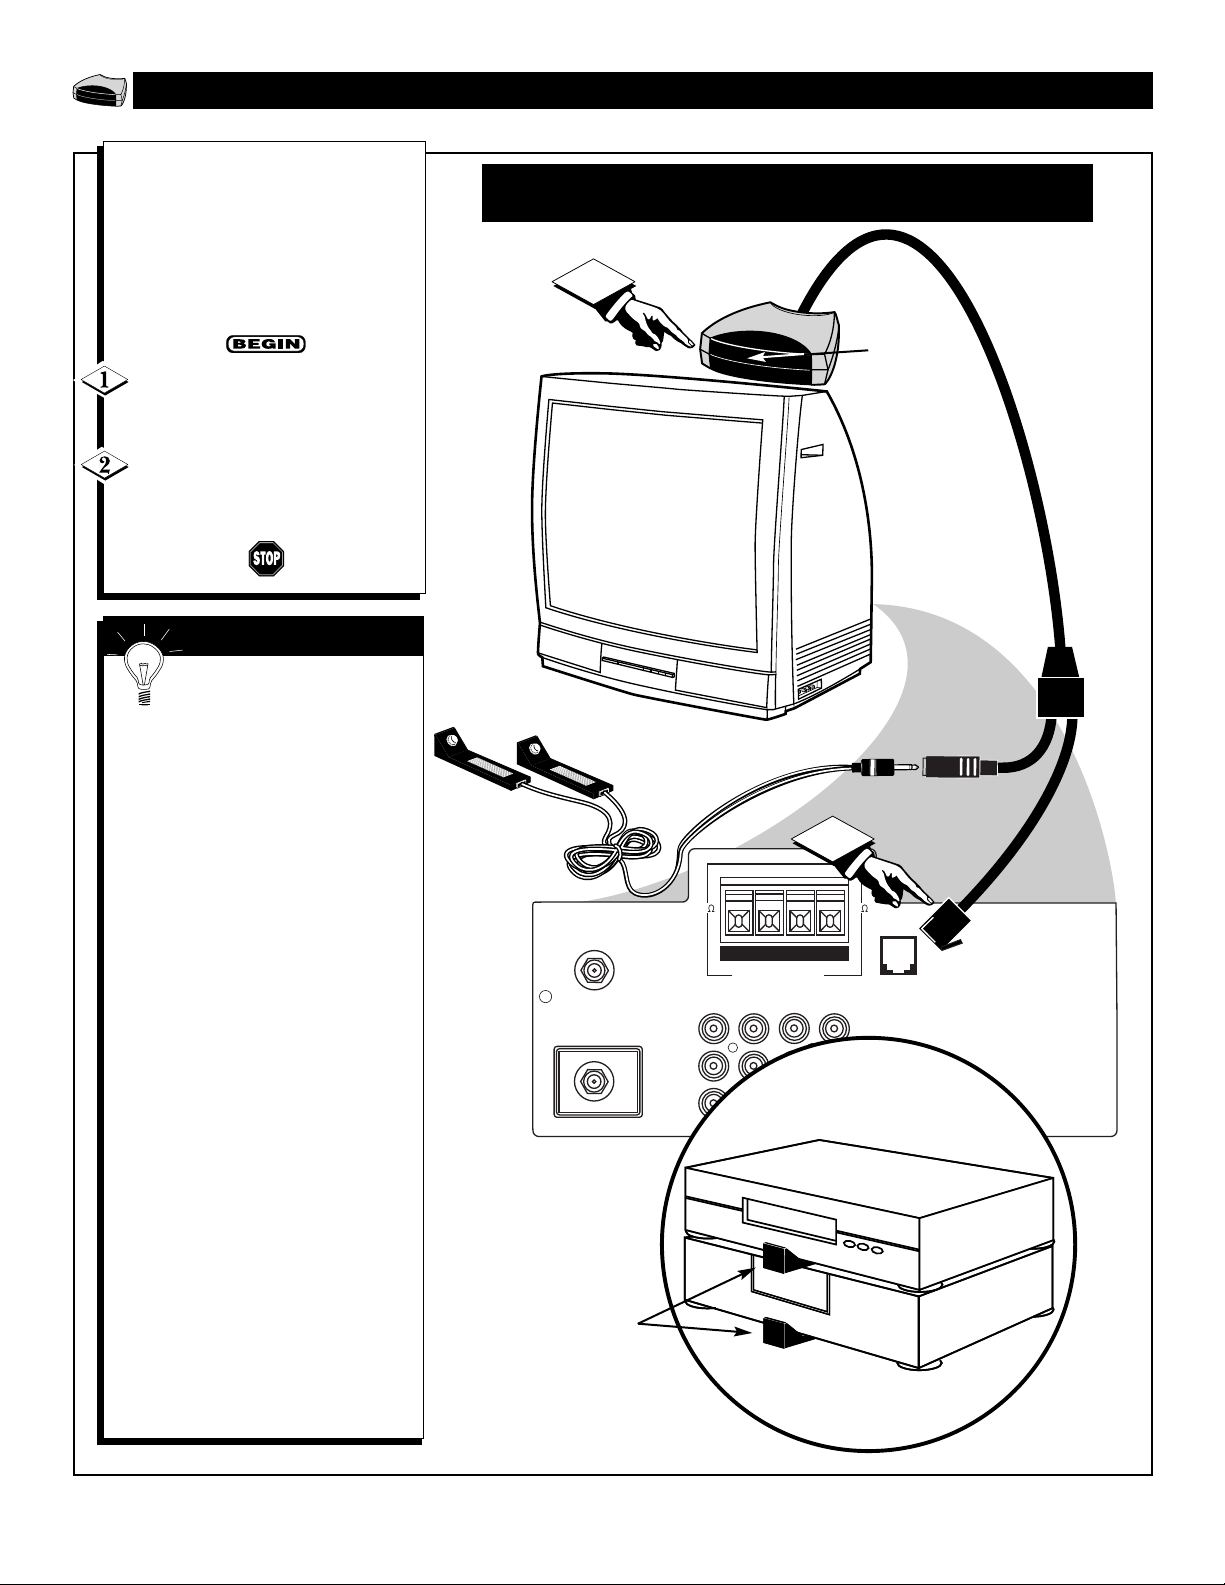
T
he (infrared) IR Blaster is a
small transmitter that enables
you to use your TV remote control
to work the various functions of
your VCRs, DVDs, or other accessory devices. Follow these steps to
properly set up the IR Blaster.
Connect the IR Blaster plug
into the M-Link input located on
the rear jack panel of the TV.
Place the IR Blaster on top of
the TV with the remote sensor window facing into the room.
The IR Blaster transmits a
signal that bounces off of
walls or objects in the room and
then to the IR sensor windows of
the accessory devices you have
connected to your TV. After accessory devices have been set up to
work with M-Link™,the transmission from the IR Blaster will enable
you to use your TV remote control
to work the accessory devices.
IR Shooters are used to more
directly transfer the IR signal from
the IR Blaster to the accessory
devices. You may need IR
Shooters if you are using your TV
set in a room decorated in light colors, for example, because the soft
colors may prevent the IR signal
from effectively bouncing and
reaching the IR remote sensor windows of your accessory devices.
You also may need the shooters if
you store your accessory devices in
a cabinet with a glass cover,
because the cover may deflect the
IR signal from the devices.
To order the optional (infrared) IR
Shooters, contact your dealer, or
call our Parts Information Center at
1-800-851-8885.
SMART HELP
NOTE: For M-Link™ to work, the IR Blaster must be connected to
the TV (as shown below) before the TV is turned ON.
2
PIP ANT "B"
75Ω
ANT "A"
75Ω
VIDEO
AUDIO
Monitor out
L
R
+ R – – L +
SURROUND SOUND
1
88
M-Link
AV1 in
AV2 in
Y
Pb
Pr
S-VIDEO
VCR
VCR
CABLE
CABLE
BOX
BOX
Page 5

5
ANTENNA
OUT
ANTENNA
IN
VIDEO AUDIO
IN
IN
OUT
OUT
LR
ANT "A"
75Ω
L
Monitor out
VIDEO
S-VIDEO
PIP ANT "B"
75Ω
SURROUND SOUND
88
+ R – – L +
AV1 in
Y
Pb
Pr
AV2 in
AUDIO
R
M-Link
S-VIDEO
VIDEO AUDIO
L R
ANT "A"
75Ω
L
Monitor out
VIDEO
S-VIDEO
PIP ANT "B"
75Ω
SURROUND SOUND
88
+ R – – L +
AV1 in
Y
Pb
Pr
AV2 in
AUDIO
R
M-Link
S-VIDEO
OUT
OUT
OUT
L
R
AUDIO
VIDEO
COMP VIDEO
Y
Pb
Pr
ANT "A"
75Ω
L
Monitor out
VIDEO
S-VIDEO
PIP ANT "B"
75Ω
SURROUND SOUND
88
+ R – – L +
AV1 in
Y
Pb
Pr
AV2 in
AUDIO
R
M-Link
ANTENNA
OUT
ANTENNA
IN
VIDEO AUDIO
IN
IN
OUT
OUT
RL
ANTENNA
OUT
VIDEO
AUDIO
OUT
OUT
LR
ANT "A"
75Ω
L
Monitor out
VIDEO
S-VIDEO
PIP ANT "B"
75Ω
SURROUND SOUND
88
+ R – – L +
AV1 in
Y
Pb
Pr
AV2 in
AUDIO
R
M-Link
AUDIO
IN
LR
HOOKING UP ACCESSORY DEVICES
Signal from antenna,
satellite, or cable
company
Cable Converter
Box
Two-Way Signal
Splitter (Optional)
(To order, contact
your dealer or call
1-800-851-8885.)
VCR
DVD (or other device)
VCR
(or other device)
Another Accessory Device
Audio Amplifier (Stereo Hi-Fi)
Back of TV
Back of TV
Back of TV
Back of TV
TV’s Side Jack Panel (AV3)
T
he M-Link™system can handle
up to five input devices (choose
from cable box, satellite, VCR,
DVD, LD, VCD, or an STB) and
one output device (external amplifier [stereo hi-fi]) at one time. This
page presents only hookup examples; the order of hookup and
devices you choose may vary. Also,
please refer to the owner’s manual
for each device for proper connections.
For a basic hookup, connect the
signal coming from your antenna,
satellite, or cable company to any
of the following: directly to the TV
antenna input(s); through a cable
converter box to the TV antenna
input(s); through a cable converter
box and a VCR to the TV antenna
input(s); or through a VCR to the
TV antenna input(s).
NOTE: For more information on
basic hookups, please see page 1 of
the Quick Use and Installation
Guide that came with your TV.
You could hook up a DVD to
the component video inputs (Y,
Pb, Pr) and the AV1 AUDIO
inputs. Those inputs are referred to
as the “CVI” source in the M-Link
™
menu (you’ll learn about selecting a
source within the M-Link™menu
when following the instructions for
setting up an accessory device with
M-Link™).
Connect a second VCR to an
AV input; AV 2, for example.
Connect another accessory
device to the inputs on the side jack
panel (recognized in the M-Link
™
menu as “AV3”)
Connect from the AUDIO
(Monitor out) on the TV to an
external amplifier (stereo hi-fi).
Page 6
6
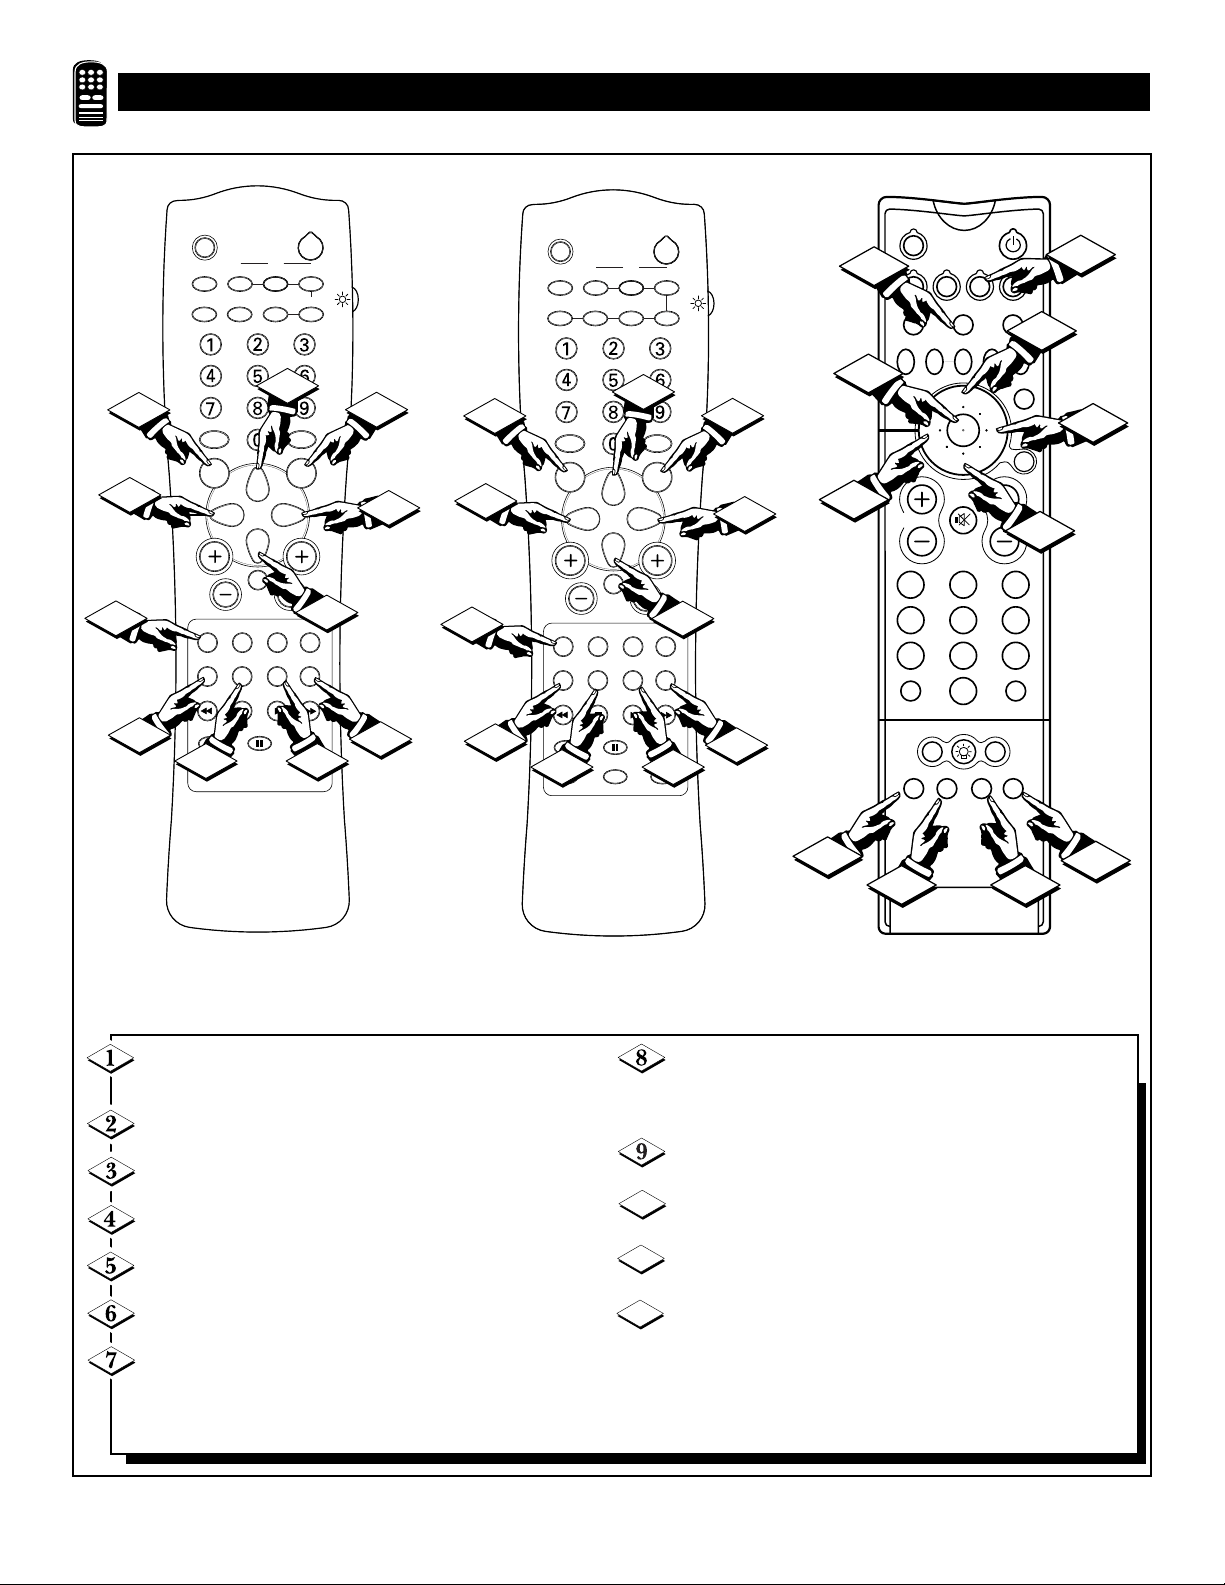
M-LINK™REMOTE NAVIGATION AND MACRO BUTTONS
Used with Models:
27PT41B1, 32PT41B1, 36PT41B1
Used with Models:
27PT71B1, 32PT71B1, 36PT71B1,
27PT81S1, 32PT81S1
Used with Models:
27PT91B1, 32PT91B1
MENU
When you’re in M-Link™mode, this allows you to exit a
menu to the previous level.
M LINK
Allows you to access or exit the M-Link™menu.
CURSOR LEFT
Allows you to access the menus and adjust the settings.
CURSOR UP
Allows you to select the previous item on the menu.
CURSOR DOWN
Allows you to select the next item on the menu.
CURSOR RIGHT
Allows you to access the menus and adjust the settings.
SOURCE
Allows you to select the various sources, either tuner or
M-Link™(accessory devices that have been set up with
M-Link™).
M LINK SOURCE
Allows you to select the various sources, either tuner or
M-Link™(accessory devices that have been set up with
M-Link™).
ITR/REC (Interactive Touch Recording/Record)
Allows you to record programs on your VCR.
HOME VIDEO
Allows you to play the VCR.
HOME MOVIES
Allows you to play a DVD, LD, or VCD.
PERSONAL
Allows you to activate functions that you have pro-
grammed into M-Link™.
10
11
12
7
3
SLEEP
TV/VCR ON/OFF POSITION FREEZE
INCR. SURR. SURF
1
VOL
SOURCE CC CLOCK
ITR/REC HOME HOME PERSONAL
PROGRAM LIST
9
10 11
PIP
A/CH
SWAP
4
SOUND PICTURE
MENU
MUTE
STATUS/EXIT
VIDEO MOVIES
OK
POWER
SOURCE
M LINK
OPEN/CLOSE
M LINK INCR. SURR.
SOURCE FREEZE
UP
MUTE
21 3
54 6
87 9
0
PIP ON/OFF
HOME
MOVIES
POWER
PICTURE
GUIDE/
CC
PERSONAL
2
2
6
TV
CH
5
3
8
1
TUNER A/B
MULTI
PROG. LIST
OK
SWAP PIP CH
SOUND
STATUS/
EXIT
VOL
TV/VCR
A/CH
SURF
ITR/
RECORD
RECORD
M LINK SOURCE OPEN/CLOSE
DN
HOME
VIDEO
SLEEP
TV/VCR ON/OFF POSITION FREEZE
A/CH
SWAP SOURCE
POWER
PIP
PIP CH
DN
UP
4
2
6
CH
5
12
7
3
1
VOL
SOURCE CC CLOCK
ITR/REC HOME HOME PERSONAL
9
INCR. SURR.
PROGRAM LIST
10 11
SOUND PICTURE
MUTE
VIDEO MOVIES
OPEN/CLOSE
M LINK
SURF
TUNER A/B
MENU
STATUS/EXIT
OK
2
6
CH
5
12
9
10 11
12
Page 7
7
SETTING UP A PHILIPS ACCESSORY DEVICE
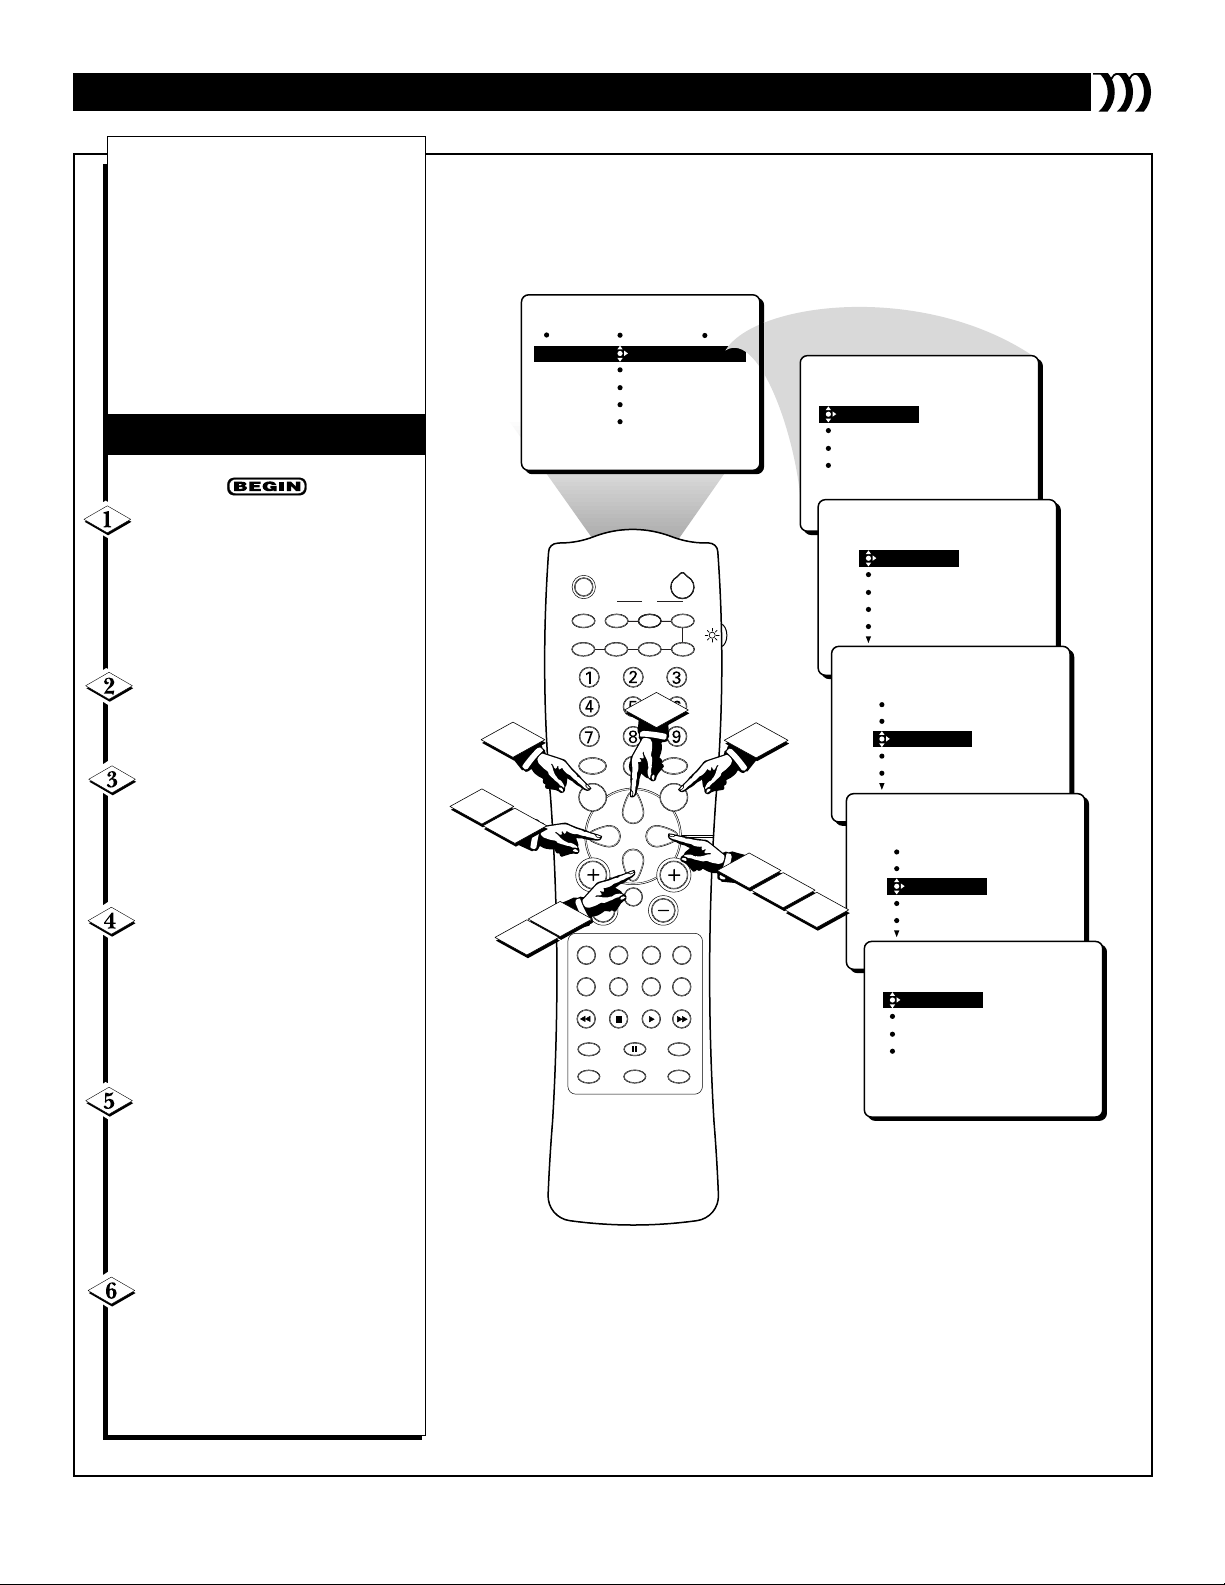
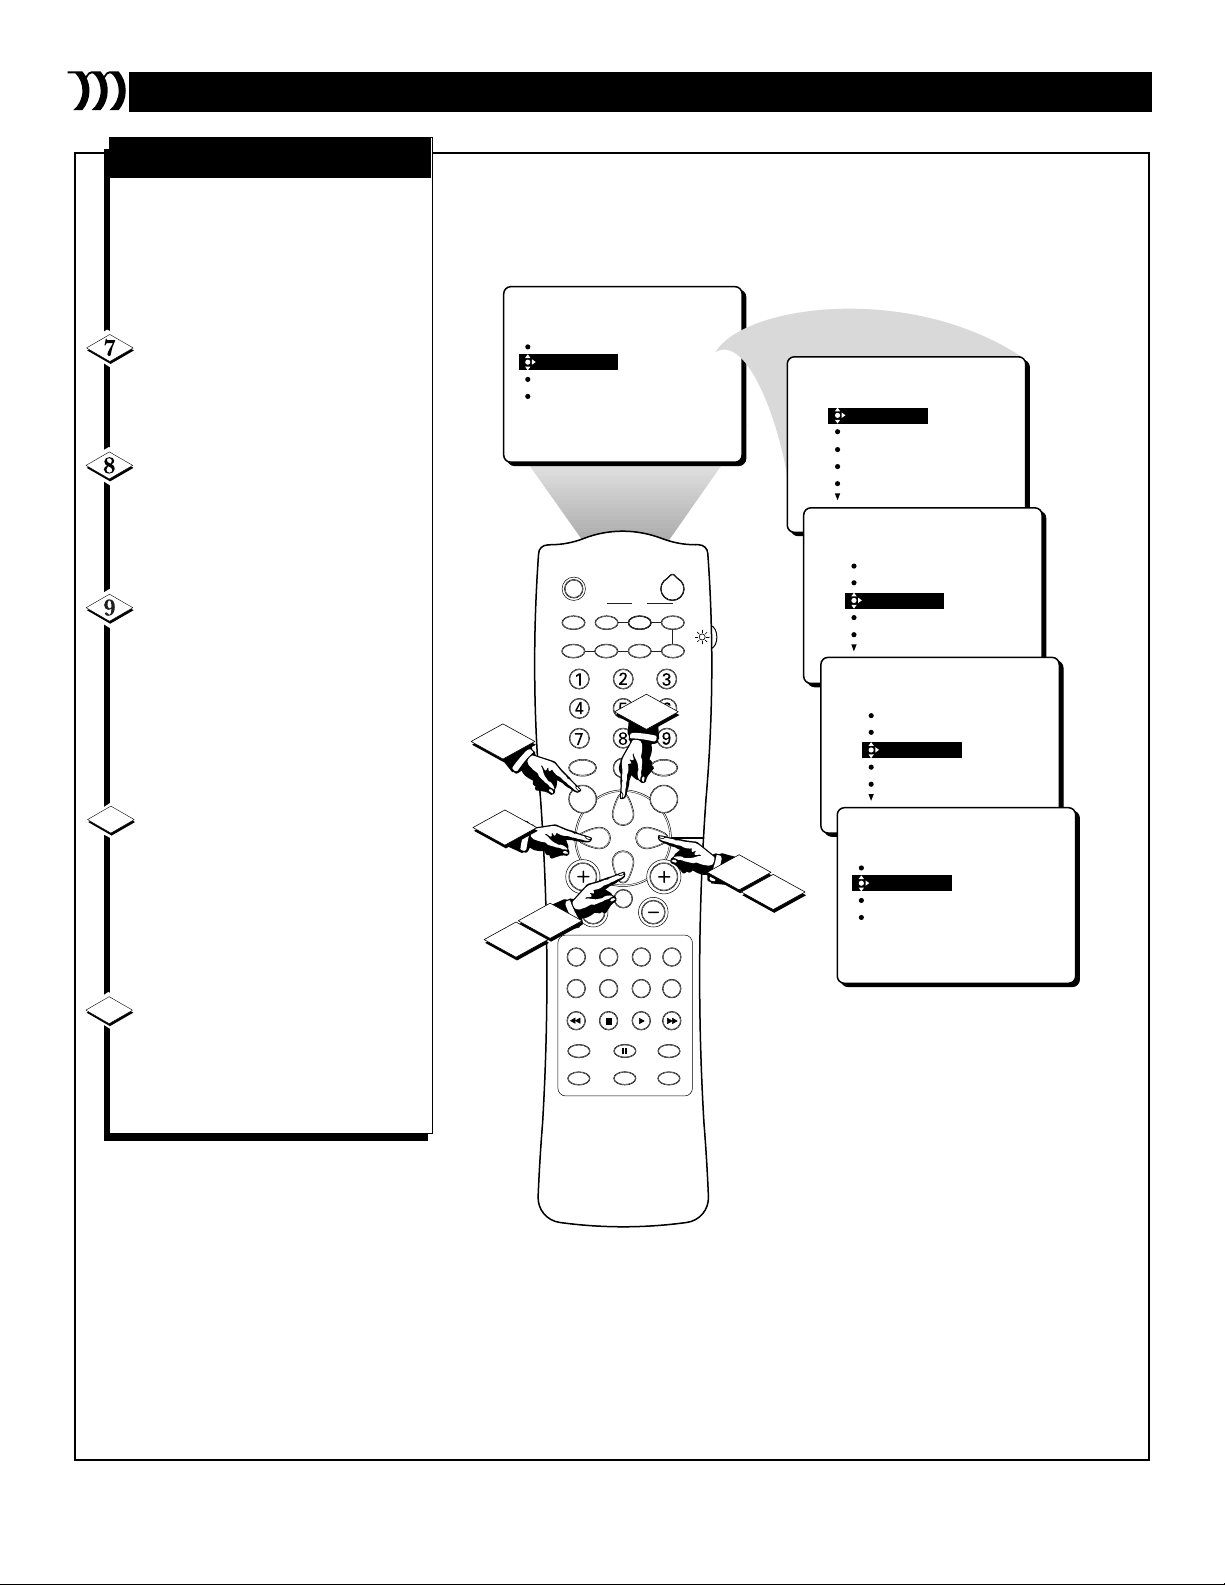
T
hese simple instructions tell
you how to set up a Philips
accessory device to work with the
M-Link™feature. You will need to
follow all of the steps contained in
each of the following sections
(“Selecting the Device,”
“Choosing the Source,” and
“Choosing the Brand and Testing
Remotes”) to set up the device.
Press the M LINK button on
your remote control to enter the
M-Link
™
menu. Then press the
CURSOR LEFT or CURSOR
RIGHT button until SETUP is
highlighted.
Press the CURSOR DOWN
button once to highlight SELECT
DEVICE.
Press the CURSOR LEFT or
CURSOR RIGHT button to enter
the SELECT DEVICE menu. The
SELECT DEVICE menu will shift
to the left.
Press the CURSOR UP or
CURSOR down button repeatedly
until the device you want to set up
with M-Link™is highlighted.
NOTE: You can set up only one
device at a time.
With the device you want to set
up highlighted, press the CUR-
SOR RIGHT button to set up the
device to work with M-Link
™
. The
name of the device you’ve selected
will move to the upper right corner
of the TV screen.
Press the MENU button to exit
the SELECT DEVICE menu and
return to the SETUP menu.
Please continue to the next page . . .
SELECTING THE DEVICE
CVI
SETUP
SELECT DEVICE
CHOOSE SOURCE
CHOOSE BRAND
DELETE DEVICE
MACRO
SETUP
SELECT DEVICE
CHOOSE SOURCE
CHOOSE BRAND
DELETE DEVICE
CBL
SAT
VCR
DVD
LD
3
6
1
2
4
SLEEP
TV/VCR ON/OFF POSITION FREEZE
A/CH
SWAP SOURCE
PIP
PIP CH
UP
4
SOUND PICTURE
MUTE
VIDEO MOVIES
OPEN/CLOSE
M LINK
TUNER A/B
MENU
VOL
SOURCE CC CLOCK
STATUS/EXIT
ITR/REC HOME HOME PERSONAL
INCR. SURR.
PROGRAM LIST
OK
POWER
SURF
SETUP
SELECT DEVICE
CBL
SAT
VCR
DVD
LD
DN
SETUP
SELECT DEVICE
CBL
SAT
1
1
CH
3
5
VCR
DVD
LD
SETUP
SELECT DEVICE
CBL
SAT
VCR
DVD
LD
SETUP
SELECT DEVICE
CHOOSE SOURCE
CHOOSE BRAND
DELETE DEVICE
VCR-
CBL
SAT
VCR
DVD
LD
Page 8
8
SETTING UP A PHILIPS ACCESSORY DEVICE
NOTE: If you are setting up an
external amplifier hi-fi (AMP), you
don’t have to choose a source; proceed to the next section, “Choosing
the Brand and Testing Remotes.”
While in the SETUP menu,
press the CURSOR DOWN button once to highlight CHOOSE
SOURCE.
Press the CURSOR LEFT or
CURSOR RIGHT button to enter
the CHOOSE SOURCE menu. The
CHOOSE SOURCE menu will shift
to the left.
Press the CURSOR DOWN or
CURSOR UP button repeatedly
until the source you want to select
is highlighted. For example, if you
have connected the device to the
side jack panel inputs (recognized
by M-Link
™
as AV3), highlight
AV3.
With the source you want to
select highlighted, press the CUR-
SOR RIGHT button. The name of
the source you selected will move
to the upper right corner of the TV
screen, in position after the name of
the device you selected in step 5.
Press the MENU button to exit
the CHOOSE SOURCE and return
to the SETUP menu.
Please continue to the next page . . .
10
11
CHOOSING THE SOURCE
11
8
SETUP
SELECT DEVICE
CHOOSE SOURCE
CHOOSE BRAND
DELETE DEVICE
7
9
CVI
AV2
AV3
CH3A
CH3A
SLEEP
TV/VCR ON/OFF POSITION FREEZE
A/CH
SWAP SOURCE
PIP
PIP CH
UP
9
SOUND PICTURE
MUTE
VIDEO MOVIES
OPEN/CLOSE
M LINK
TUNER A/B
MENU
VOL
SOURCE CC CLOCK
STATUS/EXIT
ITR/REC HOME HOME PERSONAL
INCR. SURR.
PROGRAM LIST
OK
POWER
SURF
VCR-
SETUP
CHOOSE SOURCE
CVI
AV2
AV3
CH3A
CH4A
SETUP
CHOOSE SOURCE
CVI
AV2
AV3
CH3A
DN
8
CH
10
CH4A
SETUP
CHOOSE SOURCE
CVI
AV2
AV3
CH3A
CH4A
SETUP
SELECT DEVICE
CHOOSE SOURCE
CHOOSE BRAND
DELETE DEVICE
VCR-
VCR-
VCR-AV3
VCR-AV3
CVI
AV2
AV3
CH3A
CH3A
Page 9
9
SETTING UP A PHILIPS ACCESSORY DEVICE
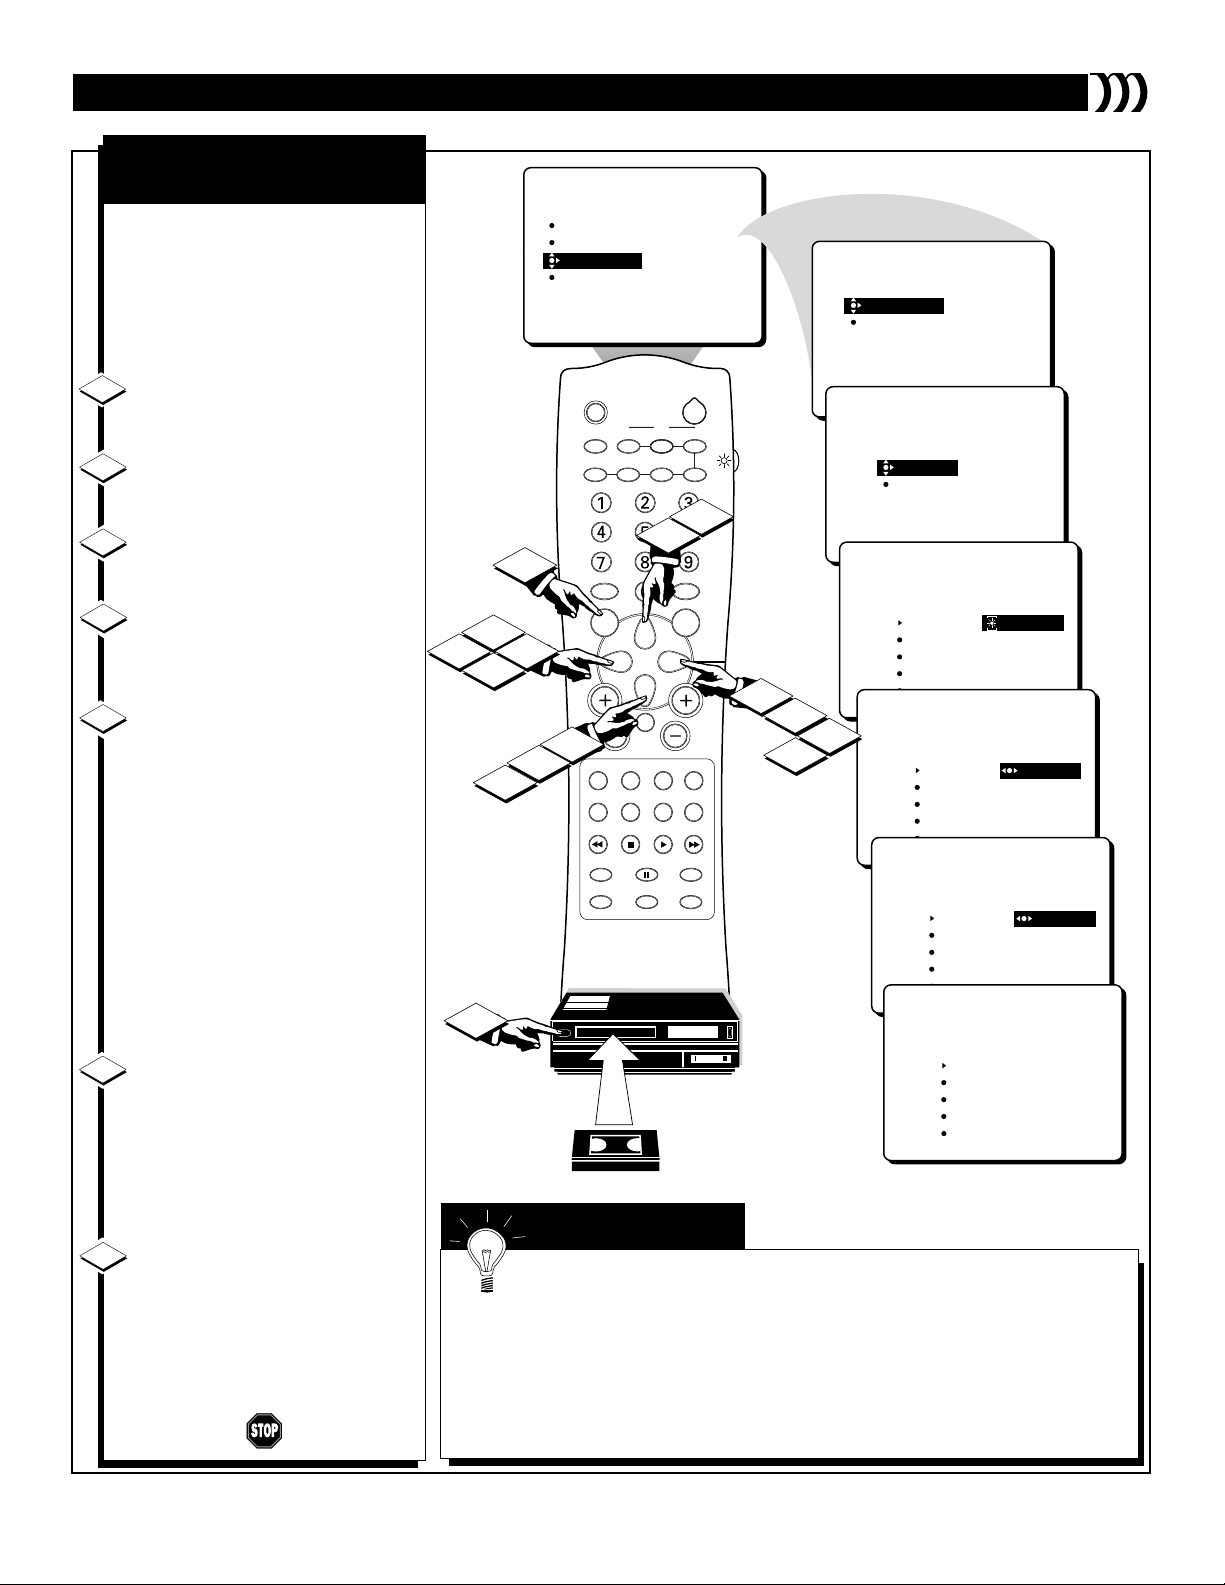
9
R
emote codes for Philips brand
accessory devices have been preprogrammed into M-Link™. Follow
these steps to choose the Philips brand
and find the right set of remote codes
(test REMOTE 0, REMOTE 1, and so
on) for your accessory device.
While in the SETUP menu, press
the CURSOR DOWN button twice
to highlight CHOOSE BRAND.
Press the CURSOR LEFT or
CURSOR RIGHT button to enter the
CHOOSE BRAND menu.
Press the CURSOR LEFT or
CURSOR RIGHT button to high-
light a REMOTE.
Turn ON the Philips accessory
device that you want to set up and
insert a disc or tape to play. Be sure
the device is in the STOP mode.
Press the CURSOR LEFT or
CURSOR RIGHT button to test the
first REMOTE (REMOTE 0) to see if
M-Link™will make the Philips device
play and stop.
NOTE: If the device responded to
the commands (play and stop), press
the CURSOR RIGHT button to
select YES. Then press the CURSOR LEFT button to store the
REMOTE command. The Philips
name will move to the upper right corner of the screen; the word
“STORED” will appear briefly on the
screen in red.
If the device did not respond
(play and stop) when you tested the
REMOTE, press the CURSOR
RIGHT button to select NO. Then
press the CURSOR LEFT button.
“TEST AGAIN” will appear on the
screen. Press the CURSOR RIGHT
button to test the REMOTE again.
If the device still does not
respond, press the CURSOR
DOWN button to highlight a new
REMOTE to test. Then press the
CURSOR LEFT or CURSOR
RIGHT button to test the remote.
(Refer to steps 16 and 17 again, as
necessary.)
CHOOSING THE BRAND
AND
TESTING REMOTES
12
13
14
15
16
17
18
If the Philips device will not respond to any of the remote tests, follow the steps
in the next section, “Setting Up a New or Multibrand Accessory Device.”
By pressing the SOURCE button, you will be able to toggle from your TV’s tuner (or
tuners [A or B], depending on your model) to the accessory devices you have set up to
work with M-Link™. Remember that when an accessory device is selected as your source
(VCR1, for example), you cannot then use the number buttons or channel (+) or (–) buttons to change the TV’s channels; you must press the SOURCE button until you have
selected a tuner source and then press the number buttons or channel (+) or (–) buttons.
SMART HELP
VCR-AV3
SETUP
CHOOSE BRAND
PHILIPS
NEW
POWER
PIP
PIP CH
DN
UP
18
9
M LINK
13
CH
14
17
SURF
TUNER A/B
SETUP
CHOOSE BRAND
16
PHILIPS
REMOTE 0 TEST
REMOTE 1
REMOTE 2
REMOTE 3
REMOTE 4
SETUP
CHOOSE BRAND
PHILIPS
REMOTE 0 PLAY
REMOTE 1
REMOTE 2
REMOTE 3
REMOTE 4
SETUP
CHOOSE BRAND
PHILIPS
REMOTE 0 YES
REMOTE 1
REMOTE 2
REMOTE 3
REMOTE 4
SETUP
CHOOSE BRAND
PHILIPS
SETUP
CHOOSE BRAND
VCR-AV3
REMOTE 0
REMOTE 1
REMOTE 2
REMOTE 3
REMOTE 4
VCR-AV3
VCR-AV3
VCR-AV3
DID VCR
RESPOND?
REMOTE 0 STORED
REMOTE 1
REMOTE 2
REMOTE 3
REMOTE 4
PHILIPS
REMOTE 0 STORED
REMOTE 1
REMOTE 2
REMOTE 3
REMOTE 4
DID VCR
RESPOND?
VCR-AV3
VCR-AV3
PHILIPS
16
15
14
17
18
11
13
SETUP
SELECT DEVICE
CHOOSE SOURCE
CHOOSE BRAND
DELETE DEVICE
12
9
SLEEP
TV/VCR ON/OFF POSITION FREEZE
A/CH
SWAP SOURCE
SOUND PICTURE
MENU
VOL
MUTE
STATUS/EXIT
SOURCE CC CLOCK
ITR/REC HOME HOME PERSONAL
VIDEO MOVIES
INCR. SURR.
OPEN/CLOSE
PROGRAM LIST
OK
Page 10

10
SETTING UP A NEW OR MULTIBRAND ACCESSORY DEVICE
T
hese simple instructions tell you
how to set up a New or
Multibrand device to work with the
M-Link™system. You will need to
follow all of the steps contained in
each of the following sections
(“Selecting the Device,” “Choosing
the Source,” and “Choosing the
Brand and Learning Remote
Commands”) to set up the device.
Press the M LINK button on
your remote control to enter the
M-Link™menu. Then press the
CURSOR LEFT or CURSOR
RIGHT button until SETUP is
highlighted.
Press the CURSOR DOWN
button once to highlight SELECT
DEVICE.
Press the CURSOR LEFT or
CURSOR RIGHT button to enter
the SELECT DEVICE menu. The
SELECT DEVICE menu will shift
to the left.
Press the CURSOR DOWN or
CURSOR UP button repeatedly
until the device you want to set up
with M-Link
™
is highlighted.
NOTE: You can set up only one
device at a time.
With the device you want to set
up highlighted, press the CURSOR RIGHT button to set up the
device to work with M-Link™. The
name of the device you’ve selected
will move to the upper right corner
of the TV screen.
Press the MENU button to exit
the SELECT DEVICE menu and
return to the SETUP menu.
Please continue to the next page . . .
S
ELECTING THE DEVICE
CVI
SETUP
SELECT DEVICE
CHOOSE SOURCE
CHOOSE BRAND
DELETE DEVICE
MACRO
SETUP
SELECT DEVICE
CHOOSE SOURCE
CHOOSE BRAND
DELETE DEVICE
CBL
SAT
VCR
DVD
LD
3
6
1
2
4
SLEEP
TV/VCR ON/OFF POSITION FREEZE
A/CH
SWAP SOURCE
PIP
PIP CH
UP
4
SOUND PICTURE
MUTE
VIDEO MOVIES
OPEN/CLOSE
M LINK
SURF
TUNER A/B
MENU
VOL
SOURCE CC CLOCK
STATUS/EXIT
ITR/REC HOME HOME PERSONAL
INCR. SURR.
PROGRAM LIST
OK
POWER
SETUP
SELECT DEVICE
CBL
SAT
VCR
DVD
LD
DN
SETUP
SELECT DEVICE
CBL
SAT
1
1
CH
3
5
VCR
DVD
LD
SETUP
SELECT DEVICE
CBL
SAT
VCR
DVD
LD
SETUP
SELECT DEVICE
CHOOSE SOURCE
CHOOSE BRAND
DELETE DEVICE
VCR-
VCR-
CBL
SAT
VCR
DVD
LD
Page 11

11
SETTING UP A NEW OR MULTIBRAND ACCESSORY DEVICE
NOTE: If you are setting up an
external amplifier hi-fi (AMP), you
don’t have to choose a source; proceed to the next section, “Choosing
the Brand and Learning Remote
Commands.”
While in the SETUP menu,
press the CURSOR DOWN button once to highlight CHOOSE
SOURCE.
Press the CURSOR LEFT or
CURSOR RIGHT button to enter
the CHOOSE SOURCE menu.
The CHOOSE SOURCE menu will
shift to the left.
Press the CURSOR UP or
CURSOR DOWN button repeat-
edly until the source you want to
select is highlighted. For example,
if you have connected the device to
the side jack panel inputs (recognized by M-Link
™
as AV3), high-
light AV3.
NOTE: Ensure that you select the
source to which you connected the
device. Otherwise, your TV
remote control will not operate the
device after you have completed
the setup process.
With the source you want to
select highlighted, press the CURSOR RIGHT button. The name of
the source you selected moves to
the upper right corner of the TV
screen, in position after the name of
the type of device you selected in
step 5.
Press the MENU button to exit
the CHOOSE SOURCE menu and
return to the SETUP menu.
Please continue to the next page . . .
10
11
CHOOSING THE SOURCE
11
8
SETUP
SELECT DEVICE
CHOOSE SOURCE
CHOOSE BRAND
DELETE DEVICE
7
9
INCR. SURR.
PROGRAM LIST
SLEEP
TV/VCR ON/OFF POSITION FREEZE
A/CH
SWAP SOURCE
SOUND PICTURE
MENU
VOL
MUTE
SOURCE CC CLOCK
STATUS/EXIT
ITR/REC HOME HOME PERSONAL
VIDEO MOVIES
OPEN/CLOSE
OK
VCR-
CVI
AV2
AV3
CH3A
CH3A
POWER
PIP
PIP CH
DN
UP
SETUP
CHOOSE SOURCE
9
M LINK
8
CH
SURF
TUNER A/B
10
CVI
AV2
AV3
CH3A
CH4A
SETUP
CHOOSE SOURCE
CVI
AV2
AV3
CH3A
CH4A
SETUP
CHOOSE SOURCE
CVI
AV2
AV3
CH3A
CH4A
SETUP
SELECT DEVICE
CHOOSE SOURCE
CHOOSE BRAND
DELETE DEVICE
VCR-
VCR-
VCR-AV3
VCR-AV3
CVI
AV2
AV3
CH3A
CH3A
Page 12

12
SETTING UP A NEW OR MULTIBRAND ACCESSORY DEVICE
While in the SETUP menu, press
the CURSOR DOWN button twice
to highlight CHOOSE BRAND.
Press the CURSOR LEFT or
CURSOR RIGHT button to enter the
CHOOSE BRAND menu.
Press the CURSOR DOWN but-
ton once to highlight NEW.
Press the CURSOR LEFT or
CURSOR RIGHT button. “NEW”
will move to the upper right corner
under the device name and source.
Press the CURSOR LEFT or
CURSOR RIGHT button again. The
LEARN menu will move to the left.
NOTE: You can go through the learn-
ing process in manual or automatic
mode.
Manual mode—If you press the
CURSOR UP, DOWN, RIGHT, or
LEFT button within three seconds of
entering the LEARN menu, you can
manually control the learning process;
that is, you can then press the CURSOR UP or CURSOR DOWN button
to highlight a remote function
(POWER/STBY, PLAY, STOP, etc.) of
your choice and then press the CURSOR LEFT or CURSOR RIGHT button to select the function (the item will
blink, indicating that the IR Blaster is
ready to receive transmission from the
accessory device remote control).
OR
Automatic mode—If you don’t press
the CURSOR UP, DOWN, RIGHT, or
LEFT button within in three seconds
of entering the LEARN menu, the first
function (POWER/STBY) will automatically become ready for learning
(the function will blink). As each item
is learned, the highlight bar will automatically move to the next function to
be learned and the function will
become ready for learning.
Please continue to the next page . . .
C
HOOSING THEBRAND
ANDLEARNINGREMOTE
C
OMMANDS
12
14
13
15
16
The various multibrand devices may have different
remote control button names for the same function. An
easy-to-use table is provided in the back of this book for you
to write down the name of each multibrand remote control
button next to the corresponding M-Link™TV remote control
button or menu name. This will help you learn and remember the button names you’ll use on the TV remote control.
SMART HELP
15
16
13
14
SETUP
SELECT DEVICE
CHOOSE SOURCE
CHOOSE BRAND
DELETE DEVICE
SLEEP
TV/VCR ON/OFF POSITION FREEZE
A/CH
SWAP SOURCE
SOUND PICTURE
MENU
VOL
12
SOURCE CC CLOCK
ITR/REC HOME HOME PERSONAL
INCR. SURR.
PROGRAM LIST
OK
MUTE
STATUS/EXIT
VIDEO MOVIES
OPEN/CLOSE
VCR-AV3
REMOTE 0
REMOTE 1
REMOTE 2
REMOTE 3
REMOTE 4
LEARN
VCR-AV3
VCR-AV3
VCR-AV3
VCR-AV3
NEW
POWER/STBY
PLAY
STOP
FF/FORWARD
REW/REVERSE
VCR-AV3
HOLD VCR
REMOTE CLOSE
TO BLASTER
AND PRESS KEY
NEW
SETUP
CHOOSE BRAND
PHILIPS
NEW
SETUP
CHOOSE BRAND
PHILIPS
POWER
PIP
PIP CH
DN
UP
M-LINK
13
CH
15
NEW
SETUP
CHOOSE BRAND
NEW
LEARN
SETUP
CHOOSE BRAND
LEARN
POWER/STBY
PLAY
STOP
FF/FORWARD
REW/REVERSE
16
SURF
TUNER A/B
Page 13

13
SETTING UP A NEW OR MULTIBRAND ACCESSORY DEVICE
To learn an accessory device
remote control function: Point the
remote control of the accessory
device at the IR Blaster (Hold the
remote control no farther than about
four and one-half inches from the IR
Blaster.) Then press the button on
the remote control that corresponds
with the highlighted function in the
LEARN menu (POWER/STBY,
PLAY, STOP, etc.). If M-Link™recognizes the button code, a sound
feedback (a beep) will occur to indicate that the function has been
learned. If M-Link
™
doesn’t recognize the button code, the sound
feedback will not occur.
After you’ve had M-Link
™
learn all the functions you want,
press the M LINK button button
to remove the menu from the
screen.
The next section will tell you how
to test the remote control commands
of your accessory devices to ensure
that they are working properly with
M-Link™.
17
18
It is important that you have M-Link™learn the
functions that are necessary for basic operation of
each New or Multibrand accessory device that you set
up to work with M-Link™(for example:
POWER/STBY, PLAY, STOP, PAUSE, FF/FORWARD,
REW/REVERSE, as appropriate for the device).
Otherwise, you may not be able to use the colored macro
buttons (ITR/REC, HOME VIDEO, HOME MOVIES,
and PERSONAL) on your TV’s remote control to power
ON and play the devices; and you may not be able to use
your TV’s remote control to work basic functions of the
new or multibrand device (for example: PLAY, PAUSE,
STOP, FF/FORWARD, REW/REVERSE).
By pressing the SOURCE button, you will be able to
toggle from your TV’s tuner (or tuners [A or B], depending on your model) to the accessory devices you have set
up to work with M-Link™. Remember that when an
accessory device is selected as your source (VCR1, for
example), you cannot then use the number buttons or
channel (+) or (–) buttons to change the TV’s channels;
you must press the SOURCE button until you have
selected a tuner source and then press the number buttons or channel (+) or (–) buttons.
SMART HELP
17
REV
JOG/SHTL
TIMER
TURBO
AUDIO/
MUTE
SEARCH
"BEEP"
-
-
REW FF
STOP
STOP
OK/STATUS
MENU
TIMER
SKIP
TAPE
MANAGER
RECREC
/OTR
FWD
17
START STOP DATE
GHI6 MNO
4
VPS/PDC DAILY
PQRS9WXYZ
7
SPEED DBS/SAT
ALT0CLEAR
ALT
0
STILL/SLOW
.......... ..........
PLAY
PLAY
CHVOL
—+
1
-+-
TUV
8
CBL/DBS
VCR/TV
QUICK PROGRAMMING
ABC3 DEF
2
*
JKL
5
+
SAT/
POWER
WEEKLY
SETUP
CHOOSE BRAND
LEARN
POWER/STBY
PLAY
STOP
FF/FORWARD
REW/REVERSE
VCRTV
SMARTPICTURE
+
VCR-AV3
NEW
HOLD VCR
REMOTE CLOSE
TO BLASTER
AND PRESS KEY
"BEEP"
SLEEP
PIP
TV/VCR ON/OFF POSITION FREEZE
A/CH
SWAP SOURCE
SOUND PICTURE
MENU
VOL
SOURCE CC CLOCK
ITR/REC HOME HOME PERSONAL
INCR. SURR.
PROGRAM LIST
OK
STATUS/EXIT
VIDEO MOVIES
OPEN/CLOSE
PIP CH
UP
M LINK
MUTE
TUNER A/B
POWER
DN
18
CH
SURF
Page 14

14
TESTING LEARNED REMOTE CONTROL FUNCTIONS
A
fter the remote control functions
of accessory devices have been
learned by M-Link™, you can test
whether the functions shown on the
screen are being correctly carried
out by the accessory device.
Press the M LINK button on
your TV remote control to enter the
M-Link™menu.
Press the CURSOR RIGHT
button repeatedly until the name of
the device whose functions you
want to test (VCR or DVD, for
example) is highlighted.
Press the CURSOR DOWN or
CURSOR UP button repeatedly
until the name of the function you
want to test is highlighted.
Press the CURSOR LEFT or
CURSOR RIGHT button to acti-
vate the highlighted function.
NOTE: If the device did not
respond to the command to perform
the function in step 4, go back to
either the section on “Setting Up a
Philips Device” or “Setting Up a
New or Multibrand Device” and
perform the steps again.
If the device performed the
POWER/STBY function, press the
CURSOR DOWN button to highlight other functions (MENU,
SPEED, SLOW, etc.). Then press
the CURSOR RIGHT button to
activate each function and check
whether the device performs the
function.
Press the M LINK button on
your TV’s remote control to remove
the M-Link™menu from the screen.
When you are setting up a New
or Multibrand device, you must
ensure that you are pressing the correct
buttons on the device’s remote control to
match with the corresponding function in
the M-Link™LEARN menu.
Different codes have sometimes been
used for the same function among Philips
accessory devices. If M-Link™will not
operate the functions of a Philips accessory device, you may need to delete the
device from M-Link™using the onscreen
menu, and then explore the functions of
the Philips accessory device using its
remote control. Follow the steps under
“Setting up a New or Multibrand
Accessory Device” to have M-Link
™
learn the remote functions.
SMART HELP
4
TV
SLEEP
TV/VCR ON/OFF POSITION FREEZE
A/CH
SWAP SOURCE
VOL
3
SOURCE CC CLOCK
5
ITR/REC HOME HOME PERSONAL
INCR. SURR.
PROGRAM LIST
CH3
VCR
POWER/STBY
MENU
SAP
SPEED
SLOW
PIP
PIP CH
UP
SOUND PICTURE
MUTE
VIDEO MOVIES
OPEN/CLOSE
M LINK
TUNER A/B
MENU
STATUS/EXIT
OK
SURF
POWER
VCR-AV3
CHI
VCR-AV3
VCR
POWER/STBY
MENU
SAP
SPEED
SLOW
VCR-AV3
VCR
POWER/STBY
MENU
SAP
SPEED
DN
SLOW
6
1
POWER ON
4
2
CH
4
5
Page 15

15
DELETING A
CCESSORY DEVICES FROM THE M-LINK
™
SYSTEM
Y
ou can remove any accessory
device you have set up to work in
the M-Link™system by following
these steps.
Press the M LINK button on
your TV remote control to enter the
M-Link™menu.
Press the CURSOR LEFT or
CURSOR RIGHT button until
SETUP is highlighted.
Press the CURSOR DOWN
button repeatedly until DELETE
DEVICE is highlighted.
Press the CURSOR RIGHT
button to enter the DELETE
DEVICE menu.
Press the CURSOR DOWN
button until the name of the device
you want to delete is highlighted.
Then press the CURSOR RIGHT
button to delete the device from
M-Link™.
Press the M LINK button to
remove the menu from the screen.
2
CVI
SLEEP
TV/VCR ON/OFF POSITION FREEZE
SWAP SOURCE
VOL
3
SOURCE CC CLOCK
5
ITR/REC HOME HOME PERSONAL
SETUP
SELECT DEVICE
CHOOSE SOURCE
CHOOSE BRAND
DELETE DEVICE
MUTE
STATUS/EXIT
VIDEO MOVIES
PIP
PIP CH
UP
A/CH
SOUND PICTURE
MENU
M LINK
POWER
VCR-AV3
MACRO
SETUP
SELECT DEVICE
CHOOSE SOURCE
CHOOSE BRAND
DELETE DEVICE
SETUP
SELECT DEVICE
CHOOSE SOURCE
CHOOSE BRAND
DELETE DEVICE
DN
SETUP
DELETE DEVICE
VCR-AV3
VCR-AV3
CBL
SAT
VCR
DVD
LD
VCR-AV3
CBL
SAT
VCR
DVD
LD
VCR-AV3
6
1
2
CH
4
5
INCR. SURR.
PROGRAM LIST
OK
OPEN/CLOSE
SURF
TUNER A/B
Page 16

REVIEWING MACRO FUNCTIONS
Here are the series of functions set in motion
by touching the macro buttons:
HOME VIDEO—turn the TV and a VCR (video
cassette recorder) ON; make the VCR begin playing;
turn ON an external amplifier (hi-fi system), if one is
set up; if an external amplifier is not present, the TV
Incredible Surround Sound and TV V. Dolby sound
features will be turned ON.
HOME MOVIE—turn the TV and a DVD (digital
video disc player), LD (laser disc player), or VCD
(video cassette disc player) ON; make the DVD or
other accessory device begin playing; turn ON an
external amplifier (hi-fi system), if one is set up;
turn ON the TV Multimedia feature; if an external
amplifier is not present, the TV Incredible Surround
and TV V. Dolby sound features will be turned ON.
ITR/REC—turn the TV ON; start recording a program on your VCR; or set start and stop times for the
later recording of a program.
PERSONAL—can be used to turn ON or OFF all
the accessory devices connected. Or you can program this button to carry out other steps of your
choice, such as recording from DVD to VCR, for
example. See page 17 for instructions for programming your Personal macro.
16
A
macro is a set of functions pro-
grammed into your TV that you can
activate with one touch of a button on
your TV remote control. Three buttons
have been preprogrammed to play
videotapes or DVD/LD/VCD movies or
to record with your VCR: HOME
VIDEO, HOME MOVIE, and ITR/REC
(Interactive Touch Record). You program the the PERSONAL macro button.
Follow these steps to review the functions that each button will activate.
Press the M LINK button on your
TV remote control to enter the M-Link
™
menu.
Press the CURSOR LEFT or
CURSOR RIGHT button repeatedly
until MACRO is highlighted.
Press the CURSOR DOWN button
to highlight REVIEW.
Press the CURSOR RIGHT but-
ton. The REVIEW menu will move to
the left and HOME VIDEO will be
highlighted. The series of functions that
can be performed automatically, one
after another, when you press the
HOME VIDEO macro button will be
listed.
Press the CURSOR DOWN button
down once to highlight HOME
MOVIE. The series of functions that
can be performed automatically when
you press the HOME MOVIE macro
button will be listed.
Press the CURSOR DOWN button
again to highlight ITR. The macro
functions will be shown.
Press the CURSOR DOWN button
again to highlight PERSONAL. You
must program functions in order for
them to be shown in the menu (see the
next section).
PIP CH
POWER
M LINK
SURF
TUNER A/B
VCR
DN
1
2
CH
4
TV
PICTURE
SOUND
FEATURES
INSTALL
CH3A
SLEEP
TV/VCR ON/OFF POSITION FREEZE
A/CH
SWAP SOURCE
SOUND PICTURE
MENU
PIP
UP
2
VOL
7
5
6
3
MUTE
SOURCE CC CLOCK
STATUS/EXIT
ITR/REC HOME HOME PERSONAL
VIDEO MOVIES
INCR. SURR.
OPEN/CLOSE
PROGRAM LIST
OK
AV3
MACRO
REVIEW
RECORD
MACRO
REVIEW
HOME VIDEO
HOME MOVIE
ITR
PERSONAL
MACRO
REVIEW
MACRO
REVIEW
MACRO
REVIEW
MACRO
REVIEW
SETUP
HOME VIDEO
HOME MOVIE
ITR
PERSONAL
HOME VIDEO
HOME MOVIE
ITR
PERSONAL
HOME VIDEO
HOME MOVIE
ITR
PERSONAL
HOME VIDEO
HOME MOVIE
ITR
PERSONAL
MACRO
REVIEW
RECORD
HOME VIDEO
HOME MOVIE
ITR
PERSONAL
TV ON
VCR ON
VCR PLAY
AMP ON
INCR. SURR ON
TV ON
VCR ON
VCR PLAY
AMP ON
INCR. SURR ON
OR
TV ON
DVD ON
DVD PLAY
AMP ON
M. MEDIA ON
OR
TV ON
START TIME
STOP TIME
VCR ON
CH. SELECT
OR
TV ON
VCR ON
VCR DELAY
AMP ON
VCR PLAY
Page 17

17
PROGRAMMING YOUR PERSONAL MACRO
Y
ou can program your Personal
macro to automatically perform
the functions you desire with one
touch of the PERSONAL macro button on your TV remote control. You
may want to use the macro to automate functions that you use often.
For example, you can set up your
Personal macro to record DVD
movies to your VCR. Or perhaps
you’d like to program it to turn ON
or OFF all of the accessory devices
connected to your TV. Try it!
Creatively program your Personal
macro to enhance your home cinema experience. Follow these steps
to program your Personal macro.
Press the M LINK button.
Then press the CURSOR LEFT
or CURSOR RIGHT button until
you enter the MACRO menu.
Press the CURSOR DOWN
button twice to highlight
RECORD.
Press the CURSOR RIGHT
button to enter the RECORD sub-
menu of your PERSONAL macro.
“RECORDING” will flash briefly
in red at the bottom of the screen;
the ADD DELAY control will be
shown.
Press the SOURCE (or
M LINK SOURCE) button on
your TV remote control repeatedly
until the source/accessory device
(SAT, DVD, VCR, etc.) functions
that you want to add to your PERSONAL macro is highlighted. The
name of the source/accessory
device will appear in the highlighted box below the ADD DELAY
control.
Press the CURSOR RIGHT
button to enter the menu of the
source/accessory device you’ve
selected. Alist of functions will be
displayed (with POWER/STBY
highlighted).
Please continue to the next page . . .
4
1
TV
PICTURE
SOUND
FEATURES
INSTALL
2
CH3A
SLEEP
TV/VCR ON/OFF POSITION FREEZE
A/CH
SWAP SOURCE
SOUND PICTURE
MENU
VOL
MUTE
SOURCE CC CLOCK
STATUS/EXIT
ITR/REC HOME HOME PERSONAL
VIDEO MOVIES
INCR. SURR.
OPEN/CLOSE
PROGRAM LIST
OK
VCR
AV3
MACRO
POWER
PIP
PIP CH
DN
UP
RECORD
PERSONAL
ADD DELAY
REVIEW
RECORD
SETUP
MACRO
REVIEW
RECORD
PERSONAL
- -
1
1 2 3 4 5 6 7 8
M LINK
SURF
TUNER A/B
1
CH
3
DELETE STEP
5
RECORD
PERSONAL
ADD DELAY
SAT
1 2 3 4 5 6 7 8
DELETE STEP
RECORD
PERSONAL
ADD DELAY
DVD
1 2 3 4 5 6 7 8
DELETE STEP
RECORD
PERSONAL
ADD DELAY
VCR
1 2 3 4 5 6 7 8
DELETE STEP
RECORD
PERSONAL
ADD DELAY
VCR
1 2 3 4 5 6 7 8
DELETE STEP
POWER/STBY
PLAY
STOP
FF/FORWARD
REW/REVERSE
Page 18

PROGRAMMING YOUR PERSONAL MACRO
18
NOTE: The numbers located at the bottom of the screen represent each step (function) that you program into your PERSONAL macro. After the first step has been
recorded, the number 1 at the bottom of the
screen will be in red, while the second
number will appear in orange to show that
the second step (function) is the next to be
recorded. The other unrecorded steps
(functions) will appear in white. As each
step (function) is recorded, its corresponding number at the bottom of the screen
will be shown in red.
Press the CURSOR DOWN or
CURSOR UP button to highlight
the action you want to record.
Press the CURSOR RIGHT
button to record the function in
your PERSONAL macro.
“RECORDING” will flash at the
bottom of the screen.
NOTE: A default delay time of
two seconds will occur between
each function when the Personal
macro is activated. You can choose
to add delay time between the execution of one function and another.
Follow steps 8–10 to add a delay
between macro functions.
Press the CURSOR UP button
until ADD DELAY is highlighted.
Press the CURSOR RIGHT or
CURSOR LEFT button to
increase or decrease the delay time.
Press the CURSOR DOWN
button to record the delay time you
have chosen. After the delay has
been recorded, the next step number at the bottom of the screen will
be highlighted in orange to show
that it is the next one to be recorded.
NOTE: Repeat steps 6 and 7 to
record other functions for the
source/accessory device. After you
have recorded all of the functions
you want for the source/accessory
device, you can press the
SOURCE button on the TV
remote control to select another
source/accessory device, and then
follow steps 6–7 again to record
functions in your PERSONAL
macro.
Press the M LINK button to
remove the menu from the screen.
10
11
RECORD
PERSONAL
ADD DELAY
VCR
1 2 3 4 5 6 7 8
DELETE STEP
SLEEP
TV/VCR ON/OFF POSITION FREEZE
A/CH
SWAP SOURCE
SOUND PICTURE
POWER
PIP
PIP CH
DN
UP
11
8
6
MENU
9
10
VOL
6
SOURCE CC CLOCK
STATUS/EXIT
ITR/REC HOME HOME PERSONAL
INCR. SURR.
PROGRAM LIST
OK
MUTE
VIDEO MOVIES
OPEN/CLOSE
M LINK
SURF
TUNER A/B
7
CH
9
RECORD
PERSONAL
ADD DELAY
VCR
1 2 3 4 5 6 7 8
DELETE STEP
RECORD
PERSONAL
ADD DELAY
VCR - POWER/STBY
1 2 3 4 5 6 7 8
DELETE STEP
RECORDING
RECORD
PERSONAL
ADD DELAY
VCR
1 2 3 4 5 6 7 8
DELETE STEP
RECORDING
RECORD
PERSONAL
ADD DELAY
1 2 3 4 5 6 7 8
DELETE STEP
RECORD
PERSONAL
ADD DELAY
DELAY - 10 SEC
1 2 3 4 5 6 7 8
DELETE STEP
RECORDING
POWER/STBY
PLAY
STOP
FF/FORWARD
REW/REVERSE
POWER/STBY
PLAY
STOP
FF/FORWARD
REW/REVERSE
10 SEC
Page 19

PROGRAMMING YOUR PERSONAL MACRO
19
I
f you have infrared remote-con-
trolled room lighting, you can use
the Personal macro to control the
lighting. The room lighting remote
functions can be learned into M-Link
™
as the USER1, USER2, and USER3
items in the list of device functions for
a DVD, for example. If you want to
program the lighting into the
Personal macro, follow these steps.
Set up the infrared lighting
model you want to use.
Press the M LINK button to
enter the M-Link
™
menu.
Press the CURSOR LEFT or
CURSOR RIGHT button until
you enter the SETUP menu.
NOTE: For this example, the light-
ing functions will be learned in with
the list of DVD functions. Thus the
following steps assume that you
have already had M-Link™learn the
remote functions of the DVD.
NOTE: See the section “Setting
Up a New or Multibrand Accessory
Device” (beginning on page 10) as
a refresher for the next two steps.
Within the SETUP menu, go into
SELECT DEVICE and select
DVD; then go into CHOOSE
BRAND and choose NEW.
Within the LEARN menu for the
DVD, cursor down the menu to
USER 1, USER 2, and USER 3
and have M-Link™learn the remote
functions of your infrared remotecontrolled room lighting through
the IR Blaster.
After having M-Link™learn the
remote functions of your infrared
remote-controlled room lighting,
you can then go to the DVD’s set of
function steps while programming
your Personal macro and add the
room lighting functions as USER1,
USER2, and USER3.
Although you will actually have M-Link™learn remote functions of
your infrared remote-controlled room lighting, the message will refer
to DVD because you are using the DVD menu for the learning.
1
Lighting/Alarm
3
CVI
5
SETUP
CHOOSE BRAND
LEARN
SUBTITLE
AUDIO
USER1
USER2
USER3
SETUP
SELECT DEVICE
CHOOSE SOURCE
CHOOSE BRAND
DELETE DEVICE
HOLD DVD
REMOTE CLOSE
TO BLASTER
AND PRESS KEY
MACRO
DVD-CVI
NEW
4
SETUP
SELECT DEVICE
VCR1
VCR2
DVD1
DVD2-CVI
LD
6
RECORD
PERSONAL
ADD DELAY
DVD
1 2 3 4 5 6 7 8
DELETE STEP
SUBTITLE
AUDIO
USER1
USER2
USER3
DVD-CVI
SETUP
CHOOSE BRAND
PHILIPS LEARN
NEW
RECORD
PERSONAL
ADD DELAY
DVD - USER1
1 2 3 4 5 6 7 8
DELETE STEP
DVD-CVI
5
5
Lighting/Alarm
Page 20

20
DELETING FUNCTIONS FROM YOUR PERSONAL MACRO
W
hen programming your
Personal macro, you may
have made some mistakes.
The following instructions will
show you how to delete accessorydevice functions (steps) from your
Personal macro.
Press the M LINK button.
Then press the CURSOR LEFT
or CURSOR RIGHT button until
you enter the MACRO menu.
Press the CURSOR DOWN
button twice to highlight
RECORD.
Press the CURSOR RIGHT
button to enter the RECORD menu
of your PERSONAL macro.
Press the CURSOR DOWN
button to highlight the step you
want to delete. The step (the name
of the accessory device function)
will appear above the step numbers.
Press the CURSOR LEFT or
CURSOR RIGHT button to select
the step to be deleted.
Press the CURSOR DOWN
button to highlight DELETE STEP.
Press the CURSOR RIGHT
button to activate the deletion of
the step.
To delete another step, press
the CURSOR UP button and
repeat steps 6 and 7.
After you have deleted all of the
steps you want, press the M LINK
button to remove the menu from
the screen.
TV
PICTURE
SOUND
FEATURES
INSTALL
CH3A
SLEEP
TV/VCR ON/OFF POSITION FREEZE
A/CH
SWAP SOURCE
VCR
1
AV3
SETUP
MACRO
REVIEW
RECORD
2
MACRO
POWER
PIP
PIP CH
DN
UP
REVIEW
RECORD
PERSONAL
5
6
1
8
2
4
SOUND PICTURE
MUTE
VIDEO MOVIES
OPEN/CLOSE
M LINK
TUNER A/B
MENU
VOL
SOURCE CC CLOCK
STATUS/EXIT
ITR/REC HOME HOME PERSONAL
INCR. SURR.
PROGRAM LIST
OK
3
9
1
1
CH
3
7
SURF
RECORD
PERSONAL
ADD DELAY
1 2 3 4 5 6 7 8
DELETE STEP
5
- -
4 5
RECORD
PERSONAL
ADD DELAY
DVD PLAY
1 2 3 4 5 6 7 8
6
RECORD
PERSONAL
ADD DELAY
DVD PLAY
1 2 3 4 5 6 7 8
DELETE STEP
7
RECORD
PERSONAL
ADD DELAY
- - - - - - -
1 2 3 4 5 6 7 8
DELETE STEP
Page 21

RUNNING MACROS
Press the HOME MOVIE but-
ton on the remote control to run the
Home Movie macro. The series of
functions will be carried out, one
after another. The name of each
function will flash on the screen as
it is activated.
Use the SCAN
NEXT, SCAN PREV., or other buttons on your TV remote control to
work the the various functions of
your DVD, LD, or VCD player.
RUNNING THE HOME
MOVIE MACRO
Press the HOME VIDEO button
to run the Home Video macro. The
series of steps will be carried out, one
after another. The name of each
function will flash on the screen as it
is activated. Use the BACK, STOP,
PLAY, FORWARD, and other buttons on your TV remote control to
work the the various VCR functions.
RUNNING THE HOME
VIDEO MACRO
Press the PERSONAL button
on the remote control to run the
Personal macro. The series of functions that you have programmed
into your Personal macro will be
carried out, one after another. The
name of each function will flash on
the screen as it is activated.
RUNNING THE
PERSONAL MACRO
21
Before you press
the HOME VIDEO
macro button, you must
have a VCR tape inserted
and rewound in the VCR
player, and the VCR and TV
must be in standby mode.
When you press the HOME
VIDEO macro button, the
VCR will turn ON and
begin playing. The macro
may not work for an accessory device that is not
turned ON by the
POWER/STBY button on
the device’s remote control.
SMART HELP
Before you press
the HOME MOVIE
macro button, you must place
a disc in the accessory device
you’ve set up with M-Link to
play movies (DVD, LD,
VCD), and the device must
be in the standby mode.
When you press the HOME
MOVIE macro button, the
accessory device will turn
ON and begin playing. The
button may not work for an
accessory device that is not
turned ON by the
POWER/STBY button on the
device’s remote control.
SMART HELP
NOTE: “VCR not configured”
will appear on the screen when
you press the HOME VIDEO
button if you have not set up a
VCR to work with M-Link™.
NOTE: “DVD not configured”
will appear on the screen when
you press the HOME MOVIE
button if you have not set up a
DVD or similar accessory
device to work with M-Link™.
VCR ON
MUTE
VIDEO MOVIES
OPEN/CLOSE
CH
SURF
TUNER A/B
VOL
SOURCE CC CLOCK
STATUS/EXIT
1
ITR/REC HOME HOME PERSONAL
INCR. SURR.
PROGRAM LIST
OK
DVD ON
MUTE
VIDEO MOVIES
OPEN/CLOSE
CH
SURF
TUNER A/B
VOL
SOURCE CC CLOCK
STATUS/EXIT
1
ITR/REC HOME HOME PERSONAL
INCR. SURR.
PROGRAM LIST
OK
VCR DELAY
AMP ON
INCR. SURR ON
DVD DELAY
AMP ON
INCR. SURR ON
VCR ON
VOL
MUTE
STATUS/EXIT
SOURCE CC CLOCK
ITR/REC HOME HOME PERSONAL
VIDEO MOVIES
INCR. SURR.
1
OPEN/CLOSE
PROGRAM LIST
OK
SURF
TUNER A/B
VCR DELAY
CH
AMP ON
VCR PLAY
Page 22

22
RUNNING MACROS
BEGINNING ITR
RECORDING NOW
Press the ITR/REC button to bring
the ITR menu to the screen.
Press the CURSOR RIGHT but-
ton to select “NOW”; the STOP TIME
options will appear.
To choose to record till the end of
the tape, press the CURSOR RIGHT
button. Then press the CURSOR
RIGHT button again to transmit the
code to M-Link™and begin recording.
OR
To input a STOP TIME, press the
CURSOR DOWN button to highlight
the STOP TIME input area. Then press
the CURSOR RIGHT button to be in
position to enter the STOPTIME.
Press the CURSOR RIGHT or
CURSOR LEFT button to move to
each spot in which time numbers can be
input. Then press the CURSORUP
or CURSOR DOWN button to input
the time; or press the number buttons
to do so.
After inputting the STOPTIME,
press the CURSOR RIGHT button.
TRANSMIT CODE and GO will
appear on the screen. Then press the
CURSOR RIGHT button again to
begin recording.
Please see the next page for instructions
in setting the ITR macro to record later.
Y
ou can connect two VCRs (referred to as VCR1 and VCR2 on the M-Link
™
menu) to your TV at once for use with M-Link™, if you’d like. In order to
use the Instant Touch Recording macro, however, you must have your cable or
antenna signal (RF) connected to one of the VCRs (VCR1) and to the TV.
Then with your VCR in TV mode you can press the ITR/REC button to begin
recording a program or to set start and stop times for recording later.
You also can press the ITR/REC button for normal REC recording. In that
case, you must have your VCR in VCR mode, and you can record on VCR1 or
VCR2, depending on your connection.
RUNNING THE ITR MACRO
START TIME
5
4
5
1
NOW
- - : - - AM
SLEEP
TV/VCR ON/OFF POSITION FREEZE
A/CH
SWAP SOURCE
SOUND PICTURE
MENU
VOL
2
SOURCE CC CLOCK
STATUS/EXIT
ITR/REC HOME HOME PERSONAL
VIDEO MOVIES
INCR. SURR.
OPEN/CLOSE
PROGRAM LIST
OK
PIP
PIP CH
UP
M LINK
MUTE
TUNER A/B
POWER
SURF
11:00 AM
DN
CH
11:00 AM
STOP TIME
TILL TAPE END
- - : - - AM
11:00 AM
TRASMIT CODE
GO
5
STOP TIME
5
2
3
TILL TAPE END
11:00 AM
TRANSMIT CODE
4
11:00 AM
11:00 AM
GO
5
6
Page 23

SETTING THE ITR MACRO
TO RECORD LATER
Press the ITR/REC button to bring
the ITR menu to the screen.
Press the CURSOR DOWN button to highlight the START TIME
input area. Then press the CURSOR
RIGHT button.
Press the CURSOR RIGHT or
CURSOR LEFT button to move to
each spot in which time numbers can
be input. Then press the CURSOR
UP or CURSOR DOWN button to
input the time; or press the number
buttons to do so.
After you’ve entered the START
TIME, press the CURSOR RIGHT
button. The STOP TIME menu will
appear.
To choose to record till the end of
the tape, press the CURSOR RIGHT
button. Then press the CURSOR
RIGHT button again to send your set-
tings to M-Link™.
OR
To input a STOP TIME, press the
CURSOR DOWN button to highlight
the STOP TIME input area. Then
press the CURSOR RIGHT button.
Press the CURSOR RIGHT or
CURSOR LEFT button to move to
each spot in which time numbers can
be input. Then press the CURSOR
UP or CURSOR DOWN button to
input the time; or press the number
buttons to do so.
After inputting the STOPTIME,
press the CURSOR RIGHT button.
TRANSMIT CODE and GO will
appear on the screen. Then press the
CURSOR RIGHT button again.
Recording will begin and end according to your settings.
R
UNNING MACROS
23
NOTE: At the START TIME you
select, the ITR/REC macro will perform
the following steps:
•Turn the VCR ON.
•Set the VCR to the current TV channel.
At the end of recording period you’ve
set, the macro will perform the following steps:
•Stop VCR recording.
•Power the VCR OFF to standby status.
11:00 AM
START TIME
NOW
- - : - - AM
SLEEP
TV/VCR ON/OFF POSITION FREEZE
A/CH
SWAP SOURCE
POWER
PIP
PIP CH
DN
UP
7
SOUND PICTURE
7
MENU
3
M LINK
3
VOL
2
SOURCE CC CLOCK
3
6
7
1
STATUS/EXIT
ITR/REC HOME HOME PERSONAL
VIDEO MOVIES
INCR. SURR.
OPEN/CLOSE
PROGRAM LIST
OK
CH
MUTE
SURF
TUNER A/B
11:00 AM
START TIME
NOW
11:00 AM
11:00 AM
7
3
STOP TIME
TILL TAPE END
- - : - - AM
11:00 AM
TRANSMIT CODE
GO
2
3
4
5
6
OR
11:00 AM
7
8
STOP TIME
TILL TAPE END
11:00 AM
11:00 AM
TRANSMIT CODE
GO
Page 24

24
TABLES FOR RECORDING MULTIBRAND REMOTE CONTROL FUNCTIONS
VCR
M-Link
™
New or Multibrand
POWER/STBY
PLAY
STOP
FF/FORWARD
REW/REVERSE
PAUSE
RECORD
EJECT
CH. UP
CH. DOWN
TV/VIDEO
MENU
LEFT
RIGHT
UP
DOWN
OK
OSD/DISPLAY
(STATUS/EXIT)
– USA ONLY
0
1
2
3
4
5
6
7
8
9
SAP
SPEED
SLOW
TRACK
USER1
USER2
DVD
M-Link
™
New or Multibrand
POWER/STBY
PLAY
STOP
SCAN NEXT
SCAN PREV.
PAUSE
SKIP LEFT
SKIP RIGHT
FRAME/STEP
OPEN/CLOSE
MENU
DISC MENU
LEFT
RIGHT
UP
DOWN
OK
OSD/DISPLAY
(STATUS/EXIT)
– USA ONLY
0
1
2
3
4
5
6
7
8
9
CHAPTER
TITLE
LAST PLAY
SUBTITLE
AUDIO
USER1
USER2
USER3
LD
M-Link
™
New or Multibrand
POWER/STBY
PLAY
STOP
SCAN NEXT
SCAN PREV.
PAUSE
SKIP LEFT
SKIP RIGHT
FRAME/STEP
OPEN/CLOSE
MENU
LEFT
RIGHT
UP
DOWN
OK
OSD/DISPLAY
(STATUS/EXIT)
– USA ONLY
0
1
2
3
4
5
6
7
8
9
CHAPTER
SIDE A/B
AUDIO
USER1
USER2
CBL
M-Link
™
New or Multibrand
POWER/STBY
CH. UP
CH. DOWN
CH. ALT
MENU
LEFT
RIGHT
UP
DOWN
OK
OSD/DISPLAY
(STATUS/EXIT)
0
1
2
3
4
5
6
7
8
9
GUIDE
TUNER A/B
USER1
USER2
USER3
USER4
USER5
Page 25

25
TABLES FOR RECORDING MULTIBRAND REMOTE CONTROL FUNCTIONS
SAT
M-Link
™
New or Multibrand
POWER/STBY
CH. UP
CH. DOWN
TV/VIDEO
MENU
LEFT
RIGHT
UP
DOWN
OK
OSD/DISPLAY
(STATUS/EXIT)
1
2
3
4
5
6
7
8
9
0
GUIDE
USER1
USER2
USER3
USER4
USER5
STB
M-Link
™
New or Multibrand
POWER/STBY
CH. UP
CH. DOWN
TV/VIDEO
MENU
LEFT
RIGHT
UP
DOWN
OK
OSD/DISPLAY
(STATUS/EXIT)
0
1
2
3
4
5
6
7
8
9
GUIDE
USER1
USER2
USER3
USER4
USER5
VCD
M-Link
™
New or Multibrand
POWER/STBY
PLAY
STOP
SCAN NEXT
SCAN PREV.
PAUSE
SKIP LEFT
SKIP RIGHT
FRAME/STEP
OPEN/CLOSE
MENU
LEFT
RIGHT
UP
DOWN
OK
OSD/DISPLAY
(STATUS/EXIT)
– USA ONLY
0
1
2
3
4
5
6
7
8
9
CHAPTER
AUDIO
USER1
USER2
AMP
M-Link
™
New or Multibrand
POWER/STBY
MUTE
VOL. UP
VOL. DOWN
USER1
USER2
USER3
USER4
USER5
Page 26

TROUBLESHOOTING
26
P
lease make these simple checks before calling for service. Because charges for adjustment of customer controls are not covered under your warranty, these tips can save you time and money.
Things to Remember about the IR Blaster
The IR Blaster transmits commands to your accessory devices to carry out functions (POWER/STBY, PLAY, STOP, etc.).
Therefore, you need to ensure that the IR Blaster’s remote sensor window is not blocked and that the IR Blaster is in a position
to send its signal into the room, where it can bounce off of walls or objects and then to remote sensor windows of the accessory
devices. The remote sensor windows of the accessory devices must not be blocked in order to receive transmissions from the
IR Blaster.
Light colors or other room conditions can prevent the IR Blaster signal from reaching accessory devices. Also, storing accessory devices in glass-covered cabinets can block the signal. If you have such conditions, IR Shooters can be attached to the IR
Blaster cable for more direct transmission of the signal from the IR Blaster to accessory devices (see page 4).
Call 1-800-851-8885 to order the IR Shooters.
A Philips Accessory Device Will
Not Respond to Any of the
Remotes Tested During Setup
Accessory Devices Will Not
Respond When Macro Buttons
Are Pressed
Difficulty
Remedy
The remote codes of the Philips accessory device you’re attempting to set up
may not be preprogrammed into M-Link™because the device is new. Go to the
section “Setting up a New or Multibrand Accessory Device” and follow the
steps to set up your Philips accessory device.
• Ensure that all of the setup steps have been followed for each accessory
device. For the Home Video macro to work, a VCR must be setup; for the
Home Movie macro, a DVD, LD, or VCD player; and for the ITR video, a
VCR. See “Setting up a Philips Device” on page 7 or “Setting up a New or
Multibrand Device” on page 10 for instructions.
• After setup, these simple requirements need to be met for each button in
order for it to operate:
Home Video—a VCR tape must be inserted and rewound in the VCR
player, and the VCR must be in standby mode. The macro may not work
for an accessory device that is not turned ON by the POWER/STBY button
on the device’s remote control.
Home Movie—A video disc must be placed in the DVD, LD, or VCD, and
the accessory device must be in the standby mode. The macro may not
work for an accessory device that is not turned ON by the POWER/STBY
button on the device’s remote control.
Remote Control Functions of
Philips Accessory Devices Are Not
Working or the Wrong Functions
Are Being Activated When M-Link
™
Is Used
Different codes have sometimes been used for the same function among some
Philips accessory devices. You may need to delete the device from M-Link
™
using the onscreen menu, and then explore the functions of the Philips accessory device using its remote control. Follow the steps under “Setting up a New
or Multibrand Accessory Device” to have M-Link™learn the remote functions.
Page 27

27
TROUBLESHOOTING
Accessory Devices Will Not Respond
When Macro Buttons Are Pressed
(continued)
Difficulty
Remedy
The TV Remote Control Will Not
Work Accessory-Device Functions
Ensure that the functions you want to use have been learned by M-Link™.
These could be functions such as FF/FORWARD, REW/REVERSE, PAUSE,
EJECT, SCAN NEXT, SCAN PREV., or others, depending on the device.
ITR/REC—a VCR tape must be inserted and rewound in the VCR
player, and the VCR must be in standby mode. The macro may not work
for an accessory device that is not turned ON by the POWER/STBY button
on the device’s remote control.
• For the PERSONAL macro button to work, you must program the macro
steps. See “Programming Your Personal Macro” on page 17.
• Ensure that the source inputs (CVI, AV2, AV3, for example) to which you’ve
connected accessory devices match with the sources you chose in the
onscreen menu during setup.
• You may need to delete a device that is not responding and set it up with
M-Link™again. See the sections “Deleting Accessory Devices from the
M-Link™System” (page 15) and “Setting up a New or Multibrand Accessory
Device” (page 10). When you have M-Link™learn an accessory-device
function, remember to ensure that the button you are pressing on the accessory device’s remote control matches the highlighted function in the M-Link
™
LEARN menu.
• Ensure that you have had M-Link
™
at least learn the remote functions that are
necessary for the basic operation of each new or multibrand device
(POWER/STBY, PLAY, and STOP, for example).
Page 28

28
INDEX
accessory device
deleting, 15
hooking up, 5
remote control functions, table of, 24–25
selecting, 7, 10
setup, 7, 10
brand, choosing, 9, 12
Home Movie macro, running, 21
Home Video Macro, running, 21
IR Blaster, hooking up, 4
ITR macro, running, 22
macros, reviewing functions, 16
Parts Information Center phone number, 4, 5, 26
Personal macro
programming, 17
adding time delays between steps, 18
running, 21
remote control buttons, 6
remotes (Philips accessory-devices), testing, 9
source, choosing, 8, 11
testing (learned accessory-device remote
control functions), 14
 Loading...