

Page 1

MCW770
Wireless PC Link Micro
Custom Installation
MCW770
Contents
Manual installation of the driver
for the wireless USB adapter, the
Philips Media Manager software
and the network setup ___________ 2
Installation of an additional audio
system or recovery if audio system
PC link settings are lost ________ 3–4
Installation of an additional PC server
or recovery of PC link settings
on your PC __________________ 4–5
Integration of MC W770 into an
existing (home) network _______ 6–9
Network utilities _______________ 10–13
Check connection ______________10
Change of USB port using the
MC W770 _________________ 10–11
Change of the wireless channel
Using a different wireless network
adapter ______________________ 14–19
___12–13
Page 2
Custom Installation Wireless PC link
English
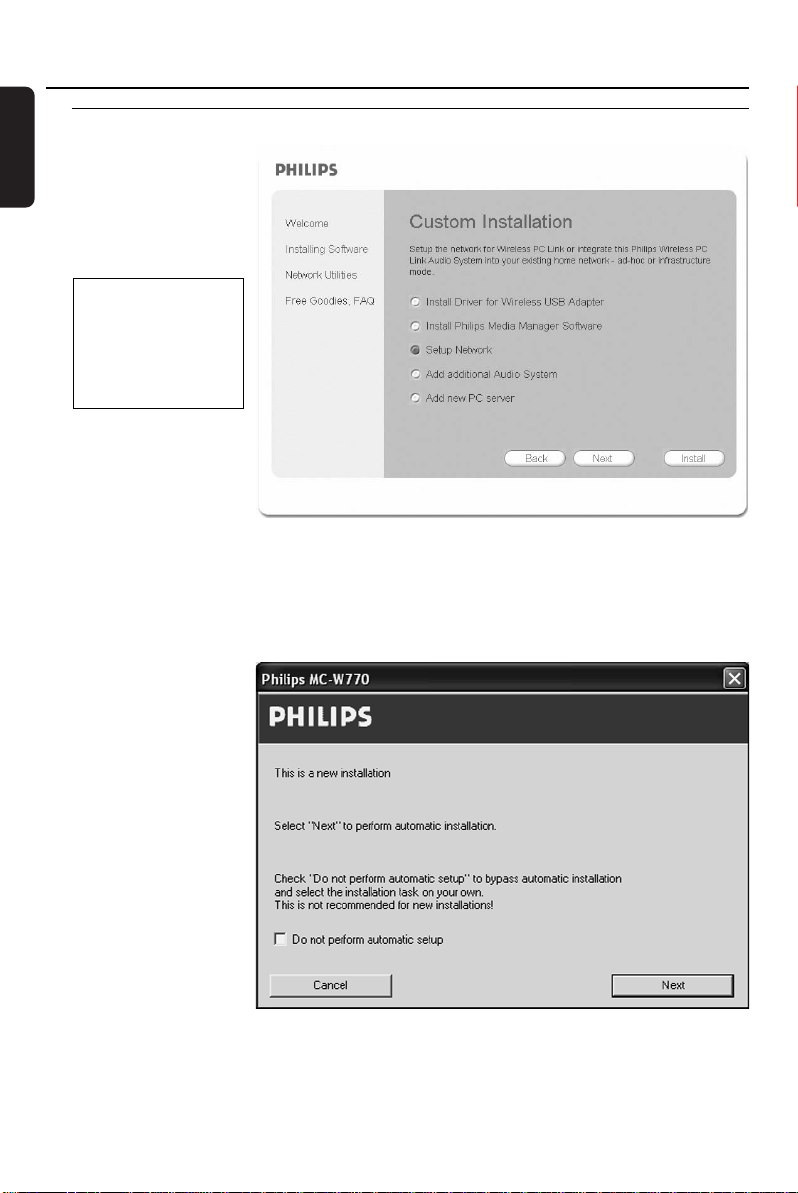
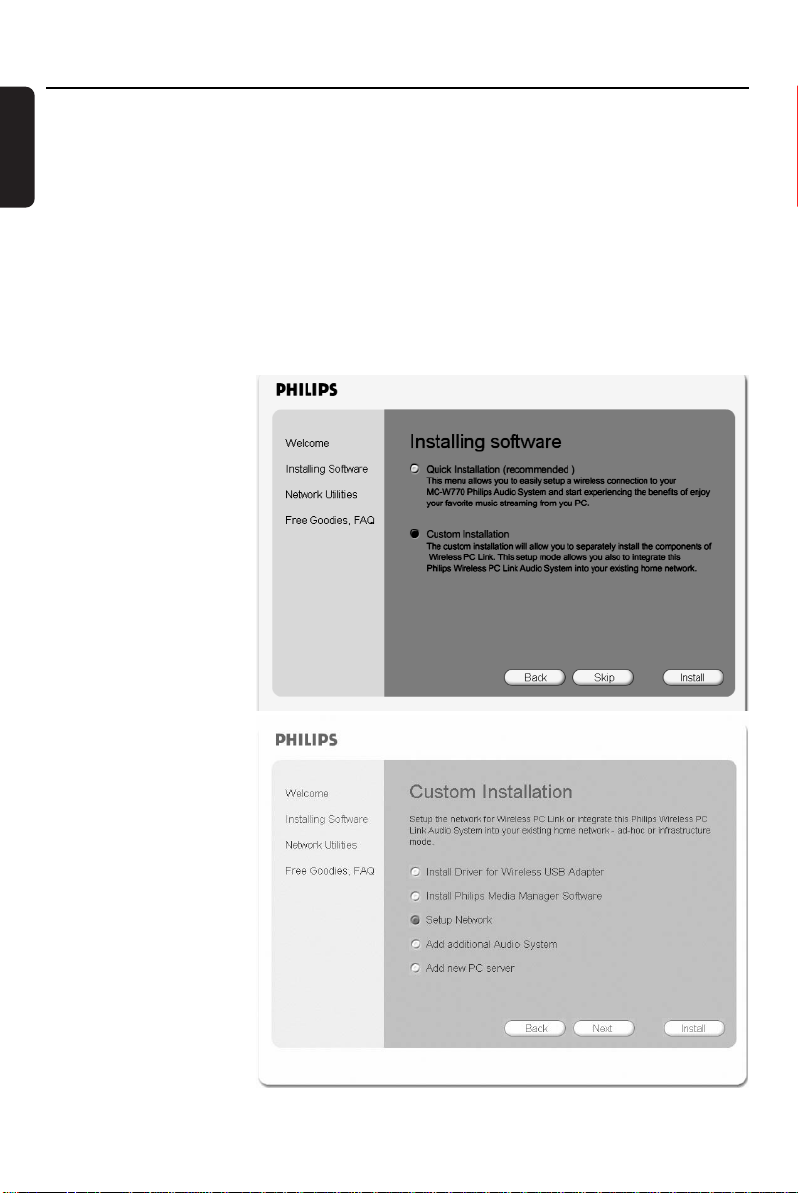
Custom installation
Beside the Quick
installation there are also
Custom installation
menus for setting up
more complex
configurations.
Please use this kind of
installation only if you
are experienced in
setting up networks
with additional options:
– Integration of MC
W770 into an
existing network
– Add an additional
audio system
– Add an additional PC server
Manual installation of the driver for the wireless USB adapter,the Philips Media
Manager software and the network setup
These 3 installation steps perform the same functionality and have the same behaviour as the
quick installation (see
“Quick installation”) in a
single piece, except for
the following additional
window, which will
appear during the
network setup:
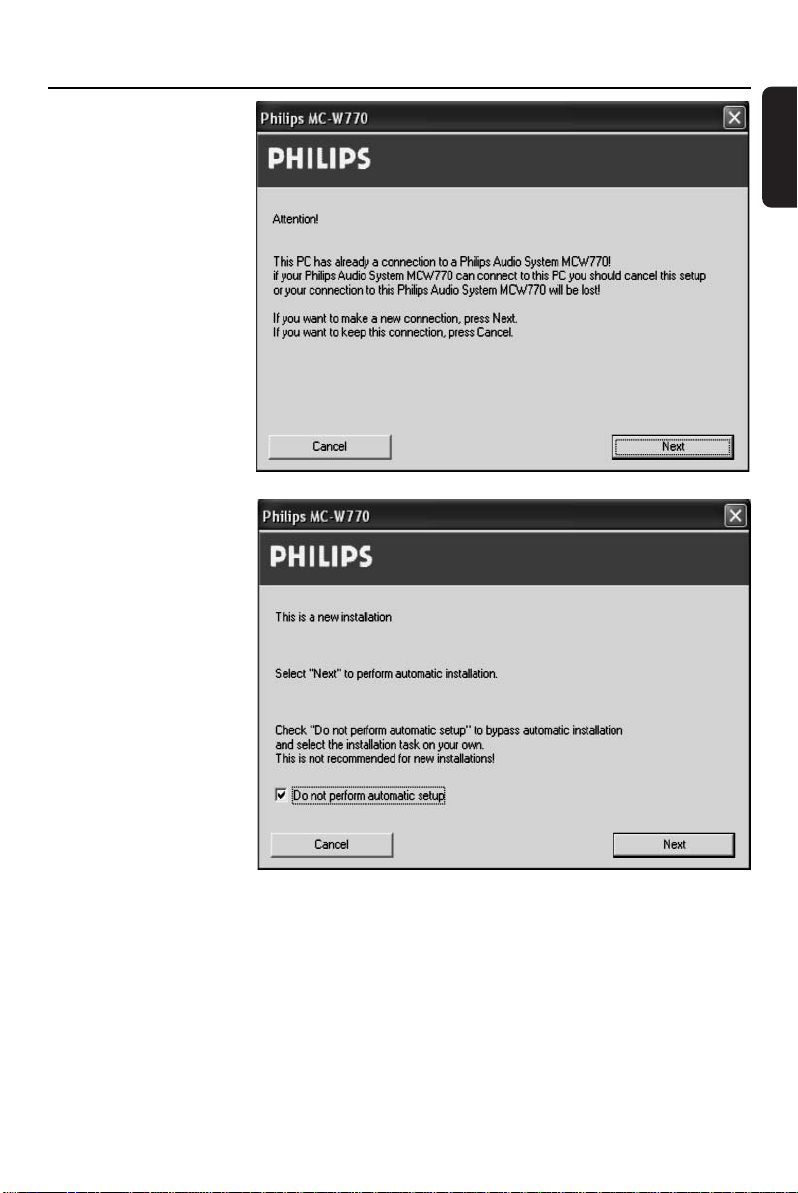
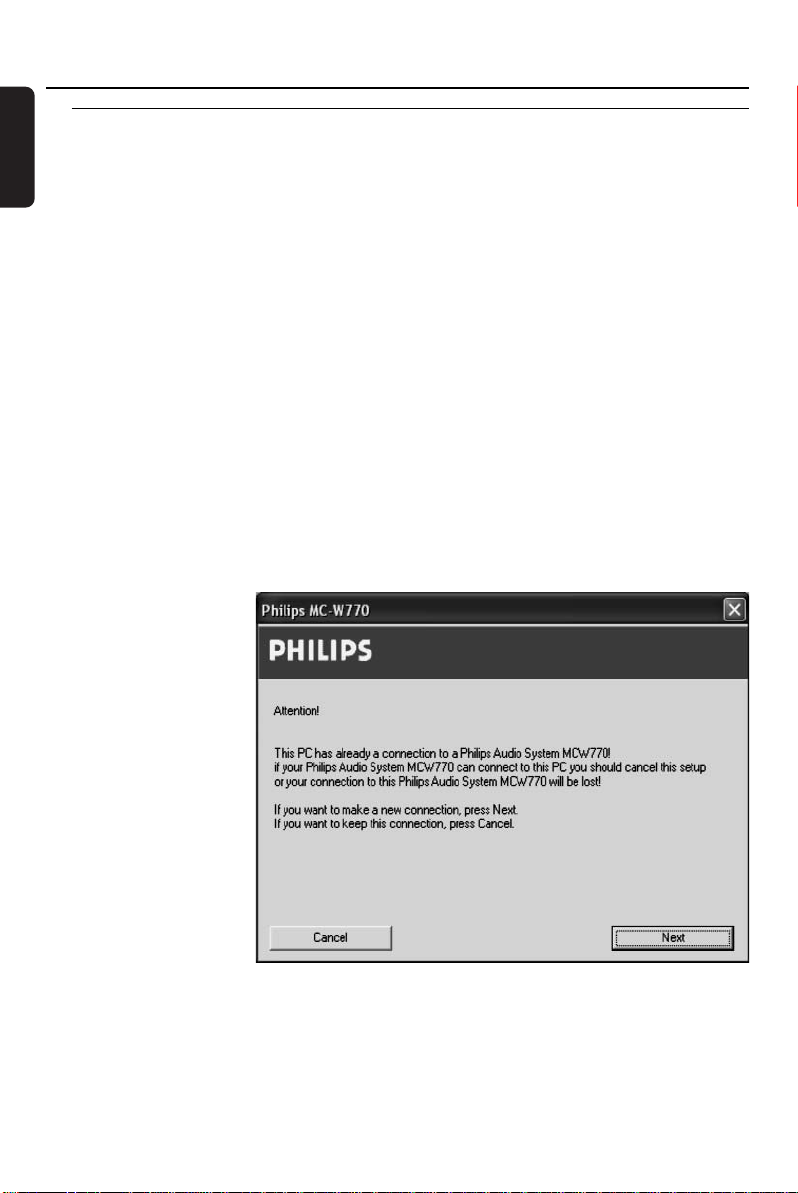
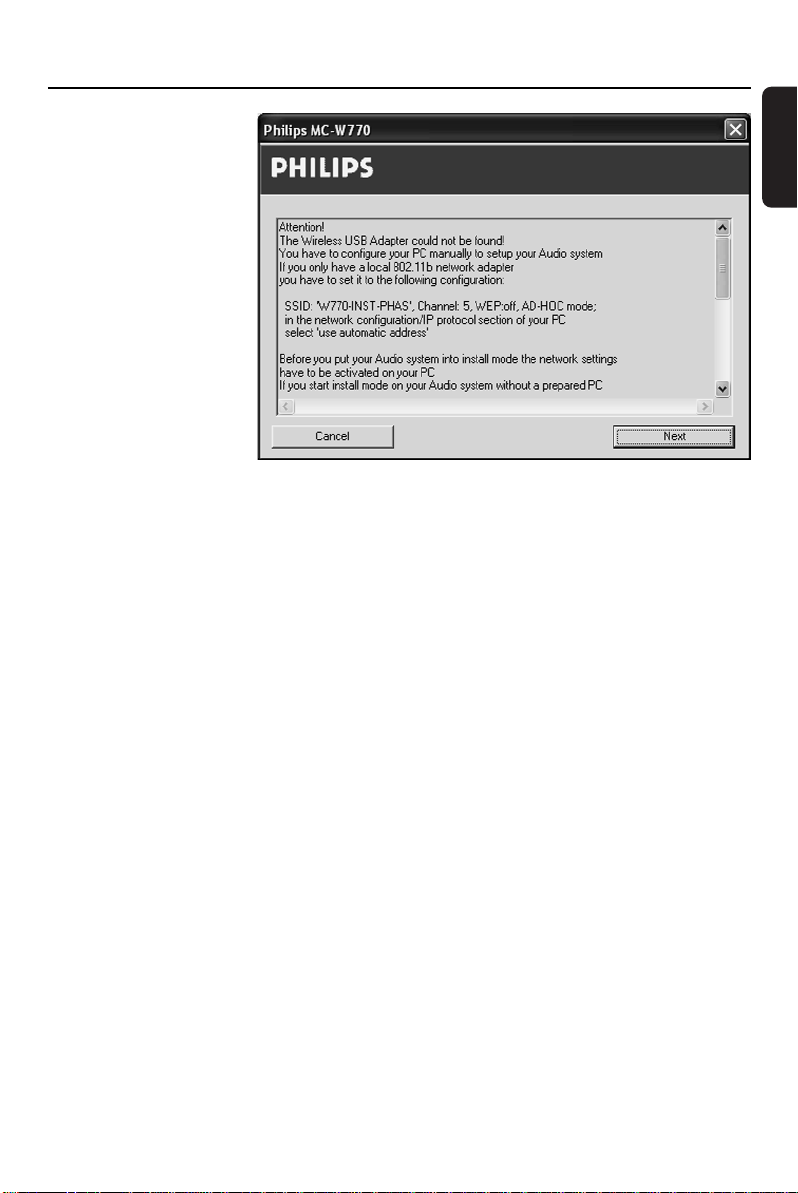
● Do not select Do not
perform automatic
setup for this type of
installation as this is necessary only to integrate the MC W770 into an existing network as
described later. Just click on Next to proceed.
2
Page 3
Wireless PC link Custom Installation
Installation of an additional audio system or recovery if audio system PC link
settings are lost
If you want to add an additional MC W770 or an equivalent audio system into your existing
MC W770 network, you can connect them to the same PC server without changing the
settings of the current PC link installation.This procedure can also be used when the PC link
settings have been lost on the audio set.
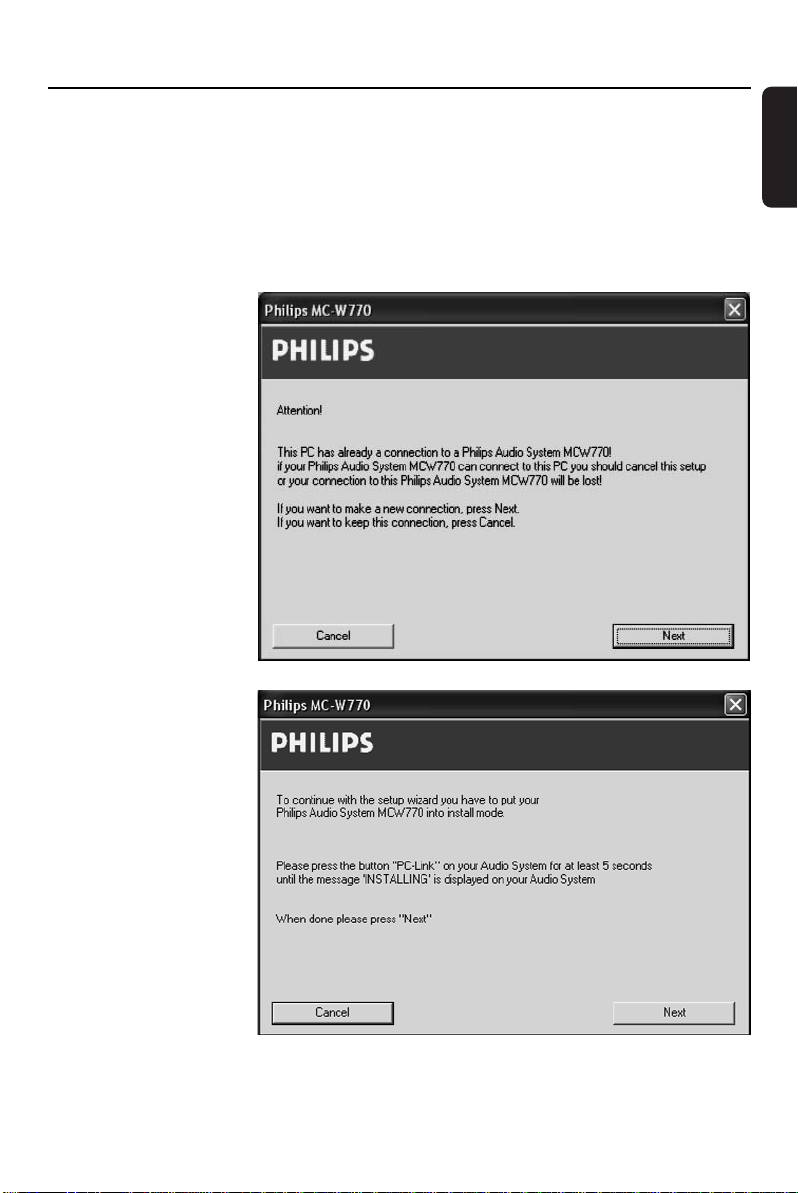
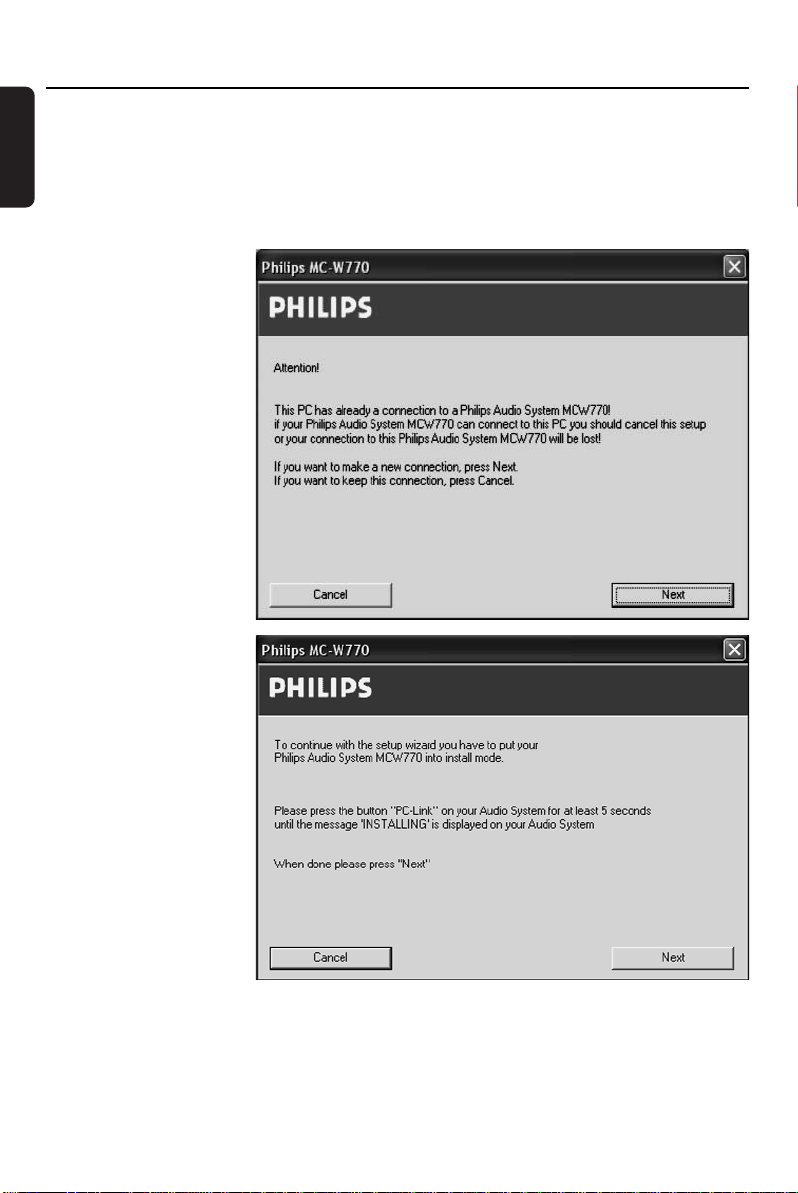
1 Select Add additional Audio System in the Custom Installation menu and click on Install.
2 ➜ The PC checks the
PC link configuration
and the following
window appears:
Click on Next to
continue.
English
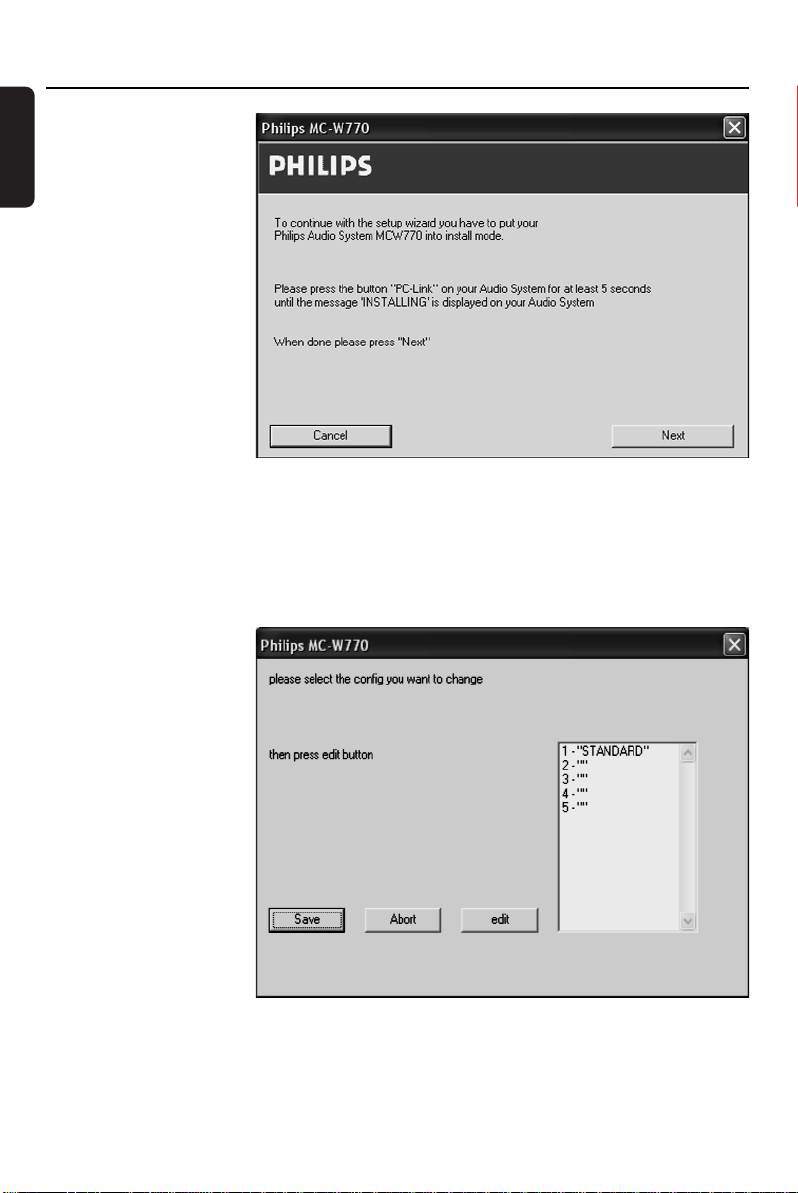
3 ➜ After some time the
following window will
appear:
3
Page 4
Custom Installation Wireless PC link
English
4 Press PC LINK A on the additional audio system for at least 5 seconds until INSTALLING is
scrolled on the set.
➜ The set searches for a connection to the PC.This can require up to about a minute. When
the connection is established, Next is activated.
Note: If the additional audio system is not an MC W770, please look at the user manual of the
device on how to enter the installation mode.
Click on Next.
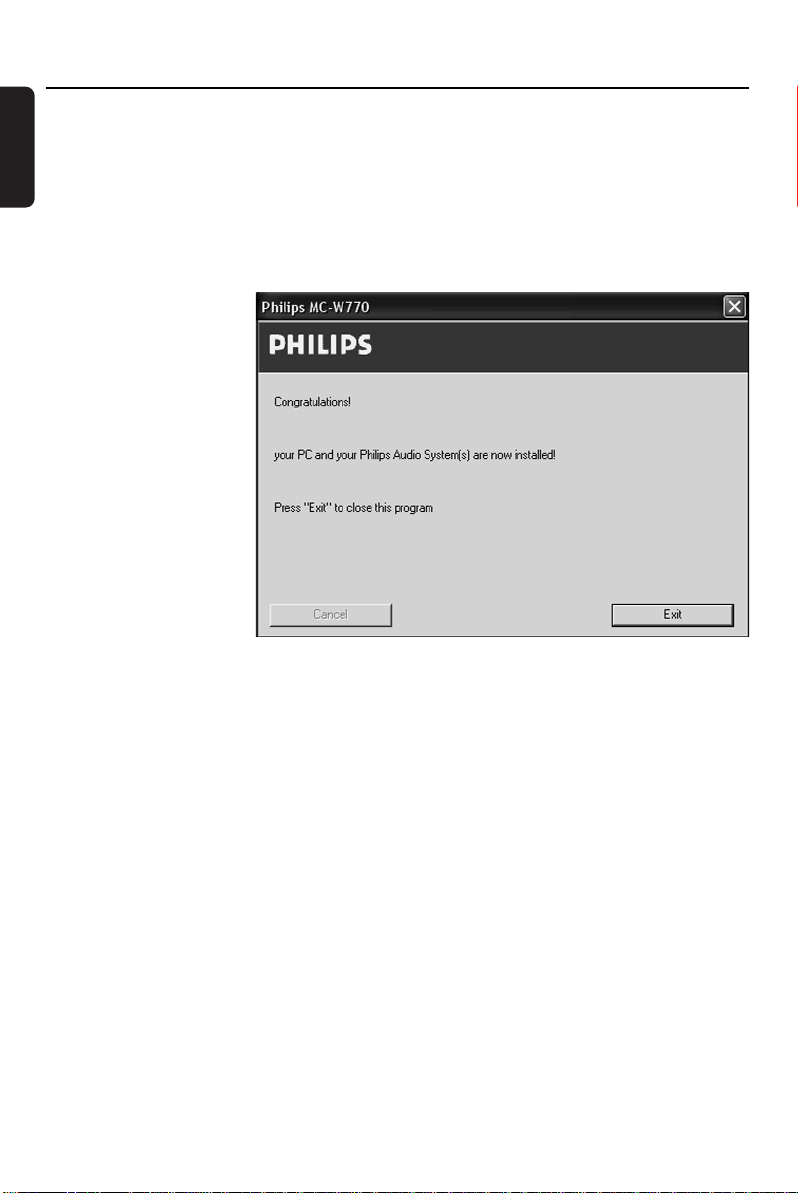
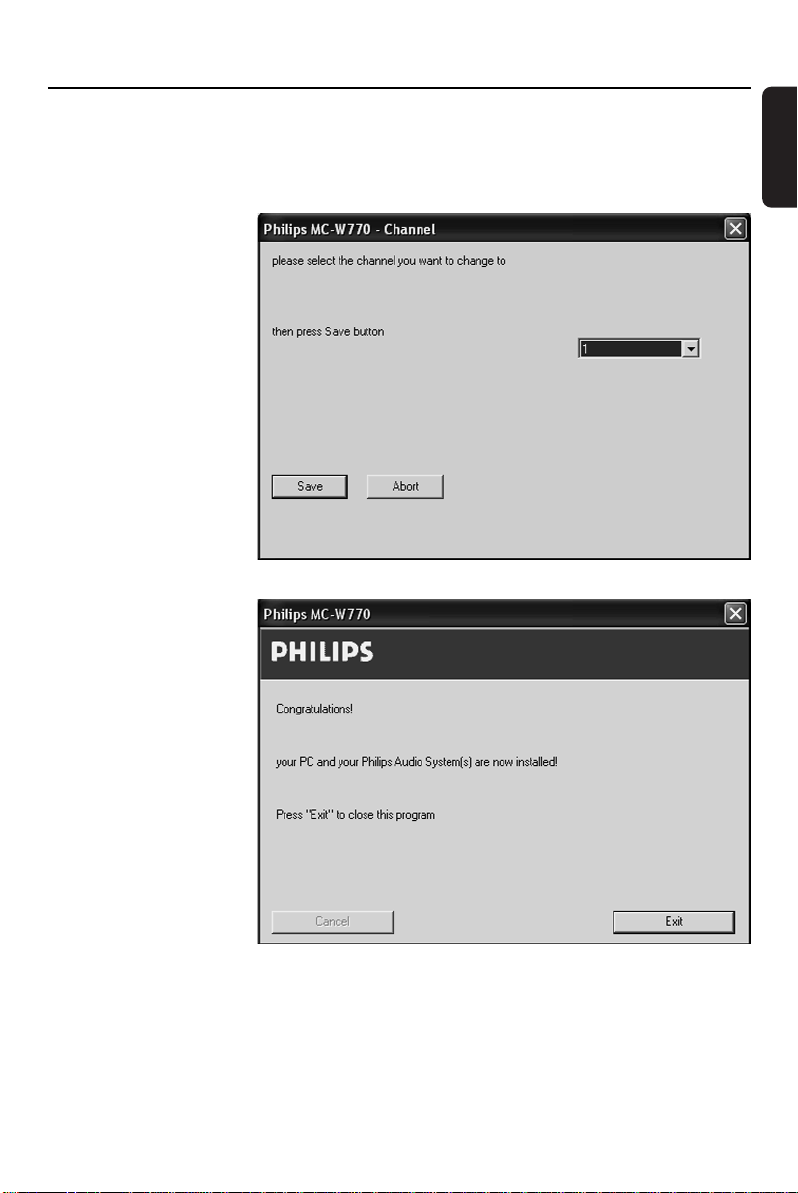
5 ➜ The installation steps
will be executed
automatically by the
PC. Afterwards PC
LINK and
COMPLETED are
displayed on the set
and the following
window will appear:
Click on Exit and the
installation is finished.
Installation of an additional PC server or recovery of PC link settings on your PC
If you want to use your MC W770(s) together with more than one PC, you have to install the
Philips Media Manager Software and the PC link setting on your PC. A wireless USB adapter is
required. If you want to use a different network adapter as bypacked with the MC W770
proceed according to chapter “Using a different wireless network adapter” (Please note that a
proper function cannot be guaranteed by using a different network adapter).This procedure
can also be used when your PC link settings on your PC are lost or destroyed.
If you use the bypacked wireless USB adapter proceed as follows:
1 Enter the Custom installation menu on PC side, select Add New PC server and click on
Install.
➜ You will be asked if you want to install the driver for the wireless USB adapter.
2 If the driver is not installed and you want to use it: Click on Ye s .
➜ The drivers will be installed and the PC has to be rebooted.
If the wireless USB adapter is already installed: Click on No.
4
Page 5
Wireless PC link Custom Installation
3 If you have clicked on
No or the driver
installation is finished,
the Philips Media
Manager Software will
be installed.Then the PC
is rebooted and PC
configurations are
checked. Finally the
following window will
appear:
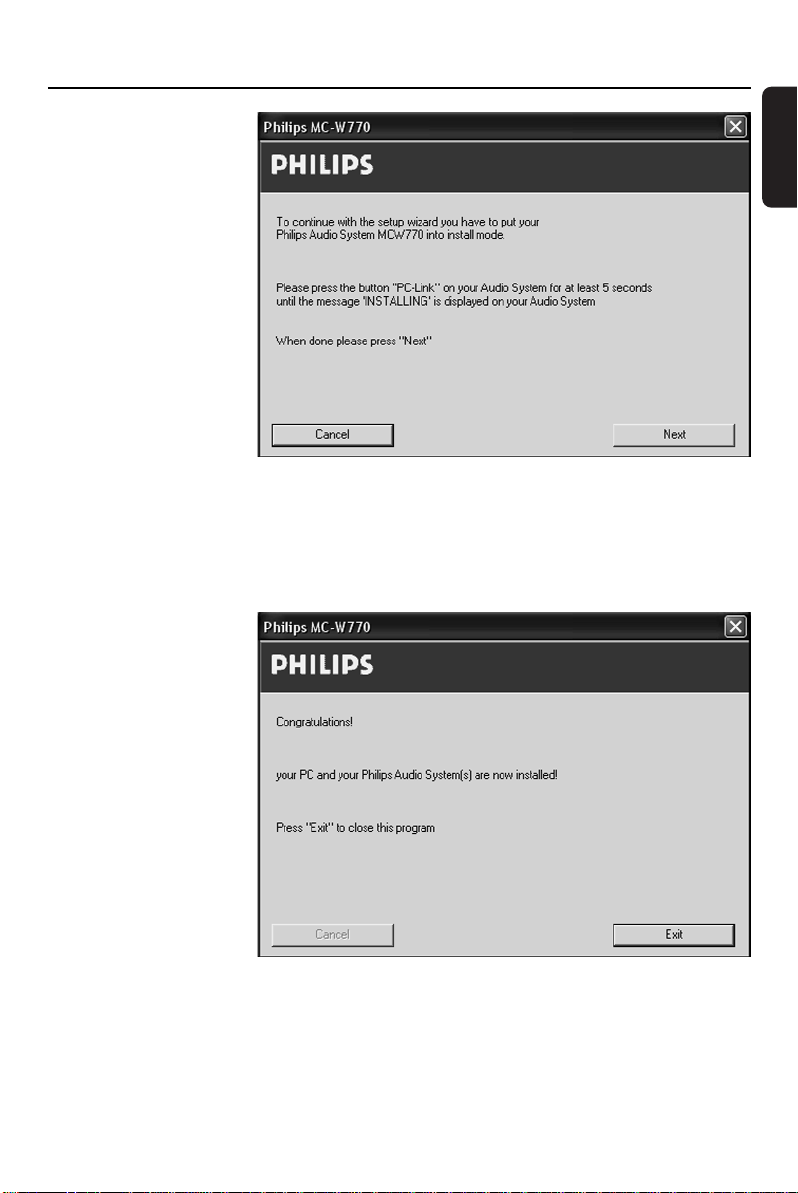
4 Press PC LINK A on the audio system for at least 5 seconds until INSTALLING is scrolled on
the set.
➜ The set searches for a connection to the PC.This can require up to about a minute. When
the connection is
established, Next is
activated. Click on
Next.
5 ➜ The following
window will appear:
Click on Exit and the
installation is finished.
English
5
Page 6
Custom Installation Wireless PC link
English
Integration of MC W770 into an existing (home) network
You can also install the MC W770 in any other, perhaps existing network, which is compliant to
the Wi-Fi or IEEE802.11b,g rules. Please use this kind of installation only if you are
experienced in handling wireless networks and experienced in setting up these
networks! In general there are 2 types of network modes: ad-hoc mode (used for direct
connections to PC’s) and infrastructure mode (used when you have accesspoint(s) in your
network). Both modes are supported.
Before starting this installation process:
– There should be a PC in the network having the dedicated Philips Media Manager Software
installed.Therefore install the Philips Media Manager software from the installation CD only.
– The wireless USB adapter has to be already installed and connected on the PC you use for
installation.
–You should have the
wireless settings for
your network like
SSID and WEP keys
available.
1 Insert the installation
disc.The installation
guide will appear
automatically. If it does
not, start the installation
manually by running
setup_.exe from the
installation CD. Follow
the installation process
until the following
window appears:
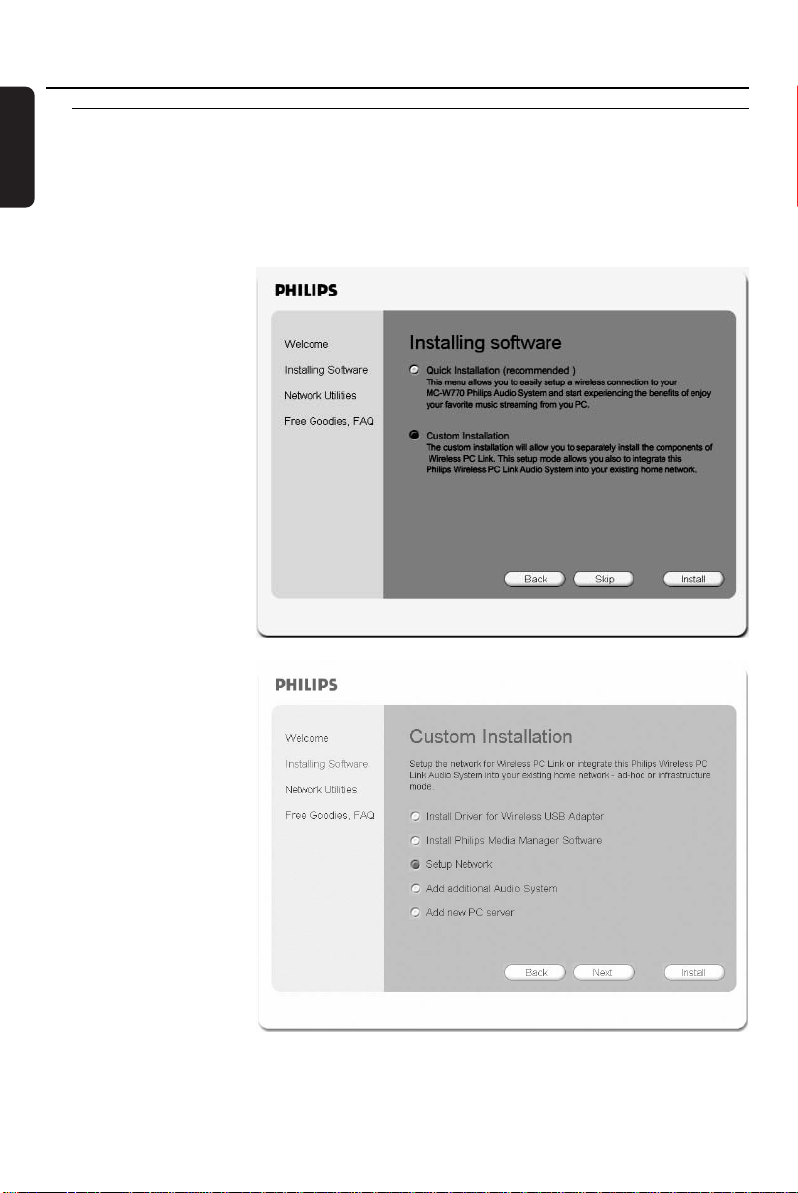
Select Custom
Installation and click on
Install.
2 ➜ The following window
appears.
Select Setup Network
and click again on Install.
6
Page 7
Wireless PC link Custom Installation
3 ➜ The PC checks the
PC link configuration
and, depending on
the PC configuration,
the following window
will appear:
Following the
procedure will not
change your PC link
settings. Click on Next.
4 ➜ The following
window appears:
Tick the option Do not
perform automatic
setup and then click on
Next.
English
7
Page 8
Custom Installation Wireless PC link
English
5 ➜ The installation
procedure configures
your network
settings. Afterwards
the following window
appears:
6 Press PC LINK A on your MC W770 for at least 5 seconds until INSTALLING is scrolled on
the set.
➜ The set searches for a connection to the PC.This can require up to about a minute. When
the connection is established, Next is activated.Click on Next.
7 ➜ The PC will read out
the network
configurations.The
following window will
appear.
Select a network
configuration, in the best
case an empty one (“”).
You should not select
STANDARD. Up to
5 network
configurations are
possible. In case all
network configurations
are used already, select
one that you don’t use
anymore. Click on edit.
8
Page 9
Wireless PC link Custom Installation
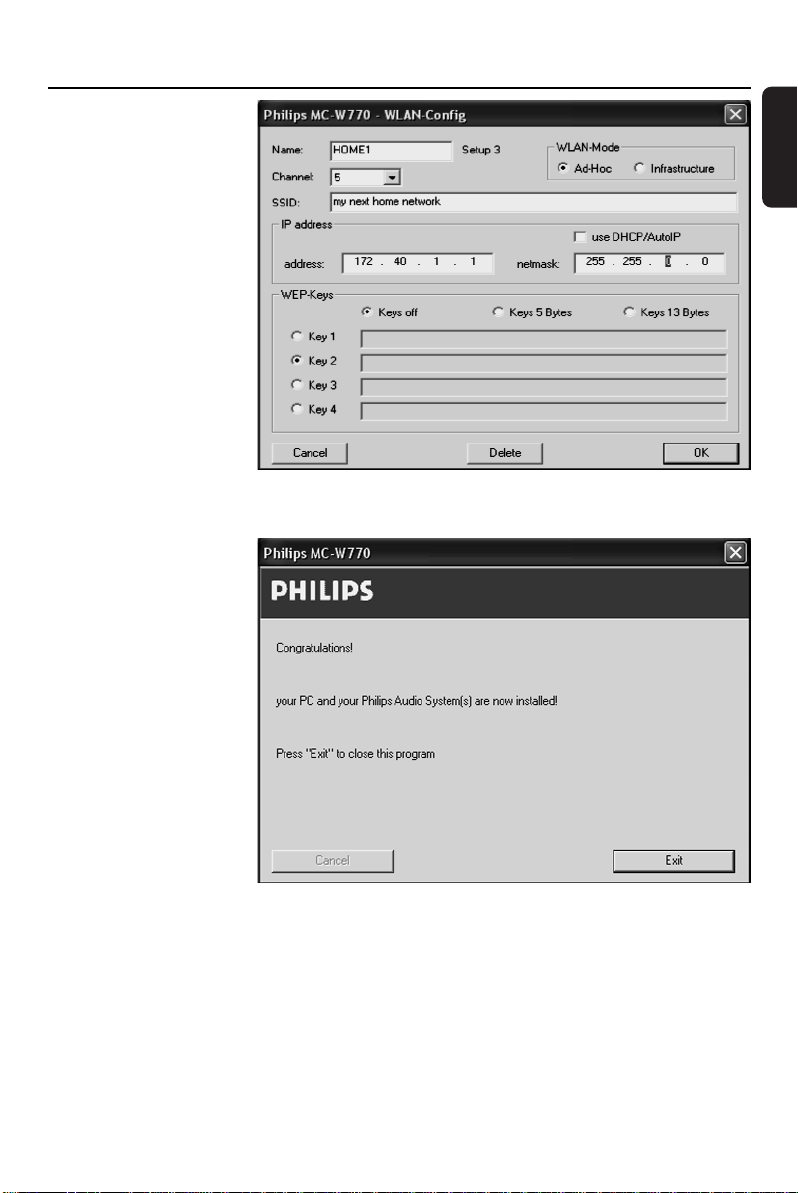
8 ➜ If you have selected
edit, the following
window appears.
Enter your wireless
settings and click on
OK.Then click on Save
in the previous window.
It is recommended to
use WEP keys
encryption for network
security reasons.
Note:The active network
you have to select from
the MCW770 (refer to
the chapter ‘How to
select another network’)
9 ➜ The new network
configurations are
stored in the MC
W770 and the
wireless settings on
your PC are
reconfigured.
Afterwards the
following window
appears:
The installation is
finished, click on Exit to
leave the installation
programme.
English
10 Your MC W770 is now able to connect to your network. Please note that music can only be
played from PCs in the same network having the dedicated Philips Media Manager Software
installed.
9
Page 10
Wireless PC link
English
Network utilities
Check connection
Perform a quick check of your wireless PC link connection.
Change of USB port using the MC W770
The installation of the MC W770 is optimised for the USB port used during installation.
Therefore the supplied wireless USB adapter should be connected only to this specific USB
port.
Changing the USB port can have the following disadvantages (Windows XP, 2000 and newer):
– Connecting MC W770 to your PC can require up to 2 minutes
– In some cases a new installation of wireless USB adapter driver can be necessary
If you nevertheless want to change the USB port (e.g. because you are using a USB hub),
proceed as described below.
1 Connect the wireless USB adapter to the new USB port.
➜ Windows will recognise it and will load the appropriate drivers. Windows may display a
warning that the driver is not approved by Microsoft (message differs with Windows
version). Ignore the message and continue with the installation.
00
If the correct driver is not found, cancel and use Installation of the wireless USB adapter
in Custom installation first.
2 Enter Network
Utilities, select Install
different USB port
and click on Start.
➜ The configuration on
PC side is checked
and, depending on
the PC configuration,
the following window
will appear:
Click on Next to
continue.
10
Page 11

Wireless PC link
3 ➜ The network settings
are reconfigured and
the following window
will appear:
4 Press PC LINK A on your MC W770 for at least 5 seconds until INSTALLING is scrolled on
the set.
➜ The set searches for a connection to the PC.This can require up to about a minute. When
the connection is established, Next is activated.Click on Next.
5 ➜ The PC will connect
to your MC W770
and read out the
presets and update
your installation.The
following window will
appear:
Click on Exit and the
installation is finished.
English
11
Page 12
Wireless PC link
English
Change of the wireless channel
The wireless PC link uses the worldwide standardised so-called 2.4GHz ISM band.The wireless
PC link can use different transmission channels and it might be necessary to change to another
channel in order to optimise link quality.
1 Enter Network Utilities, select Change transmission channel and click on Start.
2 ➜ The configuration on
PC side is checked
and the following
window will appear:
Click on Next to
confirm.
3 ➜ The settings are
reconfigured and the
following window will
appear:
12
Page 13
Wireless PC link
4 Press PC LINK A on your MC W770 for at least 5 seconds until INSTALLING is scrolled on
the set.
➜ The set searches for a connection to the PC.This can require up to about a minute. When
the connection is established, Next is activated. Click on Next.
5 ➜ The following
window for selecting
a channel will appear:
Select a random
channel.We
recommend using
channel 1, 6, or 11. In
any case the new
selected channel should
be different from the
current setting.
Click on Save to
confirm.
6 ➜ The network settings
are changed and the
following window will
appear:
Click on Exit and the
installation is finished.
English
13
Page 14
Wireless PC link
English
Using a different wireless network adapter
The following steps describe how you can use a wireless network adapter different to the one
bypacked with the MC W770 to set up the MC W770 with that adapter.Your network adapter
should be installed already, connected to the PC and ready for wireless function. Nevertheless
please note that a proper function cannot be guaranteed by using a different network adapter.
1 Insert the installation disc into the CD-ROM drive of your PC.
➜ The installation guide
will appear
automatically. If it
does not, start the
installation manually
by running
setup_.exe from
the installation CD.
Follow the installation
process until the
following window
appears:
Select Custom
Installation and click
on Install.
2 ➜ The following window
appears.
Select Setup Network
and click on Install again.
14
Page 15
Wireless PC link
3 ➜ The network setup
programme starts.
This will first look for
the installed wireless
USB adapter which
was delivered with
the set. If this adapter
is not found, the
following window
appears:
4 You have to set up the installation network for the MC W770 with your network adapter.The
installation network has the following parameter:
SSID:W770-INST-PHAS
Channel: 5
WEP: off
AD-HOC mode
Use the utility of your network adapter to set up these settings.
Note: Before setting up your network adapter to the MC W770 installation network, you might write
down the current network settings used by your adapter, which you will probably want to use for
MC W770 as network settings in normal operation.
5 Further settings have to be made in Windows Network configuration setup. Select Windows
Start/Settings/Network Connections.
6 ➜ The overview of your network adapter appears.
English
15
Page 16
Wireless PC link
English
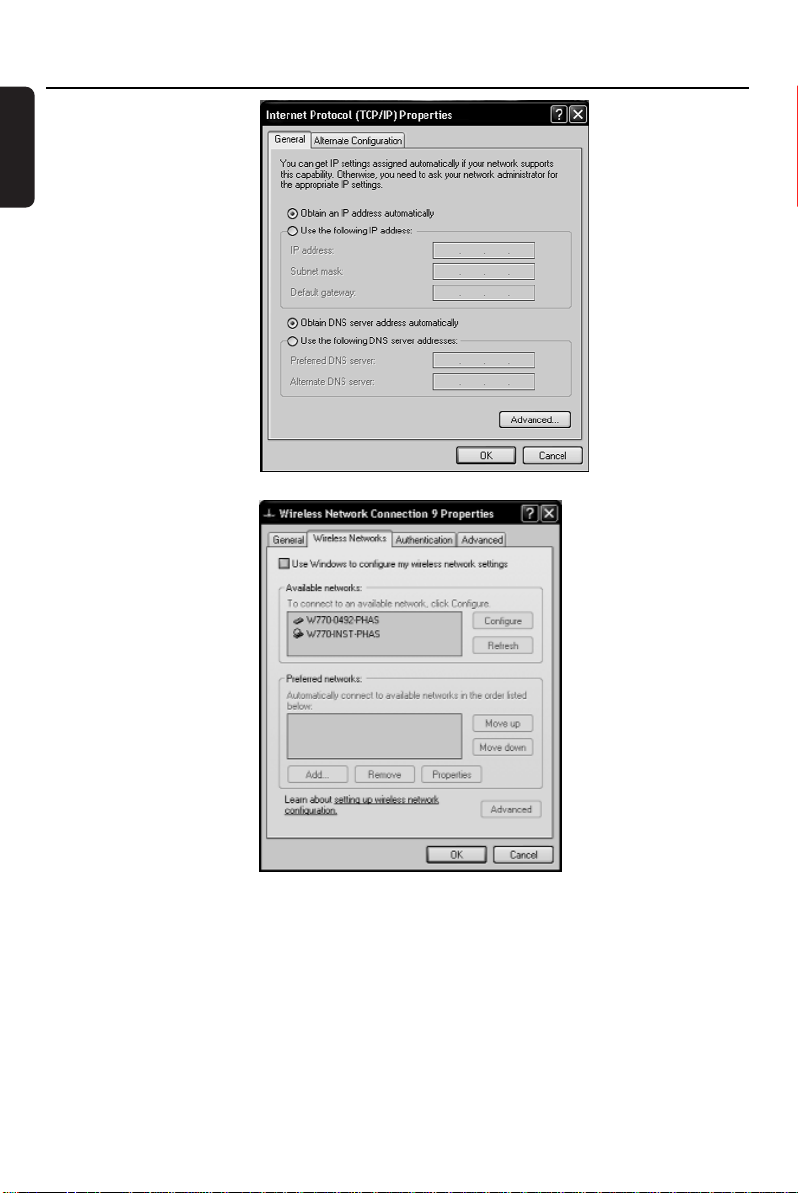
7 ➜ Set in the
Properties window
of your network
adapter the option
Obtain an IP
address
automatically.
Click on OK.
➜ In Windows XP:
under Properties
select the Wireless
Networks tab and
deselect the option
Use Windows to
configure my
wireless network
settings.
Click on OK.
8 Your wireless network adapter is now ready for installation with the MC W770.With the utility
software of your wireless adapter you might check once more if the correct installation
network with the correct network parameter is set up and activated.
9 Now you have to activate the Expert Install mode on your MC W770. Press PC LINK A on
your MC W770 to select the PC as source.
16
Page 17
Wireless PC link
10 Press PC LINK A on your MC W770 for at least 5 seconds until INSTALLING is scrolled on
the set.
11 Press HOME on your MC W770 for at least 2 seconds until EXPERT INSTALL is scrolled on
the set.
12 Click on Next in the
network setup
programme on your PC.
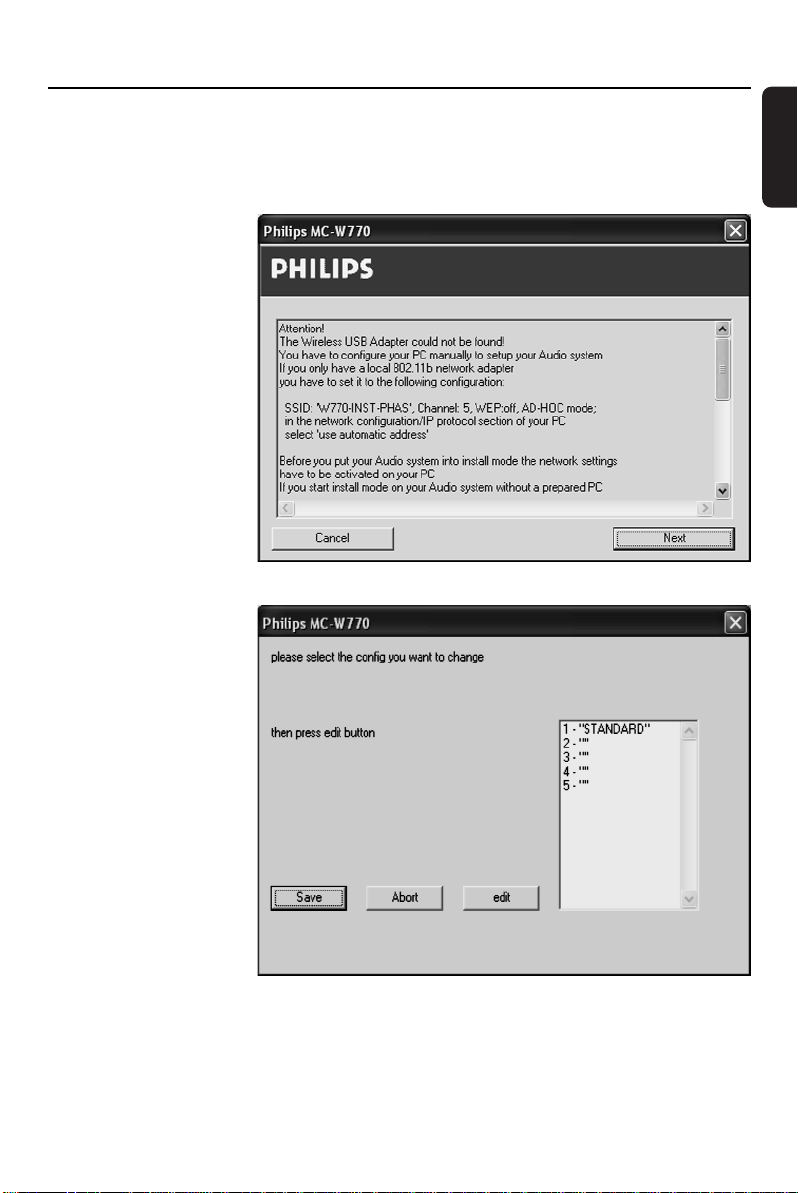
13 ➜ The network setup
programme now
searches for the
MC W770 and reads
out the current
network
configurations from
your set.The
following window will
appear.
Select a network
configuration you want
to change, in the best
case an empty one (“”).
You should not change
STANDARD. Click on
edit.
English
17
Page 18
Wireless PC link
English
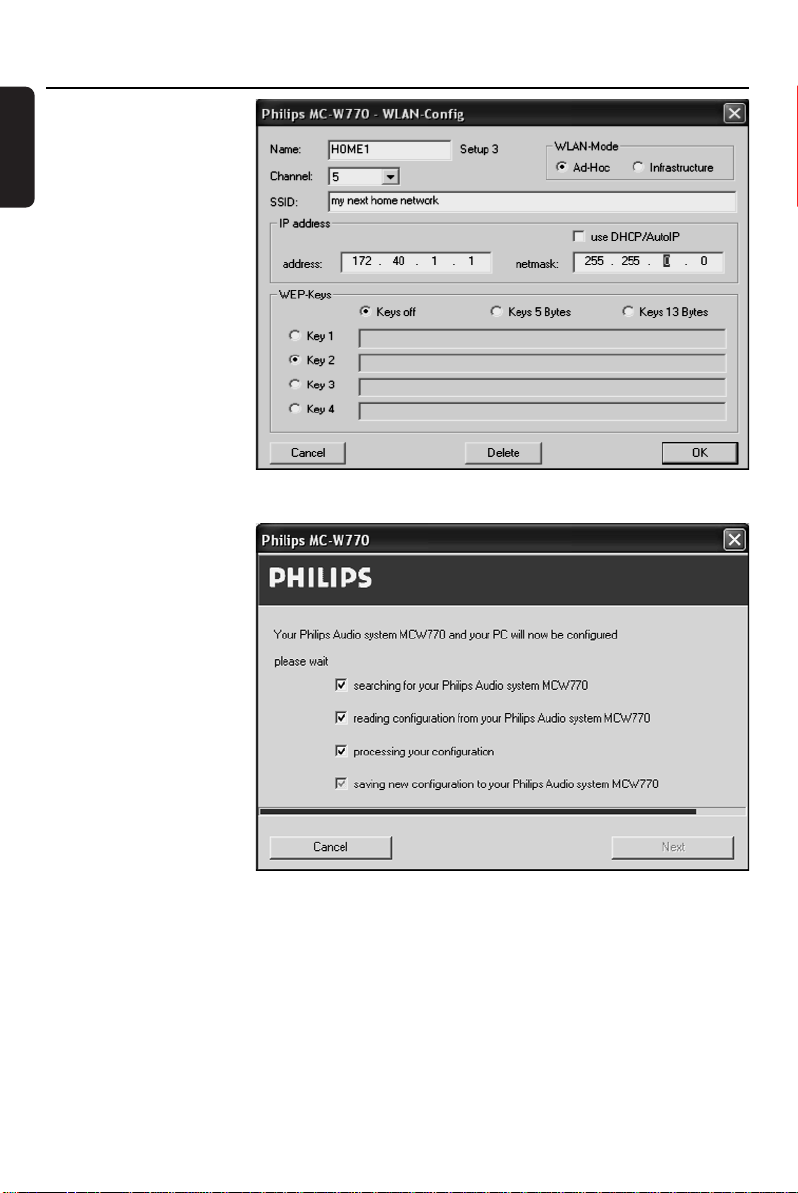
14 ➜ The following
window appears.
Enter the network
parameter of your
network and click on
OK.Then click on Save
in the previous window.
It is recommended to
use WEP keys
encryption for network
security reasons.
15 ➜ The following
window appears:
The network parameter
will be transferred now
to the MC W770 and
stored as one network
configuration in the set.
18
Page 19
Wireless PC link
16 ➜ The new network
settings are stored in
the MC W770 and
ready for using in
normal operation of
the set.The following
window appears:
Click on Exit to close
the network setup
programme on the PC.
17 The MC W770 will automatically exit the Expert Install mode and will go into normal
operation. It will setup a network for normal operation.
18 Now you have to set up your PC wireless adapter to the network which has just been stored
to the MC W770, so both can connect in normal mode too (the wireless adapter is still set up
for Expert Install mode). To do this, use your wireless adapters utility software again. For correct
function, the IP address of the PC has to be set properly too.
19 On PC installation software press Next/Next/Finish to exit the PC installation.
20 Please do not forget that for successful operation the Philips Media Manager Software has to be
set up too and operate on a PC which is part of the network you have just set up.
If more than one network configuration is stored into the MC W770, you might select the one
which has just been set up (see How to select another network in chapter “PC link
function”). Otherwise (one network configuration stored into the MC W770) the audio set will
connect to network/PC and your PC link is fully operational.
English
19
Page 20

MCW770
Wireless PC Link Micro
User manual
Manuel d'utilisation
Manual del usuario
Manual do usuário
Page 21

México
No abrir, riesgo de choque eléctrico
Verifique que el voltaje de alimentación
sea el requerido para su aparato
ATENCIÓN
Para evitar el riesgo de choque eléctrico, no quite la tapa.
En caso de requerir servicio, dirijase al personal calificado.
PRECAUCIÓN - ADVERTENCIA
Es necesario que lea cuidadosamente su instructivo de manejo.
Descripción: Microsistema de Audio con conexion
inalambrica a PC
Modelo: MC W770/21
Alimentación: 110–127 / 220–240 V ~ 50–60 Hz
Consumo: 44 W
Importador: Philips Mexicana, S.A. de C.V.
Domicilio: Av. La Palma No. 6
Col. San Fernando La Herradura
Huixquilucan
Localidad y Tel.: Edo. de México C.P. 52784
Tel. 52 69 90 00
Exportador: Philips Electronics HK Ltd.
País de Origen: China
Nº de Serie: _________________________
LEA CUIDADOSAMENTE ESTE INSTRUCTIVO
ANTES DE USAR SU APARATO.
AVISO IMPORTANTE
Philips Mexicana, S.A. de C.V.no se hace responsable por daños o desperfectos
causados por:
– Maltrato, descuido o mal uso, presencia de insectos o roedores (cucarachas,
ratones etc.).
– Cuando el aparato no haya sido operarado de acuerdo con el instructivo del
uso, fuera de los valores nominales y tolerancias de las tensiones (voltaje),
frecuencia (ciclaje) de alimentación eléctrica y las características que deben
reunir las instalaciones auxiliares.
– Por fenómenos naturales tales como: temblores, inundaciones, incendios,
descargas eléctricas, rayos etc. o delitos causados por terceros (choques
asaltos, riñas, etc.).
2
Page 22

Index
English
Français
Español
∑
Português
___________________________________
________________________________
_________________________________
____________________________________
______________________________
6
EnglishFrançais
38
70
Español∑
102
135
Português
Guarantees
_____________________________
168
Guarantees
3
Page 23

Contents
English
Technical data
General information
Supplied accessories
Environmental information
Maintenance
Disc handling
Setup
Remote control
Remote control usage
Remote control keys
Controls and connections
On the back
On the front
Installation
Speaker connections
Antenna connections
AM/MW antenna
FM antenna
Installing a PC server
Connecting an additional appliance
Mains
Wireless PC link playback
PC LINK function
How to display the current
server name
How to select another PC server __16
How to select another network
Tr ack navigation and playback
During playback
Basic functions
Switching on, switching to standby
Demonstration mode
Setting the clock
Displaying the clock
Dim mode
______________________
_____________________
___________________________
_____________________
__________________
___________________
__________________________
______________________
__________________
________________
___________
_____________
___________
_______________
______________
______________
______________
_________________
__________________
_______________
______________
__________________
_______________
10–11
12–13
___
___
________
____
10
12
14
14
14
14
15
15
15
16
16
16
17
17
18
18
19
19
19
8
8
9
9
9
9
Volume control
Volume adjustment
MUTE
Sound control
DSC
VEC
Playback
Playable discs
Loading discs
Playing discs
Direct selection and playback
of one particular disc
Playback of all loaded discs
To stop playback
Interrupting and resuming playback
Playback features
Selecting and searching
Selecting a track when playback is
stopped
Selecting a track during playback
Searching for a passage during
playback
Additional selecting and searching (on
MP3-CDs only)
Selecting an album when playback is
stopped
Selecting an album during playback _23
Selecting a track in the album
Album and track name display (on
MP3-CDs only)
SHUFFLE and REPEAT
Repeating a track, a disc or a
programme
SHUFFLE - Playing tracks in
random order
Programming track numbers
Clearing the programme
___________________
_____________
_______________________
____________________
________________________
________________________
____________________
____________________
_____________________
___________
______
__________________
___
_____________
_____________________
___
_____________________
__________________
_____________________
_____
__________________
_____________
___________________
_________________
________
___________
20
20
20
20
20
20
21
21
22
22
22
22
22
23
23
23
23
23
23
23
24
24
24
24
25
25
4
Page 24

Contents
Tuner
Tuning to radio stations
Storing radio stations
Storing by using “Plug and Play”
Storing by automatic programming _27
Storing by manual programming
Tuning to preset radio stations
Deleting a preset radio station
Switchable tuning grid (not on all
versions)
Timer
Wake-up timer
Sleep timer
Tr oubleshooting
Frequently asked questions__32–37
________________________
________________
Timer setting
Activating or deactivating
the timer
Checking the timer setting
_____________________
______________________
____________
____________
__________________
_____________
26–27
___
___
_______
_______
28–29
________
30–31
26
26
27
27
27
27
28
29
29
29
English
5
Page 25

CAUTION
109
Use of controls or adjustments or
English
performance of procedures other
than herein may result in
hazardous radiation exposure or
other unsafe operation.
DANGER
Invisible laser radiation when open.
AVOID DIRECT EXPOSURE TO
BEAM.
CAUTION
Changes or modifications not
expressly approved by Philips could
void your authority to operate this
transmitter.
IMPORTANT NOTE:
FCC Radiation Exposure
Statement:
This equipment complies with FCC
radiation exposure limits set forth for
an uncontrolled environment.This
equipment should be installed and
operated with minimum distance 20cm
between the radiator and your body.
This transmitter must not be colocated or operating in conjunction
with any other antenna or transmitter.
1 See page 16 / Voir page 47 / Véase la página 78 /
NAVIGATION (Example only)
Server 1 Server 1 Server 1 Server 1 :
9
65
ALBUM 9: ARTIST 9: GENRE 9: ........ 9: T1 9: T2....
Pop 9: Jazz 9: Classic
65 65 65
T1,T2,T3.. ------- T1,T2,T3.. ------- T1,T2,T3... :
9
Madonna 9: Pink 9: Dido
65 65 65
9
T1,T2,T3 ------- T1,T2,T3 ------- T1,T2,T3 :
Album 1 9: Album2 9: Album3
65 65 65
T1,T2,T3 ------- T1,T2,T3 ------- T1,T2,T3 :
9
9
PLAY T2.. :
6
/ Siehe
siehe Seite 140
Page 26

The set complies with the FCC-
Tested To Comply
With FCC Standards
FOR HOME OR OFFICE USE
Rules, Part 15 and with 21 CFR
1040.10. Operation is subject to the
following two conditions:
1.This device may not cause
harmful interference, and
2.This device must accept any
interference received, including
interference that may cause
undesired operation.
This equipment has been tested and
found to comply with the limits for a
Class B digital device, pursuant to Part
15 of the FCC Rules.These limits are
designed to provide reasonable
protection against harmful interference
in a residential installation.This
equipment generates, uses,and can
radiate radio frequency energy and, if
not installed and used in accordance
with the instructions, may cause harmful
interference to radio communications.
However, there is no guarantee that
interference will not occur in a
particular installation. If this equipment
does cause harmful interference to
radio or television reception, which can
be determined by turning the
equipment off and on, the user is
encouraged to try to correct the
interference by one or more of the
following measures:
– Reorient or relocate the receiving
antenna.
– Increase the separation between the
equipment and the receiver.
– Connect the equipment into an
outlet on a circuit different from that
to which the receiver is connected.
– Consult the dealer or an
experienced radio/TV technician for
help.
Canada
English: (Canadian ICES-003)
This digital apparatus does not exceed the Class B limits for radio
noise emissions from digital
apparatus as set out in the Radio
Interference Regulations of the
Canadian Department of
Communications.
Français: (La norme NMB-003 du
Canada)
Cet appareil numérique n'émet pas
de bruits radioélectriques dépassant
les limites applicables aux appareils
numériques de Classe B prescrites
dans le Règlement sur le Brouillage
Radioélectrique édicté par le Ministère des Communications du
Canada.
English
7
Page 27

Technical data / General information
English
Technical data
Subject to modification without notice.
General
AC Power
Power consumption
Active
Standby
Eco Power Standby
Dimensions,
w × h × d
Weight (without speakers)__5.5 kg, 8.8 lb
Amplifier
Output power
2 x 75 W RMS (6 Ω, 1kHz, 10% THD)
Frequency response _50–20000 Hz, - 3dB
S/N ratio
Input sensitivity
Output
CD changer
Number of programmable tracks
Frequency range
S/N ratio
Channel separation
MPEG 1 Layer 3 (MP3-CD) __MPEG AUDIO
MP3-CD bit rate
Sampling frequencies
Wireless PC LINK
Wireless standard
Frequency range
S/N ratio
Total harmonic distor tion
______
110–127 V / 220–240 V,
______________________
___________________
___________
________
_____________
AUX/CDR IN
Impedance speakers
Impedance headphones
_____________
_____________
175 × 285 × 340 mm
6.9 × 11.2 × 13.4 inches
________
__________
____
50–20000 Hz, - 3dB
____
_________
___
____________
____
50–20000 Hz, - 3dB
_____
50 Hz–60 Hz
44 W
< 10 W
< 1 W
2 x 150 W MPO
≥ 75 dBA (IEC)
500 mV/1V
_________
32 Ω – 1000 Ω
≥ 75 dBA (IEC)
≥ 60 dB (1 kHz)
128 kbps advised
32, 44.1, 48 kHz
≥ 75 dBA (IEC)
≥ 6 Ω
____
32-256 kbps
802.11b
0.3% (1 kHz)
99
Tuner
Wave range
________________
FM
MW, Grid 9
MW, Grid 10
Number of presets
Antenna
_____________________
FM
AM
Speakers
System
Impedance
Woofer
Tw eeter
Dimensions,
w × h × d
Weight
__________
_________
_________________
_____________
_____________________
____________________
_____________________
________
__________________
87.5–108 MHz
531–1602 kHz
530–1700 kHz
_______________
75 Ω wire
Loop antenna
3 way, Bass reflex
6 Ω
1 x 6.5
1 x 2"
175 × 285 × 248 mm
6.9 × 11.2 × 9.7 inches
3.1 kg each
Supplied accessories
– PC link software installer CD-ROM
– Wireless USB adapter and
extension cable
– Remote control and 2 batteries, size AA
–2 loudspeaker boxes including
2 speaker cables
– AM loop antenna
– FM wire antenna
– Mains cable
40
"
8
Page 28

General information
5 cm
2 inches
5 cm
2 inches
10 cm
4 inches
10 cm
4 inches
Environmental information
All redundant packing material has been
omitted.We have done our utmost to
make the packaging easily separable into
three mono materials: cardboard (box),
polystyrene foam (buffer) and polyethylene
(bags, protective foam sheet).
Your set consists of materials which can be
recycled if disassembled by a specialised
company. Please observe the local
regulations regarding the disposal of packing
materials, exhausted batteries and old
equipment.
Maintenance
Clean the set with a
soft, slightly dampened,
lint-free cloth. Do not
use any cleaning agents
as they may have a
corrosive effect.
Do not expose the set,
batteries or discs to
humidity, rain, sand or
excessive heat (caused by
heating equipment or
direct sunlight).
Always keep the trays of
your set closed to protect the lens from
dust. If the set fails to read discs correctly
use a commonly available cleaning-CD to
clean the lens before submitting the set to
repair. Other cleaning methods may destroy
the lens.
The lens may cloud over when the set is
moved from cold to warm surroundings.
Playing a disc is not possible then. Leave the
set in a warm environment until the
moisture evaporates.
Disc handling
To take a disc out of
its box easily, press the
centre spindle while lifting
it.After use, always take
the disc out of the set
and store it in the disc case.
Never attach a sticker to a disc. If you want
to provide a disc with an inscription use a
soft felt-tipped pen and write only on the
printed side.
To clean a disc, wipe it
in a straight line from the
centre towards the edge
using a soft, lint-free cloth.
Any cleaning agents may
damage the disc!
Setup
Place the set on a flat, hard and stable
surface.
Do not position the set on top of other
equipment that might heat it up (e.g.
receiver or amplifier).
Place the apparatus in a
location with adequate
ventilation to prevent
internal heat build up.
Allow at least 10 cm
(4 inches) clearance
from the rear and the
top of the unit and 5 cm (2 inches)
from each side.
The apparatus shall not be exposed to
dripping or splashing.
Do not place any sources of danger on the
apparatus (e.g. liquid filled objects, lighted
candles).
Do not block any ventilation openings.
English
9
Page 29

Remote control
AUX PC LINK
1
#
2
3
4
7
6
@
!
$
%
*
^
&
¡
)
™
0
(
TUNERCD
SHUFFLEPROGRAM
TIMERCLOCKSLEEP
DSC VECDIM
MUTE
CD1
CD2
CD3
CD5
CD4
ALBUM
VOL
9
REPEAT
RDS/NEWS
TIMER ON/OFF
8
DISPLAY
5
HOME
BROWSE
English
Remote control usage
1 Open the battery compartment of the
remote control and insert 2 alkaline
batteries, type AA (R06, UM-3).
2 Close the battery compartment.
Do not use old and new or different types
of batteries in combination.
Remove batteries if they are empty or if the
remote control will not be used for a long
time.
Batteries contain chemical substances,
so they should be disposed of properly.
The buttons on the remote control work
the same way as the corresponding ones
on the set.
Important!
Always select the source you wish to
control first by pressing one of the source
keys on the remote control (e. g.CD,
TUNER).Then select the desired function
(e.g. 4, ¢, ÉÅ).
The remote control remains tuned to the
selected source until another source button
on the remote control is pressed.
Remote control keys
10
Page 30

Remote control
1 2
switches the set to (Eco Power) standby
2 Source buttons
CD
selects the CD changer
TUNER
selects the tuner and toggles between the
wavebands: TUNER FM and TUNER MW
AUX
selects the input for an additional connected
appliance and toggles between the input
sensitivities: AUX (high level input sensitivity)
and AUX CDR (low level input sensitivity)
PC LINK A
selects the connected PC as source
3 CD1, CD2, CD3, CD4, CD5
selects a disc tray and starts playback
4 VOLUME-, VOLUME+
decreases/increases the volume level
5 ALBUM ∞ BROWSE-,
ALBUM 5 BROWSE+
CD: selects the previous/next album on an
MP3-CD
TUNER: selects the previous/next preset
radio station
PC LINK: selects the previous/next level
CLOCK or TIMER: sets the hours
6 Ç
stops playback
7 ÉÅ
starts and interrupts playback
8 4, ¢
CD:
– selects the previous/next track
– searches backwards/forwards (press and
hold the button) within the current track
TUNER: tunes to a lower/higher radio
frequency (press and hold the button for
more than a half second)
CLOCK or TIMER: sets the minutes
PC LINK: selects the previous/next item
9 DISPLAY
CD: displays the album and track name on
an MP3-CD
PC LINK: switches between displaying the
elapsed playing time, the track name and
the file name
0 SHUFFLE
plays tracks in random order
! PROGRAM
enters the programme menu
@ REPEAT
repeats a track, a disc or programmed
track(s)
# SLEEP
sets the sleep timer
$ CLOCK
– displays the set time
– enters the clock setting mode (press and
hold for more than 2 seconds)
% TIMER
– displays the timer setting
– enters the timer setting mode (press
and hold for more than 2 seconds)
^ TIMER ON/OFF
switches the timer on/off
& VEC
selects predefined surround sound settings
* DSC
selects predefined sound settings
( DIM
controls the brightness of the display
) RDS/NEWS
no function on this set
¡ HOME
PC LINK: returns to the first level of the
file structure
™ MUTE
switches the sound off temporarily
English
11
Page 31

1
2
3
5
4
6
7
8
9
@
$
#
^
%
&
0
!
∞
≤
£
™
*
()
¡
Controls and connections
English
On the back
1 SPEAKERS 6 Ω L/R
connect to the supplied speakers
2 AC MAINS ~
After all other connections have been
made, connect the mains lead to the wall
socket.
3 AUX/CDR IN R/L
connect to the analogue audio output of
an additional appliance
4 AM ANTENNA
connect the supplied loop antenna here
5 FM ANTENNA
connect the supplied wire antenna here
12
6 VOLTA GE SELECTOR
110V–127V, 220V–240V
(Not on all versions.) Set this selector to
the local mains voltage. Disconnect the
mains lead before resetting this selector.
On the front
7 DISC 1, DISC 2, DISC 3, DISC 4,
DISC 5
selects a disc tray and starts playback
8 OPEN/CLOSE /
opens/closes the disc tray
9 disc trays
Page 32

Controls and connections
0 STANDBY-ON 2
switches the set to (Eco Power) standby
! iR
sensor for the infrared remote control
Note: Always point the remote control
towards this sensor.
@ display
# source control lights
when a source is active the respective
control light lights up
$ SOURCE
toggles between the sources:
CD: the CD changer is selected
TUNER FM: the FM tuner waveband is
selected
TUNER MW: the MW tuner waveband is
selected
AUX: the high level input sensitivity for an
additional connected appliance is selected
AUX CDR: the low level input sensitivity for
an additional connected appliance is
selected
% HOME
PC LINK: returns to the first level of the
file structure
^ PC LINK A
selects the connected PC as source
& VOLUME rotary
adjusts the volume
* ÉÅ
starts and interrupts playback
( STOP DEMO Ç
– stops playback
– deactivates/activates the demonstration
mode (press and hold the button for
5 seconds)
) ¢
CD:
– selects the next track
– searches forwards (press and hold the
button) within the current track
TUNER: tunes to a higher radio frequency
(press and hold the button for more than
a half second)
CLOCK or TIMER: sets the minutes
PC LINK: selects the next item
¡ WIRELESS PC LINK control light
lights up and blinks when PC LINK data
are transferred
™ p
3.5 mm headphone socket
Note: Connecting the headphones will switch
off the speakers.
£ 4
CD:
– selects the previous track
– searches backwards (press and hold the
button) within the current track
TUNER: tunes to a lower radio frequency
(press and hold the button for more than
a half second)
CLOCK or TIMER: sets the minutes
PC LINK: selects the previous item
≤ ALBUM/PRESET ∞ BROWSE-
CD: selects the previous album on an
MP3-CD
TUNER: selects the previous preset radio
station
PC LINK: selects the previous level
CLOCK or TIMER: sets the hours
∞ ALBUM/PRESET 5 BROWSE+
CD: selects the next album on an
MP3-CD
TUNER: selects the next preset radio
station
PC LINK: selects the next level
CLOCK or TIMER: sets the hours
English
13
Page 33

Installation
AM ANTENNA FM ANTENNA
English
Warning:
Never make or change connections
with the mains supply switched on.
Speaker connections
Use the supplied speakers only. Using
other speakers can damage the set or
the sound quality will be negatively
affected.
● Connect the cable of the left speaker to L
(red and black) and the cable of the right
speaker to R (red and black) as follows:
Press the clip of the red terminal and fully
insert the stripped portion of the coloured
(or marked) speaker cable into the socket,
then release the clip.
Press the clip of the black terminal and fully
insert the stripped portion of the black (or
unmarked) speaker cable into the socket,
then release the clip.
Antenna connections
AM/MW antenna
The loop antenna supplied is for indoor use
only.
1 Assemble the loop antenna as shown
below.
2 Fit the plug of the loop antenna to
AM ANTENNA as shown below.
AM ANTENNA FM ANTENNA
3 Adjust the position of the antenna for
optimal reception (as far away as possible
from the TV,VCR or other radiation
sources).
FM antenna
The wire antenna supplied can only be used
to receive nearby stations. For better
reception we recommend using a cable
antenna system or an outdoor antenna.
1 Extend the wire antenna and fit it to
FM ANTENNA as shown below.
Note: If you are using a cable antenna system
or an outdoor antenna, fit the antenna plug to
FM ANTENNA instead of the wire antenna.
2 Move the antenna in different positions for
optimal reception (as far away as possible
from the TV,VCR or other radiation
sources).
3 Fix the antenna’s end to the wall.
14
Page 34

Installation
Installing a PC server
See “Wireless PC Link Quick Installation”.
Connecting an additional
appliance
It is possible to use an additional appliance,
e.g.TV,VCR or CD recorder with the set.
You can choose between high level input
sensitivity (e.g. for a connected TV or VCR)
and low level input sensitivity (e.g. for a
connected CD recorder).
1 Insert the red plug of a cinch cable to the
red socket AUX IN R and the white plug to
the white socket AUX IN L.
2 Connect the other end of the cinch cable
to the audio outputs of the additional
appliance.
3 Press SOURCE on the set repeatedly until
AUX is selected.
➜ AUX: the high level input sensitivity for an
additional connected appliance is
selected.
To select the low level input sensitivity press
and hold for more than 2 seconds
SOURCE on the set until AUX CDR is
selected.
➜ AUX CDR: the low level input sensitivity
for an additional connected appliance is
selected.
To toggle the input sensitivity press
SOURCE again for 2 seconds on the set.
or
Press AUX on the remote control
repeatedly until the desired input sensitivity
(AUX or AUX CDR) is displayed.
Note: It is not possible to connect a turntable
directly to AUX IN L/R. If you wish to use a
turntable, you have to connect an
RIAA-amplifier to AUX IN L/R on the set.
Then connect the turntable to the
RIAA-amplifier.
Mains
The type plate is located on the rear of
the set.
1 If your set is equipped with a VOLTAGE
SELECTOR set this selector to your local
mains voltage if necessary.
2 Make sure all connections have been
made before switching on the mains
supply.
3 Connect the mains cable supplied to
AC MAINS ~ and to the wall socket.This
switches on the mains supply.
00
When the mains cable is connected for the
first time to the wall socket TUNER and
AUTO INSTALL - PRESS PLAY is
displayed. Press either ÉÅ on the set to
store all available radio stations
automatically (see also chapter “Storing
radio stations”) or if you do not wish to
store them now press Ç on the set to
exit.
When the set is switched to standby, it is
still consuming some power. To disconnect
the set from the mains completely,
remove the mains plug from the wall
socket.
To avoid overheating of the set a safety
circuit has been built in.Therefore your
set may disconnect under extreme
conditions. If this happens, switch the
set off and let it cool down before
reusing it.
English
15
Page 35

AUX PC LINKTUNERCD
CD2
CD
3
CD5
CD4
CD
1
VOL
Wireless PC link playback
English
IMPORTANT !
For preparation,please refer to
the “Wireless PC Link Quick
Installation” and
www.philips.com/support.
PC LINK function
PC LINK enables you to playback your
music collection from the PC via the set.
Before playback can be started the
connection to an installed network/server
must be started. Make sure the wireless
USB adapter is connected or another
network connection is working properly.
1 Switch on your PC and wait until the PC
boot is ready.
2 Press PC LINK A to select the PC as
source.
➜ PC LINK is displayed.
➜ SERVER is displayed and the last active
server name is scrolled.
➜ The last active server name is displayed
and CONNECTING is scrolled.
Note: If no PC server is installed PC LINK is
displayed and NOT INSTALLED is scrolled.
Install the PC server (see “Wireless PC Link
Quick Installation”).
3 As soon as the connection is established:
➜ PC LINK is displayed and a track name
is scrolled.
Note:The last played track will have been
stored and will be selected automatically.
However, if you switch from one PC ser ver to
another, the first track will be selected.
How to display the current server
name
00
To display the current server name press
PC LINK A while the display is neither
showing a server name nor a network
name.
➜ SERVER is displayed and the current
server name is scrolled.
How to select another PC server
00
To switch between further installed
PC servers (see
www.philips.com/support) press
PC LINK A.
➜ SERVER is displayed and the next server
name is scrolled.
To select the displayed server press 4 or
¢ as often as necessary while a server
name is shown.To confirm the selected
server press ALBUM ∞.
How to select another network
1 To switch between further installed
PC networks (see
www.philips.com/support) press
PC LINK A and then ALBUM 5 to enter
the network display.
To select the displayed network press 4
or ¢ as often as necessary while a
network name is shown.To confirm the
selected network press ALBUM ∞.
Note: If the network is not available the first
server name is displayed and
NO CONNECTION
is scrolled.
2 After connecting the network a PC server
will be selected automatically.
➜ The server name is displayed and
CONNECTING is scrolled.
Note: If no connection has been detected the
server name is displayed and NO
CONNECTION is scrolled.
16
Page 36

HOME
Wireless PC link playback
Track navigation and playback
(See illustration on page 6, User
manual)
For easier finding of a desired track you can
navigate as follows:
BROWSE -: goes down one level
BROWSE +: goes up one level
4: skips to the previous item on the
same level
¢: skips to the next item on the same
level
1 Press BROWSE+ or BROWSE -
repeatedly to select the desired level.
➜ The selected level (e.g. ALBUM) and the
name of the selected item (e.g. first
album name) are displayed.
2 Press 4 or ¢ repeatedly to select an
item within the selected level.
➜ The name of the selected level (e.g. first
album name) and the name of the
selected item are displayed.
00
To return to the first level of the file
structure press HOME.
TIMERCLOCKSLEEP
TIMER ON/OFF
RDS/NEWS
DSC VECDIM
During playback
00
To switch between display of elapsed
playing time, track name and file name press
DISPLAY on the remote control repeatedly.
00
To find a particular passage in backwards or
forwards direction within the current track
press and hold 4 or ¢ and release the
key at the desired passage.
00
Press 4 or ¢ to skip to the beginning
of the previous or next track on the
selected disc.
00
To shuffle tracks press SHUFFLE on the
remote control.
➜ PC LINK is displayed and e.g. SHUFFLE
TRACKS is scrolled.
To deactivate the function press SHUFFLE
on the remote control again.
00
To repeat tracks press REPEAT on the
remote control repeatedly to select either:
➜ REPEAT TRACK:The current track is
played repeatedly.
➜ REPEAT ALL: All tracks in the current
setting are played repeatedly.
To return to normal playback, press
REPEAT on the remote control repeatedly
until REPEAT OFF is displayed.
4 Press STOP Ç to stop playback.
English
MUTE
Note:The set will exit from the navigation
mode if no button is pressed within
30 seconds.
3 Press ÉÅ to start playback.
➜ PC LINK is displayed and the track
name is scrolled.
➜ PC LINK and the elapsed playing time
are displayed.
17
Page 37

Basic functions
VOL
English
Switching on, switching to
standby
AUX PC LINKTUNERCD
CD
1
CD2
CD4
ALBUM
BROWSE
● To switch the set to an active mode
press one of the source keys on the remote
control (CD,TUNER,AUX, PC LINK)
or
select a source by pressing SOURCE on the
set repeatedly until CD, TUNER or AUX is
displayed,
or
select the PC as source by pressing
PC LINK A on the set.
● To switch the set to standby press and
hold STANDBY-ON 2 for more than
2 seconds.
➜ The clock is displayed.
● To switch the set to Eco Power
standby press STANDBY-ON 2.
CD
CD5
Demonstration mode
The demonstration mode displays various
features of the set.
3
● To activate the demonstration mode
press and hold STOP DEMO
5 seconds during standby or Eco Power
standby on the set until DEMO ON is
displayed.
● To deactivate the demonstration
mode press and hold STOP DEMO
again on the set for 5 seconds until
DEMO OFF is displayed.
Ç for
Ç
18
Page 38

Basic functions
TIMERCLOCKSLEEP
DSC VECDIM
MUTE
RDS/NEWS
TIMER ON/OFF
HOME
VOL
Setting the clock
ALBUM
BROWSE
SHUFFLEPROGRAMREPEAT DISPLAY
TIMERCLOCKSLEEP
TIMER ON/OFF
DSC VECDIMRDS/NEWS
1 Press and hold CLOCK on the remote
control for more than 2 seconds.
➜ SET CLOCK is displayed, the hours and
minutes digits start blinking.
2 Press ALBUM 5 or ALBUM ∞ on the
remote control repeatedly to set the hour.
3 Press 4 or ¢ on the remote control
repeatedly to set the minutes.
4 Press CLOCK on the remote control to
confirm the setting.
➜ The clock shows the set time.
00
To exit without storing the clock setting
press STOP
Notes:
The clock setting will be erased when the
system is disconnected from the power supply.
The set will exit from the clock setting
mode if no button is pressed within
90 seconds.
Ç.
Displaying the clock
This function shows the set time.
● In any mode (except in clock or timer
setting) press CLOCK on the remote
control repeatedly to switch between the
clock display and the normal display.
Note: If you press a button during the clock
display that changes the display, the
information related to the pressed button will
be shown briefly.Afterwards the clock will be
displayed again.
Dim mode
With this function you can control the
brightness of the display.
● In standby mode press DIM on the
remote control repeatedly to switch
between:
➜ The clock is displayed with half
brightness.
➜ The clock is displayed with full brightness.
● Select a source (CD, AUX,TUNER or
PC LINK) and press DIM on the remote
control repeatedly to switch between:
➜ DIM 1: indicator lights on, display full
brightness, spectrum analyser off
➜ DIM 2: indicator lights on, display half
brightness, spectrum analyser on
➜ DIM 3: indicator lights off, display half
brightness, spectrum analyser off
➜ DIM OFF: indicator lights on, display full
brightness, spectrum analyser on
English
19
Page 39

Basic functions
VOL
HOME
HOME
HOME
English
Volume control
Volume adjustment
CD
1
CD4
CD2
AUX PC LINKTUNERCD
CD5
CD
Sound control
In order to reach an optimal sound, you can
adjust only one of the following sound
controls at a time: DSC or VEC.
DSC
3
Digital Sound Control enables you to
select predefined sound settings.
TIMERCLOCKSLEEP
TIMER ON/OFF
● Adjust the volume by using the VOLUME
rotary on the set or by pressing VOLUME+
or VOLUME- on the remote control.
➜ VOLUME and the actual value (between 1
and 39) are displayed.
➜ VOLUME MIN is the minimum volume
level. VOLUME MAX is the maximum
volume level.
MUTE
You can temporarily switch off the sound
without switching off the set.
TIMERCLOCKSLEEP
TIMER ON/OFF
RDS/NEWS
DSC VECDIM
MUTE
1 Press MUTE on the remote control to
switch off the sound.
➜ The selected source and MUTE are
displayed. Playback will be continued
without sound.
2 Press MUTE on the remote control again
to switch on the sound again.
RDS/NEWS
● Press DSC repeatedly to select the desired
DSC VECDIM
MUTE
sound setting.
➜ The selected source and either POP,
ROCK, JAZZ or OPTIMAL are displayed.
VEC
Virtual Environment Control enables you
to select predefined surround sound
settings.
TIMERCLOCKSLEEP
TIMER ON/OFF
RDS/NEWS
● Press VEC repeatedly to select the desired
DSC VECDIM
MUTE
surround sound setting.
➜ The selected source and either CYBER,
HALL, CONCERT or CINEMA are
displayed.
20
Page 40

Playback
Playable discs
For playback on this set you can use the
following discs (logos shown below):
– All pre-recorded audio CDs
– All finalised audio CDR and
CDRW discs
– MP3-CDs (CD-ROMs with MP3 tracks)
Supported MP3 disc formats
The following formats are supported on
this set:
– Disc format: ISO 9660, Joliet or
UDF 1.5
– Sampling frequencies: 32 kHz,
44.1 kHz, 48 kHz
– Bit rates: 32–256 kbps, variable bit rates
– ID3-tag:V1.1,V2.2,V2.3,V2.4
– Maximum number of titles: 999
(depending on the length of the file
name)
– Maximum number of albums:99
Important!
1) This system is designed for regular
discs.Therefore, do not use any
accessories such as disc stabiliser rings
or disc treatment sheets, etc. as offered
on the market, because they may cause
jamming of the changer mechanism.
2) Do not load more than one disc
into one disc tray.
3) CDs encoded with copyright
protection technologies by some record
companies may be unplayable by this
product.
Loading discs
1 Press OPEN/CLOSE / on the set.
➜ CD and SELECT DISC are displayed.
2 Press one of the disc keys (DISC 1,DISC 2,
DISC 3, DISC 4, or DISC 5) on the set to
select the desired disc tray to be opened.
➜ CD 1 (or 2, 3, 4, 5) and OPEN 1 (or 2,
3, 4, 5) are displayed and the selected
tray is opened.
3 Load a disc with the printed side up. For
double sided discs, load the side you want
to play facing down.
4 Press OPEN/CLOSE / again on the set to
close the tray.
➜ The tray is closed and CD 1 (or 2, 3,4,
5) and READING are displayed.
➜ If an unfinalised disc is inserted DISC
NOT FINALIZED will be displayed.
➜ CD 1 (or 2, 3, 4, 5), the total number of
tracks and the total playing time of the
disc are displayed.
MP3-CD only:
➜ CD 1 (or 2, 3, 4, 5) and READING are
displayed. Due to the large number of
tracks this could take up to 2 minutes.
➜ The first album name is scrolled.
➜ The current album number and the first
track number are displayed. If no album
has been found A00 will be displayed.
00
To load further discs into the other trays
repeat steps 1–4.
Note: Only one tray can be opened at a time. If a
tray is opened and you try to open another, the
already opened tray will be closed first before the
other tray opens.
English
21
Page 41

Playback
VOL
AUX PC LINKTUNERCD
CD2
CD
3
CD5
CD4
CD
1
ALBUM
BROWSE
VOL
English
Playing discs
Direct selection and playback of one
particular disc
AUX PC LINKTUNERCD
CD
1
CD2
CD4
● Press one of the disc keys DISC 1, DISC 2,
DISC 3, DISC 4, or DISC 5 on the set or
CD 1, CD 2, CD 3, CD 4, or CD 5 on the
remote control to start playback of the
desired disc in the selected tray.
➜ CD 1 (or 2, 3, 4, 5), the current track
number and elapsed playing time are
displayed.A flashing CD symbol indicates
the active disc tray.
Playback of all loaded discs
CD
CD5
2 Press ÉÅ to start playback.
➜ Playback starts from the first track of the
current disc. All loaded discs will be
played. If one of the trays is empty, the
next available disc will be selected.
➜ CD 1 (or 2, 3, 4, 5), the current track
number and elapsed playing time are
3
displayed.A flashing CD symbol indicates
the active disc tray.
To stop playback
SHUFFLEPROGRAMREPEAT DISPLAY
TIMERCLOCKSLEEP TIMER ON/OFF
● Press STOP Ç to stop playback.
➜ Playback stops. If no key is pressed for
30 minutes the set will switch to standby.
Interrupting and resuming playback
1 Press SOURCE on the set repeatedly until
CD is selected or press CD on the remote
control.
22
SHUFFLEPROGRAMREPEAT DISPLAY
TIMERCLOCKSLEEP TIMER ON/OFF
1 Press ÉÅ during playback to interrupt
playback.
➜ The playing time where playback was
interrupted will blink.
2 Press ÉÅ again to resume playback.
Page 42

Playback features
Selecting and searching
Selecting a track when playback is
stopped
ALBUM
BROWSE
1 Press 4 or ¢ repeatedly to skip to the
desired track number.
2 Press ÉÅ to start playback.
➜ Playback starts with the selected track.
Selecting a track during playback
● Press 4 or ¢ to skip to the beginning
of the previous or next track on the
selected disc.
➜ Playback continues with the selected
track.
Searching for a passage during
playback
1 Press and hold 4 or ¢ to find a
particular passage in backwards or forwards
direction within the current track.
➜ Searching is started and playback
continues with reduced volume.
2 Release the key at the desired passage.
➜ Normal playback continues.
Note: During SHUFFLE, pressing 4 will not
affect the current playback.
Additional selecting and
searching (on MP3-CDs only)
Selecting an album when playback is
stopped
ALBUM
BROWSE
● Press ALBUM 5 or ALBUM ∞ repeatedly to
find the album number you wish to select.
➜ CD 1 (or 2, 3, 4, 5), the album name,
followed by the artist name and track
name are scrolled.
➜ The album number and the first track
number are displayed.
00
To start playback of the entire album press ÉÅ.
Selecting an album during playback
● Press ALBUM 5 or ALBUM ∞ repeatedly
to skip to the beginning of the previous or
next album on the selected disc.
➜ Playback continues with the first track of
the selected album if you do not press
the key again.
➜ CD 1 (or 2, 3, 4, 5), the album name,
followed by the track number and
elapsed playing time are displayed.
Selecting a track in the album
● Press 4 or ¢ repeatedly to skip to the
desired track.
➜ CD 1 (or 2, 3, 4, 5) is displayed and the
track name is scrolled.
➜ If you pressed 4 or ¢ when playback
was stopped:The album number and the
selected track number are displayed.
➜ If you pressed 4 or ¢ during
playback:The track number and the
elapsed playing time will be displayed.
English
23
Page 43

Playback features
SHUFFLEPROGRAMREPEAT DISPLAY
TIMERCLOCKSLEEP TIMER ON/OFF
English
Album and track name
display (on MP3-CDs only)
SHUFFLEPROGRAMREPEAT DISPLAY
TIMERCLOCKSLEEP TIMER ON/OFF
● During playback press DISPLAY on the
remote control to see the following
information, which will be scrolled once (if
available):
➜ Album name
➜ Tr ack name
SHUFFLE and REPEAT
Repeating a track, a disc or a
programme
1 During playback press REPEAT on the
remote control repeatedly to select either:
➜ REPEAT TRACK:The current track is
played repeatedly.
➜ REPEAT DISC:The entire selected disc is
played repeatedly.
➜ REPEAT PROG TRACK:The current
programmed track is played repeatedly
(only if the programme mode is active).
➜ REPEAT ALL PROG:All progammed tracks
are played repeatedly (only if the
programme mode is active).
2 Playback starts in the chosen mode.
3 To return to normal playback, press
REPEAT on the remote control repeatedly
until OFF is displayed.
Notes:
Not all REPEAT modes are possible during
SHUFFLE or while playing a programme.
Pressing OPEN/CLOSE
REPEAT mode.
SHUFFLE - Playing tracks in random
order
● Press SHUFFLE on the remote control to
activate the function.
➜ SHUFFLE is shown and all tracks of all
loaded discs will be played in random
order.The random play will start from
the current disc. After all tracks on this
disc have been shuffled, the set will
change to the next available disc. If
progamme mode is active, the
programmed tracks only will be played in
random order.
00
To deactivate the function press SHUFFLE
on the remote control again.
➜ SHUFFLE goes off and the function is
deactivated.
Note: Pressing OPEN/CLOSE
the SHUFFLE mode.
/ also cancels the
SHUFFLEPROGRAMREPEAT DISPLAY
TIMERCLOCKSLEEP TIMER ON/OFF
/ also cancels
24
Page 44

Playback features
AUX PC LINKTUNERCD
CD2
CD
3
CD5
CD4
CD
1
SHUFFLEPROGRAMREPEAT DISPLAY
TIMERCLOCKSLEEP TIMER ON/OFF
ALBUM
BROWSE
VOL
Programming track numbers
Programming tracks is possible when
playback is stopped.You can select up to 99
tracks (also MP3 tracks) and store them in
the memory. Programming is possible from
the current selected disc only.Therefore
you cannot combine MP3 tracks and audio
tracks or tracks from more than one CD.
1 Load the desired disc in the disc tray.
2 In case a source other than CD is active
(e.g.TUNER) press SOURCE on the set
repeatedly until CD is selected or press CD
on the remote control.
3 Press PROGRAM on the remote control to
enter the programme menu.
➜ PROGRAM starts blinking.
Note: If no button is pressed within 20 seconds the
set will automatically exit from the programme menu.
4 Press 4 or ¢ repeatedly to select the
desired track.
MP3-CD only:
Press ALBUM 5 or ALBUM ∞ to find the
album number you wish to select and then
press 4 or ¢ repeatedly to skip to the
desired track.
5 Press PROGRAM on the remote control to
store your selection in the memory.
➜ CD 1 (or 2, 3, 4, 5), P with the total
number of tracks programmed and the
total playing time are displayed.
➜ The number of the programmed track
and PROG are displayed.
MP3-CD only:
➜ CD 1 (or 2, 3, 4, 5) and P with the total
number of tracks programmed are
displayed.
➜ The album number and track number of
the programmed track are displayed.
6 Repeat steps 4–5 to select and store other
tracks.
Notes:
If you try to store more than 99 tracks,
PROGRAM FULL will be displayed.
If the total playing time of the programme
has reached 100 minutes --:-- is displayed
instead of the total playing time.
7 Press STOP Ç once to end programming.
00
To start playback of the programme
press ÉÅ.
Clearing the programme
1 If necessary press STOP Ç to stop playback.
2
Press STOP Ç again to clear the programme.
➜ PROGRAM goes off and PROGRAM
CLEARED is scrolled.
Note:The programme will be also erased if you
open the disc tray, if you switch to another source
or if you disconnect the set from power supply.
English
25
Page 45

Tuner
VOL
English
Tuning to radio stations
AUX PC LINKTUNERCD
1
CD
CD4
CD2
ALBUM
BROWSE
1 Press SOURCE on the set repeatedly or
press TUNER on the remote control
repeatedly until the desired waveband
(TUNER FM or TUNER MW) is displayed.
2 Press and hold 4 or ¢ for more than
a half second, then release.
➜ The set automatically tunes to the next
station with sufficient signal strength.
➜ = lights up when receiving a stereo
signal (in FM waveband only).
3 Repeat step 2 until you find the desired
station.
00
To tune to a station with a weak signal
press 4 or ¢ briefly and repeatedly
until an optimal reception is found.
CD
CD5
SHUFFLEPROGRAMREPEAT DISPLAY
Storing radio stations
You can store up to 40 radio stations in the
memory, star ting from FM and followed by MW
wavebands. Stations can be stored automatically
or manually, or by using the “Plug and Play”
3
function. If no button is pressed within 20
seconds the set will exit from the storing mode.
Storing by using “Plug and Play”
You can store all available radio stations
automatically. Attention:All previously
stored radio stations will be replaced.
1 Connect the set to the power supply.
➜ TUNER and AUTO INSTALL - PRESS
PLAY are displayed.
or
In standby mode press and hold ÉÅ on
the set until TUNER and AUTO INSTALL
PRESS PLAY are displayed.
2 Press ÉÅ on the set to start the installation.
➜ TUNER INSTALL is displayed and
automatic searching and storing starts.
➜
During searching TUNER AUTO is displayed.
➜ As soon as a radio station is found and
stored the frequency and the waveband
will be displayed.
➜ Once completed, the last tuned radio
station will be played.
Note: If no stereo signal is detected CHECK
ANTENNA is displayed.
26
Page 46

Storing by automatic programming
You can start the automatic programming
from a selected preset number. If no preset
number is selected, automatic programming
will start at preset number 1 and all your
former presets will be overridden.
1
Press SOURCE on the set repeatedly or press
TUNER on the remote repeatedly until the
desired waveband (TUNER FM or TUNER MW)
is displayed.
2 Press ALBUM 5 or ALBUM ∞ to select a
preset number.
3 Press and hold PROGRAM on the remote
control until AUTO is displayed.
➜ PROG starts blinking. All available radio
stations are stored automatically.
➜ PROG goes off, the preset number, the
waveband and the frequency of the last
preset station are displayed briefly.
00
To exit automatic programming press STOP Ç.
Notes: If a radio station has been already
stored in one of the presets, it will not be
stored again under another preset number.
Strong stations of the selected waveband
will always automatically be first to be
programmed, followed by the weak stations.
Storing by manual programming
You can use manual programming to store
your favourite radio stations only.
1 Tune to your desired radio station (see
“Tuning to radio stations”).
2 Press PROGRAM on the remote control
for less than 1 second.
➜ PROG and the current preset number
start blinking.
00
To allocate the radio station to another preset
number press ALBUM 5 or ALBUM ∞.
3 Press PROGRAM on the remote control
again to confirm the setting.
➜ PROG goes off.The preset number,the
waveband and the frequency of the
preset station are displayed.
Tuner
00
To store further radio stations repeat the
steps 1–3.
00
To exit manual programming press STOP Ç.
Tuning to preset radio stations
● In tuner mode, press PRESET 5 or
PRESET ∞ until the preset number of the
desired station is displayed.
Deleting a preset radio station
1 Tune to the preset radio station to be
deleted.
2 Press and hold STOP Ç for more than
2 seconds.
➜ PRESET DELETED is scrolled and the
current preset radio station is deleted.
➜ All other preset radio stations with
higher numbers are decreased by one.
Switchable tuning grid (not on
all versions)
In North- and South America the frequency
step between MW (AM) channels is 10 kHz. In
all other countries the MW (AM) step is 9 kHz.
Usually the frequency step has been preset for
your area.
In some versions the frequency step can be
changed (i.e. when moving to another area)
as follows:
00
If the set has been already connected to
the mains supply, remove the mains plug
from the wall socket. Attention:The clock
setting will be erased when the system
is disconnected from the mains supply.
●
Press and hold HOME and ALBUM 5 on the
set while connecting the set to the mains supply.
➜ If the frequency step has been 9 kHz the
set switches to 10 kHz and GRID 10 is
displayed.
➜ If the frequency step has been 10 kHz
the set switches to 9 kHz and GRID 9 is
displayed.
English
27
Page 47

Timer
AUX PC LINKTUNERCD
CD2
CD
3
CD5
CD4
CD
1
SHUFFLEPROGRAMREPEAT DISPLAY
TIMERCLOCKSLEEP TIMER ON/OFF
ALBUM
BROWSE
VOL
English
You can select different timer functions
which will be activated at a chosen time.
Make sure the clock is set before
using one of these features.
Wake-up timer
The set can be used as an alarm clock,
whereby the selected source (TUNER, CD
or PC LINK) starts playback at a preset
time.
Timer setting
Note:The set will exit from the timer setting
mode if no button is pressed within
90 seconds.
1 Press and hold for more than 2 seconds
TIMER on the remote control.
➜ X starts blinking, SET TIMER is
displayed and the hours and minutes
digits start blinking.
2 Press SOURCE on the set repeatedly or
press CD,TUNER or PC LINK A on the
remote control to select the source you
want to be woken up with.
➜ The selected source will be lighted.
3 Press ALBUM 5 or ALBUM ∞ repeatedly
to set the hour.
4 Press 4 or ¢ repeatedly to set the
minutes.
00
To exit without storing the timer setting
press STOP
Ç.
5 PressTIMER on the remote control to
confirm the setting.
➜ X remains shown, TIMER ON, the
selected source and the set start time
are displayed.
➜ At the preset time the selected sound
source will be played for 30 minutes. If
no button is pressed within this time, the
set switches to standby.
➜ When the wake-up timer is triggered,
the volume will increase gradually to the
last tuned volume level.
If CD is selected:
The first track of the disc in the last
selected CD tray will be played. If this
tray is empty, the set will search for the
next available disc. If all trays are empty,
the set will switch to tuner.
If TUNER is selected:
The last tuned radio station will be
played.
If PC LINK is selected:
The last played track on the last selected
server will be played. If there is no PC
connection detected, the set will switch
to tuner.
28
Page 48

Timer
Activating or deactivating the timer
SHUFFLEPROGRAMREPEAT DISPLAY
TIMERCLOCKSLEEP
TIMER ON/OFF
DSC VECDIMRDS/NEWS
● Press TIMER ON/OFF on the remote
control repeatedly to activate or deactivate
the timer.
➜ TIMER ON, the last set source and start
time are displayed and the timer is
activated.
➜ TIMER OFF is displayed and the timer is
deactivated.
Checking the timer setting
SHUFFLEPROGRAMREPEAT DISPLAY
TIMERCLOCKSLEEP
TIMER ON/OFF
DSC VECDIMRDS/NEWS
Sleep timer
You can set a certain period of time after
which the set will switch to standby.
SHUFFLEPROGRAMREPEAT DISPLAY
TIMERCLOCKSLEEP
TIMER ON/OFF
DSC VECDIMRDS/NEWS
1 Press SLEEP on the remote control
repeatedly to select the desired period of
time (in minutes). Selection as follows:
➜ SLEEP 15MIN, SLEEP 30MIN, SLEEP
45MIN, SLEEP 60MIN, SLEEP 90MIN,
SLEEP 120MIN, SLEEP OFF.
2 As soon as the desired period of time is
displayed, do not press SLEEP again.
➜ During the last 10 seconds before
switching to standby a countdown is
displayed: SLEEP 10, SLEEP 9,…
SLEEP 1, SLEEP.
➜ Then the set switches to standby.
● To deactivate the sleep timer press SLEEP
on the remote control until SLEEP OFF is
displayed or press STANDBY-ON 2.
English
● Press for less than 2 seconds TIMER on the
remote control to check the timer setting.
➜ TIMER ON, the last set source and start
time are displayed.
29
Page 49

Troubleshooting
English
WARNING
Under no circumstances should you try to repair the set
yourself as this will invalidate the guarantee. Do not open
the set as there is a risk of electric shock.
If a fault occurs, first check the points listed before taking
the set for repair. If you are unable to solve a problem by
following these hints, consult your dealer or service centre.
Laser safety
This unit employs a laser. Only a qualified service person
should remove the cover or attempt to service this device,
due to possible eye injury.
Problem Solution
No power – Make sure the mains cable is connected properly.
– Press STANDBY-ON 2 on the set to switch it to standby.
No sound or sound – Adjust the volume.
of poor quality – Disconnect the headphones.
– Make sure the speakers are connected properly.
– Correct the sound settings on the set.
– Make sure the set is not muted.
No reaction to controls – Disconnect the set from power supply, reconnect after
a few seconds.
The remote control –Point the remote control directly towards the IR sensor on the
does not work properly set.
– Remove batteries, wait 10 seconds and insert them
correctly or insert new batteries.
– Reduce the distance between remote control and set.
–Always select the source you wish to control first by pressing
one of the source keys on the remote control (e. g.CD,
TUNER).Then select the desired function (e.g. á, à, É).
Permanent feature – Press and hold for 5 seconds STOP Ç on the set until
display on the set DEMO OFF is displayed to switch off the demonstration mode.
(demonstration mode)
The timer is not – Set the clock correctly.
working – Press TIMER ON/OFF on the remote control to activate the
timer.
30
Page 50

Troubleshooting
Problem Solution
Poor radio reception – Direct the antenna for optimum reception.
– Make sure the antenna is not positioned near a radiation
source such as a TV,VCR, etc.
NO DISC indication or – Make sure the disc is not scratched or dirty.Replace or clean
disc cannot be played the disc.
– Make sure the disc is inserted printed side up.
– Make sure either a prerecorded audio CD, a finalised CDR(W)
or an MP3-CD is inserted.
– Make sure the CD is not encoded with copyright protection
technologies, as some do not conform to the Compact Disc
standard.
PC LINK and CHECK – Make sure your PC is switched on.
CONNECTION indication – Check the wireless connection between your PC and the set
(see “Quick installation of the wireless connection to a
PC server”).
– Make sure the wireless USB adapter is connected or
another network connection works properly.
English
31
Page 51

Frequently asked questions
English
Important
Do not plug in the wireless USB adapter into a USB port
of your computer, but start with the software installation
first from the CD-ROM.After the necessary driver software
has been installed you will be asked by the installation
software to plug in the wireless USB adapter.This order of
installation will ensure the proper function of your wireless
USB adapter.
Wireless USB adapter
Question Answer
I have plugged in the wireless In order that you can install the correct driver
USB adapter and completed software for the wireless USB adapter,
the installation in Windows please do the following:
without installing the software
from the bypacked CD-ROM first. Control Panel/System/Hardware/
What should I do? Device Manager
I have followed the instructions for Possibly you have a problem with the
use and the instructions shown on quality of the wireless link.We propose using
the installation software exactly the extension cable which is delivered with
but cannot successfully install. the MC W770 Philips audio system and
Since I have changed the USB port Your installation was optimised for the
for the wireless USB adapter I first USB por t used. In order to decrease
have longer connection times from connection time for the new USB port,
my MC W770 audio system to the you have to configure the new USB port
PC. for your PC link network. Select from the
1 Open Windows Start Menu/Settings/
2 Select Other Devices and delete the
USB WLAN device.
3 Unplug the wireless USB adapter.
4 Start the installation from the CD-ROM
with unplugged wireless USB adapter!
5 You will be asked during the installation to
plug in the adapter again.
placing the wireless USB adapter as close as
possible to the front side of the MC W770.
Start the installation again.
CD-ROM setup the Network Utilities
and then the Install different USB port
menu. Follow the instructions of the setup
programme. For more information please refer
to the IFU chapter “Change of USB port using
the MC W770”,
(www.philips.com/support)
32
Page 52

Frequently asked questions
I have lost my bypacked wireless You can order the wireless USB adapter
USB adapter, what can I do? at your local Philips Service organisation.
The MC W770 PC link mode will also work
with most other WiFi certified wireless
adapters. But you have to perform a complete
new setup, and a big part of the network setup
has to be done manually. First install the new
wireless adapter according to its manual. Use
the MC W770 installation disc and select
Setup Network. Continue the installation
according IFU chapter “Using a different
wireless network adapter”,
(www.philips.com/support)Your stored
music files will not get lost.
Philips Media Manager
Software Question Answer
Why can the tracks stored in my Through PC link you have access only to
PC not be played even though those music files which are in the library of the
I have successfully installed PC link? Philips Media Manager software. Please see the
chapter ‘Preparation for wireless PC Link
playback function,’ this describes how you can
add MP3 music files to the Philips Media
Manager.
How can I organise my tracks in Edit the Album,Title and other ID3 Tag
the music library and in the information of your MP3 files with the
MC W770 PC Link view? Philips Media Manager software, so you can
group your songs accordingly.To edit ID3
information select the track(s) you’d like to
edit, right click and select the ‘Edit Media
Information...’ from the popup menu.
How can I get a newer version You can download the latest version of the
of the Philips Media Manager? Philips Media Manager from
http://www.my.philips.com
Can I use other music archiving You can use another music archiving system
software than Philips Media other than Philips Media Manager under
Manager? condition that it provides an Universal Plug and
Play (UPnP
TM
) server interface.
English
33
Page 53

Frequently asked questions
English
Universal Plug and Play
Question Answer
What is Universal Plug and Play? Universal Plug and Play (UPnPTM) allows easy
What does Universal Plug and Play MC W770 implements the UPnPTMtechnology
mean for MC W770? to get access, navigate and stream audio from a
Network setup and system configuration
Question Answer
Can I have more than one Yes, you can add more than one PC (server)
PC (server) to connect to this to your audio system’s configuration.
audio system? Start the CD-ROM installation on a PC which
Can I have more than one network Yes, you can connect your audio system
to connect to this audio system? to more than one network. Each network
interoperability of devices supporting this
network techology.UPnP
networking technologies and provides
standardized protocols for a wide variety of
home and small business devices.
TM
UPnP
you want to add to your audio system
and choose Add new PC server from the
Custom Installation menu. Follow the
instructions of the setup programme. For more
information please refer to the IFU chapter
“Installation of an additional PC server or
recovery of PC link settings on your PC”,
(www.philips.com/support)
configuration has to be added to your audio
system using the installation CD.For more
information please refer to the IFU chapter
“Integration of MC W770 into an existing
(home) network”,
(www.philips.com/support) When
installed, browse through the installed
networks using the 4, ¢ keys while the
display shows NETWORK in the first line.The
network’s name is scrolled in the second
display line. Select a network by pressing the
key on your set.
music server.
TM
builds on standard
∞
34
Page 54

Frequently asked questions
What maximum number of You can install 5 different networks.
networks can be installed with
Philips audio system MC W770?
Can I have more than one Philips Yes, you can connect more than one Philips
audio system MC W770 to connect audio system MC W770 to your PC.
to my PC? In the CD-ROM installation select
Custom Installation and then the Add
additional Audio System menu. Follow the
instructions of the setup programme. For more
information please refer to the IFU chapter
“Installation of an additional audio system or
recovery if audio system PC link settings are
lost.” (www.philips.com/support)
Can I use my built-in wireless LAN Yes, you can use the built in wireless Lan card
card in my PC to set up the of your PC, but you have to setup in Windows
communication with the audio a network with this network adapter first.
system? Then use the Custom Installation menu
from the CD-ROM setup and choose
Network Setup to add the same network
configuration to the audio system. Follow the
instructions of the setup programme. For more
information please refer to the IFU chapter
“Using a different wireless network adapter”,
(www.philips.com/support)
I want to use the PC link function The MC W770 is meant to be used with the
in a wireless network which is bypacked wireless adapter. However,it is
already installed.What can I do? possible to use the MC W770 together with
most other WiFi certified wireless adapters as
well as in infrastructure mode networks using
Access Point. Use the Custom Installation
menu from the CD-ROM setup and choose
Network Setup. In this advanced setup
mode you can add to your audio system the
network configuration of your home network.
Please note that in this network at least
one PC needs the Philips Media Manager
installed and active. For more information
please refer to the IFU chapter “Integration of
MC W770 into an existing (home) network”,
(www.philips.com/support)
English
35
Page 55

Frequently asked questions
English
Connection problems and problems with link quality
Question Answer
I have successfully installed my Please check if your PC is still running and if the
MC W770, the wireless USB wireless USB adapter is installed correctly.
adapter and the software, and it The MC W770 PC link uses radio waves
worked nicely until recently.Now I to link between the PC and audio device.
have placed the MC W770 in a The output power is limited by legal
different room,and it is not able to regulations, and therefore also the distance
connect anymore.The display in which the PC link works is limited. Usually
shows NO CONNECTION.What can the PC link function works inside a typical
I do? single family house without problems. But the
My PC Link has already worked It is possible that in your area or close
nicely, but since recently this is neighbourhood a new network has been
no longer the case. installed. Use the installation CD to switch
How can the transmission There is an easy way to change the network
channel be changed? transmission channel, by using the Change
radio-waves are dampened especially by walls,
ceilings and also by metal in your furniture.
Some golden rules to improve your link
quality:The PC and the MC W770 should not
be placed more than one floor and two walls
from each other. (This depends strongly on the
wall material).The wireless USB adapter
should be placed more than 20 cm (8 inches)
away from metal plates, e.g. it should not be
placed on top of your PC or your monitor,
or even too close to them. Use the extension
cable to get some distance from your PC.Try
different positions for the wireless USB
adapter, some centimetres (inches) can already
help! Try the same with your MC W770.
to another channel.
transmission channel network utility
from the installation CD-ROM. For more
information please refer to the IFU chapter
“Change of the wireless channel”,
(www.philips.com/support)
36
Page 56

Frequently asked questions
When I press the PC LINK A button, If you receive this message you might need to
the display shows NO CONNECTION. restart your Philips Media Manager.To do this,
What can I do? click on on the taskbar and select
‘Shutdown Philips Media Manager’.
Restart the application from the Windows
Start menu.
Can PC link work when the PC PC link cannot work when the PC
is in standby? is switched off or in standby.
English
UPnPTMis a certification mark of the UPnP
TM
Implementers Corporation.
37
Page 57

AUSTRALIA- Philips 3 years Manufacturers Warranty for Australia only
These warranty conditions are valid for the
following consumer electronics products:
Colour Televisions,Video Cassette Recorders,
CD Players and Recorders, DVD Players and
Recorders,Audio Systems and Portable Audio.
The benefits given to the purchaser by this
warranty are in addition to all other rights and
remedies which the purchaser has in respect
of the product under the Trade Practices Act
or other Commonwealth or State Law.
Philips Consumer Electronics warrants its
products to the purchaser as follows and subject
to the stated conditions.
3
YEARS free Repair Service
Colour Televisions, CD Players and Recorders, DVD
Players and Recorders and Audio Systems.
3 YEARS free Replacement – at your Retailer
All Portable Audio products and all Video
Cassette recorders (VCR’s) only.
Conditions of Repair Warranty
1.
All claims for warranty service should be made to your
nearest Philips Authorised Service Centre. Reasonable
evidence of date of purchase must be provided.
2. This warranty extends only to defects in material
or workmanship occurring under normal use of
the product when operated in accordance with
the instructions.
3. This warranty applies for original purchase only. It
is not transferable if sold.
4.
Home service within the normal service area of
one of our Authorised Service Centres will only be
Guarantees
provided for television receivers with screen size 48
cm and above.All other products are to be taken
or sent to the workshop of your nearest Authorised
Service Centre (at Consumer’s expense).
5.
This Manufacturers Warranty is limited to 3 months for
above listed Consumer Electronics products if used in
commercial applications.
6.
Philips may, at its discretion choose to replace rather
than repair any product covered by this warranty.
7. This Manufacturers Warranty is neither transferable
nor valid in countries other than Australia.
This warranty does not cover:
a) Mileage or travelling time, pickup or delivery,
installations and cost of insurance.
b)
Mileage or travel outside the normal service area
covered by selected Authorised Service Centre.
c)
Service costs arising from failure to correctly adjust
the controls of the product or to observe the
instructions, or inspections that reveal that the product
is in normal working order.
d) Product failures caused by misuse, neglect,
accidental breakage, transit damage, inexpert
repairs or modification by un-authorised persons,
external fires, lightning strikes, floods, vermin
infestation or liquid spillage.
e) Cleaning of video or audio heads.
f) Inadequate receiving antennae.
g) Replacement of worn or used batteries or
other consumables.
h)
Consumer products used in commercial
applications (This warranty is limited to 3 months only).
i) Second hand products.
The conditions contained in this warranty card
replace and override the provision of the Philips
Wor ld-Wide Guarantee for products purchased in
Australia and used in Australia.
Philips Authorised Service Centres
Service is provided through 200 accredited
Authorised Service Centres throughout Australia.
For direct contact with your nearest recommended
Authorised Service Centre in major cities:
Adelaide Launceston
Melbourne Canberra Newcastle
Geelong Perth Gold Coast
Sydney Hobart Wollongong
or to find the location of your nearest recommended
Authorised Service Centre outside the above cities
please call our National Service telephone number :
Brisbane
1300 361 392
Please record the following information for your
records and keep in a safe place.
Model number:....................................................
Serial number:....................................................
Date of purchase:....................................................
Retailer:....................................................
We recommend you retain your purchase
receipt to assist in any warranty claim.
Philips Consumer Electronics
a division of Philips Electronics Australia Limited
ABN 24 008 445 743,
Level 2, 65 Epping Road NORTH RYDE NSW 2113
166
Page 58

NEW ZEALAND - Guarantee and Service for New Zealand
Thank-you for purchasing this quality Philips
product.
Philips New Zealand Ltd guarantees this product
against defective components and faulty
workmanship for a period of 12 months.Any
defect in materials or workmanship occurring
within 12 months from the date of purchase
subject to the following conditions will be
rectified free of charge by the retailer from
whom this product was purchased.
Conditions
1. The product must have been purchased in New
Zealand.As proof of purchase, retain the original
sales docket indicating the date of purchase.
2. The guarantee applies only to faults caused by
defective components, or faulty workmanship on
the part of the manufacturer.
3. The guarantee does not cover failures caused by
misuse, neglect, normal wear and tear, accidental
breakage, use on the incorrect voltage, use contrary to operating instructions, or unauthorised
modification to the product or repair by an
unauthorised technician.
4. Reasonable evidence (in the form of a sales
docket) must be supplied to indicate that the
product was purchased no more than 12 months
prior to the date of your claim.
5. In the event of a failure, Philips shall be under no
liability for any injury, or any loss or damage
caused to property or products other than the
product under guarantee.
This guarantee does not prejudice your rights
under common law and statute, and is in addition
to the normal responsibilities of the retailer and
Philips.
How to claim
Should your Philips product fail within the
guarantee period, please return it to the retailer
from whom it was purchased. In most cases the
retailer will be able to satisfactorily repair or
replace the product.
However, should the retailer not be able to conclude the matter satisfactorily,or if you have
other difficulties claiming under this guarantee,
please contact
The Guarantee Controller
Philips New Zealand Ltd.
4 P. O. Box 41.021
Auckland
3 (09) 84 94 160
fax 3 (09) 84 97 858
Guarantees
167
Page 59

POLIZA DE GARANTIA
ESTA POLIZA ES GRATUITA
Este aparato ha sido cuidadosamente diseñado y se ha fabricado con los mejores materiales bajo un
estricto control de calidad, garantizando su buen funcionamiento por los periodos establecidos según el
aparato (ver lista en la parte inferior) a partir de la entrega del aparato al consumidor.
Esta póliza incluye la reparación o reposición gratuita de cualquier parte o componente
que eventualmente fallase y la mano de obra necesaria para su reparación, misma que se
hará efectiva en cualquiera de nuestros centros de servicio autorizados en el país.
Si su aparato llegase a requerir de nuestro servicio de garantía, acuda al centro de servicio más
cercano a su domicilio, de tener alguna duda por favor llame a nuestra CENTRAL DE SERVICIO
al Tel.: 52 69 90 86, y en el interior del país LADA sin costo al 01800 506 9200 en donde con gusto le
indicaremos el centro de servicio autorizado más cercano a su domicilio.
PHILIPS MEXICANA S.A. de C.V.a través de sus centros de servicio autorizados reparará y devolverá
a usted su aparato en un plazo no mayor a 20 días hábiles, contados a partir de la fecha de
ingreso, impresa en la orden de servicio de cualquiera de nuestros centros de servicio autorizados.
La garantía de esta póliza cubre cualquier desperfecto o daño eventualmente
ocasionado por los trabajos de reparación y/o traslado del aparato en el interior de
nuestros centros de servicio autorizados.
Esta póliza sólo tendrá validez, si está debidamente requisitada, sellada por la casa
vendedora, en caso de extravío de esta póliza, podrá hacer efectiva su garantía con la presentación
de su factura de compra.
ESTA POLIZA NO SE HARA EFECTIVA EN LOS SIGUIENTES CASOS:
● Cuando el aparato sea utilizado en condiciones distintas a las normales.
● Cuando el aparato no haya sido operado de acuerdo con el instructivo de uso que se le acompaña.
● Cuando la causa de la falla o mal funcionamiento sea consecuencia de una reparación inadecuada o
alteración producida por personas no autorizadas por PHILIPS MEXICANA S.A. de C.V.
PERIODOS DE GARANTIA
36 MESES. – Monitores para computadora.
12 MESES. –Televisores con y sin reproductor de video digital DVD, videocassetteras, reproductores de
discos de video digital DVD, grabadores reproductores de disco de video digital DVD,
grabadores reproductores de disco compacto, video proyectores (excepto la lámpara),
cámaras de video, decodificadores de señal (IRD), televisores para hotel, sistemas de
observación, televisores de proyección, teléfonos celulares, pagers, minisistemas de audio,
microsistemas de audio, equipos modulares, sintoamplificadores, facsímils, LNB, antenas de
recepción de satélite, DVD ROM, CDR ROM y CDRW ROM para computadora.,
6 MESES. – Radiograbadoras con y sin reproductor de disco compacto, reproductores de cassette
portátil, reproductores de disco compacto portátil, radio relojes, radios A.M./F.M.,
reproductores de audio digital MP3 (internet), auto estéros y teléfonos inalámbricos.
3 MESES. – Accesorios, controles remotos, bocinas, cinta para fax y para cámaras de videoconferencia.
MC-719-ARCO
Page 60

Philips Mexicana, S.A. de C.V.
MODELO_________________________________ Nº DE SERIE ___________________________
La presente garantía contará a partir de: DIA_____________ MES ____________ AÑO____________
En caso que en su producto se produzca alguna falla, acuda al centro de servicio más cercano a su domicilio (según listado de talleres),
de tener alguna duda, por favor llame a nuestra CENTRAL DE SERVICIO, en donde con gusto le atenderemos.
Así mismo, cuando requiera refacciones y par tes originales para su producto, acuda a los centros de servicio. Para hacer efectiva la garantía
de su producto, es necesario que presente usted esta póliza debidamente requisitada, o de lo contrario, presentar su factura de compra.
CENTROS DE SERVICIO
NOTA: Los Centros que tengan (S) solo proporcionan Servicio y los que tengan (SR) venden Refacciones y
proporcionan Servicio.
Producto importado por:
Philips Mexicana, S.A. de C.V.
Av. La Palma No. 6
Col. San Fernando La Herradura
Huixquilucan, Edo. de México C. P. 52784
Tel. 52 69 90 00
Información General
Centro de Información al Consumidor
Lada 01 800 504 62 00
CENTRAL DE SERVICIO
Tel. 52 69 90 86
Lada 01800 506 92 00
Ciudad EDO Calle y Nº Colonia C.P.
Nombre Comercial
Lada Telefono Fax
Acapulco GRO Av. Revolucion Nº 28 M. Aleman 39300 Servicio Electronico Profesional 744 83 32 96 – S
Cd. Juarez CHIH. Rancho el Becerro 3011 Pradera Dorada 32610 Teleservicio Dominguez 656 18 21 28 18 21 28 S
Reynosa TAMPS Tiburcio Garza Nº 401 Rodriguez 88630 Teleservicio Pepe 899 22 59 86 – S
Chihuahua CHIH. Tr asviña y Retes Nº 3503-A San Felipe 31240 Zener Electronica 614 14 01 16 14 33 51 S
Colima COL Fr ancisco I. Madero Nº 426 Centro 28000 TV Antenas de Colima 312 403 01 403 01 S
Culiacan SIN Ven ustiano Carranza Nº 140-A Nte. Centro 80090 Estereo Voz 667 16 15 10 – S
Guadalajara JAL Av.Vallarta Nº 2250 Ladron de Guevara 44600 Leecom S.A.de C.V. 33
616 18 88
616 01 26
615 72 62 SR
Leon GTO Hernandez Alvarez Nº 726 San Juan de Dios 37480 Tecnicos Especializados 477 70 26 99 15 58 64 S
Merida YUC Calle 70 Nº 443 X 49 Depto. 8 Centro 97000 Servicentro 999 28 59 05 23 39 97
S
Mexicali B.C.N. Calzada Cuahutemoc Nº 816-2 Cuahutemoc Norte 21200 Baja Electronic’s 686
61 98 08
61 98 08
– S
Mexico D.F. Nor te 1 D Nº 4634
Defensores de la
Republica
7780 Tecnologia y Servicio S.A. de C. V. 55 5368 30 21 5368 30 21
S
SR
SR
SR
S
S
S
SR
S
S
SR
S
S
S
S
S
S
Mexico D.F. Calz.Vallejo Nº 1045-03 Esq. Pte. 124 Nueva Vallejo 02300 Electronica Chyr S.A. de C.V. 55
567 19 92
567 22 56
56 79 62
Mexico D.F.
Nicolas San Juan Nº 806,
Esq. div. del Norte
Del Valle 03100 Centro de Ser vicio Electronico 55
536 71 03
536 25 75
5687 13 05
Monterrey N.L. Juan Mendez Nº 825 Nte. Centro 64000
Monterrey Centro Electronico S.A.
81
375 16 17
400 54 03
375 34 86
400 54 04
Morelia MICH. Lago de Patzcuaro Nº 500-A Ventura Puente 58020
Multiserv. Profesionales de Zamora
443 12 03 17 –
Oaxaca OAX Huzares Nº 207 Centro 68000 El Francistor S. de R.L. de C.V. 951 647 37 472 97
Pachuca HGO Pza. de las Americas Lote 28 Nucleo D Valle de Sn Javier 42086 Frazare Electronica 771 14 15 81 18 86 72
Puebla PUE Av. 10 Pte. Nº 2902-B San Alejandro 72090 Selcom 222 48 77 64 31 63 77
Queretaro QRO Bolivia 32 Lomas de Queretaro 76190 Electronica Zener 442 610 09 –
San Luis Potosi S.L.P. Dr. Salvador Nava Nº 2755 Balcones del Valle 78280 Servicios Electronicos 444 534 07 –
Tampico TAMPS Laredo Nº 105 Mainero 89060 Concesionario Philips Tampico 833 12 36 04 –
Toluca
EDO
MEX
Calle Toluca Nº 505 Sanchez 50040 Concesionario Philips Toluca 722 14 83 09 1703 20 21
Tijuana B.C.N. Av. Negrete 1613 Centro 22000
Sistemas Inalambricos de
Comunicacion
666 85 23 22 85 23 22
To r reon COAH Mariano Lopez Ortiz Nº 1126 Nte. Centro 27000 Electronica Jomar 871 22 00 05
1702 19 76
Tuxtla Gutierrez CHIS 10 Nte. Ote 153-A Centro 29000 KC-Video 961 18 19 08 –
Ver acruz VER Guerrero Nº 1877 Entre Cortez y Canal Centro 91700 Antza Comunicaciones 229
32 78 23
32 44 44
31 91 66
Villahermosa TAB Sanchez Marmol Nº 206 Centro 86000 Tecnicentro 993 14 31 36 14 61 67
Page 61

Certificado de garantia para o Brasil
(Os dados deste manual estão sujeitos a alterações.)
Este aparelho é garantido pela PHILIPS DA
AMAZÔNIA INDÚSTRIA ELETRÔNICA LTDA,
por um período superior ao estabelecido por lei,
porém, para que a garantia tenha validade, é
imprescindível que, além deste certificado, seja
apresentada a nota fiscal de compra do produto.
1)
A PHILIPS DA AMAZÔNIA INDÚSTRIA
ELETRÔNICA LTDA.assegura ao proprietário
consumidor deste aparelho a garantia de 365 dias (90
dias legal mais 275 dias adicional) CONTADOS A
PA RTIR DA DATA DE ENTREGA DO
PRODUTO,CONFORME EXPRESSO NA
NOTA FISCAL DE COMPRA, que passa a fazer
parte deste cer tificado.
2) Esta garantia perderá sua validade se:
A) O defeito apresentado for ocasionado por
uso indevido ou em desacordo com o seu
manual de instruções.
B) O produto for alterado, violado ou consertado
por pessoa não autorizada pela Philips.
C) O produto for ligado a fonte de energia (rede
elétrica, pilhas,bateria, etc.) de características
diferentes das recomendadas no manual de
instruções e/ou no produto.
D) O número de série que identifica o produto
estiver de alguma forma adulterado ou rasurado.
3) Estão excluídos desta garantia defeitos
decorrentes do descumprimento do manual de
instruções do produto, de casos fortuitos ou de
força maior, bem como aqueles causados por
agentes da natureza e acidentes.
Guarantees
4) Excluem-se igualmente desta garantia defeitos
decorrentes do uso dos produtos em serviços
não doméstico/residencial regular ou em
desacordo com o uso recomendado.
5) Nos municípios onde não exista oficina autorizada
de serviço Philips, as despesas de transporte do
aparelho e/ou do técnico autorizado, correm por
conta do Sr. consumidor requerente do serviço.
6)
Este produto tem GARANTIA
INTERNACIONAL.Oserviço técnico (durante ou
após a garantia) é disponível em todos os países onde
este produto é oficialmente distribuído pela Philips.
Nos países onde a Philips não distribui este produto, o
serviço técnico da Philips local poderá prestar tal
serviço, contudo poderá ocorrer algum atraso no
prazo de atendimento se a devida peça de reposição e
o manual técnico não forem prontamente disponíveis.
7) A garantia não será válida se o produto necessitar
de modificações ou adaptações para habilitá-lo a
operar em qualquer outro país que não aquele
para o qual foi designado, fabricado, aprovado
e/ou autorizado, ou ter sofrido qualquer dano
decorrente deste tipo de modificação.
Dentro do Brasil, para informações adicionais sobre o
produto ou para eventual necessidade de utilização
da rede de oficinas autorizadas, ligue para o Centro
de Informações ao Consumidor ou escreva para Av.
Engenheiro Luis Carlos Berrini, 1400 14 andar – CEP
04571-000 Brooklin Novo – São Paulo - SP ou envie
um e-mail para: cic@philips.com.br.
CENTRO DE INFORMAÇÕES AO CONSUMIDOR
GRANDE SÃO PAULO = 3191.0091
DEMAIS LOCALIDADES = 0800.123123
Horário de atendimento: de segunda à sexta-feira,das
08:00 às 20:00 h, aos sábados das 08:00 às 13:00 h.
Para atendimento fora do Brasil, contate a Philips
local ou a:
Philips Consumer Service
Beukenlaan 2
5651 CD Eindhoven
The Netherlands
PHILIPS DA AMAZÔNIA
INDÚSTRIA ELETRÔNICA LTDA.
170
Page 62

171
Page 63

Meet Philips at the Internet
CLASS 1
LASER PRODUCT
English
Need more help or information on installation? Visit:
Ayez besoin de plus d'aide ou d'information sur l'installation? Merci de
¿Problemas de Instalación? Para más información, por favor visite nuestra
Problemas com a instalação? Para obter mais ajuda,visite:
PortuguêsFrançais Español ∑
http://www. philips.com
visiter notre site internet:
página web:
www.philips.com/support
WMC W770
3141 075 20431
PDCC-LC/JW-433
 Loading...