

Page 1
Micro Hi-Fi System
MC-
MC-
V320
V320
1
Page 2

Optimum disc playability :
ensuring excellent picture quality
Philips components and modules for the various
CD applications have always enjoyed an
excellent reputation in the market place for
super disc playability - the ability to play discs
which may be scratched, soiled or not fully
according to the standard specification. This
position has been underlined by tests showing
the superior performance of the various Philips
players, as well as by the positive experiences of
millions of individual consumers around the
world.
Constantly improving performance
As the penetration of the CD system has
increased, and new applications like CD-ROM
and Video CD have become commonplace,
Philips Components - as the CD technology
inventor and as one of the major suppliers of
CD player modules in the industry - has
constantly improved the performance of its
products.
One of the ways in which this benefits users is
by optimum disc playability. This is an important
parameter for CD players other than CD Audio,
and especially for the Video CD applications,
because any loss of data from the disc will at
best cause disturbances in the reproduced
picture, and at worst can cause the player to lose
track so that disc playing fails.
Presenting Super Error Correction
To ensure consistently good results when playing
Video CD discs of all quality grades and
conditions, Philips has introduced further
improvements in the system's playability. These
developments together are called Super Error
Correction, a proprietary Philips technology
optimizing the system's ability to handle lessthan-perfect discs with the minimum disturbance
to normal playing.
By effectively eliminating virtually all errors arising
under normal playing conditions, Super Error
Correction ensures that the picture quality as
seen by the user is independent of disc play. The
video encoding and processing during mastering
of the disc, and the MPEG-1 decoding and video
encoding in the signal processing stages, are now
the only limiting factors for picture quality.
2
Page 3
8
7
!
0
9
@
#
1
6
5
4
3
2
3
3
Page 4
¤
⁄
%
^
º
*
ª
$
•
≥
§
∞
&
*
$
(
)
¡
™
£
≤
4
Page 5
Index
English ------------------------------------------------ 6
-------------------------------------------------------- 33
English
CAUTION
Use of controls or adjustments or
performance of procedures other
than herein may result in hazardous
radiation exposure or other unsafe
operation.
5
Page 6
Contents
English
General Information
Environmental information ................................ 7
Supplied accessories ............................................ 7
Safety information ................................................ 7
Preparations
Rear connections .......................................... 8 – 9
Optional connection ........................................... 9
Inserting batteries into
the Remote Control ............................................ 9
Controls
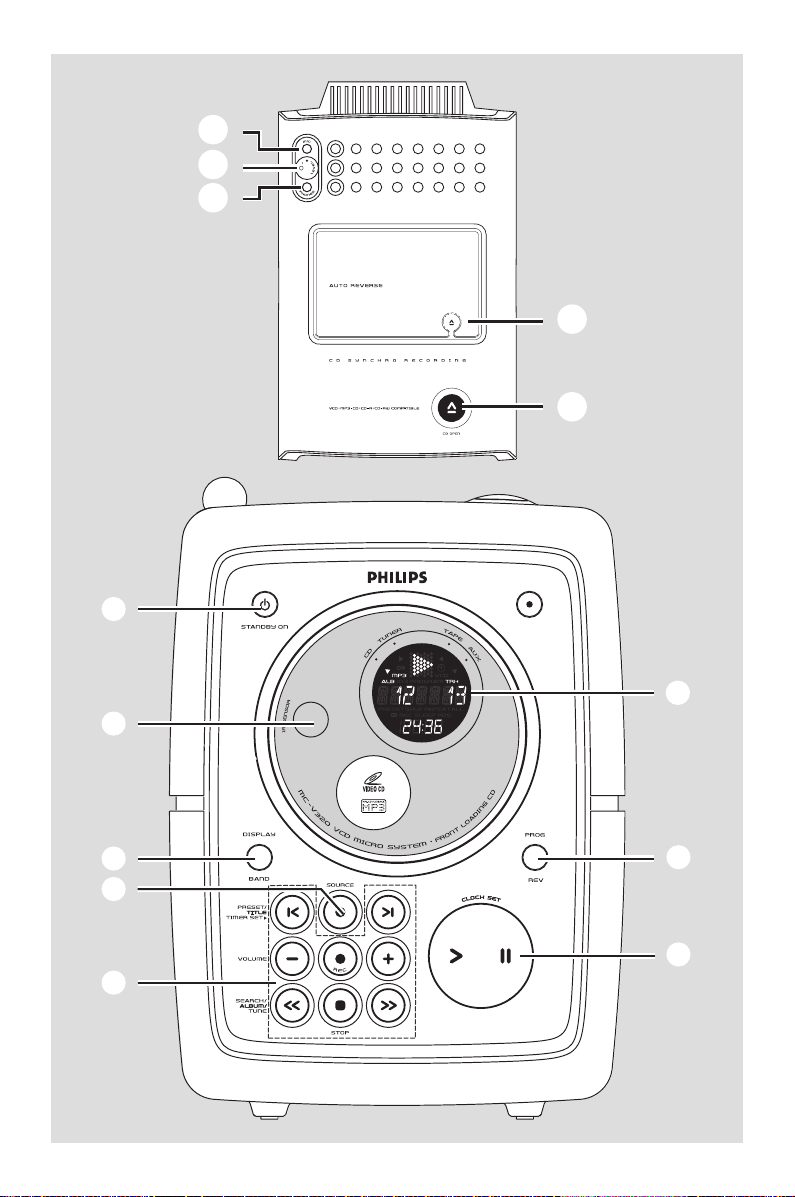
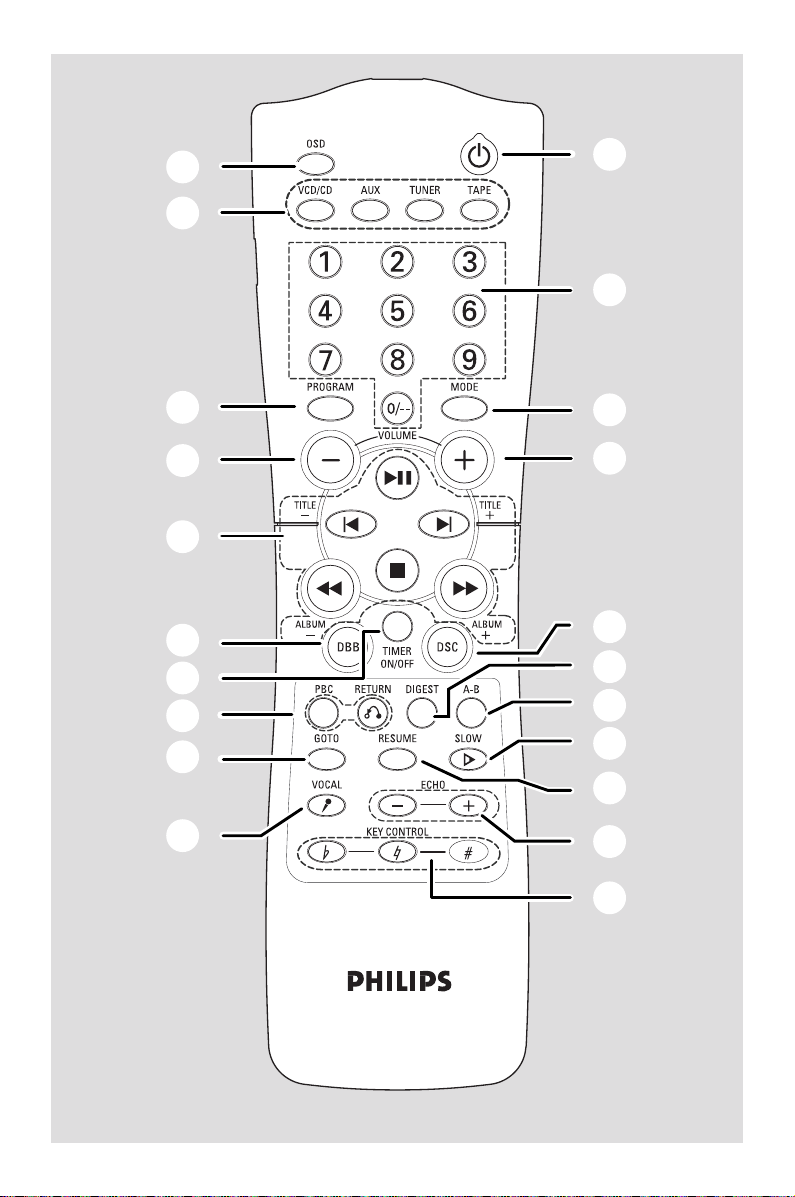
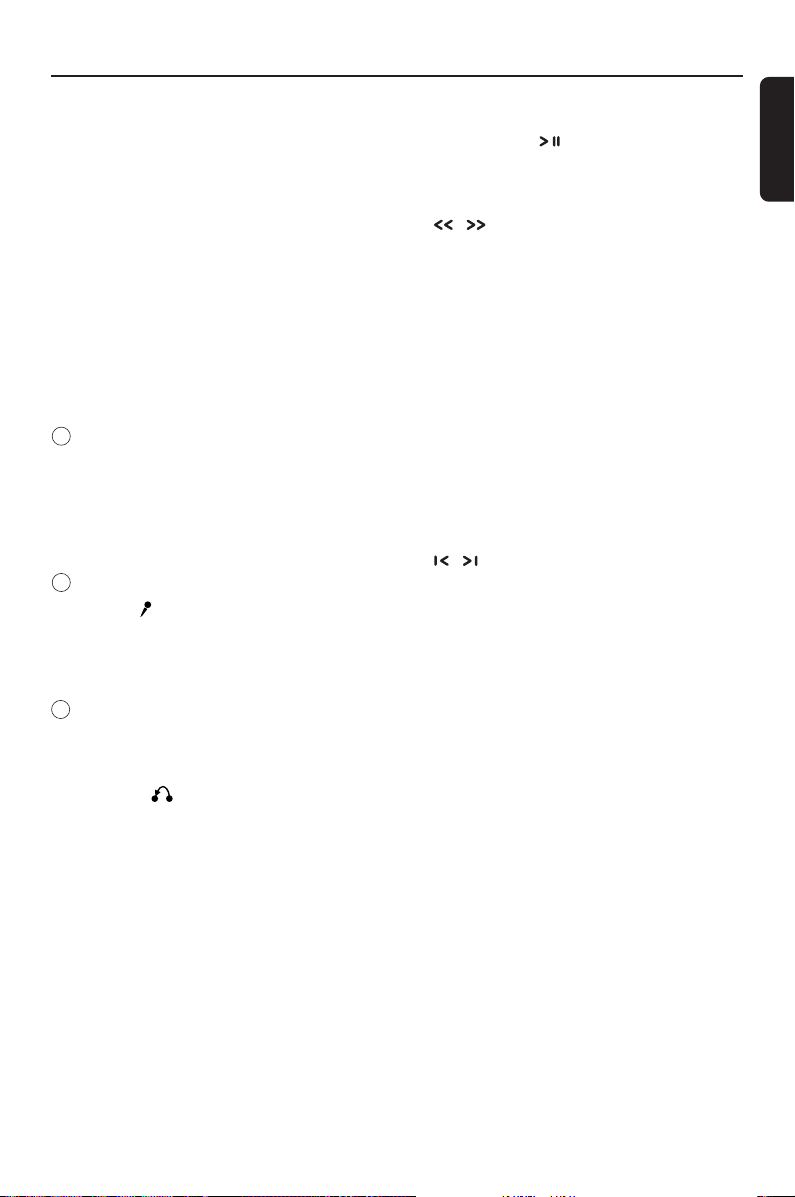
Controls on the system and remote
control ............................................................ 10-12
Basic Functions
Switching the system on ................................... 13
Power-saving automatic standby ..................... 13
Adjusting volume and sound............................ 13
CD/VCD/MP3-CD Operation
Discs for Playback .............................................. 14
Playing a disc ........................................................ 15
Selecting a different track ................................. 15
Finding a passage within a track ...................... 15
Different play modes:
SHUFFLE and REPEAT ...................................... 16
Text display and ID3 Text ................................. 16
Programming the disc tracks ........................... 16
Erasing the program .......................................... 16
Radio Reception
Tuning to radio stations .................................... 20
Programming radio stations ............................. 20
Tuning to preset radio stations ....................... 21
Changing Tuning Grid ........................................ 21
Tape Operation / Recording
Tape playback ...................................................... 22
Switching tape sides ........................................... 22
Reverse mode options ...................................... 22
General information on recording ................. 23
Synchro start CD recording ............................ 23
Recording from the radio................................. 23
Recording from the Aux ................................... 23
Recording timer .................................................. 23
Clock/Timer
Setting the clock ................................................. 24
Setting the timer ................................................. 24
Activating and deactivating TIMER ................. 24
Specifications ........................................... 25
Maintenance.............................................. 26
Troubleshooting ............................. 26–27
VIDEO CD
Adjusting the TV System ................................... 17
OSD – On Screen Display ............................... 17
Playing a Video CD with PBC .......................... 17
Return ................................................................... 18
Digest .................................................................... 18
A-B Repeat .......................................................... 18
Go To .................................................................... 18
Resume ................................................................. 19
Slow ....................................................................... 19
Vocal ...................................................................... 19
Key Control ......................................................... 19
Echo ....................................................................... 19
Microphone Mixing ............................................ 19
6
Page 7

General Information
IMPORTANT!
PLEASE NOTE THAT THE VOLTAGE
SELECTOR LOCATED AT THE REAR OF
THIS SYSTEM IS PRESET AT 220V FROM
THE FACTORY. FOR COUNTRIES THAT
OPERATE AT 110V-127V, PLEASE ADJUST
TO 110V-127V BEFORE YOU SWITCH ON
THE SYSTEM.
Environmental Information
All unnecessary packaging has been omitted. We
have tried to make the packaging easy to
separate into three materials: cardboard (box),
polystyrene foam (buffer) and polyethylene (bags,
protective foam sheet).
Your system consists of materials which can be
recycled and reused if disassembled by a
specialized company. Please observe the local
regulations regarding the disposal of packaging
materials, exhausted batteries and old
equipment.
Supplied accessories
– Remote control
– Batteries (two AA size) for remote control
– AM loop antenna
– FM wire antenna
– One Video cinch cable
– 2 speaker boxes
Safety Information
● Before operating the system, check that the
operating voltage indicated on the typeplate (or
the voltage indication beside the voltage
selector) of your system is identical with the
voltage of your local power supply. If not, please
consult your dealer.
● Place the system on a flat, hard and stable
surface.
● Place the system in a location with adequate
ventilation to prevent internal heat build-up in
your system. Allow at least 10 cm (4 inches)
clearance from the rear and the top of the unit
and 5 cm (2 inches) from each side.
● Do not expose the system, batteries or discs to
excessive moisture, rain, sand or heat sources
caused by heating equipment or direct sunlight.
● If the system is brought directly from a cold to a
warm location, or is placed in a very damp room,
moisture may condense on the lens of the disc
unit inside the system. Should this occur, the CD
player would not operate normally. Leave the
power on for about one hour with no disc in the
system until normal playback is possible.
● The mechanical par ts of the set contain self-
lubricating bearings and must not be oiled or
lubricated.
● When the system is switched to Standby
mode, it is still consuming some power.
To disconnect the system from the
power supply completely, remove the AC
power plug from the wall socket.
English
7
Page 8
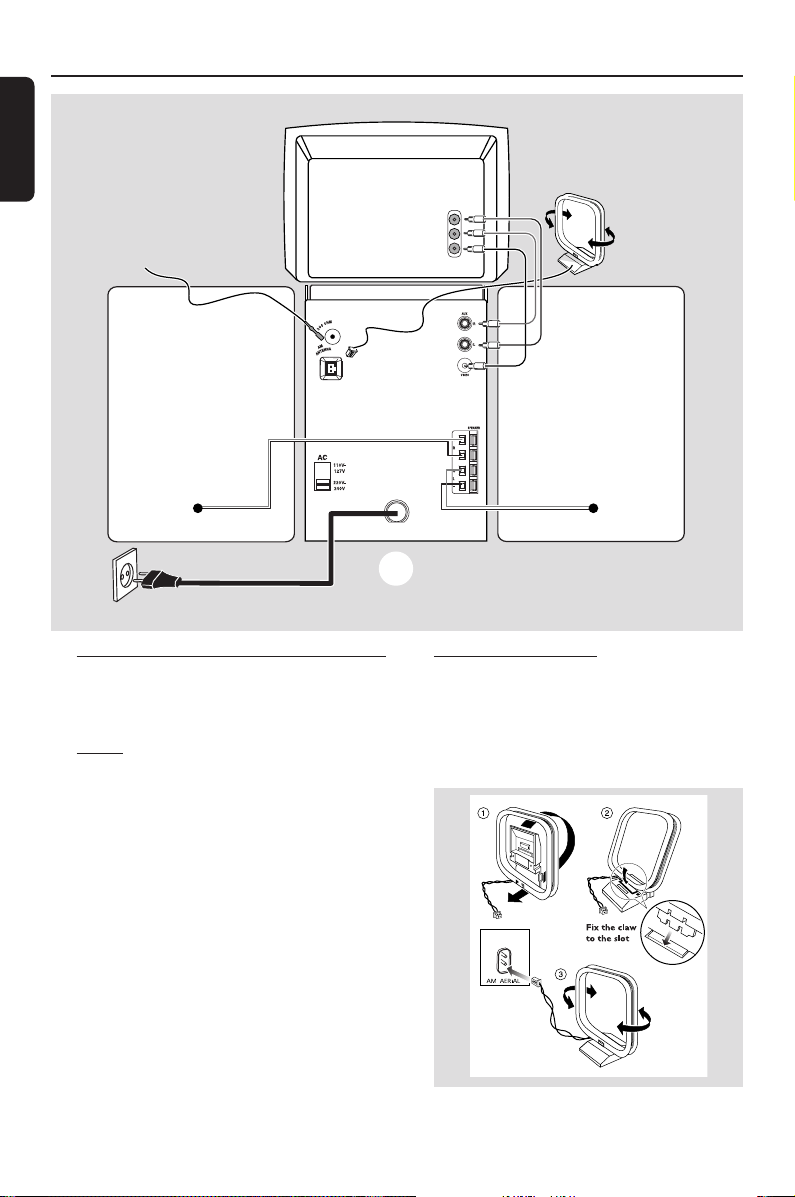
Preparations
English
FM wire antenna
Television
VIDEO
L
AUDIO
OUT
R
IN
AM loop
antenna
speaker
(right)
AC power cord
Rear connections
The type plate is located at the rear of the
system.
A Power
Before connecting the AC power cord to the
wall outlet, ensure that the following are done;
– If your system is equipped with a Voltage
Selector, set the VOLTAGE SELECTOR to the
local power line voltage.
– All other connections have been made.
WARNING!
– For optimal performance, use only the
original power cable.
– Never make or change any connections
with the power switched on.
B
D
C
A
B Antennas Connection
Connect the supplied AM loop antenna and FM
antenna to the respective terminals. Adjust the
position of the antenna for optimal reception.
AM Antenna
speaker
(left)
To avoid overheating of the system, a safety
circuit has been built in. Therefore, your
system may switch to Standby mode
automatically under extreme conditions. If
this happens, let the system cool down
before reusing it (not available for all versions).
8
Page 9
Preparations
● Position the antenna as far as possible from a TV,
VCR or other radiation source.
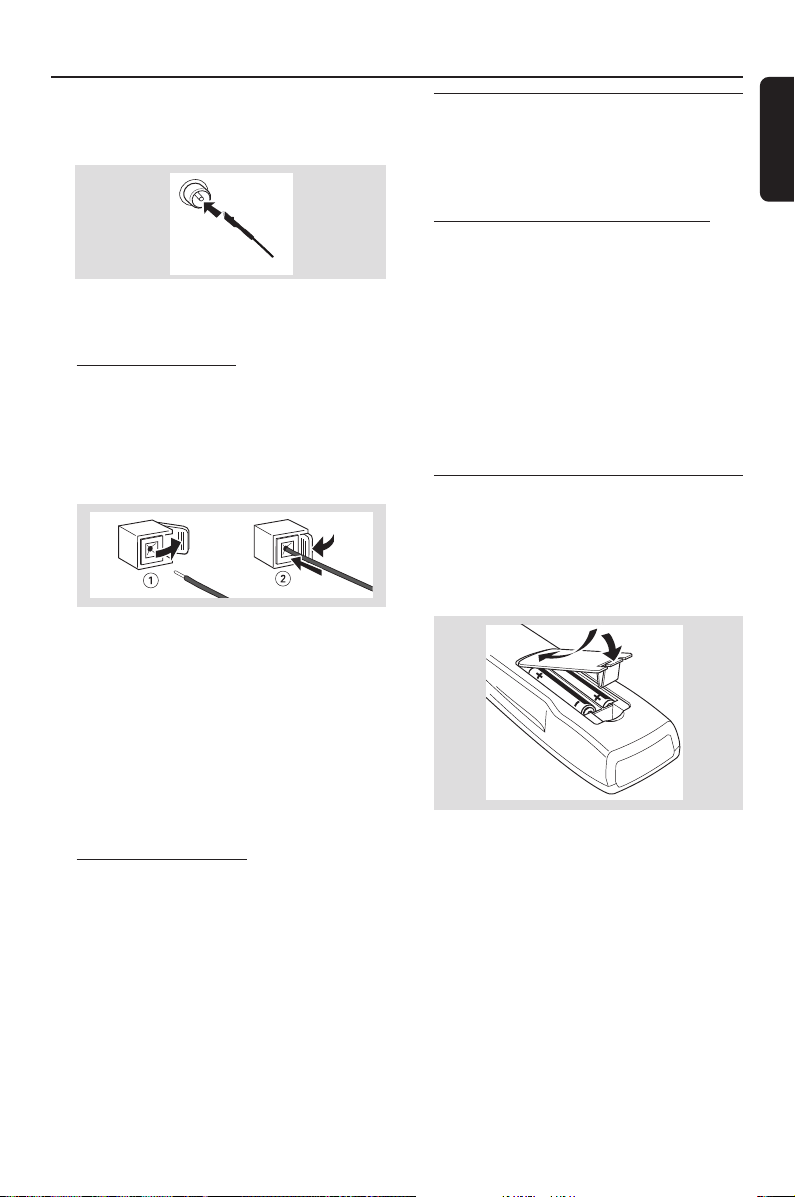
FM Antenna
● For better FM stereo reception, connect an
outdoor FM antenna to the FM AERIAL (FM
ANTENNA) terminal.
C Speakers Connection
Front Speakers
Connect the speaker wires to the SPEAKERS
terminals, right speaker to "RIGHT" and left
speaker to "LEFT", colored (marked) wire to
"+" and black (unmarked) wire to "-".
● Fully inser t the stripped por tion of the speaker
wire into the terminal as shown.
Optional connection
The optional equipment and connecting cords
are not supplied. Refer to the operating
instructions of the connected equipment for
details.
Connecting other equipment to your
system
Connect the audio left and right OUT terminals
of a TV, VCR, Laser Disc player, DVD player or
CD Recorder to the AUX terminals.
Note:
– If you are connecting equipment with a mono
output (a single audio out terminal), connect it to
the AUX left terminal. Alternatively, you can use a
“single to double” cinch cable (the output sound
still remain mono).
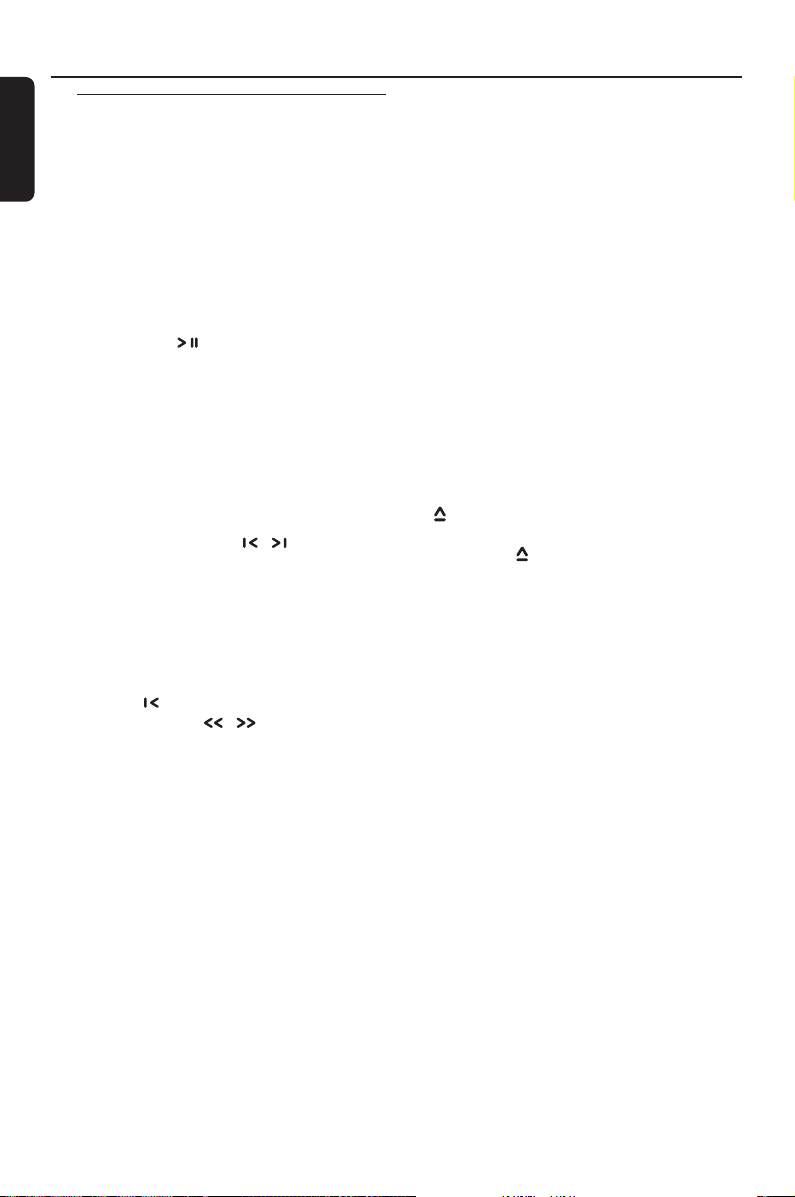
Inserting batteries into the
Remote Control
Insert two batteries (Type R06 or AA) into the
remote control with the correct polarity as
indicated by the + and - symbols inside the
battery compar tment.
English
Notes:
– For optimal sound performance, use the
supplied speakers.
– Do not connect more than one speaker to any
one pair of +/- speaker terminals.
– Do not connect speakers with an impedance
lower than the speakers supplied. Please refer to
the SPECIFICATIONS section of this manual.
D Video Out Connection
Connect the VIDEO OUT (CVBS) terminal
at the rear of the system to the TV or VCR
VIDEO IN for viewing or recording.
Note:
– To avoid magnetic interference with the picture
on your TV, do not position the front speakers too
close to the TV.
CAUTION!
– Remove batteries if they are exhausted
or not to be used for a long time.
– Do not use old and new or different
types of batteries in combination.
– Batteries contain chemical substances, so
they should be disposed off properly.
9
Page 10
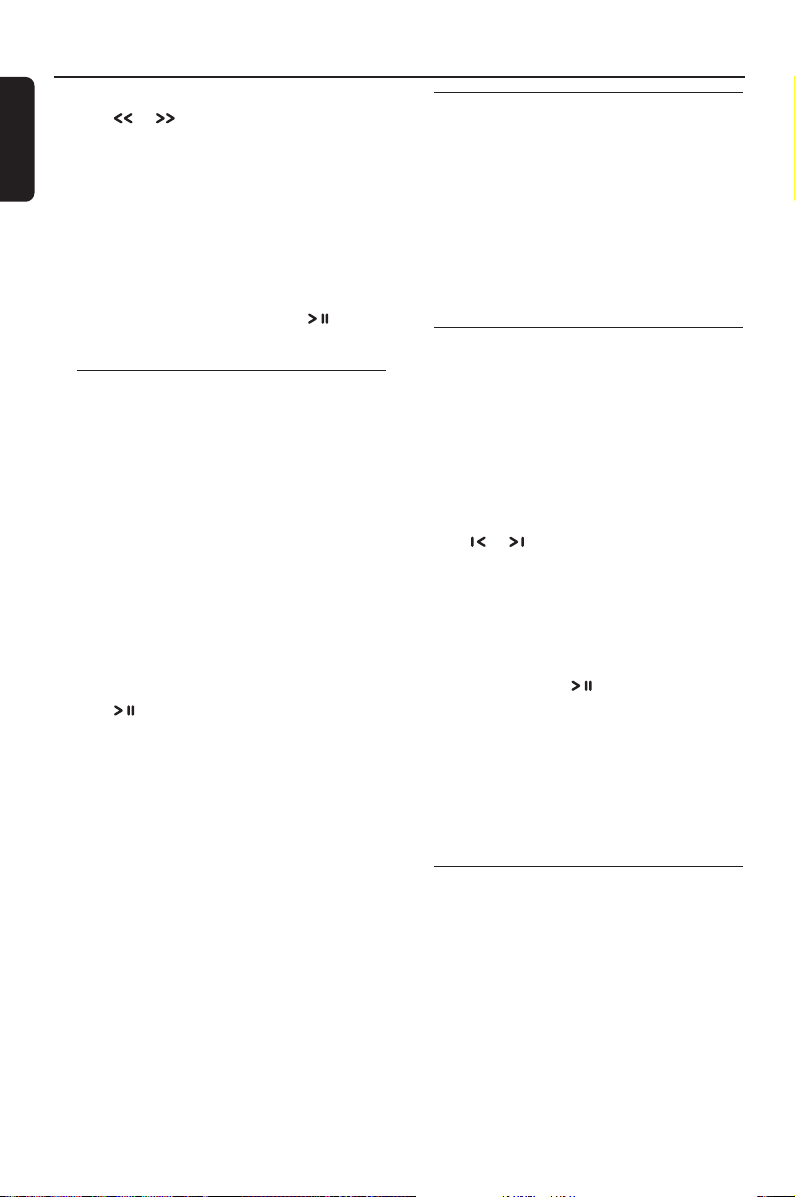
Controls (main system’s illustration on page 3&4)
English
Controls on the system and
remote control
1 Display
– shows the status of the system.
2 PROG/ REV
for VCD/ CD/ MP3 ...... programmes tracks and
reviews the programme.
for TUNER ........................ progr ammes tuner
for TAPE.............................. sets tape reverse mode
stations manually or
automatically.
3 CLOCK SET
for CLOCK ....................... set the clock function.
for VCD/ CD/ MP3 ...... star ts or interr upts CD
for TAPE.............................. starts the tape playback
playback
4 Mode Selection
VOLUME (-/+)
– adjusts the volume level.
– on the system only - adjusts the hour and minutes
for the clock/timer functions.
PRESET/ TIMER SET / (TITLE –/+)
for TUNER ........................ selects a preset radio
for VCD/ CD/ MP3 ...... skips to the beginning of a
................................................. select next or previous
for Timer ( only) to set timer under standby
SEARCH/ TUNE / (ALBUM –/+)
for TUNER ........................ Tune to a station
for VCD/ CD ................... fast searches back and
for MP3 ............................... ALBUM select.
for TAPE.............................. fast rewind/ wind tape
STOP 9
for VCD/ CD/ MP3 ...... stops VCD/ CD/ MP3
for TUNER ........................ stops progr amming
for TAPE.............................. stops tape playback/
REC ● ............................... starts recording.
station.
current track/ previous/
subsequent track
menu
forward within a track.
playback or erase a VCD/
CD/ MP3 programme.
recording.
5 SOURCE ●
– selects the respective sound source for CD/
TUNER/ TAPE /AUX.
– switches on the system.
6 DISPLAY-BAND
for TUNER ........................ change the tuner radio
band.(FM/ MW)
for VCD/ CD/ MP3 ...... change the CD display
mode
for TAPE.............................. select tape direction
7 iR SENSOR
– infrared sensor for remote control.
8 STANDBY ON 2
– switches the system to standby.
9 PHONES - connects to headphone.
0 LEVEL (mic)
– to adjust the mixing level for karaoke or
microphone recording.
! MIC
– to connect microphone jack.
@
– open/ close the cassette door.
# CD OPEN
– open the CD door.
$ INTERACTIVE SOUND controls:
DBB .................................... (Dynamic Bass Boost)
enhances the bass.
DSC ..................................... (Digital Sound Control)
selects sound
characteristics: CLASSIC/
JAZZ/ ROCK/ OPTIMAL.
% 2
– to switch the system to Standby mode.
^ DIGIT 0/-- – 9
(numbers consisting more than two or three figures
must be Press & hold 0/--.)
– to select a track number for CD/VCD/MP3-CD.
– to select tuner preset.
& MODE
REPEAT
– repeats a track/ CD programme/ entire CD.
SHUFFLE
– plays CD tracks in random order.
10
Page 11
Controls
* VOLUME (-/+)
– to increase or decrease the volume.
– adjusts the hour and minutes for the clock/ times
junctions.
( DIGEST
– to scan through a VCD or a specific track.
) A - B
– to playback a certain scene or passage of a CD/
VCD repeatedly.
¡ SLOWÖ
– to watch the VCD at a slower speed.
™ RESUME
– to continue playback again from where you have
stopped (for VCD with PBC switched off).
£ ECHO -/+
– to adjust the VCD echo level for karaoke after
24
inserted the microphone.
KEY CONTROL ( I È i )
– to change the VCD key tone level to suit your
vocal range.
I ........................... to decrease the key tone level.
È .............................. to restore the key tone level to
25
i ............................. to increase the key tone level.
VOCAL
– to fade out the original vocal from a Karaoke
VCD or to switch between mono or stereo
mode during audio disc playback.
original setting.
§ GOTO
27
– select time to begin playback within track.
VCD Operation (for VCD version 2.0 only)
PBC (PLAYBACK CONTROL)
– to switch on or off PBC mode.
RETURN
– to return to the previous MENU level during
playback (for VCD with PBC switched on).
• TIMER ON / OFF
– activates/deactivates the timer function.
ª Mode Selection
PLAY PAUSE
for CD/VCD/MP3-CD…to start or interrupt
playback.
for TAPE.................................... to start playback.
--
/ (ALBUM
for MP3-CD only ................ to select previous/next
for CD/VCD ..........................to search backward/
for TUNER .............................. to tune to a lower or
for TAPE.................................... to rewind or fast
STOP Ç
for CD/VCD/MP3-CD ..... to stop playback or to
for TAPE.................................... to stop playback or
....................................................... to reset tape counter
/ (TITLE
for MP3-CD only ................ to select previous/next
for VCD only .......................... to select next or
for CD/VCD ..........................to skip to the previous
for TUNER .............................. to select a preset radio
++
-/
+)
--
++
Album
forward.
higher radio frequency.
forward.
clear a programme.
recording.
number.
--
++
-/
+)
--
++
Title.
previous MENU or
VCD track during
playback (for VCD with
PBC switched on).
or next track.
station.
º PROGRAM
for CD/VCD/MP3-CD… to programme disc
for TUNER .............................. to programme preset
tracks.
radio stations manually
or automatically
English
11
Page 12

Controls
⁄ VCD/ CD
English
– to select disc (this system can playback normal
CD/VCD/MP3-CD format disc).
– to select corresponding video output for NTSC
or PAL system of your TV set (except Multisystem TV).
TUNER
– to select tuners mode.
TAPE
– to select tape deck mode.
AUX / (CDR/DVD)
– to select a connected external source :
CDR/DVD or AUX (auxiliary) mode.
¤ OSD (ON SCREEN DISPLAY)
– to switch on or off the on screen display on the
TV.
12
Notes for remote control:
– First, select the source you wish to control
by pressing one of the source select keys on
the remote control (VCD/ CD or TUNER, for
example).
– Then select the desired function ( ,
for example).
,
Page 13
Basic Functions
English
IMPORTANT!
Before you operate the system, complete
the preparation procedures.
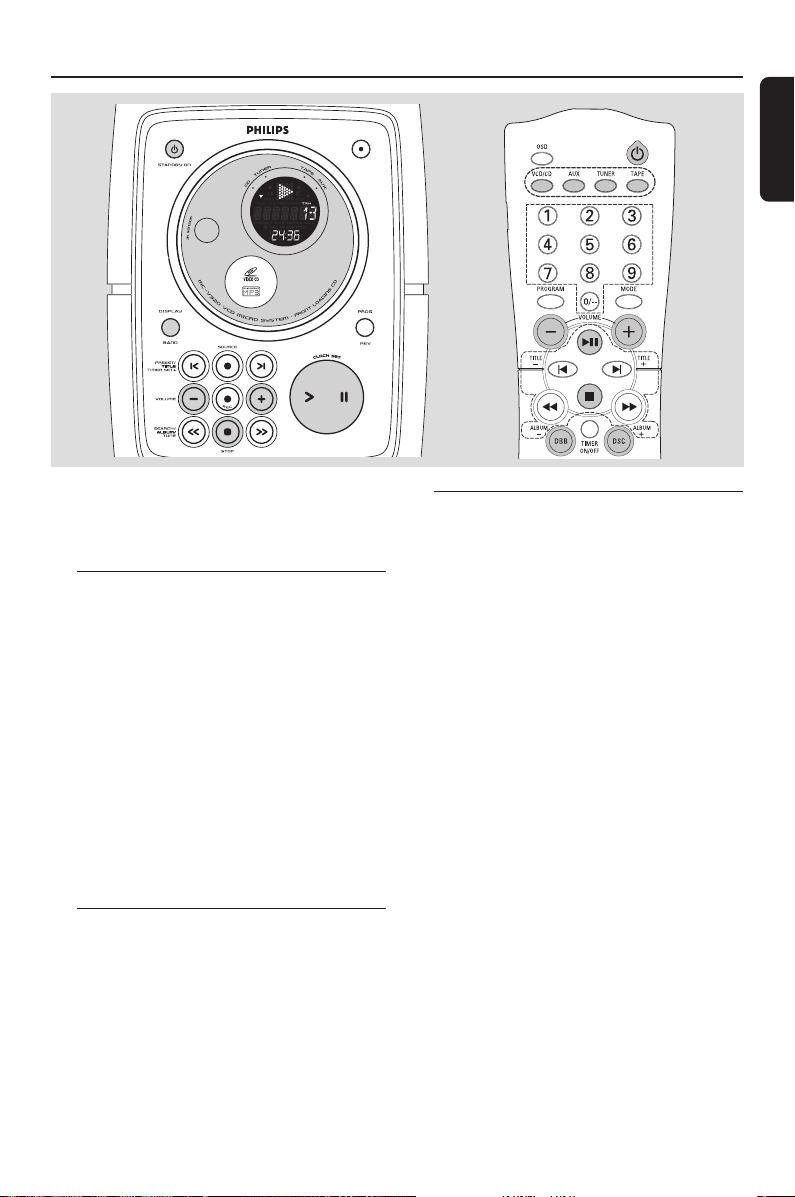
Switching the system on
● Press 2 STANDBY ON.
➜ The system will switch to the last selected
source.
● Press VCD, TUNER, TAPE or AUX on the
remote control.
➜ The system will switch to the selected source.
To switch the system to standby mode
● Press 2 STANDBY ON.
● If in recording mode, press STOP 9 first.
➜ The volume level(up to a maximum volume
level of 20), interactive sound settings, last
selected source and tuner presets will be
retained in the player's memory.
Power-saving automatic standby
As a power-saving feature, the system
automatically switches to standby 15 minutes
after a tape or CD has reached the end and no
control is operated.
Adjusting volume and sound
1 Press VOLUME –/+ to decrease to increase
volume on the system.
➜ Display shows the volume level VOL and a
number from MIN1, 2, ...38, 39 MAX.
2 Press DSC repeatedly to select the desired
sound effect: CLASSIC/ JAZZ/ ROCK/
OPTIMAL.
3 Press DBB to switch bass enhancement on or
off.
➜ Display shows: DBB ON or DBB OFF.
Note:
– To listen through the headphones connect the
headphones plug to the PHONES socket at the top
of the system.
➜ The speakers will be muted.
13
Page 14
CD/VCD/MP3-CD Operation
English
IMPORTANT!
– This system is designed for regular discs.
Therefore, do not use any accessories such
as disc stabiliser rings or disc treatment
sheets, etc., as offered on the market,
because they may jam the disc mechanism.
– Do not load more than one disc into the
tray.
Before viewing the Video CD, ensure that
the set is switched to corresponding PAL or
NTSC system of your TV set (exception
Multi-system TV).
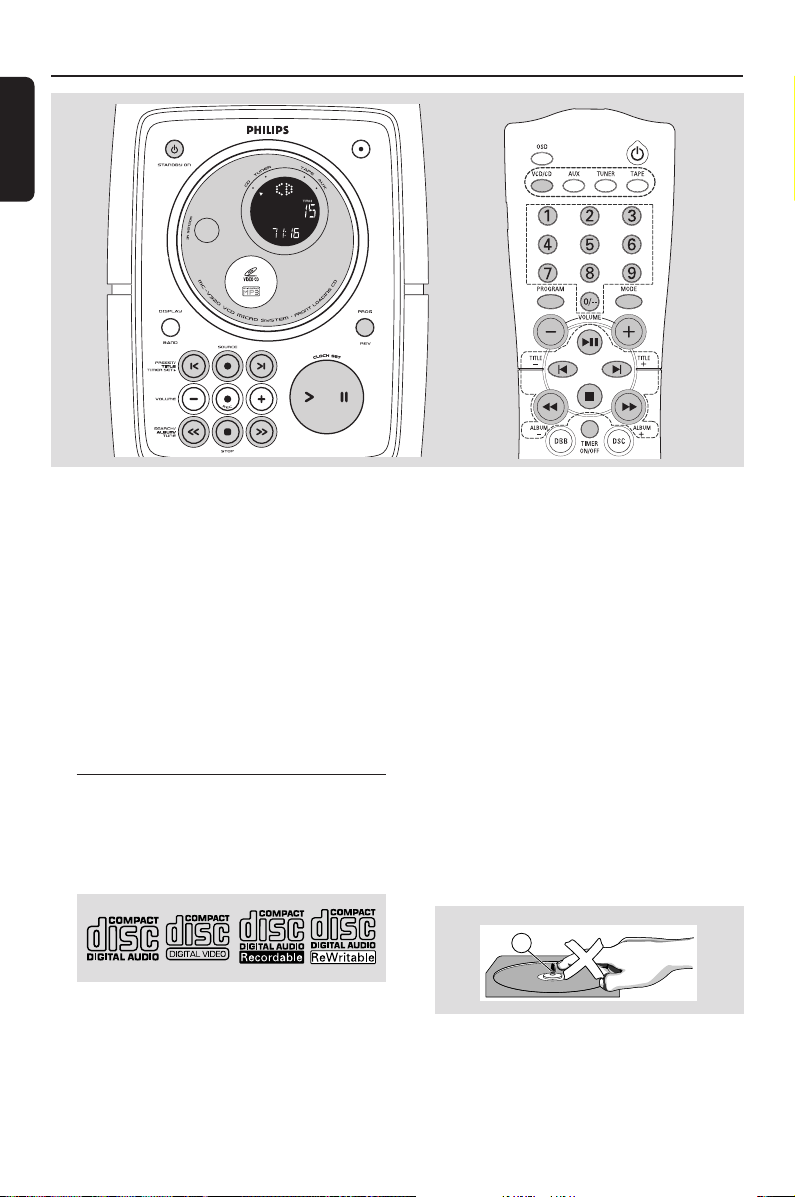
Discs for Playback
This system can playback all digital audio CD,
video CD, MP3-CD format discs, finalised digital
audio CD-Recordable (CDR) discs and finalised
digital audio CD-Rewritable (CDRW)discs.
Support following MP3-CD formats
(IS09660 format):
● Max. Title/Album name - 8 characters
● Max. Title number plus Album is 640
● Max. nested directory is 8 levels
● The max. Album number is 255
● The max. MP3 programme track number is 40
● Suppor ted VBR bit-rate
● Suppor ted sampling frequencies for MP3 disc :
32 kHz, 44.1 kHz, 48 kHz
● Suppor ted Bit-rates of MP3 disc are: 56, 64, 96,
128, 192, 256 (kbps)
Following formats can’t be supported
● The files like *.WMA, *AAC , *.DLF, *.M3U, *.PLS
● Non English Album/Title name
Note:
– For mixed mode discs, only one mode will be
selected for playback depending on the recording
format.
IMPORTANT!
The lens of the CD player should never be
touched.
X
14
Page 15
CD/VCD/MP3-CD Operation
Playing a disc
● CD-ROM, CD-I, CDV, DVD or computer CDs,
however, are not possible.
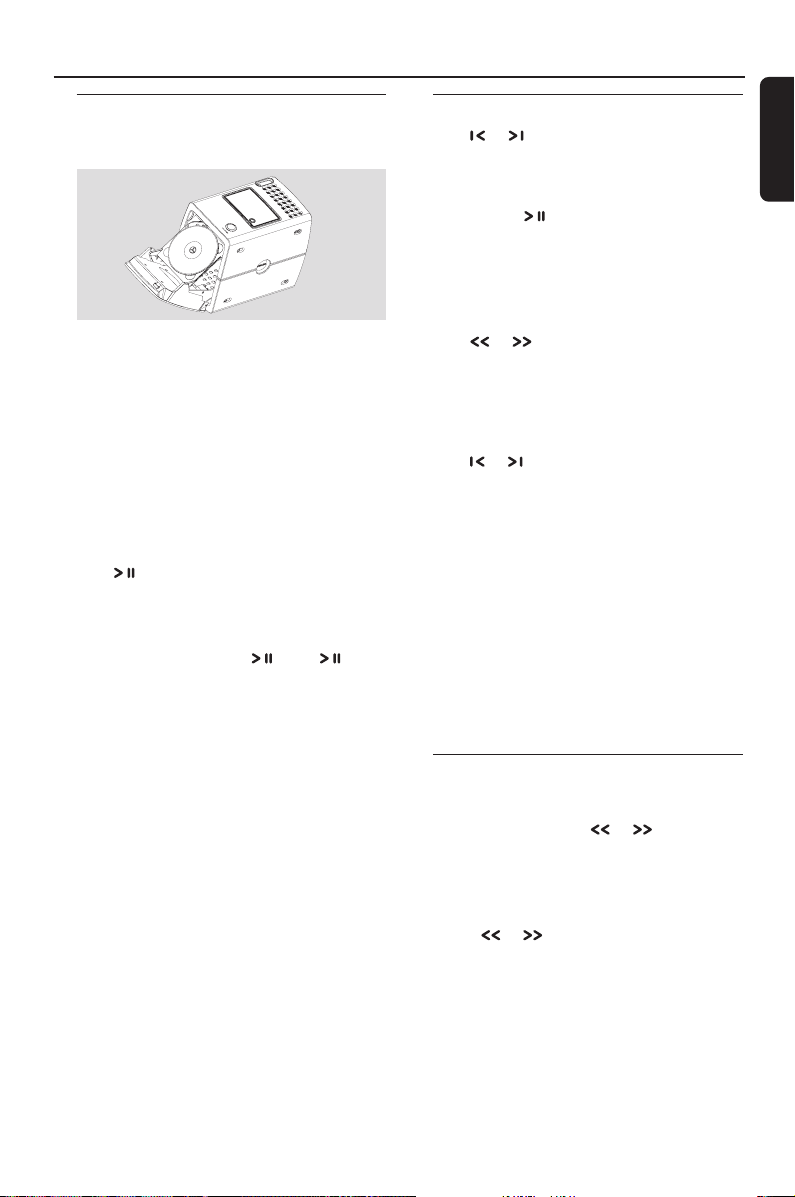
1 Select VCD/ CD source.
2 Press CD OPEN on the top
of the system to open the CD compartment.
➜ OPEN is displayed when you
open the CD compartment.
3 Put a disc with the printed side facing up and
press down. Push the front panel to close.
➜ READING as the CD player scans the
contents of a disc, and then the total number of
tracks and playing time are shown. (CD/ VCD
only)
4 Press to start playback.
➜ Current track number and elapsed playing
time of the track are displayed during disc
playback.
5 To interrupt playback press . Press again
to resume play.
6 To stop disc playback, press STOP 9.
Note: CD play will also stop when;
– the CD door is opened.
– the disc has reached the end.
– you select another source: TAPE, TUNER or AUX.
For MP3-CD only
● Load a MP-3 CD format music disc on the disc
tray.
➜ The total album number and total title/ track
number "018 120" will be displayed. MP3,
ALB and TRH will be shown.
Notes:
– Load the discs with the label side facing up.
– To ensure good system performance, wait until
the disc completely reads the disc before
proceeding.
– For MP3-CD, the disc reading time may exceed
10 seconds due to the large number of songs and
different formats compiled into one disc.
Selecting a different track
● Press or once or repeatedly until the
desired track number appears in the display.
● If you have selected a track number shortly after
loading a disc or in the PAUSE position, you will
need to press to start playback.
● Press digit 0/-- – 9 on the remote control to
direction selecting the desired track.
For MP3-CD only
To select a desired Album
● Press or (or ALBUM –/+ on Remote
Control) repeatedly until the desired Album
appears on the display.
➜ ALB and “0XX 120” will be displayed.
To select a desired Title/ Track
● Press or (on TITLE –/+ on Remote
Control) repeatedly until the desired Title
appears on the display.
● Use the digital keys on the remote control to
select the track.
➜ TRH and “018 XXX” will be displayed.
Notes:
– ALB represents ALBUM and TRH represents
Title/ Track, "XX" or "XXX" is the current selected
Album or Title/ Track number.
– Press & hold digit “0/ –” will show
– “– –” for CD & VCD
– “– – –” for MP3 then Press 0-9
Finding a passage within a track
To search for a particular passage during
playback:
1 Press and hold down on or (on à / á
on Remote Control)
➜ The disc is played at high speed and low
volume. (CD only)
2 When you recognise the passage you want,
release or . (on à / á on Remote
Control)
➜ Normal playback continues.
Note:
– During a disc programme or if SHUFFLE/
REPEAT active, searching is only possible within the
same track.
English
15
Page 16
CD/VCD/MP3-CD Operation
English
For VCD only
● Press or to select 4 different search
speed.
➜ "FRX1"; "FRX2"; "FRX3" or "FRX4" will be
displayed on the TV screen when you select a
fast rewind search.
➜ "FFX1"; "FFX2"; "FFX3" or "FFX4" will be
displayed on the TV screen when you select a
fast forward search.
➜ Normal playback will begin at the end of the
fast rewinding or forwarding of the selected
track.
● Play returns to normal when PLAY is
pressed or when a new track is selected.
Different play modes: SHUFFLE
and REPEAT
You can select and change the various play
modes before or during playback. The play
modes can also be combined with PROGRAM.
SHUFFLE ......... tracks of the entire disc are
SHUFFLE and REPEAT ALL…to repeat the
REPEAT ALL ... repeats the entire disc/ program
REPEAT ............ plays the current track
played in random order
entire disc continuously in
random order
continuously
1 To select your play mode, press the MODE on
the remote control before or during playback
until the display shows the desired function.
(SHUF, REPEAT, REPEAT ALL)
2 Press to start playback if in the STOP
position.
3 To return to normal playback, press the
respective MODE button until the various
SHUFFLE / REPEAT modes are no longer
displayed.
● You can also press STOP 9 to cancel your play
mode.
Notes:
– Stop mode
(Shuffle ➝ Shuffle Repeat all ➝ Repeat all
Repeat)
– Play mode
(Repeat all ➝ Repeat ➝ Play)
– Shuffle Play mode
(Shuffle ➝ Shuffle Repeat all ➝ Shuffle)
Text display and ID3 Text
This feature use to display the title and album
name for MP3-CD.
● Press DISPALY (OSD on Remote Control)
repeatedly to display the title or album name
and ID3 Text.
Notes:
– Album No, Title No. & Play time
– Title Name & Play time
– Album Name & Play time
– ID3 TEXT (Title/ Artis/ Album & play time)
Programming the disc tracks
Programming tracks is possible when playback is
stopped. Up to 40 tracks can be stored in the
memory in any order.
1 Load the desired discs on the disc tray.
2 Press the VCD/ CD button to select the
Source.
3 Press PROG/ REV (PROGRAM on Remote
Control) to start programming.
➜ A track number is shown and PROGRAM
will on.
4 Press or (or Digits 0/-- –9 on the remote
control) repeatedly to select the desired track.
¶ For MP3-CD, press ALBUM
--
++
-/
+ to select the desired Album and Title for
--
++
programming.
--
-/
--
5 Press PROG/ REV (PROGRAM on Remote
Control) to store the track.
¶ Repeat steps 3–5 to store other tracks.
6 Press CLOCK SET to start programme
playback.
● To end programming without starting playback,
press Ç once.
Notes:
– Programme cannot be used for VCDs when PBC
is switched on. Switch off PBC before storing tracks.
– If you attempt to programme more than 40
tracks, "MEMORY FULL" will be displayed.
Erasing the program
You can erase the program by:
● pressing STOP 9 twice during playback;
➝
● opening the CD compar tment;
➜ PROGRAM disappears from the display.
● change to other source
++
+ and TITLE
++
16
Page 17
CD/VCD/MP3-CD Operation
VIDEO CD
Adjusting the TV System
Before viewing the Video CD, ensure that the set
is switched to corresponding PAL or NTSC
system of your TV set (except Multi–system TV).
● Press and hold VCD/ CD on
Remote Control for more than
3 seconds to switch between
PAL or NTSC TV system.
➜ After TV system is selected,
the set will automatically
switch to the last TV system setting every time
the VCD source is selected.
Note:
– Before adjusting the TV system, make sure that
there is no MP3-CD in disc tray during power up.
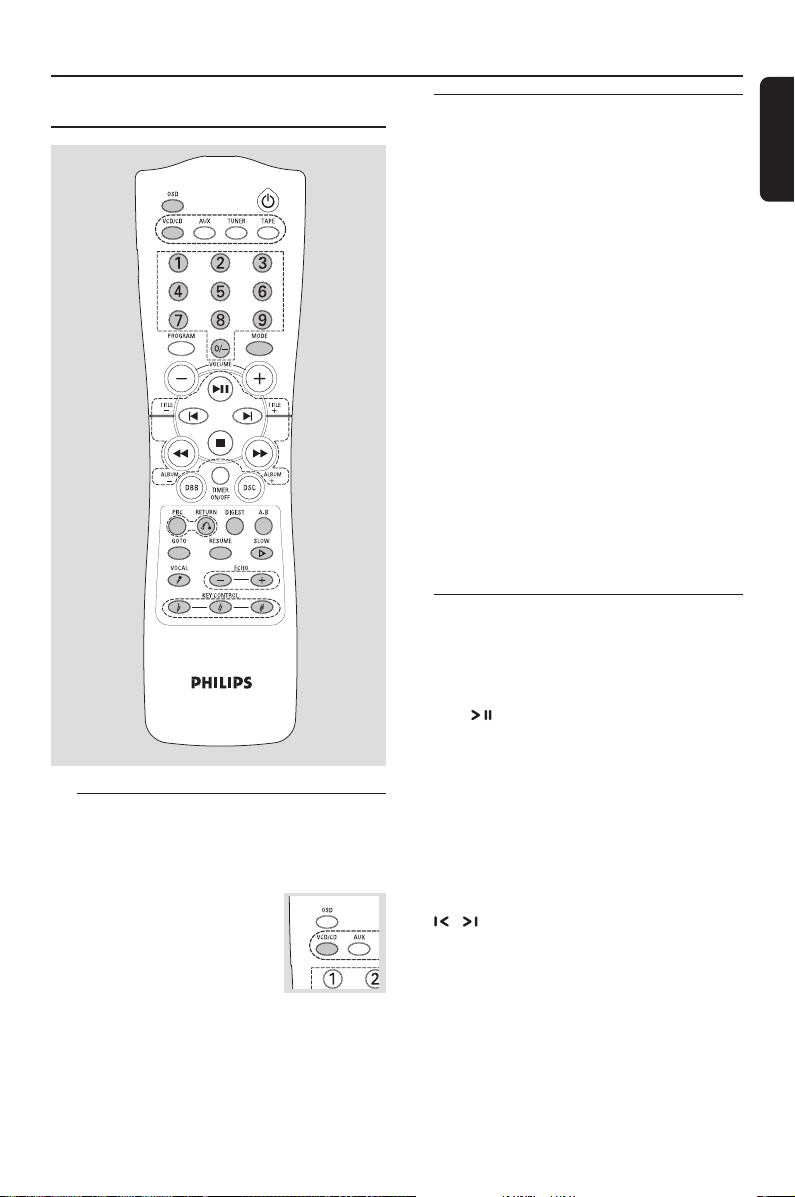
OSD – On Screen Display
If you insert VCD/ CD/ MP3, your TV screen will
serve as an additional display for messages (e.g.
PLAY, STOP), and information stored on the
VCD.
● Press DISPLAY or OSD on the remote
control repeatedly to switch on or off the On
Screen Display.
When OSD is switched ON; you can see the
following display on the TV screen.
Below is an example of the OSD message.
– Track playtime
– Track remain playtime
– Total remain playtime
– OFF
SINGLE ELAPSED
PLAY XX/TT MM:SS
–"XX" is the current track.
–"TT" is the total tracks.
–"MM" is in minutes.
–"SS" is in seconds.
Note:
– You can also view the information from a
MP3-CD or normal CD.
Playing a Video CD with PBC
VCD with PBC (Playback Control) will be
indicated on the display of the set as soon as
they are inserted. PBC is a predefined play
sequence stored on the VCD.
1 Switch on the TV, inser t a VCD with PBC and
press to start playback.
2 MENU appears on the TV screen.
If the menu consists of a list of titles, you
can select a sequence directly
● Press Digits 0/-- –9 on the remote control to
select your choice.
➜ The VCD starts playing of the selected
sequence automatically.
Note:
– If a menu consists of more than one page, press
/ to go through the pages.
Switching off PBC
● press PBC on the Remote Control.
➜ “PBC OFF” will be apears on the TV screen.
Notes:
– Programme mode is not available whenever PBC
mode is switched on.
– The menu structure depends on the information
stored on the VCD. Please refer to the information
supplied with the disc.
– Press & hold digit “0/--” will show “--” for CD &
VCD, “---” for MP3 then Press 0-9.
English
17
Page 18
CD/VCD/MP3-CD Operation
English
Return
● Press RETURN to return to the previous VCD
disc MENU level. PBC mode must be switched
on.
Digest
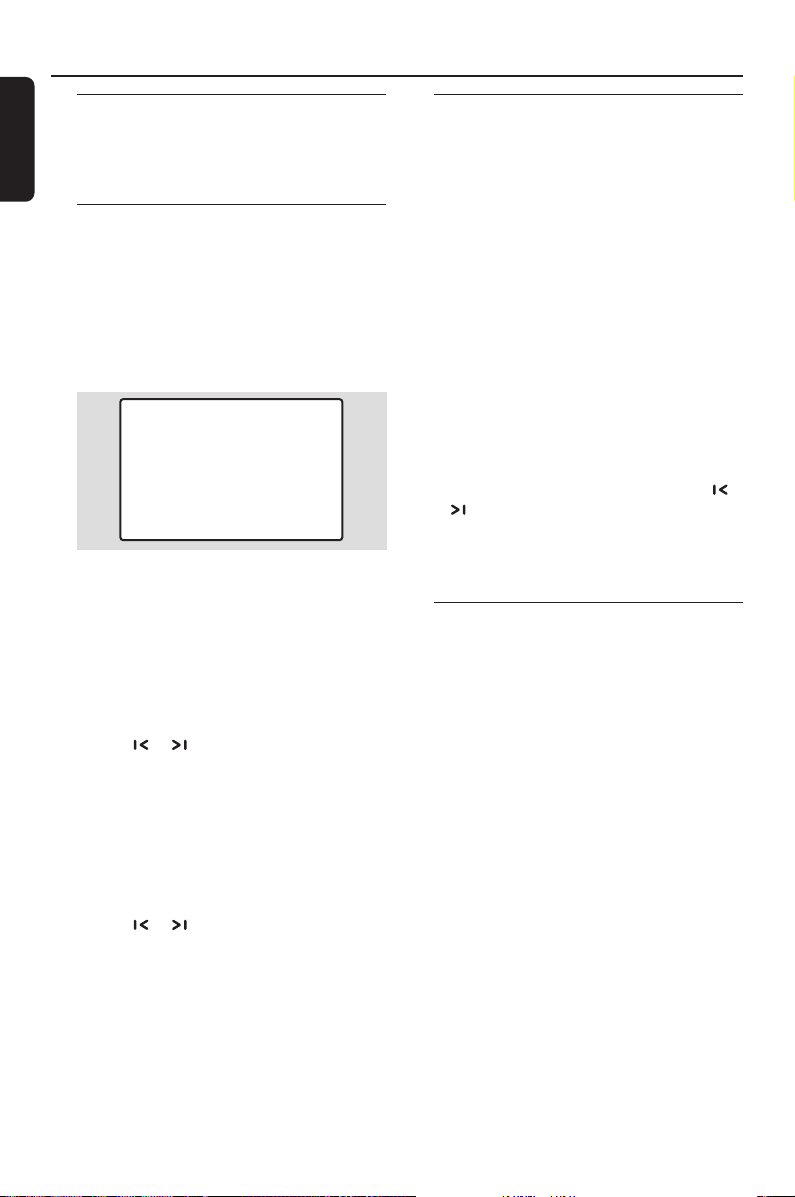
This feature allows you to scan through a VCD
for a quick review. PBC mode must be switched
off. There are four digest mode for selection.
1 Press DIGEST on the remote control.
➜ "DIGEST" appears on the display.
➜ "1. INTRO" , "2. DISC" , "3. TRACK" and
"4.EXIT" appear on the TV screen.
1. INTRO
3. TRACK
DIGEST MENU
● Press digit
"INTRO".
➜ The first 10 seconds of each track are played.
● Press digit
"DISC".
➜ The first frame of each track appears on the
TV screen.
➜ Press digit 0 – 9 on the remote control to
playback the desired tracks.
➜ Press or to view the previous or next
page for additional information.
● Press digit
"TRACK".
➜ The first track of the selected disc will be
divided into 9 parts and displayed on the TV
screen.
➜ Press digit 0 – 9 on the remote control to
playback the desired parts.
➜ Press or to digest the next track.
11
1 on the remote control to select
11
22
2 on the remote control to select
22
33
3 on the remote control to select
33
2. DISC
4. EXIT
2 To exit DIGEST mode, press digit
remote control to select "EXIT".
44
4 on the
44
A-B Repeat
This feature is also applicable to audio CD
(except for MP3-CD). To play a certain scene or
passage of the disc repeatedly.
1 Press A-B on the remote control during
playback to mark the start of the chosen scene
or passage.
➜ "SET A" appears on the display.
2 Press A-B again to mark the end of the chosen
scene or passage.
➜ "SET B" appears on the display.
● The selected scene or passage is played
repeatedly.
➜ "PLAY AB" appears on the display.
3 Press A-B once more to return to normal
playback.
➜ "CLEAR AB" appears on the display.
Notes:
– You can also cancel A-B Repeat by pressing
or .
– You can only able to set the A-B marking within
the same track. Once it crosses from one track to
the next, the A-B marking is reset.
GOTO
1 Press GOTO
➜ “--: --” appears on the TV screen.
2 Press digit 0/-- – 9 the remoto control to select
current track time to begin playback.
Notes:
– Switch off PBC before select GOTO.
18
Page 19

CD/VCD/MP3-CD Operation
Resume
This feature is also applicable to audio CD
(except for MP3-CD).
● In stop mode, press RESUME on the remote
control to start playback again from where you
have stopped.
Note:
– Resume information is lost if opened the disc
tray, change source or disconnected the system
from the power supply.
– Resume is not available when PBC mode is
switched on.
Slow
1 Press SLOW on the remote control to watch a
VCD at a slower speed. There are 3 types of
slow modes to select.
➜ The sound will be muted.
➜ On TV screen, “SLOW 1”, “SLOW 2” or
“SLOW 3” will be displayed.
2 To resume playback at normal speed, press
PLAYÉÅ.
Vocal
This feature allows you to fade out the original
vocal from a karaoke VCD. This feature is used
together with Echo mode. You can also use it to
select the different audio modes.
● Pressing VOCAL on the remote control
repeatedly allows you to select the following
modes.
➜ STEREO ™ STEREO VOCAL LEFT ™
STEREO VOCAL RIGHT ™ MONO LEFT ™
MONO RIGHT ™ STEREO …
STEREO – same effect as the original recorded
disc.
STEREO VOCAL LEFT/RIGHT – fade out the
original vocal for special recorded Karaoke disc
only (with the ECHO mode switched on).
MONO LEFT/RIGHT – select the language on a
bilingual VCD.
Ensure that Echo mode is switched on
when press VOCAL to fade out the original
vocal during STEREO VOCAL LEFT/RIGHT
mode.
Key Control ( I È i )
This feature allows you to change the key tone
of your vocal range.
● Press
● Press
● Press
II
I on the remote control to decrease
II
vocal key level.
➜ "KEY -X" appears on the display.
ii
i on the remote control to increase vocal
ii
key level.
➜ "KEY +X" appears on the display.
ÈÈ
È on the remote control to restore vocal
ÈÈ
key to original setting.
➜ "KEY FLAT" appears on the display.
Note:
–“X” denotes the key level.
Echo
This feature allows you to add echo while singing
or talking through a microphone.
--
● Press ECHO
decrease, increase or switch off the echo effect.
➜ "MIC OFF, MIC ON, ECHO +X" appears on
the display.
Notes:
–“X” denotes the echo level.
– You are advised to switch off the echo effect
when not using the feature.
++
-/
+ on the remote control to
--
++
Microphone Mixing
Connect a microphone (not supplied) to the
system allowing you to sing along with the music
source.
1 Connect a microphone to the MIC jack.
● Before connecting the microphone, set the
LEVEL to the minimum level to prevent
howling sound.
2 Press VCD/ CD source to be mixed and start
playback.
3 Press Echo to switch “MIC ON“.
4 Adjust the volume level of the source with
VOLUME –/+ control.
5 Adjust the microphone volume with LEVEL
control.
Notes:
– Keep the microphone away from the speakers to
prevent howling.
– Mixing only on VCD/ CD/ MP3 mode.
English
For Recording, please refer to “Tape
Operation/ Recording”.
19
Page 20
English
Radio Reception
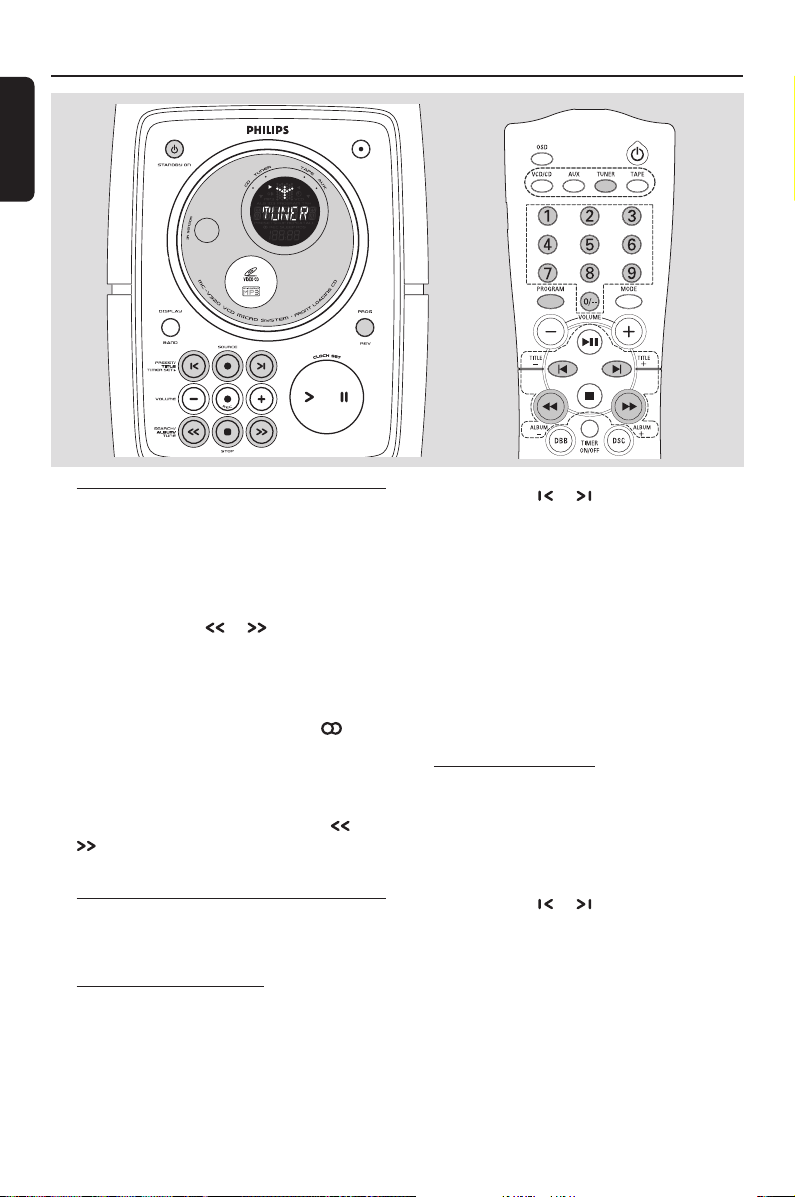
Tuning to radio stations
1 Select TUNER source.
➜ TUNER is displayed briefly.
2 Press BAND on set only once or more to
select your waveband (FM/ MW).
3 Press down TUNE or and release
button.
➜ The radio automatically tunes to a station
with sufficient reception. Display indication during
automatic tuning: SEARCH.
➜ If a FM station is received in stereo, is
shown.
4 Repeat step 3 if necessary until you find the
desired station.
● To tune to a weak station, press TUNE or
briefly and repeatedly until you have found
optimal reception.
Programming radio stations
You can store up to a total of 40 radio stations
in the memory.
Automatic programming
Automatic programming will start with a chosen
preset number. From this preset number
upwards, former programmed radio stations will
be overridden. The system will only program
stations which are not in the memory already.
1 Press PRESET or to select the preset
number where programming should start.
Note:
– If no preset number is selected, default is preset
(1) and all your presets will be overridden.
2 Press PROG/ REV (PROGRAM on remote
control) for more than 2 seconds to activate
programming.
➜ AUTO is displayed and available stations are
programmed in order of waveband reception
strength: FM followed by MW The last preset
automatically stored will then be played.
Manual programming
1 Tune to your desired station (see “Tuning to
radio stations”).
2 Press PROG/ REV (PROGRAM on remote
control) to activate programming.
3 Press PRESET or to allocate a number
from 1 to 40 to this station.
4 Press PROG/ REV (PROGRAM on remote
control) again to confirm the setting.
➜ The preset number and the frequency of the
preset station are shown.
5 Repeat the above four steps to store other
stations.
● You can override a preset station by storing
another frequency in its place.
20
Page 21

Radio Reception
Tuning to preset radio stations
● Press PRESET or (or 0/-- – 9 on
Remote Control) until the desired preset station
is displayed.
Changing Tuning Grid
In some countries, the frequency step between
adjacent channels in the MW band is 10 kHz (9
kHz in some areas). The preset frequency step
in the factory is 9 kHz.
Changing the tuning grid will erase all
previously stored preset radio stations.
1 Select TUNER source.
2 Press STOP on the set for at least 5 seconds.
➜ The display will show "GRID 9" or "GRID
10".
Notes:
– GRID 9 and GRID 10 indicate that the tuning
grid is in step of 9 kHz and 10 kHz respectively.
– The FM tuning grid also will be changed from
50 kHz to 100 kHz or vice versa.
English
21
Page 22
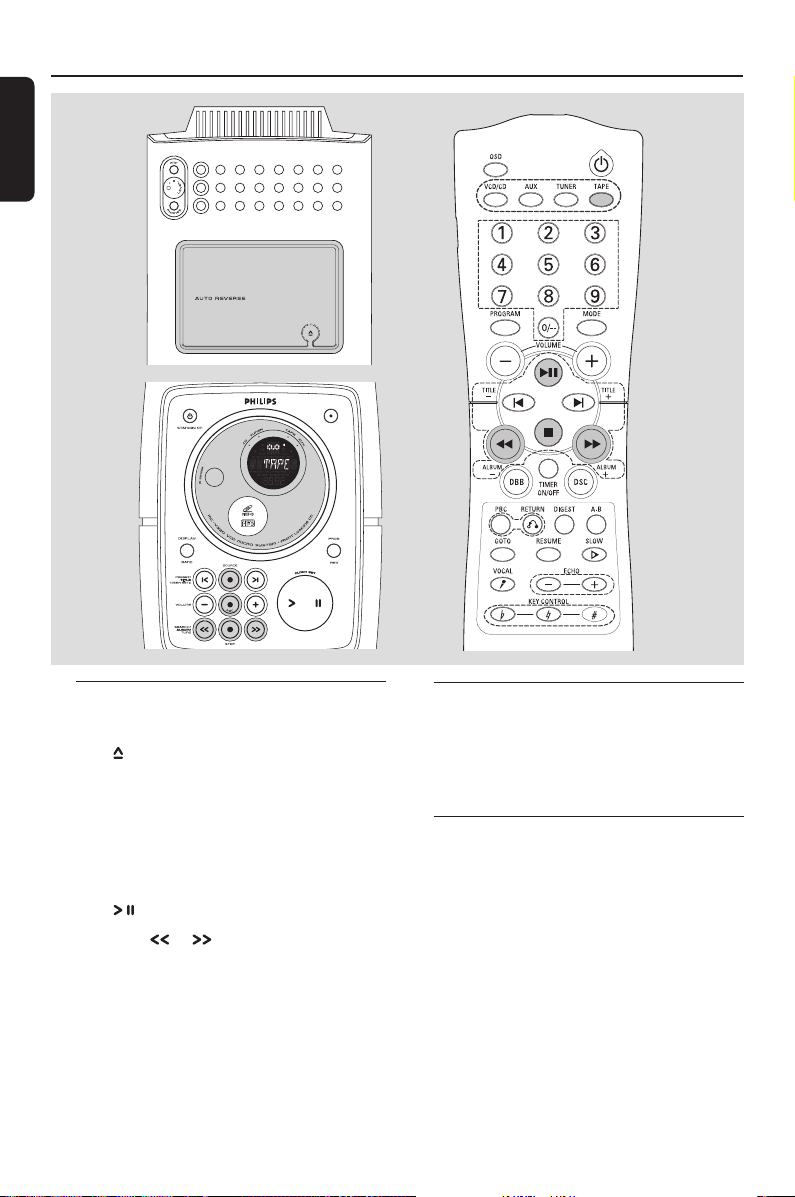
English
Tape Operation/Recording
Tape playback
1 Select TAPE source.
2 Press to open the tape door on the top of the
system.
3 Insert a recorded tape and close the tape door.
● Load the tape with the open side downward and
the full spool to the right.
➜ The display shows TAPE briefly. The tape
counter 0000 display with the SIDE A or SIDE B.
4 Press to start playback.
5 By pressing or , fast winding of tape is
possible in both directions.
● During fast winding, you can monitor the tape
message with the tape counter.
6 To stop the tape, press STOP 9 .
● To reset the tape counter, press STOP 9 again.
Note:
– The sound source cannot be changed while
recording a tape.
– “NO TAPE” will be shown if no tape inserted.
22
Switching tape sides
The tape side can be switched manually or
automatically before or during tape playback.
● Press DISPLAY BAND on set only.
➜ The display shows SIDE A or SIDE B.
Reverse mode options
● Press PROG/ REV repeatedly to select your
option;
PLAY 1 SIDE : playback or record stops at
the end of the tape.
PLAY A AND B : both sides are or recorded
played once.
REPEAT A AND B : both sides are played
repeatedly, up to 5 times
each side.
Page 23
Tape Operation/Recording
General information on
recording
● Recording is permissible insofar as copyright or
other rights of third parties are not infringed.
● For recording, use only NORMAL (IEC type I)
tapes on which the tabs have not yet been
broken. This deck is not suited for recording on
METAL (IEC IV) type tapes.
● The best recording level is set automatically.
Altering the VOLUME, DBB or INTERACTIVE
SOUND controls will not affect the recording in
progress.
● At the very beginning and end of the tape, no
recording will take place during the 7 seconds
when the leader tape passes the recorder heads.
● To protect a tape from accidental erasure, have
the tape in front of you and break out the left
tab. Recording on this side is no longer possible.
If, however, you wish to record over this side
again, cover the tabs with a piece of adhesive
tape.
Synchro start CD recording
1 Select CD source.
2 Insert a disc and if desired, program track
numbers.
3 Press to open the tape door.
4 Insert a suitable tape into the deck and close the
tape door.
5 Press REC to start recording.
➜ REC is shown during recording.
➜ Playing of the CD program starts
automatically from the beginning of the CD
after 7 seconds. It is not necessary to start the
CD player separately.
6 To stop recording, press STOP 9.
Recording from the radio
1 Select TUNER source and tune to the desired
radio station (see “Tuning to radio stations”).
2 Press to open the tape door.
3 Insert a suitable tape into the deck and close the
tape door.
4 Press REC to start recording.
➜ REC is shown during recording.
5 To stop recording, press STOP 9.
Recording from Aux
1 Select AUX source.
2 If necessary, prepare the additional appliance for
recording.
3 Press REC to start recording.
➜ REC is shown during recording.
4 To stop recording, press STOP 9.
Recording timer
To record from the radio, you will need to use a
preset radio station and to set a start (ON) and
finish (OFF) time.
1 Insert a suitable tape into the deck.
➜ If desired, press PROG/ REV to select tape
reverse mode option.
PLAY 1 SIDE : for recording one side only
PLAY A AND B : for recording on both sides
REPEAT A AND B : for recording on both sides
2 Select TUNER SOURCE and the preset radio
station to record from.
3 Press STANDBY ON to switch the system to
standby mode. Press TIMER SET / for more
than 2 seconds.
➜ flashes and a source is displayed.
4 Press SOURCE repeatedly, until REC TUN
source is displayed.
5 Press TIMER SET / to confirm the source.
➜ SET ON TIME is displayed, and the clock
digits for the hours flash.
6 Press VOLUME –/+ to set the hours.
7 Press TIMER SET / again.
➜ The clock digits for the minutes flash.
8 Press VOLUME –/+ to set the minutes.
9 Press TIMER SET / to confirm the ON star t
time.
➜ SET OFF TIME is displayed, and the
clock digits for the hours flash.
10 Repeat steps 6-8 to set the finish time.
11 Press TIMER SET / to confirm the timer
settings.
➜ is shown and the recording timer is now
set.
English
23
Page 24
Clock/Timer
English
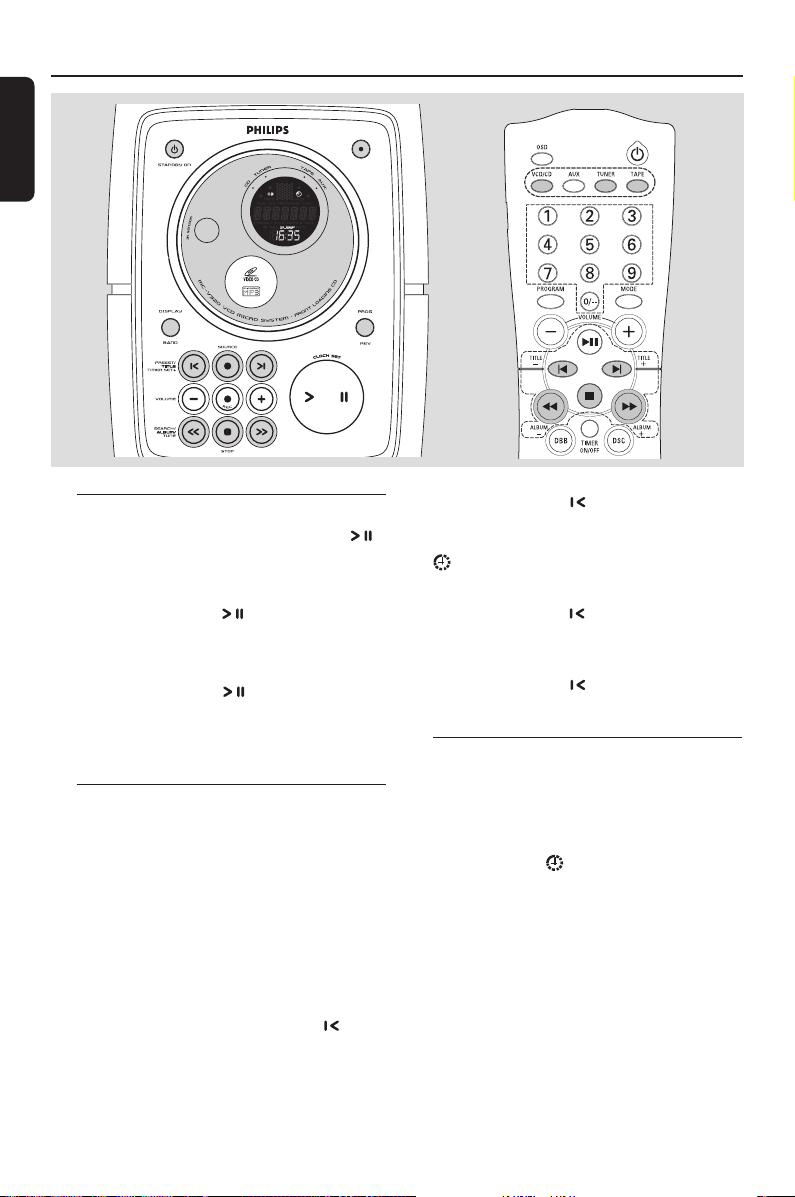
Setting the clock
1 In standby, press and hold CLOCK SET / .
➜ The clock digits for the hours flash.
2 Press VOLUME –/+ to set the hours.
3 Press CLOCK SET / again.
➜ The clock digits for the minutes flash.
4 Press VOLUME –/+ to set the minutes.
5 Press CLOCK SET / to confirm the time.
Note:
– The backlight for clock display is dim in standby.
Setting the timer
● The system can be used as an alarm clock,
whereby the CD, TUNER or TAPE is switched on
at a set time. The clock time needs to be set first
before the timer can be used.
● You can also use it to record a favourite tuner
programme at a set period (see “Recording
timer”)
● During setting, if no button is pressed within 90
seconds, the system will exit timer setting mode
automatically.
1 In standby mode, press TIMER SET / on the
system for more than 2 seconds.
2 Press SOURCE or VOLUME +/– to select
sound source.
➜ Display sequence shows CD, TUNER, TAPE or
REC TUN.
24
3 Press TIMER SET / to confirm your desired
mode.
➜ Display sequence scrolls SET ON TIME and
flashes. The clock digits for the hours flash.
4 Press VOLUME –/+ to set the hours.
5 Press TIMER SET / again.
➜ The clock digits for the minutes flash.
6 Press VOLUME –/+ to set the minutes.
7 Press TIMER SET / to confirm the time.
➜ The timer is now set and activated.
Activating and deactivating
TIMER
● In standby or during playback, press
TIMER ON / OFF on the remote control
once.
➜ Display shows if activated, and disappears
if deactivated.
Page 25

Specifications
AMPLIFIER
Output power ....................................... 2 x 20 W RMS
......................................................................... 800 W PMPO
Signal-to-noise ratio ....................................... ≥ 62 dBA
Frequency response ......... 63 – 16000 Hz, ± 3 dB
Input sensitivity AUX ....................... 0.5 V (max. 2 V)
Impedance loudspeakers ......................................... 6 Ω
Impedance headphones .................... 32 Ω -1000 Ω
......................................................................................... <0.5W
DISC PLAYER
Number of programmable tracks ......................... 40
Frequency response .......................... 30 – 16000 Hz
Signal-to-noise ratio ....................................... ≥ 75 dBA
Channel separation ..........................≥ 79 dB (1 kHz)
Total harmonic distor tion ............ < 0.02% (1 kHz)
MPEG 1 ................................................. VCD version 2.0
MPEG 1 Layer 3 (MP3-CD) .......... MPEG AUDIO
MP3-CD bit rate ................................... 32 – 256 kbps
sampling frequencies ... 48 kHz, 44.1 kHz, 32 kHz
TUNER
FM wave range ...................................87.5 – 108 MHz
AM wave range (9 kHz) ............... 531 – 1602 kHz
AM wave range (10 kHz) ............. 530 – 1700 kHz
Tuning grid ............................................................ 9/10 kHz
Sensitivity at 75 Ω
– mono, 26 dB signal-to-noise ratio ............ 2.8 µV
– stereo, 46 dB signal-to-noise ratio ........ 61.4 µV
Selectivity ................................................................. ≥ 28 dB
Total harmonic distor tion ..................................... ≤ 5%
Frequency response ..... 63 – 12500 Hz (± 3 dB)
Signal-to-noise-ratio ...................................... ≥ 50 dBA
TAPE DECK
Frequency response
Normal tape (type I) ...... 80 – 12500 Hz (8 dB)
Signal-to-noise ratio
Normal tape (type I) .................................... 50 dBA
Wow and flutter ......................................... ≤ 0.4% DIN
SPEAKERS
Bass reflex system
Dimensions (w x h x d) . 166 x 225 x 244 (mm)
............................................................. 6.5 x 8.8 x 9.6(inch)
GENERAL INFORMATION
AC Power
For Version /21-/21M ..... 110–127 / 220–240 V;
50–60 Hz Switchable
Dimensions (w x h x d) ... 166 x 225 x 274(mm)
.......................................................... 6.5 x 8.8 x 10.8(inch)
Weight(with/without speakers) ........... 8.4 / 4.3 kg
.................................................................. 17.2 / 9.5 pounds
Standby power consumption ............................ <6W
Subject to modification
English
25
Page 26
Maintenance
English
Cleaning the Cabinet
● Use a soft cloth slightly moistened with a mild
detergent solution. Do not use a solution
containing alcohol, spirits, ammonia or abrasives.
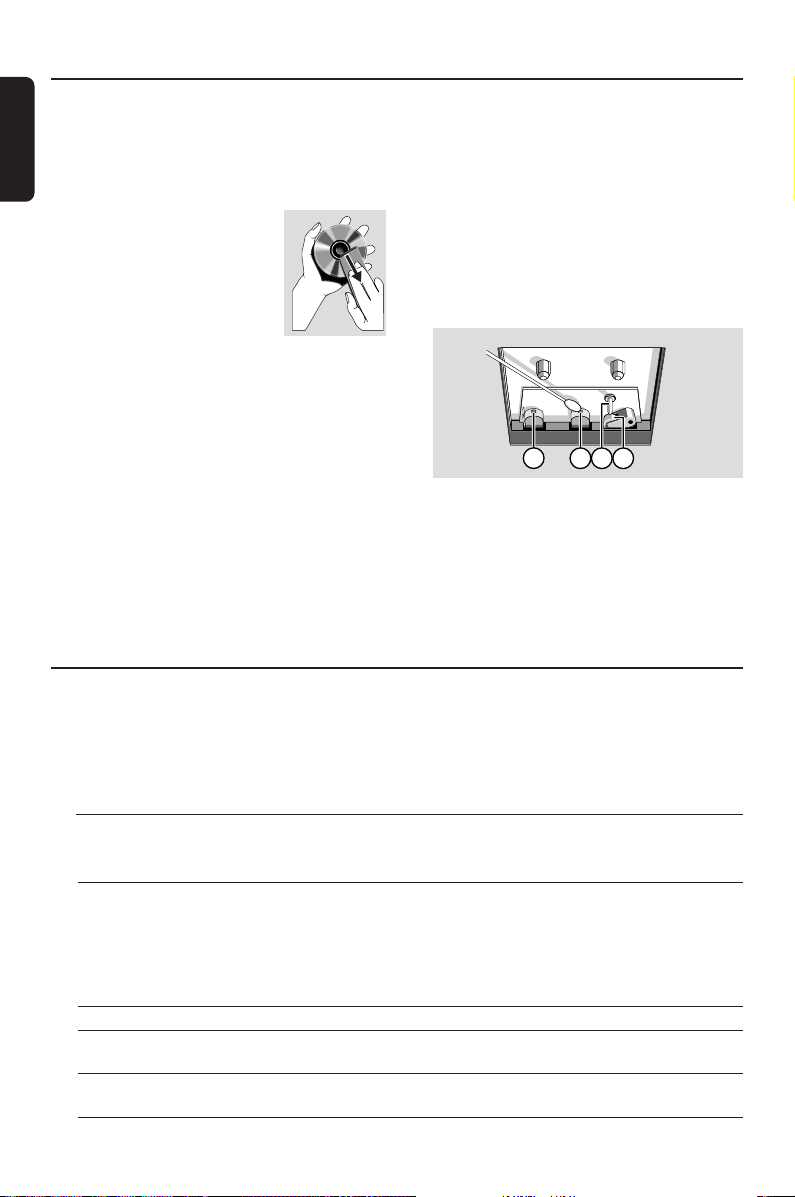
Cleaning Discs
● When a disc becomes dir ty,
clean it with a cleaning cloth.
Wipe the disc from the centre
out.
● Do not use solvents such as
benzene, thinner, commercially
available cleaners, or antistatic
spray intended for analogue records.
Cleaning the disc lens
● After prolonged use, dirt or dust may
accumulate at the disc lens. To ensure good
playback quality, clean the disc lens with Philips
CD Lens Cleaner or any commercially available
cleaner. Follow the instructions supplied with
cleaner.
Cleaning the Heads and the Tape Paths
● To ensure good recording and playback quality,
clean the heads A, the capstan(s) B, and
pressure roller(s) C after every 50 hours of
tape operation.
Caution: Do not rotate the heads during
cleaning.
● Use a cotton swab slightly moistened with
cleaning fluid or alcohol.
● You can also clean the heads by playing a
cleaning tape once.
A A B C
Demagnetising the heads
● Use a demagnetising tape available at your
dealer.
Troubleshooting
WARNING
Under no circumstances should you try to repair the system yourself, as this will invalidate the
warranty. Do not open the system as there is a risk of electric shock.
If a fault occurs, first check the points listed below before taking the system for repair. If you
are unable to remedy a problem by following these hints , consult your dealer or service center.
Problem Solution
CD OPERATION
“NO DISC” is displayed. – Insert a disc.
– Check if the disc is inserted upside down.
– Wait until the moisture condensation at the lens
has cleared.
– Replace or clean the disc, see “Maintenance”.
– Use a finalised CD-RW or CD-R.
No picture on TV screen. – Connect the cable betwen the system and TV.
No colour on TV. – Change the system to the respective PAL or
NTSC setting.
Cannot adjust the TV system to – Remove the MP-3 CD from disc tray
PAL or NTSC.
26
Page 27
Troubleshooting
RADIO RECEPTION
Radio reception is poor. – If the signal is too weak, adjust the antenna or
connect an external antenna for better reception.
– Increase the distance between the Micro HiFi
System and your TV or VCR.
TAPE OPERATION / RECORDING
Recording or playback cannot be made. – Clean deck parts, see “Maintenance”.
– Use only normal (IEC I) tape for recording.
“CHECK TAPE” is displayed. – Apply a piece of adhesive tape over the missing
tab space.
The tape deck door cannot open. – Remove and reconnect the AC power plug and
switch on the system again.
GENERAL
The system does not react when buttons – Remove and reconnect the AC power plug and
are pressed. switch on the system again.
Sound cannot be heard or is of poor – Adjust the volume.
quality. – Disconnect the headphones.
– Check that the speakers are connected correctly.
– Check if the stripped speaker wire is clamped.
The left and right sound outputs are – Check the speaker connections and location.
reversed.
The remote control does not function – Select the source (CD or TUNER, for example)
properly. before pressing the function button ( , , ).
– Reduce the distance between the remote control
and the system.
– Insert the battery with its polarities
(+/– signs) aligned as indicated.
– Replace the battery.
– Point the remote control directly toward
IR sensor on the front of the system.
The timer is not working. – Set the clock correctly.
– Press TIMER ON / OFF to switch on the timer.
– If a recording is in progress, stop the recording.
The Clock/Timer setting is erased. – Power has been interrupted or the power cord
has been disconnected. Reset the clock/timer.
English
27
 Loading...