

Page 1
Register your product and get support at
www.philips.com/welcome
MCi900/12
EN User manual 3
Contact information 70
Page 2
Philips Consumer Lifestyle
_
_
_
Philips Consumer Lifystyle AMB 544-9056
HK-1008-MCi900 2010
........................................................ ...........................................................................
(Report No. / Numéro du Rapport) (Year in which the CE mark is affixed / Année au cours
de laquelle le marquage CE a été apposé)
EC DECLARATION OF CONFORMITY
(DECLARATION DE CONFORMITE CE)
We / Nous, PHILIPS CONSUMER LIFESTYLE B.V.
(Name / Nom de l’entreprise)
TUSSENDIEPEN 4, 9206 AD DRACHTEN, THE NETHERLANDS
(address / adresse)
Declare under our responsibility that the electrical product(s):
(Déclarons sous notre propre responsabilité que le(s) produit(s) él ectrique(s):)
Philips........................................................... ....................MCi900/12, /05...........
(brand name, nom de la marque) (Type version or model, référence ou modèle)
Wi-Fi Component Hi-Fi System
..............................................................................................
(
product description, description du produit)
To which this declaration relates is in conformity with the following harmonized standards:
(Auquel cette déclaration se rapporte, est conforme aux normes harmonisées sui vantes)
(title, number and date of issue of the standard / titre, numéro et date de parution de la norme)
EN62311 : 2008 EN62301 : 2005
EN55020 : 2007 EN55013 : 2001 + A1:2003 + A2:2006
EN55022 : 2006 + A1:2007 EN55024 : 1998 + A1:2001 + A2:2003
EN301489-1 V1.8.1. : 2008 EN301489-17 V1.3.2. : 2008
EN300328 V1.7.1 :2006 EN60065 : 2002 + A1:2006 +A11:2008
Following the provisions of :
(Conformément aux exigences essentielles et autres dispositions perti nentes de:)
1999/5/EC (R&TTE Directive)
2004/108/EC (EMC Directive)
2009/125/EC (ErP Directive) – EC/1275/2008
And are produced under a quality scheme at least in conformity with ISO 9001 or CENELEC
Permanent Documents
(Et sont fabriqués conformément à une qualité au moins conforme à la norme ISO 9001 ou aux Documents Permanents CENELEC)
The Notified Body .............. Nemko ............. performed .................CB Scheme..............
(L’Organisme Notifié) (Name and number/ nom et numéro) (a effectué) (description of intervention /
description de l’intervention)
NO56043
And issued the certificate, .................................................................
(et a délivré le certificat) (certificate number / numéro du certificat)
Remarks:
(Remarques:)
Frank Dethier
Leuven, February 24, 2010
Development Manager, Innovation Lab Leven
........................................................... ............................................................................................
(place,date / lieu, date)
(signature, name and function / signature, nom et fonction)
Page 3

Contents
1 Important 5
Safety 5
Environmental notices 6
Recycling 7
Trademark notice 7
2 Your MCi900 9
Introduction 9
What’s in the box 9
Overview 10
Top and front view 10
Rear view 12
Remote control 14
Home screen 16
Play screen 17
Text entry 17
3 Prepare 19
Connect the HDD to a computer 19
Copy MCi900 les to the computer 19
Copy media les to the HDD 19
Install batteries into the remote control 20
4 Place the unit 21
Place the Soundsphere speakers 22
5 Connect 24
Connect the main unit and CD/DVD
unit 24
Connect speakers 24
Connect for disc play 24
Connect a TV 24
Play from another speaker system 25
Connect the FM antenna 26
Connect external audio devices 26
Turn on/off 27
Connect power supply 27
Turn on/off 27
6 First-time setup 28
Connect to home Wi-Fi/wired network 29
Wireless connection: One-touch
Wi-Fi Protected Setup (WPS) 30
Wireless connection: Enter
encryption key manually 31
Wireless connection: Enter IP
address manually 32
Wired connection 33
Wired connection: Enter IP
address manually 34
7 Play from home Wi-Fi/wired
network 36
Play from the hard disk drive (HDD) 36
Connect the HDD to MCi900 36
Library on the HDD 36
Play from the HDD 38
Stream from a UPnP server 39
Library on a UPnP server 40
Stream from a UPnP server 40
Play Internet radio stations 41
Tune to Internet radio stations 42
Store preset stations 42
Edit favorite stations 42
Manage Internet radio online 43
Manually add stations online 45
Stream from online music services 45
Stream from Napster 46
Search for music/pictures 46
Alphanumeric search 47
Quickjump 47
Superscroll 47
English
EN
3
Page 4

8 Play music CD/movie DVDs 48
Basic operations 48
Use the disc menu 48
Access the disc menu 49
Play movie discs(DVD/DivX/VCD) 49
Pause/Resume/Stop 49
Search 49
Select languages for disc play 49
Program favorite chapters/tracks 50
Select play options 50
Select Repeat/Shufe options 50
Zoom in/out image 51
Change a camera angle 51
9 Play FM radio 52
Tune to FM radio stations 52
Autostore 52
Manual tuning 52
Edit preset stations 52
Listen to FM radio 52
RDS (Radio Data System) 53
Use the RDS for clock setting 53
Clock settings 57
Alarm 57
Sleep timer 58
Date and time 58
Network settings 59
Setup network 59
Device name 60
USB sharing 60
Location and time zone 60
Language 60
Device information 60
Check for software upgrades 60
Demo mode 60
Call center numbers 60
Restore factory settings 61
12 Register MCi900 with Philips 62
Benets 62
Register MCi900 62
Register on the web site 62
Register on the device 62
Unregister MCi900 63
Check registration information 63
10 Play from an external audio
device (AUX) 54
Play from an external audio device 54
11 Settings 55
Play modes 55
Sound settings 55
Bass and treble 55
Full sound 55
Direct Source 55
Audio balance 55
Set the volume from the
external audio device 56
Display settings 56
Brightness 56
Wallpaper 56
Screensaver 56
Slideshow settings 56
Album art 57
Clicker sound 57
4 EN
13 Maintenance 64
Cleaning 64
14 Technical data 65
15 Troubleshooting 69
16 Contact information 70
Page 5
1 Important
Safety
Information for Europe:
Know these safety symbols
The ‘exclamation mark’ calls attention to
features for which you should carefully read
the supplied literature to prevent operating
and maintenance problems.
The ‘lightening bolt’ symbol indicates
uninsulated components within the product
that can cause an electric shock.
To reduce the risk of re or electric shock, do
not expose the product to rain or moisture
and do not place any ojects lled with liquids,
such as vases, on the product.
a Read these instructions.
b Keep these instructions.
c Heed all warnings.
d Follow all instructions.
e Do not use this product near water.
f Clean only with dry cloth.
g Do not block any ventilation openings.
Install in accordance with the
manufacturer’s instructions.
h Do not remove the casing of this
product.
i Only use this product indoors. Do
not expose the product to dripping /
splashing water, rain or high humidity.
j Keep this product away from direct
sunlight, naked ames or heat.
k Do not install near any heat sources
such as radiators, heat registers, stoves,
or other electrical equipment (including
ampliers).
l Do not place any other electrical
equipment on the product.
m Do not place any sources of danger
on the product (e.g. objects containing
liquids, burning candles).
n This product may include batteries.
Please refer to safety and disposal
instructions for batteries in this user
manual.
o This product may contain lead and
mercury. Disposal of these materials
may be regulated due to environmental
considerations. Please refer to disposal
instructions in this user manual.
Caution
Use of controls or adjustments or •
performance of procedures other than herein
may result in hazardous radiation exposure or
other unsafe operation.
Warning
Never remove the casing of this apparatus. •
Never lubricate any par t of this apparatus. •
Never place this apparatus on other electrical •
equipment.
Keep this apparatus away from direct sunlight,
•
naked ames or heat.
Never look into the laser beam inside this
•
apparatus.
Ensure that you always have easy access to the
•
power cord, plug or adaptor to disconnect this
appar atus from the power.
Where the mains plug or an appliance
•
coupler is used as the disconnect device,
the disconnect device shall remain readily
operable.
English
EN
5
Page 6
Risk of overheating! Never install this apparatus
in a conned space. Always leave a space of
at least four inches around this apparatus for
ventilation. Ensure cur tains or other objects
never cover the ventilation slots on this
apparatus.
Hearing Safety
You should use caution or temporarily
discontinue use in potentially hazardous
situations.
Environmental notices
Listen at a moderate volume:
Using headphones at a high volume can impair
your hearing. This product can produce sounds
in decibel ranges that may cause hearing loss for
a normal person, even for exposure less than a
minute. The higher decibel ranges are offered
for those that may have already experienced
some hearing loss.
Sound can be deceiving. Over time your hearing
‘comfort level’ adapts to higher volumes of
sound. So after prolonged listening, what sounds
‘normal’ can actually be loud and harmful to your
hearing. To guard against this, set your volume to
a safe level before your hearing adapts and leave
it there.
To establish a safe volume level:
Set your volume control at a low setting.
Slowly increase the sound until you can hear it
comfortably and clearly, without distortion.
Listen for reasonable periods of time:
Prolonged exposure to sound, even at normally
‘safe’ levels, can also cause hearing loss.
Be sure to use your equipment reasonably and
take appropriate breaks.
Be sure to observe the following guidelines
when using your headphones.
Listen at reasonable volumes for reasonable
periods of time.
Be careful not to adjust the volume as your
hearing adapts.
Do not turn up the volume so high that you
can’t hear what’s around you.
This product complies with the radio
inter ference requirements of the European
Community.
This product complies with the requirement of
the 1999/5/EC directive.
This apparatus includes this label:
Class II equipment symbol:
This symbol indicates that this product has a
double insulation system.
Modications
Modications not authorized by the
manufacturer may void user’s authority to
operate this product.
6 EN
Page 7
Recycling
Trademark notice
Your product is designed and manufactured with
high quality materials and components, which
can be recycled and reused.
When you see the crossed-out wheel bin
symbol attached to a product, it means the
product is covered by the European Directive
2002/96/EC:
Never dispose of your product with other
household waste. Please inform yourself about
the local rules on the separate collection of
electrical and electronic products. The correct
disposal of your old product helps prevent
potentially negative consequences on the
environment and human health.
Information about the use of batteries:
Caution
Risk of leakage: Only use the specied type of •
batteries. Do not mix new and used batteries.
Do not mix different brands of batteries.
Observe correct polarity. Remove batteries
from products that are not in use for a longer
period of time. Store bat teries in a dry place.
Risk of injur y: Wear gloves when handling
•
leaking batteries. Keep batteries out of reach
of children and pets.
Risk of explosion: Do not short circuit
•
batteries. Do not expose batteries to excessive
heat. Do not throw bat teries into the re. Do
not damage or disassemble batteries. Do not
recharge non-rechargeable batteries.
Battery disposal information:
Your product contains batteries covered by the
European Directive 2006/66/EC, which cannot
be disposed of with normal household waste.
Please inform yourself about the local rules on
separate collection of batteries. The correct
disposal of batteries helps prevent potentially
negative consequences on the environment and
human health.
HDMI, and HDMI logo and High-Denition
Multimedia Interface are trademarks or
registered trademarks of HDMI licensing LLC.
Manufactured under license from Dolby
Laboratories. Dolby and the double-D symbol
are trademarks of Dolby Laboratories.
DivX® and DivX Ultra® are registered
trademarks of DivX, Inc. and are used under
license. DivX Ultra® Cer tied to play DivX®
video with advanced features and premium
content.
ABOUT DIVX VIDEO: DivX® is a digital video
format created by DivX, Inc. This is an ofcial
DivX Cer tied device that plays DivX video.
Visit www.divx.com for more information and
software tools to conver t your les into DivX
video.
ABOUT DIVX VIDEO-ON-DEMAND: This
DivX Cer tied® device must be registered in
order to play DivX Video-on-Demand (VOD)
content. To generate the registration code,
locate the DivX VOD section in the device
setup menu. Go to vod.divx.com with this code
to complete the registration process and learn
more about DivX VOD.
‘DVD Video’ is a trademark of DVD Format/
Logo Licensing Corporation.
English
EN
7
Page 8

Windows Media and the Windows logo are
trademarks, or registered trademarks of
Microsoft Corporation in the United States
and/or other countries.
The making of unauthorized copies of copy-
protected material, including computer
programs, les, broadcasts and sound
recordings, may be an infringement of
copyrights and constitute a criminal offence.
This equipment should not be used for such
purposes.
This item incorporates copy protection
technology that is protected by U.S. patents
and other intellectual property rights of
Rovi Corporation. Reverse engineering and
disassembly are prohibited.
8 EN
Page 9
2 Your MCi900
The DVD player on MCi900 supports these
disc formats:
Congratulations on your purchase, and
welcome to Philips! To fully benet from the
support that Philips offers, register your product
at www.philips.com/welcome.
Introduction
MCi900 can
Connect a hard disk drive (USB mass •
storage device);
Connect to the existing home Wi-Fi/•
wired network, which can consist of
computers and UPnP devices;
Connect the existing home audio/•
video systems, including TV, audio
systems and MP3 players.
With such connections, you can
Play music stored on a hard •
disk drive (HDD) through the
Soundsphere speakers;
Play Internet radio stations and •
*online music services over the
Internet;
Play movie DVDs on a TV;•
Play music/photos stored on a •
computer/UPnP server;
Play music from an audio system/•
portable media player through the
Soundsphere speakers.
English
What’s in the box
Check and identify the contents of your
package:
Main unit and CD/DVD unit•
Hard disk drive (HDD) with a USB •
plug
2 SoundSphere speakers (with •
connection cables)
Remote control with batteries•
Composite audio/video cables•
FM T-type antenna•
AC power cord•
Stand for the hard disk drive (HDD)•
Software suite (stored in the •
supplied hard disk drive)
Quick Start Guide•
Tip
*Online ser vices are available in some •
countries only.
EN
9
Page 10
Overview
g
h
j
i
a fd
bc e
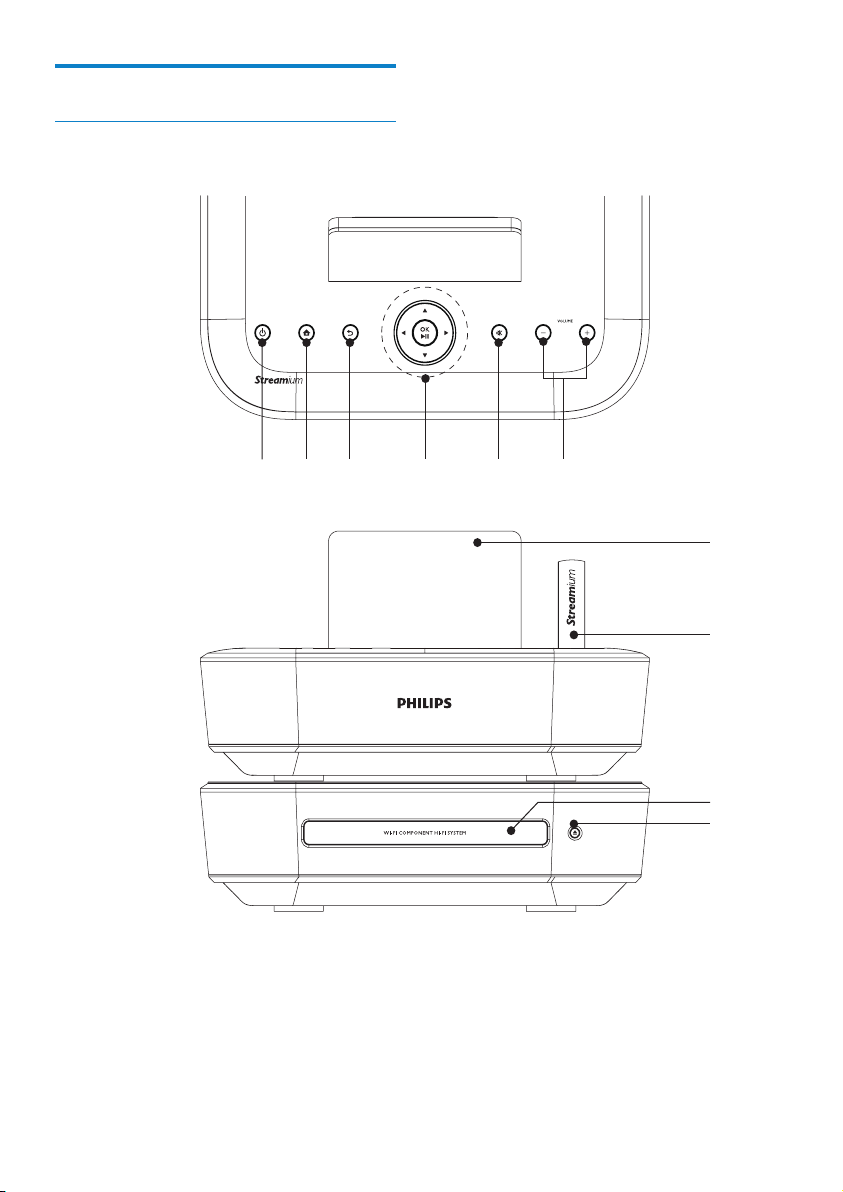
Top and front view
10 EN
Page 11

1.
Press to turn on the set;
To turn off, press to switch to
active standby; or, press and hold
to switch to Eco standby.
Exit Demo mode.
7. LCD display
8. Wi-Fi antenna
9. Disc compartment
10.
Open or close the disc
compartment.
English
2.
Return to Home screen (main
menu).
3.
Go back to the previous screen.
4.
/ / /
Navigation buttons
Press to navigate through menus.
/
In MEDIA LIB./HDD/INTERNET
RADIO mode:
Superscroll:In a long list of
options, press and hold to star t
Superscroll. Release to jump
to the rst item starting with
current alphabet/number.
In FM RADIO mode:
Press and hold to start the auto
tuning to the nex t available
station;
Press repeatedly for ne tuning.
In DISC/HDD mode:
Select an album (for MP3/WMA
CDs).
OK/
Conrm selection.
Star t/pause/resume play.
In MEDIA LIB./HDD:
Star t to play the entire le
folder(SuperPlay™).
5.
Mute/ unmute sound.
6.
VOL
Increase/decrease volume.
EN
11
Page 12
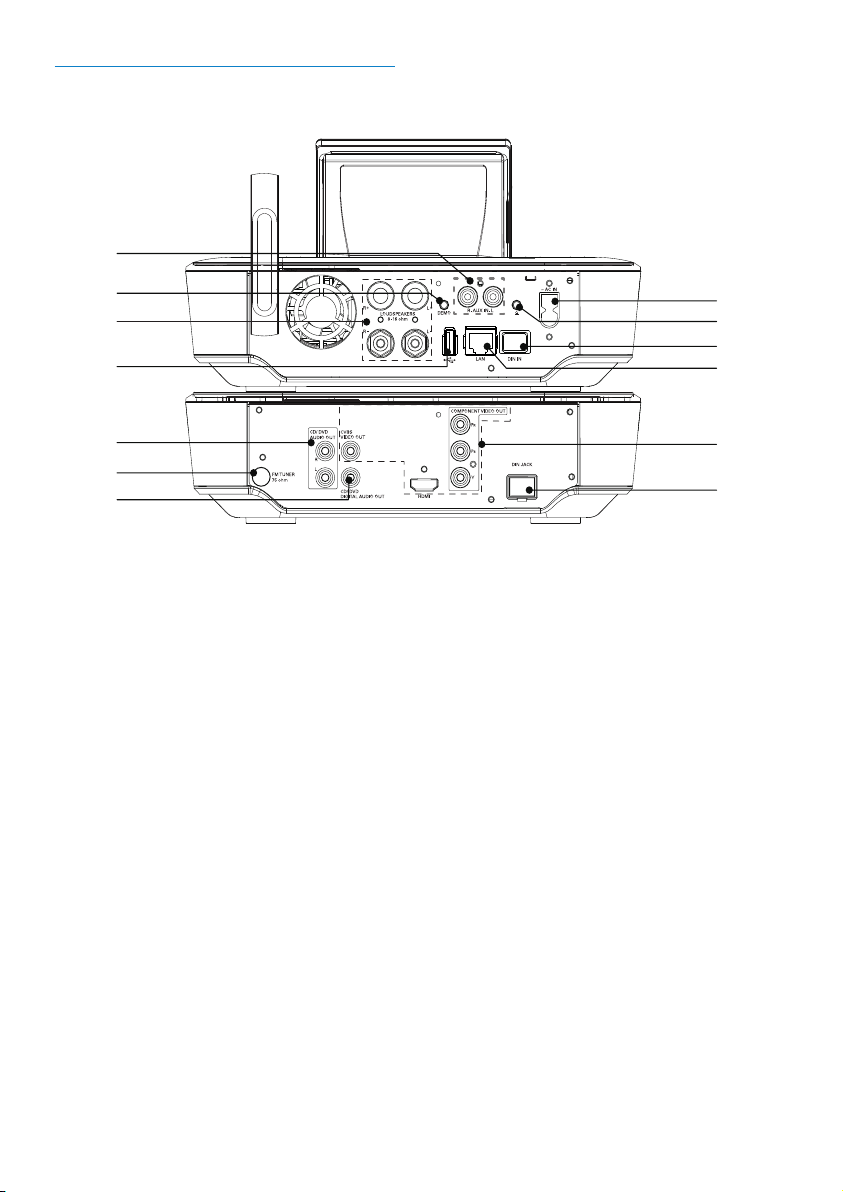
Rear view
a
b
c
d
i
j
k
l
m
h
g
e
f
see ‘Connect’ on page 24
12 EN
Page 13
1. ~ AC IN
for AC power cord
2.
3.5 mm headphone jack
3. DIN IN
socket for the connection
between the main unit and CD/
DVD unit
4. LAN
for the Ethernet cable that
connects MCi900 with home
Wi-Fi/wired network, if you want
a wired connection to the home
Wi-Fi/wired network
5. HDMI
Video output jacks for the disc
play
for the HDMI cable (not
supplied) that connects the disc
player and a high-denition TV
(HDTV)
CVBS VIDEO OUT
Video output jacks for the disc
play
for the supplied composite audio/
video cable that connects the disc
player and a standard TV
6. DIN JACK
socket for the connection
between the main unit and CD/
DVD unit
7. CD/DVD DIGITAL AUDIO
OUT
Digital audio output socket for
the disc play through an external
speaker system
8. FM TUNER
for the supplied FM antenna
9. CD/DVD AUDIO OUT
Analog audio output sockets for
the disc play through an external
speaker system
10.
USB por t for the hard disk drive
11. LOUDSPEAKERS
for connection cables
that connect the supplied
Soundsphere speakers
12. DEMO
for the audio cable supplied
to dealers only (for the use by
dealers only)
13. AUX IN L / R
Audio input sockets for a
portable media player to play
through the speakers on MCi900
English
EN
13
Page 14

Remote control
c
d
e
f
g
j
k
m
n
l
h
i
u
t
p
o
q
r
a
b
s
1.
Press to turn on the unit;
To turn off, press to switch to
active standby; or, press and hold
to switch to Eco standby.
Exit Demo mode.
2. DISC MENU
In DISC mode:
Enter or exit the disc menu.
3. Source selector
Select a media source:
INTERNET RADIO: Radio
services provided over the
Internet;
MEDIA LIB.: Media library on a
UPnP media server;
AUX: Connected external audio
device (e.g. an MP3 player or
other portable music players);
ONLINE SERVICES: Supported
music services provided over
the Internet (available in some
countries only);
FM RADIO: FM radio stations,
with RDS (Radio Data System)
supported;
HDD: Media library on the hard
disk drive connected to the unit;
DISC: DVDs, DivX/WMA/ MP3/
WMA les on discs, and audio
CDs.
4. FAVORITE
In MEDIA LIB. mode:
Add songs to the list of favorites.
In INTERNET RADIO mode:
Add current station to the list of
Favorite Stations.
5.
/ / /
Navigation buttons
Press to navigate through menus.
14 EN
Page 15
/
In MEDIA LIB./INTERNET
RADIO/HDD mode:
Superscroll: In a long list of
options, press and hold to star t
Superscroll. Release to jump
to the rst item starting with
current alphabet/number.
In DISC mode:
Select an album (for MP3/WMA
CDs).
/
In FM RADIO mode:
Press and hold to start the auto
tuning to the nex t available
station;
Press repeatedly for ne tuning.
OK
Conrm selection.
6.
HOME: Return to Home screen
(main menu).
9. VOL
Increase/decrease the volume
10. Alphanumeric
buttons
For text entry
In INTERNET RADIO/FM
RADIO mode:
On the radio play screen, press
and hold a numeric button to
store current station in the
location as a preset station.
In MEDIA LIB./INTERNET
RADIO/HDD mode:
Quickjump: In a long list of
options that are sor ted in an
alphabetical order, press once or
repeatedly to select an alphabet,
and jump to the rst item that
starts with the selected alphabet.
11. CLEAR
Press to delete the previous
entry;
English
Press and hold to delete all
BACK: Go back to previous
screen.
7.
/
Search buttons on the play
screen
In MEDIA LIB./HDD/DISC
mode:
Press to skip to the previous/
12. SUBTITLE
next chapter/track;
entries.
a/A
Press to switch between lower
and upper cases;
In FM RADIO mode, press in
the list of presets to start editing
station name.
In DISC mode: Select a subtitle
language (for video discs only).
Star t/pause/resume play;
In MEDIA LIB./HDD mode:
Star t to play the entire le
folder(SuperPlay™).
13. AUDIO
In DISC mode:
Select stereo, mono-left,
monoright,
or mix-mono channel (for
Stop play;
Exit Demo mode.
8.
Mute/ unmute sound.
14. SOUND
VCD discs only);
Select an audio language (for
DVD and DivX discs only).
Select sound settings.
EN
15
Page 16
15. REPEAT A-B
In DISC mode: Repeat a specic
section within a track/disc.
REPE AT
Toggle through repeat play
options.
SHUFFLE
Activate/deactivate random
order play.
16. ZOOM
In DISC mode: Zoom in/out (for
video discs and picture les on
CDs).
17. ANGLE
In DISC mode: Select a camera
angle (for video discs and picture
les on CDs).
18.
19. NOW PL AYING
20. SEARCH
21. SETTINGS
* Rating current music is available only for •
music services that suppor t rating, and is
available only in some countries.
RATE
In ONLINE SERVICES mode:
Increase/decrease rating* of
current music.
Return to play screen.
Press to start the search/
browsing by alphanumeric entr y.
Enter the settings menus.
Note
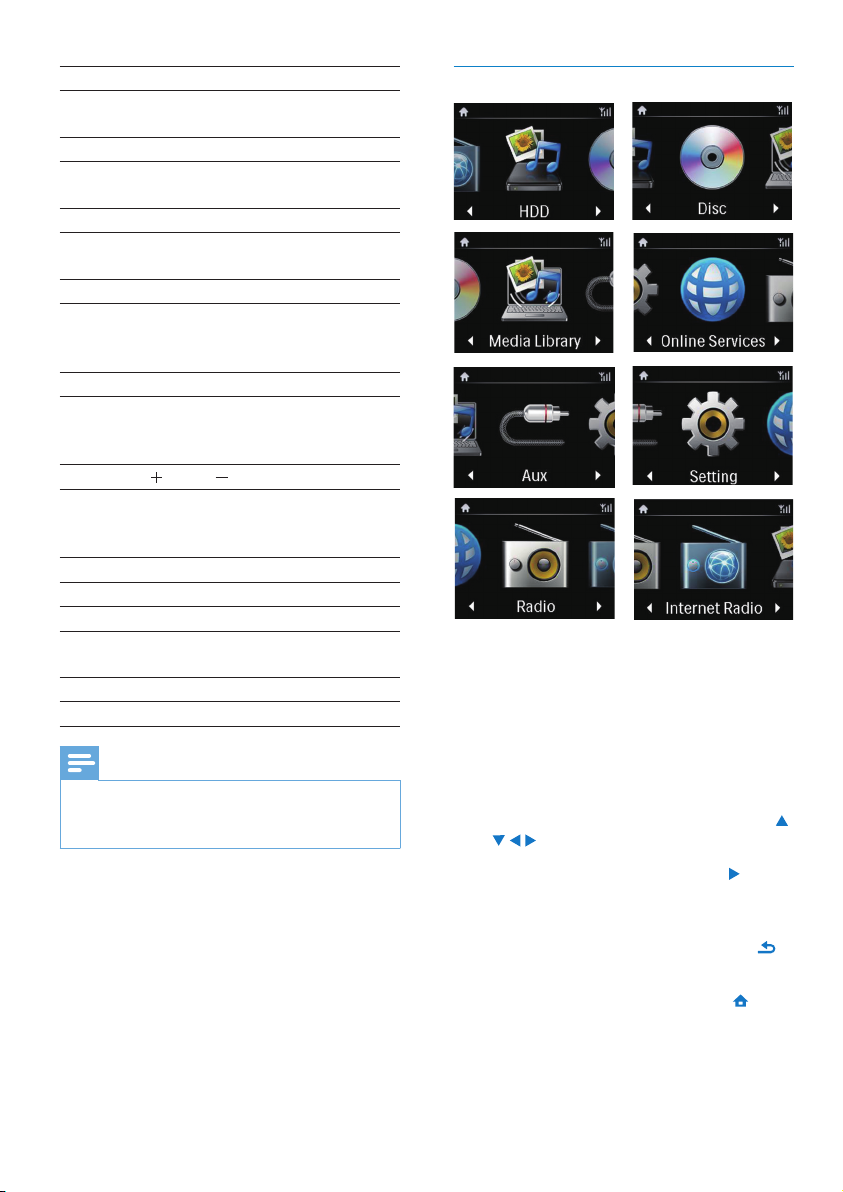
Home screen
On MCi900, you enter Home screen after the
rst-time setup is complete.
From Home screen, you can select your
desired music source*, or enter [Settings]
menu. To do so, do the following:
1 On the remote control, press the Source
selector, or use the Navigation buttons
/ / / and OK.
2 To move to the next page, press
repeatedly until you reach the end of the
page.
3 To go back to previous screen, press
BACK.
4 To return to Home screen, press
HOME.
16 EN
Page 17
Note
*Online ser vices are available in some •
countries only.
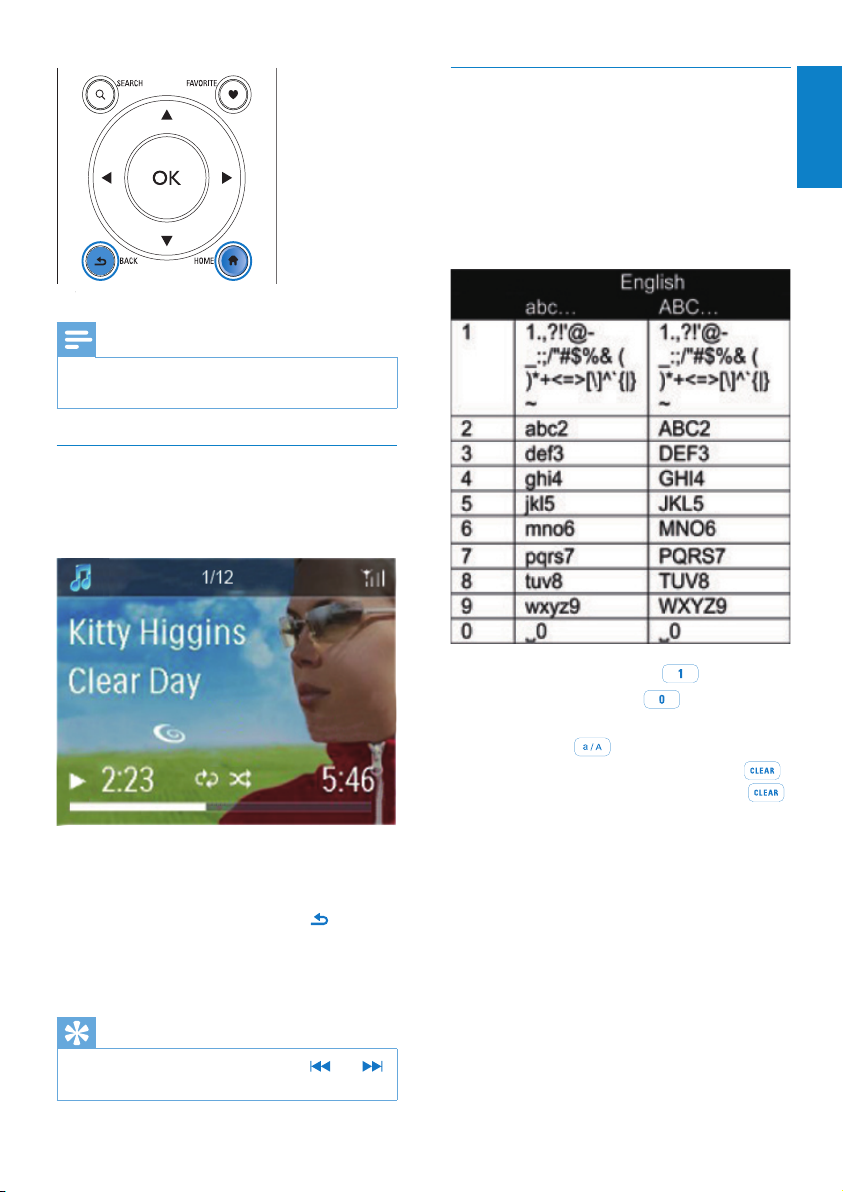
Play screen
In MEDIA LIB./INTERNET R ADIO/ONLINE
SERVICES mode, Play screen appears when
play starts.
Text entry
To enter text and symbols, press
corresponding alphanumeric buttons on the
remote control.
To enter letters/numbers/symbols •
corresponding to the same alphanumeric
button, briey and repeatedly press the
button.
English
To navigate through menus during music play,
do the following:
1 On the remote control, press and
then, use the Navigation buttons.
2 To return to Play screen, press NOW
PLAY I N G.
Tip
On Play screen, you can also press • and
repeatedly to select songs.
To enter symbols, press • repeatedly.
To enter space, press •
To switch between lower and upper •
cases, press
To delete previous character, press •
To delete all entries, press and hold
.
.
EN
.
.
17
Page 18
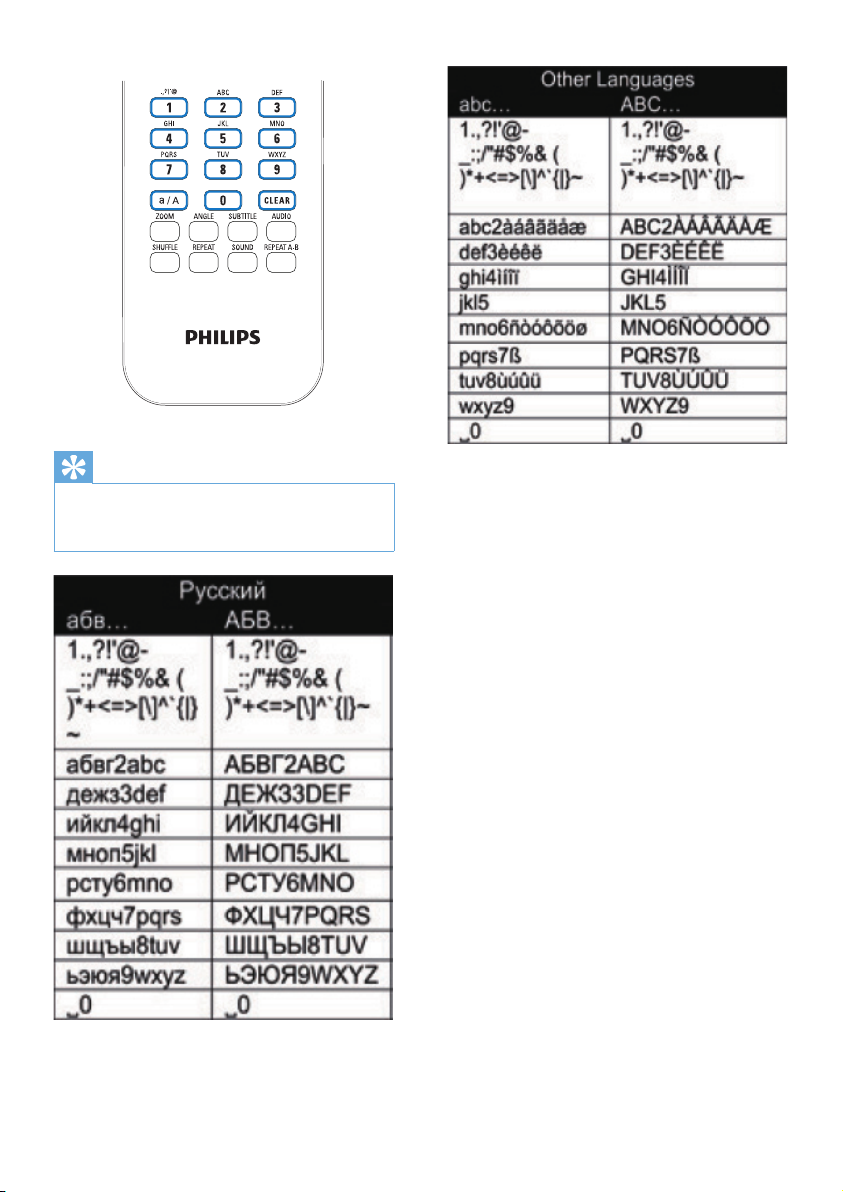
Tip
For languages other than English, letters that •
an alphanumeric but ton corresponds to may
vary.
18 EN
Page 19

3 Prepare
Connect the HDD to a computer
The supplied hard disk drive (HDD) contains
the PC/Mac software for MCi900 (Media
Browser/TwonkyMedia Server), video tutorial,
User Manual, and other information about
MCi900 that may be helpful to you.
Connect the supplied HDD to a •
computer.
Wait till the HDD is detected on »
the computer.
Copy MCi900 les to the computer
1 On the computer, under [My Computer]
or [Computer],
Find the HDD of • MCi900;
Find a location on the computer •
to store the MCi900 les from the
HDD.
2 Drag and drop the “MCi900” folder from
the HDD to the desired location on the
computer.
Copy media les to the HDD
Transfer music/picture les from the computer
to HDD. You can play music and photos on
MCi900.
1 On the computer, under [My Computer]
or [Computer],
Find the HDD of • MCi900;
Find the desired music folder. •
2 From the music/photo folder on your
computer, drag and drop music/picture
les to the HDD.
Tip
Copy media les to the HDD, regardless of •
the folder structure.
The music/picture le transfer may take you
•
some time. You may proceed to next steps
when transfer ring music/picture les to the
HDD.
English
EN
19
Page 20

Install batteries into the remote control
Caution
Risk of explosion! Keep batteries away from •
heat, sunshine or re. Never discard batteries
in re.
Risk of decreased batter y life! Never mix
•
different brands or types of bat teries.
•
Risk of product damage! When the remote
control is not used for long per iods, remove
the bat teries.
a Open the battery compartment.
b Insert two AAA R03 batteries with
correct polarity (+/-) as indicated.
c Close the battery compartment.
20 EN
Page 21

4 Place the unit
TV
TV
Wireless
Modem PC
Power
MCi900
Internet
English
Place • MCi900 near a TV to use the disc
pl ayer.
For good Wi-Fi reception, place the unit •
within the coverage of the router/ Access
point (not supplied).
To avoid magnetic interference or •
unwanted noise, never place this
apparatus and speakers too close to any
radiation devices.
Note
Never place this unit in an enclosed cabinet. •
Install this unit near the AC outlet where the •
AC power plug can be easily reached.
21
EN
Page 22

Place the Soundsphere speakers
About Soundsphere speakers
The supplied Soundsphere speakers can
produce full-frequency sounds throughout the
area of coverage.
Unlike conventional speakers, Soundsphere
speakers are much less sensitive to exact
positioning. The mid- and high-frequency
sounds from Soundsphere speakers are
retained, even if you move away from the
Soundsphere speakers. Thus, the authentic
sound experience can be ex tended to all sides
of the speakers.
22 EN
Page 23

How to place the soundsphere speakers
2-3M
English
For the best listening experience:
Place the speakers with the tweeters •
at the ear height, and at least 50 cm
away from the rear wall.
Place the speakers on speaker stands •
to get the best result.
Place the speakers 2 to 3 meters •
away from each other, with the two
speakers and your preferred listening
position forming an equilateral
triangle.
Place the speakers with the tweeters •
facing your preferred listening area.
To keep the tweeters unobstructed, •
never place the speakers in between
shelves.
Tip
Alternatively, you can place the Soundsphere •
speakers on the oor or on top of shelves,
though not preferable.
By placing the speakers at least 50 cm away
•
from the rear wall, you can make the bass
tighter and improve your listening experience.
EN
23
Page 24
a cb
5 Connect
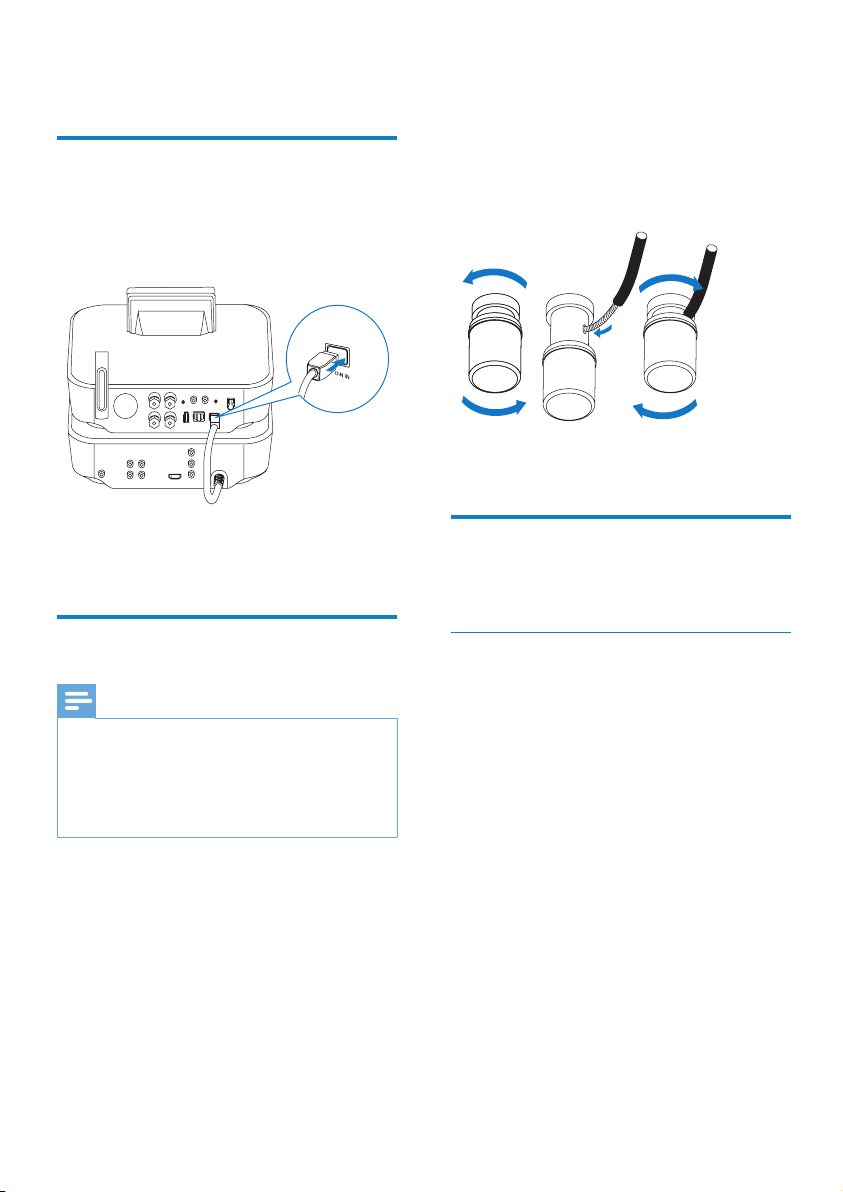
Connect the main unit and CD/DVD unit
As shown, plug the cable into • DIN IN.
As shown, unscrew to loosen the •
connectors;
Fully insert the ends of speaker wires, •
red end into the red connector, and
silver end into the black connector;
Screw the connectors until the •
speaker wires are securely fastened.
Connect speakers
Note
Always connect the speakers before you •
connect MCi900 to an AC power outlet. By
doing so, you can avoid the big noise that
may be caused during speaker ins tallation by
the speaker wires on the metallic surface of
MCi900.
1 On MCi900, ensure that you connect
the left speaker to LOUDSPEAKERS L+,
L- and right speaker to LOUDSPEAKERS
R+, R-.
2 To connect the speakers,
Connect for disc play
For disc play, make audio/video connections.
Connect a TV
On MCi900, you can connect a TV through
one of the two video jacks.
Select the video jack that your TV supports:
Composite video (CVBS): for a •
standard TV;
HDMI jack: for a high-denition •
TV compliant with HDMI (High
Denition Multimedia Inter face)/DVI
(Digital Visual Inter face), and HDCP
(High-bandwidth Digital Contents
Protec tion).
24 EN
Page 25

DIGITAL IN
COAXIAL
Using the CVBS jack
TV
TV
HDMI IN
As shown, plug the supplied composite •
audio/video cable into the corresponding
sockets.
Using the HDMI jack (sold separately)
Use the HDMI jack to connect a high-
denition T V (HDTV), which is equipped with
HDMI (High Denition Multimedia Inter face)
or DVI (Digital Visual Interface), and compliant
with HDCP (High-bandwidth Digital Contents
Protection).
As shown, connect an HDMI cable (not •
supplied) to:
the • HDMI socket on this unit, and
the • HDMI input socket on the TV.
For TV/ monitor with a DVI jack only, use •
a DVI-to-HDMI adapter.
Tip
As a compact audio/video interface, HDMI •
transmits uncompressed digital data. With the
HDMI connection, high-denition video/audio
contents can present optimum video and
audio quality on a HDTV.
Play from another speaker system
To play from another speaker system, connect
an digital audio cable (not supplied) to:
the • CD/DVD DIGITAL AUDIO OUT
socket on MCi900;
the digital audio input on an external •
speaker system.
English
Note
Ensure that the ex ternal audio system is •
switched to the Aux-in mode, if you are
playing sounds from the speaker system on an
external audio system.
EN
25
Page 26
CD/DVD
AUDIO OUT
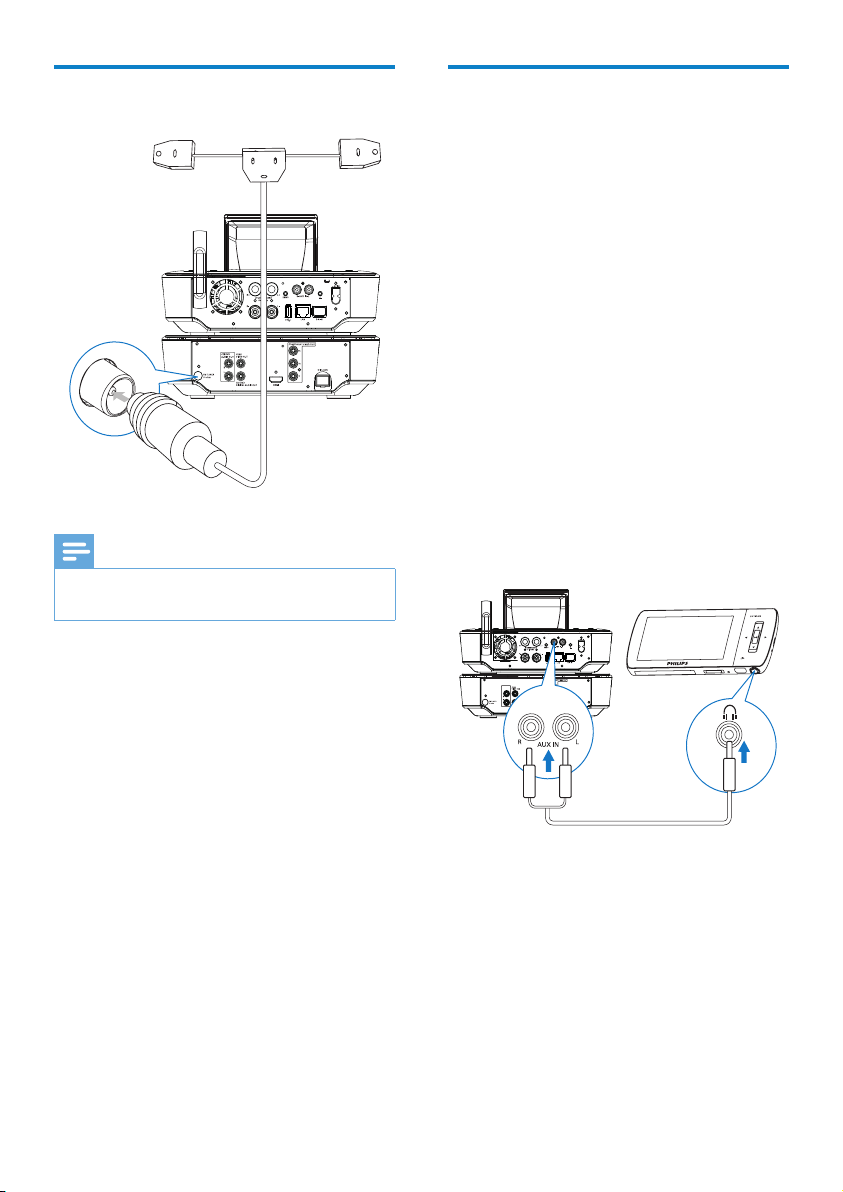
Connect the FM antenna
Note
Always plug in the FM antenna before tuning •
to an FM radio station.
Connect the supplied FM T-type antenna •
to the FM TUNER socket on the unit;
Stretch the antenna to its full length, and •
x it on the wall.
Connect external audio devices
You can listen to an external audio device
through the speakers on MCi900. To do so, do
the following connections, and then, select the
AUX mode on MCi900.
Connect audio cables (red/white - not •
supplied) to:
the • AUX IN L / R sockets on this
unit, and
the audio output sockets on the •
external audio device.
Or, to play from a portable media player •
with 3.5mm headphone jack
Connect a headphone to RCA cable (not
supplied) to:
the • AUX IN L / R sockets on this
unit, and
the 3.5mm headphone jack on the •
portable media player.
26 EN
Page 27
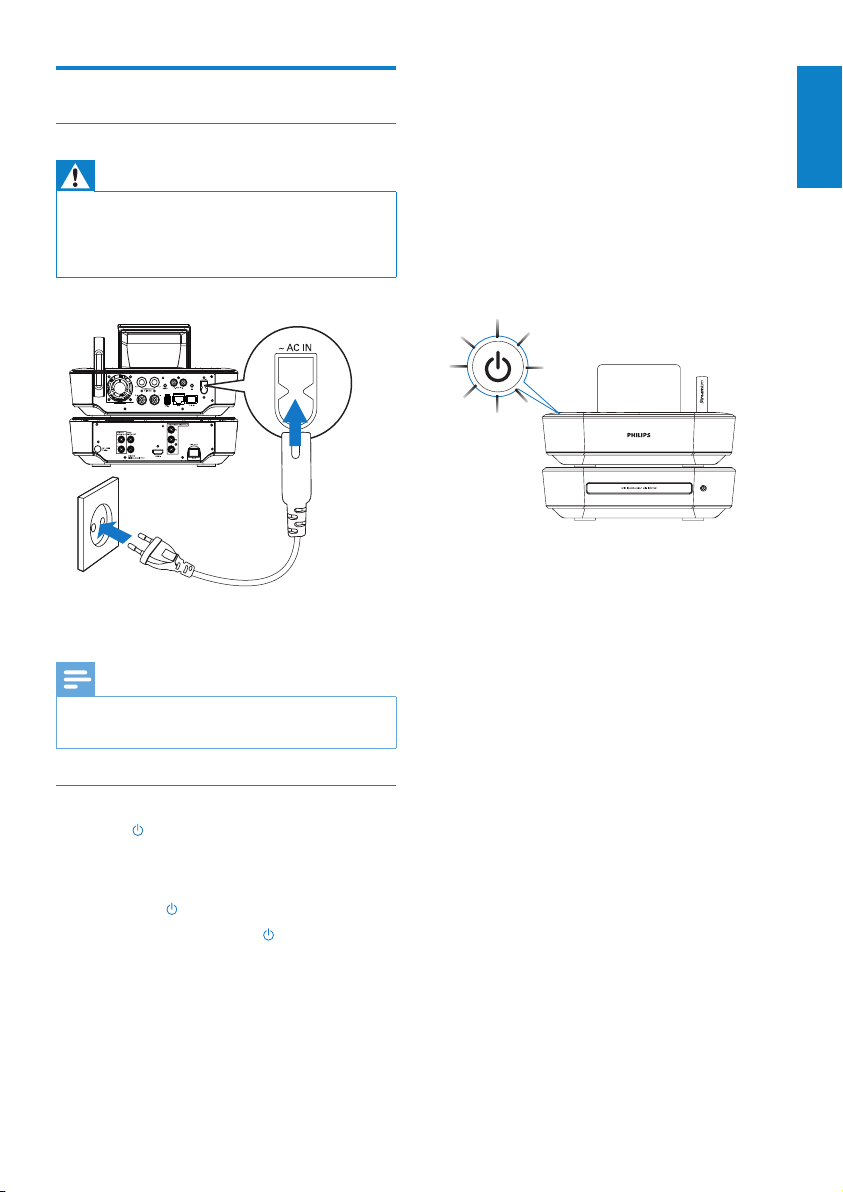
Turn on/off
Connect power supply
Warning
Risk of product damage! Ensure that the •
power supply voltage corresponds to the
voltage printed on the back or the underside
of the produc t.
Connect • MCi900 to the power supply.
Note
The type plate information is located at the •
back or at the underside of the product.
Turn on/off
1 Press or a source selector to turn on
the unit.
2 To turn off the unit,
Press •
to switch to active standby;
Or, press and hold •
Eco standby (energy-saving mode).
to switch to
Active standby
When in active standby, some major functions
of MCi900 remain in the normal state of
power consumption, e.g. Wi-Fi connection,
clock display. Thus, MCi900 can quickly go to
the running state when you switch MCi900
from active standby to on.
In active standby,
The power indicator lights up red;•
Clock time is displayed if you have set •
clock.
And, the unit is still connected to the Wi-Fi/
wired network.
Auto active standby
If no activity happens on MCi900 for 10
minutes, MCi900 can switch to active standby
automatically.
Eco standby
Eco standby is an energy-saving mode. In Eco
standby, all major functions are switched to a
low-power state or off, e.g. micro-processor,
Wi-Fi connection, display, and hard disk.
English
EN
27
Page 28

6 First-time setup
The rst time you turn on MCi900,
1 Select the desired language on the screen
as prompted.
2 To learn major functions on MCi900,
Select • [Yes, show me the demo],
when asked whether to view demo;
If necessary, press •
the volume;
To exit the demo play, press •
The unit is switched to Eco »
standby.
again to turn on MCi900,
Press »
and restart the setup.
To proceed to network setup,
Select • [No], when asked whether to
view demo.
3 Select your location and time zone from
the list as prompted.
4 Select [Ye s], when asked whether to set
up network connection.
VOL to adjust
.
28 EN
Page 29

Connect to home Wi-Fi/
MCi900
MCi900
wired network
Connect wirelessly
Connect through an Ethernet cable
English
You can connect MCi900 to home Wi-Fi/
wired network in different ways: wireless or
wired, automatic or manual.
Use a router (or Access Point) for home •
Wi-Fi/wired network. That is, connect
computers/devices to a router.
Connect • MCi900 to the router wirelessly
or through an Ethernet cable.
To have the unit connected to the •
Internet over home Wi-Fi/wired network,
ensure that the router connects to
the Internet directly and no dial-up is
required on the computer.
To switch between different connection •
methods (wireless or wired, automatic
or manual), or switch between different
routers, go to [Settings] > [Network
settings] > [Setup network].
EN
29
Page 30
MCi900
Internet
Wireless connection: One-touch Wi-
2/3
Look for network
Push button (WPS...
Pin entry (WPS - PIN)
Fi Protected Setup (WPS)
MCi900 supports Wi-Fi Protected
Setup(WPS). You can quickly and securely
connect MCi900 to a wireless router that also
supports the WPS.
You can select one of the two setup methods:
PBC (Push Button Conguration), or PIN
(Personal Identication Number).
Tip
Wi-Fi Protected Setup( WPS) is a standard •
created by Wi-Fi Alliance for easy
establishment of secure wireless home
network .
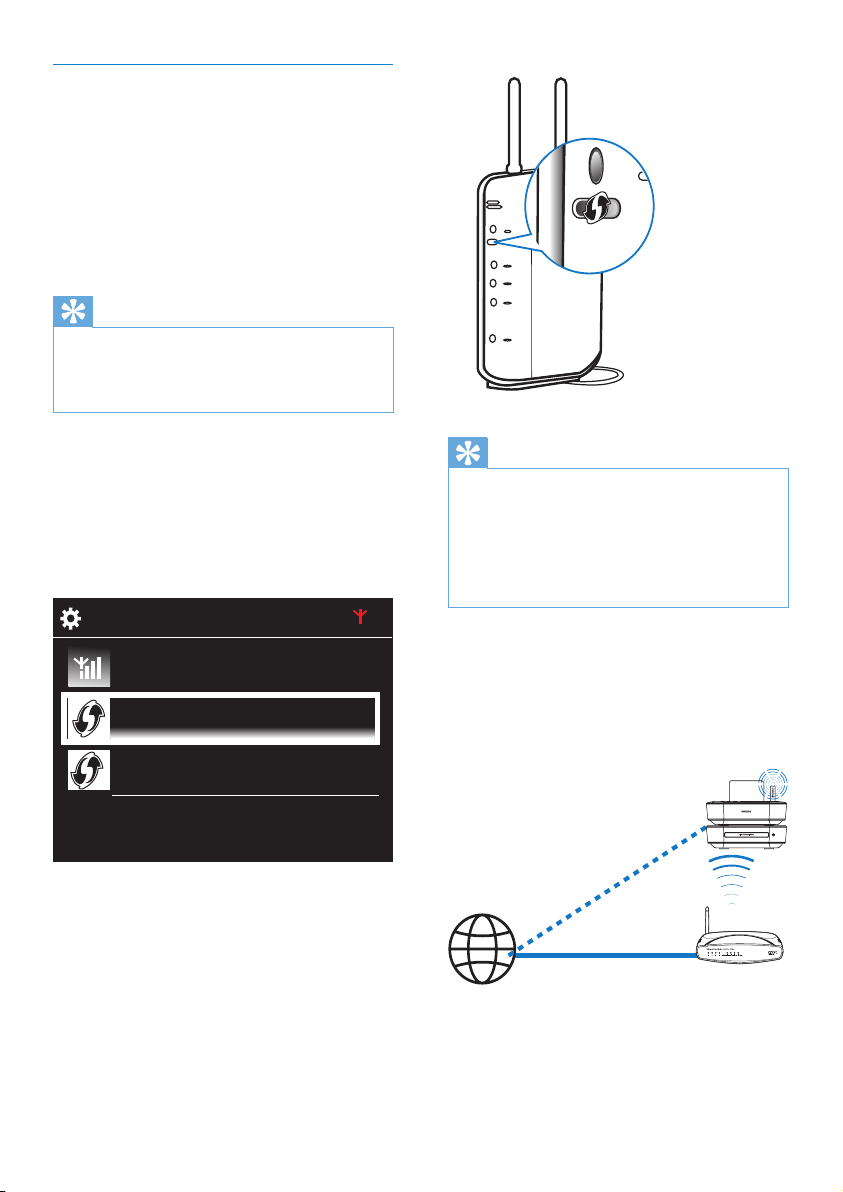
Turn on WPS-PBC on MCi900
1 Select [Ye s], when asked whether to set
up network connection (see ‘First-time
setup’ on page 28).
2 Select [Wireless (WiFi)] > [Push button
(WPS – PBC)].
Add MCi900on the router
Consult the user manual of the router to •
learn how to add a WPS device to the
router. For example:
press and hold the WPS push button.
The router starts to search for a WPS »
device.
On MCi900, a message appears »
when the connection is completed
successfully.
Tip
To use PIN (Personal Identication Number) •
as the setup method: On MCi900, select
[Wireless (WiFi)] > [Pin entry ( WPS – PIN)],
and write down the PIN that is displayed on
MCi900; On the router, enter the PIN.
Consult the user manual of the router to lear n
•
how to enter the PIN the router.
Connect to the Internet
Connect to the Internet as prompted. •
You enter Home screen after the rst- »
time setup is complete.
30 EN
Page 31

1/4
Network A
Network B
Network C
Other ...
Enter key
Note
MCi900
1/3
Look for network
Push button (WPS...
Pin entry (WPS - PIN)
Ensure that the router connects to the •
Internet directly and no dial-up is required on
the computer.
Wireless connection: Enter encryption key manually
English
Tip
Before you star t the network setup, have the •
encr yption key to your router ready.
1 Select [Ye s], when asked whether to set
up network connection (see ‘First-time
setup’ on page 28).
2 Select [Wireless (WiFi)] > [Look for
network].
The unit starts to search for wireless »
networks.
A list of available Wi-Fi networks »
appears.
3 Select the desired Wi-Fi network.
4 As prompted, enter the encr yption key to
the network.
The unit starts to acquire an IP »
address assigned by the Wi-Fi network
automatically.
A message appears when the »
connection is completed successfully.
EN
31
Page 32

Acquiring IP address...
Press <Back> to enter
IP address manually
Successfully
connected to
Network A
MCi900
2 Press BACK on the remote control to
stop getting auto IP.
Tip
If you have hidden the SSID of the router (e.g. •
disable the SSID broadcasting), go to the end
of the lis t of Wi-Fi network . Select [Other...]
> [Manual SSID entry]. In the text box, enter
the name of the router.
Note
The router may fail to assign an IP address, •
if the DHCP (Dynamic Host Congur ation
Protocol) is unavailable or disabled on the
router. You may need to enter the IP address
manually, or press BACK to start reconnecting.
Wireless connection: Enter IP address manually
Stop getting Auto IP
1 Search for the home Wi-Fi network,
and then, connect to the home Wi-Fi
network.
The unit starts to acquire an IP »
address assigned by the Wi-Fi network
automatically.
32 EN
Get the IP address of the router
Consult the user manual of the router.•
Or, to check for the settings of the router, •
enter the IP address (e.g. 192.168.1.1) in
the web browser (e.g. Internet Explorer)
of the computer, and then, get the
desired information in the setup page.
Enter the IP address manually
On the • MCi900, enter an IP address that
allows the unit to be in the same subnet
as the router.
For example, if the router has
IP address: 192.168.1.1, Subnet mask:
255.255.255.000;
Then, enter the following on the unit:
IP address: 192.168.1.XX (where XX
denotes a number), Subnet mask:
255.255.255.000.
Page 33

LAN4To Mode m12V=1A ResetLAN3 LAN2 LAN1
2/2
Wireless (WiFi)
Wired (Ethernet)
MCi900
English
Press • / repeatedly to select the entry
location;
To enter the desired digits, use the •
alphanumeric buttons on the remote
control; or press
Note
Ensure that you never enter an IP address that •
is already assigned to a computer/device on
the network.
Wired connection
/ repeatedly.
Connect to the router by using the Ethernet
cable
1 Select [Ye s], when asked whether to set
up network connection (see ‘First-time
setup’ on page 28).
2 Use an Ethernet cable to connect the unit
to the router.
Connect to the home Wi-Fi/wired network
On the unit, select • [Wired (Ethernet)].
The unit starts to acquire an IP address »
assigned by the network automatically.
A message appears when the »
connection is completed successfully.
Tip
The router may fail to assign an IP address, •
if the DHCP (Dynamic Host Congur ation
Protocol) is unavailable or disabled on the
router. You may need to enter the IP address
manually, or press BACK to start reconnecting.
EN
33
Page 34

Acquiring IP address...
Press <Back> to enter
IP address manually
Connect to the Internet
MCi900
Internet
MCi900
Connect to the Internet as prompted. •
You enter Home screen after the rst- »
time setup is complete.
Note
Ensure that the router connects to the •
Internet directly and no dial-up is required on
the computer.
Wired connection: Enter IP address manually
Stop getting Auto IP
1 Use an Ethernet cable to connect the unit
to the router.
2 On the unit, select [Wired (Ethernet)].
3 Press BACK on the remote control to
stop getting auto IP.
Get the IP address of the router
Consult the user manual of the router.•
Or, to check for the settings of the router, •
enter the IP address (e.g. 192.168.1.1) in
the web browser (e.g. Internet Explorer)
of the computer, and then, get the
desired information in the setup page.
Assign the IP address manually
On the • MCi900, enter an IP address that
allows the unit to be in the same subnet
as the router.
For example, if the router has
IP address: 192.168.1.1, Subnet mask:
255.255.255.000;
Then, enter the following on the unit:
IP address: 192.168.1.XX (where XX
denotes a number), Subnet mask:
255.255.255.000.
34 EN
Page 35

Press • / repeatedly to select the entry
location;
To enter the desired digits, use the •
alphanumeric buttons on the remote
control; or press
Note
Ensure that you never enter an IP address that •
is already assigned to a computer/device on
the network.
/ repeatedly.
English
EN
35
Page 36

1/2
Picture
Music
7 Play from home
Wi-Fi/wired
network
Tip
With the sof tware installed, the computer can •
work as a music ser ver. You can stream music/
pictures from the computer to MCi900, if both
of them are connected to the home Wi-Fi/
wired network.
Play from the hard disk drive (HDD)
Connect the HDD to MCi900
After you have transferred music/picture les
from the computer to HDD (see ‘Prepare’ on
page 19),
1 Install the supplied software on the
computer: Media Browser for PC,
TwonkyMedia Server for Mac.
On the computer, nd the “MCi900 •
folder” you copied from the HDD;
Run the setup le under •
TwonkyMedia folder to start
installation on the computer.
2 Ensure that you have removed the HDD
safely from the computer.
3 Connect the HDD to MCi900.
Library on the HDD
You can transfer the music/ picture les from
a computer to the HDD in two ways:
by using a USB cable that connects •
the HDD to the computer;
or, through the home Wi-Fi/wired •
network.
Transfer through the home Wi-Fi/wired
network
Through the network, you can conveniently
transfer a smaller number of songs/pictures
from the computer to HDD, without
removing the HDD from MCi900.
36 EN
1 Ensure that the computer is connected to
the home Wi-Fi/wired network.
On MCi900, ensure that
The HDD is properly connected;•
Page 37

In • [Settings] > [Network settings],
“[USB sharing]” is turned on.
For computers running Windows XP
Professional:
2 The rst time you connect the HDD as
a network drive, assign a network drive
to the HDD on the computer.
On the computer running Windows •
XP, double click [My Computer];
On the computer running Windows
Vista, double click [Computer].
3 On [My Computer] (Windows XP), or
[Computer] (Windows Vista),
Find the HDD under [Network •
Dr i ves] ;
Find the music/photos folder on the •
computer.
For computers running Mac OS X:
As shown, select [Go] > [Network];•
Under [SHARED], select [All] > •
[philips-network];
On [philips-network], select •
[philipsmci900], and then [usb].
English
On [My Computer], select [Tools] > •
[Map Network Drive];
Click to assign a network drive to •
the HDD (e.g. X: as shown). As
shown, type in the HDD name \\
Philipsmci900\usb. Click [Finish].
Find the music/photos folder on the •
computer.
4 Drag and drop music/picture les from
the music/photos folder to MCi900.
On MCi900, You can switched to the »
music/photo collection on the [HDD]
source (Press HDD on the remote
control).
EN
37
Page 38

Tip
In the case of a large number of media les, •
network performance may affect the transfer
speed, or even cause the interruption of
transfer.
• Philipsmci900 is the default device name. To
change the device name, go to [Settings] >
[Device ID and information].
Organize les on the HDD
Audio les: •
If the les contain le information (meta
tag or ID3 tag), the les can be sor ted
automatically by the le information, like
Artist, Album, Genre, and others.
Play from the HDD
Launch media management software to
check or edit the le information. For
example, click as shown in Windows
Media Player 11. Select the desired song,
and then, double click it to edit.
If necessary, you can also organize audio
les in different folders as desired.
Picture les:•
Organize les in different folders as desired.
The folders are sorted in an alphabetical
or d e r.
1 On MCi900, ensure that the HDD is
properly connected.
2 On the remote control, press HDD.
The le sorting process may take some »
time. During le sorting, the le folders
are displayed.
Audio les are displayed under »
different categories (e.g. Artist, Album,
Genre), if meta/ID3 tags are edited for
the les.
Picture les are also organized. »
3 Select your desired track or album.
4 Press to start play.
Play starts from the beginning of the •
album, if you press
Play screen appears when play star ts •
(see ‘Play screen’ on page 17).
5 To stop play, press .
on an album.
38 EN
Page 39

Stream from a UPnP server
Wireless
Modem PC
Power
MCi900
English
You can stream music/photos between
computers and MCi900, when
• MCi900 is connected to home Wi-Fi/
wired network;
Music sharing is set up on the computers, •
other UPnP servers that are also
connected to the home Wi-Fi/wired
network.
With the music sharing software (the supplied
Media Browser and TwonkyMedia Server),
such computers can work as UPnP media
servers (music/photo libraries) of MCi900, if
they are turned on.
Through the UPnP (Universal Plug and Play)
protocols, a UPnP media server allows music
or picture les to be streamed from the server
to a UPnP client device (e.g. MCi900). On the
UPnP client device, you can play the music and
pictures from the server.
MCi900 can also be the UPnP media server of
such computers and other UPnP devices that
are connected to the home Wi-Fi network,
if MCi900 is turned on or switched to active
standby.
Connect a hard disk drive (HDD)* to MCi900.
Music and pictures on the HDD can be played
on such computers and UPnP devices.
Tip
*The Hard disk drive (HDD) can have a •
maximum capacity of 160 GB, or up to 40,000
media les.
EN
39
Page 40

Library on a UPnP server
On the computers (UPnP servers), the
supplied software Media Browser or
TwonkyMedia Server can access music
libraries that are organized by different media
management software, including Windows
Media Player 11 and iTunes .
iTunes is the a trademark of Apple Inc.,
registered in the U.S. and other countries.
Stream from a UPnP server
On MCi900, play music/picture libraries that
are streamed from a UPnP ser ver (a computer
on the home Wi-Fi/wired network).
1 Ensure that the UPnP server is connected
to the home Wi-Fi/wired network.
2 On MCi900, press MEDIA LIB. on the
remote control.
Or, from Home screen, select •
[Media Library].
3 Select a music/pictures library.
You can see the categories by which »
the music/pictures are sorted (e.g.
Artist, Album, Genre).
4 Select your desired track or album.
5 Press to start play.
Play starts from the beginning of the •
album, if you press
Play screen appears when play star ts •
(see ‘Play screen’ on page 17).
on an album.
6 To stop play, press .
Play favorite songs
On MCi900, you may wish to listen to cer tain
songs from different ar tists, albums, and
genres. Add the songs to [Favorites].
1 Go to a list of songs.
2 On the remote control, press FAVORITE
to add current song to [Favorites].
Or, press • FAVORITE when listening
to a song.
A list of favorite songs is created •
under [Media Library] > [Favorites].
3 To nd and play the favorite songs, press
HOMEon the remote control.
From home screen, you can nd the »
favorite songs under [Media Library]>
[Favorites].
To remove a favorite song from [Favorites]
Select the song in • [Media Library] >
[Favorites]. Press FAVORITE on the
remote control.
40 EN
Play photos
Press •
Press •
picture;
Press •
slideshow mode.
/ to rotate the picture;
/ to move to previous/next
to start playing all pictures in
Page 41

Fast search forward or backward;•
MCi900
Internet
Play/pause and resume. •
4 On MCi900, do the following to exit the
external control.
Press •
on the remote control;
Press a source selector on the •
remote control;
Press •
;
Press • HOME.
English
External control from a PC
Through the home W-Fi/wired network, the
Media Browser on a PC (UPnP ser ver) allows
you to control MCi900.
1 On the PC desktop, launch Media
Browser by double clicking the icon.
2 In Media Browser, select songs to be
played on MCi900. Drag the songs to the
icon of MCi900.
A green “+” appears if the songs are in »
supported formats.
Note
The ex ternal control is stopped if the sleeper •
timer is turned on after the set time duration.
Play Internet radio stations
To play Internet radio stations, ensure that
• MCi900 is connected to the Internet
over the home Wi-Fi/wired network.
Note
Ensure that the router connects to the •
Internet directly and no dial-up is required on
the computer.
3 On the computer, you can click the
buttons to
Adjust the volume;•
Select previous/next songs if you •
have dragged more than one songs
to MCi900. See the Step 2 above.
EN
41
Page 42

Tune to Internet radio stations
1 Ensure that MCi900 is connected to the
Internet.
2 On MCi900, press INTERNET RADIO
on the remote control.
Or, from Home screen, select •
[Internet Radio].
3 To search for radio stations,
Go to [All stations] > [Locations] to •
locate stations by region;
To search for a station by name, •
use the remote control to start
alphanumeric search or Superscroll
(see ‘Search for music/pictures’ on
page 46).
4 Select the desired station to start play.
Store preset stations
On MCi900, you can store up to 10 preset
stations. Each preset station corresponds to
a numeric button on the remote control. On
the radio play screen, press a numeric button,
you quickly switch to the corresponding
preset station.
By default, preset stations are pre-loaded to
MCi900 according to the location that you
select during the rst-time setup. To check
or change the location, go to [Settings] >
[Location and time zone].
To store preset station
1 Play the desired station (see ‘Tune to
Internet radio stations’ on page 42).
2 On the play screen, press and hold the
desired numeric button (0-9).
A message appears, indicating that the »
station is added to the corresponding
location.
The new preset replaces the old one if »
the location has been lled.
To play a preset station
Go to • [Internet Radio] > [Presets].
Or, on the radio play screen, press •
the corresponding numeric button
(0-9).
Edit favorite stations
On MCi900, you can mark an Internet radio
station as favorite. All the stations are added
to [Internet Radio] > [Favorite stations]. In
this way, you can quickly access your favorite
stations.
To add a station to [Favorite stations]
On a list of stations, select the •
desired station. Press FAVORITE on
the remote control.
Or, play the desired station. On the •
play screen, press FAVORITE on the
remote control.
A message appears, indicating that »
the station is added to [Favorite
stations].
42 EN
Page 43

To remove a station from [Favorite stations]
MCi900
Internet
http://www.philips.com/welcome
Select th e station in the list of •
stations; or, go to the play screen of
the station. Press FAVORITE again.
Manage Internet radio online
English
By registering MCi900 on www.philips.com/
welcome (see ‘Register MCi900 with Philips’
EN
43
Page 44

on page 62), you can log in to Club Philips.
On Club Philips, you can do the following to
manage the Internet Radio on a computer:
Edit favorite stations;•
Manually add stations that you are unable •
to nd on MCi900.
Edit favorite stations online
Through Club Philips, you can manage the
list of favorite stations on a computer. When
connecting MCi900 to the Internet, you
update the favorite stations on MCi900.
1 On a computer, log in to Club Philips
(see ‘Register MCi900 with Philips’ on
page 62).
2 To mark/unmark stations as favorite:
Click [Streamium management] > •
[Favorites] > [Browse];
The station is marked as favorite. »
To unmark, uncheck the box •
corresponding to a station.
3 To change the order of favorite stations in
the list:
Click [Prioritize];•
Click on the row of the station to be •
moved;
Drag and drop the row upward or •
downward.
In [Browse], nd the desired stations;•
Under [Favorite], check the box •
corresponding to the station.
44 EN
On MCi900, you can nd the »
stations in the desired order
under [Internet Radio] >
[Favorite stations], if you have
connected MCi900 to the
Internet.
Page 45

Tip
In the list of favorite stations, to put a favorite •
station ahead of the rst one, make the station
just behind the rst one; drag and drop the
rst station downward.
To put a station behind the last one, make the
•
station just ahead of the last one; drag and
drop the last station upward.
Manually add stations online
Manually add stations
Through Club Philips, you can manually
add Internet radio stations to MCi900 on a
computer.
1 On a computer, log in to Club Philips
(see ‘Register MCi900 with Philips’ on
page 62).
2 To add a station, click [Streamium
management] > [My media] > [Music].
4 Click [Save].
A station is manually added the below »
the edit boxes.
To edit an added station
As shown, click the station. •
The text boxes are lled, showing »
the information about the station.
Click on the text boxes to edit the •
information.
English
3 In [Music], enter station information in
the tex t boxes:
In [URL], ll in the web site of the •
station;
In [Nickname], ll in a name that •
appears as station name in [My
media];
In [Description], ll in one-word •
description about the station, e.g.
music, spor ts, new.
The description is used as a category
to sort stations under [My media].
Stream from online music services
On MCi900, you can enjoy the online music
services.
With the online music services, you can access
their online music libraries.
Create a user account to use the services.
To access some features, you may need to
subscribe services.
EN
45
Page 46

Online ser vices are available in some countries •
only.
Note
Search for music
1 On the Napster screen, select [Search] >
[Song], [Album], or [Artist].
You can search for music by the name »
of a song, album, or artist.
Stream from Napster
Note
To stream from online music services, ensure •
that MCi900 is connected to the Internet over
the home Wi-Fi/wired net work.
Log in to your Napster account
To access Napster online music service,
you need to log in to your Napster account.
Use your existing Napster account, or use
the trial account before you create an account
with Napster.
1 On MCi900, press ONLINE SERVICES
on the remote control.
From Home screen, go to •
[Online services] > [Napster].
2 Log in to the existing account/trial
account:
Press •
or to select the entry
location;
Use the alphanumeric buttons to •
enter desired digits/letters;
You can also press •
or press and hold
desired digit/letter appears;
Press • OK to conrm.
Next time you select » Napster,
you see the account name/
password that you previously
entered.
or repeatedly,
or until the
2 Enter the name of the desired song,
album, or ar tist.
Press •
or to select the entry
location;
Use the alphanumeric buttons to •
enter desired letters;
You can also press •
or press and hold
desired letter appears;
Press • OK to conrm.
Or,
or repeatedly,
or until the
1 On the Napster screen, select [Channels].
2 Select a playlist by genre (e.g. jazz, blues).
Or,
On the • Napster screen, select
[Catalogue].
You can browse music as sorted »
and organized by the expert
music service of Napster.
Play music
To start play, press •
To stop play, press •
My Library
All your played music is saved to [My Library].
You can search for the music by song, channel,
album, artist, and genre.
.
.
Search for music/pictures
Tip
You go to the screen of account management, •
if you fail to log in to the Napster account.
As prompted, log in to the account again, or
change to another account.
46 EN
In a list of options, you can do one of the
following to search for what you need.
Tip
When doing searching in the following ways, •
ensure that MCi900 is in the mode of [Media
Library], [HDD], or [Internet Radio].
Page 47

1/6
Alive
All Of Your Life
Argentina
Avril Lavigne
ll Of Your Li
fe
rgentina
vril Lavigne
A
1/6
Alive
All Of Your Life
Argentina
Avril Lavigne
ll Of Your Life
rgentin
a
vril Lavigne
A
Use the navigation keys • , , , .
Star t quick search by using the •
alphanumeric search, Superscroll, and
Quickjump.
Note
Alphanumeric search, Superscroll and
•
Quickjump are available only when you enter
a long sorted list of options (excluding the
home screen and lists of menus).
Alphanumeric search
In a long list of options, start alphanumeric
search by entering characters that an item
starts with or contains.
1 Press SEARCH on the remote control,
if necessary.
A text box appears. »
2 Enter characters by using the remote
control (see ‘Text entry’ on page 17).
3 Press OK after completing text entry.
Search starts. »
You can nd a list of items that contain »
the characters.
You can nd a close match if there is »
no item that contains the character.
Quickjump
You can also use Quickjump for alphanumeric
search.
To reach the rst item that starts with a
certain letter
On the button corresponding to the •
letter, press once or repeatedly until
the letter appears.
To reach the rst item that starts with the
next letter
Press •
.
To reach the rst item that starts with the
previous letter
Press •
.
Superscroll
In a long list of options, Superscroll allows you
to start a search in an alphabetical order. You
can quickly reach the rst item that starts with
the selected alphabet.
1 Press and hold / to star t Superscroll.
A pop-up text box appears. Letters are »
displayed repeatedly in an alphabetical
order, starting from current letter.
2 Release / when you reach the desired
letter.
You reach the rst item that starts with »
the letter.
47
EN
English
Page 48

Printed side
TV
AV/TV
TV
WI-FI COMPONENT HI-FI SYSTEM
8 Play music CD/
Printed side
WI-FI COMPONENT HI-FI SYSTEM
movie DVDs
Caution
Never look at the laser beam inside the unit. •
Risk of product damage! Never play discs with •
accessories such as disc stabilizer rings or disc
treatment sheets.
Never put any objects other than discs into
•
the disc compartment.
3 If necessary, press DISC on the remote
control, and then,
to start play.
4 During disc play,
Press •
track/chapter. For WMA/MP3 les
on a CD-R/RW, or recordable DVD,
press
Press •
backward.
Press •
Press •
/ repeatedly to select a
/ to select a le folder.
/ to search for ward/
to pause or resume.
to stop.
Note
Ensure that you have made connections for •
disc play (see ‘Connect for disc play’ on page
24) .
For the supported disc formats, see
•
‘Introduction’ on page 9.
Basic operations
On MCi900, press .
1
The disc tray opens. »
2 Load a disc onto the tray, the printed side
facing up. Press
Play starts automatically after disc »
reading is complete.
.
Use the disc menu
After loading a disc onto the tray, you can see
the disc settings on the TV screen.
1 On MCi900, load a disc onto the tray.
2 Turn on the TV and switch to the correct
video-in channel in one of the following
ways:
On the remote control of your TV, •
press the AV/TV button repeatedly
until you see the Philips screen, or
the video disc screen.
Go to the lowest channel on your •
TV, then press the Channel Down
button until you see the Philips
screen, or the video disc screen.
Press the source button repeatedly •
on the remote control of your TV.
48 EN
Page 49

Tip
The video-in channel is between the lowest •
and highest channels and may be called
FRONT, A/V IN, VIDEO etc. See the T V user
manual on how to select the correct input on
the TV.
Access the disc menu
To access or exit the menu manually
In the • DISC mode, press DISC
MENU or SETTINGS on the remote
control.
Play movie discs(DVD/DivX/ VCD)
Pause/Resume/Stop
To pause
To resume
To stop
During disc play, press •
The TV screen shows the scenes »
where you stop play.
Or, during DVD play, press •
The TV screen shows the Philips »
screen.
Press •
Press •
.
The disc play resumes from the »
last stop point.
again.
to pause.
.
Search
Fast search forward/backward
1 During play, press and hold / to select
a search speed.
To resume play at normal speed, •
press
Search by time or chapter/track
1 During disc play, press SE ARCH until
a time eld or chapter/track eld is
displayed.
For the time eld, enter the play •
position in hours, minutes and
seconds.
For the chapter/track eld, enter the •
chapter/track.
Select languages for disc play
Select an audio language
You can select an audio language on DVDs or
DivX discs.
1 During disc play, press AUDIO.
The language options appear. If the »
selected audio channels is unavailable,
the default disc audio channel is used.
.
Play starts automatically at your »
selected point.
English
EN
49
Page 50

Note
Printed side
TV
WI-FI COMPONENT HI-FI SYSTEM
For some DVDs, the language can only be •
changed from the disc menu.
Select a subtitle language
You can select a subtitle language on DVDs.
During disc play, press • SUBTITLE.
Note
For some DVDs, the language can only be •
changed from the disc menu.
Program favorite chapters/ tracks
You can play certain chapters/tracks on a disc.
Program the chapters/tracks as desired on the
TV screen.
1 In the DISC mode, ensure that the disc
play stops.
2 Press FAVORITE on the remote control.
On the TV screen, you can see a menu »
for you to program desired chapters/
tracks.
3 Use the remote control to enter the
desired chapters/tracks.
To play the program
On the TV screen, select • [Start].
To erase the program
Press •
;
Or, remove the disc from the disc •
tr ay.
Select play options
Select Repeat/Shufe options
During disc play, you can repeatedly play a
chapter/track, or a le or les in a folder. You
can also play tracks or les in a folder in a
random order.
To turn on or off the repeat/shufe options
Press • REPE AT or/and SHUFFLE
repeatedly.
To repeatedly play a section in a disc
1 During music or video play, press
REPEAT A-B at the start point.
2 Press REPEAT A-B at the end point.
The selected section starts to play »
repeatedly.
To cancel repeat play, press » REPEAT
A-B again.
50 EN
Note
The section A and B can be set only within the •
same track/title.
Page 51

Zoom in/out image
1 During video/picture play, press ZOOM
repeatedly to zoom in/out the image.
When the image is zoomed in, you •
can press
the image.
Change a camera angle
Some DVDs contain alternate scenes, such as
scenes recorded from different camera angles.
For such DVDs, you can select from the
available alternate scenes.
1 During DVD play, press ANGLE
repeatedly to switch between camera
angles.
/ / / to pan through
English
EN
51
Page 52

9 Play FM radio
Tune to FM radio stations
Note
Before you tune to FM radio stations, ensure •
that you have properly installed the supplied
FM antenna (see ‘Connect the FM antenna’ on
page 26).
Autostore
1 On MCi900, press FM RADIO on the
remote control.
Or, from Home screen, select • [FM
radio].
2 In [FM radio], select [Auto store].
MCi900 starts to search for available »
stations automatically.
Radio play starts and a maximum of 60 »
stations are stored as presets when the
auto tune is complete.
The preset stations are listed in the »
order of reception strength, with the
RDS stations at the top.
3 To select a preset station, go to [Presets].
Manual tuning
1 In [FM radio], select [Manual tuning].
2 Press and hold / to star t auto tuning.
You tune to the next available station »
with sufcient reception.
3 Press / repeatedly for ne tuning.
Edit preset stations
Store current station to a location
When listening to a radio station, you can
store current station to a desired location
(0-9) in the preset list. The numeric buttons
(0-9) on the remote control correspond to
the locations (0-9) in the preset list.
1 Tune to your desired station.
2 On the radio play screen, press and hold
a numeric button.
If necessary, press • NOW PLAYING
to return to the radio play screen.
Current station is stored to the •
location.
Edit station information
1 In the FM RADIO mode, go to [Presets].
On the radio play screen, press •
FAVORITE .
2 In the list of preset stations,
Select the station to be edited;•
Press • a/A to start editing;
Press •
/ to select the entry
location; press
select desired letters.
/ repeatedly to
3 Press OK to conrm. Press BACK to
discard the changes.
Listen to FM radio
On MCi900, press FM RADIO on the
1
remote control.
Or, from Home screen, select • [FM
radio].
2 Tune to your desired station (see ‘Tune to
FM radio stations’ on page 52).
• To select a preset station:
Go to [FM radio] > [Presets];
Or, press the corresponding numeric
button on the radio play screen (for
the rst 10 preset stations only).
3 To mute/unmute the radio play
Press •
.
52 EN
Page 53

RDS (Radio Data System)
RDS (Radio Data System) is a service
that allows FM stations to show additional
information.
During Autostore, RDS stations are
automatically stored at the top of the list of
preset stations.
When tuning to an RDS station, you can see
the following information on the screen:
Station name;•
Program type, such as news, spor ts, •
and pop music;
Frequency;•
Scrolling tex t (RDS tex t), if available. •
Use the RDS for clock setting
Note
When you use an RDS station for clock •
setting, ensure that the RDS station broadcasts
time signals.
1 From Home screen, select [Settings] >
[Clock settings] > [Date and time].
To enter • [Settings], you can also
press SETTINGSon the remote
control.
2 In [Date and time], select [Current date
and time] > [Automatic (RDS)].
The unit searches for the rst preset »
station automatically.
The time is set according to time »
signals from the station.
English
3 To use another RDS station for clock
setting, tune to the RDS station
immediately.
Tip
To use an RDS station for regular clock setting, •
store the station as the rst preset station.
EN
53
Page 54

10 Play from an
external audio
device (AUX)
With the AUX IN L / R socket and AUX
mode, MCi900 allows you to play an external
audio device (e.g. a portable media player)
through the speakers of MCi900.
Play from an external audio device
Ensure that the external audio device
1
is properly connected to MCi900 (see
‘Connect external audio devices’ on
page 26) .
2 On MCi900, select the AUX mode.
From Home screen, select • [AUX].
Or, press • AUX on the remote
control.
3 On the external audio device, start music
play.
For the music play, you can use the •
sound settings on MCi900 (see
‘Sound settings’ on page 55).
54 EN
Page 55

11 Settings
Play modes
When playing music, you can choose to play
repeatedly, play in random order, or play one by
one. Select a play mode as desired.
To select a play mode for music play
Before or during music play,
From Home screen, go to • [Settings]
> [Play mode]; Or,
Press • REPE AT or SHUFFLE
repeatedly on the remote control.
»
- Play all songs in current folder
repeatedly;
- Play current song repeatedly;
»
- Play all songs in current
»
folder randomly.
Sound settings
On MCi900, you can select different sound
settings in [Settings] > [Sound settings].
1 From Home screen, go to [Settings] >
[Sound settings].
Or, press • SETTINGS on the remote
control to enter [Settings].
2 Select the option. Press OK to turn it on
or off.
Or,
On the remote control, press SOUND to enter
the menu of sound settings.
Bass and treble
Use [Bass / Treble] to adjust the low (bass) or
high (treble) range of musical notes.
1 From Home screen, go to [Settings] >
[Sound settings] > [Bass / Treble].
Or, press • SOUND on the remote
control to enter the menu of sound
settings.
2 Press / repeatedly to increase/decrease
the level.
Press • CLEAR to select neutral level.
Full sound
[FullSound] restores the sonic details that
music compression loses (e.g. MP3, WMA).
Turn on or off [FullSound] in [Settings]
>[Sound settings].
Direct Source
With [Direct source], you can turn off the
settings of sound effects on MCi900, including
[FullSound] and [Bass / Treble].
Thus, music plays in an original way, without
the sound effects from MCi900.
Turn on or off • [Direct source] in
[Settings] > [Sound settings].
Tip
When • [Direct source] is on, you can still
adjust the volume and [Balance].
The sound effect settings are retained and
•
enabled when [Direct source] is off.
English
Audio balance
With [Balance], you can improve listening
experience by adjusting difference between
the left and right audio channels.
1 From Home screen, go to [Settings] >
[Sound settings] > [Balance].
Or, press • SOUND on the remote
control to enter the menu of sound
settings.
EN
55
Page 56

2 Press / repeatedly to increase/decrease
the output from left/right audio channels.
Press • CLEAR for equal output from
left/right audio channels.
Set the volume from the external audio device
With [AUX in volume], you can set the
volume from the connected external device.
1 From Home screen, go to [Settings] >
[Sound settings].
Or, press • SOUND on the remote
control to enter the menu of sound
settings.
2 Go to [AUX in volume]. Select the
desired volume level.
Display settings
Brightness
On MCi900, you can adjust the brightness of
the display. As desired, the display lights up,
dims or turns off when MCi900 is turned on
or switched to active standby.
In • [Settings] > [Display settings] >
[Brightness when on] or[Brightness
when standby], select an option and
press OK.
Wallpaper
For menus on MCi900, you can set the
background display (wallpaper).
To set wallpaper
1 On MCi900, select and play a photo.
2 Press SETTINGS on the remote control
to select [Settings] > [Display settings] >
[Wallpaper].
3 In [Wallpaper], select [Current picture].
Current picture is set as wallpaper. »
Screensaver
On MCi900, the screensaver is turned on
when MCi900 is switched to active standby.
When turned on, the selected screensaver
appears. The clock is shown on the lower right
corner of the screen.
By default, clock display appears as the
screensaver.
To set screensaver
1 On MCi900, select and play a picture.
2 Press SETTINGS on the remote control
to select [Settings] > [Display settings] >
[Screen saver].
3 In [Screen saver], select [Current
picture].
Current picture is set as screensaver. »
Slideshow settings
When in the slideshow mode, you can view
pictures one by one.
To select a play mode for slideshow
1 From the home screen, go to [Settings] >
[Slideshow settings].
Or, press SETTINGS on the remote
control to enter [Settings].
2 Select one of the following play modes.
Press OK to turn it on or off.
» [Repeat]: Play all pictures repeatedly;
» [Shufe]: Play all pictures randomly.
To set the play time of each picture
1 From Home screen, go to [Settings] >
[Slideshow settings] > [Time per slide].
Or, press • SETTINGS on the remote
control to enter [Settings].
2 In [Time per slide], select the desired
time duration.
56 EN
Page 57

Album art
Album art (the picture of CD/album cover) is
sometimes available for music downloads. With
some media management software, album
art can be inserted for the songs. By turning
[Album art] on or off, you can choose whether
to show the picture of CD/album cover for
corresponding songs.
To turn on [Album art]
1 From the home screen, go to [Settings] >
[Album art].
Or, press SETTINGS on the remote
control to enter [Settings].
2 Select [Album art]. Press OK to turn it
on or off.
If [Album art] is on,
In the list of songs, the album art »
appears as thumbnail along with the
corresponding song.
During the song play, the album »
art is displayed in full screen as the
background.
English
Clicker sound
MCi900 can give you an audible feedback
(clicker sound) every time you press a button
on the remote control.
You can turn the clicker sound on or off in
[Settings] >[Clicker sound].
Clock settings
Alarm
Set the alarm
1 Ensure that you have set the clock (see
‘Date and time’ on page 58).
2 From Home screen, go to [Settings] >
[Clock settings] >[Alarm].
Or, press • SETTINGS on the remote
control to enter [Settings].
3 To set the source of alarm sound,
Select • [Music];
At the set alarm time, last played »
song starts/resumes, or you tune
to the last played Internet radio
station.
Select • [Buzzer].
At the set alarm time, the buzzer »
sounds.
EN
57
Page 58

4 To set the alarm time,
Press and hold •
/ repeatedly until you reach the
desired digits. Press OK to conrm.
Or, enter the desired digits by using •
the alphanumeric buttons on the
remote control.
The alarm icon » appears on the
screen.
To play a song or Internet radio station as
the next alarm sound
/ , or press
1 Ensure that you have selected [Music] in
the Step 3 above;
2 Before you turn off MCi900, or switch
MCi900 to active standby,
Go to • [Media Library], and select
and play the desired song;
Or, go to • [Internet Radio], and tune
to the desired station.
Use the alarm
At the set alarm time, music/Internet radio
plays as desired, or the buzzer sounds.
Note
The alarm sounds even if you have switched •
MCi90 0 to ac tive standby or Eco standby.
The buzzer sounds instead, if MCi900 fails to
•
connect to a music library or an Internet radio
station.
MCi90 0 is unmuted if it has been muted.
•
The alarm sounds in a higher volume if the •
volume level is lower than minimum.
To snooze the alarm
Press any button on the unit or •
the remote control (except for the
volume buttons).
The alarm sounds again 15 minutes »
later. The alarm icon remains.
To stop the alarm
Press and hold •
The alarm is stopped. The alarm »
icon disappears.
The alarm sounds again next day. »
or .
To turn off the alarm
Go to • [Settings] > [Clock settings]
> [Alarm]. Select [Alarm off] and
press OK on the remote control.
Sleep timer
With the sleep timer, you can have MCi900
turned off automatically after the set timer
duration.
To set the time duration
1 From the home screen, go to [Settings] >
[Clock settings] > [Sleep timer].
Or, press • SETTINGS on the remote
control to enter [Settings].
2 Select an option. Press OK to turn it on.
Date and time
The date and time can be set automatically or
manually.
Automatic setting
For automatic clock setting, use the online
service over the Internet, or use the time
signal from FM RDS radio.
Through the online service over the Internet
1 Turn on the unit, if necessary.
Ensure that the unit is connected to •
the home Wi-Fi/wired network and
Internet.
2 From Home screen, select [Settings] >
[Clock settings] > [Date and time].
Or, press • SETTINGS on the remote
control to enter [Settings].
3 In [Date and time], select [Current date
and time] > [Automatic (Internet)].
The unit starts auto time setting over »
the Internet.
A message appears when the setting »
is done.
58 EN
Page 59

13
Automatic (Internet)
Automatic (RDS)
Manual
Tip
According to the location and time zone you •
selec t, the unit can have the clock time set
and adjusted automatically through the online
service over the Inter net.
To check and change current location and time
•
zone, go to [Settings] > [Location and time
zone].
Through time signals from FM RDS radio
1 On the unit, turn on the FM radio, if
necessary.
Ensure that the FM antenna is •
connected properly (see ‘Connect
the FM antenna’ on page 26).
2 On the rst location for preset stations,
store an FM RDS station that transmits
time signals.
3 From Home screen, select [Settings] >
[Clock settings] > [Date and time].
Or, press • SETTINGSon the remote
control to enter [Settings].
4 In [Date and time], select [Current date
and time] > [Automatic (RDS)].
The unit searches for the rst preset »
station automatically.
The time is set according to time »
Manual setting
1 Turn on the unit, if necessary.
signals from the station.
2 From Home screen, select [Settings] >
[Clock settings] >[Date and time].
Or, press • SETTINGS on the remote
control to enter [Settings].
3 In [Date and time], select [Current date
and time] > [Manual].
4 To enter date and time,
Press •
or to select the entry
location;
Use the alphanumeric buttons to •
enter desired digits;
Press • OK to conrm.
You can also press •
repeatedly, or press and hold
until the desired digit appears.
Set date/time format
Select how date and time are displayed in the
clock.
or
or
1 Follow Step 1-2 under “Manual setting”.
2 In [Date and time], go to [Time format]
or [Date format] to select options.
Network settings
Setup network
After the rst-time setup, you can change
how MCi900 connectsto home Wi-Fi/wired
network:
Switch between different connection •
methods (wireless or wired,
automatic or manual);
Switch between different routers.•
To do so, do the following:
1 From Home screen, go to [Settings] >
[Network settings] > [Setup network].
Or, press • SETTINGS on the remote
control to enter [Settings].
2 Connect MCi900 as you did in the rst-
time setup (see ‘Connect to home Wi-Fi/
wired network ’ on page 29).
English
EN
59
Page 60

Device name
In [Device name], you can name/rename your
MCi900. On a connected UPnP server/client,
the MCi900 can be found as named.
1 From Home screen, go to [Settings] >
[Network settings] > [Device name].
2 In [Device name], press / to select the
entry location; press
select desired letters.
/ repeatedly to
Device information
From the home screen, go to [Settings] >
[Device ID and information] You can learn
about information about MCi900, including
model number, name to be shown on a UPnP
server/client, software version and network
settings.
USB sharing
When you connect MCi900 to home Wi-Fi/
wired network, the HDD connected to
MCi900 can work as a shared disk of the
network. Contents on the HDD can be played
or shared on computers or UPnP devices that
are also connected to the network.
To permit or prohibit the sharing, go •
to [Settings] > [Network settings]
> [USB sharing]. Press OK to turn
on or off the sharing.
Location and time zone
After the rst-time setup, you can change the
selected location and time zone when moving
to a new location or time zone.
According to the selected location and time
zone, MCi900 can
Set clock automatically over the •
Internet (see ‘Date and time’ on page
58);
Pre-load preset Internet radio •
stations automatically.
Check for software upgrades
On the MCi900, you can check for software
upgrades. After you click to agree to the terms
and conditions, the downloading and installation
of new upgrades start automatically.
1 Ensure that MCi900 is connected to the
Internet.
2 From Home screen, go to [Settings] >
[Check for software upgrades].
Demo mode
After the rst-time setup, you can view the
demo again.
1 From Home screen, go to [Settings] >
[Demo mode].
Demo play starts. »
2 To exit the demo play, press .
The unit is switched to Eco standby. »
Call center numbers
Language
After the rst-time setup, you can change the
language selection in [Settings] > [Language].
60 EN
If you need help with the usage of MCi900, go
to [Settings] > [Call centre numbers] to check
the number of your nearest call center.
Page 61

Restore factory settings
You can restore MCi900 to factory settings. All
your settings are removed, including the settings
of network, sound, display, clock, alarm and
language.
1 Go to [Settings] > [Restore factory
settings].
2 As prompted, select [ Ye s].
The unit is turned off. »
The unit is turned on again »
automatically when the factory settings
are restored.
Start the rst-time setup. »
English
EN
61
Page 62

12 Register
MCi900 with
Philips
Benets
To get the product model number
Look at the packaging box of the •
device or the product label. You can
always nd the model number on
the packaging box or product label
(e.g. MCi900, NP2900).
By registering MCi900 on www.philips.com/
welcome, you can
Get free software upgrades;•
Manage your own favorite radio stations;•
Receive Streamium newsletters.•
Note
Registration of • MCi900 requires a valid email
address.
Register MCi900
Use a valid email address as the account when
you register MCi900 on www.philips.com/
welcome.
You can complete the registration directly on
www.philips.com/welcome. Or, use an email
address to register on the device, and then,
complete the registration through the web site
link that you received in the email.
Register on the web site
To register MCi900 directly on www.philips.
com/welcome, you need to ll in the following
information as prompted during registration:
A valid email address as the registration •
account;
Product model number;•
Product registration ID. •
To get the product registration ID
On MCi900, go to • [Settings] >
[Device ID and information]. Press
repeatedly to nd [Product
Registration ID].
Register on the device
Use an email address to register on the
device, and then, complete the registration
through the web site link that you received in
the email.
1 Ensure that MCi900 is connected to the
Internet.
2 To register with www.philips.com/
welcome,
On MCi900, select • [Settings] >
[User registration] > [Register now]
> [Register on the device];
As prompted, enter your valid email •
address (see ‘Text entry’ on page
17).
You receive an email message »
from ConsumerCare@Philips.com.
On a computer, use the web site link •
in the email to complete registration.
62 EN
Page 63

Tip
To log in to Philips online ser vices later, •
use the web site link in the email, and the
password.
Unregister MCi900
When registering with www.philips.com/
welcome, you can only use one account for one
unit (e.g. MCi900). For each account, you can
maintain a set of favorite stations and manually
added stations.
To use another account for registration, you
need to unregister current one.
To unregister an account
1 On MCi900, select [Settings] > [User
registration] >[Unregister].
2 As prompted, conrm to start
unregistering the account.
Tip
When re-registering the account, you can •
recover the Internet radio s tations that you
maintained with Philips online services.
English
Check registration information
You can check whether you have registered
the MCi900, and what account you have used
for registration. To check the information,
go to [Settings] > [User registration] >
[Registration status].
EN
63
Page 64

13 Maintenance
This chapter tells you how to care for MCi900.
Cleaning
Note
Avoid moisture and abrasion. •
1 Clean MCi900 only with a soft dry cloth.
64 EN
Page 65

14 Technical data
General
AC Power (Main unit)
230V ±10%, 50Hz (for /12, /05 /79)
120V ±10%, 60Hz (for /37)
DC Power (DVD unit)
DIN connector (Output provided by Main
unit)
DC Power (HDD unit)
5V USB power, 900mA (Provided by Main
unit)¹
Dimensions
Main unit: 251 x 251 x 133mm (including
LCD)
DVD unit: 251 x 251 x 69mm
HDD unit: 122 x 75 x 13mm
Speaker box: 175 x 202 x 354mm
Weight (net)
12.50kg (all items)
Note
¹Use HDD only with the by-packed USB wire. •
Power consumption
Active (On)
< 45W (according to IEC60065)
(Active) Standby
< 13W (HDD-spun down)
ECO (Passive) Standby
< 0.8W
Audio inputs
Aux in (Line in)
2x Cinch
Input sensitivity
0.5V: Position High
1.0V: Position Medium
2.0V: Position Low
Input impedance
> 10kΩ (Ohms)
Audio outputs
Headphones
1 x 3.5mm jack, 30 – 18000Hz, 16 - 150Ω
(Ohms)
Signal to noise ratio (Headphones)
typically 90dBA (IEC)
Distortion (Headphones)
< 0.10%
Audio / Video outputs (only provide output
during disc playback)
SPDIF
1 x Cinch (Coax), 0.5V, 75 Ohm
Line out
2 x Cinch, 20 – 20000Hz, 1.5V
Signal to noise ratio (Line out)
typically 98dBA (IEC)
CVBS
1 x Cinch, 1Vpp, 75 Ohm
Composite Video output (PbPrY)
3 x Cinch, 75 Ohm, Pb/Pr: 0.7Vpp, Y: 1Vpp
HDMI
480i, 480p, 576i, 576p, 1080i, 1080p
Video system
PAL / NTSC
Video format
4:3 / 16:9
English
EN
65
Page 66

Audio amplier (Digital)
Wireless
Output power
2 x 50W (RMS) (= total power 100W )
Frequency response
20Hz to 20000Hz (±0.5dB)
Signal to noise ratio
typically 92dB/ 95dBA
Speakers
Power handling
50W (RMS) / 60W (MPO)
Impedance
8Ω (Ohms)
Sensitivity
86dB/ 1m/ W
Dimensions
Woofer: 5.00 inches
Tweeter: 1.50 inches
Frequency response
45 to 20000Hz
Sound features
FullSound®
Yes (on/ off )
Bass/ Treble control
+/ - 10 steps
Balance control
+/ - 10 steps
Direct Source (Flat)
Yes (on/ off )
Wireless standard
802.11n, backwards compatible to 802.11b/ g
Wireless security
WEP (64 or 128 bit),
WPA / WPA2 (8-63 characters)
Frequency range
2412 - 2462 MHz (CH1-CH11) (for /79, /37,
/55, /97)
2412 - 2472 MHz (CH1-CH13) (for /12, /05)
Antenna
1 x internal / 1 x ex ternal, diversity mode
enabled
Wireless protected setup (WPS)
Yes (PBC + PIN)
Network mode support
Infrastructure
Wired (LAN / Ethernet)
Wired standard
802.3 / 802.3 u
Speed
10 / 100MBit/s
Mode
half / full duplex
Crossover detection (Auto MDIX)
Yes
Note
The wired and wireless network interfaces •
cannot be turned on at the same time.
66 EN
Page 67

Internet services
FM Tuner
Internet radio
My Media
Decoding capabilities (excluding the disc
player)
MP3
8 - 320kbps (CBR / VBR)
WMA
32 - 192kbps (CBR / VBR)
WMT DRM - ND (WMA DRM - 10)
Yes, enabled (only from a UPnP server)
AAC (M4A)
16 - 320kbps (CBR / VBR)
PCM/ WAV
1x (1.4Mbps)
FLAC
Yes, suppor ted
Ogg Vorbis
Yes, suppor ted
eACC
Yes, suppor ted
JPEG
Yes, suppor ted (Maximum size: 7MB)
Playlist support (excluding the disc player)
*.m3u, *.wpl
Yes
iTunes
Yes (via by-packed UPnP Server)
Frequency range
87.50 to 108.00MHz
No. of Presets
60
Signal noise ratio
≥ 62dB
Tuning grid
50kHz
RDS
Yes, including RDS clock setting
Antenna connector
IEC (75 Ohm)
DISC player
Supported discs
DVD, VCD, SVCD, DVD+RW, DVD-RW,
DVD+R, DVD-R, Picture ( JPEG) CD, DivX
(Ultra) Disc, MP3 / WMA CDR / CDRW,
CD (CDDA)
Disc size support
8cm/ 12cm
Video decoding
MPEG 1, MPEG 2, DivX, JPEG
Audio decoding
MP3: 112 to 320kbps (Sampling rate:
32,44.1,48kHz)
WMA: 48 to 192kbps (Sampling rate: 44.1,
48kHz)
RDS
Yes; PTY, PS, Text including RDS clock setting
HDMI Audio support
Yes
English
EN
67
Page 68

USB
Display/Clock
USB port type
Type A, Host
Supported media
FAT, FAT-32, NTFS
Supported class
MSC only (no MTP support)
Multi-partition support
No, only rst readable partition
Database support
Up to 40000 songs
HDD
Disc type
2.5 inches
Size
160 G B³
Format
FAT 32
Note
³Available disc size is less due to preloaded •
contents.
Resolution
Dotmatrix, 320 x 240 dots (QVGA), Color
TFT
Size
3.5 inches
Backlight
Can be turned on/ off and can be dimmed
Clock/ Date display
Yes
Wallpaper/ Screensaver
Yes
Automatic time setting via Internet (NTP)
Yes, enabled
Sleep timer
Yes
Internal (key) clicker
Yes
Others
UPnP²
DMP (Local renderer, Local control point)
/DMS
Shared drive
Yes, Samba share
68 EN
Note
² Capable to connect to •
- Windows Media Player 11/12, Winamp,
TwonkyMedia;
- Philips Music Center WAC3500 / WAC7500
/ MCi50 0H;
- Philips NAS SPD8020CC;
-
Mobile phone Nokia N85, N95,N900.
Specications and exter nal appearance are
•
subject to changes without notice.
Page 69

15 Troubleshooting
I cannot hear any sound or the sound is poor,
what do I do?
Press • + VOL - to increase the volume.
Press the • MUTE button again to
reactivate the sound output.
Is there a maximum distance of transmission
between a wireless router and MCi900 for
effective streaming?
Yes. The maximum distance of Wi-Fi
transmission is 250m measured in open
spaces. However, in a home environment,
where solid obstacles such as walls and
doors are present, the effective transmission
distance is reduced to 50-100m. Reposition
the devices if you experience transmission
problems.
I have not received any registration email from
ConsumerCare@Philips.com.
Check that the email address that is •
entered in the user registration section is
valid and spelled correctly.
Check that the PC has an active Internet •
connection.
The Internet ser ver may be busy, try •
again later.
Check if the email was redirected to the •
spam folder.
How do I avoid Wi-Fi interferences from
other devices that operate in the same
(2.4GHz) frequency spectrum, such as Dect
phones or bluetooth devices?
Move MCi900 at least 3m away from •
such devices.
Use a WEP/WPA encryption key when •
you create the wireless connection your
PC / home network.
Change the operating channel on the •
inter fering devices.
Turn the devices in different directions to •
minimize inter ference.
English
EN
69
Page 70

16 Contact
information
Argentina (54-11) 4544-2047
Australia 1300 363 391
Austria 0810 000 205
Belgium 78250145
Belarus 882000110068
Brazil 0800 701 02 03 (all
except Sao Paulo)(11)
2121-0203 (Sao Paulo
only)
Bulgaria 8 0 01154424
Canada 1-888-744-5477
Chile 600 744 5477
(600-PHILIPS)
China 4008 800 008
Colombia 01 800 700 7445
Croatia 800222778
Czech Republic 800142840
Denmark 35258759
Estonia 8000100288
Finland 923113415
France 80502 5510
Germany 8000007520
Greece 80 031221280
Hong Kong 852-2619 9663
Hungary 680018189
India 1860 -180 -1111
Ireland 16011777
Israel 9600900-09
Italy 800088774
Japan 0570-07-6666
Korea 080-600-6600
Latvia 80002794
Luxembourg 4066615644
Malaysia 1800 880 180
Mexico 01 800 504 6200
Netherlands 8000230076
New Zealand 0800 658 224
Norway 2270 8 111
Pakistan 051 580 902-3
Peru 0800 00100
Philippines (63 2) 667 9000
Poland 8 0 03111318
Por tugal 800780903
Romania 800894910
Russia Federation (495)961-1111 (local
rate)8-800-200-0880
(mobile phone - free)
Singapore 65 6882 3999
Slovakia 800004537
South Africa (011) 471-5194
Spain 900800655
Sweden 857929100
Switzerland 844800544
Taiwan 0800 231 099
Thailand 66 2 652 8652
Turkey 0800 261 3302
Ukraine 8-800-500-69-70
United Kingdom 80 03316 015
United States 1-888-744-5477
Uruguay (598-2) 619 6666
Venezuela 0800 100 4888
70
Page 71

Streamium terms and conditions
Terms and Conditions of Use of your Philips Streamium-enabled Device
Congratulations on your purchase of a Philips Streamium-enabled Device (“Device”). These Terms and
Conditions of Use give you the rights to use certain features on your Device relating to the streaming of
content. You must agree to these Terms and Conditions of Use before using the Device. Your use of the Device
constitutes your agreement to be bound by these Terms and Conditions of Use and will give you the right to
access these features. If you do not agree to these Terms and Conditions of Use, you may return your Device to
the point of purchase. These Terms and Conditions of Use supplement, and do not replace, any terms, conditions
or disclaimers which were provided with your purchase of the Device. All such terms, conditions and disclaimers
remain in full force and effect.
Eligibility for Registration.
You must be at least 14 years of age to assume the responsibilities of these Terms and Conditions of Use. If you
are under 14 years of age, you may not use the Device unless one of your parents or legal guardians assumes
the responsibilities of these Terms and Conditions of Use. Your use of the Device constitutes your
representation that you are either 14 years of age or, if you are under 14 years of age, that your parent or legal
guardian has assumed the responsibilities of these Terms and Conditions of Use.
Restrictions on Modification of your Device
Your Device provides access to certain streams of content. As a condition of obtaining access to those streams
through the Device, you agree not to tamper with or otherwise modify or attempt to modify the Device in any
way (including through the use of software or by making physical alterations to the Device). You agree that you
will not circumvent or attempt to circumvent technological measures employed to control access to, or the
rights in, any content. You agree that you will not circumvent or attempt to circumvent any copy management
system by any means. You agree that you will not decipher or attempt to decipher cryptographic keys or
otherwise defeat or attempt to defeat any security features implemented in the Device or in the content
streams. You agree that you will not use the Device for any unauthorized purpose or in contravention of any law
or regulation.
Disclaimers Regarding Content
The streams of content which are accessible through your Device are not controlled or programmed by Philips.
Rather, they are provided by third parties. Think of your Device (in addition to its other features) as a form of
“tuner” which allows you to receive the content broadcast by many others outside of your local area. Since the
content is provided by others, PHILIPS HAS NO EDITORIAL CONTROL OVER ANY OF THAT CONTENT
RECEIVED THROUGH YOUR DEVICE AND, THEREFORE IS NOT LIABLE FOR CONTENT OR ITS NATURE
OR DELIVERY. PHILIPS DOES NOT ENDORSE ANY OPINIONS EXPRESSED IN ANY CONTENT RECEIVED
THROUGH YOUR DEVICE. PHILIPS DOES NOT GUARANTEE THE TRUTHFULNESS, ACCURACY,
RELIABILITY, COMPLETENESS OR TIMELINESS OF CONTENT. YOU AGREE THAT ANY RELIANCE ON
CONTENT IS AT YOUR OWN RISK.
Limitations on Access to Streams.
Philips does not guarantee access to any particular stream or to the content contained in any stream. Philips
may, in its discretion, add or remove access to any specific stream or content at any time. Some streams are
accessible through arrangements with online service providers which determine which streams are listed on
their directories. Although Philips will strive to provide a good selection of online service providers, Philips does
not guarantee continued access to any specific online service provider. Philips may, in its discretion, add or
remove access to any specific online service provider.
Rights in Content
Content may be protected by copyright laws or other intellectual property or proprietary laws. In some
situations, such as use of the Device in a commercial environment, it may be necessary for you to obtain, at your
own risk, a license or other authorization to use such content. You agree that, in the event such a license or
Page 72

authorization is necessary, it is your responsibility to obtain any such license or authorization. You agree that you
are solely liable for any damages you may incur resulting from your failure to obtain the proper license or
authorization for use of the content accessible through the Device. You agree that Philips will have no liability to
you with regard to your use of the content.
Changes in Features
Philips may, in its discretion, change the features of the Device, including adding features to, or removing features
from, the Device. Some new features may require changes to these Terms and Conditions of Use. Your use of
those new features will constitute your agreement to the revised Terms and Conditions of Use.
Software and Intellectual Property Rights
You may need to use certain software programs to use or have full access to certain features of the Device. You
received certain software with the purchase of the Device and may receive other software from time to time in
the future. Most of that software is contained in the Device and is not accessible to you. Some of that software
is owned by Philips and some is owned by others. Your use of software owned by Philips is subject to these
Terms and Conditions of Use and any applicable license agreement. Your use of software owned by others is
governed by their applicable license agreements. Your use of software does not transfer any title or ownership
rights in the software to you. Philips retains all its rights in software and other intellectual property, including
copyrights, patent rights, and rights in its trademarks and trade names. You agree that you will not disassemble,
decompile, create derivative works of, reverse engineer, modify, sublicense, distribute the software or use the
software for any unauthorized purpose or in contravention of any law or regulation.
Warranty Disclaimer
PHILIPS MAKES NO REPRESENTATION OR WARRANTY, EXPRESS OR IMPLIED, THAT THE DEVICE WILL
MEET YOUR REQUIREMENTS OR THAT THE USE OF THE DEVICE WILL BE UNINTERRUPTED, TIMELY,
SECURE OR FREE FROM ERRORS. PHILIPS MAKES NO WARRANTY AS TO THE CONTENT CARRIED IN
ANY STREAM. PHILIPS MAKES NO REPRESENTATION OR WARRANTY, EXPRESS OR IMPLIED, AS TO THE
INFORMATION OR CONTENT ACCESSED THROUGH YOUR DEVICE OR TO YOUR RELIANCE ON, OR
USE OF, ANY INFORMATION OR CONTENT ACCESSED THROUGH YOUR DEVICE. SPECIFIC
WARRANTIES WERE PROVIDED WITH YOUR PURCHASE OF YOUR DEVICE AND THOSE WARRANTIES,
INCLUDING ANY DISCLAIMERS TO THOSE WARRANTIES, CONTINUE TO APPLY. Because some
jurisdictions do not permit the disclaimer of implied warranties, such disclaimers may not apply to you.
Limitation of Liability
PHILIPS WILL NOT BE LIABLE TO YOU OR TO ANY OTHER PARTY FOR ANY INDIRECT, INCIDENTAL,
PUNITIVE, SPECIAL OR CONSEQUENTIAL DAMAGES (INCLUDING LOST PROFITS OR LOST SAVINGS)
OR FOR LOSS OF DATA OR BUSINESS INTERRUPTION ARISING OUT OF OR RELATING TO YOUR USE
OF THE DEVICE WHETHER OR NOT SUCH DAMAGES ARE BASED ON TORT, WARRANTY, CONTRACT
OR ANY OTHER LEGAL THEORY - EVEN IF PHILIPS HAS BEEN ADVISED, OR IS AWARE, OF THE
POSSIBILITY OF SUCH DAMAGES. IN NO EVENT WILL PHILIPS CUMULATIVE LIABILITY FOR DAMAGE
(FROM ANY CAUSE WHATSOEVER) EXCEED THE AMOUNT YOU PAID FOR YOUR DEVICE.
Miscellaneous
“This agreement will be governed by the laws of the jurisdiction in which the Device was sold and you hereby
consent to the non-exclusive jurisdiction of courts in the relevant country. If any provision of this agreement is
invalid or unenforceable under applicable law, such provision will be deemed modified to the extent necessary
to render such provision valid and enforceable and the other provisions of this agreement will remain in full
force and effect. These Terms and Conditions of Use will not be governed by the United Nations Convention of
Contracts for the International Sale of Goods, the application of which is hereby expressly waived.”
BY USING YOUR DEVICE, YOU REPRESENT THAT YOU HAVE READ AND UNDERSTOOD THESE TERMS
AND CONDITIONS OF USE AND THAT YOU ACCEPT THEM.
Page 73

NOTICE
SOFTWARE END USER LICENSE AGREEMENT
THIS SOFTWARE END USER LICENSE AGREEMENT (“THIS AGREEMENT”) IS A LEGAL AND BINDING
AGREEMENT BETWEEN YOU (EITHER AN INDIVIDUAL OR ENTITY) AND PHILIPS CONSUMER
ELECTRONICS B.V. A DUTCH LIMITED LIABILITY COMPANY, WITH ITS PRINCIPAL OFFICE AT GLASLAAN
2, 5616 LW EINDHOVEN, THE NETHERLANDS AND ITS SUBSIDIARY COMPANIES (INDIVIDUALLY AND
COLLECTIVELY “PHILIPS”). THIS AGREEMENT GIVES YOU THE RIGHT TO USE CERTAIN SOFTWARE (THE
“SOFTWARE”) INCLUDING USER DOCUMENTATION IN ELECTRONIC FORM WHICH MAY HAVE BEEN
PROVIDED SEPARATELY OR TOGETHER WITH A PHILIPS PRODUCT (THE “DEVICE”) OR A PC. BY
DOWNLOADING, INSTALLING OR OTHERWISE USING THE SOFTWARE, YOU ACCEPT AND AGREE TO
BE BOUND BY ALL OF THE TERMS AND CONDITIONS OF THIS AGREEMENT. IF YOU DO NOT AGREE
TO THESE TERMS AND CONDITIONS, DO NOT DOWNLOAD, INSTALL OR OTHERWISE USE THE
SOFTWARE. IF YOU ACQUIRED THE SOFTWARE IN TANGIBLE MEDIA E.G. CD WITHOUT THE
OPPORTUNITY TO REVIEW THIS LICENSE AND DO NOT ACCEPT THESE TERMS, YOU MAY RECEIVE A
FULL REFUND OF THE AMOUNT, IF ANY, THAT YOU PAID FOR THE SOFTWARE IF YOU RETURN THE
SOFTWARE UNUSED WITH PROOF OF PAYMENT WITHIN 30 DAYS FROM THE DATE OF PURCHASE.
1. Grant of License. This Agreement grants you a non-exclusive, nontransferable, non-sub licensable license
to install and use, on the Device or a PC, as applicable, one (1) copy of the specified version of the Software in
object code format as set out in the user documentation solely for your personal use. The Software is “in use”
when it is loaded into the temporary or permanent memory (i.e. RAM, hard disk, etc.) of the PC or the Device.
2. Ownership. The Software is licensed and not sold to you. This Agreement grants you only the right to use
the Software, but you do not acquire any rights, express or implied, in the Software other than those specified
in this Agreement. Philips and its licensors retain all right, title, and interest in and to the Software, including all
patents, copyrights, trade secrets, and other intellectual property rights incorporated therein. The Software is
protected by copyright laws, international treaty provisions, and other intellectual property laws. Therefore,
other than as expressly set forth herein, you may not copy the Software without prior written authorization of
Philips, except that you may make one (1) copy of the Software for your back-up purposes only. You may not
copy any printed materials accompanying the Software, nor print more than one (1) copy of any user
documentation provided in electronic form, except that you may make one (1) copy of such printed materials
for your back-up purposes only.
3. License Restrictions. Except as provided otherwise herein, you shall not rent, lease, sublicense, sell, assign,
loan, or otherwise transfer the Software. You shall not, and you shall not permit any third party, to reverse
engineer, decompile, or disassemble the Software, except to the extent that applicable law expressly prohibits
the foregoing restriction. You may not remove or destroy any product identification, copyright notices, or other
proprietary markings or restrictions from the Software. All titles, trademarks, and copyright and restricted
rights notices shall be reproduced on your back up copy of the Software. You may not modify or adapt the
Software, merge the Software into another program or create derivative works based upon the Software.
4. Termination of certain functionality. The Software may contain components of certain licensed software
including software licensed from Microsoft Corporation (“Microsoft”) which implements Microsoft’s digital
rights management technology for Windows Media. Content providers are using the digital rights management
technology for Windows Media (“WM-DRM”) to protect the integrity of their content (“Secure Content”) so
that their intellectual property, including copyright, in such content is not misappropriated. Your Device may also
use WM-DRM software to transfer or play Secure Content (“WM-DRM Software”). If the security of such
WM-DRM Software is compromised, Microsoft may revoke (either on its own or upon the request of the
owners of Secure Content (“Secure Content Owners”)) the WM-DRM Software’s right to acquire new licenses
to copy, store, transfer, display and/or play Secure Content. Revocation does not alter the WM-DRM Software’s
Page 74

ability to play unprotected content. A list of revoked WM-DRM Software is sent to your PC and/or your Device
whenever you download a license for Secure Content. Microsoft may, in conjunction with such license, also
download revocation lists onto your Device on behalf of Secure Content Owners, which may disable your
Device’s ability to copy, store, display, transfer, and/or play Secure Content. Secure Content Owners may also
require you to upgrade some of the WM-DRM components distributed with this Software (“WM-DRM
Upgrades”) before accessing their content. When you attempt to play Secure Content, WM-DRM Software built
by Microsoft will notify you that a WM-DRM Upgrade is required and then ask for your consent before the
WM-DRM Upgrade is downloaded. WM-DRM Software built by Philips may do the same. If you decline the
upgrade, you will not be able to access Secure Content that requires the WM-DRM Upgrade; however, you will
still be able to access unprotected content and Secure Content that does not require the upgrade. WM-DRM
features that access the Internet, such as acquiring new licenses and/or performing a required WM-DRM
Upgrade, can be switched off. When these features are switched off, you will still be able to play Secure Content
if you have a valid license for such content already stored on your Device. However, you will not be able to use
certain of the WM-DRM Software features that require Internet access such as the ability to download content
that requires the WM-DRM Upgrade. All title and intellectual property rights in and to the Secure Content is
the property of the respective Secure Content owners and may be protected by applicable copyright or other
intellectual property laws and treaties. This Agreement grants you no rights to use such Secure Content. To
summarize, if the Software contains Microsoft WM-DRM components – Secure Content you
desire to download, copy, store, display, transfer, and/or play is protected by the Microsoft
WM-DRM components of the Software. Microsoft, Secure Content Owners, or Secure Content
distributors may deny you access, or restrict your access, to Secure Content even after you have
paid for, and/or obtained, it. Neither your consent nor the consent or approval of Philips is
necessary for any of them to deny, withhold or otherwise restrict your access to Secure Content.
Philips does not guaranty that you will be able to download, copy, store, display, transfer, and/or
play Secure Content.
5. Open Source Software. (a) This software may contain components that are subject to open-source terms,
as stated in the documentation accompanying the Device. This Agreement does not apply to this software as
such. (b) Your license rights under this Agreement do not include any right or license to use, distribute or create
derivative works of the Software in any manner that would subject the Software to Open Source Terms. “Open
Source Terms” means the terms of any license that directly or indirectly (1) create, or purport to create,
obligations for Philips with respect to the Software and/or derivative works thereof; or (2) grant, or purport to
grant, to any third party any rights or immunities under intellectual property or proprietary rights in the
Software or derivative works thereof.
6. Termination. This Agreement shall be effective upon installation or first use of the Software and shall
terminate (i) at the discretion of Philips, due to your failure to comply with any term of this Agreement; or (ii)
upon destruction of all copies of the Software and related materials provided to you by Philips hereunder.
Philips’s rights and your obligations shall survive the termination of this Agreement.
7. Upgrades. Philips may, at its sole option, make upgrades to the Software available by general posting on a
website or by any other means or methods. Such upgrades may be made available pursuant to the terms of this
Agreement or the release of such upgrades to you may be subject to your acceptance of another agreement.
8. Support Services. Philips is not obligated to provide technical or other support (“Support Services”) for
the Software. If Philips does provide you with Support Services, these will be governed by separate terms to be
agreed between you and Philips.
9. Limited Software Warranty. Philips provides the Software ‘as is’ and without any warranty except that
the Software will perform substantially in accordance with the documentation accompanying the Software for a
period of one year after your first download, installation or use of the Software, whichever occurs first. Philips’
entire liability and your exclusive remedy for breach of this warranty shall be, at Philips’ option, either (i) return
of the price paid by you for the Software (if any); or (b) repair or replacement of the Software that does not
Page 75

meet the warranty set forth herein and that is returned to Philips with a copy of your receipt. This limited
warranty shall be void if failure of the Software has resulted from any accident, abuse, misuse or wrongful
application. Any replacement Software will be warranted for the remainder of the original warranty period or
thirty (30) days, whichever is longer. This limited warranty shall not apply to you if theif the Software was
provided to you free of charge on an evaluation only basis.
10. NO OTHER WARRANTIES. EXCEPT AS SET FORTH ABOVE, PHILIPS AND ITS LICENSORS DO
NOT WARRANT THAT THE SOFTWARE WILL OPERATE ERROR FREE OR UNINTERRUPTED, OR WILL
MEET YOUR REQUIREMENTS. YOU ASSUME ALL RESPONSIBILITIES FOR SELECTION OF THE SOFTWARE
TO ACHIEVE YOUR INTENDED RESULTS, AND FOR THE INSTALLATION OF, USE OF, AND RESULTS
OBTAINED FROM THE SOFTWARE. TO THE MAXIMUM EXTENT PERMITTED BY APPLICABLE LAW,
PHILIPS AND ITS LICENSORS DISCLAIM ALL WARRANTIES AND CONDITIONS, WHETHER EXPRESS OR
IMPLIED, INCLUDING BUT NOT LIMITED TO THE IMPLIED WARRANTIES OF MERCHANTABILITY, FITNESS
FOR A PARTICULAR PURPOSE, AND ACCURACY OR COMPLETENESS OF RESULTS WITH RESPECT TO
THE SOFTWARE AND THE ACCOMPANYING MATERIALS. THERE IS NO WARRANTY AGAINST
INFRINGEMENT. PHILIPS DOES NOT WARRANT THAT YOU WILL BE ABLE TO DOWNLOAD, COPY,
STORE, DISPLAY, TRANSFER, AND/OR PLAY SECURE CONTENT.
11. LIMITATION OF LIABILITY. UNDER NO CIRCUMSTANCES WILL PHILIPS OR ITS LICENSORS BE
LIABLE FOR ANY CONSEQUENTIAL, SPECIAL, INDIRECT, INCIDENTAL OR PUNITIVE DAMAGES
WHATSOEVER, INCLUDING, WITHOUT LIMITATION, DAMAGES FOR LOSS OF PROFITS OR REVENUES,
BUSINESS INTERRUPTION, LOSS OF BUSINESS INFORMATION, LOSS OF DATA, LOSS OF USE OR OTHER
PECUNIARY LOSS, EVEN IF PHILIPS OR ITS LICENSORS HAVE BEEN ADVISED OF THE POSSIBILITY OF
SUCH DAMAGES. IN NO EVENT SHALL PHILIPS’ OR ITS LICENSORS’ AGGREGATE LIABILITY FOR
DAMAGES ARISING OUT OF THIS AGREEMENT EXCEED THE GREATER OF THE PRICE ACTUALLY PAID
BY YOU FOR THE SOFTWARE OR FIVE TEN POUNDS STERLINGUS DOLLARS (510.00).
12. Trademarks. Certain of the product and Philips names used in this Agreement, the Software, and the
printed user documentation may constitute trademarks of the Philips, its licensors or other third parties. You
are not authorized to use any such trademarks.
13. Export Administration. You agree that you will not directly or indirectly, export or re-export the
Software to any country for which the United States Export Administration Act, or any similar United States law
or regulation requires an export license or other U.S. Government approval, unless the appropriate export
license or approval has first been obtained. By downloading or installing the Software you agree to abide by this
Export provision.
14. Governing law. This Agreement is governed by the laws of your country of residence ,residence, without
reference to its conflict of laws principles. Any dispute between you and Philips regarding this Agreement shall
be subject to the non-exclusive jurisdiction of the courts of your country of residence.
15. General. This Agreement contains the entire agreement between you and Philips and supersedes any prior
representation, undertaking or other communication or advertising with respect to the Software and user
documentation. If any part of this Agreement is held invalid, the remainder of this Agreement will continue in
full force and effect. This Agreement shall not prejudice the statutory rights of any party dealing as a consumer.
Page 76

Written Offer
Philips Electronics Hong Kong Ltd. hereby offers to deliver, upon request, a
copy of the corresponding source code for the open source software packages
used in this product for which such offer is requested by the respective licenses.
This offer is valid up to three years after product purchase. To obtain source
code, please contact open.source@philips.com. If you prefer not to use email
or if you do not receive conrmation receipt within a week after mailing to this
email address, please write to Open Source Team, Philips Intellectual Property
& Standards, P.O. Box 220, 5600 AE Eindhoven, The Netherlands. If you do not
receive timely conrmation of your letter, please email to the email address
above.
This product uses the following open source software:
uClinux for Blackn 2009R1 Release <http://blackn.uclinux.org/>, licensed
under GPL V2,
BusyBox R1.13.4 <http://www.busybox.net/>, licensed under GPL V2,
Samba r3.0.25a <http://samba.org/samba/>, licensed under GPL V2,
Wireless Tools for Linux v29 <http://www.hpl.hp.com/personal/Jean_Tourrilhes/
Linux/Tools.html>, licensed under GPL V2,
NTFS-3G driver r2009.11.14 <http://www.tuxera.com/community/>, licensed
under GPL V2,
Das U-Boot r1.1.6 <http://www.denx.de/wiki/U-Boot>, with exclusions for user
programs.
NOTE! This copyright does *not* cover the so-called "standalone"
applications that use U-Boot services by means of the jump table
provided by U-Boot exactly for this purpose - this is merely
considered normal use of U-Boot, and does *not* fall under the
heading of "derived work".
Page 77

The header les "include/image.h" and "include/asm-*/u-boot.h"
dene interfaces to U-Boot. Including these (unmodied) header
les in another le is considered normal use of U-Boot, and does
*not* fall under the heading of "derived work".
Also note that the GPL below is copyrighted by the Free Software
Foundation, but the instance of code that it refers to (the U-Boot
source code) is copyrighted by me and others who actually wrote it.
-- Wolfgang Denk
Linux kernel release 2.6.xx <http://kernel.org/>, licensed under GPL V2 with
exclusions for user programs.
NOTE! This copyright does *not* cover user programs that use kernel
services by normal system calls - this is merely considered normal use
of the kernel, and does *not* fall under the heading of "derived work".
Also note that the GPL below is copyrighted by the Free Software
Foundation, but the instance of code that it refers to (the Linux
kernel) is copyrighted by me and others who actually wrote it.
Also note that the only valid version of the GPL as far as the kernel
is concerned is _this_ particular version of the license (ie v2, not
v2.2 or v3.x or whatever), unless explicitly otherwise stated.
Linus Torvalds
GPL V2
GNU GENERAL PUBLIC LICENSE
Version 2, June 1991
Copyright (C) 1989, 1991 Free Software Foundation, Inc.
51 Franklin St, Fifth Floor, Boston, MA 02110-1301 USA
Everyone is permitted to copy and distribute verbatim copies
Page 78

of this license document, but changing it is not allowed.
Preamble
The licenses for most software are designed to take away your
freedom to share and change it. By contrast, the GNU General Public
License is intended to guarantee your freedom to share and change free
software--to make sure the software is free for all its users. This
General Public License applies to most of the Free Software
Foundation's software and to any other program whose authors commit to
using it. (Some other Free Software Foundation software is covered by
the GNU Library General Public License instead.) You can apply it to
your programs, too.
When we speak of free software, we are referring to freedom, not
price. Our General Public Licenses are designed to make sure that you
have the freedom to distribute copies of free software (and charge for
this service if you wish), that you receive source code or can get it
if you want it, that you can change the software or use pieces of it
in new free programs; and that you know you can do these things.
To protect your rights, we need to make restrictions that forbid
anyone to deny you these rights or to ask you to surrender the rights.
These restrictions translate to cer tain responsibilities for you if you
distribute copies of the software, or if you modify it.
For example, if you distribute copies of such a program, whether
gratis or for a fee, you must give the recipients all the rights that
you have. You must make sure that they, too, receive or can get the
source code. And you must show them these terms so they know their
rights.
We protect your rights with two steps: (1) copyright the software, and
(2) offer you this license which gives you legal permission to copy,
distribute and/or modify the software.
Also, for each author's protection and ours, we want to make certain
that everyone understands that there is no warranty for this free
Page 79

software. If the software is modied by someone else and passed on, we
want its recipients to know that what they have is not the original, so
that any problems introduced by others will not reect on the original
authors' reputations.
Finally, any free program is threatened constantly by software
patents. We wish to avoid the danger that redistributors of a free
program will individually obtain patent licenses, in effect making the
program proprietary. To prevent this, we have made it clear that any
patent must be licensed for everyone's free use or not licensed at all.
The precise terms and conditions for copying, distribution and
modication follow.
GNU GENERAL PUBLIC LICENSE
TERMS AND CONDITIONS FOR COPYING, DISTRIBUTION AND
MODIFICATION
0. This License applies to any program or other work which contains
a notice placed by the copyright holder saying it may be distributed
under the terms of this General Public License. The "Program", below,
refers to any such program or work, and a "work based on the Program"
means either the Program or any derivative work under copyright law:
that is to say, a work containing the Program or a portion of it,
either verbatim or with modications and/or translated into another
language. (Hereinafter, translation is included without limitation in
the term "modication".) Each licensee is addressed as "you".
Activities other than copying, distribution and modication are not
covered by this License; they are outside its scope. The act of
running the Program is not restricted, and the output from the Program
is covered only if its contents constitute a work based on the
Program (independent of having been made by running the Program).
Whether that is true depends on what the Program does.
1. You may copy and distribute verbatim copies of the Program's
source code as you receive it, in any medium, provided that you
conspicuously and appropriately publish on each copy an appropriate
Page 80

copyright notice and disclaimer of warranty; keep intact all the
notices that refer to this License and to the absence of any warranty;
and give any other recipients of the Program a copy of this License
along with the Program.
You may charge a fee for the physical act of transferring a copy, and
you may at your option offer warranty protection in exchange for a fee.
2. You may modify your copy or copies of the Program or any portion
of it, thus forming a work based on the Program, and copy and
distribute such modications or work under the terms of Section 1
above, provided that you also meet all of these conditions:
a) You must cause the modied les to carry prominent notices
stating that you changed the les and the date of any change.
b) You must cause any work that you distribute or publish, that in
whole or in part contains or is derived from the Program or any
part thereof, to be licensed as a whole at no charge to all third
parties under the terms of this License.
c) If the modied program normally reads commands interactively
when run, you must cause it, when started running for such
interactive use in the most ordinary way, to print or display an
announcement including an appropriate copyright notice and a
notice that there is no warranty (or else, saying that you provide
a warranty) and that users may redistribute the program under
these conditions, and telling the user how to view a copy of this
License. (Exception: if the Program itself is interactive but
does not normally print such an announcement, your work based on
the Program is not required to print an announcement.)
These requirements apply to the modied work as a whole. If
identiable sections of that work are not derived from the Program,
and can be reasonably considered independent and separate works in
themselves, then this License, and its terms, do not apply to those
sections when you distribute them as separate works. But when you
distribute the same sections as part of a whole which is a work based
Page 81

on the Program, the distribution of the whole must be on the terms of
this License, whose permissions for other licensees extend to the
entire whole, and thus to each and every part regardless of who wrote it.
Thus, it is not the intent of this section to claim rights or contest
your rights to work written entirely by you; rather, the intent is to
exercise the right to control the distribution of derivative or
collective works based on the Program.
In addition, mere aggregation of another work not based on the Program
with the Program (or with a work based on the Program) on a volume of
a storage or distribution medium does not bring the other work under
the scope of this License.
3. You may copy and distribute the Program (or a work based on it,
under Section 2) in object code or executable form under the terms of
Sections 1 and 2 above provided that you also do one of the following:
a) Accompany it with the complete corresponding machine-readable
source code, which must be distributed under the terms of Sections
1 and 2 above on a medium customarily used for software interchange; or,
b) Accompany it with a written offer, valid for at least three
years, to give any third party, for a charge no more than your
cost of physically performing source distribution, a complete
machine-readable copy of the corresponding source code, to be
distributed under the terms of Sections 1 and 2 above on a medium
customarily used for software interchange; or,
c) Accompany it with the information you received as to the offer
to distribute corresponding source code. (This alternative is
allowed only for noncommercial distribution and only if you
received the program in object code or executable form with such
an offer, in accord with Subsection b above.)
The source code for a work means the preferred form of the work for
making modications to it. For an executable work, complete source
code means all the source code for all modules it contains, plus any
Page 82

associated interface denition les, plus the scripts used to
control compilation and installation of the executable. However, as a
special exception, the source code distributed need not include
anything that is normally distributed (in either source or binary
form) with the major components (compiler, kernel, and so on) of the
operating system on which the executable runs, unless that component
itself accompanies the executable.
If distribution of executable or object code is made by offering
access to copy from a designated place, then offering equivalent
access to copy the source code from the same place counts as
distribution of the source code, even though third parties are not
compelled to copy the source along with the object code.
4. You may not copy, modify, sublicense, or distribute the Program
except as expressly provided under this License. Any attempt
otherwise to copy, modify, sublicense or distribute the Program is
void, and will automatically terminate your rights under this License.
However, parties who have received copies, or rights, from you under
this License will not have their licenses terminated so long as such
parties remain in full compliance.
5. You are not required to accept this License, since you have not
signed it. However, nothing else grants you permission to modify or
distribute the Program or its derivative works. These actions are
prohibited by law if you do not accept this License. Therefore, by
modifying or distributing the Program (or any work based on the
Program), you indicate your acceptance of this License to do so, and
all its terms and conditions for copying, distributing or modifying
the Program or works based on it.
6. Each time you redistribute the Program (or any work based on the
Program), the recipient automatically receives a license from the
original licensor to copy, distribute or modify the Program subject to
these terms and conditions. You may not impose any further
restrictions on the recipients' exercise of the rights granted herein.
You are not responsible for enforcing compliance by third parties to
this License.
Page 83

7. If, as a consequence of a court judgment or allegation of patent
infringement or for any other reason (not limited to patent issues),
conditions are imposed on you (whether by court order, agreement or
otherwise) that contradict the conditions of this License, they do not
excuse you from the conditions of this License. If you cannot
distribute so as to satisfy simultaneously your obligations under this
License and any other pertinent obligations, then as a consequence you
may not distribute the Program at all. For example, if a patent
license would not permit royalty-free redistribution of the Program by
all those who receive copies directly or indirectly through you, then
the only way you could satisfy both it and this License would be to
refrain entirely from distribution of the Program.
If any portion of this section is held invalid or unenforceable under
any particular circumstance, the balance of the section is intended to
apply and the section as a whole is intended to apply in other
circumstances.
It is not the purpose of this section to induce you to infringe any
patents or other property right claims or to contest validity of any
such claims; this section has the sole purpose of protecting the
integrity of the free software distribution system, which is
implemented by public license practices. Many people have made
generous contributions to the wide range of software distributed
through that system in reliance on consistent application of that
system; it is up to the author/donor to decide if he or she is willing
to distribute software through any other system and a licensee cannot
impose that choice.
This section is intended to make thoroughly clear what is believed to
be a consequence of the rest of this License.
8. If the distribution and/or use of the Program is restricted in
certain countries either by patents or by copyrighted interfaces, the
original copyright holder who places the Program under this License
may add an explicit geographical distribution limitation excluding
those countries, so that distribution is permitted only in or among
Page 84

countries not thus excluded. In such case, this License incorporates
the limitation as if written in the body of this License.
9. The Free Software Foundation may publish revised and/or new versions
of the General Public License from time to time. Such new versions will
be similar in spirit to the present version, but may differ in detail to
address new problems or concerns.
Each version is given a distinguishing version number. If the Program
species a version number of this License which applies to it and "any
later version", you have the option of following the terms and conditions
either of that version or of any later version published by the Free
Software Foundation. If the Program does not specify a version number of
this License, you may choose any version ever published by the Free Software
Foundation.
10. If you wish to incorporate parts of the Program into other free
programs whose distribution conditions are different, write to the author
to ask for permission. For software which is copyrighted by the Free
Software Foundation, write to the Free Software Foundation; we sometimes
make exceptions for this. Our decision will be guided by the two goals
of preserving the free status of all derivatives of our free software and
of promoting the sharing and reuse of software generally.
NO WARRANTY
11. BECAUSE THE PROGRAM IS LICENSED FREE OF CHARGE, THERE IS
NO WARRANTY FOR THE PROGRAM, TO THE EXTENT PERMITTED BY
APPLICABLE LAW. EXCEPT WHEN OTHERWISE STATED IN WRITING
THE COPYRIGHT HOLDERS AND/OR OTHER PARTIES PROVIDE THE
PROGRAM "AS IS" WITHOUT WARRANTY OF ANY KIND, EITHER
EXPRESSED OR IMPLIED, INCLUDING, BUT NOT LIMITED TO, THE IMPLIED
WARRANTIES OF MERCHANTABILITY AND FITNESS FOR A PARTICULAR
PURPOSE. THE ENTIRE RISK AS TO THE QUALITY AND PERFORMANCE
OF THE PROGRAM IS WITH YOU. SHOULD THE PROGRAM PROVE
DEFECTIVE, YOU ASSUME THE COST OF ALL NECESSARY SERVICING,
REPAIR OR CORRECTION.
Page 85

12. IN NO EVENT UNLESS REQUIRED BY APPLICABLE LAW OR AGREED
TO IN WRITING WILL ANY COPYRIGHT HOLDER, OR ANY OTHER
PARTY WHO MAY MODIFY AND/OR REDISTRIBUTE THE PROGRAM AS
PERMITTED ABOVE, BE LIABLE TO YOU FOR DAMAGES, INCLUDING ANY
GENERAL, SPECIAL, INCIDENTAL OR CONSEQUENTIAL DAMAGES
ARISING OUT OF THE USE OR INABILITY TO USE THE PROGRAM
(INCLUDING BUT NOT LIMITED TO LOSS OF DATA OR DATA BEING
RENDERED INACCURATE OR LOSSES SUSTAINED BY YOU OR THIRD
PARTIES OR A FAILURE OF THE PROGRAM TO OPERATE WITH ANY
OTHER PROGRAMS), EVEN IF SUCH HOLDER OR OTHER PARTY HAS
BEEN ADVISED OF THE POSSIBILITY OF SUCH DAMAGES.
END OF TERMS AND CONDITIONS
How to Apply These Terms to Your New Programs
If you develop a new program, and you want it to be of the greatest
possible use to the public, the best way to achieve this is to make it
free software which everyone can redistribute and change under these terms.
To do so, attach the following notices to the program. It is safest
to attach them to the start of each source le to most effectively
convey the exclusion of warranty; and each le should have at least
the "copyright" line and a pointer to where the full notice is found.
<one line to give the program's name and a brief idea of what it does.>
Copyright (C) <year> <name of author>
This program is free software; you can redistribute it and/or modify
it under the terms of the GNU General Public License as published by
the Free Software Foundation; either version 2 of the License, or
(at your option) any later version.
This program is distributed in the hope that it will be useful,
but WITHOUT ANY WARRANTY; without even the implied warranty of
MERCHANTABILITY or FITNESS FOR A PARTICULAR PURPOSE. See the
GNU General Public License for more details.
Page 86

You should have received a copy of the GNU General Public License
along with this program; if not, write to the Free Software
Foundation, Inc., 51 Franklin St, Fifth Floor, Boston, MA 02110-1301 USA
Also add information on how to contact you by electronic and paper mail.
If the program is interactive, make it output a short notice like this
when it starts in an interactive mode:
Gnomovision version 69, Copyright (C) year name of author
Gnomovision comes with ABSOLUTELY NO WARRANTY; for details type
`show w'.
This is free software, and you are welcome to redistribute it
under certain conditions; type `show c' for details.
The hypothetical commands `show w' and `show c' should show the
appropriate parts of the General Public License. Of course, the commands you
use may be called something other than `show w' and `show c'; they could
even be mouse-clicks or menu items--whatever suits your program.
You should also get your employer (if you work as a programmer) or your
school, if any, to sign a "copyright disclaimer" for the program, if
necessary. Here is a sample; alter the names:
Yoyodyne, Inc., hereby disclaims all copyright interest in the program
`Gnomovision' (which makes passes at compilers) written by James Hacker.
<signature of Ty Coon>, 1 April 1989
Ty Coon, President of Vice
This General Public License does not permit incorporating your program into
proprietary programs. If your program is a subroutine library, you may
consider it more useful to permit linking proprietary applications with the
library. If this is what you want to do, use the GNU Library General
Public License instead of this License.
Page 87

uClibc r0.9 <http://www.uclibc.org/>, , licensed under LGPL V2,
LGPL V2
GNU LIBRARY GENERAL PUBLIC LICENSE
Version 2, June 1991
Copyright (C) 1991 Free Software Foundation, Inc.
675 Mass Ave, Cambridge, MA 02139, USA
Everyone is permitted to copy and distribute verbatim copies
of this license document, but changing it is not allowed.
[This is the rst released version of the library GPL. It is
numbered 2 because it goes with version 2 of the ordinary GPL.]
Preamble
The licenses for most software are designed to take away your
freedom to share and change it. By contrast, the GNU General Public
Licenses are intended to guarantee your freedom to share and change
free software--to make sure the software is free for all its users.
This license, the Library General Public License, applies to some
specially designated Free Software Foundation software, and to any
other libraries whose authors decide to use it. You can use it for
your libraries, too.
When we speak of free software, we are referring to freedom, not
price. Our General Public Licenses are designed to make sure that you
have the freedom to distribute copies of free software (and charge for
this service if you wish), that you receive source code or can get it
if you want it, that you can change the software or use pieces of it
in new free programs; and that you know you can do these things.
To protect your rights, we need to make restrictions that forbid
Page 88

anyone to deny you these rights or to ask you to surrender the rights.
These restrictions translate to cer tain responsibilities for you if
you distribute copies of the library, or if you modify it.
For example, if you distribute copies of the librar y, whether gratis
or for a fee, you must give the recipients all the rights that we gave
you. You must make sure that they, too, receive or can get the source
code. If you link a program with the library, you must provide
complete object les to the recipients so that they can relink them
with the library, after making changes to the library and recompiling
it. And you must show them these terms so they know their rights.
Our method of protecting your rights has two steps: (1) copyright
the library, and (2) offer you this license which gives you legal
permission to copy, distribute and/or modify the library.
Also, for each distributor's protection, we want to make certain
that everyone understands that there is no warranty for this free
library. If the library is modied by someone else and passed on, we
want its recipients to know that what they have is not the original
version, so that any problems introduced by others will not reect on
the original authors' reputations.
Finally, any free program is threatened constantly by software
patents. We wish to avoid the danger that companies distributing free
software will individually obtain patent licenses, thus in effect
transforming the program into proprietary software. To prevent this,
we have made it clear that any patent must be licensed for everyone's
free use or not licensed at all.
Most GNU software, including some libraries, is covered by the ordinary
GNU General Public License, which was designed for utility programs. This
license, the GNU Library General Public License, applies to certain
designated libraries. This license is quite different from the ordinary
one; be sure to read it in full, and don't assume that anything in it is
the same as in the ordinary license.
The reason we have a separate public license for some libraries is that
Page 89

they blur the distinction we usually make between modifying or adding to a
program and simply using it. Linking a program with a library, without
changing the library, is in some sense simply using the library, and is
analogous to running a utility program or application program. However, in
a textual and legal sense, the linked executable is a combined work, a
derivative of the original library, and the ordinary General Public License
treats it as such.
Because of this blurred distinction, using the ordinary General
Public License for libraries did not effectively promote software
sharing, because most developers did not use the libraries. We
concluded that weaker conditions might promote sharing better.
However, unrestricted linking of non-free programs would deprive the
users of those programs of all benet from the free status of the
libraries themselves. This Library General Public License is intended to
permit developers of non-free programs to use free libraries, while
preserving your freedom as a user of such programs to change the free
libraries that are incorporated in them. (We have not seen how to achieve
this as regards changes in header les, but we have achieved it as regards
changes in the actual functions of the Library.) The hope is that this
will lead to faster development of free libraries.
The precise terms and conditions for copying, distribution and
modication follow. Pay close attention to the difference between a
"work based on the library" and a "work that uses the library". The
former contains code derived from the library, while the latter only
works together with the library.
Note that it is possible for a library to be covered by the ordinary
General Public License rather than by this special one.
GNU LIBRARY GENERAL PUBLIC LICENSE
TERMS AND CONDITIONS FOR COPYING, DISTRIBUTION AND
MODIFICATION
0. This License Agreement applies to any software library which
contains a notice placed by the copyright holder or other authorized
Page 90

party saying it may be distributed under the terms of this Librar y
General Public License (also called "this License"). Each licensee is
addressed as "you".
A "librar y" means a collection of software functions and/or data
prepared so as to be conveniently linked with application programs
(which use some of those functions and data) to form executables.
The "Library", below, refers to any such software library or work
which has been distributed under these terms. A "work based on the
Library" means either the Library or any derivative work under
copyright law: that is to say, a work containing the Library or a
portion of it, either verbatim or with modications and/or translated
straightforwardly into another language. (Hereinafter, translation is
included without limitation in the term "modication".)
"Source code" for a work means the preferred form of the work for
making modications to it. For a library, complete source code means
all the source code for all modules it contains, plus any associated
interface denition les, plus the scripts used to control compilation
and installation of the library.
Activities other than copying, distribution and modication are not
covered by this License; they are outside its scope. The act of
running a program using the Library is not restricted, and output from
such a program is covered only if its contents constitute a work based
on the Library (independent of the use of the Library in a tool for
writing it). Whether that is true depends on what the Library does
and what the program that uses the Library does.
1. You may copy and distribute verbatim copies of the Library's
complete source code as you receive it, in any medium, provided that
you conspicuously and appropriately publish on each copy an
appropriate copyright notice and disclaimer of warranty; keep intact
all the notices that refer to this License and to the absence of any
warranty; and distribute a copy of this License along with the
Library.
Page 91

You may charge a fee for the physical act of transferring a copy,
and you may at your option offer warranty protection in exchange for a
fee.
2. You may modify your copy or copies of the Library or any portion
of it, thus forming a work based on the Library, and copy and
distribute such modications or work under the terms of Section 1
above, provided that you also meet all of these conditions:
a) The modied work must itself be a software library.
b) You must cause the les modied to carry prominent notices
stating that you changed the les and the date of any change.
c) You must cause the whole of the work to be licensed at no
charge to all third parties under the terms of this License.
d) If a facility in the modied Library refers to a function or a
table of data to be supplied by an application program that uses
the facility, other than as an argument passed when the facility
is invoked, then you must make a good faith effort to ensure that,
in the event an application does not supply such function or
table, the facility still operates, and performs whatever part of
its purpose remains meaningful.
(For example, a function in a library to compute square roots has
a purpose that is entirely well-dened independent of the
application. Therefore, Subsection 2d requires that any
application-supplied function or table used by this function must
be optional: if the application does not supply it, the square
root function must still compute square roots.)
These requirements apply to the modied work as a whole. If
identiable sections of that work are not derived from the Library,
and can be reasonably considered independent and separate works in
themselves, then this License, and its terms, do not apply to those
sections when you distribute them as separate works. But when you
distribute the same sections as part of a whole which is a work based
Page 92

on the Library, the distribution of the whole must be on the terms of
this License, whose permissions for other licensees extend to the
entire whole, and thus to each and every part regardless of who wrote
it.
Thus, it is not the intent of this section to claim rights or contest
your rights to work written entirely by you; rather, the intent is to
exercise the right to control the distribution of derivative or
collective works based on the Library.
In addition, mere aggregation of another work not based on the Librar y
with the Library (or with a work based on the Library) on a volume of
a storage or distribution medium does not bring the other work under
the scope of this License.
3. You may opt to apply the terms of the ordinary GNU General Public
License instead of this License to a given copy of the Library. To do
this, you must alter all the notices that refer to this License, so
that they refer to the ordinary GNU General Public License, version 2,
instead of to this License. (If a newer version than version 2 of the
ordinary GNU General Public License has appeared, then you can specify
that version instead if you wish.) Do not make any other change in
these notices.
Once this change is made in a given copy, it is irreversible for
that copy, so the ordinary GNU General Public License applies to all
subsequent copies and derivative works made from that copy.
This option is useful when you wish to copy part of the code of
the Library into a program that is not a library.
4. You may copy and distribute the Library (or a portion or
derivative of it, under Section 2) in object code or executable form
under the terms of Sections 1 and 2 above provided that you accompany
it with the complete corresponding machine-readable source code, which
must be distributed under the terms of Sections 1 and 2 above on a
medium customarily used for software interchange.
Page 93

If distribution of object code is made by offering access to copy
from a designated place, then offering equivalent access to copy the
source code from the same place satises the requirement to
distribute the source code, even though third parties are not
compelled to copy the source along with the object code.
5. A program that contains no derivative of any portion of the
Library, but is designed to work with the Library by being compiled or
linked with it, is called a "work that uses the Library". Such a
work, in isolation, is not a derivative work of the Library, and
therefore falls outside the scope of this License.
However, linking a "work that uses the Library" with the Library
creates an executable that is a derivative of the Library (because it
contains portions of the Library), rather than a "work that uses the
library". The executable is therefore covered by this License.
Section 6 states terms for distribution of such executables.
When a "work that uses the Library" uses material from a header le
that is part of the Library, the object code for the work may be a
derivative work of the Library even though the source code is not.
Whether this is true is especially signicant if the work can be
linked without the Library, or if the work is itself a library. The
threshold for this to be true is not precisely dened by law.
If such an object le uses only numerical parameters, data
structure layouts and accessors, and small macros and small inline
functions (ten lines or less in length), then the use of the object
le is unrestricted, regardless of whether it is legally a derivative
work. (Executables containing this object code plus portions of the
Library will still fall under Section 6.)
Otherwise, if the work is a derivative of the Library, you may
distribute the object code for the work under the terms of Section 6.
Any executables containing that work also fall under Section 6,
whether or not they are linked directly with the Library itself.
Page 94

6. As an exception to the Sections above, you may also compile or
link a "work that uses the Library" with the Library to produce a
work containing portions of the Library, and distribute that work
under terms of your choice, provided that the terms permit
modication of the work for the customer's own use and reverse
engineering for debugging such modications.
You must give prominent notice with each copy of the work that the
Library is used in it and that the Library and its use are covered by
this License. You must supply a copy of this License. If the work
during execution displays copyright notices, you must include the
copyright notice for the Library among them, as well as a reference
directing the user to the copy of this License. Also, you must do one
of these things:
a) Accompany the work with the complete corresponding
machine-readable source code for the Library including whatever
changes were used in the work (which must be distributed under
Sections 1 and 2 above); and, if the work is an executable linked
with the Library, with the complete machine-readable "work that
uses the Library", as object code and/or source code, so that the
user can modify the Library and then relink to produce a modied
executable containing the modied Library. (It is understood
that the user who changes the contents of denitions les in the
Library will not necessarily be able to recompile the application
to use the modied denitions.)
b) Accompany the work with a written offer, valid for at
least three years, to give the same user the materials
specied in Subsection 6a, above, for a charge no more
than the cost of performing this distribution.
c) If distribution of the work is made by offering access to copy
from a designated place, offer equivalent access to copy the above
specied materials from the same place.
d) Verify that the user has already received a copy of these
materials or that you have already sent this user a copy.
Page 95

For an executable, the required form of the "work that uses the
Library" must include any data and utility programs needed for
reproducing the executable from it. However, as a special exception,
the source code distributed need not include anything that is normally
distributed (in either source or binary form) with the major
components (compiler, kernel, and so on) of the operating system on
which the executable runs, unless that component itself accompanies
the executable.
It may happen that this requirement contradicts the license
restrictions of other proprietary libraries that do not normally
accompany the operating system. Such a contradiction means you cannot
use both them and the Library together in an executable that you
distribute.
7. You may place library facilities that are a work based on the
Library side-by-side in a single library together with other library
facilities not covered by this License, and distribute such a combined
library, provided that the separate distribution of the work based on
the Library and of the other library facilities is otherwise
permitted, and provided that you do these two things:
a) Accompany the combined library with a copy of the same work
based on the Library, uncombined with any other library
facilities. This must be distributed under the terms of the
Sections above.
b) Give prominent notice with the combined library of the fact
that part of it is a work based on the Library, and explaining
where to nd the accompanying uncombined form of the same work.
8. You may not copy, modify, sublicense, link with, or distribute
the Library except as expressly provided under this License. Any
attempt otherwise to copy, modify, sublicense, link with, or
distribute the Library is void, and will automatically terminate your
rights under this License. However, parties who have received copies,
or rights, from you under this License will not have their licenses
Page 96

terminated so long as such parties remain in full compliance.
9. You are not required to accept this License, since you have not
signed it. However, nothing else grants you permission to modify or
distribute the Library or its derivative works. These actions are
prohibited by law if you do not accept this License. Therefore, by
modifying or distributing the Library (or any work based on the
Library), you indicate your acceptance of this License to do so, and
all its terms and conditions for copying, distributing or modifying
the Library or works based on it.
10. Each time you redistribute the Library (or any work based on the
Library), the recipient automatically receives a license from the
original licensor to copy, distribute, link with or modify the Library
subject to these terms and conditions. You may not impose any further
restrictions on the recipients' exercise of the rights granted herein.
You are not responsible for enforcing compliance by third parties to
this License.
11. If, as a consequence of a court judgment or allegation of patent
infringement or for any other reason (not limited to patent issues),
conditions are imposed on you (whether by court order, agreement or
otherwise) that contradict the conditions of this License, they do not
excuse you from the conditions of this License. If you cannot
distribute so as to satisfy simultaneously your obligations under this
License and any other pertinent obligations, then as a consequence you
may not distribute the Library at all. For example, if a patent
license would not permit royalty-free redistribution of the Library by
all those who receive copies directly or indirectly through you, then
the only way you could satisfy both it and this License would be to
refrain entirely from distribution of the Librar y.
If any portion of this section is held invalid or unenforceable under any
particular circumstance, the balance of the section is intended to apply,
and the section as a whole is intended to apply in other circumstances.
It is not the purpose of this section to induce you to infringe any
patents or other property right claims or to contest validity of any
Page 97

such claims; this section has the sole purpose of protecting the
integrity of the free software distribution system which is
implemented by public license practices. Many people have made
generous contributions to the wide range of software distributed
through that system in reliance on consistent application of that
system; it is up to the author/donor to decide if he or she is willing
to distribute software through any other system and a licensee cannot
impose that choice.
This section is intended to make thoroughly clear what is believed to
be a consequence of the rest of this License.
12. If the distribution and/or use of the Library is restricted in
certain countries either by patents or by copyrighted interfaces, the
original copyright holder who places the Library under this License may add
an explicit geographical distribution limitation excluding those countries,
so that distribution is permitted only in or among countries not thus
excluded. In such case, this License incorporates the limitation as if
written in the body of this License.
13. The Free Software Foundation may publish revised and/or new
versions of the Library General Public License from time to time.
Such new versions will be similar in spirit to the present version,
but may differ in detail to address new problems or concerns.
Each version is given a distinguishing version number. If the Librar y
species a version number of this License which applies to it and
"any later version", you have the option of following the terms and
conditions either of that version or of any later version published by
the Free Software Foundation. If the Library does not specify a
license version number, you may choose any version ever published by
the Free Software Foundation.
14. If you wish to incorporate parts of the Library into other free
programs whose distribution conditions are incompatible with these,
write to the author to ask for permission. For software which is
copyrighted by the Free Software Foundation, write to the Free
Software Foundation; we sometimes make exceptions for this. Our
Page 98

decision will be guided by the two goals of preserving the free status
of all derivatives of our free software and of promoting the sharing
and reuse of software generally.
NO WARRANTY
15. BECAUSE THE LIBRARY IS LICENSED FREE OF CHARGE, THERE IS NO
WARRANTY FOR THE LIBRARY, TO THE EXTENT PERMITTED BY
APPLICABLE LAW. EXCEPT WHEN OTHERWISE STATED IN WRITING THE
COPYRIGHT HOLDERS AND/OR OTHER PARTIES PROVIDE THE LIBRARY
"AS IS" WITHOUT WARRANTY OF ANY KIND, EITHER EXPRESSED OR
IMPLIED, INCLUDING, BUT NOT LIMITED TO, THE IMPLIED WARRANTIES
OF MERCHANTABILITY AND FITNESS FOR A PARTICULAR PURPOSE.
THE ENTIRE RISK AS TO THE QUALITY AND PERFORMANCE OF THE
LIBRARY IS WITH YOU. SHOULD THE LIBRARY PROVE DEFECTIVE, YOU
ASSUME THE COST OF ALL NECESSARY SERVICING, REPAIR OR
CORRECTION.
16. IN NO EVENT UNLESS REQUIRED BY APPLICABLE LAW OR AGREED
TO IN WRITING WILL ANY COPYRIGHT HOLDER, OR ANY OTHER
PARTY WHO MAY MODIFY AND/OR REDISTRIBUTE THE LIBRARY AS
PERMITTED ABOVE, BE LIABLE TO YOU FOR DAMAGES, INCLUDING ANY
GENERAL, SPECIAL, INCIDENTAL OR CONSEQUENTIAL DAMAGES
ARISING OUT OF THE USE OR INABILITY TO USE THE LIBRARY
(INCLUDING BUT NOT LIMITED TO LOSS OF DATA OR DATA BEING
RENDERED INACCURATE OR LOSSES SUSTAINED BY YOU OR THIRD
PARTIES OR A FAILURE OF THE LIBRARY TO OPERATE WITH ANY OTHER
SOFTWARE), EVEN IF SUCH HOLDER OR OTHER PARTY HAS BEEN
ADVISED OF THE POSSIBILITY OF SUCH DAMAGES.
END OF TERMS AND CONDITIONS
Appendix: How to Apply These Terms to Your New Libraries
If you develop a new library, and you want it to be of the greatest
possible use to the public, we recommend making it free software that
everyone can redistribute and change. You can do so by permitting
redistribution under these terms (or, alternatively, under the terms of the
Page 99

ordinary General Public License).
To apply these terms, attach the following notices to the library. It is
safest to attach them to the start of each source le to most effectively
convey the exclusion of warranty; and each le should have at least the
"copyright" line and a pointer to where the full notice is found.
<one line to give the library's name and a brief idea of what it does.>
Copyright (C) <year> <name of author>
This library is free software; you can redistribute it and/or
modify it under the terms of the GNU Library General Public
License as published by the Free Software Foundation; either
version 2 of the License, or (at your option) any later version.
This library is distributed in the hope that it will be useful,
but WITHOUT ANY WARRANTY; without even the implied warranty of
MERCHANTABILITY or FITNESS FOR A PARTICULAR PURPOSE. See the
GNU Library General Public License for more details.
You should have received a copy of the GNU Library General Public
License along with this library; if not, write to the Free
Software Foundation, Inc., 675 Mass Ave, Cambridge, MA 02139, USA.
Also add information on how to contact you by electronic and paper mail.
You should also get your employer (if you work as a programmer) or your
school, if any, to sign a "copyright disclaimer" for the library, if
necessary. Here is a sample; alter the names:
Yoyodyne, Inc., hereby disclaims all copyright interest in the
library `Frob' (a library for tweaking knobs) written by James Random Hacker.
<signature of Ty Coon>, 1 April 1990
Ty Coon, President of Vice
That's all there is to it!
Page 100

Curl and libcurl 7.19.7 <http://curl.haxx.se/>, licensed under a MIT/X derivate
license,
COPYRIGHT AND PERMISSION NOTICE
Copyright (c) 1996 - 2009, Daniel Stenberg, <daniel@haxx.se>.
All rights reserved.
Permission to use, copy, modify, and distribute this software for any purpose
with or without fee is hereby granted, provided that the above copyright
notice and this permission notice appear in all copies.
THE SOFTWARE IS PROVIDED "AS IS", WITHOUT WARRANTY OF ANY
KIND, EXPRESS OR IMPLIED, INCLUDING BUT NOT LIMITED TO THE
WARRANTIES OF MERCHANTABILITY, FITNESS FOR A PARTICULAR
PURPOSE AND NONINFRINGEMENT OF THIRD PARTY RIGHTS. IN NO
EVENT SHALL THE AUTHORS OR COPYRIGHT HOLDERS BE LIABLE FOR
ANY CLAIM, DAMAGES OR OTHER LIABILITY, WHETHER IN AN ACTION
OF CONTRACT, TORT OR OTHERWISE, ARISING FROM, OUT OF OR IN
CONNECTION WITH THE SOFTWARE OR THE USE OR OTHER
DEALINGS IN THE SOFTWARE.
Except as contained in this notice, the name of a copyright holder shall not
be used in advertising or otherwise to promote the sale, use or other dealings
in this Software without prior written authorization of the copyright holder.
OpenSSL 1.0.0 <http://www.openssl.org/>, licensed under both OpenSSL
License and Original SSLeay license,
OpenSSL License
 Loading...