

Philips MCI730 05 User Manual
Register your product and get support at
www.philips.com/welcome
MCi730
EN User manual

Philips Consumer Lifestyle
_
_
Philips Consumer Lifystyle AMB 544-9056
HK-1014-MCi730 2010
........................................................ ...........................................................................
(Report No. / Numéro du Rapport) (Year in which the CE mark is affixed / Année au cours
de laquelle le marquage CE a été apposé)
EC DECLARATION OF CONFORMITY
(DECLARATION DE CONFORMITE CE)
We / Nous, PHILIPS CONSUMER LIFESTYLE B.V.
(Name / Nom de l’entreprise)
TUSSENDIEPEN 4, 9206 AD DRACHTEN, THE NETHERLANDS
(address / adresse)
Declare under our responsibility that the electrical product(s):
(Déclarons sous notre propre responsabilité que l e(s) produit(s) électrique(s):)
Philips........................................................... ....................MCi730/12, /05...........
(brand name, nom de la marque) (Type version or model, référence ou modèle)
Wi-Fi Component Hi-Fi System
..............................................................................................
(
product description, description du produit)
To which this declaration relates is in conformity with the following harmonized standards:
(Auquel cette déclaration se rapporte, est conf orme aux normes harmonisées suivantes)
(title, number and date of issue of the standard / titre, numéro et date de parution de la norme)
EN62311 : 2008 EN62301 : 2005
EN55020 : 2007 EN55013 : 2001 + A1:2003 + A2:2006
EN55022 : 2006 + A1:2007 EN55024 : 1998 + A1:2001 + A2:2003
EN301489-1 V1.8.1. : 2008 EN301489-17 V1.3.2. : 2008
EN300328 V1.7.1 :2006 EN60065 : 2002 + A1:2006 +A11:2008
Following the provisions of :
(Conformément aux exigences essentielles et autres dispositions perti nentes de:)
1999/5/EC (R&TTE Directive)
2004/108/EC (EMC Directive)
2009/125/EC (ErP Directive) – EC/1275/2008
And are produced under a quality scheme at least in conformity with ISO 9001 or CENELEC
Permanent Documents
(Et sont fabriqués conformément à une qualité au moins conforme à la norme ISO 9001 ou aux Documents Permanents CENELEC)
The Notified Body .............. Nemko ............. performed .................CB Scheme..............
(L’Organisme Notifié) (Name and number/ nom et numéro) (a effectué) (description of intervention /
description de l’intervention)
NO56584
And issued the certificate, .................................................................
(et a délivré le certificat) (certificate number / numéro du certi ficat)
Remarks:
(Remarques:)
Frank Dethier
Leuven, April 6, 2010
Development Manager, Innovation Lab Leven
........................................................... ............................................................................................
(place,date / lieu, date)
(signature, name and function / signature, nom et fonction)

Contents
1 Important 5
Safety-Important notes for users
in the U.K. 5
Safety 5
Environmental notices 6
Recycling 7
Trademark notice 7
2 Your MCi730 8
Introduction 8
What’s in the box 8
Overview 9
Top and front view 9
Rear view 10
Remote control 11
Touch screen 12
Home screen 13
Text entry on the remote control 13
3 Prepare 15
Install batteries into the remote control 15
4 Connect 16
Connect speakers 16
Connect external audio devices 16
Connect a portable media player 16
Connect another audio system 16
Turn on/off 17
Connect power supply 17
Turn on/off 17
5 First-time setup 18
Connect to home network 18
Wireless connection: One-touch
Wi-Fi Protected Setup (WPS) 19
Wireless connection:
Enter encryption key manually 20
Wired connection 21
6 Play from home network 23
Play Internet radio stations 23
Tune to Internet radio stations 23
Edit favorite stations 23
Manage Internet radio online 24
Stream from a computer or
Network-attached storage (NAS) 27
On computers: Set up music
sharing 28
Library on the computer or NAS 28
Stream from the computer or NAS 28
7 Play from a USB mass storage
device 30
Connect a USB mass storage device 30
Play from the USB mass storage device 30
8 Play music CDs 31
Basic operations 31
Use the touch screen 31
9 Play FM radio 33
Tune to FM radio stations 33
Autostore 33
Manual tuning 33
Edit preset stations 33
Listen to FM radio 33
RDS (Radio Data System) 33
10 Play from an external audio device 34
Play from a portable media player 34
Play from another audio system 34
11 Settings 35
Sound settings 35
Dynamic Bass Boost 35
Equalizer 35
Set the volume from the external
audio device 35
English
EN
3

Display settings 35
Brightness 35
Clock settings 35
Alarm 35
Date and time 36
Network settings 37
Setup network 37
Location and time zone 37
Language 37
Device information 38
Check for software upgrades 38
Restore factory settings 38
12 Register MCi730 with Philips 39
Benets 39
Register MCi730 39
Register on the web site 39
Register on the device 39
Unregister MCi730 40
Check registration information 40
13 Maintenance 41
Cleaning 41
14 Technical data 42
15 Troubleshooting 45
4 EN

1 Important
Safety-Important notes for users in the U.K.
Mains plug
This apparatus is tted with an approved 13
Amp plug. To change a fuse in this type of plug
proceed as follows:
a Remove fuse cover and fuse.
b Fix new fuse which should be a BS1362 3
Amp, A.S.T.A. or BSI approved type.
c Ret the fuse cover.
If the tted plug is not suitable for your
socket outlets, it should be cut off and an
appropriate plug tted in its place.
If the mains plug contains a fuse, this
should have a value of 3 Amp. If a plug
without a fuse is used, the fuse at the
distribution board should not be greater
than 3 Amp.
Note: The severed plug must be disposed
off to avoid a possible shock hazard
should it be inserted into a 13 Amp
socket elsewhere.
How to connect a plug
The wires in the mains lead are coloured with
the following code: blue = neutral (N), brown
= live (L).
As these colours may not correspond with the
colour markings identifying the terminals in your
plug, proceed as follows:
Connect the blue wire to the terminal •
marked N or coloured black.
Connect the brown wire to the terminal •
marked L or coloured red.
Do not connect either wire to the earth •
terminal in the plug, marked E (or
coloured green (or green and yellow).
Before replacing the plug cover, make certain
that the cord grip is clamped over the sheath of
the lead - not simply over the two wires.
Copyright in the U.K.
Recording and playback of material may require
consent. see Copyright Act 1956 and The
performer’s Protection Acts 1958 to 1972.
) or
Safety
Information for Europe:
Know these safety symbols
The ‘exclamation mark’ calls attention to
features for which you should carefully read
the supplied literature to prevent operating
and maintenance problems.
The ‘lightening bolt’ symbol indicates
uninsulated components within the product
that can cause an electric shock.
To reduce the risk of re or electric shock,
do not expose the product to rain or
moisture and do not place any ojects lled
with liquids, such as vases, on the product.
a Read these instructions.
b Keep these instructions.
c Heed all warnings.
d Follow all instructions.
e Do not use this product near water.
f Clean only with dry cloth.
g Do not block any ventilation openings.
Install in accordance with the
manufacturer’s instructions.
h Do not remove the casing of this product.
i Only use this product indoors. Do
not expose the product to dripping /
splashing water, rain or high humidity.
j Keep this product away from direct
sunlight, naked ames or heat.
k Do not install near any heat sources such as
radiators, heat registers, stoves, or other
electrical equipment (including ampliers).
l Do not place any other electrical
equipment on the product.
m Do not place any sources of danger
on the product (e.g. objects containing
liquids, burning candles).
EN
English
5

n This product may include batteries. Please
refer to safety and disposal instructions
for batteries in this user manual.
o This product may contain lead and
mercury. Disposal of these materials
may be regulated due to environmental
considerations. Please refer to disposal
instructions in this user manual.
Caution
Use of controls or adjustments or •
performance of procedures other than herein
may result in hazardous radiation exposure or
other unsafe operation.
Warning
Never remove the casing of this apparatus. •
Never lubricate any par t of this apparatus. •
Never place this apparatus on other electrical •
equipment.
Keep this apparatus away from direc t sunlight,
•
naked ames or heat.
Never look into the laser beam inside this
•
apparatus.
Ensure that you always have easy access to the
•
power cord, plug or adaptor to disconnect this
appar atus from the power.
Where the mains plug or an appliance coupler
•
is used as the disconnect device, the disconnect
device shall remain readily operable.
Note
The type plate information is located at the •
back or at the underside of the produc t.
exposure less than a minute. The higher
decibel ranges are offered for those that may
have already experienced some hearing loss.
Sound can be deceiving. Over time your
hearing ‘comfor t level’ adapts to higher
volumes of sound. So after prolonged listening,
what sounds ‘normal’ can actually be loud and
harmful to your hearing. To guard against this,
set your volume to a safe level before your
hearing adapts and leave it there.
To establish a safe volume level:
Set your volume control at a low setting.
Slowly increase the sound until you can hear it
comfortably and clearly, without distortion.
Listen for reasonable periods of time:
Prolonged exposure to sound, even at normally
‘safe’ levels, can also cause hearing loss.
Be sure to use your equipment reasonably and
take appropriate breaks.
Be sure to observe the following guidelines
when using your headphones.
Listen at reasonable volumes for reasonable
periods of time.
Be careful not to adjust the volume as your
hearing adapts.
Do not turn up the volume so high that you
can’t hear what’s around you.
You should use caution or temporarily discontinue
use in potentially hazardous situations.
Risk of overheating! Never install this
apparatus in a conned space. Always leave
a space of at least four inches around this
apparatus for ventilation. Ensure cur tains or
other objects never cover the ventilation slots
on this apparatus.
Hearing Safety
Listen at a moderate volume:
Using headphones at a high volume can impair
your hearing. This product can produce
sounds in decibel ranges that may cause
hearing loss for a normal person, even for
6
EN
Environmental notices
This product complies with the radio
inter ference requirements of the European
Community.
This product complies with the requirement
of the 1999/5/EC directive.

Class II equipment symbol:
This symbol indicates that this product has a
double insulation system.
This apparatus includes this label:
Information about the use of batteries:
Caution
Risk of leakage: Only use the specied type of •
batteries. Do not mix new and used batteries.
Do not mix different brands of batteries.
Observe correct polarity. Remove batteries
from products that are not in use for a longer
period of time. Store batteries in a dry place.
Risk of injur y: Wear gloves when handling
•
leaking batteries. Keep batteries out of reach
of children and pets.
Risk of explosion: Do not short circuit
•
batteries. Do not expose batteries to
excessive heat. Do not throw batteries into
the re. Do not damage or disassemble
batteries. Do not recharge non-rechargeable
batteries.
English
Modications
Modications not authorized by the
manufacturer may void user’s authority
to operate this product.
Recycling
Your product is designed and manufactured
with high quality materials and components,
which can be recycled and reused.
When you see the crossed-out wheel bin
symbol attached to a product, it means the
product is covered by the European Directive
2002/96/EC:
Never dispose of your product with other
household waste. Please inform yourself about
the local rules on the separate collection of
electrical and electronic products. The correct
disposal of your old product helps prevent
potentially negative consequences on the
environment and human health.
Battery disposal information:
Your product contains batteries covered by the
European Directive 2006/66/EC, which cannot
be disposed of with normal household waste.
Please inform yourself about the local rules on
separate collection of batteries. The correct
disposal of batteries helps prevent potentially
negative consequences on the environment
and human health.
Trademark notice
Windows Media and the Windows logo are
trademarks, or registered trademarks of
Microsoft Corporation in the United States
and/or other countries.
The making of unauthorized copies of copy-
protected material, including computer
programs, les, broadcasts and sound
recordings, may be an infringement of
copyrights and constitute a criminal offence.
This equipment should not be used for such
purposes.
EN
7

2 Your MCi730
What’s in the box
Congratulations on your purchase, and
welcome to Philips! To fully benet from the
support that Philips offers, register your product
at www.philips.com/welcome.
Introduction
MCi730 can
Connect to the existing home •
network, which can consist of
computers and UPnP devices;
Connect the existing home audio •
systems and portable media players;
Connect a USB mass storage device.•
With such connections, you can
Play Internet radio stations over the •
Internet;
Play music stored on a computer/•
UPnP device;
Play music stored on a USB mass •
storage device through the speakers
on MCi730;
Play music CDs;•
Play music from an audio system/•
portable media player through the
speakers on MCi730.
The CD player on MCi730 supports these
disc/le formats:
Check and identify the contents of your
package:
Main unit•
2 speakers (with connection cables)•
Remote control with batteries•
AC power cord•
Software suite on a CD-ROM•
Quick Start Guide•
8
EN

Overview
g
f
e
d
h
i
a
j
c
b
Top and front view
1.
Press to turn on the set;
To turn off, press to switch to
active standby; or, press and hold
to switch to Eco standby.
Exit Demo mode.
2. Disc compartment
3.
USB por t for the USB mass
4. MP3-LINK
storage device
3.5mm audio input jack
for a por table media player to
play through the speakers on
MCi730
5.
3.5mm headphone jack
6. VOLUME
Turn the knob to adjust the
volume.
7.
Open or close the disc
compartment.
8. Wi-Fi antenna
9. Remote control sensor
10. LCD display with touch screen
English
EN
9

Rear view
c
a
b
f
d
e
see ‘Connect’ on page 16
1. ~ AC IN
for AC power cord
2. AUX IN R / L
Audio input sockets for an
external audio device to play
through the speakers on MCi730
3. DEMO
for the use by dealers only
4. ETHERNET
for the Ethernet cable that
connects MCi730 with home
network, if you want a wired
connection to the home network
5. FM antenna
6. LOUDSPEAKERS
for connection cables that
connect the supplied speakers
10
EN
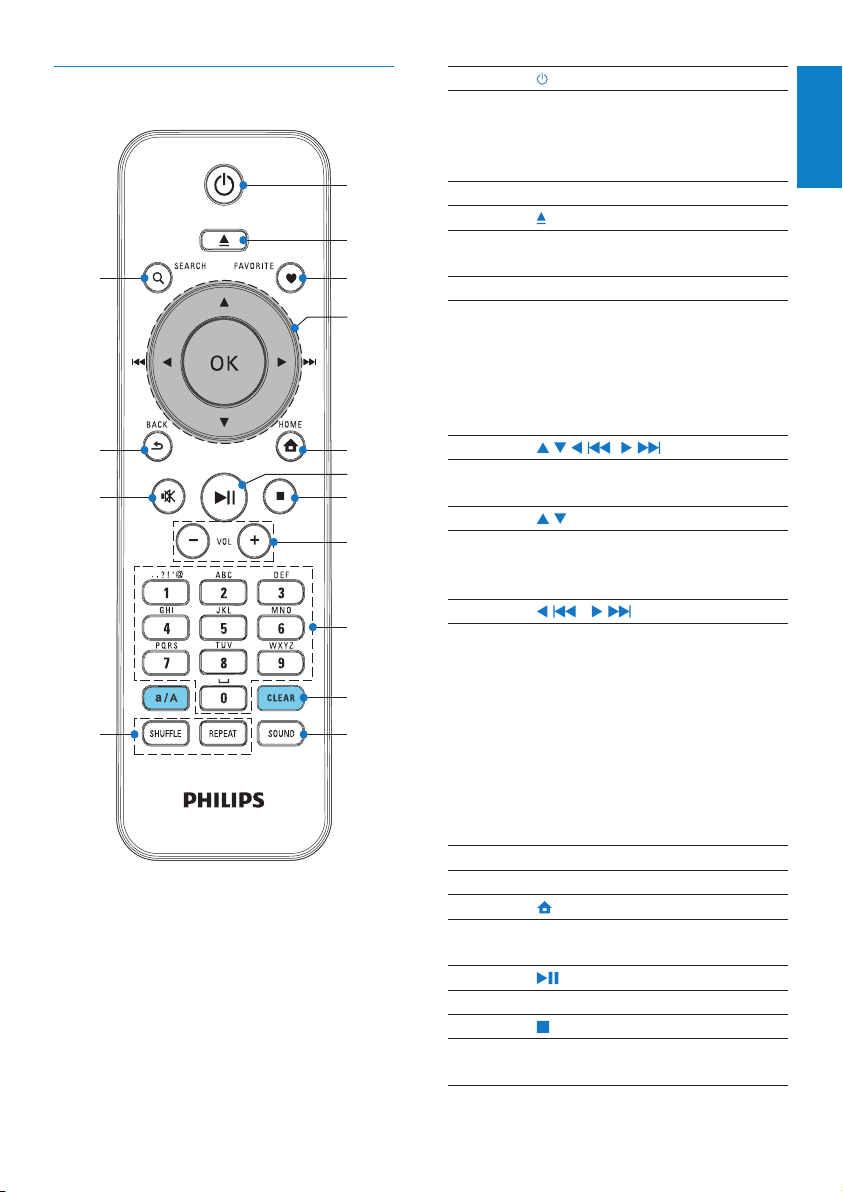
Remote control
a
b
c
d
e
g
j
i
k
o
n
m
l
h
f
1.
Press to turn on the unit;
To turn off, press to switch to
active standby; or, press and hold
to switch to Eco standby.
Exit Demo mode.
2.
Open or close the disc
compartment.
3. FAVORITE
In [Internet Radio] mode:
Add current station to the
list of Favorite Stations.
In [FM radio] mode:
On the play screen, press to add
current station to [Presets].
4.
5.
6.
7.
/ / ( )/ ( )
Navigation buttons
Press to navigate through menus.
/
In DISC mode:
Select an album (for MP3/WMA
CDs).
( )/ ( )
Search buttons on the play
screen
In [Media Library]/[USB]/DISC
mode:
Press to skip to the previous/
next track.
In [FM radio] mode:
Press and hold to start searching
for the next available station;
Press repeatedly for ne tuning.
OK
Conrm selection.
HOME: Return to Home screen
(main menu).
Star t/pause/resume play.
Stop play;
In DISC mode: Erase a program.
English
EN
11

Kitty Higgins
Clear Day
Kitty Higgins
Clear Day
0:12 4:12
AII songs
Playlists
Artists
AIbums
AII songs
Playlists
Artists
AIbums
8. VOL
Increase/decrease the volume
9. Alphanumeric
buttons
For text entry
10. CLEAR
Press to delete the previous
entry;
Press and hold to delete all
entries.
a/A
Press to switch between lower
and upper cases;
In FM RADIO mode, press in
the list of presets to start editing
station name.
11. SOUND
Select sound settings.
12. RE P E AT
Toggle through repeat play
options.
SHUFFLE
Activate/deactivate random
order play.
13.
Mute/ unmute sound.
14.
BACK: Go back to previous
screen.
Touch screen
MCi730 is equipped with a touch screen.
If necessary, tap on the screen to •
show functional buttons;
Tap on the buttons to select •
corresponding functions;
Tap on an option to select. •
12
EN
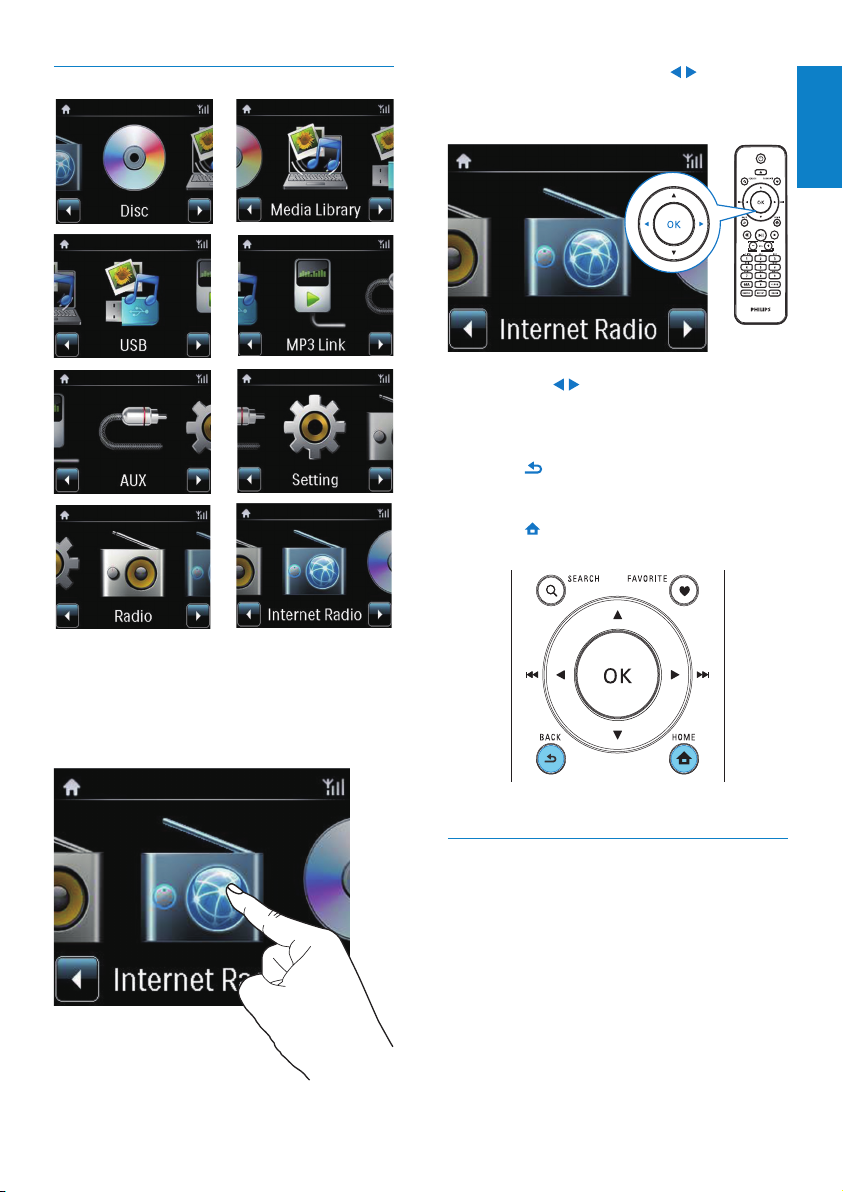
Home screen
On Home screen, tap on • / to navigate
through icons. Tap on the corresponding
icon to select.
Or, press • / /OK on the remote control
to select the desired source.
To go back to previous screen
Press •
To return to Home screen
Press •
BACK.
HOME.
English
On MCi730, you enter Home screen after the
rst-time setup is complete.
To select a music source, or
enterthe[Settings]menu
Text entry on the remote control
To enter text and symbols, press
corresponding alphanumeric buttons on the
remote control.
To enter letters/numbers/symbols •
corresponding to the same alphanumeric
button, briey and repeatedly press the
button.
EN
13
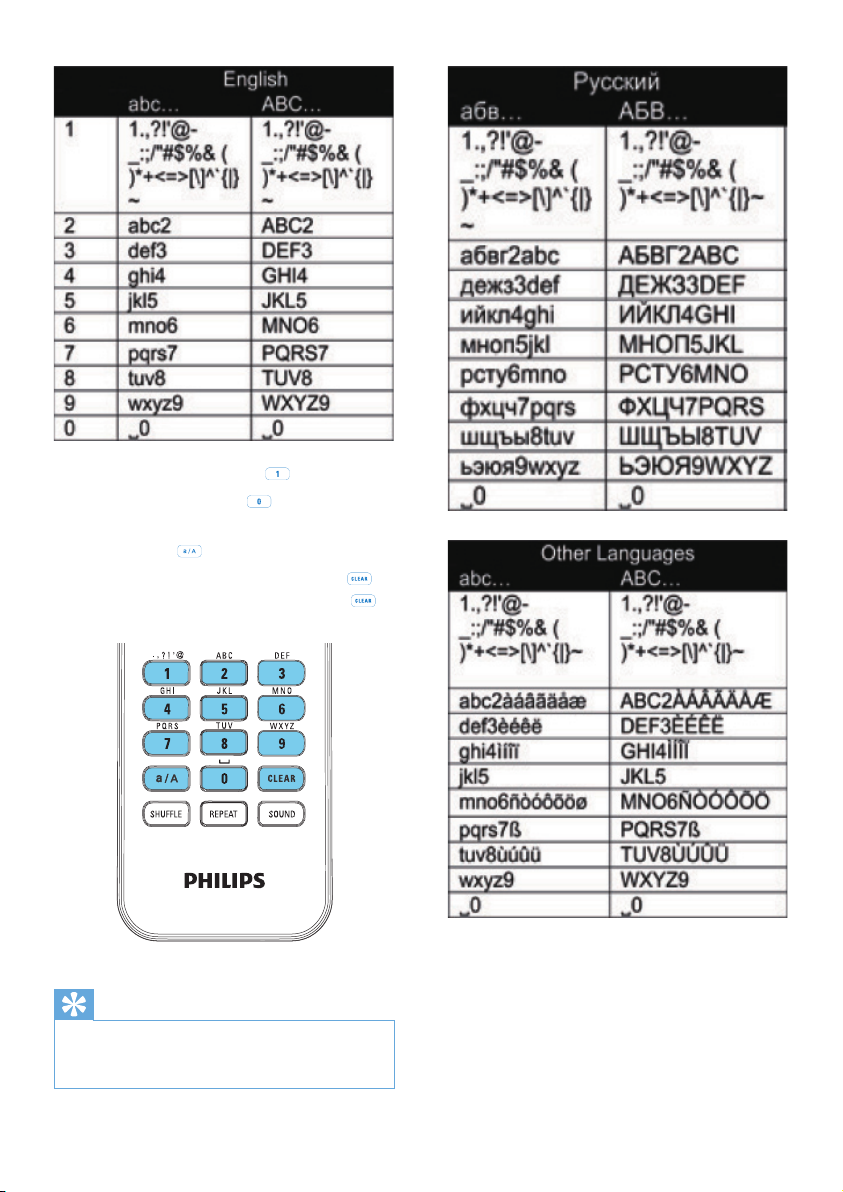
To enter symbols, press • repeatedly.
To enter space, press •
To switch between lower and upper •
cases, press
To delete previous character, press •
To delete all entries, press and hold
.
Tip
For languages other than English, letters that •
an alphanumeric but ton corresponds to may
vary.
.
.
.
14
EN
3 Prepare
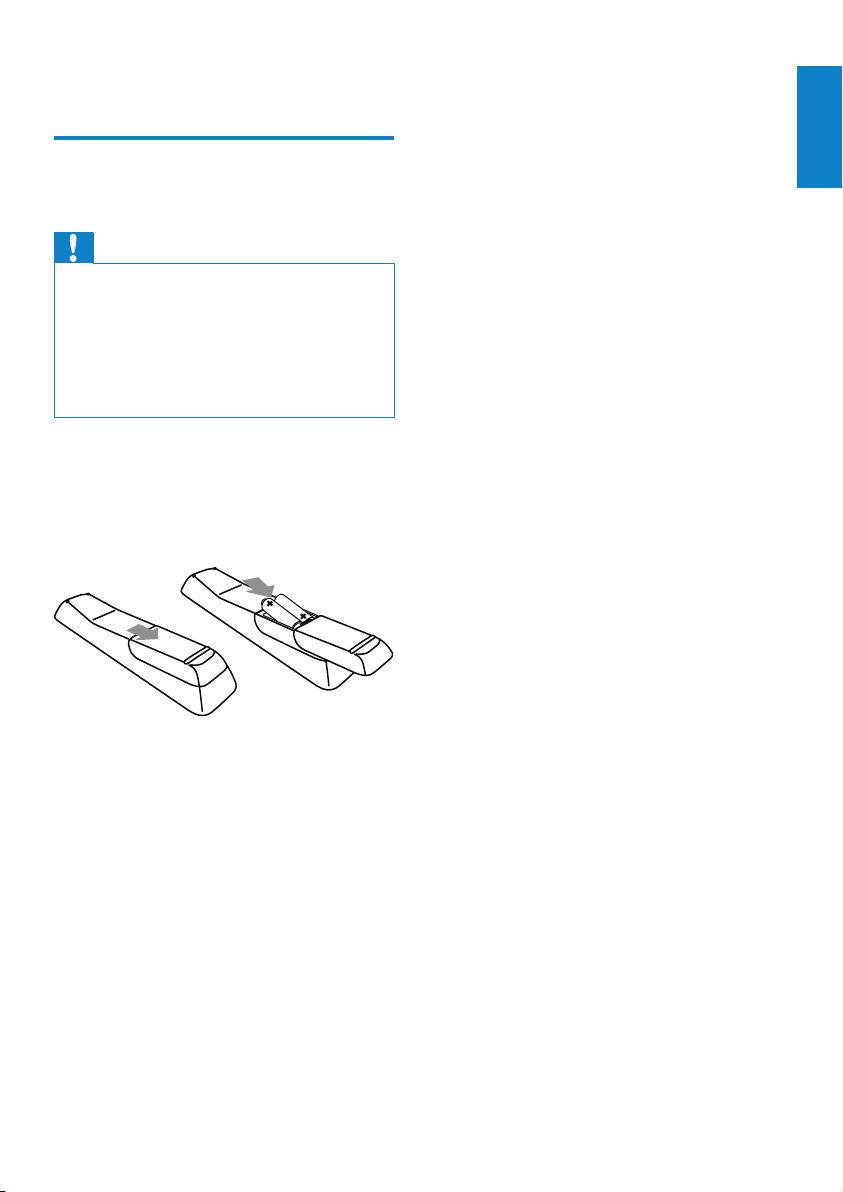
Install batteries into the remote control
Caution
Risk of explosion! Keep batteries away from •
heat, sunshine or re. Never discard batteries
in re.
Risk of decreased batter y life! Never mix
•
different brands or types of batteries.
Risk of product damage! When the remote
•
control is not used for long periods, remove
the bat teries.
a Open the battery compartment.
b Insert 2 AAA R03 batteries with correct
polarity (+/-) as indicated.
c Close the battery compartment.
English
EN
15

Å
90
33
22
2
4 Connect
a
cb
Connect speakers
On MCi730, ensure that you connect
1
the left speaker to LOUDSPEAKERS L+,
L- and right speaker to LOUDSPEAKERS
R+, R-.
2 To connect the speakers,
As shown, unscrew to loosen the •
connectors;
Fully insert the ends of speaker wires, •
red end into the red connector, and
silver end into the black connector;
Screw the connectors until the •
speaker wires are securely fastened.
Connect a headphone-to-headphone cable
(not supplied) to:
the • MP3-LINK socket on this unit, and
the 3.5mm headphone jack on the •
portable media player.
Connect another audio system
To play another audio system, do the following
connections, and then, select the [AUX]mode
on MCi730.
Connect external audio devices
You can listen to an external audio device
through the speakers on MCi730.
Connect a portable media player
To play from a portable media player with
3.5mm headphone jack, do the following
connections, and then, select the [MP3 link]
mode on MCi730.
16
EN
Connect audio cables (red/white - not
supplied) to:
the • AUX IN L / R sockets on this
unit, and
the audio output sockets on the •
external audio device.

Turn on/off
Connect power supply
Warning
Risk of product damage! Ensure that the •
power supply voltage corresponds to the
voltage printed on the back or the underside
of the produc t.
Connect • MCi730 to the power supply.
Note
The type plate information is located at the •
back or at the underside of the produc t.
Turn on/off
1 Press to turn on the unit.
2 To turn off the unit,
Press •
to switch to active standby;
Or, press and hold •
Eco standby (energy-saving mode).
to switch to
Active standby
When in active standby, some major functions
of MCi730 remain in the normal state of
power consumption, e.g. Wi-Fi connection,
clock display. Thus, MCi730 can quickly go to
the running state when you switch MCi730
from active standby to on.
In active standby,
The power indicator lights up red;•
Clock time is displayed if you have set •
clock.
And, the unit is still connected to the Wi-Fi/
wired network.
Auto active standby
If no activity happens on MCi730 for
10 minutes, MCi730 can switch to active
standby automatically.
Eco standby
Eco standby is an energy-saving mode. In Eco
standby, all major functions are switched to a
low-power state or off, e.g. micro-processor,
Wi-Fi connection, and display.
English
EN
17

5 First-time setup
MCi730
MCi730
The rst time you turn on MCi730,
1 Select the desired language on the screen
as prompted.
2 Select your location and time zone from
the list as prompted.
3 Select [ Yes] , when asked whether to set
up network connection.
Connect to home network
Connect wirelessly
Connect through an Ethernet cable
18
EN

Look for network
Push button (WPS...
Pin entry (WPS - PIN)
You can connect MCi730 to home network in
different ways, wireless or wired.
Use a router (or Access Point) for home •
network. That is, connect computers/
devices to a router.
Connect • MCi730 to the router wirelessly
or through an Ethernet cable.
To have the unit connected to the •
Internet over home network, ensure
that the router connects to the Internet
directly and no dial-up is required on the
computer.
To switch between different connection •
methods, or switch between different
routers, go to [Settings] > [Network
settings] > [Setup network].
Wireless connection: One-touch Wi-
Fi Protected Setup (WPS)
MCi730 suppor ts Wi-Fi Protected
Setup(WPS). You can quickly and securely
connect MCi730 to a wireless router that also
supports the WPS.
You can select one of the two setup methods:
PBC (Push Button Conguration), or PIN
(Personal Identication Number).
English
Add MCi730 on the router
Consult the user manual of the router to •
learn how to add a WPS device to the
router. For example:
press and hold the WPS push button.
The router starts to search for a WPS »
device.
On MCi730, a message appears »
when the connection is completed
successfully.
Tip
Wi-Fi Protected Setup( WPS) is a standard •
created by Wi-Fi Alliance for easy
establishment of secure wireless home
network .
Turn on WPS-PBC on MCi730
1 Select [ Yes] , when asked whether to set
up network connection (see ‘First-time
setup’ on page 18).
2 Select [Wireless (WiFi)] > [Push button
(WPS – PBC)].
EN
19

Look for network
Push button (WPS...
Pin entry (WPS - PIN)
Network A
Network B
Network C
Tip
MCi730
Internet
MCi730
Internet
To use PIN (Personal Identication Number) •
as the setup method: On MCi730, select
[Wireless (WiFi)] > [Pin entry ( WPS – PIN)],
and write down the PIN that is displayed on
MCi730; On the router, enter the PIN.
Consult the user manual of the router to lear n
•
how to enter the PIN the router.
Connect to the Internet
Connect to the Internet as prompted. •
You enter Home screen after the rst- »
time setup is complete.
Tip
Before you star t the network setup, have the •
encr yption key to your router ready.
1 Select [ Yes] , when asked whether to set
up network connection (see ‘First-time
setup’ on page 18).
2 Select [Wireless (WiFi)] > [Look for
network].
The unit starts to search for wireless »
networks.
A list of available Wi-Fi networks »
appears.
Tip
Ensure that the router connects to the •
Internet directly and no dial-up is required on
the computer.
Wireless connection: Enter encryption key manually
20
EN

MCi730
LAN4To Modem12V=1A ResetLAN3 LAN2 LAN1
3 Select the desired Wi-Fi network.
Enter key
Successfully
connected to
Network A
4 As prompted, enter the encryption key to
the network.
The unit starts to acquire an IP »
address assigned by the Wi-Fi network
automatically.
A message appears when the »
connection is completed successfully.
Wired connection
English
Connect to the router by using the Ethernet
cable
1 Select [ Yes] , when asked whether to set
up network connection (see ‘First-time
setup’ on page 18).
2 Use an Ethernet cable to connect the unit
to the router.
Note
The router may fail to assign an IP address, •
if the DHCP (Dynamic Host Conguration
Protocol) is unavailable or disabled on the
router.
Connect to the home network
On the unit, select • [Wired (Ethernet)].
The unit starts to acquire an IP address »
assigned by the network automatically.
A message appears when the »
connection is completed successfully.
EN
21

2/2
Wireless (WiFi)
Wired (Ethernet)
MCi730
Internet
Tip
The router may fail to assign an IP address, •
if the DHCP (Dynamic Host Conguration
Protocol) is unavailable or disabled on the
router.
Connect to the Internet
Connect to the Internet as prompted. •
You enter Home screen after the »
rst-time setup is complete.
Tip
Ensure that the router connects to the •
Internet directly and no dial-up is required
on the computer.
22
EN

6 Play from home
MCi730
Internet
network
Play Internet radio stations
Tip
By default, preset stations are pre-loaded to •
MCi730 according to the location that you
selec t during the rst-time setup. To check
or change the location, go to [Settings] >
[Location and time zone].
English
To play Internet radio stations, ensure that
• MCi730 is connected to the Internet over
the home network.
Tip
Ensure that the router connects to the •
Internet directly and no dial-up is required on
the computer.
Tune to Internet radio stations
1 Ensure that MCi730 is connected to the
Internet.
2 On MCi730, tap [Internet Radio] on
Home screen.
Or, on Home screen, press •
OK on the remote control.
3 Select the desired station to star t play.
/ and
Edit favorite stations
On MCi730, you can mark an Internet radio
station as favorite. All the stations are added
to [Internet Radio] > [Favorite stations]. In
this way, you can quickly access your favorite
stations.
To add a station to [Favorite stations]
On a list of stations, select the •
desired station. Press FAVORITE on
the remote control.
Or, play the desired station. On the •
play screen, press FAVORITE on the
remote control.
A message appears, indicating that »
the station is added to [Favorite
stations].
To remove a station from [Favorite stations]
Select the station in the list of •
stations; or, go to the play screen of
the station. Press FAVORITE again.
EN
23
 Loading...