

Philips MCI-300 Service Manual
DVD Micro System MCi300
TABLE OF CONTENTS
Location of PCBS ............................................................ 1-1
Specifications
Measurement Setup ....................................................... 1-3
Service Aids, Safety Instruction, etc. .............................. 1-4
Instructions On CD Playability .............................. 1-5 to 1-6
Software & Firmware Upgrade .............................. 2-1...2-2
Malfuction Check Chart .................................................. 2-3
Service Test Program............................................. 3-1...3-2
Disassembly Diagram .................................................. 4-1
Block Diagram ................................................................. 5-1
Wiring Diagram................................................................. 6-1
PB - AF & AMP................................................................. 7
Circuit diagram .................................................. 7-1...7-4
Layout diagram.................................................. 7-5...7-6
................................................................. 1-2
2008
PB - KEYS & IR ............................................................ 8
Circuit diagram ............................................................ 8-1
Layout diagram.................................................. 8-2...8-3
PB - Audio In/Out ............................................................ 9-1
PB - Headphone ....................................................... 10-1
PB - Wifi - Light ....................................................... 11-1
PB - Wesli - 08 ................................................................. 12
Circuit diagram ............................................. 12-1...12-9
Layout diagram........................................ 12-10...12-11
Explode View ............................................................ 13-1
Service Partlist ............................................................ 13-2
DB 0821
3141 785 32890

Location of PCBS
¥
1-1
TUNER MODULE
:(6/,%RDUG
.(<%RDUG
VERSION VARIATIONS
Type /Versions:
Board in used:
SMPS BOARD
TUNER MODULE
AF& BOARD
AUDIO IN&OUT BOARD
HEADPHONE BOARD
KEYS&IR BOARD
WIFI-LIGHT BOARD
WESLI-08 BOARD
Features
RDS
VOLTAGE SELECTOR
ECO STANDBY - DARK
Service policy
Type /Versions:
Feature diffrence
$)$03%RDUG
:
/05
M
M
M
M
M
M
M
M
/05
/12
M
M
M
M
M
M
M
M
/12
6036%RDUG
MCI300
/37
MCI300
/37
* TIPS : C -- Component Lever Repair.
M -- Module Lever Repair
-- Used

TECHNICAL SPECIFICATION
1-2
General
AC Power ...........................................230V±10%.../05/12/79
..................................................... 120V±10%.../37
.......................................120V/240V±10%.../55/97
Dimensions(w x h x d) ............................185 x 210 x 248mm
Weight(with/without speakers) ...................... 8.303kg/3.35kg
Power consumption
Active............................................................................ <45W
Standby ........................................................................ <15W
Eco standby.................................................................... <1W
Amplifier
Out power................................................................. 2 x 40W
Frequency response............................. 350Hz - 14KHz,-3dB
Signal to noise....................................................... dB (IEC)
Input sensitivity
AUX IN ............................................................. 500mV(0dB)
Impedance Speakers ................................................. 12ohm
Impedance headphone............................. 16 Ohm-150 Ohm
Wireless
Wireless standard..................802.11g,compatible to 802.11b
Wireless security ...................WEP (64 or 128bit), WPA-PSK
Frequency Range....................2412-2462 MHz (CH1-CH11)
Wired(LAN/Ethernet)
Wired standard ................................................. 802.3/802.3u
Speed ............................................................... 10/100MBit/s
Mode .............................................................. half/full duplex
Crossover detection(Auto MDIX)...................................... yes
Tuner
FM wave range................................................. 87.5-108MHz
FM aerial ....................... 75ohm xoaxial wire/T-antenna wire
Internet Radio
Internet service.......................................................Rhapsody
Streaming protocols .............. HTTP,RTSP-T,MMS-T/MMS-U
............................................ SHOUTcast
CD player
Frequency range ....................................60-20,000 Hz, -3 dB
Signal-to-noise ratio ......................................... 72 dBA (IEC)
MPEG 1 Layer 3 (MP3-CD) ........................... MPEG AUDIO
MP3-CD bit rate ........................................ 32-320 kbps, VBR
WMA bit rate ..................................................up to 160 kbps
Sampling frequencies .................................. 32, 44.1, 48 kHz
USB player
USB .................................................................... 12Mb/s,V1.1
Support format.............................................. MP3,WMA,AAC
USB class.............................................................. MSC,MTP
Number of albums/folders .................................. maximun 99
Nunber of tracks/titles...................................... maximum 999
uPnP support format .............MP3/WMA/AAC/ADPCM/PCM
Internet rhapsody services(via ECD)
.........streaming,add to library,media playback,my rhapsody
................. subscription management,DRM metering,search
..............channels,dynamic playlists,playlist creation/access
*
Specifications and external appearance are subject
to change without notice.
e
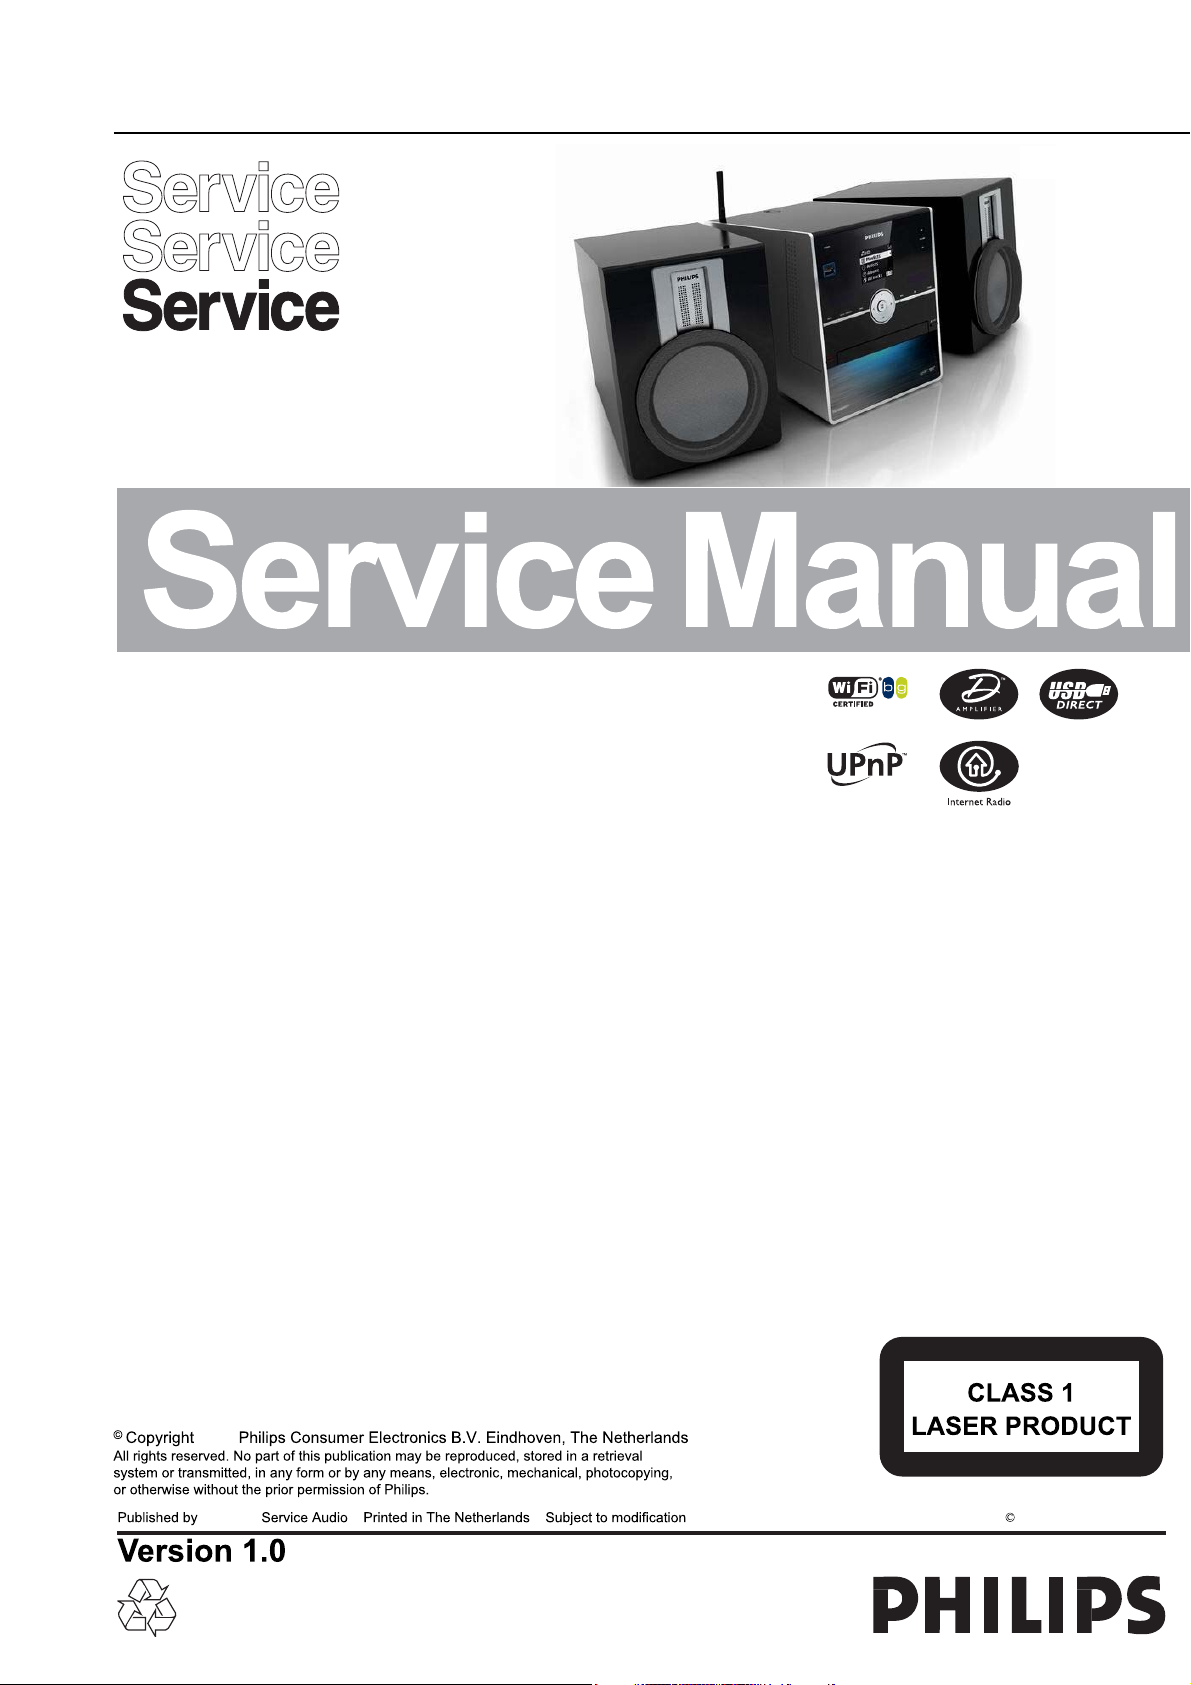
MEASUREMENT SETUP
Tuner FM
1-3
Bandpass
LF Voltmeter
e.g. PM2534
RF Generator
e.g. PM5326
DUT
250Hz-15kHz
e.g. 7122 707 48001
Ri=50:
S/N and distortion meter
e.g. Sound Technology ST1700B
Use a bandpass filter to eliminate hum (50Hz, 100Hz) and disturbance from the pilottone (19kHz, 38kHz).
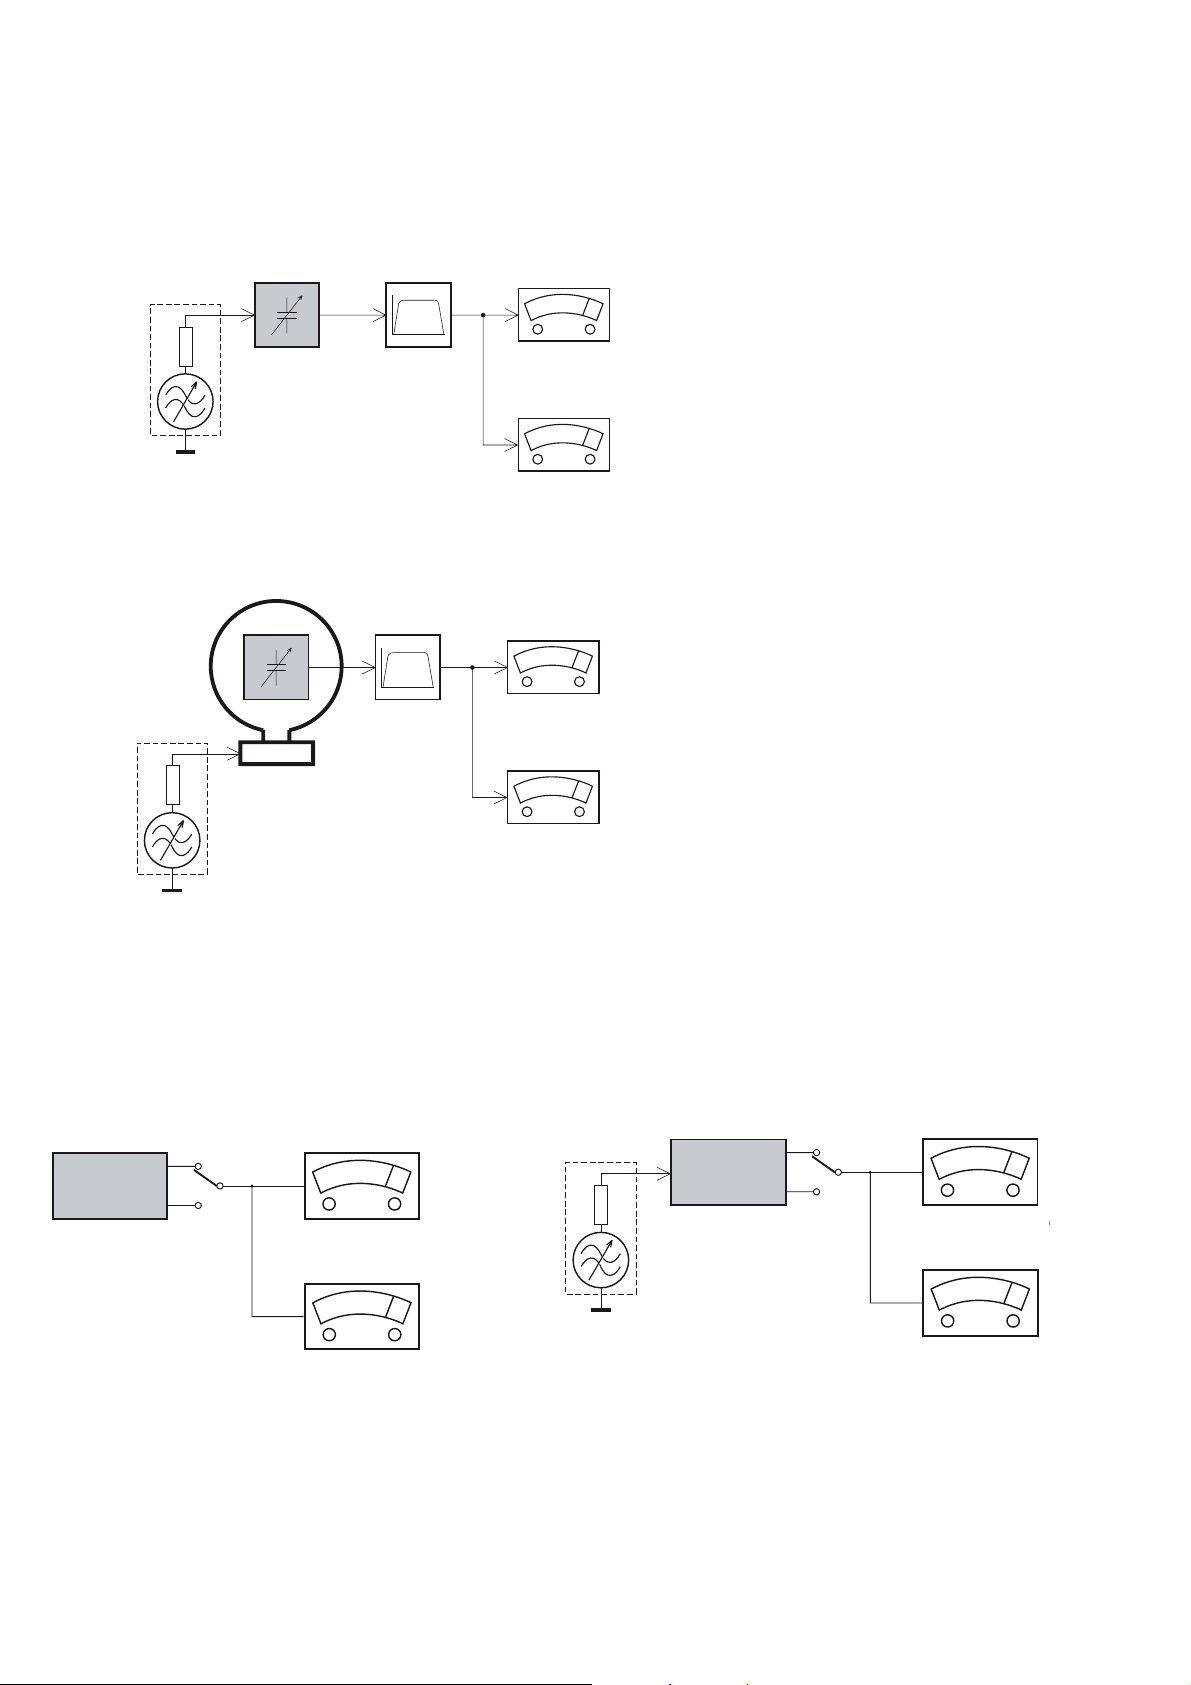
Tuner AM (MW,LW)
RF Generator
e.g. PM5326
Ri=50:
DUT
Frame aerial
e.g. 7122 707 89001
Bandpass
250Hz-15kHz
e.g. 7122 707 48001
LF Voltmeter
e.g. PM2534
S/N and distortion meter
e.g. Sound Technology ST1700B
To avoid atmospheric interference all AM-measurements have to be carried out in a Faraday´s cage.
Use a bandpass filter (or at least a high pass filter with 250Hz) to eliminate hum (50Hz, 100Hz).
CD
Use Audio Signal Disc
(replaces test disc 3)
DUT
L
R
SBC429 4822 397 30184
S/N and distortion meter
e.g. Sound Technology ST1700B
LEVEL METER
e.g. Sennheiser UPM550
-
Recorder
Use Universal Test Cassette CrO2 SBC419 4822 397 30069
or Universal Test Cassette
LF Generator
e.g. PM5110
Fe SBC420 4822 397 30071
DUT
L
R
S/N and distortion met
e.g. Sound Technology ST170
LEVEL METER
e.g. Sennheiser UPM550
with FF-filter
SERVICE AIDS
1-4
GB
All ICs and many other semi-conductors are
susceptible to electrostatic discharges (ESD).
Careless handling during repair can reduce life
drastically.
When repairing, make sure that you are
connected with the same potential as the mass
of the set via a wrist wrap with resistance.
Keep components and tools also at this
potential.
WARNING
GB
Safety regulations require that the set be restored to its original
condition and that parts which are identical with those specified,
be used
Safety components are marked by the symbol
!
.
ESD
CLASS 1
LASER PRODUCT
Lead free

INSTRUCTIONS ON CD PLAYABILITY
Customer complaint
"CD related problem"
Set remains closed!
check playability
1
1-
playability
ok ?
Y
Play a CD
for at least 10 minutes
check playability
playability
ok ?
Y
N
"fast" lens cleaning
check playability
playability
ok ?
N
3
N
Y
For flap loaders (= access to CD drive possible)
cleaning method
4 is recommended
add Info for customer
"SET OK"
2
return set
1 - 4 For description - see following pages
Exchange CDM

INSTRUCTIONS ON CD PLAYABILITY
1-
1
PLAYABILITY CHECK
For sets which are compatible with CD-RW discs
use CD-RW Printed Audio Disc ....................7104 099 96611
TR 3 (Fingerprint)
TR 8 (600μ Black dot) maximum at 01:00
• playback of these two tracks without audible disturbance
playing time for: Fingerprint t10seconds
Black dot from 00:50 to 01:10
• jump forward/backward (search) within a reasonable time
For all other sets
use CD-DA SBC 444A..................................4822 397 30245
TR 14 (600μ Black dot) maximum at 01:15
TR 19 (Fingerprint)
TR 10 (1000μ wedge)
• playback of all these tracks without audible disturbance
playing time for: 1000μ wedge t10seconds
Fingerprint t10seconds
Black dot from 01:05 to 01:25
• jump forward/backward (search) within a reasonable time
4
LIQUID LENS CLEANING
Before touching the lens it is advised to clean the
surface of the lens by blowing clean air over it.
This to avoid that little particles make scratches on
the lens.
Because the material of the lens is synthetic and coated
with a special anti-reflectivity layer, cleaning must be done
with a non-aggressive cleaning fluid. It is advised to use
“Cleaning Solvent
The actuator is a very precise mechanical component and
may not be damaged in order to guarantee its full function.
Clean the lens gently (don’t press too hard) with a soft and
clean cotton bud moistened with the special lens cleaner.
The direction of cleaning must be in the way as indicated in
the picture below.
2
CUSTOMER INFORMATION
It is proposed to add an addendum sheet to the set which
informs the customer that the set has been checked
carefully - but no fault was found.
The problem was obviously caused by a scratched, dirty or
copy-protected CD. In case problems remain, the customer
is requested to contact the workshop directly.
The lens cleaning (method 3) should be mentioned in the
addendum sheet.
The final wording in national language as well as the printing
is under responsibility of the Regional Service Organizations.

SOFTWARE UPGRADING PROCEDURE
2-12-1
Software Version Verifi cation Procedure
It is important to write down the system version information of your Center before you start the upgrade
procedure. This information is also useful in case you
need to call Philips Customer Care Center.
1. Press MENU.
2. Press ▲/▼ to select “Information”. Press OK.
3. Press ▲/▼ to select “System”. Press OK.
4. The software version number is shown on the
display.
5. If the software version is not the latest one, you
need to upgrade waC3500D.
There are 3 ways to update the software.
A) Using CD-Rom
B) Using WADM
A. Using CD-Rom
1. Software Upgrade Disc Preparation
Tools Required : You will need the following items :
- PC (Pentium III 300MHz processor or higher)
- CD-R/RW writer and writing application software
- Blank CD-R or CDRW disc
- Broadband / High speed internet connection
2. How to download the software to your computer
To download free firmware and software upgrades
1.
for your product, please login to
www.club.philips.com
Download the firmware upgrade files and store
them on your PC
2. Unzip the .zip fi le and extract fi les into your PC.
Note:
- Please do not rename the fi lename.
- If you do not have the software to open the .zip
fi le, please visit below website to download the
software.
http://www.winzip.com/
3. Steps to upgrade the waC3500D
1. Make sure the Audio Station has connected to
the Audio Center.
2. Burn the fi le to blank CD-R or CDRW. Finalize
the disc. (The application may do this automatically.)
3. Turn on the Audio Center and turn on the
Audio Station, insert the CD to the slot loader,
CD graphic printed side facing you.
4. The Audio Center will upgrade automatically.
- The message “Updating fi rmware, please
wait…..” and the “process bar” show on the
display of the Audio Center.
- The upgrade process of the Center will reboot
twice
Note: Do NOT power off the Audio Center or
eject the disc at this stage.
5. It takes around 5 mins to complete the fi rmware
upgrade for the Audio Center.
6. When done, the Audio Center will go to the HD
mode automatically.
4. After the upgrade
Do confi rm the software version by checking the
system version.
Please follow the procedure described in the
section “Software Version Verifi cation Proce-
dures”.
B. Upgrading firmware
The supplied PC Installer CD Wireless Audio
Device Manager (WADM) helps you get the
upgrades for WAC3500 Center.
1 Register your Philips Wireless Music Center
with www.club.philips.com
2 Download the firmware upgrade files and store
them on your PC
3 Place Center on a flat and firm surface
4 Connect Center to power supply
➜ HD screen appears on Center
5 Connect Center to your PC via the supplied
ethernet cable.
6 Install and launch WADM (see Connect to
your PC section B)
7 Click Device Configuration, and then click
the Firmware upgrade sub-menu
8 As prompted, click Browse and indicate the
location where you kept the firmware upgrade
files on PC
9 Click Apply to start upgrading firmware
On Philips Wireless Music Center:
➜ The display shows “Updating firmware,
please wait...”
➜ Center will reboot itself during the installa-
tion process
➜ When Center returns to HD screen, the
installation is completed
IMPORTANT!
On Philips Wireless Music Center
– Never interrupt the firmware upgrading
before its completion.
– Before finishing the installation, never
operate other functions.
* Hints: Restoring previous
firmware
After the Center’s firmware is upgraded, you
can restore it to its previous version as desired.
1 Select HD mode, and then select Restore
firmware
a. Press MENU to enter the MENU screen
b. Press the navigation controls 3 or 4 and 2
to enter Settings, Firmware and Restore
firmware one by one.
2 Press 2 to select Ye s
Helpful hint:
– After restoration to previous firmware, the set
will lost Wi-Fi links to associated stations or
external network.
* Reset
When to reset the Center:
– Resetting the Center helps to re-establish the
Wi-Fi connection between the Center and
Station.
– Change the way the Center connects to an
external Wi-Fi/wired network.
1 Check that the set is switched on (see 5.Basic
functions).
2 Press MENU to enter the menu screen
3 Press the navigation controls 3 or 4 and 2 to
enter Settings followed by Restore
settings.
4 Press 2 to select Ye s
➜ The set is rebooted. Language selection
screen appears.
5 Select your desired language: English,
Français, Español, Nederlands, Italiano or
Deutsch
➜ The set enters Installation Mode
➜ The search for Center star ts.The Wi-Fi con-
nection is being re-established
Helpful hint:
– After restoration to default settings, the network
mode will go back to Ad-Hoc mode.
– Restoring to default settings does not delete any
stored music tracks

Gracenote CD Information
W
i
re
l
es
s
B
as
e
St
at
i
on 11g T
r
u
e
T
u
r
bo
W
i
r
e
l
e
s
s
Mo
d
e
m
PC
Po
w
e
r
d. Write down the DNS and Gateway of the
current connection
On the Center
a. Press MENU to enter the menu screen
b. Press3or4and2to enter
Settings
>
Network>Internet
c. Press 2 to continue
d. Set DNS
1) Enter the DNS server you wrote down
2) Press OK/2; to confirm
3) Press OK/2; to skip Set DNS2
Helpful hint:
– If necessary, follow Steps 1) to 2) above to
set a secondary DNS server in Set DNS2
e. Set Gateway
1) Enter the Gateway you wrote down
2) Press OK/2; to confirm
f. Set proxy
If you are using a proxy server to visit websites,
enable Proxy and proceed with the proxy
setting as prompted, then press OK/2; to
confirm
Otherwise, press OK/2; to skip
3 Choose to apply the settings as prompted
➜ Settings will change. Connection to sta-
tion could be lost appears.
12.2.2 Looking up CD track information
When the internet connection is made, insert
the CD disc that you want to look for its
information into the CD loader on the Center.
Searching start immediately. It will search from
local Gracenote CD database firstly. If can’t find
the CD track information, online searching will
then start.The searching results will be shown
on the Center’s display,
Helpful hint:
If the internet query failed due to failure in
internet connection, the error message "Check the
internet setup for Gracenote online" will appear.
Check if your internet connection is correct (see
12.2.1 above)
2-22-2
The Gracenote music recognition service
enables the set to look up CD track
information (including album, artist, genre, track
information) from its built-in database. It allows
the recorded CD tracks to be properly
categorized (for example, under Ar tists, Albums,
Genres or All tracks) and also be merged with
the existing tracks in the hard disk.
12.1 Gracenote music
recognition database
A 800 MB CD database (contains 800,000
most popular CDs) is embedded in every
WAC3500 Center for quick look-up on track
information. An update file that contains newly
released CDs is available quarterly on
www.club.philips.com for download.
12.1.1 To update Gracenote
music recognition database
1
Use your PC to register your product on
www.club.philips.com and go to "Show
Upgrades & Support" page to download
Gracenote Music recognition database update.
Note that the updates are posted quarterly and
each update is independent of each other, i.e. a
later update could be installed without an earlier update.
2
After storing the file on your PC, you can either
burn a CD with the update file using your
favorite CD burning software and drop the CD
into the WAC3500 Center for automatic
update, or you can use WADM's Gracenote
update option if you have connected your PC
to WAC3500 Center.
12.2 Gracenote Internet
1
Query
If the CD track information of your new CD
disc cannot be displayed on the WAC3500, the
quickest and surest solution is to look it up
from the internet by following steps below.
12.2.1 Connecting to the Internet
Check that you have connected the Center to
an Access Point or Router with Internet access
or connect the Center to an ADSL modem
with Internet access directly
Connect to Internet for Gracenote
Internet sevices
ETHERNET
DSL modem
Wireless Base Station 11g T
Internet
rue T
urbo
Power
Wireless
Modem PC
Router/Hub/Switch
for illustration only
Helpful hint:
– Make sure that no dial-up, user name or
password is required for the Internet access.
2
Set DNS and Gateway
● If you are using a DHCP* enabled Access
Point, Router or ADSL modem, the DNS
and Gateway can be got automatically, so you
need only to set the Center to Automatic
(DHCP) mode by following steps below:
*
DHCP stands for Dynamic Host Configuration Protocol. It is a
protocol for assigning dynamic IP addresses to devices on a
network
.
a. Press MENU
b. Press 3 or 4 and 2 to select Settings
> Network > Wired
c. Press 2 to continue
d. Press 3 or 4 and 2 to select Automatic
(DHCP).
● If there is no DHCP, set the DNS and
Gateway manually by following steps below:
On your PC, carr y out the following steps:
a. Click Start > Run
b.Type cmd and click OK
c.Type ipconfig/all

Malfunction Check Chart
d
d
(
)
p
2-3
2-3
The set function no
soun
All mode
Check power wire, speaker
wire, If they fix ok?
Yes
Check FFC cable of 1706
on W08 board or 1401 on
AMP board is good or bad
Yes
Check AMP circuit of set is
good or bad
No
No
No
Fix the wire and check
speaker is good or not
Change the FFC cable of
1706 or 1401.
Change IC TAD8932
of AMP boar
CD function no sound
Check CD output is good or
bad
Yes
Check IDE Cable is good or
bad
Yes
Check the related
components of CD signal
channel is good or bad
No
No
No
Check power circuit
Change the IDE cable
Change the related
onents.
com
USB can’t read
Check the socket of USB
whether dirty or loosen
Yes
Check the wire from
socket to W08 board is
normal or not
Yes
Change USB socket
No
No
Change socket of W08
Change W08 board
Yes
Check the voltage of SMPS
which in W08 and AMP
boards are normally or not
Yes
Check mute circuit and CPU
circuit and change
No
Change the SMPS
Tuner function no sound
Check tuner output is good
or bad
Yes
Check FCC Cable is good
or bad
Yes
Change FFC cable of tuner
No
No
Change Tuner module
Check the TDA7468 circuit
of set is good or bad
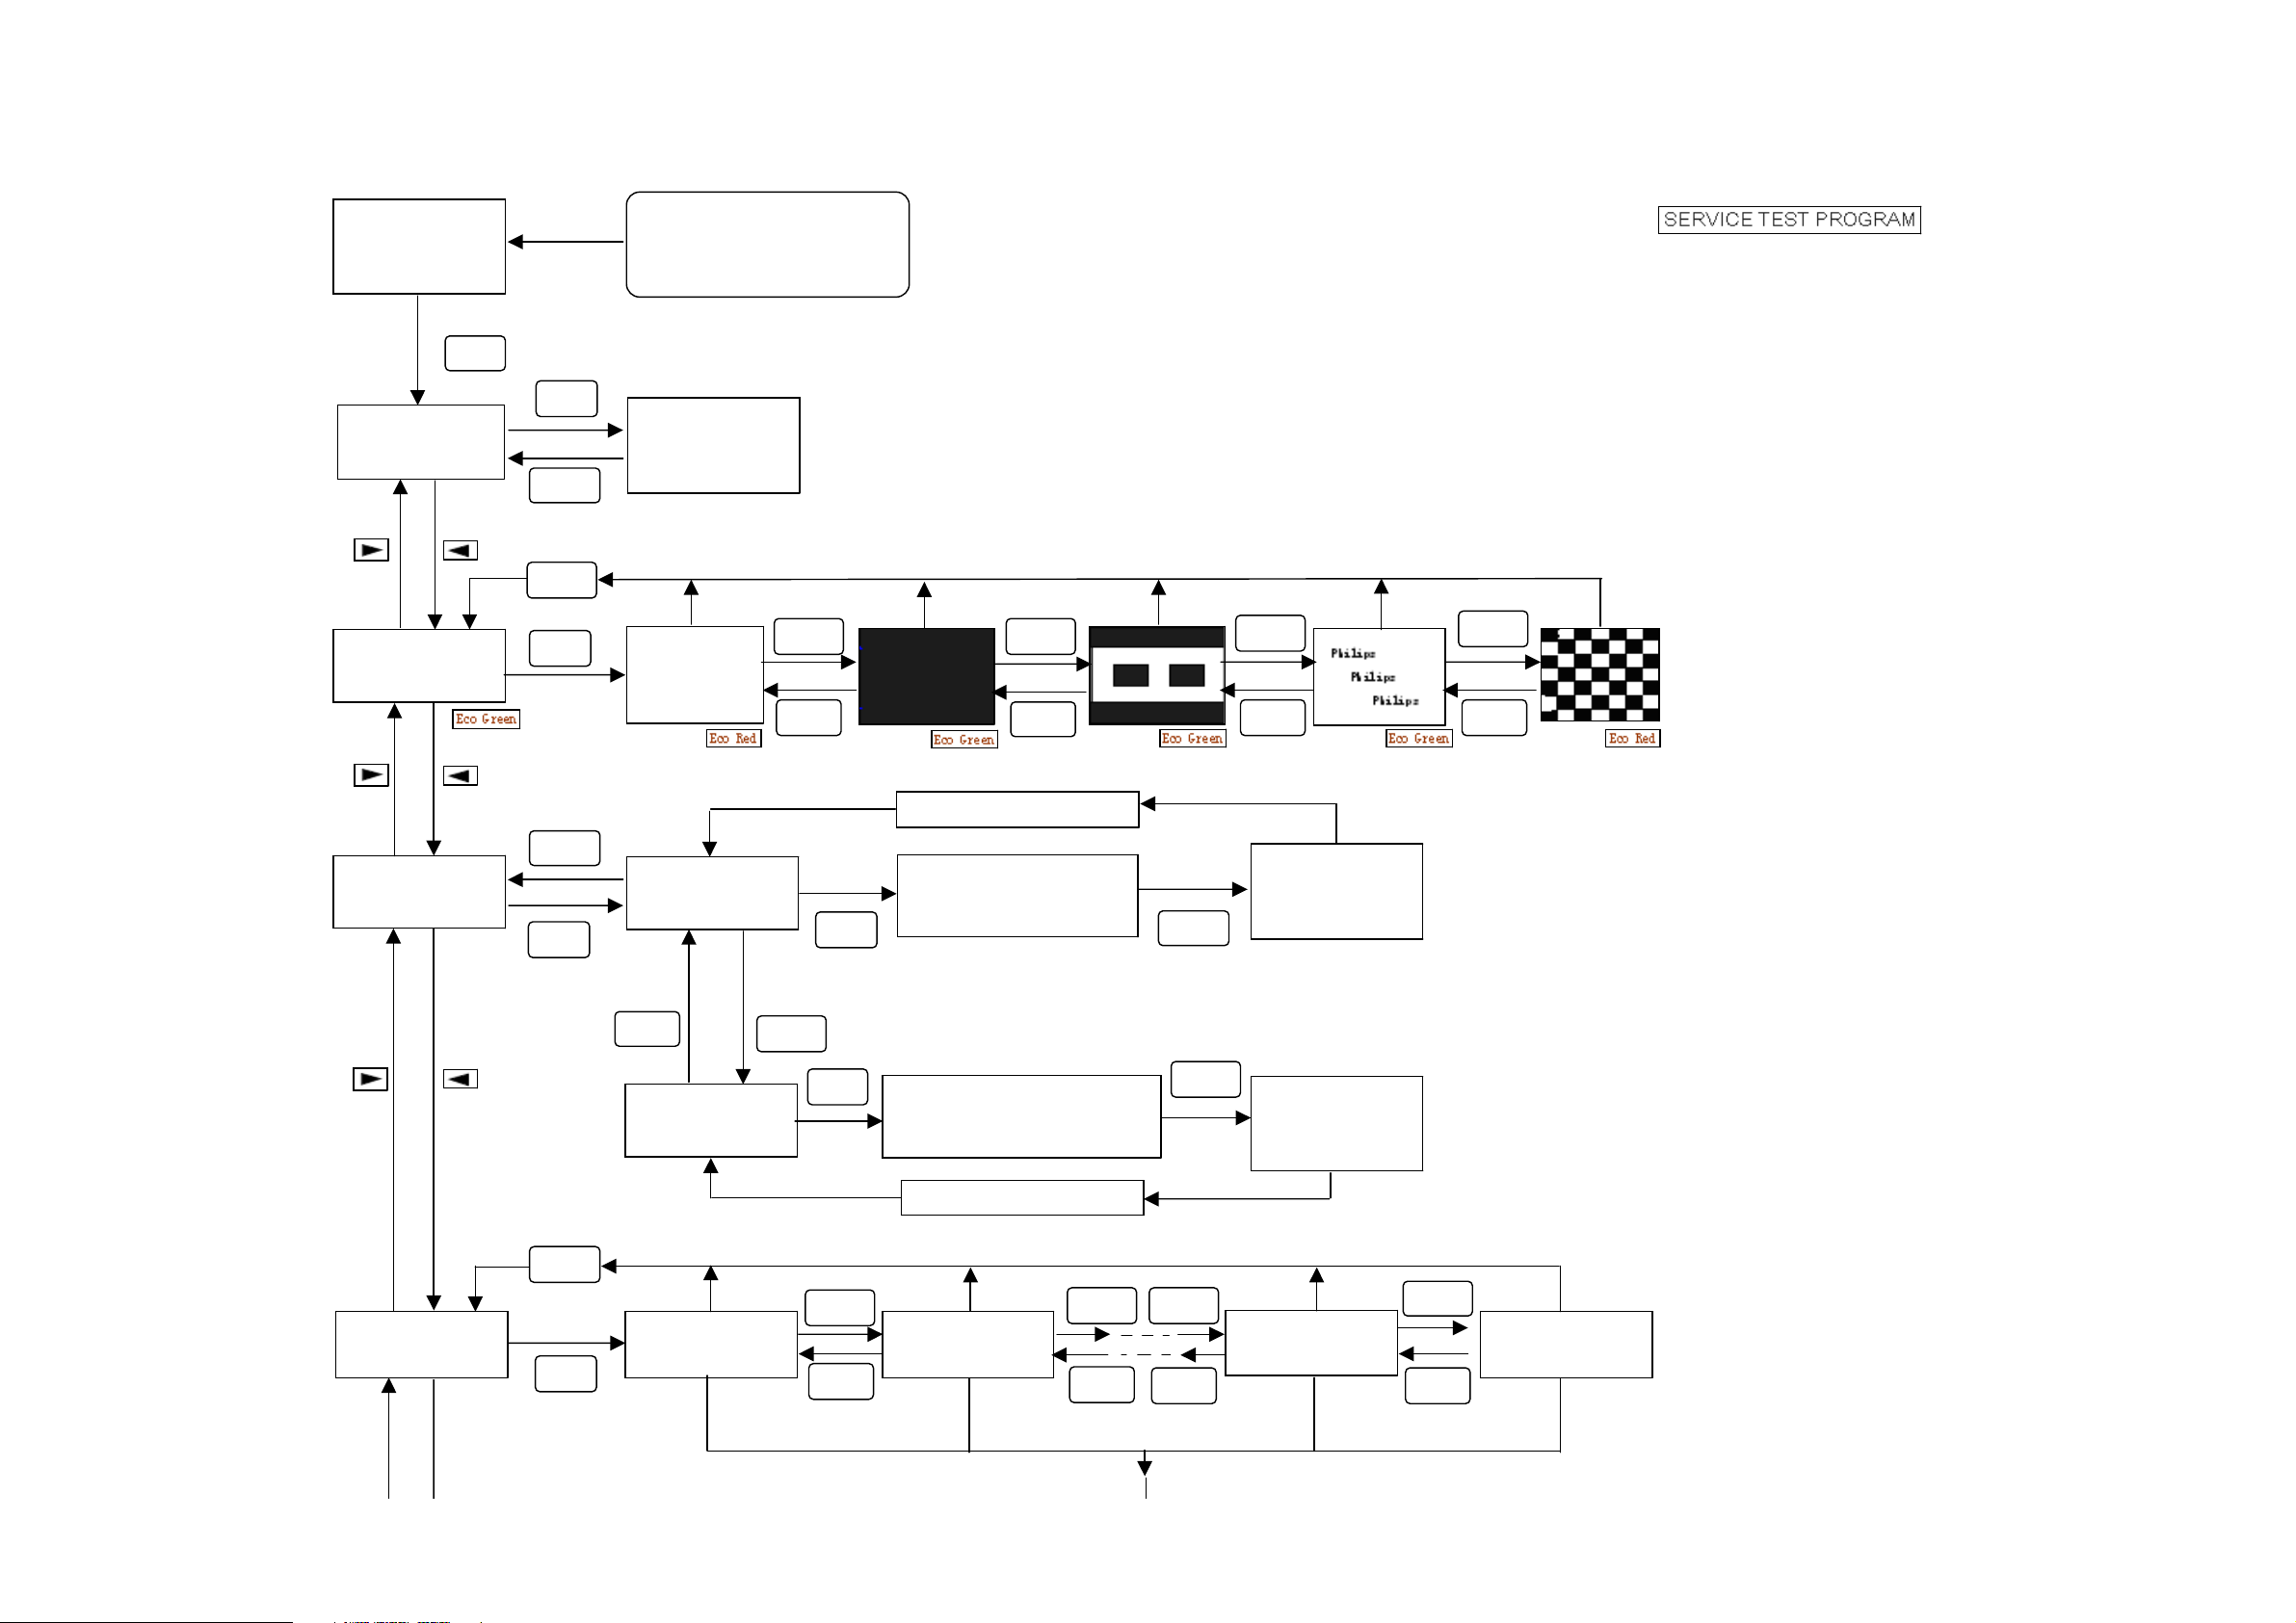
SERVICE TEST PROGRAM
p
)
(
)
3-1
3-1
Display shows
Welcom to FSM
Ver: x.x
OK
Display shows
1.HW Test
Display shows
2.LCD Test
OK
STOP
STOP
OK
To enter service mode,keep
OK key depressed while
lugging the main AC cord
Display shows
HW Result
111111
VOL
VOL
VOL
VOL
VOL
VOL
VOL
VOL
Display shows
3.KEY Test
Display shows
4.WiFiSetting
STOP
OK
STOP
OK
Display shows
3.1Keypad Test
VOL
Display shows
3.2 RC6 Test
Display shows
4.1 Channel1
VOL
OK
OK
VOL
VOL
Press STOP key twice
Test all keys on pannel
(Disolay shows key
name
Test all keys on remote
control
Disolay shows key name
Press STOP key twice
Display shows
4.2 Channel2
VOL
VOL
Display shows
Key Test OK
STOP
STOP
(or Fail)
Display shows
RC6 Test OK
(or Fail)
VOL
Display shows
4.10 Channel10
VOL
VOL
VOL
Display shows
4.11 Channel11
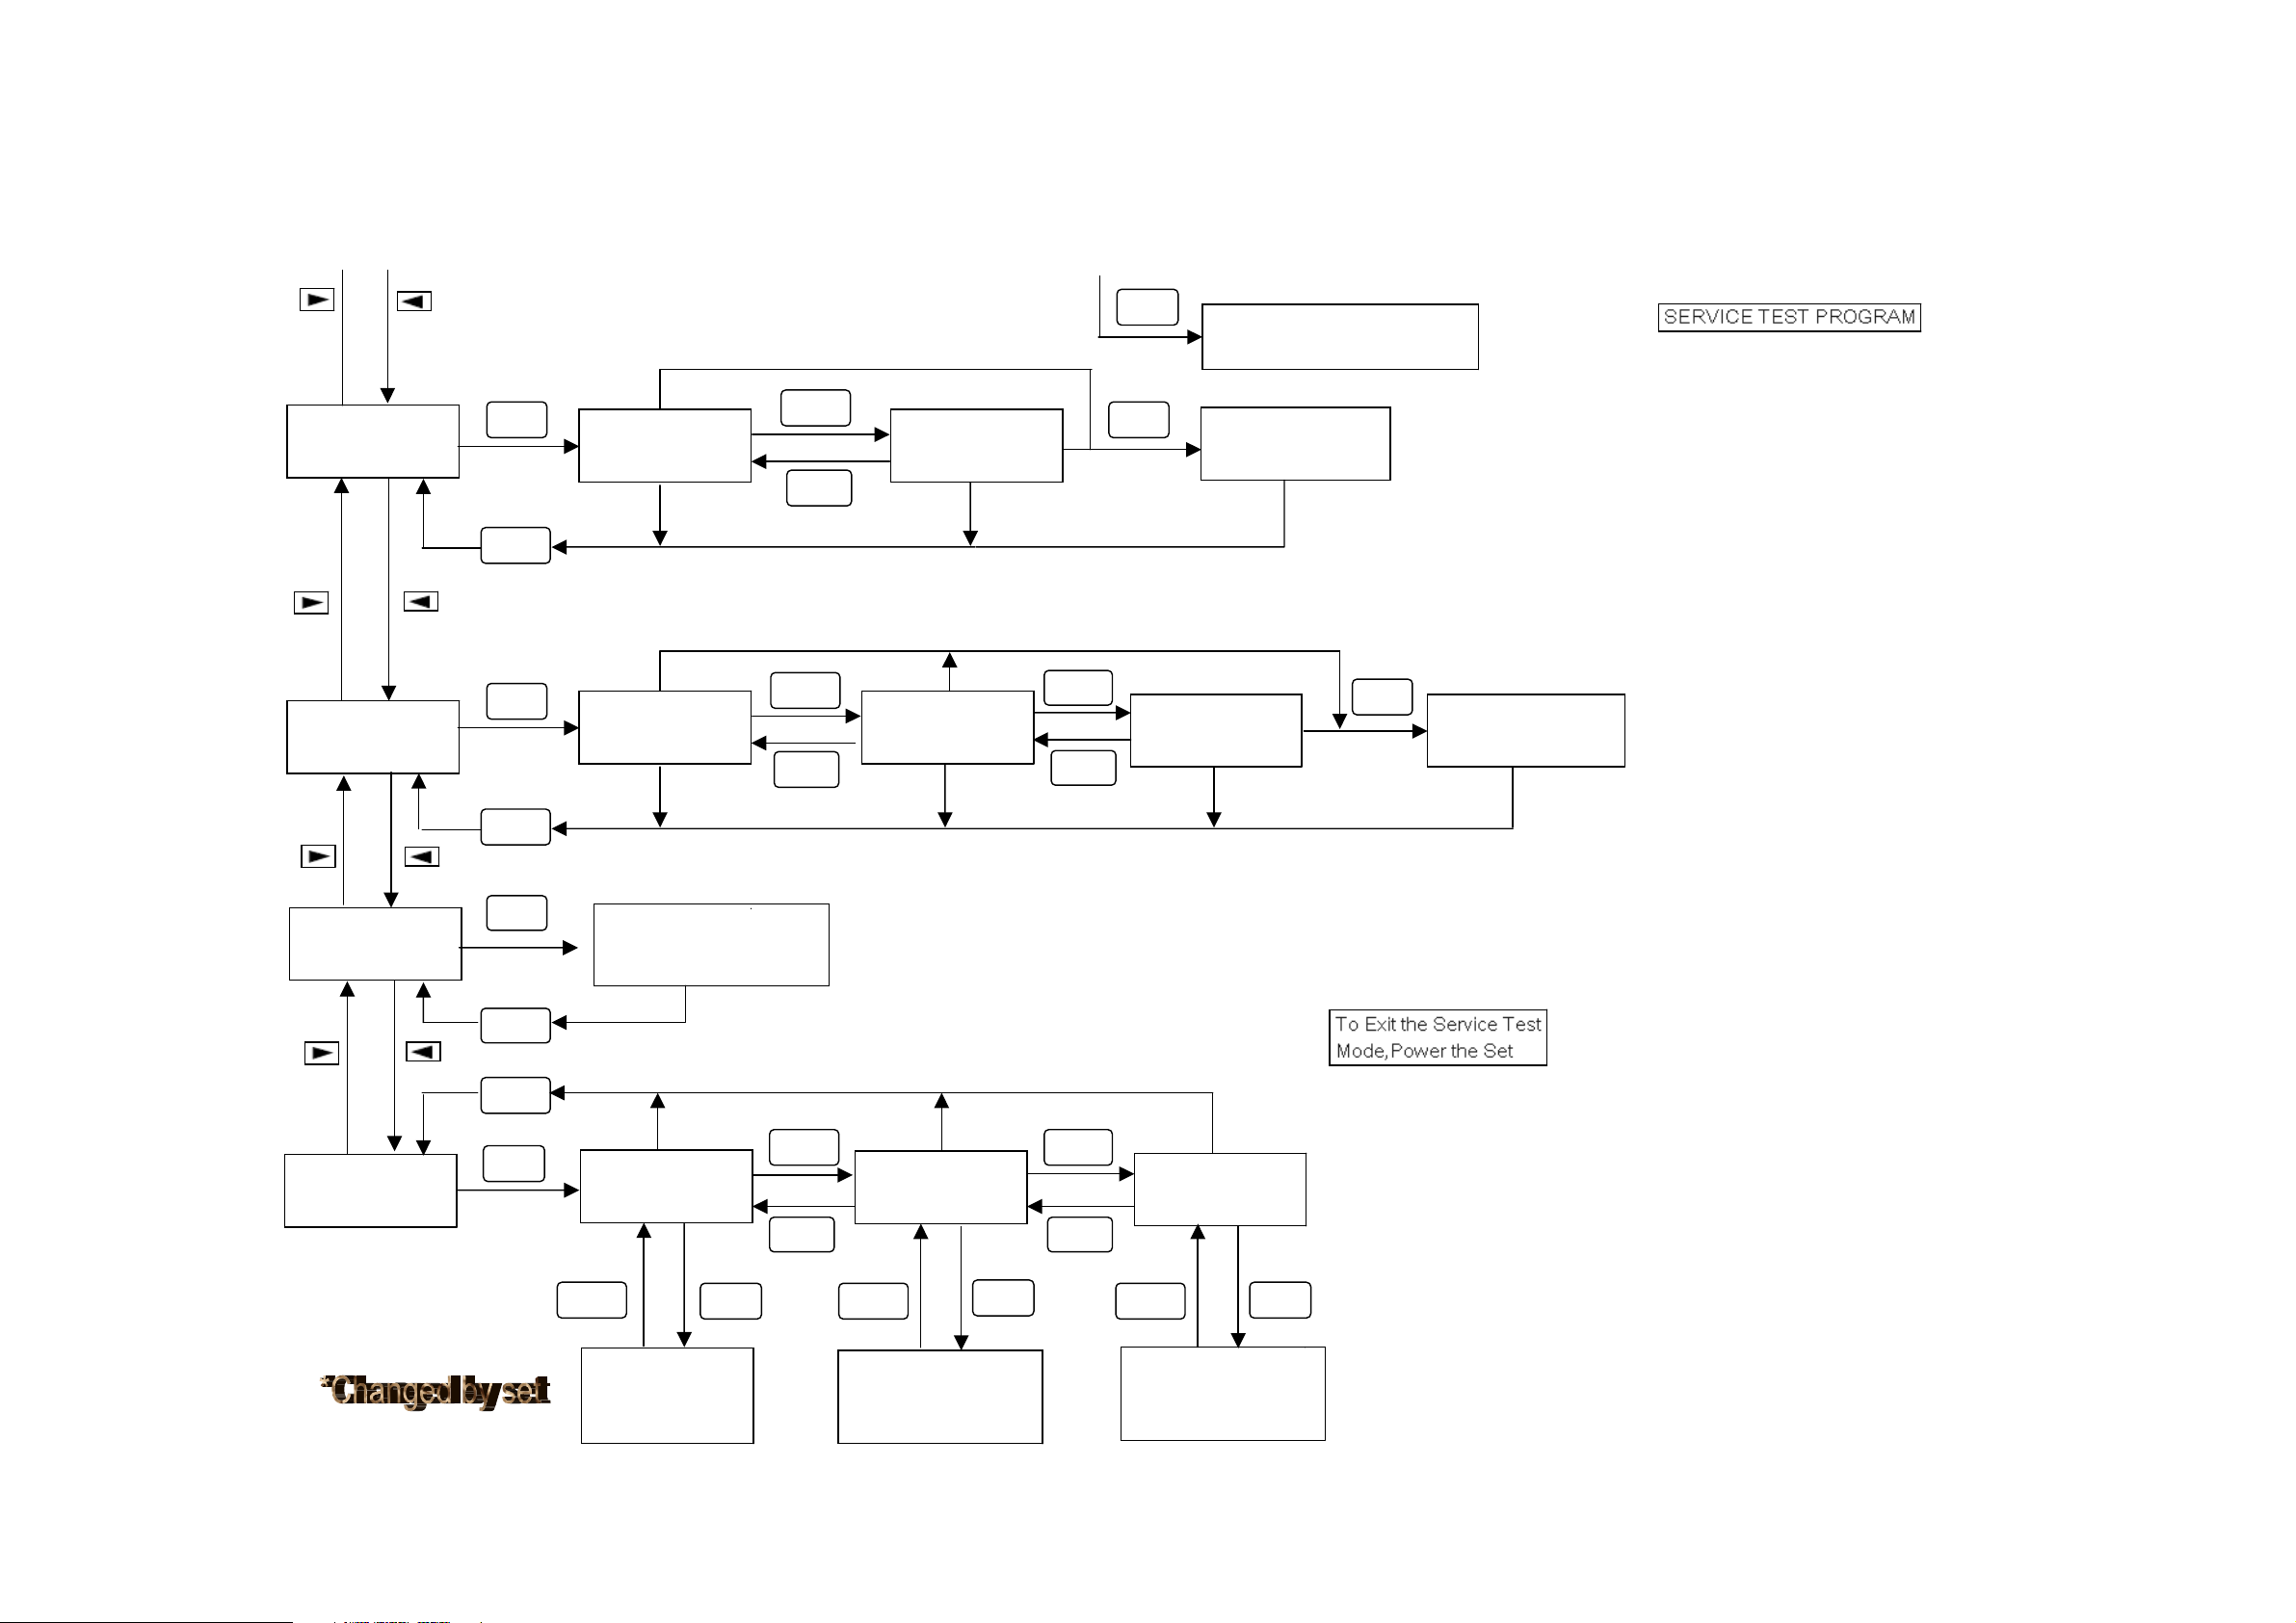
SERVICE TEST PROGRAM
3-2
3-2
Display shows
5.FANControl
Display shows
6.LCDContrast
OK
STOP
OK
STOP
Display shows
5.1Full Speed
Display shows
6.1Setting1
VOL
VOL
VOL
VOL
Display shows
5.2FAN Off
Display shows
6.2Setting2
VOL
VOL
OK
OK
Display shows
6.3Setting3
Display shows
Setting OK or Setting Fail
Display shows
Setting Deployed
OK
Display shows
Setting Deployed
Display shows
9.Reset Setting
Display shows
0.Information
OK
STOP
STOP
OK
Display shows
Reset OK or Reset Fail
Display shows
0.1ModVersion
STOP
OK
Display shows
ModuleVer
2194
VOL
VOL
Display shows
0.2WiFiMAC
STOP
OK
Display shows
WiFi MAC
0123:45:67:89:01
VOL
VOL
Display shows
0.3EtherMAC
STOP
OK
Display shows
Ethernet MAC
01:23:4567:89:01
 Loading...