

Page 1
Quick start guide
2
User Manual
1
Q
uick Start Guide
3
Wall Mounting
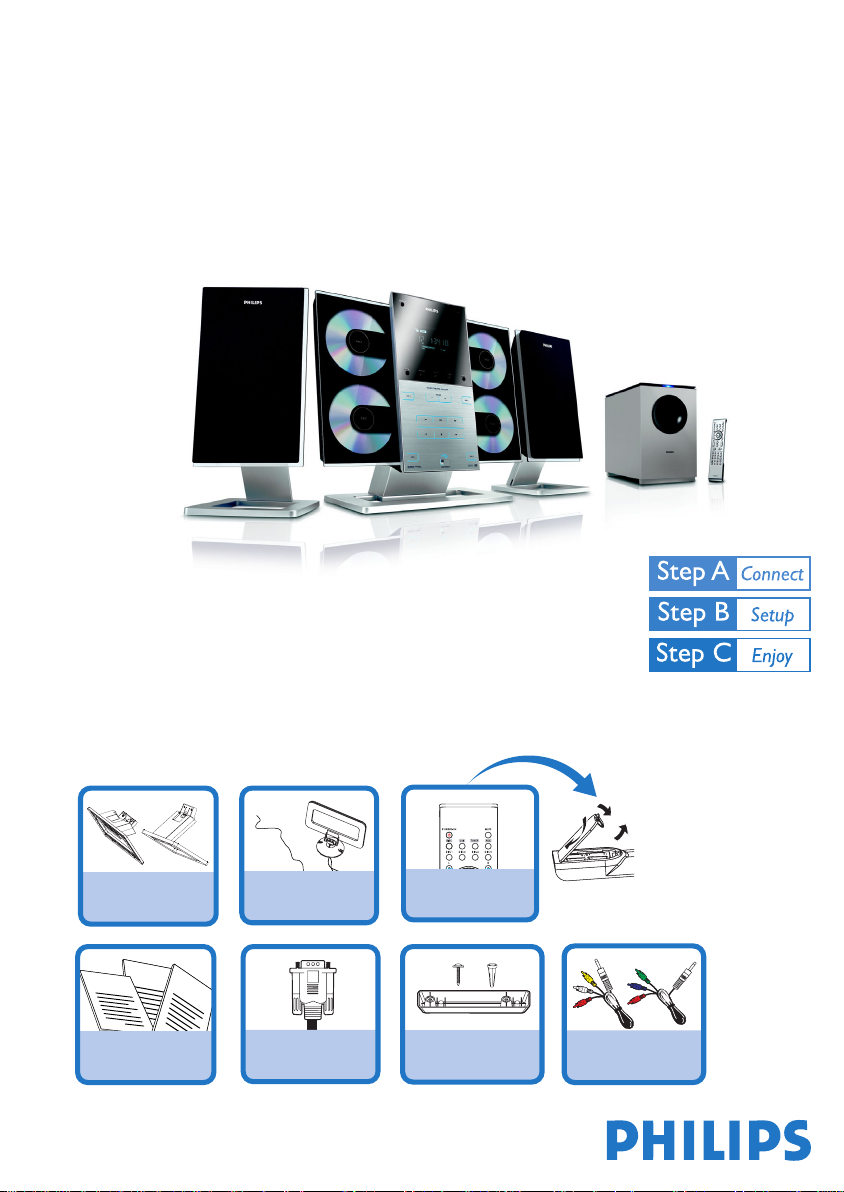
MCD 299
What’s in the Box?
You should find these items upon opening the box.
1 x main unit stand
2 x speaker stands
Quick Start Guide
Wall Mounting
User Manual
FM and MW antennas
15-pin D-Sub cable
Remote control with two
AAA batteries
6 x screws and dowels
2 x speaker brackets
A/V cord (R/W/Y)
Component video cables
(red/blue/green)
Page 2
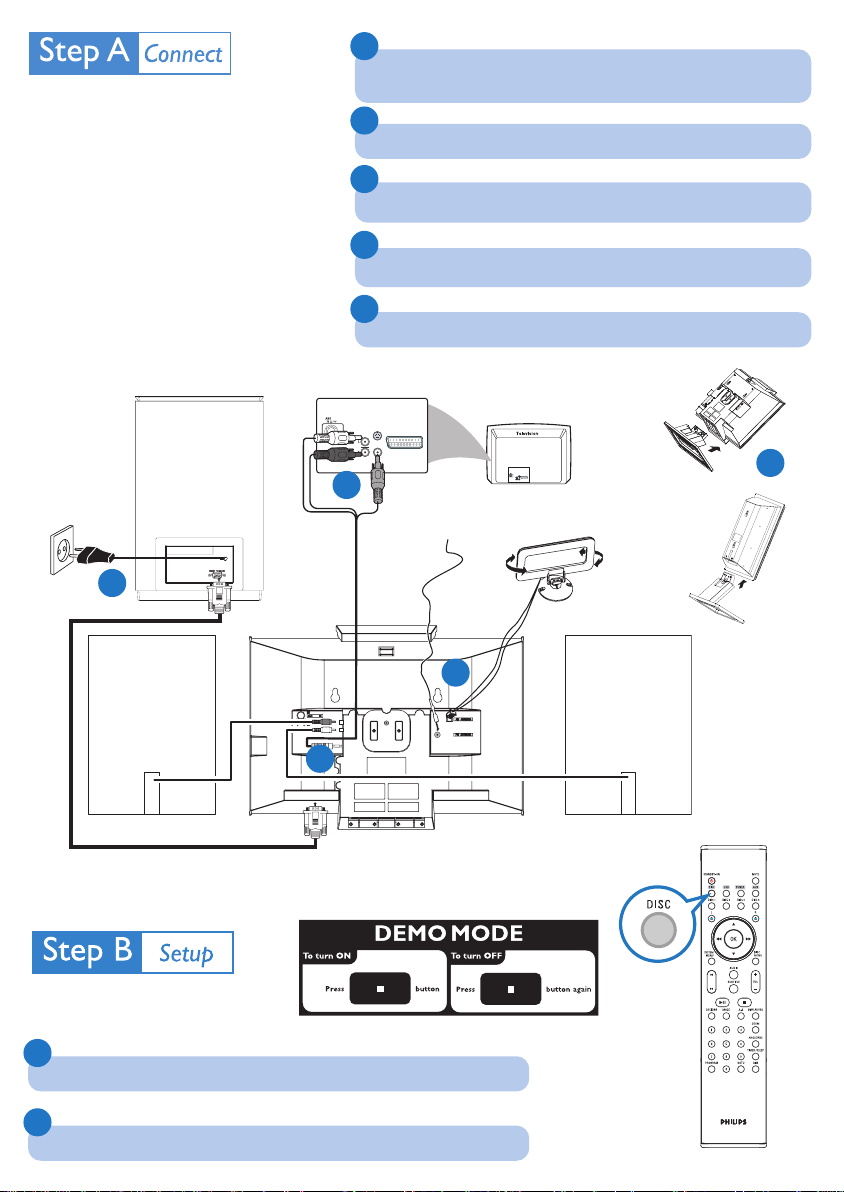
Tips
– See the User Manual for other TV
connection options.
– See Wall Mounting for detailed
instructions if you want to mount the
system on the wall.
WARNING: When you are holding
the speakers for mounting them
on the stands, please DO NOT
press on the speaker cloth directly
to avoid any speaker damage!
Subwoofer
AC power
cord
AC CORD
5
A/V cord
1
Attach the supplied stands to the main unit and speakers respectively
so that they can stand firmly on a desktop.
2
Connect the speaker and subwoofer cables.
3
Connect the MW and FM antennas.
4
Connect the A/V cord.
5
Connect the power cords of the system and TV.
S-VIDEO
IN
AUDIO
TV IN
IN
VIDEO IN
S-VIDEO
IN
AUDIO
TV IN
IN
4
FM wire antenna
VIDEO IN
MW loop antenna
1
Speaker
(right)
R
SPEAKERS 6 Ω
L
Y/Pb/Pr OUT
A/V OUT
2
CONNECT TO SUB WOOFER
Setting up the TV
1
Press SOURCE (DISC on the remote) to select disc source.
2
Turn on the TV and set it to the correct Video In channel.
3
Speaker
(left)
Page 3

Setting the clock
1
In standby mode, press and hold CLOCK on the front panel.
2
Press à / á to set the hours.
3
Press í/ë to set the minutes
4
Press PROGRAM to select clock mode.
5
Press CLOCK to confirm the time.
Setting DVD menu options
IMPORTANT!
If the progressive scan feature is activated but the connected TV does not support
progressive signals or the cables are not connected accordingly, see the user
manual for proper progressive scan setup.
– – General Setup Page – –
OSD Lang
Screen Saver
– – Audio Setup Page – –
NIGHT MODE
DIGITAL Output
Dolby Digital Setup
– – Video Setup Page – –
TV Display
PROGRESS
TV Type
– – Preference Page – –
Audio
Subtile
Disc Menu
Parental
Password
Default
Tip
See chapters "Preparation" and "System Menu Options" in the User
Manual for detailed descriptions.
Page 4

C
Enjoy
Playing a disc
1
Press LEFT ç or RIGHT ç on the front panel (L ç or R çon the remote
control) to open the left or right disc door respectively.
2
Insert one or more discs with the printed side facing you. Press LEFT ç or
RIGHT ç on the front panel (L ç or R çon the remote control) again to close
the disc door.
3
Use DISC 1/2/3/4 to select a disc for playback.
➜ Playback will start automatically. If not press ÉÅ.
4
To stop playback, press 9 .
Programming and tuning to radio stations
1
Press SOURCE on the front panel of the system repeatedly or TUNER on the
remote to select the tuner source.
2
Press PROGRAM for more than two seconds to program all available stations in
order of waveband.
///
3
Press í / ë until the desired preset station is displayed.
Playing a USB mass storage device
With the Hi-Fi system, you can use USB flash memory (USB 2.0 or USB1.1),
USB flash players
work with this Hi-Fi system).
(USB 2.0 or USB1.1), memory cards (requires an additional card reader to
1
Insert the USB device’s USB plug into the socket on the set.
2
Press SOURCE once or more (or USB on the remote control) to select USB.
3
Play the USB’s audio files as you do with the albums/tracks on a CD,
Tip
Detailed playback features and additional functions are described in the
accompany owner's manual.
PDCC-JS/JW-0740
 Loading...