

Page 1
Micro Hi-Fi System
MC-
MC-
320
320
1
Page 2
México
Es necesario que lea cuidadosamente su instructivo de
manejo.
PRECAUCIÓN - ADVERTENCIA
No abrir, riesgo de choque eléctrico
Verifique que el voltaje de alimentación
sea el requerido para su aparato
Para evitar el riesgo de choque eléctrico, no quite la tapa.
En caso de requerir servicio, dirijase al personal calificado.
Descripción: Microsistema de Audio
Modelo : MC-320/ 21
Alimentación: 110–127 / 220–240V; ~50–60 Hz
Consumo: 40 W
Importador: Philips Mexicana, S.A. de C.V.
Domicilio: Av. La Palma No.6
Localidad y Tel: Edo. de México C.P. 52784
Exportador: Philips Electronics HK, Ltd.
País de Origen: China
Nº de Serie: ______________________________
ATENCIÓN
Col. San Fernando La Herradura
Huixquilucan
Tel.52 69 90 00
LEA CUIDADOSAMENTE ESTE INSTRUCTIVO
ANTES DE USAR SU APARATO.
AVISO IMPORTANTE
Philips Mexicana, S.A. de C.V.no se hace
responsable por daños o desperfectos causados por:
– Maltrato, descuido o mal uso, presencia de
insectos o roedores (cucarachas, ratones etc.).
– Cuando el aparato no haya sido operarado
de acuerdo con el instructivo del uso, fuera
de los valores nominales y tolerancias de las
tensiones (voltaje), frecuencia (ciclaje) de
alimentación eléctrica y las características
que deben reunir las instalaciones auxiliares.
– Por fenómenos naturales tales como:
temblores, in
eléctricas, rayos etc. o delitos causados por
terceros (choques asaltos, riñas, etc .).
2
undaciones, incendios, descargas
CAUTION
Use of controls or
adjustments or performance
of procedures other than
herein may result in
hazardous radiation
exposure or other unsafe
operation.
Page 3

9
8
5
4
8
7
0
!
6
2
@
#
3
&
^
%
$
1
6
2
5
3
4
3
3
Page 4

4
Page 5

Index
English ------------------------------------------------ 6
Français -------------------------------------------- 22
Español --------------------------------------------- 38
-------------------------------------------------------- 54
English
Français
Español
5
Page 6

Contents
English
General Information
Environmental information ................................ 7
Supplied accessories ............................................ 7
Safety information ................................................ 7
Preparations
Rear connections .......................................... 8 – 9
Optional connection ........................................... 9
Before using the remote control ...................... 9
Replacing battery (lithium CR2025) into the
remote control ..................................................... 9
Controls
Controls on the system and remote
control .................................................................. 10
Basic Functions
Switching the system on ................................... 11
Power-saving automatic standby ..................... 11
Adjusting volume and sound............................ 11
CD Operation
Playing a disc ........................................................ 12
Display CD play time......................................... 12
Selecting a different track ................................. 13
Finding a passage within a track ...................... 13
Different play modes: Shuffle and Repeat ..... 13
Programming track numbers ........................... 13
Reviewing the programme ............................... 13
Erasing the programme ..................................... 13
Clock/Timer
Setting the clock ................................................. 18
Setting the timer ................................................. 18
Activating and deactivating TIMER ................. 18
Activating and deactivating SLEEP .................. 19
Specifications ........................................... 19
Maintenance.............................................. 19
Troubleshooting ............................. 20–21
Radio Reception
Tuning to radio stations .................................... 14
Programming radio stations ............................. 14
Tuning to preset radio stations ....................... 15
Changing tuning grid .......................................... 15
Tape Operation / Recording
Tape playback ...................................................... 16
Switching tape sides ........................................... 16
Reverse mode options ...................................... 16
General information on recording ................. 17
Synchro start CD recording ............................ 17
Recording from the radio................................. 17
Recording from the Aux ................................... 17
Recording timer .................................................. 17
6
Page 7

General Information
Environmental Information
All unnecessary packaging has been omitted. We
have tried to make the packaging easy to
separate into three materials: cardboard (box),
polystyrene foam (buffer) and polyethylene (bags,
protective foam sheet).
Your system consists of materials which can be
recycled and reused if disassembled by a
specialized company. Please observe the local
regulations regarding the disposal of packaging
materials, exhausted batteries and old
equipment.
Supplied accessories
– 2 speaker boxes
– remote control (with battery)
– AM loop antenna
– FM wire antenna
Safety Information
● Before operating the system, check that the
operating voltage indicated on the typeplate (or
the voltage indication beside the voltage
selector) of your system is identical with the
voltage of your local power supply. If not, please
consult your dealer.
● Place the system on a flat, hard and stable
surface.
● Place the system in a location with adequate
ventilation to prevent internal heat build-up in
your system. Allow at least 10 cm (4 inches)
clearance from the rear and the top of the unit
and 5 cm (2 inches) from each side.
● Do not expose the system, batteries or discs to
excessive moisture, rain, sand or heat sources
caused by heating equipment or direct sunlight.
● If the system is brought directly from a cold to a
warm location, or is placed in a very damp room,
moisture may condense on the lens of the disc
unit inside the system. Should this occur, the CD
player would not operate normally. Leave the
power on for about one hour with no disc in the
system until normal playback is possible.
● The mechanical par ts of the set contain self-
lubricating bearings and must not be oiled or
lubricated.
● When the system is switched to Standby
mode, it is still consuming some power.
To disconnect the system from the
power supply completely, remove the AC
power plug from the wall socket.
English
7
Page 8
Preparations
English
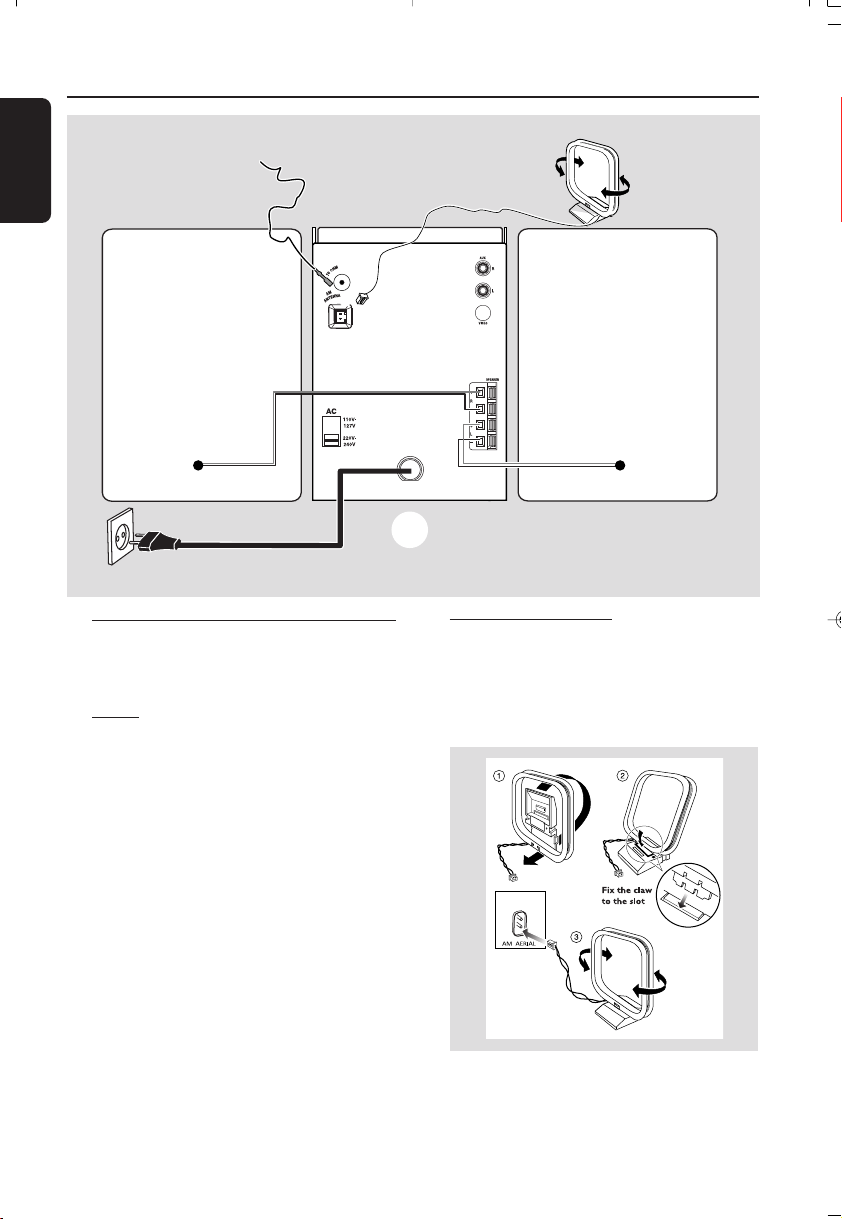
FM wire antenna
AM loop
antenna
speaker
(right)
AC power cord
Rear connections
The type plate is located at the rear of the
system.
A Powe r
Before connecting the AC power cord to the
wall outlet, ensure that the following are done;
– If your system is equipped with a Voltage
Selector, set the VOLTAGE SELECTOR to the
local power line voltage.
– All other connections have been made.
WARNING!
– For optimal performance, use only the
original power cable.
– Never make or change any connections
with the power switched on.
B
speaker
(left)
C
A
B Antennas Connection
Connect the supplied AM loop antenna and FM
antenna to the respective terminals. Adjust the
position of the antenna for optimal reception.
AM Antenna
To avoid overheating of the system, a
safety circuit has been built in. Therefore,
your system may switch to Standby mode
automatically under extreme conditions. If
this happens, let the system cool down
before reusing it (not available for all versions).
8
● Position the antenna as far as possible from a TV,
VCR or other radiation source.
Page 9

Preparations
A
C
R
2
0
2
5
L
I
T
H
I
U
M
B
➠
FM Antenna
● For better FM stereo reception, connect an
outdoor FM antenna to the FM AERIAL (FM
ANTENNA) terminal.
C Speakers Connection
Front Speakers
Connect the speaker wires to the SPEAKERS
terminals, right speaker to "RIGHT" and left
speaker to "LEFT", colored (marked) wire to
"+" and black (unmarked) wire to "-".
● Fully inser t the stripped por tion of the speaker
wire into the terminal as shown.
Notes:
– For optimal sound performance, use the
supplied speakers.
– Do not connect more than one speaker to any
one pair of +/- speaker terminals.
– Do not connect speakers with an impedance
lower than the speakers supplied. Please refer to
the SPECIFICATIONS section of this manual.
Before using the remote control
1 Pull out the plastic protective sheet.
2 Select the source you wish to control by
pressing one of the source select keys on the
remote control (for example CD, TUNER).
3 Then select the desired function (for example
, , ).
plastic
protective
sheet
Replacing battery (lithium
CR2025) into the remote control
1 Pull out the knob A slightly to the left.
2 Pull out the battery compar tment B .
3 Replace a new battery and fully inser t the
battery compar tment back to the original
position.
English
Optional connection
The optional equipment and connecting cords
are not supplied. Refer to the operating
instructions of the connected equipment for
details.
Connecting other equipment to your
system
Connect the audio left and right OUT terminals
of a TV, VCR, Laser Disc player, DVD player or
CD Recorder to the AUX terminals.
Note:
– If you are connecting equipment with a mono
output (a single audio out terminal), connect it to
the AUX left terminal. Alternatively, you can use a
“single to double” cinch cable (the output sound
still remain mono).
CAUTION!
Batteries contain chemical substances, so
they should be disposed off properly.
9
Page 10

Controls (illustrations on page 3)
English
Controls on the system and
remote control
1 Display
– shows the status of the system.
2 PROG/ REV
for CD .................programmes tracks and reviews
for TUNER ........ programmes tuner stations
for TAPE .............. sets tape reverse modes
the programme.
manually or automatically.
3 CLOCK SET /
for CLOCK .......set the clock function.
for CD .................starts or interrupts CD playback
for TAPE .............. starts the tape playback
4 Mode Selection
VOLUME (-/+)
– adjusts the volume level.
– on the system only - adjusts the hour and minutes
for the clock/timer functions.
PRESET/ TIMER SET /
for TUNER ........ selects a preset radio station.
for CD .................skips to the beginning of a
current track/previous/
for Timer ( only) to set timer under standby
SEARCH/ TUNE /
for TUNER ........ Tune to a station
for CD .................fast searches back and forward
for TAPE .............. fast rewind/ wind tape
STOP 9
................................. stops CD playback or erase a
................................. stops tape playback/recording.
................................. Changing tuning grid
REC ● ............... starts recording.
subsequent track
within a track/CD.
CD programme.
5 SOURCE ●
– selects the respective sound source for CD/
TUNER/ TAPE /AUX.
– switches on the system.
6 DISPLAY-BAND (on the remote control
DISPLAY A/B)
for TUNER ........ change the tuner radio band.(FM/
for CD .................change the CD display mode
for TAPE .............. switches tape direction
MW)
7 iR SENSOR
– infrared sensor for remote control.
8 STANDBY ON2
– switches the system to standby.
9 PHONES - connects to headphone.
0 - open/ close the cassette door.
! CD OPEN
– open the CD door.
@ INTERACTIVE SOUND controls:
DBB .................... (Dynamic Bass Boost) enhances
the bass.
DSC ..................... (Digital Sound Control) selects
INCREDIBLE SURR.
(IS) ....................... creates a super-enhanced stereo
sound characteristics: CLASSIC/
JAZZ/ ROCK/ OPTIMAL.
effect.
# REPEAT
– repeats a track/ CD programme/ entire CD.
$ SHUFFLE
– plays CD tracks in random order.
% MUTE
– interrupts and resumes sound reproduction.
^ SLEEP
– activates/deactivates or selects the sleeper time.
& TIMER ON / OFF
– activates/deactivates the timer function.
Notes for remote control:
– First select the source you wish to control
by pressing one of the source select keys on
the remote control (for example CD,
TUNER).
– Then select the desired function (for
example ,
, ).
10
Page 11

IMPORTANT!
Before you operate the system, complete
the preparation procedures.
Switching the system on
● Press 2 STANDBY ON.
➜ The system will switch to the last selected
source.
● Press CD, TUNER, TAPE or AUX on the
remote control.
➜ The system will switch to the selected source.
Basic Functions
Adjusting volume and sound
1 Press VOLUME-/+ to decrease to increase
volume on the system.
➜ Display shows the volume level VOL and a
number from MIN1, 2, ...38, 39 MAX.
2 Press DSC repeatedly to select the desired
sound effect: CLASSIC/ JAZZ/ ROCK/
OPTIMAL.
3 Press DBB to switch bass enhancement on or
off.
➜ Display shows: DBB ON or DBB OFF.
4 Press IS on the remote control to switch the
surround sound effect on or off.
➜ Display shows: IS ON or IS OFF.
Note:
– The effect of INCREDIBLE SURROUND may
vary with different types of music.
5 Press MUTE on the remote
control to interrupt sound
reproduction instantly.
➜ Playback will continue
without sound and the display
shows MUTE.
● To activate sound reproduction you can:
– press MUTE again;
– adjust the volume controls;
– change source.
English
To switch the system to standby mode
● Press 2 STANDBY ON.
● If in recording mode, press STOP 9 first.
➜ The volume level(up to a maximum volume
level of 20), interactive sound settings, last
selected source and tuner presets will be
retained in the player's memory.
Power-saving automatic standby
As a power-saving feature, the system
automatically switches to standby 15 minutes
after a tape or CD has reached the end and no
control is operated.
11
Page 12

CD Operation
English
IMPORTANT!
The lens of the CD player should never be
touched.
Playing a disc
● CD-ROM, CD-I, CDV, VCD, MP3, DVD or
computer CDs, however, are not possible.
4 Press to start playback.
➜ Current track number and elapsed playing
time of the track are displayed during disc
playback.
5 To interrupt playback press . Press again
to resume play.
6 To stop disc playback, press STOP 9.
Note: CD play will also stop when;
– the CD door is opened.
– the disc has reached the end.
– you select another source: TAPE, TUNER or AUX.
Displaying CD play time
Normal CD playback mode
● Press DISPLAY repeatedly, the following
information will be displayed consecutively.
– Track number and elapsed play time of current
track
– Track number and remaining play time of current
track
– Track number and total elapsed play time of the
disc
– Total remaining number of tracks and total
remaining time.
CD SHUFFLE and REPEAT playback mode
● Press DISPLAY repeatedly, following
information will be displayed consecutively.
– Track number and elapsed play time of current
track
– Track number and remaining play time of current
track
1 Select CD source.
2 Press CD OPEN on the top
of the system to open the CD compartment.
➜ CD OPEN is displayed when you
open the CD compartment.
3 Put a disc with the printed side facing up and
press down. Push the front panel to close.
➜ READING is displayed as the CD player
scans the contents of a disc, and then the total
number of tracks and playing time are shown.
12
CD PROGRAM playback mode
● Press DISPLAY repeatedly, following
information will be displayed consecutively
– Track number and elapsed play time of current
track
– Track number and remaining play time of current
track
– Current program number and track number
Page 13

CD Operation
Selecting a different track
● Press or once or repeatedly until the
desired track number appears in the display.
● If you have selected a track number shortly after
loading a disc or in the PAUSE position, you will
need to press to start playback.
Finding a passage within a track
1 Press and hold down on or
➜ The disc is played at high speed and low
volume.
2 When you recognise the passage you want,
release or .
➜ Normal playback continues.
Note:
– During a disc programme or if SHUFFLE/
REPEAT active, searching is only possible within the
same track.
Different play modes: SHUFFLE
and REPEAT
You can select and change the various play
modes before or during playback. The REPEAT
modes can also be combined with PROGRAM.
SHUFFLE ......... tracks of the entire disc are
played in random order
SHUFFLE and REPEAT ALL…to repeat the
entire disc continuously in
random order
REPEAT ALL ... repeats the entire disc/ program
REPEAT ............plays the current track
continuously
1 To select your play mode, press the SHUFFLE
or REPEAT on the remote control before or
during playback until the display shows the
desired function. (SHUF, REPEAT, REPEAT ALL)
2 Press to start playback if in the STOP
position.
➜ If you have selected SHUFFLE, playback starts
automatically.
3 To return to normal playback, press the
respective SHUFFLE or REPEAT button until
the various SHUFFLE / REPEAT modes are no
longer displayed.
● You can also press STOP 9 to cancel your play
mode.
Programming track numbers
Program in the STOP position to select and
store your disc tracks in the desired sequence. If
you like, store any track more than once. Up to
40 tracks can be stored in the memory.
1 Press PROG / REV (or PROGRAM / REV on
remote control) to enter the programming
mode.
➜ A track number is shown and PROGRAM
flashes.
2 Use the or to select your desired track
number.
3 Press PROG / REV (or PROGRAM / REV on
remote control) to confirm the track number to
be stored.
➜ The number of tracks programmed is shown.
4 Repeat steps 2-3 to select and store all desired
tracks.
➜ MEMORY FULL is displayed if you attempt to
program more than 40 tracks.
5 To start playback of your disc program, press
STOP 9 followed by or press directly.
Reviewing the program
In STOP mode, press and hold PROG / REV.
Until the display shows all your stored track
number in sequence.
Erasing the program
You can erase the program by:
● pressing STOP 9 twice during playback;
● opening the CD compar tment;
➜ PROGRAM disappears from the display.
English
13
Page 14

Radio Reception
English
Tuning to radio stations
1 Select TUNER source.
➜ TUNER is displayed briefly.
2 Press BAND (or DISPLAY on remote control)
once or more to select your waveband (FM/
MW).
3 Press down TUNE or and release
button.
➜ The radio automatically tunes to a station
with sufficient reception. Display indication during
automatic tuning: SEARCH.
➜ If a FM station is received in stereo, is
shown.
4 Repeat step 3 if necessary until you find the
desired station.
● To tune to a weak station, press TUNE or
briefly and repeatedly until you have found
optimal reception.
Programming radio stations
You can store up to a total of 40 radio stations
in the memory.
Automatic programming
Automatic programming will start with a chosen
preset number. From this preset number
upwards, former programmed radio stations will
be overridden. The system will only program
stations which are not in the memory already.
1 Press PRESET or to select the preset
number where programming should start.
Note:
– If no preset number is selected, default is preset
(1) and all your presets will be overridden.
2 Press PROG (PROGRAM on remote control)
for more than 2 seconds to activate
programming.
➜ AUTO is displayed and available stations are
programmed in order of waveband reception
strength: FM followed by MW The last preset
automatically stored will then be played.
Manual programming
1 Tune to your desired station (see “Tuning to
radio stations”).
2 Press PROG (PROGRAM on remote control)
to activate programming.
3 Press PRESET or to allocate a number
from 1 to 40 to this station.
4 Press PROG (PROGRAM on remote control)
again to confirm the setting.
➜ The preset number and the frequency of the
preset station are shown.
5 Repeat the above four steps to store other
stations.
● You can override a preset station by storing
another frequency in its place.
14
Page 15

Tuning to preset radio stations
● Press PRESET or until the desired preset
station is displayed.
Changing tuning grid (some versions
only)
In North and South America the frequency step
between adjacent channels in the AM and FM
band are 10 KHz and 100 KHz respectively. In
the rest of the world this step is 9 KHz and 50
KHz. Usually the frequency step has been preset
in the factory for your area if not:
1 Select TUNER source.
2 Press STOP on the set for at least 5 seconds.
➜ The display shows either GRID 9 or
GRID 10.
Note:
– All preset stations will be lost and need to be
reprogrammed.
Radio Reception
English
15
Page 16

Tape Operation / Recording
English
Tape playback
1 Select TAPE source.
2 Press to open the tape door on the top of the
system.
3 Insert a recorded tape and close the tape door.
● Load the tape with the open side downward
and the full spool to the right.
➜ The display shows TAPE briefly. The tape
counter 0000 display with the SIDE A or SIDE B.
4 Press to start playback.
5 By pressing or , fast winding of tape is
possible in both directions.
● During fast winding, you can monitor the tape
message with the tape counter.
6 To stop the tape, press STOP 9 .
● To reset the tape counter, press STOP 9 again.
Note:
– The sound source cannot be changed while
recording a tape.
– “NO TAPE” will be shown if no tape inserted.
Switching tape sides
The tape side can be switched manually or
automatically before or during tape playback.
● Press DISPLAY BAND or A/B on remote
control.
➜ The display shows SIDE A or SIDE B.
Reverse mode options
● Press PROG / REV repeatedly to select your
option;
PLAY 1 SIDE : playback or record stops at
the end of the tape.
PLAY A AND B : both sides are or recorded
played once.
REPEAT A AND B : both sides are played
repeatedly, up to 5 times
each side.
General information on
recording
● Recording is permissible insofar as copyright or
other rights of third parties are not infringed.
● For recording, use only NORMAL (IEC type I)
tapes on which the tabs have not yet been
broken. This deck is not suited for recording on
METAL (IEC IV) type tapes.
● The best recording level is set automatically.
Altering the VOLUME, INCREDIBLE
SURROUND, DBB or INTERACTIVE SOUND
controls will not affect the recording in progress.
● At the very beginning and end of the tape, no
recording will take place during the 7 seconds
when the leader tape passes the recorder heads.
● To protect a tape from accidental erasure, have
the tape in front of you and break out the left
tab. Recording on this side is no longer possible.
If, however, you wish to record over this side
again, cover the tabs with a piece of adhesive
tape.
16
Page 17

Tape Operation / Recording
Synchro start CD recording
1 Select CD source.
2 Insert a disc and if desired, program track
numbers.
3 Press to open the tape door.
4 Insert a suitable tape into the deck and close the
tape door.
5 Press REC to start recording.
➜ REC is shown during recording.
➜ Playing of the CD program starts
automatically from the beginning of the CD
after 7 seconds. It is not necessary to start the
CD player separately.
6 To stop recording, press STOP 9.
Recording from the radio
1 Select TUNER source and tune to the desired
radio station (see “Tuning to radio stations”).
2 Press to open the tape door.
3 Insert a suitable tape into the deck and close the
tape door.
4 Press REC to start recording.
➜ REC is shown during recording.
5 To stop recording, press STOP 9.
Recording from Aux
1 Select AUX source.
2 If necessary, prepare the additional appliance for
recording.
3 Press REC to start recording.
➜ REC is shown during recording.
4 To stop recording, press STOP 9.
Recording timer
To record from the radio, you will need to use a
preset radio station and to set a start (ON) and
finish (OFF) time.
1 Insert a suitable tape into the deck.
➜ If desired, press REV to select tape reverse
mode option.
PLAY 1 SIDE : for recording one side only
PLAY A AND B : for recording on both sides
REPEAT A AND B : for recording on both sides
2 Select TUNER SOURCE and the preset radio
station to record from.
3 Press STANDBY ON to switch the system to
standby mode. Press TIMER SET / for more
than 2 seconds.
➜ flashes and a source is displayed.
4 Press SOURCE repeatedly or press VOLUME
–/+ until REC TUN source is displayed.
5 Press TIMER SET / to confirm the source.
➜ SET ON TIME is displayed, and the clock
digits for the hours flash.
6 Press VOLUME –/+ to set the hours.
7 Press TIMER SET / again.
➜ The clock digits for the minutes flash.
8 Press VOLUME –/+ to set the minutes.
9 Press TIMER SET / to confirm the ON star t
time.
➜ SET OFF TIME is displayed, and the
clock digits for the hours flash.
10 Repeat steps 6-8 to set the finish time.
11 Press TIMER SET / to confirm the timer
settings.
➜ is shown and the recording timer is now
set.
English
17
Page 18

Clock/Timer
English
Setting the clock
1 In standby, press and hold CLOCK SET / .
➜ The clock digits for the hours flash.
2 Press VOLUME –/+ to set the hours.
3 Press CLOCK SET / again.
➜ The clock digits for the minutes flash.
4 Press VOLUME –/+ to set the minutes.
5 Press CLOCK SET / to confirm the time.
Note:
– The backlight for clock display is dim in standby.
Setting the timer
● The system can be used as an alarm clock,
whereby the CD, TUNER or TAPE is switched on
at a set time. The clock time needs to be set first
before the timer can be used.
● You can also use it to record a favourite tuner
programme at a set period (see “Recording
timer”)
● During setting, if no button is pressed within 90
seconds, the system will exit timer setting mode
automatically.
1 In standby mode, press TIMER SET / on the
system for more than 3 seconds.
2 Press SOURCE or VOLUME –/+ to select
sound source.
➜ Display sequence shows CD, TUNER, TAPE or
REC TUN.
3 Press TIMER SET / to confirm your desired
mode.
➜ Display sequence scrolls SET ON TIME and
flashes. The clock digits for the hours flash.
4 Press VOLUME –/+ to set the hours.
5 Press TIMER SET / again.
➜ The clock digits for the minutes flash.
6 Press VOLUME –/+ to set the minutes.
7 Press TIMER SET / to confirm the time.
➜ The timer is now set and activated.
Activating and deactivating
TIMER
● In standby or during playback, press
TIMER ON / OFF on the remote control
once.
➜ Display shows if activated, and disappears
if deactivated.
Activating and deactivating
SLEEP
The sleep timer enables the system to switch off
by itself after a set period of time.
● Press SLEEP on the remote control once or
more.
➜ Display shows SLEEP and one of the sleep
time options in sequence: 90, 80, 70, 60,...,
20,10, OFF, 90. if you have selected a time.
Once SLEEP is activated, SLEEP is display.
● To deactivate, press SLEEP
on the remote control once or
more until OFF is shown, or
press STANDBY ON on the
system or remote control.
➜ OFF is displayed.
18
Page 19

Specifications / Maintenance
AMPLIFIER
Output power ....................................... 2 x 20 W RMS
......................................................................... 800 W PMPO
Signal-to-noise ratio ....................................... ≥ 62 dBA
Frequency response ......... 63 – 16000 Hz, ± 3 dB
Input sensitivity AUX ....................... 0.5 V (max. 2 V)
Impedance loudspeakers ......................................... 6 Ω
Impedance headphones .................... 32 Ω -1000 Ω
......................................................................................... <0.5W
CD PLAYER
Frequency range .................................. 30 – 16000 Hz
Signal-to-noise ratio ............................................ 75 dBA
TUNER
FM wave range ...................................87.5 – 108 MHz
MWwave range (9 kHz) ............... 531 – 1602 kHz
MW wave range (10 kHz) ........... 530 – 1700 kHz
Tuning grid ............................................................ 9/10 kHz
Sensitivity at 75 Ω
– mono, 26 dB signal-to-noise ratio ............ 2.8 µV
– stereo, 46 dB signal-to-noise ratio ........ 61.4 µV
Selectivity ................................................................. ≥ 28 dB
Total harmonic distortion ..................................... ≤ 5%
Frequency response ..... 63 – 12500 Hz (± 3 dB)
Signal-to-noise-ratio ...................................... ≥ 50 dBA
TAPE DECK
Frequency response
Normal tape (type I) ...... 80 – 12500 Hz (8 dB)
Signal-to-noise ratio
Normal tape (type I) .................................... 50 dBA
Wow and flutter ......................................... ≤ 0.4% DIN
SPEAKERS
Bass reflex system
Dimensions (w x h x d) . 166 x 225 x 244 (mm)
Cleaning the Cabinet
● Use a soft cloth slightly moistened with a mild
detergent solution. Do not use a solution
containing alcohol, spirits, ammonia or abrasives.
Cleaning Discs
● When a disc becomes dir ty,
clean it with a cleaning cloth.
Wipe the disc from the centre
out.
● Do not use solvents such as
benzene, thinner, commercially
available cleaners, or antistatic spray intended for
analogue records.
Cleaning the disc lens
● After prolonged use, dirt or dust may
accumulate at the disc lens. To ensure good
playback quality, clean the disc lens with Philips
CD Lens Cleaner or any commercially available
cleaner. Follow the instructions supplied with
cleaner.
Cleaning the Heads and the Tape Paths
● To ensure good recording and playback quality,
clean the heads A, the capstan(s) B, and
pressure roller(s) C after every 50 hours of
tape operation.
Caution: Do not rotate the heads during
cleaning.
● Use a cotton swab slightly moistened with
cleaning fluid or alcohol.
● You can also clean the heads by playing a
cleaning tape once.
English
GENERAL INFORMATION
AC Power
For Version /21-/21M ..... 110–127 / 220–240 V;
50–60 Hz Switchable
For Version /30 ..................................... 240V / 50 Hz
Dimensions (w x h x d) ... 166 x 225 x 274(mm)
Weight(with/without speakers) ........... 8.4 / 4.3 kg
Standby power consumption ............................ <6W
Subject to modification
Demagnetising the heads
● Use a demagnetising tape available at your
dealer.
19
Page 20

Troubleshooting
English
WARNING
Under no circumstances should you try to repair the system yourself, as this will invalidate the
warranty. Do not open the system as there is a risk of electric shock.
If a fault occurs, first check the points listed below before taking the system for repair. If you
are unable to remedy a problem by following these hints, consult your dealer or service center.
Problem Solution
CD OPERATION
“NO DISC” is displayed. – Insert a disc.
– Check if the disc is inserted upside down.
– Wait until the moisture condensation at the lens
has cleared.
– Replace or clean the disc, see “Maintenance”.
– Use a finalised CD-RW or CD-R.
RADIO RECEPTION
Radio reception is poor. – If the signal is too weak, adjust the antenna or
connect an external antenna for better reception.
– Increase the distance between the Micro HiFi
System and your TV or VCR.
TAPE OPERATION / RECORDING
Recording or playback cannot be made. – Clean deck parts, see “Maintenance”.
– Use only normal (IEC I) tape for recording.
“CHECK TAPE” is displayed. – Apply a piece of adhesive tape over the missing
tab space.
The tape deck door cannot open. – Remove and reconnect the AC power plug and
switch on the system again.
GENERAL
The system does not react when buttons – Remove and reconnect the AC power plug and
are pressed. switch on the system again.
Sound cannot be heard or is of poor – Adjust the volume.
quality. – Disconnect the headphones.
– Check that the speakers are connected correctly.
– Check if the stripped speaker wire is clamped.
The left and right sound outputs are – Check the speaker connections and location.
reversed.
20
Page 21

Troubleshooting
The remote control does not function – Select the source (CD or TUNER, for example)
properly. before pressing the function button ( , , ).
– Reduce the distance between the remote control
and the system.
– Insert the batter y with its polarities
(+/– signs) aligned as indicated.
– Replace the battery.
– Point the remote control directly toward
IR sensor on the front of the system.
The timer is not working. – Set the clock correctly.
– Press TIMER ON / OFF to switch on the timer.
– If a recording is in progress, stop the recording.
The Clock/Timer setting is erased. – Power has been interrupted or the power cord
has been disconnected. Reset the clock/timer.
English
21
Page 22

AUSTRALIA - Philips 3 years Manufacturers Warranty for Australia only
These warranty conditions are valid for the
following consumer electronics products:
Colour Televisions, Video Cassette Recorders,
CD Players and Recorders, DVD Players and
Recorders, Audio Systems and Portable
Audio.
The benefits given to the purchaser by this
warranty are in addition to all other rights
and remedies which the purchaser has in
respect of the product under the Trade
Practices Act or other Commonwealth or
State Law.
Philips Consumer Electronics warrants its products
to the purchaser as follows and subject to the stated
conditions.
3 years free Repair Service
Colour Televisions, CD Players and Recorders, DVD
Players and Recorders and Audio Systems.
3 years free Replacement – at your Retailer
All Portable Audio products and all Video Cassette
recorders (VCR’s) only.
Conditions of Repair Warranty
1. All claims for warranty service should be made to
your nearest Philips Authorised Service Centre.
Reasonable evidence of date of purchase must be
provided.
2. This warranty extends only to defects in material or
workmanship occurring under normal use of the
product when operated in accordance with the
instructions.
3. This warranty applies for original purchase only. It is
not transferable if sold.
4. Home service within the normal service area of one
of our Authorised Service Centres will only be
provided for television receivers with screen size 48
cm and above. All other products are to be taken or
sent to the workshop of your nearest Authorised
Service Centre (at Consumer’s expense).
5. This Manufacturers Warranty is limited to 3 months
for above listed Consumer Electronics products if
used in commercial applications.
6. Philips may, at its discretion choose to replace rather
than repair any product covered by this warranty.
7. This Manufacturers Warranty is neither transferable
nor valid in countries other than Australia.
This warranty does not cover:
a) Mileage or travelling time, pickup or delivery,
installations and cost of insurance.
b) Mileage or tr avel outside the normal service area
covered by selected Authorised Ser vice Centre.
c) Ser vice costs arising from failure to correctly
adjust the controls of the product or to observe the
instructions, or inspections that reveal that the
product is in normal working order.
d) Product failures caused by misuse, neglect,
accidental breakage, transit damage, inexpert repairs
or modification by un-authorised persons, external
fires, lightning strikes, floods, vermin infestation or
liquid spillage.
e) Cleaning of video or audio heads.
f) Inadequate receiving antennae.
g) Replacement of worn or used batteries or other
consumables.
h) Consumer products used in commercial
applications (This warranty is limited to 3 months
only).
i) Second hand products.
The conditions contained in this warranty card
replace and override the provision of the Philips
World-Wide Guarantee for products purchased in
Australia and used in Australia.
Philips Authorised Service Centres
Service is provided through 200 accredited
Authorised Service Centres throughout Australia. For
direct contact with your nearest recommended
Authorised Service Centre in major cities:
Adelaide Launceston
Brisbane Melbourne
Canberra Newcastle
Geelong Perth
Gold Coast Sydney
Hobart Wollongong
or to find the location of your nearest recommended
Authorised Service Centre outside the above cities
please call our National Service telephone number :
1300-36-13-92
Please record the following information for your
records and keep in a safe place.
Model number:....................................................
Serial number:....................................................
Date of purchase:....................................................
Retailer:....................................................
We recommend you retain your purchase
receipt to assist in any warranty claim.
Philips Consumer Electronics
a division of Philips Electronics Australia Limited
ABN 24 008 445 743,
Level 2, 65 Epping Road NORTH RYDE NSW 2113
70
3 year Warranty valid for all new products purchased after 1st July 2002
Page 23

New Zealand - Guarantee and Service for New Zealand
Thank-you for purchasing this quality Philips
product.
Philips New Zealand Ltd guarantees this product
against defective components and faulty
workmanship for a period of 12 months. Any
defect in materials or workmanship occurring
within 12 months from the date of purchase
subject to the following conditions will be
rectified free of charge by the retailer from whom
this product was purchased.
Conditions
1. The product must have been purchased in New
Zealand. As proof of purchase, retain the original
sales docket indicating the date of purchase.
2. The guarantee applies only to faults caused by de-
fective components, or faulty workmanship on
the part of the manufacturer.
3. The guarantee does not cover failures caused by
misuse, neglect, normal wear and tear, accidental
breakage, use on the incorrect voltage, use contrary to operating instructions, or unauthorised
modification to the product or repair by an
unauthorised technician.
4. Reasonable evidence (in the form of a sales
docket) must be supplied to indicate that the
product was purchased no more than 12 months
prior to the date of your claim.
5. In the event of a failure, Philips shall be under no
liability for any injury, or any loss or damage
caused to property or products other than the
product under guarantee.
This guarantee does not prejudice your rights
under common law and statute, and is in addition
to the normal responsibilities of the retailer and
Philips.
How to claim
Should your Philips product fail within the
guarantee period, please return it to the retailer
from whom it was purchased. In most cases the
retailer will be able to satisfactorily repair or
replace the product.
However, should the retailer not be able to
conclude the matter satisfactorily, or if you have
other difficulties claiming under this guarantee,
please contact
The Guarantee Controller
Philips New Zealand Ltd.
4 P.O. Box 41.021
Auckland
3 (09) 84 94 160
fax 3 (09) 84 97 858
71
Page 24

POLIZA DE GARANTIA
ESTA POLIZA ES GRATUITA
Este aparato ha sido cuidadosamente diseñado y se ha fabricado con los mejores materiales bajo un
estricto control de calidad, garantizando su buen funcionamiento por los periodos establecidos según el
aparato (ver lista en la parte inferior) a partir de la entrega del aparato al consumidor.
Esta póliza incluye la reparación o reposición gratuita de cualquier parte o componente
que eventualmente fallase y la mano de obra necesaria para su reparación, misma que se
hará efectiva en cualquiera de nuestros centros de servicio autorizados en el país.
Si su aparato llegase a requerir de nuestro servicio de garantía, acuda al centro de servicio más
cercano a su domicilio, de tener alguna duda por favor llame a nuestra CENTRAL DE SERVICIO
al Tel.: 52 69 90 86, y en el interior del país LADA sin costo al 01800 506 92 00 en donde con gusto le
indicaremos el centro de servicio autorizado más cercano a su domicilio.
PHILIPS MEXICANA S.A. de C.V. a través de sus centros de servicio autorizados reparará y devolverá
a usted su aparato en un plazo no mayor a 20 días hábiles, contados a partir de la fecha de
ingreso, impresa en la orden de servicio de cualquiera de nuestros centros de servicio autorizados.
La garantía de esta póliza cubre cualquier desperfecto o daño eventualmente
ocasionado por los trabajos de reparación y/o traslado del aparato en el interior de
nuestros centros de servicio autorizados.
Esta póliza sólo tendrá validez, si está debidamente requisitada, sellada por la casa
vendedora, en caso de extravío de esta póliza, podrá hacer efectiva su garantía con la presentación
de su factura de compra.
ESTA POLIZA NO SE HARA EFECTIVA EN LOS SIGUIENTES CASOS:
●
Cuando el aparato sea utilizado en condiciones distintas a las normales.
●
Cuando el aparato no haya sido operado de acuerdo con el instructivo de uso que se le acompaña.
●
Cuando la causa de la falla o mal funcionamiento sea consecuencia de una reparación inadecuada o
alteración producida por personas no autorizadas por PHILIPS MEXICANA S.A. de C.V.
PERIODOS DE GARANTIA
36 MESES. – Monitores para computadora.
12 MESES. – Televisores con y sin reproductor de video digital DVD, videocassetteras, reproductores de
discos de video digital DVD, grabadores reproductores de disco de video digital DVD,
grabadores reproductores de disco compacto,
video proyectores (excepto la lámpara),
cámaras de video, decodificadores de señal (IRD), televisores para hotel, sistemas de
observación, televisores de proyección, teléfonos celulares, pagers,
microsistemas de audio,
equipos modulares, sintoamplificadores, facsímils, LNB, antenas de
minisistemas de audio,
recepción de satélite, DVD ROM, CDR ROM y CDRW ROM para computadora.,
6 MESES. – Radiograbadoras con y sin reproductor de disco compacto, reproductores de cassette
portátil, reproductores de disco compacto portátil, radio relojes, radios A.M./F.M.,
reproductores de audio digital MP3 (internet), auto estéros y teléf
onos inalámbricos.
3 MESES. – Accesorios, controles remotos, bocinas, cinta para fax y para cámaras de videoconferencia.
MC-719-ARCO
72
Page 25

Philips Mexicana, S.A. de C.V.
y
Producto importado por:
Philips Mexicana, S.A. de C.V.
Av. La Palma No. 6
Col. San Fernando La Herradura
Huixquilucan, Edo. de México C. P. 52784
Tel. 52 69 90 00
Información General
Centro de Información al Consumidor
Lada 01 800 504 62 00
MODELO_________________________________ Nº DE SERIE ___________________________
MC-320
La presente garantía contará a partir de: DIA_____________ MES ____________ AÑO____________
En caso que en su producto se produzca alguna falla, acuda al centro de servicio más cercano a su domicilio (según listado de talleres),
de tener alguna duda, por favor llame a nuestra CENTRAL DE SERVICIO, en donde con gusto le atenderemos.
Así mismo, cuando requiera refacciones y par tes originales para su producto, acuda a los centros de servicio. Para hacer efectiva la garantía
de su producto, es necesario que presente usted esta póliza debidamente requisitada, o de lo contrario, presentar su factura de compra.
CENTROS DE SERVICIO
Ciudad EDO Calle y Nº Colonia C.P. Nombre Comercial Lada Telefono Fax
Acapulco GRO Av. Revolucion Nº 28 M. Aleman 39300 Servicio Electronico Profesional 744 83 32 96 – S
Cd. Juarez CHIH. Rancho el Becerro 3011 Pradera Dorada 32610 Teleservicio Dominguez 656 18 21 28 18 21 28 S
Reynosa TAM P S Tiburcio Garza Nº 401 Rodriguez 88699 Teleservicio Pepe 899 22 59 86 – S
Chihuahua CHIH. Trasviña y Retes Nº 3503-A San Felipe 31240 Zener Electronica 614 14 01 16 14 33 51 S
Colima COL Francisco I. Madero Nº 426 Centro 28000 TV Antenas de Colima 312 403 01 403 01 S
Culiacan SIN Venustiano Carranza Nº 140-A Nte. Centro 80090 Estereo Voz 667 16 15 10 – S
Guadalajara JAL Av.Vallarta Nº 2250 Ladron de Guevara 44600 Leecom S.A. de C.V. 33
Leon GTO Hernandez Alvarez Nº 726 San Juan de Dios 37480 Tecnicos Especializados 477 70 26 99 15 58 64 S
Merida YUC Calle 70 Nº 443 X 49 Depto. 8 Centro 97000 Servicentro 999 28 59 05 23 39 97 S
Mexicali B.C.N. Calzada Cuahutemoc Nº 816-2 Cuahutemoc Norte 21200 Baja Electronic’s 686
Mexico D. F. Norte 1 D Nº 4634
Mexico D. F. Calz.Vallejo Nº 1045-03 Esq. Pte. 124 Nueva Vallejo 02300 Electronica Chyr S.A. de C.V. 55
Mexico D. F.
Monterrey N.L. Juan Mendez Nº 825 Nte. Centro 64000
Morelia MICH. Lago de Patzcuaro Nº 500-A Ventura Puente 58020
Oaxaca OAX Huzares Nº 207 Centro 68000 El Francistor S. de R.L.de C .V. 951 647 37 472 97
Pachuca HGO Pza. de las
Puebla PUE Av
Queretaro QRO Bolivia 32 Lomas de Queretaro 76190 Electronica Zener 442 610 09 –
San Luis Potosi S.L.P. Dr. Salvador Nava Nº 2755 Balcones del Valle 78280 Ser vicios Electronicos 444 534 07 –
Tampico TA MP S Laredo Nº 105 Mainero 89060 Concesionario Philips Tampico 833 12 36 04 –
Tijuana B.C.N. Av.
EDO
Toluca
Torreon COAH Mariano Lopez Or tiz Nº 1126 Nte. Centro 27000 Electronica Jomar 871 22 00 05
Tuxtla Gutierrez CHIS 10 Nte. Ote 153-A Centro 29000 KC-Video 961 18 19 08 –
Veracruz VER Guerrero Nº 1877 Entre Cor tez y Canal Centro 91700 Antza Comunicaciones 229
Villahermosa TA B Sanchez Marmol Nº 206 Centro 86000 Tecnicentro 993
MEX
Nicolas San Juan Nº 806,
. del Norte
Esq. div
Americas Lote 28 Nucleo D
. 10 Pte. Nº 2902-B
Negrete 1613
Calle Toluca Nº 505 Sanchez 50040 Concesionario Philips Toluca 722 14 83 09 1703 20 21
NOTA: Los Centros que tengan (S) solo proporcionan Servicio y los que tengan (SR) venden Refacciones
Defensores de la
Republica
Del Valle 03100 Centro de Ser vicio Electronico 55
Valle de Sn Ja
San Alejandro 72090 Selcom 222 48 77 64 31 63 77
Centro 22000
7780 Tecnologia y Servicio S.A. de C.V. 55 5368 30 21 5368 30 21 S
Monterrey Centro Electronico S.A.
Multiserv. Profesionales de Zamora
vier
42086 Frazare Electronica 771 14 15 81 18 86 72
Sistemas Inalambricos de
unicacion
Com
CENTRAL DE SERVICIO
Tel. 52 69 90 86
Lada 01 800 506 92 00
616 18 88
615 72 62 SR
616 01 26
61 98 08
61 98 08
567 19 92
567 22 56
536 71 03
536 25 75
375 16 17
81
400 54 03
443 12 03 17 –
666 85 23 22 85 23 22
32 78 23
32 44 44
14 31 36
– S
56 79 62
5687 13 05
375 34 86
400 54 04
1702 19 76
31 91 66
14 61 67
SR
SR
SR
S
S
S
SR
S
S
SR
S
S
S
S
S
S
73
Page 26

English
Français
Español
Meet Philips at the Internet
http://www.philips.com
MC-320
CLASS 1
LASER PRODUCT
hk-0309
MC-320/21-2
 Loading...