

Page 1
MàGNAVOX
Smart.\fery smart!
Page 2

Page 3
MB7000M001
AutoScan Color Monitor
English Operating instructions 2-18
Français Mode d'emploi...................19-38
For Customer Use:
Enter below the Serial No. which is located on the
back of the cabinet. Retain this information for
future reference.
i
Model No.
Serial No.
A
CAUnON TO REDUCE THE RISK OF ELECTKCAL SHOCK DO NOT REf.'OVE COVEft(OR BACK)
NO USER SERViCEASLE PARTS LNSiDE REFER SERVJONQ TO QUAURED SERVICE PERSONXEU
This "bolt of lightning" indicates that uninsulated material
within your unit may cause an electrical shock. For the safety
of everyone, do not remove product covering.
A
you should read the enclosed literature carefiiUy to prevent operating
and maintenance problems.
This "exclamation point" calls attention to a feature for which
_______________________________
CAUTION
RISK OF ELECTRICAL SHOCK
DO NOT OPEN
ATTENTION
i RISQUE DE CHOC ELECTRIQUE
NE PAS OUVRIR
A
Page 4

в
Page 5

ш
Page 6

B
Safety precautions and maintenance
♦ Disconnect the monitor from the mains supply if the monitor is not
to be used for an extended period of time.
♦ Do not attempt to remove the back cover, as you wiU be exposed to
a shock hazard. The back cover should only be removed by qualified
service personnel.
♦ Do not place objects on top of the monitor cabinet, which could fall
into vents or which could cover them and prevent proper cooling of
the monitor's electronic devices.
♦ Do not expose the monitor to rain or excessive moisture to avoid the
risk of shock or permanent damage to the set.
♦ Do not use alcohol or ammonia based liquid to clean the monitor. If
necessary, clean with a slightly damp cloth. Disconnect the monitor
from the mains supply before cleaning.
♦ Consult a service technician if the monitor does not operate normally
when operating instructions of this manual are followed.
Package
Yomr package includes the following items:
• The monitor (integrated with tilt / swivel pedestal)
• Power cord
• Interface cable (flying-in)
End of life disposal
Your new set contains materials which can be recycled and reused.
Specialized companies can recycle your product to increase the amoimt
of reusable materials and to ininimize the amoimt of materials to be
disposed of.
Please inform yourself on local regulations on disposal of yoiur old set.
Page 7

Installation
Important: Please refer to the user's manuals of your computer and
video adapter to make sure these equipments are properly installed
and configured before installing the monitor.
Positioning / Ventilation
♦ Avoid exposing the monitor to direct sunlight, stoves or any other
heat sources.
♦ To prevent overheating, make sure that the ventilation openings of
the monitor are not covered.
♦ Keep moisture and dust away.
♦ Keep away from any magnetic objects, such as speakers, electric
motors, transformers, ...etc.
♦ When positioning this monitor, make sure that the mains plug and
socket are easily accessible.
Pedestal
With the built-in pedestal you can tilt and / or swivel the monitor for a
most comfortable viewing angle.
a
Page 8
B
Connection
Important: Please make sure the AC power to your computer is
"OFF" before connecting or disconnecting any display peripheral.
Failure to do so may cause serious personal injmry as well as
permanent damage to your computer equipments.
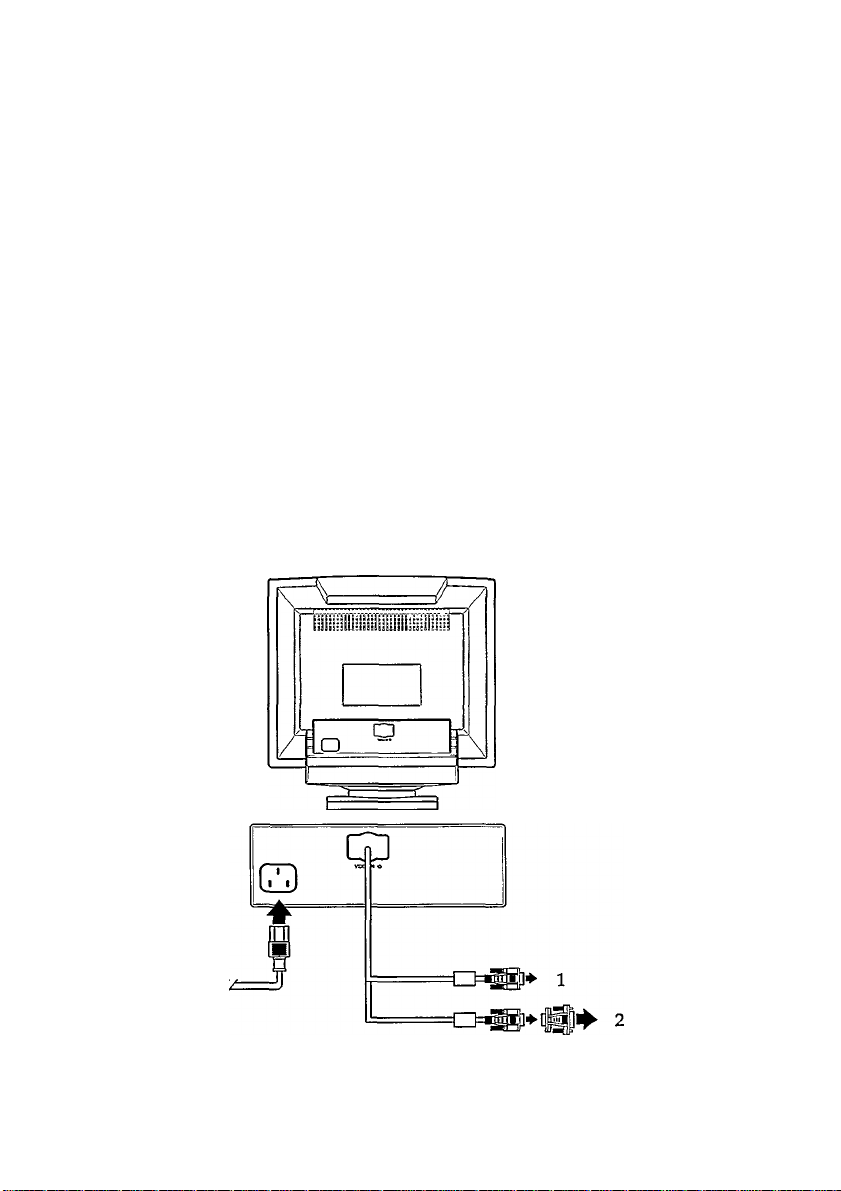
Connect the monitor to the computer using the supplied interface
cables. Connection with computer system other than IBM PC or
Apple computers may need different l^e of adapters. Please consult
your computer supplier for these adapters. Connect the power cord
to a wall outlet after the interface cable is properly connected.
Monitor rear view
1) IBM PC connection
2) Apple's connection
3) Mains connection
Page 9

Control locations and functions
Monitor control panel
©(D(D® (D (D ®
a
©00© g ^ n
Descriptions of knobs and keypads on front control panel
© © • Press this knob to switch ON and OFF of monitor's power
@ 3 • Adjust contrast of the display
@ ^ • Adjust brightness of the display
@ 10 • Activate OSD menu
• To scroll down the OSD function
Decrease value for controlled item
® +
© 0 • To scroU up the OSD function
Confirm the selection on highlighted icon
Increase value for controlled item
0
—
Page 10

в
8
OSD menu tree structure
First Level
• SIZE&POSrriON
COLOR TEMPERATURE
QUIT
SAVE AND EXIT
SCROLL ^ : Up O' : Dovm
Second Level
HORIZONTAL POSITION
HORIZONTAL SIZE
VERTICAL POSITION
VERTICAL SIZE
EXIT
TRAPEZOID
PINCUSHION
TILT
EXIT
DEGAUSSING
POWER SAVING ON
RECALL
EXIT
■ s:::i
£;::^
USER COLOR #1 —
. USER COLOR #2 —
• EXIT
Third Level
------
RED (red color)
- GREEN (green co!or)
- BLUE (blue color)
- EXIT
- RED (red color)
“ GREEN (green color)
- BLUE (blue co’or)
- EXIT
SELECT+: ENTER
Page 11

Adjustment via On-Screen-Display
One example
Use following steps to adjust horizontal (position) of the display:
• Press O, you will see an OSD window (main menu) presented on
the screen. resolution and frequency of the display
layer of the OSD menu
StZE & POSITION
GEOMETRY
SPECIAL
COLOR TEMPERATURE
QUIT
SAVE AND EXIT
Press |C> to place highlighted (BLUE) item.
GEOMETRY
SPECIAL
COLOR TEMPERATURE
QUIT
SAVE AND EXIT
Press +, a scale presented on the picture of OSD window.
HORIZONTAL SIZE
VERTICAL POSITION
VERTICAL SIZE
EXIT
IIIIIIMI-
........................................
•■■■-29%
adjustment functions
i
Press + or - to adjust the horizontal position of the display. The scale
in OSD window shows the controllable range.
HORIZONTAL SIZE
VERTICAL POSITION
VERTICAL SIZE
EXIT
IIIIIIIII................... ..................
the magnitude value of scale bar will be
decreased or increased according to the
adjustment
When the display has been adjusted to an appropriated position,
press lO scroll down to "EXIT" position and then press + once to
go back to first layer of OSD menu. Press 10 once to "SAVE AND
EXIT", press "+",then the adjusted parameters are automatically
saved.
Page 12

в
10
Page 13

11
i
Page 14

B
12
SPECIAL
SPECIAL SUB-MENU
(1) DEGAUSSING
POWER SAVING ON
RECALL
Press IC> to activate OSD menu.
Press 0, 0> to move the highlight
to the function you want to adjust.
Press O to select "SPECIAL" and
press + to confirm the selection.
Press lO to "EXIT" and press + to
back to the OSD main menu.
Press O to "SAVE AND EXIT".
Press + to confirm the save, and the
adjustments will be automatically
saved.
Press ^ to move the highlight
to the "DEGAUSSING" function.
Press + to perform DEGAUSSING.
Press l0> to "EXIT" and press + to
back to the OSD main menu.
Press O to "SAVE AND EXIT".
Press + to confirm the save, and the
adjustments will be automatically
saved.
Page 15

(2) POWER SAVING ON/OFF
DEGAUSSING
POWER SAVING ON
(3) RECALL
DEGAUSSING
POWER SAVING ON
COLOR TEMPERATURE
wot »».»fcfTCM«
SIZE & POSITION
GEOMETRY
SPECIAL
______________________
QUIT
SAVE AND EXIT
|>iHDC»WN
13
You can enable or disable automatic
power saving fimction (described
in the following chapter). Default
setting is "ON". You can use"-" to
choose "OFF" if you don't want the
monitor to automatically reduce its
power consumption.
In the 2nd layer of "SPECIAL"
of OSD menu. Press C> r lC> to place
highlighted item on RECALL.
Press + to perform recall function.
In this case, the horizontal position,
horizontal size, vertical position,
vertical size, geometry, and input
selection of current mode are
restored by factory preset
parameters.
Press lC> to activate OSD menu.
Press lC> , > to move the highlight
to the function you want to adjust.
Press IC> to select "COLOR
TEMPERATURE" and press + to
confirm the selection.
Press ^ , 10 to choose the selected
2nd layer function.
Press 10 to "EXIT" and press + to
back to the OSD main menu.
Press 10 to "SAVE AND EXTI".
Press + to confirm the save and the
adjustments will be automatically
saved.
a
Page 16

14
Page 17

15
Data Storage
(A) Factory preset mode:
This monitor has 13 factory-preset modes as indicated in the following
table:
Frequence Sync polarity
Mode Resolution
MOl VGA 640x400 31.5
M02 VGA
M03 MACn 640x480
M04 VGA
SVGA
M05
SVGA
M06
M07 SVGA
M08 QUADRA 832x624 49.7
8514 / A
M09
MIO VESA
Mil VESA
M12
VESA 1024x768 60.0
M13 1280x1024 64.0
* Does not support sync-on-green.
640x480 31.5
640x480 37.5 75
800x600 35.2
800x600 37.8
800x600
1024x768
1024x768 48.4 60
1024x768 56.5 70
H(KHz) V(Hz)
70
60
35.0 66.7
56
60
46.9
35.5
75
75
87 +
75
60
H V
-
- -
-
-
+ /-
+ /- + /-
+ /+
+
-
— —
+ +
- -
+
_
-
+
+
-
+
a
(B) User mode
In addition to factory preset modes, the monitor can also provides
additional 13 User-defined modes.
If the input video signal is different from our factory-preset modes,the
new timing data wiU be automatically stored. However, the displayed
parameters may need to be adjusted. User can adjust the parameters
via OSD, as preceding procedures which already described on
"Adjustment via On-Screen-Display" section.
(C) New mode
The monitor is reversed for 4 new modes in case non-standard video
modes are used.
Page 18

16
B
Automatic Power Saving
If you have VESA's DPMS (version l.Op) compliance display card or
software installed in your PC, the monitor can automatically reduce its
power consumption when not in use. And if an input from keyboard,
mouse or other input devices is detected, the monitor will automatically
"wake up". The following table shows the power consumption and
signalling of this automatic power saving feature:
Power Manag
VESA's mode
ON
Stand-by Blanked No Yes <15W
Suspend Blanked Yes
OFF Blanked No No < 5W 95%
This monitor is Energy Star compliant and TCO'92 power
management compatible.
AS AN ENERGY STAR PARTNER, MAGNAVOX HAS
DETERMINED THAT THIS PRODUCT MEETS THE ENERGY
STAR GUIDELINES FOR ENERGY EFFICIENCY.
Video H-sync
Active Yes Yes
ement Definition
V-sync Power
used
<100W 0% Green
No <15W 85% Yellow
Power
saving(%)
85% Yellow
LED
color
Amber
Page 19

Specification*
(I) General
CRT
Screen size
Focusing method
Dot pitdi
Phosphor
Screen treatment
Display area
Factory preset
Maximum usable
Scarming frequency
Horizontal (line)
Vertical (frame)
Input power
Power consumption
Input signal
Video
Sync
Pedestal
Tilt
Srvivel
Physical
Unit dimension (WxHxD)
Net weight
Operating condition
Temperature
Humidity
Storage condition
Temperature
Humidity
17
i
17' (43.2 cm) flat & square
Dynamic focus
0.28 mm
P22 or equivalent, medium short
persistence
Anti-glare, anti-static
300 mm (H) x 225 mm (V)
329 mm (H) x 248 mm (V)
30-66 kHz (AutoScan)
50-130 Hz (AutoScan)
100-240 VAC, 50-60 Hz
100 Watt normal, 110 Watt maximum
0.7 Vpp, 75 Ohm inpedence
Separate sync. TIL level
Composite sync. TTL level
5° fonvard, 13° backward
90° leftward, 90° rightward
422 X 430 x 449 (mm)
18.5 kg
0° C - 40° C
20% - 80%
-25° C - 70° C
10% - 95%
Because of a policy of continuous product improvement, the above specifications
are subjected to change without notice.
Page 20

в
18
(II) Pin assignment:
s4—• • • • Ф—1-1
10-\-# • • • • —j- 6
■ • m—f- 11
(1)
(1) The 15-pin D-sub connector (male) of the signal cable (IBM systems):
IsA^ • • • • • »7^ 9
(2)
Pin No.
(2) The 15-pin D-sub connector (male) of the adapter (Apple
Pin No.
Assignment Pin No. Assignment
Red video input 9
1
Green video input 10 Logic ground
2
Blue video input
3
Identical output
4
- Connected to pin 10
Ground 13
5
Red video groimd
6
7 Green video groimd 15
Blue video ground
8
Macintosh systems):
Assignment Pin No. Assignment
1 Red ground
2 Red video
Composite Sync, H+V 11 Composite Sync &
3
Sense 0
4
Green video
5
Green groimd 13
6
7 Sense 1
Not connected 15
8
No pin
Identical output
11
- connected to pin 10
12 Serial data line (SDA)
H. Sync / H+V
14 V. Sync (VCLK for DDC)
Data clock line (SDA)
9 Blue video
Sense 2
10
V.Sync ground
12 V. Sync
Blue \ddeo groimd
14 H. Sync groimd
H. Sync
Page 21

Federal Communications Com
mission
(FCC Statement)
NOTE: This equipment has been tested and found to comply with the
limits for a Class B digital device, pursuant to Part 15 of the FCC
Rules. These limits are designed to provide reasonable protection
against harmful interference in a residential installation. This
equipment generates, uses and can radiate radio frequency energy
and, if not installed and used in accordance with the instructions, may
cause harmful interference to radio communications. However, there
is no guarantee that interference will not occur in a particular
installation. If this equipment does cause harmful interference to radio
or television reception, which can be determined by turning the
equipment off and on. The user is encouraged to try to correct the
interference by one or more of the following measures;
— Reorient or relocate the receiving antenna.
— Increase the separation between the equipment and receiver.
— Connect the equipment into an outlet on a circuit different from that
to which the receiver is connected.
— Consult the dealer or an experienced radio/TV technician for help.
CAUTION: Changes or modifications not expressly approved by the
party responsible for compliance could void the user’s authority to
operate the equipment.
Use only RF shielded cable that was supplied with the monitor when
connecting this monitor to a computer device.
Warning:
WHEN POSITIONING THIS EQUIPMENT ENSURE THAT THE
MAINS PLUG AND SOCKET IS EASILY ACCESSIBLE.
To prevent damage which may result in fire or shock hazard, do not
expose this appliance to rain or excessive moisture.
THIS CLASS B DIGITAL APPARATUS MEETS ALL
REQUIREMENTS OF THE CANADIAN INTERFERENCE-CAUSING
EQUIPMENT REGULATIONS.
Page 22

Commission Federale de la Communica
tion
(Declaration FCC)
Note: Cet équipement a été testé et déclaré conforme auxiimites des
appareils numériques de class B,aux termes de l'article 15 des règles
de la FCC. Ces limites sont conçues de façon à fourir une protection
raisonnable contre les interférences nuisibles dans le cadre d'une
installation résidentielle. Cet appareil produit, utiiise et peut émettre
des hyperfréquences qui, si l'appareil n'est pas installé et utilisé selon
les consignes données, peuvent causer des interférences nuisibles
aux communications radio. Cependant, rien ne peut garantir l'absence
d'interférences dans le cadre d'une installation particulière. Si cet
appareil est la cause d'interférences nuisibles pour la réception des
signaux de radio ou de télévision, ce qui peut être décelé en fermant
l'équipement, puis en le remettant en fonction, i'utilisateur pourrait
essayer de corriger la situation en prenant les mesures suivantes:
- Réorienter ou déplacer l’antenne de réception.
- Augmenter la distance entre l'équipement et le récepteur.
- Brancher l'équipement sur un autre circuit que celui utilisé par
le récepteur.
- Demander l'aide du marchand ou d'un technicien chevronné
en radio/télévision.
ATTENTION: Toutes modifications n’ayant pas reçu l'approbation des
services compétents en matière de conformité est susceptible
d'interdire à l'utilisateur l'usage du présent équipement.
N’utiliser que des câbles RF armés pour les connections avec des
ordinateurs ou périphériques.
CET APPAREIL NUMERIQUE DE LA CLASSE B RESPECTE
TOUTES LES EXIGENCES DU REGLEMENT SUR LE MATERIEL
BROUILLEUR DU CANADA.
Page 23

Information for Users in the U. S.
For units set at 115 V;
Use a UL Listed Cord Set consisting of a
niinimiun 18 AWG, Type SVT or SJT three
conductor cord a maximum of 15-feet in length
and a parallel blade, grounding type attachment
plug rated 15 A, 125 V.
For rmits set at 230 V:
Use a UL Listed Cord Set consisting of a
minimxun 18 AWG, Type SVT or SJT three
conductor cord a maximum of 15-feet in length
and a tandem blade, grotmding type attachment
plug rated 15 A, 250 V.
Information for Users outside the U.S.
For units set at 230 V;
Use a Cord Set consisting of a minimum 18 AWG
cord and groxmding type attachment plug rated
15 A, 250 V. The Cord Set should have the
appropriate safety approvals for the country in
'which the equipment wiU be installed and
marked HAR,
Page 24

LIMITI-;!) WAKKAN'n'
COMPUTER MONITOR
One Year Free Labor
Three Years I-rec Service on P>arls
This monitor must bo brought in for repair.
WHO IS COVl-JiSD?
You must ha\c proof of purchase to rccchc v.:arTam>'service. A sales
receipt or other doamicnt showing that you purchased the product
is considered proof of purchase.
\vi lAT IS covbki-:d?
Warranty cot erage begins the day y ou buy j our product Any and all
defective parts will be repaired, and/or replaced, free of charge for the
first three (3) years from the day of purchase. You have free labor for
the first of the three (3)
year from the day of purchase you pay all labor and after the first three
(3) years from the day of purchase you pay the cost of all repaired
and/or replaced parts.
All parts, including repaired and/or replaced parts, arc cov ered only
lor the original warranty period (Three years free service on pans and
One year free labor). When the warranty on the product expires, the
warranty on all repaired and/or replaced parts also expires.
\VI lAT IS KXCLUDIiD?
Your warrant)- docs not coven
• labor charges for installation or setup of the protluct, adjustment
of customer controls on the product, and installation or repair of
antenna sv-stems outside of the product.
• product repair and/or part rcplaccmcnr because of misuse, acci
dent, unauthori7cd repair or other cause not within the control of
Philips Consumer Klcctronics Company.
• reception problems caused by signal conditions or cable or anten
na s)-stcms outside the unit.
• a product that requires modification or adaptation to enable it to
operate in any country other than the counny for which it was
designed, manutacrured, approved and/or authorized, or repair
of products damaged by these modifications.
• incidental or consequential damages resulting from the product.
(Some states do not allow the exclusion of incidental or conse
quential damages, so the above cxcluaon may not apply to you.
This includes, but is not limited to, prerecorded material, whether
copyrighted or not copyrighted.)
\VI IBRli IS SI'RVICE AVAII-ABLE?
Warranty service is available in all countries where the product is officiall)' distribured by Philips Consumer Electronics Company In
countries where Philips Consumer Elcaronics Company does not
distribute the product, the local Philips service organization will
attempt to provide service (although there may be a delay if the
appropriate spare parts and technical manual(s) arc not readily avail
able)
y ears from the day of purchase. After the first
VAs ìFarrtiMy)ùu iprafic Xf<u ruay I ns otìKrri^htt vhicb Tsn frL'». iî.nr to
MAKE SURE YOU KEEP...
Please keep your sales receipt or other document showing proof of
purchase. Attach it to this owner's manual and keep both nearby
Also keep the original box and packing marcnal in case you need to
return your product,
BEI'ORE REQUESTING SERVICE...
Please check your owner’s manual before requesting service.
Adjustments of the controls discussed there may save you a service
call.
TO GET WARRAISTY SERVICE IN U.S.A.,
PUERTO RICO OR U.S. VIRGIN ISLANDS...
Take the product to a Philips factory service center (sec enclosed fist)
or authorized service center for repair. When the product has been
repaired, you must pick up the unit at the center. Centers may keep
defective parts.
(In U.Sj\., Puerto Rico and U.S. Virgin Islands, all implied war*
ranrics, including implied warranties of merchantability and fitness
for a particular purpose, arc limited in duration to the duration of this
express warranty-. But, because some states do not allow- limitations
on how long an implied warranty may last, this limitation may not
apply to you.)
TO GET WARRyXN’TY SERVICE IN C;\NADA...
Take the product to a Philips consumer service center (listed below),
scif-servidng dealer or authorized service depot.
601 Milner Avenue, Scarborough, Ontario, MIB IMS
3695 Grandview Highway, Vancouver, B.C., V5M 2G7
(In Canada, thisvvarranty is given in lieu of all other warranties. No
other warranties arc expressed or implied, including any implied war
ranties of merchantability or fitness for a particular purpose. Philips
is not Iiablp under any circumstances for any dirca, indirca, ^ccial,
incidental or consequential damages, howsoever incurred, even if
notified of the possibility of such damages.)
REMEMBER...
Pfease record the model and serial numbers found on the product
below. Also, please fill out and mail your warranty registration card
promptly. It will be easier for us to nonly- you if necessary-.
MODEL #
__________________________________________________
SERIAL#
__________________________________________________
Philips Electronics Ltd
5930 Cote dc Liesse, Montreal, Quebec, H4T lEl
(416) 292 S16Î
(514)342-9180
(604) 435-4411
Philips Service Company
401 East Andrew Johnson Highway
(615) 475-8869
hL5046K001 / me 4412 / 12-94
Jefferson City, Tennessee 37760
Page 25

Page 26

Page 27

Page 28

MAGNAVOX
Smart-Very smart!
This manual has been printed on recycled paper. EN
Le présent mode d'emploi est imprimé sur'du papier recyclé. FR
PRINTED IN USA
IB7688E001
313810532363
 Loading...