

Page 1

Owner’s Manual
Important!
Return your Warranty Registration
Card within 10 days. See why inside.
webtv
Power
Connected
Message
Smartcard
Internet Terminal
MAT972
For Keyboard
Information See
MAT972KB QUG
(Quick Use Guide)
Page 2

Once your PHILIPS MAGNAVOX purchase is registered, you’re eligible to receive all the privileges of owning
a PHILIPS MAGNAVOX product. So complete and return the Warranty Registration Card enclosed with your
purchase at once. And take advantage of these important benefits.
Return your Warranty Registration card today to ensure you
receive all the
benefits
you’re entitled to.
Congratulations
on your
purchase,
and welcome to the
“family!”
Dear PHILIPS MAGNAVOX product owner:
Thank you for your confidence in PHILIPS MAGNAVOX. You’ve selected one of the best-built, best-backed products
available today. And we’ll do everything in our power to keep you happy with your purchase for many years to come.
As a member of the PHILIPS MAGNAVOX “family,” you’re entitled to protection by one of the most comprehensive warranties and outstanding service networks in the industry.
What’s more, your purchase guarantees you’ll receive all the information and special offers for which you qualify, plus easy
access to accessories from our convenient home shopping network.
And most importantly you can count on our uncompromising commitment to your total satisfaction.
All of this is our way of saying welcome–and thanks for investing in a PHILIPS MAGNAVOX product.
Sincerely,
Robert Minkhorst
President and Chief Executive Officer
For Customer Use
Enter below the Serial No. which is located on the rear of the cabinet. Retain this information for future reference.
Model No. ____________________________________ Serial No. ______________________________________________
Know these
safetysymbols
t This “bolt of lightning” indicates uninsulated material within your unit may cause an electrical
shock. For the safety of everyone in your household, please do not remove product covering.
s The “exclamation point” calls attention to features for which you should read the enclosed
literature closely to prevent operating and maintenance problems.
WARNING: TO PREVENT FIRE OR SHOCK HAZARD, DO NOT EXPOSE THIS EQUIPMENT
TO RAIN OR MOISTURE.
CAUTION: To prevent electric shock, match wide blade of plug to wide slot, and fully insert.
ATTENTION: Pour éviter les chocs électriques, introduire la lame la plus large de la fiche dans la
borne correspondante de la prise et pousser jusqu’au fond.
CAUTION
RISK OF ELECTRIC SHOCK
DO NOT OPEN
CAUTION: TO REDUCE THE RISK OF ELECTRIC SHOCK, DO NOT
REMOVE COVER (OR BACK). NO USER-SERVICEABLE PARTS
INSIDE. REFER SERVICING TO QUALIFIED SERVICE PERSONNEL.
Warranty
Verification
Registering your product within
10 days confirms your right to maximum protection under the
terms and conditions of your
PHILIPS MAGNAVOX warranty.
Owner
Confirmation
Your completed Warranty Registration Card serves as verification of
ownership in the event of product
theft or loss.
Model
Registration
Returning your Warranty
Registration Card right away guarantees you’ll receive all the information and special offers which you
qualify for as the owner of your
model.
P.S. Remember, to get the most from your
PHILIPS MAGNAVOX product, you must
return your Warranty Registration Card within
10 days. So please mail it to us right now!
R
E
G
I
S
T
R
A
T
I
O
N
N
E
E
D
E
D
W
I
T
H
I
N
1
0
D
A
Y
S
Hurry!
Visit our World Wide Web Site at http://www.philipsmagnavox.com
Page 3

3
This product was designed and manufactured to meet strict quality and safety standards.
There are, however, some installation and operation precautions which you should be particularly aware of.
1. Read Instructions - All the safety and operating instructions should be read and understood
before the appliance is operated.
2. Retain Instructions - The safety and operating instructions should be retained for future
reference.
3. Heed Warnings - All warnings on the appliance and in the operating instructions should be
adhered to.
4. Follow Instructions - All operating and use instructions should be followed.
5. Water and Moisture - The appliance should not be used near water - for example, near a
bathtub, washbowl, kitchen sink, laundry tub, in a wet basement, or near a swimming pool,
etc.
6. Carts and Stands - The appliance should be used only with a cart or stand that is recom-
mended by the manufacturer.
6A. An appliance and cart combination should be moved with care. Quick stops,
excessive force, and uneven surfaces may cause the appliance and cart combination to
overturn.
7. Wall or Ceiling Mounting - The appliance should be mounted to a wall or ceiling only as
recommended by the manufacturer.
8. Ventilation - The appliance should be situated so that its location or position does not
interfere with its proper ventilation. For example, the appliance should not be situated on a
bed, sofa, rug, or similar surface that may block the ventilation openings; or, placed in a
built-in installation, such as a bookcase or cabinet that may impede the flow of air through
the ventilation openings.
9. Heat - The appliance should be situated away from heat sources such as radiators, heat
registers, stoves, or other appliances (including amplifiers) that produce heat.
10. Power Cord Protection - Power supply cords should be routed so that they are not likely
to be walked on or pinched by items placed upon or against them, paying particular attention to cords and plugs, convenience receptacles, and the point where they exit from the
appliance.
11. Non-use Periods - The power cord of the appliance should be unplugged from the outlet
when left unused for a long period of time.
12. Object and Liquid Entry - Care should be taken so that objects do not fall and liquids are
not spilled into the enclosure through openings.
13. Damage Requiring Service - The appliance should be serviced by qualified service personnel
when:
A. The power supply cord or the plug has been damaged; or
B. Objects have fallen, or liquid has been spilled into the appliance; or
C. The appliance has been exposed to rain; or
D. The appliance does not appear to operate normally or exhibits a marked change in
performance; or
E. The appliance has been dropped, or the enclosure damaged.
14. Servicing - The user should not attempt to service the appliance beyond that described in
the operating instructions. All other servicing should be referred to qualified service personnel.
READ BEFORE OPERATING EQUIPMENT
SAVE THESE INSTRUCTIONS
Getting Started
Safety Instructions
Page 4

4
This symbol is to alert you to important operating or servicing instructions that may
appear in your owner’s manual. When using your telephone equipment, always follow
these basic safety precautions in order to reduce the risk of fire, electric shock, and
injury to persons.
15. Unplug this product from the wall outlet before cleaning. Do not use liquid cleaners or
aerosol cleaners; use a damp cloth for cleaning. If the product comes in contact with any
liquid, unplug the phone line and the power adapter and let the unit dry thoroughly before
plugging it back in.
16. This product should be operated only from the type of power source indicated on the
marking label or in the owner’s manual. If you are not sure of the type of power supply to
your home, consult your dealer or local power company.
17. Do not overload wall outlets and extension cords, as this can result in the risk of fire or
electric shock.
18. Never push objects of any kind into this product through cabinet slots, as they may touch
dangerous voltage points or short out parts, resulting in the risk of fire or electric shock.
Never spill liquid of any kind on the product.
19. To reduce the risk of electric shock, do not disassemble this product, but take it to a qualified serviceman when service or repair work is required. Opening or removing covers may
expose you to dangerous voltage or other risks. Incorrect reassembly can cause electric
shock when this product is subsequently used.
20. Unplug this product from the wall outlet and refer servicing to qualified service personnel
under the following conditions: a) when the power supply cord or plug is damaged or
frayed; b) if liquid has spilled into the product; c) if the product has been exposed to rain
or water; d) if the product does not operate normally when you follow the operating
instructions (adjust only those controls that are discussed in the owner’s manual, as
improper adjustment of other controls may result in damage, often requiring extensive
work by a qualified technician to restore the product to normal performance); e) if the
product has been dropped or the cabinet has been damaged; f) if the product exhibits a
distinct change in performance.
21. Avoid using a telephone (other than a cordless type) during an electrical storm. There may
be a remote risk of electric shock from lightning.
22. Do not use a telephone in the vicinity of a gas leak. If you suspect a gas leak, report it
immediately, but use a telephone away from the area where gas is leaking. With a cordless
phone, also make sure that the phone base is away from the gas leak.
23. Grounding or Polarization - This product may be equipped with a polarized alternating current line plug (a plug having one blade wider than the other). This plug will fit into the
power outlet only one way. This is a safety feature. If you are unable to insert the plug fully
into the outlet, try reversing the plug. If the plug still fails to fit, contact your electrician to
replace the obsolete outlet. Do not defeat the safety purpose of the grounding-type plug.
Getting Started
Safety Instructions (continued)
Page 5

5
This equipment complies with Part 68 of the FCC rules. On the back panel of this equipment is
a label that contains, among other information, the FCC Registration Number and Ringer
Equivalence Number (REN) for this equipment. You must, upon request, provide this information to your telephone company. The REN is useful to determine the quantity of devices
you may connect to your telephone line and still have all of those devices ring when your
telephone number is called. In most, but not all areas, the sum of the RENs of all devices
connected to one line should not exceed five. To be certain of the number of devices you
may connect to your line as determined by the REN, you should contact your local telephone company to determine the maximum REN for your calling area.
If your telephone equipment causes harm to the telephone network, the telephone company
may discontinue your service temporarily. If possible, they will notify you in advance. But, if
advance notice is not practical, you will be notified as soon as possible. You will be
informed of your right to file a complaint with the FCC.
Your telephone company may make changes in its facilities, equipment, operations or proce-
dures that could affect the proper functioning of your equipment. If they do, you will be
notified in advance to give you an opportunity to maintain uninterrupted telephone service.
If you experience trouble with this telephone equipment, please contact Philips Consumer
Electronics repair facility at Philips Service Solutions Group, P.O. Box 555, Old Andrew
Johnson Highway, Jefferson City, TN 37760, for more information on obtaining service or
repairs. The telephone company may ask that you disconnect this equipment from the network until the problem has been corrected or until you are sure that the equipment is not
malfunctioning.
This equipment may not be used on coin service provided by the telephone company.
Connection to party lines is subject to state tariffs.
This device is equipped with an RJ11 connector.
CAUTION: Changes or modifications to this equipment not expressly approved by Philips
Consumer Electronics could void the user’s authority to operate this equipment.
Federal Communications Commission Information
Copyright 1998 by Philips Consumer Electronics and WebTV Networks, Inc.
WebTV, WebTV Network, the WebTV logo, Around Town, LineShare, and WebPIP are trademarks of WebTV
Networks, Inc.; webeye is a trademark of Philips Consumer Electronics.
Getting Started
Page 6

6
The Canadian Department of Communications label identifies certified equipment. This certifi-
cation means that the equipment meets certain telecommunications network protective,
operational, and safety requirements. The department does not guarantee the equipment
will operate to the user’s satisfaction.
Before installing this equipment, users should ensure that it is permissible to be connected to
the facilities of the local telecommunications company. The equipment must be installed
using an acceptable method of connection. In some cases, the company’s inside wiring associated with a single line individual service may be extended by means of a certified connector assembly (telephone extension cord). The customer should be aware that compliance
with the above condition may not prevent degradation of service in some situations.
Repairs to some certified equipment should be made by an authorized maintenance facility des-
ignated by the supplier. Any repairs or alterations made by the user to this equipment, or
any equipment malfunctions, may give the telecommunications company cause to request
the user to disconnect the equipment.
Users should ensure for their own protection that the ground connections of the power utility,
telephone lines, and internal metallic water pipe system are connected together. This precaution may be important particularly in rural areas.
CAUTION: Users should not attempt to make such connections themselves but should con-
tact the appropriate electrical inspection authority or electrician as appropriate.
The RINGER EQUIVALENCE NUMBER (REN) assigned to each terminal device denotes the
percentage of the total load to be connected to a telephone loop which is used by the
device to prevent overloading. The termination on a loop may consist of any combination
of devices subject only to the requirement that the total of the REN of all devices does not
exceed five.
The REN for the MAT972 is .2A.
Canadian Ringer Equivalence Number Notice
Getting Started
Page 7

7
Federal Communications Commission (FCC) Statement
The Philips Magnavox MAT972 has been tested and found to comply with the limits for a Class
B digital device, pursuant to Part 15 of the FCC Rules. Operation is subject to the following two conditions: (1) this device may not cause harmful interference, and (2) this device
must accept any interference received, including interference that may cause undesired
operation.
The FCC Class B limits are designed to provide reasonable protection against harmful interfer-
ence in a residential installation. This equipment generates, uses, and can radiate radio frequency energy and, if not installed and used in accordance with the instructions, may cause
harmful interference to radio communications. However, there is no guarantee that interference will not occur in a particular installation. If this equipment does cause harmful
interference to radio or television reception, which can be determined by turning the
equipment off and on, the user is encouraged to try to correct the interference by one or
more of the following measures:
• Reorient or relocate the receiving antenna.
• Increase the separation between the equipment and receiver.
• Connect the equipment into an outlet on a circuit different from that to which the receiver is
connected.
• Consult your point of purchase or service representative for additional suggestions.
The manufacturer is not responsible for any radio or television interference caused by the use
of cables other than those recommended or by unauthorized changes or modifications to
this equipment. Unauthorized changes or modifications could void the user’s authority to
operate this equipment.
Supplemental Television Broadcasting
Receiving Apparatus Canada GRR Part 2
This digital apparatus does not exceed the Class B limits for radio noise emissions from digital
apparatus set out in the radio interference regulations of the Canadian Department of
Communications.
Emission Notices
Getting Started
Page 8

8
❐ Explore - A directory of the most exciting Internet sites.
❐ Email (electronic messages) - Exchange messages with members of any
Internet service.
❐ Search - An easy way to locate information on specific topics.
❐ Favorites - Provides instant access to your favorite sites on the Internet.
❐ Multiple accounts - Lets members of your household have private email
addresses and Favorites folders.
❐ SurfWatch and kid-friendly - Allow you to restrict access to email and
sites on the Internet that contain mature material. These items will be
available under User Restrictions when you add a user.
❐ TV Listings - Provides TV programming information for your area (channel,
time, and description of program).
❐ WebPIP™ (Picture in Picture) - Enables you to watch TV and surf the
Internet at the same time.
❐ Around Town™ - Provides weather and entertainment information for
your locale.
❐ Screen saver - If you do not press any remote control buttons for a few
minutes, a screen saver will appear. This reduces the possibility of TV picture tube damage. (If an image remains on a TV screen for an extended
period of time, the image may become permanently etched on your TV
picture tube.)
Additional on-screen instructions are available from the WebTV Network. To
access these instructions, go to the Web Home Page. Use the Arrow buttons
on the remote control to select Using WebTV. Press the GO button, then
use the Arrow buttons to select Instructions, then press the GO button again.
If you still have questions, call 1-800-GO-WEBTV (469-3288). (Service and
support fees may apply for accessing WebTV Network customer support.)
Getting Started
Welcome
WebTV Network Features
Additional Instructions
Thank you for purchasing the Philips Magnavox Internet Terminal.
Before you use this product to access the Internet, you must first subscribe to
the WebTV®Network. Subscribing is easy once you’ve connected your
Internet Terminal.
This manual will help you connect the Internet Terminal and subscribe to the
WebTV Network; it also describes the basic features of the Internet
Terminal.
The WebTV Network is constantly changing to meet your needs. The screens
you see once you’re connected to the WebTV Network may look different
than the examples used in this manual. The appearance of the WebTV
Network will change as new features become available to you.
Page 9

9
Getting Started
Getting Started
Safety Instructions . . . . . . . . . . . . . . . . . . . . . . . . . . . . . . . . .3 - 4
Federal Communications Commission Information . . . . . . . . . . .5
Canadian Ringer Equivalence Number Notice . . . . . . . . . . . . . . .6
Emission Notices . . . . . . . . . . . . . . . . . . . . . . . . . . . . . . . . . . . . .7
Welcome . . . . . . . . . . . . . . . . . . . . . . . . . . . . . . . . . . . . . . . . . . .8
WebTV Network Features . . . . . . . . . . . . . . . . . . . . . . . . . . . . .8
Additional Instructions . . . . . . . . . . . . . . . . . . . . . . . . . . . . . . . . .8
Table of Contents . . . . . . . . . . . . . . . . . . . . . . . . . . . . . . . . . . . .9
Package Contents . . . . . . . . . . . . . . . . . . . . . . . . . . . . . . . . . . .10
Remote Control Battery Installation . . . . . . . . . . . . . . . . . . . . .10
Back Panel . . . . . . . . . . . . . . . . . . . . . . . . . . . . . . . . . . . . . . . . .11
Front Panel . . . . . . . . . . . . . . . . . . . . . . . . . . . . . . . . . . . . . . . .12
Remote Control . . . . . . . . . . . . . . . . . . . . . . . . . . . . . . . . . . . .13
Connections
Before You Begin . . . . . . . . . . . . . . . . . . . . . . . . . . . . . . . . . . . .14
WebTV Network Subscription . . . . . . . . . . . . . . . . . . . . . . . . .14
Usage Requirements . . . . . . . . . . . . . . . . . . . . . . . . . . . . . . . . .14
Step 1 Connecting the Internet Terminal to the TV . . . . . . .15-16
Step 2 Connecting the Antenna/Cable TV Signal,
a Cable Box (or Satellite Box), or a VCR . . . . . . . . . . . . . . .17-20
Step 3 Connecting the IR Blaster . . . . . . . . . . . . . . . . . . . . .21-22
Step 4 Connecting the Telephone Cord . . . . . . . . . . . . . . . . . .22
Step 5 Connecting the webeye . . . . . . . . . . . . . . . . . . . . . . . . . .23
Step 6 Connecting the AC Power Cord . . . . . . . . . . . . . . . . . .23
Connecting a Printer (optional) . . . . . . . . . . . . . . . . . . . . . . . . .24
Telephone Options . . . . . . . . . . . . . . . . . . . . . . . . . . . . . . . . . .24
Connecting to the WebTV Network
Signing Up for the WebTV Network . . . . . . . . . . . . . . . . . . . .25
Additional Sign-up Tips . . . . . . . . . . . . . . . . . . . . . . . . . . . . . . .26
Using Your Current Internet Service Provider . . . . . . . . . . . . .26
Basic Information
Using the On-screen Keyboard . . . . . . . . . . . . . . . . . . . . . . . . .27
Terms You Need to Know . . . . . . . . . . . . . . . . . . . . . . . . . . . .28
Options Panel (WebTV) . . . . . . . . . . . . . . . . . . . . . . . . . . . . . .29
Options Panel (TV) . . . . . . . . . . . . . . . . . . . . . . . . . . . . . . . . . .29
Remote Control
Setting the Remote Control to Operate a TV . . . . . . . . . . .30-31
TV Home Page
TV Home Page . . . . . . . . . . . . . . . . . . . . . . . . . . . . . . . . . . . . .32
TV Listings . . . . . . . . . . . . . . . . . . . . . . . . . . . . . . . . . . . . . . . . .33
Remind . . . . . . . . . . . . . . . . . . . . . . . . . . . . . . . . . . . . . . . . . . .33
On-Screen VCR Controls . . . . . . . . . . . . . . . . . . . . . . . . . . . . .34
VCR Programming . . . . . . . . . . . . . . . . . . . . . . . . . . . . . . . . . . .34
Web Home Page
Web Home Page . . . . . . . . . . . . . . . . . . . . . . . . . . . . . . . . .35-36
WebPIPTM . . . . . . . . . . . . . . . . . . . . . . . . . . . . . . . . . . . . . . . . . .37
My WebTV . . . . . . . . . . . . . . . . . . . . . . . . . . . . . . . . . . . . . . . .37
Attaching Images to Email . . . . . . . . . . . . . . . . . . . . . . . . . . . . .38
Attaching Sound to Email . . . . . . . . . . . . . . . . . . . . . . . . . . . . . .39
Specifications . . . . . . . . . . . . . . . . . . . . . . . . . . . . . . . . . . . . . . . . . . . . . .40
Warranty . . . . . . . . . . . . . . . . . . . . . . . . . . . . . . . . . . . . . . . . . . . . . . . . .41
Index . . . . . . . . . . . . . . . . . . . . . . . . . . . . . . . . . . . . . . . . . . . . . . . . .42
Accessories . . . . . . . . . . . . . . . . . . . . . . . . . . . . . . . . . . . . . . . . . . . . . . .44
Table of Contents
Page 10
10
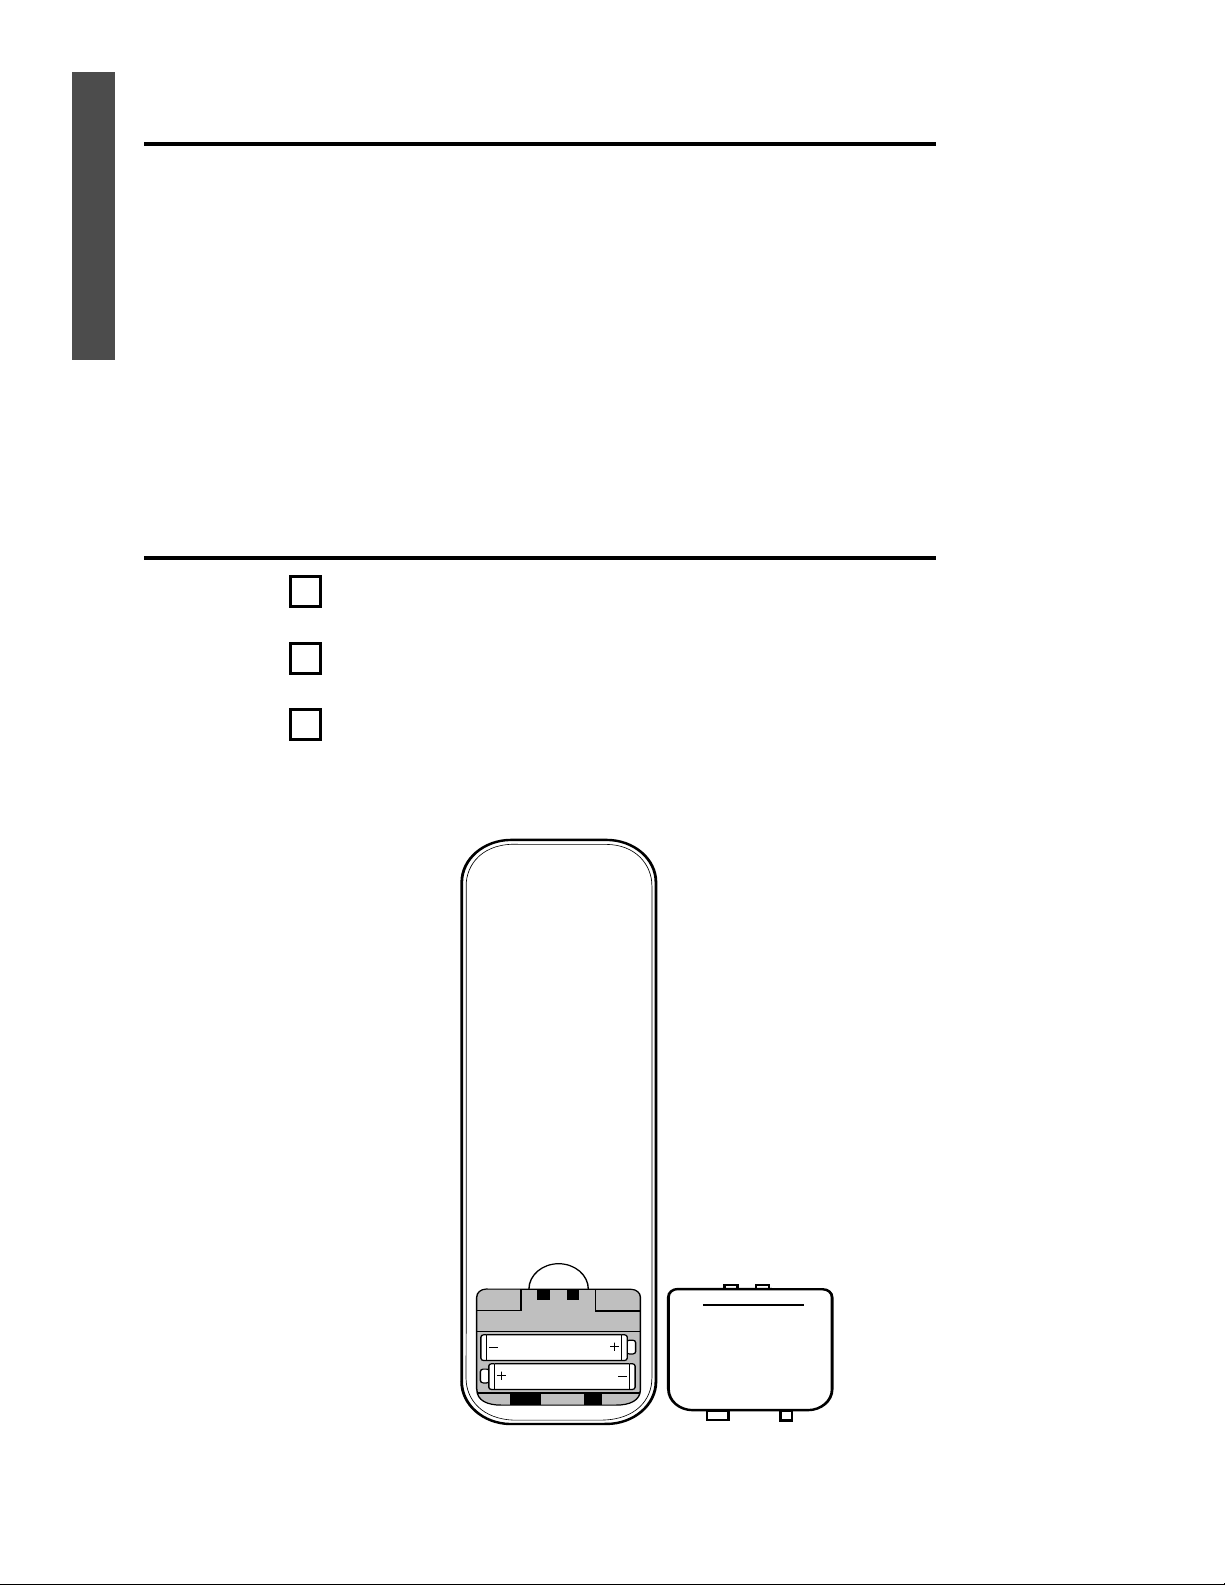
Make sure you received the following items:
❐ Remote control
❐ Two AAA batteries (for remote control)
❐ AC power cord
❐ Telephone cord
❐ One video cable (yellow)
❐ One set of audio cables (red and white)
❐ Telephone-splitter (T-splitter)
❐ IR (infrared) Blaster
❐ webeye
❐ Coaxial cable
❐ S-video cable
Additional literature may be included. Additional accessories are available. See
page 44 for details.
Getting Started
Remove the battery compartment cover by lifting the cover.
Insert two AAA batteries as indicated inside the battery compartment.
Replace the battery compartment cover.
Package Contents
Remote Control Battery Installation
1
2
3
•
•
•
•
Page 11
11
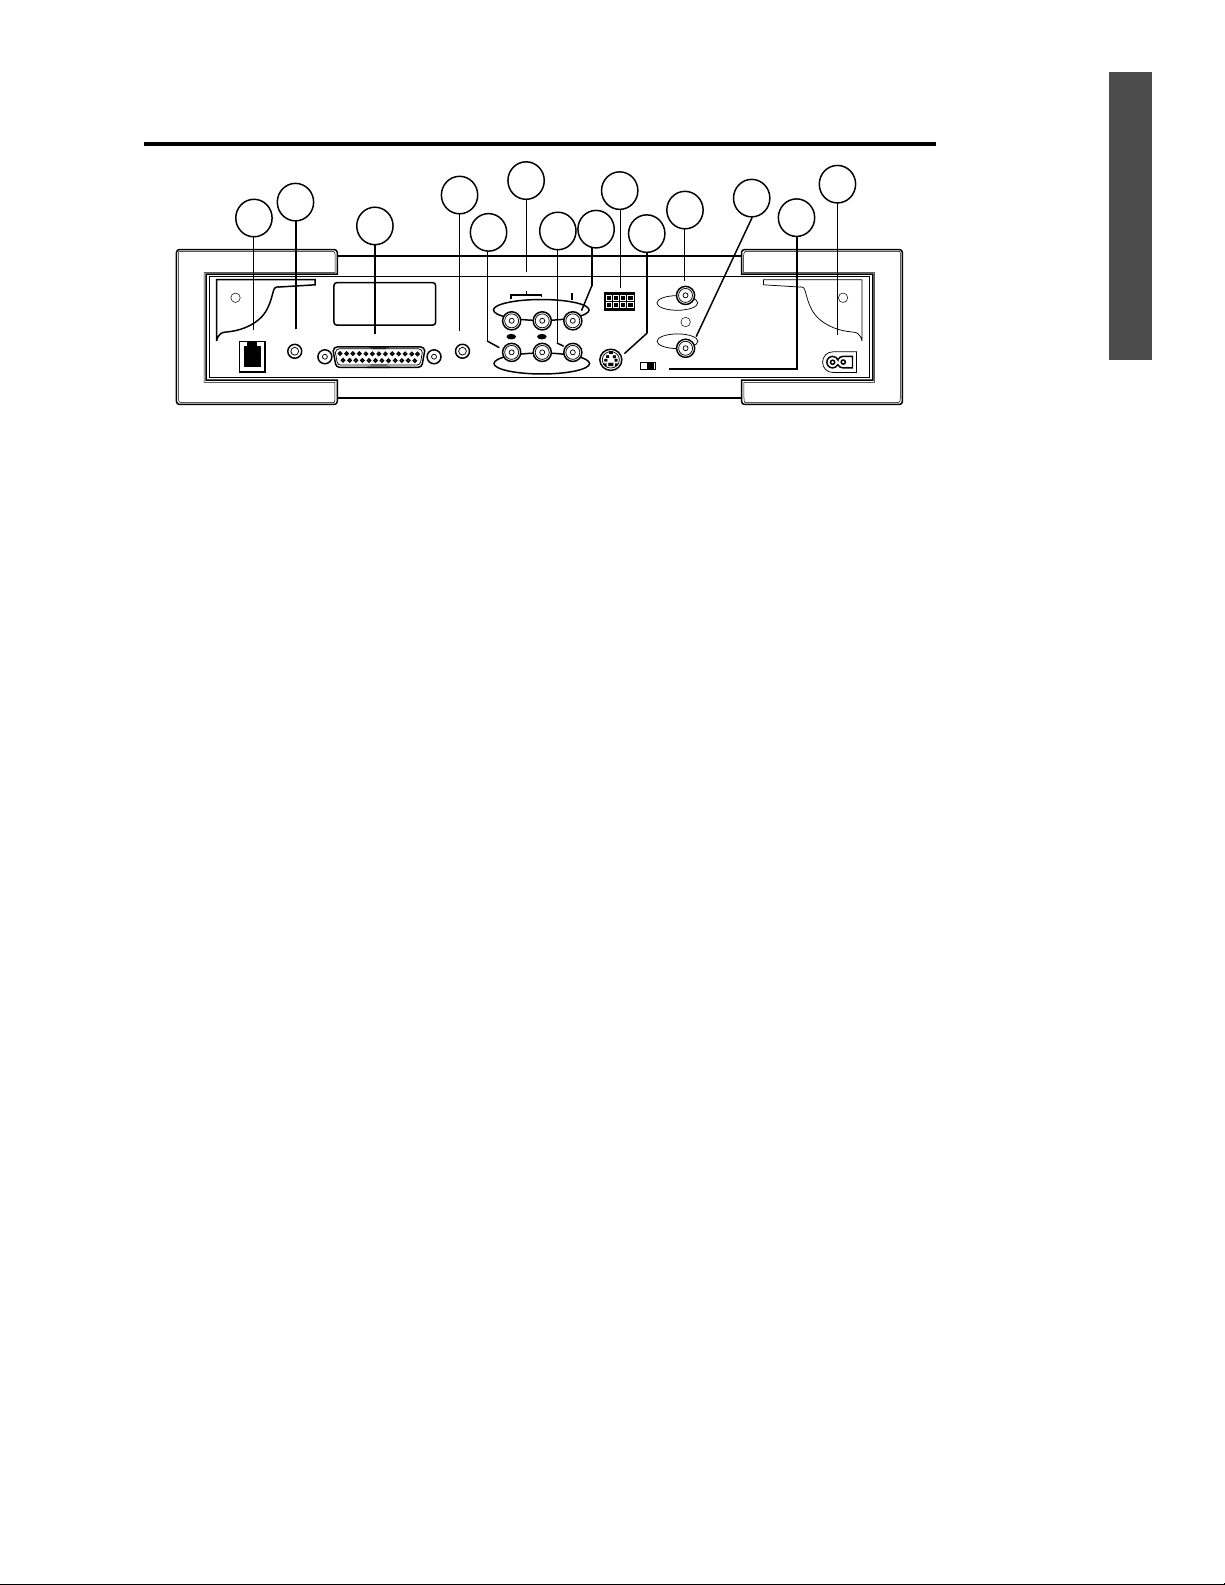
Getting Started
1 Phone jack
Connect one end of the telephone cord to this jack. Connect the other end of the cord to
the wall telephone jack.
2 IR Blaster jack
Connect the IR Blaster’s cable here. This will allow you to use the Internet Terminal’s
remote control to operate a Cable Box, Satellite Box, or VCR.
3 Printer Port
Connect a parallel printer cable to this jack and to a printer (optional).
4 Mic(rophone) jack
Connect a microphone here. Use a microphone that has a 1/8” connector. A suitable
microphone is available from Philips Consumer Electronics. To order, see page 44. Refer to
the on-screen instructions (see page 8) for more information on microphone use. To send
sound with an email, see page 39.
5 Audio (right and left) Out jacks
Connect the set of red and white audio cables (provided) to these jacks and to the Audio In
jacks on your TV.
6 Audio (right and left) In jacks
You may connect a set of red and white audio cables (additional cables not provided) to
these jacks and to the Audio Out jacks on your accessory equipment (such as a VCR, if
applicable).
7 Video Out jack
Connect the yellow video cable (provided) to this jack and to the VideoIn jack of the TV.
8 Video In jack
You may connect a yellow video cable (additional cable not provided) to this jack and to the
Video Out jack on your accessory equipment (such as a VCR).
9 webeye jack
Connect the cable of the webeye here.
10 S-Video jack
Connect an S-Video cable to this jack and to the S-Video In jack on your TV.
11 Cable In jack
Connect the antenna or the Cable TV signal to this jack.
12 Cable Out jack
If your TV does not have Audio/Video jacks, you may connect a coaxial cable or an RF
adapter (not supplied) here to connect the Internet Terminal to the TV.
13 Channel 3/4 switch
When you use a coaxial cable to connect the Internet Terminal to the TV, set this switch to
3 or 4 (your TV Auxiliary In channel). Set the TV to the same channel. (If you experience a
lot of interference once you’re connected to the WebTV Network, adjust this switch and
change the TV channel.)
14 AC Input jack
Connect the AC (120V) power cord here. Plug the other end into the wall outlet.
Back Panel
1
Phone
2
IR Blaster
3
Printer Port
4
Mic
6
R
7
Audio
In
L
Out
5
Video
8
S-Video
w e b
9
e y e
Channel
3 4
10
Cable
11
In
Out
12
14
13
AC Input
Page 12

12
Front Panel
Getting Started
1 Smartcard port
Allows you to use Smartcard technology when it becomes available. Accessories may be
required. Additional information will be available from the WebTV Network when features
are available.
2 Power indicator
Indicates the Internet Terminal power is on.
3 Connected indicator
This indicator flashes when the Internet Terminal is connecting to the WebTV Network. It
remains lit while the terminal is in use. It also may flash when you try a different feature or
move among sites.
4 Message indicator
Indicates that you have a new email message.
5 Infrared sensor
Allows you to operate your Internet Terminal with the remote control. When you are not
using the webeye, point the remote control at the Internet Terminal. If you are using the
webeye, point the remote control at the webeye.
6 Expansion Port (on the side of the unit)
Allows you to use optional accessories that will be introduced in the future. The port
should remain closed when you are connected to the WebTV Network.
Additional information will be available from the WebTV Network when features are available.
Smartcard
Power
Connected
4321
webtv
Message
5
6
Page 13
13
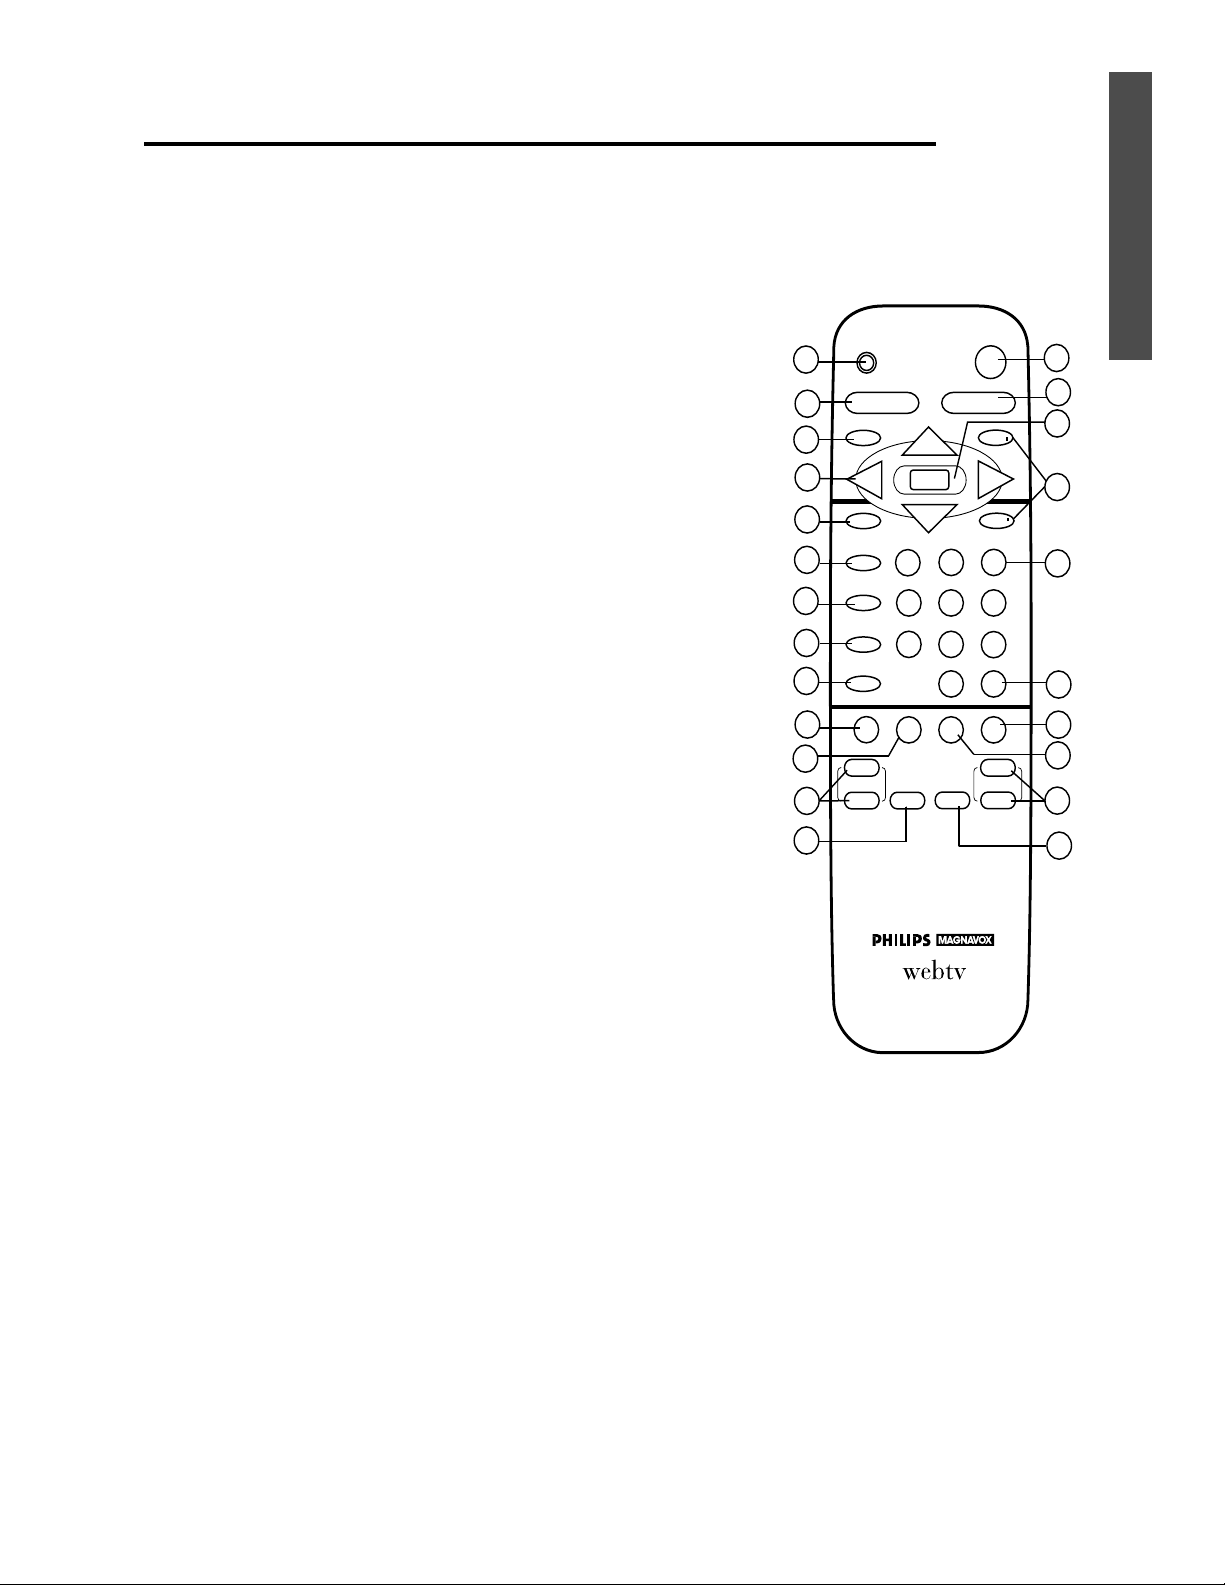
1 CODE SET button - Allows you to program the remote control to
operate your TV.
2 TV MODE button - Press before pressing other buttons to operate
the TV.
3 Back (EXIT) button - Press to return to the previous screen or to
remove the on-screen keyboard.
4 Arrow buttons - Press to move the yellow highlight box to a differ-
ent link on the screen; press to select different keys on the on-screen
keyboard.
5 HOME button - Press to display the Web Home Page or the TV
Home Page.
6 VIEW button - Press to switch between the Web Home Page and
the TV Home Page.
7 OPTIONS button - Press to display an Options panel. Press again to
remove the Options panel. There are two Options panels: one while
accessing the Internetand one while watching TV.
8 MAIL button - Press to go to the Mail feature.
9 TV/VIDEO button - With some TVs, press when in TV mode to
select a TV video input (S-Video, Auxiliary In).
10 FAVORITES button - While accessing the Internet, press to go
directly to your Favorites folders. While watching TV, press to go to
your listing of Favorite TV Channels.
11 RELOAD button - Press to update the current Internet site.
12 VOLUME UP/DOWN buttons - Press to adjust the TV volume.
(You do not have to press the TV MODE button first.)
13 A/CH (Alternate Channel) button - Press to return to the previ-
ous TV channel (when in TV mode only).
14 POWER button - Press to turn on the Internet Terminal. Or, press
to turn off the Internet Terminal. To turn on the TV, press the TV
MODE button, then press the POWER button (if you have programmed the remote control to operate the TV).
15 WebTV MODE button - Press before using the remote control to
operate the features of the Internet Terminal.
16 GO button - Activates a highlighted link or command; displays the
on-screen keyboard; displays a moveable arrow when the currently
displayed page contains an image map.
17 SCROLL (Up/Down) buttons - Moves the Internet page up or
down when the page is too long for one screen.
18 Number buttons - Use to change the TV channels.
19 ENTER button - Use when programming the remote control to
operate your TV. Press to move the WebPIP window from side to
side on the TV screen while accessing the Internet.
20 RECENT button - Displays miniature versions of the Internet sites
or TV channels you’ve visited recently.
21 EXPLORE button - While accessing the Internet, press this button
to go to the Explore site.
22 CHANNEL UP/DOWN buttons - Press to change TV channels
when using the WebPIP feature or while watching TV.
23 MUTE button - Press to mute or restore the volume. (You do not
have to press the TV MODE button first.)
Remote Control
Getting Started
10
11
12
13
POWER
321
654
9
DOWN
14
15
16
▲
17
▼
18
19
20
21
UPUP
22
23
Back
HOME
CODE SET
EXIT
VIEW
WebTV MODETV MODE
SCROLL
GO
SCROLL
1
2
3
4
5
6
OPTIONS
7
MAIL
8
TV/VIDEO
9
FAVORITES
VOLUME
DOWN
7
RELOAD
A/CH
8
0
EXPLORE
MUTE
ENTER
RECENT
CHANNEL
Page 14

ConnectionsConnections
You probably already have your TV connected to other devices, such as a
VCR or a Cable Box. You may need to disconnect some cables before you
connect the TV to your Internet Terminal. The Internet Terminal must be the
device that is connected directly to your TV.
You may use the cables that came with your VCR, Cable Box, or Satellite Box
when connecting the Internet Terminal to these devices. Some connections
may require additional cables or adapters.
If you connect other equipment to the Internet Terminal, make sure all equipment is set to the same channel. For example, if the Cable Box is on channel
3, all equipment should be set to channel 3.
Before you can connect to the WebTV Network, you must connect your
Internet Terminal to each of the following:
❐ a Cable TV or antenna signal,
❐ your television,
❐ a telephone line,
❐ and an AC power outlet.
The type of connection you choose depends on whether your TV:
❐ has an S-Video jack, Audio/Video jacks, or an RF coaxial (combined
UHF/VHF) Antenna In jack,
❐ is connected to a VCR,
❐ or is connected to a Cable Box/Satellite Box.
Remember: Objects placed on top of the Internet Terminal could hinder the
flow of air through the ventilation openings. Do not place anything on top
of the Internet Terminal.
Before You Begin
After you complete these connections, you will subscribe to the WebTV
Network, which has a monthly subscription fee. WebTV Network service is
not available as a local call everywhere. Toll charges may apply. To see if you
have local access, please call 1-800-GO-WEBTV (469-3288). (Service and support fees may apply for accessing WebTV Network customer support.)
WebTV Network Subscription
The Philips Magnavox Internet Terminal is to be used solely with the WebTV
Network, a subscription-based Internet service operated by WebTV
Networks, Inc. (WNI). Access to and use of the WebTV Network is subject
to your agreement to WNI’s terms of service.
This product contains software licensed from WNI. By opening this package,
you agree that you will not modify it.
Usage Requirements
Always disconnect all equipment from power sources
before changing connections.
14
Page 15

Step 1 Connecting the Internet Terminal to the TV
15
Connections
Connections
If your TV has an S-Video jack, use this option for the best picture quality. If you
want to watch TV with the Internet Terminal turned off, you also should connect a
Coaxial Cable as shown in Option C.
Connect an S-Video cable to the S-Video Out jack on your Internet Terminal
and to the S-Video In jack on your TV.
Set the TV to the S-Video In channel. (Refer to the TV owner’s manual.)
Connect the set of audio cables (red and white) to the Audio Out R(ight) and
L(eft) jacks on the back of the Internet Terminal and to the Audio In jacks on
your TV, matching colors. If there is only one audio jack, connect the white
plugs.
Go to step 2 - Connecting the Antenna/Cable TV Signal,
a Cable Box (or Satellite Box), or a VCR.
If the TV has a video jack (yellow RCA type), use this option. If you want to watch
TV with the Internet Terminal turned off, you also should connect a Coaxial Cable as
shown in Option C.
Connect the video cable (yellow) to the Video Out jack on the back of the
Internet Terminal and to the Video In jack on the TV.
Set the TV to the Auxiliary In or Video In channel. (Refer to the TV owner’s
manual.)
Connect the set of audio cables (red and white) to the Audio Out R(ight) and
L(eft) jacks on the back of the Internet Terminal and to the Audio In jacks on
your TV, matching colors. If there is only one audio jack, connect the white
plugs.
Go to step 2 - Connecting the Antenna/Cable TV Signal,
a Cable Box (or Satellite Box), or a VCR.
OPTION A
OPTION B
Audio
Video
Phone
IR Blaster
Printer Port
Audio cables
In
R
L
Mic
Out
L
R
w e b
e y e
S-Video
Channel
3 4
S-Video cable
In
Cable
Out
VHF/UHF
L
RL
IN
S-VIDEO
VIDEO
AUDIO
Back of TV
example only
AC Input
Audio
Phone
IR Blaster
Printer Port
Mic
Audio cables
Video
In
R
L
Out
L
R
w e b
e y e
S-Video
Channel
3 4
Video cable
Cable
VHF/UHF
In
Out
L
RL
IN
VIDEO
AUDIO
Back of TV
example only
AC Input
Page 16

Step 1 Connecting the Internet Terminal to the TV (continued)
16
Connections
If your TV does not have S-Video or Audio/Video jacks, use this option.
Connect the Coaxial Cable to the Cable Out jack on the back of the Internet
Terminal and to the Antenna In jack on your TV.
When using the Internet Terminal, set the TV to the Auxiliary In channel
(usually channel 3 or 4). Set the Channel 3/4 switch on the back of the
Internet Terminal to the same channel.
Go to step 2 - Connecting the Antenna/Cable TV Signal,
a Cable Box (or Satellite Box), or a VCR.
OPTION C
Audio
Phone
IR Blaster
Printer Port
Video
In
R
L
Mic
Out
S-Video
In
w e b
e y e
Cable
Channel
3 4
Out
Coaxial cable
AC Input
ANT. IN
OUT
Back of TV
example only
Page 17

Step 2 Connecting the Antenna/Cable TV Signal,
a Cable Box (or Satellite Box), or a VCR
17
Connections
If you have a standard coaxial cable type of antenna or a Cable TV signal, use this
option.
Connect the antenna or Cable TV signal to the Cable Injack on the back of
the Internet Terminal.
Go to step 4 - Connecting the Telephone Cord.
OPTION B
If you do not have a standard coaxial cable type of antenna or a Cable TV signal,
use this option. You will need to purchase an adapter (matching transformer) like
the one shown above.
Fasten the twin antenna leads (UHF and VHF) to the screws on the adapter.
Connect the adapter to the Cable In jack on the back of the Internet
Terminal.
Go to step 4 - Connecting the Telephone Cord.
OPTION A
Phone
IR Blaster
Printer Port
Audio
Video
In
R
Mic
L
Out
w e b
S-Video
e y e
Channel
3 4
Cable
Out
Twin antenna leads
Adapter
In
AC Input
Antenna/Cable TV signal
Audio
Phone
IR Blaster
Printer Port
Video
In
R
Mic
L
Out
w e b
S-Video
e y e
Channel
3 4
Cable
In
Out
AC Input
Page 18

Step 2 Connecting the Antenna/Cable TV Signal, a
Cable Box (or Satellite Box), or a VCR (continued)
18
Connections
If you have a VCR only (no Cable Box), choose this option.
Connect the Antenna or Cable TV signal to the Antenna In jack on your VCR.
Connect a Coaxial Cable to the Antenna Out jack on your VCR and to the
Cable In jack on the back of the Internet Terminal.
Note: Control your VCR using the Internet Terminal’s remote control, and
set a recording using the TV Planner. Details are on page 34.
Set the VCR’s 3/4 switch and the Internet Terminal’s 3/4 switch to the same
channel, then set the TV to the same channel.
Go to step 3 - Connecting the IR Blaster.
OPTION D
If you have a Cable Box only (no VCR), choose this option.
Connect the Cable TV signal to the In jack on your Cable Box.
Connect a Coaxial Cable to the Out jack on your Cable Box and to the Cable
In jack on the back of the Internet Terminal.
Go to step 3 - Connecting the IR Blaster.
OPTION C
Cable TV signal
OUT
IN
Cable Box
Coaxial Cable
Audio
Video
In
Phone
IR Blaster
Printer Port
R
Mic
L
Out
1
2
w e b
S-Video
e y e
Channel
3 4
Cable
In
Out
AC Input
Antenna or Cable TV signal
IN
ANT. IN
OUT
OUT
AUDIO VIDEO
Video
Cassette
Recorder
Coaxial Cable
Audio
Phone
IR Blaster
Printer Port
Video
In
R
L
Mic
Out
w e b
S-Video
e y e
Channel
3 4
Cable
In
Out
AC Input
1
2
Page 19

Step 2 Connecting the Antenna/Cable TV Signal, a
Cable Box (or Satellite Box), or a VCR (continued)
19
Connections
If you are using a Cable Box and a VCR, choose this option.
Connect the Cable TV Signal to the In jack on your Cable Box.
Connect a Coaxial Cable to the Out jack on your Cable Box and to the
Antenna In jack on your VCR.
Connect a Coaxial Cable to the Antenna Out jack on your VCR and to the
Cable In jack on the back of the Internet Terminal.
Go to step 3 - Connecting the IR Blaster.
OPTION E
Cable Box
Cable TV Signal
OUT
IN
Coaxial Cable
Audio
Video
In
Phone
IR Blaster
Printer Port
R
Mic
1
2
w e b
L
S-Video
Out
e y e
Channel
3 4
Cable
In
Out
IN
OUT
Coaxial Cable
LINE
LINE
OUT
IN
AUDiO VIDEO
AC Input
Video
Cassette
Recorder
3
Page 20

Step 2 Connecting the Antenna/Cable TV Signal, a
Cable Box (or Satellite Box), or a VCR (continued)
20
Connections
If you have a VCR and want to watch one show while recording another, use
this connection. The Internet Terminal will tell the VCR to record a program
as you specify in the TV Planner. (Details are on page 34.) Meanwhile, you
may watch another TV channel from the TV Home Page.
Connect the cable signal to the In jack on the splitter.
Connect a coaxial cable from one of the Out jacks on the splitter to the
Antenna In jack on your VCR.
Connect another coaxial cable from the other Out jack on the splitter to the
Cable In jack on the Internet Terminal.
Connect audio and video cables to the Audio/Video Out jacks on your VCR
and to the Audio/Video In jacks on your Internet Terminal, matching like colors.
Go to step 3 - Connecting the IR Blaster.
OPTION F
Cable TV signal
IN
Two-way splitter
OUT
OUT
Video
Cassette
Recorder
Coaxial Cable
ANT. IN
OUT
IN
OUT
AUDIO VIDEO
L
R
Coaxial Cable
Video
Audio
cable
L
L
Video
In
L
Out
w e b
S-Video
e y e
Channel
3 4
Cable
In
Out
AC Input
Phone
IR Blaster
Printer Port
Audio cables
R
R
Mic
1
2
3
4
Page 21

Step 3 Connecting the IR Blaster
21
Connections
For the Internet Terminal to communicate with your VCR, Cable Box, or
Satellite Box, you must position the IR Blaster correctly. Position the light on
the IR Blaster so that it faces the sensor on your VCR, Cable Box or Satellite
Box.
If you only use one IR Blaster, (for example, if you only have a VCR connected to the Internet Terminal), place the unused IR Blaster behind the equipment.
NOTE: If you use the IR Blaster in an enclosed setting, such as an entertainment center with glass doors, keep the doors open. This will reduce interference and allow the infrared signals to travel freely.
Go to step 4 - Connecting the Telephone Cord.
You will complete the second half of step 3 (setting up
the IR Blaster) after you sign up with the WebTV
Network.
The IR Blaster enables your Internet Terminal to program your VCR and to
select channels on your Cable Box or Satellite Box.
Connect the IR Blaster cable to the IR Blaster jack on the back of the Internet
Terminal.
Find the infrared sensor on your VCR, Cable Box, or Satellite Box. (The sensor usually is located behind the display panel on the front of the VCR, Cable
Box, or Satellite Box. If the sensor is not labelled on your equipment, refer to
the equipment’s manual for details.)
1
Phone
IR Blaster
Printer Port
2
Audio
Video
In
R
L
Mic
Out
Place the IR Blaster directly in front of the
sensor on the VCR, Cable Box, or Satellite
Box. The light on the IR Blaster must directly
face the sensor on the equipment.
S-Video
In
w e b
e y e
Cable
Out
Channel
3 4
AC Input
3
Page 22

Step 3 Connecting the IR Blaster, continued
22
Connections
Step 4 Connecting the Telephone Cord
Connect the telephone cord to the Phone jack on the back of the Internet
Terminal and to your home’s telephone jack.
Use a telephone jack that isn’t connected to a telephone. If you have only one
telephone jack, plug the T-splitter into the wall telephone jack, then plug your
phone into one side and the telephone cord for the Internet Terminal into
the other side of the T-splitter.
Go to step 5 - Connecting the webeye.
After you have connected the Internet Terminal and signed up with
the WebTV Network, you must set up your IR Blaster to work with
your equipment. Simple instructions are available after you sign up with the
WebTV Network. Follow these steps to access the instructions.
Once you are connected to the WebTV Network, press the VIEW button
until the TV Home page appears on the screen.
Use the Arrow buttons to select Settings. Press the GO button.
Use the Arrow buttons to select Hooking up. Press the GO button. You’ll be
guided through a few screens to complete the setup of your VCR, Cable Box,
or Satellite Box.
1
2
3
Audio
Video
In
w e b
Phone
IR Blaster
Printer Port
R
Mic
L
Out
e y e
S-Video
Channel
3 4
Cable
In
Out
AC Input
Page 23

23
Connections
If you want to place the Internet Terminal in a cabinet, or somewhere out of
view, use the webeye. Then, point the remote control at the webeye (not the
Internet Terminal) in order to control the Internet Terminal.
Connect the webeye cord to the webeye jack on the back of the Internet
Terminal. Then, place the webeye in a convenient location, such as on top of the
entertainment center.
Go to step 6 - Connecting the AC Power Cord.
Make sure your local AC voltage corresponds to the voltage of the AC
power cord (120V) before connecting
the Internet Terminal to AC power. If
it does not, consult your dealer.
Then, c
onnect one end of the AC
power cord to the Internet
Terminal’s AC Input jack. Connect
the other end (two-prong plug end)
to an AC outlet.
Make sure all other equipment
(Cable Box, VCR, etc.) is plugged in.
You are ready to connect to the
WebTV Network. Instructions
are on page 25.
Step 6 Connecting the AC Power Cord
Step 5 Connecting the webeye
Phone
IR Blaster
Printer Port
Audio
Video
In
R
Mic
L
Out
w e b
S-Video
e y e
Channel
3 4
Cable
In
Out
AC Input
w e b
S-Video
e y e
Channel
3 4
Cable
In
Out
AC Input
Page 24

Connecting a Printer (optional)
24
Connections
You may connect a printer to the Internet Terminal. This will enable you to
print email messages and Internet pages. To see which printers can be connected and to learn how to print, select Using WebTV from the Web Home
Page, then select Instructions, then select Printing.
To connect a printer, follow these steps.
Turn off the Internet Terminal and disconnect the power cord.
Connect one end of a parallel printer cable to the Printer Port jack on the
back of the Internet Terminal.
Connect the other end of the printer cable to the connector on your printer
(refer to the printer owner’s manual).
You will not need to use the software disks that came with your printer. The
only software needed to print from your Internet Terminal is provided by the
WebTV Network.
To access or change your telephone options, go to the Web Home Page. Use
the Arrow buttons on the remote control to select Using WebTV. Press the
GO button. Use the Arrow buttons to select Settings, then press the GO
button. Use the Arrow buttons to select the Dialing and Connecting information, then press the GO button. Information about the following features will
be available.
❐ Some phone lines require a dialing prefix, such as 9, to make an outside
call. You may enter this number if necessary.
❐ You can select pulse dialing or tone dialing.
❐ If you have Call Waiting, you may receive phone calls while you’re connect-
ed to the WebTV Network. Your telephone will ring, and you may take
the call as you normally do. You may reconnect to the WebTV Network
when you’re finished with the call and go directly to the page you were
visiting when the call was received.
❐ Advanced dialing options includes information about voice mail, audible dial-
ing, and dialing speeds.
❐ Your Internet Terminal was set at the factory to work for the most com-
mon dialing situations. You can reset the dialing options to the factory settings if necessary.
❐ To keep your phone line free, your Internet Terminal automatically discon-
nects from the WebTV Network if you do not use the remote control for
several minutes. To reconnect, press the GO button.
Telephone Options
1
2
3
Page 25

Connecting to the WebTV Network
Signing Up for the WebTV Network
Turn on your television.
Press the WebTV MODE button, then the POWER button, to turn on the
Internet Terminal and to connect to the WebTV Network. This may take a
minute or more.
Set the TV to the appropriate Auxiliary In channel. The WebTV Network
symbol appears on your TV screen. (If you have not programmed the Internet
Terminal’s remote control to operate the TV, use your TV remote control to
set your TV to the channel reserved for viewing other devices, if necessary.
Refer to your TV owner’s manual if you need further details.)
The Connecting to WebTV message will appear. (If your unit is having trouble
connecting, you may see various messages on-screen. Follow the directions
on-screen carefully.)
You will see some introductory information. The remaining sign-up screens
will ask for the following information.
❐ Name
❐ Address
❐ Billing Options (credit card or check)
❐ Internet name - You will create your own Internet name, which will be your email
address. It may contain letters and numbers, but it must start with a letter. It
must contain at least three characters, and no more than 15. If you enter an
unacceptable name, a message will appear on-screen. Follow the on-screen
instructions to continue.
The last screen will contain all the information you entered. After you make
sure the information is correct, you’re finished!
Note: If you are using a VCR, Cable Box, or Satellite Box, you must complete
the IR Blaster setup now. This is the second part of step 3 on page 22.
Signing up for the WebTV Network is an easy process that asks you to provide some billing information. You may use the on-screen keyboard to enter
the information. If you have trouble signing up, please call 1-800-GO-WEBTV
(469-3288). (Service and support fees may apply for accessing WebTV
Network customer support.)
Before you begin:
❐ Program the remote control to operate your TV. See pages 30-31 for details.
❐ Read the information about the on-screen keyboard on page 27.
25
1
2
3
4
5
6
Page 26

26
❐ The sign-up pages will reappear each time you turn on your Internet Terminal
until you complete the sign-up process.
❐ If you make a mistake, press the Back (EXIT) button until the incorrect page
appears. Going back deletes the information on the current page. Make the
correction, then continue as instructed.
❐ A screen may appear that asks if you want to update your Internet Terminal
with the latest features. Use the Arrow buttons to select Update Now, then
press the GO button.
If you have trouble connecting to the WebTV Network:
❐ Make sure the phone jack used for WebTV is a working line. You can check by
plugging a phone into the phone jack and listening for a dial tone.
❐ If you receive an error message when your Internet Terminal tries to connect to
the WebTV Network, follow these steps:
1. Use the Arrow buttons to select Options, then press the GO button to view
the Dialing options screen.
2. Use the Arrow buttons to select Advanced, then press the GO button.
3. Use the Arrow buttons to select the Audible dialing box, then press the GO
button to place a check in the box.
4. Use the Arrow buttons to select Done, then press the GO button.
5. Use the Arrow buttons to select Connect, then press the GO button.
6. Turn up the volume on the TV to listen to the dialing process. You should
hear a dial tone, numbers being dialed, and the sound of a modem.
If you hear an operator message, your Internet Terminal is dialing incorrectly.
Turn off the Internet Terminal, then turn it on again. You may need to adjust
your Telephone Options before trying to connect to the WebTV Network again.
Details are on page 24.
If you already have an account with an Internet Service Provider (ISP), you
can use this account to connect to the WebTV Network.
Go to the Web Home Page. Use the Arrow buttons on the remote control
to select Using WebTV. Press the GO button. Use the Arrow buttons to
select Instructions, then press the GO button. Information about using your
current ISP will be available.
The WebTV Network has thousands of local access points across the country. However, some access points may result in long-distance charges. The
WebTV Network is continually adding local access points. For more information about the one nearest you, call 1-800-GO-WEBTV (469-3288). (Service
and support fees may apply for accessing WebTV Network customer support.)
Using Your Current Internet Service Provider
Additional Sign-up Tips
Connecting to the WebTV Network
Page 27

27
Basic Information
Using the On-screen Keyboard
Use the on-screen keyboard to type information when an activity requires
typing, such as sending an email message. When a text box appears on the
screen, a vertical line appears in the box. This line indicates exactly where you
may type.
Displaying the on-screen keyboard
Use the Arrow buttons to select a text box. A vertical line appears inside the
box.
Press the GO button on the remote. The keyboard slides onto your screen.
To remove the on-screen keyboard at any time, press the Back (EXIT) button.
Typing letters, numbers, and punctuation marks
Use the Arrow buttons to move the yellow highlight box to a keyboard character.
Press the GO button on the remote control.
Continue moving to other characters, pressing the GO button each time, to
type your text. When you finish entering text, use the Arrow buttons to highlight Continue, then press the GO button.
1
2
1
2
3
Page 28

28
Areas on a page that can be highlighted are called links, because they link
you to another page. Links can be words, pictures, icons, or boxes. The
WebTV Network finds each link on a page for you when you press the
Arrow buttons on the remote. To activate a link, use the Arrow buttons to
highlight a link, then press the GO button.
In some instances, the highlight might surround a large area of the page or
the entire page. When this happens, an arrow will appear in the lower right
corner of the highlight to signify that this is an image map.
To activate a link on an image map, press the GO button. Another arrow
will appear. Use the Arrow buttons on the remote to move the arrow to
the link you want. Press the GO button to access the link.
Image map
Terms You Need to Know
The Page Title displays the title of the page currently on your screen.
Indicator Arrows are green when the currently displayed page is longer than
your screen. Green arrows indicate the direction or directions in which more
of the page can be viewed. Press the SCROLL (Up/Down) buttons on the
remote to view more of the page.
Page Title
Indicator Arrows
Utah Texas Maine Ohio
Basic Information
Page 29

29
Basic Information
The WebTV Options Panel allows you to quickly perform common features
of the WebTV Network. Each option is described below.
To use the WebTV Options Panel, follow these steps.
While accessing the Internet, press the OPTIONS button on the remote control.
Use the Arrow buttons on the remote control to select an option.
Press the GO button on the remote control.
❐ WebTV - Select to return to the Web Home Page.
❐ Find - Select to find a word or a phrase on the current page.
❐ Info - Select to display a panel specific to the current page. Information
might include the page’s address or the time of the page’s most recent
update.
❐ Go to - Select to go to an Internet site by typing its address.
❐ Save - Select to save the current page in your Favorites folder.
❐ Send - Select to email the current page to someone else.
❐ TV window - Select to view TV programming in a small window. This
enables you to view TV programming and access the Internet at the same
time.
❐ Print - Select to print. You must have a printer connected to your Internet
Terminal.
❐ Reload - Select to update the page you are viewing. This is helpful if the
page is frequently updated.
❐ Hangup - Select to temporarily disconnect from the WebTV Network,
make a telephone call, then reconnect to the page you were viewing. This
is helpful if your telephone and the Internet Terminal share the same
phone line.
Options Panel (WebTV)
Options Panel (TV)
The TV Options Panel gives you easy access to television channels and programming information. While watching television from the TV Home Page, follow steps 1 - 3 above to access the TV Options Panel. The TV Options Panel
includes the following:
❐ Today’s Listings - Select to view today’s program listings for local channels.
❐ Program Info - Select to see more information about the current TV pro-
gram. In Program Info, you may choose to record the program or ask
WebTV to remind you when a future program will air.
❐ TV Favorites - Select to add your favorite channels into memory. A list of
your favorite channels and the title of each channel’s current programming
will appear on the screen. When you select a channel, the channel’s current programming will appear in the TV window.
1
2
3
Page 30

30
Remote Control
You can program the Internet Terminal remote control to operate your TV.
It is already programmed to control your Internet Terminal. Your television
must be able to receive an infrared (IR) signal from a remote control. There is
no guarantee that the remote control will operate your brand of TV.
Find the three-digit code for your TV from the list of Remote Control Codes
below. If more than one code is listed, you may need to try several codes
before finding the correct one.
Press the TV MODE button.
Press and hold the CODE SET button for three seconds.
Within 30 seconds, enter the three-digit code for your brand of TV and press
the ENTER button.
To see if the remote control operates your TV, press the TV MODE button,
then the POWER button. Your television should turn on or off.
Press the CHANNEL UP/DOWN buttons. The TV channels should change.
If the remote control does not operate the TV, repeat steps 1-4, using a different code at step 4.
Setting the Remote Control to Operate a TV
A-Mark 030
Abex 059
Admiral 120
Adventura 073
Aiko 119
Akai 057
Alleron 206, 210
Ambassador 204
Anam 095, 207
Anam National 082
AOC 030, 046, 057, 079, 212
Archer 030
Audiovox 030, 207
Belcor 046
Bell & Howell 043, 181
Bradford 207
Brockwood 046
Broksonic 030
Candle 057, 073, 083, 213
Carnivale 057
Carver 081
Celebrity 027
Citizen 057, 066, 073, 083
087, 119, 213, 307
Clairtone 212
Concerto 083
Contec 184, 185, 207, 212
Craig 207
Crown 066, 207
Curtis Mathes 057, 066, 087, 181
CXC 207
Daewoo 046, 066, 119, 478
Daytron 046
Dumont 044, 046
Electroband 027, 212
Electrohome 408, 416, 436
Emerson 046, 065, 066, 181, 185
204, 205, 206, 207, 209
210, 212, 263, 307, 309, 490
Envision 057
Fisher 181, 186
Fujitsu 206
Funai 198, 206, 207
Futuretech 207
GE 048, 054, 056, 074, 078, 082
162, 201, 205, 306, 309, 478
Remote Control Codes
For additional codes, see page 31.
1
2
3
4
Page 31

31
Remote Control
Setting the Remote Control to Operate a TV, continued
Gibralter 044, 046, 057
Goldstar 028, 046, 057, 059
066, 083, 205, 436
Grunpy 206, 207
Hallmark 205
Harman/Kardon 105
Harvard 095, 207
Hitachi 059, 065, 083, 172
178, 306, 436
Infinity 081
Janeil 073
JBL 081
JCB 027
JVC 080, 209
Kawasho 185
Kaypani 079
KEC 207
Kenwood 046, 057
Kloss 051, 073, 105
KTV 057, 066, 207, 210, 212, 307
Logik 043
Luxman 083
LXI 074, 081, 181, 183, 205
Magnavox 047, 051, 055, 057, 081
123, 213, 214, 413, 845
Majestic 042, 043
Marantz 057, 081
Matsushita 277
Megatron 030, 172, 205
MEI 212
Memorex 043, 083, 177, 181, 205
MGA 046, 057, 177, 205
Midland 044, 059, 066, 074, 078, 162
Minutz 048
Mitsubishi 046, 120, 177, 205, 268
Motorola 082, 120
MTC 046, 057, 083, 087, 212
Multitech 207
NAD 183, 193, 205
NEC 046, 057, 083
Nikko 057, 119, 205
Noshi 045
NTC 119
Onwa 207
Optimus 181, 193, 277
Optonica 120, 192
Orion 263
Panasonic 078, 082, 277
Penney 030, 045, 046, 048, 054
057, 059, 066, 074, 078
087, 162, 176, 183, 205
Philco 046, 047, 055, 057, 081, 123
Philips 081, 845
Pilot 046, 057, 066
Pioneer 065, 193
Portland 046, 066, 119
Prism 078
Proscan 074
Proton 030, 079, 205
Pulsar 044, 046
Quasar 078, 082, 192, 277
Radio Shack 046, 057, 059, 066
074, 083, 181, 192
205, 207, 436
RCA 045, 046, 056, 065
074, 117, 162, 201
Realistic 046, 057, 059, 066, 083
181, 192, 205, 207
Rhapsody 210, 212
Runco 044, 057
Sampo 057, 059, 066, 079
Samsung 046, 057, 059, 066, 083
087, 205
Samsux 066
Sanyo 173, 181, 186
Scimitsu 046
Scotch 205
Scott 046, 205, 206, 207, 263
Sears 042, 074, 081, 083, 173, 176
181, 183, 186, 198, 205, 206
Sharp 066, 120, 184, 192, 413
Shogun 046
Signature 043
Simpson 213, 214
Sony 027, 038, 107, 138
Soundesign 205, 206, 207, 213
Spectricon 030
Squareview 198
SSS 046, 207
Starlite 207
Supre-Macy 073
Supreme 027
Sylvania 047, 055, 057, 081,123, 408
Symphonic 198
Tandy 120
Tatung 030, 082
Technics 078, 277
Technol Ace 206
Techwood 030, 078, 083
Teknika 043, 046, 066, 081, 083, 087
119, 177, 206, 207, 213
TMK 083, 204, 205
Toshiba 087, 176, 181, 183
Tosonic 212
Totevision 066
Trical 184
Universal 054
Vector Research 057
Victor 080
Vidikron 081, 269
Vidtech 046, 205
Viking 073
Wards 043, 046, 047, 048, 054, 055
056, 057, 081, 083, 107, 123
138, 192, 201, 205, 206
Yamaha 046, 057
Zenith 043, 044
Zonda 030
Page 32

32
TV Home Page
TV Home Page
To get to the TV Home Page, press the VIEW button on the remote control
until the TV Home Page appears.
The following information appears on the TV Home Page:
❐ Title, time, and channel of current TV program - To go to the Program Info
page (where you have the option to record the program or to be reminded
of the program), use the Arrow buttons to select the program title, then
press the GO button.
❐ Current Date and Time
❐ Programming of the current channel - For full-screen TV viewing, use the
Arrow buttons on the remote control to select the TV window, then press
the GO button. To return to the TV Home Page, press the HOME button
or the Back (EXIT) button.
❐ WebTV logo - To go to the Web Home Page, use the Arrow buttons to
select this link, then press the GO button.
❐ Web Home - To go to the Web Home Page, use the Arrow buttons to
select this link, then press the GO button.
❐ Settings - To customize your TV viewing or to set up other equipment (such
as a VCR), use the Arrow buttons to select this link, then press the GO
button.
❐ TV Listings - To see TV program information for channels in your area, use
the Arrow buttons to select this link, then press the GO button. This information may not correspond correctly if you are using a Direct Broadcast
System. For additional information about this feature, see page 33.
❐ How to - For additional information about features, use the Arrow but-
tons to select this link, then press the GO button.
❐ TV Favorites - To create a menu of your favorite TV channels and quickly
move between them, use the Arrow buttons to select this link, then press
the GO button.
❐ TV Planner - To check your schedule of upcoming VCR recordings and TV
show reminders, use the Arrow buttons to select this link, then press the
GO button. You also may set up future Recordings or Reminders here.
❐ VCR - To access your VCR controls with the Internet Terminal’s remote
control, use the Arrow buttons to select this link, then press the GO button.
❐ TV Sites - To go to related web sites while watching TV, use the Arrow
buttons to select this link, then press the GO button.
Page 33

33
Remind
Remind tells you when the shows you want to watch are coming on.
Go to the TV Home page.
Use the Arrow buttons to select TV Listings, then press the GO button.
Select a search method, then use the Arrow buttons to select a future show
you want to watch, then press the GO button. The Program Info page
appears. (If the show is in progress, the TV programming will appear in full
screen.)
Use the Arrow buttons to select Remind, then press the GO button.
Remind also will switch to the right channel for you. To activate this feature,
select “Tune to channel when program begins” on the Program Info page.
Press the GO button so that a check appears in the box. Use the Arrow buttons to select Done, then press the GO button.
A banner will appear across the top of your TV screen one minute before
your show starts.
TV Home Page
TV Listings
With TV Listings, you can see what’s coming on in the next hour or during
the next seven days. The Search feature quickly lists the shows you’re looking
for.
Go to the TV Home Page.
Select TV Listings.
Select a search method under View TV Listings or Search TV Listings.
View TV Listings - View programs for today or for the upcoming week.
Select the date and time for which you want information.
Search TV Listings - Two additional search methods are available. You
may type in a word that relates to what you’re looking for, such as an actor’s
name, show title, or topic. Or, you may choose one of the categories listed.
If you select a show that is in progress, programming of that show will
appear in full screen.
If you select a show that will air in the future, the Program Info page will
appear. To record the program, see VCR Programming on page 34. To have
WebTV remind you when the program airs, read the Remind information
below.
1
2
3
1
2
3
4
Page 34

34
TV Home Page
VCR Programming
You can program your VCR to record an upcoming show. You may select any
upcoming show (up to a week in advance) from the TV Listings.
Go to the TV Home page.
Use the Arrow buttons to select TV Listings, then press the GO button.
Select an upcoming show that you want to record. The Program Info page
appears. (If you select a show that is in progress, the program will appear in
full-screen view.)
Use the Arrow buttons to select Record, then press the GO button.
Insert a tape in your VCR. Turn off the VCR.
Note: WebTV may ask you to set up your VCR. Go to the TV Home Page
and choose Settings for more information. For details on connecting your
VCR to the Internet Terminal, see pages 18-22.
You may use your Internet Terminal’s remote control to operate your
VCR. Do not use your VCR’s remote; the VCR controls will appear on the
TV screen.
If you can’t use your Internet Terminal remote control to operate your
VCR, make sure your IR Blaster is set up properly. Details are on pages 21-
22.
A Combination TV/VCR (a TV with a built-in VCR) is not supported by the
WebTV Network.
Go to the TV Home Page.
Use the Arrow buttons to select VCR, then press the GO button. Some
VCR control buttons will appear on the screen, including POWER,
TV/VCR, REC(ORD), PAUSE, PLAY, STOP, REW(IND) and FF(fast forward).
To activate the VCR controls, use the Arrow buttons on the Internet
Terminal’s remote control to select an on-screen VCR button, then press
the GO button.
To turn on the VCR, select the POWER button.
If you don’t see a picture, select the TV/VCR button.
You can view the VCR playback in full-screen and still access the VCR controls. Select the Playback window, then press the GO button. Press the
OPTIONS button on the remote control. The VCR controls will appear on
the screen. To remove the controls, press the OPTIONS button again.
On-Screen VCR Controls
1
2
3
1
2
3
4
5
Page 35

35
Web Home Page
Web Home Page
To get to the Web Home Page, press the VIEW button on the remote control
until the Web Home Page appears.
The following links appear on the Web Home Page:
❐ TV Home - To go to the TV Home Page, use the Arrow buttons to select
this link, then press the GO button.
❐ Using WebTV - To find more information and instructions about the
WebTV Network, use the Arrow buttons to select this link, then press the
GO button. More information will be available about: your WebTV
Network account; new features; dialing and connecting options; and instruc-
tions for WebTV Network features.
❐ Community - To access Around Town sites or to access on-line communi-
ties (“chat rooms”), use the Arrow buttons to select this link, then press the
GO button.
❐ Switch User - To identify multiple users for your Internet Terminal or to
sign on as a different user, use the Arrow buttons to select this link, then
press the GO button. Users may create their own settings for email and
Favorites folders and create individual passwords.
Note: The Switch User feature will appear only if you have set up more
than one user for your Internet Terminal.
❐ WebTV logo - To go to the TV Home Page, use the Arrow buttons to
select this link, then press the GO button.
❐ Mail - To go to your Mail list, use the Arrow buttons to select this link, then
press the GO button. Your email messages are listed here. To read a mes-
sage, use the Arrow buttons to highlight a message, then press the GO
button. In the Mail list, you may also: address, create, and send email mes-
sages; save messages; personalize your mailbox; store and edit email
addresses; and delete an email message.
Page 36

Web Home Page
36
❐ Favorites - To go to your Favorites folders, use the Arrow buttons to select
this link, then press the GO button. This is where you store your favorite
Internet sites.
To learn how to save a site to your Favorites folders, go to the Web
Home Page, then select Using WebTV, then select Instructions.
The first time you access the Favorites folders, additional instructions will
appear on the screen.
When you are connected to the WebTV Network, you may go directly to
the Favorites folders by pressing the Favorites button on the remote con-
trol.
❐ Explore - Use the Arrow buttons to select Explore, then press the GO
button. Some of the most interesting sites of the Internet are listed at the
Explore site. Select one of the links to go to related pages.
❐ Search - The Search feature allows you to search the Internet for informa-
tion on general and specific topics.
Use the Arrow buttons to select Search, then press the GO button. Use
the on-screen keyboard to type a topic in the text box. Use the Arrow
buttons to select Search, then press the GO button. A list appears on your
screen. Use the Arrow buttons to highlight an item of interest, then press
the GO button.
❐ My WebTV - This area displays updates for categories that you specify,
such as weather, sports, or stocks. Details are on page 37.
Web Home Page (continued)
Page 37

37
WebPIP™ (Picture-In-Picture) works on any TV. It displays a TV window on
the screen and allows you to watch TV while you browse the Internet. For
example, during a ball game you can go to a sports web site and check up-tothe-minute scores, player statistics, and game summaries without missing a
single play.
Go to the Web Home Page.
Press the OPTIONS button on your Internet Terminal remote control to
bring up the options panel.
Use the Arrow buttons to select TV window, then press the GO button.
Your WebPIP window appears in the corner. To move the WebPIP window
from side to side, press the ENTER button on the remote control.
Note: If a recording is in progress, a picture may not appear unless you are
using a splitter. Details are on page 20.
To remove the WebPIP window, press the OPTIONS button again, then
select TV window again.
Web Home Page
WebPIP
TM
My WebTV
My WebTV is the area near the bottom of the Web Home Page. News items,
including Weather, Sports, Stocks, and headline News, appear within this area.
You may select the information you want to appear in this area. Limit the
news to information about your favorite sport or your area by following these
steps.
Go to the Web Home page.
Select the My WebTV area near the bottom of the screen. Notice how the
information changes between the currently selected subjects, such as Weather
or Stocks. Press the GO button.
My WebTV switches to a full-screen view of news headlines, sports scores,
and more. The first time you access this feature, additional instructions will
appear on the screen.
Press the SCROLL (Up/Down) buttons on your remote control to view all of
the subjects in My WebTV.
To change the subjects that appear in My WebTV, select “Change Topics.”
You also may personalize within subjects. For example, select “Change City” if
you want continuous weather information for your vacation destination
instead of your hometown.
1
2
3
4
1
2
3
4
Page 38

Attaching Images to Email
38
Email lets you send pictures to your friends and family. To attach an image
from your camcorder, VCR, or Digital Camera, follow steps 1-8 below.
Before you begin, make sure your video equipment is connected correctly.
To connect video equipment to the Internet Terminal, connect the audio and
video cables to the Audio/Video Out jacks of your video equipment and to
the Audio/Video In jacks on the back of the Internet Terminal, matching like
colors. If you have cables connected to the Audio/Video In jacks on the
Internet Terminal already, temporarily disconnect them.
Go to the Web Home page.
Select Mail.
Select Write. Compose your message as usual.
Select Photo.
Select the on-screen TV/Video switch. Press the GO button so that Video is
selected. (Make sure the video equipment is connected properly to your TV.
If the equipment is not connected correctly, you will see a “No video signal”
message on the screen.)
Or, if you want to send an image from a television show, set the TV/Video
switch to TV.
Play your video or image. When you see the picture you like, select Freeze.
Select Add to Message.
You will return to your email message. Select Send to mail the message as
usual.
Web Home Page
1
2
3
4
5
6
7
8
Page 39

39
Web Home Page
Attaching Sound to Email
Email lets you add your voice or other audio to a message. You may record
sound from a microphone or a camcorder.
To attach a microphone to the MIC(rophone) jack on the back of the Internet
Terminal, see page 11.
To connect a camcorder to the Internet Terminal, connect the audio and
video cables to the Audio/Video Out jacks of the camcorder and to the
Audio/Video In jacks on the back of the Internet Terminal, matching like colors. If you have cables connected to the Audio/Video In jacks on the Internet
Terminal already, temporarily disconnect them.
Once you’ve connected a microphone or a camcorder, follow these steps to
send an audio message with your email.
Go to the Web Home page.
Select Mail.
Select Write. Compose your message as usual.
Select Recording.
Select Record to begin recording.
Select Stop to end the recording. To review your Recording, select Play.
Select Add to Message.
You will return to your email message. Select Send to mail the message as
usual.
1
2
3
4
5
6
7
8
Page 40

40
Specifications
Specifications
Terminals
❐ Phone jack
❐ Mic(rophone) jack
❐ IR (Infrared) Blaster jack
❐ Printer Port
❐ Audio In/Out (right and left) jacks
❐ Video In/Out jacks
❐ webeye jack
❐ S-Video jack
❐ Cable In jack
❐ Cable Out jack
❐ AC Input jack
Dimensions
338.6 mm x 77.5 mm x 207.6 mm
Weight
5 lbs. 9.4 oz.
Power requirements
AC 120V
Power consumption
25W maximum
15W standby
Specifications are subject to change without notice.
Page 41

Web Home Page
41
Warranty
WHO IS COVERED?
You must have proof of purchase to receive warranty service.
A sales receipt or other document showing that you purchased
the product is considered proof of purchase.
WHAT IS COVERED?
Warranty coverage begins the day you purchase your product.
For 90 days from the date of purchase, the Internet Unit will
be replaced with a new, repaired, renewed or comparable
product (whichever is deemed necessary) if it becomes defective or inoperative. This exchange is done without charge to
you.
From 90 days to one year from the date of purchase, your
Internet Unit will be replaced with a new, repaired, renewed,
or comparable product (whichever is deemed necessary) if it
becomes defective or inoperative. You will be responsible for
all labor costs. Contact Philips Service Solutions Group at 1888-813-7069 to obtain your cost (labor costs) for exchange. If
you live in Canada and need to talk with a French-speaking representative, call 1-800-661-6162.
All products, including replacement products, are covered only
for the original warranty period. When the warranty on the
original product expires, the warranty on the replacement
product also expires.
After one year from the date of purchase, you pay for the
replacement of all parts, and for all labor charges.
WHAT IS EXCLUDED?
Your warranty does not cover:
• labor charges for installation or setup of the product.
• installation, performance of, or repair of audio/video
cabling, telephone line, or accessory attachments used in
accessory ports outside of the product.
• product replacement because of misuse, accident, lightning
damage, unauthorized repair, or other cause not within the
control of Philips Consumer Electronics.
• incidental or consequential damages resulting from the
product. (Some states do not allow the exclusion of incidental or consequential damages, so the above exclusion
may not apply to you.)
• reception transmission problems caused by signal conditions, telephone line, or cable or antenna systems outside
the unit.
• a product that requires modification or adaptation to
enable it to operate in any country other than the country
for which it was designed, manufactured, approved and/or
authorized, or repair of products damaged by these modifications.
• a product used for commercial or institutional purposes.
Philips makes no warranty that the access connection will
be a local (not long distance) call, or that international dialing connection(s) may be required for usage of the product
outside the United States.
WebTV service is separate and distinct from this product
(hardware) warranty.
MAKE SURE YOU KEEP...
Please keep your sales receipt or other document showing
proof of purchase. Attach it to this owner’s manual and keep
both nearby. Also keep the original box and packing material
in case you need to return your product.
BEFORE REQUESTING SERVICE...
Please check your owner’s manual before requesting service.
Adjustments of the controls discussed there may save you a
service call.
TO GET WARRANTY SERVICE...
Warranty service will be provided by Philips Consumer
Electronics. If you believe you need service for your Internet
Unit, contact Philips Service Solutions Group at 1-888-813-
7069. If you live in Canada and need to talk with a Frenchspeaking representative, call 1-800-661-6162. A representative
will go through a diagnostic checklist with you. If it is determined that the product needs to be exchanged, you will
receive a return authorization number.
The representative will give you complete shipping details.
PHILIPS MAGNAVOX SERVICE CONTRACT
Enjoy peace of mind, even after your product’s warranty
expires. A Philips Magnavox Service Contract protects you
from unexpected (and unwelcome) expenses by fully covering
the cost of both parts and labor, should a repair be necessary.
And, we’re there when you need us. You’ll receive fast, convenient service with a single phone call, seven days a week.
Receiving this protection is simple. Complete and mail your
warranty registration card. Or, if you’d like more information,
call 1-888-813-7069 today. If you live in Canada and need to
talk with a French-speaking representative, call 1-800-661-6162.
TO GET OUT-OF-WARRANTY SERVICE...
Out-of-warranty service can be obtained at a nominal cost for
replacement and handling. To obtain out-of-warranty service:
1. Contact Philips Service Solutions Group at 1-888-813-7069
to obtain the cost of out-of-warranty exchange for your product. If you live in Canada and need to talk with a Frenchspeaking representative, call 1-800-661-6162.
2. Pack the Internet Unit in a carton suitable for safe shipment.
3. Ship the unit, freight prepaid, to:
Philips Service Solutions Group
112 Polk Street
Greeneville, Tennessee 37745
Make sure you write your complete return address on the outside of the carton. Also, include a letter inside the carton
describing the problem. Be sure the letter includes your name,
address, telephone number, and product serial number. Enclose
your money order in the amount quoted to you by the Philips
Service Solutions Group representative.
4. When your product is received, it will be replaced by a
new, repaired, renewed, or comparable product which meets
Philips’ high quality standards and returned to you by prepaid
transportation. You will be responsible for all transportation
and shipping costs.
REMEMBER...
Record below the model and serial numbers found on the
product. Also, fill out and mail your warranty registration card
promptly. It will be easier for us to notify you if necessary.
(The return of the warranty registration card is not a condition
for warranty coverage.)
MODEL # _____________________________________
SERIAL # _______________________________________
EL6176E002 / MAC5972 / 05-98
This warranty gives you specific legal rights. You may have other
rights which vary from state to state. All implied warranties, including
implied warranties of merchantability and fitness for a particular
purpose, are limited in duration to the duration of this express war-
ranty. Some states do not allow limitations on how long an implied
warranty lasts, so the above limitation may not apply to you.
Philips Service Solutions Group
P.O. Box 555
Jefferson City, TN 37760
(423) 475-8869
Internet Terminal
90 Days Free Labor
One Year Parts Exchange
Page 42

Web Home Page
42
Index
accessories . . . . . . . . . . . . . . . . . . . . . . .44
a/ch button . . . . . . . . . . . . . . . . . . . . . . .13
ac input jack . . . . . . . . . . . . . . . . . . .11, 23
around town . . . . . . . . . . . . . . . . . . . . . .35
arrow buttons . . . . . . . . . . . . . . . . . . . . .13
audio in/out jacks . . . . . . . . . . . .11, 15, 20
back (exit) button . . . . . . . . . . . . . . .13, 26
battery installation (remote) . . . . . . . . . .10
cable box connections . . . . . . .18-19, 21-22
cable in/out jacks . . . . . . . . . . . . .11, 16-20
canadian ringer equivalence
number notice . . . . . . . . . . . . . . .6
channel 3/4 switch . . . . . . . . . . . . . . .11, 16
channel up/down buttons . . . . . . . . . . . .13
code set button . . . . . . . . . . . . . . . . .13, 30
connected indicator . . . . . . . . . . . . . . . .12
connections . . . . . . . . . . . . . . . . . . . .14-24
dimensions . . . . . . . . . . . . . . . . . . . . . . .40
email . . . . . . . . . . . . . . . . . . . .8, 35, 38-39
enter button . . . . . . . . . . . . . . . . . . .13, 30
expansion port . . . . . . . . . . . . . . . . . . . .12
explore . . . . . . . . . . . . . . . . . . . . . . . .8, 36
explore button . . . . . . . . . . . . . . . . . . . .13
favorites button . . . . . . . . . . . . . . . . .13, 36
favorites folders . . . . . . . . . . . . . . . . . . .36
fcc information . . . . . . . . . . . . . . . . . . . . .5
find option . . . . . . . . . . . . . . . . . . . . . . .29
go button . . . . . . . . . . . . . . . . . . . . . . . .13
go to option . . . . . . . . . . . . . . . . . . . . . .29
hangup option . . . . . . . . . . . . . . . . . . . . .29
home button . . . . . . . . . . . . . . . . . . . . .13
image map . . . . . . . . . . . . . . . . . . . . . . . .28
index . . . . . . . . . . . . . . . . . . . . . . . . . . . .42
indicator arrows . . . . . . . . . . . . . . . . . . .28
info option . . . . . . . . . . . . . . . . . . . . . . .29
infrared sensor . . . . . . . . . . . . . . . . . . . .12
instructions (on-screen) . . . . . . . . . . . . . .8
ir blaster jack . . . . . . . . . . . . . . . . . .11, 21
ir blaster setup . . . . . . . . . . . . . . . . . . . .22
kid-friendly . . . . . . . . . . . . . . . . . . . . . . . .8
limited warranty . . . . . . . . . . . . . . . . . . .41
links . . . . . . . . . . . . . . . . . . . . . . . . . . . .28
mail button . . . . . . . . . . . . . . . . . . . . . . .13
mail list . . . . . . . . . . . . . . . . . . . . . . . . . .35
mail option . . . . . . . . . . . . . . . . . . . . . . .35
message indicator . . . . . . . . . . . . . . . . . .12
mic(rophone) jack . . . . . . . . . . . . . . . . . .11
my webtv . . . . . . . . . . . . . . . . . . . . . . . .37
number buttons . . . . . . . . . . . . . . . . . . .13
on-screen keyboard . . . . . . . . . . . . . . . .27
options button . . . . . . . . . . . . . . . . . . . .13
options panel . . . . . . . . . . . . . . . . . . . . .29
package contents . . . . . . . . . . . . . . . . . . .10
page title . . . . . . . . . . . . . . . . . . . . . . . . .28
phone jack . . . . . . . . . . . . . . . . . . . . .11, 22
power button . . . . . . . . . . . . . . . . . . . . .13
power consumption . . . . . . . . . . . . . . . .40
power indicator . . . . . . . . . . . . . . . . . . .12
printer port . . . . . . . . . . . . . . . . . . . .11, 24
recent button . . . . . . . . . . . . . . . . . . . . .13
reload button . . . . . . . . . . . . . . . . . . . . .13
reload option . . . . . . . . . . . . . . . . . . . . .29
remote control . . . . . . . . .10, 13, 30-31, 34
safety information . . . . . . . . . . . . . . . . .3-4
save option . . . . . . . . . . . . . . . . . . . . . .29
scroll (up/down) buttons . . . . . . . . . .13, 28
search . . . . . . . . . . . . . . . . . . . . . . . . .8, 36
send option . . . . . . . . . . . . . . . . . . . . . . .29
smartcard port . . . . . . . . . . . . . . . . . . . .12
specifications . . . . . . . . . . . . . . . . . . . . . .40
splitter . . . . . . . . . . . . . . . . . . . . . . . . . .20
surfwatch . . . . . . . . . . . . . . . . . . . . . . . . .8
s-video jack . . . . . . . . . . . . . . . . . . . .11, 15
table of contents . . . . . . . . . . . . . . . . . . . .9
telephone connections . . . . . . . .22, 24, 26
tv connections . . . . . . . . . . . . . . . . . .15-16
tv mode button . . . . . . . . . . . . . . . . . . . .13
tv/video button . . . . . . . . . . . . . . . . . . . .13
vcr connections . . . . . . . . . . . . . . . . .18-22
vcr controls . . . . . . . . . . . . . . . . . . . .32, 34
video in/out jacks . . . . . . . . . . . .11, 15, 20
view button . . . . . . . . . . . . . . . . . . . . . . .13
volume up/down buttons . . . . . . . . . . . .13
webeye . . . . . . . . . . . . . . . . . . . . . . . . . .23
webeye jack . . . . . . . . . . . . . . . . . . . .11, 23
webpip . . . . . . . . . . . . . . . . . . . . . . . . . .37
webtv mode button . . . . . . . . . . . . . . . .13
Page 43

43
Page 44

Web Home Page
44
Accessories
IB8060B002
To order an accessory, write to:
Philips Service Solutions Group
P.O. Box 967
Greeneville, TN 37744-0967.
Or, call 1-888-813-7069.
The following accessories are packed with your Internet Terminal. These
accessories are provided to help you use or set up your Internet Terminal.
If any of these items are not included, or if you need to replace an accessory,
contact Philips Service Solutions Group at the address listed below.
❐ Remote control
❐ Two AAA batteries
❐ AC power cord
❐ Phone cord
❐ One video cable
❐ One set of audio cables
❐ T-splitter
❐ IR (Infrared) Blaster
❐ webeye
❐ Coaxial cable
❐ S-video cable
The Infrared Keyboard (model number MWK122) is included with some models. It may or may not be included with your model, but it is available from
Philips Service Solutions Group. Use this keyboard to type information on the
screen without having to access the on-screen keyboard.
To order a keyboard, contact Philips at the address listed below.
The Universal Microphone M62080 is included with some models. It may or
may not be included with your model, but it is available from Philips Service
Solutions Group. You may use the microphone to attach audio to an email
message.
To order a microphone, contact Philips at the address listed below.
 Loading...