

Instructions for use
mVOK

Once your PHILIPS /VIAGNA VOX purchase is registered, you're eligible to receive all the privileges of
owning a PHILIPS MAGNAVOX product. So complete and return the Warranty Registration Card
enclosed with your purchase at once. And take advantage of these important benefits.
Congratulationson your purchase,
and welcome to the "family!"
PHILIPS
Dear PHILIPS MAGNAVOX product owner:
Thank you for your confidencein PHILIPS MAGNAVOX. You'veselected one ofthebest-built, best-
backedproductsavailabletoday.And we'lldo everythinginourpowerto keep you happywith your
purchasefor many yearstocome.
As a member of the PHILIPS MAGNAVOX "family," you'reentitledto protectionby one ofthe most
comprehensive warrantiesand outstandingservicenetworksinthe industry.
What's more,yourpurchaseguaranteesyou'llreceiveallthe informationand specialoffersfor which
you qualify,plus easy access to accessoriesfromour convenienthome shoppingnetwork.
And mostimportantlyyou can count on our uncompromisingcommitmenttoyourtotal satisfaction.
All ofthisis ourway ofsayingwelcome-and thanksfor investingin a PHILIPS MAGNAVOX product.
Sincerely,
Robert Minkhorst
President and Chief Executive Officer
P.S. Remember, to get the most from your PHIMPS
MAGNAVOX product, you must retum your
Warranty Registration Card within 10 days. So
please mail itto us right now!
Know these
safetysymbols
,_k This "bolt oflightning" in_cates uninsulated material within your unit may cause an electrical
shock. For the safety of everyone in your household, please do not remove product covering.
,_L The"exciamation point"calls attention to features for which you should read the esclused lit-
erature closely to prevent ope_ and maintenance problems.
WARNING: TO PREVENT FIRE OR SHOCK HAZARD, DO NOT EXPOSE THIS EQUIPMENT
TO RAIN OR MOISTURE.
CAUTION: To prevent electric shock, rrmtchwk:Jeblado of plug to wide slot, and fully insert.
ATTENTION: Pour d,viter les chocs elestriques, introduire la lame la plus large do la fiche clans la
borne correspondante de la prise et pousser jusqu'au fond.
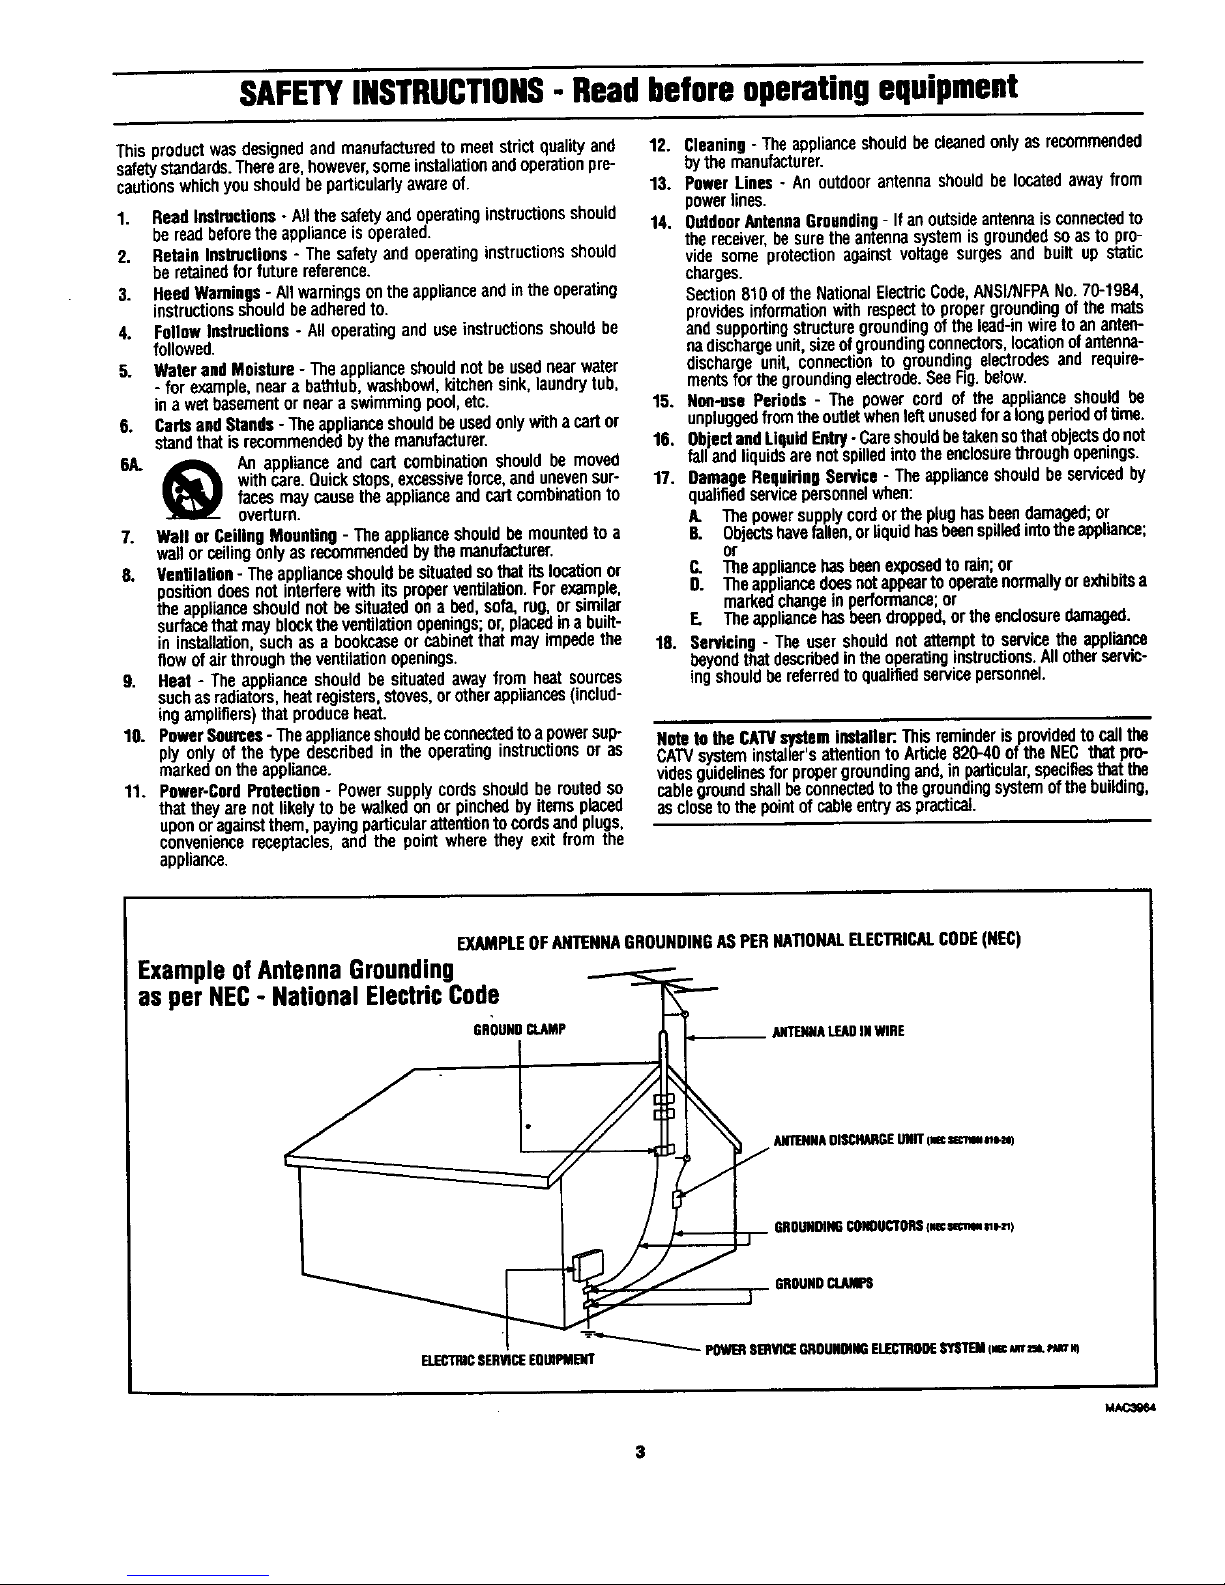
SAFETYINSTRUCTIONS- Readbeforeoperatingequipment
Thisproductwasdesignedandmanufacturedtomeetstrictqualityend
safetystandards.Thereare,however,someinstallationandoperationpre-
cautionswhichyoushouldbeparticularlyawareof.
1. ReadInstructions-Allthesafetyandoperatinginstructionsshould
bereadbeforetheapplianceisoperated.
2. RetainInstructions- Thesafetyend operatinginstructionsshould
beretainedforfuturereference.
3. HeedWarnings- Allwarningsontheapplianceandintheoperating
instructionsshouldbeadheredto.
4. FollowInstructions- Alloperatinganduseinstructionsshouldbe
followed.
5. WaterandMoisture- Theapplianceshouldnotbeusednearwater
- forexample,neara bathtub,washbowf,kitc_ensink,laundrytub,
inawetbasementorneara swimmingpool,etc.
6. CartsandStands- Theapplianceshouldbeusedonlywithacartor
standthatisrecommendedbythemanufacturer.
6/L A An applianceand cart combina_,onshouldbe mov_
withcare.Quickstops,excessiveforce,andunevensur-
facesmaycausetheapplianceandcartcombinationto
overturn.
7. Wallor CeilingMounting- Theapplianceshouldbe mountedtoa
wallorceilingonlyasrecommendedbythemanufacturer.
8. Ventilation- Theapplianceshouldbesituatedsothatitslocationor
positiondoesnotinterferewithits properventilation.Forexample,
theapplianceshouldnotbe situatedona bed,sofa,rug,orsimilar
surfacethatmayblocktheventilationopenings;or,placedinabuilt-
in installation,suchas a bookcaseorcabinetthatmay impedethe
flowofairthroughtheventitationopenings.
9. Heat- The applianceshouldbesituatedawayfromheatsources
suchasradiators,heatregisters,stoves,orotherappliances(includ-
ingamplifiers)thatproduceheat.
10. PowerSources- TheapplianceshouldbeconnectedtoapowersulP
plyonlyof the typedescribedin the operatinginstructionsor as
markedontheappliance.
11. Power-CordProtection- Powersupplycordsshouldberoutedso
thattheyarenotlikelytobe walkedonor pinchedbyitemsplaced
uponoragainstthempayingparticularattentionto cordsandplugs,
conveniencereceptacles,and the pointwheretheyexitfromthe
appliance.
12. Cleaning- Theapplianceshouldbecieenedonlyasrecommended
bythemanufacturer.
13. PowerLines- An outdoorantennashouldbelocatedawayfrom
powerlines.
14. OutdoorAntennaGrounding- Ifanoutsideantennaisconnectedto
thereceiver,besuretheantennasystemisgroundedsoasto pro-
videsomeprotectionagainstvoltagesurgesand builtup static
charges.
Section810oftheNationalElectricCode,ANSIiNFPANo.70-1984,
providesinformationwithrespectto propergroundingofthemats
andsupportingstructuregroundingofthelead-inwiretoananten-
nadischargeunit,sizeofgroundingconnectors,locationofantenna-
discharge unit, connectionto groundingelectrodesandrequire-
meritsforthegroundingelectrode,SeeFig.befow.
15. Non-usePeriods- The powercordof the applianceshouldbe
unpluggedfromtheoutletwhenleftunusedforalongperiodoftime.
16. ObjectandLiqufdEntq/-Careshouldhetakensothatobjectsdonot
fallandliquidsarenotspilledintotheenclosurethroughopenings.
17. DamageRequidggService- Theapplianceshouldbeservicedby
qualifiedservicepersonnelwhen:
/L Thepowersupplycordortheplughasbeendamaged;or
B. Objectshavefallen,orliquidhasbeenspilledintothe appliance;
or
C. Theappliancehasbeenexposedto rain;or
D. llle appliancedoesnotappeartooperatenormallyorexhibitsa
markedchangeinperformance;or
E. Theappliancehasbeendropped,ortheenolesuredamaged.
18. Servicing- Theusershouldnotattemptto servicethe appliance
beyondthatdsecrihedintheoperatinginstructions.Allotherservic-
ingshouldbereferredtoqualifiedservicepersonnel.
NotetotheCATVsysteminstaller:.Thisreminderisprovidedtocallthe
CATVsysteminstalier'sattentionto Article820-40ofthe NECthatpro-
vidsSguidelinesforpropergroundingand,inparticular,specifiesthatthe
cablegroundshallbeconnectedtothegroundingsystemofthebuilding,
asclosetothepointofcableentryaspractical.
EXAMPLEOFANTENNAGROUNDINGASPERNATIONALELECTRICALCODe(NI:C)
Example of Antenna Grounding
as per NEC- National Electric Code
S
ANTENNALEADINWIRE
ANTIENNAOI_HARGEUNIT_ _
ROUNDINGCONDUCTORS{mc_ _e-a_)
GROUNDCLAMPS
"_-_'_ POWERSERVICEGROUNOiNDEJ.IEC1ROOESYSTEM(meAmnL _ m
E1.1ECTRICSrnVICEEQUfPMENT
MA¢3064
3
Welcome/Registration of Your TV ............................ 2
Safety/Precautions ..................................................... 3
Table of Contents ....................................................... 4
Features ...................................................................... 5
--7 On-Screen MENU
cture
-¢-Adjusting the TV Picture ................................... 6
?eatures
"_Setting the TV's On-screen Clock ...................... 7
_Activating the TV's On "lamer Control ............... 8
_-Selecting the TV's On Timer Channel .............. 9
e-Setting the TV's On Timer Startup Time .......... 10
_'Turning on the On Timer Display ..................... 11
_Setting the Access Code within SmartLock .....12
'_Using SmartLock to Block Channels ............... 13
_Using the Noise Reduction (NR) Control ........ 14
•_Using the Contrast + Control ............................ 15
,ffSetting the TV for Closed Caption ................... 16
Using the Sleep Timer Control ......................... 17
GeneraLInformatim
Sound
_'Adjusting the Treble, Bass, and Balance Sound
Controls ............................................................. 18
¢"Setting the TV for Stereo and SAP Programs ..19
_'Using the Incredible Stereo Control ................. 20
_Using the Volume Bar Control ......................... 20
_Using the Audio Out Jacks (with TV Speaker
On/Off Control) ................................................ 21
_)'Using the TV's Audio!Video Input Jacks ....22-23
I! Remote Control Oneration
Using the Smart Picture Control .................. 24
Using the Smart Sound Control (AVL) ......... 25
Using the Surf and Alternate Channel Buttons ....... 26
Setting the Remote to Operate
Accessory Devices .......................................... 27-28
Setting the TV Remote to Operate Accessory Devices
(Search Method) ..................................................... 29
Remote Control Direct Entry Code List ............ 30-31
Using the Remote's VCR Buttons .......................... 32
_--] Picture-ln-Picture (PIP't
PIP Connection ........................................... 33
Choosing the PIP Picture Source ............................ 34
How to Use PIP with the "IV Remote .................... 35
Adjusting the PIP Color and Tint Controls ........... .36
More PIP Connections ........................................ 37-38
_1 Tips if Something Isn't Working ................ 39
Glossary of TV Terms .............................................. 40
Index ........................................................................ 41
Factory Service Locations .................................. 42-43
Warranty ................................................................... 44
Waming/Precantions ................................. I
Honking Up Your TV ............................... I
How to Use the "INSTALL" Controls .................. 2-3
Using the Language Control ...................................... 2
Setting the TV to Auto Program Channels ................ 2
Setting the TV for a Cable orAntenna Signal ........... 2
Using the Adding and Deleting Channels ................. 3
Setting the Channel Name Control ............................ 3
How to use the Smart Clock control ......................... 3
Basic 'IV and Remote Control Operation ................. 4
Copyright @ 1997 Philips Consumer Electronics Company. All fights reserved.
4

Infrared Remote Control works your TV set, VCR,
and a variety of wireless remote control Cable
Converters (Satellite Receivers, DVD, etc.).
Standard broadcast (VHF/UHF) or Cable TV
(CATV) channel capability.
Stereo Ready TV with built-in audio amplifier and
twin speaker system for receiving TV programs
broadcast in stereo sound.
Closed Captioning allows the viewer to read "IV
program dialogue or voice conversations as on-screen
text.
Automatic Programming of Channels for quick
and easy selection of favorite stations available in
your area.
On-Screen Features (in either English, French, or
Spanish) show helpful messages for setting of 'IV
controls.
Audio/Video Jackpanel for direct connections with
VCRs (or other video accessories) providing quality
TV picture and sound playback.
On Timer automatically turns the TV ON at a preset
time, and channel.
Sleep-Timer automatically turns the TV OFF at pre-
settimes.
SmartLock feature allows you to block the viewing
of certain channel or external andio/video connec-
tions were you might not want your children viewing
inappropriate material.
Smart Picture allows you to set the picture color,
tint, contrast, etc. for various types of programming
such as Sports, Movies, Multi Media (Gaming), or
Weak Signals with the push of one button.
Smart Sound controls the sudden volume changes
that occur when changing programs or when a com-
mercial break comes on. Iteliminates the peaks and
valleys in the TV's sound with one pleasant list6ning
level.
Picture-In-Picture (PIP) allows you vie_v to differ-
ent programs (or picture sources) on the TV screen at
the same time. PIP will also let you swap the pie-
tures, move the PIP picture to any of the four comers
and even freeze the picture until you shut it off.
Use the simple Set-Up Guide (supplied with
your TV information packet) for details on:
Cable/Antenna
Hook-ups
Auto-Programming
of Channels
Channel Editing
• Automatic Clock Setting (Smart Clock)
• Basic TV and Remote Control Operation
• On-Screan Menu Use
Your new television and its packing contain
materials that can be recycled and reused.
Specialized companies can recycle your
product to increase the amount of reusable
materials and minimize the amounts which
need to be properly disposed.
Your product also uses batteries which
should not be thrown away when depleted,
but should be handed in and disposed of as
small chemical waste.
Please find out about the local regulations
on how to dispose of your old television,
batteries, and packing materials whenever
you replace existing equipment.
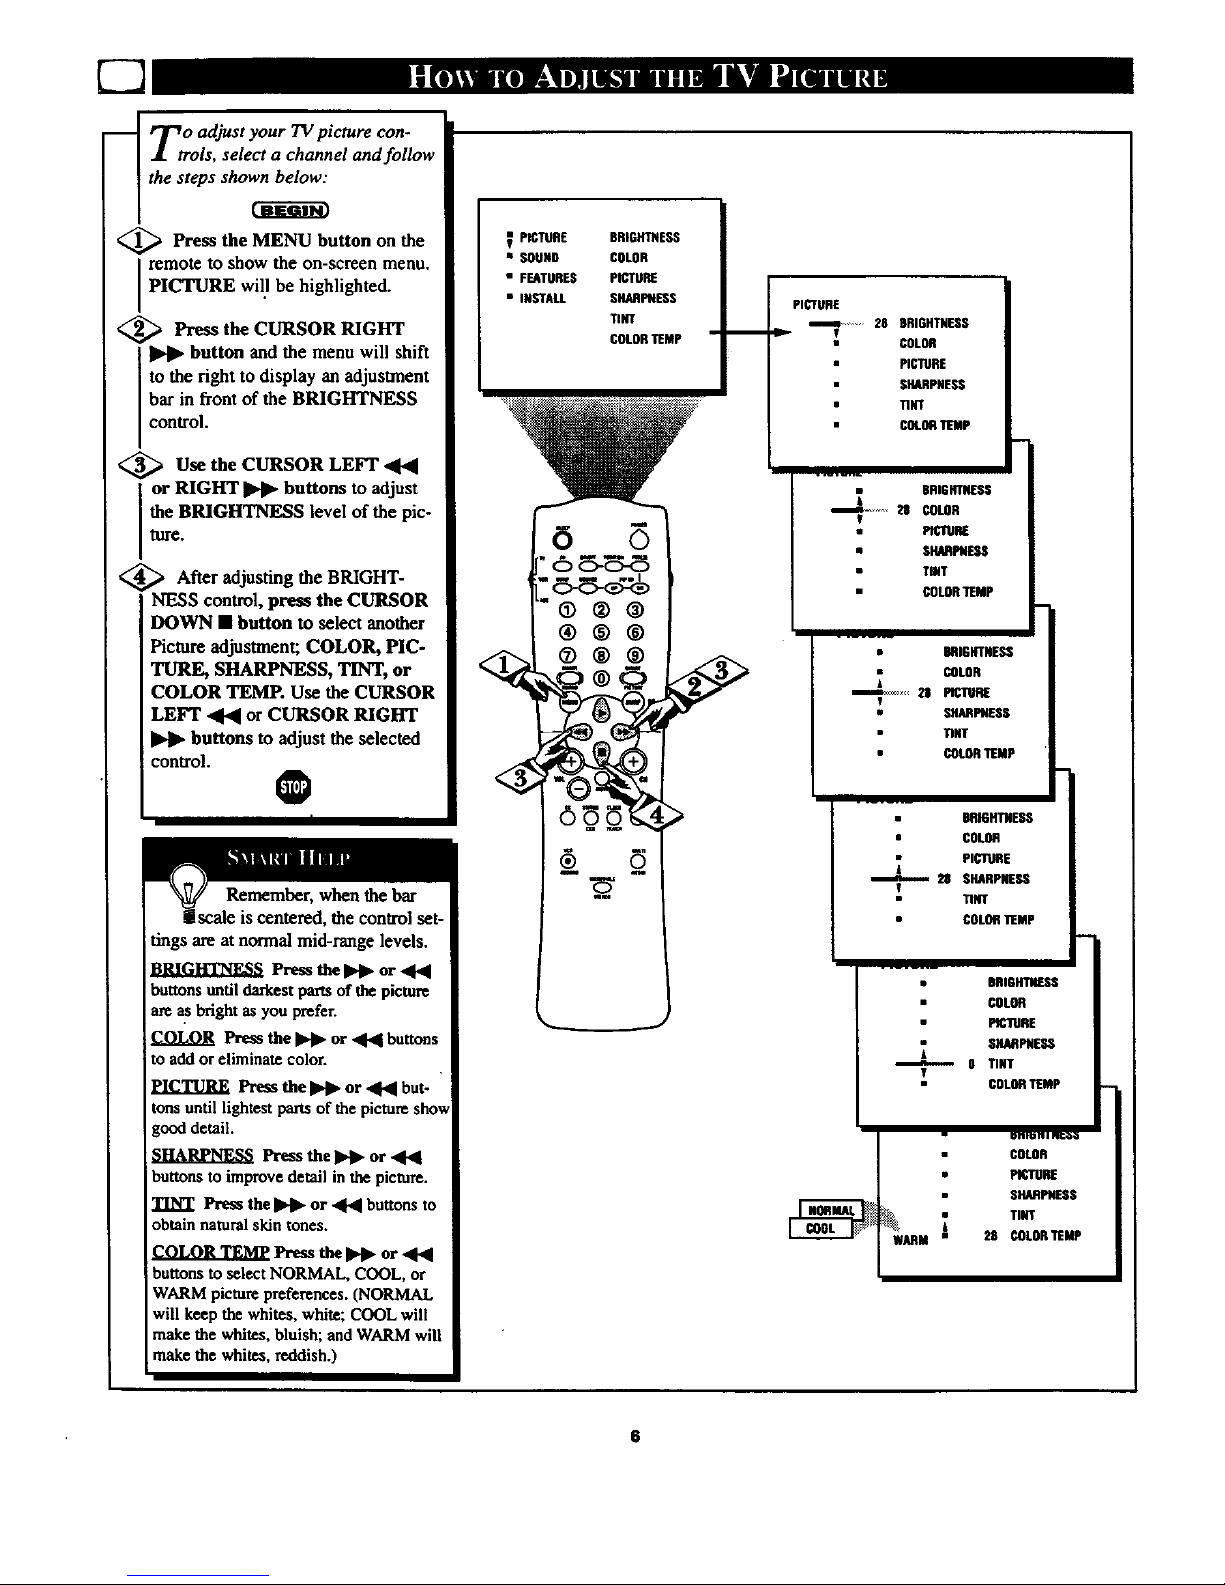
_ '_o adjust your TV picture con-
J. trois, select a channel and follow
the steps shown below:
<_ Press the MENU button the
on
remote to show the on-screen menu.
PICTURE will be highlighted.
<_ Press the CURSOR RIGHT
button and the menu will shift
to the right to display an adjustment
bar in front of the BRIGHTNESS
control.
<_Use the CURSOR LEFT
or RIGHT _ buttons to adjust
the BRIG_ level of the pic-
ture.
<_ After the BRIGHT-
adjusting
NESS control, press the CURSOR
DOWN • button to select another
Picture adjustment; COLOR, PIC-
TURE, SHARPNESS, TINT, or
COLOR TEMP. Use the CURSOR
LEFT .4141or CURSOR RIGHT
buttons to adjust the selected
icontrol.
0
Remember, when the bar
lscale is centered, the control set-
tings are at normal mid-range levels.
Press the Ilq_ or ,441
buttons until darkest pm-lsof the picture
are_ bright as you prefer.
COLOR Press the I1_ or ._-_1bu_s
to add or eliminate color.
PICTURE Press the Ilbl_ or _l_l but.
tons until lightest partsof the picture show
good detail.
SHA_IW_SS Press the IWI_or ,q41
buttons to improve detail in the picture.
_NT Press the _ or _ buttons to
obtainnatural skin tones.
_ Press the IWI_or ,4_
buttons to select NORMAL, COOL,or
WARM picturepreferences. (NORMAL
will keep the whites, white; COOL will
make the whites, bluish; and WARM will
make the whites, reddish.)
PICTURE
• SOUND
• FEATURES
• INSTALL
BRIGHTNESS
COLOR
PICTURE
SHARPNESS
TINT
COLORTEMP
(9®®
®®®
®®®
PICTURE
iit _ 28 BRIGHTNESS
uf COLOR
PICTURE
SHARPNESS
• TINT
COLORTEMP
COLORTEMP
• BRIGHTNESS
_ COLOR
_ ES PICTURE
T
• SHARPNESS
lINT
• COLORTEMP
BRIGHTNESS
• COLOR
PICTURE
28 SHARPNESS
V
TINT
COLOR"I1EMp
BRIGHTNESS
COLOR
PICmRE
SHARPNESS
COLORTEMP
6

m
y:ur television comes with an
n+screen clock. During normal
operation the clock appears on the
screen when the STATUS/EXIT but-
ton is pressed or if the Timer DIS-
PLAY control is turned ON.
<_ Press the MENU button the
on
remote to show the on-screen menu.
PICTURE will be highlighted.
_ Press the CURSOR DOWN II
button twice to select the FEA-
TURES menu.
<_ Press the CURSOR RIGHT
Ikqk.button and the menu will
shift to the left to display the
TIMER controls.
<_ Press the CURSOR RIGHT
I _ button again to shift the dis-
Iplay left and highlight the TIME
control.
<_ Press the CURSOR RIGHT
ll_l_ button again to highlight the
time indicator area.
<_ Press the NUMBERED buttons
to enterthe correct time. (Use the
CURSOR UP It. or CURSOR
DOWN • buttons to set AM or PM.
0
"0" first and then the
hour number for single digit
entries.
The Clock can also be set automat-
ically using the Smart Clock fea-
ture found on page 2 of the Quick
Use Guide.
The television's clock settings may
be lost when it is unplugged (or AC
power to the set is interrupted.)
• PEmRE TIMER
SOUND Sma_Lock
FEATURES NR
• INSTALL CONTRAST+
PIP
CLOSEOCAP
• FEATURES
• _ TIMER TIME
e,.m Sr4mriLock ACTIVATE
• NR CHANNEL
•CONTRAST • STARTT1ME
• PIp DISPLAY
• CLOSEOCAP
-- rul un_o
• • T]MER
• _TH_E --:--AM
• ACTIVATE
• CHANNEL
• STARTTIME
• DISPLAy
• FEATURES
• mTIM_
• • TIME n 12:30 PM
• ACTWATE
• CHANNEL
• STAR[ TIME
• DISPLAY
The TIME (Clock) feature can be
accessed directly by pressing the
CLOCK button on the remote, then
simply follow steps 5 and 6 to com-
plete the task.
• FEATURES
• • riMER
TIME 12_0 PM
• CHANNEL
• START"riME
• DISPLAY
7

E2
2nalarm clock you can
set the TV to turn itself on at the
same time everyday.
<_ Press the MENU button on the
remote to show the on-screen menu.
PICTURE will be highlighted.
_ Press the CURSOR DOWN •
button twice to select the FEA-
TURES menu.
<_ Press the CURSOR RIGHT
button and the menu will
shift to the left to display the
TIMER controls.
<_ Press the CURSOR RIGHT
button again to shift the dis-
play left, then CURSOR DOWN
• to highlight the ACTIVATE
timer control.
PresstheCURSORRIGHT
button again to highlight the
ACTIVATE timer option. Then,
press me CURSOR UP _ or CUR-
SOR DOWN • buttons to turnthe
timer ON or OFF.
O
• PICTURE
SOUND
,_FEAmRES
• INSTALL
TIMER
$martLock
NR
CONTRAST÷
PIP
C!.0S_9 CAP
• FEATURES
• vmTIMER TIME
1
,.. • SrnartLock ACTIVATE
• NR CHANNEL
• CONTRAST÷ STARTTIME
• PiP DISPLAY
• CLOSERCAP
6
®®®
o®®
-- r r._q i v_o
n •TIMER
• • TIME
|
ACTIVATE
• CHANNEL
• STARTTIME
• DISPLAY
• FF.ATRS
• • TIMER
••TIME
• ACTIVATE
• CHANNEL
• STARTTIME
• DISPLAY
• FEATURES
• • TIMER
• • TIME
• ACTIVATE
• CHANNEL
• STARTTIME
• DISPLAY
" ON
• OFF
8

U;eed along with the on timer
ature, you can select a spe-
cific channel that the television will
tune to when the 7qmer ACTIVATE
control is turned ON.
<_ Press the MENU button on the
remote to show the on-screen menu.
PICTURE will be h ghlighted.
<_ Press the CURSOR DOWN •
button twice to select the FEA-
TURES menu.
<_ Press the CURSOR RIGHT
button and the menu will shift
to the left to display the TIMER
controls.
<_ Press the CURSOR RIGHT
button again to shift the dis-
[play left, then CURSOR DOWN
I• to highlight the CHANNEL con-
Itrol.
<_ Press the CURSOR RIGHT
button again to highlight the
channel indicator area.
<_ Press the NUMBERED buttons
to enter the desired start up channel.
[(Or, use the CHANNEL (+) or (-)
buttons to select_desired channel.
• PICTURE TIMER
ssUNO SmHLock
_£S ss
• INSTALL _T+
tiP
CLOSEDCAP
• _tuR_
i_M_
i _l NR
TIME
ACTIVATE
C_NEL
• COmeT * $TA_ _ME
• _P D_MAY
-- r_ i urlE_
• • TIME
A_WATU
g_L
• $T_ _ME
• _AtuRES
• • _ME
• C_NN|L •
• START_ME
• _SP_Y
control ON after selecting the
desired start up channel. (Refer to
page 8for further details.)

USfeed along with the on timer
ature, you can select a spe-
cific time the television will turn on
when the 1liner ACTIVATE control
is turned ON.
<_ Press the MENU button on the
remote to show the on-screen menu.
PICTURE will be highlighted.
<_ Press the CURSOR DOWN •
Ibutton twice to select the FEA-
TURES menu.
<_ Press the CURSOR RIGHT
_ button and the menu will shift
to the left to display the TIMER
controls.
<_ Press the CURSOR RIGHT
button again to shift the dis-
play left, then CURSOR DOWN
• to highlight the START TIME
control.
<_ Press the CURSOR RIGHT
III_1_ button again to highlight the
time indicator area.
<_ Press the NUMBERED buttons
to enter the desired startup time.
(Use the CURSOR UP _ or CUR-
SOR DOWN • buttons to set AM or
PM.)
s p_Tll_
SOUND
FEATURES
• INSTALL
TIMER
SmartLock
DR
CONTRAST+
PiP
CLOSESCAP
v
• FEAtuRES
• _ TIMT.R TIME
T
• $marlLock ACTIVAI_
i le_• NR CHANNEL
• CONTRAST+ STARTTIME
• PiP DISPLAY
• CLOSEDCAP
• • TIMER
IITi |
• AC_IVATE
• DISPI-4Y
• FESmE$
• • TIMER
Smll_
• ACTIVATE
• GD_NEL
• STARTTIME
• DISPLAY
n 12:00PM
10

Once the television clock has
been set, you can use your
elevision as a clock. The Timer
)ISPLAY control allows you to per-
nanently display the time in the
upper right corner of the screen.
<_ Press the MENU button on the
remote to show the on-screen menu.
PICTURE will be highlighted.
<_ Press the CURSOR DOWN •
I button twice to select the FEA-
TURES menu.
,_ Press the CURSOR RIGHT
button and the menu will shift
to the left to display the TIMER
controls.
_ Press the CURSOR RIGHT
button again to shift the dis-
play left, then CURSOR DOWN •
to highlight the DISPLAY control.
<_ Press the CURSOR RIGHT
I_1_ button again to highlight the
DISPLAY control options. Then,
press the CURSOR UP I_ or CUR-
SOR DOWN • buttons to turn the
timer ON or OFF.
O
Remember, be sure you
[have set the television's
clock with the correct current time.
(Refer to page 7 to set the Clock
Manually or page 2 of the Quick
Use Guide to set the Clock
Automatically using the Smart
Clock feature.)
• PICrlJFiE
SOUN9
FEATUTIES
• INSTALL
TWE_
Smrlt¢|
tmR
CONTI_+
PIP
¢LOSEOCAP
m
• FEATURES
• ? TIMF.R
_m SmaclLv, k
• NR
• _mRkST +
• PIP
• CLO,_II CAP
- rr._t i olw.o
• mTIMER
• • 11|
TIME
ACTIVATE
CFIANN_.
STARTTIME
DISPLAY
• ACTIVATE
• P,ELqNNEL
STARTTIME
• DISPLAY
• FEATURES
• • TIMER
• • TIME
• ACTWAllE
• CHANNEl.
• STARTTiME
• OISF1.AY
• CHANNEL
• STARTTIME
• DISPLAY
n ON
• OFF
11

S_blort Lock allows to
parents
ck out, or "censor any
channels they think children should
not watch. A channel blocked by
the Smart Lock control cannot be
viewed until a correct access code
is used to unlock the channel for
viewing. First let's set your Smart
Lock access code:
<_ PresstheMENU buttonon the
remote to show the on-screen menu.
PICTURE will be highlighted.
<_ Press the CURSOR DOWN •
button twice to select the FEA-
<
TURES menu.
,_ Press the CURSOR RIGHT
button and the menu will
shift to the left, then CURSOR
DOWN • to highlight the SMART
LOCK control.
Press the CURSOR RIGHT
button again to shift the dis-
play left, then CURSOR DOWN •
to highlight SETUP CODE.
Press the CURSOR RIGHT
button. "--- Enter current
access code" will appear within the
menu.
i Press O, 7, 1, 1 on the remote.
i_,,x/P_Prex-shows on the SETUP
CODE display as you press the
NUMBER buttons. "XXXX
Incorrect - Please re-enter your
access code" will appear. Re-enter
the 0, 7, 1, 1 code on the remote.
"XXXX Code Correct" will
appear.
"_ "Next enter your new access
code" shows on the screen. Press
the NUMBER buttons on the
remote to enter a NEW four digit
code. Confirm your new code by
re-entering it again.
"XXXX Code changed" shows on
the screen to let you know the new
code has been set.
Continue to the next page to learn
how to block channels from viewing.
• PICTURE
SOUND
FEATURES
• INSTALL
TIMER
Sln_llte_k
DNR
INCR, nCT.
PIP
• FEATURES
ll
_ TIMER
• Smt_lLKk
• FEAItlRES
TIME
ACTIVATE
CHANNEL
TUHER
BLOCKCH4NN[L
SEnJPCOOE
Parents - it isn't possible for
your child to unblnek achan-
nel without knowing your
access code or changing it to a
new one. If your code
changes, and you didn't
change it, then you know it's
been altered by someone else
and block channels have been
viewed.
£
!
• ff,Anlll_
• IILiDCKCHANNEL
• FEATUPJ_
u = SiedLo_
•l
Is"BL_ CHANNEL
• SETUPCODE
Fr_11JIqtS
........ • StO_ _N_
Phnm re-enter Sulewmma N • S_UP COOE
a_4s_ cAMe iw_
)ew ICUI_ _44.
t
• FEATURES • FUIUR[S
• • SmaflLock • • Sma_L_k
n_ aicum _ the came
• FEAn_Es
I • S_m_eck
o•
.... . • BL0_ CHANNEL
• FEA1URES
• • SmmlLe_k
• IL0¢K CWNEk
• S_I_ CODE
_(_lem
30_CedockN
.... u DLiD_KC_
12

After your personal access code
as been set (see previous
page), you are now ready to select
up to 5 channels or inputs to block
OWt or censor.
€_ Press the MENU button the
on
remo_ to show the on-screen menu.
PICTURE will be highlighted.
_,' ._ Press the CURSOR DOWN •
button twice to select the FEA-
TURES menu.
_.' _ Press the CURSOR RIGHT
• _ button and the menu will
shift to the left, then CURSOR
DOWN • to highlight the SMART
LOCK control.
L_. Press the CURSOR RIGHT
button again to shift the dis-
play left, the BLOCK CHANNEL
control will be highlighted.
_1 _ Press the CURSOR RIGHT
button. "--- Enter current
access code" will appear within the
menu.
<_n Enter correct access code
the
umber. "XXXX" shows on the
SETUP CODE display as you press
the NUMBER buttons. "XXXX
Code correct" will appear.
< r_, Press the CHANNEL (+) or
(-) buttons (or NUMBER but-
tons) to select the channel you want
to block.
_ll,_Press the CURSOR RIGHT
button to block viewing of
the channel, or the CURSOR
LEI_ _ button to allow viewin
of the channel.
Repeat steps 5 through 7 for any
other channels you wish to block
from viewing.
Note: You can also block out the use of the A/V extemal inputs on the rear of the "IV.
This stops the viewing of VCR, DVD, etc., programswhich can be shown through the
AJV Input jacks. Select AV 1,AV 2, or SVID-R, MM 1, MM2, MM3, and select block.
o ©
Any channel that has been
blocked will be skipped
when Ihe Channel (+) and
(-) buttons are used to scan
all available channels. To
view a blocked channel,
press the number buttons
on the remote to directly
access the chaonel and
refer w the Unblocking
Channels section below.
I
I
t
• FEATUli_
m • S_tLNt
II" I _i _1111
• _ CILANIIEI.
• _ CODE
I I _I11111.I_I
• 'P I_El. I'_
mct_
...... • _ CHANNEL
PI pIlSS,ctq
mv_
13

-- r_ue many reason such as poor
l.J cable reception, the picture
can sometime appear slightly
"speckled" (noise in the picture).
The NR (Noise Reduction) control
can help eliminate this type of
interference and improve the quali-
ty of the picture.
_ Press the MENU button the
on
remote to show the on-sct_,en menu.
PICTURE will be highlighted.
<_ Press the CURSOR DOWN •
button twice to select the FEA-
TURES menu.
<_ Press the CURSOR RIGHT
button and the menu will
shift to the left, TIMER will be
highlighted.
<_ Press the CURSOR DOWN •
to highlight the NR control.
<_ Press the CURSOR RIGHT
button again to highlight the
NR option area.
<_ lh-ess the CLTRSOR UP I_ or
CURSOR DOWN • buttons to
turn the NR feature ON or OFF.
®
• PICTURE TIMER
SOUND Sm_Lock
_ _llJRES NR
• IHCTALL CONTRAST÷
PiP
CLOSEDCAP
@®®
®®®
• FEA'HIRE$
• _ TIMBR TIME
• Sn_rtLock ACTIVATE
'li_"I NR CHANNEL
• CONTRAST* STARTTIME
• PiP DISPLAY
• CLO_OCAP
• I F.ATRRES
• | T_MER
• $ma_.ock
_NR ON
• ¢_T÷
e_
• CLOSED_
• FEA_QR_S
• • riMER
• SmaflLock
• NR •ON
• CONTRAST+
• MP
• CLOSEDCAP
• FEATURES
i i Tlik-n
• SmadLock
• NR mOFF
• CONTRAST,
• PiP
• CLOSEDCAP
14

._ The Contrast + feature helps to
i "sharpen the picture quality.
The black portions of the picture
become richer in darkness and the
whites become brighter.
<_ Pl'eSSthe MENU button the
on
remote to show the on-screen menu.
PICTURE w 11be high ghted.
<_ Press CURSOR DOWN •
the
button twice to select the FEA-
TURES menu.
> Press the CURSOR RIGHT
I_ button and the menu will
hift to the left, TIMER will be
ighlighted.
<_ Press the CURSOR DOWN •
to highlight the CONTRAST +
control.
_, _ Press the CURSOR RIGHT
button again _ highlight the
CONTRAST + option area.
<_ Press the CURSOR UP • or
CURSOR DOWN • buttons to
I_ the CONTRAST + featureON
i O
• pICTURE
SOUND
V FEATURES
• INSTALL
TIMER
Shylock
CONTRAST+
PIP
®®®
®®®
• F_ATURES
• _ TIMER TIME
• SmmflLock ACTIVATE
• NR CHANNEL
• CONTRAST+ STARTTIME
• PIP 91$PLAY
• CLOSERCAP
• FFJLTIJRES
• • TIMER
• Sma4Lo_
• NR
_CO_ ÷ O#
• PIp
• CUO_O CAP
• FEATURES
I I T1ME_
• Smartl.ock
• NR
• CONTRAST* mOR
• PIP
• CLOSERCAP
• FEAtuRES
• i TU_R
• Smm_Lock
eNR
• CONTRAST+ •OFF
• PIp
• CLOSEDCAP
15
i
ClyOSed Captioning(CC) allows
ou to read the voice content o
television programs on the TV
screen. Designed to help the hear-
ing impaired, this feature uses on-
screen "text boxes" to show dia-
logue and conversations while the
TV program is in progress.
<_ Press the MENU button on the
I remote to show the on-screen menu.
PICTURE will be highlighted.
<_ Press the CURSOR DOWN •
button twice to select the FEA-
TURES menu.
<_ Press the CURSOR RIGHT
I IHI_ button and the menu will
shift to the left, TIMER will be
highlighted.
<_ Press the CURSOR DOWN •
to highlight the CLOSED CAP
control.
_ Press the CURSOR RIGHT
IHI_ button again to highlight and
choose either CAPTION MODE or
TEXT MODE.
_ Press the CURSOR RIGHT
_ button again m highlight the
CAPTION MODE or TEXT
MODE options area.
<_ Press the CURSOR UP I1_or
CURSOR DOWN • buttons to
select the CLOSED CAPTION
option you want.
CAPTION MODE:CCI, CC2,
CC3,CC4, CC MUTE, or OFF
-dialogue (and descriptions) for the
action on the captioned TV program
shows on-screen.
TEXT MODE: TXTI, TXT2,TXT3
TXT4, or OFF
-often used for channel guide, sched-
ules, or bulletin board information
for CC programs.
@
NOTE: Not all TV programs and product commercials are made for broadcast
with Closed Caption (CC) information included. Neither are all Closed Caption
imodes (CAPTION 1-4, orTEXT 1-4)) necessarily being used by a broadcast station
during the transmission of a closed caption program. Refer to your area's "IV pro-
gram listings for the stations and times of Closed Caption shows.
• PICTURE TIMER
SOUND SmartLock
FEATURES DR
• INSTALL CONTRAST+
PiP
CLOSEDCAP
• FEATURES
• _ TIMER TIME
SmadLock ACTIVATE
• NR CHANNEL
• CONTRAST+ STARTTIME
• PiP DISPLAY
• CLOSEDCAP
6
CAPTION mode
Example Display
• • $martLock
• NR
• CONTRAST*
• P1P CAPll0D MODE
&
wt CLOSE0CAP _ MODE
• • CLOSEOCAP
V _TION roDE CCOFF
• TEXTmllOE
CLOSED
CAPTION menu
options directly.
TEXT mode _tample Display
TV screen will be
blocked nora viewing
• • CLOSEO CAP
• CAPTIONMODE nCC1
• "flEX[MODE
• • CLOSEDCAP "71
• [+
]
[2
r3
• CAPTIONMOOE r4
• TEXTMOOE nIXT1
NOTE: The CC MUTE option
can be used to set the TV to
turn the Closed Caption mode
"ON" whenever the MUTE but-
ton on the remote is pressed.
16
H_roVe you ever fallen asleep in
nt of the TV only to have in
wake you up at two in the morning
with a test pattern screeching in
your ears? Well, your TV can save
you all that trouble by automatical-
ly turning itself off.
<_ Press the SLEEP button the
on
remote control and the SLEEP timer
on-screen display will appear in the
lower center of the display.
<_ Press the SLEEP
button
repeatedly to pick the amount of
time (!5 minutes to 2 hours ahead)
before the TV will turn itself off.
An on-screen count down will
appear during the last minute before
the TV shuts itself off.
O
•llll I
SLEEPO
®®®
®®®
SLEEP15
SLEEp34
SLEEP45
SLEEP60
SLEEP75
SLEEP90
SLEEPlEE
SLEEP120
down will be displayed. J
J,,,- SLEEPU
GOODBYE
SlEEp $
l_,_ing d_ le._ l0 sccoe, ds o_ra
display will n_ad GOOD BYE.
SLEEP timer samn_S, sn co-screen
17

i
Besides the normal volume level
control, your TV also has indi-
vidual sound adjustment controls.
The TREBLE (high frequency),
BASS (low frequency), and Speaker
BALANCE may all be used to
adjust the sound playback of TV
programs.
<_ Press the MENU button on the
remote to show the on-screen
menu. PICTURE will be high-
lighted.
<_ Press the CURSOR DOWN •
button to select the SOUND
menu.
<_ Press the CURSOR RIGHT
IP_ button and the menu will
shift to the right to display an
I adjustment bar in front of the TRE-
I BLE control.
@Use the CURSOR LEFF "41"4
or RIGHT _ buttons to adjust
the TREBLE (high frequency)
level of the television's sound.
<_ After the TREBLEadjusting
control, press the CURSOR
DOWN • button to select another
Sound adjustment; BASS or BAL-
ANCE. Use the CURSOR LEFT
or CURSOR RIGHT
buttons to adjust the selected con-
trol.
@
TREBLE
BASS
BALANCE
AVL
STEREO
@@®
®®®
®®®
• SOUND
_ 28 TREBLE
T
• BASS
• BALANCE
• AVL
STEREO
=SOUNO
• _ TREI_E
,=---a,_, 28 8ASS
Y
BALANCE
AVL
STEREO
=SOUHO
T
I
TREBLE
BASS
BALANCE
AVI.
STEREO
v
18
your TV can receive broadcast
tereo TV programs. The TV
has both an amplifier and twin
speakers through which the stereo
sound can be heard.
<_ Press the MENU button
ON
I the remote to show the on-screen
menu. PICTURE will be high-
lighted.
<_ Press the CURSOR DOWN
• button to select the SOUND
menu.
<_ Press the CURSOR RIGHT
button and the menu will
shift to the right to display an
adjustment bar in front of the
TREBLE control.
<_ Press the CURSOR
DOWN
1 button to select the STEREOcontrol.
<_ Use the CURSOR LEFT
or RIGHT _ buttons to select
STEREO or MONO. With
STEREO selected the television
will reproduce any stereo broad-
cast signal it receives.
SAP is an additional part of the
stereo broadcast system. Sent as a
third audio channel SAP can be
heard apart from the current TV
program sound. TV stations are
free to use SAP for any number
of purposes, but many experts
believe it will be used for foreign
language translations of TV
shows (or for weather and news
bulletins.)
If a SAP signal is not present
with a selected program, the SAP
option cannot be selected. Also, if
SAP is selected on a channel
(with SAP) and you select anoth-
er channel, when you return to
the original channel SAP will be
OFF (and you will have to rese-
lect the SAP feature.)
• PICTURE
SOUND
• FEATURES
• INSTALL
TREBLE
BASS
BALANCE
AVL
STEREO
®®®
®®®
• SOUN9
BASS
• AVL
STBtEO _ STEREO
V
mSOIIn
TRBL_
14010 _ Sll[RE9
V
This TV will set the
_TEREOfeature automatically
to thecorrect Stenm/Mono option from
the broadcast signal it is receiving.
Stereoprograms can be set to moan but
as soon as the channel is changed,Auto
StereoSelect will change the STEREO
feature back to its original option.
Whe_ usingthe A/V modes, yon will
have to select the STEREO or MONO
option manually.
-- II --
"SOUNO
19
Tahe Incredible Stereo feature
dds greater depth and dimen-
sion to both monaural (MONO)
and stereo TV sound. With the con-
trol turned ON the TV's speakers
can add even wider sound separa-
tion to normal broadcasts.
<_ Press the INCREDIBLE
STEREO but_n on the remote to
ram the Incredible Stereo feature
ON.
When the "IV signal is being
received in STEREO, the on-screen
display will read INCR. STEREO.
When the TV signal is being
received in MONO, the on-screen
display will read SPATIAL.
Both will give increased TV sound
performancewhen watching movies
or musical programs,
O
When the TV signal is
being received in MONO,
SPATIAL will appear on-
screen when the INCR.
_TEREO button is
_ressed.
<
o 0
"®@®
®®®
®@®
O®O
when the TV signal is
being received in
STEREO, INCR.
STEREO will appear on-
screen when the INCR.
STEREO button is pressed.
U_h e the Volume Bar control to see
e TV s volume level settings
on the TV screen. The Volume Bar
will be seen each time the VOLUME
buttons (on the TV or remote) are
pressed.
<,_ Press the VOLUME (+) or (-)
buttons on the remote to show the
VOLUME bar display on-screen.
Press the VOLUME (+) or (-) but-
tons again to adjust the television's
sound level.
0
VOLUME _,.w_.. 211
®@®
®@®
Try it out.
Press the VOL (+)
and (-) buttons. The
VOLUME BAR
should appear near
the bottom center of
he screen.
2O
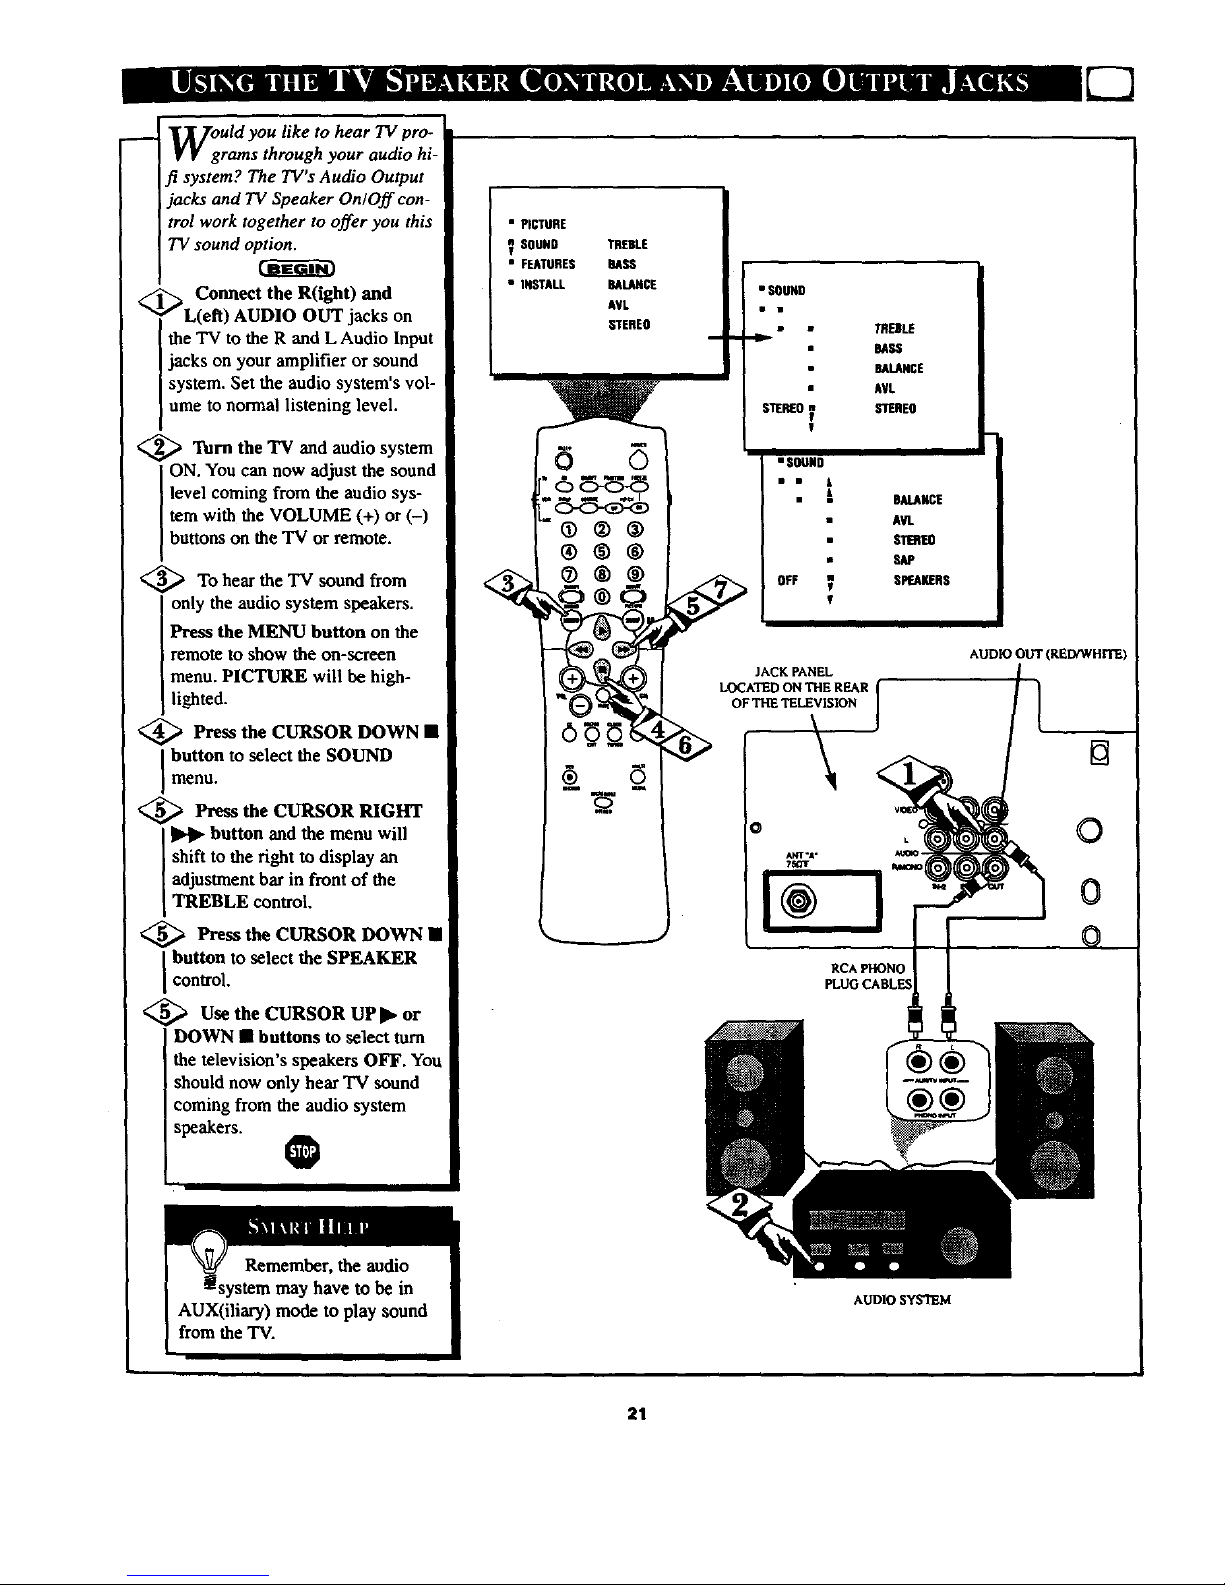
I
W:uld you like to hear TV pro-
rams through your audio hi-
f! system? The TV's Audio Output
jacks and TV Speaker On/Off con-
trol work together to offer you this
TV sound option.
_ Connect the R(ight) and
L(eft) AUDIO OUT jacks on
the TV to the R and L Audio Input
jacks on your amplifier or sound
system. Set the audio system's vol-
ume to normal listening level.
<_ 'lMrn the TV and audio system
ON. You can now adjust the sound
level coming from the audio sys-
tem with the VOLUME (+) or (-)
buttons on the TV or remote.
<_To hear the "IV sound from
only the audio system speakers.
Press the MENU button on the
remote to show the on-screen
menu. PICTURE will be high-
lighted.
@Press the CURSOR DOWN •
button to select the SOUNDmenu.
_ Press the CURSOR RIGHT
button and the menu will
shift to the right to display an
[ adjustment bar in front of the
[ TREBLE control.
<_ Press the CURSOR DOWN •
I button to select the SPEAKER
control.
Use the CURSOR UP I_ or
DOWN • buttons to select turn
the television's speakers OFF. You
should now only hear TV sound
coming from the audio system
speakers.
0
• PICTURE
V SOUND
• FEATURES
• INSTALL
TREBLE
BASS
BALANCE
AVL
STEREO
®®®
®®®
o_
• SOUND
SllEREO_
I
TREBLE
BASS
BALANCE
AVL
STEREO
• SOUND
• • t
_A BALANCE
AVL
STERE0
.lACK PANEL
RCAPHONO
PLUGCABLES
AUDIO OUT (RED/WHITE)
¥¥
AUDIO SYSTEM
21
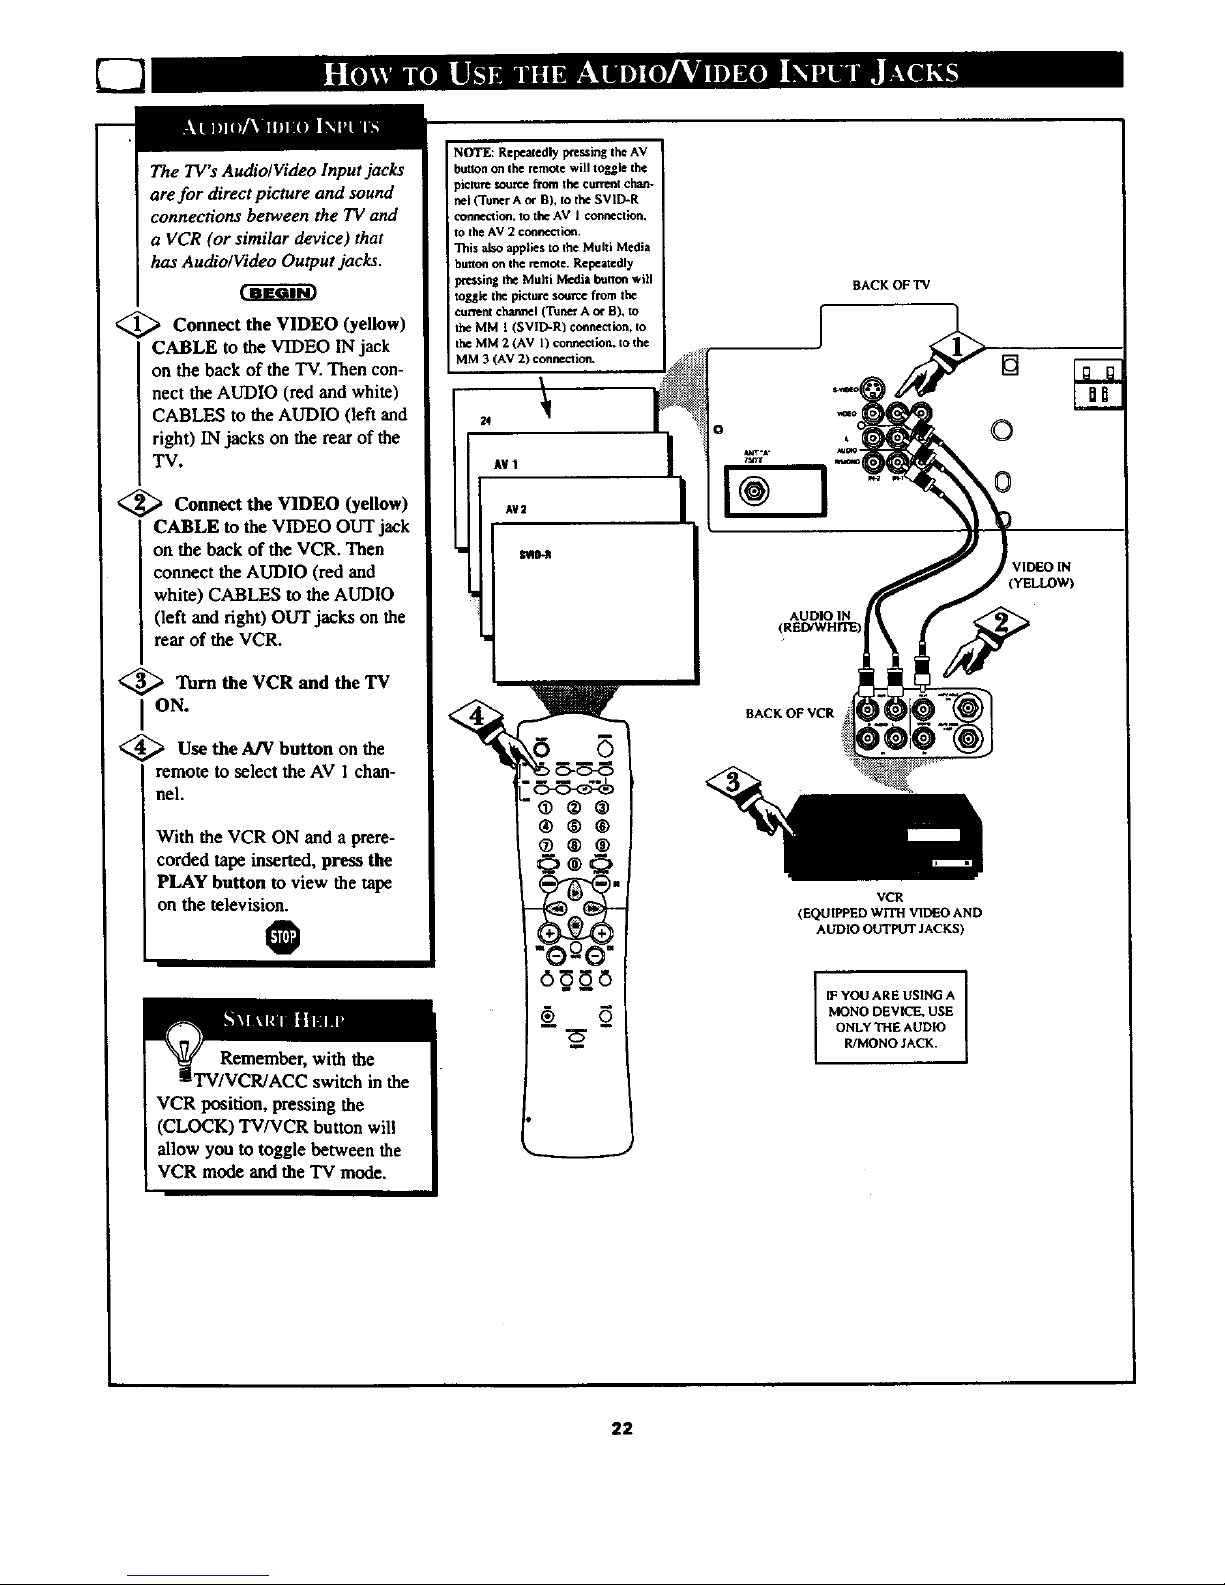
The TV's Audio/Video Input jacks
are for direct picture and sound
connections between the TV and
a VCR (or similar device) that
has AudiolVideo Output jacks.
<_ Connect the VIDEO
(yellow)
CABLE to the VIDEO IN jack
on the back of the TV. Then con-
nect the AUDIO (red and white)
CABLES to the AUDIO (left and
right) IN jacks on the rear of the
TV.
<_ Connect the (yellow)
VIDEO
CABLE to the VIDEO OUT jack
on the back of the VCR. Then
connect the AUDIO (red and
white) CABLES to the AUDIO
(left and right) OUT jacks on the
rear of the VCR.
_Turn the VCR and the TV
ION.
<_ Use the A/V button on the
remote to select the AV 1 chan-
nel.
With the VCR ON and a prere-
corded tape inserted, press the
PLAY button to view the tape
on the television.
O
Remember, with the
TV/VCR/ACC switch in the
VCR position, pressing the
(CLOCK) TV/VCR button wil!
allow you to toggle between the
VCR mode and the TV mode.
NOTE: Repeatedly pressing the AV
button on the remote will toggle the
zrce from the current chart.
nel (Tuner A or B), to the SVID-R
connection, to the AV I connection.
to the AV 2 coortecfiot_.
This also applies to the Multi Media
button on the remole. Repeatedly
pee_ing the Multi Media burton will
toggle the picture source from the
current charmel (Tuner A o¢ B), to
the MM I (SVID-R) connection, to
the MM 2 (AV 1) connection, to the
MM 3 (AV 2) connection.
,- II
A¥ 2
®@®
®@@
®®®
BACK OF "IV
AUDIO IN
(RED¢WHITE)
BACKOFVCR
VCR
(EQUIPPED WITH VIDEO AND
AUDIO OUTPUT JACKS)
IF YOUARE USING A [
MONO DEVICE, USE
ONLY THE AUDIO
R/MONO JACK.
[]
0
0
VIDEO IN
(YELLOW)
22
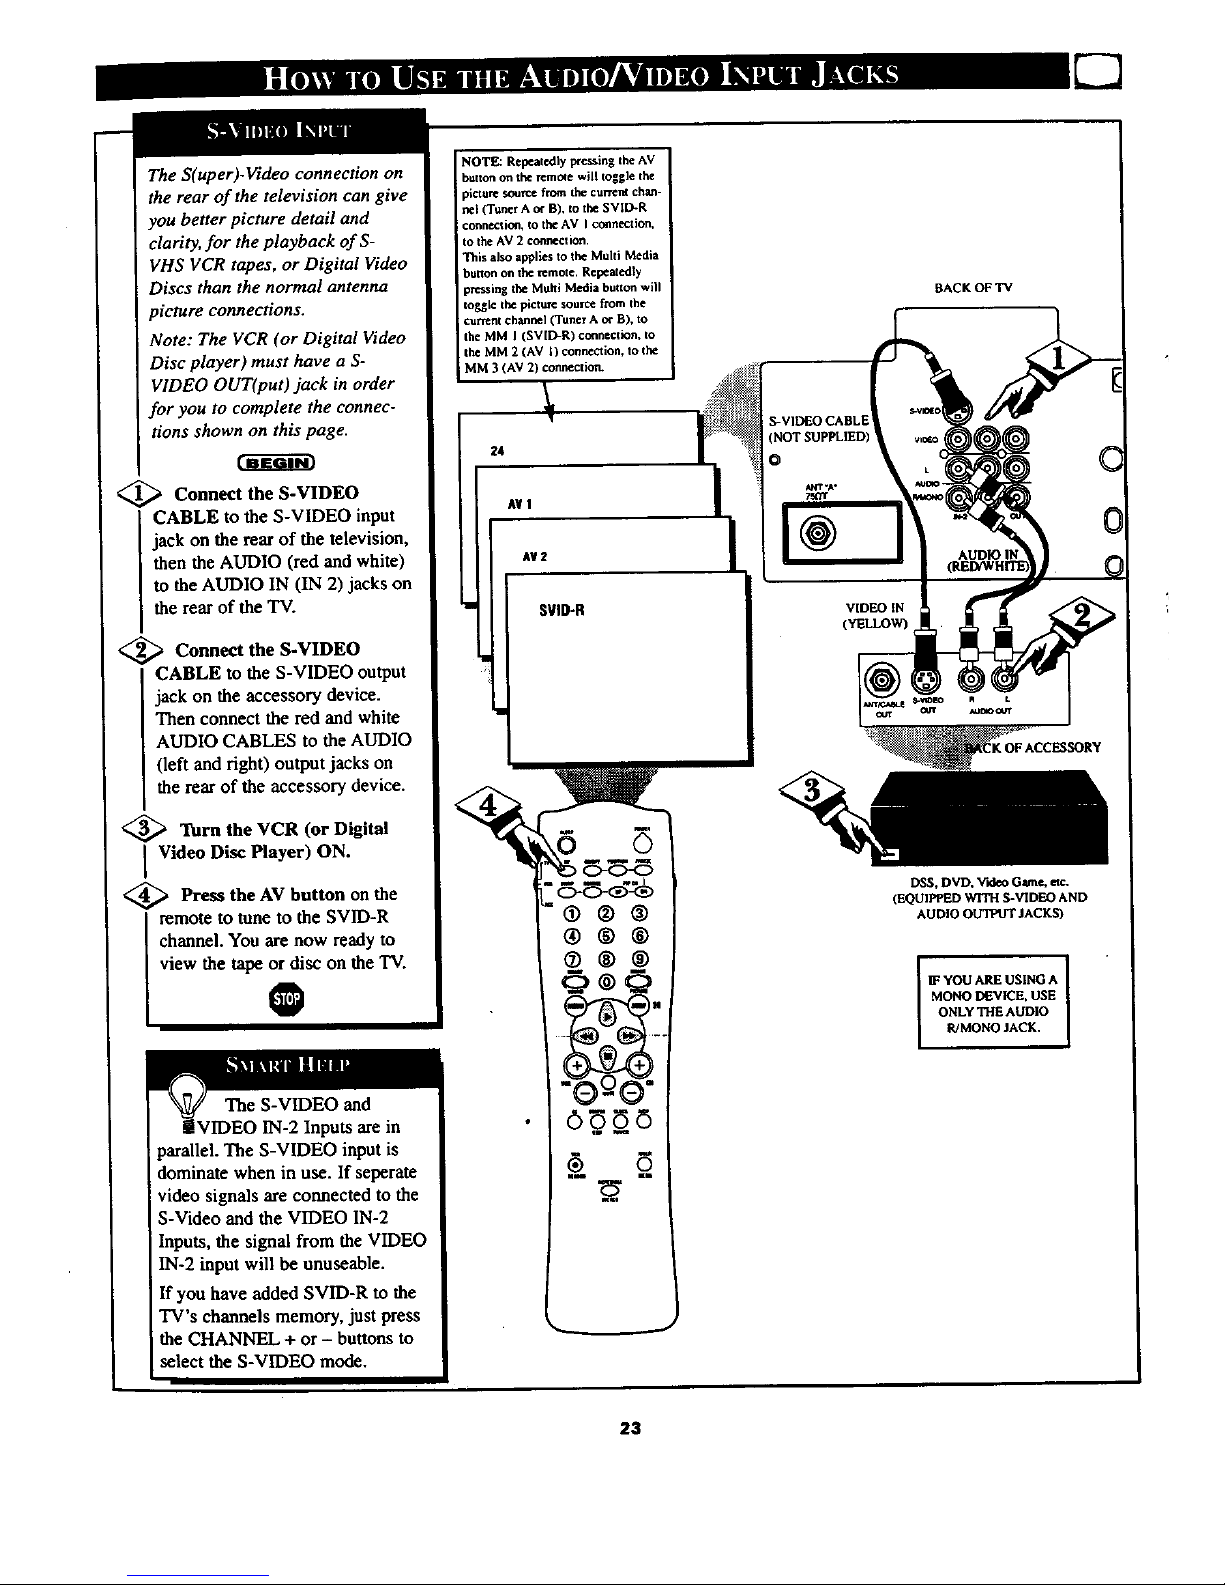
The S(uper)-Video connection on
the rear of the television can give
you better picture detail and
clarity, for the playback of S-
VHS VCR tapes, or Digital Video
Discs than the normal antenna
picture connections.
Note: The VCR (or Digital Video
Disc player) must have a S-
VIDEO OUT(put)jack in order
for you to complete the connec-
tions shown on this page.
<_ the S-VIDEO
Connect
CABLE to the S-VIDEO input
jack on the rear of the television,
then the AUDIO (red and white)
to the AUDIO IN (IN 2) jacks on
the rear of the TV.
<_ Connect the S-VIDEO
CABLE to the S-VIDEO output
jack on the accessory device.
Then connect the red and white
AUDIO CABLES to the AUDIO
(left and right) output jacks on
the rear of the accessory device.
<_ Turn the VCR (or Digital
I Video Disc Player) ON.
<_ Press the AV button on the
remote to tone to the SVID-R
channel. You are now ready to
view the tape or disc on the TV.
O
NOTE: Relatedly pcessing the AV
button on tbl_ remote will toggle the
picture source from the current chan-
nel (Tuner A o¢ B), to the SVID-R
connection,to the AV I connection,
to the AV 2 connection.
This also applies to the Multi Media
baron on the remote. Repeatedly
pressing the Multi Media button will
Ioggle the picttm: source from the
current channel (Tuner A OrB), to
the MM I (SVID-R) connection, to
the MM 2 (AV l) connection, to the
iMM3 (AV 2) connection.
24
A¥1
A¥ 2
• i_
II
SVID-R
S-VII_O CABLE
(NOT SUPPLIED)
@
VIDEOIN
(YELLOW)
BACK OF "IV
DS$, DVD. _rtdeo Gsane, etc,
(EQUIPPED WITH S-VIDEO AND
AUDIO O_ JACKS)
H: YOU ARE USING A
MONO DEVICE, USE
ONLY THE AUDIO
R/MONO JACK.
parallel. The S-VIDEO input is
dominate when in use. If seperate
video signals are connected to the
S-Video and the VIDEO IN-2
Inputs, the signal from the VIDEO
IN-2 input will be unuseable.
If you have added SVID-R to the
TV's channels memory, just press
the CHANNEL + or - buttons to
select the S-VIDEO mode.
U
23
!
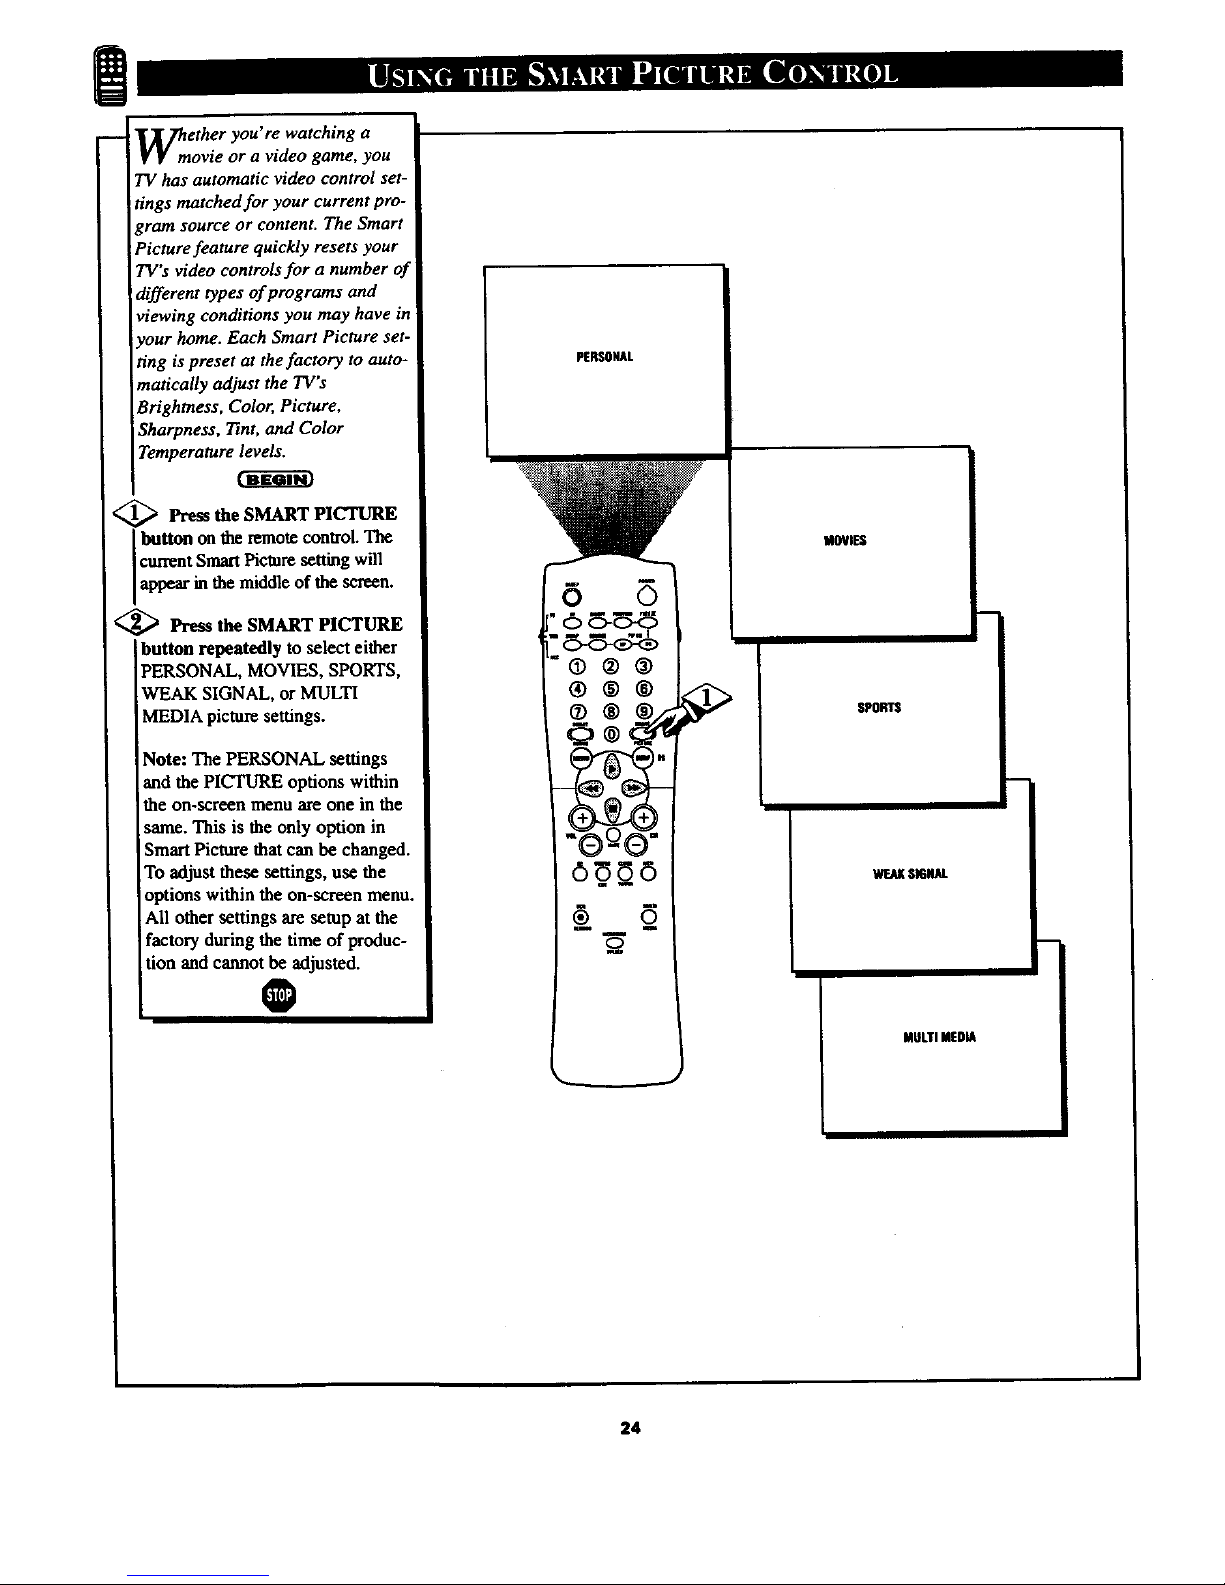
_ ] _hether you're watching a
VV movie or a video game, you
TV has automatic video control set-
tings matched for your current pro-
gram source or content. The Smart
Picture feature quickly resets your
TV's video controls for a number of
different types of programs and
viewing conditions you may have in
your home. Each Smart Picture set-
ting is preset at the factory to auto-
matically adjust the TV's
Brightness, Color, Picture,
Sharpness, Tint, and Color
Temperature levels.
<_ Press the SMART
PICTURE
I button on the remote control. The
currentSmartPicture setting will
appear in the middle of the smeen.
<_ Press the SMART PICTURE
button repeatedly to select either
PERSONAL, MOVIES, SPORTS,
WEAK SIGNAL, or MULTI
MEDIA picture settings.
Note: The PERSONAL settings
and the PICTURE options within
the on-screen menu are one in the
same. This is the only option in
Smart Picture that can be changed.
To adjust these settings, use the
options within the on-screen menu.
All other settings are setup at the
factory during the time of produc-
tion and cannot be adjusted.
O
PERSONAL
MOVIES
SPORTS
SIGNAL
MULTI MEDIA
24
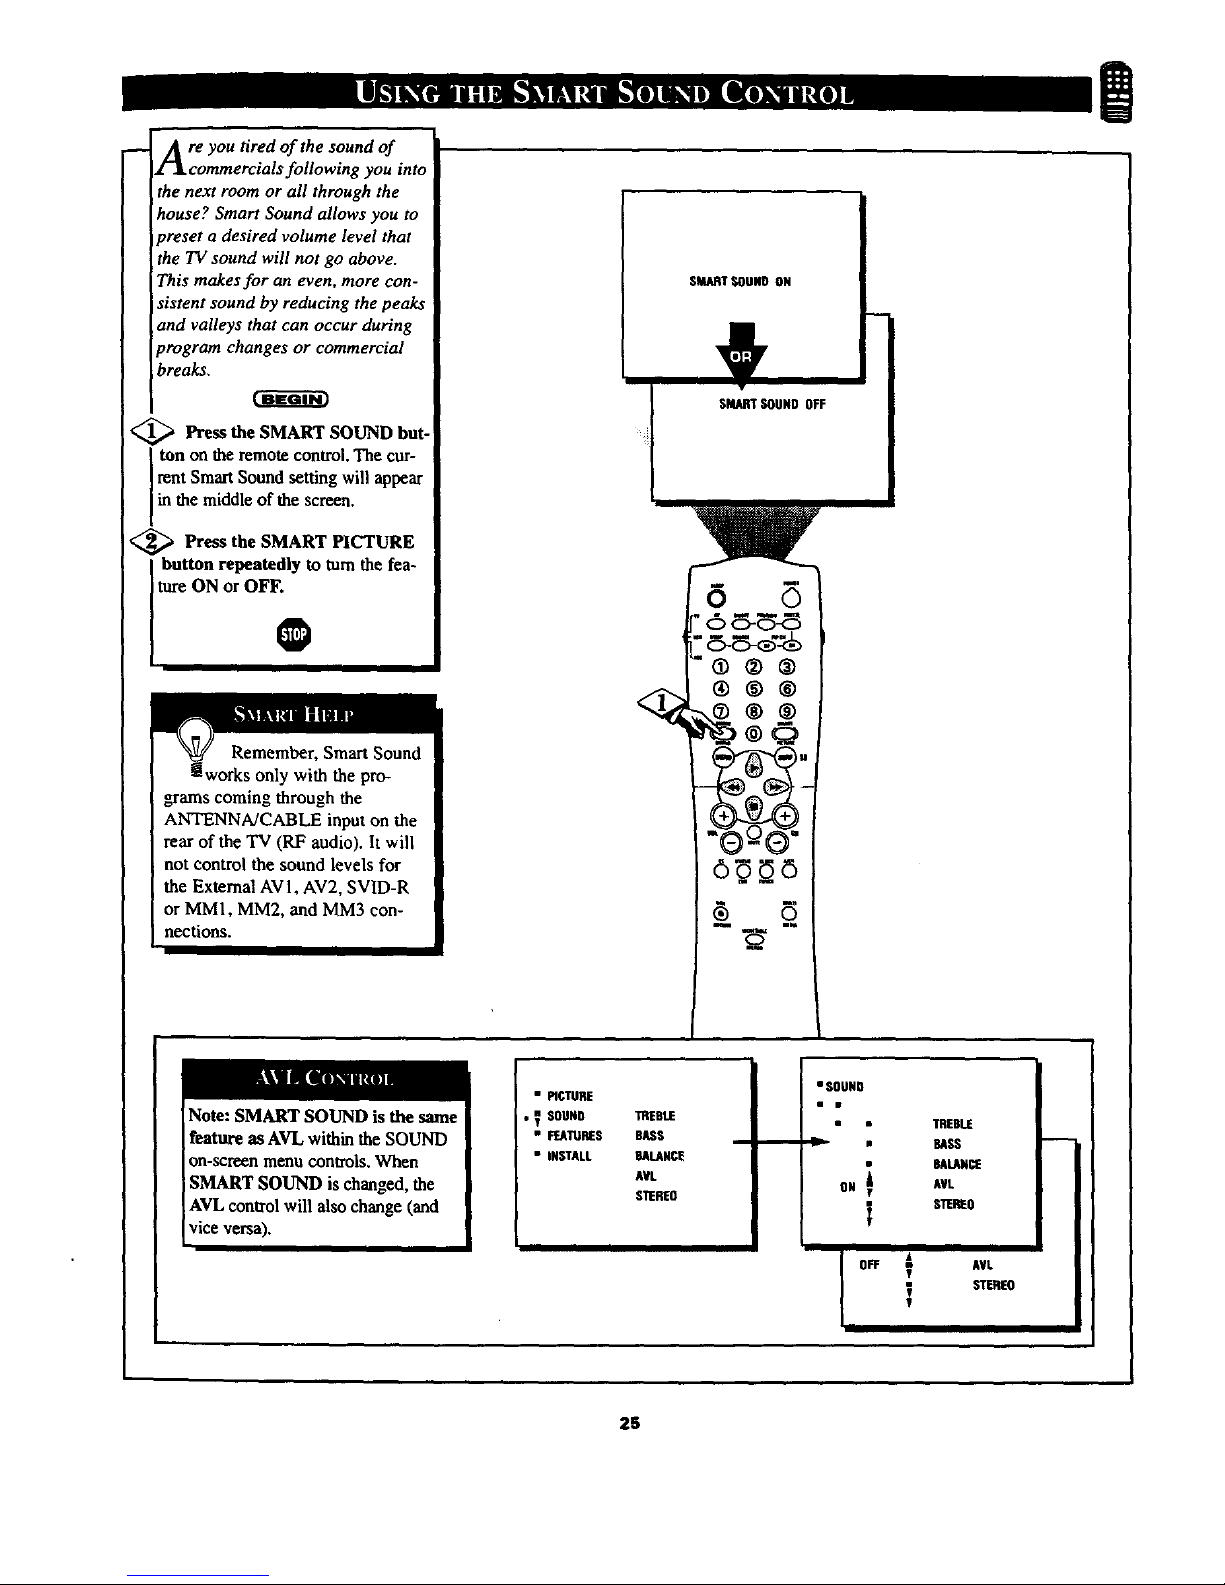
Are you tired of the sound of
C']kcommercials following you into
the next room or all through the
house? Smart Sound allows you to
preset a desired volume level that
the IV sound will not go above.
This makes for an even. more con-
sistent sound by reducing the peaks
and valleys that can occur during
program changes or commercial
breaks,
<_ Press the SMART SOUND but-
ton on the remote control. The cur-
rent STuart Sound setting will appear
in the middle of the screen.
_ Press the SMART PICTURE
button repeatedly to turnthe fea-
ture ON or OFF.
®
, with the pro-
grams coming through the
ANTENNA/CABLE input on the
rear of the TV (RF audio). It will
not control the sound levels for
the External AV 1,AV2, SVID-R
or MMI, MM2, and MM3 con-
nections.
SMART_OUND ON
SMART SOUND OFF
W
<_ ®®®
!
Note: SMART SOUND is the same
feature as AVL within the SOUND
ou-screen Tuemucontrols, When
SMART SOUND is changed, the
AVL control will also change (and
vice versa).
• PICTURE
• _ $OUMO
• INSTALL
TREBLE
BASS
BALANCE
AVL
S11EREO
eseUNO
iw
i
I°°
TREBLE
BASS
BALANCE
AVL
STEREO
T
I
v
AVL
STEREO
25

6
A "list" or series of previously
l
1"1viewed channels can be select-
ed with the SURF button on your
remote control. With this feature
you can easily switch between dif-
ferent TV programs that currently
interest you. The SURF control
allows you set up to ten channels in
its quick viewing "list".
<_ Press the CHANNEL (+) or (-)
buttons (or the NUMBER buttons)
to select a channel to add to the
SURF lisL
_ Press the SURF button on the
remote. The on-screen display will
Iread, "THE SURF LIST IS
EMPTY, Press > t_ add".
<_ Press the CURSOR RIGHT
button to add the present
channel to the SURF list.
<_ Press the CURSOR LEFT
button to delete the present
channel from the SURF list.
Repeat steps 1through 3 to add
additional channels (up to 10) to
the SURF list.
O
I
I
SURF
5
THESURF UST
IS EM_
i
_>_
i
®
®®®
m_
. I
SURF
5
s
Press> hi add
_URF
Pren • todelete
Press• to delete
Along with regular programmed chan-
nels, the External Video Source connoc-
tions can be added to the SURF list.
This means the AV 1, AV 2, SVID-R,
MM 1, !viM 2, and MM 3 channels can
be added to your SURF list. Just tune to
their channel and us the same procedure
described on this page.
26

your remote control is set to
ork your TV and many
infrared remote (IR) control
VCRs, Cable Boxes, Satellite
Systems, DSS, DVD, etc.
However, an easy onetime step
may be necessary before the
remote will work your VCR.
Try this initial check to see if
going on to the following section
is necessary.
i
<_ Place the TV/VCR/ACC
l Mode Switch in the proper posi-
tion.
<_ Point the remote control at
I the device and press the POWER
button.
<_ Does the remote turn the
device ON?
If YES, stop and try other func-
tion buttons on the remote. If
they also work the device, then
the remote is ready and no fur-
ther steps are needed.
If NO, continue...
I
<_ First up a
look THREE-DIGIT
remote control number for your
brand of Device before going
through the ssmple "1, 2, 3" steps
(on the following page).
Find your Three-Digit Code on
pages 30-31.
Satellite Receiver
VCR
SLEEP
0
-'IV /IV ON/OFF
0
VCR SWAP SOURCE
- ACC
(9 ®
Cable Converter
!
have to try more that the firstThree-
Digit code given in orderto locate
your Device's remote code.
27

8
NOhW that you have looked up
e three-digit Remote Code
Number for your brand of device,
you are ready to follow the four
simple steps below.
Please read through steps 1-4
before beginning.
<_ Place the TV/VCR/ACC
I Mode Switch in the proper posi-
tion.
<_ Press the VCR RECORD
button on the remote control and
release.
<_ Press the SMART SOUND
I button on the remote within 30
seconds, then release.
<_ Enter the THREE-DIGIT
REMOTE CODE NUMBER
for your desired device. The
remote is now ready to send
commands to the unit.
_ Point the remote at the
Device. Press the POWER button
on the remote to turn the unit
ON.
using the same remote code number.
After a second try and the remote
does not operateyourdevice, see if
there is another three*digit code num-
ber (pages 30-31) listed for your
device and repeat the steps above
using the new number.
If after repeated attempts the code
numbermethod does not work you
device, try the SEARCH METHOD
on page 29.
0 0-0-0
VCR
Satellim Receiver
or DSS, DVD
d) ®
®
II
Cable Converter
0
28

your TV remote can be set to
ork various external devices
such as VCRs, Cable Boxes,
Satellite Receivers, Dss, DVD.
etc. by what is called the search
method of remote control pro-
gramming.
lf the "Remote Code" number
method shown on page did not
set your remote to work your
external device, then follow the
easy steps listed below.
Please read steps 1-4 before
beginning.
<_ Press the POWER button
on
the device your are attempting toprogram to turn it ON.
<_ Place the TV/VCR/ACC
[ Mode Switch in the proper posi-
_fion.
Press the VCR RECORD and
the SMART SOUND buttons
Isimultaneously and hold them
<_ down.
The device will begin to change
channels after the remote identi-
fies the correct code. When the
channels start to change release
the VCR RECORD and SMART
SOUND buttons. The remote
should be ready to operate the
device.
O
two minutes to preform.
Don't let the device scan up more
than five channels. If you do the
remote may pass up the right code
and another two minute search cycle
will have to be repeated.
If no channel change happens within
two minutes, repeat steps 1-4.
Should a channel change still not
occur, the remote will not work the
desired device.
Satellite Receiver,
DSS, DVD,
or similar device
Cable Converter
VCR
29
!

!
REMOTE
VCR
Admiml ........................ 048
Advantz ........................ 358
Adventure ...................... 000
Aiko .......................... 278
Aiwa ........... 000, 037, 307, 348, 352
Akai ....... 041,049, 053,061,106, 315
Aiba ........................... 352
Amercian High .................. 035
Amstrad .................... 325, 332
Asha .......................... 240
Audiovox ....................... 037
Baird .......................... 107
Beaumark ...................... 240
Bell & Howell ................... 104
Blaupunkt ............... 003, 006, 154
Bmndt ................. 187, 320, 321
Bmksonic .......121,184,211,295,361
Bush ..........................352
CCE .......................072,278
Calix..........................037
Canon .........................035
Capchart ....................... 020
Carver .....................081,146
Citizen.....................037,278
Colt ........................... 072
Combitach ...................... 352
Craig .......... .037, 047, 072, 240, 271
Curtis Mathes ........... .035, 041,060
Cybarmax .................. 05 I, 240
D_ewoo ................ 020, 045, 276
I)ayn'on ........................ 020
Dcnon .........................042
Dynatech.......................000
Eiextrophonic....................037
Emerex ........................032
Emerson .... 000, 002, 036, 037. 043, 061
.......... 068, 088, 121, 164, 208, 209,
........... 211,212, 278, 295, 361,479
Ferguson ............... 107, 320, 321
F_sher.............. 047,054, 066, 104
Fuji ...................... .033, 035
Funai .......................... 000
GE ................035,060,065,202
Oan'a_ ........................000
Go Video ...............232,279,432
GoldStar...................037,038
Gradiente...................000,406
Onmdig ............003,007,195,347
HI-Q ..........................047-
HarlyDavidson..................000
Harman/Ka_on ..............038,075
Ha'wood ...................068,072
Headquarter.....................046
Hinari.....................004,352
Hitachi ............. 000, 004, 041,042,
................... 065, I05, 168, 235
Ingersol ........................ 004
JVC ........ 008, 041,067, 208,384, 486
]onsen ......................... 041
KEC ....................... 037, 278
KLH .......................... 072
Keawond .......... .038,041,067, 384
Kodak .................... .035,037
LXI ........................... 037
Lloyd's ..................... 000, 206
REMOTE
VCR CODENO.
Loewe .......................... 004
Logik ...................... 004, 072
MEI .......................... .035
MGA ...................... 043, 061
MGN Technology ................ 240
MTC ...................... 000, 240
Magnavox ....... 000, 035, 08 l, 146, 18 I
Marta .......................... 037
Matsul ................. 004, 348, 352
Matsushita .............. 035, 162, 454
Memmorex ..................... 307
Memorex ....... 000, 035,037, 039, 046,
........... 047,048, 104, 240, 266, 307
Metz ...................... 003, 347
Minolta .................... 042, 105
Mitsubishi ...043, 061,067, 075, 173, 443
Motorola ................... 035,048
Multitech ................... 000, 072
NAD .......................... 058
NEC ........... 036, 040, 041,067, I04
Nikko .........................037
Nikon ...................... 034, 253
Nohlex ......................... 240
Nordmende .............. 297, 320, 321
Okano ......................... 346
Olympus .................. .035, 226
Optlmus ........... .037, 048,058, 104,
...................... 162, 432, 454
Optonica ....................... 062
Orion .......... 004, 295, 348, 352, 479
Panasonic .......... 035, 077, 162, 225,
...................... 226, 378, 454
Peaney ............. 035, 037, 038, 040,
......................042,065,105
Pentax .................042,065,105
Philco.........................035
Philips..........035,062,081,II0,403
Pilot...........................037
Pioneer.....................058,067
Pm'fland........................020
Profax.........................322
Profitronic......................240
Protec.........................072
Pulsar ......................039, 051
Quarter ........................ 046
Quartz ......................... 046
Quasar ............ .035, 077, 162, 454
RCA .............. 042, 060, 065, 077,
................... 105, 106, 149, 202
Radio Shack ................. 000, 037
Radix ......................... .037
Rande£ ........................ 037
Realistic ........ 000, 035, 037, 045, 047
..................048,062,066, 104
Ricoh ...................... 034,253
Rtmco ......................... 039
SEG .......................... .322
SEI ........................... 004
STS ...........................042
Saba ...................297,320,321
Saisho.........................004
Salora.........................075
Samsung ............045,051,053,240
Sanky ......................039,048
Sansui..............000,041,067,271
REMOTE
vcn CODE No.
Sanyo ..........046,047,104,240,268
Savitte.........................352
Scott.......043,045,121,164,21I,212
Scars..........000,035,037,042,046,
...............047,054,066,104,105
Sharp ..................... ,046,062
Shintom ........................ 072
Shogun .................... .051,240
Shoral ......................... 004
Siemens ........................ 003
Singer ........................ .072
Sinadyne ....................... 004
Sony .......... 000, 011,022, 032, 033,
.................. .034, 035, 253, 275
Sunkel ......................... 348
Sunpak ........................ 253
Sylvania .... 000, 035, 043, 081,103, 110
Symphonic ...................... 000
TMK .................. 036, 208,240
Tamng ......................... 041
Teac ...................... .000, 04t
Technics .................... 035, 162
Teknika ................ 000, 035, 037
Telefunken .............. 187, 320, 321
Tamal ......................... 322
Thomas ........................ 000
Thomson ....................... 320
Toshiba ......... 043, 045, 066, 212, 366
Totavision .................. 037, 240
Towada ........................ 322
Unitech ....................... .240
Universum ..................... .325
Vactor .........................045
VactorResearch..............038,040
VideoConcepts..........040,045,061
Videosonic......................240
Wards..000, 035,042,047, 048,060, 062,
...........072,081,149,161,212,240
XR-1000 ...............000,035,072
Yamaha ....................... .038
Zenith .............. 000, 033, 034, 039
CABLE REMOTE
coNwnTon coDz No.
ABC .............. 001,003, 007, 008,
.................. .011,013, 014, 017
Aliegio ........................ 153
Am:lover ....................... .544
Antronix ...................... .022
Archer ..................... 022, 153
Balcor ......................... 056
British Telecom .................. 105
Cable Star ...................... 056
Cablatenna ...................... 022
Cabletim¢ ........... 161,271,377, 448
Cab[eview ...................... 022
Century ........................ 153
Citizen ......................... 153
Clyde..........................086
ColourVoice ................025,031
Commc ........................274
Comtronics ..................... 040
Co, tee.........................019
Cryptovision .................... 600
Dot:eat ......................... 423
3O

CABLE REMOTE
CONVERTOR CODE NO.
Eastern ..................... 002, 274
Everquest ................... 015,040
Filmnet ........................ 443
Focus .......................... 400
France Telecom .................. 451
GC Electronics ................. .056
GEC ......................... .086
Ganard ......................... 153
Gemini ................ .015, 070, 242
General Instrument ........ 0l I, 276, 476
Gold Star ....................... 040
Grondig ....................... .529
Hamlin ............. 009, 020, 034, 259
Hitachi ......................... 011
Hytex .......................... 007
Jasco .......................... 153
Jerrold ............. 003, 011,012, 014,
.................. .015, 024, 276, 476
M.N.E.T. ....................... 443
MNet .......................... 443
Macon ......................... 033
Magnavox .............. 027, 032, 334
Memorex ....................... 000
Movie Time ..................... 063
NSC ....................... 063, 070
Oak ....................... 007, 019
Optlmus ........................ 02 I
Panasonic ............... 0(30, 021, 107
Paragon ........................ 000
Philips . .025, 027, 031, 153, 242, 290, 334
Pioneer ..................... 533, 753
Popular Mechanics ................ 400
Pulsar ......................... 000
RCA .......................... 02 I
Radio Shack .................... 015
Reeot_n ........................ 400
Regal ...................... 620, 259
Regency ........................ 002
Rembrandt .................. 01 I, 070
Ranco ......................... 000
SL Marx ....................... 040
Salora ......................... 382
Samsuug ....................... 040
Satbox ......................... 375
Scientific Atlanta ......... 008,017, 477
Signal .................... .015,040
Signature ....................... 011
Sprucer ........................ 021
Star Sight ....................... 542
Starcom .................... 003, 015
Stargate .................... 015, 040
Starquest ....................... 015
Sylvania ........................ 001
TV85 .......................... 063
Tandy ......................... 258
Tele+l ......................... 443
Teleserviee ...................... 28I
Teleview ....................... 040
Texscan ........................ 001
Timeless ....................... 274
Tocom ................. 012, 013,059
Toshiba ........................ 000
Tudl ........................... 286
Tusa ........................... 015
Unike ...................... 022, 153
CABLE REMOTE
cone NO.
United Artists .................... 007
United Cable .................... 003
Universal ........... 022, 056, 153, 191
Videoway ...................... 250
Viewstar ................ 027. 063, 258
Visi Cable+ ..................... 461
Westminster ..................... 105
Wolsey Gaiue ................... 544
Zenith .................. 000, 054, 525
Zentek ......................... 400
REMOTE
CODENO.
Alpha Star ...................... 772
Echostar ........................ 775
FITS ........................... 775
Hitachi ......................... 819
Hughes Network System ........... 749
Jerrold ......................... 627
Magnavox ................. .722, 724
Memorex ....................... 724
Panasonic ...................... 701
Philips .................... .722, 724
Primestar ....................... 627
RCA ......................... .566
Sony .......................... 639
Toshiba ........................ 790
Uniden ......................... 724
REMOTE
AST ........................... 35 I
Akai ........................... 515
Alba ................... 352, 515, 613
Aldea .......................... 288
Amstrad .... 080, 252, 345, 461,509, 689
Ankaro ................. 220, 288, 369
Anitron ........................ 183
Armstrong ..................... .243
Astra .......................... 108
Avalon ......................... 396
Axis ........................... 369
BT ....................... .515, 668
Beko .......................... 189
Best ........................... 369
Boca ...................... 243, 513
Bush .......................... 067
Cambridge .................. 344, 515
Channel Master .................. 362
Commlink ...................... 288
Connexious ..................... 396
Conrad.." ....................... 607
Crown ......................... 243
DDC .......................... 362
DNT .......................... 396
Echostar ........................ 396
Farguson ............ 067, 183, 189, 336
Fidelity ........................ 252
Finiux ..................... 108, 397
Fuha ....................... 369, 396
G-Bat .......................... 183
Galaxis ........................ 286
Gooding ........................ 571
Grandig ............ 173, L89, 571,750
Hinari ......................... 183
a
REMOTE
COOSNO.
Hirsehmann ................. 397, 573
Houston ........................ 668
Huth ................... 220, 243, 268
I'FI" ........................... 10_
lntervision ..................... .592
JVC ....................... 515, 571
Kathrein ............ 092, 504, 622, 658
La Sat ..................... 513, 607
Lennox ....................... .592
Lupus ........................ .369
Luxor ...................... 108, 573
Manhatten ..................... .592
Maspro ................. 092, 336, 750
Matsui ........................ .571
Mediamarkt ..................... 248
Minerva ....................... .57 I
Mintec ........................ .576
Morgan's ................... 243, 513
Newhaus ...................... .220
Nikko ...................... 360, 713
Nokia .................. 108, 397, 573
N(admonde ..................... 362
Orbltech ....................... .501
Pace ........... 067, 183, 336, 455, 791
Palladium ..................... .571
Palsat ......................... .501
Philips ............. 200, 292. 571,750
Phonota'ond.................. 288, 592
Plasmatic ....................... 442
Proset ........................ .288
Quadral .................... 362, 628
RFT ....................... 220, 288
Radix .......................... 396
SAT ....................... 351,461
SEG ........................... 369
Saba ........................... 336
Salora ......................... 108
Sates .......................... !83
Schwaiger .................. 183, 504
Seemann ................ 396, 578, 626
Skymaster .................. 288,626
Sony .......................... 704
Star Trak ....................... 421
Strong ......................... 42 I
Sunstar ........................ 513
Tantec ......................... 336
Techai Sat .................. 262, 501
Teleka ..................... 243, 613
Tonna ......................... 668
Triad .......................... 351
Universum ...................... 571
Vteeh .......................... 351
W'tsi ...................... .351,396
REMOTE
Kenwood ....................... 534
Mitsubishi ...................... 521
Panasonie ...................... 490
Philips ........................ .539
Pioneer ........................ 550
RCA .......................... 522
Sony .......................... 552
Toshiba ........................ 503
31
!
Wwen using the TV remote
ith a VCR, first make cer-
tain it is set to control your VCR
(by the REMOTE CODE or
SEARCH method).
<_Set TV/VCR/ACC mode
the
I switch to VCR on the remote.
<_ Point the of the remote
top
toward the front of the VCR
(remote sensor window) when
pressing the buttons.
Set in the VCR position to send
remote commands to the VCR.
Press to begin playback of a
video tape. (Or, press PLAY but-
ton and VCR/RECORD button to
begin a VCR recording.)
Press to rewind tapes. For some
VCR's the STOP button may
have to be pressed first, then
REWIND. In playback mode
hold down the button to view
picture moving rapidly in
reverse.
Press to stop the motion of a tape
in playback, rewind, fast for-
ward, etc.
Hold the VCR/RECORD button
and the PLAY button down to
recording.
@ ® ®
® ® ®
® ® ®
WR MULl1
0
RECORD MEDIA
INCREOIOLE
0
/--
/-
/
P
J
/
/
Press m turn the VCR ON and
OFF.
Press buttons for direct VCR
haonel selections.
Press to temporarily stop the tape
during a playback or recording.
Press again to release Pause.
FAST FORWARD BUTTON
Press to rapidly advance the tape.
For some VCR's you may need
to press the STOP button first,
then the FAST FORWARD but-
tom In playback mode hold the
button down to view the picture
moving rapidly in the forward
direction.
I_ItANNEL + & - BUTTONS
Presstoscan up or down through
the VCR channel numbers.
(CLOCK) TV/VCR BUTTON
Press to the VCR position (VCR
indicator on the front of the unit
will light) to view the playback
of a tape, watch a program while
recording it, or to watch a TV
broadcast using the VCR CH (+)
(-) or Number buttons. Press
again to place in the "IV position
(VCR indicator light will go off)
to view one program while
recording another program.
Remember, the VCR but-
ntheremote will not
operate your VCR if thosefeatures
am not found on your VCR remote
control.
Note: All VCR functions (particularly
Search, Rewind, FastForward,etc.)
will operate
inal VCRremote controlprovided
with theVCR.
32
J
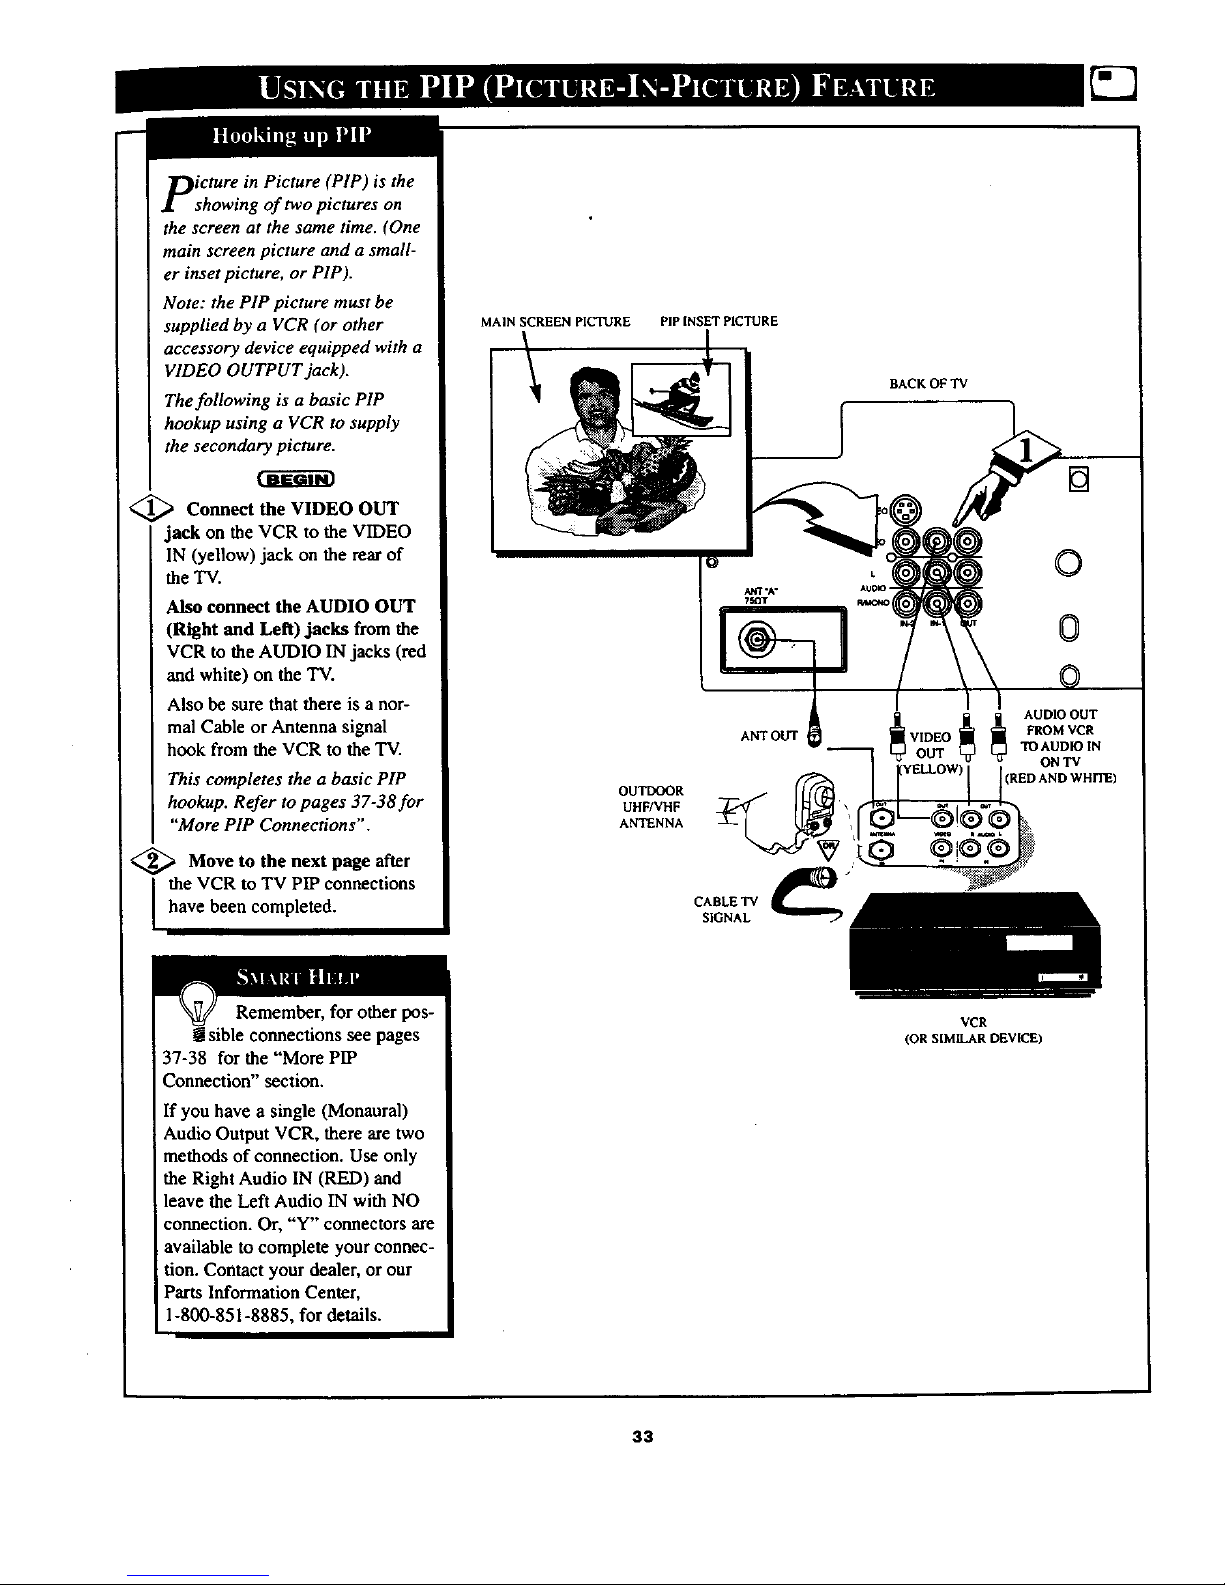
picture in Picture (PIP) is the
showing of two pictures on
the screen at the same time. (One
main screen picture and a small-
er inset picture, or PIP).
Note: the PIP picture must be
supplied by a VCR (or other
accessory device equipped with a
VIDEO OUTPUT jack).
The following is a basic PIP
hookup using a VCR to supply
the secondary picture.
<_ Connect the VIDEO OUT
jack on the VCR to the VIDEO
IN (yellow) jack on the mar of
the TV.
Also connect the AUDIO OUT
(Right and Left) jacks from the
VCR to the AUDIO IN jacks (red
and white) on the "IV.
Also be sure that there is a nor-
mal Cable or Antenna signal
hook from the VCR to the TV.
This completes the a basic PIP
hookup. Refer to pages 37-38for
"More PIP Connections".
<_ to next page
Move the after
I the VCR to TV PIP connections
have been completed.
MAIN SCREEN PICTURE PIP INSET PICTURE
OUTDOOR
UHF/VHF
ANTENNA
BACK OF TV
Remember, for other pos-
[sible connections see pages
37-38 for the "More PIP
Connection" section.
If you have a single (Monaural)
Audio Output VCR, there are two
methods of connection. Use only
the Right Audio IN (RED) and
leave the Left Audio IN with NO
connection. Or, "Y" connectors are
available to complete your connec-
tion. Contact your dealer, or our
Parts Information Center,
1-800-851-8885, for details.
VCR
(OR SIM_AR DEVICE)
33
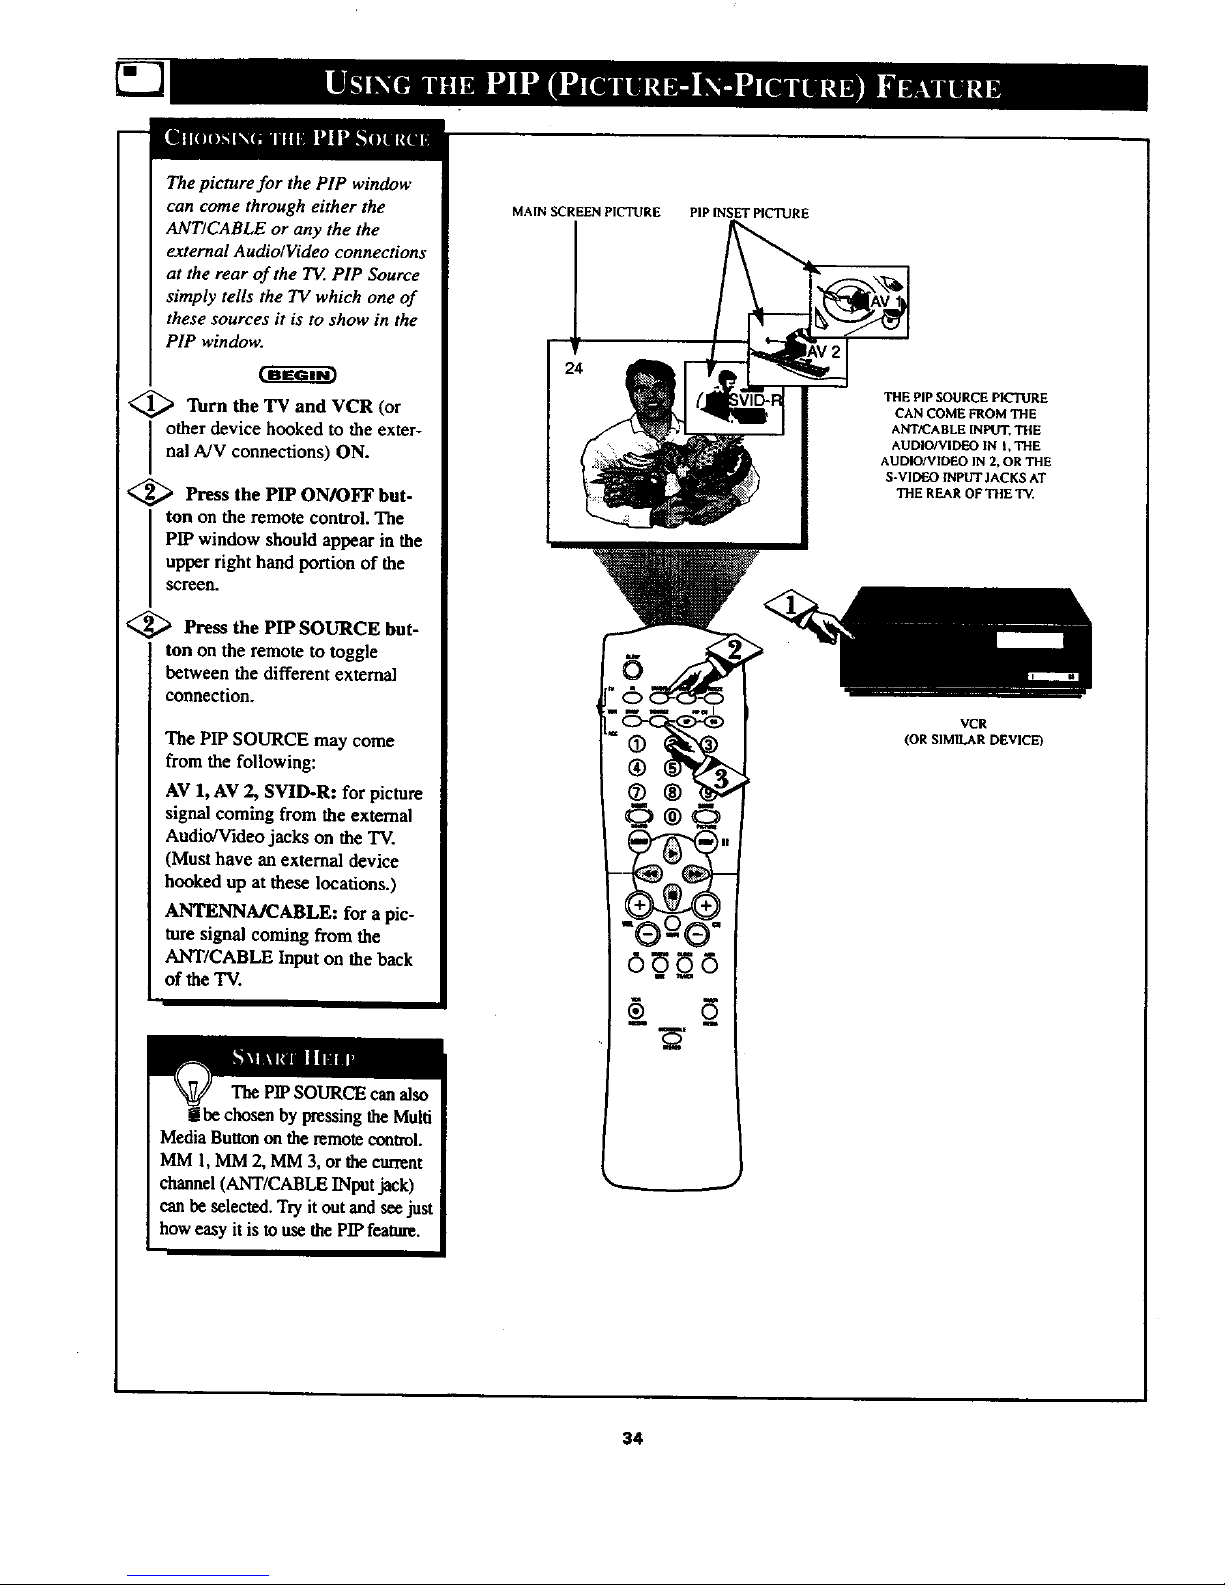
The picture for the PIP window
can come through either the
ANT/CABLE or any the the
external Audio/Video connections
at the rear of the T_. PIP Source
simply tells the TV which one of
these sources it is to show in the
PIP window.
<_ Turn the TV and VCR (or
other device hooked to the exter-
nal M¥ connections) ON.
<_ Press PIP ON/OFF but-
the
ton on the remote control. The
PIP window should appear in the
upper right hand portion of the
screen.
<_ Press the PIP SOURCE
but-
ton on the remote to toggle
between the different external
connection.
The PIP SOURCE may come
from the following:
AV 1, AV 2, SVID-R: for picture
signal coming from the external
Audio/Video jacks on the "IV.
(Must have an external device
hooked up at these locations.)
ANTENNA/CABLE: for a pic-
ture signal coming from the
ANT/CABLE Input on the back
of the TV.
The PIPSOURCE can also
[be chosen by pressing the Multi
MediaButton on the remote control.
MM 1, MM 2, MM 3, or the cun_nt
channel (ANT/CABLE INputjack)
can be selected. Try it outand see just
how easy it is to use the PIPfeal_re.
MAIN SCREEN PICTURE PIP INSET PICTO RE
THE PIP SOURCE pICTURE
CAN COME FROM THE
ANT/CABLE INPUT, THE
AUDIO/VIDEO IN I, THE
AUD_3/VIE_O IN 2, OR THE
S-VIDEO INPUT JACKS AT
THE REAR OF THE TV.
VCR
(OR SIMILAR DEVICE)
34
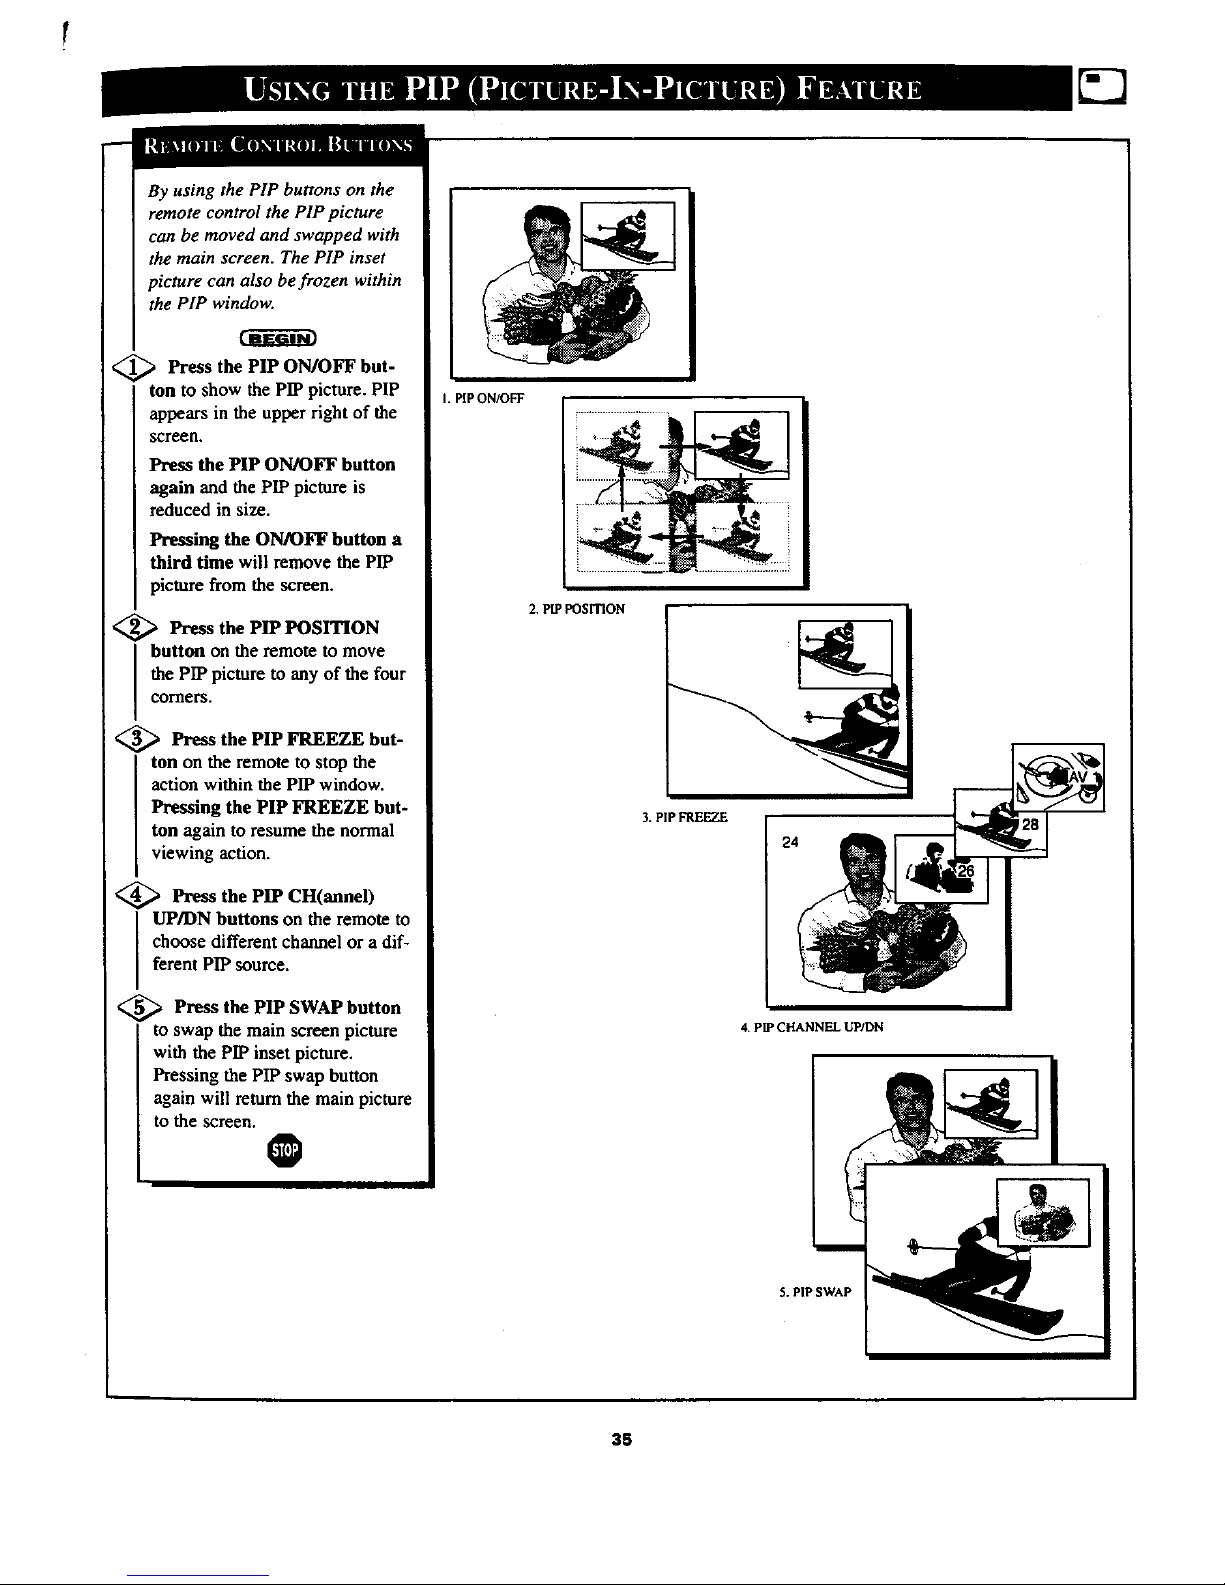
By using the PIP buttons on the
remote control the PIP picture
can be moved and swapped with
the main screen. The PIP inset
picture can also be frozen within
the PIP window.
<_ Press the PIP ON/OFF but-
ton to show the PIP picture. PIP
appears in the upper right of the
screeu.
Press the PIP ON/OFF button
again and the PIP picture is
reduced in size.
Pressing the ON/OFF button a
third time will remove the PIP
picture from the screen.
<_ Press the PIP POSITION
button on the remote to move
the PIP picture to any of the four
corners.
<_ Press the PIP FREEZE
but-
ton on the remote to stop the
action within the PIP window.
Pressing the PIP FREEZE but-
ton again to resume the normal
viewing action.
<_ Press the PIP CH(annel)
UP/ON buttons on the remote to
choose different channel or a dif-
ferent PIP source.
<_ Press the PIP SWAP button
to swap the main screen picture
with the PIP inset picture.
Pressing the PIP swap button
again will return the main picture
to the screen.
@
I. PIP ON/OFF
2. PIP POSITION
3. PIPFREEZE
2,4
4. Pff_CHANNEL UP/DN
5. PiP SWAP
35
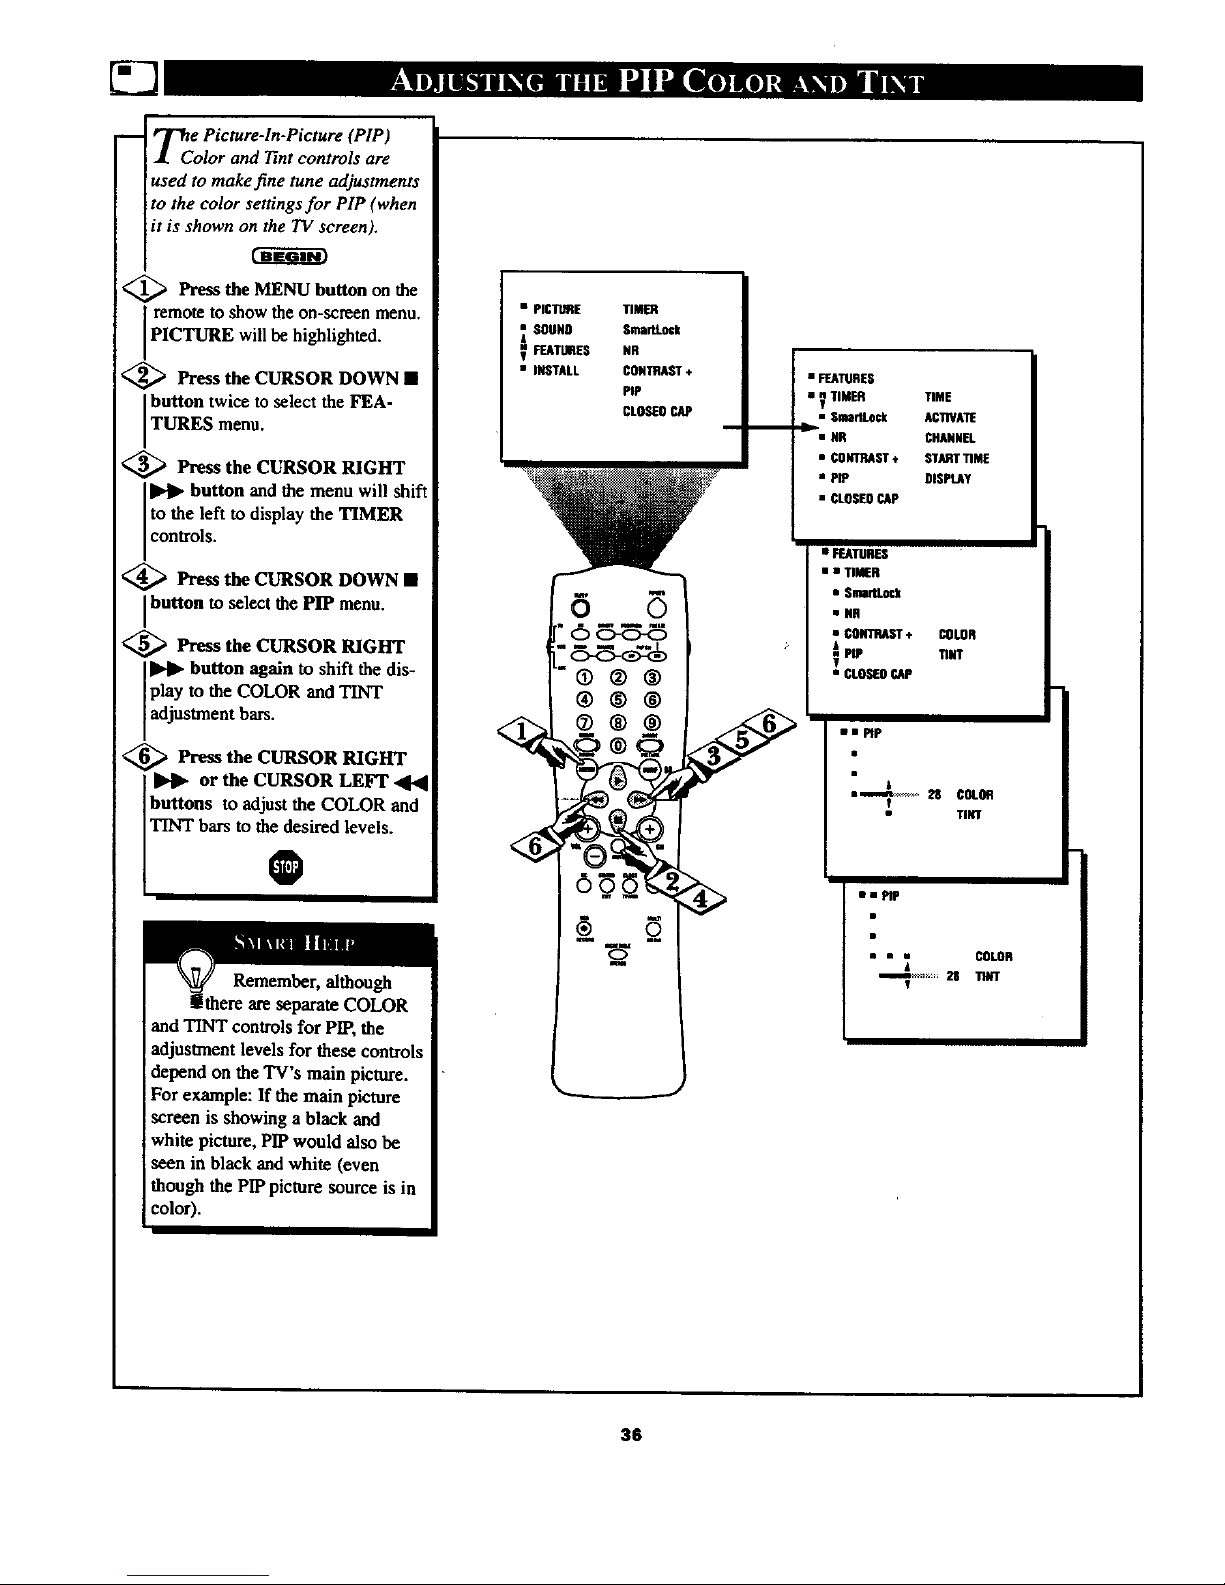
m
_Co e Picture-In-Picture (PIP)
lor and Tint controls are
used to make fine tune adjustments
to the color settings for PIP (when
it is shown on the TV screen).
<_ Press MENU button on the
the
remote to show the on-screen menu.
PICTURE will be highlighted.
<_ Press the CURSOR DOWN •
button twice to select the FEA-
TURES menu.
<_ Press the CURSOR RIGHT
button and the menu will shift
to the left to display the TIMER
controls.
<_ Press the CURSOR DOWN •
button to select the PIP menu.
<_ Press the CURSOR RIGHT
button again to shift the dis-
play to the COLOR and TINT
adjustment bars.
<_ Press the CURSOR RIGHT
or the CURSOR LEFT _14
buttons to adjust the COLOR and
TINT bars to the desired levels.
®
and TINT controls for PIP, the
adjustment levels for these controls
depend on the TV's main picture.
For example: If the main picture
screen is showing a black and
white picture, PIP would also be
seen in black and white (even
though the PIP picture source is in
color).
• PICTURE TIMER
SOUNO SmarkLock
_ VdUUIIES NR
• INSTALL cONmAST +
PiP
CLOSEOCAP
• FEATURES
• _ TIMER TIME
i
• $mrtL#k ACTIVATE
4im'u NR CHANNEL
I I
• CONTRAST* STARTTIME
• PiP DISPLAY
• CLOSEOCAP
• FEATURES
• • TIMER
• SmrU.ock
• NR
• CONTRAST÷ COLOR
• CLOSEOCAP
iipIp
• t
•-,,_ .... 211COLOn
• TINT
_ uu_p
• • m COLOR
T
36
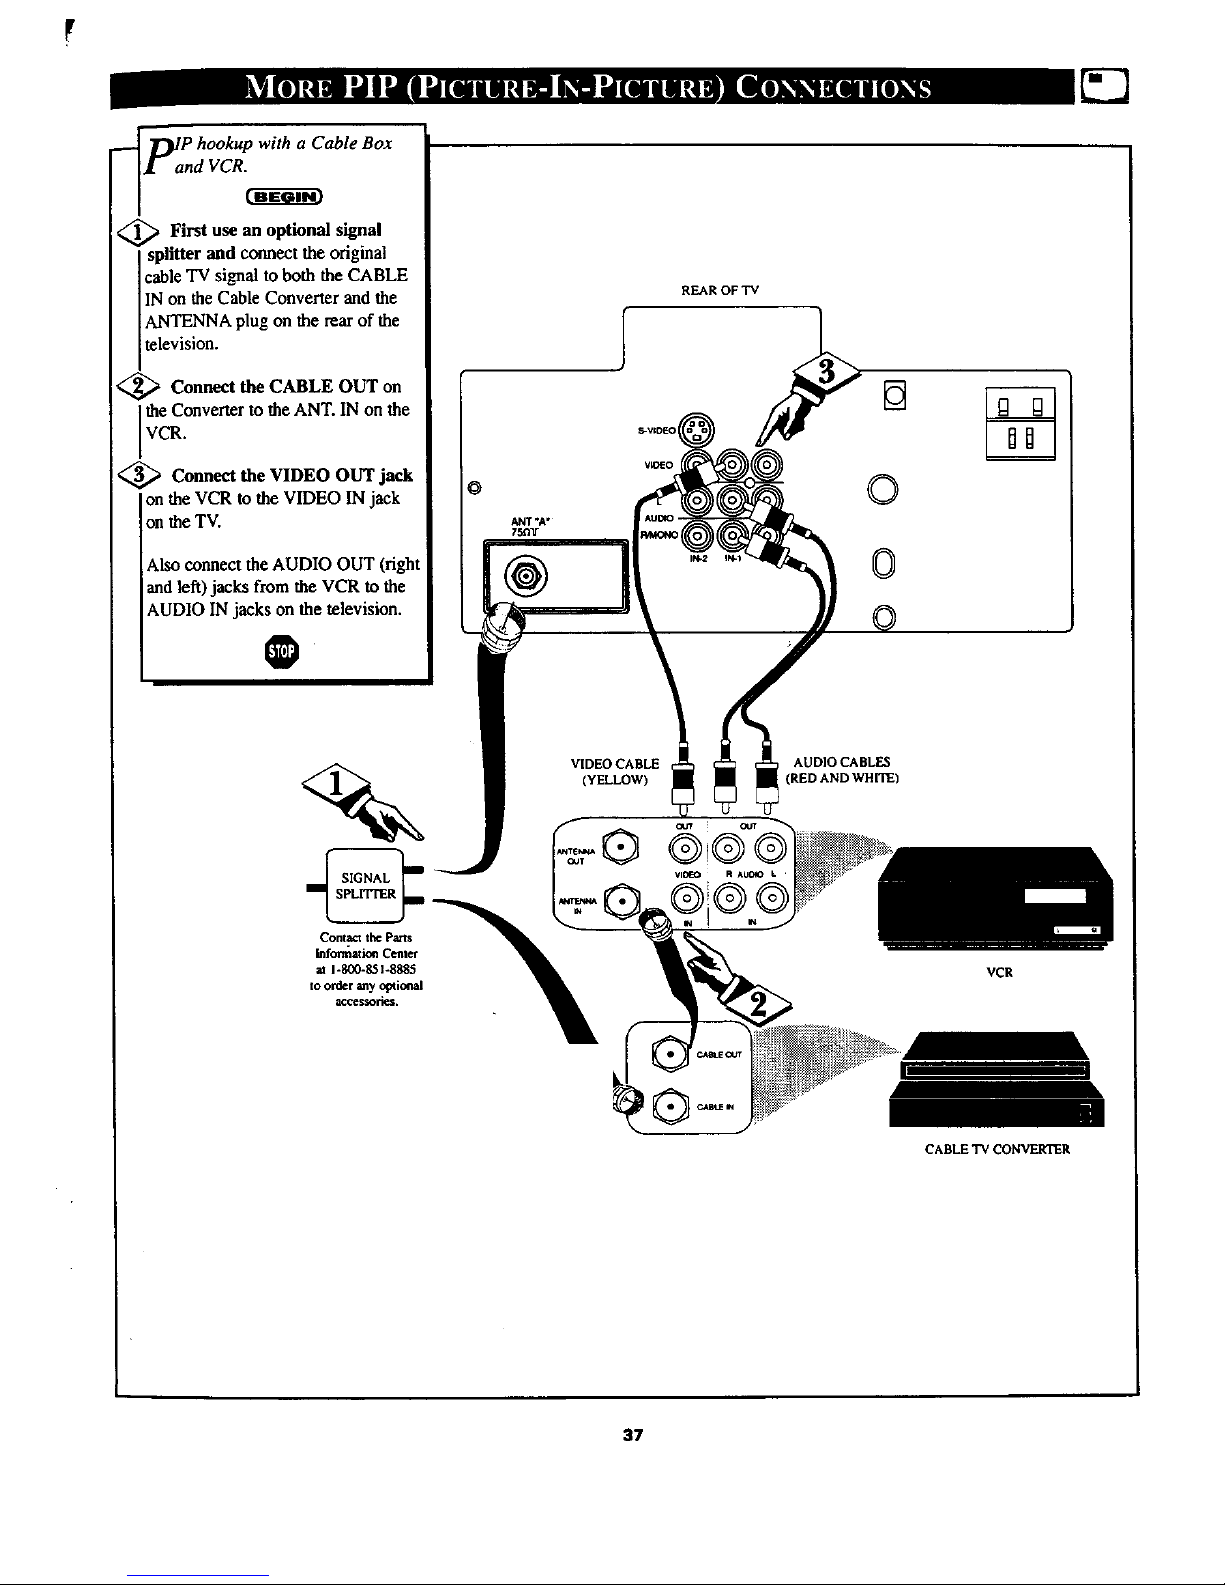
_a P with Cable Box
hookup
O
nd VCR.(_)
_ First use an optional signal
splitter and connect the original
cable TV signal to both the CABLE
IN on the Cable Converter and the
ANTENNA plug on the rear of the
television.
_ Connect the CABLE OUT on
the Converter to the ANT. IN on the
VCR.
<_ Connect the VIDEO OUT jack
on the VCR to the VIDEO IN jack
on the TV.
Also connect the AUDIO OUT (right
andleft) jacks from the VCR to the
AUDIO IN jacks on the television.
@
Contac_ the Parts
lafor_atio_ Center
at 1-800-851-8885
to order any o_i_l
accegf.OlJeS.
REAR OF TV
©
VIDEO CABLE
(YELLOW)
®
AUDIO CABLES
VCR
CABLE "IV CONVERTER
37
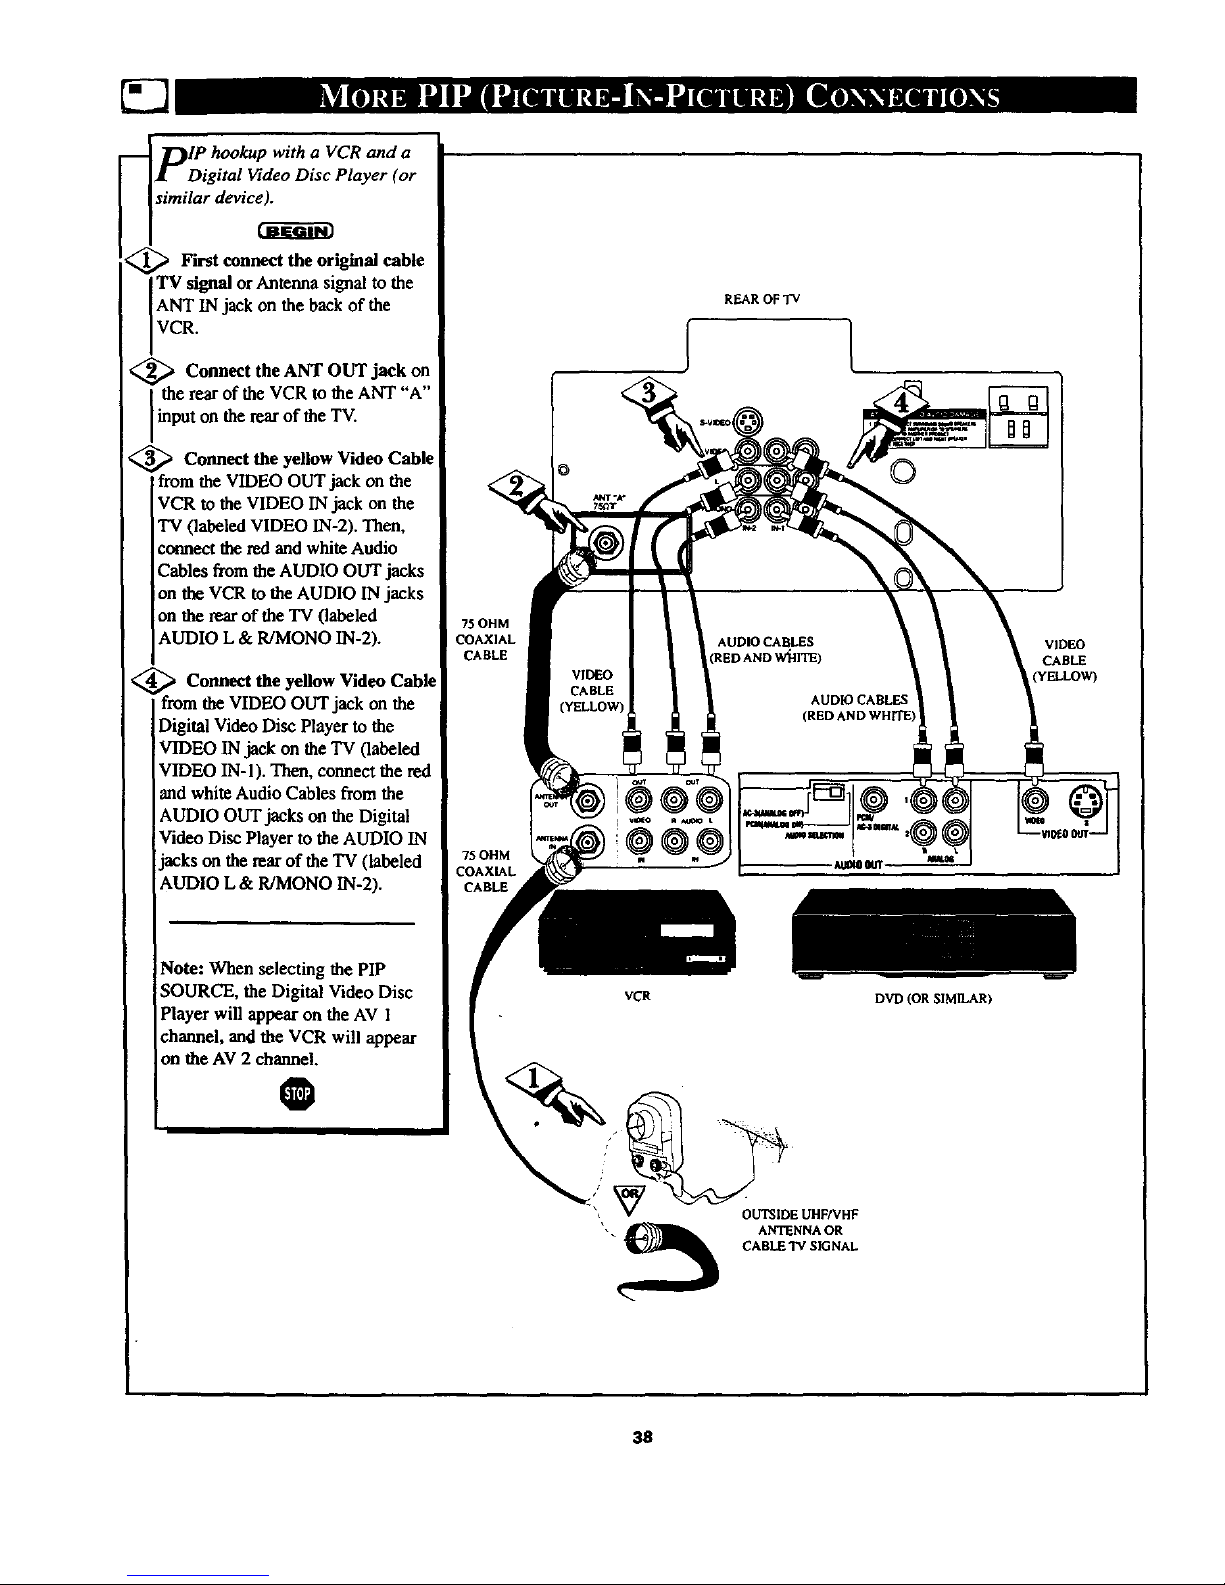
_ DIP hookup a a
with VCR and
IDigital Video Disc Player (or
similar device_
_ First connect the cable
original
'IV signal or Antenna signal to the
ANT IN jack on the back of the
VCR.
_ Connect the ANT OUT jack on
the rear of the VCR to the ANT "A"
inputon the rearof the TV.
<_ Connectthe VideoCable
yellow
fromtheVIDEO OUT jackonthe
VCR totheVIDEO INjackon the
TV (labeledVIDEO IN-2).Then,
connecttheredandwhiteAudio
Cables from the AUDIO OUT jacks
on the VCR to the AUDIO IN jacks
on the rear of the TV (labeled
AUDIO L & R/MONO IN-2).
_ Connect the yellow Video Cable
from the VIDEO OUT jack on the
Digital Video Disc Player to the
VIDEO IN jack on the TV (labeled
VIDEO IN-I). Then, connect the red
and white Audio Cables from the
AUDIO OUT jscks on the Digital
Video Disc Player to the AUDIO IN
jacks on the rear ofthe TV (labeled
AUDIO L & R/MONO IN-2).
Note: When selecting the PIP
SOURCE, the Digital Video Disc
Player will appear on the AV I
channel, and the VCR will appear
on the AV 2 channel.
O
75 OH M
COAXIAL
CABLE
75 OHM
COAXIAL
REAR OF "IV
©
_'_ V OUTSIDE UHF/VHF
._ ANTENNA OR
CABLE TV SIGNAL
tdlff_ 9tff
DVD (OR SIMILAR)
VIDEO
CABLE
38
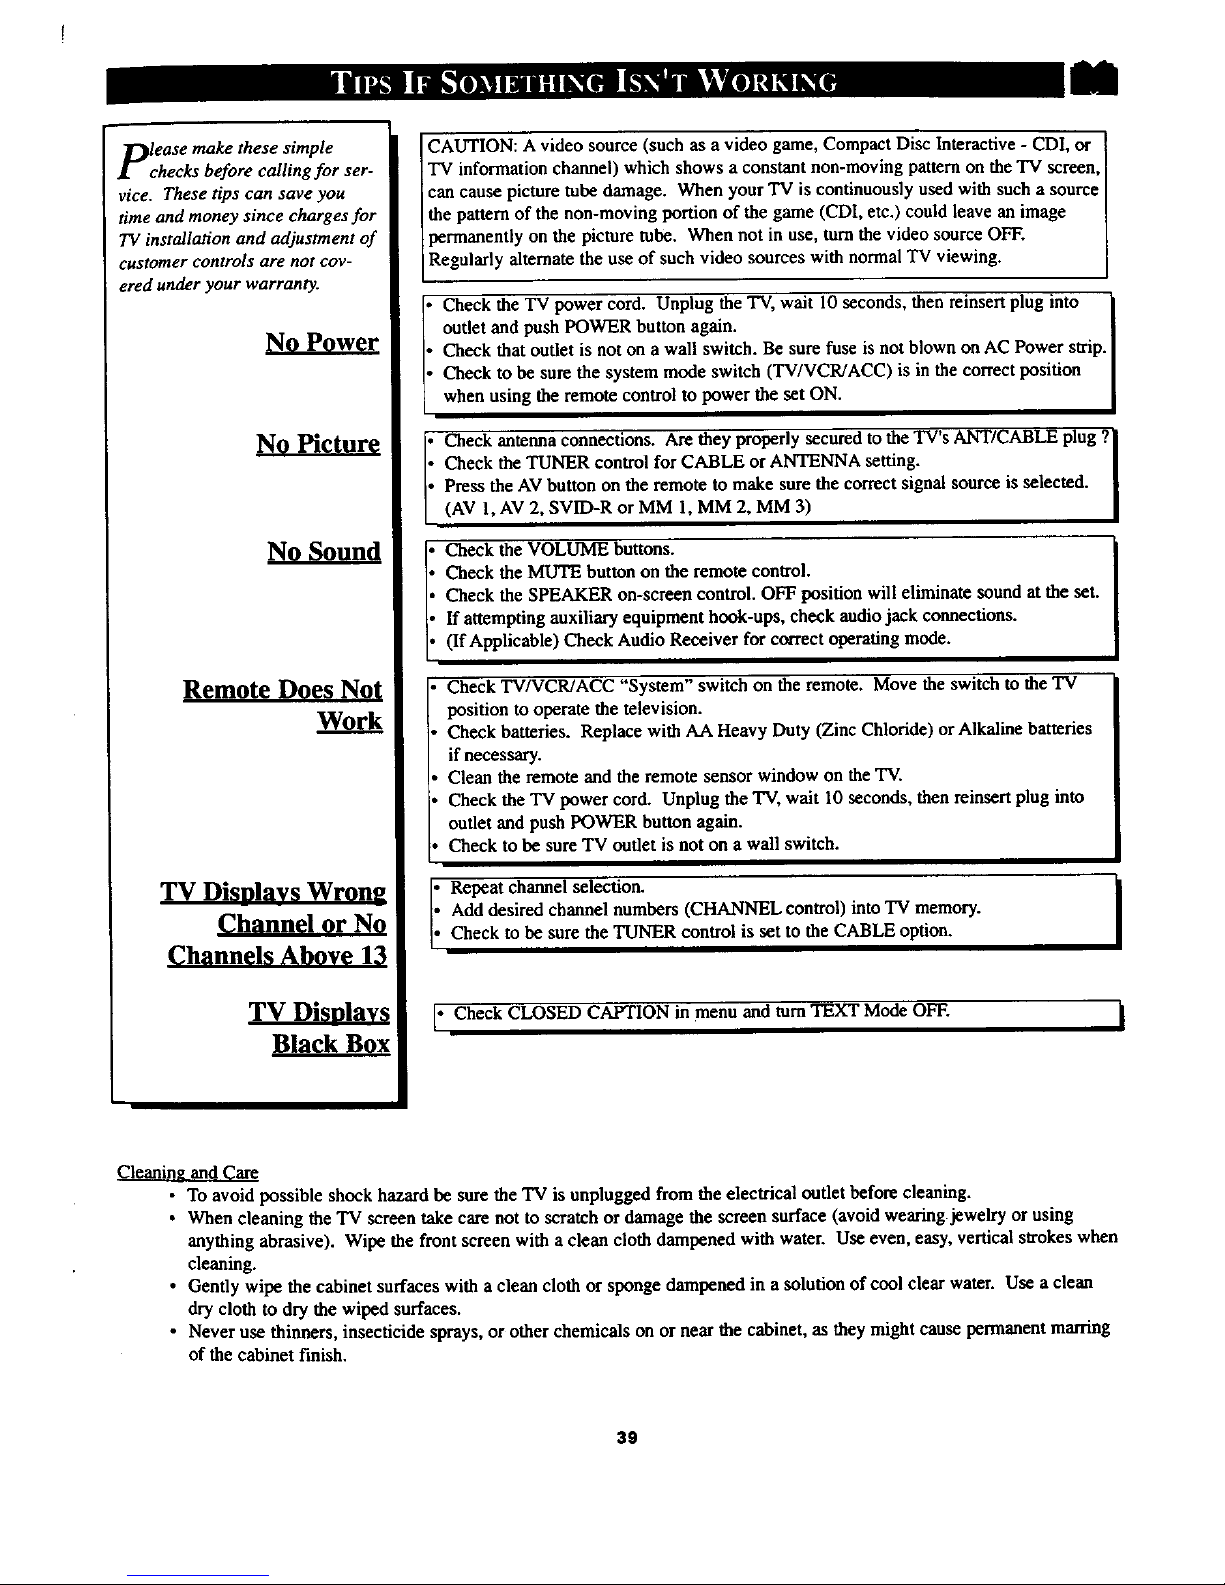
please make these simple
checks before calling for ser-
vice. These tips can save you
time and money since charges for
TV installation and adjustment of
customer controls are not cov-
ered under your warranty.
No Power
No Sound
Remote Does Not
Work
TV Disnlavs Wron
Channel or No
Channels Above 13
TV Disnlavs
Black Box
CAUTION: A video source (such as a video game, Compact Disc Interactive - CDI, or
TV information channel) which shows a constant non-moving pattern on the TV screen,
can cause picture tube damage. When your TV is continuously used with such a source
the pattern of the non-moving portion of the game (CDI, etc.) could leave an image
permanently on the picture tube. When not in use, turn the video source OFF.
Regularly alternate the use of such video sources with normal TV viewing.
i Check the TV power cord. Unplug the TV, wait 10 seconds, then reinsert plug into
outlet and push POWER button again.
Check that outlet is not on a wall switch. Be sure fuse is not blown on AC Power strip.
Check to be sure the system mode switch (TV/VCR/ACC) is in the correct position
when using the remote control to power the set ON.
i Check antenna connections. Are they properly secured to the TV's ANT/CABLE plug ?
Check the TUNER control for CABLE or ANTENNA setting.
Press the AV button on the remote to make sure the correct signal source is selected.
(AV 1, AV 2, SVID-R or MM 1, MM 2, MM 3)
Check the VOLUME buttons.
Check the MUTE button on the remote control.
Check the SPEAKER on-screen control. OFF position will eliminate sound at the set.
If attempting auxiliary equipment hook-ups, check audio jack connections.
(If Applicable) Check Audio Receiver for correct operating mode.
Check TV/VCR/ACC "System" switch on the remote. Move the switch to the TV
position to operate the television.
Check batteries. Replace with AA Heavy Duty (Zinc Chloride) or Alkaline batteries
if necessary.
Clean the remote and the remote sensor window on the TV.
Check the TV power cord. Unplug the TV, wait 10 seconds, then reinsert plug into
outer and push POWER button again.
Check to be sure TV outlet is not on a wall switch.
Repeat channel selection.
Add desired channel numbers (CHANNEL control) into TV memory.
Check to be sure the TUNER control is set to the CABLE option.
[- Check CLOSED CAPTION in menu and turn TEXT Mode OFF.
Cleanin2 and Care
• To avoid possible shock hazard be sure the TV is unplugged from the electrical outlet before cleaning.
• When cleaning the TV screen take care not to scratch or damage the screen surface (avoid wearing jewelry or using
anything abrasive). Wipe the front screen with a clean cloth dampened with water. Use even, easy, vertical strokes when
cleaning.
• Gently wipe the cabinet surfaces with a clean cloth or sponge dampened in a solution of coul clear water. Use a clean
dry cloth to dry the wiped surfaces.
• Never use thinners, insecticide sprays, or other chemicals on or near the cabinet, as they might cause permanent marring
of the cabinet finish.
3g
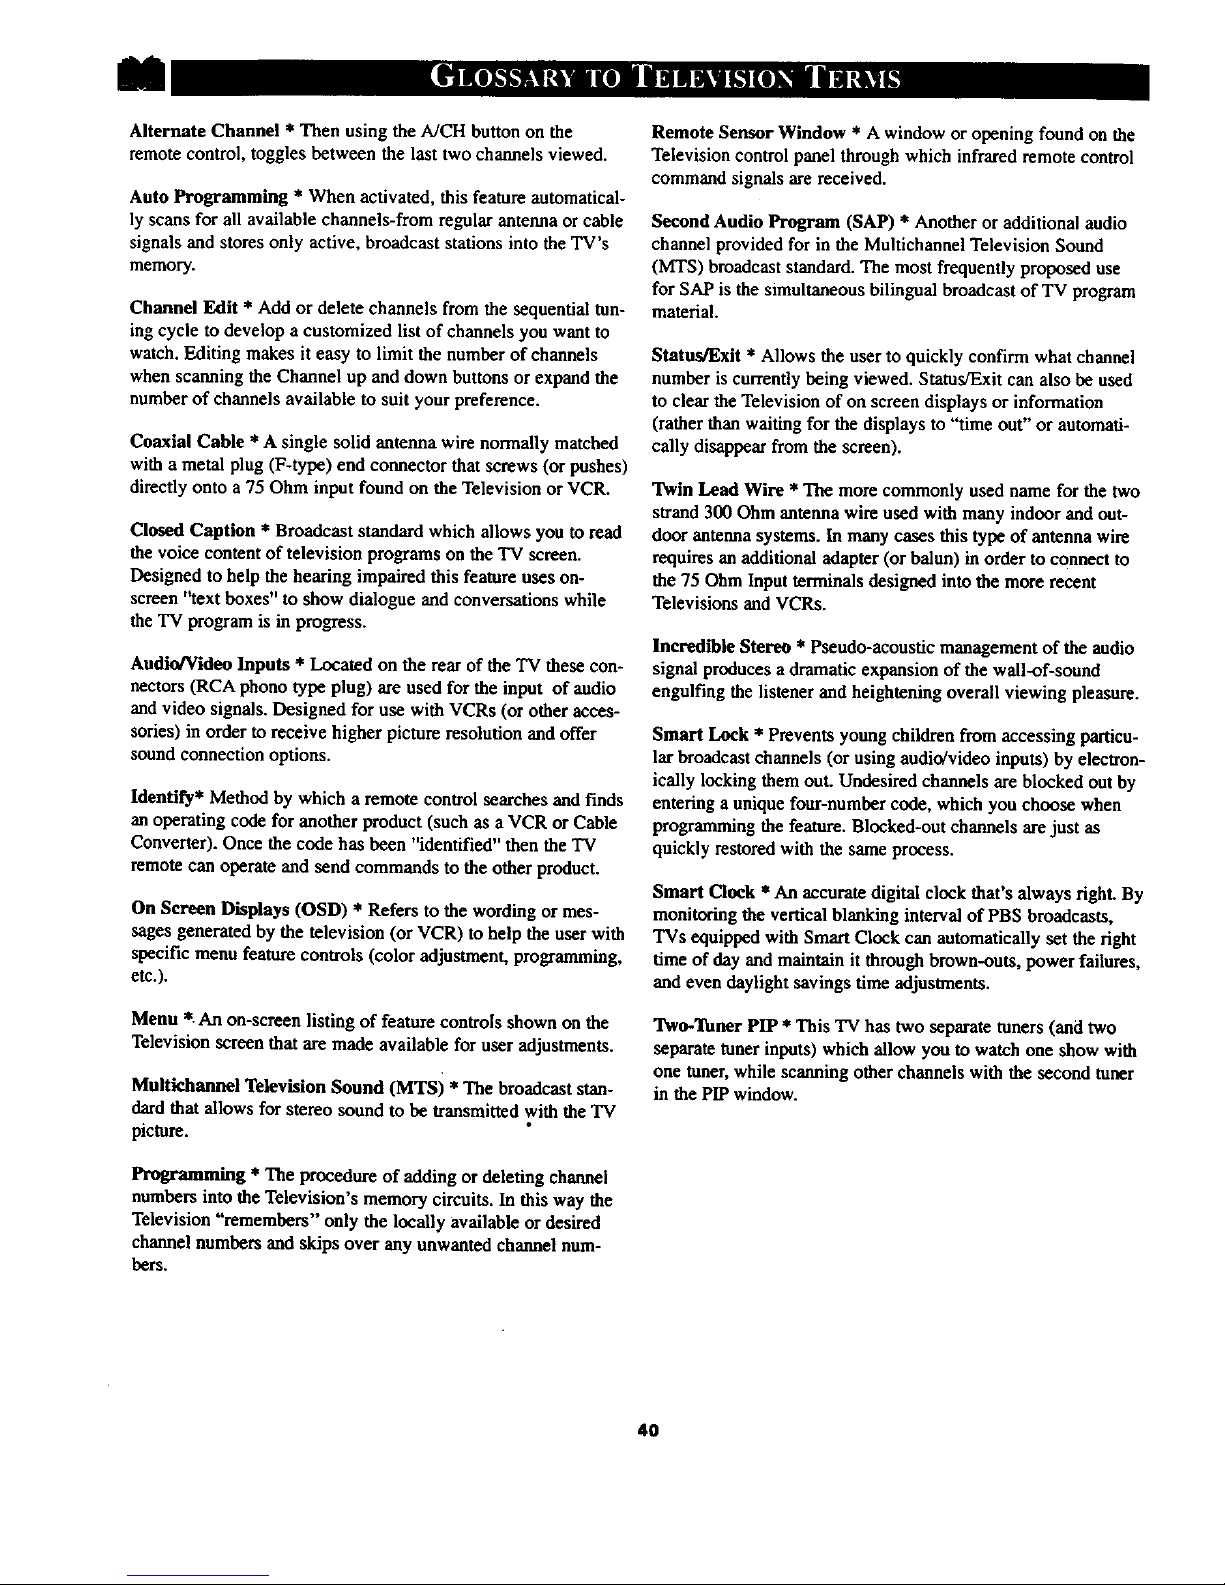
AlternateChannel* Thenusingthe A/CH button on the
remote control, toggles between the last two channels viewed.
Auto Programming * When activated, this feature automatical-
ly scans for all available channeis-from regular antenna or cable
signals and stores only active, broadcast stations into the TV's
memory.
Channel Edit * Add or delete channels from the sequential tun-
ing cycle to develop a customized list of channels you want to
watch. Editing makes it easy to limit the number of channels
when scanning the Channel up and down buttons or expand the
number of channels available to suit your preference.
Coaxial Cable * A single solid antenna wire normally matched
with a metal plug (F4ype) end connector that screws (or pushes)
directly onto a 75 Ohm input found on the Television or VCR.
Closed Caption * Broadcast standard which allows you to read
the voice content of television programs on the 'IV screen.
Designed to help the heating impaired this feature uses on-
screen "text boxes" to show dialogue and conversations while
the "IV program is in progress.
Audio/Video Inputs * Located on the rear of the TV these con-
hectors (RCA phono type plug) are used for the input of audio
and video signals. Designed for use with VCRs (or other acces-
sories) in order to receive higher picture resolution and offer
sound connection options.
Identify* Method by which a remote control searches and f'mds
an operating code for another product (such as a VCR or Cable
Converter). Once the code has been "identified" then the 'IV
remote can operate and send commands to the other product.
On Screen Displays (OSD) * Refers to the wording or mes-
sages generated by the television (or VCR) to help the user with
specific menu feature controls (color adjustment, programming,
etc.).
Menu *.An on-screen listing of feature controls shown on the
Television screen that are made available for user adjustments.
Multichannel Television Sound (MTSi * The broadcast stan-
dardthat allows for stereo sound to be transmitted with the TV
picture.
Programming * The procedure of adding or deleting channel
numbers into the Television's memory circuits. In this way the
Television "remembers" only the locally available or desired
channel numbers and skips over any unwanted channel num-
bers.
Remote Sensor Window * A window or opening found on the
Television control panel through which infrared remote control
command signals are received.
Second Audio Program (SAP) * Another or additional audio
channel provided for in the Multichannel Television Sound
(MTS) broadcast standard. The most frequently proposed use
for SAP is the simultaneous bilingual broadcast of TV program
material.
Status/Exit * Allows the user to quickly confirm what channel
number is currently being viewed. Status/Exit can also be used
to clear the Television of on screen displays or information
(ratherthan waiting for the displays to "time out" or automati-
cally disappear from the screen).
Twin Lead Wire * The more commonly used name for the two
strand 300 Ohm antenna wire used with many indoor and out-
door antenna systems, in many cases this type of antenna wire
requires an additional adapter (or balun) in order to connect to
the 75 Ohm Input terminals designed into the more recent
Televisions and VCRs.
Incredible Stereo * Pseudo-acoustic management of the audio
signal produces a dramatic expansion of the wall-of-sound
engulfing the listener and heightening overall viewing pleasure.
Smart Lock * Prevents young children from accessing particu-
lar broadcast channels (or using audio/video inputs) by electron-
ically locking them out. Undesired channels are blocked out by
entering a unique four-number code, which you choose when
programming the feature. Blocked-out channels are just as
quickly restured with the same process.
Smart Clock * An accurate digital clock that's always right. By
monitoring the vertical blanking interval of PBS broadcasts,
TVs equipped with Smart Clock can automatically set the fight
time of day and maintain it through brown-outs, power failures,
and even daylight savings time adjustments.
Two-Tuner PIP * This TV has two separate tuners (and two
separate tuner inputs) which allow you to watch one show with
one tuner, while scanning other channels with the second tuner
in the PIP window.
4O
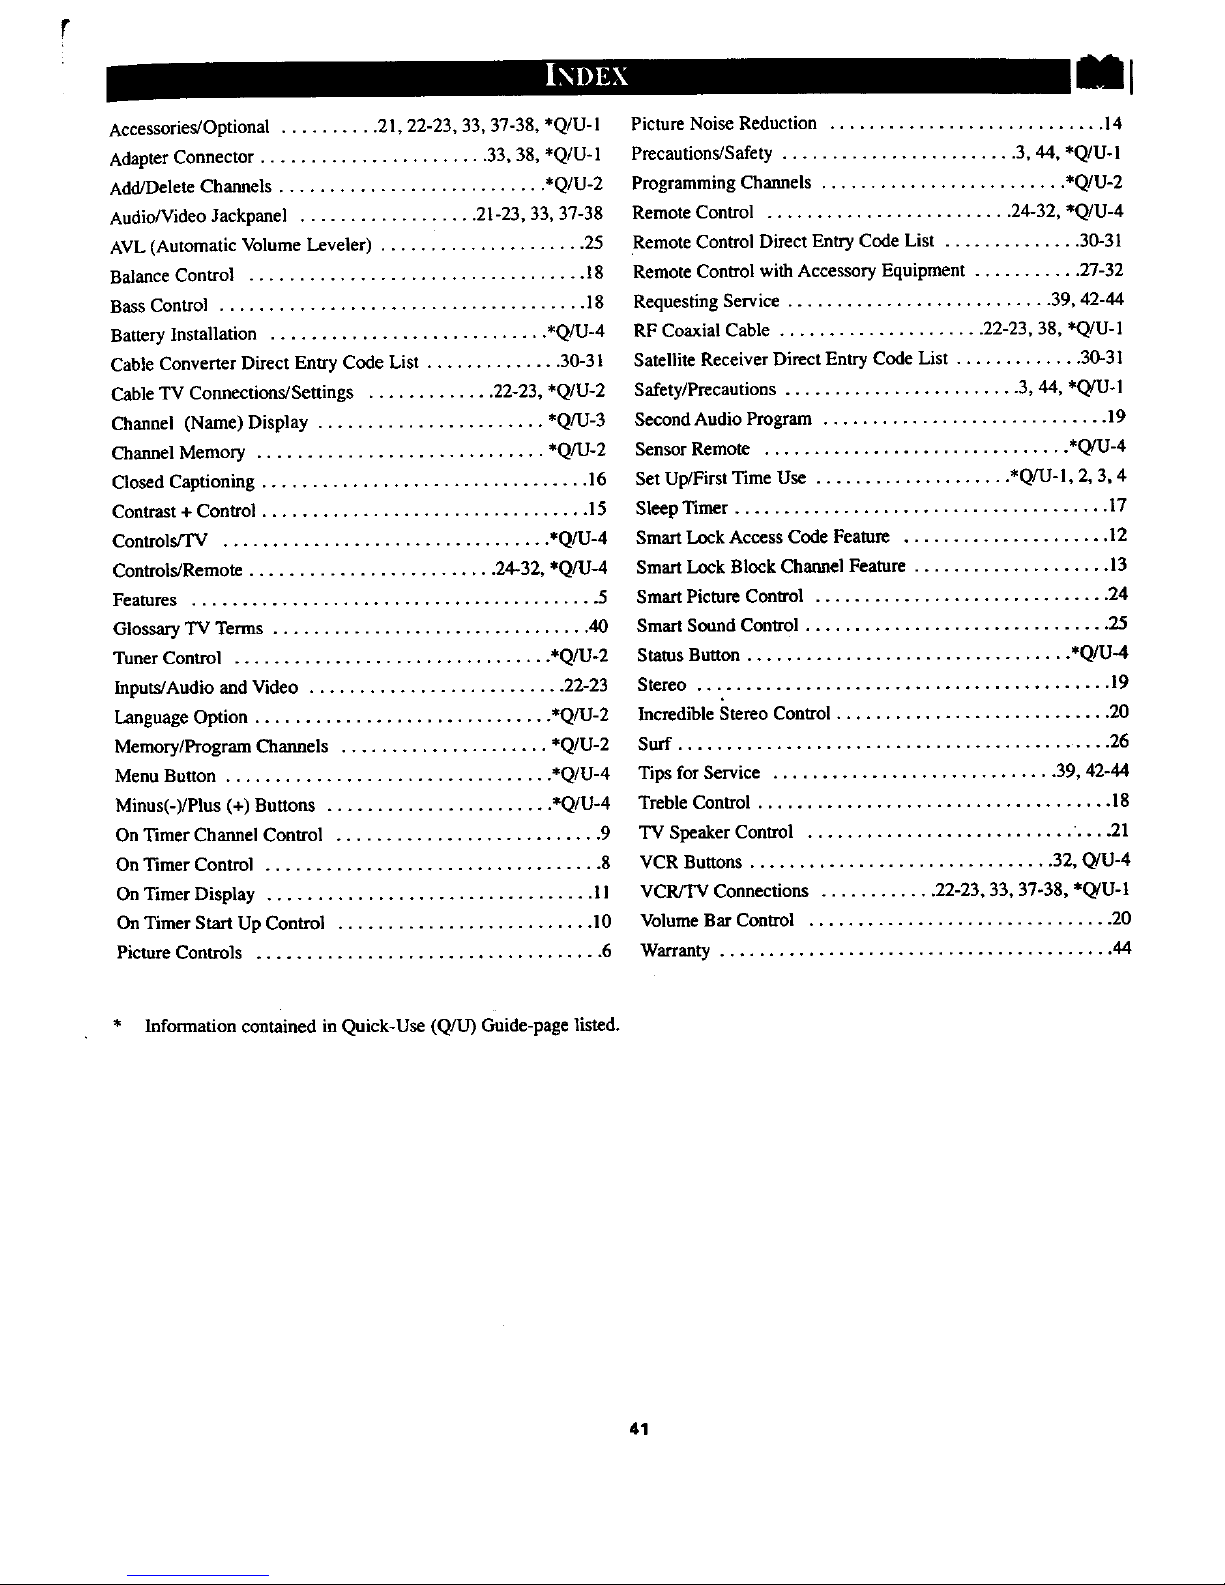
Accessories/Optional.......... 2I,22-23,33,37-38,*Q/U-1
AdapterConnector....................... 33,38,*Q/U-1
Add/DeleteChannels........................... *Q/U-2
Audio/VideoJackpanel.................. 21-23,33,37-38
AVL(AutomaticVolumeLeveler)..................... 25
BalanceControl.................................. 18
BassControl..................................... 18
BatteryInstallation............................ *Q/U-4
CableConverterDirectEntryCodeList.............. 30-31
CableTVConnections/Settings............. 22-23,*Q/U-2
Channel(Name)Display....................... *Q/U-3
ChannelMemory............................. *Q/U-2
ClosedCaptioning................................. 16
Contrast+Control................................. 15
Controlst'l'V................................. *Q/U-4
Controls/Remote......................... 24-32,*Q/U-4
Features......................................... 5
GlossaryTVTerms................................ 40
TunerControl................................ *Q/U-2
Inputs/AudioandVideo.......................... 22-23
LanguageOption.............................. *Q/U-2
Memory/ProgramChannels..................... *Q/U-2
MenuButton................................. *Q/U-4
Minus(-)/Plus(+)Buttons....................... *Q/U-4
OnTimerChannelControl........................... 9
OnTimerControl.................................. 8
OnTimerDisplay................................. 1I
OnTimerStartUpControl.......................... 10
PictureControls................................... 6
PictureNoiseReduction............................ 14
Precautions/Safety........................ 3,44,*Q/U-I
ProgrammingChannels......................... *Q/U-2
RemoteControl......................... 24-32,*Q/U-4
RemoteControlDirectEntryCodeList .............. 30-31
RemoteControlwithAccessoryEquipment........... 27-32
RequestingService........................... 39,42-44
RFCoaxialCable..................... 22-23,38,*Q/U-1
SatelliteReceiverDirectEntryCodeList............. 30-31
Safety/Precautions........................ 3,44,*Q/U-1
SecondAudio Program ............................. 19
Sensor Remote ............................... *Q/U-4
Set Up/First Time Use .................... *Q/U-l, 2, 3, 4
Sleep Timer ...................................... 17
Smart Lock Access Code Feature ..................... 12
Smart Lock Block Channel Feature .................... 13
Smart Picture Control .............................. 24
Smart Sound Control ............................... 25
Status Button ................................. *Q/U-.4
Stereo .......................................... 19
Incredible Stereo Control ............................ 20
Surf ............................................ 26
Tips for Service ............................. 39, 42-44
Treble Control .................................... 18
TV Speaker Control ........................... .... 21
VCR Buttons ............................... 32, Q/U-4
VCR/TV Connections ............ 22-23, 33, 37-38, *Q/U-I
Volume Bar Control ............................... 20
Warranty ........................................ 44
* Information contained in Quick-Use (Q/U) Guide-page listed.
41

Philips Consumer Electronics Company
Factory Service Center Locations
See Reverse Side for More Details.
• Philadelphia/S New Jersey
"k Indicates In-Home Service Only
1-800-242-9_25
• Indica_ In-Honlm/Carry-lnService
ampa/WRorida
Myers/SWFlorida
M.iamWSZRodda
NOTE:If youreside in oneof ourPhilipsFactoryServiceBranchareas(see directoryon back),youcan contactthe nearestServiceBranchto
obtainefficientandexpedier_repairfor your product.If your productis In-Warranty,youshouldhaveproof-of-purchaseto ensureNoCharge
Service.ForOut-of-Warranty service,callthe locationnearestyou.
NOTA:Sivousr_sidezdensonedesr_Jionsdesserviesparunesuccorcaledeserviceapr_sventedutabricantPhilips(voirlisteci-deeaous),
vouspourrezcontacterlabranchedeserviceapr_sventelapiusprosdechezvouspourobtenirunsense aprt_sventerapideetefficace.Si le
produitestsonsgarantie,ilsuffiradepresenterunepreuved'achatpourb6ndficierd'unservicesansfrais. Pourlesproduitsnoncouvertsparla
garantie,contactezlecentreleplusprosdechezvous.
NOTA:SiUd.resideen unadenuestreszonesparasucurealesPhilipsdeservicioaldefiibdca(verdirectoriorobsabajo),Ud.puedecomunicarse
conlasucurealdeserviciom_ cercanaparaobtenerunareparaci0noportunayeflcazdesuproducto.Si suproductoestatodev[abajogaran-
tia,Ud.debepresentarcomprobantedecompraparanoocasionarningunoscargosporservicio.Pareearviciodespu_sdsivencimientodela
garantla,Ilameallugarm_scercenodelosabajoindicados.
incanada
Howyoucanobtainefficientandexpedient'carry-in,mail-in,orin-homeserviceforyourproduct
PleasecontactPhilipsat 1o800-661-6162(Frenchspeaking)
1-800-383-7278(Englishspeaking)
&LGZeada
Commentobtenirleserviceapr_,s-ventepourlesproduitsapport_souenvoy_sparlaposte_notrecentredeserviceouleservice_ domicile
Veuillezcontacterphilips4: 1-800-661-6162(Francophone)
1-800-363-7278
EnelCa=
C6morecibirservicioefficienteparesuproducto,en persona,porcorreooadomicillo
FavordecomunicareaconPhilipsal: 1-800-661-6162(franc6fono)
1-800-363-7278(angl6fono)
MA(_S'Z__/98 EL4482-3 Rev, X
42

QUALJT_SERVICEIS AS CLOSEAS YOUR TELEPHONE!SIMPLY LOOKOVER THELIST BELOW FOR 'n4E NUMBEROF A FACTORYSERVICE CENTER
NEARYOU. YOURPRODUCT WnL RECEIVEEFFICIENTAND EXPEDIENTCARRY-IN, MAIL-IN, OR IN-HOME SERVICE, AND YOU WILL RECEIVEPEACEOF MIND,
KNOWINGYOUR PRODUCT IS BEINGGIVENTHE EXPERTAI"r_ON OF PHU Ips' FACTORYSERVICE. AND, IF THE PRONE NUMBER LISTEDFOR YOUR AREA
IS LONG DISTANCE, CALL1..800-242-9225FOeFACTORYSewIcE.
COMMENTOBTENIRNOTRESERVICEAPRfESDEN'fiERAPIDEETEFFIGACESUITPARCOURR_R,_ DOMICILE,OUENSEPI_SENTANTA UNCENTREDESERV1CEPHILIPS.PLUSDE610CENTRES
DERI_CEPTIONDEPRODUITSAREPADERATRADERSliEPAYS:CONTACTERliECENTREDESERVICEAUXCONSOMMATEURSIF PLUSPROCSEPOURSAVOIRL'EMPLACEMENTDECE$DI_p_I_
DANSUMRAYONDE50JL75 MILES(H 1(50A 120KM)OgCENTREDESERVICELOCAL.
C_MO OB1EDERUHSERVlCIOOPONTUHOY EFICiENTEPORCORDEU,Ell CASA0 ENRERSONAPARASU PRODUCTOA TRRVI_SOEgM CENTROPHILIPSDESERVICIO.MAS DE600 SrllOS POR
TOSOEL.pAlSPARALARECEPOIONDEPROOUCTRSDESESITADOSDEAEPARACIODES:COMUNICARSECONEL.CENTReDESERVICIOOE FABRiCAMAS CERCAHOPARAESTOSLUGARESOENTRO
OEUN RADIOOE80 A 120 KM(50 A 75 MILL.AS)DELCENTRODESERViCIOLOCAL.
GEORGIA
PhilipsFactoryServiceof Georgia
200 N. CobbPkwy.,Suite120
Marietta,GA30062
770) 795-0085
FT.MYERS,FLORIDA
Philips FactoryServiceSatellite- R. Myers
11601 ClevelandAve.,Suite15
Ft.Myers,FL33907
(941) 278-4242
FLORIDA
PhilipsFactoryServiceofFlorida
1911 USHighway301 North
Tampa,FL33619
(813) 621-8181
WESTERNU.S.A.
PhilipsFactoryServiceWesternRegion
681 EastBrokawRd.
SanJose,CA95112
(408) 436-8566
NORTHCAROLINA
PhilipsFactoryServiceof N. Carolina
520 G ClantonRd.
Charlotte,NC28217
(704) 529-6330
TEXAS
Philips FactoryService of Texas
1110 N. PostOakRd.,Suite100
Houston,IX 77055
(713) 682-3990
CENTRALU.S.A.
PhilipsFactoryServiceCentralUS
950 KeynoteCircle
BrooklynHeights,OH44131
(216) 741-3334
MICHIGAN
PhUipsFactoryServiceof Michigan
25173 Dequindre
MadisonHeights,MI 48071
(248) 544-2110
ILLINOIS
PhilipsFactoryServiceof Illinois
1360 W. HamiltonPkwy.
Itasca,IL 60143
(630) 775-0990
TENNESSEE
PhilipsFactoryServiceof EastTennessee
6700 D PapermUlRd.
Knoxville,TN 37919
(423) 584-6614
MID-ATLANTIC
PhilipsFactoryServiceMid-Atlantic
352 DunksFerryRd.
Bensalem,PA 19020
(215) 638-7500
MAC_ 1/98
43

COLOR TELEVISION
90 Days Free labor
One Year Free Replacement of Parts (Two Years Free Replacement on Color Picture Tube}
This product can be repaired in-home.
WHO IS COVERED?
You must have proof of purchaseto receive warranty service. A sales
receipt or other document show:_gthat you purchasedthe product is
consideredproof of purchase.
WHAT IS COVERED?
Warranty coveragebeginsthe dayyou buy your product. For90 days
thereafter,allparts will be repaired or replaced free, and labor is fre_
From 90 days to one year from the day of purchase,all parts will be
repaired or replaced free, but you pay for all labor charges. Fromone
to two years from the day of purchase,you pay for the replacement or
repair of all parts except the picture tube, and for all labor charges.
After two years from dm day of purchase,you pay for the replacement
or repair ofall parts, and for all laborcharges.
All parts, includingrepaired and replaced par=, are covered only for
the originalwarranty period. When the warranty on d_ product
expires, the warranty on all replacedand repaired parts alsoexpires.
WHAT IS EXCLUDED?
Your warranty does not cover:.
labor chargesfor installationor setupof_he product, adjustmentof
customer controls on the product,and installationor repair of
antennasystemsoutside of the product_
product repair and/or part replacement becauseof misuse,acci-
dent, unauthorized repair or other causenot within the control of
PhilipsConsumer Electronics Company.
reception problems caused by signal conditionsor cableor antenna
systems outside the unit.
• a product that requires modificationor adaptationto enable it to
operate inany country other than the country for which it was
designed,manufactured, approved and/or authorized, or repair of
products damagedbydlese modifications.
incidental or consequential damages resulting from the product.
(Somestatesdo not allow the exclusion of incidentalor consequen-
tial damages,sothe above exclusionmaynot applyto you. This
includes, but isnot limited to, prerecorded material, whether copy-
rightedor not copyrighted.)
• a product used for commercialor institutionalpurposes.
WHERE IS SERVICE AVAILABLE?.
Warranty serviceisavailablein all countrieswhere the product is offi-
ciallydistributed byPhilips Consumer ElectronicsCompany, In coun-
tries where Philips Consumer ElectronicsCompany does not distribute
the product, the local Philipsserviceorganizationwill attempt to pro-
vide service (althoughthere may be a delay if the appropriate spare
partsand technicalmanual(s)are not readily available).
MAKE SURE YOU KEEP...
Pleasekeep your sales receipt or other documentshowingproof of
purchas_ Attach it to this owner's manualandkeep both nearby.
Also keep the originalbox and packingmaterial in caseyou needto
return your product.
BEFORE REQUESTING SERVICE...
Pleasecheckyour owner's manualbefore requestingservice.
Adjustmentsof the conu'otsdiscussedthere may save you a service
call.
TO GET WARRANTY SERVICE IN U.S.A.,
PUERTO RICO OR U.S. VIRGIN ISLANDS...
Contact a Philipsfactoryservice center (seeenclosed list) or autho-
rized service cenm- to arrange repair.
(In U.S_., Puerto Ricoand U.S,Virgin Islands,allimpliedwarranties.
includingimpliedwarranties of merchantabilityand fitnessfor apartic-
ular purpos_ are.limited in durationto dm duration of tl-_sexpress
warranty. But,b_ause some statesdo not allow limitationson how
longan impliedwarranty mayPast,this limitationmay not applyto
you.)
TO GET WARRANTY SERVICE IN CANADA...
Please contact Philips at:
1-800-661-6162 (FrenchSpeaking)
1-800-363-7278 (EnglishSpeaking)
(In Canada,this warranty isgiven in lieu of all other warranties. No
other warranties are expressedor implied,includingany impliedwar-
ranties of merchantability or fitnessfor a particularpurpose. Philipsis
not liableunder anycircumstancesfor any direct, indirect,special,inci-
dentalor consequentialdamages,howsoever incurred,even if notified
of the possibilityof suchdamages)
REMEMBER...
Pleaserecordthe modelandserialnumbersfoundonthe product
below.Also,pleasefill out andmailyourwarranty re_stration card
promptly.Itwillbeeasierfor usto notifyyouif necessary.
MODEL #
SERIAL#
Philips Service Company, P.O. Box $55, Jefferson City, Tennessee 37760, (423) 475-8869
inU.S.A.
3135 015 04510 44
 Loading...