

Page 1

M2636B TeleMon B Companion Monitor
Service Manual
Part Number M2636-90034
Printed in the U.S.A. December 2003
Third Edition
Page 2

Notice
This document contains proprietary information which is protected by copyright.
All Rights Reserved. Reproduction, adaptation, or translation without prior
written permission is prohibited, except as allowed under the copyright laws.
Copyright Philips Medical Systems, 1999-2003
All rights reserved.
Printed in U.S.A. December 2003
Part No. M2636-90034
Third Edition
Warranty The information contained in this document is subject to change without notice.
We make no warranty of any kind with regard to this material, including, but not
limited to, the implied warranties or merchantability and fitness for a particular
purpose.
We shall not be liable for errors contained herein or for incidental or
consequential damages in connection with the furnishing, performance, or use of
this material.
Copyright © 2001-2003
Page 3

Printing History
New editions of this document incorporate all material updated since the
previous edition. Update packages may be issued between editions and contain
replacement and additional pages to be merged by a revision date at the bottom
of the page. Pages that are rearranged due to changes on a previous page are not
considered revised.
The documentation printing date and part number indicate its current edition.
The printing date changes when a new edition is printed. (Minor corrections and
updates which are incorporated at reprint do not cause the date to change.) The
document part number changes when extensive technical changes are
incorporated.
All Editions and Updates of this manual and their publication dates are listed
below.
M2636-90034, First Edition....................................................... December 2001
Printing History
M2636-90034, Second Edition....................................................... January 2003
M2636-90034, Third Edition....................................................... December 2003
About this Book
This User’s Guide covers the use of TeleMon B, model M2636B, a companion
monitoring device for use with the Telemetry System Series C.
The User’s Guide contains information on performing day-to-day tasks and
troubleshooting common problems as well as detailed information about all
clinical applications. It includes lists of information messages and configuration
choices. Your purchased system may not include all the functionality
described in this document.
User information for the TeleMon Monitor is also contained in the TeleMon
Monitor On-line Info. Info focuses on how to complete basic tasks and
troubleshoot problems.
Page 4

About this Book
For operating information about the transmitter, ECG and SpO2
measurements, and the Telemetry System in general, please refer to the
Telemetry System Series C User’s Guide. See also the Information Center
User’s Guide for operating information on the Information Center.
Document
Conventions
Warnings
Warning
Warnings are information you should know to avoid injuring patients and
personnel.
Cautions
Caution
Cautions are information you should know to avoid damaging your equipment
and software.
Notes
Note—Notes contain additional information on the Telemetry System usage.
Procedures
Procedures are indicated in the text by the heading “Task Summary” followed
by the following table:
Step Action
1
2
3
Page 5

Contents
1. Introduction. . . . . . . . . . . . . . . . . . . . . . . . . . . . . . . . . . . . . . . . . . . . . . . . . . . . . 1-1
Overview and Functional Description . . . . . . . . . . . . . . . . . . . . . . . . . . . . . . . . . . . . . . . . . . . . . . 1-1
System Compatibility . . . . . . . . . . . . . . . . . . . . . . . . . . . . . . . . . . . . . . . . . . . . . . . . . . . . . . .1-1
Information Messages and Alarms . . . . . . . . . . . . . . . . . . . . . . . . . . . . . . . . . . . . . . . . . . . . . 1-1
Ambulatory Use . . . . . . . . . . . . . . . . . . . . . . . . . . . . . . . . . . . . . . . . . . . . . . . . . . . . . . . . . . . 1-1
A Quick Description of the Monitor . . . . . . . . . . . . . . . . . . . . . . . . . . . . . . . . . . . . . . . . . . . . . . .1-2
Front of TeleMon . . . . . . . . . . . . . . . . . . . . . . . . . . . . . . . . . . . . . . . . . . . . . . . . . . . . . . . . . . 1-2
Back of TeleMon . . . . . . . . . . . . . . . . . . . . . . . . . . . . . . . . . . . . . . . . . . . . . . . . . . . . . . . . . . 1-2
Front Panel . . . . . . . . . . . . . . . . . . . . . . . . . . . . . . . . . . . . . . . . . . . . . . . . . . . . . . . . . . . . . . . 1-2
Direct Action Keys . . . . . . . . . . . . . . . . . . . . . . . . . . . . . . . . . . . . . . . . . . . . . . . . . . . . 1-3
Input Keys . . . . . . . . . . . . . . . . . . . . . . . . . . . . . . . . . . . . . . . . . . . . . . . . . . . . . . . . . . . 1-3
Help . . . . . . . . . . . . . . . . . . . . . . . . . . . . . . . . . . . . . . . . . . . . . . . . . . . . . . . . . . . . . . . . 1-3
Indicators
Main Screen. . . . . . . . . . . . . . . . . . . . . . . . . . . . . . . . . . . . . . . . . . . . . . . . . . . . . . . . . . 1-4
Major Assemblies . . . . . . . . . . . . . . . . . . . . . . . . . . . . . . . . . . . . . . . . . . . . . . . . . . . . . . . . . . 1-5
Software . . . . . . . . . . . . . . . . . . . . . . . . . . . . . . . . . . . . . . . . . . . . . . . . . . . . . . . . . . . . . . . . . 1-5
2. Hardware and Software Description . . . . . . . . . . . . . . . . . . . . . . . . . . . . . . . . 2-1
Hardware . . . . . . . . . . . . . . . . . . . . . . . . . . . . . . . . . . . . . . . . . . . . . . . . . . . . . . . . . . . . . . . . . . . . 2-1
Front Panel Assembly. . . . . . . . . . . . . . . . . . . . . . . . . . . . . . . . . . . . . . . . . . . . . . . . . . . . . . .2-1
Monitor Assembly . . . . . . . . . . . . . . . . . . . . . . . . . . . . . . . . . . . . . . . . . . . . . . . . . . . . . . . . . 2-1
Chassis Assembly . . . . . . . . . . . . . . . . . . . . . . . . . . . . . . . . . . . . . . . . . . . . . . . . . . . . . . . . . . 2-1
Main Board Assembly . . . . . . . . . . . . . . . . . . . . . . . . . . . . . . . . . . . . . . . . . . . . . . . . . . . . . . 2-1
The NBP Board. . . . . . . . . . . . . . . . . . . . . . . . . . . . . . . . . . . . . . . . . . . . . . . . . . . . . . . . . . . . 2-2
The Inverter Board . . . . . . . . . . . . . . . . . . . . . . . . . . . . . . . . . . . . . . . . . . . . . . . . . . . . . . . . . 2-2
The Display. . . . . . . . . . . . . . . . . . . . . . . . . . . . . . . . . . . . . . . . . . . . . . . . . . . . . . . . . . . . . . . 2-2
The Rear Housing Assembly . . . . . . . . . . . . . . . . . . . . . . . . . . . . . . . . . . . . . . . . . . . . . . . . . 2-3
Software . . . . . . . . . . . . . . . . . . . . . . . . . . . . . . . . . . . . . . . . . . . . . . . . . . . . . . . . . . . . . . . . . . . . . 2-4
3. Site Planning—Specific Requirements . . . . . . . . . . . . . . . . . . . . . . . . . . . . . . . 3-1
Environmental Considerations. . . . . . . . . . . . . . . . . . . . . . . . . . . . . . . . . . . . . . . . . . . . . . . . . . . . 3-2
Temperature . . . . . . . . . . . . . . . . . . . . . . . . . . . . . . . . . . . . . . . . . . . . . . . . . . . . . . . . . . . . . . 3-2
Operating Altitude . . . . . . . . . . . . . . . . . . . . . . . . . . . . . . . . . . . . . . . . . . . . . . . . . . . . . . . . . 3-2
Radio Frequency Interference. . . . . . . . . . . . . . . . . . . . . . . . . . . . . . . . . . . . . . . . . . . . . . . . . 3-2
Power Requirements . . . . . . . . . . . . . . . . . . . . . . . . . . . . . . . . . . . . . . . . . . . . . . . . . . . . . . . . . . . 3-3
Antenna System Site Information . . . . . . . . . . . . . . . . . . . . . . . . . . . . . . . . . . . . . . . . . . . . . . . . .3-3
Contents-1
Page 6

Antenna Coverage Area . . . . . . . . . . . . . . . . . . . . . . . . . . . . . . . . . . . . . . . . . . . . . . . . . . . . . 3-3
4. Installation. . . . . . . . . . . . . . . . . . . . . . . . . . . . . . . . . . . . . . . . . . . . . . . . . . . . . . 4-1
Placement on a Flat Surface . . . . . . . . . . . . . . . . . . . . . . . . . . . . . . . . . . . . . . . . . . . . . . . . . . . . . 4-2
Mounting on a Pole . . . . . . . . . . . . . . . . . . . . . . . . . . . . . . . . . . . . . . . . . . . . . . . . . . . . . . . . . . . . 4-3
Use of Pole Clamp with Monitor . . . . . . . . . . . . . . . . . . . . . . . . . . . . . . . . . . . . . . . . . . . . . . 4-3
Use of Pole Clamp with External Power Supply . . . . . . . . . . . . . . . . . . . . . . . . . . . . . . . . . . 4-4
Mounting on the Wall (General) . . . . . . . . . . . . . . . . . . . . . . . . . . . . . . . . . . . . . . . . . . . . . . . . . . 4-5
5. Parts List . . . . . . . . . . . . . . . . . . . . . . . . . . . . . . . . . . . . . . . . . . . . . . . . . . . . . . . 5-1
6. Troubleshooting, Service and Repair . . . . . . . . . . . . . . . . . . . . . . . . . . . . . . . . 6-1
Troubleshooting . . . . . . . . . . . . . . . . . . . . . . . . . . . . . . . . . . . . . . . . . . . . . . . . . . . . . . . . . . . . . . 6-2
Purpose. . . . . . . . . . . . . . . . . . . . . . . . . . . . . . . . . . . . . . . . . . . . . . . . . . . . . . . . . . . . . . . . . . 6-2
Alarms and Information Messages . . . . . . . . . . . . . . . . . . . . . . . . . . . . . . . . . . . . . . . . . . . . 6-2
Patient Alarms. . . . . . . . . . . . . . . . . . . . . . . . . . . . . . . . . . . . . . . . . . . . . . . . . . . . . . . . . 6-2
Suspending Patient Alarms. . . . . . . . . . . . . . . . . . . . . . . . . . . . . . . . . . . . . . . . . . . . . . . 6-3
Task Summary . . . . . . . . . . . . . . . . . . . . . . . . . . . . . . . . . . . . . . . . . . . . . . . . . . . . . . . . 6-3
Information Messages. . . . . . . . . . . . . . . . . . . . . . . . . . . . . . . . . . . . . . . . . . . . . . . . . . . 6-3
Self-Test Error and Event Log Messages . . . . . . . . . . . . . . . . . . . . . . . . . . . . . . . . . . . . . . . 6-8
NBP Event Log Error Codes . . . . . . . . . . . . . . . . . . . . . . . . . . . . . . . . . . . . . . . . . . . . . 6-9
Power On Self-Test . . . . . . . . . . . . . . . . . . . . . . . . . . . . . . . . . . . . . . . . . . . . . . . . . . . . . . . 6-11
Service Mode. . . . . . . . . . . . . . . . . . . . . . . . . . . . . . . . . . . . . . . . . . . . . . . . . . . . . . . . . . . . . . . . 6-12
Activating Service Mode . . . . . . . . . . . . . . . . . . . . . . . . . . . . . . . . . . . . . . . . . . . . . . . . . . . 6-12
Restoring Standard Settings . . . . . . . . . . . . . . . . . . . . . . . . . . . . . . . . . . . . . . . . . . . . . 6-12
Entering Demo Mode . . . . . . . . . . . . . . . . . . . . . . . . . . . . . . . . . . . . . . . . . . . . . . . . . . 6-13
Change Date & Time, Display Contrast . . . . . . . . . . . . . . . . . . . . . . . . . . . . . . . . . . . . 6-13
Viewing Transmitter Information. . . . . . . . . . . . . . . . . . . . . . . . . . . . . . . . . . . . . . . . . 6-13
Performing Service Functions . . . . . . . . . . . . . . . . . . . . . . . . . . . . . . . . . . . . . . . . . . . . . . . 6-14
Viewing the Event Log . . . . . . . . . . . . . . . . . . . . . . . . . . . . . . . . . . . . . . . . . . . . . . . . . 6-15
Downloading the Event Log . . . . . . . . . . . . . . . . . . . . . . . . . . . . . . . . . . . . . . . . . . . . . 6-15
Configuring the Transmitter. . . . . . . . . . . . . . . . . . . . . . . . . . . . . . . . . . . . . . . . . . . . . . . . . 6-16
NBP Diagnostics, Calibration. . . . . . . . . . . . . . . . . . . . . . . . . . . . . . . . . . . . . . . . . . . . 6-17
Conducting NBP Calibration . . . . . . . . . . . . . . . . . . . . . . . . . . . . . . . . . . . . . . . . . . . . 6-18
Upgrading the Software . . . . . . . . . . . . . . . . . . . . . . . . . . . . . . . . . . . . . . . . . . . . . . . . . . . . 6-19
Getting Started . . . . . . . . . . . . . . . . . . . . . . . . . . . . . . . . . . . . . . . . . . . . . . . . . . . . . . . 6-19
Setting Up the Host Computer . . . . . . . . . . . . . . . . . . . . . . . . . . . . . . . . . . . . . . . . . . . 6-20
Installing the TeleMon Support Tool . . . . . . . . . . . . . . . . . . . . . . . . . . . . . . . . . . . . . . 6-22
Upgrading TeleMon’s Operating System . . . . . . . . . . . . . . . . . . . . . . . . . . . . . . . . . . . 6-22
Installing TeleMon’s Application Software . . . . . . . . . . . . . . . . . . . . . . . . . . . . . . . . . 6-23
Contents-2
Page 7

Cloning Settings . . . . . . . . . . . . . . . . . . . . . . . . . . . . . . . . . . . . . . . . . . . . . . . . . . . . . . . . . . 6-25
Changing TeleMon’s Language Display . . . . . . . . . . . . . . . . . . . . . . . . . . . . . . . . . . . . . . . 6-26
Using the Battery Reconditioner . . . . . . . . . . . . . . . . . . . . . . . . . . . . . . . . . . . . . . . . . . . . . . . . .6-26
Recondition a Battery . . . . . . . . . . . . . . . . . . . . . . . . . . . . . . . . . . . . . . . . . . . . . . . . . . . . . .6-27
Charging a Battery . . . . . . . . . . . . . . . . . . . . . . . . . . . . . . . . . . . . . . . . . . . . . . . . . . . . . . . . 6-28
Repair . . . . . . . . . . . . . . . . . . . . . . . . . . . . . . . . . . . . . . . . . . . . . . . . . . . . . . . . . . . . . . . . . . . . . . 6-28
Tools . . . . . . . . . . . . . . . . . . . . . . . . . . . . . . . . . . . . . . . . . . . . . . . . . . . . . . . . . . . . . . . . . . . 6-28
Overview. . . . . . . . . . . . . . . . . . . . . . . . . . . . . . . . . . . . . . . . . . . . . . . . . . . . . . . . . . . . . . . . 6-29
Before You Begin . . . . . . . . . . . . . . . . . . . . . . . . . . . . . . . . . . . . . . . . . . . . . . . . . . . . . . . . .6-31
The Battery . . . . . . . . . . . . . . . . . . . . . . . . . . . . . . . . . . . . . . . . . . . . . . . . . . . . . . . . . . . . . . 6-32
Removal of Battery . . . . . . . . . . . . . . . . . . . . . . . . . . . . . . . . . . . . . . . . . . . . . . . . . . . 6-32
Replacement of Battery . . . . . . . . . . . . . . . . . . . . . . . . . . . . . . . . . . . . . . . . . . . . . . . . 6-32
The Front Panel Assembly . . . . . . . . . . . . . . . . . . . . . . . . . . . . . . . . . . . . . . . . . . . . . . . . . . 6-33
Removal of Front Panel. . . . . . . . . . . . . . . . . . . . . . . . . . . . . . . . . . . . . . . . . . . . . . . . 6-33
Installation of Front Panel . . . . . . . . . . . . . . . . . . . . . . . . . . . . . . . . . . . . . . . . . . . . . . 6-34
The Chassis Assembly . . . . . . . . . . . . . . . . . . . . . . . . . . . . . . . . . . . . . . . . . . . . . . . . . . . . . 6-35
Removal of Chassis Assembly . . . . . . . . . . . . . . . . . . . . . . . . . . . . . . . . . . . . . . . . . . 6-35
Installation of Chassis Assembly. . . . . . . . . . . . . . . . . . . . . . . . . . . . . . . . . . . . . . . . . 6-36
The NBP Board. . . . . . . . . . . . . . . . . . . . . . . . . . . . . . . . . . . . . . . . . . . . . . . . . . . . . . . . . . . 6-38
Removal of NBP Board. . . . . . . . . . . . . . . . . . . . . . . . . . . . . . . . . . . . . . . . . . . . . . . . 6-38
Installation of NBP Board . . . . . . . . . . . . . . . . . . . . . . . . . . . . . . . . . . . . . . . . . . . . . . 6-38
The Inverter Board . . . . . . . . . . . . . . . . . . . . . . . . . . . . . . . . . . . . . . . . . . . . . . . . . . . . . . . . 6-39
Removal of Inverter Board . . . . . . . . . . . . . . . . . . . . . . . . . . . . . . . . . . . . . . . . . . . . . 6-39
Installation of Inverter Board. . . . . . . . . . . . . . . . . . . . . . . . . . . . . . . . . . . . . . . . . . . . 6-40
The Display. . . . . . . . . . . . . . . . . . . . . . . . . . . . . . . . . . . . . . . . . . . . . . . . . . . . . . . . . . . . . . 6-41
Removal of Display . . . . . . . . . . . . . . . . . . . . . . . . . . . . . . . . . . . . . . . . . . . . . . . . . . . 6-41
Installation of Display . . . . . . . . . . . . . . . . . . . . . . . . . . . . . . . . . . . . . . . . . . . . . . . . . 6-41
The Main PC Board . . . . . . . . . . . . . . . . . . . . . . . . . . . . . . . . . . . . . . . . . . . . . . . . . . . . . . . 6-42
Removal of Main Board . . . . . . . . . . . . . . . . . . . . . . . . . . . . . . . . . . . . . . . . . . . . . . . 6-42
Installation of Main Board. . . . . . . . . . . . . . . . . . . . . . . . . . . . . . . . . . . . . . . . . . . . . . 6-43
Replacing the Main Board Fuse or Battery . . . . . . . . . . . . . . . . . . . . . . . . . . . . . . . . . 6-43
The Speaker . . . . . . . . . . . . . . . . . . . . . . . . . . . . . . . . . . . . . . . . . . . . . . . . . . . . . . . . . . . . . 6-44
Removal of Speaker. . . . . . . . . . . . . . . . . . . . . . . . . . . . . . . . . . . . . . . . . . . . . . . . . . . 6-44
Installation of Speaker . . . . . . . . . . . . . . . . . . . . . . . . . . . . . . . . . . . . . . . . . . . . . . . . . 6-44
The Battery Compartment . . . . . . . . . . . . . . . . . . . . . . . . . . . . . . . . . . . . . . . . . . . . . . . . . . 6-45
Removal of Battery Compartment. . . . . . . . . . . . . . . . . . . . . . . . . . . . . . . . . . . . . . . . 6-45
Installation of Battery Compartment . . . . . . . . . . . . . . . . . . . . . . . . . . . . . . . . . . . . . . 6-46
The Battery Door . . . . . . . . . . . . . . . . . . . . . . . . . . . . . . . . . . . . . . . . . . . . . . . . . . . . . . . . . 6-46
Removal of Battery Door. . . . . . . . . . . . . . . . . . . . . . . . . . . . . . . . . . . . . . . . . . . . . . . 6-46
Installation of Battery Door. . . . . . . . . . . . . . . . . . . . . . . . . . . . . . . . . . . . . . . . . . . . . 6-46
Contents-3
Page 8

The Transmitter Dock . . . . . . . . . . . . . . . . . . . . . . . . . . . . . . . . . . . . . . . . . . . . . . . . . . . . . 6-47
Removal of Transmitter Dock . . . . . . . . . . . . . . . . . . . . . . . . . . . . . . . . . . . . . . . . . . . 6-47
Installation of Transmitter Dock. . . . . . . . . . . . . . . . . . . . . . . . . . . . . . . . . . . . . . . . . . 6-47
The Fan Assembly . . . . . . . . . . . . . . . . . . . . . . . . . . . . . . . . . . . . . . . . . . . . . . . . . . . . . . . . 6-48
Removal of Fan Assembly . . . . . . . . . . . . . . . . . . . . . . . . . . . . . . . . . . . . . . . . . . . . . . 6-48
Installation of Fan Assembly . . . . . . . . . . . . . . . . . . . . . . . . . . . . . . . . . . . . . . . . . . . . 6-48
The Splash Guard. . . . . . . . . . . . . . . . . . . . . . . . . . . . . . . . . . . . . . . . . . . . . . . . . . . . . . . . . 6-48
Removing the Old Splash Guard . . . . . . . . . . . . . . . . . . . . . . . . . . . . . . . . . . . . . . . . . 6-48
Installing the New Splash Guard . . . . . . . . . . . . . . . . . . . . . . . . . . . . . . . . . . . . . . . . . 6-48
7. Test and Inspection Matrix . . . . . . . . . . . . . . . . . . . . . . . . . . . . . . . . . . . . . . . . 7-1
M2600A Telemetry System - Test and Inspection Matrix . . . . . . . . . . . . . . . . . . . . . . . . . . . . . . 7-2
Safety Tests . . . . . . . . . . . . . . . . . . . . . . . . . . . . . . . . . . . . . . . . . . . . . . . . . . . . . . . . . . . . . . . . . . 7-5
M2600A Telemetry System - When to Perform Test Blocks . . . . . . . . . . . . . . . . . . . . . . . . . . . . 7-8
8. Maintenance and Cleaning . . . . . . . . . . . . . . . . . . . . . . . . . . . . . . . . . . . . . . . . 8-1
Maintenance . . . . . . . . . . . . . . . . . . . . . . . . . . . . . . . . . . . . . . . . . . . . . . . . . . . . . . . . . . . . . . . . . 8-1
Date & Time. . . . . . . . . . . . . . . . . . . . . . . . . . . . . . . . . . . . . . . . . . . . . . . . . . . . . . . . . . . . . . 8-1
TeleMon Disinfection . . . . . . . . . . . . . . . . . . . . . . . . . . . . . . . . . . . . . . . . . . . . . . . . . . . . . . 8-1
Disinfection Instructions. . . . . . . . . . . . . . . . . . . . . . . . . . . . . . . . . . . . . . . . . . . . . . . . . 8-2
NBP Cuff Cleaning . . . . . . . . . . . . . . . . . . . . . . . . . . . . . . . . . . . . . . . . . . . . . . . . . . . . . . . . 8-2
NBP Calibration. . . . . . . . . . . . . . . . . . . . . . . . . . . . . . . . . . . . . . . . . . . . . . . . . . . . . . . . . . . 8-3
Accessories. . . . . . . . . . . . . . . . . . . . . . . . . . . . . . . . . . . . . . . . . . . . . . . . . . . . . . . . . . . . . . . 8-3
9. Safety and System Specifications. . . . . . . . . . . . . . . . . . . . . . . . . . . . . . . . . . . . 9-1
Safety Information. . . . . . . . . . . . . . . . . . . . . . . . . . . . . . . . . . . . . . . . . . . . . . . . . . . . . . . . . . . . . 9-1
Cautions . . . . . . . . . . . . . . . . . . . . . . . . . . . . . . . . . . . . . . . . . . . . . . . . . . . . . . . . . . . . . . . . . 9-6
Accidental Wetting . . . . . . . . . . . . . . . . . . . . . . . . . . . . . . . . . . . . . . . . . . . . . . . . . . . . . . . . 9-7
Electro-magnetic Compatibility. . . . . . . . . . . . . . . . . . . . . . . . . . . . . . . . . . . . . . . . . . . . . . . 9-8
EN 61000-4-3 . . . . . . . . . . . . . . . . . . . . . . . . . . . . . . . . . . . . . . . . . . . . . . . . . . . . . . . . . 9-8
Avoiding Electro-magnetic Interference. . . . . . . . . . . . . . . . . . . . . . . . . . . . . . . . . . . . . 9-8
System Specifications . . . . . . . . . . . . . . . . . . . . . . . . . . . . . . . . . . . . . . . . . . . . . . . . . . . . . . . . . . 9-9
Intended Use . . . . . . . . . . . . . . . . . . . . . . . . . . . . . . . . . . . . . . . . . . . . . . . . . . . . . . . . . . 9-9
Safety Standards . . . . . . . . . . . . . . . . . . . . . . . . . . . . . . . . . . . . . . . . . . . . . . . . . . . . . . . 9-9
NBP Standards . . . . . . . . . . . . . . . . . . . . . . . . . . . . . . . . . . . . . . . . . . . . . . . . . . . . . . . . 9-9
Authorized Europe/
Middle East/Africa Representative. . . . . . . . . . . . . . . . . . . . . . . . . . . . . . . . . . . . . . . . 9-10
Electrical Specifications. . . . . . . . . . . . . . . . . . . . . . . . . . . . . . . . . . . . . . . . . . . . . . . . . . . . 9-10
Environmental Specifications . . . . . . . . . . . . . . . . . . . . . . . . . . . . . . . . . . . . . . . . . . . . . . . 9-10
NBP Measurement Specifications for TeleMon B . . . . . . . . . . . . . . . . . . . . . . . . . . . . . . . 9-11
Contents-4
Page 9

Explanation of Symbols . . . . . . . . . . . . . . . . . . . . . . . . . . . . . . . . . . . . . . . . . . . . . . . . . . . . 9-12
Contents-5
Page 10

Contents-6
Page 11

Overview and Functional Description
The M2636B TeleMon Companion Monitor is a telemetry extension device
providing non-invasive blood pressure (NBP) capability, a bedside/patient-side
monitor/display, and isolated line power or battery power to extend the M2601A
Telemetry Transmitter battery life.
As part of the Telemetry System, TeleMon with a docked transmitter provides local
display of ECG waveforms, a pleth wave, a delayed/annotated ECG wave, heart rate,
%SpO2, and NBP while simultaneously transmitting ECG, %SpO2 and NBP via a
unidirectional RF telemetry link to the Information Center. This is provided by
TeleMon within the antenna system coverage area. At the central station, a “docked
transmitter” indication will be displayed to distinguish data being sourced from a
transmitter docked with TeleMon.
1
Introduction
System Compatibility
Information Messages and Alarms
The M2636B TeleMon Monitor is designed for use with the Telemetry System
Series C, and either a conventional Series C or EASI
The communication from the transmitter to the TeleMon is via an infrared port on
the transmitter.
Patient alarms are generated and annunciated at the Information Center and at
TeleMon B when local alarms are enabled. TeleMon displays information messages;
these messages are also displayed in the patient sector at the Information Center,
along with the ECG waveforms and SpO
and NBP readings.
2
TM
transmitter.
Ambulatory Use The transition to ambulatory monitoring is seamless, given that the same transmitter
continues to source patient data and no user interaction is required to continue
monitoring. The clinician needs only to remove the transmitter from TeleMon.
Introduction 1-1
Page 12
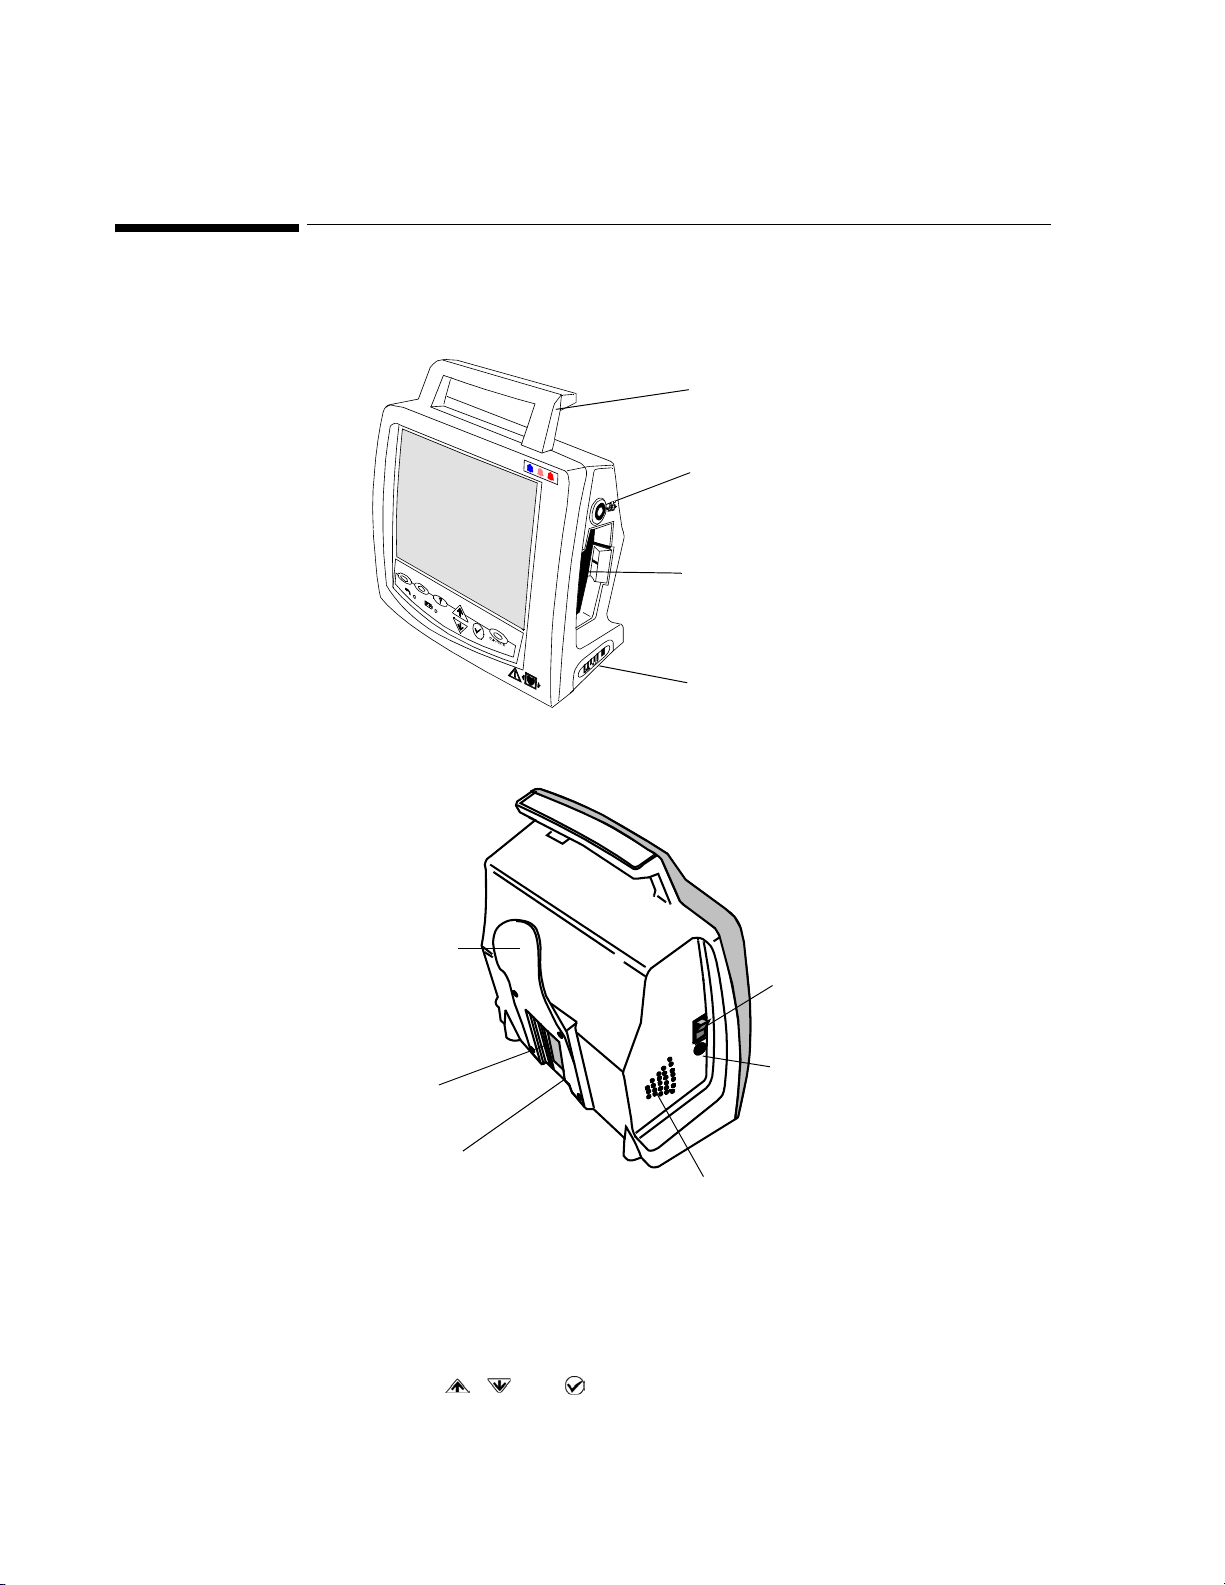
A Quick Description of the Monitor
A Quick Description of the Monitor
Front of TeleM on
Handle
NBP Connector
Transmitter
Docking Recess
Battery Compartment
Back of TeleM on
NBP Cuff Holder
Power ON/OFF
DC Power
Product Label
Upgrade Port
(underneath)
*
Use only a TeleMon-specific power supply.
Speaker
Connector*
(18V, 1.83A)
Front Panel All operational interactions except power on/off and the docking/undocking of the transmitter
are performed using the keys on the front panel. In monitoring mode, there are three kinds of
keys:
• Direct Action keys (RECORD, SUSPEND, and NBP) — enable immediate actions.
• Input keys ( , , and ) — enable you to navigate through a menu of choices.
1-2 Introduction
Page 13

A Quick Description of the Monitor
• Help key - provides access to operational information during product use.
Below the keys, two indicators provide information on the power status of the monitor.
RECORD
at Central
(Silence)
SUSPEND HELP
Input Keys
START NBP
STOP NBP
Battery Charge Status
Initiates central recording. A flashing strip above the label
indicates a recording is in progress.
Direct Action
Keys
AC Power Status
The function of each of the three Direct Action keys is displayed on the screen directly above
the key.
RECORD at Central
Silence Silences current alarm at TeleMon
SUSPEND at Central
- or -
xx:xx min to
Temporarily suspends telemetry alarms at central for 3
minutes. Indicates the number of minutes remaining.
Press again to UNSUSPEND.
UNSUSPEND
START
STOP
Starts and stops individual NBP measurement. Scheduled
measurements continue uninterrupted.
Input Keys The three Input keys enable you to select a function by moving the highlight box (cursor) and
making task choices about that function.
For general operation:
Use arrows to select a function or make a choice on a task list.
Help
For general operation:
Press check mark to open or close the task list for a selected
function.
? Displays, scrolls, and dismisses context sensitive help on the
selected function.
Introduction 1-3
Page 14
A Quick Description of the Monitor
Indicators
AC Power On/Green—AC power is connected
Off—No AC power is connected.
Battery Charge Status On/Yellow—Charging the battery
On/Blinking Yellow—Initiating communication with the
battery, or error condition
Off—No charging because either no battery or battery
charged
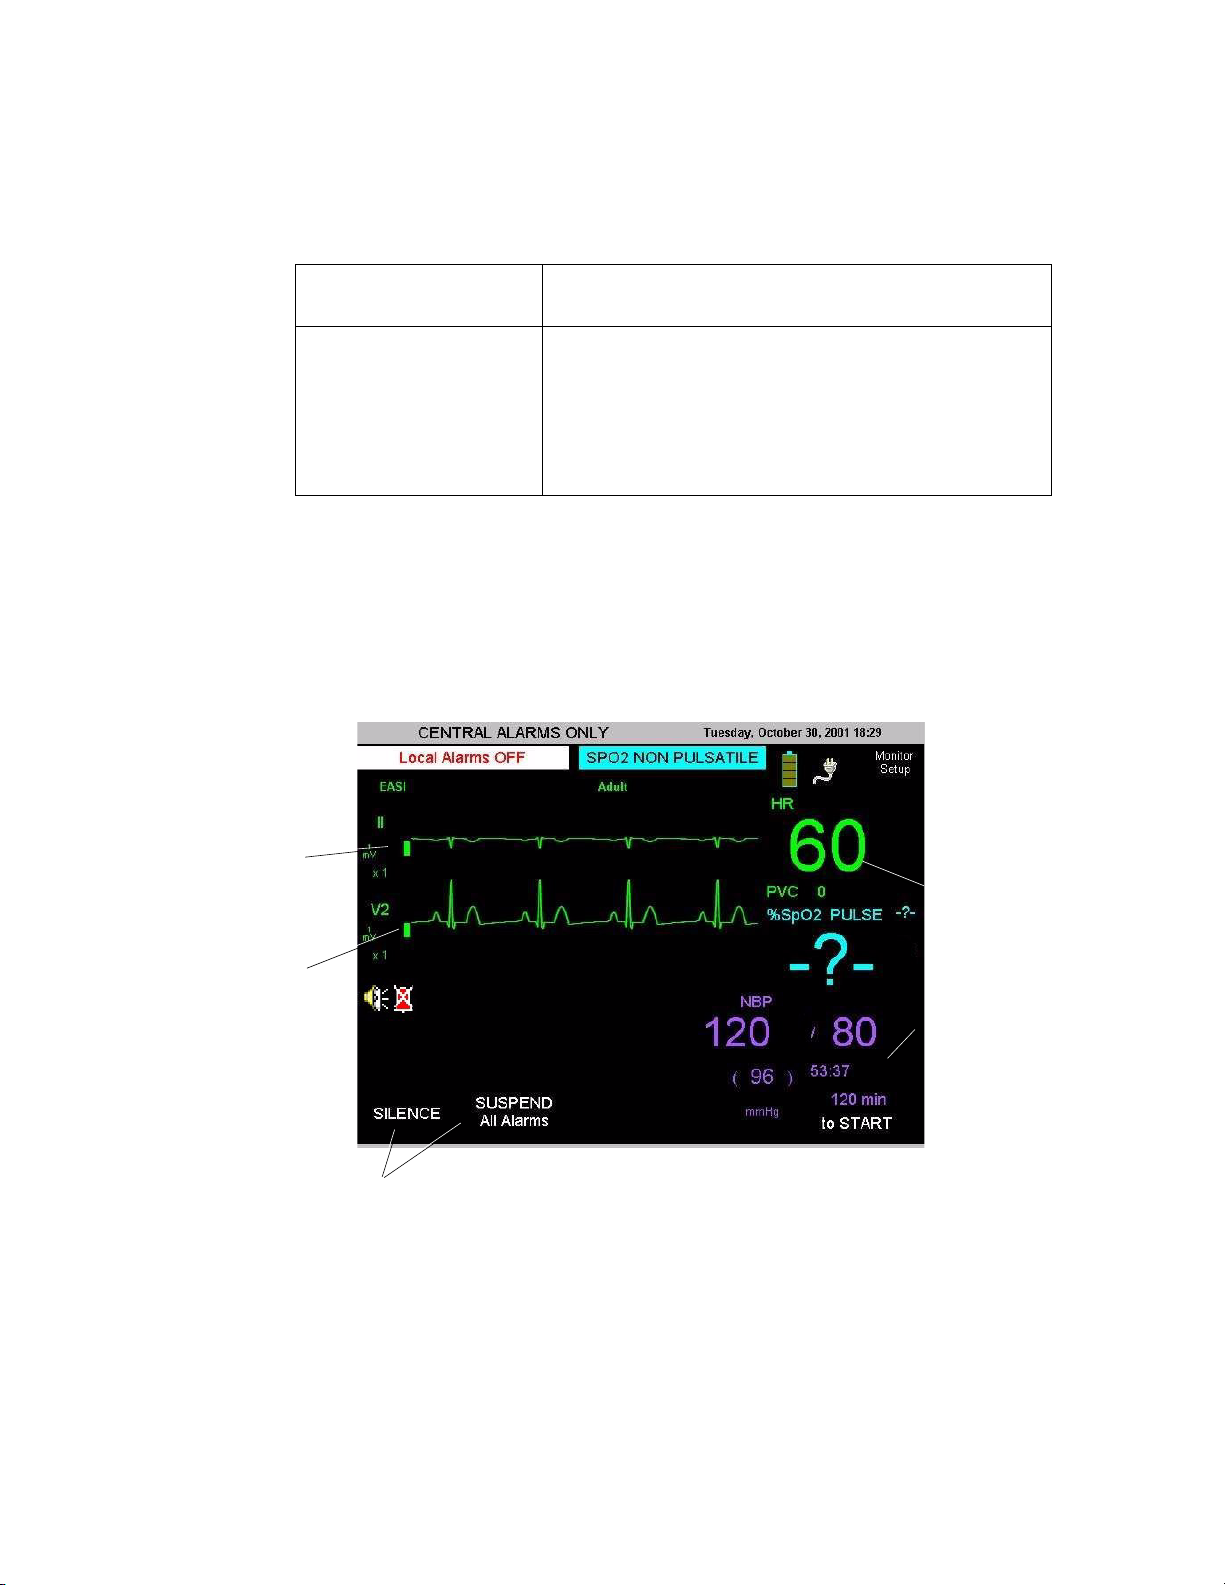
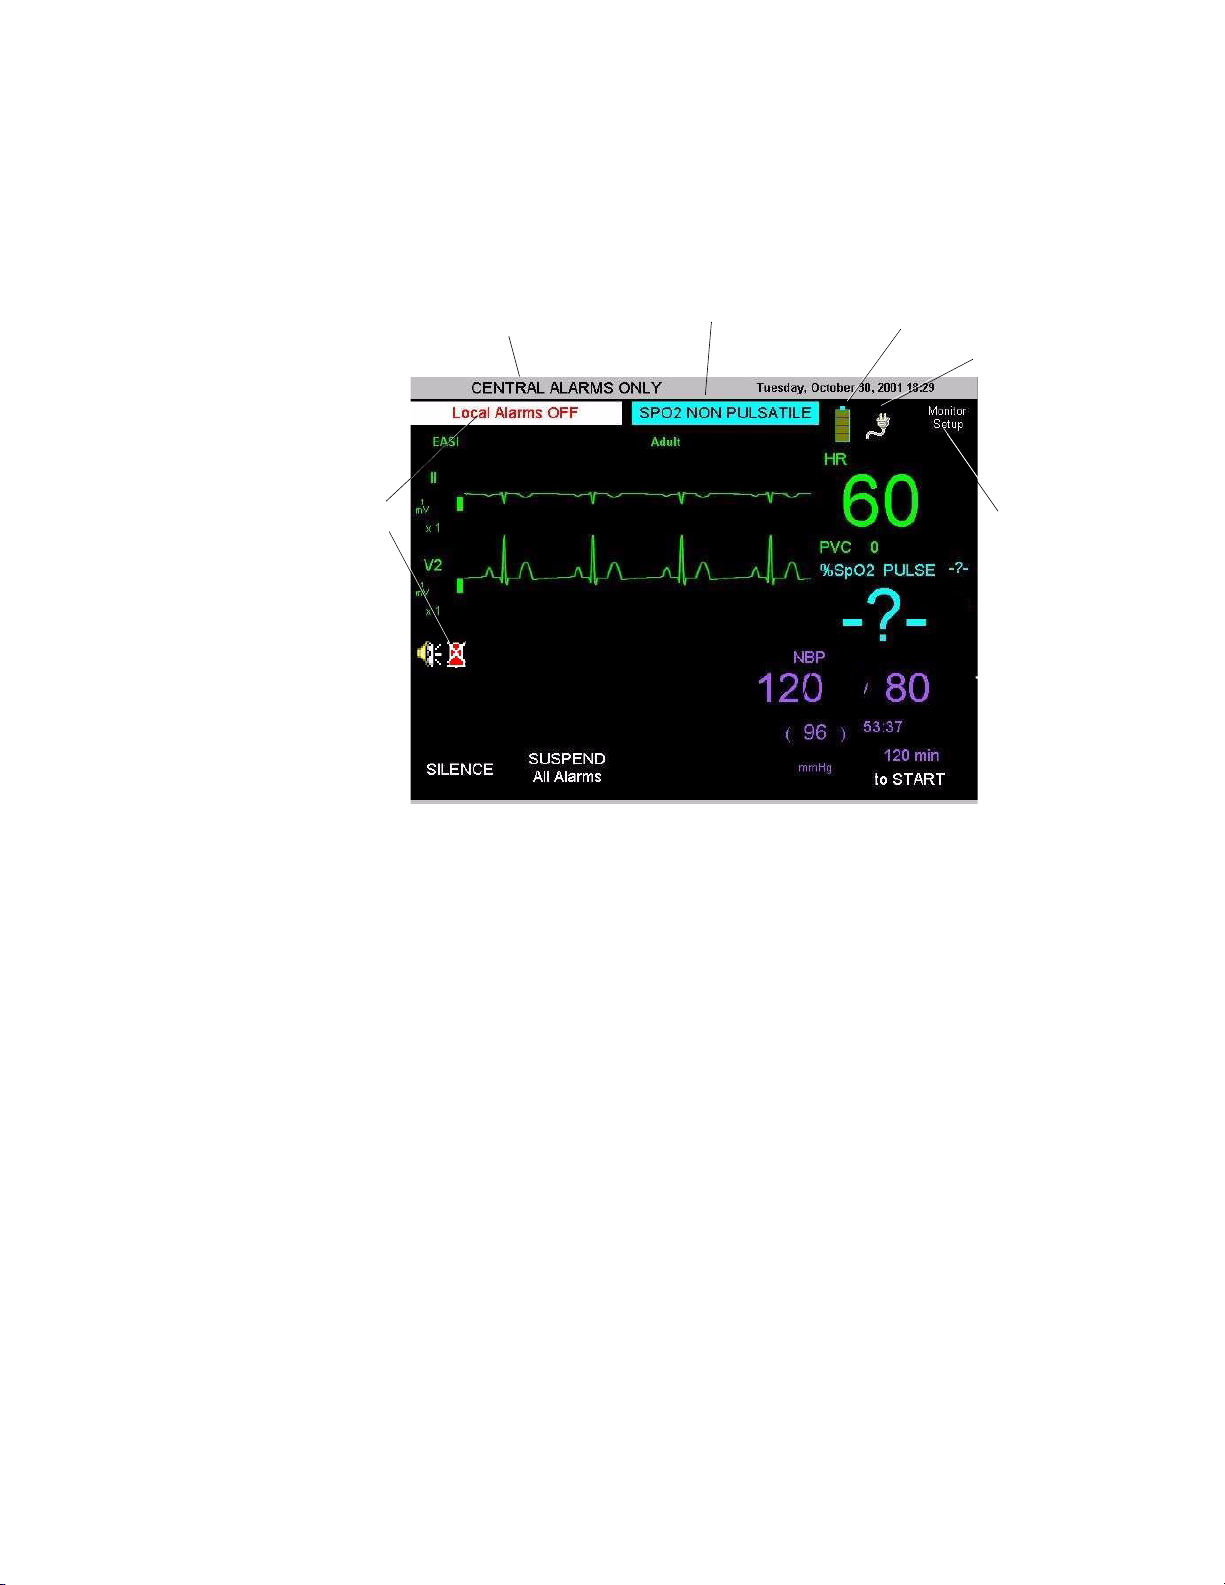
Main Screen The Main Screen presents the data in graphical and alphanumeric formats. Up to two waves
can be displayed on the screen: two ECG waves, or one ECG and the pleth wave. If an EASI
transmitter is docked, the text EASI will be displayed above the primary wave sector.
Numerics are presented on the right: HR, %SpO
, and systolic/diastolic and mean NBP.
2
Softkey labels appear across the bottom of the screen. These define the multi-purpose keys
directly below.
Waves
Size
Lead
Cal Bar
1 mV
Numerics
NBP
Measurement
Time*
Softkey labels
* Time remaining until next automatic measurement, or time of most recent manual measurement.
1-4 Introduction
Page 15
A Quick Description of the Monitor
Other information on the Main Screen includes alarm and information message status, battery
and AC power status, and access to monitor setup and service functions.
Alarm Status—
TeleMon
Alarm Status—Central
Information Message
Battery Gauge
AC Power ON
Setup &
Service
Major Assemblies
TeleMon is made up of three major assemblies:
• Front Panel Assembly
• Monitor Assembly
• Chassis Assembly
The monitor assembly has three boards, the main board, the NBP board and the Inverter
board. The distinctive functionality of each board makes this unit particularly easy to service
and troubleshoot. Additionally, the unit is designed to require little or no maintenance,
making it ideal for today’s clinical environment.
Software TeleMon software is part of the Information Center system, which contains these basic
components:
• TeleMon
• Transmitter
• TeleFrame
•SDN
• Information Center/Surveillance Center
TeleMon interfaces to the Information Center using an RF link provided by the transmitter
and an SDN interface provided by TeleFrame.
Introduction 1-5
Page 16

A Quick Description of the Monitor
Introduction 1-6
Page 17

Hardware
2
Hardware and Software Description
The following is a summary of the major TeleMon subassemblies.
Front Panel Assembly
The Front Panel Assembly (Figure 6-3 on page 6-31) contains:
• Molded plastic front housing
• Anti-glare panel bonded to the inside of the window in the front housing.
• Touch-key keyboard unit, including power status LEDs, bonded into a recess
below the window of the front housing.
• Keyboard-to-main cable.
Monitor Assembly The Monitor Assembly contains
• the Chassis Assembly, on which all the PC boards are located.
• the Rear Housing assembly, in which the transmitter dock, the battery
compartment, the cooling fan and the speaker are mounted.
Chassis Assembly The Chassis is a metal plate. To one side of it three PC boards are fastened,
containing the major electronics of the TeleMon. The LCD is fastened to the other
side.
Main Board Assembly
The Main Board (Figure 6-14 on page 6-42) contains:
• ICs required to store the software and perform the logic of measurement,
analysis, calculation and display.
• Coin battery for the Real Time (RT) clock. This clock provides time stamps
for data and times the transfer of data to and from TeleMon.
• Keyed connectors for the cables that supply power and control data to units
performing specialized functions, such as display or NBP measurement. Each
connector is uniquely keyed to prevent any misconnection. All power comes
from Main Board circuits.
• The OFF/ON Power Switch, which extends through an opening in the left side
of the rear housing when the unit is fully assembled. The switch performs the
following functions:
– When ON, applies line power to the Main Board if the External Power
Supply is connected.
– When ON, applies battery power to the Main Board if the External Power
Supply is not connected.
Hardware and Software Description 2-1
Page 18

Hardware
– When OFF, applies line power to the battery for charging if the External Power
Supply is connected. Only the various power and battery indicators are functional.
– When OFF, shuts off all power if the External Power Supply is not connected. The
coin battery on the Main Board continues to drive the Real Time (RT) clock and
some memory circuits.
• The External Power Connector, which extends through an opening in the rear housing.
Use of this connector feeds power from the External Power Supply to the Main Board,
which may also distribute it to other modules.
• Serial Port. The Serial Port Connector on the Main Board is accessed through an
opening at the bottom of the Rear Housing. The port is used for software updates. The
opening is covered by a snap-lock door.
• Optical devices. The transmitter communicates with the TeleMon, when docked,
through an infrared (IR) path. IR data is reflected onto an optical device on the Main
Board through a perforation in the IR Shield. Another device provides a control and
data path to the transmitter through a second perforation.
The NBP Board
The Inverter Board
The Non-invasive Blood Pressure (NBP) Board (Figure 6-9 on page 6-38) performs
operations relating to taking a blood pressure with the cuff. The NBP Board contains:
• IC’s for regulating the operation of the Air Pump.
• A connector for the NBP-to-Main Cable.
• The Air Pump with mounting device. The pump is specified for at least 30,000 cycles
before it needs to be replaced; 10,000 cycles before it needs to be calibrated.
• Conduit tubing for the air.
The Inverter Board (Figure 6-10 on page 6-39) applies 380 VAC at 5 mA to the LCD’s
backlight, which is fluorescent. An oscillator in the inverter circuit changes DC input current
from either the 10.8 battery or the external power supply to AC.
The Inverter Board Assembly consists of:
• A metal shield to limit radiation from the inverter circuits.
• The Inverter Board.
• Integral connectors for the Inverter-to-Main and Inverter-to-Display Cables.
The Display The Display (Figure 6-13 on page 6-41) contains:
• LCD. The LCD has a half-life of approximately two years. It should be replaced when
it loses its brightness.
• Back Light.
• Non-detachable Inverter-to-Display power cable.
2-2 Hardware and Software Description
Page 19

Hardware
• Connector for the Display-to-Main Cable, a ribbon cable conducting LCD control
signals from the Main Board.
The Rear Housing Assembly
The Rear Housing Assembly consists of:
• Molded plastic rear housing.
• Speaker Mount (Figure 6-16 on page 6-44), a formed stainless metal piece bent into
extensions for the Speaker mount and the data path reflector. Coded optical beams from
a docked transmitter are reflected onto the optical receptor of the Main Board and
beams from the emitter on the Main Board are reflected into the transmitter. Broken
beams are interpreted by software in the processing unit of the Main Board as an
undocked transmitter. On the outside of the Rear Housing, the NBP Cuff Holder is
screwed to the Speaker Mount through the housing.
• Cooling Manifold Assembly, a formed metal piece fastened to the Rear Housing above
the Transmitter Dock. A small cooling fan with integral drive motor is fastened to it.
From the fan housing extends the Fan-to-Main Cable. Cooling and venting are
facilitated by slots in the bottom and top rear surfaces of the Rear Housing, perforations
on the side of the Rear Housing, and large perforations in the Battery Housing. The fan
is powered by the OFF/ON switch at the side of the monitor.
• Transmitter Dock (Figure 6-19). Three interlocking plastic pieces forming a dock that
fits into the docking port on the side of the Rear Housing. The Dock screws to mounts
on the Rear Housing. The screws also hold the dock together. The Transmitter-to-Main
power cable interlocks to the back of the Dock and terminates in a connector for Main
Board attachment. An integral latch furnishes some resistance to docking and
undocking the transmitter, and holds the transmitter in place. An opening in the top of
the Dock passes optical data streams between the transmitter and the Main Board via a
reflector surface on the Speaker Mount. All ECG and SpO
transmitter. All RF transmission between the monitor and the Information Center
requires docking and ECG cables and leads.
data comes from the
2
• Speaker held to the Speaker Mount with a metal clip. The Speaker-to-Main Cable is
integrally attached to the speaker but features a connector on the Main Board side. The
speaker faces perforations in the Rear Housing.
• Formed metal Battery Compartment (Figure 6-17) with detachable connector for the
replaceable Battery-to-Main Cable. A flange on this compartment anchors the Chassis.
Perforations in the compartment support air cooling. The battery may get warm during
charging, especially as it approaches full charge.
• Sliding battery compartment door of molded plastic, key-locked to the Rear Housing.
• NBP tubing with collar connector on one end and external connector on the other,
fastened to the Rear Housing with a large hex nut. The tubing carries air from the Air
Pump located on the NBP Board.
• Four slip-resistant feet mounted to the bottom of the Rear Housing. They also hold the
Battery Compartment in place.
Hardware and Software Description 2-3
Page 20

Software
Software
TeleMon interfaces to the Information Center using an RF link provided by the transmitter
and an SDN interface provided by the Receiver Mainframe. However, this link is for clinical
purposes only. There is a serial port on the bottom of the rear housing of TeleMon, for use in
upgrading software.
Within TeleMon’s memory, the monitoring software and its configuration files are stored
separately from the operating system binary image, allowing the product monitoring software
to be upgraded without having to reprogram the entire operating system.
All software components necessary for upgrading a TeleMon are included on a TeleMon
Installation CD. These components include:
• TeleMon Application Software
• A compatible TeleMon OS image
• A programming tool for programming the operating system in TeleMon directory
• Microsoft® ActiveSync® Connectivity Software
Service people upgrading/programming TeleMon Monitoring Software will also need the
following components:
• TeleMon
• A host computing platform (laptop or desktop) with free serial port
• A synch cable that fits into TeleMon’s Upgrade Connector (for example an HP F122360901 cable)
• The TeleMon Installation CD
2-4 Hardware and Software Description
Page 21

3
Site Planning—Specific Requirements
This chapter provides an overview of site planning for your telemetry system. It
includes the following sections:
• Environmental Considerations . . . . . . . . . . . . . . . . . . . . . . . . . . . . . . . . . . . . 3-2
• Power Requirements. . . . . . . . . . . . . . . . . . . . . . . . . . . . . . . . . . . . . . . . . . . . 3-3
• Antenna System Site Information. . . . . . . . . . . . . . . . . . . . . . . . . . . . . . . . . . 3-3
Site Planning—Specific Requirements 3-1
Page 22

Environmental Considerations
Environmental Considerations
The monitor should be used in an area reasonably free from vibration, dust, corrosive or
explosive gases, and extremes of temperature and humidity. The following paragraphs give
information concerning environmental considerations.
Temperature The monitor operates within specifications at ambient temperatures between 0 and 35
Celsius. Temperatures exceeding these limits could affect instrument accuracy and cause
damage.
Operating
Operate and store TeleMon at altitudes up to 3,048 meters (10,000 feet).
Altitude
Radio Frequency Interference
Management of the RF environment in your facility is important to the overall performance of
your telemetry system, including the monitor. The considerations are the same. In most cases,
use of the monitor implies that the Telemetry System is already in place and the RF
environment has already been taken into consideration. For full coverage of this topic, refer to
the Telemetry System documentation, especially Chapter 2 of the Service Guide.
WarningWarning
TeleMon units containing transmitters that are 25 kHz apart in transmitter frequency
interfere with one another at distances of 1-3 feet. This situation is aggravated by ECG
cable proximity. Symptoms include dropout (at the information center), waveform
artifact of the ECG (at central and TeleMon), and screen freeze (at TeleMon). To avoid
this situation, maintain a distance of >3 feet between TeleMon units.
o
3-2 Site Planning—Specific Requirements
Page 23

Power Requirements
The monitor is a mobile extension of the Telemetry System and can display and broadcast
information through the antenna on battery power alone for up to a five hours. However, for
bedside use it should be connected to a grounded wall outlet through its own external power
supply. The bedside wall outlet should provide input of 100 - 250 VAC at 50 - 60 Hz. The
monitor and therefore the bed need to be within 6 feet of where the external power supply is
to be mounted. The line cord between the wall outlet and the external power supply must be
grounded and routed and/or mounted to avoid accidental tripping or pulling.
The External Power Supply must be grounded during operation. If a 3-wire receptacle is not
available, then a hospital electrician must be consulted to ensure that proper grounding is
available on installation. Never attempt to use a three-wire to a two-wire adaptor with the
External Power Supply. For details, see the “Electrical Specifications” on page 9-10.
Note—The TeleMon battery may not arrive at your site fully charged due to time in transit or
storage. Make sure that the battery is fully charged before using TeleMon.
Power Requirements
Antenna System Site Information
Antenna Coverage Area
All transmitter information is available at the TeleMon, whether or not the transmitter is in the
antenna coverage area. However, if the TeleMon is outside the antenna coverage area, there is
no communication to the Information Center and no indication at the TeleMon that the RF
signal is not being received at the Information Center. Outside the coverage area, no alarms
can be generated at the Information Center.
Site Planning—Specific Requirements 3-3
Page 24

Antenna System Site Information
Site Planning—Specific Requirements 3-4
Page 25

Installation
This chapter describes the alternatives available for the installation of a TeleMon
monitor and its External Power Supply.
• Placement on a Flat Surface . . . . . . . . . . . . . . . . . . . . . . . . . . . . . . . . . 4-2
• Mounting on a Pole. . . . . . . . . . . . . . . . . . . . . . . . . . . . . . . . . . . . . . . . 4-3
• Mounting on the Wall (General). . . . . . . . . . . . . . . . . . . . . . . . . . . . . . 4-5
4
Installation 4-1
Page 26

Placement on a Flat Surface
Placement on a Flat Surface
The easiest and most mobile way to mount the TeleMon is simply to stand it on a flat surface.
The monitor needs to be visible and in a safe place, as free as possible from the danger of
accidental pulling, knocking over, or spilling of fluids.
The simplest placement of the External Power Supply is on the floor near the TeleMon. The
power output cable allows a distance from TeleMon of six feet. Do not place the monitor
where it can be pulled down onto the patient. The power input cord should run directly to the
wall wherever possible. It should not be strung across a passage.
WarningWarning
To avoid the risk of accidental entanglement and strangling, place or mount the AC
power cabling away from the patient. Use similar caution in temporarily storing ECG,
NBP or SpO2 cables.
WarningWarning
TeleMon units containing transmitters that are 25 kHz apart in transmitter frequency
interfere with one another at distances of 1-3 feet. This situation is aggravated by ECG
cable proximity. Symptoms include dropout (at the information center), waveform
artifact of the ECG (at central and TeleMon), and screen freeze (at TeleMon). To avoid
this situation, maintain a distance of >3 feet between TeleMon units.
4-2 Installation
Page 27

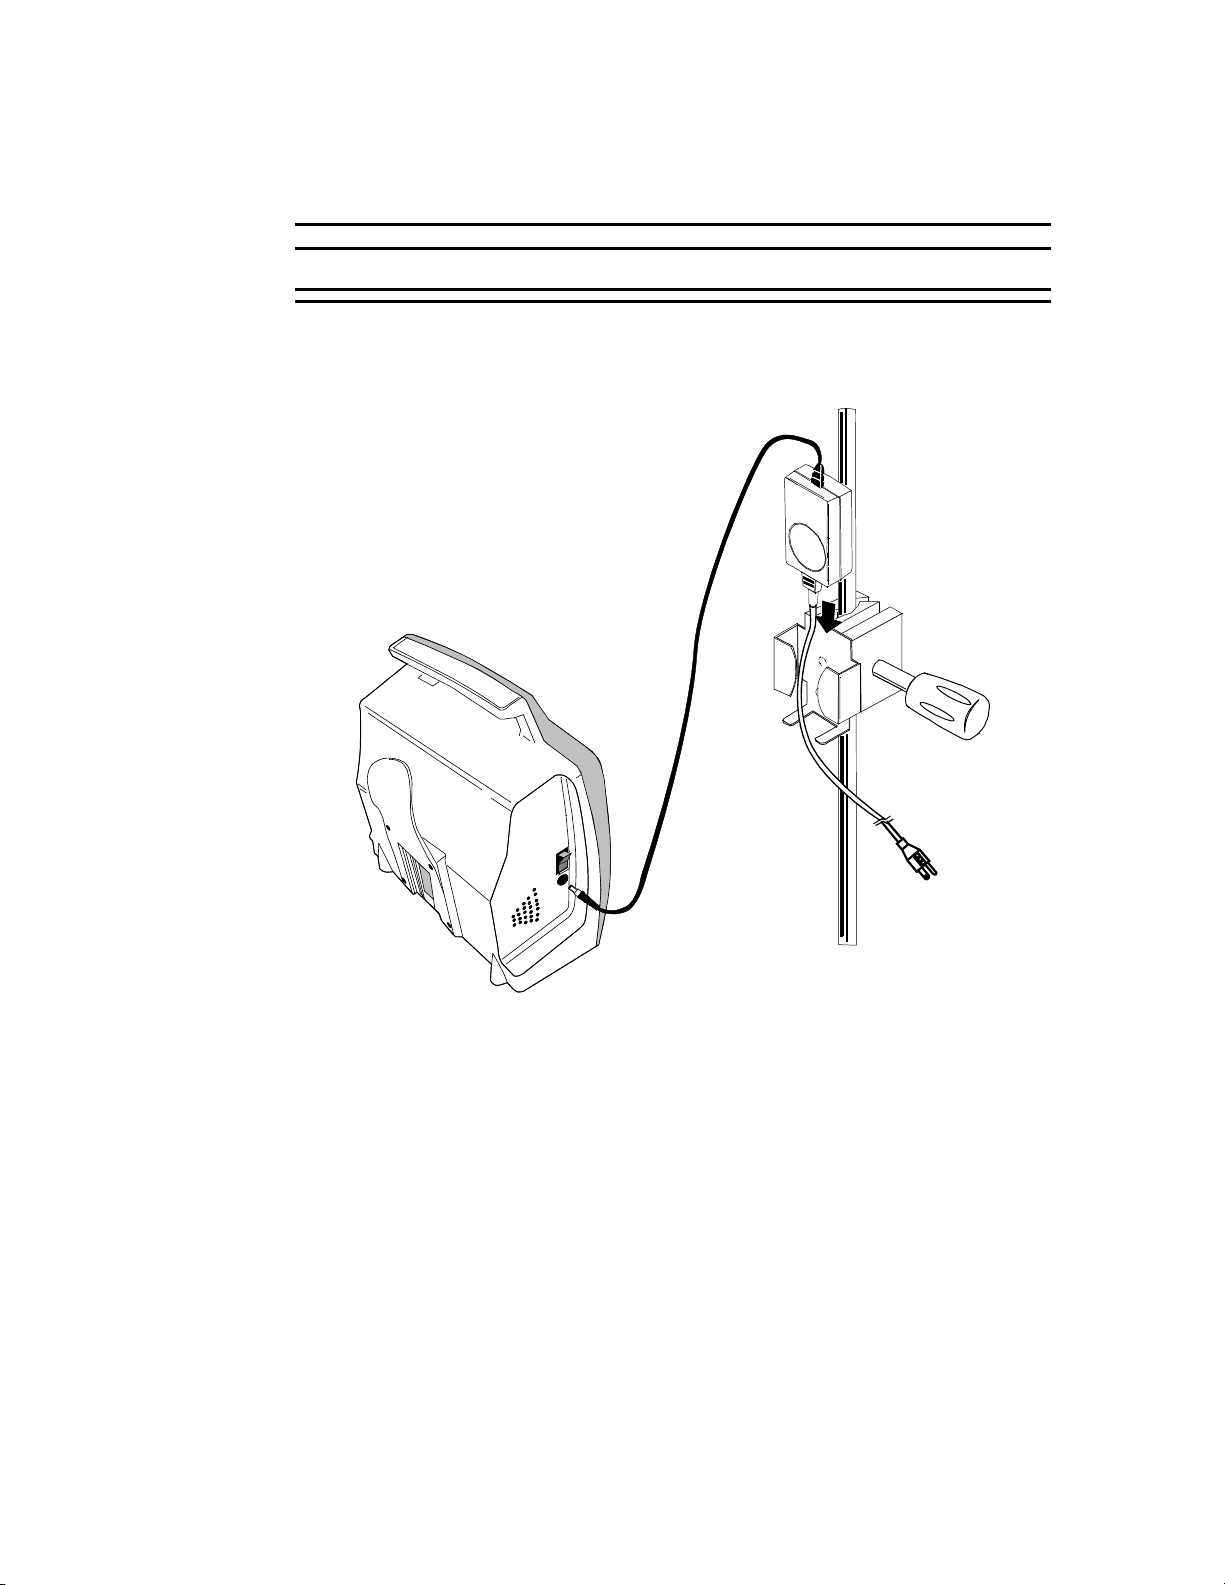
Mounting on a Pole
Mounting on an IV pole combines mobility with stability. The External Power Supply can be
mounted apart or near the TeleMon on the same pole. For example, mount the power supply
at the bottom of the IV pole.
Note—The power input cord must run from the TOP of the power supply to the monitor, to
avoid seepage of spills into the plug on the other side (Figure 4-2).
For pole mounting, use the Pole Clamp, Part Number 5061-8363, which can support a
maximum load of 14 pounds (6.5 kg).
Mounting on a Pole
Use of Pole Clamp with Monitor
Figure 4-1 Mounting TeleMon with Pole Clamp
Step 1. Screw the Dovetail to the rear surface of the Pole Clamp, using the screws provided
with the Dovetail. Two alignments are available, horizontal and vertical.
Step 2. Fasten the Pole Clamp to the supporting rail or pole. Use your judgement to
determine the most stable and solid method of mounting.
Step 3. Slide the NBP Cuff Holder on the back of the TeleMon down over the Dovetail
until the latch snaps.
Note—To remove the monitor, slide your finger under the TeleMon and push the latch
at the back, which is on the Dovetail.
Installation 4-3
Page 28
Mounting on a Pole
Use of Pole Clamp with External Power Supply
WarningWarning
Do not mount the TeleMon below fluids, which may drip or leak onto it.
4-4 Installation
Figure 4-2 Mounting Power Supply with Pole Clamp
Step 1. Screw the External Power Supply Bracket to a Pole Clamp with the screws
provided.
Step 2. Fasten the Pole Clamp to the supporting rail or pole.
Step 3. Slide the External Power Supply into its bracket.
Page 29

Mounting on the Wall (General)
Wall mounting requires the most preparation and is the most stable, but least mobile,
configuration.
Caution
These mounting instructions are neither applicable in California nor sanctioned by the
California OSHPD for installation in the State of California, U.S.A., in conformance to
that state’s requirements for seismic protection.
The following instructions describe surface wall mount base installation to a wall.
Before instruments have been installed, the hospital or other facility, its consultants, or its
contractors shall be responsible for meeting the following conditions:
• That the wall is adequate to safely mount monitoring instruments, including the
selection of fasteners and their proper installation.
Mounting on the Wall (General)
• That the installation has been completed in accordance with accepted standards of good
workmanship.
• Anchorage or support in a metal stud or wood stud wall must be verified by a registered
professional engineer before installing the mounting system.
Installation 4-5
Page 30

Mounting on the Wall (General)
WarningWarning
Existing wall construction and reinforcement:
The wall mounts must be capable of supporting four times the specified weight capacity
after they have been properly installed. To provide this support in plaster, plasterboard,
or gypsum board walls, the wall covering must be removed in the area of work and a
reinforcement must be provided within the wall structure.
Do not install a wall mount onto solid brick or brick veneer walls, or onto crumbly wall
material such as cinder blocks or deteriorated concrete or concrete block.
Ensure that no electrical wiring, piping, or other utilities within the wall interfere with or
can be damaged by the installation process.
Fastenings:
Lead expansion bolts or plastic expansion anchors specifically are not adequate or safe.
Use the anchors specified for solid concrete construction.
Never mount heavy instrumentation to plain gypsum board using expansion anchors.
The wall covering (plasterboard or plaster) must be removed and the wall must be
reinforced internally, in new or existing construction.
In Installation:
No portion of the mount or mainframe may extend over a patient’s bed.
Never exceed the maximum rated load specified on the label(s) attached to the wall
mount in use.
Never exceed any maximum instrument stacking height specified on the label(s) attached
to the wall mount in use.
Do not attempt to remove any wall mount while instruments are attached.
The wall mount is mounted directly to the wall. All mountings and anchorages must conform
to local building codes and regulations. A variety of mounts are available and can be
purchased, or the user can devise his own, provided it conforms to the warnings and
regulations stated in this manual.
Installation consists of building a mount to which the Dovetail or External Power Supply
Bracket are fastened. The monitor then slides and snaps onto the Dovetail and the External
Power Supply slips into its bracket. The bracket can also be mounted directly on the wall.
In general, wall mounts must be installed securely to the wall’s internal structure with number
10 sheet metal screws, 1/4-20 or 10-32 pan head machine screws, or bolts with nuts or toggle
wings. The type of fastening and method depends on the wall construction.
Note—Machine screws have built-in lock washers or other means of securing threads. All
sheet-metal screws have type-A threads.
4-6 Installation
You can install the mount base in three ways:
1. On Hollow Block or Hollow Tile Walls.
2. On Solid Concrete or Solid Block Walls.
3. On Drywall.
Page 31

Mounting on the Wall (General)
WarningWarning
Do not install wall mount onto solid brick walls or tile veneer walls, or onto weak or
crumbly wall material such as cinder blocks, brick, brick veneer, clay or rubble
construction.
Installation 4-7
Page 32

Mounting on the Wall (General)
Installation 4-8
Page 33

This chapter includes an orderable parts list for the M2636B TeleMon Monitor.
Number Description Part
0950-3769 Transformer between the wall outlet and the TeleMon
monitor.
External Power Supply
5
Parts List
0950-3919 A PC board mounting the electronics for the inverter.
1420-0864 3 V Lithium battery pressed into a holder mounted on the
main board. It powers the internal RT clock.
2090-0392 A 19.6 cm. color DSTN Liquid Crystal Display (LCD) with
integral backlight, used as the front display screen.
8121-0109 Runs between the Battery Compartment and the Main
Board. Integral connectors on each end.
M1204-61025 Circular speaker with integral input cable.
M1275-01026 Wire clip holding speaker to mount.
M2626-40001 Pre-formed plastic case for mounting the other parts of the
Rear Housing Assembly.
M2636-01007 Formed metal exhaust conduit to which the cooling fan with
integral cable have been bonded.
M2636-01008 The bracket holding the External Power Supply to its
mount.
M2636-11302 Contains the operating system, application software and PC
Connectivity Tool.
Inverter Board
Coin Cell Battery
Display
Battery-to-Main Cable
Speaker and Cable
Speaker Clip
Rear Housing
Cooling Manifold Assembly
External Power Supply Bracket
Software CD ROM Kit
M2636-20010 Fastens battery cable connector to the Battery Compartment. Alignment Pin for battery
connector
M2636-40002 Pre-formed plastic part.
M2636-40003 Pre-formed plastic part, one-half of the Transmitter Dock.
M2636-40004 The other half of the Transmitter Dock.
M2636-40005 Pre-formed plastic part, fastened to rear of Rear Housing. It
hold the external cables and cuff attaching to the monitor.
M2636-40006 Plastic foot attached to bottom of monitor.
M2636-40007 Pre-formed plastic part, which screws to a wall or pole
mount. It then slides into the NBP Cuff Holder and is held
by a snap latch.
Battery Door
Transmitter Bay
Transmitter Latch
NBP Cuff Holder
Monitor Foot (4)
Dovetail
Parts List 5-1
Page 34

Number Description Part
M2636-40008 Pre-formed plastic part. The door covering the serial
upgrade port, visible through an opening in the bottom of
Serial Upgrade Door
the Rear Housing.
M2636-60100 Assembly consisting of pre-formed plastic case, display,
antiglare panel, keyboard and keyboard overlay.
M2636-60101 Splash guard kit consisting of plastic film with adhesive.
M2636-60102 Kit of extra screws required for reassembly. Consists of:
Screw used for monitor assembly.
Screw used for monitor assembly.
Screw used for monitor assembly.
Screw used for monitor assembly.
Screw used for monitor assembly.
Screw used for monitor assembly.
M2636-60110 Ribbon cable between the LCD and the Main Board. Splits
at one end. Three integral connectors.
M2636-60120 Runs between the Inverter Board and the LCD. Integral
connectors on each end.
M2636-60130 Runs between the NBP Board and the Main Board. Integral
connectors on each end.
Front Panel Assembly
Splash Guard Kit
Screw Kit
M3.0x8mm Torx T-10
M2.0x4mm Torx T6
M3.0x14mm Torx T-10
M3.0x6mm Torx T-10
M3.0x4mm Torx T-10
M3.0x16mm Torx T-10
LCD Data Cable
Inverter-to-LCD Cable
NBP-to-Main Cable
M2636-60140 Power cable running between the transmitter and the Main
Board. Integral connector on each end.
M2636-60302 A PC board mounting the electronics and the cuff pump for
non-invasive blood pressure (NBP) measurements.
Note—The new NBP module is compatible with older
versions of the TeleMon software and hardware.
M2636-60301 The air conduit tubing, mount, and collar connector.
M2636-60412 Device for reconditioning the battery.
M2636-60500 10.8-volt, rechargeable NiMH.
M2636-68200 A PC board mounting ICs and other electrical components,
containing the TeleMon’s major electronics (exchange
assembly).
M2636-90035 TeleMon Release B User and Service Documentation (CD-
ROM).
5-2 Parts List
Transmitter-to-Main Cable
NBP Board Assembly
NBP Connector Assembly
Battery Conditioner
Internal Battery
Main Board
User and Service Documentation
CD
Page 35

6
Troubleshooting, Service and Repair
This chapter describes maintenance, troubleshooting and service. It includes the
following sections:
• Troubleshooting . . . . . . . . . . . . . . . . . . . . . . . . . . . . . . . . . . . . . . . . . . 6-2
– Purpose. . . . . . . . . . . . . . . . . . . . . . . . . . . . . . . . . . . . . . . . . . . . . 6-2
– Alarms and Information Messages. . . . . . . . . . . . . . . . . . . . . . . . 6-2
— Patient Alarms . . . . . . . . . . . . . . . . . . . . . . . . . . . . . . . . . . . 6-2
— Suspending Patient Alarms . . . . . . . . . . . . . . . . . . . . . . . . . 6-3
— Task Summary. . . . . . . . . . . . . . . . . . . . . . . . . . . . . . . . . . . 6-3
— Information Messages . . . . . . . . . . . . . . . . . . . . . . . . . . . . . 6-3
– Self-Test Error and Event Log Messages. . . . . . . . . . . . . . . . . . . 6-8
— NBP Event Log Error Codes . . . . . . . . . . . . . . . . . . . . . . . . 6-9
– Power On Self-Test . . . . . . . . . . . . . . . . . . . . . . . . . . . . . . . . . . 6-11
• Service Mode . . . . . . . . . . . . . . . . . . . . . . . . . . . . . . . . . . . . . . . . . . . 6-12
– Activating Service Mode . . . . . . . . . . . . . . . . . . . . . . . . . . . . . . 6-12
– Performing Service Functions . . . . . . . . . . . . . . . . . . . . . . . . . . 6-14
– Configuring the Transmitter. . . . . . . . . . . . . . . . . . . . . . . . . . . . 6-16
– Upgrading the Software . . . . . . . . . . . . . . . . . . . . . . . . . . . . . . . 6-19
– Cloning Settings. . . . . . . . . . . . . . . . . . . . . . . . . . . . . . . . . . . . . 6-25
– Changing TeleMon’s Language Display . . . . . . . . . . . . . . . . . . 6-26
• Using the Battery Reconditioner . . . . . . . . . . . . . . . . . . . . . . . . . . . . 6-26
• Repair . . . . . . . . . . . . . . . . . . . . . . . . . . . . . . . . . . . . . . . . . . . . . . . . . 6-28
– Tools. . . . . . . . . . . . . . . . . . . . . . . . . . . . . . . . . . . . . . . . . . . . . . 6-28
– Overview . . . . . . . . . . . . . . . . . . . . . . . . . . . . . . . . . . . . . . . . . . 6-29
– Before You Begin . . . . . . . . . . . . . . . . . . . . . . . . . . . . . . . . . . . 6-31
– The Battery. . . . . . . . . . . . . . . . . . . . . . . . . . . . . . . . . . . . . . . . . 6-32
– The Front Panel Assembly. . . . . . . . . . . . . . . . . . . . . . . . . . . . . 6-33
– The Chassis Assembly . . . . . . . . . . . . . . . . . . . . . . . . . . . . . . . . 6-35
– The NBP Board . . . . . . . . . . . . . . . . . . . . . . . . . . . . . . . . . . . . . 6-38
– The Inverter Board . . . . . . . . . . . . . . . . . . . . . . . . . . . . . . . . . . . 6-39
– The Display . . . . . . . . . . . . . . . . . . . . . . . . . . . . . . . . . . . . . . . . 6-41
– The Main PC Board . . . . . . . . . . . . . . . . . . . . . . . . . . . . . . . . . . 6-42
– The Speaker . . . . . . . . . . . . . . . . . . . . . . . . . . . . . . . . . . . . . . . . 6-44
– The Battery Compartment . . . . . . . . . . . . . . . . . . . . . . . . . . . . . 6-45
– The Battery Door . . . . . . . . . . . . . . . . . . . . . . . . . . . . . . . . . . . . 6-46
– The Transmitter Dock . . . . . . . . . . . . . . . . . . . . . . . . . . . . . . . . 6-47
– The Fan Assembly . . . . . . . . . . . . . . . . . . . . . . . . . . . . . . . . . . . 6-48
– The Splash Guard. . . . . . . . . . . . . . . . . . . . . . . . . . . . . . . . . . . . 6-48
Troubleshooting, Service and Repair 6-1
Page 36

Troubleshooting
Troubleshooting
Purpose This section provides troubleshooting instructions for TeleMon. To properly troubleshoot
TeleMon, a clear understanding of the Telemetry system is required.
When troubleshooting TeleMon consider that problems can occur because of:
• Equipment malfunctions: hardware failures, etc.
• Application faults: usually leads off, battery problems, ECG equipment malfunction,
transmitter malfunction, %SpO
• RF problems: as a result of RF environmental conditions, or problems like not receiving
a signal, receiving a weak signal, etc. (Solutions to this type of problem are described in
the Telemetry System Service and Reference Guide.)
This section presents symptoms that show up when failures occur, and provides a corrective
action to fix those failures. In this section you will find:
• Alarms and Information Messages
• Self-test Error and Event Log Messages
• NBP Event Log Error Codes
• Additional Troubleshooting Tips
•Power O2
•n Self-test
malfunction.
2
Alarms and Information Messages
Patient Alarms When a transmitter is docked in TeleMon, all patient alarms are generated, displayed,
Two types of signals can be generated during monitoring:
• Patient alarms indicate a life-threatening situation or less urgent situation, such as heart
rate alarm.
• Information messages indicate that the monitor cannot measure or detect alarm
conditions reliably.
recorded, and silenced either at TeleMon locally, or at the Information Center and
Surveillance Center.
WarningWarning
No patient alarms are annunciated at the TeleMon when local alarms are off. When
local alarms are off, telemetry alarms are presented at the central monitor only, and all
alarm adjustments must be made at central.
All central alarms can be temporarily suspended for 3 minutes from TeleMon. When alarms
are suspended at TeleMon, any active alarm will be silenced. When alarms are unsuspended,
the arrhythmia time outs will be reset.
NBP alarm settings (limits and on/off) are adjusted at central.
Visual Indicators on TeleMon for Patient Alarms:
• Message CENTRAL ALARMS ONLY displayed in black on top banner
• Message Local Alarms OFF displayed in alarm message area.
6-2 Troubleshooting, Service and Repair
Page 37

Troubleshooting
Suspending
Patient Alarms
You can suspend central telemetry alarms from TeleMon for 3 minutes to prevent false alarms
from occurring during a change of electrodes or other activity that could cause motion artifact
alarms.
Visual Indicators on TeleMon for Suspended Alarms:
• Message CENTRAL ALARMS SUSPENDED displayed in red on top banner
opposite the date.
• Number of minutes remaining in the suspension period displayed above the Suspend
Alarms key.
• The SUSPEND at Central key label changed to xx:xx min to UN SUSPEND.
Note—When the transmitter is undocked, the suspend capability reverts to standard telemetry
operation; that is, suspend is enabled at central.
Task Summary To suspend alarms at central from TeleMon, use the following procedure.
Step 1. Press the key below SUSPEND at Central to suspend all telemetry alarms at
central for 3 minutes.
Step 2. To restart suspended alarms, press xx:xx min to UNSUSPEND.
Information
Messages
The following table lists all the information messages that TeleMon can display. These
messages are text only; no sound is generated at TeleMon when any of these conditions is
active.
WarningWarning
When local alarms are off, information messages at TeleMon are silent.
If multiple information messages are active, an up arrow (↑) will be displayed to the right of
the information message area. Messages will cycle through the sector at a rate of one every
two seconds. There is no audible indicator for any information signal.
All information messages are non-latching, that is, the information message resets
automatically when the condition is corrected, and the information message is erased from the
display. NBP information messages will remain on the display until the situation is corrected.
Visual Indicators on TeleMon for Information Message Conditions:
• Message displayed in information message area
Troubleshooting, Service and Repair 6-3
Page 38

Troubleshooting
The following table lists all of the information signals (in alphabetic order) that could appear
in the information message area at the top center of the TeleMon display.
Table 6-1. TeleMon Information Messages
Information Message Problem Corrective Action
CHARGE MON BAT
TeleMon battery is <= 25%.
If TeleMon battery level is <=
Note—Will not be
displayed at central if
Xmtr BATTERY WEAK
message is also in effect,
but both information
messages will be
displayed at TeleMon.
15%, TeleMon will start a 5minute shutdown counter, and if
no action is taken to clear the
condition, TeleMon will
shutdown the device and latch the
power supply until it is connected
to AC power.
CUFF NOT DEFLATED Cuff pressure is greater than a
specified safety limit for a period
of time.
ECG EQUIP MALF ECG PC board in the transmitter
is malfunctioning
Connect to AC power and
charge battery, or insert battery
with >25% charge.
Remove cuff from patient and
disconnect from tubing. Gently
expel any air. [If water in cuff,
replace cuff.] Reconnect and
reapply cuff to patient.
Note—If the alarms are
suspended at the Information
Center, this information message
unsuspends them. To clear the
information message, initiate a
new NBP measurement.
Replace transmitter.
For details, see the Telemetry
System Service Training and
Reference Guide.
INVALID LEADSET EASI transmitter has a 3-wire
LEADS OFF Lead(s) not connected, or 3-wire
CHECK LEADS Selectable lead unavailable due to
6-4 Troubleshooting, Service and Repair
leadset, or no leadset attached to
it.
leadset is connected to a 5-lead
transmitter trunk cable.
leads off condition.
Undock transmitter and attach a
5-wire leadset.
Reconnect lead(s).
Attach 3-lead trunk cable.
Reconnect lead(s).
Page 39

Troubleshooting
Table 6-1. TeleMon Information Messages
Information Message Problem Corrective Action
NBP CUFF
OVERPRESS
Cuff pressure increased above
overpressure safety limits
NBP EQUIP MALF The tube in the cuff may be
kinked or disconnected, or there is
a malfunction in the NBP
hardware.
Remove cuff from patient and
disconnect from tubing. Gently
expel any air. [If water in cuff,
use new cuff.] Reconnect and
reapply cuff to patient.
Note—If the alarms are
suspended at the Information
Center, this information message
unsuspends them. To clear the
information message, initiate a
new NBP measurement.
Unkink and/or connect tubing.
Reconnect the transmitter by
redocking.
Take another measurement. If
problem persists, contact your
service provider.
Replace the cuff.
Conduct an NPB calibration,
(see “NBP Diagnostics,
Calibration” on page 6-17 ).
NBP INTERRUPTED The preset maximum time for
total measurement has been
exceeded because of motion
artifact or arrhythmia activity or,
the user pressed STOP during the
measurement.
NBP MEASURE
FAILED
No measurement values can be
derived because no pulse or
inconstant pulse is sensed.
Troubleshooting, Service and Repair 6-5
If necessary, replace the NBP
Board (see “The NBP Board” on
page 6-38 ).
Reapply cuff. Ask patient to
refrain from moving during
measurement.
Reapply cuff, or choose a new
location.
Reconnect the transmitter by
redocking.
Obtain a manual measurement.
If problem persists, use a
different transmitter.
Page 40

Troubleshooting
Table 6-1. TeleMon Information Messages
Information Message Problem Corrective Action
XMTR FAIL Error writing TeleMon data to
transmitter eeprom.
SPO2 EQUIP MALF Malfunction in the %SpO
2
hardware, or transducer/adapter
cable damaged
SPO2 ERRATIC Erratic %SpO
measurements,
2
often due to a faulty transducer or
incorrect positioning of the
transducer
May also be caused by optical
shunting if sensor too big or too
small.
SPO2 INTERFERENCE Level of ambient light is so high
that the %SpO
measure %SpO
transducer cannot
2
or pulse rate.
2
Transducer or adapter cable is
damaged.
May also be due to electrical
interference.
May also be generated by a
defective transmitter.
Replace transmitter and contact
service.
Change transducer or adapter
cable.
If message persists, replace
transmitter.
Line up light source and
photodetector - they must be
opposite each other and light
must pass through the arteriolar
bed.
Reposition transducer to site
with higher perfusion.
Replace transducer or adapter
cable.
Use different sensor with correct
fit.
Cover sensor with non-white
opaque material (for example,
pulse oximeter probe wraps Posey wrap or equivalent) to
reduce ambient light.
If message persists, inspect and
replace transducer or adapter
cable as needed.
Reduce sources of electrical
interference.
6-6 Troubleshooting, Service and Repair
If the above corrective actions
are ineffective, use a different
transmitter, and replace the
defective one.
Page 41

Troubleshooting
Table 6-1. TeleMon Information Messages
Information Message Problem Corrective Action
SPO2 NOISY SIGNAL Excessive patient movement or
electrical or optical interference is
causing irregular pulse patterns
SPO2 NON PULSATILE Pulse too weak or not detectable
May also be generated by a
defective transmitter.
NPB measurement being made on
the same extremity as %SpO
SPO2 TRANS MALF The %SpO
transducer is
2
2
malfunctioning.
%SpO
connector on the
2
transducer or transmitter is dirty
or corroded.
Locate sensor at site with less
movement.
Reduce sources of electrical or
optical interference.
If the above corrective actions
are ineffective, consult the
Telemetry System Service
Training and Reference Guide.
Relocate sensor to site with
improved circulation.
Warm area to improve
circulation.
Try another sensor type.
If the above corrective actions
are ineffective, use a different
transmitter.
Replace the transducer or
adapter cable.
Change the transmitter.
Xmtr BATTERY DEAD If it communicates, transmitter
was docked with a dead 9-volt
Undock transmitter and replace
transmitter battery.
battery.
Transmitter EPROM may be
damaged; ECG monitoring may
stop.
Xmtr BATTERY WEAK
Note—Overrides
Transmitter was docked with a
weak 9-volt battery.
Undock transmitter and replace
transmitter battery.
CHARGE MON BAT
message at central, but
both messages will be
displayed at TeleMon.
XMTR MALF Transmitter malfunctioning Replace transmitter.
Troubleshooting, Service and Repair 6-7
Page 42

Troubleshooting
Self-Test Error and Event Log Messages
The following table describes TeleMon Self-Test Error Messages, and Event Log Messages
(available in Service Mode). Additionally, this table provides corrective action to remedy
these failures.
There are differences in the severity of event log messages and error messages:
• Error messages can prevent TeleMon from getting into monitoring mode, and require
immediate attention.
• Screen messages and event log messages, on the other hand require attention, but don’t
prevent TeleMon from getting into monitoring mode.
For details on displaying the Event Log, see “Viewing the Event Log” on page 6-15 .
Table 6-2. TeleMon Information Messages
Message Problem Message
Battery dead. System
will shut down.
Restart with AC
cable attached.
Battery needs
reconditioning
Battery Error No Recharge battery.
Battery Message No Recondition
Type
Log
Entry
Corrective
Action
battery. If problem
persists, replace
battery.
Button “xxx” is not
functioning
Calibration
EXPIRED
Calibration
INVALID
NBP communication
failure
Calibration date
UNKNOWN
Keyboard Error No Reboot. If problem
persists, replace
keyboard.
NBP Message No Conduct NBP
calibration.
NBP Error No NBP Calibration
process has failed.
Recalibrate NBP
module.
NBP Error Yes
“NBP test
err
XXXXX”
NBP Message No Caused by
Reboot TeleMon.
If problem persists,
replace NBP
board.
TeleMon software
upgrades where
the NBP module
has been used
more than 100
measurements.
Conduct NBP
calibration.
6-8 Troubleshooting, Service and Repair
Page 43

Table 6-2. TeleMon Information Messages
Troubleshooting
Message Problem Message
Type
No/FFX1/Startup.ini
OS Err 2
Cannot find ‘selftest,’ (or one of its
components).
Make sure the path
and filename are
correct and that all
required libraries are
available.
None Time Error No Set clock correctly.
OS Error No TeleMon
OS Error No Irreversible
Log
Entry
Corrective
Action
automatically tries
to connect to host
PC for service.
Reload the
TeleMon
application
software.
damage to the
main processor
board caused by
disconnecting
adapter cable
during application
software upgrade.
Replace main
processor board.
If problem persists,
replace coin cell
battery.
NBP Event Log
Error Codes
None Time (Reboot
with no
corresponding
error log)
None Time (Time
stamp on NBP
measurement is
incorrect)
Every NBP measurement is captured in the event log in the following format:
INFO <time> <date> Nbp.cpp(349) NBP SunTech Err=XX data=SYS/DIA/MEAN
where,
• XX = the error code (see table below)
• SYS = returned systolic value
• DIA = returned diastolic value
• MEAN = returned mean value
Error No Replace coin cell
battery.
Error No Replace coin cell
battery.
Troubleshooting, Service and Repair 6-9
Page 44

Troubleshooting
The following table lists NBP error codes and their appropriate TeleMon message. For details
on troubleshooting NBP messages, see “TeleMon Information Messages” on page 6-4 .
Table 6-3. NBP Event Log Error Codes
NBP
Error
Code
TeleMon Message Probable Cause
Additional
Information
0 N/A No error Valid NBP
measurement
1 NBP MEASURE FAILED Weak or no oscillometric signal
2 N/A Artifact/erratic oscillometric
signal
Questionable
NBP
measurement
3 NBP MEASURE FAILED Exceeded retry count
4 NBP INTERRUPTED Exceeded measurement time
limit
85 NBP MEASURE FAILED Blocked valves of pneumatics
86 NBP INTERRUPTED User aborted measurement
87 NBP INTERRUPTED Inflation time-out, or air leak
88 NBP INTERRUPTED Safety time-out
89 NBP CUFF OVERPRESS Cuff overpressure
90 NBP EQUIP MALF Power supply out of range, or
other hardware problem
91 NBP EQUIP MALF Safety override fitted or
autozero out of range
97 NBP EQUIP MALF Transducer out of range
98 NBP EQUIP MALF A/D out of range
99 NBP EQUIP MALF EEPROM calibration data CRC
failure
NBP MEASURE FAILED Any communication failures
CUFF NOT DEFLATED Cuff has pressure > 15 mmHg
after 3 minutes of measurement
Table 6-4. Additional Troubleshooting Tips
Issue Probable Cause
Parameters transmitted
to Information Center
Antenna coverage area It is important to keep the patient within the antenna covering
6-10 Troubleshooting, Service and Repair
TeleMon displays ECG waveforms, a pleth wave, a delayed/
annotated ECG wave, heart rate, %SpO2, and NBP, and transmits
to the IC ECG, %SpO2 and NBP. ECG, %SpO2 and NBP are
calculated by TeleMon, the remainder parameters are calculated
by the transmitter.
area because TeleMon does not indicate when and if the
transmitter is outside the covering area.
Page 45

Troubleshooting
Table 6-4. Additional Troubleshooting Tips
Issue Probable Cause
Display looks dark If the display looks dark even after adjusting the brightness, it’s
possible the display needs to be replaced. The display’s estimated
half-life is approximately two years. (For details, see “The
Display” on page 6-41 .)
NBP measurement
difficulties
Diminishing battery life If the battery life seems to be diminishing after a number of
If you experience difficulties conducting NPB measurements,
(for example a new patient has higher HR than the previous one),
reboot TeleMon to reset internal settings.
charge/discharge cycles, the battery may need reconditioning. For
details on how to recondition the battery, see “Using the Battery
Reconditioner” on page 6-26 .
Power On Self-Test
The self-test function checks the following components:
• Circuit boards operation (including processor board)
• Reporting of application and operating system revision numbers
• Reporting of internal NBP module software revision number
• TeleMon hardware revision
• Speaker for alarm sounds
•Clock
•Keypad
• Battery charge
• Battery reconditioning
• NBP calibration and use count
• NBP measurement failure messages
If during the power-on self-test you do not hear the alarm sound, turn off the monitor and turn
it back on again. If the alarm sound still cannot be heard, contact your service representative.
If during the self-test the battery charge is detected to be below 15%, the monitor will not
come up in Monitoring Mode. Instead, the monitor will power off and log a shutdown event
in the Event Log. To start the monitor again, insert the AC/DC power cable, or insert a fullycharged battery.
If during self-test the NBP calibration is determined to be invalid, you are forced to enter
Service Mode. You cannot enter Monitoring Mode until you complete a valid NBP
calibration.
Note—If a message displays on the screen indicating that the battery needs reconditioning,
TeleMon still comes up to monitoring mode. You may continue using the battery if it has
enough charge for your monitoring needs. However, the battery should be reconditioned as
soon as possible.
If power is interrupted to the TeleMon and it does not have a battery installed, TeleMon’s
settings revert to the unit settings.
Troubleshooting, Service and Repair 6-11
Page 46

Service Mode
Service Mode
This section covers TeleMon’s Service Mode.
Service mode presents all the device setup functions in the Device Setup Menu. All settings
selected in the Device Setup Menu are saved once you exit the Setup Menu and are retained
even after a power cycle. The following settings are available in Service Mode:
• Restore standard settings
• Enter Demo mode
• Adjust the display contrast, and date & time.
• View transmitter information.
• Perform service functions on TeleMon and the transmitter
– View TeleMon event log
– Calibrate and diagnose NBP
– Upgrade software/clone settings
– Configure alarms
– Configure the transmitter
Activating Service Mode
Restoring
Standard
Settings
The first four items are available to users as well as service personnel. All other service
functions are password protected and should be performed by qualified service personnel
only.
Note—A transmitter is only needed in Service Mode when you are configuring it. All other
functions can be performed without a transmitter.
Service Mode can be activated during the power-up sequence in either one of two ways:
• turn TeleMon ON. After the logo displays at the center of the screen, and the message
Push button for Service appears, press the Check button below the display.
• once you have a PC setup to service TeleMon, attach an appropriate service cable, (for
example an HP F1223-60901 cable) from the PC to the upgrade port on TeleMon, and
turn TeleMon ON.
To exit Service Mode, you can either:
• turn the monitor off, or
• click Done at the General Configuration Menu and press Accept.
For more information on display settings, see “Monitor Setup” in the TeleMon B Companion
Monitor Information for Use document. When you restore standard settings, all setting revert
to the factory default, except for alarm sound type, NPB calibration date and use count, and
the ability to turn off local alarms.
When you restore standard settings, all setting revert to the factory default, except for alarm
sound type, NPB calibration date and use count, and the ability to turn off local alarms.
To restore standard settings, use the following instructions.
Step 1. From the Device Setup Menu, select Restore Standard Settings.
6-12 Troubleshooting, Service and Repair
Page 47

Caution
Current settings will be lost when standard unit settings are restored.
Step 2. Press Go.
Step 3. Press Accept or Cancel at the confirmation dialog box.
If you press Accept, a message appears when the restore completes.
Step 4. Press Done to return to the Device Setup menu.
Service Mode
Entering Demo
Mode
Change Date &
Time, Display
Contrast
Demo mode facilitates learning how to use TeleMon. It shows sample wave forms for a 5lead transmitter and helps you familiarize yourself with the controls.
Note that no EASI measurements are available in Demo Mode, and that the ECG wave form
has a drop-out every 60 seconds. No transmitter is required to run the demo.
WarningWarning
If the transmitter is docked to TeleMon while in Demo Mode, the transmitter continues
to transmit information to the Information Center, but that information doesn’t display
on TeleMon, nor does the demo data go to the Information Center. While in Demo Mode
TeleMon displays only the pre-programmed demonstration.
Step 1. To activate Demo Mode, select Enter Demo Mode from the Device Setup Menu.
Step 2. To exit Demo Mode, turn the monitor OFF.
This selection allows you to change the contrast of the display to better suit your viewing
conditions. It also allows you to verify or change the date and time.
To adjust the display contrast or work with the date and time, follow these instructions.
Step 1. From the General Configuration Menu, select Date & Time, Display Contrast.
Step 2. Press Go.
Step 3. Select either Adjust Display Contrast or Set or Verify Time and Date.
Viewing Transmitter Information
Step 4. To adjust the display contrast: Use the arrow keys to adjust the contrast. The screen
sample displays the result of the selection. Press Done.
To set the date and time: Use the arrow keys to adjust each number and use the
Next Setting key to move among fields. Press Done after you complete the
changes.
This selection allows you to view the current settings of the docked transmitter.
To view the transmitter information, follow these steps.
Step 1. From the General Configuration Menu, select View Transmitter Information.
Step 2. Press Go.
Step 3. Press View SpO2 Hardware to view the SpO2 hardware information.
Troubleshooting, Service and Repair 6-13
Page 48

Service Mode
Step 4. If you remove the transmitter and insert a different one, press Update to update the
display with information from the new transmitter.
Step 5. Press Done to exit.
Performing Service Functions
This section describes the service functions that are password-protected. When you select
TeleMon and Transmitter Service from the Device Setup Menu, you are prompted to enter the
password. The password to access these functions is 14432.
To access the TeleMon and Transmitter Service menu:
Step 1. Select it and press Go.
Step 2. Enter the password 14432.
To enter the password:
a. Use the Navigate through digits button to move the flashing cursor to the
next field. Use the Select digit arrows to change the number.
b. After you have entered the password of 14432, press Enter password.
If you entered the password correctly, the TeleMon and Transmitter Service menu appears.
6-14 Troubleshooting, Service and Repair
Page 49

Service Mode
Viewing the
Event Log
Displaying the event log is useful during troubleshooting. Events that are logged include:
• Monitor mode start
• Watchdog timer arming
• Watchdog timer resets
• System exception resets
• Battery critically low shutdown events
• Alarm suspend/unsuspend events
• NBP out of calibration
• Battery out of calibration
To view the event log, use the following steps.
Step 1. Select View the Event Log from the Device Setup Menu.
Step 2. Use the up/down arrows on the front panel to scroll through the log.
Step 3. Use the up/down buttons to view the upper or lower portion of the screen. For logs
with more than one section, press the View older log. This key is available only if
two sections exist.
Step 4. Press Done to exit the Event Log.
Step 5. To exit Setup, press Done twice and then Accept.
Note—When the Event Log reaches a maximum size, TeleMon copies the Event Log to a
different file (RunTimeOld.txt) and makes space for a new file. For details on downloading
event log files, see page 6-15.
Downloading
the Event Log
Downloading the event log may be necessary when troubleshooting TeleMon. To download
the event log, a connection between the PC and TeleMon needs to be established. This
Troubleshooting, Service and Repair 6-15
Page 50

Service Mode
connection gives you access to the event log file(s). For information on connecting the
TeleMon to a PC, see “Upgrading the Software” on page 6-19 . Use the following steps to
download the TeleMon Event Log onto a PC.
Step 1. Enable ActiveSync serial connections. For details, see “Enabling/Disabling
ActiveSync Serial Connections” on page 6-23 .
Step 2. Connect the synch cable to the host PC.
Step 3. With TeleMon OFF, remove the door that protects the TeleMon upgrade port,
underneath the monitor. (You may use a slot-head screwdriver to carefully push and
release the latch.)
Step 4. Connect the free end of the synch cable to TeleMon.
Step 5. Turn TeleMon ON to establish the connection.
Step 6. When the host PC asks if you want to set up a partnership, select No. (TeleMon
does not support full partnerships over ActiveSync.)
Step 7. Click the Next button on the PC.
Step 8. Open Windows Explorer on the PC.
Step 9. Select the Mobile Device directory, and double-click on My Computer.
Step 10. Double click on the Ffx1 subdirectory.
Configuring the Transmitter
Step 11. Copy the RunTimeLog.txt file to a floppy, or to the hard drive.
If a file RunTimeOld.txt is available, copy that file as well.
Step 12. Before disconnecting, make sure that the RunTimeLog.txt file displays in the
destination folder. (The file is standard text accessible through Notepad, or a similar
application.)
Step 13. Rename the log files on the PC using the following format:
– TeleMonSerial#_date.txt
Step 14. When done, close Windows Explorer.
Step 15. Disconnect the cable and restart TeleMon.
Configuring the transmitter allows the user or service personnel to change the frequency of
the transmitter, the RF auto shutoff, the leadsets, and the SpO
transmitters.
To configure the transmitter, use the following procedure.
Step 1. Select Configure Transmitter from the Device Setup Menu.
Step 2. Select Go.
Step 3. Insert the transmitter and select Update.
Step 4. Choose an item to configure:
If you want to... Select
determinations of undocked
2
change the RF frequency RF Configure
change the SpO2 determinations
choose the leadset Leadset and Misc. Status
6-16 Troubleshooting, Service and Repair
Undocked SpO
2
Page 51

Service Mode
Step 5. Select Go.
Step 6. Make changes to the settings using the up and down arrows on the front panel.
Step 7. When complete, select Done. The message “You have made changes. Do you want
to save?” is displayed.
Step 8. Select Accept.
Step 9. Enter the password number. (For instructions, see Step 2 on page 6-14.)
Step 10. Select Enter check code. The message “RF frequency has been saved” is displayed.
Step 11. Select Done.
Step 12. Select Done again until the message “Do you want to Exit Service Mode?” is
displayed.
Step 13. Select Accept.
NBP
Diagnostics,
Calibration
Determining When to Perform Calibrations
The NBP calibration should be performed once a year or every 10,000 measurements,
whichever comes first. (A measurement count appears on the screen during the self-test after
the monitor is first turned on.). If “NBP USE COUNT HIGH” appears, the relative NBP use
count is higher than the count limit detected in self-test mode. You must calibrate NBP to
remove either of these messages. The calibration procedure is done in Service Mode.
Quick-Check Capability
TeleMon gives you the ability to check the pressure reading before you perform the
calibration. To check the pressure reading, you need an adult cuff or a manometer pressure
generator (BP bulb), and a T adaptor. You do not need a PC or a transmitter for this
procedure.
Use these steps to check the pressure reading.
Step 1. Connect the adult cuff, or manometer to the monitor.
Expansion Chamber
NBP Connector
Manometer
Step 2. Select TeleMon and Transmitter Service from the General Configuration menu and
press Go!
Step 3. Enter the password 14432 and press Enter Password.
Step 4. Select Calibrate and Diagnose NBP from the TeleMon and Transmitter Service
Menu and press Go!.
Step 5. Apply pressure and press the Read Pressure button.
Step 6. Check the pressure reading on the TeleMon screen to see if it’s different from the
pressure you applied. This reading will be a good indicator of the need to conduct a
Troubleshooting, Service and Repair 6-17
Page 52

Service Mode
calibration.
Note, regardless of the accuracy of this quick-check, the NBP calibration should
be performed at least once a year or every 10,000 measurements, whichever
comes first.
Step 7. To exit Setup, press Done twice and then press Accept.
Conducting NBP
Calibration
To conduct the calibration, you will need a manometer pressure generator (BP bulb), and a
T adaptor. It’s also recommended that you use an expansion chamber, or an adult cuff
applied around a bottle or other object of appropriate size; using an expansion chamber or
a cuff makes it easier to stabilize at a given pressure. You will not need a PC or a
transmitter to conduct this calibration.
Before you start this calibration, note that you must complete the calibration within three
minutes, and that valves release if pressure is over 300 mmHg.
Note—If the calibration fails and you power off TeleMon, you are forced to enter service
mode when you start TeleMon again. You cannot use any monitoring functions until you
successfully complete NBP calibration.
Step 1. Connect a manometer with a pressure generator to the monitor using the tubing
and the T adapter.
Expansion Chamber
NBP Connector
Manometer
Step 2. Select TeleMon and Transmitter Service from the General Configuration menu
and press Go!
Step 3. Enter the password 14432 and press Enter Password.
Step 4. Select Calibrate and Diagnose NBP from the TeleMon and Transmitter Service
Menu and press Go!.
Step 5. Apply 0 mmHg, and press Read Pressure.
Step 6. Apply 250 mmHg and press Read Pressure.
– If calibration is successful, the function reports that the Calibration is
successful.
Step 7. Press the check-mark button to return to the Setup menu.
– If calibration fails, you must restart the NBP Calibration.
Step 8. To exit Setup, press Done twice and then press Accept.
Note—The air pump is rated for approximately 30,000 cycles. After that, the assembly
must be replaced. For details, see “The NBP Board” on page 6-38 .
6-18 Troubleshooting, Service and Repair
Page 53

Service Mode
Upgrading the Software
TeleMon ships with the appropriate software from the factory. However, it may be necessary
to upgrade the monitor’s software while servicing the unit. This section describes how to
upgrade the software, for both application and operating system.
TeleMon’s monitoring software and its configuration files are stored separately from the
operating system. This setup allows you to upgrade the monitoring software without
reprogramming the operating system.
Note—You use the TeleMon Support Tool to upgrade the application software. Therefore, the
TeleMon Support Tool must first be installed on your host computer. Refer to “Installing the
TeleMon Support Tool” on page 6-22 for more information.
The required software components for upgrading TeleMon are contained on the TeleMon
Installation CD. Those components are:
• TeleMon Application Software (in directory \Telemon Support)
• TeleMon Operating System (in directory \Tm_os)
• Programming tool for programming the Operating System in TeleMon (in directory
\OS_Tool)
• Microsoft ActiveSync Connectivity Software (in directory \msasync)
Additionally you will need the following items to upgrade TeleMon:
• A host computer, laptop or desktop, with a free serial port.
Note—If you are using a laptop, it must be plugged into an AC power source to insure
that the processes are not interrupted.
• A synch cable that fits into TeleMon’s upgrade connector, for example an HP F1258A
or HP F1223-60901 cable.
• A TeleMon Installation CD.
Getting Started The first step to upgrade TeleMon’s software is setting up the host computer; this includes
installing the TeleMon Support Tool. Once the host computer is setup, and you’ve determined
what portion of the software needs to be upgraded, you can proceed with the installation.
Note—TeleMon must be connected to AC power when you are upgrading the software or
operating system.
The following table describes the different software installation procedures described in this
section.
Table 6-5. Software Installation
If Then
you need to install the operating system, see “Upgrading TeleMon’s
Operating System” on page 6-22 .
you need to install TeleMon’s
application software,
see “Installing TeleMon’s
Application Software” on page 623 .
Troubleshooting, Service and Repair 6-19
Page 54

Service Mode
Table 6-5. Software Installation
If Then
you need to enable or disable
ActiveSync connections,
see “Enabling/Disabling
ActiveSync Serial Connections” on
page 6-23 .
you need to download the event log, see “Downloading the Event Log”
on page 6-15 .
Setting Up the
Host Computer
To upgrade the TeleMon software, you need a PC with the TeleMon Support Tool and
Microsoft ActiveSync installed. The Microsoft ActiveSync connectivity software is included
on the TeleMon Installation CD under CD:\msasync. You only need to install this software on
your PC once, when you first set it up for servicing TeleMon.
If you already have Microsoft ActiveSync installed, you will need to uninstall it and make
modifications to your synchronization files. Follow this procedure to ensure the register files
are setup correctly, otherwise you may experience difficulties upgrading TeleMon software.
Note—Setting up your PC to service TeleMon requires changes to existing partnership and
synchronization files on your PC; furthermore, previously established partnerships and
synchronization files could be lost. For this reason, it is recommended that you back up
existing Microsoft ActiveSync settings before using this procedure.
Use the following steps to setup your computer.
Step 1. If you already have Microsoft ActiveSync installed, back up existing Microsoft
ActiveSync settings on your PC.
If you do not have ActiveSync installed, skip to step 3.
Step 2. Uninstall Microsoft ActiveSync from your PC.
Step 3. Insert the installation CD into the CD-ROM drive.
Step 4. Activate Windows Explorer and double-click on the
CD:\msasync\Current_User_CE_Service.reg file to install this register.
Step 5. Double-click on the CD:\msasync\Local_Machine_CE_Service.reg to install this
register.
Step 6. Install ActiveSync on your PC (CD:\msasync\Msasync.exe), and follow the
instructions on the screen.
Step 7. When the installation screen displays, click Next.
6-20 Troubleshooting, Service and Repair
Page 55

Step 8. When the reinstall screen displays, click Next.
Service Mode
Step 9. When the Registry Settings Failed message displays, click OK.
Troubleshooting, Service and Repair 6-21
Page 56

Service Mode
Step 10. Set the baud rate of COM1 to 115K (if you are using a port other than COM1 to
connect to TeleMon, set that port’s baud rate to 115K).
Installing the
TeleMon
Support Tool
Upgrading
Tel e Mon’s
Operating
System
The TeleMon Support Tool simplifies the process of upgrading TeleMon’s software, cloning
settings from one TeleMon to another, and changing the displayed language used by
TeleMon.
To install the TeleMon Support Tool:
Step 1. Insert the TeleMon Support Tool installation CD into your host computer’s CD-
ROM drive.
Step 2. Navigate to the TM_Support directory of the CD, run TeleMon Support.msi, and
follow the on-screen instructions.
Note—If the installation program does not run, refer to the ReadMe.txt file in the TM-Support
directory for instructions.
At this point, the PC is ready for servicing TeleMon.
Upgrading the operating system is necessary only when the operating system is corrupt, or
when required by an upgrade/service procedure.
Upgrading the software can take over ten minutes. To upgrade TeleMon’s operating system,
use the following steps.
Step 1. With TeleMon OFF, remove the door that protects the TeleMon upgrade port,
underneath the monitor (you can use a slot-head screwdriver to carefully push and
release the latch).
Step 2. Connect the synch cable to TeleMon. Do not connect it to the PC yet.
Note—When connecting and disconnecting the adapter cable, do so very gently to ensure that
no damage is done to the circuit board. The circuit board can be damaged if not handled
properly.
Step 3. Disable the Microsoft ActiveSync serial port connection on the PC. (See “Enabling/
Disabling ActiveSync Serial Connections” on page 6-23 .)
Step 4. Be sure that the baud rate is set to 115K for the port that you are using to connect to
TeleMon.
Step 5. Insert the installation CD into the CD-ROM drive.
Step 6. Run the Clearcom program, CD:\OS_Tool\Clearcom.exe, on the host PC. (The
program will run in the background. You won’t see a message on the screen.)
Step 7. Run the OS download tool, CD:\OS_Tool\TabletDL.exe, on the host PC. (A dialog
box displays on the screen.)
Step 8. Click on the Browse button, select the OS image you want to download;
CD:\Tm_os\xxxxxxxx.bin, where xxxxxxxx is the revision number, and then click
Open.
Step 9. Connect the serial cable to the PC’s serial port COM1.
Step 10. Click the Download button.
6-22 Troubleshooting, Service and Repair
Page 57

Service Mode
Step 11. To initiate the download process, press and hold the NBP button, (last button on the
right), and turn TeleMon ON. Hold the NBP button down until the download
process starts.
– If the download doesn’t start, and a time-out error displays on the computer screen,
restart the process beginning with step 1.
Step 12. When the PC recognizes TeleMon and the download begins, release the NBP button.
You’ll see a progress bar on the screen. (If the download is unsuccessful, close the
download window and restart the process starting with step 1.)
Once the download completes, the progress bar disappears from the screen.
Step 13. When done, click Exit on the computer.
Step 14. Remove the cable, replace the upgrade port door, and reboot TeleMon.
Step 15. As TeleMon boots up, check the self-test to ensure no errors are detected.
Enabling/Disabling ActiveSync Serial Connections
Use the following steps to enable or disable Microsoft ActiveSync on the host PC.
Step 1. Double-click on the ActiveSync icon on the desktop.
Step 2. Click on File and select Connection Settings.
Installing
Tel e Mon’s
Application
Software
Step 3. To enable or disable ActiveSync, click the Allow serial cable or infrared
connection to this COM port box, and select the appropriate COM setting from the
pull-down menu.
Step 4. Click OK when done.
Step 5. Close the Microsoft ActiveSync window to exit this menu.
Once the host PC has ActiveSync and the TeleMon Support Tool installed, install the
TeleMon Application Software by using the following steps.
Note—Except for NBP calibration and use count, all TeleMon settings revert to the default
settings when the upgrade is complete. If you need to preserve the current settings of your
TeleMon, use Clone Settings to retrieve the configuration from the TeleMon and save the
settings. Refer “Cloning Settings” on page 6-25 for more information. Make sure that the OS
programming tool is not running on the host PC. If it is, exit that program.
Step 1. Enable the ActiveSync serial connections on the host PC. (“Enabling/Disabling
ActiveSync Serial Connections” on page 6-23 .)
Step 2. Connect the synch cable to the host PC.
Step 3. Be sure that the baud rate is set to 115K for the port that you are using to connect to
TeleMon.
Step 4. With TeleMon OFF, remove the door that protects the TeleMon upgrade port,
underneath the monitor.
Step 5. Turn TeleMon ON.
Step 6. When the self-test screen appears, connect the cable to the TeleMon upgrade port.
Troubleshooting, Service and Repair 6-23
Page 58

Service Mode
Caution
Make sure that synch cable is not accidentally disconnected while the application
software is being installed. Should this happen, irreversible damage to the main
processor board will occur, and you will need to replace it. If the cable is accidentally
disconnected, the following error message displays on the TeleMon screen: “Cannot find
‘self-test,’ (or one of its components). Make sure the path and filename are correct and
that the required libraries are available.”
Note—When connecting and disconnecting the adapter cable, do so very gently to ensure
that no damage is done to the circuit board. This board is fragile and can be damaged
if not handled properly.
– TeleMon should recognize the connection to the host PC and boot to Service
Mode. At this point, you’ll see the Connecting to Serial @ 115K message on the
TeleMon screen.
– TeleMon automatically connects to the host PC. If it doesn’t, repeat this process.
(It is possible the Clearcom program wasn’t launched properly. See step 1.)
Step 7. When the PC asks if you want to set up a partnership, select No, and click the Next
button. (The ActiveSync task bar icon will turn green when connected.)
Step 8. Start the TeleMon Support Tool.
Step 9. Click Upgrade TeleMon Software.
Step 10. Select the language for the upgrade.
– If necessary, select either AAMI or IEC. Be sure to select the appropriate standard
for your location.
Step 11. Click Upgrade Software
6-24 Troubleshooting, Service and Repair
Page 59

Service Mode
– A progress bar indicates the status of the upgrade.
Step 12. When the upgrade is complete, you can turn TeleMon OFF and remove the cable.
Step 13. Replace the upgrade port door and turn TeleMon ON. The application installation
process is now complete.
Step 14. Verify that the TeleMon software version in the boot screen matches the version of
the software on the CD-ROM.
Step 15. Verify that the time and date are properly set.
Cloning Settings
The Clone TeleMon Settings function of the Support Tool allows you to configure other
TeleMon monitors with identical settings. Using the Support Tool, you can retrieve
configuration settings from a monitor, create a new configuration file, or open a configuration
file. You can also print a configuration file for later reference.
Before you can use the cloning software, you must prepare your computer as described in the
section “Setting Up the Host Computer” on page 6-20 .
To use the support software to clone settings, follow these steps:
Step 1. Connect one end of the serial cable to your computer.
Step 2. Power on TeleMon and connect the serial cable to TeleMon when the self-test
screen displays.
Step 3. Start Active Sync if it is not already running.
You are prompted to start Active Sync if it is not running when you try to retrieve or
send settings.
Step 4. Start the TeleMon Support Tool.
Step 5. Click Clone TeleMon Settings.
The Clone TeleMon Settings window displays.
Note—The Clone Settings selection on the TeleMon monitor displays an information screen
only. You cannot change any settings on this screen.
Creating and Using a New Configuration
If you are creating a new configuration, adjust the settings and either save them or send them
to the TeleMon. If there are any settings in the fields, click New Configuration to clear all
fields.
To send the settings to the TeleMon, click the Send Configuration button.
To save the settings, click Save Configuration.
Retrieving a Saved Configuration
If you want to use a previously saved configuration, click Open Configuration and open the
configuration file you want to use.
You can edit a saved configuration file and save it with a different name if you want to keep
the older configuration file.
Retrieving a Configuration from TeleMon
If you want to retrieve a configuration from a TeleMon, click Get Configuration. You can
then make changes, save the configuration, or send the configuration to other TeleMon
monitors.
Troubleshooting, Service and Repair 6-25
Page 60

Using the Battery Reconditioner
Changing TeleMon’s Language Display
The Change Language function of the Support Tool allows you to change the language that
TeleMon displays. This might be necessary if your location needs to use more than one
language.
Before you can change TeleMon’s language, you must prepare your computer as described in
the section “Setting Up the Host Computer” on page 6-20 .
To use the support software to change the language, follow these steps:
Step 1. Connect one end of the serial cable to your computer.
Step 2. Power on TeleMon and connect the serial cable to TeleMon when the self-test
screen displays.
Step 3. Start Active Sync if it is not already running.
You are prompted to start Active Sync if it is not running when you try to change
the language.
Step 4. Start the TeleMon Support Tool.
Step 5. Click Change Language.
The Change TeleMon Language window displays.
Step 6. Select the language you want to use.
– If necessary, select either AAMI or IEC. Be sure to select the appropriate standard
for your location.
Step 7. Click Change Language.
– A progress bar indicates the status.
Step 8. When the process is complete, you can turn TeleMon OFF and remove the cable.
Step 9. Replace the upgrade port door and turn TeleMon ON.
Step 10. Verify that the language displayed is the one you selected.
Step 11. Verify that the time and date are properly set.
Using the Battery Reconditioner
The Battery Reconditioner can be used for charging or reconditioning the TeleMon battery.
The reconditioner is an optional accessory.
During normal operating conditions, the battery is recharged while TeleMon is connected to
an AC power source. However, over time the battery loses its ability to fully charge. When
the battery’s capacity changes by 10% from the last time it was reconditioned, a microchip
inside the battery indicates that it needs reconditioning to optimize its performance.
To keep the battery within its optimum capacity range, it’s necessary to recondition it when it
loses 10% of its capacity, or approximately after 30 cycles. TeleMon indicates when the
battery needs reconditioning during the self-test.
This section describes how to use the reconditioner.
6-26 Troubleshooting, Service and Repair
Page 61

Using the Battery Reconditioner
WarningWarning
Do not use the battery reconditioner in the patient vicinity.
Be sure there is no contact between the patient and the charger, including no contact
from the charger to a medical care giver to the patient.
The Battery Reconditioner can be used for charging or reconditioning the TeleMon battery.
During normal operating conditions, the battery is recharged while TeleMon is connected to
an AC power source. However, over time the battery loses its ability to fully charge. When
the battery’s capacity changes by 10% from the last time it was reconditioned, a microchip
inside the battery indicates that it needs reconditioning to optimize performance.
During the reconditioning process, the battery is discharged, charged, discharged again, and
then charged again.
The following table lists the definition for each LED state on the reconditioner.
LED State Icon Definition
Off No battery detected in bay
Green Flash Charging
Green Solid Fully charged
Yellow Flash Reconditioning
Yellow/Green Flash Reconditioned and fully charged
Yellow Solid Standby: battery in bay waiting to be charged
Error:
• Check the battery reconditioner bays to ensure that
they are clean of foreign objects.
Red Flash
Determining when to recondition or charge the battery
The TeleMon monitor checks the battery during self-test, and the display indicates when the
battery needs reconditioning or charging.
Before you start this process, note that reconditioning the battery can take over 12 hours.
During the reconditioning process, the battery is discharged, charged, and again discharged a
second time to reset its internal settings; finally to get it ready for use, it’s recharged.
• Ensure that the correct type of battery has been
inserted.
• Check to see if a battery is defective. The
reconditioner indicates an error if a battery reaches
a temperature higher than 65°C (149°F).
Recondition a Battery
To recondition a battery, use the following procedure.
Step 1. Connect the reconditioner to power.
Step 2. Insert the battery to be reconditioned into the LEFT bay.
Note—Only the LEFT bay can be used for reconditioning.
Troubleshooting, Service and Repair 6-27
Page 62

Repair
Step 3. Press the recondition button. The recondition button is the blue button with the
symbol.
During reconditioning, the LED flashes yellow. When reconditioning is complete,
the LED flashes between yellow and green.
Charging a Battery
Repair
To charge a battery using the Reconditioner, use the following procedure.
Step 1. Connect the reconditioner to power.
Step 2. Insert the battery to be charged into either bay.
During charging, the LED flashes green. When charging is complete, the LED stays
green.
Note—When a message displays on the screen indicating that the battery needs
reconditioning, TeleMon still comes up to monitoring mode. You may continue using the
battery if it has enough charge for your monitoring needs. However, the battery should be
reconditioned as soon as possible.
This section covers how to repair TeleMon.
Repair is the replacement of currently defective replaceable modules. Once you have
determined the module in which the defect is located, disassemble the monitor to the
appropriate level, replace the module, and reassemble. Refer to the overview below to locate
the appropriate level.
Note—Replaceable modules are listed in Chapter 7.
Note—If you replace the NBP Board or Main Board, you must recalibrate the NBP.
Tools Table 6-6 lists the tools required to disassemble and reassemble the Monitor Unit of the
M2636B TeleMon.
Table 6-6. Tools for Monitor Disassembly/Reassembly
Tools
Number 6 Torx screwdriver
Number 10 Torx screwdriver
3/16 Nut Driver
6-28 Troubleshooting, Service and Repair
Page 63

Overview
Repair
Remove Battery
(page 6-32)
Remove Front Panel
Assembly
(page 6-33)
Remove Chassis
Assembly
(page 6-35)
Remove Speaker
(page 6-44)
Remove Battery
Compartment
(page 6-39)
Remove Battery Door
(page 6-46)
Remove Transmitter
(page 6-39)
Dock
Working on
Chassis
Assembly?
Remove Main PC
Board
(page 6-42)
YesNo
Remove NBP Board
(page 6-38)
Remove Inverter
Board
(page 6-39)
Remove Display
(page 6-41)
Remove Fan Assembly
(page 6-48)
Figure 6-1 Monitor Disassembly Overview
Troubleshooting, Service and Repair 6-29
Page 64

Repair
START HERE
A
Install Fan
Fan
Installed?
Y
Battery Door
In Place?
Y
Xmitter Dock
Installed?
Y
Battery
Compartment
Installed?
Y
Speaker
Installed?
N
Assembly
(page 6-48)
Replace
N
Battery Door
(page 6-46)
Install Xmitter
N
Dock
(page 6-47)
Install Battery
N
Compartment
(page 6-46)
N
Install Speaker
(page 6-44)
Display
Installed?
Y
Inverter Board
Installed?
Y
NBP Board
Installed?
Y
Main Board
Installed?
N
N
N
N
B
Install
Display
(page 6-41)
Install Inverter
Board
(page 6-40)
Install NBP
Board
(page 6-38)
Install Main PC
Board
(page 6-43)
Y
Chassis
Assembled?
N
B
Y
Note—The order of
reassembly depends on what
modules you accessed.
6-30 Troubleshooting, Service and Repair
Y
Install Chassis
(page 6-36)
Install Front
Panel Assembly
(page 6-34)
Replace battery
(page 6-32)
END HERE
Y
Rear Housing
Assembled?
Figure 6-2 Monitor Reassembly Overview
N
A
Page 65

Chassis Assembly
Front View
Repair
Rear Housing Assembly
Before You Begin
Chassis Assembly
Rear View
Front Panel Assembly
Figure 6-3 Exploded View of the TeleMon Monitor
Before you begin, please keep in mind that the M2636B TeleMon is a carefully engineered,
complex measuring instrument, even though compact and easy to use. It should be treated
with care. Use a flexible work surface. Do not drop or shove the assemblies aside. Refrain
from placing fluids where they can be accidentally spilled onto TeleMon’s electronic
components.
Pay special attention to inserting and removing assemblies and to deploying the fasteners.
Never force an assembly. During reassembly, tighten the screws only until they are snug. If
you are tightening a set of screws, proceed in sequence to opposite sides; for example, if 1, 2,
3 and 4 are at the four corners of a square, tighten in the sequence, 1, 3, 2, 4. This practice
helps to prevent misalignment and breakage.
Troubleshooting, Service and Repair 6-31
Page 66

Repair
The Battery
Caution
Your monitor contains components that will be damaged if ESD precautions are not
observed.
Removal of
Battery
Replacement
of Battery
x
x
x
x
x
x
x
x
x
x
x
x
x
x
x
x
x
x
x
x
x
x
x
x
x
x
x
x
x
x
x
x
x
x
x
x
x
x
x
x
x
Figure 6-4 Removing the Battery
Step 1. Open the battery door on the lower right side of the monitor.
Step 2. Pull the battery straight out by the battery strap.
Note—Installing the battery in the monitor is the last step of any reassembly. Do not install
the battery in a partially disassembled monitor.
Step 1. Stand the fully assembled monitor upright.
Step 2. Insert the battery with the battery name down. Make sure that it is all the way in.
Step 3. Close the battery door.
Step 4. Turn the power switch to the “ON” position. The self-test display should appear,
followed by the standard display.
Step 5. Check the battery gauge to verify the charge state of the battery.
Step 6. Perform operational and safety tests as applicable.
6-32 Troubleshooting, Service and Repair
Page 67

The Front Panel Assembly
6mm T-10
Repair
6mm T-10
Rear View
Removal of
Front Panel
16mm T-10
16mm T-10
Figure 6-5 Unfastening the Front Panel Assembly
Step 1. Place the monitor face-down on a clean, soft surface.
Step 2. Remove the two 6mm T-10 screws in the handle and the two 16mm T-10 screws
near the base. You may have to invert the monitor to drop out the screws.
Step 3. Placing the monitor on its back, open the front panel from the top and slide it toward
the top of the unit, uncovering the Keyboard-to-Main Cable.
Troubleshooting, Service and Repair 6-33
Page 68

Repair
Installation of
Front Panel
Figure 6-6 Disconnecting the Keyboard-to-Main Cable
Step 4. Lift the tabs on the monitor connector to the Keyboard-to-Main Cable to unlock the
cable. Pulling the cable out, lift off the Front Panel Assembly.
Note—The monitor must be completely assembled except for the Front Panel Assembly. Only
the Monitor Assembly, the Front Panel Assembly and the fasteners should remain loose on
hand.
Step 1. Place the Monitor on its back on the work surface.
Step 2. On the Front Panel, to remove dust that can be trapped in the display area, wipe the
LCD screen and anti-glare panel with a lint-free cloth moistened with isopropyl
alcohol.
Step 3. Position the Front Panel Assembly over the Monitor, with the Keyboard-to-Main
Cable closest to the bottom of the monitor.
Step 4. The cable connector is visible through an opening in the bottom front of the Chassis
Assembly. Make sure the side tabs are fully up.
Step 5. Insert the loose end of the cable into the top of the connector and lock by sliding the
tabs down.
Step 6. Slide the Front Panel Assembly toward the bottom of the unit and snap it in place.
The Keyboard-to-Main cable assumes an S shape.
Note—The Front Panel must contain the plastic film for ESD and water protection. It is
suggested you begin closure at the handle and push the film under the front panel at the
bottom.
Step 7. Holding the Front Panel tightly to the Rear Assembly, turn the monitor over and
secure the Front Panel Assembly with two 6mm T-10 screws in the handle and two
6-34 Troubleshooting, Service and Repair
Page 69

The Chassis Assembly
Repair
16mm T-10 screws in the housing. Be sure to tighten in a sequence of opposite
corners.
6mm T-10
6mm T-10
Removal of
Chassis
Assembly
Figure 6-7 Detaching the Chassis Assembly
Step 1. Place the monitor on its back.
Step 2. Remove the four 6mm T-10 screws holding the Chassis to the monitor.
Step 3. Stand the monitor up. Carefully lift out the Chassis Assembly, right side first, so
that you can pass the power switch through its opening on the left side of the Rear
Housing.
Note—The assembly remains tethered to the monitor by four cable connections and a
tubing connection.
Troubleshooting, Service and Repair 6-35
Page 70

Repair
NBP Collar Connector
Cable Connectors
Installation of
Chassis
Assembly
Figure 6-8 Chassis Assembly Cables
Step 4. Unhook the NBP tubing from behind the Speaker Clip. Twist the NBP Tubing
Collar Connector to separate the tubing.
Note—Half the tubing remains attached to the Rear Housing Assembly and half to the
NBP Board.
Step 5. Gently pull on the Fan-to-Main Cable connector at the Main Board to release the
cable. It remains attached to the fan.
Step 6. Squeeze the spring tab on the Speaker-to-Main Cable Connector at the Main Board
to release the cable. It remains attached to the Speaker.
Step 7. Squeeze the spring tab on the Transmitter Power Cable at the Main Board to release
the cable. It remains attached to the Transmitter Bay Assembly.
Step 8. Gently pull on the Battery-to-Main Cable connector from the Main Board. The
cable remains connected to the Battery Compartment.
Note—The order of disassembly at this point depends of which units attached to the
Chassis Assembly, or to the Rear Housing Assembly, you wish to replace.
Note—The Chassis Assembly and the Rear Housing Assembly must be completely
assembled. Make sure the films are in position on the top of the Rear Housing and on the
bottom of the Chassis.
6-36 Troubleshooting, Service and Repair
Page 71

Repair
Note—All the connectors on the Main Board are keyed to the appropriate cable connector. Do
not force a connector. If it does not easily fit, it is the wrong connector.
Step 1. Stand the Rear Housing Assembly up on the work surface, facing you.
Step 2. Align the Chassis Assembly flat on the work surface before the Rear Housing
Assembly, with the Main Board up and the NBP Board closest to you.
Step 3. Fit the flange on the bottom front of the Battery Compartment between the Chassis
and the Main Board.
Step 4. Press the connector of the Transmitter Power Cable into the keyed connector on the
Main Board.
Step 5. Press the connector of the Speaker-to-Main Cable into the keyed connector on the
Main Board. You may have to tilt the Chassis Assembly up a little.
Step 6. Tilting the Chassis Assembly up, press the Battery-to-Main Cable connector into the
keyed connector at the left side of the Main Board.
Caution
Make sure that when the Chassis Assembly is tilted into place, the cable folds into the
pocket formed by the fold in the battery connector film (attached to the Speaker
Housing).
Step 7. Twist the two halves of the NBP Tubing Collar Connector together until they snap-
lock into place. Hook the tubing behind the top of the Speaker Clip.
Step 8. Running the Fan-to-Main Cable over the top of the NBP Tubing, press the
connector into the keyed connector on the Main Board.
Step 9. Holding the Chassis Assembly, lay the Rear Housing Assembly on its back on the
work surface.
Step 10. Starting from the left side, so that you can insert the power switch on the Main
Board into the appropriate opening in the Rear Housing Assembly, insert the
Chassis Assembly into the Rear Housing Assembly.
Note—With your finger, insure that the Fan-to-Main Cable bows to the left, out of the
way of the transmitter optical path.
Step 11. Aligning the screw holes in the Chassis with the screw mounts on the Rear Housing
Assembly, fasten the Chassis Assembly to the Rear Housing Assembly with four
6mm T-10 screws.
Hint—Place the most accessible screws first.
Step 12. Be sure no ribbon cable protrudes beyond the Display on the left side of the Monitor
Assembly, adjusting the position of the cable and/or Chassis Assembly, if
necessary.
Troubleshooting, Service and Repair 6-37
Page 72

Repair
The NBP Board
Remove the NBP Board either to replace it or to access the Inverter Board or the Display. The
Main Board can have been removed or it can be in place.
6 mm T-10
NBP-to-Main Cable
Connectors
Removal of
NBP Board
Step 1. If necessary, press the spring tab on the NBP-to-Main Connector and disconnect the
NBP-to-Main Cable from the Main Board.
Note—If the Main Board has been removed from the Chassis, this cable may already
have been disconnected.
Step 2. Remove the four 6mm T-10 screws holding the NPB Board to the Chassis and lift
the board from the Chassis.
Installation of
NBP Board
The Display and Inverter Board with shield must be in place and must be connected. The
Inverter-to-Main and Display-to-Main Cables will run under the NBP Board and must be in
place now.
Step 1. Place the NBP Board on the Chassis with the pump facing up and on the outside
edge. The holes in the board should match the mounts on the chassis. Be sure the
two cables are under the board, and that one screw mount divides the ribbon cable.
Step 2. Secure the board to the Chassis with four 6mm T-10 screws.
Step 3. Make sure the NBP-to-Main Cable is attached to the connector on the NBP Board.
6-38 Troubleshooting, Service and Repair
Figure 6-9 Removal of the NBP Board
Page 73

Repair
Step 4. If the Main Board is in place, press the connector of the NBP-to-Main Cable into
the keyed connector on the Main Board. If the Main Board is not in place, perform
this step when you mount the Main Board.
The Inverter Board
Removal of
Inverter Board
Remove the Inverter Board to replace it or to access the Display. Before removing the
Inverter Board, remove the NBP Board. The Main Board can have been removed or can be in
place.
14mm T-10
Inverter Shield
8mm T-10
IR Shield
Figure 6-10 The Inverter and IR Shields
Step 1. If necessary, remove the 14mm and 8 mm T-10 screws holding the IR Shield to the
Main Board and take off the shield.
Note—If the Main Board has been removed, the IR Shield has been removed already.
4 mm T-6
Troubleshooting, Service and Repair 6-39
Page 74

Repair
Figure 6-11 Removing the Inverter Shield
Step 2. Using the T-10 screwdriver, remove the two 4mm T-10 screws holding the Inverter
Shield to the Chassis.
Step 3. Lift and slide out the Inverter Shield.
Inverter-to-Main Cable
Installation of
Inverter Board
Inverter-to-Display
Cable Connector
Figure 6-12 Inverter Board Connections
Step 4. If necessary, detach the Inverter-to-Main Cable connector from the Inverter Board
by using fingernails on the two edges of the connector to work it loose. Do not pull
on the wires or use a screwdriver.
Caution—Take extra care, as excessive force can damage the connector.
Step 5. Detach the Inverter-to-Display connector from the Inverter Board.
Step 6. Remove the two 4mm T-6 screws holding the Inverter Board to the Chassis. Lift off
the board.
The Display must be in place and must be connected. The NBP Board must have been
removed. If the Main Board is in place, the IR Shield must have been removed.
Step 1. Place the Inverter Board on the Chassis with the large connector on the right. The
screw holes in the board should match the screw mounts on the Chassis. If the large
square aperture is farthest from you and the ribbon cable is on the left, the Inverter
Board will be on the side closest you and to the right.
Step 2. Fasten the Inverter Board to the Chassis with the two 4mm T-6 screws.
Step 3. On the right side, gently press the connector of the Inverter-to-Display Cable into
the large connector of the Inverter Board.
Step 4. On the left side of the Inverter Board, press the Inverter-to-Main Cable into the
keyed connector.
6-40 Troubleshooting, Service and Repair
Page 75

Repair
Note—This cable will run under the NBP Board and must be in place, regardless of
whether the Main Board is present. Take it off the Main Board, if necessary.
Step 5. If the Main Board is present, connect the Inverter-to-Main Cable to the small keyed
female connector on the side of the Main Board closest to the future position of the
NBP Board.
Step 6. Slide the Inverter Shield over the Inverter Board from the right. Make sure that the
positioning tab on the shield is lined up with the corresponding slot of the projection
on the Chassis, and that the screw holes are aligned with the mounts.
Note—The tab does not have to be in the slot.
Note—No wires should be showing under the right side of the shield.
Step 7. Fasten the shield to the Chassis with the two 4mm T-10 screws.
Step 8. If the Main Board is present, fasten the IR Shield to the Main Board. The 14mm T-
10 screw goes on the inside. The other is an 8mm T-10.
The Display The LCD has a half-life of approximately two years. It should be replaced when it loses its
brightness.
Removal of
Display
Removal of the Display requires prior removal of the Inverter Shield and Board, which in turn
require prior removal of the NBP Board. The Main Board may be in place.
6mm T-10
6mm T-10
Figure 6-13 The Display
Step 1. Detach the Display-to-Main Cable connector from the Main Board Connector by
pulling.
Step 2. Holding the Chassis upright, remove the four 6mm T-10 screws from the Display.
Step 3. Lift off the Display.
Installation of
Display
Step 1. Hold the Chassis on its edge with the board side facing away from you. If no board
is present, the board side is the one with the tall screw mounts. The large square
aperture should be at the bottom. The ESD film should be over the yellow strip on
the bottom of the board side.
Troubleshooting, Service and Repair 6-41
Page 76

Repair
Step 2. Start two 6mm T-10 screws in the screw mounts on the right of the chassis.
Step 3. Position the Display in front of the Chassis with the ribbon cable to the left
(Display-to-main) and the dark side toward you. Insert the slots on the right side of
the display under the two screws that were started.
Step 4. Start the screws on the left side of the Display and tighten all four 6mm T-10
screws.
Step 5. Place the Chassis flat on the work surface with the Display down.
Step 6. Bend the Display-to-Main Cable over the edge of the Chassis so that one half of the
cable falls on each side of the screw mounting post.
Step 7. If the Main Board is present, connect the cable to the female connector on the Main
Board by pushing down.
The Main PC Board
Removal of
Main Board
Remove the Main Board only to replace it. The NBP Board, Inverter Board and Display can
remain in place.
6 mm T-10
Fuse
Battery
14 mm T-10
8 mm T-10
Figure 6-14 Main PC Board
Step 1. If necessary, disconnect the Display-to-Main cable from the Main Board.
Note—If the Display has been removed, the cable may not be connected to the Main
Board. If present, it is the ribbon cable that runs under the NBP Board.
Step 2. If necessary, disconnect the Inverter-to-Main Cable from the Main Board.
Note—If the Inverter Board Assembly has been removed, the cable may not be present.
If present, it is the other cable that runs under the NPB Board.
Step 3. If necessary, disconnect the NBP-to-Main Cable from the Main Board.
Note—If the NBP Board has been removed, the cable may not be present. It is the large
and obvious cable connected to the top of the Main Board.
6-42 Troubleshooting, Service and Repair
Page 77

Step 4. Remove the three 6mm T-10 screws holding the Main Board to the Chassis.
Step 5. Lift the Main Board off the Chassis.
Repair
Installation of
Main Board
Replacing the
Main Board
Fuse or
Battery
Step 1. Place the Chassis face down on the work surface. The face is the side that features
the short screw mounts, to which the Display is attached.
Step 2. Align the Main Board on the mounting posts, face up.
Step 3. If necessary, connect the Inverter-to-Main Cable to the Main Board. The connector
on the board is the small one nearest to the location of the NBP Board.
Note—If the NBP Board is in place, connecting the cable before fastening the board
permits you to maneuver the board. However, if the Inverter Board is not in place, the
cable may not yet be available.
Step 4. Fasten the Main Board to the mounting posts with three 6mm T-10 screws. Leave
the holes for the IR Shield empty.
Step 5. If necessary, connect the Display-to-Main Cable to the board.
Note—If the NBP Board is in place, this ribbon cable runs under it. If the Display is not
in place, the cable may not yet be available.
Step 6. If necessary, connect the NBP-to-Main Cable to the Main Board.
Note—If the NBP Board is not in place, the cable may not be available.
Step 7. Fasten the IR Shield to the Main Board with a 14mm T-10 screw nearest the
Display-to-Main connector and an 8mm T-10 screw on the other side.
The main board contains fuses and a battery. Refer to the following diagram for the locations
and specifications of these components. Both components are field replaceable.
Fuse (4 Amps—125 Volts)
Board Location BT1
Battery (3V Lithium—CR1225)
Board Location F301
Figure 6-15 Main PC Board
Troubleshooting, Service and Repair 6-43
Page 78

Repair
The Speaker
Speaker Clip
Removal of
Speaker
Installation of
Speaker
Figure 6-16 The Speaker
Step 1. Inside the Rear Housing, remove the Speaker Clip holding the Speaker to the
mount.
Step 2. Twist and pull out the Speaker.
Step 1. Position the Speaker against the mount, making sure the Speaker-to-Main Cable is
on the outside. Slide the rim of the Speaker under the prongs provided.
Step 2. Insert one end of the Speaker Clip into the slot on the bottom of the mount, bend it
over the outside rim of the speaker, and insert the other side into the slot on the top
of the mount.
Caution—The clip must follow the notch in the outside rim of the speaker. Placing it
across the center will create a path for ESD between the clip and the cable connector.
6-44 Troubleshooting, Service and Repair
Page 79

The Battery Compartment
Repair
Bottom of TeleMon
8 mm T-10
Removal of
Battery
Compartment
Figure 6-17 Removal of the Battery Compartment
Step 1. Remove the four 8mm T-10 screws holding the four feet to the bottom of the Rear
Housing and pull the feet off.
Step 2. Slide the Battery Compartment out of the open front of the Rear Housing.
Troubleshooting, Service and Repair 6-45
Page 80

Repair
Hint—The Battery Door must be open, and the serial port door must have been
removed.
Step 3. Remove the pin holding the Battery Connector to the compartment.
Installation of
Battery
Compartment
The Battery Door
Step 1. Stand the Rear Housing up with the open side facing you.
Step 2. Open the battery door on the housing, if necessary.
Step 3. Attach the Battery Connector to the Battery Compartment with the pin. Make sure
that the wires face up.
Step 4. Place the Battery Compartment in the bottom of the Rear Housing through the front,
making sure the cable is on the left. The left side of the film pocket must go over the
left side of the Battery Compartment.
Step 5. Place the Rear Housing on its back.
Step 6. Fasten the four feet to the bottom of the case with four 8mm T-10 screws. The cut-
outs in the feet must face the inside.
Caution—Tighten the screws only until snug. Do not overtighten.
Removal of
Battery Door
Installation of
Battery Door
6-46 Troubleshooting, Service and Repair
Step 1. Make sure the Battery Door is open and is in a horizontal position.
Step 2. Push the Battery Door post closest to the open side of the Rear Housing. The door
falls out.
Step 1. Placing the Battery Door in a horizontal position under the battery port, hook the
door post closest to the back of the TeleMon into the slot provided.
Figure 6-18 The Battery Door
Page 81

The Transmitter Dock
Repair
Step 2. Snap the other door post into its slot, pushing up from the bottom.
Removal of
Transmitter
Dock
Installation of
Transmitter
Dock
16 mm T-10
Figure 6-19 The Transmitter Dock
Step 1. Remove the two 16 mm T-10 screws holding the dock to the case.
Step 2. Lift and slide the dock part way through the docking opening.
Step 3. Thread the connector of the Transmitter Power Cable (attached to the bay) through
the bottom of the docking port and finish removing the Transmitter Bay Assembly.
Rocking the assembly facilitates removal. The three component pieces come apart
in your hand.
Step 1. Holding the three component pieces of the dock together, insert the top rear into the
docking port. The cable should be at the bottom.
Step 2. Thread the connector of the Transmitter Power Cable through the bottom of the
port.
Step 3. Push the dock fully in.
Step 4. Fasten the dock to the case with the two 16mm T-10 screws.
Troubleshooting, Service and Repair 6-47
Page 82

Repair
The Fan Assembly
Note—Before you insert the fasteners, make sure the Fan-to-Main Cable and the NBP Tubing
run outward over the top of the dock.
Removal of
Fan Assembly
Installation of
Fan Assembly
The Splash Guard
Step 1. If the NBP Tubing is in place, remove it from the supporting channel of the Speaker
Mount.
Step 2. Remove the two 14 mm T-10 screws from the top of the fan housing and the one 6
mm T-10 screw from the exhaust conduit.
Step 3. Lift and slide the Fan Assembly out over the reflective surface of the Speaker
Mount.
Note—Do not attempt to pry the fan housing from the exhaust conduit, to which it has been
bonded.
Step 1. With an alcohol swab, wipe away any dust or lint that have accumulated on the Rear
Housing or vent.
Step 2. Insert the Fan Assembly over the top of the reflective surface of the Speaker Mount
and hold it so that the holes are aligned with the screw mounts.
Step 3. Fasten Fan Assembly to the screw mounts with two 14 mm T-10 screws through the
top of the fan housing and one 6 mm T-10 screw through the exhaust conduit.
Hint—Replace the 6mm screw first.
Step 4. Replace the NBP Tubing in the supporting channel of the Speaker Mount.
Step 5. Insure that the Fan-to-Main Cable runs over the top of the NBP Tubing.
The splash guard helps protect the internal components of the TeleMon.
Removing the
Old Splash
Guard
Installing the
New Splash
Guard
6-48 Troubleshooting, Service and Repair
If necessary, remove the old splash guard by carefully pulling the guard away from the
TeleMon housing. You should do this with no other components attached to the rear housing.
Step 1. Remove the adhesive protector from the middle portion ONLY of the guard.
Step 2. Align edge of adhesive with top edge of rear housing and press into place. Note that
the plastic extends beyond the housing. No adhesive, however, should be exposed
beyond the housing.
Page 83

Repair
Caution
The adhesive on the splash guard is very strong. Therefore, be very careful when
installing it. Do not reposition the splash guard. If you make a mistake when installing
the splash guard, remove it and install a new one.
Step 3. Remove the other adhesive protectors and press the guard into the corners.
There should be no gaps between the rear housing and the splash guard.
Remove adhesive
protector from center
portion first.
Remove adhesive
protector from sides
and press into corners.
Troubleshooting, Service and Repair 6-49
Page 84

Repair
6-50 Troubleshooting, Service and Repair
Page 85

Test and Inspection Matrix
This chapter includes the Test and Inspection Matrix for the M2636B TeleMon
Monitor.
Tests that require power should be performed with the TeleMon on AC power, but
with the battery installed.
7
Test and Inspection Matrix 7-1
Page 86

M2600A Telemetry System - Test and Inspection Matrix
M2600A Telemetry System - Test and Inspection Matrix
Test Block
Name
V
isual Test: Inspect the system (and packing material if
P
ower On: Monitor boots up displaying
Test or “Inspection” to Perform Expected Test Results What to Record
The system does not have any
applicable) for obvious signs of damage.
Also check external leads and accessories.
Step Action
1 Switch on the M2636B.
2 Observe that the monitor boots
up successfully without
displaying any error codes and
that output appears on the
display (example waveform
and parameter labels). An
indication that the “battery
needs reconditioning” is
acceptable.
3 Insert a functioning Telemetry
transmitter that is compatible
with the M2636B. Observe that
the “Transmitter Disconnected”
prompt disappears when the
transmitter is docked.
obvious signs of damage =
Pass.
no error codes, responds
correctly to telemetry
transmitter = Pass
on Service
Record
V:P or V:F
where P=Pass and
F=Fail
PO:P or PO:F
where P = Pass
and F = Fail
7-2 Test and Inspection Matrix
Page 87

M2600A Telemetry System - Test and Inspection Matrix
Test Block
Name
P
erformance
Test NBP:
Test or “Inspection” to Perform Expected Test Results What to Record
on Service
Record
Accuracy Test Value displayed on Monitor =
x1
Step Action
1 Connect the manometer and the
pump to the NBP connector.
2 Go to Service Mode.
3 Go to the Calibration
application.
4 Raise the pressure to 280
mmHg with the manometer and
pump.
5 Wait 10 seconds for the
measurement to stabilize.
6 Compare the manometer values
with the displayed values.
Document the value displayed
by the Monitor. If the
difference is greater than
3mmHg then calibrate the
module.
If difference <=3mm proceed
to next test
Leakage Test Leakage test value = x2
If <= 6mmHg proceed to next
Step Action
1 Watch the pressure value for 60
seconds. After 60 seconds the
value should have decreased by
less than 6 mmHg.
2 Calculate and document:
Leakage test = Accuracy displayed value.
test
Test and Inspection Matrix 7-3
Page 88

M2600A Telemetry System - Test and Inspection Matrix
Test Block
Name
S
afety (1):
Test or “Inspection” to Perform Expected Test Results What to Record
on Service
Record
Linearity Test Value displayed by Monitor =
x3
Step Action
1 Reduce the manometer
pressure to 150 mmHg.
2 Wait 10 seconds for the
measurement to stabilize, then
compare the manometer values
with the the displayed values.
PN:P/x1/x2/x3
or
PN:F/x1/x2/x3
Where P = Pass
And F = Fail
3 Document the value displayed.
If the difference is greater than
3mmHg then calibrate the
module.
Step Action
1 System Safety Test Enclosure
Leakage Current/Normal
Condition:
See the next section, “Safety
Normal Condition
maximum leakage current =
x1
(≤300 µA)
S1:P/x1/x2 or
S1:F/x1/x2
Tests,” for details.
2 System Safety Test Enclosure
Leakage Current/Single Fault
Condition:
Single fault maximum
leakage current = x2
(≤300 µA)
See the next section, “Safety
Tests”, for details.
afety (2): Protective Earth. See the next section,
S
“Safety Tests,” for details.
S
afety (3): Patient Leakage Current/ Single Fault
Condition: See the next section, “Safety
Tests,” for details.
7-4 Test and Inspection Matrix
Protective earth with mains
cable:
Maximum impedance = x1
(≤200 µOhm)
Maximum leakage current =
x1(≤300 µA)
S2: P/x/ or
S2:F/x
S3:P/x or S3:F/x
Page 89

Safety Tests
Safety Tests
The test procedures outlined in this section are to be used only for verifying safe installation
or service of the product in question.
The setups used for these tests and the acceptable ranges of values are derived from local and
international standards but may not be equivalent.
These tests are not a substitute for local safety testing
or a service event.
If using the Metron Safety tester use your local regulation to perform the test, for example in
Europe IEC601-1/IEC601-1-1 and in the US UL2601-1. The Metron Report should print
results with the names listed below, along with other data.
Safety checks at installation refer to safety aspects directly related to the installation and setup
activities and not to intrinsic safety features that have already been checked during final
acceptance testing at the factory.
where it is required for an installation
Test and Inspection Matrix 7-5
Page 90

Safety Tests
Test Block Name Test or Inspection to perform
S(1) System
Enclosure Leakage
Current - NC (normal
condition)
L (N)
Instrument under test
Medical electrical system
Signal parts
in- and/or
output
(**)
Signal parts
in- and/or
output
S(1) System
Enclosure Leakage
current - OE (open
earth)
Other
Instrument
N (L)
S2
S1
S4
(*)
MD
PE
(*) Not present in Class 2.
(**) Can be multiple different connections to different equipment at same time.
Applied part
Measures leakage current of exposed metal parts of Instrument under Test (IUT) and
between parts of the system within the patient environment; normal and reversed
polarity using S2. Safety test according IEC 601-1-1 (Clause 19.201.1) Report largest
value
Medical electrical system
L (N)
N (L)
Instrument under test
S2
S1
S4
MD
PE
Signal parts
in- and/or
output
Applied part
(**)
Signal parts
in- and/or
output
Other
Instrument
Measures leakage current of exposed metal parts of Instrument under Test (IUT) with
Protective Earth (PE) open circuit (S4= open) and between parts of the system within the
patient environment; normal and reversed polarity using S2. Safety test according IEC
601-1-1 (clause based on 19.201.1} Report largest value.
7-6 Test and Inspection Matrix
(**) Can be multiple different connections to different equipment at same time.
Page 91

Test Block Name Test or Inspection to perform
S(2)
Protective Earth
Safety Tests
Instrument under test
L (N)
S(3)
Patient Leakage
current - AC
PE
N (L)
Applied part
(*)
Insulating pad
(*) If equipotential connection present: measure also
with yellow/green E.P. conductor connected.
Ri
Ohm
6V
50 Hz 25 A or 1.5 Ir
Measures impedance of Protective Earth (PE) terminal to all exposed metal parts of
Instrument under Test (IUT), which are for safety reasons connected to the Protective
Earth (PE). Includes normally the wiring in the mains cable (max. 200 mOhm). Test
current 25 Amps applied for 5 seconds to 10 seconds. The recommendation is to flex the
main cable during the test in order to identify potential bad contact or damage of the
earth wire.
Safety test according IEC 601-1 (Clause 18) Report largest value.
(*) Not present in Class 2
L (N)
S1
N (L)
S4 (*)
S2
PE
Instrument under test
Applied part
Signal part
in- and/or
output
MD
Insulating pad
L (N)
S6
N (L)
S5
R
Measures patient leakage current from applied Part to earth caused by external main
voltage on applied Part with switch S5 open and closed. Each polarity combination
possible is tested using S2 and S6. This test is applicable for every listed module. (ECG,
ECG / RESP, Invasive Pressure, Cardiac Output, CO
, SpO2, SvO2, FiO2 Temperature)
2
Safety test according IEC 601-1 (Clause 19.4.h} Report largest value.
Test and Inspection Matrix 7-7
Page 92

M2600A Telemetry System - When to Perform Test Blocks
M2600A Telemetry System - When to Perform Test Blocks
Service Event
When performing.....
Installation of M2636B. Perform Visual, Power On test block.
Repairs affecting the power supply assembly
(excluding battery).
Repairs where the monitor has been dropped. Perform Power On and Safety (2) and (3) test blocks.
Repairs where NBP or main processor board have
been replaced.
All other repairs, hardware or software upgrades. Perform Power On test block.
Upgrade to hardware. Perform Power On test block.
Upgrade to software. Perform Power On test block and check revision code for
Preventive Maintenance. Perform all Performance test blocks.
Test Block(s) Required
Complete these tests
Perform Power On and Safety (2) test blocks.
Calibrate NBP and perform Power On test block.
correct load.
7-8 Test and Inspection Matrix
Page 93

Maintenance and Cleaning
Maintenance
Care and maintenance of TeleMon is limited to making sure the unit is clean and
inspected to see if the unit damaged should it be dropped or exposed to any other
such trauma. In order to keep your Telemon in the best working condition, perform
all maintenance activities as described in this manual.
Date & Time The date and time displayed at the upper right of the display can be adjusted in
Service Mode. See “Change Date & Time, Display Contrast” on page 6-13 for
details.
8
TeleMon Disinfection
Under normal operation, the transmitter recess and TeleMon exterior should be
disinfected between patients.
WarningWarning
To prevent fire, provide adequate ventilation and do not permit smoking when
cleaning or disinfecting the equipment.
WarningWarning
Disconnect line power and remove battery from TeleMon to prevent electrical
shock and accidental turn-on during cleaning.
WarningWarning
Exposure of electrical contacts or connections to saline or other liquids is
dangerous. Electrical contacts and connections such as cable connectors, power
supplies, and plug-in connections must be kept clean and dry. Do not immerse
this device in water.
WarningWarning
Do not use any abrasive cleaning materials on any part or component of the
TeleMon. Do not clean any part or component of the TeleMon in any overly
vigorous or abrasive fashion. Using abrasive cleansers and abrasive cleaning
actions will damage the components.
Maintenance and Cleaning 8-1
Page 94

Maintenance
Caution
Use only a 10% solution of sodium hypochlorite (bleach) in water as a cleaning fluid. Do
not use any other cleansers, such as betadine.
Caution
Remove the battery and any cables or accessories before you clean TeleMon.
Disinfection Instructions
To disinfect the TeleMon exterior, battery compartment, and transmitter recess, use the
following directions:
Step 1. Turn TeleMon OFF.
Step 2. Disconnect the power cord, and remove the battery.
Step 3. Undock the transmitter as well, and the NBP cable.
Step 4. Wipe the outside surface, the battery compartment, and the transmitter recess with a
pad dampened with a solution of 10% sodium hypochlorite (bleach) in water.
Do not use any other cleaning agents.
Step 5. Wipe all cleaned surfaces dry with a clean, dry pad.
Step 6. If further cleaning is necessary,
a. lightly spray surfaces with cleaning solution.
b. scrub down surfaces with a cotton swab, sponge applicator, or stiff brush. The
area under the power contacts should be carefully cleaned such that all visible
contamination is removed.
c. tip TeleMon to allow excess fluid to run out of recess and battery compartment.
d. wipe cleaned surfaces dry with a clean, dry pad.
Note—Do not immerse the monitor in cleaning solution.
Step 7. Allow TeleMon to air-dry for 1/2 hour before reuse.
NBP Cuff Cleaning
8-2 Maintenance and Cleaning
The cuff can be disinfected by immersion in a decontamination solution of 70-85% isopropyl
alcohol, but remember to remove the rubber bag if you use this method. The cuff should not
be dry cleaned.
The cuff can also be machine-washed or hand-washed as recommended by the manufacturer;
the latter method will prolong the service life of the cuff. Before washing, remove the latex
rubber bag and, for machine-washing, close the Velcro fastening. Allow the cuff to dry
thoroughly after washing, then reinsert the rubber bag.
Page 95

Maintenance
NBP Calibration
NBP calibration should be performed once a year or every 10,000 measurements, whichever
comes first. The calibration procedure is done in the Service Mode of TeleMon. See “NBP
Diagnostics, Calibration” on page 6-17 for instructions.
Accessories The performance specifications and tolerance of TeleMon are established using our supplied
accessories and supplies. Non-supplied accessories and supplies may corrupt the performance
of the equipment. We assume no liability for poor performance or injury caused by nonsupplied accessories and supplies.
WarningWarning
Non-supplied accessories and supplies may corrupt the performance of the equipment.
Use only EC-12 compliant electrodes with this device. Use of electrodes that are noncompliant may provide erroneous results.
The following accessories are available for use with the TeleMon Monitor.
Description Order Number
Power Supply M4792A or Philips
equivalent
10.8V Nickel Metal Hydride Battery NI1030AG, or
NI1030PH, rechargeable
M4790A
Battery Reconditioner, Universal
Note—This part does not include a power cord; be sure
to order the appropriate localized power cord.
ECG Transmitter Trunk Cable
5-lead AAMI M4793A
5-lead IEC M4794A
3-lead AAMI M4795A
3-lead IEC M4796A
ECG/%SpO
Cable Clip M1509A
2
M4791A or
M2636-60412
Maintenance and Cleaning 8-3
Page 96

Maintenance
Description Order Number
3-wire ECG Lead Set
Snap, AAMI for M2601A, 0.7 m (30 inch) M2590A
Grabber, AAMI for M2601A, 0.7 m (30 inch) M2591A
Snap, IEC for M2601A, 0.7 m (30 inch) M2594A
Grabber, IEC for M2601A, 0.7 m (30 inch) M2595A
5-wire ECG Lead Set
Snap, AAMI for M2601A, 0.7 m (30 inch) M2592A
Grabber, AAMI for M2601A, 0.7 m (30 inch) M2593A
Snap, IEC for M2601A, 0.7 m (30 inch) M2596A
Grabber, IEC for M2601A, 0.7 m (30 inch) M2597A
Combiner Shield Replacement Kit
3-wire M2598A
5-wire M2599A
ECG Electrode Kit
ECG radiotranslucent foam electrode kit, 5/pack,
300/case
Paper tape electrodes, 30/pack, 300/case 40489E
Foam electrodes, 5/pack, 300/case 40493D
Foam electrodes, 30/pack, 300/case 40493E
SpO
Sensors
2
Philips Reusable Adult Finger M1191A
Philips Reusable Pediatric Finger M1192A
Philips Reusable Adult/Pediatric >30kg Ear Clip M1194A
Philips Disposable Adult >40kg M1901B
Philips Disposable Pediatric M1903B
Philips Disposable Adult M1904B
Nellcor Disposable Adhesive Oxisensor II
TM
D-
20
Nellcor Disposable Adhesive Oxisensor II
TM
D-
25
M2202A
N/A from Philips
N/A from Philips
8-4 Maintenance and Cleaning
Page 97

Description Order Number
Nellcor Disposable Adhesive Oxisensor II
TM
N-
N/A from Philips
20 Adult >40kg
Nellcor Disposable Adhesive Oxicliq II
A
N/A from Philips
TM
(Uses reusable OC-3 Sensor Cable)
Nellcor Disposable Adhesive Oxicliq II
TM
N
N/A from Philips
(Uses reusable OC-3 Sensor Cable)
Nellcor Disposable Adhesive Oxicliq II
TM
P
N/A from Philips
(Uses reusable OC-3 Sensor Cable)
Nellcor Disposable OxiMax II
MAX-A (Uses
N/A from Philips
TM
reusable OC-3 Sensor Cable)
Nellcor Disposable OxiMax II
TM
MAX-N (Uses
N/A from Philips
reusable OC-3 Sensor Cable)
Nellcor Disposable OxiMax II
TM
MAX-P (Uses
N/A from Philips
reusable OC-3 Sensor Cable)
Maintenance
Wristband (ten straps per pack) M1627A
Extender Cable, 2m (6.5 ft) M1941A
SpO
2
Adapter Cable for Nellcor SpO
sensors (Not available
2
M1943A
in Canada or Japan)
NBP Cuff
Traditional Multi-Patient—Pediatric 40401B
Traditional Multi-Patient—Adult 40401C
Traditional Multi-Patient—Large Adult 40401D
Traditional Multi-Patient—Adult Thigh 40401E
Latex-Free, Long-Life Multi-Patient—Pediatric M1572A
Latex-Free, Long-Life Multi-Patient—Small
M1573A
Adult
Latex-Free, Long-Life Multi-Patient—Adult M1574A
Latex-Free, Long-Life Multi-Patient—Large
M1575A
Adult
NBP Cuff Connect Tubing
Standard, 1.5m (5 ft) M1598B
Long, 3.0m (10 ft) M1599B
.
OXISENSOR II™ is a trademark of NELLCOR® Incorporated.
Maintenance and Cleaning 8-5
Page 98

Maintenance
Note—Disposable transducers are not available from us as parts in the USA or Canada. In
those countries, contact NELLCOR® Incorporated directly.
Maintenance and Cleaning 8-6
Page 99

Safety and System Specifications
Safety Information
9
WarningWarning
The equipment is not suitable for use in the presence of a flammable anesthetic
mixture with air or with oxygen or nitrous oxide.
WarningWarning
Possible explosive hazard if used in the presence of flammable anesthetics.
WarningWarning
No patient alarms are annunciated at the TeleMon. Telemetry alarms are
presented at the central monitor only, and all alarm adjustments must be made
at central.
WarningWarning
Information messages at TeleMon are silent. There is no audible sound at
TeleMon associated with any information message.
WarningWarning
Do not touch the patient, bed, transmitter, or TeleMon during defibrillation.
WarningWarning
Do not mutilate or puncture battery; do not dispose of in fire. The battery can
burst or explode, releasing hazardous chemicals. Replace battery with only the
type recommended in this manual. Recycle or dispose of properly per local
regulations.
WarningWarning
If battery leakage should occur, use caution in removing the battery. Avoid
contact with skin. Clean the battery compartment according to instructions in
this manual. See “TeleMon Disinfection” on page 8-1.
Safety and System Specifications 9-1
Page 100

Safety Information
WarningWarning
Certain failure conditions, such as extended short circuiting, can cause a battery
to overheat during normal use. High temperatures can cause burns to the
patient and/or user, or cause the battery to flame. If TeleMon becomes hot to
the touch, unplug the AC power, turn the device off, and place it aside until it
cools. Then remove and discard the battery. It’s a good idea to place a piece of
tape across the contacts of the battery to prevent inadvertent shorting. Have
TeleMon operation checked by service to identify the cause of overheating.
WarningWarning
Failure on the part of the responsible individual hospital or institution
employing the use of this equipment to implement a satisfactory maintenance
schedule may cause undue equipment failure and possible health hazards.
WarningWarning
If TeleMon is out of antenna range, there is no local indication at TeleMon of
this state. No signal will be received at central, and the message NO SIGNAL
will be displayed at the central.
WarningWarning
Cycling power repeatedly when the battery is critically low may harm TeleMon
or the transmitter. If the battery is critically low, do not attempt to cycle power
(reboot) the monitor until the either the battery has been replaced or AC power
has been applied.
WarningWarning
Non-supplied accessories and supplies may corrupt the performance of the
equipment. Use only EC-12 compliant electrodes with this device. Use of
electrodes that are non-compliant may provide erroneous results.
WarningWarning
Some pace pulses can be difficult to reject. When this happens, the pulses are
counted as a QRS complex, and could result in an incorrect HR and
misdetection of cardiac arrest or some arrhythmias. Keep pacemaker patients
under close observation.
9-2 Safety and System Specifications
 Loading...