

Page 1
Philips 150P4AG/150P4AB Electronic User's Manual
file:///D|/C/english/150p4agb/index.htm [2/24/2003 2:49:14 PM]
Page 2

Safety and Troubleshooting Information
Safety Precautions and Maintenance • Installation Locations • FAQs • Troubleshooting •
Regulatory Information • Other Related Information
Safety precautions and maintenance
WARNING: Use of controls, adjustments or procedures other than those
specified in this documentation may result in exposure to shock, electrical
hazards and/or mechanical hazards.
Read and follow these instructions when connecting and using your computer monitor:
Unplug the monitor if you are not going to use it for an extensive period of time.●
Unplug the monitor if you need to clean it with a slightly damp cloth. The screen many be wiped with
a dry cloth when the power is off. However, never use alcohol, solvents or ammonia-based liquids.
●
Consult a service technician if the monitor does not operate normally when you have followed the
instructions in this manual.
●
The casing cover should be opened only by qualified service personnel.●
Keep the monitor out of direct sunlight and away from stoves or any other heat source.●
Remove any object that could fall into the vents or prevent proper cooling of the monitor’s electronics.●
Do not block the ventilation holes on the cabinet.●
Keep the monitor dry. To avoid electric shock, do not expose it to rain or excessive moisture.●
When positioning the monitor make sure the power plug and outlet are easily accessible.●
If turning off the monitor by detaching power cable or DC power cord, wait for 6 seconds before
attaching the power cable or DC power cord for normal operation.
●
To avoid the risk of shock or permanent damage to the set do not expose the monitor to rain or
excessive moisture.
●
When positioning the monitor, make sure the power plug and outlet are easily accessible.●
IMPORTANT: Always activate a screen saver program during your application. If a still image in high
contrast remains on the screen for an extended period of time, it may leave an 'after-image' or 'ghost
image' on front of the screen. This is a well-known phenomenon that is caused by the shortcomings
inherent in LCD technology. In most cases the after-image will disappear gradually over a period of
time after the power has been switched off. Be aware that the after-image symptom cannot be
repaired and is not covered under warranty.
●
Consult a service technician if the monitor does not operate normally when the operating instructions given
in this manual have been followed.
RETURN TO TOP OF THE PAGE
Installation Locations
Safety & Troubleshooting
file:///D|/C/english/150p4agb/safety/safety.htm (1 of 2) [2/24/2003 2:49:15 PM]
Page 3

Avoid exposure to heat and extreme cold●
Do not store or use the LCD monitor in locations exposed to heat, direct sunlight or extreme cold.●
Avoid moving the LCD monitor between locations with large temperature differences. Choose a site
that falls within the following temperature and humidity ranges.
Temperature: 5-40°C 41-104°F
❍
Humidity: 20-80% RH❍
●
Do not subject the LCD monitor to severe vibration or high impact conditions. Do not place the LCD
monitor inside a car boot.
●
Take care not to mishandle this product by either knocking or dropping during operation or
transportation.
●
Do not store or use the LCD monitor in locations where there is a high level of humidity or in dusty
environments. Do not allow water or other liquids to spill on or into the LCD monitor.
●
RETURN TO TOP OF THE PAGE
Safety & Troubleshooting
file:///D|/C/english/150p4agb/safety/safety.htm (2 of 2) [2/24/2003 2:49:15 PM]
Page 4

About This Manual
About This Guide • Notational Descriptions
About This Guide
This electronic user's guide is intended for anyone who uses the Philips LCD Monitor. It describes the LCD
monitor's features, setup, operation and other important information. Its contents are identical to the
information in our printed version.
It includes the following sections:
Safety and Troubleshooting Information provides tips and solutions for common problems as well as
other related information you may need.
●
About This Electronic User's Manual gives an overview of information included, along with notation
icon descriptions and other documentation for your reference.
●
Product Information gives an overview of the monitor's features as well as the technical specifications
for this monitor.
●
Installing Your Monitor describes the initial setup process and gives an overview of how to use the
monitor.
●
On-Screen Display provides information on adjusting the settings on your monitor.●
Customer Care and Warranty contains a list of worldwide Philips Consumer Information Centers
along with help desk phone numbers and information on the warranty applicable to your product.
●
Glossary defines technical terms.●
Download and Print Option transfers this entire manual to your hard drive for easy reference.●
RETURN TO TOP OF THE PAGE
Notational Descriptions
The following subsections describe notational conventions used in this document.
Notes, Cautions and Warnings
Throughout this guide blocks of text may be accompanied by an icon and printed in bold or italic type.
These blocks contain notes, cautions or warnings. They are used as follows:
NOTE: This icon indicates important information and tips that help you make better
use of your computer system.
About This Electronic User's Manual
file:///D|/C/english/150p4agb/about/about.htm (1 of 2) [2/24/2003 2:49:17 PM]
Page 5

CAUTION: This icon indicates information that tells you how to avoid either potential
damage to hardware or loss of data.
WARNING: This icon indicates the potential for bodily harm and tells you how to
avoid the problem.
Some warnings may appear in alternate formats and may not be accompanied by an icon. In such cases,
the specific presentation of the warning is mandated by the relevant regulatory authority.
RETURN TO TOP OF THE PAGE
©2003 Koninklijke Philips Electronics NV
All rights reserved. Reproduction, copying, use, modification, hiring, renting, public performance, transmission and/or broadcasting in whole or in
part is prohibited without written consent of Philips Electronics NV
About This Electronic User's Manual
file:///D|/C/english/150p4agb/about/about.htm (2 of 2) [2/24/2003 2:49:17 PM]
Page 6

Product Information
Product Features • Technical Specifications • Resolution & Preset Modes • Philips Pixel
Defect Policy • Automatic Power Saving • Physical Specification • Pin Assignment •
Product Views • Physical Function
Product Features
150P4AG/150P4AB
LightFrame
TM
for brightest, sharpest and vivid images ever!
15-inch color LCD monitor with excellent display performance
●
Front firing speakers with 2x1W RMS stereo sound output●
Dual input - accepts both DVI Digital and VGA analog inputs●
Embedded universal AC power supply●
sRGB compliance●
Adjustable viewing height●
AUTO adjustment optimizes picture quality●
RETURN TO TOP OF THE PAGE
LightFrameTM for Windows
Introduction
Philips LightFrame
TM
feature enriches the experience of pictures and video on a Philips monitor.
LightFrame
TM
will boost the brightness and sharpness of photos and videos on the monitor screen.
To control the LightFrame
TM
feature in your monitor, you have to install the LightFrameTM application
which you will find on this CD-ROM.
Note
Philips LightFrame
TM
will only work with monitors that have been built to use this software. Earlier Philips
monitors or other manufacturers monitors will not work with this special software. It is recommended
that you install this software only on a Philips monitor designed to use it. These monitors can be identified
by the LightFrame
TM
logo on the front of the monitor.
LightFrame
TM
will work with true Windows-based programs and DOS-based programs that operate in a
Windows environment. It will not work with DOS-based programs operating only in a DOS environment.
Language Selection
Product Information
file:///D|/C/english/150p4agb/product/product.htm (1 of 10) [2/24/2003 2:49:20 PM]
Page 7

While English is the default language of LightFrameTM, the User Interface can be set up to operate in
Dutch, French, German, Italian, Portuguese, Spanish, Simplified Chinese, Traditional Chinese or Korean.
Installation
1) To install LightFrame
TM
, place the CD in the CD-ROM drive.
2) Next, when the menu of items on the CD appears on your screen, click on 'Install LightFrame
TM
'.
3) Now, follow the on-screen prompts to properly install the program. The software checks to see if you
have a compatible monitor. You must agree to the license agreement terms for the software to install.
4) After installation, LightFrame
TM
automatically loads and the icon appears in the taskbar.
Notes
If LightFrame
TM
detects that your monitor is not LightFrameTM compatible, a message appears on the
monitor screen. If you see this message, you can select to abort or continue the installation. However, if
you continue the installation, LightFrame
TM
will probably not work on the monitor.
How to use LightFrame
TM
After installation, LightFrameTM starts up automatically whenever the computer is started.
For information about using LightFrame
TM
please refer to the help information which is available after
installation.
Compatibility
This version of LightFrame
TM
is compatible with
Windows 95
Windows 98
Windows Me (Millennium Edition)
Windows XP
Windows 2000 Professional Edition.
LightFrameTM 3 -- Frequently Asked Questions (and answers)
Q: Is LightFrame
TM
2 compatible with LightFrameTM 3?
A: No. If you run LightFrame
TM
1 or 2 software with a Philips LightFrameTM 3 monitor, nothing will
happen.
Q: Can I use LightFrame
TM
3 software on my LightFrameTM 1 / 2 monitor.
A: No for a LightFrame
TM
1 or 2 monitor you need to use LightFrameTM 1 or 2 software. It is however
possible to use the LightFrame
TM
2 software on a LightFrameTM 1 monitor.
Q: What is the difference between LightFrame
TM
1, LightFrameTM 2 and LightFrameTM 3?
A: LightFrame
TM
1 was the very first generation of the LightFrameTM feature introduced by Philips. In that
version the user needs to manually turn on/off the feature and select the window or area to apply it to.
LightFrame
TM
2 offers the automatic detection in Internet Explorer on top of the LightFrameTM 1
functions. With this feature LightFrame
TM
will automatically scan a web page in Internet Explorer, find the
largest picture and enhance it.
Product Information
file:///D|/C/english/150p4agb/product/product.htm (2 of 10) [2/24/2003 2:49:20 PM]
Page 8

LightFrameTM 3 offers everything that LightFrameTM 2 has but now with the possibility to enhance
multiple pictures at the same time. So in a web page LightFrame
TM
will find all the pictures and enhance
them simultaneously or in a photo viewing application you can enhance multiple photos at once.
Furthermore LightFrame
TM
3 comes with an easy to activate full screen function. This is especially handy
for games and movies. Just one click on the full screen button and LightFrame
TM
enhances your total
monitor.
Q: Can I upgrade my current Philips monitor to LightFrame
TM
3?
A: No. For LightFrame
TM
3 Philips developed special hardware which is build into the monitor. Therefore
upgrading from LightFrame
TM
1 or 2 to 3 is not possible. It is however possible to upgrade your
LightFrame
TM
1 monitor to LightFrameTM 2 by installing the LightFrameTM 2 software.
Q: Can I install LightFrame
TM
3 over an older version?
A: When you install LightFrame
TM
3 the setup wizard will scan your system to check if you have an older
version installed. If so, the setup wizard will remove that version before continuing with the installation of
the new version. Please be aware that for LightFrame
TM
3 you also need a monitor which is capable of
running the LightFrame
TM
3 feature.
Q: How many windows can I enhance at the same time?
A: In LightFrame
TM
3 it is possible to enhance up to 7 windows at the same time. It is however important
to understand that when other windows, toolbars or menus overlap the enhanced windows, the maximum
number of enhanced windows can be less.
Q: How many pictures can LightFrameTM enhance in Internet Explorer?
A: In Internet Explorer LightFrame
TM
3 can enhance up to 14 pictures at the same time. LightFrameTM 3
filters the pictures it finds based on the minimum size of the picture therefore it may happen that some
pictures are not enhanced when you open a web page.
Q: Can I enhance two or more areas at the same time?
A: Yes. With LightFrame
TM
3 you have the possibility to select several windows with pictures and videos
and enhance them at the same time.
Q: Some times my mouse changes to a light bulb with a plus sign and sometimes with a minus
sign. What is the difference?
A: The mouse pointer in the shape of a light bulb indicates that LightFrame
TM
is ready to accept a
selection from you for which window should be enhanced.
If there is a minus sign it means that you are moving over a window where LightFrame
TM
is already
active and clicking this window will switch the enhancement off. A plus sign appears when moving over a
window which is not enhanced and clicking that one will enable LightFrame
TM
on that window.
Q: What is wrong when my mouse changes into a light bulb with a red cross?
A: Nothing. It just means that your mouse moves outside the application where you already have one or
more windows enhanced. You can only select windows with in the same application. The cross indicates
that you move into an area where you cannot make a selection.
Q: Can I use LightFrame
TM
with Netscape?
A: You can use LightFrame
TM
with Netscape, but its functions are limited to manually highlighting the
entire Netscape client window. Since LightFrame
TM
is specifically designed for bright, high contrast photo
Product Information
file:///D|/C/english/150p4agb/product/product.htm (3 of 10) [2/24/2003 2:49:20 PM]
Page 9
and video display, highlighting an entire Web page -- including text -- is not recommended.
For best results, we recommend you use LightFrame
TM
with Microsoft Internet Explorer version 5.0 or
higher. You can downloaded Internet Explorer free of charge from the Microsoft website
(www.microsoft.com). A copy of Internet Explorer 5.5 is also included on the CD-ROM shipped with your
monitor.
Q: Can I activate LightFrame
TM
on my entire screen?
A: Yes you can. And with LightFrame
TM
3 this becomes even easier. You just press the LightFrame
TM
button on the bezel to activate it.
Q: When I apply LightFrame
TM
to a text document I get blurry characters, what is wrong?
A: Nothing is wrong. The effect which you see is due to the sharpness enhancement that LightFrame
TM
is doing on your monitor. This sharpness improves a photo or video significantly however on black text on
a light background the effect is less favorable. Please keep in mind that LightFrame
TM
is developed to
enhance your photos and videos and not really for text or synthetic pictures.
You can decrease this effect by lowering the sharpness setting in the LightFrame
TM
3 control panel.
Q: How can I tell if my monitor comes with LightFrame
TM
3?
A: All Philips LightFrame
TM
monitors display this logo on their front bezel:
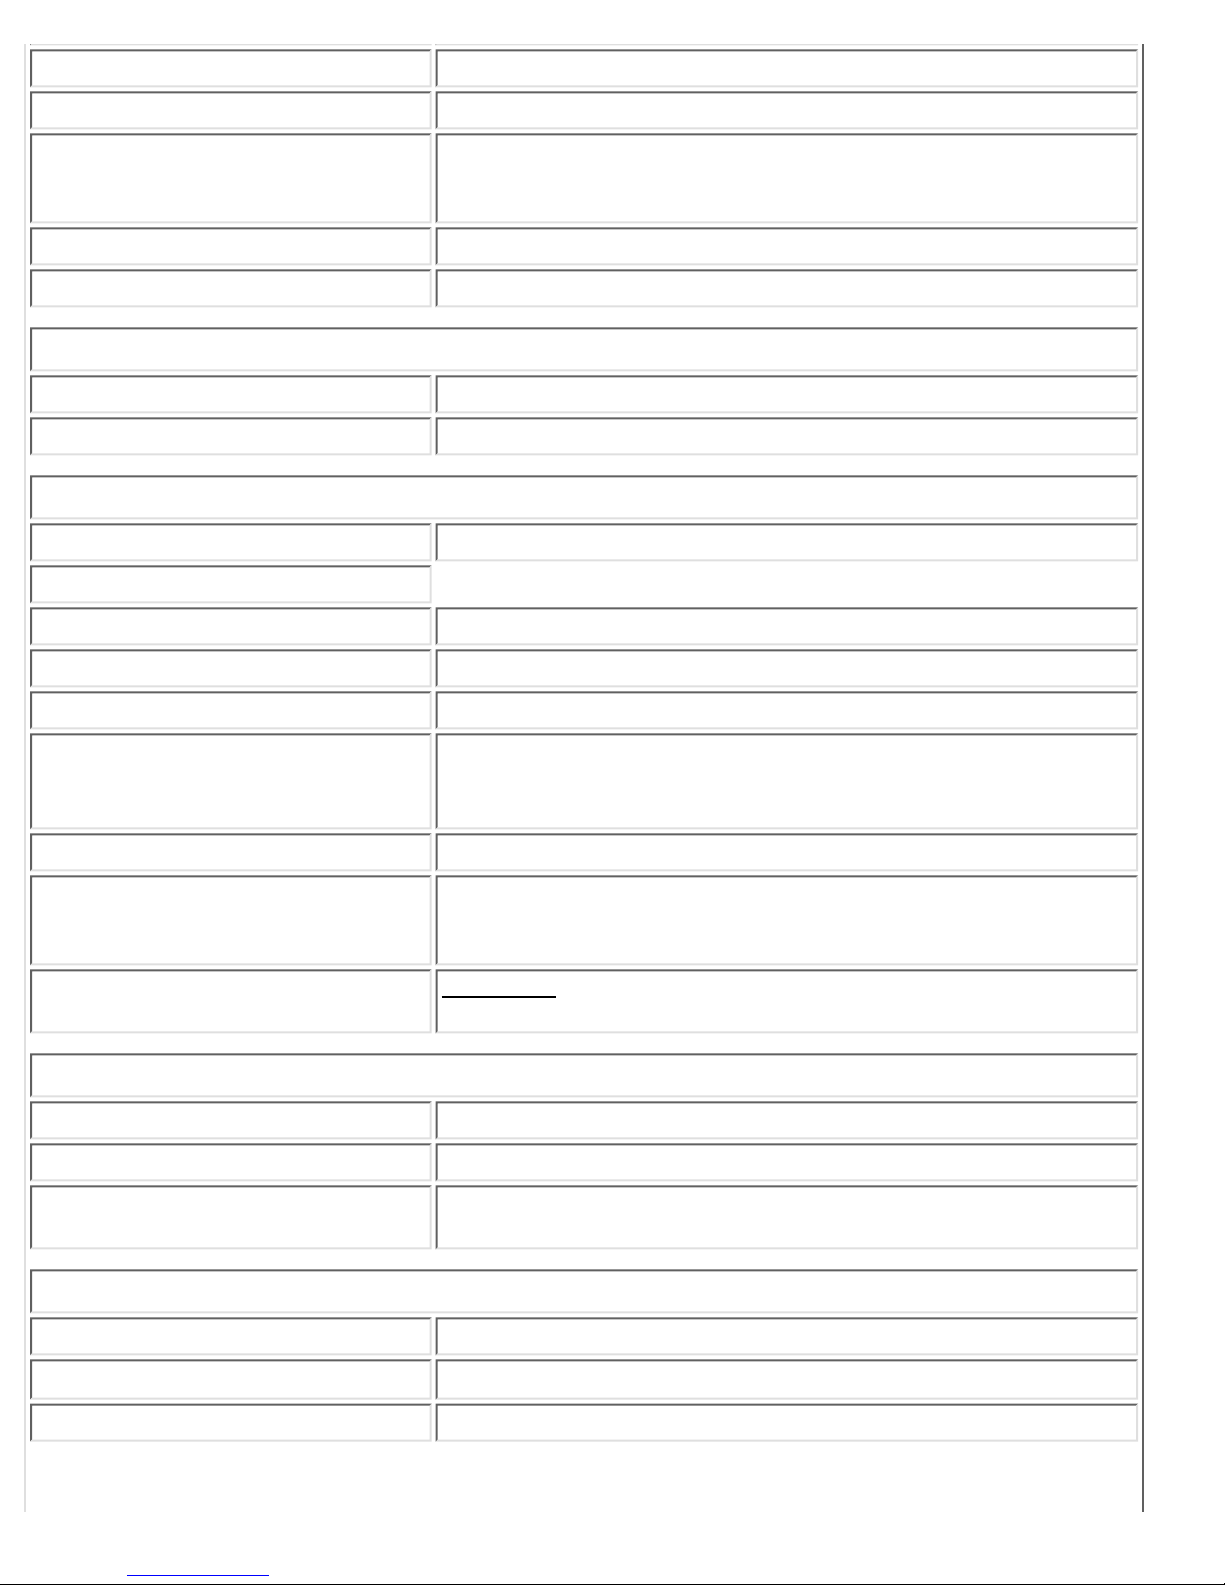
Q: How do I use the LightFrameTM 3 control bar that appears at the top my screen?
A: The control bar is another upgrade that helps you run all LightFrame
TM
3's neat, new features. The
illustration below describes the tasks each button performs.
RETURN TO TOP OF THE PAGE
Technical Specifications*
LCD PANEL
• Type TFT LCD
Product Information
file:///D|/C/english/150p4agb/product/product.htm (4 of 10) [2/24/2003 2:49:20 PM]
Page 10
• Screen size 15" visual
• Pixel Pitch 0.297 x 0.297mm (15.0")
• LCD Panel type
1024 x 768 pixels
R.G.B. vertical stripe
Anti-glare polarizer, hard coated
• Effective viewing area 304.1 x 228.1mm (15.0")
• Display Colors 16.7M colors
SCANNING
• Vertical refresh rate 56Hz-76Hz
• Horizontal frequency 30kHz-61kHz
VIDEO
• Video dot rate 80 MHz
• Input impedance
- Video 75 ohm
- Sync 2K ohm
• Input signal levels 700m Vpp
• Sync input signal
Separate sync
Composite sync
Sync on Green
• Sync polarities Positive and negative
• Input Frequency
XGA Hsync 48- 61 kHz, Vsync 60 - 76 Hz (N.I.)
SVGA Hsync 35- 50 kHz, Vsync 56 - 75 Hz (N.I.)
VGA Hsync 31- 38 kHz, Vsync 60 - 76 Hz (N.I.)
• Video interface
Dual input: Both Analog (D-Sub) and DVI-D (Digital only) are
available. It can be switched via OSD selection.
AUDIO
• Input signal level 0.7 Vpp
• Input signal connector 3.5mm mini jack
• Loudspeaker
2W Stereo Audio (1W/channel RMS x2, 300Hz-13kHz, 16 ohm,
THD=10%)
OPTICAL CHARACTERISTICS
• Contrast ratio 400 (typ.)
• Brightness
250 cd/m2 (typ.)
• Peak contrast angle 6 o'clock
Product Information
file:///D|/C/english/150p4agb/product/product.htm (5 of 10) [2/24/2003 2:49:20 PM]
Page 11

• White Chromacity
x: 0.283 y: 0.297 (at 9300° K)
x: 0.313 y: 0.329 (at 6500° K)
x: 0.313 y: 0.329 (at sRGB)
• Viewing Angle (C/R >5)
Upper >50° (typ.)
Lower >60° (typ.)
Left >75 ° (typ.)
Right >75 ° (typ.)
• Response time <=25ms (typ.)
sRGB
sRGB is a standard for ensuring correct exchange of colors between different devices (e.g. digital
cameras, monitors, printers, scanners, etc.)
Using a standard unified color space, sRGB will help represent pictures taken by an sRGB compatible
device correctly on your sRGB enabled Philips monitors. In that way, the colors are calibrated and you
can rely on the correctness of the colors shown on your screen.
Important with the use of sRGB is that the brightness and contrast of your monitor is fixed to a
predefined setting as well as the color gamut. Therefore it is important to select the sRGB setting in the
monitor's OSD.
To do so, open the OSD by pressing the OK button on the front of your monitor. Use the down button
to go to Adjust Color and press OK again. Then move the down button to go to sRGB and press OK
again.
Exit this OSD.
After this, please don't change the brightness or contrast setting of your monitor. If you change either of
these, the monitor will exit the sRGB mode and go to a color temperature setting of 6500K.
For more information on sRGB, please visit: www.srgb.com
Note: sRGB mode is not available while 'LightFrameTM' function is activated.
* This data is subject to change without notice.
RETURN TO TOP OF THE PAGE
Resolution & Preset Modes
• Maximum 1024 x 768 at 75Hz
• Recommended 1024 x 768 at 60Hz
14 user definable modes
14 factory preset modes:
Product Information
file:///D|/C/english/150p4agb/product/product.htm (6 of 10) [2/24/2003 2:49:20 PM]
Page 12
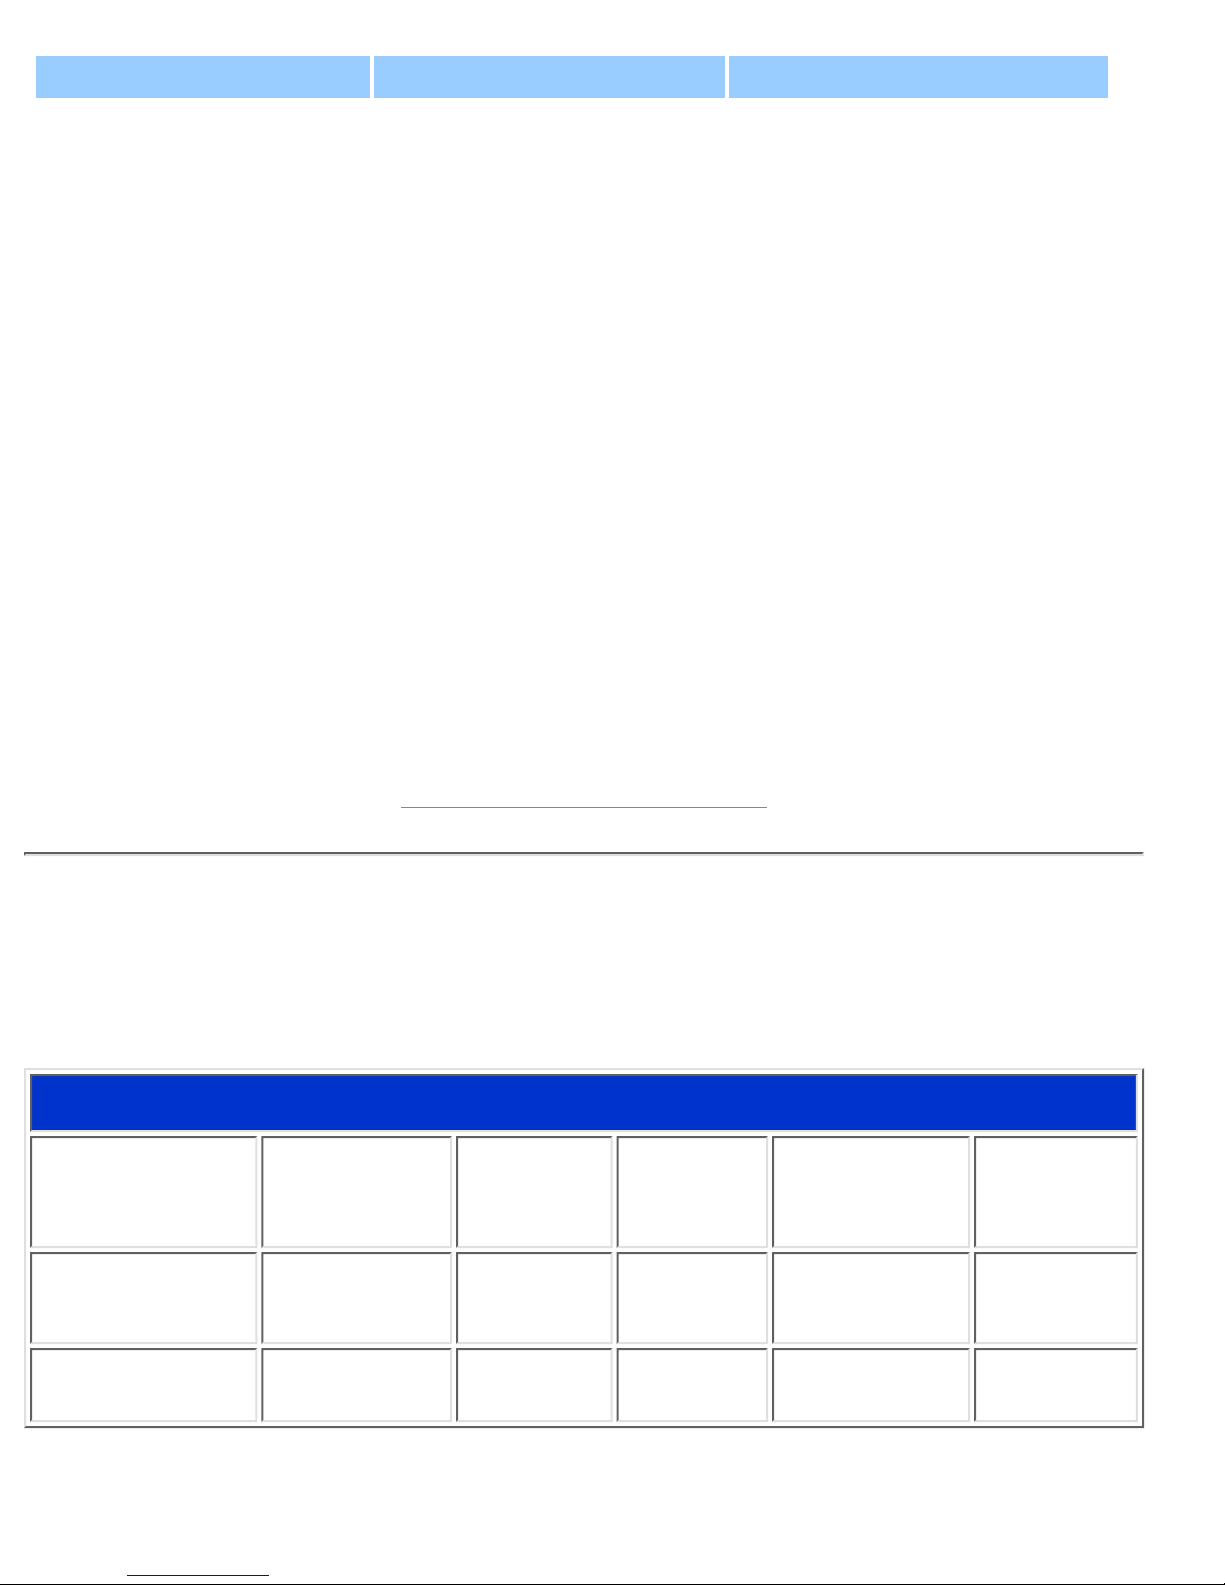
H. freq (kHz) Resolution V. freq (Hz)
31.469 640*350 70.086
31.469 720*400 70.087
31.469 640*480 59.940
35.000 640*480 67.000
37.861 640*480 72.809
37.500 640*480 75.000
35.156 800*600 56.250
37.879 800*600 60.317
48.077 800*600 72.188
46.875 800*600 75.000
49.700 832*624 75.000
48.363 1024*768 60.004
56.476 1024*768 70.069
60.023 1024*768 75.029
RETURN TO TOP OF THE PAGE
Automatic Power Saving
If you have VESA DPMS compliance display card or software installed in your PC, the monitor can
automatically reduce its power consumption when not in use. If an input from a keyboard, mouse or other
input device is detected, the monitor will 'wake up' automatically. The following table shows the power
consumption and signaling of this automatic power saving feature:
Power Management Definition
VESA Mode Video H-sync V-sync Power Used LED color
ON Active Yes Yes < 30W Green
OFF Blanked No No < 1W Amber
Product Information
file:///D|/C/english/150p4agb/product/product.htm (7 of 10) [2/24/2003 2:49:20 PM]
Page 13
This monitor is ENERGY STAR® compliant. As an ENERGY STAR® Partner, PHILIPS has
determined that this product meets the
ENERGY STAR
®
guidelines for energy efficiency.
RETURN TO TOP OF THE PAGE
Physical Specifications
• Dimension incl. Pedestal
(WxHxD) *
343 x 319 x 218 mm (in lowest position)
• Weight * 3.9 kg
• Height adjustment rang 48 mm
• Tilt (Forward / Backward) - 5° / 25°
• Power supply 100 — 240 VAC, 50/60 Hz
• Power consumption 20 W (typ.)
• Temperature (operating) 5° C to 40° C
• Relative humidity 20% to 80%
• System MTBF 50K hrs (CCFL 40Khrs)
• Cabinet color
150P4AG: Light Gray
150P4AB: Black
* This data is subject to change without notice.
RETURN TO TOP OF THE PAGE
Pin Assignment
1. The digital only connector contains 24 signal contacts organized in three rows of eight contacts. Signal
pin assignments are listed in the table:
Pin
No.
Signal Assignment
Pin
No.
Signal Assignment
Pin
No.
Signal Assignment
1 T.M.D.S. Data2- 9 T.M.D.S. Data1- 17 T.M.D.S. Data02 T.M.D.S. Data2+ 10 T.M.D.S. Data1+ 18 T.M.D.S. Data0+
3
T.M.D.S. Data2/4
Shield
11
T.M.D.S. Data1/3
Shield
19
T.M.D.S. Data0/5
Shield
4 No connect 12 No connect 20 No connect
5 No connect 13 No connect 21 No connect
6 DDC Clock 14 +5V Power 22
T.M.D.S. Clock
Shield
7 DDC Data 15 Ground (for +5V) 23 T.M.D.S. Clock+
Product Information
file:///D|/C/english/150p4agb/product/product.htm (8 of 10) [2/24/2003 2:49:20 PM]
Page 14
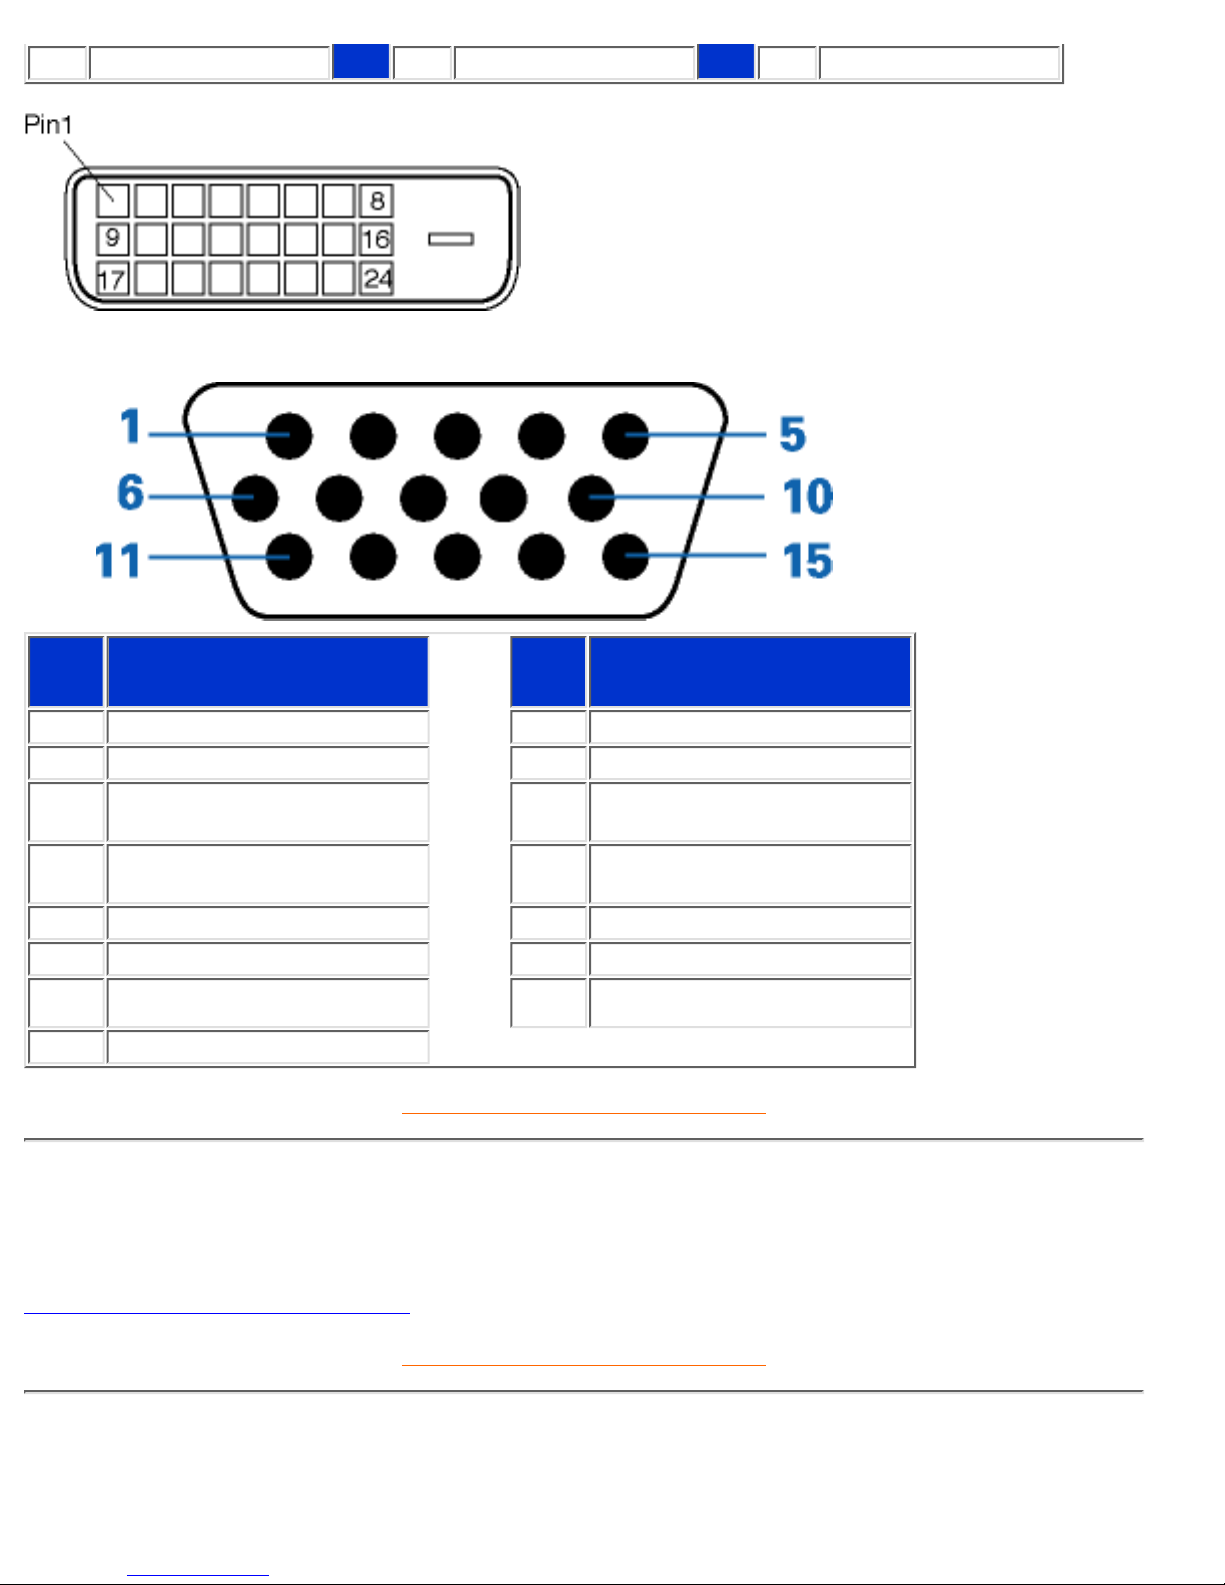
8 No connect 16 Hot Plug Detect 24 T.M.D.S. Clock-
2. The 15-pin D-sub connector (male) of the signal cable:
Pin
No.
Assignment
Pin
No.
Assignment
1 Red video input 9 DDC +5V
2 Green video input 10 Logic ground
3 Blue video input 11
Identical output - connected
to pin 10
4
Identical output - connected
to pin 10
12 Serial data line (SDA)
5 Cable detect 13 H. Sync / H+V
6 Red video ground 14 V. Sync
7 Green video ground 15 Data clock line (SCL)
8 Blue video ground
RETURN TO TOP OF THE PAGE
Product Views
Follow the links to see various views of the monitor and its components.
Front View Product Description
RETURN TO TOP OF THE PAGE
Physical Function
Product Information
file:///D|/C/english/150p4agb/product/product.htm (9 of 10) [2/24/2003 2:49:20 PM]
Page 15
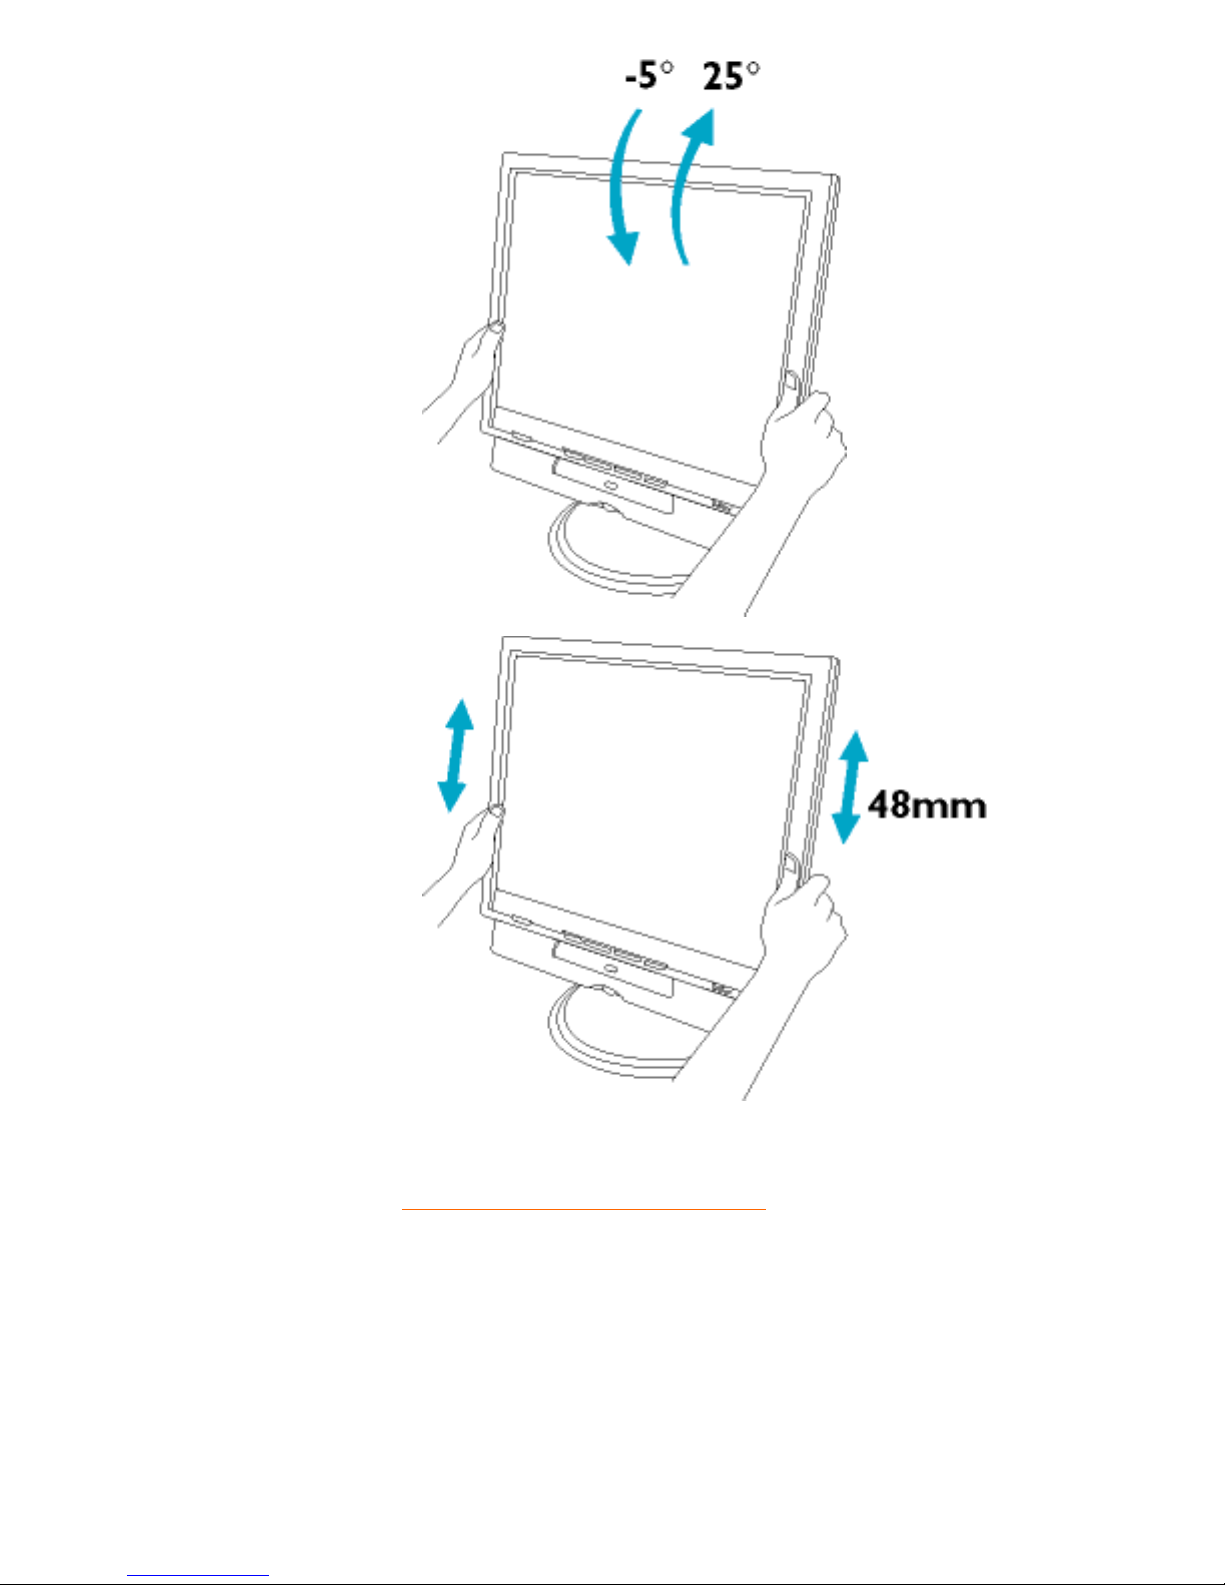
1) Tilt
2) Height adjustment
RETURN TO TOP OF THE PAGE
Product Information
file:///D|/C/english/150p4agb/product/product.htm (10 of 10) [2/24/2003 2:49:20 PM]
Page 16
Installing your LCD Monitor
Your LCD Monitor : Front View Product Description • Connecting to Your PC • The Base •
Getting Started • Optimizing Performance
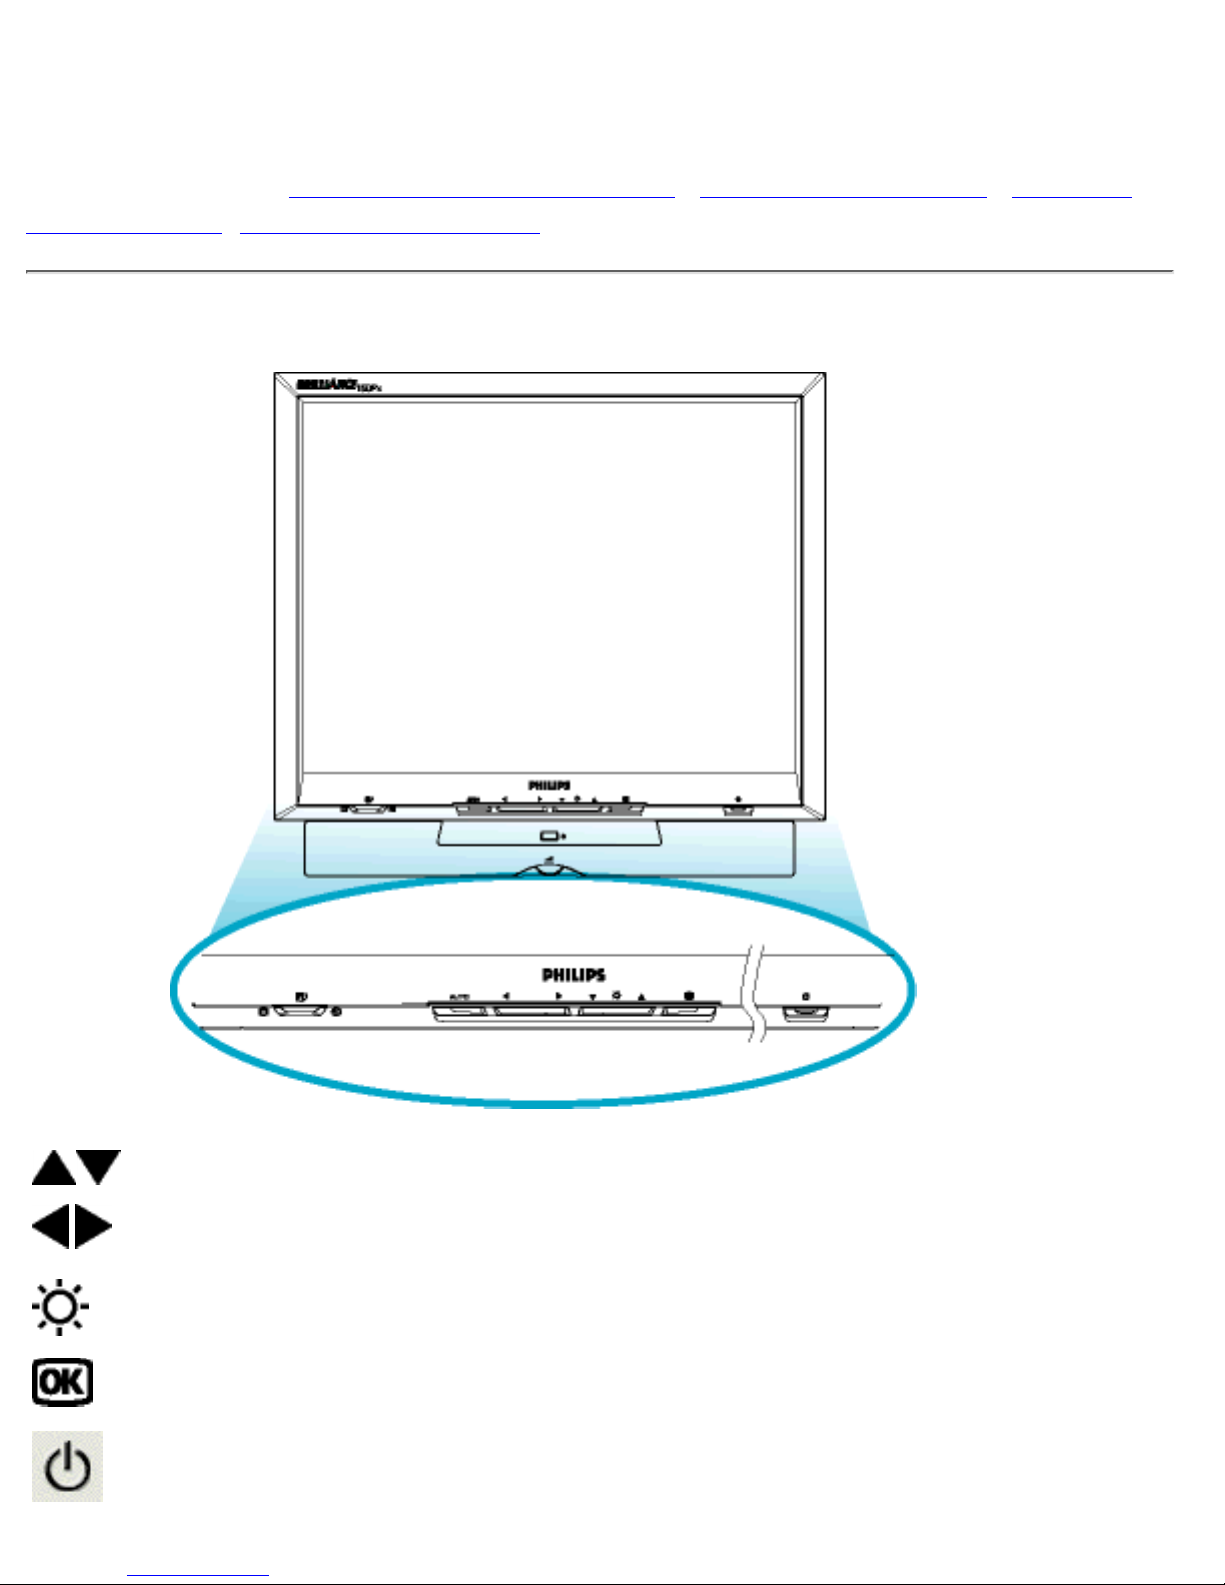
Front View Product Description
UP and DOWN buttons are used when adjusting the OSD of your monitor
LEFT and RIGHT buttons, like the UP and DOWN buttons, are also used
in adjusting the OSD of your monitor.
BRIGHTNESS hotkey. When the UP and DOWN arrow buttons are
pressed, the adjustment controls for the BRIGHTNESS will show up.
OK button which when pressed will take you to the OSD controls
POWER button switches your monitor on
Installing your LCD Monitor
file:///D|/C/english/150p4agb/install/install.htm (1 of 2) [2/24/2003 2:49:23 PM]
Page 17
Automatically adjust the horizontal position, vertical position, phase and
clock setting.
LightFrameTM hotkey for mode-switching between full-screen mode and
multi-window mode
.
RETURN TO TOP OF THE PAGE
Optimizing Performance
For best performance, ensure that your display settings are set at 1024x768@60Hz (for 14"/15") or
1280x1024, 60Hz (for 17"/18").
●
Note: You can check the current display settings by pressing the 'OK' button once.
Go into the Product Information. The current display mode is shown on the item
called RESOLUTION.
You can also install the Flat Panel Adjust (FP Adjust) program, a program for getting the best
performance out of your monitor. This included on this CD. Step-by-step instructions are provided to
guide you through the installtion process. Click on the link to know more about this program.
More about
FP_setup01.exe
●
RETURN TO TOP OF THE PAGE
Installing your LCD Monitor
file:///D|/C/english/150p4agb/install/install.htm (2 of 2) [2/24/2003 2:49:23 PM]
Page 18
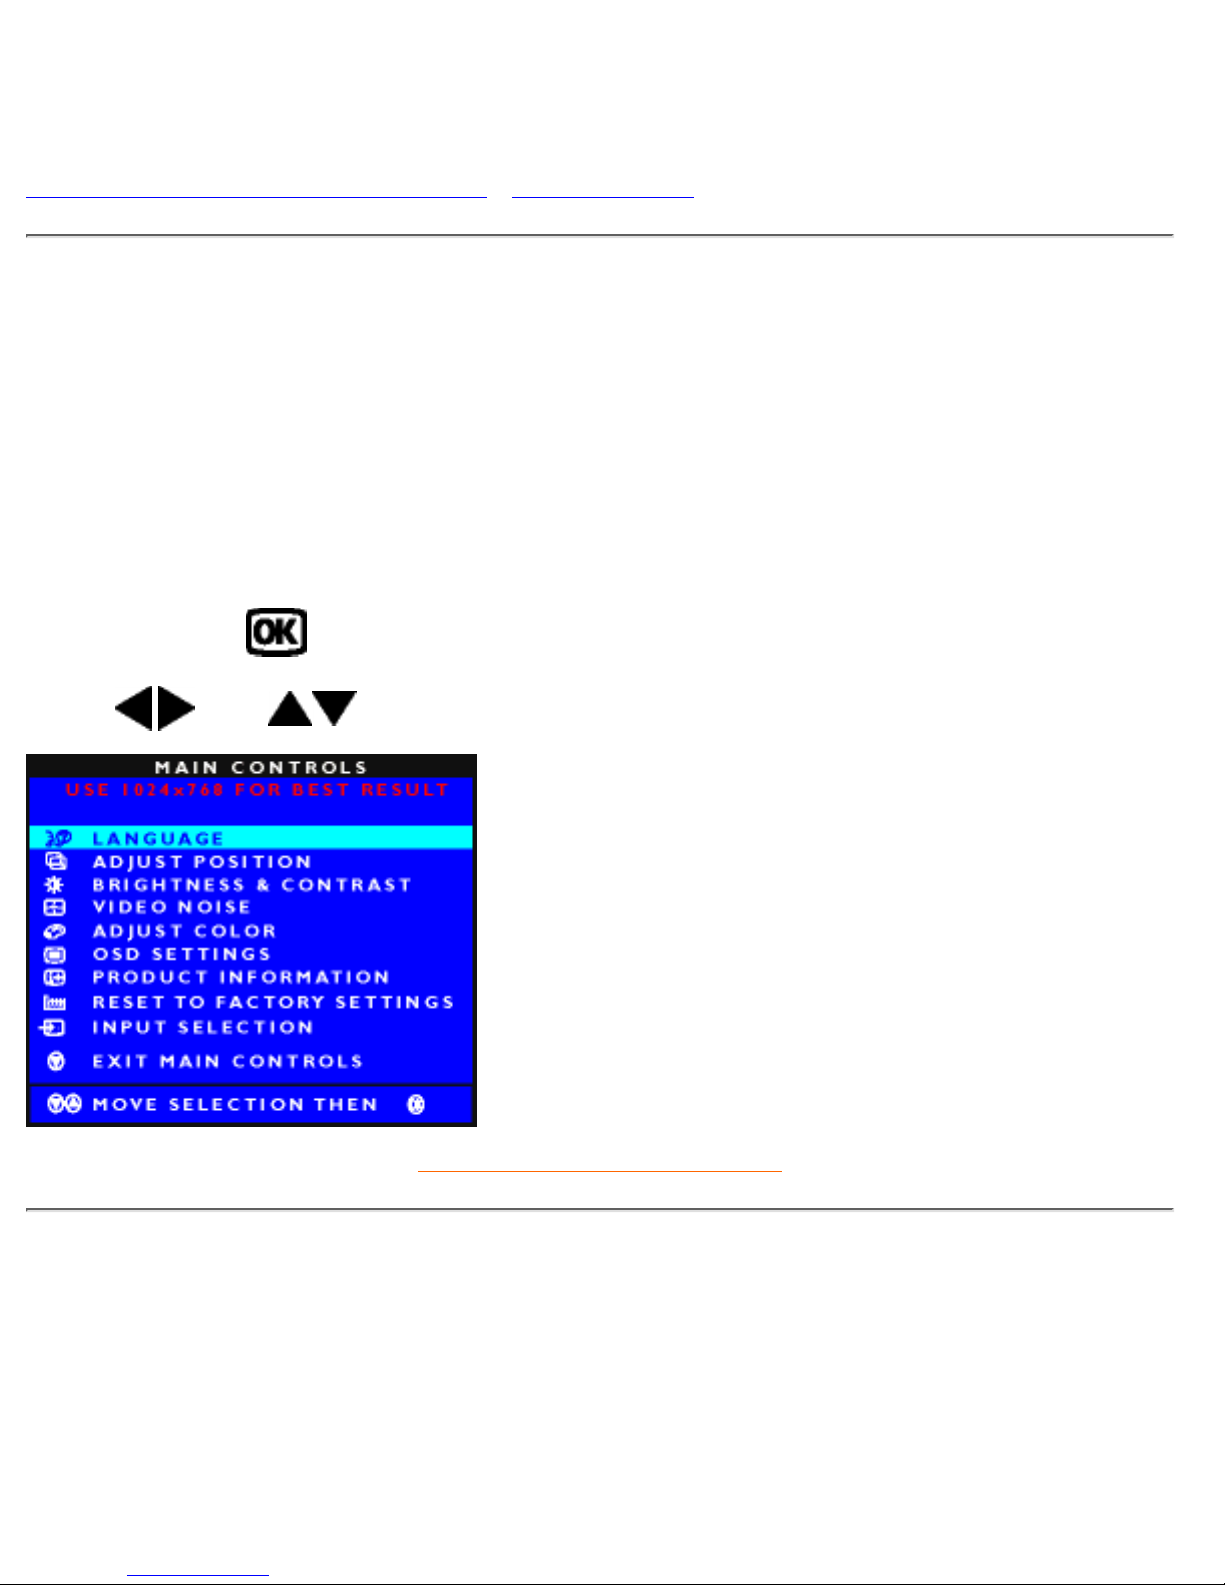
On-Screen Display
Description of the On-Screen Display • The OSD Tree
Description of the On Screen Display
What is the On-Screen Display?
This is a feature in all Philips LCD monitors. It allows an end user to adjust screen performance of the
monitors directly though an on-screen instruction window. The user interface provides user-friendliness and
ease-of-use when the user is operating the monitor.
Basic and simple instruction on the control keys.
When you press the
button on the front control of your monitor, the On-Screen Display (OSD) Main
Controls window will pop up and you can then start making adjustments to your monitor's various features.
Use the
or the keys to make your adjustments.
RETURN TO TOP OF THE PAGE
The OSD Tree
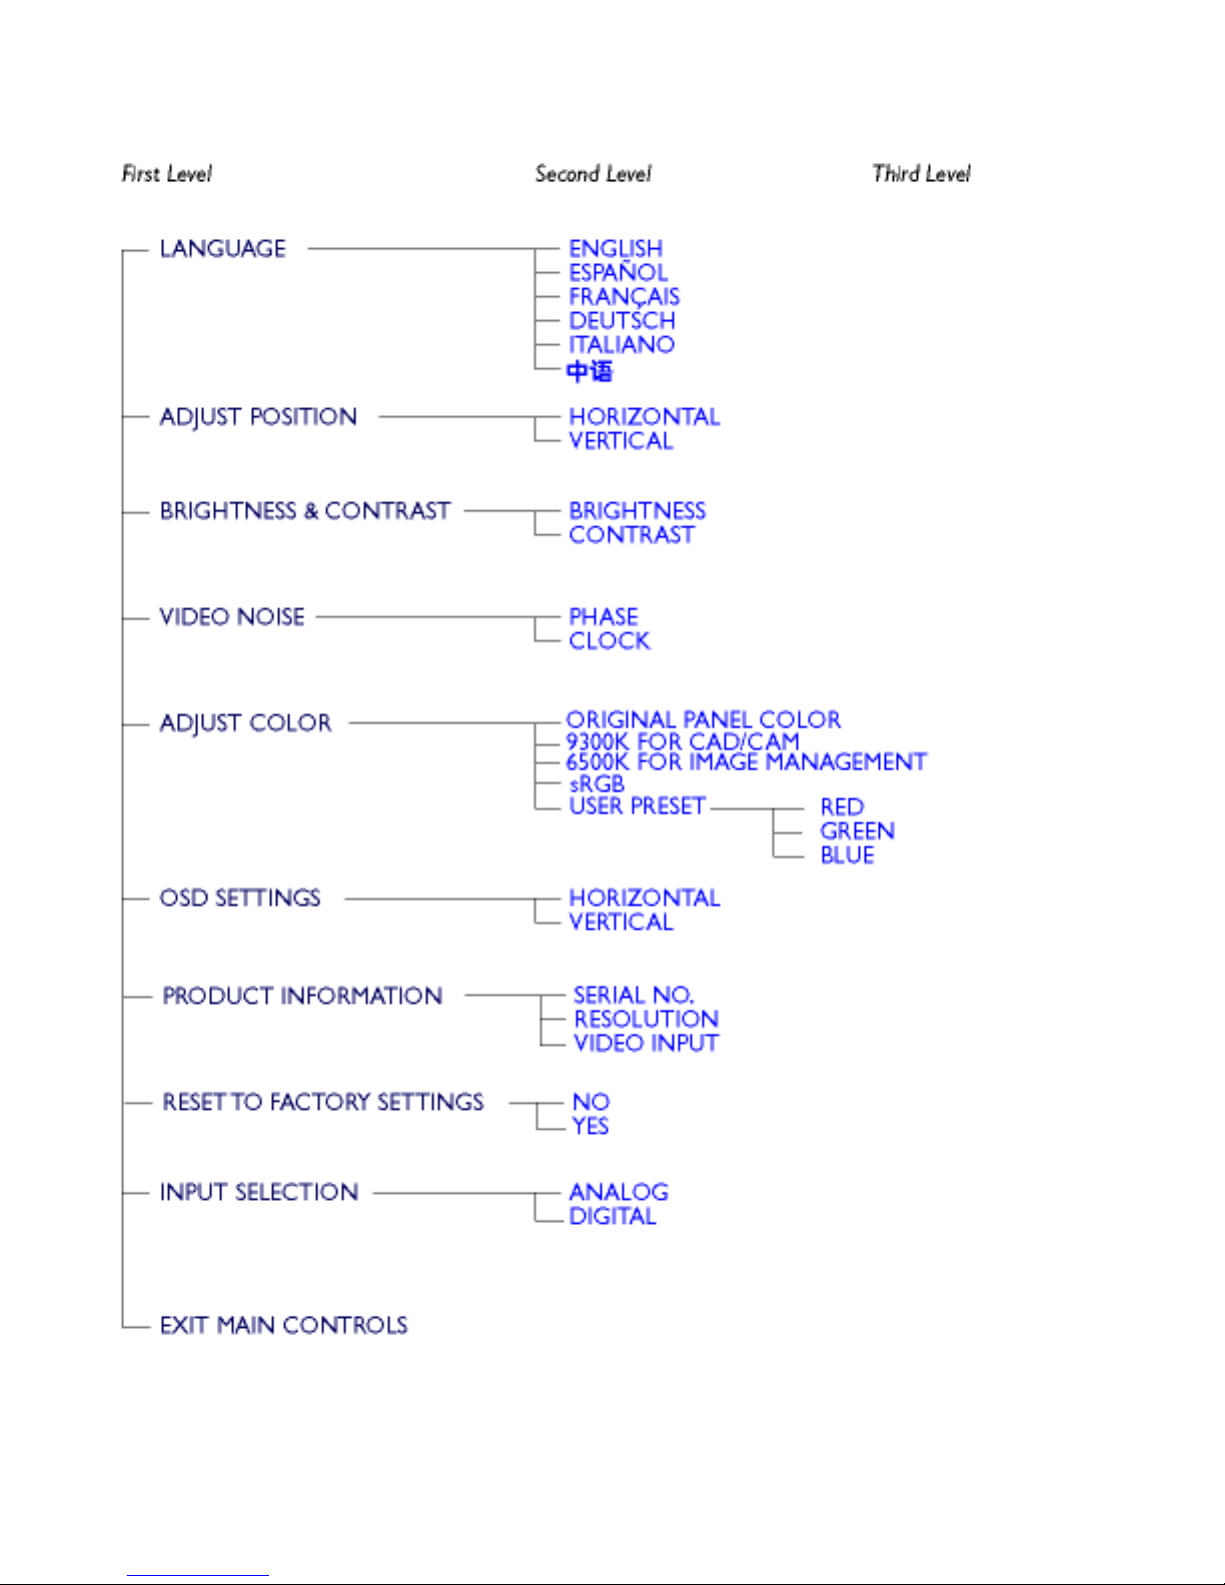
Below is an overall view of the structure of the On-Screen Display. You can use this as a reference when
you want to work your way around the different adjustments later on.
Analog signal input:
On-Screen Display
file:///D|/C/english/150p4agb/osd/osddesc.htm (1 of 3) [2/24/2003 2:49:25 PM]
Page 19
On-Screen Display
file:///D|/C/english/150p4agb/osd/osddesc.htm (2 of 3) [2/24/2003 2:49:25 PM]
Page 20
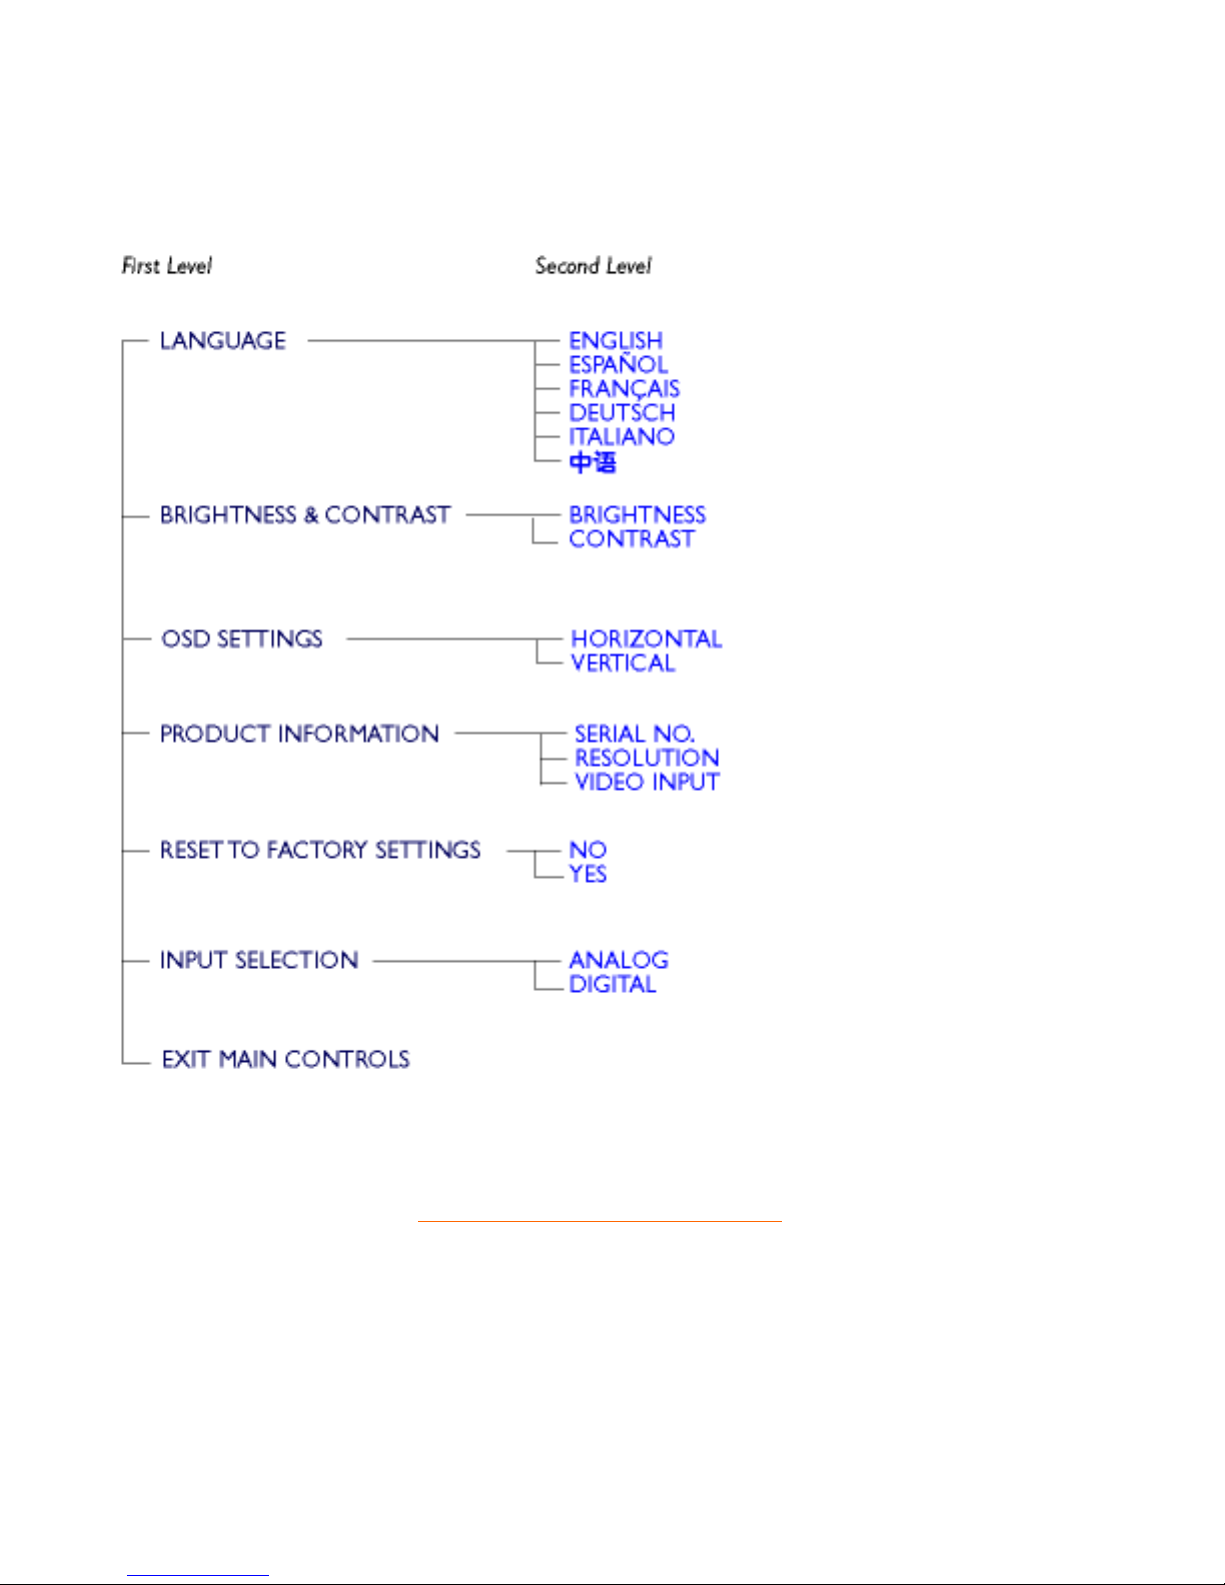
Digital signal input:
RETURN TO TOP OF THE PAGE
On-Screen Display
file:///D|/C/english/150p4agb/osd/osddesc.htm (3 of 3) [2/24/2003 2:49:25 PM]
Page 21

Customer Care & Warranty
PLEASE SELECT YOUR COUNTRY/AREA TO REVIEW DETAILS OF YOUR WARRANTY
COVERAGE
WESTERN EUROPE: Austria • Belgium • Cyprus • Denmark • France • Germany • Greece •
Finland • Ireland • Italy • Luxembourg • the Netherlands • Norway • Portugal • Sweden •
Switzerland • Spain • United Kingdom
EASTERN EUROPE: Czech Republic • Hungary • Poland • Russia • Turkey
LATIN AMERICA: Antilles • Argentina • Brasil • Chile • Colombia • Mexico • Paraguay • Peru
• Uruguay • Venezuela
NORTH AMERICA: Canada • USA
PACIFIC: Australia • New Zealand
ASIA: Bangladesh • China • Hong Kong • India • Indonesia • Japan • Korea • Malaysia •
Pakistan • Philippines • Singapore • Taiwan • Thailand
AFRICA: Morocco • South Africa
MIDDLE EAST: Dubai • Egypt
Customer Care and Warranty
file:///D|/C/english/warranty/warranty.htm [2/24/2003 2:49:26 PM]
Page 22

Glossary
A B C D E F G H I J K L M N O P Q R S T U V W X Y Z
C
Color temperature
A way of describing the color of a radiating source in terms of the temperature (in degrees Kelvin) of a black
body radiating with the same dominant frequency as the source.
Most Philips monitors offer the possibility of setting the color temperature to any desired value.
RETURN TO TOP OF THE PAGE
D
D-SUB
Your monitor comes with a D-Sub cable.
Digital Visual Interface (DVI)
The Digital Visual Interface (DVI) specification provides a high-speed digital connection for visual data types
that is display technology independent. The interface is primarily focused at providing a connection between
a computer and its display device. The DVI specification meets the needs of all segments of the PC industry
(workstation, desktop, laptop, etc.) and will enable these different segments to unite around one monitor
interface specification.
The DVI interface enables:
Content to remain in the lossless digital domain from creation to consumption.1.
Display technology independence.2.
Plug and play through hot plug detection, EDID and DDC2B.3.
Digital and Analog support in a single connector.4.
RETURN TO TOP OF THE PAGE
Glossary
file:///D|/C/english/150p4agb/glossary/glossary.htm (1 of 4) [2/24/2003 2:49:29 PM]
Page 23

E
Energy Star Computers Programme
An energy conservation programme launched by the US Environmental Protection Agency (EPA) with the
primary aim of promoting the manufacture and marketing of energy-efficient office automation equipment.
Companies joining this programme must be willing to commit themselves to manufacturing one or more
products capable of going into a low -power state (< 30 W) either after a period of inactivity or after a
predetermined time selected by the user.
RETURN TO TOP OF THE PAGE
L
LCD Liquid Crystal Display
An alphanumeric display using the unique properties of liquid crystal to form characters. The latest flat-panel
displays comprise a matrix of hundreds or thousands of individual LCD cells that generate text and colorful
graphics on a screen. They consume little power though they do require external lighting to make them
legible to the user.
RETURN TO TOP OF THE PAGE
U
USB or Universal Serial Bus
A smart plug for PC peripherals. USB automatically determines resources (like driver software and bus
bandwidth) required by peripherals. USB makes necessary resources available without user intervention.
USB eliminates "case angst" -- the fear of removing the computer case to install add-on peripherals.
And USB also eliminates adjustment of complicated IRQ settings when installing new peripherals.
●
USB does away with "port gridlock." Without USB, PCs are normally limited to one printer, two Com
port devices (usually a mouse and modem), one Enhanced Parallel Port add-on (scanner or video
camera, for example) and a joystick. More and more peripherals for multimedia computers arrive on
the market every day. With USB, up to 127 devices can run simultaneously on a computer.
●
USB permits "hot plug-in." There's no need to shut down, plug in, reboot and run set-up to install
peripherals. And no need to go through the reverse process to unplug a device.
●
In short, USB transforms today's "Plug-and-Pray" into true Plug-and-Play!
Hub
Glossary
file:///D|/C/english/150p4agb/glossary/glossary.htm (2 of 4) [2/24/2003 2:49:29 PM]
Page 24
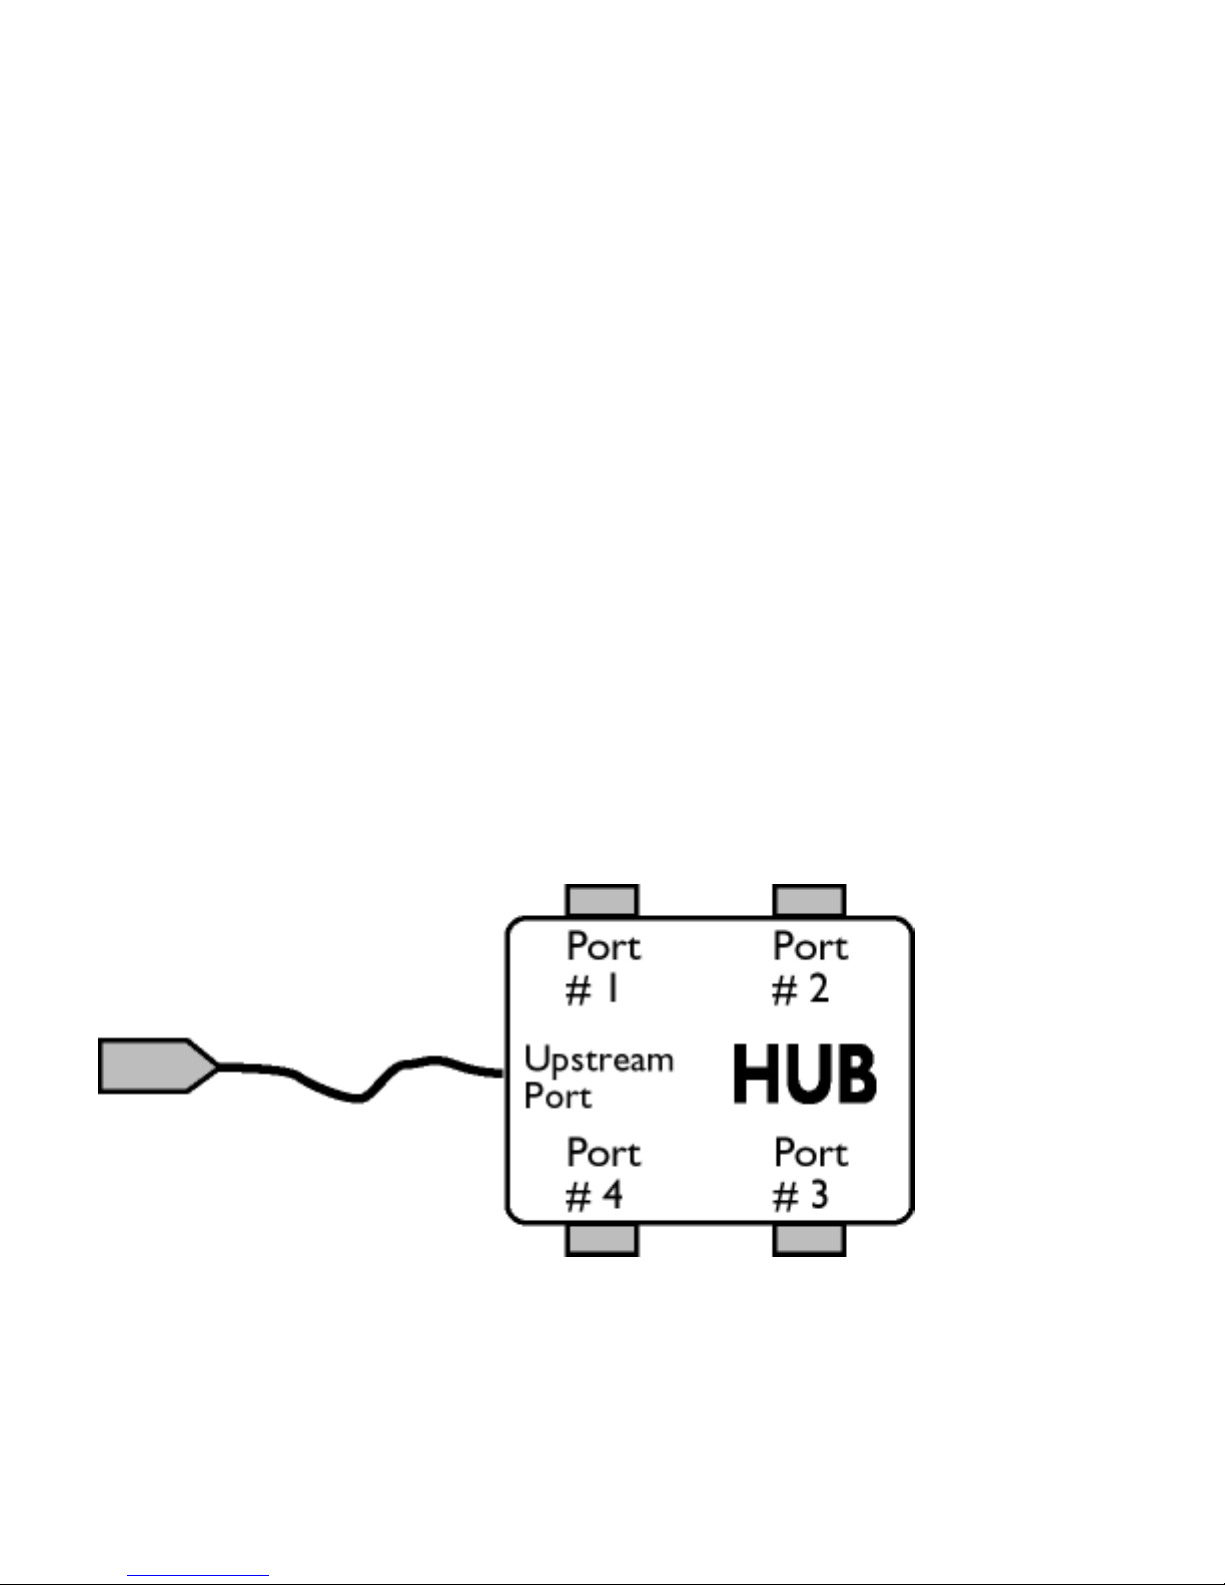
A Universal Serial Bus device that provides additional connections to the Universal Serial Bus.
Hubs are a key element in the plug-and-play architecture of USB. The Figure shows a typical hub. Hubs
serve to simplify USB connectivity from the user's perspective and provide robustness at low cost and
complexity.
Hubs are wiring concentrators and enable the multiple attachment characteristics of USB. Attachment points
are referred to as ports. Each hub converts a single attachment point into multiple attachment points. The
architecture supports concatenation of multiple hubs.
The upstream port of a hub connects the hub towards the host. Each of the other downstream ports of a
hub allows connection to another hub or function. Hubs can detect, attach and detach at each downstream
port and enable the distribution of power to downstream devices. Each downstream port can be individually
enabled and configured at either full or low speed. The hub isolates low speed ports from full speed
signaling.
A hub consists of two portions: the Hub Controller and Hub Repeater. The repeater is a protocol-controlled
switch between the upstream port and downstream ports. It also has hardware support for reset and
suspend/resume signaling. The controller provides the interface registers to allow communication to/from
the host. Hub specific status and control commands permit the host to configure a hub and to monitor and
control its ports.
Device
A logical or physical entity that performs a function. The actual entity described depends on the context of
the reference. At the lowest level, device may refer to a single hardware component, as in a memory device.
At a higher level, it may refer to a collection of hardware components that perform a particular function, such
as a Universal Serial Bus interface device. At an even higher level, device may refer to the function
performed by an entity attached to the Universal Serial Bus; for example, a data/FAX modem device.
Devices may be physical, electrical, addressable, and logical.
Downstream
The direction of data flow from the host or away from the host. A downstream port is the port on a hub
electrically farthest from the host that generates downstream data traffic from the hub. Downstream ports
receive upstream data traffic.
Glossary
file:///D|/C/english/150p4agb/glossary/glossary.htm (3 of 4) [2/24/2003 2:49:29 PM]
Page 25

Upstream
The direction of data flow towards the host. An upstream port is the port on a device electrically closest to
the host that generates upstream data traffic from the hub. Upstream ports receive downstream data traffic.
RETURN TO TOP OF THE PAGE
V
Vertical refresh rate
Expressed in Hz, it is the number of frames (complete pictures) written to the screen every second.
RETURN TO TOP OF THE PAGE
Glossary
file:///D|/C/english/150p4agb/glossary/glossary.htm (4 of 4) [2/24/2003 2:49:29 PM]
Page 26

Download and Print
Installing your LCD monitor driver • Download and Printing Instructions • Installing FPadjust
Program
Installing Your LCD monitor driver
System requirements:
PC running Windows 95, Windows 98, Windows 2000 , Windows Me, Windows XP or later
●
Find your driver ".inf/.icm/.cat" at : /PC/drivers/●
Read the "Driver_install02.txt" file before installing.
This page provides an option to read the manual in .pdf format. PDF files can be downloaded into your hard
disk, then viewed and printed with Acrobat Reader or through your browser.
If you do not have Adobe® Acrobat Reader installed, click on the link to install the application. Adobe®
Acrobat Reader for PC / Adobe® Acrobat Reader for Mac.
Download instructions:
To download the file:
1. Click-and-hold your mouse over the icon below. (Win95/98/2000/Me/XP users right-click)
Download
150P4AB.pdf
Download
150P4AG.pdf
Download
150P4CB.pdf
Download
150P4CG.pdf
2. From the menu that appears, choose 'Save Link As...', 'Save Target As...' or 'Download Link to Disk'.
3. Choose where you would like to save the file; click 'Save' (if prompted to save as either 'text' or 'source',
Download and Print
file:///D|/C/english/download/download.htm (1 of 2) [2/24/2003 2:49:31 PM]
Page 27

choose 'source').
Printing instructions:
To print the manual:
1. With the manual file open, follow your printer's instructions and print the pages you need.
RETURN TO TOP OF THE PAGE
Installing FPadjust Program
The FP Adjust program generates alignment patterns which will help you adjust monitor settings such as
CONTRAST, BRIGHTNESS, HORIZONTAL & VERTICAL POSITION, PHASE and CLOCK.
System requirements:
PC running Windows 95, Windows 98, Windows 2000, Winodws Me, Windows XP or later
●
To install FPadjust Program:
Click on the link or icon to install FPadjustment Program.
or
●
Click-and-hold your mouse over the icon. (Win95/98/2000/Me/XP users right-click)●
Download
FP_setup01.exe
From the menu that appears, choose 'Save Link As...', 'Save Target As...' or 'Download Link to Disk'.
●
Choose where you would like to save the file; click 'Save' (if prompted to save as either 'text' or
'source', choose 'source').
●
Exit your browser and install the FPadjust Program.●
Read the "FP_Readme01.txt" file before installing.
RETURN TO TOP OF THE PAGE
Download and Print
file:///D|/C/english/download/download.htm (2 of 2) [2/24/2003 2:49:31 PM]
Page 28

FAQs (Frequently Asked Questions)
Safety and Troubleshooting • General FAQs • Screen Adjustments • Compatibility with Other
Peripherals • LCD Panel Technology • Ergonomics, Ecology and Safety Standards •
Troubleshooting • Regulatory Information • Other Related Information
General FAQs
Q:
When I install my monitor what should I do if the screen shows 'Cannot display this video
mode'?
A: Recommended video mode for Philips 14"/15": 1024x768 @60Hz for Philips 17"/18"
1280x1024@60Hz.
Unplug all cables, then connect your PC to the monitor you used previously which displayed
correctly.
1.
In the Windows Start Menu, select Settings/Control Panel. In the Control Panel Window, select the
Display icon. Inside the Display Control Panel, select the 'Settings' tab. Under the settings tab, in a
box labelled 'desktop area', move the slide bar to 1024x768 pixels (14"/15") / 1280x1024 pixels
(17"/18").
2.
Open 'Advanced Properties' and set the Refresh Rate to 60Hz, then click OK.3.
Restart your computer and repeat step 2 and 3 to verify that your PC is set at 1024x768@60Hz
(14"/15") / 1280x1024@60Hz (17"/18").
4.
Shut down your computer, disconnect your old monitor and reconnect your Philips LCD monitor.5.
Turn on your monitor and then turn on your PC6.
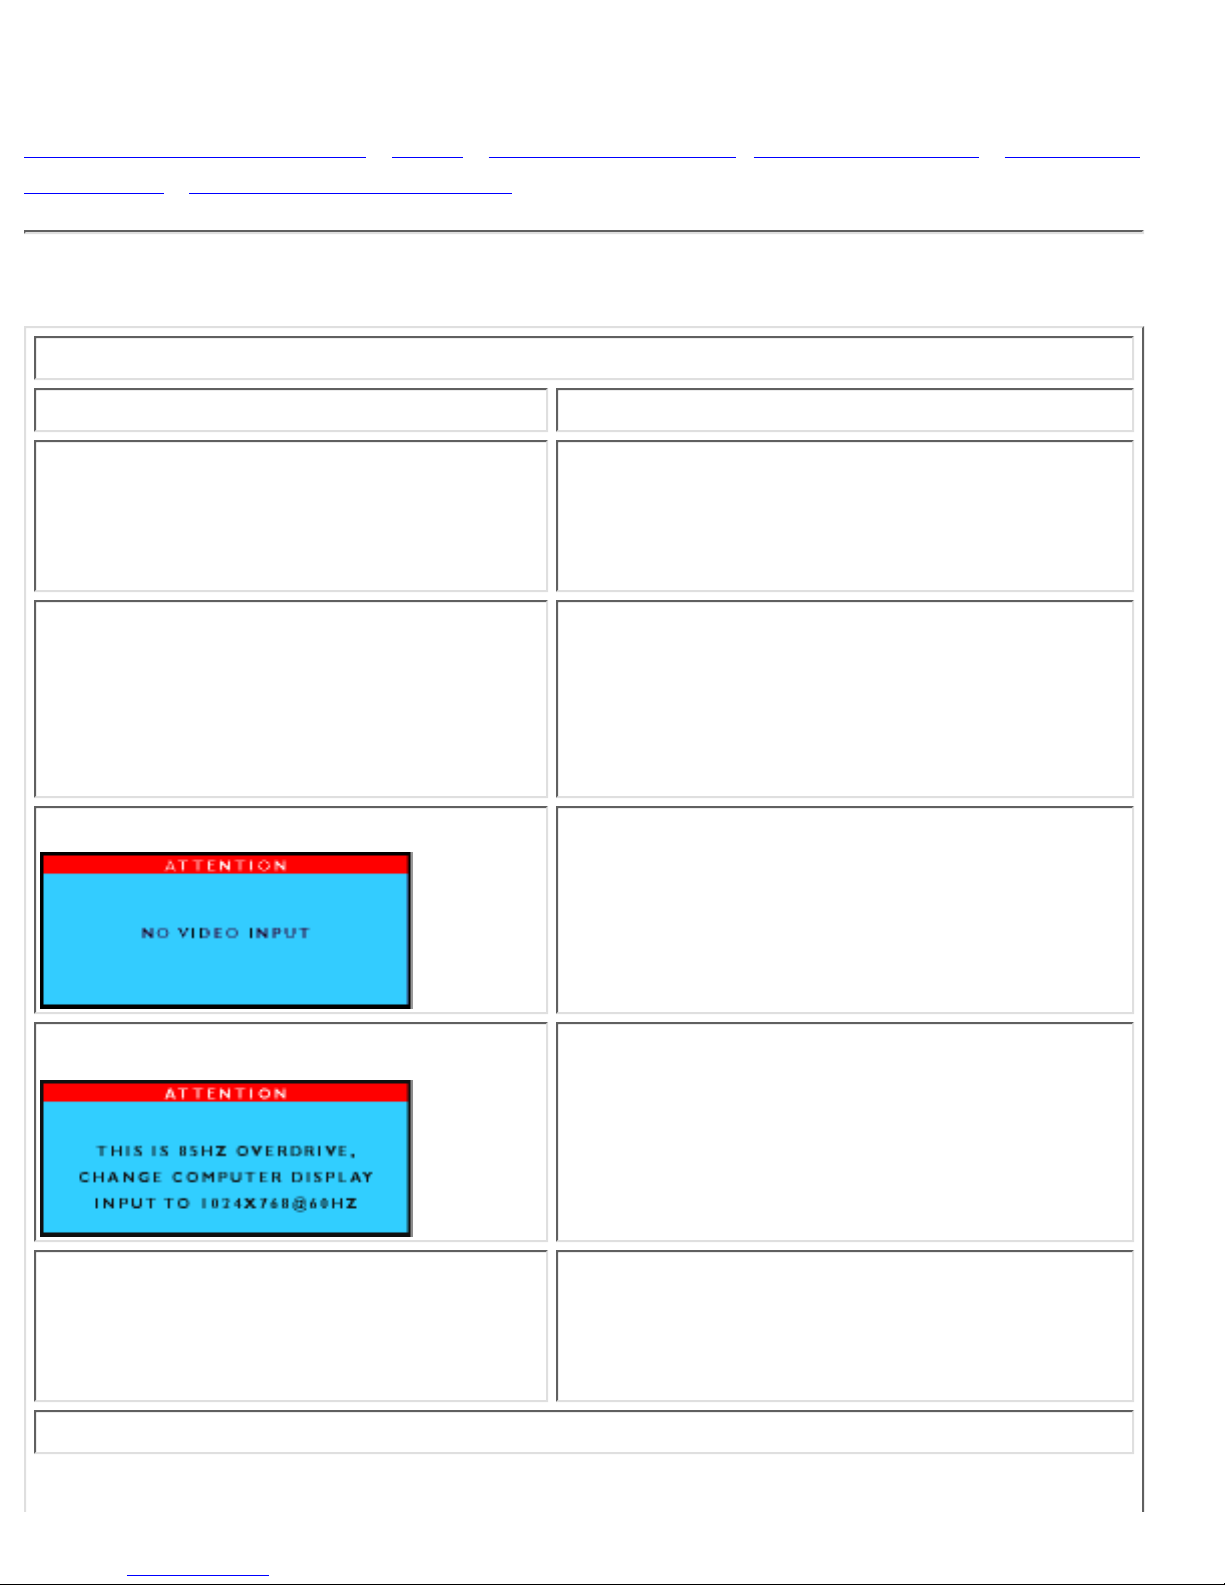
Q: What should I do when screen shows: THIS IS 85HZ OVERSCAN, CHANGE COMPUTER DISPLAY
INPUT TO 1024 x 768 @60HZ or THIS IS 85HZ OVERDRIVE, CHANGE COMPUTER DISPLAY INPUT
TO 1280 x 1024 @60HZ?
A: It means the signal input from your PC is 85Hz -- outside the range that the monitor can display.
New Generation LCD intelligent monitor capabilities temporarily override the overscan, providing
you with 10 minutes to reset timing to recommended settings.
Here's how:
Go to your Windows Start menu. Select Settings, then Control Panel. Select Display. Move to
Settings and click on the Advanced button. Under Adaptor, change the refresh rate to 56~75.
You have 10 minutes to complete the operation; if you do not complete within 10 minutes, power off
and re-power on monitor to enter changes.
FAQs (Frequently Asked Questions)
file:///D|/C/english/150p4agb/safety/saf_faq.htm (1 of 8) [2/24/2003 2:49:38 PM]
Page 29

Q: What does 'refresh rate' mean in connection with an LCD monitor?
A: The refresh rate is of much less relevance for LCD monitors. LCD monitors display a stable,
flicker-free image at 60Hz. There is no visible difference between 85Hz and 60Hz.
Q: What are the .inf and .icm files on the set-up disk & CD-ROM? How do I install the drivers (.inf
and .icm)?
A: These are the driver files for your monitor. Follow the instructions in your user manual to install
the drivers. You computer may ask you for monitor drivers (.inf and Icm files) or a driver disk when
you first install your monitor. Follow the instructions to insert the driver disk (either floppy or
CD-ROM) included in this package. Monitor drivers (.inf and Icm files) will be installed automatically.
Q: How do I adjust the resolution?
A: Your video card/graphic driver and monitor together determine the available resolutions. You
can select the desired resolution under Windows 95/98 with the 'Display properties/Settings' control
panel.
Q: What if I get lost when I am making monitor adjustments?
A: Simply press the OSD button, then select 'Reset' to recall all of the original factory settings.
Q: What is the Auto function?
A: The AUTO adjustment key restores the optimal screen position, phase and clock settings at the
press of a single button – without the need to navigate through OSD menus and control keys.
Q: My Monitor has no power (Power LED does not light up). What should I do?
A: Make sure the AC power cord is connected to the Monitor.
Q: Will the LCD monitor accept an Interlace signal?
A: No If an Interlace signal is used, the screen displays both odd and even horizontal scanning lines
at the same time, thus distorting the picture.
FAQs (Frequently Asked Questions)
file:///D|/C/english/150p4agb/safety/saf_faq.htm (2 of 8) [2/24/2003 2:49:38 PM]
Page 30

Q: What does the Refresh Rate mean for LCD?
A: Unlike CRT display technology, in which the speed at which the electron beam is swept from the
top to the bottom of the screen determines flicker, an active matrix display uses an active element
(TFT) to control each individual pixel and the refresh rate is therefore not really applicable to LCD
technology.
Q: Will the LCD screen be resistant to scratches?
A: A protective coating is applied to the surface of the LCD, which is durable to a certain extent
(approximately up to the hardness of a 2H pencil). In general, it is recommended that the panel
surface is not subjected to any excessive shocks or scratches. An optional protective cover with
greater scratch resistance is also available.
Q: How should I clean the LCD surface?
A: For normal cleaning, use a clean, soft cloth. For extensive cleaning, please use isopropyl
alcohol. Do not use other solvents such as ethyl alcohol, ethanol, acetone, hexane, etc.
Q: Can the Philips LCD Monitor be mounted on the wall or used as a touch panel?
A: Yes, Philips LCD monitors have this optional feature. The standard VESA mount holes on the
back cover allow the user to mount the Philips monitor on any VESA standard ARM or accessories.
Touch panels are being developed for future applications. Check with your Philips sales
representative for more information.
RETURN TO TOP OF THE PAGE
Screen Adjustments
Q: What is the FPadjust program on the set-up disk and CD-ROM?
A: The FPadjust program generates alignment patterns that help you adjust monitor settings such
as Contrast, Brightness, Horizontal Position, Vertical Position, Phase, and Clock for optimal
performance.
FAQs (Frequently Asked Questions)
file:///D|/C/english/150p4agb/safety/saf_faq.htm (3 of 8) [2/24/2003 2:49:38 PM]
Page 31

Q: When I install my monitor, how do I get the best performance from the monitor?
A:
For best performance, make sure your display settings are set at 1024x768@60Hz for 14"/15",
1280x1024@60Hz for 17"/18". Note: You can check the current display settings by pressing the OSD
OK button once.
The current display mode is shown in the product information in the OSD main controls.
1.
To install the Flat Panel Adjust (FPadjust) program located on the monitor setup CD-ROM, open the
CD-ROM and double click the FP_setup01.exe icon. This will install FP Adjust automatically and
place a shortcut on your desktop.
2.
Run FPadjust by double clicking the shortcut. Follow the instructions step by step to optimize image
performance with your system's video controller.
3.
Q: How do LCDs compare with CRTs in terms of radiation?
A: Because LCDs do not use an electron gun they do not generate the same amount of radiation at
the screen surface.
RETURN TO TOP OF THE PAGE
Compatibility with other Peripherals
Q:
Can I connect my LCD monitor to any PC, workstation or Mac?
A: Yes, all Philips LCD monitors are fully compatible with standard PCs, Macs and workstations.
You may need a cable adapter to connect the monitor to your Mac system. Please contact your
dealer/retailer for more information.
Q: Are Philips LCD monitors Plug-and-Play?
A: Yes, the monitors are Plug-and-Play compatible with Windows® 95, 98, 2000, ME, XP and the
PC98/99 platforms.
Q: What is USB (Universal Serial Bus)?
A: Think of USB as a smart plug for PC peripherals. USB automatically determines resources (like
driver software and bus bandwidth) required by peripherals. USB makes necessary resources
available without user intervention. There are three main benefits of USB. USB eliminates 'case
FAQs (Frequently Asked Questions)
file:///D|/C/english/150p4agb/safety/saf_faq.htm (4 of 8) [2/24/2003 2:49:38 PM]
Page 32

angst,' the fear of removing the computer case to install circuit board cards -- that often require
adjustment of complicated IRQ settings -- for add-on peripherals. USB does away with 'port
gridlock.' Without USB, PCs are normally limited to one printer, two Com port devices (usually a
mouse and modem), one Enhanced Parallel Port add-on (scanner or video camera, for example), and
a joystick. More and more peripherals for multimedia computers come on the market every day.
With USB, up to 127 devices can run simultaneously on one computer. USB permits 'hot plug-in.' No need
to shut down, plug in, reboot and run set up to install peripherals. No need to go through the reverse
process to unplug a device. Bottom line: USB transforms today's 'Plug-and-Pray' into true Plug-and-Play!
Q: What is a USB hub ?
A: A USB hub provides additional connections to the Universal Serial Bus. A hub's upstream port
connects a hub to the host, usually a PC. Multiple downstream ports in a hub allows connection to
another hub or device, such as a USB keyboard, camera or printer.
RETURN TO TOP OF THE PAGE
LCD Panel Technology
Q:
What is a Liquid Crystal Display?
A: A Liquid Crystal Display (LCD) is an optical device that is commonly used to display ASCII
characters and images on digital items such as watches, calculators, portable game consoles, etc.
LCD is the technology used for displays in notebooks and other small computers. Like light-emitting
diode and gas-plasma technologies, LCD allows displays to be much thinner than cathode ray tube
(CRT) technology. LCD consumes much less power than LED and gas-display displays because it
works on the principle of blocking light rather than emitting it.
Q: How are LCDs made?
A: LCDs are created from two glass plates separated from each other at a distance of a few
microns. The plates are filled with liquid crystal and then sealed together. The top plate is coloured
with an RGB pattern to make the colour filter. Polarizers are then glued to both plates. This
combination is sometimes called 'glass' or 'cell.' The LCD cell is assembled into a 'module' by
adding the backlight, driver electronics and frame.
Q: What is polarization ?
A: Polarization is basically directing light to shine in one direction. Light is electromagnetic waves.
Electric and magnetic fields oscillate in a direction perpendicular to the propagation of the light
beam. The direction of these fields is called the 'polarization direction'. Normal or non-polarized light
FAQs (Frequently Asked Questions)
file:///D|/C/english/150p4agb/safety/saf_faq.htm (5 of 8) [2/24/2003 2:49:38 PM]
Page 33

has fields in several directions; polarized light has a field in only one direction.
Q: What differentiates passive matrix LCDs from active matrix LCDs?
A: An LCD is made with either a passive matrix or an active matrix display grid. An active matrix has
a transistor located at each pixel intersection, requiring less current to control the luminance of a
pixel. For this reason, the current in an active matrix display can be switched on and off more
frequently, improving the screen refresh time (your mouse pointer will appear to move more
smoothly across the screen, for example). The passive matrix LCD has a grid of conductors with
pixels located at each intersection in the grid.
Q: How does a TFT LCD Panel work?
A: On each column and row of the TFT LCD panel a data source drive and a gate drive and attached,
respectively. The TFT drain of each cell is connected to the electrode. The molecular arrangement of
liquid crystal elements differs according to whether it is impressed with voltage or not. It varies the
direction of polarized light and the amount of light by letting it through different arrays of liquid
crystal elements. When two polarized filters are arranged vertically on a polarized light pole, the
light that passes through the upper polarized panel is turned 90 degrees along with the spiral
structure of the liquid crystal molecules and goes through the polarized filter at the bottom. When
impressed with voltage, liquid crystal molecules are arranged vertically from the original spiral
structure and the direction of the light is not turned through 90 degrees. In this case, light that
comes through the top polarized panel may not go through the polarized panel at the bottom.
Q: What are the advantages of TFT LCD compared with CRT?
A: In a CRT monitor, a gun shoots electrons and general light by colliding polarized electrons on
fluorescent glass. Therefore, CRT monitors basically operate with an analog RGB signal. A TFT LCD
monitor is a device that displays an input image by operating a liquid crystal panel. The TFT has a
fundamentally different structure than a CRT: Each cell has an active matrix structure and
independent active elements. A TFT LCD has two glass panels and the space between them is filled
in with liquid crystal. When each cell is connected with electrodes and impressed with voltage, the
molecular structure of the liquid crystal is altered and controls the amount of inlet lighting to display
images. A TFT LCD has several advantages over a CRT, since it can be very thin and no flickering
occurs because it does not use the scanning method.
Q: Why is vertical frequency of 60Hz optimal for an LCD monitor?
A: Unlike a CDT monitor, the TFT LCD panel has a fixed resolution. For example, an XGA monitor
has 1024x3 (R, G, B) x 768 pixels and a higher resolution may not be available without additional
software processing. The panel is designed to optimize the display for a 65MHz dot clock, one of the
standards for XGA displays. Since the vertical/horizontal frequency for this dot clock is 60Hz/48kHz,
the optimum frequency for this monitor is 60Hz.
FAQs (Frequently Asked Questions)
file:///D|/C/english/150p4agb/safety/saf_faq.htm (6 of 8) [2/24/2003 2:49:38 PM]
Page 34

Q: What kind of wide-angle technology is available? How does it work?
A: The TFT LCD panel is an element that controls/displays the inlet of a backlight using the
dual-refraction of a liquid crystal. Using the property that the projection of inlet light refracts toward
the major axis of the liquid element, it controls the direction of inlet light and displays it. Since the
refraction ratio of inlet light on liquid crystal varies with the inlet angle of the light, the viewing angle
of a TFT is much narrower than that of a CDT. Usually, the viewing angle refers to the point where
the contrast ration is 10. Many ways to widen the viewing angle are currently being developed and
the most common approach is to use a wide viewing angle film, which widens the viewing angle by
varying the refraction ratio. IPS (In Plane Switching) or MVA (Multi Vertical Aligned) is also used to
give a wider viewing angle.
Q: Why is there no flicker on an LCD Monitor?
A: Technically speaking, LCDs do flicker, but the cause of the phenomenon is different from that of
CRT monitor -- and it has no impact of the ease of viewing. Flickering in an LCD monitor relates to
usually undetectable luminance caused by the difference between positive and negative voltage. On
the other hand, CRT flickering that can irritate the human eye occurs when the on/off action of the
fluorescent object becomes visible. Since the reaction speed of liquid crystal in an LCD panel is
much slower, this troublesome form of flickering is not present in an LCD display.
Q: Why is an LCD monitor virtually free of Electro Magnetic Interference?
A: Unlike a CRT, an LCD monitor does not have key parts that generate Electro Magnetic
Interference, especially magnetic fields. Also, since an LCD display utilizes relatively low power, its
power supply is extremely quiet.
RETURN TO TOP OF THE PAGE
Ergonomics, Ecology and Safety Standards
Q:
What is the CE mark?
A: The CE (Conformité Européenne) mark is required to be displayed on all regulated products
offered for sale on the European market. This 'CE' mark means that a product complies with the
relevant European Directive. A European Directive is a European 'Law' that relates to health, safety,
environment and consumer protection, much the same as the U.S. National Electrical Code and UL
Standards.
Q: Does the LCD monitor conform to general safety standards?
FAQs (Frequently Asked Questions)
file:///D|/C/english/150p4agb/safety/saf_faq.htm (7 of 8) [2/24/2003 2:49:38 PM]
Page 35

A: Yes. Philips LCD monitors conform to the guidelines of MPR-II and TCO 95/99/03 standards for
the control of radiation, electromagnetic waves, energy reduction, electrical safety in the work
environment and recyclability. The specification page provides detailed data on safety standards.
More information is provided in the Regulatory Information section.
RETURN TO TOP OF THE PAGE
FAQs (Frequently Asked Questions)
file:///D|/C/english/150p4agb/safety/saf_faq.htm (8 of 8) [2/24/2003 2:49:38 PM]
Page 36
Troubleshooting
Safety and Troubleshooting • FAQs • Common Problems • Imaging Problems • Regulatory
Information • Other Related Information
This page deals with problems that can be corrected by the user. If the problem still persists after you
have tried these solutions, contact your nearest Philips dealer.
Common Problems
Having this problem? Check these items
No Picture
(Power LED not lit)
Make sure the Power cable is plugged to the
wall and the back of the monitor.
●
Firstly, ensure that the power button in front of
the monitor is in the OFF position, then press
it to ON position again.
●
No Picture
(Power LED is amber or yellow)
Make sure the computer is turned on.●
Make sure the signal cable is properly
connected to your computer.
●
Check to see if the monitor cable has bent
pins.
●
The Energy Saving feature may be activated●
Screen says
Make sure the monitor cable is properly
connected to your computer. (Also refer to the
Quick Set-Up Guide).
●
Check to see if the monitor cable has bent
pins.
●
Make sure the computer is turned on.●
Screen says
Make sure the vertical sync of input signal is
within the range of 56 ~ 75 Hz.
●
Change the refresh rate to 56~75Hz within 10
minutes.
●
Re-power on monitor to start over again if you
failed to change the refresh rate within 10
minutes.
●
AUTO button not working properly
The Auto Function is designed for use on
standard Macintosh or IBM-compatible PCs
running Microsoft Windows.
●
It may not work properly if you are using
non-standard PC or video card.
●
Imaging Problems
Troubleshooting
file:///D|/C/english/150p4agb/safety/saf_troub.htm (1 of 3) [2/24/2003 2:49:38 PM]
Page 37
Display position is incorrect
Press the Auto button.●
Adjust the image position using the Horizontal
Position &/or Vertical Position in OSD Main
Controls.
●
Image vibrates on the screen
Check that the signal cable is properly
connected to the graphics board or PC.
●
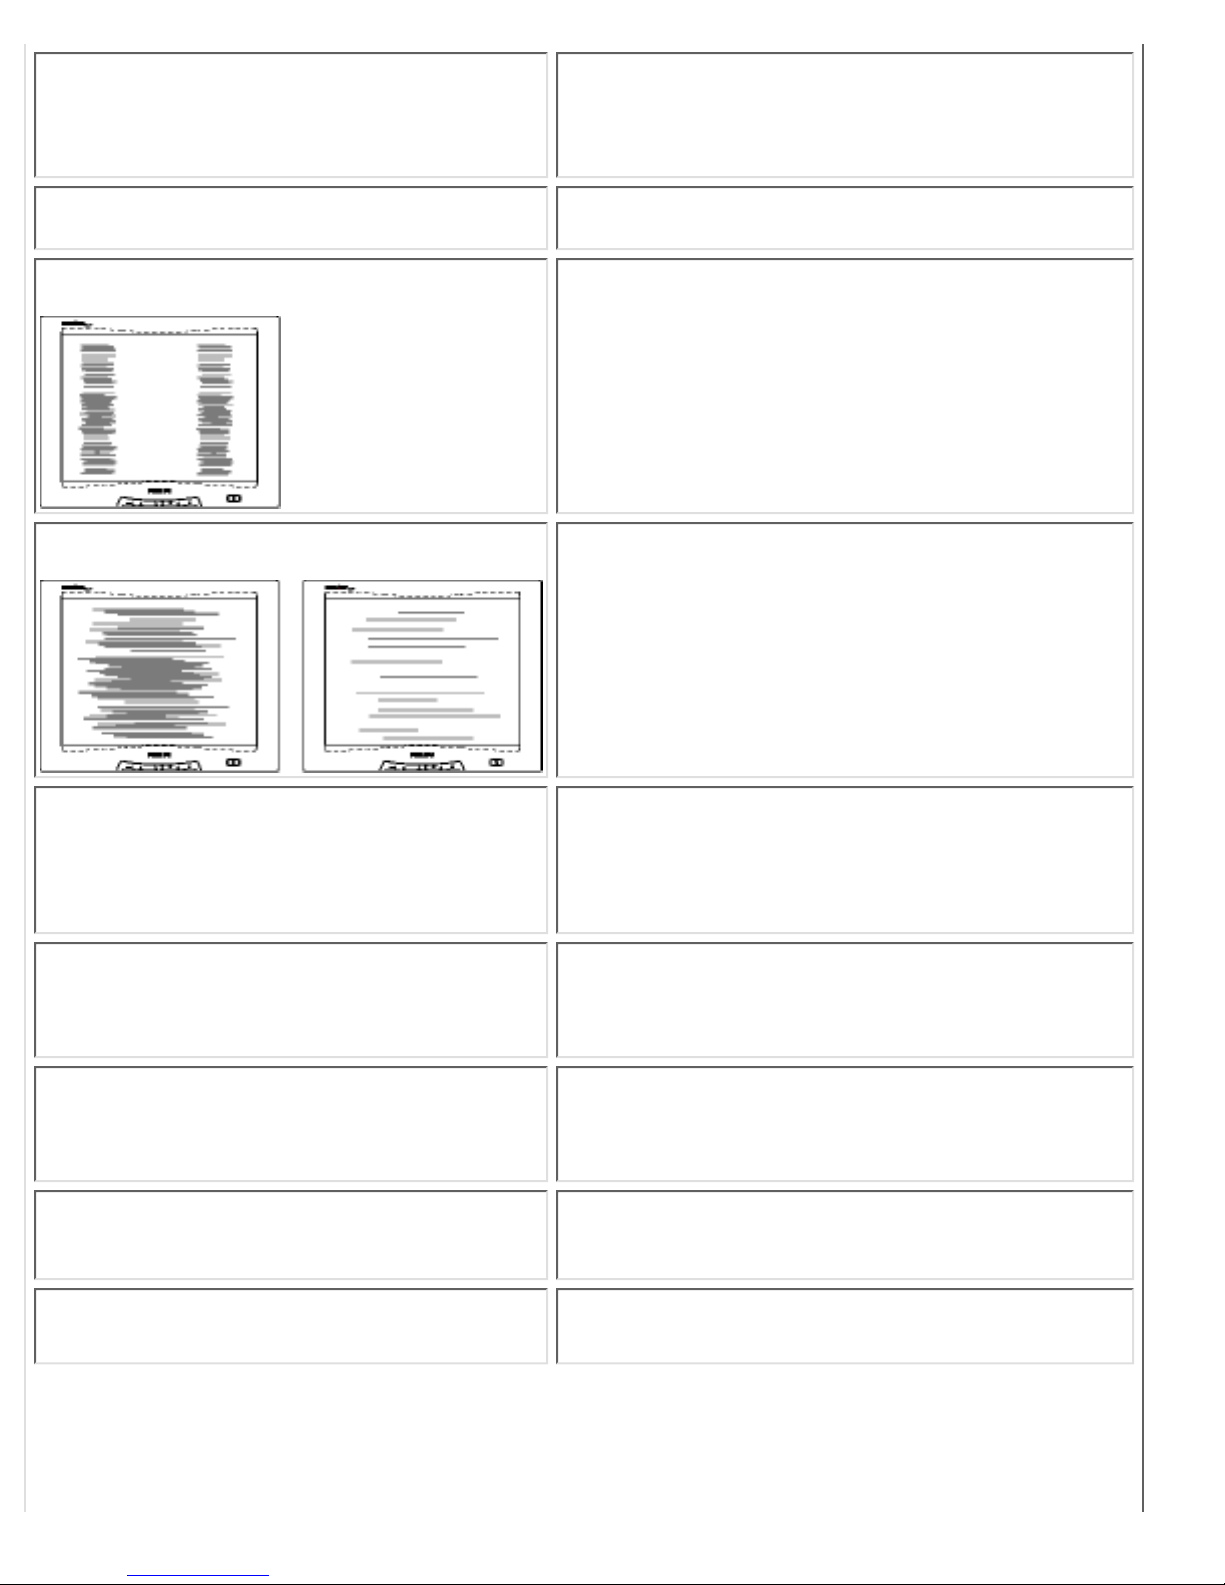
Vertical flicker appears
Press the Auto button.●
Eliminate the vertical bars using the Clock
Adjustment of VIDEO NOISE in OSD Main
Controls.
●
Horizontal flicker appears
Press the Auto button.●
Eliminate the horizontal bars using the Phase
Adjustment of VIDEO NOISE in OSD Main
Controls.
●
The screen is too bright or too dark
Adjust the contrast and brightness in OSD
Main Controls. (The backlight of the LCD
monitor has a fixed life span. When the screen
becomes dark or begins to flicker,
please
contact your dealer.
●
An after-image appears
If an image remains on the screen for an
extended period of time, it may be imprinted in
the screen and leave an afterimage This
usually disappears after a few hours
●
An afterimage remains after the power
has been turned off.
This is characteristic of liquid crystal and is not
caused by a malfunction or deterioration of the
liquid crystal. The afterimage will disappear
after a given amount of time
●
Green, red, blue, dark and white dots
remain
The remaining dots are normal characteristic
of the liquid crystal used in today’s
technology.
●
LightFrameTM doesn't work
Press the Auto button.●
Activate the LightFrameTM software again.●
Troubleshooting
file:///D|/C/english/150p4agb/safety/saf_troub.htm (2 of 3) [2/24/2003 2:49:38 PM]
Page 38

For further assistance, refer to the Consumer Information Centers list and contact your local Philips
distributor.
RETURN TO TOP OF THE PAGE
Troubleshooting
file:///D|/C/english/150p4agb/safety/saf_troub.htm (3 of 3) [2/24/2003 2:49:38 PM]
Page 39

Regulatory Information
TCO'95/99 Information • TCO'95/99 Environmental Requirements • TCO'03 Information •
Recycling Information for Customers • CE Declaration of Conformity • Energy Star
Declaration • Federal Communications Commission (FCC) Notice (U.S. Only) • Commission
Federale de la Communication (FCC Declaration) • EN 55022 Compliance (Czech Republic
Only) • VCCI Class 2 Notice (Japan Only) • MIC Notice (South Korea Only) • Polish Center
for Testing and Certification Notice • North Europe (Nordic Countries) Information • BSMI
Notice (Taiwan Only) • Ergonomie Hinweis (nur Deutschland) • Philips End-of-Life Disposal •
Information for UK only
Safety and Troubleshooting • Troubleshooting • Other Related Information • Frequently
Asked Questions (FAQs)
TCO'95/99 Information
Congratulations!
You have just purchased a TCO'95 or TCO'99 approved and labelled product! Your choice has provided you
with a product developed for professional use. Your purchase has also contributed to reducing the burden
on the environment and also, to the further development of environmentally adapted electronics products.
Why do we have environmentally labelled computers?
In many countries, environmental labeling has become an established method for encouraging the
adaptation of goods and services to the environment. The main problem, as far as computers and other
electronics equipment are concerned, is that environmentally harmful substances are used both in the
products and during their manufacture. Since it is not so far possible to satisfactorily recycle the majority of
electronics equipment, most of these potentially damaging substances sooner or later enter nature.
There are also other characteristics of a computer, such as energy consumption levels, that are important
from the viewpoints of both the work (internal) and natural (external) environments. Since all methods of
electricity generation have a negative effect on the environment (e.g. acidic and climate-influencing
emissions, radioactive waste), it is vital to save energy. Electronics equipment in offices is often left running
continuously and thereby consumes a lot of energy.
What does labelling involve?
Regulatory Information
file:///D|/C/english/150p4agb/safety/regs/regulat.htm (1 of 13) [2/24/2003 2:49:40 PM]
Page 40

This product meets the requirements for the TCO'95/TCO'99 scheme which provides for international and
environmental labeling of personal computers. The labeling scheme was developed as a joint effort by the
TCO (The Swedish Confederation of Professional Employees), Svenska Naturskyddsforeningen (The
Swedish Society for Nature Conservation) and Statens Energimyndighet (The Swedish National Energy
Administration).
Approval requirements cover a wide range of issues: environment, ergonomics, usability, emission of
electric and magnetic fields, energy consumption and electrical and fire safety.
The environmental demands impose restrictions on the presence and use of heavy metals, brominated and
chlorinated flame retardants, CFCs (freons) and chlorinated solvents, among other things. The product must
be prepared for recycling and the manufacturer is obliged to have an environmental policy which must be
adhered to in each country where the company implements its operational policy.
The energy requirements include a demand that the computer and/or display, after a certain period of
inactivity, shall reduce its power consumption to a lower level in one or more stages. The length of time to
reactivate the computer shall be reasonable for the user.
Labeled products must meet strict environmental demands, for example, in respect of the reduction of
electric and magnetic fields, physical and visual ergonomics and good usability.
Below you will find a brief summary of the environmental requirements met by this product. The complete
environmental criteria document may be ordered from:
TCO Development
SE-114 94 Stockholm, Sweden
Fax: +46 8 782 92 07
Email (Internet): [email protected]
Current information regarding TCO'95/TCO'99 approved and labeled products may also be obtained via
the Internet, using the address: http://www.tco-info.com/
RETURN TO TOP OF THE PAGE
Environmental Requirements
Flame retardants
Flame retardants are present in printed circuit boards, cables, wires, casings and housings. Their purpose is
to prevent, or at least to delay the spread of fire. Up to 30% of the plastic in a computer casing can consist of
flame retardant substances. Most flame retardants contain bromine or chloride, and those flame retardants
are chemically related to another group of environmental toxins, PCBs. Both the flame retardants containing
bromine or chloride and the PCBs are suspected of giving rise to severe health effects, including
reproductive damage in fish-eating birds and mammals, due to the bio-accumulative* processes. Flame
retardants have been found in human blood and researchers fear that disturbances in fetus development
may occur.
The relevant TCO'95/TCO'99 demand requires that plastic components weighing more than 25 grams must
not contain flame retardants with organically bound bromine or chlorine. Flame retardants are allowed in the
printed circuit boards since no substitutes are available.
Cadmium**
Regulatory Information
file:///D|/C/english/150p4agb/safety/regs/regulat.htm (2 of 13) [2/24/2003 2:49:40 PM]
Page 41

Cadmium is present in rechargeable batteries and in the color-generating layers of certain computer
displays. Cadmium damages the nervous system and is toxic in high doses. The relevant TCO' 95/TCO'99
requirement states that batteries, the color-generating layers of display screens and the electrical or
electronics components must not contain any cadmium.
Mercury**
Mercury is sometimes found in batteries, relays and switches. It damages the nervous system and is toxic in
high doses. The relevant TCO'95/TCO'99 requirement states that batteries may not contain any mercury. It
also demands that mercury is not present in any of the electrical or electronics components associated with
the labeled unit.
CFCs (freons)
The relevant TCO'95/TCO'99 requirement states that neither CFCs nor HCFCs may be used during the
manufacture and assembly of the product. CFCs (freons) are sometimes used for washing printed circuit
boards. CFCs break down ozone and thereby damage the ozone layer in the stratosphere, causing
increased reception on earth of ultraviolet light with increased risks e.g. skin cancer (malignant melanoma)
as a consequence.
Lead**
Lead can be found in picture tubes, display screens, solders and capacitors. Lead damages the nervous
system and in higher doses, causes lead poisoning. The relevant TCO'95/TCO'99 requirement permits the
inclusion of lead since no replacement has yet been developed.
* Bio-accumulative is defined as substances which accumulate within living organisms.
** Lead, Cadmium and Mercury are heavy metals which are bio-accumulative.
RETURN TO TOP OF THE PAGE
TCO'03 Information
(Option, only available for TCO'03 version)
Regulatory Information
file:///D|/C/english/150p4agb/safety/regs/regulat.htm (3 of 13) [2/24/2003 2:49:40 PM]
Page 42

Congratulations!
The display you have just purchased carries the TCO'03 Displays label. This
means that your display is designed, manufactured and tested according to
some of the strictest quality and environmental requirements in the world. This
makes for a high performance product, designed with the user in focus that also
minimizes the impact on our natural environment.
Some of the features of the TCO'03 Display requirements.
Ergonomics
Good visual ergonomics and image quality in order to improve the working environment for the user
and to reduce sight and strain problems. Important parameters are luminance, contrast, resoluction,
reflectance, colour rendition and image stability.
●
Energy
Energy-saving mode after a certain time-beneficial both for the user and the environment
●
Electrical safety●
Emissions
Electromagnetic fields
●
Noise emissions●
Ecology
The product must be prepared for recycling and the manufacturer must have a certified environmental
management system such as EMAS or ISO 14 000
●
Restrictions on
chlorinated and brominated flame retardants and polymers❍
heavy metals such as cadmium, mercury and lead.❍
●
The requirements included in this label have been developed by TCO Development in co-operation with
scientists, experts, users as well as manufacturers all over the world. Since the end of the 1980s TCO has
been involved in influencing the development of IT equipment in a more user-friendly direction. Our labelling
system started with displays in 1992 and is now requested by users and IT-manufacturers all over the world.
For more information, please visit
www.tcodevelopment.com
RETURN TO TOP OF THE PAGE
Recycling Information for Customers
Philips establishes technically and economically viable objectives to optimize the environmental performance
of the organization's product, service and activities.
From the planning, design and production stages, Philips emphasizes the important of making products that
Regulatory Information
file:///D|/C/english/150p4agb/safety/regs/regulat.htm (4 of 13) [2/24/2003 2:49:40 PM]
Page 43

can easily be recycled. At Philips, end-of-life management primarily entails participation in national take-back
initiatives and recycling programs whenever possible, preferably in cooperation with competitors.
There is currently a system of recycling up and running in the European countries, such as The Netherlands,
Belgium, Norway, Sweden and Denmark.
In U.S.A., Philips Consumer Electronics North America has contributed funds for the Electronic Industries
Alliance (EIA) Electronics Recycling Project and state recycling initiatives for end-of-life electronics products
from household sources. In addition, the Northeast Recycling Council (NERC) - a multi-state non-profit
organization focused on promoting recycling market development - plans to implement a recycling program.
In Asia Pacific, Taiwan, the products can be taken back by Environment Protection Administration (EPA) to
follow the IT product recycling management process, detail can be found in web site www.epa.gov.tw
For help and service, please contact Consumers Information Center or F1rst Choice Contact Information
Center in each country or the following team of Environmental specialist can help.
Mr. Job Chiu - Environment manager
Philips Electronics Industries (Taiwan) Ltd, Monitor Business Unit
E-mail: [email protected]
Tel: +886 (0) 3 454 9839
Mr. Maarten ten Houten - Senior Environmental Consultant
Philips Consumer Electronics
E-mail: [email protected]
Tel: +31 (0) 40 27 33402
Ms. Patricia A. Franco
Philips Electronics North America
E-mail: [email protected]
Tel: +1 202 962 8550
RETURN TO TOP OF THE PAGE
CE Declaration of Conformity
Philips Consumer Electronics declare under our responsibility that the product is in conformity with the
following standards
- EN60950:1992+A1+A2+A3+A4+A11 (Safety requirement of Information Technology Equipment)
- EN55022:1998 (Radio Disturbance requirement of Information Technology Equipment)
- EN55024:1998 (Immunity requirement of Information Technology Equipment)
- EN61000-3-2:1995 (Limits for Harmonic Current Emission)
- EN61000-3-3:1995 (Limitation of Voltage Fluctuation and Flicker)
following provisions of directives applicable
- 73/23/EEC (Low Voltage Directive)
- 89/336/EEC (EMC Directive)
- 93/68/EEC (Amendment of EMC and Low Voltage Directive)
and is produced by a manufacturing organization on ISO9000 level.
The product also comply with the following standards
- ISO9241-3, ISO9241-7, ISO9241-8 (Ergonomic requirement for Visual Display)
Regulatory Information
file:///D|/C/english/150p4agb/safety/regs/regulat.htm (5 of 13) [2/24/2003 2:49:40 PM]
Page 44

- ISO13406-2 (Ergonomic requirement for Flat panels)
- GS EK1-2000 (GS specification)
- prEN50279:1998 (Low Frequency Electric and Magnetic fields for Visual Display)
- MPR-II (MPR:1990:8/1990:10 Low Frequency Electric and Magnetic fields)
- TCO'95, TCO'99, TCO'03 (Requirement for Environment Labelling of Ergonomics, Energy, Ecology and
Emission,
TCO: Swedish Confederation of Professional Employees) for TCO versions
RETURN TO TOP OF THE PAGE
Energy Star Declaration
PHILIPS
150P4AG/150P4AB
This monitor is equipped with a function for saving energy which supports the VESA Display Power
Management Signaling (DPMS) standard. This means that the monitor must be connected to a
computer which supports VESA DPMS to fulfill the requirements in the NUTEK specification 803299/94.
Time settings are adjusted from the system unit by software.
NUTEK VESA State LED Indicator Power Consumption
Normal operation ON Green < 30 W
Power Saving
Alternative 2
One step
OFF Amber < 1W
As an ENERGY STAR
®
Partner, PHILIPS has determined that this product meets
the
ENERGY STAR® guidelines for energy efficiency.
We recommend you switch off the monitor when it is not in use for quite a long time.
RETURN TO TOP OF THE PAGE
Federal Communications Commission (FCC) Notice (U.S. Only)
Regulatory Information
file:///D|/C/english/150p4agb/safety/regs/regulat.htm (6 of 13) [2/24/2003 2:49:40 PM]
Page 45
This equipment has been tested and found to comply with the limits for a Class B digital
device, pursuant to Part 15 of the FCC Rules. These limits are designed to provide
reasonable protection against harmful interference in a residential installation. This
equipment generates, uses and can radiate radio frequency energy and, if not installed and
used in accordance with the instructions, may cause harmful interference to radio
communications. However, there is no guarantee that interference will not occur in a
particular installation. If this equipment does cause harmful interference to radio or television
reception, which can be determined by turning the equipment off and on, the user is
encouraged to try to correct the interference by one or more of the following measures:
Reorient or relocate the receiving antenna.●
Increase the separation between the equipment and receiver.●
Connect the equipment into an outlet on a circuit different from that to which the receiver is connected.●
Consult the dealer or an experienced radio/TV technician for help.●
Changes or modifications not expressly approved by the party responsible for compliance
could void the user's authority to operate the equipment.
Use only RF shielded cable that was supplied with the monitor when connecting this monitor to a computer
device.
To prevent damage which may result in fire or shock hazard, do not expose this appliance to rain or
excessive moisture.
THIS CLASS B DIGITAL APPARATUS MEETS ALL REQUIREMENTS OF THE CANADIAN
INTERFERENCE-CAUSING EQUIPMENT REGULATIONS.
RETURN TO TOP OF THE PAGE
Commission Federale de la Communication (FCC Declaration)
Cet équipement a été testé et déclaré conforme auxlimites des appareils numériques de
class B,aux termes de l'article 15 Des règles de la FCC. Ces limites sont conçues de façon
à fourir une protection raisonnable contre les interférences nuisibles dans le cadre d'une
installation résidentielle. CET appareil produit, utilise et peut émettre des hyperfréquences
qui, si l'appareil n'est pas installé et utilisé selon les consignes données, peuvent causer
des interférences nuisibles aux communications radio. Cependant, rien ne peut garantir
l'absence d'interférences dans le cadre d'une installation particulière. Si cet appareil est la
cause d'interférences nuisibles pour la réception des signaux de radio ou de télévision, ce
qui peut être décelé en fermant l'équipement, puis en le remettant en fonction, l'utilisateur
pourrait essayer de corriger la situation en prenant les mesures suivantes:
Réorienter ou déplacer l'antenne de réception.●
Augmenter la distance entre l'équipement et le récepteur.●
Brancher l'équipement sur un autre circuit que celui utilisé par le récepteur.●
Demander l'aide du marchand ou d'un technicien chevronné en radio/télévision.●
Toutes modifications n'ayant pas reçu l'approbation des services compétents en matière de
conformité est susceptible d'interdire à l'utilisateur l'usage du présent équipement.
Regulatory Information
file:///D|/C/english/150p4agb/safety/regs/regulat.htm (7 of 13) [2/24/2003 2:49:40 PM]
Page 46
N'utiliser que des câbles RF armés pour les connections avec des ordinateurs ou périphériques.
CET APPAREIL NUMERIQUE DE LA CLASSE B RESPECTE TOUTES LES EXIGENCES DU
REGLEMENT SUR LE MATERIEL BROUILLEUR DU CANADA.
RETURN TO TOP OF THE PAGE
EN 55022 Compliance (Czech Republic Only)
RETURN TO TOP OF THE PAGE
VCCI Notice (Japan Only)
This is a Class B product based on the standard of the Voluntary Control Council for Interference (VCCI) for
Information technology equipment. If this equipment is used near a radio or television receiver in a domestic
environment, it may cause radio Interference. Install and use the equipment according to the instruction
manual.
Class B ITE
RETURN TO TOP OF THE PAGE
Regulatory Information
file:///D|/C/english/150p4agb/safety/regs/regulat.htm (8 of 13) [2/24/2003 2:49:40 PM]
Page 47

MIC Notice (South Korea Only)
Class B Device
Please note that this device has been approved for non-business purposes and may be used in any
environment, including residential areas.
RETURN TO TOP OF THE PAGE
Polish Center for Testing and Certification Notice
The equipment should draw power from a socket with an attached protection circuit (a three-prong socket).
All equipment that works together (computer, monitor, printer, and so on) should have the same power
supply source.
The phasing conductor of the room's electrical installation should have a reserve short-circuit protection
device in the form of a fuse with a nominal value no larger than 16 amperes (A).
To completely switch off the equipment, the power supply cable must be removed from the power supply
socket, which should be located near the equipment and easily accessible.
A protection mark "B" confirms that the equipment is in compliance with the protection usage requirements of
standards PN-93/T-42107 and PN-89/E-06251.
Regulatory Information
file:///D|/C/english/150p4agb/safety/regs/regulat.htm (9 of 13) [2/24/2003 2:49:40 PM]
Page 48
RETURN TO TOP OF THE PAGE
North Europe (Nordic Countries) Information
Placering/Ventilation
VARNING:
FÖRSÄKRA DIG OM ATT HUVUDBRYTARE OCH UTTAG ÄR LÄTÅTKOMLIGA, NÄR
DU STÄLLER DIN UTRUSTNING PÅPLATS.
Placering/Ventilation
ADVARSEL:
SØRG VED PLACERINGEN FOR, AT NETLEDNINGENS STIK OG STIKKONTAKT ER
NEMT TILGÆNGELIGE.
Regulatory Information
file:///D|/C/english/150p4agb/safety/regs/regulat.htm (10 of 13) [2/24/2003 2:49:40 PM]
Page 49

Paikka/Ilmankierto
VAROITUS:
SIJOITA LAITE SITEN, ETTÄ VERKKOJOHTO VOIDAAN TARVITTAESSA HELPOSTI
IRROTTAA PISTORASIASTA.
Plassering/Ventilasjon
ADVARSEL:
NÅR DETTE UTSTYRET PLASSERES, MÅ DU PASSE PÅ AT KONTAKTENE FOR
STØMTILFØRSEL ER LETTE Å NÅ.
RETURN TO TOP OF THE PAGE
BSMI Notice (Taiwan Only)
RETURN TO TOP OF THE PAGE
Ergonomie Hinweis (nur Deutschland)
Der von uns gelieferte Farbmonitor entspricht den in der "Verordnung über den Schutz vor Schäden durch
Röntgenstrahlen" festgelegten Vorschriften.
Auf der Rückwand des Gerätes befindet sich ein Aufkleber, der auf die Unbedenklichkeit der Inbetriebnahme
hinweist, da die Vorschriften über die Bauart von Störstrahlern nach Anlage III ¤ 5 Abs. 4 der
Röntgenverordnung erfüllt sind.
Damit Ihr Monitor immer den in der Zulassung geforderten Werten entspricht, ist darauf zu achten, daß
Reparaturen nur durch Fachpersonal durchgeführt werden.
1.
nur original-Ersatzteile verwendet werden.2.
bei Ersatz der Bildröhre nur eine bauartgleiche eingebaut wird.3.
Aus ergonomischen Gründen wird empfohlen, die Grundfarben Blau und Rot nicht auf dunklem
Untergrund zu verwenden (schlechte Lesbarkeit und erhöhte Augenbelastung bei zu geringem
Zeichenkontrast wären die Folge).
Der arbeitsplatzbezogene Schalldruckpegel nach DIN 45 635 beträgt 70dB (A) oder weniger.
Regulatory Information
file:///D|/C/english/150p4agb/safety/regs/regulat.htm (11 of 13) [2/24/2003 2:49:40 PM]
Page 50
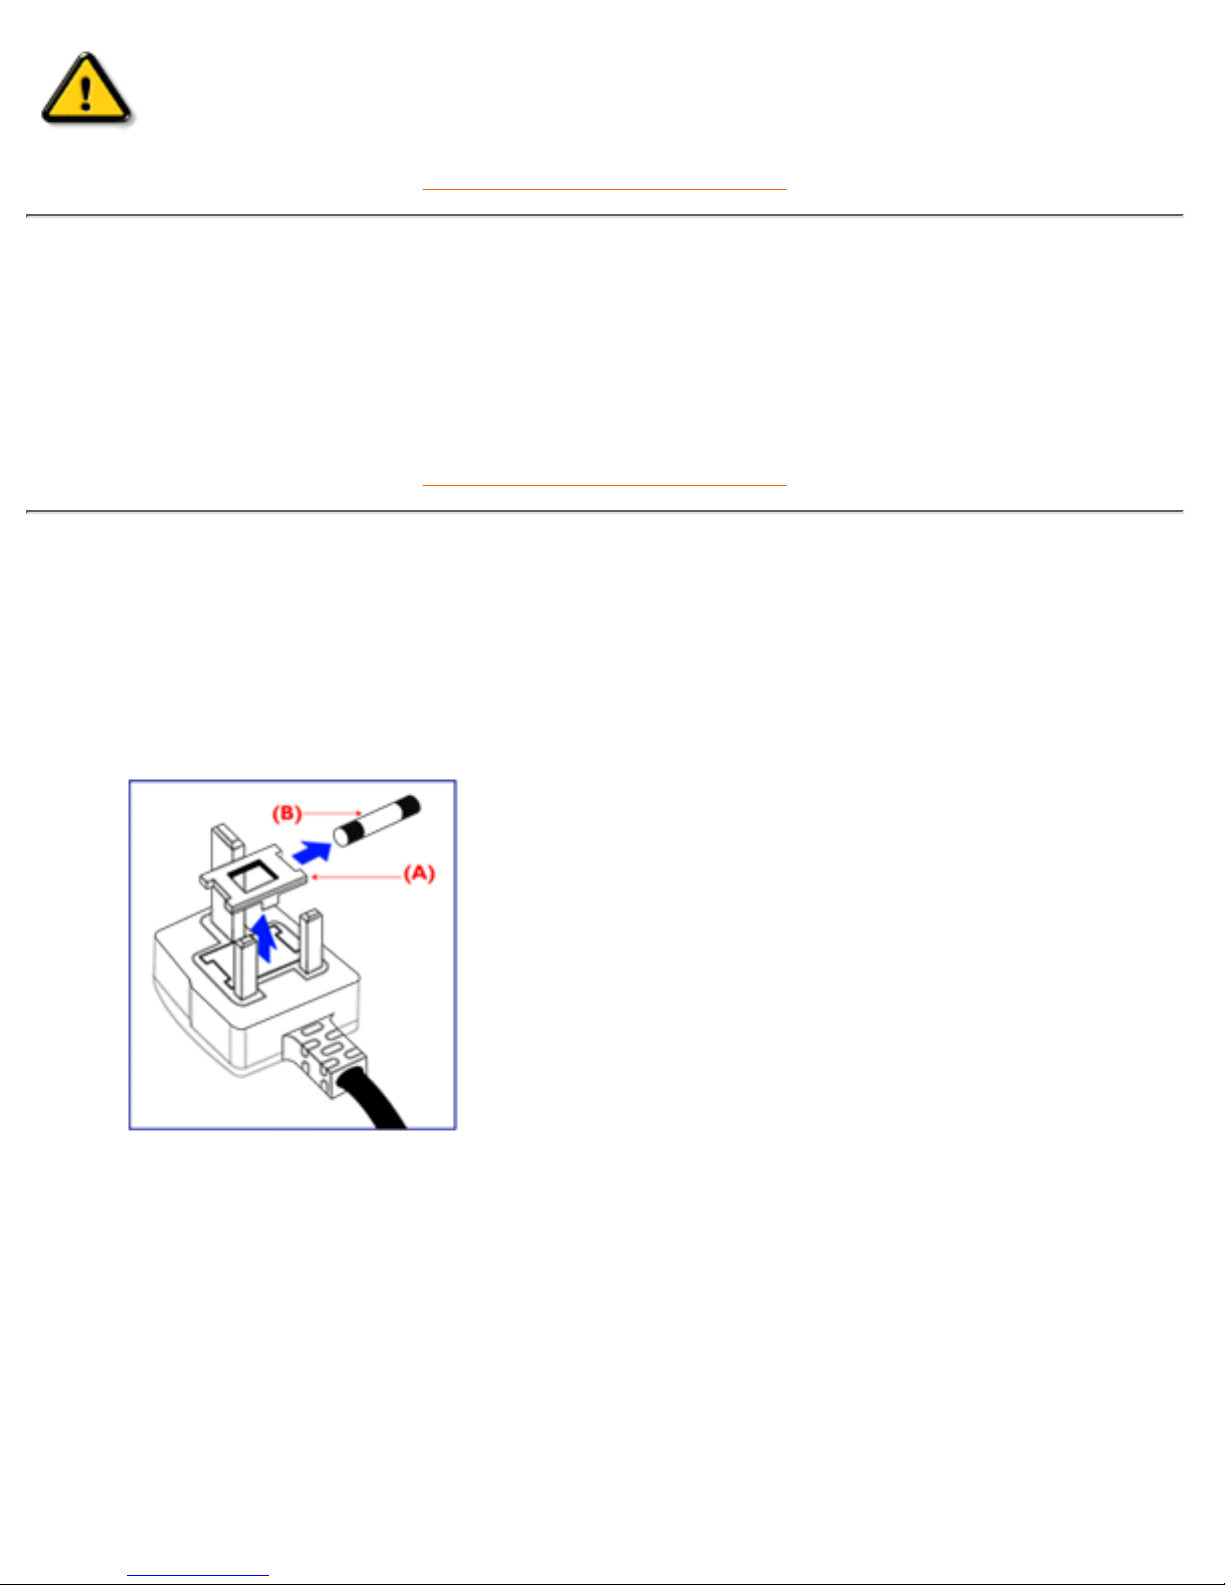
ACHTUNG: BEIM AUFSTELLEN DIESES GERÄTES DARAUF ACHTEN, DAß
NETZSTECKER UND NETZKABELANSCHLUß LEICHT ZUGÄNGLICH SIND.
RETURN TO TOP OF THE PAGE
End-of-Life Disposal
Your new monitor contains materials that can be recycled and reused. Specialized companies can recycle
your product to increase the amount of reusable materials and to minimize the amount to be disposed of.
Please find out about the local regulations on how to dispose of your old monitor from your local Philips
dealer.
RETURN TO TOP OF THE PAGE
Information for UK only
WARNING - THIS APPLIANCE MUST BE
EARTHED.
Important:
This apparatus is supplied with an approved
moulded 13A plug. To change a fuse in this type
of plug proceed as follows:
1. Remove fuse cover and fuse.
2. Fit new fuse which should be a BS 1362
5A,A.S.T.A. or BSI approved type.
3. Refit the fuse cover.
If the fitted plug is not suitable for your socket
outlets, it should be cut off and an appropriate
3-pin plug fitted in its place.
If the mains plug contains a fuse, this should
have a value of 5A. If a plug without a fuse is
used, the fuse at the distribution board should
not be greater than 5A.
Note: The severed plug must be destroyed to
avoid a possible shock hazard should it be
inserted into a 13A socket elsewhere.
How to connect a plug
Regulatory Information
file:///D|/C/english/150p4agb/safety/regs/regulat.htm (12 of 13) [2/24/2003 2:49:40 PM]
Page 51
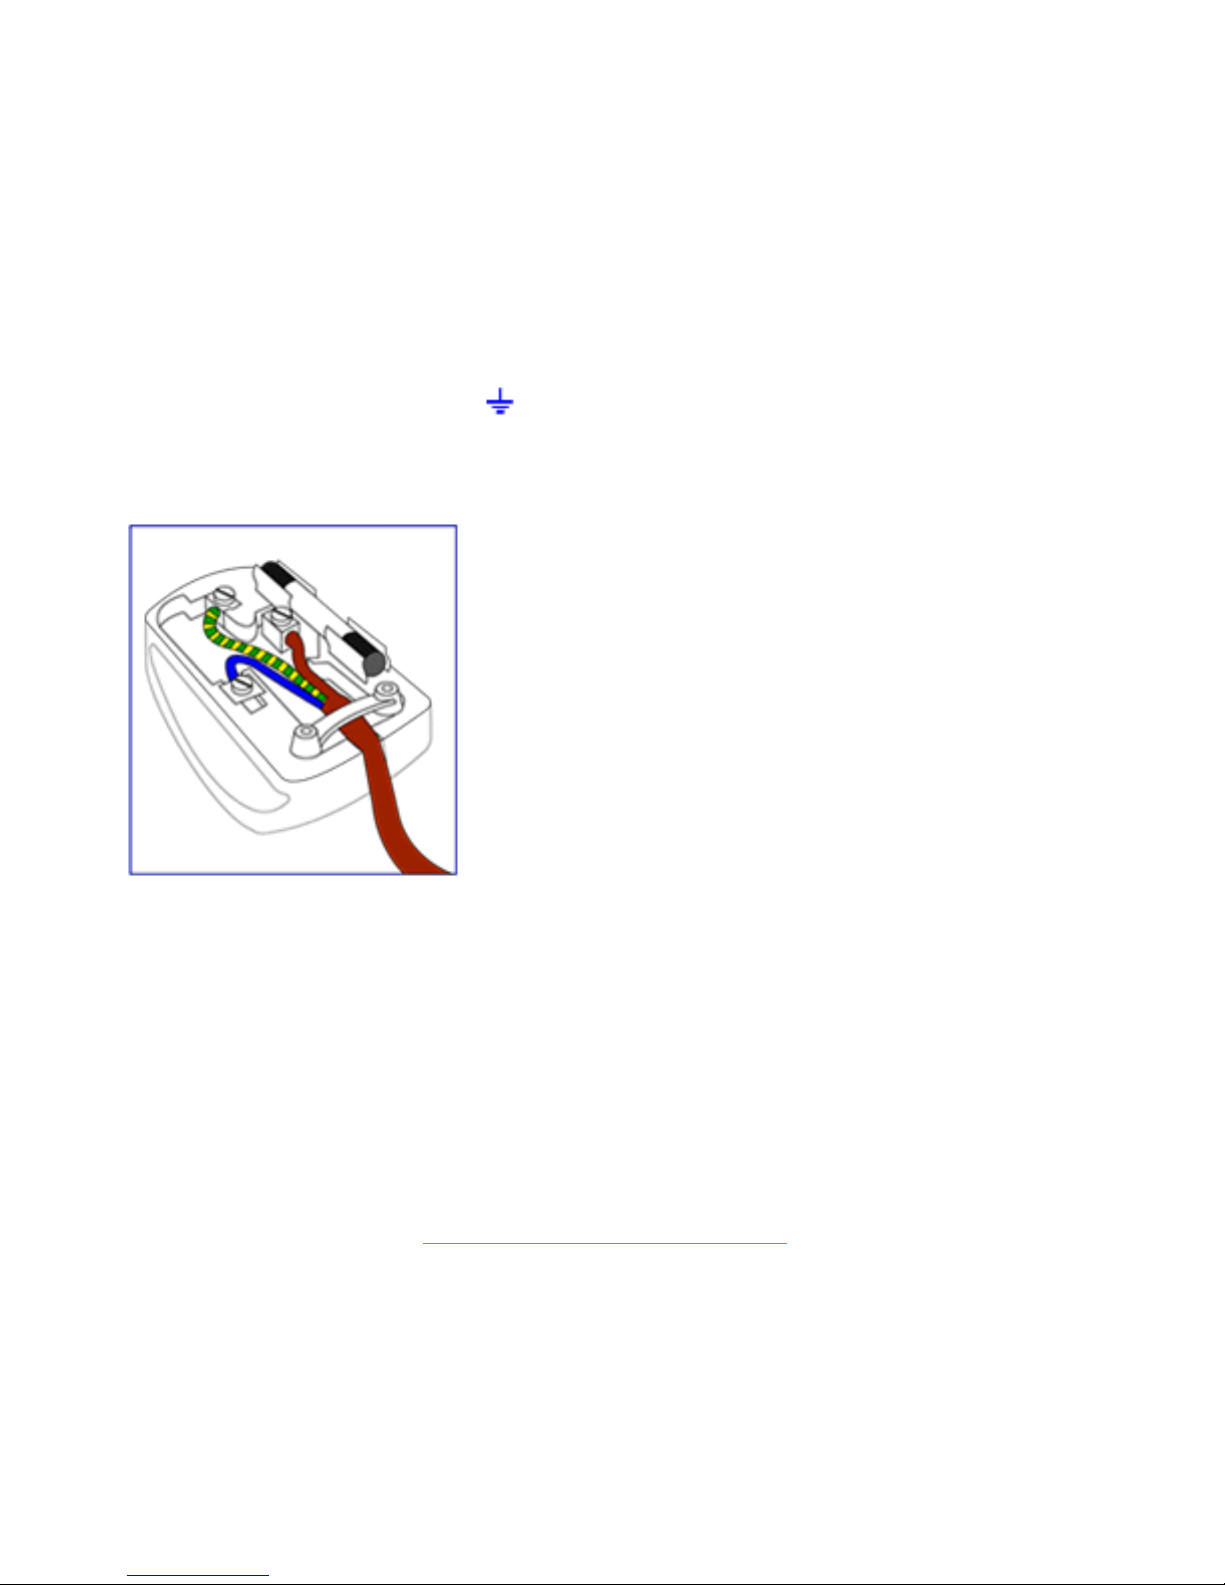
The wires in the mains lead are coloured in
accordance with the following code:
BLUE - "NEUTRAL" ("N")
BROWN - "LIVE" ("L")
GREEN & YELLOW - "EARTH" ("E")
1. The GREEN AND YELLOW wire must be
connected to the terminal in the plug which is
marked with the letter "E" or by the Earth symbol
or coloured GREEN or GREEN AND
YELLOW.
2. The BLUE wire must be connected to the
terminal which is marked with the letter "N" or
coloured BLACK.
3. The BROWN wire must be connected to the
terminal which marked with the letter "L" or
coloured RED.
Before replacing the plug cover, make certain
that the cord grip is clamped over the sheath of
the lead - not simply over the three wires.
RETURN TO TOP OF THE PAGE
Regulatory Information
file:///D|/C/english/150p4agb/safety/regs/regulat.htm (13 of 13) [2/24/2003 2:49:40 PM]
Page 52

Other Related Information
Safety and Troubleshooting • FAQs • Troubleshooting • Regulatory Information • Information
for Users in the U. S. • Information for Users Outside the U.S
Information for Users in the U. S.
For units set at 115 V :
Use a UL Listed Cord Set consisting of a minimum 18 AWG, Type SVT or SJT three conductor cord a
maximum of 15-feet long and a parallel blade, grounding type attachment plug rated 15 A, 125 V.
For units set at 230 V:
Use a UL Listed Cord Set consisting of a minimum 18 AWG, Type SVT or SJT three conductor cord a
maximum of 15-feet long and a tandem blade, grounding type attachment plug rated 15 A, 250 V.
Information for Users outside the U.S.
For units set at 230 V:
Use a Cord Set consisting of a minimum 18 AWG cord and grounding type attachment plug rated 15 A, 250
V. The Cord Set should have the appropriate safety approvals for the country in which the equipment will be
installed and / or be marked HAR.
RETURN TO TOP OF THE PAGE
Other Related Information
file:///D|/C/english/150p4agb/safety/saf_other.htm [2/24/2003 2:49:41 PM]
Page 53
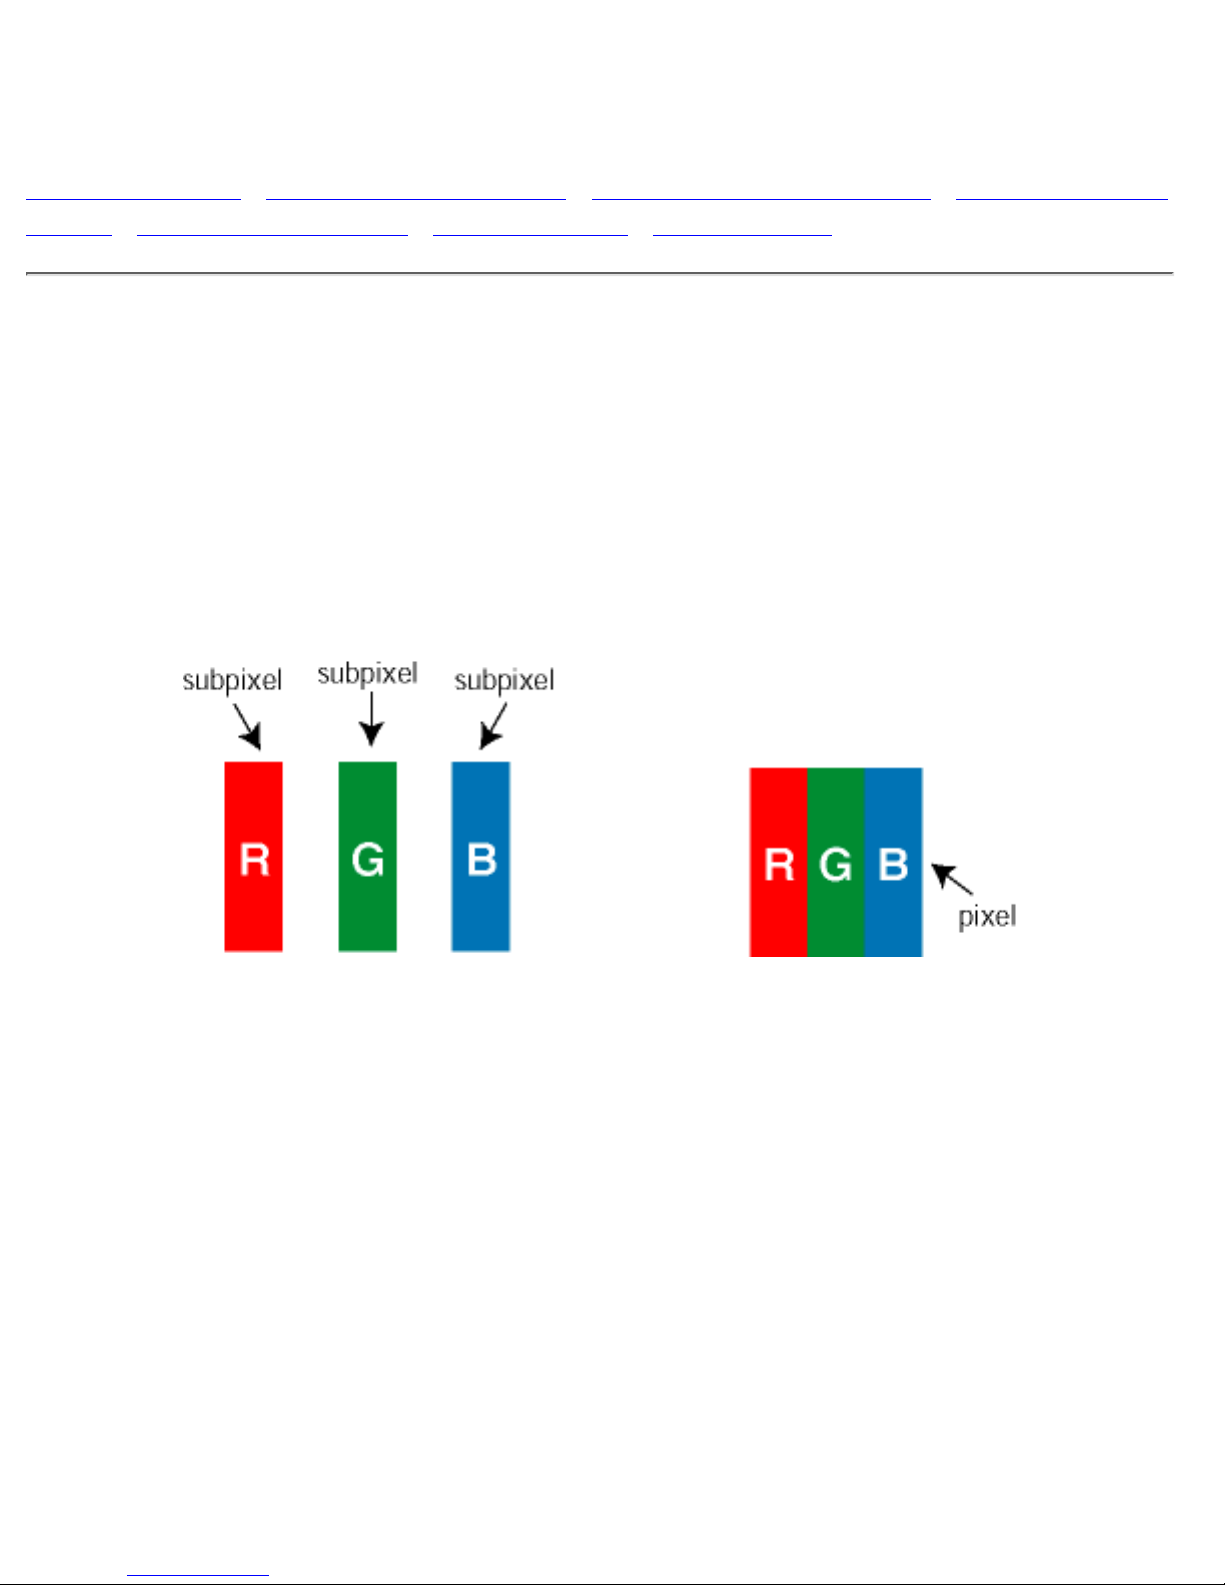
Philips Pixel Defect Policy
Product Features • Technical Specifications • Resolution & Preset Modes • Automatic Power
Saving • Physical Specification • Pin Assignment • Product Views
Philips' Flat Panel Monitors Pixel Defect Policy
Philips strives to deliver the highest quality products. We use some of the industry's most advanced
manufacturing processes and practise stringent quality control. However, pixel or sub pixel defects on the
TFT LCD panels used in flat panel monitors are sometimes unavoidable. No manufacturer can guarantee
that all panels will be free from pixel defects, but Philips guarantees that any monitor with an unacceptable
number of defects will be repaired or replaced under warranty. This notice explains the different types of
pixel defects and defines acceptable defect levels for each type. In order to qualify for repair or replacement
under warranty, the number of pixel defects on a TFT LCD panel must exceed these acceptable levels. For
example, no more than 0.0004% of the sub pixels on a 15" XGA monitor may be defective. Furthermore,
Philips sets even higher quality standards for certain types or combinations of pixel defects that are more
noticeable than others.
Pixels and Sub pixels
A pixel, or picture element, is composed of three sub pixels in the primary colors of red, green and blue.
Many pixels together form an image. When all sub pixels of a pixel are lit, the three colored sub pixels
together appear as a single white pixel. When all are dark, the three colored sub pixels together appear as a
single black pixel. Other combinations of lit and dark sub pixels appear as single pixels of other colors.
Types of Pixel Defects
Pixel and sub pixel defects appear on the screen in different ways. There are two categories of pixel defects
and several types of sub pixel defects within each category.
Bright Dot Defects Bright dot defects appear as pixels or sub pixels that are always lit or 'on'. These are the
types of bright dot defects:
Philips Pixel Defect Policy
file:///D|/C/english/150p4agb/product/pixel.htm (1 of 3) [2/24/2003 2:49:48 PM]
Page 54
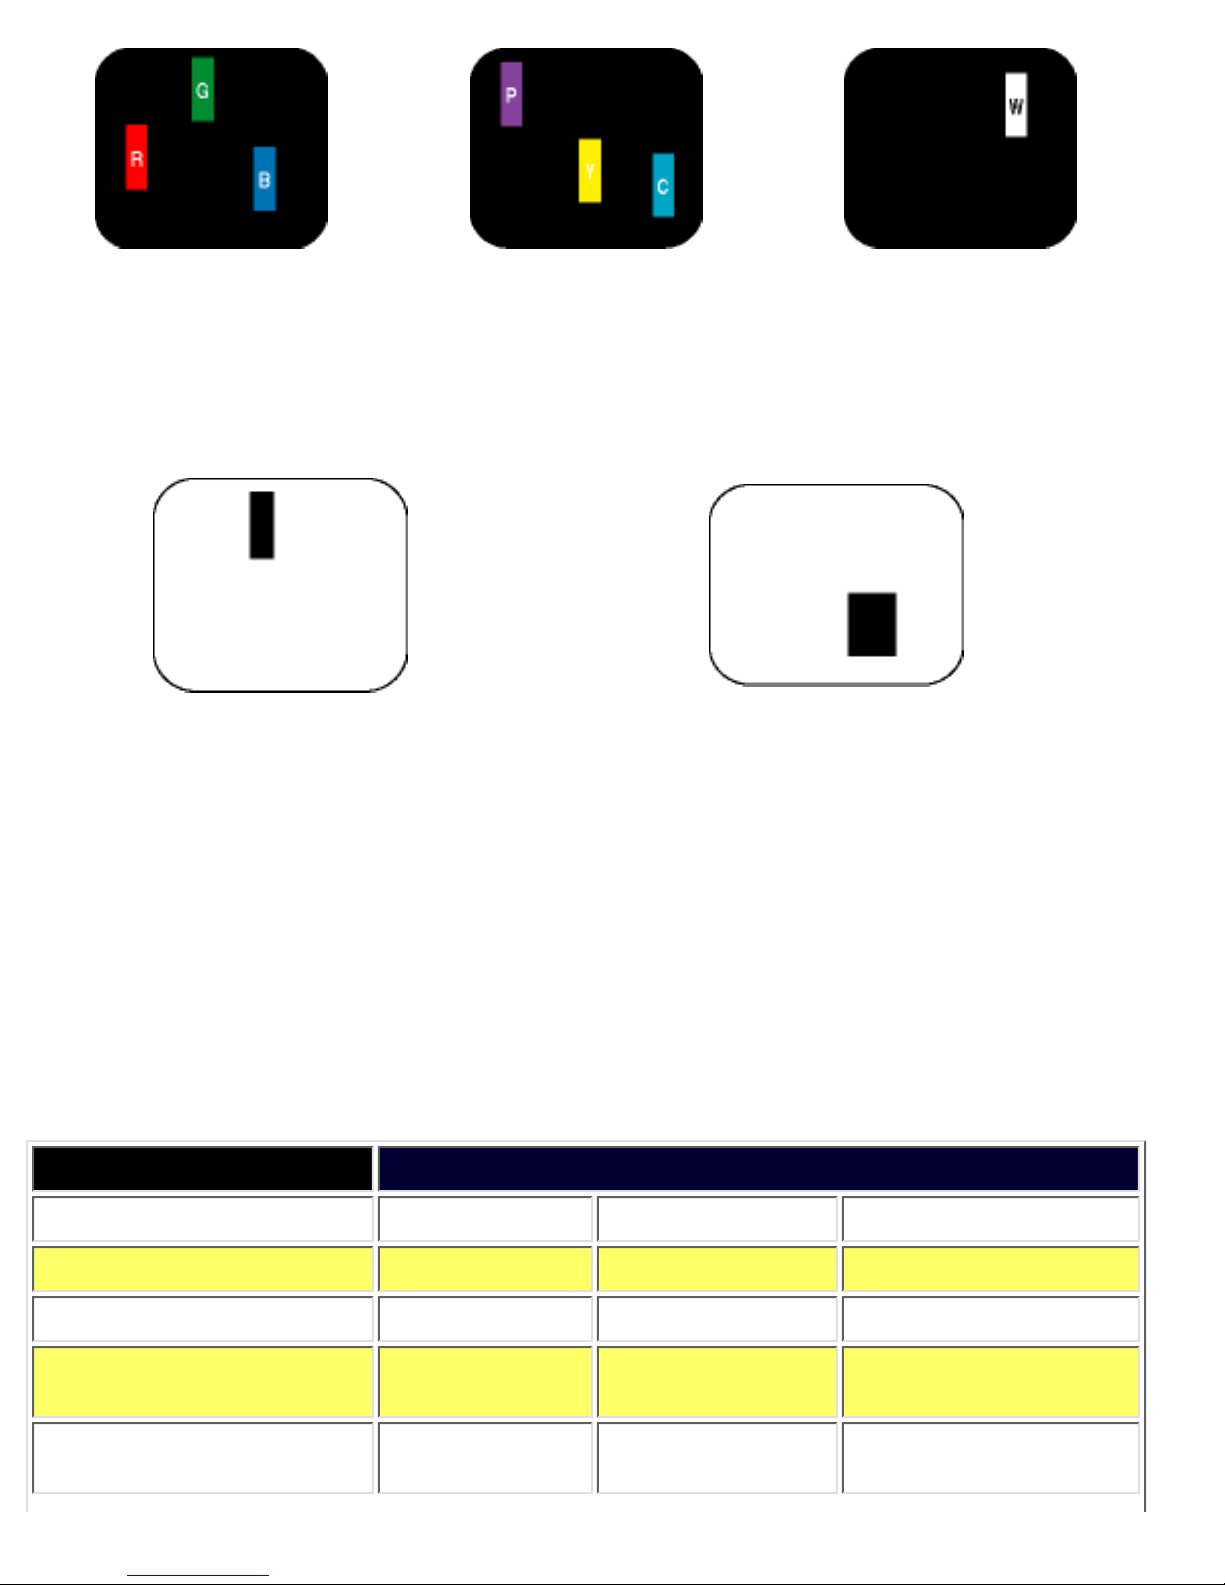
One lit red, green or blue sub
pixel
Two adjacent lit sub pixels:
- Red + Blue = Purple
- Red + Green = Yellow
- Green + Blue = Cyan (Light Blue)
Three adjacent lit sub pixels
(one white pixel)
Black Dot Defects Black dot defects appear as pixels or sub pixels that are always dark or 'off'. These are
the types of black dot defects:
One dark sub pixel Two or three adjacent dark sub pixels
Proximity of Pixel Defects
Because pixel and sub pixels defects of the same type that are near to one another may be more
noticeable, Philips also specifies tolerances for the proximity of pixel defects.
Pixel Defect Tolerances
In order to qualify for repair or replacement due to pixel defects during the warranty period, a TFT LCD
panel in a Philips flat panel monitor must have pixel or sub pixel defects exceeding the tolerances listed in
the following tables.
BRIGHT DOT DEFECTS ACCEPTABLE LEVEL
MODEL
150P4 150B4 150S4
1 lit sub pixel 0 0 8 or fewer
2 adjacent lit sub pixels 0 0 3 or fewer
3 adjacent lit sub pixels (one
white pixel)
0 0 1 or fewer
Distance between two bright
dot defects*
0 0 15 mm or more
Philips Pixel Defect Policy
file:///D|/C/english/150p4agb/product/pixel.htm (2 of 3) [2/24/2003 2:49:48 PM]
Page 55
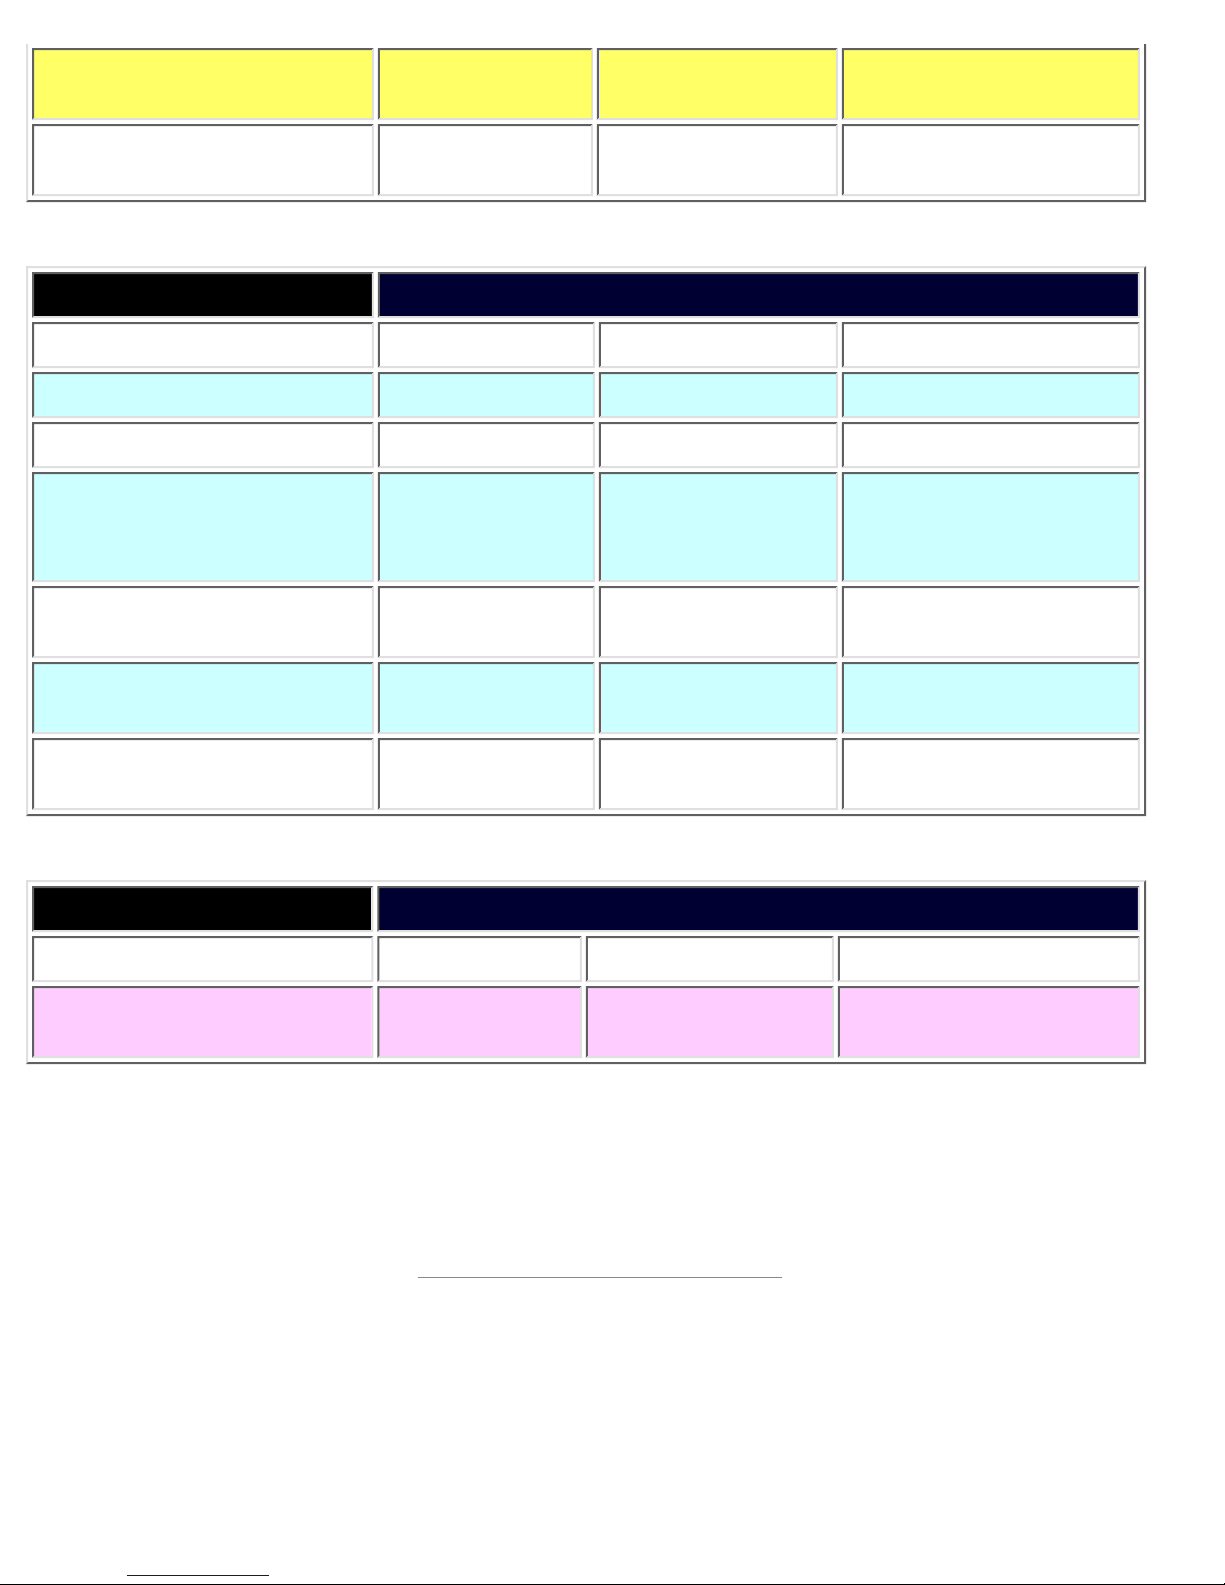
Bright dot defects within 20
mm circle
0 0 3 or fewer
Total bright dot defects of all
types
0 0 8 or fewer
BLACK DOT DEFECTS ACCEPTABLE LEVEL
MODEL
150P4 150B4 150S4
1 dark sub pixel 4 or fewer 4 or fewer 8 or fewer
2 adjacent dark sub pixels 1 or fewer 1 or fewer 3 or fewer
3 adjacent dark sub pixels 0 0 1 or fewer
Distance between two black
dot defects*
15 mm or more 15 mm or more 15 mm or more
Black dot defects within 20
mm circle*
3 or fewer 3 or fewer 3 or fewer
Total black dot defects of all
types
4 or fewer 4 or fewer 8 or fewer
TOTAL DOT DEFECTS ACCEPTABLE LEVEL
MODEL
150P4 150B4 150S4
Total bright or black dot
defects of all types
4 or fewer 4 or fewer 10 or fewer
* Note: 1 or 2 adjacent sub pixel defects = 1 dot defect
RETURN TO TOP OF THE PAGE
Philips Pixel Defect Policy
file:///D|/C/english/150p4agb/product/pixel.htm (3 of 3) [2/24/2003 2:49:48 PM]
Page 56
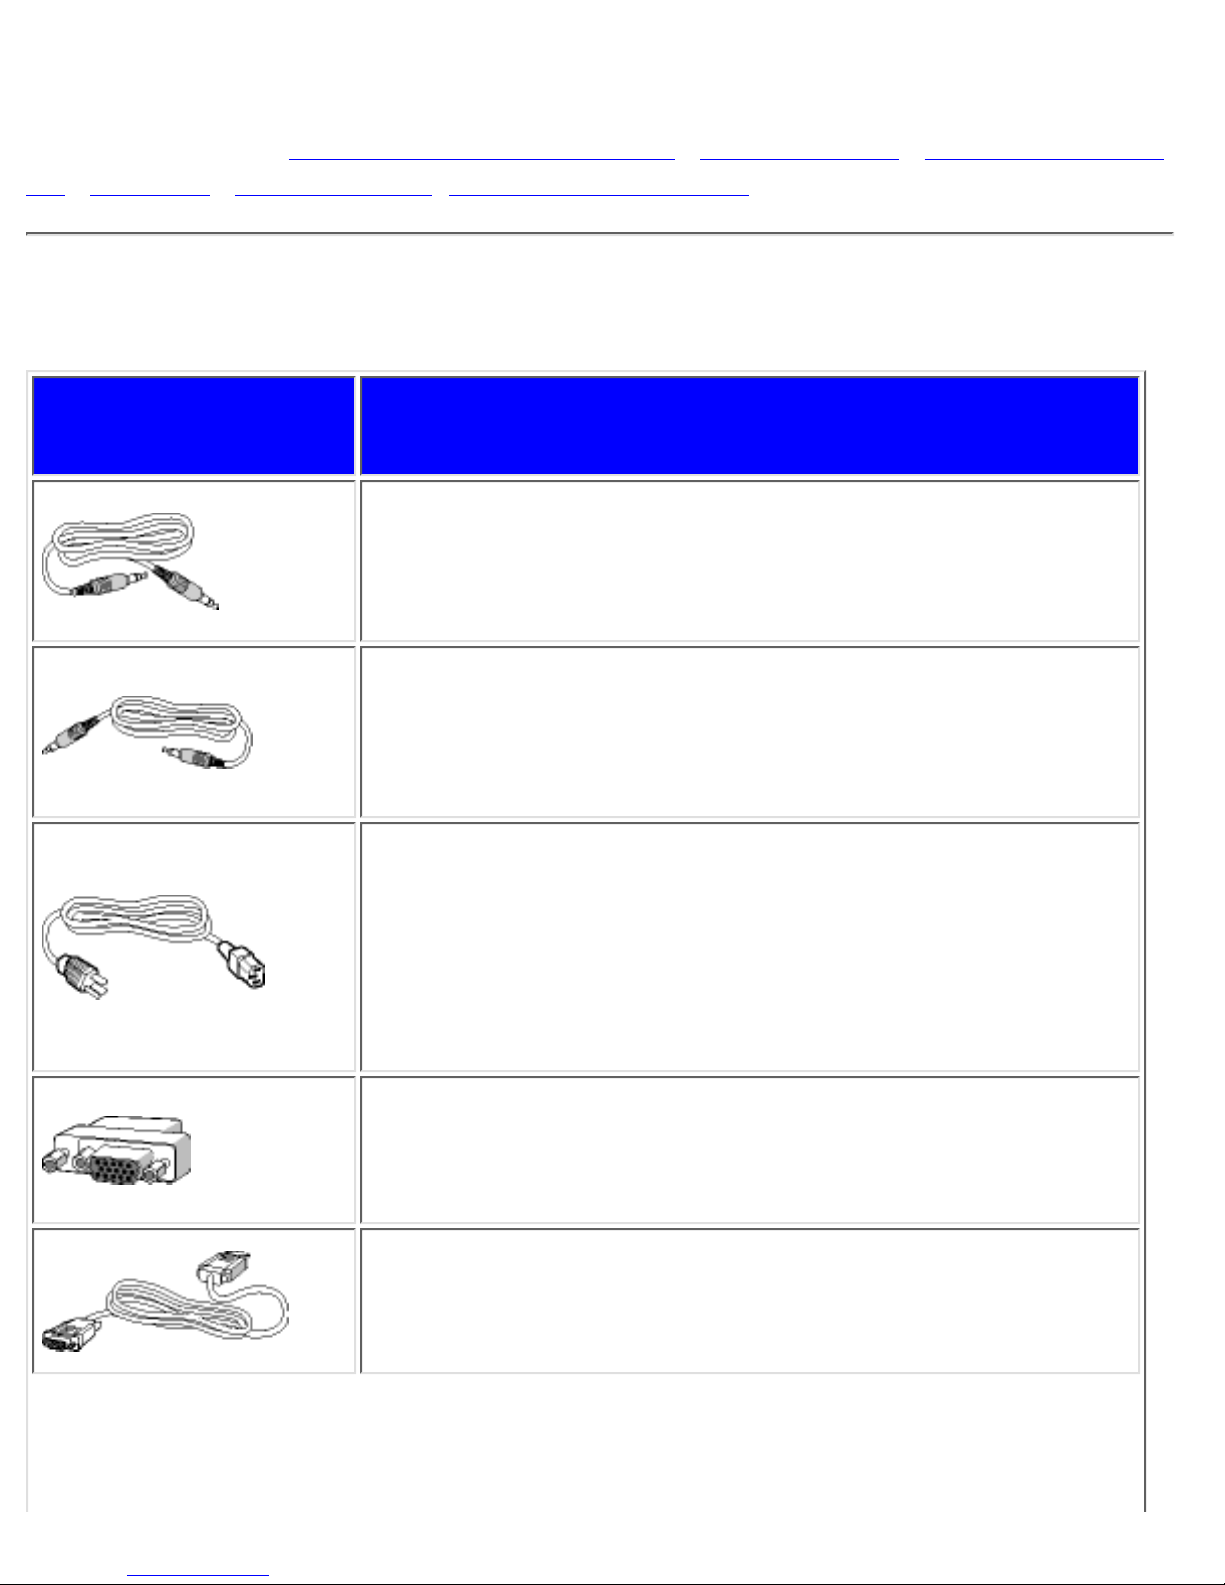
Connecting to Your PC
Your LCD Monitor : Front View Product Description • Accessory Pack • Connecting to Your
PC • The Base • Getting Started • Optimizing Performance
Accessory Pack
Unpack all the parts.
Item Description
1) Audio in Cable (Option only available for Multimedia version)(color
lime)
2) Microphone out Cable (Option only available for Multimedia
version)(color pink)
3) Power Cable (socket may differ for different countries)
4) Macintosh Adapter (optional)
5) VGA Signal Cable
Connecting to Your PC
file:///D|/C/english/150p4agb/install/connect.htm (1 of 4) [2/24/2003 2:49:58 PM]
Page 57
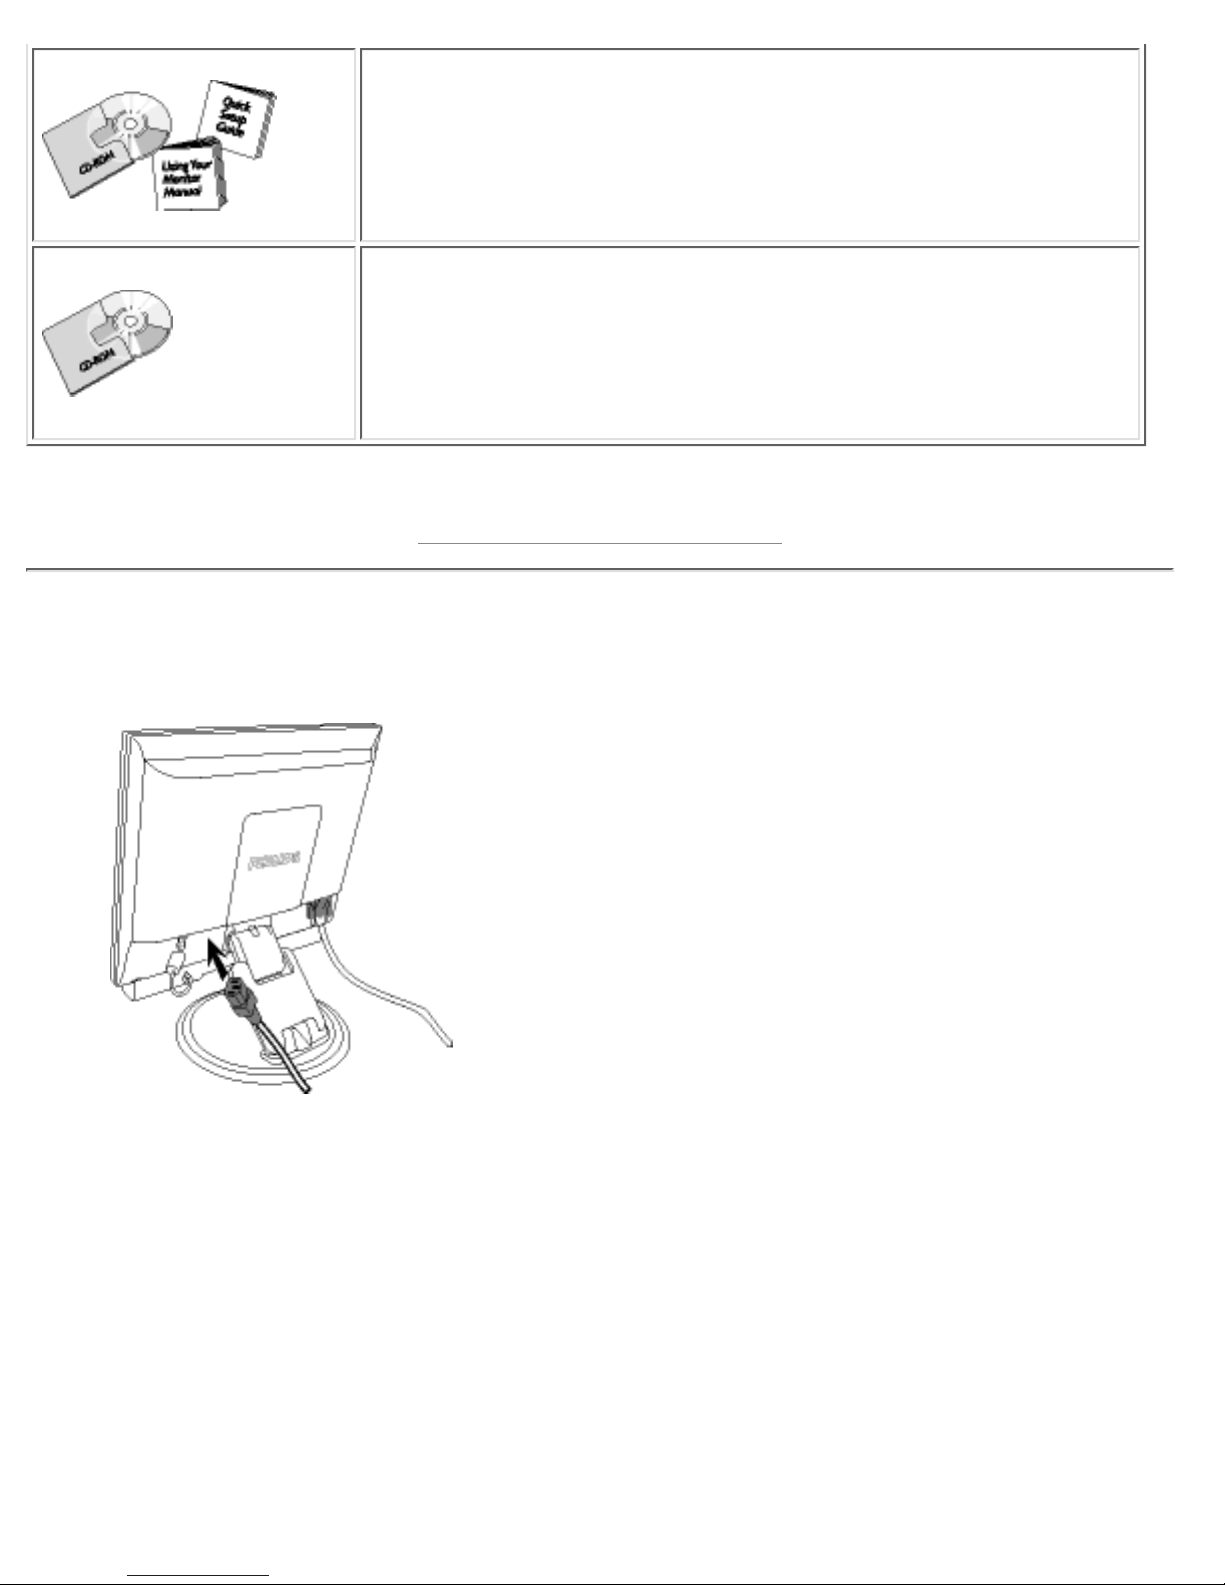
6) E-DFU package with Quick Setup Guide, Using Your Monitor
Manual, and CD-ROM.
7) Pivot CD-ROM (optional)
RETURN TO TOP OF THE PAGE
Connecting to Your PC
1) Plug the power cord into monitor firmly.
Connecting to Your PC
file:///D|/C/english/150p4agb/install/connect.htm (2 of 4) [2/24/2003 2:49:58 PM]
Page 58
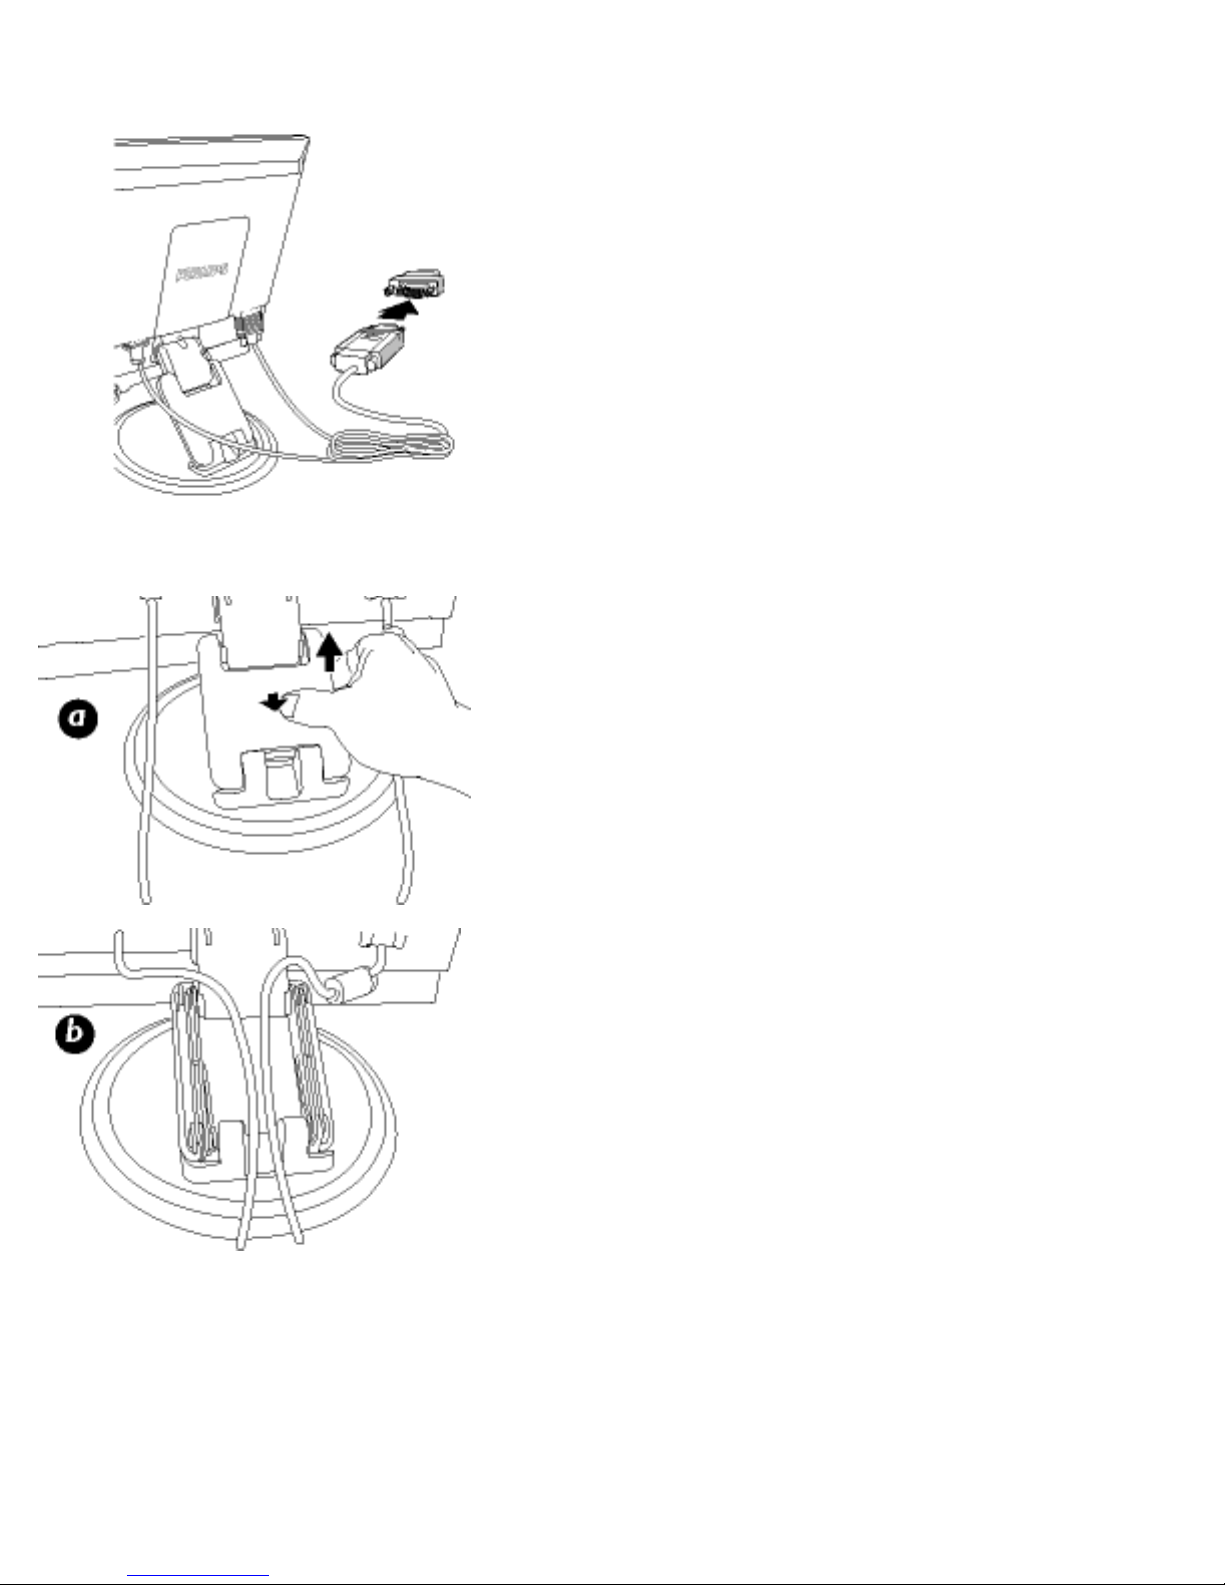
Note: If you use an Apple Macintosh, you need to
connect the special Mac adapter to one end of the
monitor signal cable
Cable management
a) Remove the top cover of the arm box
b) Put the cables inside the arm box
c) Put the top cover back
Connecting to Your PC
file:///D|/C/english/150p4agb/install/connect.htm (3 of 4) [2/24/2003 2:49:58 PM]
Page 59
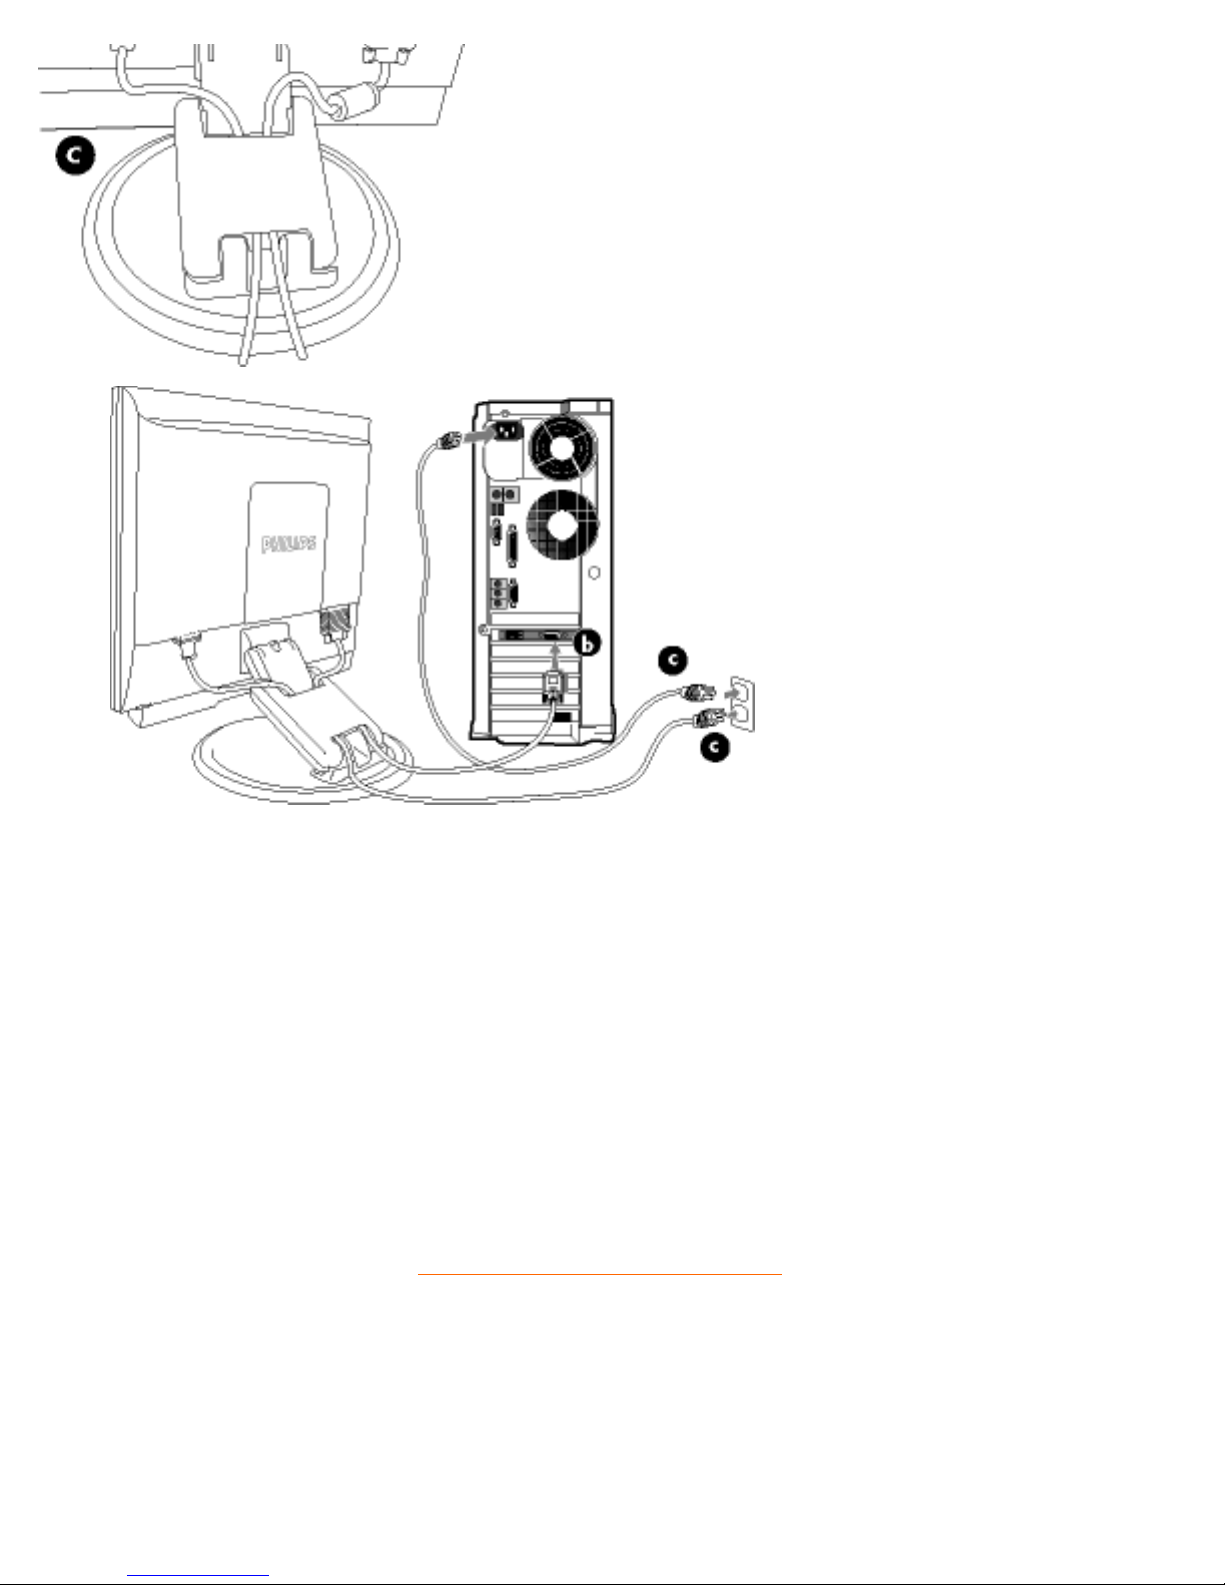
2) Connect to PC
(a) Turn off your computer and unplug its power cable.
(b) Connect the monitor signal cable to the video connector on the back of your
computer.
(c) Plug the power cord of your computer and your monitor into a nearby outlet.
(d) Turn on your computer and monitor. If the monitor displays an image,
installation is complete.
RETURN TO TOP OF THE PAGE
Connecting to Your PC
file:///D|/C/english/150p4agb/install/connect.htm (4 of 4) [2/24/2003 2:49:58 PM]
Page 60
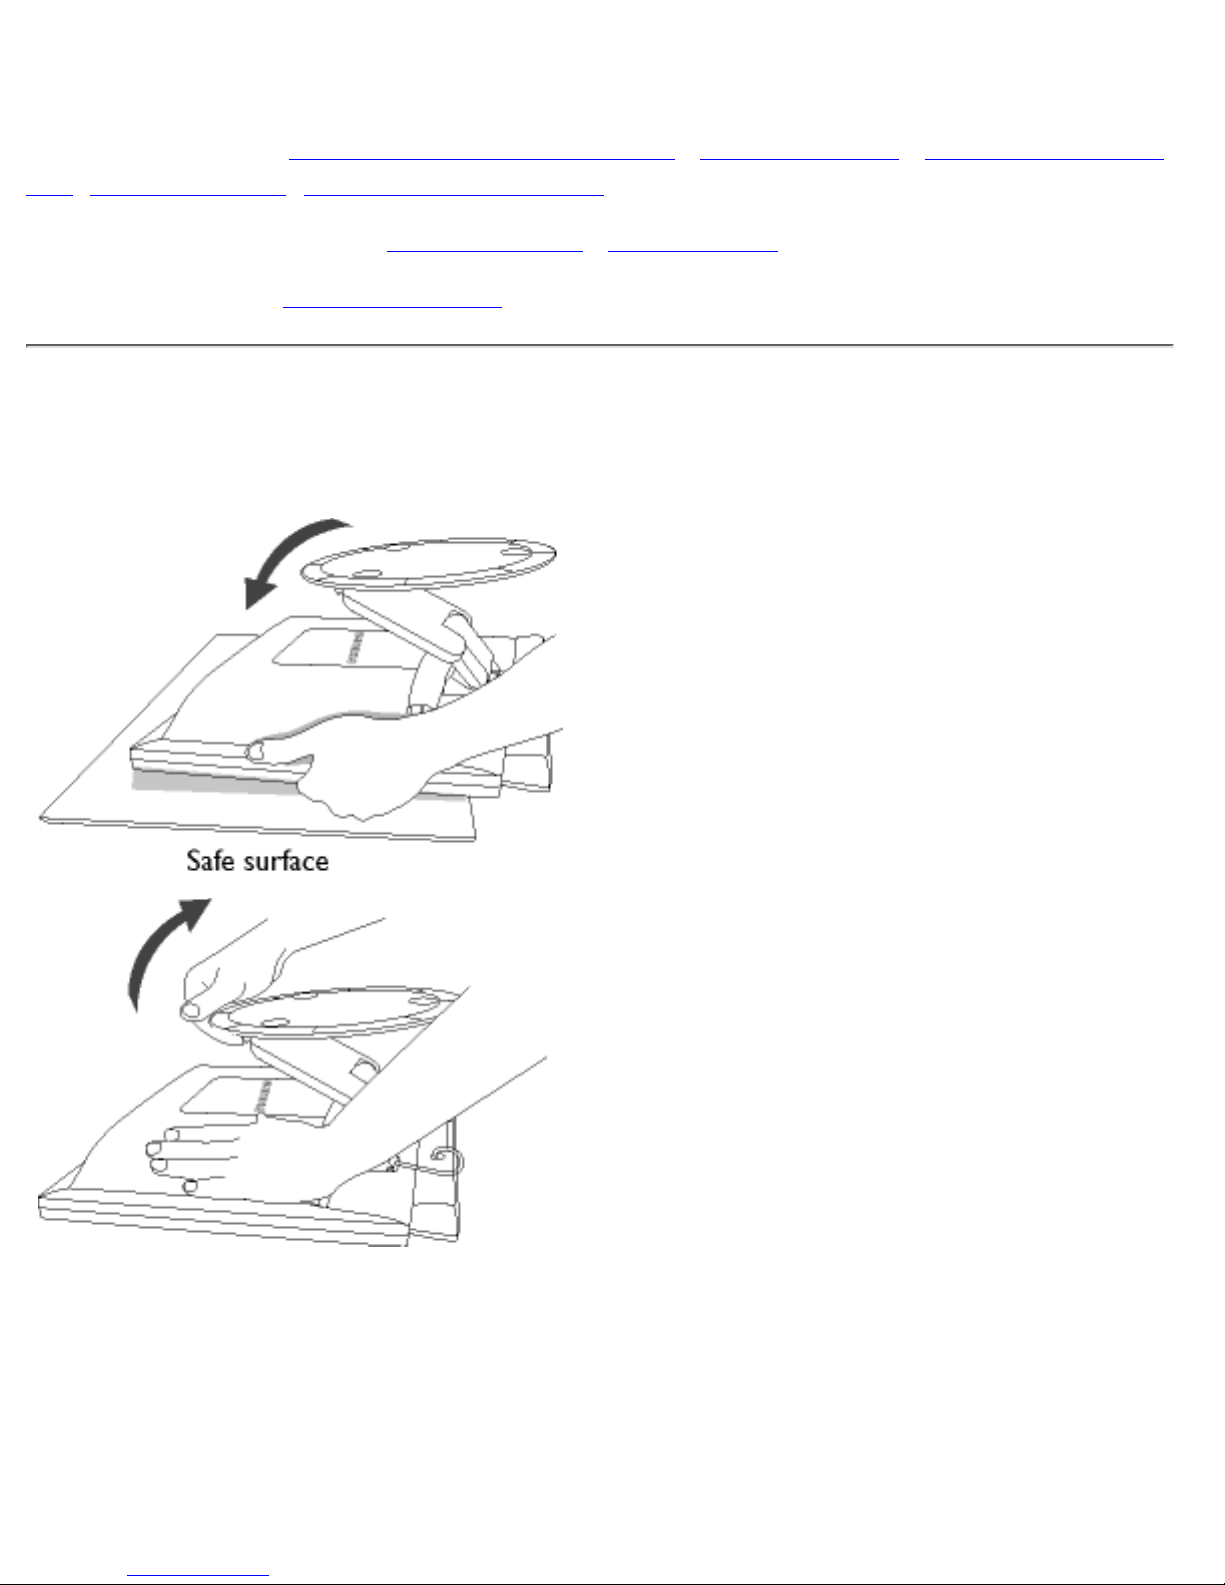
The Base
Your LCD Monitor : Front View Product Description • Accessory Pack • Connecting to Your
PC • Getting Started • Optimizing Performance
Unfold and Fold the Base : Unfold the base • Fold the base
Remove the Base : Remove the base
Unfold and Fold the Base
Unfold the Base
1) Put monitor face down on the
safe surface
2) Pull up the base
Fold the Base
The base
file:///D|/C/english/150p4agb/install/base.htm (1 of 4) [2/24/2003 2:49:59 PM]
Page 61
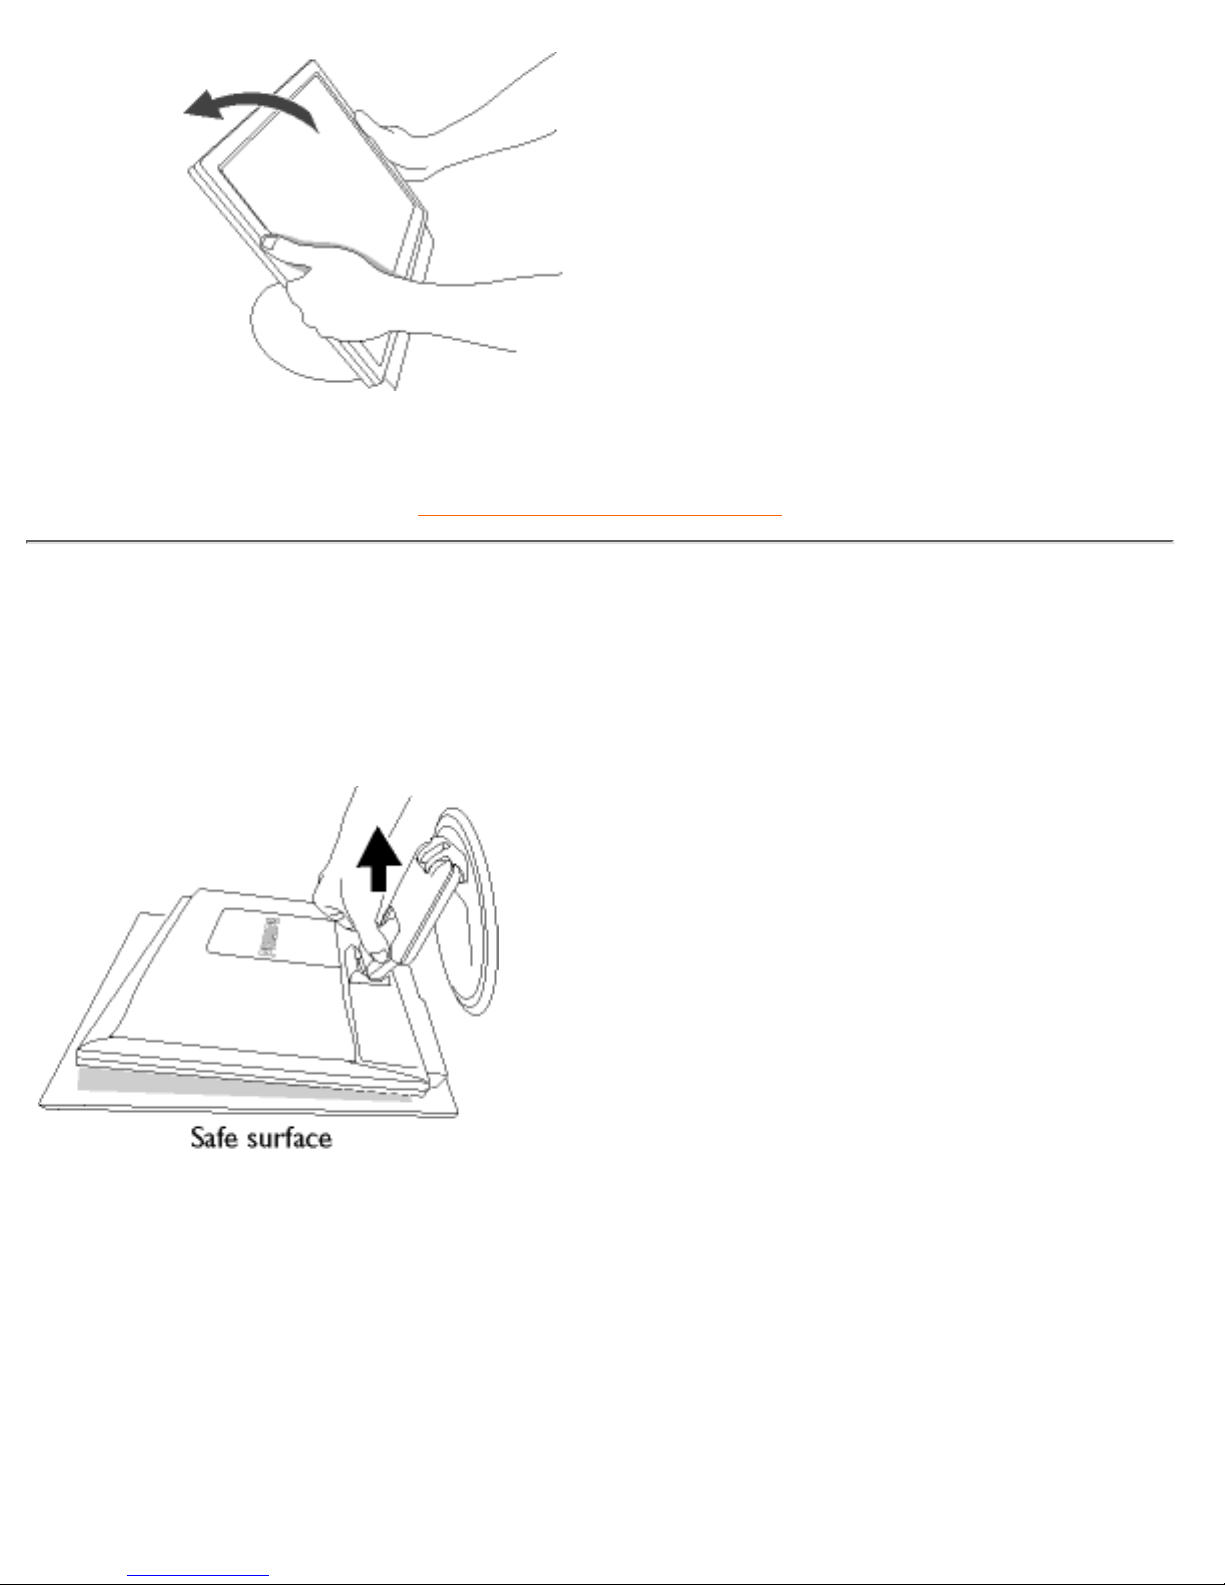
1) Push down the head of monitor
RETURN TO TOP OF THE PAGE
Remove the Base
Condition:
for VESA standard mounting applications
●
1) Remove the top cover
The base
file:///D|/C/english/150p4agb/install/base.htm (2 of 4) [2/24/2003 2:49:59 PM]
Page 62
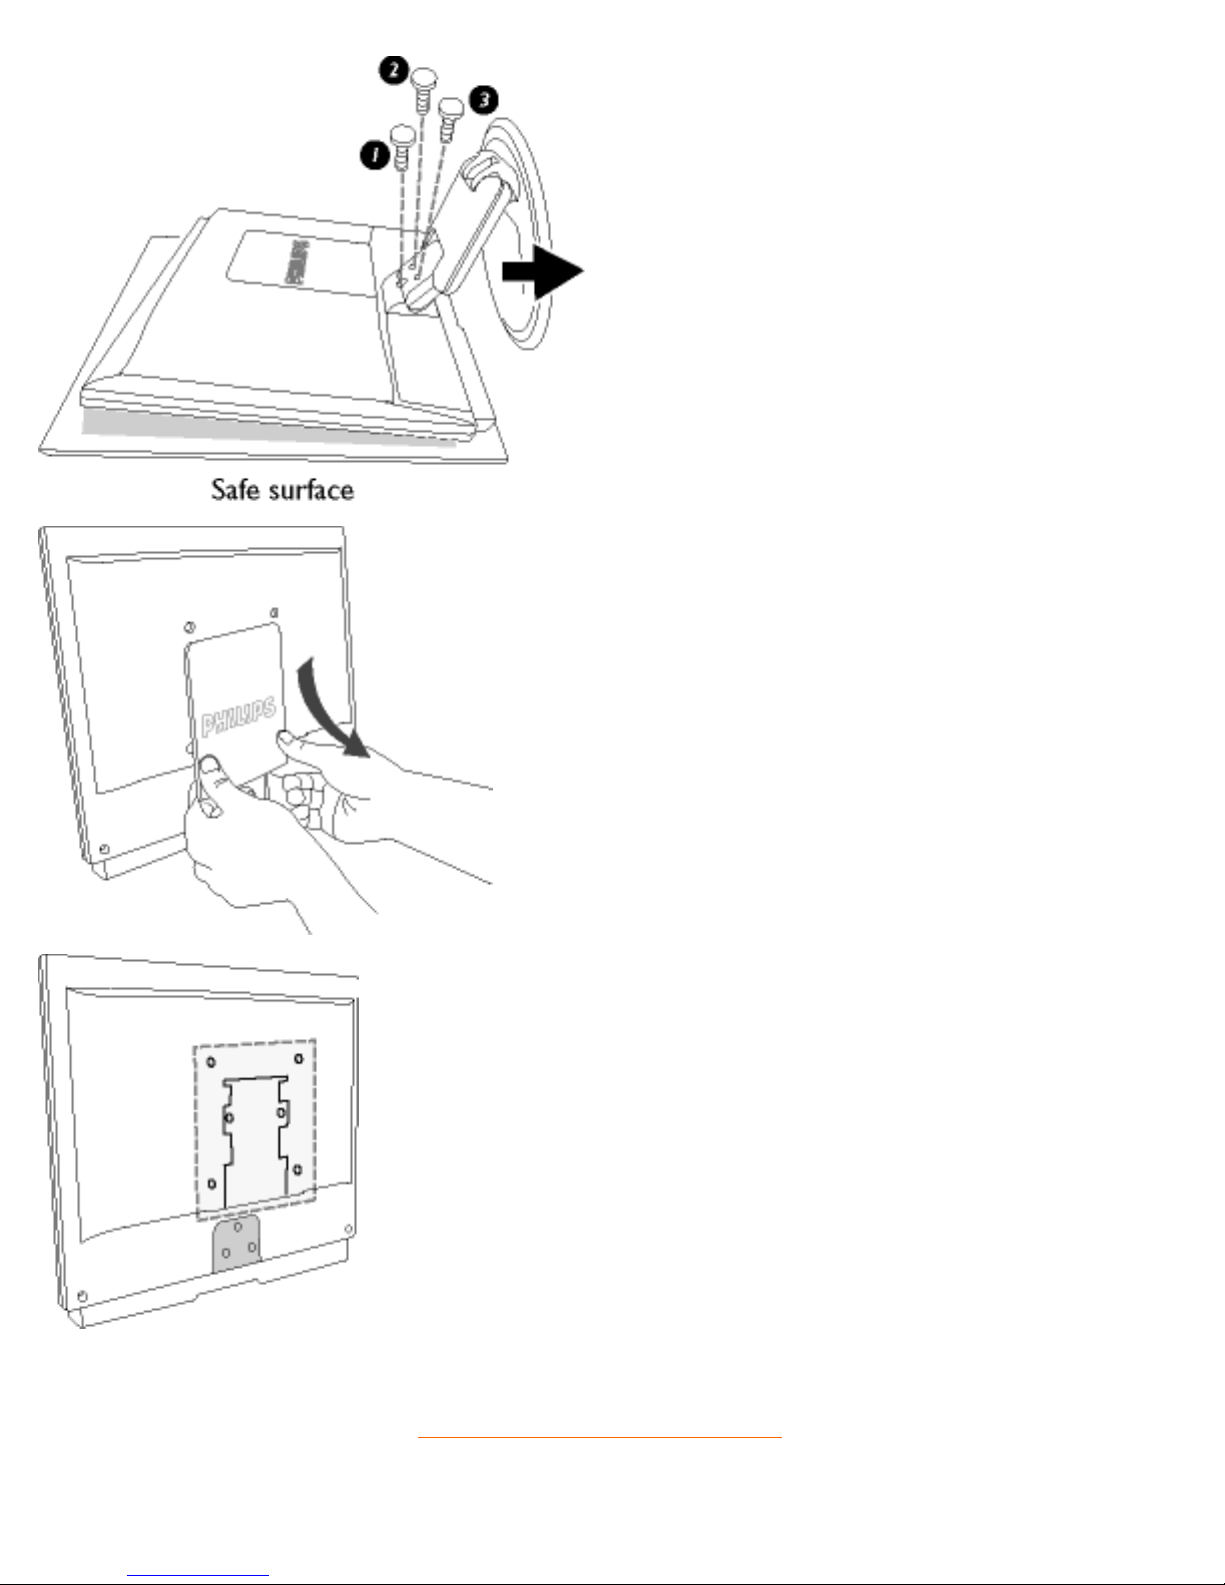
2) Remove the three screws and then
remove the base from the LCD
monitor.
3) Remove the back cover
Note: This monitor accepts a
100mmx100mm VESA-Compliant
mounting interface.
RETURN TO TOP OF THE PAGE
The base
file:///D|/C/english/150p4agb/install/base.htm (3 of 4) [2/24/2003 2:49:59 PM]
Page 63

The base
file:///D|/C/english/150p4agb/install/base.htm (4 of 4) [2/24/2003 2:49:59 PM]
Page 64

Getting Started
Your LCD Monitor : Front View Product Description • Connecting to Your PC • The Base
• Getting Started • Optimizing Performance
Getting Started
Use the information file ( .inf) for Windows 95/98/2000/Me/XP or later
The built-in VESA DDC2B feature in Philips Monitors supports Plug & Play requirements for Windows
95/98/2000/Me/XP. This information file ( .inf) should be installed in order that your Philips monitor can
be enabled from the 'Monitor' dialog box in Windows 95/98/2000/Me/XP and the Plug & Play application
can be activated. The installation procedure based on Windows '95 OEM Release 2 , 98 , Me, XP and
2000 is specified as follows.
For Windows 95
Start Windows '95
1.
Click on the 'Start' button, point to 'Settings', and then click on 'Control Panel'.2.
Double click on the 'Display' Icon.3.
Select the 'Settings' tab then click on 'Advanced...'.4.
Select the 'Monitor' button, point to 'Change...' then click on 'Have Disk...'.5.
Click on the 'Browse...' button, select the appropriate drive F: ( CD-ROM Drive) then click on the
'OK' button.
6.
Click on the 'OK' button then select your monitor model and click on the 'OK'.7.
Click on the 'Close' button.8.
For Windows 98
Start Windows 98
1.
Click on the 'Start' button, point to 'Settings', and then click on 'Control Panel'.2.
Double click on the 'Display' Icon.3.
Select the 'Settings' tab then click on 'Advanced...'.4.
Select the 'Monitor' button, point to 'Change...' then click on 'Next'5.
Select 'Display a list of all the drivers in a specific location, so you can choose the driver you
want.' then click on 'Next' and then click on 'Have Disk...'.
6.
Click on the 'Browse...' button, select the appropriate drive F: ( CD-ROM Drive) then click on the
'OK' button.
7.
Click on the 'OK' button then select your monitor model and click on the 'Next' button.8.
Click on the 'Finish' button then the 'Close' button.9.
For Windows Me
Start Windows Me
1.
Getting Started
file:///D|/C/english/150p4agb/install/gt_start.htm (1 of 3) [2/24/2003 2:49:59 PM]
Page 65

Click on the 'Start' button, point to 'Settings', and then click on 'Control Panel'.2.
Double click on the 'Display' Icon.3.
Select the 'Settings' tab then click on 'Advanced...'.4.
Select 'Monitor' button, then click on 'Change...' button.5.
Select 'Specify the location of the driver(Advanced)' and click on the 'Next' button.6.
Select 'Display a list of all the drivers in a specific location, so you can choose the driver you
want', then click on 'Next' and then click on 'Have Disk...'.
7.
Click on 'Browse...' button, select the appropriate drive F: ( CD-ROM Drive) then click on the 'OK'
button.
8.
Click on the 'OK' button, select your monitor model and click on the 'Next' button.9.
Click on 'Finish' button then the 'Close' button.10.
For Windows 2000
Start Windows 2000
1.
Click on the 'Start' button, point to 'Settings', and then click on 'Control Panel'.2.
Double click on the 'Display' Icon.3.
Select the 'Settings' tab then click on 'Advanced...'.4.
Select 'Monitor'
- If the 'Properties' button is inactive, it means your monitor is properly configured. Please stop
installation.
- If the 'Properties' button is active. Click on 'Properties' button. Please follow the steps given
below.
5.
Click on 'Driver' and then click on 'Update Driver...' then click on the 'Next' button.6.
Select 'Display a list of the known drivers for this device so that I can choose a specific driver',
then click on 'Next' and then click on 'Have disk...'.
7.
Click on 'Browse...' button then select the appropriate drive F: ( CD-ROM Drive).8.
Click on the 'Open' button, then click on the 'OK' button.9.
Select your monitor model and click on the 'Next' button.10.
Click on the 'Finish' button then the 'Close' button.
If you can see the 'Digital Signature Not Found' window, click on the 'Yes' button.
11.
For Windows XP
Start Windows XP
1.
Click on the 'Start' button and then click on 'Control Panel'.2.
Select and click on the category 'Printers and Other Hardware'3.
Click on the 'Display' Item.4.
Select the 'Settings' tab then click on the 'Advanced' button.5.
Select 'Monitor' tab
- If the 'Properties' button is inactive, it means your monitor is properly configured. Please stop
installation.
- If the 'Properties' button is active, click on 'Properties' button.
Please follow the steps below.
6.
Click on the 'Driver' tab and then click on 'Update Driver...' button.7.
Select the 'Install from a list or specific location [advanced]' radio button and then click on the
'Next' button.
8.
Getting Started
file:///D|/C/english/150p4agb/install/gt_start.htm (2 of 3) [2/24/2003 2:49:59 PM]
Page 66

Select the 'Don't Search. I will choose the driver to install' radio button. Then click on the 'Next'
button.
9.
Click on the 'Have disk...' button, then click on the 'Browse...' button and then select the
appropriate drive F: (CD-ROM Drive).
10.
Click on the 'Open' button, then click the 'OK' button.11.
Select your monitor model and click on the 'Next' button.
- If you can see the 'has not passed Windows Logo testing to verify its compatibility with Windows
XP' message please click on the 'Continue Anyway' button.
12.
Click on the 'Finish' button then the 'Close' button.13.
Click on the 'OK' button and then the 'OK' button again to close the Display_Properties dialog
box.
14.
If your Windows 95/98/2000/Me/XP version is different or you need more detailed installation
information, please refer to Windows 95/98/2000/Me/XP user's manual.
RETURN TO TOP OF THE PAGE
Getting Started
file:///D|/C/english/150p4agb/install/gt_start.htm (3 of 3) [2/24/2003 2:49:59 PM]
Page 67

Your International Philips F1rst Choice Warranty
Thank you for purchasing this Philips monitor.
All Philips monitors are designed and manufactured to high standards and deliver
high-quality performance, ease of use and ease of installation. Should you encounter any
difficulties while installing or using this product, please contact Philips directly to benefit
from your Philips F1rst Choice Warranty. This three-year service warranty entitles you to a
swap model on-site within 48 hours of your call being received.
An extended warranty called Philips F1rst Choice Premium is available in addition to your Philips F1rst
Choice warranty. For more details contact your Philips dealer.
Before contacting Philips, please prepare the following details so we can solve your problem quickly.
Philips type number
●
Philips serial number●
Purchase date (copy of purchase may be required)●
PC environment Processor:
286/386/486/Pentium Pro/Internal memory❍
Operating system (Windows, DOS, OS/2, MAC)❍
Fax/Modem/Internet program?❍
●
Other cards installed●
Having the following information available will also help speed up the process:
Your proof of purchase indicating: date of purchase, dealer name, model and
product serial number.●
The full address to which the swap model should be delivered.●
Just a phone call away
Philips’ customer help desks are located worldwide. You can contact Philips Monday - Friday from 08.00 -
20.00 hrs Central European Time (CET) and on Saturdays and Sundays from 10.00 to 18.00 hrs CET by
using one of the toll-free numbers. Click here to access the F1rst Choice Contact Information. Or you can
reach us via:
Website: http://www.philips.com
F1rst Choice Warranty
file:///D|/C/english/warranty/war_1st.htm [2/24/2003 2:50:06 PM]
Page 68

Your International Guarantee
Dear Customer,
Thank you for purchasing this Philips product which has been designed and manufactured to the highest
quality standards.
If, unfortunately, something should go wrong with this product Philips guarantees free of charge labor and
replacement parts irrespective of the country where it is repaired during a period of 12 months from date of
purchase. This international Philips guarantee complements the existing national guarantee obligations to
you of dealers and Philips in the country of purchase and does not affect your statutory rights as a
customer.
The Philips guarantee applies provided the product is handled properly for its intended use, in accordance
with its operating instructions and upon presentation of the original invoice or cash receipt, indicating the
date of purchase, dealer's name and model and production number of the product.
The Philips guarantee may not apply if:
the documents have been altered in any way or made illegible;
●
the model or production number on the product has been altered, deleted, removed or made illegible;●
repairs or product modifications and alterations have been executed by unauthorized service
organizations or persons;
●
damage is caused by accidents including but not limited to lightning, water or fire, misuse or neglect.●
Please note that the product is not defective under this guarantee in the case where modifications become
necessary in order for the product to comply with local or national technical standards which apply in
countries for which the product was not originally designed and/or manufactured. Therefore always check
whether a product can be used in a specific country.
In case your Philips product is not working correctly or is defective, please contact your Philips dealer. In the
event you require service whilst in another country a dealer address can be given to you by the Philips
Consumer Help Desk in that country, the telephone and fax number of which can be found in the relevant
part of this booklet.
In order to avoid unnecessary inconvenience, we advise you to read the operating instructions carefully
before contacting your dealer. If you have questions which your dealer cannot answer or any related
question please contact the Philips Consumer Information Centers or via:
Website: http://www.philips.com
International Guarantee
file:///D|/C/english/warranty/war_intl.htm [2/24/2003 2:50:07 PM]
Page 69

LIMITED WARRANTY (Computer Monitor)
Click here to access the Warranty Registration Card.
Three Years Free Labor / Three Years Free Service on Parts / One Year Exchange*
*Product will be exchanged with a new or renewed to original specifications unit within two business days
for the first year. This product must be shipped in at your expense for service during years two and three.
WHO IS COVERED?
You must have proof of purchase to receive warranty service. A sales receipt or other document showing
that you purchased the product is considered proof of purchase. Attach it to this owner's manual and keep
both nearby.
WHAT IS COVERED?
Warranty coverage begins the day you buy your product. For three years thereafter, all parts will be
repaired or replaced, and labor is free. After three years from the day of purchase, you pay for the
replacement or repair of all parts, and for all labor charges.
All parts, including repaired and replaced parts, are covered only for the original warranty period. When the
warranty on the original product expires, the warranty on all replaced and repaired products and parts also
expires.
WHAT IS EXCLUDED?
Your warranty does not cover:
labor charges for installation or setup of the product, adjustment of customer controls on the product,
and installation or repair of antenna systems outside of the product.
●
product repair and/or part replacement because of misuse, accident, unauthorized repair or other
cause not within the control of Philips Consumer Electronics.
●
reception problems caused by signal conditions or cable or antenna systems outside the unit.●
a product that requires modification or adaptation to enable it to operate in any country other than the
country for which it was designed, manufactured, approved and/or authorized, or repair of products
damaged by these modifications.
●
incidental or consequential damages resulting from the product. (Some states do not allow the
exclusion of incidental or consequential damages, so the above exclusion may not apply to you. This
includes, but is not limited to, prerecorded material, whether copyrighted or not copyrighted.)
●
a product used for commercial or institutional purposes.●
Where IS SERVICE AVAILABLE?
Warranty service is available in all countries where the product is officially distributed by Philips Consumer
Electronics. In countries where Philips Consumer Electronics does not distribute the product, the local
United States Guarantee
file:///D|/C/english/warranty/war_usa.htm (1 of 3) [2/24/2003 2:50:07 PM]
Page 70

Philips service organization will attempt to provide service (although there may be a delay if the appropriate
spare parts and technical manual(s) are not readily available).
Where CAN I GET MORE INFORMATION?
For more information, contact the Philips Customer Care Center by calling (877) 835-1838 (U.S.A.
customers only) or (903) 242-4804.
Before Requesting Service...
Please check your owner's manual before requesting service. Adjustments of the controls discussed there
may save you a service call.
TO GET WARRANTY SERVICE IN U.S.A., PUERTO RICO OR U.S. VIRGIN ISLANDS...
Contact the Philips Customer Care Center phone number listed below for product assistance and
procedures for servicing:
Philips Customer Care Center
(877) 835-1838 or (903) 242-4804
(In U.S.A., Puerto Rico and U.S. Virgin Islands, all implied warranties, including implied warranties of
merchantability and fitness for a particular purpose, are limited in duration to the duration of this express
warranty. But, because some states do not allow limitations on how long an implied warranty may last, this
limitation may not apply to you.)
TO GET WARRANTY SERVICE IN CANADA...
Please contact Philips at:
(800) 479-6696
Three years free parts and three years free labor will be provided at Philips Canada depot or any one of its
authorized service centers.
(In Canada, this warranty is given in lieu of all other warranties. No other warranties are expressed or
implied, including any implied warranties of merchantability or fitness for a particular purpose. Philips is not
liable under any circumstances for any direct, indirect, special, incidental or consequential damages,
howsoever incurred, even if notified of the possibility of such damages.)
REMEMBER... Please record the model and serial numbers found on the product below.
MODEL # ________________________________________________
SERIAL # ________________________________________________
This warranty gives you specific legal rights. You may have other rights which vary from state/province to
state/province.
United States Guarantee
file:///D|/C/english/warranty/war_usa.htm (2 of 3) [2/24/2003 2:50:07 PM]
Page 71

Philips Customer Care Center, P. O. Box 2976, Longview, TX 75601
Your International Philips F1rst Choice Warranty
Thank you for purchasing this Philips monitor.
All Philips monitors are designed and manufactured to high standards and deliver
high-quality performance, ease of use and ease of installation. Should you encounter
any difficulties while installing or using this product, please contact Philips directly to
benefit from your Philips F1rst Choice Warranty. This three-year service warranty
entitles you to a swap model on-site within 48 hours of your call being received
within the first year of purchase. If you have any problems with your monitor within
the second or third year of purchase, we will repair it after it has been sent to the
service provider at your expense and returned to you within five working days, free of
charge.
An extended warranty called Philips F1rst Choice Premium is available in addition to your Philips F1rst
Choice warranty. For more details contact your Philips dealer.
Before contacting Philips, please prepare the following details so we can solve your problem quickly.
Philips type number
●
Philips serial number●
Purchase date (copy of purchase may be required)●
PC environment Processor:●
286/386/486/Pentium Pro/Internal memory❍
Operating system (Windows, DOS, OS/2, MAC)❍
Fax/Modem/Internet program?❍
Other cards installed●
Having the following information available will also help speed up the process:
Your proof of purchase indicating: date of purchase, dealer name, model and
product serial number.●
The full address to which the swap model should be delivered.●
Just a phone call away
Philips’ customer help desks are located worldwide. You can contact Philips Monday - Friday from 08.00 -
20.00 hrs Central European Time (CET) and on Saturdays and Sundays from 10.00 to 18.00 hrs CET by
using one of the toll-free numbers. Click here to access the F1rst Choice Contact Information. Or you can
reach us via:
Website: http://www.philips.com
United States Guarantee
file:///D|/C/english/warranty/war_usa.htm (3 of 3) [2/24/2003 2:50:07 PM]
Page 72

F1rst Choice Contact Information
Telephone numbers:
Austria
01 546 575 603
Luxembourg
408 443 5501
Belgium
02 275 0701
Netherlands
053 482 9800
Cyprus (Greek)
800 92256
Norway
22 70 82 50
Denmark
35 25 87 61
Portugal
0800 831 363
France
03 8717 0033
Sweden
08 632 0016
Germany
0696 698 4712
Switzerland
02 23 10 21 16
Greece
00800 3122 1223
Spain
09 17 45 62 46
Finland
09 2290 1908
United Kingdom
0207 949 0069
Ireland
01 601 1161
U.S.A.
877 835 1838
Italy
02 48 27 11 53
F1rst Choice Contact Information
file:///D|/C/english/warranty/warfirst.htm [2/24/2003 2:50:12 PM]
Page 73

Consumer Information Centers
Antilles • Argentina • Australia• Bangladesh • Brasil • Canada • Chile• China • Colombia •
Czech Republic • Dubai • Egypt • Hong Kong • Hungary • India • Indonesia • Korea •
Malaysia • Mexico • Morocco • New Zealand • Pakistan • Paraguay • Peru • Philippines •
Poland • Russia • Singapore • South Africa • Taiwan • Thailand • Turkey • Uruguay •
Venezuela
Eastern Europe
CZECH REPUBLIC
Philips Service
V Mezihorí 2180 00 Prague
Phone: (02)-6831581
Fax : (02)-66310852
HUNGARY
Philips Markaszerviz.
Kinizsi U 30-36Budapest 1092
Phone: (01)-2164428
Fax : (01)-2187885
POLAND
Philips Polska CE
UL.Marszalkowska 45/49
00-648 Warszawa
Phone: (02)-6286070
Fax : (02)-6288228
RUSSIA
Philips Representation Office
Ul. Usacheva 35a
119048 Moscow
Phone: 095-937 9300
Fax : 095-755 6923
TURKEY
Türk Philips Ticaret A.S.
Talatpasa Caddesi No 5.
80640-Gültepe/Istanbul
Phone: (0800)-211 40 36
Fax : (0212)-281 1809
Latin America
Consumer Information Centers
file:///D|/C/english/warranty/warcic.htm (1 of 8) [2/24/2003 2:50:17 PM]
Page 74

ANTILLES
Philips Antillana N.V.
Kaminda A.J.E. Kusters 4
Zeelandia, P.O. box 3523-3051
Willemstad, Curacao
Phone: (09)-4612799
Fax : (09)-4612772
ARGENTINA
Philips Antillana N.V.
Vedia 3892 Capital Federal
CP: 1430 Buenos Aires
Phone: (011)-4544 2047
BRASIL
Philips da Amazônia Ind. Elet. Ltda.
Av. Luis Carlos Berrini,
1400 - Sao Paulo -SP
Phone: 0800-701
-0203
CHILE
Philips Chilena S.A.
Avenida Santa Maria 0760
P.O. box 2687Santiago de Chile
Phone: (02)-730 2000
Fax : (02)-777 6730
COLOMBIA
Industrias Philips de Colombia
S.A.-Division de Servicio
CARRERA 15 Nr. 104-33
Bogota, Colombia
Phone:(01)-8000 111001 (toll free)
Fax : (01)-619-4300/619-4104
MEXICO
Consumer Information Centre
Norte 45 No.669
Col. Industrial Vallejo
C.P.02300, -Mexico, D.F.
Phone: (05)-3687788 / 9180050462
Fax : (05)-7284272
Consumer Information Centers
file:///D|/C/english/warranty/warcic.htm (2 of 8) [2/24/2003 2:50:17 PM]
Page 75

PARAGUAY
Philips del Paraguay S.A.
Avenida Artigas 1513
Casilla de Correos 605
Asuncion
Phone: (021)-211666
Fax : (021)-213007
PERU
Philips Peruana S.A.
Customer Desk
Comandante Espinar 719
Casilla 1841
Limab18
Phone: (01)-2136200
Fax : (01)-2136276
URUGUAY
Ind.Philips del Uruguay S.A.
Luis Alberto de Herrera 1248
Customer Help Desk
11300 Montevideo
Phone: (02)-6281111
Fax : (02)-6287777
VENEZUELA
Industrias Venezolanas Philips S.A.
Apartado Postal 1167
Caracas 1010-A
Phone: (02) 2377575
Fax : (02) 2376420
Canada
CANADA
Philips Electronics Ltd.
281 Hillmount Road
Markham, Ontario L6C 2S3
Phone: (800) 479-6696
Pacific
AUSTRALIA
Philips Consumer Service.
Customer Information Centre.
3 Figtree Drive
Homebush Bay NSW 2140
Phone: CIC: 1300-363 391 PCE Service: 1300-361 392 (toll free)
Fax : +61 2 9947 0063
Consumer Information Centers
file:///D|/C/english/warranty/warcic.htm (3 of 8) [2/24/2003 2:50:17 PM]
Page 76

NEW ZEALAND
Philips New Zealand Ltd.
Consumer Help Desk
2 Wagener Place, Mt.Albert
P.O. box 1041
Auckland
Phone: 0800 477 999 (toll free)
Fax : 0800 288 588 (toll free)
Asia
BANGLADESH
Philips Service Centre
100 Kazi Nazrul Islam
Avenue Kawran Bazar C/A
Dhaka-1215
Phone: (02)-812909
Fax : (02)-813062
CHINA
BEIJING
Beijing Authorized Service Centre.
Consumer Information Centre
Building 6, West Street
Chong Wen Men, Beijing, Jin Bang Co. Led.
100051 BEIJING
GUANGZHOU
Philips Authorized Service Centre
801 Dong Feng Road East
Guangzhou 510080
SHANGHAI
Philips Service Logistic Centre
Consumer Information Centre
P.O.Box 002-027, Nextage Department Store
Puding New District
200002 SHANGHAI
Philips Authorized Service Centre
Consumer Information Centre
148 Fu Jian Road M
200001 Shanghai
Phone: 800 820 5128 (toll free)
Fax: 21-656 10647
Consumer Information Centers
file:///D|/C/english/warranty/warcic.htm (4 of 8) [2/24/2003 2:50:17 PM]
Page 77

HONG KONG
Philips Hong Kong Limited
Consumer Information Centre
16/F Hopewell Centre
17 Kennedy Road, WANCHAI
Phone: 2619 9663
Fax : 2481 5847
INDIA
Phone:
91-20-712 2048 ext: 2765
Fax: 91-20-712 1558
BOMBAY
Philips India
Customer Relation Centre
Bandbox House
254-D Dr. A Besant Road, Worli
Bombay 400 025
CALCUTTA
Customer Relation Centre
7 justice Chandra Madhab Road
Calcutta 700 020
MADRAS
Customer Relation Centre
3, Haddows Road
Madras 600 006
NEW DELHI
Customer Relation Centre
68, Shivaji Marg
New Dehli 110 015
INDONESIA
Philips Group of Companies in Indonesia
Consumer Information Centre
Jl.Buncit Raya Kav. 99-100
12510 Jakarta
Phone: (021)-794 0040
/ 798 4255 ext: 1612
Fax : (021)-794 7511 / 794 7539
Consumer Information Centers
file:///D|/C/english/warranty/warcic.htm (5 of 8) [2/24/2003 2:50:17 PM]
Page 78

KOREA
Philips Korea Ltd.
Philips House
C.P.O. box 3680
260-199, Itaewon-Dong.
Yongsan-Ku, Seoul 140-202
Phone:080-600-6600 (Local toll free)
Fax : (02)-709-1245
MALAYSIA
Philips Malaysia Sdn. Berhad
Service Dept.
No.51,sect.13 Jalan University.
46200 Petaling Jaya, Selagor.
P.O.box 12163
50768 Kuala Lumpur.
Phone: (03)-7950 5501
/02
Fax : (03)-7954 8504
PAKISTAN
KARACHI
Philips Electrical Ind. of Pakistan
Consumer Information Centre
F-54, S.I.T.E, P.O.Box 7101
75730 KARACHI
Philips Consumer Service Centre
168-F, Adamjee Road
Rawalpindi Cantt
Phone: (021)-7731927
Fax : (021)-7721167
PHILIPPINES
Philips Electronics and Lighting Inc.
106 Valero St., Salcedo Village
Makati, Metro Manilla.
Phone: (02)-888 05 72
Domestic toll free: 1-800-10-PHILIPS or 1-800-10-744 5477
Fax : (02)-888 05 71
Consumer Information Centers
file:///D|/C/english/warranty/warcic.htm (6 of 8) [2/24/2003 2:50:17 PM]
Page 79

SINGAPORE
Philips Singapore Private Ltd.
Consumer Service Dept.
Lorong 1,Toa Payoh., P.O. box 340
Singapore 1231
Phone: 6882 3999
Fax : 6250 8037
TAIWAN
Philips Taiwan Ltd.
Consumer Information Centre
26F, 66, Chung-Hsiao W. Road Sec. 1
TAIPEI
Phone:
0800-231-099 or (02)-2382-4567
Fax : (02)-2382-3027
THAILAND
Philips Electronics (Thailand) Ltd.
Philips Service Centre
209/2 Sanpavut Road,
Bangna, Bangkok 10260
Phone : (02)-652 8652
Fax : (02)-614 3531
Africa
MOROCCO
Philips Electronique Maroc
304,BD Mohamed V
Casablanca
Phone: (02)-302992
Fax : (02)-303446
SOUTH AFRICA
South African Philips.
S.V. Div. 195 Main R.D.
Martindale., Johannesburg
P.O.box 58088
Newville 2114
Phone: +27 11 471 5000
Fax : +27 11 471 5020
Middle East
Consumer Information Centers
file:///D|/C/english/warranty/warcic.htm (7 of 8) [2/24/2003 2:50:17 PM]
Page 80

DUBAI
Philips Middle East B.V.
Consumer Information Centre
P.O.Box 7785
DUBAI
Phone: (04)-335 3666
Fax : (04)-335 3999
EGYPT
Philips Egypt
Consumer Information Centre
10, Abdel Rahman El Rafei
Mohandessin - Cairo, P.O.Box 242
DOKKI
Phone: (02)-3313993
Fax : (02)-3492142
Consumer Information Centers
file:///D|/C/english/warranty/warcic.htm (8 of 8) [2/24/2003 2:50:17 PM]
 Loading...