

Page 1

DRAFT Revision 6
Revision 6
User manual
Page 2
1.0
2.0
3.0
3.1
3.2
3.3
3.4
3.5
3.6
4.0
4.1
4.2
7.0
5.0
6.0
Page 3

8.0
8.1
8.2
Page 4

DRAFT Revision 6
Table of content
Introduction..........................................................................3
Notes and warnings..........................................................3
Product Overview.................................................................4
Remote Control Unit.........................................................4
MP 3 Player...................................................................... 4
Mobile Phone....................................................................4
Earphone and Microphone unit......................................... 4
Installation............................................................................ 5
Preparation.......................................................................5
Assembly.......................................................................... 6
Special part on Mooring jacket combination......................7
Special section for the producer jacket.............................8
Usage.................................................................................10
Playing music..................................................................10
Answering and making a phone call ...............................10
Adjustments....................................................................11
Maintenance.......................................................................12
Before requesting service...............................................12
Page 5

DRAFT Revision 6
Introduction
Levi’s Industrial Clothing Division and Philips Electronics
have developed clothing for the next generation of workers,
featuring exclusive technology.
Levi Strauss & Co was founded by providing strong utility
pants with reinforced pockets for the Californian gold miners
in 1850’s. This new Levi’s ® brand ICD+ is a natural
evolution of the company’s ‘form follows function’ work-wear
heritage.
The ICD+ range of wearable electronics combines modern
day garment functionality with up to the minute
communication technology and has been designed for
people who live life under their own rules.
Notes and warnings
Before washing please remove all devi ces and
connectors from the jacket!
Page 6

DRAFT Revision 6
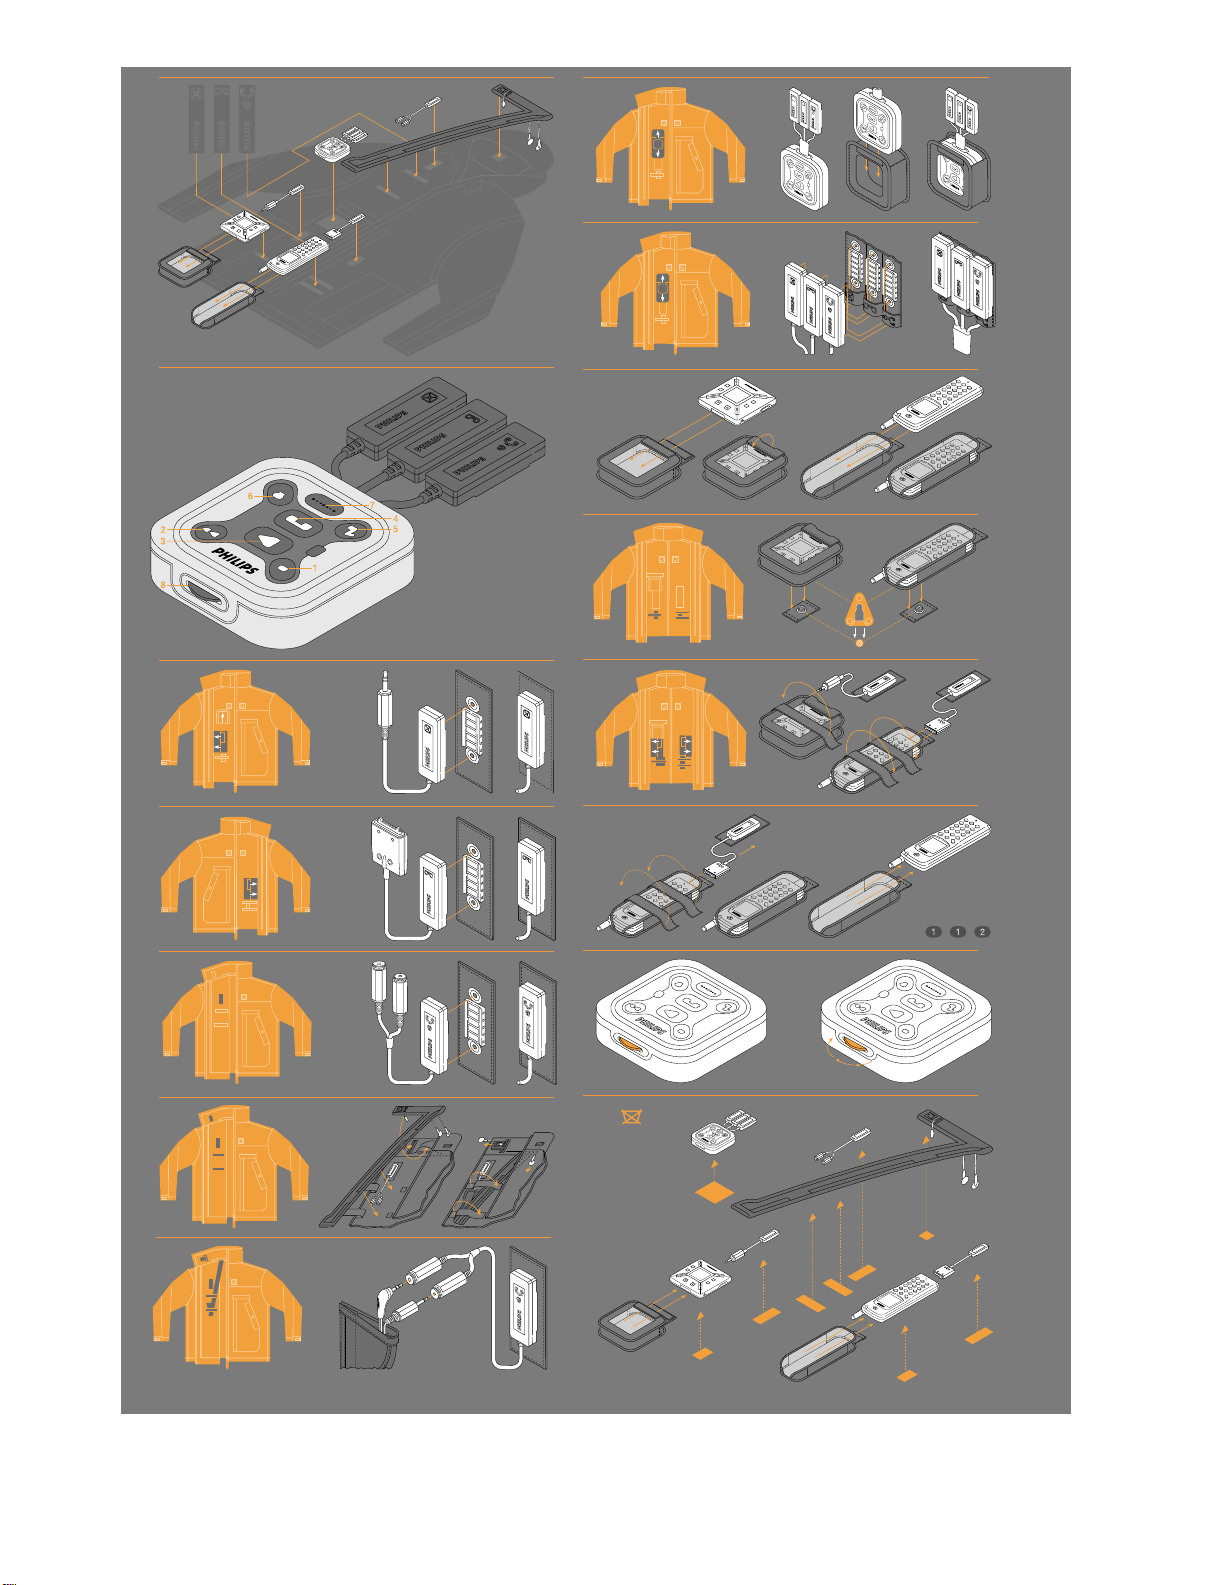
Product Overview
Overview diagram with call outs. The text of the call outs consist of a label of the control/item plus a brief explanation of its function and
workings. e.g.:
Unified Remote Control Unit
Stop Interrupt music playback.
Play Start music playback.
Next Select a next track
Fast forward the music
Phone Voice Dial - make a call using voice dialling.
Accept call - answer an incoming call.
Hang-up - close the connection.
Music Sends the music of the MP 3 player down the
Telephone.
Mute Mutes the Microphone.
Stereo Select left mono – right mono or stereo sound.
Volume Adjust the volume of the earphones.
MP 3 Player
See Philips Rush MP3 player manual or visit
www.rush.philips.com
Mobile Phone
See Philips Xenium GSM phone manual or visit
www.pcc.philips.com
Earphone and Microphone unit
Philips Eargear earphones, plus microphone inside a
detachable fabric collar piece
Page 7

DRAFT Revision 6
Installation
The system consists of two devices, the MP 3 player and
Mobile Phone, plus a Unified Remote Control unit and an
earphones and microphone unit.
Preparation
Before using the devices please make sure all batteries are
new or fully charged and placed correctly.
• To charge the phone first remove the phone from the
jacket (see the phone manual details of charging the
phone battery).
• The MP3 player requires 2 AAA (LR03) batteries. The
battery cover is at the back of the unit. (see the MP 3
player manual).
• The Unified Remote Control unit requires a single AAA
(LR03) battery. The battery cover is at the back of the
unit.
To enable voice dialling the phone must be programmed to
recognise your voice, telephone numbers must be stored and
matched with whatever word you want (see the Voice Dial
section of the phone manual).
• Before programming the phone, make sure the phone is
not connected to the system. Either remove the phone
from the jacket or unplug the connector.
In order to play music from the MP 3 player make sure that
you have stored music onto the device.
For downloading music please refer to the MP 3 player
manual.
• Remove the player from the jacket before downloading
music to the MP 3 player.
Page 8

DRAFT Revision 6
Assembly - First Time Use & After Washing
(Note: This part can vary depending on the type of jacket)
After preparing the devices you can start to assemble the
system onto the jacket.
Some items only need assembling the first time you use the
jacket, then each time after you wash the jacket.
1. Plug the popper connectors for the phone and MP 3
player into the jacket.
2. Plug the popper connectors for the microphone and
earphones into the jacket.
A. Combined illustration for 1 and 2
These popper connectors can remain in the jacket until
you prepare to wash it, at which point they should be
temporally removed.
Note: There are identification tags located on t he
connectors, pouches and jacket. This makes it easier to
match the device and the connector.
(Overview drawings showing the pouches locations and the icons with explanation call outs comes in here).
(Detailed drawing of the popper connector).
3. Insert the fabric collar piece containing the headphones
and microphone through collar opening guiding
headphones through buttonholes at back of collar. Pull
microphone tongue through large button hole on collar
and secure with velcro, then slide microphone into
housing.
B. illustration for 3
(Overview drawing showing how and where to put the fabric strip).
4. Connect the earphones and microphone jack plugs to the
sockets.
C. illustration for 4
5. Insert the Unified Remote Control unit into its pocket.
D. illustration for 5
6. Plug the Unified Remote Control popper connectors into
the jacket.
The Unified Remote Control can remain in the jacket until
you prepare to wash it, at which point they should be
temporally removed.
From time to time you will have to remove the Unified
Remote Control from it's pocket in order to change the
battery.
Page 9

DRAFT Revision 6
E. illustration for 6
Note: Make sure all connectors are firmly connected.
You have now prepared the jacket for everyday use.
Assembly - Day to Day Use
(Note: This part can vary depending on the type of jacket)
1. Insert the Phone and MP 3 player into its designated
F. illustration for 1
Notes: There are several places to attach the devices onto
the jacket, which can be identified according to the
identification tags.
pockets.
Make sure that the Phone and MP3 plug-points face upwards
when you put the devices in their pockets.
The phone sits upside-down!
Make sure that the phone is switched on and in its neutral
state. With the Xenium phone this means that the clock is
showing.
Make sure the MP 3 player is switched on and the HOLD
switch set.
2. Attach the pockets to the jacket.
G. illustration for 2
3. Connect the phone plug into the phone and the jack plug
into the MP3 player.
H. illustration for 3
(Overview drawings showing the pouches locations and the icons with explanation call outs comes in here).
(Detailed drawings showing how to place the devices)
(Detailed drawing of the popper connector).
Note: Make sure all connectors are firmly connected.
The jacket is equipped with special holders for placing the
earphones and microphone.
Now the jacket is ready to use.
Page 10

DRAFT Revision 6
Note: You can always remove the Phone or MP3 player from
the system by unplugging and simply tearing off the pockets
from the Velcro strips.
The pockets can be used as carry cases. This allows you to
use the products independently wherever you want.
Special part on Mooring jacket combination.
The Mooring gilet-jacket combination allows you to zip the
gilet together with the jacket. When zipped together, it is
possible to attach the MP 3 player and phone onto the jacket
rather than on the gilet. This makes it easier to access the
devices when needed.
You can also wear the Unified Remote Control on top of the
jacket in stead of inside.
To attach the devices onto the jacket,
1. Unplug the Phone and MP3 player and remove the
device-pockets from the gilet.
G + H re-used as illustration for 1
2. Attach the pockets in the locations provided on the
outside of the jacket. The connectors can be fed through
the special holes which are provided in the jacket.
I. illustration for 2
(detailed illustration of the holes and how to put the wires through).
3. Push the Unified Remote Control pocket in its entirety
through the opening in the jacket
J. illustration for 3
(detailed illustration of the hole and how to put the RC through).
Special section for the producer jacket.
The producer jacket allows you to “wear” the Unified Remote
Control unit either behind the front flap or on t he front.
• To wear the Unified Remote Control unit on top, it has to
be pushed in its entirety through the opening in the jacket
(detailed illustration of the hole and how to put the RC through).
Page 11

DRAFT Revision 6
Page 12

DRAFT Revision 6
Usage
The system is provided with a Unified Remote Control unit.
This unit offers control to the paramount functions of the
connected devices while being mobile.
It allows you to play back music, make and receive calls and
even play music down the phone.
If you want to use more functions of a device, simply unplug
it and you can use it’s full functionality. This is particularly
handy to store new music on the MP 3 player or to change
your phone settings.
(Overview drawings with the RC unit and call outs at the highlighted button with the text label. Only for the discussed button)
Playing music
• To play music press the play button [symbol] on the RC.
• To stop playing music, press the stop button [symbol] on
the RC.
• To jump to the next track, press the next buttons [symbol]
on the RC. Keep the next button [symbol] pressed to fast
forward.
Answering and making a phone call
• To answer a call press the phone button [symbol]. This
will automatic stop playing music, if the MP 3 player was
in use.
1. To initiate a call press the phone button [symbol]. If the
phone is able receive a voice command, you will hear a
beep.
2. Then say the name of the number to dial. The phone will
now try to establish a connection.
Note: When connected to the jacket system the phone will be
in hands-free calling mode.
Page 13

DRAFT Revision 6
To make an emergency call
1. Unplug the phon e
2. Remove the phone from its pocket
3. Dial 112.
4. Press the Make –Call button on the phone [symbol].
K. Combined illustration for 1, 2, 3, and 4
112 is the European Emergency Number. If you are using
the phone outside of Europe dial the local emergency
number.
• To end a call press the phone button [symbol]. This will
automatic resume playing music if the MP 3 player was in
use before the call.
• To mute the microphone during a call, press the Mute
button [symbol]. This will prevent the microphone from
picking up sound, which might be convenient if you need
to have a conversation without the person on the phone
overhearing you.
à In case you want the person on the phone to listen to the
music you have stored on your MP 3 player press the
Music button [symbol].
Notes: while sending music down the phone you will not be
able to hear the music yourself.
Adjustments
• To adjust the volume, turn the wheel on the Unified
Remote Control unit.
L. Illustration for ‘to adjust the volume, turn etc.’
• To switch the sound from the earphones from left- mono
to right mono or stereo repeatedly press the stereo button
[symbol].
Page 14

DRAFT Revision 6
Maintenance
Washing
The Jacket can be machine washed.
Note: Before washing make sure you have removed and
unplugged all devices, the Unified Remote Control unit and
the earphone and microphone unit.
To remove the system units:
1. Disconnect all popper connectors, one for the Phone,
MP3 player, and Microphone & Earphones.
A + D + E re-used as illustration for 1
2. Remove the Phone, MP 3 player, earphone and
microphone unit, and the Unified Remote Control unit.
Including the pockets.
B + G re-used as illustration for 2
Note: Make sure that the complete earphone and
microphone unit is detached from the jacket.
Make sure no popper connectors remain connected to the
jacket. The integrated connectors in the jacket are safe in the
washer so long as the wash instructions are followed.
After washing re-assemble the system as described for initial
Assembly.
Before requesting service
Problem Possible cause Remedy
Unified Remote Control
does not respond.
• Phone not connected.
• MP 3 player not connected.
• Check the plug to the devices
and the popper connectors.
No audio.
• Unified Remote Control unit
not connected.
• RC battery flat.
• Phone battery flat.
• MP 3 player battery flat.
• Earphone not connected.
• MP 3 player not connected.
• Check each device and the
RC unit independently for flat
battery or low power
indications.
• Check connections of the
earphone unit.
Page 15

DRAFT Revision 6
Caller can’t hear me.
MP 3 player behaves
strangely.
• Phone not connected.
• No music stored on the MP 3
player.
• Microphone not connected.
• Interference from the
environment or a weak
reception.
• MP 3 player is not on hold
and the buttons are getting
pressed accidentally
• Check connections of the MP
3 player or phone.
• Make sure music is stored
onto the MP 3 player. (see
user manual of the MP 3
player)
• Check connection of the
microphone.
• Try a different location or
position. Check reception.
• Set the hold switch on the
MP3 player.
Philips ICD+ Rev: 6 28/04/2000PNJF
 Loading...