

Page 1
Quick installation guide
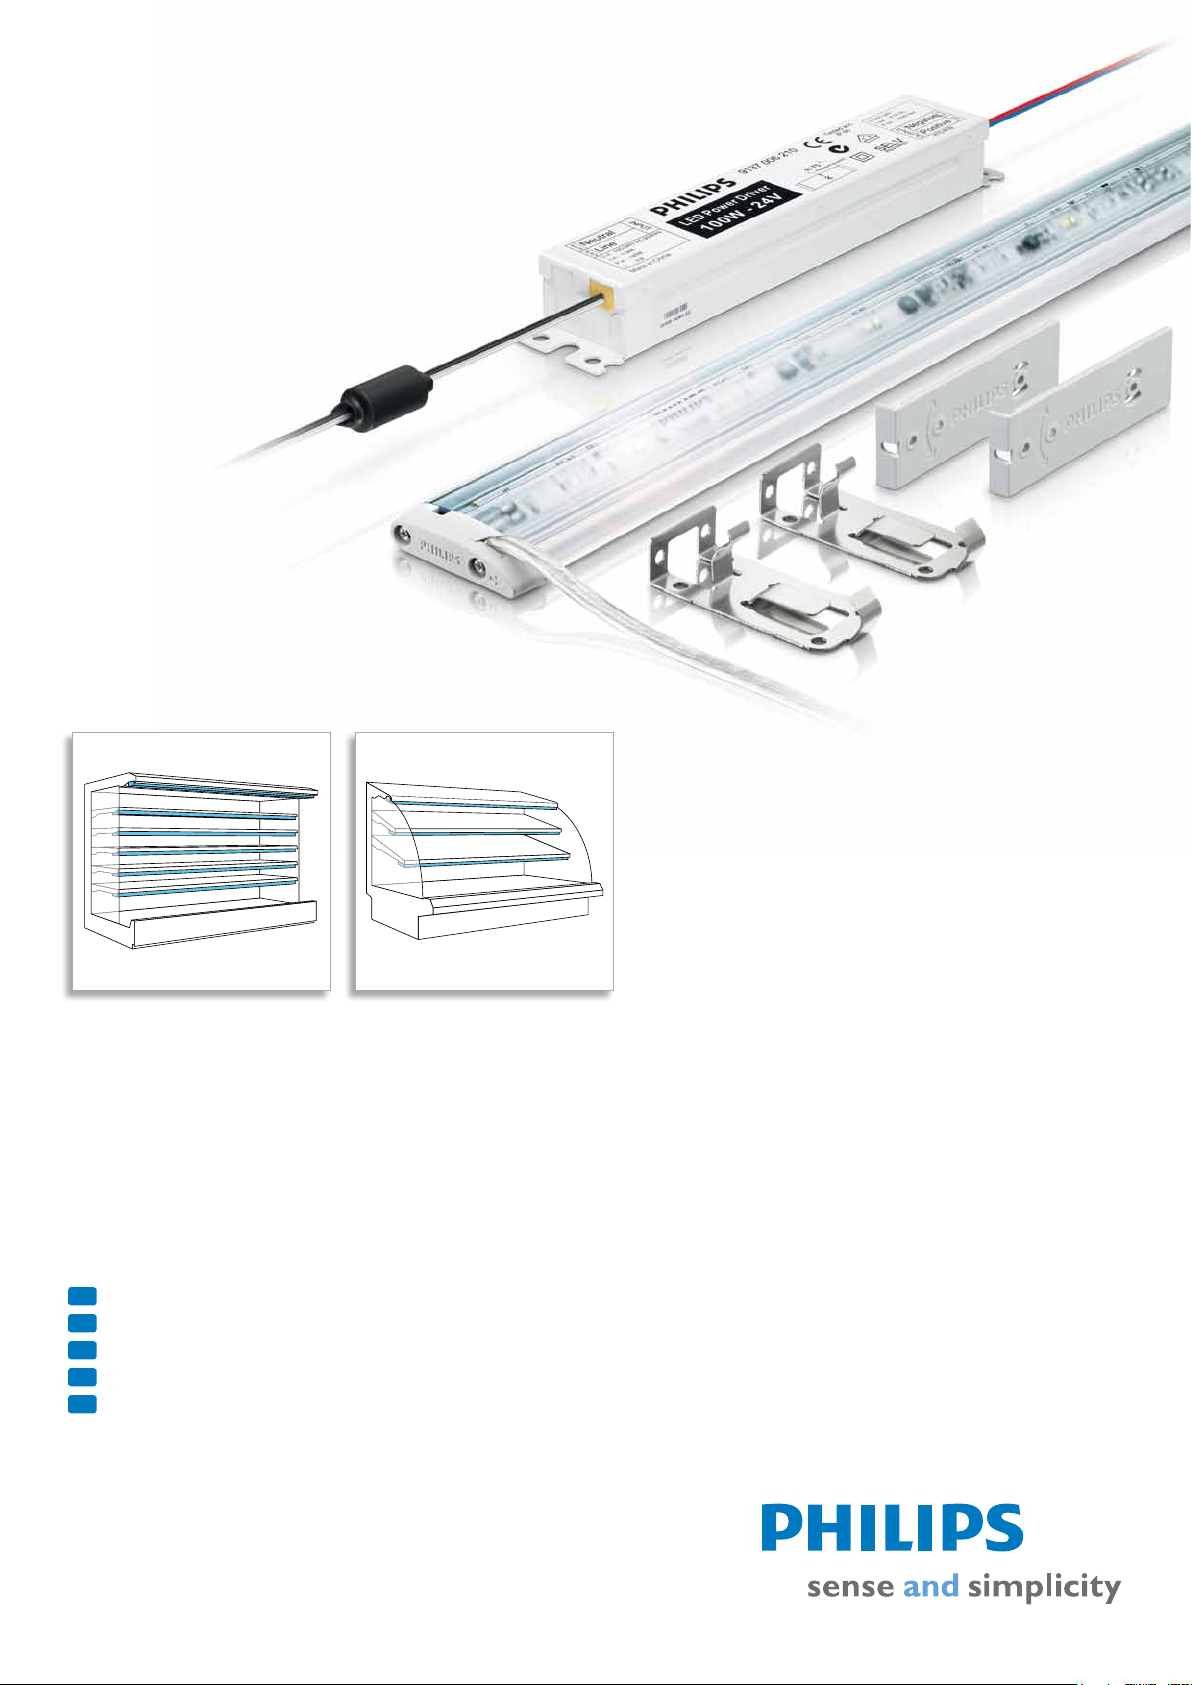
Afnium LED cooler modules Value-plus and Vision-plus LCM310
installation with mounting clip or mounting set shelf arm
Kurzanleitung - Afnium LED Kühler-Systeme Value-plus und Vision-plus LCM310 installation mit Montageclip oder Verbindungsstück für Regale
DE
Guía de inicio rápido - Módulos Afnium LED Cooler LCM310 Value-plus y Vision-plus instalación con ‘clip de montaje’ o ‘conjunto de brazo de estante’
ES
Guide de démarrage rapide - Modules pour refroidisseur Afnium LED Value-plus et Vision-plus LCM310 installation avec ‘clip de montage’ ou ‘jeu de montage pour rebord étagère’
FR
Guida rapida d’installazione - Moduli per refrigeratori Afnium LED Value-plus e Vision-plus LCM310 installazione con "clip di montaggio" o "set di staffe di montaggio per ripiano"
IT
Verkorte handleiding - Afnium LED cooler-modules Value-plus en Vision-plus LCM310 installatie met ‘montageklem’ of ‘montagebeugel’
NL
Page 2

Page 3

Important
Please take the time to read this installation guide before you install the Afnium LED cooler system and LED power driver.
The guide contains important information and notes regarding the installation and operation.
Warnings
• The installation guide does not supersede local and (inter)national regulations for electrical installations.
• The Philips Afnium LED cooler system and LED power driver must be installed by a professional electrician in accordance with the applicable
and appropriate electrical codes and the instructions provided by Philips.
• Please note that the driver should be built in (Tcase max. 70 °C).
• The Philips Afnium LED cooler module is designed to be connected to a circuit from a class II power source (Philips LED power driver) with
energy limited supply. Connection to mains voltage will damage the module. Although the module is fully insulated and unsafe situations are
unlikely to occur, the module will be damaged beyond repair if it is connected to mains voltage.
• To allow for variance in the installation, it is not recommended to load the power driver beyond 80% of its rated maximum power. The energy
consumption of the module is a nominal value, with an estimation of 20% deviation.
• Before installation, maintenance or cleaning, always rst switch off or disconnect the power and follow appropriate safety procedures.
• Before removing any lens covers or uorescent lamps, always rst switch off or disconnect the mains power to the lighting system.
• Do not use tape to x the module in position; please use the appropriate mounting sets.
• Do not attempt to replace the power cable to the Philips Afnium LED cooler module because this cable is permanently attached to the
module.
• Do not make sharp bends with electrical wires.
• Please note that the colors of the wires of different types of cooler(s) may differ. The position of the (original) ballast may also differ.
• Due to the variety of cooler designs and brands, you may need to use customized brackets to t the specic cooler type you are using. If you
require further support, please contact your local Philips sales organization.
• To prevent unwanted tripping caused by the inrush current of the LED power driver, an MCB (mini circuit breaker) / fuse (slow blow) of
at least 6A must be installed. If upgrading the MCB/ fuse, consult a qualied engineer rst to ensure that this will not cause any additional
problems.
Cleaning
Use a damp cloth and a mild cleaning agent. Do not wipe the module with a dirty or very wet dishcloth or towel because these may leave
residues that can damage the tube.
Do not use abrasive cleaners, scouring pads, bleach or cleaners containing bleach because these products can scratch and damage the module.
www.lighting.philips.com/support
3
Page 4

Wichtig
Bitte nehmen Sie sich die Zeit, um sich diese Installationsanleitung durchzulesen, bevor Sie die Afnium LED-Kühler System
und den LED-Leistungstreiber installieren.
Die Anleitung enthält wichtige Informationen und Hinweise in Bezug auf die Installation und den Betrieb.
Warnhinweise
• Die Installationsanleitung ersetzt weder lokale noch (inter)nationale Vorschriften für Elektroinstallationen.
• Das Philips Afnium LED-Kühler System und der LED-Leistungstreiber müssen von einem qualizierten Elektriker entsprechend den geltenden
und zutreffenden elektrischen Vorschriften und der von Philips gelieferten Anleitung installiert werden.
• Bitte beachten Sie, dass der Treiber eingebaut sein sollte (Tcase max. 70 °C).
• Das Philips Afnium LED-Kühler System kann an den Schaltkreis einer Stromquelle der Klasse II (Philips LED-Leistungstreiber) mit begrenzter
Stromversorgung angeschlossen werden. Durch den Anschluss an die Netzspannung wird das Modul beschädigt. Obwohl das Modul
vollständig isoliert ist und daher gefährliche Situationen sehr unwahrscheinlich sind, wird das Modul unreparierbar beschädigt, wenn es mit der
Netzspannung verbunden wird.
• Um Veränderungen der Installationsbedingungen zu berücksichtigen, sollte der Leistungstreiber mit mehr als 80% seiner maximalen
Nennkapazität geladen werden. Der Stromverbrauch des Moduls ist ein nominaler Wert mit einer geschätzten Abweichung von 20%.
• Schalten Sie das Modul immer aus oder trennen Sie es von der Stromversorgung und treffen Sie die geeigneten Sicherheitsmaßnahmen, bevor
Sie das Modul installieren, warten oder reinigen.
• Schalten Sie immer die Stromversorgung des Beleuchtungssystems aus oder trennen Sie das Beleuchtungssystem von der Stromversorgung,
bevor Sie eine Linsenabdeckung entfernen oder Leuchtstofampen ausbauen.
• Fixieren Sie das Modul nicht mit Klebeband, sondern mit den hierfür vorgesehenen Montagesets.
• Versuchen Sie nicht, das Netzkabel zum Philips Afnium LED-modul zu ersetzen, weil dieses Kabel fest mit dem Modul verbunden ist.
• Achten Sie darauf, dass die elektrischen Drähte nicht zu stark gebogen oder geknickt werden.
• Bitte beachten Sie, dass die Farben der Drähte bei verschiedenen Kühlertypen unterschiedlich sein können. Auch die Position des (Original-)
Vorschaltgerätes kann unterschiedlich sein.
• Aufgrund der verschiedenen Kühlerausführungen und -marken werden Sie eventuell spezielle Halterungen für den betreffenden
Kühlerschranktyp benötigen. Wenn Sie weitere Unterstützung benötigen, wenden Sie sich bitte an Ihre lokale Philips Vertretung.
• Um ein unerwünschtes Auslösen durch den Einschaltstrom des LED-Leistungstreibers zu verhindern, muss ein Mini-Leistungsschalter mit
träger Sicherung für mindestens 6A installiert werden. Ziehen Sie beim Nachrüsten des Mini-Leistungsschalters / der Sicherung einen
qualizierten Techniker zu Rate, um sicherzustellen, dass hierdurch keine weiteren Probleme entstehen.
Reinigung
Benutzen Sie ein feuchtes Tuch und ein mildes Reinigungsmittel. Wischen Sie das Modul nicht mit einem verschmutzten oder sehr nassen Tuch
oder Handtuch ab, weil hierdurch eventuell Rückstände zurückbleiben, die die Röhre beschädigen können. Benutzen Sie keine scheuernden
Reinigungsmittel, Scheuerschwämme, Bleichmittel oder Reinigungsmittel, die Bleichmittel enthalten - diese Produkte können die Modul
verkratzen und beschädigen.
www.lighting.philips.com/support
4
Page 5

Importante
Lea atentamente estas instrucciones antes de proceder a la instalación de sistema LED Afnium para refrigeradores y del alimentador LED.
La guía contiene información importante sobre su instalación y uso.
Advertencias
• La guía de instalación no invalida los reglamentos locales, nacionales o internacionales aplicables a las instalaciones eléctricas.
• El sistema LED Afnium de Philips y el alimentador LED deben ser instalados por un electricista profesional conforme a los códigos eléctricos
aplicables y a las instrucciones facilitadas por Philips.
• Adviértase que el alimentador debe ir integrado (Tcase max. 70 °C).
• El módulo LED Afnium de Philips está diseñado para la conexión a un circuito de alimentación eléctrica de clase II (alimentador LED de
Philips) con suministro limitado de energía. La conexión a tensión de red ocasionará daños en el módulo. Aunque está completamente aislado
y no es probable que se produzcan situaciones de riesgo, el módulo resultará dañado de forma irreversible si se conecta a una toma de tensión
de red.
• A n de permitir variantes en la instalación, no se recomienda cargar el alimentador por encima del 80% de su potencia nominal máxima. El
consumo energético del módulo es un valor nominal con una desviación estimada del 20%.
• Antes de realizar tareas de instalación, mantenimiento o limpieza, siempre deberá apagar o desconectar la unidad y respetar los procedimientos
de seguridad pertinentes.
• Antes de retirar cualquier protector de lente o lámpara uorescente, siempre deberá desactivar o desconectar el suministro de alimentación al
sistema de alumbrado.
• Utilice los conjuntos de montaje apropiados para aanzar el módulo en su posición, en ningún caso cinta adhesiva.
• No intente reemplazar el cable de alimentación del módulo LED Afnium de Philips, ya que está conectado de forma ja al módulo.
• No trace curvas cerradas con los cables eléctricos.
• Advierta que los colores de los cables pueden diferir de un tipo de refrigerador a otro. También puede ser diferente la posición de la reactancia
(original).
• Debido a la variedad de diseños y marcas de refrigeradores, es posible que tenga que utilizar unos soportes personalizados para el tipo de
refrigerador especíco. Si necesita más ayuda, póngase en contacto con la organización de ventas local de Philips.
• Para evitar desconexiones por la corriente de entrada del alimentador LED, deberá instalarse un magnetotérmico (MCB) o fusible (acción
lenta) de 6A como mínimo. Si reemplaza el magneto o fusible, consulte antes a un técnico cualicado para asegurarse de que no se van a
ocasionar problemas adicionales.
Limpieza
Utilice un paño húmedo y un producto de limpieza suave. No frote el módulo con una bayeta o toalla excesivamente sucias o húmedas, ya que
pueden dejar residuos y dañar el tubo. No utilice agentes abrasivos, estropajos, lejía ni productos que contengan lejía, ya que podrían rayar o
dañar el módulo.
www.lighting.philips.com/support
5
Page 6

Important
Veuillez prendre le temps de lire le présent guide d’installation avant d’installer le système LED Afnium pour refroidisseur ainsi que le ballast
LED. Le guide comporte des informations de premier plan et est accompagné de remarques concernant l’installation et le fonctionnement.
Avertissements
• Le guide d’installation ne remplace pas les réglementations locales et (inter)nationales relatives aux installations électriques.
• Le système LED Afnium de Philips pour refroidisseurs ainsi que le ballast LED doivent être installés par un électricien professionnel
conformément à la réglementation en vigueur en matière électrique et aux instructions fournies par Philips.
• Veuillez noter que l’unité doit être intégrée (Tcase max. 70 °C).
• Le module LED Afnium est conçu pour être connecté à un circuit avec source d’alimentation de classe II (ballast LED Philips) et apport
d’énergie limité.Toute connexion à la tension secteur endommagera le module. Bien que ce dernier soit totalement isolé et qu’il est
improbable que se produisent des situations dangereuses, le module sera irrémédiablement endommagé s’il est connecté à la tension secteur.
• Pour permettre des variations dans l’installation, il est recommandé de ne pas charger le ballast au-delà de 80% de sa puissance nominale
maximale. La consommation d’énergie du module est une valeur nominale, avec un écart estimé à 20%.
• Avant toute opération d’installation, de maintenance ou de nettoyage, il est impératif de toujours commencer par mettre le système hors
tension ou de le débrancher et de suivre les procédures de sécurité appropriées.
• Avant de retirer les protège-lentilles ou les lampes uorescentes, il est impératif de toujours commencer par mettre le système d’éclairage
hors tension ou de le débrancher de la tension secteur.
• Non utilizzare nastro adesivo per ssare il modulo in posizione; servirsi dei kit di montaggio appropriati.
• Ne pas utiliser de ruban adhésif pour xer le module en place ; veuillez utiliser les kits de montage prévus.
• Ne pliez pas les ls électriques suivant un angle trop serré.
• Veuillez noter qu’il est possible que les couleurs des ls des divers types de congélateur diffèrent. La position du ballast (d’origine) peut
également être différente.
• Étant donné la variété des types et des marques de refroidisseurs, il est possible que vous ayez besoin d’utiliser les étriers de xation sur
mesure an qu’ils correspondent au type de refroidisseur que vous possédez. Si vous avez besoin d’une assistance complémentaire, veuillez
prendre contact avec votre organisation de vente Philips locale.
• Pour éviter tout déclenchement indésirable provoqué par le courant de démarrage du ballast LED, un mini disjoncteur (MCB) / fusible (à action
retardée) d’au moins 6A doit être installé. En cas d’augmentation de puissance du mini disjoncteur/ fusible, consultez d'abord un technicien
qualié pour être sûr que cela ne causera aucun problème supplémentaire.
Nettoyage
Utiliser un chiffon humide et un produit de nettoyage non abrasif. Ne pas essuyer le module avec un torchon ou une serviette très sales ou trop
humides car ils pourraient laisser des résidus pouvant endommager le tube. Ne pas utiliser de produits d’entretien abrasifs, ni de tampons à
récurer, d’eau de Javel ni de produits de nettoyage contenant de l’eau de Javel vu que ces produits peuvent rayer et endommager le module.
www.lighting.philips.com/support
6
Page 7

Importante
Leggere attentamente la presente guida di installazione prima di installare il Philips Afnium LED cooler sistema e l’alimentatore LED nell
cooler/refrigerante. La guida contiene informazioni importanti e note relative all’installazione e all’uso.
Avvertenze
• La guida di installazione non sostituisce le disposizioni locali e internazionali in materia di impianti elettrici.
• Il sistema Philips LED Afnium per cooler e l’alimentatore LED devono essere installati da personale tecnico qualicato in conformità con le
norme sugli impianti elettrici applicabili e le istruzioni fornite da Philips.
• Attenzione: il driver deve essere integrato (Tcase max. 70 °C).
• Il modulo LED Afnium per cooler di Philips è stato concepito per il collegamento a un circuito a limitazione di energia tramite una sorgente
di alimentazione di classe II (driver LED di Philips). Anche se il modulo è completamente isolato ed è improbabile che si verichino situazioni
pericolose, il modulo subirà danni irreparabili se collegato alla tensione di rete.
• Per consentire una maggiore varianza dell’impianto, si consiglia di non alimentare il driver con un’energia superiore all’80% della sua potenza
massima nominale. Il consumo energetico indicato per il modulo è un valore nominale, con una deviazione stimata del 20%.
• Prima di procedere con l’installazione, la manutenzione o la pulizia, spegnere o disconnettere sempre la tensione di rete e seguire le procedure
di sicurezza adeguate.
• Prima di rimuovere qualsiasi copriobiettivo o lampada uorescente, spegnere o disconnettere sempre la tensione di rete dell’impianto di
illuminazione.
• Non utilizzare nastro adesivo per ssare il modulo in posizione; servirsi dei kit di montaggio appropriati.
• Non cercare di sostituire il cavo di alimentazione del modulo Philips LED Afnium per cooler perché si tratta del cavo del modulo stesso.
• Fare attenzione a non piegare eccessivamente i cavi elettrici.
• I colori dei cavi possono variare a seconda del cooler. Anche la posizione del reattore (originale) può variare.
• Grazie alla varietà di modelli e marchi di cooler, potrebbe essere necessario utilizzare staffe personalizzate da adattare al tipo di cooler
specico che si sta utilizzando. Per ulteriore assistenza, contattare gli ufci commerciali Philips locali.
• Per evitare sbalzi indesiderati provocati da corrente di picco del driver LED, è necessario installare un mini interruttore (mcb) / fusibile (ad
azione lenta) di almeno 6A. In caso di sostituzione del mini interruttore / fusibile, consultare prima un tecnico qualicato così da assicurarsi di
non provocare problemi aggiuntivi.
Pulizia
Utilizzare un panno umido e un prodotto delicato. Non stronare il modulo con uno stronaccio o un asciugamano sporco o molto bagnato,
perché tali prodotti potrebbero lasciare residui dannosi per il tubo. Non utilizzare detergenti abrasivi, pagliette, candeggina o detergenti
contenenti candeggina, che potrebbero grafare e danneggiare il modulo.
www.lighting.philips.com/support
7
Page 8

Belangrijk
Neemt u alstublieft de tijd om deze installatiehandleiding goed door te lezen alvorens het Afnium LED cooler systeem en het LEDvoedingsapparaat te installeren. De handleiding bevat belangrijke informatie en opmerkingen betreffende installatie en bediening.
Waarschuwingen
• De installatiehandleiding vervangt geen locale en (inter)nationale voorschriften voor elektrische installaties.
• Het Philips Afnium LED cooler systeem en het LED-voedingsapparaat moeten worden geïnstalleerd door een professionele elektromonteur
overeenkomstig de van toepassing zijnde elektrische voorschriften en de door Philips verstrekte instructies.
• Houd er rekening mee dat de driver moet worden ingebouwd (Tcase max. 70 °C).
• De Philips Afnium LED-koelkast dient te worden aangesloten op een voedingsbron klasse-II (Philips LED-voeding) met beperkte
energievoeding. Aansluiting op de netspanning leidt tot beschadiging van de module. Ofschoon deze volledig geïsoleerd is en er waarschijnlijk
geen onveilige situaties zouden ontstaan, zal de module bij aansluiting op de netspanning onherstelbaar worden beschadigd.
• In verband met eventuele afwijkingen bij de installatie is het niet raadzaam de voeding hoger te belasten dan 80% van de maximale
aansluitwaarde. Het stroomverbruik van de module is nominaal, met een mogelijke afwijking van 20%.
• Schakel vóór installatie, onderhoud of reiniging altijd eerst de netspanning uit of verbreek de verbinding met de netspanning, en volg de van
toepassing zijnde veiligheidsprocedures.
• Schakel alvorens lenskappen of uorescentielampen te verwijderen altijd eerst de netspanning uit, of verbreek de verbinding van de netspanning
met het verlichtingssysteem.
• Bevestig de module niet met tape maar gebruik hiervoor de voorgeschreven montagesets.
• Probeer de voedingskabel naar de Philips Afnium cooler module niet te vervangen omdat deze permanent aan de module is bevestigd.
• Leg elektrische bedrading niet in scherpe bochten.
• Houdt u er rekening mee dat de kleuren van de draden van de diverse typen koelkasten onderling kunnen verschillen. Ook de positie van het
(originele) voorschakelapparaat kan verschillend zijn.
• In verband met de grote verscheidenheid aan constructies en merken van koelkasten is het mogelijk dat u speciale beugels nodig hebt om het
specieke type koelkast dat u gebruikt te kunnen monteren. Als u verdere ondersteuning nodig hebt, kunt u contact opnemen met uw locale
Philips-verkooporganisatie.
• Om te voorkomen dat de zekering onverhoopt doorslaat ten gevolge van de aanloopstroom van de LED power driver dient een MCB
(mini circuit breaker) of trage zekering van ten minste 6A geïnstalleerd te worden. Raadpleeg een gekwaliceerde technicus voordat u de
MCB/zekering vervangt, om te verzekeren dat deze geen andere problemen zal veroorzaken.
Reiniging
Gebruik hiervoor een vochtige doek en een niet-agressief reinigingsmiddel. Veeg de module niet af met een vuile of zeer vochtige droogdoek
of handdoek omdat deze resten kunnen achterlaten waardoor de buis kan worden beschadigd. Gebruik geen schuurmiddelen, schuursponsjes,
bleekmiddel, of schoonmaakmiddelen die bleekmiddel bevatten, omdat dit kan leiden tot krassen op en beschadiging van de module.
www.lighting.philips.com/support
8
Page 9

LED Power Driver
100W - 24V DC
LCM310
Connecto
protector
Connector
set
Mounting clip
for canopy and shelves
Mounting set shelf arm
for shelves
Product and tools
OFF
ON
Produkt und Werkzeuge
DE
Producto y herramientas
ES
Produit et outils
FR
Prodotto e utensili
IT
Producten en gereedschappen
NL
r
Start
Start
DE
Inicio
ES
Début
FR
Avvio
IT
Start
NL
A
C D
B
9
Page 10

Switch
Xitanium LED Driver
100W/24V DC
LCM
LCM
LCM
LCM
LCM
Wiring diagram
Schaltplan
DE
Esquema de cableado
ES
To allow for variance in the installation, it is not recommended to load the power driver beyond 80% of it’s rated maximum power.
UK
Um Veränderungen der Installationsbedingungen zu berücksichtigen, sollte der Leistungstreiber mit weniger als 80% seiner maximalen Nennkapazität geladen werden.
DE
Para realizar un cambio en la instalación, no se recomienda cargar el controlador de potencia por encima del 80% de su capacidad nominal máxima.
ES
Pour permettre des variations dans l’installation, il est recommandé de ne pas charger le pilote au-delà de 80 % de sa puissance nominale maximale.
FR
Per consentire la variazione dell’installazione, non è consigliabile sottoporre il driver a un carico superiore all’80% della sua potenza nominale.
IT
Om enige speelruimte mogelijk te maken in de installatie wordt aangeraden de powerdriver niet hoger te belasten dan tot 80% van zijn nominale maximumvermogen.
NL
A
LED Power Driver
Schéma de câblage
FR
Schema elettrico
IT
Bedradingsschema
NL
B
LED Power Driver
1 2 3
Shelf installation with mounting set shelf arm
EN
Installation in Regal mit Verbindungsstück
DE
ES
FR
IT
NL
Instalación en estante con brazo de montaje
Installation d’étagère avec jeu de montage pour
rebord étagère
Installazione su ripiano con set di staffe di montaggio
Installatie onder schap met montagebeugel
Shelf installation with mounting clip
EN
Installation in Regal mit Montageclip
DE
Instalación en estante con clip de montaje
ES
Installation d’étagère avec clip de montage
FR
Installazione su ripiano con clip di montaggio
IT
Installatie onder schap met montageklem
NL
Tcase max. 70 °C
CannopyShelfShelf
Canopy installation with mounting clip
EN
Installation in der Kopfblende mit Montageclip
DE
Instalación en visera con clip de montaje
ES
Installation de l’auvent avec clip de montage
FR
Installazione su copertura con clip di montaggio
IT
Installatie onder overkapping met montageklem
NL
10
Page 11

1
2
3
1
2
1
10 mm
10 mm
Shelf installation with
mounting set shelf arm
Installation in Regal mit Verbindungsstück
DE
Instalación en estante con brazo de montaje
ES
A
D
Installation d’étagère avec jeu de montage pour
FR
rebord étagère
B
Optional
UK
Optional
DE
Opcional
E
ES
En option
FR
Optional
IT
Optioneel
NL
Installazione su ripiano con set di staffe di montaggio
IT
Installatie onder schap met montagebeugel
NL
C
F 4
➔
Shelf installation with
2
mounting clip
Installation in Regal mit Montageclip
DE
Instalación en estante con clip de montaje
ES
A
Installation d’étagère avec clip de montage
FR
Installazione su ripiano con clip di montaggio
IT
B
Installatie onder schap met montageklem
NL
C
Optional
UK
Optional
D
E
DE
Opcional
ES
En option
FR
Optional
IT
Optioneel
NL
➔
4
F
11
Page 12

1
2
OFF
ON
10 mm
3
Canopy installation with
mounting clip
Installation in der Kopfblende mit Montageclip
DE
Instalación en visera con clip de montaje
ES
A
D
Installation de l’auvent avec clip de montage
FR
Installazione su copertura con clip di montaggio
IT
1
2
3
E 4
➔
Installatie onder overkapping met montageklem
NL
CB
Putting into operation
4
Inbetriebnahme
DE
Puesta en funcionamiento
ES
A
A
Mise en service
FR
Messa in funzione
IT
B
© 2011 Koninklijke Philips Electronics N.V.
All rights reserved. Reproduction in whole or in part is prohibited without the prior written consent of the copyright owner. The information presented
in this document does not form part of any quotation or contract, is believed to be accurate and reliable and may be changed without notice. No liability
will be accepted by the publisher for any consequence of its use. Publication there of does not convey nor imply any license under patent- or other
industrial or intellectual property rights.
Document order number: 3222 635 59711
11/2011
www.philips.com/oem
www.philips.com/ledrefrigeration
www.lighting.philips.com/support
Inbedrijfstelling
NL
 Loading...