

Page 1
PHILIPS
0"Q ■0-Q-0-0-0""0 D 4 6 8 ^
DATA/VIDEO PROJECTOR
OWNER'S MANUAL
PHILIPS
MODEL LC 3500
PLEASE SEE INSIDE COVER
FOR 3 IMPORTANT STEPS
TO TAKE BEFORE
OPERATING YOUR
NEW PROJECTOR
Page 2

PHILIPS
Smart.Veiy smart;
WARRANTY
REGISTRATION
CARD
Return your Warranty Registration Card today
to ensure you receive all the benefits you're entitled
Once your PHILIPS purchase is registered, you're eligible to receive all the privileges of owning a
PHILIPS product. So complete and return the Warranty Registration Card enclosed with your purchase
at once. And take advantage of these important benefits.
■ Warranty
Verification
Registering your product within
10 days confirms your right to
maximum protection under the
terms and conditions of your
PHILIPS warranty.
■ Owner
Confirmation
Your completed Warranty
Registration Card serves as
verificaton of ownership in the
event of product theft or loss.
PHILIPS
SmartYeiy smart;
Congratulations on your purchase,
and welcome to the 'family'!
Dear MAGIMAVOX product owner
Thank you for your confidence in PHILIPS. You've selected
one of the best-built, best-backed products available today.
And we'll do everything in our power to keep you happy with
your purchase for many years to come.
As a member of the PHILIPS 'family', you're entitled to
protection by one of the most comprehensive warranties and
outstanding service networks in the industry.
What's more, your purchase guarantees you'll receive all the
information and special offers for which you qualify, plus easy
access to accessories from our convenient home shopping
network.
And most importantly you can count on our uncompromising
commitment to your total satisfaction.
All of this is our way of saying welcome and thanks for inves
ting in a PHILIPS product.
Sincerely,
Robert Minkhorst
President and Chief Executive Officer
P.S. Remember, to get the most from your MAGNAVOX
product, you must return your Warranty Registration
Card within 10 days. So please mail it to us right now!
■ Model
Registration
Returning your Warranty
Registration Card right away
guarantees you'll receive all the
information and special offers
which you qualify for as the
owner of your model.
Know these safety symbols
RISK OF ELECTRIC SHOCK
A A
CAUTION. To reduce the risk of electric shock, do not
remove cover (or back). No user>serviceable parts
inside« Refer servicing to qualified service personnel.
A This 'bolt of lightning' indicates
uninsulated material w'lthin your
unit may cause an electrical shock.
For the safety of everyone in your
household, please do not remove
product covering.
A The 'exclamation point' calls
attention to features for which you
should read the enclosed literature
closely to prevent operating and
maintenance problems.
WARNING: To prevent fire or
shock hazard, do not expose
this equipment to rain or
moisture.
CAUTION: To prevent electric
shock, match wide blade of plug
to wide slot, and fully insert.
For Customer Use
Enter below the Serial No.
which is located on the rear of
the cabinet. Retain this informa
tion for future reference.
Model No.
Serial No.
DO NOT OPEN
____________________
Page 3

Table of Contents
Gettim? Started
Warning/Precautions.................................................... 2
How your Projector works
Description of Projector Controls
Description of Remote Control....................................
Setting-up the Projector + Screen
Audio connections
External speakers. Audio Output Jacks,
Personal computer........................................................
Basic Projector Operation
Zoom and Focus...........................................................
On-Screen Features
* How to Use On-Screen Menus
AUDIO Control Adjustments
Bass, Treble, Balance
* Stereo........................................................................
* Expand
VIDEO Control Adjustments
* Bright, Contrast, Color, Tint, Sharp..........................
INPUT Tuning Control Adjustments
* Picture Source - S-Video
DATA INPUT Control Adjustments
FEATURES Control Adjustments
* Personal Preferences
LENS CONTROL with remote
® Zoom........................................................................
* Focus.........................................................................
.....................................................................
Picture Source - AUX 1, AUX 2 & AUX 3
To select Data Input..................................................
Autostart
...................................................................
...........................................
................................
................................
............................................
.................................
...............................................
.............
..........................................
.................................................
......
......
......
......
......
......
......
......
......
......
......
......
......
......
......
......
......
......
......
4
5
8
10
13
14
15
16
18
19
20
21
23
24
25
27
29
30
30
DATA MENU Control Adjustments
* Image - Phase, Brightness, Contrast
* Audio ' Bass, Treble, Balance, Sound Mode, Expand ... 32
* Setup ' Hor. position. Vert, position.
Personal Preference, Curtain, Computer Ident
* Data exit.............................................................................. 34
Remote Control Operation
* Timer................................................................................... 35
* Closing/Opening Curtain..................................................... 36
* Direct Access....................................................................... 36
Replacing the Lamp................................................................ 37
General Information
Tips if something isn't working
Technical Specifications......................................................... 40
Glossary of Terms.................................................................. 41
Warranty................................................................................. 42
...................................
.......................
..............................................
31
33
39
This device complies with Part 15 of the FCC
Rules. Operation is subject to the following two
conditions: (1) This device may not cause
harmful interference, and (2) this device must
accept any interference received, including
WARNING: TO PREVENT FIRE OR
SHOCK HAZARD DO NOT
EXPOSE THIS UNIT TO RAIN OR
EXCESSIVE MOISTURE.
interference that may cause undesired operation
Tlie Model and Serial Numbers are found on the back of this Projector. Please record these numbers and purchase date in the space belovt.
Refer to tltem whenever you ask your dealer about this Projector.
Model No. .........................................................................................................................................................................................................
Serial No. ..........................................................................................................................................................................................
Purchase Date .....................................................................
Please attach your sales receipt to this book and keep it for future reference.
Page 4

our Projector is a compact unit which
enables you to project large pictures onto
Y
screens, just like a slide or movie projector.
Inside your Projector are two main
sections:
• the Electronic section which handles
the signals coming from your computer
or video source
• the Optical section which projects
the pictures onto your screen.
The picture is built up inside the
projector on three Liquid Crystal panels,
one for each of the three primary colors
(red, green and blue). The optical
system combines these into one highquality, full-color picture which is then
projected onto your screen.
The Projector uses a zoom lens so you
can easily change the picture size to fit
your screen.
How YOUR Projector Works
OpScal section
FEATURES
Compact Projector with 2x zoom lens,
giving pictures from 40 to 140 inches
wide. Zoom and focus manually and via
remote control.
Liquid Crystal Display panels for high
quality pictures. Long life metal Halide
Lamp. Multi beam light collection for
excellent comer brightness.
On-Screen graphics display for feature
controls such as channel programming,
timer settings, and color adjustments.
Infrared Remote Control operates your
Projector and VCR.
Stereo-Ready for receiving transmissions
in stereo sound. Internal, monaural
speaker. Connects to audio
hi-fi systems for stereo sound.
AudioA^ideo jackpanel for direct
connections of accessories such as
VCRs.
RGB Inputs
Timer which automatically turns the
Projector OFF after a preset time period.
Page 5
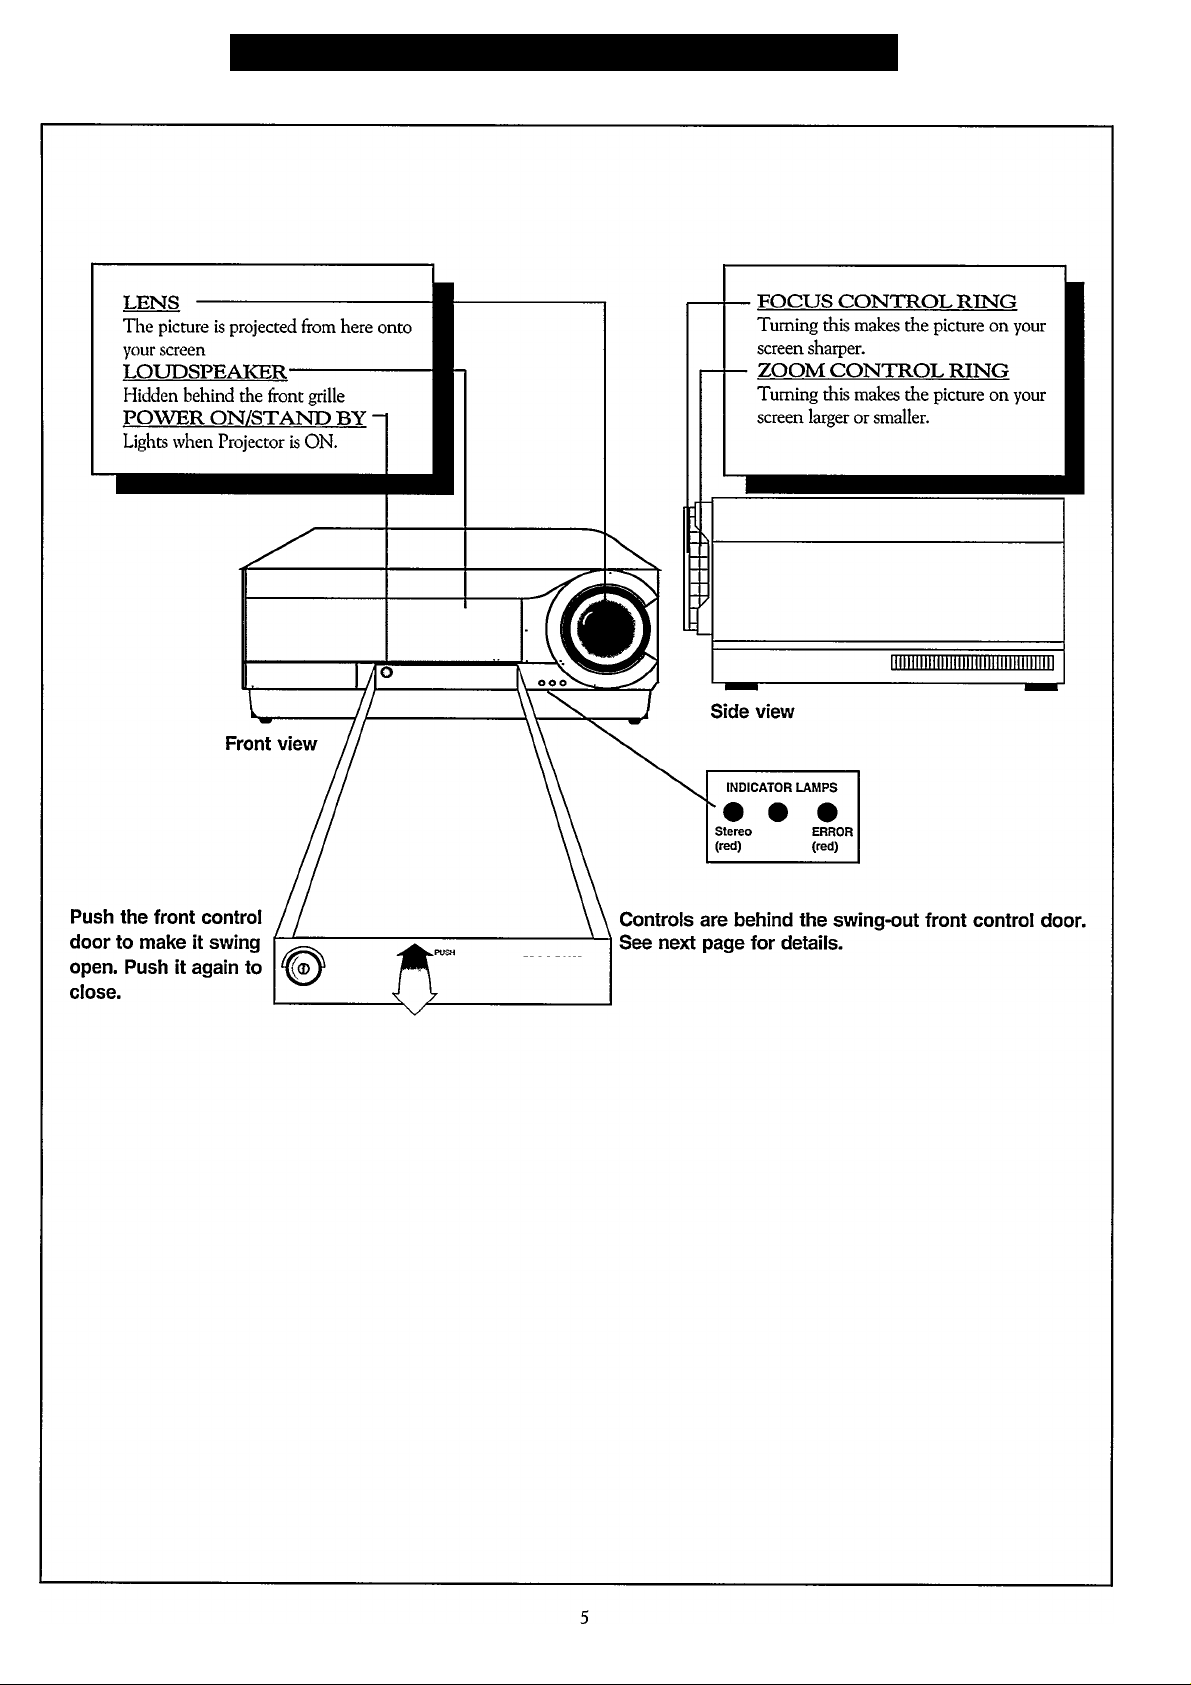
Getting Started - Projector Controls
Page 6
Getting Started - Projector Controls (continued)
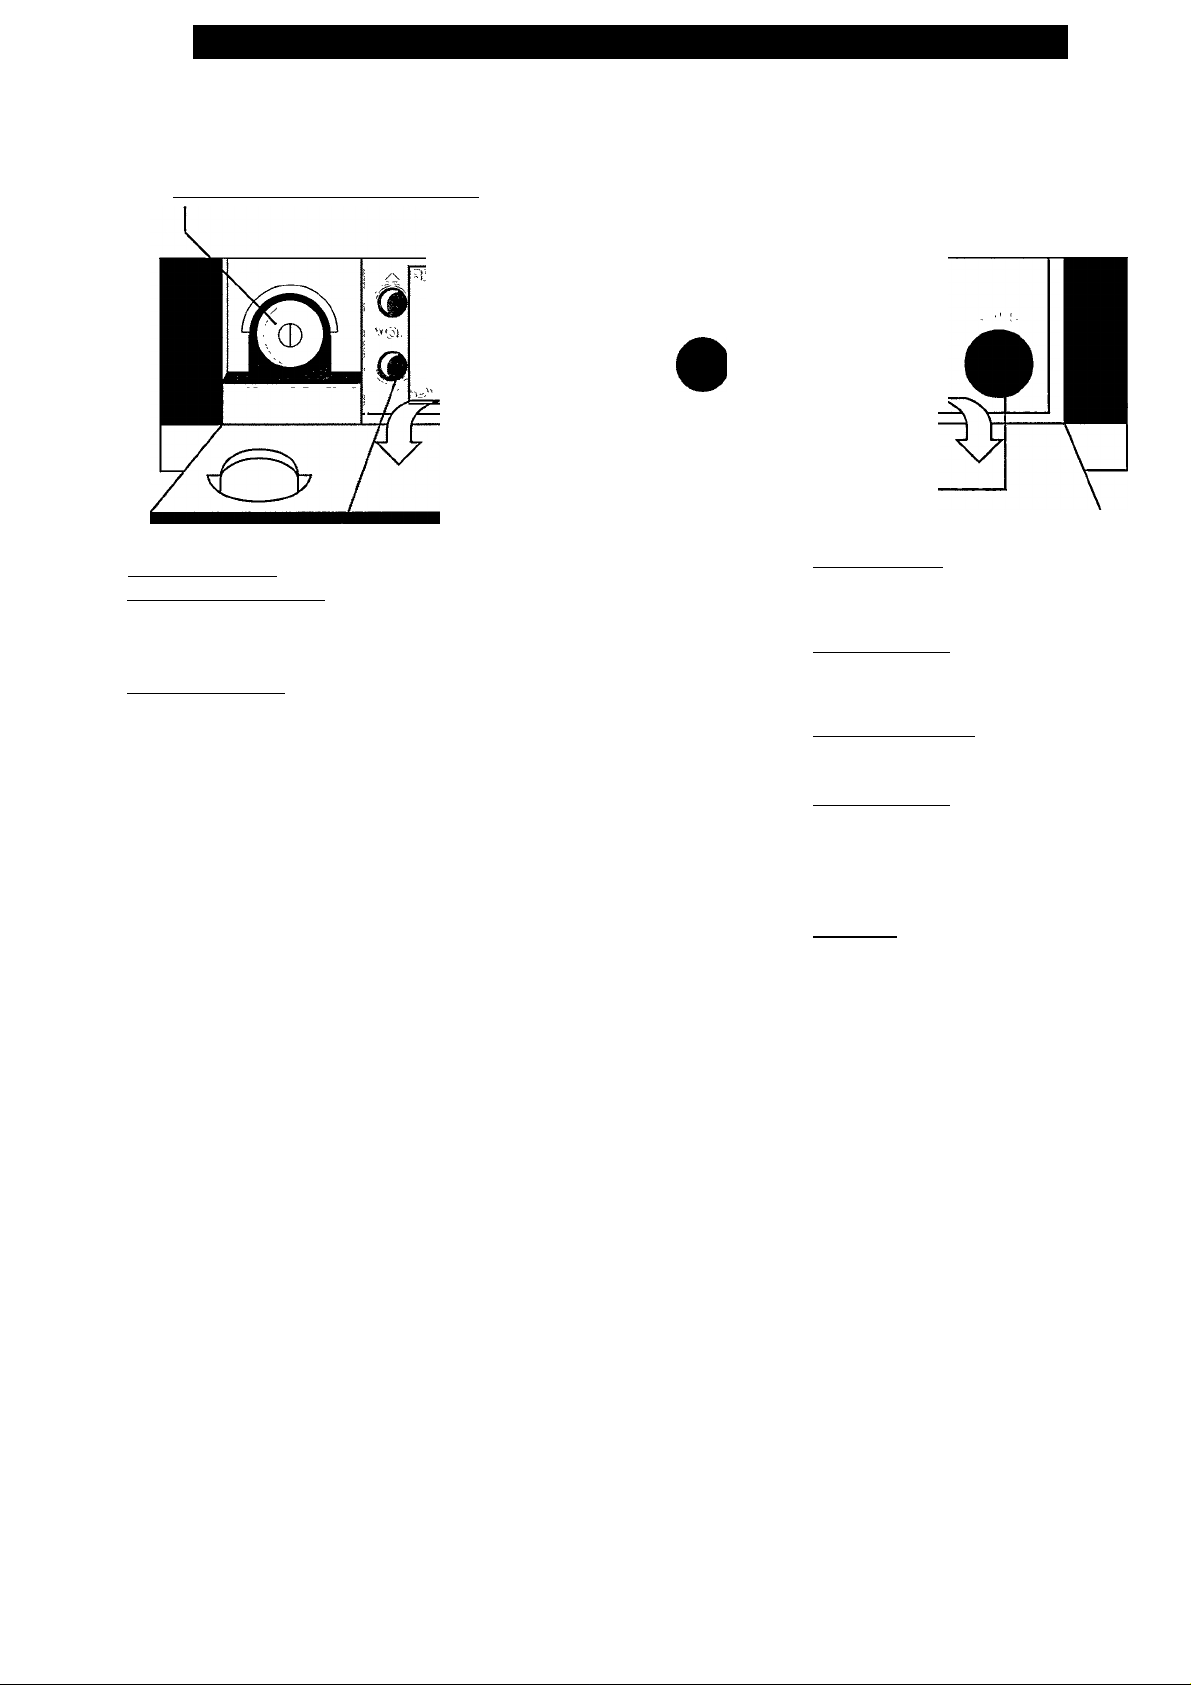
Projector Front Panel Buttons and Jacks
POWER ON / STAND BY BUTTON
i.K-%
(B
VOLUME A(UP).
+
▼ (DOWN) BUTTONS
Press to adjust the Projector sound
level.
MENU BUTTONS
Press the MENU button to display OnScreen feature controls.
Press ADVANCE or RETURN to move
through the list of On-Screen features.
Press ▲ to get a menu of a selected OnScreen feature.
Press A and T to adjust the menu item
selected.
In Menu mode, press STATUS (EXIT) to
switch On-Screen displays OFF.
In normal mode, press STATUS (EXIT)
once to get short display of settings, twice
to get long, more detailed display.
_________
(B (B
ooo
S-VHS (AUX 3)
Jack for S-VHS, Video input from VCR or
camcorder.
AUDIO TACKS
L(eft) jack for left-channel audio input.
R(ight) jack for right-channel audio input.
VIDEO IN (AUX 3)
RCA Jack for VCR or camcorder.
HEADPHONES " 4^^ "
Jack for headphones (6,3 mm).
You can switch off the internal speaker with
the IN 1EKNALJEX1EKNAL speaker switch
on the back of the Projector (See page 7).
MIRROR
This button controls an internal electronic
“mirror” which determines how the picture
appears on your screen. You only need to use
this control when you want to use the
Projector with a rear projection screen or
mirror. Each time you press the button it
changes the orientation of the picture on
your screen (See page 11).
The Projector 'remembers' its last setting.
Page 7
Getting Started - Projector Controls (continued)
AUDIO
Tlie selected audio signal is output here for
connection to an external audio amplifier.
(Not remote controlled)
••VHS INPUT
Plug your S'VHS VCR or camcorder in
here (See page 24 for details).
S-VHS OUTPUT
Loop output of S'VHS input.
AUX
Use diese connectors for external equipment
such as a VCR or CDV (Compact Disc
Video) (See page 23).
AUX 1
Use diese connectors (BNC) to connect the
video from (or to) e.xtetnal equipment such as
a VCR or CDV (Compact Disc Video).
Gmnect die audio (R+L, or mono) to the
RCA jacks.
AUX 2
Use diese connectors (BNC) to connect an
RGB video source. Connect the audio (R+L,
or mono) to die RCA jacks. At sync/video
input alai VCR or CDV connection is possible.
For RGB diis input is for the syndironizatioa
Page 8

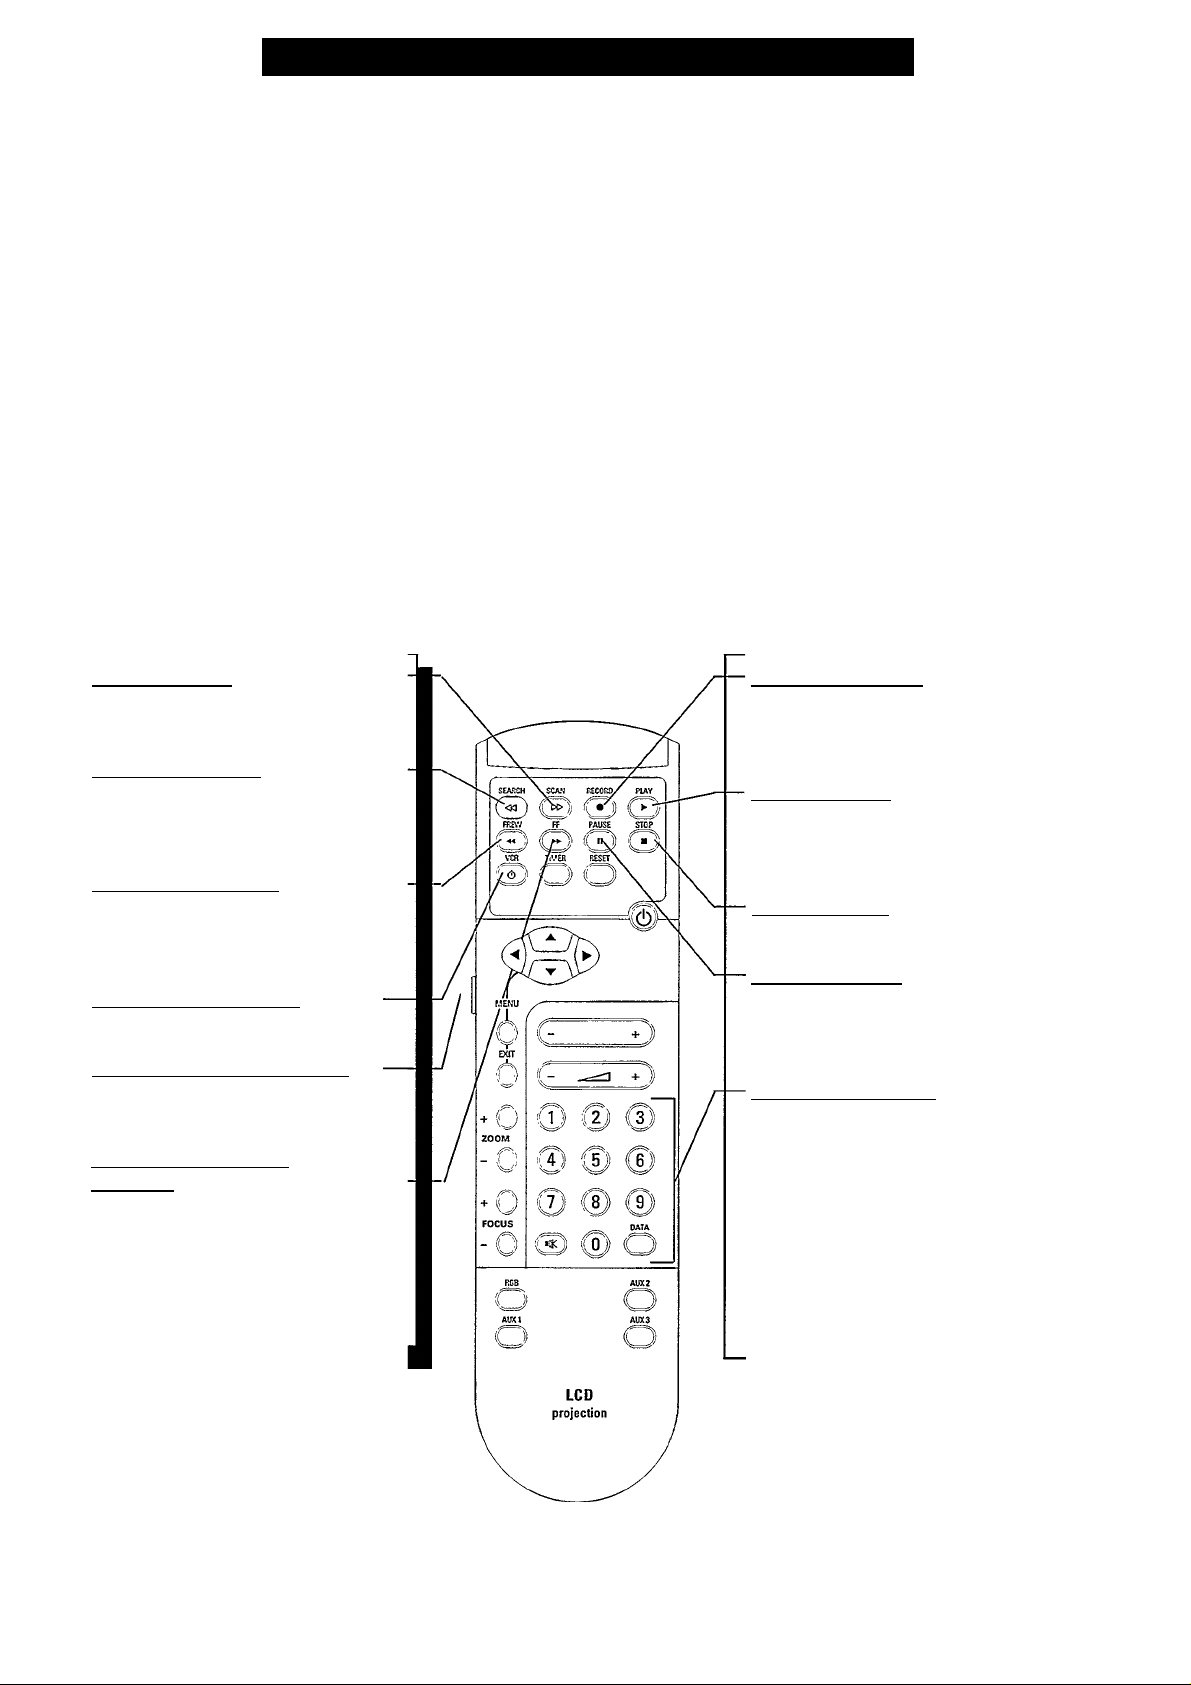
Remothe Control Unit
VCR BUTTONS
For use of VCR (Video Cassette Recorder)
buttons see "Remote Control Operatioin of
a VCR" on page 9.
VCR POWER BUTTON
Press to turn VCRs ON and OFF.
MENU BUTTONS
Press the MENU button to display OnScreen feature controls. Press A or
buttons to move forward and backward
through the list of On-Screen items. Press
or ►to select an On-Screen item and
adjust settings. Press the EXIT button to
clear the screen after control adjustments.
Also press the EXIT button to see the
current channel number or source on the
projector screen.
ZOOM AND FOCUS BUTTONS
Press ZOOM +/' to cotrol ZOOM.
Press FOCUS +/- to cotrol FOCUS.
You can enable/disable the zoom and focus
controls using the LENS CONTROL
menu (See page 27).
MUTEBUTTON
Press to turn the sound of the projector
OFF. Press again to return the sound to its
previous level.
T
TIMER BUTTON
Set the Projector to turn itself OFF
automatically (See page 35 for details).
RESET BUTTON
Selection of 4 personal preference settings
and one Factory preset.
PROIECTORA^CR SWITCH
Press to operate a VCR. Do not press to
operate the projector.
PROTECTOR POWER BUTTON
Press to turn projector ON and OFF.
BRIGHTNESS BUTTON
Press to adjust the brightness level.
VOLUME BUTTON
Press to adjust the sound level.
NUMBER BUTTONS
Press these buttons to select items in the
menu's.
CURTAIN BUTTON
When the projector is in the DATA
INPUT mode, press DATA to blank the
projector picture with a pre-defined curtain
(see page 33 for details).
DIRECT ACCESS BUTTONS
Press to select one of the e.xtemal input
sources. Direct access is not possible when
the menu is activated.
To bad the supplied (9 Volt)
battery into the remote:
BEGIN
Remove the battery
compartment lid on the back of the
remote.
Place the battery in the remote.
Be sure to line the (+) and (-) ends of the
battery up correctly.
Reattach the battery lid.
Bottom of remote control unit
Page 9
Remote Control Operation of a VCR
<>>
towarck the front of the VCR (remote
sensor window) when pressing buttons.
buttons on the Projector remote will
not operate your VCR if it does not have
those features.
Press the Projector-VCR switch.
Point the front of the remote
Remember. The VCR function
SCAN BUTTON-------------------------
In playback mode, hold the SCAN button
to view picture moving rapidly fonvard.
SEARCH BUTTON---------------------
In playback mode, hold the SEARCH
button to view picture moving rapidly in
reverse.
REW(TND) BUTTON
Press to rewind tapes. For some VCRs you
may need to press the STOP button first,
then REWIND.
VCR POWER BUTTON
Press to turn the VCR ON and OFF.
----------------
-----------
PROTECTOR-VCR SWITCH
Press to operate the VCR. Do not press to
to operate the projector.
FF (FAST FORWARD)
BUTTON
Press to rapidly advance the tape. For
some VCRs you may need to press STOP
first, then FF.
---------------------------------
RECORD BUTTON
Hold the RECORD button down and then
press the PLAY button to begin a VCR
recording.
PLAY BUTTON
Press to playback a tape. Hold down after
pressing the RECORD button to start a
recording.
STOP BUTTON
Press to stop the tape.
PAUSE BUTTON
Press to temporarily stop the tape during a
playback or recording. Press again to release
PAUSE.
NUMBER BUTTONS
Press buttons for direct VCR channel
selections or menu items.
Page 10

Getting Started - Setting up the Projector + Screen
roper installation of your Projector mil
P
ensure that you make the most of the
set’s features. Read all of pages 10 throu^
14 carefully before starting to install your
Projector.
1) Choose the screen position
You get maximum picture contrast when
the least ambient light falls on the
screen. Place the screen where light from
windows, room lighting etc. does not
disturb the picture.
2) Choose the Projector position
Ideally, the Projector should be located
at about the same height from the floor
as the top of the screen and directly in
front of it.
1. LIGHTING
2. MOUNTING
The Projector can be placed on a wallmounted shelf (minimum size 17 x 24
inches), a cabinet top, or a rack can also
be used. Make sure you can hide the
cables connected to the set.
The Projector has adjustable feet at the
rear. Turn these if you need to point the
Projector downwards to the screen.
Side view
Top of screen
Projection Screen
Projector
Top view
90’
Side view
10
to
lower
(Continued on next page)
to
raise
Page 11
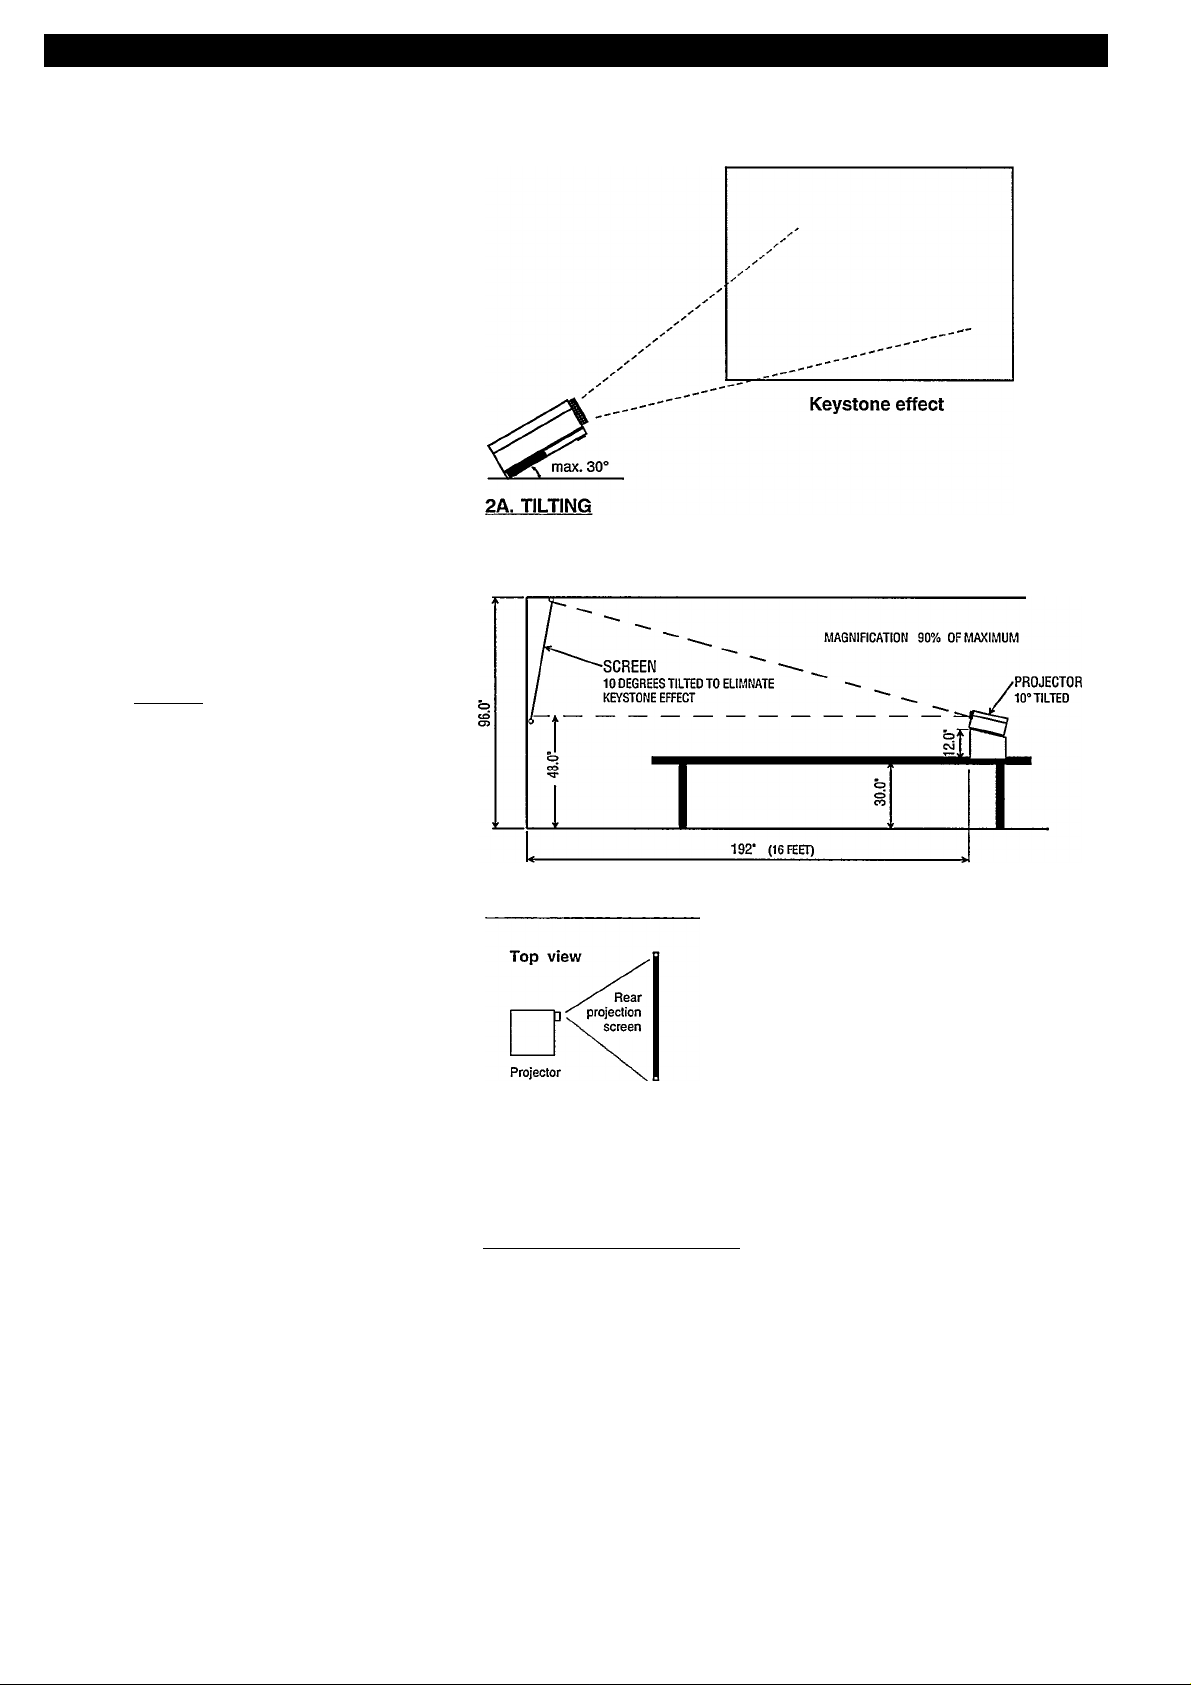
Getting Started - Setting up the Projector + Screen (continued)
If you cannot put the Projector at the
same height as the bottom of the screen,
but rather lower, you have two choices:
2A. Tlie front of the Projector can be
tilted upwards; the picture will not then be
perfectly rectangular when the screen
hangs vertically. This is called the
“keystone” effect.
By pushing the sides of the handle it can
be turned.
Now the handle can be used for lifting the
front of the projector.
Tlie handle can also be removed by
removing the caps in the sides. The holes
appearing can be closed with the supplied
caps.
Tlie projector has adjustable feet at the
rear. Turn these if you need to point the
projector downwards to the screen.
Note: The Projector should not be tilted
up or down more than 15 degrees from its
normal horizontal position.
2B. If you want to use the Projector with a
rear projection screen or in a ceiling mount
(Projector positioned upside down), you
will need to change the internal mirror.
You do this using the button marked
MIRROR which is behind the swing-out
control door on the front panel. Each time
you press MIRROR, the picture on the
screen changes orientation.
3) Choose the size of screen
Choose a screen size that fits the planned
seating capacity and room dimensions.
A good guide is:
Two times tlie screen width should equal
the distance from the screen to the front
row of seats
Si.\ times the screen width should equal
the distance from the screen to the back
row of seats.
SAMPLE SET-UP FOR TABLE TOP USE
2B. REAR PROJECTION
viewers
3. CHOOSING THE SCREEN SIZE
Top view
Back
row ^
11
6 X screen width ,
. 2 X screen width
Front
row
■H
screen
width
Page 12
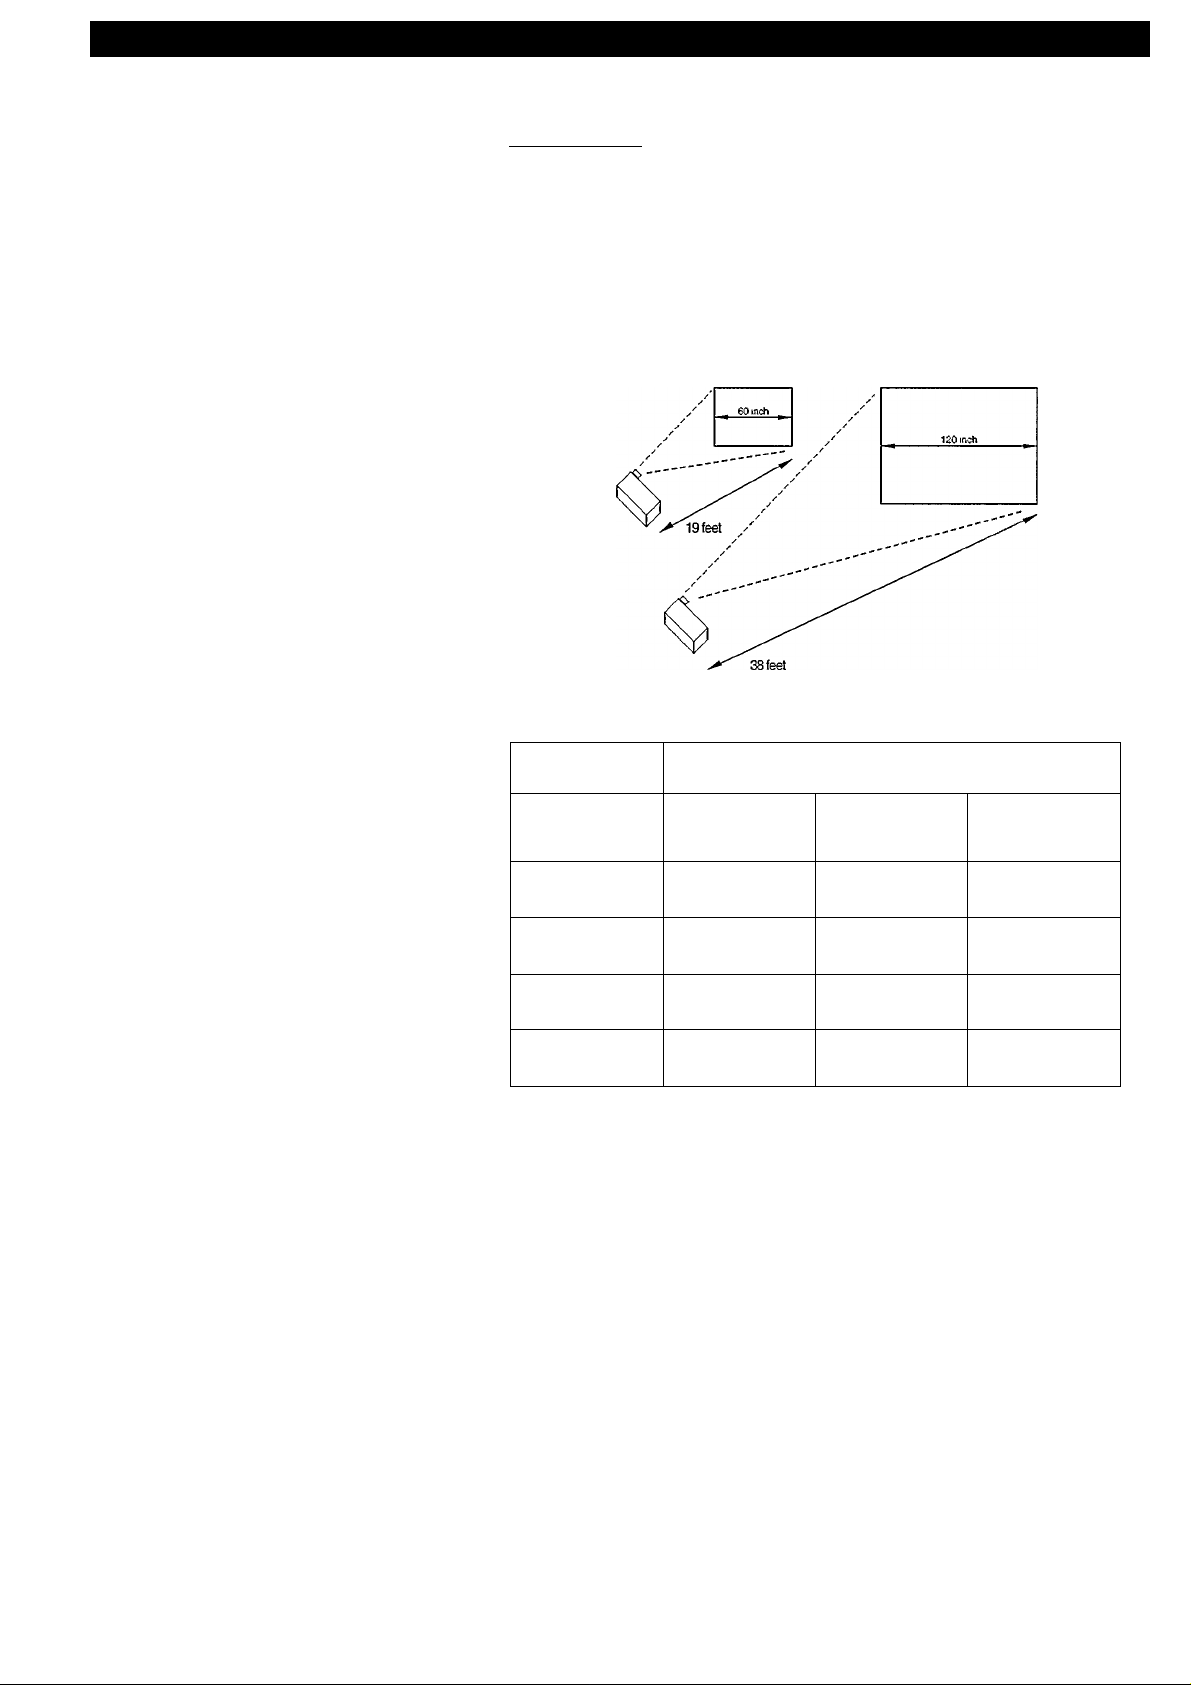
Getting Started - Setting up the Projector + Screen (continued)
Your Projector has a 2x zoom lens. This
means that the picture you get on the
screen at maximum magnification is twice
as big as that projected at minimum
magnification. For example, at a distance
of 22 feet you get a 100-inch picture on
the screen at full magnification. You can
use the zoom lens to reduce this to 50
inches at minimum magnification.
If you want a picture size of 100 inches,
the Projector can be between about 22
and 44 feet from the screen. Choose a
screen and projection distance in the
middle of the zoom range (mid-range
magnification). This gives the best
picture quality and means you can fit the
picture exactly to your screen by zooming
in or out a little.
The table alongside shows you typical
picture sizes at various distances. More
information is given in the "Technical
Specification" on page 40.
MAGNIFICATION
Maximum and minimum magnification (examples)
maximum picture size
at 22 feet distance
minimum picture size
at 22 feet distance
Mid - range magnification (examples)
3) Choose the type of screen
Choose the type of screen-mount you
prefer (stand type, wall-mount, pull-down
etc).
Choose a screen with a width to height
ratio of 4:3 (aspect ratio of 1.33) to match
the NTSC picture format. A black
masking border around the screen will
give a crisp rectangular picture.
The picture appears brightest (highest
gain) when you sit directly in front of it
and gets dimmer as you move to the sides.
Try to keep the viewing angle as narrow
as possible for most viewers.
Choose the type of screen surface best
suited to your room and viewing
conditions:
Pearlescent - highest gain, narrow
viewing angles.
Silver lenticular - medium gain, wide
viewing angles. This type of screen is not
recommended.
Matt white - wide viewing angles, needs
darkened room.
Polarized - By using this type of screen,
the contrast in a light environment can
be improved.
Distance from Projector to screen (in feet)
Picture width in
inches
40
60
80
100 22
Larger picture sizes can be reached by putting the Projector at a
greater distance.
For best results, choose your screen and projection distance using
mid-range magnification of the zoom iens.
Maximum
magnification
Mid-range
magnification
9 13 18
14
19 26
18 25 35
31
Minimum
magnification
44
If in doubt, consult your dealer on the
best choice of screen for your room.
12
Page 13
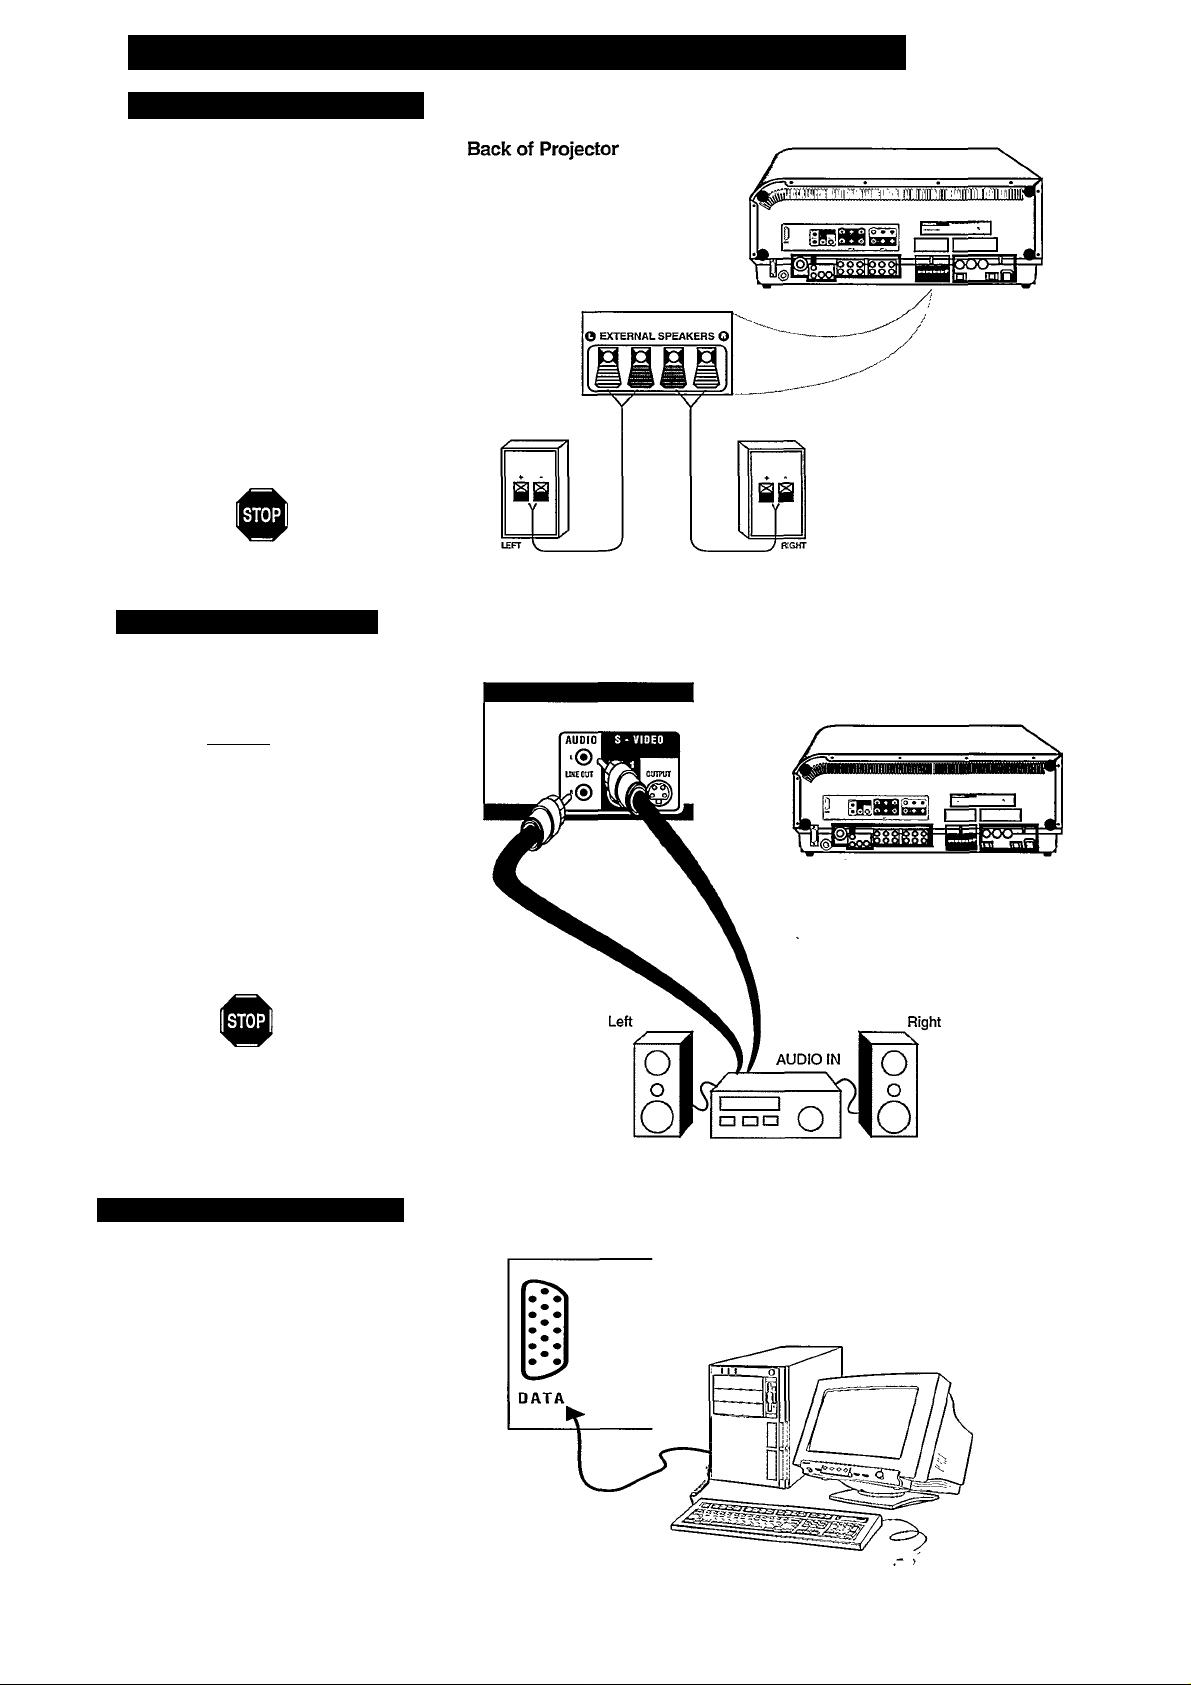
Getting Started - Audio Connections
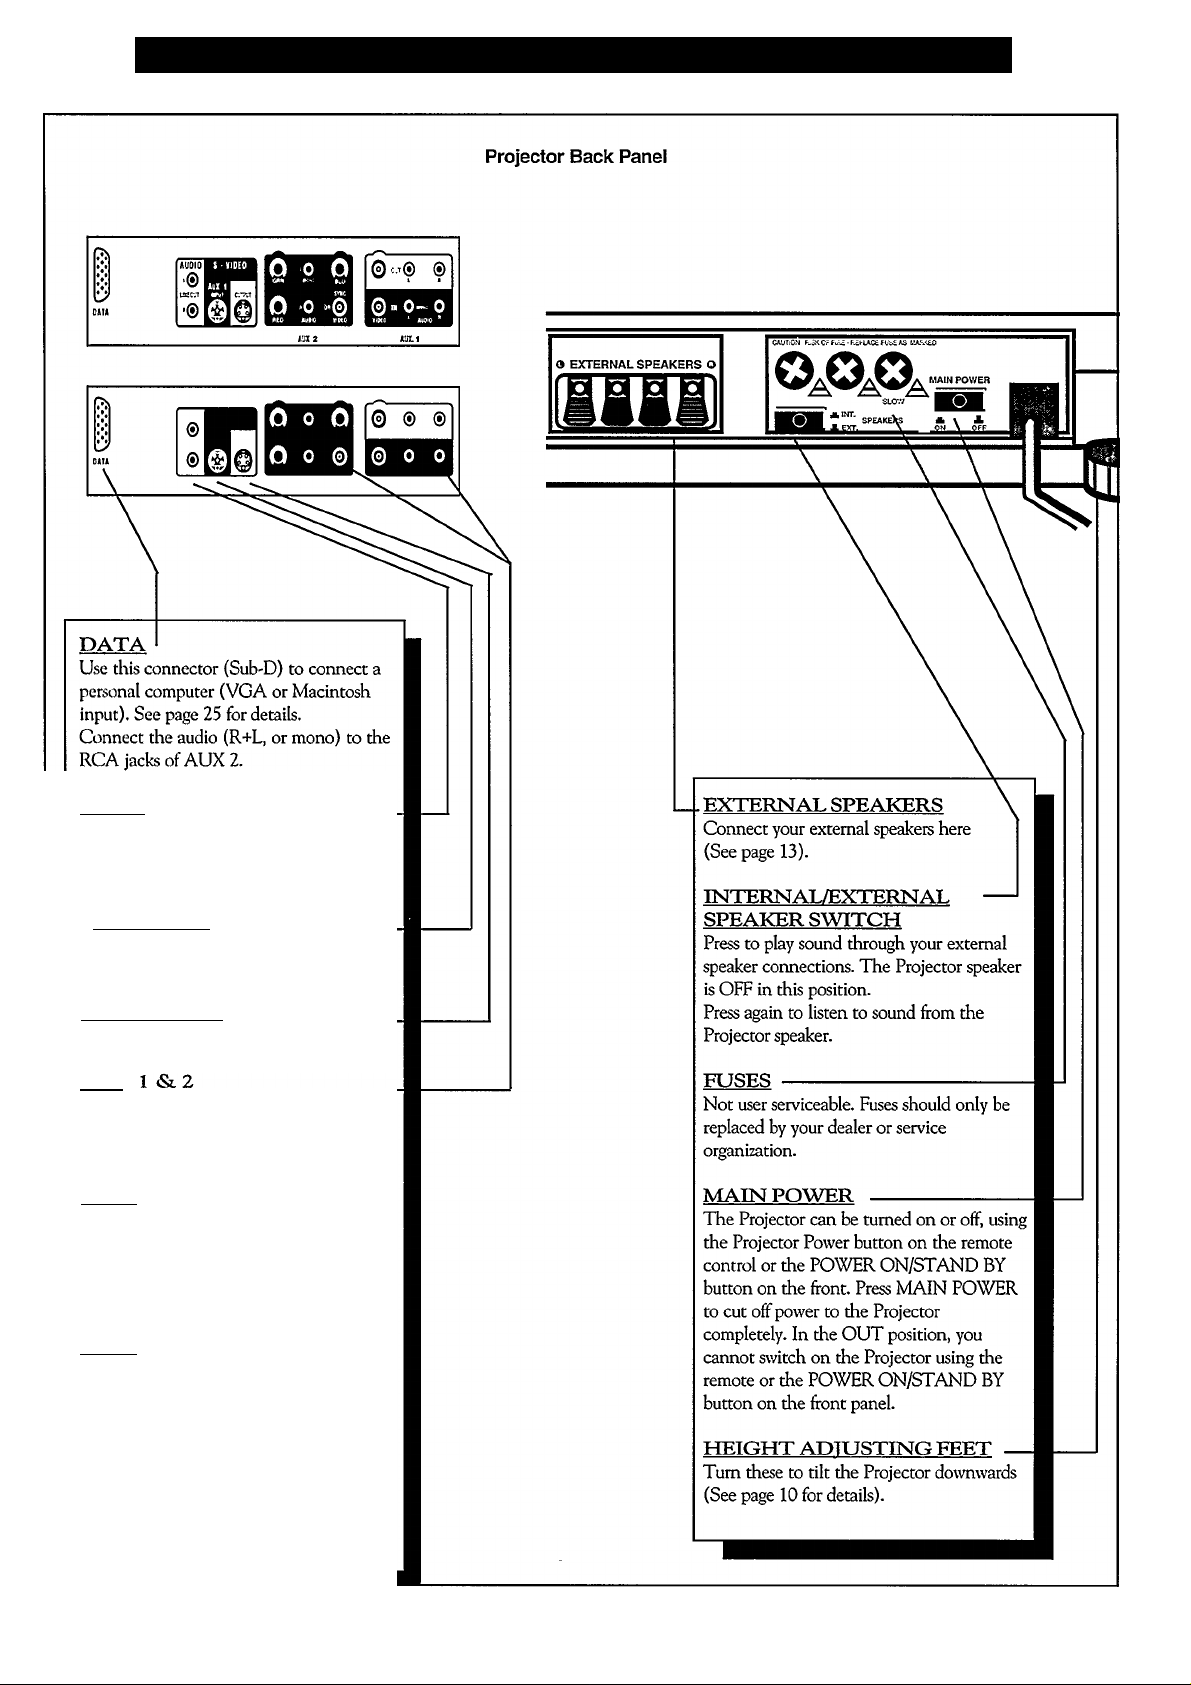
EXTERNAL SPEAKERS
’’ou can connect external speakers to enjoy
stereo sound.
BEGIN
Connect external speakers to the
speaker wire terminals on the Projector.
Speakers: 8 ohm, 10 watt minimum.
< s>
Menu and place the Projector in the
STEREO mode (See page 19).
good stereo sound.
T
tite connected signal througli an audio hi-fi system.
<i>.
AUDIO OUT(put) jacks on the Projector
to the R and L AUDIO IN(put) jacks on
your amplifier or sound system.
<s>
your audio system. Adjust the sound level
coming from the Projector with the audio
amplifier VOLUME control.
Turn Projector on. Select AUDIO
Place the speakers so you enjoy
AUDIO OUTPUT JACKS
he AUDIO OUTfput) jacks on tfie rear of
the Projector may be used to play the sound of
I BEGIN
Connect the R(ight)and L(eft)
First turn your Projector on; then
External Speakers
Projector Back Panel
Remember. The audio system may
have to be in AUX mode to play the sound
of the connected signal.
PC (VGA OR MAC II-INPUT)
ou can connect a personal computer to
display the computerscreens onto the
Y
Projector screen
< x>
Projector.
computer to the DATA input socket.
or mono) to the RCA jacks of AUX 2 (See
page 7).
First turn OFF your computer and
Use a Sub'D plug to connect your
If available, connect the audio (R+L,
AUDIO SYSTEM
Computer Back Panel
13
Page 14
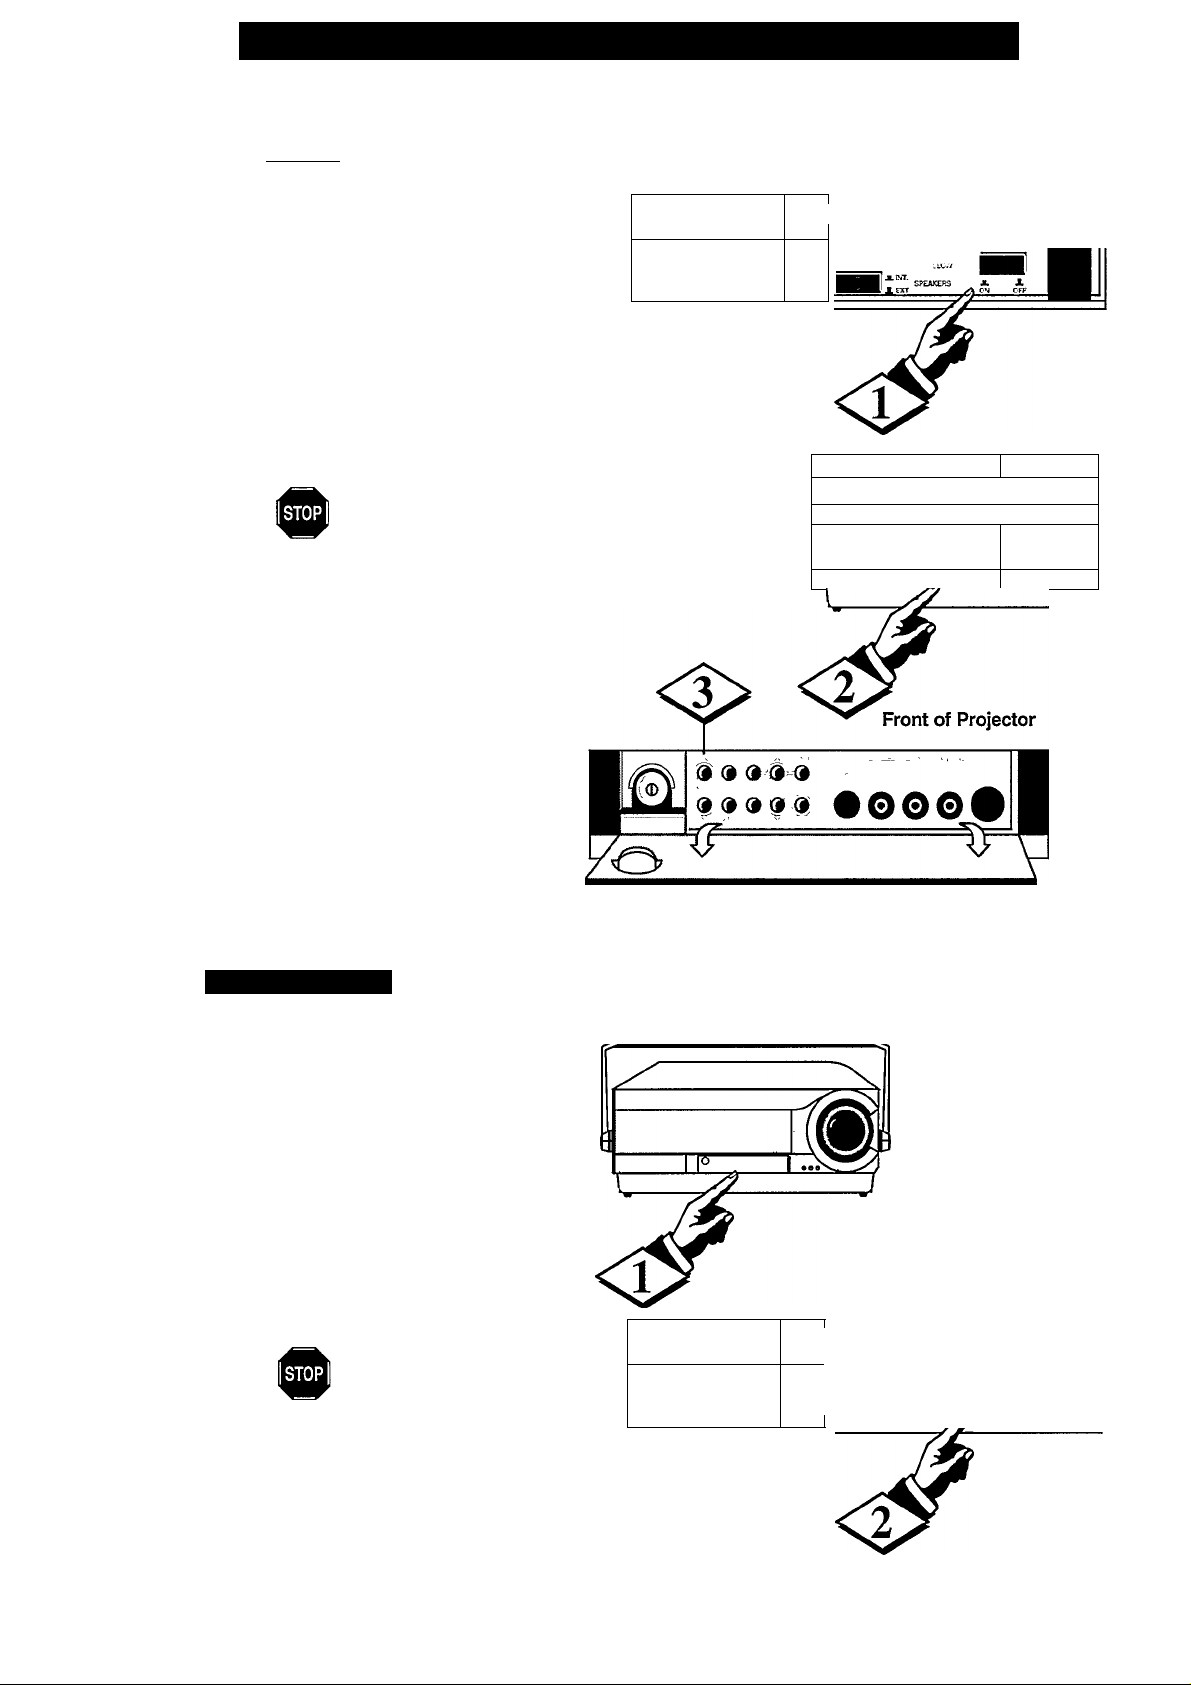
Getting Started - Basic Protector Operation
'ou can operate your Projector using the
controls on the set itself.
I BEGIN I
Press in the MAIN POWER button at
the back of the set to turn the Projector ON.
(For new sets this button is on).
<S>:
button on the front of the Projector.
A green light above the button lights up.
Press the POWER ON/STANDBY
Projector Back Panel
O EXTERNALSPEAKERS 0
igii
Press the VOLUME ▲ (UP) or
(EXDWN) buttons to adjust the sound level.
' Remember. When you first switch on,
theTast'Selected source is selected automatically
and its number appears briefly on the screen.
After that, just press the STATUS button to
see wlwt source is selected.
Remember. During starting of the set
a 'sparking' noise may be heard. This is quite
normal.
T
TO SWITCH OFF
Front of Projector
1 1^ ^
«
BEGIN
Stand By:
Press the POWER ON/STAND BY
button on the front of the Projector.
Completely off:
Press the MAIN POWER button
(at the back of the Projector ) so it goes to
the OUT position.
' Remember. After switching off
Mffilhe POWER ON/STAND BY button
(or with the Remote ) the cooling fan will
run for a few more minutes. It is advised
not to press the MAIN POWER button
before the fan has stopped.
O EXTERNAL SPEAKERS O
lili
Front of Projector
Projector Back Panel
®ySk®A= .
SPEAKER X
MAIN POWER
14
Page 15

MANUALLY
he zoom lens on your projector can be
adjusted by hand to make the picture on
T
the screen larger or smaller. It also has a focus
control to malte the picture sharp.
It is best to adjust die picture size first and
then áte focus.
BEGIN
Zoom and Focus
<i>
until the picture on the screen is the size
you want.
until the picture is sharp.
Turn the Zoom Control ring
Turn the Focus Control ring
. USING THE REMOTE
BEGIN
<A> Press one of the zoom buttons on
the remote until the picture on the screen
is the size you want. You will see the word
“ZOOM” on the screen while you do this.
Press one of the focus buttons on
the remote so that you see the word
“FOCUS“ on the screen. Press the focus
buttons until the word is as sharp as
possible. This is the best focus.
Remember. The zoom and focus
llinctions on your remote can be disabled
via the menu (See page 26).
Zoom Adjustments
Focus Adjustments
15
Page 16

How TO Use On-Screen Menus with Remote
You make adjustments to your projected
picture and sound using On-Screen Menus.
To get them on your screen, first press the
MENU button on your remote; you should
then see this MAIN MENU. It is called a
menu because, like in a restaurant, it lists the
choices available to you. You will notice that
the first item 1. AUDIO is highlighted.
This means it is selected. The other available
selections are white.
MAIN MENU Screen
TELEVISION ADJUSTMENTS
When you are switched to On-Screen Menu's
the ▲ and T buttons now let you step up
and down through the menu choices. Try it.
Press the T button and watch how each menu
item is highlighted in turn.
Now we'll try changing the treble sound (the
high notes). Press MENU button to highlight
"1. AUDIO". Then press the ► button to get
a menu of all the choices available for
adjusting the sound.
You should now see a picture like the one on
the right here. Notice that there is a new
element at the top of your picture. It has a
solid blue bar. We will now make the blue bar
longer and shorter to adjust the treble sound.
Press the T button to highlight "2. TREBLE".
You could also push a number button, in this
case 2, to select treble in a direct manner.
Then press the ► button and watch the blue
bar get longer. Press the
button to make the blue bar shorter. As
you make these changes, you will hear the
sound changing to give you more or less
treble. The Projector is set in the factory to
give the best general performance when the
blue bar reaches the middle position as shown
in our diagram. But you can adjust things to
suit yourself. When you're happy with the
treble sound you can adjust some other items
in the same way if you wish.
Most of the other menus work as described on
the previous page except that you don't always
have the blue ban sometimes you get a choice
of two or three items instead.
Remote
1. AUDIO
2. VIDEO
3. PICTURE SELECT
4. DATA INPUT
5. FEATURES
1.BASS
2. TREBLE
3. BALANCE
4. STEREO
5. EXPAND
BASS Adjustments
1.BASS
[2. TREBLE I
3. BALANCE
4. STEREO
5. EXPAND
TREBLE Adjustments
(Continued on next page)
(Continued on next page)
16
Page 17

How TO Use On Screen Menus with Remote (continued)
To try this out, press the T button to
highlight "4. STTREO". You should get a
display like the one on the right here. Press
tlie or ► button to highlight in turn
MONO or STEREO.
You can get back to the MAIN MENU at
any time by pressing MENU.
You can also switch the On-Screen Displays
OFF at any time by pressing the EXIT
button.
EXTERNAL AUDIO SOURCE
MONO I STEREO
1. BASS
2. TREBLE
3. BALANCE
|4. STEREO
1
5. EXPAND
STEREO Screen
; -
V
EXIT
+ ^ '
Cl
ZOOM
- c
Li.
+ :
■ J
FOCUS
^RG8
/^1 AUX3
LCD
projection
Remote
+ ;
f?;
6'
vD
'8 ;
;9;
DATA
•A'
ADX2
17
Page 18

Audio Contool Adjustments with Remote
TO SELECT AUDIO CONTROLS
Press MENU button on the remote
to show MAIN MENU.
Press 1 on the remote to select
AUDIO (on the MAIN MENU).
Press number of the desired feature
on the remote (See below).
Remember. The highlighted item is
ready for adjustment.
l.BASS 2. TREBLE 3. BALANCE
MAIN MENU Screen
TELEVISION ADJUSTMENTS
h. AUDIO I
2. VIDEO
3. PICTURE SELECT
4. DATA INPUT
5. FEATURES
Remote
eyond the normal volume level controk,
your Projector ako has individual sound
B
controk for BASS (bw frequency), TREBLE
(hi^ frequency), and Speaker BALANCE
sound.
I BEGIN
WitWith the AUDIO Menu displayed,
press 1 for BASS, 2 for TREBLE, or 3 for
BALANCE.
Press the or ► button to adjust
the sound to levels you prefer.
4>
screen.
when the bar scale is centered, speaker
BALANCE is centered between the
Projector's right and left side speakers.
Press the EXIT button to clear the
Go to next adjustment or remember,
LCD
prc.iittl
AUDIO Screen:
BASS Adjustment Selected
^
_______________
h.BASS I
2. TREBLE
3. BALANCE
4. STEREO
5. EXPAND
L
18
Remote
Page 19

Audio Contool Adjustments (continued)
Page 20

Audio Control Adjustments (continued)
5. EXPAND
xpanded sound can be used to add greater
depth and dimension to both monaural
E
(MONO) and STEREO sound.
BEGIN
>,1/ With the AUDIO Menu displayed,
press button 5 for EXPAND.
Press the ◄ or ► button to place the
Projector in the EXPAND sound mode.
The word “EXPANDED” is highlighted to
confirm setting.
Press the EXIT button to clear the
screen.
Remember. Under some
nonstandard transmission conditions the
stereo signal received by the Projector may be
unsuitable for the EXPANDED mode. If this
condition exists, you may still receive quality
stereo (or mono) sound by turning the
EXPAND mode OFF (set Projector to
NORMAL).
Expanded sound can only be heard with
external speakers connected.
EXTERNAL AUDIO SOURCE
NORMAL EXPANDED
1. BASS
2. TREBLE
3. BALANCE
4. STEREO
5. EXPAND
AUDIO Screen:
EXPANDED Sound Adjustment
Selected
20
Remote
Page 21

TO SELECT VIDEO CONTROLS
BEGIN
Video Control Adjustments
<l>
to show the main menu.
VIDEO (on the main menu).
<S>:
on the remote.
1^ Remember. The highlighted item is
ready for adjustment.
Press MENU button on the remote
Press 2 on the remote to select
Press number of the desired feature
1.BRIGHT 2.CONTRAST
3.COLOR 4.TINT 5.SHARP
o adjust your Projector color and picture
controls, select a source and follow the
T
steps shown below:
I BEGIN I
Select BRIGHT, CONTRAST,
COLOR, TINT, or SHARP picture control.
With the VIDEO Menu displayed, press 1 for
BRIGHT, 2 for CONTRAST, etc.
111 (21 <31
(4) i5) <6)
(7) <8)fi|)
Remote
MAIN MENU Screen
1. AUDIO
W
|2. VIDEO 1
3. PICTURE SELECT
4. DATA INPUT
5. FEATURES
|1. BRIGHT 1
2. CONTRAST
3. COLOR
4. TINT
5. SHARP
VIDEO Screen:
BRIGHT Adjustment
(Also for PICTURE, COLOR)
< s>
the selected control.
the selec
<l>
screen.
centered, control settings are at normal mid
range levels.
BRIGHTNESS; Press -4 or ► to see more or
less detail in dark scenes.
CONTRAST; Press -4 or ► to adjust the
white level.
COLOR; Press -4 or ► to add or eliminate
color.
TINT; Press -4 or ► to obtain natural skin
tones. (Is not available in RGB)
SHARPNESS; Press "4 or ► to improve
detail in the picture.
Press the or ► button to adjust
Press the EXIT button to clear the
Remember, when the bar scale is
(- »•)
V
0
(T) (2) (?)
•0
-0 0 0 0
•0
© 0 ©
<S> (0) C>
-0
(Z.
LCD
pceitcusa
Remote
L
1. BRIGHT
2. CONTRAST
3. COLOR
k TINT I
5. SHARP
VIDEO Screen:
TINT Adjustment
Selected
NORMAL
C)
1. BRIGHT
2. CONTRAST
3. COLOR
4. TINT
Is. SHARP I
ENHANCED
VIDEO Screen:
SHARP Adjustment
Selected
21
Page 22

Picture Select Control Adjustments
TO SELECT PICTURE SELECT
CONTROLS
BEGIN
MAIN MENU Screen
Press the MENU button on the
remote to show the main menu.
Press 3 on the remote to select
PICTURE SELECT (on the main menu).
<l>:
desired feature on the remote to select the
desired picture source.
ready for adjustment.
Press the or ► button of the
Remember. The highlighted item is
5' 16 fe.
0 'T
Remote
TELEVISION ADJUSTMENTS
1. AUDIO
2. VIDEO
|3. PICTURE SELECTI
4. DATA INPUT
5. FEATURES
22
Page 23

Picture Select Control Adjustments (continued)
3. PICTURE SELECT AUX 1,2 and 3
he Projector's Picture Source controb aUow
you to tise the INPUT Jacks (Audio,
T
Video and S(uper)~Video heated on the front and
rear of tite Projector. The Projector's INPUT
jacks may be used for direct picture and sound
connections with VCRs (or Video Disc Players,
etc) dtat have their own Audio/Video OUTPUT
jacits.
To view the playback of a VCR tape (or Video
Disc) by using the Audio/Video jacks on the
Projector:
BEGIN
Connect the VIDEO OUT jack
from the VCR (or CDV) to the AUXl
VIDEO IN jack on the Projector.
Connect the AUDIO OUT jacks
R(ight) and L(eft) from the VCR to the
AUX 1 AUDIO IN jacks on the Projector.
Back of Projector
cTTp
ni olri
TELEVISION ADJUSTMENTS
1. AUDIO
2. VIDEO
|3. PICTURE SELECTi
4. DATA INPUT
5. FEATURES
4>
on the Projector.
With the MAIN Menu displayed, press 3 for
PICTURE SELECT.
Projector in the AUX 1 mode.
"AUX I" is highlighted to confirm the
setting.
Turn the VCR (or CDV) ON and playback
the tape (or disc) in a normal manner.
Projector's AUX 2 and 3 INPUT jacks are the
.sime as those described for the AUX 1 jacks
(e.\cept" AUX 2 or 3" is selected as the
PICTURE SOURCE)
Select PICTURE SELECT control
Press the or button to place the
Press EXIT to clear screen.
Connections and operation of the
VCR
4 ,5' '6
I 7 I 8 ' ■ 9 '
OUT
I AUX 1 AUX 2 AUX3 RGB
I PICTURE SOURCE I
PICTURE SELECT
Adjustment
Selected
PICTURE SOURCE RGB
Connect RGB and SYNC to the AUX 2
inputs and select RGB as picture source.
(Tlie SYNC signal must be composite
negative sync.)
(Continued on next page)
Remote
(Continued on next page)
23
Page 24

Picture Select Control Adjustments (continued)
3. PICTURE SELECT - S-VIDEO
he S(nper)'VIDEO connection available
on the rear of the Projector can result in far
T
better picture clarity and detail, for the playback of
VCR tapes or Video Discs, than the normal
connections.
Note: The VCR (or Compact Disc Player) must
be equipped with a S-VIDEO OUT(put) jack in
order to complete the connections shown on this
page.
BEGIN
<i>^
OUT jack from the VCR (or CDV) to the
S-VIDEO IN jack on the Projector.
4>,
R(ight) and L(eft) from the VCR to the
AUX 1 AUDIO IN jacks on the Projector.
<S>:
on the Projector.
With the MAIN Menu displayed, press 3 for
PICTURE SELECT.
Connect the S-VIDEO (or S-VHS)
Connect the AUDIO OUT jacks
Select PICTURE SELECT control
Back of Projector
Otg o o o o o o
goQllooolloool
IL
I—II—I
TiV 1
m
e
N/ Press the or ► button to place the
Projector in the AUX 1 mode for
S-VIDEO 1.
"AUX 1" is highlighted to confirm the
setting.
<5> ,
place it in the S-VIDEO (or S-VHS)
playback mode. Insert S-VHS cassette tape
and playback in a normal manner.
Press EXIT to see: S-VIDEO.
connecting cable will be supplied with the
S-VHS VCR (or Compact Disc Player).
S-Video (or S-VHS) and audio can also be
connected to the front panel jacks (AUX 3)
Turn the VCR (or CDV) ON and
Remember. The S-VIDEO
S-VIDEO OUT
4 ‘5
7 '8 '9
« 0
LCD
VCR
I AUX 11 AUX 2 AUX 3 RGB
PICTURE SOURCE
PICTURE SELECT
Adjustment
Selected
Do not connect simultaneously equipment to
the S-VHS and VHS input.
Remote
24
Page 25

TO SELECT DATA INPUT
Data Input
TELEVISION ADJUSTMENTS
<i>:
remote control to show the main menu.
select DATA INPUT.
The menu disappears and the Projector is in
tire DATA mode.
MENU controls see pages 31 thru 34-
Press the MENU button on the
Press 4 on the remote control to
Remember. To adjust the DATA
1. AUDIO
2. VIDEO
3. PICTURE SELECT
|4. DATA input!
5. FEATURES
25
Page 26

Feature Control Adjustments with Remote
Page 27

Feature Control Adjustments (continued)
1. PERSONAL PREFERENCE
he Personal Preference button (heated on
the remote) will return the Projector to
T
specific preset sources and their picture and audio
level setting.
PUSH 0 TO MODIFY
PRESET PICTURE CONTROLS
Four Personal Preference settings are available,
so titat the settings of each source can be stored
(e.g. AUX I for VCR setting).
I BEGIN I
Select a source and adjust the audio
and picture controls to settings you personally
prefer (See pages 18-21).
<S>:
Press 5 (FEATURES).
With the FEATURES Menu displayed, press
1 for PERSONAL PREFERENCE.
<^3N
settings you have made in step <1>.
"SELECT P. PREF ITEM TO STORE TV
SETTINGS " appears on screen. Four levels
are available.
Press MENU.
N,/' Press the or ► button to store the
1. [personal preferenceI
2. OPERATING HOURS TIMER
3. AUTOSTART
4. LENS CONTROL
FEATURES Screen
PUSH 0 TO STORE
TV SETTINGS AS P. PREF.
I I.P. PREF STORE I
2.P. PREF MODIFY
SELECT P. PREF ITEM
TO STORE TV SETTINGS
I1.AUX1
2. AUX 2
3. AUX 3
4. RGB
<A>:
remote to select one of the listed levels.
"P. PREF CAPTION" appears on screen.
to change the CAPTION title for the
selected P. PREF. level (e.g. "VCR" instead of
AUX 1).
Press the A
each new character space. Example Caption:
VCR.
When the P. PREF. caption is complete, press
the EXIT button to clear the screen.
Press the A
Press the or ► button if you want
T
T
buttons on the
buttons to move indicator to
P. PREF CAPTION
t
1 VUX1
t
PERSONAL PREFERENCE
Screen: 1. P. PREF. STORE
Writing a name
27
(Continued on next page)
Page 28

Feature Control Adjustments (continued)
rj^o recall the Personal Preference:
I BEGIN I
<A> Press RESET (Personal Preference)
button on the remote.
"PERSONAL PREFERENCES" list (with
caption) appears on screen.
Press the A
T
buttons on the
remote to select one of the listed personal
preference levels.
Source, picture and audio settings will change
to the preset levels you selected in the set-up
procedure on the previous page.
REF(erence). MODIFY is available to
P
quickly make changes to any existing
P. P^F. setting.
BEGIN
<i>:
Press MENU.
Press 5 (FEATURES).
Press 1 (PERSONAL PREFERENCE).
With the P. PREF Menu displayed, press 2 for
P.PREF MODIFY.
«XT
♦ • 1
*oevi
. I
r-'-'
' -
'
'll 1 2' 3'
■ 4i <5
' 1 1 0
■ ' '
Remote
♦ 1
' - ^
1 '
6'
7 i ' 8 9 -
SA'A
' - '
LCD
trc.ict:*i
PERSONAL PREFERENCES
1.AUX1
2. AUX 2
3. AUX3
4. RGB
5. FACTORY PRE-SETS
PERSONAL PREFERENCE
select
PUSH 0TO MODIFY
PREVIOUS P. PREF. SETTINGS
1 .P.PREF STORE
|2.P. PREF MODIFY |
"SELECT P.PREF ITEM FOR
MODIFICATION" appears on screen.
< s>
Select desired P. PREF from list.
Example: press 1 for AUX 1.
Press 1 on the remote.
"P. PREF CAPTION" appears on screen.
<d> Press the ▲ T buttons to select the
desired adjustment item.
Press the or ► button to adjust
the highlighted item.
zoou
- ( 1
♦ ' 1
rocv$
*
t
4 ) 1 5 )
( 7 1 1 8 ’
> ^ 1 1 0 1
LCD
prc,??!;*!
Remote
PERSONAL PREFERENCE
Screen
r
16 '
i9’
SELECT P. PREF ITEM
FOR MODIFICATION
h.AUXI
2. AUX 2
3. AUX3
4. RGB
t
P. PREF
1
BRITE —i—
COiNTTR —i—
COLOR —\—
TINT —I—
SHARP-NORMAL
LENS - ENHAN
SOURCE-AUX1
PERSONAL PREFERENCE
Screen: 2. P. PREF MODIFY
Adjustment
CAPTION
AUX 1
1
BASS —I—
TREB —i—
BAL —i—
MODE-STEREO
EXPAND-OFF
28
Page 29

Feature Control Adjustments (continued)
3. AUTOSTART
f the Projector is turned on with the mean
switch and autostart is activated, the
I
Projector will start with the main picture
connected to the last selected source.
BEGIN
<i>
With the FEATURES menu displayed press 3
for AUTOSTART.
Select AUTOSTART control.
push|+|toturn
AUTOSTART ON OR OFF
1. PERSONAL PREFERENCE
2. OPERATING HOURS TIMER
|3. AUTOSTART I
4. LENS CONTROL
<S>:
function ON or OFF.
Press the or ► button to turn the
29
Page 30

4. Lens Control with Remote
ZOOM
Y^u use the zoom controh to mahe the picture
on the screen larger or smaller.
You ENABLE or DISABLE the controls, using
the LENS CONTROL menu.
I BEGIN I
Press the ZOOM + button to make
the picture larger.the pictu
<s>
the picture smaller.
Note: The word ZOOM appears on screen
when using these controls.
Press the ZOOM - button to make
FOCUS
s you make the picture larger or smaller, it
may appear fuzzy. You use the Focus -
A
and Focus + buttons to focus.
I BEGIN I
Press the FOCUS - and + buttons
until the picture is sharp.
Note: The word FOOUS appears on screen
when using these controls. Adjust the control
so that the word FOCUS is sharp.
Note: The message ZOOM or FOCUS only
appears on screen if no menu is activated.
30
Page 31

Data Menu Control Adjustments
LIMAGE - PHASE,
BRIGHTNESS, CONTRAST
eyond the normal picture levels, you can
B
also control the image of projected
computer pictures.
To adjust these settings, the Projector must be in
the DATA mode (See page 29).
BEGIN
<P
press M(enu) on the remote.
The DATA MENU appears on screen.
press 1 for IMAGE.
Tlie first ring-menu (PHASE) appears on
screen.
Tlie PHASE adjustment can be used to
optimize the picture performance of the
DATA picture.
<S>:
remote to select another ring-menu
displayed (BRIGHTNES or CONTRAST).
<S>:
the setting of the ring-menu displayed.
the DATA MENU.
With the DATA mode selected
NX With the DATA MENU selected
Press the
Press the or ► button to adjust
Press MENU again to return to
A T
buttons on the
Remember. When the bar scale is
centered, control settings are at normal mid
range levels.
31
Page 32

32
Page 33

Data Menu Control Adjustmdents (continued)
3.SETUP - HOR. POSITION,
VERT. POSITION, PERSONAL
PREFERENCE, CURTAIN,
COMPUTER IDENT.
o adjust the setup of the computer image
displayed, the Projector must be in the
T
DATA mode (See page 25).
DATA MENU
1. IMAGE
2. AUDIO
|3. SETUP ~]
4. DATA EXIT
I BEGIN I
With the DATA mode selected
press MENU on the remote.
Tile DATA MENU appears on screen.
<s> With the DATA MENU selected
press 3 for SETUP.
The first ring-menu (HOR(izontal).
POSITION) appears on screen.
Press the
remote to select another ring-menu displayed
(VERT(ical). POSITION, PERSONAL
PREFERENCE, CURTAIN or COMPUTER
I DENT(ification).).
Press the or ► button to adjust
the setting of the ring-menu displayed.
Press MENU again to return to the
DATA MENU.
A T
buttons on the
> r
HOR. POSITION
I M M M I II i
>
>
VERT. POSITION
lllllllllll
$
PERSONAL PREFERENCE
- STORE
J
<
>
r
CURTAIN
- RED
>
<
>
f
COMPUTER IDENT.
- AUTOMATIC
AT
+
+
+
Remember. When the bar scale is
centered, control settings are at normal mid
range levels.
PERSONAL PREFERENCE: After pressing
the or ► button the current setting for the
DATA mode will be stored. The text
"VALUES STORED" will be displayed
briefly.
CURTAIN: Press or ► to change the
curtain color. The following colors can be
selected: red, green blue, yellow, magenta,
cyan, white and black.
COMPUTER IDENT.: The projector is able
to automatically identify the connected type
of computer signal. However, if the connected
computer signal does not match the known
signal standards, automatic identification can
be overruled. Press the or ► button to
select AUTOMATIC, VGA 480, VGA 400,
VGA350orMAC-II.
33
Page 34

Data Menu Control Adjustments (continued)
4.DATA EXIT
s long as the Projector is in the DATA
mode, only the DATA MENU items can
A
be selected and adjusted.
To return to the normal mode, you have to exit
the DATA mode first.
I BEGIN I
With the DATA mode selected
press the MENU on the remote. The
DATA MENU appears on the screen.
<s>,
With the DATA MENU selected
press 4 for DATA EXIT.
DATA MENU
1. IMAGE
2. AUDIO
3. SETUP
|4. DATA E)drl
34
Page 35

Remote Control Operation - Timer
TIMER
ave you ever forgotten to turn off the
Projector and found it the next day tvith a
H
test pattern screeching in your ears? Well, your
Projector can save you all that trouble by
automatically turning itself off.
BEGIN
Press the TIMER button on the
remote.
"TIMER' 0:00" appears on screen.
4> Press the TIMER button
repeatedly to select the amount of time
before the Projector will turn OFF.
swai sew iscero put
te. • ►
FTT,/ B PA.-St sre?
TIMER
--------
TIMER Screen
------
0:00
0:30
1:00
1:30
2:00
< s>
Press the EXIT button to clear the
screen.
Remember. If you ever want to see
how many minutes are left before the
Projector shuts off, reselect the TIMER
display.
If you ever want to stop a TIMER setting,
reset tlie timer to 0:00 (or you could just
turn the Projector off and then back on to
cancel a setting).
r
PiiWJ
1
EOT
+
ZOOM
+
FOCUS
« 0
P.S3 Aua
A^Kt At.*«
LCD
projection
Remote
35
Page 36

Remote Control Operation - Curtain
CLOSING/OPENING
THE CURTAIN
ou can use àie curtain control to blank the
displayed computer picture. The screen will
Y
be blanked in the color selected (See page 33).
This option can be useful when there is a
waiting time between changing computer
screens.
The Projector must be in the DATA mode (See
page 25).
BEGIN
<i>-
press button DATA on the remote.
The screen is blanked and the curtain is
closed in the selected color.
<s>,
any other button on the remote) to open
the curtain again.
cannot be used if a source other than
DATA has been selected.
With the DATA mode activated,
Press the button DATA again (or
Remember, the curtain function
DIRECT ACCESS
he keys provide direct access of external
input sources. E.g. press AUX 1 to select
T
external input source AUX 1, DATA to select
DATA INPUT mode, etc.
Note: The direct access controls are not
available when a menu is activated.
36
Page 37

Replacing The Lamp
he lamp used as the light source in your
Projector will eventually have to be replaced.
T
Shordy after 6,000 hours of viewing, you will see a
warning display on your screen:
FOR BEST PERFORMANCE
PLEASE REPLACE LAMP.
RESET OPERATING HOURS TIMER
When you see this warning, the lamp should be
replaced as soon as possible to restore brightness
and to avoid sudden bum-out.
BEGIN
FOR BEST
PERFORMANCE
PLEASE REPLACE LAMP
RESET OPERATING HOURS TIMER
SEE USER MANUAL
LAMP Screen
<i> Switch off your Projector and unplug
the power line.
<s> Wait for the lamp to cool. THIS IS
IMPORTANT. In operation the lamp mns
very hot. You can bum yourself severely if you
handle the lamp when it is hot.
Give the screw on the lid a quarter
turn to the left and lift the lid.
Ф:
Take the spare lamp out of the box and remove
the plastic bag.
Pull the lampconnector from it's base by
moving it to the left.
Remove the old lamp house by pulling it by the
top and lift out the old lamp. Discard it by
putting it in the trash can. DO NOT PUT IT
IN A FIRE.
Remove the 2 screws fixing the lamp.
Top of Projector
<$>
Insert the new lamp house.
Push the lamp connector onto its base until
you feel a slight ‘click.
1^^^ Important
Do not forget to fix the anti-interference wire
with the screw after replacing the lamp house.
(Continued on next page)
37
Page 38

Replacing The Lamp (continued)
Replace the lid by pushing it back in
its original position.
Fix the lid by giving the screw a quarter turn to
the right.
Plug in the power line and press the
ON switch.
Note: If some lamps on the front blink
continuously, the lid has not been placed back
properly into position.
OPERATING HOURS TIMER
fter replacing the lamp, you must reset the
operating hours timer.
A
BEGIN
Press MENU (local or remote) to
show MAIN MENU.
Press 5 on the remote to select
FEATURES (on the MAIN Menu).
Press 2 on the remote to select
OPERATING HOURS TIMER.
Press 2 on the remote to select RESET
OPERATING HOURS.
Press ► to reset OPERATING
HOtJRS.
You will see the operating hours
screen with 0000 HRS.
PUSH [3to view or reset
OPERATING hours TIMER
1. PERSONAL PREFERENCE
12. OPERATING HOURS TIMER
3. AUTOSTART
4. LENS CONTROL
1253 HOURS
|1. OPERATING HOURS
2. RESET OPERATING HOURS
PUSH 0TO RESET
OPERATING HOURS
1. OPERATING HOURS
12. RESET OPERATING HOURS |
_________
FEATURES Screen
OPERATING HOURS TIMER
MENU Screen
0000 HOURS
ll, OPERATING HOURS I
2. RESET OPERATING HOURS
Press the EXIT button to return to
normal viewing.
38
Page 39

Tips if Something isn’t Working
Y) lease malce these simple checks before cahingfor
service. These tips can save you time and
money since charges for Projector installation and
adjustment of customer controb are not covered
under your warranty.
NO POWER
NO PICTURE
NO SOUND
REMOTE DOES NOT WORK
YOU CAN'T ’ESCAPE» FROM
A MENU
This Projector is equipped with protective circuitry that shuts the Projector
OFF in case of moderate power surges. Should this occur turn the Projector
back ON by pressing the POWER ON/STAND BY button, or unplug and
then replug the power cord at the AC outlet.
This feature is not designed to prevent damage due to high voltage, such as
lightning, which is not covered by your warranty.
Check the Projector power cord. Unplug the Projector, wait 2 minutes, then
reinsert plug into outlet and push POWER button again.
Check main power switch on back of Projector.
Check if the front grill is mounted properly.
Check PICTURE SELECT display for correct position. Using the VCR/AUX
position without a signal source will result in a blank screen.
Check the VOLUME buttons.
Check the MUTE button on the remote control.
Check the INT.(ERNAL)/EXT.(ERNAL) speaker switch on the rear of the
Projector. EXT. position cuts sound of the Projector’s internal speakers off.
Check battery.
Clean the remote and the remote sensor window on the Projector.
Press EXIT on the remote control. If that doesn't work, press the PCWER
CFF switch on the back of the Projector and immediately SWITCH ON
again.
WRONG MENU APPEARS
THE ERROR LED BLINKS
ALL THE TIME
MESSAGE "REPLACE
PROTECTION LAMP"
THE ERROR LED AND ONE
OR TWO OTHER LEDS
BLINKS ALL THE TIME
(See page 5)
SET DOES NOT START
IMMEDIATELY
If the DATA menu appears, go to page 34 for instructions on how to exit
DATA mode.
If the MAIN menu appears, go to page 25 for instmetions on how to enter and
control DATA mode adjustments.
The lamp needs changing.
Go to page 37 for instructions on how to do this.
and
There is a problem inside the set.
Don't try to fix it yourself; call your dealer for help.
Maybe the set 'ran' too hot. Check if ventilation slots are blocked.
Check if the lid for the lamp compartment is closed properly.
If you try to restart the set a short time after switching it off, it is possible that the
lamp does not turn on immediately. In this situation the POWER button light
blinks. The set will restart automatically within a few minutes.
If the set does not restart within 2 minutes, it will switch off and the error LED starts
blinking. Wait until the blinking has stopped and switch on the set again.
If the set does not start within 2 minutes, replace the lamp.
If the set still does not start, please contact your dealer.
39
Page 40

Technical Specification
Optical display system
Projector using metal halide gas discharge
projection lamp source in an optical
system with three liquid crystal panels and
a combination of folding and dichroic
mirrors.
Liquid Crystal Panels
Panel size: 2.8 inch diagonally 1 or 3), video and stereo audio, no video
Display system: transmission type liquid
crystal panels
Drive system: TTO-R (Thin Film Diodereset) active matrix
Inputs
Two S-video, two composite video and
one RGB/composite video and 15 pin SubD data graphic.
Outputs
Selected source - S-video (loop from AUX
output from RGB.
External speaker coimections
Stereo - spring-loaded clips
LCD resolution
640 lines, 480 columns
Color
16.8 million colors
Horizontal scan rate
15.6, 31.4'36 kHz
(video, VGA, MAC-11)
Lens
F = 4.5, zoom lens with
range f = 150 to 300 mm
Image size (mid-range magnification)
40 inch wide at 13 feet from screen
140 inch wide at 43 feet from screen
Lamp
Ultra High Pressure lamp
100 W
Remote Control
IR with a Projector-VCR switch and
buttons for VCR power. Projector power.
mute, volume up and down, brightness up
and down, SEARCH/SCAN, record, play.
stop, pause, fast fonvard/rewind, timer.
reset (per. pref. set), exit, ►, menu,
zoom -, zoom +, focus -, focus +, 10-digit
keypad.
Internal audio amplifier
2 X 10 watts for external speakers
1 X 10 watts for internal speaker
Internal speaker
One 3 1/3 inch
Audio frequency response
Speaker comiectors 40 Hz to 16 kHz,
line out 40 Hz to 16 kHz.
Special features
1/4-inch headphone jack, four personal
preference menu settings for picture and
audio, front panel inputs, mirror button for
adjusting picture for front projection, rear
projection or via mirror systems, remote
control of zoom and focus.
Rated voltage
100 to 140 VAC
Rated frequency
60 Hz
Power consumption
190 W average, 220 W peak
Working temperature
4UFto95'>F(5°Cto35'C)
40
Casing
Metal
External dimensions
8 X 22 X 15 inches (200 x 554 x 390 mm)
Weight
Approx 48 lbs (22 kg)
Accessories included
Remote Control
Battery (9v)
Lens cap
Users manual
Safety Tips leaflet
Warranty
VGA cable
Page 41

Glossary OF Terms
Display An on-screen message or graphics that help the user
operate and adjust his Projector feature controls. See On Screen
Displays (OSD).
Direct AudioA^ideo Inputs/Outputs * Located on the rear of the
Projector these connectors (RCA phono type plug) are used for the
input or output of audio and video signals.
Designed for use with VCRs (or other accessories) in order to
receive higher picture resolution and offer a variety of sound
connection options.
Focus’’’ Adjusting the sharpness of the picture by changing the
lens setting.
LCD Liquid Crystal Display ’•’ A new type of screen display
which is used instead of the conventional cathode ray tube. In this
Projector, the picture is formed on LCD displays inside the
projection unit and then projected onto a screen like a slide or
movie, (see How Your Projector Works on page 4)
Menu ’•’ An on-screen listing of feature controls shown on the
Projection screen that are made available for user adjustments.
On Screen Displays (OSD) ’•’ Refers to the wording or messages
generated by the projector to help the user with specific feature
controls (control adjustment, programming etc.)
Remote Sensor Window ’•’ A window or opening on the Projector
control panel through which infrared remote control command signals
are received.
Status Allows the user to quickly confirm what input source is
currently being viewed. Status can also be used to clear the Projector
of on screen displays or information (rather than waiting for the
displays to ‘time out’ or automatically disappear from the screen).
S'VHS or S-Video’-' A higher quality version of the VHS standard
for videorecorders and other devices, such as CD-I players.
VCR (Video Cassette Recorder)’^ Device for playing pre-recorded
video casssette tapes. Can also be used to record pictures and sound
from an external source.
Zoom’-’ Changing the size of the picture by changing the lens settings.
41
Page 42

Limited Warranty
LIMITED WARRANTY
PROJECTOR
One (1) Year Free Carry-In Service Labor Warranty
Six (6) Month Exchange Warranty Projector Lamp
One (1) Year Exchange Warranty Parts
For purchases outside the U.S., see applicable warranty from country of purchase.
This warranty gives you specific legal rights and you may also have other rights which vary from state to state.
Parts and Labor
For one year (sbc months for the Projector Lamp) after installation, a
Philips Factory Service Center (see below) will repair any product
defect and replace any defective part without charge to you for parts
or labor.
What the Purchaser Must Do
Before you call for service, check your operating instmction booklet.
A slight adjustment of the customer controls discussed in your
instmction booklet may save you a service call.
How to get Warranty Service
Due to the sophisticated namre of this product warranty service will
be provided by a Philips Factory Service Center. If you feel you
require warranty service, or need to discuss a problem about your LCD
Projector, please contact the Philips Factory Service Center, listed .
below. If it is determined that the Projector needs to be repaired, you
will be given a remm authorization number. Carefully pack the LCD
Projector in secure packaging for safe shipment.
Be sure that you retain the carton and all packing materials
from this unit. These materials are specifically designed for
shipping this product.
Deliver or ship the Projector freight prepaid and insured to the
Factory Service Center.
Philips Factory Service Center
5164 Blazer Parkway
Dublin, OH 43017
(614) 792-1495
YOU MUST PRESENT PROOF OF THE DATE ON
WHICH THE LCD PROJECTOR TV WAS FIRST
PURCHASED (SALES RECEIPT OR OTHER EVIDENCE)
WHEN REQUESTING SERVICE OR REPLACEMENT
PART WARRANTY PERFORMANCE.
Also please include a description of the problem when remming
product for repair. Following warranty repair, the unit will be remmed
to you freight prepaid. Be sure to include your complete remm address
on the outside of the carton.
Warranty Exclusions
Your Warranty Does Not Cover:
Labor charges for Projector installation or set-up, adjustment of
customer or preference controls, and installation or repair of antenna
systems outside the Projector.
Product repair and/or part replacement because of misuse, accident,
unauthorized repair or other cause not within the control of Philips
Consumer Electronics Company.
Reception problems caused by signal conditions or cable or anterma
systems outside the Projector.
A Projector purchased, used or serviced outside the U.S.A. Puerto
Rico and the Virgin Islands.
Incidental or consequential damages resulting from the product. Some
states do not allow the exclusion of incidental or consequential
damages, so the above exclusion may not apply to you.
ALL IMPLIED WARRANTIES INCLUDING IMPLIED
WARRANTIES OF MERCHANTABILITY AND FITNESS
FOR A PARTICULAR PURPOSE, ARE LIMITED IN
DURATION TO THE DURATION OF THIS EXPRESS
WARRANTY. Some states do not allow limitations on how long
an implied warranty lasts, so the above limitation may not apply
to you.
IMPORTANT REMINDER
PLEASE HLL OUT AND MAIL YOUR WARRANTY'
REGISTRATION CARD PROMPTLY. IT WILL BE EASIER
FOR US TO NOTIFY YOU IF IT SHOULD EVER BE
REQUIRED.
How to get Warranty Service After the Warranty Expires
Out of warranty service can be obtained under the following
arrangements:
• Contact the Philips Factory Serv'ice Center at (614) 792-1495
to obtain service.
• Pack your product in a safe carton for shipment.
• Mail the product to the Philips Factory Service Center listed in
'How to Get Warranty Service'. Also include a letter inside the carton
describing the problem and listing your name, address and phone
number.
Please write your model and Serial numbers below. The numbers
are located on the back of your unit. Please remember to have
these numbers on hand any time you call.
MODEL NO. __________________________
SERIAL NO. __________________________
IB 6758-E001
PHILIPS SERVICE COMPANY
P.O. BOX 555 • JEFFERSON CITY, TENNESSEE 37760
(615) 475-8869
42
Page 43

43
Page 44

 Loading...