

Page 1

1
Colour Television Chassis
L7.2E
AA
CL 86532008_004.ai
160298
Service Manual
Table of contents Page
1 Technical specifications 2
Location of panels
2 Connection facilities 3
3 Safety instructions, Warnings 4
and Notes
4 Mechanical instructions 6
5 Repair facilities 7
Software adjustments
and Hotel mode
6 Fault finding tree 13
Block diagram, 14
Survey of testpoints 15
Diagram supply voltages survey 15
7 Electrical Diagrams and print lay-outs
Power supply diagram A1 16 17,19
Sync, Horizontal + Vertical output diagram A2 18 17,19
Tuner, IF,Video,Chroma diagram A3 20 17,19
Control diagram A4 21 17,19
Sound processing, Sound interfacediagram A5 22 17,19
CRT panel diagram B 23 23
Sound Multi-mono panel diagram C 24 25
Sound Nicam-2CS panel diagram D 26 25
8 Electrical adjustments 27
9 Circuit diagram description (new circuits) 29
10 Directions for use 32
11 List of abbreviations 36
Published by FM 9863 TV Service DepartmentPrinted in The NetherlandsCopyright reserved 1998 Philips Consumer Electronics B.V. Eindhoven, The Netherlands. All rights reserved. No part of this publication may be reproduced, stored in a retrieval system or transmitted, in any form or by any means, electronic, mechanical, photocopying, or otherwisewithout the prior permision of Philips.Subject to modification5 4822 727 21567
12 Spareparts list 37
Diagram PWB
©
Copyright reserved 1998 Philips Consumer Electronics B.V. Eindhoven, The
Netherlands. All rights reserved. No part of this publication may be reproduced,
stored ina retrievalsystem ortransmitted, in any form or by any means, electronic, mechanical, photocopying, or otherwise without the prior permision of Philips.
Published by FM 9863 TV Service Department Printed in The Netherlands Subject to modification 5 4822 727 21567
Page 2

2 L7.2E
1 Technical specifications
Mains Voltage: : 220 - 240 V AC
1 Technical specifications
: (+/- 10%)
Power consumption : 17” 50 W
: (stand by < 7 W)
: 21” 57 W
: (stand by < 7 W)
Pull in range colour sync : +/- 300 Hz
Pull in range horizontal sync : +/- 600 Hz
Pull in range vertical sync : 45 - 64.5 Hz
Location of panels
C
OR
D
MULTIMONO
NICAM,
AUDIO PANEL
MAIN
CRT
POWER SUPPLY
SYNCHRONISATION
HOR.DEFLECTION
VERT. DEFLECTION
TUNER IF
VIDEO PROCESSING
CONTROL
AUDIO SOURCE INPUT
AUDIO PROCESSING
B
A1
A2
A3
A4
A5
CL 86532008_005.ai
260398
Page 3
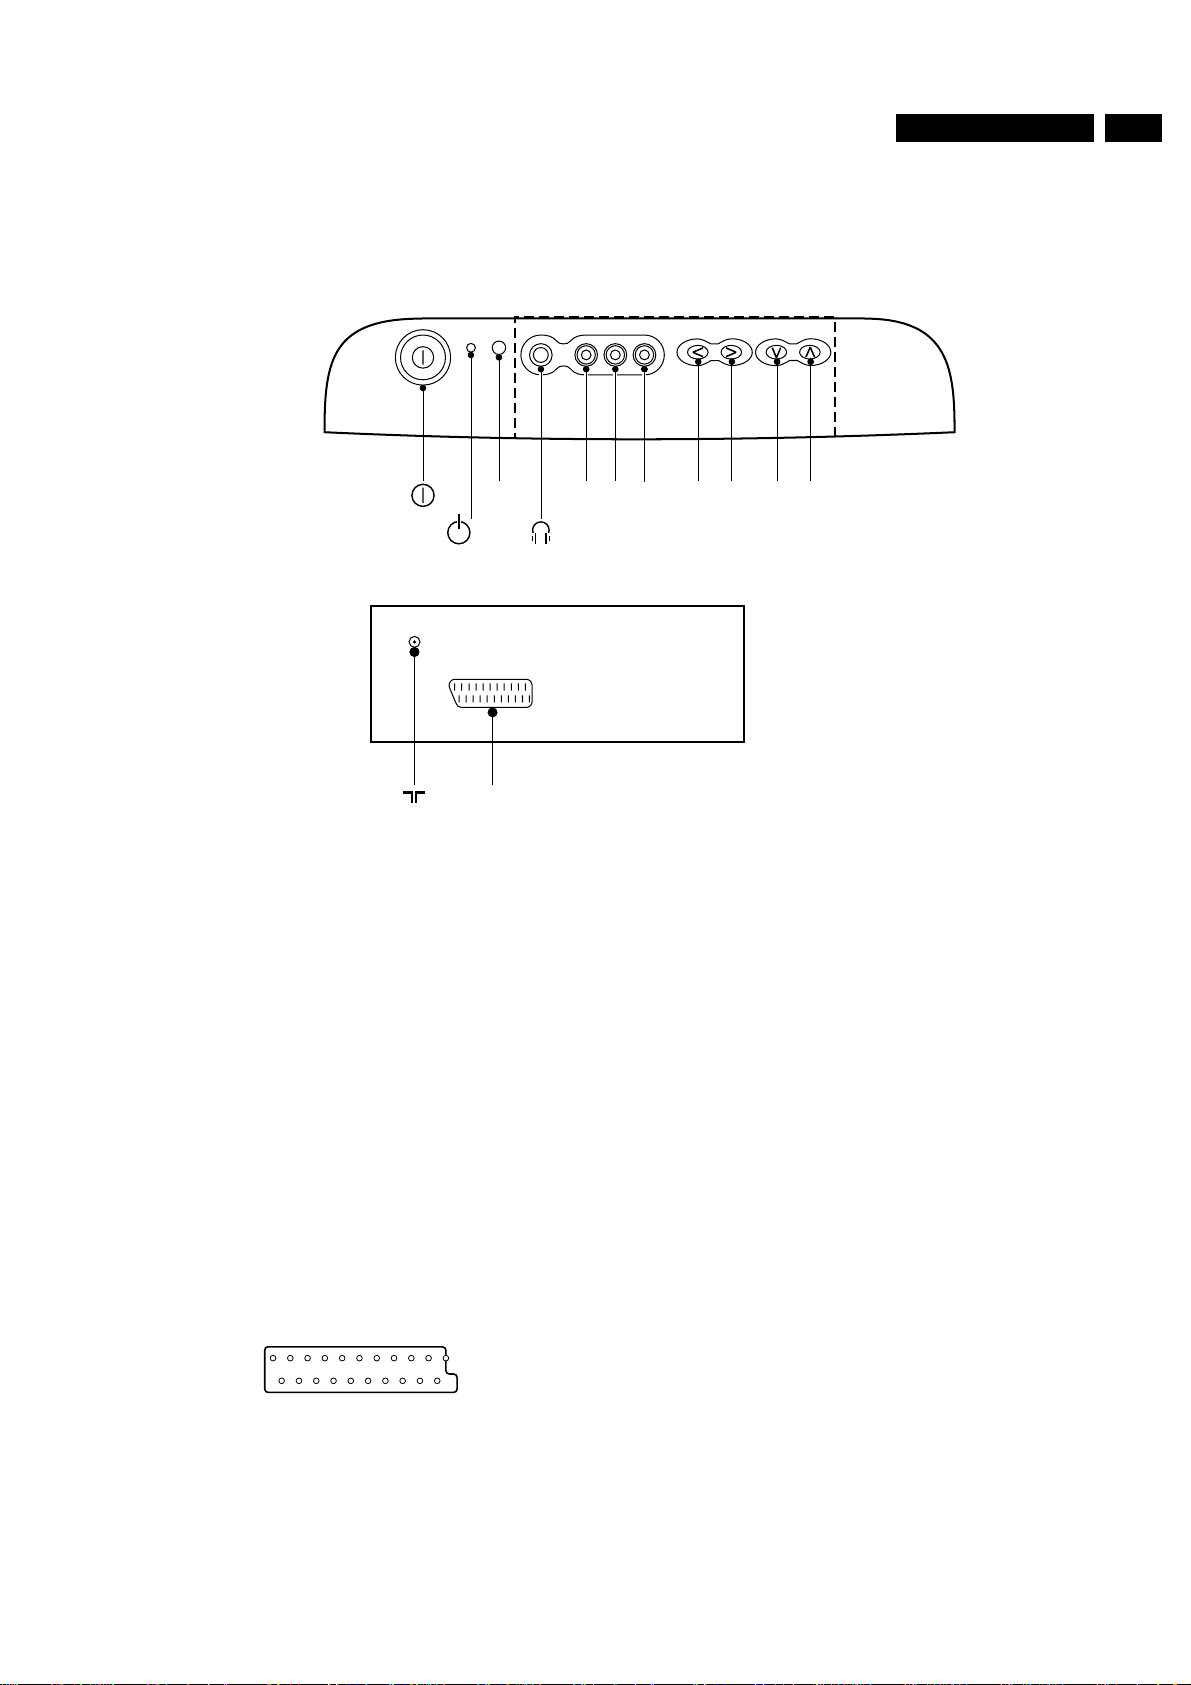
2 Connection facilities
2 Connection facilities
3L7.2E
2.1 Cinch
IR Video
Red
EXT1
(Ext2)
L R
Audio
CL86532008_008.ai
++--
ChannelVolume
170298
4.5-7V:EXT 16:9
- Video 1Vpp/75Ω q
- Audio L(0.5Vrms ≥10kΩ) q
- Audio R(0.5Vrms ≥10kΩ) q
2.2 Head phone
- (32-600Ω≥10mW) ot
2.3 Euroconnector
1- Audio R (0.5Vrms ≤1kΩ) k
2- Audio R (0.5Vrms ≥10kΩ) j
3- Audio L (0.5Vrms ≤1kΩ) k
4- Audio v
5- Blue v
6- Audio L (0.5Vrms ≥10kΩ) j
7- Blue (0.7Vpp/75Ω)
8- CVBS-
status 0-1.3V:INT
9- Green v
9.5-12V:EXT 4:3 j
1011- Green (0.7Vpp/75Ω)
1213- Red v
14- RGB-
status v
15- Red (0.7Vpp/75Ω)
16- RGB-
status (0-0.4V:INT
1-3V:EXT/75Ω)
17- CVBS v
18- CVBS v
19- CVBS (1Vpp/75Ω) k
20- CVBS (1Vpp/75Ω) j
21- Earth
socket
Page 4

4 L7.2E
3 Safety instructions, Maintenance instruction,
3 Safety instructions, Maintenance instruction, Warnings and Notes
3.1 Safety instructions for repairs
Figure 3-1
1. Safety regulations require that during a repair:
– the set should be connected to the mains via an
isolating transformer;
– safety components, indicated by the symbol (see fig.
3.1), should be replaced by components identical to
the original ones;
– when replacing the CRT, safety goggles must be worn.
2. Safety regulations require that after a repair the set must
be returned in its original condition. In particular attention
should be paid to the following points.
– As a strict precaution, we advise you to resolder the
solder joints through which the horizontal deflection
current is flowing, in particular:
• all pins of the line output transformer (LOT);
• fly-back capacitor(s);
• S-correction capacitor(s);
• line output transistor;
• pins of the connector with wires to the deflection
coil;
• other components through which the deflection
current flows.
Note: This resoldering is advised to prevent bad
connections due to metal fatigue in solder joints and is
therefore only necessary for television sets older than
2 years. The wire trees and EHT cable should be
routed correctly and fixed with the mounted cable
clamps.
– The insulation of the mains lead should be checked for
external damage.
– The mains lead strain relief should be checked for its
function in order to avoid touching the CRT, hot
components or heat sinks.
– The electrical DC resistance between the mains plug
and the secondary side should be checked (only for
sets which have a mains isolated power supply). This
check can be done as follows:
• unplugthe mains cordand connecta wirebetween
the two pins of the mains plug;
• set the mains switch to the on position (keep the
mains cord unplugged!);
• measure the resistance value between the pins of
the mains plug and the metal shielding of the tuner
or the aerial connection on the set. The reading
should be between 4.5 MW and 12 MW;
• switchoff the TV andremove the wire between the
two pins of the mains plug.
– The cabinet should be checked for defects to avoid
touching of any inner parts by the customer.
– When the set is used in circumstances with higher dust,
grease or moisture levels, for example in a kitchen, the
recommended interval is 1 year.
– The maintenance inspection contains thefollowing actions:
• Execute the above mentioned 'general repair
instruction'.
• Clean the power supply and deflection circuitry on the
chassis.
• Cleanthe picture tube panel and the neck of the picture
tube.
3.3 Warnings
1. ESD
All ICs and many other semiconductors are susceptible to
electrostatic discharges (ESD). Careless handling during
repair can reduce life drastically. When repairing, make
sure that you are connected with the same potential as the
mass of the set by a wristband with resistance. Keep
components and tools also at this same potential.
– Available ESD protection equipment:
– anti-static table mat (large 1200x650x1.25mm) 4822
466 10953
– anti-static table mat (small 600x650x1.25mm) 4822
466 10958
– anti-static wristband 4822 395 10223
– connection box (3 press stud connections, 1 M ohm)
4822 320 11307
– extension cable (2 m, 2 M ohm; to connect wristband
to connection box) 4822 320 11305
– connecting cable (3 m, 2 M ohm; to connect table mat
to connection box) 4822 320 11306
– earth cable (1 Mohm; to connect any product to mat or
connection box) 4822 320 11308
– complete kit ESD3 (combining all 6 prior products -
small table mat) 4822 310 10671
– wristband tester 4822 344 13999
2. In order to prevent damage to ICs and transistors, all highvoltage flashovers must be avoided. In order to prevent
damage to the picture tube, the method shown in Fig. 3.2
should be used to discharge the picture tube. Use a highvoltageprobe and a multimeter (positionDC-V). Discharge
until the meter reading is 0V (after approx. 30s).
3. Togetherwith the deflection unit and anymultipole unit, the
flat square picture tubes used from an integrated unit. The
deflection and the multipole units are set optimally at the
factory.Adjustmentofthisunit during repair is therefore not
recommended.
4. Be careful during measurements in the high-voltage
section and on the picture tube.
5. Never replace modules or other components while the unit
is switched on.
6. When making settings, use plastic rather than metal tools.
This will prevent any short circuits and the danger of a
circuit becoming unstable.
7. Wearsafety goggles during replacement ofthe picture tube
3.2 Maintenance instruction
It is recommended to have a maintenance inspection carried
out by a qualified service employee. The interval depends on
the usage conditions:
– When the set is used under normal circumstances, for
example in a living room, the recommended interval is 3 to
5 years.
3.4 Notes
1. The direct voltages and oscillograms should be measured
with regard to the tuner earth , or hot earth as this is called
(see fig. 3.3)
2. The direct voltages and oscillograms shown in the
diagrams are indicative and should be measured in the
Service Default Mode (see chapter 8) with a colour bar
signal and stereo sound (L:3 kHz, R:1 kHz unless stated
otherwise) and picture carrier at 475.25 MHz.
Page 5

3 Safety instructions, Maintenance instruction,
3. Wherenecessary, the oscillograms and directvoltages are
measured with and without aerial signal. Voltages in the
power supply section are measured both for normal
operation and in standby . These values are indicated by
means of the appropriate symbols (see fig. 3.3).
4. The picture tube PWB has printed spark gaps. Each spark
gap is connected between an electrode of the picture tube
and the Aquadag coating.
5. The semiconductors indicated in the circuit diagram and in
the parts lists are completely interchangeable per position
with the semiconductors in the unit, irrespective of the type
indication on these semiconductors.
V
CL 26532098/042
140792
Figure 3-2
5L7.2E
tuner earth
tuner aarde
la masse du tuner
Tuner-Erde
massa del tuner
tierra del sintonizador
with aerial signal
met antenne signaal
avec signal d'antenne
mit Antennensignal
con segnale d'antenna
con la señal de antena
normal condition
normaal bedrijf
fonctionnement normal
normaler Betrieb
funzionamento normale
funcionamiento normal
massa calda
zonder antenne signaal
Figure 3-3
hot earth
hete aarde
la terre directe
heißen Erde
tierra caliente
without aerial signal
sans signal d'antenne
.ohne Antennensignal
senza segnale d'antenna
sin la señal de antena
stand by
stand by
position de veille
in Bereitschaft
modo di attesa
posición de espera
Page 6

6 L7.2E
4 Mechanical instructions
For the service position of the main carrier see Fig. 4.1.
The main carrier can be removed by releasing the 2 carrier
blocking lips (1) and pulling the carrier panel backwards.
4 Mechanical instructions
1
11
B
A
CL 86532008_007.ai
160299
Figure 4-1
Page 7

5 Repair facilities
7L7.2E
5 Repair facilities
5.1 Test points
The PWB boards have service printing on both sides. In the
service printing test points are included. These test points are
referring to the electrical function as mentioned below:
Test pointElectrical function
• A1,A2, etc.: Audio
• C1,C2, etc.: Control
• F1,F2, etc.: Frame drive and frame output
• L1,L2, etc.: Line drive and line output
• P1, P2,etc.: Power supply
• S1,S2- etc.: Synchronisation
• V1,V2, etc.: Video
The numbering is done in a for diagnostics logical sequence.
Example: Checking the power supply, start with test point P1,
P2 etc.).
5.2 Service mode
The service mode is split into two parts:
– Service Default Mode (SDM).
– Service Alignment Mode (SAM).
– For Multi-Europe setsPAL-BG
– For Multi-France setsSECAM-L
Tuning:
– For sets with VST tuner: Programme number 1is selected .
Further settings:
– The automatic switch off (no IDENT) timer and the sleep
timer will be ignored.
– The child lock will be disabled.
– If the TV set was in hotel mode, this mode is disabled as
long as the TV is in SDM or SAM mode.
– Brightness, saturation, sharpness, contrast and balance
are initialised on 50% level.
– The volume is set to 25% level.
– The TV set is normally controllable.
– All displayed text in SDM and SAM menu are in English.
5.4 SDM (Service Default Mode)
5.4.1 SDM menu
Below in Fig.6.1 an example of the SDM menu is shown.
Between clamps a short explanation of each item is added.
5.2.1 Entering and leaving SDM and SAM
1. Entering SDM
• To entry the SDM , there are two possibilities:
– Via the "DEFAULT" button on the DST (Dealer
Service Tool)
– Via short circuiting the service pins 0025 and 0024
(mass), while switching on the set via the mains
switch. For 0025 and 0024 see Diagram A4 and
the PWB drawing of the main panel.
• Inthe SDM mode aS (in green) and the SDM menu(in
red) is displayed.(see Fig.6.1).
2. Entering SAM
• To entry the SAM , there are two possibilities.
– Viathe "ALIGN" button on the DST (Dealer Service
Tool)
– Via short circuiting the Service pins M28 and M29
(mass), while switching on the set via the mains
switch. For M28 and M29 see Diagram A4 and the
PWB drawing of the main panel.
• In the SAM mode a S (in green) and the SAM main
menu (in red) is displayed.(see Fig.6.2).
Remark: After the set is in the SDM or SAM mode the short
circuit can be removed.
001E 2.17.6 S
(life timer) (software
indication)
AS ON
(option abbreviation) (option status)
ERR 0 0 0 0 0
(error) (error buffer)
OPT 36C8 B805 2401
(option) (12 digit option
code)
Fig.6.1
(service mode
indication)
5.2.2 Leaving SDM or SAM
To leave the SDM or SAM mode , push the stand-by button on
the remote control
Remark:After switching off and on bythemains switch , the set
remains in the SDM or SAM mode.
5.3 Initial states
The initial state after switching on in the SDM or SAM mode is:
System:
Below a more detailed information of each item is given
5.4.2 Life timer
The indication is in hexadecimal notation. Each hour the set is
switched on (not standby) the number is incremented by 1.
Also each time the set is switched on the number is
incremented by 1.
Page 8
8 L7.2E
5 Repair facilities
5.4.3 Software indication number.
For each software change this number will be changed.
5.4.4 Service mode indication.
The S indicates that the set is in SDM or SAM mode.
5.4.5 ERROR and ERROR buffer
(ERR refers to the "ERROR BUFFER")
00000 represent the contents of the so called "ERROR
BUFFER". This buffer consist of 5 digits. In each digit an
ERROR code can be displayed. The last five errors, are stored
in the EEPROM, and are shown in this buffer. An error will be
added to the buffer if this error differs from the last error in the
buffer. The last detected error is displayed on the most left
digit.
Example: Suppose the display shows: 3 4 1 3 1. This means
the last found error is error code 3; the last found error but one
is error code 4, etc.
Remark: The ERROR BUFFER is erased when the set is
switched from SDM or SAM in stand by , or via code 99 via
DST.(Dealer service Tool).
5.4.7 Option abbreviation and Option status.
To select another option abbreviation use the MENU UP/
DOWN buttons and to change the status use the MENU LEFT/
RIGHT buttons.
Elucidation:
With above items the option statuses stored in the EEPROM
can be changed.
This is necessary if the EEPROM is replaced by a fresh
EEPROM, because a fresh EEPROM is initial loaded with
default options and statuses by the microcomputer. The
options stored in the factory can differ per type and stroke
number. Therefore it is necessary to load the EEPROM with
the correct statuses These options with statuses are indicated
on a sticker glued on the CRT. For an example of the sticker
see table 6.1 (this table is valid for 21PT1663/00).
Table 6.1
Option abbreviation Status
AT ON
AV ON
The following error codes have been defined:
Error code Error description Possible defective
0 No error
1 Internal RAM error
of æC
2 General I2C error
3 EEPROM
Configuration error
(Checksum error)
4 I2C error audio
processor
5 I2C error TV
processor
6 EEPROM error ST24C04
7 I2C error PLL tuner PLL tuner
8 POR bit high (43-
IC7600)
omponent
IC7600
Set not correct
configured
MSP3410 on
NICAM panel
TDA8373/74
BA ON
BL ON
CO OFF
GM ON
HO ON
MT PH
PG ON
PR 99
SA ON
SB IN
SP ON
SS ON
SU ON
SY EW
TR ON
UH OFF
VI OFF
5.4.6 ERROR code indication via blinking stand by LED
The ERROR codes 2, 5 and 8 are also indicated via blinking of
the stand by LED. This is important if no OSD function or
picture is available.
The method is to show LED blinks as many as the error code.
Example: Error code 5 will result in five blinks ( 0.25 seconds
ON and 0.25 seconds OFF).
After this sequence the LED will be OFF for 3 seconds.
XT ON
(Table only valid for 21PT1663/00)
Loading a fresh EEPROM
– Switch on the TV via the power switch.
– Audio mute the TV (to get no big noise).
– Change the option statuses as indicated on the sticker on
theCRT.
– Put TV in stand by via the remote control.
– Switch on the TV again via the remote control.
Page 9

5 Repair facilities
9L7.2E
– Switch OFF the TV via the power switch
– Switch on the TV again via the power switch.
In table 2 all the possible option abbreviation with full option
name and possible statuses for "Europe" sets are listed. The
status can be "ON", "OFF" or can have another indication.
Table 2 : Options
Option abbr Option full name Status possibilities
AT Auto tuning system ON/OFF
AV AVL ON/OFF
BA Bass ON/OFF
BL Balance ON/OFF
CO Clock In Menu ON/OFF
GM Game mode ON/OFF
HO Hotel mode ON/OFF
MT Menu type PH = Philips
5.4.8 OPTION code
OPT is the abbreviation of OPTION, this abbreviation refers to
the following 12 digit hexadecimal option codes (36C8 B805
2401)
The option code can not be selected. It only give a quick
indication in hexadecimal form of the options settings of the
relevant set.
5.5 SAM (Service Alignment Mode)
Via the SAM, service software alignments can be executed.
When entering SAM a main menu is displayed Via the main
menu sub menus can be selected.
5.5.1 SAM main menu (see Fig. 6.2)
In the main menu the items of the basic software alignments
are indicated.
Theitems can be selected withthe UP(+)/DOWN(-) arrow keys
on the remote control. Entry into the sub menus is executed
with the VOL.(+)/VOL.(-) arrow keys.
SAM MAIN MENU
NB = National brand
MV = Magnavox
PG Program guide ON/OFF
PR Presets 99
59
79
SA Spatial ON/OFF
SB Sound Board IN = ITT NICAM
IT = ITT 2CS
MA = MONO ALL
MM = Multi Mono
SP Smart picture ON/OFF
SS Smart Sound Full ON/OFF
SU Surf ON/OFF
SY System Cluster EW = Europe West
EE = Europe East
EM = Europe
Manual
SS = Single System
TR Treble ON/OFF
UH UHF only ON/OFF
VI Virgin Mode ON/OFF
XT EXT 2 Available ON/OFF
S
AKB ON
TUN.FOA ON
TUN.FOB ON
EXT.FOA ON
EXT.FOB OFF
TUNER >
WHITE TONE >
GEOMETRY >
Fig.6.2
Below each item is explained.
5.5.2 AKB (Auto Kine Biasing)
With the option AKB the "black current loop" can be enabled
or disabled
ON =enabled, OFF = disabled.
5.5.3 TUNER Speed setting.
With the items TUN.FAO and TUN.FOB the speed ( time
constant) for internal signals is set. The speed can be set to
normal, slow or fast.
Table 3: Options for Tuner Speed settings
Page 10

10 L7.2E
5 Repair facilities
5.5.6 White tone
TUN.FOA TUN.FOB Speed
OFF OFF Normal
OFF ON Slow
ON X Fast
5.5.4 EXTERNAL A/V Speed setting
With the items EXT.FAO and EXT.FOB the speed ( time
constant) for external signals is set. The speed can be set
normal, slow and fast.
Table 4: Options for External AV Speed settings
EXT.FOA EXT.FOB Speed
OFF OFF Normal
OFF ON Slow
ON X Fast
5.5.5 Tuner
Below an example of the sub menu Tuner is shown.
Below an example of the white tone sub menu and the derived
"WARM", "COOL" and "NORMAL" sub menus are given. With
these menus the WARM, COOL and NORMAL colour
temperatures can be changed.
MAIN WHITE TONE MENU
S
WARM <
COOL <
NORMAL <
WARM TEMPERATURE SUB MENU
WARM S
RED 39
Tuner S
AGC 23
F-PLL 3
IF PLL L' 0
AFW 240 KHz
AFA 0
AFB 1
Item AGC:
For the setting of the item AGC see RF AGC adjustment
paragraph 8.1.4 of chapter 8.
Item IF-PLL, IF-PLL L ACCENT, AFW, AFA and AFB,
When the main signal processor IC TDA8373/74 is changed,
the IF-PLL and IF-PLL L ACCENT need to be realigned
GREEN 39
BLUE 25
COOL TEMPERATURE SUB MENU
COOL S
RED 39
GREEN 39
BLUE 25
NORMAL TEMPERATURE SUB MENU
NORMAL S
RED 39
GREEN 39
BLUE 25
Forthe settings of IF-PLL, IF-PLL L ACCENTandAFW see the
picture demodulator adjustments paragraph 8.1.5 of chapter 8.
Remark: AFA and AFB are adjusting indicators and therefore
not selectable.
Remark:
Only one of the 3 items (RED, GREEN or BLUE) will be
displayedonthescreen.Via"scrollingwiththeUP/DOWN keys
the items can be changed.
The item's red, green or blue can be changed by first pressing
the control left/right keys to highlight the desired setting. With
the desired setting high lighted, the user can increment or
decrement the setting by using the control up/down key. All
Page 11

5 Repair facilities
11L7.2E
changed data are stored into the EEPROM after returning to
the SAM main menu via the OK key.
The initial default value for all setting is 37.
The factory settings of the colour temperatures are:
WARM; R = 45, G = 32, B = 26
NORMAL; R = 37, G = X, B = Y
COOL; R = 37, G = 32, B = 31
Remark: In NORMAL position the values X (G) and Y (B) are
adjusted for 8500K colour temperature.
5.5.7 GEOMETRY
The geometry menu contains the following information:
S
HSH 25
VSL 32
VAM 23
– All software is suspended till the DST mode is left.
– The dealer mode status is left if the stand-by command is
received
5.7 Hotel-mode
Entering the hotel-mode :
– Select channel 38
– Push the menu button on the local keyboard (vol. + & vol.
- ) and the OSD-button of the RC simultaneously for 3
seconds.
– The screen shows the "HOTEL MODE SUB MENU "ON".
Via this menu the wanted blanked channels can be
selected.
Leaving the hotel mode :
– Same as entering the hotel mode.
– The screen shows the "HOTEL MODE SUB MENU "OFF".
Remarks:
– In the HOTEL mode the Installation menu cannot be
entered.
– When entering the hotel mode the maximum volume will
be the current value.
– The set will always switch to a selectable channel when
set is switched on.
SC 13
VSH 27
Uponenter into the picture geometry menu, thefirstitem will be
highlighted.
The value can be incremented or decremented by pressing the
control right or left key.
Therestof the parameters can be scrolled through by usingthe
control up/down keys.
All changed data will be stored into the EEPROM after
returning to the service main menu via the OK key.
Abbreviation explanation
– HSH - Horizontal shift
– VSL - Vertical linearity
– VAM - Vertical amplitude
– SC - S-correction
– VSH - Vertical shift
5.6 Use of Dealer Service Tool (DST)
With the SDM, under mentioned extra service features can be
executed
HOTEL MODE SUB MENU "ON"
38 HOTEL ON
EXIT >
HOTEL CHANNEL 38
HOTEL MODE SUB MENU " OFF "
38 HOTEL OFF
– Direct entering SDM via the "DEFAULT" button on the
DST.
– Direct entering SAM via the "ALIGN" button on the DST.
– Incase of no (OSD)picture theerror buffercan be readout
using the "BLINKING LED"procedure (see also paragraph
6.7) by pressing the "DIAGNOSE" button on the DST.
Remark:
– Entry of the SDM and SAM via the DST is possible in all
states, except from stand-by.
Remark: The Hotel mode can only be activated if the Hotel
mode option status (HO=ON), see table 2.
Page 12

12 L7.2E
5 Repair facilities
Page 13

Check:
- R3451 [A2]
- R3449 [A2]
No
Reference
[A1] Diagram
13L7.2E
THE TV. SET
SWITCH - ON
No picture
Sound OK
No Sound
No picture
Reaction on RC
Over voltage protection
Yes
>2v5?
Peak voltage
at pin 6 IC7520 [A1]
LED
No
No
ON ?
Continuously
is OK ?
Voltage
+13V, -13V (Lot)
<2v5?
Voltage
at pin 14 IC7520 [A1]
Check:
D6540, L5540 [A1]
"Take-over circuit"
No
No
Yes
Check:
LED Blinking?
(not error codes)
Yes
Check:
"Primary circuit sensing
"Feedback loop"
D6537, R3541 [A1]
Yes
No
LED reaction on RC
Check:
Heater voltage [A2]
Check:
+8V supply
FM / CVBS
Check:
Horz. cicuit
No
Check:
D6445 [A2]
TS7445 [A2]
mode?
Set in Hick-up
Check:
IC7401 [A2]
Vertical defl. problem
FET7518 [A1]
No
No
present?
Voltag on C2508 [A1]
Yes
Check:
R3500 [A1]
TS7518 [A1]
FUSE Item 1500 [A1]
Check:
+5V (supply control)
FUSE Item 1560 [A1]
Check:
No
IC7520? [A1]
Voltage at pin 1
R3510 [A1]
D6510 [A1]
Yes
Yes
IC7520? [A1]
Pulses at pin3
Check:
R3525 [A1]
R3517 [A1]
No
Replace IC7520 [A1]
FET7518 [A1]
No Sound
No picture
Reaction on RC
Yes
Check:
"Protection mode".
Set in "Stand-by" or
Stand-by circuit
+8V, VFL, Flyback
+13V (LOT), IC7541
Yes
Check:
D6445 [A2]
FET7518 [A1]
TS7445 on Shortcircuit [A2]
whiteSnowB/W
+160V
Check:
Tuner
Check:
Check:
Vertical
Check:
Horzontal
Check:
C 2205 [A3]
R3470 [A2]
+9V
Voltage
Pin 6 [A3]
Defl.circuit
IC 7401 [A2]
Defl.circuit
D 6441 [A2]
D 6445 [A2]
TS 7445 [A2]
R 3234 [A3]
R 3254 [A3]
D 6560 [A1]
IC 7541 [A1]
6 Fault finding, Block diagram
6 Fault finding, Block diagram
86532008_001.AI
120298
Page 14

PANELS
SYSTEM
-
AUDIO
DIFFERENT
C
MONO
-
MULTI
C
MONO
MULTI
A5
A5
0033
M 11
0130
7501-2B
7505‚7507
1501 7501-2A
A5
0030
0030
D
0130
0088
NICAM
0022
0033
0022
A5
A5
A5
M 9
AM
M 9
M 11
8
DET.
7511,7514
0030
0130
6
AUDIO OUTPUT
7402
TDA7056B (3WATT)
3
BASS
TRBLE
7508‚7510
12345
12345
+ R
8
AMPLIFIER
PROC.
˜˜˜
+8V
19
N C
MOD_L_IN1
+13V/+9V
123456789
0022
123456789
M 9
INT/EXT
+10V/14V
(A4- 48)
A3
3141
55
FM
AUDIO
7225_6F
7225 - 5E
1
A5
1101
14L7.2E
123456789
0033
1236789
4
M 11
SCL
LEFT_OUT
RIGHT_OUT
(A4 - 40)
(A4 - 38)
(A4 - 37)
CVBS EXT1 (A3-18)
2018161412
2119171513
SCART
CVBS - OUT(A3-29)
5
SDA
(A4 - 39)
BL TXT1 OSD(A3-27)
+8V
R TXT OSD(A3-26)
10
11
101112131415161718
CVBS_SOUND
MOD_L_IN2
MOD_R_IN2
(A3 - 34)
(A4-80)
864
10
97531
11
G TXT OSD(A3-25)
13141516171819
L - EXT 1
AV1/AV2/AVL
MONO/STROB/BG-L
(A3 - 31) IF
(A4 - 45)
(A4 - 43)
CHROM2-STATUS
MOD_L_IN1
2
B TXT OSD(A3-24)
LEFT OUT(A5-37)
SIF/FM
MOD_R_IN1
MOD_R_IN1
RIGHT OUT(A5-38)
SOUND-PROCESSING VIDEO-INTERFACE SOUND-INTERFACE
A 5
(A1 - 2)
(A3 - 21)
SDA
V-TUNE
(A3 - 33)
(A3 - 34)
VOLUME
(A5 - 51)
(A3 - 13)
SCL
0025
7620
BG-L
/
STOBE
/
MONO
(A5 - 43)
(A3 - 22)
SERVICE
DK
/
BG
-
or
-
L
/
BG
(A5 - 36)
(A3 - 40)
SDM
MODE
0024
EEPROM
SW
-
STR
-
BLACK
(A5 - 23)
(A3 - 80)
1670
RESET
7603
REMOTE
RECEIVER
CHROMA-2 / STATUS
RC5
+5 VD
C6
101112
101112
AVL
LL
2/
/
AV
EXT
STA
/
/
1 -
SID
AV
TREBLE
INT
(A5 - 52)
(A5 - 48)
(A5 - 45)
(A5 - 49)
X - TAL
7601
(NONTXT)
BASS
(A5 - 50)
HZ
12M
30
48K
13
13
(A3 - 12)
C3
+5 VD
C2
C1
525150494847464544434241394038
42414039383736353433323129
123456789
123456789
CONTROL
A4
6 Fault finding, Block diagram
(A4 - 54)
STANDBY
7681
28
151416
OCAL
L
(A2 - 9)
(A2 - 10)
VFL
FLYBACK
36
37
27
1718192021 32
1718192021
KEYBOARD
BS 1(A3 - 43)
(A3 - 35) CVBS - SOUND
(A3 - 27)
(A3 - 26)
OSD
OSD
_
_
TXT
TXT
_
_
R
BL
BS 2
STANDBY
(A3 - 43)
(A1 - 3)
Ω/3W
16
4
CONN
HEAD PHONE
- L
- R
+ L
EARTH
5
TREBLE
BASS
MONO_OUT
VOLUME
(A4- 49)
(A4- 50)
(A4- 51)
15
2
DET
˜˜˜
(A4 - 36) BG/L - D - BG/DK
(A3 - 25)
(A3 - 24)
OSD
OSD
_
_
TXT
TXT
_
_
B
G
333435
31
2223242526
LED
0028
SERVICE
(A4 - 54)
Ω/3W
16
123
6
SID/STA/LL'
(A4- 52)
5128
NC
302928
7600 (TXT)
23
24
0029
SAM
MODE
2130
SAA5297
252622
27
64K
TXT
-
CVBS
(A3 - 28)
MODULE
CRT
B
IF
/
UNER
T
A 3
V 3
7225 - 5B
(A5- 17)
(A5 - 18)
(A5 - 32)
(A5- 35)
(A5 - 34)
I F (A5 - 31)
+5.5V+9V
CHROMA
/
VIDEO
V15a V16a
7255
( Y )
28
Y
TDA8373/74
13
CVBS -OUT
+8Vb
40039011
CRT
G
0177
077
V 14V 13
27
7225 - 5C
TDA8373/74
V 11
11
TDA4665
V 4
(B - Y) _ OUT
17
-INT
CVBS - EXT2
CVBS -EXT1
CVBS -SOUND
7215
5260
R
G
V16b
R
7302/7307/7306
GRB
12354
12354
212219
20
GRB
DOS
Blank
R G B
G- Y
C
2
MATRIX
I
8
32
31
12
V 12
-(R-Y)
-(B-Y)
64uS
64uS
V 5
(R - Y) _ OUT
V6
293033
PAL/NTSC
DECODER
38 35 34
SY
10
11
CVBS
+8Vb
7200
+8Vb
3216
6
I 1
34
DET
VIDEO
7225 - 5A
TDA8373/74
48
49
˜˜˜
1015
11
10
I 2
6
3010
!
UV 1300
B
V16c
7301/7304/7305
V15b
V 15
18
23
25
38
7
9
-(R-Y)
ADD FOR SECAM
REF
7241
TDA8395
+8Va
4.43MHz
1275
I6
3202
6MHz
1207
5.5MHz
1206
7214
54
RF-AGC
1
92
354
25kV
B
V15c
7265
BLACK CURRENT
26
24
10
-(B-Y)
INDENT
CHROMA
1
16
7204
V2
or
6MHz
1208
6.5MHz
3217
˜
I 3
I 5
TUNE
V -
SCL
SDA
ONLY FST
(A4 - 13)
(A4 - 12)
3341
7303/7308/7309
BCI
BL-TXT-OSD
R-TXT_OSD
G
TXT_OSD
-
B
TXT_OSD
-
BLACK
STR-SW
-
SCL
SDA
SAND-CASTLE
3
3208
-1
SWITCH
AND
B
BS 1
ONLY VST
(A4 - 15)
+160V
CVBS-TXT
CVBS-OUT
BS 2
(A4 - 14)
15
FOCUS
EHT
V
VG2
0166
FF
FF
!
(A2 - 11)
(A4 - 27)
(A4 - 26)
(A4 - 25)
(A4 - 24)
(A4 - 23)
(A4 - 22)
(A4 - 21)
(A2 - 30)
(A4 - 28)
(A5 - 29)
(A5 - 33)
321
321
E H T
OCUS
F
VG2FOCUS
VG2
V
E H T
25K
!
54457445
2470
1
6470
+160V
L 1
(A5 - 18)
(A2- 1)
DISCHARGE
6420
!
!
P1
!!!
!
6445
BUT11AX
3447
L 2
3444
1571
5570
5545
6502/05
5500
SK 1
3442
7440
FLYBACK
+8V
2420
10
7
2508
AC
1500
3470
0055
7441
SANDCASTLE
!
SYNC
P11
T 1.6 A
5572
11
4
T 4 AL
220V˜
2
3443
L 3
3430 3440
3405
+10V / 14V
6570
DC
FF
FF
M 6
HORIZONTAL
+14V+95V
(A2 - 8)
DEFLECTION
SYNC - HORZ. & VERTICAL
A 2
7420/7421
MAINS SUPPLY
A1
7
1
BCI
(A2 - 6)
+13V
3450
2460
8
DEFECTION
HORZ.
3461 2469
2571
7518
STP6N60FI
(A2 - 6)
BCI
2
2450
37
42
7225 - 5D
TDA8374
P10
12
P3
D
G
7520
MC44603AP
(A2 - 7)
+95V
6550
(A3 - 11)
2462
G
SYNC
BAT
V
5573
S
P4
40
43
+95V
+5,5V
+9V
+13V
L 12
L 10
L 11
2452
6454
!
3450
9
10
VERTICAL
L 4
47
44
16kHz
41
S 1
SANDCASTLE
(A2 - 8)
(A3 -38)
+95A
5551
P13
6480
7480
2480
6481
!
3480
4
L 6
2443
L 7
6443
6449
!
!
3451
5
3449
6
3
M 4
263
TDA9302H
BCI
(A2 - 7)
7541
TDA8139
2
5
+
7
3415
DISCHARGE
(A1 - 1)
+8V
0V6 STB
2563
9
8
2
Op.Amp
1
3417
3
VERT.
1
F 3
-
P14
2562
4
DEFECTION
4
F 2
(A4 - 2)
RESET
P12
!
F 4
6468 2463
+13V
7401
F 1
46
50
HZ
G
50
3435
52
51
+5V
+14V
P15
120198
-13V
86532008_002.ai
2453
(A5 - 9)
VFL
3411
(A4 - 3)
STANDBY
2551
2561
6560
14
16
13
15
1
2
3518
!
3525
P8
3
UFFER
B
SC
O
!
6540
3541
2540
2537
3538 6537
3528
P9
2
7
8
14
3540
BAT
+95V
Adjust
V
4
Page 15

C
µ
µ
µ
µ
µ
µ
µ
D
AUDIO PANELS
2M9
P11
+10V / 14V
6570
!
1571
5570
10
!
5545
7
P1
6502/05
!!
0011
A1 MAINS SUPPLY
+10V / 14V
+8V
T 1.6 A
2508
AC
1500
6M11
5572
T 4 AL
2571
Mains
A4
CONTROL
11
4
+33V
Tuning voltage
3617
50-7225-5D
(for protection)
CIRCUIT
DISCHARGE
7420.7421
6420
DC
6610
!
7518
A3
!
IF & VIDEO
P10
12
P3
D
G
STP61160FI
P4
7520
+8VB
+8VA
3234
5203
5201
+95V
BAT
V
6550
5550
14
S
!
7520
MC44603AP
A2
6451
2 - 5445 (LOT)
LINE OUTPUT STAGE
+95A
5551
2551
16
3518
3525
3
BUFFER
Control
+8VC
P13
6560
IC
+8V
!
3447
3430
+14V
6540
A5
SOUND PROCESSING
+5V
P15
13
!
6537
3528
2
7541
14
4
+8V
2563
TDA8139
2561
15
A4
D
+5V
33 - 7600
19 - 7600
5601
CONTROL
P14
9
2
1
3541
P9
3540
STANDBY
RESET 1
2562
+8V
P12
8
6
4
2
+95V
Adjust
BAT
V
B
+160Va
Anode CRT
!
3341
FOCUS GRID
1-0166
+160V
6470
FOCUS
E H T (25kV)
2470
2
BAT
V
+95V
VG2 GRID
VG 2
+14V+95V
CRT PANEL
L 8
3470
!
5445
A2 SYNC - HORZ & VERTICAL DEFL
Filement CRT
0003
2-0166
3-0166
FF
FF
+13V
VG2FOCUS
3460
2460
9
BUT11AX
3442
L 2
7440
G
7441
40
10
DEFECTION
HORZ.
3443
L 3
16kHz
HOR
DRIVE
8
1
7
L 1
7445
3447
3444
L 4
3430
+8V
37
!
7225-5D
TDA8373/74
A3
3010
4003
TUNER
+5,5V
L 11
2452
6454
!
3450
3
BCI
Discharge (from A1)
50
42
{
INPUTS
Protection
+VB
!
9011
+9V
L 10
7480
6481
!
3480
4
2480
A2
200298
2 - 7401
4 - 7401
-13V
2453
(from 3-7401
vertical output,
see diagram A2)
86532008_003.AI
FRAME OUTPUT
+13V
L 12
6480
2443
L 7
6443
6449
!
!
3451
6
+13V
16
Protection
3449
VFL
37
{
INPUTS
5
7600 (µp)
A4
15L7.2E
6505
7600
0.5V / div DC
0.5V / div DC
5V / div AC
2508
P3
2
7541
P13
µC
5ms / div
5µs / div
1ms / div
7520
D
7518
SG
8
9
P14
P15
AUDIO
PANEL
(5- 7401)
F3
(3 - 7520)
P4
(52 - 7600)
C1
5V DC
P9
14
3
1
P4
V9
16
1
7255
5ms / div
(7- 7401)
F1
(7 - 5545)
P1
(1 - 7225 - 5E)
A1
(1 - 7401)
0.5V / div DC
F2
(S - 7518)
5ms / div
100V / div DC
P3
(55 - 7225 - 5E)
0.1ms / div
0.1V / div AC
A2
sk1
1500
P1
0024
SDM
0025
7620
6600
EEPROM
C1
Main panel (component side)
C6
C3
C5
C2
50
49
27
42
41
152
0028
SAM
26
0029
6 Fault finding, Block diagram
7241
V10
5ms / div
(3 - 7401)
20V / div DC
F4
5ms / div
(C - 7445)
10V / div DC
L1
(3445 / 3442)
20µs / div
100V / div DC
L2
(E- 7440)
20µs / div
2V / div DC
L3
(40 - 7225 - 5D)
20µs / div
2V / div DC
L4
(2M7)
20µs / div
2V / div DC
V14
(3 - 7520)
5µs / div
2V / div DC
P4
(50 - 7600)
C2
3445
L2
B
E
P6
10
7
P8
P11
6570
2571
2561
V7
161
V6
14
12
C
7445
7441
3540
L3
6444
2551
2448
2562
6550
6550
P10
2452
V14
V13
8
L7
V3
28113
7225
29
30
V4
V2
V5
6481
2480
A3
V1
15
405641
38
L4
S1
0077
1
5
V15
V11
V12
11
8
5
V8
5µs / div
(10 - 7520)
2V / div DC
P6
(49 - 7600)
5ms / div
1V / div DC
C3
B
E
C
L1
LOT
6454
2453
L6
I1
A1
6
F2
L11
6443
1
F4
2443
6449
357
L12
F3
F1
TUNER
7401
5µs / div
(7 - 7520)
1V / div DC
P8
(42 - 7600)
5ms / div
1V / div DC
C6
(13 - 7225 - 5B)
V1
0166
0004
V16a
B
R
G
V16c
V16b
CRT panel (track side)
5µs / div
(14 - 7520)
0.5V / div DC
P9
(30 - 7225 - 5B)
0.5µs / div
1V / div DC
V5
(38 - 7225 - 5B)
20µs / div
1V / div DC
V2
1
3
0322
8
0003
1
0177
5
170298
CL86532008_009.ai
V15bV15a
V15c
(12 - 7225)
5µs / div
0.5V / div DC
V12
(11 - 7225 - 5B)
20µs / div
0.5V / div DC
V6
(28 - 7225 - 5B)
20µs / div
1V / div DC
V3
(41 - 7225 - 5D)
S1
(Green)
V16b
(4M7)
V15a,b,c
(PAL)
3.5V DC
(3M7)
20µs / div
0.5V / div DC
V13
(11 - 7255)
V11
(29 - 7225 - 5B)
20µs / div
1V / div DC
V4
20µs / div
(6 - 7225 - 5A)
1V / div DC
I1
(Red)
20µs / div
20V / div DC
V16c
(Blue)
20µs / div
1V / div DC
V16a
s / div
20
1V / div DC
s / div
20
1V / div DC
s / div
20
0.5V / div DC
s / div
20
0.5V / div DC
s / div
20
1V / div DC
s / div
20
20V / div DC
s / div
20
20V / div DC
Page 16

(7 - 7520)
P8
5µs / div
(14 - 7520)
0.5V / div DC
P9
(C - 6550)
5µs / div
0.5V / div DC
P10
95V DC
(C - 6550)
P10
104V DC
(C - 6570)
16V DC
P11
(C - 6570)
P11
14.4V DC
(6 - 7541)
P12
2.1V DC
(6 - 7541)
P12
2V DC
(2 - 7541)
14.5V DC
P13
(2 - 7541)
P13
13.6V DC
(8 - 7541)
8V DC
P14
(8 - 7541)
P14
0.6V DC
(9 - 7541)
5V DC
P15
(9 - 7541)
P15
5V DC
(7 - 5545)
P1
(C - 6510)
5ms / div
100V / div DC
P2
(S - 7518)
5ms / div
5V / div DC
P3
(3 - 7520)
5µs / div
0.5V / div DC
P4
(3 - 7520)
5µs / div
2V / div DC
P4
5µs / div
2V / div DC
(1 - 7520)
P5
14V DC
(10 - 7520)
P6
5µs / div
(6 - 7520)
1V / div DC
P7
015_008.EPS
5µs / div
0.5V / div DC
16L7.2E
7 Diagrams and print lay-outs
7 Diagrams and print lay-outs
Page 17

9615C2
9616C3
9620C1
9628D3
9637C1
9643D2
9644D3
9647D2
9649C2
9650C3
9651C4
9658C1
9660C2
9663D2
9667D2
9677C2
9690D2
9691C3
9692C3
9693C3
9900B5
9901B5
9902D5
9903C5
9904D5
9905D5
9906D5
9907C5
M0 B3
M11 E4
M9 E3
*=chip
component
9103E4
9104E4
9107D4
9108E5
9109E4
9110E3
9111 E2
9112D5
9113C4
9115E4
9116E3
9118C3
9122E4
9123E4
9124E4
9125E4
9126D4
9131D5
9132B1
9133E3
9134E3
9135E3
9137E5
9138E5
9139D2
9141D3
9145D5
9147D5
9148D5
9202D4
9203C4
9206C3
9207C3
9208D3
9209C3
9210E4
9211D3
9212D3
9220D3
9221C3
9225C3
9229D2
9233D1
9235D3
9236D3
9237C3
9238D3
9240C4
9245D3
9246D3
9247C3
9248C3
9250D3
9251D3
9252D1
9261D3
9270C3
9313E1
9317D1
9334E2
9337E1
9341E2
9347E2
9370E1
9372E1
9377E1
9403B4
9404C5
9405C3
9406B5
9408C5
9410C4
9411B5
9413C5
9416C4
9417C2
9418D3
9419C4
9423C4
9424C4
9425C4
9426D3
9443D5
9448B4
9450A4
9454A5
9461B4
9462B4
9469C5
9500A2
9501A1
9505B2
9515A3
9518C3
9519C3
9520C2
9590C3
9601D3
9602C1
9603B1
9604D3
9605D2
9606E4
9607C2
9611D2
9613D1
9614D2
6455A5
6456A5
6461B4
6464B4
6468C5
6470B5
6480C4
6481C4
6502B2
6503B2
6504B2
6505B2
6507B3
6508A3
6510A2
6524A3
6537A3
6540A3
6550C3
6560B3
6570B3
6581C2
6583B4
6585C2
6586C2
6600C1
6610D1
6653C1
6661D2
6663A1
6690D2
6691C3
6692C3
6693C3
7001E3*
7002E3*
7003E3*
7100C3*
7101C3*
7115D5 *
7118E5 *
7200C4*
7204D3*
7214C4*
7215C4*
7220D3*
7225D4
7241D3
7255E3
7265C3*
7301E2
7302E2
7303E1
7304E2
7305E2
7306E2
7307E2
7308E1
7309E1
7401C5
7420D5*
7421C4*
7440C3*
7441A4
7445A4
7518B3
7520A3
7541C3
7581A4
7583B3*
7584B4*
7585C2*
7586C2*
7587C2*
7600C2
7601C2
7603C2*
7608D1*
7610D1*
7620C1
7644D3*
7655C1*
7681C2*
7682C2*
7683C2*
7684C2*
9001E4
9003E5
9006E4
9007D4
9008D2
9009E3
9010E3
9011E3
9013E4
9016D5
9018D5
9019D4
9020D3
9021D3
9023C3
9024E4
9025D4
9040E4
9100C4
9101C4
9102E3
4003E3*
4004D4*
4007D5*
4008D4*
4011E5*
4013E5*
4014E5*
4026E4*
4052D4*
4100B1*
4101E3*
4102B1*
4107B1*
4113C5 *
4116C4 *
4121D5*
4177E2*
4178E5*
4180C5*
4200E3*
4201E3*
4202D4*
4211D4*
4212D4*
4213D4*
4214C4*
4216C4*
4217B1*
4219D2*
4235C4*
4236C5*
4251E3*
4421C4*
4555C2*
4600C1*
4601C2*
4603C2*
4605C2*
4609C2*
4613D2*
4621D2*
4647C2*
4677E1*
4682C2*
4684C2*
4694C2*
4695C2*
4696C2*
5010E4
5128D4
5201C3
5202D4
5203E3
5206C3
5260D4
5370E1
5441A5
5442A4
5443A5
5445B4
5451A4
5456B4
5457B4
5458B4
5500B2
5515A3
5516B3
5540A3
5545B3
5550B3
5551C4
5553C3
5570B3
5571E3
5572B3
5573B3
5600D1
5601C1
5602C2
5603C2
5605C2
5620C1
6001E3
6002E3
6003E4
6016D5
6100C4
6101C4
6109D5
6110D5
6111 C3
6254E3
6265C4
6311E2
6321D2
6331D2
6332E1
6341E2
6347E2
6420C3
6440A4
6441A4
6443C5
6444B4
6445A4
6449C4
6454B4
3505B1
3506B2
3507B2
3510B2
3512A3 *
3513A3 *
3517A3 *
3518A3
3520A3 *
3521A3
3524A3 *
3525A3
3528A3
3529A3
3530A3
3532A3 *
3534A3 *
3536A3 *
3537A3 *
3538A3
3539A3
3540A3
3541A3
3542A2
3545B2
3546B3
3552C3*
3553C3*
3554C3*
3565C2*
3570B3*
3580C2*
3581C2*
3582C2*
3585B4
3586B4*
3587B3*
3588B4*
3589B3*
3590C2*
3591C2*
3593C2*
3601C1
3602D2
3603D1
3604C2*
3605C2*
3606C2*
3607C2*
3608D1
3610D1*
3612D1*
3613D1
3614D1*
3615E4
3616D1*
3617C3
3618C3
3621C1*
3622C1*
3623C1*
3624C1*
3625C1*
3628E3*
3629C1*
3630D1*
3632D2*
3633D2
3634D2
3636E3
3637E2
3640E2*
3641E2*
3644D2
3653D1*
3654D2*
3655D2
3656C1*
3657D2
3660D2*
3661D2*
3662D2*
3663C1*
3664D3*
3665D2*
3666D2*
3667C1*
3670C2
3671C1*
3674C2
3675C2
3676C2*
3681C2
3684C2*
3685C2
3686C2*
3688C2*
3689C2*
3690C2
3693C2*
3694C2*
3695C2*
3696C2*
3698C2*
3699D2*
4000E5*
4002E4*
3216C4*
3217C4*
3218C4*
3220C4
3221C4
3223D3
3224D3*
3225D3*
3227D4*
3229D4*
3234D3
3248E3*
3249D3*
3250D3*
3251D3
3252E3*
3253E3*
3254E3*
3265C3*
3266C3
3267C4
3273D4*
3280D3*
3311E2
3312E2*
3313E2*
3314D2
3315E2
3316D2
3317E2
3321E2*
3322E2*
3323E2*
3324E2
3325E2
3326E2
3327E2
3331E1*
3332E1*
3333E1*
3334E1
3335E2
3336E1
3337D1
3341E1
3342D1
3347E2
3371E1
3372E1
3374E2
3400E4
3401C5
3402C5
3403D4*
3404C5
3405E4*
3406C5
3407C5
3408E4*
3410D4*
3411C5
3412B5*
3413C5
3415C5*
3417C5*
3418B5
3420C4*
3421D4*
3422D4*
3423D4*
3430E4
3431A5
3432A5
3433D4
3434D4*
3435D4
3436C5
3437C4
3440C3*
3441C3*
3442A4
3443B4*
3444A4
3445A4
3446A4
3447B4
3448B4
3449B5
3450B4
3451B4
3456A5
3457A5
3458A5
3459A4
3460B5
3461C3*
3462B4
3470B5
3471A5
3480C4
3481C4
3490D4*
3491D4*
3500A2
3501A1
3503B2
3504B2
2607D2*
2608D2*
2610D1
2611D1
2613D1*
2615E4
2621C1*
2622C1*
2623C1*
2630D1
2639D2*
2644D2
2650D1*
2652D1*
2655C1
2660D2*
2661D2*
2663D3*
2664D2*
2666D2*
2670C1*
2671A1
2674C2*
2680C2*
2682C2*
2683C2*
2684C2*
2685C2*
2690C2*
2691C2*
2692C2*
2693C2*
2694C2*
2695C2*
3000E4*
3001E4
3002E4
3004E4*
3005E3*
3006E3*
3007E3
3008E3*
3009E3*
3010E3
3013E3
3015E3
3016D5
3020E5*
3022E5*
3040E4*
3100B1
3104C3
3105C3*
3106C3*
3107C3*
3108C4*
3114C1
3115C1
3121C5
3122C5
3123D5
3124D5*
3125D5
3126C3*
3127D5
3128D5
3129C3*
3130C3*
3141D3
3144D4*
3160D5
3161C5
3162D5
3163D5
3164D5
3165D5*
3166D5*
3167D5*
3168D5*
3169C4*
3170E5*
3178E5*
3179E5*
3180E5*
3181E5*
3185C1
3186C1
3187C1
3188C1
3191B1
3192B1
3193B1
3194E5
3195D5
3201D4*
3202D4*
3203D4
3204D5*
3205D4
3206C4*
3207C4
3208D3*
3209D4*
3210C4*
3211C4*
3214C4*
3215C4*
2222E3*
2224D4
2226D3
2240D3*
2241D3*
2242D3*
2248E3*
2249D3*
2251E3*
2252E3*
2254E3*
2260D3
2261C3*
2272D4*
2273D3*
2275D4*
2277D4*
2283C3*
2284C3*
2285C3*
2313E2*
2321E2*
2323E2*
2333E1*
2341E1
2342D1
2373E1
2401C5
2403D4
2406D4*
2409D4*
2410D4
2414C5
2420C3
2421D4
2422B2
2430D4
2434D4*
2436D4*
2437D4*
2440C3
2442A4 *
2443C4
2444A4
2445A4
2448B4
2450A5
2451A4
2452C4
2453C4
2456A5
2460B5
2461D3
2462A4
2463C5
2464B5*
2465B5*
2466C5*
2467C5*
2468C5*
2469A4
2470A5
2471A4
2476C5*
2480C4
2485B5*
2487C5*
2500A1
2502B2
2504B2
2505B2
2508A2
2509B3
2510B3
2517A3 *
2518B2
2520A3 *
2521A3 *
2522A3 *
2524A3 *
2529A3 *
2530A3
2531A3
2532A3 *
2533A3 *
2534A3 *
2537A3
2540A3
2541A3
2545B3
2550B4
2551B4
2553C2*
2554C2*
2560B3*
2561C3
2562B4
2563C2
2570B3*
2571C3
2572B3*
2580C2*
2582B4*
2583C2
2584C2
2601C1*
2602C1
0003E2
0004D1
0010C2
0011A2
0015D3
0020B1
0022B1
0024C1
0025C1
0026D1
0028D2
0029D2
0030B1
0044C5
0055A4
0066B5
0077D3
0088B1
0139A1
0166E1
0177E2
0231C5
0232B1
0233D1
0321E1
0322E1
1000E5
1015D4
1060C1
1061D1
1062D1
1063D1
1064A1
1100B1 *
1102D4
1103B1 *
1104D4
1105C1 *
1106B1 *
1107B1 *
1108C5 *
1109C5 *
1110D5*
1111 C5 *
1112D5*
1120B1 *
1121B1 *
1122B1 *
1123B1 *
1206C3
1207C4
1208C4
1209E4
1275D4
1277D4
1500A2
1560C3
1571B3
1670B1
1681C2
2008E5*
2010D4
2011E4*
2016D5
2042E4*
2043E4*
2104E5
2105D5
2108D4
2110D5
2115B1
2116B1
2117C4 *
2120D5
2121D5
2124C1*
2125C1*
2128D4*
2130D4*
2144D4
2145D5*
2161D5
2163C1
2164C1
2166C5*
2167D5
2168C5*
2169C5*
2170E5
2171E5
2180C5*
2198B1
2199B1
2200D5*
2201D4*
2202D4
2203D4*
2205E3
2209D4*
2211D4
2212D4*
2213D4*
2214C1*
2215D4*
2217C4
2218D4*
A
B
C
D
E
2221E3*
170398
015_006.EPS
5
17L7.2E
4
3
2
1
7 Diagrams and print lay-outs
Page 18

9615C2
9616C3
9620C1
9628D3
9637C1
9643D2
9644D3
9647D2
9649C2
9650C3
9651C4
9658C1
9660C2
9663D2
9667D2
9677C2
9690D2
9691C3
9692C3
9693C3
9900B5
9901B5
9902D5
9903C5
9904D5
9905D5
9906D5
9907C5
M0 B3
M11 E4
M9 E3
*=chip
component
9103E4
9104E4
9107D4
9108E5
9109E4
9110E3
9111 E2
9112D5
9113C4
9115E4
9116E3
9118C3
9122E4
9123E4
9124E4
9125E4
9126D4
9131D5
9132B1
9133E3
9134E3
9135E3
9137E5
9138E5
9139D2
9141D3
9145D5
9147D5
9148D5
9202D4
9203C4
9206C3
9207C3
9208D3
9209C3
9210E4
9211D3
9212D3
9220D3
9221C3
9225C3
9229D2
9233D1
9235D3
9236D3
9237C3
9238D3
9240C4
9245D3
9246D3
9247C3
9248C3
9250D3
9251D3
9252D1
9261D3
9270C3
9313E1
9317D1
9334E2
9337E1
9341E2
9347E2
9370E1
9372E1
9377E1
9403B4
9404C5
9405C3
9406B5
9408C5
9410C4
9411B5
9413C5
9416C4
9417C2
9418D3
9419C4
9423C4
9424C4
9425C4
9426D3
9443D5
9448B4
9450A4
9454A5
9461B4
9462B4
9469C5
9500A2
9501A1
9505B2
9515A3
9518C3
9519C3
9520C2
9590C3
9601D3
9602C1
9603B1
9604D3
9605D2
9606E4
9607C2
9611D2
9613D1
9614D2
6455A5
6456A5
6461B4
6464B4
6468C5
6470B5
6480C4
6481C4
6502B2
6503B2
6504B2
6505B2
6507B3
6508A3
6510A2
6524A3
6537A3
6540A3
6550C3
6560B3
6570B3
6581C2
6583B4
6585C2
6586C2
6600C1
6610D1
6653C1
6661D2
6663A1
6690D2
6691C3
6692C3
6693C3
7001E3*
7002E3*
7003E3*
7100C3*
7101C3*
7115D5 *
7118E5 *
7200C4*
7204D3*
7214C4*
7215C4*
7220D3*
7225D4
7241D3
7255E3
7265C3*
7301E2
7302E2
7303E1
7304E2
7305E2
7306E2
7307E2
7308E1
7309E1
7401C5
7420D5*
7421C4*
7440C3*
7441A4
7445A4
7518B3
7520A3
7541C3
7581A4
7583B3*
7584B4*
7585C2*
7586C2*
7587C2*
7600C2
7601C2
7603C2*
7608D1*
7610D1*
7620C1
7644D3*
7655C1*
7681C2*
7682C2*
7683C2*
7684C2*
9001E4
9003E5
9006E4
9007D4
9008D2
9009E3
9010E3
9011E3
9013E4
9016D5
9018D5
9019D4
9020D3
9021D3
9023C3
9024E4
9025D4
9040E4
9100C4
9101C4
9102E3
4003E3*
4004D4*
4007D5*
4008D4*
4011E5*
4013E5*
4014E5*
4026E4*
4052D4*
4100B1*
4101E3*
4102B1*
4107B1*
4113C5 *
4116C4 *
4121D5*
4177E2*
4178E5*
4180C5*
4200E3*
4201E3*
4202D4*
4211D4 *
4212D4*
4213D4*
4214C4*
4216C4*
4217B1*
4219D2*
4235C4*
4236C5*
4251E3*
4421C4*
4555C2*
4600C1*
4601C2*
4603C2*
4605C2*
4609C2*
4613D2*
4621D2*
4647C2*
4677E1*
4682C2*
4684C2*
4694C2*
4695C2*
4696C2*
5010E4
5128D4
5201C3
5202D4
5203E3
5206C3
5260D4
5370E1
5441A5
5442A4
5443A5
5445B4
5451A4
5456B4
5457B4
5458B4
5500B2
5515A3
5516B3
5540A3
5545B3
5550B3
5551C4
5553C3
5570B3
5571E3
5572B3
5573B3
5600D1
5601C1
5602C2
5603C2
5605C2
5620C1
6001E3
6002E3
6003E4
6016D5
6100C4
6101C4
6109D5
6110D5
6111 C3
6254E3
6265C4
6311E2
6321D2
6331D2
6332E1
6341E2
6347E2
6420C3
6440A4
6441A4
6443C5
6444B4
6445A4
6449C4
6454B4
3505B1
3506B2
3507B2
3510B2
3512A3 *
3513A3 *
3517A3 *
3518A3
3520A3 *
3521A3
3524A3 *
3525A3
3528A3
3529A3
3530A3
3532A3 *
3534A3 *
3536A3 *
3537A3 *
3538A3
3539A3
3540A3
3541A3
3542A2
3545B2
3546B3
3552C3*
3553C3*
3554C3*
3565C2*
3570B3*
3580C2*
3581C2*
3582C2*
3585B4
3586B4*
3587B3*
3588B4*
3589B3*
3590C2*
3591C2*
3593C2*
3601C1
3602D2
3603D1
3604C2*
3605C2*
3606C2*
3607C2*
3608D1
3610D1*
3612D1*
3613D1
3614D1*
3615E4
3616D1*
3617C3
3618C3
3621C1*
3622C1*
3623C1*
3624C1*
3625C1*
3628E3*
3629C1*
3630D1*
3632D2*
3633D2
3634D2
3636E3
3637E2
3640E2*
3641E2*
3644D2
3653D1*
3654D2*
3655D2
3656C1*
3657D2
3660D2*
3661D2*
3662D2*
3663C1*
3664D3*
3665D2*
3666D2*
3667C1*
3670C2
3671C1*
3674C2
3675C2
3676C2*
3681C2
3684C2*
3685C2
3686C2*
3688C2*
3689C2*
3690C2
3693C2*
3694C2*
3695C2*
3696C2*
3698C2*
3699D2*
4000E5*
4002E4*
3216C4*
3217C4*
3218C4*
3220C4
3221C4
3223D3
3224D3*
3225D3*
3227D4*
3229D4*
3234D3
3248E3*
3249D3*
3250D3*
3251D3
3252E3*
3253E3*
3254E3*
3265C3*
3266C3
3267C4
3273D4*
3280D3*
3311E2
3312E2*
3313E2*
3314D2
3315E2
3316D2
3317E2
3321E2*
3322E2*
3323E2*
3324E2
3325E2
3326E2
3327E2
3331E1*
3332E1*
3333E1*
3334E1
3335E2
3336E1
3337D1
3341E1
3342D1
3347E2
3371E1
3372E1
3374E2
3400E4
3401C5
3402C5
3403D4*
3404C5
3405E4*
3406C5
3407C5
3408E4*
3410D4*
3411C5
3412B5*
3413C5
3415C5*
3417C5*
3418B5
3420C4*
3421D4*
3422D4*
3423D4*
3430E4
3431A5
3432A5
3433D4
3434D4*
3435D4
3436C5
3437C4
3440C3*
3441C3*
3442A4
3443B4*
3444A4
3445A4
3446A4
3447B4
3448B4
3449B5
3450B4
3451B4
3456A5
3457A5
3458A5
3459A4
3460B5
3461C3*
3462B4
3470B5
3471A5
3480C4
3481C4
3490D4*
3491D4*
3500A2
3501A1
3503B2
3504B2
2607D2*
2608D2*
2610D1
2611D1
2613D1*
2615E4
2621C1*
2622C1*
2623C1*
2630D1
2639D2*
2644D2
2650D1*
2652D1*
2655C1
2660D2*
2661D2*
2663D3*
2664D2*
2666D2*
2670C1*
2671A1
2674C2*
2680C2*
2682C2*
2683C2*
2684C2*
2685C2*
2690C2*
2691C2*
2692C2*
2693C2*
2694C2*
2695C2*
3000E4*
3001E4
3002E4
3004E4*
3005E3*
3006E3*
3007E3
3008E3*
3009E3*
3010E3
3013E3
3015E3
3016D5
3020E5*
3022E5*
3040E4*
3100B1
3104C3
3105C3*
3106C3*
3107C3*
3108C4*
3114C1
3115C1
3121C5
3122C5
3123D5
3124D5*
3125D5
3126C3*
3127D5
3128D5
3129C3*
3130C3*
3141D3
3144D4*
3160D5
3161C5
3162D5
3163D5
3164D5
3165D5*
3166D5*
3167D5*
3168D5*
3169C4*
3170E5*
3178E5*
3179E5*
3180E5*
3181E5*
3185C1
3186C1
3187C1
3188C1
3191B1
3192B1
3193B1
3194E5
3195D5
3201D4*
3202D4*
3203D4
3204D5*
3205D4
3206C4*
3207C4
3208D3*
3209D4*
3210C4*
3211C4*
3214C4*
3215C4*
2222E3*
2224D4
2226D3
2240D3*
2241D3*
2242D3*
2248E3*
2249D3*
2251E3*
2252E3*
2254E3*
2260D3
2261C3*
2272D4*
2273D3*
2275D4*
2277D4*
2283C3*
2284C3*
2285C3*
2313E2*
2321E2*
2323E2*
2333E1*
2341E1
2342D1
2373E1
2401C5
2403D4
2406D4*
2409D4*
2410D4
2414C5
2420C3
2421D4
2422B2
2430D4
2434D4*
2436D4*
2437D4*
2440C3
2442A4 *
2443C4
2444A4
2445A4
2448B4
2450A5
2451A4
2452C4
2453C4
2456A5
2460B5
2461D3
2462A4
2463C5
2464B5*
2465B5*
2466C5*
2467C5*
2468C5*
2469A4
2470A5
2471A4
2476C5*
2480C4
2485B5*
2487C5*
2500A1
2502B2
2504B2
2505B2
2508A2
2509B3
2510B3
2517A3 *
2518B2
2520A3 *
2521A3 *
2522A3 *
2524A3 *
2529A3 *
2530A3
2531A3
2532A3 *
2533A3 *
2534A3 *
2537A3
2540A3
2541A3
2545B3
2550B4
2551B4
2553C2*
2554C2*
2560B3*
2561C3
2562B4
2563C2
2570B3*
2571C3
2572B3*
2580C2*
2582B4*
2583C2
2584C2
2601C1*
2602C1
0003E2
0004D1
0010C2
0011A2
0015D3
0020B1
0022B1
0024C1
0025C1
0026D1
0028D2
0029D2
0030B1
0044C5
0055A4
0066B5
0077D3
0088B1
0139A1
0166E1
0177E2
0231C5
0232B1
0233D1
0321E1
0322E1
1000E5
1015D4
1060C1
1061D1
1062D1
1063D1
1064A1
1100B1 *
1102D4
1103B1 *
1104D4
1105C1 *
1106B1 *
1107B1 *
1108C5 *
1109C5 *
1110D5*
1111 C5 *
1112D5*
1120B1 *
1121B1 *
1122B1 *
1123B1 *
1206C3
1207C4
1208C4
1209E4
1275D4
1277D4
1500A2
1560C3
1571B3
1670B1
1681C2
2008E5*
2010D4
2011E4*
2016D5
2042E4*
2043E4*
2104E5
2105D5
2108D4
2110D5
2115B1
2116B1
2117C4 *
2120D5
2121D5
2124C1*
2125C1*
2128D4*
2130D4*
2144D4
2145D5*
2161D5
2163C1
2164C1
2166C5*
2167D5
2168C5*
2169C5*
2170E5
2171E5
2180C5*
2198B1
2199B1
2200D5*
2201D4*
2202D4
2203D4*
2205E3
2209D4*
2211D4
2212D4*
2213D4*
2214C1*
2215D4*
2217C4
2218D4*
2221E3*
110398
015_007.EPS
1
18L7.2E
2
34
5
7 Diagrams and print lay-outs
A
B
C
D
E
Page 19

015_009.EPS
19L7.2E
(3 - 7401)
F4
(5- 7401)
F3
(1 - 7401)
F2
(7- 7401)
F1
(C - 6443)
(C - 6454)
L11
5V DC
L12
(40 - 7225 - 5D)
L4
13V DC
5ms / div
10V / div DC
5ms / div
20V / div DC
5ms / div
0.5V / div DC
5ms / div
0.5V / div DC
20µs / div
2V / div DC
7 Diagrams and print lay-outs
(E- 7440)
L3
(3445 / 3442)
L2
(C - 7445)
L1
(41 - 7225 - 5D)
S1
20µs / div
2V / div DC
20µs / div
2V / div DC
20µs / div
100V / div DC
20µs / div
1V / div DC
Page 20

(12 - 7225)
V12
(3M7)
20µs / div
0.5V / div DC
V13
(2M7)
20µs / div
1V / div DC
V14
(4M7)
20µs / div
1V / div DC
V15
20µs / div
1V / div DC
(6 - 7225 - 5A)
I1
20µs / div
(IF - Tuner)
1V / div DC
I2
20µs / div
(1 - Tuner)
0.2V / div AC
I3
20µs / div
(1 - Tuner)
0.5V / div DC
I4
(2 - Tuner)
only FST tuner
I5
2V DC
015_010.EPS
(16 - 7241)
V7
(PAL)
(11 - 7225 - 5B)
V6
3.5V DC
(30 - 7225 - 5B)
V5
(29 - 7225 - 5B)
V4
(28 - 7225 - 5B)
V3
(38 - 7225 - 5B)
V2
20µs / div
0.5V / div DC
20µs / div
0.5V / div DC
(11 - 7255)
20µs / div
0.5V / div DC
V11
(14 - 7255)
20µs / div
1V / div DC
V10
(16 - 7255)
20µs / div
1V / div DC
V9
20µs / div
0.5V / div DC
20µs / div
0.5V / div DC
20µs / div
0.5V / div DC
20L7.2E
(13 - 7225 - 5B)
V1
(5 - 7255)
20µs / div
1V / div DC
V8
20µs / div
1V / div DC
7 Diagrams and print lay-outs
Page 21

21L7.2E
C1 (52 - 7600)
5V DC
(50 - 7600)
C2
5ms / div
1V / div DC
C3 (49 - 7600)
5ms / div
1V / div DC
(with RC5 signal)
C4 (1 - 1670)
(41 - 7600)
5ms / div
1V / div DC
C5
(42 - 7600)
0.5µs / div
1V / div DC
C6
0.5µs / div
1V / div DC
7 Diagrams and print lay-outs
Page 22

015_012.EPS
22L7.2E
A7, A8, A9, A10
(Video out)
A6
(Audio out)
A5
(Audio out)
A4
(15 - 7225 - 5E)
A3
(55 - 7225 - 5E)
A2
1ms / div
0.1V / div DC
20µs / div
1V / div DC
0.5ms / div
1V / div DC
0.5ms / div
1V / div DC
0.5ms / div
1V / div DC
1ms / div
5V / div AC
7 Diagrams and print lay-outs
(1 - 7225 - 5E)
A1
0.1ms / div
0.1V / div AC
Page 23

A
100398
015_004.EPS
9347A2
9370B1
9372B1
9377B2
3
2
3
2
*=chipcomponent
1
7308B1
7309A1
9313B1
9317A1
9334A3
9337B1
9341B3
9347A2
6347B3
7301B3
7302B3
7303A1
7304B3
7305B2
7306B3
7307B3
3374B2
4677B1*
5370B1
6311A2
6321A3
6331A3
6332A1
6341B3
2
3335B3
3336A1
3337A1
3341A1
3342A1
3347B3
3371B1
3372B1
3324A3
3325B3
3326A3
3327A3
3331B1*
3332B1*
3333B1*
3334A1
3313B3*
3314A3
3315A3
3316A2
3317A2
3321B3*
3322B3*
1
1
2321B3*
3323B3*
3
2323B3*
2333A1 *
2341B1
2342A1
2373B2
3311B3
3312B3*
3313B3*
B
100398
015_005.EPS
9347A2
9370B1
9372B1
9377B2
*=chipcomponent
1
7308B1
7309A1
9313B1
9317A1
9334A3
9337B1
9341B3
9347A2
6347B3
7301B3
7302B3
7303A1
7304B3
7305B2
7306B3
7307B3
3374B2
4677B1*
5370B1
6311A2
6321A3
6331A3
6332A1
6341B3
2
3335B3
3336A1
3337A1
3341A1
3342A1
3347B3
3371B1
3372B1
3324A3
3325B3
3326A3
3327A3
3331B1*
3332B1*
3333B1*
3334A1
3313B3*
3314A3
3315A3
3316A2
3317A2
3321B3*
3322B3*
3323B3*
3
2321B3*
2323B3*
2333A1 *
2341B1
2342A1
2373B2
3311B3
3312B3*
3313B3*
23L7.2E
A A
B B
A
A428 A 2
A399 A 5
A390 A 4
A382 F 4
A381 B 3
A380 E 5
A379 C 1
A378 G 2
A377 F 3
A376 E 4
A375 D 2
A374 E 3
A373 D 3
A372 C 3
A343 B 2
A342 B 3
+200Va
A399A390
3341
10R
22u/250V
2342
100n
2341
A280
220k
3342
AQUADAG
2 0321
0004
A302 G 2
A301 G 2
A300 D 5
A296 D 4
A288 D 2
A287 D 2
A056 A 2
9372 E 5
9370 E 5
9341 H 2
7309 A 3
7308 B 3
7303 B 2
7302 D 2
7301 G 2
6347 H 3
6341 H 2
6332 B 3
A341 A 3
A340 A 3
A334 A 4
A319 H 1
A285 C 1
A282 C 3
A281 C 4
A280 A 5
7307 D 3
7306 D 3
7305 F 3
7304 G 3
451 6723
200V
6331 A 3
6321 D 3
6311 G 3
5370 E 5
3374 E 5
3372 E 4
3371 E 4
3347 H 3
3342 A 5
3341 A 4
A334
1N4148
+200Va +200Va
+200Va
6331
220R
3336
15k
3334
CRT
183V
A
A428
7309
BF422
V15a
1k5
3337
116V8
121V
A056
2V1
B
3337 A 3
3336 A 3
3335 B 3
3334 A 2
3333 C 2
3332 B 2
3331 B 2
3327 D 3
3326 C 3
3325 E 3
3324 C 2
3323 E 2
3322 E 2
3321 D 2
3317 G 3
3316 F 3
3315 H 3
3314 F 2
3313 H 2
3312 G 2
3311 G 2
2373 F 5
2342 A 5
2341 A 5
2333 B 2
2323 E 2
2321 H 2
2313 G 2
0322 D 6
0322 B 4
0322 D 4
0322 D 5
0322 C 4
0322 D 5
0322 B 4
0322 D 5
0322 D 6
0321 B 4
0321 D 5
0321 C 4
0321 D 5
0321 D 5
0321 D 4
0321 B 4
0321 A 5
0321 D 6
0177 C 1
0166 H 4
0004 A 5
0003 H 5
7 Diagrams and print lay-outs
V16a
6332
A340
7303
BF422
3 0321
or
BAV21
7308
BF423
1V8
B
11 0322
B
B
V16b
A342A341
5V1
*
A343
1k
3331
G
6 0322
or
2333
*
0003B2
9 0321
A381
330R
3335
3332
0004A1
03228
0166B1
R
03217
or
A282
47R
3333
A379
0177B3
+200Va
0003B2
0004A1
0166B1
0177B3
0233A1
0321B2
0322A2
0233A1
0321B2
0322A2
2313B3*
C
FOCUS
A281
+200Va
C
V16c
FF FF Vg1 Vg2
A372
220R
3326
183V
0177
TO
1010
032212
03211
03221
03227
or
03225
or
03229
or
032210
or
7307
15k
3324
A285
5
0077
03218
03216
03215
03214
1k5
3327
BF422
115V
118V
V15b
4
OF
A
D
6321
BAV21
A373
7302
BF422
2V1
A288
G
321
A3
D
A296
Video
E
220p
270P
270P
430R
17" 21"
150p
180p
220p
470R
2313
3312
2323
2333
1K5
3374
(RES)
9370
*
5370
A300
*
3372
*
3371
A374
7306
BF423
5V1
A287A301
*
2323
*
1V8
3322
A375
1k
3321
Processing
A380
A376
E
+200Va
330R
3325
47R
3323
33n
2373
9372
+200Va+200Va
A382
F
430R
470R
3322
15k
F
430R
470R
3332
A377
220R
3316
3314
B
G
25KVEHT
56u22u5370
2R71R3372
2R71R3371
FOCUS
0003
Vg2
200V
FL_A
0166
GND_LOT
1k5
3317
6311
BAV21
7305
BF422
120V
183
124V
7301
V15c
2V1
A302
R
BF422
1V8
G
7304
BF423
*
A378
5V1
2313
*
1k
3311
3312
2313B3*
H
1
1
A2
2
3
TO 0066 OF Line-output
330R
1K
3315
3347
9341
RES
47R
6341
3313
RES
2321
H
015_013.EPS
6347
BZX79C-8V2
BLACK_CURRENT
A319
V16c (Red)
V16b (Green)
V16a (Blue)
(Bleu)V15b (Green)V15a (Blue)
V15c
20V / div DC
20V / div DC
20V / div DC
1V / div DC 1V / div DC 1V / div DC
Page 24

015_014.EPS
24L7.2E
7 Diagrams and print lay-outs
Page 25

3229B1*
3230B1*
3233B1*
3234B1*
3235A1 *
3238B1*
3239B1*
3240A1 *
3242A1 *
3243B1*
3244B1*
3246B2
3247B1
3248B1*
3249B3
3250B2
3251B3*
3252B3*
3253B3*
3254B2
4200B2*
4201A2 *
4203B2*
4204B2*
4205B2*
4206B2*
4207B2*
4209B2*
4211B3*
4214B2*
4220B1*
4221B1*
4222B1*
4223B1*
4233A1 *
5201B2*
5202B2
5203B1
5204A1
5205A2
5206B2
5207B2
6201B2
6202B2
6204A1
6205B1
6206B3
6207B3
7201B2
7202A1
7203B1
7204B3
7205B2*
7207B2*
7208B2*
7209B1*
7210B2*
7211A2*
7212A2 *
7214B1
7215B2*
7216B2*
7220B3
9200B1
9201B2
9202B2
9205B3
9206A2
9207A2
9208B1
9209A2
9210B1
9211B1
9212B1
9213B3
9214A2
9215B2
9216B1
9217B2
9220B2
9221B3
9223B1
9224B2
9257B3
0022B3
0033B1
0130B3
1202B2
1203B2
1204A2
2201B2*
2202B2*
2203B2
2206B2*
2207B2*
2208A2
2209A1 *
2210B2*
2211A1*
2212A1 *
2213A2 *
2214A2 *
2215A2 *
2216A1 *
2217A1 *
2220A1 *
2221A1 *
2224A2 *
2225A2 *
2226A2 *
2227A1 *
2228A2
2229B1
2230A1
2231A1 *
2232A1 *
2234A1
2235A1 *
2236A1 *
2237B2*
2238B2*
2239A1 *
2240A1 *
2241A1
2242A1 *
2243A1 *
2244A1 *
2245B1
2246B1*
2247B1*
2248B1
2249B1*
2250B1
2251B1*
2252A1
2253B1*
2254B1*
2255A2
2256B3*
2257B3
2260A1
2261A2
2262A2
2263A2
2264B3
2265B3*
2266B1*
2267B1*
2268B1
2271B3*
2272B3*
2273B1*
2274A1 *
2276A1 *
2277A1 *
2278A1 *
2279A2 *
2280A1 *
2281A1 *
3201B2*
3202B2*
3203B2*
3207B2*
3211B2*
3213B3
3214B2*
3215B2*
3216B1
3217B1
3218A2 *
3219A2 *
A
B
*=chipcomponent
3220A2 *
3221A2 *
3222B2*
3223A2 *
3224A1 *
3227A1 *
3228B2*
170398
015_008.EPS
25L7.2E
1
2
3
A
B
3
2
1
7 Diagrams and print lay-outs
A
100398
015_003.EPS
9503B1
9504B3
9505B3
9506B2
9507B2
9508A2
9510B2
9514B1
3
7507B1
7508B2
6503B2
6504B3
3532B2
3533B2
9515B3
7509B2
7510B2
7511A1
7512A1
7513A1
7514A1
7515A2
9501B1
6505B3
7220B3
7501B1
7502B3
7503B2
7504B2
7505A1
7506A1
3534B3
3536B3
3537B3
3539B2
3540B2
5501B1
6501B1
6502B2
2
3522A2
3523A2
3524A2
3525B2
3526B2
3527B2
3528B2
3529B2
3530B2
3531A2
3502B2
3503B2
3504B2
3505B2
3506B1
3507B2
3508B1
3509A1
3510B1
3511A1
2517B3
2518B3
2519B3
2520B3
2521B2
2522B1
2523B1
2524B1
2525A2
3501B2
1
2507A1
2508A2
2509A1
2510A1
2511B2
2512B2
2513A2
2514B2
2515B3
2516B3
0022B3
0033B1
0130B3
1501B2
2501B2
2502B1
2503B1
2504B1
2505A1
B
2506A1
Page 26

015_015.EPS
26L7.2E
7 Diagrams and print lay-outs
Page 27

8 Electrical adjustments
8 Electrical adjustments
Note:
Unless stated otherwise, the supply voltage used is:
220V to 240V +/- 10%, 50 - 60 Hz +/- 5%.
Voltage and wave forms are measured in respect to earth.
Remarks:
– Never use the heatsink as earth.
– Where in the adjustment a pattern generator is mentioned,
a colour pattern generator PM5418 has been used with an
RF output voltage of 1mV.
– For some adjustments the set has to be put in the SAM
(Service Alignment Mode).
– When in the text "Enter SAM" is mentioned proceed as
follows:
– Enter SAM by Dealer Service Tool (button "ALIGN"), or via
short-circuit the service pins 0028 and 0029 on the main
PCB while switching on the set via the mains switch.
– The SAM menu is displayed when the SAM mode is
entered (see also chapter 5).
8.1 Settings on the main chassis panel
8.1.1 (95V supply voltage (17", 21" )
– Connect a multi meter (DC) across C2551.
– Set brightness and contrast to minimum
– Tune to a colour-bar test signal
– Apply a colour bar pattern.
– Adjust potentiometer R3540 to:
• 96.7V +/- 1V for 21" sets
• 100V +/- 1V for 17" sets.
8.1.2 Geometry adjustments (software adjustment)
– Apply a cross hatch pattern
– Enter SAM.
– Enter into GEOMETRY menu.
– The value of the geometry settings can be decrement or
increment by pressing the right or left key on the remote
control.
Remark: Before doing the geometry alignment HSH,VSH and
VAM, set first item VS (vertical slope) to 25 and SC (Vertical Scorrection) to 13 for 21" and to 15 for 17".
* Horizontal centring
Select item HSH for horizontal shift.
* Vertical centring
Select item VSH for vertical shift
* Picture height
Select item VAM for vertical amplitude .
8.1.3 Focusing
27L7.2E
– Enter into TUNER menu, select item AGC for RF AGC
adjustment.
– Connect a multi-meter (DC) at pin 1 of the tuner.
– The "AGC" value can be increment or decrement by
pressing the remote control right or left key. Adjust so that
the voltage at pin 1 of the tuner is 5V ( 0.5V DC
8.1.5 Picture demodulator adjustment.
– Enter SAM .
– Enter into TUNER menu
– Connect a signal generator (PM5326) to pin 11 of the tuner
* IF-PLL setting (for all versions)
– Set generator signal to 38.9MHz (negative modulation).
– Set AFW = 80 and adjust IF PLL until AFA = 1 and AFB is
just switching from 1 to 0 or 0 to 1.
* IF-PLL L ACCENT setting
– Set generator signal to 33.9MHz (positive modulation) in
Band I & System L for Mono BGLI version
– Set generator signal to 34.0MHz (positive modulation) in
Band I & System L for Nicam BGLI version.
– Set AFW = 80 and adjust IF PLL ACCENT until AFA = 1
and AFB is just switching from 1 to 0 or 0 to 1.
Remark: For IF PLL ACCENT adjustment, the set has to be
tuned on system France, VHF 1 and varicap voltage <9V.
8.2 Vg2 and white-D settings
8.2.1 Vg2 cut off alignment
– Apply a black picture pattern.
– Connect an oscilloscope to the picture tube cathodes for
red, green and blue. Set the oscilloscope to DC 50V/Div
and 2ms/Div.
– Measure the DC level of the measuring pulses at the end
of the frame blanking (see Fig 8.1)
– Adjust the VG2 potmeter (lower knob on the LOT) so that
the measuring pulses with the highest level are:
• 140V +/- 2V for 21"
• 130V +/- 2V for 17"
8.2.2 White-D adjustment (software adjustment)
– Enter into WHITE TONE menu, select item WARN, COOL
or NORMAL, only one of the three items Apply a white
raster pattern.
– Enter SAM (see chapter 6).
– (R, G or B) will be displayed on the screen.
– The initial default value for all setting is 37.
– The factory settings of the colour temperatures are :
• WARM(R = 45, G = 32, B = 26)
• NORMAL(R = 37, G = X, B = Y)
• COOL(R = 37, G = 32, B = 31)
– Apply a cross hatch pattern.
– Set brightness and contrast at maximum.
– Adjusted with focusing potentiometer (upper knob of LOT
5445 ) for maximum sharpness of the picture.
8.1.4 RF-AGC adjustment (software adjustment)
– Apply a PAL colour bar pattern and set RF-frequency on
189.25MHz (output voltage 1mV).
– Enter SAM
Remark: X and Y values in NORMAL setting are adjusted for
8500K colour temperature.
Page 28

28 L7.2E
Figure 8-1
8 Electrical adjustments
MEASURING PULS
Vcu
ADJUST
LEVEL
0V
Main panel (component side view)
CL 86532008_006.ai
160298
AUDIO
PANEL
0028
SAM
0029
7620
EEPROM
7600
µP
7225
TV.PROC.
0025
SDM
0024
LOT
Hot Area
17" 100V ±1V
21" 96V7 ± 1V
3540
V
BATT
Figure 8-2
1900
TUNER
Focus
Screen
CRT panel (track side view)
1
0322
8
0177
1
CL86532008_010.ai
0166
1
170298
Page 29

9 Circuit diagram description
9 Circuit diagram description
Introduction
29L7.2E
9.1.5 Primary current (I-prim) sensing (pin 7 of IC7520)
For a quick overall view of all diagrams see the block diagram
on sheet 4.
This chassis is executed with:
– A mains isolated SMPS (switched mode power supply)
– Asingle chip TVprocessor withsoftware controlledpicture
geometry adjustments
– Micro computer with teletext function (execution
depended)-
– Separateaudio module (multi mono or NICAM) withoutput
amplifier
9.1 Power supply (Diagram A1)
9.1.1 Mains input and degaussing
The mains voltage is filtered by L5500, L5501 and L5502, full
wave rectified by a diode bridge (6502-6505)and smoothed by
C2508. The DC voltage for the SMPS is applied at pin 7 of
T5545 (e.g. 300V DC for 220V AC mains).
Thedegaussing current is applied via dualPTC resistorR3504
After switching "on" the set, the PTC is cold so low-ohmic and
therefore the degaussing current is very high. During
degaussing,thePTCis heated up and is getting high-ohmic, as
a result the current through the PTC becomes very low.
The current sense voltage Vpin 7 is a measure for the I-prim
through FET 7518. The I-prim is converted into a voltage by
R3518. The current sense voltage Vpin 7 is used to control
both the secondary output voltages and the maximum I-prim.
9.1.6 Demagnetization control (pin 8 0f IC7520)
The voltage across winding 1 - 2 has the same polarity as the
voltage across the secondary windings. As a result the voltage
across this winding is negative during the FET is conducting,
and positive during the FET is not conducting. The so called
demagnetization "DEMAG" function in IC7520 (input pin 8) is
used for blocking the output Vpin3 during the time that there is
still energy in the transformer (Isec not zero). This is realized
by delaying the switch "on" point of the FET until the
demagnetization is completely finished.
9.1.7 Standby mode
In the standby mode the load decreases under a certain
threshold level. The SMPS is than switching to the so called
"reduced frequency mode". The switching frequency is than
reduced to 20 kHz. The minimal load threshold level is
determined by R3532 connected to pin 12.
In normal operation mode the internal oscillator is adjusted at
70 kHz. This frequency is determined by C2531 and R3537
connected to pin 10 and pin 16 respectively of the IC7520.
9.1.2 Switched mode power supply
The switched mode power supply (SMPS) is mains isolated.
The control device IC7520 (MC44603AP) delivers duty cycle
controlled pulses for driving switching FET 7518. The pulses
have a fixed frequency of 70 kHz in normal operation.
For a detailed block diagram of IC7520 (MC44603) see Fig.
9.1.
9.1.3 Start up and take over circuitry.
Via the start-up circuitry R3530 and R3529 one side of the
220V AC mains is used to start-up IC7520 via the supply pin
(Vpin1). As long as Vpin 1hasnot reached 14V5, IC7520 does
not start up and only sinks 0.3mA. As soon as Vpin 1 reaches
the 14V5, IC7520 starts driving FET 7518 into conduction and
pin 1 sinks a typical supply current of 17mA. This supply
current can not be delivered by the start-up circuit, so a takeover circuit has tobe available. If no take-over take's place, the
voltage on pin 1 will decrease and IC7520 switches off . In that
case the restart will start again. During start-up a voltage
across winding 1 - 2 is built up. At the moment the voltage
across winding 1 - 2 reaches approx. (12V, D6540 start
conductingand takes over the supplyvoltage Vpin 1 of IC7520
(take over current is approx. 17mA).
9.1.4 Secondary output voltages sensing (pin 14 of IC7520)
Winding 1 - 2 has the same polarity as the secondary windings
witch are supplying the load. During the FET is not conducting
the secondary windings and winding 1-2 are positive. D6537
conducts and charges C2537; the DC level across C2537 is a
reference for the secondary output voltages e.g. the
+95V((VBATT). This control voltage (feedback voltage) is
applied via voltage divider R3538, R3539 and potentiometer
R3540 (for adjusting the +VBATT) to the error amplifier input
IC7520 pin 14.
In standby mode the internal oscillator is adjusted at 20 KHz.
This frequency is determined by R3536 connected to pin 15
IC7520.
9.1.8 FET 7518 gate regulation
D6524 prevents pin 3 of IC7520 from becoming negative (this
will destroy the IC) due to stray inductance in the gate part of
the FET. The safety resistor R3525 limits the drive current to
the gate of the FET 7518
9.1.9 Over voltage protection of the secondary voltages
Afterstart-upisthesupplyvoltage Vpin 1 taken over by positive
winding 1 - 2, and so after start up Vpin 1 is a measuring point
forthesecondary output voltages. After start-up (via an internal
switch) this Vpin 1 is internally tapped (voltage divided) to a
voltage which can be measured at pin 6 (so Vpin 6 is also a
measuringpointforthesecondary output voltages). As soon as
the voltage Vpin 6 > 2V5 the logic in IC 7520 will shut down the
output at pin 3. This 2V5 threshold at Vpin 6 is equivalent to a
Vpin1 of 16V DC which is equivalent to a voltage at the supply
voltage (VBATT of approx. 95V DC (normal operation) and
102V DC (standby). After switching "off" because of over
voltage protection, the IC starts up again In case an over
voltage situation is sensed at the secondary output voltages,
the SMPS will go in over voltage protection. In case the over
voltage situation remains present, the SMPS will give over
voltage protection slow-start, over voltage protection slowstart, etc. ( a very good audible hick-up mode).
9.1.10 Undervoltage protection of the secondary voltages
If the supply voltage Vpin 1 < 9V DC the output pulse at pin 3
will be shut down. As soon as Vpin 1 < 7V5, the IC7520 will be
totally shut "off". Vpin 1 of 9V DC is equivalent to a voltage at
(VBATT of approx. 70V DC (normal operation) and 95V
DC(standby). Vpin 1 of 7V5 is equivalent to a voltage at
Page 30

30 L7.2E
9 Circuit diagram description
(VBATT of approx. 55V DC (normal operation) and 65V DC
(standby).
In case an under voltage situation is sensed at the secondary
output voltages, the SMPS will first switch "off" the pulse and
then switch "off" the complete IC 7520.
Incase the IC 7520 isswitched "off",the SMPS will switch "off".
In case the under voltage situation remainspresent, the SMPS
will give under voltage protection, slow-start, under-voltage
protection, slow-start, etc. ( a very good audible hick-up mode).
9.1.11 Unload protection
In case the load goes down (e.g. the line deflection goes down
because of standby mode or some failure in the line deflection
circuit) this is detected by IC7520 via I-prim and secondary
output voltages sensing. In case the load decreases below a
certain threshold the SMPS will switch in "reduced frequency
mode" of 20 kHz (this threshold is determined by the voltage
level at pin 12 IC7520);
In case of an unload situation the set will switch to "low
frequency mode" or standby mode. Whether this unload
situationof the SMPS is caused by thestandbycommand or by
a failure (e.g. in the line circuit),can only be determined by
switching on the set again which the remote control, in case of
standby mode the TV will switch "on" again, in case of unload
situation the set will not switch "on".
9.1.12 Overload (short-circuit) protection
If the secondary load becomes too high, I-prim becomes too
high which is sensed by the current sense voltage Vpin 7. This
voltage Vpin 7 is not allowed to exceed 1V DC by IC 7520 and
so gives current limiting.
As the I-prim is limited, the secondary output voltages will also
drop and so supply voltage Vpin 1 will drop. As soon as Vpin
1<9V DC the driving pulse at pin 3 will stop.
As a result of these 2 mechanism in case of an overload the
secondary voltages will drop very fast. This is called the foldback mechanism, the fold-back point can be adjusted by pin 5
IC7520 this point is adjusted to a maximum tolerable output
power of 85W at 90V AC and 165W at 276VAC.
After this fold-back, the IC starts up again.In case the overload
situation remains present, the SMPS will give fold back again,
slow-start, fold-back, slow-start, etc.;
As a result in case of short-circuit (or overload) the TV will be
in a very good audible hick-up mode.
9.1.13 Output voltages
• +VBATT(95V) used for the line outputstage and the tuning
system.
• 10V / 14V used for the audio amplifier.
• 14V used for the horizontal synchronization circuit and as
input voltage for IC7541.
• +5V (pin 9 of IC7541).used for the control circuit The 5V is
also available in the standby mode).
• +8V (pin 8 of IC7541) used for the video processing. The
+8V output is determined by the voltage on pin 7 of IC
7541 This voltage is adjusted via voltage divider 3552 and
3554.
9.1.14 DC Output Voltages Protections
• +5V protection :When any overload for the +5V supply
occurs (pin 1 of IC7541 < 6.5V) the protection circuit in
IC7541turns on. and shuts downthe +5V supply. and also
+8V supply.
• +8V protection : When any overload for the +8V supply
occurs (pin 1 of IC7541 < 6.5V) the protection circuit in
IC7541 turns on and shut down the output +8V supply. If
the voltage on pin 7 is < 2.4V the +8V will also shut down.
9.2 Single chip TV-processor IC7225 (TDA8374)
Introduction :
In this chip most of the video, audio and sync circuits are
integrated.
In the diagrams the IC is split up in next 5 parts (5A,5B,5C,5D
and 5E).
– IC7225-5A, video detector (see diagram A3).
– IC7225-5B, source select en PAL demodulator (see
diagram A3).
– IC7225-5C, video control (see diagram A3).
– IC7225-5D, horizontal and vertical synchronization (see
diagram A2)
– IC7225-5E, mono sound FM demodulator (see diagram
A5)
9.3 Micro computer (Diagram A4)
Two kinds of microprocessors are used, one with and one
without teletext function The (C with teletext (IC7600) is drawn
in the diagram with the outer pin numbering. In case of no TXT
a (C (IC7601) is used with fewer pins. This (C is drawn in the
diagrams with the internal pinnumbering. In case of the (C with
integrated teletext function, the CVBS-TXT signal is fed to pin
23. The TXT and OSD informationare combined at pins 32-33-
34.
9.4 The line output circuitry (see diagram A2)
Pin 40 IC 7225-5D delivers the drive signal for the line output
stage. Via TS7440 and TS7441 the drive signal is applied to
the line output transistor 7445 and line output transformer
(LOT) 5445. The line output stage supplies the line deflection
current. Via secondary windings of the LOT the following
supply voltages are generated:
• EHT voltage (25kV)
• Vg2 voltage
• Focus voltage
• Filament supply voltage (ff)
• (160V for RGB amplifiers on the CRT panel
• +5.5V for the control circuit and tuner supply
• + 9V for the tuner supply
• +13V for the control and vertical drive output circuit
• -13V for the vertical drive output circuit
9.5 Frame output circuitry
IC 7401 (TDA9302) is usedfor the vertical deflection. This IC is
controlled on pins 1 and 3 by the vertical drive signal delivered
by IC 7225-5D. The deflection current is generated on pin 5.
The vertical fly-back voltage is generated on pin 3 of the IC.
Page 31

9 Circuit diagram description
31L7.2E
9.6 Protections
General: In the set next protections are build in:
9.6.1 Fast discharge circuit.
TS7420and TS7421 (see diagram A1) formedafast discharge
circuit. When the voltage on the collector of TS7421is >6V the
circuit will switch off the horizontal drive immediately via pin 50
IC7225-5D (see diagram A2).
9.6.2 CRT flash protection.
TheBCIinformation is applied to pin 42 of IC7225-5D.(diagram
A2) If due to a flash in the picture tube the voltage on pin 42 is
>6V, the horizontal drive is switched off immediately. If the
voltage is again <6V the horizontal drive is switched on again.
9.6.3 EHT over voltage protection.
The BCI information is also applied to pin 50-IC7225-5D
(diagram A2). First the BCI compensate vertical picture
amplitude variations due to beam current variations. The
controlrange is between 1.2V and2.8V. Howeverif the voltage
on pin 50 exceeds 3.9V the EHT over voltage protection is
activated and the horizontal drive is switched off.
9.6.4 +13V protection
Protection input pin 16 of IC7600 (see diagram A4). If this pin
is connected to ground, the set is switchedin protection. At this
pin the +13V is monitored via the circuit 7655,7608. The
emitter of 7608 becomes "low" (0V7 lower than the base
voltage) if the +13V drops. This will force pin 16 of the (C "low"
and will switches the set in protection.
9.6.5 +13V and -13V protection
Vertical deflection output IC7401(see diagram A2) issupplied
by +13V and -13V. When the current delivered by the +13V or
13V is increasing to much will this result in a voltage drop of
<6.5V.at pin 3 of the IC (VFL) . This voltage drop is applied to
pin 37-IC7600 (micro computer). The micro-computer will
place the set in the standby mode.
DEMAGNETIZATION
DETECTION
SYNCHRONIZATION
INPUT V
PIN 10
C
R
F ST-BY
R
P ST-BY
VOLTAGE
FEEDBACK
INPUT
E/A OUTPUT
8
9
10
T
15
12
14
13
Figure 9-1
DEMAGNETIZATION
MANAGEMENT
Iref
Vref/2
+
-
FOLDBACK
FOLDBACK
INPUT
BLOCK DIAGRAM MC44603P
Rref
Vdemag out
OSCILLATOR
STAND-BY
(REDUCED
FREQUENCY)
AMP
A
5 11
Vref
Iref
Verror
CURRENT
7
CURRENT
SENSE INPUT
V
PIN 7
SENSE
reference
block
Vosc
Vcs out
B
SOFT-START
CONTROL
SOFT START (Css) /
VOLTAGE MODE CONTROL
Vosc prot
Dmax &
Dmax (R
Vcc enableIrefVref
supply &
initialisation block
C
THERMAL
SHUTDOWN
Iref
max)
D
Set
PWM
LATCH
Reset
UVLO1
Vcc enable
UVLO1
UVLO2
Q
Vref Vcc
OVER
VOLTAGE
MANAGEMENT
UVLO2 Vcc enable
V
CC
116
BUFFER
D
18V
MC44603
CL 56532018/012
080695
V
2
C
OUTPUT V
3
GND
4
OVERVOLTAGE
5
PROTECTION
PIN 3
Page 32

32 L7.2E
10 Direction for use
10 Direction for use
Page 33

10 Direction for use
33L7.2E
Page 34

34 L7.2E
10 Direction for use
Page 35

10 Direction for use
35L7.2E
Page 36

36 L7.2E
11 Abbreviations
(R-Y)_OUT R-Y output from chroma demodulator
uC Microcomputer
AQUA Aquadag layer on the outside of the picture
AV_MUTE Signal to mute the sound on the Audio-out
AVL_AV2/AVL Switching signal from UP to the Auto Volume
B_TXT_OSD Blue TXT or OSD signal from (C to the video
BASS Control signal for BASS
BCI Beam Current information
BG/1_or_BG/0 K Monochrome TV system sound carrier +
BL_TXT_OSD Fast blanking signal to IC7725-5C to display
BLACKSTR_SW Black stretch switch
BS1 TV band selection 1 signal
BS2 TV band selection 2 signal
CHROMA_O/
NTSC_SW Switch on signal for NTSC chroma oscillator
CHROMA_1/BG/L Switch on signal for BG/L chroma oscillator
CHROMA_1/
STATUS Switch on signal for NTSC chroma oscillator
CHROMA_2/
STATUS Signal to select the correct system in case of
CVBS_EXT1 CVBS external 1 input signal
CVBS_EXT2 CVBS external 2 signal
CVBS_IN CVBS internal 1 (from tuner)
CVBS_OUT CVBS output signal
CVBS_OUT_1 CVBS output signal 1
CVBS_SOUND CVBS for inter carrier sound detector
CVBS_TXT CVBS for TXT processing in uC
DISCHARGE To have a fast discharge after switching off
EAR Earth
EEPROM Electrical Erasable Programmable Read Only
ESD Electrical Static Discharge
ff Filament (heater voltage) from LOT to the
FL_A Filament voltage for CRT
G_TXT_OSD Green TXT or OSD signal from the
GND Ground
GRD_LOT Ground of LOT
HOR.FLYBACK Horizontal flyback pulse used for looking the
12C Digital Control bus of the microcomputer
IF Intermediate frequency signal for sound
INT/EXT Switchingsignal for Internal or external audio +
L_EXT1 Audio left external 1
LEFT_OUT Audio left out
MOD_L_1N1 SCART I/P 1 in left
MOD_L_1N2 SCART I/P 2 in left
MOD_R_1N1 SCART I/P 1 in right
MOD_L_1N2 SCART I/P 2 in right
MONO/STROBE/
BG_L Strobe signal for HEF 4094 on multi-mono
MONO_OUT Audio mono out
NTSC NTSC colour system
PAL/SECAM PAL or SECAM colour system
R_TXT_OSD Blue TXT or OSD signal from the
tube
cinch
leveller on the ITT on Panel
controller IC7225-5C
5.5MHz (BG), Sound carrier +6MHz(I), Sound
carrier + 6.5MHz(DK)
OSD and TXT
(3.575MHz)
(3.582MHz)
(3.579MHz)
trinorma
the set
Memory
picture tube
microcomputer to IC7225-5C
horizontal oscillator
processing
video switching
sound panel
microcomputer to the video controller
IC72255C
11 Abbreviations
RAM Random Access Memory
RESET1 Reset signal for the uC
RF_AGC Automatic gain control signal I for tuner
RIGHT_OUT Audio right out
ROM Read Only Memory
SAM Service Alignment Mode
SANDCASTLE Sand castle signal from IC7225-5D to delay
line IC7255 and SECAM chrominance
decoder IC7241.
SCL Clock line of the 12C-bus
SDA Data line of the 12C-bus
SDM Service Default Mode; predefined mode for
faultfinding
SECAM_REF SECAM reference
SID/STA/LL Sound identification / stereoavailable / France
system "L"
SIF Sound IF signal for FM demodulator
STANDBY Switchingsignal from microcomputer "low" for
standby (power supply will be switched to
stand-by mode), "high" for normal operation
TREBLE Treble control signal
V_TUNE Tuning voltage for tuner
VFB Vertical flyback pulse
VFL 50 Hz vertical flyback pulse used to inform the
microcomputerthat flyback takes place. This is
important for OSD and TXT
VG2 Voltage on grid 2 of the picture tube
VOLUME Controlsignal (from uC, but on DC level via RC
nework) for volume control of sound
processing in sound panel
Page 37

12 Spareparts list
37L7.2E
12 Spareparts list
Main carrier [A1-A5]
Various
0024∆ 4822 267 31858 Con. 1P
0011∆ 4822 265 20723 Con. 2P
0022∆ 4822 267 10774 Con. 2P
0055 4822 267 10775 Con. 2P
0044 4822 267 10538 Con. 3P
0088 4822 267 10542 Con. 4P
0030 4822 267 10537 Con. 5P
M9 4822 265 10422 Con. 9P (F-pin)
M11 4822 267 10421 Con. 19P (F-pin)
0231∆ 4822 267 60243 21P scart
0232 4822 265 10392 2P Cinch
0233 4822 267 10687 3P Cinch
0020 4822 267 31014 Headphone socket
0138∆ 4822 276 13603 Mains switch
∆ 4822 492 70289 Spring fix. Ts
∆ 4822 265 11253 Fuse holder
4822 492 70788 Spring fix. IC
∆ 4822 492 62076
g
1000 4822 210 10812 VHF/UHF tuner
1000 4822 210 10815 UHF tuner
1002 4822 242 10743 OFWK6272K
1015 4822 242 10575 OFWJ1980M
1015 4822 242 70936 OFWJ1952
1015 4822 242 81388 OFWG1961M
1015 4822 242 81436 OFWK3953M
1015 4822 242 81737 OFWG1965M
1015 4822 242 81964 OFWG1984M
1060 4822 276 13775 Switch
1061 4822 276 13775 Switch
1062 4822 276 13775 Switch
1063 4822 276 13775 Switch
1102 4822 242 10314 Filter 5,5MHz
1102 4822 242 10362 Filter 6,0MHz
1104 4822 242 10314 Filter 5,5MHz
1104∆ 4822 242 10316 Filter 6,5MHz
1104 4822 242 10362 Filter 6,0MHz
1204 4822 242 10434 X-tal 18,432MHz
1206 4822 242 81301 Filter 6,5MHz
1206 4822 242 81572 Filter 6,0MHz
1207 4822 242 81572 Filter 6,0MHz
1207 4822 242 81712 Filter 5.5/5.74MHz
1209 4822 242 10875 X-tal 40MHz
1275 4822 242 10356 X-tal 4,433619MHz
1277 4822 242 10355 X-tal 3,579545MHz
1500 4822 070 34002 Fuse 4A/desc>
1501 4822 242 81423 OFWL9453M
1560∆ 4822 071 51002 Fuse 1A
1560∆ 4822 071 56301 Fuse 630MA
1571∆ 4822 071 51602 Fuse 1.6A
1670 4822 218 11573 RC rec. GP1U28QP
1681 4822 242 10694 X-tal 12MHz
(38.9MHz)
(38.9MHz)
(38.9MHz)
(38.9MHz)
(38.9MHz)
(38.9MHz)
(38.9MHz)
(38.9MHz)
g
2008∆ 4822 126 13838 100nF 50V 20%
2010∆ 4822 124 40196 220µF 20% 16V
2010 4822 124 41545 220µF 20% 16V
2016∆ 4822 124 40433 47µF 20% 25V
2042 5322 122 32531 100pF 5% 50V
2043 5322 122 32531 100pF 5% 50V
2104∆ 4822 124 41579 10µF 20% 50V
2105∆ 4822 124 41579 10µF 20% 50V
2108 4822 124 40248 10µF 20% 63V
2108∆ 4822 124 41579 10µF 20% 50V
2110∆ 4822 124 41579 10µF 20% 50V
2115 4822 124 40255 100µF 20% 63V
2115 4822 124 81029 100µF 20% 25V
2116 4822 124 40255 100µF 20% 63V
2116 4822 124 81029 100µF 20% 25V
2117 4822 126 13695 82pF 1% 63V
2120 4822 126 10334 470pF 10% 50V
2121 4822 126 10334 470pF 10% 50V
2124 5322 122 32268 470pF 10% 50V
2125 5322 122 32268 470pF 10% 50V
2128∆ 4822 122 32627 2.7nF 10% 50V
2128 5322 126 10465 3.9nF 10% 50V
2130 5322 126 10511 1nF 5% 50V
2144 4822 124 40242 1µF 20% 63V
2145 5322 122 31863 330pF 5% 50V
2161∆ 4822 124 41579 10µF 20% 50V
2163 4822 126 13461 680pF 10% 50V
2164 4822 126 13461 680pF 10% 50V
2166 5322 122 32268 470pF 10% 50V
2167 4822 126 13461 680pF 10% 50V
2168 5322 122 32268 470pF 10% 50V
2169 5322 122 32268 470pF 10% 50V
2170 4822 126 13461 680pF 10% 50V
2171 4822 126 13461 680pF 10% 50V
2180 5322 122 32268 470pF 10% 50V
2198 4822 126 13512 330pF 10% 50V
2199 4822 126 13512 330pF 10% 50V
2200∆ 4822 126 13838 100nF 50V 20%
2201∆ 5322 122 32654 22nF 10% 63V
2202 4822 124 40242 1µF 20% 63V
2202 4822 124 41576 2.2µF 20% 50V
2203 4822 126 14087 100nF 10% 63V
2205 4822 124 11566 47µF 20% 50V
2205 4822 124 41751 47µF 20% 50V
2209∆ 4822 126 13838 100nF 50V 20%
2210 5322 122 32658 22pF 5% 50V
2211 4822 124 41576 2.2µF 20% 50V
2212∆ 5322 122 32654 22nF 10% 63V
2213 4822 126 13061 220nF 20% 25V
2213 4822 126 13692 47pF 1% 63V
2214 4822 122 33926 12pF 50V
2214∆ 4822 126 13838 100nF 50V 20%
2215 4822 126 13061 220nF 20% 25V
2215 4822 126 13692 47pF 1% 63V
2216 4822 126 13473 220nF 80-20% 50V
2217 4822 124 41584 100µF 20% 10V
2217 4822 126 13473 220nF 80-20% 50V
2218 5322 122 32967 5.6pF 10% 63V
2220 4822 126 13473 220nF 80-20% 50V
2221 4822 126 13473 220nF 80-20% 50V
2221∆ 4822 126 13838 100nF 50V 20%
2222∆ 4822 126 13838 100nF 50V 20%
2224 4822 123 14024 1000µF 16V 20%
2224∆ 4822 126 13838 100nF 50V 20%
2225 5322 122 32448 10pF 5% 50V
2226 4822 124 40242 1µF 20% 63V
2226 5322 122 32448 10pF 5% 50V
2227∆ 4822 126 13838 100nF 50V 20%
2228∆ 4822 124 41579 10µF 20% 50V
2229∆ 4822 124 41579 10µF 20% 50V
2230∆ 4822 124 41579 10µF 20% 50V
2231∆ 4822 126 13838 100nF 50V 20%
2234∆ 4822 124 41579 10µF 20% 50V
2235 5322 126 10511 1nF 5% 50V
2236 5322 126 10511 1nF 5% 50V
2237 4822 126 13561 220nF 10% 16V
2238 4822 126 13561 220nF 10% 16V
2240 4822 126 14087 100nF 10% 63V
2241∆ 4822 124 40246 4.7µF 20% 63V
2241 4822 126 13561 220nF 10% 16V
2242∆ 4822 126 13838 100nF 50V 20%
2242∆ 5322 122 32654 22nF 10% 63V
2243 5322 126 10511 1nF 5% 50V
2244 5322 126 10511 1nF 5% 50V
2245 4822 124 41751 47µF 20% 50V
2246 5322 122 32448 10pF 5% 50V
2247 5322 126 10511 1nF 5% 50V
2248 4822 124 81151 22µF 50V
2248 5322 126 10511 1nF 5% 50V
2249 5322 126 10511 1nF 5% 50V
2250 4822 124 41751 47µF 20% 50V
2251 4822 122 33216 270pF 5% 50V
2251 5322 122 32448 10pF 5% 50V
2252∆ 4822 124 41579 10µF 20% 50V
2252∆ 5322 122 32654 22nF 10% 63V
2253∆ 5322 126 10223 4.7nF 10% 63V
2254∆ 5322 122 32654 22nF 10% 63V
2254∆ 5322 126 10223 4.7nF 10% 63V
2255∆ 4822 124 41579 10µF 20% 50V
2256 4822 126 13561 220nF 10% 16V
2257 4822 124 22263 220µF 20% 25V
2260∆ 4822 124 40246 4.7µF 20% 63V
2260 4822 124 40255 100µF 20% 63V
2260∆ 4822 124 41579 10µF 20% 50V
2261 4822 124 40255 100µF 20% 63V
2261∆ 5322 122 32654 22nF 10% 63V
2262∆ 4822 124 41579 10µF 20% 50V
2263∆ 4822 124 41579 10µF 20% 50V
2264 4822 124 81029 100µF 20% 25V
2265 4822 126 13561 220nF 10% 16V
2266 4822 126 13561 220nF 10% 16V
2267 4822 126 13561 220nF 10% 16V
2268 4822 121 42868 220nF 5% 50V
2271 5322 126 10511 1nF 5% 50V
2272 5322 122 33446 3.3nF 10% 63V
2272 5322 126 10511 1nF 5% 50V
2273 4822 126 13561 220nF 10% 16V
2273 4822 126 14087 100nF 10% 63V
2274∆ 4822 126 13838 100nF 50V 20%
2275 4822 126 13486 15pF 2% 63V
2276 4822 126 13694 68pF 1% 63V
2277 4822 126 13486 15pF 2% 63V
2277 4822 126 13694 68pF 1% 63V
2278 5322 126 10511 1nF 5% 50V
2279 5322 126 10511 1nF 5% 50V
2280 5322 126 10511 1nF 5% 50V
2281 5322 126 10511 1nF 5% 50V
2283 4822 126 13751 47nF 10% 63V
2284 4822 126 13751 47nF 10% 63V
2285 4822 126 13751 47nF 10% 63V
2403 4822 124 40242 1µF 20% 63V
2406 4822 122 33127 2.2nF 10% 63V
2409∆ 5322 126 10223 4.7nF 10% 63V
2410 5322 121 42386 100nF 5% 63V
2414 4822 121 42868 220nF 5% 50V
2420 5322 121 42386 100nF 5% 63V
2421∆ 4822 124 41579 10µF 20% 50V
2422 5322 121 42386 100nF 5% 63V
2430∆ 4822 124 41579 10µF 20% 50V
2434∆ 4822 126 13838 100nF 50V 20%
2436 5322 126 10511 1nF 5% 50V
2437 5322 126 10511 1nF 5% 50V
2440 4822 121 70654 2N210% 50V
2442 4822 126 13473 220nF 80-20% 50V
2443 4822 124 80791 470µF 16V 20%
2444 4822 121 51319 1µF 10% 63V
2445∆ 4822 121 70617 10nF 5% 1.6KV
2445∆ 4822 121 70649 9.1nF 5% 1.6KV
2447∆ 4822 126 14078 220pF 10% 2KV
2448 4822 121 43368 47µF 160V
2450 4822 121 10507 250V 470nF 5%
2450∆ 4822 121 10518 250V 390nF 5%
2451 4822 121 51319 1µF 10% 63V
2452 4822 124 80195 470µF 20% 10V
2453 4822 124 80791 470µF 16V 20%
2456 4822 124 80069 1µF 20% 160V
2460 4822 121 51385 33nF 20% 100V
2461 4822 126 11131 18pF 5% 50V
2461 4822 126 13645 27P 50V
2462 4822 126 13866 4.7nF 10% 1KV
2462 4822 126 14079 2.2nF 10% 1KV
2463 4822 124 40255 100µF 20% 63V
2464∆ 4822 126 13838 100nF 50V 20%
2465 5322 126 10184 680P 5% 50V.
2466∆ 4822 122 33172 390pF 5% 50V
2467 5322 126 10184 680P 5% 50V.
2468∆ 4822 126 13838 100nF 50V 20%
2469 4822 126 14237 470pF 10% R 2KV
2470 4822 124 11845 22µF 20% 250V
2471 4822 122 30043 10nF 80% 63V
2476∆ 4822 122 33172 390pF 5% 50V
2480 4822 123 14024 1000µF 16V 20%
2485 5322 126 10184 680P 5% 50V.
2487 5322 126 10184 680P 5% 50V.
2500∆ 4822 126 13589 470nF 275V
2501 4822 121 10686 4.7nF 10% 50V
2502∆ 4822 124 40246 4.7µF 20% 63V
2502∆ 4822 126 12793 2.2nF 10% 2KV
2503∆ 4822 124 40246 4.7µF 20% 63V
2504 4822 121 42868 220nF 5% 50V
2504∆ 4822 126 12793 2.2nF 10% 2KV
2505 4822 124 41576 2.2µF 20% 50V
2505∆ 4822 126 12793 2.2nF 10% 2KV
2506∆ 4822 124 41579 10µF 20% 50V
2507∆ 4822 124 41579 10µF 20% 50V
2508∆ 4822 124 41556 100µF 20% 385V
2508 4822 124 41576 2.2µF 20% 50V
2509∆ 4822 124 41579 10µF 20% 50V
2509 4822 126 13517 820pF 10% 1000V
2510∆ 4822 124 41579 10µF 20% 50V
2510 4822 126 13517 820pF 10% 1000V
2511∆ 4822 124 41579 10µF 20% 50V
2512∆ 4822 121 43996 33nF 5% 50V
2514 4822 121 51472 39nF 5% 250V
2515∆ 4822 121 43823 470nF 5% 50V
2516 4822 121 43925 2.2nF 5% 50V
2517 4822 124 81029 100µF 20% 25V
2517∆ 5322 122 34123 1nF 10% 50V
2518 4822 121 42868 220nF 5% 50V
2518∆ 4822 122 50116 470pF 10% 1KV
2519 5322 121 42386 100nF 5% 63V
2520 4822 124 22263 220µF 20% 25V
2520 4822 126 13695 82pF 1% 63V
2521 4822 121 10686 4.7nF 10% 50V
2521 4822 122 33127 2.2nF 10% 63V
2522 4822 122 33127 2.2nF 10% 63V
2522∆ 4822 124 41579 10µF 20% 50V
2523 4822 124 81029 100µF 20% 25V
2524 4822 121 42868 220nF 5% 50V
2524 5322 122 32268 470pF 10% 50V
2529∆ 4822 126 13838 100nF 50V 20%
2530 4822 124 40242 1µF 20% 63V
2531 4822 121 10673 560pF 1% 630V
2532 5322 126 10511 1nF 5% 50V
2533 5322 122 31863 330pF 5% 50V
2534 5322 126 10511 1nF 5% 50V
2537 5322 121 42386 100nF 5% 63V
2540∆ 4822 124 40433 47µF 20% 25V
2541 4822 121 10686 4.7nF 10% 50V
2545∆ 4822 126 14037 2.2nF 20% 250V
2550∆ 4822 122 50116 470pF 10% 1KV
2551 4822 124 42336 47µF 20% 160V
2553 5322 122 31866 6.8nF 10% 63V
2554 4822 126 13061 220nF 20% 25V
2561 4822 124 80707 2200µF 20% 25V
2562 4822 124 80707 2200µF 20% 25V
2563 4822 124 41097 220µF 20% 16V
2563 4822 124 42403 220µF 20% 16V
2571 4822 124 80707 2200µF 20% 25V
2572 5322 122 32531 100pF 5% 50V
2601 4822 126 13061 220nF 20% 25V
2602∆ 4822 124 40433 47µF 20% 25V
2607∆ 5322 122 34123 1nF 10% 50V
2608∆ 5322 122 34123 1nF 10% 50V
2610 5322 121 42386 100nF 5% 63V
2611∆ 4822 124 41579 10µF 20% 50V
2615 4822 121 42868 220nF 5% 50V
2621 4822 126 13695 82pF 1% 63V
2622 4822 126 13695 82pF 1% 63V
2623∆ 5322 122 32654 22nF 10% 63V
2630∆ 4822 124 41579 10µF 20% 50V
2650 5322 126 10184 680P 5% 50V.
2655 4822 124 41643 100µF 20% 16V
2660 5322 126 10184 680P 5% 50V.
2661 5322 126 10184 680P 5% 50V.
2664∆ 4822 126 13838 100nF 50V 20%
2666∆ 4822 126 13838 100nF 50V 20%
2670 5322 122 32531 100pF 5% 50V
2671 4822 124 81029 100µF 20% 25V
2674 5322 122 32531 100pF 5% 50V
2680 4822 126 13061 220nF 20% 25V
2682 4822 126 13693 56pF 1% 63V
2683 4822 126 13693 56pF 1% 63V
2684 4822 126 13061 220nF 20% 25V
2685 4822 122 33127 2.2nF 10% 63V
2690 5322 122 32531 100pF 5% 50V
2691 5322 122 32531 100pF 5% 50V
2692 5322 122 32531 100pF 5% 50V
2693 5322 122 32531 100pF 5% 50V
2695∆ 4822 126 13838 100nF 50V 20%
f
3000 4822 051 10102 1k 2% 0.25W
3001 4822 116 83864 10k 5% 0.5W
3002 4822 116 83864 10k 5% 0.5W
3004 4822 051 10102 1k 2% 0.25W
3005 4822 051 20223 22k 5% 0.1W
3006 4822 051 20223 22k 5% 0.1W
3007∆ 4822 050 22701 270Ω 1% 0.6W
3008 4822 051 10102 1k 2% 0.25W
3009 4822 051 10102 1k 2% 0.25W
3010∆ 4822 052 10478 4Ω7 5% 0.33W
3016 4822 116 52238 12k 5% 0.5W
3040∆ 4822 051 20109 10Ω 5% 0.1W
3040 4822 051 20391 390Ω 5% 0.1W
3100∆ 4822 051 20472 4k7 5% 0.1W
3101 4822 117 10833 10k 1% 0.1W
3104 4822 116 52283 4k7 5% 0.5W
3105 4822 051 20223 22k 5% 0.1W
3106∆ 4822 051 20472 4k7 5% 0.1W
3107∆ 4822 051 20472 4k7 5% 0.1W
3108 4822 117 11449 2k2 1% 0.1W
3114 4822 116 52257 22k 5% 0.5W
3115 4822 116 52257 22k 5% 0.5W
3121 4822 116 83868 150Ω 5% 0.5W
3122 4822 116 83868 150Ω 5% 0.5W
3123 4822 116 52201 75Ω 5% 0.5W
3124∆ 4822 051 20101 100Ω 5% 0.1W
3125 4822 116 52201 75Ω 5% 0.5W
3126 4822 051 20331 330Ω 5% 0.1W
3127 4822 116 52201 75Ω 5% 0.5W
3128 4822 116 52201 75Ω 5% 0.5W
3129 4822 051 20331 330Ω 5% 0.1W
3130 4822 051 20331 330Ω 5% 0.1W
3141 4822 050 11002 1k 1% 0.4W
3144 4822 051 10102 1k 2% 0.25W
3160 4822 116 52257 22k 5% 0.5W
3161 4822 116 80175 4k7 5% 0.5W
3162 4822 116 52257 22k 5% 0.5W
3163 4822 116 80175 4k7 5% 0.5W
3164 4822 116 52201 75Ω 5% 0.5W
3165∆ 4822 051 20229 22Ω 5% 0.1W
3166 4822 051 20689 68Ω 5% 0.1W
3167 4822 117 11449 2k2 1% 0.1W
3168∆ 4822 051 20101 100Ω 5% 0.1W
3169 4822 051 10102 1k 2% 0.25W
3170∆ 4822 051 20471 470Ω 5% 0.1W
3178 4822 051 20394 390k 5% 0.1W
3179 4822 051 20331 330Ω 5% 0.1W
3179 4822 117 11503 220Ω 1% 0.1W
3180 4822 051 20681 680Ω 5% 0.1W
3181 4822 051 10102 1k 2% 0.25W
3181∆ 4822 051 20471 470Ω 5% 0.1W
3185 4822 116 80175 4k7 5% 0.5W
3186 4822 116 80175 4k7 5% 0.5W
3187 4822 116 52201 75Ω 5% 0.5W
3188∆ 4822 050 12201 220Ω 1% 0.4W
3192 4822 116 83881 390Ω 5% 0.5W
3193 4822 116 83881 390Ω 5% 0.5W
3194 4822 116 83961 6k8 5%
3195 4822 116 80175 4k7 5% 0.5W
3201 4822 051 20391 390Ω 5% 0.1W
3203 4822 116 52257 22k 5% 0.5W
3204 4822 051 20822 8k2 5% 0.1W
3205∆ 4822 050 12201 220Ω 1% 0.4W
3205 4822 116 83872 220Ω 5% 0.5W
3206 4822 051 20399 39Ω 5% 0.1W
3206 4822 051 20829 82Ω 5% 0.1W
3207 4822 116 52231 820Ω 5% 0.5W
3208∆ 4822 051 20472 4k7 5% 0.1W
3209 4822 051 10102 1k 2% 0.25W
3210∆ 4822 051 20471 470Ω 5% 0.1W
3211∆ 4822 051 20471 470Ω 5% 0.1W
3214 4822 051 10102 1k 2% 0.25W
3215 4822 117 10353 150Ω 1% 0.1W
3216 4822 051 20391 390Ω 5% 0.1W
3216 4822 116 52175 100Ω 5% 0.5W
3217 4822 051 20391 390Ω 5% 0.1W
3217 4822 116 52175 100Ω 5% 0.5W
3217 4822 117 10353 150Ω 1% 0.1W
3217 4822 117 11503 220Ω 1% 0.1W
Page 38

38 L7.2E
12 Spareparts list
3218 4822 117 10833 10k 1% 0.1W
3218 4822 117 11507 6k8 1% 0.1W
3220 4822 116 52175 100Ω 5% 0.5W
3221 4822 116 52175 100Ω 5% 0.5W
3223 4822 116 83864 10k 5% 0.5W
3224 4822 051 20564 560k 5% 0.1W
3224 4822 117 10834 47k 1% 0.1W
3225 4822 051 20569 56Ω 5% 0.1W
3227 4822 051 20569 56Ω 5% 0.1W
3229 4822 051 20561 560Ω 5% 0.1W
3229 4822 051 20569 56Ω 5% 0.1W
3230 4822 117 10834 47k 1% 0.1W
3233 4822 117 11449 2k2 1% 0.1W
3234∆ 4822 052 10228 2Ω2 5% 0.33W
3234 4822 117 10834 47k 1% 0.1W
3235 4822 117 10834 47k 1% 0.1W
3238 4822 051 20561 560Ω 5% 0.1W
3239 4822 117 11449 2k2 1% 0.1W
3240 4822 051 20333 33k 5% 0.1W
3242 4822 051 20333 33k 5% 0.1W
3243 4822 117 11437 8k2 1% 0.1W
3244 4822 117 11154 1k 1% 0.1W
3246 4822 116 83864 10k 5% 0.5W
3247∆ 4822 052 10109 10Ω 5% 0.33W
3248∆ 4822 051 20471 470Ω 5% 0.1W
3250 4822 116 52256 2k2 5% 0.5W
3250 4822 117 10833 10k 1% 0.1W
3250∆ 4822 117 11846 10k 5% 1/16W
3251 4822 051 20681 680Ω 5% 0.1W
3251 4822 116 83864 10k 5% 0.5W
3252∆ 4822 051 20109 10Ω 5% 0.1W
3252∆ 4822 051 20332 3k3 5% 0.1W
3253∆ 4822 051 20109 10Ω 5% 0.1W
3253∆ 4822 051 20153 15k 5% 0.1W
3254 4822 116 83864 10k 5% 0.5W
3254 4822 117 11503 220Ω 1% 0.1W
3265 4822 051 20122 1k2 5% 0.1W
3265 4822 051 20561 560Ω 5% 0.1W
3266 4822 050 11002 1k 1% 0.4W
3267 4822 116 52264 27k 5% 0.5W
3267 4822 116 83884 47k 5% 0.5W
3273 4822 051 20104 100k 5% 0.1W
3280 4822 051 20561 560Ω 5% 0.1W
3401∆ 4822 050 24708 4Ω7 1% 0.6W
3401 5322 116 53564 3Ω3 5% 0.5W
3402∆ 4822 050 24708 4Ω7 1% 0.6W
3402 5322 116 53564 3Ω3 5% 0.5W
3403∆ 4822 051 20153 15k 5% 0.1W
3404 4822 050 22202 2k2 1% 0.6W
3406 4822 116 83872 220Ω 5% 0.5W
3407 4822 116 83872 220Ω 5% 0.5W
3410 4822 051 20393 39k 5% 0.1W
3411 4822 050 22202 2k2 1% 0.6W
3412 4822 117 10833 10k 1% 0.1W
3413∆ 4822 052 10158 1Ω5 5% 0.33W
3415 4822 051 10102 1k 2% 0.25W
3417 4822 051 10102 1k 2% 0.25W
3418 4822 116 52234 100k 5% 0.5W
3420 4822 051 20223 22k 5% 0.1W
3421 4822 117 11149 82k 1% 0.1W
3422 4822 051 20223 22k 5% 0.1W
3423 4822 051 10102 1k 2% 0.25W
3430∆ 4822 052 10478 4Ω7 5% 0.33W
3431 4822 052 10152 1k5 5% 0.33W
3431∆ 4822 052 10472 4k7 5% 0.33W
3432 4822 052 10152 1k5 5% 0.33W
3432∆ 4822 052 10472 4k7 5% 0.33W
3433 4822 116 52271 33k 5% 0.5W
3434 4822 117 10833 10k 1% 0.1W
3435 4822 116 83878 270k 5% 0.5W
3436 4822 050 11002 1k 1% 0.4W
3437 4822 050 11002 1k 1% 0.4W
3440 4822 051 10102 1k 2% 0.25W
3441 4822 051 20124 120k 5% 0.1W
3442 4822 116 52186 22Ω 5% 0.5W
3443 4822 051 20561 560Ω 5% 0.1W
3444 4822 117 12819 10k 5% 3W
3445 4822 117 12624 10Ω 5% 2W
3446 4822 050 21502 1k5 1% 0.6W
3447 4822 050 11002 1k 1% 0.4W
3448 4822 117 12822 4Ω7 5% 5W
3449∆ 4822 052 11108 1Ω 5% 0.5W
3450∆ 4822 052 10278 2Ω7 5% 0.33W
3451∆ 4822 052 10228 2Ω2 5% 0.33W
3456 4822 116 52297 68k 5% 0.5W
3457 4822 116 52297 68k 5% 0.5W
3458 4822 116 52297 68k 5% 0.5W
3459∆ 4822 050 21202 1k2 1% 0.6W
3460∆ 4822 050 21503 15k 1% 0.6W
3460 4822 116 52251 18k 5% 0.5W
3461 4822 051 20273 27k 5% 0.1W
3462∆ 4822 117 12513 4k7 5% 3W
3470∆ 4822 052 11478 4Ω7 5% 0.5W
3471 4822 053 11399 39Ω 5% 2W
3480∆ 4822 052 10109 10Ω 5% 0.33W
3481 4822 117 12821 220Ω 5% 1W
3490 4822 051 20105 1M 5% 0.1W
3491 4822 117 12955 2k7 1% 0.1W 0805
3500 4822 116 21228 VDR 430V-710V
3501 4822 116 83864 10k 5% 0.5W
3501 4822 117 12181 470Ω 20% 0.5W
3502 4822 116 52256 2k2 5% 0.5W
3503 4822 116 52256 2k2 5% 0.5W
3504∆ 4822 116 40137 PTC 36Ω 365V
3504 4822 116 52256 2k2 5% 0.5W
3505 4822 116 83864 10k 5% 0.5W
3505 4822 252 60151 470Ω
3506 4822 116 52175 100Ω 5% 0.5W
3506 4822 117 12822 4Ω7 5% 5W
3507 4822 117 12654 100Ω 5% 5W
3508 4822 116 52176 10Ω 5% 0.5W
3509 4822 116 52257 22k 5% 0.5W
3510 4822 116 52244 15k 5% 0.5W
3510 4822 117 12647 33k 5% 3W
3511 4822 116 52283 4k7 5% 0.5W
3512 4822 050 11002 1k 1% 0.4W
3512∆ 4822 051 20153 15k 5% 0.1W
3513 4822 051 20184 180k 5% 0.1W
3513 4822 116 52291 56k 5% 0.5W
3514 4822 116 52234 100k 5% 0.5W
3515 4822 116 52256 2k2 5% 0.5W
3516 4822 116 52243 1k5 5% 0.5W
3517 4822 116 52243 1k5 5% 0.5W
3517 4822 117 10833 10k 1% 0.1W
3518 4822 116 52256 2k2 5% 0.5W
3518 4822 117 10422 0.33Ω 5% 3W
3519 4822 116 52234 100k 5% 0.5W
3520 4822 116 52291 56k 5% 0.5W
3520 4822 117 11149 82k 1% 0.1W
3521 4822 050 11002 1k 1% 0.4W
3521 4822 116 52219 330Ω 5% 0.5W
3522 4822 116 52244 15k 5% 0.5W
3523 4822 050 11002 1k 1% 0.4W
3524 4822 050 11002 1k 1% 0.4W
3524∆ 4822 051 20008 0Ω jumper
3525∆ 4822 052 10229 22Ω 5% 0.33W
3525 4822 116 83876 270Ω 5% 0.5W
3526 4822 050 11002 1k 1% 0.4W
3527 4822 116 52289 5k6 5% 0.5W
3528 4822 116 52238 12k 5% 0.5W
3528 4822 116 83868 150Ω 5% 0.5W
3529∆ 4822 050 24708 4Ω7 1% 0.6W
3529 4822 116 83883 470Ω 5% 0.5W
3530 4822 116 52276 3k9 5% 0.5W
3530 4822 116 83961 6k8 5%
3531 4822 116 52249 1k8 5% 0.5W
3532 4822 051 20562 5k6 5% 0.1W
3532 4822 116 52249 1k8 5% 0.5W
3533 4822 116 83872 220Ω 5% 0.5W
3534 4822 051 20224 220k 5% 0.1W
3534 4822 116 52228 680Ω 5% 0.5W
3536 4822 051 20393 39k 5% 0.1W
3536 4822 116 83961 6k8 5%
3537 4822 116 52269 3k3 5% 0.5W
3537 4822 117 10833 10k 1% 0.1W
3538 4822 116 52234 100k 5% 0.5W
3539 4822 116 52251 18k 5% 0.5W
3539 4822 116 52276 3k9 5% 0.5W
3540 4822 101 11189 4.7k 30%LIN 0.1W
3540 4822 116 52256 2k2 5% 0.5W
3540 4822 116 52257 22k 5% 0.5W
3541 4822 117 12653 47Ω 5% 2W
3542∆ 4822 053 21475 4M7 5% 0.5W
3545∆ 4822 053 21475 4M7 5% 0.5W
3546∆ 4822 053 21475 4M7 5% 0.5W
3552∆ 4822 051 20332 3k3 5% 0.1W
3553∆ 4822 051 20121 120Ω 5% 0.1W
3554 4822 117 11139 1k5 1% 0.1W
3565 4822 117 10833 10k 1% 0.1W
3570∆ 4822 051 20109 10Ω 5% 0.1W
3601 4822 116 90885 8k2X6
3602 4822 117 12168 2k2 X 6
3603 4822 117 12167 8k2 X 12
3607 4822 051 20822 8k2 5% 0.1W
3608 4822 116 52234 100k 5% 0.5W
3610 4822 117 10833 10k 1% 0.1W
3612 4822 051 20224 220k 5% 0.1W
3613 4822 116 83868 150Ω 5% 0.5W
3614∆ 4822 051 20153 15k 5% 0.1W
3615 4822 116 83864 10k 5% 0.5W
3616 4822 051 20223 22k 5% 0.1W
3617 4822 116 52238 12k 5% 0.5W
3618 4822 116 52244 15k 5% 0.5W
3621∆ 4822 051 20101 100Ω 5% 0.1W
3622∆ 4822 051 20101 100Ω 5% 0.1W
3623 4822 117 10833 10k 1% 0.1W
3624∆ 4822 051 20101 100Ω 5% 0.1W
3625∆ 4822 051 20101 100Ω 5% 0.1W
3628∆ 4822 051 20101 100Ω 5% 0.1W
3629 4822 117 11449 2k2 1% 0.1W
3630 4822 051 10102 1k 2% 0.25W
3630 4822 117 11139 1k5 1% 0.1W
3632 4822 117 10833 10k 1% 0.1W
3633 4822 116 83864 10k 5% 0.5W
3634 4822 116 52283 4k7 5% 0.5W
3636 4822 116 83864 10k 5% 0.5W
3637 4822 116 52256 2k2 5% 0.5W
3640 4822 117 10833 10k 1% 0.1W
3641 4822 117 10833 10k 1% 0.1W
3653 4822 051 20105 1M 5% 0.1W
3654 4822 051 20822 8k2 5% 0.1W
3655 4822 116 52175 100Ω 5% 0.5W
3656∆ 4822 051 20471 470Ω 5% 0.1W
3657 4822 116 52175 100Ω 5% 0.5W
3660 4822 051 10102 1k 2% 0.25W
3661 4822 051 10102 1k 2% 0.25W
3662 4822 051 10102 1k 2% 0.25W
3663 4822 051 20331 330Ω 5% 0.1W
3664∆ 4822 051 20008 0Ω jumper
3666 4822 051 20273 27k 5% 0.1W
3667 4822 051 20122 1k2 5% 0.1W
3670 4822 116 52175 100Ω 5% 0.5W
3671∆ 4822 051 20332 3k3 5% 0.1W
3674 4822 116 52283 4k7 5% 0.5W
3681 4822 116 83864 10k 5% 0.5W
3684 4822 117 10833 10k 1% 0.1W
3685 4822 116 52297 68k 5% 0.5W
3686 4822 051 20333 33k 5% 0.1W
3690 4822 116 52249 1k8 5% 0.5W
3693 4822 117 11503 220Ω 1% 0.1W
3694 4822 051 20182 1k8 5% 0.1W
3695 4822 051 20182 1k8 5% 0.1W
3696 4822 051 20182 1k8 5% 0.1W
3698 4822 051 10102 1k 2% 0.25W
4xxx 4822 051 10008 0Ω 5% 0.25W
4xxx 4822 051 20008 0Ω 5% 0.25W
b
5010 4822 157 11533 390µH 10%
5010 4822 157 11615 220µH
5010 4822 157 63065 0.68µH
5128 4822 157 53575 3.3µH
5201∆ 4822 157 53941 100µH
5203 4822 157 50961 22µH
5203 4822 157 53139 4.7µH
5204∆ 4822 157 51462 10µH
5205∆ 4822 157 51462 10µH
5206 4822 153 20251 18µH 10%
5206∆ 4822 156 21721 2.2µH
5206 4822 157 53634 5.6µH 10%
5207∆ 4822 157 51462 10µH
5260 4822 157 11534 Coil 78MHz
5260 4822 157 11607 Coil 38.9MHz
5441∆ 4822 157 11076 Linearity coil
5441 4822 157 11539 Linearity cor. coil
5442 4822 157 53139 4.7µH
5445∆ 4822 140 10634 LOT for 17" CRT
5445∆ 4822 140 10637 LOT for 21" CRT
5451 4822 157 11167 47µH 5%
5456 4822 156 20915 33µH
5457 4822 156 20915 33µH
5458 4822 156 20915 33µH
5500∆ 4822 157 11399 30mH
5501 4822 152 20678 33µH
5516 4822 157 60171 Bead coil 100MHz
5540 4822 157 52007 4U7 10%
5545∆ 4822 146 10866 Mains trafo for 21"
5545∆ 4822 146 10931 Mains trafo for 17"
5550 4822 157 60171 Bead coil100MHz
5551 4822 157 71157 27µH 5%
5553 5322 157 53016 10µH
5570 4822 157 60171 Bead coil 100MHz
5571∆ 4822 157 51462 10µH
5573 4822 157 60171 Bead coil 100MHz
5600∆ 4822 157 50963 2.2µH
5601∆ 4822 158 10604 6.8 µH
5602 4822 157 53001 27µH 10%
5603 4822 157 62767 8.2µH
5605 4822 157 62767 8.2µH
5620 4822 157 60123 6.8µH
d
6001∆ 4822 130 34173 BZX79-B5V6
6002∆ 4822 130 34173 BZX79-B5V6
6003 5322 130 34955 BA482
6016∆ 4822 130 30621 1N4148
6100∆ 4822 130 30621 1N4148
6100 4822 130 80888 BA682
6101∆ 4822 130 30621 1N4148
6109 4822 130 34382 BZX79-B8V2
6110 4822 130 34382 BZX79-B8V2
6111 4822 130 34382 BZX79-B8V2
6204∆ 4822 130 30621 1N4148
6205∆ 4822 130 34173 BZX79-B5V6
6206∆ 4822 130 30621 1N4148
6207∆ 4822 130 30621 1N4148
6254 4822 130 34233 BZX79-B5V1
6265∆ 4822 130 30621 1N4148
6420∆ 4822 130 30621 1N4148
6440∆ 4822 130 80791 BYV28-200/20
6441 5322 130 31938 BYV27-200
6443 4822 130 42488 BYD33D
6444 4822 130 34145 BZX79-B39
6445∆ 4822 130 32896 BYD33M
6449 4822 130 42488 BYD33D
6454 4822 130 42488 BYD33D
6455 4822 130 42606 BYD33J
6456 4822 130 42606 BYD33J
6461∆ 4822 130 30621 1N4148
6464∆ 4822 130 30621 1N4148
6468 4822 130 42488 BYD33D
6470 4822 130 42606 BYD33J
6480∆ 4822 130 61219 BZX79-B10
6481 4822 130 42488 BYD33D
6501∆ 4822 130 30621 1N4148
6502∆ 4822 130 30621 1N4148
6502∆ 4822 130 31933 1N5061
6503∆ 4822 130 30621 1N4148
6503∆ 4822 130 31933 1N5061
6504∆ 4822 130 30621 1N4148
6504∆ 4822 130 31933 1N5061
6505∆ 4822 130 30621 1N4148
6505∆ 4822 130 31933 1N5061
6510∆ 4822 130 34499 BZX79-B20
6537 4822 130 30842 BAV21
6540 4822 130 30842 BAV21
6550 4822 130 10807 BYM36C
6560 4822 130 10256 EGP20DL-5300
6570 4822 130 10256 EGP20DL-5300
6600 4822 130 34233 BZX79-B5V1
6610 4822 130 82037 HZT33
6653 4822 130 30862 BZX79-B9V1
6661∆ 4822 130 30621 1N4148
6663 4822 130 10859 TLDR5400
6690∆ 4822 130 31983 BAT85
6691∆ 4822 130 31983 BAT85
6692∆ 4822 130 31983 BAT85
6693∆ 4822 130 31983 BAT85
ce
7001 5322 130 41983 BC858B
7002 5322 130 41983 BC858B
7003 4822 130 60511 BC847B
7100 4822 130 60511 BC847B
7101 4822 130 60511 BC847B
7115 4822 130 60511 BC847B
7118 4822 130 60511 BC847B
7202 4822 209 13099 MSP3400C/C6
7203 4822 209 71873 TA7668BP
7204 4822 130 60511 BC847B
7204 4822 209 13646 TDA7057AQ/N2
7209 4822 130 60511 BC847B
7214 4822 130 40855 BC337
7214 4822 130 60511 BC847B
7215 4822 130 60511 BC847B
7216 4822 130 60511 BC847B
7220 4822 130 60511 BC847B
7225 4822 209 15828 TDA8347C/N3
7225 4822 209 16326 TDA8374/N3
7241 4822 209 90129 TDA8395/N2
7255 4822 209 12635 TDA4665/V4
7265 5322 130 60508 BC857B
7401 4822 209 13176 TDA9302H
7420 5322 130 60508 BC857B
7421 4822 130 60511 BC847B
7440 4822 130 60511 BC847B
7441 5322 130 44647 BC368
7445∆ 4822 130 10206 BUT11AX
7480 5322 130 44647 BC368
7501 4822 209 31555 TDA9830/V1
7502 4822 209 90462 TDA7056B/N1
7503 4822 130 40937 BC548B
7504 4822 130 40937 BC548B
7505 4822 130 40937 BC548B
7506∆ 4822 130 44197 BC558B
7507∆ 4822 130 44197 BC558B
7508 4822 130 40937 BC548B
7509 4822 130 40937 BC548B
7510 4822 130 40937 BC548B
7511 4822 130 40937 BC548B
7512 4822 130 40937 BC548B
7513 4822 130 40937 BC548B
7514 4822 130 40937 BC548B
7515 4822 130 40937 BC548B
7518∆ 4822 130 10806 STP6NA60FI
7520 4822 209 15684 MC44603AP
7541 4822 209 15829 TDA8139
7600 4822 209 16325 SAA5297PS/044
7600 4822 209 16332 SAA5297PS/057
7600 4822 209 16333 SAA5297PS/048
7600 4822 209 16435 SAA5297PS/060
7603 4822 130 60511 BC847B
7608 4822 130 60511 BC847B
7610∆ 4822 209 73852 PMBT2369
7620 4822 816 10769 ST24W04B6
7655 4822 130 60511 BC847B
7681 4822 130 60511 BC847B
7682 4822 130 60511 BC847B
7682∆ 5322 130 41982 BC848B
CRT panel [B]
Various
CRT 4822 212 11703 CRTPanel 17”
CRT 4822 212 11704 CRT Panel 21”
∆ 4822 255 70293 CRT socket 17"
∆ 4822 255 70261 CRT socket 21”
g
2313 4822 122 33575 220pF 5% 50V
2313 5322 122 33538 150pF 2% 63V
2323 4822 122 33216 270pF 5% 50V
2323 4822 122 33575 220pF 5% 50V
2333 4822 122 33216 270pF 5% 50V
Page 39

12 Spareparts list
39L7.2E
2333 4822 126 10326 180pF 5% 63V
2341 4822 121 41689 100nF 10% 250V
2342∆ 4822 124 11508 22µF 250V 20%
2373 4822 121 41926 33nF 5% 630V
f
3311 4822 050 11002 1k 1% 0.4W
3313 4822 051 20479 47Ω 5% 0.1W
3314 4822 117 12818 18k 5% 3W
3315∆ 4822 052 10331 330Ω 5% 0.33W
3316∆ 4822 052 10221 220Ω 5% 0.33W
3317 4822 117 11896 1k5 20% 0.5W
3321 4822 051 10102 1k 2% 0.25W
3322∆ 4822 051 20471 470Ω 5% 0.1W
3322 4822 117 11452 430Ω 1% 0.1W
3323 4822 051 20479 47Ω 5% 0.1W
3324 4822 117 12818 18k 5% 3W
3325∆ 4822 052 10331 330Ω 5% 0.33W
3326∆ 4822 052 10221 220Ω 5% 0.33W
3327 4822 117 11896 1k5 20% 0.5W
3331 4822 051 10102 1k 2% 0.25W
3332∆ 4822 051 20471 470Ω 5% 0.1W
3332 4822 117 11452 430Ω 1% 0.1W
3333 4822 051 20479 47Ω 5% 0.1W
3334 4822 117 12818 18k 5% 3W
3335∆ 4822 052 10331 330Ω 5% 0.33W
3336∆ 4822 052 10221 220Ω 5% 0.33W
3337 4822 117 11896 1k5 20% 0.5W
3341∆ 4822 052 11109 10Ω 5% 0.5W
3342 4822 116 83874 220k 5% 0.5W
3347∆ 4822 052 10102 1k 5% 0.33W
3371∆ 4822 052 10108 1Ω 5% 0.33W
3371∆ 4822 052 10278 2Ω7 5% 0.33W
3372∆ 4822 052 10108 1Ω 5% 0.33W
3372∆ 4822 052 10278 2Ω7 5% 0.33W
3374 4822 117 11896 1k5 20% 0.5W
3312∆ 4822 051 20471 470Ω 5% 0.1W
3312 4822 117 11452 430Ω 1% 0.1W
b
5370 4822 157 50961 22µH
5370 4822 157 70468 56µH
d
6311 4822 130 30842 BAV21
6321 4822 130 30842 BAV21
6331∆ 4822 130 30621 1N4148
6332 4822 130 30842 BAV21
6341∆ 4822 130 30621 1N4148
6347 4822 130 34382 BZX79-B8V2
ce
7301 4822 130 41782 BF422
7302 4822 130 41782 BF422
7303 4822 130 41782 BF422
7304 4822 130 41646 BF423
7305 4822 130 41782 BF422
7306 4822 130 41646 BF423
7307 4822 130 41782 BF422
7308 4822 130 41646 BF423
7309 4822 130 41782 BF422
Mono panel [C]
Various
1020 4822 212 11558 Audio panel Mono +
1020 4822 212 11559 AudiopanelMono no
4822 267 10755 Con 19P
4822 267 10537 Con 5P
4822 492 70788 Spring fix. IC
1501 4822 242 81423 Filter OFWL9453M
g
2501 4822 121 10686 4.7nF 10% 50V
2502∆ 4822 124 40246 4.7µF 20% 63V
2503∆ 4822 124 40246 4.7µF 20% 63V
2504 4822 121 42868 220nF 5% 50V
2505 4822 124 41576 2.2µF 20% 50V
2506∆ 4822 124 41579 10µF 20% 50V
2507∆ 4822 124 41579 10µF 20% 50V
2508 4822 124 41576 2.2µF 20% 50V
2509∆ 4822 124 41579 10µF 20% 50V
2510∆ 4822 124 41579 10µF 20% 50V
2511∆ 4822 124 41579 10µF 20% 50V
2512∆ 4822 121 43996 33nF 5% 50V
2514 4822 121 51472 39nF 5% 250V
2515∆ 4822 121 43823 470nF 5% 50V
AM sound
AM sound
(38.9MHz)
2516 4822 121 43925 2.2nF 5% 50V
2517 4822 124 81029 100µF 20% 25V
2518 4822 121 42868 220nF 5% 50V
2519 5322 121 42386 100nF 5% 63V
2520 4822 124 22263 220µF 20% 25V
2521 4822 121 10686 4.7nF 10% 50V
2522∆ 4822 124 41579 10µF 20% 50V
2523 4822 124 81029 100µF 20% 25V
2524 4822 121 42868 220nF 5% 50V
f
3501 4822 116 83864 10k 5% 0.5W
3502 4822 116 52256 2k2 5% 0.5W
3503 4822 116 52256 2k2 5% 0.5W
3504 4822 116 52256 2k2 5% 0.5W
3505 4822 116 83864 10k 5% 0.5W
3506 4822 116 52175 100Ω 5% 0.5W
3508 4822 116 52176 10Ω 5% 0.5W
3509 4822 116 52257 22k 5% 0.5W
3510 4822 116 52244 15k 5% 0.5W
3511 4822 116 52283 4k7 5% 0.5W
3512 4822 050 11002 1k 1% 0.4W
3513 4822 116 52291 56k 5% 0.5W
3514 4822 116 52234 100k 5% 0.5W
3515 4822 116 52256 2k2 5% 0.5W
3516 4822 116 52243 1k5 5% 0.5W
3517 4822 116 52243 1k5 5% 0.5W
3518 4822 116 52256 2k2 5% 0.5W
3519 4822 116 52234 100k 5% 0.5W
3520 4822 116 52291 56k 5% 0.5W
3521 4822 050 11002 1k 1% 0.4W
3522 4822 116 52244 15k 5% 0.5W
3523 4822 050 11002 1k 1% 0.4W
3524 4822 050 11002 1k 1% 0.4W
3525 4822 116 83876 270Ω 5% 0.5W
3526 4822 050 11002 1k 1% 0.4W
3527 4822 116 52289 5k6 5% 0.5W
3528 4822 116 52238 12k 5% 0.5W
3529 4822 116 83883 470Ω 5% 0.5W
3530 4822 116 83961 6k8 5%
3531 4822 116 52249 1k8 5% 0.5W
3532 4822 116 52249 1k8 5% 0.5W
3533 4822 116 83872 220Ω 5% 0.5W
3534 4822 116 52228 680Ω 5% 0.5W
3536 4822 116 83961 6k8 5%
3537 4822 116 52269 3k3 5% 0.5W
3539 4822 116 52276 3k9 5% 0.5W
3540 4822 116 52256 2k2 5% 0.5W
3540 4822 116 52257 22k 5% 0.5W
b
5501 4822 152 20678 33µH
d
6501∆ 4822 130 30621 1N4148
6502∆ 4822 130 30621 1N4148
6503∆ 4822 130 30621 1N4148
6504∆ 4822 130 30621 1N4148
6505∆ 4822 130 30621 1N4148
ce
7501 4822 209 31555 TDA9830/V1
7502 4822 209 90462 TDA7056B/N1
7503 4822 130 40937 BC548B
7504 4822 130 40937 BC548B
7505 4822 130 40937 BC548B
7506∆ 4822 130 44197 BC558B
7507∆ 4822 130 44197 BC558B
7508 4822 130 40937 BC548B
7509 4822 130 40937 BC548B
7510 4822 130 40937 BC548B
7511 4822 130 40937 BC548B
7512 4822 130 40937 BC548B
7513 4822 130 40937 BC548B
7514 4822 130 40937 BC548B
7515 4822 130 40937 BC548B
Nicam +2CS panel [D]
Various
1020 4822 212 11561 Nicam panel + AM
1020 4822 212 11562 Nicam panel no AM
1020 4822 212 11563 2CS stereo panel
4822 267 10755 Con. 19P
4822 267 10537 Con. 5P
∆ 4822 492 62076 Spring fix IC
1202 4822 242 10688 OFWK9456M
1203 4822 242 81436 OFWK3953M
Sound
sound
38.9MHZ
38.9MHz
1204 4822 242 10434 X-tal 18,432MHz
g
2201 4822 126 13693 56pF 1% 63V
2202∆ 4822 126 13838 100nF 50V 20%
2203 4822 124 41576 2.2µF 20% 50V
2206 4822 126 13473 220nF 80-20% 50V
2207 4822 126 13751 47nF 10% 63V
2208 4822 124 41576 2.2µF 20% 50V
2210 5322 122 32658 22pF 5% 50V
2213 4822 126 13692 47pF 1% 63V
2214 4822 122 33926 12pF 50V
2215 4822 126 13692 47pF 1% 63V
2216 4822 126 13473 220nF 80-20% 50V
2217 4822 126 13473 220nF 80-20% 50V
2220 4822 126 13473 220nF 80-20% 50V
2221 4822 126 13473 220nF 80-20% 50V
2224∆ 4822 126 13838 100nF 50V 20%
2225 5322 122 32448 10pF 5% 50V
2226 5322 122 32448 10pF 5% 50V
2227∆ 4822 126 13838 100nF 50V 20%
2228∆ 4822 124 41579 10µF 20% 50V
2229∆ 4822 124 41579 10µF 20% 50V
2230∆ 4822 124 41579 10µF 20% 50V
2231∆ 4822 126 13838 100nF 50V 20%
2234∆ 4822 124 41579 10µF 20% 50V
2235 5322 126 10511 1nF 5% 50V
2236 5322 126 10511 1nF 5% 50V
2237 4822 126 13561 220nF 10% 16V
2238 4822 126 13561 220nF 10% 16V
2241∆ 4822 124 40246 4.7µF 20% 63V
2242∆ 4822 126 13838 100nF 50V 20%
2243 5322 126 10511 1nF 5% 50V
2244 5322 126 10511 1nF 5% 50V
2245 4822 124 41751 47µF 20% 50V
2246 5322 122 32448 10pF 5% 50V
2247 5322 126 10511 1nF 5% 50V
2248 4822 124 81151 22µF 50V
2249 5322 126 10511 1nF 5% 50V
2250 4822 124 41751 47µF 20% 50V
2251 5322 122 32448 10pF 5% 50V
2252∆ 4822 124 41579 10µF 20% 50V
2253∆ 5322 126 10223 4.7nF 10% 63V
2254∆ 5322 126 10223 4.7nF 10% 63V
2255∆ 4822 124 41579 10µF 20% 50V
2256 4822 126 13561 220nF 10% 16V
2257 4822 124 22263 220µF 20% 25V
2260 4822 124 40255 100µF 20% 63V
2261 4822 124 40255 100µF 20% 63V
2262∆ 4822 124 41579 10µF 20% 50V
2263∆ 4822 124 41579 10µF 20% 50V
2264 4822 124 81029 100µF 20% 25V
2265 4822 126 13561 220nF 10% 16V
2266 4822 126 13561 220nF 10% 16V
2267 4822 126 13561 220nF 10% 16V
2268 4822 121 42868 220nF 5% 50V
2271 5322 126 10511 1nF 5% 50V
2272 5322 126 10511 1nF 5% 50V
2273 4822 126 13561 220nF 10% 16V
2274∆ 4822 126 13838 100nF 50V 20%
2276 4822 126 13694 68pF 1% 63V
2277 4822 126 13694 68pF 1% 63V
2278 5322 126 10511 1nF 5% 50V
2279 5322 126 10511 1nF 5% 50V
2280 5322 126 10511 1nF 5% 50V
2281 5322 126 10511 1nF 5% 50V
f
3201 4822 117 11449 2k2 1% 0.1W
3202 4822 117 10833 10k 1% 0.1W
3203 4822 117 11449 2k2 1% 0.1W
3207 4822 117 10833 10k 1% 0.1W
3211 4822 117 11449 2k2 1% 0.1W
3213 4822 116 83864 10k 5% 0.5W
3214 4822 051 20562 5k6 5% 0.1W
3215∆ 4822 051 20101 100Ω 5% 0.1W
3216 4822 116 52175 100Ω 5% 0.5W
3217 4822 116 52175 100Ω 5% 0.5W
3222 4822 051 20562 5k6 5% 0.1W
3224 4822 117 10834 47k 1% 0.1W
3229 4822 051 20561 560Ω 5% 0.1W
3230 4822 117 10834 47k 1% 0.1W
3233 4822 117 11449 2k2 1% 0.1W
3234 4822 117 10834 47k 1% 0.1W
3235 4822 117 10834 47k 1% 0.1W
3238 4822 051 20561 560Ω 5% 0.1W
3239 4822 117 11449 2k2 1% 0.1W
3240 4822 051 20333 33k 5% 0.1W
3242 4822 051 20333 33k 5% 0.1W
3243 4822 117 11437 8k2 1% 0.1W
3244 4822 117 11154 1k 1% 0.1W
3246 4822 116 83864 10k 5% 0.5W
3247∆ 4822 052 10109 10Ω 5% 0.33W
3248∆ 4822 051 20471 470Ω 5% 0.1W
3249 4822 116 83864 10k 5% 0.5W
3250 4822 116 52175 100Ω 5% 0.5W
3250 4822 116 52256 2k2 5% 0.5W
3250 4822 116 83884 47k 5% 0.5W
3251 4822 051 20681 680Ω 5% 0.1W
3252∆ 4822 051 20332 3k3 5% 0.1W
3253∆ 4822 051 20153 15k 5% 0.1W
3254 4822 116 83864 10k 5% 0.5W
4xxx 4822 051 10008 0Ω 5% 0.25W (1206)
4xxx 4822 051 20008 0Ω 5% 0.25W
b
5201 4822 157 10586 2.2µH 10%
5202 4822 157 11014 Coil 78MHz
5203 4822 157 53139 4.7µH
5204∆ 4822 157 51462 10µH
5205∆ 4822 157 51462 10µH
5206 4822 153 20251 18µH 10%
5207∆ 4822 157 51462 10µH
d
6201∆ 4822 130 30621 1N4148
6202∆ 4822 130 30621 1N4148
6204∆ 4822 130 30621 1N4148
6205∆ 4822 130 34173 BZX79-B5V6
6206∆ 4822 130 30621 1N4148
6207∆ 4822 130 30621 1N4148
ce
7201 4822 209 16441 TDA9810/V1
7202 4822 209 13099 MSP3400C/C6
7202 4822 209 15832 MSP3410D-PP-B4
7203 4822 209 71873 TA7668BP
7204 4822 209 13646 TDA7057AQ/N2
7205 4822 130 60511 BC847B
7207 4822 130 60511 BC847B
7208 5322 130 41983 BC858B
7209 4822 130 60511 BC847B
7210 4822 130 60511 BC847B
7214 4822 130 40855 BC337
7215 4822 130 60511 BC847B
7216 4822 130 60511 BC847B
 Loading...