

Page 1

CDR 570 / CDR 930
CDR770 / CDR771
CDR775 / CDR776 / CDR777 / CDR778
CDR950 / CDR779
CDR785
FW-R7 / FW-R8
CDR – Reflash
THIRD GENERATION CDR RECORDERS
Philips Consumer Electronics BCU Audio Service 1
09-04-01
Page 2

System requirement
1. PC AT
2. Windows 95
3. Two serial connection cables RS232(M/F)
Equipment
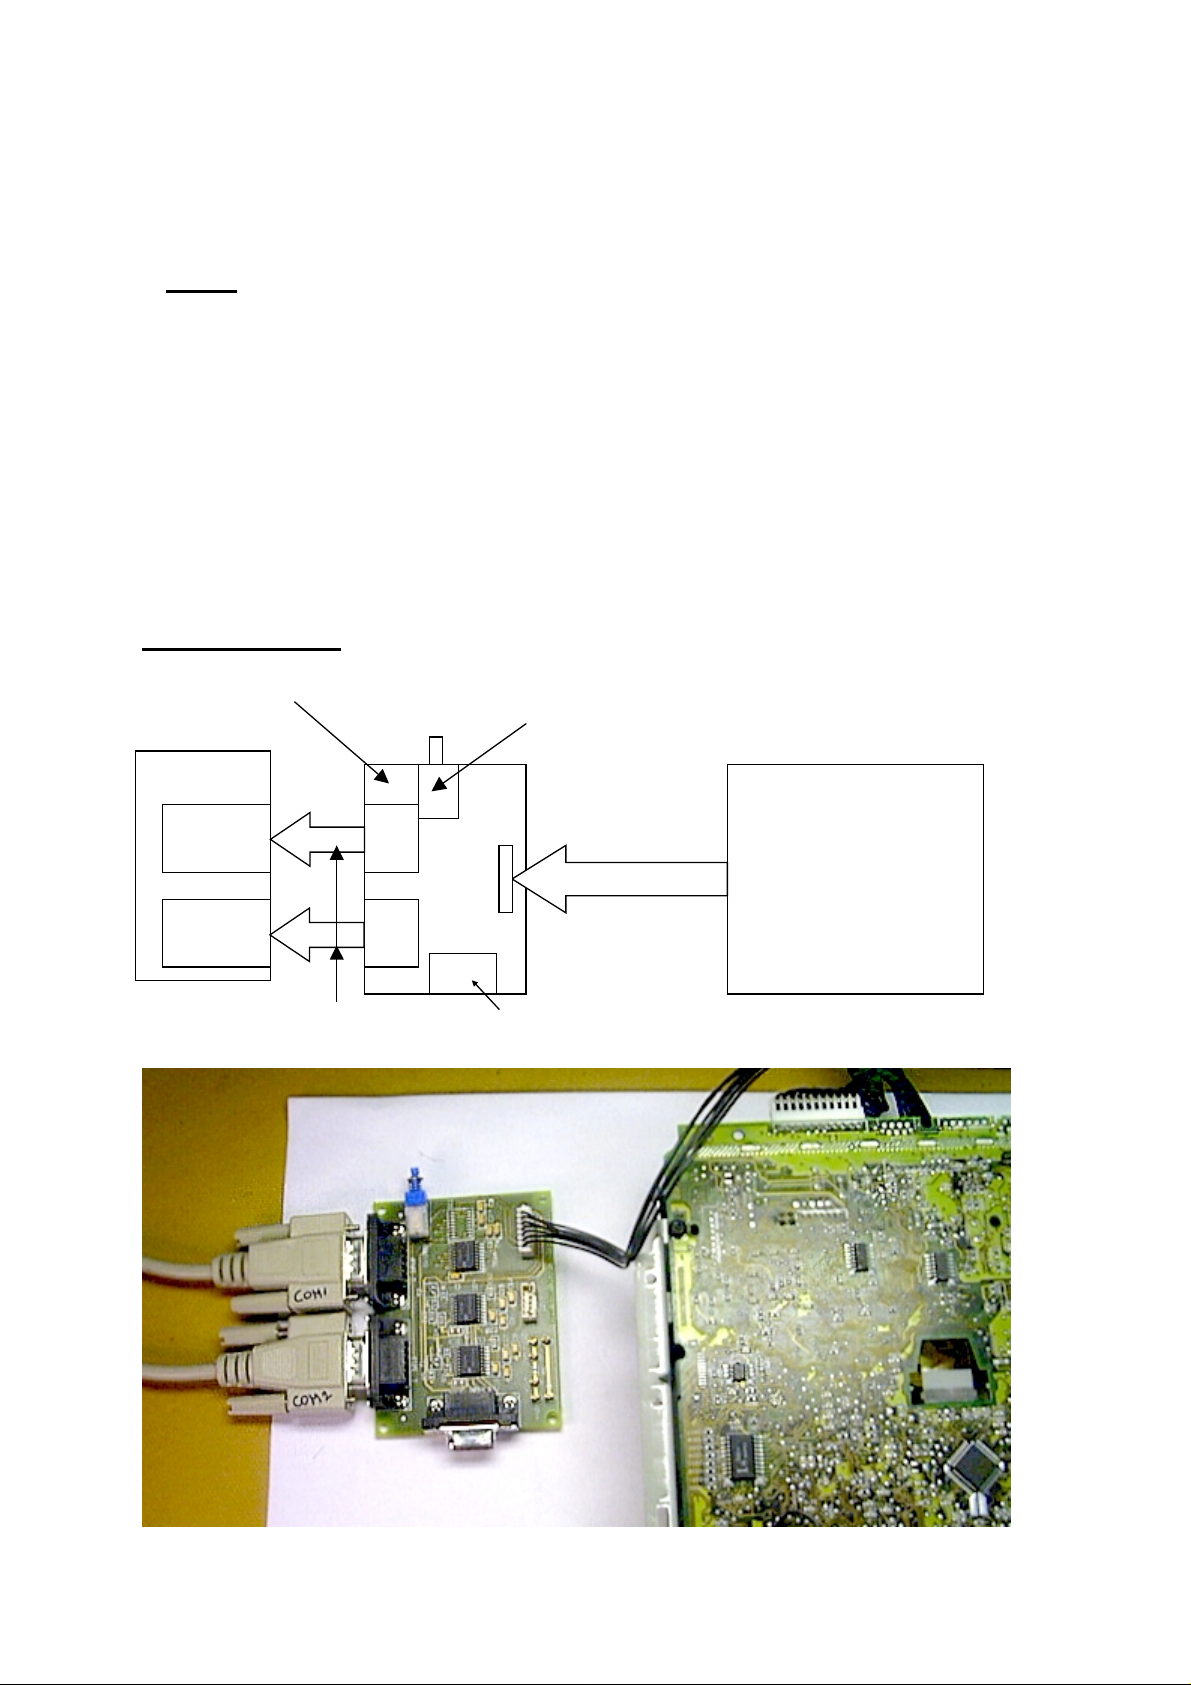
1. Interface board(3122 785 90200)
2. Adapter cable included with 3122 785 90200 for communication with CDR module
3. 5 fold connection cable between interface board connector 1015 and solder islands for
Mace download connection. (not a normal service part)
4. Software package(cdrflash.exe)
Info
With the interface board 3122 785 90200 you can also update the third generation CDRecorder.
Two procedures have to run for updating MACE- and DASP-flash ICs. These procedures are
described in chapter “Flashing the DASP” and chapter “Flashing the MACE”
Setting up the PC
1) COM ports
To get the right settings for the communication ports do the following:
Open with Start → Settings → Control Panel the window Ports. Select a port and
click the Settings button. Change the settings in:
Settings for COM1 and COM2:
Baud Rate : 19200
Data Bits : 8
Parity : None
Stop Bits : 1
Flow Control : None
For the communication with the DASP we are using PC ports COM1 and COM2. In
this case connect COM1 with connector 1010 (also used for Compair communication)
and COM2 with connector 1011 on the interface board 3122 785 90200.
For the MACE communication we are using also COM2. Therefore connect then
COM2 with connector 1014 on the interface board 3122 785 90200.
In case your PC has 3 com ports COM3 can be applied. Settings for COM3 should
then be as COM2.
Does your PC have only 2 (two) com ports then the connection from COM2
has to be changed after the downloading of the DASP and make the connection for
MACE.
Philips Consumer Electronics BCU Audio Service 2
09-04-01
Page 3

2) Software Installation
Start cdrflash.exe from CD-ROM or temp directory and follow the instructions on your
desktop.
Preparation and using the tool
1. Take always the necessary ESD prevention.
2. Always check if the tool (and set) has been powered down before connecting or
disconnecting.
3. Start the service program from your CD-Recorder.
Press <<PLAY/PAUSE + FFWD>> simultaneously and switch on the unit.
On the display you can see the recorder information
• Player Identity
• SW version DASP
• SW version MACE
• …>>
For CDR 570; CDR 930; CDR770; CDR771; CDR775; CDR776; CDR777; CDR778;
CDR950 and CDR779 this should read 1.56 and 92.11. In case of lower SW versions update
is requested. Apply files “CDR99_R1_56.dwn” and “Engine92_11.cvt”
For CDR785; FW-R7 and FW-R8 this should read 0.31 and 92.11. In case of lower SW
versions update is requested. Apply files “CDR99_R0_31.dwn” and “Engine92_11.cvt”
These mentioned download files have been installed after cdrflash.exe on c:\CDR Download.
The Mace file (Engine92_11.cvt) in subdirectory Mace and the Dasp files
“CDR99_R1_56.dwn” and “CDR99_R0_31.dwn” in subdirectory Dasp
Philips Consumer Electronics BCU Audio Service 3
09-04-01
Page 4
Flashing the DASP
1. Intro
Flash99 (Version 2) allows you to test and reflash the DASP flash IC in a CDR99 module
What you need:
• The Flash99 program
• A win95 / WinNT PC with 2 serial ports.
• An interface board.
• Two direct serial cables. (Do not use nullmodem cables!)
• a CDR99 module
2. Connection:
Interface 7104 086 91110
Switch. ( in outmost position ! )
PC
COM 1
COM 2
1010
1011
Serial cables
1009
1000
1012
7 – wire connection
not used for DASP download
CDR 99 Module
Philips Consumer Electronics BCU Audio Service 4
09-04-01
Page 5

Interface 3122 785 90200
Switch. ( in outmost position ! )
PC
COM 1
COM 2
1010
1011
Serial cables
1009
1000
1015
1014
not used for DASP download
7 – wire connection
CDR 99 Module
Philips Consumer Electronics BCU Audio Service 5
09-04-01
Page 6
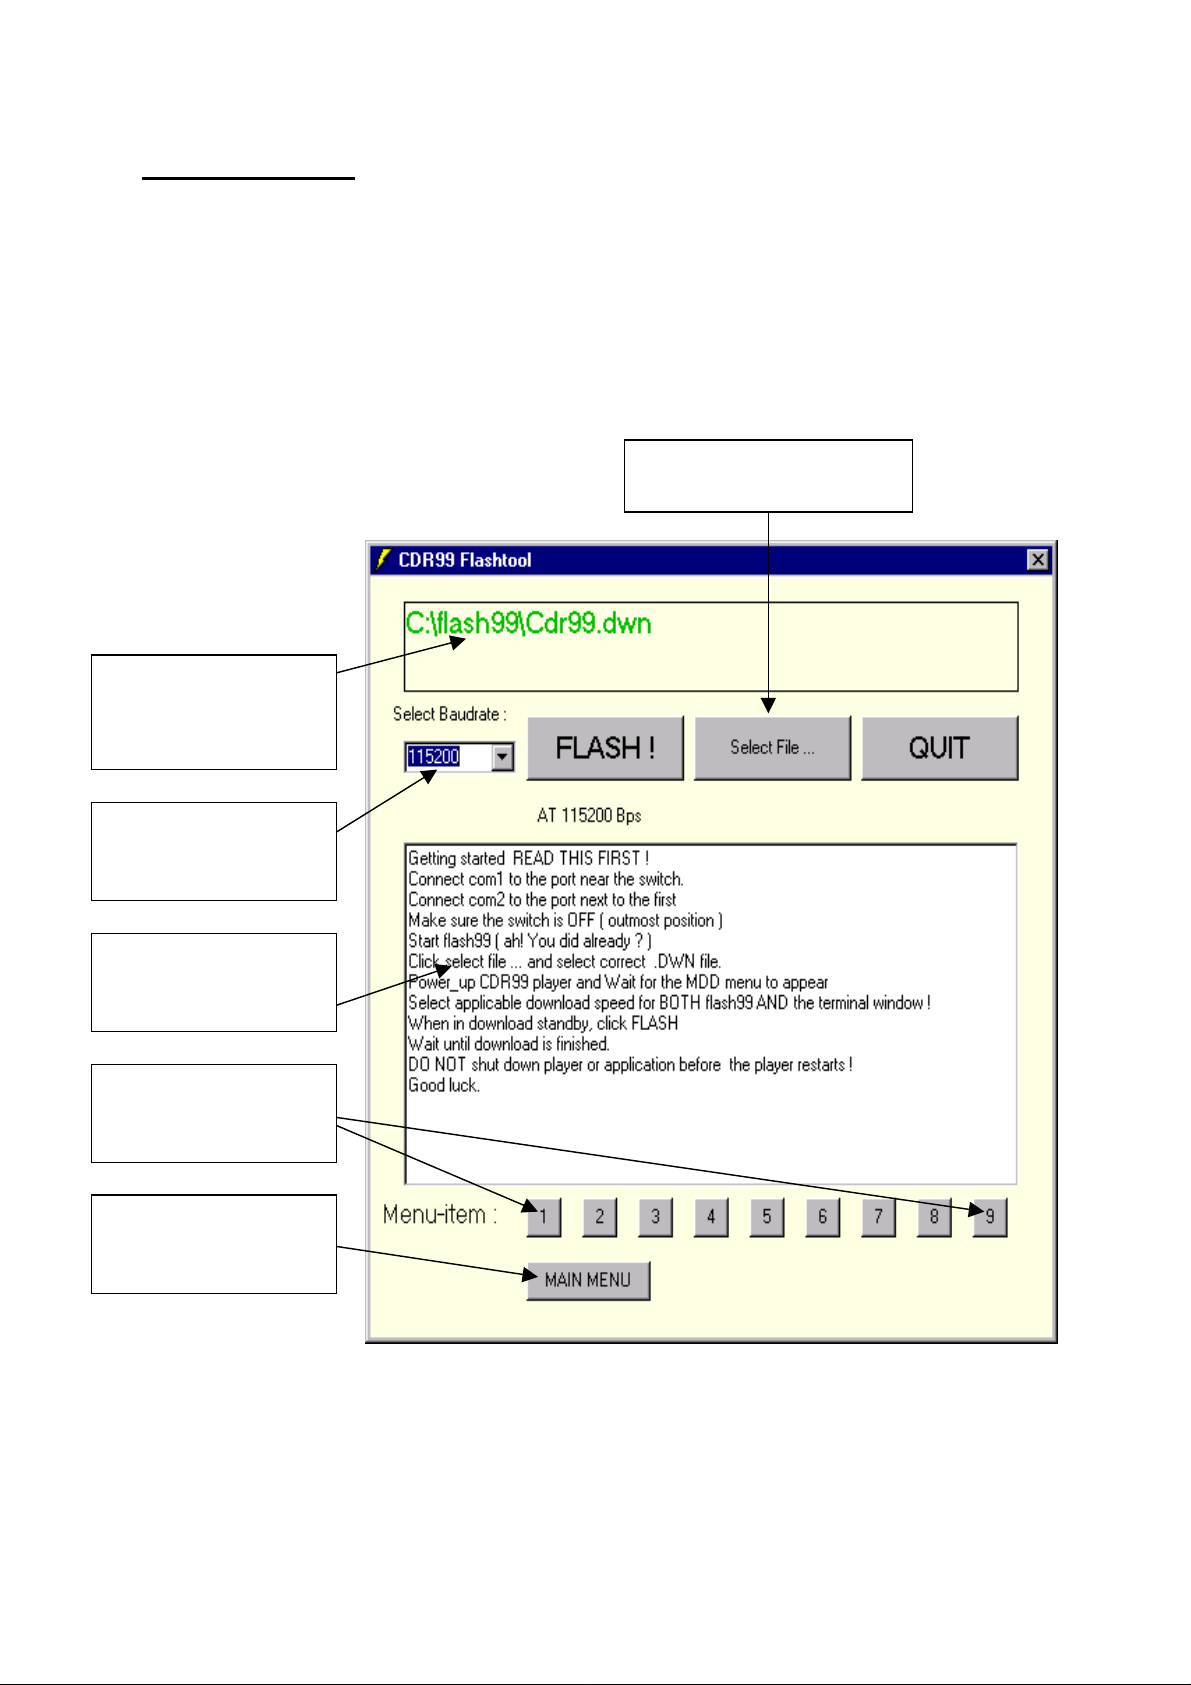
3. How to start:
When all connections are in place, it is time to start the flash99 program via windows start
button>programs>flash99:
The start-up screen looks like this:
Select File ...
Select appropriate .DWN
Status window
displays selected
.dwn file
Select baudrate
Make sure correct
baudate is selected
Terminal window
Gives Mdd menu
info.
Menu buttons :
Use these to browse
through the MDD
Main Menu button
Takes you back to the
main menu
Philips Consumer Electronics BCU Audio Service 6
09-04-01
Page 7

When flash99 is started, we can power_up the cdr99 player:
After a few seconds, the MDD menu appears:
Power_up player :
after a few seconds,
the Mdd menu
appears
You can use the MDD menu to test the basic functionality of the player.
Select the correct menu-item with the buttons 1..9.
Select the MAIN MENU button for the main MDD window.
You can also select a menu-item by activating the terminal window, (click on it once) and
then use the numeric keypad to browse to the menu’s.
Philips Consumer Electronics BCU Audio Service 7
09-04-01
Page 8

4. Reflashing
Suppose we want to reflash the player at 115200 baud with the cdr99_test.dwn file.
We need to:
• select the correct download speed
• select the correct flash file
• use the MDD menu to put the cdr99 player in Download standby mode ( item 6 or
7 in the main menu, depending on the download speed )
• start flashing
• wait until player restarts ( the MDD menu appears again after flashing is finished)
Click the select file... button:
Select the file you
want to download.
You can select the file
with the open button,
or double click on it.
A file browser window appears. Go to the correct directory and select the appropriate .dwn
file.
NOTE: you can only select .DWN files. The program ignores other file extensions.
We’ll select the CDR99_test.dwn file.
Philips Consumer Electronics BCU Audio Service 8
09-04-01
Page 9

The CDR99_test.dwn
file
is now selected
The Baudrate selection
is correct.
The player is not in
download standby yet.
select item 6. (115200
baud)
now that the player is in
download standby, we
can select FLASH ! to
start downloading the
new software.
Philips Consumer Electronics BCU Audio Service 9
09-04-01
Page 10

The program starts
downloading the new
software.
DO NOT POWER
DOWN
THE PLAYER AT
THIS MOMENT !!
After downloading,
The flash will be
reprogrammed
DO NOT POWER DOWN
THE PLAYER AT THIS
MOMENT !!
Wait until the MDD menu
appears again before you
power down the player.
Philips Consumer Electronics BCU Audio Service 10
09-04-01
Page 11

When flashing is finished,
The MDD menu appears
again.
This means that the player
was successfully
programmed.
Selecting the flash button
when the player is not in
download mode, or in the
wrong baudrate,
This error occurs.
Check all settings and try
again.
Philips Consumer Electronics BCU Audio Service 11
09-04-01
Page 12

Problem list :
• The MDD menu doesn’t appear when you power_up the player.
make sure COM1 and COM2 are connected correctly. Try switching the serial
cables.
• I can only download at 115200 baud, there is no 7th item in the mdd menu.
possible. Downloading at 19200 baud was not implemented in the first CDR99
software.
You will have a 7th option after reflashing.
Philips Consumer Electronics BCU Audio Service 12
09-04-01
Page 13

Flashing the MACE
1. Connection
• For the MACE communication we are using also COM2. Therefore connect then
COM2 with connector 1014 on the interface board 3122 785 90200.
• In case your PC has 3 com ports COM3 can be applied.
• Does your PC have only 2 (two) com ports then the connection from COM2 has to be
changed after the downloading of the DASP and make the connection for MACE.
• Connect the interface board with the mainboard via connector 1818 and the mains
powersupply of the set. Via the connection 1818 to connector 1000 the interface has
been powered by +5V.
• The connection between connector 1015 and the 5 solder islands (in line) on the
mainboard (bottomside) can be soldered.
• Connect 1015-1 to F451,
• Connect 1015-2 to F450,
• Connect 1015-3 to F453,
• Connect 1015-4 to F452,
• Connect 1015-5 to F454.
Note: the measuring points F451, F450, F453, F452 and F454 are the 5 islands in row
located at the left side of the mainboard, seen from front (tray-opening) side of the
module. F454 is mass connection.
Interface Board 3122 785 90200
COM 1
Serial cable
1010
Switch (in outmost position)
1009
PC
1011
COM 2
Serial cable
Make sure COM 2 is connected correctly
1014
1000
7 - wire connection
1015
1
2
3
4
5
GND
Used for MACE download
CDR 99 Module
1(F451)
2(F450)
3(F453)
4(F452)
5(F454)
Philips Consumer Electronics BCU Audio Service 13
09-04-01
Page 14

F451
F450
F453
F452
F454
Philips Consumer Electronics BCU Audio Service 14
09-04-01
Page 15

2. How to start:
When all connections are in place, it is time to power on the mainsswitch of the CDRrecorder and start your PC via windows start button > programs> Boot-Rom Flash tool>
Boot-Rom Flash tool.
The start-up screen looks like this:
Philips Consumer Electronics BCU Audio Service 15
09-04-01
Page 16

1. Select flash image to load the Update file in the Flash Tool
A file browser window appears. Go to the correct directory and select the appropriate
.cvt file.
NOTE: you can only select .CVT files. The program ignores other file extensions.
In the example C:\cdr_reflash\mace\engine.cvt (Via cdrflash.exe the Mace file is stored under
C:\CDR Download\Mace\Engine92_11.cvt).
Philips Consumer Electronics BCU Audio Service 16
09-04-01
Page 17

Select File>Set Options
Now the window to choose for COM port appears. Choose for COM2
Philips Consumer Electronics BCU Audio Service 17
09-04-01
Page 18

Select “FLASH THE DRIVE!”
After update message is shown “FIRMWARE SUCCESFULLY FLASHED!”
And Close the Boot-ROM Flash tool by “Exit”
CHECKING THE FIRMWARE:
To check the firmware remain the loader connected to the set.
Disconnect connector 1000 and 1015 when not already done.
During powering up the set hold down the buttons <PLAY/PAUSE> and <SEARCH FWD>.
Now the electrical diagnostic program will start with displaying the new firmware version of
the CDR-RECORDER.
Philips Consumer Electronics BCU Audio Service 18
09-04-01
 Loading...